

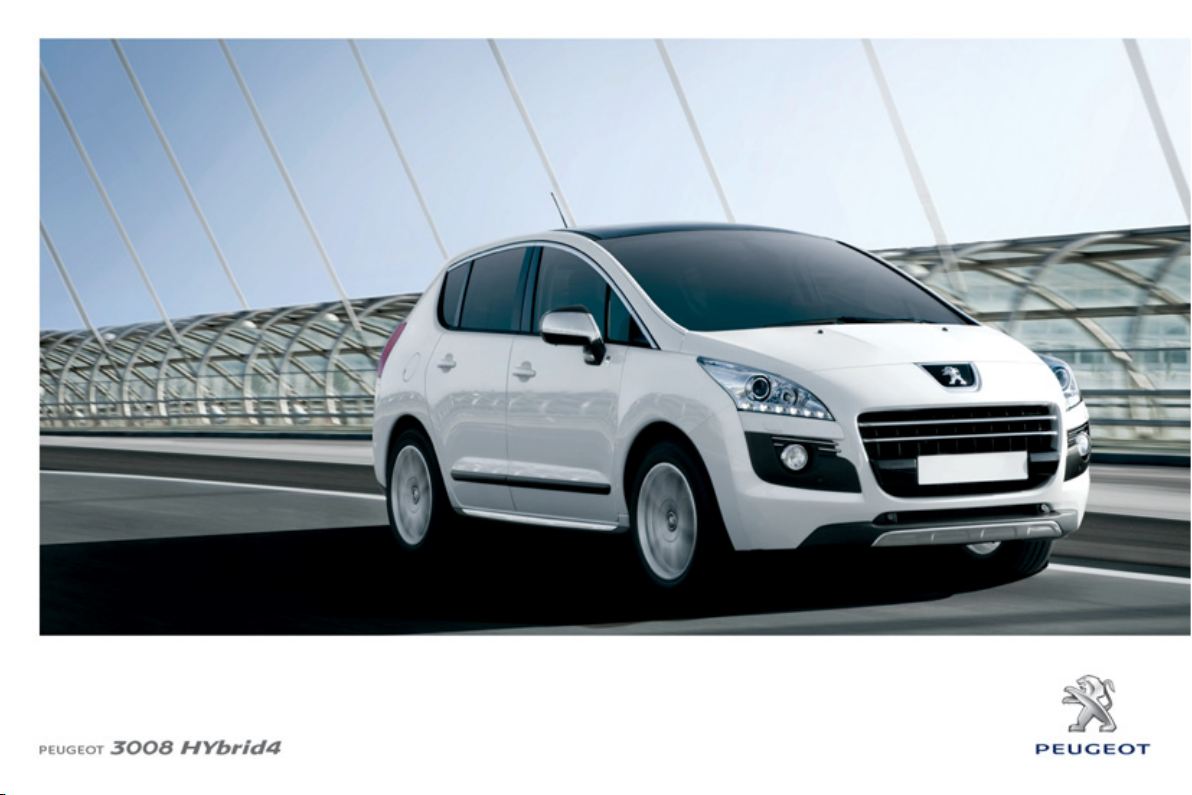
Peugeot 3008 Hybrid 4 2011 Owner's Manual
Handbook
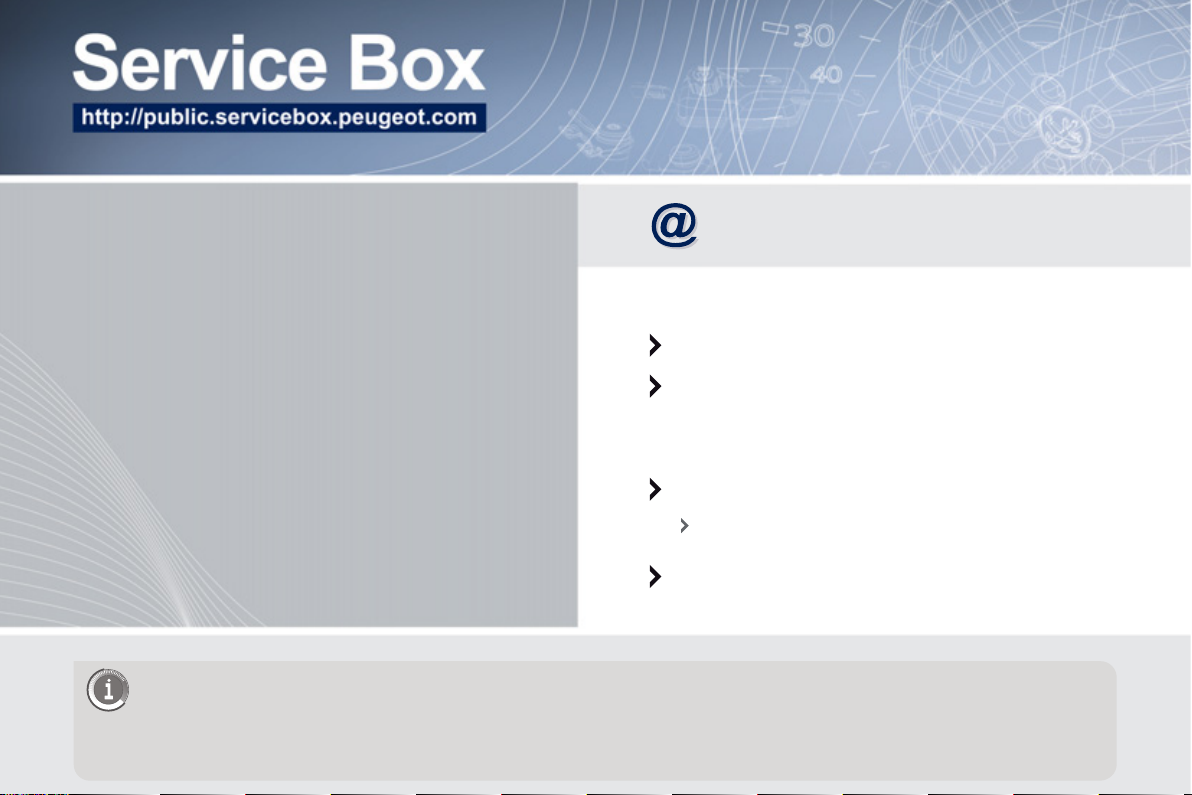
PEUGEOT's SERVICE BOX Internet site permits easy
and free consultation of your vehicle documentation
on line.
Simple and user friendly, SERVICE BOX allows you access:
● to your Handbook,
● to previous Vehicle documentation.
Please note the following point:
The fi tting of electrical equipment or accessories which are not recommended by PEUGEOT may result in a failure
of your vehicle's electronic system. Please note this specifi c warning. It is advisable to contact a PEUGEOT dealer
to be shown the recommended equipment and accessories.
Your vehicle lives on the Internet!
Access the latest information available.
Connect to http://public.servicebox.peugeot.com:
select your language,
click on the link in the "Private customer access"
zone to consult the Vehicle documentation,
A window opens giving access to all of the handbooks...
select your vehicle,
choose its body type then the date of publication
of the handbook,
fi nally, click on the item which is of interest to you.
Thank you for choosing a 3008
HYbrid4, a symbol of pleasure and innovation.
This handbook has been designed to
enable you to make the most of your
3008 HYbrid4.
On the fi rst few pages, you will fi nd a
detailed summary, followed by a quick
reference guide intended to make it
easier for you to become familiar with
your vehicle.
All of the details specifi c to your 3008
HYbrid4, comfort, safety, driving, are
then presented in this handbook, to increase your appreciation of the vehicle
and help you make the most of it.
At the end of the handbook, illustrations
of the interior and exterior of the vehicle
will assist you in locating information on
equipment or a function in the book.
Each model will be fi tted with only some
of the equipment mentioned in this
handbook, depending on its trim level,
model, version and the specifi cation for
the country in which it is sold.
Key
Warning:
this symbol marks warnings
for your own safety, for the safety of
others or to avoid any risk of damaging
your vehicle.
which it is essential to observe
Information:
this symbol draws your attention to additional information for better use of your
vehicle.
Protection of the
environment:
advice relating to protection of the
environment.
this symbol accompanies
Page reference:
this symbol invites you to refer to the pages which provide details of the function.
FAMILIARISATION 4-25
7
S
6
V
6
.............
4
s
dicators
..........................
Adj
.......................
1
k
........................
2
)
.
s
.
n
................................
seat belts
.
...........................
Ventilation
.........................
/defrost
g
....................
seats
.......................
seats
w
.
..............................
y
.
s
...............
................................
oot
.
...........................
4
............
..................
t
0
............
..............
0
g
0
p
0
0
est
0
HYBRID SYSTEM 26-42
INSTRUMENTS and CONTROLS 43-5
nstrument panels
Indicator and warning lamp
ULTIFUNCTION SCREEN
creen C
Peugeot Connect Sound
n
ustment buttons
58-6
16/9 high definition retractable
olour screen (Peugeot
onnect Media) ...............
COMFORT 67-80
r screen
mist
Dual-zone digital air
onditionin
ront
r
teering
heel adjustment..........
rrors
ACCESS 81-95
emote control ke
Alarm ...............................
Electric window
rs
B
Lower tailgate ..................
l tank
isfuel prevention
ISIBILITY 96-105
Lighting controls
Automatic illumination
f headlamps
eadlamp adjustmen
Wiper controls
Automatic rain
ensitive wipers
Courtesy lamps
nterior mood lightin
1
Boot lam
FITTINGS 106-11
nterior fittings
Front armr
r multimedia..............
1
1
Boot fittings
CHILD SAFETY 117-125
hild seats
SOFIX child seats
1
hild loc
SAFETY 126-135
irection indicator
azard warning lamps
r
..
ESP system
Front
Airbags
..............
1
1
1
1

RIVING 136-15
5
8
ke
.....
3
assist
y
.................
4
x
5
)
5
e
5
6
kit
.......................
6
l
b
y
....................
e
8
g
................
8
g
e
8
..............
Very
een
9
ccessories
9
...................
9
9
9
sions
.....................
9
9
V
6
a
....
0
...........................
4
ectric parking bra
ill start
ead-up displa
..................
1
ruise control
-speed electronic
ear control gearbo
4
Parking sensors ..............
ECHNICAL DATA 193-19
1
1
4
tric drive
Diesel engines
Diesel weights
1
1
1
men
Identification markings
1
1
CHECKS 156-162
Bonnet............................
Running out of fuel
Diesel
iesel engin
hecking levels ..............
hecks
1
1
RACTICAL INFORMATION 163-192
Temporary puncture
repair
Changing a whee
hanging a bul
hanging a fuse .............
nergy
V Batter
conomy mod
hangin
1
a wiper blade
16
ecoverin
the vehicl
Fitting roof bars
1
A
cold
limate scr
...............
AUDIO EQUIPMENT and TELEMATICS 199-265
1
Emergency or assistance....
Peugeot Connect Medi
Peugeot Connect
2
ound
2
ALPHABETICAL INDEX 266-269
1
1
1
1
ISUAL SEARCH 270-27
4
id
RESENTATION OF THE HY
Thank you for choosing a 3008 HYbrid4;
this vehicle has characteristics that are
different from conventional vehicles.
Study this handbook to learn about the
specifi c hybrid functions and for more
information, refer to the "Hybrid System"
section.
The HYbrid4 technology allows two
sources of energy to be associated in an
effective manner: that of the Diesel HDi
engine which drives the front wheels and
that of the electric motor which drives the
rear wheels.
These two motors can operate alternately or simultaneously, according to
the hybrid mode selected and the driving conditions.
The electric motor alone provides power
for the vehicle in "ZEV" (Zero Emissions
Vehicle) mode, and in "Auto" mode for
running at slow speed and low load. It
also assists the Diesel engine when
moving off, accelerating and changing
gear.
The battery that powers the electric motor recharges itself during phases of
deceleration and stores the energy for
subsequent use.
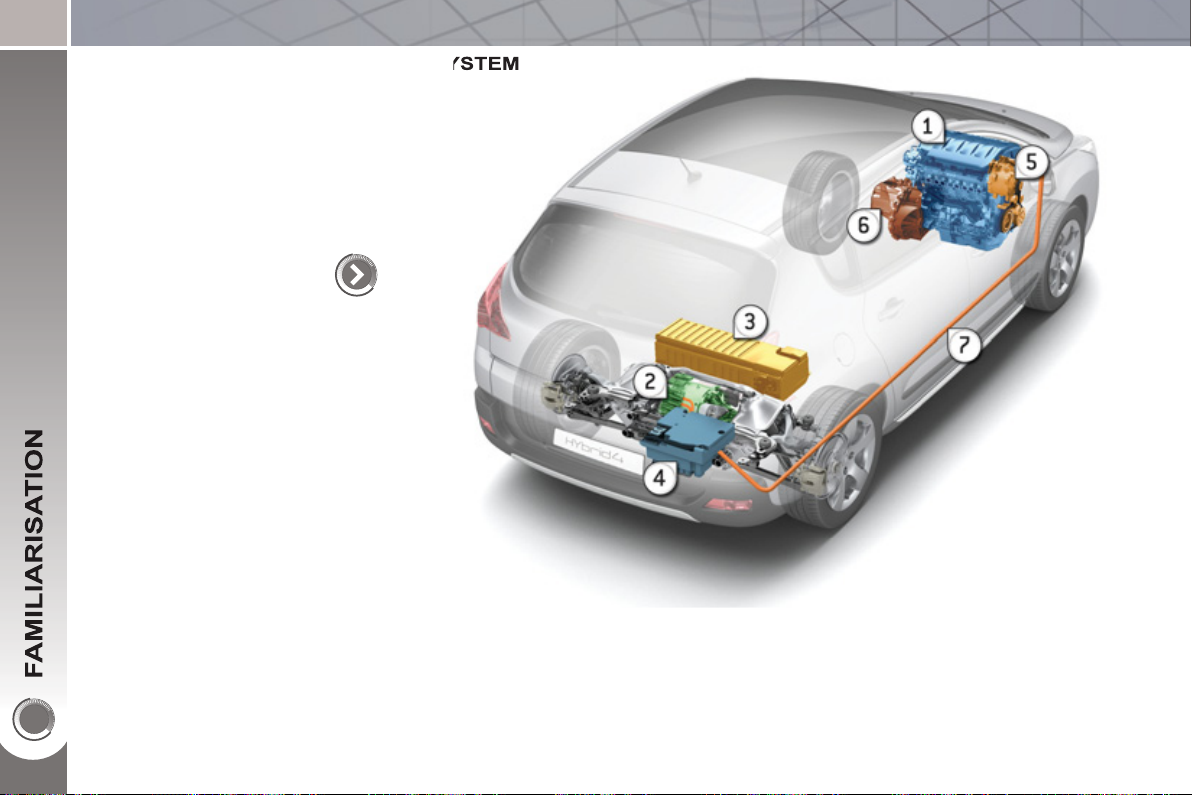
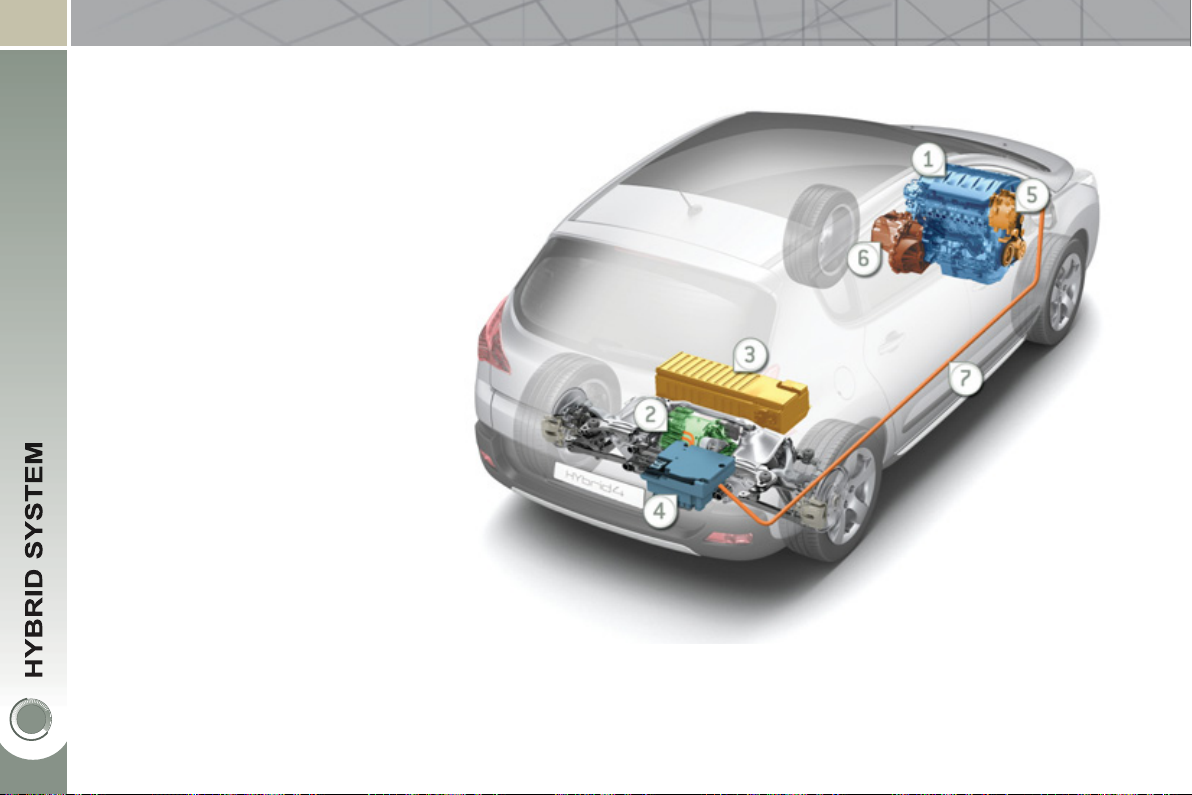
r
26
1. Diesel HDi engine (front wheel drive).
2. Electric motor (rear wheel drive).
3. High voltage battery.
4. Electronic power supervisor.
5. Stop & Start system.
6. Electronic gear control gearbox.
7. Electric fl ow.
H
ow to start your vehicle
the hybrid sy
- Ensure that the gear lever is in posi-
tion N .
- Switch the ignition on by turning the
key to position 2 .
- Press fi rmly on the brake pedal, turn
the ignition key to position 3 to start
up the hybrid system, then release
the key.
- The Ready lamp and the instrument
panel come on. The power meter
needle sweeps through its travel indicating that the hybrid system is
active, confi rmed by a message
"hybrid system active" ; the dial in
the centre console is in AUTO mode
(default mode for starting).
- The hybrid system determines
whether it is necessary to start the
Diesel engine.
- With the brake still applied, move
the gear lever to position A to go
forwards or R (by lifting the lever
slightly) for reverse.
- Lift your foot off the brake pedal, you
can move off.
- The parking brake is released automatically as you move off, if confi gured to do so (otherwise, release
the parking brake manually).
stem
- Apply the brake until the vehicle
comes to a complete stop.
- Preferably, place the gear lever in
position N .
- Turn the ignition key to position 1 ,
the parking brake is applied automatically if confi gured to do so.
- Otherwise apply the parking brake
manually.
In most cases the vehicle
starts in electric mode. This
means that your 3008 HYbrid4
makes no noise. So be very
careful of pedestrians as they will not
hear you coming.
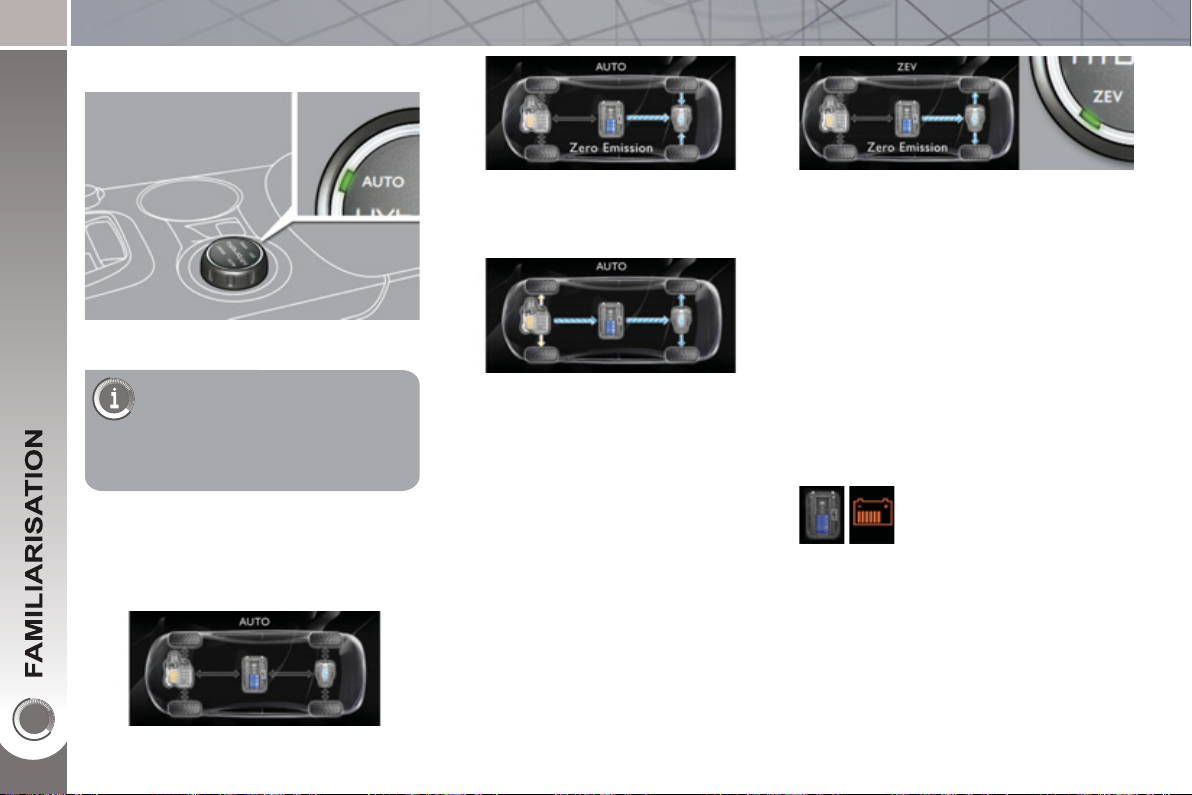
rid MODE SELECTOR
ZEV
AUTO Mode
The standard mode to use
in preference for optimum
fuel consumption.
This mode is activated automatically
on starting the vehicle.
This mode automatically manages the
operation of the Diesel engine and the
electric motor, separately or together,
according to the vehicle's own inherent
parameters, the driving conditions and
the driving style.
When stationary and when starting
the hybrid system
In particular, this mode will activate "zero
emissions" electric operation when the
conditions permit.
The electric motor is also used to supplement the Diesel engine when moving
off and changing gear, when accelerating and when the front wheels do not
provide suffi cient drive (the extra power
is automatically provided in 4 wheel
drive).
mode
Zero Emissions Vehicle)
"Zero emissions vehicle" operation is
provided by 100 % electric drive.
This mode allows silent running to be
imposed at moderate speed (urban,
parking, …).
This mode can be activated when conditions permit (in particular if the state
of charge of the high voltage battery is
high enough) and allows driving up to
35 mph (60 km/h).
The range depends on
the state of charge of the
battery and the driving
conditions (of the order of
1.2 miles (2 km) in favourable conditions).
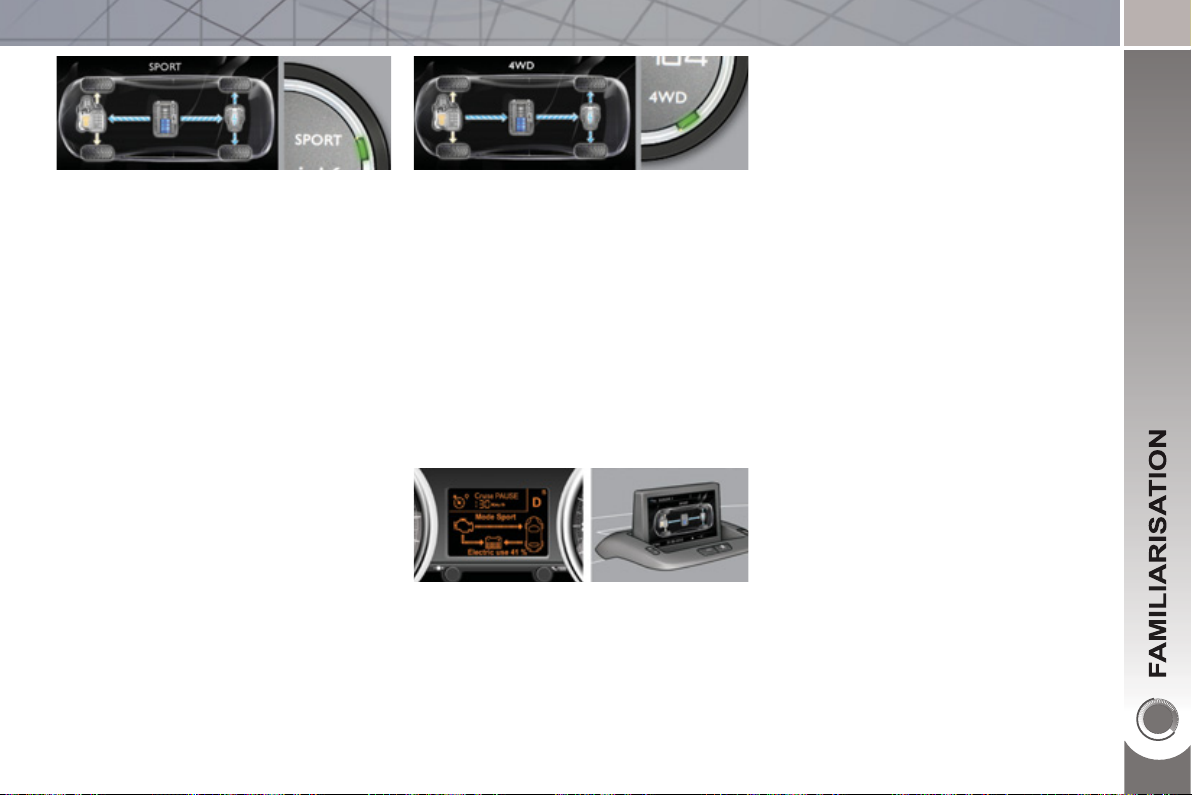
Sport mode 4WD mode
4 wheel drive)
This mode allows a more dynamic driving style providing increased performance.
Acceleration and pickup are maximised
using the full capacity of the electric motor to supplement the Diesel engine.
The Stop & Start system operates in
this mode.
This mode provides improved traction.
The Diesel engine drives the front
wheels continuously and the electric
motor drives the rear wheels.
Their coupling is managed automatically
to optimise traction on slippery surfaces
and uneven ground (mode reserved for
severe conditions: deep snow, mud,
sand, …).
Displays according to version in the instrument panel screen or the Peugeot
Connect Media screen.
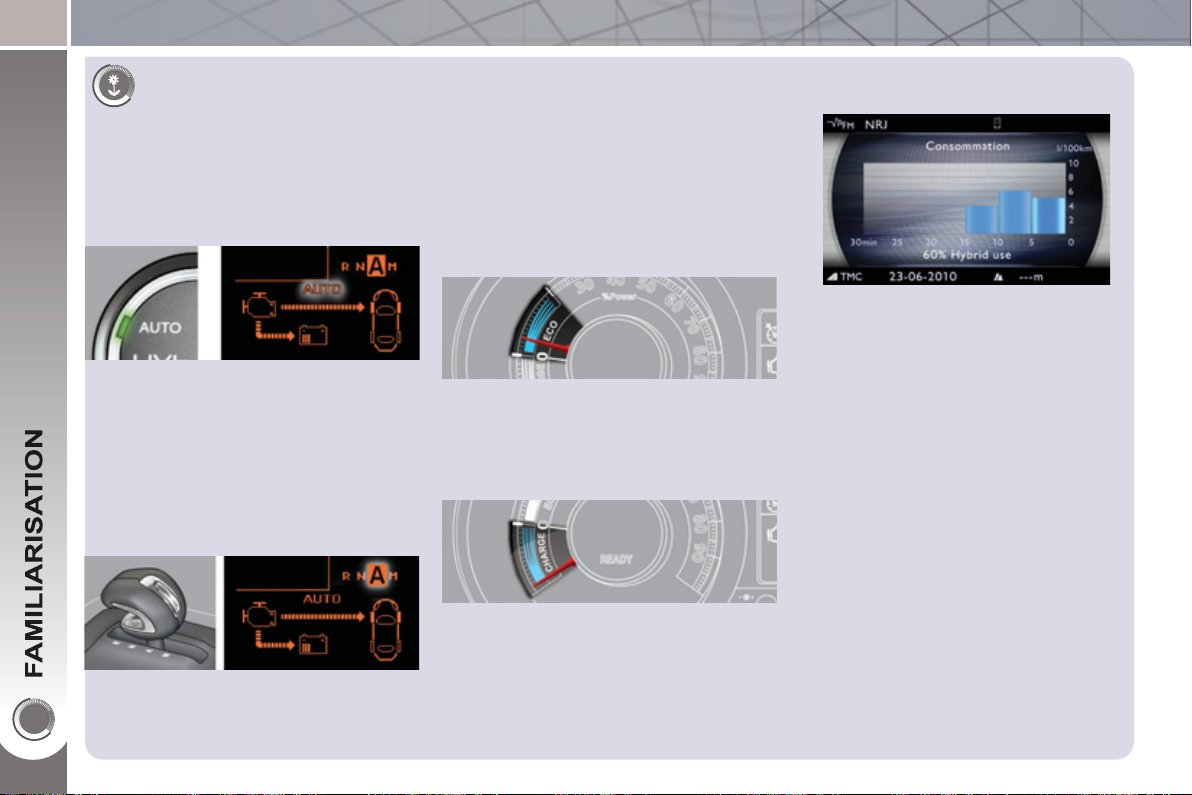
FOR ECONOMICAL DRIVING, CARING FOR THE ENVIRONMENT
g
The fuel consumption of a vehicle varies greatly :
- according to the driver's style of driving (moderate, aggressive, fast, ...),
- according to the type of journeys made (urban, main road, motorway, fl ow-
ing, heavy traffi c, …) and the speed.
Main recommendations for drivin
Hybrid mode selector
To optimise fuel consumption, use the
Auto mode of the selector whenever
possible (the mode is activated automatically when starting) including for
urban journeys.
This mode optimises the use of the energy sources (internal combustion engine and/or electric) contrary to other
modes, which are for use in particular
cases.
Gear lever
Use the automatic mode A as much
as possible as this optimises gear
changes to suit the requirements.
economically
Drive smoothly
Stay in the "eco" zone indicated in the
power meter: accelerate gently, drive at
steady speeds using the speed limiter
or cruise control as soon as possible.
Use the "charge" zone: anticipate the
need to slow down by taking your foot
off the accelerator rather than braking.
The movement of the power meter needle (into the "charge" zone), indicates
the level of energy recovery.
Consumption history
See the impact of your style of driving
and the type of journey by reviewing
the history of your energy consumption.
Refer to the "Multifunction screens"
section.
Causes of high consumption and
checks
As with any vehicle, limit overloading,
wind resistance (windows open above
30 mph (50 km/h), roof rack, loaded or
not, …), the use of power consumers
(air conditioning, heated seats, heated
rear screen, …).
Observe the recommendations on
checks (regular check of tyre pressures, correct tyre pressures, …) and
routine servicing.
EXTERIOR
Panoramic sunroof
This roof provides incomparable visibility
and light in the passenger compartment.
Temporary tyre repair kit
This kit is a complete system, consisting
of a compressor and an integral sealant
cartridge, for the temporary repair of a
tyre.
Lower tailgate
This lower tailgate permits remarkable
accessibility and makes the loading of
bulky objects easier.
163
93
112
When using an automatic car wash:
- unscrew the aerial,
- fold back the mirrors.
Visual and audible front and/or rear
parking sensors
This system warns you if an obstacle is
detected in front of or behind the vehicle
in forward or reverse gear.
154
1
0
y
OPENING
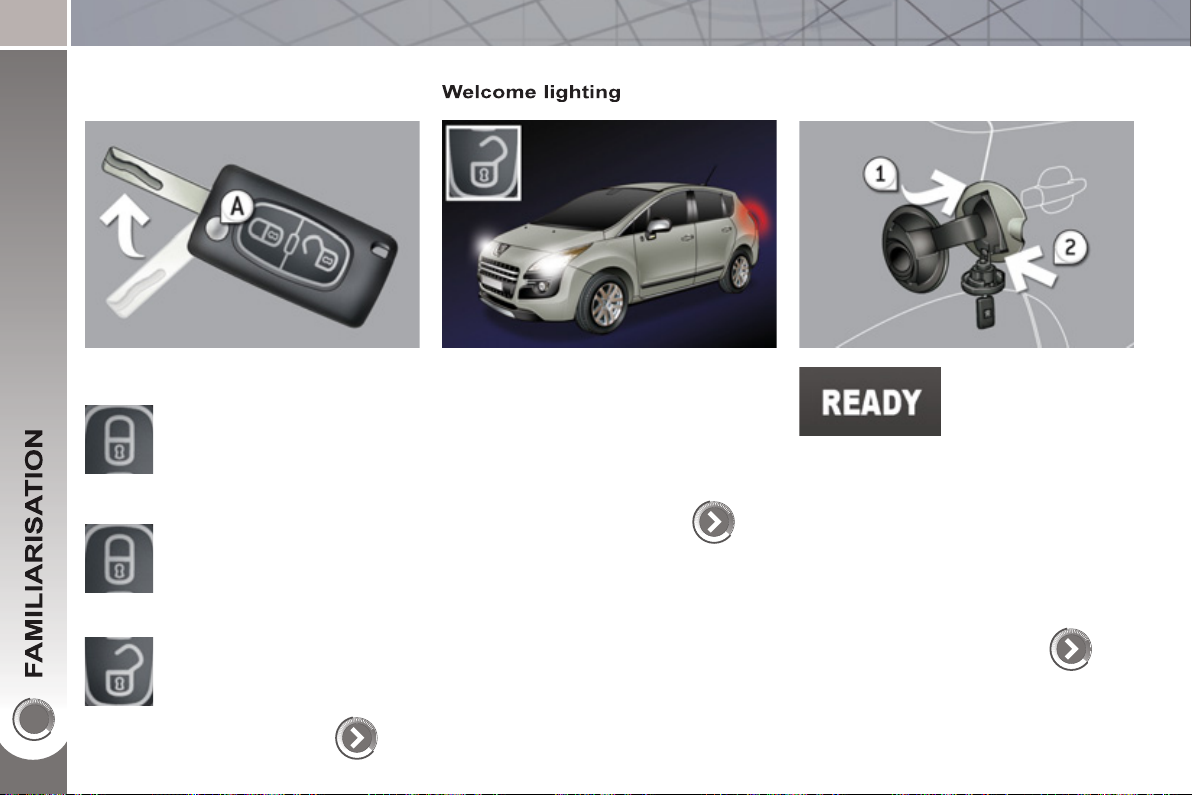
Remote control ke
Fuel tank
A. Unfolding/Folding the key.
Normal locking
(press once; fi xed lighting of
the direction indicators).
or
Deadlocking the vehicle
(press twice in succession;
fi xed lighting of the direction
indicators).
Complete or selective unlocking of the vehicle
(rapid fl ashing of the direction
indicators).
When the light is poor, detected by
a sensor, the remote switching on of
the dipped headlamps and sidelamps
makes your approach to the vehicle
easier.
This function can be programmed via
the confi guration menu.
81
Before refuelling, you
must switch of the
ignition and ensure
that the Ready lamp
is off.
1. Open the fuel fi ller fl ap.
2. Open and hook the fuel fi ller cap.
98
The type of fuel to be used is indicated
on the inner face of the fuel fi ller fl ap.
Capacity of the tank: approximately
56.5 litres.
94
OPENING
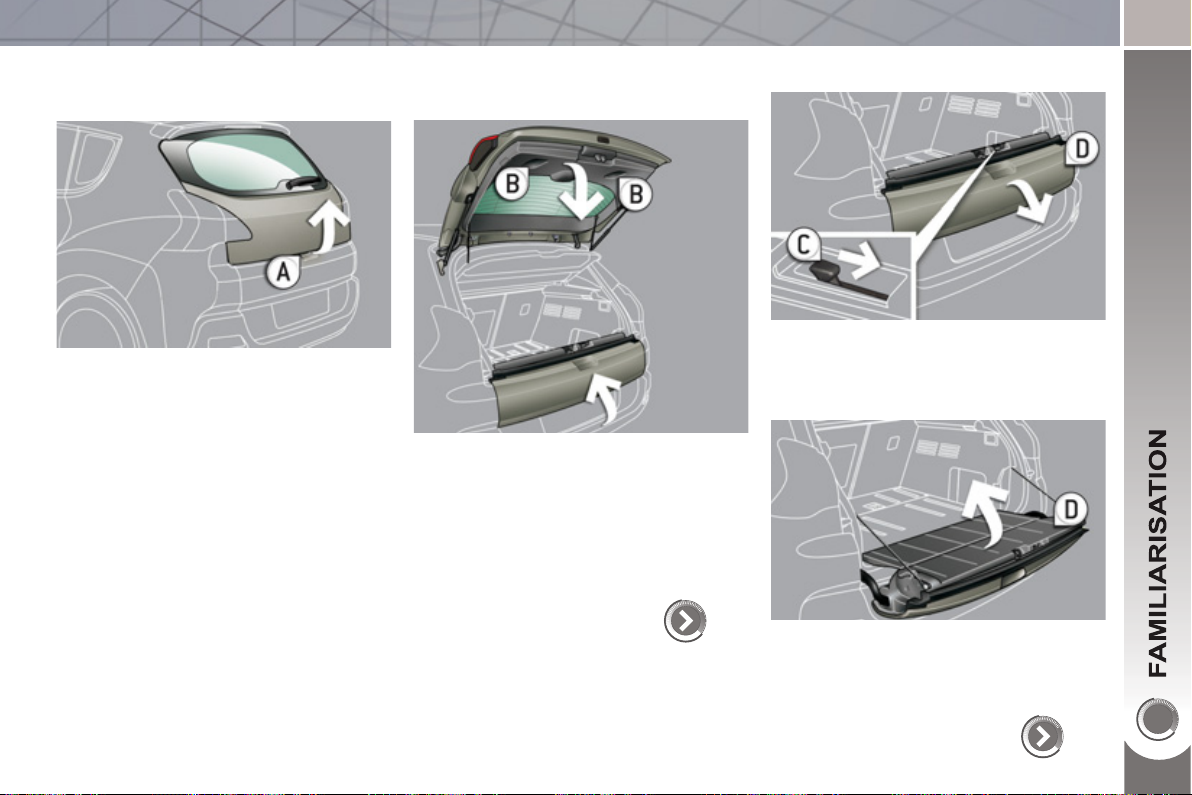
ilg
Boot
Opening
) After unlocking the vehicle using the
remote control or the key, press the
handle A and lift the tailgate.
Closing
) After closing the lower tailgate, pull
the handle B downwards to guide
the tailgate.
Lower ta
Opening
) Push the handle C to the right and
tilt the tailgate D .
92
Closing
) Raise the tailgate D , push it fully to
close it, check that it is locked correctly.
ate
93
1
2
INTERIOR
Electric parking brake
This combines the functions of auto-
matic application on switching off the
engine and automatic release on accel-
eration.
Manual application/release is possible.
Head-up display
This system projects certain information
into the driver's fi eld of vision: speed,
cruise control/speed limiter.
144
136
Audio and communication systems
These systems benefi t from the latest
technology: MP3 compatible Peugeot
Connect Sound, Peugeot Connect USB,
Bluetooth, Peugeot Connect Media with
16/9 retractable colour screen, audio
system, auxiliary socket.
Dual-zone digital air conditioning
This systems allows different levels of
comfort to be set for the driver and front
passenger. It then controls these level
automatically according to the ambient
conditions.
69
Peugeot Connect
Media
Peugeot Connect
Sound
Peuget Connect
USB
203
247
254
Bluetooth
PEUGEOT
Assistance
231,
257
199
1
3
S
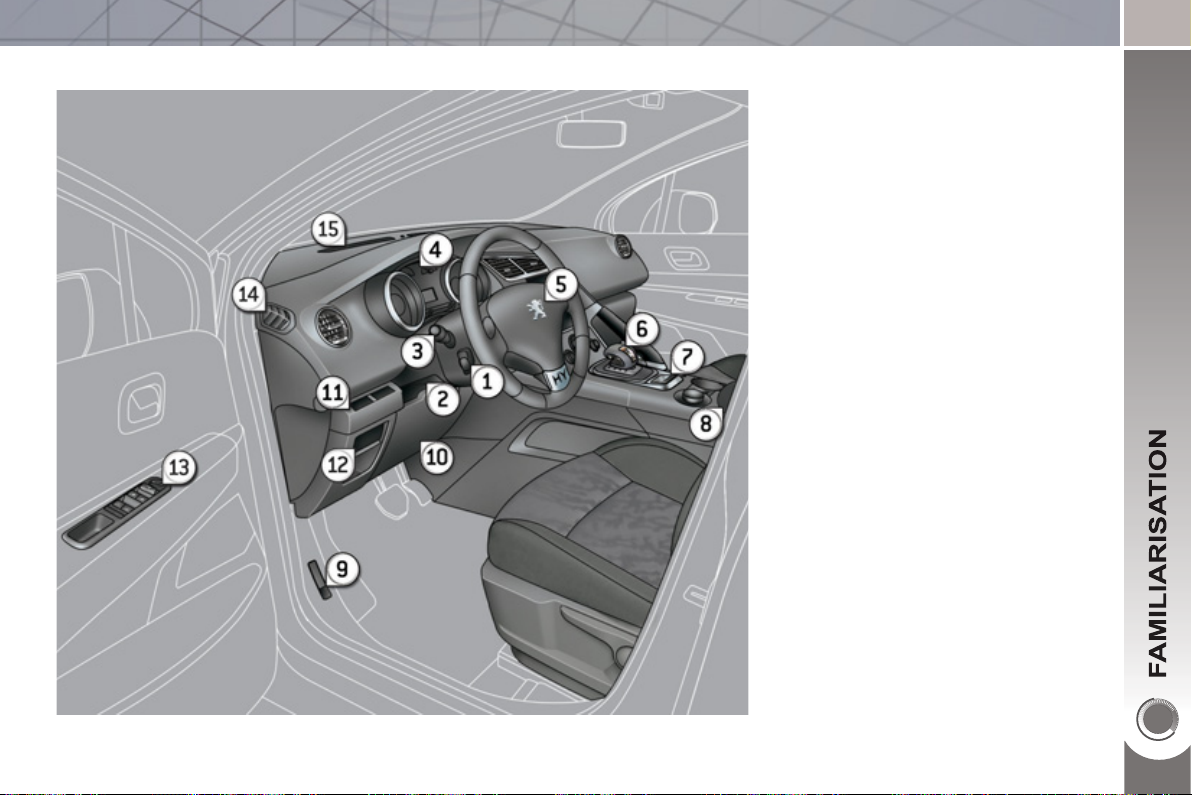
INSTRUMENTS AND CONTROL
1. Cruise control/speed limiter
switches.
2. Steering wheel adjustment control.
3. Lighting and direction indicator
control stalk.
4. Instrument panel.
5. Driver's airbag.
Horn.
6. Gear lever.
7. Electric parking brake.
8. Front armrest - Peugeot Connect
USB.
9. Bonnet release.
10. Driver's storage compartment
(Handbook).
11. ECO OFF button
Alarm button.
Parking sensors button.
Dynamic stability control button
(ESP/ASR).
12. Manual headlamp adjustment.
Instrument panel navigator
associated with the Peugeot
Connect Media.
13. Door mirror controls.
Electric window controls.
Child lock.
14. Front side window demisting vent.
15. Windscreen demisting vent.
14
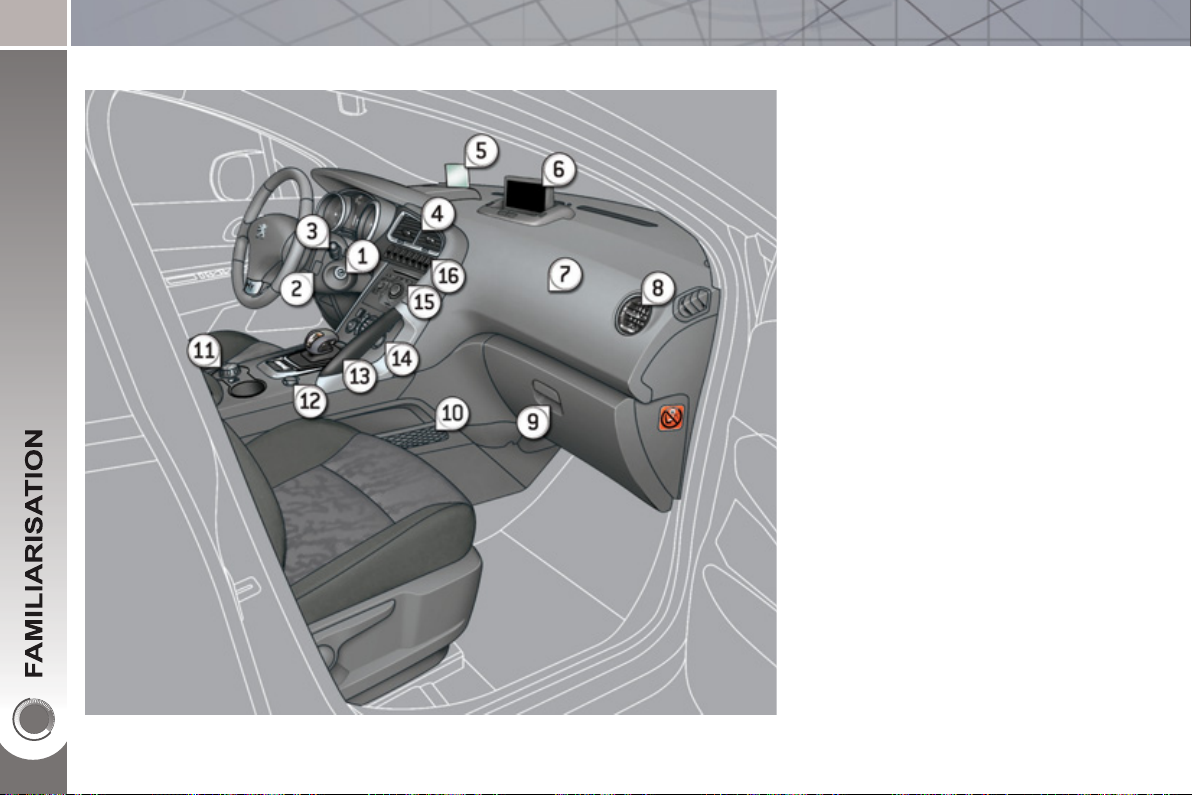
S
INSTRUMENTS AND CONTROL
1. Steering lock and ignition.
2. Audio and telematics system
steering mounted control.
3. Wipers/screenwash/trip computer
control stalk.
4. Central adjustable air vents.
5. Head-up display.
6. Multifunction screen.
7. Passenger's airbag.
8. Side adjustable air vent.
9. Glove box - Audio/video sockets -
Passenger's airbag deactivation.
10. Storage compartment with net.
11. HYbrid4 mode selector.
12. 12 V accessory socket.
13. Grab handle.
14. Heating/air conditioning controls.
15. Audio and telematics system.
16. Buttons:
- head-up display,
- hazard warning lamps,
- central locking.
5
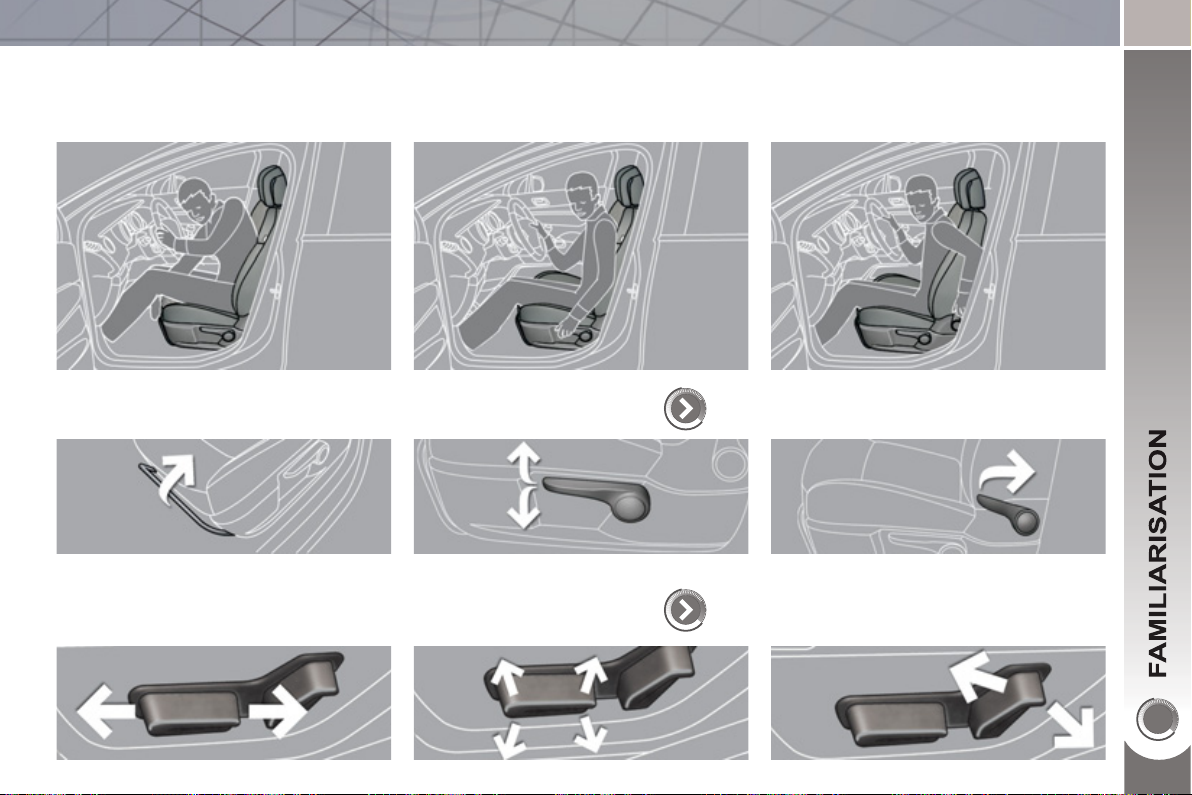
SITTING COMFORTABLY
Driver's seat
Forwards-backwards Height
Manual adjustment
Electric adjustment
1
Seat back angle
72
73
1
6
SITTING COMFORTABLY
Front seats
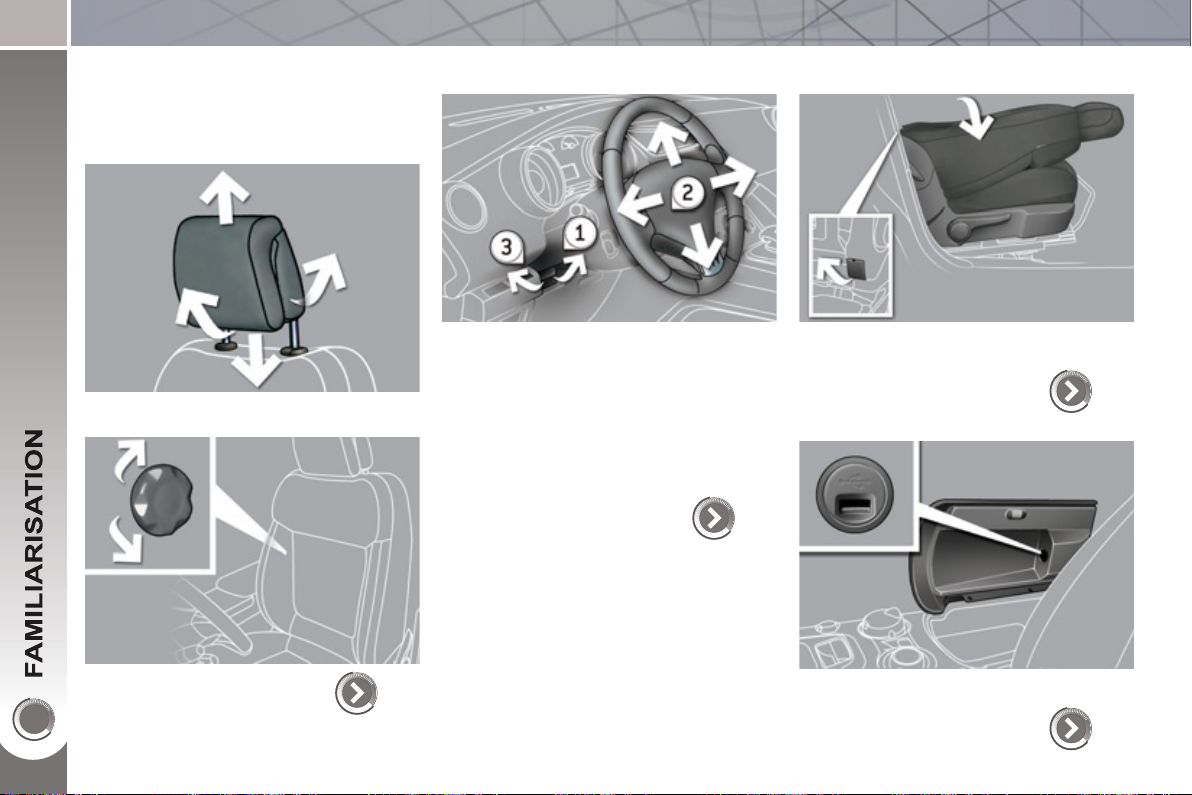
Head restraint height and angle
Lumbar
Steering wheel adjustment
1. Release the adjustment mechanism.
2. Adjust for height and reach.
3. Lock the adjustment mechanism.
As a safety precaution, these operations must only be carried out when stationary.
78
Table position (front passenger
seat)
To place objects on the table or to make
the loading of long objects in the vehicle
easier.
75
Front armrest
74
It contains the Peugeot Connect USB port.
108
SITTING COMFORTABLY
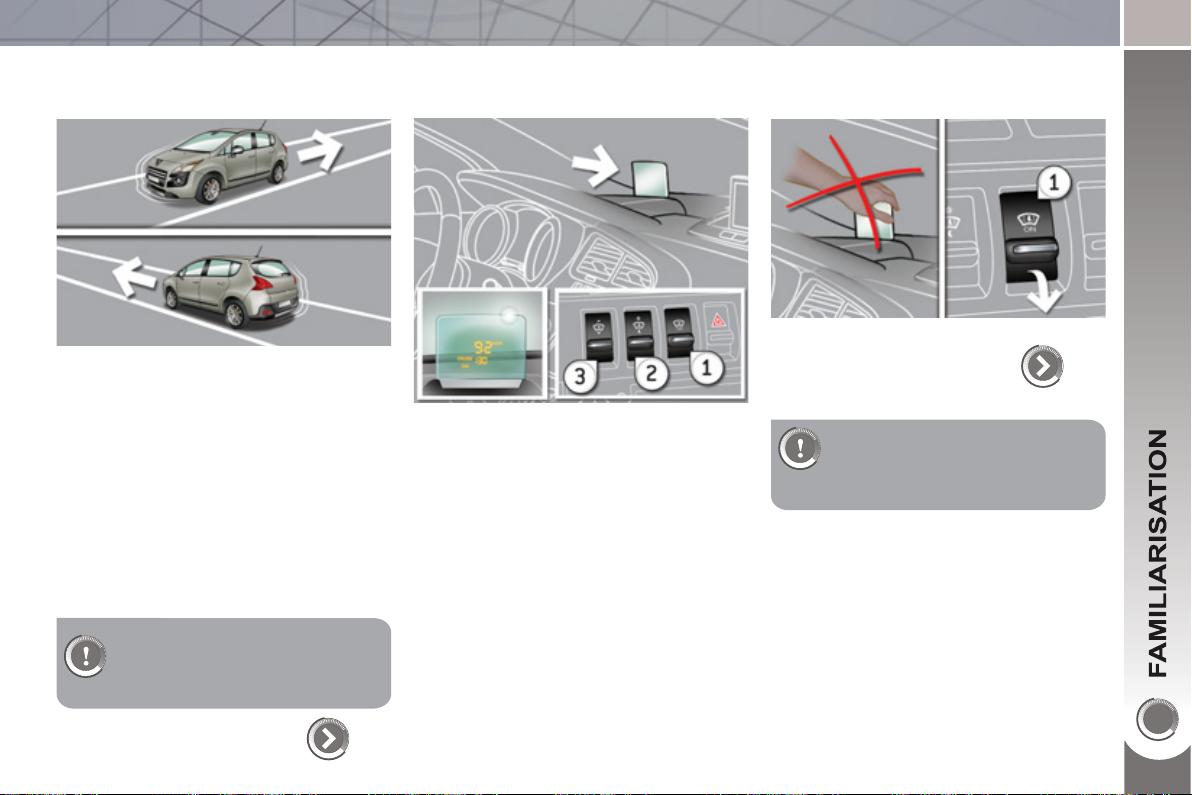
F
Door mirrors
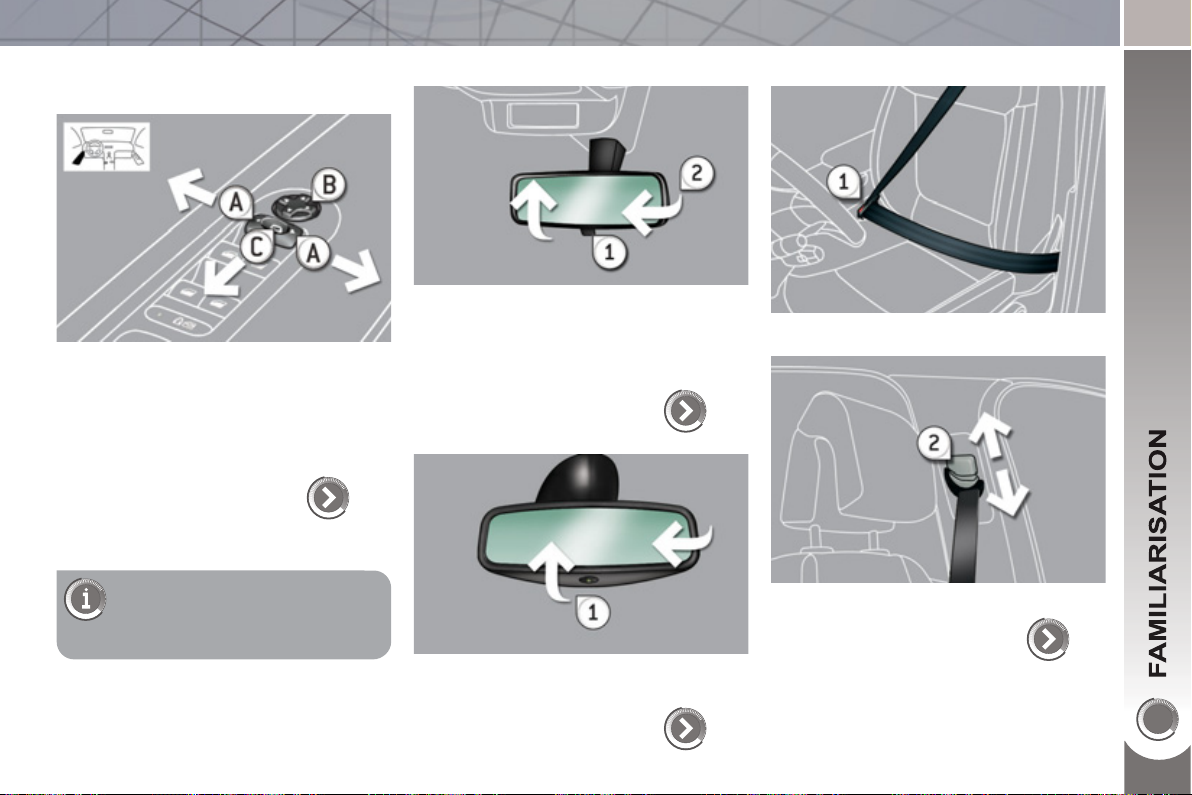
Adjustment
A. Selection of the mirror to be adjusted.
B. Adjustment of the position of the
mirror in the four directions.
79
Rear view mirror
Manual model
1. Selection of the "day" position of the
mirror.
2. Adjustment of the mirror.
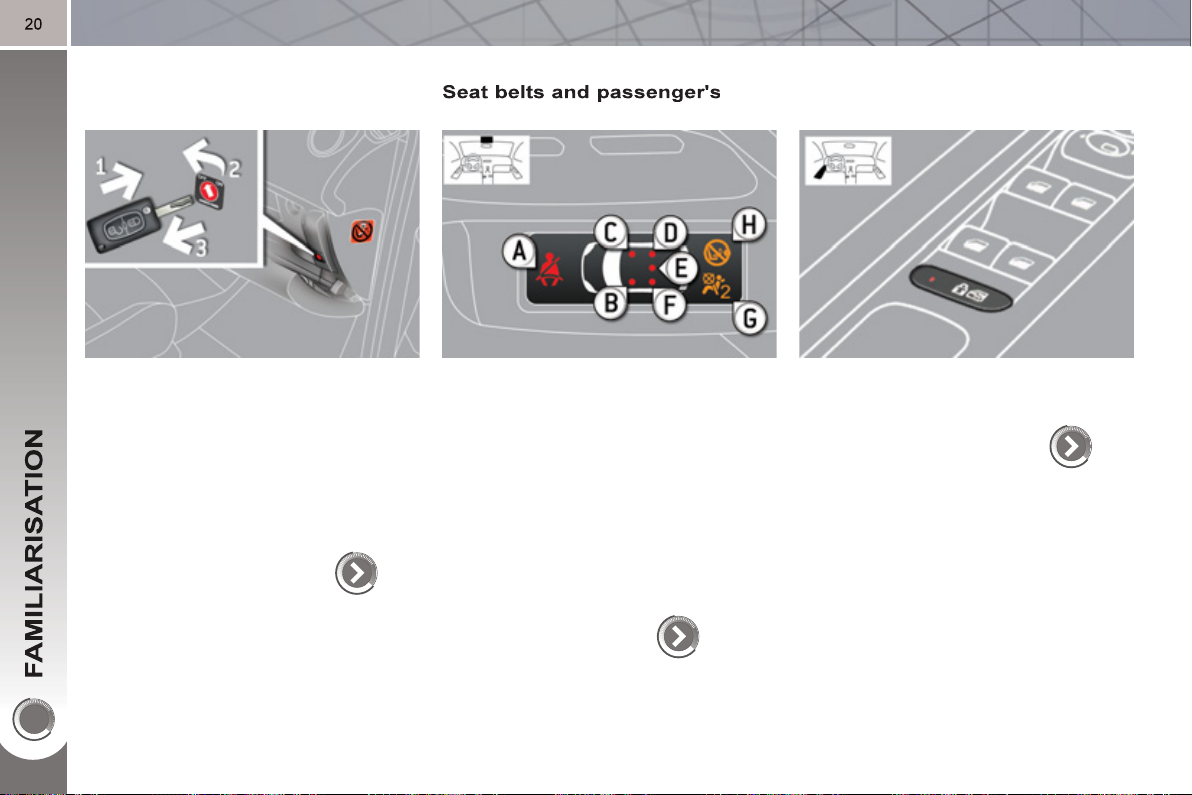
ront seat belts
1. Fastening of the buckle.
80
Also...
C. Folding/Unfolding.
Automatic day/night model
1. Adjustment of the mirror.
2. Height adjustment.
129
80
1
8
g
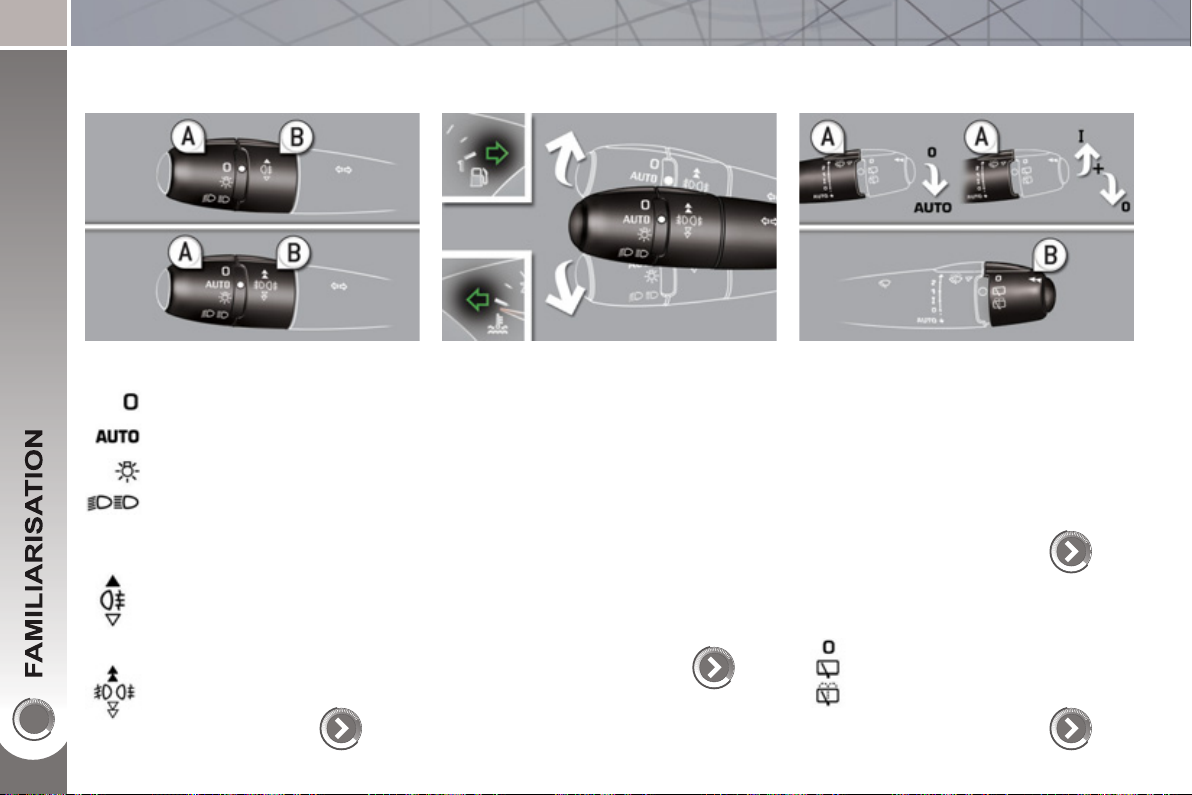
SEEING CLEARLY
hting
Li
Direction indicators
Wipers
Ring A
Lighting off.
Automatic illumination of head-
lamps.
Sidelamps.
Dipped/main beam headlamps.
Ring B
Rear foglamp.
or
Front and rear foglamps.
96, 97
Raise or lower the lighting stalk passing
the point of resistance; the corresponding
direction indicators will fl ash for as long
as the stalk remains in this position.
"Motorway" function
Press the lighting stalk up or down once,
without passing the point of resistance;
the corresponding direction indicators will
fl ash three times.
This function can be used at any speed,
but it is particularly useful when changing lane on high-speed roads.
126
Stalk A: windscreen wipers
Switching on "AUTO"
) Press the stalk down and release it.
Switching off "AUTO"
) Push the stalk up and return it to
position "0" .
100
Ring B: rear wiper
Park.
Intermittent wipe.
Wash-wipe.
101
9
MONITORING
p
Instrument
anel
Warning lamps
1
Switch panels
Lower
Lighting of the indicator lamp indicates
the status of the corresponding function.
A. With the ignition on, the needle
should indicate the level of fuel remaining.
B. With the engine running, its associ-
ated low level warning lamp should
go off.
C. With the ignition on, the oil level in-
dicator should display "OIL OK" for
a few seconds.
If the levels are not correct, top up the
levels which are low.
1. With the ignition on, the orange and
red warning lamps come on.
2. With the engine running, these
warning lamps should go off.
If warning lamps remain on, refer to the
page concerned.
43
A. ECO OFF.
B. Visual and audible
parking sensors.
C. ESP OFF.
D. Interior volumetric
45
protection alarm.
Central
E. Head-up display.
F. Hazard warning lamps.
G. Central locking.
36
154
128
86
144
126
91
PASSENGER SAFETY
g
g
f
g
)
Passen
er's front airba
ront airba
Child lock
locking of the rear doors
1. Insert the key.
2. Select the position:
"OFF" (deactivation), with "rear fac-
ing" child seat,
"ON" (activation), with front passen-
ger or "forwards facing" child seat.
3. Remove the key keeping the switch
in the new position.
A. Front and/or rear seat belts not fas-
tened/unfastened warning lamp.
B. Front left seat belt warning lamp.
C. Front right seat belt warning lamp.
D. Rear right seat belt warning lamp.
E. Rear centre seat belt warning lamp.
F. Rear left seat belt warning lamp.
G. Passenger's front airbag deactivated
warning lamp.
H. Passenger's front airbag activated
133
warning lamp.
Illumination of the indicator lamp indicates
the status of the corresponding function.
125
130, 133

A
RRANGE YOUR BOOT
Adj
ustable boot floor
Rear seats
100 kg max.
Place the fl oor in this position (at an
angle), two stops support it to allow access underneath it.
) Check that nothing is preventing the
seat backs from folding (front seats
moved forwards, head restraints,
seat belts, ...).
) Check also that no object on or un-
der the seat could hinder its movement.
114
) Pull the control of the 1/3 section,
from the boot.
) Pull the control of the 2/3 section,
from the boot.
The seats are aligned with the fl oor and
the lower tailgate.
76
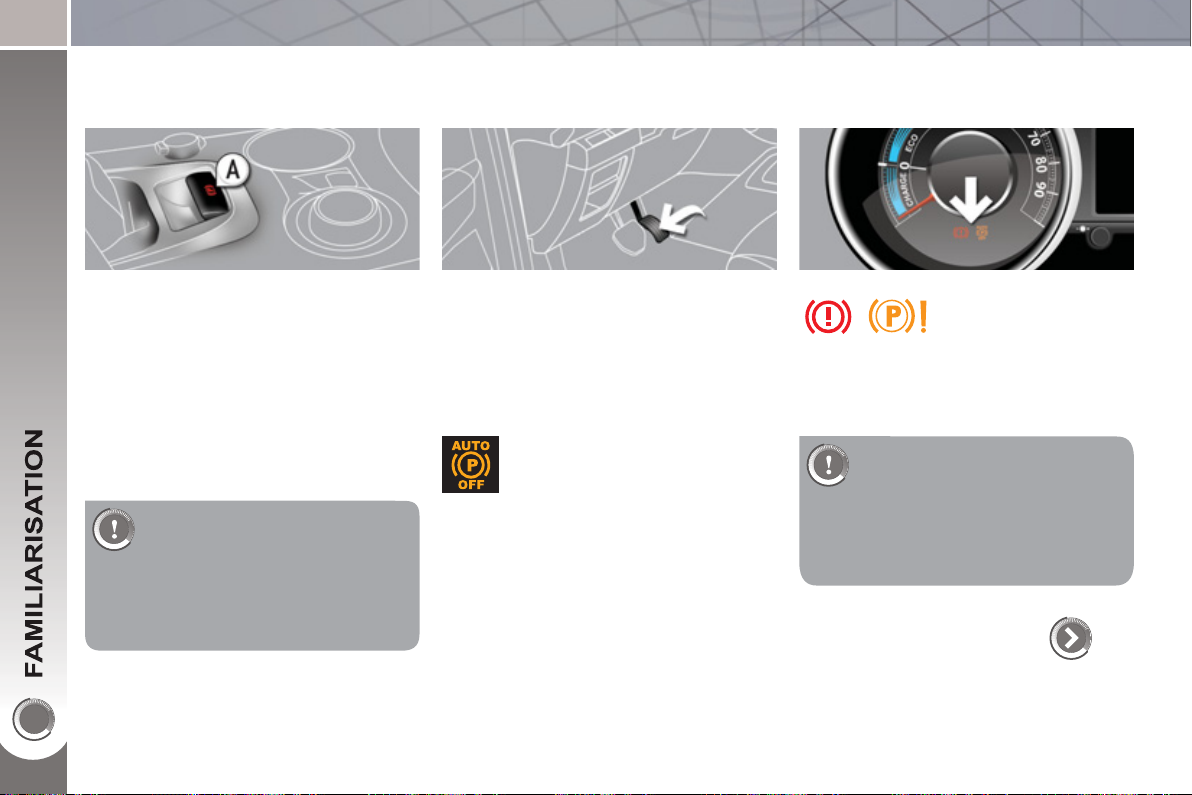
DRIVING SAFELY
g
Electric parkin
brake
Manual application/release
The parking brake can be applied man-
ually by pulling the control lever A .
When the ignition is on, the parking
brake can be released manually by
pressing the brake pedal and pulling
then releasing the control lever A .
If you get out of your vehicle
with the engine running, apply
the parking brake manually.
Never leave a child alone in the vehicle with the ignition on; they could
release the parking brake.
Automatic application/release
Press the accelerator, the parking brake
is released automatically and progressively on acceleration.
When the engine is switched off , the
parking brake is applied automatically.
If this warning lamp is on in the
instrument panel, the automatic
application/release are deacti-
vated .
Before getting out of
the vehicle, check that
the braking warning
lamp ( red! ) and the
warning lamp P in the control lever A
are on (not fl ashing).
If you are towing a trailer or if
the slope could alter (transport
by ship, lorry, recovery of the
vehicle, ...), make a manual
maximum application of the parking
brake (long pull on the control lever A )
to immobilise the vehicle.
136
3
DRIVING SAFELY
Hill start assist
2
Head-up display
Your vehicle is equipped with a system
which keeps it immobile for a short time
(approximately 2 seconds) to assist you
when starting on a hill, the time required
for you to move your foot from the brake
pedal to the accelerator pedal.
This function is only active:
- when the vehicle has been immobilised completely with your foot on
the brake pedal,
- on certain gradients,
- when the driver's door is closed.
Do not get out of the vehicle
during the hill start assist temporary hold phase.
1. Head-up display on/off.
2. Brightness adjustment.
3. Display height adjustment.
141
144
The adjustments must be
made with the ignition on and
the Ready lamp on, with the
vehicle stationary.
24
p
S
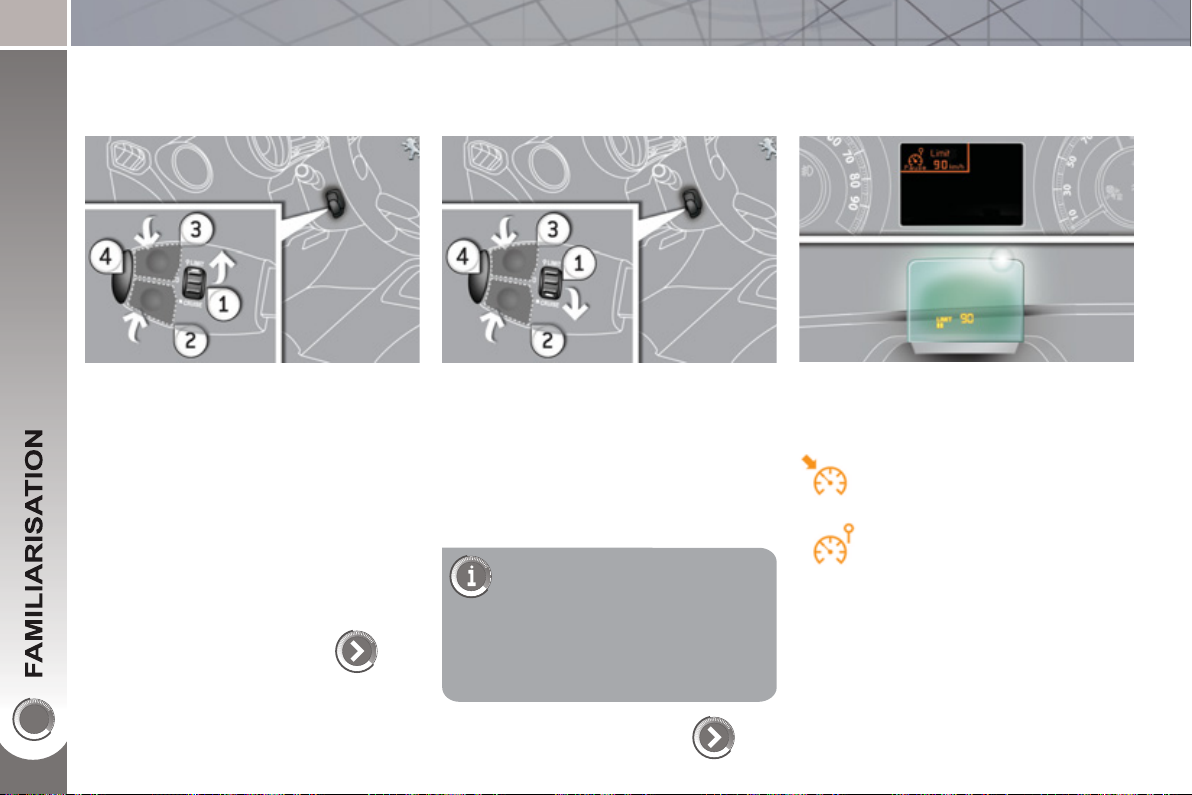
DRIVING SAFELY
S
eed limiter "LIMIT"
Cruise control "CRUI
E"
Display in the instrument panel
1. Limiter mode Selection/Off.
2. Decreasing the programmed value.
3. Increasing the programmed value.
4. Speed limiter On/Off.
1. Cruise control mode Selection/Off.
2. Programming a speed/Decreasing
the programmed value.
3. Programming a speed/Increasing
the programmed value.
4. Cruise control Off/Resume.
In order to be programmed or
activated, the vehicle speed
must be higher than 25 mph
(40 km/h), with at least second gear
engaged.
146
The cruise control or speed limiter mode
appears in the instrument panel when it
is selected.
Cruise control
Speed limiter
148
5
DRIVING SAFELY
g
6-speed electronic
ear control
earbox
This 6-speed gearbox offers a choice
between the comfort of fully automatic
operation or the pleasure of manual
gear changing.
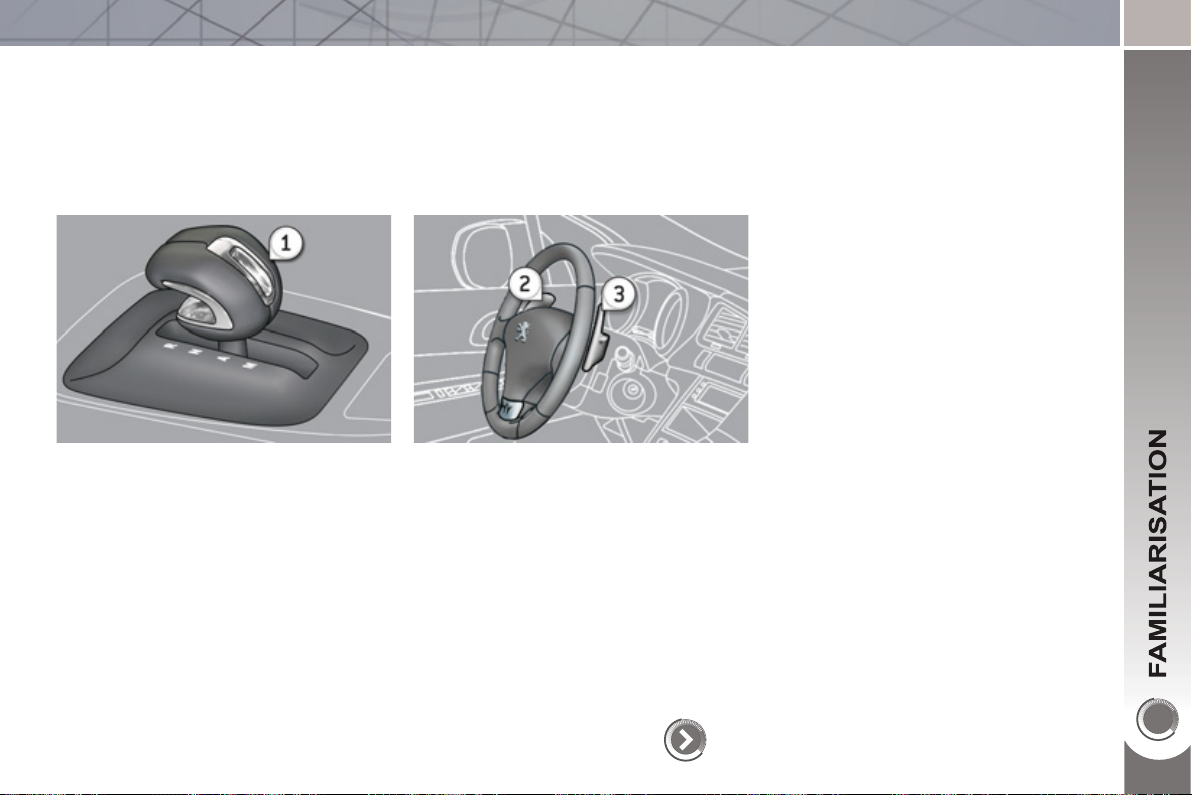
2
1. Gear lever:
R. Reverse.
N. neutral.
A. Automatic mode.
M. Sequential mode with manual
gear changing at the steering wheel.
2. Steering mounted "-" paddle.
3. Steering mounted "+" paddle.
Moving off
) Ensure that the gear lever is in
position N and press the brake ped-
al fi rmly while starting the engine.
) Move the gear lever to position A
or M to go forwards or position R to
reverse.
) Take your foot off the brake pedal
then accelerate.
150
2
6
RESENTATION
The HYbrid4 technology allows two
sources of energy to be associated in an
effective manner: that of the Diesel HDi
engine which drives the front wheels and
that of the electric motor which drives
the rear wheels.
These two motors can operate alternately or simultaneously, according to
the hybrid mode selected and the driving
conditions.
The electric motor alone provides power
for the vehicle in "ZEV" (Zero Emissions
Vehicle) mode, and in "Auto" mode for
running at slow speed and low load. It
also assists the Diesel engine when
moving off, accelerating and changing
gear.
The battery that powers the electric motor recharges itself during phases of
deceleration and stores the energy for
subsequent use.
1.
Diesel HDi engine (front wheel drive).
2. Electric motor (rear wheel drive).
3. High voltage battery.
4. Electronic power supervisor.
5. Stop & Start system.
6. Electronic gear control gearbox.
7. Electric fl ow.
ain parts of the h
y
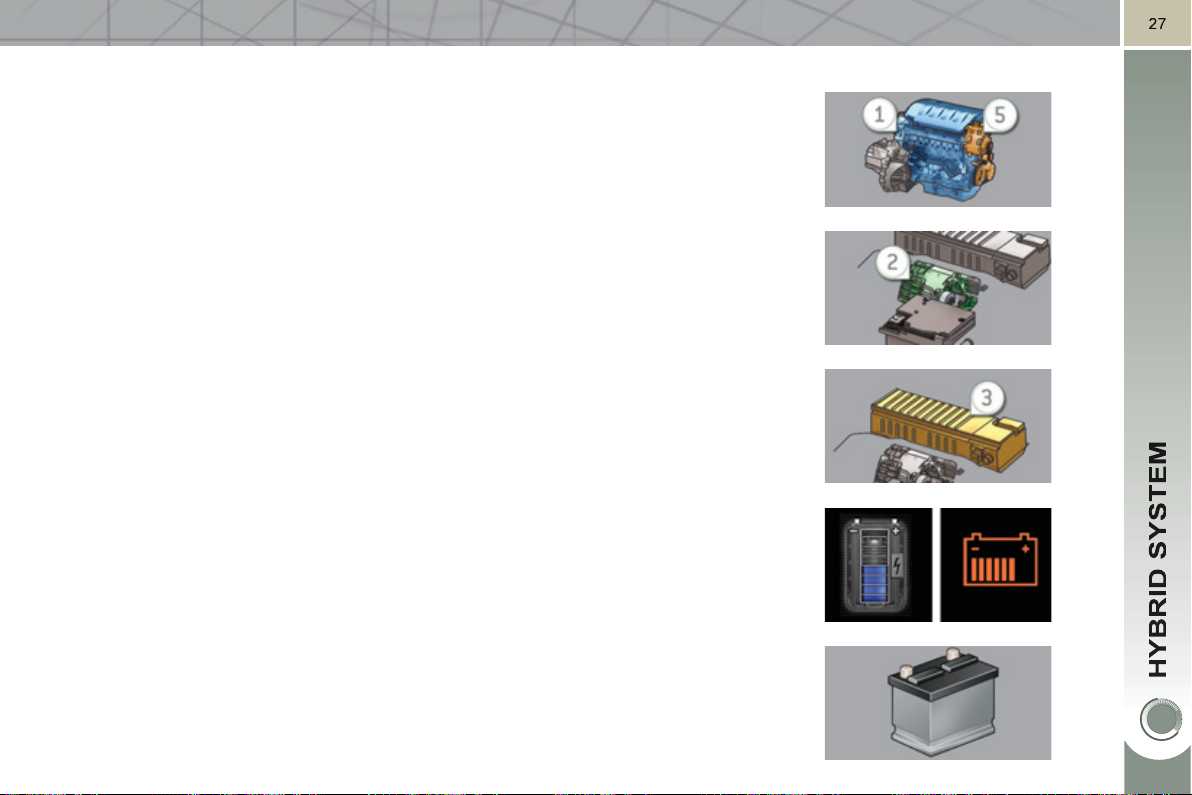
The Diesel HDi Diesel engine 1 , located at the front, drives the front wheels and
provides most of the power needed to drive the vehicle.
It is fi tted with the Stop & Start system 5 which recharges the batteries and
provides additional power when needed (in 4x4 mode).
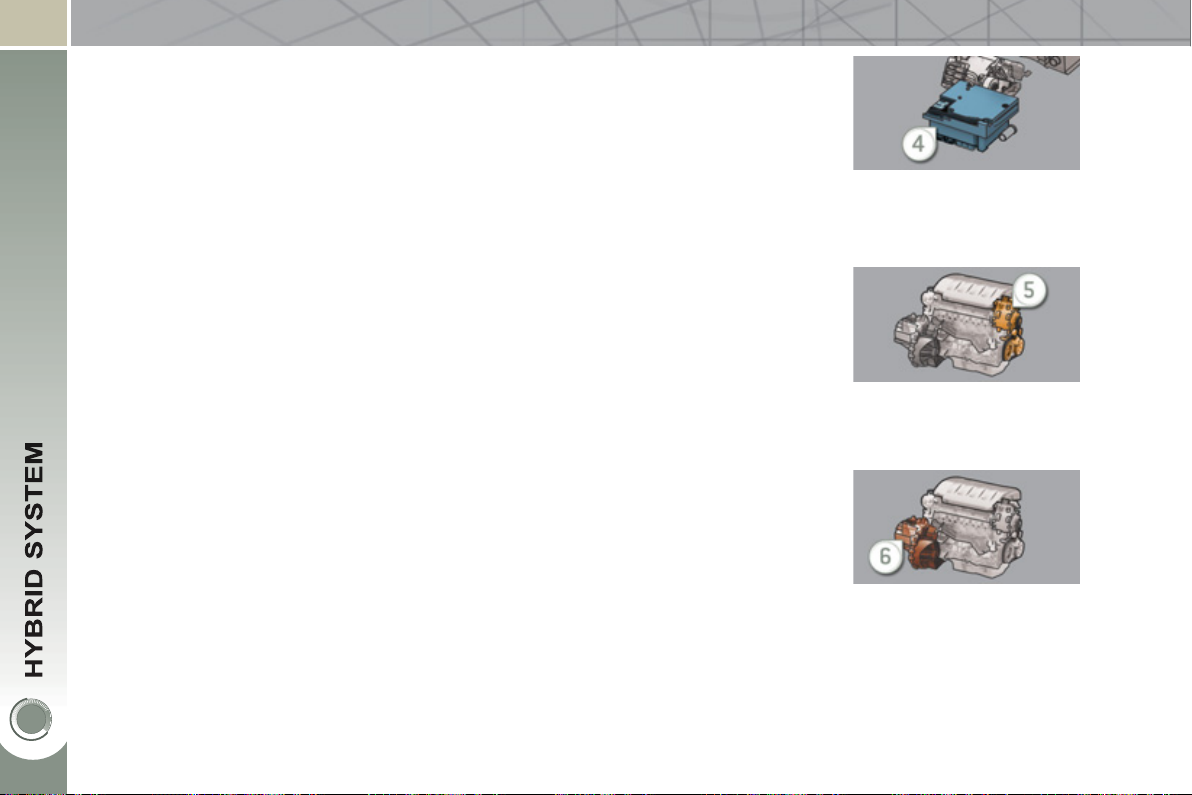
The electric motor 2 , located at the rear, drives the rear wheels on its own, or
supplements the Diesel engine, according to the hybrid mode selected.
It recovers energy and charges the batteries during phases of deceleration of the
vehicle and is active up to 70 mph (120 km/h).
A 200 V NI-MH high voltage battery 3 , provides a source of energy for the rear
electric motor.
Its charging rate is managed automatically by the vehicle during phases of
deceleration.
It is located in a compartment in the boot, access to which is restricted to trained
service technicians.
The battery state of charge is indicated by 8 horizontal or vertical bars (depending
on the screen).
brid system on 3008 HYbrid4
The conventional battery , located under the bonnet, powers the vehicle's 12 V
systems. It is recharged automatically by the high voltage network.
2
8
The electronic power supervisor 4 automatically manages the operation of the
two power units (Diesel and electric) to provide the lowest consumption.
An inverter and a transformer are needed to manage the electric power.
The inverter acts on the torque of the electric motor, by regulating the current
coming from the high voltage battery pack. Its operating range is between 150 and
270 volts.
The transformer converts the 200 V of the battery pack to 12 V, to power the
vehicle's ancillary systems.
The Stop & Start system 5 allows the Diesel engine to be put into standby during
stops (traffi c lights, a stop, or in a traffi c jam, for example) or during phases of
running in all-electric mode.
The stopping and restarting of the Diesel engine is done in a way that is instantaneous and transparent for the driver.
The electronic gear control gearbox 6 provides, in automatic mode, signifi cant
savings in fuel consumption compared to a conventional manual gearbox, thanks
to its electronic control system.
It also offers improved driving pleasure with the possibility at any time of choosing
the gear changing mode: automatic or manual, using the paddles located behind
the steering wheel.
 Loading...