

Peugeot 3008 Dag 2009 Owner's Manual
24
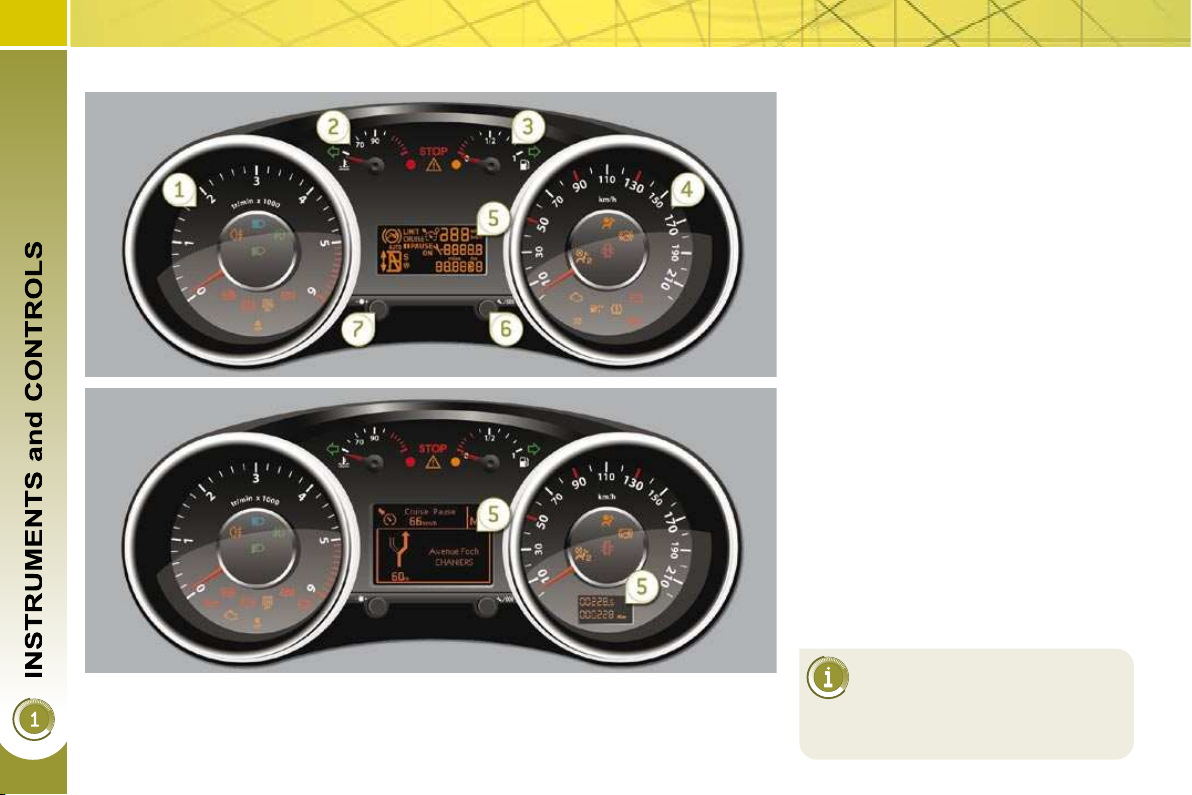
INSTRUMENT PANELS
Panel grouping together the vehicle operation indication dials and warning lights.
Dials
1. Rev counter.
Indicates the speed of rotation of the
engine (x 1 000 rpm).
2. Coolant temperature.
Indicates the temperature of the en-
gine coolant (° Celsius).
3. Fuel level.
Indicates the quantity of fuel remain-
ing in the tank.
4. Vehicle speed.
Indicates the current speed of the
moving vehicle (km/h or mph).
5. Display.
6. Display zero reset or service indi-
cator re-display button.
Resets the selected function to zero
(trip distance recorder or service
indicator) or displays the service indicator again.
7. Instrument panel lighting rheostat.
Adjusts the brightness of the light-
ing of the instruments and controls,
if the lights are on.
For further information, refer
to the paragraph relating to
the button or function and its
associated display.
25
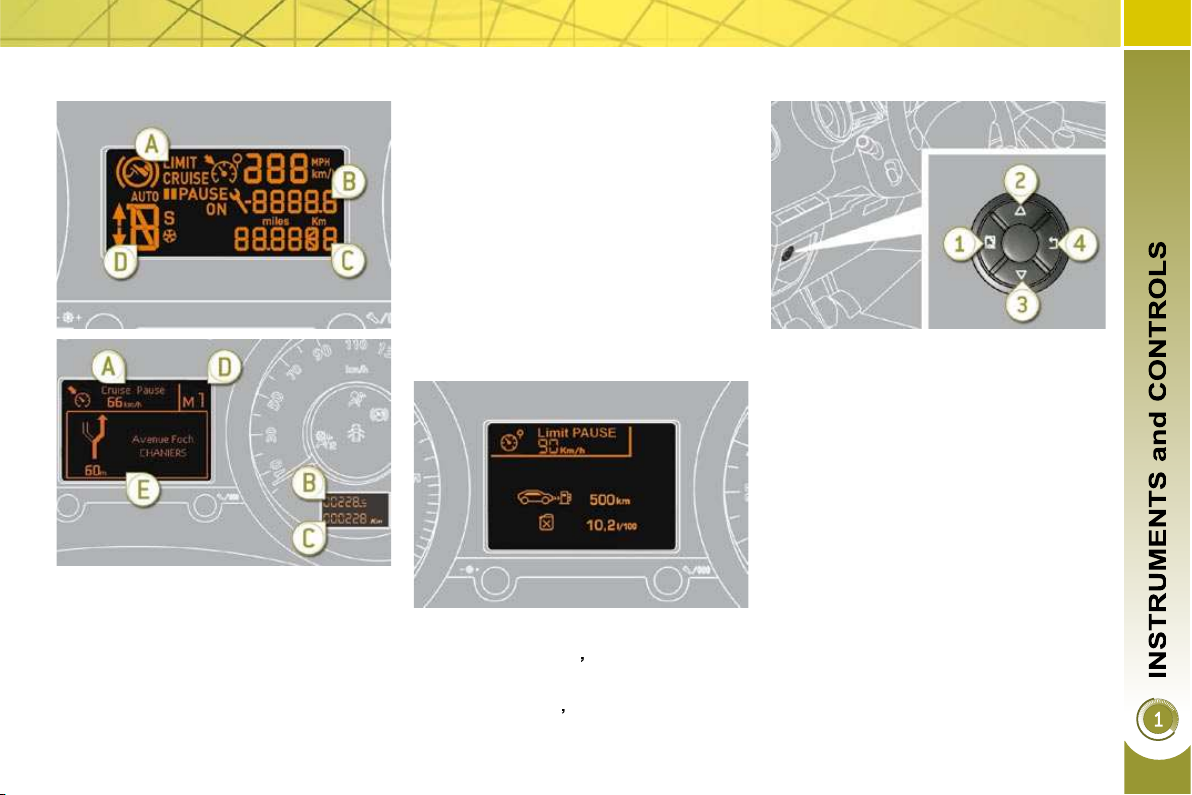
Display/Displays
The instrument panel navigator
associated with the PC Com 3D
A. Speed limiter
or
Cruise control.
(km/h or mph)
B. Trip distance recorder.
(km or miles)
C. Service indicator.
(km or miles) or,
Engine oil level indicator.
or
distance recorder.
(km or miles)
D. 6-speed piloted manual or auto-
matic gearbox.
E. Warning messages and function
status messages, trip computer, GPS navigation information,
menus (with PC Com 3D).
This group of buttons permits:
- when stationary
vehicle's equipment and of the parameters of the display (languages, units...),
- while driving
functions (trip computer, navigation...).
confi guration of the
scrolling of the active
Controls
There are four buttons to control the instrument panel 16/9 large display:
1. access the general menu, confi rm
the selection,
2. move up through the menu,
3. move down through the menu,
4. return to the previous screen, exit
from the menu.

The general menu and its as-
INDICATOR AND WARNING
sociated functions can only be
accessed when stationary, via
buttons 1 to 4 .
A message appears on the display,
above a certain speed threshold, indicating that the general menu cannot be displayed.
The trip computer displays can only
be accessed while driving, via buttons 2 and 3 (refer to the "Trip com-
puter" paragraph).
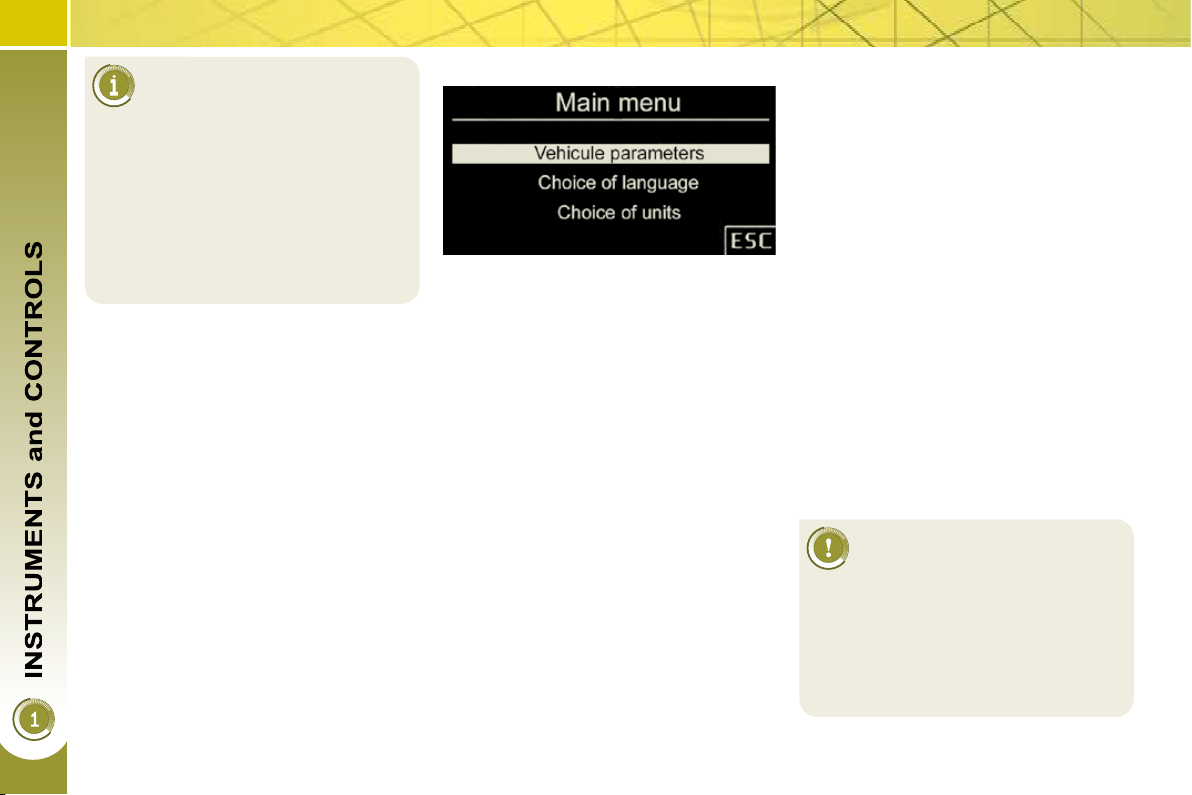
General menu
Press button 1 to gain access to the
general menu and select one of the
following functions:
- "Vehicle parameters",
- "Selection of the language",
- "Selection of the units".
Press button 2 or 3 to move on the
screen.
Press button 1 again to confi rm the
selection.
Vehicle parameters
This menu allows you to activate or
deactivate certain driving and comfort
equipment:
- wiper linked with reverse gear (refer
to the "Visibility" section),
- selective unlocking (refer to the
"Accesses" section),
- follow-me-home and welcome lighting (refer to the "Visibility" section),
- ambient lighting (refer to the "Visibility" section),
- daytime lights (refer to the "Visibility" section),
- directional headlamps (refer to the
"Visibility" section),
- automatic or manual parking brake
(refer to the "Driving" section).
Selection of the language
This menu allows you to select the language used by the display: Deutsch,
English, Espanol, Français, Italiano,
Nederlands, Portugues, Türkçe * .
Selection of the units
This menu allows you to select the units:
temperature (°Celsius or °Fahrenheit)
and consumption (l/100 km, mpg or km/l).
Visual indicators informing the driver
that a system is in operation (operation
or deactivation indicator lights) or of the
occurrence of a fault (warning light).
When the ignition is switched on
Certain warning lights come on for a
few seconds when the vehicle's ignition
is switched on.
When the engine is started, these warning lights should switch off.
If they remain on, before moving off,
consult the warning light concerned.
Associated warnings
The switching on of certain warning lights
may be accompanied by an audible signal
and a message on the multifunction display or on the instrument panel display.
The warning lights may come
on continuously or fl ash.
Certain warning lights may
come on in two different modes. Only
by relating the type of lighting to the
operating status of the vehicle can it
be ascertained whether the situation
is normal or whether a fault has occurred.
* According to country.
The general menu and its as-
INDICATOR AND WARNING
sociated functions can only be
accessed when stationary, via
buttons 1 to 4 .
A message appears on the display,
above a certain speed threshold, indicating that the general menu cannot be displayed.
The trip computer displays can only
be accessed while driving, via buttons 2 and 3 (refer to the "Trip com-
puter" paragraph).
General menu
Press button 1 to gain access to the
general menu and select one of the
following functions:
- "Vehicle parameters",
- "Selection of the language",
- "Selection of the units".
Press button 2 or 3 to move on the
screen.
Press button 1 again to confi rm the
selection.
Vehicle parameters
This menu allows you to activate or
deactivate certain driving and comfort
equipment:
- wiper linked with reverse gear (refer
to the "Visibility" section),
- selective unlocking (refer to the
"Accesses" section),
- follow-me-home and welcome lighting (refer to the "Visibility" section),
- ambient lighting (refer to the "Visibility" section),
- daytime lights (refer to the "Visibility" section),
- directional headlamps (refer to the
"Visibility" section),
- automatic or manual parking brake
(refer to the "Driving" section).
Selection of the language
This menu allows you to select the language used by the display: Deutsch,
English, Espanol, Français, Italiano,
Nederlands, Portugues, Türkçe * .
Selection of the units
This menu allows you to select the units:
temperature (°Celsius or °Fahrenheit)
and consumption (l/100 km, mpg or km/l).
Visual indicators informing the driver
that a system is in operation (operation
or deactivation indicator lights) or of the
occurrence of a fault (warning light).
When the ignition is switched on
Certain warning lights come on for a
few seconds when the vehicle's ignition
is switched on.
When the engine is started, these warning lights should switch off.
If they remain on, before moving off,
consult the warning light concerned.
Associated warnings
The switching on of certain warning lights
may be accompanied by an audible signal
and a message on the multifunction display or on the instrument panel display.
The warning lights may come
on continuously or fl ash.
Certain warning lights may
come on in two different modes. Only
by relating the type of lighting to the
operating status of the vehicle can it
be ascertained whether the situation
is normal or whether a fault has occurred.
* According to country.
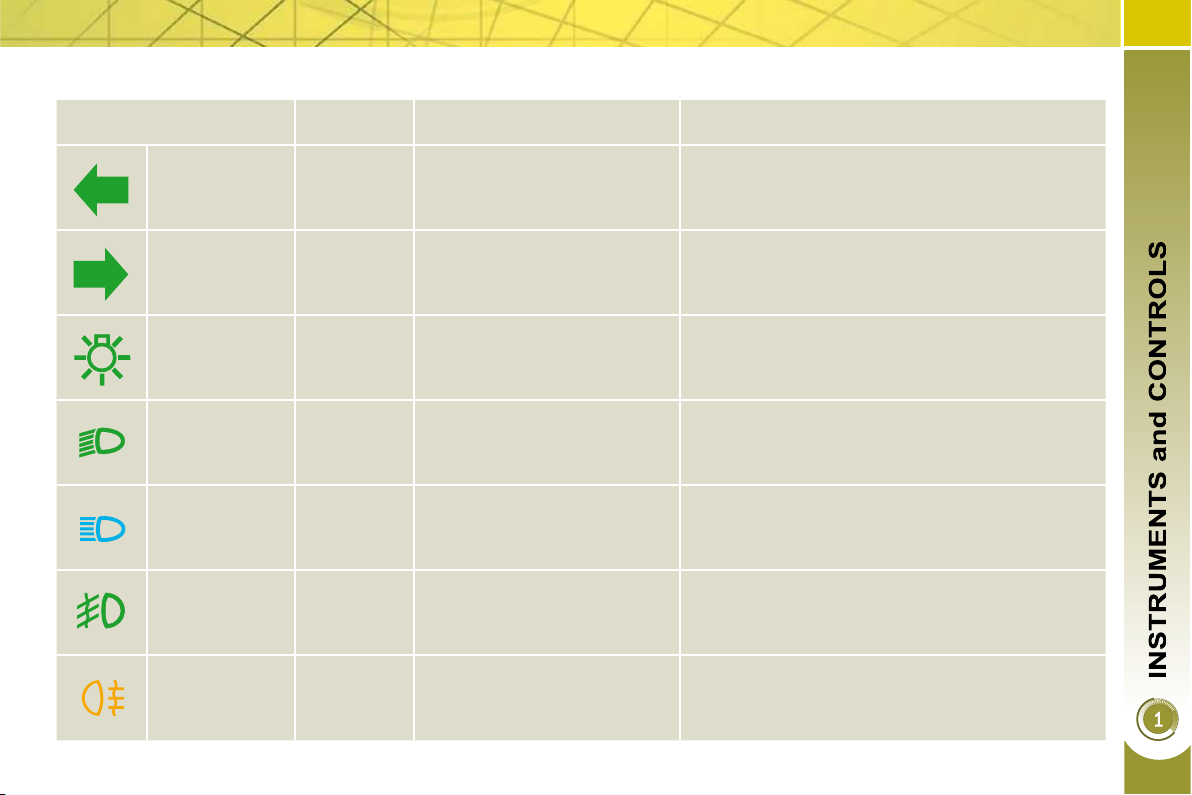
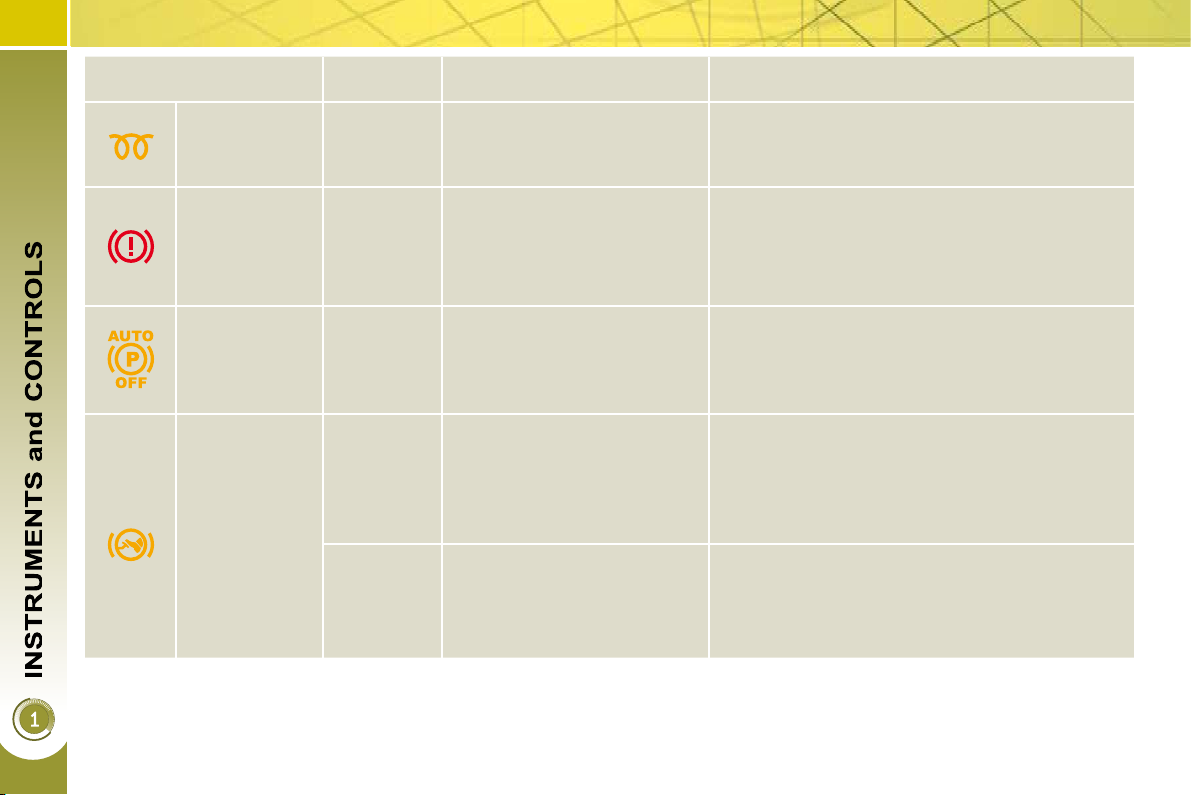
Operation indicator lights
The switching on of one of the following indicator lights confi rms the activation of the system.
Indicator lights is on Cause
Actions, observations
Left-hand
direction
indicator
fl ashing
with buzzer.
The lights stalk is pressed
down.
Right-hand
direction
indicator
fl ashing
with buzzer.
The lights stalk is pushed up.
Side lights fi xed.
The lights stalk is in the "Side
lights" position.
Turn the control to the position required.
Dipped head-
lamps
fi xed.
The lights stalk is in the
"Dipped headlamps" position.
Turn the control to the position required.
Main beam
headlamps
fi xed.
The lights stalk is pulled
towards you.
Pull the stalk to return to dipped headlamps.
Front fog
lamps
fi xed.
The front fog lamps are
switched on.
Turn the ring on the stalk rearwards to switch off
the fog lamps.
Rear fog
lamps
fi xed.
The rear fog lamps are
switched on.
Turn the ring on the stalk rearwards to switch off
the fog lamps.
Indicator lights is on Cause Actions, observations
Wait until the warning light has switched off
Diesel engine
pre-heating
Electronic
parking brake
fi xed. The ignition switch is at ON.
fi xed.
The electronic brake is
applied.
before starting.
The duration for which the warning lights is
displayed is determined by the climatic conditions.
Release the electronic brake to switch off the
warning light: with your foot on the brake pedal,
pull the electronic brake control.
Observe the safety recommendations.
For further information about the electronic
brake, refer to the "Driving" section.
Deactivation of
the automatic
functions of the
electronic
parking brake
Foot on
brake
fi xed.
fi xed.
fl ashing.
The "automatic application"
(on switching off the engine)
and "automatic release"
functions are deactivated or
faulty.
The brake pedal must be
pressed.
In the case of a piloted
manual gearbox, if you
hold the vehicle for too
long on a gradient using
the accelerator, the clutch
overheats.
Activate the function via the vehicle confi guration
menu or contact a PEUGEOT dealer.
Press the brake pedal to start the engine with
the 6-speed piloted manual gearbox (lever in
position P) or automatic gearbox (lever in
position N).
If you wish to release the parking brake without
pressing the brake pedal, this warning light will
remain on.
Use the brake pedal and/or the electronic
parking brake.
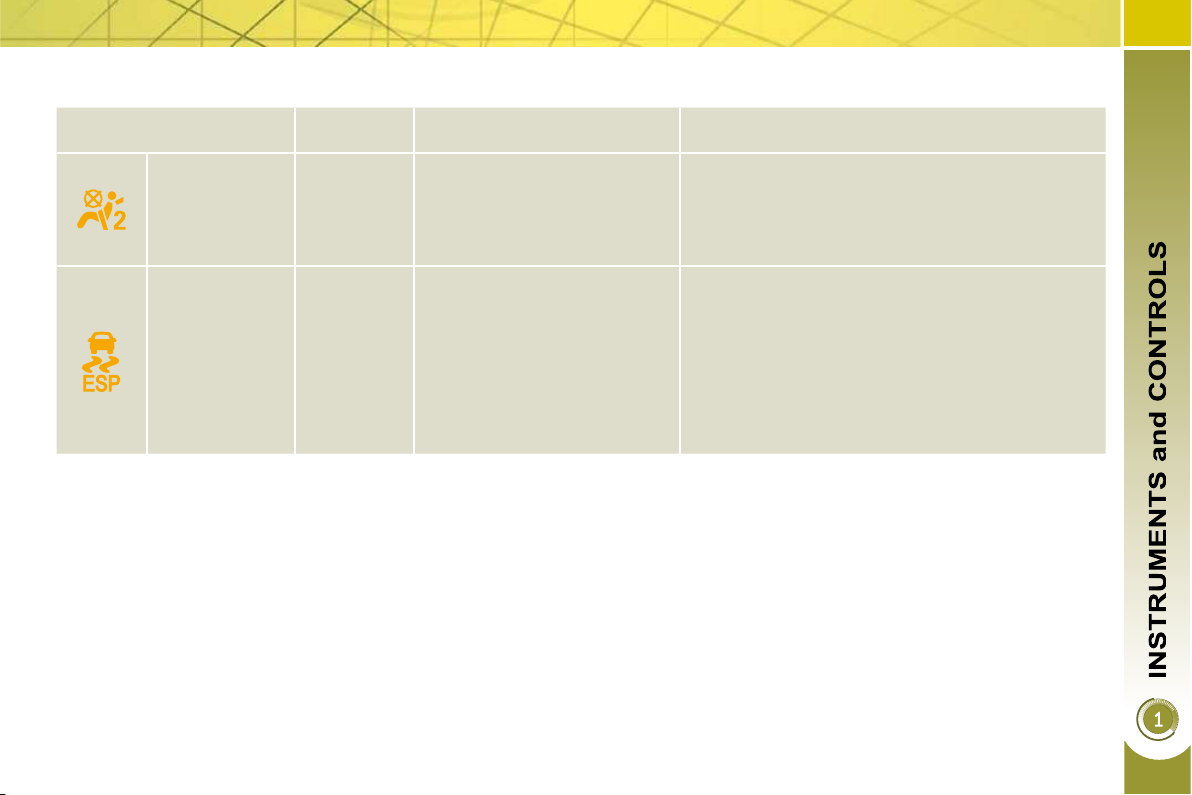
Deactivation indicator lights
The switching on of one of the following indicator lights confi rms the intentional switching off of the corresponding system.
Indicator lights is on Cause Actions, observations
Passenger air
bag system
fi xed.
The control, located in the
glove box, is set to OFF.
The passenger's air bag is
disarmed.
Set the control to ON to activate the
passenger's air bag.
The passenger's air bag system is activated
automatically when the vehicle is started.
Dynamic
stability control
(ESP/ASR)
fi xed.
The button (located at the
bottom left of the fascia
panel) or the "Grip control"
dial is operated. The
indicator light comes on.
The ESP/ASR is deactivated.
ESP: electronic stability
programme.
ASR: anti-skid regulation.
Press the button to activate the ESP/ASR or
turn the "Grip control" dial to ESP.
From approximately 30 mph (50 km/h),
the system is reactivated automatically.
The ESP/ASR system is activated automatically
when the vehicle is started.
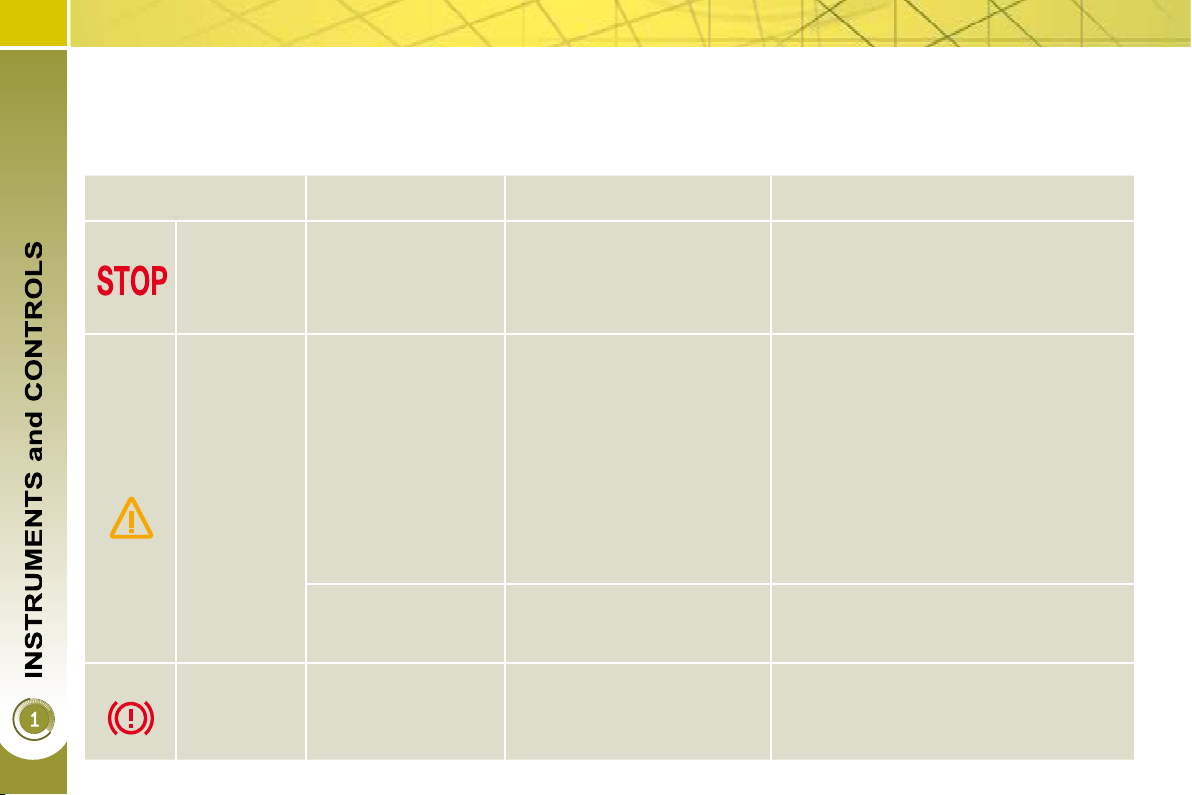
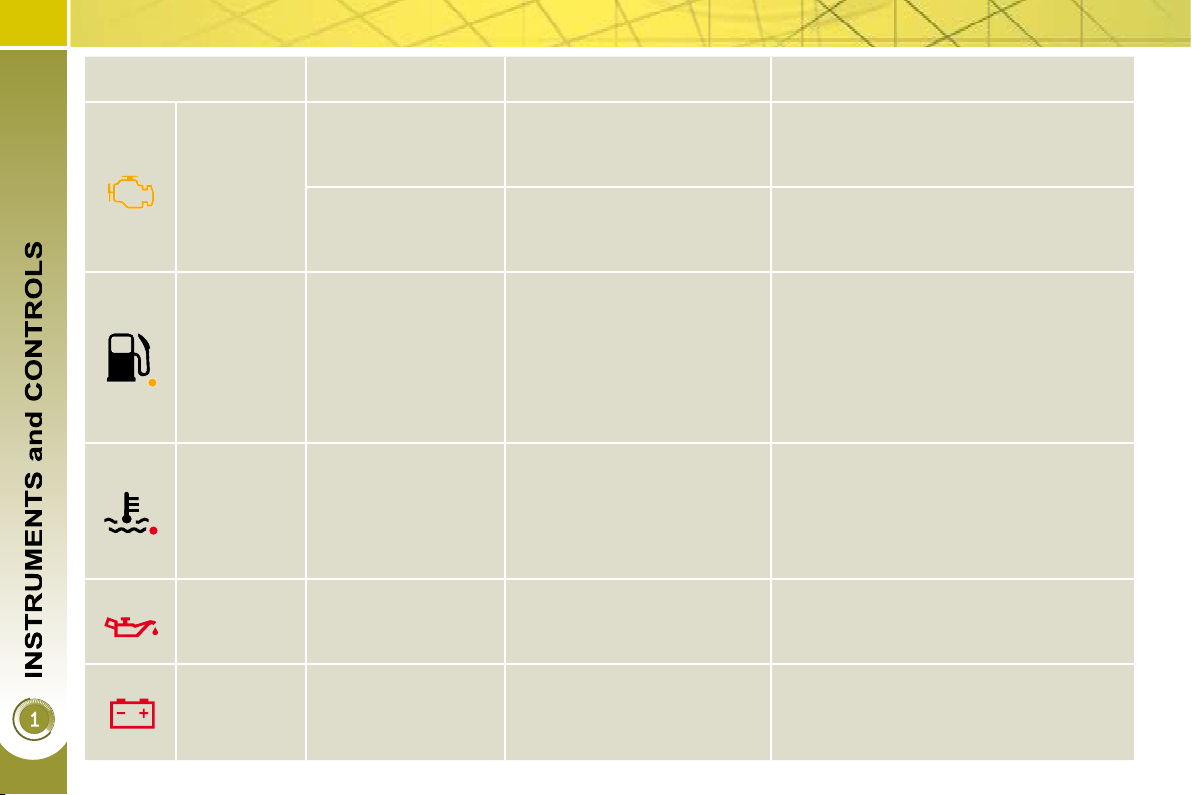
Warning lights
When the engine is running or the vehicle is being driven, the switching on of one of the following warning lights indicates the
occurrence of a fault which requires action on the part of the driver.
Any fault resulting in the switching on of a warning light must be investigated further by reading the associated message on
the multifunction display.
If you encounter any problems, do not hesitate to contact a PEUGEOT dealer.
Warning lights is on Cause Actions, observations
fi xed, associated with
STOP
Service temporarily.
Electronic
parking brake
another warning light
and accompanied by
a message on the
display.
fi xed.
fl ashing.
It is associated with a
punctured wheel, the
braking, the power steering,
the engine oil pressure or
the coolant temperature.
A minor fault which does not
have a specifi c warning light
has occurred.
A major fault which does not
have a specifi c warning light
has occurred.
The electronic brake is not
applied automatically.
You must stop immediately where it is
safe to do so.
Park, switch off the ignition and call a
PEUGEOT dealer.
Identify the fault by consulting the
message shown on the display, such as:
- the closing of the doors, boot or
bonnet,
- the engine oil level,
- the screenwash level,
- the remote control battery,
- the pressure of the tyres,
- the end of saturation of the particle
emission fi lter (Diesel).
For any other faults, contact a
PEUGEOT dealer.
Identify the fault by consulting the
message shown on the display and
contact a PEUGEOT dealer.
You must stop immediately where it is
safe to do so.
Park on level ground, switch off the
ignition and contact a PEUGEOT dealer.
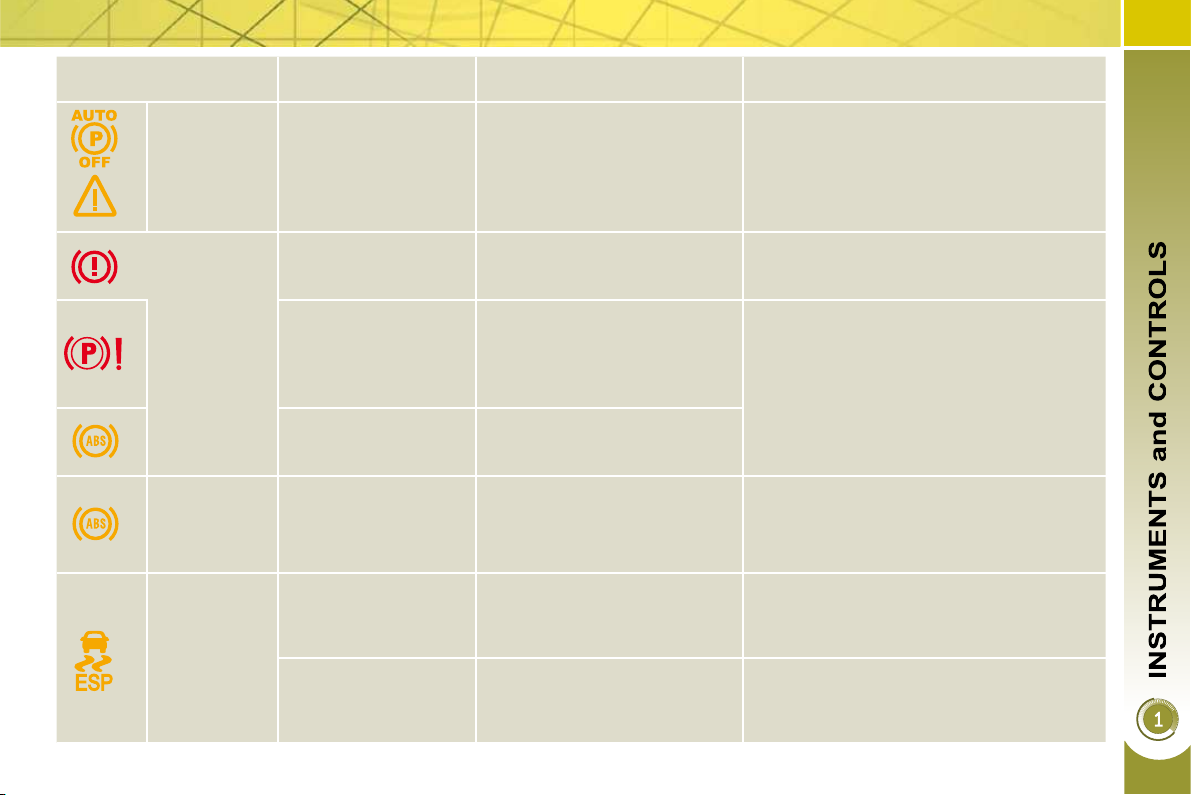
Warning lights is on Cause Actions, observations
+
Electronic
parking
brake fault
fi xed. The electronic brake is faulty.
Contact a PEUGEOT dealer without
delay.
The brake can be released manually.
For further information about the
electronic brake, refer to the "Driving"
section.
fi xed.
The braking circuit level has
dropped signifi cantly.
Top up with a fl uid recommended by
PEUGEOT.
+ Braking
fi xed, associated with
the electronic parking
brake fault warning
light, if the parking
brake is released.
The braking circuit is faulty.
You must stop immediately where it is
safe to do so.
Park, switch off the ignition and contact
a PEUGEOT dealer.
+
fi xed, associated
with the ABS warning
light.
The electronic brake force
distribution (EBFD) is faulty.
Anti-lock
Braking
System
(ABS)
fi xed.
The anti-lock braking system
is faulty.
The vehicle retains conventional braking
without assistance.
Drive carefully at reduced speed and
contact a PEUGEOT dealer without
delay.
Dynamic
stability
control (ESP/
ASR)
fl ashing.
The ESP/ASR regulation is
active.
The system optimises traction and
improves the directional stability of the
vehicle.
fi xed.
Unless it has been deactivated
with the indicator light on the
button on, the ESP/ASR system
is faulty.
Check the pressure of the tyres.
Contact a PEUGEOT dealer.
Warning lights is on Cause Actions, observations
This light should switch off when the
engine is started.
If it does not switch off, contact a
PEUGEOT dealer.
You must stop immediately where it is
safe to do so.
Park, switch off the ignition and contact
a PEUGEOT dealer.
Depending on your style of driving and
your engine, you have enough fuel left to
drive approximately 30 miles (50 km).
Fill your fuel tank as soon as possible.
Capacity approximately 60 litres.
Never continue to drive until you run out
of fuel, this could damage the emission
control and injection systems.
You must stop immediately where it is
safe to do so.
Wait until the engine has cooled down
before topping up the level, if necessary.
If the problem persists, park, switch off
the ignition and call a PEUGEOT dealer.
You must stop immediately where it is
safe to do so.
Park, switch off the ignition and contact
a PEUGEOT dealer.
Engine
autodiagnostics
system
Low fuel
level
Coolant
temperature
Engine oil
pressure
fi xed.
fl ashing.
fi xed with the needle
in the red zone.
fi xed with the needle
in the red zone.
fi xed.
The emission control system
is faulty.
The engine management
system is faulty, there is a risk
of destruction of the catalytic
converter.
The fuel tank contains
approximately 5 litres.
The temperature of the
cooling system is too high.
The engine lubrication circuit
is faulty.
Battery
charge
fi xed.
The battery charging circuit
is faulty (dirty or loose
terminals, slack or cut
alternator belt, ...).
This light should switch off when the
engine is started.
If it does not switch off, contact a
PEUGEOT dealer.
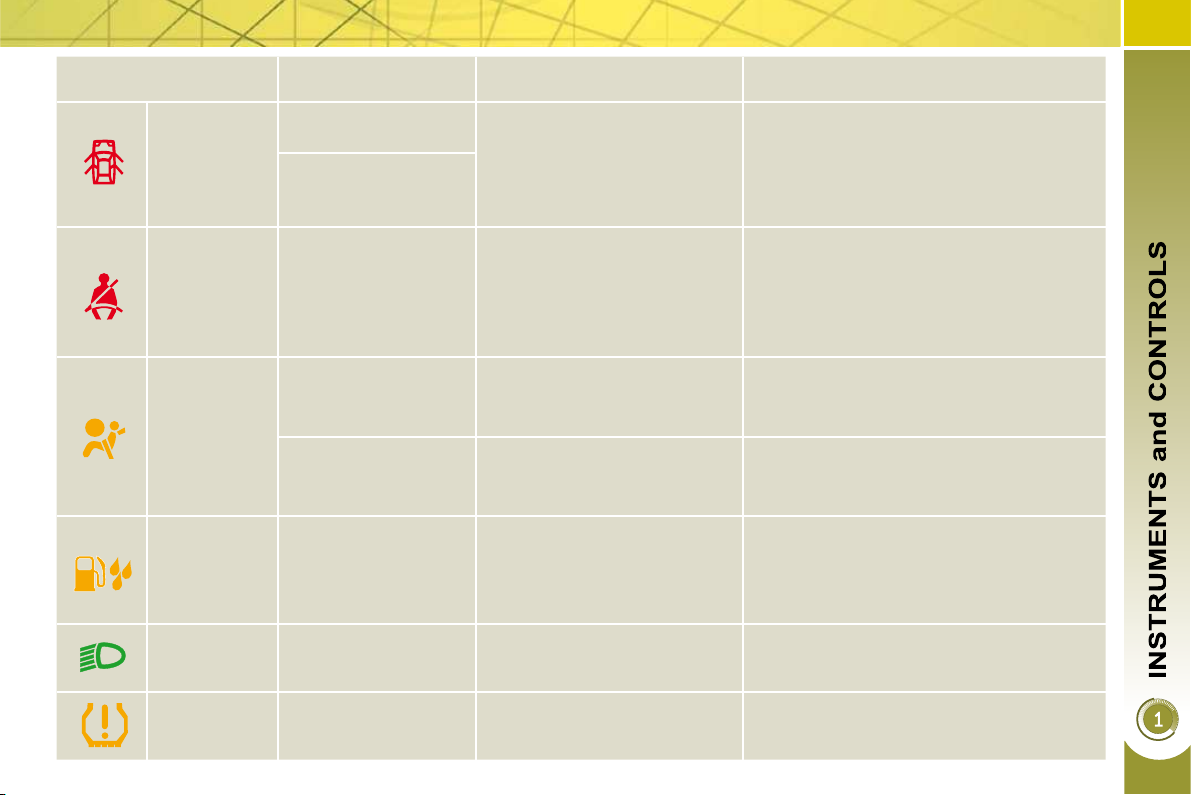
Warning lights is on Cause Actions, observations
Door(s) open
fi xed if the speed is
below 6 mph (10 km/h).
A door, the boot, the lower
tailgate or the bonnet (only
with alarm) is still open.
Close the access concerned.
fi xed if the speed is
above 6 mph (10 km/h),
accompanied by an
audible signal.
Seat belt not
fastened/
unfastened
fi xed then fl ashing
accompanied by an
audible signal.
The driver and/or the front
passenger has not fastened
or has unfastened his seat
belt.
One or more rear
passengers have also
unfastened their seat belt.
Pull the strap then insert the tongue in
the buckle.
Air bags
temporarily.
This light comes on for a few
seconds then switches off
when you turn the ignition to
"ON".
This light should switch off when the
engine is started.
If it does not switch off, contact a
PEUGEOT dealer.
fi xed.
One of the air bag or seat
belt pretensioner systems is
faulty.
Contact a PEUGEOT dealer.
Water in
diesel
fi xed.
The diesel fi lter contains
water.
There is a risk of damage
to the injection system on
Diesel engines.
Contact a PEUGEOT dealer without
delay.
Directional
headlamps
fl ashing.
The directional headlamps
system is faulty.
Contact a PEUGEOT dealer.
Defl ated
wheel
fi xed.
The pressure in one or more
wheels is too low.
Check the pressure of the tyres as soon
as possible.
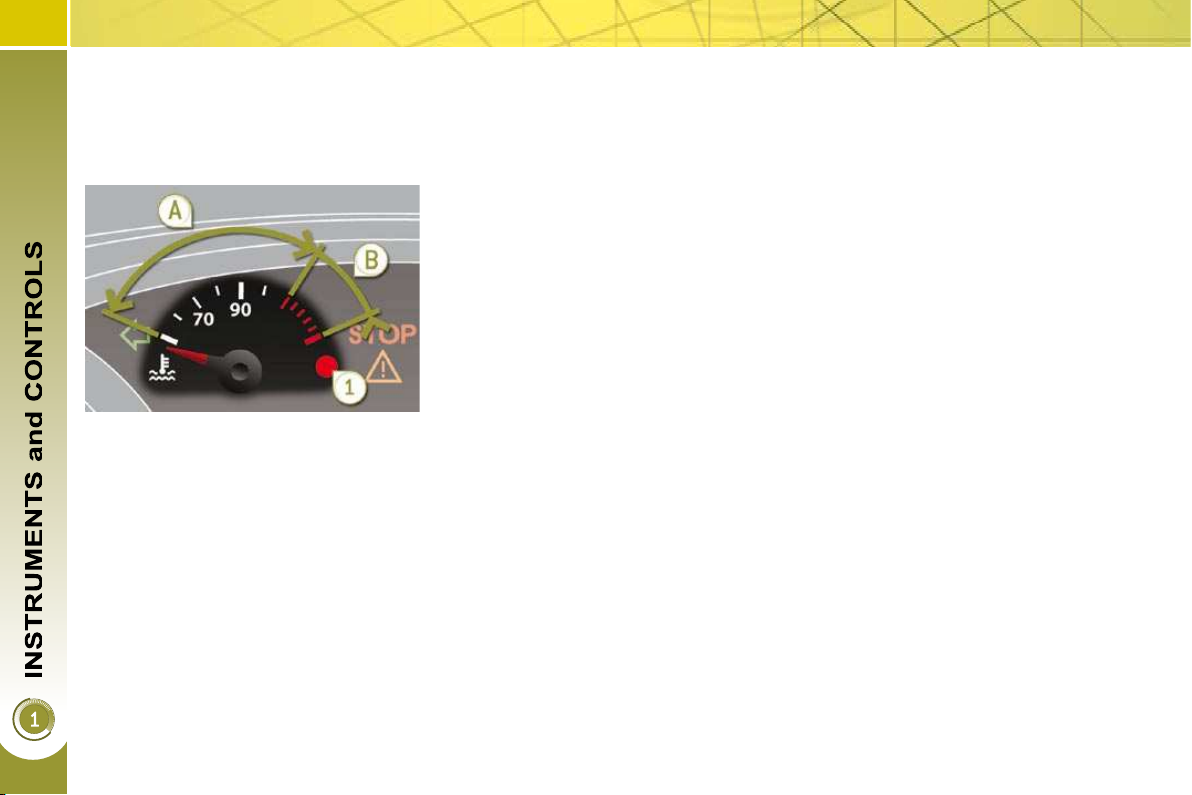
Coolant temperature indicator
System which informs the driver of the
changes in the temperature of the engine coolant while driving.
With the engine running, when the
needle is:
- in zone A , the temperature is correct,
- in zone B , the temperature is too
high; the max temperature warning
light 1 and the central STOP warning
light come on, accompanied by an
audible signal and a message on
the multifunction display.
You MUST stop as soon as it is safe
to do so.
Wait a few minutes before switching off
the engine.
Consult a PEUGEOT dealer.
After driving for a few minutes, the temperature and pressure in the cooling
system increase.
To top up the level:
wait for the engine to cool,
unscrew the cap by two turns to
allow the pressure to drop,
when the pressure has dropped,
remove the cap,
top up the level to the "MAX" mark.
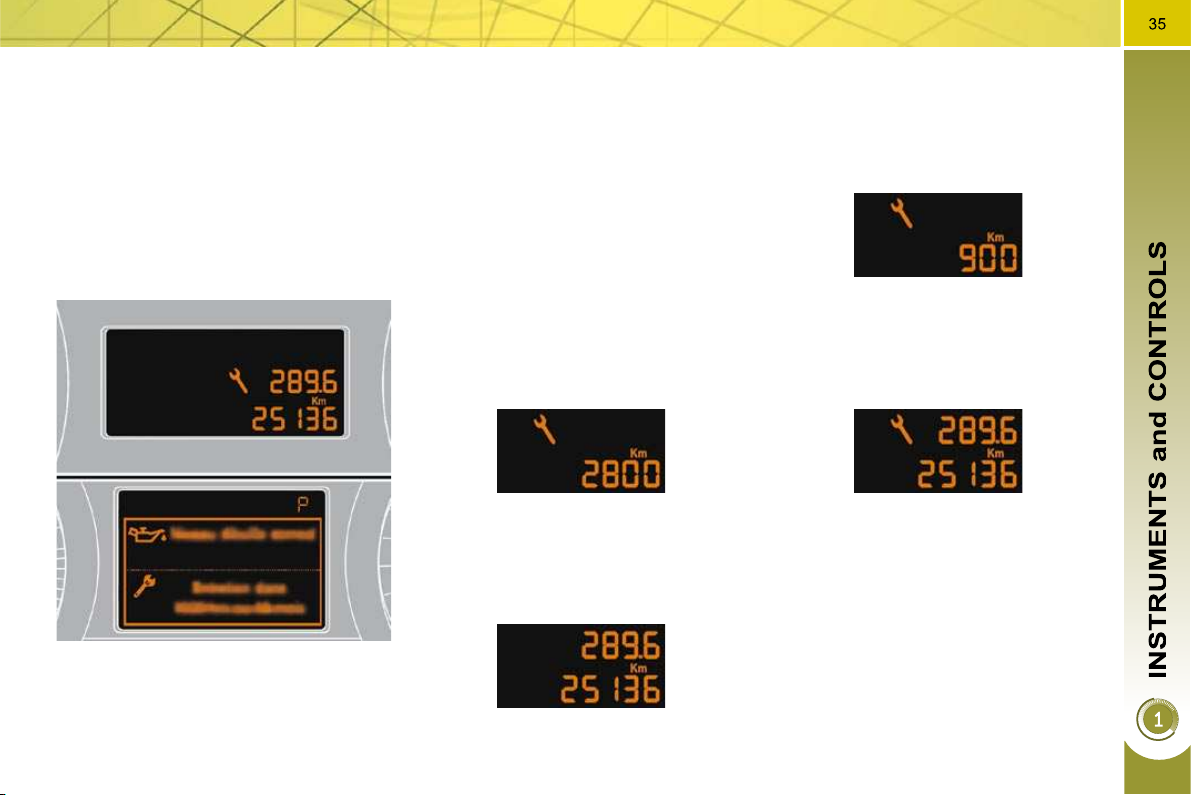
Service indicator
System which informs the driver when
the next service is due, in accordance with the manufacturer's servicing
schedule.
The point at which the service is due is
calculated from the last indicator zero
reset. It is determined by two parameters:
- the distance travelled,
- the time elapsed since the last service.
Between 600 miles (1 000 km) and
1 800 miles (3 000 km) remain before
the next service is due
For 5 seconds after the ignition is switched
on, the spanner symbolising the service
operations comes on. The distance recorder display line indicates the distance
remaining before the next service is due.
Example: 2 800 km remain before the
next service is due.
For 5 seconds after the ignition is
switched on, the display indicates:
5 seconds after the ignition is switched
on, the spanner is switched off ; the
distance recorder resumes its normal
operation. The display then indicates
the total and trip distances.
Less than 600 miles (1 000 km) remain
before the next service is due
Example: 900 km remain before the
next service is due.
For 5 seconds after the ignition is
switched on, the display indicates:
5 seconds after the ignition is switched
on, the distance recorder resumes its
normal operation. The spanner re-
mains on to indicate that a service
must be carried out soon.
More than 1 800 miles (3 000 km)
remain before the next service is due
When the ignition is switched on, no
service information appears on the display.
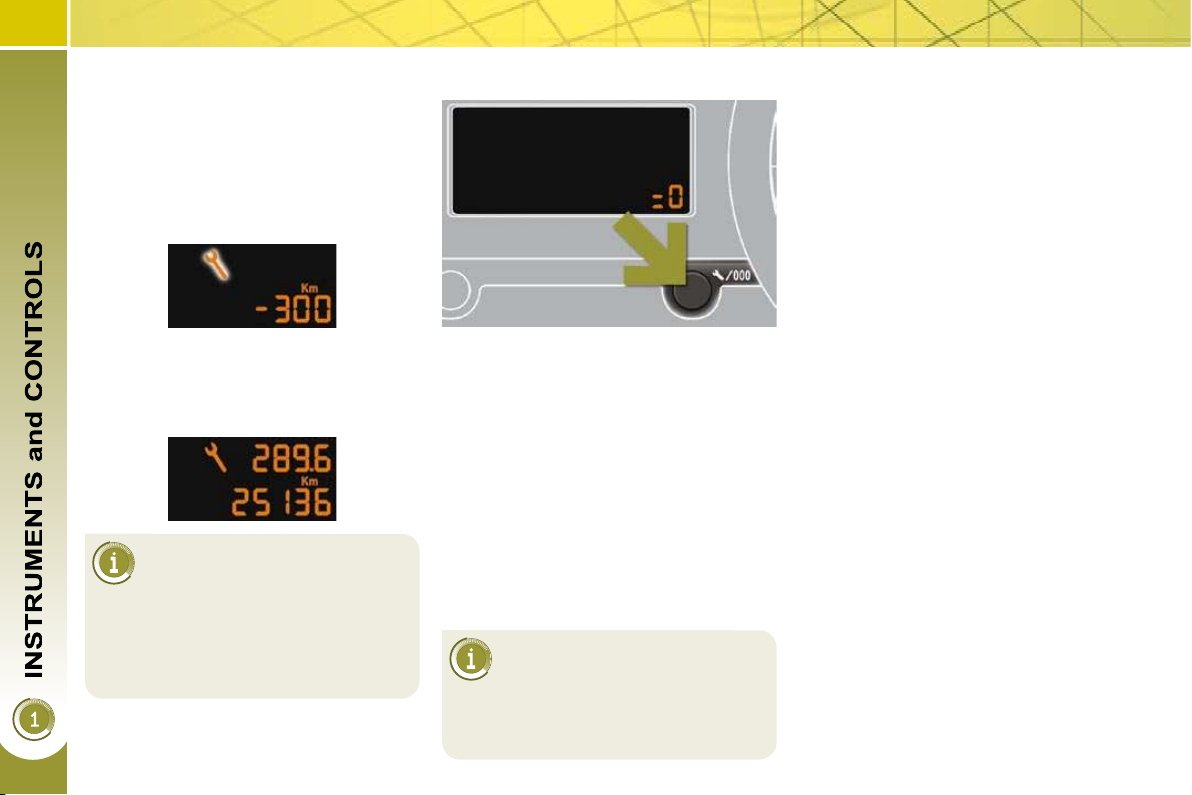
Service overdue
For 5 seconds after the ignition is
switched on, the spanner fl ashes to
indicate that the service must be carried
out as soon as possible.
Example: the service is overdue by
300 miles (km).
For 5 seconds after the ignition is
switched on, the display indicates:
Maintenance indicator zero reset
Retrieving the service information
You can access the service information
at any time.
Press the trip distance recorder zero
reset button.
The service information is displayed
for a few seconds, then disappears.
5 seconds after the ignition is switched
on, the distance recorder resumes its
normal operation. The spanner remains
lit .
The distance remaining may
be weighted by the time factor, depending on the driver's
driving habits.
Therefore, the spanner may also
come on if you have exceeded the
two year service interval.
After each service, the maintenance indicator must be reset to zero.
The procedure for resetting to zero is as
follows :
switch off the ignition,
press and hold the trip distance re-
corder zero reset button,
switch on the ignition; the distance
recorder display begins a countdown,
when the display indicates "=0" , re-
lease the button; the spanner disappears.
Following this operation, if you
wish to disconnect the battery,
lock the vehicle and wait at
least fi ve minutes for the zero reset
to be taken into account.
The level read will only be correct if the vehicle is on level
ground and the engine has
been off for more than 15 minutes.
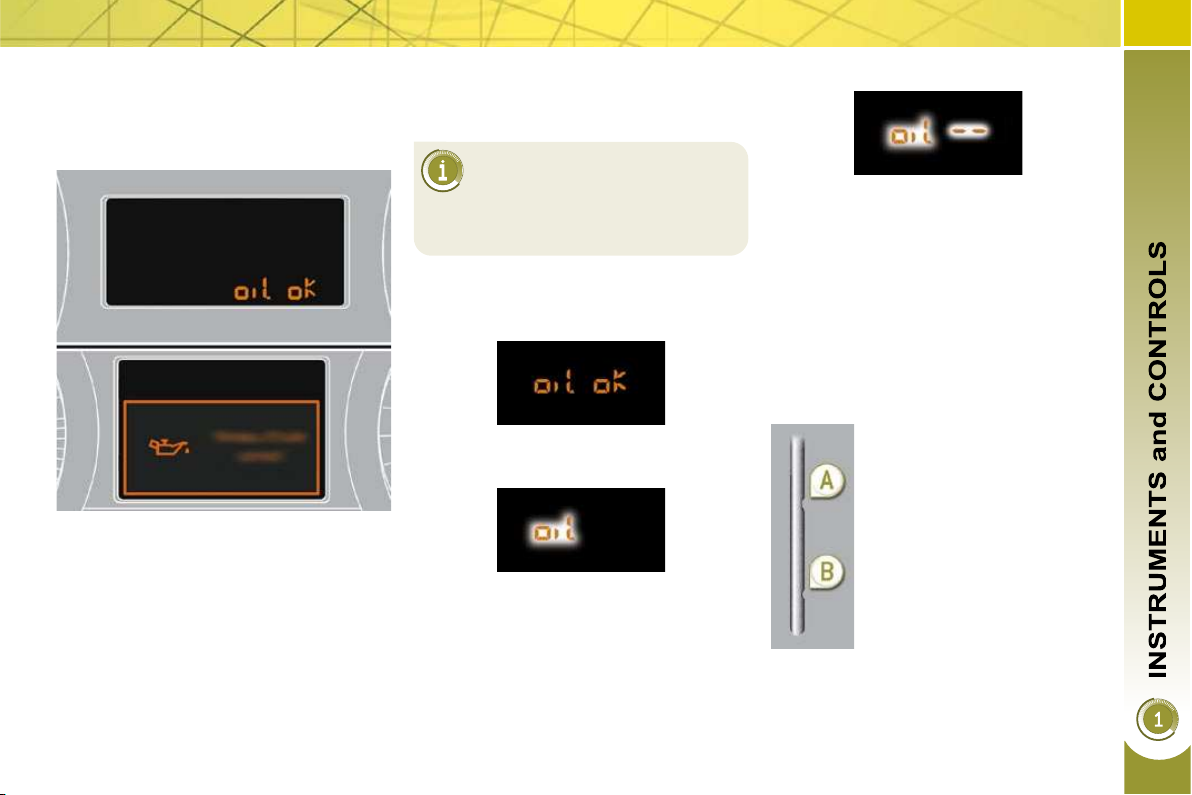
Engine oil level indicator
System which informs the driver of the
validity or invalidity of the engine oil
level.
This information is indicated for a few
seconds when the ignition is switched
on, after the service information.
Oil level gauge fault
This is indicated by the fl ashing of
"OIL--" . Consult a PEUGEOT dealer.
Oil level correct
Lack of oil
This is indicated by the fl ashing of "OIL" ,
linked with the service warning light, accompanied by an audible signal and a
message on the multifunction display.
If the lack of oil is confi rmed by a check
using the dipstick, it is essential that the
level is topped up to prevent damage to
the engine.
Dipstick
Refer to the "Checks" section to locate
the dipstick and the oil fi ller cap on your
engine.
There are 2 marks on the
dipstick:
- A = max; never exceed
this level (risk of damage
to the engine),
- B = min; top up the level
via the oil fi ller cap, us-
ing the type of oil suited
to your engine.
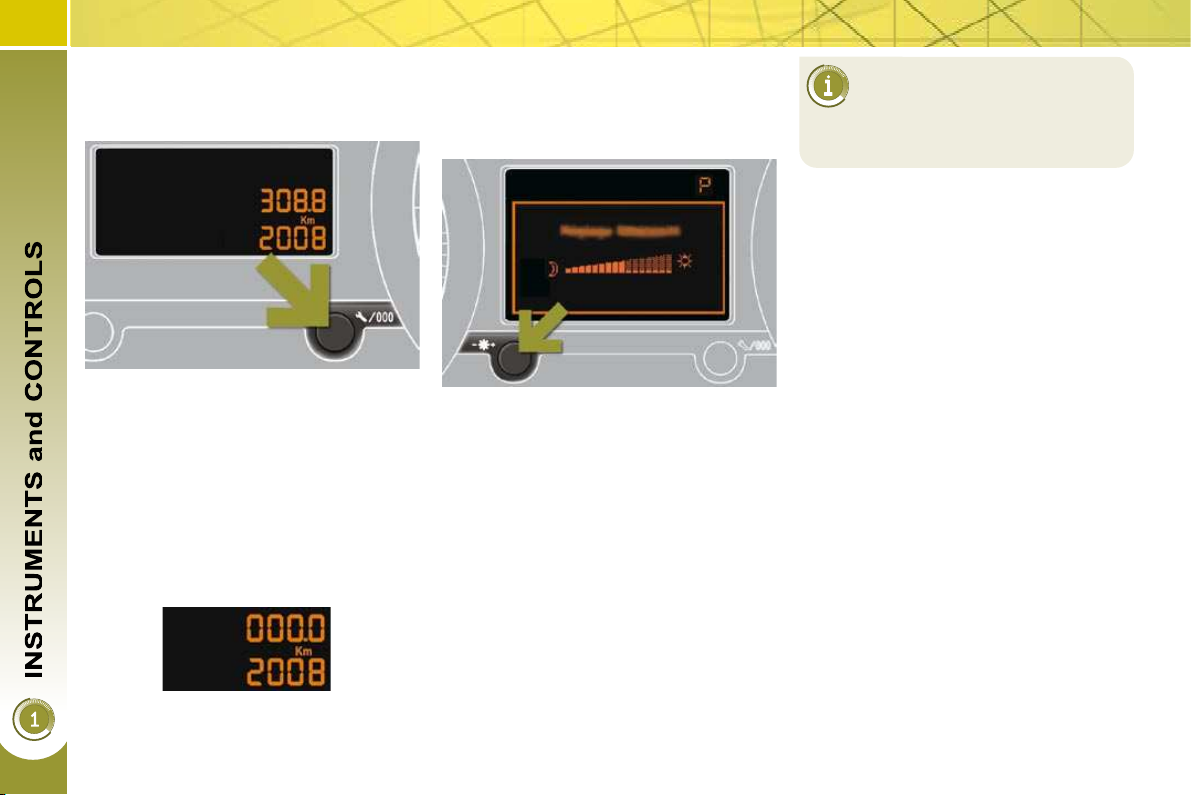
Total distance recorder
System which measures the total dis-
Lighting rheostat
Trip distance recorder
tance travelled by the vehicle during its
life.
The total and trip distances are displayed for thirty seconds when the ignition is switched off, when the driver's
door is opened and when the vehicle is
locked or unlocked.
System which measures a distance
travelled during a day or other period
since it was reset to zero by the driver.
System for manual adjustment of the
brightness of the instrument panel in relation to the exterior brightness.
Activation
When the lights are on:
press the button to change the
brightness of the instrument panel,
when the lighting reaches the mini-
mum setting, release the button,
then press again to increase it,
or
when the lighting reaches the maxi-
mum setting, release the button,
then press again to reduce it,
when the lighting reaches the level
of brightness required, release the
button.
When the lights are on, you
cannot switch the lighting off
but you can adjust it to minimum.
Deactivation
When the lights are off, or in day mode
on vehicles fi tted with daytime lights,
pressing the button does not have any
effect.
With the ignition on, press the but-
ton until zeros appear.

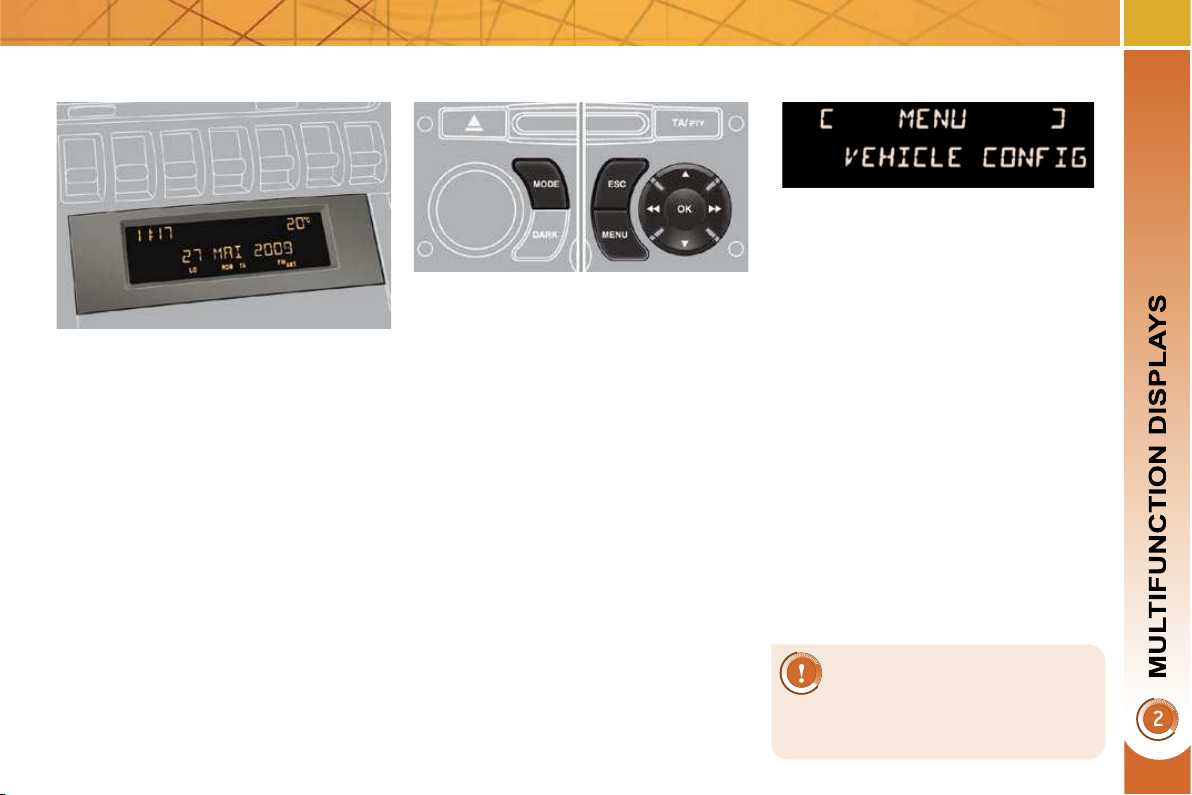
Displays on the screen
This displays the following information:
Controls
General menu
- the time,
- the date,
- the outside temperature * (this fl ashes
if there is a risk of ice),
- the status of the accesses (doors,
boot, ...),
- the trip computer (refer to the end of
the section).
Warning messages (e.g.: "Emission
control system faulty") or information
messages (e.g.: "Boot open") may
appear temporarily. Some can be
cleared by pressing the "ESC" button.
* With air conditioning only.
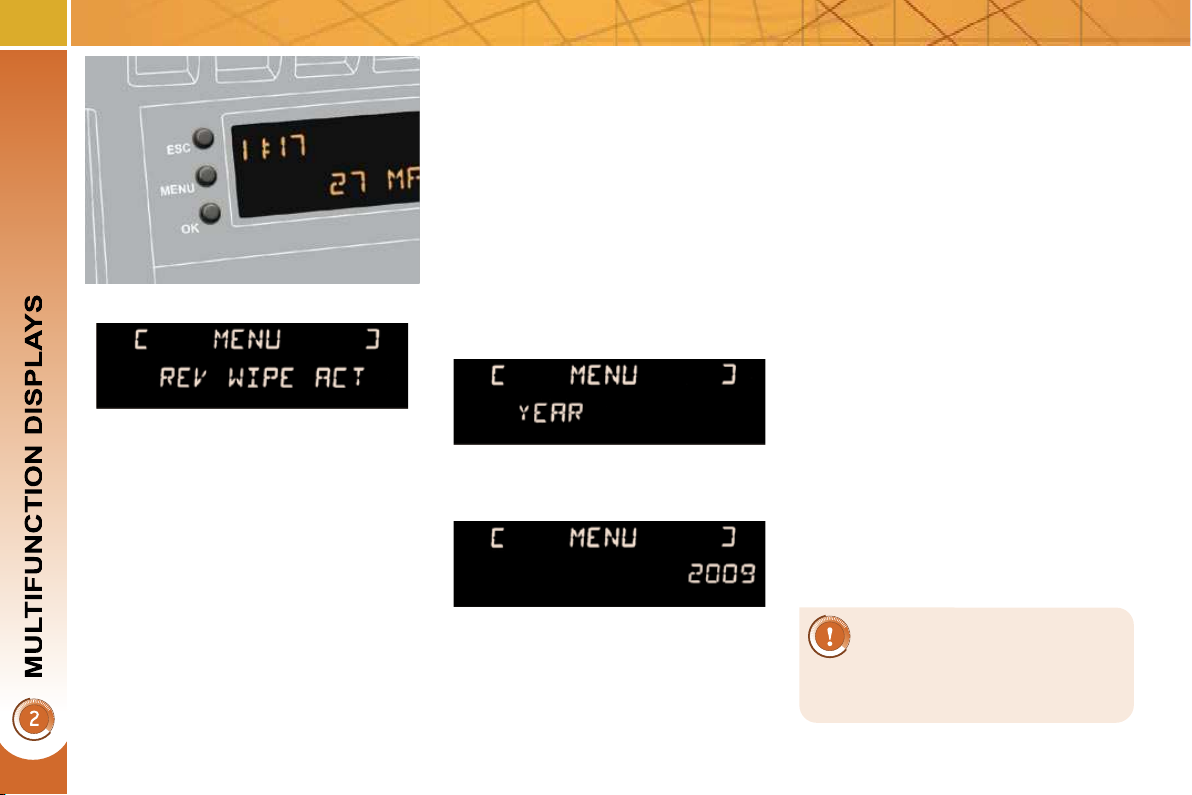
There are three display control buttons:
- "ESC" to abandon the operation in
progress,
- "MENU" to scroll through the menus
or sub-menus,
- "OK" to select the menu or sub-
menu required.
Press the "MENU" button to scroll
through the various menus of the
general menu :
- vehicle confi guration,
- options,
- display settings,
- languages,
- units.
Press the "OK" button to select the
menu required.
Vehicle confi guration
Once the "Vehicle confi guration" menu
has been selected, you can activate or
deactivate the following equipment:
- wiper linked with reverse gear (refer
to the "Visibility" section),
- selective unlocking (refer to the
"Accesses" section),
-
"follow-me-home" and welcome lighting (refer to the "Visibility" section),
- ambient lighting (refer to the
"Visibility" section),
- daytime lights (refer to the "Visibility"
section),
- directional headlamps (refer to the
"Visibility" section),
- automatic or manual parking brake
(refer to the "Driving" section),
- ...
Options
Once the "Options" menu has been
selected, you can start diagnostics of
the status of the equipment (active, not
active, faulty).
Display settings
Once the "Display settings" menu has
been selected, you can gain access to
the following settings:
- year,
- month,
- day,
- hour,
- minutes,
- 12 or 24 hour mode.
Once you have selected a setting,
press the "OK" button to change its
value.
Wait for approximately ten seconds
without any action to allow the changed
data to be recorded or press the "ESC"
button to cancel.
The display then returns to the normal
display.
Languages
Once the "Languages" menu has been
selected, you can change the language
used by the display (Français, Italiano,
Nederlands, Portugues, Portugues-Brasil,
Türkçe, Deutsch, English, Espanol).
Units
Once the "Units" menu has been selected, you can change the units of the
following parameters:
- temperature (°C or °F),
- fuel consumption (l/100 km, mpg or
km/l).
For safety reasons, it is impera-
tive that confi guration of the
multifunction displays by the
driver takes place when stationary.
Controls
Displays on the screen
This displays the following information:
General menu
- the time,
- the date,
- the outside temperature * (this fl ashes
if there is a risk of ice),
- the status of the accesses (doors,
boot, ...),
- the audio sources (radio, CD, ...),
- the trip computer (refer to the end of
the section).
Warning messages (e.g.: "Emission
control system faulty") or information
messages (e.g.: "Boot open") may
appear temporarily. Some can be
cleared by pressing the "ESC" button.
* With air conditioning only.
From the audio equipment control panel,
you can:
press the "MENU" button to gain
access to the general menu ,
press the " " or " " buttons to scroll
through the items on the screen,
press the "MODE" button to change
the permanent application (trip computer, audio source, ...),
press the " " or " " buttons to
change a setting value,
press the "OK" button to confi rm,
or
press the "ESC" button to abandon
the operation in progress.
Press the "MENU" button to gain
access to the general menu , then
press the " " or " " buttons to
scroll through the various menus:
- radio-CD,
- vehicle confi guration,
- options,
- display settings,
- languages,
- units.
Press the "OK" button to select the
menu required.
Radio-CD
With the audio equipment switched on,
once the "Radio-CD" menu has been
selected you can activate or deactivate
the functions linked with use of the radio
(RDS, REG), the CD or the CD changer
(introscan, shuffl e, CD repeat).
For further details concerning
the "Radio-CD" application, refer
to the "Audio and Telematics"
section.

Vehicle confi guration
Display settings
Once the "Display settings" menu has
been selected, you can gain access to
the following settings:
- year,
- month,
- day,
- hour,
- minutes,
- 12 or 24 hour mode.
Languages
Once the "Languages" menu has been
selected, you can change the language
used by the display (Français, Italiano,
Nederlands, Portugues, Portugues-Brasil,
Türkçe, Deutsch, English, Espanol).
Units
Once the "Units" menu has been selected,
you can change the units of the following
parameters:
- temperature (°C or °F),
- fuel consumption (l/100 km, mpg or
km/l).
Once the "Vehicle Confi guration" menu
has been selected, you can activate or
deactivate the following equipment:
- wiper linked with reverse gear (refer
to the "Visibility" section),
- selective unlocking (refer to the
"Accesses" section),
-
"follow-me-home" and welcome lighting (refer to the "Visibility" section),
- ambient lighting (refer to the
"Visibility" section),
- daytime lights (refer to the "Visibility"
section),
- directional headlamps (refer to the
"Visibility" section),
- automatic or manual parking brake
(refer to the "Driving" section),
- ...
Options
Once the "Options" menu has been
selected, you can start diagnostics of
the status of the equipment (active, not
active, faulty).
Once you have selected a setting,
press the " " or " " buttons to
change its value.
Press the " " or " " buttons to
switch respectively to the previous
or next setting.
Press the "OK" button to record
the change and return to the normal
display or press the "ESC" button to
cancel.
For safety reasons, it is impera-
tive that confi guration of the mul-
tifunction displays by the driver
takes place when stationary.
General menu
Displays on the screen
This displays the following information:
Controls
- the time,
- the date,
- the outside temperature * (this fl ashes
if there is a risk of ice),
- the status of the accesses (doors,
boot, ...),
- the audio sources (radio, CD, ...),
- the trip computer (refer to the end of
the section).
Warning messages (e.g.: "Emission
control system faulty") or information
messages (e.g.: "Automatic switching
on of the headlamps activated") may
appear temporarily. Some can be
cleared by pressing the "ESC" button.
* With air conditioning only.
From the audio equipment control panel,
you can:
press the "MENU" button to gain
access to the general menu ,
press the " " or " " buttons to scroll
through the items on the screen,
press the "MODE" button to change
the permanent application (trip computer, audio source, ...),
press the " " or " " buttons to
change a setting value,
press the "OK" button to confi rm,
or
press the "ESC" button to abandon
the operation in progress.
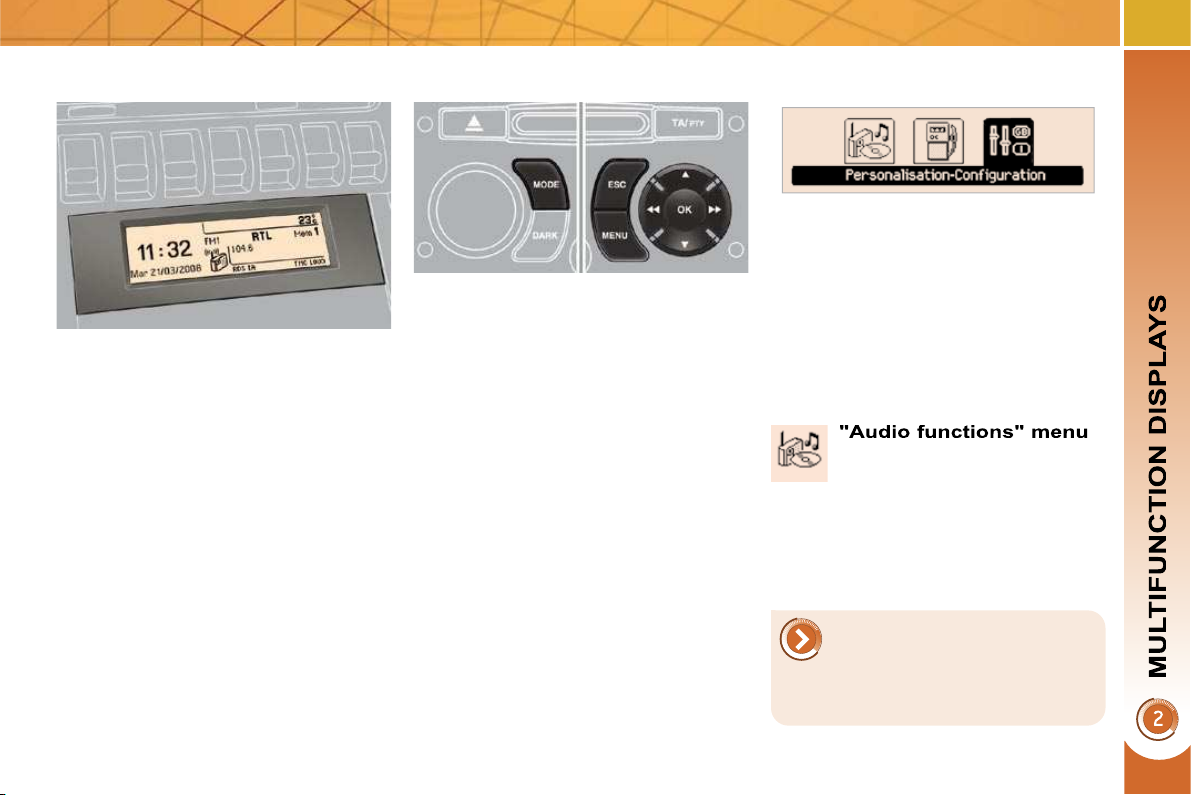
Press the "MENU" button to gain
access to the general menu :
- audio functions,
- vehicle diagnostics,
- personalisation-confi guration,
- telephone (hands-free kit).
Press the " " or " " buttons to select
the menu required, then confi rm by
pressing the "OK" button.
With the audio equipment switched on,
once this menu has been selected you
can activate or deactivate the functions
linked with use of the radio (RDS, REG,
RadioText), the CD or the CD changer
(introscan, shuffl e, CD repeat).
For further details concerning
the "Audio functions" application, refer to the "Audio and
Telematics" section.
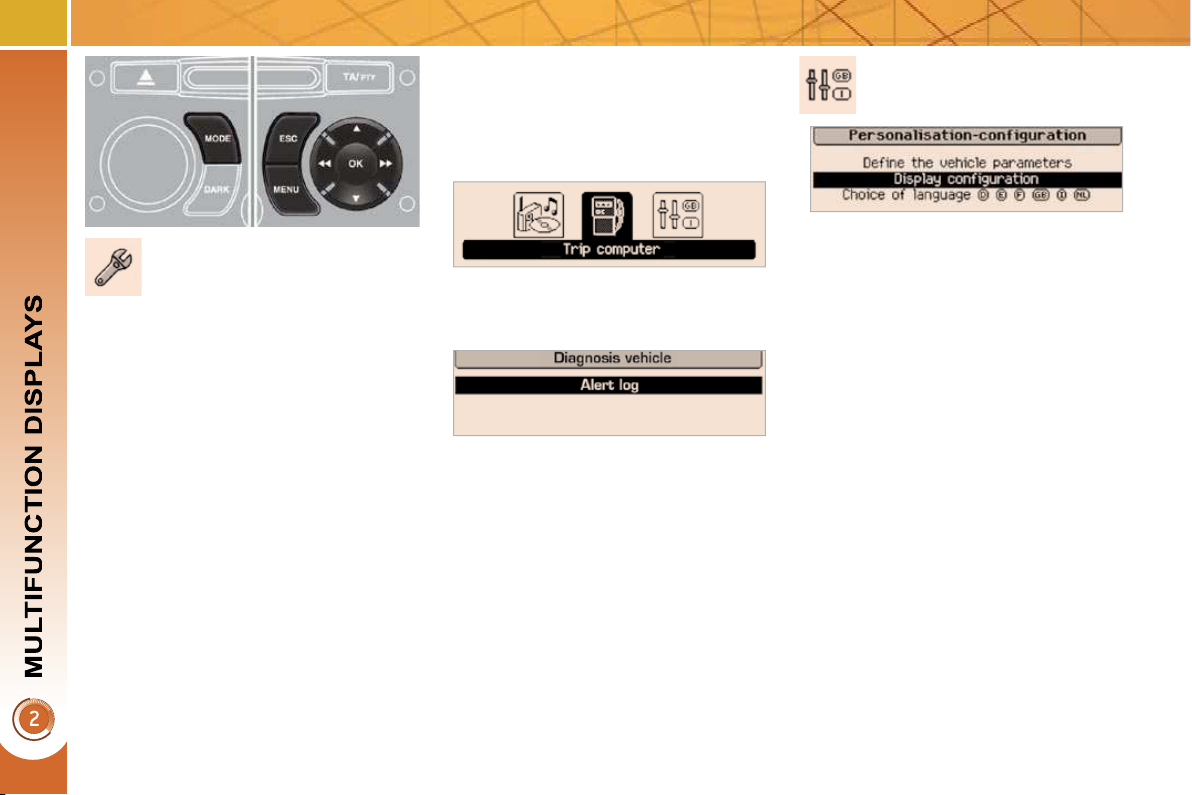
"Vehicle diagnostics"
Once this menu has been selected, you
"Personalisation-
can consult information concerning the
status of the vehicle, such as the warnings
log.
Warnings log
This summarises the active warning
messages, displaying them in succession on the multifunction display.
Press the "MENU" button to gain
access to the general menu.
Press the arrows, then the "OK"
button to select the " Vehicle diag-
nostics " menu.
On the " Vehicle diagnostics " menu,
select the following application:
Once this menu has been selected, you
can gain access to the following functions:
- defi ne the vehicle parameters,
- display confi guration,
- selection of the language.
Defi ne the vehicle parameters
Once this menu has been selected, you
can activate or deactivate the following
equipment:
- wiper linked with reverse gear (refer
to the "Visibility" section),
- selective unlocking (refer to the
"Accesses" section),
- "follow-me-home" and welcome
lighting (refer to the "Visibility" section),
- ambient lighting (refer to the
"Visibility" section),
- daytime lights (refer to the "Visibility"
section),
- directional headlamps (refer to the
"Visibility" section),
- automatic or manual parking brake
(refer to the "Driving" section),
- ...
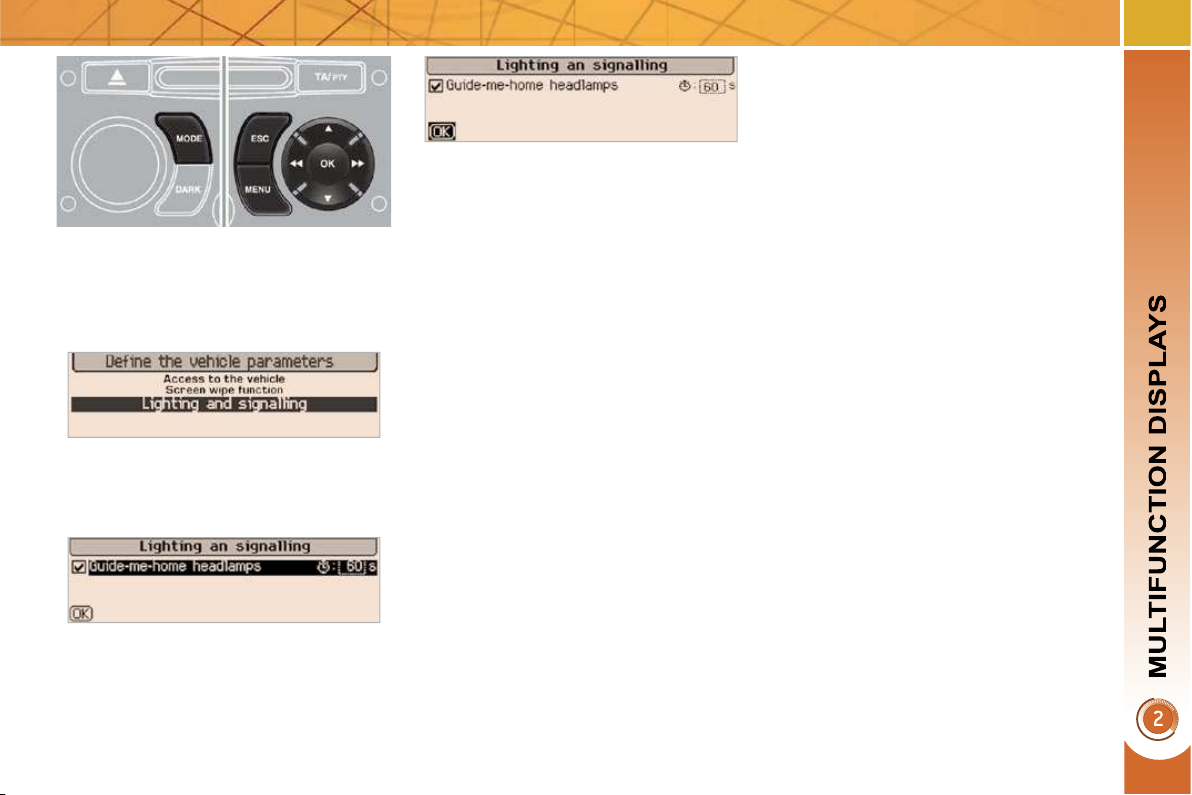
Example: setting of the duration of the
"follow-me-home" lighting
Press the " " or " " buttons, then
the "OK" button to select the menu
required.
Press the " " or " " buttons, then
the "OK" button to select the "OK"
box and confi rm or press the "ESC"
button to cancel.
Display confi guration
Once this menu has been selected, you
can gain access to the following settings:
- brightness-video setting,
- date and time setting,
- selection of the units.
Press the " " or " " buttons,
then the "OK" button to select the
"Follow-me-home lighting" line.
Press the " " or " " buttons to set the
value required (15, 30 or 60 seconds),
then press the "OK" button to confi rm.
Selection of the language
Once this menu has been selected,
you can change the language used by
the display (Deutsch, English, Espanol,
Français, Italiano, Nederlands, Portugues,
Portugues-Brasil, Türkçe).
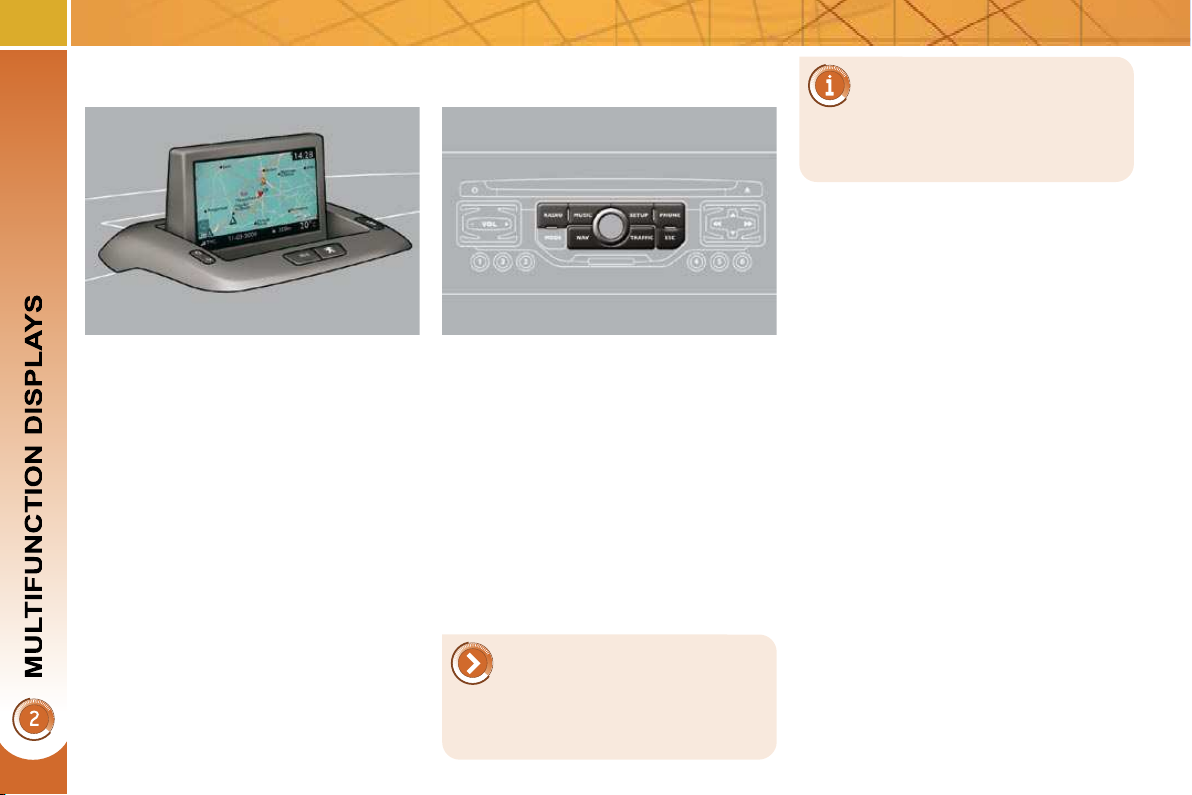
Displays on the screen
When the screen is unfolded, it displays
Controls
the following information automatically
and directly:
- the time,
- the date,
- the altitude,
- the exterior temperature (the value
displayed fl ashes if there is a risk of
ice),
- the accesses check,
- the warning and vehicle function
status messages, displayed temporarily,
- the audio functions,
- the trip computer information,
- the satellite navigation system information.
For operation of the retractable display (opening, closing,
adjustment of the position,
etc.), refer to the paragraph "Access
to the retractable display".
From the PC Nav control panel, to select one of the applications:
press the dedicated "RADIO" ,
"MUSIC" , "NAV" , "TRAFFIC" ,
"SETUP" or "PHONE" button to
gain access to the corresponding
menu,
turn the navigator to move the se-
lection,
press the navigator to confi rm the
selection,
or
press the "ESC" button to abandon
the current operation and return to
the previous display.
For further details concerning
these applications, refer to the
"Audio and Telematics" section.
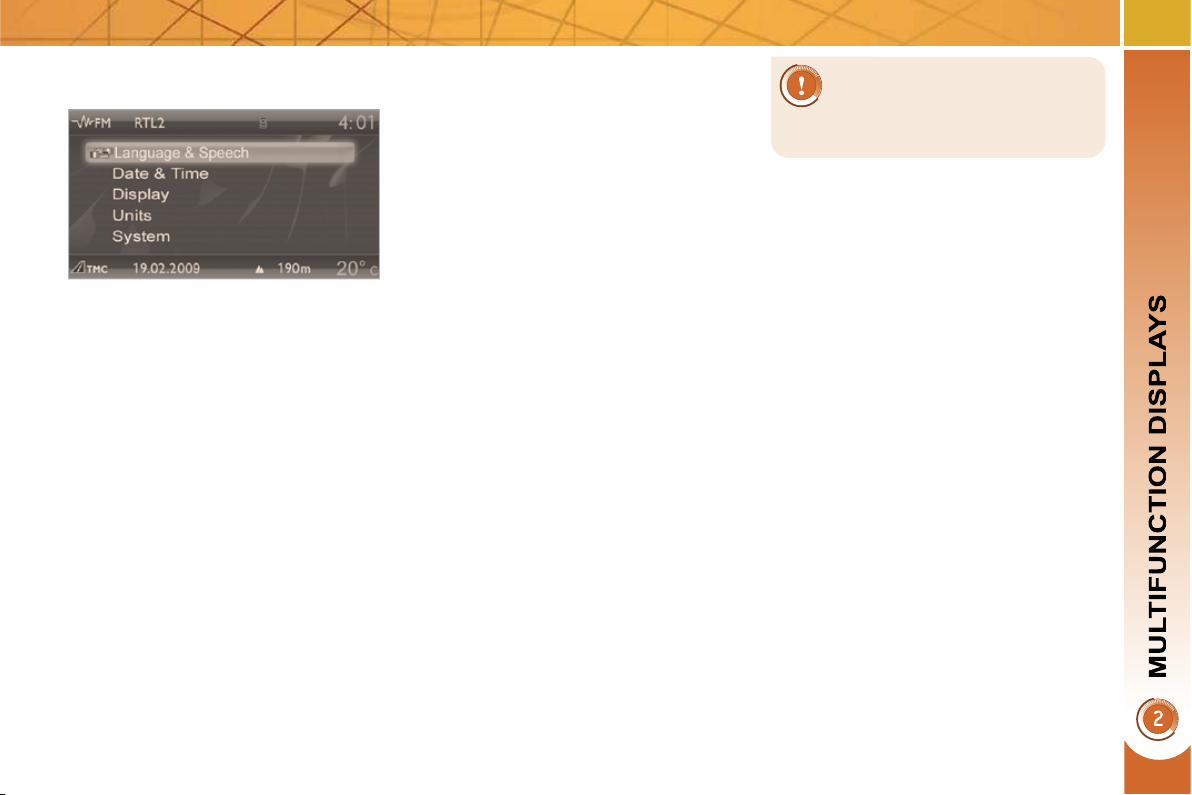
"SETUP" menu
Press the "SETUP" button to gain
access to the "SETUP" menu. This
allows you to select from the following functions:
- "Languages",
- "Date and time",
- "Display",
- "Vehicle parameters",
- "Units",
- "System parameters".
Languages
This menu allows you to select the language used by the display: Deutsch,
English, Espanol, Français, Italiano,
Nederlands, Polski, Portugues, Türkçe * .
Date and time
This menu allows you to set the date
and time, the format of the date and the
format of the time (refer to the "Audio
and Telematics" section or to the specifi c
user guide given to you with the other
owner's documents).
Display
This menu allows you to set the brightness of the screen, the screen colour
scheme and the colour of the map (day/
night or auto mode).
Vehicle parameters
This menu allows you to activate or
deactivate certain driving and comfort
equipment:
- wiper linked with reverse gear (refer
to the "Visibility" section),
- selective unlocking (refer to the
"Accesses" section),
- follow-me-home and welcome lighting (refer to the "Visibility" section),
- ambient lighting (refer to the
"Visibility" section),
- daytime lights (refer to the "Visibility"
section),
- directional headlamps (refer to the
"Visibility" section),
- automatic or manual parking brake
(refer to the "Driving" section),
- ...
Units
This menu allows you to select the
units: temperature (°C or °F) and consumption (km/l, l/100 or mpg).
System parameters
This menu allows you to restore the fac-
tory confi guration, display the software
version and activate the scrolling text.
For safety reasons, it is im-
perative that confi guration of
the multifunction displays by
the driver is carried out when
stationary.
* According to country.
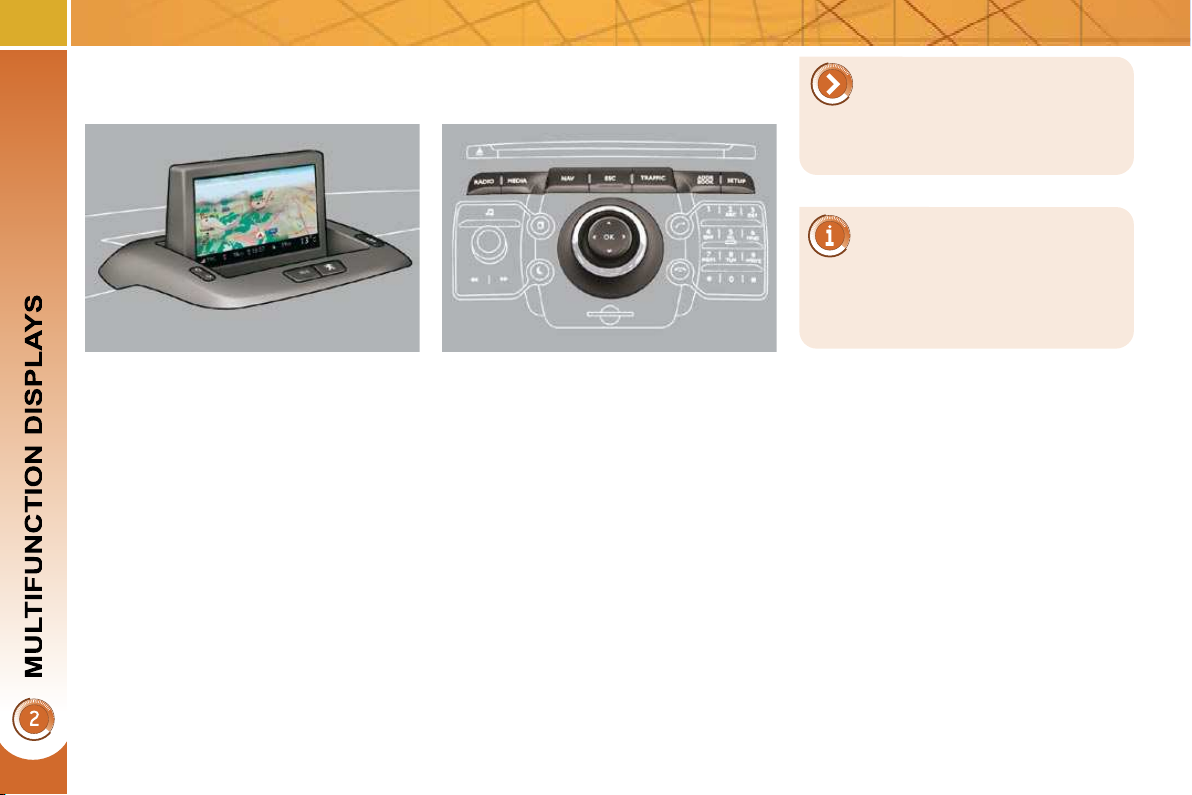
Displays on the screen
When the screen is unfolded, it displays
Controls
the following information automatically
and directly:
- the time,
- the date,
- the altitude,
- the exterior temperature (the value
displayed fl ashes if there is a risk of
ice),
- the audio functions,
- the telephone and address book
information,
- the satellite navigation system information.
From the PC Com 3D control panel, to
select one of the applications:
press the dedicated "RADIO" ,
"MEDIA" , "NAV" , "TRAFFIC" ,
"ADDR BOOK" or "SETUP" button
to gain access to the corresponding
menu,
turn the navigator to move the
selection,
press the navigator to confi rm the
selection,
or
press the "ESC" button to abandon
the current operation and return to
the previous display.
For further details concerning
these applications, refer to the
"Audio and Telematics" sec-
tion or to the specifi c user guide given
to you with the other owner's documents.
For operation of the retractable display (opening, closing,
adjustment of the position,
etc.), refer to the paragraph "Access
to the retractable display".
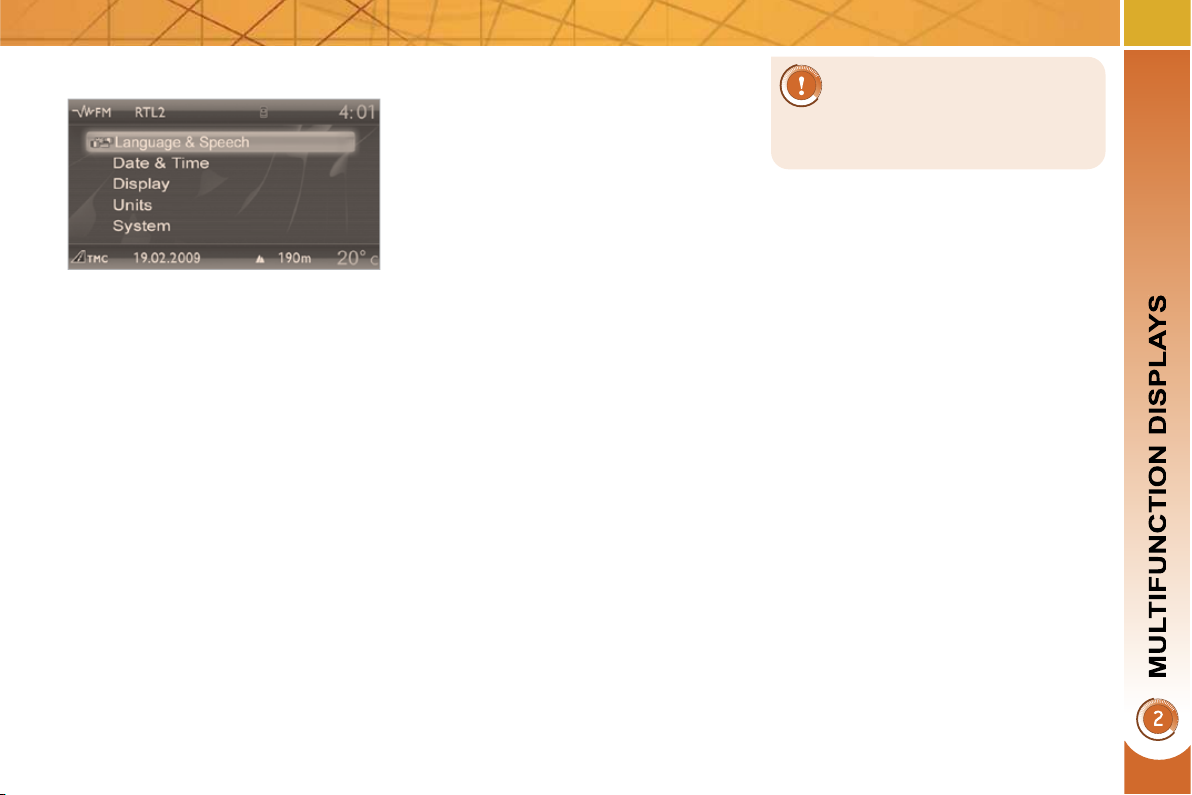
"SETUP" menu
Press the "SETUP" button to gain
access to the "SETUP" menu. This
allows you to select from the following
functions:
- "Languages and voice functions",
- "Date and time",
- "Display",
- "Units",
- "System parameters".
Languages and voice functions
This menu allows you to:
- select the language used by the
display (Deutsch, English, Espanol,
Français, Italiano, Nederlands,
Polski, Portugues, Türkçe * ),
- select the voice recognition parameters (activation/deactivation, advice
on use, personal voice programming, etc.),
- set the volume of the voice synthesiser.
Date and time
This menu allows you to set the date and
time, the format of the date and the format of the time (refer to the "Audio and
Telematics" section or to the specifi c
user guide given to you with the other
owner's documents).
Display
This menu allows you to set the brightness of the screen, the screen colour
scheme and the colour of the map (day/
night or auto mode).
Units
This menu allows you to select the
units: temperature (°C or °F) and distance (km or miles).
System parameters
This menu allows you to restore the fac-
tory confi guration, display the software
version and activate the scrolling text.
For safety reasons, it is impera-
tive that confi guration of the
multifunction displays by the
driver is carried out when stationary.
* According to country.
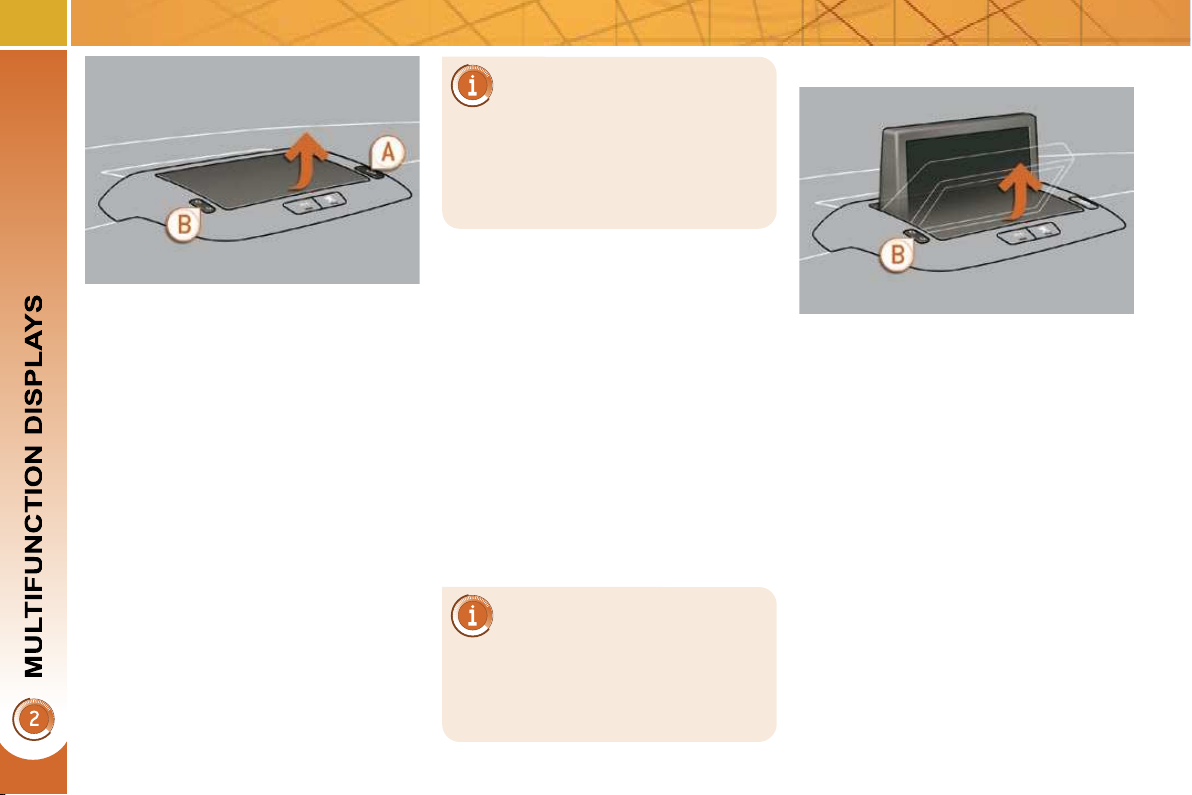
Access to the retractable screen
This screen is opened and stored automatically.
However, you can also open it, store it
and adjust it using the various manual
controls:
- opening or storing by means of con-
trol A ,
- angle adjustments by means of con-
trol B .
It is also fi tted with safety auto-reverse
protection.
Opening the screen
With the screen stored, press con-
trol A to open it.
The screen opens automatically when
the ignition is switched on, when the audio and telematics system is switched
on, when an outgoing telephone call is
made, when a voice command is given
and when a warning message linked
with the STOP warning light is received.
If you close the screen during operation of the audio and
telematics system, it will only
re-open automatically when an outgoing telephone call is made, when
a voice command is given or when
a warning message linked with the
STOP warning light is received.
Closing the screen
With the screen open, press con-
trol A to store it.
The screen is stored automatically
when the ignition is switched off, after
approximately three seconds, if the audio and telematics system is off.
Safety auto-reverse
If the screen meets an obstacle as it
opens or closes, the movement stops
immediately and is reversed by a few
millimetres.
After clearing the obstacle, issue the
command required again.
If you wish the screen to open
or close automatically when
the audio and telematics system is switched on or off, the screen
must not be closed when the audio
and telematics system is operating.
Adjusting the position of the screen
When the screen is open, you can adjust it precisely in different ways:
press the corresponding part of con-
trol B to move the screen towards
you or towards the windscreen,
or
push or pull the screen gently by
hand.
Storing the position of the screen
The system has four pre-set positions
in its memory.
Each time the screen is closed, the
system stores the last position of the
screen.
Each time the screen is re-opened, the
system returns the screen to the pre-set
position closest to that stored.
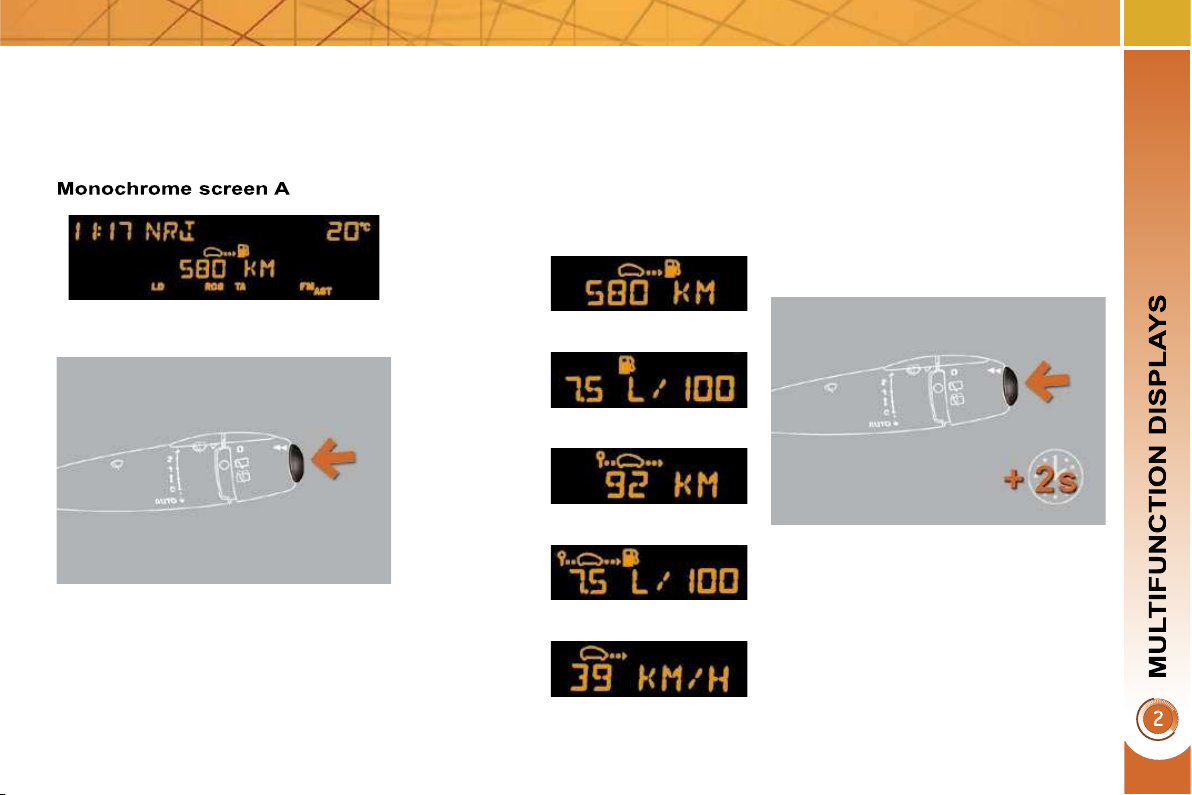
Press the button, located at the end
of the wiper stalk , to display the
various items of trip computer data
in succession.
The trip computer provides the following
information:
System which provides current information concerning the route travelled
(range, consumption...).
Press the control for more than
two seconds to reset to zero the distance
travelled, the average consumption and
the average speed.
Data displays
- range,
- current consumption,
- distance travelled,
- average consumption,
- average speed.
The next press then returns you to
the normal display.
Zero reset
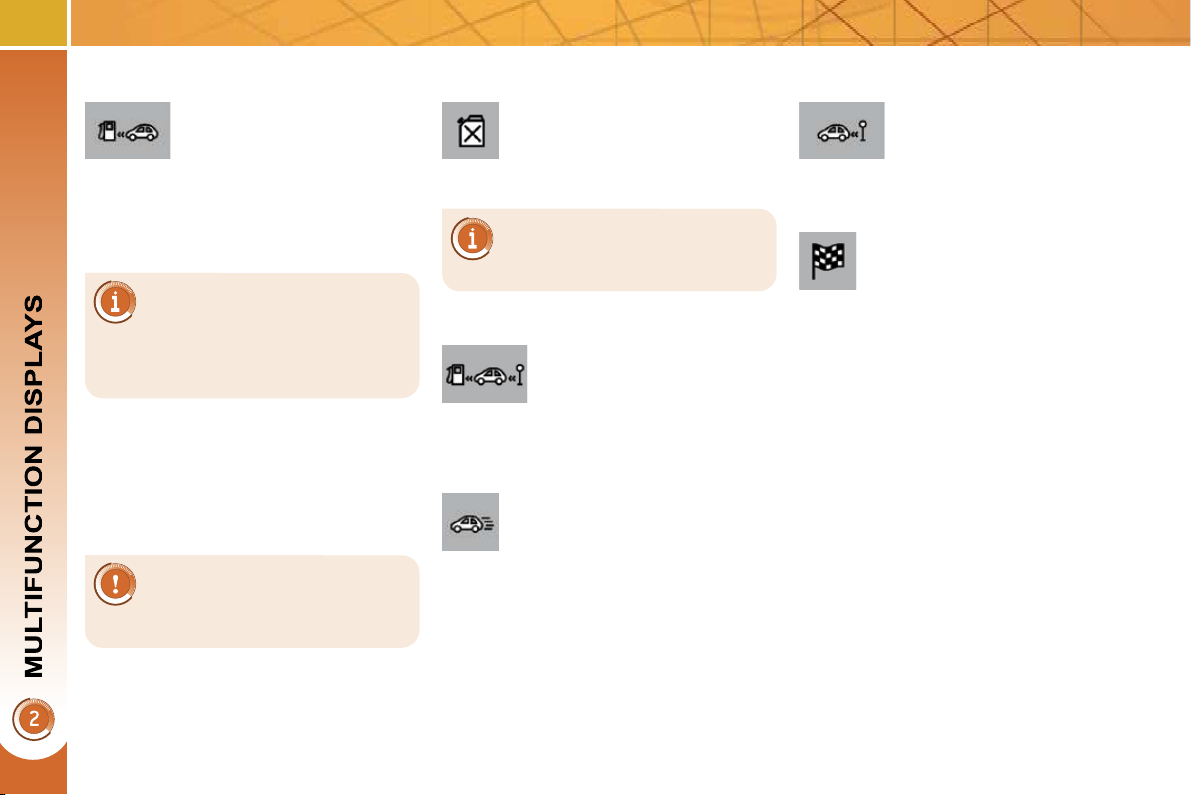
A few definitions…
Range
(km or miles)
This indicates the distance
which can still be travelled
with the fuel remaining in the tank in
relation to the average consumption
over the last few miles (kilometres) travelled.
This fi gure may vary following
a change in the style of driving or the relief, resulting in a
signifi cant change in the current con-
sumption.
When the range falls below 20 miles
(30 km), dashes are displayed. After fi ll-
ing with at least 5 litres of fuel, the range
is recalculated and is displayed when it
exceeds 60 miles (100 km).
If dashes are displayed
continuously while driving in
place of the digits, contact a
PEUGEOT dealer.
Current consumption
(l/100 km or km/l or mpg)
This is the average fuel con-
sumption during the last few
seconds.
This function is only displayed
from 20 mph (30 km/h).
Average consumption
(l/100 km or km/l or mpg)
This is the average fuel con-
sumption since the last trip
computer zero reset.
Distance travelled
(km or miles)
This indicates the distance trav-
elled since the last trip computer
zero reset.
Average speed
(km/h or mph)
This is the average speed
calculated since the last trip
computer zero reset (ignition on).
Distance remaining to
destination
(km or miles)
This is the distance remaining to be
travelled to the fi nal destination. It is
either calculated instantly by the navigation system, if guidance is activated,
or entered by the user.
If the distance is not entered, dashes
are displayed in place of the digits.
 Loading...