


english(eng).qxp 10/27/2005 11:39 AM Page ENG-1
Command Series™
Trainers
Covers Models: |
NE |
Gebruikshandleidin |
|
CS-1600YE, CS-1600TTE, and |
FR |
Guide d´emploi |
|
CS-300E |
DE |
Bendienungsanleitung |
|
Operating Instructions |
IT |
Guida di funzionamento |
|
ES |
Guia de Funcionamiento |
||
|
|||
|
|
|
ABOUT INNOTEK® TRAINING COLLARS
This INNOTEK electronic dog collar is among the safest, most humane and effective training products you can buy. Used properly, the collar's electronic stimulus serves as a distraction that your dog will find undesirable. By obeying, your dog quickly learns to shut off the stimulus, thus gaining confidence in response to your commands. Like most INNOTEK training products, this collar has adjustable stimulation levels. This feature allows you to use the level that best matches your dog's temperament.
CAUTION
Please take a few minutes to read the instruction manual prior to your first use. This instruction manual contains important programming and setup information to help your training proceed as successfully as possible. For best results, follow these tips:
•The electronic dog collar is intended only for use on dogs.
•Most dog owners are surprised at how much can be accomplished by using low-level stimulation, therefore use the lowest stimulation necessary to get the desired behavior.
•A low battery may cause intermittent operation. DO NOT USE if you suspect a low battery.
•Allow your dog to get used to the collar before you begin training. You want your dog to accept the collar as part of a routine, not to associate the collar with correction.
•DO NOT leave the collar on your dog for more than 12 hours.
•NEVER perform set-up procedures when the collar is on your dog.
•An electronic collar should only be used under close supervision by the dog's owner.
•KEEP OUT OF THE REACH OF CHILDREN.
•Read all instructions before using this product. If you have questions or concerns, contact your nearest INNOTEK dealer or service center.
IMPORTANT
Realize that because individual dogs have unique temperaments, there is no way of knowing how your dog will react to its introduction to this product. For the safety of your dog, initial training should take place using a long lead to keep you in control of the situation. Also realize that an aggressive animal could turn against the handler upon receiving the stimulus. Therefore, if you feel your dog has an aggressive behavior and/or it has a history of aggressive behavior, you should consult a certified animal behaviorist before using this product. Please refer to the Helpful Hints and Training Guide section before proceeding.
ENG
ENG-1
english(eng).qxp 10/27/2005 11:39 AM Page ENG-2
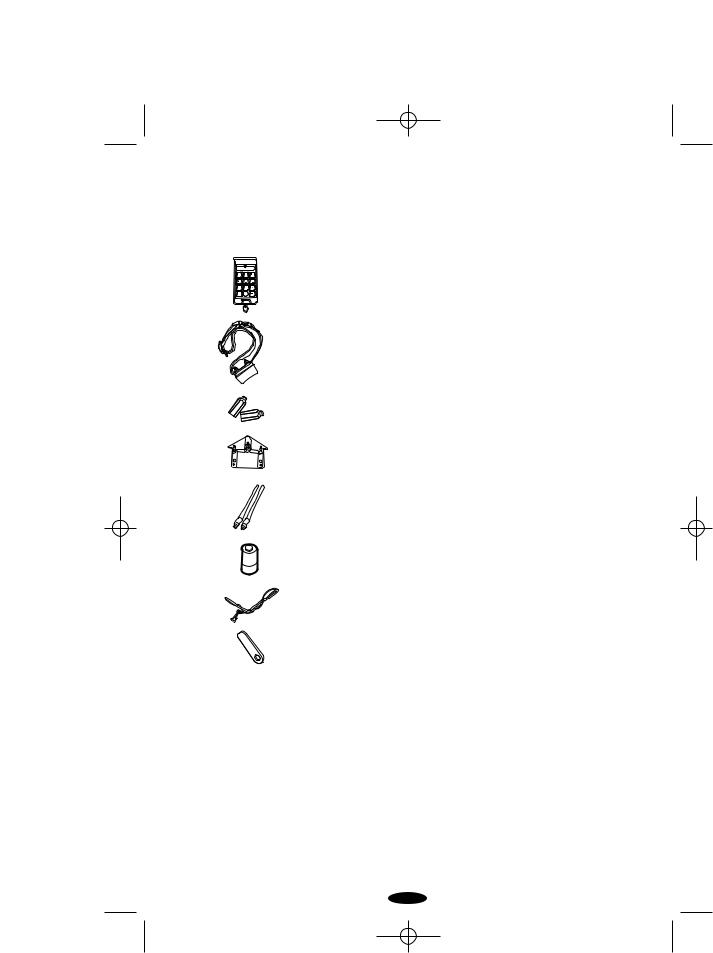
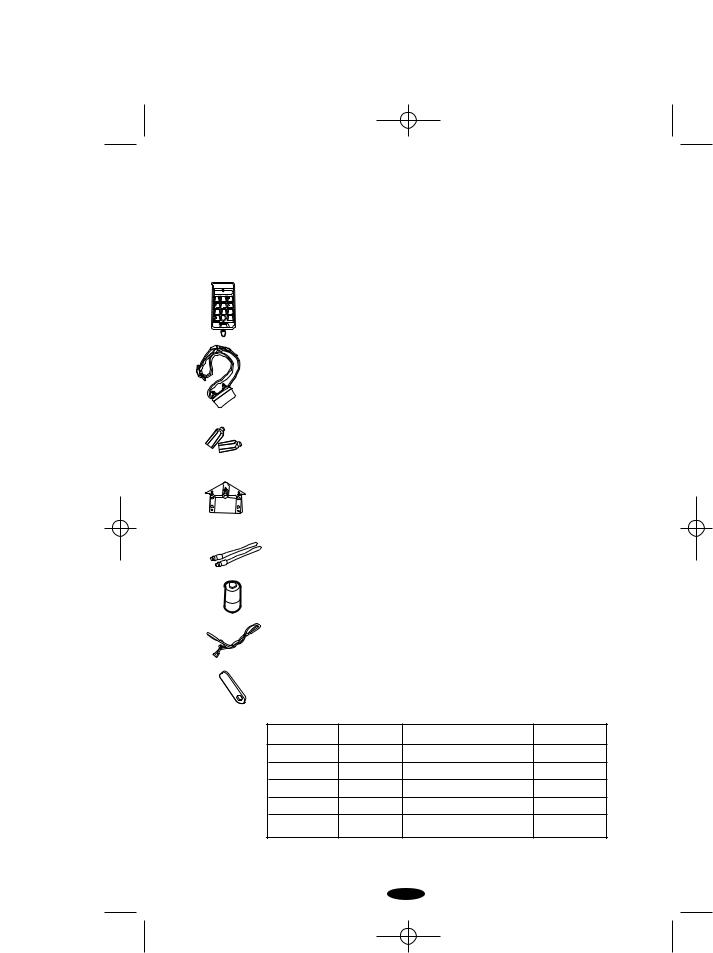
Components
Before you begin, please take a few moments to become familiar with the basic components and their functions.
Components
All
Transmitter - The compact hand-held transmitter sends a coded signal to the collar receiver and confirms operation whenever the button is pressed. It operates on a 9-volt alkaline battery.
Training Collar - This rugged, water-resistant collar receiver is attached to a strap. The dog receives the stimulus from the transmitter via the collar receiver's probes.
Collar Probes - Two sets are included so you can use the collar with dogs of varying coat thickness.
Test Light - To test the system, bridge the collar probes with the tester and press the transmitter button. If the lamp glows, the collar is delivering stimulation.
Antennas - Two antennas are included. For best results, use the 5cm antenna in European countries. The 17cm antenna may be used in the USA only.
Batteries – Batteries are supplied for the transmitter and receiver collar(s)
Lanyard – A nylon cord with clip is included. Clip the transmitter to the lanyard; loop the lanyard around your wrist or neck to keep the transmitter close at hand.
Probe wrench – A thin metal probe wrench is included for tightening collar probes.
|
CS-300E |
CS-1600TTE |
CS-1600YE |
|
|
|
|
|
|
Transmitter |
• |
• |
• |
|
|
|
|
|
|
Collar(s) |
3 |
1 – Trainer plus |
1 |
|
Beeper |
||||
|
|
|
||
|
|
|
|
|
Probe Sets |
• |
• |
• |
|
|
|
|
|
|
Test light |
• |
• |
• |
|
|
|
|
|
|
Antennas |
2 |
2 |
2 |
|
|
|
|
|
ENG-2

english(eng).qxp 10/27/2005 11:39 AM Page ENG-3
Transmitter Set Up and Programming
Setting Up the Transmitter
Screw the supplied antenna into the port on the top of the transmitter. Install the battery by removing the battery cover on the back of the transmitter and snapping the supplied 9-volt alkaline battery into the correct battery terminals.
Setting Up the CS-300E
(for CS-1600E, CS-1600TTE, see next section)
Your CS-300E allows you to administer:
•Stimulation with tone; or
•Stimulation with no tone; or
•Stimulation after tone and a 1.5-second delay
Note: Read Steps 1 and 2 carefully before proceeding. You must begin Step 2 within 10 seconds of completing Step 1.
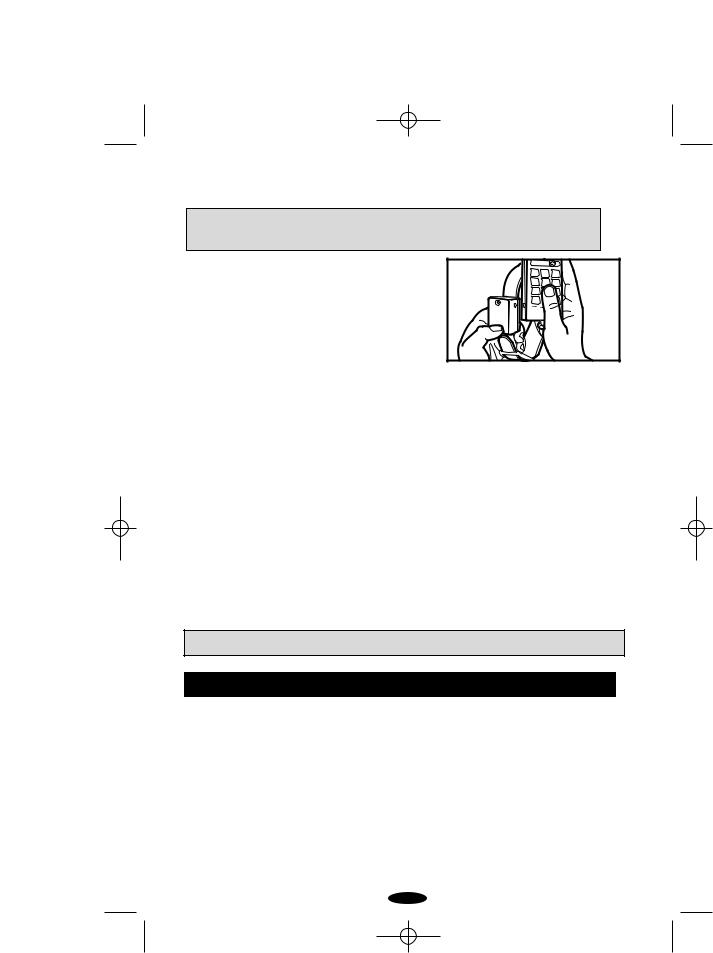
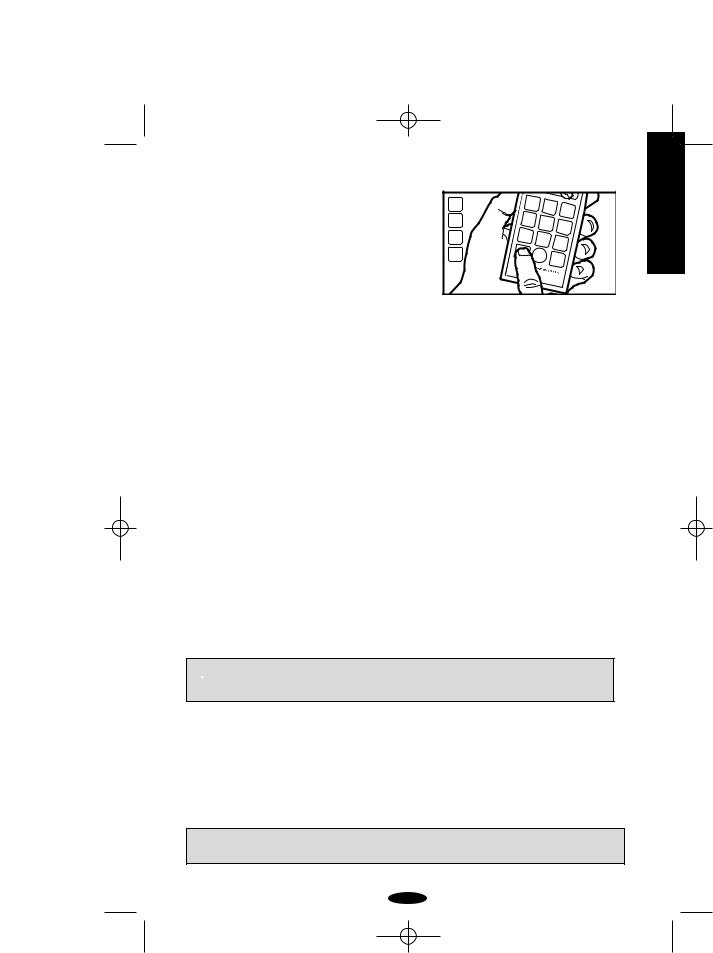
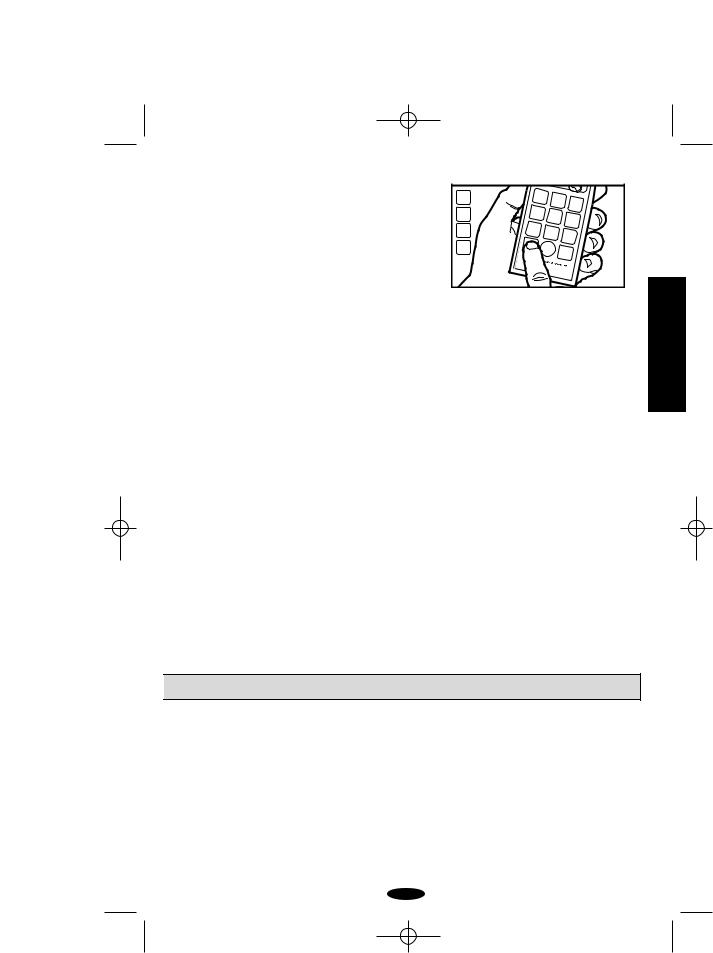
1.Press the white reset button above the battery (Fig. 1). The light on the face of the transmitter will glow solid YELLOW.
2.Immediately press one of the buttons in the center column:
•GREEN – Stimulation with tone
•YELLOW – Stimulation with no tone
•RED – Stimulation after tone and a 1.5-second delay
Note: The light will change color to match your selection.
If you do not select a tone option, the system automatically defaults to stimulation with no
tone.
RANGE
Selecting an ID Code |
|
Setting/Changing the ID Code – You must set an |
|
ID code before first use and whenever you |
|
change the transmitter battery. In the unlikely |
|
event you experience interference from another |
|
INNOTEK trainer in your area, you can simply |
|
change your transmitter's code. To set or change |
Fig. 1 – Reset button |
the ID code: |
|
1. Press the white reset button above the |
. 1). The light on the face of the transmitter |
will glow solid YELLOW. |
|
2. Press and release the round BLUE button |
column. The light will flash alternating |
RED and GREEN several times as it selects |
. |
Setting Up the Collar Receiver |
|
Install the battery. With the edge of the |
or a small coin, unscrew the battery |
screw cap. Insert the supplied 3-volt lithium |
with the positive terminal (+) facing out. |
Replace and tighten the battery screw cap. |
|
ENG
ENG-3
english(eng).qxp 10/27/2005 11:39 AM Page ENG-4
Matching the Transmitter to the Collar Receiver
 CAUTION:
Never place the collar on your dog before matching the collar receiver to the transmitter.
1.Synchronize each collar receiver one at a time, making sure all collar receivers are OFF except the one you are currently synchronizing. This will prevent the possibility of matching two dogs to the same DOG column.
2.Locate the red paper dot on both the transmitter and collar receiver. Hold the two dots together for 5 to 8 seconds until a solid YELLOW light glows on the receiver.
3.Separate the two units by at least 30 cm.
COMMAND |
|
SERIES MODEL 800 |
|
DOG 1 |
DOG 2 |
11
2 |
MOMENTARY |
2 |
3 |
RISING |
3 |
4 |
PROGRAM |
4 |
Fig. 2 – Synchronizing
transmitter and collar
4.Press any button in the DOG 1, DOG 2, or DOG 3 column. The light on the collar receiver flashes RED as the button is pressed. The light slowly flashes GREEN after release, indicating a successful match.
5.Note: We suggest you synchronize the yellow collar to the yellow column of buttons, blue collar to the blue column, etc.
Turning the Collar Receiver On and Off
1.The collar receiver features a magnetic ON/OFF switch. Turn the receiver ON/OFF using the magnet built into the transmitter.
2.Locate the red paper dot on both the transmitter and collar receiver.
3.Slide its surface against the red paper dot on the receiver. A continuous short GREEN flash indicates that the receiver is ON. One long RED flash followed by no light indicates the receiver is OFF. (Note: A continuous short RED flash indicates the receiver is ON but the battery is low and must be replaced.) Always turn the collar receiver OFF when not in use.
4.Note: Whenever the transmitter battery is replaced, the transmitter must be resynchronized.
Setting Up the CS-1600E or CS-1600TTE
(for CS-300E, see previous section)
Stimulation Type, Level, and Tone (CS-1600E, CS-1600TTE)
The following identifies the different stimulation types, levels, and tones available to you and your dog(s). Remember that your Command Series 1600E allows the transmitter to operate two receiver collars. Each of these receivers may have different stimulation type, level, and tone from the other receiver collar. As you review each, you may wish to mark the programming feature most appropriate for each of your dogs.
ENG-4
english(eng).qxp 10/27/2005 11:39 AM Page ENG-5
Types
Your system lets you choose between three different types of stimulation:
Continuous Stimulation:
•Delivered as long as the button is held
•Shuts down after 10 seconds (safety
•Will not restart for at least 5 seconds; you
Momentary Stimulation
•1/8th second duration
•Stimulation resumes if button is released
•Momentary stimulation is useful for dogs reminder.
Rising Stimulation
•Exclusive patented INNOTEK feature
•Stimulation starts at lowest level and rises
•Button 1 = Lowest to highest stimulation
•Button 2 = Lowest to highest stimulation
•Button 3 = Lowest to highest stimulation
Special Note on Button 4 (Model 1600E)
Regardless of the stimulation type you choose, administer a continuous Level 7 stimulation
Safety feature: To prevent accidental ond to deliver this highest stimulation.
Stimulation Levels
While there are seven levels of stimulation access to no more than four patterns of
These four pre-determined patterns are transmitter for stimulation levels, you are numbered buttons in each dog column.
the button, release, and press again.
again.
trained and need an occasional gentle
until button is released seconds
seconds seconds
4 is preprogrammed as a "hot button" to tone.
must press Button 4 twice within one sec-
to Level 7-maximum), you have
dog.
page. When you initially program your of these patterns to correspond to the four
ENG
ENG-5
english(eng).qxp 10/27/2005 11:39 AM Page ENG-6
If you press this button when |
The buttons in the DOG 1 column will |
||
programming stimulation level |
be set for these stimulation levels |
||
Button 1 in DOG 1 column |
Button # 1 = Level 1 stimulation (minimum) |
||
|
|
||
|
Button # 2 = Level 2 stimulation (low) |
||
|
|
||
|
Button # 3 = Level 3 stimulation (low medium) |
||
|
|
||
|
Button # 4 = Level 7 stimulation (maximum) |
||
Button 2 in DOG 1 column |
Button # 1 = Level 2 stimulation (low) |
||
|
|
||
|
Button # 2 = Level 3 stimulation (low medium) |
||
|
|
||
|
Button # 3 = Level 4 stimulation (medium) |
||
|
|
||
|
Button # 4 = Level 7 stimulation (maximum) |
||
|
|
|
|
Button 3 in DOG 1 column |
Button # 1 = Level 3 stimulation (low medium) |
||
|
Button # 2 = Level 4 stimulation (medium) |
||
|
|
||
|
Button # 3 = Level 5 stimulation (medium high) |
||
|
|
||
|
Button # 4 = Level 7 stimulation (maximum) |
||
|
|
|
|
Button 4 in DOG 1 column |
Button # 1 |
= Level 4 stimulation (medium) |
|
|
|
|
|
|
Button # 2 |
= Level 5 stimulation (medium high) |
|
|
|
|
|
|
Button # 3 |
= Level 6 stimulation (high) |
|
|
|
|
|
|
Button # 4 |
= Level 7 stimulation (maximum) |
|
|
|
|
|
Note: In all patterns, Button #4 delivers the maximum level of stimulation (Level 7). To prevent accidental stimulation, you must quickly press Button #4
Tone
Your CS-1600E allows you to administer:
•Stimulation with tone; or
•Stimulation with no tone; or
•Stimulation after a 1.5-second warning tone
In the following procedure, reference this table of tone settings. Press one of the buttons in the center column:
•GREEN – Stimulation with tone
•YELLOW – Stimulation with no tone
•RED – Stimulation after tone and a 1.5-second delay
Note the light on the transmitter will change color to match your selection.
ENG-6
english(eng).qxp 10/27/2005 11:39 AM Page ENG-7
Setting Stimulation Type, Level, and Tone
Your Command Series 1600E allows the transmitter to operate two receiver collars. Each of these receivers may have different stimulation type, level, and tone from the other receiver collar.
Program your transmitter in just 4 button pushes.
|
DOG 1 |
L 800 |
1 |
1 |
DOG 2 |
|
||
|
|
1 |
2 |
2 |
|
|
|
2 |
3 |
3 |
|
|
3 |
|
|
|
|
4 |
|
|
Fig. 3 – Programming the transmitter
A. |
B. |
C. |
D. |
E. |
Press the round |
Set stimulation |
Set stimulation |
Set tone by |
Programming is |
BLUE button to |
type by pressing |
level following |
pressing either |
complete. |
begin program- |
either the: |
the table on the |
the: |
Repeat the pro- |
ming |
GREEN button |
previous page; |
GREEN button |
cedure for the |
|
(Continuous |
in the DOG 1 col- |
(tone with stimu- |
right-hand DOG |
|
stimulation); |
umn, press |
lation); |
2 column. |
|
YELLOW |
either 1, 2, 3, |
YELLOW |
|
|
(momentary |
or 4. |
(no tone with |
|
|
stimulation) or |
1. Lowest range |
stimulation) or |
|
|
RED |
2. Medium |
RED |
|
|
(rising stimula- |
range |
(tone with 1.5 |
|
|
tion) |
3. Med./High |
second delay |
|
|
|
range |
before stimula- |
|
|
|
4. Highest range |
tion) |
|
|
|
|
|
|
Setting Up the Collar Receiver
Install the battery. With the edge of the supplied wrench or a small coin, unscrew the battery screw cap. Insert the supplied 3-volt lithium battery with the positive terminal (+) facing out. Replace and tighten the battery screw cap.
Matching the Transmitter to the Collar Receiver
 CAUTION:
Never place the collar on your dog before matching the collar receiver to the transmitter.
1.Hold the red paper dots on the transmitter and collar receiver together.
2.Continue to hold the red paper dots together during the following series of lights on the collar receiver. A solid light will come on and go out followed by another solid light.
3.Separate the transmitter and collar receiver by about 30 cm. A flashing light will be on the collar receiver.
4.Press Button 1 on the transmitter for 2 seconds. The light on the collar receiver will pulsate red. Stimulation will be delivered when Button 1 is pressed so do not touch the probes.
5.Release Button 1. The light on the collar receiver will begin blinking green.
Note: We suggest you synchronize the yellow collar to the yellow column of buttons, blue collar to the blue column, etc.
ENG
ENG-7
english(eng).qxp 10/27/2005 11:39 AM Page ENG-8
Turning the Collar Receiver On and Off
1.The collar receiver features a magnetic ON/OFF switch. Turn the receiver ON/OFF using the magnet built into the transmitter, or a strong household magnet.
2.Locate the red paper dot on both the transmitter and collar receiver.
3.Slide its surface against the red paper dot on the receiver. A continuous short GREEN flash indicates that the receiver is ON. One long RED flash followed by no light indicates the receiver is OFF. (Note: A continuous short RED flash indicates the receiver is ON but the battery is low and must be replaced.)
4.Always turn the collar receiver OFF when not in use.
Note: Whenever the transmitter battery is replaced, the transmitter must be resynchronized.
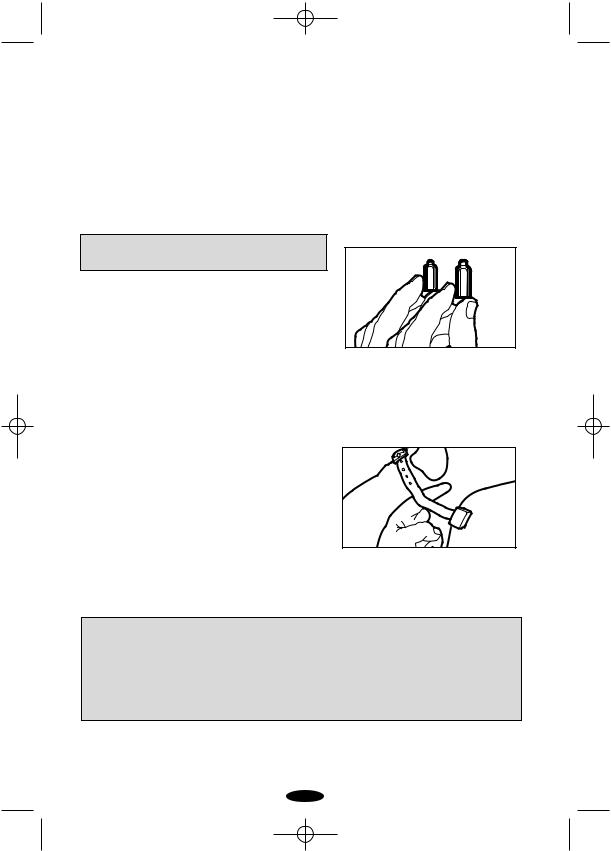
Fitting the Collar to Your Dog Probes
•Use short probes for short-haired dogs
•Use long probes for long-haired or thick-coated dogs
•Finger-tighten the probes, then turn one additional revolution with the probe wrench. Do not over-tighten.
Fig. 4 – Collar probes
Collar Strap
•Place the collar around the dog's neck with the receiver box on the bottom.
•Fit the strap as snugly as possible, without restricting breathing.
•Make sure both probes contact the dog's skin.
•Remove the collar and trim the excess collar length, leaving 10 to 15 cm.
Proper Fit: The collar strap fit should be snug, yet loose enough to allow two fingers to fit between the strap and dog’s neck.
For Best Results: If the dog does not seem to be feeling the stimulus, try moving the receiver to another part of the neck. This may improve the contact.
Fig. 5 – Proper collar fit
Dummy collars, which are non-operational but get the dog used to wearing a training collar, are also available. Contact your nearest INNOTEK Service Center to order.
Important!
•Always use the rubber insulators between the collar strap and probes to provide insulation in damp conditions.
•If needed, a small amount of hair removal or thinning will improve probe contact with the skin.
•Never leave the collar on your dog for more than 12 hours a day or when you are away.
•Check your dog periodically for skin irritation.
ENG-8
english(eng).qxp 10/27/2005 11:39 AM Page ENG-9
Bird Launchers, and Track & Train Collars (1600E only)
Any Command Series 1600E transmitter can be programmed to operate up to two collar receivers and a variety of bird launchers. The transmitters can also operate bird launchers in lieu of collar receivers.
INNOTEK Brand Remote Bird Launcher (Model RL-10)
INNOTEK bird launchers are excellent tools for training pointing and flushing dogs. The RL-10 is perfect for small birds such as pigeons, quail and chukar.
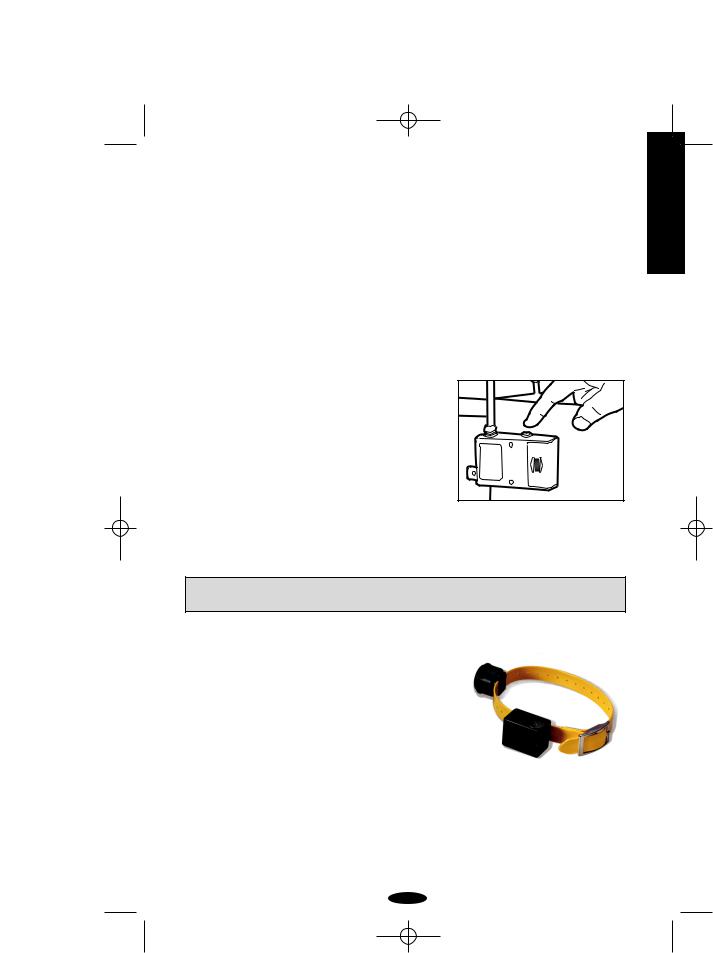
1.Install the battery. Carefully open the launcher and remove the battery cover located on the small black receiver. Snap the 9-volt alkaline battery into the correct battery terminals. The receiver light next to the battery compartment flashes YELLOW.
2.Above the battery compartment, press and hold the
RED button. The receiver light will flash GREEN, then go out, and then glow YELLOW.
3. After the YELLOW light has appeared, release the RED button. The YELLOW light will glow on for 2 seconds, then start to flash YELLOW. The launcher is ready to be synchronized.
4. Press the button on your transmitter that you wish to use to activate the launcher. The launcher arm moves and the light on the launcher glows GREEN for one second then goes out. Your launcher is now ready to use.
5.To add additional launchers, repeat the above steps for
each launcher, using different transmitter buttons for activation.
Note: If the launcher will not respond when the programmed button is pressed, you may need to reset the transmitter ID code. See "Selecting an ID code" on page ENG-3 for details.
The Track & Train® Collar (CS-1600TTE)
Match the collar receiver to the transmitter. Select the desired tracking mode from the choices below. The modes differ according to how often the collar beeps
1.Normal Mode (Button 1): Dog moving: chirps every 10 seconds; Dog on point: chirps every 1 second
2.Grouse Mode (Button 2): Dog moving: chirps every 5 seconds; Dog on point: chirps every 1 second
3.Silent Mode (Button 3): Dog moving: no chirps; Dog on point: chirps every 1 second
4.In addition, the OFF/CALL button (Button 4) allows the trainer to turn OFF the tracking mode, or to emit a call tone to help locate the dog.
ENG
ENG-9
english(eng).qxp 10/27/2005 11:39 AM Page ENG-10
Note: When the dog goes on point, there is a delay before the collar goes into point mode. In Normal and Silent Mode, the delay is as long as 10 seconds. In Grouse Mode, the delay is as long as 5 seconds. This feature keeps the pointing mode from activating when the dog stops momentarily.
Programming the collar receiver(s) for tracking
1.Press the round BLUE program button. A solid YELLOW light glows on the transmitter.
2.Select tracking mode by pressing one button in the DOG 1 column that corresponds to the table above. The YELLOW transmitter light glows GREEN and goes out.
3.To program a second collar receiver, repeat the process, selecting a tracking mode from the buttons in the DOG 2 column.
Activating the CALL feature
1.Press the BLUE program button. A solid YELLOW light glows on the transmitter.
2.Press Button 4 in the DOG 1 column to locate the primary dog. The continuous tone will sound until you release the button.
3.Note this step also turns OFF the tracking feature. To turn ON the tracking mode, follow the procedure, "programming the collar receiver(s) for tracking," above.
Helpful Hints and Training Guide
To get the most out of your new remote trainer, please make sure to follow these steps before you begin:
•Use conventional training methods to teach your dog what commands you expect it to respond to. When the dog understands your commands, only then should you introduce the collar.
•Always make sure the collar is functioning properly before you put it on the dog.
•Set the units on the lowest stimulation level. This allows the dog to respond with a light touch but gives you higher levels if needed.
•Keep sessions brief (10 minutes). After a 30-minute rest period, repeat the training process.
•Have the dog wear the collar for a few hours each day for a week or two before you start using it for training.
•Put the collar on the dog at least 30 minutes before beginning a training session. This can help prevent the dog from becoming collar-wise.
•Once you have started a program with your electronic remote trainer, never start a training session without it. A good rule would be to simply never take the dog out without the collar on.
•Always end each session on a good note. Have the dog repeat a mastered task. This will keep the dog’s interest for the next training session.
ENG-10
english(eng).qxp 10/27/2005 11:39 AM Page ENG-11
Troubleshooting
•To manually test the system for proper functioning, attach the test light to the probes of the collar receiver and press the transmitter button. The test lamp should light to indicate stimulation is being delivered. If the test lamp does not light, refer to the Important Note in Section 1.
•If signals from another transmitter or similar device interfere with your training, change the ID Code as explained on page ENG-3.
•If your dog seems sometimes to not be receiving the stimulus, the cause could be discharged batteries, a collar that is too loose or probes of insufficient length. Recharging the collar, replacing the transmitter battery or adjusting the collar and probes solves these problems.
If you still cannot solve the problem, contact your nearest INNOTEK Service Center.
Important: The perceived stimulation intensity is increased when your dog's hair and skin are wet. Use a lower level of stimulation when the dog is wet.
For more information, visit our web site at www.innotek.net.
CAUTION FOR BATTERY USE:
•Do not disassemble
•Do not short circuit
•Do not expose to high temperature: 60°C/140°F
•Do not incinerate
•Avoid high humidity
•Keep batteries out of reach of children
Batteries must be recycled or disposed of properly. They should NEVER be placed in municipal waste. Should it be necessary to remove or replace your unit’s battery, your INNOTEK Service Center will dispose of it according to local regulations.
Intended Use
INNOTEK® remote training systems are short-range radio transmitters designed for use in European countries: AT, BE, CH, DE, DK, ES, FI, FR, GB, GR, IE, IS, IT, LU, NL, NO, PT & SE.
Note that in some countries there could be a limitation of use due to national frequency planning requirements. The user is responsible for respecting those rules.
This product is in full compliance with the provisions of the R&TTE – Directive 1999/05/EEC. The Declaration of Conformity can be found at http://www.innotek.net/world.shtml
ENG
ENG-11
english(eng).qxp 10/27/2005 11:39 AM Page ENG-12
LIMITED INTERNATIONAL WARRANTY
INNOTEK, Inc. warrants to the original retail purchaser, that INNOTEK brand products will be free from defects in material and workmanship, under normal use, for a period of two years from the date of the original retail purchase. This Limited Warranty excludes: accidental damage due to dog chews; lightning damage where an INNOTEK brand lightning protection component is not in use (in-ground pet fencing systems); or neglect, alteration, and misuse.
INNOTEK Inc. offers several product exchange options during the warranty period. If service is required, call your authorized INNOTEK Service Center to discuss the service plan that best serves your needs. Costs are dependent on the processing time and the desired shipping options. Please do not return this product to your retailer.
After two years from date of original retail purchase, we will repair, replace or upgrade your product at a fixed rate based on the component.
INNOTEK, Inc., shall not be liable or responsible for any incidental or consequential damages resulting from the use of the product or caused by any defect, failure or malfunction of the product, whether a claim is based upon warranty, contract, negligence or otherwise.
INNOTEK brand products are not substitutes for traditional obedience training. INNOTEK, Inc. does not guarantee the effectiveness of its products due to variances in canine personality, temperament, and influences beyond INNOTEK’s control.
If services are required, please contact the nearest INNOTEK Service Center to obtain a Return Merchandise Authorization (RMA) number and return instructions. If the return request is approved, please send the defective part or the complete system by insured carrier to the specified address. Shipping costs are not covered.
INNOTEK® is a registered trademark (USA) of INNOTEK, Inc. © 2002 INNOTEK, Inc. All rights reserved.
ENG-12
dutch(ne).qxp 10/27/2005 11:36 AM Page NE-1
Command Series™
Trainers
Covers Models: CS-1600YE, CS-1600TTE, CS-300E
Operating Instructions
OVER INNOTEK® TRAININGSHALSBANDEN
NE
Deze elektronische hondhalsband van INNOTEK is één van de veiligste, meest menselijke en doeltreffende trainingsprodukten die te koop aangeboden worden. Op de juiste manier gebruikt, doet de elektronische stimulus dienst als een ongewenste afleding voor uw hond. Door te gehoorzamen, leert uw hond vlug de stimulus af te zetten, en verkrijgt daardoor vertrouwen in de reactie op uw bevelen. Zoals alle INNOTEK trainingsprodukten, heeft deze halsband regelbare stimulatieniveaus. Deze eigenschap laat u toe het niveau te gebruiken dat best overeen komt met het temperament van uw hond.
VOORZICHTIG
Vóór het eerste gebruik, neem a.u.b. enkele minuten om de handleiding te lezen. Deze handleiding bevat belangrijke informatie over programmering en instelling om uw training zo succesvol mogelijk te laten verlopen. Voor de beste resultaten, volg deze wenken:
•De elektronische hondhalsband dient enkel voor honden.
•De meeste hondeigenaars zijn verbaasd over hoeveel men kan bereiken met laag stimulatieniveau. Gebruik daarom de laagste stimulatie nodig om het gewenste gedrag te bekomen.
•Een ontladen batterij kan intermitterende werking veroorzaken. GEBRUIK de halsband NIET als u ver moedt dat de batterij ontladen is. Als de batterij leeg is, vervang de batterijen, of herlaad ze voor het gebruik.
•Laat uw hond vertrouwd geraken met de halsband alvorens met de training te beginnen. De halsband moet door uw hond aanvaard worden als een onderdeel van een routine. De halsband mag niet geassocieerd worden met correctie.
•Laat de halsband NIET langer dan 12 uren op uw hond.
•Verricht NOOIT instelprocedures als uw hond de halsband aan heeft.
•Een elektronische halsband mag enkel gebruikt worden onder strikte supervisie van de hondeigenaar.
•HOUD BUITEN HET BEREIK VAN KINDEREN.
BELANGRIJK
U moet zich realizeren dat individuele honden unieke temperamenten hebben. Het valt niet te voorspellen hoe uw hond initieel zal reageren op dit produkt. Voor de veiligheid van uw hond, moet de initiële training plaats hebben met een lange leiband zodat u meester blijft van de situatie. U moet er zich ook van bewust zijn dat een agressief dier zich kan keren tegen de begeleider bij het ontvangen van een stimulus. Bijgevolg, als u denkt dat uw hond een agressief gedrag heeft en/of bekend is omwille van agressief gedrag in het verleden, raadpleeg een deskundige in dierlijk gedrag vooraleer dit produkt te gebruiken.
Zie de Nuttige Wenken en Trainingshandleiding delen vooraleer verder te gaan.
NE-1
dutch(ne).qxp 10/27/2005 11:36 AM Page NE-2
Components
All
ONDERDELEN
Vooraleer te beginnen, neem a.u.b. enkele ogenblikken om vertrouwd te geraken met de basisonderdelen en hun functies.
Zender – De compacte handzender stuurt een gecodeerd signaal naar de hals bandontvanger en confirmeert de werking telkens de knop wordt ingedrukt. De zender wordt gevoed door een 9-volt alkalische batterij.
Trainingshalsband – Deze sterke, waterdichte halsbandontvanger is aan een halsband vastgemaakt. De hond ontvangt de stimulus van de zender via de sondes in de halsbandontvanger. De halsbandontvanger wordt in de fabriek gedeeltelijk opgeladen. Vóór het eerste gebruik is het best de eenheid volledig op te laden.
Halsbandsondes – Twee sets zijn inbegrepen, zodat men de halsband kan gebruiken op honden met variërende vachtdikte.
Testlamp – Om het systeem te testen, overbrug de halsbandsondes met de tester en druk de zendknop in. Als het lampje oplicht, produceert het systeem stimulatie.
Antennes – Twee 15 cm antennes zijn inbegrepen. Voor de beste resultaten gebruik het systeem altijd met zowel de halsbandontvangerantenne als de zenderantenne geïnstalleerd.
Batterijen – Batterijen voor zender en ontvangerhalsband(en) zijn bijgeleverd
Trekkoord – Een nylon koord met gesp is inbegrepen. Bevestig de zender aan de trekkoord; wind de trekkoord rond uw pols of nek om de zender dicht bij de hand te houden.
sondesleutel is inbegrepen voor het
|
CS-300E |
CS-1600TTE |
CS-1600YE |
Zender |
• |
• |
• |
Halsband |
3 |
1 – Trainer plus semafoon |
1 |
Sonde Sets |
• |
• |
• |
Testlamp |
• |
• |
• |
Antennes |
2 |
2 |
2 |
NE-2

dutch(ne).qxp 10/27/2005 11:36 AM Page NE-3
Zender instellen en programmeren
Zender instellen
Schroef de bijgeleverde antenne in de poort boven op de zender. Installeer de batterij door het batterijdeksel in de achterkant van de zender te verwijderen, en de bijgeleverde 9-volt alkalische batterij in de juiste polen aan te sluiten.
Instellen van de CS-300E
(voor CS-1600E, CS-1600TTE, zie het volgend deel)
Uw Command Series systeem laat u toedienen:
• Stimulatie met toon; of
• Stimulatie zonder toon; of
• Stimulatie na toon en een 1.5-seconde vertraging
1. Druk op de witte terugstelknop boven de batterij. De lamp in de voorkant van de zender zal continu GEEL branden.
2. Druk onmiddellijk op één van de knoppen in de middenkolom:
• GROEN – Stimulatie met toon
• GEEL – Stimulatie zonder toon
• ROOD – Stimulatie na toon en een vertraging van 1.5-seconde
Nota de kleur van de lamp zal veranderen in overeenkomst met uw keuze.
Als u geen toonoptie selecteert, zal het systeem automatisch overgaan tot stimulatie zonder toon.
Instellen/Veranderen van ID Code |
|
Vóór het eerste gebruik en telkens de zenderbatterij vervangen |
RANGE |
wordt moet u een ID code instellen. In het onwaarschijnlijke |
|
geval dat u interferentie ondervindt van een andere INNOTEK |
|
trainer in de buurt, kunt u eenvoudigweg de code van uw zen- |
|
der veranderen. Om de ID code in te stellen of te veranderen: |
|
1.Druk op de witte terugstelknop boven de batterij . De lamp 


 in de voorkant van de zender zal continu GEEL branden.
2.Druk éénmaal kort op de ronde BLAUWE knop in de mid
denkolom. De lamp zal verschillende keren alternerend ROOD en GROEN knipperen tijdens de selectie van een ID code.
De halsbandontvanger instellen
Installeer de batterij. Schroef het batterijdeksel los met de zijkant van de bijgeleverde sleutel of met een klein geldstuk. Installeer de bijgeleverde 3-volt lithium batterij met de positieve pool (+) naar buiten. Bevestig het schroefdeksel terug op zijn plaats.
NE
NE-3
dutch(ne).qxp 10/27/2005 11:36 AM Page NE-4
Zender en halsbandontvanger op elkaar afstemmen
VOORZICHTIG: Doe de halsband nooit aan uw hond vooraleer halsbandontvanger en zender op elkaar afgestemd te hebben.
1.Synchroniseer één voor één alle halsbandontvangers. Zorg ervoor dat alle halsbandontvangers UIT (OFF) zijn, uitgezonderd degene die gesynchroniseerd wordt. Hierdoor vermijdt men dat twee honden op dezelfde HOND (DOG) kolom afgestemd worden.
2.Zoek de rode papierstip op de zender en de halsbandontvanger. Houd de twee eenheden met de stippen tegen elkaar gedurende 5-8 seconden tot een continu GEEL licht begint te branden op de ontvanger.
3.Houd de twee eenheden minstens 30 cm van elkaar.
4.Druk op één van de knoppen in de HOND 1, HOND 2, of HOND 3 (DOG 1, DOG 2, of DOG 3) kolom. De lamp in de halsbandontvanger zal ROOD knipperen bij het indrukken van de knop. Na het loslaten van de knop, zal de lamp zal langzaam GROEN knipperen om aan te geven dat de afstemming geslaagd is.
5.Nota: Wij raden aan de gele halsband met de gele knopkolom te synchroniseren, de blauwe halsband met de blauwe knopkolom, enz.
De halsband AAN (ON) en UIT (OFF) schakelen
1.De AAN/UIT (ON/OFF) schakelaar van de halsband is aangegeven door een rode papierstip aan de zijkant van de ontvanger. De schakelaar wordt geactiveerd door de magnetische schakelaar van de zender, welke ook door een rode papierstip is aangegeven.
2.Om de halsband AAN (ON) te schakelen, houd kortstondig de rode papierstip van de zender tegen de rode papierstip van de halsbandontvanger. Een traag knipperend licht geeft aan dat de halsband AAN (ON) is en klaar voor gebruik.
3.Om de halsband UIT (OFF) te schakelen, houd kortstondig de rode papierstip van de zender tegen de rode papierstip van de halsbandontvanger. Een korstondig rood licht geeft aan dat de eenheid UIT (OFF) geschakeld is.
Nota: Bij elke vervanging van de zenderbatterij, moet de zender gesynchroniseerd worden.
Instellen van de CS-1600E of CS-1600TTE
(voor CS-300E zie het vorig deel)
Stimulatietype, Niveau, en Toon (CS-1600E, CS-1600TTE)
De volgende discussie identificeert de verschillende stimulatietypes, niveaus, en tonen die voor u en uw hond(en) beschikbaar zijn. Onthoud dat met uw Command Series 1600E de zender twee halsbandontvangers kan bedienen. Elk van deze halsbandontvangers kan een stimulatietype, niveau, en toon hebben die verschilt van de andere. Als u ze evalueert, kunt u indien gewenst nota nemen van de programmeringskenmerken die het meest geschikt zijn voor elk van uw honden.
NE-4
dutch(ne).qxp 10/27/2005 11:36 AM Page NE-5
Types
Uw systeem laat u kiezen uit drie verschillende stimulatietypes:
Continue Stimulatie:
•Geleverd zolang de knop ingedrukt is
•Gaat uit na 10 seconden (beveiliging)
•Zal niet terug starten voor minstens 5 seconden; u moet de knop indrukken, loslaten, en dan terug indrukken.
Kortstondige Stimulatie |
|
|
• |
Duurt 1/8th van een seconde |
NE |
• |
Stimulatie herneemt als men de knop loslaat en dan terug indrukt. |
|
• |
Kortstondige stimulatie is nuttig voor getrainde honden die af en toe een zachte aanmaning nodig |
|
hebben.
Stijgende Stimulatie
•Exclusief gepatenteerd kenmerk van INNOTEK
•Stimulatie begint op het laagste niveau en stijgt incrementeel tot de knop losgelaten wordt
•Knop 1 = van laagste naar hoogste stimulatieniveau in 2 seconden
•Knop 2 = van laagste naar hoogste stimulatieniveau in 4 seconden
•Knop 3 = van laagste naar hoogste stimulatieniveau in 8 seconden
Speciale Nota over Knop 4 (Model 1600E)
Ongeacht het door u gekozen stimulatietype, Knop 4 is vooraf geprogrammeerd als een "directe knop" om een Niveau 7 continue stimulatie zonder toon te geven.
Beveiliging: Om accidentele stimulatie te vermijden, moet u Knop 4 tweemaal binnen de seconde indrukken om deze hoogste stimulatie te geven.
Stimulatieniveaus
Ofschoon er zeven stimulatieniveaus zijn (Niveau 1-minimum tot Niveau 7-maximum), heeft u slechts de beschikking over niet meer dan vier stimulatiepatronen per hond.
Deze vier, vooraf bepaalde patronen zijn hieronder getoond. Als u de stimulatieniveaus voor de eerste maal programmeert in de zender, kiest u één van deze patronen voor elk van de vier genummerde knoppen in elke hondkolom.
NE-5
dutch(ne).qxp 10/27/2005 11:36 AM Page NE-6
|
|
|
|
|
Als u deze Knop indrukt bij het |
|
De knoppen in de HOND 1 (DOG 1) kolom zullen voor |
|
|
programmeren van het stimulatieniveau |
|
deze stimulatieniveaus ingesteld zijn |
|
|
|
|
|
|
|
|
|
|
|
|
Knop 1 in HOND 1 (DOG 1) kolom |
|
Knop # 1 = Niveau 1 stimulatie (minimum) |
|
|
|
|
Knop # 2 = Niveau 2 stimulatie (laag) |
|
|
|
|
Knop # 3 = Niveau 3 stimulatie (laag middelmatig) |
|
|
|
|
Knop # 4 = Niveau 7 stimulatie (maximum) |
|
|
Knop 2 in HOND 1 (DOG 1) kolom |
|
Knop # 1 = Niveau 2 stimulatie (laag) |
|
|
|
|
Knop # 2 = Niveau 3 stimulatie (laag middelmatig) |
|
|
|
|
Knop # 3 = Niveau 4 stimulatie (middelmatig) |
|
|
|
|
Knop # 4 = Niveau 7 stimulatie (maximum) |
|
|
Knop 3 in HOND 1 (DOG 1) kolom |
|
Knop # 1 = Niveau 3 stimulatie (laag middelmatig) |
|
|
|
|
Knop # 2 = Niveau 4 stimulatie (middelmatig) |
|
|
|
|
Knop # 3 = Niveau 5 stimulatie (middelmatig high) |
|
|
|
|
Knop # 4 = Niveau 7 stimulatie (maximum) |
|
|
Knop 4 in HOND 1 (DOG 1) kolom |
|
Knop # 1 |
= Niveau 4 stimulatie (middelmatig) |
|
|
|
Knop # 2 |
= Niveau 5 stimulatie (middelmatig high) |
|
|
|
Knop # 3 |
= Niveau 6 stimulatie (hoog) |
|
|
|
Knop # 4 |
= Niveau 7 stimulatie (maximum) |
|
Nota: In alle patronen, geeft Knop #4 het maximum stimulatieniveau (Niveau 7).
Om accidentele stimulatie te vermijden , druk Knop #4 snel in.
Toon
Uw CS-1600E laat u toedienen:
•Stimulatie met toon; of
•Stimulatie zonder toon; of
•Stimulatie na een waarschuwingstoon van 1.5-seconde
In de volgende procedure, refereer naar deze tabel van tooninstellingen. Druk op één van de knoppen in de middenkolom:
•GROEN – Stimulatie met toon
•GEEL – Stimulatie zonder toon
•ROOD – Stimulatie na toon en een vertraging van 1.5-seconde
Nota: de lamp op de zender zal van kleur veranderen in overeenkomst met uw keuze.
NE-6
dutch(ne).qxp 10/27/2005 11:36 AM Page NE-7
Instellen van Stimulatietype, Niveau, en Toon
Met Uw Command Series 1600 kan de zender twee halsbanontvangers bedienen. Elk van de deze ontvangers kan een stimulatietype, niveau, en toon hebben die verschilt van de andere.
Programmeer uw zender door slechts viermaal een knop in te drukken.
1
2
3
4
DOG 1 1
2
3
L 800
DOG 2 1
2
3
A. |
B. |
C. |
D. |
E. |
Druk op de |
Stel het stimu- |
Stel het stimu- |
Stel de toon in |
Programmering |
ronde BLAUWE |
latietype in |
latieniveau in |
door ofwel te |
is voltooid. |
knop om de |
door ofwel te |
volgens de |
drukken op de: |
Herhaal de pro- |
programmering |
drukken op de: |
tabel op de |
GROENE knop |
cedure voor de |
te beginnen |
GROENE knop |
voorgaande |
(toon met stim- |
rechtse HOND |
|
(Continue stim- |
bladzijde; druk |
ulatie); GELE |
2 (DOG 2) |
|
ulatie); GELE |
op 1,2,3, of 4 |
knop (geen |
kolom. |
|
knop (kort- |
in de HOND 1 |
toon met stim- |
|
|
stondige stimu- |
(DOG 1) |
ulatie); RODE |
|
|
latie); RODE |
kolom,. |
knop (toon met |
|
|
knop (stijgende |
1. Laagste |
1.5 seconde |
|
|
stimulatie) |
bereik |
vertraging voor |
|
|
|
2. Gemiddeld |
de stimulatie) |
|
|
|
bereik |
|
|
|
|
3. Gemmiddeld |
|
|
|
|
/ Hoog bereik |
|
|
|
|
4. Hoogste |
|
|
|
|
bereik |
|
|
|
|
|
|
|
De halsbandontvanger instellen
Installeer de batterij. Met de zijkant van de bijgeleverde sleutel of een klein geldstuk, schroef het batterijdeksel los. Installeer de bijgeleverde 3-volt lithium batterij met de positieve pool (+) naar buiten. Installeer de schroefkap terug op zijn plaats.

 VOORZICHTIG Verricht NOOIT instelprocedures als uw hond de halsband aan heeft.
Afstemmen van Zender en Halsbandontvanger
1.Houd de rode papierstippen op zender en halsbandontvanger tegen elkaar.
2.Blijf de rode papierstippen tegen elkaar houden tijdens de volgende serie van lichten op de halsbandontvanger. Een lampje zal continu branden en dan uitgaan, gevolgd door een ander continu brandend lampje.
3.Houd zender en halsbandontvanger minstens 30 cm van elkaar. Een knipperend lampje zal op de halsbandontvanger verschijnen.
4.Druk KNOP 1 op de zender in gedurende 2 seconden. Het lampje op de halsbandontvanger zal pulseren rood. Bij het indrukken van KNOP 1 wordt stimulatie geproduceerd, raak daarom de sondes niet aan.
5.Laat KNOP 1 los. Het lampje op de halsbandontvanger zal beginnen knipperen groen.
NE
NE-7

dutch(ne).qxp 10/27/2005 11:36 AM Page NE-8
De halsbandontvanger AAN en UIT draaien
1.De halsbandontvanger heeft een magnetische AAN/UIT (ON/OFF) schakelaar. Draai de ontvanger AAN/UIT (ON/OFF) met de in de zender ingebouwde magneet, of een gewone sterke magneet.
2.Zoek de rode papierstip op zender en halsbandontvanger.
3.Schuif de magneet tegen de rode papierstip op de ontvanger. Een korte continue GROENE flits geeft aan dat de ontvanger AAN (ON) is. Een lange RODE flits gevolgd door geen licht geeft aan dat de ontvanger UIT (OFF) is. (Nota: Een korte continue RODE flits geeft aan dat de ontvanger AAN (ON) is maar de batterij is leeg en moet vervangen worden.)
4.Draai de halsbandontvanger altijd UIT (OFF) wanneer hij niet in gebruik is.
Nota: Bij elke vervanging van de batterij moet de zender terug gesynchroniseerd worden.
De halsband aan uw hond aanpassen
Sondes:
1.Gebruik korte sondes voor honden met korte haren.
2.Gebruik lange sondes voor honden met lange haren of dikke vacht.
3.Draai de sondes met de hand vast. Draai dan één bijkomende toer met de sondesleutel. Draai niet te hard vast.
Halsbandriem:
1.Bevestig de halsband aan de nek van de hond met de ontvangerdoos naar onder.
2.Trek de riem zo strak mogelijk aan, zonder de ademhaling te belemmeren.
3.Zorg ervoor dat beide sondes het vel van de hond aanraken.
4.Verwijder de halsband en snij de overschot af, zodat 10 – 15 cm overblijft (indien gewenst).
Contact punter
Juiste passing
Juiste passing: De halsband moet nauw aanpassen, maar voldoende los zijn om twee vingers te kunnen steken tussen riem en nek.
Voor beste resultaten: Als de hond de stimulus niet schijnt te ontvangen, probeer de ontvanger te verplaatsen naar een andere plaats van de nek. Het contact zou hierdoor kunnen verbeteren.
Er zijn ook dummy halsbanden beschikbaar, die niet werken maar de hond gewend maken aan het dragen van een trainingshalsband. Contacteer het dichtste INNOTEK Service Center om te bestellen.
BELANGRIJK!
•Gebruik altijd de rubberen isolators tussen halsbandriem en sondes om te isoleren in vochtige condities.
•Indien nodig kan men het contact tussen sondes en vel verbeteren door een kleine hoeveelheid haar te verwijderen of door het haar uit te dunnen.
•Laat de halsband nooit langer dan 12 uren per dag op uw hond, of als u weg gaat.
•Controleer uw hond regelmatig voor velirritatie.
NE-8
dutch(ne).qxp 10/27/2005 11:37 AM Page NE-9
Vogellanceerders, en Track & Train halsbanden (enkel 1600E)
Elke Command Series 1600E zender kan geprogrammeerd worden om maximum twee halsbandontvangers en een variëteit van vogellanceerders te bedienen. De zenders kunnen ook vogellanceerders bedienen in plaats van halsbandontvangers.
INNOTEK Afstandsbediende Vogellanceerders (Model RL-10)
INNOTEK vogellanceerders zijn uitstekend geschikt voor het trainen van jachthonden en drijvershonden. RL-10 – perfect voor kleine vogels zoals duiven, kwartels en patrijzen
1.Installeer de batterij. Open voorzichtig de lanceerder en verwijder het batterijdeksel op de kleine zwarte ontvanger. Steek de
9-volt alkalische batterij in de juiste batterijpolen. De ontvangerlamp naast het batterij compartiment zal GEEL knipperen.
2.Houd de RODE knop boven op het batterijcompartiment inge- 
drukt. De ontvangerlamp zal GROEN flitsen, uitgaan, en dan
GEEL branden. 
3.Na het aangaan van de GELE lamp, laat de RODE knop los. De GELE lamp zal 2 seconden branden, en dan GEEL beginnen
knipperen. De lanceerder is nu klaar om gesynchroniseerd te worden.
4.Druk op de zenderknop dat u wenst te gebruiken om de lanceerder te activeren. De lanceerderarm beweegt en de lamp op de lanceerder zal één seconde GROEN branden en dan uitgaan. Uw lanceerder is nu klaar voor gebruik.
5.Om lanceerders bij te voegen, herhaal voor elke lanceerder de voorgaande stappen. Gebruik verschillende zenderknoppen om te activeren.
Nota: Als de lanceerder niet reageert op het indrukken van de geprogrammeerde knop, is het mogelijk dat de zender ID code terug moet ingesteld worden. Zie "Instellen/Veranderen van ID Code" op pagina NE-3 voor details.
De Track & Train™ Halsband (CS-1600TTE)
Stem de halsbandontvanger af op de zender.
Kies de gewenste tracking modus uit de hieronder vermelde keuzen. De modi verschillen naargelang hoe dikwijls de halsband piept
1.Normaal Modus (Knop 1): Hond beweegt: tjilpt om de 10 seconden; Hond staat: tjilpt elke seconde.
2.Bos (Grouse) Modus (Knop 2): Hond beweegt: tjilpt om de 5 seconden; Hond staat: tjilpt elke seconde
3.Stille Modus (Knop 3): Hond beweegt: geen tjilp; Hond staat: tjilpt elke seconde.
4.Bovendien, de UIT/ROEP (OFF/CALL) knop (Knop 4) laat de trainer toe de tracking modus UIT (OFF) te draaien, of een roeptoon uit te zenden om de hond te helpen localiseren.
NE
NE-9
dutch(ne).qxp 10/27/2005 11:37 AM Page NE-10
Nota: Als de hond gericht is, zal er een vertraging zijn vooraleer de halsband in richtwijze overgaat. In de Normaal en Stil wijzen is de vertraging tot 10 seconden lang, terwijl in Bos wijze de vertraging tot 5 seconden lang kan zijn. Deze voorziening belet dat de richtwijze geactiveerd zou worden als de hond enkele ogenblikken stilstaat.
De halsbandontvanger(s) voor tracking programmeren
1.Druk de ronde BLAUWE programmaknop in. Een continu GEEL licht brandt op de zender.
2.Kies tracking modus door in de HOND 1 (DOG 1)) kolom een knop in te drukken dat overeenkomt met de tabel hierboven. De GELE zenderlamp zal GROEN branden en uitgaan.
3.Om een tweede halsbandontvanger te programmeren , herhaal de procedure door een tracking modus te kiezen uit de knoppen van de HOND 2 (DOG 2) kolom.
Activeren van de ROEP (CALL) karakteristiek
1.Druk op de BLAUWE programmaknop. Een continu GEEL licht brandt op de zender.
2.Druk op Knop 4 in de HOND 1 (DOG 1)) kolom om de primaire hond op te sporen. De continue toon zal hoorbaar zijn tot u de knop loslaat.
3.Noteer dat deze stap ook de tracking karakteristiek UIT (OFF) draait. Om de tracking modus AAN (ON) te draaien, volg de procedure hierboven "de halsbandontvanger(s) voor tracking programmeren,".
Nuttige Wenken en Trainingshandleiding
Om het meeste te halen uit uw afstandsbediende trainer, zorg ervoor deze stappen te volgen vooraleer te beginnen:
•Gebruik conventionele trainingsmethoden om uw hond aan te leren op welke bevelen te reageren. Pas als de hond uw bevelen verstaat mag u de halsband introduceren.
•Verzeker u er altijd van dat de halsband behoorlijk werkt vooraleer de halsband op de hond te plaatsen.
•Stel de eenheden af op het laagste stimulatieniveau. De hond kan dan reageren op een lichte aanraking. Hogere niveaus blijven beschikbaar indien nodig.
•Houd het bij korte sessies (10 minuten). Na een 30 minuten rustperiode, herhaal het trainingsproces.
•Ga niet verder met een sessie als de hond interesse verloren heeft. Onderbreek voor een rustof pretperiode.
•Laat de hond enkele uren per dag de halsband dragen gedurende een of twee weken vooraleer de training aan te vatten.
•Doe de halsband aan de hond minstens 30 minuten voor het begin van een trainingssessie. Hierdoor vermijdt men dat de hond argwanend wordt over de halsband.
•Eens dat u aan een programma begonnen bent met uw elektronische afstandsbediende trainer, start nooit een trainingssessie zonder de trainer. Een goede regel is eenvoudigweg de hond niet uit te nemen zonder de halsband.
NE-10
 Loading...