


Remote Trainers
GS-6000 |
GS-7000 |
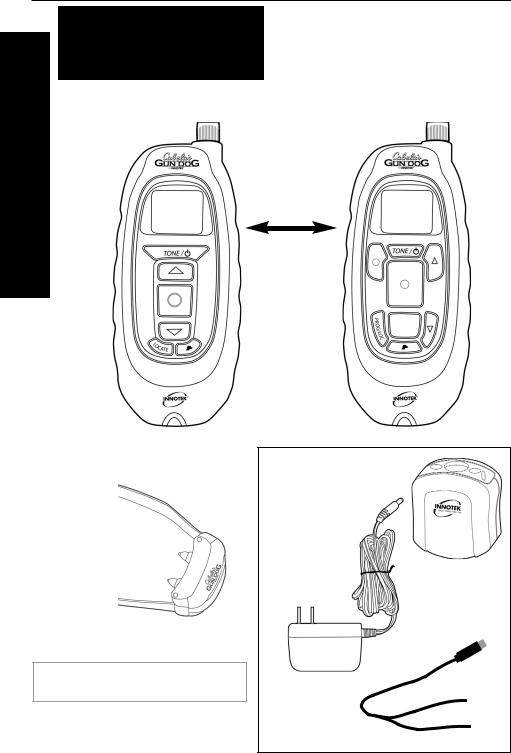
Cabela’s® Gun Dog®
by INNOTEK®
Remote Trainer Kit
ContentsKit |
|
GS-6000 |
|
|
Transmitter |
|
|
Receiver Collar
Gun Dog Hardware
includes Antenna,Test Light, Lanyard, Belt Clip, Long Contacts, and Contact Wrench.
FIRST THINGS FIRST
Your deluxe Gun Dog® Transmitter and Receiver collar need to charge their batteries before you can use them. While your Gun Dog Transmitter and Receiver collar are charging, read this manual to become familiar with the devices.
GS-7000
Transmitter
OR
Gun Dog Charging System
AC Adapter |
Receiver Cradle |
“Y” Cable
|
|
|
|
|
|
|
|
|
|
|
|
|
|
|
|
|
|
|
|
|
|
|
|
|
|
|
|
|
|
|
|
|
|
|
|
|
|
|
|
|
|
|
|
|
|
|
|
|
|
|
|
|
|
|
|
2 |
Cabela’s® Gun Dog® — Owner’s Manual |
|||||
Quick Start Guide
Step 1 Charging the Batteries
1
AC Adapter
3
From AC Adapter to “Y” Cable to Receiver Cradle
2 |
Receiver |
|
4 |
||
Light |
||
“Y” |
|
Guide Start Quick
Back view of Transmitter
1. |
Plug the AC Adapter into a 110VAC |
|
|
|
electric outlet. |
to |
|
2. |
Connect the AC Adapter to the “Y” cable. |
Transmitter |
|
3. |
|
||
Connect the “Y” cable to the Receiver |
|
||
|
Cradle. |
Charge |
|
|
|
||
4. |
Put the Receiver on the Receiver Cradle as |
Port |
|
|
shown in figure 4 (both logos are on the same |
|
|
|
side). The light on the Receiver glows red while |
||
|
charging, and glows green when fully charged. If |
||
|
the light does not come on, check Receiver orientation |
||
|
on the Cradle. |
|
|
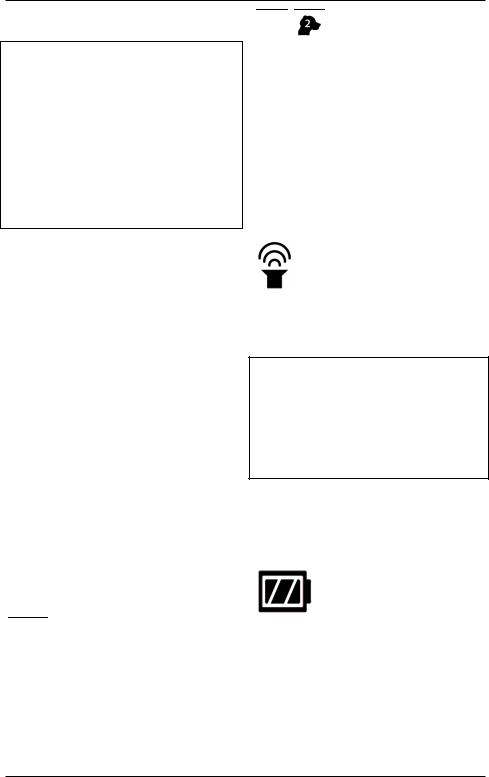
5. On the Transmitter, move the Charge Port Cover away from the Charge Port. Connect the remaining end of the “Y” cable to the Transmitter’s Charge Port. Charge the transmitter for at least 2 hours.
5
Charge Port Cover
To maintain maximum range, keep the Transmitter antenna away fro all magnets (there is a magnet in the Charging Cradle), otherwise effective range may be permanently diminished.
Cabela’s® Gun Dog® — Owner’s Manual |
3 |
Quick Start Guide
Quick Start Guide
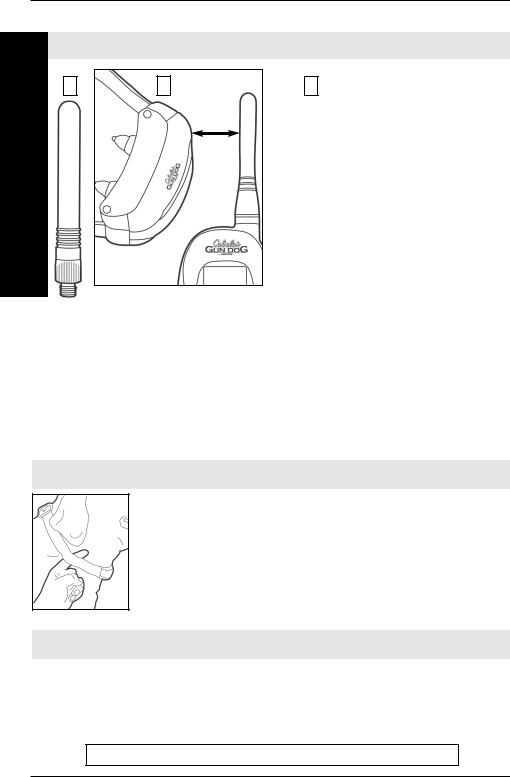
Step 2 Turning the Receiver ON and OFF
1 2
1 inch
The ON/OFF command only works when the Transmitter and Receiver are in close proximity; it will not work at a distance. The ON/OFF command only works when the Transmitter antenna is installed.
Never turn the unit ON or OFF while your dog is wearing the receiver collar.
3Press 
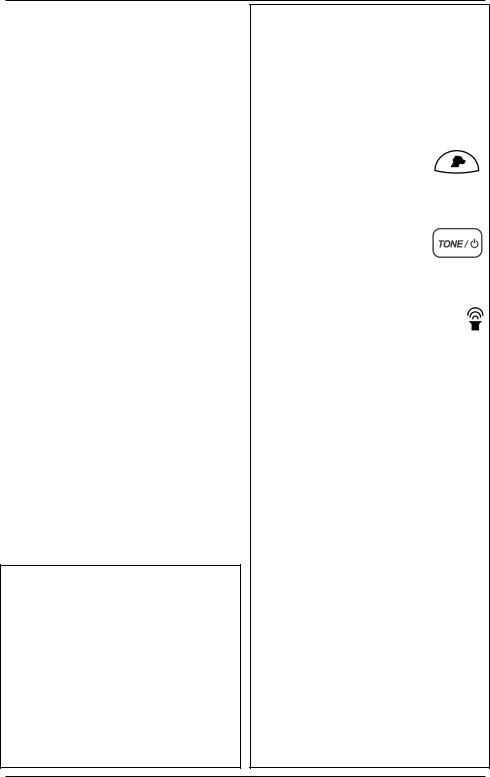
1.Put the threaded end of the Antenna into the Transmitter and turn until finger-tight.
2.Hold the Receiver one inch away from the Transmitter, be careful — do not touch the Receiver’s contacts; the self test may fail.
3.Press and hold the Tone button. The Receiver emits a start-up tone and its light turns on showing the level of battery charge (solid green, amber, or red). Release the Tone button.
4.To turn Receiver OFF, hold Receiver and Transmitter one inch apart and press and hold the Tone button. The Receiver will emit a shut-down tone sequence, and the light will glow solid red, then go out. Release the Tone button.
NOTE for Two Collar Use: Set the Transmitter to Dog 2 and repeat steps 2 and 3 using the second collar.
Step 3 Fit the Collar on Your Dog
Put the collar around your dog’s neck and adjust to find the proper fit. Fasten the collar so the fit is snug, yet loose enough to allow one finger to fit between the strap and the dog’s neck. Fit is important because a loose collar may cause inconsistent performance.
Step 4 Begin Training
Watch the included training DVD and read the information in the Training section on page 14. Your dog may show good initial response to the training; be sure to follow the training procedure for several weeks. The convenience that your new remote training system offers is well worth the time invested.
Throughout this manual, items in a bordered box apply to GS-7000 ONLY.
4 |
Cabela’s® Gun Dog® — Owner’s Manual |
THE TRANSMITTER
The waterproof Transmitter signals the electronic Receiver collar to produce a harmless, yet effective stimulation and/or tone. The no-slip grip feels comfortable in your hand for extended periods of training time or field time.
Explaining the
Transmitter Keypad Buttons:
|
|
|
|
|
|
|
|
|
|
|
|
|
|
|
|
|
|
|
Alternate |
|
|
Tone/ON-OFF |
|
|
|
|
|||||||||
|
Stimulation |
|
|
|
|
|
|
|
Stimulation |
||||||||
|
|
|
|
|
|
|
|
|
|
|
|
||||||
|
|
|
|
|
|
|
|
|
|
|
|
Level Up |
|||||
|
|
Momentary |
|
|
|
|
|
|
|
||||||||
|
|
|
|
|
|
|
|
|
|
|
|
|
|
|
|||
|
|
Stimulation |
|
|
|
|
|
|
|
Stimulation |
|||||||
|
|
|
|
|
|
|
|
|
|
|
|
(Continuous) |
|||||
|
|
|
|
|
|
|
|
|
|
|
Stimulation |
||||||
|
|
Program/ |
|
|
|
|
|||||||||||
|
|
|
|
|
|
|
|
|
Level Down |
||||||||
|
|
Locate |
|
|
|
|
|
|
|
||||||||
|
|
|
|
|
|
|
|
|
|
|
|
|
|
|
|
||
|
|
|
|
|
|
|
|
|
|
|
|
|
|
|
|
|
|
|
|
|
|
|
|
|
|
Dog Select |
|||||||||
|
|
|
|
|
|
|
|
|
|
|
|
|
|
|
|
|
|
|
|
|
|
|
GS-7000 keypad shown above, |
||||||||||||
|
|
|
|
|
GS-6000 keypad shown below. |
||||||||||||
|
|
|
|
|
|
|
|
|
|
|
|
|
|
|
|
|
|
|
|
|
|
|
|
|
|
|
Tone/ON-OFF |
|
|||||||
|
|
|
|
|
|
|
|
|
|
|
|
|
|
|
|||
|
|
|
|
|
|
|
|
|
|
|
|
Stimulation |
|||||
|
|
|
|
|
|
|
|
|
|
|
|
Level Up |
|
||||
|
|
|
|
|
|
|
|
|
|
|
|
|
|||||
|
|
|
|
|
|
|
|
|
|
|
|
|
|||||
|
|
|
|
|
|
|
|
|
|
|
Stimulation |
||||||
|
|
Stimulation |
|
|
|
|
|
|
|||||||||
|
|
Level Down |
|
|
|
|
|
|
|
|
|
|
|
|
|
||
|
|
|
|
|
|
|
|
|
|
|
|
|
|
|
|
||
|
|
|
|
|
|
|
|
|
|
|
|
|
|
|
|
|
|
|
|
|
|
|
|
|
|
|
|
|
Dog Select |
||||||
|
|
Locate |
|
|
|
|
|
|
|
|
|
|
|||||
|
|
|
|
|
|
|
|
|
|
|
|
|
|
|
|
||
|
|
|
|
|
|
|
|
|
|
|
|
|
|
|
|
|
|
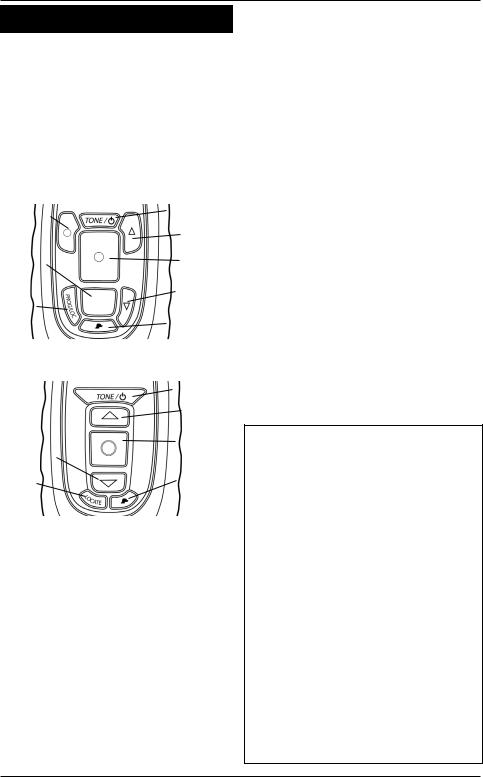
Above keypad buttons are explained as follows:
Tone/On-Off – When pressed, causes the Receiver to produce a tone. No stimulation is delivered. This button is also used to turn the Receiver on and off.
Stimulation – also called the “Stim Button,” when pressed, this sends continuous stimulation signal to the receiver collar at the intensity shown in the display for as long as you hold down
the button (See “Over Stimulation Protection.” on page 14.) Button features one raised bump to easily locate by touch, even with gloves on! See “Program the Stim Type.” on page 7.
Stimulation Level Up & Stimulation Level Down – adjusts the stimulation intensity through a range of levels. GS-7000 stimulation range is 1 to 20. GS-6000 stimulation range is 1 to 15.
Exclusive feature: Hold either stim level up or stim level down button for half a second for INNOTEK’s Rapid Ramp™ feature to start — The Transmitter display scrolls through stim levels more quickly.
Dog Select – Switches Transmitter control from Dog (Collar) 1 to Dog (Collar) 2, for training two dogs. You can purchase a second collar to expand the system for training two dogs.
GS-7000 ONLY:
Alternate Stimulation (Alt Stim)
– (top left red button) – When you press the Alt Stim button, the 
symbol displays. Program this preset button to the desired stimulation level. See Alternate Stimulation (Alt Stim) on page 8.
Momentary Stimulation – When you press the Momentary Stim button (large gray button below the Stimulation button), the  symbol displays. Momentary pulse stimulation is one quick stim per button press (also called Nick stimulation or Brief-tap stimulation).
continued on the next page
Cabela’s® Gun Dog® — Owner’s Manual |
5 |
Explaining the Transmitter Keypad
Buttons (continued)
continued from previous page
Prog/Loc (GS-7000 only) – Pressing and holding this dual-function button until the PROG symbol appears in the display puts the Transmitter in programming mode.
Briefly pressing this button starts or stops Locate Mode (explained on page 10).
Locate (GS-6000 only) – Press this button to start or stop Locate mode (explained on page 10).
Transmitter Display Symbols:
The display stays on for 30 minutes after a button press. After 30 minutes with no button presses, the display shuts off.
Pressing any button will make the display to turn back on.
Various symbols you might see in the Transmitter display are explained as follows:


 (Numeric readout) – Appears in the middle of the display, this shows the chosen stimulation level. Adjust with the Stim level up / Stim level down (arrow) buttons.


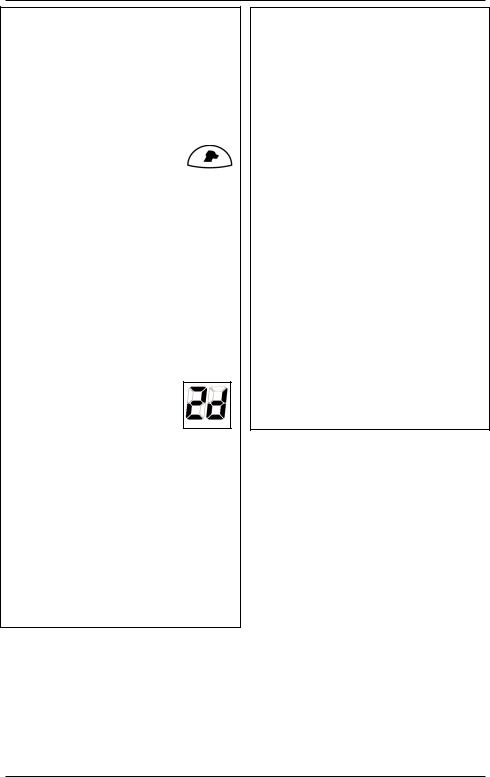
 – The left symbol displays when the Transmitter is controlling Dog receiver collar 1. You can purchase a second collar to expand the system for training two dogs. The right symbol displays when controlling Dog receiver collar 2. Switch between Receiver collars by pressing the Dog Select button. Both symbols display when in Dual Dog mode. See ‘Set Dual Dog mode’ on page 7.
 – This symbol appears whenever Tone is part of the Stimulation type chosen. See Program the Stim Type on page 7.
GS-7000 ONLY:
 – This symbol appears when the Transmitter is in programming mode. See Programming Mode on page 7.
 – This symbol appears when the Transmitter is in Locate mode.
 – The battery indicator provides constant awareness of your battery’s power level. See Battery Indicator on page 9.
Backlight – The Transmitter features a backlit display. The display backlight stays on for 5 seconds after a button press.
6 |
Cabela’s® Gun Dog® — Owner’s Manual |
USING THE TRANSMITTER
Turning ON the Transmitter
Power up the Transmitter by pressing any button. You will see the display turn on when you press any button.
Reset All Programmable Settings
Press  and
and  at the same time to reset all programmable settings to the default settings. The Transmitter Display shows all symbols for two seconds during reset.
Transmitter Default Settings
GS-6000 Defaults
Dog 1&2 Primary Stim Level: 5
GS-7000 Defaults
Dog 1&2 Stim Type: Stim without Tone Dog 1&2 Primary Stim Level: 7
Dog 1&2 Alt Stim Level: 14
Set Stim Button Intensity Level
To change the intensity level for the Stim button:
Press  or
or  until the desired stimulation level is displayed. When the Stim button is pressed, the Receiver will deliver a stimulation at this setting.
GS-7000 ONLY:
Programming Mode
To enter Programming Mode, press and hold the Prog/Loc button until the PROG symbol displays, then release the button. The Transmitter is now in Programming mode.
To exit Programming Mode, press and release the Prog/Loc button again. The PROG symbol no longer displays.
GS-7000 ONLY:
Program the Stim Type (Tone Option)
For GS-7000 Transmitters, stimulation may be delivered with or without a tone. The Transmitter’s default setting is Stim without Tone.
To choose:
1.Choose desired dog. Press (Dog Select button).
2.Press the Prog/Loc button until the PROG symbol shows in the Transmitter display. Release Prog/Loc button.
3.Press and release TONE. If you keep pressing the TONE button, the selection
switches between these choices:
• Stim without Tone (no Tone symbol
displayed)
• Stim with Tone (Tone symbol displayed)
4.Press and relase the Prog/Loc button to save setting and exit.
For additional information regarding using the Tone, see Training Tone Option on page 14.
GS-7000 ONLY:
Set Dual Dog mode
In Dual Dog mode, the continuous stimulation button (red) controls Dog 1 receiver collar, and the momentary stimulation button (gray) controls Dog 2 receiver collar. Lets you control two dogs without using the Dog Select button to switch between dogs. In this mode, Stim type is stim without tone.
continued on next page
Cabela’s® Gun Dog® — Owner’s Manual |
7 |
continued from previous page
To use Dual Dog mode:
1.Turn on receiver collar 1 using the TONE key. Place receiver collar 1 at least 6 feet away.
2.Set the desired Dog 1 stim level with the UP and DOWN arrow keys.
3.Press Dog Select button to switch to Dog 2.
4.Turn on receiver collar 2 using the TONE key.
5.Set the desired Dog 2 stim level with the UP and DOWN arrow keys.
6.Press the Prog/Loc button until the PROG symbol displays, then release the button.
7.Press the Dog Select button to switch between DOG 1 – 2 mode (displays single dog head symbol and stim number) and DUAL DOG mode (displays both dog
head symbols and “2d” in the display).
8.Repeatedly pressing the Dog Select button switches between DOG 1 – 2 mode and DUAL DOG mode.
9.To save the chosen setting and exit programming, press and release the Prog/Loc button.
Remember, the red stim button is for Dog receiver collar 1, and the gray stim button is for Dog receiver collar 2.
When using Dual Dog mode, the following buttons are not functional:
•Tone
•Alt Stim
•stim level down 
•stim level up 
GS-7000 ONLY:
Alternate Stimulation (Alt Stim)
Some trainers depend upon instant access to a higher stimulation setting for circumstances where the dog may not respond to lower levels, such as a high distraction environment. Your GS-7000 Transmitter features a red, preset Alt Stim button that you can use to deliver an alternate (higher) level of stimulation.
Program the Alt Stim Button
To change the stimulation level of the GS-7000 Alt Stim button:
1.Press the Prog/Loc button and hold until the PROG symbol is displayed, then release the button.
2.Press the Alt Stim button.
3.Press  or
or  until you get to the desired stimulation level.
4.When finished, press and release the Prog/Loc button.
8 |
Cabela’s® Gun Dog® — Owner’s Manual |
 Loading...