


PetSafe®
Deluxe Patio Panel
Installation Guide
Manuel d’installation
Manual de instalación
Please read this entire guide before beginning Veuillez lire tout ce manuel avant de commencer
Por favor, antes de comenzar, lea completamente esta guía
Thank you for choosing PetSafe®. Our mission is to ensure your pet’s safety by providing you the tools and techniques to successfully train your pet. If you have any questions, please contact the Customer Care Center at 1-800-732-2677 or visit our
website at www.petsafe.net.
_____________________________________________________________________________________
Table of Contents |
|
Components................................................................................................ |
3 |
Other ItemsYou Will Need........................................................................... |
3 |
Inserting the Patio Panel into the Door Track................................................ |
4 |
Securing the Height Adjuster........................................................................ |
4 |
Installing the Glass Sweep and Weather Stripping.......................................... |
5 |
Methods for Installation............................................................................... |
6 |
TrainingYour Pet to Use the Door................................................................ |
7 |
Using the Closing Panel............................................................................... |
7 |
Lock Installation.......................................................................................... |
8 |
Assembly For 96" Patio Panels..................................................................... |
9 |
Terms of Use and Limitation of Liability....................................................... |
9 |
Français.................................................................................................. |
10 |
Espagñol.................................................................................................. |
18 |
Latch Mounting Template.......................................................................... |
27 |
2 |
1-800-732-2677 |
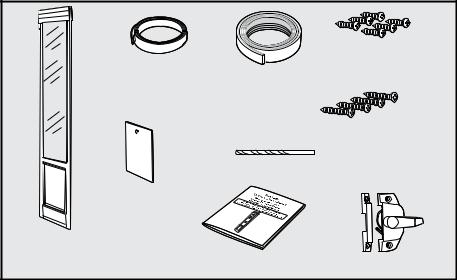
Components
|
Foam |
|
Six #6 x 5/8" |
|
|
Sheet Metal Screws |
|
|
Weather Stripping |
Glass |
|
|
|
Sweep |
|
|
|
Four #6 x 3/4" Flat Head |
|
|
|
|
Sheet Metal Screws |
|
|
7/64" Drill Bit |
|
|
Closing Panel |
|
|
PetSafe® Deluxe |
|
|
|
Patio Panel |
Installation Guide |
Latch Assembly |
|
|
|||
Other ItemsYouWill Need
•Drill
•Safety Glasses
•9/64" Drill bit
•1/4" Drill bit
•Phillips Screwdriver
•Flat Head Screwdriver
•Scissors
www.petsafe.net |
3 |

Step
1
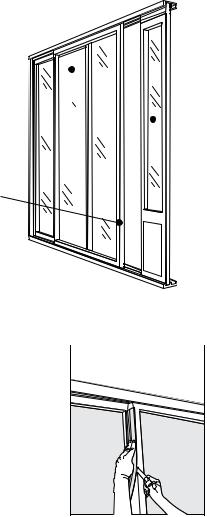
Inserting the Patio Panel into the DoorTrack
Important: Remove all packaging materials from Deluxe Patio Panel.
Note: If you purchased the 96” Patio Panel, please refer to the assembly instructions on page 8 before proceeding to the installation.
The Deluxe Patio Panel inserts into the opening in your sliding glass door against the doorjamb.Your sliding glass door will then close flush against the Deluxe Patio Panel.
1.Place the top of the Patio Panel in the top door track groove.
2.Position the bottom part of the Patio Panel into the bottom door track.
3.Move the Patio Panel against the doorjamb.The Patio Panel should fit flush against the doorjamb without any gaps.
1
2
3 |
Step
2
__________________________________________________________________________
Securing the Height Adjuster
The following steps will help to ensure that the Height Adjuster stays in place over time.
Note: Make sure you are satisfied with the fit of the Patio Panel before drilling.
1.Drill 7/64" holes through the four pre-drilled holes on the interior and exterior side of the Height Adjuster.
2.Secure the Height Adjuster to the Patio Panel with four #6 x 5/8" sheet metal screws.
Height
Adjuster Pre-drilled
Holes
4 |
1-800-732-2677 |
3Step Installing the Glass Sweep andWeather Stripping
Patio door shown here slightly open 

 Deluxe Patio Panel
Install Glass Sweep here 
Install Weather-Stripping here
Glass Sweep
The Glass Sweep should be installed onto the BACK EDGE of your sliding glass door to form a seal between the sliding glass door and the stationary glass door.
1. Clean the back edge of your sliding glass door.
2. Position the Glass Sweep at the top of the door with the flexible part touching the glass of the stationary door.
3.Carefully peel the backing and press the Glass Sweep in place as you move down to the bottom of the door.
4.Trim any excess with scissors.
www.petsafe.net |
5 |

Weather Stripping
The Weather Stripping helps form a seal between the
Deluxe Patio Panel and your sliding glass door.
1.Clean the leading edge of your sliding glass door.
2.Position the Weather Stripping at the top of the door.
3.Carefully peel the backing and press the Weather Stripping in place as you move down to the bottom of the door.
4.Trim any excess with scissors.
_______________________________________________
Step Methods for Installation
4Important: Drilling holes into your door frame may void the warranty on your frame. Please refer to your door manufacturer’s warranty before drilling.
Since models of sliding glass doors differ, please review the choices below carefully. If your sliding glass doorjamb has a recessed door track, you will need to use Method B. Additional hardware may be purchased at most hardware stores.
Note: Installing screws into vinyl door frames or doorjambs may crack the vinyl.
Method A:
1.Along the top and bottom of the door frame, drill two 9/64" clearance holes through the door frame.
2.Drill two 7/64" holes through into the Patio Panel.
3.Fasten the door frame to the Patio Panel using four #6 x 1/2" or longer sheet metal screws depending on the thickness of your door track.
Note: Screws should be long enough to fasten the Patio Panel to the door frame, but not go through or warp the track.
Method B:
Use an “L” bracket at the top and bottom of the Patio Panel.
Step TrainingYour Pet to Use the Door
5Bring your pet to the Deluxe Patio Panel. Lift the vinyl flap a few inches and try to talk your pet into going through. It may help for you to be on one side of the door and your pet on the other.While on the other side of the door, call your pet.You may try persuading your pet by holding a small piece of food or a treat on the opposite side of the door. If your pet will not go through the door, DO NOT shove him through the door.Tape the flap in the up position and wait for your pet to go through on his own.
6 |
1-800-732-2677 |
Using the Closing Panel
The Closing Panel attaches to the inside of the Deluxe Patio Panel.
During inclement weather, or to keep your pet from using the door, place the closing panel in the track on the inside of the Deluxe Patio Panel.
Step
6
_______________________________________________
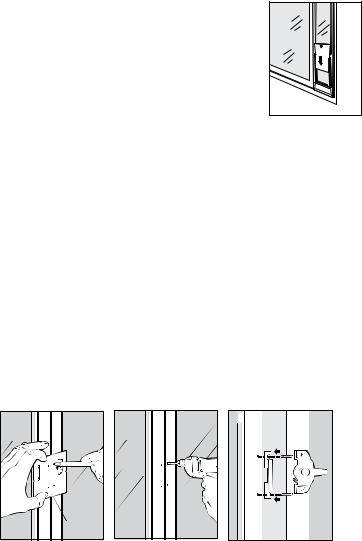
Lock Installation
Important: Drilling holes into your door frame may void the warranty on your frame. Please refer to your door manufacturer’s warranty before drilling.
1.Determine location for Latch Assembly at a convenient height from floor.
2.Slide patio (house) door and Patio Panel tightly together.
3.Using template provided, align vertical center line on template with door mating line (keeping “latch” side of template to the RIGHT) and mark location for four (4) mounting screws (1A).
4.Remove template and inspect location of holes on patio (house) door to determine if there is a possibility that location will allow drill bit to contact glass inside door.This is only required if the “latch” portion is mounted to the patio (house) door.
5.Drill four (4) 7/64” dia. mounting holes using drill bit provided. DO NOT drill completely through either door (1B).
6.Secure the “latch” and “keeper” with the four (4) #6 x 3/4” flat head sheet metal screws provided. DO NOT overtighten (1C). Recommended torque is 8-10 ft/lbs.
7.If over tightening results in stripped connection, you may do one of the following:
a.Move latch slightly up or down and re-drill mounting holes.
b.Drill existing holes to a larger size and install a plastic anchor (not provided) for a #6 screw. Plastic anchors can be purchased at any local hardware or home improvement store.
1A |
1B |
|
1C |
||
|
 Vertical
Center Line
www.petsafe.net |
7 |

Assembly For 96" Patio Panels
Remove the 4 screws from the connection bar mounted on the bottom sections of the door. Align and slide TOP section of panel to the BOTTOM section. Reinstall and tighten the 4 screws just removed through the Top sections of the connector bar.
|
Connecting |
|
|
Bar |
|
Bottom |
Factory |
|
(Door) |
Installed |
|
Section |
Screws |
|
On Each |
||
|
||
|
Side |
Replacement Flaps
Replacement flaps can be purchased at your local retailer or by contacting the Customer Care
Center at 1-800-732-2677.
___________________________________________________________________
Fitting your flexible flap
1
1.If needed the flexible flap is adjustable to fit into frame correctly.
2 |
2.HORIZONTAL ADJUSTMENT
Move flap left or right to adjust position.Tighten screws when correct.
3 |
3.VERTICAL ADJUSTMENT
Move flap up or down to adjust position.Tighten screws when correct.
8 |
1-800-732-2677 |
ProductWarranty
To get the most protection out of your limited warranty, please register your product within 90 days at www.petsafe. net. By registering, you will enjoy the product’s full warranty and should you ever need to call the Customer Care Center at 1-800-732-2677 (US), 1-800-457-3911 (Canada), we will be able to help you faster. Additionally, you will not have to save your product receipt as registering serves as proof of purchase. Most importantly, PetSafe®
will never give or sell your valuable information to anyone.
___________________________________________________________________
Terms of Use and Limitation of Liability
1.Terms of Use
This Product is offered to you conditioned upon your acceptance without modification of the terms, conditions and notices contained herein. Usage of this Product implies acceptance of all such terms, conditions, and notices.
2.Limitation of Liability
In no event shall Radio Systems Corporation® be liable for any direct, indirect, punitive, incidental, special or consequential damages, or any damages whatsoever arising out of or connected with the use or misuse of this Product. Buyer assumes all risks and liability from the use of this Product.
3.Modification of Terms and Conditions
Radio Systems Corporation reserves the right to change the terms, conditions and notices under which this Product is offered.
www.petsafe.net |
9 |
 Loading...