


Operating Guide Manuel d’utilisation Gebruiksaanwijzing
Manual de funcionamiento Guida all’uso Gebrauchsanweisung
D360SS-CA-17
D360SS-AU-17
D360SS-UK-17
D360SS-EU-45
360 Stainless Steel Pet Fountain - 3.8 Litres
360 Fontaine pour animaux de compagnie en acier inoxydable - 3,8 litres 360 Roestvrijstalen drinkfontein - 3,8 liter
Fuente para mascotas 360 de acero inoxidable - 3,8 litros Fontana per animali domestici in acciaio inossidabile 360 - 3,8 litri Edelstahl-Trinkbrunnen 360 - 3,8 Liter
Please read this entire guide before beginning
Veuillez lire ce manuel en entier avant de commencer
Gelieve deze gids volledig door te lezen voordat u begint
Por favor, lea detenidamente este manual antes de empezar
Si prega di leggere attentamente la guida al uso prima di utilizzare il collare
Bitte lesen Sie die gesamte Betriebsanleitung vor dem Train

ES NL FR EN
Important Safety Information
Explanation of Attention Words and Symbols used in this guide
This is the safety alert symbol. It is used to alert you to potential personal injury hazards. Obey all safety messages that follow this symbol to avoid possible injury or death.
WARNING indicates a hazardous situation which, if not avoided, could result in death or serious injury.
CAUTION, used without the safety alert symbol, indicates a hazardous situation which, if not avoided, could result in harm to your pet.
NOTICE is used to address safe use practices not related to personal injury.
DE IT
 When using electrical appliances, basic safety precautions should always be followed to reduce the risk of fire, electric shock and/or injury to persons, including the following:
•To reduce the risk of injury, close supervision is necessary when an appliance is used by or near children.
•To protect against electric shock, do not place electrical Power Cord or plug in water or other liquids.
•Do not use outdoors. FOR INDOOR HOUSEHOLD USE ONLY.
•Do not pull on the electrical Power Cord to remove the plug from the electrical outlet.
To unplug, grasp the plug, not the electrical Power Cord.
•Do not operate any appliance if it has a damaged electrical Power Cord or plug, or if it is malfunctioning or has been damaged. Call Customer Care Centre immediately for further instructions.
•For a portable appliance - To reduce the risk of electric shock, do not place or store an appliance where it can fall or be pulled into a bath tub or sink.
•Always unplug any appliance when not in use, before putting on or taking off parts and before cleaning.
•Do not use an appliance for anything other than its intended use.
•If the plug of this device gets wet, turn off the electricity to that electrical outlet. Do not attempt to unplug.
•Examine this appliance after installation. Do not plug into electrical outlet if there is water on the electrical Power Cord or plug.
2 |
www.petsafe.net |

|
|
|
EN |
|
• Do not allow pets to chew on or swallow any parts. If you are concerned about the |
||||
|
||||
electrical Power Cord, purchase a cord conduit (a hard plastic protector) at any |
|
|||
hardware store. |
FR |
|||
• The plastic Pet Fountain parts are BPA-FREE. However, some animals have been |
||||
|
||||
known to be sensitive to plastic food and water containers. If your animal shows |
|
|||
signs of an allergic reaction to the plastic, please discontinue use until you have |
|
|||
consulted with your veterinarian. |
NL |
|||
|
|
|
||
|
|
|
||
|
|
|
||
• The Pet Fountain is intended to run continuously (always plugged into an electrical |
ES |
|||
outlet), as long as the water level is maintained and the Pet Fountain is cleaned |
||||
regularly. Be sure to check the Pet Fountain regularly to help prevent damage to the |
||||
|
||||
Pump, as the water may get consumed or evaporate causing the Pump to run dry. |
|
|||
• Do not attempt repairs on the Pump. |
IT |
|||
• To avoid the possibility of the plug or electrical outlet getting wet, the electrical outlet |
||||
should always be above the level of the Pet Fountain. |
|
|||
• If an extension cord is necessary, an extension cord with a proper rating should |
|
|||
be used. |
DE |
|||
• The electrical use of this appliance is 2 watts. |
||||
• The use of attachments not recommended or sold by the manufacturer may cause an |
|
|||
unsafe condition. Do not modify the appliance. |
|
|||
• Do not install or store appliance where it will be exposed to weather or temperatures |
|
|||
below 4.5° C. |
|
|||
• When cleaning your Pet Fountain, do not use any abrasive cleaning solutions, |
|
|||
sponges, or pads. These abrasive surfaces can scratch the stainless steel parts. |
|
|||
• Read and observe all important notices listed on the appliance and in the |
|
|||
packaging. |
|
|||
SAVE THESE INSTRUCTIONS
www.petsafe.net |
3 |

NL FR EN
Thank you for choosing the PetSafe® brand. You and your pet deserve a companionship that includes memorable moments and a shared understanding together. Our products promote a lifestyle of protection, teaching and love; essentials that influence memories for a lifetime. If you have any questions about our products, please visit our website at www.petsafe.net or contact our Customer Care Centre.
To get the most protection out of your warranty, please register your product within 30 days at www.petsafe.net. By registering and keeping your receipt, you will enjoy the product’s full warranty and should you ever need to call the Customer Care Centre, we will be able to help you faster. Most importantly, your valuable information will never be given or sold to anyone. Complete warranty information is available online at www.petsafe.net.
DE IT ES
Table of Contents
Components. |
. . |
. . . . . . . . . . |
. . . . . |
. . . . . . |
. . . . . . . . |
|
5 |
Features . . |
. . . . . . . . . . . |
. . . . . . . . . . . . . . . . . . . . |
. |
5 |
|||
Key Definitions. |
. . . . . . . . . . |
. . . . . . . . . . . . . . . . . . . . |
|
. 6 |
|||
Operating Instructions.. . . . . . . |
. . . . . . . . . . . . . . . . . . . . |
. |
7 |
||||
Filters and Pet Fountain Cleaning. |
. . |
. . . . . . . . . . . . . . . . . . . . |
. |
9 |
|||
Pump Maintenance.. . . . . . . . |
. . . . . . . . . . . . . . . . . . . . |
. |
11 |
||||
Pet Fountain Reassembly. . |
. . . . . |
. . . . . . . . . . . . . . . . . . . . |
|
12 |
|||
The Pet Fountain and Your Environment. |
. . . . . . . . . . . . . . . . . . . . |
|
13 |
||||
General Tips. |
. . . |
. . . . . . . . . . |
. . . . |
. . . . . . |
. . . . . . . |
|
13 |
Warranty . . |
. . . . . . . . . . . |
. . . . . . . . . . . . . . . . . . . . |
|
14 |
|||
Compliance. |
. |
. . . . . . . . . . |
. . . . . . . . . . . . . . . . . . . . |
|
15 |
||
Important Recycling Advice. |
. . . . |
. . . . . . . . . . . . . . . . . . . . |
. |
15 |
|||
Terms of Use and Limitation of Liability. |
. . . . . . . . . . . . . . . . . . . . |
|
16 |
||||
Français. . |
. . . |
. . . . . . . . . . |
. . . |
. . . . . . |
. . . . . . . . |
|
17 |
Nederlands. . |
. . . . . . . . . |
. . . . . . . . . . . . . . . . . . . . |
|
31 |
|||
Español. . |
. |
. . . . . |
. . |
. . . |
. . . . . . . . . . . . . . . . . . . . 45 |
||
Italiano. . |
. |
. . . . . |
. . |
. . . |
. . . . . . . . . . . . . . . . . . . . 59 |
||
Deutsch. . |
. . . . . . . . . . . |
. . . . . . . . . . . . . . . . . . . . |
|
73 |
|||
4 |
www.petsafe.net |
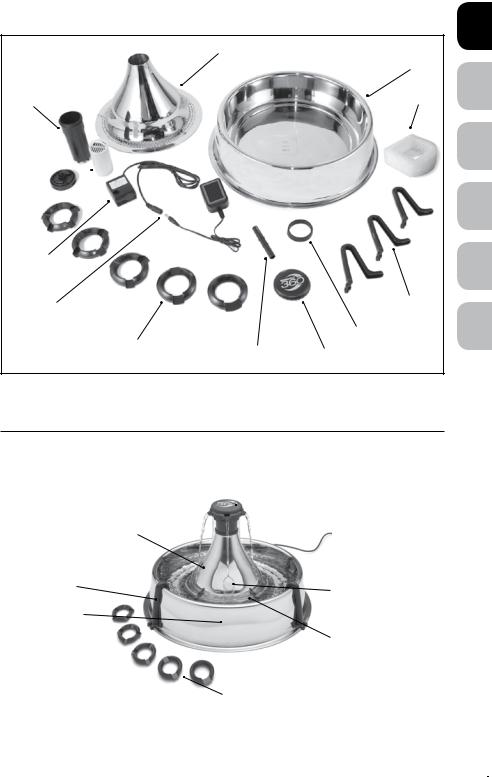
Components
Cone
Bowl
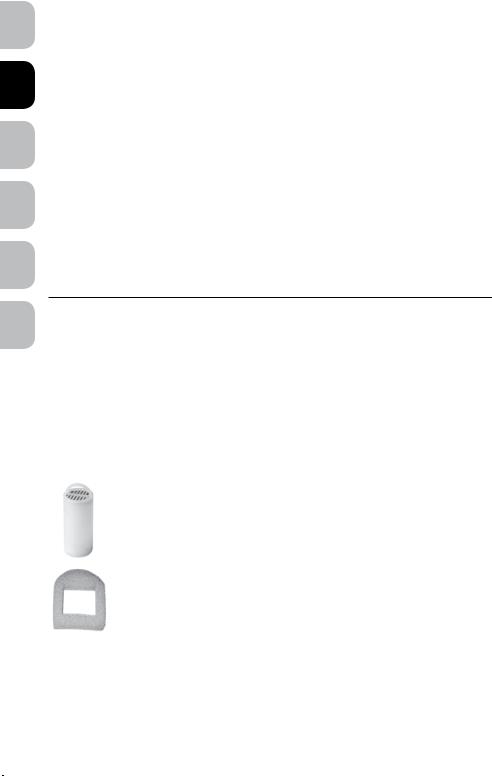
Filter Housing |
Foam Filter |
Charcoal
Filter 
Filter 
Housing
Cap
Pump |
|
|
|
In-Line Plug & |
|
Cord Clips |
|
|
|
||
Power Cord/ |
|
|
|
Adaptor |
|
Rubber Gasket |
|
Interchangeable Spout Rings |
Intake Tube |
Flow Control Cap |
|
(5 versions) |
|||
|
|
Note: Your Pet Fountain will come partially assembled, however, it is a good idea to make sure none of the Pet Fountain pieces have come loose in shipping.
Features
Cone reduces splash and sound of falling water
Cord Clips hide the Power Cord and hold housing securely in place
Dishwasher safe (excluding Pump)
3.8 L Water Capacity
Low-Voltage (12V) System
 Adjustable Flow Control Cap
 Charcoal Filter removes bad tastes and odours
Interchangeable Spout Rings create up to five individual streams
Submersible Pump for quiet operation
Foam Filter keeps pump cleaner by catching hair, debris and pet food
DE IT ES NL FR EN
www.petsafe.net |
5 |

DE IT ES NL FR EN
Key Definitions
Bowl: The stainless steel Bowl is the foundation of the Pet Fountain. The circular Bowl piece can be carried by simply gripping underneath the sidewalls of the Bowl.
Cone: The stainless steel Cone serves as the housing for the Pet Fountain components and encloses the Pump from curious pets. The Cone acts to reduce the splash and sound of the falling water.
Filter Housing: The Filter Housing slides into the opening at the top of the Cone and its main purpose is to hold the Charcoal Filter in place.
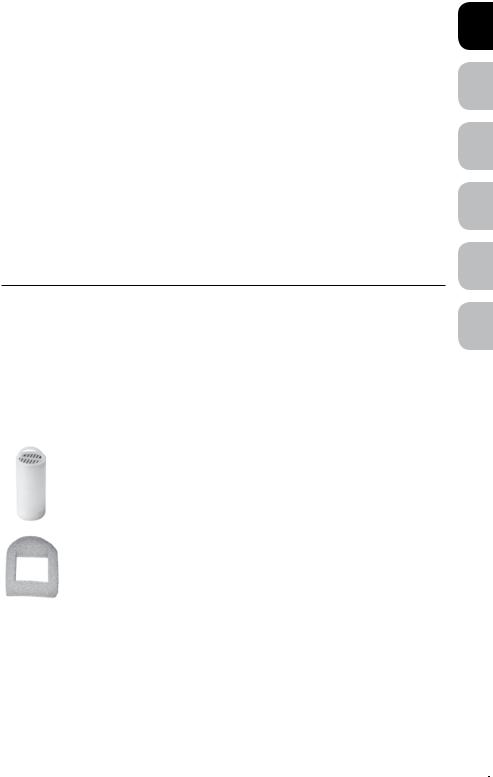
Charcoal Filter: The cylindrical Charcoal Filter features a pull-tab at the top and should be placed in the Filter Housing with the tab facing upwards for easy placement and removal.
Foam Filter: The Foam Filter collects hair, debris and pet food before they reach the Pump. It is important to use the Foam Filter as it helps maintain proper Pump function.
Filter Housing Lid: The Filter Housing Lid is a screw on lid that attaches to the Filter Housing to keep the Charcoal Filter in place. It serves as the base piece to attach the interchangeable Spout Rings & Flow Control Cap.
Spout Rings: The five interchangeable Spout Rings can be easily changed based upon your pet’s preference and can provide up to 5 streams of water for multiple pet households.
Flow Control Cap: The Flow Control Cap is attached to the top of the Pet Fountain and easily adjusts the flow of water by turning the Flow Control Cap to the left or right. Turn to the right, to increase the flow of water. Turn to the left to decrease flow.
Pump: The small submersible aquarium Pump can be dismantled for cleaning. Important: THE PUMP IS NOT DISHWASHER SAFE! Remove Pump from Pet Fountain prior to cleaning (See “Pump Maintenance”). The Pump also features an In-Line Plug for easy attachment and removal.
Cord Clips: The three plastic Cord Clips serve to cover the electrical Power Cord as it feeds over the rim of the Bowl and these Cord Clips are required to hold the Cone piece in place.
6 |
www.petsafe.net |

Operating Instructions
Important: DO NOT RUN DRY - FOR INDOOR USE ONLY.
1. As with any electrical device, check the electrical Power |
|
Fig. 1 |
|
Cord for any tears or damage before use. |
|
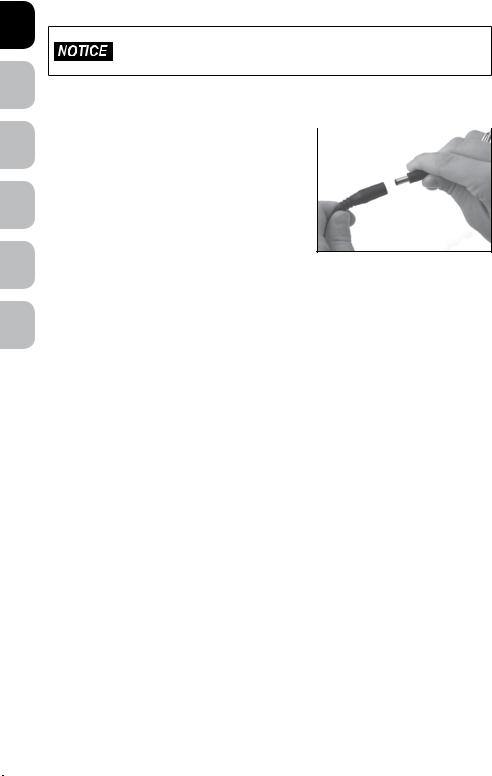
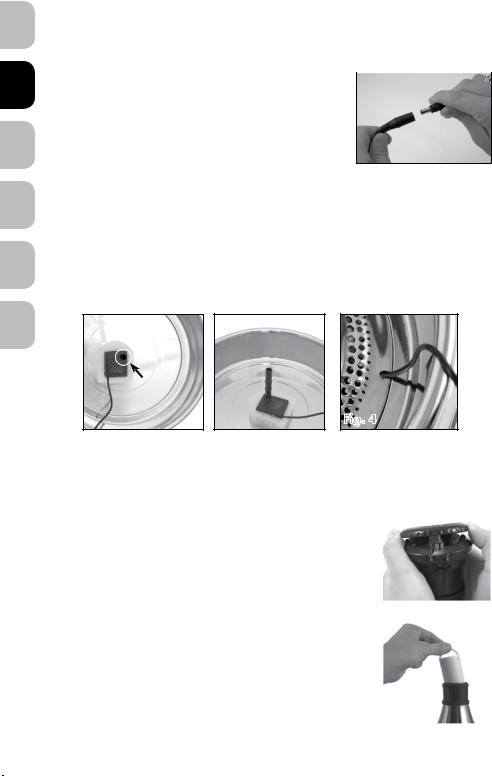
2.Make sure the In-Line Plug is connected (Fig. 1).
3.Place the Foam Filter around the Pump. The rounded side of the Foam Filter should be directly in front of the Faceplate on the Pump. Make sure the electrical Power
Cord runs over the top of the Foam Filter, not underneath it, as this will keep the Foam Filter in place.
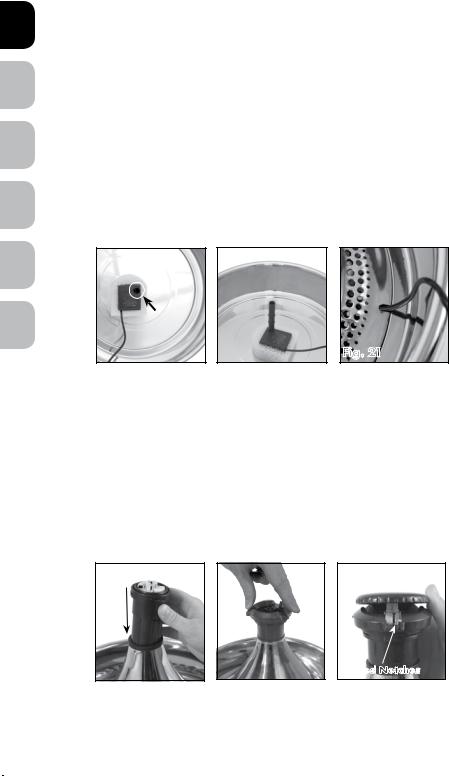
4.With the Foam Filter securely around the Pump, place the Pump inside the indention in the Bowl. Position the Pump so that the circular opening on the top is in the true center of the Bowl (Fig. 2). Press down on the Pump to engage the suction cups. Place the Intake Tube into the circular opening on the top of the Pump (Fig. 3).
|
|
|
|
|
Notch |
Fig. 2 |
|
Fig. 3 |
|
|
True center of the Bowl
Fig. 4
5.Align the Cone so that the electrical Power Cord runs through the Notch (Fig. 4) without moving the Pump from its original position. Once the electrical Power Cord is aligned, gently place the Cone piece into resting position.
6. |
Take the partially assembled Filter Housing and remove the |
|
|
Fig. 5 |
|||
|
Flow Control Cap by gently lifting straight up - DO NOT |
||
|
|
||
|
TWIST TO REMOVE (Fig. 5). Gently lift up and remove |
|
|
|
the Spout Ring to access the Filter Housing Cap. |
|
|
7. |
Unscrew Filter Housing Cap and insert the Charcoal Filter |
|
|
|
into the Filter Housing with the pull-tab facing up (Fig. 6). |
|
|
|
The Charcoal Filter will slide easily into place. Next, screw |
|
|
|
|
||
|
on the Charcoal Filter Housing Cap. |
|
|
|
Fig. 6 |
||
Important: Rinse the Charcoal Filter thoroughly under cold |
|||
|
|||
water to help remove any loose charcoal dust. |
|
||
|
|
|
|
DE IT ES NL FR EN
www.petsafe.net |
7 |
DE IT ES NL FR EN
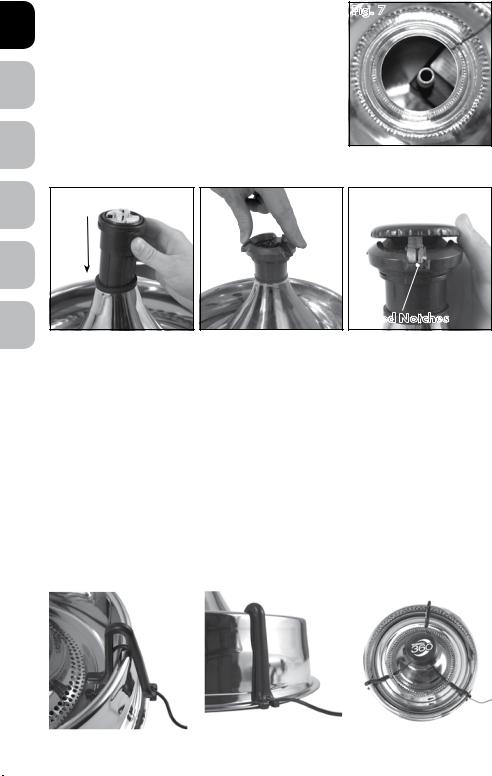
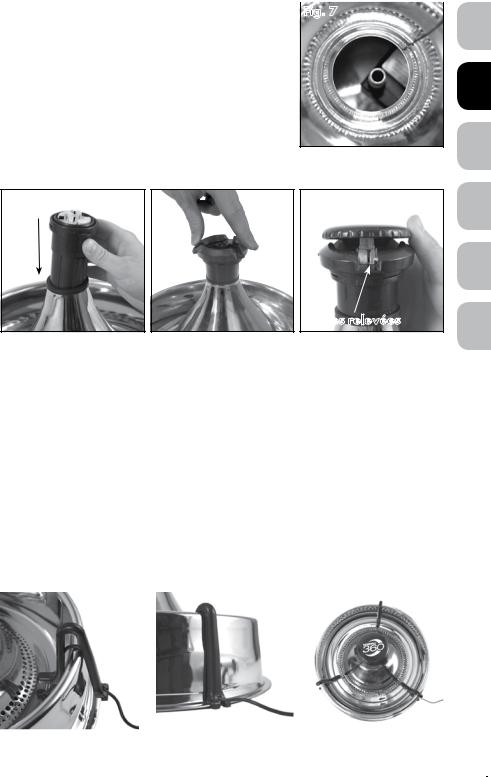
8. Look into the Cone opening and make sure the Intake Fig. 7 Tube is sticking straight up from the Pump (Fig. 7).
Carefully, insert the Filter Housing into the Cone opening and push straight down (Fig. 8). By pushing the Filter Housing all the way down to the rubber gasket, the Filter Housing should easily attach to the Intake Tube.
9.Select one of the five interchangeable Spout Rings based upon your personal preference or your pet’s. Place the chosen Spout Ring on top of Filter Housing Cap and gently press down to secure in place (Fig. 9).
Fig. 8 |
Fig. 9 Fig. 10 |
Raised Notches
10.On the Filter Housing Cap, align the Flow Control Cap with the raised notches (Fig. 10). Press down gently and the Flow Control Cap will snap into place. With the Flow Control Cap, you will be able to easily adjust the intensity of the water flow. Turn the Flow Control Cap to the right to increase the flow of water and turn to the left to decrease. Important: If you notice a decrease in the flow of the water that is not corrected by increasing the flow control to max flow, this may be an indication of a clogged and dirty filter and/or the need to rinse and clean the Filter Housing. Consult the “Filters and Pet Fountain Cleaning” section of this Operating Guide for details on cleaning and maintaining your Pet Fountain.
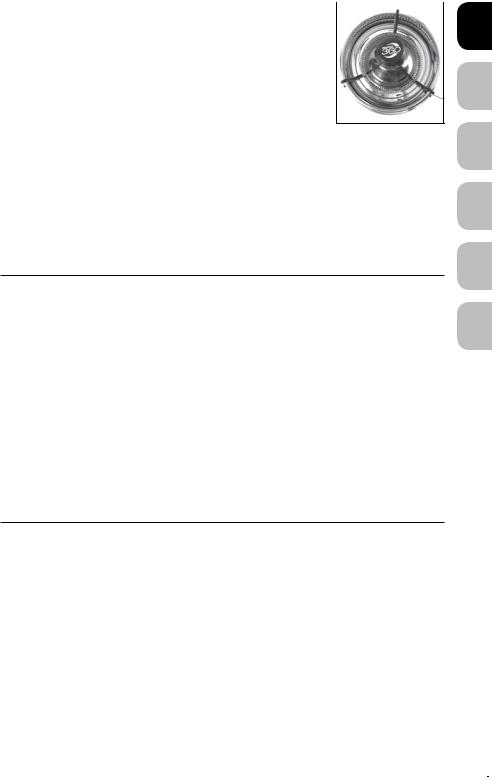
11.Take one of the plastic Cord Clips and align with the electrical Power Cord hanging over the rim of the Bowl. With the two-prong end on the outside of the Bowl (Fig. 11), slide the Cord Clip all the way down until it clips onto the bottom of the Bowl (Fig. 12).
12.Take the other two plastic Cord Clips and attach them to the Bowl so that the three clips together form the three points of a triangle (Fig. 13). This will lock the Cone in place.
Fig. 11 |
|
Fig. 12 |
|
Fig. 13 |
|
|
|
|
|
8 |
www.petsafe.net |
13.Fill the Pet Fountain Bowl with water. Make sure the water level is at least to the minimum MIN (minimum) fill line so the Pump does not run dry. This will prime the Pump for use. Do not fill the Pet Fountain past the MAX (maximum) fill line.
14.Place Pet Fountain in desired location. Do not pick up a full Pet Fountain by the Cone piece. To properly pick up the Pet Fountain, use both hands and grip the sidewalls of the Bowl and lift. Important: To protect your floor always use a protective mat, such as a towel or water-resistant placemat. This will help protect your floor from splashing or spills caused by your pet.
15.Make sure the electrical Power Cord, the Adaptor and your hands are completely dry before you plug the Pet Fountain into an electrical outlet. Connect the Inline Plug and make sure no silver is showing, then plug the Adaptor into an electrical outlet.
16.Add water to Pet Fountain as needed. Never let the water level fall lower than the MIN (minimum) fill line (approximately 2.5 cm above the bottom of the Bowl) or you may risk burning out the Pump. Replacement Pumps are sold separately by calling a Customer Care Centre. Visit www.petsafe.net for a telephone listing of the Customer Care Centre near you.
Filters and Pet Fountain Cleaning
Filter System
The Pet Fountain is equipped with two types of filters that should be replaced on a regular basis. The Charcoal Filter removes bad tastes and odours, keeping water fresh. The Foam Filter collects hair, debris and pet food and prevents them from reaching the Pump, providing optimal filtration. The filters together will keep the Pump cleaner and provide fresher water to your pet.
Charcoal Filter: Filters should be changed every two to four weeks. Replace filters more frequently when using the Pet Fountain for multiple pets or pets that produce a lot of saliva. Important: Always rinse the Charcoal Filter prior to use. A small amount of charcoal dust may be released for the life of the filter, this is normal and is not harmful to your pet.
Foam Filter: Replace the Foam Filter every four to six weeks, depending on the location of the Pet Fountain and the number of pets using it. If you do not intend to replace the filter at the time of cleaning, rinse the Foam Filter thoroughly with fresh water.
Filters are an added feature of the Pet Fountain. Using the filters is not required for normal operation. However, when used properly and changed regularly, the filters help keep the water cleaner and fresher, while extending the life of your Pet Fountain. Filters may be rinsed out when the Pet Fountain is cleaned. Important: Never wash the filters with soapy water, as the soap residue will seep into the filters and cannot be removed. Only rinse the filters with water.
DE IT ES NL FR EN
www.petsafe.net |
9 |
DE IT ES NL FR EN
Pet Fountain
When cleaning your Pet Fountain, do not use any abrasive cleaning solutions, sponges, or pads. These abrasive surfaces can scratch the stainless steel parts.
Important: Clean Pet Fountain once a week.
The Pet Fountain must be cleaned on a regular basis to continue working normally.
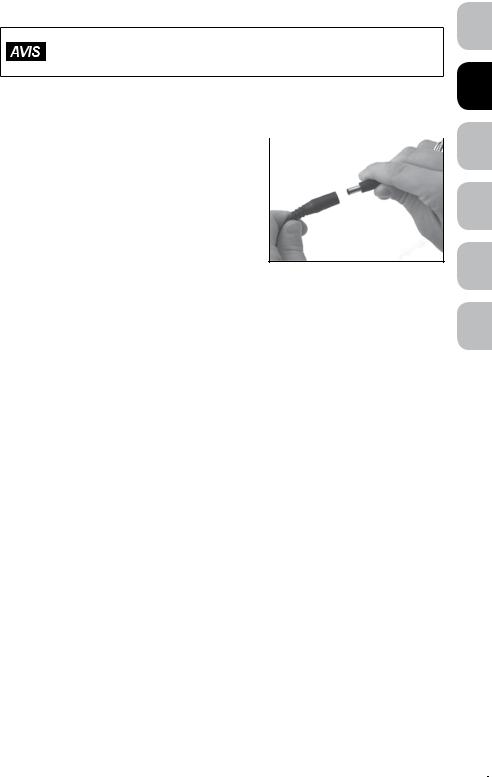
1. Unplug Pet Fountain from electrical source |
|
|
Fig. 14 |
||
and disconnect the In-Line Plug from the |
||
|
||
Pump (Fig. 14). |
|
2.Remove the Flow Control Cap and Spout Ring.
3.Next, remove the three Cord Clips by gently pulling the two-prong clip up and away from the bottom of the Bowl. Set the Cord Clips aside.
4.While holding the Cone steady, wrap your thumb
and two fingers around the top of the Filter Housing and lift up to remove. If the Filter Housing is too tight and not moving easily, try twisting the Filter Housing back and forth in a circular motion until it loosens up enough to remove. Lift the Filter Housing up and set aside. Most likely, the Intake Tube will still be attached to the bottom of the Filter Housing.
5.Lift up the stainless steel Cone and set aside for cleaning.
6.Reach in the Bowl and lift up the Pump, remove and set aside for cleaning.
7.Remove the Foam Filter from the Pump. Clean away any hair, debris or pet food that may have accumulated on the Faceplate of the Pump.
8.While holding underneath the sidewalls of the Bowl, empty the water out of the Pet Fountain.
9.Clean the Pet Fountain parts with warm water and soap. You can also place the Pet Fountain in the dishwasher. Important: Do not use any abrasive cleaning solutions, sponges, or pads that could potentially scratch the stainless steel parts. Remove
the Pump before placing the Pet Fountain in the dishwasher. NEVER PLACE PUMP IN DISHWASHER! See “Pump Maintenance” section of this Operating Guide for detailed instructions on how to properly clean the Pump.
10.If you have trouble reaching certain spots or hard-to-reach corners, try using a cotton swab or purchase the Drinkwell® Cleaning Kit, a 3-Piece Brush Kit. To purchase a Cleaning Kit, visit our website at www.petsafe.net to locate a retailer near you or to find a listing of Customer Care Centre telephone numbers for your area.
10 |
www.petsafe.net |
Pump Maintenance
Important: Cleaning the Pump is essential to the longevity of the Pet Fountain as well as the cleanliness of the water. Clean the Pump at least every two weeks. Warranty may be voided if the Pump is not cleaned regularly.
Intake Plate |
Faceplate |
Pump Impeller
1.Remove Pump from the Pet Fountain as explained in the “Filters and Pet Fountain Cleaning” section of this Operating Guide.
2. Remove the Faceplate by using your thumb and |
|
|
|||
|
Fig. 15 |
||||
forefinger to gently squeeze on both sides of the |
|
||||
|
|
||||
Faceplate and pull off. It may be necessary to insert |
|
||||
a fingernail into the seam of the Faceplate to pry it |
|
|
|||
off (Fig. 15). |
|
|
|
|
|
3. Next, remove the Intake Plate by placing your |
|
|
|||
fingernail under the small lip located on the narrow |
|
||||
side of teardrop-shaped Intake Plate and pull out to |
|
||||
|
|||||
remove (Fig. 16). |
Intake Plate |
|
|||
|
|||||
4. Once the Intake Plate is removed, |
|
||||
Pull-Tab |
|
|
|||
remove the Impeller (white, 3-bladed |
|
|
|||
|
|
|
|
||
propeller). The Impeller is held in |
|
|
|
|
|
place by a magnet, simply insert a |
|
|
|
|
|
fingernail or slim object underneath the plastic |
|
|
|||
blade and lift out (Fig. 17). |
|
|
|
Fig. 16 |
|
5. Once the Pump is disassembled you can clean the |
|
|
|||
|
Fig. 17 |
||||
parts with soap and warm water. Use a cotton swab |
|||||
or the “motor” brush from the Drinkwell® Cleaning Kit |
|
||||
to clean inside the Pump’s motor cavity and remove |
|
||||
any build-up (Fig. 18). For added disinfecting |
|
|
|||
and/or hard water removal, clean the Pump with a |
|
||||
diluted vinegar solution (20% white vinegar & 80% |
|
|
|||
water). Be sure to rinse thoroughly with |
|
|
|
|
|
|
|
|
|
||
fresh water. |
|
|
Fig. 18 |
||
6. Once the parts are clean and dry, you can |
|
|
|
||
reassemble the Pump for use. |
|
|
|
|
|
a) |
Replace the Impeller. |
|
|
|
|
b) |
Replace the Intake Plate. |
|
|
|
|
|
|
|
|
||
c) |
Replace the Faceplate. |
|
|
|
|
|
www.petsafe.net |
11 |
|||
DE IT ES NL FR EN
DE IT ES NL FR EN
Pet Fountain Reassembly
1.Place the Foam Filter around the Pump. The rounded side of the Foam Filter should be directly in front of the Faceplate on the Pump. Make sure the electrical Power Cord runs over the top of the Foam Filter, not underneath it, as this will keep the Foam Filter in place.
2.Replace the Pump into its original location (Fig. 19). Be sure that the circular opening on the top of the Pump is positioned in the Bowl’s true center or the Intake Tube will not properly align with the Filter Housing. Gently push down to engage the suction cups.
3.Replace the Intake Tube into the circular opening on the top of the Pump (Fig. 20).
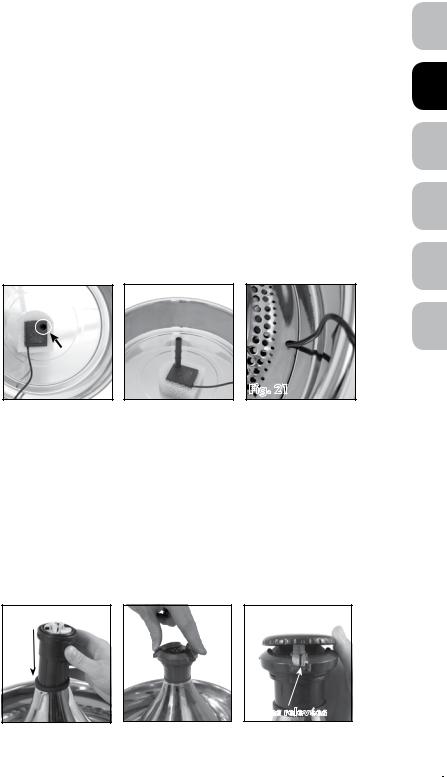
4.Align the Cone so that the electrical Power Cord runs through the Notch while keeping the Pump in its original position. Once the electrical Power Cord is aligned (Fig. 21), gently place the Cone piece into resting position.
Fig. 19 Fig. 20
True center of the Bowl
Fig. 21
5.After cleaning your Pet Fountain, it is a good idea to replace the Charcoal Filter. After replacing the Charcoal Filter, screw on the Filter Housing Cap.
6.Look into the Cone opening and make sure the Intake Tube is sticking straight up from the Pump. Carefully, insert the Filter Housing into the Cone opening and push straight down (Fig. 22). By pushing the Filter Housing all the way down to the rubber gasket, the Filter Housing should easily attach to the Intake Tube.
7.Place chosen Spout Ring on top of the Filter Housing Cap and gently press down to secure in place (Fig. 23).
8.Replace the Flow Control Cap by aligning the Flow Control Cap with the raised notches on the Filter Housing Cap (Fig. 24). Gently push down to secure in place.
Fig. 22 |
Fig. 23 |
Fig. 24 |
Raised Notches
12 |
www.petsafe.net |
9. Attach the three Cord Clips around the base of the Pet |
|
Fig. 25 |
|
Fountain to hide the electrical Power Cord and secure the |
|
Cone piece into place (Fig. 25). |
|
10.Fill the Pet Fountain Bowl with water. Make sure the water level is at least to the minimum MIN (minimum) fill line so the Pump does not run dry. This will prime the Pump for use. Do not fill the Pet Fountain past the MAX (maximum) fill line.
11.Place Pet Fountain in desired location. Do not pick up a full
Pet Fountain by the Cone piece. To properly pick up the Pet Fountain, use both hands and grip the sidewalls of the Bowl and lift. Important: To protect your floor always use a protective mat, such as a towel or water-resistant placemat. This will help protect your floor from splashing or spills caused by your pet.
12.Make sure the electrical Power Cord, the Adaptor and your hands are completely dry before you plug the Pet Fountain into an electrical outlet. Connect the Inline Plug and make sure no silver is showing, then plug the Adaptor into an electrical outlet.
The Pet Fountain and Your Environment
If you live in a humid environment and have problems with mold or algae, soak all Pet Fountain parts in a diluted vinegar solution (20% white vinegar and 80% water) for 10 minutes after regular cleaning. Also, pour the diluted vinegar solution into the Pump’s motor cavity.
If you have hard water, small white mineral deposits may form on or inside the Pump. This can eventually prevent the Impeller from turning properly. To avoid replacement or damage to the Pump, please take the following precautions:
•Clean the Pump more frequently.
•Clean the Pump with a diluted vinegar solution weekly.
•Use bottled water instead of tap water.
General Tips
•When being introduced to the Pet Fountain, your pet may be cautious of this new and unusual object. After beginning operation of your Pet Fountain, simply allow your pet to adjust at his or her own pace. Some pets may take several days or longer to begin use, while others will start right away.
•Your pet may prefer that the Pet Fountain be placed away from their normal feeding area. Try placing it in another location, such as a different area of the kitchen or in a bathroom or utility room.
•Add ice cubes to the bowl for refreshing, ice-cold running water!
DE IT ES NL FR EN
www.petsafe.net |
13 |

DE IT ES NL FR EN
Warranty
Two Year Non-Transferrable Limited Warranty
This Product has the benefit of a limited manufacturer’s warranty. Complete details of the warranty applicable to this Product and its terms can be found at www.petsafe.net and/ or are available by contacting your local Customer Care Centre.
•Radio Systems PetSafe Europe Ltd., 2nd Floor, Elgee Building, Market Square, Dundalk, Co. Louth, Ireland
•Radio Systems Corporation, 10427 PetSafe Way, Knoxville, TN 37932 USA
Australia/New Zealand – In compliance with the Australian Consumer Law, Warranties Against Defects, effective January 1, 2012, warranty details of this Product are as follows:
Two Year Non-Transferrable Limited Warranty
What is covered: Radio Systems Australia Pty Ltd. (hereinafter referred to as “Radio Systems”) warrants to the original retail purchaser, and not any other purchaser or subsequent owner, that its Product, when subject to normal and proper residential use, will be free from defects in material or workmanship for a period of two (2) years from the purchase date. An “original retail consumer purchaser” is a person or entity who originally purchases the Product, or a gift recipient of a new Product that is unopened and in its original packaging. When serviced by Radio Systems Customer Service, Radio Systems covers labor and parts for the first two years of ownership; after the first two years, a service or upgrade charge will apply relative to replacement of the Product with new or refurbished items at Radio Systems’ sole discretion.
The limited warranty is non-transferrable and shall automatically terminate if the original retail consumer purchaser resells the Radio Systems Product or transfers the property on which the Radio Systems Product is installed. This Limited Warranty excludes accidental damage due to dog chews; lightning damage; or neglect, alteration, and misuse.
Consumers who purchase products outside of Australia, New Zealand, or from an unauthorised dealer will need to return the Product to the original place of purchase for any warranty issues.
Please note that Radio Systems does not provide refunds, replacements, or upgrades for change of mind, or for any other reason outside of these Warranty terms.
Claims Procedure:
Any claim made under this Warranty should be made directly to Radio Systems Australia Pty Ltd. Customer Care Centre at:
Radio Systems Australia Pty Ltd.
PO Box 765, Mudgeeraba QLD 4213 Australia Residents: 1800 786 608 New Zealand Residents: 0800 543 054
Email: info@petsafeaustralia.com.au
To file a claim, a proof of purchase must be provided. Without a proof of purchase, Radio Systems will not repair or replace faulty components. Radio Systems requests the
14 |
www.petsafe.net |
Consumer to contact the Radio Systems Customer Care Centre to obtain a Warranty Return number, prior to sending the Product. Failure to do so may delay in the repair or replacement of the Product.
If the Product is deemed to be faulty within 30 days from date of original purchase, Radio Systems will organise for a replacement to be sent in advance of returning the faulty
Product. A Post Bag will be included with the replacement Product for the return of the faulty Product. The Product must be returned within 7 days of receiving the replacement. If the Product is deemed to be faulty after 30 days from the date of original purchase, the consumer will be required to return the Product to Radio Systems at the consumer’s own expense. Radio Systems will test and replace the faulty unit or its components and return to the consumer free of charge, provided the Product is within its said warranty period. This warranty is in addition to other rights and remedies available to you under the law. Radio Systems goods come with guarantees that cannot be excluded under the Australia Consumer Law. You are entitled to a replacement or refund for a major failure and for compensation for any other reasonably foreseeable loss or damage. You are
also entitled to have the goods repaired or replaced if the goods fail to be of acceptable quality and the failure does not amount to a major failure.
Should you have any queries or require any further information, please contact our Customer Care Centre on 1800 786 608 (Australia) or 0800 543 054 (New Zealand).
Compliance
This equipment complies with the EMC and Low Voltage Directives. Unauthorised changes or modifications to the product that are not approved by Radio Systems Corporation may violate EU regulations, could void the user’s authority to operate the equipment, and will void the warranty.
The Declaration of Conformity can be found at: http://www.petsafe.net/customercare/eu_docs.php.
Important Recycling Advice
Please respect the Waste Electrical and Electonic Equipment regulations in your country. This equipment must be recycled. If you no longer require this equipment, do not place it in the normal municipal waste system. Please return it to where it was purchased in order that it can be placed in our recycling system. If this is not possible, please contact the Customer Care Centre for further information.
DE IT ES NL FR EN
www.petsafe.net |
15 |

DE IT ES NL FR EN
Terms of Use and Limitation of Liability
1.Terms of Use
Use of this Product is subject to your acceptance without modification of the terms, conditions and notices contained herein. Use of this Product implies acceptance of all such terms, conditions and notices. If you do not wish to accept these terms, conditions, and notices, please return the Product, unused, in its original packaging and at your own cost and risk to the relevant Customer Care Centre together with proof of purchase for a full refund.
2.Proper Use
If you are unsure whether this Product is appropriate for your pet, please consult your veterinarian or certified trainer prior to use. Proper use includes, without limitation, reviewing the entire Operating Guide and any safety information statements.
3.No Unlawful or Prohibited Use
This Product is designed for use with pets only. Using this Product in a way that is not intended could result in violation of Federal, State or local laws.
4.Limitation of Liability
In no event shall Radio Systems Corporation or any of its associated companies be liable for (i) any indirect, punitive, incidental, special or consequential damage and/ or (ii) any loss or damages whatsoever arising out of or connected with the misuse of this Product. The Purchaser assumes all risks and liability from the use of this Product to the fullest extent permissible by law. For the avoidance of doubt, nothing in this clause 4 shall limit Radio Systems Corporation’s liability for human death or personal injury or fraud or fraudulent misrepresentation.
5.Modification of Terms and Conditions
Radio Systems Corporation reserves the right to change the terms, conditions and notices governing this Product from time to time. If such changes have been notified to you prior to your use of this Product, they shall be binding on you as if incorporated herein.
Covered by: U.S. Patents No. 5,799,609 and 5,842,437
16 |
www.petsafe.net |
Français
Consignes de sécurité importantes
Description des termes et symboles utilisés dans ce manuel
Ce symbole est une alerte de sécurité. Il est utilisé pour vous alerter des risques de blessures. Veuillez respecter tous les messages de sécurité qui suivent ce symbole pour éviter tout risque de blessure ou de décès.
AVERTISSEMENT indique une situation dangereuse qui, si elle n’est pas évitée, pourrait entraîner la mort ou des blessures graves.
ATTENTION, utilisé sans le symbole d’alerte de sécurité, indique une situation dangereuse qui, si elle n’est pas évitée, pourrait blesser votre animal.
AVIS, indique les pratiques d'utilisation sûres qui ne risquent pas d'entraîner des blessures corporelles.
 Appliquez toujours les règles élémentaires de sécurité suivantes lorsque vous utilisez des appareils électriques, afin de réduire les risques d'incendie, de choc électrique et/ou de blessure :
•Pour réduire le risque de blessures, une surveillance attentive est nécessaire lorsque l'appareil est utilisé à proximité d'enfants.
•Ne mettez pas le cordon d'alimentation électrique ni la prise dans l'eau ni dans d'autres liquides, afin d'éviter tout choc électrique.
•N'utilisez pas l'appareil à l'extérieur. POUR USAGE EN INTÉRIEUR UNIQUEMENT.
•Ne tirez pas sur le cordon électrique pour retirer la prise mâle de la prise femelle. Pour le débranchement, saisissez la prise et non le cordon d'alimentation.
•Ne faites pas fonctionner l'appareil si le cordon d'alimentation électrique ou la prise est endommagé(e), s'il (elle) ne fonctionne pas correctement ou s'il (elle) est endommagé(e). Contactez immédiatement votre Service clientèle pour obtenir des instructions.
•Pour un appareil portable : afin de réduire le risque de choc électrique, évitez de déposer ou de ranger l'appareil à un endroit d'où il pourrait tomber ou se retrouver dans une baignoire ou un évier.
•Débranchez toujours l'appareil lorsque celui-ci n'est pas utilisé, avant d'installer ou de retirer des pièces, et avant de le nettoyer.
•N'utilisez jamais un appareil à d'autres fins que celles prévues.
•Si la prise de ce dispositif est mouillée, coupez l'alimentation du secteur. Ne tentez pas de débrancher l'appareil lui-même.
•Vérifiez cet appareil après installation. Ne le branchez pas sur le secteur si le cordon électrique ou la prise est mouillé(e).
DE IT ES NL FR EN
www.petsafe.net |
17 |

EN |
|
|
|
|
• Ne laissez pas les animaux de compagnie mordre ou avaler les pièces de |
||||
|
||||
|
l'appareil. Si vous avez des inquiétudes concernant le cordon d'alimentation, vous |
|||
FR |
pouvez vous procurer un canal pour cordon (dispositif de protection en plastique |
|||
dur) dans n'importe quelle quincaillerie. |
||||
|
||||
|
• Les pièces en plastique qui composent la fontaine pour animaux de compagnie |
|||
|
ne contiennent pas de bisphénol. Cependant, certains animaux sont sensibles aux |
|||
NL |
récipients pour nourriture et boisson en plastique. Si votre animal montre des signes |
|||
de réaction allergique au plastique, veuillez interrompre l'utilisation de l'appareil |
||||
|
jusqu'à ce que vous ayez consulté votre vétérinaire. |
|||
ES |
|
|
|
|
|
|
|
||
• La fontaine pour animaux de compagnie est conçue pour fonctionner sans |
||||
|
||||
|
interruption (toujours branchée sur une prise du secteur), aussi longtemps que le |
|||
IT |
niveau d'eau est maintenu et que la fontaine pour animaux de compagnie est |
|||
nettoyée régulièrement. Assurez-vous de vérifier régulièrement la fontaine pour |
||||
|
animaux de compagnie afin d'éviter toute détérioration de la pompe dans le cas |
|||
|
où l'eau aurait été entièrement consommée ou se serait évaporée entraînant le |
|||
DE |
fonctionnement de la pompe à vide. |
|||
• Ne tentez pas de réparer la pompe vous-même. |
||||
|
• Afin d'éviter de mouiller le cordon d'alimentation ou la prise électrique, la prise |
|||
|
du secteur doit toujours être placée au-dessus de la fontaine pour animaux |
|||
|
de compagnie. |
|||
|
• Si vous avez besoin d'une rallonge électrique, veillez à utiliser une rallonge de |
|||
|
puissance électrique appropriée. |
|||
|
• La consommation électrique de cet appareil est de 2 watts. |
|||
|
• L'utilisation d'accessoires non recommandés ou non vendus par le fabricant peut |
|||
|
engendrer de mauvaises conditions de sécurité. Ne modifiez pas l'appareil. |
|||
|
• N'installez et ne conservez pas non plus l'appareil dans des lieux susceptibles d'être |
|||
|
exposés à des températures inférieures à 4,5° C. |
|||
|
• Lors du nettoyage de la fontaine pour animaux de compagnie, n'utilisez pas de |
|||
|
tampons, éponges ou solutions abrasifs. Les surfaces abrasives risquent de rayer les |
|||
|
pièces en acier inoxydable. |
|||
|
• Lisez et respectez toutes les remarques importantes mentionnées sur l'appareil et |
|||
|
contenues dans son emballage. |
|||
|
|
CONSERVEZ CES INSTRUCTIONS |
||
18 |
www.petsafe.net |

Merci d'avoir choisi la marque PetSafe®. Votre relation avec votre animal doit être faite de moments mémorables et d'une complicité mutuelle. Nos produits promeuvent l'attention, l'éducation et l'amour, des éléments essentiels qui imprègnent les souvenirs de toute une vie. Si vous avez des questions sur nos produits, veuillez contacter notre service clientèle ou visitez notre site web, www.petsafe.net.
Pour bénéficier pleinement de votre garantie, veuillez enregistrer votre article dans les 30 jours sur le site www.petsafe.net. Grâce à cet enregistrement et en conservant le reçu, votre produit sera totalement couvert par notre garantie ; et si vous deviez contacter notre Service clientèle, nous pourrions vous aider plus rapidement. Il est important de souligner que vos informations personnelles ne seront jamais données ni vendues à qui que ce soit. Une description complète de la garantie est disponible sur le site www.petsafe.net.
Table des matières
Contenu du kit. . |
. . . . . . . . . . . . . . . . . . . . . |
. . . . . . . |
. 20 |
|||||
Caractéristiques.. . . . . . . . . . . . . . . . . . . . . . . . . . . . . . |
|
|
|
20 |
||||
Définitions. . |
. . . . . |
. . . . . . . . . . . . . . . . . . . . . . . . . |
|
|
|
|
|
21 |
Mode d'emploi. . |
. . . . . . . . . . . . . . . . . . . . . |
. . . . . . . |
. 22 |
|||||
Nettoyage des filtres et de la fontaine pour animaux de compagnie |
. . . . . . . . . . . . . . |
. |
. 24 |
|||||
Entretien de la pompe. . . . . . . . . . . . . . . . . . . . . . . . |
. . . |
|
|
|
|
26 |
||
Réassemblage de la fontaine pour animaux de compagnie. . |
. . |
. . . . . . . . |
27 |
|||||
La fontaine pour animaux de compagnie et votre environnement. . |
. . . . . . . . |
28 |
||||||
Conseils. . |
. . . . . . . . . . . . . . . . . . . . . . . . |
. . . . . . . . 28 |
||||||
Garantie.. . . . . . . . . . . . . . . . . . . . . . . . . . . . . . . . . 29 |
||||||||
Conformité. |
. . . . . . . . . . . . . . . . . . . . . . . . |
. . . . . . . |
|
. 29 |
||||
Remarque importante concernant le recyclage. . |
. . . . . . . . |
. . . . . . . |
|
. 29 |
||||
Conditions d’utilisation et limitation de responsabilité. . |
. . . . . |
. . . . . . . . |
30 |
|||||
DE IT ES NL FR EN
www.petsafe.net |
19 |

DE IT ES NL FR EN
Contenu du kit
|
Cône |
|
|
|
|
Bol |
|
Compartiment du filtre |
|
Filtre en mousse |
|
Filtre au |
|
|
|
charbon |
|
|
|
Capuchon du |
|
|
|
compartiment |
|
|
|
du filtre |
|
|
|
Pompe |
|
|
|
Prise en ligne et |
|
Clips du cordon |
|
|
|
||
cordon d'alimentation/ |
|
|
|
adaptateur |
|
Joint en caoutchouc |
|
Bagues interchangeables du |
Tube d'entrée |
Capuchon de réglage du débit |
|
bec verseur (5 versions) |
|||
|
|
Remarque : votre fontaine pour animaux de compagnie est fournie partiellement montée ; néanmoins, il peut être judicieux de vérifier qu'aucune pièce ne s'est desserrée au cours de l'expédition.
Caractéristiques
Le cône réduit les éclaboussures et le bruit de l'eau qui tombe
Les clips du cordon permettent de masquer le cordon d'alimentation et de maintenir le compartiment
en place
Lavable au lavevaisselle (excepté la pompe)
Capacité en eau de 3,8 l
Système à basse tension (12 V)
Capuchon de débit réglable
 Le filtre au charbon remplaçable élimine les mauvais goûts et les mauvaises odeurs
Les bagues interchangeables du bec verseur permettent de créer jusqu'à cinq courants distincts
Pompe submersible pour un fonctionnement silencieux
Le filtre en mousse garde la pompe plus propre en retenant les poils, les saletés et la nourriture pour animaux
20 |
www.petsafe.net |
Définitions
Bol : le bol en acier inoxydable est l'élément de base de la fontaine pour animaux de compagnie. Circulaire, il peut être transporté facilement : il suffit de le saisir par le bas des parois latérales.
Cône : le cône en acier inoxydable sert de compartiment aux pièces de la fontaine pour animaux de compagnie et protège la pompe des animaux curieux. Le cône réduit les éclaboussures et le bruit de l'eau qui tombe.
Compartiment du filtre : le compartiment du filtre se glisse dans l'ouverture située en haut du cône ; sa fonction principale est de maintenir le filtre au charbon en place.
Filtre au charbon : le filtre au charbon cylindrique comporte une tirette à son sommet et doit être placé dans le compartiment de filtre, tirette vers le haut, pour un placement et un retrait plus faciles.
Filtre en mousse : le filtre en mousse retient les poils, les saletés et la nourriture pour animaux avant qu'ils n'atteignent la pompe. Il est important d'utiliser le filtre en mousse car il permet d'assurer le bon fonctionnement de la pompe.
Couvercle du compartiment du filtre : le couvercle du compartiment du filtre se visse et permet de fixer le compartiment du filtre afin de maintenir le filtre au charbon en place. Il sert de pièce de base pour la fixation des bagues du bec verseur et du capuchon de réglage du débit.
Bagues du bec verseur : les cinq bagues interchangeables du bec verseur peuvent être facilement changées, en fonction des préférences de votre animal de compagnie, et permettent d'obtenir jusqu'à 5 courants d'eau, pour les foyers ayant plusieurs animaux.
Capuchon de réglage du débit : le capuchon de réglage du débit est fixé au sommet de la fontaine pour animaux de compagnie et permet de régler facilement le débit de l'eau ; il suffit pour cela de le tourner vers la gauche pour diminuer le débit ou vers la droite pour l'augmenter.
Pompe : la petite pompe d'aquarium submersible peut être démontée pour le nettoyage. Important : LA POMPE N'EST PAS CONÇUE POUR ÊTRE MISE AU LAVEVAISSELLE ! Retirez la pompe de la fontaine pour animaux de compagnie avant de la nettoyer (consultez la section « Entretien de la pompe »). La pompe comprend également une prise en ligne, pour une fixation et un retrait plus faciles.
Clips du cordon : les trois clips en plastique du cordon servent à couvrir le cordon d'alimentation lorsqu'il passe par-dessus le bord du bol ; ils sont également nécessaires au maintien du cône.
DE IT ES NL FR EN
www.petsafe.net |
21 |
DE IT ES NL FR EN
Mode d'emploi
Important : NE PAS FAIRE FONCTIONNER À SEC - POUR USAGE EN INTÉRIEUR UNIQUEMENT.
1. Comme pour tous les dispositifs électriques, vérifiez que |
|
Fig. 1 |
|
le cordon d'alimentation ne présente aucune coupure |
|
ou détérioration avant de l'utiliser. |
|
2.Assurez-vous que la prise en ligne est connectée (Fig. 1).
3.Placez le filtre en mousse autour de la pompe. La partie
ronde du filtre en mousse doit faire directement face à la façade de la pompe. Assurez-vous que le cordon d'alimentation passe au-dessus du filtre en mousse et non en dessous ; cela permettra de maintenir le filtre en place.
4.Lorsque le filtre en mousse est bien placé autour de la pompe, placez cette dernière à l'intérieur de l'encoche du bol. Positionnez la pompe de sorte que l'ouverture circulaire au sommet se trouve exactement au centre du bol (Fig. 2). Appuyez sur la pompe pour coller les ventouses. Placez le tube d'entrée dans l'ouverture circulaire au sommet de la pompe (Fig. 3).
Fig. 2 |
Fig. 3 |
Centre réel du bol
Fig. 4
5.Alignez le cône de sorte que le cordon d'alimentation passe par la fente prévue à cet effet (Fig. 4), sans que la pompe ne quitte sa position d'origine. Une fois le cordon d'alimentation aligné, placez avec précaution le cône en position « de repos ».
6. |
Prenez le compartiment du filtre partiellement monté et |
|
|
Fig. 5 |
|||
|
retirez le capuchon de réglage du débit en soulevant |
||
|
|
||
|
doucement, tout droit. NE PAS TORDRE POUR RETIRER |
|
|
|
(Fig. 5). Soulevez doucement et retirez la bague du bec |
|
|
|
verseur pour accéder au capuchon du compartiment |
|
|
|
du filtre. |
|
|
7. |
Dévissez le capuchon du compartiment du filtre et insérez |
|
|
|
|||
|
le filtre au charbon dans son compartiment, tirette tournée |
|
|
|
Fig. 6 |
||
|
vers le haut (Fig. 6). Le filtre au charbon coulissera |
||
|
|
||
|
facilement pour prendre sa place. Ensuite, vissez le |
|
|
|
capuchon du compartiment du filtre au charbon. |
|
|
Important : rincez abondamment le filtre au charbon à |
|
||
l'eau froide afin d'éliminer toute accumulation de poussière de |
|
||
charbon libre. |
|
||
22 |
www.petsafe.net |
|
|
8. Regardez à l'intérieur du cône et assurez-vous que le |
|
Fig. 7 |
|
tube d'entrée sort bien de la pompe (Fig. 7). Insérez |
|
avec précaution le logement du filtre dans l'ouverture |
|
du cône et poussez vers le bas (Fig. 8). En poussant |
|
le compartiment du filtre jusqu'au joint en caoutchouc, |
|
le compartiment devrait se fixer facilement au tube |
|
d'entrée. |
|
9.Sélectionnez l'une des cinq bagues interchangeables du bec verseur selon les préférences de votre animal. Placez la bague choisie au-dessus du capuchon du
compartiment du filtre et appuyez doucement pour la mettre en place (Fig. 9).
Fig. 8 |
Fig. 9 Fig. 10 |
Fentes relevées
10.Sur le capuchon du compartiment du filtre, alignez le capuchon de réglage du débit avec les fentes relevées (Fig. 10). Appuyez doucement pour que le capuchon de réglage du débit prenne sa place. Grâce au capuchon de réglage du débit, vous pourrez facilement régler l'intensité du débit de l'eau. Tournez le capuchon de réglage
du débit vers la droite pour augmenter le débit de l'eau et vers la gauche pour le réduire. Important : si vous remarquez une diminution du débit de l'eau et que vous ne parvenez pas à y remédier en poussant le réglage du débit au maximum, cela peut signifier que le filtre est bouché/sale et/ou que son compartiment doit être rincé et nettoyé. Consultez la section « Nettoyage des filtres et de la fontaine pour animaux de compagnie » pour plus de détails quant au nettoyage et à l'entretien de votre fontaine.
11.Prenez l'un des clips en plastique du cordon et alignez-le avec le cordon
d'alimentation électrique pendant par-dessus le rebord du bol. En vous servant de l'extrémité à deux branches à l'extérieur du bol (Fig. 11), faites glisser le clip du cordon jusqu'en bas, de sorte qu'il se fixe au fond du bol (Fig. 12).
12.Prenez les deux autres clips en plastique du cordon et fixez-les au bol de sorte que les trois clips forment un triangle (Fig. 13). Cela permettra de maintenir le cône en place.
Fig.11 |
|
Fig.12 |
|
Fig. 13 |
|
|
|
|
|
DE IT ES NL FR EN
www.petsafe.net |
23 |
DE IT ES NL FR EN
13.Remplissez le bol de la fontaine pour animaux de compagnie avec de l'eau. Assurezvous que le niveau d'eau corresponde au moins à la ligne de remplissage MIN (minimum), de sorte que la pompe ne s'assèche pas. Cela permettra d'amorcer la pompe. Ne remplissez pas la fontaine au-delà de la ligne MAX (maximum).
14.Placez la fontaine pour animaux de compagnie à l'endroit voulu. Ne soulevez pas la fontaine remplie en la tenant par le cône. Pour soulever la fontaine de
façon adéquate, utilisez les deux mains et saisissez les parois latérales du bol. Important : pour protéger votre sol, utilisez toujours un tapis protecteur, absorbant ou imperméable. Cela permettra de protéger votre sol contre les éclaboussures et les déversements provoqués par votre animal.
15.Assurez-vous que le cordon d'alimentation électrique, l'adaptateur et vos mains sont complètement secs avant de brancher la fontaine pour animaux de compagnie
àune prise du secteur. Branchez la prise en ligne et assurez-vous que la partie argentée est complètement insérée, puis branchez l'adaptateur à la prise du secteur.
16.Ajoutez de l'eau à la fontaine pour animaux de compagnie selon les besoins. Ne laissez jamais le niveau de l'eau descendre en dessous de la ligne MIN (minimum,
àsavoir environ 2,5 cm à partir du fond du bol), car vous risqueriez d'user la pompe. Les pompes de rechange sont vendues séparément ; appelez pour cela le Service clientèle. Pour connaître les numéros de téléphone du Service clientèle le plus proche de chez vous, consultez notre site www.petsafe.net.
Nettoyage des filtres et de la fontaine pour animaux de compagnie
Système de filtre
La fontaine pour animaux de compagnie est équipée de deux types de filtre qui doivent être régulièrement remplacés. Le filtre au charbon élimine les mauvais goûts et les mauvaises odeurs en gardant l'eau fraîche. Le filtre en mousse retient les poils, les saletés et la nourriture pour animaux et les empêche d'atteindre la pompe, offrant ainsi une filtration optimale. Les deux filtres associés maintiennent la pompe propre et fournissent une eau plus fraîche à votre animal de compagnie.
Filtre au charbon : les filtres doivent être changés toutes les deux à quatre semaines. Remplacez les filtres plus fréquemment si vous utilisez la même
fontaine pour animaux de compagnie pour plusieurs animaux ou si votre animal salive beaucoup. Important : rincez toujours le filtre au charbon
avant l'utilisation. Une petite quantité de poussière de charbon peut s'écouler du filtre ; ceci est normal et ne présente aucun danger pour votre animal.
Filtre en mousse : changez le filtre en mousse toutes les quatre à six semaines, selon l'endroit où est placée la fontaine pour animaux de compagnie et le nombre d'animaux qui l'utilisent. Si vous ne prévoyez pas de changer le filtre au moment du nettoyage, rincez abondamment le filtre en mousse à l'eau claire.
Les filtres sont des accessoires complémentaires de la fontaine pour animaux de compagnie. L'utilisation des filtres n'est pas requise pour un usage normal. Cependant, lorsqu'ils sont utilisés correctement et changés régulièrement, les filtres aident à garder une eau plus propre et plus fraîche tout en allongeant la durée de vie de votre
fontaine pour animaux de compagnie. Les filtres peuvent être rincés lors du nettoyage de la fontaine pour animaux de compagnie. Important : ne lavez jamais les filtres avec
de l'eau savonneuse, car les résidus de savon s'insinuent dans les filtres et ne peuvent ensuite plus être éliminés. Rincez les filtres à l'eau uniquement.
24 |
www.petsafe.net |
Fontaine pour animaux de compagnie
Lors du nettoyage de la fontaine pour animaux de compagnie, n'utilisez pas de tampons, éponges ou solutions abrasifs. Les surfaces abrasives risquent de rayer les pièces en acier inoxydable.
Important : nettoyez la fontaine pour animaux de compagnie une fois par semaine.
La fontaine pour animaux de compagnie doit être régulièrement nettoyée afin de continuer à fonctionner normalement.
1. Débranchez la fontaine pour animaux |
|
|
Fig. 14 |
||
de compagnie de sa source électrique |
||
|
||
et déconnectez la prise en ligne de la |
|
|
pompe (Fig. 14). |
|
2.Retirez le capuchon de réglage du débit et la bagu du bec verseur.
3.Ensuite, retirez les trois clips du cordon en tirant doucement sur le clip à deux branches pour
l'extraire du fond du bol. Mettez les clips de cordon de côté.
4.Tout en maintenant le cône pour qu'il reste stable, placez votre pouce et deux autres doigts autour de la partie supérieure du compartiment du filtre et soulevez-le pour le retirer. Si le compartiment du filtre ne se déloge pas facilement, essayez de le faire bouger d'avant en arrière selon un mouvement circulaire, jusqu'à ce qu'il se desserre suffisamment pour pouvoir être retiré. Soulevez le compartiment du filtre et mettez-le de côté. Il est très probable que le tuyau d’entrée reste fixé au fond du compartiment du filtre.
5.Soulevez le cône en acier inoxydable et mettez-le de côté pour le nettoyer.
6.Mettez la main dans le bol et soulevez la pompe ; retirez-la et mettez-la de côté pour la nettoyer.
7.Retirez le filtre en mousse de la pompe. Retirez tous poils, saletés ou nourriture pour animaux susceptibles de s'être accumulés sur la façade de la pompe.
8.Tout en maintenant les parois latérales du bol par le dessous, videz la fontaine de son eau.
9.Nettoyez les éléments en plastique de la fontaine pour animaux de compagnie au
savon et à l'eau chaude. Vous pouvez aussi mettre la fontaine dans votre lavevaisselle. Important : n'utilisez pas de tampons, éponges ou solutions abrasifs, car cela risquerait de rayer les pièces en acier inoxydable. Retirez la pompe avant de placer la fontaine dans le lave-vaisselle. NE METTEZ JAMAIS LA POMPE DANS LE LAVE-VAISSELLE ! Consultez la section « Entretien de la pompe » de ce manuel d'utilisation pour des instructions détaillées sur la méthode de nettoyage appropriée de la pompe.
10.Si vous rencontrez des difficultés pour atteindre certaines parties ou certains recoins difficiles d'accès, essayez d'utiliser un coton-tige ou bien procurez-vous le kit de nettoyage Drinkwell®, un système de brossage en 3 pièces. Pour vous procurer
un kit de nettoyage, consultez notre site web www.petsafe.net afin de trouver un revendeur proche de chez vous, ou une liste des numéros de téléphone des Services clientèle proches de chez vous.
DE IT ES NL FR EN
www.petsafe.net |
25 |

DE IT ES NL FR EN
Entretien de la pompe
Important : le nettoyage de la pompe est essentiel à la longévité de la fontaine pour animaux de compagnie et permet de maintenir la propreté de l'eau. Nettoyez la pompe toutes les deux semaines au moins. La garantie peut être annulée si le moteur de la pompe n'est pas nettoyé régulièrement.
Plaque d'entrée |
Façade |
Pompe Turbine
1.Retirez la pompe de la fontaine comme indiqué dans la section concernant le nettoyage des filtres et de la fontaine pour animaux de compagnie de ce manuel d’utilisation.
2. Retirez la façade en utilisant votre pouce et votre |
Fig. 15 |
||
index pour presser doucement les deux côtés de la |
|
||
façade puis tirer. Il peut s'avérer nécessaire |
|
||
d'introduire un ongle dans la fente à l'arrière de la |
|
||
façade pour faire levier (Fig. 15). |
|
|
|
3. Ensuite, retirez la plaque d'entrée en plaçant votre |
|
||
ongle sous la petite languette de la partie étroite de |
|
||
la tirette en forme de goutte de la plaque d'entrée et |
|
||
en tirant (Fig. 16). |
Tirette de |
|
|
|
|||
|
|||
4. Une fois la plaque d'entrée retirée, |
|
||
enlevez la turbine (turbine à 3 pales). |
la plaque |
|
|
La turbine est retenue par un aimant ; |
d'entrée |
|
|
insérez simplement votre ongle ou un |
|
|
|
autre objet fin sous la pale en |
|
|
|
plastique puis soulevez (Fig. 17). |
|
|
|
5. Une fois la pompe démontée, vous |
|
|
Fig. 16 |
pouvez nettoyer les éléments au savon |
|
|
|
|
|
|
|
et à l'eau chaude. Utilisez un coton-tige ou la balai |
Fig. 17 |
||
de « moteur » du kit de nettoyage Drinkwell® afin de |
|
||
nettoyer l'intérieur de la chambre du moteur de la |
|
||
pompe et retirer toute saleté accumulée (Fig.18). |
|
||
Pour une désinfection plus importante et pour |
|
||
éliminer l'eau dure, nettoyez la pompe à l'aide |
|
||
d'une solution composée de 20 % de vinaigre blanc |
|
||
et 80 % d'eau. Assurez-vous de la rincer |
|
|
|
|
Fig. 18 |
||
abondamment avec de l'eau propre. |
|
||
6.Une fois que tous les éléments sont propres et secs, vous pouvez remonter la pompe.
a)Replacez la turbine.
b)Replacez la plaque d'entrée.
c)Replacez la façade.
26 |
www.petsafe.net |
Réassemblage de la fontaine pour animaux de compagnie
1.Placez le filtre en mousse autour de la pompe. La partie ronde du filtre en mousse doit faire directement face à la façade de la pompe. Assurez-vous que le cordon d'alimentation passe au-dessus du filtre en mousse et non en dessous ; cela permettra de maintenir le filtre en place.
2.Replacez la pompe à sa place d'origine (Fig. 19). Assurez-vous que l'ouverture circulaire au sommet de la pompe se trouve exactement au centre du bol ; sinon, le tube d'entrée ne s'alignera pas correctement avec le compartiment du filtre.
Appuyez doucement pour coller les ventouses.
3.Replacez le tube d'entrée dans l'ouverture circulaire au sommet de la pompe (Fig. 20).
4.Alignez le cône de sorte que le cordon d'alimentation passe par la fente prévue à
cet effet, sans que la pompe ne quitte sa position d'origine. Une fois le cordon d'alimentation aligné (Fig. 21), placez avec précaution le cône en position
« de repos ».
Fig. 19 Fig. 20
Centre réel du bol
Fig. 21
5.Après avoir nettoyé votre fontaine pour animaux de compagnie, il est conseillé de remplacer le filtre au charbon. Ensuite, vissez le capuchon du compartiment du filtre au charbon.
6.Regardez à l'intérieur du cône et assurez-vous que le tube d'entrée sort bien de la
pompe. Insérez avec précaution le compartiment du filtre dans l'ouverture du cône et poussez vers le bas (Fig. 22). En poussant le compartiment du filtre jusqu'au joint en caoutchouc, le compartiment devrait se fixer facilement au tube d'entrée.
7.Placez la bague du bec verseur sélectionnée au sommet du capuchon du compartiment du filtre et appuyez doucement pour la mettre en place (Fig. 23).
8.Replacez le capuchon de réglage du débit en alignant le capuchon de réglage du débit avec les fentes relevées, sur le capuchon du compartiment du filtre (Fig. 10). Appuyez doucement pour le mettre en place.
Fig. 22 |
Fig. 23 |
Fig. 24 |
Fentes relevées
DE IT ES NL FR EN
www.petsafe.net |
27 |
 Loading...