

Page 1
ENG
Digital Camera
Operating Manual
To ensure the best performance from your camera, please read
the Operating Manual before using the camera.
Page 2

Thank you for purchasing this PENTAX Digital Camera.
Please read this manual before using the camera in order to get the most out of
all the features and functions. Keep this manual safe, as it can be a valuable tool
in helping you to understand all the camera’s capabilities.
This operating manual applies to Optio WG-2 GPS and Optio WG-2.
The illustrations used in this manual are those of Optio WG-2 GPS.
Regarding copyrights
Images taken using the PENTAX Digital Camera that are for anything other than
personal enjoyment cannot be used without permission according to the rig hts as
specified in the Copyright Act. Please take care, as there are cases where limitations
are placed on taking pictures even for personal enjoyment during demonstrations,
performances or of items on display. Images taken with the purpose of obtaining
copyrights also cannot be used outside the scope of use of the copyright as laid out in
the Copyright Act, and care should be taken here also.
Regarding trademarks
• SDXC logo is a trademark of SD-3C, LLC.
• Microsoft and Windows are registered trademarks of Microsoft Corporation in
the United States and other countries. Windows Vista is either a registered
trademark or trademark of Microsoft Corporation in the United States and/or
other countries.
• Macintosh and Mac OS are trademarks of Apple Inc., registered in the U.S. and
other countries.
•ArcSoft
, and its logo are either the registered trademark or trademark of
ArcSoft Inc. in the United States and/or other countries.
• HDMI, the HDMI logo, and High-Definition Multimedia Interface are trademarks
or registered trademarks of HDMI Licensing, LLC in the United States and/or
other countries.
• Eye-Fi, the Eye-Fi logo and Eye-Fi connected are trademar ks of Eye-Fi, Inc.
• This product supports PRINT Image Matching III. PRINT Image Matching
enabled digital still cameras, printers and software help photographers to
produce images more faithful to their intentions. Some functions are not
available on printers that are not PRINT Image Matching III compliant.
Copyright 2001 Seiko Epson Corporation. All Rights Reserved.
PRINT Image Matching is a trademark of Seiko Epson Corporation. The PRINT
Image Matching logo is a trademark of Seiko Epson Corporation.
• This product is licensed under the AVC Patent Portfolio License for the personal
use of a consumer or other uses in which it does not receive remuneration to (i)
encode video in compliance with the AVC standard (“AVC video”) and/or (ii)
decode AVC video that was encoded by a consumer engaged in a personal
activity and/or was obtained from a video provider licensed to provide AVC
video. No license is granted or shall be implied for any other use.
Additional information may be obtained from MPEG LA, LLC.
See http://www.mpegla.com.
• All other brands or product names are trademarks or registered trademarks of
their respective companies.
• In this manual, the TM and ® marks are not specified.
Page 3

Regarding Product Registration
In order to better serve you, we request that you complete the product registration,
which can be found on the CD-ROM supplied with the camera o r on the PENTAX
website. Thank you for your cooperation.
Refer to “Product Registration on the Internet” (p.201) for more information.
To users of this camera
• Do not use or store this device in the vicinity of equipment that generates strong
electromagnetic radiation or magnetic fie lds.
Strong static charges or the magnetic fields pro duced by equipment such as radio
transmitters could interfere with the monitor, damage the stored data, or affect the
product’s internal circuitry and cause camera misoperation.
• The liquid crystal panel used in the display is manufactured using extremely high
precision technology. Although the level of functioning pixels is 99.99% or better, you
should be aware that 0.01% or fewer of the pixels may not illuminate or may
illuminate when they should not. However, this has no effect on the recorded image.
• A band of light may appear on the display if the camera is aimed at a bright subject.
This is known as a smear, but it is not a malfunction.
• There is a possibility that the illustrations and the display screen in this manual are
different from the actual product.
• In this manual, SD Memory Cards, SDHC Memory Cards and SDXC Memory Cards
are referred to as SD Memory Cards.
• In this manual, the generic term “computer(s)” refers to either a Windows PC or a
Macintosh hereafter.
• In this manual, the term “battery(ies)” refers to any type of batteries used for this
camera and accessories.
Using Your Camera Safely
We have paid close attention to the safety of this product. When using
this product, we request your special attention regarding items marked
with the following symbols.
Warning
Caution
This symbol indicates that violating this item could
cause serious personal injuries.
This symbol indicates that violating this item could
cause minor or medium personal injuries, or loss of
property.
1
Page 4

About the Camera
Warning
• Do not attempt to take the camera apart or modify the camera. High voltages
are present within the camera, and there is a danger of electric shock if the
camera is taken apart.
• If the inside of the camera should become exposed as a result of, for example,
the camera being dropped, please do not under any circumstances touch such
exposed portions, as there is a danger of receiving an electric shock.
• Wrapping the strap of the camera around your neck is also dangerous. Please
take care that small children do not hang the strap around their necks.
• If any irregularities occur during use, such as smoke or a strange odor, stop use
immediately, remove the battery or the AC adapter, and contact your nearest
PENTAX Service Center. Continuing to use the product can cause a fire or
electric shock.
Caution
• Do not place your finger on the flash when it is discharging as there is a risk of
burns.
• Do not discharge the flash while it is touching your clothing as there is a risk of
discoloring.
• Some portions of the camera heat up during use, so please take care, as there
is a risk of low temperature burns if such portions are held for long periods of
time.
• Should the LCD be damaged, be careful of glass fragments. Also, be careful
not to allow the liquid crystal to get on your skin, in your eyes, or in your mouth.
• Depending on your individual factors or physical condition, the use of the
camera may cause itching, rashes or blisters. In case of any abnormality, stop
using the camera and get medical attention immediately.
2
Page 5

About the Battery Charger and the AC Adapter
Warning
• Always use the battery charger and AC adapter exclusively developed for this
product, with the specified power and voltage. Using a battery charger or AC
adapter not exclusive to this product, or using the exclusive battery charger or
AC adapter with an unspecified power or voltage can cause a fire, electric
shock, or camera breakdown. The specified voltage is 100-240V AC.
• Do not disassemble or modify the product. This can cause a fire or electric
shock.
• If the generation of smoke or strange odor from the product or other abnormality
occurs, immediately discontinue its use and consult a PENTAX Service Center.
Continuing to use the product can cause a fire or electric shock.
• If water should happen to get inside the product, consult a PENTAX Service
Center. Continuing to use the product can cause a fire or electric shock.
• If a thunder storm should occur while using the battery charger or AC adapter,
unplug the AC plug cord and discontinue use. Continuing to use the product can
cause damage to the equipment, fire, or electric shock.
• Wipe off the plug of the AC plug cord if it becomes covered with dust. Dust on
the plug may cause a fire.
Caution
• Do not place heavy objects on the AC plug cord, allow heavy objects to drop
onto it or allow the AC plug cord to become damaged due to excessive bending.
If the AC plug cord becomes damaged, consult a PENTAX Service Center.
• Do not short or touch the output terminals of the product while it is still plugged
in.
• Do not plug in the AC plug cord with wet hands. This can cause an electric
shock.
• Do not subject the product to strong impacts or allow it to drop onto a hard
surface. This can cause a malfunction.
• Do not use the batter y charger to charge a battery other than a rechargeable
lithium-ion battery D-LI92. This can cause overheating, explosion, or battery
charger failure.
• To reduce the risk of hazards, use only a CSA/UL certified power supply cord
set, cord is Type SPT-2 or heavier, minimum NO.18 AWG copper, one end with
a molded-on male attachment plug cap (with a specified NEMA configuration),
and the other is provided with a molded-on female connector body (with a
specified IEC nonindustrial type configuration) or the equivalent.
3
Page 6

About the Battery
Warning
• Be sure to store the battery out of the reach of small children. Placing it in their
mouths may cause an electric shock.
• If any leakage from the battery should come in contact with your eyes, it may
cause a loss of sight. Flush your eyes with clean water and get medical
attention immediately. Do not rub them.
Caution
• Only use the specified battery with this camera. Use of other batteries may
cause an explosion or fire.
• Do not disassemble the battery. Disassembling the battery may cause an
explosion or leakage.
• Remove the battery from the camera immediately if it becomes hot or begins to
smoke. Be careful not to burn yourself during removal.
• Keep wires, hairpins, and other metal objects away from the + and - contacts of
the battery.
• Do not short the battery or dispose of the bat tery in fire. This can cause an
explosion or fire.
•
If any leakage from the battery should come in contact with skin or clothes, it may
cause irritation to the skin. Wash the affected areas thoroughly with water.
• Precautions for D-LI92 Battery Usage:
BATTERY MAY EXPLODE OR FIRE IF MISTREATED.
- DO NOT DISASSEMBLE OR DISPOSE OF IN FIRE.
- DO NOT CHARGE EXCEPT SPECIFIED CHARGING CONDITION.
- DO NOT HEAT ABOVE 140°F / 60°C, OR SHORT CIRCUIT.
- DO NOT CRUSH OR MODIFY.
Keep the Camera and Accessories Out of the Reach of Small
Children
Warning
• Be sure to keep the camera and its accessories out of the reach of small
children.
1. Injuries may result from the product falling or from unexpected movement.
2. Suffocation may result from wrapping the strap around the neck.
3. Small accessories such as battery or an SD Memory Card may be
swallowed. Seek medical attention immediately if an accessory is
accidentally swallowed.
4
Page 7

Care to be Taken During Handling
Before Using Your Camera
• When traveling, take the Worldwide Service Network listing that is included in
the package. This will be useful if you experience problems abroad.
• When the camera has not been used for a long time, confirm that it is still
working properly, particularly prior to taking important pictures (such as at a
wedding or when traveling). Contents of the recording cannot be guaranteed if
recording, playback or transferring your data to a computer, etc. is not possible
due to a malfunction of your camera or recording media (SD Memory Card), etc.
• The lens on this camera is not interchangeable. The lens is not removable.
About the Battery and Battery Charger
• Storing the battery fully charged may decrease the battery performance. Avoid
storing it especially in high temperatur es.
If the battery is left inserted and the camera is not used for a long time, the
batter y will over-discharge and shorten the batter y’s service life.
• Charging the battery a day before use or on the day of use is recommended.
• The AC plug cord supplied with the camera is for exclusive use with the battery
charger D-BC92. Do not use it with any other equipment.
Precautions on Carrying and Using Your Camera
•
Hot and humid places should be avoided. Particular care should be taken
regarding vehicles, which can become very hot inside.
• Ensure that the camera is not subjected to substantial vibrations, shocks, or
pressure as this may cause damage, malfunction, or a loss in waterproof
performance. Place the camera on a cushion for protection when the camera is
subjected to the vibrations of a motorbike, car, ship, etc. If the camera is
subjected to substantial vibrations, shocks, or pressure, take your camera to
your nearest PENTAX Service Center and have it checked.
• The temperature range in which the camera can be used is -10°C to 40°C (14°F
to 104°F).
• The liquid crystal display will become black at high temperatures but will return
to normal at normal temperatures.
• The response speed of the liquid crystal display becomes slow at low
temperatures. This is due to the properties of the liquid crystal and is not a
malfunction.
5
Page 8

• If the camera is subjected to rapid temperature changes, condensation may
form on the inside and outside of the camera. Therefore put the camera in a bag
or plastic bag and take the camera out when the difference in temperature has
subsided.
• Avoid contact with garbage, mud, sand, dust, water, toxic gases, or salts. These
could cause t he camera to breakdown. Wipe the camera to dry off any rain or
water drops.
• Please do not press forcefully on the display. This could cause it to break or
malfunction.
• Be careful not to sit down with the camera in your back pocket as this may
damage the exterior of the camera or the display.
• When using a tripod with the camera, be careful not to overtighten the screw in
the tripod socket on the camera.
Cleaning Your Camera
• Do not clean the product with organic solvents such as thinner, alcohol or
benzene.
• Use a lens brush to remove dust accumulated on the lens. Never use a spray
blower for cleaning as it may damage the lens.
Storing Your Camera
• Avoid storing the camera where pesticides and chemicals are handled.
Remove the camera from its case and store it in a well-ventilated place to
prevent the camera from becoming moldy during storage.
• Avoid using or storing the camera where it may be exposed to static electricity
or electrical interference.
• Avoid using or storing the camera in direct sunlight or in locations where it may
be exposed to rapid changes in temperature or to condensation.
Other Precautions
• Periodic inspections are recommended every one to two years to maintain high
performance.
• Please note that deleting data, or formatting the SD Memory Cards or the builtin memory does not completely erase the original data. Deleted files can
sometimes be recovered using commercially available software. It is user’s
responsibility to ensure the privacy of such data.
6
Page 9

• The SD Memory Card is equipped with a
Write-protect
switch
write-protect switch. Setting the switch to
LOCK prevents new data from being
recorded on the card, the stored data from
being deleted, and the card from being
formatted by the camera or a computer.
r appears on the display when the card is
write-protected.
• Care should be taken when removing the SD Memory Card immediately after
using the camera, as the card may be hot.
• Keep the battery/card cover closed and do not remove the SD Memory Card or
turn the camera off while the data is being played back or saved to the card, or
the camera is connected to a computer with the USB cable, as this may cause
the data to be lost or the card to be damaged.
• Do not bend the SD Memory Card or subject it to violent impact. Keep it away
from water and store away from high temperature.
• Do not remove the SD Memory Card during formatting as this may damage the
card and render it unusable.
• The data on the SD Memory Card may be deleted in the following circumstances.
We do not accept any liability for data that is deleted.
(1) When the SD Memory Card is mishandled by the user.
(2) When the SD Memory Card is exposed to static electricity or electrical
interference.
(3) When the SD Memory Card has not been used for a long time.
(4) When the SD Memory Card is ejected or the battery is removed while the
data on the card is being recorded or accessed.
• If it is not used for a long time, the data on the card may become unreadable.
Be sure to regularly make a backup of important data on a computer.
• When using an SD Memory Card with a slow recording speed, recording may
stop while you are taking movies even when there is adequate space in the
memory, or shooting and playback may take a long time.
• Be sure to format SD Memory Cards that are unused or have been used on
another camera. Refer to “Formatting the Memory” (p.174).
7
Page 10
Regarding Waterproof, Dustproof, and
Packing contact surface
Waterproof packing
Packing contact surface
Waterproof packing
Shockproof Design
• This camera is provided with a waterproof/dustproof design complying with JIS
waterproof grade 8 and JIS dustproof grade 6 (equivalent to IP68).
• The camera satisfies the PENTAX drop test (1.5 m height onto a 5 cm thick
plywood surface) complying with MIL-Standard 810F Method 516.5-Shock
testing.
• The camera satisfies the PENTAX test for the waterproof, dustproof, and
shockproof performance, but this does not guarantee it will remain free of
trouble or damages.
• Waterproof performance is not guaranteed if the camera is exposed to impact
such as being dropped or hit.
Precautions Before Using the Camera in the Water
Check the Following Before Going Near the Water
• Make sure that there are no cracks or scratches on the rubber seal of the
batter y/card and terminal covers.
• Make sure there are no foreign objects (dust, sand, hair, lint or liquid) on the
rubber seals or the surface they contact before closing the battery/card and
terminal covers. Wipe off any foreign objects with a clean lint-free cloth.
8
Page 11

• Close the battery/card and terminal covers properly until they click. Otherwise
water may get in and damage the camera.
Be Careful Near the Water
• Avoid opening the battery/card and terminal covers when near the waterside or
with wet hands. Wait until the camera is completely dry before changing the
battery or the SD Memory Card. Avoid changing the battery or card where the
camera is likely to get wet or dirty, and make sure that your hands are dry.
• The camera will sink if dropped in water, so be sure to attach the strap and slip
the strap over your wrist when using the camera in or near water.
• To enhance the waterproof performance of the camera, the front of the lens is
protected by glass. As any dirt or water on the glass will affect the quality of
pictures taken, the glass should be kept clean at all times.
Precautions When Using the Camera in the Water
• Do not use the camera deeper than 12 meters underwater. Do not use the
camera underwater for more than 120 minutes consecutively.
• Do not open the battery/card and terminal covers underwater .
• Do not use in hot water or in a hot spring.
• Do not apply excessive force to the camera, for example diving into water with
it. Doing so may compromise the waterproof performance of the camera or
cause the covers to open.
• Leaving the camera on the sand at the beach may cause the camera to exceed
its operating temperature or cause the speaker or microphone to become
blocked with sand.
• Avoid subjecting the camera to substantial vibrations, shocks, or pressure as
this may cause a loss in waterproof performance. If the camera is subjected to
substantial vibrations, shocks or pressure, take your camera to your nearest
PENTAX Service Center and have it checked.
• Avoid getting sunscreen or sun oil on the camera as it may cause discoloration
of the surface. If any oil gets on the camera, wash it off immediately with warm
water.
• Sudden and extreme changes in temperature may cause condensation to form
in and on the camera. Keep the camera in a bag or case to reduce the
difference in temperature.
9
Page 12
Precautions After Using the Camera in the Water
• Do not open the battery/card cover or terminal cover if the camera is wet. Wipe
off any water with a clean lint-free cloth.
• The inside surface of the covers may get wet when they are opened. Wipe off
any water that is on the cover.
• Wiping off the camera while there is sand or dust on it may scratch the surface
of the camera. Make sure that the battery/card cover and terminal cover are
firmly closed before washing the camera in tap water. After washing the
camera, dry it with a soft cloth.
• Wipe off any dirt or sand on the waterproof packing or the packing contact
surface. The camera’s wat erproof performance may be compromised by loose
packing or cracks or dents in the packing or packing contact surface. If there is
any such damage, contact your nearest PENTAX Service Center.
• If the camera is very dirty or after it has been used in the sea, make sure that it
is turned off and the battery/card and terminal covers are firmly closed before
rinsing it under running tap water or leaving it in a bowl of clean water for a short
time (2 or 3 minutes).
• Avoid cleaning with agents such as soapy water, mild detergents, or alcohol as
this may compromise the waterproof performance of the camera.
• To maintain the waterproof performance of the camera, you are recommended
to change the waterproof packing once a year. Contact your nearest PENTAX
Service Center regarding changing the packing. (A charge will be made.)
• The camera’s accessories are not waterproof.
10
Page 13

Contents
Using Your Camera Safely...................................................................... 1
Care to be Taken During Handling.......................................................... 5
Regarding Waterproof, Dustproof, and Shockproof Design.................... 8
Precautions Before Using the Camera in the Water................................ 8
Precautions When Using the Camera in the Water................................. 9
Precautions After Using the Camera in the Water................................. 10
Contents................................................................................................ 11
Composition of the Operating Manual................................................... 17
Camera Features ........................................................................................ 18
Checking the Contents of the Package ................................................. 22
Names of Parts...................................................................................... 23
Names of Operating Parts..................................................................... 24
Monitor Indications ................................................................................ 25
Getting Started 32
Attaching the Carabiner Strap .................................................................. 32
Powering the Camera ................................................................................ 33
Charging the Battery ............................................................................. 33
Installing the Battery.............................................................................. 34
Using the AC Adapter............................................................................ 37
Installing the SD Memory Card ................................................................. 39
Turning the Camera On and Off................................................................ 41
Starting-up in Playback Mode ...............................................................42
Initial Settings............................................................................................. 43
Setting the Display Language ............................................................... 43
Setting the Date and Time.....................................................................46
Common Operations 48
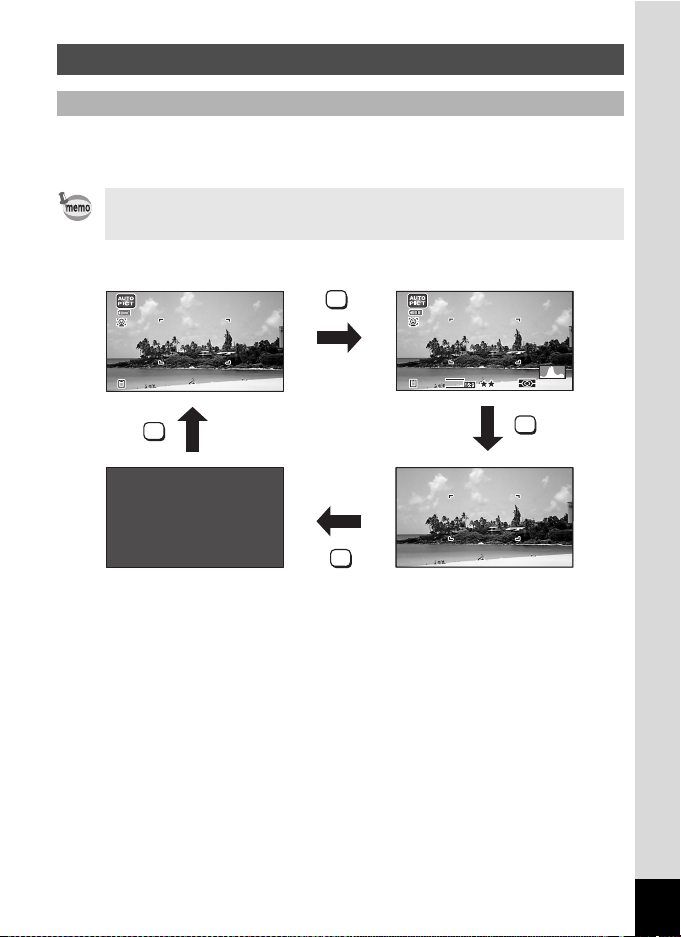
Understanding the Button Functions....................................................... 48
A Mode ................................................................................................ 48
Q Mode ............................................................................................... 50
Switching Between A Mode and Q Mode.......................................... 52
Setting the Camera Functions .................................................................. 53
Operating the Menus............................................................................. 53
Menu List............................................................................................... 55
11
Page 14

Taking Pictures 60
Taking Still Pictures................................................................................... 60
Taking Pictures...................................................................................... 60
Using the Zoom ..................................................................................... 63
Setting the Shooting Mode .................................................................... 65
Using the Face Detection Function ....................................................... 69
Taking Pictures in Basic Mode (Green Mode)....................................... 73
Taking Pictures of Your Pet (Pet Mode)................................................ 74
Taking Pictures of Text (Text Mode) ..................................................... 77
Taking Pictures in Digital Microscope Mode.......................................... 77
Framing Your Pictures (Frame Composite Mode)................................. 78
Taking Pictures at a Set Interval (Interval Shot).................................... 79
Using the Self-timer............................................................................... 81
Taking a Series of Pictures (Continuous Shooting/Burst Shooting) ...... 82
Taking Pictures Using the Remote Control Unit (Optional) ................... 83
Taking Pictures with Automatic Exposure Adjustment
(Auto Bracketing)............................................................................ 84
Using the Digital Wide Function (Digital Wide Mode)............................ 85
Taking Panoramic Pictures (Digital Panorama Mode)........................... 87
Setting the Shooting Functions ................................................................ 89
Setting the Rec. Mode Menu................................................................. 89
Selecting the Flash Mode...................................................................... 90
Selecting the Focus Mode..................................................................... 91
Setting the Image Tone .........................................................................95
Selecting the Number of Recorded Pixels.............................................96
Selecting the Quality Level of Still Pictures ...........................................97
Adjusting the White Balance ................................................................. 98
Setting the AE Metering ........................................................................ 99
Setting the Sensitivity .......................................................................... 100
Setting AUTO ISO Range ...................................................................101
Setting the Exposure (EV Compensation)........................................... 101
Correcting the Brightness (D-Range Setting)...................................... 102
Setting Pixel Track SR ........................................................................ 103
Setting Blink Detection ........................................................................ 104
Setting the Instant Review...................................................................104
Setting the Green Button..................................................................... 105
Setting the Image Sharpness (Sharpness) .........................................108
Setting the Saturation/Tone Adjustment.............................................. 108
Setting the Image Contrast (Contrast).................................................109
Setting the Date Imprint Function........................................................ 109
Setting the IQ Enhancer Processing ................................................... 110
Setting the Macro Light ....................................................................... 110
Taking Pictures Underwater.................................................................... 111
Taking Underwater Pictures (Und erwater Mode/Underwater
Movie Mode)................................................................................. 111
12
Page 15

Recording Movies .................................................................................... 113
Recording Movies................................................................................ 113
Selecting the Number of Recorded Pixels and Frame Rate
for Movies..................................................................................... 115
Setting the Movie SR (Movie Shake Reduction) Function................... 116
Recording a Movie from Pictures Taken at a Set Interval
(Interval Movie)............................................................................. 116
Using the High Speed Movie Function................................................ 119
Saving the Settings (Memory)................................................................. 120
Playing Back and Deleting Images 122
Playing Back Images ...............................................................................122
Playing Back Still Pictures................................................................... 122
Playing Back a Movie.......................................................................... 123
Multi-Image Display............................................................................. 124
Using the Playback Function...............................................................126
Slideshow............................................................................................ 129
Rotating the Image.............................................................................. 131
Zoom Playback.................................................................................... 132
Zoom In on the Subject’s Face Automatically
(Face Close-up Playback) ............................................................133
Deleting Images and Sound Files ........................................................... 135
Deleting a Single Image/Sound File.................................................... 135
Deleting Selected Images and Sound Files ........................................ 136
Deleting All Images and Sound Files .................................................. 137
Protecting Images and Sound Files from Deletion (Protect) ............... 138
Connecting the Camera to AV Equipment............................................. 140
Connecting the Camera to a Video Input Terminal .............................140
Connecting the Camera to an HDMI Terminal .................................... 142
Editing and Printing 143
Editing Images.......................................................................................... 143
Changing the Image Size (Resize)...................................................... 143
Cropping Images ................................................................................. 144
Processing Images to Make Faces Look Smaller ............................... 145
Using the Digital Filters ....................................................................... 146
Using the HDR Filter ........................................................................... 148
Using the Ink Rubbing Filter................................................................ 148
Creating a Collage Image.................................................................... 149
Red-eye Compensation....................................................................... 152
Adding a Frame (Frame Composite)...................................................153
Overlaying Your Original Frame on Still Pictures ................................ 156
Editing Movies ..................................................................................... 160
Copying Images and Sound Files ....................................................... 163
Printing Settings ...................................................................................... 165
Setting the Printing Service (DPOF).................................................... 165
13
Page 16

Recording and Playing Back Sound 168
Recording Sound (Voice Recording Mode) ........................................... 168
Setting Voice Recording...................................................................... 168
Recording Sounds............................................................................... 169
Playing Back Sound ............................................................................ 170
Adding a Voice Memo to Images ............................................................171
Recording a Voice Memo .................................................................... 171
Playing Back a Voice Memo................................................................ 172
Settings 173
Camera Settings....................................................................................... 173
Setting the Setting Menu ..................................................................... 173
Formatting the Memory .......................................................................174
Changing the Sound Settings.............................................................. 175
Changing the Date and Time .............................................................. 176
Setting the Alarm................................................................................. 178
Setting the World Time........................................................................ 180
Setting the Text Size on the Menu ...................................................... 182
Changing the Display Language ......................................................... 182
Changing the Naming System of the Folder........................................ 183
Changing the Naming System of the File............................................ 185
Changing the Video Output Format..................................................... 187
Selecting the HDMI Output Format ..................................................... 188
Setting the Eye-Fi Communication ...................................................... 189
Adjusting the Brightness of the Display............................................... 189
Using the Power Saving Function .......................................................190
Setting Auto Power Off........................................................................ 190
Setting the Quick Zoom Function........................................................191
Setting the Guide Display.................................................................... 191
Perform Pixel Mapping ........................................................................ 192
Changing the Start-up Screen............................................................. 193
Resetting to Default Settings (Reset) .................................................. 194
Setting the Startup Shortcut ................................................................194
Displaying the Clock Display............................................................... 195
Light up the LED.................................................................................. 196
14
Page 17

Connecting to a Computer 197
Setting Up Your Computer ...................................................................... 197
Provided Software...............................................................................197
System Requirements......................................................................... 198
Installing the Software ......................................................................... 199
Setting the USB Connection Mode...................................................... 202
Connecting to a Windows PC ................................................................. 204
Connecting the Camera and Your Windows PC ................................. 204
Transferring Images ............................................................................ 205
Disconnecting the Camera from Your Windows PC............................ 207
Starting “MediaImpression 3.5 for PENTAX”....................................... 208
Viewing Images ...................................................................................210
Details on How to Use “MediaImpression 3.5 for PENTAX”................ 211
Connecting to a Macintosh .....................................................................212
Connecting the Camera and Your Macintosh...................................... 212
Transferring Images ............................................................................ 213
Disconnecting the Camera from Your Macintosh................................ 214
Starting “MediaImpression 2.1 for PENTAX”....................................... 215
Viewing Images ...................................................................................217
Details on How to Use “MediaImpression 2.1 for PENTAX”................ 217
Transferring Images Using an Eye-Fi Card............................................218
Appendix 220
Functions Available for Each Shooting Mode ....................................... 220
Messages.................................................................................................. 223
Troubleshooting ....................................................................................... 225
Default Settings........................................................................................ 227
List of World Time Cities ......................................................................... 232
Optional Accessories .............................................................................. 233
Main Specifications.................................................................................. 234
Utilities Guide for GPS............................................................................. 239
Before using GPS..................................................................................... 239
About GPS .......................................................................................... 239
Function of Optio WG-2 GPS .............................................................. 239
Precautions for using GPS .................................................................. 239
Using the GPS .......................................................................................... 241
Preparation for Using GPS Function ................................................... 241
Record the GPS Information on Captured Images.............................. 242
Recording and Saving a Log ............................................................... 243
Correcting time automatically.............................................................. 248
Warranty Policy ........................................................................................ 250
Index.......................................................................................................... 255
15
Page 18
In this manual, the method for operating the four-way controller is shown in
5
or
2 or
3
or
or
4
3
5
2
4
4
2
5
3
illustrations, such as in the one below.
The meanings of the symbols used in this Operating Manual are explained below.
1
A Mode
Q Mode
Indicates the reference page number for an explanation of the
related operation.
Indicates information that is useful to know.
Indicates precautions to be taken wh en operatin g the camera.
This is the mode for taking still pictures and movies. In this
manual, “Still Picture Capture Mode” refers to only the mode for
taking still pictures.
This is the mode for viewing still pictures and playing back movies
and sound files.
16
Page 19

Composition of the Operating Manual
This Operating Manual contains the following chapters.
1 Getting Started ––––––––––––––––––––––––––––––––––––––––––––––––
This chapter explains what you need to do after purchasing the camera before
you start taking pictures. Be sure to read it and follow the instructions.
2 Common Operations –––––––––––––––––––––––––––––––––––––––––––
This chapter explains common operations such as t he functions of the buttons and
how to use the menus. For more details, refer to the respective chapters below.
3 Taking Pictures –––––––––––––––––––––––––––––––––––––––––––––––
This chapter explains the various ways of capturing images and how to set the
relevant functions.
4 Playing Back and Deleting Images ––––––––––––––––––––––––––––––––
This chapter explains how to view still pictures and movies on the camera or on
a TV and how to delete images, sound files, and movies from the camera.
5 Editing and Printing––––––––––––––––––––––––––––––––––––––––––––
This chapter explains the various ways of printing still pictures and how to edit
images with the camera.
6 Recording and Playing Back Sound–––––––––––––––––––––––––––––––
This chapter explains how to record sound files or add sound (a voice memo) to
an image and how to play back sound files.
7 Settings ––––––––––––––––––––––––––––––––––––––––––––––––––––––
This chapter explains how to set camera-related functions.
8 Connecting to a Computer ––––––––––––––––––––––––––––––––––––––
This chapter explains how to connect the camera to a computer, and includes
installation instructions and a general overview of the provided software.
9 Appendix–––––––––––––––––––––––––––––––––––––––––––––––––––––
This chapter deals with troubleshooting and lists the optional accessories.
1
2
3
4
5
6
7
8
9
17
Page 20

Camera Features
In addition to basic picture-taking, this camera has a variety of shooting modes to
suit different situations. This section describes how to make the most of the key
features of your camera. For details on how to operate the camera, look at the table
of contents or in the index for specific functions.
Suitable for Outdoor Activities
This camera is both waterproof and dustproof and has a tough body.
You need not worry about sprays of water while fishing or unexpected rain or dust
while trekking.
Functions that expand photo
opportunities to the sea, the hills, and
the rivers
• Waterproof at a depth of 12 meters
(39.4 ft.)
• Take pictures underwater for up to
two hours.
• Covers can be locked*1
• Shockproof performance*2
• Water repellent coating on the lens
cover glass.
*1 This camera has locks for the battery/card and terminal covers. The battery
compartment and the card and terminal compartment are not waterproof or
dustproof. Lock the covers properly before approaching anyplace that is wet
or dirty.
*2 The camera satisfies the PENTAX drop test (1.5 m height onto a 5 cm thick
plywood surface) complying with MIL-Standard 810F Method 516.5-Shock
testing.
• Waterproof performance is not guaranteed if the camera is exposed to impact
such as being dropped or hit.
• The camera is not guaranteed to be free of trouble or damages under every
condition.
18
Page 21
Easy-to-Navigate Capture and Playback Functions!
For taking enlarged pictures of very close objects such
as the veins of leaves or specimens of tiny insects in
Digital Microscope mode (p.77).
For creating an image like an ink rubbing using the Ink
Rubbing Filter (p.148).
X
XX
XXX
XX
XXX
XXX
XX
XXX
XX
X
XXX
XX
XXX
XX
X
XX
XXXXX
X
X
X
XXX
XX
XXX
XX
X
XXXX
X
XXX
X
1
/2
XX
XX
A shooting mode guide is displayed in the Capture Mode
Palette and a playback mode guide in the Playback Mode
Palette (p.65, p.126).
Use Green Mode to take pictures easily using standard
settings (p.73).
The user-friendly design of the
camera enables easy operation with
only a few buttons. Simply by
choosing the appropriate icon, you
can select the shooting mode (p.67)
and choose the optimal settings for
the situation, or the playback mode
(p.128) and enjoy the various
playback and editing functions. A
guide on the d isplay lets yo u check the
functions available in each mode and
how to use them.
19
Page 22

Perfect for Portrait Shots!
Face Detection function (p.69).
Close-ups of people’s faces for easy checking during
playback (p.133).
Self-portrait Assist function tells you the face position
on the screen (p.72).
Use the camera to shoot fun-filled movies of your
children or pets as a visual diary of their development
(p.113).
This camera comes with a “Face Detection” function that spots the faces in your
shot and automatically adjusts the focus and exposure for the faces. It can
recognize up to 32 people per shot (*1), so it will help you take perfect group shots
too. It automatically releases the shutter when people are smiling, and if anyone
blinks, it tells you that. It also tells you where faces are detected on the screen
(*2), so you can take the shot again until it is perfect. It also has a feature that lets
you enlarge each person’s face in sequence during playback so you can quickly
check their facial expressions.
*1 Up to 31 face detection frames are displayed on the monitor.
*2 The camera can tell the position of up to 3 detected faces.
Advanced Movie Recording Functions!
This camera includes Movie SR to reduce camera shake during movie recording
(p.116). It also supports 1920 x 1080 Full HDTV so you can view your recordings
as stunning wide-screen movies.
20
Page 23
A Multitude of Functions inside the Camera for
Resize (p.143), Cropping (p.144) and Red-eye
Compensation (p.152) can be used, while the image is
displayed in playback mode.
You can divide a movie in two or select a frame from a
movie to save it as a still picture (p.160).
Enjoying Images Without a Computer!
This camera has a variety of functions
to let you enjoy playing back and
editing images without having to
connect the camera to your computer
and transfer the images first. The
camera is all you need to take and edit
still pictures and movies (p.143).
21
Page 24
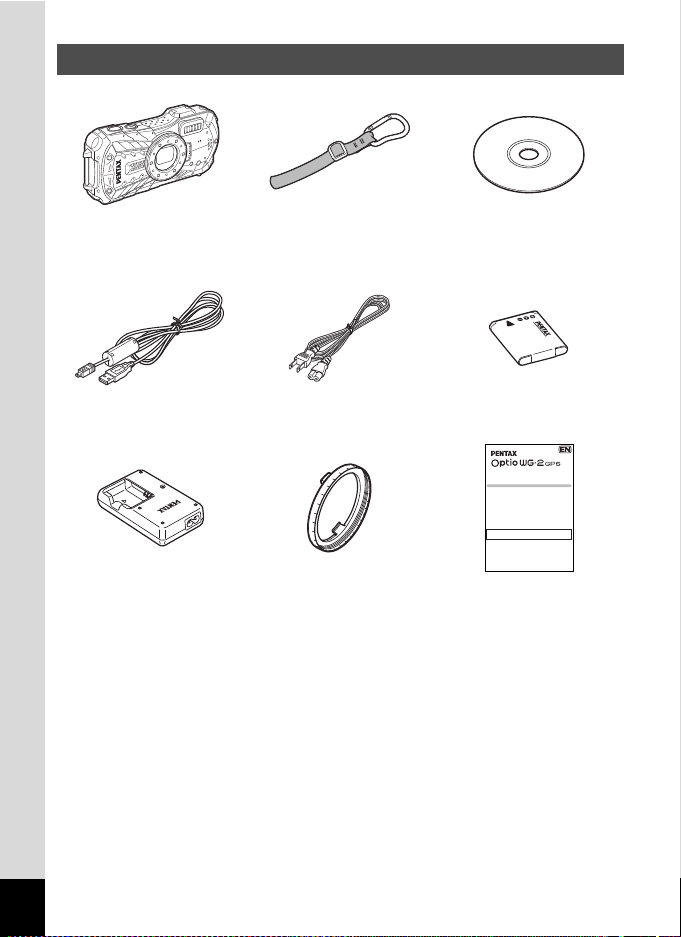
Checking the Contents of the Package
Camera
Optio WG-2 GPS/
Optio WG-2
USB cable
I-USB7 (*)
Battery charger
D-BC92 (*)
Carabiner strap
O-ST124 (WG-2 GPS) (*)
Software (CD-ROM)
S-SW125
O-ST125 (WG-2) (*)
AC plug cord (*) Rechargeab le lithium-ion
battery D-LI92 (*)
Utilities Guide for GPS
Before using GPS ....................................... 2
Using the GPS .............................................4
This manual describes how to use the Optio WG-2 GPS camera’s GPS function
and precautions when using it. Please read this manual before using the GPS
function with this camera.
54565 R01BAA12
Macro stand
O-MS1
Utilities Guide for GPS
(Optio WG-2 GPS only)
Printed in Indonesia
Operating Manual
(this manual)
Quick Guide
Items marked with an asterisk (*) are also availab le as optiona l accessories.
The battery charger and AC plug cord are only sold as a set (battery charger kit
K-BC92).
For other optional accessories, refer to “Optional Accessories” (p.233).
22
Page 25

Names of Parts
Shutter
release button
Lens
Power switch/Power lamp (green)
Flash
Microphone
Self timer lamp/
Focus assist light
Remote control receiver
LED Macro Lights
Speaker
Display
Tripod socket
Battery/card cover
PC/AV terminal
Battery lock lever
Terminal cover
lock lever
HDMI terminal
Terminal cover
Battery/card cover
lock lever
Remote control
receiver
Front
Back
23
Page 26
Names of Operating Parts
4/W button
3 button
Four-way controller
Green/i button
Power switch
I button
Q button
W/T/f/y button
Shutter release button
Refer to “Understanding the Button Fu nctions” (p.48 - 51 ) for an explanation
of the function of each button.
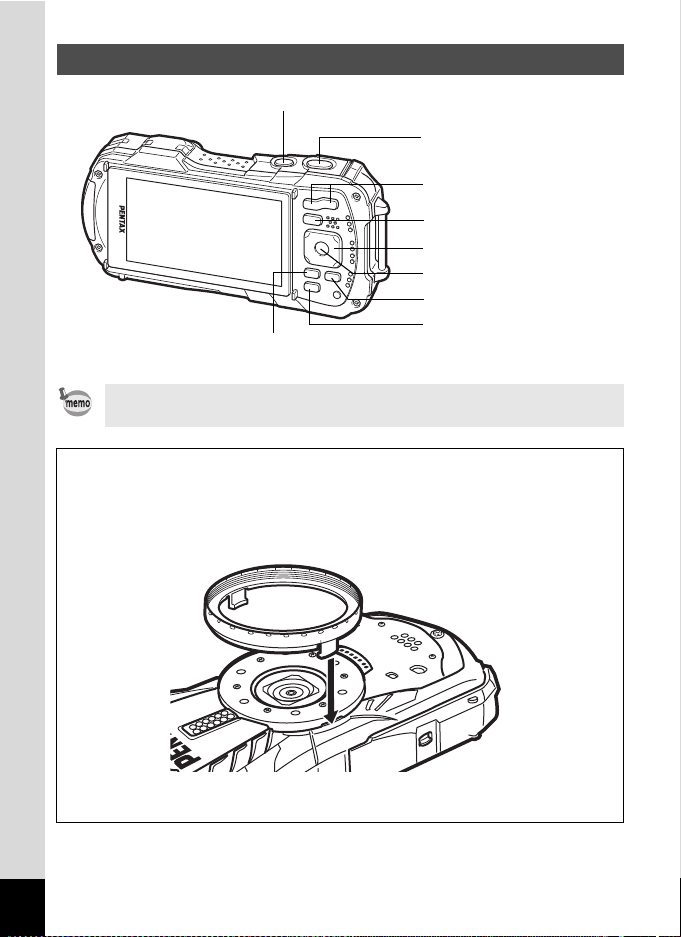
Macro stand
Attaching the supplied macro stand (O-MS1) reduces camera shake during shooting
in Digital Microscope mode (p.77). Insert two clips above and below the LED Macro
Lights part. When attaching and detaching the macro stand, do not hold the clip part.
* When using the macro stand, the camera may not be able to focus if the objects
have uneven surfaces.
24
Page 27
Monitor Indications
AWBWB
12
M
ISO
200
Histogram + Info
No Info
Normal Display
LCD Off
Display in A Mode
The display changes in the following sequence each time you press the 4/
W button: “Normal Display”, “Histogram + Info”, “No Info”, “LCD Off”.
• All the camera buttons function as normal even when the LCD is off. Press
the shutter release button to take pictures as normal.
• The displa y cannot be changed in some shooting modes.
OK
12
12
M
383838
383838
AWB
200
200
ISO
ISO
OK
OK
OK
25
Page 28
Normal Display in Still Picture Capture Mode
P
1 4 : 2 5
ISOISO
200200
AWBWB
ISO
200
AWB
1212
M
383 838
+ 1 .0+ 1 . 0+ 1 .0
1 / 2 50
1 / 2 5 01 / 2 50
F3.5
F 3 . 5F3.5
DATE
12
M
0 2 /02 /'12
15
16
11 12 13 14
10
1
2
3
4
5
6
7
8
9
19 20 B1 B2 B3 B4
A1
17
B6
B5
18
1 to 21 and A1 appear when “Normal Display” is selected. B1 to B6 appear at the
position of 18 when “Histogram + Info” is selected. Only A1 appears when “No
Info” is selected.
1 4:2 5
1 4:2 5
Shooting mode (p.65)
1
Battery level indicator (p.36)
2
Face Detection icon (p.70)
3
26
Date Imprint setting (p.109)
4
EV Compensation (p.101)
5
Shutter speed
6
Aperture
7
Pixel Track SR icon (p.103)
8
Memory status (p.41)
9
Remaining image storage capacity
10
Flash mode (p.90)
11
Drive mode (p.81 - p.84)
12
Focus mode (p.91)
13
Eye-Fi communication status (p.189)
14
Digital zoom/Intelligent Zoom icon (p.63)
15
GPS data
16
(Optio WG-2 GPS only)
GPS log icon
17
(Optio WG-2 GPS only)
Date and time (p.46)
18
World Time setting (p.180)
19
D-Range Setting (p.102)
20
Focus frame (p.60)
A1
Recorded pixels (p.96)
B1
Quality Level (p.97)
B2
White Balance (p.98)
B3
AE Metering (p.99)
B4
Histogram (p.31)
B5
Sensitivity (p.100)
B6
Page 29

* 6 and 7 are only displayed when the shutter release button is pressed half-way.
* For 13, when the focus mode is set to = and the Auto Macro function is
activated, q appears on the display (p.91).
* 14 changes depending on [Eye-Fi] setting in [W Setting] menu.
* 16 changes depending on [GPS] setting in [WSetting] menu.
No icon is displayed on the screen when [GPS On/Off] is set to [Off].
* 17 appears when recording the GPS log.
* 18 disappears two seconds after the camera is turned on.
* 20 changes depending on [D-Range Setting] setting in the [A Rec. Mode]
menu.
No icon is displayed on the screen when [Highlight Correction] and [Shadow
Correction] are both set to P (Off).
* When the shooting mode is b (Auto Picture) and if you press the shutter
release button halfway, the automatically selected shooting mode appears in
A1 even when “No Info” is selected.
* When there is an ar ea on the screen that is overexposed it appears white, the
indicated area blinks red as a warning. Similarly, when there is an area that is
underexposed it appears black, the indicated area blinks yellow as a warning.
* Some indications may not appear depending on the shooting mode.
27
Page 30
Display in Q Mode
10 0
-
00 38
10 0
-
00 38
F 3 . 5
1 / 2 5 0
ISO
200
AWBWB
12
M
Edi t
Edi t
Edi t
02 / 02 / '1 2
14 :2 5
Edi t
10 0
-
00 38
10 0
00 38
N
GPS
13 9
4 1' 2 9 "
35
4 5' 5 2"
N
W
06 : 25:00
02 / 02 / '1 2
Normal Display Histogram + Info
No InfoGPS information display
The display shows the shooting information of the image in playback mode. The
display changes in the following sequence each time you press the 4/
W button:
• The disp lay cannot be chan ged by pressing the 4/W button while
playing back a voice memo/movie or pausing playback.
• Only the Optio WG-2 GPS can display GPS information.
If you are using the Optio WG-2, the display changes to the normal display
by pressing the 4 button at no info display.
100
0038
Edit
Edit
100
0038
100-0038
02 /02 /'12 14:25
14:2 5
02 /02 /'12
OK
1 / 2 50
1 / 2 50
F3.5
F3.5
Edit
Edit
12
12
M
AWB
100-0038
ISO
200
ISO
200
OK
100
0038
100
0038
100-0038
06: 25:00
02 /02 /'12
02 /02 /'12
GPS
Edit
Edit
GPS
N
W
139
139
35
35
45' 52"
45' 52"
41' 2 9"
41' 2 9"
OK
28
Edit
Edit
OK
Page 31

Histogram + Info Display in Playback Mode
1 0 0
-
0 0 3 8
F 3 . 5
1 / 2 5 0
ISO
200
AWBWB
12
M
Edit
(All of the display items are displayed here for explanatory purposes.)
The display shows information such as the shooting conditions. A1 to A11 also
appear when “Norm al Display” is selected . B1 to B8 appear only when “Histogram
+ Info” is selected.
A1
1 00
0038
A2
1 00-0038
A3
A4
A5
B1
B2
1 / 2 50
1 / 2 50
F3.5
F3.5
A6
12
M
Edit
Edit
Face Detection icon (p.69)
A1
Playback mode
A2
Q : Still Picture (p.122)
K : Movie (p.123)
L : Sound (p.170)
Battery level indicator (p.36)
A3
Protect icon (p.138)
A4
Voice memo icon (p.172)
A5
Four-way controller guide
A6
File number
A7
Folder number (p.183)
A8
Memory status (p.41)
A9
* A1 appears only if the Face Detection function worked when the image was
shot.
* In “Normal Display”, A3 disappears if no operation is performed for two
seconds.
* A6 appears even when “No Info” is selected, but disappears if no operation is
performed for two seconds. When no operation is performed for two seconds in
“Normal Display” or “Histogram + Info”, only “Edit” disappears.
* A11 appears only when the volume is being adjusted during playback of
movies, sounds, or voice memos (p.123, p.170, p.172).
* When “Normal Display” is selected, the current date and time appears for two
seconds in the B4 t o B8 positions.
12
B6 B7 B8
B5
AWB
A10
A11
B1
B2
B3
B4
B5
B6
B7
B8
ISO
200
ISO
200
Eye-Fi communication status
(p.189)
Volume icon
Shutter speed
Aperture
Histogram (p.31)
Sensitivity (p.100)
Recorded pixels (p.96)
Quality Level (p.97)
White Balance (p.98)
AE Metering (p.99)
A7
A8
A9
A10
A11
B3
B4
29
Page 32

* When there is an ar ea on the screen that is overexposed it appears white, the
1 0 0
-
0 0 3 8
139
35
41' 29"
N
W
45' 52 "
06 : 25:00
GPS
0 2 / 0 2 / ' 1 2
Edit
OK
SHUTTER
indicated area blinks red. Similarly, when there is an area that is underexposed
it appears black, the indicated area blinks yellow.
GPS Information Display in Playback Mode (displayed only on the Optio
WG-2 GPS)
1
1 00
0038
2
1 00-0038
3
4
5
7
8
9
10
11
0 2 /02 /'12
0 2 /02 /'12
GPS
6
Edit
Edit
1 Face Detection icon 8 Folder number
2 Playback mode 9 Memory status
3 Battery level indicator 10 Eye-Fi communication status
4 Protect icon 11 Volume icon
5 Voice memo icon 12 Positioning time
6 Four-way controller guide 13 Positioning latitude
7 File number 14 Positioning longitude
* 12 is displayed in GP S time (time data received from GPS satellites). This may
be different from the time you have set on the camera.
GPS
06: 2 5:00
N
35
35
W
139
139
45' 52"
45' 52"
41' 2 9"
41' 2 9"
Guide Display
A guide for each available button operation appears as follows on the display
during operation.
2 Four-way controller (2) Zoom button
3 Four-way controller (3) 4/W button
30
4 Four-way controller (4) Shutter release button
5 Four-way controller (5) X,
MENU
3 button I, JI button
i G reen/i button
12
13
14
Page 33

Histogram
Number of pixels
Brightness(Dark) (Bright)
Dark portions Bright portions
Dark image Correct image Bright image
A histog ram shows the bright ness
distribution of an image. The
horizontal axis represents
brightness (dark at the left and
bright at the right) and the vertical
axis represents the number of
pixels.
The shape of the histogram
before a nd after shoo ting tells you
whether the brightness and
contrast are correct or not, and
lets you decide if you need to use EV compensation and take the picture again.
Setting the Exposure (EV Compensation) 1p.101
Understanding Brightness
If the brightness is correct, the graph peaks in the middle. If the image is
underexposed, the peak is on the left side, and if it is overexposed, the peak is on
the right side.
When the image is underexposed, the part to the left is cut off (dark portions) and
when the image is overexposed, the part to the right is cut off (bright portions).
This camera has a function where overexposed areas are indicated as blinking
red and underexposed areas as blinking yellow.
Understanding Contrast
The graph peaks gradually for images in which contrast is balanced. The graph
peaks on both sides but sinks in the middle for images with a large difference in
contrast and low amounts of mid-level brightness.
31
Page 34

Attaching the Carabiner Strap
1Getting Started
Attach the carabiner strap supplied with the camera.
1
Getting Started
1
Pass the end of the strap through the strap lug on the camera.
2
Fix the end of the strap to the stopper.
Protective rubber ring
The carabiner has rubber rings to prevent damage to the display. These rubber rings
cushion the impact when the carabiner hits the display.
Be sure to adjust the position of the rubber rin gs as shown in the figure below for the
best results before using the carabiner strap.
32
Page 35

Powering the Camera
3
1
2
Battery charger
Charging indicator
While charging: Lights
Charging finished: T urns off
Battery
AC plug cord
To power outlet
Charging the Battery
Use the supplied battery charger (D-BC92) to charge the supplied rechargeable
lithium-ion battery (D-LI92) before using it in the camera for the first time or after
a long period of non-use, or when the [Battery depleted] message appears.
Note: AC plug cord “Listed, Type SPT-2 or NISPT-2, 18/2 flexible cord, rated
125 V, 7A, minimum 6 ft (1.8 m)”
1
Connect the AC plug cord to the battery charger.
2
Plug the AC plug cord into the power outlet.
3
Place the battery in the battery charger so that the PENTAX
4
logo is facing up.
The charging indicator turns on while charging.
When charg ing is finished, the charging indicator turns off.
Remove the battery from the battery charger when charging is finished.
• Do not charge batteries other than the rechargeable lithium ion D-LI92
battery using the supplied D-BC92 battery charg er. Doing otherwise may
cause damage or o verheating.
• The battery has reached the end of its service life when it starts to run down
soon after being charged. Replace it with a new battery.
• If the battery is inserted correctly but the charging indicator fails to ligh t, the
battery may be faulty. Replace it with a new battery.
1
Getting Started
33
Page 36

The time required to fully charge the battery is about 120 minutes (max.).
Battery/card cover
lock lever
Battery lock lever
Battery/card cover
Battery
(The charging time may vary dependin g on the ambient temperature and
charging conditions.) The appropriate ambient temperature for charging the
battery is 0°C to 40°C (32 °F to 104°F).
1
Getting Started
Installing the Battery
Use the rechargeable lithium-ion battery D-LI92 that is provided with the camera.
Charge the battery before using it in the camera for the first time.
1
Open the battery/card cover.
Press the ba ttery/card cover lock lever in the direction shown 1, slide the
cover towards 2 and op en it towards 3.
2
Using the side of the battery to press the battery lock lever in
the direction of 4, insert the battery with the PENTAX logo
pointing toward the lens.
Push the battery in until it is locked in place.
If the battery is incorrectly oriented, malfunction may result.
34
3
Close the battery/card cover.
While lightly pressing the battery/card cover, slide the cover in the opposite
direction indicated by 2. The cover clicks to confirm that it is securely
closed.
Page 37

Removing the Battery
1
Open the battery/card cover.
2
Press the battery lock lever towards 4.
The battery will be ejected. Take ca re not to drop the battery when remov ing
it.
• Do not use excessive force when sliding the battery/card cover open and
closed because the waterproof packing may peel off. If the packing is not
in the correct position, the camera will not be waterproof.
• If the battery/card cover is not locked securely when you close it, water,
sand, or dirt may get into the camera.
• This camera uses a recha rgeable lithium-ion battery D-LI92. Use of any
other type of battery may damage the camera and cause malfunction.
• Insert the battery correctly. If the battery is incorrectly oriented, malfunction
may result.
• Do not remove the battery while the camera is turned on.
• When storing the battery for more than 6 months, charge the battery for 30
minutes using the battery charger and store the battery separately.
Be sure to recharge the battery every 6 to 12 months. Storing the battery
below room temperature is ideal. Avoid storing it in high temperatures.
• The date and time may be returned to the default setting if the camera is
left without the battery for a long time.
• Be careful as the camera or the battery may become hot when the camera
is used continuously for a long period of time.
• Allow the camera to dry completely before changing the ba ttery. Avoid
changing the battery where the camera is likely to get wet or dirty, and
make sure that your hands are dry.
1
Getting Started
35
Page 38

• Image Storage Capacity, Movie Recording Time, Sound Recording Time,
and Playback Time
(at 23°C or 73.4°F with the display on and the battery fully charged)
1
Getting Started
Image Storage
(flash used for 50% of
Approx. 260 pictures Approx. 70 min. Approx. 270 min. Approx. 240 min.
Capacity
shots)
*1
Movie Recording
Time
*2
Sound Recording
Time
*2
Playback Time
*1 Recording capacity shows approximate number of shots recorded during
CIPA-compliant testing (with display on, flash used for 50% of the shots, and
23°C or 73.4°F). Actual performance may vary according to operating
conditions.
*2 According to the results of in-house testing.
• Battery performance may deteriorate as temperature decreases. When
using the camera in cold regions, we recommend carrying a spare battery
in your pocket to keep it warm. Battery performance will return to normal in
normal temper atures.
• If [GPS On/Off] on the [GPS] setting is set to [On], the camera performs
positioning regularly even if it is turned off, which reduces the battery life.
• Be sure to take a spare battery with you when traveling abroad or to a cold
region, or if you intend to take a lot of pictures.
• Battery Level Indicator
You can check the battery level by the indicator on the display.
Screen Display Battery Status
(green) Adequate power remains.
(green) Battery is running low.
(yellow) Battery is running very low.
(red) Battery is exhausted.
[Battery depleted] The camera will turn off after this message appears.
*2
36
Page 39

Using the AC Adapter
DC terminal
3
1
6
5
DC coupler
4
Use of the optional AC adapter kit (K-AC117) is recommended if you intend to use
the camera for a long time or connect it to a computer.
1
Make sure that the camera is turned off and open the battery/
card cover.
2
Remove the Battery.
Refer to p.34 - p.35 on how to open the battery/card cover and remove the
battery.
3
Insert the DC coupler.
Using the side of the DC coupler to press the battery lock lever, insert the
DC coupler. Confirm that the DC coupler is locked in place.
The battery/card cover will not close while the DC coupler is inserted. Leave
the cover open when using the AC adapter and do not attempt to close it.
4
Connect the DC terminal of the AC adapter to the DC terminal
of the DC coupler.
5
Connect the AC plug cord to the AC adapter.
6
Plug the AC plug cord into the power outlet.
1
Getting Started
37
Page 40

• Make sure that the camera is turned off before connecting or disconnecting
the AC adapter.
• Make sure that the AC plug cord and the DC terminal connecting the AC
adapter to the camera are inserted securely. Data may be lost if either
1
Getting Started
becomes disconnected while data is being recorde d on the SD Memory
Card or the built-in memory.
• Use the AC adapter with due care to avoid fire or electric shock.
Be sure to read “About the Battery Charger and the AC Adapter” (p.3)
before using the AC adapter.
• Be sure to read the operation manual accompanying the AC adapter kit
K-AC117 before using the adapter.
• When con necting the AC ada pter, you cannot set the camera upright on the
table because the cor d from the DC coupler comes out of the bottom of the
camera.
• Do not use excessive force when sliding the battery/card cover open and
closed because the waterproof packing may peel off. If the packing is not
in the correct position, the camera will not be waterproof.
38
Page 41

Installing the SD Memory Card
This camera uses SD Memory Cards, SDHC Memory Cards or SDXC Memory
Cards. (These cards are referred to as SD Memory Cards hereafter.) Captured
images and sound files are saved on the SD Memory Card if a card is inserted in
the camera. They are saved in the built-in memory if a card is not inserted (p.41).
• Be sure to use this camera to format (initialize) an SD Memory Card
that is unused or has been used on other cameras or digital devices.
Refer to “Formatting the Memory” (p.174) for instructions on
formatting.
• Make sure that the camera is turned off before inserting or remov ing the SD
Memory Card.
• Allow the camera to dry completely before changing the SD Memory Card.
Avoid changing the card where the camera is likely to get wet or dirty, and
make sure that your hands are dry.
• Do not use excessive force when sliding the battery/card cover open and
closed because the waterproof packing may peel off. If the packing is not
in the correct position, the camera will not be waterproof.
• The still picture storage capacity varies depending on the capacity of the
SD Memory Card and the selected number of recorded pixels and quality
leve l (p.23 5).
•
The power lamp blinks while the SD Memory Card is being accessed (data
is being recorded or read).
Backing Up Data
The camera may not be able to access data in the built-in memory in the case of a
malfunction. Use a computer or othe r device to back up important data in another
location.
1
Getting Started
39
Page 42

1
SD Memory Card
Battery/card cover
SD Memory Card
socket
Getting Started
1
Open the battery/card cover.
Press the ba ttery/card cover lock lever in the direction shown 1, slide the
cover towards 2 and op en it towards 3.
2
Insert the SD Memory Card into the SD Memory Card socket
so that the label is facing toward the front of the camera (the
side with the lens).
Push the card in all the way. Images and sound may not be recorded
correctly if the card is not inserted all the way.
To remo ve the SD Memory card, push it in once and then pu ll it out.
3
Close the battery/card cover.
While lightly pressing the battery/card cover, slide the cover in the opposite
direction indicated by 2. The cover clicks to confirm that it is securely
closed.
If the battery/card cover is not locked securely when you close it, water, sand,
or dirt may get into the camera.
• The file size differs depe nding on the number of recorded pixels of the
images and the number of the recordable images to the SD Memory Card
also differs.
•
Set the number of recorded pixels for still pictures from [A Rec. Mode]
menu and for movies from [
•
For an approximate numbe r of recordable images or time that can be saved
on an SD Memory Card, see “Main Specifications” (p.234).
C
Movie] menu.
40
Page 43

Turning the Camera On and Off
Power switch/Power lamp
3 8
Memory status
1
Press the power switch.
The camera turns on and both the power lamp and display turn on.
If the [Language/ ] screen or [Date Adjustment] screen appears when
you turn the camera on, follow the procedure on p.43 to set the display
language and/or curre nt date and time.
2
Press the power switch again.
The camera turns off and both the power lamp and display turn off.
Taking Still Pictures 1p.60
Checking the SD Memory Card
The SD Memory Card is checked when the
camera turns on and the memory status is
displayed.
The SD Memory Card is inserted. Images
and sound files will be saved on the SD
a
Memory Card.
The SD Memory Card is not inserted.
Images and sound files will be saved in the
+
built-in memory.
The write-protect switch on the SD Me mory
Card is in the LOCK position (p.7). Images
r
and sounds cannot be recorded.
38
38
1
Getting Started
41
Page 44

Starting-up in Playback Mode
Q button
Power switch
Use this function when you want to play back images or sound files straightaway
without taking any pictures.
1
Getting Started
1
Press and hold down the Q button.
The display turns on and the camera starts up in playback mode.
• To switch from playback mode to A mode, press the Q button or press
the shutter release button halfway.
• In order to set the start up in playback mode to off, set [Playback Mode] to
P (Off) from [Startup Shortcut] in the [W Setting] menu. (p.194)
Playing Back Still Pictures 1p.122
42
Page 45

Initial Settings
3 button
Four-way controller
4 button
OFF
Daylight saving time
The [Language/ ] screen appears when the camera is turned on for the first
time. Perform the operations in “Setting the Display Language” below to set the
language, and in “Setting the Date and Time” (p.46) to set the current date and
time.
The langua ge, date, and time can be changed later. Refer to the pa ges below for
instructions.
• To change the language, follow the steps in “Changing the Display Language”
(1p.182).
• To change the date and time, follow the steps in “Changing the Date and Time”
(1p.176).
Setting the Display Language
1
Use the four-way controller (2345) to choose the display
language.
1
Getting Started
2
Press the 4 button.
The [Initial Setting] screen appea rs in
the selected language. If the desired
settings for [Hometown] and [DST]
(Daylight Saving Time) appear,
proceed to Step 9.
Initial Setting
Hometown
New York
Settings complete
MENU
Cancel
English
DST
OFF
OFF
43
Page 46

3
OFF
Press the four-way controller (3).
The frame moves to [W Hometown].
1
Getting Started
4
Press the four-way controller (5).
The [W Hometown] screen appears.
5
Use the four-way controller (45)
to choose a city.
6
Press the four-way controller (3).
The frame moves to [DST] (Daylight Saving Time) .
7
Use the four-way controller (45) to select O or P.
8
Press the 4 button.
The [Initial Setting] screen reapp ears.
9
Press the four-way controller (3) to select [Settings
Initial Setting
Hometown
New York
Settings complete
MENU
Cancel
Hometown
City
DST
MENU
Cancel
New York
English
DST
OFF
OFF
OK
OK
complete].
10
Press the 4 button.
The [Date Adjustment] screen appears. Next, set the date and time.
44
Page 47

If you accidentally select the wrong language and go to the next procedure, perform
the following operation to set the language back.
When the Wrong Langu age Has Been Inadvertently Selected
1
Press the four-way controller (5).
2
Use the four-way controller (2345) to select the language
and press the 4 button.
The [Initial Setting] screen appears in the selected language.
When the Screen After Step 2 Appears in the Wrong Language
1
Press the 3 button.
This exits the settings screen and returns the camera to capture mode.
2
Press the 3 button.
The [A Rec. Mode] menu app ears.
3
Press the four-way controller (5) twice.
4
Use the four-way controller (32) to select [Language/ ].
5
Press the four-way controller (5).
The [Language/ ] screen appears.
6
Use the four-way controller (2345) to select the
language.
7
Press the 4 button.
The [W Setting] menu appears in the selected language.
The langu age is now switched to your desire d language. To reset [Hometown], [Date]
and [Time], refer to the pages below for instructions.
• To change [Hometown], follow the steps in “Setting the World Time” (1p.180).
• To change the date and time, follow the steps in “Changing the Date and Time”
(1p.176).
The video output format (NTSC/PAL) is set to the format of the city selected in
[Hometown] on the [Initial Setting] screen. See the following pages for information on
the available video output formats and how to change the initial settings.
• Video output formats available initially: “List of World Time Cities” (1p.232)
• To change the video output format: “Changing the Video Output Format” (1p.187).
1
Getting Started
45
Page 48

Setting the Date and Time
MENU
mm/dd/yy 24
h
00:00
Cancel
Settings complete
Date Adjustment
Date Format
Date
Time
01/01/2012
Set the current date and time and the display format.
1
1
Getting Started
Press the four-way controller (5).
The frame moves to [mm/dd/yy].
2
Use the four-way controller (23)
to choose the date and time
display format.
Choose from [mm/dd/yy], [dd/mm/yy] or
[yy/mm/dd].
3
Press the four-way controller (5).
The frame moves to [24h].
4
Use the four-way controller (23) to select [24h] (24-hour
display) or [12h] (12-hour display).
5
Press the four-way controller (5).
The frame returns to [Date Format].
6
Press the four-way controller (3).
The frame moves to [Date].
7
Press the four-way controller (5).
The frame moves to the month.
8
Use the four-way controller (23) to change the month.
Change the day and year in the same manner.
Next, change the time.
If you selected [12h] in step 4, the setting switches between am and pm
corresponding to the time.
9
Press the four-way controller (3) to select [Settings
complete].
10
Press the 4 button.
This confirms the date and time.
46
If you press the 4 button in step 10, the came ra clock is reset to 00
seconds. To set the exact time, press the 4 button when the time signal (on
the TV, radio, etc.) rea ches 00 seconds.
Page 49

When the [Initial Setting ] or [Date Adjustment] screen is displayed, you can
cancel the setting operation and switch to the capture mode by pressing the
3 button. In this case, the [Initial Setting] screen will appear next time
you turn the camera on.
[Languag e/ ], [Date], [Time], [Hometown] and [DST] can be changed. Refer to
the pages below for instructions.
• To change the language, follow the steps in “Changing the Display Language”
(1p.182).
• To change the date and time, follow the steps in “Changing the Date and Time”
(1p.176).
• To change the city or turn DST on and off, follow the steps in “Setting the World
Time” (1p.180).
1
Getting Started
47
Page 50

Understanding the Button Functions
2Common Operations
2
4
8
6
9
5
3
1
7
A Mode
2
Common Operations
1 Power switch
Turns the camera on and off (p.41).
2 Shutter release button
Focuses the camera on the subject when pressed halfway in Still Picture
Capture Mode (excep t when the focus mode is set to 3, s, and \) (p.61).
Takes a still picture when pressed down fully (p.61).
Pressing down fully starts and stops movie recording in C (Movie),
(Underwater Movie), and (High Speed Movie) modes (p.111, p.113).
Pressing down fully starts and stops sound file record ing in O (Voice Recording)
mode (p.169).
3 W/T button
Changes the captured area (p.63).
4 Q button
Switches to the Q mode (p.52).
5 Four-way controller
(2) : Changes the drive mode (p .81 - p.84).
(3) : Displays the Capture Mode Palette (p.67).
(4) : Changes the flash mode (p.90).
(5) : Changes the focus mode (p.91).
(23) : Adjusts the focus when the focus mode is set to \ (p.92).
48
Page 51

6 4/W button
Changes the information on the display (p.25).
7 3 button
Displays the [A Rec. Mode] menu (p.53).
8 I button
Switches the Face Detection function (p.69). The Face Detection function is
switched as follows each time the I button is pressed:
Smile Capture Self-portrait Assist Self-portrait Assist + Smile Capture
Face Detection Off Face Detection On
Selects or registers a pet in e (Pet) mode.
9 Green button
Switches to 9 (Green ) mode (p.73).
Calls up the assigned function (p.105).
2
Common Operations
49
Page 52

Q Mode
2
4
8
6
9
5
3
1
7
2
Common Operations
1 Power switch
Turns the camera on and off (p.41).
2 Shutter release button
Switches to A mode (p.52).
3 f/y button
In single-image display, pressing f switches to 6-image display. Pressing f
again switches to 12-image display (p.124). Press y to return to the previous
display.
In single-image display, pressing y enlarges the image. Press f to return to
the previous display (p.132).
In 12-image display press f to change to folder or calendar display (p.125).
In folder/calendar display, press y to change to 12-image displa y (p.125).
Adjusts the volume during playback of movies, sound files or voice memo
(p.123, p.170, p.172).
4 Q button
Switches to A mode (p.52).
50
Page 53

5 Four-way controller
(2) : Plays back and pauses a movie or sound file (p.12 3, p.170,
p.172).
(3) : Displays the Playback Mode Palette (p.128).
Stops a movie or sound file during playback (p.123, p.170,
p.172).
(45) : Displays the pr evious or next image and sound file during single-
image display (p.122).
Fast-forwards, fast-reverses, frame forwards, frame reverses,
reverses a movie and makes a movie play forwards during
playback (p.123).
Fast forwards, reverses, and moves to the next index in sound
file playback (p.170).
(2345) : Moves the display area dur ing zoom display (p.132).
Selects an image in 6- or 12-image display, a folder in folder
display, and a date in calendar displa y (p.124, p.125).
Moves the image when using the Frame Composite function
(p.154).
Adjusts the position of a frame or an image when you are usin g
the Original Frame function (p.158).
6 4/W button
Changes the information on the display (p.28).
Returns zoom, 6- or 12-image display to single-image display (p.125, p.132).
Changes to 12-image display of the selected folder during folder display (p.125).
Changes to single-image display of the selected date during calendar display
(p.126).
7 3 button
Displays the [W Setting] menu during single-image display (p.53).
Returns to single-image display during Playback Mode Palette display (p.127).
Returns zoom, 6- or 12-image display to single-image display.
Changes to 12-image display of the selected folder during folder display (p.126).
Changes to 12-image display of the selected date during calendar display
(p.126).
8 I button
Zooms up on the subjects’ faces in the order in which they were recognized
during shooting (Face close-up playback) (p .133).
9 Green/i button
Switches from single-image display to the Delete screen (p.135).
Switches from 6- or 12-image display to the Select & Delete screen (p.136).
Switches from folder display to the calendar display scre en (p.125).
Switches from calendar display to the folder display screen (p.125).
2
Common Operations
51
Page 54

Switching Between A Mode and Q Mode
Make sure that the camera is turned off before inserting or removing the
SD Memory Card.
In this manual, the capture mode, such as for taking still pictures, is referred to as
“A mode” (capture mode). Playback mode, such as for displaying captured
images on the monitor, is referred to as “Q mode” (playback mode). In Q mode,
you can perform simple editing operations on the images that are played back.
Follow the procedure below to switch bet ween A mode and Q mode.
2
To Switch from A Mode to Q Mode
Common Operations
1
Press the Q button.
The camera sw itche s to Q mode.
To Switch from Q Mode to A Mode
1
Press the Q button or the shutter release button halfway.
The camera sw itche s to A mode.
Displaying data stored in the built-in memory
When an SD Memory Card is inserted in the camera, still pictures, movies, and
sounds on the SD Memory Card are displayed. If you want to display still pictures,
movies, and sounds stored in built-in memory, turn the camera off and remove the
SD Memory Card.
52
Page 55

Setting the Camera Functions
1 4: 25
' 10 /0 2/ 02
1 4: 25
' 10 /0 2/ 02
Edi t
10 0
-
00 38
12
M
In capture mode
In playback mode
To change the camera settings, press the 3 button to display the [A Rec.
Mode] menu or [W Setting] menu. Functions for playing back and editing images
and sound files are displayed from the Playback Mode Palette.
Operating the Menus
There are three types of menu: [A Rec. Mode], [C Movie] and [W Setting]. Press
the 3 button in A mode to display the [A Rec. Mode] menu. Press the
3 button in Q mode to display the [W Setting] menu.
Use the four-way controller (45) to move between menus.
P
38
Edit
Edit
'10/02/02
100
100-0038
'10/02/02
02/02/'12
14:25
14:25'10/02/02
0038
14:25
14:25'10/02/02
14:25
MENU
SHUTTER
SHUTTER
MENU
Rec. Mode
Image Tone
Recorded Pixels
Quality Level
White Balance
AF Setting
AE Metering
MENU
Exit
Movie
Recorded Pixels
Mov
iSRe
MENU
Exit
Sound
Date Adjustment
Alarm
World Time
Text Size
Language
MENU
Exit
Setting
1/4
Bright
12
M
12
16:9
AWB
1/4
01/01/2012
Standard
English
2
Common Operations
53
Page 56

2
MENU
Common Operations
• Available button and key operations appear on the display during menu
operation.
• The 3 button function differs depending on the screen. Refer to the
guide indications.
Exit Exits the menu and return s to the original screen.
MENU
Cancel Cancels the curr ent selection, exits the menu and
MENU
Returns to the previous screen with the current setting.
returns to the previous screen.
54
Page 57

Menu List
This displays the items that can be set with the menus and provides descriptions
of each item. See the list of default settings in the Appendix “Default Settings”
(p.227) to decide whether you want the settings saved when the camera is turned
off and whether you want the settings returned to the defaults when the camera
is reset.
[A Rec. Mode] Menu
This menu shows the functions related to taking still pictures and recording
movies.
Item Descrip tion Page
Image Tone For setting the tone of images p.95
Recorded Pixels
Quality Level For setting the quality level of still pictures p.97
White Balance
Focusing
AF
Setting
AE Metering
Sensitivity For setting the sensitivity p.100
AUTO ISO Range
EV Compensation For adjusting the overall brightness of the picture p.101
D-Range
Setting
Pixel Track SR
Blink Detection
Digital Zoom
Instant Review For choosing whether to display Instant Review p.104
Memory
Area
Auto Macro
Focus
Assist
Highlight
Correction
Shadow
Correction
For choosing the number of recorded pixels of still pictures
For adjusting the color balance according to the
lighting conditions
When = (Standard), q (Macro), or (1cm
Macro) is selected as the focus mode, you can
change the autofocus area (Focusing Area)
For choosing whether or not to use the auto macro function
For setting whether or not to use the focus assist
light
For choosing the area of the screen that is metered
to determine the exposure
For setting the adjustment range when sensitivity is
set to AUTO
For setting whether to perform bright portion
compensation
For setting whether to perform da rk portion
compensation
For choosing whether to compensate for camera
shake while taking still pictures
For choosing whether to use the Blink Detection
function with the Face Detection function
For choosing whether or n ot to use the dig ital zoom
function
For choosing whether to save the set values of the
shooting function or return to the defaults when the
camera is turned off
p.96
p.98
p.93
p.94
p.94
p.99
p.101
p.102
p.102
p.103
p.104
p.65
p.120
2
Common Operations
55
Page 58

Item Descrip tion Page
[A Rec. Mode] Menu 1 [A Rec. Mode] Menu 2
[A Rec. Mode] Menu 3 [A Rec. Mode] Menu 4
Green Button
For assigning a function to the Green button in A
mode
Sharpness For choosing sharp or soft o utlines p.108
Saturation
(Tone Adjustment)
For set ting the color saturation. When [Monochrome] is
selected, the i tem changes to [Tone Adj ustment]
Contrast For setting the image contrast level p.109
Date Imprint
2
Common Operations
IQ Enhancer* For setting whether to perform the IQ enhancer. p.110
Macro Light
For choosing whether to imprint the date and /or time
when taking still picture s
For setting whether or not to turn on the LED Macro
Lights for macro photography
*IQ Enhancer = Image Quality Enhancer
p.105
p.108
p.109
p.110
Rec. Mode
Image Tone
Recorded Pixels
Quality Level
White Balance
AF Setting
AE Metering
MENU
Exit
Rec. Mode
Digital Zoom
Instant Review
Memory
Green Button
Sharpness
Saturation
MENU
Exit
1/4
Bright
12
M
AWB
3/4
Rec. Mode
Sensitivity
Auto ISO Range
EV Compensation
D-Range Setting
Pixel Track SR
Blink Detection
MENU
Exit
Rec. Mode
Contrast
Date Imprint
IQ Enhancer
Macro Light
MENU
Exit
•Use 9 (Green) mode to enjoy easy picture -taking using standard settings,
regardless of the setting s in the [A Rec. Mode] menu (p.73).
• Assigning frequently used functions to the Green button enables you to go
straight to the desired function (p.105).
56
2/4
AUTO
4/4
Off
ISO
125-1600
0.0
Page 59

[C Movie] Menu
[C Movie] Menu
Item Descrip tion Page
Recorded Pixels
Movie SR
Movie
Recorded Pixels
Mov
iSRe
MENU
Exit
For choosing the number of record ed pixels and the
frame rate for movies
For choosing whether or not to use the Movie Shake
Reduction function
[W Setting] Menu
Item Description Page
For adjusting the operation volume and playba ck
Sound
volume, and setting the start-up sound, shutter
sound, key operation sound, and self-timer sound
Date Adjustment For adjusting the date and time p.176
Alarm For setting the alarm p.178
World Time For setting the hometown and destination p.180
Text Size For settin g the text size of the menu p.182
Language/
Folder Name
File Name
USB Connection
For setting the language in which menus and
messages appear
For choosing how names are assigned to folders for
storing images and sound files
For choosing how names are assigned to images and
sound files
For setting the method for connecting to a PC (MSC
or PTP)
Video Out For setting the outpu t format to the AV equipment p.187
HDMI Out
Eye-Fi
For setting the HDMI output format when connecting
to an AV device with an HDMI terminal
For setting whether or not to use Eye- Fi
communication
Brightness Level For changing the brightness of the display p.189
p.115
p.116
2
Common Operations
p.175
p.182
p.183
p.185
p.202
p.188
p.189
57
Page 60

Item Description Page
Power Saving
Auto Power Off
Quick Zoom
2
Guide Display
Common Operations
Reset
Delete All For deleting all the images and sound files at once p.137
Pixel Mapping For correcting for defective pixels on the CCD sensor p.192
Playback
Mode
Startup
Shortcut
Format For formatting the SD Memory Card/built-in memory p.174
GPS (*)
(*) Optio WG-2 GPS only
LED
Lighting
Clock
Display
GPS
On/Off
GPS
Logging
GPS
Time
Sync
For setting the time until the camera enters power-
saving mode
For setting the time until the camera turns off
automatically
For choosing whether to use [Quick Zoom] (p.132)
when playing back images
For setting whether to display explanations for
selected items in Capture Mode Palette and Playback
Mode Palette displays
For returning settings other than the date an d time,
language, world time and video out to their defaults
For choosing whether to start-u p the camera in
playback mode.
For choosing whether to turn the LED Macro Lights
on while the camera is turned off.
For choosing whether to display the clock while the
came ra is tur ned off.
For setting whether to record the GPS data on
captured images
For settin g the interval and duration of logs. Saving
and deleting of received logs can be selected also.
For setting whether to correct the clock in the camera
automatically using the received GPS data
p.190
p.190
p.191
p.191
p.194
p.194
p.194
p.194
GPS
Guide
58
Page 61

2
MENU
Exit
Sound
Date Adjustment 01/01/2012
World Time
Alarm
Standard
Text Size
Language
Setting
1/4
English
[W Setting] Menu 1 [W Setting] Menu 2
[W Setting] Menu 3
MENU
Exit
Video Out
HDMI Out
Folder Name
File Name
Date
Auto
Eye-Fi
NTSC
USB
Connection
MSC
IMG
P
Setting
2/4
[W Setting] Menu 4
Common Operations
Setting
Brightness Level
Power Saving
Auto Power Off
Quick Zoom
Guide Display
Reset
MENU
Exit
5
3
sec.
min.
3/4
Delete All
Pixel Mapping
Startup Shortcut
Format
GPS
MENU
Exit
Setting
4/4
59
Page 62

Taking Still Pictures
3Taking Pictures
W/T button
Power switch
Shutter release button
3 8
Focus frame
383 838
Face detection frame
Taking Pictures
This camera is equipped with functions and shooting modes that support a wide
array of scenes and subjects. This sect ion explains shooting using the default
settings when shipped.
3
Taking Pictures
1
Press the power switch.
The camera turns on and is ready to take still pictures. In this manual, this is
called Still Picture Capture Mode.
2
Confirm the subject and shooting
information on the display.
The focus frame in the middle of the display
indicates the zone of automatic focusing.
38
38
When the camera detects a person’s face,
the Face Detection function is activated and
the face detection frame appears (p.69).
60
Page 63

You can change the captured area by pre ssing the zoom button (p .63).
F 4 . 6
1 / 2 50
3 8
Right ( T) Enlarges the subject.
Left (W) Widens the area that is captured by the camera.
3
Press the shutter release button
halfway.
The camera emits focu s assist light in dark
shooting situations.
The focus frame (or face de tection frame)
on the display turn s green when the camera
focuses on the subject at the correct
distance.
4
Press the shutter release button fully.
The picture is taken.
The flash discharges automatically depending on the light conditions.
The image appears on the display temp orarily (Instant Review: p.63) and is
saved to the SD Memory Card or the built-in memory.
• Press the Green button to switch to 9 (Green) mode and let the camera
set all the shooting functions automatically (p.73).
• f is displayed when the shutter release button is pressed ha lfway if there
is a risk of camera shake.
1/250
1/250
F4.6
F4.6
38
38
3
Taking Pictures
61
Page 64

Using the Shutter Release Button
Not pressed Pressed halfway
(first position)
Pressed fully
(second position)
The shutter release button works in a two-step action as follows.
Press halfway
This refers to pressing the shutter release button gently to the first position. This
locks the focus setting and the exposure. The green focus frame lights on the
display when the shutter release button is pressed halfway and the subject is in
focus. If the subject is out of focus, the frame turns white.
Press fully
This refers to pressing the shutter release button all the way down to the fully
depressed position. This takes a picture.
3
Taking Pictures
Poor focusing conditions
The camera may not be able to focus under the following conditions. In these cases,
lock the focus on an object the same distance away as the subject (by pressing and
holding the shutter release button halfway), then aim the camera at your subject and
press the shutter release button fully.
• Objects that lack contrast such as a blue sky or white wall
• Dark places or objects, or conditions that prevent light being reflected back
• Intricate patterns
• Fast moving objects
• When there is an object in the foreground and an object in the background in the
captured area
• Strongly reflected light or strong backligh ting (bright background)
62
Page 65

Instant Review and Blink Detection
3 button
W/T button
Four-way controller
4 button
3 8
Zoom bar
Zoom ratio
The image appears on the display temporarily (Instant Review) immediately after
it is captured. If the camera detects that the subject’s eyes are closed while Face
Detection (p.69) is activated, the message [Closed eyes have been detected]
appears for 3 seconds (Blink Detection).
• When the Face Detection function does not work, Blink Detection also does
not function. Even if the subject’s faces are recognized, Blink Detection
may not function depending on the condition of the recognized faces.
• You can also disable the Blink Detection function (p.104).
Using the Zoom
You can use the zoom to change the captured area.
1
Press the W/T button in A mode.
W Wide (left)
Widens the area that is captured
by the camera.
T Tele (right)
Enlarges the subject.
If you continue to press T, the camera
automatically switches from optical zoom to
Intelligent Zoom and stops at the point where
the zoom switches to digital zoom.
Once the button is released and pressed again, the camera switches to digital
zoom.
If the digital zoom is set to off on the menu, the optical zoom and the Intelligent
Zoom ranges are available for use. The zoom ratio of the Intelligent Zoom
changes depending on the number of recorded pixels.
The zoom bar is displayed as follows.
38
38
3
Taking Pictures
363636
63
Page 66

*1 You can zoom in to a maximum of 5× optically.
Zoom in with high image quality.
Zoom in with some degree of image
deterioration.
Optical zoom range*1 Intelligent
zoom range*2
Digital zoom
range
*2 The Inte lligent Zo om range differs de pending on the reco rded pixels. See the
following table.
3
Recorded pixels and the maximum zoom ratio
Taking Pictures
Record ed Pixe ls
//
6/
f/
h
h
V
l
m
(*) V can only be set for recorded pixels when (Report) mode is set.
• We recommend you use a tripod to prevent camera shake when taking
pictures at high zoom.
• Pictures taken in the digital zoom range appear grainier than pictures taken
in the optical zoo m range.
• For details on the available functions, refer to “Functions Available for Each
Shooting Mode” (p.220).
• The image enlarged using Intelligent Zoom may appear rough on the
display. This does not affect the quality of the recorded image.
• Intellig ent Zoom is available regardless of whether d igital zoom is turned on
or off.
(The zoom ratio includes the 5× optical zoom.)
Not Available (5× optical zoom only)
(*)
Not Available (5× optical zoom only)
Approx. 36× (same as digital zoom)
Intelligent Zoom
Approx. 7.5×
Approx. 8.9×
Approx. 11.3×
Approx. 12×
Approx. 22.5×
Digital zoom
Equivalent to
approx. 36×
Equivalent to
approx. 36×
64
Page 67

To Set the Digital Zoom
Four-way controller
4 button
The digital zoom is set to O (On) in the default settings. To take pictures using
only the optical zoom and Intelligent Zoom, set the digital zoom to P (Off).
1
Press the 3 button in A mode.
The [A Rec. Mode] menu appears.
2
Use the four-way controller (23) to select [Digital Zoom].
3
Use the four-way controller (45)
to switch between O (On) or P
(Off).
O(On) Uses digital zoom
P (Off) Uses only optical zoom and
The setting is saved.
4
Press the 3 button.
The camera returns to capture mode.
Saving the Digital Zoom Function setting 1p.120
Intelligent Zoom
Rec. Mode
Digital Zoom
Instant Review
Memory
Green Button
Sharpness
Saturation
MENU
Exit
3/4
Setting the Shooting Mode
This camera has a variety of shooting modes that let you take pictures or record
movies and sound in different situations simply by choosing the right mode for the
particular situation from the Capture Mode Palette.
3
Taking Pictures
1
Press the four-way controller (3) in A mode.
The Capture Mode Palette appears.
65
Page 68

2
Landscape
For capturing landscape
views. Enhances colors
of sky and foliage
1/2
OK
OK
MENU
Cancel
Use the four-way controller
(2345) to choose a shooting
mode.
A guide of the selected shooting mode is
displayed in the lower part of the display.
3
Press the 4 button.
The shooting mode is selected and the camera returns to capture mode.
3
Taking Pictures
66
Page 69

The following 24 modes can be selected with Capture Mode Palette.
Standard Night Scene
Night Scene
Portrait
Landscape Flower Portrait
Sport Candlelight Blue Sky
Portrait×
Blue Sky
Portrait×
Backlight
Sunset
Portrait×
Sunset
Group
Photograph
Text
Item Descrip tion Page
The camera automatically selects the
appropriate capture mode from the following
fifteen modes
Auto Picture
b
* When the camera detects the pet’s full face,
the shutter is automatically released.
Used for basic shooting. The shutter speed and
Program
R
Night Scene
A
Handheld Night
Snap
Movie
C
Underwater For capturing images underwater p.111
Underwater Movie Use this mode for taking underwater movie p.111
Digital Microscope
Landscape
a
b Flower
the aperture are set automatically by the camera
during shooting. However, you can select other
functions such as the flash mode and recorded
pixels
For night time images. Use of a tripod or other
support is suggested
Minimizes camera shake for shooting at night or
other low light settings
For recording movies. Sound is recorded at the
same time
Capture the bigger images of the closer objects
(fixed to h)
For captur ing landscape views. Focuses the
camera on wide range
For images of flowers. The outline of the flower is
softened
p.113
p.77
3
Taking Pictures
67
Page 70

Item Descrip tion Page
Portrait
c
Interval Shot
Interval Movie
High Speed Movie
Digital SR Higher sensitivity reduces blur
c
Surf & Snow
Q
3
Taking Pictures
Kids
R
Pet
e
Sport
\
Candlelight For capturing scenes in candlelig ht
U
Fireworks
S
Night Scene
B
Portrait
Text
B
Food
K
X Digital Wide
Digital Panorama
F
Frame Composite
N
Report
* 9 (Green) (p.73) and O (Voice Recording) (p.168) mo des are available in addition
to the ones noted above.
For captur ing portraits. Reprodu ces a healthy
and bright skin tone
Shoots a series of images at a specified interval
of time
Shoots a series of images at a specified interval,
and saves them as a movie
Records a high speed movie for slow motion
playback
For bright images such as sand or snow.
Accurately meters for bright scenes
For capturing mo ving kids. Repr oduces a healthy
and bright skin tone
For capturing moving pets. Available to detect
registere d pets
For a fast moving subject. Tracks the subject un til
the picture is taken
For capturing fireworks. Use of a tripod or other
support is suggested
For images of people at night. Use of a tripod or
other support is advised
Captures text in an easy to read manner. Text
contrast can be adjusted
For images of food and prepared dishes.
Enhan ces saturation and contr ast
Stitches two pictures together to create a wider
image (fixed to h)
Stitches images taken with the camera to create
a panoramic photograph
For capturing images with a frame. Recorded
pixels is fixed to h or h
For captur ing image with fixed 1280×960 pixels
for reports
p.79
p.116
p.119
p.74
p.77
p.85
p.87
p.78
68
Page 71

• In shooting modes other than R (Program), A (Night Scene), C (Movie),
3 8
Face detection frame
3 8
When the multiple faces are
detected
Main frame White frame
(Digital Microscop e), (Handheld N ight Snap), (Interval Sh ot), c
(Digital SR), F (Digital Panorama), X (Digital Wide), and N (Frame
Composite), Saturation, Contrast, Sharpness, White Balance, etc. are
automatically set to the optimal settings for the selected mode.
• Some functions may not be available or may not function fully depending
on the sele cted shooting mode. For details, refer to “Function s Available for
Each Shooting Mode” (p.220).
• You can turn off the shooting mode guide on the Capture Mode Palette
(p.191).
• The shutter speed tends to be slower when taking pictures of dark scenes.
To prevent camera shake, set the Pixel Track SR to O (On) (p.103) or use
a tripod and/or remote control (optional), the self-timer function (p.81).
Using the Face Detection Function
When the camera detects a person’s face in
the image, the Face Detection function displays
a yellow face detection frame around the
face on the display screen, sets the focus
(Face Detection AF) and compensates the
exposure (Face Detection AE).
If the subject in th e face de tection frame moves,
the frame also moves and changes size as it
tracks the face.
The Face Detection function can recognize up
to 32 people’s faces. If it recognizes multiple
faces, the camera displays a yellow frame over
the main face and white frames over the other
faces. It can display up to a total of 31 frames,
including both the main and white frames.
38
38
3
Taking Pictures
38
38
69
Page 72

• Face Dete ction AF and AE may not work if the subject is wearing
I button
sunglasses, has part of their face covered or is not looking toward the
camera.
• If the camera cannot detect the subject’s face, the camera focuses using
the setting currently selected in [Focusing Area].
• However, the Smile Capture function may not work and an image may not
be captured, even when turned on, depending on the condition of the
recognized faces, such as the faces are too small. If this happens, press
the shutter release button to take a picture.
•In e (Pet) mode, th e Face Detection mode is switched to Pet De tection
(only one pet).
• If you use the Face Detection function when the flash mode is set to
3
Taking Pictures
, (Auto), the flash mode automatically changes to d (Fla sh On + Red-
eye).
To Switch the Face Detection Function
By default, the Face Detection function is set to Face Detection On. You can
switch to the Smile Capture function, which automatically releases the shutter
when your subject smiles. The Face Detection function is switched as follows
each time the I button is pressed:
Smile Capture Self-portrait Assist Self-portrait Assist + Smile Capture
Face Detection Off Face Detection On
An icon indicating either Face Detection or Smile Capture appears on the display.
(The Face Detection Off icon only appears right after the Face Detection function
is switched to off.)
70
Page 73

The Face Detection function cannot be selected in some shooting modes.
P
PPP
P
Face Detection On Smile Capture Self-portrait Assist
Face Detection Off Self-portrait Assist
+ Smile Capture
Refer to “Functions Available for Each Shooting Mode” (p.220) for details.
3
Taking Pictures
71
Page 74

To Use the Self-portrait Assist Function
The LED Macro Lights around the lens blink when the camera detects people
faces in the Self-portrait Assist or Self-portrait Assist + Smile Capture function.
The position of the blinking LED indicates where the detected face is on the
screen.
The position (area) of the detected face corresponds to t he blinking LED as
follows.
1
3
Taking Pictures
2
3 4
Example 1. When the camera detects a person in area 1 on the display.
Example 2. When the camera detects two people in areas 2 and 5 on the
display.
6
5
2
1
6
3 4
5
72
Page 75

• When the camera detects two faces in the same area, the closest LED to
the blinking LED also blinks.
• The camera can tell the position of up to three detected faces by blinking
LED.
• When the camera detects three faces in area 2, LED 1 to 3 blink.
• When the camera detects three faces in area 5, LED 4 to 6 blink.
• When the camera detects four or five faces, the LED blink depending on
the number of detected faces. When the camera detects six or more faces,
all LED (six) blink (the lights do not tell the position of detected faces).
•In b (Auto Picture) mode, LED turn off after pressing the shutter release
button halfway when the camera is in a mode with no Face Detection
function.
• When the Self-portrait Assist function is on, LED do not turn off after the set
period of Powe r Saving.
• LED do not blink when the detected faces are too small.
Taking Pictures in Basic Mode (Green Mode)
In 9 (Green) mode, you can enjoy easy picture-taking using standard settings,
regardless of the settings in the [A Rec. Mode] menu.
9 mode settings are as shown below.
Flash Mode
Drive Mode 9 (Standard) Shadow Correction P (Off)
Focus Mode = (Stand ard) Sensitivity AUTO (125-1600)
Information Display Standard EV Compensation ±0.0
Pixel Track SR P (Off) Blink Detection O (On)
Recorded Pixels (4608×2592) Digital Zoom O (On)
White Balance
Focusing Area
Auto Macro O (On) Saturation G (Normal)
Focus Assist O (On) Contrast G (Normal)
AE Metering
Image Tone Bright Macro Light P (Off)
Quality Leve l D (Better)
, (Auto)
F (Auto)
J (Multiple)
L (Multi-segment
metering)
Highlight Correction P (Off)
Instan t Review O (On)
Sharpness G (Normal)
Date Imprint Off
IQ Enhancer O (On)
3
Taking Pictures
73
Page 76

1
Press the Green button in A
mode.
The camera sw itche s to 9 mode.
Press th e Green button again to return
to the status before 9 mode was
selected.
When the camera detects a person’s face,
the Face Detection function is activated and
the face detection frame appears (p.69).
2
\Press the shutter release button halfway.
3
Taking Pictures
The focus frame on the display turns green when the camera focuses on the
subject at the correct distance.
3
Press the shutter release button fully.
The picture is taken.
• Assign 9 mode to the [Green Button] on the [A Rec. Mode] menu for
using 9 mode (p.105). (The default setting is 9 mode).
• Press the 3 button in 9 mode to display the [W Settin g] menu. The
[A Rec. Mode] menu cannot be displayed.
• When the camera is turned off in 9 mode, it turns on in 9 mode next time
the power switch is pressed.
383838
Taking Pictures of Your Pet (Pet Mode)
In e (Pet) mode, the camera automatically releases the shutter when the pet is
detected. Also the camera can register pets.
1
Use the four-way controller (2345) to select e (Pet) from
the Capture Mode Palette.
2
Press the 4 button.
e (Pet) mode is selected and the camera returns to capture status.
When the camera detects the pet’s full face, the shutter is automatically
released.
74
Page 77

To Register the Pet
Can cel
If pet fa ce turn s t o ca mer a
fro nt, it 's self -re gist eri ng
Pet registration screen
Reg iste r thi s im age ?
Registry confirmation screen
3 8
Sel ecti on / Regi str y
Capture status screen
1
Press the I button on the
capture status screen in e (Pet)
mode.
The pet selection screen appears.
Selecting pet to shoot
2
Press the I button again.
The pet registration screen appears.
Aiming the camera at the pet’s full face
automatically releases the shutter and the
pet registration confirmation dialog
appears.
When you select [Registry] using four-way
controller (2) and press the 4 button,
the picture of the registered pet is indicated
on the upper-left corner of the display and
the camera returns to the capture status.
When the camera detects the pet’s full
face, the camera automa tically releases
the shutter.
You can also take a picture by pressing the
shutter release button.
When you press the I button twice in the
capture status screen, the pet registration
screen app ears to register another pet. You
can register up to three pets.
• When you pre ss the 3 button on the pet registration screen, the
registration will be canceled and the camera returns to the Still Picture
Capture Mode.
• Only dogs and cats can be re gistered using the Pet Detection function.
Other animals or human faces cannot be registered. You may not be able
to register a pet’s face if, for example, the pet’s face is too small.
• The camera may not detect the registered pet’s face, depending on the
shooting situation.
New Registry
MENU
Cancel
If pet face turns to camera
If pet face turns to camera
front, it's self-registering
front, it's self-registering
MENU
Cancel
Cancel
Register this image?
Register this image?
Registry
Cancel
Selection / Registry
38
38
Selection / Registry
OK
OK
3
Taking Pictures
OKOKOK
OKOKOKOKOKOKOK
75
Page 78

To Switch the Pet You Want to Shoot
OK
OK
Delete
MENU
Cancel
Selecting pet to shoot
If you have registered two or three pets, choose the pet you want to detect.
1
Press the I button on the
Selecting pet to shoot
capture status screen in e (Pet)
mode.
The pet registration screen appears.
MENU
Cancel
3
2
Taking Pictures
Use the four-way controller (45) to select the pet you want to
detect.
3
Press the 4 button.
The selected pet is switched to the pet you want to detect and the camera
returns to capture status.
To Delete the Pet from the Entry
1
Press the I button on the
capture status screen in e (Pet)
mode.
The pet registration screen appears.
2
Use the four-way controller (45) to select the pet you want to
delete.
3
Press the i button.
4
Use the four-way controller (2) to select [Delete].
5
Press the 4 button.
The selected pet is deleted.
Delete
OK
OK
76
Page 79

Taking Pictures of Text (Text Mode)
MENU
OK
Can cel
Take crisp and easy-to-read pictures of text. It is useful for taking pictures of and
saving important documents, and when the text is too small and difficult to read.
Color A picture of the text is taken in its original color.
Reversed Color The colors are reversed.
B&W A picture of the text is taken in black and white.
Negative Black and w hite are reversed.
1
Use the four-way controller (2345) to select (Text) from
the Capture Mode Palette.
2
Press the 4 button.
The text mode selection screen appears.
MENU
MENU OK
Cancel
3
Use the four-way controller (23) to select , , , or .
4
Press the 4 button.
The selected icon appears and the camera returns to capture status.
OK
OKOKOKCancel
Taking Pictures in Digital Microscope Mode
In (Digital Microscope) mode, you can take pictures of objects as close as 1
cm, also because the LED Macro Lights around the lens are always lighted, you
can take minute pictures of text, the veins of leaves, or specimens of tiny insects
etc.
The illumination of the LED Macro Lights may be uneven or insufficient
depending on the shooting conditions.
1
Use the four-way controller (2345) to select (Digital
Microscope) from the Capture Mode Palette.
2
Press the 4 button.
mode is selected and the camera returns to capture mode.
3
Taking Pictures
77
Page 80

3
Press the W/T button.
If you press T, the camera enlarges the subject.
You can enla rge the subject up to 6.5 times(*).
(*)Intelligent Zoom is included. Up to 1.8 times for optical zoom.
W Wide (left)
Widens the area that is captured by the camera.
T Tele (right)
Enlarges the subject.
Attaching the supplied macro stand (O-MS1) reduces camera shake during
macro photography (p.24).
3
Taking Pictures
Framing Your Pictures (Frame Composite Mode)
In N (Frame Composite) mode, you can take pictures using the frames stored
in the camera.
1
Use the four-way controller (2345) to select N (Frame
Composite) from the Capture Mode Palette.
2
Press the 4 button.
The 12-frame display of the frame selection screen appears.
3
Use the four-way controller
(2345) to choose the frame
you want to use.
OK
OKOKOK
78
4
Press the y button.
The selected frame appe ars in single-image display.
You can choose another frame using either of the following operations.
Four-way controller (45) Press to choose a different frame.
Zoom button left (f) Press to return to the 12-fr ame display of th e frame
selection screen, and then perform step 4 to
choose a different frame.
Page 81

5
Press the 4 button.
The frame appears on the display.
When the camera detects a person’s face, the Face Detection function is
activated and the face detection frame appears (p.69).
At shipment, the camera includes 3 default frames for each aspect ratio (4:3
and 16:9).
Optional Frames
The optional frames are stored in the CD-ROM supplied with the camera. To use
these frames, copy them from the CD-ROM (p.155). These optional frames are
deleted if the files on the built-in memory are deleted with a computer or if the builtin memory is formatted.
Adding a Frame to a captured image 1p.153
Taking Pictures at a Set Interval (Interval Shot)
In this mode, a set number of pictures can be taken automatically at a set interval
from a set time.
Set the camera to take pictures at intervals. The
intervals can be set in increments of one second from
Interval 10 sec. – 99 min.
Number
of Shots
Start Delay 0 min. – 24 hours
2 shots – number of
recordable images
ten seconds to 4 minutes, or i n 1 mi nute i ncrements
from 4 to 99 minutes. You cannot set the camera to
take interval shots at less than ten seconds.
You can set this to up to 1000 shots. However, it
cannot exceed the number of recordable images.
You can set 1 minute increments for the first 59
minutes and 1 hour increments from there. If the
start time is set to 0 minutes, the first picture is taken
as soon as the shutter release button is pressed.
3
Taking Pictures
1
Use the four-way controller (2345) to select (Interval
Shot) from the Capture Mode Palette.
2
Press the 4 button.
The current interval shot setting s appear for approxima tely 1 minute. To take
pictures with the current settings, go to step 10.
3
Press the 4 button while the settings are displayed.
The [Interval Shot] setting screen appears. [Interval] is marked with the frame.
79
Page 82

4
MENU
Interval
Number of Shots
Start Delay
min.
0
hr.0min.
0
2
sec.
10
Interval Shot
5
3
Taking Pictures
6
7
8
9
10
11
80
Set the interval.
1
Press the four-way controller
2 Use the four-way controller (23)
to set the minutes, then press the
four-way controller (5).
3 Use the four-way controller (23)
to set the seconds, then press the
four-way controller (5).
The frame returns to [Interval].
(5).
Press the four-way controller (3).
The frame moves to [Number of Shots].
Set the number of shots.
1 Press the four-way controller (5).
2 Use the four-way controller (23) to set [Number of Shots],
then press the four-way controller (5).
The frame returns to [Number of Shots].
Press the four-way controller (3).
The frame moves to [Start Delay].
Set the start delay.
1 Press the four-way controller (5).
2 Use the four-way controller (23) to set the hours, then press
the four-way controller (5).
3 Use the four-way controller (23) to set the minutes, then press
the four-way controller (5).
The frame returns to [Start Delay].
Press the 3 button.
The [Interval Shot] settings are saved and the camera returns to capture mode.
Press the shutter release button halfway.
The focus frame on the display turns green if the subject is in focus.
Press the shutter release button fully.
Interval shooting starts.
The LCD turns off between shots (dur ing standby). Press the power swit ch during
standby to display the remaining number of shots and interval on the monitor.
The [Stop interval shooting?] message is displayed when the power switch and
then the 3 button are pressed during standby. Pressing the 4 button
cancels interval shooting.
Page 83

• Even if an alarm is set, the alarm will not ring during interval shooting.
MENUMENU OKOKMENU OK
Drive ModeDri ve M od e
Self-timerS elf -tim er
Drive Mode
Self-timer
CancelCan celCancel OKOKOK
• Interval shot stops if the SD Memory Card is removed or inserted during
standby.
Using the Self-timer
In Self-timer mode, the picture is taken ten seconds or two seconds after the
shutter release button is pressed.
Stabilize the camera with a tripod or other support when taking a picture with the
self-timer.
Use this mode when you want to be included in a group picture. The picture
g
is taken approximately ten seconds after the shutter release button is pressed.
Use this mode to avoid camera shake. The picture is taken approximately two
Z
seconds afte r the shutter release bu tton is pressed.
1
Press the four-way controller (2) in A mode.
The [Drive Mode] screen appears.
2
Use the four-way controller (45) to select g and press the
four-way controller (3).
3
Use the four-way controller (45)
to select g or Z and press the
4 button.
The camera is ready to take the picture
using the self-timer.
When the camera detects a person’s face,
the Face Detection function is activated
and the face detection frame appears
(p.69).
4
Press the shutter release button to take a picture.
Countdown starts and the remaining seconds are displayed on the screen.
If you select g
The self timer lamp and all of the LED Macro Lights turn on.
From 5 seconds before shooting, the LED Macro Lights turn off in
order from the top right.
From 3 seconds before shooting, the self timer lamp also blinks.
If you select Z
The self timer lamp and the LED Macro Lights blink.
3
Taking Pictures
81
Page 84

The picture is taken after a countdown of either ten seconds or two seconds.
Focusing may be compromised if you move the camera while the self-timer
lamp is blinking when taking still pictures.
•In C (Movie) mo de, recording will start after ten seconds (or two seconds).
• Press the shutter release button halfway while the self-timer is engaged to
stop the countdown and press fully to restart the countdown.
• Z cannot be selected while 9 (Green) mode is in default setting. Select Z
in another shooting mode and then switch the shooting mode to 9.
• The self-timer lamp does not flash in e (Pet) mode.
• In the following situations, the LED Macro Lights remain turned on
3
Taking Pictures
regardless of the countdown.
-In
(Digital Microscope) mode
- When [Macro Light] on the [A Rec. Mode] menu is set to O (On)
Taking a Series of Pictures (Continuous Shooting/Burst Shooting)
Pictures are taken continuously as long as the shutter release button is pressed.
Continuous
j
Shooting
Burst
c
Shooting
* The number of images that can be shot continuously and the interval between shots
depend on shooting situations.
1
Press the four-way controller (2) in A mode.
The [Drive Mode] screen appears.
2
Use the four-way controller (45) to select j or c and press
the 4 button.
The camera is ready for continuous shooting and burst shooting.
3
Press the shutter release button to take a picture.
Pictures are taken continuously as long as you keep the shutter release button
pressed.
j/c cannot be selected in some shooting modes. Refer to “Functions
Available for Each Shooting Mode” (p.220) for details.
Each time a picture is taken, the image is saved in the memory
before the next image is taken. The higher the image quality,
the longer the interval between shots.
The number of recorded pixels is fixed at f/ and the
interval between shots is shorter than “Continuous Shooting”.
82
Page 85

•With j, you can continue shooting until the memory capacity of the SD
MENU
OK
Dri ve M od e
Rem ote Co ntr ol
Can cel
OK
Memory Card or built-in memory is full.
• The interval of j varies according to the [Recorded Pixels] and [Quality
Level] settings.
• The focus, exposure an d white balance are locked with the first shot.
• When the Face Detection function is activated (p.69), it works only when
taking the first sho t.
• The Blink Detection function works only for the last shot.
• The number of recorded pixels is fixed at f/ in c mode. When the
shooting mode is set to (Report), the number of recorded pixels is set
to V.
Taking Pictures Using the Remote Control Unit (Optional)
You can use the remote control (optional) to take pictures while you are away
from the camera.
The shutte r will be released a fter about three seconds whe n the shutter relea se
i
button on the remote control unit is pressed.
The shutter will be released immediately when the shutter release button on
h
the remote control unit is pressed.
1
Press the four-way controller (2) in A mode.
The [Drive Mode] screen appears.
2
Use the four-way controller (45) to select i and press the
four-way controller (3).
3
Use the four-way controller (45)
to select i or h and press the
4 button.
The self-timer lamp begins to blink slowly
and the camera is ready to take a picture
with the remote control.
When the camera detects a person’s face,
the Face Detection function is activated
and the face detection frame appears (p.69).
MENU
MENU OK
Drive Mode
Drive Mode
Remote Control
Remote Control
Cancel
Cancel OK
OK
3
Taking Pictures
OK
83
Page 86

4
Point the remote control at the remote control receiver and
press the shutter release button on the remote control.
The focus frame turns green when the subject is in focus and the camera takes
a picture at the following timing.
When i is selected:
The self-timer lamp and the LED Macro Lights blink quickly and the
camera takes a picture after about three seconds.
When h is selected:
The camera takes a picture immediately.
• The shooting with remote control is available from the front of the camera
3
Taking Pictures
and the back of the camera.
• The operating range is approx. 4 m from the front of the camera and 2 m
from the back of it.
•In C (Movie) mode, pressing the shutter release button again stops the
recording.
• The camera takes a picture even if the focus is not achieved.
• If the shutter release button on the camera is pressed halfway during the
countdown, the countdown stops. If the shutter release button on the
remote control is pressed again, the camera starts the countdown again.
• i/h cannot be selected in some shooting modes. Refer to “Functions
Available for Each Shooting Mode” (p.220) for details.
• The self-timer lamp does not flash in e (Pet) mode.
Taking Pictures with Automatic Exposure Adjustment (Auto Bracketing)
Press the shutter release button once to automatically adjust the exposure and
take three pictures in succession. After taking the pictures, you can select the best
one.
The shooting order is best exposure –1.0 EV +1.0 EV.
84
1
Press the four-way controller (2) in A mode.
The [Drive Mode] screen appears.
2
Use the four-way controller (45) to select a (Auto
Bracketing) and press the 4 button.
The camera is now ready to take pictures with Auto Bracketing.
• When the Instant Review is set to O (On) (p.104), the pictures taken are
shown in Instant Review after shooting (p.63).
• a cannot be selected in some shooting modes. Refer to “Functions
Available for Each Shooting Mode” (p.220) for details.
Page 87

Using the Digital Wide Function (Digital Wide
+
Mode)
In X (Digital Wide) mode, you can stitch two vertical images captured with this
camera into a single frame up to approx. 21 mm coverage (35 mm film
equivalent).
1
Use the four-way controller (2345) to select X (Digital
Wide) from the Capture Mode Palette.
2
Press the 4 button.
The camera enters X mode.
Turn the camera 90° clockwise and align your firs t
picture.
When the camera detects a person’s face, the
Face Detection function is activated and the face
detection frame appears (p.69).
1
38
3
Taking Pictures
85
Page 88

3
2
Press the shutter release button to take
a picture.
The first captured image is temporarily saved, and
the shooting screen for the second image is
displayed.
3
Taking Pictures
4
Take the second image.
Overlap the image on the preview guide on the left of the screen to compose the
second image. Repe at steps 4 and 5 to take the second image. This combines
first and second images.
The stitched first and second image appears on the display temporarily (Instan t
Review), and then is saved.
• To minimize distortio n when taking the second image, turn the camera so
that it pivots around the righ t edge of the preview guide on the screen.
• Some distortion may result from moving objects, repeating patterns, or if
nothing exists when overlapping the first and second image o n the preview
guide.
• When the Face Detection function is activated (p.69), it works only when
taking the first sho t.
• The number of recorded pixels for images captured with X mode is fixed
at f.
2
OK
Exit
To Cancel after Taking the First Shot
1
When the shooting screen for the second image is displayed
in step 5 on p.86, press the 4 button or the four-way
86
controller (3).
A confirmation dialog appears.
Page 89

2
Set shift directionSet shi ft di rect ionSet shift direction
Use the four-way controller (23) to select an option and
press the 4 button.
Save
Discard Discards the first image and you can retake the first shot.
Cancel Re turns to the shooting screen for the second image.
Saves the first image and you can retake the first shot. The first
image is saved at
h
.
Taking Panoramic Pictures (Digital Panorama Mode)
In F (Digital Panorama) mode, you can stitch together two or three captured
frames to create a panoramic photograph with the camera.
1
Use the four-way controller (2345) to select F (Digital
Panorama) from the Capture Mode Palette.
2
Press the 4 button.
The camera enters F mode and the message [Se t shift direction] is displayed.
3
Use the four-way controller (45)
to choose the direction in which
the images will be joined.
The screen for taking the first frame is
displayed.
When the camera detects a person’s face,
the Face Detection function is activated and
the face detection frame appears (p.69).
4
Press the shutter release button to take a picture.
The screen for taking the second frame is displayed after you take the first
frame.
If you select right (5) in step 4:
The right edge of the first frame appears in semi-transparent form on
the left edge of the display.
If you select left (4) in step 4:
The left edge of the first frame appears in semi-transparent form on
the right edge of the display.
3
Taking Pictures
87
Page 90

5
OK
SHUTTER
Exi t
2nd Fra me
Take the second frame.
Move the camera so that the semitransparent image and the actual view
overlap and press the shutter release
button.
6
Take the third frame.
Repeat steps 4 to 5 to take the third frame.
The panorama images are joined and a stitched together image appears.
3
Taking Pictures
The stitched together image does not appear when [Instant Review] (p.104) is
off.
• Some distortion may result from moving objects, repeating patterns, or if
nothing exists when overlapping the first an d second frames or the second
and third frames on the preview guide.
• When the Face Detection function is activated (p.69), it works only when
taking the first sho t.
To Cancel after Taking the First or Second Frame
1
After shooting the first frame in step 6 on p.88 or the second
frame in step 7, press the 4 button or the four-way
controller (3).
A confirmation dialog appears.
2
Use the four-way controller (23) to select an option and
press the 4 button.
1 2
SHUTTER
SHUTTER
2nd Frame
2nd Frame
OK
OK
Exit
Exit
88
Save Saves the captured image(s) and you can retake the first frame.
Discard Discards the captured image(s) and you can retake the first frame.
Cancel Returns to the previou s shooting screen.
When this option is selected after shooting the second frame, the first
and the second frames are stitched together and saved as a
panoramic photograph.
Unstitched images shot in F mode are fixed at i (1600×1200).
Page 91

Setting the Shooting Functions
Setting the Rec. Mode Menu
Settings for shooting are mostly set from the [A Rec. Mode] menu. Refer to
explanations for each function on how to make these settings.
1
Press the 3 button in Still Picture Capture Mode.
The [A Rec. Mode] menu appears.
Pressing the 3 button in C (Movie), (Underwater Movie), (High
Speed Movie) and (Interval Movie) modes displays the [C Movie] menu.
2
Use the four-way controller (2345) to select an item and
set it up.
To Finish the Setting
3
After setting, press the 3 button.
The camera returns to capture status.
The setting is saved and the camera returns to the previous screen.
To Save the Setting and Start Taking Pictures
3
Press the shutter release button halfway.
The setting is saved and the camera returns to capture mode.
When the [W Setting] menu is displayed from Q mode, you can switch to
A mode by pressing the Q button.
3
Taking Pictures
To Save the Setting and Start Playback of Images
3
Press the Q button.
When the [A Rec.Mode] , [C Movie] or [W Setting] menu is displayed from
A mode, the setting is saved and the camera returns to playback mode.
To Cancel the Changes and Continue with Menu Operations
3
Press the 3 button.
The changes are canceled and you can select a menu.
89
Page 92
The 3 button function differs depending on the screen. Refer to the
MENU
MENU
OK
Can cel
Fla sh M od e
Aut o
guide indications.
Exit Exits the menu and returns to the original screen.
MENU
Cancel Cancels the current selection, exits the menu and returns
MENU
Returns to the previous screen with the current setting.
to the previous screen.
Selecting the Flash Mode
3
Taking Pictures
Auto
,
Flash Off
a
Flash On The flash discharges regardless of the brightness.
b
Auto + Red-e ye
c
Flash On +
d
Red-eye
• The selectable function differs depending on the shooting mode, focus
mode or drive mode you have set. Refer to “Functions Available for Each
Shooting Mode” (p.220) for details.
• If you use the Face Detection function when , is selected, the mode is
automatically set to d.
• A pre-flash discharges when using the red-eye reduction function.
The flash discharges automatically depending on the light
conditions.
The flash does not discharge, regardless of the brightness.
Use this mode to take pictures where flash photography is
prohibited.
This mode reduces the phenomenon of red eyes caused by
the light from the flash being reflected in the subject’s eyes.
The flash discharges automatically.
This mode reduces the phenomenon of red eyes caused by
the light from the flash being reflected in the subject’s eyes.
The flash discharges regardless of the light conditions.
90
Using the flash when capturing images at a close distance may cause
irregularities in the image due to the light distribution.
1
Press the four-way controller (4)
in A mode.
The [Flash Mode] screen appears.
The flash mode changes each time the
button is pressed. You can also change the
setting using the four-way controller (23).
MENU
MENU OK
Cancel
Flash Mode
Flash Mode
Auto
Auto
OK
OKOKOKCancel
Page 93

2
Press the 4 button.
The setting is saved and the camera returns to capture mode.
About the red-eye phenomenon
Taking pictures using the flash may cause the subject’s eyes to appear red in the
resulting picture. This phenomenon occurs when the light from the flash is reflected
in the subject’s eyes. It can be reduced by illuminating the area around the subject or
moving c loser to the subje ct and zooming out to a wider angle . Settin g the flash mode
to c (Auto + Red-eye) or d (Flash On + Red-eye) is also an e ffective way of reducing
red eyes.
If the subject’s eyes appear red despite such precautions, they can be corrected by
the red-eye compensation function (p.152).
Saving the Flash Mode setting 1p.120
Selecting the Focus Mode
3
Taking Pictures
Standard
=
Macro
q
1cm Macro
Pan Focus
3
Infinity
s
Manual Focus This mode lets you adjust the focus manually.
\
This mode is used when the distance to the subject is from 50 cm
to . The camera is focused on the subject in the autofocus area
when the shutter release button is pressed halfway.
This mode is used when the distance to the subject is from 10 cm
to 60 cm. The camera is focused on the subject in the autofocus
area when the shutter release button is pressed halfway.
This mode is used when the distance to the subject is from 1 cm
to 30 cm. The camera is focused on the subject in the autofocus
area when the shutter release button is pressed halfway.
This mode is used when you ask someone to take picture s for
you, or when taking pictures of the scenery through the window
of a car or train. The entire picture, from the front to the back, is
focused.
This mode is used for taking distant objects. The flash is set to
a (Flash Off).
91
Page 94

1
MENUMENU OKOKMENU OK
CancelCan celCancel OKOKOK
Focus Mode
Foc us M od e
StandardSta ndar d
Focus Mode
Standard
MENU
OK
OK
\ indicator
Press the four-way controller (5)
in A mode.
The [Focus Mode] screen appears.
The focus mode changes each time the
button is pressed. You can also change the
setting using the four-way controller (23 ).
2
Press the 4 button.
The setting is saved and the camera returns to capture mode.
3
Taking Pictures
• The selectable function differs depending on the shooting mode. Refer to
“Functions Available for Each Shooting Mode” (p.220) for details.
• The noise from focusing is recorded when a focus mode other than 3 or
s is selected in C (Movie) and (Underwater Movie) modes.
• When [Auto Macro] is on and shooting with q selected, if the subject is
further than 60 cm away, the camera automatically focuses to (Infinity).
Saving the Focus Mode setting 1p.120
To Set the Manual Focus
The procedure for setting the focus manually (\) is described below.
1
Press the four-way controller (5) in A mode.
The [Focus Mode] screen appears.
2
Use the four-way controller (5) to select \.
3
Press the 4 button.
The centra l portion of the image is magnified to full screen on the display.
4
Press the four-way controller
(23).
The \ indicator appears on the display to
indicate the approximate distance to the
subject. Use the four-way controller (23)
to adjust the focus using the indicator as a
guide.
2 for distant focus
3 for closer focus
MENU
MENU
m
2
1
0.5
OK
OK
OK
OK
92
Page 95

5
Press the 4 button.
The focus is fixed and the camera retur ns to capture mode.
After the focus is fixed, you can press the four-way controller (5) again to
display the \ indicator and readjust the focus.
The shooting mode and drive mode cannot be changed while the \
indicator is displayed.
To switch from \ to another focus mode, press the four-way controller (5 )
while the \ indicator is displayed.
Changing the Focusing Area (= area)
You can change the autofocus area (Focusing Area).
J Multiple Normal autofocus area
K Spot The autofocus area becomes smaller.
W Automatic Tracking AF Keeps moving subjects in focus.
1
Use the four-way controller (23) to select [AF Setting] on the
[A Rec. Mode] menu.
2
Press the four-way controller (5).
The [AF Setting] screen appears.
3
Use the four-way controller (23) to select [Focusing Area].
4
Press the four-way controller (5).
A pull-down menu appears.
5
Use the four-way controller (23) to change the Focusing
Area.
6
Press the 4 button.
The setting is saved.
The selectable function differs depending on the shooting mode. Refer to
“Functions Available for Each Shooting Mode ” (p.220) for details.
3
Taking Pictures
93
Page 96

Setting the Auto Macro
When [Auto Macro] is on, the focus is adjusted to the macro range (distance to
the subject is 10 cm to 60 cm) as necessary, even if the focus mode setting is AF
(Standard).
When it is off and the focus mode is set to Standard (=), the AF operates only in
the standard range, and focusing is not done in the macro range.
When the focus mode is set to Macro or 1cm Macro, the focus is only adjusted in
the respective macr o range and is not done in the standard range.
1
Use the four-way controller (23) to select [AF Setting] on the
3
Taking Pictures
[A Rec. Mode] menu.
2
Press the four-way controller (5).
The [AF Setting] screen appears.
3
Use the four-way controller (23) to select [Auto Macro].
4
Use the four-way controller (45) to select O (On)/P (Off).
The setting is saved.
Setting the = Assist Light (Focus Assist)
The camera automatically emits the focus assist light in dark shooting situations.
You can set the light to on or off.
1
Use the four-way controller (23) to select [AF Setting] on the
[A Rec. Mode] menu.
2
Press the four-way controller (5).
The [AF Setting] screen appears.
3
Use the four-way controller (23) to select [Focus Assist].
4
Use the four-way controller (45) to select O (On)/P (Off).
The setting is saved.
94
Looking at the light directly will not create a safety hazard. However, do not
look into the emitter from a very short distance since you may feel dazzled.
The camera does not emit the focus assist light depending on the shooting
mode or focus mode. Refer to “Functions Available for Each Shooting Mode”
(p.220) for details.
Page 97

Setting the Image Tone
For setting the tone of images.
You can select from [Bright], [Natural], or [Monochrome].
The default setting is [Bright].
1
Use the four-way controller (23) to select [Image Tone] on
the [A Rec. Mode] menu.
2
Press the four-way controller (5).
A pull-down menu appears.
3
Use the four-way controller (23) to select a finishing tone.
4
Press the 4 button.
The setting is saved.
When [Monochrome] is selected, [Tone A djustment] appears on the [A Rec.
Mode] menu for setting the tone of monochrome images instead of
[Saturation].
3
Taking Pictures
95
Page 98

Selecting the Number of Recorded Pixels
Clearer
383 838
P
You can choose the number of recorded pixels settings for still pictures.
The larger the number of recorded pixels, the clearer the details will appear when
you print your picture. As the quality of the printed picture also depends on the
image quality, exposure control, r esolution of the printer, and other factors, you
do not need to select more than the required number of recorded pixels. h is
adequate for making postcard-size prints. The more pixels there are, the larger
the picture and the bigger the file size.
Refer to the following table for the appropriate settings according to expected
usage.
Recorded Pixe ls Expected Usage
3
Taking Pictures
• The default setting is .
• V can only be set for recorded pixels when (Report) mode is set. V does not
4608×3456
3456×3456
4608×2592
6 3072×2304
3072×1728
f 2592×1944
2592×1464
h 2048×1536
h 1920×1080
V 1280×960
l 1024×768
m 640×480
appear in the Recorded Pixels menu.
If you se lect /6/f/h/l/m,
the aspect ratio of the screen is 4:3. The
monitor display for recording and
playback is as shown on the right.
For printing high quality photos or A4-size pictures or
larger, or editing images on a computer.
For making postcard-size prints.
For posting on a website or attaching to e-mail.
96
Page 99

1
Use the four-way controller (23) to select [Recorded Pixels]
on the [A Rec. Mode] menu.
2
Press the four-way controller (5).
A pull-down menu appears.
3
Use the four-way controller (23) to change the number of
recorded pixels.
4
Press the 4 button.
The setting is saved.
The selectable number of recorded pixels differs depending on the shooting
mode. Refer to “Functions Available for Each Shooting Mode” (p.220) for
details.
Selecting the Quality Level of Still Pictures
Select the quality level (data compression ratio) for still images according to how
the images will be used.
The more stars (E), the higher the quality of the image, but the file size increases.
The selected recorded pixels setting also affects the size of the image file (
Quality Level
Best Lowest compression ratio. Suitable for photo prints.
C
D
E
Better
Good
Standard compression ratio. Suitable for viewing the image
on a computer screen. (default setting)
Highest compression ratio. Suitable for attaching to e-mails
or creating websites.
1
p.96
3
Taking Pictures
).
1
Use the four-way controller (23) to select [Quality Level] on
the [A Rec. Mode] menu.
2
Press the four-way controller (5).
The pull-down menu appears.
3
Use the four-way controller (23) to change the quality level.
The number of recordable still pictures is displayed at the top of the screen when
you select a quality level.
4
Press the 4 button.
The setting is saved.
97
Page 100

Adjusting the White Balance
OKOKMENUMENU OKMENU
White Balance
Auto
Aut oAuto
OKOKCancelCa ncel OKCancel
You can take pictures in natural colors by adjusting the white balance according
to the light conditions at the time of shooting.
Auto The camera adjusts the white balance automatically.
F
Daylight Use this mode when taking pictures outside in sunlight.
G
Shade Use this mode when takin g pictures outside in the shade.
l
Tungsten Light
I
3
Taking Pictures
1
2
3
Fluores. Light
J
Manual Use this mode when adjusting the white balance manually.
K
• Set another white balance if you are not satisfied with the color balance of
pictures taken with the white balance set to F.
• The White balance setting may not be changed depending on the selected
shooting mode. Refer to “Functions Available for Each Shooting Mode”
(p.220) for details.
Use the four-way controller (23) to select [White Balance] on
the [A Rec. Mode] menu.
Press the four-way controller (5).
The [White Balance] screen appears.
Use the four-way controller (23)
to change the setting.
You can check th e results of availab le white
balance settings on the pr eview image each
time you press the four-way controller.
Use this mode when taking pictures under electric or other
tungsten light.
Use this mode when taking pictures under fluorescent
light.
4
98
Press the 4 button.
The setting is saved.
If you change the [White Balance] setting frequently, you can save time by
assigning the Fn settings to the Green button (p.105).
Saving the White Balance setting 1p.12 0
 Loading...