

Page 1

SLR Digital Camera
Operating Manual
K-500
O
To ensure the best performance from your camera,
please read the Operating Manual before using the camera.
Page 2

Thank you for purchasing this PENTAX K-500 Digital Camera. Please read this manual
before using the camera in order to get the most out of all the features and functions.
Keep this manual safe, as it can be a valuable tool in helping you to understand all
the camera's capabilities.
Lenses you can use
In general, lenses that can be used with this camera are DA, DA L, D FA and FA J lenses
and lenses that have an s position on the aperture ring. To use any other lens or accessory,
see p.56 and p.272.
Regarding copyrights
Images taken with the K-500 that are for anything other than personal enjoyment cannot be
used without permission according to the rights as specified in the Copyright Act. Please take
care, as there are cases where limitations are placed on taking pictures even for personal
enjoyment during demonstrations, performances or of items on display. Images taken with
the purpose of obtaining copyrights also cannot be used outside the scope of use of the
copyright as laid out in the Copyright Act, and care should be taken here also.
Regarding trademarks
Microsoft and Windows are registered trademarks of Microsoft Corporation in the United
States and other countries. Windows Vista is either a registered trademark or trademark
of Microsoft Corporation in the United States and/or other countries.
Macintosh, Mac OS, and QuickTime are trademarks of Apple Inc., registered in the U.S.
and other countries.
Intel, Intel Core, and Pentium are trademarks of Intel Corporation in the U.S. and other
countries.
SDXC Logo is a trademark of SD-3C, LLC.
Eye-Fi, the Eye-Fi logo and Eye-Fi
This product includes DNG technology under license by Adobe Systems Incorporated.
The DNG logo is either a registered trademark or trademark of Adobe Systems Incorporated
in the United States and/or other countries.
All other trademarks are the property of their respective owners.
This product supports PRINT Image Matching III. PRINT Image Matching enabled digital still
cameras, printers and software help photographers to produce images more faithful to their
intentions. Some functions are not available on printers that are not PRINT Image Matching
III compliant.
Copyright 2001 Seiko Epson Corporation. All Rights Reserved. PRINT Image Matching
is a trademark of Seiko Epson Corporation. The PRINT Image Matching logo is a trademark
of Seiko Epson Corporation.
This product is licensed under the AVC Patent Portfolio License for the personal use
of a consumer or other uses in which it does not receive remuneration to (i) encode video
in compliance with the AVC standard (“AVC video”) and/or (ii) decode AVC video that was
encoded by a consumer engaged in a personal activity and/or was obtained from a video
provider licensed to provide AVC video. No license is granted or shall be implied for any
other use. Additional information may be obtained from MPEG LA, L.L.C.
See http://www.mpegla.com.
connected
are trademarks of Eye-Fi, Inc.
Page 3

To users of this camera
• Do not use or store this camera in the vicinity of equipment that generates strong
electromagnetic radiation or magnetic fields. Strong static charges or the magnetic
fields produced by equipment such as radio transmitters could interfere with
the monitor, damage the stored data, or affect the camera’s internal circuitry
and cause camera misoperation.
• The liquid crystal panel used for the monitor is manufactured using extremely high
precision technology. Although the level of functioning pixels is 99.99% or better,
you should be aware that 0.01% or fewer of the pixels may not illuminate or may
illuminate when they should not. However, this has no effect on the recorded image.
• There is a possibility that the illustrations and the display screen of the monitor
in this manual are different from the actual ones.
• In this manual, SD Memory Cards, SDHC Memory Cards, SDXC Memory Cards
and Eye-Fi Cards are referred to as “SD Memory Cards”.
• In this manual, the generic term “computer(s)” refers to either a Windows PC
or a Macintosh.
• This camera can be powered with the rechargeable lithium-ion battery D-LI109,
the AA battery holder D-BH109 with four AA batteries, or an optional AC adapter.
The power supply provided with this camera varies depending on the country
or region where the camera was purchased. This manual is mainly written assuming
that the camera is used with the rechargeable lithium-ion battery D-LI109.
• In this manual, both D-LI109 and D-BH109 are referred to as the “battery” unless
otherwise stated. Except this, the generic term “battery(ies)” refers to any type
of batteries used for this camera and its accessories.
For Using Your Camera Safely
1
We have paid close attention to the safety of this camera. When using this camera,
we request your special attention regarding items marked with the following
symbols.
Warning
Caution
This symbol indicates that ignoring this item could cause
serious personal injuries.
This symbol indicates that ignoring this item could cause
minor or medium personal injuries, or loss of property.
About the Camera
Warning
• Do not disassemble or modify the camera. High voltage areas are present inside
the camera, with the risk of electric shock.
• If the camera interior is exposed due to dropping or otherwise damaging the camera,
never touch the exposed portion. There is a risk of electric shock.
Page 4

2
• Do not aim the camera at the sun or other strong light sources when taking pictures
or leave the camera sitting in direct sunlight with the lens cap off. Doing so may cause
the camera to malfunction or cause a fire.
• Do not look at the sun or other strong light sources through the lens. Doing so may
lead to a loss of eyesight or cause vision to be impaired.
• If any irregularities occur during use, such as smoke or a strange odor, stop use
immediately, remove the battery or the AC adapter, and contact your nearest
PENTAX Service Center. Continued use can cause a fire or electrical shock.
Caution
• Do not place your finger over the flash when discharging the flash. You may burn yourself.
• Do not cover the flash with clothing when discharging the flash. Discoloration may occur.
• Some portions of the camera heat up during use. There is a risk of low temperature
burns when holding such portions for long periods.
• Should the monitor be damaged, be careful of glass fragments. Also, be careful not to
allow the liquid crystal to get on your skin or in your eyes or mouth.
• Depending on your individual factors or physical condition, the use of the camera may
cause itching, rashes or blisters. In case of any abnormality, stop using the camera
and get medical attention immediately.
About the Battery Charger and AC Adapter
Warning
• Always use the battery charger and AC adapter exclusively developed for this
camera, with the specified power and voltage. Using a battery charger or AC adapter
not exclusive to this camera, or using the exclusive battery charger or AC adapter
with an unspecified power or voltage can cause a fire, electric shock, or camera
breakdown. The specified voltage is 100 - 240V AC.
• Do not disassemble or modify the product. This can cause a fire or electrical shock.
• If the generation of smoke or strange odor from the product or other abnormality
occurs, immediately discontinue using and consult a PENTAX Service Center.
Continued use can cause a fire or electrical shock.
• If water should happen to get inside the product, consult a PENTAX Service Center.
Continued use can cause a fire or electrical shock.
• If you see a lightning flash or hear thunder during use of the battery charger or AC
adapter, unplug the power plug and discontinue use. Continued use can cause
damage to the product, fire or electrical shock.
• Wipe off the power plug if it should become covered with dust. Accumulated dust
may cause a fire.
• To reduce the risk of hazards, use only CSA/UL certified power supply cord set, cord
is Type SPT-2 or heavier, minimum NO.18 AWG copper, one end with a molded-on
male attachment plug cap (with a specified NEMA configuration), and the other is
provided with a molded-on female connector body (with a specified IEC nonindustrial
type configuration) or the equivalent.
Page 5
Caution
• Do not place or drop heavy objects on or forcefully bend the AC plug cord. Doing
so may damage the cord. Should the AC plug cord be damaged, consult a PENTAX
Service Center.
• Do not touch or short-circuit the terminal area of the AC plug cord while the cord
is plugged in.
• Do not handle the power plug with wet hands. This can cause an electric shock.
• Do not drop the product, or subject it to violent impact. This can cause the product
breakdown.
• Do not use the battery charger D-BC109 to charge batteries other than the
rechargeable lithium-ion battery D-LI109. Attempting to charge other types of
batteries may cause an explosion or heating, or may damage the battery charger.
About the Rechargeable Lithium-ion Battery
Warning
• If any leakage from the battery should come in contact with your eyes, do not rub
them. Flush your eyes with clean water and get medical attention immediately.
Caution
• Only use the specified battery with this camera. Use of other batteries may cause
an explosion or fire.
• Do not disassemble the battery. Disassembling the battery may cause an explosion
or leakage.
• Remove the battery from the camera immediately if it becomes hot or begins
to smoke. Be careful not to burn yourself during removal.
• Keep wires, hairpins, and other metal objects away from the + and - contacts
of the battery.
• Do not short the battery or dispose of the battery in fire. This can cause an explosion
or fire.
• If any leakage from the battery should come in contact with skin or clothing, it may
cause irritation to the skin. Wash the affected areas thoroughly with water.
• Precautions for D-LI109 Battery Usage:
USE SPECIFIED CHARGER ONLY.
- DO NOT INCINERATE.
- DO NOT DISASSEMBLE.
- DO NOT SHORT CIRCUIT.
- DO NOT EXPOSE TO HIGH TEMP. (140°F/60°C)
3
Page 6

4
About the Usage of AA Batteries
Warning
• If any leakage from the battery should come in contact with your eyes, do not rub
them. Flush your eyes with clean water and get medical attention immediately.
Caution
• When using the AA battery holder D-BH109, four AA alkaline, AA lit hiu m or AA Ni -MH
batteries can be used. Do not use batteries other than those specified here.
Using other types of batteries may cause the camera to function poorly,
or the batteries may explode or cause a fire.
• The batteries should be inserted correctly, observing (+) and (-) marks on the
batteries. Inserting the batteries incorrectly may cause an explosion or fire.
• When replacing the batteries, do not combine different brands, types or capacities.
Also, do not combine old batteries with new ones. Inserting the batteries incorrectly
may cause an explosion or fire.
• Do not short the batteries or dispose of the batteries in fire. Do not disassemble
the batteries. The batteries could explode or catch fire.
• Do not charge any batteries other than rechargeable Ni-MH batteries. The batteries
could explode or catch fire. AA batteries for use with this camera other than Ni-MH
batteries cannot be charged.
• Do not open the battery cover or remove the batteries while the power is on.
• Remove the batteries when you do not plan to use the camera for a long time.
The batteries may leak.
• If any leakage from the battery should come in contact with skin or clothes, it may
cause irritation to the skin. Wash the affected areas thoroughly with water.
• Remove the batteries from the camera immediately if they become hot or begin
to smoke. Be careful not to burn yourself during removal.
Keep the Camera and its Accessories out of the Reach of Small
Children
Warning
• Do not place the camera and its accessories within the reach of small children.
1. If the product falls or is operated accidentally, it may cause serious personal
injuries.
2. Wrapping the strap around a neck may cause suffocation.
3. To avoid the risk of a small accessory such as the battery or SD Memory Cards
from being swallowed by mistake, keep them out of the reach of small children.
Seek medical attention immediately if an accessory is accidentally swallowed.
Page 7

Care to be Taken During Handling
Before Using Your Camera
• When traveling, take the Worldwide Service Network listing that is included
in the package. This will be useful if you experience problems abroad.
• When the camera has not been used for a long time, confirm that it is still working
properly, particularly prior to taking important pictures (such as at a wedding or when
traveling). Contents of the recording cannot be guaranteed if recording, playback
or transferring your data to a computer, etc. is not possible due to a malfunction
of your camera or recording media (SD Memory Card), etc.
About the Rechargeable Lithium-ion Battery and Battery
Charger
• To keep the battery in optimum condition, avoid storing it in a fully charged state
or in high temperatures.
• If the battery is left inserted and the camera is not used for a long time, the battery
will over-discharge and shorten the battery’s life.
• Charging the battery a day before use or on the day of use is recommended.
• The AC plug cord provided with this camera or included with the battery charger
kit K-BC109 is developed exclusively for the battery charger D-BC109. Do not use
it with other devices.
5
Precautions on Carrying and Using Your Camera
• Do not subject the camera to high temperatures or high humidity. Do not leave
the camera in a vehicle, as the temperature can get very high.
• Do not subject the camera to strong vibrations, shocks, or pressure. Use a cushion
to protect the camera from vibrations of motorcycles, automobiles, or ships.
• The temperature range for camera use is -10°C to 40°C (14°F to 104°F).
• The monitor may appear black at high temperatures, but will return to normal
at normal temperatures.
• The monitor may respond more slowly at low temperatures. This is due to liquid
crystal properties, and is not a malfunction.
• Sudden temperature changes will cause condensation on the inside and outside
of the camera. Place the camera in your bag or a plastic bag, and remove it after
temperature of the camera and surroundings are equalized.
• Avoid contact with garbage, mud, sand, dust, water, toxic gases, or salt. These could
cause the camera to breakdown. Wipe the camera to dry off any rain or water drops.
• Do not press the monitor with excessive force. This could cause it to break or
malfunction.
• Be careful not to overtighten the screw in the tripod socket when using a tripod.
Page 8
6
Cleaning Your Camera
• Do not clean the camera with organic solvents such as thinner, alcohol, or benzine.
• Use a lens brush to remove dust accumulated on the lens or viewfinder.
Never use a spray blower for cleaning as it may damage the lens.
• Please contact a PENTAX Service Center for professional cleaning of the CMOS
sensor. (This will involve a fee.)
• Periodic inspections are recommended every one to two years to maintain high
performance.
Storing Your Camera
• Do not store the camera with preservatives or chemicals. Storage in high
temperatures and high humidity can cause mold to grow on the camera.
Remove the camera from its case and store it in a dry and well-ventilated place.
• Avoid using or storing the camera where it may be exposed to static electricity
or electrical interference.
• Avoid using or storing the camera in direct sunlight or in locations where it may
be exposed to rapid changes in temperature or to condensation.
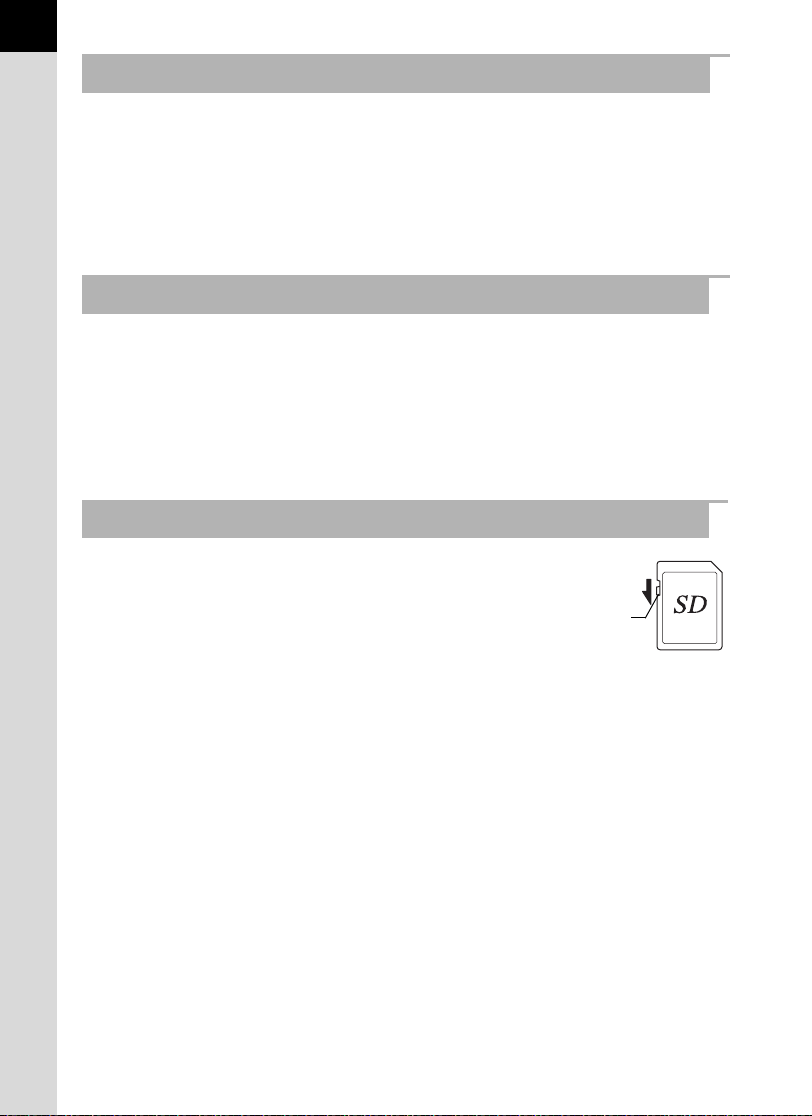
About SD Memory Cards
• The SD Memory Card is equipped with a write-protect
switch. Setting the switch to LOCK prevents new data
from being recorded on the card, the stored data from
being deleted, and the card from being formatted by
the camera or computer.
• The SD Memory Card may be hot when removing
the card immediately after using the camera.
• Do not remove the SD Memory Card or turn off the power while the card is being
accessed. This may cause the data to be lost or the card to be damaged.
• Do not bend the SD Memory Card or subject it to violent impact. Keep it away from
water and store away from high temperatures.
• Do not remove the SD Memory Card while formatting. The card may be damaged
and become unusable.
• Data on the SD Memory Card may be deleted in the following circumstances.
We do not accept any liability for data that is deleted if
1. the SD Memory Card is mishandled by the user.
2. the SD Memory Card is exposed to static electricity or electrical interference.
3. the SD Memory Card has not been used for a long time.
4. the SD Memory Card or the battery is removed while the card is being accessed.
• If the SD Memory Card is not used for a long time, the data on the card may become
unreadable. Be sure to regularly make a backup of important data on a computer.
• Format new SD Memory Cards. Also format SD Memory Cards previously used with
other cameras or devices.
Write-protect
switch
Page 9

• Please note that deleting data stored on an SD Memory Card, or formatting an SD
Memory Card does not completely erase the original data. Deleted data can
sometimes be recovered using commercially available software. If you are going
to discard, give away or sell your SD Memory Card, you should ensure that the
data on the card is completely deleted or the card itself is destroyed if it contains
any personal or sensitive information.
• The data on your SD Memory Card should be managed at your own risk.
About Eye-Fi Cards
• An SD Memory Card with a built-in wireless LAN ("Eye-Fi card") can be used with
this camera.
• Use of an access point and an Internet connection are required for transferring
images via wireless LAN. For details, refer to the Eye-Fi website. (http://www.eye.fi).
• Use Eye-Fi cards which have been updated to the newest firmware.
• Set [Eye-Fi] to [Off], or do not use an Eye-Fi card in a location where the use
of wireless LAN devices is restricted or prohibited, such as airplanes.
• Eye-Fi cards can be used only in the country in which the card was purchased.
Please observe all local laws governing Eye-Fi card usage.
• This camera features a function to enable/disable the communication function
of the Eye-Fi card, however, we do not guarantee the operability of all Eye-Fi card
functions.
• Refer to the Eye-Fi card manual for details on how to use the card.
• Please contact the Eye-Fi card manufacturer regarding any malfunctions or problems
concerning Eye-Fi cards.
7
Regarding User Registration
In order to better serve you, we request that you complete the user registration, which
can be found on the CD-ROM supplied with the camera or on the PENTAX website.
Refer to p.247 for details. Thank you for your cooperation.
Page 10

8
Memo
Page 11

Contents
For Using Your Camera Safely ............................................................ 1
Care to be Taken During Handling ...................................................... 5
Contents............................................................................................... 9
Composition of the Operating Manual ............................................... 15
Before Using Your Camera 17
Checking the Contents of the Package ......................................... 18
Names and Functions of the Working Parts .................................. 19
Capture Mode .................................................................................... 20
Playback Mode .................................................................................. 23
Monitor Display .................................................................................. 25
Viewfinder .......................................................................................... 37
How to Change Function Settings ................................................. 39
Using the Direct Keys ........................................................................ 39
Using the Control Panel ..................................................................... 40
Using the Menus ................................................................................ 41
Getting Started 45
Attaching the Strap ........................................................................ 46
Inserting the Battery ...................................................................... 47
Using the Lithium-ion Battery............................................................. 47
Using the AA Batteries....................................................................... 50
Using the AC Adapter ........................................................................ 52
Inserting/Removing an SD Memory Card ...................................... 54
Attaching a Lens............................................................................ 56
Adjusting the Viewfinder Diopter.................................................... 58
Turning the Camera On and Off .................................................... 59
Initial Settings ............................................... ................................. 60
Setting the Display Language ............................................................ 60
Setting the Date and Time ................................................................. 62
9
Page 12

10
Basic Operations 65
Basic Shooting Operation .............................................................. 66
Letting the Camera Choose the Optimal Settings.............................. 66
Using the Built-in Flash.................................................................. 70
Setting the Flash Mode...................................................................... 70
Using the Built-in Flash ...................................................................... 73
Reviewing Images ......................................................................... 74
Playing Back Images ......................................................................... 74
Deleting a Single Image..................................................................... 75
Shooting Functions 77
How to Operate the Shooting Functions........................................ 78
Direct Keys Setting Items................................................................... 78
Rec. Mode Menu Items...................................................................... 79
Movie Menu Items.............................................................................. 82
Custom Setting Menu Items............................................................... 83
Selecting the Appropriate Capture Mode....................................... 86
Auto Picture Modes............................................................................ 87
Scene Modes ..................................................................................... 88
Exposure Modes ................................................................................ 90
Setting the Exposure .....................................................................91
Setting the Sensitivity......................................................................... 91
Changing the Exposure Mode ........................................................... 93
Adjusting the Exposure ...................................................................... 96
Locking the Exposure Before Shooting (AE Lock) ........................... 100
Selecting the Metering Method ........................................................ 101
Reducing the Image Noise (Noise Reduction) ................................. 102
Focusing ...................................................................................... 105
Setting the Focus Mode ................................................................... 105
Selecting the Focusing Point (AF Point) .......................................... 108
Setting the Contrast AF during Live View ........................................ 110
Checking the Focus ......................................................................... 113
Adjusting the Focus Manually (Manual Focus) ................................ 114
AF Fine Adjustment ......................................................................... 116
Checking the Depth of Field (Preview) ........................................ 118
Displaying the Optical Preview ........................................................ 118
Displaying the Digital Preview.......................................................... 119
Page 13

Using the Shake Reduction Function to Prevent
Camera Shake............................................................................. 120
Taking Pictures Using the Shake Reduction Function ..................... 120
Shooting with the Self-timer ............................................................. 122
Shooting with a Remote Control Unit (Optional).............................. 124
Taking Pictures Continuously ...................................................... 126
Continuous Shooting........................................................................ 126
Interval Shooting .............................................................................. 128
Multi-exposure ................................................................................. 131
Recording Movies........................................................................ 133
Changing the Settings for Movie Recording .................................... 133
Recording Movies ............................................................................ 136
Interval Movie................................................................................... 138
Playing Back Movies........................................................................ 140
Editing Movies.................................................................................. 142
Shooting Settings 145
Setting a File Format ................................................................... 146
File Format....................................................................................... 147
JPEG Recorded Pixels .................................................................... 148
JPEG Quality ................................................................................... 148
Color Space ..................................................................................... 148
Setting the White Balance ........................................................... 149
Adjusting the White Balance Manually............................................. 152
Adjusting the White Balance with Color Temperature ..................... 154
Correcting Images ....................................................................... 155
Brightness Adjustment ..................................................................... 155
High Dynamic Range Image Capture .............................................. 156
Lens Correction................................................................................ 158
Composition Adjustment .................................................................. 160
Setting the Image Finishing Tone ................................................ 161
Custom Image.................................................................................. 161
Digital Filter ...................................................................................... 165
Customizing the Button/E-dial Functions..................................... 168
Setting the E-dials Operation ........................................................... 168
Setting the V/Y Button Operation ............................................. 171
Setting the =/L Button Operation .......................................... 174
Saving Frequently Used Settings ................................................ 175
Saving the Settings .......................................................................... 175
Checking the Saved USER Settings ................................................ 178
Using Saved USER Settings............................................................ 178
Resetting to Default Settings ........................................................... 179
11
Page 14

12
Playback Functions and Image Editing 181
How to Operate the Playback/ Edit Functions ............................. 182
Playback Mode Palette Items .......................................................... 182
Playback Menu Items....................................................................... 184
Setting the Playback Display Method .......................................... 185
Selecting the Playback Functions................................................ 186
Magnifying Images........................................................................... 186
Displaying Multiple Images .............................................................. 187
Playing Back Images Continuously.................................................. 190
Rotating Images............................................................................... 192
Deleting Multiple Images ............................................................. 193
Deleting Selected Images ................................................................ 193
Deleting a Folder.............................................................................. 194
Deleting All Images .......................................................................... 195
Processing Images ...................................................................... 196
Changing the Number of Recorded Pixels (Resize) ........................ 196
Cutting Out Part of the Image (Cropping) ........................................ 197
Processing Images with Digital Filters ............................................. 198
Joining Multiple Images (Index) ....................................................... 203
Developing RAW Images............................................................. 205
Developing One RAW Image........................................................... 205
Developing Multiple RAW Images ................................................... 207
Connecting the Camera to an AV Device .................................... 209
Connecting the Camera to a Video Input Terminal .......................... 209
Setting the Video Output Format ..................................................... 210
Page 15

Changing Additional Settings 211
How to Operate the Set-up Menu................................................ 212
Set-up Menu Items........................................................................... 212
Camera Settings .......................................................................... 214
Setting the Sound Effects, Date and Time, and Display Language ...... 214
Setting the Monitor and the Menu Displays ..................................... 218
Battery Settings................................................................................ 222
Selecting Settings to Save in the Camera (Memory) ....................... 224
Resetting the Camera Settings ........................................................ 226
Checking the Camera Version Information ...................................... 227
File Management Settings...........................................................228
Formatting an SD Memory Card ...................................................... 228
Protecting Images from Deletion (Protect)....................................... 229
Setting the Naming System of the Folder ........................................ 230
Creating New Folders ...................................................................... 232
Setting the File Name ...................................................................... 233
Setting the Photographer Information .............................................. 234
Using an Eye-Fi Card....................................................................... 236
Setting the DPOF Settings............................................................... 239
Connecting to a Computer 241
Manipulating Captured Images on a Computer........................... 242
Saving Images on a Computer .................................................... 243
Setting the USB Connection Mode .................................................. 243
Connecting the Camera and a Computer ........................................ 244
Using the Provided Software ....................................................... 245
Installing the Software...................................................................... 245
13
Using the Flash 249
Using the Built-in Flash................................................................ 250
Flash Characteristics in Each Exposure Mode ................................ 250
Using the Slow-speed Sync Flash ................................................... 250
Distance and Aperture when Using the Built-in Flash ...................... 252
Using an External Flash (Optional).............................................. 254
Using the P-TTL Auto Flash............................................................. 255
Using the High-speed Sync Flash.................................................... 256
Using Flash in Wireless Mode ......................................................... 257
Connecting an External Flash with an Extension Cord .................... 260
Using the Contrast Control Sync Flash............................................ 261
Page 16

14
Appendix 263
Default Settings ............................................... ............................ 264
Functions Available with Various Lens Combinations ................. 272
Setting the Focal Length .................................................................. 275
Using the Aperture Ring................................................................... 276
Cleaning the CMOS Sensor ........................................................ 277
Removing Dust by Shaking the CMOS Sensor (Dust Removal) ..... 277
Removing Dust with a Blower .......................................................... 278
Using the GPS Unit ..................................................................... 280
Shooting Celestial Bodies (ASTROTRACER) ................................. 281
Error Messages ........................................................................... 282
Troubleshooting........................................................................... 285
Main Specifications...................................................................... 288
Index............................................................................................ 297
WARRANTY POLICY .................................................................. 305
Page 17

Composition of the Operating Manual
This Operating Manual contains the following chapters.
15
1 Before Using Your Camera
Explains the provided accessories and the names and functions of the working
parts.
2 Getting Started
Explains your first steps from purchasing the camera to taking pictures.
Be sure to read this chapter and follow the instructions.
3 Basic Operations
Explains basic operations for taking and playing back pictures.
4 Shooting Functions
Explains shooting-related functions.
5 Shooting Settings
Explains procedures for changing the shooting settings, such as the file
format.
6 Playback Functions and Image Editing
Explains various operations for playing back and editing images.
7 Changing Additional Settings
Explains general camera settings and file management settings such
as the monitor display settings and the image folder naming system.
8 Connecting to a Computer
Explains how to connect the camera to a computer, and includes installation
instructions and a general overview of the provided software.
1
2
3
4
5
6
7
8
9
10
9 Using the Flash
Explains how to use the built-in flash and external flashes.
10Appendix
Explains troubleshooting and provides various resources.
Page 18
16
The symbols used in this Operating Manual are explained below.
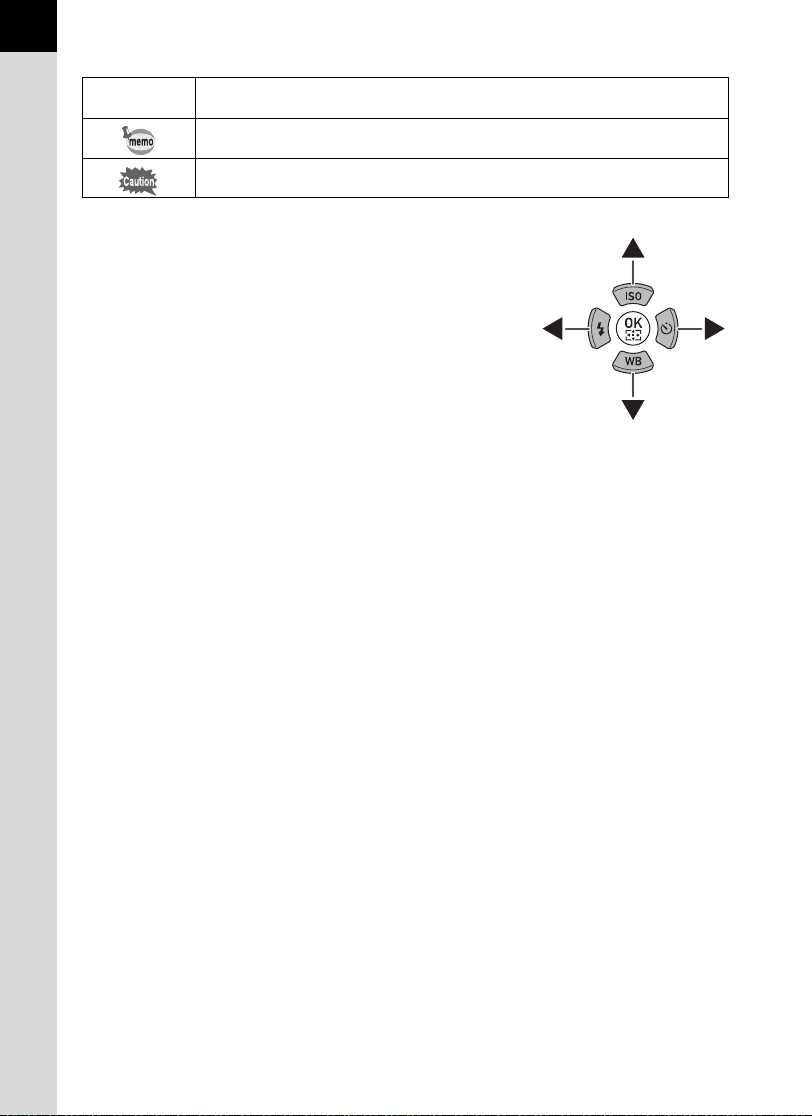
1
In this manual, the arrow keys of the four-way
controller are referred to in the following way.
Indicates reference page numbers explaining a related operation.
Indicates useful information.
Indicates precautions to take when operating the camera.
Page 19

1 Before Using Your Camera
Check the package contents and the names and functions
of the working parts before use.
Checking the Contents of the Package ..................18
Names and Functions of the Working Parts ...........19
How to Change Function Settings ..........................39
Page 20
18
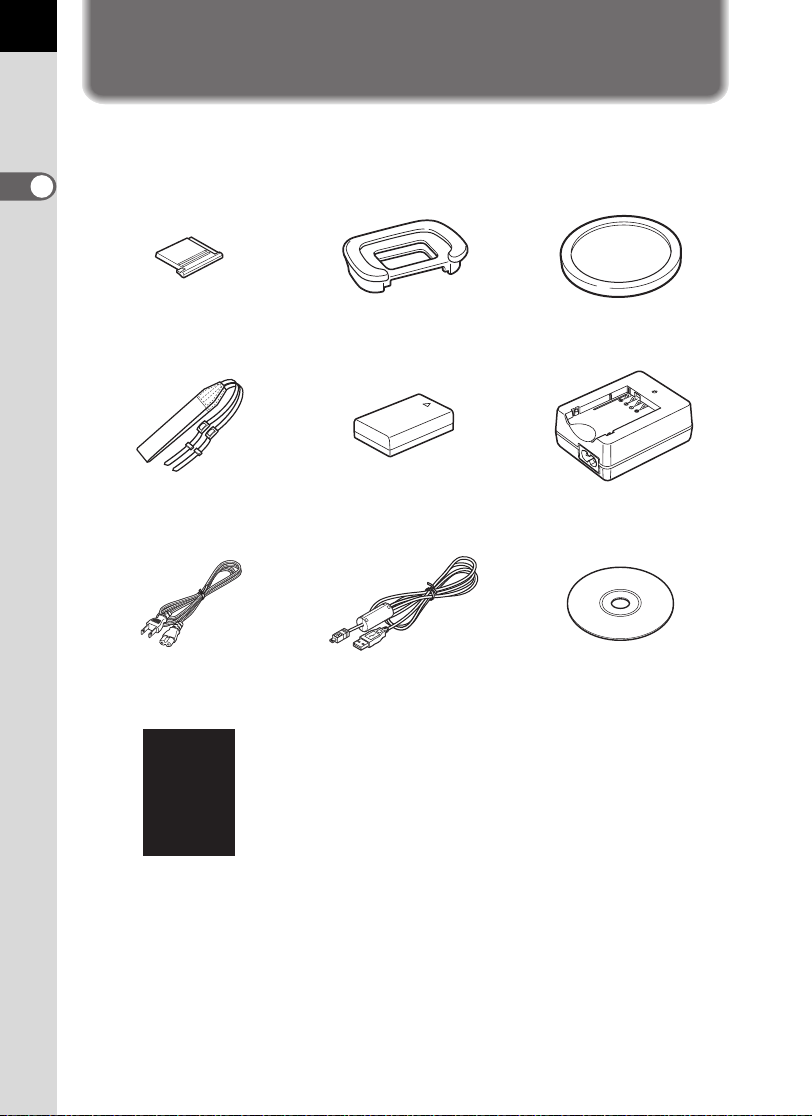
Checking the Contents of the Package
The following accessories are packaged with the camera.
Check that all accessories are included.
1
Before Using Your Camera
Hot shoe cover FK
(installed on camera)
Strap
O-ST132
AC plug cord USB cable
Operating Manual
(this manual)
Eyecup F
(installed on camera)
Rechargeable lithium-ion
battery D-LI109
I-USB7
R
*
Body mount cover
(installed on camera)
Battery charger
D-BC109
Software (CD-ROM)
S-SW133
*
* The power supply set provided with this camera varies depending on the country or region
where the camera was purchased. The camera may come with the AA battery holder
D-BH109 and four AA lithium batteries, instead of the rechargeable lithium-ion battery
D-LI109 and battery charger D-BC109.
Page 21
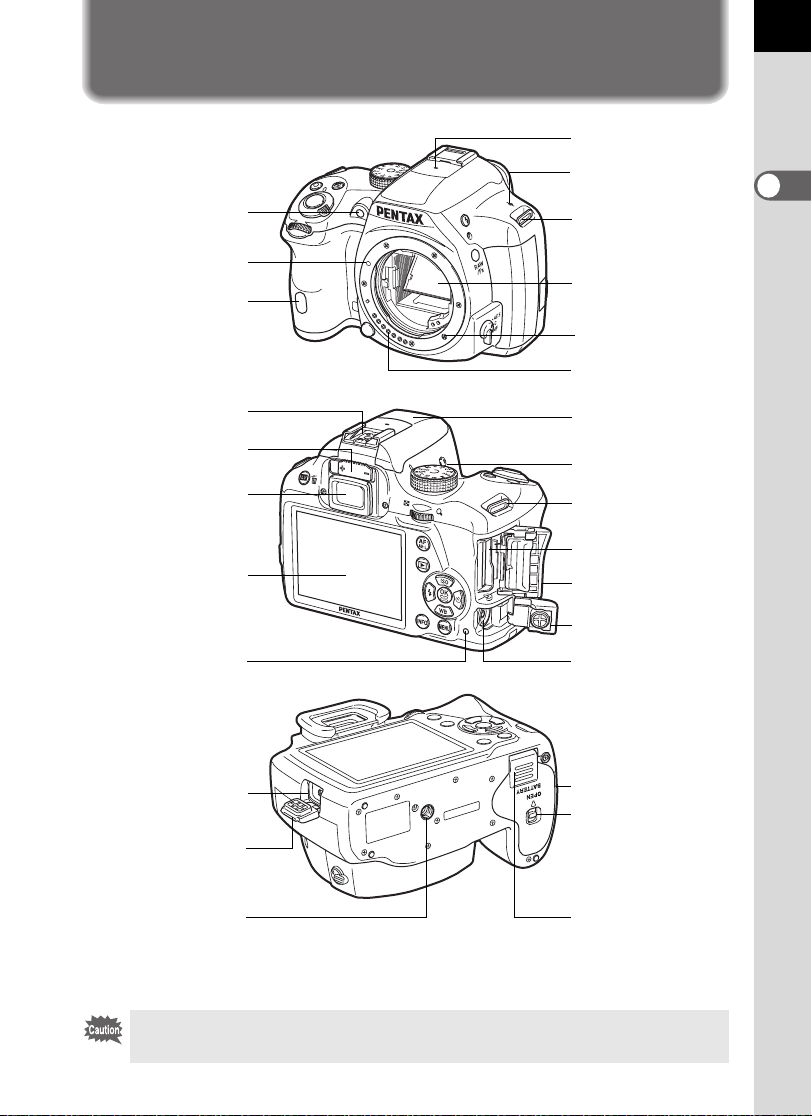
Names and Functions of the Working
Parts
Microphone
19
AF assist light
Lens mount index
(red dot)
Self-timer lamp/
Remote control
receiver
Hot shoe
Diopter adjustment
lever
Viewfinder
Monitor
Card access lamp
Image plane
indicator
Strap lug
Mirror
AF coupler
Lens information
contacts
Built-in flash
Speaker
Strap lug
SD Memory Card
slot
Card cover
Terminal cover
Cable release
terminal
1
Before Using Your Camera
Connection cable
VIDEO/PC output
terminal
Terminal cover
Tripod socket
cover
Battery cover
unlock switch
Battery cover
* In the second illustration, the camera is shown with the Hot shoe cover FK
and the Eyecup F
If the terminal covers and the connection cable cover are not closed correctly,
the dust-proof and water-resistant qualities of the camera will not be effective.
R removed.
Page 22
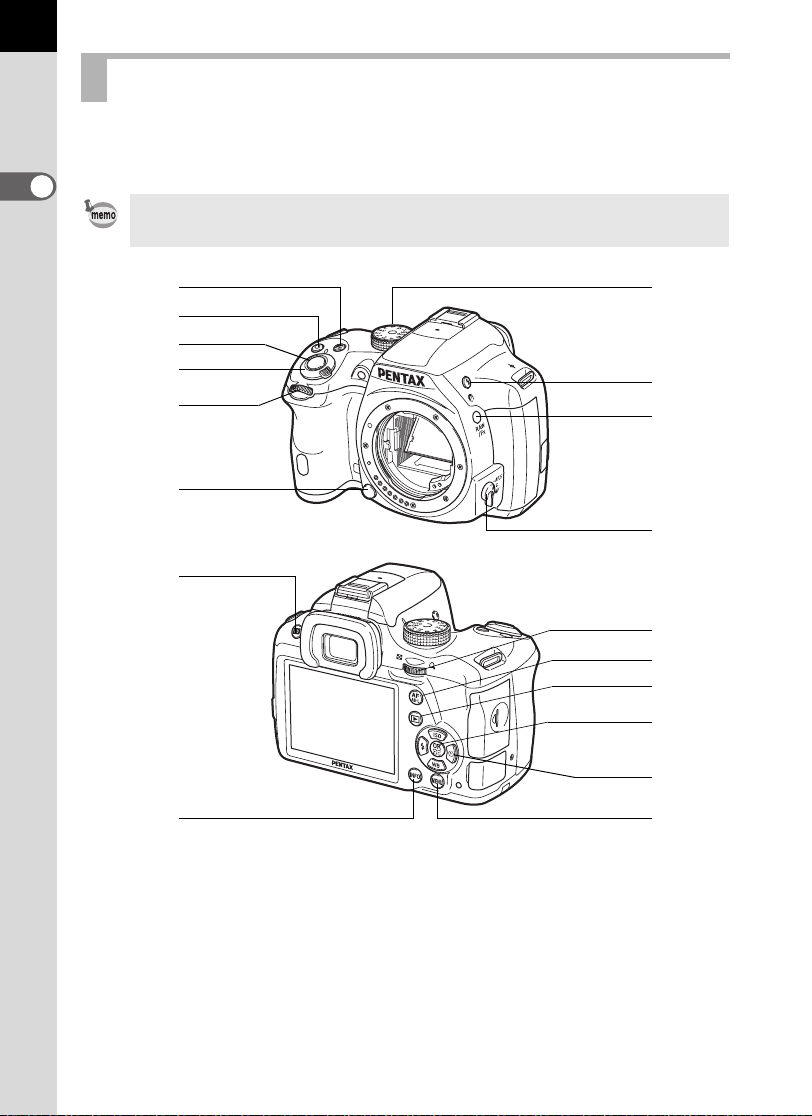
20
Capture Mode
Here, you can learn which parts are used and how they function when
in capture mode.
1
Before Using Your Camera
The factory default setting of each part is explained here, but some parts have
multiple functions and work differently depending on the selected setting.
1
2
3
4
5
6
a
b
7
8
9
0
c
d
e
f
g
h
Page 23

1 m (EV Compensation)
button
Press to set the EV
compensation value. (p.96)
Turn the rear e-dial (S)
after or while pressing the m
button to change the setting.
2 d (Green) button
Press to reset the values
being adjusted.
3 Shutter release button
Press to capture images. (p.68)
4 Main switch
Move to turn the camera
on and off. (p.59)
5 Front e-dial (R)
Changes the set value.
You can change the menu
when a menu screen is
displayed. (p.42)
6 Lens unlock button
Press to detach a lens. (p.57)
7 Mode dial
Changes the capture
mode. (p.86)
8 E (Flash pop-up) button
Press to pop up the built-in
flash. (p.73)
9 V/Y button
You can assign a function
to this button. (p.171)
0 Focus mode switch
Changes the focus
mode. (p.105)
a U/i (Live View) button
Displays the Live View
image. (p.27)
Deletes the image during
Instant Review. (p.68)
b M button
Displays the control panel.
(p.29) Press again to change
the type of information
displayed in standby mode.
(p.30)
c Rear e-dial (S)
Sets the shutter speed,
aperture and EV compensation
values. (p.94)
You can change the settings
when the control panel
is displayed. (p.41)
You can change the menu
when a menu screen is
displayed. (p.42)
d =/L button
You can select the function
of this button either to focus
on the target or to lock the
exposure value. (p.100, p.174)
e Q (Playback) button
Switches to playback
mode. (p.74)
21
1
Before Using Your Camera
Page 24

22
f 4 button
When the control panel or
a menu screen is displayed,
press this button to confirm
the selected item.
1
Before Using Your Camera
When both [AF Active Area]
and [Contrast AF] are set to
[Select], press this button to
enable or disable changing
the autofocusing (AF) point
or area. (p.109, p.112)
When the camera is in \
mode or when the focus is
locked during Live View, press
this button to magnify the image
on the monitor. (p.113)
g Four-way controller
(2345)
Displays the Sensitivity/White
Balance/Flash Mode/Drive
Mode setup menu. (p.78)
When the control panel or
a menu screen is displayed,
use this to move the cursor
or change the item to set.
h 3 button
Displays the [A Rec. Mode 1]
menu (p.79). Press this button
when a menu screen is
displayed to return to the
previous screen. (p.41)
Page 25
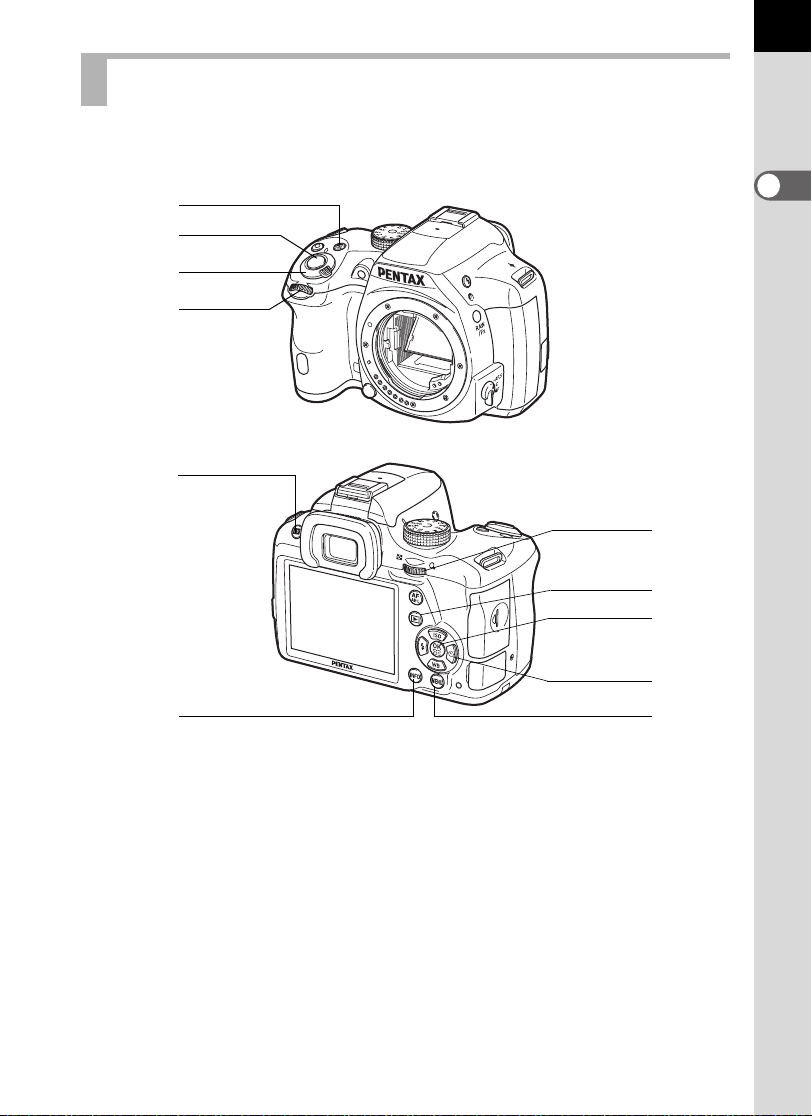
Playback Mode
Here, you can learn which parts are used and how they function when
in playback mode.
1
2
3
4
5
7
8
9
23
1
Before Using Your Camera
6
1 m (EV Compensation)
button
When the file format of the last
captured image is JPEG,
and its data still remains
in the buffer memory, press
this button to save the image
in RAW format. (p.74)
2 Shutter release button
Press halfway to switch
to capture mode.
0
a
3 Main switch
Move to turn the camera
on and off. (p.59)
4 Front e-dial (R)
Use this to display the next
or previous image. (p.74)
5 U/i (Delete) button
Press to delete images. (p.75)
Page 26

24
6 M button
Changes the type of
information displayed in
playback mode. (p.31)
7 Rear e-dial (S)
1
Before Using Your Camera
Use this to magnify an image
or display multiple images at
the same time (p.186, p.187).
8 Q (Playback) button
Switches to capture mode.
9 4 button
Confirms the setting you
selected in the menu
or playback screen.
0 Four-way controller
(2345)
Use this to move the cursor
or change the item to set in
the menu or playback screen.
Press the four-way controller
(3) in the single image display
to display the playback mode
palette. (p.182)
a 3 button
Displays the [Q Playback 1]
menu (p.184).
Page 27
Monitor Display
128
128
Cancel
Status Screen
OK
Custom Image
Bright
Various information appears on the monitor depending on the status
of the camera.
The brightness level and the color of the monitor can be adjusted. (p.219)
Capture Mode
With this camera, you can take pictures while looking through
the viewfinder or while viewing the image on the monitor.
When using the viewfinder, check the status screen displayed on the
monitor and the viewfinder indicators while shooting. When not using
the viewfinder, display the Live View image on the monitor while shooting.
The camera is in “standby mode” when the status screen or the Live View
image is displayed. Press the M button in standby mode to display
the “control panel” and change settings. (p.29)
If you press the M button while the control panel is displayed, you can
select the type of information displayed in standby mode. (p.30)
25
1
Before Using Your Camera
1/
90 4.0
200
Standby mode
(status screen)
F
128
Custom Image
Bright
MM
128
Control panel Shooting Info Display
Status Screen
MENU
Cancel
selection screen
OK
OK
Page 28

26
+1.0
G1A1
123/999
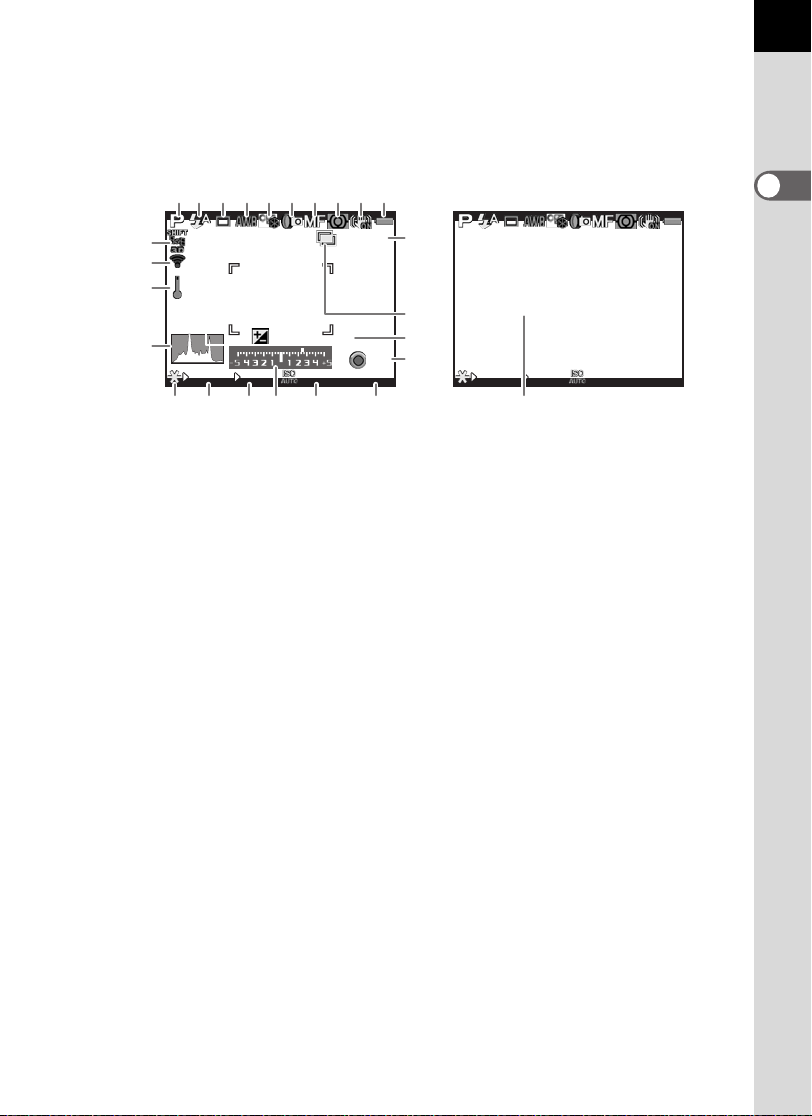
Status screen
The settings for shooting with the viewfinder are displayed.
(All items are displayed here for explanatory purposes. The actual display may differ.)
1
Before Using Your Camera
1/
2000
1600
+1.0
1 Capture mode (p.86)
2 AE Lock (p.100)
3 GPS positioning status
4 Custom Image (p.161)
5 HDR Capture (p.156)/
Digital Filter (p.165)
6 Focus mode (p.105)
7 AE Metering (p.101)
8 Shake Reduction (p.120)
9 Battery level (p.51)
10 Front/rear e-dial guide
11 Shutter speed
12 Aperture value
13 Sensitivity (p.91)
14 EV Compensation (p.96)/
Exposure Bracketing (p.97)
15 EV bar scale
G1A1
5.6F
123/999
123
10
10
14
10
21 22 24
2625
456789
11
13
15
10
17
23
16
18
20
12
19
2827
16 Sensitivity (p.91)
17 Flash Mode (p.70)
18 AF point (p.108)
19 Drive Mode (p.78)
20 White Balance (p.149)
21 Flash Exposure
Compensation (p.72)
22 White Balance fine-tuning (p.150)
23 Eye-Fi communication
status (p.236)
24 Number of shots during Interval
Shooting or Multi-exposure
25 File Format (p.147)
26 JPEG Recorded Pixels (p.148)
27 JPEG Quality (p.148)
28 Number of recordable still pictures/
| button guide
* Indicator 3 appears only when the optional GPS unit is attached to the camera
and is operating. (p.280)
* Indicator 23 appears only when the Eye-Fi card is in use. M indicates that
Eye-Fi communication is in standby mode, L indicates that Eye-Fi is not
connected, and the icon is animated during Eye-Fi communication.
The status screen will disappear if no operations are made within 30 seconds,
and will also disappear after 2 seconds, immediately after shooting.
Press the M button to display it again.
Page 29
Live View
001/999
1/
2000
F2.8
1600
[
9999
]
+1.7
EV
1/
2000
F2.8
1600
[
9999
]
±0
EV
Live View is displayed when the U/i button is pressed. You can capture images
while checking the composition on the monitor.
(All items are displayed here for explanatory purposes. The actual display may
differ.)
27
123 456789
11
12
13
EV
F2.8
+1.7
1600
14
1/
2000
19 20 21 23 2522
1 Capture mode (p.86)
2 Flash Mode (p.70)/Recording
Sound Level (p.134)
3 Drive Mode (p.78)
4 White Balance (p.149)
5 Custom Image (p.161)
6 HDR Capture (p.156)/
Digital Filter (p.165)
7 Focus mode (p.105)
8 AE Metering (p.101)
9 Shake Reduction (p.120)/
Movie SR (p.134)
10 Battery level (p.51)
11 GPS positioning status
12 Eye-Fi communication
status (p.236)
10
001/999
±0
[
9999
24
15
16
17
EV
18
]
1/
2000
F2.8
1600
13 Temperature warning
14 Histogram (p.35)
15 Number of shots during Interval
Shooting or Multi-exposure
16 Interval Shooting (p.128)/
Multi-exposure (p.131)
17 AF frame
18 | button guide
19 AE Lock (p.100)
20 Shutter speed
21 Aperture value
22 EV bar scale
23 Sensitivity (p.91)
24 Number of recordable still
pictures/movie recordable time
25 Face detection frame
[
9999
1
Before Using Your Camera
]
* Indicator 11 appears only when the optional GPS unit is attached to the camera
and is operating. (p.280)
* Indicator 12 appears only when the Eye-Fi card is in use. M indicates that
Eye-Fi communication is in standby mode, L indicates that Eye-Fi is not
connected, and the icon is animated during Eye-Fi communication.
* Indicator 17 is displayed in white. It turns green when the subject is in focus
and turns red when the subject is not in fo cus. I t is not displayed when the focus
mode switch is set to \. (p.69)
* For indicator 25, multiple face detection frames are displayed when [Contrast
AF] is set to [Face Detection]. A main face detection frame is displayed in yellow
and other frames in white. (p.110)
Page 30

28
• The Live View image may differ from the actual image captured
if the brightness of the subject is low or high.
• If any changes occur in the shooting light source during Live View, the image
on the monitor may flicker. You can cut down on flicker by setting the power
frequency in [Flicker Reduction] of the [R Set-up 2] menu to that used in your
1
Before Using Your Camera
region.
• If the camera position is changed rapidly during Live View, the image may not
be displayed with the appropriate brightness. Wait for the display to become
stable before shooting.
• Noise may appear on the Live View image when used in dark locations.
• The higher the sensitivity, the more noise and color unevenness may occur
in the monitor image and/or captured image.
• If you continue shooting for a prolonged period, the internal temperature
of the camera may increase, resulting in lower quality images. It is
recommended that you turn off the camera when not shooting. To prevent
the image quality from degrading, allow enough time for the camera to cool
down while shooting with long exposures or recording movies.
• If the internal temperature of the camera becomes high, l (temperature
warning) is displayed and Live View may not be available. If this happens,
stop shooting or use the viewfinder.
You can change the Live View display settings in [Live View] of the [A Rec.
Mode 4] menu. (p.111)
Page 31

Control panel
128
Custom Image
Bright
1:15'30"
128
Exposure Setting
Program AE
Custom Image
Bright
Press the M button in standby mode to display the control panel and change
settings. (p.40)
Still picture capture mode
29
1 Function name
2 Setting
3 Custom Image (p.161)/
H mode (p.88)
4 Digital Filter (p.165)
5 HDR Capture (p.156)
6 AF Active Area (p.108)
7 AF.A (p.107)
8 Distortion Correction (p.158)
9 Lateral Chromatic Aberration
Adjustment (p.158)
10 Highlight Correction (p.155)
11 Shadow Correction (p.155)
12 AE Metering (p.101)
13 File Format (p.147)
Custom Image
Bright
128
18
1
2
34567
8 9 10 11 12
13 14
15 16 17
19
20 21
C mode
Exposure Setting
Program AE
1:15'30"
• If no operations are made within 1 minute in the control panel, the camera
returns to standby mode.
• You can change the display color of the status screen and control panel.
Set in [LCD Display] of the [R Set-up 1] menu. (p.218)
1
2
22 3 4 12 17
10 11 14 23 15
24 16
19
201821
14 JPEG Recorded Pixels (p.148)/
Movie Recorded Pixels (p.134)
15 JPEG Quality (p.148)/
Movie Quality Level (p.134)
16 Shake Reduction (p.120)/
Movie SR (p.134)
17 Contrast AF (p.110)
18 Destination setting (p.215)
19 Current date and time (p.62)
20 SD Memory Card status
21 Number of recordable still
pictures/movie recordable time
22 Exposure Setting (p.133)
23 Framerate (p.134)
24 Recording Sound Level (p.134)
1
Before Using Your Camera
Page 32

30
Shooting Info Display
If you press the M button while the control panel is displayed, you can select
the type of information displayed in standby mode for when shooting with the
viewfinder. Use the four-way controller (2345) to select a display type and
press the 4 button.
1
Before Using Your Camera
Screen
Display
Status
Displays the settings for shooting with the viewfinder. (p.26)
Displayed Information
Screen
Display Off Nothing is displayed on the monitor.
The current latitude, longitude, altitude, direction, and Coordinated
Universal Time (UTC) are displayed. Press the shutter release
Electronic
Compass
button halfway or turn the camera off and on again to return to
the status screen.
Available only when the optional GPS unit is attached to the camera
and is operating. (p.280)
The Shooting Info Display selection screen is not displayed when the mode dial
is set to C.
• If [Display Off] is selected, the display setting returns to the status screen
when the camera is turned off and on again. If you select the check box
for [Shooting Info Display] in [Memory] of the [A Rec. Mode 4] menu,
the selected screen display appears the next time the camera is turned on.
(p.216)
• The Live View image and the indicators which provide shooting information
are displayed during Live View shooting. If you do not want to display the
indicators, you can change the setting in [Live View] of the [A Rec. Mode 4]
menu. (p.111)
Page 33

Playback Mode
100-0001
1/
2000
F2.8
200
Cancel
Standard Information Display
OK
The captured image and shooting information are displayed in the single
image display of playback mode.
1Playing Back Images (p.74)
Press the M button to call up the playback information display selection
screen. Use the four-way controller (2345) to select the type of screen
display that appears in the single image display and press the 4 button.
31
1
Before Using Your Camera
100-0001
Standard Information Display
M
1/
2000
F2.8
200
Single image display
(Standard Information Display)
Screen Display Displayed Information
Standard Information
Display
Detailed Information
Display
The captured image, file format and operation guide
indicators are displayed.
Detailed information on how and when the image
was taken is displayed in two pages. (p.32)
The captured image and brightness histogram
Histogram Display
are displayed. (p.34)
Not available during movie playback.
The captured image and RGB histogram are
RGB Histogram Display
displayed. (p.34)
Not available during movie playback.
No Information Display Only the captured image is displayed.
Cancel
MENU
Playback Info Display
selection screen
OK
OK
The screen display selected here is displayed the next time the camera
is switched to playback mode.
• If you clear the check box for [Playback Info Display] in [Memory] of the
[A Rec. Mode 4] menu, the Standard Information Display always appears
first when the camera is turned on. (p.224)
• If [Bright/Dark Area] (p.185) of the [Q Playback 1] menu is enabled by
selecting the check box, bright (overexposed) portions blink red, while dark
(underexposed) portions blink yellow. This information is not displayed
in Detailed Information Display or RGB Histogram Display.
Page 34

32
+1.0
1/
2000
F2.8
G1A1
50mm
1600
100-0001
+1.5
±
0
±
0
±
0
±
0
±
0
10:30
10'10"
0.0
1/
125
F8.0
G1A1
50mm
125
100-0001
±
0
±
0
±
0
±
0
±
0
10:30
N 36°45.410'
W140°02.000'
0m
123°
100-0001
10:00:00
05/05/2013
05/05/2013
05/05/2013
Detailed Information Display
Use the four-way controller (23) to switch between pages.
(All items are displayed here for explanatory purposes. The actual display
may differ.)
1
Before Using Your Camera
Page 1
Still picture
1/
2000
F2.8
Movie
1/
125
F8.0
Page 2
50mm
+1.5
1600
05/05/2013
10'10"
50mm
0.0
125
05/05/2013
N 36°45.410'
W140°02.000'
05/05/2013
100-0001
+1.0
G1A1
10:30AMAM
100-0001
G1A1
10:30AMAM
100-0001
0m
123°
10:00:00
1
±
0
±
0
±
0
±
0
±
0
±
0
±
0
±
0
±
0
±
0
10 11 12
14 15 16 17
22 23 24 25 26 27 28
31
10
14 15 34
23
1
3456 7
2
89
3
2
11 8 9 12
35 24 25 26
2
39
37
39
41
43
201918 21
32
33
32
44
29
13
30
67
29
30
2120418
636 7
38
40
42
37
Page 35

1 Rotation information (p.192)
2 Captured image
3 Capture mode (p.86)
4 Digital Filter (p.165)
5 DPOF setting (p.239)
6 Protect setting (p.229)
7 Folder number-File number
8 Drive Mode (p.78)
9 AE Metering (p.101)
10 Shutter speed
11 Lens focal length
12 Shake Reduction (p.120)/
Movie SR (p.134)
13 Focus mode (p.105)/AF point
(p.108)/Contrast AF (p.110)
14 Aperture value
15 EV Compensation (p.96)
16 Flash Mode (p.70)
17 Flash Exposure
Compensation (p.72)
18 Sensitivity (p.91)
19 HDR Capture (p.156)/
Multi-exposure (p.131)
20 White Balance (p.149)
21 White Balance fine-tuning (p.150)
22 File Format (p.147)
23 JPEG Recorded Pixels (p.148)/
Movie Recorded Pixels (p.134)
24 JPEG Quality (p.148)/Movie
Quality Level (p.134)
25 Highlight Correction (p.155)
26 Shadow Correction (p.155)
27 Distortion Correction (p.158)
28 Lateral Chromatic Aberration
Adjustment (p.158)
29 Custom Image (p.161)
30 Custom Image parameters (p.162)
31 Color Space (p.148)
32 Shooting date and time
33 Recording time
34 Recording Sound Level (p.134)
35 Framerate (p.134)
36 Transferred via Eye-Fi (p.236)
37 Lens direction
38 Photographer (p.234)
39 Information tampering warning
40 Copyright Holder (p.235)
41 Latitude
42 Altitude
43 Longitude
44 Universal Coordinated Time
33
1
Before Using Your Camera
* Indicator 36 appears only for images that have been transferred using the Eye-Fi
card.
* Indicators 37 and 41 to 44 appear only for images in which GPS
stored.
is
information
Page 36

34
1/
2000
F2.8
200
100-0001
1/
2000
F2.8
200
100-0001
Histogram Display/RGB Histogram Display
Use the four-way controller (23) to switch between the Histogram Display
and RGB Histogram Display.
1 2 3 4 2 3
1
Before Using Your Camera
1/
2000
F2.8
100-0001
200
4
1/
2000
F2.8
100-0001
200
5 6 7 8 5 6 7 8
Histogram Display RGB Histogram Display
1 Histogram (Brightness) 7 Aperture value
2 Protect setting 8 Sensitivity
3 Folder number-File number 9 Histogram (R)
4 Save RAW Data 10 Histogram (G)
5 File Format 11 Histogram (B)
6 Shutter speed
* Indicator 4 appears only when the file format of the last captured image is JPEG,
and the image can also be saved in RAW format. (p.74)
9
10
111
Page 37

Using the Histogram
A histogram shows the brightness
distribution of an image.
The horizontal axis represents
brightness (dark at the left and bright
at the right) and the vertical axis
represents the number of pixels.
The shape and the distribution of the
histogram before and after shooting
tell you whether the exposure level
and contrast are correct or not, and
let you decide if you need to adjust
the exposure and take a picture
again.
1Adjusting the Exposure (p.96)
1Brightness Adjustment (p.155)
When the image is underexposed, the part to the left is cut off
(underexposed portions with no detail) and when the image is
overexposed, the part to the right is cut off (overexposed portions
with no detail).
You can set whether to display the bright/dark area warning during capture
or playback mode.
Number of pixels →
(Dark) ←Brightness→ (Bright)
Dark portions Bright portions
35
1
Before Using Your Camera
1Setting the Playback Display Method (p.185)
1Setting the Display for Instant Review (p.220)
Distribution of color intensity is displayed for each color in RGB Histogram
Display. If a color is partially cut off on one side, it indicates that the color
is under- or overexposed, that the light is very weak or strong in that color,
or that the white balance is incorrect.
1Setting the White Balance (p.149)
Page 38

36
Guide Indicators
The following indicators appear on the monitor to indicate the keys,
buttons and e-dials that can be operated at that time.
Example:
1
Before Using Your Camera
2
3
4
5
R
S
Four-way controller (2) d button
Four-way controller (3) M button
Four-way controller (4) m button
Four-way controller (5) U/i button
3 button =/L button
4 button |/Y button
Front e-dial Shutter release button
Rear e-dial
Page 39

Viewfinder
When shooting with the viewfinder, the following information appears
in the viewfinder.
2
37
1
Before Using Your Camera
1
3
4 6 7 8
5910
171615141312
1 AF frame
2 Spot metering frame (p.101)
3 Flash indicator (p.73)
Lit: when the flash is available.
Blinks: when the flash is necessary or is being charged.
4 Focus mode (p.105)
Appears when set to \.
5 Shutter speed
Underlined when it can be adjusted.
6 Aperture value
Underlined when it can be adjusted.
7 Focus indicator (p.67)
Lit: when the subject is in focus.
Blinks: when the subject is not in focus.
8 EV bar scale
Displays the EV compensation values or difference between
the appropriate and current exposure values in a mode. (p.94, p.96)
9 ISO/ISO AUTO (p.91)
Appears when the sensitivity is displayed.
1
18
11
Page 40

38
10 Sensitivity/Remaining image storage capacity
Underlined when it can be adjusted.
Displays the number of recordable still pictures (up to “9999”) immediately
after shooting.
Displays the compensation value while adjusting the EV compensation.
11 AE Lock (p.100)
1
Before Using Your Camera
Appears while the AE Lock function is activated.
12 Changing AF point (p.109)
Appears when the AF point can be changed.
13 Multi-exposure (p.131)
Appears when Multi-exposure is set.
14 AE Metering (p.101)
Appears when Center-weighted metering or Spot metering is selected.
15 Shake Reduction (p.120)
Appears when the Shake Reduction function is activated.
16 Flash Exposure Compensation (p.72)
Appears when the flash exposure compensation value is being adjusted.
17 EV Compensation (p.96)/Exposure Bracketing (p.97)
Appears when adjusting the EV compensation or when Exposure
Bracketing is set.
18 File Format (p.147)
Appears when the file format is RAW or RAW+.
The information is displayed in the viewfinder when the shutter release button
is pressed halfway, or during the meter operating time (default setting: 10 sec.).
(p.101)
Page 41

How to Change Function Settings
Cancel
Auto Flash Discharge
OK
0.0
Function settings can be changed using the direct keys, control panel
or menus.
This section explains the basic ways to change function settings.
Using the Direct Keys
In standby mode, you can set Sensitivity, White Balance, Flash Mode
and Drive Mode by pressing the four-way controller (2345). (p.78)
Below, how to set [Flash Mode] is explained as an example.
1
Press the four-way controller (4)
in standby mode.
The Flash Mode setting screen appears.
39
1
Before Using Your Camera
2
Use the four-way controller (45)
to select a flash mode.
3
Press the 4 button.
The camera is ready to take a picture.
Auto Flash Discharge
0.0
Cancel
MENU
OK
OK
Page 42

40
Custom Image
Bright
128
JPEG Quality
128
JPEG Quality
128
OK
Cancel
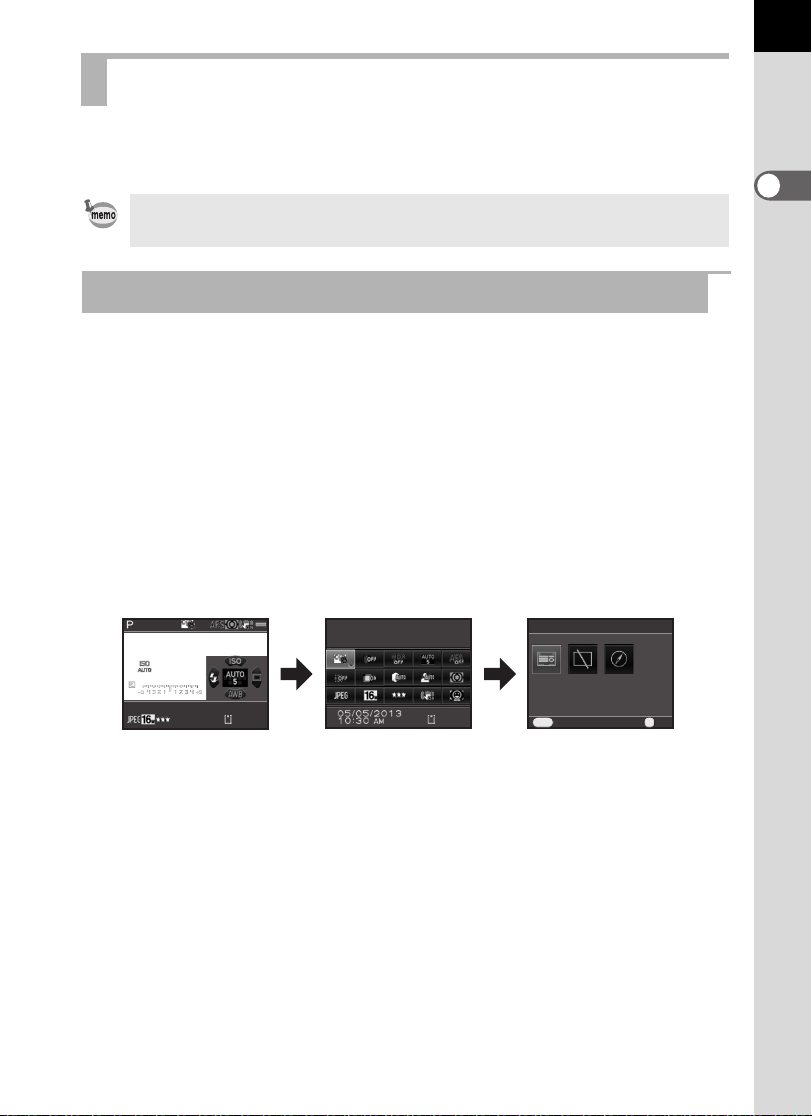
Using the Control Panel
In standby mode, you can switch to the control panel and change settings.
Below, how to set [JPEG Quality] is explained as an example.
1
Before Using Your Camera
1
Press the M button
in standby mode.
The control panel appears.
2
Use the four-way controller
(2345) to select the item you
want to change the setting for.
You cannot select items that cannot be
changed as a result of current camera
settings.
Custom Image
Bright
128
3
4
Press the 4 button.
The setup screen of the selected
item appears.
Use the four-way controller (45)
or rear e-dial (S) to select
a setting value.
Items not available with the current
camera settings cannot be selected.
JPEG Quality
JPEG Quality
Cancel
MENU
OK
128
128
OK
Page 43

5
Press the 4 button.
The camera returns to the control panel.
Next, set other items.
41
6
Press the 3 button or the shutter release button halfway.
The camera is ready to take a picture.
You can also change the setting by turning the rear e-dial (S) after selecting
the item you want to change in Step 2 ([Recording Sound Level] for C mode
can only be set using this operation). Detailed settings such as for Custom
Image and Digital Filter can be changed after pressing the 4 button.
Using the Menus
This section explains how to use the following menus: [A Rec. Mode],
[C Movie], [Q Playback], [R Set-up] and [A Custom Setting].
Below, how to set [Slow Shutter Speed NR] in the [A Rec. Mode 3] menu
is explained as an example.
1
Press the 3 button in standby
mode.
The [A Rec. Mode 1] menu appears
on the monitor.
The menus listed below are displayed
in the following situations.
When the mode dial is set to C [C Movie 1] menu
1
Before Using Your Camera
In playback mode [Q Playback 1] menu
Page 44

42
Custom Image
Digital Filter
Image Capture Settings
AE Metering
HDR Capture
Exit
High-ISO NR
Slow Shutter Speed NR
Shake Reduction
Input Focal Length
Exit
Composition Adjust.
High-ISO NR
Slow Shutter Speed NR
Shake Reduction
Input Focal Length
Exit
Composition Adjust.
High-ISO NR
Slow Shutter Speed NR
Shake Reduction
Input Focal Length
Composition Adjust.
Cancel
OK
2
Press the four-way controller
(5)twice.
Each time the four-way controller (5)
1
Before Using Your Camera
is pressed, the menu will change in the
following sequence: [A Rec. Mode 2],
[A Rec. Mode 3], [A Rec. Mode 4],
[C Movie 1] ... [A Rec. Mode 1].
You can also change the menu by turning
the rear e-dial (S).
When the front e-dial (R) is turned to the right, the menu will change in
the following sequence: [A Rec. Mode 1], [C Movie 1], [Q Playback 1],
[R Set-up 1], [A Custom Setting 1].
3
Use the four-way controller (23)
to select an item.
1 234
Custom Image
Digital Filter
HDR Capture
Image Capture Settings
AE Metering
Exit
MENU
123 4
High-ISO NR
Slow Shutter Speed NR
Composition Adjust.
Shake Reduction
Input Focal Length
Exit
MENU
4
Press the four-way controller (5).
Available settings are displayed
in the pop-up menu or submenu.
5
Use the four-way controller (23)
to select a setting.
Press the 3 button to cancel
the pop-up menu, or return
to the previous screen.
123 4
High-ISO NR
Slow Shutter Speed NR
Composition Adjust.
Shake Reduction
Input Focal Length
Exit
MENU
123 4
High-ISO NR
Slow Shutter Speed NR
Composition Adjust.
Shake Reduction
Input Focal Length
Cancel
MENU
OK
OK
Page 45

6
Press the 4 button.
The setting is saved.
Press the 3 button
if a submenu is displayed.
Next, set other items.
7
Press the 3 button.
The screen that was displayed before
selecting the menu item appears again.
Your settings may not be saved if the camera is turned off improperly
(such as by removing the battery while the camera is on).
• You can select either to display the menu tab selected the last time first,
or to always display the [A Rec. Mode 1] menu first. (p.221)
• Refer to the following pages for details on each menu.
• [A Rec. Mode] menu 1p.79
• [C Movie] menu 1p.82
• [Q Playback] menu 1p.184
• [R Set-up] menu 1p.212
• [A Custom Setting] menu 1p.83
43
1
Before Using Your Camera
Page 46

44
Memo
1
Before Using Your Camera
Page 47

2 Getting Started
This chapter explains your first steps from purchasing the
camera to taking pictures. Be sure to read this and follow
the instructions.
Attaching the Strap .................................................46
Inserting the Battery ...............................................47
Inserting/Removing an SD Memory Card ...............54
Attaching a Lens ....................................................56
Adjusting the Viewfinder Diopter ............................58
Turning the Camera On and Off .............................59
Initial Settings .........................................................60
Page 48

46
Getting Started
Attaching the Strap
1
Pass the end of the strap through
the strap lug, then secure it on
the inside of the clasp.
2
2
Attach the other end of the strap in the same manner
as described above.
Page 49

Inserting the Battery
47
The following power supplies can be used with the camera.
• Rechargeable Lithium-ion Battery D-LI109
• AA Battery Holder D-BH109 with four AA batteries
• AC Adapter Kit K-AC128 (optional)
* Either one of these is provided with the camera. The provided power supply varies
depending on the country or region where the camera was purchased. The item not
provided with the camera is optionally available.
*
*
Using the Lithium-ion Battery
Use the battery charger D-BC109 and the rechargeable lithium-ion battery
D-LI109 to power the camera.
Charging the Battery
When using the battery for the first time or when the battery capacity
becomes low, recharge the battery.
Note: AC plug cord “Listed, Type SPT-2 or NISPT-2, 18/2 flexible cord,
rated 125 V, 7A, minimum 6ft (1.8m)”
1
Connect the AC plug cord to the battery charger.
2
Getting Started
2
Plug the AC plug cord into the power outlet.
Battery charger
Indicator lamp
AC plug cord
Page 50

48
Getting Started
3
Face the 2 mark on the battery up,
and insert the battery into the
battery charger.
First, insert the battery at an angle, as
shown in the illustration, and then push
down on the battery until it clicks.
2
The indicator lamp lights up when
charging and turns off when the battery
is fully charged.
4
When the battery is fully charged, remove the battery from
the battery charger.
• Do not use the Battery Charger D-BC109 to charge batteries other than
D-LI109. Charging other batteries may cause damage or heating.
• Replace the battery with a new one in the following cases:
• If the indicator lamp blinks or does not light after the battery is inserted
correctly
• If the battery starts to run down more quickly even after being charged
(the battery may have reached the end of its service life)
The maximum charging time is approximately 240 minutes (depends on
temperature and remaining battery power). Charge in a location where
the temperature is between 0°C and 40°C.
Page 51

Inserting/Removing the Battery
• Do not open the battery cover or remove the battery while the power is on.
• Insert the battery correctly. If the battery is inserted incorrectly, it may not
be removed. Wipe the electrodes of the battery with a soft dry cloth before
inserting.
• Be careful as the camera or battery may become hot when the camera
is used continuously for a long period of time.
• Remove the battery when you will not use the camera for a long while.
The battery may leak and damage the camera if left installed during
prolonged periods of non-use. If the removed battery will not be used for six
months or longer, charge the battery for about 30 minutes before storing it.
Be sure to recharge the battery every six to twelve months.
• Store the battery in a location where the temperature will remain below
room temperature. Avoid locations with high temperatures.
• The date and time may be reset if you leave the battery out of the camera
for a long period of time. If this occurs, follow the procedure described in
“Setting the Date and Time” (p.62) to set the current date and time.
1
Slide the battery cover unlock
switch in the direction of
the arrow (1), and open
the battery cover (2).
49
2
Getting Started
2
1
2
With the 2 mark facing towards
outside of the camera, push the
battery in until it locks into place.
To remove the battery, push the battery
lock switch in the direction of
the arrow (3).
3
Close the battery cover.
The battery cover is locked.
3
Page 52

50
Using the AA Batteries
When using AA batteries, be sure to use the AA battery holder D-BH109.
Use four AA lithium batteries, AA Ni-MH rechargeable batteries,
or AA alkaline batteries.
2
Getting Started
Available Batteries Characteristics
AA lithium batteries Recommended when using the camera in cold climates.
AA Ni-MH
rechargeable
batteries
AA alkaline batteries
• For precautions when using the batteries, refer to “About the Usage
of AA Batteries” (p.4).
• If AA Ni-MH rechargeable batteries with a capacity of approximately
1000 mAh are used, the batteries may not last for very long. Use Ni-MH
rechargeable batteries with a large capacity.
1
Insert the AA batteries according
These are rechargeable and reusable.
A battery charger that is compatible with the batteries
is required.
These are easily obtainable when the batteries you are
using run out but they may not support all the camera
functions under certain conditions. Use them in
emergencies or when checking the camera functionality.
to the +/- indicators on the battery
holder.
2
Open the battery cover.
Refer to Step 1 on p.49.
3
Insert the battery holder into the battery chamber until it locks
into place, and close the battery cover.
• To use the AA batteries, set the AA battery type in [AA Battery Type]
of the [R Set-up 3] menu before use. (p.222)
• Check the orientation of the batteries if the camera does not operate properly.
Page 53

Battery Level Indicator
51
You can confirm remaining battery level by checking the
w displayed
in the status screen or Live View screen.
Display Battery Level
w (green) Battery is full.
x (green) Battery is close to full. (D-LI109 only)
f (orange) Battery is running low. (D-BH109 only)
y (yellow) Battery is running low. (D-LI109 only)
F (red) Battery is almost empty.
[Battery depleted] The camera turns off after displaying the message.
• f, y or F (red) may appear even when the battery level is
sufficient if the camera is used at low temperatures or when performing
continuous shooting for a long period of time.
• Battery performance temporarily decreases as the temperature decreases.
When using the camera in cold climates, have extra batteries at hand and
keep them warm in your pocket. The battery performance will return to
normal at room temperature.
• Have extra batteries ready when traveling abroad, or taking a lot of pictures.
2
Getting Started
Page 54

52
Using the AC Adapter
We recommend the use of the optional AC adapter kit K-AC128 when
using the monitor for a long time or when connecting the camera to
a computer or AV device.
2
Getting Started
The AC Adapter Kit K-AC128 includes AC Adapter D-AC120, DC Coupler
D-DC128, and AC plug cord.
1
Make sure that the camera is turned off.
2
Open the battery cover.
Refer to Step 1 on p.49.
Remove the battery if it is inserted in the camera.
3
Pull out the connection cable cover
(1) on the right of the battery
cover, and insert the DC coupler
into the battery chamber until
it locks into place.
4
Close the battery cover.
The connection cable is pulled out from
the connection cable cover section.
1
Page 55

5
Connect the DC coupler and the AC adapter.
7
5
6
6
Connect the AC adapter to the AC plug cord.
7
Plug the AC plug cord into the power outlet.
• Make sure the camera is turned off before connecting or disconnecting
the AC adapter.
• Make sure connections are secure between the terminals. SD Memory Card
or data may be corrupted if the connection to the power supply is lost while
the card is being accessed.
• The connection cable will protrude from the connection cable cover
on the camera while the AC adapter is in use.
• After removing the DC coupler, return the connection cable cover
to its original position.
53
2
Getting Started
• When the AC adapter is connected to the camera, W is displayed
for the battery level indicator.
• Be sure to read the manual of the AC adapter kit before using the AC adapter.
Page 56

54
Inserting/Removing an SD Memory
Card
This camera uses a commercially available SD Memory Card, SDHC
Memory Card, or SDXC Memory Card.
Make sure the camera is turned off before inserting or removing
the SD Memory Card.
2
Getting Started
• Do not remove the SD Memory Card while the card access lamp is lit.
• Do not open the card cover while the camera is in use.
• Use this camera to format (initialize) an SD Memory Card that is unused
or has been used on other devices. Refer to “Formatting an SD Memory
Card” (p.228) for details on formatting.
• Use a high-speed memory card when recording movies. If the writing speed
cannot keep up with the recording speed, writing may stop during recording.
1
Make sure that the camera is turned off.
2
Slide the card cover in the direction
of the arrow, and then lift it to
open (1→2).
1
2
3
Insert the card all the way with
the SD Memory Card label
facing toward the monitor.
Page 57

Push the SD Memory Card in once
to remove.
4
Close the card cover (3),
and then slide it in the direction
of the arrow (4).
Be sure to fully close the card cover. The camera will not turn on if the card
cover is open.
For details on the approximate number of still pictures and amount of time
of movies that can be recorded on an SD Memory Card, refer to “Approximate
Image Storage Capacity by Size” (p.295).
55
2
Getting Started
4
3
Page 58

56
Attaching a Lens
Attach a proper lens to the camera body.
When you use one of the following lenses with this camera,
all the camera’s capture modes are available.
(a) DA, DA L, D FA, FA J lenses
2
Getting Started
(b) Lenses with an s (Auto) position; when used in the s position
• When attaching or removing a lens, choose an environment that is relatively
free of dirt and dust.
• Keep the body mount cover on the camera when a lens is not attached.
• Be sure to attach the lens mount cover and lens cap to the lens after
removing the lens from the camera.
• Do not insert any fingers into the camera mount or touch the mirror.
• The camera body and lens mount incorporate lens information contacts.
Dirt, dust, or corrosion on the contacts may damage the electrical system.
Please contact a PENTAX Service Center for professional cleaning.
• Some functions will be restricted when one of lenses described in (b) is used
with the aperture ring set to the position other than s, or when a lens other
than listed above and/or other accessories are used. Refer to “Functions
Available with Various Lens Combinations” (p.272) for details.
• If a lens for which the focal length information cannot be automatically
obtained is used, the [Input Focal Length] screen appears when the camera
is turned on. Refer to “Setting the Focal Length” (p.275) for details.
• We assume no responsibility nor liability for accidents, damages and
malfunctions resulting from the use of lenses made by other manufacturers.
1
Make sure that the camera is turned off.
2
Remove the body mount cover (1)
and lens mount cover (2).
Be sure to put the lens down with the lens
mount side facing upward to protect the
lens mount from damage when there
is no lens mount cover on the lens.
Page 59

3
Align the lens mount index
(red dots: 3) on the camera and
the lens, and secure by turning
the lens clockwise until it clicks.
After attaching, turn the lens
counterclockwise to make sure
that the lens is locked in place.
4
Remove the front lens cap by
pushing the indicated portions
inward.
To remove the lens
Attach the lens cap first, and then turn
the lens counterclockwise while holding
down the lens unlock button (4).
57
3
2
Getting Started
4
The body mount cover (1) is for preventing scratches and blocking dust when
shipped. Body Mount Cap K that has a lock on the body is sold separately.
Page 60

58
2
Getting Started
Adjusting the Viewfinder Diopter
You can adjust the viewfinder diopter to suit your eyesight.
The Eyecup F
leaves the factory. The diopter can be adjusted with the eyecup attached.
However, adjustment is easier with the eyecup removed.
1
Remove the eyecup by pulling it out
in the direction of the arrow.
2
Look through the viewfinder,
and slide the diopter adjustment
lever left or right.
Adjust the lever until the AF frame
in the viewfinder is focused.
Point the camera at a white wall or other
bright and consistent surface.
R is attached to the viewfinder portion when the camera
AF frame
3
Align the eyecup with the groove on the viewfinder eyepiece
and push it into the position.
You can also use the optional Magnifier Eyecup O-ME53 for more precise
focusing.
Page 61

Turning the Camera On and Off
1
Turn the main switch to [ON].
The camera turns on.
Set the main switch to the position
[OFF] to turn off the camera.
• Always turn the camera off when not in use.
• The power will automatically turn off when you do not perform any operations
within a set period of time (Auto Power Off). To reactivate the camera,
turn it on again or perform any of the following operations.
• Press the shutter release button halfway.
• Press the 3 button or M button.
• [Auto Power Off] is set to [1min.] by default. You can change the setting
in [Auto Power Off] of the [R Set-up 3] menu. (p.222)
• To turn the camera on in playback mode, turn the main switch to [ON]
while holding down the Q button.
59
2
Getting Started
Page 62

60
Cancel
Date Adjustment
Date Format
Date
Time
mm/dd/yy
24h
01/01/2013
00:00
Settings complete
Cancel
Initial Setting
Settings complete
English
New York
Text Size
Standard
Initial Settings
The first time the camera is turned on, the [Language/u] screen
appears on the monitor. Follow the procedure below to set the language
displayed on the monitor and the current date and time.
If the [Date Adjustment] screen appears,
2
proceed to “Setting the Date and Time”
Getting Started
(p.62).
Date Adjustment
Date Format
Date
Time
Settings complete
Cancel
MENU
Setting the Display Language
You can set the language in which the menus, error messages, etc.
are displayed.
1
Use the four-way controller (2345) to select the desired
language, and press the 4 button.
The [Initial Setting] screen appears
in the selected language.
Proceed to Step 6 if W (Hometown)
does not have to be changed.
Initial Setting
New York
Text Size
Settings complete
Cancel
MENU
mm/dd/yy
01/01/2013
00:00
24h
English
Standard
2
Press the four-way controller (3) to move the frame to W,
and press the four-way controller (5).
The [W Hometown] screen appears.
Page 63

3
Hometown
DST
New York
Cancel
OK
Settings complete
Cancel
Initial Setting
English
New York
Text Size
Standard
Large
Cancel
Initial Setting
Settings complete
English
New York
OK
Text Size
Standard
Use the four-way controller (45)
Hometown
to select a city.
Turn the rear e-dial (S) to change
the region.
Refer to “List of World Time Cities”
(p.217) for cities that can be selected
as a hometown.
4
Press the four-way controller (3) to select [DST], and use
New York
DST
Cancel
MENU
the four-way controller (45) to select O (On) or P (Off).
5
Press the 4 button.
The [Initial Setting] screen reappears.
6
Press the four-way controller (3) to select [Text Size],
and press the four-way controller (5).
7
Use the four-way controller (23)
Initial Setting
to select [Standard] or [Large],
and press the 4 button.
Selecting [Large] increases the text size
of the selected menu items.
New York
Text Size
Settings complete
Cancel
MENU
OK
English
Standard
Large
OK
61
2
Getting Started
8
Press the four-way controller (3)
to select [Settings complete],
and press the 4 button.
The [Date Adjustment] screen appears.
Initial Setting
New York
Text Size
Settings complete
Cancel
MENU
English
Standard
OK
OK
Page 64

62
Cancel
Date Adjustment
Date Format
Date
Time
mm/dd/yy
24h
01/01/2013
00:00
Settings complete
OK
24h
00:00
Cancel
Date Adjustment
Date Format
Date
Time
mm/dd/yy
01/01/2013
Settings complete
OK
• If the hometown and the date and time are not set, the [Initial Setting] screen
or [Date Adjustment] screen will be displayed again the next time the camera
is turned on.
• You can change the text size from the [R Set-up 1] menu later. In this
manual, the menu screens hereafter are described with [Text Size]
set to [Standard].
2
Getting Started
Setting the Date and Time
Set the current date and time and the display style.
1
Press the four-way controller (5),
and use the four-way controller
(23) to select the date format.
Choose [mm/dd/yy], [dd/mm/yy] or
[yy/mm/dd].
2
Press the four-way controller (5), and use the four-way
controller (23) to select [24h] or [12h].
3
Press the 4 button.
The frame returns to [Date Format].
4
Press the four-way controller (3), and press the four-way
controller (5).
The frame moves to the month if the date format is set to [mm/dd/yy].
Date Adjustment
Date Format
Date
Time
Settings complete
Cancel
MENU
mm/dd/yy
01/01/2013
00:00
OK
24h
OK
5
Use the four-way controller (23)
to set the month.
Set the day and year in the same manner.
Next, set the time.
If you select [12h] in Step 2, the camera
switches between am and pm depending
on the time.
Date Adjustment
Date Format
Date
Time
Settings complete
Cancel
MENU
mm/dd/yy
01/01/2013
00:00
OK
24h
OK
Page 65

6
Cancel
Date Adjustment
Date Format
Date
Time
mm/dd/yy
24h
05/05/2013
10:00
Settings complete
OK
Press the four-way controller (3)
to select [Settings complete],
and press the 4 button.
The camera is ready to take a picture.
If you set the date and time from the
menu, the [R Set-up 1] menu reappears.
In this case, press the 3 button.
• When you press the 4 button in Step 6, the seconds value is set to 0.
To set the exact time, press the 4 button when the time signal (on the TV,
radio, etc.) reaches 0 seconds.
• Pressing the 3 button while setting the date and time cancels the
settings made up to that point and switches the camera to capture mode.
• You can change the language and date and time settings from
the [R Set-up 1] menu later.
Date Adjustment
Date Format
Date
Time
Settings complete
Cancel
MENU
mm/dd/yy
05/05/2013
10:00
OK
24h
OK
63
2
Getting Started
Page 66

64
Getting Started
Memo
2
Page 67

3 Basic Operations
This chapter explains basic operations for shooting by
setting the mode dial to n (Auto Picture) to have the
camera select the optimum settings based on the subject.
For information about advanced functions and settings
for taking pictures, refer to chapter 4 and onward.
Basic Shooting Operation ......................................66
Using the Built-in Flash ..........................................70
Reviewing Images ..................................................74
Page 68

66
Basic Shooting Operation
Letting the Camera Choose the Optimal Settings
This camera features various capture modes, focus modes, and drive
modes. This section explains how to take pictures by simply pressing
the shutter release button.
You can take pictures while looking through the viewfinder or while viewing
the image on the monitor.
3
Basic Operations
Taking Pictures Using the Viewfinder
1
Set the mode dial to n.
The capture mode is set to n mode.
1Selecting the Appropriate Capture
Mode (p.86)
Page 69

2
Set the focus mode switch to l.
In n mode, the focus mode changes
to f (Autofocus/Auto) mode.
1Setting the Focus Mode (p.105)
3
Look through the viewfinder to view
the subject.
When using a zoom lens, turn the zoom
ring to the right or left to change the angle
of view.
4
Position the subject inside the AF frame, and press the shutter
release button halfway.
67
3
Basic Operations
The autofocus system operates.
The focus indicator ] appears and you
will hear a beep when the subject comes
into focus (focus lock).
When set to n mode, the optimal
capture mode is automatically selected
from U (Standard), c (Portrait),
s (Landscape), b (Macro), \ (Moving
Object), . (Night Scene Portrait),
K (Sunset), d (Blue Sky) or
x (Forest). (p.87)
The AF assist light turns on in a dark or
backlit location. If the flash is necessary,
the flash status E blinks in the viewfinder.
Press the E button to pop up the flash.
Flash
status
Focus indicator
Page 70

68
Basic Operations
5
Press the shutter release button fully.
The picture is taken.
This action is referred to as “releasing the shutter” or “release”.
6
Review the captured image on the monitor.
The image appears for 1 second on the monitor shortly after it is captured
(Instant Review).
The following operations can be performed during Instant Review.
3
Available operations
U/i button Deletes the image. (p.75)
Rear e-dial (S) Magnifies the image. (p.186)
m button Saves the RAW image (only when the data
is available). (p.74)
1Setting the Display for Instant Review (p.220)
• The beep that sounds when the image is focused can be turned off. (p.214)
• You can set the camera so that it automatically focuses when the =/L
button is pressed. (p.174)
• You can preview the image on the monitor and check the depth of field before
shooting. (p.118)
Power zoom functions (Image Size Tracking, Zoom Clip and Auto Zoom Effect)
are not available with this camera. Use manual zoom.
Page 71

Taking Pictures Using Live View
1/
2000
F2.8
1600
[
37
]
1
Press the U/i button in Step 3
on p.67.
The Live View image is displayed
on the monitor.
2
Position the subject inside the AF
frame on the monitor, and press
the shutter release button halfway.
The autofocus system operates.
The AF frame turns green when focused.
Subsequent steps are the same
as shooting with the viewfinder.
Press the U/i button to end
the Live View shooting.
• You can magnify the central area in focus by pressing the 4 button while
the focus is locked (except when [Contrast AF] is set to [Tracking]). (p.113)
• In this manual, the explanations and examples are mainly for shooting with
the viewfinder.
1/
2000
F2.8
AF frame
1600
[
37
69
3
Basic Operations
]
Page 72

70
Using the Built-in Flash
Use a flash to take pictures in low light or backlit conditions.
The built-in flash is optimum for a subject at a distance from approx. 0.7 m
to 5 m. Vignetting (darkening of the corners of the image due to a lack of
light) may occur when used at a distance closer than 0.7 m (this distance
varies slightly depending on the lens being used and the sensitivity setting
(p.252)).
Basic Operations
3
• When using the built-in flash, remove the lens hood before shooting.
Vignetting may occur depending on the lens being used and the shooting
conditions. Refer to “Lens and Built-in Flash” (p.273) for details.
• The built-in flash always fully discharges when using a lens without an s
(Auto) position.
For details on the built-in flash and instructions on how to take pictures with
an external flash, refer to “Using the Flash” (p.249).
Setting the Flash Mode
Flash Mode Function
Auto Flash
C
Discharge
Auto Flash+
i
Red-eye Reduction
Flash On Discharges the flash for each picture.
E
Flash On+
F
Red-eye Reduction
Slow-speed Sync
G
Slow-speed
H
Sync+Red-eye
Automatically measures the ambient light and
determines whether to use the flash.
Discharges a pre-flash for red-eye reduction before
the automatic flash.
Discharges a pre-flash for red-eye reduction before
the main flash.
Sets to a slow shutter speed depending on the
brightness. When using this to shoot a portrait with
the sunset in the background, both the person and
the background are captured beautifully. (p.250)
Discharges a pre-flash for red-eye reduction before
the main flash is discharged with Slow-speed Sync.
Page 73

Flash Mode Function
Cancel
Auto Flash Discharge
OK
0.0
Trailing Curtain
I
Sync
k
Wireless Mode
r
Discharges the flash immediately before closing
the shutter. Captures moving objects as if they are
leaving a light trail behind them.
You can synchronize an optional external flash
without using a sync cord. (p.257)
The flash modes that can be selected differ depending on the capture
mode.
71
Capture Mode Selectable Flash Mode
n/H
e/K/c
b/L/a/p
The flash does not discharge in the following capture modes:
• C mode
• K (Sunset) or d (Blue Sky) of n mode
• K (Sunset), d (Blue Sky), A (Night Scene), Z (Night Scene HDR),
y (Backlight Silhouette), U (Candlelight), n (Stage Lighting) or
E (Museum) of H mode
1
Press the four-way controller (4) in standby mode.
C/i/E/F/r
E/F/G/H/I/r
E/F/k/r
The Flash Mode setting screen appears.
2
Use the four-way controller (45)
Auto Flash Discharge
to select a flash mode, and press
the 4 button.
The camera is ready to take a picture.
3
Basic Operations
0.0
Slow-speed Sync and Trailing Curtain Sync slow down the shutter speed.
To avoid camera shake, either turn on the Shake Reduction function, or use
a tripod.
MENU
Cancel
OK
OK
Page 74

72
Cancel
Auto Flash Discharge
OK
+0.7
Compensating Flash Output
You can adjust the flash output in a range of -2.0 to +1.0. The following
flash compensation values can be set according to the step interval set
in [1. EV Steps] of the [A Custom Setting 1] menu.
EV Steps Selectable Flash Compensation Value
-2.0, -1.7, -1.3, -1.0, -0.7, -0.3, 0.0, +0.3, +0.7, +1.0
-2.0, -1.5, -1.0, -0.5, 0.0, +0.5, +1.0
Auto Flash Discharge
Basic Operations
1/3 EV
1/2 EV
3
1
Press the four-way controller (3) in Step 2 on p.71.
2
Turn the rear e-dial (S).
The flash compensation value is set.
Press the d button to reset the value
to 0.0.
+0.7
• When the flash output exceeds its maximum amount, the compensation will
not be effective even if the compensation value is set to the plus (+) side.
• Compensating to the minus (-) side may have no effect if the subject is too
close, the aperture is set to a large opening, or the set sensitivity is high.
• The flash output compensation is also effective for external flash units which
support the P-TTL auto flash mode.
MENU
Cancel
OK
OK
Page 75

Using the Built-in Flash
1
Press the E button.
The built-in flash pops up and begins
charging. While the flash is charging, E
blinks in the viewfinder or Live View
screen.
When the flash is fully charged, E stops
blinking and stays lit continuously.
When you do not want the flash to
discharge, keep the built-in flash retracted.
2
Take a picture.
The flash discharges.
When the flash mode is set to C or i, the flash is not discharged if the
lighting conditions do not require flash for correction even when the flash
is popped up.
3
Push down on the top of the flash
to retract the built-in flash.
73
3
Basic Operations
By default, you cannot take pictures while the built-in flash is being charged.
If you want to take pictures while charging the built-in flash, set [15. Release
While Charging] to [On] in the [A Custom Setting 3] menu.
Page 76

74
Reviewing Images
Playing Back Images
You can play back captured images with the camera.
1
Press the Q button.
The camera switches to the single image
3
Basic Operations
display of playback mode and the most
recently captured image (for movies, only
the first frame) is displayed on the
monitor.
2
Review the captured image on the monitor.
Available operations
Four-way controller (4)/
front e-dial (R) to the left
Four-way controller (5)/
front e-dial (R) to the right
m button Saves the RAW image (only when
• When the file format of the last captured image is JPEG, and its RAW data
still remains in the buffer memory, you can save the RAW image during
Instant Review or playback (if [Save RAW Data] is enabled in [Instant
Review] of the [A Rec. Mode 4] menu (p.220)).
If the image was captured using any of the following settings,
the corresponding image listed below is saved.
• Exposure Bracketing RAW image of the third image
• Multi-exposure RAW image with Multi-exposure
• Interval Shooting RAW image for the last captured image
• HDR Capture RAW image with standard exposure
• Digital Filter RAW image without a filter effect
Images captured with Z (Night Scene HDR) of H mode or Continuous
Shooting cannot be saved in RAW format.
• Refer to “Playback Functions and Image Editing” (p.181) for details on
the playback functions.
Displays the previous image.
Displays the next image.
the data is available).
Page 77

Deleting a Single Image
Delete
100-0001
Cancel
OK
You can delete images one by one.
• Deleted images cannot be restored.
• Protected images cannot be deleted. (p.229)
1
Press the Q button, and display an image to delete.
75
2
Press the U/i button.
The delete confirmation screen appears.
3
Press the four-way controller (2)
to select [Delete], and press
the 4 button.
The image is deleted.
• You can delete multiple images at once. Refer to “Deleting Multiple Images”
(p.193) for details.
• For the images captured with [File Format] (p.147) set to [RAW+], you can
select the file format to delete in Step 3.
Delete
Cancel
100-0001
OK
OK
3
Basic Operations
Page 78

76
Basic Operations
Memo
3
Page 79

4 Shooting Functions
This chapter describes the various basic and advanced
shooting functions available with this camera.
How to Operate the Shooting Functions ................78
Selecting the Appropriate Capture Mode ...............86
Setting the Exposure ..............................................91
Focusing ...............................................................105
Checking the Depth of Field (Preview) .................118
Using the Shake Reduction Function
to Prevent Camera Shake ....................................120
Taking Pictures Continuously ...............................126
Recording Movies ................................................133
Page 80

78
How to Operate the Shooting Functions
You can change capture-related settings using the direct keys, control
panel, [A Rec. Mode] menu, [C Movie] menu or [A Custom Setting]
menu.
For details on how to use the direct keys and menus, refer to “How to Change
Function Settings” (p.39).
Direct Keys Setting Items
4
Press the four-way controller (2345) in
Shooting Functions
standby mode to set the following items.
Key Item Function Page
2
Sensitivity Sets the ISO sensitivity. p.91
3
White Balance
4
Flash Mode Sets the method of flash discharge. p.70
5
Drive Mode
Adjusts the color balance to match
the type of the light source illuminating
the subject.
Selects Single Frame, Continuous
Shooting, Self-timer, Remote Control
or Exposure Bracketing.
p.149
p.126
p.122
p.124
p.97
Page 81

Rec. Mode Menu Items
The following items are available in
the [A Rec. Mode 1-4] menus.
Press the 3 button in standby mode
to display the [A Rec. Mode 1] menu.
Menu Item Function Page
79
Exposure Mode
Custom Image
Digital Filter
HDR Capture
A1
AE Metering
*1
Sets the capture mode when
the mode dial is set to B
or C.
*2 *3
Sets the image finishing tone
such as color and contrast
before shooting an image.
*2
Applies a digital filter effect
when taking pictures.
*2
Enables capturing images
with high dynamic range.
File Format
JPEG Recorded
Pixels
JPEG Quality
Color Space Sets the color space to use.
Image Capture Settings
*2
*2
*2
*2
Sets the file format.
Sets the recording size of
images saved in JPEG format.
Sets the quality of images
saved in JPEG format.
Selects the part of the sensor to
use for measuring brightness
and determining exposure.
p.178
p.161
p.165
p.156
p.146
p.101
4
Shooting Functions
Page 82

80
Menu Item Function Page
Shooting Functions
Sets the action for l/k
when shooting with the
p.107
AF.A
*2
viewfinder.
Sets whether to continue to
focus on your subject based
on information from the focus
points surrounding the selected
Expanded Area AF
focus point if your subject
p.109
briefly moves out from the
selected focus point when
AF Settings
4
AF Active Area
*2
the focus point selection mode
is set to [Select].
Selects the part of the
viewfinder to focus on.
p.108
Sets whether to use the AF
AF Assist Light
A2
assist light when autofocusing
in dark locations.
p.107
Reduces distortions and lateral
Lens Correction
*2
chromatic aberrations
occurring due to lens
p.158
properties.
Creates a picture by taking
Multi-exposure
multiple exposures and
merging them into a single
p.131
image.
Interval Shooting
D-Range Settings
Takes pictures at a set interval
from a set time.
*2
Expands the dynamic range
and prevents bright and dark
p.128
p.155
areas from occurring.
Page 83

Menu Item Function Page
Sets the Noise Reduction
High-ISO NR
setting when shooting with
p.102
a high ISO sensitivity.
Sets the Noise Reduction
Slow Shutter Speed NR
setting when shooting with
p.104
a slow shutter speed.
Allows you to adjust the
Composition Adjust.
A3
composition of your image
using the Shake Reduction
p.160
mechanism.
81
Shake Reduction
*2
Activates the Shake Reduction
function.
Sets the focal length when
Input Focal Length
using a lens for which focal
length information cannot
be obtained.
Live View
Instant Review
Sets the Live View display
and focus method settings.
Sets the Instant Review display
settings.
For each exposure mode,
E-Dial Programming
you can set what the front
and rear dials control.
Sets the function of the
Button Customization
A4
V/Y button and =/L
button.
Determines which settings
Memory
to save when the power
is turned off.
Sets the functions for when
GPS
the optional GPS unit is
attached to the camera.
Saves the current camera
Save USER Mode
settings as A mode so you
can use them by setting the
mode dial to B or C.
*1 Appears only when the mode dial is set to B or C.
*2 Can also be set through the control panel.
*3 When the mode dial is set to H, [Scene Mode] appears instead.
p.120
4
Shooting Functions
p.275
p.111
p.220
p.168
p.171
p.224
p.280
p.175
Page 84

82
Movie Menu Items
The following items are available in the [C Movie 1] menu.
Press the 3 button when the mode dial is set to C to display
the [C Movie 1] menu.
Menu Item Function Page
Exposure Setting
Recorded Pixels
4
Shooting Functions
C1
*1 Can also be set through the control panel.
Framerate
Quality Level
Movie Capture Settings
Recording Sound Level
Movie SR
Interval Movie
*1
*1
*1
*1
*1
Selects the movie exposure
mode from e, c, or a mode.
Sets the number of recorded
pixels and size of the movie.
Sets the number of frames shot
per second.
Sets the quality level of
the movie.
*1
Sets the microphone sensitivity.
Activates the Movie Shake
Reduction function.
Takes still pictures at a set
interval from a set time and
saves it as a single movie file.
p.133
p.138
Page 85

Custom Setting Menu Items
The following items of the [A Custom Setting 1-3] menus enable you
to make the best use of the camera.
Menu Item Function Page
83
1. EV Steps
2. Sensitivity Steps
3. Meter Operating Time Sets the meter operating time. p.101
4. AE-L with AF Locked
A1
5. Link AE and AF Point
6. Bracketing Order
7. One-Push Bracketing
Sets the adjustment steps
for exposure.
Sets the adjustment steps
for ISO sensitivity.
Sets whether to lock the
exposure value when the focus
is locked.
Sets whether to link the
exposure and AF point in
the focusing area when
[AE Metering] is set to
[Multi-segment].
Sets the order for Exposure
Bracketing shooting.
Sets whether to shoot three
frames with one release when
using Exposure Bracketing.
p.96
p.92
p.100
p.101
p.97
p.99
4
Shooting Functions
Page 86

84
Menu Item Function Page
Sets the operation when
8. Bulb (B) Mode Options
pressing the shutter release
button in p mode.
p.95
Shooting Functions
9. WB When Using Flash
10. AWB in Tungsten Light
11. Color Temperature Steps
A2
4
12. AF.S Setting
13. AF.C Setting
14. AF with Remote Control
Sets the white balance setting
when using the flash.
Sets whether to adjust the
tungsten light color tone when
the white balance is set to
F (Auto White Balance).
Sets the adjustment steps
for color temperature.
Sets the action priority for when
the focus mode is set to l
and the shutter release button
is fully pressed.
Sets the action priority for
Continuous Shooting when
the focus mode is set to k.
Sets whether to use autofocus
when shooting with a remote
control unit.
p.151
—
p.154
p.106
p.107
p.125
Page 87

Menu Item Function Page
Sets whether to release
15. Release While Charging
the shutter while charging
the built-in flash.
p.73
85
16. Flash in Wireless Mode
17. Save Menu Location
18. Catch-in Focus
A3
19. AF Fine Adjustment
20. Using Aperture Ring
Reset Custom Functions
Sets the built-in flash discharge
method in wireless mode.
Sets whether to save the last
menu tab displayed on the
monitor and to display it again
the next time the 3 button
is pressed.
Enables Catch-in Focus
shooting when a manual focus
lens is attached, and the shutter
is released automatically when
the subject comes into focus.
Allows you to precisely fine tune
your lenses with the camera’s
autofocus system.
Sets whether to enable shutter
release when the lens aperture
ring is set to a position other
than s.
Resets all the settings in
the [A Custom Setting 1-3]
menus to the defaults.
p.258
p.221
p.117
p.116
p.276
p.226
4
Shooting Functions
Page 88

86
Selecting the Appropriate Capture Mode
This camera features various capture modes, enabling you to take
pictures with settings suited for your photographic vision.
In this manual, the capture modes are referred to as follows.
Capture Mode Characteristics Page
n (Auto Picture) mode
H (Scene) mode
4
Exposure modes
Shooting Functions
(e/K/b/c/L/a/p)
C (Movie) mode Records a movie. p.136
A modes (B/C)
1
Turn the mode dial to set the
Automatically selects the optimal capture
mode for the subject.
Lets you choose the capture mode from
various scene styles.
Changes the shutter speed and aperture
value, and takes pictures.
Lets you capture images with the saved
camera settings. Up to two settings can
be saved.
desired capture mode to the dial
indicator.
Dial indicator
p.87
p.88
p.90
p.175
Page 89

The selected capture mode is displayed
Program
Automatic Exposure
for 3 seconds on the monitor (guide
display).
Program
Automatic Exposure
You can set the camera to not display the guides in [LCD Display]
of the [R Set-up 1] menu. (p.218)
Auto Picture Modes
When set to n (Auto Picture) mode, the camera automatically selects
the optimal mode from the following capture modes for the subject.
Mode Characteristics
U
Standard This mode is selected when none of the following modes apply.
c Portrait
s Landscape
b Macro
Moving
\
Object
Night
Scene
.
Portrait
K
Sunset For capturing sunrises or sunsets in beautiful, vivid color.
d
Blue Sky
x Forest
For capturing portraits. Reproduces a healthy and bright skin
tone.
For capturing landscape views. Increases color saturation
and produces a vivid color image.
For capturing tiny objects at close focus range like flowers,
coins, jewelry, and more.
For capturing images of fast moving subjects, such as at
sporting events.
For capturing images of people in low light conditions, such
as dusk or at night.
Even though the flash is used, the camera will use slow shutter
speeds so the background areas beyond the flash reach will
also appear correctly exposed in the picture (Slow-speed Sync
(p.250)). To prevent camera shake, either turn on the Shake
Reduction function, or mount the camera on a tripod.
For capturing images of blue sky. Produces a more
impressive deep blue.
Enhances colors of trees and sunbeams through foliage and
produces a vivid color image.
87
4
Shooting Functions
The autofocus mode is fixed to f when shooting with the viewfinder.
(p.107) If the camera determines that \ is the optimal mode, the autofocus
mode is fixed to k, while l is used for all other modes.
Page 90

88
Scene Modes
When set to H (Scene) mode, you can choose from the following
shooting scenes.
Mode Characteristics
4
Shooting Functions
c Portrait
s Landscape
b Macro
Moving
\
Object
Night
.
Scene
Portrait
K
Sunset For capturing sunrises or sunsets in beautiful, vivid color.
d
Blue Sky
x Forest
Night
A
Scene
Night
Z
Scene
HDR
l Night Snap For taking snapshots in poorly lit place.
K Food
Z Pet
R Kids
Surf &
Q
Snow
For capturing portraits. Reproduces a healthy and bright skin tone.
For capturing landscape views. Increases color saturation and
produces a vivid color image.
For capturing tiny objects at close focus range like flowers,
coins, jewelry, and more.
For capturing images of fast moving subjects, such
as at sporting events.
The drive mode is fixed to [Continuous Shooting (Hi)].
For capturing images of people in low light conditions, such
as dusk or at night.
Even though the flash is used, the camera will use slow shutter
speeds so the background areas beyond the flash reach will
also appear correctly exposed in the picture (Slow-speed
Sync (p.250)). To prevent camera shake, either turn on the
Shake Reduction function, or mount the camera on a tripod.
For capturing images of blue sky. Produces a more impressive
deep blue.
Enhances colors of trees and sunbeams through foliage
and produces a vivid color image.
Used for shooting at night. Use a tripod or flat surface
to prevent camera shake blur.
Generates a single HDR image with less noise from 3 images
(-3 EV, Standard, and +3 EV) captured in dim lighting.
The file format is fixed to [JPEG].
For capturing images of food. Saturation will be rather high
to make it look appetizing.
For capturing moving pets.
The drive mode is fixed to [Continuous Shooting (Hi)].
For capturing moving kids. Reproduces healthy and bright
skin tone.
The drive mode is fixed to [Continuous Shooting (Hi)].
For capturing images of dazzling backgrounds, such as snowy
mountains.
Page 91

Mode Characteristics
128
Scene Mode
Portrait
128
Backlight
y
Silhouette
U Candlelight For capturing scenes in candlelight.
Stage
n
Lighting
E
Museum For capturing images in places where a flash is prohibited.
The flash is deactivated in K, d, A, Z, y, U, n, and E modes.
To prevent camera shake, either turn on the Shake Reduction function,
or mount the camera on a tripod.
Produces a silhouette image of subject in backlight condition.
For capturing moving subjects in poorly lit place.
89
When shooting with the viewfinder, the autofocus mode is automatically set
according to the selected shooting scene. (p.107)
Selecting a Scene Mode
1
Set the mode dial to H.
The camera switches to the H mode
status screen.
1/
125
200
2
Press the M button.
The icon for the currently selected capture mode appears in the control
panel.
3
Use the four-way controller
(2345) to select [Scene Mode],
and press the 4 button.
The Scene Mode selection screen
appears.
Scene Mode
Portrait
F
4
Shooting Functions
4.0
128
128
Page 92

90
Cancel
OK
Portrait
For capturing portraits.
Reproduces a healthy
and bright skin tone
ġ
Scene Mode
Digital Filter
HDR Capture
AE Metering
Image Capture Settings
Exit
4
Use the four-way controller
(2345) or rear e-dial (S)
to choose a scene mode,
and press the 4 button.
The camera returns to the control panel
and is ready to take a picture.
Portrait
For capturing portraits.
Reproduces a healthy
and bright skin tone
ġ
Cancel
MENU
OK
OK
When the 3 button is pressed while
the mode dial is set to H, the item [Scene
Mode] appears on the [A Rec. Mode 1]
menu. Press the four-way controller (5)
to display the Scene Mode selection screen
4
Shooting Functions
and you can select a scene mode in the
same way as described in Step 4.
Exposure Modes
Use the following exposure modes to change the shutter speed
and aperture value.
Program Automatic
e
Exposure
Sensitivity Priority
K
Automatic Exposure
Shutter Priority
b
Automatic Exposure
Aperture Priority
c
Automatic Exposure
Shutter & Aperture
L
Priority Automatic
Exposure
a
Manual Exposure
p
Bulb Exposure
1 234
Scene Mode
Digital Filter
HDR Capture
Image Capture Settings
AE Metering
Exit
MENU
Mode Characteristics Page
Automatically sets the shutter speed and
aperture value to obtain a proper exposure
according to the program line.
Lets you set the desired sensitivity to suit
the brightness of the surroundings.
Lets you set the desired shutter speed
for expressing subject movement.
Lets you set the desired aperture value
p.93
for controlling the depth of field.
Automatically sets the sensitivity to obtain
a proper exposure with the set shutter
speed and aperture value.
Lets you set the sensitivity, shutter speed,
and aperture value to match your
photographic vision.
Lets you capture images that require slow
shutter speeds such as fireworks and night
p.95
scenes.
Page 93

Setting the Exposure
Cancel
OK
100
3200
-
6400
Setting the Sensitivity
You can set the sensitivity to suit the brightness of the surroundings.
The sensitivity can be set to [ISO AUTO] or within a sensitivity range
equivalent to ISO 100 to 51200. The default setting is [ISO AUTO].
1
Press the four-way controller (2) in standby mode.
The Sensitivity setting screen appears.
2
Use the four-way controller (23)
to select [ISO AUTO] or [ISO].
ISO AUTO
ISO Sets a fixed value.
Sets the range to be
adjusted automatically.
MENU
100
Cancel
3200
-
6400
OK
91
4
Shooting Functions
OK
3
Turn the rear e-dial (S) to change the sensitivity value.
For [ISO AUTO], turn the front e-dial (R) to set the minimum
sensitivity.
4
Press the 4 button.
The camera is ready to take a picture.
Page 94

92
Shooting Functions
•In L mode, or Z (N igh t Sc ene HDR) /l (Night Snap)/n (Stage Lighting)
of H mode, the sensitivity is fixed to [ISO AUTO] (up to ISO 6400 for H
mode).
•In K or p mode, [ISO AUTO] is not displayed. If the mode dial is set to p,
the sensitivity is set to the last fixed value. If the mode dial is set to a when
the sensitivity is set to [ISO AUTO], the camera operates in L mode.
• More noise may appear in captured images if a higher sensitivity is set.
You can reduce image noise by using Noise Reduction. Set in [High-ISO NR]
of the [A Rec. Mode 3] menu. (p.102)
• You can select whether to set the sensitivity in increments of 1 EV or in
accordance with the EV step setting for exposure (p.96). This can be set
in [2. Sensitivity Steps] of the [A Custom Setting 1] menu.
4
Page 95

Changing the Exposure Mode
128
This camera features the following exposure modes.
The settings available for each exposure mode are as follows.
z: Available #: Restricted ×: Not available
Exposure Mode
Program Automatic
e
Exposure
Sensitivity Priority
K
Automatic Exposure
Shutter Priority
b
Automatic Exposure
Aperture Priority
c
Automatic Exposure
Shutter & Aperture
L
Priority Automatic
Exposure
a
Manual Exposure
p
Bulb Exposure
*1 In [E-Dial Programming] of the [A Rec. Mode 4] menu, you can make the setting so that the
shutter speed and/or aperture value can be changed by turning the front/rear e-dial. (p.168)
*2 [ISO AUTO] is not available.
*3 If the mode dial is set to a when the sensitivity is set to [ISO AUTO], the camera operates
in L mode.
Change
Shutter Speed
*1
#
× × z
z
×
zz
zz
×
Change
Aperture Value
*1
#
×
zzz
z
Change
Sensitivity
zz
*2
zz
×
*3
z
*2
z
EV
Compensation
z
z
z
×
93
4
Shooting Functions
1
Set the mode dial to e, K, b,
c, L, a or p.
R or S appears on the status
screen for the value that can be changed.
1/
2000
1600
F
2.8
128
Page 96

94
1/
2000
F2.8
1600
[
128
]
128
The value that can be changed
is underlined in the viewfinder.
During Live View, 5 appears for
the value that can be changed.
Shooting Functions
2
Turn the rear e-dial (S).
1/
2000
F2.8
1600
[
128
]
The aperture value can be changed
4
in c, L, a, or p mode.
The sensitivity can be changed
in K mode.
3
Turn the front e-dial (R).
The shutter speed can be changed in b,
L, or a mode.
In a mode, the difference from the proper
exposure is displayed in a bar scale while
the shutter speed or aperture value is
adjusted. The exposure value blinks red
1/
125
200
F
5.6
when the difference from the proper
exposure is ±3.0 or larger.
128
• The proper exposure may not be obtained with the selected shutter speed
and aperture value when the sensitivity is set to a fixed value (p.91).
• For each exposure mode, you can set the functions for when the front/rear
e-dial is turned or the d button is pressed. Set in [E-Dial Programming]
of the [A Rec. Mode 4] menu. (p.168)
Page 97

Bulb Shooting
This is useful when capturing images of night scenes and fireworks which
require long exposures.
1
Set the mode dial to p (Bulb).
2
Press the shutter release button.
The shutter remains open as long as the shutter release button is kept
pressed.
3
Take your finger off the shutter release button.
Exposure ends.
In p mode, the following functions are not available.
- Continuous Shooting - Exposure Bracketing
- EV Compensation - AE Lock
- Interval Shooting - HDR Capture
- Shake Reduction
• You can set the operation of the shutter release button in p mode in [8. Bulb
(B) Mode Options] of the [A Custom Setting 2] menu.
Mode1 Exposure continues while the shutter release button
Mode2 Exposure starts with the first press of the shutter release
• More noise may appear in captured images if a slower shutter speed is set.
You can reduce image noise by using Noise Reduction. Set in [Slow Shutter
Speed NR] of the [A Rec. Mode 3] menu. (p.104)
• Use a tripod and the optional cable switch or an optional remote control unit
to prevent camera shake during Bulb shooting.
• We recommend using the optional AC adapter kit as the battery drain is high
during Bulb shooting.
• When the optional GPS unit is attached and [Action in B Mode] is set to
[ASTROTRACER] in [GPS] of the [A Rec. Mode 4] menu, the
ASTROTRACER function is activated in p mode. (p.281)
is pressed. (default setting)
button and ends with the second press of the shutter
release button.
95
4
Shooting Functions
Page 98

96
1/
2000
F2.8
1600
128
±0
EV
+1.7
EV
Adjusting the Exposure
This allows you to deliberately overexpose (brighten) or underexpose
(darken) your picture.
The compensation value can be set between -5 and +5 EV (-2 and +2 EV
in C mode). The value that can be set varies according to the step interval
set in [1. EV Steps] of the [A Custom Setting 1] menu.
EV Steps Exposure Compensation Value
Shooting Functions
1/3 EV
4
1/2 EV
1
Press the m button (1), and then
±0.3, ±0.7, ±1.0, ±1.3, ±1.7, ±2.0, ±2.3, ±2.7, ±3.0, ±3.3, ±3.7, ±4.0,
±4.3, ±4.7, ±5.0
±0.5, ±1.0, ±1.5, ±2.0, ±2.5, ±3.0, ±3.5, ±4.0, ±4.5, ±5.0
1
turn the rear e-dial (S) (2).
The exposure is adjusted.
2
m and the compensation value are
displayed in the status screen, viewfinder,
and Live View screen during adjustment.
1/
90 4.0
F
200
EV
+1.7
±0
1/
2000
F2.8
1600
EV
128
Page 99

Available operations
m button Starts/ends selecting the compensation value.
d button Resets the compensation value to the default
setting.
• EV Compensation is not available in p mode.
• The set compensation value is not canceled by turning the camera off
or by switching to another capture mode.
Changing the Exposure Automatically when Shooting
(Exposure Bracketing)
You can take three consecutive pictures at three different exposure levels.
Standard exposure Underexposure Overexposure
97
4
Shooting Functions
Set the bracketing order in [6. Bracketing Order] of the [A Custom Setting 1]
menu.
0 – +
– 0 +
+ 0 –
0 + –
Standard ´ Underexposed ´ Overexposed (default setting)
Underexposed ´ Standard ´ Overexposed
Overexposed ´ Standard ´ Underexposed
Standard ´ Overexposed ´ Underexposed
Exposure Bracketing is not available in the following situations.
• when p mode, or \ (Moving Object)/Z (Night Scene HDR)/Z (Pet)/
R (Kids) of H mode is set
• when Interval Shooting, Multi-exposure or HDR Capture is set
Page 100

98
Cancel
Exposure Bracketing
OK
±0.7
EV
Shooting Functions
1
Press the four-way controller (5) in standby mode.
The Drive Mode setting screen appears.
2
Use the four-way controller (45) to select l.
3
Press the four-way controller (3),
Exposure Bracketing
and set the bracket value.
The value that can be set varies
according to the step interval
set in [1. EV Steps] of the
[A Custom Setting 1] menu. (p.96)
4
Available operations
Rear e-dial (S) to the right (y) Increases the bracket value.
Rear e-dial (S) to the left (f) Reduces the bracket value.
m button
´ Rear e-dial (S)
d button Resets the compensation value
Adjusts the EV compensation value
(when taking pictures in either underor overexposed direction only).
to the default setting.
MENU
Cancel
±0.7
EV
OK
OK
4
Press the 4 button.
The camera is ready to take a series of pictures.
5
Press the shutter release button halfway.
The EV compensation value is displayed in the status screen, viewfinder,
and Live View screen when the subject comes into focus.
6
Press the shutter release button fully.
Press and hold the shutter release button until three pictures are taken.
The pictures will be taken according to the order set in [6. Bracketing
Order] of the [A Custom Setting 1] menu.
 Loading...