

Page 1

SLR Digital Camera
Operating Manual
For optimum camera performance, please read
the Operating Manual before using the camera.
Page 2

Thank you for buying the PENTAX w Digital Camera. Please read this
manual before using the camera in order to get the most out of all the features and
functions. Keep this manual safe, as it can be a valuable tool in helping you to
understand all the camera's capabilities.
Lenses you can use
In general, lenses that can be used with this camera are FA J lenses and lenses
that have an Aperture A (Auto) position.
To use any other lens or accessory, use the custom function settings to set the
camera to allow shutter release in modes other than lens Aperture A.
Under the default settings, the camera will cease to operate.
See page 113 for setting custom functions.
Regarding copyrights
Images taken using the w that are for anything other than personal
enjoyment cannot be used without permission according to the rights as specified
in the Copyright Act. Please take care, as there are even cases where limitations
are placed on taking pictures even for personal enjoyment during demonstrations,
industrial enterprise or as items for display. Images taken with the purpose of
obtaining copyrights also cannot be used outside the scope of use of the copyright
as laid out in the Copyright Act, and care should be taken here also.
Regarding trademarks
• CompactFlash and CF are trademarks of SanDisk Corporation.
• PENTAX is a trademark of PENTAX Corporation.
• w is a trademark of PENTAX Corporation.
• Microdrive is a registered trademark of Hitachi Global Storage Technologies
Netherlands, B.U.
• PENTAX PHOTO Browser and PENTAX PHOTO Laboratory are registered
trademarks of Pentax Corporation.
• All other brands or product names are trademarks of registered trademarks of
their respective companies.
• The USB driver uses software developed by inSilicon Corporation.
Copyright © 2002 inSilicon Corporation. All rights reserved.
• This product supports PRINT Image Matching II.
When used in combination, PRINT Image Matching II enabled digital still
cameras, printers and software help photographers to produce images more
faithful to their intentions.
Copyright 2001 Seiko Epson Corporation. All Rights Reserved.
PRINT Image Matching is a trademark of Seiko Epson Corporation.
To users of this camera
• There is a possibility that recorded data may be erased or that the camera may
not function correctly when used in surroundings such as installations generating
strong electromagnetic radiation or magnetic fields.
• The liquid crystal panel used in the LCD display is manufactured using extremely
high precision technology. Although the level of functioning pixels is 99.99% or
better, you should be aware that 0.01% or fewer of the pixels may not illuminate
or may illuminate when they should not. However, this has no effect on the
recorded image.
• There is a possibility that the illustrations and the display screen of the LCD
monitor in this manual are different form the actual product.
Page 3

FOR YOUR SAFETY
We have paid close attention to the safety of this product. When using this
product, we request your special attention regarding items marked with the
following symbols.
Warning This symbol indicates that violating this item could
cause serious personal injury.
Caution This symbol indicates that violating this item could
cause minor or medium personal injury, or material loss.
Warning
• Do not disassemble or modify the camera. High voltage areas are present inside
the camera, with the risk of electric shock.
• If the camera interior is exposed due to dropping or otherwise damaging the
camera, never touch the exposed portion. There is the risk of electric shock.
• Wrapping the strap around your neck is dangerous. Take care that small children
do not hang the strap over their necks.
• Do not look directly at the sun through the camera, as viewing the sun may
damage your eyes, and / or parts of the camera (e.g.: shutter curtains, etc.)
• Be sure to store batteries out of the reach of children. Seek medical assistance
immediately if accidentally swallowed.
• Always use the AC adapter specified exclusively for this product, with the
specified power and voltage. Using an AC adapter not exclusive to this product,
or using the exclusive AC adapter with an unspecified power or voltage can
cause a fire, electric shock, or camera breakdown.
• If any irregularities occur during use, such as smoke or a strange odor, stop use
immediately, remove the batteries or the AC adapter, and contact your nearest
PENTAX service center. Continued use could cause a fire or electric shock.
• During thunderstorms, unplug and discontinue use of the AC adapter. Continued
use could cause equipment failure, a fire, or electric shock.
Caution
• Do not short the battery or dispose of the battery in fire. Do not disassemble the
battery. The battery could explode or catch fire.
• Do not charge any batteries other than rechargeable Ni-MH batteries. The
battery could explode or catch fire. Of the batteries that can be used in this
camera, only the Ni-MH battery can be recharged.
• Remove the battery from the camera immediately if it becomes hot or begins to
smoke. Be careful not to burn yourself during removal.
• Some portions of the camera heat up during use. There is the risk of low
temperature burns when holding such portions for long periods.
• Do not place your finger on the flash when it is discharging as there is a risk of
burns.
1
Page 4

2
PRECAUTIONS FOR BATTERY USAGE
• Misuse of the battery can cause hazards such as leakage, overheating,
explosion, etc. The battery should be inserted correctly with regard to polarity (+
and -) marked on the battery and the camera.
• Battery performance may be temporarily hindered in low temperatures, but will
recover in normal temperatures.
• Keep a spare battery on hand for replacement convenience when shooting
outdoors or while traveling.
• If the built-in flash is used continuously, the battery may become warm, but it
does not mean that the battery is faulty; it is one of the battery's characteristics.
• Replace the batteries at the same time. Do not mix battery brands, type or an old
battery with a new one. It may cause explosion or overheating.
Handling the Camera
• Always confirm that the camera is working properly when the camera has not
been used for a long time, or before important occasions (weddings, trips, etc.).
PENTAX is not responsible for consequential damages (costs incurred for
photography, lost profits, etc.) arising from failure of this product.
• Do not clean the product with organic solvents such as thinner, alcohol, or benzene.
• Do not subject to high temperatures or high humidity. Do not leave the camera in
a vehicle, as the temperature can get very high.
• Do not store the camera with preservatives and chemicals. Storage in high
temperatures and high humidity can cause molding. Remove from case and
store in a dry and well-ventilated location.
• This camera is not waterproof, and cannot be used in the rain or where the
camera could get wet.
• Do not subject the camera to strong vibrations, shocks, or pressure. Use a cushion
to protect the camera from vibrations of motorcycles, automobiles, or ships.
• The temperature range for camera use is 0°C to 40°C.
• The LCD display may appear black under high temperatures, but will return to
normal as temperatures normalize.
• The LCD display may respond more slowly at low temperatures. This is due to
liquid crystal properties, and is not a fault.
• Periodic inspections are recommended every one to two years to maintain high
performance.
• Sudden temperature changes will cause condensation on the inside and outside
of the camera. Place the camera in your bag or a plastic bag, retrieving the
camera after decreasing the temperature difference.
• Avoid contact with garbage, mud, sand, dust, water, toxic gases, or salts. These
could cause a camera breakdown. Wipe dry any rain or water drops on the camera.
• Use a blower or lens brush to remove dust accumulated on the lens or viewfinder.
Never use a spray blower for cleaning as it may damage the lens or viewfinder screen.
• See “Precautions When Using a CF Card” (p.151) for details on the compact
flash memory card (CF Card).
• Please do not press forcefully on the LCD monitor. This could cause breakage or
malfunction.
Page 5

CONTENTS
FOR YOUR SAFETY............................................................................1
PRECAUTIONS FOR BATTERY USAGE............................................2
Handling the Camera............................................................................2
CONTENTS..........................................................................................3
Contents of this manual........................................................................7
Before using your camera 9
Camera Characteristics............................................................... 10
Checking Package Contents....................................................... 11
Names of Working Parts ............................................................. 12
Camera ...............................................................................................12
LCD Panel Indications ........................................................................14
LCD Monitor Indications .....................................................................15
Viewfinder Indications.........................................................................17
Getting Started 19
Attaching the Strap ...................................................................... 20
Powering the Camera .................................................................. 21
Batteries..............................................................................................22
Battery level indicator .........................................................................23
Backup battery....................................................................................23
Number of Captures and Playback Time (new batteries) ...................24
Using the AC Adapter.........................................................................25
Turning the Camera On and Off.................................................. 26
3
Initial Settings .............................................................................. 27
Setting the Display Language.............................................................27
Setting the Home Town ......................................................................28
Setting the D.S.T. Mode .....................................................................28
Setting the Video Output Format ........................................................29
Setting the Date and Time ..................................................................29
Attaching the Lens....................................................................... 32
Installing / Removing the CF Card.............................................. 34
Installing..............................................................................................34
Removing............................................................................................35
Adjusting the Viewfinder Diopter ............................................... 36
Page 6

4
Basic Operation 37
Basic Operation (Shooting)......................................................... 38
Holding the Camera............................................................................38
Taking Pictures...................................................................................39
Basic Operation (Playback) ........................................................ 41
Playing Back Images ..........................................................................41
Selecting Previous or Next Images.....................................................42
Shooting Functions 43
Selecting the Drive Mode ............................................................ 44
Single-frame shooting.........................................................................44
Consecutive Shooting.........................................................................45
Self-Timer shooting.............................................................................46
Remote Control Shooting ...................................................................49
Setting the Recorded Pixels and Quality Level......................... 51
Setting the Recorded Pixels ...............................................................51
Setting the Quality Level.....................................................................52
Setting the Sensitivity ................................................................. 54
Setting the White Balance........................................................... 55
Selecting the Metering Method ................................................... 57
Using the Multi(16)-Segment Metering...............................................57
Using the Center-Weighted Metering .................................................58
Using the Spot Metering .....................................................................58
Capture Modes ............................................................................. 59
Using the Green Program AE mode...................................................59
Using the P (Hyper Program) mode ...................................................60
Using the Tv (Shutter-priority) mode...................................................62
Using the Av (Aperture-priority) mode ................................................64
Using the M (Hyper manual exposure) mode .....................................66
Using the B (Bulb) mode.....................................................................68
About the AE-L (AE Lock)...................................................................69
Focusing ....................................................................................... 70
Using the AF.S Autofocus (Single mode) ...........................................70
Using the AF.C Autofocus (Continuous mode)...................................71
Manual Focus .....................................................................................72
Selecting the focus points...................................................................74
Focus lock...........................................................................................76
Autofocus illuminator ..........................................................................78
Hard-to-Autofocus Subjects................................................................78
AF Button............................................................................................78
Page 7

EV Compensation ........................................................................ 79
Using the Zoom Lens .................................................................. 81
Auto Bracketing ........................................................................... 82
Multiple Exposure Shooting........................................................ 84
Using the Flash ............................................................................ 86
Using the built-in flash ........................................................................86
Using an External Flash......................................................................93
Playback Functions 99
Zoom Playback........................................................................... 100
Nine-Image Display .................................................................... 101
Deleting Images ......................................................................... 102
Deleting a Single Image....................................................................102
Deleting All Images...........................................................................103
Protecting Images from Deletion (Protect)........................................104
Printing Service Settings (DPOF) ............................................. 106
Single Image Settings.......................................................................106
Settings for All Images......................................................................108
Settings 111
5
Setting Menu List ....................................................................... 112
How to Operate the Settings Menu........................................... 113
Camera Settings......................................................................... 114
Formatting a CF card........................................................................114
Setting the Custom Functions...........................................................115
Setting the Color Saturation..............................................................117
Setting the Image Sharpness ...........................................................117
Setting the Contrast..........................................................................118
Setting the Instant Review................................................................118
Auto Power Off .................................................................................119
Turning the Beep On and Off............................................................119
Changing the Date Style and Date / Time ........................................120
Setting the World Time .....................................................................120
Setting the Display Language...........................................................122
Selecting the Video Output Format...................................................123
Setting the LCD Monitor Brightness .................................................123
Resetting the File Number ................................................................124
Setting the Slideshow .......................................................................125
Page 8

6
Sensor Cleaning ...............................................................................125
Resetting to Default Settings ............................................................126
Custom Function Chart ............................................................. 127
List of City Names...................................................................... 130
Connecting 131
Connecting to a TV ....................................................................132
Connecting to a PC.................................................................... 133
Appendix 135
More Details about Capture Functions .................................... 136
Effect of Aperture and Shutter Speed...............................................136
Calculating flash distance from the aperture used
(using built-in flash)...........................................................................139
Calculating aperture used from the flash distance
(using the built-in flash).....................................................................139
F, FA and FA J Lenses Compatibility with the Built-in Flash ............140
Setting the White Balance Manually .................................................142
FUNCTIONS AVAILABLE WITH VARIOUS LENS
COMBINATIONS..............................................................................144
Optional Accessories ................................................................ 146
Battery grip D-BG1 ...........................................................................146
AC adaptor D-AC10..........................................................................146
Cable Switch.....................................................................................146
Flash Accessories.............................................................................147
For Viewfinder...................................................................................148
Camera Case....................................................................................148
Others...............................................................................................148
Cleaning the CCD....................................................................... 149
Precautions Regarding Memory Cards.................................... 151
Error Messages .......................................................................... 152
Troubleshooting......................................................................... 153
Main Specifications ................................................................... 154
Specification for Remote Control (Optional) .....................................157
Program lines....................................................................................158
Glossary...................................................................................... 160
WARRANTY POLICY.................................................................. 162
Page 9

Contents of this manual
This operating manual contains the following chapters.
7
1 Before using your camera
Explains camera characteristics, accessories and the names of
various parts.
2 Getting Started
Explains your first steps from purchasing the camera to taking
pictures. Be sure to read it and follow the instructions.
3 Basic Operation
Explains the simplest way to take pictures and play back images.
Use it if you want to get started right away.
4 Shooting Functions
Explains how to take better pictures by using the various shooting
functions.
5 Playback Functions
Explains how to play back images and how to delete.
6 Settings
Explains setting camera functions.
7 Connecting
Explains how to connect your camera to a TV or PC.
8 Appendix
Explains troubleshooting, introduces accessories sold separately and
provides various resources.
1
2
3
4
5
6
7
8
The symbols used in this operating manual are explained below.
Shows reference page number explaining a related
operation.
Shows information useful to know.
Shows precautions to take when operating the camera.
Page 10

1
Before using your camera
Camera Characteristics ........................................10
Checking Package Contents ................................11
Names of Working Parts.......................................12
Page 11

10
Camera Characteristics
• Uses a 23.5×15.7mm CCD with 6.1 mega-pixels of effective pixels for
high precision and a wide dynamic range.
• Small, light, and highly rigid among digital cameras with interchangeable
1
lenses.
Before using your camera
• Consecutive shooting at approximately three 2.6 per second (6 frames
max.) with noise reduction off.
• Features a newly developed AF sensor, with 11-point distance
measurement. (Center uses a wide cross area AF including 9 focus
points.)
• Improved manual focusing using a viewfinder similar to a conventional
35mm SLR camera, but with 0.95× magnification. Also features a
superimpose function, in which the focus points on the viewfinder
illuminate red.
• Can use two CR-V3 lithium batteries, four AA lithium batteries, four AA
Ni-MH batteries or four AA alkaline batteries.
• Features the two-dial hyper operating system.
• Can install the battery grip (sold separately) which uses the same
batteries as the camera, extends battery life and has a vertical shutter
release button.
This camera can be used with a variety of Pentax 35mm interchangeable
lenses.
While the size of the CCD is 23.5×15.7mm, the format size of the 35mm
camera is 36×24mm. As a result, the angle of view (the size and scale of
the subject to be photographed) will differ from 35mm cameras when
lenses of the same focal length are used to take pictures from the same
distance.
The format size of a 35mm camera is approximately 1.5 times larger than
the format size of this camera. As such, focal distance when the lens for
35mm format lens is attached to this camera will be equivalent to approx.
1.5 times more than the value noted on the lens.
Page 12

Checking Package Contents
The following accessories are packaged with your camera.
11
1
Before using your camera
Hot shoe cover FK
(Supplied with camera)
Body mount cover
(Supplied with camera)
Software (CD-ROM)
S-SW10
Eyecup F
L
(Supplied with camera)
USB cable
I-USB2
Strap
O-ST10
SLR Digital Camera
Operating Manual
ME Viewfinder cap
Video cable
I-VC2
Lithium batteries
CR-V3 (two)
Operating manual
Lithium battery CR2016
(Installed on camera)
For optimum camera performance, please read
the Operating Manual before using the camera.
Operating manual
PENTAX PHOTO Browser
PENTAX PHOTO Laboratory
Operating manual
Page 13

12
1
Before using your camera
Names of Working Parts
Camera
Main switch
Shutter release button
Mode dial
Self-timer lamp
Flash mode button
Drive mode
button
Green button
Tv dial
Lens mount index
MENU button
Delete
button
Strap lug
INFO button
Lens unlock button
AE lock button /
Protect button
X-synch terminal
Mirror
Manual white
balance button
Focus mode
AF coupler
Lens information contacts
Exposure compensation button
AF button
Four-way controller /
OK button
lever
Focus point
select dial
Access lamp
Battery cover
Playback button
Backup battery chamber cover
Tripod
socket
Battery grip
connection
terminal cover
Battery cover
unlock lever
Page 14

13
Flash pop-up
button
Metering mode
select lever
Cable release
socket
Terminal cover
Built-in flash
Hot shoe
Multiple exposure / Auto bracket button
DPOF button
PC / Video terminal
DC input terminal
Diopter adjustment lever
LCD panel
Av dial
Nine-image display /
Zoom display dial
Card cover
Card cover
unlock lever
Viewfinder
LCD monitor
1
Before using your camera
Page 15

14
1
Before using your camera
LCD Panel Indications
123 4
5
6
7
8
9
10
11
12
13
14
15
1 Quality level (p.52) 9 White balance mode (p.55, 142)
2 Recorded Pixels (p.51) 10 Busy
3 Drive mode (p.44) 11
Battery exhaustion warning (p.24)
4 Flash mode (p.86) 12 Auto Bracket (p.82)
5 Shutter speed (p.62) 13 Multiple exposure shooting (p.84)
Sensitivity (p.54) 14
6 Tv dial enabled (p.62)
Number of recordable images
Exposure compensation step (
p.79
7 Av dial enabled (p.64) Multiple exposure frames (p.84)
8 Aperture (p.64) 15 Exposure compensation (p.79)
Turn the main switch to | to see the LCD panel in the dark. The LCD panel will
light up for about 10 seconds. The LCD panel on the AF360FGZ will also light
up when the AF360FGZ is used.
)
Page 16

LCD Monitor Indications
1. Capture Mode
15
Press the INFO button in capture mode to display the capture function
settings on the LCD monitor.
Information
AF.S
1
2
3
4
ISO
WB
200
AWB
L
sRGB
2003/10/01
S
12:00
1 Color space (p.128) 7 Focus points (p.74)
2 Sensitivity (p.54) 8 Saturation (p.117)
Quality level / Recorded pixels
3
(p.51, 52)
9 Sharpness (p.117)
4 White Balance (p.55, 142) 10 Contrast (p.118)
5 Custom Function (p.115) 11 Lens focal length
6 Focus mode (p.70) 12 Date and Time
1
18mm
5
6
7
8
9
10
11
12
1
Before using your camera
Page 17

16
2. Playback
The camera switches between Normal Playback Screen → Histogram
Display → Detailed Information Display every time you press the INFO
button during playback.
1
• Histogram • Detailed information
Before using your camera
34 5 6
100-0120
1
2
7
8
9
1/2000 F2.8 +0.5Ev
P
10
11
12
13
ISO
WB
800
L
N
14 15
AF.S
sRGB
2003/10/01
100-0121
S
12:00
100mm
2
16
17
18
19
20
21
1 Histogram 10 Metering mode (p.57)
2 Folder name / File name (p.124) 11 Sensitivity (p.54)
3 Drive mode (p.44) 12 Recorded quality / pixels (p.51,
52)
4 Exposure compensation step
13 White balance (p.55, 142)
(p.79)
5 Auto bracket / Multiple exposure
14 Flash mode (p.86)
(p.82, 84)
6 Focus mode (p.70) 15 Color space (p.128)
7 Aperture value (p.64) 16 Focus points (p.74)
8 Shutter speed (p.62) 17 Saturation (p.117)
9 Capture mode 18 Sharpness (p.117)
7 :Green program AE mode
19 Contrast (p.118)
(p.59)
e :Hyper-Program (p.60) 20 Lens focal length
b :Shutter speed-priority AE
21 Captured date and time
(p.62)
c :Aperture-priority AE (p.64)
a :Hyper-Manual (p.66)
Press the four-way controller (23) in the histogram display to move the
histogram display position up or down.
Page 18

Viewfinder Indications
17
12
3
4
5678 910
Focus points
1
Spot metering frame
2
Autofocus frame
3
Shutter speed
4
Flash status information
5
Focus points indication Exposure compensation step
6
Focus indicator
7
Tv dial enabled
8
Av dial enabled
9
AE Lock indicator
10
Aperture value
11
Number of recordable images
12
Bar graph
13
1
Before using your camera
3
13
12
11
The focus points are superimposed in red when the shutter release button is
pressed halfway down. The superimpose function can be canceled using the
custom function. See page 115 for setting Custom Functions.
Page 19

2 Getting Started
Attaching the Strap ...............................................20
Powering the Camera............................................21
Turning the Camera On and Off...........................26
Initial Settings........................................................27
Attaching the Lens ................................................32
Installing / Removing the CF Card.......................34
Adjusting the Viewfinder Diopter.........................36
Page 20

20
Attaching the Strap
1
Pass the end of the strap through
the strap lug, then secure to the
inside of the clasp.
2
Getting Started
2
Pass the other end of the strap
through the other strap lug on the
camera, then secure to the inside
of the clasp.
Page 21

Powering the Camera
Load batteries in the camera. Use two CR-V3, or use four AA lithium
batteries, AA Ni-MH batteries, or AA alkaline batteries.
1
Open the battery cover by
pushing the battery cover
unlock lever as shown in the
illustration and slide the
battery cover toward the lens
before flipping it open.
2
Insert the batteries according
to the + / - indicator in the
battery chamber.
21
2
Getting Started
3
Press down on the batteries
with the battery cover to close
and slide it as shown in the
illustration.
• Please use the AC adapter when using the camera for a prolonged period.
(p.25)
• Check the battery orientation if the camera will not operate properly after
replacing the batteries.
• The optional battery grip D-BG1 is also available.
Page 22

22
• AA lithium batteries, AA alkaline batteries and CR-V3 are not rechargeable.
• Do not open the battery cover or remove the batteries when the power switch
is on.
• Remove the batteries when you will not use the camera for a long while.
Otherwise, the battery may leak.
• If the date and time settings have been reset when you insert new batteries
after a long while, follow the procedure for “Setting the Date and Time” p.29.
• Insert batteries correctly. Batteries inserted backwards can cause a camera
2
Getting Started
breakdown.
• Replace all the batteries at the same time. Do not mix battery type, brands or
an old battery with a new one.
Batteries
You can use a variety of batteries with your camera. Battery performance
differ by battery type. Please choose the type that best suits your purpose.
CR-V3
The provided CR-V3 is a long-life battery and is convenient for trips.
AA Ni-MH battery
These are rechargeable for multiple uses and are economical.
AA lithium batteries
It is recommended that you use these batteries in cold climates. It shows
a fine performance in such cold temperatures.
AA alkaline batteries
You can use readily available AA alkaline batteries when your usual
batteries run out. AA alkaline batteries may not adequately handle all the
camera functions under certain conditions. We do not recommend their
use except in emergencies.
Page 23

Battery level indicator
You can confirm remaining battery life by checking the { displayed on
the LCD panel.
{ : Adequate power
23
↓ :
} : Battery is running low
↓ :
? : Battery is exhausted
↓ :
[Battery Depleted] :
The camera turns off after displaying this
message.
Backup battery
When the backup battery is nearly exhausted, the date and time setting
screen will appear on the LCD monitor when you change the camera
batteries. When this happens, change the backup battery (CR2016).
(Replace the battery once every five years.)
1
Turn off the camera.
2
Getting Started
2
Use a coin to remove the
backup battery chamber cover.
Page 24

24
3
Remove the backup battery
from the backup battery
chamber cover using a pen tip
or similar object and insert a
new backup battery with the +
facing towards the cover.
2
4
Getting Started
Close the backup battery
chamber cover until it clicks.
Number of Captures and Playback Time (new batteries)
Batteries
(temperature)
CR-V3
AA Lithium
Ni-MH
AA-Alkaline
• These figures are based on PENTAX measuring conditions and may vary by
capture mode or shooting conditions.
(20°C) Approx.1000 Approx.900 Approx.800 Approx.600
(0°C) Approx.650 Approx.600 Approx.500 Approx.400
(20°C) Approx.900 Approx.800 Approx.700 Approx.400
(0°C) Approx.800 Approx.700 Approx.600 Approx.350
(20°C) Approx.450 Approx.400 Approx.350 Approx.300
(0°C) Approx.400 Approx.350 Approx.300 Approx.250
(20°C) Approx.110 Approx.100 Approx.80 Approx.120
(0°C) Not applicable Not applicable Not applicable Approx.60
• Battery performance temporarily decreases as the temperature decreases.
When using the camera in cold climates, have extra batteries on hand,
keeping them warm in your pocket. Battery performance will return to normal
when returned to room temperature.
• AA alkaline batteries may not adequately handle all the camera functions. We
do not recommend their use except in emergencies.
• When traveling overseas, taking pictures in cold climates, or when you will be
taking a lot of pictures, please have extra batteries ready.
• For image storage capacity when using the Battery Grip D-BG1, see p.146.
Normal
recording
Flash photography
50% use 100% use
Playback time
(min.)
Page 25

Using the AC Adapter
25
1
2
We recommend using the AC adapter D-AC10 (optional) when using the
LCD monitor for a long time or when connecting to your PC.
1
Make sure the camera is turned off before opening the
4
3
terminal cover.
2
Connect the DC terminal on the AC adapter to the DC input
terminal on the camera.
3
Connect the AC plug cord to the AC adapter.
2
Getting Started
4
Plug the AC cord into the power outlet.
• Make sure the camera is turned off before connecting or disconnecting the
AC adapter.
• Make sure connections are secure between the camera, AC adapter, AC
plug cord terminal and the power outlet. Disconnection while the camera is
recording or reading data on the CF card will corrupt your data.
• When using the AC adapter, be sure to read the AC adapter D-AC10
operating manual.
• Connecting the AC adapter will not charge the rechargeable batteries in your
camera.
Page 26

26
Turning the Camera On and Off
1
Turn the main switch to ON.
The camera will turn on.
Turn the main switch to OFF to turn off the
2
Getting Started
camera.
• Always turn the camera OFF when not in use.
• Turn the main switch to | to illuminate the LCD panel for about 10 seconds.
• Auto Power Off will be activated when you do not perform any operations
The depth of field can also be checked in the viewfinder by turning the main
switch to | position. See page 138 for preview display.
within a set period of time. (Default setting is 1 minute)
Page 27

Initial Settings
The first time the camera is turned on after purchasing, the “Initial Setting”
screen appears on the LCD monitor. Follow the procedure below to set the
language displayed on the LCD monitor and the current date and time.
Once setting is done, these will not need to be set again when turning your
camera on.
Setting the Display Language
You can choose the language in which the menus, error messages, etc.
are displayed from the following: English, French, German, Spanish,
Italian and Japanese.
1
Turn the camera on.
Initial setting
City
DST
Video Out NTSC
English
NYC
27
2
Getting Started
OK
2
Use the four-way controller (45) to select your applicable
language.
The default setting is English.
3
Press the four-way controller (3).
The screen for setting the [City] will be displayed.
You can change the setting after it has been made. Refer to “Setting the Display
Language” p.27.
:
Ok
Page 28

28
Setting the Home Town
You can choose the city (Home Town) in which you will use the camera.
1
Use the four-way controller (45)
Initial setting
to select your applicable city
2
Getting Started
(Home Town).
2
Press the four-way controller (3).
The screen for setting the [DST] will be displayed.
• See p.92 for the list of cities and corresponding code names.
• You can change the setting after it has been made. Refer to
Time” p.120.
City
DST
Video Out NTSC
OK
“Setting the World
Setting the D.S.T. Mode
:
English
NYC
Ok
You can choose whether or not to display the D.S.T (Daylight Saving
Time) mode.
1
Use the four-way controller (45)
to select O (on) or P (Off).
The default setting is P (Off).
2
Press the four-way controller (3).
The screen for setting the [Video Out] will be displayed.
You can change the setting after it has been made. Refer to “Setting the World
Time” p.120
.
Initial setting
OK
:
English
Ok
City
DST
Video Out NTSC
NYC
Page 29

Setting the Video Output Format
You can choose the output format (NTSC or PAL) for playing back pictures
using a TV monitor.
1
Use the four-way controller (45)
to select the video output format.
The default setting is NTSC.
2
Press the OK button.
The screen for setting the [Date and Time] will be displayed.
You can change the setting after it has been made. Refer to “Selecting the Video
Output Format” p.123.
Initial setting
OK
:
English
NYC
Ok
City
DST
Video Out NTSC
Setting the Date and Time
29
2
Getting Started
Set the current date and time and the display style.
1
Use the four-way controller (23)
to select the date and time display
style.
23 are displayed above and below the
display style.
2
Press the four-way controller (5).
23 are displayed above and below
“24h”.
Date Adjust
Date Style
01 / 01 /2003
Date Adjust
Date Style
01 / 01 /2003
mm/dd/yy
00 00
:
OK
Ok
mm/dd/yy
00 00
:
OK
Ok
24h
24h
Page 30

30
3
Use the four-way controller (23) to select 24h (24-hour
display) or 12h (12-hour display).
4
Press the four-way controller (5).
23 is displayed above and below the
month.
2
Getting Started
5
Use the four-way controller (
to change the month.
6
Press the four-way controller (5).
23 are displayed above and below the
date.
23
Date Adjust
Date Style
01 / 01 /2003
00 00
OK
)
Date Adjust
Date Style
01 / 01 /2003
00 00
OK
Date Adjust
Date Style
01 / 01 /2003
mm/dd/yy
:
Ok
mm/dd/yy
:
Ok
mm/dd/yy
24h
24h
24h
7
Use the four-way controller (23)
to set the date and press the fourway controller (5) again.
23 are displayed above and below the
year.
8
Repeat step 7 to set the year, hour and minutes.
Date Adjust
Date Style
00 00
:
OK
Ok
mm/dd/yy
01 / 01 /2003
00 00
:
OK
Ok
24h
Page 31

9
Press the OK button.
The camera is ready to take a picture. When you set the date and time
using the MENU button, you will return to the Menu screen. Press the OK
button again.
Press the OK button to set the clock to 0 seconds when the clock reaches 00
second.
• If you press the MENU button before initial settings are complete, your
settings will be cancelled, but you can take pictures. If this occurs, the Initial
settings screen is appeared the next time the camera is turned on.
• Your settings can be changed later from the Menu screen. To access the
menu, see “Changing the Date Style and Date / Time” p.120.
31
2
Getting Started
Page 32
32
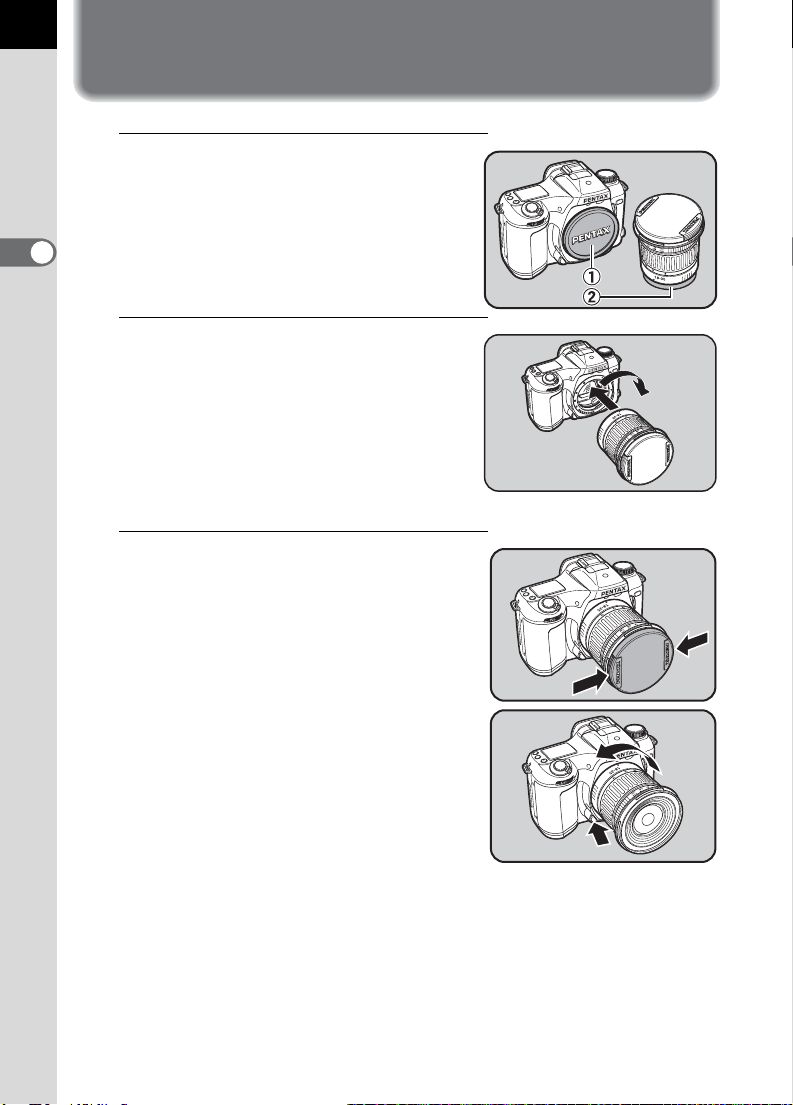
Attaching the Lens
1
Remove the body mount cover
c and the lens mount cover d
in the illustration.
2
Getting Started
2
Align the red dots on the camera
and the lens, and secure by
turning the lens clockwise until
it clicks.
Turn the lens to the left to confirm that
it is locked in place after attaching the
lens.
3
Remove the front lens cap by
pushing the indicated portion
inward.
To detach the lens, hold down the lens
unlock button and turn the lens
counterclockwise.
Page 33

• The body mount cover c is a cover for shipping purpose to prevent scratches
and block dust. For long-term camera storage, the optional accessory “Body
Mount Cap K” is available, and has a lock mechanism.
• Turn the camera OFF before attaching or removing the lens to prevent
unexpected lens movement.
• Be sure to put the lens down with the lens mount side facing upward to
protect the lens information contacts and AF coupler of the lens against
damage after removal.
• We assume no responsibility nor liability for damages resulting from the use
of lenses made by other manufacturers.
• The camera body and lens mount incorporate lens information contacts and
an AF coupler. Dirt, dust, or corrosion may damage the electrical system.
Clean the contacts with a soft dry cloth.
33
2
Getting Started
Page 34

34
Installing / Removing the CF Card
Captured images are recorded on the compact flash (CF) card.
Make sure the camera is turned off before installing or removing a CF card
(market product).
You can also use a Microdrive™ in addition to a CF card.
2
Getting Started
Installing
1
Push the card cover unlock
lever in the direction indicated
to open the card cover.
2
Insert the card all the way with
the CF card label toward the
LCD monitor.
3
Close the card cover.
Page 35
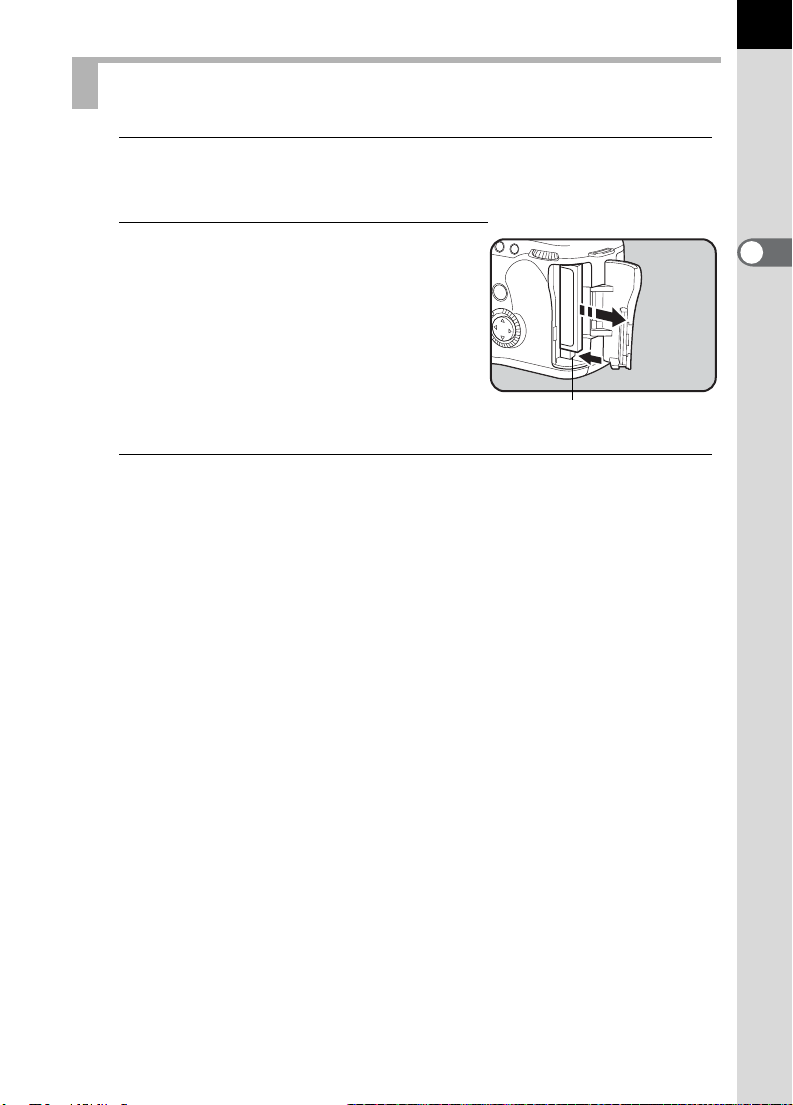
Removing
1
Push the card cover unlock lever in the direction indicated
to open the card cover.
2
Press the card eject button to
remove the CF card.
Card eject
button
3
Close the card cover.
35
2
Getting Started
Page 36

36
Adjusting the Viewfinder Diopter
Adjust the viewfinder to match your eyesight.
1
Look through the viewfinder
and point and camera at a well-
2
Getting Started
lit scene. Then move the diopter
adjustment lever left or right.
Adjust the position until the autofocus
frames and the focus points in the
viewfinder are in clear focus.
• You can adjust the diopter from -2.5~+1.5m-1 (Per meter).
Page 37

3 Basic Operation
Basic Operation (Shooting)..................................38
Basic Operation (Playback)..................................41
Page 38

38
Basic Operation (Shooting)
Holding the Camera
How you hold the camera is important when taking pictures.
• Hold the camera firmly with both hands.
• Press the shutter release button gently when taking a picture.
3
Basic Operation
Horizontal position Vertical position
• To reduce camera shake, support your body or the camera on a solid
object - a table, tree, or a wall for instance.
• Although there are individual differences among photographers, in
general the shutter speed for a hand held camera is 1/focal length ×1.5.
For example, it is 1/75 of a second for a focal length of 50mm and 1/150
of second for 100mm. A tripod should be used for shutter speeds slower
than this.
• When using an telephoto lens, a tripod that is heavier than the total
weight of the camera and lens is recommended to avoid camera shake.
Page 39

Taking Pictures
1
Set the camera to green
program AE mode.
Set the mode dial to 7.
(p.59)
2
Set the focus mode to Autofocus.
Set the focus mode lever to l.
(p.70)
3
Press the flash pop-up button
to activate the flash.
39
3
Basic Operation
You do not need to pop-up the flash
when you do not intend to use it.
4
Adjust the size of the subject.
Turn the zoom ring to determine the
size of the subject.
(p.81)
Page 40

40
5
Adjust the focus and take a
picture.
Position the subject within the
autofocus frame and press the shutter
release button to take the picture (p.17).
The flash fires automatically based on
light conditions.
Push the flash down by hand after you
finish taking pictures.
3
Basic Operation
OPERATING THE SHUTTER RELEASE BUTTON
The shutter release button has two positions.
Not pressed Pressed
halfway
(first position)
Fully pressed
(second
position)
Pressing it down halfway (first position) turns on the viewfinder and LCD
display indications and the autofocus system operates. Pressing it fully
(second position) takes the picture.
• Press the shutter release button gently to prevent camera shake when taking
a picture.
• Practice pressing the shutter release button halfway to learn where the first
position is.
• The viewfinder indications stay on for about 10 seconds (initial value) after
the button is released from the halfway position. Pressing the shutter release
button halfway down keeps the LCD indicator on.
Instant Review
Instant Review displays the image immediately after taking a picture. The
Instant Review default setting displays for 1 sec. Press the Delete button
(i) to display the delete screen while the image is displayed. Press the
four-way controller (2) to select [Delete] and press OK. The image is
deleted.
Page 41
Basic Operation (Playback)
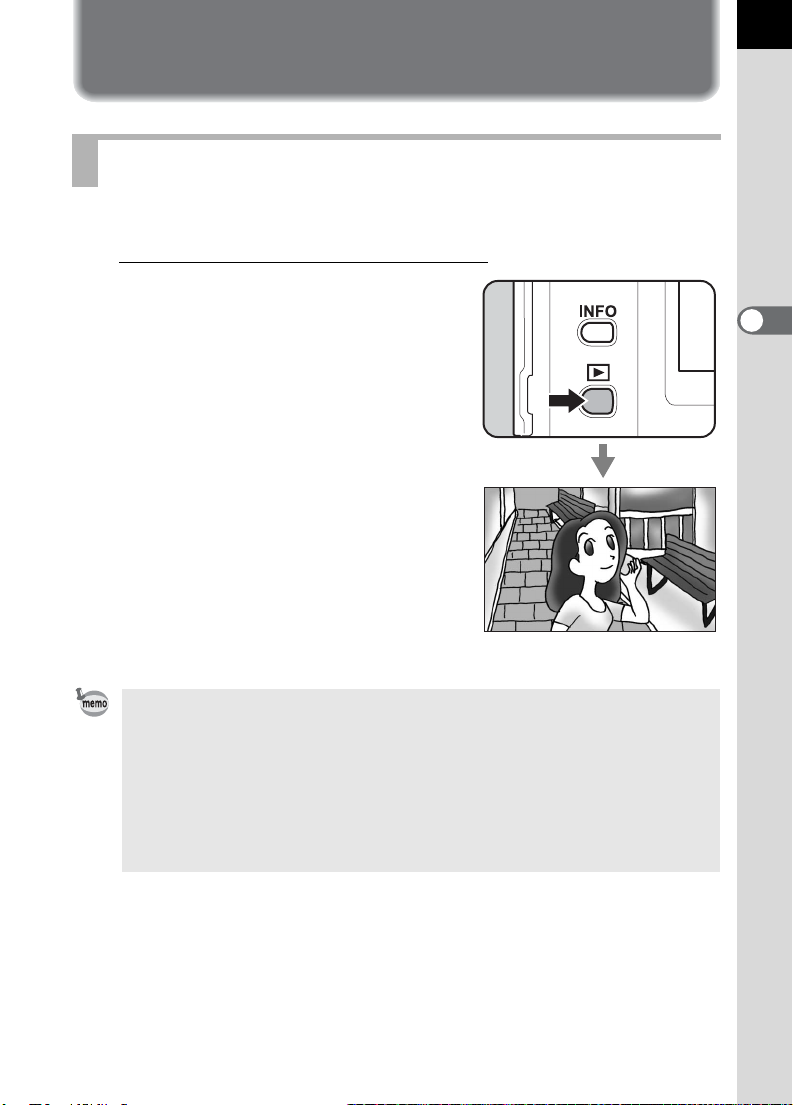
Playing Back Images
You can play back the still pictures.
1
Press the playback button (Q)
after taking a picture.
The most recently captured image is
displayed on the LCD monitor.
Press the Playback button again,
or press the shutter release button
halfway to return to capture mode.
41
3
Basic Operation
• Pressing the four-way controller(3) will rotate the image 90°, 180° and 270°.
The image captured in vertical position can be displayed for easy viewing.
(Only the display is rotated. The recorded image is not updated.)
• The image with the highest file number is shown first when you switch to the
playback screen.
• You can enlarge the image displayed on the LCD monitor by turning Nineimage Display / Zoom Display dial.
• If no images are stored, the “No Image” message is appeared.
(p.100)
Page 42

42
Selecting Previous or Next Images
You can play back the still pictures, cycling through one at a time.
1
Press the playback button (Q)
after taking a picture.
The captured image is displayed on
the LCD monitor.
3
Basic Operation
2
Press the four-way controller
(4 or 5).
4 Displays the previous image.
5 Displays the next image.
Deleting Images
Press the Delete button (i) to display the
Delete screen when the image is displayed.
Press the four-way controller (
[Delete] and press OK. The image is
deleted.
Press the Playback button again or press
the shutter release button halfway to
return to capture mode.
2
) to select
Delete
100-0120
OK
One All
Delete
Cancel
:
Ok
Page 43

4 Shooting Functions
Selecting the Drive Mode......................................44
Setting the Recorded Pixels and Quality Level
Setting the Sensitivity...........................................54
Setting the White Balance ....................................55
Selecting the Metering Method ............................57
Capture Modes ......................................................59
Focusing ................................................................70
EV Compensation..................................................79
Using the Zoom Lens............................................81
Auto Bracketing.....................................................82
Multiple Exposure Shooting.................................84
Using the Flash......................................................86
......51
Page 44
44
Selecting the Drive Mode
This camera has four drive modes. Set the mode dial to your desired
capture mode before selecting the drive mode. (p.59)
9 Single-frame
j
g
h
4
Shooting Functions
Consecutive
shooting
Self-timer
shooting
Remote control
shooting
The Self-timer shooting [g] and the Remote control shooting [h] modes will
be reset to the Single-frame drive mode when the camera is turned OFF and
then ON.
One picture is taken each time the shutter release button
is pressed. This is the most common drive mode. (p.44)
Pictures can be taken consecutively while the shutter
release button is held down. (p.45)
Self-timer mode (p.46)
The shutter can be released with the remote control unit.
(p.49)
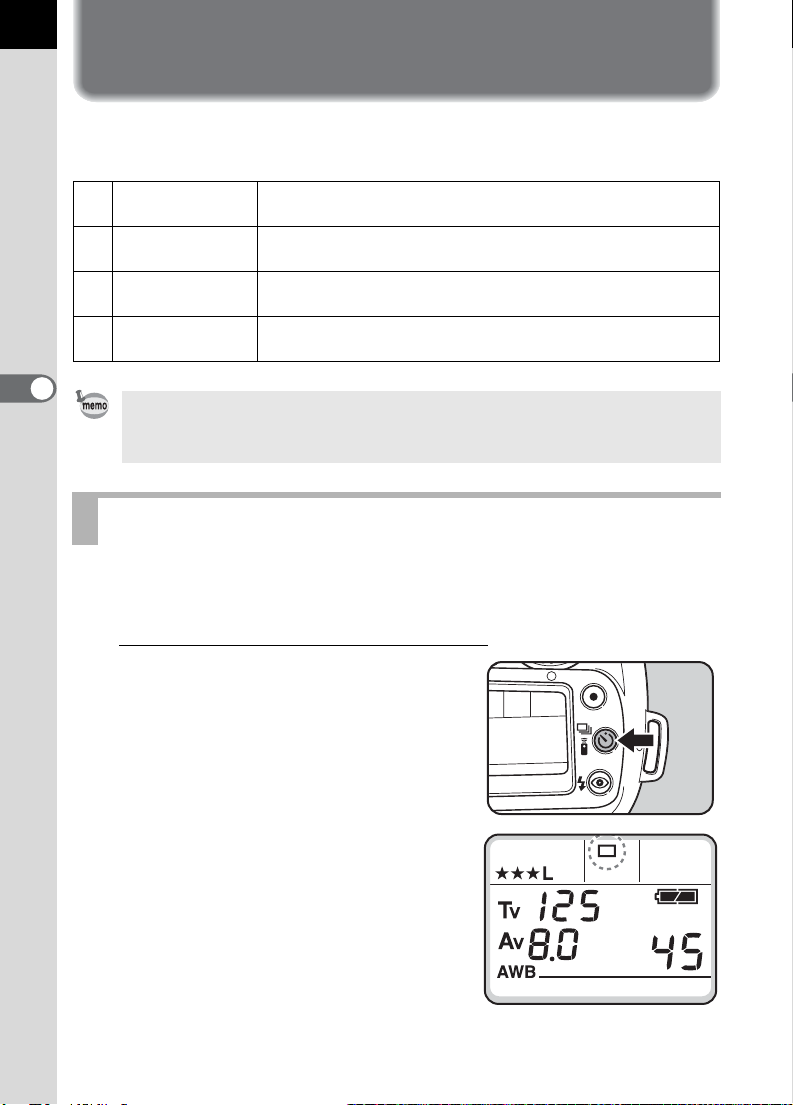
Single-frame shooting
One picture is taken each time the shutter release button is pressed.
This is the most common drive mode.
1
Press the drive mode button [g]
until [9] appears on the LCD
panel.
Page 45

Consecutive Shooting
Pictures can be taken consecutively while the shutter release button is
held down.
1
Press the drive mode button [g]
until [j] appears on the LCD
panel.
45
4
Shooting Functions
2
Press the shutter release button halfway down to focus on
the subject.
3
Press the shutter release button completely.
Pictures are taken consecutively while the shutter release button is fully
pressed. Take your finger off of the shutter release button to stop taking
consecutive pictures.
• When the focus mode lever is set to l (single), the focus is locked in the
first frame position and used for subsequent continuous frames.
• When the focus mode lever is set to k (continuous), the focus is adjusted
for each shot. However, note that the shutter will release even if the focusing
is not complete.
• The shutter cannot be released until charging is complete when using the
built-in flash. Use a custom function to enable shutter release before the builtin flash is ready. See page 115 for setting Custom Functions.
Page 46

46
Self-Timer shooting
Use the self-timer mode to include the photographer in the picture.
The shutter will be released about 12 seconds after the shutter release
button is pressed.
1
Mount the camera to a tripod.
4
Shooting Functions
2
Press the drive mode button [g]
until [g] appears on the LCD
panel.
Page 47

3
Press the shutter release
button halfway down to
compose and focus on the
subject by looking through the
viewfinder.
The focus indicator []] lights up when
the subject is in focus.
4
Press the shutter release
button completely.
The self-timer lamp starts blinking
slowly and blinks rapidly two seconds
before the shutter is released. Also the
audible PCV signal is heard and the
rate increases for the last two seconds.
The shutter will be released about 12
seconds after the shutter release button is pressed fully.
47
4
Shooting Functions
• The audible PCV signal can be turned
off. See page 119.
• Exposure may be affected if light enters
the viewfinder during self-timer
operation in any capture mode other
than a (metered manual exposure).
Attach the provided viewfinder cap or
use the AE lock function (see page 69).
• Remove the Eyecup F
side upward when using accessories
such as the viewfinder cap.
L by pulling one
Removing the Eyecup
Attaching the viewfinder cap
Page 48

48
5
Press the drive mode button [g]
after the picture is taken.
The drive mode returns to single-frame
shooting from self-timer shooting.
Press the drive mode button to cancel the self-timer operation before it is
completed.
Mirror lock up function
4
Shooting Functions
When this function is set, the mirror stays up and the shutter is released
about 2 seconds later when the shutter release button is pressed.
You can reduce camera shake caused by mirror movement with mirror
lock up.
Follow the procedure below to take a picture with the mirror lock up:
1 In Custom Function, set “Self-timer delay time” to “2 sec”. See page 115
for setting Custom Functions.
2 Press the drive mode button until g appears on the LCD panel.
3 Focus on the subject and then press the shutter release button
completely.
The mirror stays up and the picture will be taken 2 seconds later.
AE lock is enabled with the exposure value immediately before the
mirror goes up.
Page 49

Remote Control Shooting
The shutter can be released with the remote control unit (optional). The
shutter will be released 3 seconds after the shutter release button on the
remote control unit is pressed.
1
Mount the camera to a tripod.
2
Press the drive mode button [g]
until [h] appears on the LCD
panel.
• The camera is not focused by operating
the remote control. Focus on the subject
first before operating the remote control.
• The self-timer lamp will blink letting you
know the camera is in remote control wait
status when you display h.
49
4
Shooting Functions
3
Press the shutter release
button on the remote control
towards the camera.
The shutter will be released 3 seconds
after the shutter release button on the
remote control unit is pressed. When
the picture is taken, the self-timer lamp
lights for 2 seconds and will then
resume blinking. Press the drive mode button after the picture is taken.
The drive mode returns to single-frame drive mode.
Page 50

50
• The operating distance of the remote
control unit is approx. 5m from in front
of the camera.
• Remote control shooting with the
capture mode set to p (bulb) mode will
allow bulb shooting while the shutter
release button on the remote control
unit is pressed.
• Exposure may be affected if light enters
the viewfinder during remote control
operation in any capture mode other than a (metered manual exposure).
Attach the provided viewfinder cap or use the AE lock function (see page 69).
See page 47 for attaching the viewfinder cap.
• You can use a custom function to change the remote control operation time
from 3 seconds to immediate operation. See page 115 for setting Custom
4
Shooting Functions
Functions.
• Press the drive button or turn the main switch off to stop the remote control
operation after it has been activated.
• The remote control may not operate in backlit conditions.
• The remote control does not work while the flash is being charged.
• When using the built-in flash, raise the flash into position first.
• The camera automatically returns to single-frame drive mode after the
remote control shooting mode is left unused for 5 minutes.
• The remote control unit battery can send a remote control signal about
30,000 times. Please contact PENTAX service center to exchange the
battery. (This will involve a fee.)
5m
Page 51

Setting the Recorded Pixels and Quality Level
Setting the Recorded Pixels
You can select the number of recorded pixels from L (3008 × 2008), M
(2400 × 1600) and S (1536 × 1024). The more pixels there are the larger
the image size and file size. The image file size will also differ according
to quality level settings.
L 3008 × 2008 Suited for printing on A3 paper.
M 2400
S 1536
1
× 1600 Suited for printing on A4 paper.
× 1024 Suited for printing on A5 paper.
Set the mode dial to 8.
51
4
Shooting Functions
2
Select the recorded pixels with
the Av dial.
3
Confirm the recorded pixels on
the LCD panel.
Page 52

52
4
Set the mode dial to your desired capture mode.
The camera is ready to take a picture.
• Pressing the green button while setting the recorded pixels will make the size
revert to the default value (L).
• You can set a custom function to set the recorded pixels for S to 1536 × 1024,
1152 × 768, or 960 × 640. See page 115 for setting Custom Functions.
• The Recorded Pixels cannot be selected if the Quality Level is set to RAW.
(Fixed at 3008 × 2008)
4
Shooting Functions
Setting the Quality Level
You can set the image compression rate.
The image file size will also differ according to Recorded Pixels settings.
1 RAW
2 TIFF
C Best
D Better
E Good
Raw data, just as it was captured. You can process this on
your PC using dedicated utility software.
Image is recorded as uncompressed data. Suited for
processing on your PC. Image is saved with “TIFF”
extension.
Lowest compression rate, suited for printing large pictures
on A4 paper. Image is saved with “JPEG” extension.
Standard compression rate, suited for viewing as standard
photographs or on your computer screen. Image is saved
with “JPEG” extension.
Highest compression rate, suited for attaching to e-mail, or
for creating websites. Image is saved with “JPEG”
extension.
Page 53

1
Select the mode dial to 8.
2
Select the quality level with the
b dial.
3
Confirm the quality level on the
LCD panel.
53
4
Shooting Functions
4
Set the mode dial to your desired capture mode.
The camera is ready to take a picture.
Pressing the green button while setting the quality level will make the quality
level revert to the default value (C(Best)).
Page 54

54
Setting the Sensitivity
You can set the sensitivity to match the brightness of the surroundings.
The sensitivity can be set within a range of sensitivity equivalent to ISO
200 to 1600.
1
Set the mode dial to o.
4
Shooting Functions
2
Select the sensitivity with the
Tv dial.
The larger the sensitivity value, the
more suitable for darker places, on the
other hand, pictures tend to be affected
by noise and appear rough.
3
Confirm the sensitivity level on
the LCD panel.
4
Set the mode dial to your desired capture mode.
• Turn the Tv dial counterclockwise to decrease the number. Turn the Tv dial
clockwise to increase the number.
• Pressing the green button while setting the sensitivity will make the quality
level revert to the default value (Sensitivity 200).
• You can set sensitivity up to 3200 when you select “Wide” in “Sensitivity
Range” settings in the Custom Function menu. (p.115)
Page 55

Setting the White Balance
The color of the subject changes with the light source. For example, the
same white object will be a different shade of white in daylight than under
a light bulb. In cameras using film, this is adjusted by changing the film or
using filters. In digital cameras, the whiteness is adjusted using white
balance.
F Automatic The camera makes the adjustment automatically.
G Daylight For taking pictures outside in sunlight.
H Shade For taking pictures outside in the shade.
^ Cloudy For taking pictures on cloudy days.
Fluorescent
J
Light
I Tungsten Light For taking pictures under tungsten light bulbs.
b Flash For taking pictures using the electronic flash.
K Manual
* The color temperature (°K) is estimated. This does not indicate precise colors. See page
143 for color temperature.
For taking pictures under fluorescent light. Select the
type of fluorescent light, from W white (4200°K)*,
N neutral white (5000°K)*, and D daylight (6500°K)*.
For taking pictures by manually adjusting the white
balance.
55
4
Shooting Functions
1
Set the mode dial to n.
2
Select the white balance with
the Av dial.
Page 56
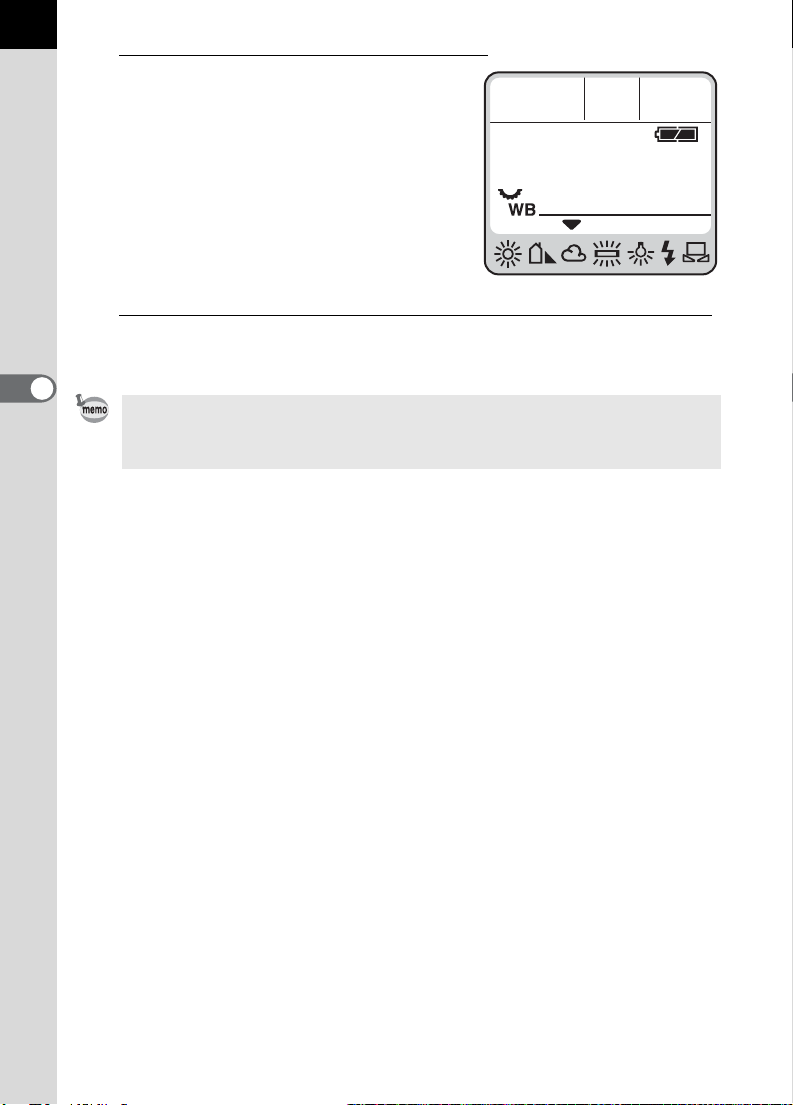
56
3
Confirm the white balance on
the LCD panel.
4
Set the mode dial to your desired capture mode.
4
Shooting Functions
• See page142 for manual adjustment method.
• Pressing the green button while setting the white balance will make the white
balance revert to the default value (F).
Page 57

Selecting the Metering Method
You can choose the part of the screen to use for measuring brightness and
determining exposure. Multi (16)-segment metering, center-weighted
metering or spot metering mode can be selected in this camera.
Using the Multi(16)-Segment Metering
The scene in the viewfinder is metered in 16
different zones as shown in the illustration
when using the multi-segment metering.
This mode automatically determines what
level of brightness is in which portion.
1
Rotate the metering mode
select lever to set the white
index to [.
57
4
Shooting Functions
The center-weighted metering mode is automatically set even if you select the
multi-segment metering mode when using a lens other than an FA J, FA, F or
A lens. (the lens can only be used when a custom function is set to permit
shutter release with a position other than aperture A.)
Page 58

58
Using the Center-Weighted Metering
Metering is weighted at the center of the screen. Use this metering when
you want to compensate the exposure by experience, instead of leaving it
to the camera.
The illustration shows that sensitivity
increases as the pattern height increases
(center). This mode does not automatically
compensate for backlit scenes.
4
1
Shooting Functions
Rotate the metering mode
select lever to set the white
index to M.
Using the Spot Metering
With spot metering, brightness is measured
only within a limited area at the center of the
screen as shown in the illustration. You can
use AE lock in combination when the
subject is extremely small and proper
exposure is difficult to obtain. (p.69)
1
Rotate the metering mode
select lever to set the white
index to 6.
Spot metering zone
Page 59

Capture Modes
This camera has six capture modes available: green program AE mode,
e (program) mode, b (shutter-priority) mode, c (aperture-priority)
mode, a (manual) mode and p (bulb) mode.
Using the Green Program AE mode
Shutter speed and aperture are set automatically according to the program
line, for taking pictures at the proper exposure.
1
Set the mode dial to 7.
AE lock shooting (p.69), auto bracket shooting (p.82), multiple exposure
shooting (p.84), and EV compensation (p.79) are not available in green
program AE mode.
59
4
Shooting Functions
Page 60

60
Using the P (Hyper Program) mode
Shutter speed and aperture are automatically set according to the program
line for taking pictures at the proper exposure. You can also use the Tv dial
and Av dial to change the shutter speed and aperture while keeping the
proper exposure (Hyper program).
1
Set the mode dial to e.
4
Shooting Functions
2
Confirm the shutter speed and
aperture value in the
viewfinder or on the LCD panel.
• Set the aperture to the s position while
holding down the auto-lock button
when using a lens with an aperture ring.
• You can set a custom function to
change the program line used. See
page 115 for setting Custom Functions.
• You can set a custom function to
compensate the sensitivity
automatically to obtain the proper
exposure when the conditions set are
not providing proper exposure. See page 115 for setting Custom Functions.
Page 61

Hyper Program
• To change shutter speed
The camera switches to shutter speed-priority AE when you turn the b
dial in the e (Hyper Program) mode.
• Shutter speed can be set to a value within the range appropriate for the
aperture value.
• The aperture values on the LCD panel and in the viewfinder will flash
when the brightness changes and the aperture value falls outside the
appropriate range.
• The camera returns to Hyper Program mode when you press the green
button.
61
• To change aperture value
The camera switches to Aperture-priority AE when you turn the c dial in
the e (Hyper Program) mode.
• Aperture can be set only to a value within the range appropriate for the
shutter speed value.
• The shutter speeds on the LCD panel and in the viewfinder will flash
when the brightness changes and the shutter speed value falls outside
the appropriate range.
• The camera returns to Hyper Program mode when you press the green
button.
4
Shooting Functions
Page 62

62
Using the Tv (Shutter-priority) mode
The appropriate aperture value is automatically set by the camera for a
proper exposure to match the brightness of the subject when the shutter
speed is selected.
This mode is suitable for freezing the action with a faster shutter speed or
capturing a flowing dynamic image with a slower shutter speed. See page
136 for the effect of shutter speed.
1
Set the mode dial to b.
4
Shooting Functions
2
Select the shutter speed with
the Tv dial.
3
Confirm the shutter speed and
aperture value in the
viewfinder or on the LCD panel.
Page 63

• Set the aperture to the s position while
holding down the auto-lock button
when using a lens with an aperture ring.
• The shutter speed is displayed on the
LCD panel whenever the camera is on.
• You can set a function to enable noise
reduction processing when taking
pictures at a slow shutter speed. See
page 115 for setting Custom Functions.
• You can set a custom function to
automatically compensate the sensitivity to obtain the proper exposure, when
the conditions set are not providing proper exposure. See page
Custom Functions.
115
for setting
63
Exposure Warning
If the subject is too bright or too dark, the
aperture value will blink in the viewfinder and
on the LCD panel. When the subject is too
bright, choose a faster shutter speed. If it is
too dark, choose a slower shutter speed.
When the shutter speed indication stops
blinking, you can take the picture with proper
exposure.
If both the shutter speed and aperture value
are blinking, this indicates being out of
metering range, unable to obtain the proper
exposure even if the shutter speed is adjusted.
Use an ND (Neutral Density) filter if the subject is too bright. Use a flash or
faster sensitivity if it is too dark.
4
Shooting Functions
Page 64

64
Using the Av (Aperture-priority) mode
The shutter speed is automatically set by the camera for a proper
exposure to match the brightness of the subject when the aperture value
is selected. This mode is ideal for shooting landscapes with increased
depth of field, or a portrait against a blurred background. See page 136 for
the effect of aperture.
1
Set the mode dial to c.
4
Shooting Functions
2
Select the aperture value with
the Av dial.
3
Confirm the shutter speed and
aperture value in the
viewfinder or on the LCD panel.
Page 65

• Set the aperture to the s position while
holding down the auto-lock button when
using a lens with an aperture ring.
• The aperture is displayed on the LCD panel
whenever the camera is on.
• You can set a custom function to
compensate the sensitivity automatically to
obtain the proper exposure, when the
conditions set are not providing proper
exposure. See page 115 for setting Custom Functions.
Exposure Warning
If the subject is too bright or too dark, the
shutter speed will blink in the viewfinder and
on the LCD panel. When too bright, set the
aperture smaller (larger number), and when
too dark, open the aperture further (smaller
number). Once blinking stops, you can take
the picture.
If both the shutter speed and aperture value
are blinking, this indicates being out of
metering range, unable to obtain the proper
exposure even if the aperture is adjusted.
Use an ND (Neutral Density) filter if the subject is too bright.
Use a flash or faster sensitivity if it is too dark.
65
4
Shooting Functions
Page 66

66
Using the M (Hyper manual exposure) mode
This mode is a convenient for taking pictures using the same shutter
speed and aperture setting combination or taking intentionally underexposed (darker) or over-exposed (brighter) photographs.
1
Set the mode dial to M
4
Shooting Functions
2
Press the green button
Shutter speed and aperture are
changed automatically to achieve the
proper exposure setting.
From this point, you can use the b dial
or c dial to change exposure values
manually and then take a picture.
• Hold down the auto-lock button while setting
the aperture to the A position when using a
lens with an aperture ring.
• When pressing the green button to get the
proper exposure setting, how shutter speed
and aperture values are determined will
change depending on the “Green Button in
Manual” in the custom function menu.
e
: The proper exposure setting is
determined based on the program mode
selected in the custom settings menu.
b
: The aperture value is fixed to the point when the green button is pressed and
then the shutter speed that will produce the proper exposure is determined.
c
: The shutter speed is fixed to the point when the green button is pressed and
then the aperture value that will produce the proper exposure is determined.
Page 67

How to read the viewfinder bar graph
In a (Hyper manual exposure) mode, a bar graph appears in the
viewfinder. If the 9 are at the center of the bar, it indicates correct
exposure. If the 9 are on the negative end of the bar graph, it
indicates under exposure. If they are on the positive end, it
indicates over exposure. If the exposure setting exceeds the bar
graph display limit, the 7 or 8 will blink.
• The shutter speed and aperture value are displayed on the LCD panel
whenever the camera is on.
Exposure Warning
If the subject is too bright or too dark,
both the shutter speed and aperture
value will blink in the viewfinder and on
the LCD panel to indicate being out of
metering range. Adjusting the shutter
speed and aperture will not attain
proper exposure. Use an ND (Neutral
Density) filter or select a darker subject
if the subject is too bright. Select a
brighter subject or use a flash if it is too
dark.
67
4
Shooting Functions
Combining with AE-L
You can use the AE-L button (p.69) to memorize the exposure value in
Hyper Manual mode. In this state, the shutter speed and aperture value
combination is changed, with the exposure value said as is, when you
change either the shutter speed or the aperture value.
Ex) If you press AE-L with the shutter speed set to 1/125 seconds and the
aperture set to f/5.6, using the Tv dial to change the shutter speed to
1/30 seconds will result in the aperture value automatically changing to
f11.
Page 68

68
Using the B (Bulb) mode
This mode is useful for the long exposures required for shooting night
scenes and fireworks.
1
Set the mode dial to p.
4
Shooting Functions
• Use a steady tripod to prevent camera
shake and use the optional Cable
Switch CS-205 when using this mode.
• With the remote control shooting mode,
the shutter remains open as long as the
optional remote control's shutter
release button is held down.
• You can set whether or not to perform
noise reduction in the Custom Function
settings.
Page 69

About the AE-L (AE Lock)
AE Lock is a function that memorizes the exposure prior to taking the
picture. Use this when the subject is too small or backlit and a proper
exposure setting cannot be obtained.
1
Press the AE lock button.
The camera memorizes the exposure
(brightness) at that instant.
Press it again to disengage.
• @ is displayed in the viewfinder while the AE lock is engaged.
• The exposure remains in memory for twice as much time as the metering
timer after releasing the AE lock button. The exposure remains locked as long
as the AE lock button is kept pressed or the shutter release button is kept
pressed halfway.
• You will hear a beep when the AE lock button is pressed. The beep can be
turned off. (p.119)
• AE lock is not available when the exposure mode is set to p (Bulb) mode.
• When the exposure mode is set to e (program) mode, you can use a Hyper
program while the AE lock is engaged.
• The combination of shutter speed and aperture value changes depending on
the zooming position even while the AE lock is engaged when using a zoom
lens for which maximum aperture varies depending on the focal length.
However, the exposure value does not vary, and therefore the picture is taken
at the brightness level set by the AE lock.
• The exposure value set when you press the AE lock button is saved when the
exposure mode is set to a (Hyper manual exposure) mode. In this state, the
shutter speed and aperture value combination is changed, with the exposure
value said as is, when you change either the shutter speed or the aperture
value.
69
4
Shooting Functions
Page 70

70
Focusing
Autofocus
The camera adjusts the focus automatically. There are two autofocus
modes. When you press the shutter release button halfway, l (Single
mode) locks the focus and k (Continuous mode) adjusts the focus
continuously. (p.70, 71)
Manual focus
You can adjust the focus manually. (p.72)
Selecting the focus point
You can set the camera to automatically select the focus point, select a
4
Shooting Functions
specified position or the center position within the viewfinder. (p.74)
The following three methods are provided for adjusting focus.
Using the AF.S Autofocus (Single mode)
1
Set the focus mode lever to
l.
Page 71

2
Look through the viewfinder
and press the shutter release
button halfway down to focus
on the subject.
The focus indicator []] lights up in
the viewfinder when the subject is in
focus.
(The subject is out of focus when it is
blinking.)
71
• The focus is locked while []] is lit (focus lock). To focus on another subject,
take your finger off of the shutter release button first.
• The shutter cannot be released until the subject is in focus in l (single
mode). If the subject is too close to the camera, move back and take the
picture. Set the focus manually when the subject is difficult to focus. (see
page 78)
Using the AF.C Autofocus (Continuous mode)
1
Set the focus mode lever to
k.
4
Shooting Functions
Page 72

72
2
Look through the viewfinder
and press the shutter release
button halfway down to focus
on the subject.
The focus indicator []] lights up in
the viewfinder when the subject is in
focus.
(The subject is out of focus when it is
blinking.)
• The camera switches to predictive AF mode automatically when a moving
subject is detected in k (continuous mode).
4
Shooting Functions
• The shutter can be released even when the subject is out of focus in k
(continuous mode).
Manual Focus
When you adjust the focus manually, you can either check with the focus
indicator in the viewfinder or use the viewfinder matte field to adjust focus.
Using the focus indicator
You can manually adjust the focus using the focus indicator.
1
Set the focus mode lever to
\.
Page 73

2
Look through the viewfinder
and press the shutter release
button halfway and turn the
focusing ring to adjust focus
on the subject.
The focus indicator []] lights up and
you will hear a double beep when the
subject comes into focus.
• Use the viewfinder's matte field as described below when the subject is
difficult to focus (see p.78) and the focus indicator will not stay lit.
• The beep can be turned off. (p.119)
Using the viewfinder matte field
1
Set the focus mode lever to
\.
73
4
Shooting Functions
2
Look through the viewfinder
and turn the focusing ring until
the subject looks sharp on the
screen
Page 74
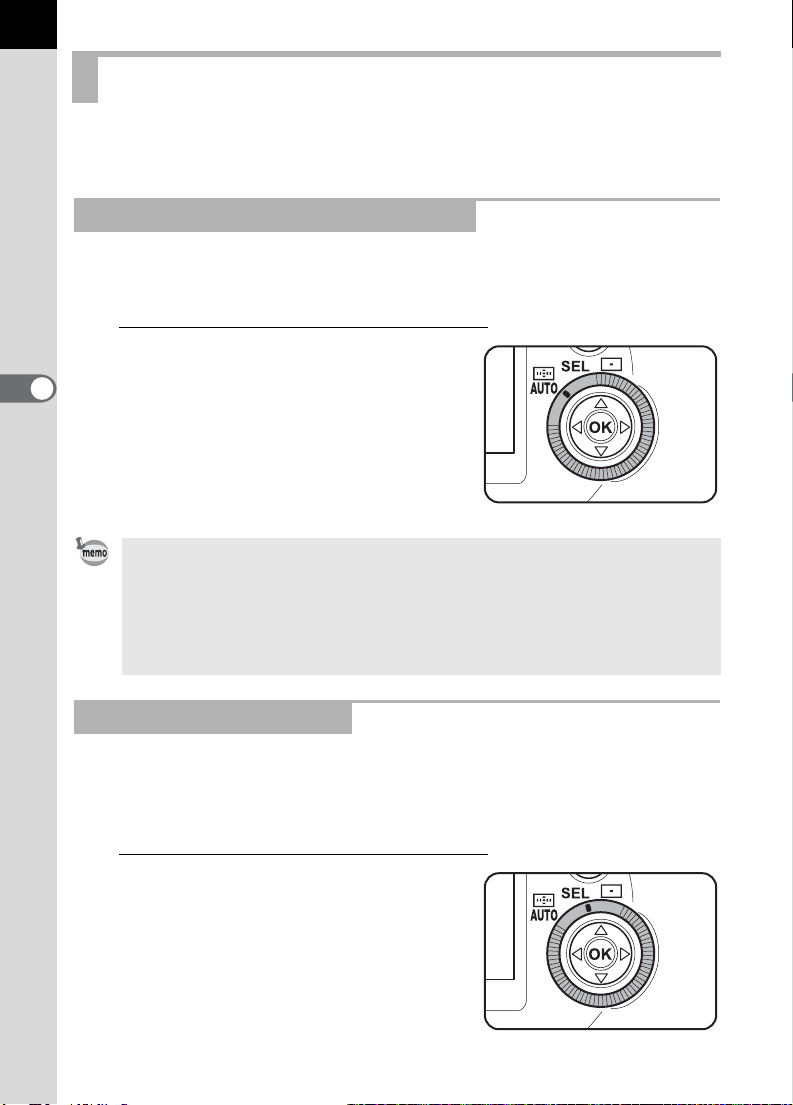
74
Selecting the focus points
There are 11 focus points in the autofocus frames. You can select the
focus points to use depending on the scene you are shooting.
Setting the focus point mode to AUTO
The camera selects the optimum focus point position even if the subject is
not centered.
1
Set the focus point select dial
4
Shooting Functions
to 5.
The area in the autofocus frame is the
range available for autofocus.
• The focused point is superimposed in red in the viewfinder when the shutter
release button is pressed halfway down. The superimpose function can be
canceled using a custom function. See page 115 for setting Custom
Functions.
• The focus point is fixed to the center position regardless of this setting with
lenses other than FA J, FA, F lenses.
Selecting the Focus Point
There are 11 focus points in the autofocus frames. If the camera does not
select the desired focus point in Auto mode, you can select the desired
focus point manually.
1
Set the focus point select dial
to j.
Page 75

2
Look through the viewfinder and
check where you want to focus.
3
Use the four-way controller
[2 3 4 5] to select the
desired focus point.
75
The selected focus point is
superimposed in red in the viewfinder.
Check the set focus point with the focus points indicator at the bottom of
the viewfinder when you have trouble seeing the superimposed focus
point because of the backlit or other conditions.
• Set the focus point select dial to 5 to cancel the selected focus point and
return to automatic setting.
• The focus point is fixed to the center position regardless of this setting with
lenses other than FA J, FA, F lenses.
Fixing the Focus Point on the Center
1
Set the focus point select dial
to 6.
4
Shooting Functions
Page 76
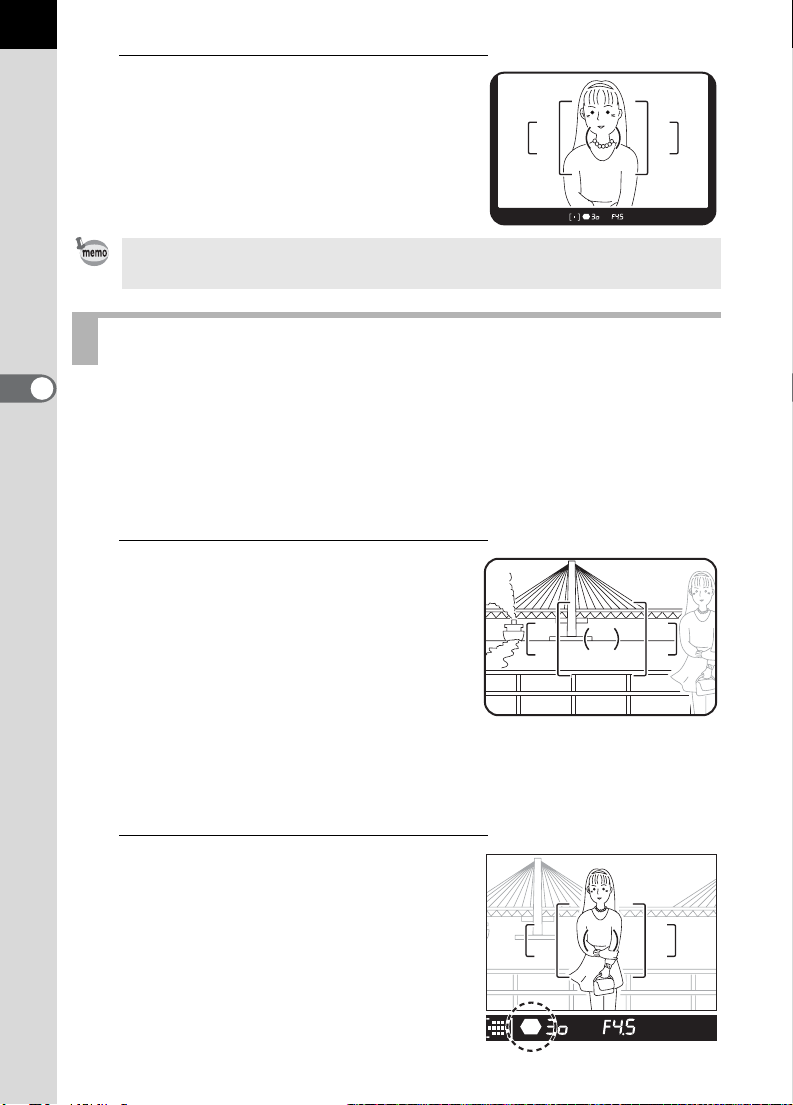
76
2
Press the shutter release
button halfway.
Only the center is focused where the
focus point is superimposed.
Set the focus point select dial to 5 to cancel the selected focus point and return
to automatic setting.
Focus lock
4
If the subject is beyond the range of the focus points area, the camera
Shooting Functions
cannot automatically focus on the subject. In this situation, you can aim the
focus point on the subject, use focus lock, then recompose the picture.
You can take pictures in Focus lock mode when the focus mode is set to
l (Single Mode).
1
Frame the desired composition
for your picture in the
viewfinder.
You can use focus lock when the
subject you wish to focus on is not
within the focus point area.
2
Aim the center of the
viewfinder over the subject,
then press the shutter release
button halfway down.
The focus indicator []] lights up and you
will hear a beep when the subject comes
into focus. (If it is blinking, the subject is
out of focus.)
(Example)
The person is out of focus
and the background is
focused instead.
Page 77

3
Lock the focus.
Keep the shutter release button pressed halfway. The focus will remain
locked.
4
Re-compose the picture while
keeping the shutter release
button pressed halfway down and
press the shutter release button
fully to take the picture.
77
• The focus is locked while the focus indicator []] is lit.
• Turning the zooming ring in focus lock mode may cause the subject to be out
of focus.
• The beep can be turned off. (p.119)
4
Shooting Functions
Page 78

78
Autofocus illuminator
When the flash is up in l (single mode) where the subject in dark area,
pressing the shutter release button halfway will automatically fire the builtin flash several times, enabling the autofocus to focus on the subject.
Hard-to-Autofocus Subjects
The autofocus mechanism is not all-powerful. Subjects which may not
focus are listed below. These also apply to manual focusing using the
focus indicator []] in the viewfinder.
For any of these, set the focus mode switch to \ and use the manual
4
focus mode to focus on the subject with the aid of the matte field in the
Shooting Functions
viewfinder.
a) Extremely low-contrast subject such as a white wall in the focus points
range.
b) Subjects which don't reflect much light within the focus points range.
c) Subjects that are moving extremely fast.
d) Powerfully reflected light or strong backlight (subjects with extremely
bright backgrounds).
e) If vertical or horizontal line patterns appear within the focus points range.
f) Multiple subjects in the foreground and background within the focus
points range.
It may not be in focus even if the focus indicator []] is lit.
g)
AF Button
You can activate autofocus by pressing the
AF button and press the shutter button to take
a picture.
This functions the same as when you press
the shutter button halfway down. Once you
press the AF button during l (Single
Mode) to adjust the focus, focus lock will
operate while you hold down the button.
The camera will continue to adjust the focus while you hold down the
button in k (Continuous Mode).
Page 79

EV Compensation
This allows you to deliberately over-expose (brighten) or under-expose
(darken) your picture. The exposure compensation range is -3 EV to +3 EV
in 0.5 EV or 0.3 EV steps.
1
Turn the b dial to set the
desired compensation value
while holding down the
Exposure compensation
button.
2
Confirm the compensation
value in the viewfinder or on
the LCD panel.
The set value and m are displayed
during compensation.
79
4
Shooting Functions
How to read the viewfinder bar graph
If the [9] are on the negative side of the bar graph, it indicates
under-exposure. If they are on the positive side, it indicates overexposure. One dot on the bar graph indicates 0.5 step (0.5 EV).
• The exposure compensation cannot be canceled by turning the camera off,
or by setting any other exposure mode.
• Press the green button to reset the exposure compensation value to 0 while
pressing the exposure compensation button.
• You can set a custom function to allow setting exposure compensation by 0.3
steps (EV). See page 115 for setting Custom Functions.
Page 80

80
Exposure compensation is not available when the exposure mode is set to
green program AE mode, a (metered manual exposure) mode or p (bulb)
mode.
4
Shooting Functions
Page 81

Using the Zoom Lens
You can use the zoom lens to freely change the size of your chosen
subject. Adjust it to the desired size and take the picture.
1
Turn the zoom ring clockwise for
telephoto and counterclockwise
for wide angle.
• The smaller the number shown on the zoom scale ring, the wider the angle.
The larger the number, the more magnified the image appears.
• Power Zoom, Image Size Tracking, Zoom Clip, and Auto Zoom Effect are not
compatible with this camera.
81
4
Shooting Functions
Page 82

82
Auto Bracketing
You can capture three consecutive images at different exposures. The first
frame is exposed with no compensation. The second frame is underexposed and the third frame is over-exposed.
You can set the negative or positive exposure compensation step to be
1/2EV (±0.5, ±1.0, ±1.5) or 1/3EV (±0.3, ±0.7, ±1.0), using “Exposure
setting steps” in custom functions.
4
Shooting Functions
Normal exposure Under-exposure Over-exposure
1
Press the multiple exposure /
auto bracket button until V]
appears on the LCD panel.
2
Turn the Tv dial to select ]
while holding down the
multiple exposure / auto
bracket button.
Page 83

3
Turn the Av dial to set the
exposure compensation step
while holding down the multiple
exposure / auto bracket button.
4
Hold down the shutter release button.
Three consecutive pictures will be taken, the first with no compensation,
the second with negative compensation, and the third with positive
compensation. The mode returns to the single-frame drive mode
automatically after the third picture is taken.
• By combining this function with consecutive shooting mode, you can take
consecutive auto bracketing shots for as long as you keep the shutter release
button pressed.
• The focus is locked in the first frame position when the focus mode lever is set
to
l
(single).
• The focus is adjusted for each shot when the focus mode lever is set to
(continuous). However, note that the shutter will release even if the focusing is
not complete.
• The auto bracketing exposure setting will remain effective for twice as much
time as the metering timer (initial value 20 seconds) when you release your
finger from the shutter release button during auto bracketing, and you can take
the next picture at the next compensation step. In this case, auto focusing works
for each frame. After about twice as much time as the metering timer (initial
value 20 seconds), the camera returns to settings for taking the first picture.
• You can combine this function with the built-in flash or external flash (TTL and
P-TTL auto only) to change only the flash light output consecutively. However,
when using an external flash, holding the shutter release button down to take
three continuous frames may cause the second and third frame to be taken
before the flash is fully recharged. Always take one frame at a time after
confirming that charging is complete.
• You can change the auto bracketing sequence using a custom function.
See page 115 for setting Custom Functions.
k
83
4
Shooting Functions
Taking only over-exposed or under-exposed pictures
You can use the auto bracketing mode for only under-exposure or overexposure shots by combining the operation with exposure compensation
(p.79). The auto bracketing is performed in both cases on the basis of the
specified exposure compensation value.
Page 84

84
Multiple Exposure Shooting
You can overlap multiple images to take one picture.
For example, you can take composite pictures such as a night scene with
a bright moon superimposed.
1
Press the multiple exposure /
auto bracket button until V]
appears on the LCD panel.
4
Shooting Functions
2
Turn the Tv dial to select V
while holding down the
multiple exposure / auto
bracket button.
3
Use the Av dial to set the
number of multiple exposures
while holding down the multiple
exposure / auto bracket button.
Here, as an example, the number is set to
2 (two).
Page 85

4
Release the finger from the
multiple exposure / auto bracket
button and press the shutter
release button to take the first
image.
The first image is captured, and is displayed
on the LCD monitor for instant review.
5
Press the shutter release button to
take the superimposed image.
The composite image is displayed on the
LCD monitor.
• The V on the LCD panel disappears and multiple exposure mode is
cancelled when the picture is taken.
• You can delete the first image by pressing the delete button while the delete
screen is displayed.
• Repeat step 5 to take three or more.
• The maximum number of frames is 9 (nine) at one time.
85
4
Shooting Functions
Page 86
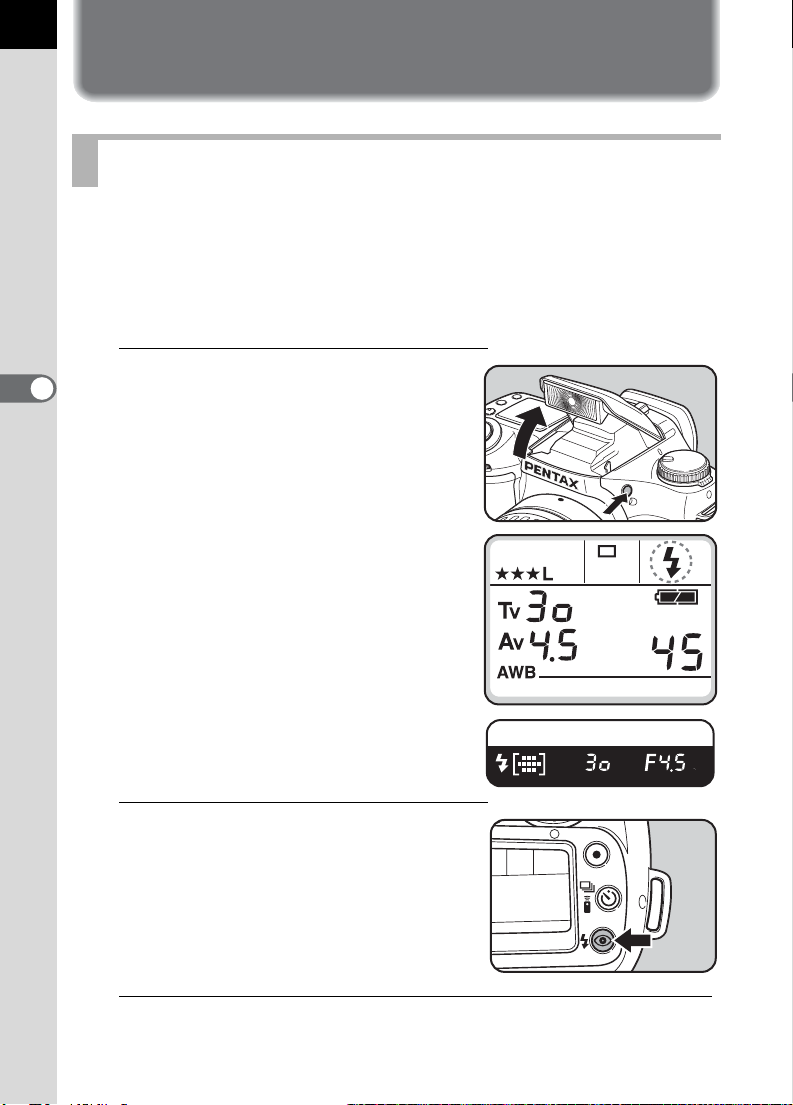
86
Using the Flash
Using the built-in flash
When you use a flash in low light or backlit conditions, manually pop up
the built-in flash before taking the picture.
Vignetting may occur depending on the lens being used and the capture
conditions. We recommend to take a test shoot to confirm this. Also refer
to Page 140 “F, FA and FA J Lenses Compatibility with the Built-in Flash”.
1
4
Shooting Functions
Press the flash pop-up button
to raise the flash.
The flash pops up and starts charging
automatically.
When flash is fully charged, b appears
in the viewfinder and on the LCD
panel.
2
Press the flash mode button to
select a flash mode.
See page 87.
3
Press the shutter release button fully and the flash
discharges.
Page 87

4
Push down on the portion in
the illustration to retract the
flash.
Setting Flash Modes
1
Press the flash mode button to
select a flash mode.
The flash mode on the LCD panel cycles
as shown in the chart with each press of
the button.
Flash modes for each capture mode
Flash modes differ by capture mode. See below for the flash modes
corresponding to each capture mode. (The indications shown are with the
built-in flash popped up.)
87
4
Shooting Functions
• Green program AE mode
Automatic flash
Red-eye reduction
automatic flash
Page 88

88
• e (program) mode
Automatic flash
Red-eye reduction
flash ON
Red-eye reduction
automatic flash
Flash ON
• b (Shutter priority) mode / c (Aperture priority) mode
4
a (Manual exposure mode) / p (Bulb) mode
Shooting Functions
Flash ON
Wireless high-
speed sync mode
Red-eye reduction
flash ON
Wireless mode
Wireless mode
Wireless high-
speed sync mode
Red-eye Reduction
This camera has a red-eye reduction function, which reduces red-eye by
discharging the flash twice. When > is displayed on the LCD panel, the
pre-flash is discharged just before the shutter is released. This reduces the
pupil diameter. Then the main flash is discharged while the pupils are
smaller, reducing the red-eye effect.
• If red-eye reduction is used when the AF360FGZ or AF500FTZ, etc. is set as
a slave unit or wireless, the preflash for red-eye reduction will trigger the
external flash to fire. Do not use red-eye reduction when using a slave unit.
• The red-eye reduction feature works even when only an external flash is
used. See page 97.
Page 89

About Red-eye Phenomenon
Shooting portraits with a flash in a dark environment often results in eyes
looking reddish in the photograph. This phenomenon, commonly known
as “Red-Eye”, is caused by the reflection of the electronic flash in the
retina of the eye. It can be reduced by taking a picture in brighter light or
by shooting with a wider-angle lens at a closer distance. When using an
external flash, it may also help to position the flash as far away from the
camera as possible.
Flash photography distance
As a rule of thumb, the distance for using the built-in flash (which varies
with the lens used) is within about four meters of the subject. (With
sensitivity 400)
• The flash effective range does not come closer than 0.7m (2.6ft), even if the
lens aperture is very small. The exposure will not be properly controlled when
taking a picture closer than 0.7m. Note that this can also cause and you will
see vignetting in the picture corners.
• To calculate the flash photography distance from the aperture size, see
p.139.
89
4
Shooting Functions
Flash Recommended indicator
The flash recommended indicator [b] in the viewfinder and on the LCD
panel will blink to recommend that you use the flash when you attempt to
take a picture in low light and backlight condition.
• b will blink only in backlit conditions when the capture mode is set to b
(shutter priority) mode or a (manual exposure) mode.
• b stops blinking when the flash is fully charged.
• b will not appear in Bulb mode.
Page 90

90
Daylight-Sync Shooting
In daylight conditions, the flash will eliminate the shadow when a portrait
picture is taken with a person’s face cast in shadow.
Daylight-sync shooting is the same as normal shooting with a flash.
• Taking pictures
1 Press the flash pop-up button.
2 Confirm that the flash mode is set to Flash ON.
3 Confirm that the flash is fully charged.
4 Take the picture.
• It may be over-exposed when the background is too bright.
4
Shooting Functions
• Press the flash button and turn off 3 on the LCD panel when shooting with
daylight-sync. The flash may not discharge when taking a daylight-sync
photograph with 3 displayed on the LCD panel (3 on the LCD panel cannot
be turned off in the green program AE mode.)
Without Daylight-Sync With Daylight-Sync
Page 91

Using the flash in each capture mode
Using b (Shutter priority) Mode
• When taking a moving subject, you can use the flash to change the blur
effect.
• Any desired shutter speed 1/150 sec. or slower can be set for taking a
flash photograph.
• The aperture automatically changes according to the ambient
brightness.
Using Av (Aperture-priority) Mode
91
• You can set the desired aperture to take a flash photograph when you
want to change the depth of field or shoot any far away subject.
• The shutter speed automatically changes with the ambient brightness.
• The shutter speed shifts automatically anywhere from 1/150 sec. to a
slow shutter speed that does not cause camera shake. The slowest
shutter speed depends on the focal length of the lens in use.
• The shutter speed is fixed at 1/150 sec when any lens other than FA J,
FA or F is used.
Slow-Speed-Sync Mode
It is possible to balance the exposure of a foreground subject in a low light
background by using the flash to properly expose the foreground subject
and a slow-shutter-speed to expose the low light background.
y Using M (Hyper manual exposure) Mode
1 Set the exposure mode to a(Hyper manual exposure) mode
2 Set the shutter speed (under 1/150 sec) and aperture value to obtain
correct exposure.
3 Press the flash pop-up button to activate the flash.
4 Take the picture.
The flash can be raised at any time before taking the picture in Hyper manual
exposure mode.
4
Shooting Functions
Page 92

92
y Using b (Shutter priority) Mode
1 Set the exposure mode to b (shutter priority) mode.
2 Use the Tv dial to set the desired shutter speed.
3 Press the flash pop-up button to activate the built-in flash.
4 Take the picture.
• If the aperture value blinks when the shutter speed is set, the background will
not be exposed correctly.Adjust the shutter speed so that the aperture value
stops blinking.
• If the flash is popped up before setting the shutter speed, the background will
not be exposed correctly.
• The picture will be blurred when the subject is not stop moving, use of a tripod
is recommended to prevent camera shake.
• You can use slow-speed-sync shooting by performing the same operation in
Hyper program b (shutter priority) mode.
4
Shooting Functions
• Slow-speed-sync shooting can also be performed with an external flash.
Page 93

Using an External Flash
Using the optional external flash AF360FGZ enables a variety of flash
modes, such as P-TTL automatic flash mode, TTL auto-flash mode, highspeed flash sync mode, and wireless mode. Available functions differ by
the external flash being used. See the chart below for details.
93
Flash
CAMERA FUNCTION
Built-in
Flash
AF360FGZ
AF500FTZ
AF330FTZ
AF400FTZ
AF240FT
Red-eye reduction flash
Automatic flash discharge
After the flash is charged, the
camera automatically switches
to the flash sync speed.
Aperture is set automatically in
the Hyper Program and
Shutter-Priority AE Modes
Flash confirmation in the
viewfinder
P-TTL auto flash* (appropriate
sensitivity: 200 to 3200)
TTL auto flash* (appropriate
sensitivity: 200 to 800)
*1 *1
*2 *2
Slow-speed sync
Autofocus illuminator
Trailing-shutter-curtain sync*3
flash
*4
Contrast-control-sync flash*3
mode
Slave flash
Multiple flash
*5
High-speed flash sync
Wireless flash
*1 When using FA J, FA, F or A lens.
*2 When a lens used in position other than aperture A.
*3 The shutter speed will be 1/60 sec. or slower.
*4 It can be combined with AF360FGZ / AF500FTZ / AF330FTZ or AF400FTZ / AF240FT
flash for trailing-shutter-curtain sync flash.
*5 Not available with AF330FTZ.
*5
4
Shooting Functions
Page 94

94
About the LCD panel display for AF360FGZ
• The AF360FGZ will automatically convert the
field angle differential between 35mm and the
w format resulting from the focal length of
the lens you are using. (When using FA J, FA, or
F lenses)
• Display the format size for w during the
exposure metering timer of the camera is turned
on when combining the AF360FGZ with the
w. (It returns to a 35mm format display
when the exposure metering timer is turned off.)
Using P-TTL Auto Mode
4
Shooting Functions
Use this flash mode with the AF360FGZ flash unit. P-TTL auto flash, which
pre-fires the flash using the 16-segment metering allows more precise
control. P-TTL auto is available in wireless flash mode.
1 Remove the hot shoe cover and attach the flash unit.
2 Turn the external flash ON.
3 Set the flash unit mode switch to P-TTL auto.
4 Confirm that the flash is fully charged and then take the picture.
Lens
used
85mm ⇔ 58mm
70mm ⇔ 48mm
50mm ⇔ 34mm
35mm ⇔ 24mm
28mm ⇔ 19mm
24mm ⇔ 16mm
20mm ⇔ 13mm
AF 360
FGZ
display
• P-TTL auto is available with the AF360FGZ flash unit only. The mode will be
TTL auto when using a flash other than the AF360FGZ.
• The b will light in the viewfinder when the flash is fully charged.
• For details such as operation method and effective distance, please read the
external flash manual.
• The external flash discharges automatically when 3 is lit in on the LCD panel.
The flash does not discharge when the subject is bright enough, (therefore, it
may not suitable for daylight-sync shooting).
• Never press the flash pop up button when any external flash unit is attached
to the camera. The built-in flash will hit the external flash. If you want to use
both at once, see page 97 for the connection method.
Page 95

Using High-Speed Flash Sync Mode
With the AF360FGZ, you can discharge the flash to take a picture at a
shutter speed faster than 1/150 second. High-speed flash sync can be
used with the flash attached to the camera, or as a wireless.
y Using High-speed flash sync on the camera
1 Remove the hot shoe cover and attach the flash unit.
2 Set the mode dial to any exposure mode other than the green program
AE mode or p (Bulb) mode.
3 Turn the external flash ON.
4 Set the flash unit sync mode switch to HS (high-speed flash sync.).
5 Confirm that the flash is fully charged and then take the picture.
• The b will light in the viewfinder when the flash is ready (fully charged).
• High-speed flash sync is only available when the shutter speed is faster than
1/150 sec. For the e (Hyper Program) mode, rotate the b or the c dial
using the Shutter-priority mode or the Aperture-priority mode to make the
shutter speed faster than 1/150 sec.
• High-speed flash sync is not available when the exposure mode is set to p.
y Using the AF360FGZ flash as wireless High-speed flash sync
1 Place the flash unit at the desired location.
2 Set the flash unit power switch to [WIRELESS]
3 Set the flash unit wireless mode switch to S (Slave).
4 Press the flash pop-up button to enable using the built-in flash.
5 Press the flash mode button until is displayed.
95
4
Shooting Functions
• The b will light in the viewfinder when the flash is ready (fully charged).
• High-speed flash sync is only available when the shutter speed is faster than
1/150 sec.
Using Wireless Mode
With the AF360FGZ, you can discharge a flash without having a cord
connection between the camera and flash unit. The High-speed sync
mode can also be used with wireless flash.
1 Place the flash unit at the desired location.
2 Set the flash unit power switch to [WIRELESS]
3 Set the flash unit wireless mode switch to S (Slave).
Page 96

96
4 Press the flash pop-up button to enable using the built-in flash.
5 Press the flash mode button until is displayed.
• The b will light in the viewfinder when the flash is ready (fully charged).
• The AF360FGZ can be attached directly to the camera hot shoe and wireless
mode can still be used with one or more additional AF360FGZ flashes.
• Set the AF360FGZ wireless slave mode to SLAVE 1.
Wireless flash control (P-TTL flash mode)
When the AF360FGZ is used for wireless flash, the following information
is exchanged between the built-in flash and AF360FGZ before the flash is
discharged.
1 Press the shutter release button completely.
4
2 The built-in flash discharges a pre-flash.
Shooting Functions
(the camera’s flash mode is transmitted)
3 The external flash unit discharges a pre-flash.
(the subject's lighting condition is checked)
4 The internal flash unit discharges a pre-flash.
(the required flash output is transmitted to the external flash)
The built-in flash will discharge another pre-flash to transmit the flash
duration time in HS (High-speed flash sync mode).
5 The AF360FGZ discharges the main flash.
• You can set a custom function to select how the built-in flash is to be used:
either as an information controller for the external flash, or as a flash to affect
the exposure. See page 115 for setting Custom Functions.
• Set the AF360FGZ in wireless slave mode to SLAVE 1.
Channel settings for wireless flash control
For wireless control, a channel (e.g. CH1) for the AF360FGZ must be set
as follows.
Attach the AF360FGZ to the camera, turning on the camera and pressing
the shutter release button halfway down to set the channel.
The present channel is displayed for about 10 seconds when flash mode 4 or
is set.
Page 97

Red-eye Reduction
As with the built-in flash, red-eye reduction is available using an external flash.
This may not be available on some flashes and it may have any restrictions for
usage conditions may be required. See the chart given on p.93.
Trailing-Shutter-Curtain Sync Flash
When using the built-in flash with an external flash that has a trailingshutter-curtain sync flash function, the external flash is set to the trailingshutter-curtain flash function, the internal flash will also use this mode.
Confirm that both flash units are fully charged before shooting.
97
Using the built-in flash with an external flash
As shown in figure 1 below, attach the optional hot shoe adapter F
camera hot shoe and an off-camera shoe adapter to the bottom of the
external flash, and connect these with the extension cord F5P.
The off camera shoe adapter F comes with a tripod screw for securing to
your tripod.
Fig. 1 When combining with the built-in flash
G to the
Discharging multiple flashes
To use two or more external flashes simultaneously, either use the same
type of flashes as shown in the flash function chart on p.93, or use the
following combinations: AF360FGZ / AF500FTZ / AF330FTZ and
AF400FTZ / AF240FT. The built-in flash can be used with any type. Connect
them as shown in Fig. 2 on the next page: Attach an off-camera shoe
adapter F to the external flash and the hot shoe adapter F and connect the
extension cord F5P to the off-camera shoe adapter F on the other external
flash.
4
Shooting Functions
Page 98

98
Fig. 2 When combining two or more external flashes
4
Shooting Functions
The AF500FTZ can be connected directly to the Extension cord F5P without
the off-camera shoe adapter F.
Contrast-Control-Sync Flash
Using the dedicated external flash in combination with the built-in flash
allows twin flash photography (contrast-control-synch flash photography).
This is based on the difference between the amounts of light discharged
from two units. Contrast control synch flash is possible with the
combination of following flash units:
AF360FGZ, AF330FTZ, AF500FTZ and the built-in flash
1 Refer to page 97 for connecting the external flash off-camera.
2 Set the synch mode for AF360FGZ, AF330FTZ / AF500FTZ to the
Contrast-Control-Synch mode.
3 Confirm that both the external flash and built-in flash are fully charged
and then take the picture.
• For contrast control synch flash photography when using two external
flashes, the flash set as the contrast control flash is flash 2, and the other
external flash is flash 1. When using an external flash with the built-in flash,
the built-in flash is flash 1, and the external flash is flash 2.
• Do not combine an accessory with a different number of contacts such as a
“Hot Shoe Grip”, as a malfunction may occur.
• The fastest flash synchronization speed is 1/60 second in the ContrastControl-Synch mode.
• Combining with flashes from other manufacturers may cause equipment
breakdown. We recommend using the PENTAX dedicated automatic flashes.
Page 99

5 Playback Functions
Zoom Playback ....................................................100
Nine-Image Display .............................................101
Deleting Images...................................................102
Printing Service Settings (DPOF) ......................106
Page 100

100
x 2.0
Zoom Playback
You can play back images magnified up to 12 times.
1
Press the Playback button and
use the four-way controller (45)
to select an image.
2
Turn the Nine-image display /
Zoom display dial clockwise.
5
Playback Functions
The image is magnified (1×~12×).
You can move the zoom position with
the four-way controller during zoom
display.
Turn the Nine-image display / zoom
display dial counterclockwise to
reduce the magnification.
x 2.0
x 2.0
Press the Playback button or press the shutter release button halfway to return
to capture mode.
 Loading...