


DISC SANDER PTSG 140 A1
DISC SANDER
Translation of the original instructions
TELLERSCHLEIFGERÄT
Originalbetriebsanleitung
IAN 280366
SKIVSLIP
Översättning av bruksanvisning i original

Before reading, unfold both pages containing illustrations and familiarise yourself with all functions of the
device.
Vik ut båda bildsidorna och ha den till hands när du läser igenom anvisningarna och gör dig bekant med
apparatens / maskinens funktioner.
Klappen Sie vor dem Lesen die beiden Seiten mit den Abbildungen aus und machen Sie sich anschließend
mit allen Funktionen des Gerätes vertraut.
GB Translation of the original instructions Page 1
SE Översättning av bruksanvisning i original Sidan 11
DE / AT / CH Originalbetriebsanleitung Seite 21


Contents
Introduction ......................................................2
Intended use ................................................................ 2
Depicted components ......................................................... 2
Package contents ............................................................ 2
Technical data .............................................................. 2
General Power Tool Safety Warnings ................................3
Working safely .............................................................. 3
Residual risks ............................................................... 5
Before use .......................................................5
Appliance position ........................................................... 5
Assembling/disassembling the sanding table with sanding table holder .................. 5
Replacing or attaching the sanding paper ......................................... 6
Adjusting the sanding table angle ............................................... 6
Adjusting the angle stop ....................................................... 6
Dust extraction .............................................................. 6
Connecting/removing the dust extraction unit ...................................... 6
Operation .......................................................7
Switching on and off .........................................................7
Grinding ................................................................... 7
Maintenance and care .............................................7
Disposal .........................................................7
Kompernass Handels GmbH warranty ...............................8
Service ..........................................................9
Importer ........................................................9
Translation of the original Conformity Declaration ......................9
PTSG 140 A1
GB
│
1 ■

DISC SANDER PTSG 140 A1
Introduction
Congratulations on the purchase of your new appliance. You have chosen a high-quality product. The
operating instructions are part of this product. They
contain important information about safety, usage
and disposal. Before using the product, please
familiarise yourself with all operating and safety
instructions. Use the product only as described and
for the range of applications specified. Please also
pass these operating instructions on to any future
owner.
Intended use
The disc sander is designed for sanding a wide
range of wood types. It can be used for the precision sanding of softwoods and hardwoods.
The appliance is not intended for commercial use.
Any other uses or modification of the appliance is
deemed to be improper use and carries the risk of
serious personal injury. The manufacturer accepts
no responsibility for damage(s) attributable to
misuse.
Depicted components
Sanding disc
Mains plug
On/Off switch
Speed control
Screw clamp mounting
Angle scale
Rotary knob
Plain washer
Hex socket screw
Sanding table holder
Sanding table
Table groove
Extraction nozzle
Adapter
Reducer piece
Screw clamp
Angle stop bolt
Angle stop angle scale
Guide rail
Sandpaper
Hex key
Storage covers
Package contents
1 disc sander
1 angle stop
1 screw clamp
1 adapter
1 reducer piece
2 sanding paper sheets, 80 grain
2 sanding paper sheets, 150 grain
2 sanding paper sheets, 240 grain
6 storage covers
1 Hex key
1 set of operating instructions
Technical data
Rated voltage: 230 V ∼ 50 Hz
(AC)
Rated power
consumption: 140 W
S2: 15 min
Protection class: II /
Protection Class: IP20
Rated idle speed: 0–3600 rpm
Weight: approx. 3 kg
Ø sanding disc: 125 mm
Sanding table dimensions: 140 x 98 mm
Noise emission value:
Noise measurement value determined in accordance with EN 61029. The rated noise level of the
power tool is typically as follows:
Sound pressure level: L
Uncertainty: K
Sound power level: LWA = 78 dB (A)
Uncertainty: KWA = 3 dB
Wear hearing protection!
(double insulation)
= 65 dB (A)
pA
= 3 dB
pA
■ 2 │ GB
PTSG 140 A1

Total vibration value:
Total vibration value as per EN 61029:
Vibration emission value: a
Uncertainty K = 1.5 m/s
2
≤ 2.5 m/s
h
NOTE
► The vibration level specified in these instruc-
tions has been measured in accordance with
a standardised measuring procedure and
can be used for equipment comparisons. The
specified vibration emission value can also
be used to make an initial exposure estimate.
WARNING!
► The vibration level will vary according to the
use of the power tool and may sometimes
be higher than the value specified in these
instructions.
Regular use of the power tool in this way may
cause the user to underestimate the vibration.
To estimate the vibration load during a specific working period accurately, periods during
which the appliance is switched off (or running, but not being used) must also be taken
into account. This can significantly reduce the
vibration load over the total working period.
General Power Tool
Safety Warnings
2
CAUTION!
► Read all the safety information, instructions,
illustrations and technical data provided
with this electric tool. Failure to follow the
warnings and instructions may result in electric shock, fire and/or serious injury.
Save all warnings and instructions for future
reference.
The term “power tool” in the warnings refers
to your mains-operated (corded) power tool or
batteryoperated (cordless) power tool.
Working safely
■ Keep your workspace tidy. Clutter in the work
area can cause accidents.
■ Take account of environmental influences!
Do not expose the power tool to rain. Do not
use the power tool in wet or moist environments.
Ensure that your workspace is adequately lit.
Do not use power tools where there is a risk of
explosion or fire.
■ Protect yourself from electric shocks! Avoid
body contact with grounded surfaces (e.g.
pipes, radiators, electric cookers, refrigerators
and freezers).
■ Keep other people at a distance! Do not allow
other people, especially children, to touch the
power tool or the cord. Keep them out of your
work area.
■ Store unused power tools safely! Unused
electric tools should be placed in a dry, high-up
or closed-off place out of the reach of children.
PTSG 140 A1
GB
│
3 ■

■ Do not overload your power tool! The tool
will work better and more safely in the specified
performance range.
■ Use the right power tool for the job! Do not
use low performance tools for heavy duty work.
Do not use the power tool for purposes for which
it is not intended. For example, do not use a
circular saw to cut tree branches or logs.
■ Wear suitable clothing! Do not wear loose
clothing or jewellery to avoid getting them
caught in moving parts. Wear non-slip footwear
when working outdoors. If you have long hair,
wear a hairnet.
■
■ Connect the dust extraction unit! If there are
connections for dust extraction and collection,
make sure that these are connected and used
properly.
■ Do not use the cord for purposes for which
it is not intended! Do not pull on the cord to
unplug the power tool. Protect the cord from
heat, oil and sharp edges.
■ Secure the workpiece! Use clamps or a vice to
hold the workpiece firmly in place. This is much
safer than simply holding it in your hand.
■ Do not overreach! Keep both feet on the
ground an maintain your balance at all times.
Use protective equipment!
Wear safety goggles.
Use a breathing mask for work which
produces a lot of dust.
■ Maintain tools with care! Keep the cutting tools
sharp and clean to be able to work better and
more safely. Follow the instructions on lubrication and exchanging tools. Check the power
cord regularly and have it replaced by a certified specialist if it is damaged. Check extension
leads regularly and replace them if they are
damaged. Keep the handles dry, clean and free
from oil and grease.
■ Unplug the appliance from the mains socket!
When the power tool is not in use, before maintenance and when changing tools such as saw
blades, drill bits and milling tools.
■ Never leave any tool key attached! Check
that all keys and adjusting tools are removed
before switching the appliance on.
■ Avoid accidentally starting the appliance!
Ensure that the switch is switched to off before
inserting the plug into the wall socket.
■ Use the extension cord for outdoor use! Use
only suitably certified and labelled extension
cords outdoors.
■ Remain alert at all times! Pay attention to what
you are doing. Proceed with caution when
working with the tool. Do not use the power
tool when distracted.
■ Check the power tool for any damage!
Before continuing to use the power tool, check
all safety devices and any slightly damaged
parts to make sure they function properly and
as intended.
■ 4 │ GB
PTSG 140 A1
■ Check that all moving parts work properly with-
out jamming and whether parts are damaged.
All parts must be properly fitted and meet all
the conditions to ensure the proper operation of
the power tool. Damaged safety devices and
parts must be properly repaired or replaced by
a specialist workshop unless otherwise indicated in the instructions.
■ Damaged switches must be replaced at an
authorised customer service centre.
■ Do not use any power tools that you cannot
switch on and off with the power switch.
CAUTION! The use of other tools and accessories could lead to an increased risk of personal
injury for you.
■ Have your power tool repaired by a qualified
electrician! This power tool complies with all
relevant safety regulations. Repairs may only
be performed by a qualified electrician using
original spare parts. Failure to do so could put
the user at risk of accidents.
Residual risks
Even if you operate this power tool properly, there
will still be residual risks. The following risks can
occur in relation to the power tool’s design and
structure:
▯ Lung damage, if no suitable breathing protec-
tion is worn.
▯ Hearing damage, if no suitable hearing protec-
tion is worn.
▯ Damage to health caused by vibrations if the
appliance is used for extended periods or is
not properly used and maintained.
WARNING!
■ The power tool creates an electromagnetic
field during operation. This field can, in certain circumstances, impair active or passive
medical implants. To reduce the risk of fatal
injuries, we recommend that people with
medical implants consult their doctor and the
manufacturer of the medical implant before
operating this machine.
Before use
CAUTION!
■ This appliance is not designed for continuous
operation.
– If the appliance overheats, switch it off and
allow it to cool down.
Appliance position
■ The appliance can be set horizontally or verti-
cally.
♦ Fix the supplied screw clamp
clamp mounting to a table edge to prevent
the appliance tipping over.
Assembling/disassembling the
sanding table with sanding table
holder
♦ Undo and remove the hex socket screw and
the plain washer underneath the sanding
table holder .
♦ Now pull the sanding table holder
with the sanding table off towards the front.
♦ To refit the sanding table
table holder with the sanding table back
into the normal position.
♦ After this, reinsert the hex socket screw
the plain washer and tighten the screw.
using the screw
together
, push the sanding
and
PTSG 140 A1
GB
│
5 ■

Replacing or attaching the sanding
paper
CAUTION!
► Ensure that the appliance has been discon-
nected from the power in order to prevent it
from being accidentally switched on during
the replacement process and causing injuries.
♦ Before replacement, dismantle the sanding table
holder
access the disc more easily.
♦ Select the sanding paper
remove the backing film.
♦ Stick the sanding paper
disc making sure not to trap any air
underneath.
NOTE
► Stick sanding paper
with the sanding table in order to
you require and
to the sanding
you have already
used to one of the storage covers supplied
so that you can reuse it.
Adjusting the sanding table angle
♦ Undo the rotary knobs fixed to both sides of
the sanding table holder .
♦ Using the angle scale
sanding table to the required angle.
♦ The angle can be adjusted to anything from
-10 to +50 degrees.
♦ Next, tighten the rotary knobs
sanding table remains in the required position.
you can adjust the
so that the
Adjusting the angle stop
♦ Undo the angle stop bolt and use the scale
to adjust it to the required angle. The marking
on the scale must match the marking on the
guide rail .
♦ Retighten the stop bolt
♦ Push the guide rail
located on the sanding table .
to retain the angle.
into the table groove
Dust extraction
WARNING! RISK OF FIRE!
■ When working with electrical appliances that
can be connected to a vacuum cleaner via
a vacuum cleaner adapter, there is a risk of
fire! Under certain conditions, wood dust in
the bag of the vacuum cleaner can spontaneously ignite. This can occur due to flying
sparks or when sanding over residual metals
in wood. This is particularly likely if the wood
dust is mixed with paint residues or other
chemicals and the workpiece has become hot
after being used for a long time. Therefore,
do not allow the material being sanded and
the appliance to overheat. Always empty the
vacuum cleaner dust bag before taking work
breaks.
Connecting/removing the dust
extraction unit
Connecting:
♦ Insert the adapter
into the extraction nozzle .
When doing so, note the guidance aid on the
appliance and on the adapter .
♦ To lock, turn the adapter
♦ If necessary, use the reducer piece
pushing it onto the adapter .
♦ Push the hose from a suitable dust extraction
appliance (e.g. a workshop vacuum cleaner)
onto the adapter
extraction or the reducer piece .
Removal:
♦ Pull the vacuum cleaner hose off the adapter
for external vacuum extraction.
♦ To unlock, turn the adapter
until the arrow ( ) points to the slot on the
extraction nozzle .
♦ Pull the adapter
traction including the reducer piece if nec-
essary
off.
for outside dust extraction
clockwise.
by
for external vacuum
anticlockwise
for external vacuum ex-
■ 6 │ GB
PTSG 140 A1
Operation
Maintenance and care
Switching on and off
NOTE
►
Before first use, allow the sanding paper
to run without a load at top speed for about
5 minutes. Keep out of the danger area.
♦ To switch the appliance on, plug the mains
into a wall socket and press the on/off
plug
switch “I”.
♦ Now set the required sanding paper speed
using the speed control
on the side of the
appliance. The speed is infinitely variable.
♦ To switch the appliance off again press the on/
off switch
“0” and pull the mains plug
out of the power socket.
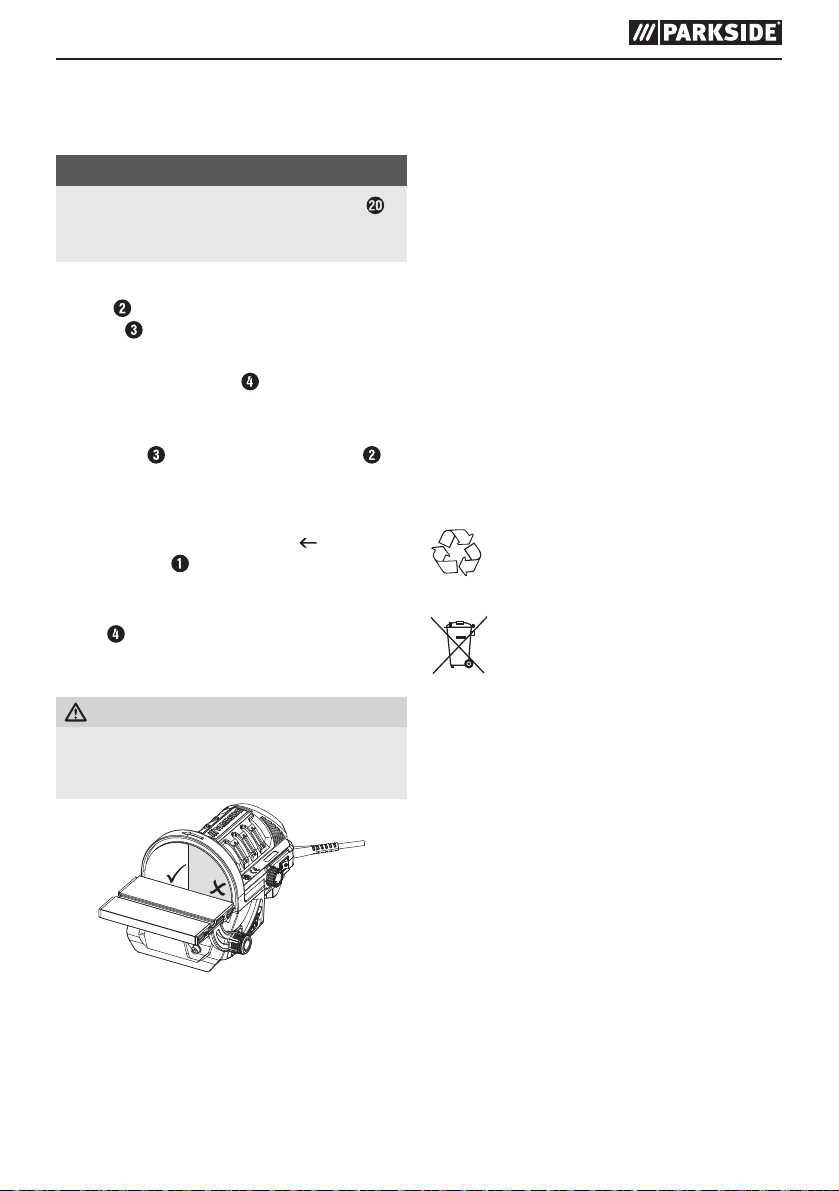
Grinding
The arrow on top of the appliance ( ) shows you
the sanding disc rotation direction (in this case,
anticlockwise).
The sanding speed can be adjusted using the speed
control
you to process the material optimally according to
your requirements.
on the side of the appliance. This allows
WARNING!
■ HAZARDOUS WORKING AREA: The grey
working area of the grinding wheel. Do not
work in this area (see fig. A).
Safe
Danger!
Ensure that the appliance has been disconnected
from the power in order to prevent it from being
accidentally switched on during the replacement
process and causing injuries.
The appliance is maintenance-free.
■ Always clean the appliance directly after com-
pletion of work.
■ Use a dry cloth to clean the housing. Under no
circumstances should you use fuel, detergents,
solvents or abrasive cleaners.
■ Keep the ventilation openings free of obstruc-
tions at all times.
■ Remove any sanding dust stuck to the appliance
with a brush.
Disposal
The packaging is made from environmen-
tally friendly material and can be disposed of at your local recycling plant.
Do not dispose of power tools in
your normal household waste!
In accordance with European Directive 2012/19/EU
on Waste Electrical and Electronic Equipment and
its integration into national law, used power tools
must be disposed of separately and recycled in an
environmentally friendly manner.
Your local community or municipal authorities
can provide information on how to dispose of the
appliance.
Fig. A
PTSG 140 A1
GB
│
7 ■
 Loading...