

Panasonic WV-S2531LN, WV-S2511LN Installation Guide
Step1
Fixing the brackets
Step2
Making connections
Step3
Mount the camera
⇨
⇨
Step5
Configure the network
settings
⇨
Step4
Adjustment
Installation method
Description
of installation
method
Mount the camera on the two-gang junction box using the attachment
plate (accessory).
【Type 1】
Directly mount the camera onto the ceiling or wall using the
attachment plate (when wiring can be installed in the ceiling or wall).
【Type 2】
Mount the camera onto the ceiling or wall using
the base bracket
(
accessory) (when conduits are used for wiring
, or when there is no
space available for wiring in the ceiling or the wall).*
1
【Type 3】
Mount the camera using WV-Q105A (Ceiling mount bracket), WV-Q169A
(Ceiling mount bracket), WV-Q121B (Ceiling mount bracket), WV-Q122A
(Wall mount bracket), or WV-Q124 (Mount bracket) .
Refertoeach
instructionguide
ofthebracket.
⇨
ø
25.4 mm
ø
73 mm
*1
FRONT
83.5 mm
46 mm
B When using the conduit on the ceiling or wall for
wiring, remove the cap for the female thread for the
conduit by using a hexagon wrench (ISO 2936,
width across flats S=5 mm {3/16 inches}).
CMount the attachment plate and the base bracket.
Waterproof tape
【
Common
】
*2 Select any of the
two wiring holes of
template B (accessory) when installing the base
bracket. After
mounting the
attachment plate,
the mounting
direction of the
camera can be
adjusted in 90°
increments.
*3 When attaching
the base bracket
to a one-gang
junction box in
Position E, secure
the base bracket
with 2 screws (M4,
locally procured).
PGQX2088ZAavs1016-0Printed in China
WV-S2531LN
Network Camera
Model No. WV-S2531LN / WV-S2511LN
Installation Guide
Included Installation Instructions
For U.S. and Canada:
Panasonic System Communications
Company of North America,
Unit of Panasonic Corporation
of North America
www.panasonic.com/business/
For customer support, call 1.800.528.6747
Two Riverfront Plaza, Newark, NJ 07102-5490
Panasonic Canada Inc.
5770 Ambler Drive, Mississauga,
Ontario, L4W 2T3 Canada
(905)624-5010
www.panasonic.ca
For Europe and other countries:
Panasonic Corporation
http://www.panasonic.com
Panasonic System Networks Co., Ltd.
Fukuoka, Japan
Authorised Representative in EU:
Panasonic Testing Centre
Panasonic Marketing Europe GmbH
Winsbergring 15, 22525 Hamburg, Germany
Panasonic System Networks Co., Ltd. 2016
Important safety instructions
1) Read these instructions.
2) Keep these instructions.
3) Heed all warnings.
4) Follow all instructions.
5)
Do not block any ventilation openings. Install in accordance with the manufacturer's instructions.
6)
Do not install near any heat sources such as radiators, heat registers, stoves, or other apparatus (including
amplifiers) that produce heat.
7) Only use attachments/accessories specified by the manufacturer.
8) Use only with the cart, stand, tripod, bracket, or table specified by the manufacturer, or sold with the
apparatus. When a cart is used, use caution when moving the cart/apparatus combination to avoid injury
from tip-over.
9) Unplug this apparatus during lightning storms or when unused for long periods of time.
10) Refer all servicing to qualified service personnel. Servicing is required when the apparatus has been damaged in any way, such as power-supply cord or plug is damaged, liquid has been spilled or objects have
fallen into the apparatus, the apparatus has been exposed to rain or moisture, does not operate normally,
or has been dropped.
Troubleshooting
Open Source Software
This product contains open source software licensed under GPL (GNU General Public License),
LGPL (GNU Lesser General Public License), etc.
Customers can duplicate, distribute and modify the source code of the software under license of
GPL and/or LGPL.
Refer to the “readme.txt” file on the provided CD-ROM for further information about open source
software licenses and the source code.
Please note that Panasonic shall not respond to any inquiries regarding the contents of the source
code.
Before requesting service, refer to the Important Information (included in the CD-ROM) and
“Troubleshooting” in the Operating Instructions (included in the CD-ROM) and confirm the
trouble.
The model number and serial number of this
product may be found on the surface of the unit.
You should note the model number and serial
number of this unit in the space provided and
retain this book as a permanent record of your
purchase to aid identification in the event of
theft.
Model No.
Serial No.
NOTE: This equipment has been tested and found
to comply with the limits for a Class A digital
device, pursuant to Part 15 of the FCC Rules.
These limits are designed to provide reasonable
protection against harmful interference when the
equipment is operated in a commercial environment. This equipment generates, uses, and can
radiate radio frequency energy and, if not installed
and used in accordance with the instruction manual, may cause harmful interference to radio communications.
Operation of this equipment in a residential area is
likely to cause harmful interference in which case
the user will be required to correct the interference at his own expense.
FCC Caution: To assure continued compliance,
(example - use only shielded interface cables
when connecting to computer or peripheral devices). Any changes or modifications not expressly
approved by the party responsible for compliance
could void the user’s authority to operate this
equipment.
For U.S.A.
CAN ICES-3(A)/NMB-3(A)
For Canada
WARNING:
• To prevent injury, this apparatus must be securely attached to the wall/ceiling in accordance with
the installation instructions.
• All work related to the installation of this product
should be made by qualified service personnel
or system installers.
• The installation shall be carried out in accordance with all applicable installation rules.
• The connections should comply with local electrical code.
• Batteries (battery pack or batteries installed)
shall not be exposed to excessive heat such as
sunlight, fire or the like.
CAUTION:
• Any changes or modifications not expressly
approved by the party responsible for compliance could void the user’s authority to operate
the equipment.
• The network camera is only intended for a connection to an ethernet or PoE network without
routing to the outside plant.
Disposal of Old Equipment and Batteries
Only for European Union and countries with recycling systems
These symbols on the products, packaging, and/or accompanying documents mean that used
electrical and electronic products and batteries must not be mixed with general household waste.
For proper treatment, recovery and recycling of old products and used batteries, please take them
to applicable collection points in accordance with your national legislation.
By disposing of them correctly, you will help to save valuable resources and prevent any potential
negative effects on human health and the environment.
For more information about collection and recycling, please contact your local municipality.
Penalties may be applicable for incorrect disposal of this waste, in accordance with national
legislation.
Note for the battery symbol (bottom symbol)
This symbol might be used in combination with a chemical symbol. In this case it complies with the
requirement set by the Directive for the chemical involved.
The following notations are used when describing the functions limited for specified models.
The functions without the notations are supported by all models.
S2531L
:The functions with this notation are available when using the model WV-S2531LN.
S2511L
:The functions with this notation are available when using the model WV-S2511LN.
About the user manuals
Product documentation is composed of the following documents.
• Installation Guide (this document): Explains installation, mounting, cable connections, and adjusting the
fi eld of view. This manual uses the WV-S2511LN as an example in the explanations.
• Important Information (included in the CD-ROM):
Provides basic information about the product.
• Operating Instructions (included in the CD-ROM): Explains how to perform the settings and how to
operate this camera.
Adobe® Reader® is required to read these operating instructions on the provided CD-ROM.
When the Adobe Reader is not installed on the PC, download the latest Adobe Reader from the Adobe web site
and install it.
The external appearance and other parts shown in this manual may differ from the actual product within the
scope that will not interfere with normal use due to improvement of the product.
About notations
Standard accessories
Installation Guide (this document) ........................1 set
IMPORTANT SAFETY INSTRUCTIONS ............... 1 pc.
Warranty card*
1
...................................................1 set
CD-ROM*
2
.......................................................... 1 pc.
Code label*3........................................................ 1 pc.
*1 This product comes with several types of warranties. Each warranty is only applicable to the products pur-
chased in the regions indicated on the relevant warranty.
*2 The CD-ROM contains the operating instructions and different kinds of tool software programs.
*3 This label may be required for network management. Use caution not to lose this label.
The following parts are used during installation procedures.
Base bracket ...................................................... 1 pc.
Attachment plate ................................................ 1 pc.
Fixing screws for attachment plate
(M4 × 8 mm {5/16 inches}) ................................5 pcs.
(of them, 1 for spare)
Template A (for the attachment plate) ............... 1 sheet
Template B (for the base bracket) ....................1 sheet
Waterproof tape .................................................. 1 pc.
RJ45 waterproof connector cover ...................... 1 pc.
RJ45 waterproof connector cap ......................... 1 pc.
Bit (Hex wrench, screw
size 6.35 mm {1/4 inches} T20) ............................. 1 pc.
2P power cable .................................................. 1 pc.
4P alarm cable ................................................... 1 pc.
MONITOR OUT conversion plug ......................... 1 pc.
Auxiliary handle .................................. 1 pc.
S2511L
Auxiliary handle
MONITOR OUT
conversion plug
Bit
Preparations
Prepare the required parts for each installation method before starting the installation. The following
are the requirements for the various installation methods.
IMPORTANT:
Procure 4 screws (M4) to secure the attachment plate (accessory) to a ceiling or a wall.
The minimum required pull-out capacity of a single screw or anchor bolt is 196 N {44 lbf} or
more when mounting with the installation method 【Type 1】, 【Type 2】, or 【Type 3】
described in the right table.
Select screws according to the material of the ceiling that the camera will be mounted to. In
this case, wood screws and nails should not be used.
If a ceiling board such as plaster board is too weak to support the total weight, the area shall
be sufficiently reinforced.
This product can only be installed indoors when WV-Q105A or WV-Q169A is used to install it
on the ceiling.
Installation
The installation tasks are explained using 5 steps.
Remove the camera using the reverse order of the installation procedures.
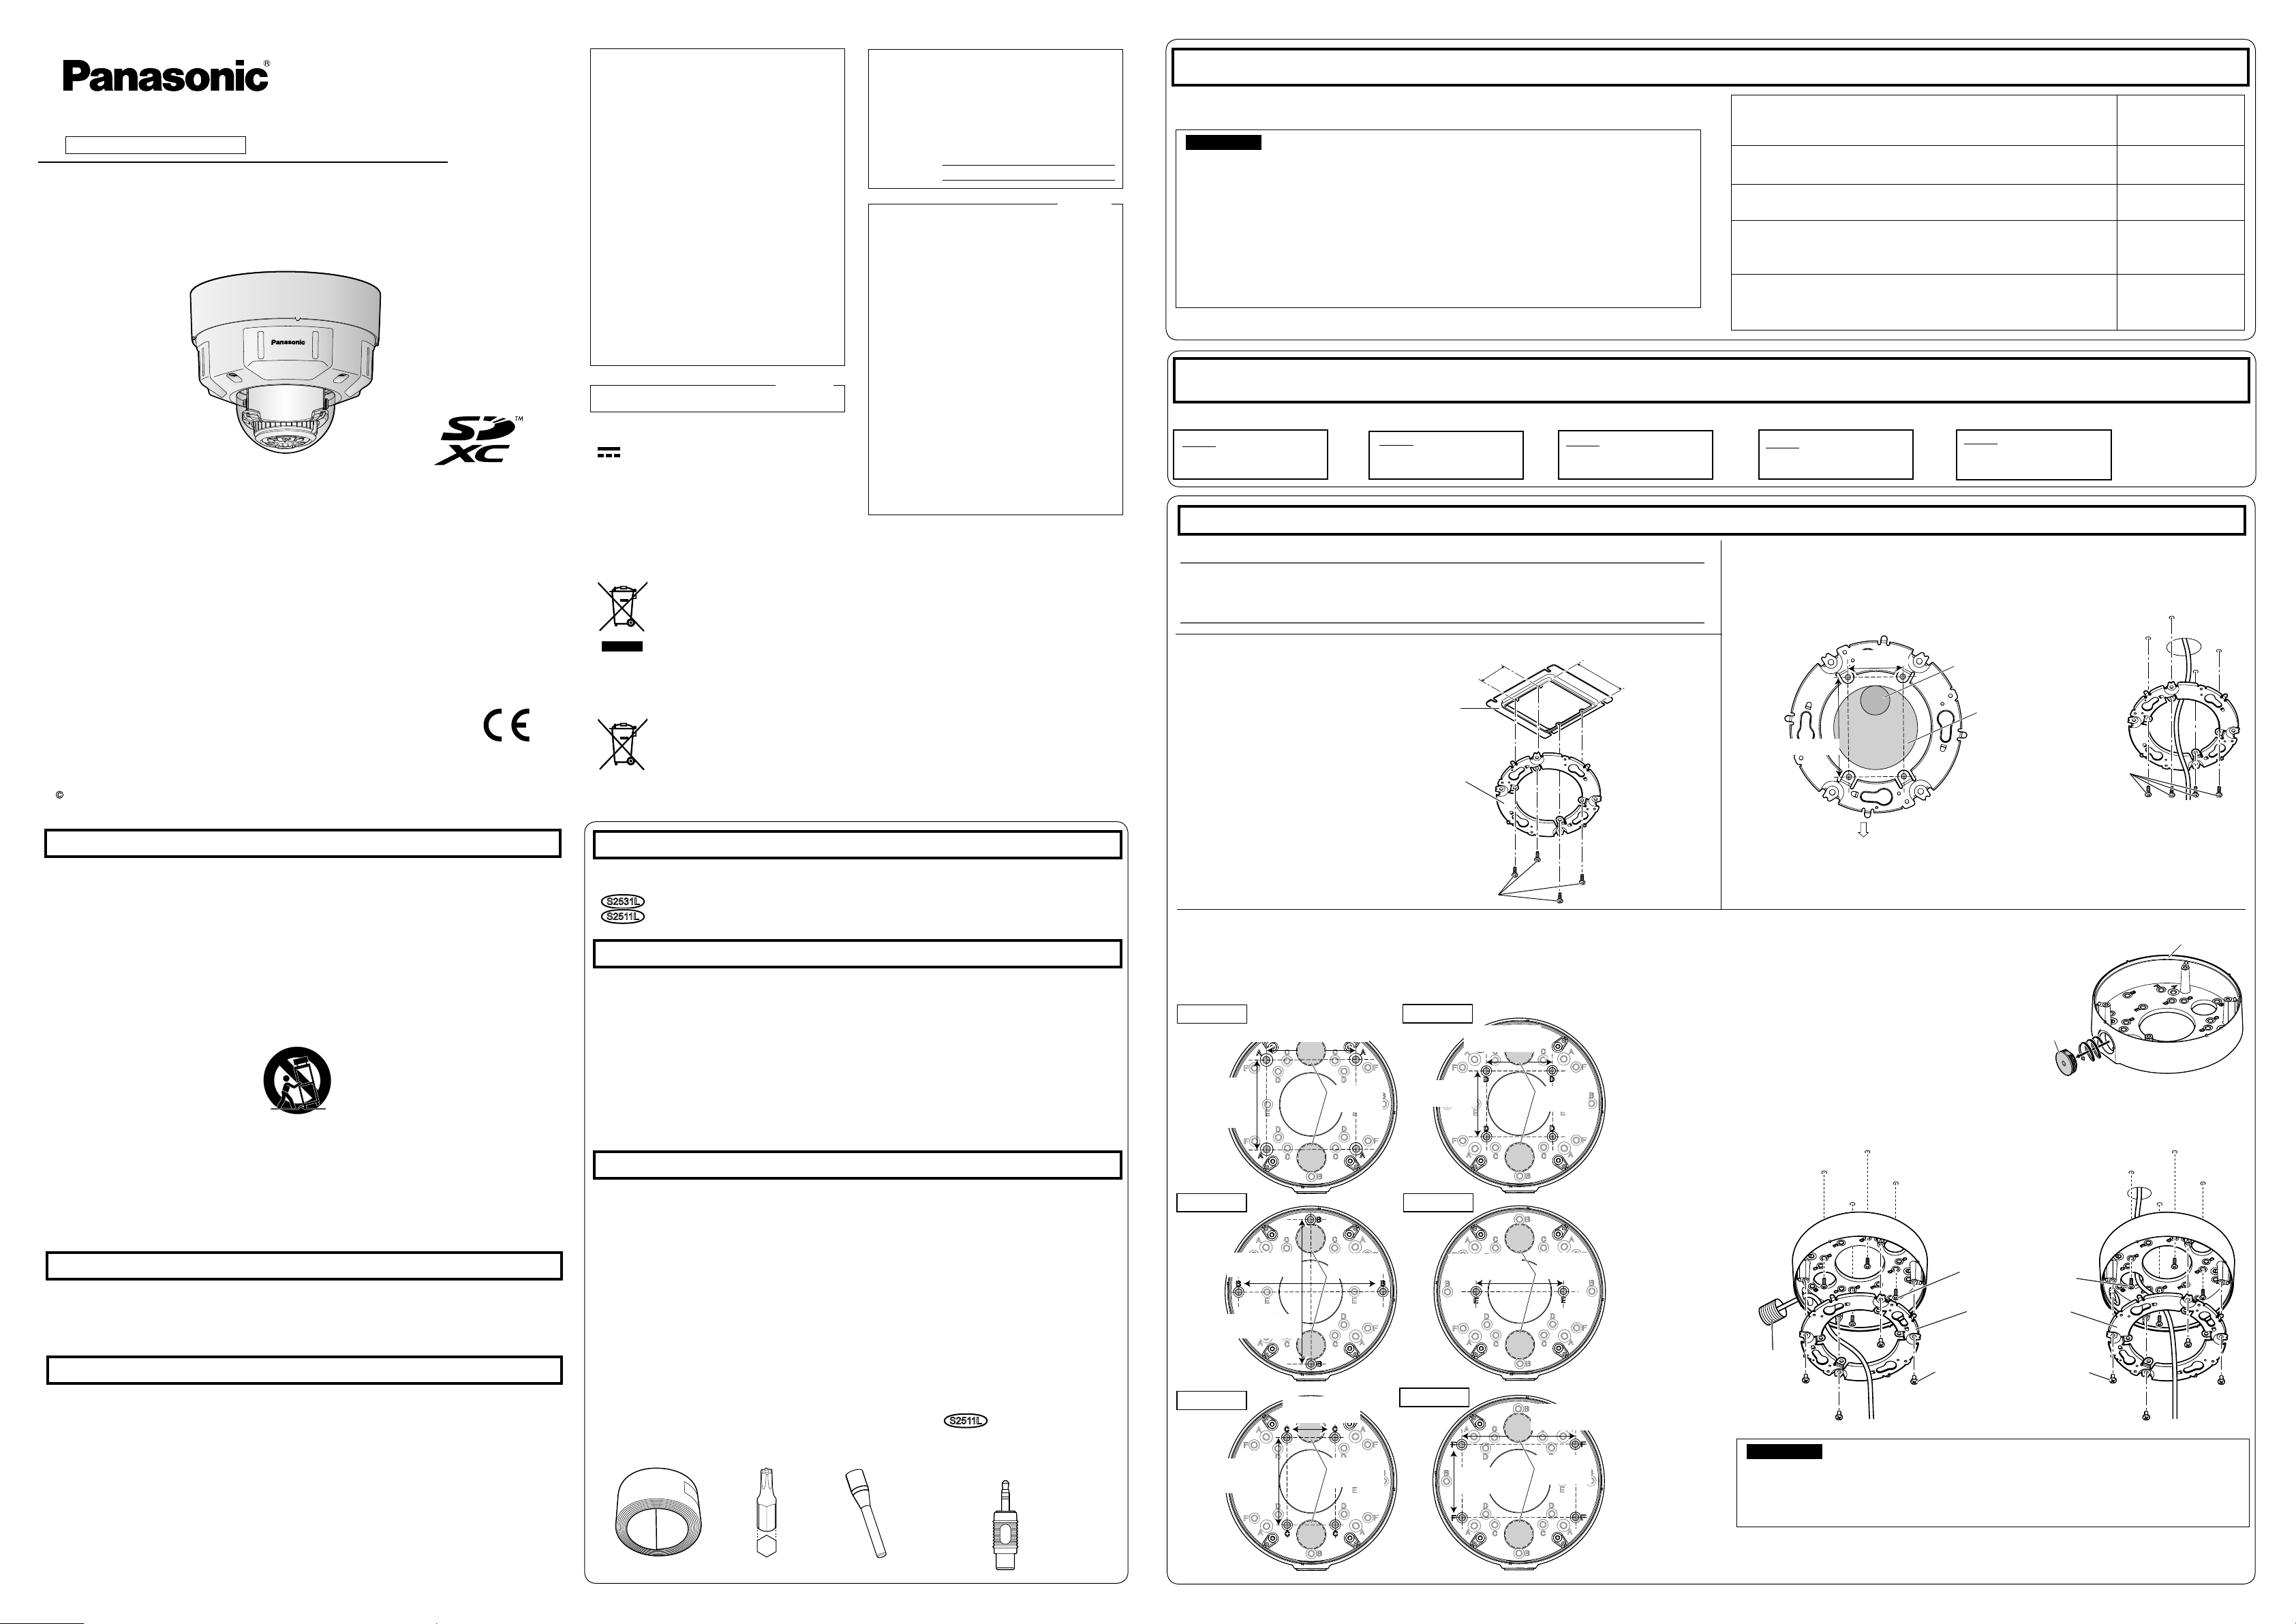
Step 1 Fixing the brackets *There are 3 methods to install the camera to a ceiling or wall.
Note:
Attach the attachment plate (accessory) so that the marking (PGYE1054) faces toward the
ceiling or wall to be installed.
【
Type 1】Using a two-gang junction box.
46 mm {1-13/16 inches}
83.5 mm
{3-9/32 inches}
Two-gang junction box
Attachment plate
(accessory)
Fixing screws for attachment plate: ×4 (M4, locally procured)
【
Type 2
】
Directly mount the camera to the ceiling or wall using the attachment plate.
*1
If the mounting direction of the camera is not determined yet or if you want to change
the direction of the camera after it has been installed
If you want to be able to change the direction of the camera, drill through a 73 mm {2-7/8 inches} diameter hole in the center. By doing so you can adjust the mounting direction of the camera in 90° increments.
Align the FRONT direction of the template A (accessory) with the desired direction, and
drill through a 25.4 mm {1 inch} diameter hole to attach the attachment plate. Then, the
direction of the marker “FRONT⇩” on the camera (see the figure in [4] of “Step 3 Mount
the camera”) should face the desired direction of the camera.
Fixing screws for attachment plate: x4
(M4, locally procured)
【
Type 3】Mount the camera to a ceiling or a wall using base bracket (accessory).
Attachment plate
(accessory)
The base bracket can be fixed in any of the following 6 screwing positions according to ceiling and
wall conditions. Match the hole used when installing the camera to any of positions A to F.
*
3
Position A
85 mm {3-11/32 inches}
(85.7 mm {3-3/8 inches})
138 mm
{5-7/16 inches}
46 mm
{1-13/16 inches}
138 mm
{5-7/16 inches}
83.5 mm
{3-9/32 inches}
108.5 mm
{4-9/32 inches}
70 mm
{2-3/4 inches}
83.5 mm
{3-9/32 inches}
85 mm
{3-11/32 inches}
(85.7 mm
{3-3/8 inches})
Ø25.4 mm
{Ø1 inch}
*2
Ø25.4 mm
{Ø1 inch}
*2
Ø25.4 mm
{Ø1 inch}
*2
Ø25.4 mm
{Ø1 inch}
*2
Ø25.4 mm
{Ø1 inch}
*2
Ø25.4 mm
{Ø1 inch}
*2
63 mm
{2-15/32 inches}
63 mm
{2-15/32 inches}
Position D
Position E
Position B
Position C
Position F
A
Using the template B (accessory), make screw holes for fixing the base bracket and wiring holes.
The female thread for conduit is compliant with ANSI NPSM (parallel pipe
threads) 3/4 or ISO 228-1 (parallel pipe
threads) G3/4.
Base bracket (accessory)
Cap for the female
thread for the
conduit
< When using the conduit on the ceiling or
wall for wiring>
< When drilling a hole through the ceiling
or wall for wiring>
Fixing screws × 4
(M4, locally procured)
Minimum pull-out
strength: 196 N
{44.06 lbf} (per 1 pc.)
Attachment plate
(accessory)
Fixing screws for attachment
plate: ×4 (accessory)
(Recommended tightening
torque: 0.78 N·m {0.58 lbf·ft})
IMPORTANT:
If open wiring is conducted, be sure to use conduits and run the cables inside the tubes to
protect the cables from direct sunlight.
Installation work shall be such that there is no exposure to water into the architecture
through the conduits having been joined..
Conduit
: Direct current symbol
Before attempting to connect or operate this product, please read these instructions carefully and
save this manual for future use.
For information about the basic description of this product, refer to the Important Information on
the provided CD-ROM. For information about how to perform the settings and how to operate the
camera, refer to the Operating Instructions on the provided CD-ROM.
The model number is abbreviated in some descriptions in this manual.
WV-S2531LN
S3125A
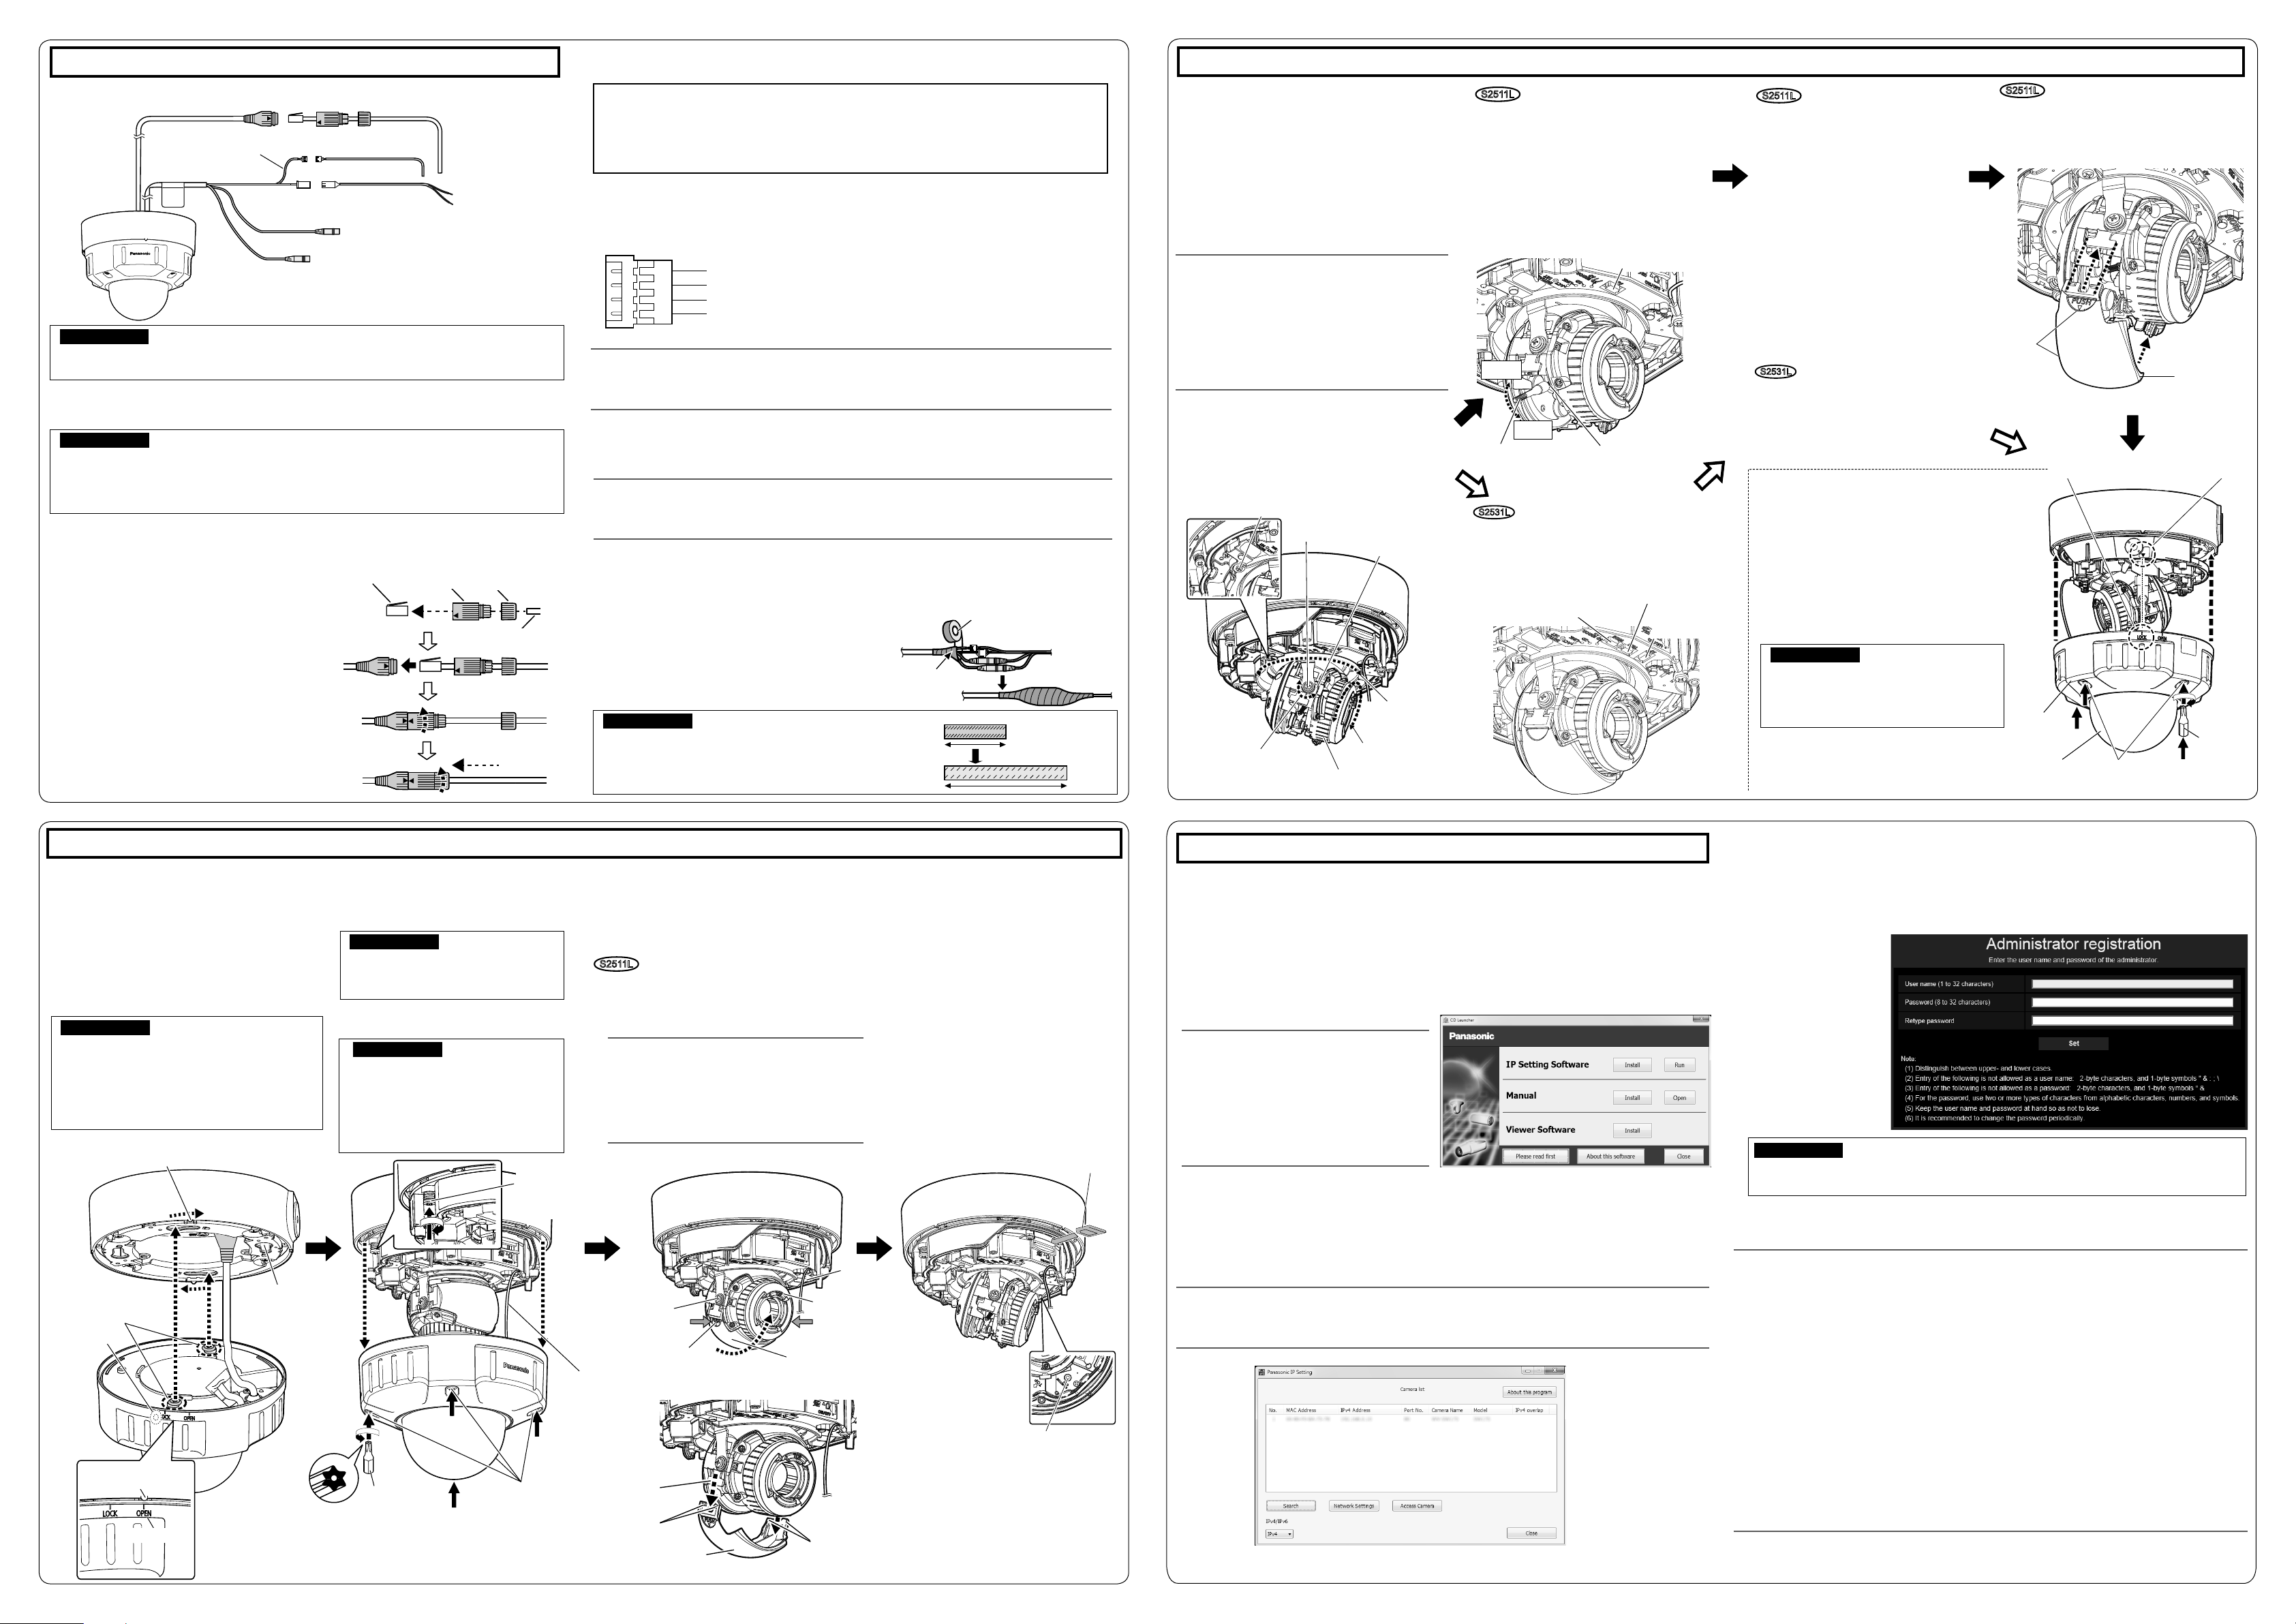
【1】
Align the OPEN mark of the enclosure side
panel with the protruding part of base bracket, insert 2 attachment mounting screws into
the attachment plate, and rotate the camera
approximately 15°. The LOCK mark is moved
to the protruding part of base bracket and
the camera is temporarily secured. (When
directly attaching the attachment plate to a
ceiling or wall, align the OPEN mark to the
tab position of the attachment plate.)
【2】Loosen 4 enclosure fi xing screws
using the bit (accessory), and
remove the enclosure from the
camera.
【3】Secure the camera by tightening
the camera fixing screws (red).
【5】Press the PUSH mark on both sides of
the inner cover at the same time, and
remove the inner cover as shown in the
following illustration.
S2511L
【4】Loosen the cross-head side of tilt table fix-
ing screw (on one side), and incline the tilt
table while keeping the TOP mark on the
camera lens head facing the front (i.e. the
direction of FRONT mark on the camera).
Position of
dehumidifying device
(Nail of the attachment plate)
OPEN mark
The camera body is waterproof, but the cable ends, inside the base bracket (accessory) are not
waterproof. Apply waterproof treatment on the connecting part as shown below.
【6】
Adequate waterproof treatment is required for the cables when installing the cam-
era with cables exposed.
Apply some waterproof tape (accessory) as
shown in the right.
<Waterproof treatment for other cables than the Ethernet cable>
(Red: 12 V DC side, Black: GND side)
▼ mark
【6】Disconnect the MONITOR OUT con-
version plug (accessory).
Attach the enclosure and secure it
by tightening the enclosure fi xing
screws.
Align the LOCK mark on the enclosure with
the ▼mark on the camera. Then mount the
enclosure directly to the camera.
(Recommended tightening torque:
0.78 N·m {0.8 lbf·ft})
S2511L
Dome
cover
【7】After complete installation,
remove the protection fi lm from
the dome cover.
LOCK mark
S2511L
Step 5 Configure the network settings
Configure the setting of the camera after temporarily invalidating the firewall software. Once the
camera configuration is completed, return to the original state.
Contact the network administrator or your Internet service provider for information about configuring
the settings of the network.
【2】Click the [Run] button next to [IP Setting Software].
⇒
[Panasonic IP Setting] screen will be displayed.
The MAC Address / IP address of the detected camera will be displayed.
【1】Insert the provided CD-ROM into theCD-ROM drive of your PC.
The License Agreement will be displayed. Read the Agreement and choose “I accept the term in
the license agreement”, and click [OK].
⇒The launcher window will be displayed.
Note:
If the launcher window is not displayed,
double click the “CDLauncher.exe” file
on the CD-ROM.
Refer to “Using the CD-ROM” in the
Operating Instructions on the provided
CD-ROM for further information about
CDLauncher
Note:
For more information on the following content, refer to the Operating Instructions.
Please set [Time & date] on the [Basic] screen of “Setup” before using the camera.
It is impossible to display H.265 (or H.264) or MJPEG images, receive/transmit audio, display
logs, and use full-screen display when the viewer software “Network Camera View 4S” is not
installed on the PC.
Depending on the environment of your PC, it may take time for images to be displayed.
At the time of purchase, the audio input and output connectors are set to “Off”.If needed,
change the setting on the “Audio” screen in “Setup”.
Due to security enhancements in “IP Setting Software”, “Network settings” cannot be
changed when around 20 minutes have passed after turning on the power of the camera to
be configured. (When the effective period is set to “20 min” in the “Easy IP Setup
accommodate period”.) However, settings can be changed after 20 minutes for cameras in
the initial set mode.
Defocus may be caused by the reinstalled enclosure. In this case, perform the auto focus
function from the setup menu.
If images are not displayed, set the Web browser to compatibility view. For details on how to
configure, refer to our website (http://security.panasonic.com/support/info.html)
【3】Select the camera you want to configure (A), and click [Access Camera] (B).
Note:
Select the camera with same MAC address as the MAC address printed on the camera that you
want to configure.
A
B
【4】When the administrator registration window is displayed, enter “User
name”,“Password” and “Retype password” by following the instructions
displayed on the screen, and then click the [Set] button.
IMPORTANT:
When the camera is used over the Internet, setting user authentication to “Off” may lead
to unintended access by a third party. Please leave user authentication set to “On”.
【5】When live images from the camera are displayed, the network connection
is complete.
Please keep your user name and password in a safe place free from public view to ensure
security. After completing the registration, the camera will automatically be re-connected and
the authentication window will be displayed. Enter the registered user name and password.
The default setting of user
authentication is “On”. For
further information, refer
to the “Preface” section in
the Operating
Instructions.
Step 2 Making connections
■
Refer to the Important Information on the provided CD-ROM
for details about each cable.
*Make sure to use the
stereo mini plug.
Audio input cable* (white)
Audio output cable* (black)
12 V DC (red)
GND (black)
12 V DC power
supply terminal
2P power cable
(accessory)
4P alarm cable
(accessory)
Alarm input/output cable
LAN cable (category 5e or better, straight)
RJ45 (female) Network cable
IMPORTANT:
Turn off each system’s power supply before making a connection.
The 12 V DC power supply shall be insulated from the commercial AC power.
【1】
Connect an Ethernet cable (category 5e or better, straight) to RJ45
(female) network cable.
IMPORTANT:
If the procedure for the RJ45 waterproof connector (accessory) part is not correctly followed, the
waterproofing may be compromised. Do not install the camera where the RJ45 waterproof
connector is exposed to constant rain or moisture.
The external dimensions of the Ethernet cable are from ø5 mm {ø3/16 inches} to ø6.5 mm {ø1/4inches}.
AFirst pass the Ethernet cable through the RJ45
waterproof connector cap (accessory) and then
through the RJ45 waterproof connector cover
(accessory). Next, use a specialized tool (locally
procured) to crimp the RJ45 plug (locally procured)
to the end of the Ethernet cable.
•
Take care not to remove the rubber parts from
inside the RJ45 waterproof connector cover.
BInsert the RJ45 plug into the RJ45 waterproof jack
connected to the camera.
C
Connect the RJ45 waterproof connector cover to the
RJ45 waterproof jack and then rotate the RJ45
waterproof connector cover until the "▲" marks align.
D
Connect the RJ45 waterproof connector cap to the
RJ45 waterproof connector cover and rotate the
RJ45 waterproof connector cap until there is no gap
between it and the RJ45 waterproof connector cover.
RJ45
plug
(locally
pocured)
RJ45
waterproof
connector
cover
(accessory)
RJ45
waterproof
connector
cap
(accessory)
Ethernet
cable
RJ45
waterproof
jack
Connect the output cable of the AC adaptor to the 2P power cable (accessory).
【2】
When connecting an AC adaptor or an external power supply, use the 2P
power cable (accessory) to connect it to the camera.
【3】
If needed, connect the 4P alarm cable (accessory).
4P alarm cable (accessory)
GND (Black)
ALARM IN3 (Alarm input / AUX output) (Gray)
ALARM IN2 (Alarm input / Alarm output) (Red)
ALARM IN1 (Alarm input / Black & white input / Auto time adjustment input)
(Green)
Caution:
A READILY ACCESSIBLE DISCONNECT DEVICE SHALL BE INCORPORATED TO THE
EQUIPMENT POWERED BY 12 V DC POWER SUPPLY.
ONLY CONNECT 12 V DC CLASS 2 POWER SUPPLY (UL 1310/CSA 223) or LIMITED
POWER SOURCE (IEC/EN/UL/CSA 60950-1).
Note:
The default of EXT I/O terminals is "Off". Refer to the Operating Instructions on the provid-
ed CD-ROM for further information about the EXT I/O terminal settings.
【4】
If needed, connect a microphone or the line out of an external device to the
audio input cable.
【5】
If needed, connect a powered speaker to the audio output connector.
Note:
The audio output can be switched to the monitor output. Refer to the "Operating
Instructions" on the provided CD-ROM for descriptions of how to switch the output.
IMPORTANT:
Stretch the tape by approx. twice (see the illustration) and wind it
around the cable. Insufficient tape stretch causes insufficient
waterproofing.
Stretch the tape to
about twice.
Wind the tape in a halfoverlapping manner.
Waterproof tape
(accessory)
Step 3 Mount the camera
IMPORTANT:
For installations on the wall, to prevent water
from accumulating on the surface of the
dehumidifying device, install the camera so that
the dehumidifying device does not face up. If
water accumulates on the surface of the
dehumidifying device, it cannot function properly.
Holes of the
attachment plate
(×4)
Protruding part of base bracket
Attachment
mounting screws
Protruding part of
base bracket
Bit (accessory)
Enclosure fixing
screw (×4)
Installed
auxiliary
wire
Camera
fixing
screw
(red)
IMPORTANT:
Enclosure is fixed to the camera body
by the installed auxiliary wire, so
please do not remove it.
Cross-head side
of tilt table fixing
screw
Press
PUSH mark
(×2)
TOP mark
FRONT
mark
Press both
sides at the
same time
Inner cover
Tilting table
Tab of the
inner cover
Tab of the
inner cover
Inner cover
Note:
Unhook the nails provided at the four
corners of the inner cover from the tilting
table, and remove the inner cover.
When using WV-S2531LN, do not
remove the inner cover.
【6】Connect the MONITOR OUT con-
version plug (accessory) to the
MONITOR OUT terminal of the
camera, and then connect the
monitor for adjustment with a RCA
pin cable (locally procured).
【7】 Insert an SD memory card into the
slot, if necessary.
Refer to the "Important Information" on the
provided CD-ROM for how to insert/remove
the SD memory card.
SD memory card
(with label facing down)
MONITOR OUT terminal
【1】
Turn on power for the camera and
then remove the protection fi lm from
the camera lens.
【2】Loosen the pan table fi xing screw.
Adjust the angle of the camera with
the tilt table, pan table, and azimuth
adjustment ring.
Horizontal (PAN) angle: ±180 °
Vertical (TILT) angle:+85 °
– -30 °
Azimuth (YAW) angle: ±100 °
【3】Tighten the cross-head side of tilt
table fi xing screw (on one side) and
the pan table fi xing screw, and fi x
the camera.
(Recommended tightening torque:
0.59 N·m {0.44 lbf·ft})
Note:
When mounting the camera on a ceiling,
adjust the tilt angle so that the TOP mark
above the lens always comes to the top side.
When mounting the camera on a wall, rotate
the pan table by 180° to the left and rotate
the tilt table till the TOP mark above the lens
always comes to the top side.
Pan table fi xing screw with washer
Tilt table fi xing screw
Tilting table
Vertical (TILT)
angle
Horizontal
(PAN) angle
Azimuth
(YAW) angle
Azimuth adjustment ring
WIDE button
TELE button
【4】Adjust the zoom and focus.
A adjust the viewing angle by pressing
the WIDE or TELE buttons.
B Adjust the focus by pressing the auto
focus (AF) button.
S2511L
WIDE
TELE
Auxiliary handle (accessory)
Zoom knob
【4】Adjust the zoom and focus.
A Loosen the zoom knob equipped with
auxiliary handle (accessory) by rotating the knob to the left, and move it
between TELE and WIDE to obtain the
appropriate angle of view. Then, lock
the zoom knob by rotating it back to
the right.
B
Adjust the focus by pressing the auto
focus (AF) button.
C
Adjust the screen size and focus
by repeating steps A and
B
.
Readjust the angle of the camera
with the tilt table, pan table, and
azimuth adjustment ring if neces-
sary.
After the adjustment, remove the
auxiliary handle (accessory).
Auto focus (AF)
button
【5】
Press the PUSH mark on both
sides of the inner cover, and
install the inner cover to the
place where it was removed.
Inner cover
PUSH mark (x2)
IMPORTANT:
Check that the water-proof rubber installed
in the slot around the camera does not
slide out of the slot, and then mount the
enclosure.
Enclosure
Enclosure fixing
screw (x4)
Bit
(accessory)
Step 4 Adjustment
Auto focus
(AF) button
C
Adjust the screen size and focus by
repeating steps A and
B
.
Readjust
the angle of the camera with the tilt
table, pan table, and azimuth adjustment ring if necessary.
IMPORTANT:
Be sure to tighten the camera fixing
screw. Failure to observe this may
cause camera trouble due to camera falling.
(Recommended tightening torque:
0.78N·m {0.58 lbf·ft})
x2
S2531L
S2531L
 Loading...