

Page 1

Administrator Console
Operating Instructions
Model No. WJ-ND300
Before attempting to connect or operate this product,
please read these instructions carefully and save this manual for future use.
Page 2

Contents
Limitation of Liability ........................................................................................................3
Disclaimer of Warranty .................................................................................................... 3
Features .......................................................................................................................... 4
About Copyright and License ...................................................................................... 4
Trademarks and Registered Trademarks ................................................................... 4
System Requirement ................................................................................................... 4
Preparations .................................................................................................................... 5
Connections ................................................................................................................ 5
Performing the network settings of the network disk recorder .................................... 5
Performing the network settings of a PC ..................................................................... 5
Installing This Software ................................................................................................... 6
Uninstalling This Software ............................................................................................... 7
Start the Software ............................................................................................................ 8
About the Operation Window .......................................................................................... 10
Setting Items ................................................................................................................... 11
Download the Setting Values .......................................................................................... 14
Upload the Setup File ...................................................................................................... 16
Open the Setup File ........................................................................................................ 19
Save the Setup File ......................................................................................................... 20
Create a Setup File Newly ............................................................................................... 21
Convert the Version of the Setup File Format ................................................................. 22
Change the Password ..................................................................................................... 23
Error Messages ............................................................................................................... 24
Troubleshooting ............................................................................................................... 25
2
Page 3

Limitation of Liability
THIS PUBLICATION IS PROVIDED "AS IS" WITHOUT WARRANTY OF ANY KIND, EITHER EXPRESS OR
IMPLIED, INCLUDING BUT NOT LIMITED TO, THE IMPLIED WARRANTIES OF MERCHANTABILITY, FITNESS
FOR ANY PARTICULAR PURPOSE, OR NON-INFRINGEMENT OF THE THIRD PARTY’S RIGHT.
THIS PUBLICATION COULD INCLUDE TECHNICAL INACCURACIES OR TYPOGRAPHICAL ERRORS.
CHANGES ARE ADDED TO THE INFORMATION HEREIN, AT ANY TIME, FOR THE IMPROVEMENTS OF THIS
PUBLICATION AND/OR THE CORRESPONDING PRODUCT (S).
Disclaimer of Warranty
IN NO EVENT SHALL MATSUSHITA ELECTRIC INDUSTRIAL CO., LTD. BE LIABLE TO ANY PARTY OR ANY
PERSON,
EXCEPT FOR REPLACEMENT OR REASONABLE MAINTENANCE OF THE PRODUCT, FOR THE CASES,
INCLUDING BUT NOT LIMITED TO BELOW:
(1) ANY DAMAGE AND LOSS, INCLUDING WITHOUT LIMITATION, DIRECT OR INDIRECT, SPECIAL, CONSE-
QUENTIAL OR EXEMPLARY, ARISING OUT OF OR RELATING TO THE PRODUCT;
(2) PERSONAL INJURY OR ANY DAMAGE CAUSED BY INAPPROPRIATE USE OR NEGLIGENT OPERATION
OF THE USER;
(3) UNAUTHORIZED DISASSEMBLE, REPAIR OR MODIFICATION OF THE PRODUCT BY THE USER;
(4) ANY PROBLEM, CONSEQUENTIAL INCONVENIENCE, OR LOSS OR DAMAGE, ARISING OUT OF THE SYS-
TEM COMBINED BY THE DEVICES OF THIRD PARTY.
(5) ANY CLAIM OR ACTION FOR DAMAGES, BROUGHT BY ANY PERSON OR ORGANIZATION BEING A PHO-
TOGENIC SUBJECT, DUE TO VIOLATION OF PRIVACY WITH THE RESULT OF THAT SURVEILLANCE-
CAMERA’S PICTURE, INCLUDING SAVED DATA, FOR SOME REASON, BECOMES PUBLIC OR IS USED
FOR THE PURPOSE OTHER THAN SURVEILLANCE
3
Page 4
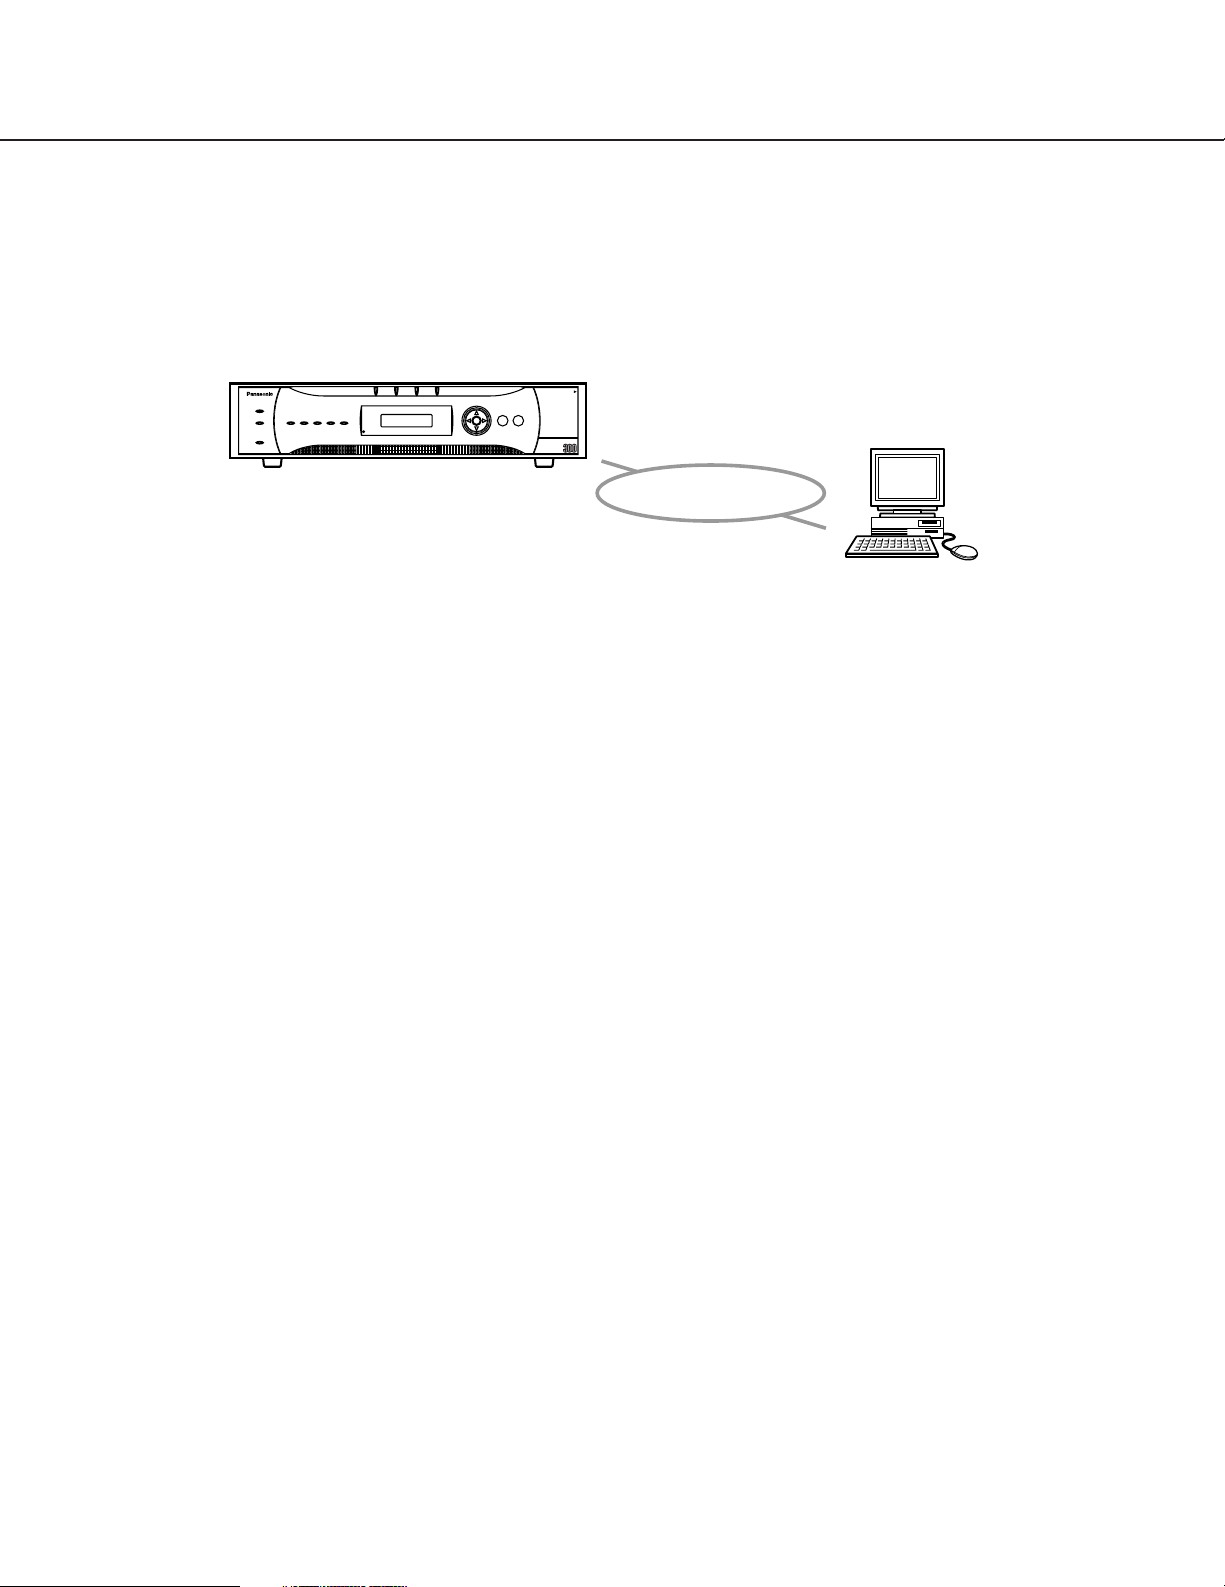
Features
The WJ-ND300 Administrator Console is the exclusive setup tool for the Network Disk Recorder WJ-ND300.
By using this software, it is possible to perform the settings of the network disk recorder using a PC via a network.
It is also possible to download the setting values and save it as a setup file, and upload the edited setup file to the
network disk recorder.
This software is applicable for version 2.0 or later of the WJ-ND300.
WJ-ND300
Network Disk Recorder
WJ-ND
PULL
Network
PC
ALARM
ALARM
TIMER REC 1-LINK/ACT-2
ERROR
SUSPEND
OPERATE
HDD1 HDD2 HDD3 HDD4
ESC SET
About Copyright and License
This software can be distributed and used only if you agree to the copyright and license agreement of this software.
Distributing, copying, disassembling, reverse compiling, reverse engineering, and also exporting in violation of export
laws of the software provided with this product are expressly prohibited.
Trademarks and Registered Trademarks
• Microsoft®, Windows®and Windows®XP are registered trademarks of Microsoft Corporation in the U.S. and/or
other countries.
• Intel®and Pentium®are trademarks of Intel Corporation.
• Adobe®, Adobe logos, and Acrobat®are registered trademarks of Adobe Systems Incorporated in the U.S.
and/or other countries.
• Other names of companies and products contained in these operating instructions may be trademarks or registered trademarks of their respective owners.
System Requirement
It is recommended to install this software on a PC that meets the following system requirements.
OS: Microsoft®Windows®2000 Professional SP4
Microsoft®Windows®XP Professional or Home Edition SP2
Note: It is required that Microsoft .NET Framework 1.1 is installed on the PC being used to
activate this software. (If Microsoft .NET Framework 1.1 is not installed on a PC, it will
be installed automatically when installing this software.)
CPU: Pentium®4 1.4 GHz or faster
Memory: 512 MB or more
CD-ROM drive: Required for the installation of this software
Hard disk drive: Approx. 160 MB of available disk space for installation
Monitor: 1 024 x 768 pixels or more, 16-bit HIGH color or better
Network Interface: 10/100 Mbps Network interface card must be installed
4
Page 5

Adobe®Reader: Adobe®Reader should be installed on a PC to read these operating instructions. When the Adobe
Reader is not installed on the PC, download the latest Adobe®Reader from the Adobe web site and install it.
Notes:
• This software must be installed or started by the administrator. Otherwise, any problems will not be covered by
the warranty.
• In these operating instructions, the settings are performed on Windows XP as examples.
Preparations
It is necessary to complete the connections between a PC and the network disk recorder and perform the network
settings of the PC and the network disk recorder respectively.
®
Connections
There are 2 methods to connect a PC and the network disk recorder:
• Connecting a PC and the network disk recorder directly
• Connecting a PC to the network disk recorder via a hub or a router
When connecting a PC to the network disk recorder, the required hardware and cables are different depending on
the system configuration. Prepare before starting connection.
Refer to the Setup Instructions (PDF) of the network disk recorder for descriptions of how to perform the network settings.
Performing the network settings of the network disk recorder
Use the buttons on the front panel of the network disk recorder or a web browser on the connected PC to conform to
the network settings to the network environment of the PC.
Refer to the Setup Instructions (PDF) of the network disk recorder for further information about the network settings.
Performing the network settings of a PC
Change the TCP/IP setting of the PC on which this software is to be installed to conform to the network settings of
the network disk recorder.
It is required to set the IP address of the PC to "192.168.1.XX (a number from 2 to 254)" to access the network disk
recorder.
Refer to the Installation Guide (book) and the Setup Instructions (PDF) of the network disk recorder for descriptions
of how to perform the network settings of a PC.
5
Page 6
Installing This Software
Install this software as follows after completing the network settings of the network disk recorder and PC.
Step 1
Insert the provided CD-ROM into the PC disk drive.
Step 2
Double click "setup.exe" in the "Admin" folder.
The confirmation window will be displayed.
Step 3
Click the "OK" button and follow the installation wizard to install this software.
The "WJ-ND300 Administrator Console" folder will be created (C:\Program Files\Panasonic\WJ-ND300 Administrator
Console) and the necessary files will be copied in it.
When installation is complete, the application will be added to "Programs" in "Start" and the shortcut will be created
on the desktop.
Important:
Do not edit, remove, or move the directory path of the files above. Otherwise, this software may not function
properly.
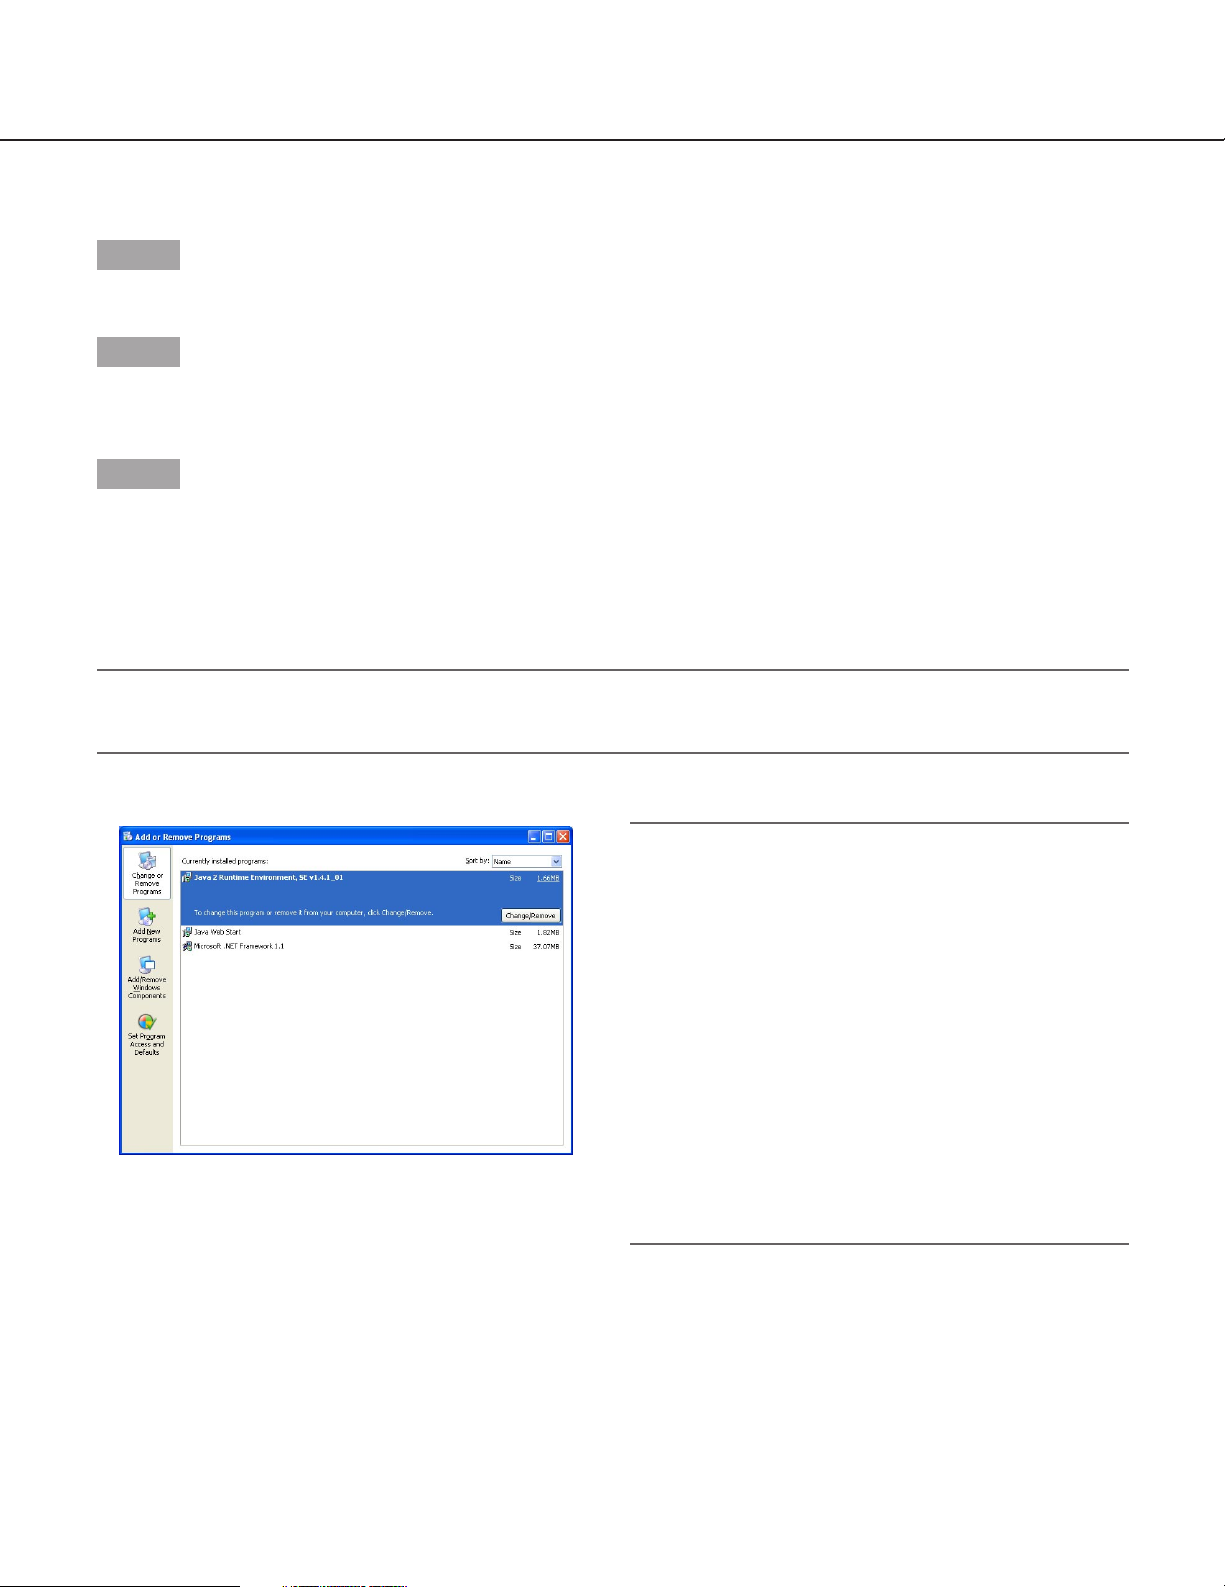
Notes:
• If Microsoft .NET Framework 1.1 is not installed on a
PC, it will be installed automatically when installing
this software.
It is possible to check with "Control Panel" whether
Microsoft .NET Framework 1.1 is installed on a PC
or not.
Open the "Change or Remove Programs" window by
selecting "Add or Remove Programs" in "Control
Panel".
The installed applications will be displayed in list
form.
Check if "Microsoft .NET Framework 1.1" is on the
list or not.
• When re-installing this software is needed, the existing software must be uninstalled first.
6
Page 7

Uninstalling This Software
If required, uninstall this software as follows.
Step 1
Open "Add or Remove Programs" in "Control Panel".
The "Add or Remove Programs" window will be displayed.
Step 2
Select "WJ-ND300 Administrator Console" and click the "Remove" button.
Step 3
Follow the uninstall wizard.
7
Page 8
Start the Software
Start the software as follows.
Screenshot 1
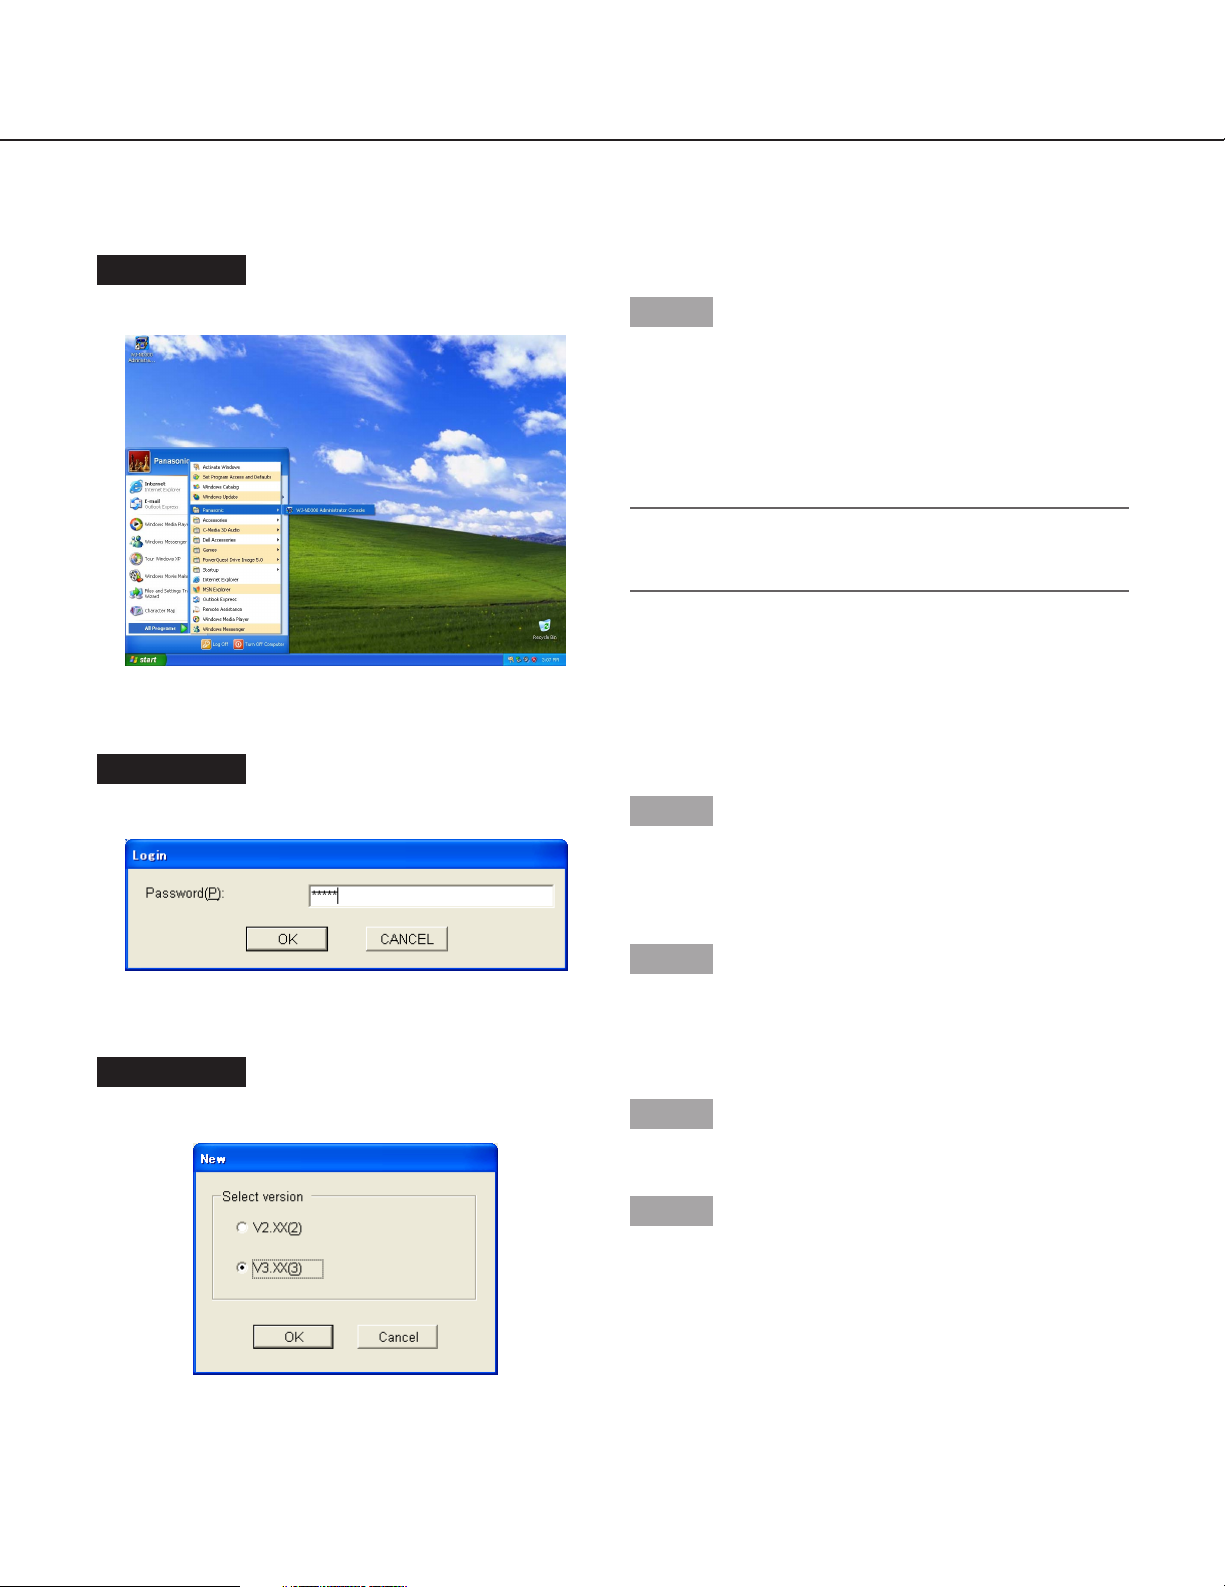
Start just after the PC is started up.
Step 1
Select "WJ-ND300 Administrator Console" from the
"Start" menu ("Start" - "All Programs" - "Panasonic" "WJ-ND300 Administrator Console") or double click the
shortcut icon of "WJ-ND300 Administrator Console" on
the desktop.
The software will start up.
Important:
Log in to the PC as an administrator before starting
the software.
Screenshot 2
The login window will be displayed.
Screenshot 3
The version selection window will be displayed.
Step 2
Enter the password.
The default password is "12345".
Refer to page 22 for how to change the password.
Step 3
Click the [OK] button.
Step 4
Select the version of the setup file to be created.
Step 5
Click the [OK] button.
8
Page 9
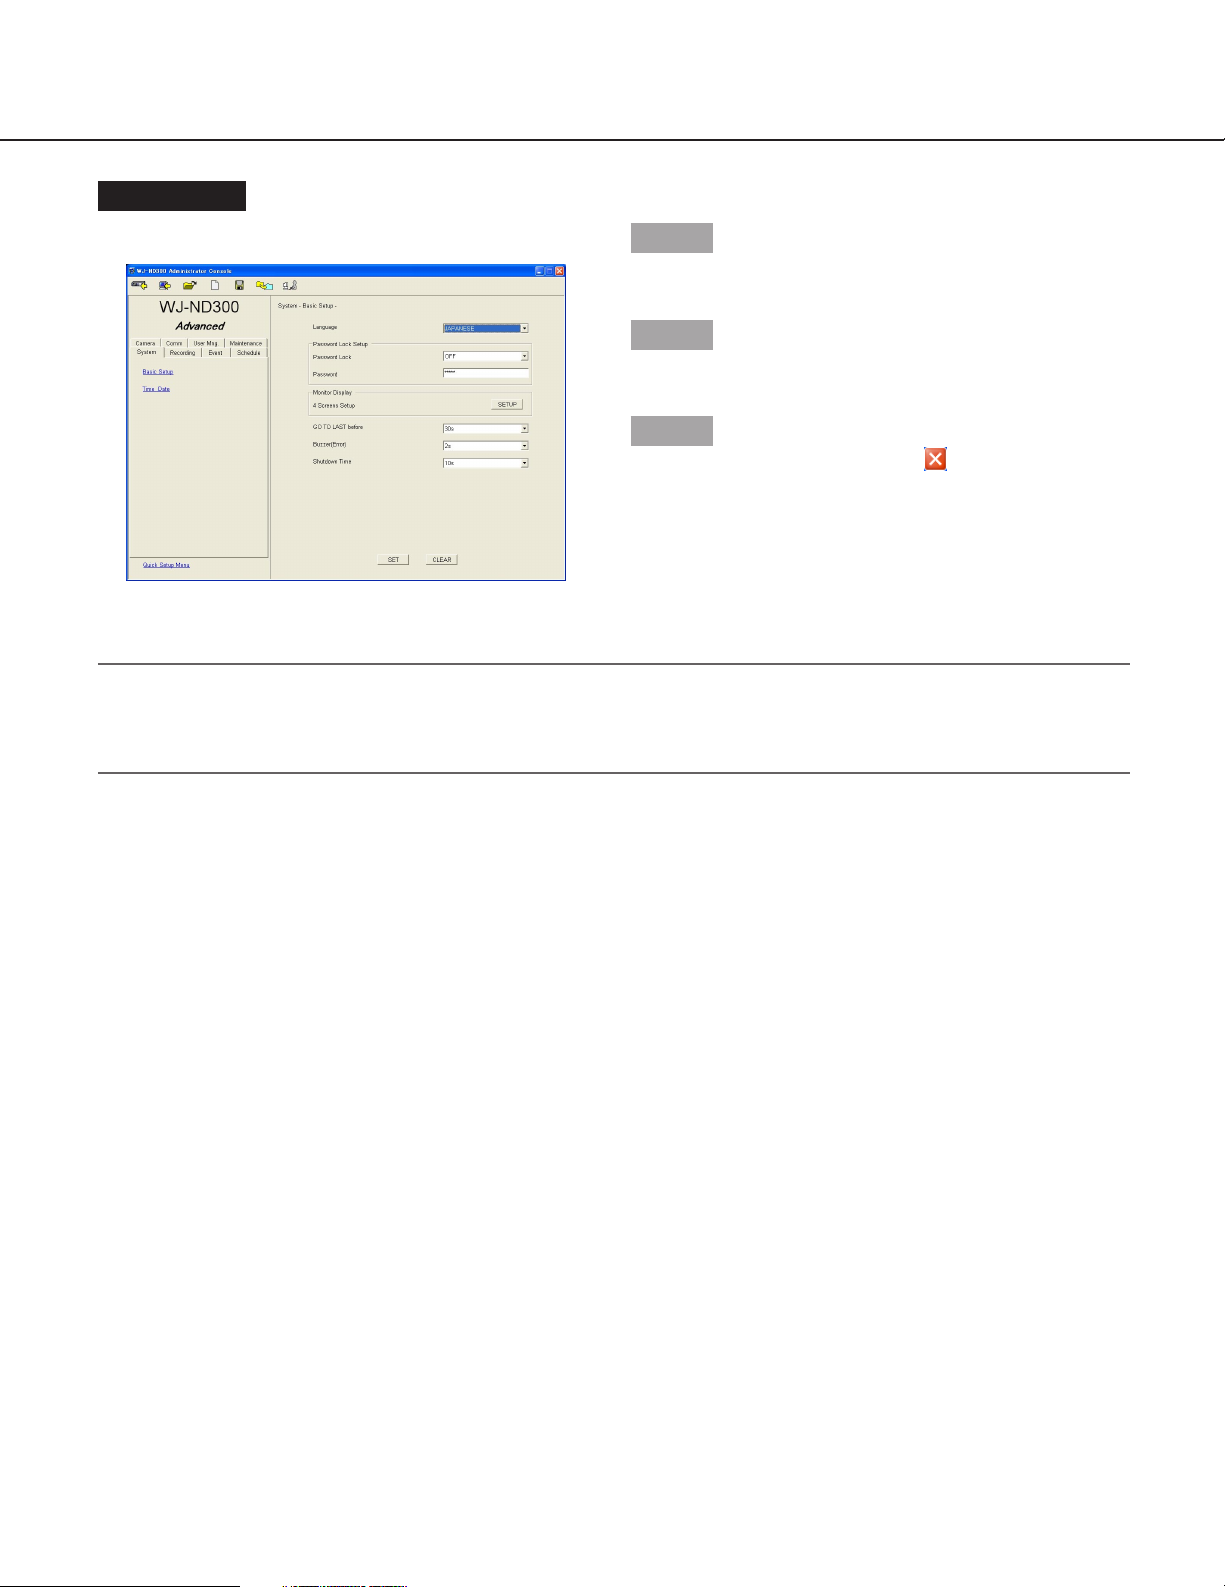
Screenshot 4
The top page of the operation window will be displayed.
Note:
It is possible to check version of the setup menu by displaying the "Product Information" page of "Maintenance"
on the setup menu (Advanced) using a web browser.
Refer to the Setup Instructions (PDF) of the network disk recorder.
Step 6
Perform the settings for each item.
Step 7
Click the [SET] button after completing the settings.
Step 8
Close the window by clicking the button at the top
right of the window to exit the software.
9
Page 10

About the Operation Window
Tool bar
Menu tabs
Main area
Tool bar
[Upload]: The setup file created/edited using this
software will be uploaded to the network disk
recorder by clicking this button. (page 16)
[Download]: The setting values will be downloaded from the network disk recorder by clicking
this button. (page 14)
[Open]: Click this button to open the saved
setup file. (page 19)
[New]: Click this button to create a new setup
file. (page 21)
[Save As]: Click this button to save the created/edited setup file. (page 20)
[Version conversion]: Click this button to convert the version of the setup file format. The version of the setup file format can be upgraded
when the version of the setup file format is 2.xx.
Menu tabs: It is possible to display the respective set-
tings page of the clicked menu tab.
Refer to page 11 for further information about each
menu.
It is possible to display the top page of "Quick Setup
Menu" by clicking the "Quick Setup Menu" link text
at the bottom left of the window.
(When "Quick Setup Menu" is displayed, the
"Advanced Setup Menu" link text will be displayed at
the bottom left of the window. It is possible to display
the top page of "Advanced Setup Menu" by clicking
it.
Main area: The setting items of the selected menu will
be displayed in this area.
: Click this button to apply the edited settings.
: Click this button to cancel to apply the edited
settings.
Note:
When the version of the WJ-ND300 in use is 3.xx or
later, this icon will not be displayed.
10
[Password]: Click this button to change the login
password. (page 23)
Page 11

Setting Items
The following setting items can be operated using this software.
The tables below show the available setting items when using this software and when using a web browser respectively.
Refer to the Setup Instructions (PDF) of the network disk recorder.
Quick Setup Menu
Settings menu
Display Setup
Camera Setup
Rec & Event Setup
Network Setup
Advanced Setup Menu
Settings menu
System
Basic Setup Operable Operable
Time & Date Only the settings relating to time &
This software
Only the settings relating to time &
date is operable.
It is impossible to set the clock.
Operable
It is impossible to perform the settings of the connected cameras.
Operable
Operable
This software Web browser
date is operable.
It is impossible to set the clock.
Web browser
Operable
Operable
Operable
Operable
Operable
Recording
REC Setup Operable Operable
Emergency REC Operable Operable
Event
Basic Setup Operable Operable
Terminal Setup Operable Operable
Site Alarm Setup Operable Operable
Command Alarm Setup Operable Operable
Schedule
Time Table Operable Operable
Program Operable Operable
Special Days Operable Operable
11
Page 12

Camera
Settings menu This software Web browser
NW Camera Setup Operable
Group Setup Operable Operable
Sequence Setup Operable Operable
Comm
Basic Setup Operable Operable
DNS Setup Operable Operable
DDNS Setup Operable Operable
Proxy Setup Operable Operable
SNMP Setup Operable Operable
NTP Setup Operable Operable
FTP Setup Operable Operable
Mail Setup Operable Operable
Panasonic Alarm Protocol Operable Operable
User Mng.
Basic Setup
It is impossible to perform the settings of the connected cameras.
Operable
Operable
Operable
User Regist. Operable Operable
"Administrator Edit" and "User
Edit/Delete" are operable on the
"User Regist." window.
Host Regist.
"Host Edit/Delete" is operable on the
"Host Regist." window.
User Level
Operable
Operable
Operable
Operable
12
Page 13

Settings menu This software Web browser
Maintenance
Product Information Operable
Temperature inside the unit will
not be displayed.
Disk Information Only "Warning for Disk Life Time" is
operable.
It is impossible to display information of HDD such as available disk
space of the built-in HDD or HDD of
the extension unit.
Partition Information Not operable Not operable
Network Information Not operable Not operable
Disk End Mode
HDD Capacity Warning
Data Delete
Save/Load
Config Not operable Operable
Only "HDD Auto Delete" is operable.
It is impossible to delete data in the
recording area manually.
Operable
Operable
Not operable
Operable
Operable
Operable
Operable
Operable
Operable
13
Page 14

Download the Setting Values
It is also possible to download the setting values and save it as a setup file.
Important:
• It is impossible to download the setting values while starting up the network disk recorder or during performing
the system check of the network disk recorder.
• When trying to download the setting values, entering the Administrator password of the administrator of the network disk recorder will be required. Refer to the Setup Instructions (PDF) for further information.
Screenshot 1
Operate using the buttons on the tool bar on the operation window.
Step 1
Click the [Download] button on the tool bar.
Screenshot 2
The "Download" window will be displayed.
Step 2
Enter the address of the network disk recorder from
which the setting values are to be downloaded.
Step 3
Enter the HTTP port number of the network disk
recorder.
Step 4
Enter the Administrator password of the network disk
recorder.
Step 5
When using a proxy server, check the "Use a Proxy
Server" checkbox and enter the address and the port
number.
Step 6
Click the [OK] button after completing the settings.
14
Page 15

Screenshot 3
The "Download" window will be displayed.
Screenshot 4
The "Download Completed" window will be displayed
when download is completed.
Step 7
After confirming that the displayed address is correct,
click the [Start Download (D)] button.
Downloading of the setting values will start.
Step 8
Click the [OK] button.
Important:
When download is started while the setup file is being edited, the following window will be displayed.
When the [Yes] button is clicked, the setup file currently
being edited will be overwritten by the setting values to be
downloaded.
When the setup file currently being edited is to be saved,
click the [No] button to cancel downloading of the setting
values. Save the edited setup file first and then start the
download.
15
Page 16

Upload the Setup File
It is also possible to upload the created/edited setup file to the network disk recorder.
Important:
• When trying to upload the setup file, entering the Administrator password of the network disk recorder will be
required. Refer to the Setup Instructions (PDF) for further information.
• When the camera settings ("Camera" - "NW Camera Setup") are changed, there may be possibilities that images
from the camera cannot be displayed. At the default setting, the setting values of "NW Camera Setup" are set as
a masked item. (The setting values will not be uploaded.)
• When the network settings ("Comm" - "Basic setup") are changed, connection error may occur on the network
disk recorder.
At the default setting, the setting values of "Basic setup" are set as a masked item. (The setting values will not be
uploaded. Refer to the next page for further information.)
• Do not upload the setup file to the same network disk recorder from two or more PCs simultaneously using this
software. Otherwise, an error may occur on the network disk recorder.
• When the setting for "Line Speed" ("Comm" - "Basic setup" - "Line Speed") is changed, the network disk recorder
will restart.
• It is impossible to upload the setup file during starting up the network disk recorder or while performing the system check of the network disk recorder.
Screenshot 1
Operate using the buttons on the tool bar on the operation window.
Step 1
Click the [Upload] button on the tool bar.
16
Page 17

Screenshot 2
The "Upload" window will be displayed.
Step 2
Enter the address of the network disk recorder to which
the setup file is to be uploaded.
Step 3
Enter the HTTP port number of the network disk
recorder.
Step 4
Enter the Adminisrator password of the network disk
recorder.
Step 5
When any settings of the following items are not to be
uploaded, check the "Mask Setup Data" checkbox and
click the [Property Settings] button.
When all of the settings are to be uploaded, go to step 8
after confirming that the "Mask Setup Data" check box is
not checked.
Screenshot 3
The "Mask Setup" window will be displayed.
Step 6
Check the checkbox next to the setup item not to be
uploaded.
Note:
At the default setting, the setting values of the
"Camera"– "NW Camera Setup" and "Comm" –
"Basic Setup" are set as a masked item.
Step 7
Click the [OK] button.
17
Page 18

Screenshot 4
The "Mask Setup" window will be closed.
Screenshot 5
The "Upload" window will be displayed.
Step 8
When using a proxy server, check the "Use a Proxy
Server" checkbox and enter the address and the port
number.
Step 9
Click the [OK] button after completing the settings.
Step 10
After confirming that the displayed address is correct,
click the [Start Upload (U)] button.
Uploading of the setup file will start.
Screenshot 6
The "Upload Completed" window will be displayed when
upload is completed.
Step 11
Click the [OK] button.
18
Page 19

Open the Setup File
Open the saved setup file as follows.
Screenshot 1
Operate using the buttons on the tool bar on the operation window.
Step 1
Click the [Open] button on the tool bar.
Screenshot 2
The "Open" window will be displayed.
Step 2
Select the desired setup file and click the [Open] button.
The setup file will open and the operation window will be
displayed.
Important:
When opening a setup file while other setup file is
being edited, the following window will be displayed.
When the [Yes] button is clicked, the newly opened
setup file will overwrite the setup file currently being
edited.
When the setup file currently being edited is to be
saved, click the [No] button to cancel to open the
setup file. Save the edited setup file first and then
open the desired setup file.
19
Page 20

Save the Setup File
Save the edited setup file as follows.
Screenshot 1
Operate using the buttons on the tool bar on the operation window.
Step 1
Click the [Save As] button on the tool bar after editing
the setup file.
Screenshot 2
The "Save As" window will be displayed.
Important:
Do not edit the setup file using any other software such as a text editor. Otherwise, it may be impossible to open
or upload the setup file with this software.
Any problem occurring which is caused by the edited setup file using other software is not covered by the warranty.
Step 2
Designate the file name and the directory where the file
is to be saved.
Step 3
Click the [Save] button to save the setup file.
The setup file will be saved.
Notes:
• The setup file will be saved as an xml format file
(extension: xml).
• The following characters cannot be used for a file
name.
\, /, :, *, ?, “, <, >, |
20
Page 21

Create a Setup File Newly
Create a setup file newly as follows. The default setting values will be applied for a newly created setup file.
Screenshot 1
Operate using the buttons on the tool bar on the operation window.
Step 1
Click the [New] button on the tool bar.
Screenshot 2
The version selection window will be displayed.
Important:
When creating a new setup file while the other setup file is being edited, the following window will be displayed.
When the [Yes] button is clicked, the newly opened
setup file will overwrite the setup file currently being edited (with the default setting values).
When the file currently being edited is to be saved, click
the [No] button to cancel creation of a new setup file.
Save the edited setup file first and then create a new
setup file.
Step 2
Select the version of the WJ-ND300 currently in use.
Step 3
Click the [OK] button.
A new setup file will be created and the top page of the
operation window will be displayed.
21
Page 22

Convert the Version of the Setup File Format
It is possible to convert the version of the setup file format.
Version conversion is available only when the version of the WJ-ND300 in use is 2.xx.
Screenshot 1
Operate using the buttons on the tool bar on the operation window.
Step 1
Click the [Version conversion] button on the tool bar.
Screenshot 2
The version conversion window will be displayed.
Screenshot 3
The confirmation window will be displayed.
Screenshot 4
When version conversion is completed, the following
window will be displayed.
Step 2
Select "Upgrade".
Step 3
Click the [OK] button.
Step 4
Click the [Yes] button.
Version conversion will start.
Step 5
Click the [OK] button.
22
Page 23

Change the Password
Change the login password as follows.
Screenshot 1
Operate using the buttons on the tool bar on the operation window.
Step 1
Click the [Password] button on the tool bar.
Screenshot 2
The "Change Password" window will be displayed.
Screenshot 3
When the password is changed successfully, the following window will be displayed.
Step 2
Enter the current password in the "Old Password (O)"
box.
Step 3
Enter the desired password to be used as a new password in the "New Password (N)" box.
Enter up to 8 alphanumeric characters.
Step 4
Enter the new password in the "Confirm New Password
(C)" box for confirmation.
Step 5
Click the [OK] button.
Step 6
Click the [OK] button on the displayed confirmation window.
23
Page 24

Error Messages
At startup
Message Cause
Cannot load language data.(Label.txt is damaged.) Will show in English text.
Starting failure. The registry value may be
changed. Please reinstall.
The initial display setup file is broken. The broken part of the
file will be displayed in English. Re-install this software to fix
this problem.
It may be possible that the registry values have been changed.
Re-install this software to fix this problem.
When downloading/uploading
Message Cause
Communication error. It may be possible that the entered address is incorrect, con-
nection to the network disk recorder has been disconnected, or
no reply from the network disk recorder. Check if the entered
address is correct or not. If the entered address is correct,
check the connection of the network disk recorder. If it is possible to monitor live images using a web browser, it may be possible that timeout has occurred because the processing performance of the recorder has temporarily slipped. Check if alarm
signals are being supplied continuously or not, and retry
uploading.
Memory error. Processing failed because of memory shortage. Close other
applications and retry. If it fails again, restart the PC.
File error. Check whether the write protection is applied for the folder in
which this software is to be installed or not. Check also the
available disk space. If this error occurs continuously, restart
this software.
Incorrect password. The entered Administrator Password of the network disk
recorder is incorrect. Enter the correct Administrator Password.
Upgrade the setup menu of the WJ-ND300 to
version 2.0 or later.
Since WJ-ND300 series differs from the version
of a setup under edit, it cannot upload.
The setup file is about to be uploaded/downloaded to the WJND300 whose setup menu version is older than version 2.0.
Upgrade the setup menu of the WJ-ND300 to version 2.0 or
later.
The setup file whose version is 2.xx is about to be uploaded to
the WJ-ND300 whose setup menu version is 3.xx, or vice
versa.
When opening a file
Message Cause
Cannot open setup file.
Cannot open setup file.
(Incorrect type (NTSC/PAL).)
It is impossible to open the file because the file is corrupted.
It is impossible to open a file of this type since the television
system (NTSC/PAL) is different.
24
Page 25

Troubleshooting
Before asking for repairs, check the symptoms with the following table.
Contact your dealer if a problem cannot be solved even after checking and trying the solution or a problem is not
described below, and when having a problem with installations.
Symptom
Cannot access from this
software.
Cause/solution
• Is the Ethernet cable firmly connected to the 10/100
BASE-T port? Confirm the cable is firmly connected.
• Is the connection indicator of the 10/100BASE-T port
lit? When it is not lit, connection to a LAN is not established or a network is not working correctly. Confirm
that the connection indicator of the 10/100BASE-T
port is lit. Refer to a system administrator if it is not lit.
• Is the valid IP address set?
Refer to a system administrator for further information.
• Are you accessing the wrong IP address?
Check the connection as follows:
>ping "IP address of this unit"
If there is a reply from this unit, the connection is normal.
If not, check the settings of the IP address and the
subnet mask.
Reference
pages
–
–
Operating
Instructions/
Setup
Instructions
–
• Is the same IP address provided to other devices?
Refer to a system administrator for further information.
• Are there contradictions between the address and the
network subnet to be accessed?
Or is "Use Proxy Server" for the settings of the browser checked?
When accessing this unit in the same subnet, entering
the address of this unit in the "Don’t Use Proxy For
These Addresses" box is recommended.
Operating
Instructions/
Setup
Instructions
Operating
Instructions/
Setup
Instructions
25
Page 26

Symptom
Cannot login.
Cause/solution
• Are the correct password entered?
Confirm the correct password.
Reference
pages
23
The installer started up at
startup of this software, or
the message window saying
that it is necessary to reinstall this software was displayed.
• It may be possible that the initial setup files have been
removed, edited, or moved from their original directory path.
Re-install this software following the displayed instructions, or re-install after uninstalling the software.
6, 7
26
Page 27

For U.S., Canadian and Puerto Rican fields:
Panasonic System Solutions Company,
Unit Company of Panasonic Corporation of North America
Security Systems
www.panasonic.com/security
For customer support, call 1.877.733.3689
Executive Office: Three Panasonic Way 2H-2, Secaucus, New Jersey 07094
Zone Office
Eastern: Three Panasonic Way, Secaucus, New Jersey 07094
Central: 1707 N. Randal Road, Elgin, IL 60123
Southern: 1225 Northbrook Parkway, Suwanee, GA 30024
Western: 6550 Katella Ave., Cypress, CA 90630
Panasonic Canada Inc.
5770 Ambler Drive,Mississauga,
Ontario, L4W 2T3 Canada (905)624-5010
http://www.panasonic.ca
Panasonic Sales Company
Division of Panasonic Puerto Rico Inc.
San Gabriel Industrial Park 65th Infantry Ave. KM. 9.5 Carolina
P.R. 00985(809)750-4300
For European and other fields:
Matsushita Electric Industrial Co., Ltd.
Osaka, Japan
http://panasonic.net/
© 2006 Matsushita Electric Industrial Co., Ltd. All Rights Reserved. N0106-2066 V8QB6425CN Printed in Japan
 Loading...