


Panasonic WJ-ND300 Maintenance Manual
Digital Disk Recorder
ALARM
A
LARM
SUSPENDED
ERROR
TIMER
REC
OPERATE
1-LINK/ACT-2
HDD 1
H
D
D 2
HDD 3
ES
C
PULL
Network Disc Recorder
WJ-ND
300
A
SE
T
HDD 4
WJ-ND300 SATA conversion guide (RAID)
22. Jan. 2009
System Solutions Company
WJ-ND300 SATA conversion guide (RAID)
Maintenance guide
1. Outline
This guide describes how to convert the hard disk drive installed in the WJ-ND300, ND300A from PATA type to SATA type.
2. Preparation
Following items are required for the SATA conversion.
(1) Screwdriver
(2) Wrench for hexagonal nut (5.5m/m)
(3) SATA HDD: Refet to the HDD compatibility chart in the BIG-WEB site.
(4) SATA conversion kit (0E0A0061AA)
Part name Part number Quantity
SATA Board Ass’y JHE30JKY3A 2
K1V224Y20004 (SATA: RED, Power: RED/BLUE)
SATA cables
Cord clamp FCA16 9
SATA board mounting bracket 3CA006051AAA 1
Hexagonal spacer 7 mm 1CJ001311AAA 4
Screw with washer XYN3+F8FJ 4
Caution label
HDD Caution label
SATA Cable label 3PD003960AAA 1
SATA label, small (for front) 3PD003840AAA 1
SATA label, large (for top) 3PD003841AAA 4
SATA conversion leaet ND300PSATARB 1
K1V224Y20005 (SATA: GLAY, Power: RED/YELLOW)
1 each
K1V224Y20004 (SATA: RED, Power: WHITE/PURPLE)
K1V224Y20004 (SATA: GLAY, Power: WHITE/ORANGE)
3PC001235AAA 1
3PD003138BAA 1
Panasonic
2
ND300_SATAConversionGuideR_A
WJ-ND300 SATA conversion guide (RAID)
A
LA
R
M
OPERATE
A
LA
R
M
SUS
PE
N
DED
ERRO
R
T
IME
R
R
EC
LINK
1
L
IN
K
2
HDD
1
H
DD
2
HD
D
3
ES
C
N
e
t
w
or
k
D
is
c
Re
c
or
de
r
W
J-N
D
300
S
E
T
H
D
D4
Connectorscover
Screw
Front panel
connector
Front panel
connector
Maintenance guide
3. Replacement Procedure
Important +++++++++++++++++++++++++++++++++++++++++++++++++++++++++++++++++++++++++++++++++++++++
• Power off the unit and disconnect from the mains power supply before carrying out this work.
• Do not detach the cable connecting the unit and the front panel while the HDD status indicators are still lit or until 30 seconds have
passed since the HDD status indicators went off.
• Protect the hard disk drives from static electricity.
• Do not stack them, or keep them upright.
• Do not use an electric screwdriver to x them. (Tightening torque: Approx. 0.49 N · m (5 kgf · cm))
• Avoid rapid changes in the temperature/humidity to prevent condensation. (Acceptable change: within 15°C/h (59 °F/h))
+++++++++++++++++++++++++++++++++++++++++++++++++++++++++++++++++++++++++++++++++++++++++++++++
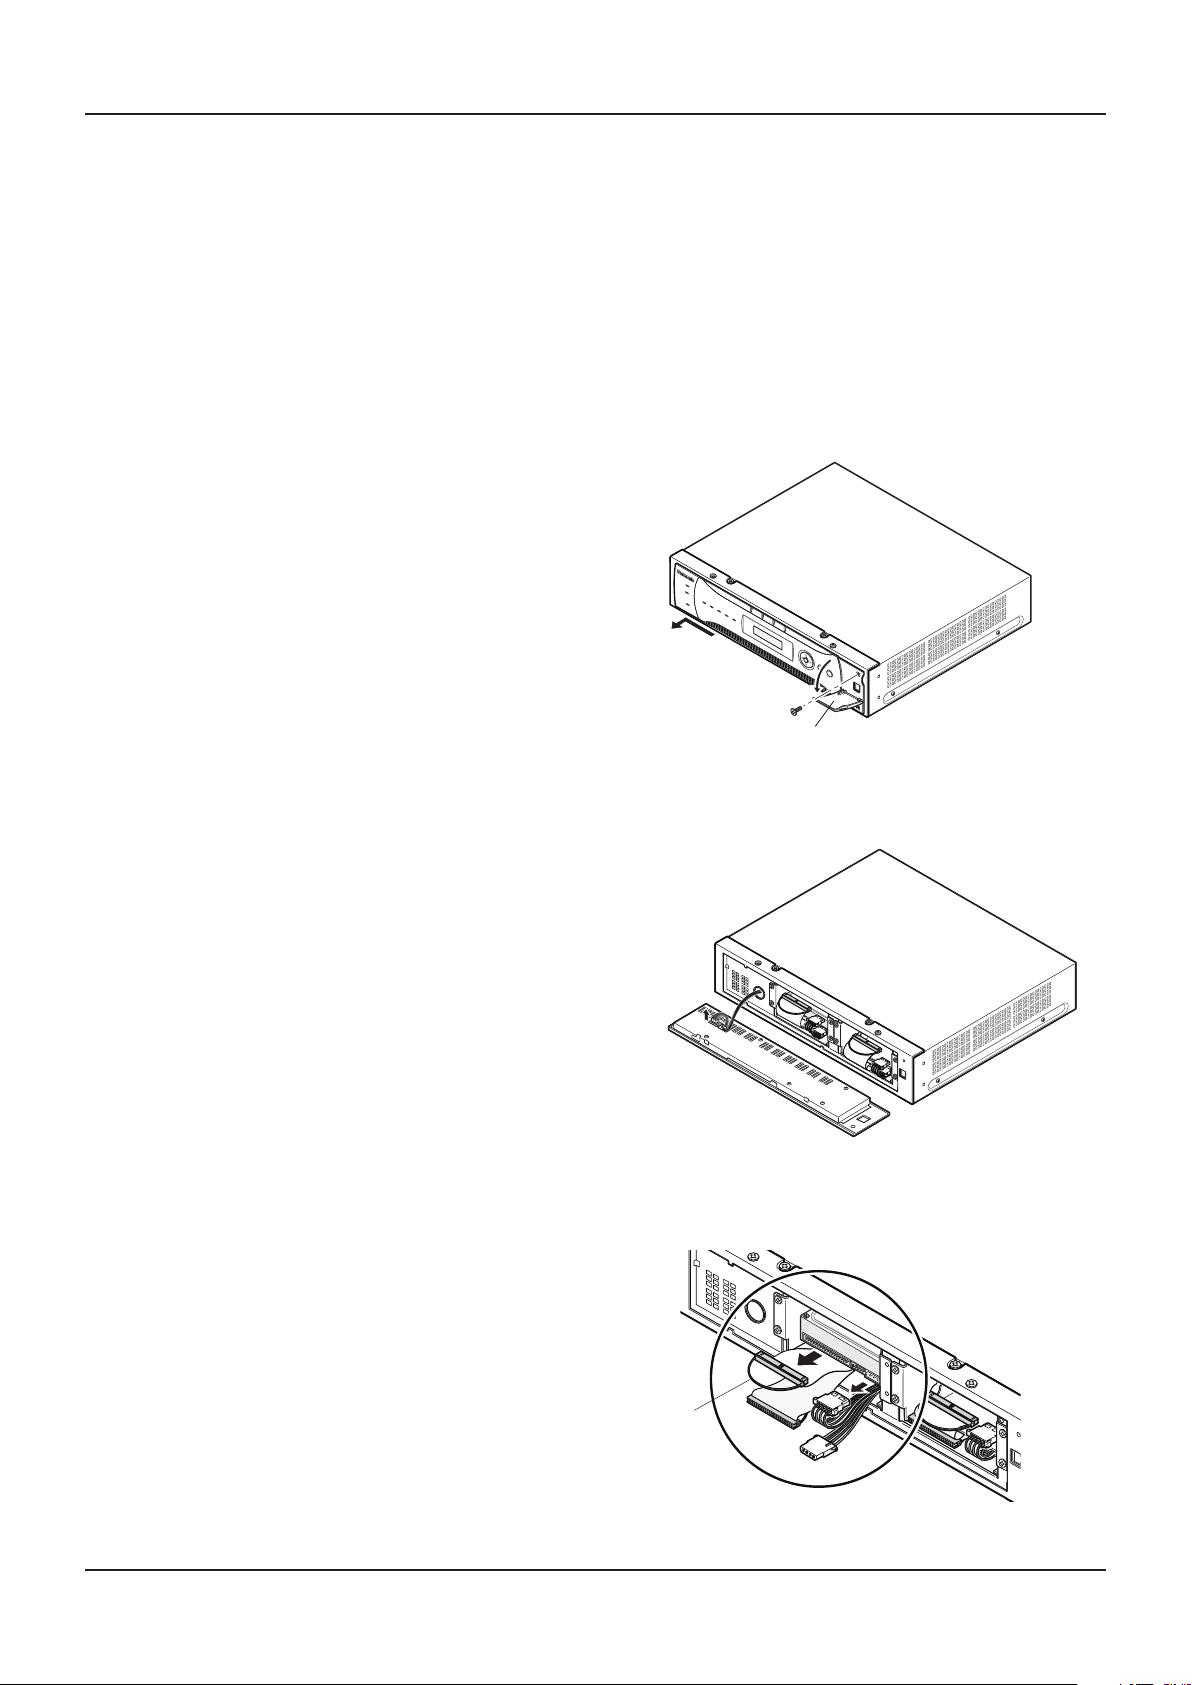
(1) Open the connectors cover on the front panel and remove the
xing screw.
Detach the front panel by sliding it after removing the screw.
(2) Disconnect the connector from the front panel.
(3) Disconnect four ATA cables and four HDD power cables
of all HDDs.
When disconnecting the ATA cables, pull the pull-ring
Note:
slowly and straightforward.
Pull-ring
Panasonic
3
ND300_SATAConversionGuideR_A
WJ-ND300 SATA conversion guide (RAID)
HDD 2
HDD 1
HDD 4
HDD 3
Damper
Sleeve
Maintenance guide
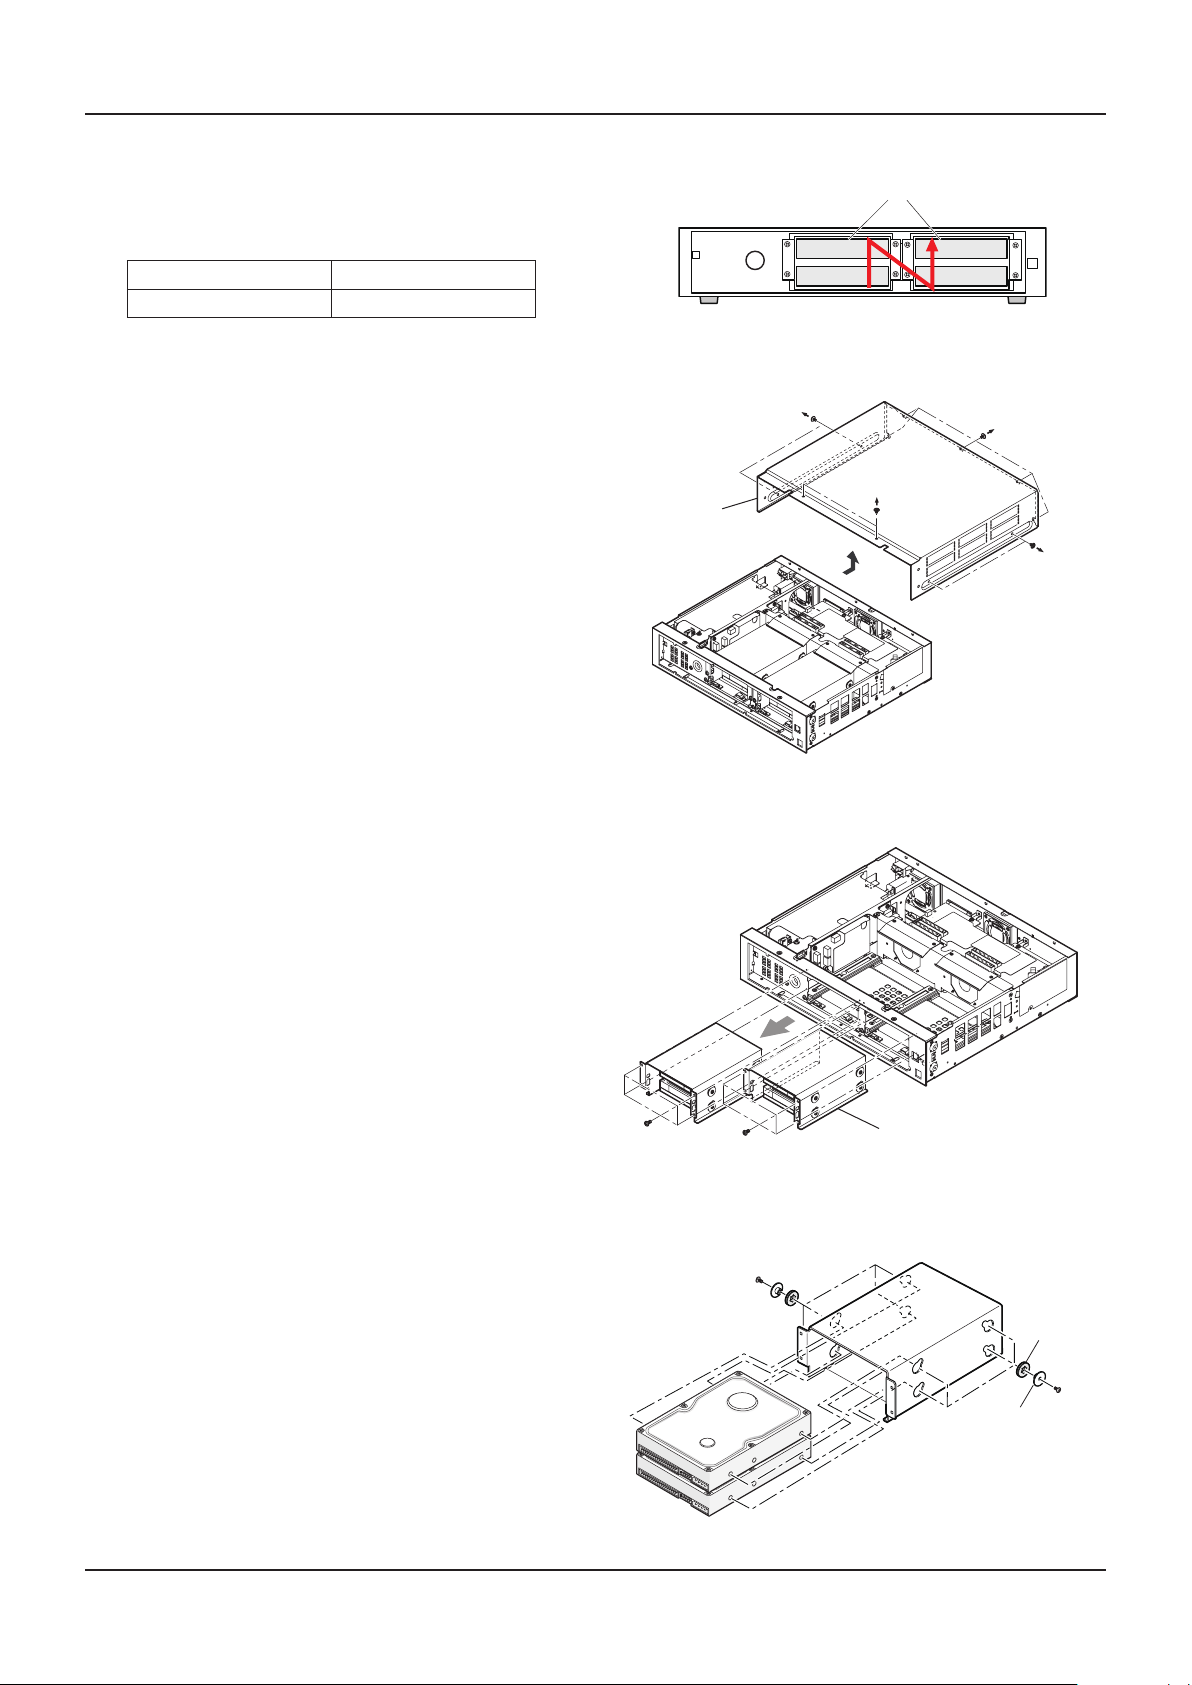
Important +++++++++++++++++++++++++++++++++++++++++++++++++++++++++++++++++++++++++++++++++++++++
The HDDs should be installed in the correct positions in the
order as shown right. Do not skip a drive position or reverse the
Inside the front cover
order of the HDD positions. Incorrectly placed drives will result
in the recorder not recognizing the extension unit or the drives.
HDD #1 slot : HDD1 HDD #2 slot : HDD2
HDD #3 slot : HDD3 HDD #4 slot : HDD4
+++++++++++++++++++++++++++++++++++++++++++++++++++++++++++++++++++++++++++++++++++++++++++++++
(4) Remove 11 screws that x the top cover to the main unit,
and then remove the top cover.
Top cover
(5) Remove eight screws xing the HDD unit, pull out the
unit.
(6) Remove the screws (four pieces each) xing the HDDs,
the sleeves and dampers and then remove the HDDs.
HDD unit
Panasonic
4
ND300_SATAConversionGuideR_A
WJ-ND300 SATA conversion guide (RAID)
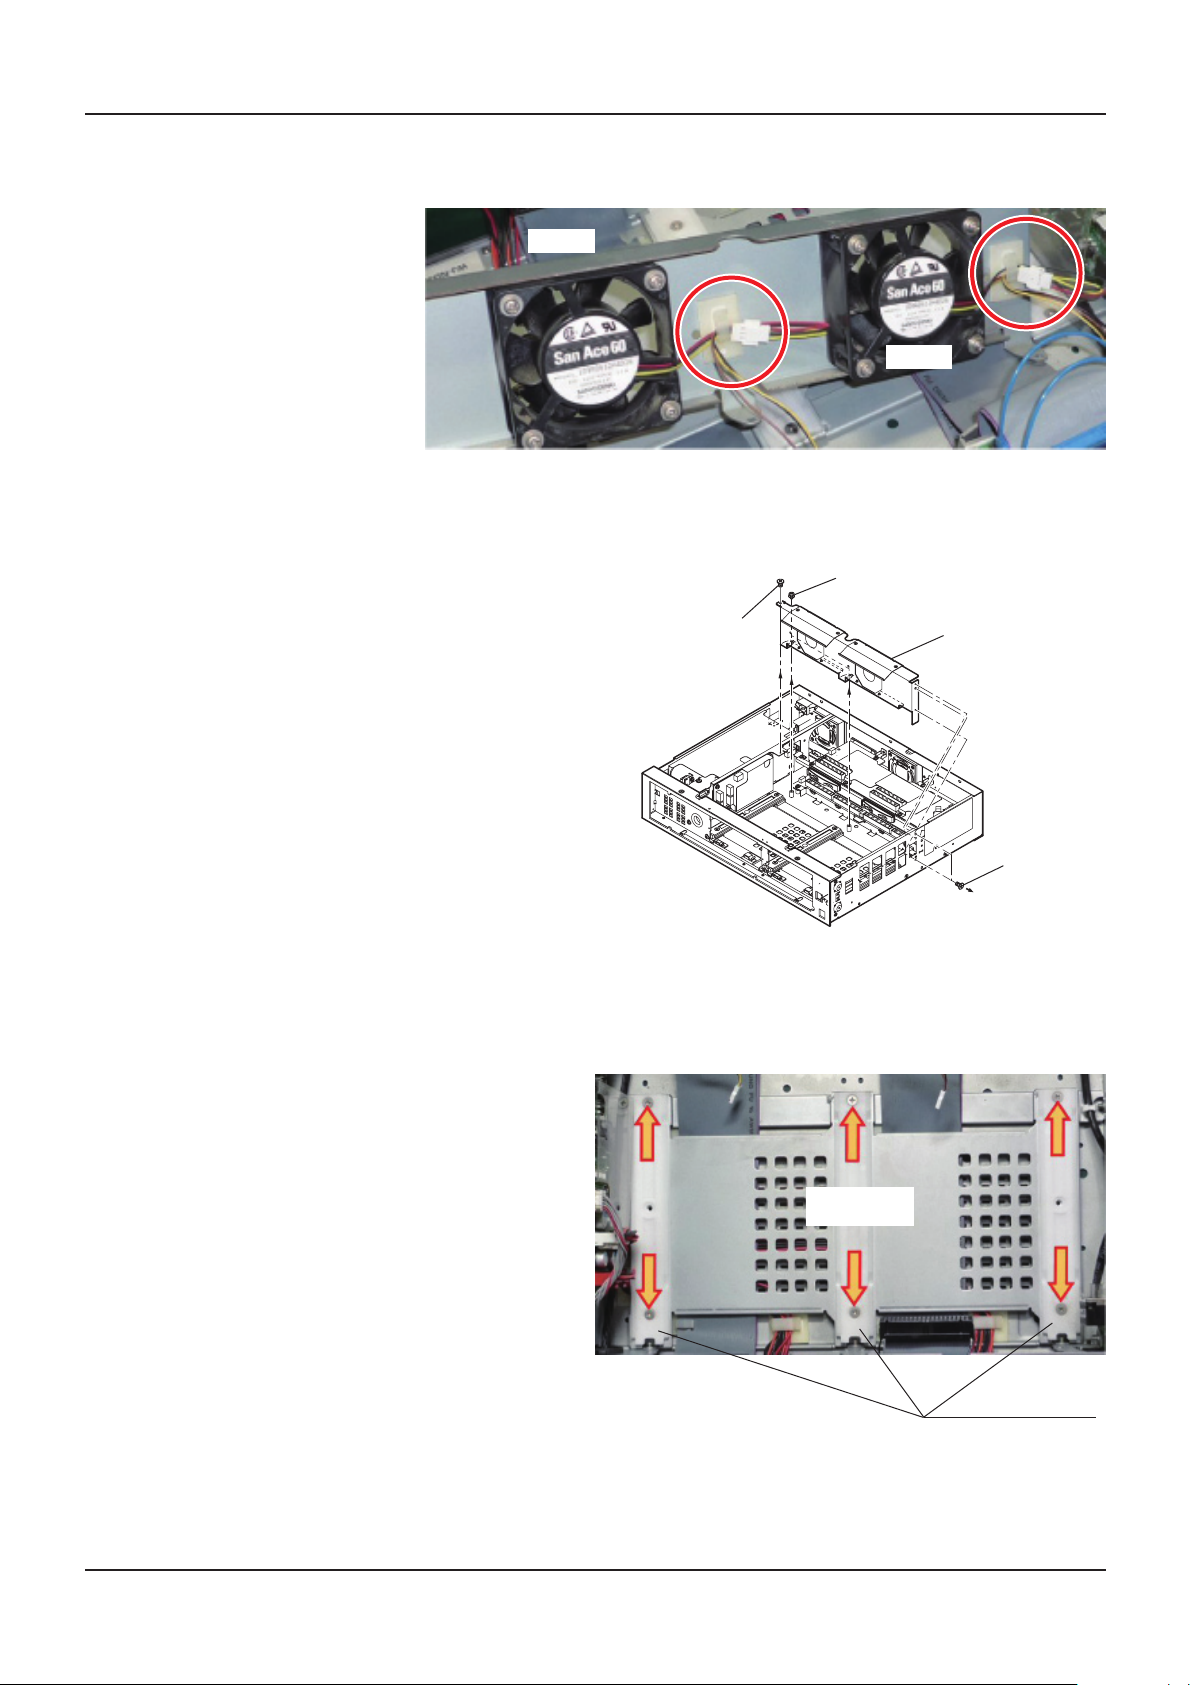
(7) Release the radiator fan cable from two cord clamps attached to the HDD Fan Ass’y, and disconnect respective junction connectors,
and remove the HDD Fan Ass’y.
Maintenance guide
FAN1
FAN2
(8) Remove ve screws (3x wafer-head screws, 2x screw with
washer) xing the HDD Fan Ass’y and then remove the
HDD fan Ass’y.
(9) Remove six screws (Wafer-head screws) and remove three
HDD unit guide rails.
wafer-head
screw
screw with washer
HDD Fan Ass'y
wafer-head
screw
Panasonic
six wafer-head
screws
HDD unit guide rail
5
ND300_SATAConversionGuideR_A