

Page 1

Before attempting to connect or operate this product,
please read these instructions carefully and save this manual for future use.
Network Disk Recorder
IP Quick Setup Tool
Operating Instructions
Model No. WJ-ND300
Page 2

2
Contents
Limitation of Liability ........................................................................................................3
Disclaimer of Warranty .................................................................................................... 3
Precaution ....................................................................................................................... 3
Preface ............................................................................................................................ 4
System Configuration .................................................................................................. 4
System Requirement for a PC .................................................................................... 5
Trademarks and Registered Trademarks ................................................................... 5
Abbreviations .............................................................................................................. 5
Start/exit the software ...................................................................................................... 6
Main window ....................................................................................................................7
Icons in the tree display area ........................................................................................... 8
Operation flow .................................................................................................................9
Detect recorders/cameras and confirm the current settings ............................................ 11
Arrange the camera number by moving/deleting the camera icon .................................. 13
Move a camera icon .................................................................................................... 13
Delete a camera icon .................................................................................................. 14
Edit the settings ............................................................................................................... 16
Register the recorder and cameras, and confirm the result
(CAM IP Auto Addressing) .............................................................................................. 17
Register the recorder and cameras, and confirm the result (Manual Registration) ......... 19
Tips to configure the settings .......................................................................................... 21
Troubleshooting ............................................................................................................... 22
Page 3

3
Limitation of Liability
Precaution
THIS PUBLICATION IS PROVIDED "AS IS" WITHOUT WARRANTY OF ANY KIND, EITHER EXPRESS OR
IMPLIED, INCLUDING BUT NOT LIMITED TO, THE IMPLIED WARRANTIES OF MERCHANTABILITY, FITNESS
FOR ANY PARTICULAR PURPOSE, OR NON-INFRINGEMENT OF THE THIRD PARTY’S RIGHT.
THIS PUBLICATION COULD INCLUDE TECHNICAL INACCURACIES OR TYPOGRAPHICAL ERRORS.
CHANGES ARE ADDED TO THE INFORMATION HEREIN, AT ANY TIME, FOR THE IMPROVEMENTS OF THIS
PUBLICATION AND/OR THE CORRESPONDING PRODUCT (S).
Distributing, copying, disassembling, reverse compiling, reverse engineering, and also exporting in violation of export
laws of the software provided with this product, is expressively prohibited.
Disclaimer of Warranty
IN NO EVENT SHALL MATSUSHITA ELECTRIC INDUSTRIAL CO., LTD. BE LIABLE TO ANY PARTY OR ANY
PERSON,
EXCEPT FOR REPLACEMENT OR REASONABLE MAINTENANCE OF THE PRODUCT, FOR THE CASES,
INCLUDING BUT NOT LIMITED TO BELOW:
(1) ANY DAMAGE AND LOSS, INCLUDING WITHOUT LIMITATION, DIRECT OR INDIRECT, SPECIAL, CONSE-
QUENTIAL OR EXEMPLARY, ARISING OUT OF OR RELATING TO THE PRODUCT;
(2) PERSONAL INJURY OR ANY DAMAGE CAUSED BY INAPPROPRIATE USE OR NEGLIGENT OPERATION
OF THE USER;
(3) UNAUTHORIZED DISASSEMBLE, REPAIR OR MODIFICATION OF THE PRODUCT BY THE USER;
(4) ANY PROBLEM, CONSEQUENTIAL INCONVENIENCE, OR LOSS OR DAMAGE, ARISING OUT OF THE SYS-
TEM COMBINED BY THE DEVICES OF THIRD PARTY;
(5) ANY CLAIM OR ACTION FOR DAMAGES, BROUGHT BY ANY PERSON OR ORGANIZATION BEING A PHO-
TOGENIC SUBJECT, DUE TO VIOLATION OF PRIVACY WITH THE RESULT OF THAT SURVEILLANCE-
CAMERA’S PICTURE, INCLUDING SAVED DATA, FOR SOME REASON, BECOMES PUBLIC OR IS USED
FOR THE PURPOSE OTHER THAN SURVEILLANCE.
Page 4
4
Preface
By using this software, the following settings of the digital disk recorder WJ-ND300 can be configured on a PC via a
network.
• Network settings
• Registration of cameras, and deletion/edit of the registered cameras
IP addresses of the cameras connected to the WJ-ND300 can be automatically assigned with this software.
When using multiple network disk recorders, it is necessary to configure the above settings independently.
This software works only when the software version of the WJ-ND300 is 3.00 or later.
When failed to configure the above settings with this software, configure them using the setup menu of the WJND300. To configure the settings of the connected cameras, use the setup software of the cameras.
Refer to the setup instructions (PDF) of the WJ-ND300 or the operating instructions of the camera for further information.
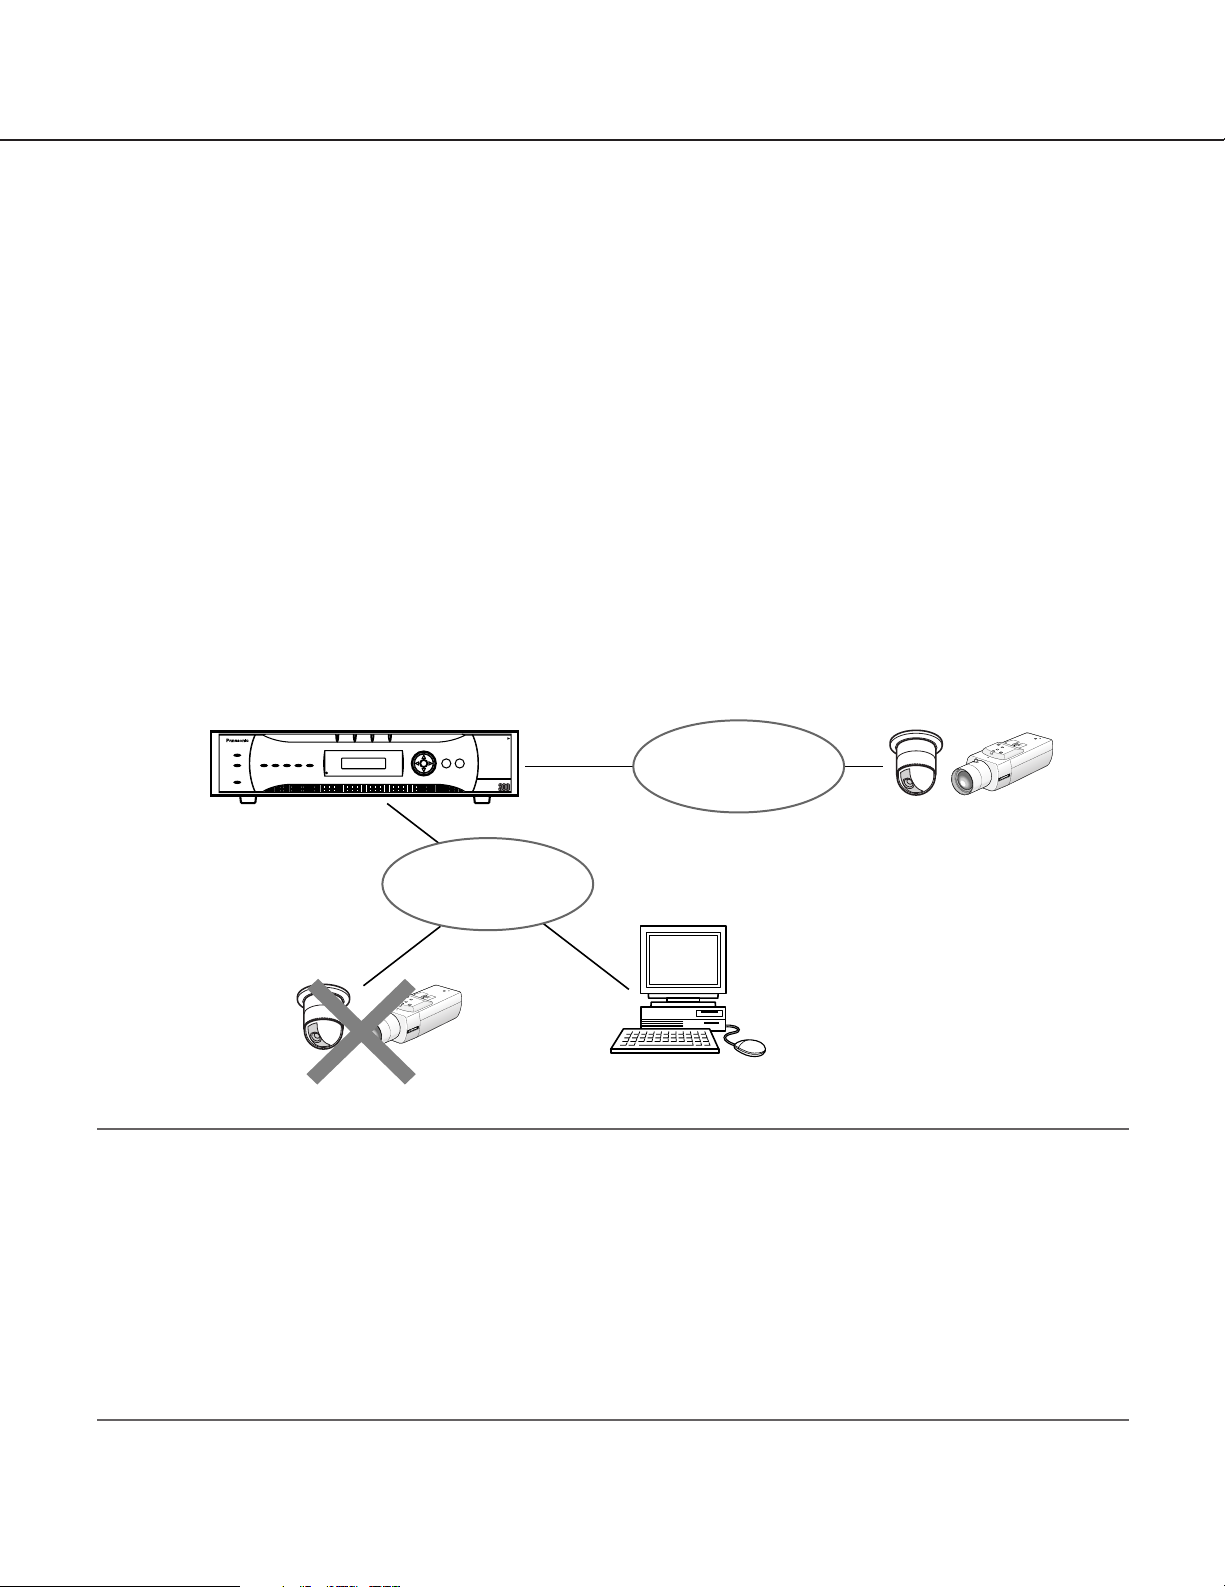
System Configuration
To configure the settings with this software, connect the PC in which this software is installed to the client PC port of
the WJ-ND300 and the camera to the camera port of the WJ-ND300. When the camera is connected to the client PC
port, it is impossible to detect and configure the camera.
Important:
• This software is inoperable in a different subnet over a router.
• The WJ-ND300 can be detected and configured using this software. However, for enhancing security, this soft-
ware will not detect the WJ-ND300 when 20 minutes have passed after the power is turned on once the default
settings are changed.
To detect the WJ-ND300 after the settings have been changed, click the [Available] button of "IP Setup Tool" on
the "NW Camera Setup" page (under the "Camera" page of the WJ-ND300 setup menu). Refer to the setup
instructions (PDF) of the WJ-ND300 for further information.
• Depending on the model of camera, this software will not detect it when 20 minutes have passed after the power
is turned on once the default settings are changed. Refer to the operating instructions of the camera in use for
further information.
Recorder
ALARM
ALARM
TIMER REC 1-LINK/ACT-2
ERROR
SUSPEND
OPERATE
Client PC port
HDD1 HDD2 HDD3 HDD4
ESC SET
Network Disk Recorder
WJ-ND
PULL
Camera port
Network
Camera
P
U
S
H
T
O
L
O
C
K
/
E
J
E
C
T
Network
P
U
S
H
T
O
L
O
C
K
/
E
J
E
C
T
Detection and
configuration are
unavailable
Camera
PC in which this software is installed
Page 5

5
System Requirement for a PC
This software is operable when installed on a PC that meets the following system requirements.
OS Microsoft®Windows®2000 Professional SP4
Microsoft®Windows®XP Professional SP2
Microsoft®Windows®XP Home Edition SP2
CPU Intel®Pentium®4 1.4 GHz or faster
Memory 512 MB or more
Monitor 1024 x 768 pixels or more
Network interface 100 Mbps Network interface card must be installed
Adobe®Reader Required to read these operating instructions.When the Adobe®Reader is not installed
on the PC, download the latest Adobe®Reader from the Adobe web site and install it.
Trademarks and Registered Trademarks
• Microsoft®and Windows®are registered trademarks of Microsoft Corporation in U.S. and/or other countries.
• Intel®and Pentium®are trademarks of Intel Corporation.
• Adobe®, Adobe logos, Acrobat®are registered trademarks of Adobe Systems Incorporated in the U.S. and/or
other countries.
• Other names of companies and product contained in these operating instructions may be trademarks or registered trademarks of their respective owners.
Abbreviations
The following abbreviations are used in these operating instructions.
• Microsoft®Windows®2000 Professional Service Pack 4 is described as Windows 2000.
• Microsoft®Windows®XP Professional SP2 and Microsoft®Windows®XP Home Edition SP2 are described as
Windows XP.
Page 6

6
Start/exit the software
Start: Double-click the "IP Quick Setup Tool" icon (ND300IPsetup.exe) to start this software. The software will start
and the main window will be displayed.
Exit: Click the [Exit] button on the main window or the [x] button at the top right of the window to exit the software.
Notes:
• When using a PC on which Windows XP SP2 is installed, the security warning window may be displayed when
the IP setup tool is started. When this occurred, click the [Unblock(U)] button.
• When multiple network interface cards are installed on the PC, the network adapter selection window will be displayed when the software starts. Select a network adapter to be used.
Page 7
7
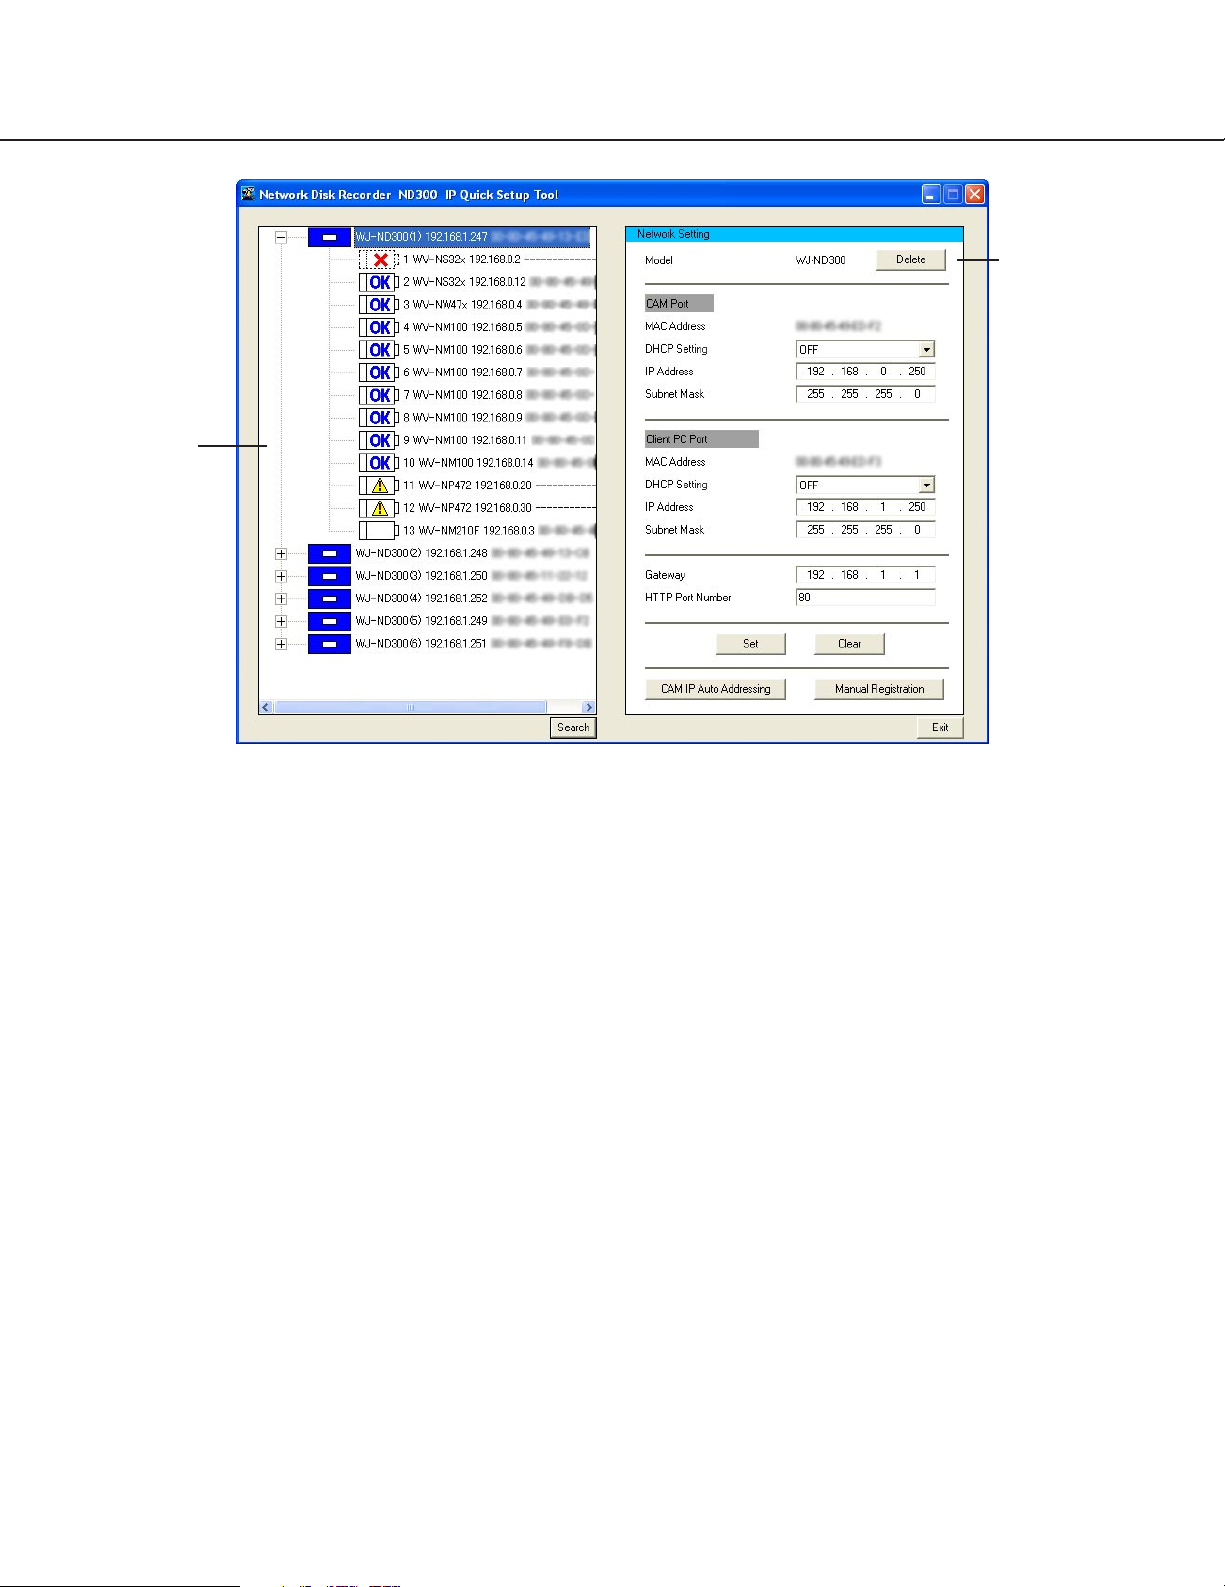
Main window
Tree display area
Icons of the detected recorders and cameras will be displayed and their IP addresses and MAC addresses will be
displayed. (When failed to detect the camera, its MAC address will not be displayed.) Refer to the next page for further information about the icons.
Network settings area
The network settings of the recorder/camera selected in the tree display area will be displayed.
[Delete] button: Click this button to delete the icon of the selected recorder/camera.
[Set] button: Click this button to determine the edited settings.
[Clear] button: Click this button to cancel the edited settings and return to the previous settings. The settings will
return to the previous settings only when the [Set] button is not clicked yet.
[CAM IP Auto Addressing] button*: Click this button to register the edited settings in the recorder. IP addresses
will automatically be assigned to the cameras connected to the recorder.
[Manual Registration] button*: Click this button to register the edited settings to the recorder/camera.
* The [CAM IP Auto Addressing] button and the [Manual Registration] button will be displayed only when the WJ-
ND300 is selected in the tree display area.
[Search] button: Click this button to search the connected recorder and the cameras connected to the recorder.
The search result will be displayed in the tree area.
[Exit] button: Click this button to exit this software.
Tree display
area
Network settings
area
Page 8
8
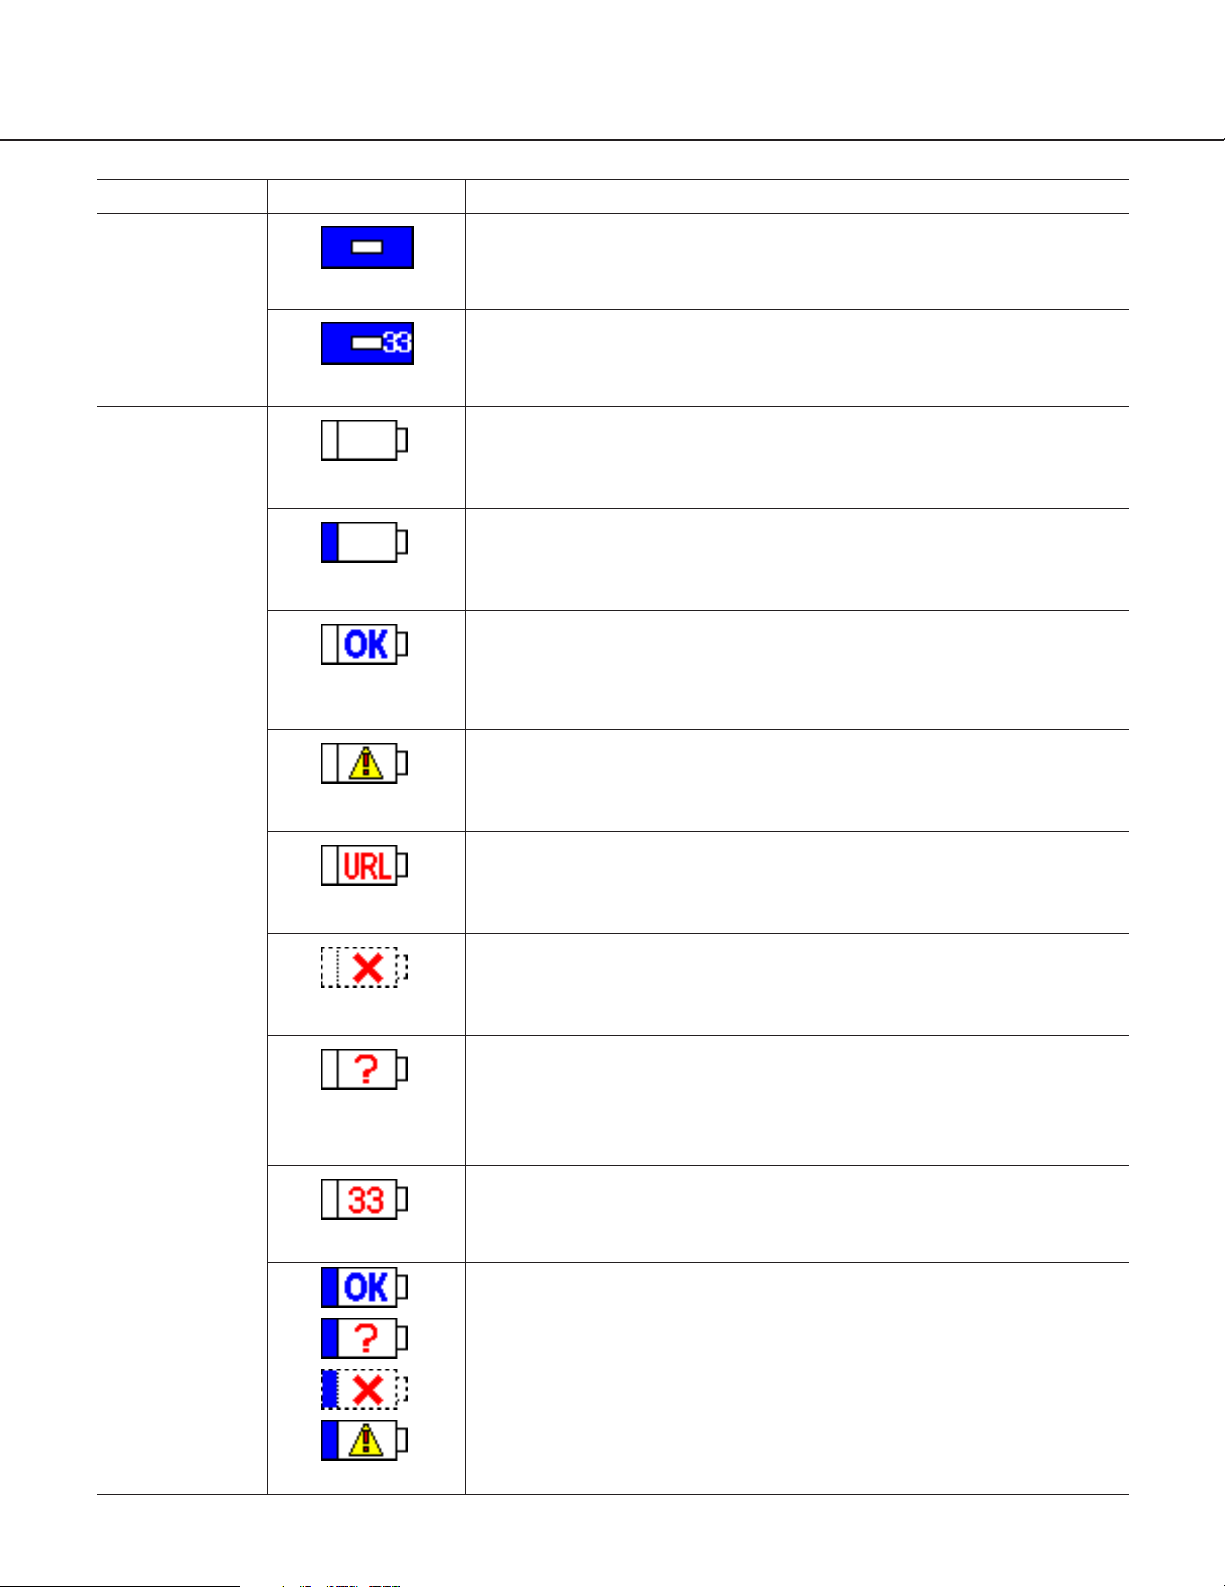
Icons in the tree display area
Type
Recorder
Icon (Name) Description
Indicates the network disk recorder WJ-ND300. (Normal display)
This icon will be displayed when number of the detected cameras that are
connected to the recorder is 33 or more.
Camera
Indicates a camera whose network settings are edited with this software.
To apply the edited settings to the recorder/camera, it is necessary to
register this camera again.
Indicates a camera whose network information is not registered in the
recorder.
It is necessary to configure the network settings and register them in the
recorder.
Indicates that the network information of this camera is conformed to the
information registered in the recorder and the camera. (Camera in normal
status)
Indicates that this camera is not applicable with this software to configure
the network settings even though the network information of this camera
is registered in the recorder. (Including cameras of other manufacturers)
Network setting configuration is unavailable with this software.
Indicates the camera whose host name is registered in the recorder,
instead of IP address.
Network setting configuration is unavailable with this software. Moving
and copying the icon of this camera is also unavailable.
Indicates a camera not detected even though its network information is
registered in the recorder.
For enhancing security, some cameras may not respond (not be detected) even though whose status is normal.
Indicates that the network information of this camera is not conformed to
the information registered in the recorder and the camera (IP address,
etc.) even though the camera is normally detected. This icon will be displayed when there is no available IP address for this camera or when
failed to automatically assign an IP address to this camera.
Indicates the 33rd detected camera or later.
The settings for this camera will not be applied since the recorder can
register up to 32 cameras.
Indicates that the camera number of this camera has been changed since
this camera is deleted or moved.
It is necessary to register this camera in the recorder again. When this
camera is registered in the recorder again, it is necessary to configure the
settings since the settings such as the recording rate will return to the
default settings.
(Recorder)
(Recorder)
(Edited)
(New)
(Camera in normal
status)
(Not applicable)
(Host name)
(Not detected)
(Incorrect settings)
(33rd or later)
(Settings changed)
Page 9

Change the settings
(for the recorder and camera) (page 16)
Register the recorder and cameras,
and confirm the result.
(Manual Registration) (page 19)
Register the recorder and cameras,
and confirm the result.
(CAM IP Auto Addressing) (page 17)
Change the settings
(only for the recorder) (page 16)
Arrange the camera number by moving/
deleting the camera icon (pages 13 and 14)
Detect recorders/cameras and confirm
the current settings. (page 11)
9
Operation flow
The following settings can be configured with this software.
• Network settings of the recorder (Camera port, client PC port)
• Camera network settings of the recorder (Camera registration for each channel)
• Network settings of the cameras connected to the recorder (IP address, etc.)
Configure the network settings of the recorder/camera as follows.
Important:
• Any recording currently being performed on the recorder will stop in the processes of "CAM IP Auto Addressing"
and "Manual Registration".
• The model WV-NS202 accepts "Manual Registration" only.
Notes:
• When using multiple recorders, repeat the above procedures for each recorder.
• Do not change the network settings of the cameras and register the cameras with the automatically assigned IP
addresses when automatically assigning IP addresses to the cameras. (page 17)
To register the cameras
with the automatically
assigned IP addresses
(when installing newly)
To register the cameras
with the manually assigned
IP addresses
Page 10

10
The settings for the recorder/camera will be different as follows according to how the registration is made ("CAM IP
Auto Addressing" or "Manual Registration").
*1 "CAM IP Auto Addressing" is available only when "OFF" is selected for the DHCP setting of the camera.
*2 The compression method will automatically be applied (JPEG/M-JPEG).
*3 Check if the same IP addresses are not in use already even vacant IP addresses are searched and assigned
automatically. When the message saying that no IP address is available is displayed, check the settings and perform "Manual Registration".
Setup item
Recorder
Camera
Camera port
Client PC port
Default gateway
HTTP port number
NW camera setup
(Manufacturer, MODEL/COMPRESSION, ADDRESS, Port
number)
Live image transmission rate
DHCP setting
IP address
Subnet mask
DHCP setting
IP address
Subnet mask
Edited value
Edited value
Edited value
Edited value
Edited value
Edited value
Edited value
Edited value
Cameras will be registered for
each channel with edited
values.*
2
Fixed at "1 ips"
"OFF" only *
1
Edited value
Edited value
Edited value
Edited value
Edited value
Edited value
Edited value
Cameras will be registered for
each channel with edited
values.*
2
Fixed at "1 ips"
Rate settings other than the live
image transmission rate
Default setting Default setting
DHCP setting Edited value Fixed at "OFF"
IP address Edited value
Auto incremented value (+1)
starting from the IP address of
the camera port of the recorder *
3
Subnet mask Edited value
Same value as for the camera
port of the recorder
Gateway
HTTP port number
Edited value
Edited value
Same value as for the default of
the recorder
Fixed at "80"
Manual Registration CAM IP Auto Addressing
Page 11

Screenshot 2
The search processing window will be displayed, and
then the search result will be displayed.
Step 2
Click the icon of the recorder/camera whose settings
are to be checked.
Notes:
• When "+" displayed on the left of the recorder icon is
clicked, the icons of the camera registered already
or detected newly will be displayed.
• When the PC and multiple recorders are on the
same network, multiple icons (up to 16) will be displayed.
• Order of the recorder icon displayed in the tree display area will change each time search is executed.
11
Detect recorders/cameras and confirm the current settings
Screenshot 1
Start operation when displaying the main window.
Step 1
Click the [Search] button.
The detected recorders/cameras will be displayed with icons.
The current network settings of the selected recorder/camera will be displayed in the network setting area.
Page 12

12
Screenshot 3
The network settings of the selected recorder/camera
will be displayed.
Notes:
• When "ON" is selected for the host authentication
function on the recorder, it is impossible to search
recorders using a PC that is not allowed to edit the
network settings of the recorder.
• When search is executed by multiple PCs simultaneously, cameras may not be searched correctly.
Page 13

13
Arrange the camera number by moving/deleting the camera icon
The camera numbers will be assigned to each camera channel of the recorder in order of the camera icons displayed in the tree display area.
The camera numbers can be changed by changing the order of the icons in the tree display area.
By deleting the icons of the cameras from the tree display area, the deleted camera will not be registered. It will be
useful to prevent registering unwanted cameras.
Move a camera icon
Screenshot 1
Start operation when the search result is displayed on
the main window.
Step 1
Drag the desired camera icon and drop to the desired
point. (Dropped between 6 and 7 on screenshot 2.)
Note:
Moving and copying the icon is unavailable when the
respective camera is registered with the host name.
Screenshot 2
The camera icon will be moved.
Note:
When multiple recorder icons are displayed, the
camera icon can be copied onto the other recorder
by drag and drop.
Page 14

14
Delete a camera icon
Screenshot 1
Start operation when the search result is displayed on
the main window.
Step 1
Click to select the icon of the camera not to be used
with the recorder.
Screenshot 2
The settings of the selected camera will be displayed.
Step 2
Click the [Delete] button.
Step 3
Click the [OK] button when the confirmation window is
displayed.
Page 15

15
Screenshot 3
The selected camera icon will be deleted.
Notes:
• When the selected icon is deleted, the camera icons
below the deleted icon will move up.
However, the camera number of the camera registered with the host name (displayed with " ") will
not be changed.
• When the [Delete] button is clicked after selecting
the recorder icon with " ", the selected recorder
icon will be deleted from the tree display area.
Important:
When the camera number is changed once, the settings such as the recording rate will become "OFF"
after registration. It is necessary to configure the settings again.
Page 16

16
Edit the settings
Edit the network settings of the recorder/camera such as IP address.
Screenshot 1
Start operation when the search result is displayed on
the main window.
Step 1
Edit the network settings of the recorder/camera such
as IP address.
Step 2
Click the [Set] button after editing the settings.
Notes:
• It is possible to cancel the settings edited in step 1
and return to the previous settings by clicking the
[Clear] button when the [Set] button is not clicked
yet.
• When the settings are changed once, the respective
camera icon will turn to the edited icon ( ).
• To register the newly detected camera ( ) without changing the network settings, click the [Set]
button without changing the settings and display the
edited icon ( ).
The camera respective to the edited icon will be registered in the recorder.
• When IP addresses are to be automatically
assigned, do not change the settings of the cameras. When the camera settings are changed, the
[CAM IP Auto Addressing] button will become
unavailable. In this case, click the [Search] button
again.
• When the recorder settings are edited, registration
will be unavailable until the [Set] button or the [Clear]
button is clicked.
Page 17

17
Register the recorder and cameras, and confirm the result (CAM IP Auto Addressing)
Register the edited settings in the recorder and the automatically assigned IP addresses in the cameras.
Screenshot 1
Start operation when the search result is displayed on
the main window.
Step 1
Select the icon of the recorder to be registered.
Step 2
Click the [CAM IP Auto Addressing] button.
Note:
Select "OFF" for the DHCP setting of "CAM Port" in
advance since the [CAM IP Auto Addressing] button
will become unavailable if "ON" is set.
Step 3
Click the [OK] button when the confirmation window is
displayed.
Important:
• Automatically incremented value (+1) starting from
the IP address of the camera port of the recorder will
be assigned to the cameras orderly.
The subnet should be "255.255.255.0" since the
value will be determined at the fourth octet of the IP
address. When the subnet cannot be not
"255.255.255.0", register recorders/cameras manually.
The cameras displayed in the tree display area are
subject to be registered in the recorder using "CAM
IP Auto Addressing". Delete unwanted cameras in
advance.
• Any recording currently being performed on the
recorder will stop in the process of "CAM IP Auto
Addressing".
• The model WV-NS202 accepts "Manual
Registration" only.
Notes:
• IP addresses will not automatically be assigned to
cameras that are not applicable with this software
( ) and cameras registered with the host name
().
• IP addresses can automatically be assigned to up to
32 cameras.
Page 18

18
Screenshot 2
The registration processing window will be displayed,
and then the registration result will be displayed.
Page 19

Screenshot 1
Start operation when the search result is displayed on
the main window.
Step 1
Select the icon of the recorder to be registered.
Step 2
Click the [Manual Registration] button.
Step 3
Click the [OK] button when the confirmation window is
displayed.
Important:
• To register the newly detected camera ( ) in the
recorder, the camera icon should be the edited icon
( ). (page 16)
• Any recording currently being performed on the
recorder will stop in the process of "Manual
Registration".
Notes:
• Edit of the settings of the cameras that are not
applicable with this software ( ) and of the cameras registered with the host name ( ) is
unavailable.
• IP addresses can automatically be assigned to up to
32 cameras.
19
Register the recorder and cameras, and confirm the result (Manual Registration)
Register the edited settings in the recorder and the camera. When not registered, the edited settings will not be
applied to the recorder.
Page 20

20
Screenshot 2
The registration processing window will be displayed,
and then the registration result will be displayed.
Step 4
Confirm the registration result. Display live images from
the camera and confirm that they are normally displayed.
Notes:
• Display live images from the camera and confirm
that they are normally displayed. The live image
transmission rate is set to "1 ips" on the recorder.
The image compression method of the camera is set
to "JPEG" or "M-JPEG".
• The recording rate, camera title, and user
name/password of the camera will return to the
default when the already registered camera is registered again. It is necessary to configure them again.
• The deleted camera icon will be displayed as the
newly detected icon ( ) after registration. (Not
registered in the recorder)
Page 21

21
• The IP addresses of the camera registered in the recorder and in the
camera are not the same.
Configure as follows.
q Delete a camera icon .
w Click the [Set] button after selecting the camera icon to turn
the icon to the edited icon .
e Select the recorder icon and click the [Manual Registration] button.
• Display the network settings of the camera and click the [Set] button
without changing the settings.
The newly detected icon will turn to the edited icon ( ) and the settings will be registered in the recorder.
Tips to configure the settings
When having a problem to configure the settings with this software, check and try the solution described below.
Need to register the network
settings of the newly detected camera without changing.
The cameras with the same
MAC address are displayed
with the and
icons.
IP address is not displayed
when registered after selecting "ON" for the DHCP function of the camera.
No live image is displayed
even though the camera
icon is displayed.
Reference
pages
Tip
Problem
• It may take time for the camera to obtain the IP address. Wait for a
while and display IP address by executing search.
Registration of the camera (registration of IP address, etc.) in the
recorder is necessary after displaying the IP address.
• When the camera is already registered, the model number of the camera or the HTTP port number may be incorrect. When the user authentication of the camera is "ON", it is necessary to register the user
name/password on the "Camera" page of the recorder. Check and edit
the settings.
Page 22

22
• Is the connection indicator of the 100BASE-Tx port
lit? When it is not lit, connection to a LAN is not
established or a network is not working correctly.
Confirm that the connection indicator of the
100BASE-Tx port is lit. Refer to a system administrator if it is not lit.
• Is the Ethernet cable firmly connected to the
100BASE-Tx port?
Confirm the cable is firmly connected.
• Is the hub installed between the recorder and a network applicable for 100 Mbps?
When the hub is not applicable for 100 Mbps, the
recorder may not be detected correctly.
• Has 20 minutes passed after the default settings of
the recorder such as IP address had been changed?
The recorder can be detected only 20 minutes after
changing the default settings.
To detect the recorder after the settings have been
changed, click the [Available] button of "IP Setup
Tool" on the "NW Camera Setup" page (under the
"Camera" page of the WJ-ND300 setup menu. The
recorder can be detected only for 20 minutes.
Troubleshooting
Contact your dealer if a problem cannot be solved even after checking and trying the solution or a problem is not
described below.
–
–
Setup
Instructions
(PDF)
–
The recorder is not detected
using this software.
Reference
pages
Cause/solution
Symptom
• Isn’t the host authentication function set to "ON"?
Is the PC (host) in use to search allowed to edit the
network settings of the recorder?
When the host authentication is "ON", use a PC
(host) that is allowed to edit the network settings of
the recorder.
Setup
Instructions
(PDF)
• Is the DISK CONFIG MENU of the recorder being
operated, or is the recorder in the process of the
measurement operation?
When the DISK CONFIG MENU of the recorder is
being operated or when the measurement operation
is being executed, the settings cannot be configured.
Try to search the recorder after the DISK CONFIG
MENU operation or the measurement operation is finished.
Setup
Instructions
(PDF)
Page 23

23
• Has 20 minutes passed after the default settings of
the camera such as IP address had been changed?
Some models can be detected only 20 minutes after
changing the default settings.
To apply the settings, reboot the camera.
• When multiple recorders are used, some models cannot be detected correctly. (Some recorders may
detect them and some may not.)
In this case, register the camera using the WJ-ND300
setup menu.
Operating
instructions of
the camera
–
Cameras cannot be detected from the recorder.
Reference
pages
Cause/solution
Symptom
Page 24

For U.S., Canadian and Puerto Rican fields:
Panasonic System Solutions Company,
Unit Company of Panasonic Corporation of North America
Security Systems
www.panasonic.com/security
For customer support, call 1.877.733.3689
Executive Office: Three Panasonic Way 2H-2, Secaucus, New Jersey 07094
Zone Office
Eastern: Three Panasonic Way, Secaucus, New Jersey 07094
Central: 1707 N. Randal Road, Elgin, IL 60123
Southern: 1225 Northbrook Parkway, Suwanee, GA 30024
Western: 6550 Katella Ave., Cypress, CA 90630
Panasonic Canada Inc.
5770 Ambler Drive,Mississauga,
Ontario, L4W 2T3 Canada (905)624-5010
http://www.panasonic.ca
Panasonic Sales Company
Division of Panasonic Puerto Rico Inc.
San Gabriel Industrial Park 65th Infantry Ave. KM. 9.5 Carolina
P.R. 00985(809)750-4300
© 2006 Matsushita Electric Industrial Co., Ltd. All Rights Reserved. N0606-1106 V8QB6443BN Printed in Japan
For European and other fields:
Matsushita Electric Industrial Co., Ltd.
Osaka, Japan
http://panasonic.net
 Loading...