

Panasonic wj-asc8501p Operation Manual
Before attempting to operate this product,
please read these instructions carefully and save this manual for future use.
Model No. WJ-ASC8501
Administration Console
Users' Guide
INFORMATION
(
ALARM
)
OPERATEOPERATE
TL
OPERATEOPERATE
RESETRESET
FAN ALARMFAN ALARM
HDDHDD
ACTIVEACTIVE


Admin Console
Software Version 1.5
for use with an SX850 Surveillance Control System
Installation & Configuration
Document Version 1.5 for System Administrators
installing and configuring the Admin Console
Admin Console 1.5

Admin Console CONTENTS
INTRODUCTION 5
DOCUMENT CONVENTION 6
WHAT IT DOES 7
By Clock, Calendar, and Event 7
In Response to Emergencies 7
HOW IT WORKS 8
Configuration Management 8
User Control 8
Installation 8
PLATFORM 9
Hardware Requirements 9
Operating System Requirements 9
Video Display Setting Requirements 9
FROM DISKETTES 10
FROM CD-ROM 10
WHAT TO DO NEXT 10
WORKSHEET TASKS 11
INSTRUCTIONS 12
CHECKLIST 12
LOGIN 14
FIRST-TIME OPERATION 15
CPU Setup 15
Scheduled Modes 18
MAIN MENU 20
DATABASE MANAGEMENT 21
Database Archive 22
Create a Database 22
Select a Database 23
Copy a Database 24
Rename a Database 25
Delete a Database 25
Backup or Restore a Database 26
Get Current Database 30
Load a Database 30
System Configuration 32
INPUT TO SCREEN 38
SCS CPU Configuration 38
3 Admin Console CONTENTS

Matrix Frames 39
COMPONENTS 42
Cameras 43
System Controllers 53
Monitors 58
Alarm Input/Output 62
Alarms 66
Operators 79
SEQUENCES 84
Tour Sequences 85
Group Presets 91
Group Sequences 97
AREAS 103
Monitor Surveillance Area 103
EVENT SCHEDULER 104
MANAGEMENT 107
Log Manager 108
AC Log 112
Account Manager 114
Help 117
ACRONYMS 118
TERMS 119
INSTRUCTIONS 128
TEAMWORK 129
CHECKLIST 129

Admin Console WELCOME
IN TRO DU C TIO N
Welcome to the SX850 Admin Console. This guide is organized in a
logical step-by-step sequence that will allow for both an easy and accurate
configuration. First, an explanation of what the Admin Console is and
how it works in a Security Surveillance System (SCS) is presented in
general terms. Next, you will be guided through installing the software,
creating a configuration database, and loading the database into the
Security Control System CPU.
While creating the configuration database, you will find that many
components interact with each other, and are dependent on specific values.
It will be important to utilize the worksheets provided at the end of this
manual to gather the data necessary to create the configuration database,
and to develop an understanding of your Security Control System. These
worksheets, once completed, should also be utilized when making
updates or changes to the system’s configuration, to ensure accurate
results.
This part of the process will be explained in the Configuration section of
this manual, which is divided into three phases: physical planning,
worksheet tasks, and keying in the data.
5 Admin Console WELCOME
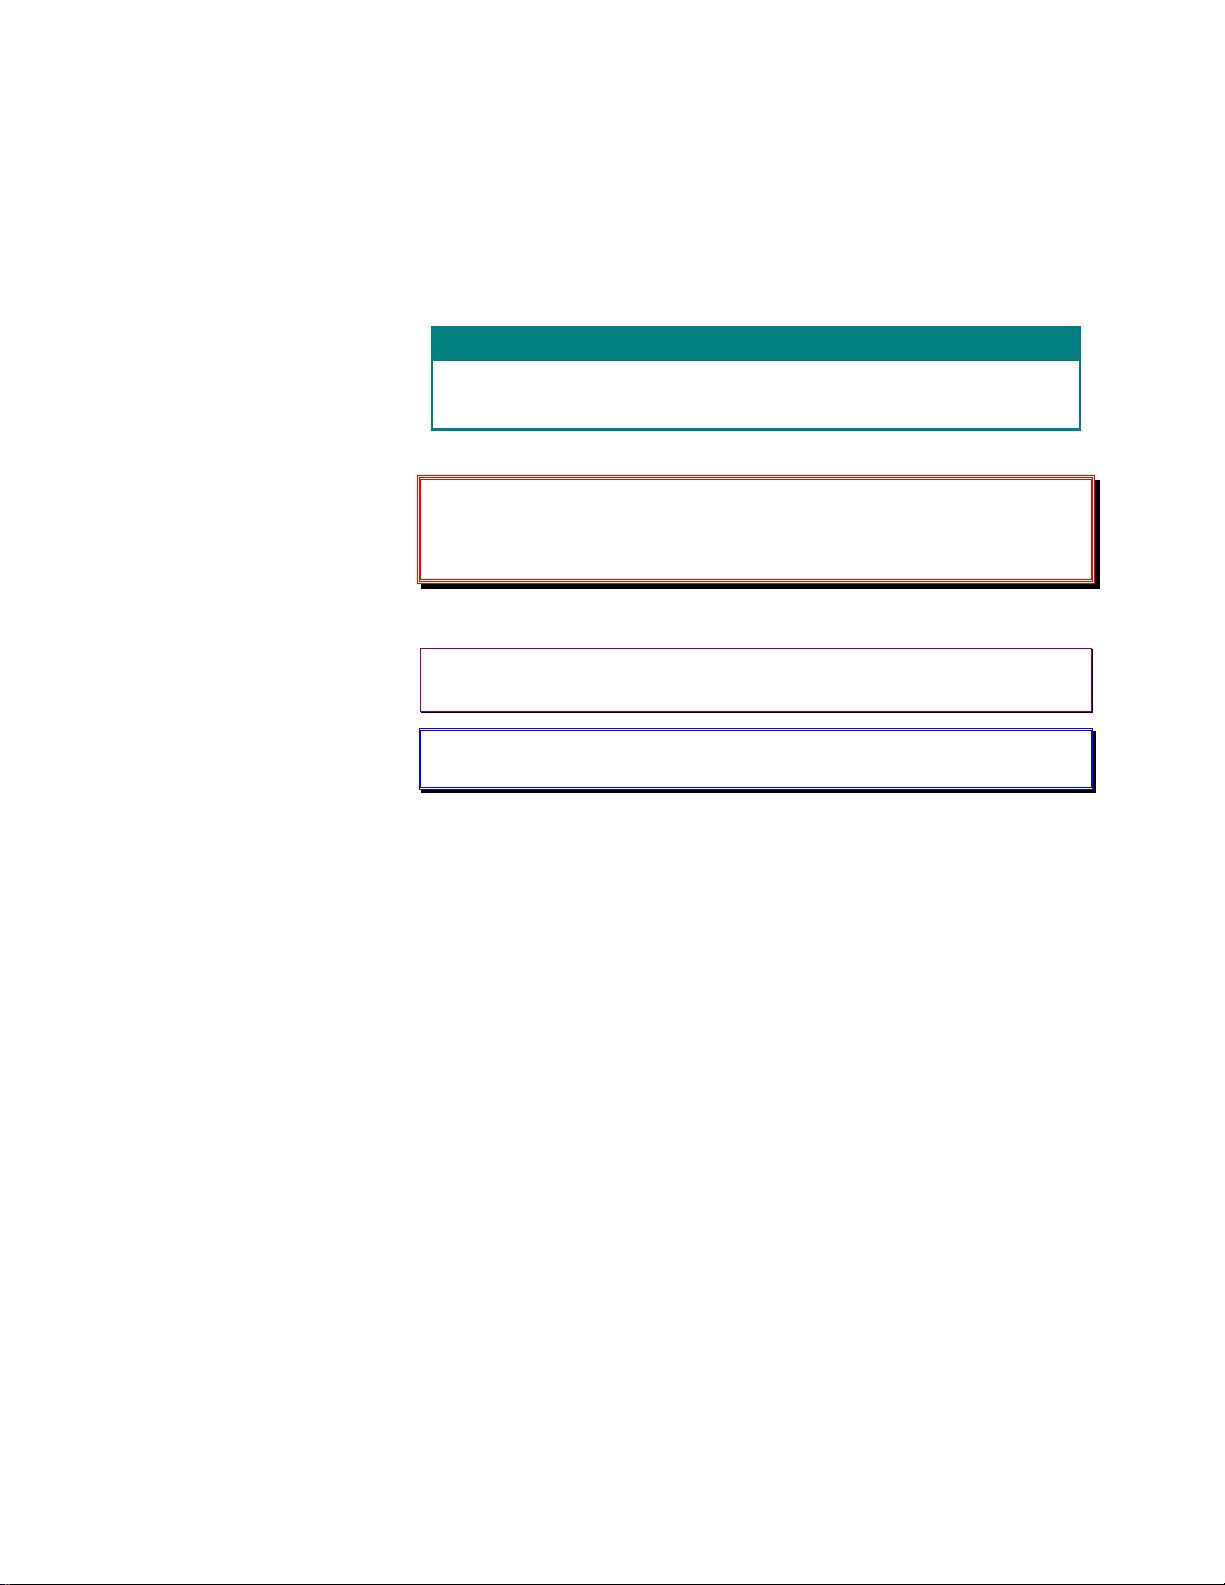
DOCUM ENT CO N VEN TIO N
This guide uses the following conventions when describing the use and
operation of this product.
Com ponent or Sequence Definition
Field Data
This box will describe each field in a definition screen.
› Warning: Text with this appearance suggests potential
problems or situations that you may encounter when
attempting to do something in the Admin Console.
¤ Note: Text with this appearance is a special instruction, rule,
or side comment related to the topic.
• Tip: Text with this appearance offers suggestions or hints to
make using the Admin Console easier.
6

Admin Console WHAT AND HOW
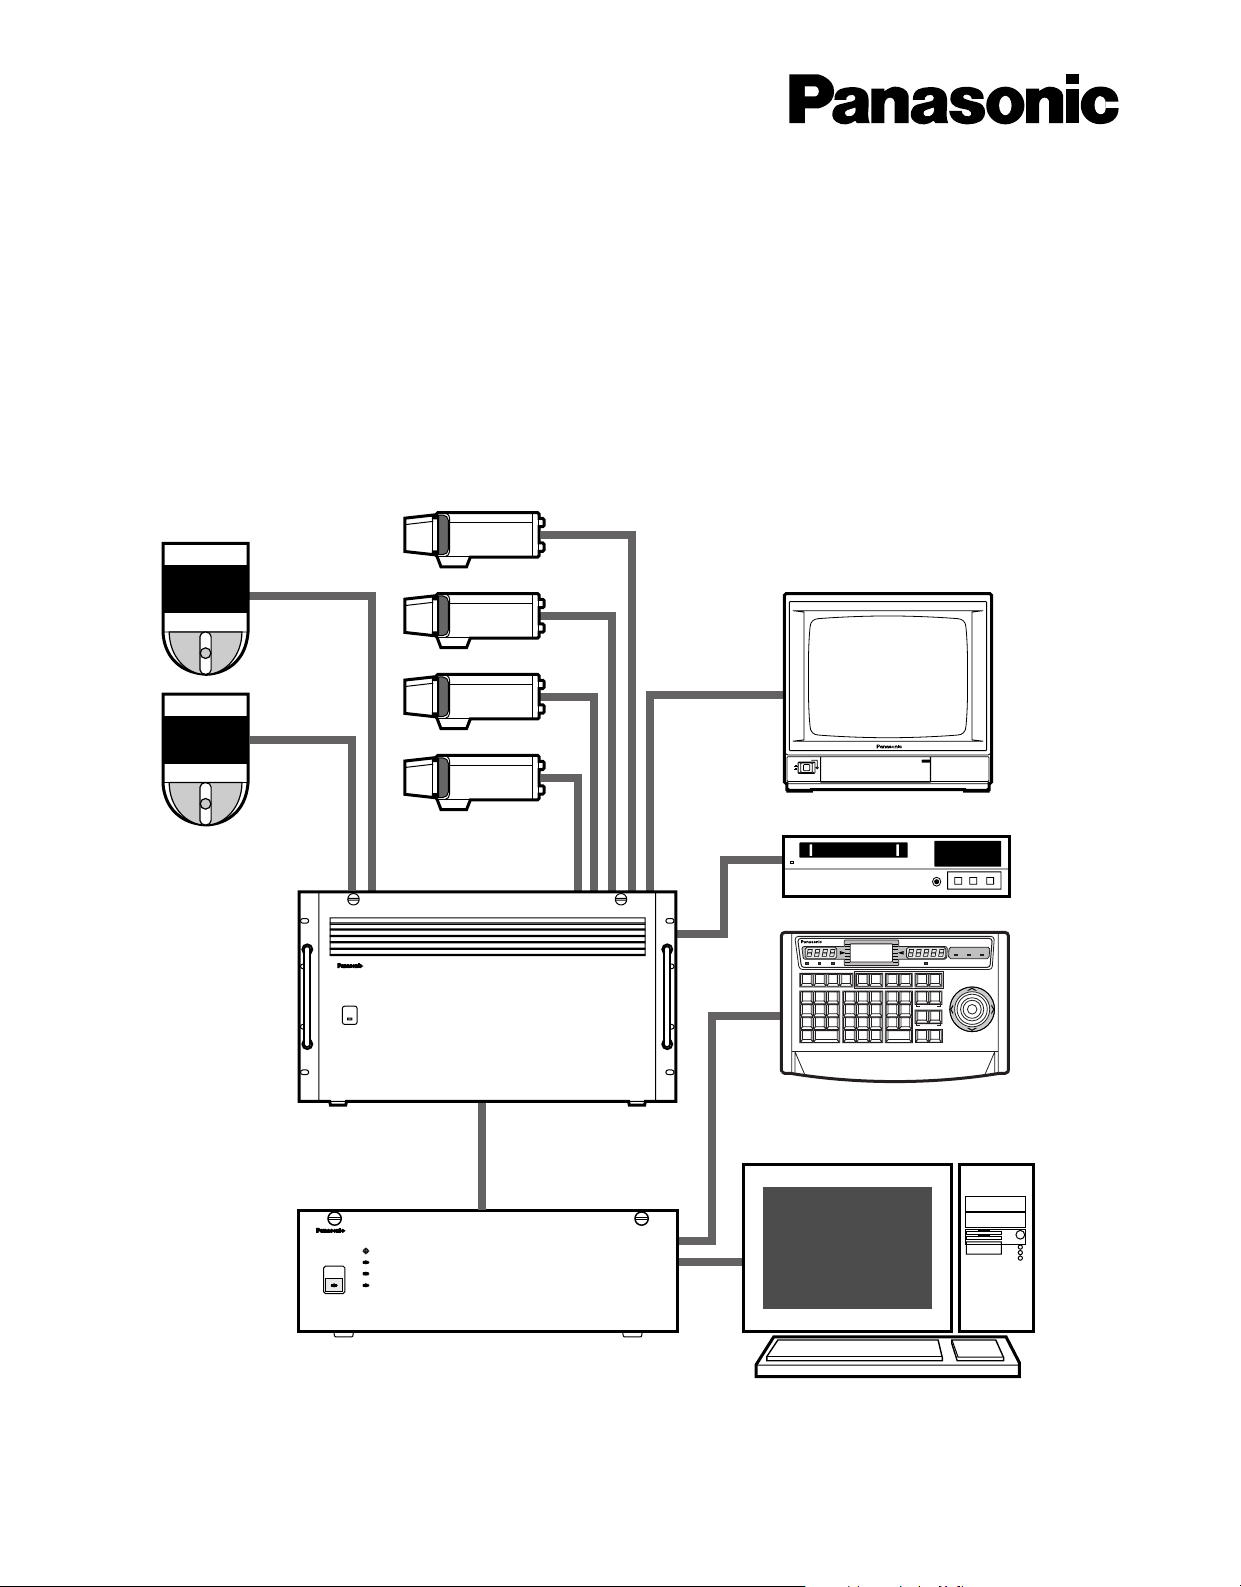
Admin Console enables an administrator and other users to closely
control the operation of a Surveillance Control System (SCS). Such a
system can include as many as 8,192 cameras and 1,024 monitors. You
will be guided through the process of installing the Admin Console to
manage an SCS, creating the databases that dictate the operation of the
SCS, and allowing an administrator to easily change the system’s
configuration when necessary.
WHAT IT DOES
Admin Console enables an administrator to utilize an SCS’s performance
capabilities to meet the surveillance needs of a facility during initial
installation, as well as when conditions change.
By Clock, Calendar, and Event
The SCS can be configured to help security personnel respond in different
ways using the Admin Console utility. For example, based on:
¤ Time of day - such as open to the public, closed, and after-
hours cleaning and maintenance.
¤ Night quiet time.
¤ Quiet day of the week - which would be a 24-hour period
of quiet time without any activity except security personnel
doing rounds.
¤ Special business activity - such as taking physical
inventory, restocking, and doing routine maintenance of
special equipment.
¤ Visits by celebrities, dignitaries, or officials, with or
without entourage - protective or otherwise.
In Response to Emergencies
The SCS can be configured using the Admin Console utility to allow for
quick responses to unexpected disruptions of normal activity that could be
caused by power, fire, police, health, or other emergencies.
7 Admin Console WHAT AND HOW

HOW IT WORKS
The Admin Console maintains tracking, reporting, and functional
relationships between the various components in a surveillance control
system.
Configuration Management
It is possible for the Admin Console to maintain several separate
configurations for a given system. They could be very similar or differ
greatly.
One configuration, for example, could be very different than the typical
configuration used, because its purpose may be to watch over a particular
activity, such as the taking of an equipment and supplies inventory when
the facility is closed to the public.
User Control
In addition to controlling individual cameras, the Admin Console
provides the user with selections from lists of presets and sequences.
¤ If the user chooses a preset, a group of monitors will
display a set of video outputs from a group of cameras at
preset positions.
¤ A sequence, on the other hand, is a self-generated series of
views - one of several cameras on one monitor (a Tour
Sequence) or of group presets (a Group Sequence).
Installation
Installing the Admin Console software only takes a few minutes and is
very simple to complete. Whether installing from a CD-ROM or floppy
diskettes, a series of Windows’ dialogue boxes guide the installation onto
the PC.
The subsequent task of configuring the software, once installed, can range
from modest, for a small system, to complex, for a very large,
complicated system, such as in an airport.
When it comes to security surveillance, all potential contingencies should
be considered when planning a system’s functionality. The Admin
Console is the tool that simplifies this process.
8

Admin Console INSTALLATION
Part of installing the Admin Console means copying program files from
either a CD-ROM or a set of floppy diskettes onto the hard drive of a
dedicated PC. The Admin Console is a tool that allows an administrator
to configure the SCS (Surveillance Control System) with information
compiled about components and users, and to use well-planned presets
and sequences.
PLATFORM
As with any PC application that must be reliable, Admin Console should
be the primary program running on the computer it is installed on. There
should be little other than Admin Console running on the same computer.
The PC used for Admin Console should have the following
characteristics:
Hardware Requirements
IBM PC or 100% compatible, Pentium-133MHz or higher, 16MB RAM,
20MB of available hard drive space for the installation of the Admin
Console, with additional space available for configuration database
(.adm) and log files.
In addition, the Admin Console PC must be equipped with an Ethernet
network interface card using the TCP/IP protocol.
Operating System Requirements
¤ Microsoft Windows 95 OSR 2, 98 SE, NT 4.0, 2000
Video Display Setting Requirements
¤ 256 colors or higher
¤ 800 x 600 resolution
9 Admin Console INSTALLATION

FR O M DISK ETTES
1111.... In s e rt d isk e tte 1 in to th e fl oppy dr ive.
2222.... From th e W indow s’ St ar t m enu, select Run.
3333.... Type a:\setup, t hen cl ick O K or pr ess t he Ent er key.
4444.... R espond to t he dial ogue boxes th a t appear by follow ing the
dir ect i ons gi ven.
5555.... Rem ove each disket t e w hen prom pted, and re p l ace it w ith th e
next one.
The last diskette asks you to click Finish in order to complete setup.
FR O M CD-ROM
Insert the CD-ROM program disk into the CD-ROM drive on your
computer. The Admin Console program will begin installing
automatically. Respond to the dialog boxes by following the directions
given.
WHAT TO DO NEXT
The next section will guide you through the phases involved with the
setup and configuration of the Admin Console.
10
Admin Console CONFIGURATION
The tasks covered in the Installation section, beginning on page 9,
must be completed before attempting to configure the Admin
Console.
The Admin Console configuration is a three-step process:
¤ Mark copies of drawings of the facility under
surveillance.
¤ Fill in the appropriate worksheets provided at the end
of this manual. (This will result in a survey of all the
components in your system, and how they interact with
one another.)
¤ Enter the values collected on the worksheets into the
Admin Console. (The values entered determine the
operation of the Surveillance Control System (SCS) in
complete detail by creating relationships among all of
the components, including the users.)
Once existing copies of the facility’s drawings are marked, there is a basis
for assigning logical or area/local numbers, titles, and practical names for
the various components of the surveillance system. With this information,
you can then continue with the Admin Console worksheet tasks indicated
below.
W O RK SH EET TASK S
The Admin Console worksheets aid in the collection and organization of
information needed to configure the SCS. One person can complete all of
the worksheets in a smaller system, but to speed up any installation,
consider assigning a team of several individuals to complete different
worksheets concurrently.
Perhaps the surveillance system you are working with is small enough for
you to collect the required information, and input those values directly on
to the Admin Console screens.
11 Admin Console CONFIGURATION

However, if the system is more complex, it is best to gather and write
down the information needed for the initial configuration of Admin
Console.
If settings need to be modified or updated in the future because of a
change in surveillance needs, or changes made in the components of the
system, the worksheets can be used to track past, current, and to-be
configurations. The worksheets make it very easy to do this, regardless of
the size of your system.
As with any system configuration, it is wise to keep initial and updated
worksheets on file, just in case there is ever a need to re-enter the data, or
troubleshoot the system.
IN STRU CTIO N S
The title of each worksheet is the same as the title of the Admin Console
window it supports. For example, the “Operators” worksheet supports the
“Operators” window. The fields that need to be filled in on the various
Admin Console windows correspond to the sequence presented on the
worksheets.
1111.... R eproduce th e w ork sheets supplied with t he system .
You may only need a single copy of a certain worksheet, but dozens of
copies of others, depending on the size and components that make up
your surveillance system.
Copy pages from the actual worksheets located in the back of this manual.
CHECKLIST
Worksheets are arranged alphabetically to make them easy to find.
However, the checklist below indicates a workable sequence for
completing them.
For a team approach to information collection, use best judgment to
decide how to distribute the worksheet among several individuals.
q SCS-CPU Setup
q Matrix Frame
q Cameras
q System Controllers
q Monitors
q Alarm Input/Output
q Operators
q Tour Sequences
12

Admin Console CONFIGURATION
q Camera Presets
q Group Presets
q Group Sequences
q Alarm Definition(s)
q Alarm Target Definition(s)
q Alarm Target Assignment(s)
q Camera -to- Monitor Permission(s)
q Controller -to-Camera View Permission(s)
q Controller -to-Camera Control Permission(s)
q Controller -to-Monitor Permission(s)
q Controller -to-Group Sequence Permission(s)
q Controller -to- Alarm IO Permission(s)
q Controller -to- Alarm Permission(s)
q Operator -to- Controller Permissions
q Event Scheduler
13 Admin Console CONFIGURATION
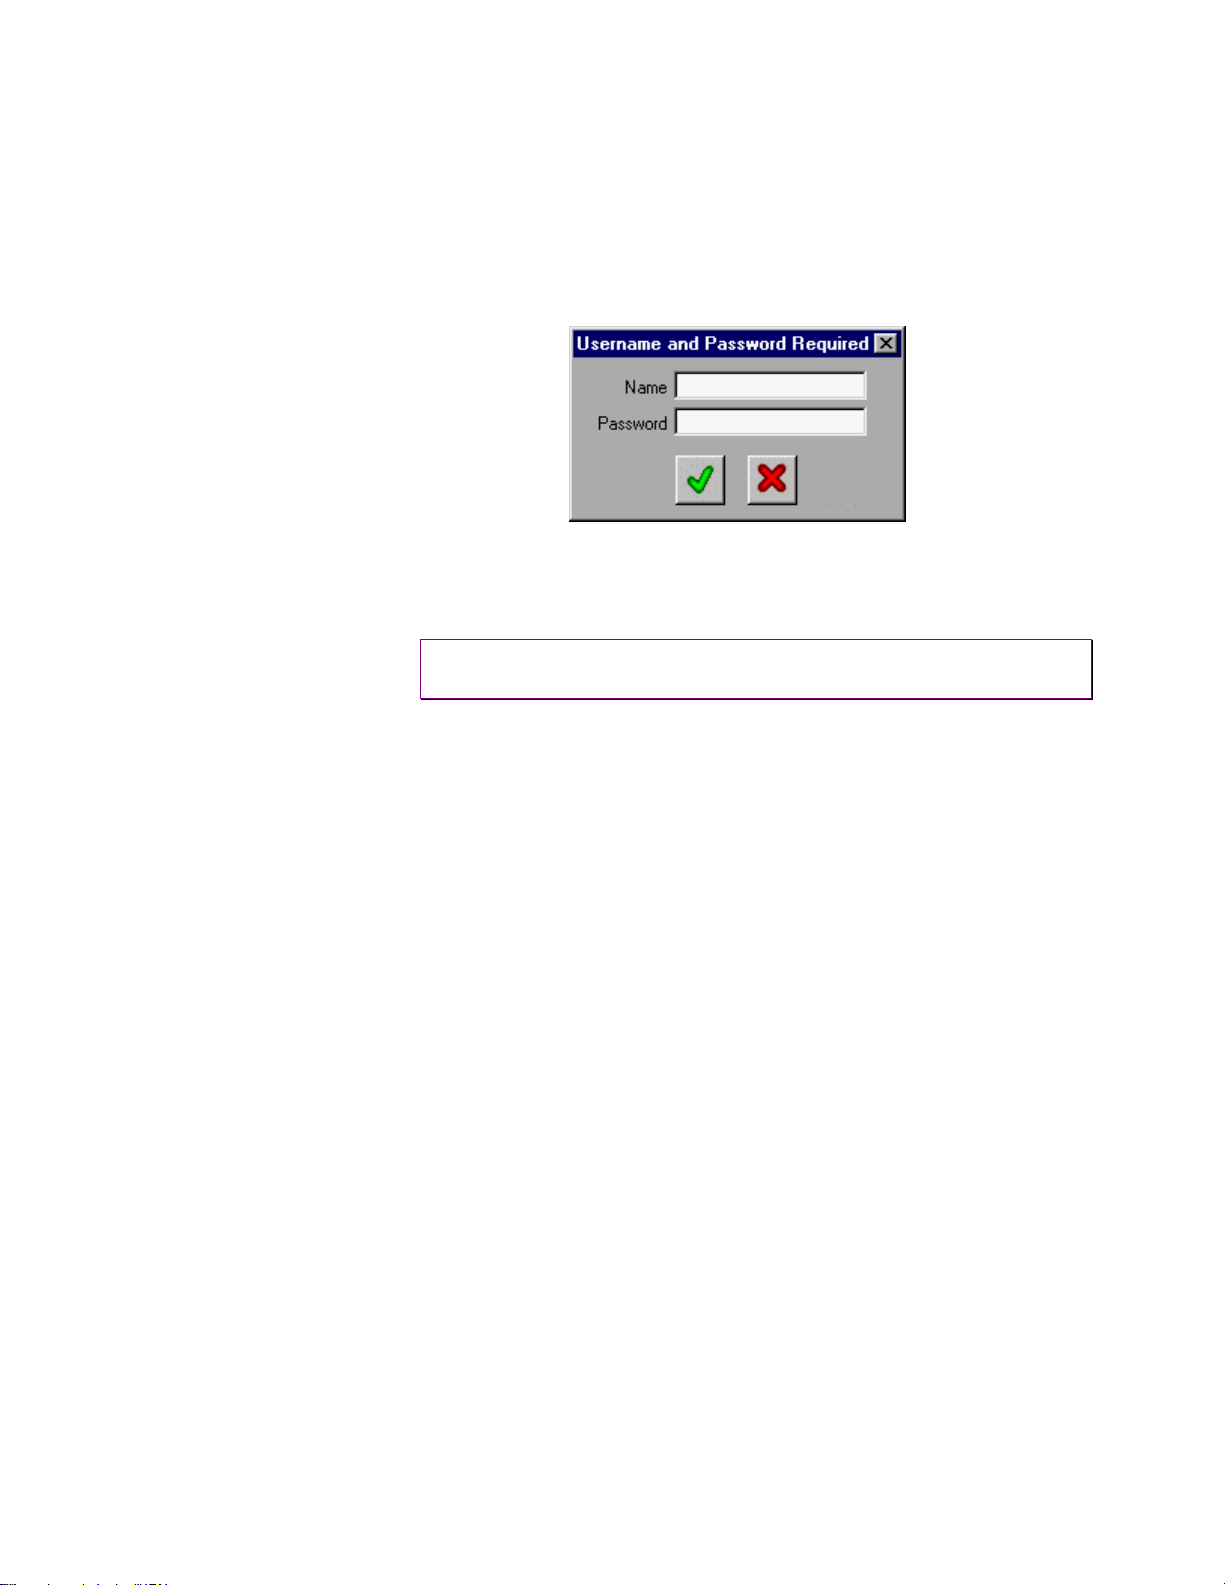
LOGIN
When running Admin Console after having installed it, and each
subsequent time that it is run, this login screen will appear.
Enter the user login name (default = admin) and user password (default =
sx850) to open the application.
¤ Note: Both the user login name and password fields are case
sensitive.
It is recommended that after entering the Admin Console the first time,
that the user login name and password are changed from the defaults, in
order to control administrative access.
During the configuration, add user names and passwords at various access
levels as needed. See the Account Manager section.
14

Admin Console CONFIGURATION
FIRST-TIM E OPERATION
CPU Setup
When Admin Console is run the first time, the following window will
appear after you enter the default login name and password.
On this window you must match the CPU configuration in the software
with the actual CPU running the SCS.
1111.... Enter th e IP addr ess f or the Main A CPU.
Ask your installer or network administrator for the IP address for the
Main A CPU. This will let the Admin Console software know where to
load the configuration database, when initiated later.
2222.... If your system is equipped w ith a redundant CPU, the n
check t he “R edundant” box and e n te r th e IP addr ess
fo r the Main B CPU.
15 Admin Console CONFIGURATION
Ask your installer or network administrator for the IP address for the
Main B CPU. If the system has just a single CPU, leave the redundant
check box blank. The Main B CPU IP address will not be required.
3333.... Click th e gr een check mark to save th is s e ttin g .
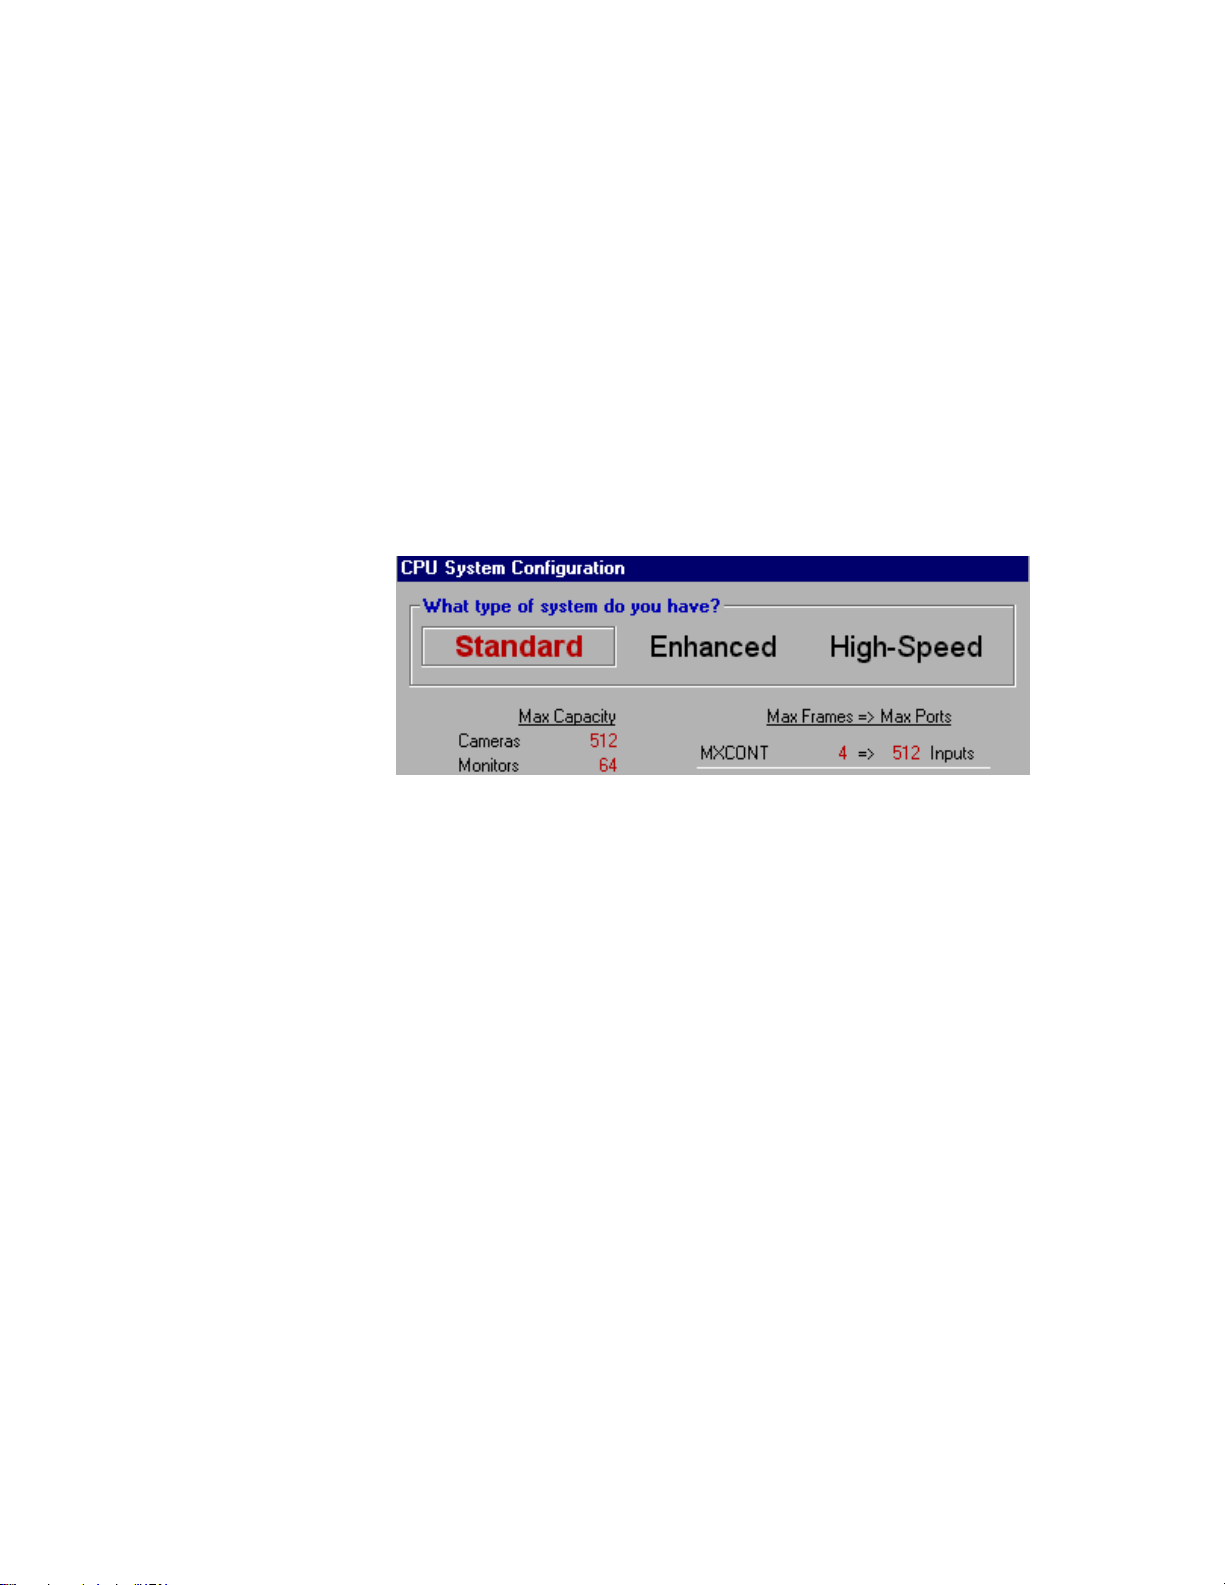
4444.... Decide on the operational m ode fo r th e SCS CPU.
Click the “Size” tab on the right side of the CPU System Configuration
window. This is where you will specify the size of your CPU. As you
click on Standard, Enhanced, or High-Speed, each will display its
maximum capacities. The maximum capacity is the largest supported
number of each of the components listed. You must match the MCPU
capacity with the capacity in this window.
Standard
If any of the components in your system exceed the maximum capacity
listed, you must choose the next highest system type. For example, if the
number of each of your system’s components are less than the maximums
listed for “Standard”, but you have 65 monitors, you would need to select
“Enhanced” as your system type.
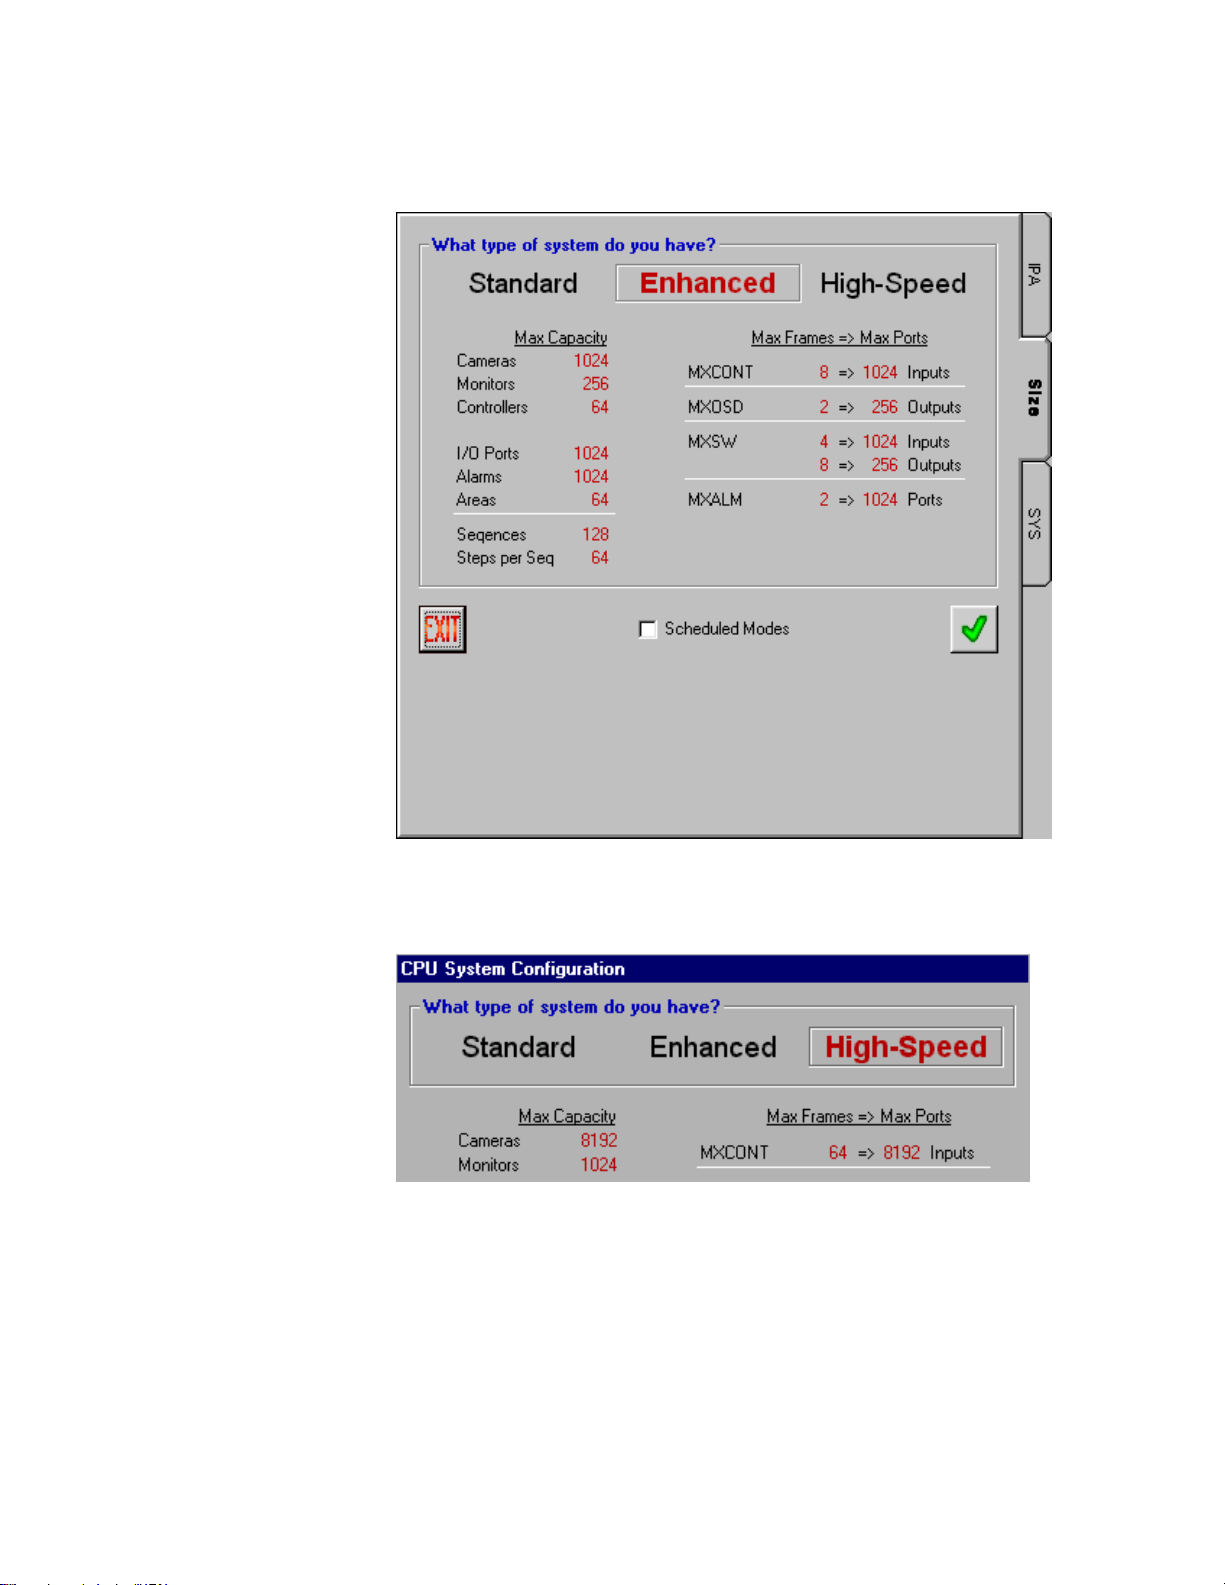
Enhanced
This is the next SCS CPU type available. Using the Enhanced CPU type
will increase the capacity of the system. This can be chosen as long as
your system MCPU is the correct version for this type.
16
Admin Console CONFIGURATION
High-Speed
This is the largest CPU type available, providing the capacity for handling
the largest number of components.
5555.... Click on Standar d, E nhanced, or High-Speed, and th e n
click the gr een check mark to save.
6666.... You can t hen click on the EXIT button to leave th i s
window .
17 Admin Console CONFIGURATION
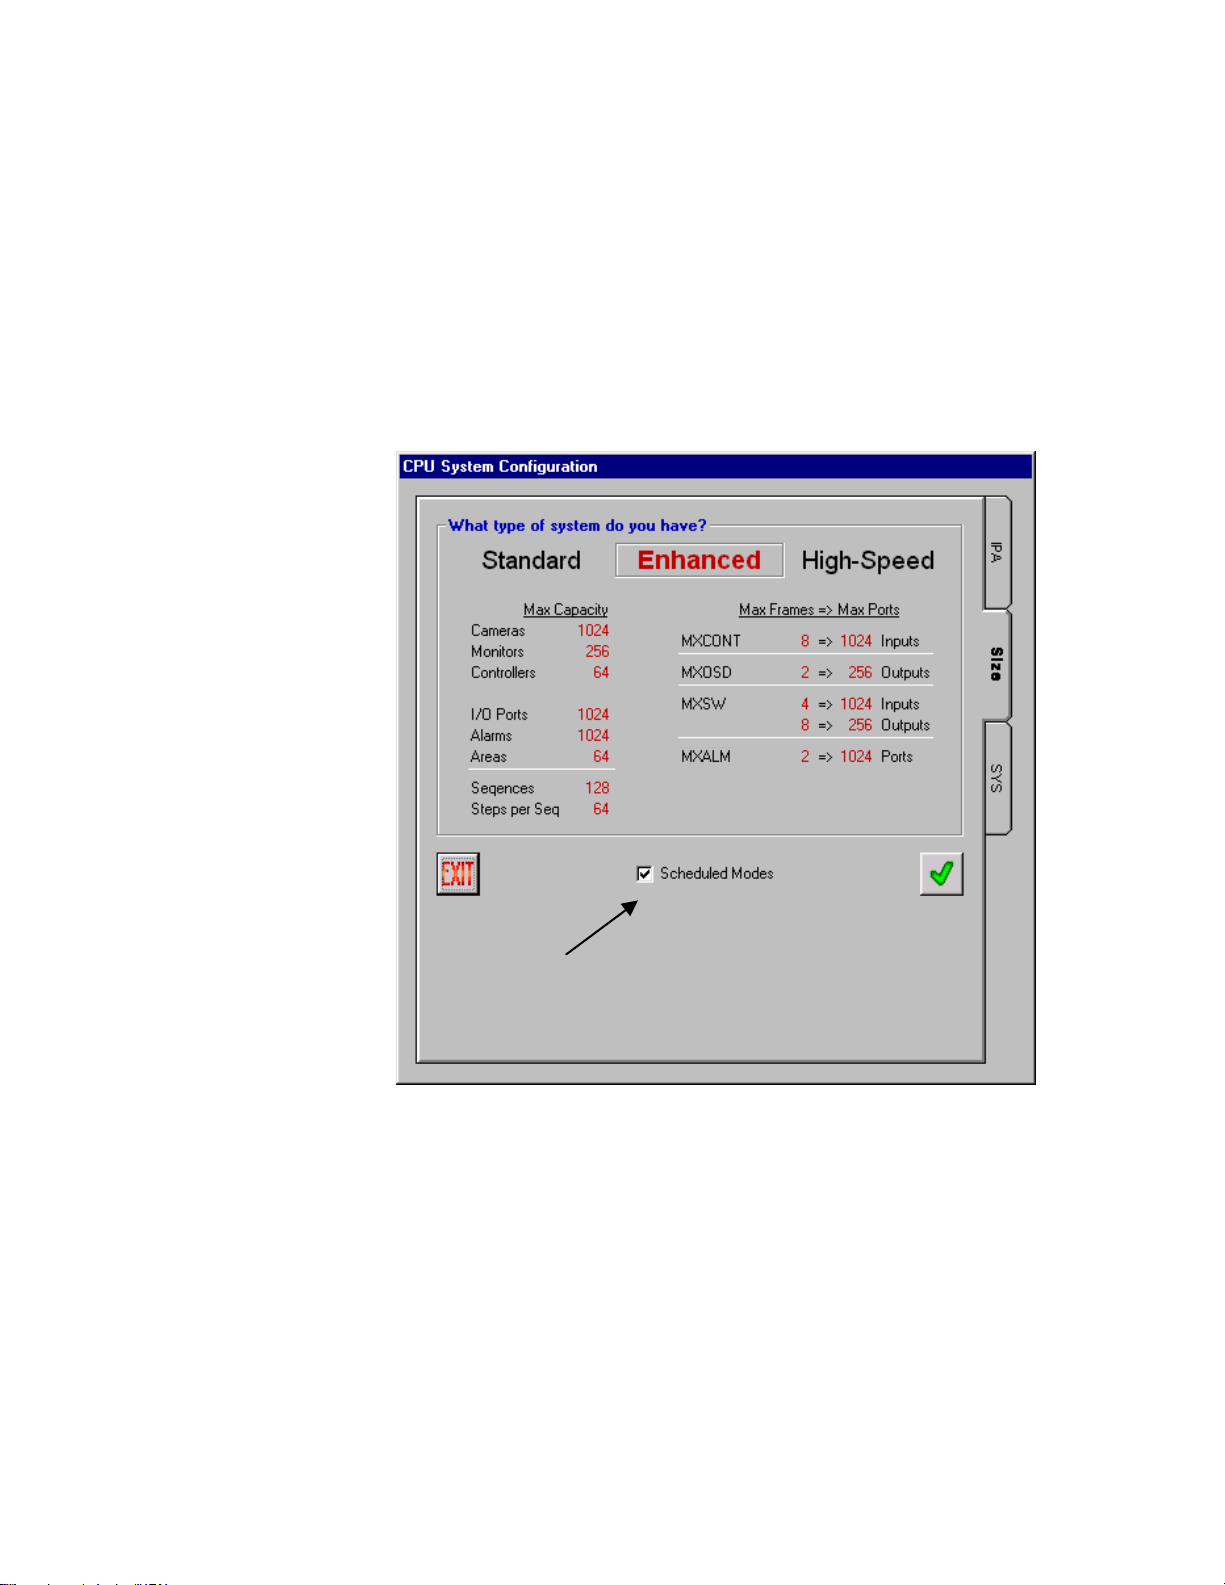
Scheduled Modes
If the Scheduled Modes check box is selected on the CPU System
Configuration window’s “Size” tab, an administrator can configure up to
four different modes of operation that can then be scheduled to become
active as desired. The configuration of these modes are programmed, or
set by an administrator during the configuration of the system’s
components through Admin Console.
18
Admin Console CONFIGURATION
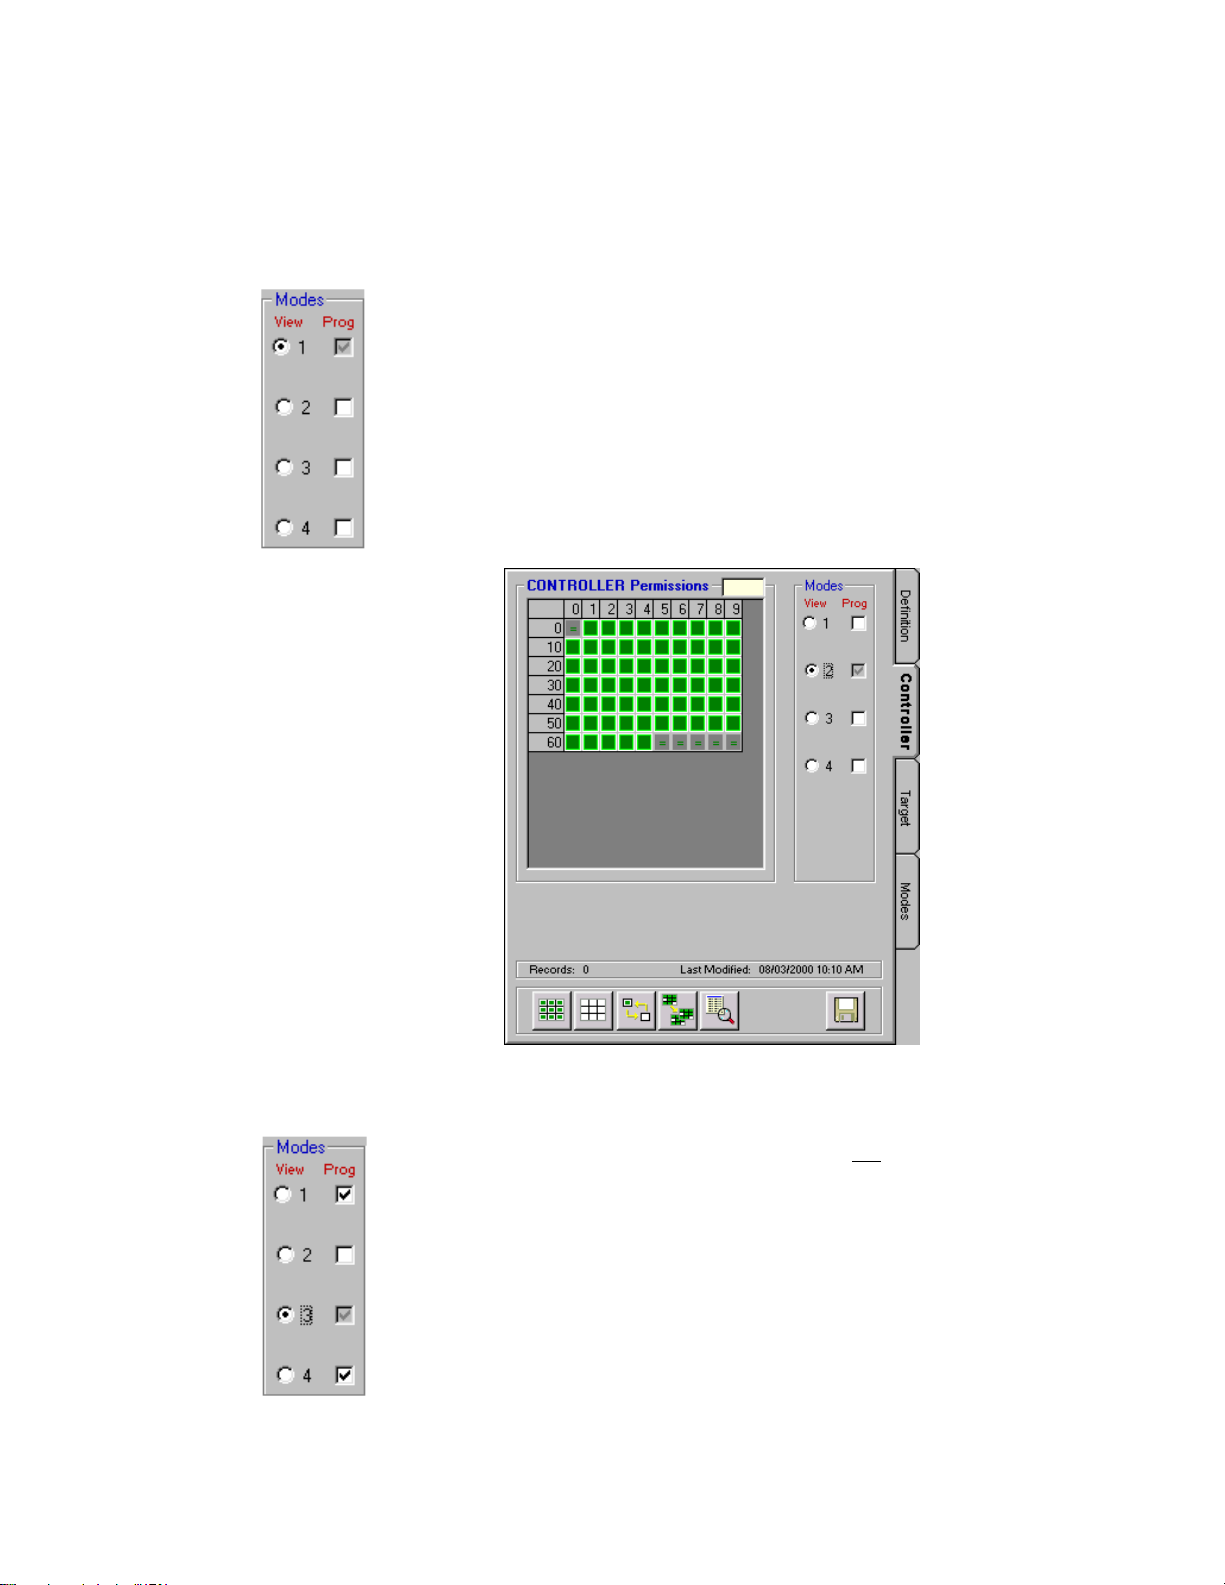
VIEWING AND PROGRAMMING
In each of the components’ permissions tabs that contain a section like the
one shown to the left, modes can be viewed and programmed.
Clicking the View option button allows you to view permissions for the
mode chosen, and defaults to programming for the same mode. In the
case of the graphic to the left, mode 1 is set for viewing, and thereby
programming.
The permissions grid reflects the contents of the mode whose view is
selected with the View option button. In the image below, the permission
grid is displaying the contents of mode 2.
More than one mode can be programmed at the same time by clicking on
the Prog check boxes of the other mode numbers that you wish to
program simultaneously. This will append, or add any permissions that
are then changed on the permissions grid, but will not duplicate entire
modes or overwrite existing permissions in the other modes.
The image to the left indicates that the permissions grid would now be
displaying the contents of mode 3 (which is also by default being
programmed), and would simultaneously be programming any subsequent
changes into modes 1 and 4 as well.
It is not necessary to perform a Save for each mode viewed or
programmed. Saving permissions, when completed, automatically saves
all four modes, regardless of the current View or Prog selection.
Permissions are described on page 47.
19 Admin Console CONFIGURATION
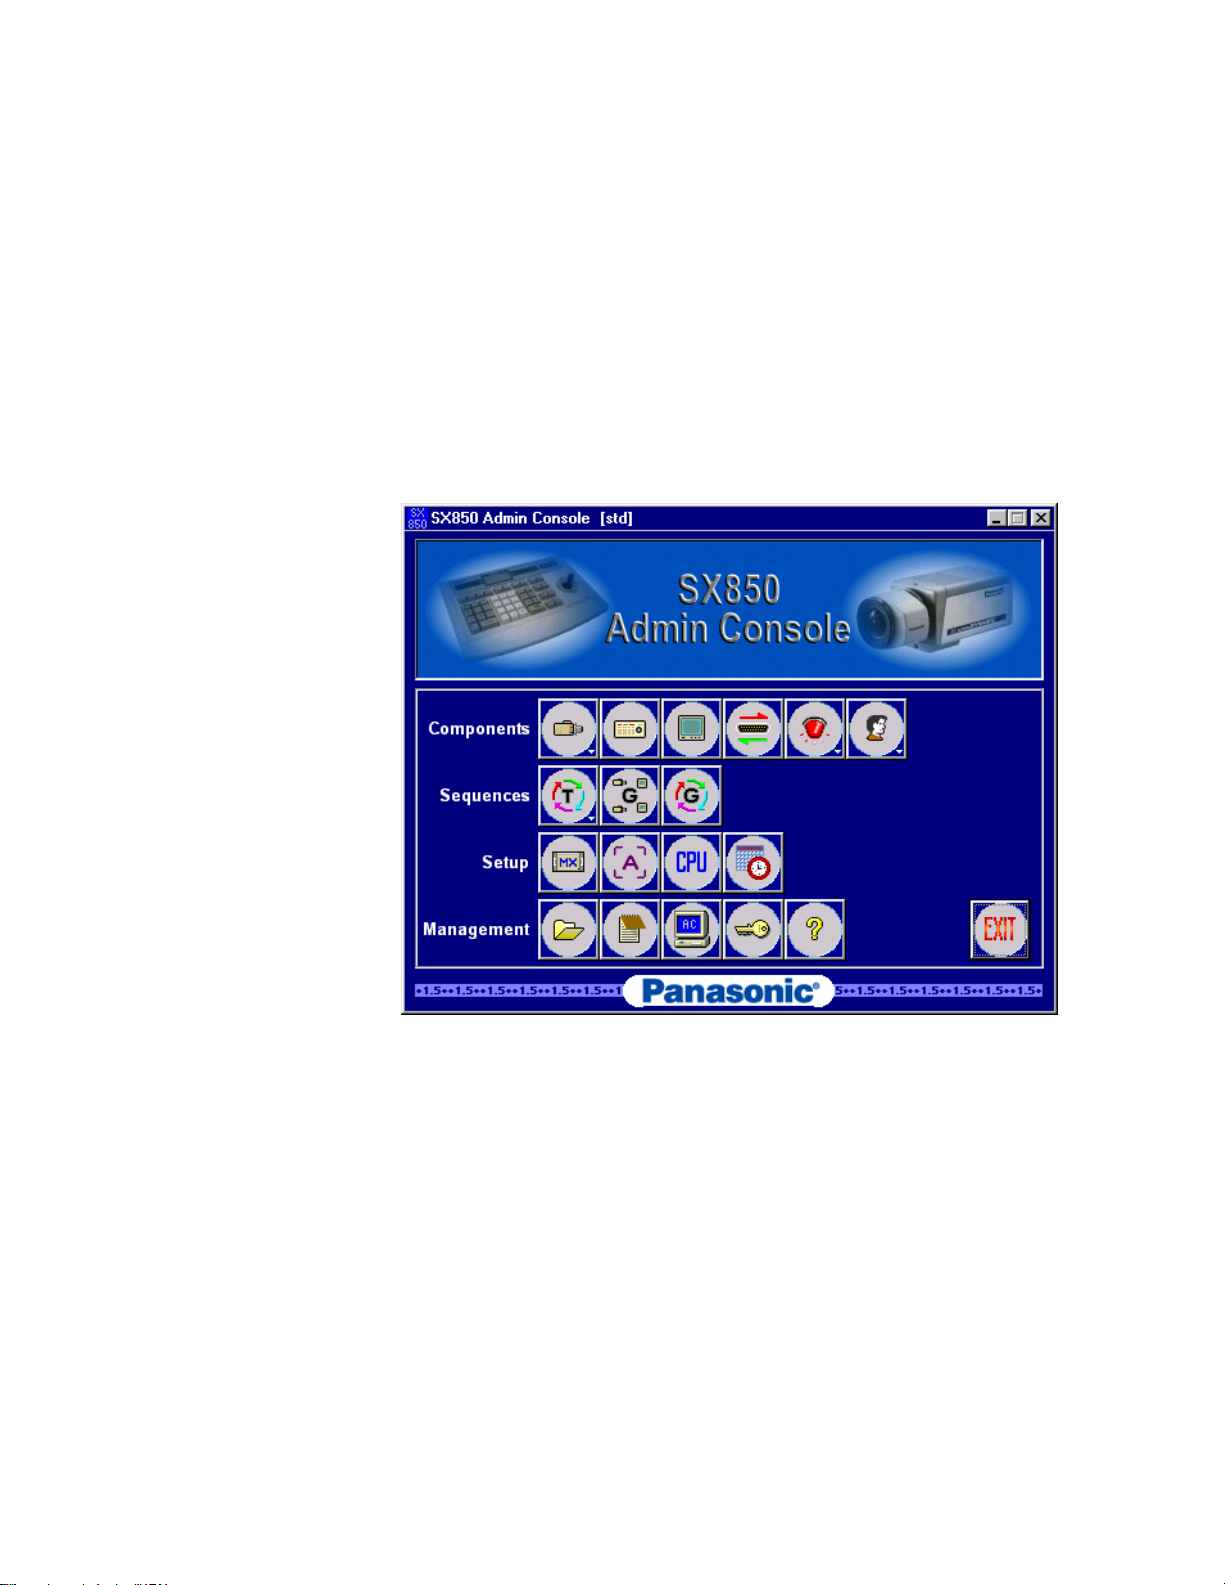
MAIN MENU
After entering the CPU IP address, selecting your system’s size, and
exiting, the following window will appear, which is the Admin Console
main menu. This window will be the first one you see from now on
whenever you enter the Admin Console.
The main menu is the heart of the Admin Console configuration software.
Each component, sequence, setup, and management task will be accessed
from this main window.
Each section will be utilized in order to configure and maintain the SCS.
To view information about this application, such as the version of the
software, click on the Panasonic logo. An “About” window will appear.
20

Admin Console CONFIGURATION
DATABASE MANAGEMENT
The active database for this system is the one residing within the
Surveillance Control System (SCS). Admin Console is used to create that
database initially, and from that point forward works with copies of it in
order to establish and maintain useful variations.
AT INSTALLATION
When Admin Console is first installed, an administrator must create and
name a new database. The database is stored on the Admin Console
computer’s hard drive.
The administrator then enters all the information available about frames,
components, users, and sequences, and saves these details into the
database using the Database Manager.
See Create a Database on page 22 for initial and subsequent database
creations.
21 Admin Console CONFIGURATION

Database Archive
The Database Archive section of the Database Manager window is where
each configuration file (database) is manipulated. Several functions that
can be performed with the configuration files are selecting, creating,
copying, renaming, or deleting.
This section also includes options to backup or restore a configuration file
to or from removable media or an alternate location, such as a floppy
diskette or network drive.
Select
New
Copy
Rename
Delete
Restore
Backup
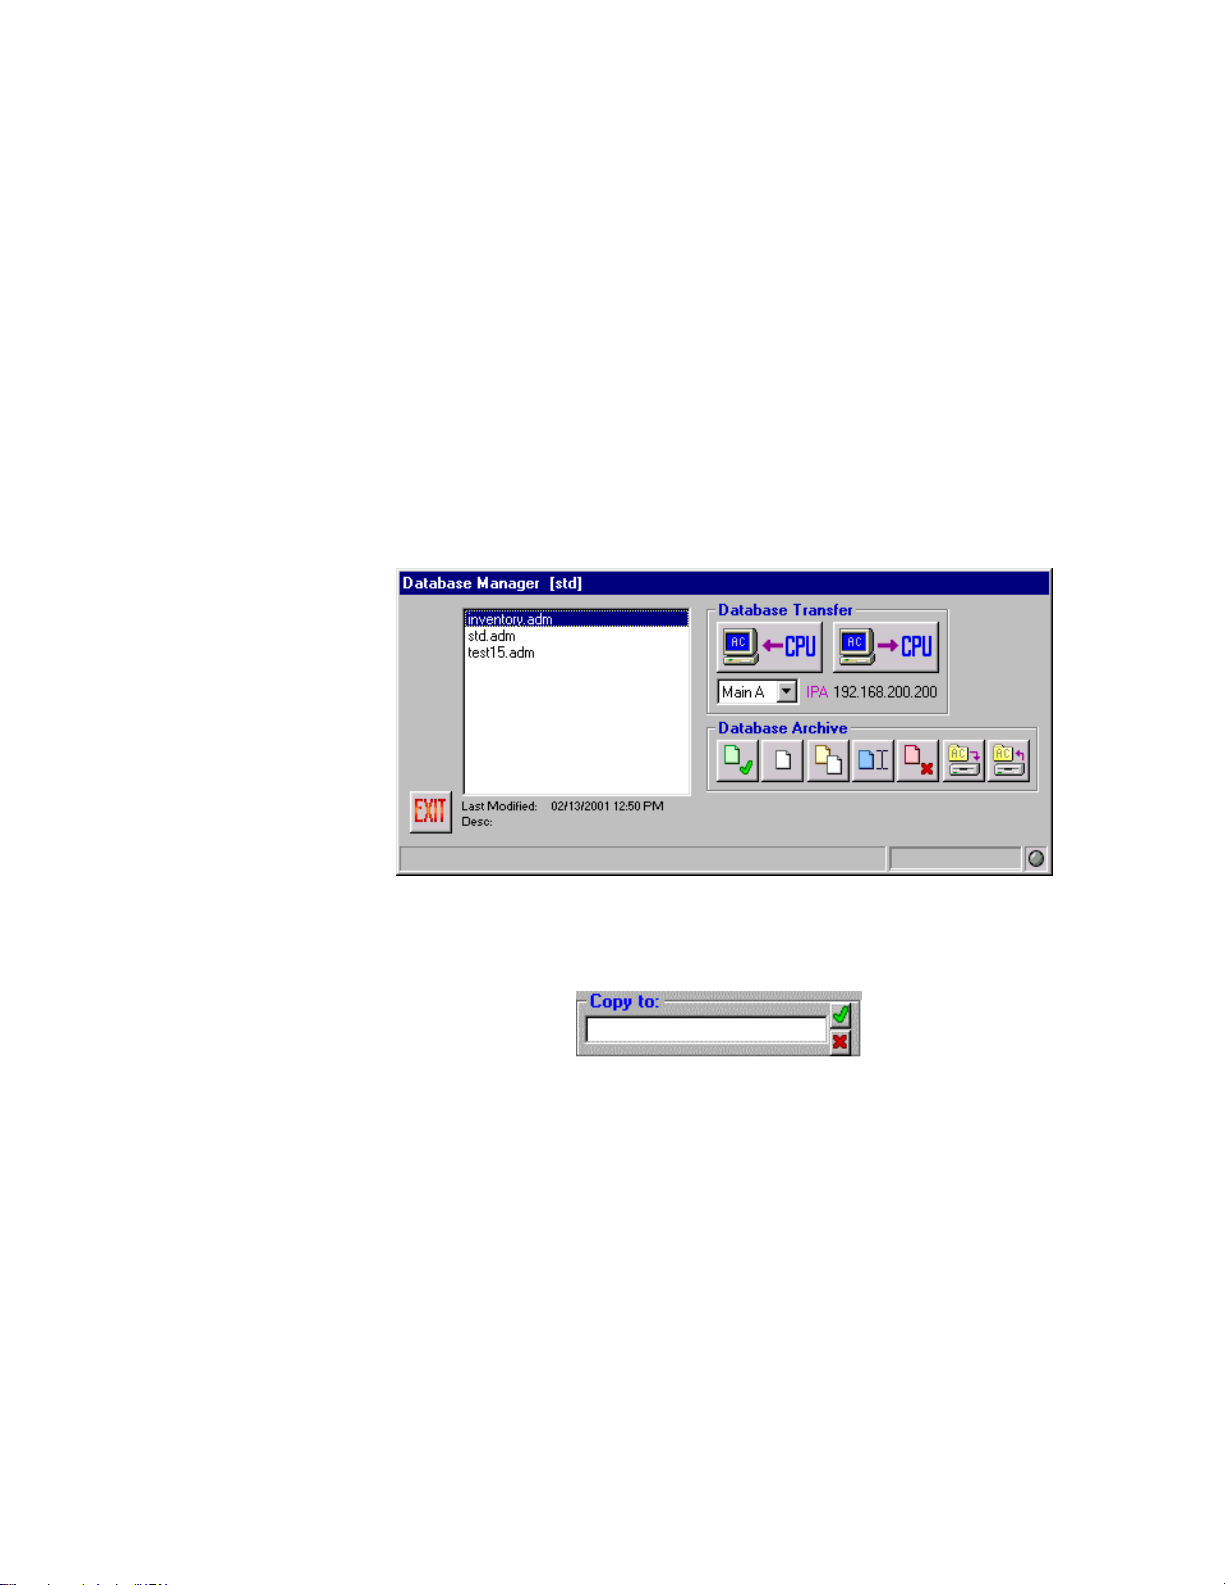
Create a Database
Database Manager is entered into by clicking the first icon on the
“Management” row of the main menu – the picture of the open folder.
When entering Database Manager for the first time, there will not be
any .adm files listed, as none have yet been created. An administrator
must create and name a new database for configuration.
1111.... Click on t he D atabase M anager but t on on th e main
menu.
2222.... Click on t he “N e w ” bu tto n – th e 2nd button under t he
Database Ar chive section.
22

Admin Console CONFIGURATION
3333.... Type in a new nam e fo r the new database in th is fie ld
4444.... Click th e gr een check mark.
Enter any name that fits in the space provided. It is best if the name is
practical, and easy to understand by anyone using the system. You will
be returned to the main menu after naming the database.
This database will reside in the Admin Console. Adding and saving
information about the components and desired operation of the system
will configure it.
Select a Database
VIEWING AND RECONFIGURING
Whenever you wish to view or edit settings from the components,
sequences, or setup choices on the main menu, you must have the
database whose contents you wish to work with open. If you have just
entered Admin Console, and click on one of those options, you will
automatically be prompted to select a database. The database you choose
will open, and will immediately be followed by the option window you
have chosen. The database you select becomes the default database for
all settings until you go back to Database Manager to choose or create a
different one.
1. Highlight th e nam e of a database.
2. Click th e Select button - th e 1st button under t he
Database Ar chive section, or double clic k on th e
desire d database.
23 Admin Console CONFIGURATION
When changing the database you are working with, Admin Console will
open the selected database, making it the default, and will close the
Database Manager window. You will be returned to the main menu,
ready for the configuration or review of the database you just selected.
Copy a Database
MAKING SIMILAR OR ALTERNATIVE DATABASES
An administrator can make copies of a database, as desired, and name
them to reflect their purpose. This would normally be done to enable the
system to respond to changing conditions and surveillance needs without
having to completely recreate a database to accommodate these changes.
1. Highlight the nam e of the database you w i sh t o copy
in th e Database M anager window .
2. Click th e Copy button - the 3rd button under t he
Database Ar chive section.
3. Nam e the copy in the space pr ovided
4. Click th e gr een check mark.
Enter any name that fits the space provided. It is best if the name is
practical and easy to understand by anyone using the system.
24
Admin Console CONFIGURATION
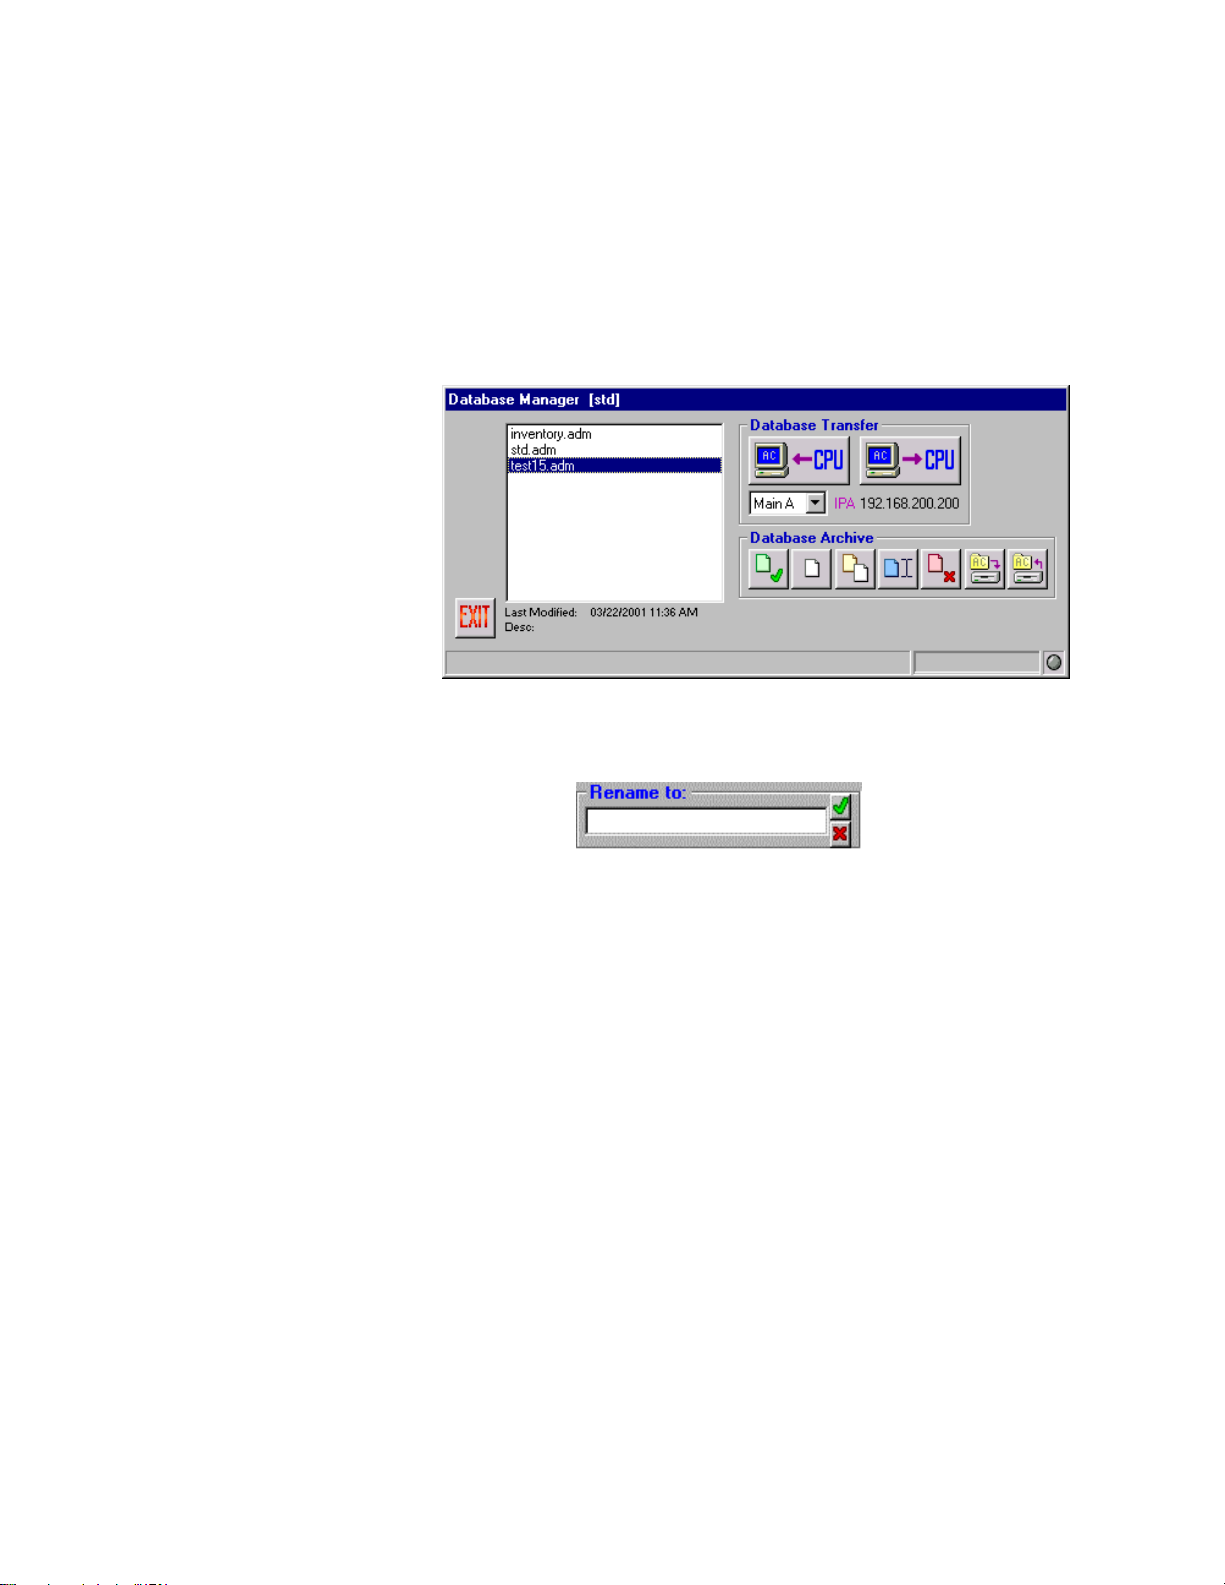
Rename a Database
Renaming a database is useful when creating several configurations to fit
the needs of specific occasions, and changing the name to ensure each file
has been updated. For example, if date codes or initials are used in the
name or description of a database, an administrator may want to revise
the date code or user initials as necessary.
1. To r enam e a database, highlight a database nam e.
2. Click th e Renam e button - th e 4th button under t he
Database Ar chive section.
3. In t he “ Renam e to : ” box, ty p e th e n e w nam e desi red.
4. Click th e gr een check mark
Delete a Database
In order to reduce the number of configuration files listed in Database
Manager, and thereby decrease the potential for confusion as to which file
is loaded on the SCS CPU, outdated or unused configuration files can be
deleted. If the files may be needed again in the future, it is recommended
that you backup the files to an alternate location (see page 26), so they
can be deleted from the Admin Console, and restored later if necessary.
25 Admin Console CONFIGURATION
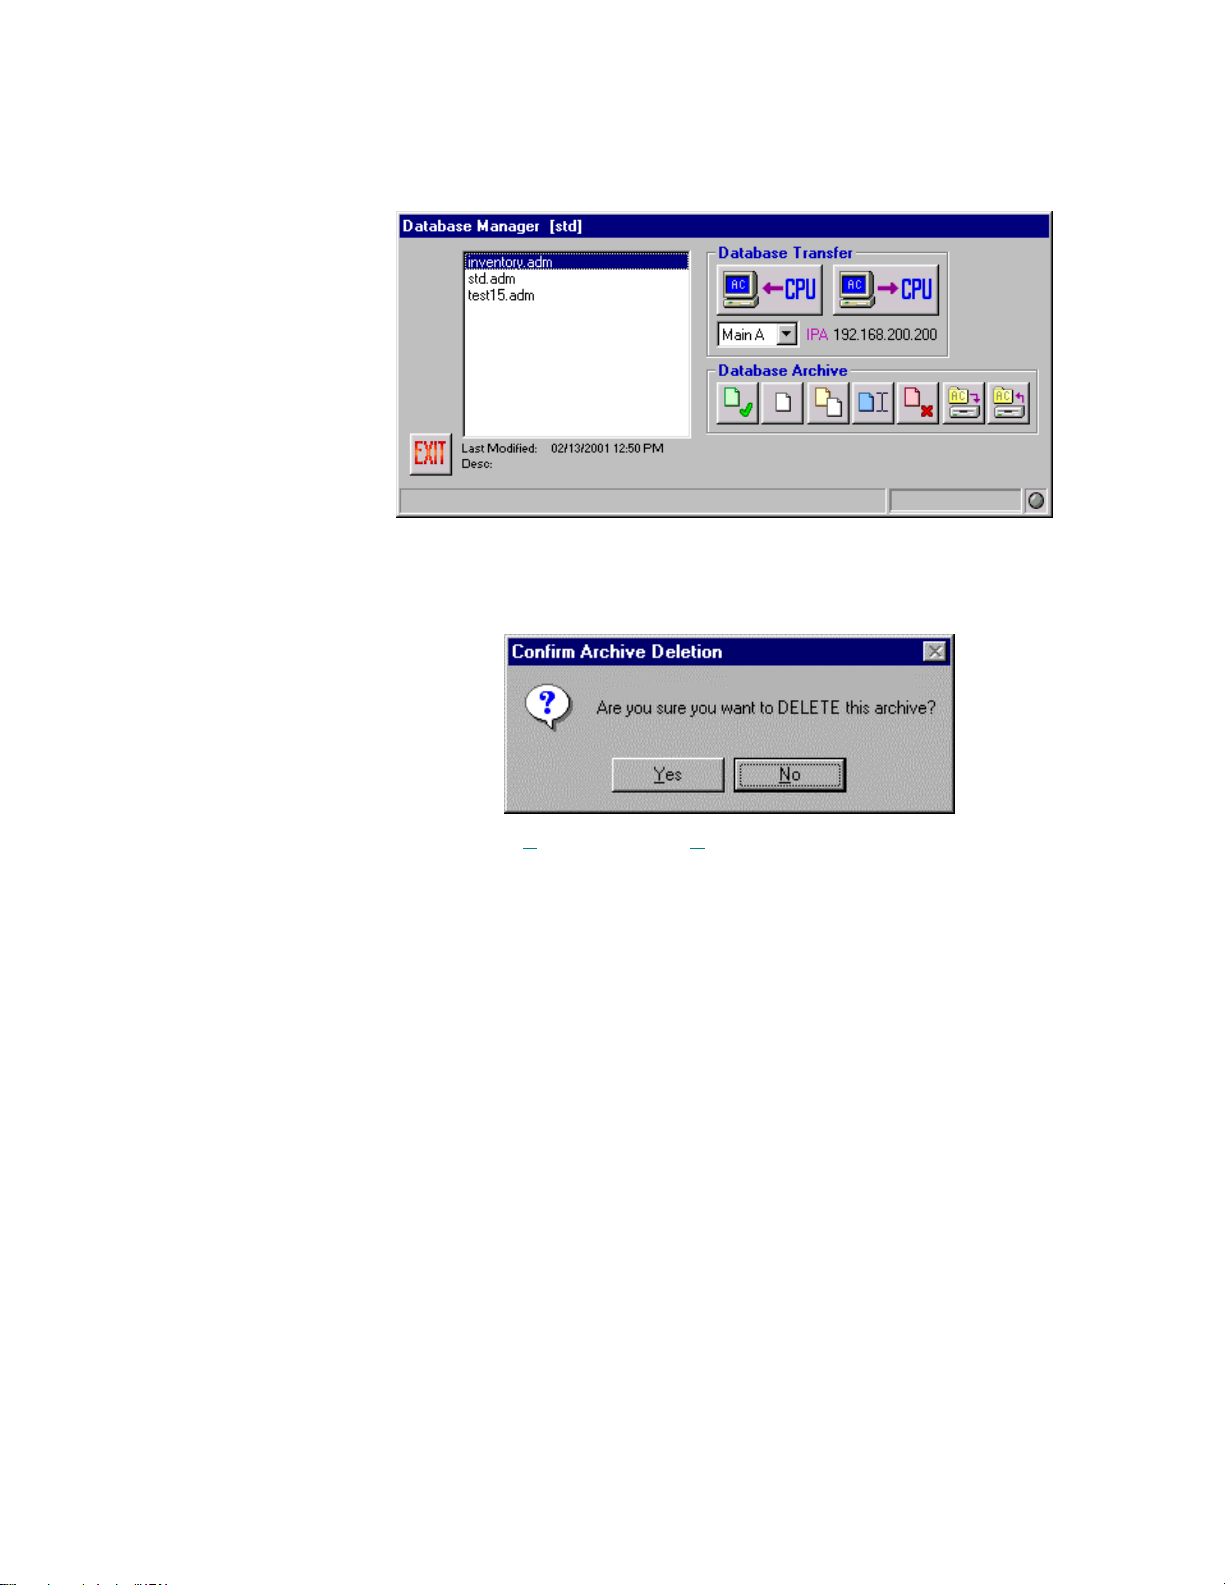
1. To delet e a database, highlight t he dat abase nam e.
2. Click th e Delete button - th e 5th button under t he
Database Ar chive section.
The following confirmation message will appear:
3. Click Yes t o delete, or N o to cancel.
Backup or Restore a Database
It may be necessary at times to save a copy of a particular database for
backup, e-mail, troubleshooting, or other purposes. The Admin Console
allows an administrator to perform both backup and restore functions in
order to maintain copies of the configuration files outside of the Admin
Console system.
26
Admin Console CONFIGURATION
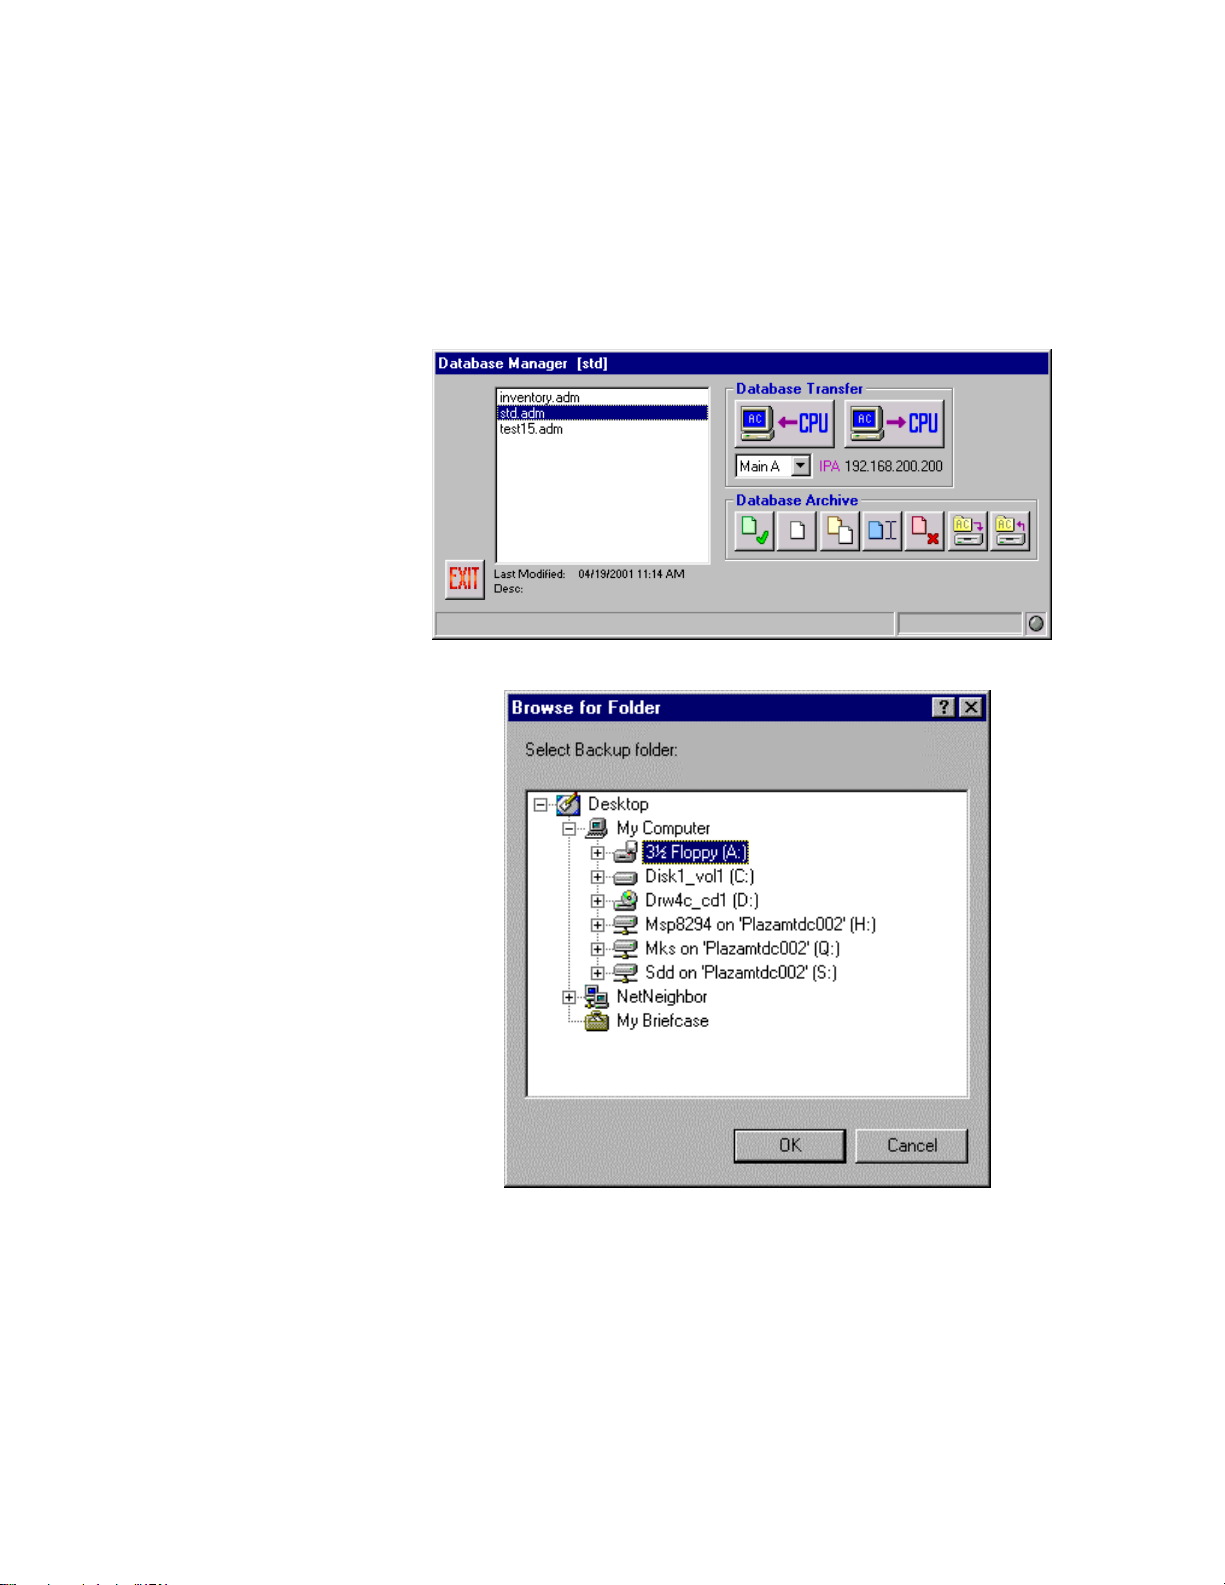
BACKUP A DATABASE
1. Wit hin Dat abase M anager, hi ghl ight a dat abase nam e
and clic k t he Backup button - th e 6
Database Ar chive section.
2. The fo ll ow ing w i ndow will appear .
th
button under t he
3. Choose the dr i ve and fo lder you w i sh t o backup t o,
just as you w ould in W indow s E xplorer.
4. Click OK.
This procedure will only copy the highlighted configuration file to the
specified location. It will not remove it from the Admin Console.
27 Admin Console CONFIGURATION
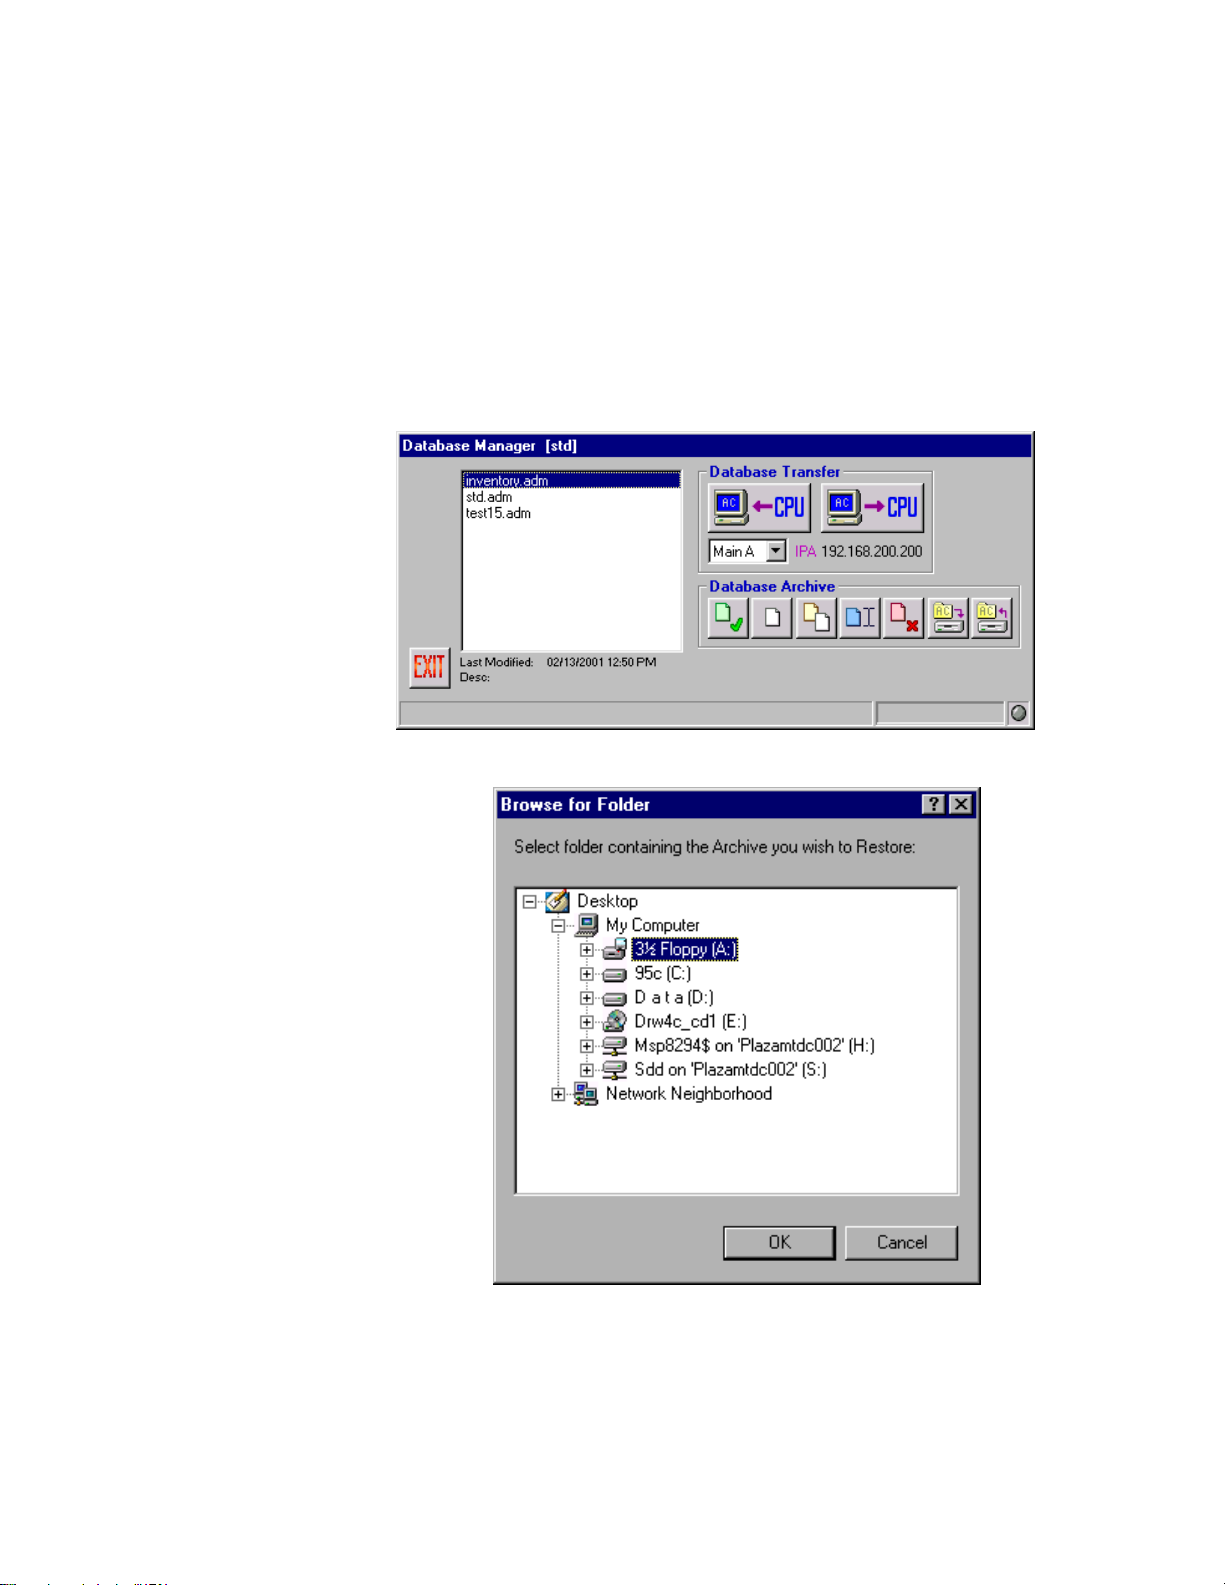
RESTORE A DATABASE
In addition to backing up a configuration file, it may also be necessary at
times to restore a copy of a particular database from a backup, an e-mail,
or from troubleshooting personnel. The Admin Console allows an
administrator to perform a database restore from a source outside of the
Admin Console.
1. Wit hin Dat abase M anager, cl ick t he Rest or e button -
the last button under the Datab as e Archive section.
2. The fo ll ow ing w i ndow will appear .
3. Choose the dr i ve and fo lder th a t contains th e
desire d .a d m file, just as you w oul d i n Window s
Explorer.
28
 Loading...