

Page 1
Facsimile
Panafax® UF-321
Model No. UF-321
User’s Guide
Panasonic
W:
i'.i-•.’ •. ^’>V
...
Page 2
IMPORTANT INFORMATION
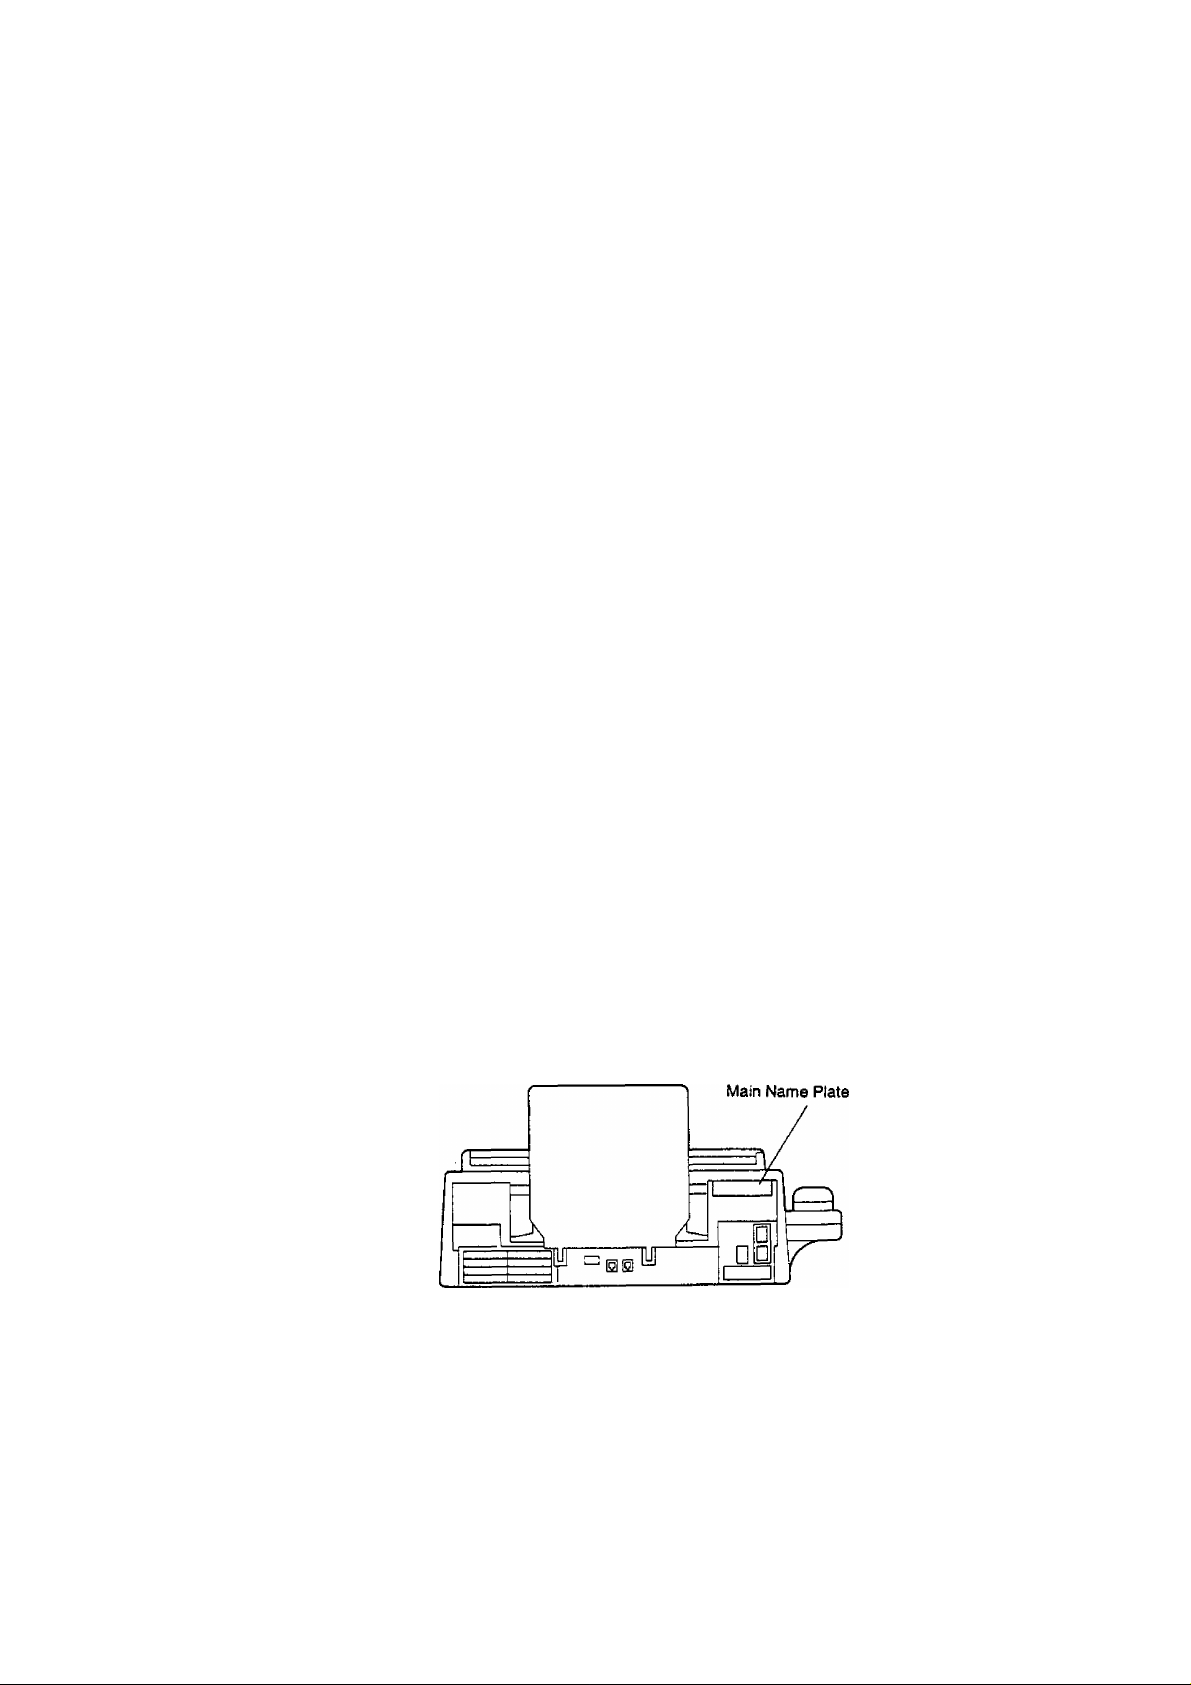
When requesting information, supplies, or service always refer to the model and serial number of your
machine. The model and serial number’s plate (Main Name Plate) is located on the machine as shown below.
For your convenience, space is provided below to record the information you may need in the future.
Model No. UF-321
Date of Purchase
Dealer
Address
Telephone Number
( )
Supplies Telephone Number
{ )
Service Telephone Number
( )
Serial No.
Copyright © 1993 by Matsushita Graphic Communication Systems, Inc.
All rights reserved. Printed in Japan.
The contents of this User’s Guide are subject to change without notice.
Page 3

Table of Contents
1 GETTING TO KNOW YOUR MACHINE
Introduction ..................................................................................................... 5
External View...................................................................................................... 7
Control Panel ..................................................................................................... 8
Function Key ............................................................................................... 10
2 INSTALLING YOUR MACHINE
Safety information........................................................................................... 11
Main Unit and Accessories............................................................................ 13
Installing Accessories .................................................................................. 14
Installing Print Cartridge............................................................................... 15
Loading Recording Paper............................................................................... 17
Paper Specifications................................................................................................... 17
How to Load Recording Paper ..................................................................................... 17
Connecting the Telephone Line Cord and Power Cord
Setting the Dialling Method (Tone or Pulse)
Adjusting Volume ......................................................................................... 21
Setting Monitor Volume ............................................................................................... 21
Setting Ringer Volume ................................................................................................ 21
User Parameters ............................................................................................. 22
Setting the Date and Time............................................................................................ 22
Setting Your LOGO....................................................................................................... 23
Setting Your Character ID ............................................................................................ 24
Setting Your ID Number (Fax Telephone Number) ..................................................... 25
..............................
................................................
18
20
3 PROGRAMMING YOUR MACHINE
Entering Characters
.............................................................. —
One-Touch/Abbreviated Dialling Numbers
Entering One-Touch/Abbreviated Dialling Numbers ................................................... 28
Changing or Erasing One-Touch/Abbreviated Dialling Numbers
Printing Out a Directory Sheet...................................................................................... 32
Customizing Your Machine
Setting Fax Parameters................................................................................................ 33
Fax Parameter Table.................................................................................................... 34
.........................................................................
4 BASIC OPERATIONS
Loading Documents........................................................................................ 37
Documents You Can Send........................................................................................... 37
Documents You Cannot Send...................................................................................... 37
How to Load Documents.............................................................................................. 38
Basic Transmission Settings......................................................................... 39
Original (Contrast)........................................................................................................ 39
Resolution..................................................................................................................... 39
Halftone......................................................................................................................... 40
Verification Stamp......................................................................................................... 40
..................
..............................................
...............................
27
28
30
33
Page 4

Sending Documents............................................................................................................... 41
Direct Transmission (ADF Transmission) .................................................................... 41
Off-Hook Dialling........................................................................................................... 41
On-Hook Dialling........................................................................................................... 42
Manual Number Dialling (ADF Transmission) ............................................................. 43
One-Touch Dialling (ADF Transmission)....................................................................... 44
Abbreviated Dialling (ADF Transmission)
Memory Transmission......................................................................................................... 46
Manual Number Dialling (Memory Transmission)
One-Touch Dialling (Memory Transmission)................................................................. 48
Abbreviated Dialling (Memory Transmission)
Multi-Station Transmission (Broadcasting)
Multifile Transmission.......................................................................................................
Redialling .......................................................................................................................... 52
Automatic Rediailing..................................................................................................... 52
Manual Redialling ........................................................................................................ 52
Receiving Documents ............................................................................................................ 53
Reception Modes ............................................................................................................... 53
Telephone Mode ................................................................................................................ 54
Setting the Telephone Mode ........................................................................................ 54
Operation of Telephone Mode....................................................................................... 54
Fax / Tel Auto Switching Mode........................................................................................... 55
Setting the Fax / Tel Auto Switching Mode .................................................................. 55
Operation of Fax / Tel Auto Switching Mode
Fax Mode............................................................................................................................ 56
Setting the Fax Mode.................................................................................................... 56
Operation of Fax Mode.................................................................................................. 56
TAM (Telephone Answering Machine) Interface Mode.................................................... 57
Installing your TAM ..................................................................................................... 57
Setting the TAM Interface Mode
Operation of TAM Interface Mode................................................................................. 58
Print Reduction.................................................................................................................. 59
Selecting the Print Reduction Mode.............................................................................. 59
Substitute Memory Reception............................................................................................. 60
Making Copies......................................................................................................................
Using the Machine’s Telephone ............................................................................................. 62
Making a Regular Call .................................................................................................. 62
Making Voice Contact after Sending/Receiving
Answering a Voice Contact Request
.................................................................................. 58
.....................................................................
........................................................
...............................................................
...........
...........................................................................
........................................................... 50
................................................................
...........................................................
45
47
49
51
55
61
62
62
ADVANCED FEATURES
Timer Controlled Communications
Deferred Transmission.................................................................................................. 63
Deferred Polling............................................................................................................ 64
Polling ..................................................................................................................................... 65
Setting Polling Password............................................................................................. 65
To Poll Documents from Another Station ..................................................................... 66
File Edit Mode...................................................................................................................... 67
Printing a File List ........................................................................................................ 67
Changing Start Time or Station of a File....................................................................... 68
Deleting File.................................................................................................................. 69
Printing Out a File......................................................................................................... 70
................
........................................................................
63
Page 5

b NETWORKED FEATURES
Selective Reception........................................................................................... 71
Setting Selective Reception............................................................................................ 71
7 PRINTOUT JOURNALS AND LISTS
Journals and Lists
32 Transaction Journal................................................................................................... 73
Individual Transmission Journal (IND. XMT JOURNAL)................................................ 73
Communication Journal (COMM. JOURNAL)
One-Touch/Abbreviated List .......................................................................................... 77
FAX Parameter List........................................................................................................ 79
Power Failure Report...................................................................................................... 80
Directory Sheet {see page 32)
Memory File List (see page 67)
......................................................................................
8 PROBLEM SOLVING
Troubleshooting ............................................................................................ 81
If You Have Any of These Problems
Information Codes.......................................................................................................... 84
Clearing Recording Paper Jam
Clearing a Document Jam............................................................!
Replacing the Print Cartridge ........................................................................................ 88
Cleaning the Print Cartridge Contact.............................................................................. 89
Removing Dried Ink from the Print Cartridge Contact
Cleaning the Drain Pan ................................................................................................. 90
Cleaning the Document Scanning Area ....................................................................... 91
Adjusting the Automatic Document Feeder (ADF)........................................................ 92
Verification Stamp......................................................................................................... 93
Checking the Telephone Line ....................................................................................... 94
......................................................................................
.....
.........................................................
..........................................................................
..............................
...................................................
73
76
81
86
87
90
9 APPENDIX
Specifications................................................................................................... 95
Recording Paper Specifications................................................................... 97
Options and Supplies
Glossary........................................................................................................... 100
Index................................................................................................................. 104
QUICK GUIDE
......................................................................................
installing Memory Card................................................................................................. 99
98
Page 6

This page is intentionally left blank.
Page 7

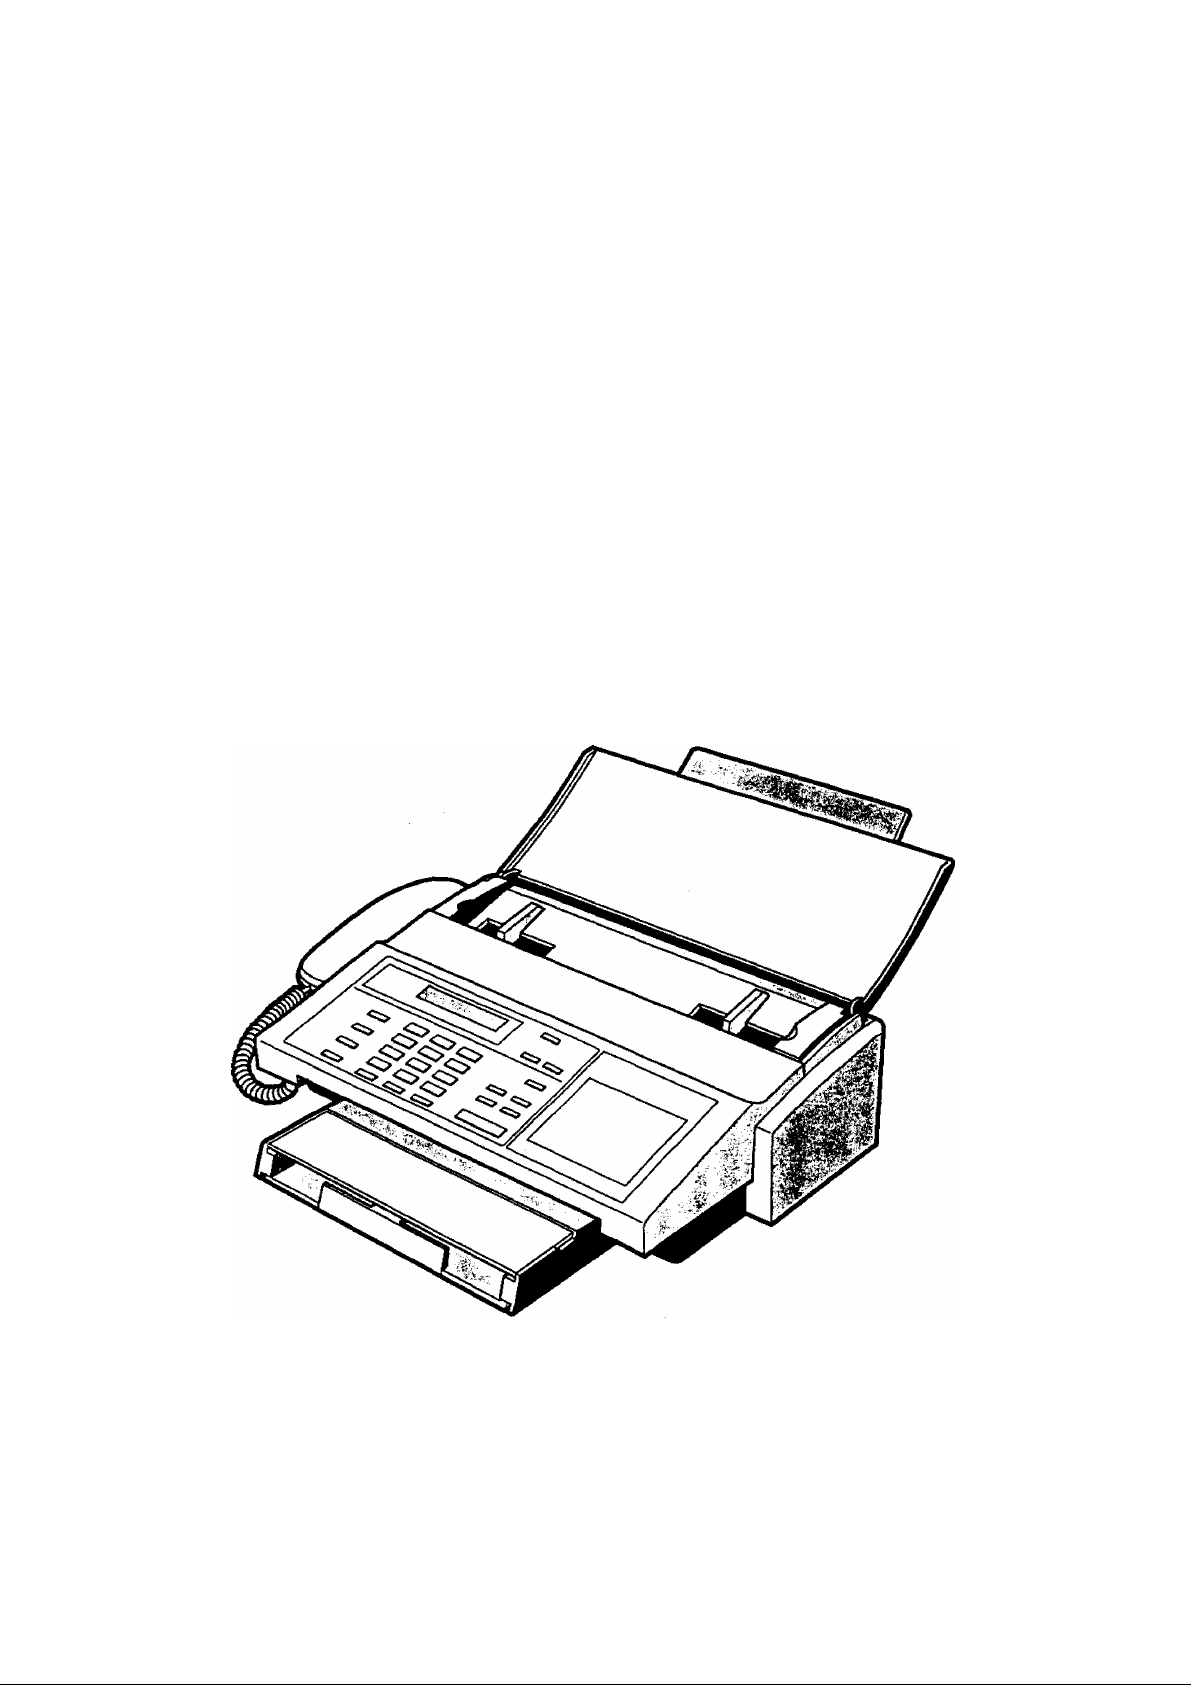
Introduction
Thank you very much for purchasing the Panasonic PRO LINE UF-321.
The UF-321 is one of the most advanced models in the Panasonic PRO LINE series of G3 compatible, desktop
facsimile machines.
Some of its many features are
1. Plain Paper Printing
2. Easy Maintenance
3. Memory Function
4. Fax / Telephone Auto
Switch
Plain paper printing means you can easily write on received documents
with a pen or pencil. Documents do not curl, making filing easier. In
addition, plain paper does not fade, making it ideal for long term storage
of important documents.
Maintenance requires only changing a print cartridge,'making it quicker
and easier than with other types of plain paper fax machines.
A standard Image memory feature allows you to store up to 12 standard
pages into the document memory. After the UF-321 stores your
documents, it can send them to selected station(s) automatically. You do
not have to wait until the transmission ends before retrieving your
originals.
The UF-321 differentiates between an incoming fax or voice call and
automatically switches the circuit to either receive a document or to ring
until you pick up the telephone. With the UF-321 you do not require a
separate telephone line for your fax.
[ Note : For some countries, this feature is not available because of the
country’s regulation. ]
1
5. TAM Interface
6. 64 level Panasonic
Super Gray Scale
7. Panasonic Super
Smoothing
8. Selective Reception
A Telephone Answering Machine (TAM) can be connected to the UF-321.
The UF-321 determines whether the signal from the calling side is a fax
or voice call. If it is a fax, the UF-321 will switch the telephone line to start
the fax communication. If a fax signal is not detected, the UF-321 will stay
in the TAM mode and the caller can leave a message.
[ Note : For some countries, this feature is not available because of the
country’s regulation. ]
The UF-321 offers a 64-level Super Gray Scale using Error Diffusion
technology. Switching to this mode assures clear, realistic reproduction
of photographs and text, brochures, and illustrations.
The UF-321 incorporate’s a new sophisticated image processing
technology to enhance the print quality of an ordinary received fax Image
by smoothing out the curving edge of a character to reproduce a high
quality document.
To prevent unwanted faxes being received by comparing the ID Number
of the transmitting machine with the teiephone number stored in the built-in
automatic telephone dialer.
With a little practice, anyone can learn how to use the most popular
features of the UF-321.
This User's Guide will help you to use your UF-321 quickly and easily. The
Table of Contents shows where to find information on each feature.
Although we recommend that you review each section briefly, it will only
be necessary to read the sections that contain the feature(s) you will be
using.
Page 8

•'• ■ Ai> '•■ ■ -
:p!%-
y- If.
This page is intentionally left blank.
Page 9

No«=
. jíOf
itfieS’
COUÍ^'
ds®^
jsnot
dt30C'
aus®
oftne
cou^
ntíV
,..100 0'=^'
,чгед^^
Page 10
7T ■ u.vrw-^ V- «.
Control Panel
ORIGINAL
RESOLUTION
.''.'XlA>,# L^ÙW-V' ..
Used to set Normal, Light, or Dark,
(see page 39) Also serves as an
□ <
arrow key (<) to move the cursor
over recorded numbers and
characters.
Used to set Standard, Fine, SuperFine. (see page 39) Also serves as
an arrow key (>) to move the cursor
over recorded numbers and
characters.
HALFTONE
STAMP
£iù....
Provides OFF, QUALITY or FAST, settings
for halftone documents (see page 40). Also
used for followings.
•Confirm entered station for multi-station
communication.
•Select functions.
Used to turn the verification stamp ON or
OFF (see page 40). Also used for
followings.
•Confirm entered station for multi-station
communication.
•Select functions.
LCD Display
Indicates date and time,
or the current operation.
m CD
n~i
m □□ □□
n~i
cz:
□□
m
cz:
cs
TONE
and
13
PAUSBREOIAL
A88R
FLASH
Used to Manual Number Dialling,
recording phone numbers, and
selecting functions.
Used to temporarily change
Dialling Mode to Tone when
Pulse mode is set.
Used to confirm current
communication modes (e.g. Page
number, ID, Dialed Telephone
number) when unit is on line.
Used to enter a pause when
recording or dialling a telephone
number, or to redial the last dialed
number, (see page 52)
Used to start Abbreviated Dialling,
(see page 45 and 49)
Used to access some features of
your PBX.
ORtGtNM.
OARka
1
..........
LKWrO
»fME D RESOUmON
FMEO 1 l>
HALFTONE '
MsT a
QUAUTYO
1 lA
n
^ STAM P
"1<
■' ■■ , ■■ ; . -
1 4 1
1 7 1
TONE
nn
PAU 3EAEOIAL
1
I_^
rn
1 8 1
1 0 1
AB8R
t 1
L3j
1 6__ 1
1 8J
1 * 1
FLASH
1 1
8
Page 11
Control Panel
r
RCV MODE
1_____1
MEMORY
ir—1
I^FUNCTIONJ
MONITOR
VOL
L--
- ■
Used to select either attended
mode or unattended mode, (see
page 53)
Used to select either memory or
direct ADF communication, (see
page 41 to 51)
Used to start or select the
function and sub-functions.
These functions are explained
in detail on the next page.
_______________________________
pCVMODEO attended
A I ilji^ UNATTENDED
MEMORY FUNCTIONl
il=3 tfiZH
«STOP
3 1^31
CLEAR TEUDIAL
r*
1 1
set Q COPY
11
START
—'
01
05
_____^—
09
13
02 103
06
10 ;
14,.
\
pJ
07
11 |12
15
1
One-Touch Keys (01-16)
Used for One-Touch Dialling, (see page 44
and 48)
Character Keys
The One-Touch Keys also serve as character
and symbol input keys which are used to record
your LOGO and station name. The character key
template is printed on the panel under the
directory sheet cover.
Directory Sheet
Cover
13 •
n O
o
o
A AlB
+
a
04
B -
06
14 Ole
B
+
D
. o\o
Q a
01 AlBjoa EI F 103 1 1 J 04 MIN'
cVd 1 ^ 1 iHl 01 P
16
-
05 Q|_R 06 m\0 7 YIZIos c
13 •IP 14 0 ♦
OlO OlO
SIT ^ 1 TO 1 6
09 I 10 1Ц hl 6JJ_ I 12 : ! : ~
+ 1 - 1 <i > 1 T\ . 1 SPACE
15 OJP
16 pip
•io
Oi«j
jj'
e
3^iiтoRMONITOR
VOL
TEUDWL
CLEAR
Used to cancel operations. When it is
pressed, the machine will return to standby.
Used to start On-Hook Dialling or to make
voice contact request, {see page 42 and
62)
Used to erase the previously entered input.
Also used to adjust monitor volume, (see
page 21)
MONITOR
L-CZZ
□ COPY
<^ START
VOL sgj
Used to set operations. Also used to
adjust monitor volume, (see page 21)
Used to make photo copies, (see
page 61)
Used to start operations.
Page 12
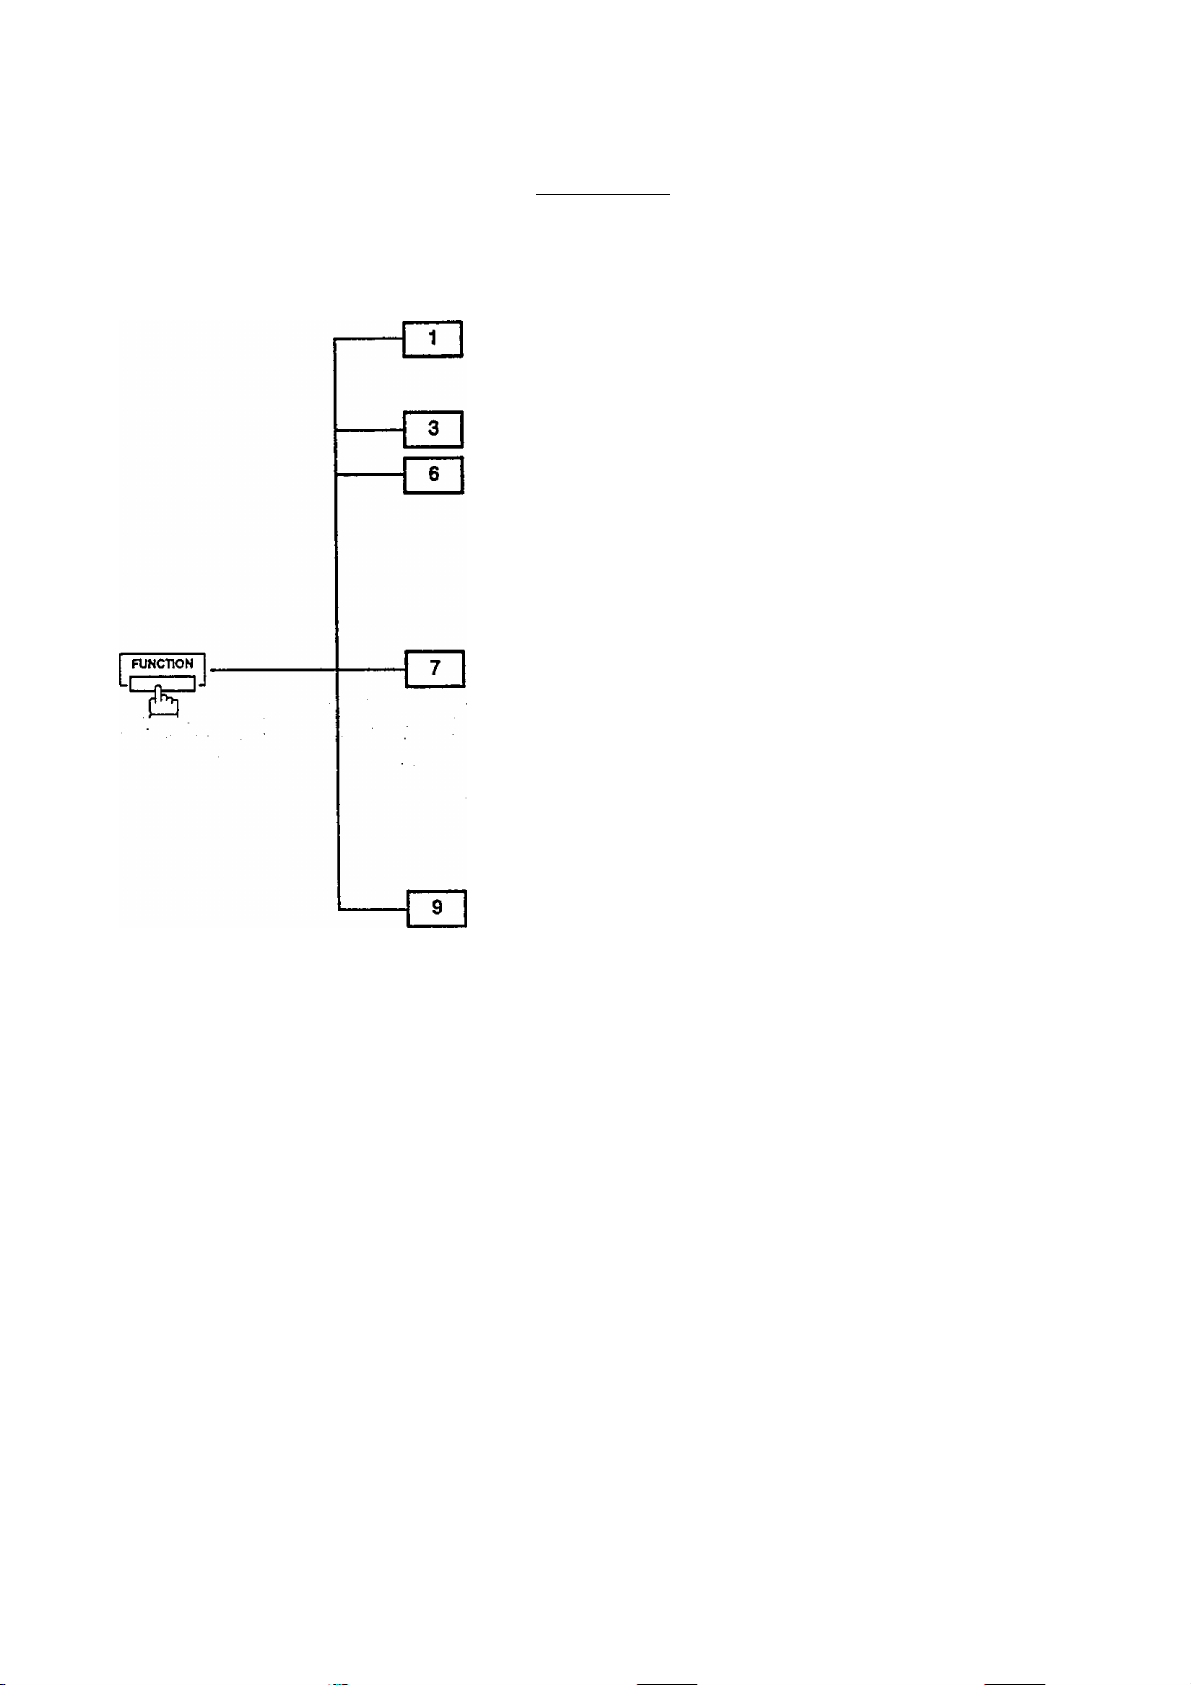
Any function can be started by first pressing 1 FUNCTION 1 and then enter the function number, or by pressing 0 or E scroll key repeatedly until the desired function appears on the display.
Deferred Communication
1 =XMT
2 = Polling
Polling
Printout
1 « Journal
2 s= One-Touch/Abbreviated List
3 « Not used
4 = Fax Parameter List
5 = Not used
6 = Individual XMT Journal
7 = Directory Sheet
Set Mode
1 = User parameters
• Date & Time
• Logo
• Character ID
• ID Number (Fax Telephone Number)
2 One-Touch/Abbreviated Numbers
3 = Not used
4 = Fax Parameters
5 = Not used
Edit File Mode
1 = Print File List
2 = Change Time/Station
3 = Delete File
4 = Print File
10
Page 13

Safety Information
A WARNING
• TO PREVENT FIRE OR SHOCK, DO NOT EXPOSE THIS PRODUCT TO RAIN OR ANY TYPE OF
MOISTURE.
• TO MINIMIZE THE POSSIBILITY OF SHOCK OR DAMAGE TO THE MACHINE, IT MUST BE
PROPERLY GROUNDED.
• WHEN YOU OPERATE THIS EQUIPMENT, THE SOCKET-OUTLET SHOULD BE NEAR THE
EQUIPMENT AND BE EASILY ACCESSIBLE.
• PLUG POWER SUPPLY CORD INTO ORDINARY AC OUTLET BEFORE CONNECTING TELEPHONE LINE
CORD. DISCONNECT TELEPHONE LINE CORD BEFORE UNPLUGGING POWER SUPPLY CORD FROM
AC OUTLET.
• DISCONNECT THE EQUIPMENT IMMEDIATELY SHOULD IT EVER SUFFER PHISICAL DAMAGE WHICH
RESULTS IN THE INTERNAL PARTS BECOMING ACCESSIBLE IN NORMAL USE. IN THIS INSTANCE
USERS SHOULD HAVE THE EQUIPMENT REPAIRED OR DISPOSE OF.
• IF THE POWER SUPPLY CORD AND/OR TELEPHONE LINE CORD OF THIS EQUIPMENT ARE
DAMAGED, THEY MUST BE REPLACED BY THE SPECIAL CORDS SUPPLIED BY AN AUTHORIZED
PANASONIC SERVICE CENTRE.
denotes a potential hazard that could result in serious injury or death.
CAUTION
1 When you know that a thunderstorm is coming, we recommend that you:
(1) Unplug the telephone line cord from the phone jack.
(2) Turn off the power and unplug the power supply cord from the AC outlet.
2 This equipment may not necessarily provide for the effective hand-over of a call to or from a telephone
connected to the same line.
3 The operation of this equipment on the same line as telephones or other equipment with audible warning devices
or automatic ring detectors will give rise to bell tinkle or noise and may cause false tripping of the ring detector.
Should such problems occur, the user is not to contact telecom {telephone company) faults service.
11
Page 14
Information^#^ ^ ,m
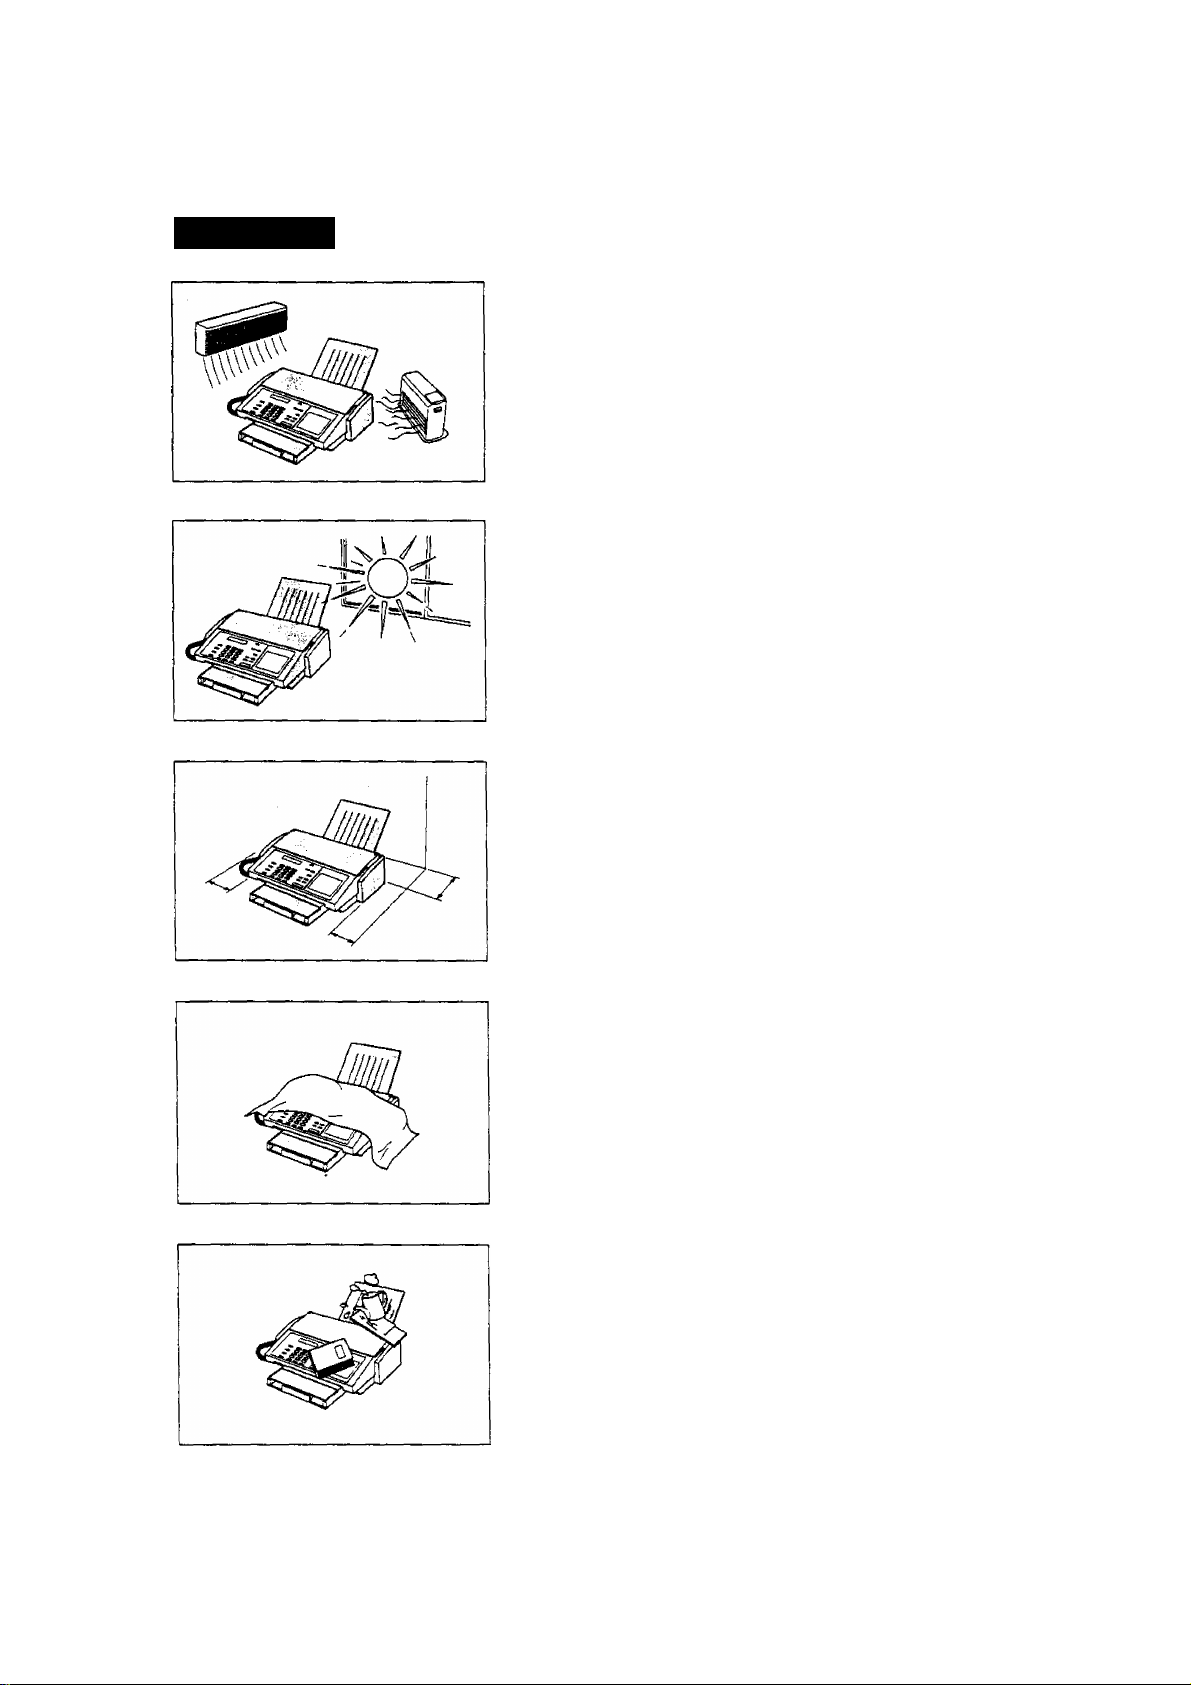
A CAUTION
denotes hazards that could result in minor injury or damage to the machine.
Do not install the machine near heating or air conditioning unit.
Avoid exposure to direct sunlight.
Install the machine on a flat surface, leave at least 10 cm of space
between the machine and other objects.
12
Do not block the ventilation openings.
Do not place heavy objects, or spill liquids on the machine.
Page 15
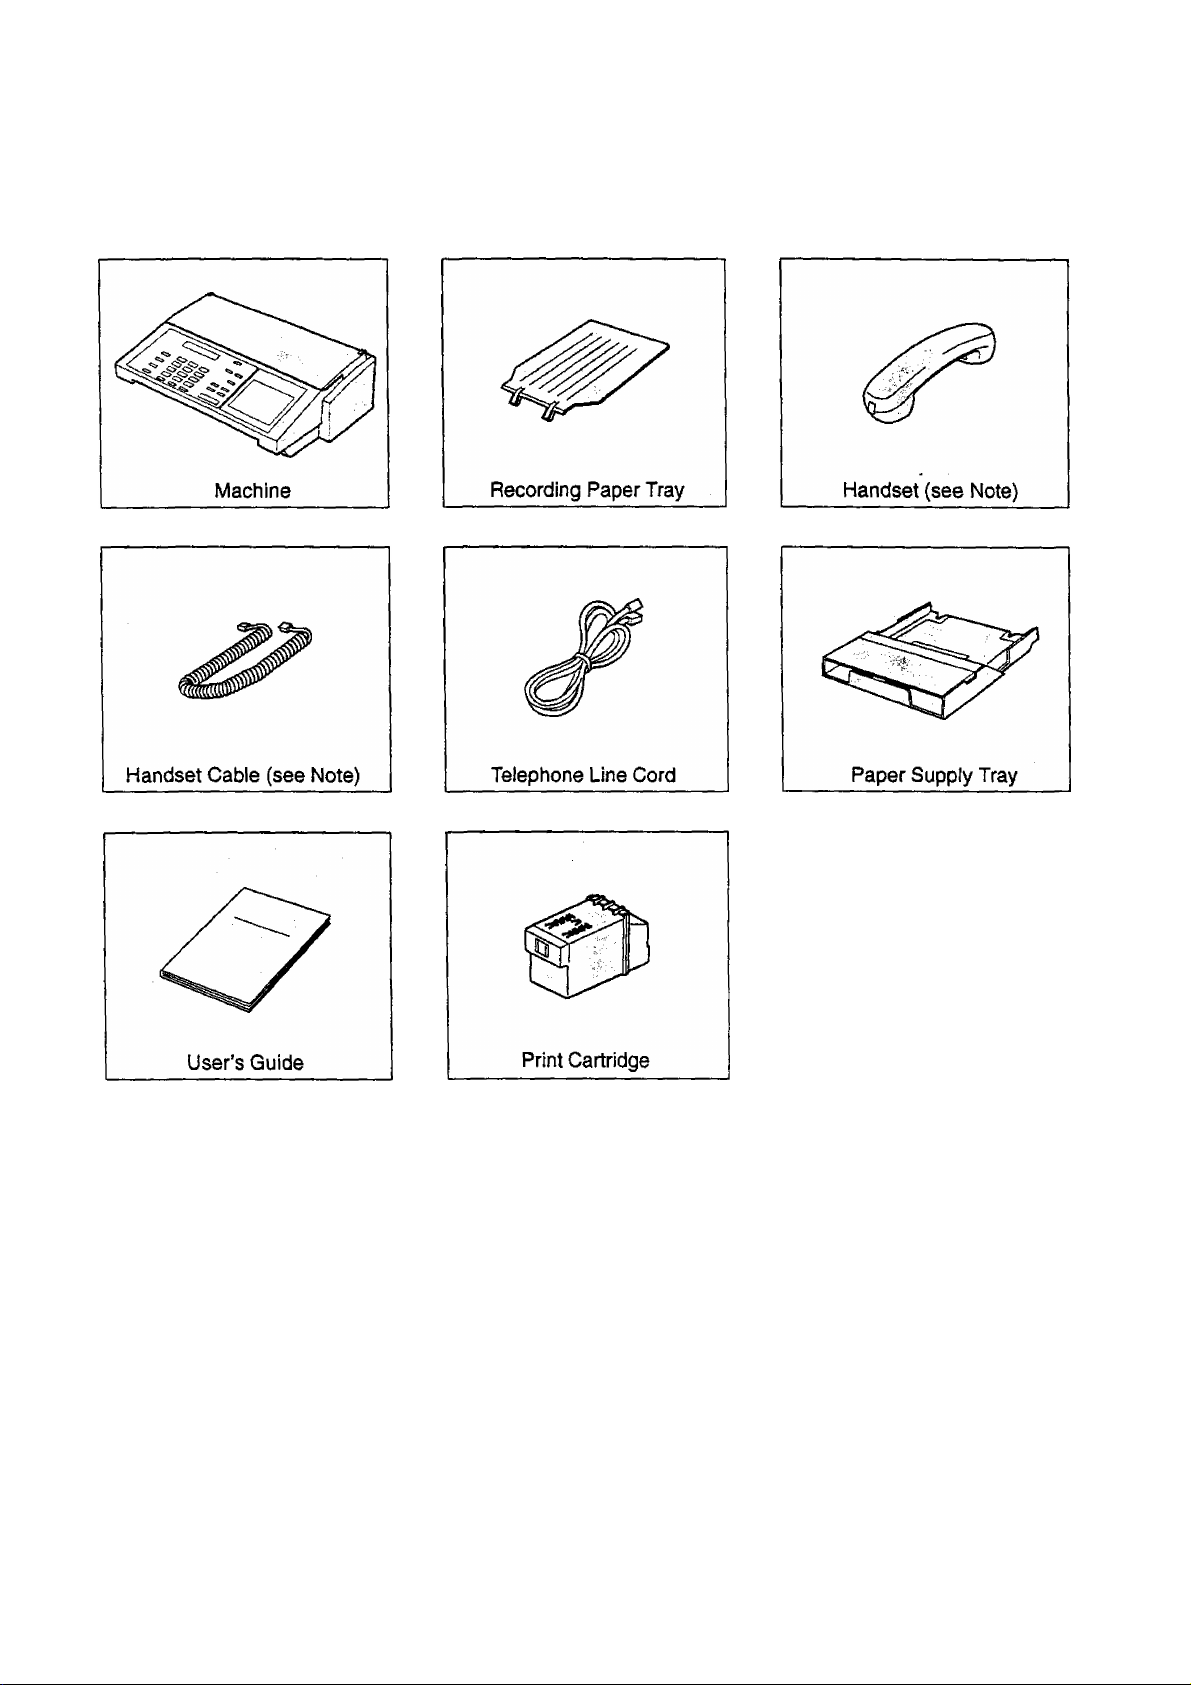
Main Unit and Accessories
Unpack the carton and check that you have all accessories illustrated.
in
Note: For some countries, these accessories are not attached because of the country’s regulation or
specification.
13
Page 16
InstaHincfAccess^ejS
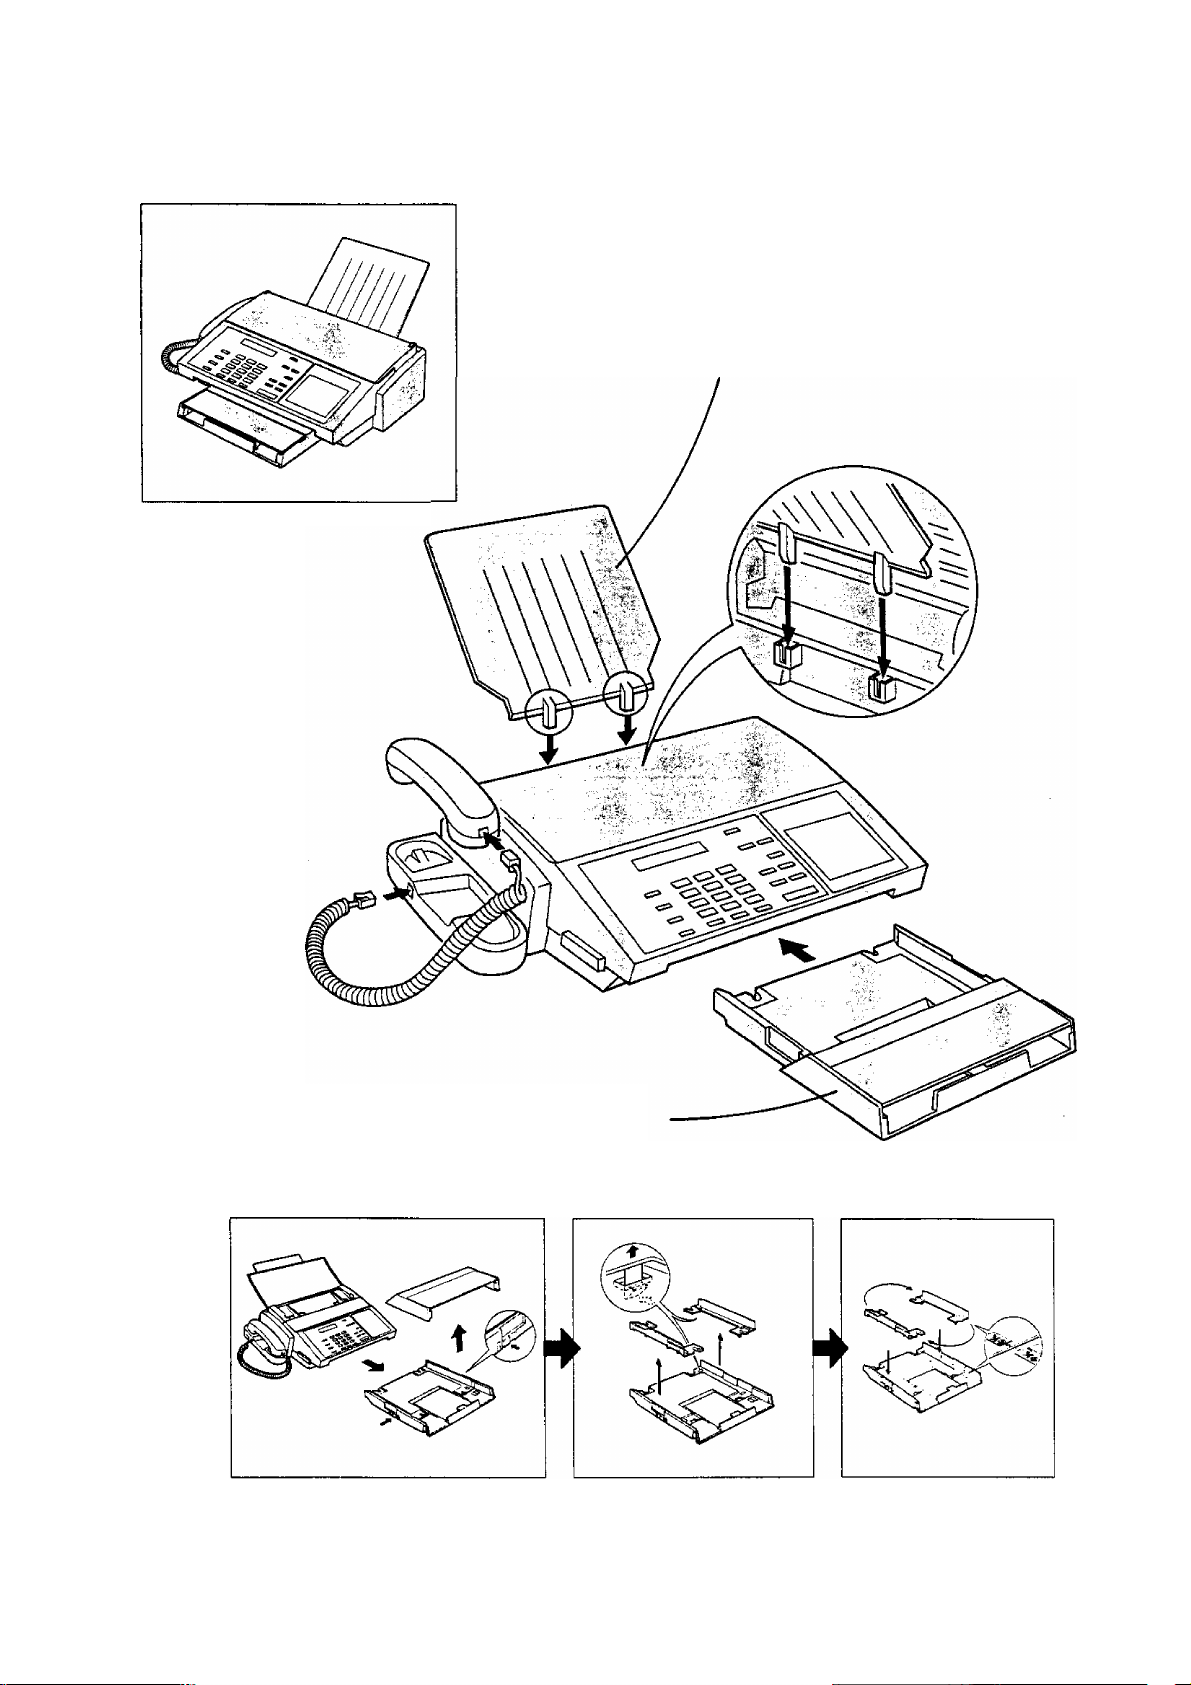
Final installed View
.it;
Recording Paper Tray
Hook the projections of the Recording
Paper Tray into the square holes on the
rear of the machine.
Paper Supply Tray
Insert the Paper Supply Tray to the front
of the machine.
ffl
Note: If you wish to use LetterAegal size paper, change the position of paper width guide as shown below.
14
Page 17
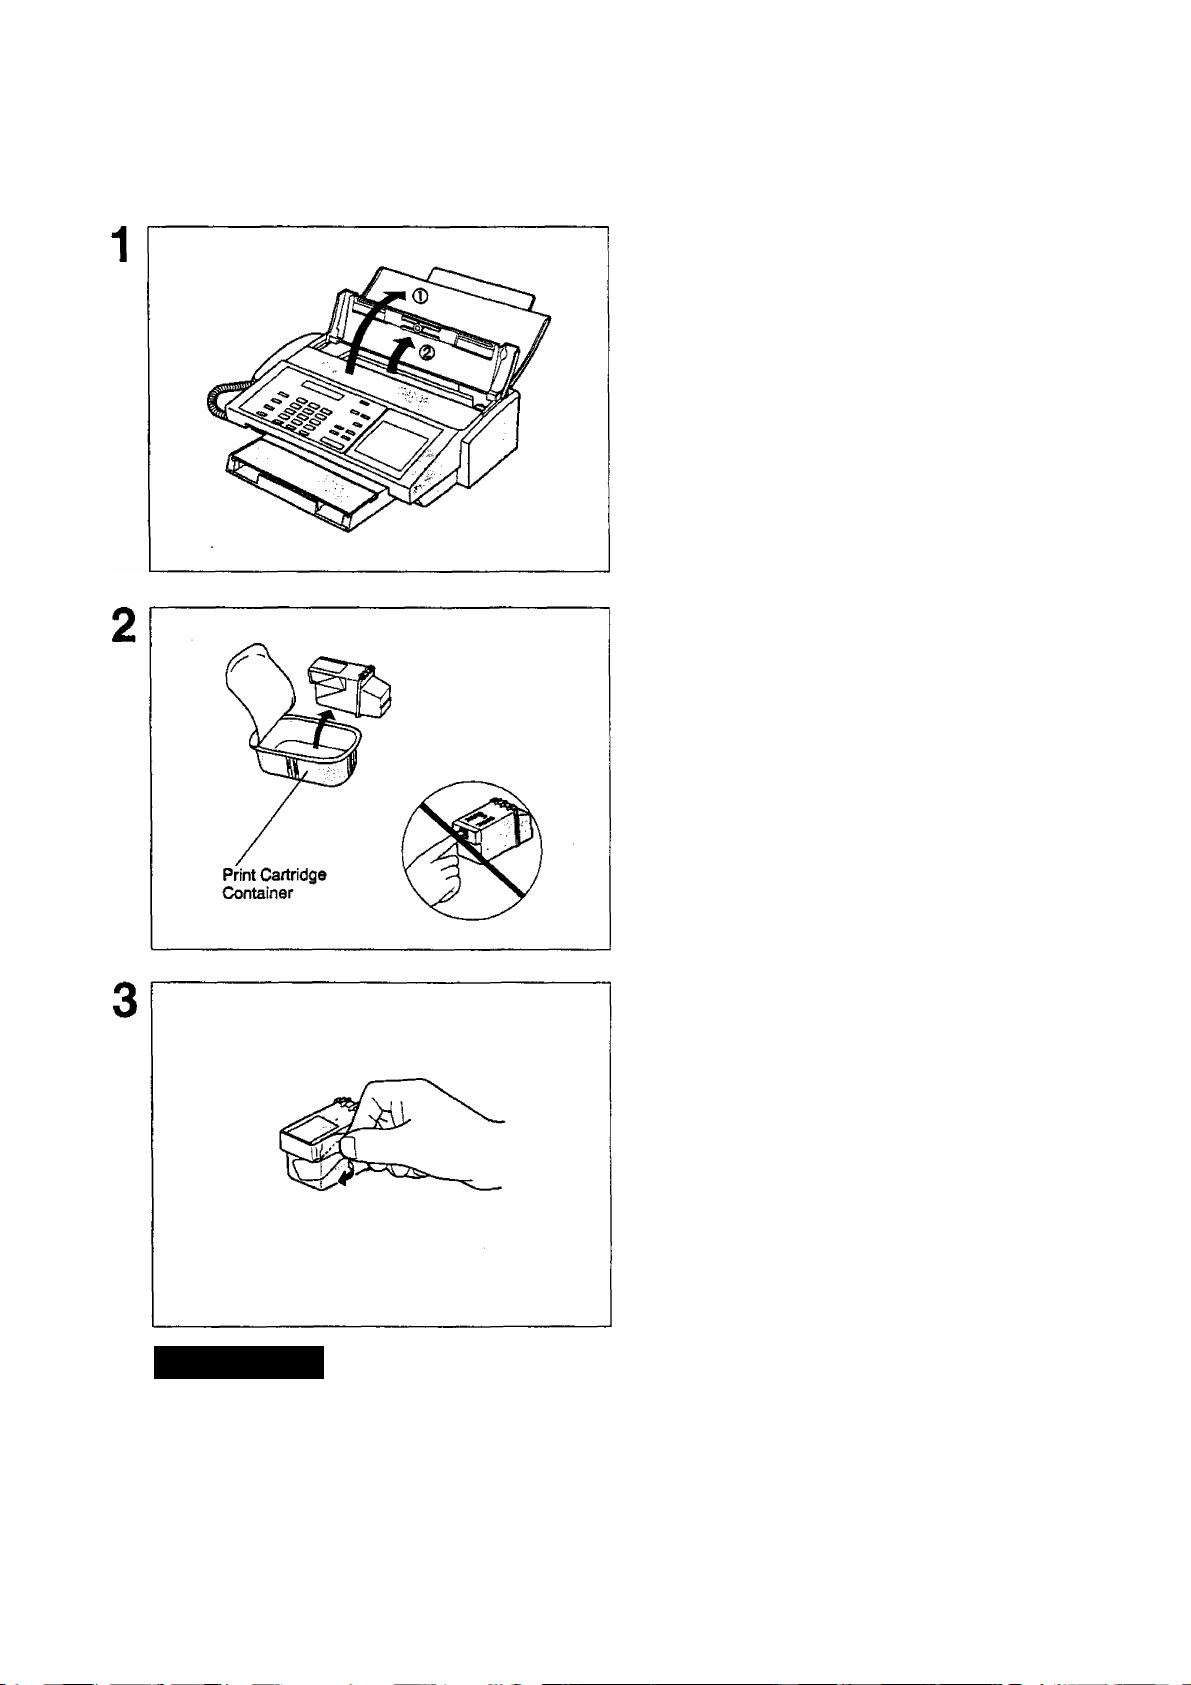
Installing Print Cartridge
0 Open the Document Tray.
d) Open the Printer Cover.
Open the Print Cartridge Container. Grasp the
Print Cartridge by the green part and remove it
from its container.
Take care not to touch the copper ’’Ribbon”
located on the front edge of the Print
Cartridge. Also be sure that the copper
"Ribbon” does not come in contact with
any surface.
CAUTION
Gently remove the protective tapes from the
front of the Print Cartridge.
The Ink in the Print Cartridge may be harmful to children if swallowed. Keep new or
used cartridges out of the reach of children and immediately discard used cartridge.
15
Page 18
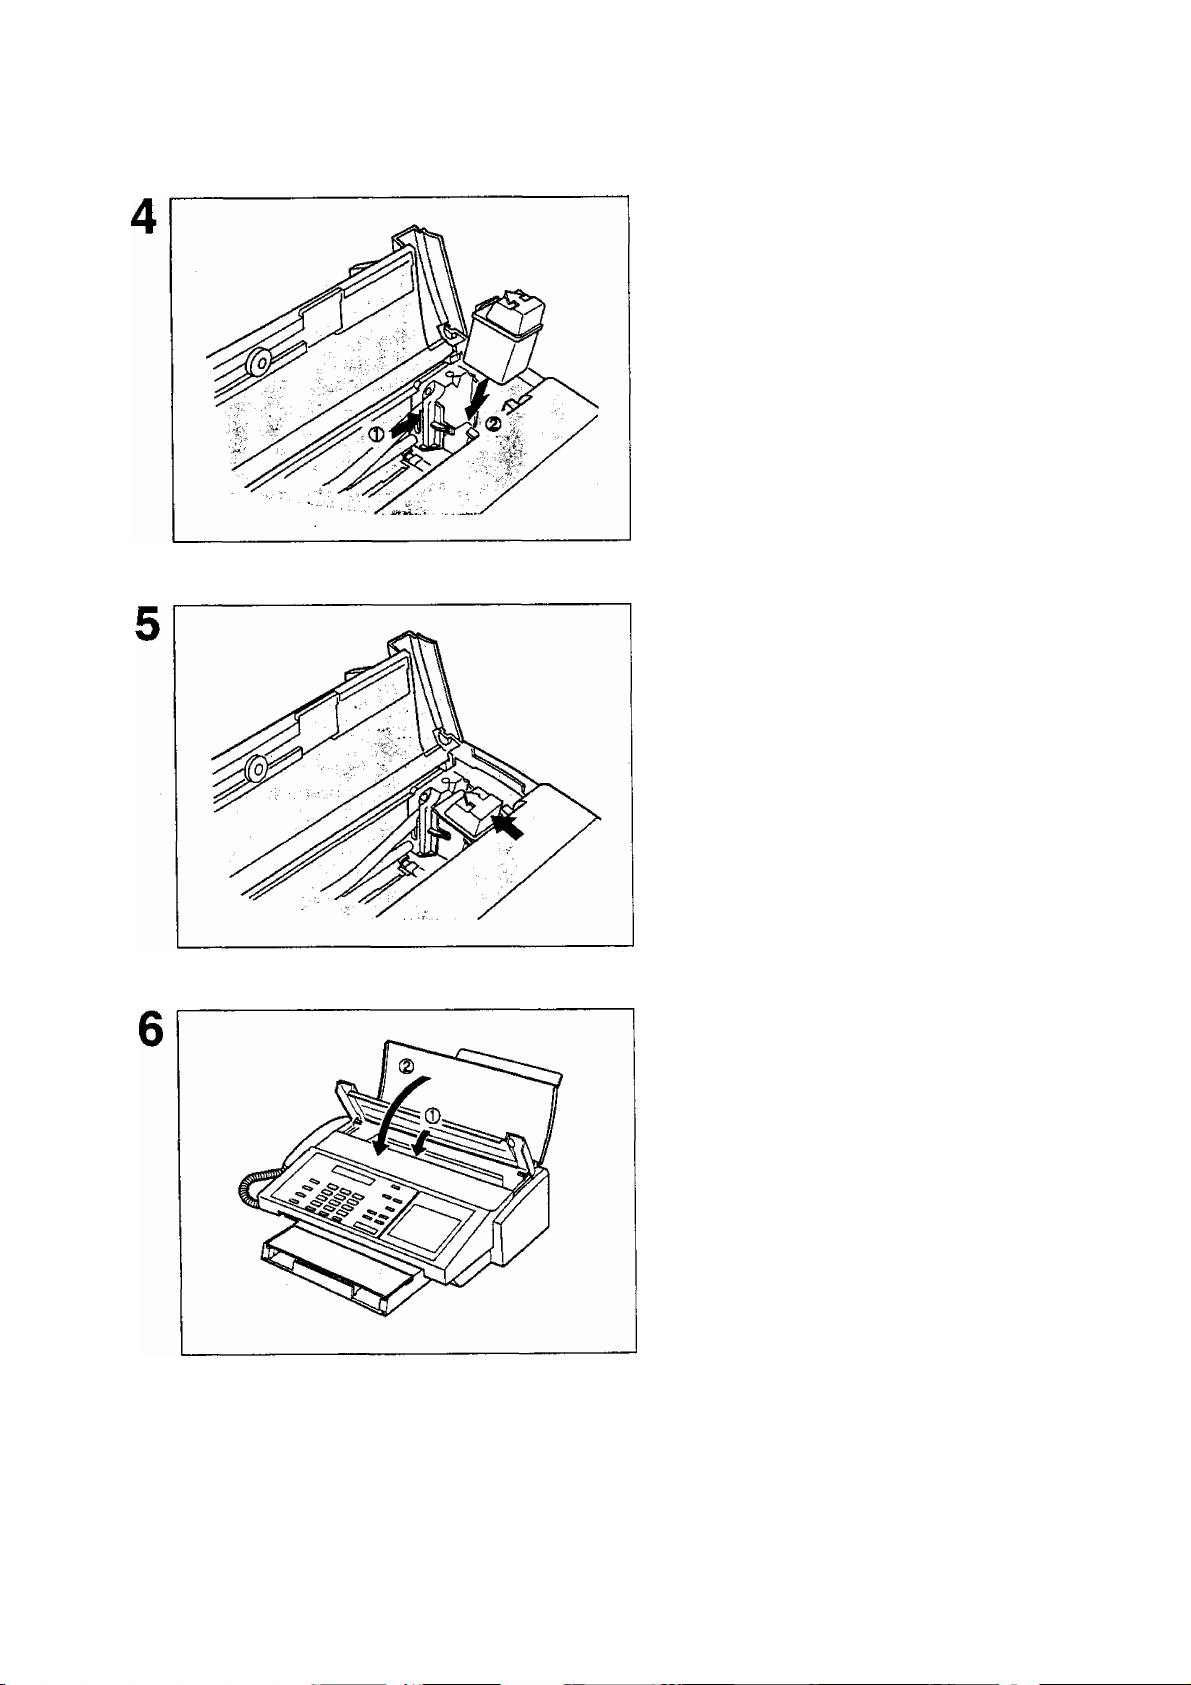
I nspl I i ng Pri PlPisr!® 9®
..m.
■; ' ■^-■. ■^;-
W'-
© Slide the Print Cartridge Cradle all the way
to the right of the machine.
© Insert the Print Cartridge into the cradle with
the green arrow on the cartridge top pointing
to the green dot on the top of the cradle.
Push the cartridge into the cradle, snapping the
cartridge into place.
: .jwaMt ; i.ajii.iiivt.'at. ■, i
16
© Close the Printer Cover.
© Close the Document Tray.
Page 19
Loading Recording Paper
Paper Specifications
In general, most bond papers will produce excellent results. Most photocopy papers will also work very well.
There are many "name” and "generic” brands of paper available. We recommend that you test various papers
until you obtain the results you are looking for. For detailed recommended paper specifications, see page
97.
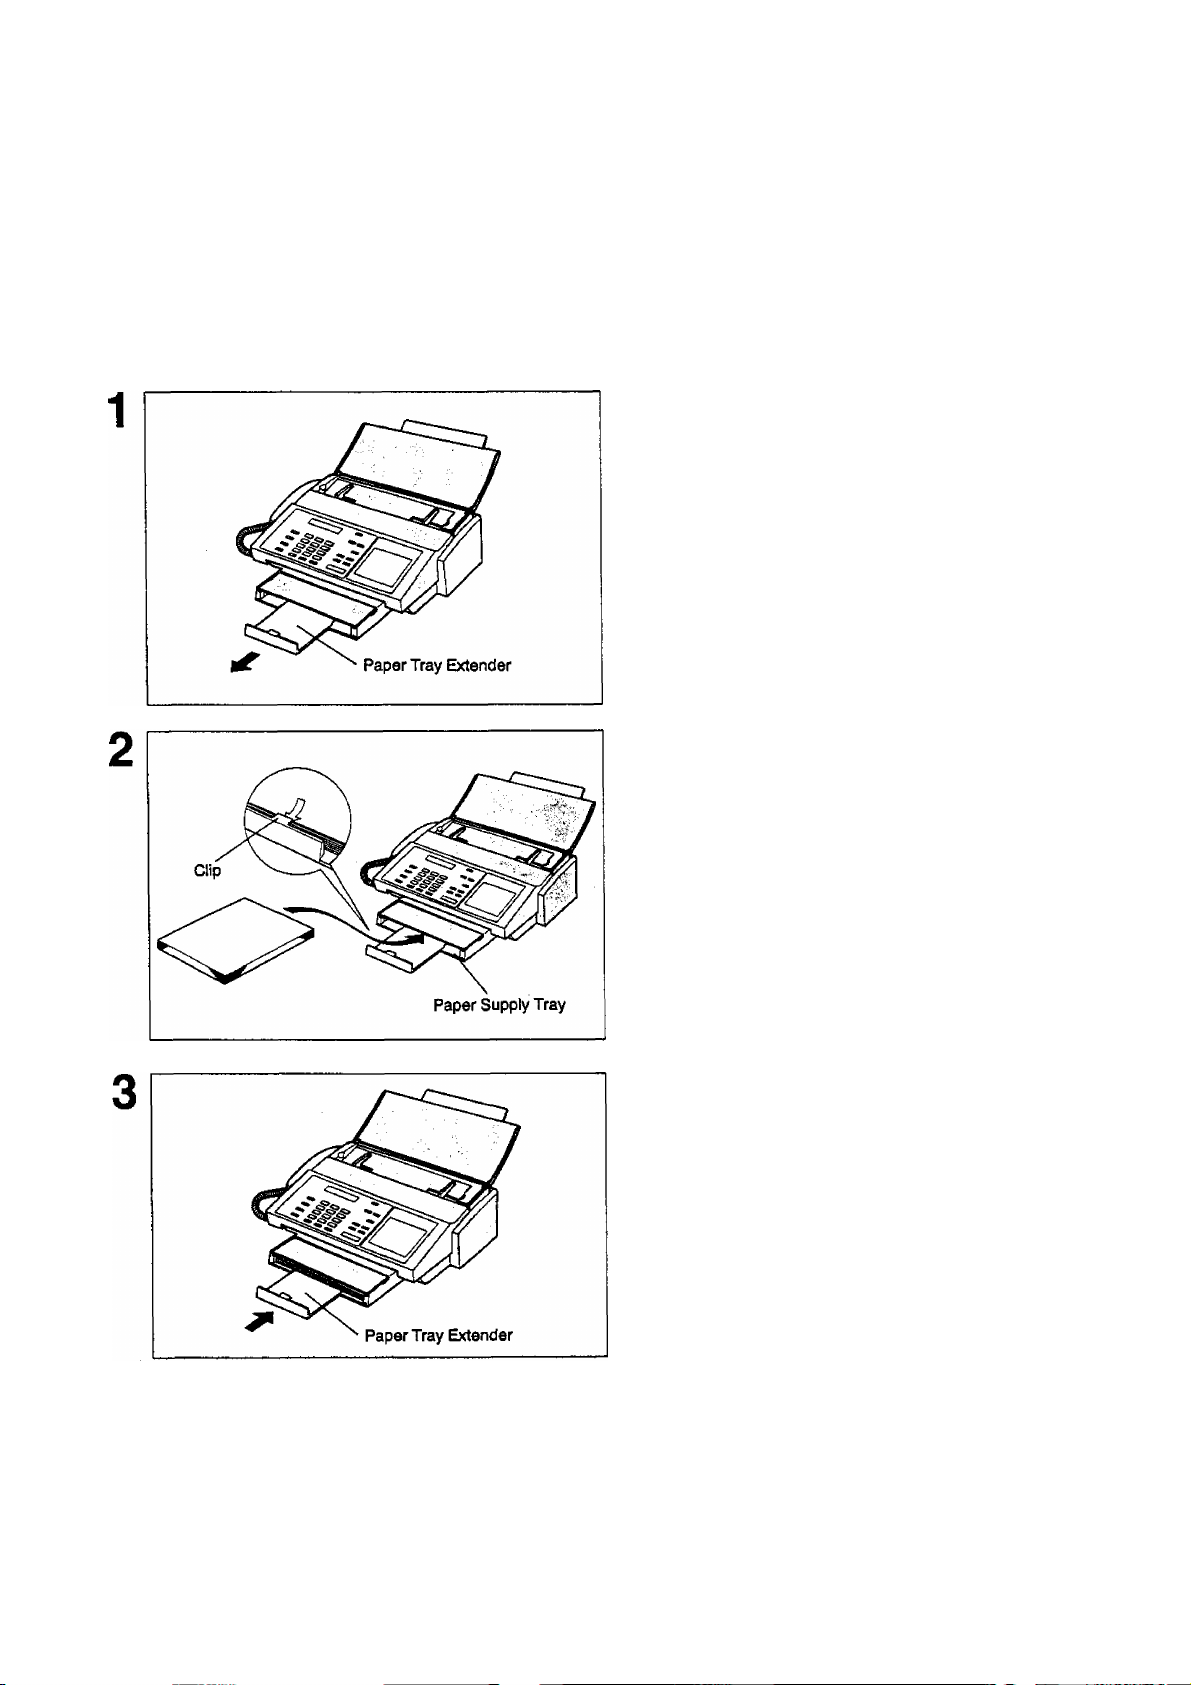
How to Load Recording Paper
Pull out the Paper Tray Extender.
Insert a stack of paper about 12 mm thick
(approximately 100 sheets of paper) squarely
into the Paper Supply Tray.
Caution; Make sure that the paper does not
exceed over the clip of the paper tray extender.
Slide the Paper Tray Extender in toward the
paper to hold the paper against the printer.
Note: 1. The setting of Fax Parameter No. 23 (Recording Paper Size) must be set according to the paper you
m
have loaded, (see page 35)
2. Do not add the recording paper while machine is printing a document
17
Page 20

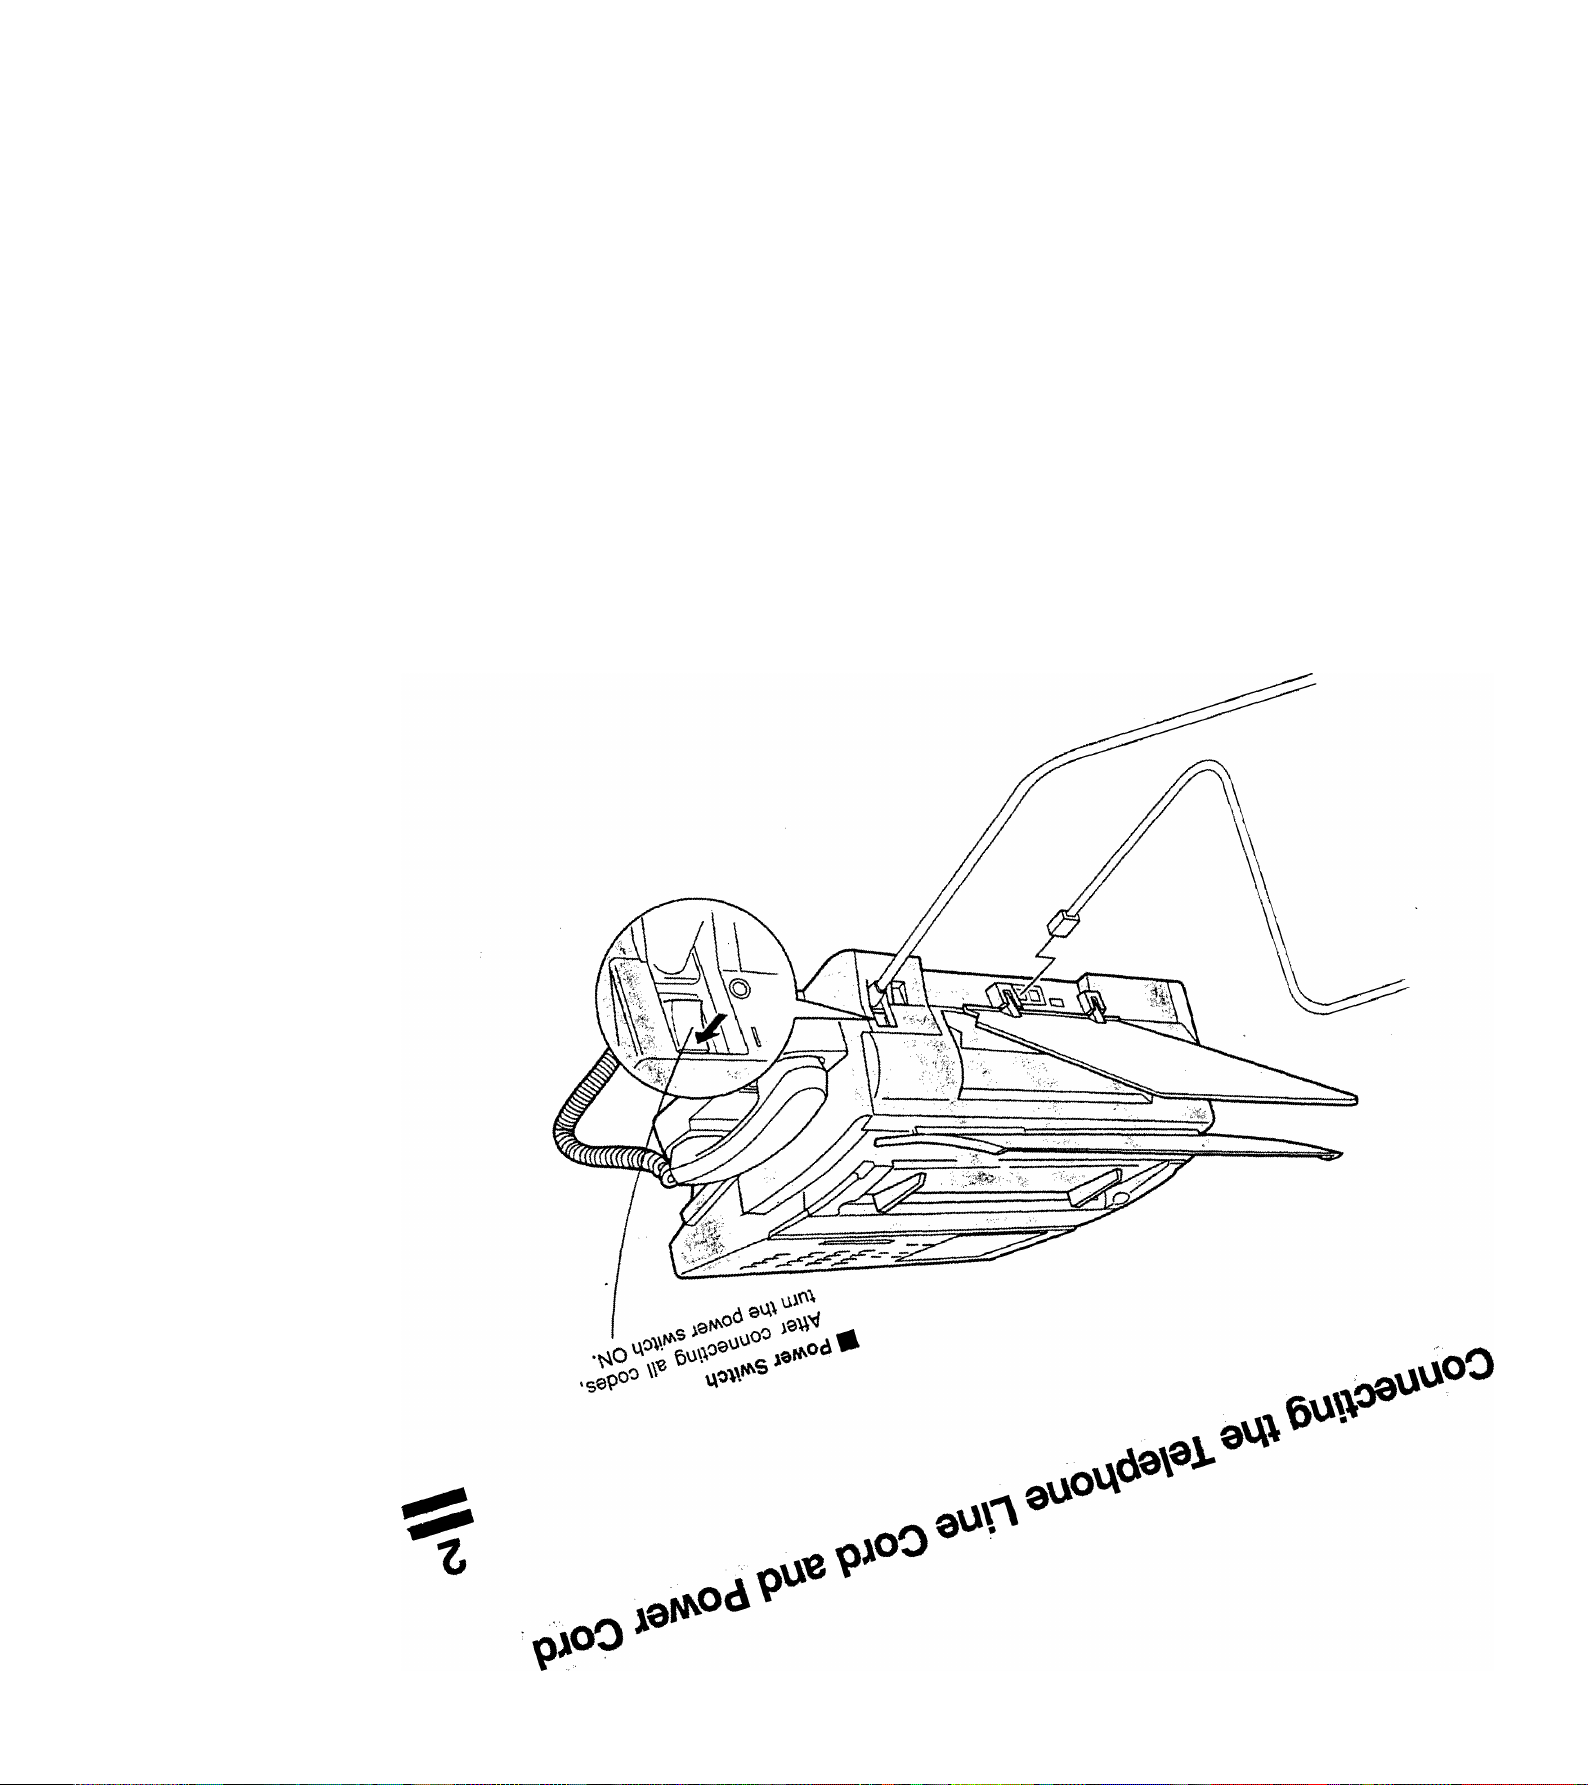
Connecting the Telephone Line
Telephone Line Cord
Plug one end of the telephone line cord into the telephone jack supplied by the telephone company and the other end into the LINE jack on the rear of the machine.
I^S
Power Cord
Plug the Power Cord into an ordinary AC outlet.
Warning : This apparatus must be properly grounded.
ini! f|Dwer|[^«l I
Telephone Line Cord(Attachmenl)
Power Cord (Attachment)
Note: 1. When you turn the power switch ON, the ADF Protective Sheet wiil be ejected automatically.
m
2. Your machine uses little power and you should keep It ON at all times. If the power is turned OFF for too
long, the contents of the memory will be lost.
3. Your machine has a rechargeable haffery io preserve the memory contents which contain the machine
parameter (such as LOGO, ID Number, Auto-dlaler Telephone Number, etc.) in case of a power failure.
The battery can back up the information for up fo iO days.
4. The built-in rechargeable battery requires 48 hours to be fully charged In the machine.
18
Page 21
6V
Page 22

Settingithe Diallingl/létl^ITohéM Riilse)
Your machine can operate with either of two diailing methods {Tone or Puise), depending on the type of teiephone
line you are connected to. If you need to change the dialling method to Tone or Pulse, follow the procedure below.
¿S*í'-Í :t • :*í#íi:^•■• • A •.■ ►'j-,/ j
I FUNCTION I
I
2
3
tr ^
or
2
for Pulse.
for Tone.
SET
t~T~" 1
SET MODE
ENTER NO.
FAX PARAMETER(01-53)
NO.=|
06 DIALLING METHOD
2 -.TONE
06 DIALLING METHOD
1:PULSE
or
06 DIALLING METHOD
2 : TONE
(1-5)
OR A V
20
(@ STOP
5
& ^
Page 23
Adjusting Volume
You can adjust the monitor volume and ringer volume on your machine. The built-in speaker enables you to hear
the dial tone, dialling signals, and busy tone. The ringer sounds when your machine receives a call.
Setting Monitor Volume
You can adjust the volume by using both I CLEAR I and I SET I.
The following describes the method of using I CLEAR 1 and I SET 1.
J TEUDIAL
DIALLING
1 ^
You will hear the dial tone through the speaker.
CLEAR
MONITOR VOLUME
2
MONITOR
VOL
MONITOR
VOL
L_,
repeatedly to raise the volume.
or
SET
repeatedly to lower the volume.
LOW llllllll HIGH
MONITOR VOLUME
LOW HIGH
e
@ STOP
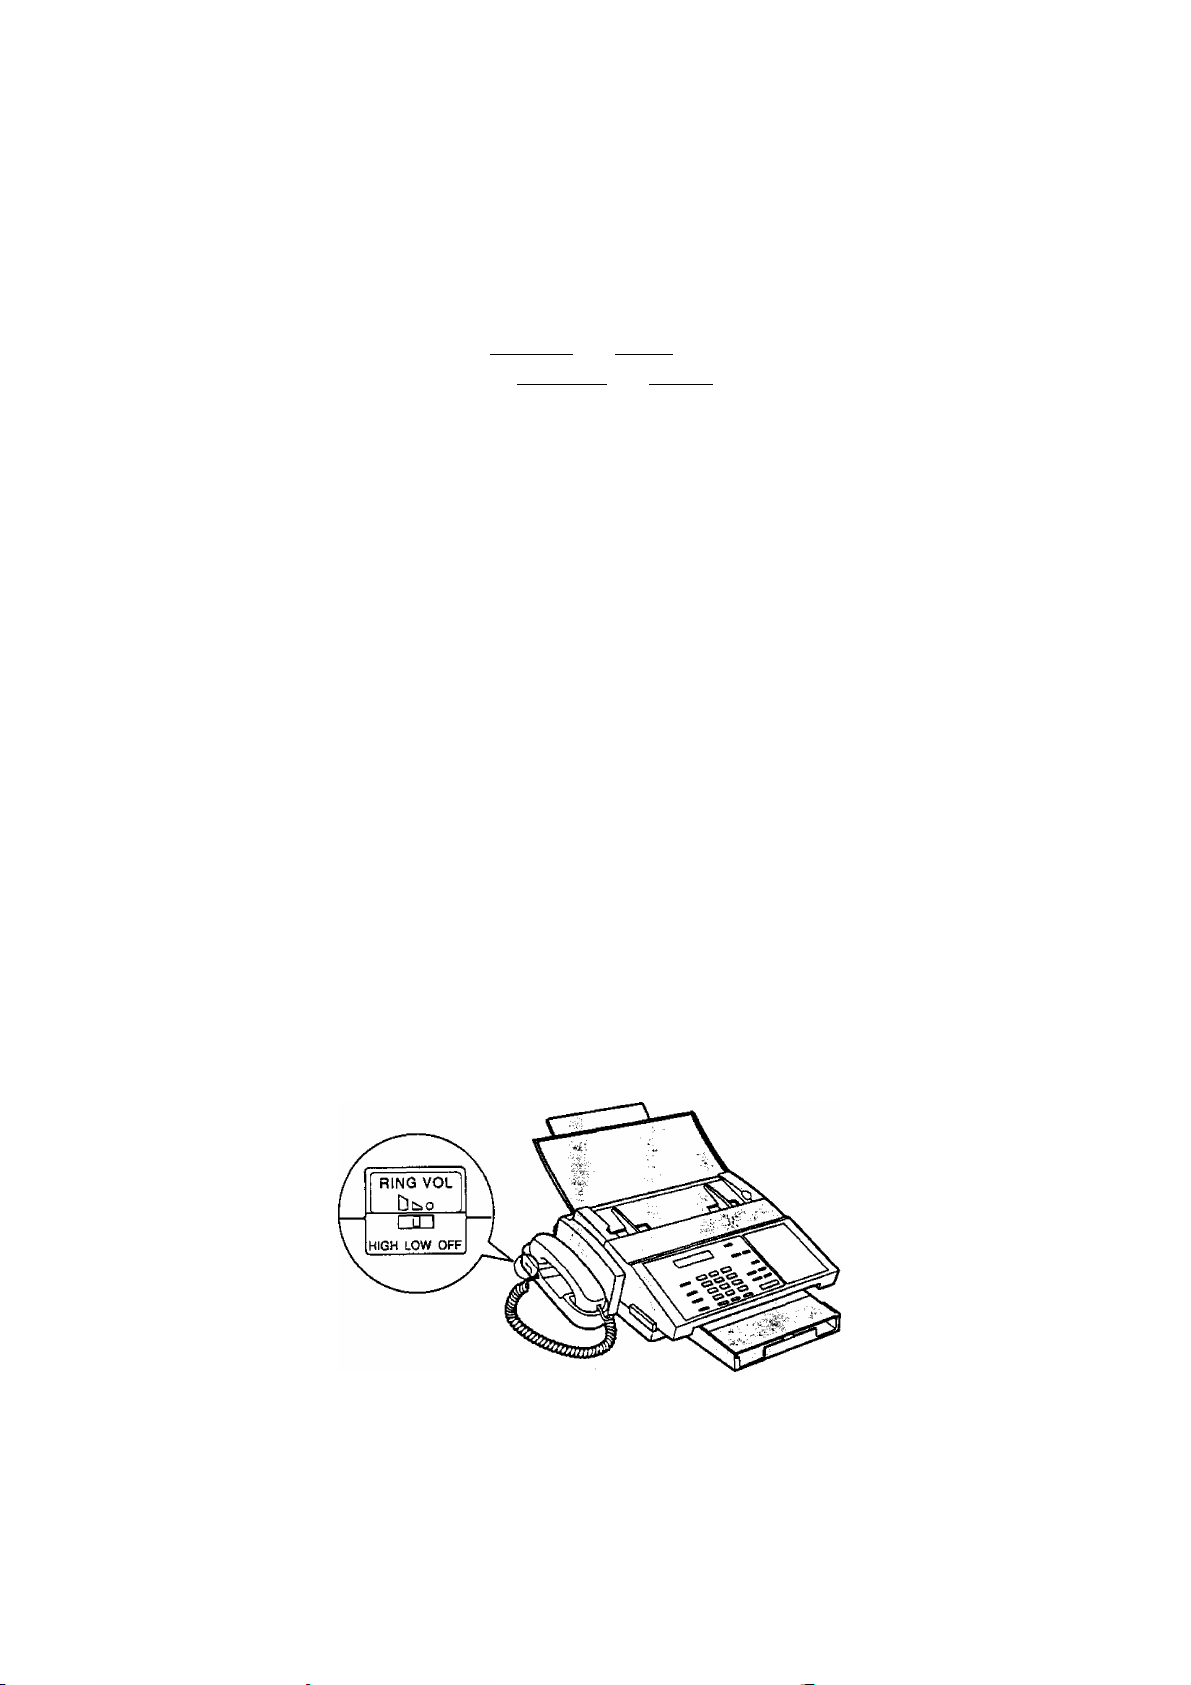
Setting Ringer Volume
The ringer volume is located on the upper left of the handset cradle.
Move the switch to a desired position, either high, low or off.
Note: You can also adjust the volume of the key touch tone and the volume of the buzzer in Fax Parameter
No. 10 (KEY/BUZZER VOLUME), (see page 34}
21
Page 24
User Parameters
:-s' •. .'.ivni^diKi- «.♦ . '.
Your facsimile machine has several basic settings (User Parameters) to help you keep records of the documents
you send or receive. For example, the built-in clock keeps the current date and time, and your LOGO and ID
Number help to identify you when you send or receive documents.
If a power failure occurs, a built-in battery will back up this information for up to 10 days when it is fully charged.
Setting the Date and Time
At standby the display will show the date and time. Once the standby display is set, it will automatically be
updated.
"î'f
w
, ■' ï^.-
■ _ ïj
1
3 ^
Enter the new date and time.
Ex;®]®
Œ1E!
min SIS]
[I][5][S[0]
Date : 08th
Month : December
Year : 1993
Time : 3:00 PM
SET MODE
ENTER NO.
liUSER PARAMETERS?
PRESS SET TO SELECT
DATE & TIME
ll-Ol-OOOO 00:00
DATE & TIME
08-12-1993 15:00
(1-5)
OR A V
22
If you make a mistake, use the < IORIGINAÜ and
> I RESOLUTION I to move the cursor to the incorrect
number and enter the new number over it.
@ STOP
SET
5
Page 25

Setting Your LOGO
User Parameters
When you send a document, your LOGO appears on the top of the copy printed out at the other station.
The LOGO helps to identify you to someone who receives ycfur document.
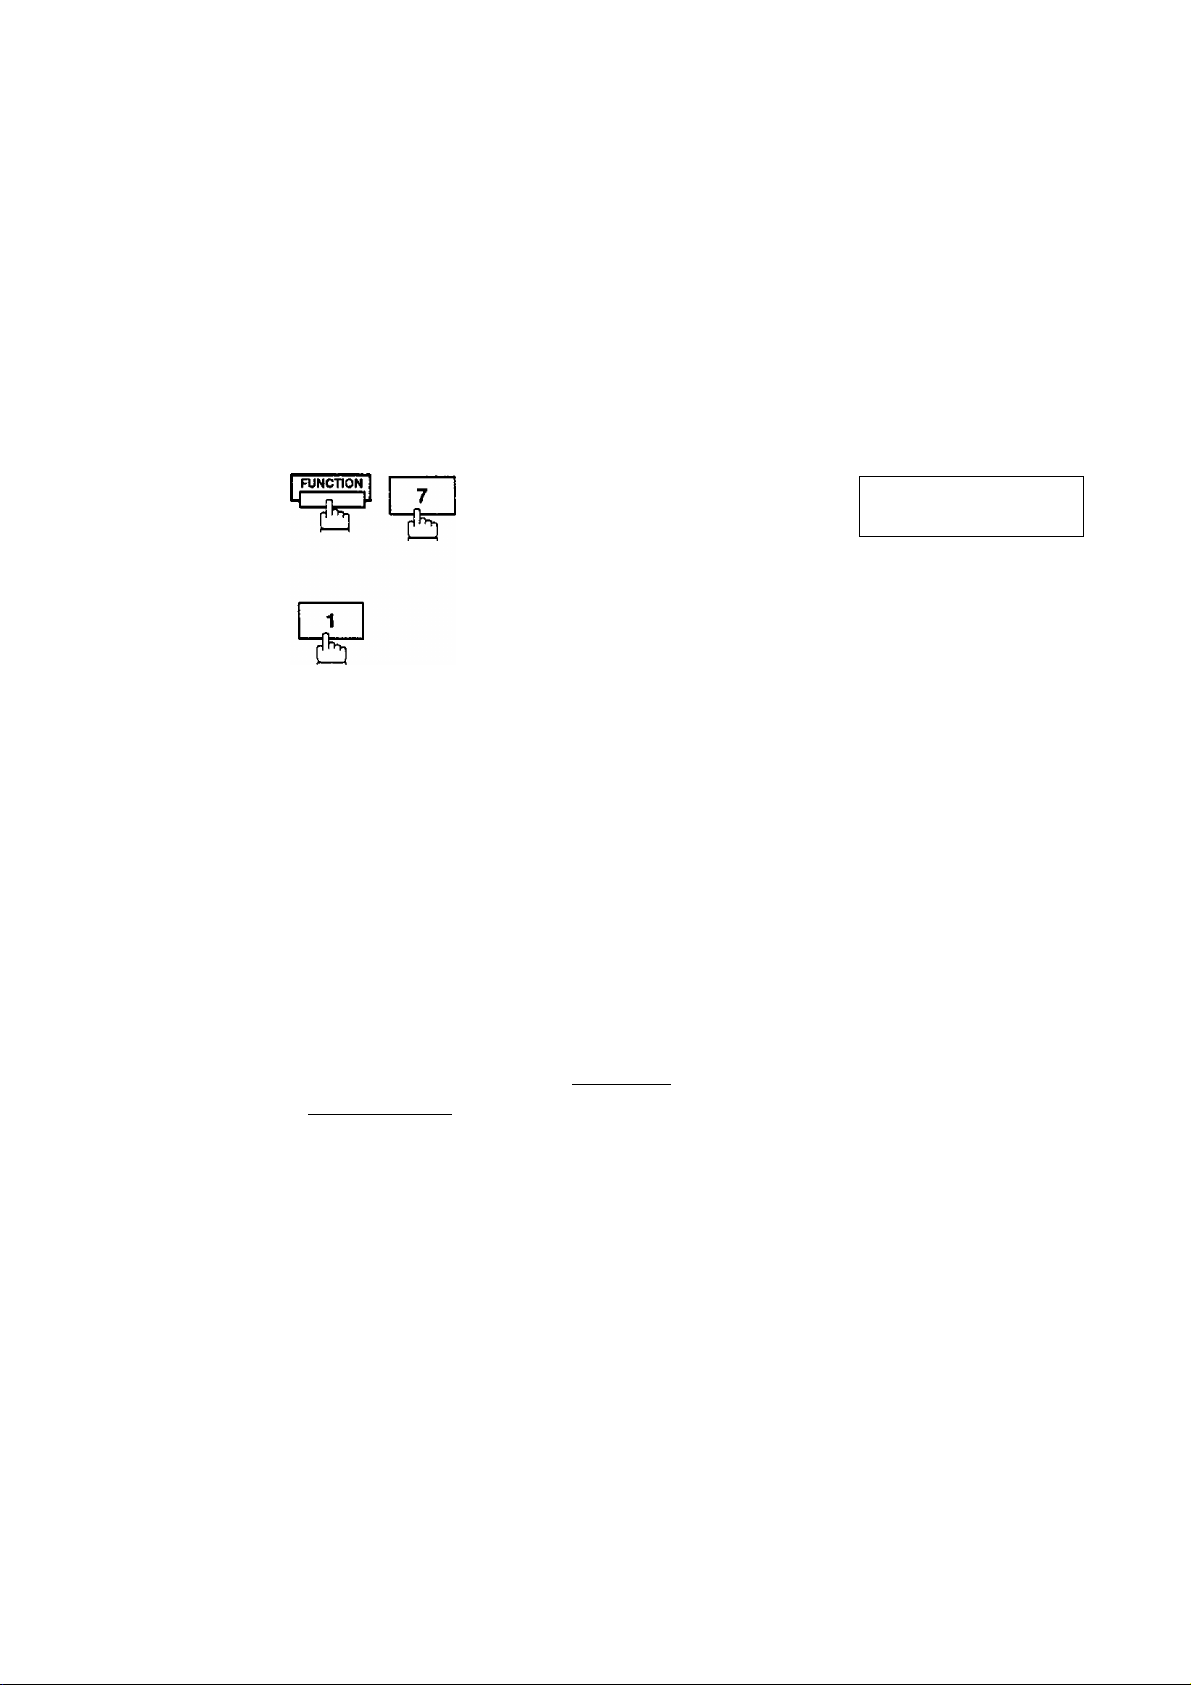
1
2
3
FUNCTION 1
1
srr
7
repeatedly until display shows;
SET MODE (1-5)
ENTER NO. OR A V
1:USER PARAMETERS?
PRESS SET TO SELECT
LOGO
1
r
£
5
Enter your LOGO {max. 25 characters and digits) by
using the Character keys (see page 9 and 27).
Ex: [P][A][N][A][S][Ol[N]II][C]
if you make a mistake, use < lORIGINALl and
> I RESOLUTION I to move the cursor to the incorrect
character and enter the new character over it.
If more than 19 characters are entered, the left side
characters will scroll off the display.
SET
® STOP
LOGO
PANASONICI
23
Page 26

’ÎÎ.^Ty'*''■ •••*-• -’‘S^^^---- •
^UseriParameters F
Setting Your Character ID
If the remote machine has a Character ID capabilities, when you are sending or receiving, your Character
ID will appear on the remote machine’s display and the remote machine’s Character ID will appear on your
display.
)v''Mï.
I FUNCTION I
I
3
1
SET
repeatedly until display shows;
Enter your Character ID (max. 16 characters) by using
the Character keys (see page 9 and 27).
ex:[B[1[a][d] H [ôlEFlEmElE
If you make a mistake, use < IORIGINAÜ and
> 1 RESOLUTION I to move the cursor to the incorrect
character and enter the new character over it.
SET MODE
ENTER NO.
1:USER PARAMETERS?
PRESS SET TO SELECT
CHARACTER ID
I
CHARACTER ID
HEAD OFFICEl
(1-5)
OR A V
24
@ STOP
Note: The special characters of A, A, O, U, /E, e and e cannot be used for Character ID.
m
Page 27

User Parameters
Setting Your ID Number (Fax Telephone Number)
If the remote machine does not have a Character ID but it has an ID Number, when sending or receiving, your ID Number will appear on the remote machine’s display and their ID Number will appear on your display.
We suggest you use your facsimile telephone number as your ID number for up to 20 digits long.
__ SET
3
Enter your ID (max. 20 digits) by using the key pad and I SPACE I.
Ex: [2] [0] m [IMCB E] d] iU
If you make a mistake, press I CLEAR I to erase the number then reenter the correct number.
repeatedly until display shows;
1 SPACE imr^mr^
SET MODE
ENTER NO.
1:USER PARAMETERS?
PRESS SET TO SELECT
ID NO.
ID NO.
201 555 1212
(1-5)
OR A V
@ STOP
pm
Note: 1. You may use H to enter a character at the beginning of the ID number to indicate the following
m
digit(s) for your country code.
Ex: +1201 555 1212 +1 for U.S.A. country code.
+81 3 111 2345 +81 for Japan country code.
2. For some countries, this feature is not a vailable depending on the country's regulation.
The display may not show this feature.
25
Page 28

This page is intentionally left blank,
26
Page 29

Entering Characters
The One-Touch Keys on the Control Panel also serve as character and symbol input keys when you record
your LOGO, Character ID and station names. A template is printed on the panel under the directory sheet
cover.
Character Keys
+
“1“
13 0
W
14 0
n O
O
O
•
o
A| B
01 A
B
B
D
C
Y
i j i | 1 1 &
1
03
15
^ t I •
j
04 M
L
iT
u
Z
I 08
r e I
12
SPACE
[ 0
o
16
l o
01
B
A
c
D
05
Q I _ R 1
S i r I W l X 1
02
06
09
E,
G
13
^ 1
^
F
H
07
|10
1
14
Following is the example to enter a LOGO using the character keys.
To enter "PANASONIC” for LOGO.
N
Ml
_ol
fP
1
to select M, N, O or P
B
16 o
o
to enter P
01 ^
2
to select A, B, C or D
n '
0
p ,
0
4 ,
Jli
0
o
m
LOGO
LOGO
P|
LOGO
P|
3
13 «0
to enter A
Enter all characters as steps shown above.
SET
LOGO
FA|
LOGO
PANASONIC I
27
Page 30

One-l^uch/Abbreviiateci Dialling Numbers * i p i
Entering One-Touch/Abbreviated Dialling Numbers
One-Touch and Abbreviated Dialling are two fast ways of dialling full telephone numbers. To use these dialling
methods, you must first store the telephone number using the following procedure.
To enter a One-Touch key, follow these steps below
I FUNCTION I
I
3
tr ^
2
1
n
01
Ex:
Enter the telephone number.
(up to 36 digits including pauses and spaces)
Ex: i9ll PAUSEirsirsIfSirSPACEimillflim
SET
1 IV'"*
SET MODE
ENTER NO. OR A V
1:ONE-TOUCH
2;ABBR. NO-
ONE-TOUCH< >
PRESS ONE-TOUCH KEY
ONE-TOUCH<01> TEL.
1
ONE-TOUCH<01> TEL.
9-555 1234|
(1-5)
28
__
SET
6 'T5
Enter the station name using character keys
(up to 15 characters).
ex:[1][a][E[i][s] a [DiaiBma
CX=3
8
To record another number, repeat step 4 to 8.
To return to standby, press I STOP I.
SET
ONE-TOUCH<01>
1
ONE-TOUCH<01>
SALES DEPT.I
ONE-TOUCH< >
PRESS ONE-TOUCH KEY
NAME
NAME
Page 31

One-Touch/Abbreviated Dialling Numbers
To set an Abbreviated Dialling Number, follow these steps below
1
2 ?
3.
Ex: ElE] (01 to 34)
4
Enter the telephone number.
5
6
(up to 36 digits including pauses and spaces)
Ex: i^l PAUSE ir^isir^rSPAC^r^r^lTir?
SET
SET
SET MODE
ENTER NO.
1:ONE-TOUCH
2:ABER. NO,
ABBR[| ]
ENTER ABER. NO.
ABBR[22]
1
ABBR[22]
9-555 23451
ABBR[22]
1
OR A V
(1-5)
TEL.
TEL.
NAME
Enter the station name using character keys
(up to 15 characters).
Ex:[S[C]El[Q]Cni[l[I][I][N][Sl [a
[0[1|P1[I1
SET
8
To record another number, repeat step 4 to 8.
To return to standby, press I STOP I.
m
Note: 1, If you require a special access number to get an outside line, enter it first and then press ¡PAUSE I.
A hyphen is displayed for pause.
2. Use [>] to enter a space between the numbers to make it easier to read.
3. The builhin battery can back up One~Touch/ABBR. Numbers up to 10 days when a power failure
occurs.
4. If you are using Pulse dialling and you wish to change to Tone dialling in the middle of dialling, press
i TONE I (represented by aT}. The dialling method will be changed from Pulse to Tone after
dialling the digit T.
5. You can search an unused One-Touch key or ABBR. number by pressing H or 0 in step 3 or 4.
ABER[22] NAME
ACCOUNTING DEPTI
ABBR[| ]
ENTER ABBR. NO.
29
Page 32

Опе|ТойЬК/АЬЬ№еШЩЩ D^liirfg
Changing or Erasing One-Touch/Abbreviated Diaiiing Numbers
If you have to change or erase any of the One-Touch/Abbreviated dialling numbers, follow the steps below.
To change the settings of a One-Touch/ABBR. dialling number
■-^f-
^.jSi
1
5
FUNCTION 1
Select 1 for One-Touch Dialling number. Select 2 for ABBR. Dialling Number.
Ex:[T]
Enter the station you wish to change.
07
Ex:
CLEAR
then enter a new telephone number.(see Note 1 and 2)
Ex: f9li9lf9ll SPACE irsimrslfel
SET
7 2
SET
1:ONE-TOUCH
2:ABBR. NO.
ONE-TOUCH< >
PRESS ONE-TOUCH
ONE-TOUCH<07>
9-555 1234
ONE-TOUCH<07>
1
ONE-TOUCH<07>
999 34561
ONE-TOUCH<07>
PANASONIC
KEY
TEL.
TEL.
TEL.
NAME
CLEAR
6
then enter a new station name.(see Note 1 and 3)
Ex: EE] и и шиш
1
■ fe
SET
7
To return to standby, press ISTOP I.
LJ Note: 1. Use H or[3 to move the cursor, then enter the correct number over the ;ncorrecf number.
Ш
2. Use
I
COPY
I
to insert a space between the numbers you sef. if the telephone number has full
digit (36 digits),
3.1 COPY I cannot be used to insert a space in setting of the station name.
4. If the One-Touch/Abbreviated dialling number has been used for a communication reservation, the
settings cannot be changed or erased until the communication has ends.
To change or erase the settings, cancel the communication first by File Edit Mode (see page 67).
I
COPY
I
cannot be used to insert a space.
ONE-TOUCH<07> NAME
1
ONE-TOUCH<07>
PANAFAXi
ONE-TOUCH< >
PRESS ONE-TOUCH KEY
NAME
30
Page 33

^ bne^Touch/Abbreviated Dialling Numbers
To erase the setting of One-Touch/ABBR. Dialling number
I^FUNCTtQNj
I
Select 1 for One-Touch Dialling number.
Select 2 for ABBR. Dialling Number.
2
Exim
Enter the station you wish to erase.
3
Ex:
CLEAR
"S’
01
SET
1:ONE-TOUCH
2:ABBR. NO.
ONE-TOUCH< >
PRESS ONE-TOUCH KEY
ONE-TOUCH<01> TEL.
9-555 4567
ONE-TOUCH<01> TEL.
1
5
SET
ONE-TOUCH< >.
PRESS ONE-TOUCH KEY
To return to standby, press 1 STOP I.
31
Page 34

^ggpFpHilpaied^^ "WW
Printing Out a Directory Sheet
After programming a one-touch dialling number, you can print out the directory sheet which includes the first
10 characters of each station name. Cut along the dotted line and place it over the One-Touch key under the
Directory Sheet Cover. To print out a directory sheet, follow these steps below.
PRINT OUT (1-7)
1
ENTER NO. OR A V
7 I
2
* PRINTING *
DIRECTORY SHEET
32
Directory Sheet Cover
Page 35

Customizing Your Machine
Your facsimile machine has a variety of adjustable Fax Parameters. These parameters, listed in the Parameter
Table, are preset for you and do not need to be changed. If you do want to make a change, read the table
carefully. Some parameters, such as the Resolution, Original, and Verification Stamp parameters, can be
temporarily changed by simple key operations just before a transmission is made. When the transmission ends,
however, these parameters return to their preset values (Home position). Other parameters can only be changed
by the procedure described below.
Setting Fax Parameters
FUNCTION I I _ 1
1
2
4
Enter Fax Parameter number from the Parameter Table
3
4 ^
(see pages 34 to 36).
Ex:[0][II for ORIGINAL
m SET
Enter the new setting value.
SET
7
SET MODE (1-5)
ENTER NO-. OR A V
FAX PARAMETER(01-53)
NO.=|
FAX PARAMETER(01-53}
NO.=01
01 ORIGINTUli
1¡NORMAL
Ex: [2] for LIGHT
<9G I
6
To set another parameter, press I CLEAR I to return to
step 3, or, to return to standby, press I STOP I.
Note: 1. To scroll the Fax Parameters in Step 2 or 4, press 0 or 0 •
m
2. To print out a Fax Parameter List, see page 79.
3. The built-in battery when fully charged can back up the Fax Parameter settings for up to 10 days
when a power failure occurs.
01 ORIGINAL
2-.LIGHT
02 RESOLUTION
1:STANDARD
33
Page 36

С^Шщшпд
Fax Parameter Table
.♦ л.... ( -Ч'
MacITiñe
No.
01
02
04
05
06 DIALING METHOD
07 HEADER PRINT
06 HEADER FORMAT
Parameter
ORIGINAL
RESOLUTION
STAMP
MEMORY
Setting
Number
1
2 Ught
3 Dark
1
2
3
1
2 On
1
2 On
r Pulse
2 Tone
1 Inside
2
3 No print
1 Logo, ID No.
Setting Comments
Normal
Standard
S-Rne
Outside
Rne
Off
Off
Setting home position of the ORIGiNAL key.
Setting home position of the RESOLUTION key.
Setting home position of the STAMP key.
To select the stamp function when document is stored in memory
{see Fax Parameter No. 28).
Setting home position of the MEMORY key.
Selecting dialling method.
Selecting printing position of the header.
Inside : Inside TX copy area.
Outside ; Outside TX copy area.
No print: Header is not printed.
Selecting header format.
09 RCV'DTIME PRINT
10
KEY/BUZZER VOLUME
12
13
15 ATTENDED MODE
16
Continued on the next page.
COMM. JOURNAL
AUTO JOURNAL
UNATTENDED MODE
2
1 Invalid
2 Valid
1 Off
2 Soft
3
1 Off
2 Always
3
1 Invalid
2
1 Tel
2
1
2
From To
Loud
Inc. only
Valid
FaxTTel SW
Fax
TAM l/F
Selecting whether or not the machine prints received time, page
no, and remote ID on bottom of each received page.
Selecting the volume of the Key/Buzzer tone.
Selecting home position of printout mode for COMM. Journal
Off/Always/Inc. only
Off : No printout
Always : Always prints out
Inc. only; Printout when communication has failed.
Selecting whether or not the machine prints the journal
automatically after every 32 transaction.
Selecting attended mode eitherTelephone Mode or Fax/Tel Auto
Switching Mode.
Selecting attended mode either Fax Mode or TAM Interface
Mode.
34
Page 37

Customizing Your Machine
No.
18
19
20
22
23
24 PRINT REDUCTION
Parameter
OP CALL TIMER
OGM Length (TAM !/F)
SILENT DET. (TAM l/F)
SUBSTITUTE RCV
RECORDING PAPER
SIZE
Setting
Number
1
2 30 sec.
3
4 50 sec.
1
60
1
2
1
2
1
2
3
1
2
Setting
20 sec.
40 sec.
1 sec. Setting the OGM length of your TAM from 1 to 60 second. Unit will
—
60 sec.
Invalid
Valid
Invalid Selecting whether or not the machine receives to memory when
Valid
A4
Letter
Legal
Fixed
Auto
Selecting the length of time that your machine signal (rings) for
an incoming voice call in FaxTTel Auto Switching mode (see page
55).
not start to detect a SILENT until the time lapse after detecting a
call in TAM Interface mode.—
Selecting Silent Detection Mode.
recording paper runs out, ink runsout or recording paperjammed.
Setting the recording paper size installed in your machine.
Selecting print reduction mode.
Fixed: Reduce document according to setting of Parameter No.
25.
Auto: Reduce document according to the length of received
documents.
Comments
%
25
26
28
32
46
47
48
Continued on the next page.
REDUCTION RATIO
POLLING PASSWORD
STAMP AT MEM. TX
COPY REDUCTION
SELECT RCV
REMOTE RCV
TELEPHONE LINE
PSTN ACCESS CODE
49
50
FLASH KEY
70
...
100
1
2
1
2
1
2
1
2
1
2
1
2
70% Selecting fixed print reduction ratio from 70% to 100%. This
...
100%
{....)
Invalid
Valid
Invalid Selecting whether or not the machine performs copy reduction in
Valid
Invalid
Valid
Invalid
Valid
PSTN Selecting the type of line connected.
PBX
0—
Earth
Rash
parameter functions when fixed print reduction is selected on fax
parameter no. 24 or when available memory getting low.
Setting a 4-diglt password for secured polling.
Selecting whether or not the machine stamps the original
documents when storing the documents into memory.
accordance with the setting of Parameter No. 24 and 25.
Selecting whether or not the machine performs selective
reception, (see page 71)
Selecting whether or not the machine accepts remote reception
command (see page 54).
Setting PSTN Access Code. (max. 4 digits)
Selecting to use FLASH on control pane! either as Earth key or
35
Page 38

Customizing YouriMachine
»7r>~ --------------
■“■'^Tr-'
No.
52
53
Parameter
DIAGNOSTIC
PASSWORD
OPTION MEMORY
Setting
Number
- -
Setting Comments
(—)
Setting the password for Remote Diagnostic Mode. Please ask
your Panasonic Authorized Dealer for details.
Display the amount of base and option memory installed.
(Base Memory + Option Memory)
36
Note: 1. The contents of Fax Parameter may differ depending on the each country’s regulation or
m
specification.
2. The standard settings are printed on the Fax Parameter List. To print out Fax Parameter List, see
page 79.
Page 39

Loading Documents
Documents You Can Send
In general, your machine will send any document printed on Letter or Legal size paper.
Document Size Document Thickness
Maximum Size
Direction
Minimum Size
148mm
128mm
Direction
Documents You Cannot Send
You must never try to send documents that are
Single sheet;
0.06mm (45g/m2) to
0.15mm (112g/m2)
Multiple sheets;
0.06mm (45g/m2) to
0.12mm (75g/m2)
Coated (e.g., glossy
paper, etc.)
Chemically processed
(e.g., pressure-sensitive paper,
carbon-coated paper, etc.)
or made of cloth or metal
To transmit these kinds of documents, make a photocopy first and then transmit the copy instead.
37
Page 40

Loading Documents
How to Load Documents
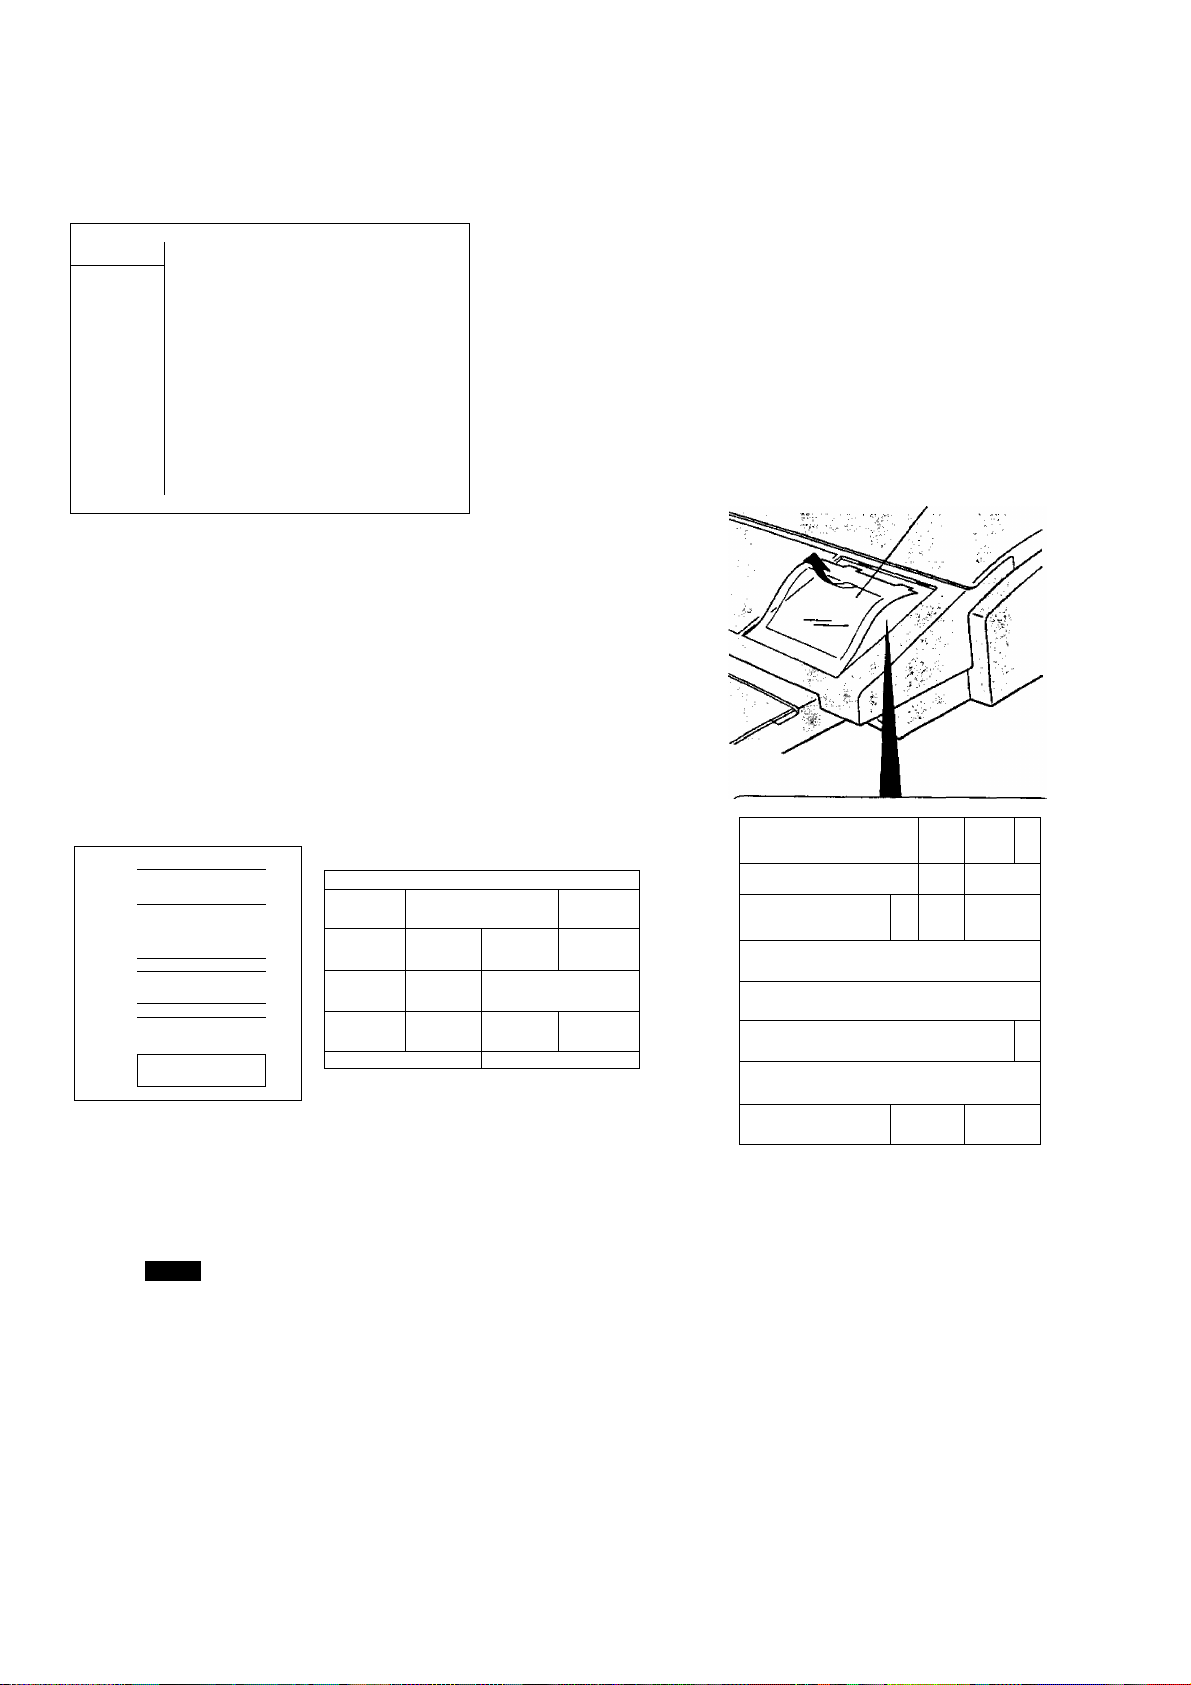
1. Be sure the document(s) is free of staples, paper clips and is not torn, greasy or covered by foreign objects.
2. Place the document(s) FACE DOWN on the Automatic Document Feeder (ADF) until the leading edge
placed into the machine stops.
If you are sending multiple pages, make sure that the bottom sheet enters first. You can also stack up
to 30 PAGES {see Note 1) on the ADF at one time. If you have more than 30 pages, wait until transmission
or storing in memory starts as pages feed through, place any remaining pages on top of the last page in
the feeder.
3. Adjust the Document Guides to center the document on the ADF.
CORRECT
When you set a document on the ADF, the display message will change from date and time (standby) to
DOCUMENT SET. You can now change basic transmission settings, or begin the dialling procedure.
Note: 1, The document limitation to send multiple pages is as follows.
m
INCORRECT
DOCUMENT SET
ENTER STATION
00%
38
Documenf Size
Up to 20 pages
Up to 30 pages*
* Paper that have rough surface may not be able to utilize all 30 pages even if the size and thickness
specification are met.
2. Transmitting documents longer than 356 mm requires user's assistance.
Up to 280 mm x 364mm
A4 size or Letter size
Document Thickness
0.06 mm to 0.12mm
0.06 mm to 0.10 mm
Page 41

Basic Transmission Settings
You can temporarily change the transmission settings either before or after you place document on the ADF.
These settings are as follows;
• Original (Contrast)
• Resoiution
• Halftone
• Stamp
After your document has been sent, your machine will automatically return to the preset settings.
Original (Contrast)
Your machine is preset to Normal contrast. If you have to send a document with light print contrast, you may
get better results by changing the setting to Light. If you have to send a document with dark print contrast,
change the setting to Dark.
Press IORIGINAP to:
a
DARK a ORIGINAL
LIOHT a I ~ "1
ORIGINAL = Normal
i
DARK qa^ ORIGINAL
uaHT-^M r I 1
ORIGINAL = Light
i
DARK
LIGHT
in Hotel To change the preset Contrast position, change the setting of Fax Parameter No. 01, see page 34.
Resolution
Your machine is preset to Standard resolution, which is suitable for most documents.
Use Fine or Super Fine for detailed documents.
Press I resolution! to;
FINE a r I
RNE-jBr 1 " 1
ORIGINAL
i~"" :i
1
S-PINE C3 r eso lution
i
RESOLU TION
ORIGINAL = Dark
RESOLUTION = Standard
RESOLUTION = Fine
'i
FINE C3 I ' I
RESOLU mOH
RESOLUTION = Super Fine
Note: To change the preset Resolution position, change the setting of Fax Parameter No. 02, see page 34.
in
39
Page 42

"'^.■‘'■■■'r;-" I’Wr T!i,7r
Basic Trahsrnissi^S^tings
i; 'p ■■-SI
Halftone
The Halftone setting is useful when sending photographs or illustrations with gray tones. Your machine is
preset to HALFTONE = Off. You can select either Fast mode or Quality mode.
FAST a
T
I
▼
HALFTONE
I
_____
HALFTONE
1 1
HALFTONE
1 Z-..I
I
HALFTONE = Off
HALFTONE = Quality
HALFTONE = Fast
OUAUTY a
QUALfTY-B-
FAST
QUALfTY C3
m
iJ Note: When you select HALFTONE to FAST or QUALITY, your machine will automatically select Fine
Resolution.
' :
M. F: „ • ;:r J.
Verification Stamp
The Verification Stamp helps you to confirm successful transmissions by stamping the bottom of each successfully transmitted page with a small (gi mark.
Press I STAMP 1 to:
1
C3
i
^ I ^ ^ STAMP
i
.......
n STAMP = Off
STAMP = On
40
Note: 1. When you store document in memory, the Verification Stamp will not function.
m
If you wish to enable the use of the Verification Stamp when storing document in memory, change
the setting of Fax Parameter No. 28, see page 35.
2. To change the preset Verification Stamp position, change the setting of Fax Parameter No. 04, see
page 34.
Page 43

Sending Documents
You can choose either Memory Transmission or Direct Transmission.
Use Direct Transmission if:
• The memory is full.
• You want to send the document after talking with the other party.
Use Memory Transmission if:
• You want to send the same document to multiple stations.
• You have to retrieve the document immediately.
Direct Transmission (ADF Transmission)
If the machine’s memory is full or you wish to send the document after talking with the other party, use Direct
Transmission.
Off-Hook Dialling
For Off-Hook Dialling, follow these steps
1
3
Set document(s) face down.
Lift the handset of your external telephone and dial the
telephone number from the keypad.
Ex: [IliaEIITlEIEIS]
When you hear the voice of the other party, tell the other
party to prepare to receive a document.
Then, when you hear a beep, press ISTART I and hang
up the handset.
DOCUMENT SET
ENTER STATION
ON LINE * XMT *
5551234
00%
LJ Note: To stop the transmission, press I STOP I.
m
The dispiay shows;
COMMUNICATION STOP?
1:YES 2:N0
Press iXI to stop the transmission.
41
Page 44

Sending Documents
.. ;'^'4>4.''. ^ Slit J
On-Hook Dialling
)g!
For On-Hook Dialling, follow these steps
*гЧт.:
, -.»t'-V
.тьп'А/.'-'-
Щ..#;
.-■ ■ r^^uäSi.'
■ '""'.г Г''
Nrfskc.. . r, LJtisli-**,
i -’f
ЯЩ'-М
'■■' Ш. ■. ''.!
1
2
3
Set document(s) face down.
TEUDIAL
You will hear dial tone through the monitor speaker.
Dial the telephone number from the keypad.
Ex:[1][5][5][I][I][I][4]
Machine will start sending automatically.
DOCUMENT SET
ENTER STATION
DIALLING *
* DIALLING *
55512341
ON LINE * XMT *
5551234
00%
42
Ш
Note: t If you need a special access number to get an outside line, dial it first then press I
pause (represented by a "-") before dialling the full number.
Ex: 9 PAUSE 5551234
2. If you are using Pulse dialling and you wish to change to Tone dialling in the middle of dialling, press
I TÖNE I freoresenfed bv a
The dialling mode will be changed from Pulse to Tone after dialling the digit T.
3. To stop the transmission, press
The display shows;
COMMUNICATION STOP?
1:YES 2:NO
Press [T] to stop the transmission.
4. When you hear the voice of the other party through the monitor speaker in step 3, lift the handset of
your external telephone and press F
Then, when you hear a beep, press
T).
I STOP I.
STOP I
I START I.
and tell the other party to prepare to receive a document
PAUSE
1 to enter a
Page 45

Manual Number Dialling (ADF Transmission)
To dial the telephone number manually, follow the steps below.
Sending Documents
1
2
3
4
Set document(s) face down.
MEMORY
a I I
Make sure that the lamp is off. If not, press ГМЕМОВУ" to set "off”.
Enter a telephone number from the keypad.
Ex: Ц] IS ОШЕ] Ш SI
Ф START
Your machine starts to dial the telephone number.
DOCUMENT SET
ENTER STATION
PRESS START TO DIAL
55512341
* DIALLING
55512341
00%
Ш
Note: 1. If you need a special access number to get an outside line, dial it first then press \ PAUSE I to enter a
pause (represented by a ”-) before dialling the full number
Ex: 9 PAUSE 5551234
2. If you are using Pulse dialling and you wish to change to Tone dialling in the middle of dialling, press
I
TONE
i
(represented by a T).
The dialling mode will be changed from Pulse to Tone after dialling the digit T.
3. To stop the transmission, press
The display shows;
COMMUNICATION STOP?
1:YES 2:NO
Press [T] fo stop the transmission.
4. If you hear the voice of the other party through the monitor speaker after last step, lift the handset of
your external telephone and press
I
STOP
I
to stop the alarm. When you hear the beep after telling the other party to prepare to receive
the document, press
I
START
I
STOP I.
I
STOP
I
and{J] to stop the communication. Then press
i
to start fax communication.
43
Page 46

Sending Documentsnaina uocumentf
__
:;^..
One-Touch Dialling (ADF Transmission)
One-Touch Dialling allows you to dial a full number by pressing a single key. To set One-Touch keys, see
page 28.
1
3
Set document(s) face down.
MEMORY
I
-----
"I
Make sure that the lamp is off. If not, press I MEMORY
toset"ofr.
Press a One-Touch key.
01
Ex:
The display will show the One-Touch number and station
name. The full number (e.g. 9-555 1234) will then be
dialed.
DOCUMENT SET
ENTER STATION
00%
44
LI Note: 1. To stop the transmission, press I STOP I.
m
The display shows;
COMMUNICATION STOP?
1:YES 2:NO
Press [T] fo stop the fransm/ss/on.
2. If you hear the voice of the other party through the monitor speaker after last step, lift the handsef of
your external telephone and press I STOP I anc/Q] fo stop the communication. Then press
I STOP i to stop the alarm. When you hear the beep after telling the other party to prepare to receive
the document, press! START I to start fax communication.
Page 47

Sending Documents
Abbreviated Dialling (ADF Transmission)
Abbreviated dialling is a speedy way to dial a frequently dialed telephone number by preprogram the
telephone number in the built-in auto-dialer with a 2-digit abbreviated code. To program an abbreviated
dialling number, see page 28.
1
Set document(s) face down.
MEMORY
2
2 Press I ABBR i and a 2-digit code.
Make sure that the lamp is off. If not, press I MEMORY
to set "off.
exiFabbr imroi
The display will show the ABBR number and station
name. The full number {e.g. 9-555 1234) wiil then be
dialed.
DOCUMENT SET
ENTER STATION
ABBR
[10](Station name}
* DIALLING ’
9-555 12341
00%
m Note: 1. To stop the transmission, press
The display shows;
COMMUNICATION STOP?
1:YES 2:NO
Press Q] fo Stop the transmission.
2. If you hear the voice of the other party through the monitor speaker after last step, lift the handset of
your external telephone and press
I
STOP I fo stop the alarm. VWien you hear the beep after telling the other party to prepare to receive
the document, press
I
START
I
STOP
I
STOP
1
and
[T]
to stop the communication. Then press
I
to start fax communication.
45
Page 48

Sending Dbicunnient^
Memoty Transmission
Your machine quickly stores the document into the machine’s memory.
Then, starts to dial the teiephone number.
if the transmission fails, your machine will re-transmit the remaining unsuccessful page{s) automatically.
®
_________
Store document
in memory
_____
a
Receive
-►
Note: 1. The File Number of the document being stored is shown at the
upper right corner of the display while storing the document. It is
also printed on the Communication Journal (COMM. JOURNAL), 32
Transaction Journal and File List. The percentage of memory used
is shown on the lower right corner of the display after each page is
stored.
2. If a memory overflow occurs while storing documents into memory,
the machine will prompt on the display whether to start transmitting
those pages which are successfully stored or to cancel the
transmission. Press [T] to cancel; press [H fo transmit. See
Specifications, page 96 for the image memory capacity.
3. An Information Code will be displayed if the transmission has failed
or no answer at the receiving side after the last automatic redial.
The document stored for this transmission will be erased from the
memory automatically and the transmission is marked INC"
(incomplete) on the Communication Journal (COMM. JOURNAL).
4. When a power failure occurs, the document information stored in the memory will be lost. In this case a
Power Failure Report will be printed out automatically after the Power is turned ON again. The report is
not printed out it there are no documents stored in the memory, (see page 80)
* STORE * N0.003
PAGES=02
* STORE * COMPLETED
TOTAL PAGES=05 30%
MEMORY OVERFLOW
INFO. CODE=870
15 PAGES COMPLETED
DELETE? 1:YES 2: NO
INCOMPLETE
INFO. CODE=XXX
10%
46
Page 49

Sending Documents
Manual Number Dialling (Memory Transmission)
To dial the telephone number manually using the keypad, follow the steps below.
1
Set document(s) face down.
MEMORY
DOCUMENT SET
ENTER STATION
00%
2
3
Make sure that the MEMORY lamp is on.
Enter a telephone number from the keypad.
Ex: [5][1][HIT][2]SIS]
O START
tS
The document is stored into memory with a file number. Then starts to dial the telephone number.
TEL, NO.
55512341
STORE * N0,002
PAGES=01 05%
* STORE * COMPLETED
TOTAL PAGES=05 25%
* DIALLING
55512341
m Note: 1. If you need a special access number to get an outside line, dial it first then press I PAUSE I to insert
a pause (represented by a before dialling the full number.
Ex: 9 PAUSE S5S1234
2. If you are using Pulse dialling and you wish to change to Tone dialling in the middle of dialling, press
I TONE Ifreoresented bva T).
The dialling mode will be changed from Pulse to Tone after dialling the digit T.
3. To stop the transmission, oressf STOP I.
The display shows;
COMMUNICATION STOP?
1:YES 2:N0
Press [T] to Stop the transmission. The document you stored will be erased aufoma//i;a//y.
47
Page 50

Sendingpocuments.:'^ iil;'IS SI
One-Touch Dialling (Memory Transmission)
One-Touch Dialling allows you to dial a full number by pressing a single key. To set One-Touch keys, see
page 28.
1 ^
Set document(s) face down.
MEMORY
Make sure that the MEMORY lamp is on.
Press a One-Touch key.
DOCUMENT SET
ENTER STATION
00%
3
01
Ex:
^ START
The document is stored into memory with a file number.
Then starts to dial the telephone number.
ONE-TOUCH
<01>{Station name)
STORE * N0.002
PAGES=01 05%
* STORE * COMPLETED
TOTAL PAGES=05 25%
48
Page 51

Sending Documents
Abbreviated Dialling (Memory Transmission)
Abbreviated dialling is a speedy way to dial a frequently dialed telephone number by preprogram the
telephone number in the built-in auto-dialer with a 2-digit abbreviated code. To program an abbreviated
dialling number, see page 28.
DOCUMENT SET
1 4
Set document(s) face down.
MEMORY
Make sure that the MEMORY lamp is on.
ENTER STATION
00%
3
Press l ABBR I then enter a 2-digit code.
Ex: I ABBR UTiro
O START
The document is stored into memory with a file number.
Then starts to dial the telephone number.
ABBR
[10]{Station name)
* STORE * N0.002
PAGES=01 05%
* STORE * COMPLETED
TOTAL PAGES=05 25%
49
Page 52

'1Ж
Sending Dbcumehts
Multi-Station Transmission (Broadcasting)
If you have to send a same document to multiple stations, you can save time in feeding the document by using
memory transmission. That is, you can store the document into memory and then send it to the station(s)
automatically.
1
2
3
Set document(s) face down.
MEMORY
B-fiSC
Make sure that the MEMORY lamp is on.
Dial by any combination of the following methods.
• Manual Number Dialling (Up to 3 stations)
• One-Touch Dialling
• Abbreviated Dialling
(For details, see page 43 to 45.)
Ex:
I ABBR imr^
(When entering a station for Manual Number Dialling,
press r SET I after each station is entered.)
DOCUMENT SET
ENTER STATION
ONE-TOUCH
<01>(Station name)
ABBR STNS=002
[10](Station name)
00%
O START
4
The document is stored into memory with a file number.
Then starts to dial the telephone number in sequence.
Note: You can review the stations you enfered in step 3 before storing your document into memory by pressing
Ш
И or 0 • Press
1
CLEAR
I
to clear an enfered station show on display if needed.
STORE * N0.001
PAGES=01 01%
* STORE * COMPLETED
TOTAL PAGES=05 25%
50
Page 53

Sending Documents
Multifile Transmission
When you have to send several documents to different stations, you do not have to wait until each
transmission is completed. You can store all the different documents into memory and program the machine
to dial each telephone number for each document. Instead of sending the documents separately, you can
reserve all the transmission at one time.
1
2
3
4
Set document(s) face down.
MEMORY
Make sure that the MEMORY lamp is on.
Dial by any combination of the following methods.
• Manual Number Dialling (Up to 3 stations total in all files)
• One-Touch Dialling
• Abbreviated Dialling
{For details, see page 43 to 45.)
01
Ex:
tasbr imn^
(When entering a station for Manual Number Dialling, press
I SET I after each station is entered.)
MEMORY
a ^ I
to store the document into memory.
The document is stored into memory with a file number.
DOCUMENT SET
ENTER STATION
A
00%
Repeat step 1 through 4 for each document that you are
5
sending, (see Note 3)
O START
6
Your machine starts to dial the telephone number in
sequence.
Note: 1. You can review the stations you entered in step 3 before storing your document into memory by
m
pressing 0 or 0 • Pf6SS I CLEAR I to clear an entered station show on display if needed,
2. The home position of MSMORY key can be set by Fax Parameter No. 05.
3. Up to 3 Memory Transmission flies (2 Deferred Communication, 1 polling XMT file or a combination not
exceed maximum 3 files) can be set
51
Page 54

pend)ng Dociim^ts
Redialling
Automatic Redialling
If the line is busy or there is no answer, your machine will redial the
number up to 5 times at 3 minutes interval. During that time, a
message wiii appear as shown to the right.
"tî ... .
:,.ÎJ.'ilâiü-i,.-v*iÎ>
WAITING TO DIAL
(Telephone number)
• If the iine is still busy after the last try, a message will appear as
shown to the right and your machine will print out a COMM.
Journal depending on the setting of Fax Parameter No. 12.
• When transmitting from memory and there is no answer after the last try, the stored document will be
automatically erased.
Manual Redialling
You can also redial the last dialed number manually by pressing the IREDIALI key.
To redial the last dialed number through memory
1
Set document(s) face down.
Make sure that the MEMORY lamp is on.
PAUSE/REOIAL
2
<I> START
3
INCOMPLETE
INFO. CODE=630
DOCUMENT SET
ENTER STATION(S) 00%
TEL NO.
5551234
* STORE *
PAGE=01 01%
N0.002
The document is stored into memory with a file number.
Then dials the last dialed number.
To redial the last dialed number through ADF
1
Set document(s) face down.
TEUDIAL
2
PAUSE/REDIAL
3
Your machine starts to dial the last dialed number.
DIALLING
* DIALLING *
55512341
52
Page 55

Reception Modes
You can select one of the four modes as shown below.
Receiving Documents
Conditions
You normally receive
only voice calls.
You receive both voice
and fax calls.
You normally receive
fax calls only.
You receive both voice
and fax calls. And a
Telephone Answering
Machine (TAM) is
connected.
Suggested Reception Mode Settings
Telephone Mode
(Attended)
You can answer the incoming call via the handset.
If you receive a fax calling signal, simply press
START to receive manually, (see page 54)
Fax / Tel Auto Switching Mode (see Note 2)
(Attended)
Unit will answer the incoming call then
distinguishes whether it is voice or fax call. If it is
a fax call, the unit will receive automatically, if it is
a voice call, the unit will signal (rings) through the
speaker for your attention, (see page 55)
Fax Mode
(Unattended)
Unit will receive the document automatically. All
incoming calls (including a voice call) are
answered by the fax machine, (see page 56)
TAM interface Mode (see Note 2)
(Unattended)
The TAM answers the Incoming call. During that
time, the unit also monitors whether it is a voice
call, the TAM continue to operate. If it is a fax call,
the unit wiii automatically switch the line to fax
and begin receiving document, (see page 58)
Ф Fax Parameter No. 15 set
to 1 : Tel
^ RCV MODE
a
n
Lamp: OFF
(D Fax Parameter No. 15 set
to 2 : Fax / Tel SW,
/Яч RCV MODE
Lamp: OFF
Ф Fax Parameter No. 16 set
to 1 : Fax
^ RCV MODE
Launp: ON
Ф Fax Parameter No. 16 set
to 1 : TAM 1 / F.
(2) RCV MODE
Lamp: ON
Note: 1. Depending on the model of the Telephone Answering Machine (TAM) that is connected, some of the
Ш
feature may not be compatible with the your machine operating in the TAM Interface mode.
2. For some countries, this mode is not available because of the country’s regulation and specification.
53
Page 56

R^^lymg [^curWb^ti
Telephone Mode
When your machine is set to this mode, your machine wili not receive documents automatically, if you receive
a fax call, follow the procedure to receive documents manually.
Setting the Telephone Mode
Change Fax Parameter No. 15 (ATTENDED MODE) to 1 : Tel. (see page 34)
1
nCV MODE
o [;
Confirm that the lamp is OFF and the display as shown to
the right.
Operation of Telephone Mode
When your telephone rings, lift the fax handset or an extension phone.
1
08-DEC-1993 15:00
RCV MODE=TEL 00%
3a
4
¡Tf you hear a beep from the phone, it means someone wants to send a fax. Or, if the caller |
|_answers and says he/she wants to send a fax, then^^^___ ^
Remove the document from ADF, if any.
|lf you answered the call using th^ |
|_fax handset, (See Note 1)
O START
tj
Hang up the phone.
___
_|
3b
I If you answered the call on an |
l_extension phone, _[
within 1 second
from the extension
n a
Your machine will be activated
remotely.
phone, (see Note 2)
54
Note: 1. If your machine does not have the handset, follow the step 3b.
ffl
2. This procedure is called "REMOTE RCV" and will work on a touch tone phone. If your extension
phone is not touch tone phone, press
1
START
I
on the control panel of your fax machine.
Page 57

Receiving Documents
Fax / Tel Auto Switching Mode
When your machine is set to this mode, your machine will switch to document reception or voice
communication automatically.
Setting the Fax / Tel Auto Switching Mode
Change Fax Parameter No. 15 (ATTENDED MODE) to 2: Fax / Tel SW. (see page 34)
1
RCV MODE
08-DEC-1993 15:00
RCV MODE=FAX/TEL 00%
Confirm that the lamp is OFF and the display as shown to
the right.
Operation of Fax/Tel Auto Switching Mode
Your machine will soon answer the call when a call is received, then distinguish whether it is
1
a voice or fax call.
2a
If the call is a Fax call,
Your machine begins to receive the
documents.
2b
3b
If the call is a Voice call,
Your machine begins signal (ringing)
through the machine's speaker for
your attention, (see Note)
Lift the fax handset and talk,
or
Lift the handset of your extension
phone and press I STOP Ito talk.
Q]Note: The length of time the machine signals can be changed by Fax Parameter No. 18 (OP CALL TIMER)
and the volume can be set by Fax Parameter No. 10 (KEY/BUZZER VOLUME), (see page 34 and 35).
55
Page 58

ijeceiying Dpc^ ^M.
Fax Mode
When your machine is set to this mode, it will immediately begin to receive documents automatically when
a call is received.
Setting the Fax Mode
^ Change Fax Parameter No. 16 {UNATTENDED MODE) to 1: Fax. (see page 34)
RCV MODE
2
Confirm that the iamp is ON and the dispiay as shown to the
right.
Operation of Fax Mode
Your machine will soon begin receiving automaticaiiy when a fax call is received.
08-DEC-1993 15:00
00%
56
Page 59

Receiving Documents
TAM (Telephone Answering Machine) Interface Mode
Your machine is equipped with a unique feature called TAM Interface which enables It to automatically switch
a single telephone line either to Fax or TAM. You can connect most TAMs in the market to your machine and
use your existing telephone line very efficiently. However, some TAMs may not be compatible with this
machine. For the operation of your TAM, please refer to the User’s Guide of the TAM.
Installing your TAM
Type 1
Ф Remove the telephone line cord of your TAM from
the wall jack.
Ф Plug the telephone line cord of your TAM into the
TEL jack on the rear of the fax machine as shown.
ШNote: The connection method for TAM may differ depending on the each country regulation.
Please follow the appropriate method for your country among above methods (Type 1 to 4).
For details, please ask to your local Panasonic dealer.
57
Page 60

Receiving Do(pmerits
Setting the ТАМ Interface Mode
-нГ^ , 4^ 4* .- iéiT^'^-^SXiL.- MjàlJÈiéf \Чнк^-i* ¡i ^t-iilUt/tiL*^
Change Fax Parameter No. 16 (UNATTENDED MODE) to 2: TAM I / F. (see page 34)
1
’ ' • 'V^’- •• ' -V i’-
Щ.
RCVMODE
2
Confirm that the lamp is ON and the display as shown to the
right.
Operation of TAM Interface Mode
When your TAM and Fax receives an incoming call, the TAM always answers the call first
1
2a
Sample of OGM
Hello, this is Smith, Sorry I am unable to take your call. Please leave your message after the
beep or if you are calling to send a fax, press the asterisk button twice on your touch tone
phone now and start your machine. Thank you for calling.
and then the TAM sends an OGM (Outgoing Message) recorded in your TAM to the calling
station. During the time the TAM is answering the call, your fax machine will be monitoring
the line to distinguish whether it is a voice or fax call.
If the call is Fax call,
Your machine will switch the line to the
fax and then begins to receive the
documents immediately from the
calling station.
2b
If the call is Voice call,
Your TAM continues to record a
message (ICM) after sending out an
OGM.
08-DEC-1993 15:00
RCV MODE=FAX/TAM 00%
58
Page 61

Receiving Documents
Print Reduction
This machine can use Letter, Legal or A4 size plain paper for recording. Sometimes, oversized documents
sent to you by the other parties cannot be printed within a single page. When this occurs, the document will
be divided into separate pages.
This machine is equipped with a Print Reduction function to solve this problem. You may select the most
appropriate setting from the selections described below.
1. Automatic Reduction
Each page of a received document is first stored in memory. Based on the document length, your machine
will automatically calculate the suitable reduction ratio {70% to 100%) to print the entire document on a single
page. If the received document is extremely long (over 35% longer than the recording paper), the document
will be divided into separate pages and printed with no reduction.
IMPORTANT!
This mode requires the entire page to be received into memory before printing. However, this mode is
disabled automatically and fixed reduction mode will be used in the cases described below:
a) Available memory is low
e.g. deferred transmission is stored in memory.
b) Receiving documents with large amount of data
e.g. photo sent by halftone mode.
2. Fixed Reduction
You can predetermine the reduction ratio from 70% to 100% in 1% steps. The document you received will
be reduced to this ratio regardless of the size.
Selecting the Print Reduction Mode
Set Fax Parameters as shown below, (see page 35)
1. To set Automatic Reduction mode.
(1) No. 24 Print Reduction set to "Auto”.
2. To set Fixed Reduction mode.
(1) No. 24 Print Reduction set to "Fixed".
(2) No. 25 Reduction Ratio set to any number between 70% through 100%. (see Note)
Ex: A4 to A4 - 94%
A4 to Letter - 90%
Letter to Letter - 94%
Legal to Letter - 75%
Note: If sending side is set to print the header on outside of the copy area, more reduction ratio will be required.
m
59
Page 62

Receiving Documents
Substitute Memory Reception
If the recording paper runs out or jam or if the ink runs out during reception, the machine automatically starts
receiving document into its image data memory. Stored documents are printed automatically after replacing
the recording paper or print cartridge.
1
2
When the machine finishes the memory reception and
there is no recording paper or ink, an Information Code
appears on the display.
Install recording paper (see page 17) and press
I START I or replace the print cartridge (see page 15).
The machine will automatically start printing the
document stored in the memory.
NO RECORDING PAPER
INFO, CODE=010
OUT OF INK
INFO.CODE=015
* PRINTING *
MEMORY RCV'D DOC
60
Note: 1. If the memory overflows, the machine will stop receiving and release the communicatiori line.
The document(s) stored in the memory up to that moment will be printed out automatically
2. When a power failure occurs, the document information will be lost and a Power failure Report will be
printed out. (see page 80)
3. If you wish to turn off the substitute reception function, change the setting of Fax Parameter No. 22 to
"Invalid” (see page 35).
Page 63

Making Copies
Your machine has a copy function which can make single or multiple copies. When copying, your machine will automaticaily select Fine resolution, but you may select the Standard or Super Fine resolution.
DOCUMENT SET
ENTER STATION 00%
Set document{s) face down.
* COPY *
NO. OF COPY=l
3
4
Enter the number of copies.
Ex: IHIS]
O START
The machine stores the document, then prints out
copies.
* COPY *
NO. OF COPY=10
STORE * NO.005
PAGES=01 01%
* STORE * COMPLETED
TOTAL PAGES=05 25%
* COPY *
NO. OF COPY=01/10
Note: 1. Your machine will print the document with no reduction when making copy.
m
If you wish to enable reduction function in copy mode, change the setting of Fax Parameter No. 32
(COPY REDUCTION) to "Valid”, (see page 35}
The reduction ratio will be fixed depending on the setting of Fax Parameter No. 24 (PRINT
REDUCTION) and No. 25 (REDUCTION RATIO) after the Fax Parameter No. 32 is set to ’’Valid”.
2. The print quality is not different between Fine resolution and Super Fine resolution when making copy.
61
Page 64

Using theiMiÌiìì^
Making a Regular Call
[ Note : This feature is only available from the handset of facsimile machine. ]
You can use the handset on your machine to make regular calis. To do so, lift the handset and dial the full
number just as you would using an ordinary telephone, if you wish, you can also use the One-Touch/ABBR.
Number dialling.
Remove the document from the ADR
'-^ 0m "'è-
, V>'% ■,->■■ r'- ■••-.*■■■
1
Lift the handset.
* PHONE OFF HOOK *
2
Dial a number by using one of the following methods.
3
Making Voice Contact after Sending/Receiving
You may want to talk to the other person over the telephone after sending or receiving documents. To do
so, perform Step 1 while the machine is stili sending or receiving.
1
• Manual Number Dialling
• One-Touch Dialling
• Abbreviated Dialling
02
Ex;
TEUPIAL
ONE-TOUCH
<02>(Station name)
* DIALLING
555 12341
When sending When receiving
ON LINE * XMT *
ID:(Identification)
ON LINE * XMT * TEL
ID;(Identification)
ON LINE * RCV *
ID:(Identification)
ON LINE * RCV * TEL
ID:(Identification)
When sending/receiving is over, you will hear a signal
(ringing) through the monitor speaker.
ON LINE * XMT * TEL
OPERATOR CALLING OPERATOR CALLING
Lift the handset and talk,
2
Lift the handset of your extension phone and press
I STOP I to talk.
Answering a Voice Contact Request
When you hear a signal (ringing) through the monitor speaker, it means you are receiving a voice contact
request. Follow the above Step 2 to talk.
or
ON LINE * RCV * TEL
62
Page 65

Timer Controlled Communications
You can send a document to one or multiple stations at any preset time within the next 24 hours. Up to 2 built-in timers can be set for deferred transmission and deferred polling.
Deferred Transmission
1 j
2
3
4
5
6
Set document(s) face down.
Enter start time using the keypad. (Use a 4-digit, 24-hour clock)
Ex: [2][3][3][0]{11:30 p.m.) and i SET
MEMORY
5«
(See Note 2)
Dial by any combination of the following methods.
• Manual Number Dialling (Up to 3 stations)
• One-Touch Dialling
• Abbreviated Dialling
DOCUMENT SET
ENTER STATION
DEFERRED COMM. NO.=l
1:XMT 2¡POLLING
DEFERRED XMT
START TIME I :
DEFERRED XMT
ENTER STATION(S)
00%
Ex:
(When entering a station for Manual Number Dialling, press
I SET i after each station is entered.)
<3>
START
to store documents into the memory.
■fe
m
Hole: 1. If you enter a wrong number in Step 4, press I CLEAR I then re-enter the right number.
2. if you wish to send the document without storing into memory (memory may not be big enough for
storing the entire document), skip step 5 and enter only one station in step 6. In this case the document
will remain on the ADF for Timer Transmission after step 7.
If you resen/ed the deferred transmission without storing into memory, the display shows "TIMER’’ on
the upper right corner after pressing I START 1 in last step.
3. To change or cancel the Deferred Communication settings, see page 68 and 69.
4. Up to 2 Deferred Communication files (3 Memory Transmission, 1 polling XMT file ora combination not
exceed maximum of 3 files) can be set.
ONE-TOUCH
<02>{Station name)
* STORE * N0.002
* STORE * COMPLETED
TOTAL PAGES=05 30%
PAGES=01 05%
63
Page 66

irimei^Cpntrolled*(Gommunicatipns^^i^ ¥
Deferred Polling
I FUNCTION I
I
2
3
4
1
TV
t5'
Enter a 4-digit polling password.
Ex: H][I][7]I1] and I SET I
Enter start time using the keypad.
(Use a 4-digit, 24-hour clock)
Ex: [0][I][3][0] (3:30 a.m.) and I SET
DEFERRED COMM. NO.=l
1:XMT 2:POLLING
DEFERRED POLLING
PASSWORD= nil
DEFERRED POLLING
START TIME I
DEFERRED POLLING
ENTER STATION(S)
Dial by any combination of the following methods.
5
• Manual Number Dialling (Up to 3 stations)
• One-Touch Dialling
• Abbreviated Dialling
10
Ex:
(When entering a station for Manual Number Dialling,
press I SET I after each station is entered.)
^ START
ONE-TOUCH
<10>(Station name)
STORE N0.001
6
H]
■J Note: 1, If you enter a wrong number in Step 3. press I CLEAR I, then re-enter the right number.
2. To change or cancel the Deferred Communication settings, see page 68 and 69.
64
Page 67

Polling
Polling means calling other station(s) to retrieve a dociiment. The other station must know in advance that you
will call and must have a document set on the ADF or stored in the memory. You may need to set a polling
password, shared by the other station, to ensure security.
Setting Polling Password
if the polling password does not match with the polled station, your polling request will be refused
automatically.
To set the polling password, follow the steps below.
1
2
3
4
SET
tv
SET
Enter a 4-digit poiling password.
Ex: mil]S][4]
SET MODE'
ENTER NO.
FAX PARAMETER (01-53)
NO.=|
26 POLLING PASSWORD
26 POLLING PASSWORD
(1-5)
OR A V
III!
1234
@ STOP
5
Note: 1. Polling might not function with all fax machines. We suggest you attempt a trial polling before you
m
actually poll important documents.
2. If a password is not set in the polled station, you may poll the other station even though your machine
has a password.
65
Page 68

Polling'^. .m ■■■ J'-'\ß "
To Poll Documents from Another Station
The following procedure lets you poll a document from one or multiple stations (up to 53 stations). Be sure
to set the polling password before polling (see page 65).
1 ^
Enter a 4-digit polling password.(see Note 2)
2
Bx:K\[J]\T\[T]
3
Dial by any combination of the following methods.
• Manual Number Dialling (Up to 3 stations)
• One-Touch Dialling
• Abbreviated Dialling
Ex: i ABBR I and[Ti[0]
(When entering a station for Manual Number Dialling,
press I SET I after each station is entered.)
SET
3
POLLING
PASSWORD=1234
POLLING
PASSWORD=llll
POLLING
ENTER STATION(S)
ABER
[10](Station name)
66
START
* STORE * N0.001
5
* DIALLING *
[10](Station
Note: 1. You can review the entered stations in step 5 by pressing 0 o/'0 press I CLEAR i to erase the
displayed station as needed.
2. If you have set the polling password in Fax Parameter No. 26. the password will appear on the display.
You can still change the password temporarily by overwriting it with a new one.
name)
Page 69

File Edit Mode
Your machine has a document image memory which enables you to reserve memory transmission, memory
deferred transmission, memory polling and so on.
After reserving communications in memory, you may need to change the settings of the communications while
it is still in memory. This section describes how to use the file editing features.
Printing a File List
The contents of the communication settings may have to be modified or deleted. To verify the contents, follow these steps below to print out a file list.
1
SET
3
CD Note: Your machine cannot print a File List when sending a document.
Sample File List
(1) (2}
FILE COMM. TYPE
NO.
001 DEFERRED XMT
002 KEM.DEF. XMT
003 RCV TO MEMORY
004 CONF. MAIL
-FILE LIST- ******
(3)
CREATE TIME
08-DEC 18:20
08-DEC 18:20
07- DEC 22:00
08- DEC 03:15
******* DATE
(4) (5) (6)
START TIME
20:30 001 [01], [02], [03],<01>
22:30 003
08-DEC-1993 *****TIME 12:00 *******
PAGES DESTINATION(S)
002
005
EDIT MODE
ENTER NO. OR Л V
1:PRINT FILE LIST?
PRESS SET TO PRINT
* PRINTING *
FILE LIST
a 555 1234
[11], [12], [13], [16], [17]
(1-4)
Explanation of Contents
(1) File number
(2) Communication type
(3) Stored date/time
(4) Executing time
(5) Number of stored page(s)
(6) Destination
(7) Own LOGO
(8) Own ID number
(9) Own Character ID
******-HEAD OFFICE
(9)
:Date/time that these files were stored.
:lf the file is Timer Controlled Communication, the start time is printed
in this column.
:ABBR. No./One-Touch No./Manual Dialling No.
:Up to 25 characters
:Up to 20 digits
:Upto 16 characters
(7)
-PANASONIC
201 555 1212“* *♦♦*★♦**»******
(8)
67
Page 70

File EdiFMode
Changing Start Time or Station of a Fite
Follow these steps to change the start time and/or stations in a communication file.
1 ^
2
3
4
5
9
SET
iSr* *~t5r'
Enter the file number you want to change.
Ex: [HE] ID
SET
Enter a new start time,
Ex:E][1][0][S (6:00 AM)
(If you do not have to change the time, skip to step 6.)
EDIT MODE
ENTER NO. OR A V
CHANGE TIME/STN
FILE NO.=111
CHANGE TIME/STN
FILE NO.=001
DEFERRED XMT
START TIME 20:30
DEFERRED XMT
START TIME 06:00
U-4)
6
7
8
SET
1=;^
Todelete stationfsV press orM key until the station you
want to delete appears. Then press I CLEAR I.
or
Enter the station(s) you want to add.
Ex:
O START
TEL NO.
5551234
DEFERRED XMT
ENTER STATION(S)
ONE-TOUCH
<02>(Station name)
68
Page 71

Deleting File
Follow these steps to delete the file in memory.
File Edit Mode
FUNCTION 1
1
2
3
4
4=^
SET DELETE FILE
Enter the file number you want to delete.
SET
EDIT MODE (1-4)
ENTER NO. OR
FILE NO.=|
DELETE FILE
FILE NO.=001
* DELETING *
FILE NO.=001
Л V
69
Page 72

Printing Out a File
Follow these steps to print the contents of the communication file.
I FUNCTION I
I
2
3
4
4M
4
SET
&
Enter the file number you want to print
Ex: ElOQ]
SET
c
Your machine will print the file. The document will remain
in memory even after printing the fiie.
EDIT MODE (1-4)
ENTER NO. OR
PRINT FILE
FILE NO.=111
PRINT FILE
FILE NO.=001
* PRINTING *
A V
PAGE=001/003
70
Note: Your machine cannot print out a file while machine is on line.
m
Page 73

Selective Reception
Your machine has a special feature, Selective Reception, which can prevent the receiving of unnecessary
document (i.e. junk fax, direct maii, etc.).
Before receiving the document, the iast 4 digits of the iD Number received from the sending machine wiil be
compared with the last 4 digits of the telephone number programmed in each One-Touch or Abbreviated station.
When a match is found, your machine will starts receiving the document. If a match is not found, your machine
will cancel the reception and an Information Code 406 will be recorded on the Journal.
Setting Selective Reception
1
2
3
FUNCTION I
4
cV
4
LgJ
7
cV
SET
6
SET
SET MODE
ENTER NO.
FAX PARAMETER(01-53)
NO.=|
46 SELECT RCV
1:INVALID
46 SELECT RCV
2 :VALID
(1-5)
OR A V
SET
® STOP
5
m Note: 1. When the Selective Reception is set, your machine can receive from only the 50 stations which are
programmed in the built-in auto-dialer.
2. If your ID number has not been set, your machine might not be able to receive from some models.
To set your ID number, see page 25.
71
Page 74

iV^V;'•iV'i -S^,- *
.TC»'i.'' *iY’'^5i'’’^*n^Ws ' ’*^'!X -'' - J
This page is intentionally left blank.
72
Page 75

Journals and Lists
To help you maintain records of the documents you sent and received, as well as lists of the numbers you record,
your facsimile machine is equipped to print the following journals and lists: 32 Transaction Journal, Individual
Transmission Journal, Communication Journal, One-Touch/ABBR. No. List, Fax Parameter List, Power Failure
Report and File List.
32 Transaction Journal
The "Journal" is a record of the last 32 transaction (a transaction is recorded each time you send or receive
a document). It is printed out automatically after every 32 transaction, but you can print it manually using
the following procedure:
1 ^
6
1
2
SET
3
m
Note: If you wish to disable the automatic print out of the 32 Transaction Journal, change the setting of Fax
Individual Transmission Journal (IND. XMT JOURNAL)
An individual Transmission Journal contains information on the latest transmission.
a
Parameter No. 13 to "InvaJid”. (see page 34)
PRINT OUT (1-7)
ENTER
1:JOURNAL?
PRESS SET TO PRINT
* PRINTING *
JOURNAL
NO.
OR A V
2 ®
3
SET
PRINT
ENTER
6: IND. XMT JOURNAL?
PRESS SET TO PRINT
* PRINTING *
IND. XMT JOURNAL
OUT
NO.
(1-7)
OR A V
73
Page 76

Journals and _
Sample Journal
-JOURNAL-
(4)
(3)
NO.
01
02
03
04
S-OK
05
06
(
)
31
32
*******irn************OFFICE _#****^
(5) (6)
COM
PAGES
OK
001
003
OK
OK 001 00:00'31 XMT ACCOUNTING DEPT. 07-DEC
630
000/005
000 00:00-34
OK
001/001
(
)
OK
002/002
OK
003/003
(7)
DURATION X/R IDENTIFICATION
FILE
00:00'22
00:01'17
021
00:00'00
022
00:00-20
023)00:00*31
00:01-32
024
*************** date 08-DEC-
(8)
XMT SERVICE DEPT. 07-DEC
RCV
XMT 342345676 07-DEC
XMT
XMT 44567345
(9)
Ill 222 333
12324567
(
XMT
XMT S0353678980 08-DEC
(15) (14)
0245674533
Explanation of Contents
(1) Printout date
(2) Printout time
(3) Journal number
(4) Communication result
(5) Number of pages transmitted or
received
(6) File number
01-32 (Does not always begin with 01 when printed out manually)
"OK" indicates that the communication was successful.
"S-OK" indicates that STOP was pressed during communication.
"P-OK" indicates that memory overflow or document misfeeding occurred
when storing the documents in memory to send the document(s) but the
successful stored document(s) was sent.
3-digit information code (see page 84) appears when there was a problem.
The 3-digit number is the number of pages successfully transmitted or
received.
When the documents are stored into memory, two three-digit numbers will
appear. The first 3-digit number represents the number of pages successfully
transmitted. The second 3-digit number represents the total number of pages
that were attempted to be transmitted.
001 to 255 (If the communication is stored into memory, a file number is
assigned for each communication.)
(7) Duration of communication
(8) Type of communication
(9) Remote station identification
; ”XMT' means Transmission or Polled
"RCV" means Reception
"POL" means Polling
: Name : Recorded name in One-Touch or ABBR. Numbers or remote station's
Character ID.
S number ; Dialed telephone number (PIN code will not be shown)
Number : Remote station’s ID number.
(10) Communication date
(11) Communication Start time
(12) Diagnostic
(13) Own LOGO
(14) Own ID number
(15) Own Character ID
For service personnel only
Up to 25 characters
Up to 20 digits
Up to 16 characters
(1)
(
)
(13)
-PANASONIC
(2)
-1993 ***** TIME
(10)
DATE
07-DEC
07-DEC
07-dec
(11)
TIME
17:35
17:41
17:50
17:57
18:35
18:44
(
)
08-DEC
201 555
03:35
08:57
1212- *********************
12:00 *************
(12)
DIAGNOSTIC
C00449O3COOOO
C0O449O3C0O00
C0044903COOOO
0800420000000
0210260200000
C8O44BO3CO0OO
(
)
C8044B03C1000
C8044E03C1000
74
Page 77

Sample individual Transmission Journal (IND. XMT JOURNAL)
^*********** —
JOURNAL- *********** DATE 08-DEC-1993 ***** TIME 12:00 *************
XMT
Journals and Lists
DATE/TIME
(1)
(2)
JOURNAL No.=21
(3)
COMM.RESULT
PAGE(S}
(4)
(5)
DURATION
(6) FILE No.
(7)
MODE
(8) DESTINATION=[01] / 37 /ABCDEFG
(9)
RECEIVED ID
(10) RESOLUTION
***'*i^'**'^**-****4r*i^***«-*«***«#i%office
08-DEC-1992 09:00
=
=
OK
=
001 ^
=
00:00-16
=
TRANSMISSION
=
=
=
STD
(13)
Explanation of Contents
(1) Transmitted date and time
(2) Journal number
(3) Communication result
(4) Number of pages transmitted or
received
(5) Duration of communication
(6) File number
(7) Type of communication
(8) Destination
(9) Received remote station’s ID
(10) Resolution
(11) Own LOGO
(12) Own ID number
(13) Own Character ID
(11)
-PANASONIC
_*♦**★** _
"OK" indicates that the transmission was successful.
"S-OK" indicates that STOP was pressed during transmission.
"P-OK" indicates that memory overflow or document misfeeding occurred
when storing the documents in memory to send the document(s) but the
successful stored document(s) was sent.
3-digit information code (see page 84) appears when there was a problem.
The 3-digit number is the number of pages successfully transmitted or
received. When the documents are . stored into memory, two three-digit
numbers will appear. The first 3-digit number representslhenumber of pages
successfully transmitted. The second 3-digit number represents the total
number of pages that were attempted to be transmitted.
: 001 to 255 (When the communication is stored into memory, a file number is
assigned for each communication.)
: Transmission or memory transmission
: If a One-Touch or ABBR was used for the transmission:
One-Touch or ABBR. No./Telephone Number/Recorded Name
If not: Telephone number
: Character ID/ID number
: "STD" means standard resolution
"FINE" means fine resolution
"S-FINE" means super fine resolution
: Up to 25 characters
: Up to 20 digits
: Up to 16 characters
201 555 1212^ **************** ****
(12)
75
Page 78

Journals
Communication Journal (COMM. JOURNAL)
The Communication Journal (COMM. JOURNAL) iets you verify if transmission or polling was successfui or
not. You may select the printout condition (Off/Aiways/inc. oniy) in Fax Parameter No. 12 (COMM.
JOU RNAL), see page 34.
Sample COMM. JOURNAL
****************************_C0MM. JOURNAL- ********daTE 08-DEC-1993 ***** TIME 12:00 ***** p.l
m
■ ■ iT
il)
MODE = MEMORY TRANSMISSION
FILE NO. = 079 (4)
(5)
NO.
001
002 OK [02] SALES DEPT. 001/001
003
004 INC 2S
****♦**♦***★♦********♦**♦**★*'»'^-HEAD OFFICE
(6)
COM
(7)
ABBR/NTWK
OK [01] SERVICE DEPT. 001/001
OK [03] ACCOUNTING DEPT. 001/001
(3) (9)
STATION NAME/
TELEPHONE NO.
021 111 1234
_******* _
(12)
Explanation of Contents
(1) Indication of comnnunication mode
(2) Starting time of communication
(3) Ending time of communication
(4) File number
(5) Communication number
001 to 255 (When the communication is stored into memory, a file number
is assigned for each communication.)
(2)
START=03-DEC 11:50
PAGES
000/001
(10)
-PANASONIC
(11)
(3)
END=08-DEC 12:00
201 555 1212- *****************
(6) Communication result
(7) Abbreviated number or S mark
(8) Recorded name in One-Touch,
ABBR. or direct dialing number
(9) Number of pages transmitted or
received
(10) Own LOGO
(11) Own ID number
(12) Own Character ID
76
"OK” indicates that the transmission was successful.
"INC" indicates that the transmission was not completed.
S mark indicates dialed by direct number dial.
The 3-digit number is the number of pages successfuliy transmitted or
received.
When the documents are stored into memory, two 3-digit numbers will
appear. The first 3-digit number represents the number of pages successfully
transmitted. The second 3-digit number represents the total number of pages
that were attempted to be transmitted.
Up to 25 characters
Up to 20 digits
Up to 16 characters
Page 79

Journals and Lists
One-Touch/Abbreviated List
To print a One-Touch/Abbreviated Number List of the telephone numbers you have stored.
r pUNCTION r
I
2
3
tu
t—rt
S'
SET
----
PRINT OUT {1-7)
EliTER NO. OR A V
2; ONE-TCH/ABBR LIST?|
PRESS SET TO PRINT
1
* PRINTING *
ONE-TOUCH/ABER.LIST
77
Page 80

Jdurh^;anqj|ists
Sample One-Touch List
********************* _gjj^_FpQU^jj LIST- ********* DATE 08-DEC-1993 ***** TIME 12:00 ***** P,1
(1)
ONE- STATION NAME TELEPHONE NO
TOUCH
<01> SERVICE DEPT.
<02>
<03>
NO. OF STATIONS = 03 (4)
******************************.
(2)
SALES DEPT. 222
ACCOUNTING DEPT
HEAD OFFICE
(7)
Sample ABBR. Number List
******************»iHi ^ NO- LIST*
ABBR
NO.
STATION NAME TELEPHONE NO
(3)
121
555 1234
666
333 3456
313
,★♦♦***#
2345
(5>
-PANASONIC
_____
DATE 08-DEC-1993 ***** TIME 12:00 ***** P.l
201 555 1212- *****************
(6)
[01]
[02]
[03] REGULATION DEPT
NO. OF STATIONS = 03
***************************** *-HEAD OFFICE
ENG. DEPT. 338
PURCHASE DEPT.
777
Explanation of contents
(1) One-Touch number or Abbreviated number
(2) Station name recorded in the machine
(3) Telephone number recorded in the machine
(4) Number of recorded One-Touch and ABBR. numbers
(5) Own LOGO
(6) Own ID number
{7) Own Character ID
555 1234
666
999
2345
333 3456
-PANASONIC
_Hr****** _
<nn> = One-Touch number, [nn] =Abbreviated number
Up to 15 characters
Up to 36 digits
Up to 25 characters
Up to 20 digits
Up to 16 characters
201 555 1212- *****************
78
Page 81

FAX Parameter List
To print out a FAX Parameter List:
Journals and Lists
1
3
FUNCTION
to
SET
6
PRINT OUT (1-7)
ENTER NO. OR A V
4:FAX PARA LIST?
PRESS SET TO PRINT
* PRINTING *
FAX PARAMETER LIST
Sample FAX Parameter List
««*«****««*****«**«****-** _PAX PARAMETER LIST- ***** DATE 08-DEC-1993 ***** TIME 20:00 ********
(1)
PARAMETER DESCRIPTION
NUMBER
01
02
04
(
)
47
52
S3
(2)
ORIGINAL (HOME)
RESOLUTION (HOME)
STAMP (HOME)
c
)
REMOTE RCV
REMOTE DIAGNOSTIC (1:Invalid
OPTION MEMORY
(3)
SELECTION
(l;Normal
(1;Standard
(l:Off 2:On)
2!Light
2!Fine
(
)
(1:Invalid
2¡Valid)
2¡Valid)
3;Dar)c)
3:S-Fine) 2
(256K+None)
(4)
CURRENT STANDARD
SETTING SETTING
1 1
1
(5)
1
1
(
)
2
1
)
2
1
(6)
********************************—iJEAD OFFICE
(9)
Explanation of Contents
(1) Parameter number
(2) Description
(3) Selection
(4) Current setting
"(HOME)" means home position (6) Memory sizes : (Base memory + option
setting. memory)
"—" indicates code or password Is (9) Own Character ID : Up to 16 characters
not set. When the code or
password is set, it Is shown in
parenthesis.
(7)
-PANASONIC
.«««**** _
(5) Standard setting : Factory preset standard setting
(7) Own LOGO : Up to 25 characters
(8) Own ID number : Up to 20 digits
201 555 1212- *****************
(8)
-
79
Page 82

’Clo®mals^inclLi6ts*#| ■■#
Power Failure Report
If a power failure occurs, the document information stored in machine’s memory will be lost. In this case, a
Power Failure Report will be printed automatically for each file separately after the Power is turned ON again.
This report is not printed if there were no files in the memory.
Sample Power Failure Report
***************************_PWR FAILURE REP- **»•**** DATE 08-DEC-1993 ***** TIME 12:00 ***** P.l
POWER FAILURE OCCURRED !
MODE = MEMORY TRANSMISSION (1)
FROM *** 08-DEC-1993 10:00'24 *** (2)
TO *** 08-DEC-1993 12:00'26 *** (3)
FOLLOWING FILE HAS BEEN LOST.
(4)
FILE NO.
001
******************************—HEIAD OFFICE
(5)
ABBR/NTWK
[04]
(6)
STATION NAME/
TELEPHONE NO.
ENGINEERING DEPT. 000/005
(10)
Explanation of Contents
(1) Communication mode
(2) Power failure date and time
(3) Power return date and time
(4) File number
(5) One-Touch number and ABBR. number
(6) Station name in the One-Touch/ABBR. key or telephone
number
(7) Number of pages stored
(8) Own LOGO
(9) Own ID number
(10) Own Character ID
(7)
PAGES
(8 )
-PANASONIC
201 555 1212- *****************!
(9)
001 to 255.
<nn> = One-Touch number, [nn] - Abbreviated number
: The first three-digit number represents the number of pages
successfully transmitted. The second three-digit number
represents the number of pages stored into memory.
Up to 25 characters
Up to 20 digits
Up to 16 characters
80
Page 83

If You Have Any of These Problems
Troubleshooting
Mode Symptom Action
During Installation
Problem
During Transmission
Probiems
Transmission Copy
Quality Problems
The display is blinking
Document doesn't
feed/multiple feed
Document jam
Does not stamp
Stamp too light
Vertical lines on the
transmitted document
Transmitted document
is blank
Battery discharged completely. This may happen at first
installation. After setting the clock, the blinking will stop.
1. Check that your document is free of staples and paper
clips, and that it is not greasy or torn.
2. Check that your document is the right type to send through
a fax machine by consulting the list on "Documents You
Cannot Send". If your document has the characteristics
listed, make a photocopy of your document and send the
copy instead.
3. Check that the document is loaded properly.
4. Adjust the ADF Pressure Plate.
The information code 031 will appear on the display if the
document becomes jammed.
1. Check if Stamp LED is lit.
2. Check Fax parameter No. 04 and No. 28 settings.
Replace stamp or refill ink.
Check own copy quality. If copy is OK, your machine has no
problem, report to receiving party that they have a problem. If
copy is NG, clean the Document Scanning Area.
1. Make sure the document is set face down.
2. Check own copy quality. If copy is OK, your machine has
no problem, report to receiving party that they have a
problem.
Page
—
37
38
92
87
40
34,35
93
91
During Reception
Problems
No recording paper
Recording paper jam
Recording paper
doesn't advance into
machine
Recording paper
doesn’t eject after
printing
Document auto
reduction doesn't work
Out of ink
The information code 010 will appear on the display if the paper
runs out.
The information code 001,002 or 016 will appear on the display
if the paper gets jammed.
Make sure that there is paper in the Paper Supply Tray.
Follow instructions for loading paper.
Check to see if the recording paper is jammed inside of the
machine.
Check Print Reduction settings.
The information code 015 will appear on the display if the Print
Cartridge runs out of ink.
17
86
17
86
59
15
81
Page 84

tyòubl^HpÒting
Mode
Print Copy Quality
Problems
Print Copy Quality
Problems
Symptom
Vertical lines printing
on the received
document
Fuzzy print 1. Make sure you are using the correct paper for the best
Missing dots or
lines/inconsistent
darkness within print
Fading print
Faint print
No diai tone
Printout a Journal report (e.g. FUNCTION, 6, 1 and SET) and
check quality to make sure if your machine has trouble or not.
If Journal report quality is OK, your machine has no problem,
report to sending party that they have a problem.
If copy is NG, replace the Print Cartridge.
possible print quality.
2. Try reversing the recording paper to the other side.
1. Make sure you are using the correct paper for the best
possible print quality.
2. Replace Print Cartridge.
The Print Cartridge may be running out of ink. Replace Print
Cartridge.
You may need to choose a different paper for the best possible
print quality.
1. Check the connection of telephone line.
2. Check the telephone line.
Action
page
73
88
97
97
15
15
97
94
Communication
Problems
No Unit Operation
No auto answer
Cannot transmit or
receive
No unit operation
1. Check the connection of telephone line.
2. Check Reception mode setting.
3. Check if machine is printing a report, (e.g.: 32 Transaction
Journal, Fax Parameter List).
If machine is printing a report, machine cannot receive until
printing is completed.
4. If the printed document is 32nd Transaction, machine will
usually print the 32 Transaction Journal automatically after
printing out the document. In this case, machine cannot
receive until the 32 Transaction Journal has been printed.
An information code will be shown on the display. Refer to the
information code table to find out the trouble.
To reset the machine, turn-off the Power Switch for a few second
then turn-on again.
94
53
84
82
Page 85

Troubleshooting
Mode
TAM Interface
Trouble in
Unattended TAM l/F
Mode
Symptom
Cannot utilize the remote
turn-on feature of the
telephone answering
machine (TAM). The fax
machine always answers
after the 8th ring.
Fax machine will not start
up when the telephone
answering machine is set
to give only an outgoing
message (OGM).
A beep...beep sound is
recorded on the telephone
answering machine.
Fax machine start up in
the middle of the outgoing
message even through the
caller wants to leave a
voice message.
Cannot record any
incoming message (ICM).
The fax machine always
starts up at the end of the
OGM and before the tape
advances to the end of
last ICM.(Your TAM only
uses a single cassette
tape to give OGM and to
record ICM.)
Action
This feature is not compatible. The fax machine is
designed to answer after 8 rings if the TAM does
not answer.
TAM give outgoing announcement only is not compatible.
The fax machine will work with a TAM that will record
Incoming message (ICM).
Speak a little slower between each word while recording
an outgoing message (OGM).
Make sure the outgoing message (OGM) does not have a
silent pause longer than 5 seconds.
Set Fax Parameter No. 20 (Silent Detection) to "Invalid".
And, instruct the calling party to press * twice on their
touch-tone phone during the OGM to start up your fax
machine remotely.
page
—
—
8
35
TAM Interface
Trouble In
Unattended Fax
Mode
Cannot receive from a
machine that does not
send CNG signal (a short
beep tone every 3
seconds) after dialing.
Cannot retrieve message
from the answering
machine remotely, the fax
machine always starts up
after the command code is
entered.
Cannot receive a fax
message, but can record
voice message.
Fax machine will not start
to receive with the
telephone answering
machine in the
auto-answer mode.
Set Fax Parameter No. 20 (Silent Detection) to "Valid".
Or, Instruct the calling party to press * twice on their
touch-tone phone during the OGM to start up your fax
machine remotely.
Set Fax Parameter No. 20 (Silent Detection) to "Invalid".
Check your outgoing message, if it is too long, the calling fax
machine may have timed out. Try shorten your outgoing
message to less than 15 seconds, or ask the calling party to
program your telephone number in their fax machine with 3
pauses and a "#" at the end.(ex. 5551212 PAUSE PAUSE
PAUSE #)
Increase the ring count for detection on the telephone
answering machine.
35
35
83
Page 86

l^ou^shoQting
Information Codes
When something unusual occurs, the display may show one of the Information Codes below. These wilt help
you to identify and correct the problem.
Info.
Code
001/002 Recording paper jam.
010
014 Print Cartridge is not installed. Install the Print Cartridge.
015
016
030
031
060
061
401
No recording paper.
Out of ink.
Print Cartridge Cradle can not move.
Document misfeeding.
Document paper is too long or jammed.
Document length exceeds 78.8 inches {2 meters).
Printer Cover is opened.
ADF Door is opened.
400
402
During initial handshake, receiving station did not
respond or communication error occurred.
Remote Station required Receiving Password to
receive the document.
During initial handshake, communication error
occurred.
Meaning
Remove jammed paper.
Load the paper.
Replace the Print Cartridge.
Paper jam may occur. Remove jammed paper.
1. Reload the document properly. 38
2. Remove document jam.
3. Adjust ADF.
1. Reload the document properly.
2. Remove document jam.
Close the Printer Cover.
Close the ADF Door.
1. Check with other party.
2. Reload the document and send again.
Check with the remote station.
Reload the document and send again.
Action
Page
86
17
15
15
86
87
92
38
87
—
—
—
—
—
403 No polling capability at the remote side.
404/405
406
407 No confirmation from the receiving station for the
408/409
411 Polling password does not match.
416/417
418/419
During initial handshake, communication error
occurred.
Received from an unauthorized station in Selective
Reception mode.
previous page sent.
Remote side confirmation of previous page is illegible.
412
414 Polling password does not match.
415
No data from the transmitting side.
Polling transmission error.
Received data has too many errors.
84
Ask remote side to set "POLLED=ON".
Reload the document and send again.
Check the telephone number in One-Touch or
Abbreviated station.
Wait a few minutes and send again. —
Wait a few minutes and send again.
Check polling password.
Check with the other party.
Check polling password.
Check polling password.
Check with the other party.
—
—
71
—
65
_
65
65
—
Page 87

Troubleshooting
Info.
Code
420
422/427 interface is incompatible.
430/434
436/490
492/493
494
495
540/541
542
543/544
552/553
554/555
Machine goes to receiving mode, but receives no
command from the transmitting side.
Communication error occurred while receiving.
Received data has too many errors.
Communication error occurred while receiving.
Telephone line disconnected.
Communication error occurred while transmitting.
550
623 No document was on the ADR
Telephone line disconnected.
Communication error occurred while receiving.
Meaning
Action
1. Remote side misdial.
2. Check with the other party.
Check with the other party.
Check with the other party.
Check with the other party.
Check with the other party. —
Check with the other party.
1. Reload the document and send again.
2. Check with the other party.
Check with the other party.
Check with the other party.
Reload the document and send again.
Page
' ‘ ■
—
—
—
—
—
8
—
—
—
630
631 During dialing, STOP was pressed.
634
638
870
879
975
Redial was not successful due to a busy line or no
response from the called station.
Redial was not successful due to a busy line or no
response from the called station.
Power failure occurred during the communication.
Memory overflow occurred while storing
documents into memory for transmission.
Memory overflow occurred while receiving
documents into memory.
Receiving documents with data that is greater than
the memory size.
DRAM parity error. The document information in
memory is lost.
Reload the document and send again.
Reload the document and send again.
Reload the document and send again.
Check the power cord and plug.
Transmit documents without storing into memory.
Check recording paper and print cartridge.
1. Unit will print out a Power Failure Report.
2. Resend the lost document.
—
—
—
18
41
15
17
80
85
Page 88

fVoubI^h^tin||'“ y-' ,.^^*i. :is:
.,-v.
Clearing Recording Paper Jam
)f the recording paper becomes jammed in the machine, the display wiii show Information Code 001,002 or
016.
To clear the jam, Info. Code 001
0 Remove the Recording Paper Cover.
0 Remove the jammed paper.
@Pressl STOP
0 Re-install the Recording Paper Cover.
0 Open the Printer Cover.
0 Remove the jammed paper.
0 Close the Printer Cover.
I.
86
Page 89

Troubleshooting
Clearing a Document Jam
If a document becomes jammed in the machine, the display will show the Information Code 031.
To clear the jam
(D Remove the documents from ADF and open the
ADF Door.
CD Remove the jammed paper,
d) Close the ADF Door.
8
87
Page 90

troubìes^Qòtln^ r
Replacing the Print Cartridge
When the ink decreases to a level requiring replacement, the display shows the code 015.
m
Note: If your machine detect Out-of-ink even though the cartridge has still enough ink, remove the cartridge
and shake the cartridge up and down until the ink is jetted from the nose. Then, re-install the cartridge.
To replace the Print Cartridge
0 Open the Printer Cover.
0 Slide the Cradle to the right.
Maintaining Print Quality
Storing Print Cartridge
0 Pull the Cartridge forward until the Cartridge
"pops” loose. Lift the Cartridge out of the
Cradle by the green arrow on the top of the
Cartridge and discard it.
0 Set new Cartridge, then close Printer Cover,
(see page 15)
Keep the print cartridge in the cradle at all times. Removing the cartridge will expose it to air,
causing the ink to evaporate, and degrade the print quality.
Keep the print cartridge in its "home” position when the printer is not being used. Leaving it
out of position will cause the ink to evaporate quickly.
The following instructions will help you when storing unused print cartridges.
•Keep the print cartridge in its sealed container until you are ready to use it.
•Store the print cartridge container at room temperature.
•Check the expiration date on the cartridge package and use before that date.
•Instai! the print cartridge in the cradle immediately after opening the sealed container.
88
Page 91

Cleaning the Print Cartridge Contact
If the received document has dots or lines missing, check the Print Cartridge.
To dean the Print Cartridge
0 Turn off the power, {see page 18)
d) Open the Printer Cover, (see page 15)
(D Remove the Cartridge from the Cradle.
Gently clean the contact on the Printer
Cartridge with a swab moistened only with
water.
troubleshooting
DO NOT clean the ’’Nose” of the Printer
Cartridge.
0 Gently clean the contact on the Printer
Cradle with a swab moistened only with
water.
0 Re-install the Printer Cartridge and reevaluate
the print quality.
8
89
Page 92

i^oubleshooting#
Removing Dried Ink from the Print Cartridge Contact
If print cartridge is exposed to air for an extended period of time, a layer of dried ink will form as crust on the
nose of the print cartridge. If this occurs, follow the steps below to remove the dried ink from the nose of the
print cartridge.
Business Card or
HILJ Note: It is recommended to make a copy on the machine at ieast once a week to prevent ink from
drying on the nose of the print cartridge.
® Ho id the print cartridge over a waste can so that
the nose of the print cartridge is pointed toward
the waste can.
d) Gently scrape the dried ink with the edge of a
business card or other rigid paper stock so that
the dried ink falls into the waste can.
DO NOT use a swab to remove dried ink from
print cartridge.
Cleaning the Drain Pan
To prevent spillage, aiways ciean the Drain Pan of excess ink before moving the machine.
To clean the Drain Pan
(D Open the Printer Cover.
d) Remove Print Cartridge.
d) i nspect the Drain Pan for excess ink. if necessary,
ciean up the excess ink with a swab or a paper
towel.
90
Page 93

Troubleshooting
Cleaning the Document Scanning Area
If the receiving party reports that the received documents were black, or contained black lines, try making
a copy on your unit to verify. If the copy is black or has black lines, the document scanning area is probably
dirty and must be cleaned.
To clean the scanning area
0 Open the ADF Door.
0 Wipe the scanning area gently with a soft cloth or
gauze wet with ethyl alcohol.'Be sure to use a
clean cloth, the scanning area can be easily
scratched.
91
Page 94

^ L^J.». -..r.- -i^\l.;^ ;^ae£^.Jx:^M 1»rtfilfer'ft4.\, j%i№*-3akk..... Jvir: - 4t /:. :;i. s
Adjusting the Automatic Document Feeder (ADF)
if document misfeeding occurs frequently, we suggest you to adjust the ADR
To adjust the ADF
Slide the Pressure Adjusting Lever to the desired
position depends on the condition.
Position
1 To prevent no feed trouble
2
3 To prevent multiple feed trouble
Standard position
Condition
92
Page 95

Trou bleshooti ng^
Verification Stamp
The Verification Stamp contains ink. When the stamp mark appears faded or hard to see, the stamp should
be repiaced or refilled with ink.
To remove the stamp
<3) Remove the Recording Paper Cover,
d) Remove the Recording Paper.
8
® Push up on the Stamp Shaft from under the
machine. Then, remove it.
CD
Remove the Verification Stamp. Repiace the
stamp with a new one or refill the stamp with
a few drops of the specified ink into the back
of the stamp.
Note: Please contact your local Panasonic dealer to purchase a new stamp. See page 98 for order number.
ffl
93
Page 96

it ro U b10SIIOb11 nQ ■ -i#'" " ■ ' ■ •'ii -f-'-
Checking the Telephone Line
When you do not hear a dial tone through the telephone connected to the machine or when the telephone
does not ring (No automatic receive).
1
Unplug the Telephone Line Cord from the
telephone jack that was supplied by the telephone
company.
94
Page 97

Specifications
Compatibility
Scanning Method
Document Size
Document Thickness
ADF Capacity
(Automatic Document Feeder)
Effective Scanning Width
Recording Method
CCiTT Group 3
Rat bed scanning with CCD type image sensor
Max. : 280 mm x 2000 mm
(with operator’s assistance)
Min. : 148 mm X 128 mm
Single sheet : 0.06mm (45 g/m^) to 0.15mm (112 g/m^)
Multiple sheets : 0.06mm (45 g/m^) to 0.12mm (75 g/m^)
Built-in, up to 30 sheets
Note: The document limitation to send multiple pages is as follows.
Document Size
Up to 20 pages
Up to 30 pages*
if the size and thickness specification are met.
208 mm
Thermal Inkjet Recording Head
Up to 280 mm x 364 mm
A4 size or Letter size 0.06 mm to 0.10 mm
Document Thickness
0.06 mm to 0.12 mm
Recording Paper
Recording Paper Size
Effective Recording Size
Print Margin
Plain Paper
Letter / Legal / A4
Letter : 203 mm x 265 mm
A4 : 203 mm x 283 mm
Legal : 203 mm x 342 mm
1,5mm
12.5mm
Letter/Legal: 6.5mm
A4 :3.5mm
6.5mm
3.5mm
95
Page 98

‘iSpecif ications
Recording Paper Capacity
Resolution
Coding Scheme
Modem Type
Modem Speed
One-Touch/Abbreviated
Dialing Memory Capacity
Approx. 100 sheets (using 75 g/m^ paper)
Horizontal
CCITT Standard mode 203 pels/inch
(8 pels/mm
CCITT Fine mode 203 pels/inch
(8 pels/mm
CCiTT Super Fine mode
(Transmission only)
CCITT 300dpi mode 300 pels/inch
(Reception only)
MH, MR, MMR (Conform to CCITT)
CCITT V.29, V.27 ter and V.21
9600, 7200, 4800, 2400 and 300 bps
50 stations (including 16 One-Touch keys Each station can
register up to 36 digits for each telephone number (including
pauses and spaces) and up to 15 characters for each station
name
203 pels/inch
(8 pels/mm
(11.8 pels/mm
X
X
X
X
X
X
X
X
Vertical
98 lines/inch
3.75 lines/mm)
196 lines/inch
7.7 lines/mm)
392 lines/inch
15.4 lines/mm)
300 lines/inch
11.8 lines/mm)
Image Memory Capacity
Power Supply
Power Consumption
Dimensions
Weight
Operating Environment
Optimum Printing Environment
Approx. 12 pages (Standard base memory)
Approx. 42 pages (with optional 512 KB 1C Memory Card)
Approx. 72 pages (with optional 1 MB 1C Memory Card)
Approx. 132 pages (with optional 2 MB 1C Memory Card)
(Based on CCITT Test Chart No.1 using Standard Resolution)
180-264 VAC, 47-63HZ, Single Phase ; 200 V version
(108-132 VAC, 47-63HZ, Single Phase : 100 V version)
Standby
Transmission
Reception
Copy
Max
401 mm (W) x 379 mm (D) x 154 mm (H)
(excluding Projections)
Approx. 8.3 Kg
(excluding consumable supplies and options)
Temperature
Relative Humidity
Temperature
Relative Humidity
: Approx. 11W
: Approx. 25W
: Approx. 16W
; Approx. 29W
: Approx. 40W
5 to 35X
15 to 70%
15 to 35®C
20 to 70%
96
Page 99

Recording Paper Specifications
In general, most bond papers will produce excellent results. Most photocopy papers will also work very well.
There are many "name” and "generic” brands of paper available. We recommend that you test various papers
until you obtain the results you are looking for.
The following table summarizes the major specifications to consider when selecting white or colored paper.
Basic Weight
Cut Edge Conditions
Finishing Dimensions
Grain
Moisture Content
Opacity
Packing
Sizes
Type
Wax Pick
60 to 90 g/m2
Cut with sharp blades, no visible frayed edges
±0.8 mm of nominal, corners 90® ±0.2®
Long grain
4% to 6% by weight
84% minimum
Polyiaminated moisture-proof ream wrap
Letter : 216 mm x 279 mm
A4 : 210 mm X 297 mm
Legal : 216 mm x 356 mm
Cut sheet
304.8 mm minimum (Dimension)
Note: It is possible that paper could meet all of the speci^catioris listed above and still not print welt because of
ffl
the variations in paper manufacturing. Therefore, we recommend that you test paper thoroughly before
purchasing.
97
Page 100

Please contact your local Panasonic dealer for availability.
A. Options:
Order No.
UE-410005
UE-410006
UE-410007
B. Supplies:
Order No.
PC-60BK Print Cartridge
Picture
Expansion IC Memory Card, 512KB
Expansion IC Memory Card, 1MB
Expansion IC Memory Card, 2MB
Picture
Description
Description
FX-13-2P
Verification Stamp
98
 Loading...