

Page 1

Panafax
UF-311
USER’S GUIDE
Page 2

IMPORTANT INFORMATION
When requesting information, supplies, or service always refer to the model and serial number of
your machine. The model and serial number's plate (Main Name Plate) is located on the rear of the
machine.
For your convenience, space is provided below to record the information you may need in the future.
Model No. UF-311
Date of Purchase
Dealer
Address
Telephone Number
i
___________
)________
Supplies Telephone Number
L
-1
Service Telephone Number
i
___________1_______________
Serial No.
Copyright * 1992 by Matsushita Graphic Communication Systems, Inc.
All rights reserved. Printed In Japan.
The contents of this Operation Guide ate subject to change without notice.
Page 3

INTRODUCTION
Thank you very much for purchasing the Panafax UF-311.
The UF-311 is one of the most advanced models in the Panafax family
of G3 compatible, desktop facsimile machines.
Some of its many features are given below.
1. Plain Paper Printing
2, Easy Maintenance
3. Timer Transmission
4. Fax I Telephone Auto
Switch
5. TAM Interface
Plain paper printing means you can easily write on received documents
with a pen or pencil. Documents do not curl, making filing easier. In
addition, plain paper does not fade, making it ideal for long term
storage of important documents.
Low cost operation is achieved by the use of an inkjet printer.
Maintenance requires only changing an ink cartridge, making it
quicker and easier than with other type of plain paper fax machines.
A built-in 24-hour timer enables the UF-311 to transmit at a preset
time. You can save money by programming operations to occur during
off-peak hours when telephone rates, especially long distance, are at
their lowest.
The UF-311 differentiates between an incoming fax or voice call and
automatical ly switches the circuit to either receive a document or to
ring until you pick up the telephone. With the UF-311 you do not
require a separate telephone line for your fax.
A Telephone Answering Machine (TAM) can be connected to the UF-
311. The UF-311 determines whether the signal from the calling side is a
fax or voice call. If it is fax, the UF-311 will switch the telephone line to
startthe fax communication. If a fax signal is not detected, the UF-311
will stay in the TAM mode and the caller can leave a message.
6. Memory Function
A standard Image memory feature allows you to store up to 12
standard pages into the document memory. After the UF-311 stores
your documents, it can send them to selected station(s) automatically.
You do not have to wait until the transmission ends before retrieving
your documents.
With a little practice, anyone can learn howto use the most frequently
used features of the UF-311.
This User's Guide will help you to use your UF-311 quickly and easily.
The Table of Contents shows where to find information on each
feature. Although we recommend that you review each section briefly,
it will only be necessary to read the sections that contain the feature(s)
you are interested in, and will be using.
Page 4

CONTENTS
Chapter 1 GETTING TO KNOW YOUR MACHINE
1.1. EXTERNAL VIEW ......................................................................................................... 1-1
1.2. CONTROLPANEL..........................
1.3. FUNCTION LIST ........................................................................................................... 1-3
Setting Parameters.................................................................................................... 1-3
Print out Lists ........................................................................................................... 1-3
Chapter 2 INSTALLING YOUR MACHINE
2.1. CAUTION ....................................................................................................................... 2-1
2.2. UNPACKING ................................................................................................................. 2-2
2.3. INSTALLING ACCESSORIES ..................................................................................... 2-3
Final Installed View .................................................................................................. 2-3
Installing Document Return Tray
Installing Sub-Tray ................................................................................................................. 2-4
2.4. INSTALLING PRINT CARTRIDGE .............................................................................. 2-5
2.5. LOADING RECORDING PAPER ................................................................................. 2-7
Paper Specifications .............................................................................................................. 2-7
Loading Recording Paper .................................................................................................... 2-7
2.6. CONNECTING THE TELEPHONE LINE
AND POWER SUPPLY CORD ............................................................................................. 2-8
2.7. LIGHTNING PRECAUTIONS ............................................................................................... 2-9
2.8. SETTING THE DIALLING METHOD (TONE OR PULSE)
AND RECORDING PAPER SIZE ..................................................................................... 2-10
Setting the Dialling Method (Tone or Pulse) .............................................................. 2-10
Setting the Recording Paper Size
2.9. FINAL INSTALLATION TEST............................................................................................. 2-11
................................................
.............................................................................
.......................................................................................
..............................
2*4
1-2
2-10
Chapter 3 SETTING UP YOUR MACHINE
3.1. USER PARAMETERS ......................................................................................................... 3-1
HowtoSetthe Date and Time ................................................................................................. 3-1
How to Set Your ID Number ..................................................................................... 3*2
How to Set Your LOGO ......................................................................................................... 3-3
3.2. ONE-TOUCH/ABBREVIATED DIALLING NUMBERS
Entering One-Touch/Abbreviated Dialling Numbers .............................................................. 3-4
Filling Out the Station Directory Sheet ................................................................................. 3-5
3.3. FAX PARAMETERS ........................................................................................................... 3-6
Setting Fax Parameters ......................................................................................................... 3-6
Fax Parameter Table ............................................................................................................. 3-7
........................................................
3-4
Page 5

Chapter 4 BASIC OPERATION
4.1. TRANSMITTING DOCUMENTS
4.1.1. LOADING DOCUMENTS ............................................................................. 4-1
Documents You Can Send ........................................................................... 4-1
Documents You Cannot Send ...................................................................... 4-1
How to Use the Carrier Sheet
How to Load Documents .............................................................................. 4-2
4.1.2. BASIC TRANSMISSION SETTINGS
Resolution
Original (Contrast) ........................................................................................ 4-3
4.1.3. DIALLING TECHNIQUES ........................................................................................ 4-4
Off-Hook Dialling ....................................................................................................... 4-4
On-Hook Dialling .......................................................................................... 4-S
One-Touch/Abbreviated Dialling ............................................................................... 4-6
4.1.4. MEMORY TRANSMISSION .................................................................................... 4-7
How to Send a Document Using Memory Transmission
4.2. RECEIVING DOCUMENTS ................................................................................................... 4-9
4.2.1. RECEPTION MODES ............................................................................................... 4-9
4.2.2. HOW TO SET/USE TELEPHONE MODE .................................................... 4-10
Setting the Telephone Mode ........................................................................ 4-10
Operation of Telephone Mode
4.2.3. HOWTO SET/USE FAX MODE
Setting the Fax Mode ............................................................................................ 4-10
Operation of Fax Mode
4.2.4. HOW TO SET/USE AUTO SWITCHING MODE (FAXAEL AUTO SWITCH) ... 4-11
Setting the Auto Switching Mode (Fax/Tel Auto Switch)
Operation of Auto Switching Mode (FaxAel Auto Switch) .............................. 4-11
4.2.5. HOW TO SET/USE AUTO SWITCHING MODE (TAM INTERFACE)
Installing Your TAM ................................................................................................ 4-12
Setting the Auto Switching Mode (TAM Interface)
Operation of Auto Switching Mode (TAM Interface)
4.2.6. PRINT MARGIN ...................................................................................................... 4-14
4.2.7. PRINT REDUCTION ............................................................................................... 4-15
How to Select the Print Reduction Mode
4.2.8. SUBSTITUTION RECEPTION .............................................................................. 4-16
...................................................................................
......................................................................
...........................................................
.................................................................................................. 4-3
...............................
................................................................................
...................................................................
.................................
............................................
...............................
........................................
...............................................
......................................................
4-t
4-3
4-10
4-10
...................
4-1
4-8
4-10
4-11
4-12
4-13
4-13
4-15
4.3. MAKING COPIES ................................................................................................................. 4-17
4.4. VOICE CONTACT AFTER SENDING/RECEIVING
Making Voice Contact after Sending/Receiving
Answering a Voice Contact Request
............................................................
......................................................................
Chapters GETTING THE MOST OUT OF YOUR MACHINE
5.1. POLLING ................................................................................................................................ 5-1
How to Set the Polling Password
How to Poll
5.2. TIMER CONTROLLED TRANSMISSION .............................................................................. 5-2
How to Set Timer Transmission
Howto Cancel Timer Transmission ........................................................................... 5-3
How to Change Timer Transmission ............................................................. 5-3
............................................................................................................... 5-1
.................................................................
...................................................................
................................... .......
4-17
4-17
4-17
5-1
5-2
Page 6

Chapter 6 PRINT OUT JOURNALS AND LISTS
6.1. PRINT OUT JOURNALS AND LISTS ............................................................................. 6-1
32 Transaction Journal
Individual Transmission Journal (IND.XMT JOURNAL)
Communication Journal (COMM. JOURNAL) .............................................................. 6-4
One-Touch/ABBR. No.List ............................................................................................ 6-6
Character Code Table ................................................................................................... 6-7
FAX Parameter List ...................................................................................................... 6-8
Power Failure Report .................................................................................................... 6-9
................................................................................. 6-1
Chapter 7 PROBLEM SOLVING
7.1. PROBLEMSOLVING ..........................................................................................................
If You Have Any of These Problems
Information Codes ......................................................................................................... 7-4
Clearing Recording Paper Jam .................................................................................... 7-6
Clearing a Document Jam ............................................................................................ 7-7
Cleaning the Scanning Plate and Scanning Glass .......................................... 7-8
Replacing Print Cartridge .............................................................................................. 7-9
Cleaning the Print Cartridge Contact .......................................................................... 7-10
Removing Dried Ink from the Print Cartridge
Cleaning the Drain Pan .................................................................................. 7-11
Adjusting the Automatic Document Feeder (ADF)
Checking the Telephone Line
.................................................................................
..................................
..............................................................
..................................................
..........................................
6-1
7-1
7-1
7-10
7-12
7-13.
Chapters APPENDIX
8.1. SPECIFICATIONS .................................................................................................................... 8-1
8.2. RECORDING PAPER SPECIFICATIONS ................................................................................ 8-2
8.3. CHARACTER CODE TABLE .................................................................................................... 8-3
8.4. INDEX ........................................................................................................................................ 8-4
Page 7
Chapter 1. GETTING TO KNOW YOUR MACHINE
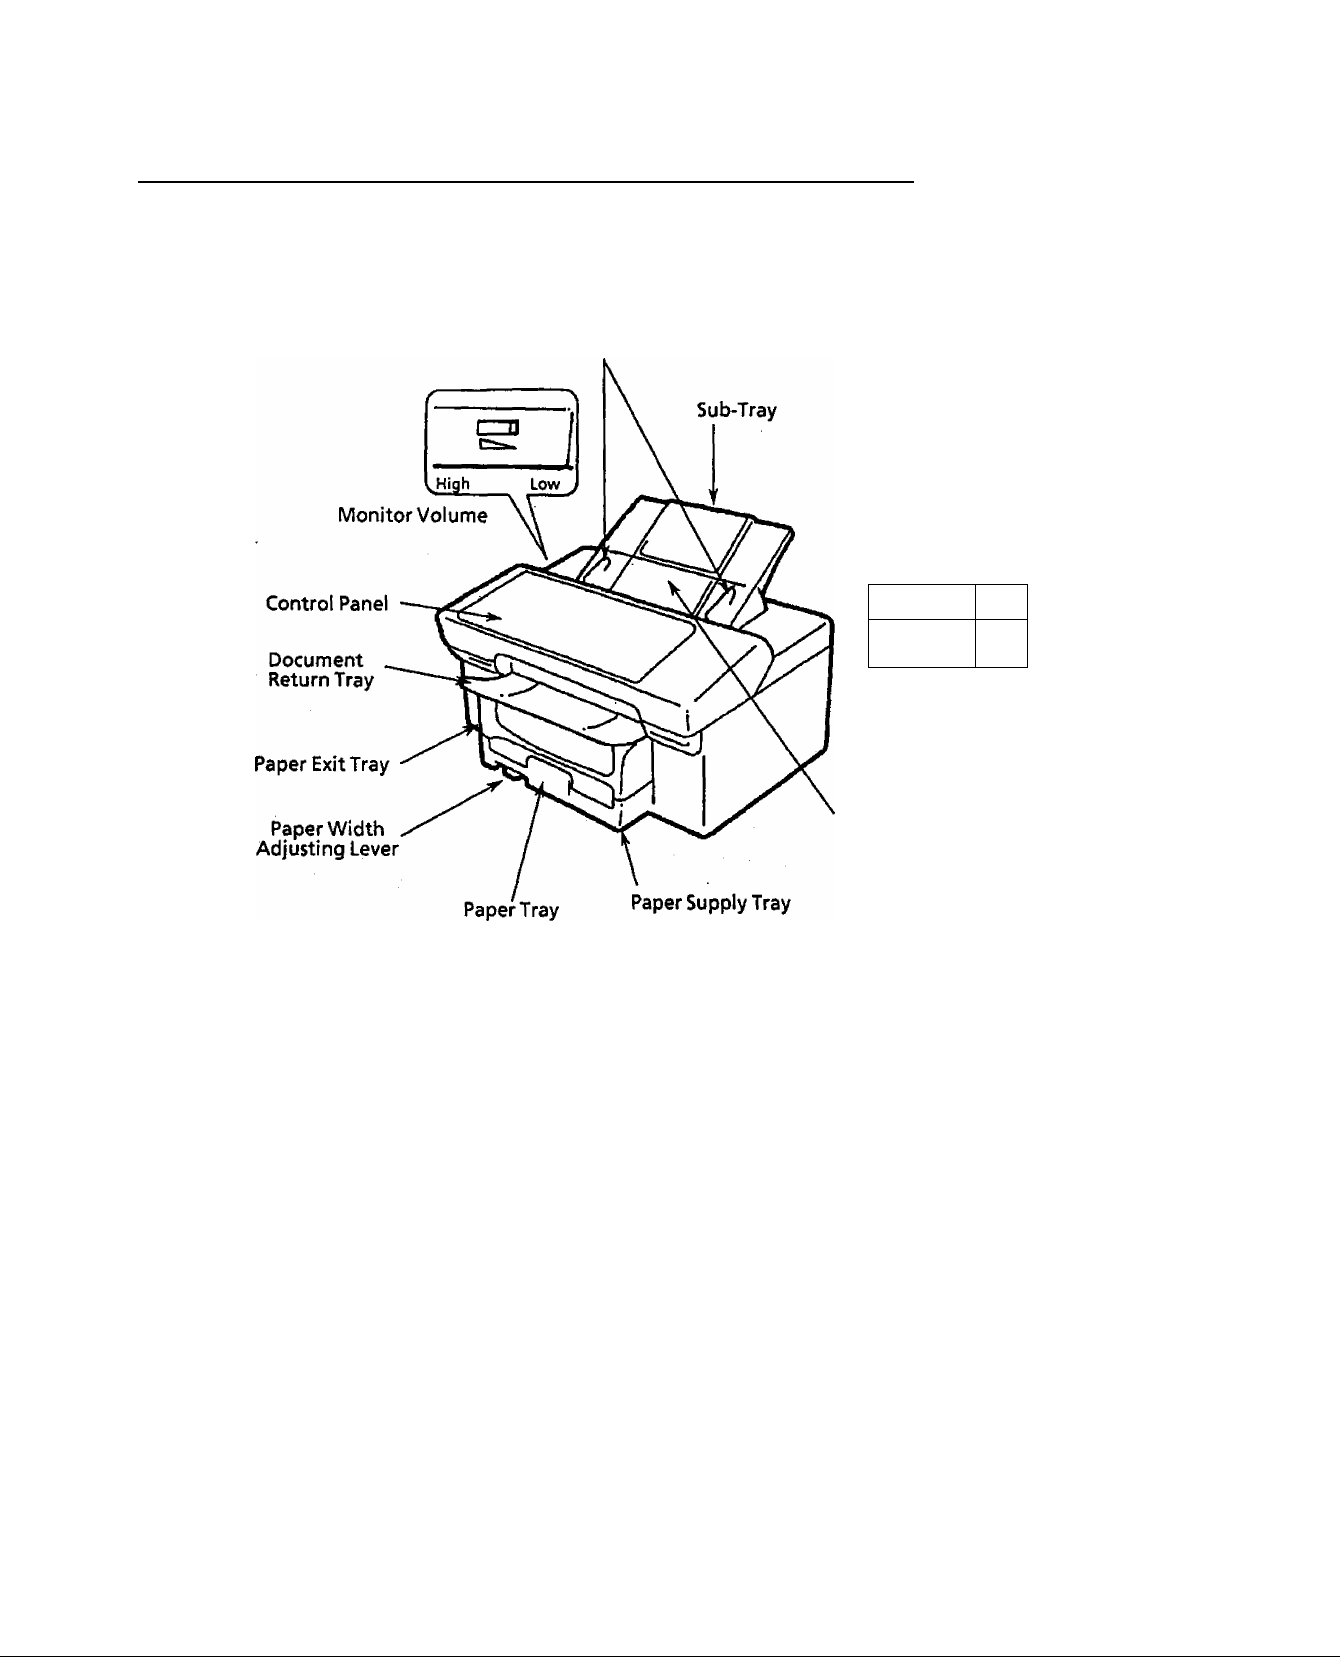
1.1.
EXTERNAL VIEW
Document Guides
Extender
.. 1. .-i_
1 □]
On Off
Power Switch
ADF {Automatic
Document Feeder)
-
0
\
Page 8

1.2.
CONTROL PANEL
POWER Ump
Lights when the power is ON.
ON LINE Lamp
Lights when communication begins.
Flashes when you place a document in the
AOF unit correctly.
ALARM Lamp
Lights when a document becomes
jammed, a communication error occurs or
recording paper runs out.
;aROWER CSONUHE OALARMr
|вмкдт
1
wSBÍ, иоДг ммйггвч tiv
OWONAL
1
1
1
1
AESOLUnON
FAX/TELEPHONE
Used to select TEL Mode, FAX Mode
or Auto Switching Mode
TIMER
Used for Timer Controlled
Transmission.
MEMORY
Used for Memory Transmission.
POLLING
Used to poll a document from remote
station.
FU/meww
°IZZ]
пмея
“ IZZI
MEMORY
"ШИ
ROLLMO
CHI CD CD
D CD CD
D CD CD
CD CD CD
CZ]
Key Pad
Used for Direct Dialling, recording
ihone numbers, and selecting
i
unctions.
Used to temporary change Dialling
Mode to Tone when Pulse mode is set.
#
Used to set some parameters.
•aTEUOIAL
OLUJUCOfV
>AWbRffilAl. “ ABSi ftjíeÜ “
□ CZ] CZZI
О STOP
SRACf
Ф START
Om-Tm* M._* t Cm- ГиА
MMBW
___
_____
«*UCI •ML
• • t
DiM t 1b.
P«aif FMmTZ* • t
Ш I
ew-Twbwii iM—cefv <
M xur
________
Panasonic
RESOLUTION
Used to set Standard or Fine. Also used
as an arrow key (>}, together with
ORIGINAL (<}.to move the cursor over
recorded numbers and characters.
ORIGINAL
Used to set Normal, Light or Half Tone.
Also serves as an arrow key (<),
together with RESOLUTION (>), to
move the cursor over recorded numbers
and characters.
LCD Display
Indicates Date and Time and
the current setting of Resolution and
Original.
' -4 * on the upper left during
communication indicatesthatthe
remote station is sending an ID.
СТАЯТ
eorr <
1 • trur
X • iTMT
X • iTW
*• CTAOT
«-■caAMS
Í
ABBR
Used to start Abbreviated Dialling.
PAUSE/REDIAL
Used to enter a pause when recording
or dialling a telephone number, or to
start last number redialting.
FLASH
Used to Flash dial.
One-Touch Keys (01-16)
Used for One-Touch Dialling.
r
STOP
Used to cancel operations. When it 1$
pressed, the machine will return to
standby.
SPACE
TEL/DIAL
Used to start Direct Dialling, and to
enter a space in recorded telephone
numbers,
CLEAR/COPY
Used to erase the previously entered
input
Used to make document copies.
Used to print out various list.
START
Used to start or set operations.
Page 9

1.3.
FUNCTION LIST
Setting Parameters Your machine uses the SET key to perform various functions, as shown
below.
SET
Print Out Lists addition to making copies or to erase the previously entered input,
the CLEAR/COPY key can also be used to print out various Lists and
Journals.
CLEAR/COPY
C
n
Page 10
Chapter 2. INSTALLING YOUR MACHINE
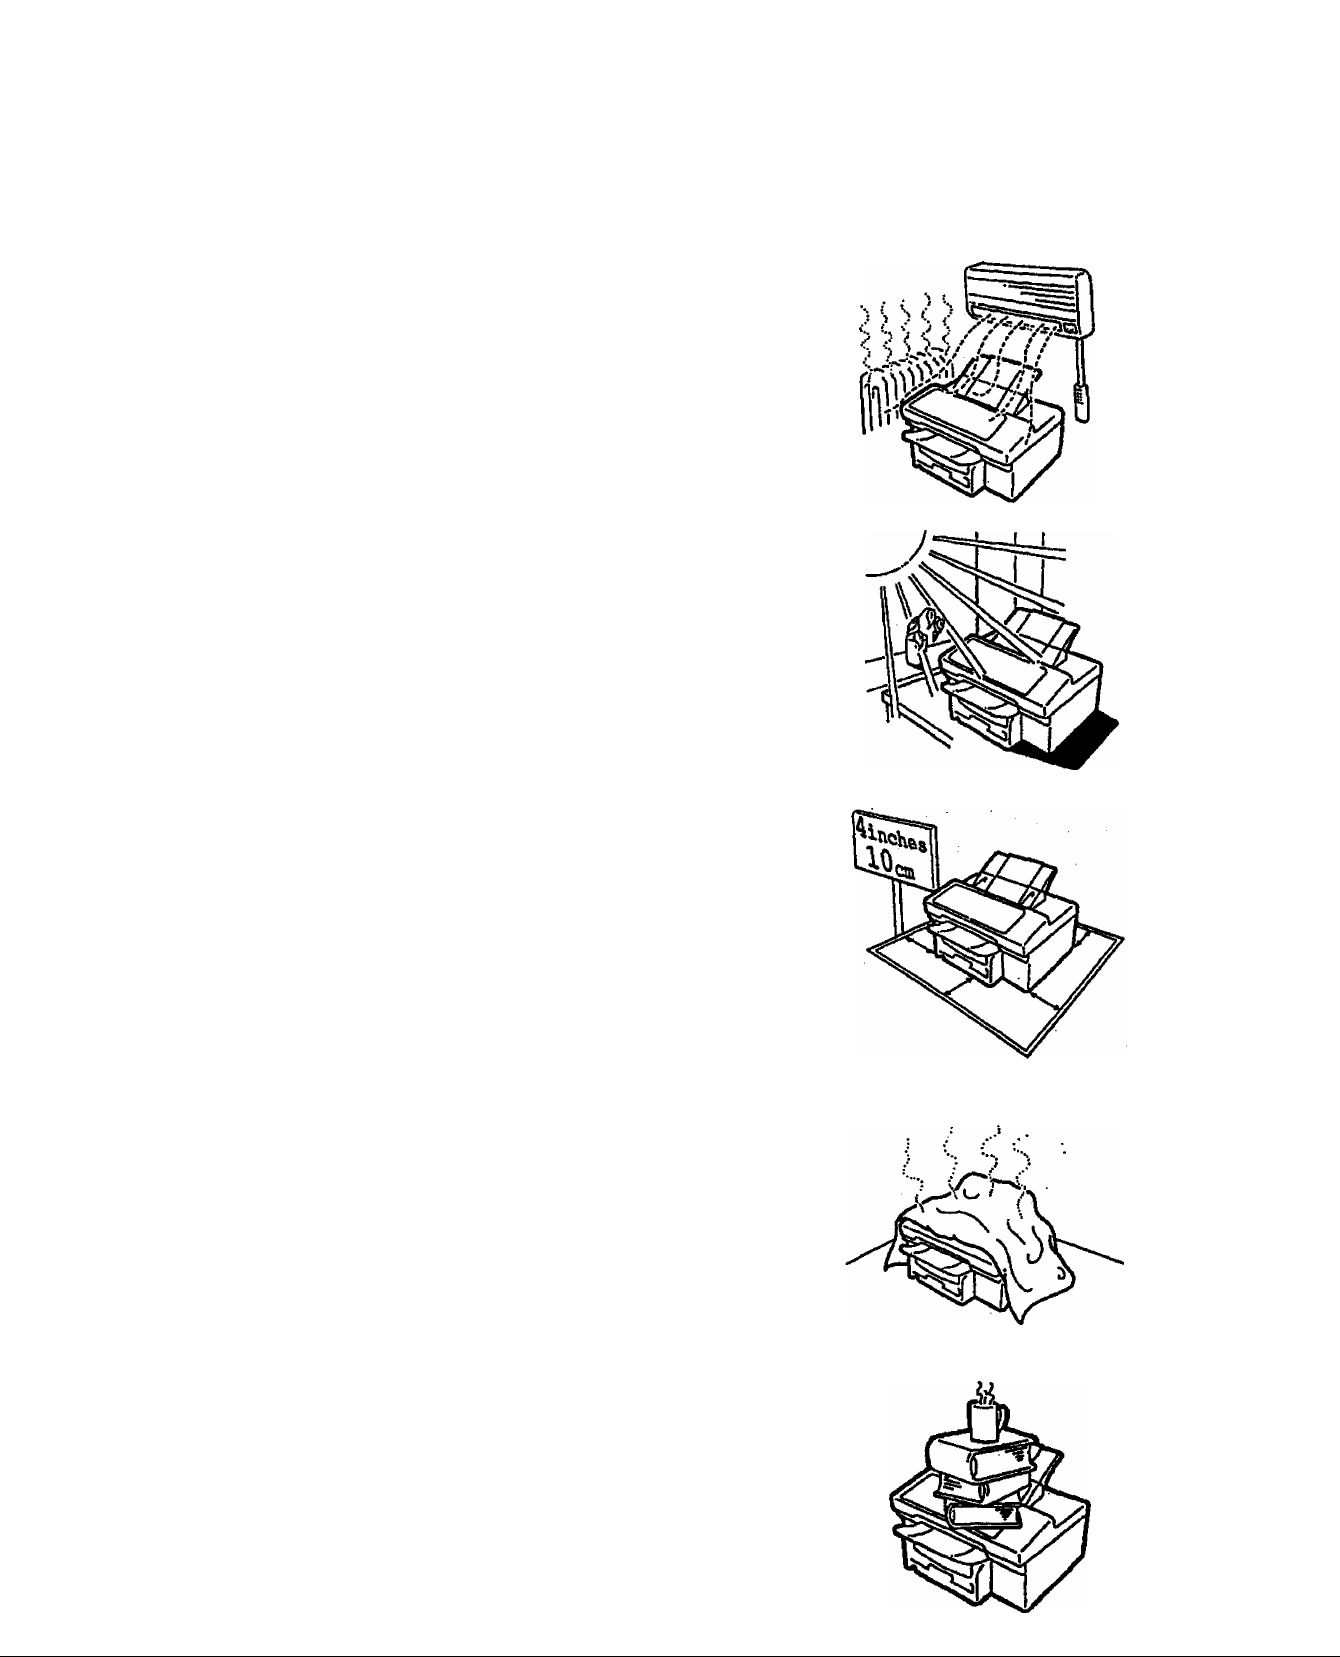
2.1.
CAUTION
1. Do not install the machine near
heating or air conditioning unit
2. Avoid exposure to direct
sunlight.
3. Install the machine on a flat
surface, leave at least
10 cm of space betvween the
machine and other objects.
NOTE
If you move the machine to another
location, clean the drain pan before
moving the machine to prevent ink
spillage, see page 7-i l.
4. Do not block the ventilation
openings.
5. Do not place heavy objects, or
spill liquids on the machine.
Page 11
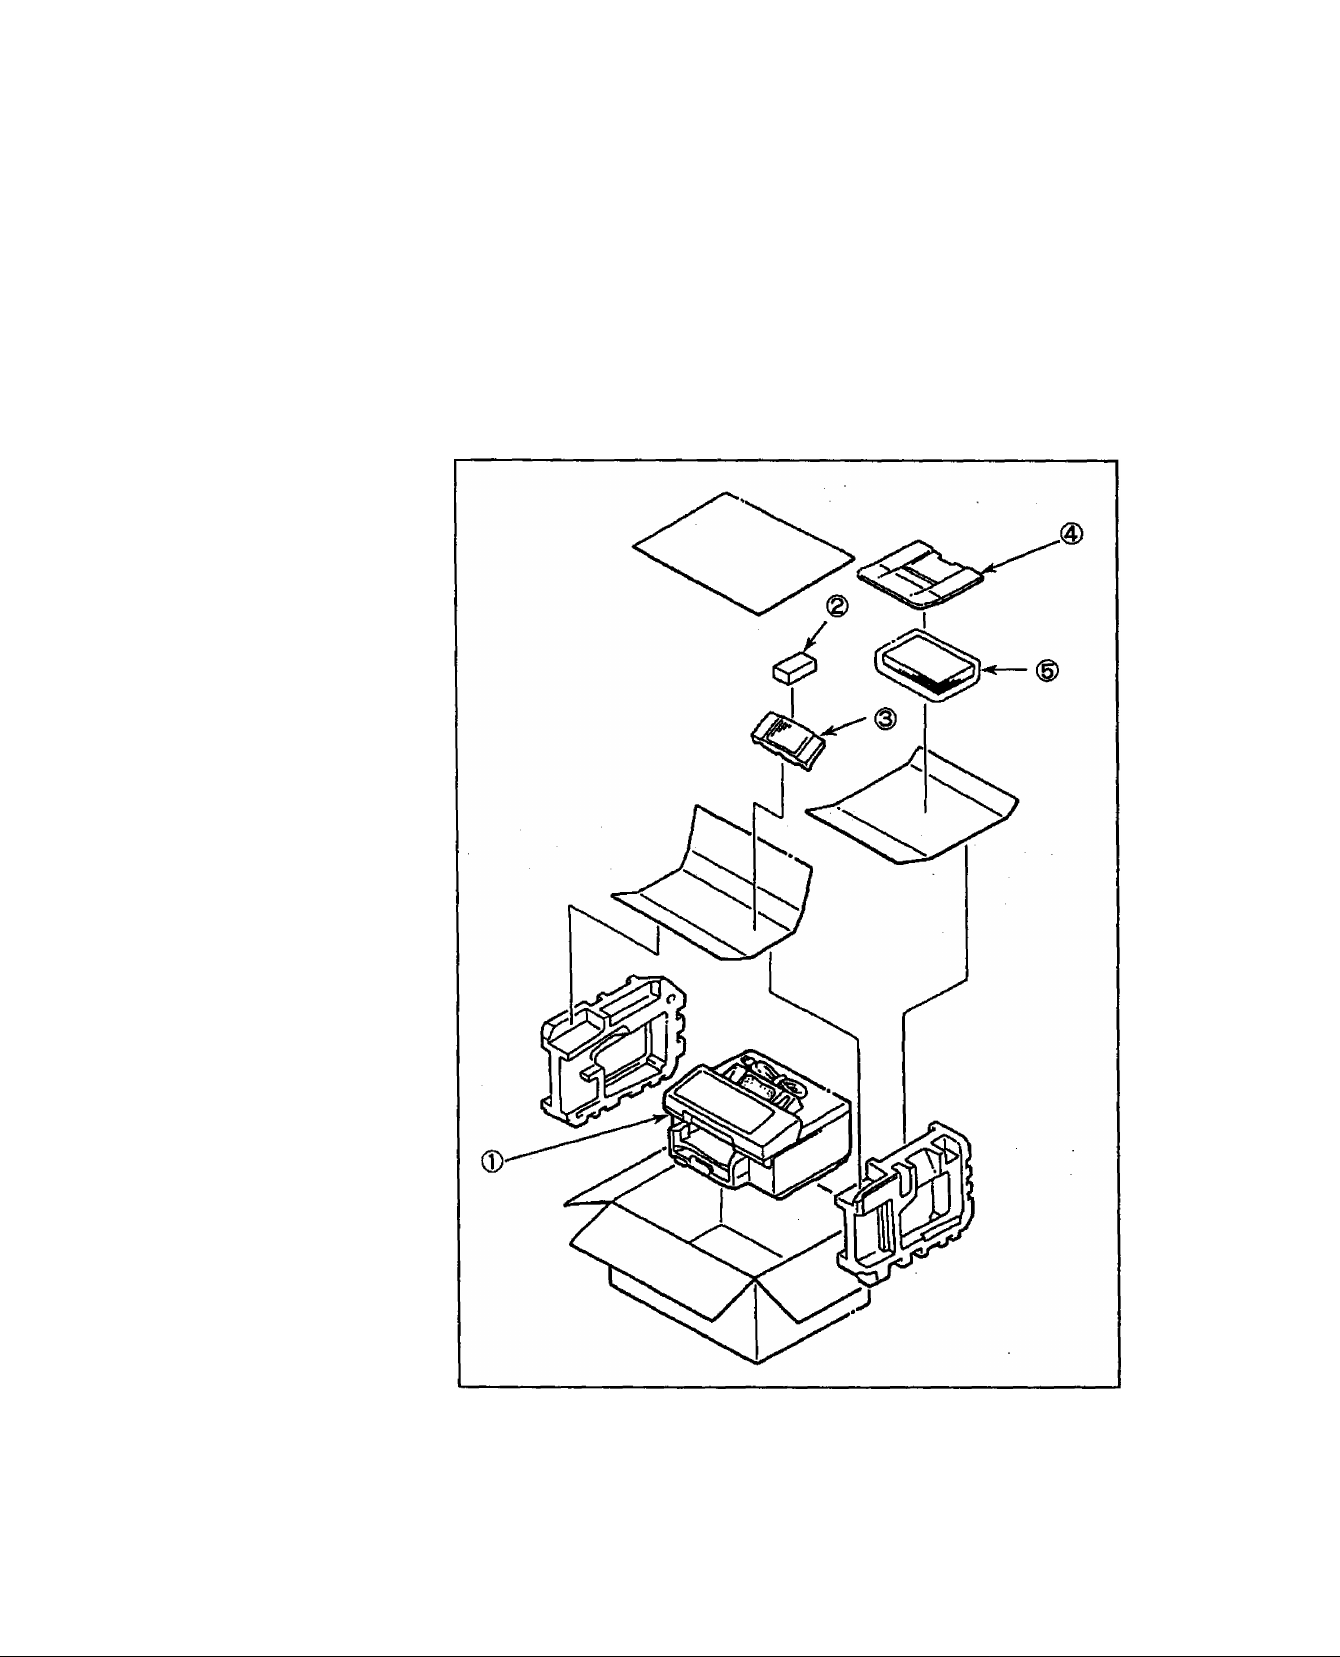
2.2.
UNPACKING
Unpack the carton referring to the illustration shown below. Inspect
the machine for any shipping damage and check that you have all
accessories illustrated.
<D Machine
Print Cartridge
0) Sub-Tray
Document Return Tray
0 User's Guide
Quick Guide
Carrier Sheet
Page 12
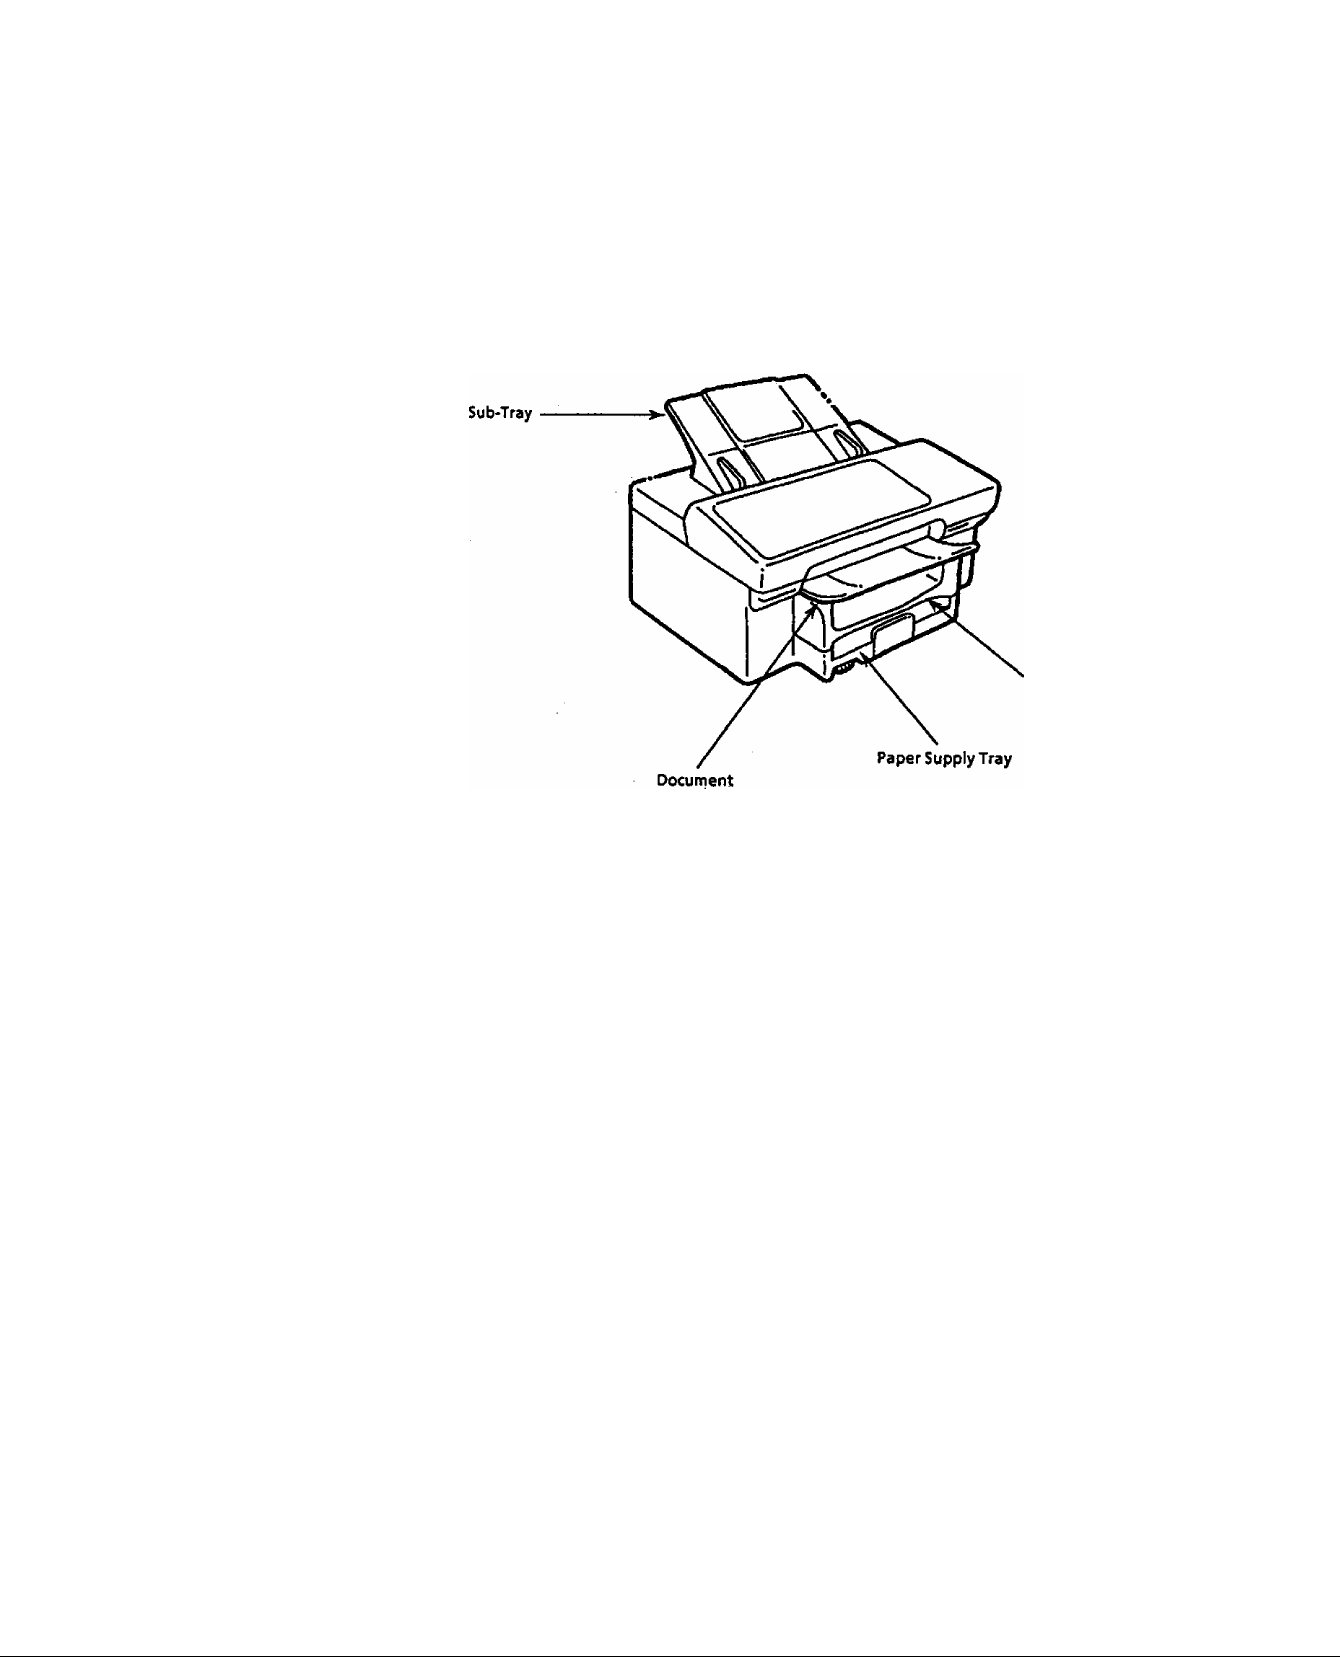
2.3.
INSTALLING
ACCESSORIES
Final Installed View
Paper ExitTray
Return Tray
Page 13
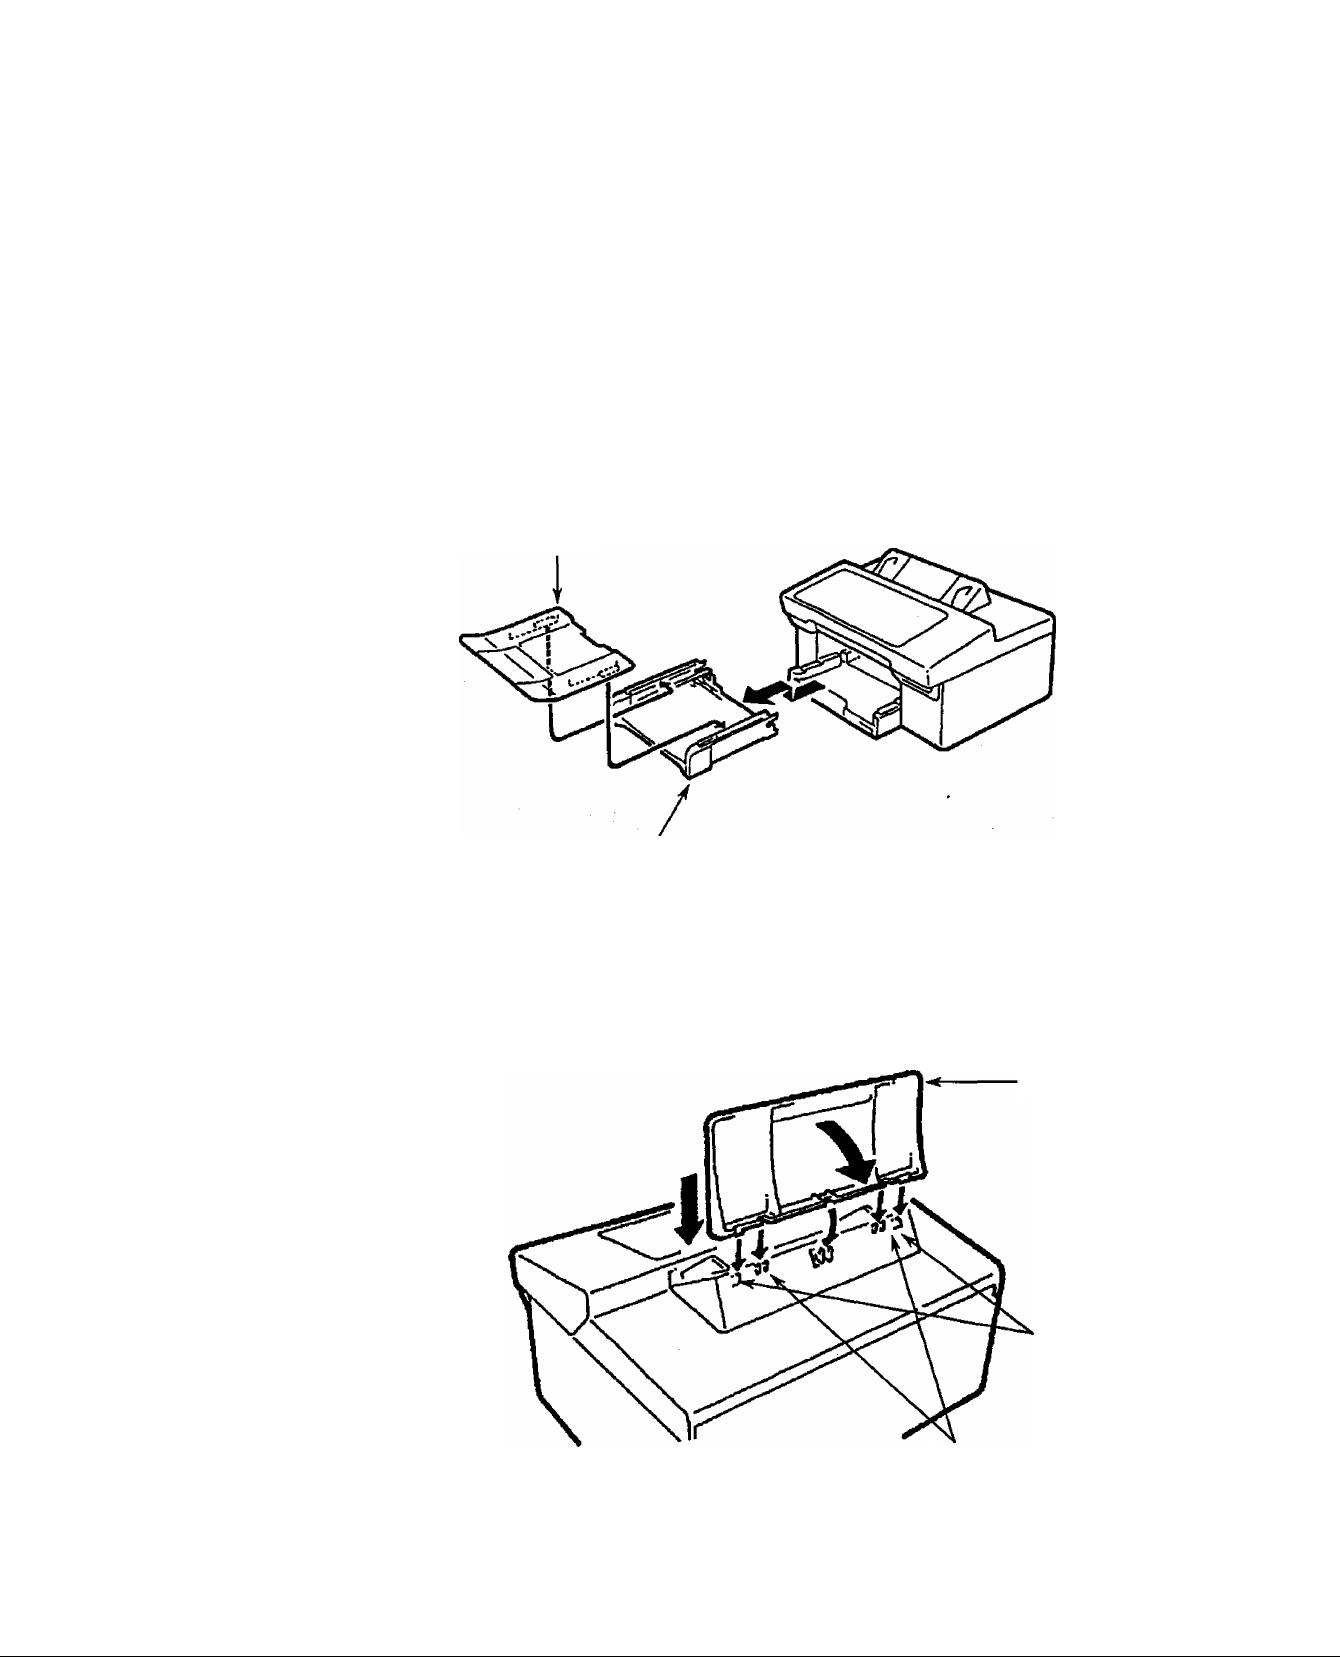
Installing Document 1. Remove the Paper Exit Tray.
Return Tray 2. install the Document Return Tray into the groves on the Paper Exit
Tray,
3. Re-instali the Paper Exit Tray with the Document Return Тагу.
Document
Return Tray
Paper Exit Tray
Installing Sub-Tray 1. set the Sub-Tray onto the two hooks.
2. Tilt the Sub-Tray into the two holes until it latches.
Sub-Tray
Holes
Hooks
Page 14

2.4,
INSTALLING PRINT CARTRIDGE
1. Open the ADF Door and then open the Printer Cover.
Printer Cover
ADf Door
2. Open the Print Cartridge Container.
Grasp the Pri nt Cartridge by the green arrow and remove it from its
container.
Takecare nottotouchthecopper"Ribbon" locatedonthe front
edge of the Print Cartridge. Also be sure that the copper "Ribbon*
does not come In contact with any surface. ^
Print Cartridge
3. Gently remove the protective tape from the front of the Print
Cartridge,
CAUTION
The ink In t/ie Print Cartridge may be
harmfui to chlidren if swallowed.
Keep new or used cartridges out of
the reach of^ldren and
Immediately discard used cartridge.
2-5
Page 15

4. Hold the Print Cartridge by the green arrow located on the
cartridge top, and insert the cartridge into the cradle with the
green arrow on the cartridge top pointing to the green dot on the
top of the cradle.
5. Place your thumb on the cartridge top and your forefinger on the
cradle and squeeze your thumb and forefinger together, snapping
the cartridge into place.
6. Close the Printer Cover and then the ADF Door,
Printer Cover
Page 16
2.5-
LOADING RECORDING PAPER
Paper Specifications
Loading Recording Paper
In general, most bond papers will produce excellent results. Most
photocopy papers will also work very well. There are many "name*
and "generic* brands of paper available. We recommend that you test
various papers until you obtain the results you are looking for.
For detailed recommended paper specifications, see page 8-2.
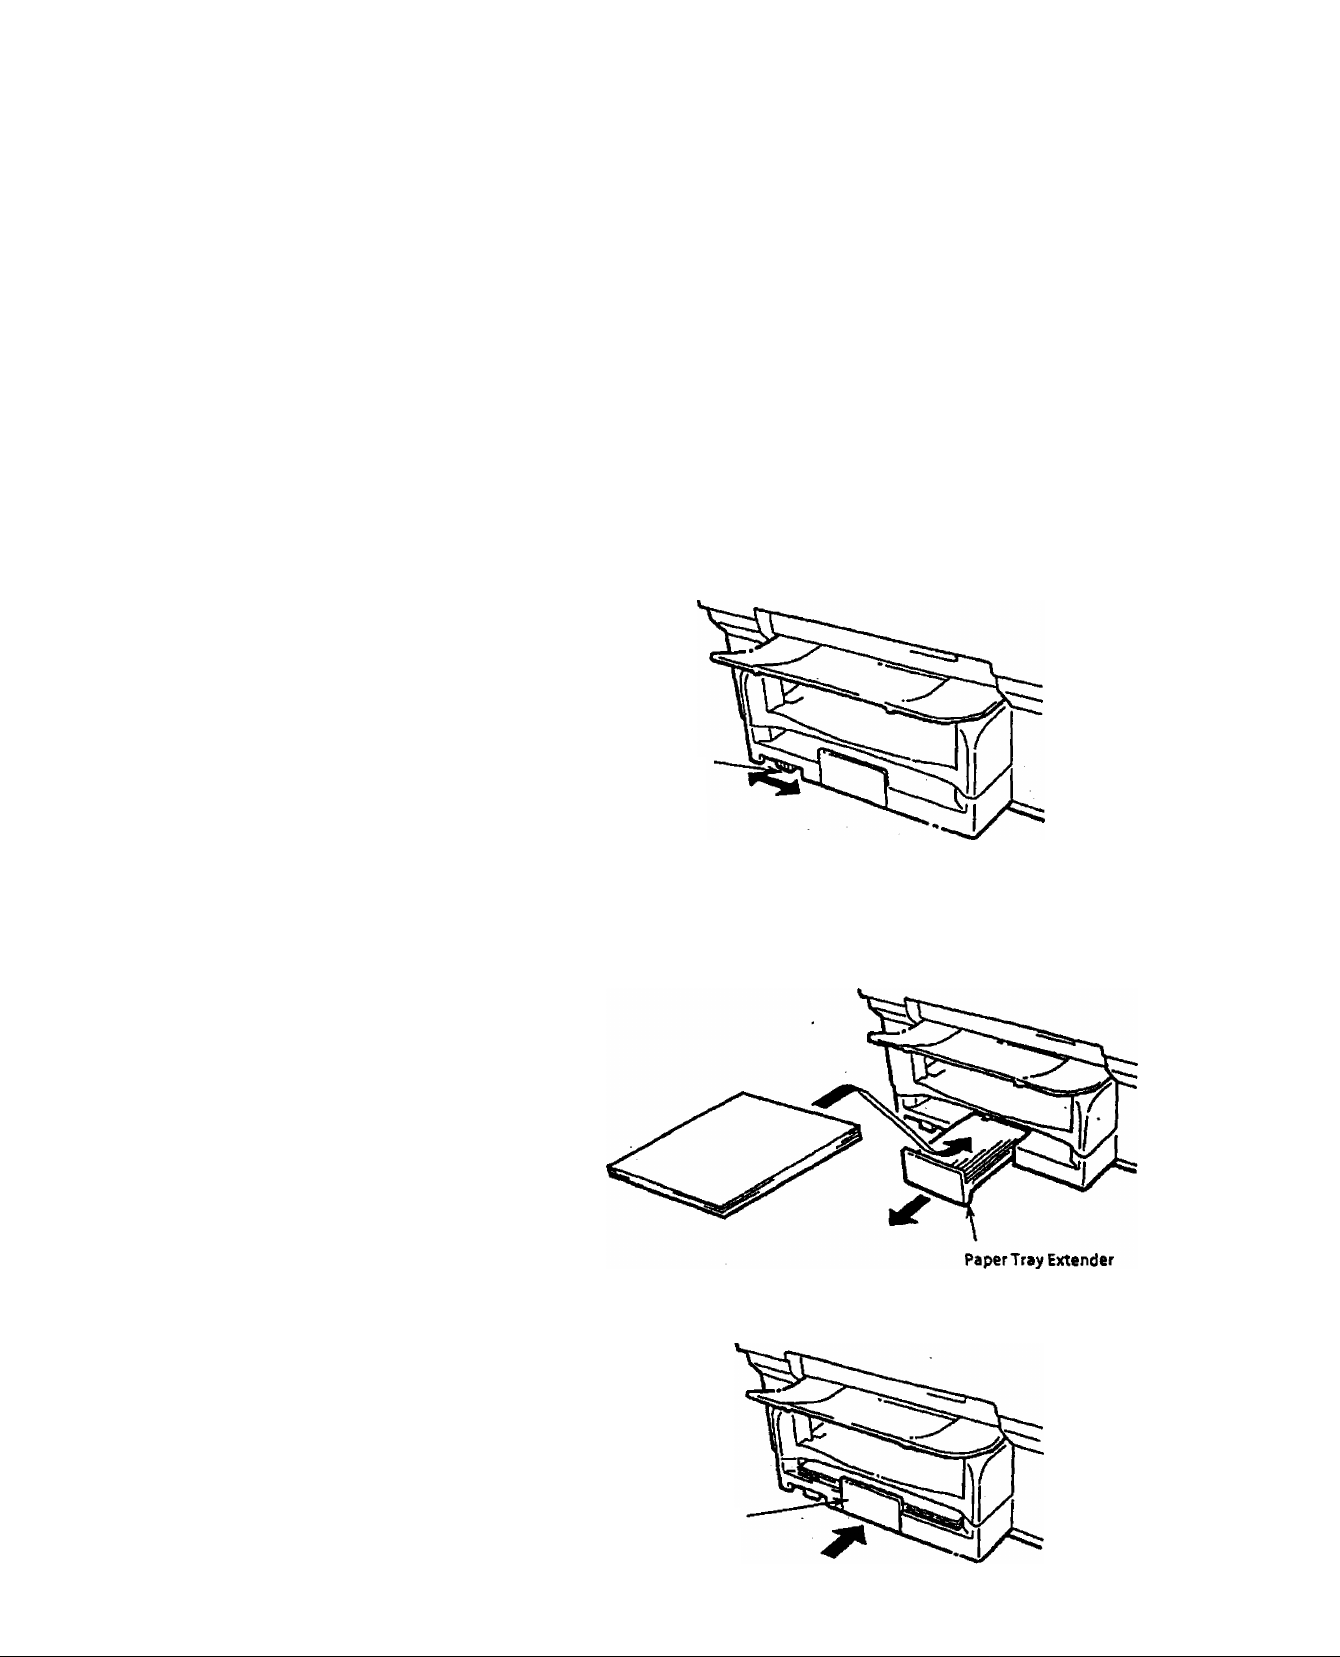
1, If you are using letter or legal size paper, slide the Paper Width
Adjustment Lever, located below the left side of the Paper Supply
Tray, to the left. If you are using A4 size paper, slide the Paper
Width Adjustment Lever to the right.
You must also change the Recording Paper Size parameter (Fax
Parameter No. 13). See page 2-10 or 3-6.
Paper Width
Adjustment Lever
2. Pull out the Paper Tray Extender located on the centre front edge of
the Paper Supply Tray.
Insert a stack of paper about 12mm thick (approximately 100 sheets
of paper) squarely into the Paper Supply Tray, right side flush
against the right side of the Tray.
3. Slide the Paper Tray Extender in toward the paper to hold the paper
against the printer.
Paper Tray Extender
2-7
Page 17
2.6-
CONNECTING THE
TELEPHONE LINE AND
POWER SUPPLY CORD
NOTE
1. When you operate this equipment^
the power socket/outietshouid be
near the equipment and be easily
accessible.
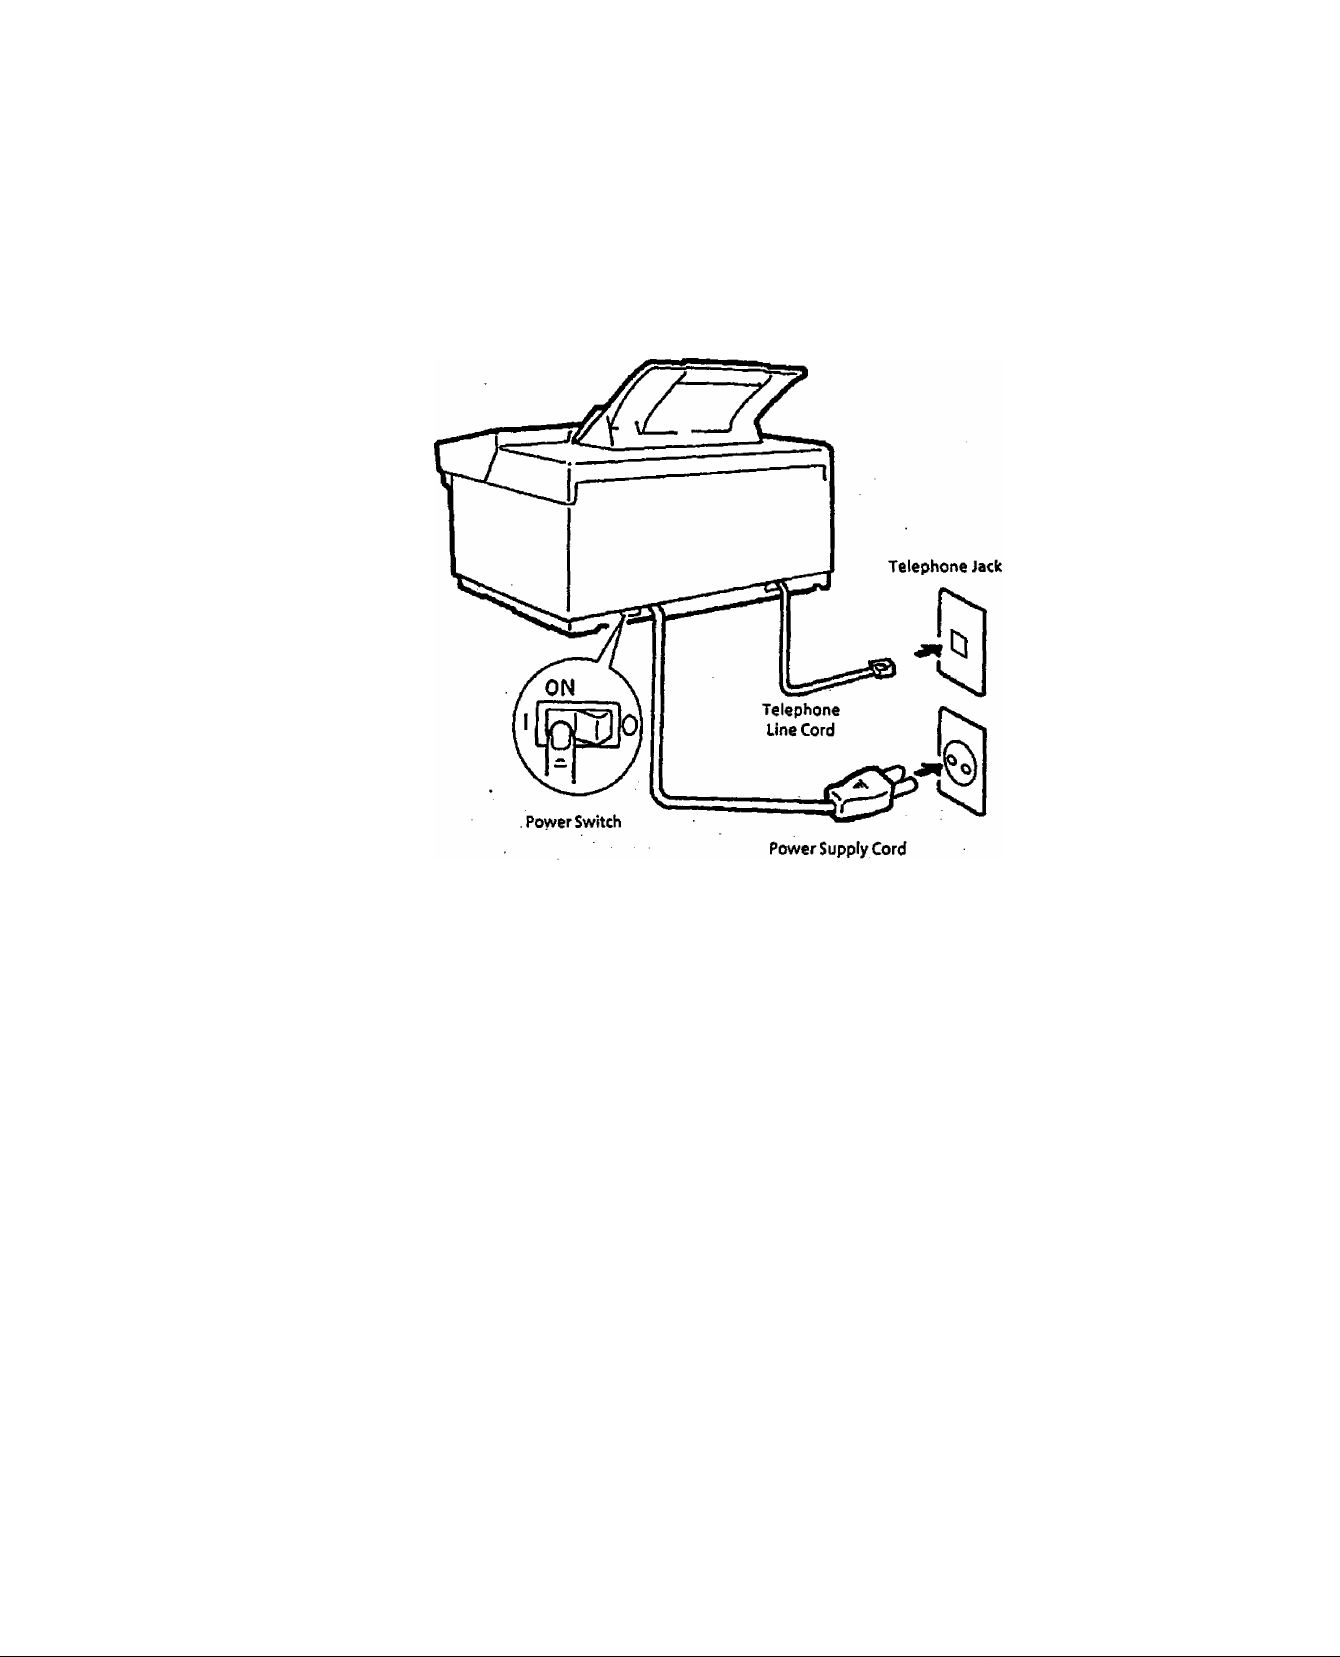
1. Plug the Telephone Line Cord into the Telephone Jack supplied by
the Telephone Company.
2. Plug the Power Supply Cord into an ordinary AC outlet.
3. Turn the Power Switch ON.
Notice To Users In New Zealand
1. Immediately disconnect the equipment should it become physical
damaged, and arrange for its disposal or repair.
2. Disconnect the telecom connection before disconnecting the
power connection prior to relocating the equipment, and
reconnect the power f i rst
3. This equipment may not necessarily provide for the effective hand
over of a call to or from a telephone connected to the same line.
4. The operation of this equipment with audible warning devices or
automatic ring detectors will give rise to bell tinkle or noise and
may cause false tripping of the ring detector. Should such
problems occur, the user is not to contact telecom faults service.
5. If the supply cord of this appliance is damaged, it must be replaced
by the special cord supplied by a authorised Panasonic service
centre.
2-8
Page 18
2.7.
LIGHTNING
PRECAUTIONS
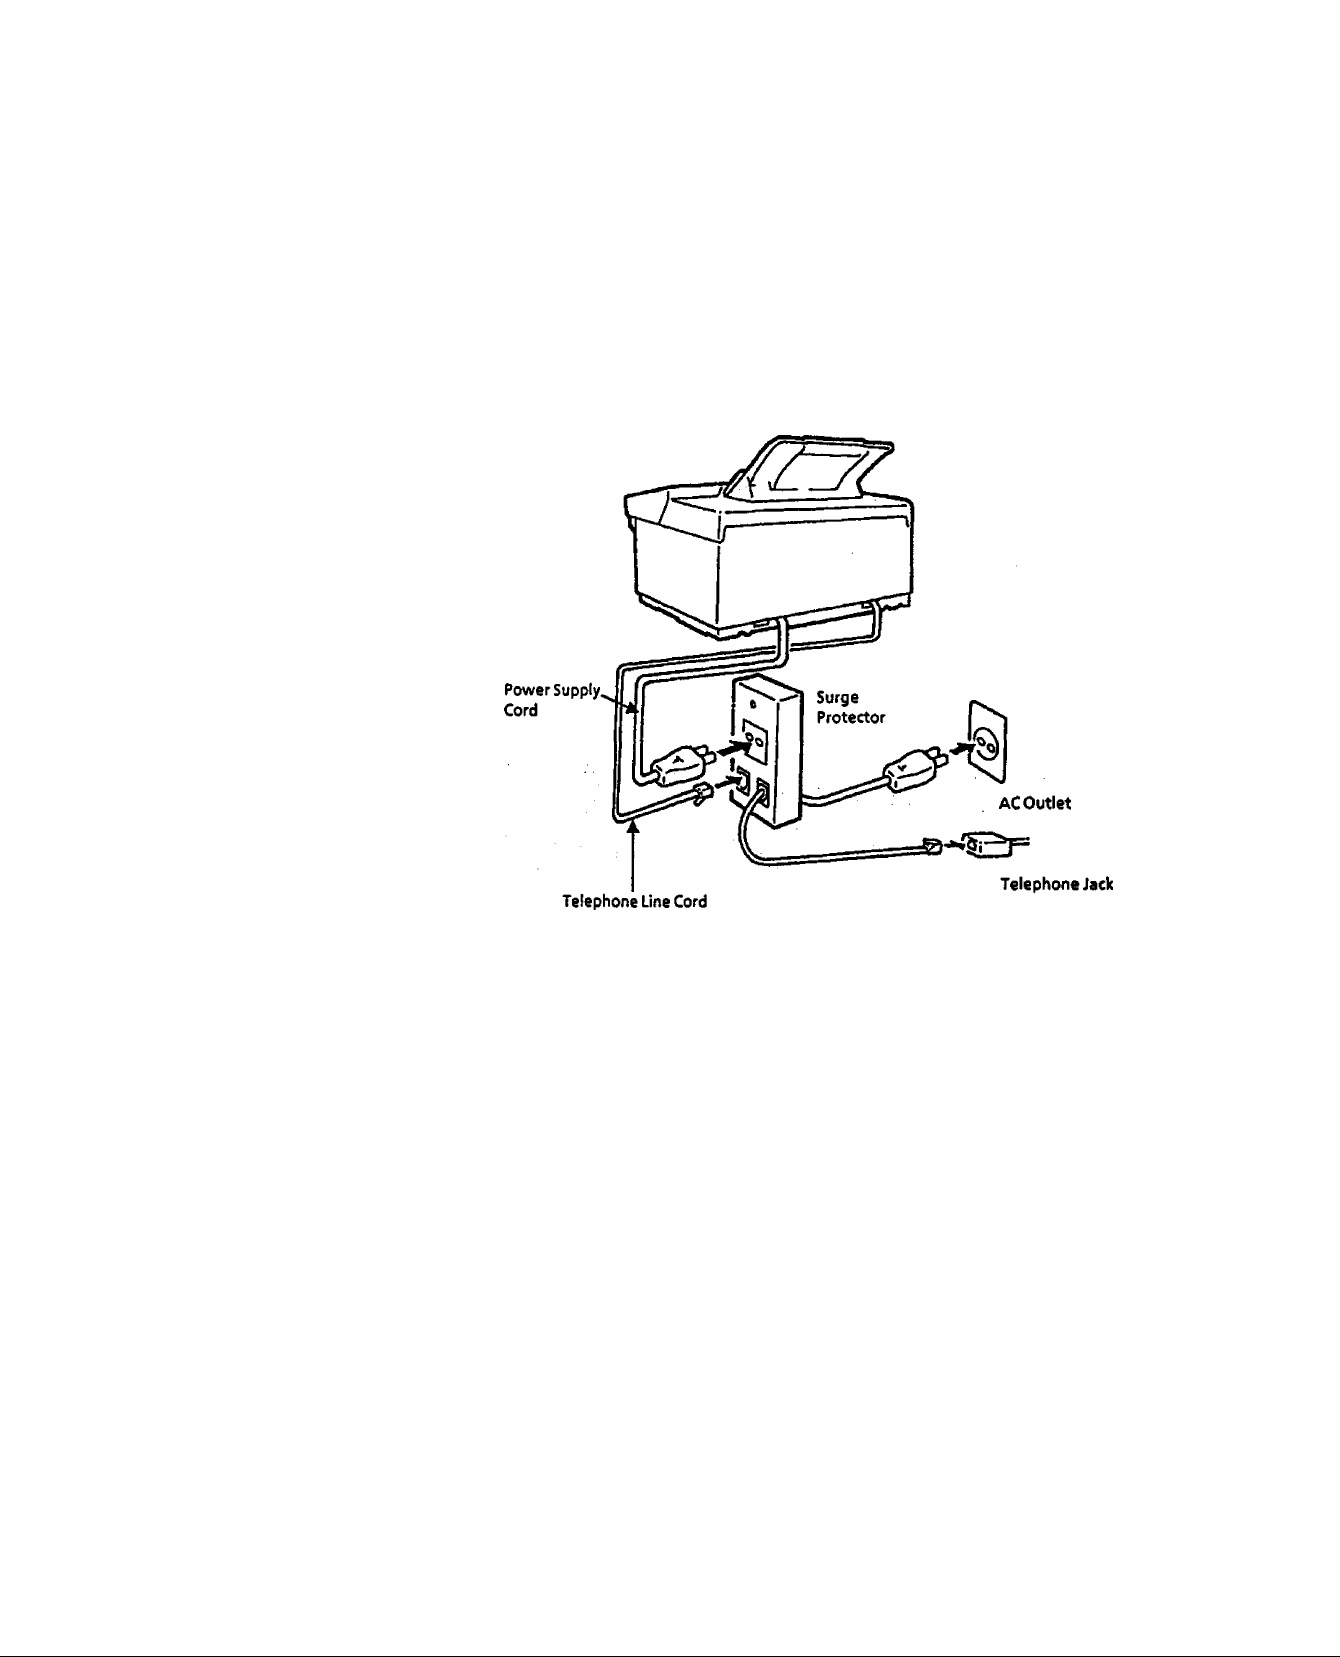
To minimize the possibility of damage due to lightning, a surge
protector Is built into your machine. Sometimes through this is not
enough to protect the machine completely when a strong lightning
surge comes through the telephone line or AC power line. To further
protect the equipment, we recommend that you:
1. Install a surge protector that you may purchase at a computer store
or electric store. (Please purchase a unit that will protect both the
telephone line and AC tine.)
NOTE
The buiit-ln battery can back up the
contents of ID, Logo, Telephone
number memory for up to / 0 days
when fully charged.
Assoon asthe thunderstorm 1$ over,
plug In the ACCordand Telephone
Line Cord, then turn ON the Power
Switch.
2. If you know that a thunderstorm is coming:
• Turn off the Power Switch and unplug the Power Supply Cord
from the AC outlet, (see Note)
• Unplug the Telephone Line Cord from the telephone jack.
2-9
Page 19

2.8.
SETTING THE DIALLING METHOD(Tone or Pulse)
8i RECORDING PAPER SIZE
Setting the Dialling Yourmachmecanoperatewitheitheroftwodiallingmethods(Toneor
Method (Tone or Pulse) Pulse), depending on the type of telephone line you are connected to.
If you need to change the dialling method to Tone or Pulse, follow the
procedure below.
SET
TONE
—
Enter setting number.
Press 1 for Pulse
Press 2 for Tone
Ex: Press 2.
^ START @ STOP
06
06
Cl] 1 1
[1] 2 1
o ^
Setting the Recording Use the procedure below to set the correct recording pa per size to the
Paper Size physical sizeof the paper being used (A4, Letter or Legal size).
SET TONE
Enter setting number.
J / Press 1 for A4 size.
Press 2 for Letter si ze.
Press 3 for Legal size.
Ex: Press2.
^ START STOP
13
13
[1] 1 1
Ci] i
Page 20

2.9.
FINAL INSTALLATION
TEST
After installing your machine, it is advisable to make a copy and send a
test fax to check whether the machine is working properly.
• Copy Test
Place a document face down on the
J 7 ADF. Adjust the left and right
x/ Document Guides.
^ CLEAR/COPY
• Communication Test
Place a document face down on the
1 “*7 ADF. Adjust the left and right
x/ Document Guides.
O SPACE
TEL/DlAL
and dial thenumber
from the keypad.
EX: 5551234
(See page 4-4 for more details.)
2-11
Page 21

Chapters. SETTING UP YOUR MACHINE
3.1,
USER PARAMETERS
Howto Set the
Date and Time
Your facsimile machine has several basic settings (User Parameters) to
help you keep records of the documents you send or receive. For
example, the built-in clock keeps the current date and time, and your
LOGO and ID Number help identify you when you send or receive
documents.
The built-in battery can back up this information for up to 10 days
when it is fully charged.
SET
12-12-1991 12:00
0^ w
The display will show a date and time.
Use the keypad to enter the new day
(two-digits), month (two-digits), year
(four-digits) and time (4-digits / 24hour clock)
EX: 12Augustl99203:00
120819920300
If you make a mistake, use the
<(ORIGINAL) and > (RESOLUTION)
keys to move the cu rsor to the
incorrect number and enter the new
number over it.
12-08-1992 03:00
To set the date and time,
^ START
t)
Page 22

Howto Set Your ID
Number
If the remote machine has an ID Number, when sending or receiving,
your ID Number will appear on the remote machine's display and the
remote machine's ID Number will appear on your display.
We suggest you use your facsimile telephone number as your ID
number, but you may use any number up to 20 digits long.
Enter ID digits (max. 20 digits). Use
SPACE to enter a space. Use PAUSE to
enter " + ".
EX: PAUSE 1 SPACE212SPACE 111
SPACE 1234
|>1 212 111 1234..
If you make a mistake, press
CLEAR/COPY to erase the digit then
re-enter the correct number.
If more than 15 digits are entered, the
first part of number will scroll off the
display.
NOTE
1. Whtnyou enter '+ * by pressing
PAUSE, the display will show ' ^
2. If you wish to conhrm entered ID
number, print out a Journal and
check the bottom tine
(see page 6‘1).
3. For Turkey version machine :
This h/nction is not available
because of Turkish regulation. The
display may not show this function.
To set the ID number,
^ START
n
3-2
Page 23

Howto Set Your LOGO
When you transmit a document, a header (LOGO, date, time and page
number) appear on the top of each copy printed out at the other
station.
The LOGO helps identify you to someone who receives your
document. To set your LOGO (max. 25 characters), enter a two-digit
code corresponding to the Character Code Table on page 8-3.
SET
Enter each letter (max. 25 characters),
number and/or symbol in your LOGO
using the keypad to enter each two-
digit code and followed by the SET key
(#).
EX: AB CDEF
[10#11 #SPACE12#13#14#15#1
00 0000
• Symbol "o" appears when you enter
a two-digit code for each chararter.
• The SPACE key can be used to enter
a space instead of entering 72.
NOTE
1. You can print out the Chara cter
Code Table (see page 6-7).
2. If you wish to confirm the entered
ID number, print out a Journal and
check the bottom line
(see page 6-1).
If you make a mistake, use the
<(ORIGINAL)and > (RESOLUTION)
keys to move the cursor to the
incorrect character and re-enter the
new character over it.
If more than 13 characters are entered,
the first part of characters will scroll
off the display.
To set the LOGO,
^ START
Page 24

3.2.
ONE-TOUCH/ABBREVIATED DIALLING NUMBERS
Entering One-Touch/ One-Touch and Abbreviated Dialling are two fast ways of dialling full
Abbreviated Dialling . telephone numbers. To use these dialling methods, you must first
Numbers store the telephone number using the following procedure.
To assign a One-Touch number, press a
One-Touch key (01 to 16)
EX: One-Touch 07
To assign an Abbreviated number,
press ABBR and two-digit code on the
keypad to enter any code from 16 to
50.
EX: ABBR 30
£07]
[30]
NOTE
1. tfyou require e special access
r}umber to get an outside line,
enter it first and then press PAUSE.
A hyphen is displayed for pause.
2. Use SPACE to enter a space
between the numbers to make It
easier to read.
3. If you Input a wrong number in
Step 3, use < (ORIGINAL) and >
(RESOLUTION) keys to move the
cursor to the Incorrect number,
then re-enter the correct number
and press START.
4. When you press "and*# ", 'l'
is displayed for"* " and "j " for "
5. If you are udng Pulse dialling and
you wish to diange the Tone
diailipg In the middle of dialling,
press the display shows
after diis, diatling mode will be
changed from Pulse to Tone.
^1 Enter the facsimile telephone number
[3
7
(up to 36 digits including pauses and
spaces).
EX: 9 PAUSE 555 SPACE 1234
To set the number,
^ START
t)
[07] 9-S5S 1234 I
3-4
Page 25

NOTE
1. If you want to change the
telephone number/station name
a fter it is set, go to Step 3 or 5 then
use < (ORIGINAi}and >
(RBSOLUTIOW keys to move cursor
to the number/characteryou want
to change and enter the new
number or character
2. To print out a One-Touch/ABBR.
Oiaiiing Number List, see page 6-6.
3. The built-in battery can back up the
One-Touch/ABBR.Numbers up to 10
days when a power failure occurs.
Enter receiving station's name (up to 15
characters) using the Character Code
Table on page 8-3.
(Press SET after entering the two-digit
code for each character.)
EX; EFGHIJKL
14#15#16#17#18#T9#20#21 #
To set the name,
^ START
[
Repeat Steps 2a/2b to 6 to record more
numbers, or, to return to standby, press
STOP.
00000000
Filling Out the Station
Directory Sheet
Use a pencil or a ball-point pen to fill in the station directory with
station names corresponding to the One-Touch keys. The station
directory sheet is held in place by a transparent plastic cover sheet.
To remove the station directory sheet,
1) Push the transparent plastic cover sheet downward until it is bent
enough to take out.
2) Remove the transparent plastic cover sheet together with the
station directory sheet
NOTE
If you use a pen, be sure the ink is dry.
If you use a pencil, remove any excess
lead before repladng the station
directory.
To replace the sheet,
1) Set the station directory sheet into proper position.
2) Place the transparent plastic cover sheet over the station
directory sheet and insert the projections while bending the
sheet.
Page 26

3.3.
FAX PARAMETERS
Setting Fax Parameters
Your facsimite machíne has a variety of adjustable Fax Parameters,
These parameters, listed in the Parameter Table, are preset for you
and do not need to be changed. If you do want to make a change,
read the table carefully. Some parameters, such as the Resolution and
Original parameters, can be temporarily changed by a simple key
operations Just before a transrnission is made. When the transmission
ends, however, these parameters return to their preset values (Home
position). Other parameters can only be changed by the procedure
described below.
SET
Enter Fax Parameter number from the
Fax Parameter Table (see page 3-7)
TONE
oi
Cl] 1 I
EX: 01 for RESOLUTION
The number showing inside the
brackets is the standard setting and
the number blinking on the right is the
current setting.
NOTE
1 To print out a Fax Parameter List, see
page 6S.
2. The buiit-in battery can back up Fax
Parameter settings up to todays
when a power failure occurs.
3. If you entered a wrong number in
steps, re-enter the correctnumber
over ft.
V ^
Enter the new setting value.
EX: 2 for FINE
Return to Step 2 to change another
parameter, or, to return to standby,
press STOP.
01
[13 2
3-6
Page 27

Fax Parameter Table
NOTE
f. The content of Fax Parameter
may vary depending on each
country regulation or
specification.
2. Standard settings a re printed on
the Fax Parameter List To
printout Fax Parameter List see
page 6-8.
No.
01
02
05
06
07
08
09
11 TAM l/F
12
13
14
IS
T6
17
18
19
20
21
22 PSTN ACCESS CODE
Parameter
RESOLUTION
ORIGINAL
COMM.
JOURNAL
DIALLING METHOD
HEADER
PRINT
HEADER
FORMAT
RECEIVED TIME
PRINT
SILENT DETECTION
(TAM l/F)
REC. PAPER
SIZE
PRINT
QUALITY
PRINT
REDUCTION
REDUCTION
RATIO
SUBSTITUTE
RCV
AUTO
JOURNAL PRINT
KEY/BUZ2ER
VOLUME
DIAGNOSTIC
PASSWORD
TELEPHONE LINE
Setting
Number
1
2
1
2
3
1
2
3
1
2
1
2
3
1
2 . From To
1
2
1
2
1
2
1
2
3
1
2
1
2
70 70%
... ...
100
1
2
1
2
1
2
1
2
—
Setting
Standard
Fine
Norma)
Light
Halftone
Off
On
INC
Pulse
Tone
Inside
Outside
No print
Logo, ID No.
Invalid
Valid
None
Connected
Invalid
Vaiid
A4
Letter
Legal
Quality
Fast
Fixed
Auto
100%
Invalid
Valid
Invalid
Valid
Soft
Loud
(—)
PSTN
P8X
0-.-
Comments
Setting home position of the Resolution
mode.
Setting home position of the Original
mode.
Selecting home position of printout
mode for COMM, Journal Off/On/tNC.
Off : No printout
On ; Always prints out
Inc : Printout when communication
has failed.
Selecting dialling method.
Selecting printing location of the
header.
Inside : Inside TX copy area
Outside : Outside TX copy area
No print ; No header print
Selecting header format
Selecting whether or not the machine
prints received time, page no., and
remote ID on bottom of each received
page.
Selecting TAM Interface Mode.
Selecting Silent Detection Mode.
Selecting recording paper size.
Selecting print quality.
Quality ; Print is clear and dark
Fast : Prints fast to save ink
Selecting print reduction mode.
Fixed : Reduce document according to
Auto : Reduce document according to
setting of Parameter No. 24
length of received documents.
Selecting fixed print reduction ratio
70% to 100%.
Selecting whether or not the machine
receives to memory when recording
paper runs out.
Selecting whether or not the machine
prints the journal automatically after
every 32 transactions.
Selecting volume of the Key/Buzzer
tone.
Setting the password for Remote
Diagnostic Mode. See your Panasonic
Authorized Dealer for details.
Selecting type of connected line.
Setting PSTN Access Code,
(max. 4 digits)
3.7
Page 28

Chapter 4. BASIC OPERATION
4.1.
TRANSMITTING
DOCUMENTS
4.1.1.
LOADING DOCUMENTS
Documents You Can Send in general, your machine will send any document printed on A4 size
paper.
Document Size
Maximum Size Minimum Size
Direction
Documents You Cannot
Send
Document Thickness
J
148mm
128mm
f
1
Direction
You must never try to send documents that are;
• Wet
• Covered with wet ink or paste
• Wrinkled, curled or folded
• Too thin (e.g. onionskin, airmail paper, pages from magazines,
etc.)
Too thick (e.g. card, etc.)
Chemically processed (e.g. pressure-sensitive paper, carboncoated paper, etc.)
Coated (e.g. glossy paper, etc.)
Made of cloth or metal
To transmit these kinds of documents, make a photocopy first and
then transmit the copy.
Single sheet;
0.06mm to
0.15mm
Multiple sheets;
0.06mm to
t
0.1 2mm
(NOTE 2)
How to Use the Carrier
Sheet
NOTE
1. Transmitting documents longer
than 3S6mm requires user's
assistance,
2. You can stack up to 20 sheets on títe
ADFatone time.
3. Effective scanning width is 208mm.
If you send documents wrinkled, curled, folder, too thin or smaller
than 148mm (W) x 128mm (L), you can send them using the carrier
sheet in the ADF with the sealed edge first.
Sealed
edge
Direction
4-1
Page 29

Howto Load Documents
1. Besurethedocument(s) is free of staples, paper clips and is not
torn, greased or covered by any foreign objects.
2. Place the document(s) FACE DOWN on the Automatic Document
Feeder (ADF) with the top edge going into the machine until it
stops.
If you are sending multiple pages, make sure that the bottom sheet
enters first, you can also stack up to 20 PAGES on the ADF at one
time. If you have more than 20 pages, you can place them on top of
the last page on the ADF once transmission has started, as long as
you do not have more than 20 pages on the ADF at any one time.
3. Adjust the Document Guides to ensure the document is centred on
the ADF.
Face down
Document Guides
NOTE
1, when trammiWng documents
longer than A4 size, please extend
sub-tray as below.
CORRECT
INCORRECT
When you set a document on the ADF correctly, the ON LINE lamp will
flashes. You can now change basic transmission settings, or begin the
dialling procedure.
ON LINE >=l ALARM
12-08-1992
12:00 I
2. Transmitting documents longer
than 208mm requires user's
assistance.
A.O
Page 30

4.1.2.
BASIC TRANSMISSION
SETTINGS
You can temporarily change Resolution and Contrast settings before
any ordinary transmission.
These settings can be altered before or after you place documents on
the ADF. You can also change these settings during transmission, but
the change will notbecome effective until the machine starts
transmitting the next page
Resolution
NOTE
1. When trensmisshn ends, the setting
returns to the prese t se tting.
2. To change the preset Hesoiution
position, change Fax Parameter
No.01 setting, see page 3‘6.
Original (Contrast)
Your machine is preset to Standard resolution, which is suitable for
ordinary documents. Use Fine for very detailed documents.
Press RESOLUTION button to :
RESOLUTIONS Standard
RESOLUTION = Fine
Your machine is preset to Normal contrast. If you have to send a
document with Light contrast, it may be wise to change the setting to
Light. If you have to send a photographs or illustrations with grey
tones, it may be wise to change the setting to Halftone.
Press ORIGINAL button to;
f
12-08-1992 12:00
NOTE
1. when transmission ends, the setting
returns to the preset setting.
2. To change the preset Contrast
position, change Fax Parameter
No.02 setting, see page 3-6.
3. You can verify ifdte transmission was
successful or not by printing out a
Communication Journal. Printout
condition can be selected
(ON/OFFUNC) by a fax parameter (see
page 3~B).
NORMAL U6HT HALFTONE
12-08-1992 12:00
1
---
' I I
NORMAL LKHT HALFTONE
W-08-199^^^2^oJ
I
----
' 1 I
NORMAL LIGHT HALFTONE
4-3
ORIGINAL = Normal
i
ORIGINALS Light
1
ORIGINAL» Halftone
L
Page 31

4.1.3.
DIALLING TECHNIQUES
Off-Hook Dialling
This section explains how to perform the following:
• Off-Hook Dialling
• On-Hook Dialling
• One-Touch/Abbreviated Dialling
Place the document face down on the o** line
ADF. Adjustthe Document Guides.
Lift the handset of the telephone set
you have connected to the machine
and then dial the number from the
telephone set
EX; 5551234
.lamp blinking
12-08-1992
-lampON
12:00 [
%/ sent
When you hear a beep sound, press
START, then hang up the handset
1^ ON LINE
5551243-
If the remote station has an ID, "
and the ID will appear on the display.
to DISPLAY ^ ON LINE
When transmission is completed, the □ qj| line
display will show the number of pages
212 555 1234
lamp OFF
03
Page 32

On-HobkDialling
Place the document face down on the
ADF. Adjust the Document Guides.
12-08-1992 12:00
El SPACE
TEL/DIAL
Dial the telephone number from the
keypad.
EX: 5551234
Your machine will dial the number. If
the line is free, your documents will be
transmitted.
Ifthe remote Station has an ID,"
and the ID will appear on the display.
ID DISPUY
When transmission is completed, the
display will show the number of pages
sent.
ON LINE
ON LINE
5SS1234-
^ ON LINE
5551234.
^ ON LINE
212 555 1234
ON LINE
03
NOTE
1. ffyou need a special access number
to get an outside line, dial it first
d%en press PAUSE to enter a pause
(represented by a '-*) before
dialling the full number.
EX: 9PAU5ESSS1234
2. If you are using Pulse dialling and
you wish to change the Tone
dialling in the middle of dialling,
press the display shows
after this, dialling mode will be
changed from Pulse to Tone
Ifthe line is busy, your machine will
redial the number for you up to three
times with three minute intervals.
If no contact is made after all
automatic redials, the display will show
an information code 630 or 634, that
means the line was busy or did not
answer.
4-5
ON LINE
wmm
]
-Blinking
i4^0N LINE ALARM
630
I
Page 33

One-Touch/Abbreviated
Dialling
Place the document face down on the
ADF. Adjust the Document Guides.
Press a ABBR and two-digit code.
^ - s ^
12-08-1992 12:00
Press a One-Touch key.
EX: ioT
Thedisplay will show the One-Touch on line
or ABBR. number and the full number
(e.g. 9-5551234).
[01]
9-&S51234
]
The machine will dial the number
automatically.
ON LINE
9-5551234
If the line is free, your documents will
be transmitted. If the remote station
has an ID, " and the ID will appear
on the display.
ID DISPLAY
ON LINE
555 1234
When transmission is completed, the a line
display will show the number of pages
sent.
If the line is busy, your machine will
OK LINE
03.
redial the number for you up to three
times with three minute intervals
'Blinking
If no contact is made after all
automatic redials the display^ ->K-on line eo alarn
an information code 630 or 634, that
means the line was busy or did not
630
answer.
Page 34

4.1.4.
MEMORYTRANSMISSION
The memory function allows you to easily perform many different
tasks. You can store your documents into memory and then have the
machine transmit the stored documents automatically. You do not
have to wait around until transmission is finished.
The advantages of memory transmission are :
1. The same document can be transmitted to multiple stations.
2. If communications fail when transmitting from the memory, your
machine will re-transmit the remaining unsuccessful page(s)
automatically.
1
-------
©
NOTE
1, You can verify if the memory transmission was successful or not by printing
out a Commumcaf/on Journal. Print out condition can be selected
(OFF/ON/INC) by a fax parameter (see page 3-6).
2. If a memory overflow condition occurs while storing documents into memory,
the machine will start transmitting those pages which are successfully stored.
If you wish to cancel this transmission Just press STOP. See Specifications,
page 8-2 for the Image Memory Capacity.
^ ALARM
870
3, The percentage of memory used is shown by "q" mark starting from theleft
corner of the display and the two-digits at the righ t corner indica fes the
number of pages storing into the memory.
4. An Information Code will be displayed if the transmission has failed or no
answer at the receiving side after the last automatic redial. The document
stored for this transmission will be erased from the memory automatically and
the transmission is marked "INC" (incomplete) on the Communication Journal
(COMM. JOURNAL).
5. When a power failure occurs, the document information stored in the
memory will be lost. In this case a Power Failure Report will be printed out
automatically after the Power is turned ON again. The report is not printed
out if there are no documents stored in trie memory. (Seepage6-9)
4-7
□ao-------- 02
{Each " □ " represents 10 %
of memory used.)
ESI ALARM
407
Page 35

Howto Send a Document
Using Memory
Transmission
if you have a number of pages to send to a single station or multiple
stations at one time« you can save time by using memory transmission.
That is, you can store the document in your machine's memory and
then transmit it to the selected station(s) automatically.
Place the document face down on the
ADF. Adjust the Document Guides.
, MEHORY
Dial by pressing a One-Touch key,
ABBR and two-digit code or TEL/DIAL
and a full number (up to 3 stations) or
any combination of these.
Ex: One-Touch01, ABBR20and
TEL/DEAL 9 PAUSE 7824831
^ START
to store the document
into memory.
ON LINE
12-08-1992 12:00
ON LINE
[01] 9-6551234
ON LINE
[20] 9-7777890
->K- OH LINE
g-7824831
01
]
NOTE
1. To review the entered station(s) in
steps before going to the next step,
press < (ORtGINAL), > (RESOLUTION),
if you find an error, press CLEAR to
erase the displayed station.
2. If you press STOP while the machine is
still dialling or sending a document,
the transmission will be cancelled and
the documentstoredin the memory
will be erased automatically.
The machine begins dialling
automatically.
=P: ON LINE
9-5551234-
Page 36

4.2.
RECEIVING
DOCUMENTS
4.2.1.
RECEPTION MODES When you set up your machine, you can select one of four Reception
Modes as shown below. Your machine is preset to Fax Mode.
Reception Mode
Conditions
You normally receive only
voice calls.
You normally receive only
fax calls.
You receive both voice and
fax calls.
You receive both voice and
fax calls and a Telephone
Answering Machine (TAM) is
connected.
Suggested
Reception Mode
Telephone Mode
You can answer the incoming calls
the same as a normal phone. If you
receive a fax call, simply press START
to receive manually. (See page 4-10.)
Fax Mode
Unitwill receive document
automatically. All incoming calls
(including a voice call) are answered
by the fax. (See page 4-10.)
Auto Switching Mode
(Fax/Tel Auto Switch)
Unit will answer the incoming call
then distinguishes whether it is a
voice or fax call. If it is a fax call, unit
will receive document. If it is a voice
call, unitwill start beeping for your
attention. (See page 4-11.)
Auto Switching Mode
(TAM Interface)
The TAM answers the incoming call.
During that time, the unit also
monitors whether it is a voice call, the
TAM will continue to function. If it is
a fax call, the unitwill automatically
switch the line to fax and begin
receiving document.(See page 4-12.)
Settings
FAX/TELEPHOHE
(Lamp: OFO
FAX/TELEPHONE
(UmptOW
FAX/TELEPHOHE
(Lamp: FlashesVJ
Set Fax Parameter No. 11
TAM Vf to 1 :None.
(Lamp: Flashes)^ F^
Set Fax Parameter No. 11
TAM l/F to2 iConnected.
-Ж ca
,FAX/TELEPHONE
Ж- oa
NOTE
TAM • Telephone Answering Machine.
4-9
Page 37

4.2.2.
HOWTO SET/USE
TELEPHONE MODE
When your machine is settothis mode, your machine will not receive
documents automatically. If you receive a fax call, follow the
procedure to receive documents manually.
Setting the
Telephone Mode
Operation of
Telephone Mode
Press the FAX/TELEPHONE key and confirm that the tamp is
OFF. This indicates that the machine is now set for Telephone
Mode (Manual Reception).
FAX/TELEPHONE
When your telephone rings, lift the handset.
If you hear a beep...beep sound from the phone, it means someone j
wants to send a fax. Or, if the caller answers and says he/she wants to |
send a fax, then...
Remove the document from ADF, if any.
^ START
4.2.3.
HOWTO SET/USE
FAX MODE
Setting the
Operation of
Fax Mode
Fax Mode
Hang up the telephone.
When your machine is set to this mode, your machine will
immediately begin to receive documents automatically when a call is
received.
Press the FAX/TELEPHONE key and confirm that the lamp is ON.
This indicates that the machine is now set for Fax Mode
FAX/TELEPHONE
Your machine will soon begin receiving automatically when a
fax call is received.
Page 38

4.2.4.
HOWTO SET/USE
AUTO SWITCHING MODE
(FAX/TEL AUTO SWITCH)
When your machine is set to this mode, your machine will switch to
document reception or voice communication automatically.
Setting the
Auto Switching Mode
(Fax/Tel Auto Switch)
Operation of
Auto Switching Mode
(Fax/Tel Auto Switch)
Set Fax Parameter No.11 TAM l/F to 1: None. (See page 3-6)
Press the FAX/TELEPHONE key and confirm that the lamp is
flashing. This indicates that the machine is now set for the Auto
Switching Mode.
^ FAX/TELEPHONE
Your machine will soon answer the call when a call is received,
then distinguish whether it is a voice or fax call.
If the call is a Fax call.
Your machine begins to
receive the document.
в'
If the call is a Voice call.
You machine begins
making beep-beep-beep
sounds through the
machine's speaker.
NOTE
T/ie calling party will be charged for
the call even though you are not
available to answer the call when this
modeissetto "Valid".
4-11
Lift the phone and
SPACE
TEL/DIAL
Talk.
Page 39

4.2.5.
HOWTO SET/USE
AUTO SWITCHING MODE
(TAM INTERFACE)
Installing YourTAM
Your UF-311 is equipped with a unique feature called TAM Interface
which enables it to automatically switch a single telephone line either
to Fax or TAM. You can connect most TAMs in the market to your
machine and use your existing telephone line very efficiently.
However, some TAMs are not compatible with this machine. For the
operation of your TAM, please refer to the User's Guide of the TAM.
1. Remove the telephone linecord of yourTAM from the wall jack.
2. Plug the telephone line cord of your TAM into the Jack as shown
below. (See NOTE 2)
NOTE
1. TAM - Telephone Answering
Machine.
2. The connecting method for TAM may
differ depending on the each country
reguratioru Please follow the
appropriciate method for your
country among above methods (Type
1to5).
For more details, please ask to your
local Panasonic dealer.
4-12
Page 40

Setting the
Auto Switching Mode
(TAM Interface)
Set Fax Parameter No.11 TAM l/F to 2: Connected,
(See page 3>6)
/1 Press the FAX/TELEPHONE key and confirm that the lamp is
12 7 flashing. This indicates that the machine is now set for the Auto
\/ Switching Mode.
FAX/TELEPHONE
Operation of
Auto Switching Mode
(TAM Interface)
When your TAM and Fax receives an incoming call, the TAM
always answers the cajl first and then the TAM sends an OGM
(Outgoing Message) recorded in your TAM to the calling
station.
During the time theTAM is answering the call, your fax machine
will be monitoring the line to distinguish whether it is a voice or
fax call.
If the call is a Fax call.
Your machine will switch
the line to the fax and
then beginsto receive
the documents
immediately from
calling station.
Sample of OGM
"Hello, this is Smith. I am sorry but I cannot come to the phone right
now. Please leave your message after the beep. I will call you back as
soon as possible. This telephone is connected to a Panafax machine
also. If you want to send a fax message, please send it now. Fax will
answer automatically. Thank you for calling.
If the call is a Voice call.
Your TAM continues to
record a message (ICM)
after sending out an
OGM.
4-13
Page 41

4.2.6.
PRINT MARGIN
Your machine requires print margins as shown below.
The machine cannot print in these area.
j
f ,
e
i
Effective
i
i
w
1
Printing
Area
1
Paper
Size
A4 1mm 13mm
Letter 1mm
Legal
Margin "a"
(Top)
1mm
Margin "b"
(Bottom)
13mm
13mm
4
Margin "c"
(Left)
1mm
4mm 4mm
4mm 4mm
Margin "d"
(Right)
1mm
H-t
Maximum
Print Length
283mm
265mm
342mm
e
Maximum
Print Width
208mm
208mm
208mm
NOTE
If you receive the same size of
document as recordiryg paper,
ciocumenf jm// be divided into
separate pages if reduction mode is
not used. (See page 4-15).
Page 42

4.2.7,
PRINT REDUCTION
This macHne uses A4, Letter or Legal size plain paper for recording.
Oversized documents sent to you by the other party cannot be printed
within a single page. When this occurs« the document will be divided
into separate pages.
This machine is equipped with a Print Reduction function to solve this
problem. You may select the most appropriate setting from the
selections described below.
1. Fixed Reduction
You may set the machine to reduce all received documents to a fixed
reduction ratio from 70% to 100% in 1% steps.
2. Automatic Reduction
Each page of a received document is first stored in memory. Based
on the document length« this machine wifi automatically calculate
the suitable reduction ratio (70% to 100%) to print the entire
document on a single page. If the received document is extremely
long (over 36% longer than the recording paper), document will be
divided into separate pages when printing with no reduction.
IMPORTANT!
This mode requires the entire page to be received into memory
before printout. However, this mode is disabled automatically and
fixed rwuction mode will be used in the cases described below;
a) Av^lable memory is low
e.g. deferred transmission is stored in memory.
b) Receiving documents with large amount of data
e.g. photo sent by halftone mode.
Howto Select the Print
Reduction Mode
NOTE
If sending side sets Header print
onto outdde copy area, more
reduction is required.
Set Fax Parameters as shown below. (See page 3-6)
1. To set Fixed Reduction mode.
(1) No.15 Print Reduction set to "Fixed".
(2) No.16 Reduction Ratio set to 94% or any number between 70%
through 10 0%.
Ex. A4toA4-94%
A4 to Letter-88 %
Letter to Letter - 94%
Legal to Letter - 73% (See note )
2. To set Automatic Reduction mode.
(1) No.15 Print Reduction set to "Auto".
(3) Na13 Recording Paper Size set to correct recording paper size to
the physical size of the paper being used (A4, Letter or Legal).
4-15
Page 43

4.2.8.
SUBSTITUTE RECEPTION
If the recording paper or ink runs out during reception, the machine
automatically starts receiving into its image data memory. Stored
documents are printed out automatically after replacing recording
paper or ink cartridge.
NOTE
f. tf the memory overflows, the
méchhe will stop receiving and
release the communication iine.
The document(s) stored in the
memory up to that moment wili be
printed out after replacing
recording paper or ink cartridge.
2. When a power failure occurs, the
document information stored in
memory will be lost and a Power
Failure Report will be printed out.
(see page 6-9).
3. If you wish to turn off the
substitute reception function,
change Fax Parameter No. 17 to
“Invalid“ (see page 3-6).
When the machine finishes the
memory reception and there is no
ALARM
010
recording paper(lnfo.code = 010) or
ink(lnfo.code = 015), an Information
Code appears on the display.
^ AURM
015
Install recording paper (see page 2-7)
and press STOP or replace ink
cartridge (see page 7-9).
The machine will automatically start
printing out the document stored in
the memory, which will be erased after
printing is completed.
CAUTION
If the paper is jammed in the machine (machine will display Info. Code
001 or 002) and MEMORY light is on, DO NOT turn the power off when
removing the jammed paper. Otherwise, the document stored in
memory will be lost, (See page 7-6)
Page 44

4.3.
MAKING COPIES
NOTE
t. When making a copy, yourmachine
will automatically select Fine
Resolution.
2. Print reduction function does not
work in the copy mode.
3. You cannot make a copy of a
document whose size is bigger than
recording paper size feffeciiVe
printing size), see page 4-15.
4.4.
VOICE CONTACT
AFTER SENDING/
RECEIVING
Before you send a document, you can make a copy of it to see what it
will probably look like to the person who receives it.
Place the document face down on the
ADF. Adjust the Document Guides.
CLEAR/COPY
C
The machine begins making a copy.
You may want to talk to the other person over the telephone after
sending or receiving documents. To do so, perform Step 1 while the
machine is still sending or receiving.
3
-J=pz OH LIHE
12-08-1992 12:00
Making Voice Contact
after Sending/Receiving
IT / TEL/DIAL
^ SPACE
"IT’
When sending/receiving is over and the other party replies
with a Voice Contact request, you will hear a beep-beep-beep
sound coming through the monitor speaker and the TEL/DIAL
lamp starts blinking.
Lift up the handset.
□ SPACE
"IT
Talk.
TEL/DIAL
tD DISPLAY
ON LINE
212 555 1234
Answering a Voice
Contact Request
When you hear a beep-beep-beep sound coming through the monitor
speaker and the TEL/DIAL lamp starts blinking, it means you are
receiving a voice contact request. Reply by following the above
procedure from Step 3.
Page 45

Chapter 5, GETTING THE MOST OUT OF YOUR MACHINE
5.1.
POLLING
How to Set the Polling
Password
NOTE
1. Polling might not function with all
fax machines. We suggest you
attempt a trial polling before you
actually poll for important
document
2. If you make a mistake in Step 2, use
the < (OR/GIMLJ or >
(RFSOLUTIOIV) to move the cursor
to the incorrect number, and then
enter the new number over it. To
erase the password, press
CLEARICOPY.
3. If a pa«word is not set in the polled
station, you may poll the other
station even through your machine
has a password.
Polling means calling other station(s) to retrieve a document. The
other station must know in advance that you will call and must have a
document set on the ADF or stored in the memory. You may need to
set a polling password, shared by the other station, to ensure security.
If the polling password does not match with polled station, your
polling request will be refused automatically.
Enter four-digit password.
9876
Ex : 9876
^ START
How to Poll The following procedure lets you poll a document from one station.
NOTE
1. You can verify if polling was
successful or not by printing out a
Communication Journal. Printout
condition can be selected
(OFF/ON/INC) before polling. See
page 6-4 for details.
Be sure to set the polling password before polling.
POLLING
Dial by pressing a One-Touch key,
ABBR and two-digit code or TEL/DIAL
â
and a full number.
Ex : ABBR and 20
^ START
T)
12-08-1992 12:00
[20]
5551234-
5551234
Page 46

5.2.
TIMER CONTROLLED TRANSMISSION
How to Set Timer
Transmission
You can send a document to one or multiple stations at any fixed time
within 24 hours by a Built-in timer. This machine has one timer for
Timer Controlled Transmission,
Place the document face down on the
12-06-1992 12:00
ADF. Adjust the Document Guides.
TIMER
Enter start time from keypad.
(Use four-digit, 24-hour clock)
Ex; 0230
^ START
02:30
C- 3
MEMORY
NOTE
1. ffyou enter a wrong number in
Step 3. press CLEARKOPY, then
re-enter the right number,
2. If you wish to perform Timer
Transmisión without storing into
memory (memory may not be big
enough for storing the entire
document), skip step 5 and enter
only one station in step 6, In this
case the document wili remain on
the ADF for Timer Transmisión at
step 7,
3. you cannot use direct dialling in
Step 6. All called stations for
Timer Controlled Transmisión
must be set in advance in One-
Touch/ABBR. Numbers.
4. To cancel the Deferred
Communication settings, see
page 5-3.
(See NOTE 2)
Dial by pressing a One-Touch key,
ABBR and two-digit code or any
combination of these.
Ex: One-Touch 02
ABBR and 15
^ START
to store the document
n
into the memory.
The TIMER and MEMORY lamp will be
lit until transmission actually takes
place.
C02]
[15]
□ □□□□
9-SSS1234 1
9-7824831 1
Page 47

How to Cancel Timer
Transmission
TIMER
N t ^
-cp-
To cancel Deferred Transmission,
CLEAR/COPY
02:30
How to Change Timer
Transmission
^ START
The TIMER lamp will go off and
document stored in memory will be
erased automatically.
TIMER
To change transmission time,
enter the new transmission time and
then press START.
EX:0300
To delete a station, press <
(ORIGINAL) or > (RESOLUTION) to find
the station you want to delete, then
press CLEAR / COPY to delete the
displayed station.
12-08-1992 12:00
02:30
03:00
C02] 9-S5S1234
To add a station, enter a station
number by pressing a One-Touch key,
or ABBR and two-digit code.
To store the new setting,
^ START
The machine returns to waiting mode
for Timer Transmission.
5-3
Page 48

Chapter 6. PRINT OUT JOURNALS AND LISTS
6.1.
PRINT OUTJOURNALS
AND LISTS
32 Transaction Journal
Print Out Procedure
NOTE
If you wish to disable the print
out of the 32 Transactions Journal
automatically, change the Fax
Parameter No. 18 to invalid.
(See page 3-6)
To help you maintain records of the documents you send and receive,
as well as lists of the numbers you record, your facsimile machine is
equipped to print out the following journals and lists; a 32
Transaction Journal, Individual Transmission Journal, Communication
Journal, One-Touch/ABBR. No. List, Character Code Table, Fax
Parameter List and a Power Failure Report.
The "Journal" is a record of the last 32 transactions (a transaction is
recorded each time you send or receive a document). It is printed out
automatically after every 32 transactions, but you can print it out
manually in the following way :
CLEAR/COPY
3
^ START
The machine starts printing out a
Journal (see next page).
Individual Transmission An individual Transmission Journal contains information on the latest
Journal transmission.
(IND.XMT JOURNAL)
Print Out Procedure
CLEAR/COPY
^ START
The machine starts printing out an
Individual Transmission Journal
(see page 6-3).
Page 49

Sample Journal
(3) (4)
NO. COM
01 OK
02 OK
03 OK
04
05 S-OK
06 OK
(5)
PAGES
001 00:00'22
003
001
000/005
630
000
001/001
OK 002/002
OK 003/003
Explanation of Contents
“JOURNAL”
(6)
DURATION
00:01'17
00:00'31
00;00'00
00:00'34 XMT 12324567
00:00'20
00:00'31
00;01'32
********* DATE 12-08- 1992 ***
(7) (8)
X/R IDENTIFICATION
XMT SERVICE DEPT.
RCV
XMT ACCOUNTING DEPT.
XMT
XMT
XMT
XMT
Ill 222 333
342345676
44567345
0245674533
2X0353678980
in.
(12)
-SALES DEPT.
-12345678901234567890-
(2)
(9)
DATE
11-08 17:35
11-08 17:41
11-08 17:50
11-08 17:57
11-08 18:35
11-08
12-08
12-08
(13)
(10)
TIME
18:44
08:35
08:57
12:00
(11)
DIAGNOSTIC
C00449O3CO00O
C0044903CD000
C0044903C0000
0800420000000
0210260200000
C8044B03C0000
C8044B03C1000
C8044B03C1000
(1) Printout date
(2) Printout time
(3) Journal number
(4) Communication result
(5) Number of pages transmitted or
Received
(6) Duration of communication
(7) Type of communication
(8) Remote station identification
(9)Communication date
(10) Comm unication Start time
(11) Diagnostic
(12) OwnLOGO
(13) Own to number
01-'32 (Doesnot always begin with 01 when printed out manually)
"OK" indicates that the communication was successful.
"S-OK" indicates that STOP was pressed during communication.
Three-digit information code (see page 7-4) appears when there was a problem.
The three-digit number is the number of pages successfully transmitted or received.
When the documents are stored into memory, two three-digit numbers will appear. The
first three-digit number represents the number of pages successfully transmitted. The
second three-digit number represents the total number of pages that were attempted to
be transmitted.
"XMT" means Transmission
"RCV" means Reception
"POL" means Polling
Name : Recorded name in One-Touch or ABBR. Numbers or remote station’s ID number.
Qnumber: Dialled telephone number
Number: Remote station's ID number.
For service personnel only
Up to 25 characters
Up to 20 digits
6-2
Page 50

Sample Individual Transmission Journal (IND. XMT JOURNAL)
JOURNAL No,
DATE/TIME
DURATION
COMM.RESULT - OK (4)
PAGES
MODE
DESTINATION * [01] / 37 /ABCDEFG (7)
RECEIVED ID (8)
RESOLUTION
Explanation of Contents
. 21 (1)
* 12-08-1992 09:00 (2)
= 00:00'16 (3)
= 001 (5)
* TRANSMISSION (6)
= STD (9)
(10)
-SALES DEPT.
(11)
(1) Journal number
(2) Transmitted date and time
(3) Duration of communication
(4) Communication result
(5) Number of pages transmitted or
Received
(6) Type of communication
(7) Remote station identification
(8) Received remote station's ID
(9) Resolution
(10) Own LOGO
(11) Own ID number
"OK" indicates that the transmission was successful.
"S-OK" indicates that STOP was pressed during transmission.
Three-digit information code (see page 7-4) appears when there was a probtern.
The three-digit number is the number of pages successfully transmitted or received.
When the documents are stored into memory, two three-digit numbers will appear. The
first three-digit number represents the number of pages successfully transmitted. The
second three-digit number represents the total number of pages that were attempted to
be transmitted.
Transmission or memory transmission
If a One-Touch or ABBR key was used for the transmission :
One-Touch or ABBR. No./Telephone Number/Recorded Name
if not: Telephone number
ID number
"STD" means standard resolution
"FINE" means fine resolution
Up to 25 characters
Upto 20 digits
Page 51

Communication Journal
(COMM.JOURNAL)
A Communication Journal lets you verify if transmission or polling
communication was successful or not. You can select printout
condition as follows;
When you set COMM. JOURNAL = ON, a Communication Journal is
printed out automatically after every communication.
When you set COMM. JOURNAL = INC., a Communication Journal is
printed out automatically only if the communication has failed.
However, when you set COMM. JOURNAL = OFF, a Communication
Journal is not printed out at ail.
TONE
05 [3] 3
Press 1,2 or 3. (OFF/ON/INC)
EX; 2 for ON.
^ START
@ STOP
05
[3] 2
Page 52

Sample COMM. JOURNAL
(1)
MODE » MEMORY' TRANSMISSION
-COMM. JOURNAL- ****♦♦•* DATE lE-08-199l ***** TIME 12:00 **** P.l
(2)
START=12-08 11:50
(3)
END=l2-08 12:00
(4)
NO.
001
002
003
004
(5)
COM
OK
OK
OK
INC
(6)
ABBR
[01]
[02]
[03]
s
(7) (8)
STATION NAME/
TELEPHONE NO,
Explanation of Contents
(1) lndication of communication mode
(2) Starting time of communication
(3) Ending time of communication
(4) Communication number
(5) Communication result
(6) Abbreviated number or S mark
(7) Recorded name in One-Touch, ABBR, Number
ordirectdialling number
(8) Numberof pages transmitted or received
(9) Own LOGO
(lO)Own ID number
SERVICE DEPT.
SALES DEPT.
ACCOUNTING DEPT.
021 111 1234
"OK" indicates that the transmission was successful.
"INC" indicates that the transmission was not completed.
Q mark indicates dialled by direct number dial.
The three-digit number is the number of pages successfully transmitted or
received.
When the documents are stored into memory, two three-digit numbers will
appear. The first three-digit number represents the number of pages
successfully transmitted. The second three-digit number represents the
total number of pages that were attempted to be transmitted.
Up to 25 characters
Up to 20 digits
PAGES
001/001
001/001
001/001
000/001
(9)
-SALES DEPT.
-12345678901234567890-
(10)
Page 53

One-Touch/ABBR. No. List ToprintoutaOne-Touch/Abbreviated Number List of the telephone
numbers you have stored.
Print Out Procedure
Sample One-Touch / ABBR. No. List
-ONE-TOUCH/ABBR.NO.LIST-
(1)
ABBR.NO.
[013
[02]
[03]
(2)
STATION NAME
SERVICE DEPT.
SALES DEPT.
ACCOUNTING DEPT.
CLEAR/COPY
"IT
^ START
ti
The machine starts printing out a
One-Touch/Abbreviated Number List.
DATE 12-08-1992
(3)
TELEPHONE NO.
121 555 1234
222 666 2345
313 333 3456
TIME 12:00 ****P.l
NO. OF STATIONS =04 (4)
Explanation of Contents
(1) Abbreviated number or One-Touch number
(2) Station name recorded in the machine : Up to 15 characters
(3) Telephone number recorded in the machine : Upto 36 digits
(4) Number of recorded ABBR. and One-Touch
numbers.
{5)OwnLOGO : Up to 25 characters
(6) Own ID number ; Up to 20 digits
(5)
-SALES DEPT.
-12345678901234567890-
6-6
(6)
Page 54

Character Code Table To print out a copy of the character Code Table, which is used to
record your LOGO, etc.,
Printout Procedure
Sample Character Code Table
-CHR.
CODE
CHR.
(CODE)
CHR.
(CODE) (23)
CHR, A
(CODE) (36)
A B
(10)
N
C D E
(12) (13) (14)
(li)
P
0
(24)
(25)
A
(37)
6 0
(38) (39)
0
(26) (27)
CLEAR/COPY
^ START
tl
The machine starts printing out a
Character Code Table.
TABLE-
R
F
(15) (16)
S
(28)
G
T
(29)
DATE 12
H I
(17)
U
(30)
-08-19!
(18)
V
(31)
92 ***^
J K
(19)
(20) (21)
W X Y
(32)
(33) (34) (35)
12:00
L M
(22)
Z
CHR.
(CODE) (40) (41) (42)
CHR.
(CODE) (53)
CHR.
(CODE) (66) (67)
CHR,
(CODE)
CHR,
(CODE) (72) (73) (74) (75)
CHR.
(CODE) (85) (86) (87)
CHR.
(CODE)
a b
N
(54)
& a 6 (j
0 1
(00) (01) (02) (03)
(SP)
+
_
(98) (99)
0
t
4
c d
(43) (44)
P
(55)
(68) (89)
Q
(56) (57)
2
3 4
If
(88) (89) (90)
f
e
(45) (46)
R
(58)
a
(70)
(71)
(04)
(76)
$.
(05) (06)
•
(77)
%
g
S
(59)
a
5
>
(78)
<
(91) (92)
h i
(47)
T
U
(60)
6
7
(07)
/
# &
(79)
a
>
-SALES DEPT.
-12345678901234567890-
(48)
V
(61)
8 9
(08)
(80)
? 3
(93)
k 1 m
j
(49)
(50)
W X
(62)
(63) (64) (65)
(09)
_
(81)
(94)
( )
(82)
t
(95)
(51)
(52)
Y Z
♦
(84)
(83)
]
(96) (97)
‘
Page 55

FAX Parameter List To print out the fax Parameter List.
Print Out Procedure
rTv CLEAR/COPY TONE
<7 ra
^ START
NOTE
1. The contents of Fax Parameter List
may vary cfepenc/ing on each
country regulation.
The machine starts printing out a Fax
Parameter List.
Sample FAX Parameter List
*****«**«•«4*4*«*«***** parameter list- •♦***♦* DATE 12-08-1992 TIME 12:00 *♦♦**•♦♦*
(1)
PARAMETER DESCRIPTION
NUMBER
01 RESOLUTION (HOME)
02
03 (NO FUNCTION)
04 (NO FUNCTION)
05
06
(2)
ORIGINAL (HOME)
COMM. JOURNAL
DIALLING METHOD
(3)
SELECTION
(1 iStandard
(1: Normal
(l:Off
(1:Pulse
2;Fine)
2:Dark
2:On 3:lnc)
2:Tone)
3;Halftone)
(4) (5)
CURRENT STANDARD
SETTING
2
1
3 3
2
SETTING
1
1
2
)
(
18
19
20 DIAGNOSTIC PASSWORD (nnnn)
21 TELEPHONE LINE
22 (NO FUNCTION)
23
24
25
—
AUTO JOURNAL PRINT
KEY BUZZER VOLUME
PSTN ACCESS CODE
(NO FUNCTION)
(NO FUNCTION)
OPTION MEMORY
)
(
(1:Invalid
(l-.Soft
(1:PSTN
)
(
2:Val1d)
2-.Loud)
2:PBX)
(7)
-SALES DEPT.
-12345678901234667890-
(8)
Explanation of Contents
(1) Parameter number
(2) Description : "(HOME)" means home position
setting.
(3) Selection
(4) Current setting : "nnnn" indicates Diag. Password
(5) Standard setting
(6) Memory sizes
(7) Own LOGO
(8) Own to number
)
, (
2
2
1 1
(0)
(256K+None)
: Factory preset standard setting
; (Base memory + Option memory)
: Up to 25 characters
: Up to 20 digits
)
(
2
2
(6)
6-8
Page 56

Power Failure Report
Sample Power Failure Report
If a power failure occurs; the document information stored in the
machine's memory will be lost. In this case a Power Failure Report will
be printed out automatically afterthe Power is turned ON again. The
report is not printed out if there were no documents stored in the
memory.
.,***«***4,,**«* _py,R failure rep- •***-
POWER FAILURE OCCURRED
FROM *** 12-08-1992 10:00'24 ♦** (1)
TO *♦* 12-08-1992 12;00'26 **• (2)
FOLLOWING FILE HAS BEEN LOST.
(3)
ABBR STATION NAME/
[04] ENGINEERING DEPT.
Explanation of Contents
(1) Power failure date and time
(2) Power return date and time
(3) One-Touch number, ABBR.
number
(4) Station name in the One-
Touch/ABBR. key or telephone
number
(5) Number of pages stored
(6) Own LOGO
(7) Own 10 number
(4)
TELEPHONE NO.
DATE 12-08-1992
(5)
PAGES
001/005
TIME 12:00 P.l
(6)
-SALES DEPT.
-12345678901234567890-
V)
The first three-digit number represents the number of pages successfully transmitted. The
second three-digit number represents the number of pages stored into memory.
Up to 25 characters
Up to 20 digits
Page 57

:hapter 7, PROBLEM SOLVING
7.1
.
PROBLEM SOLVING
If You Have Any of These
Problems
During Installation
Problem
During Transmission
Problems
Transmission
Copy Quality Problems
During Reception
Problems
Symptom
The display is blinking
Document Doesn't Feed/
Multiple Feed
Document Jam
Vertical Lines on the
Transmitted Document
Transmitted document
is Blank
No Recording Paper
Recording Paper Jam
Recording Paper doesn't
Advance into machine
Recording paper doesn't
eject after printing
Action
Battery discharged completely. May happen at first
installation. After setting the clock, blinking wilt stop.
1. Check that your document is free of staples and
paper dips and that it is not greasy or torn.
2. Check that your document is the right type to send
through a fax machine by consulting the list on
"Documents You Cannot Send", page 4-1. If your
document has the characteristics listed, make a
photocopy of your document and send the copy
instead.
3. Check that the document is loaded properly. See
page 4-2.
4. Adjust the ADF Pressure Plate, see page 7-12.
The information code 031 will appear on the display if
the document becomes jammed. To clear the jam, see
page 7-7.
Check own copy quality. If copy is OK, your machine
has no problem, report to receiving party that they
have a problem. If copy is NG, Clean the Scanning
Plate and Glass, see page 7-8.
1. Make sure the document is set face down.
2. Check own copy quality. If copy is OK, your machine
has no problem, report to receiving party that they
have a problem.
The information code 010 will appear on the display if
the paper runs out. To load the paper, see page 2-7.
The information code Opi or 002 will appear on the
display if the paper gets jammed. To clear the jam, see
page 7-6.
1. Make sure that there is paper in the Paper Supply
Tray. Follow instructions for loading paper, see
page 2-7.
2. Make sure that there is enough paper in the Paper
SupptyTray.
3. Make sure that the paper tray extender is holding
the paper against the machine, see page 2-7.
4. Make sure that paper is loaded squarely in the
Paper Supply Tray, with the right side of the paper
flush against the right side of the Paper Supply
Tray. And also paper width lever is set at the proper
paper size position, see page 2-7.
1. Make sure that the printing process has completed.
Printing time may be slower than receiving time.
2. Check to see if the recording pa per jammed inside
of the machine.
7-1
Page 58

During Reception
Problems
Print Copy Quality
Problems
Communication Problems
No unit operation
Symptom Action
Document Auto
reduction
doesn't work
Out of Ink
Print is too dark or too
light
Vertical Lines Printing on
the received Document
Fuzzy Print
Missing Dots or Lines/
Inconsistent Darkness
within Print
Fading Print
Faint Print
No Dial Tone
No auto answer
Cannot Transmit or
receive
"POWER" LED is not lit
No unit operation
1. Check if Fax Parameter No. 13 Recording Paper size
setting is set properly.
2. Check the Fax Parameter settings, see page 3-6
"Print Reduction".
The information code 015 will appear on the display if
the Print Cartridge runs out of ink. To replace the
Print Cartridge, see page 7*9.
Try changing Fax Parameter No.14 Print Quality
Setting, see page 3-6.
Printout a journal report (e g. CLEAR/COPY, 2 and
START) and check quality to make sure if your
machine has trouble or not.
If Journal report quality is OK, your machine has no
problem, report to sending party that they have a
problem,
tf copy is NG, Clean the Print Cartridge, see page 7-10.
1. Make sure you are using the correct paper for the
best possible print quality. See page 8-2.
2. Try reversing the recording paper to the other side.
1. Make sure you are using the correct paper for the
best possible print quality. See page 8-2.
2. Clean the Print Cartridge, see page 7-10.
3. Replace Print Cartridge, see page 7-9.
Your print cartridge may be running out of ink.
Replace Print Cartridge, see page 7-9.
You may need to choose a different paper for the
best possible print quality. See 8-2.
1, Check the connection of telephone line.
2. Check the telephone line. See page 7-13.
1. Check the connection of telephone line.
2. Check Reception mode setting. See page 4-9.
3. Check if machine is printing or not. If machine is
printing received document from memory,
machine cannot receive until printing is completed.
An information code will be shown on the display.
Refer to the information code table to find out the
trouble.
Check the connection of power cord and the position
of Power Switch.
To reset the machine, turn off the Power Switch then
turn on again.
Page 59

ТАМ Interface Trouble
(in Auto Switching Mode)
TAM Interface Trouble
(in Fax Mode)
Symptom
Cannot utilize the remote
turn-on feature of the
telephone answering
machine. The fax machine
always answer after 8
rings.
Fax machine will not start
up when the telephone
answering machine is set
to give only an outgoing
message (OGM).
A beep... beep sound is
recorded on the
telephone answering
machine.
Fax machine starts up in
the middle of the
outgoing message even
though the caller wants
to leave a voice message.
Cannot record any
incoming message (ICM).
The fax machine always
starts up at the end of the
OGM and before the tape
advances to the end of
last ICM.
Cannot receive from
machine that does not
send CNG signal (a short
beep tone every 3
seconds) after dialling.
Cannot retrieve message
from the answering
machine remotely, the fax
machine always starts up
after the command code
is inputted.
Cannot receive fax
message, but can record
voice message.
Fax machine will not start
to receive with the
telephone answering
machine in the auto
answer mode.
Action
This feature is not compatible. The fax machine is
designed to answer after 8 rings if TAM does not
answer.
TAM with outgoing message (OGM) only is not
compatible. The fax machine will work with a TAM
that will record Incoming Message (ICM).
Speak a little slower between each word while
recording an outgoing message (OGM).
Make sure the outgoing message (OGM) does not
have a silent pause longer than 3 seconds.
If your TAM uses a single cassette tape to give OGM
and record ICM, set fax Parameter No. 12 to off (silent
detection).
However, you may not able to receive fax message
from machine that does not send CNG signal (a short
beep tone every 3 seconds).
Set fax Parameter No. 12 to on (silent detection).
After the command code is inputted, press a digit on
the telephone keypad approx, every 2 seconds until
you start hearing your message. Select a digit that
does not correspond to any of the remote functions
of your telephone answering machine. Refer to your
answering machine's operation guide.
Check your outgoing message, if it is too long, the
catling fax machine may be time out. Try shorten your
outgoing message to less than 15 seconds, or ask the
calling party to program your telephone number in
their fax machine with 3 pauses and *#* at the end.
(ex. 555 1212 PAUSE PAUSE PAUSE #}
Increase the number of ringing detection on the
telephone answering machine.
Page 60

Information Codes
When something unusual occurs, the display may show one of the
Information Codes below. These will help you fix the problem.
Info. Code
001/002
010
014
015
030
Recording paper jam.
No recording paper.
Print Cartridge is not attached.
Out of Ink.
Document misfeeding.
Document paper is too long or jammed.
03l‘
Document length exceeds 78.8 inches {2
meters).
060 Cover is opened.
061 ADF Door is opened.
During initial handshake, receiving station
400
did not respond or communication error
occurred.
402
During initial handshake, communication
error occurred.
403
404/405
No polling capability at the remote side.
During initial handshake, communication
error occurred.
407
408/409
411
412
414
415
416/417
418/419
No confirmation from the receiving
station for the previous page sent.
Remote side confirmation of previous
page is illegible.
Polling password does not match.
No data from the transmitting side.
Polling password does not match.
Polling transmission error.
Received data has too many errors.
Machine goes to receiving mode, but
420
receives no command from the
transmitting side.
422/427
430/434
436/490
492/493
494
495
Interface is incompatible.
Communication error occurred while
receiving.
Received data has too many errors.
Communication error occurred while
receiving.
Telephone line disconnected.
Meaning
Action
Remove jammed paper.
(See page 7-6)
To load the paper,
(see page 2-7)
Attach the Print Cartridge,
(see page 2-5)
Replace the Print Cartridge,
(see page 7-9)
1. Reload the document properly, (see
page 4-2.)
2. Remove document jam. (see page 7-7.)
3. Adjust ADF. (see page 7-12.)
1. Reload the document properly, (see
page 4-2)
2. Remove document jam.
(see page 7-7)
Close the Cover.
Close the ADF Door.
1. Check with other party.
2. Reload the document and send again.
Reload the document and send again.
Ask remote side to set '"POLLBDsON'".
Reload the document and send again.
Wait a few minutes and send again.
Wait a few minutes and send again.
Check polling password,
(see page 5-1)
Check with the other party.
Check polling password,
(see page 5-1)
Check polling password,
(see page 5-1)
Check with the other party.
1. Remote side misdiat.
2. Check with the other party.
Check with the other party.
Check with the other party.
Check with the other party.
Check with the other party.
Check with the other party.
7-4
Page 61

Info. Code
540/541
542
543/544
550
552/553
554/555
Communication error occurred while
transmitting.
Telephone line disconnected.
Communication error occurred while
receiving.
Meaning
623 No document was on the ADF.
630 .
631
634
638
640
870
Redial was not successful due to a busy line
or no response from the called station.
During dialling, STOP was pressed.
Redial was not successful due to a busy line
or no response from the called station.
Power failure occurred during the
communication. -
The telephone is off the hook after
communication is completed.
Memory overflow occurred while storing
documents into memory for transmission.
Memory overflow occurred while
879
documents receiving into memory.
Receiving documents with data that is
greater than the memory size.
975
DRAM parity error.The document
information in memory is lost.
Action
1. Reload the document and send again.
2. Check with the other party.
Check with the other party.
Check with the other party.
Reload the document and send again.
Reload the document and send again.
Reload the document and send again.
Reload the document and send again.
Check the power supply cord and plug.
Hang up the telephone or press the
"STOP" button to stop the alarm sound if
you wish to carry on a conversation with
the other party
Transmit documents without storing into
memory.
1. Check recording paper and print
cartridge, see page 2-7 and 7-9.
1. Unitwill print out a Power Failure
Report.
2. Resend the lost document.
Page 62

Clearing Recording
Paper Jam
CAUTION 1
DO NOT turn the power off when the
MEMORY light is lit
Otherwise, the data stored in
memory will be lost.
Document Return Tray
If the recording paper becomes jammed in the machine, the display
will show Information Code 001 or 002. To clear the jam, follow the
procedure below.
1. Remove the Document Return Tray, Paper Exit Tray and paper from
the Paper Supply Tray.
Open the ADF Cover and then the Printer Cover (see CAUTION 1).
Printer Cover
ADF Cover
Paper Supply Tray
CAUTION 2
DO NOT puU the Jammed Paper from
the end of the ® side. It may cause
damage to the machine.
If you cannot reach the paper from <5>
side, carefully and slowly pull the
paper from ® side.
Paper
Paper Exit Tray
2. Tear off any paper ® beyond the Guide Plate by using the guide as
a tear edge.
Reach inside and gently pull the remaining paper © from around
bottom of the Feed Roller, (see CAUTION 2)
Page 63

Clearing a Document Jam if a document becomes jammed in the machine, the display will show
the Information Code 031.
To clear the jam; follow the procedure below.
1. Remove the document from the ADF.
2. Push the Latch Button on the upper left side of the Control Panel
and open the ADF Door.
3. Remove the jammed paper.
4. Close the ADF Door.
ADF Door
Page 64

Cleaning the Scanning if the receiving party reports that the received documents were black,
Plate and Scanning Glass or contained black lines, try making a copy on your unit. If the copy is
black or has black lines, the Contact Image Sensor unit or the Scanning
Roller is probably dirty or defective and must be cleaned.
To clean the Scanning Plate or the Scanning Glass, follow the
procedure below,
1. Push the Latch Button on the upper left side of the Control Panel
and open the ADF Door.
2. Wipe the Scar>ning Plate and Scanning Roller gently with a soft
cloth. Be sure to use a clean cloth, the Scanning Glass can be easily
scratched.
3. Close the ADF Door.
7-8
Scanning Plate
Page 65

Replacing Print Cartridge when the ink decreases to a level requiring replacement, the display
shows the Information Code 015.
To replace the Print Cartridge, follow the procedures below;
1. OpentheADF Door and Printer Cover.
Printer Cover
2. Place your thumb on the back of the cartridge cradle (the side
closest to you) and your forefinger in the groove on the cartridge
top. Squeeze your thumb and forefi nger together until the
cartridge "pops" loose. Lift the cartridge out of the cradle by the
green arrow on the top of the cartridge and discard it.
CAUTION
Tht ink in the Print Cartridge may
be harmful to children if swallowed.
Keep new or used cartridges out of
the reach of children and
immediately discard used cartridge.
Maintaining Print Quality : Keep the print cartridge in the cradle at all times. Removing the cartridge will
expose it to air, causing the ink to evaporate, and degrade the print quality.
Keep the print cartridge in its "home" position when the printer is not being
used. Leaving it out of position will cause the ink to evaporate quickly.
Storing Print Cartridge : The following instructions will help you when storing unused print cartridges.
• Keep the print cartridge in its sealed container until you are ready to use it
• Store the print cartridge container at room temperature.
• Check the expiration date on the cartridge package and use before that
• Install the print cartridge in the cradle immediately after opening the sealed
3. Set new cartridge, then close Printer Cover and ADF Door.
date.
container.
7-9
Page 66

Cleaning the Print
Cartridge Contact
If the received document has dots or lines missing, check the Print
Cartridge. It is probably dirty and must be cleaned.
To clean the Print Cartridge, follow the procedure below.
1. Turn off the power and open the ADF Door and Printer Cover.
2. Remove the print cartridge from the cradle and re-install it. If print
has not improved, try step 3.
3. Remove the print cartridge from the cradle. Gently clean the
contacts on the print cartridge and the contacts on the printer
cradle with a swab moistened only with water.
DO NOT clean the "nose" of the print cartridge.
Re-install the print cartridge and re-evaluate the print quality.
Print Cartridge Contact
Swab
Removing Dried Ink from
the Print Cartridge
Business Card or Rigid Paper
Cradle Contact
If print cartridge is exposed to air for an extended period of time, a
layer of dried ink will form a crust on the nose of the print cartridge. If
this occurs, follow the steps below to remove the dried ink from the
nose of the print cartridge.
1. Hold the print cartridge over a waste bln so that the nose of the
print cartridge is pointed toward the waste bin.
2. Gently scrape the dried ink with the edge of a 80mm x 130mm
business card or other rigid paper stock so that the dried ink falls
into the waste bin.
DO NOT use a swab to remove dried ink from print cartridge.
7-10
Page 67

Cleaning the Drain Pan
Print Cartridge
To prevent spillage, always dean the Drain Pan of excess ink before
moving the machine.
To clean the Drain Pan, follow the procedure below.
1. Turn off the power and open the ADF Door and Printer Cover.
2. Slide the Print Cartridge Cradle to the left.
3. Inspect the Drain Pan for excess ink. If necessary, clean up the excess
ink with a swab or a paper towel.
Drain Pan
Page 68

Adjusting the Automatic if document misfeeding occurs frequently, we suggest you adjust the
Document Feeder (ADF) adf.
To adjust the ADF, follow the procedure below,
1. Push the Latch Button on the upper leftside of the Control Panel
and open the ADF Door.
2. Slide the Pressure Adjusting Lever,
Pressure Adjusting Lever
Position,
3
2 Standard position
1
3, Close the ADF Cover.
7-12
Condition
To prevent multiple feed trouble
To prevent no feed trouble
Page 69

Checking the
Telephone line
When you do not hear a dia) tone through the telephone connected
to the machine or when the telephone does not ring (No automatic
receive).
(a) Unplug the Telephone Line Cord from the telephone jack that
was supplied by the telephone company.
■ 0
(b) Plug a different regular telephone into the telephone jack that
was supplied by the telephone company.
(c) Check for dial tone through the handset. If there is still no dial
tone, report it to your local telephone company.
Call from another telephone to this number. If the telephone
does not ring, report it to your local telephone company.
Page 70

Chapter 8. APPENDIX
8.1.
SPECIFICATIONS
Compatibility
Scanning Method
Document Size
Document Thickness
ADF Capacity
(Automatic Document Feeder)
Effective Scanning Width
Recording Method
Recording Paper
Recording Paper Size
Effective Recording Size
Recording Paper Capacity
CCITT Groups
Flat bed scanning with CCD type image
sensor
Max.: 216mm x 2000mm
(with operator's assistance)
Min.: 148mm x 128mm
Single sheet : 0.06mm to
0.15mm
Multiple sheets: 0.06mm to
0.12mm
Built-in, up to 20 sheets
(Average thickness, 0.06mm to 0.15mm)
208mm
Thermal Inkjet Recording Head
Plain Paper
A4/Letter/Legal
Letter : 208mm x 265mm
A4 : 208mm x 283mm
Legal : 208mm x 342mm
Approx. 100 sheets (using 0.12mm paper)
Resolution
Coding Scheme
Modem Speed
Abbreviated Dialling Memory
Capacity
( Scanner )
Standard :
Fine
< Printer >
11.8 pels/mm X11.8 lines/mm
(300pel$/inch x300lines/inch)
MH, MR, MMR (Conform to CCITT)
9600,7200,4800,2400bps
50 stations (including 16 One-Touch keys)
Each station can register up to 36 digits for
each telephone number (including pauses
and spaces) and up to 15 characters for each
station name
8 pels/mm x 3.85 lines/mm
8 pels/mm x 7.7 lines/mm
8-1
Page 71

Image Memory Capacity
<BaseMemory>
Approx. 12 pages
< Option Memory >
M n ; Base memory plus Approx. 30 pages
MM : Base memory plus Approx. 60 pages
MW : Base memory plus Approx. 120 pages
(Based on CCITTTest Chart No.1 using
Standard Resolution.)
8.2.
RECORDING PAPER
SPECIFICATION
Power Supply
Power Consumption
180 - 264 VAQ47 - 63Hz, Single Phase
Standby : Approx. 13W
Transmission : Approx. 25W
Reception ; Approx. 23W
Copy : Approx. 34W
Dimensions
452 mm(W) x 380 mm(D) x 230 mm(H)
(excluding projections)
Weight
Approx. 11 Kg
(excluding Recording Paper)
Operating Environment
Temperature
Relative Humidity
:41 to95“F(5to35"C)
:20to 80%
In general, most bond papers will produce excellent results. Most photocopy
papers will also work very well. There are many "name" and "generic"
brands of paper available. We recommend that you test various papers until
you obtain the results you are looking for.
The following table summarizes the major specifications to consider when
selecting white or colored paper.
NOTE
tt is possible that paper could
meet all of the specifications
listed in this table and still not
print well because of the
variations in paper
manufacturing. Therefore, we
recommend that you teif paper
thoroughly before purchasing.
Basic Weight
Cut Edge Conditions
Finishing Dimensions
Grain
Moisture Content
Opacity
Packing
Sizes
Type
Wax Pick
60 to 90 g/m2
Cut with sharp blades with no visible frayed
edges
± 0.8mm of nominal, corners 90® ± 0.2®
Long grain
4% to 6% by weight
84% minimum
Poiyiaminated moisture-proof ream wrap
A4 ; 210mm X 297mm
Letter : 216mm x 280mm
Legal : 216mm x 356mm
Cut sheet
304.8mm minimum (Dennison)
Page 72

8.3.
CHARACTER CODE
TABLE
Character A В
Code 10
11
Character N О P
Code 23
24 25 26 27
C D E F G
13 14 15
12
R
Q
Character A A 0 0
Code 36
Character a b c d e
Code 40
Character
Code
Character 3 a 5 0 3 ё
Code 66
Character 0 1
Code 00
Character
Code
Character
Code
Sp«ee
37
38 39
41 42
n
0
P
53 54 55 56 57
67
68 69 70 71
2
02 03
01
t
72
+
85
73
I
86
74 75
87 88
44 45
43
q
3
04
f
76 77 78 79
%
$
89 90 91 92
r
4
;
H 1 J К L M
17
16
T
S
28 29 30 31 32 33 34
f
g
46 47 48 49 50 51 52
t
$
58 59 60 61 62 63 64 65
5 6 7 8
05 06 07
/
t
s
<
18 19 20 21 22
V
U
h i
u
W X Y Z
к 1 m
j
V w
X
9
08 09
?
-
( )
81 82
@
94
[ 1
95 96 97
# &
80
>
93
35
У
83 84
z
*
-
Character
Code 98 99
NOTE
1. T09nteraspac9,inpat^aracter
code 72 or press SPACE key on the
controtpanei
Я.З
Page 73

8.4.
INDEX
Index Page
ABBR.No.Ust
Abbreviated Dialling ............................................ 4-6
Abbreviated Dtatling Numbers .......................... 3-4
ADF Capacity
Auto Switching Mode
Automatic Document Feeder (ADF) ................. 4-2.7-12
Automatic Reduction
Character Code Table ...................................... 6-7
Communication Journal
(COMM. JOURNAL)
Copy ......................................................................
Date and Time....................................................... 3-1
Dialling Method (Tone or Pulse) .......................... 2-10
Dimensions
DocumentJam
Document Misfeeding
Document Return Tray
Document Size ..................................................... 4-1,8-1
Document Thickness
Document Type
Drain Pan
Fax Mode ................................................................ 4-10
Fax Parameter List................................................ 6-8
Fax Parameter Table ............................................. 3-7
Fixed Reduction.................................................... 4-15
Function List .......................................................... 1-3
HatfTone...............................................................i 4-3
ID Number
Image Memory Capacity
Individual Transmission Journai
(IND.XMTJournal) .................................................. 6-1
Information Codes
Journal ................................................................... 6-1
Kcy/BuzzerVolume
......................................................- 6-6
.......................................................
......................................
....
.......................................
.............................................
..........................................................
.....................................................
...........................................
.......................................
..........................................
....................................................
...............................................................
..............................................................
......................................
................................................
......
.........................................
4-11,4-12
8-1
4-15
6-4
4-17
8-2
7-7
7-12
1-1
4-1.8-1
4-1,8-1
7-11
3-2
8-2
7-4
3-7
Index Page
Off-Hook Dialling
On-Hook Dialling
One-Touch Dialling
One-Touch Dialling Numbers
One-Touch Key ..............................................
One-Touch List
Operating Environment ................................... 8-2
Original (Contrast)
PaperExitTray .................................................. 1-1
Paper Specification
Paper Supply Tray............................................ 1-1
Paper Tray Extender
Polling
...............................................................
Polling Password
Power Consumption......................................... 8-2
Power Failure Report
Pressure Adjusting Lever ................................ 7-12
Print Cartridge
Print Cartridge Contact
Print Margin
Print Quality ..................................................... 3-7
Print Reduction ............................................. 3-7,4-15
Print Reduction Ratio
Reception Modes
Recording Paper
Recording Paper Jam......................................
Recording Paper Size
Resolution ........................................................ 4-3
Scanning Plate
Scanning Glass
Station Directory Sheet
Sub-Tray
Substitute Reception
TAM Interface................................................... 4-12
Telephone Mode .............................................. 4-10
Timer Controlled Transmission
Transmission
.............................................
.............................................
.........................................
.........................
................................................
............................................
..........................................
........................................
......................................... 5-1
.......................................
.................................................
...
................................
.....................................................
.....................................
...
...................................... 4-9
............................................ 8-1
......................................
...................-............................
...............................................
....................................
..........................................................
.......................................
......................
....................................................
4-4
4-5
4-6
3-4
1-2
6-6
4-3
8-2
1-1
5-1
6-9
7-10
7-10
4-14
3-7,4-l 5
7-6
8-1
7-8
7-8
3-5
1-1
4-1
5-2
4-1
Loading Documents
Logo ....................................................................... 3-3
Memory Transmission.......................................... 4-7
Monitor Volume
Multi-Station Transmission.................................. 4-7
.............................................
....................................................
4-1
1-1
User Parameters
Voice Contact
Weight
.............................................................. 8-2
........................'.....................
..................................................
3-1
4-17
Page 74

Page 75

 Loading...