

Page 1
HOW TO
YOUR
Panafax
UF-250
Panasonic
Page 2

© 1988 by Matsushita Graphic Communication Systems, Inc.
All rights reserved.
Printed in Japan.
The contents of this manual are subject to change without notice
Page 3

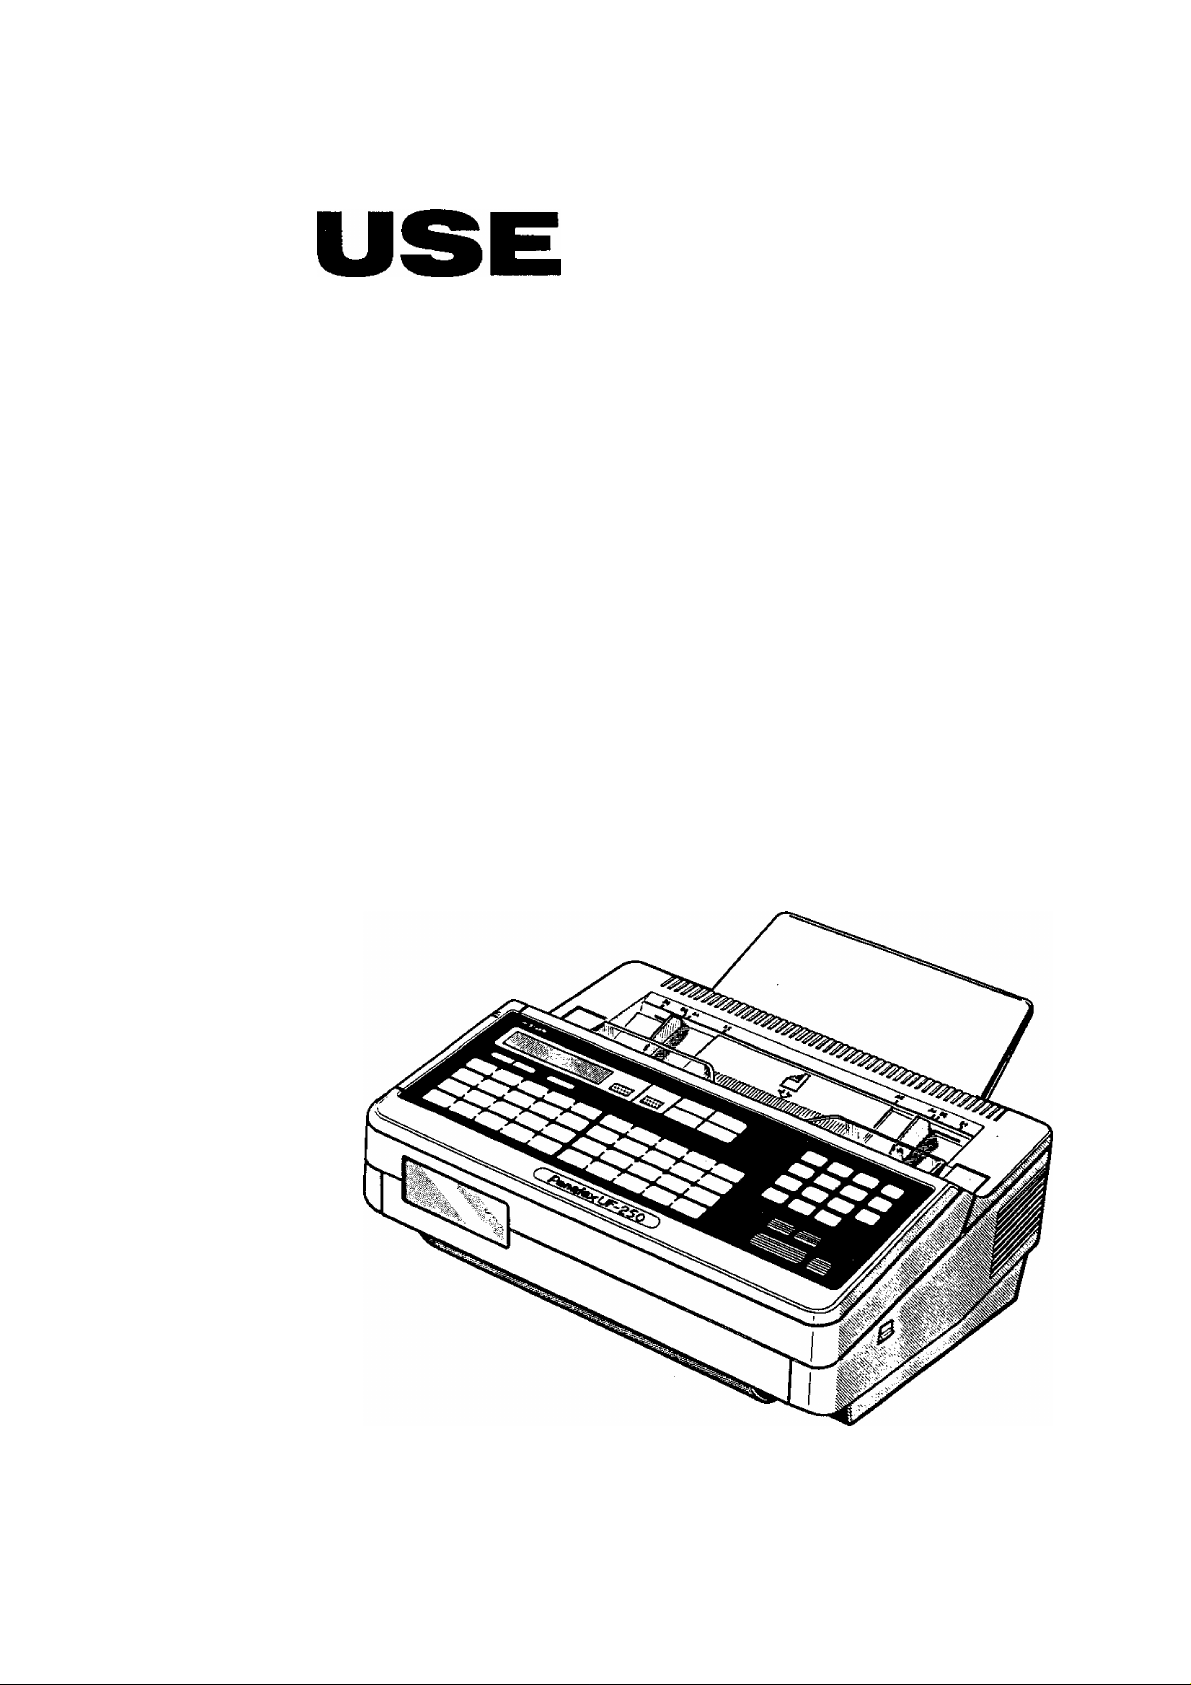
The Panafax UF-250 is an amazingly compact and
versatile facsimile machine, it has ail the easy-to-use and
practical features* you would expect to find, and
probably some new ones that will surprise you. To get
the most out of your new facsimile machine, we
recommend that you read this user’s guide carefully, and
practice fingering the key operations as you read along.
Everyone should read the section CAUTION! and
Chapter 1. GETTING TO KNOW YOUR UF-250. This will
prepare you for Chapter 2. SETTING UP YOUR
MACHINE. You may not need to use some of the
features described here, e.g. the Program Keys and FAX
Parameters, but you should know what they are about.
Chapter 3. TRANSMISSION explains all the transmission
features. The first three sections (Basic Transmission
Settings, Making Copies, and Direct Dialing Procedure)
tell you the simplest features you need to know. But the
remaining sections on Speed Dialing Techniques, Using
the Timers, Program Keys, etc. will help you make the
best use of your machine.
Chapter 4. RECEIVING DOCUMENTS complements the
transmission features described in Chapter 3. In
particular, it introduces you to Polling, Turnaround
Polling, and Deferred Polling.
INTRODUCTION
The last three chapters, PRINTOUT REPORTS AND
LISTS, PROBLEM SOLVING, and APPENDIX provide
additional information which you will eventually want to
know, especially if you are interested in managing your
facsimile system.
* The Panafax UF-250 is compatible with CCITT G3 and
G2 machines.
Page 4

CONTENTS
INTRODUCTION .................................................................................
CAUTION!
1. GETTING TO KNOW YOUR UF-250.............................................5
MAJOR PARTS ............................................................................5
— External View...........................................................................
— Power Switch .........................................................................5
— Control Panel...........................................................................6
— One-Touch/Character Key Layout
— Filling Out the Station Directory Sheet
LOADING DOCUMENTS............................................................. 10
—- Documents You Can Send
— Loading Procedure..................................................................10
— Documents You Cannot Send
— How to Use the Document Carrier
2. SETTING UP YOUR MACHINE................................................... 12
USER PARAMETERS
— How to Set the Date and Time...............................................
— How to Set Your LOGO
~ How to Set Your ID Number
— How to Set the Polling Password
ONE-TOUCH/ABBREVIATED NUMBERS....................................17
— Recording One-Touch and Abbreviated
PROGRAM KEYS
“ Setting Program Keys
— How to Erase or Change Program Key Settings
FAX PARAMETERS
— Setting FAX Parameters
— Parameter Table
3. TRANSMISSION
BASIC TRANSMISSION SETTINGS.............................................29
— Resolution................................................................................29
“ Contrast.......................................................................................30
— Halftone ...................................................................................31
— Verification Stamp .................................................................
— Total Pages
-- Individual Transmission Journal
— Error Correction Mode (ECM)................................................ 35
MAKING COPIES...........................................................................36
— Dialing from the Keypad
— Dialing from the Telephone Set
.......................................................... ................................
.........................................
.................................
...................................................
.............................................
........................................
....
.............................................................
.........................................................
................................................... 15
..........................................
Dialing Numbers
DIRECT DIALING PROCEDURE...................................................37
SPEED DIALING TECHNIQUES
— One-Touch Dialing
— Abbreviated Dialing
— Redialing
..................................................................................
..........................................
...
.............................................................
.............................................................
......................................................................
.........................................................
......................................................................
..........................................................................
............................................................................ 33
....
.......................................
.........................................................
.............................................
...................................................39
..................................................................
................................................................
......................... 17
..................
1
4
5
8
9
10
11
11
13
14
19
19
13
16
23
26
26
28
29
32
34
37
38
39
41
43
Page 5

XMT RESERVE ............................................................................ 44
— Reserving Your Machine for Transmission
(XMT Reserve)
— Cancelling XMT Reserve
USING THE TIMERS FOR TRANSMISSION
— Deferred Transmission...........................................................46
—- How to Cancel or Change Timer Settings
PROGRAM KEYS ........................................................................ 48
—- How to Use Program Keys.....................................................48
VOICE CONTACT .........................................................................49
— Making Voice Contact after Sending
— What to Do When the Other Party is Set for
Manual Reception................................................................. 49
4. RECEIVING DOCUMENTS
AUTOMATIC RECEPTION ...........................................................50
MANUAL RECEPTION
— What to do When Your Telephone Rings
POLLING .................................................................................. 52
— How to Poll
— Combined Transmission and Polling
(Turnaround Polling) .............................................................
— How to Prepare to be Polled
USING THE TIMERS FOR POLLING
— Deferred Polling
— How to Cancel or Change Timer Settings
VOICE CONTACT..........................................................................57
— Making Voice Contact After Receiving
5. PRINTOUT REPORTS AND LISTS...............................................58
— Journal Printout
— One-Touch/ABBR. Dialing Number List
— Program List
— FAX Parameter List.................................................................65
6. PROBLEM SOLVING....................................................................66
HOW TO LOAD RECORDING PAPER....................................... 66
CLEARING A DOCUMENT JAM...................................................68
REFILLING AND REPLACING THE VERIFICATION
STAMP ......................................................................................... 70
REPLACING THE FLUORESCENT LAMP.................................. 72
CLEANING THE THERMAL HEAD
INFORMATION CODES
7. APPENDIX....................
SUMMARY OF FUNCTION KEY FUNCTIONS.............................75
SPECIFICATIONS...............................................................................76
.........................................................................
....................................................
................................
............................
..................................
...........................................................
....
............................................................
.............................
............................................................................
....
............................................
.......
...................................
..................................................................
............................
.................................
......
................................................................
...............................
...........
................................................................63
..............................................
.....
......................... ................................
..................
...............................................75
45
44
46
47
49
50
50
51
52
55
53
54
55
56
57
58
61
73
74
Page 6
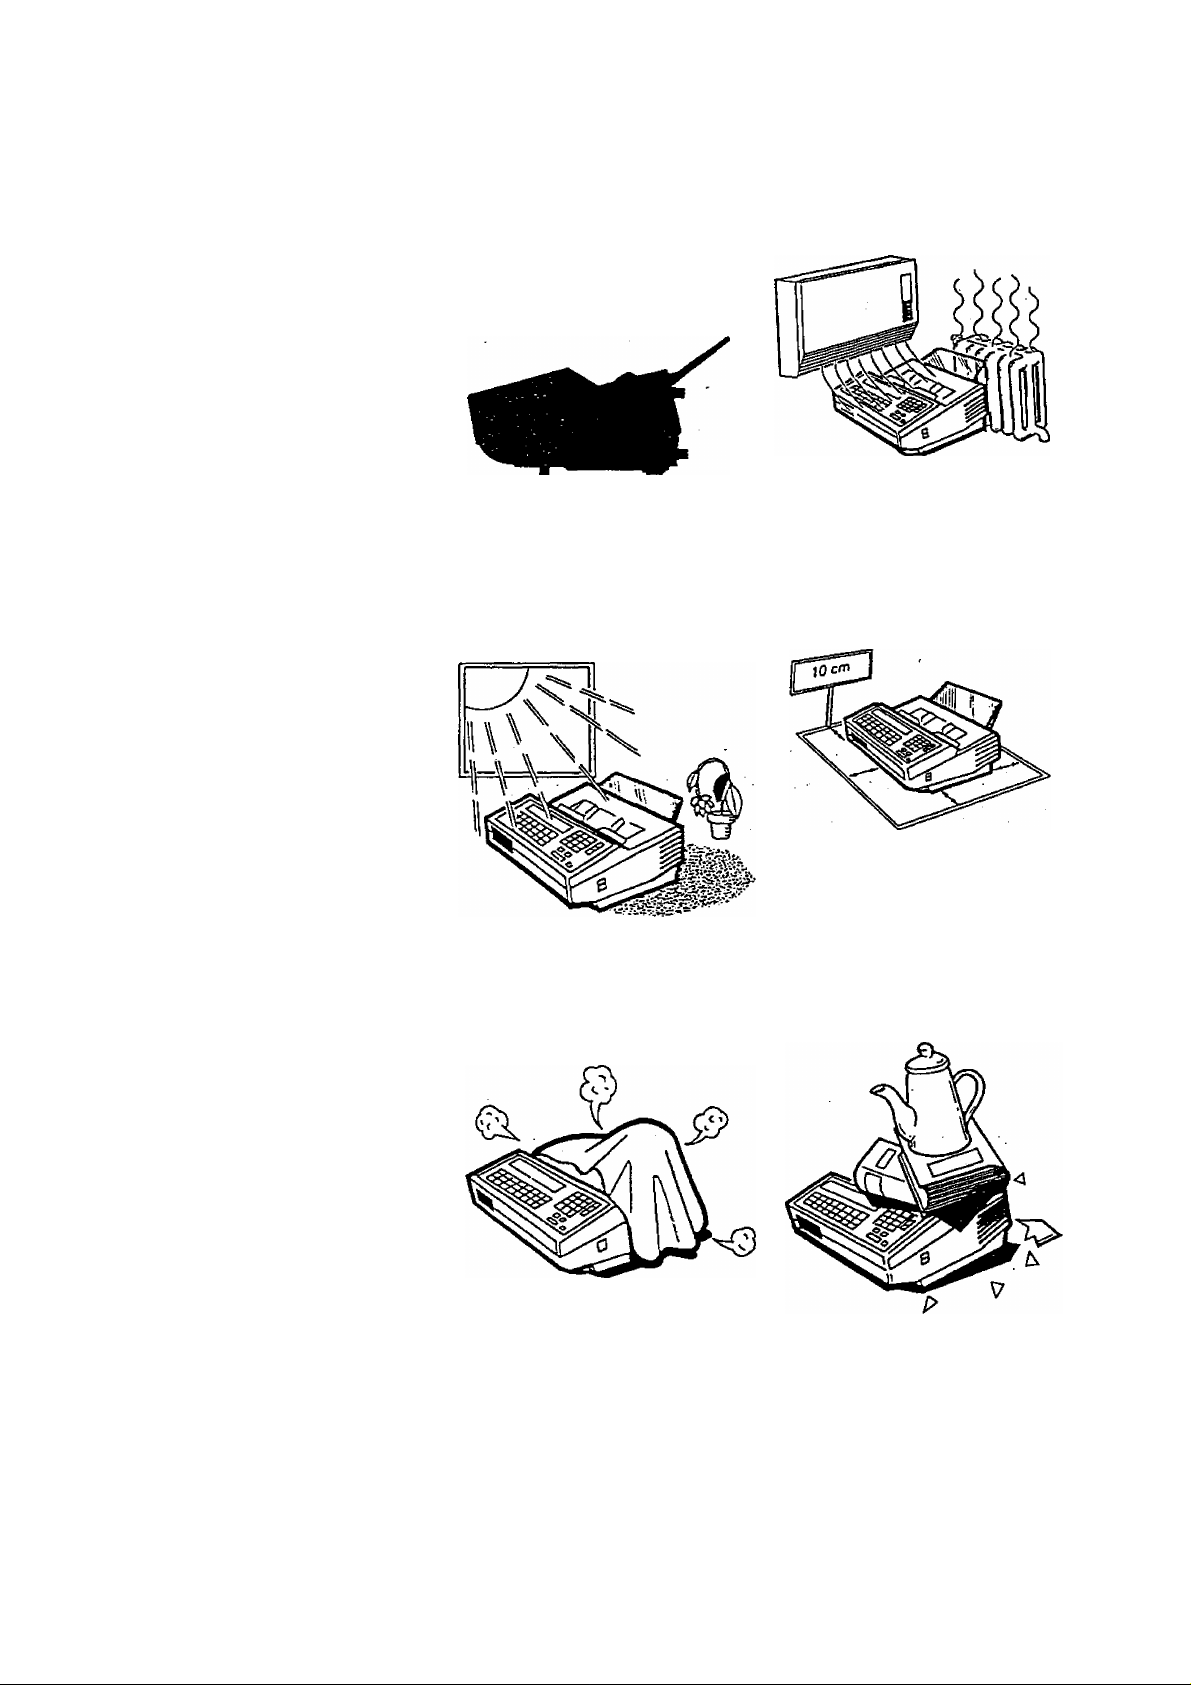
CAUTION!
2, Avoid exposure lo
direct sunlight.
1. Do not install the
machine near heating
or air conditioning
units.
3. Install the machine on
a flat place, and leave
at least 10 cm of
space between the
machine and other
objects.
4. Do not block the
ventilation openings.
5. Do not place heavy
objects, or spill liquids
on the machine.
Page 7
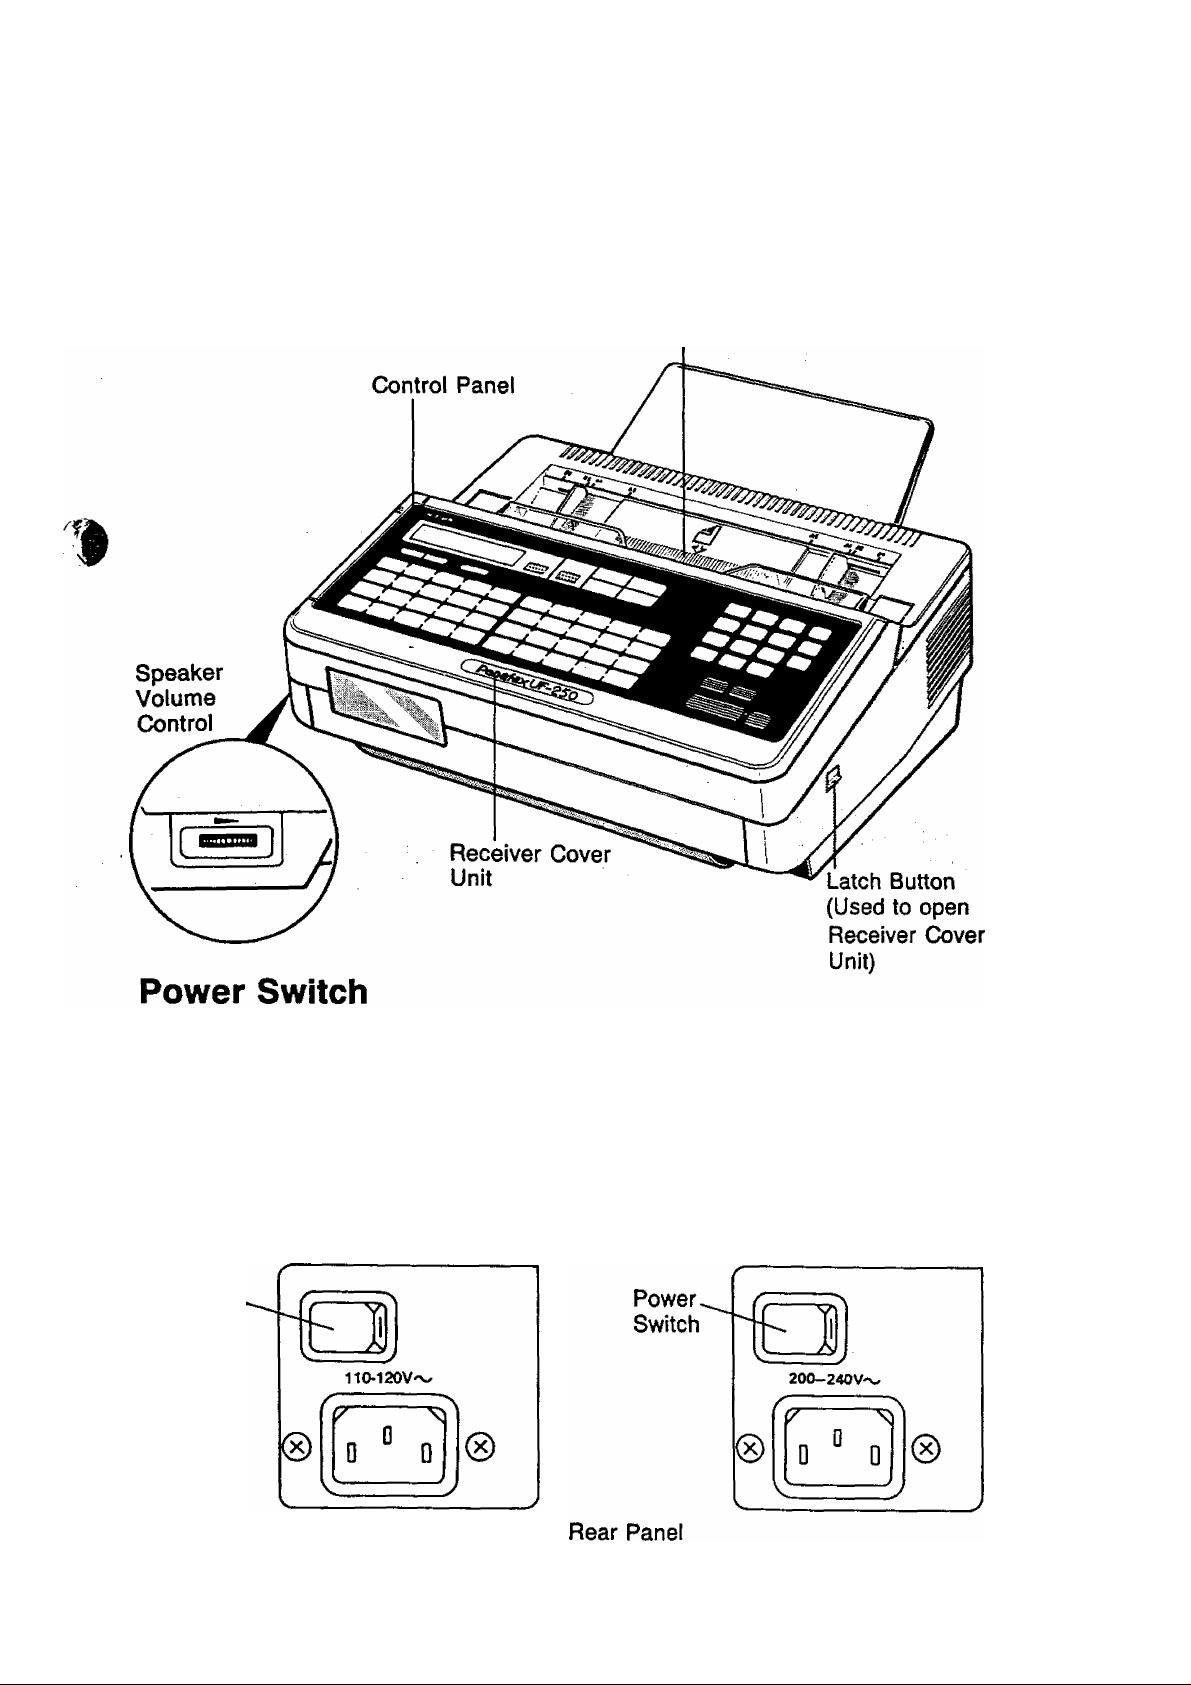
GETTING TO KNOW YOUR UF-250
MAJOR PARTS
External View
ADF (Automatic Document Feeder)
To turn the power ON, set the power switch to Keep your machine
ON at all times. A constant power supply is necessary in order to
maintain data (including facsimile numbers) stored in the machine's
memory.
When you turn on the power, the LCD display will show a date and
time (which you must reset). This indicates that the machine is in
Standby.
100 V Version
Power
Switch
Note that your machine also has a backup battery to keep stored data
intact in case of short power failures. ^
200 V Version
Page 8
GETTING TO KNOW YOUR UF-250
Control Panel
-SELECT
Used to switch Basic Transmission settings.
■MODE Q ani* S
Used to set Total Pages, Individual
Transmission Journal, etc.
Also used to select Sub-functions (i.e., instead
of pressing the sub-function number key, you
can scroll In opposite directions by pressing
either key repeatedly).
-Display
Shows Date and Time, or the current
operation.
“Power Lamp
Lights when the power is ON.
О POWER
FUNCTIOK XMT
MODE
SELECT
(
-----
1
FUNCTION
Used to start or set the following functions and sub-functions;
1 DEFERRED COMMUNICATION
3 POLLING
4 XMT & POLUNG
6 PRINTOUT
©JOURNAL PRINT
@ ONE-TOUCH/ABBR. NOS.
<D PROGRAM LIST
© FAX PARAMETER LIST
7 SET MODE
® USER PARAMETERS
® ONE-TOUCH/ABBR. NOS,
© PROGRAM KEYS
® FAX PARAMETERS
NOT€
Any function can be started by first pressing
IFUNCTION] and the function’s number key, or by
pressing IFUNCTIQNT repeatedly until the function
appears on the display. <
RESERVE
RESOLUTION
:::: ►
ORIGINAL
■<::::
HALF TONE
STAMP
■■ --
01
___ _
11 If 12
21
31
V02 If 03
_J1
_______
_Jl
________
Ti3
A
_____
ЛГ22
Л
_____
V 32
Л
One-Touch/Character Keys (01 -32)
Used for One-Touch Dialing and recording
letters and symbols.
il
______
X23
Jl
____ _
^ITpX
_j
__________J________
Program Keys (PI - P8)
Used to record long dialing
procedures, Group Number keys, and extra
One-Touch keys.
U 04
A
_____
lfl4 Vl5
_Jl
________
_ji
________
V P2
—
If 05
—
A
_____
V 25
_Jl
________
If P3
... . Л A
---
^
Л _J
06
r
16
b
____
p*
26 V 27 V28
-- -
V07
_Jl
________
_____
If 08
A
_____
_____
V 09
_Jl
________
U 19 ¥ 20
JL A
U 29
_ JL .
P4
U P5
________
XMT RESERVE
Used to reserve transmission when the
machine is still receiving.
ORIGINAL
Used to set Normal, Dark, or Light. Also serves'
as an arrow key (^), together with
RESOLUTION (-►), to move the cursor over
recorded numbers and characters.
STAMP
Used to set the Verification Stamp ON or OFF. *
HALF TONE (SHIFT)
Provides ON and OFF settings for halftone
documents. Also used as a shift key when
entering capital and smalt letters with the
One-Touch/Character Keys.
RESOLUTION
Used to set Normal, Fine, or Super-Fine.
Also used as an arrow key (-»), together with —
ORIGINAL («-), to move the cursor over
recorded numbers and characters.
V P6
_Jl
________
V P7
_J_________
Ifio
V 30
A
V P6
_J
________
-------------------
--------------
—'
Ю-
Page 9
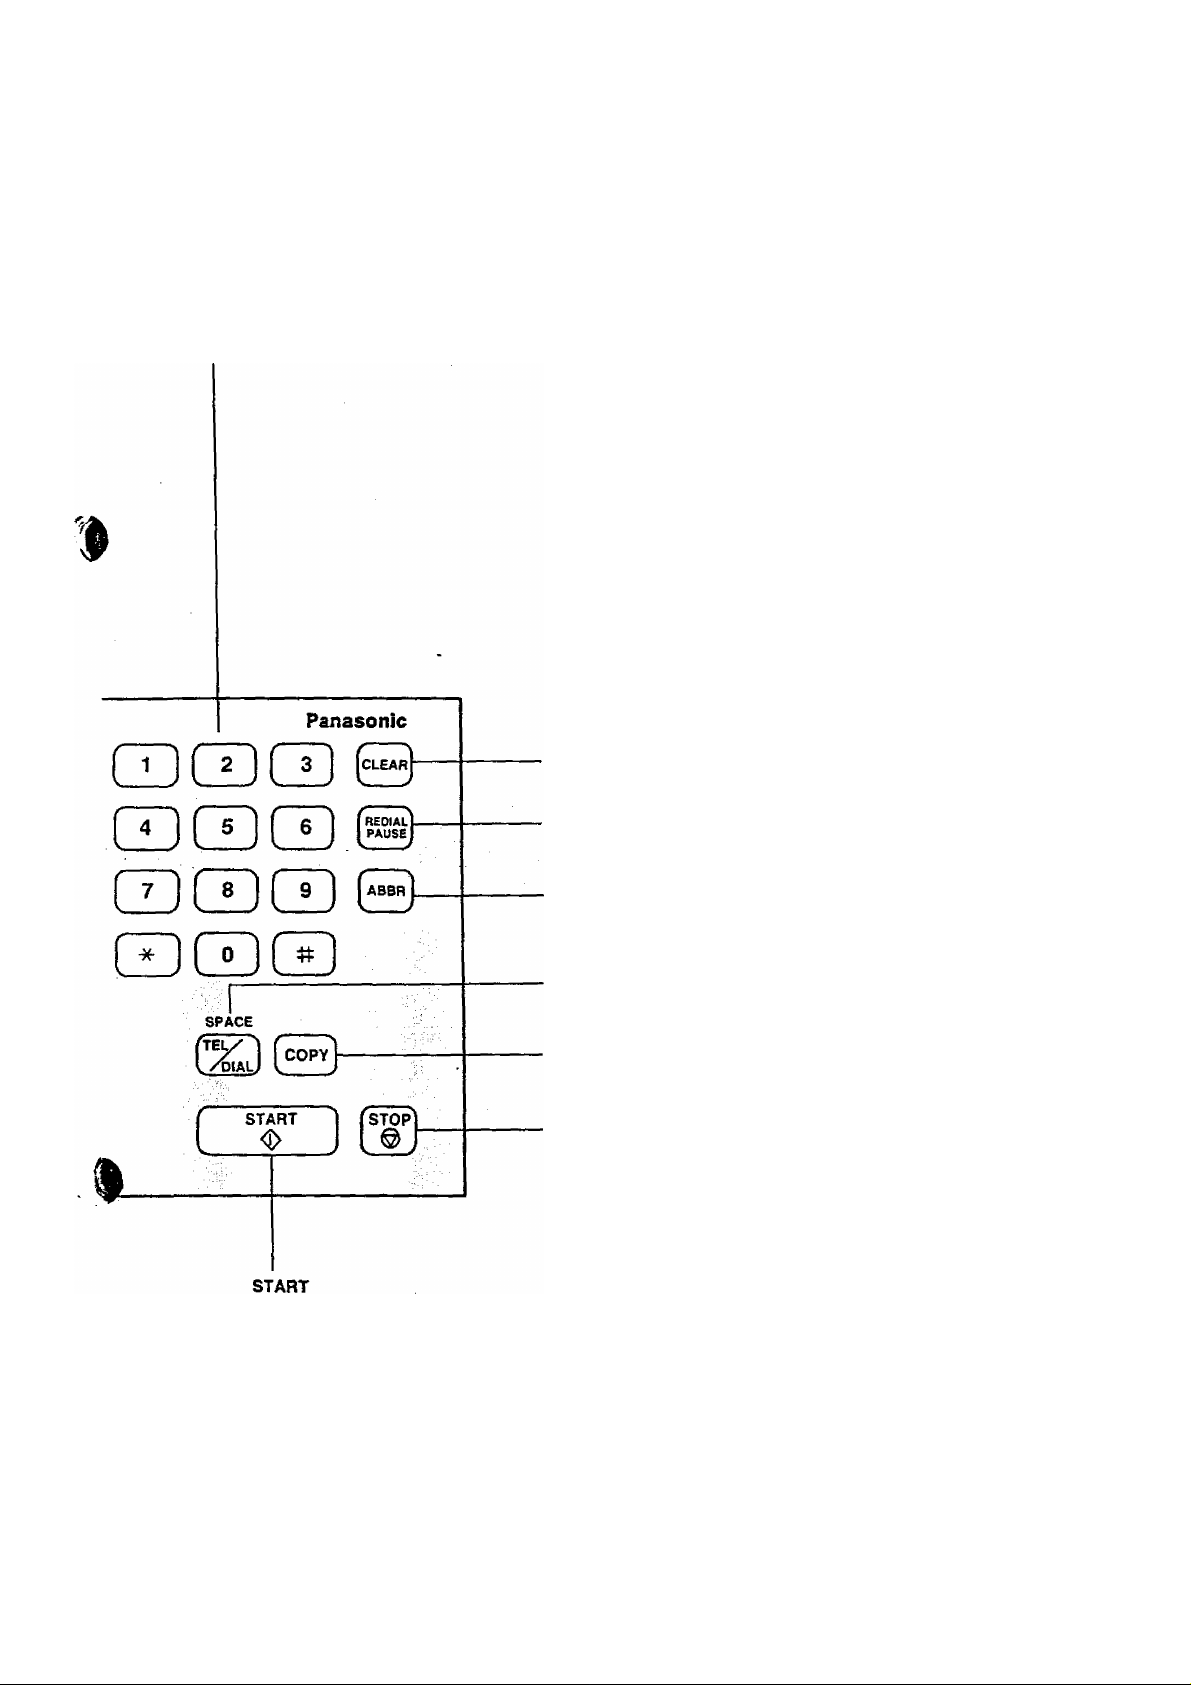
Keypad
Used for Direct Dialing, recording phone numbers, and selecting
functions.
CLEAR
Used to erase the previously entered input.
REDIAL or PAUSE
Used to start Redialing, or to enter a pause when
recording or dialing a telephone-number.
ABBR
Used to start Abbreviated Dialing.
Used to start or set operations.
TEL/DIAL (SPACE)
Used to start Direct Dialing, and to enter a
space in recorded telephone numbers.
COPY
Used to make document copies.
STOP
Used to cancel operations. When it is pressed,
the machine will return to standby.
Page 10

GETTING TO KNOW YOUR UF-250
One-Touch/Character Key Layout
The One-Touch keys on the control panel also serve as character and symbol
input keys when you need to record your LOGO and other station name. This
layout is printed on the panel under the Station Directory Sheet, which can be
pulled out as shown below.
Station Directory Cap Station Directory Sheet
NOT€
CD POWER
MODE ' SELECT
FUNCTION
XMT
RESERVE
resoluteon
ORIGINAL
SHIFT
HALF TONE
STAMP
■ — ■ - J
CZDCZZ) CZD
®(0 1 )“^ ( 02 ))l '(0 3 ))[ ^^ (0 4 ) j }|( 05 )
U(2 1) ][ ;^( 22 )j {;( 23 )] {*( 24 )] {^ y (25)
: (31) 1 j (32) ^ ( (P I) 1 , (P2) j{ . (P3)
Whenever One-Touch keys are changed to the character key mode (to record your
LOGO and other station names), capital letters are selected first. Use the SHIFT key
to alternate to and from capital letters and small letters.
‘p(0 6 )i{ |(0 7) [; ;(0 8) ][i (0 9) ]{ i ( 10 )
/p( 16 )j[ ’(1 7 ))[ '„ (1 8)j {|( 19 )[ *( 20 );
^(2 6) j{| (2 7) j{| (2 8) }[| (2 9) j[“ (3 0)
(P4 )j[ (P5)]{ (P6 )^ (P 7) j[ (P8)
8
Page 11

Filling Out the Station Directory Sheet
Slide the Station Directory Cap forward and puli it off. Then pull out the Station
Directory Sheet. Use a pencil or a bail-point pen to fill in the station directory
with station names corresponding to the One-Touch number keys.
Station Directory Cap
01 02
03
Station Directory Sheet
Station Directory Sheet
04 05 06 07
T
Ti
08
09 10
NOT€
11
гТ
зТ
12 13
22
32
23
14
24 25 26 27
15
16
17
18
28
b^
19
'•29
20
30
If you use a pen, be sure the ink is dry. If you use a pencil, remove any excess
lead before replacing the station directory.
Page 12
GETTING TO KNOW YOUR UF-250
LOADING DOCUMENTS
Documents You Can Send
in general, your machine will send any
document printed on A4- or B4-size paper.
You can also stack up to 30 sheets on the
Automatic Document Feeder (ADF) at one
time. If you want to send more pages, you
can place them on top of the last page on the
ADF once transmission has started, as long
as you do not have more than 30 sheets on
the ADF at any one time.
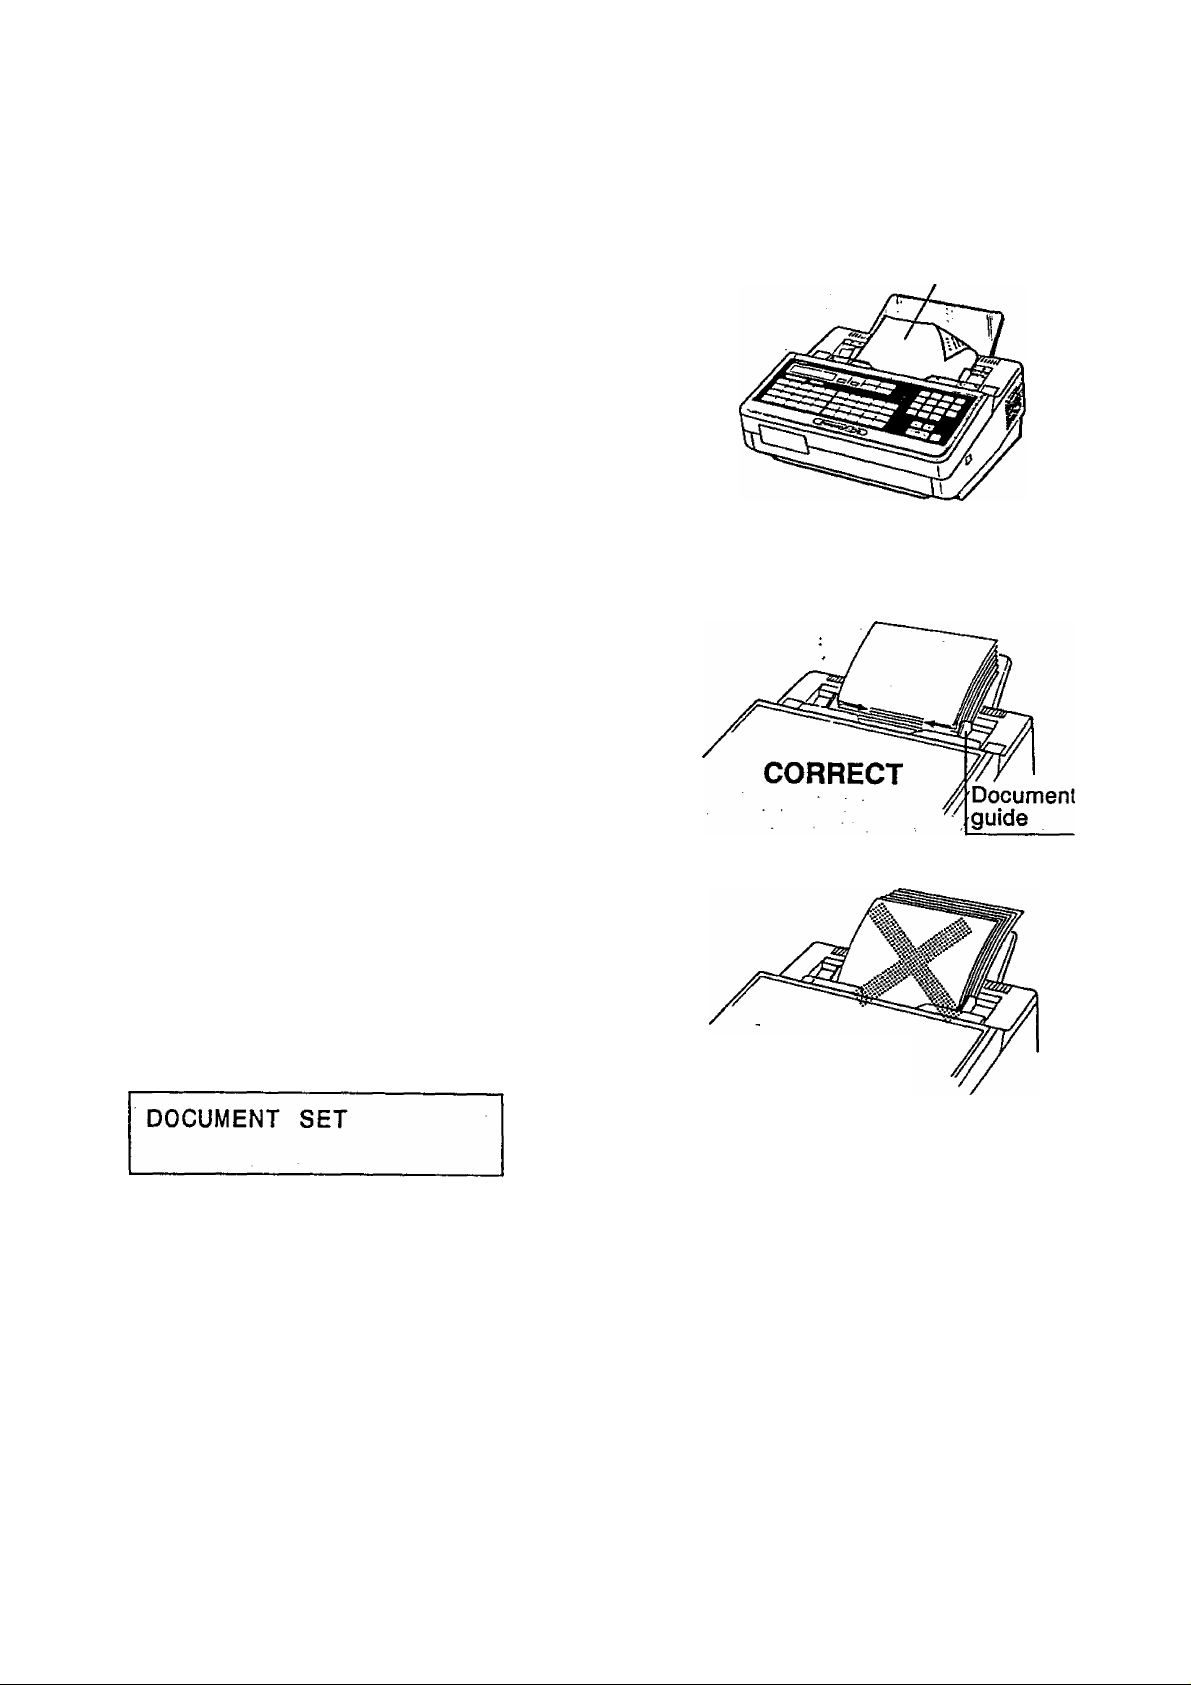
Loading Procedure
First, make sure that your document is free of
staples, paper clips, or other foreign objects.
Place the document face down on the ADF
with the top edge going into the machine. If
you are sending 2 or more pages, make sure
that the bottom sheet enters first.
Adjust the sliding document guides to ensure
that the document is centred on the ADF.
Face down
Thè display message should change from
date and time (standby) to DOCUMENT SET.
You can now make basic transmission
settings, or begin the dialing procedure.
INCORRECT
10
Page 13
Documents You Cannot Send
You must never try to send documents that are;
— Wet
— Covered with wet ink or paste
— Wrinkled, curled or folded
— Too thin (e.g. onionskin, airmail paper, pages from some magazines, etc.)
— Chemically processed (e.g. pressure-sensitive paper, carbon-coated paper,
etc.)
— Coated (e.g. glossy paper, etc.)
— Smaller than 148 mm (W) x 73 mm (L)
'I
— Made of cloth or metal
To transmit these kinds of documents, make a photocopy first, and then
transmit the copy. In some cases you may use the Document Carrier instead.
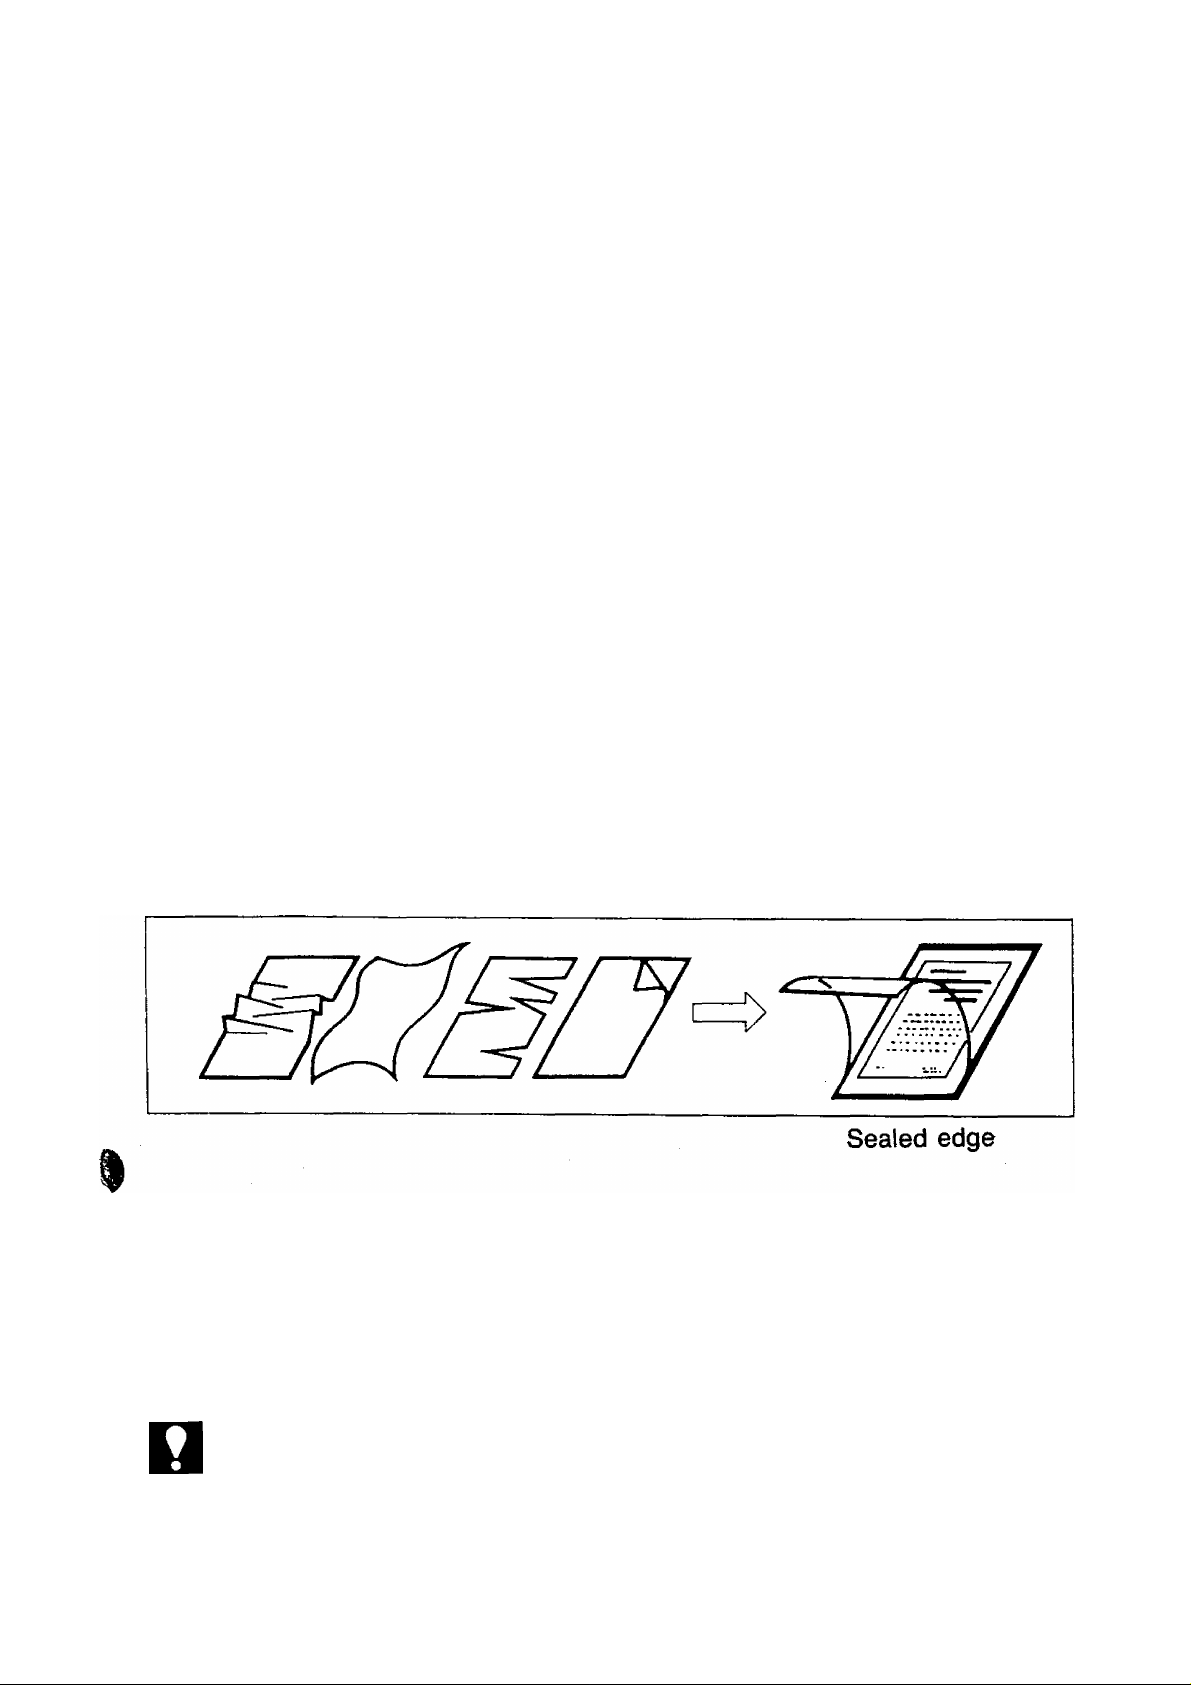
How to Use the Document Carrier
The Document Carrier is an A4-size transparent envelope that comes with your
machine. Some kinds of documents which cannot be sent by themselves (e.g.
torn, wrinkled, thin, chemically processed or coated documents) may be sent by
putting them in the carrier, then placing the carrier in the ADF with the sealed
edge in first, then start transmission.
NOT€
Originals that are thick or made of cloth, metal, photographic paper, etc., should be
photocopied and the copies sent instead. Do not send documents larger than the
carrier. Only one carrier may be sent at a time.
11
Page 14

SETTING UP YOUR MACHINE
This chapter is divided into four sections. The first section explains some basic
settings, called User Parameters, which help you keep records of the
documents you send and receive. These parameters include a built-in clock,
which keeps the exact date and time, and a LOGO and ID number which help
to identify your machine to the machines you communicate with. These
parameters may be set for you when your machine is installed, but you should
know how to set them yourself in case you want to change or reset anything.
The second section explains how to record fax numbers for “One-Touch” and
"Abbreviated” dialing. Instead of dialing long numbers each time you send a
document, you can assign a two-digit code number to each of the numbers you
dial most often and store them in the machine’s memory (it can hold up to 100
numbers).
One-Touch Dialing uses the first 32 two-digit code keys (01 - 32) on the control '
panel. To dial a number assigned to one of these codes, all you have to do is to
press the right key and the Panafax UF-250 will dial the full number for you. |
You can also use the eight Program Keys (PI - P8) as extra One-Touch keys '
too.
Abbreviated Dialing involves using the keypad on the control panel to dial code
numbers 01 through 99 or 00. When you dial one of these codes, your machine
will dial the full number assigned to the code for you. Note that codes 01 ~ 32
will call the same numbers recorded under the One-Touch keys.
The third section explains the procedures for setting and changing the Program
Keys, labelled P1 ~ P8. These keys can be used as extra One-Touch keys. Or,
they can be used to record long dialing procedures, such as Deferred
Transmission, Polling, and Deferred Polling. They can also be used as OneTouch "Group Keys” by recording two or more One-Touch or Abbreviated
dialing numbers. However, the numbers you record in the Program keys must
be One-Touch Dialing or Abbreviated Dialing numbers which you have already
recorded.
The last section describes the FAX Parameters which help to control the
features of your machine.
NOT€
Whenever you make a mistake in one of the above settings (except for the ID
Number Setting), you can move the cursor left and right by pressing the
I ORIGINALI and | RESOLUTION jj<evs. They serve as and function keys
during these procedures. Press | CLEAR | or | SPACE | to erase a character you just
entered.
12
Page 15

USER PARAMETERS
How to Set the Date and Time
You can set or reset the date and time when your machine is in standby, or
when you have already placed some documents on the ADF. To do so,
and
DATE & TIME
01 -01 -1988 15:00
The display will show a date and time. Use the keypad to enter the new day
(two digits), month (two digits), year, and time (24-hour clock).
Ex: 01 Jan. 1988 15:00 E 5] 5] QJ 5] 5] 5] BBS EE
If you make a mistake, use the IORIGINÀP and I RESOLUTION I keys to
move the cursor to the incorrect number, and then enter the new number
over it.
To set the date/time,
Now you can go on and set the LOGO,
or return to standby with ISTOP
13
Page 16

SETTING UP YOUR MACHINE
How to Set Your LOGO
The LOGO helps identify you to someone who receives your document.
To set your LOGO (25 characters max.), use the One-Touch/Character keys (see
page 8).
If you have just set the date and time and pressed I START I, skip to Step
3 below. If not, start from Step 1.
and
Enter each letter, number and/or
symbol in your LOGO using the One-
Toujch/Character Keys.
Ex; for PanaFax
ISHIFTI [a] In] lal [SHIFfl [f] |SHIFT| @
If you use 21-25 characters, the display will not show the first 20 characters.
START
To set the LOGO,
Now you can go on and set the ID, or return
to standby with I STOP
c
14
Page 17

How to Set Your ID Number
When you transmit, your ID will appear on the other person’s display. When you
receive documents, the sender’s ID will appear on your display. We suggest you
use your facsimile telephone number as your ID, but you may use any number
up to 20 digits long.
If you have just set your LOGO and pressed I START , skip to Step 3. If not
start from Step 1.
FUNCTION
1
MODE
repeatedly.
Enter the ID digits. Use I SPACEI to
enter a space. If you enter 20 digits
you will hear a pip-pip-pip sound at
the end.
To set the ID,
Now you can go on and set the POLLING
PASSWORD, or return to standby with
STOP .
ID NO.
ID NO.
777 9876
NOT€
Press CLEAR to erase the number you just entered.
15
Page 18
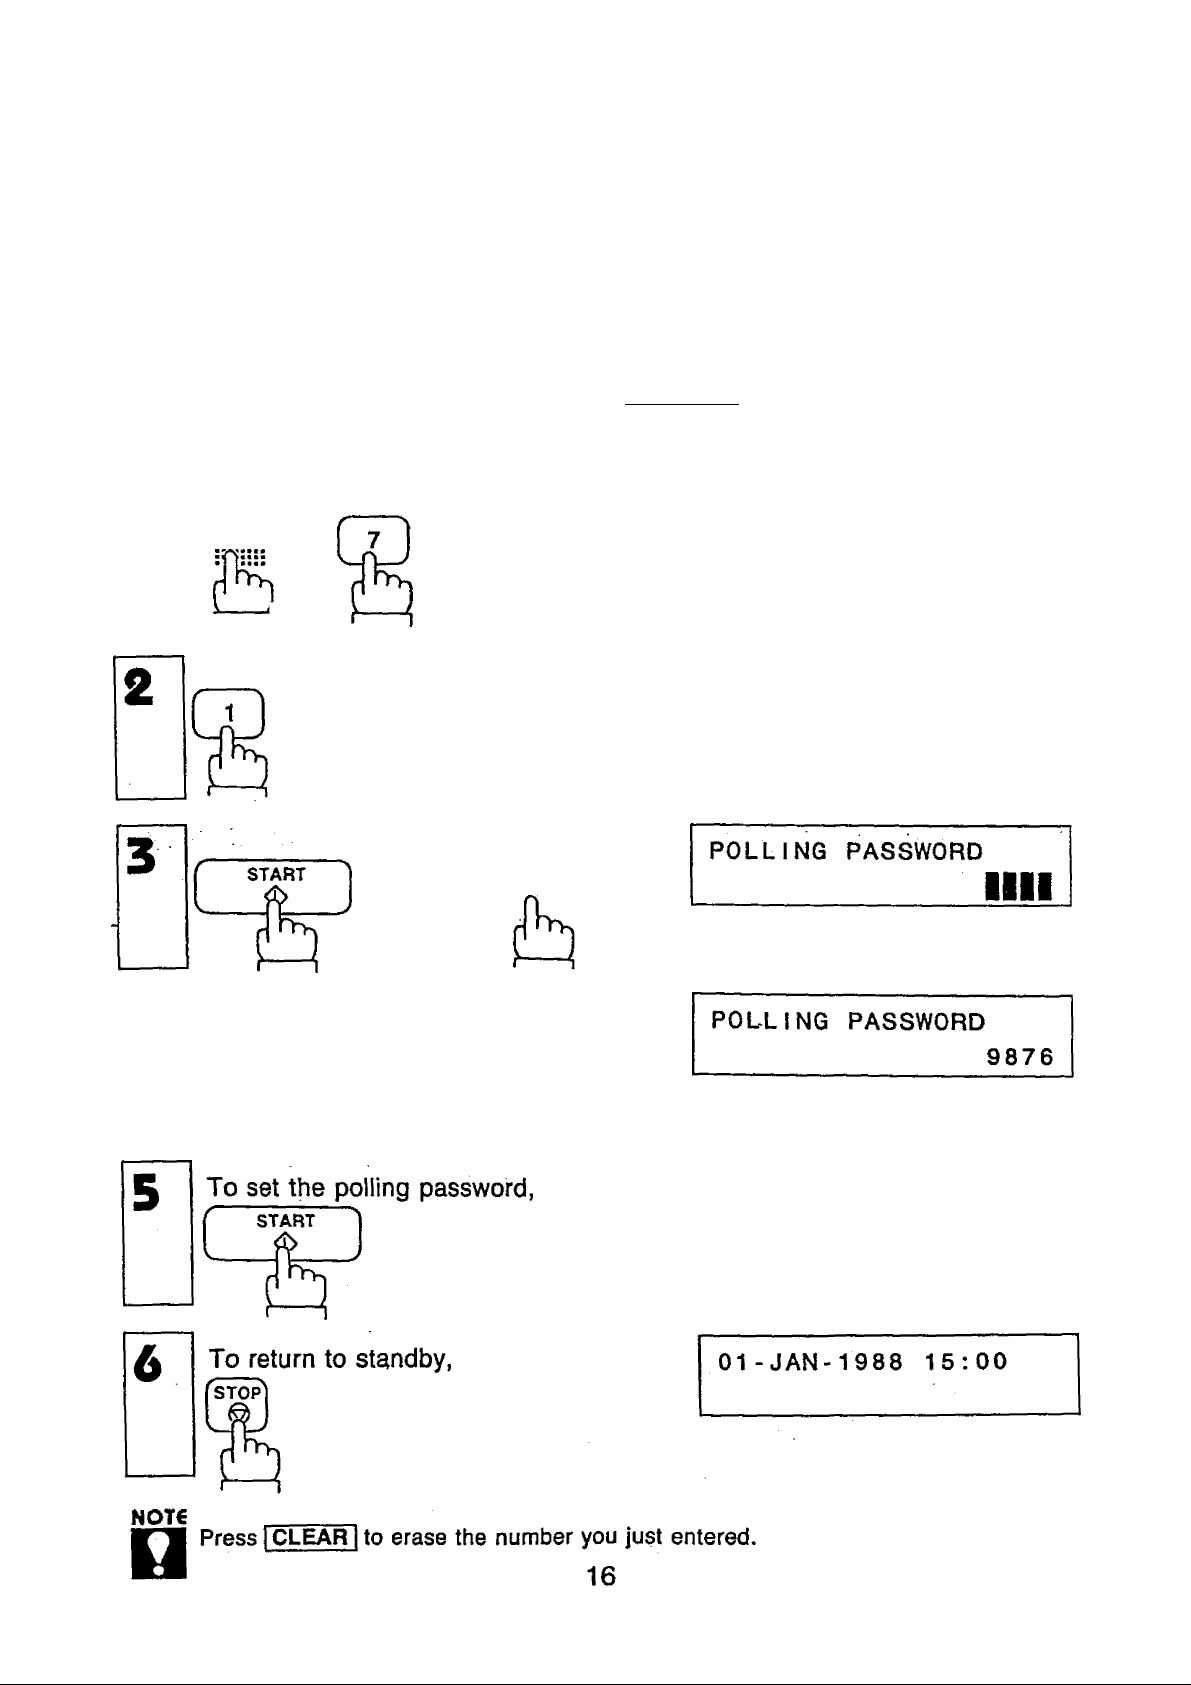
SETTING UP YOUR MACHINE
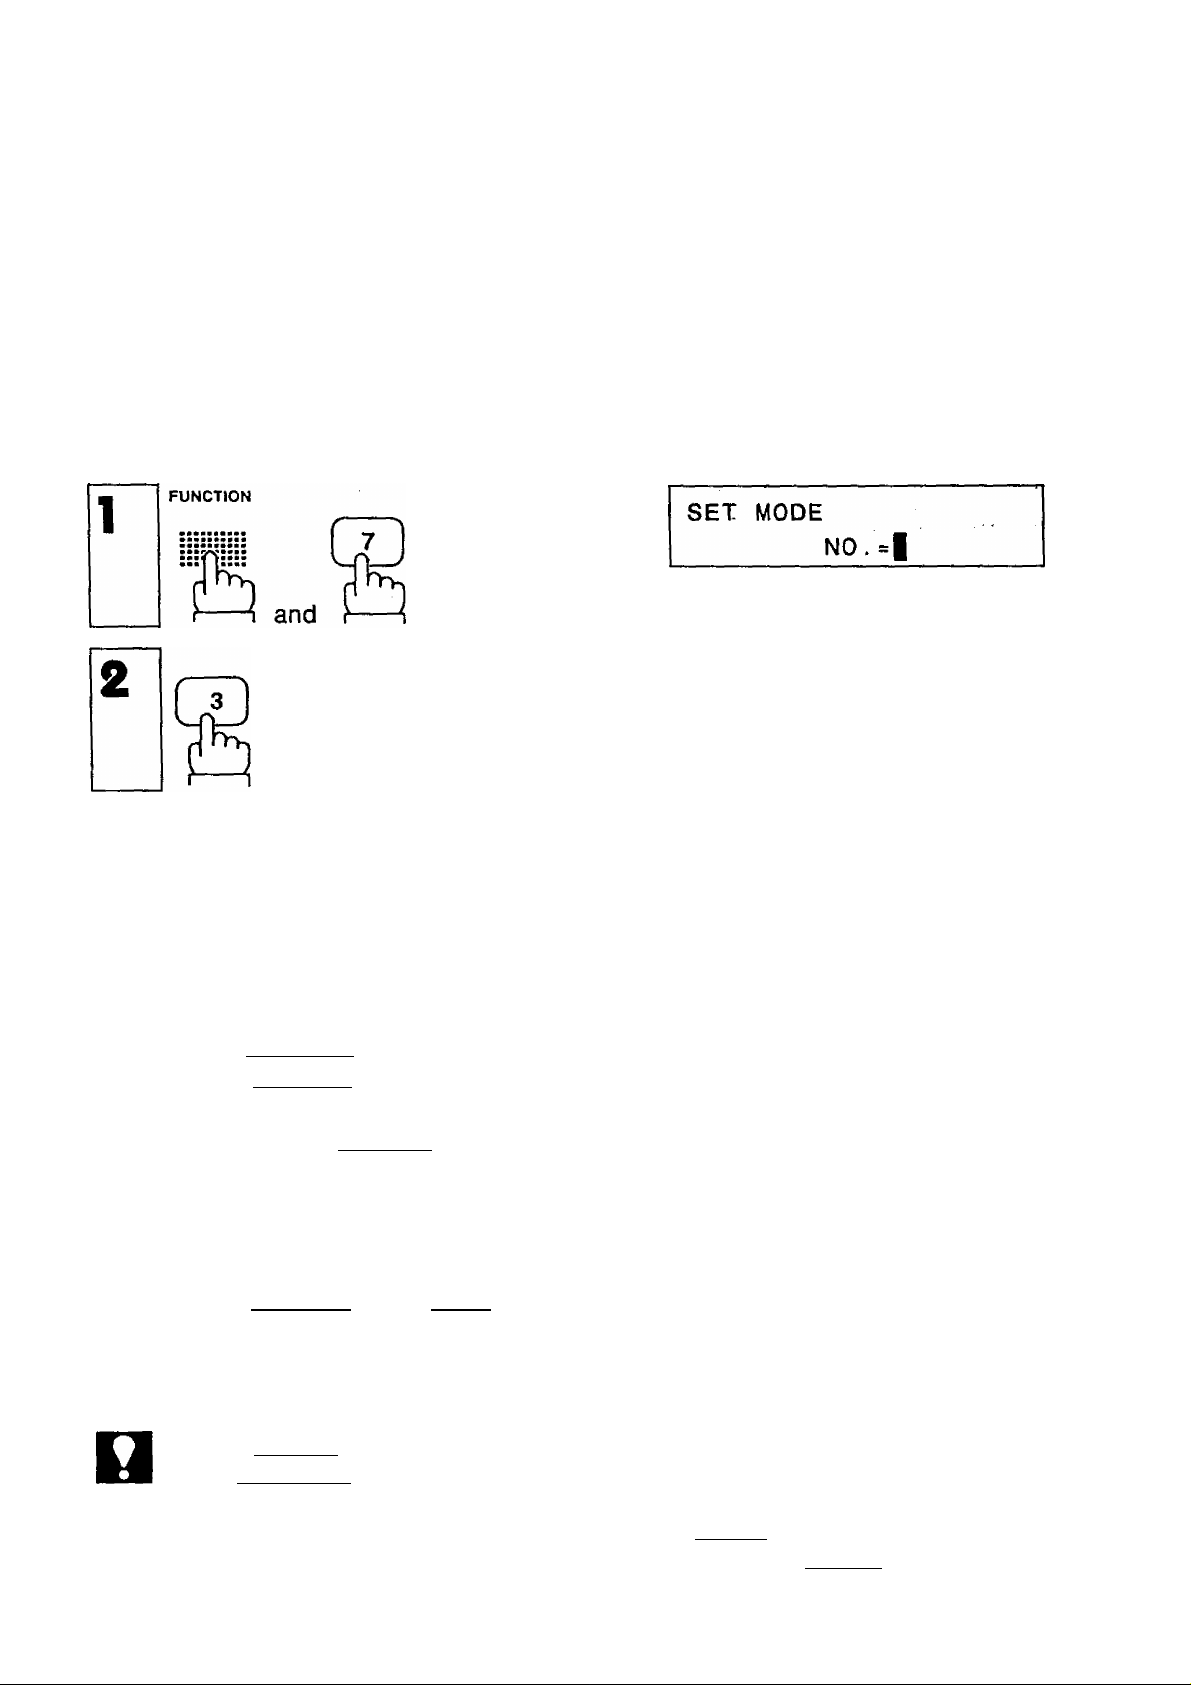
How to Set the Polling Password
Polling means calling another station and requesting the transmission of
documents to you. In this case, the other station must know in advance that you
will call, and must have a document set on the ADF. You also need to record a
polling password, shared by the other station, to ensure security.
If you have just set your ID No. and pressed I START |, skip to step 3. If not
start from step 1.
1
FUNCTION
1 and
CHZICZZ)
and i or
Enter 4-digit password.
SET MODE
NO . =1
USER PARAMETERS
MODE
repeatedly.
Ex:® Em a
DATE & TIME
g|l-01 -1988 15:00
Page 19
ONE-TOUCH/ABBREVIATED NUMBERS
Recording One-Touch and Abbreviated Dialing Numbers
One-Touch Dialing and Abbreviated Dialing are two fast ways of dialing full
numbers.
To use these dialing methods, you must first record the full numbers using the
following procedure.
ONE -TOUCH/ABBR.NOS
f
START
ft
n
To assign a One-Touch number, press
one One-Touch key. Ex: 1_07_
To assign an Abbreviated number,
press i ABBR I and two keys on the
keypad to enter any code from 33 to
99 or 00. Ex: lABBRlfsIf^
Enter facsimile telephone number (up
to 36 digits) including pauses, and
spaces.
Ex: r^lPAUSEir^lTIfFIISPj^rrilTIfyifl
ONE-TOUCH/ABBR. |
[07] TELEPHONE NO
[62] TELEPHONE NO
I
[07] TELEPHONE NO
9-555 1234|
NOT€
1. If you need a special access number to get an outside line, enter it first and then
press I PAUSE |. A hyphen is displayed for pause.
2, Use SPACE to enter a space between the numbers to make it easier to see.
3. When you input a wrong number in step 5, press CLEAR to erase the number
before the cursor, then reenter the right number and press [START
17
Page 20

SETTING UP YOUR MACHINE
8
START
(07) STATION NAME
To set the number,
Enter receiving station’s name (up to
[07] STATION NAME
15 characters) using One-
Touch/Character keys (see page 8).
Ex: Panasonic ~^[P] I SHIFT I f¥]|1rri|T1[Tll^nrri|T1[cl.
START
k
___
To set the name,
If the receiving party has a second
facsimile telephone number, and you
have already recorded it under
O
107] 2nd ABBR.
[15] (St at ion
another One-Touch or ABBR. key, you
can enter it here as a second ABBR.
NO. by pressing the One-Touch or
ABBR. key. Ex: Ql]
I
Panason i c|
N0.
name )
ONE TOUCH/ABBR. |
Repeat steps 4 to 10 to record more
numbers, or, to return to standby
press STOP
If you want to go back and change anything, e.g., the telephone number, press
START I repeatedly to skip through the preceding steps. You do not need to
reenter everything again.
18
Page 21
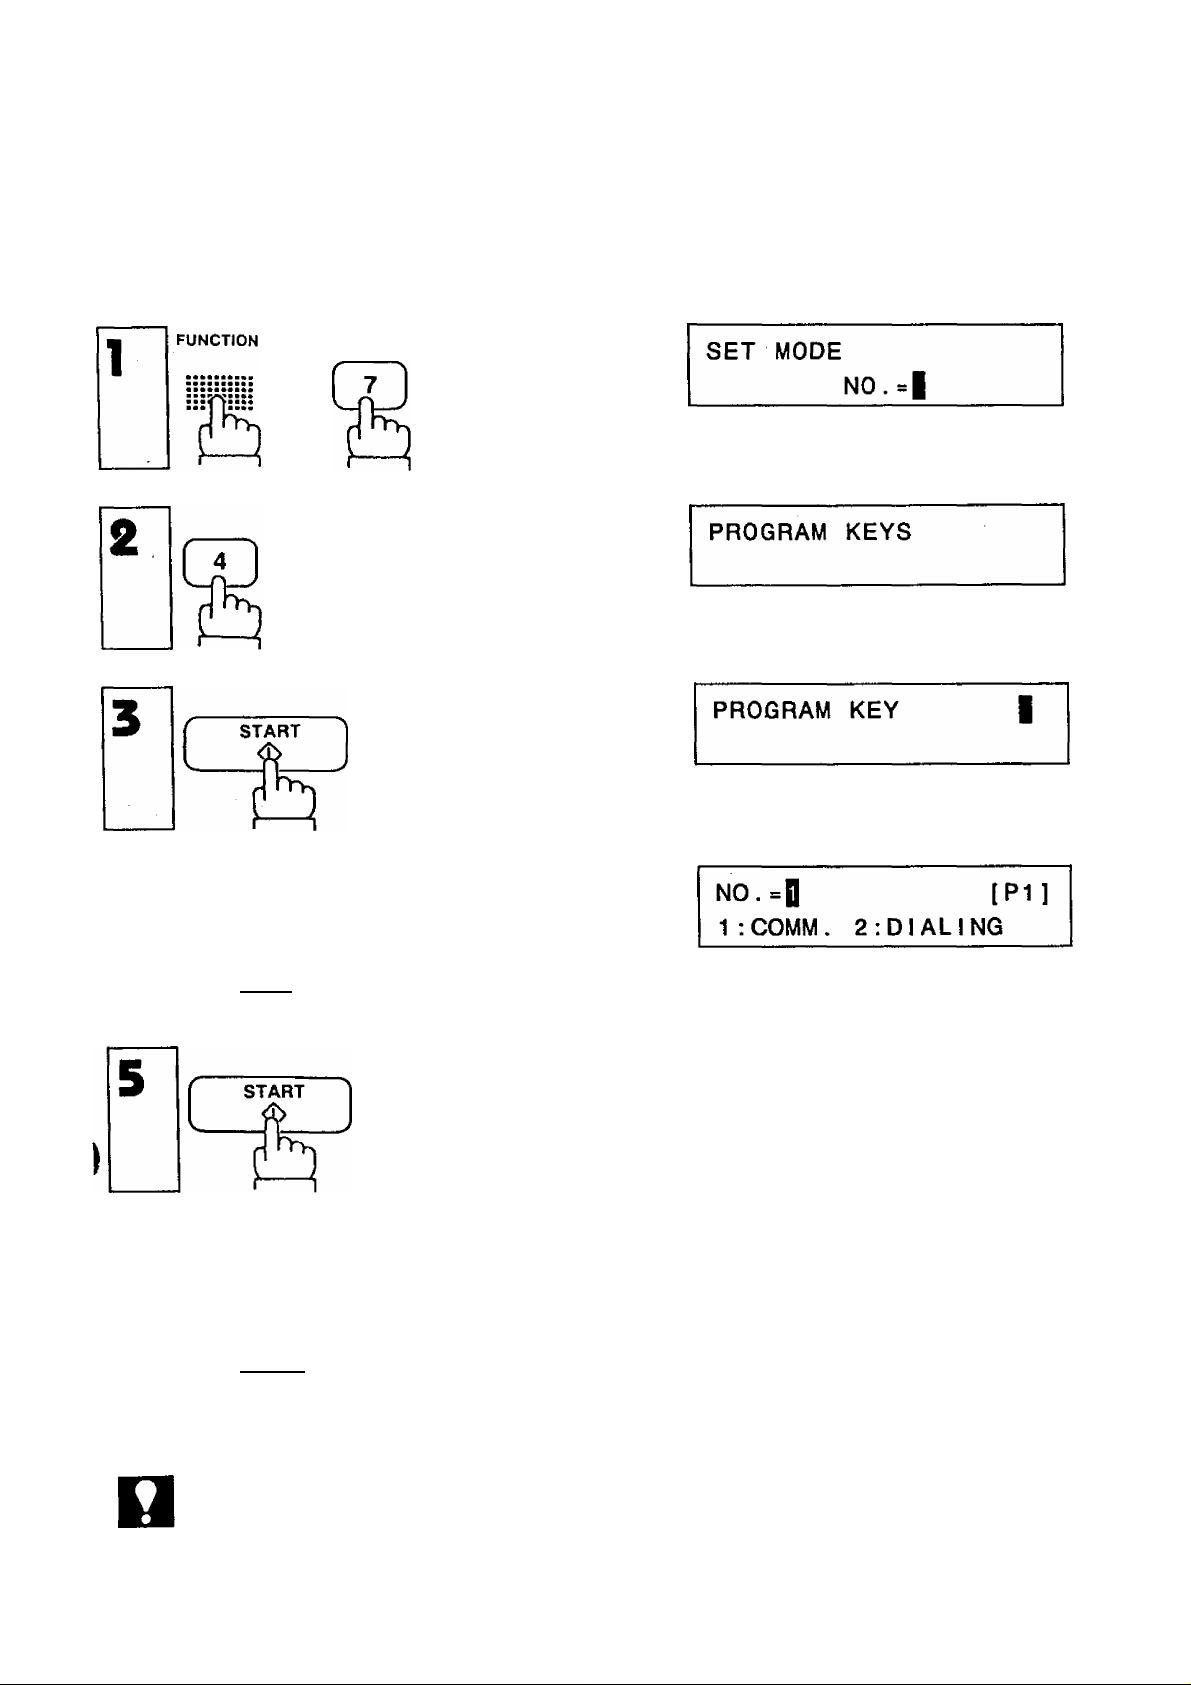
PROGRAM KEYS
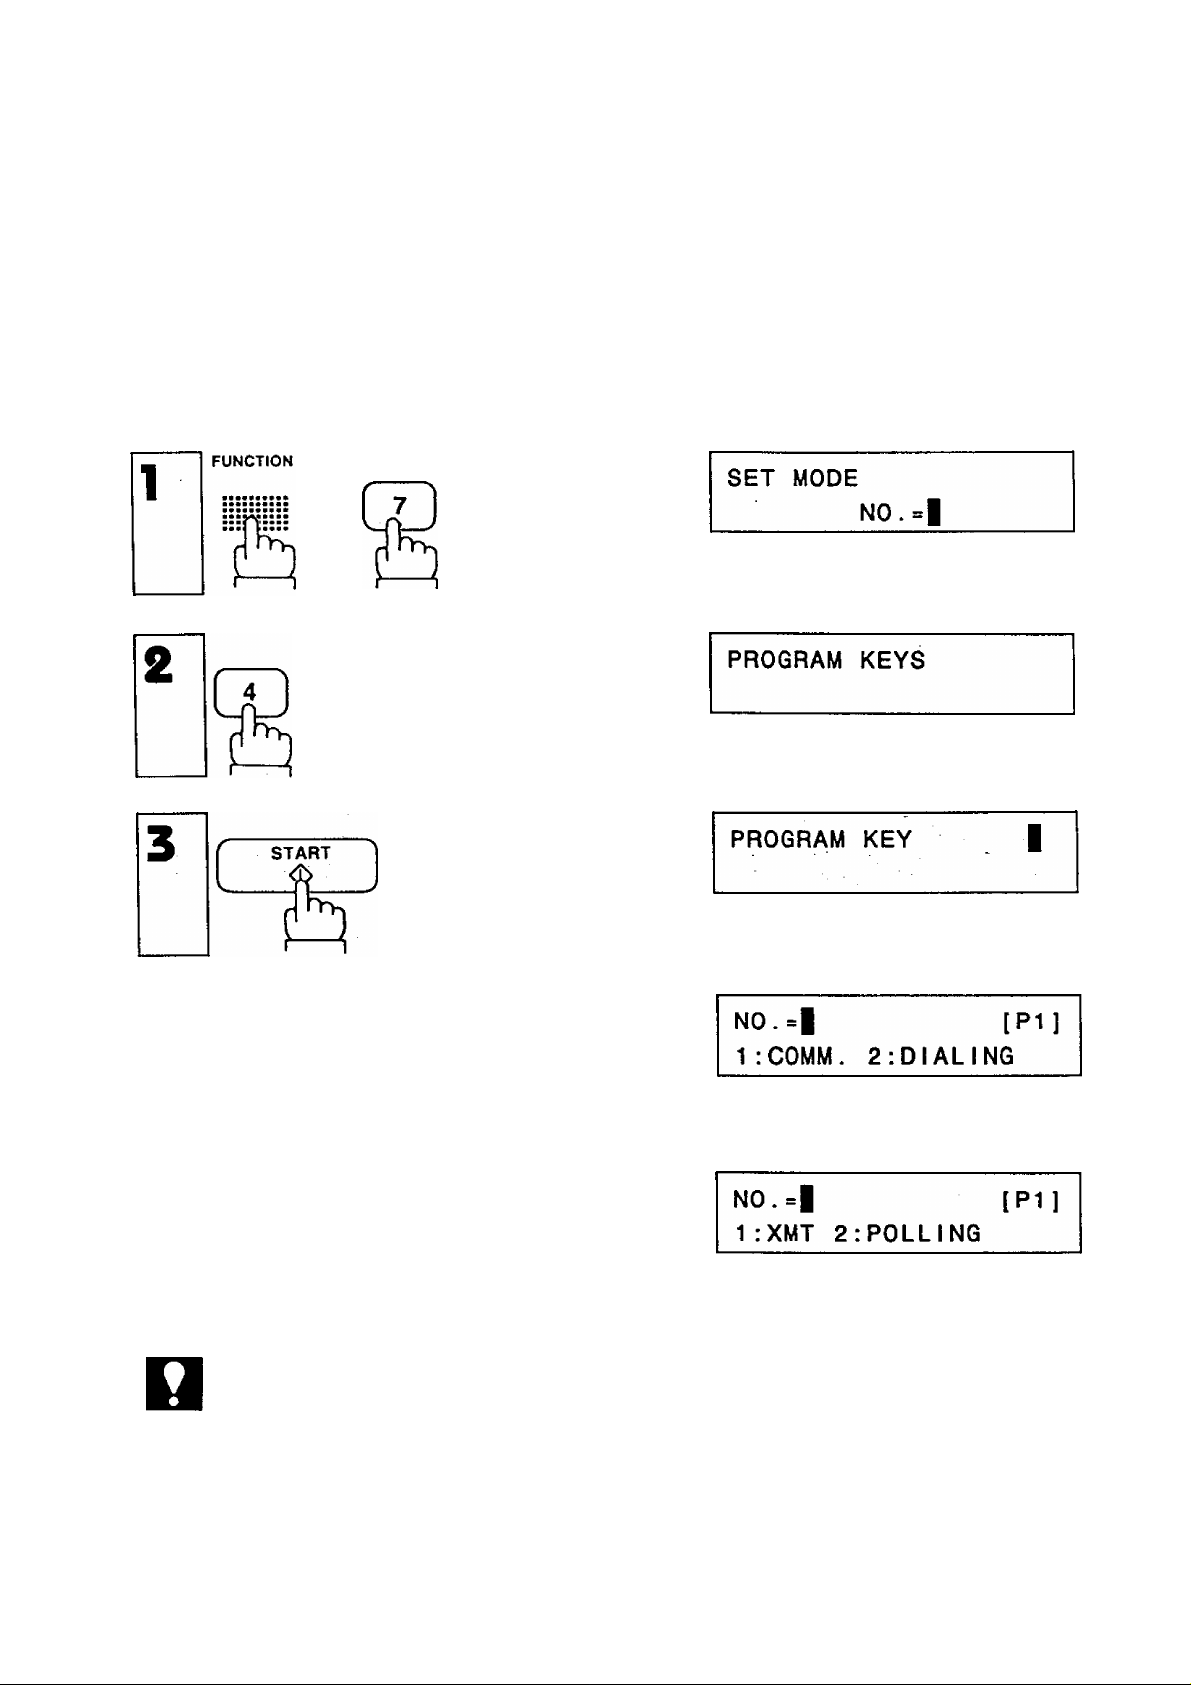
Setting Program Keys
Use the following procedure to record a number, or a group of numbers, in a
Program Key for Transmission, Deferred Transmission, Polling, or Deferred
Polling.
and
MODE
CZZIC3ZD
repeatedly.
)
NOT€
Press one program key:
\K\~\K
To record Transmission or Poiiing,
press Q] for COMM.
To record an extra One-Touch key, or a
One-Touch group of numbers, press for
DIALiNG and go to Step 6, page 22.
CALLED STATiONS [P1]
I
19
Page 22
SETTING UP YOUR MACHINE
To record Transmission numbers
(Deferred or Not), press Q] for XMT.
Or, to record Polling numbers, press
in for POLLING and use the same
procedure below.
For Deferred Transmission (or
Deferred Polling) press [T] for YES.
For ordinary Transmission (or Polling)
press [2].
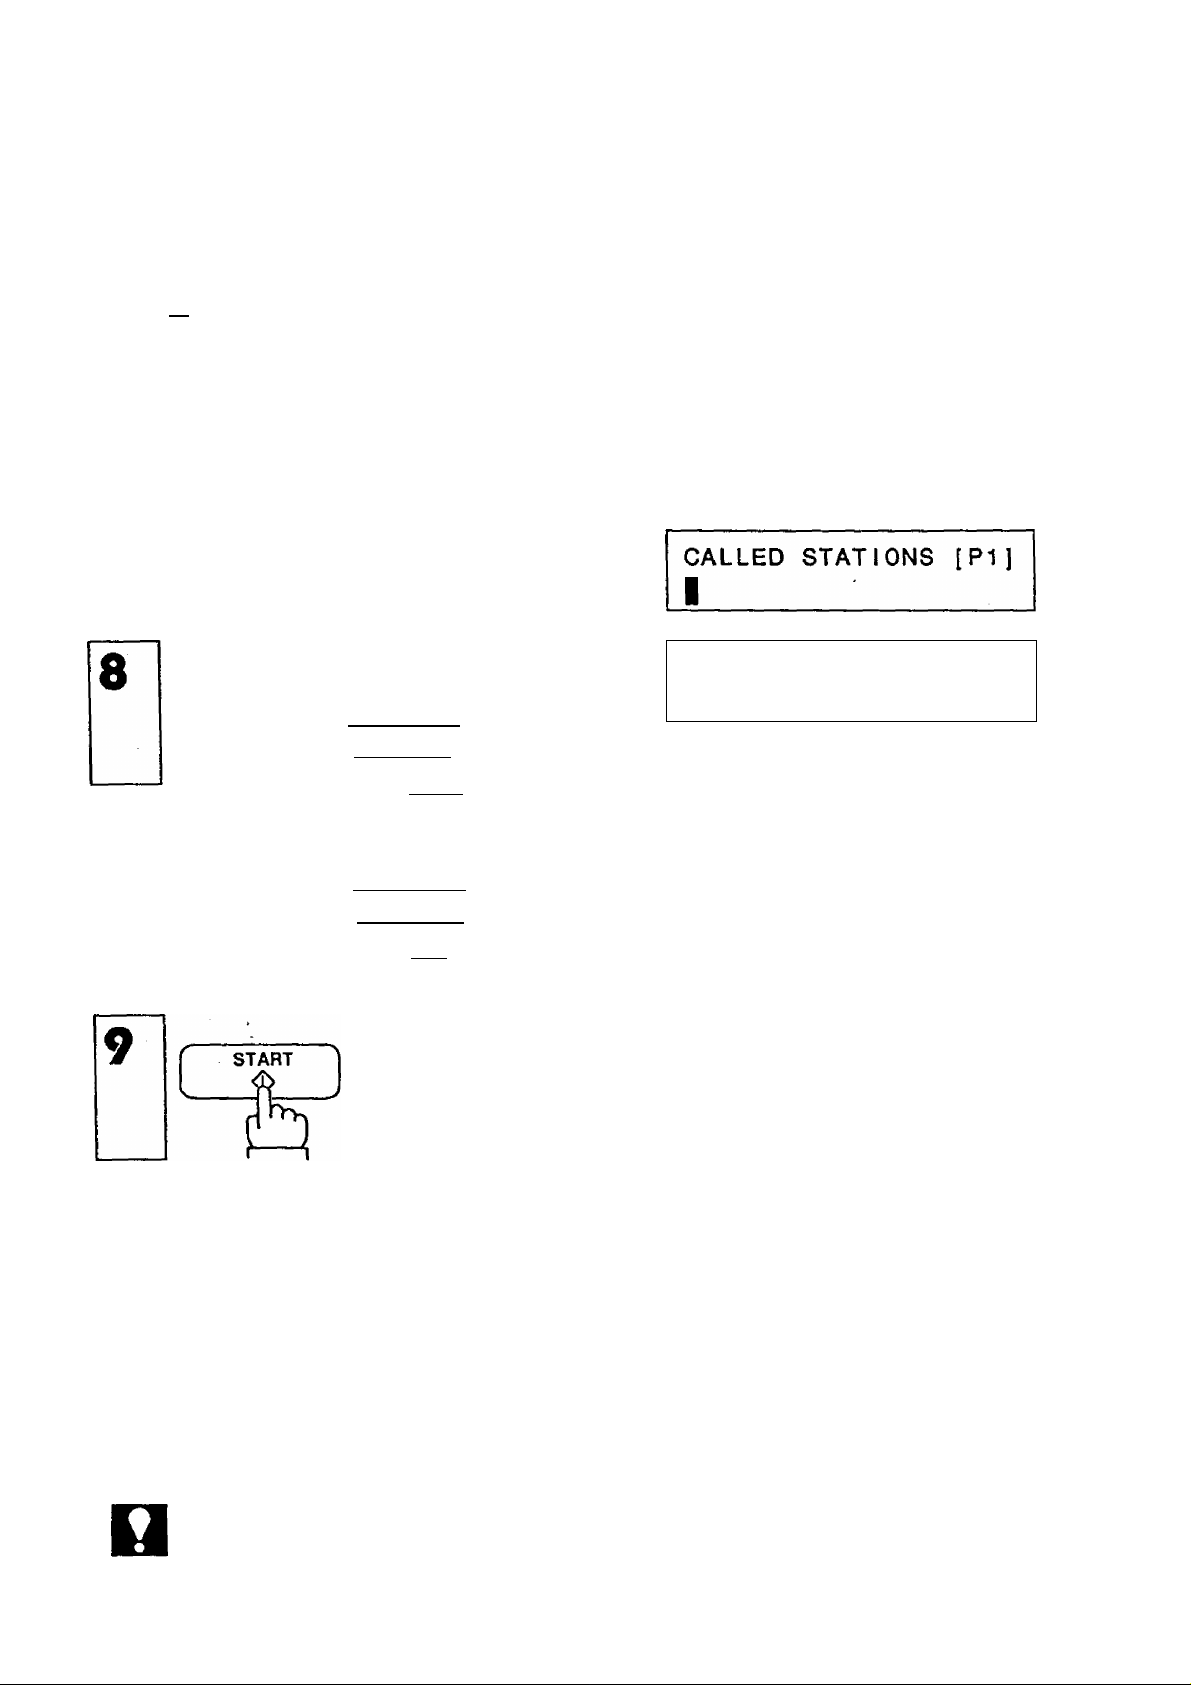
If you pressed jT] , enter the starting
time (4 digits), and one or more
station numbers (see Note) using OneTouch keys, or IABBRI and two digits.
Ex: One-Touch key | io1
DEFERRED XMT [P1]
1:YES 2:NO N0.=|
DEFERRED POLL [P1]
1:YES 2:N0 N0.=|
START TIME I
CALLED STATIONS
START
[10]
TIME
(Stat ion name)
15:00
10
If you pressed n . enter one or more
station numbers (see Note) using One-
Touch keys, or I ABBR I and two digits.
Ex: One-Touch key |15
Enter PROGRAM NAME (up to 15
characters) using the One-
Touch/Character keys (see page 8).
CALLED STATIONS [PI]
[15] (Station name)
PROGRAM NAME
[P11
I
PROGRAM NAME [P1]
XMT AT 3PM|
NOT€
You can use a Program Key for Muiti-Station Polling, but cannot use for Multi
station Transmission.
20
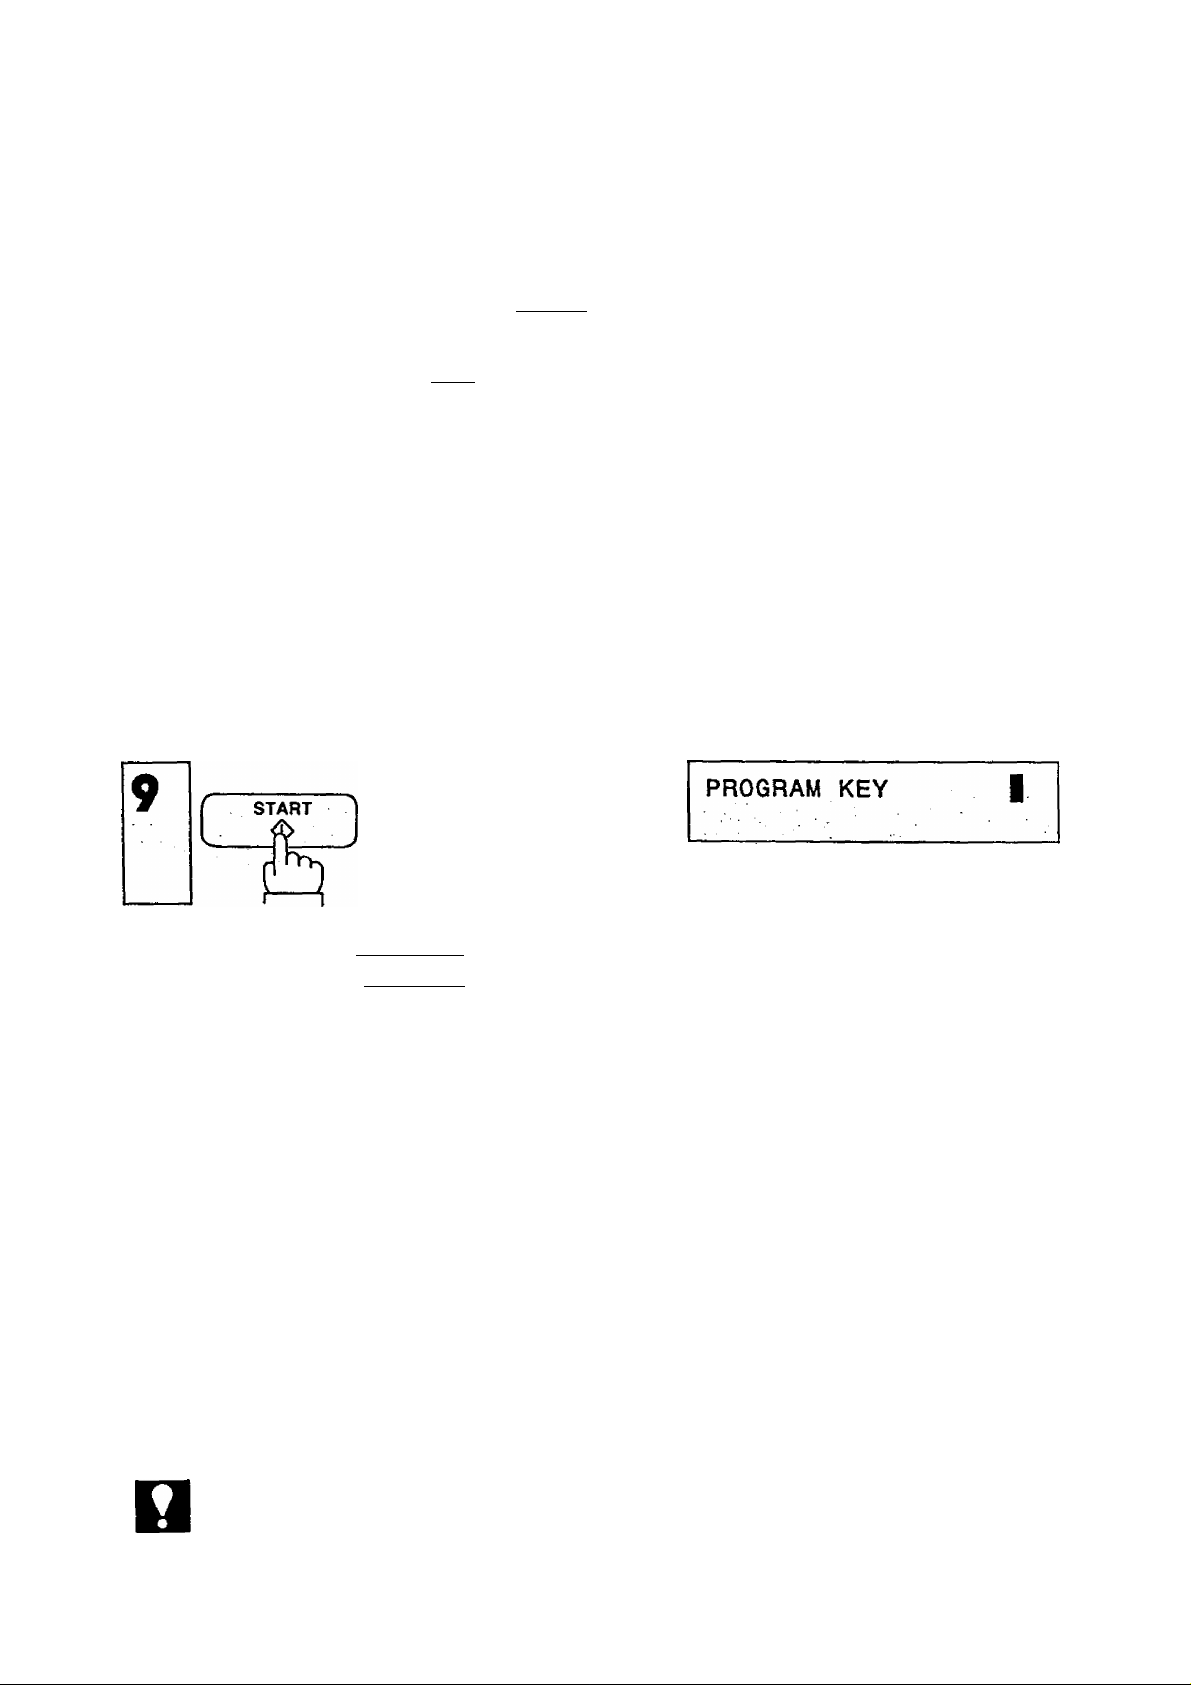
Page 23

11
START
r
n
You can now set another Program Key starting at step 4, or return to standby
by pressing I STOP
21
Page 24
SETTING UP YOUR MACHINE
If You Selected 2. Dialing in Step 5. Above,
8
Enter one or more station numbers
using One-Touch keys, or ABBR and
two digits.
Ex: One-Touch key 132
START1
ft
n
Enter PROGRAM NAME (up to 15
characters) using the One-
Touch/Character keys (see page 8).
CALLED STATIONS [PI]
[32] (Station name)
PROGRAM NAME
[PI ]
I
PROGRAM NAME
PROG. 1I
[P11
You can now set another Program Key starting at step 4 (page 19), or return to
standby by pressing I STOP I.
NOTC
You cannot record basic transmission settings, such as Resolution.
22
Page 25
How to Erase or Change Program Key Settings
To erase the settings in a Program Key, either completely or partially, and/or
add new numbers, or change the program name, use the following procedure.
and
MODE
CEZlIZiZ)
¿botb
repeatedly.
Press the key you want to erase or
change.
Ex: |P1 |.
(Press repeatedly)
NOT€
If the key is a “Deferred” program,
START TIME DS:00
use steps (6a) through (6d) below.
Ex: [lo1.
If not, skip to steps (6e) through (6i).
Ex:[H].
When Deferred Communication program is used, first cancel the Deferred
Communication by the instructions on page 47 and 56, and then complete the
steps for canceling the Program Key Setting.
[101 (Station name)
CALLED STATIONS [PI]
[32] (Station name)
23
Page 26

SETTING UP YOUR MACHINE
For Deferred Programs:
6q
6b
6c
To erase the program key, press CLEAR in step 4 and then press
START 1.
To change the start time, write over the start time, then press I START
To erase, add or change the stations, first press MODE f— I or [ + I to
erase the cursor on the start time. Then, to erase some of the stations,
use MODE I I or | + | to find the station you want, and press
I CLEAR 1. To add new stations, use One-Touch keys or | ABBRI and two
digits. To change stations, erase and add new numbers as explained
above.
Then press START
6d
NOT€
To change the program name, press START I repeatedly until
PROGRAM NAME is displayed, then write over the name and press
START
n steps (6a), (6b), (6c) and (6d) ^ove.^ou can return to standby by pressing
STOP . But, be sure to press [START|to store the new settings before pressing
STOP
24
Page 27

For Non-Deferred Programs:
6e
6f
6o
6h
To erase the program key, press I CLEAR in step 4 (page 23) and then
press
To erase some of the stations, use MODE | - | and | +1 to find the
station you want, then press CLEAR
To add new stations, use One-Touch keys or ABBR and two digits.
To change stations, erase and add new numbers as explained above.
START
After step (6f), (6g) or (6h) is completed, press START .
6i
NOT€
To change the program name, press START I repeatedly until
PROGRAM NAME is displayed, then write over the name and press
START
n steps (6e), (6f), (6g), (6h) and (6i) above, you can return to standby by pressing
STOP . But, be sure to press | START | to store the new settings before pressing
STOP
25
Page 28

SETTING UP YOUR MACHINE
I
FAX PARAMETERS
Your facsimile machine has a variety of adjustable FAX parameters. These
parameters, listed in the Parameter Table, are normally preset for you and do
not need to be changed. If you do decide to change anything, read the table
carefully.
Some parameters, such as the Resolution, Contrast, and Verification Stamp
parameters, can be temporarily changed by simple key operations just before a
transmission is made. When the transmission ends, however, these parameters
return to their preset values. Other parameters can only be changed by the
procedure described below.
Setting FAX Parameters
and
MODE
CZZIOZ)
, or
Enter a fax parameter number (always
2 digits) from the Parameter Table
(see page 28).
Ex; |i]|T]for RESOLUTION.
or
repeatedly.
FAX PARAMETER
N0.01[1 I
(Note: The bracketed number is a
factory preset value which you
may ignore.)
Enter different setting number.
Ex: [2] changes Resolution to FINE.
26
FAX PARAMETER
N0.01[1]=i
Page 29

FAX PARAMETER
NO.I
You can now return to step 4 to set the next parameter, or, return to
standby by pressing [STOP
NOT€
To cancel any digit entered, press [CLEAR] in step 5, and then stasrt again from
step 3.
27
Page 30

SETTING UP YOUR MACHINE
Parameter Table
Parameter
number
01
02
03
04
05
Parameter
Resolution
Contrast
Verification
Stamp
Polled
Automatic
Journal Print
Setting
Number
1
2
3
1
2
3
1
2 OFF '
1
2
1
2
Standard
Super Fine
Setting
Fine
Normal
Dark
Light
ON
OFF
ON
Yes
No
Standard
Setting
o
0
o I
o :
i
(
° i
1
06
07
15
Printout
Heading
Dialing
Method
ECM
(Error Correction
Mode)
1
2
3
1
2
1
2
Inside copy area
Outside copy area
Not printed
Tone
Pulse
OFF
ON
0
o
o
28
Page 31

TRANSMISSION
BASIC TRANSMISSION SETTINGS
You can temporarily change six basic settings (Resolution, Contrast, Halftone,
Verification Stamp, Total Pages, and Individual Transmission Journal) before
any ordinary transmission. These settings can be altered before or after you
place documents on the ADF. After you finish transmission, your machine will
automatically return to the preset settings (except for Individual Transmission
Journal, which will remain as you set it). You can also change these settings
during transmission, but the change will not become effective until the next
page is transmitted.
Resolution
Your machine is preset to Standard resolution, which is suitable for ordinary
documents. Use FINE or Super-FINE for very detailed documents.
01 -JAN- 1988 15:00
RESOLUTlON=STD
If satisfied, go to Step 4.
To return to Standard, press RESOLUTION again.
You can now dial by pressing TEL/DIALI and a full number,
a One-Touch key, IaBBR I and two digits, or I REDIAL
(STD = Standard)
01-JAN-1988 15:00
RESOLUTION=FINE
01-JAN-1988 15:00
RESOLUTION=S FINE
(S FINE = Super-FINE)
NOTC
After changing the Resolution setting, you can
1. return to standby with STOP , or.
2. make a copy of the document to test the new Resolution setting by pressing
COPY
3. start a different series of settings by pressing IHALF TONE
STAMP I. MODE rn nn. or rFDN5fiON
4. To change the preset Resolution position, see page 26.
, or,
ORIGINAL
29
Page 32
TRANSMISSION
I
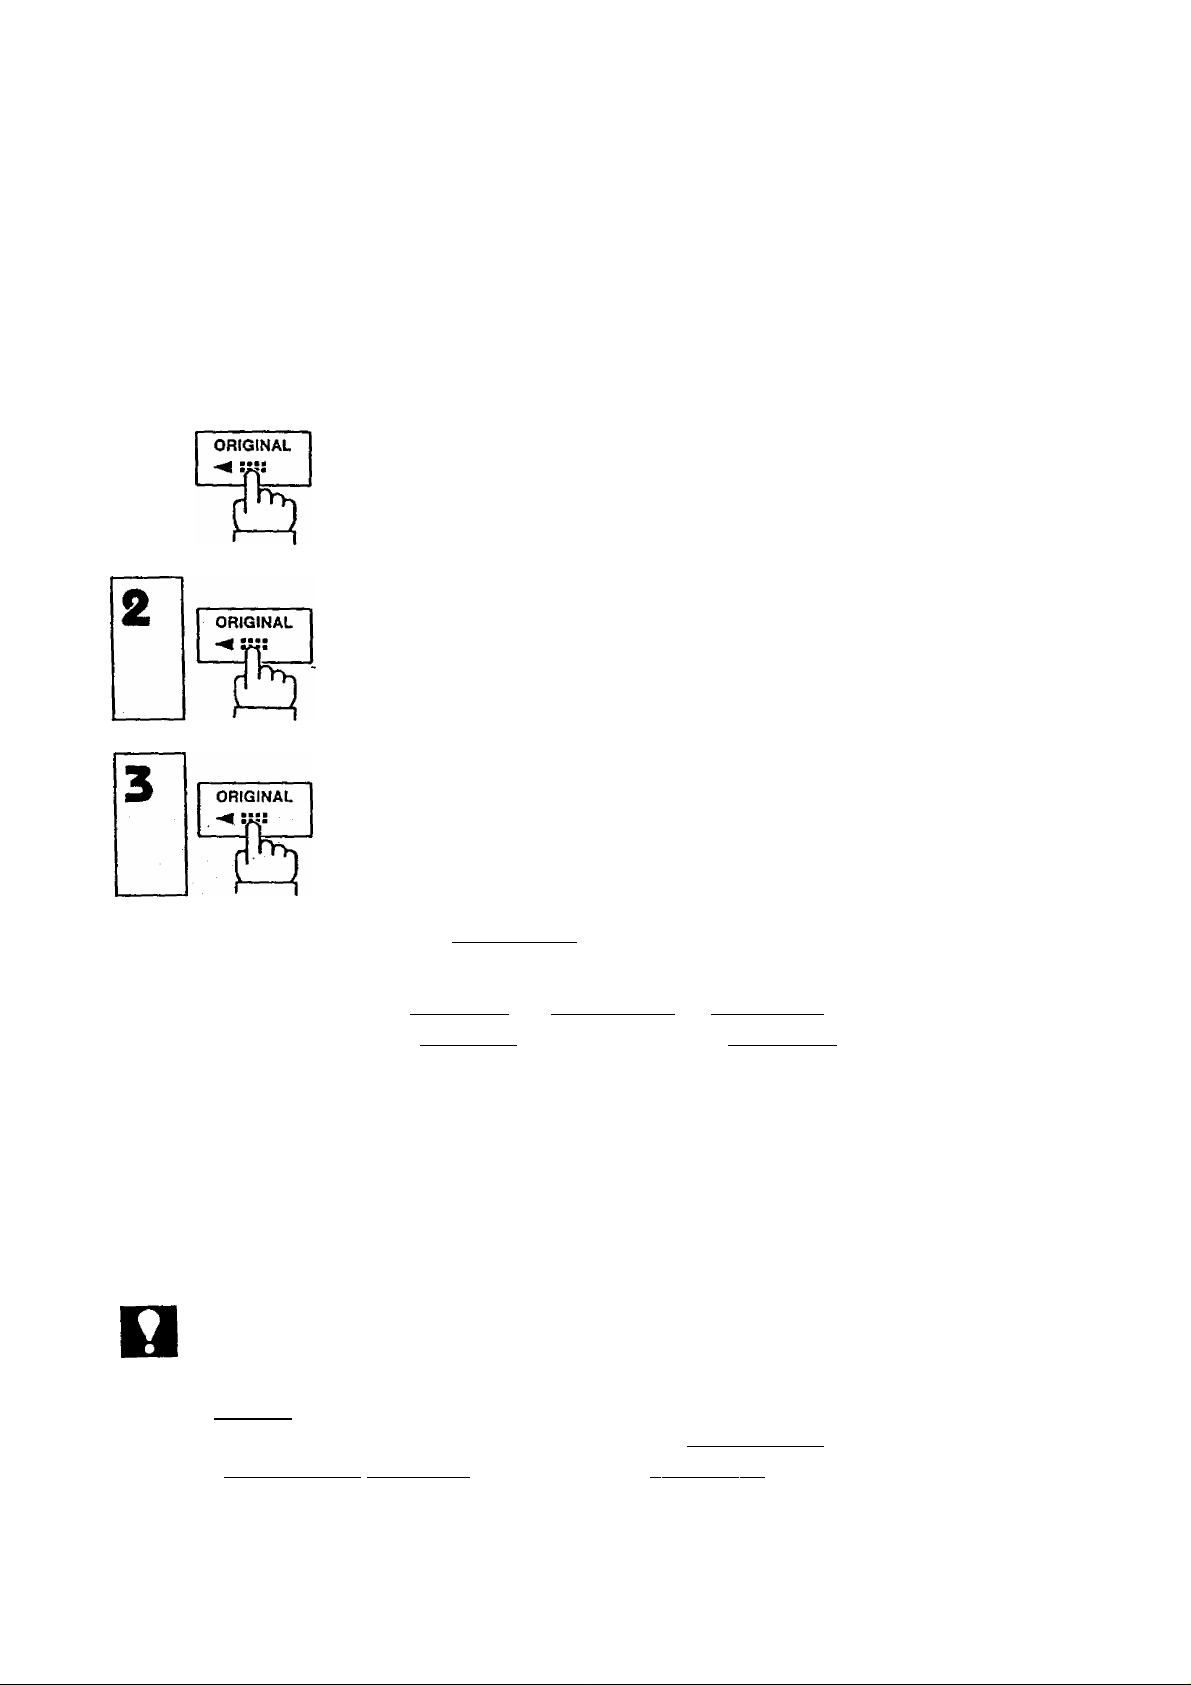
Contrast
Your facsimile machine is preset for NORMAL contrast. If you have to send a
document with dark contrast, you may get better results by changing the setting
to DARK. If you have to send a document with light contrast, it may be wise to
change the setting to LIGHT, As a test, you can make a trial copy before
transmitting (see page 36).
1
If satisfied, go to Step 4.
Jo return to NORMAL, press ORIGINAL again.
You can now dial by pressing [TEL/DlALl and a full number,
a One-Touch key, IABBRI and two digits, or I REDIAL
01-JAN-1988 15:00
ORIGINAL=NORMAL
01-JAN-1988 15:00
ORIG INAL DARK
01-JAN-1988 15:00
ORIGINAL^LIGHT
NOT€
After changing the Contrast setting, you can
1. go to standby with fSTOP
2, make a copy of the document to test the new Contrast setting by pressing
I COPY
3, start a different series of settings by pressing RESOLUTION
HALF TONE 1.1 STAMP I, MODE (- |( + |. of | FU'NCTTo'N 1.
4. To change the preset Contrast position, see page 26.
or,
or,
30
Page 33
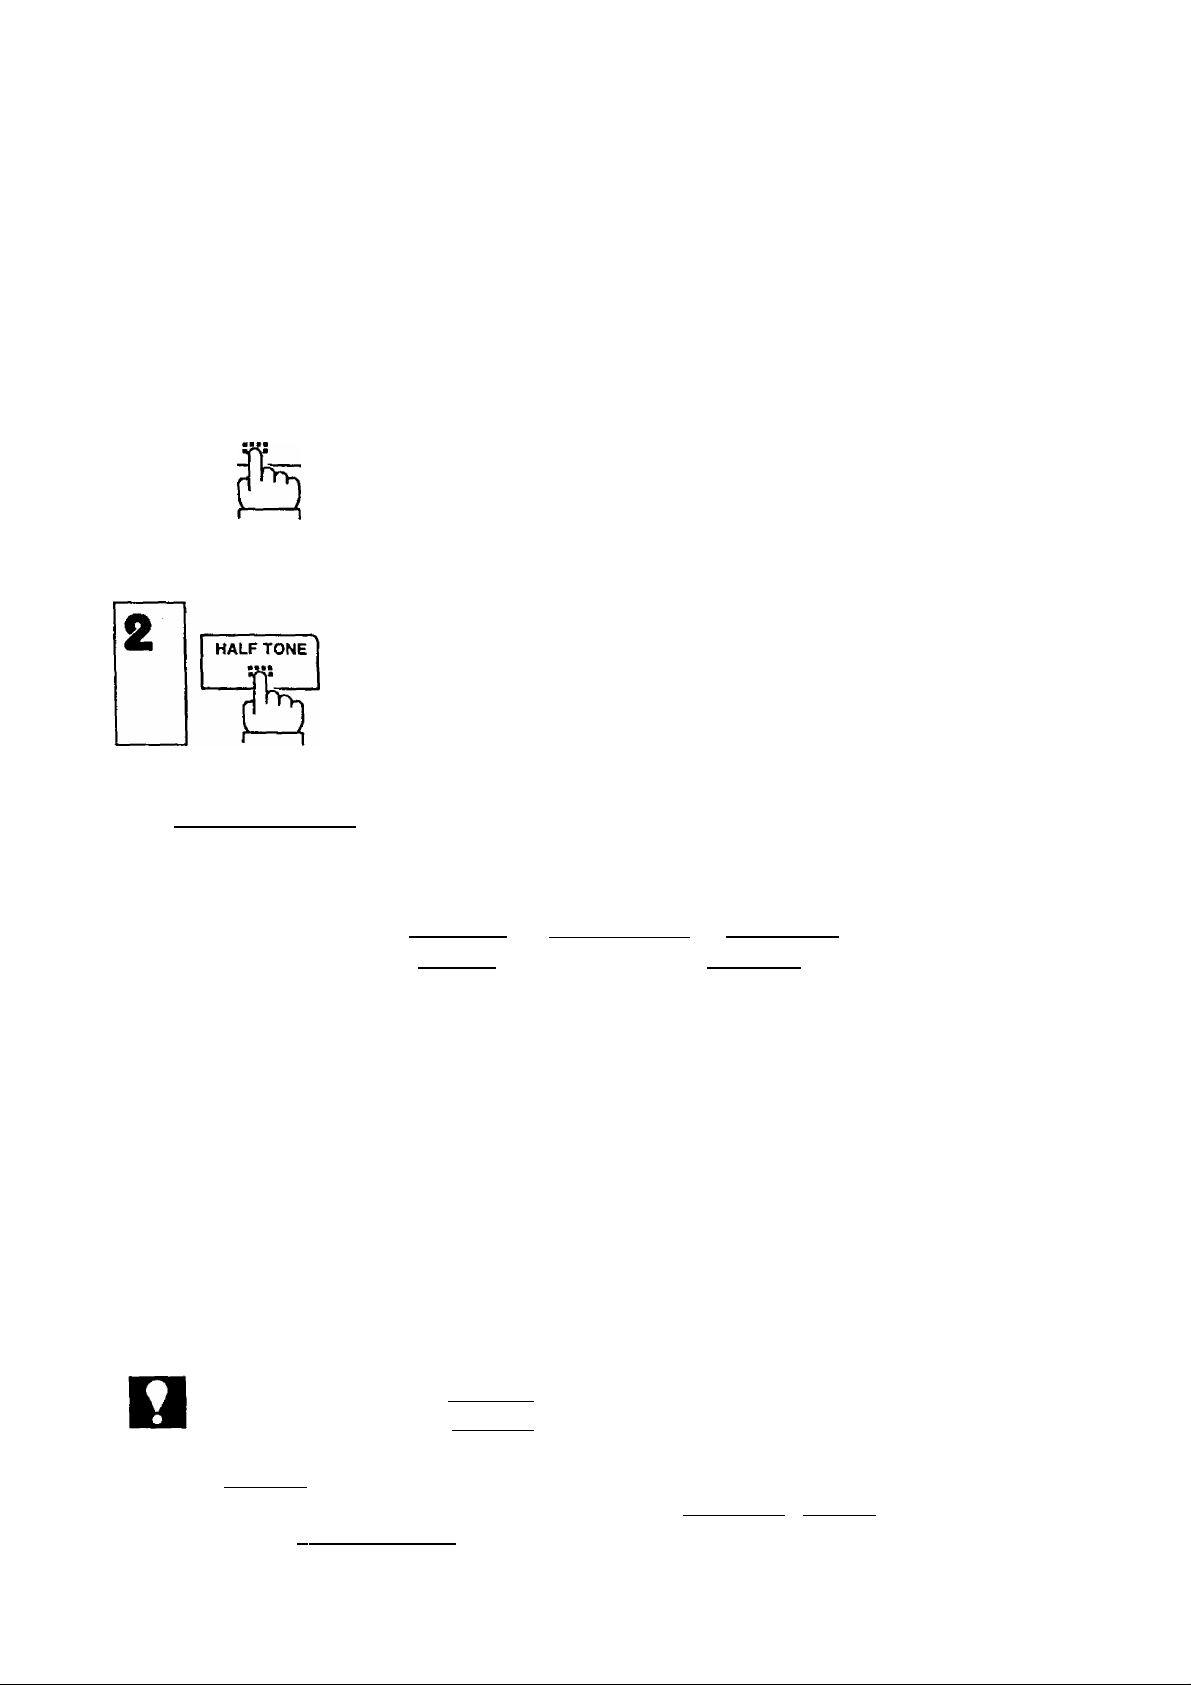
Halftone
The Halftone setting is useful when sending photos or illustrations with gray
tones. Your machine is preset with HALF TONE = OFF because a transmission
with halftone may take longer. To switch to HALF TONE = ON,
1
HALF TONE
01-JAN-1988 15:00
HALF TONE=OFF
Your display should show HALF TONE = OFF.
01-JAN-1988 15:00
HALF TONE=ON
In this case Resolution is automatically set at FINE and Original is limited to
NORMAL and PARK selections only. If you wish to go to HALF TONE = OFF,
press
HALF TONE
again.
You can now dial by pressing I TEL/DIALI and a full number,
a One-Touch key, IABBR and two digits, or REDIAL
NOT€
After changing the Halftone setting, you can
1. return to standby with [STOP 1, or,
2. make a copy of the document to test the new Halftone setting by pressing
I COPY I. or.
3. start a different series of settings by pressing ORIGINAL , STAMP , MODE
rnm or I FUNCTION I ■
31
Page 34

TRANSMISSION
I
Verification Stamp
Your facsimile machine is normally preset to stamp the bottom of each page
you send with a small pink mark indicating that the page was successfully
transmitted. Although this mark will not show up in copies or facsimiles (if you
decide to send the same document again), you may not want to have this mark
on some of your documents. To set the Verification Stamp OFF,
1 STAMP
STAMP
To return to STAMP = ON, press [STAMP again.
You can now dial by pressing TEL/DIAL and a full number,
a One-Touch key, IABBRI and two digits, or I REDIAL
01-JAN-1988 15:00
STAMP=ON
01-JAN-1988 15:00
STAMP=OFF
NOT€
After changing the Stamp setting, you can
1. return to standby with | STOP |, or, -__________ .
2. start a different series of settings by pressing 1 RESOLUTION I, j ORIGINAL
I HALF TONE I . MODE РП ПП. or ПНЖСТЮМ
3. To change the preset Stamp position, see page 26.
32
Page 35

Total Pages
The page number will be printed at the top of each page you send. You can
also set, however, the total number of pages you send so that it will be printed
on each page in addition to the page number, (e.g., 01/05, 02/05, etc.)
1
MODE
CZZICZD
01-JAN-1988 15:00
TOTAL PAGES=|
repeatedly.
Enter any number 1-99. If you make
an error, press I CLEAR I and reenter
01-JAN-1988 15:00
TOTAL PAGES=5|
the correct number.
Ex:
You can now dial by pressing I^TEL/DIAL! and a full number,
a One-Touch key, IABBR and two digits, or REDIAL
NOT€
1. Remember, stack 30 pages maximum at a time.
2. After changing the Pages setting, you can
a) return to standby with fSTOP |, or,
b) start a different series of settings by pressing | RESOLUTION
STAMP
HALF TONEl. MODE PH fTI or fFUNCTION
33
ORIGINAL
Page 36

TRANSMISSION
Individual Transmission Journai
You may want to keep a separate record of each transmission you make to
some or al! your clients. Your machine can save you the trouble of writing
records by printing out a Transmission Journai for you at the end of any
particular transmission. To obtain a journai printout, set as follows;
1
MODE
CHDCZZZD
too,to
repeatedly.
01-JAN-1988 15:00
01-JAN-1988 15:00
To return to XMT JRNL = OFF, press [SELECT I again.
You can now dial by pressing ITEL/DIAL l and a full number,
a One-Touch key, ABBR and two digits, or I REDIAL
XMT JRNL=OFF
XMT JRNL=ON
NOT6
After changing the XMT JRNL setting, you can
1. return to standby with STOP , or,
2. start a different series of settings by pressing RESOLUTION , ORIGINAL
HALF TONE I .[STAMP I MODE rn [+1 ■ or | FUNCTION
3. Untike the other settings. Individual Transmission Journai does not return to a
preset position after transmission.
34
Page 37

Error Correction Mode (ECM)
You can transmit documents free of errors by setting ECM to ON. In case
transmission speed is more important than reproduction quality of documents
being sent, you may set ECM to OFF. To set ECM to OFF,
01-JAN-1988 15:00
ECM=ON
repeatedly.
01-JAN-1988, 15:00
ECMiOFF
To return to ECM=sON, press SELECT again.
You can now dial by pressing TEL/DIAL|and a full number,
a One-Touch key. I ABBWI and two digits, or fREblAlT
NOT€
After changing the ECM setting, you can
1. return to standby with | STOP |, or,
2. start a different series of settings by pressing
STAMP U HALF TONE
3. To change the preset ECM position, see page 26.
MODE L3H . or ¡FUNCTION
35
RESOLUTION
ORIGINAL
Page 38
TRANSMISSION
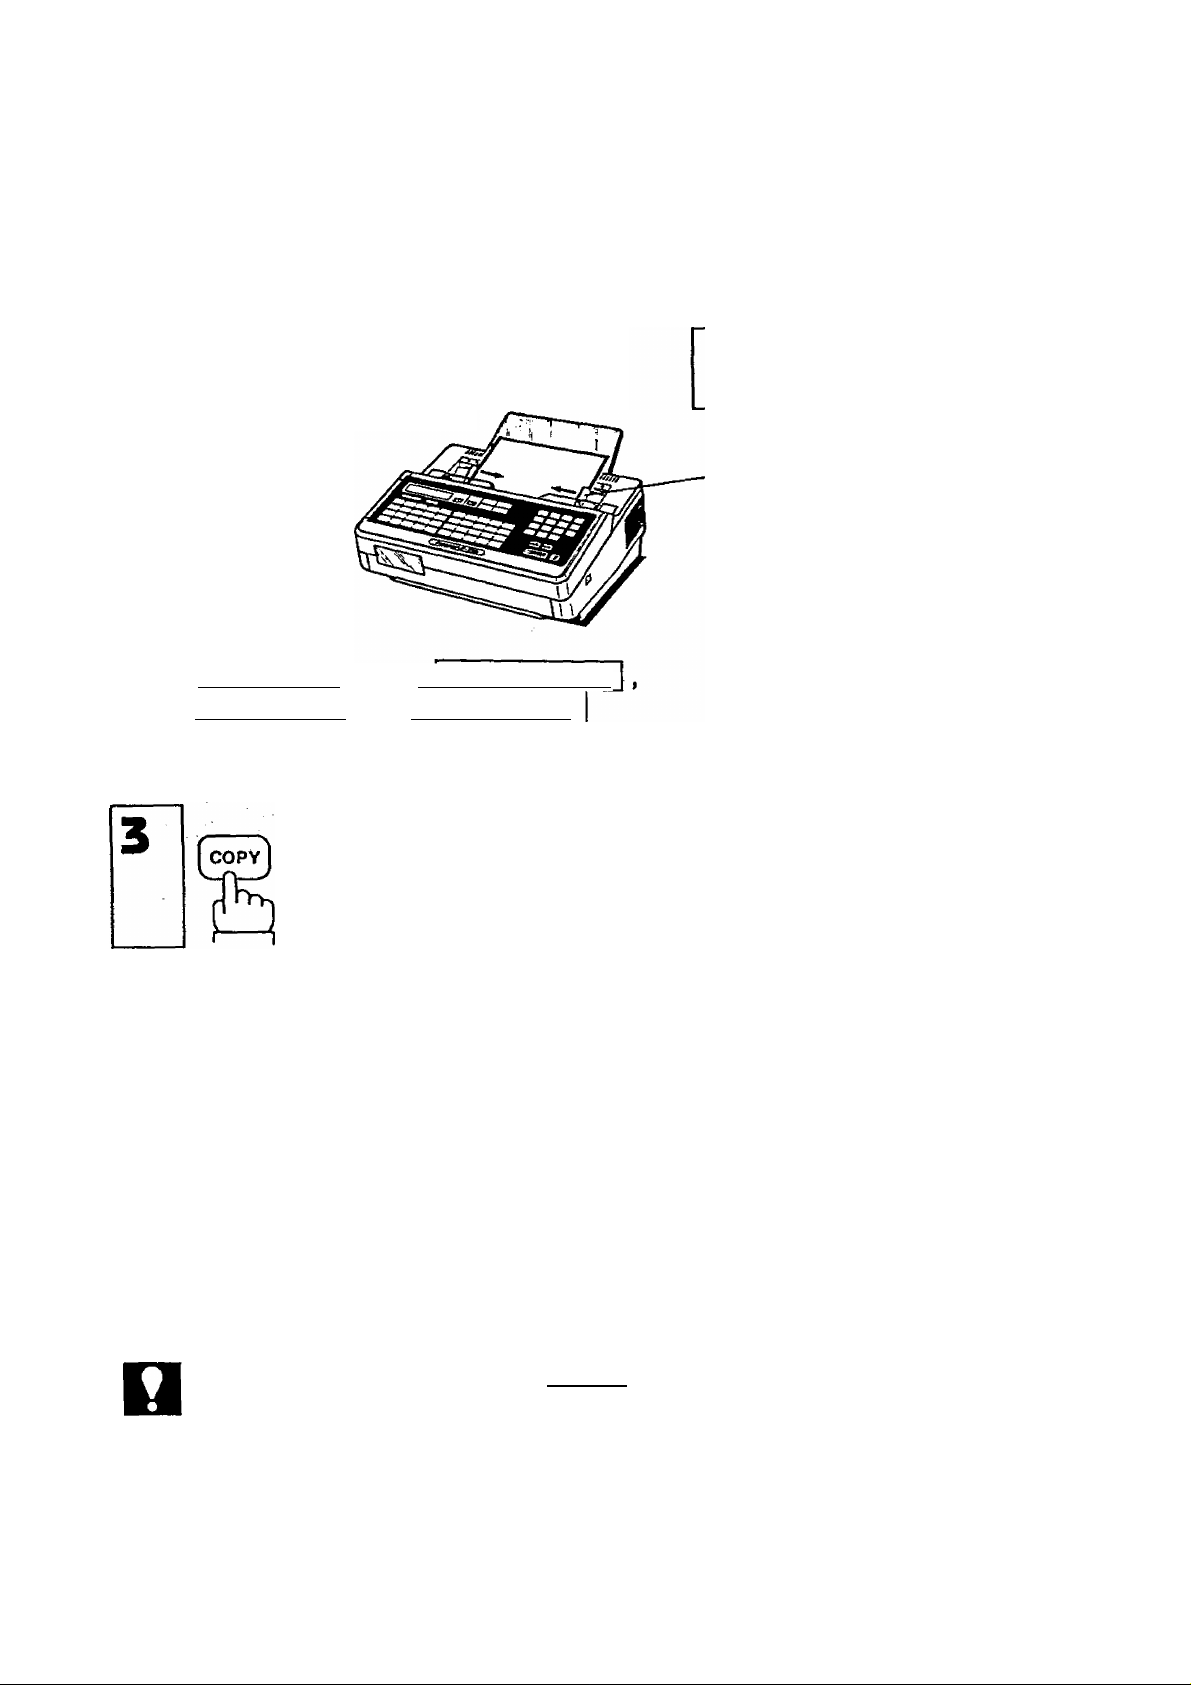
MAKING COPIES
Before you send a document, you can make a copy of it to see what it will
probably look like to the person who receives it.
1
Place documents face down on the
ADF, Adjust left and right Document
Guides.
If necessary, adjust | RESOLUTION
I ORIGINAL I, and I HALF TONE
(review pages 29 * 31)-
DOCUMENT SET
Document Guide
* COPY *
NOT€
1 .To stop the copy process, press | STOP |.
2. To make copies of more than 30 pages, add additional pages while at least one
page still remains on the ADF.
3. When making a copy, your machine will automatically select Fine Resolution,
unless you change the setting.
36
Page 39
DIRECT DIALING PROCEDURE
You can send facsimiles in several ways. Here we explain the two most basic
ways: Dialing from the keypad and dialing from the telephone set connected to
your machine. These two direct dialing methods will let you use your machine
right away, and show you that it is as easy to use as your telephone.
Dialing from the Keypad
1
Place documents face down on the
ADF. Adjust left and right Document
Guides.
Use the keypad to "dial” a number.
Ex: [u [5] [n - m E a B.
(See Note 1).
Document Guide
* DIALING *
1
* DIALING ♦
5551234
Your machine will ring the number, if the line
is free, your documents will be sent. If the
other station has an ID, it will appear on the
display.
If the line is busy, your machine wili redial
the number for you twice after three minute
intervals (see Note 2). When transmission
ends, the display will show the number of
pages sent.
NOT€
1. If you need a special access number to get an outside line, dial it first and then
press PAUSE
number.
Example: [9] I PAUSE I [f] [s] [f] [T] [2] [T] [4]
2. If the line is still busy after the second automatic try, you can start another round
of automatic dialing by pressing [REDIAL I (see page 43).
to enter a pause (represented by a "
37
COMPLETED
TOTAL PAGES=30
) before dialing the full
Page 40

TRANSMISSION
Dialing from the Telephone Set
1
Place documents face down on the
ADF. Adjust left and right Document
Guides. '
Lift receiver 0 and dial the
number of the receiving facsimile
machine.
Ex:® min-mm [as
DOCUMENT SET
Document Guide
DOCUMENT SET
If the line is free and the other machine answers, you will hear a long “beep”
sound.
ON LINE * XMT *
ON LINE * XMT *
ID:
COMPLETED
TOTAL PAGES=05
BEEP
then
START
then hang up.
Your machine will send your documents (see Note). If the other station has an
ID, it will appear on the display. When transmission ends, the display will show
the number of pages sent.
NOT€
If the line is busy, you must hang up and try again later. You cannot use the
Redia! feature for numbers dialed from the telephone set.
38
Page 41

SPEED DIALING TECHNIQUES
This section explains how to perform One-Touch dialing and Abbreviated
dialing. Redialing and Reserving for Transmission (XMT RESERVE) are also
explained.
To review how to record One-Touch and Abbreviated dialing numbers, see
pages 17 and 18.
One-Touch Dialing
1
Place documents face down on the
ADF. Adjust left and right Document
Guides.
Press a One-Touch key.
Ex: 07
The display will show the 2-digit code and
station name. The full number (e.g. 9-555
1234) will then be dialed and shown on the
display.
Document Guide
* DIALING *
[071 (Station name)
* DIALING *
9-555 1234
If the number dialed answers, document
transmission will start. If the other station has
an ID, it will appear on the display. When
transmission ends, the display will show the
number of pages sent.
39
COMPLETED
TOTAL PAGES=05
Page 42

TRANSMISSION
When 2nd ABBR. NO. is set,
3q
If the 2nd number is also busy, the machine
will wait three minutes and then automatically
redial the 1st number and 2nd number each
2 times in the same way.
If the number is busy, the machine will
automatically dial the 2nd ABBR. NO.
which you have already recorded
(Ex: 111 I). (See page 18.)
When 2nd ABBR. NO. is not set,
if the number is busy, the machine will
3b
wait three minutes and then
automatically redial the same number.
If the line is still busy, the machine
will wait and redial one more time
automatically.
* DIALING *
[111 (Station name)
WAITING TO DIAL
[07] (Station name)
WAITING TO DIAL
[071 (Station name)
If no contact is made, the display will
show an information code (e.g.,
CODE = 630 Indicates the line was
busy).
INCOMPLETE
INFO. CODE=630
NOT€
To redial a busy number, see page 43.
40
Page 43

Abbreviated Dialing
1
The display will show the 2-digit code and
station name. The full number (e.g. 555 1234)
will then be dialed and shown on the display.
Place documents face down on the
ADF. Adjust left and right Document
Guides.
and two keys. Ex:
Document Guide
* DIALING *
[62] (Station name)
* DIALING *
555 1234
If the number dialed answers, document
transmission will start. If the other station has
an ID, it will appear on the display. When
transmission ends, the display will show the
number of pages sent.
When 2nd ABBR. NO. is set,
If the number is busy, the machine will
3q
If the 2nd number is also busy, the machine
will wait three minutes and then automatically
redial the 1st number and 2nd number each
2 times in the same way.
automatically dial the 2nd ABBR. NO.
which you have already recorded
(Ex:l70j). (See page 18.)
COMPLETED
TOTAL PAGES=05
* DIALING *
[70] (Station name)
WAITING TO DIAL
[62] (Station name)
41
Page 44

TRANSMISSION
When 2nd ABBR. NO. is not set,
3b
If the number is busy, the machine will
wait three minutes and then
automatically redial the same number,
if the line is still busy, the machine
will wait and redial one more time
automatically.
If no contact is made, the display will
show an information code (e.g.,
CODE = 630 indicates the line was
busy).
WAITING TO DIAL
[62] (Station name)
INCOMPLETE
INFO. C0DE=630
NOT€
To redial a busy number, see page 43.
42
Page 45

Redialing
If the number you dialed is busy or there is
no answer, your machine will wait three
minutes and then automatically redial the
* DIALING *
[07] (Station name)
number for you. If the line is still busy, the
machine will wait and redial one more time.
If the line is still busy you can redial the last
number (e.g. 07) by simply pressing
REDIAL
WAITING TO DIAL
[07] (Station name)
If no contact is made, the display will show
an information code.
NCOMPLETE
INFO. CODE=:630
You can use Redial after dialing a number using one of the following,
One-Touch dialing
— Abbreviated dialing
— Direct dialing from the keypad
— Redialing
Your machine will redial the last number a
* DIALING *
total of three times.
[07] (Station name)
Even if you make contact and succeed in sending your documents, you can still
REDIAL 1 to contact the same number again.
use
43
Page 46
TRANSMISSION
XMT RESERVE
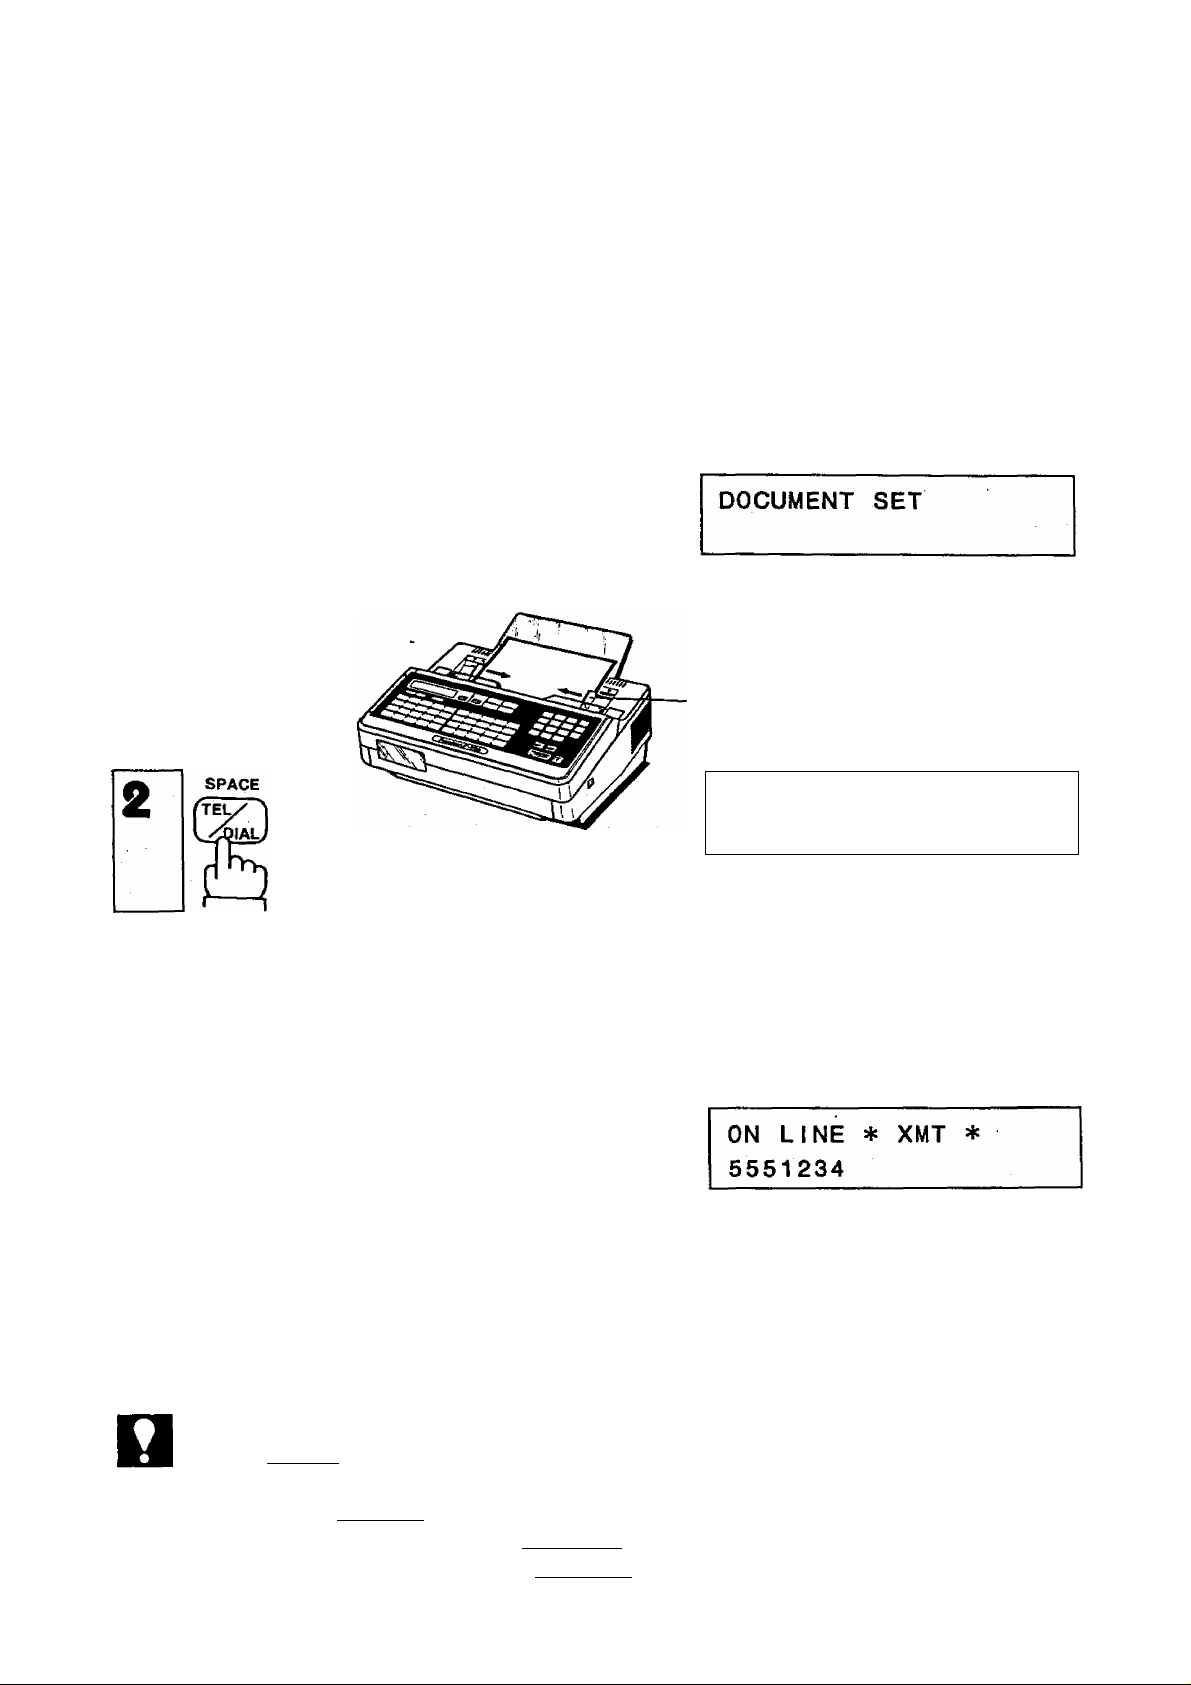
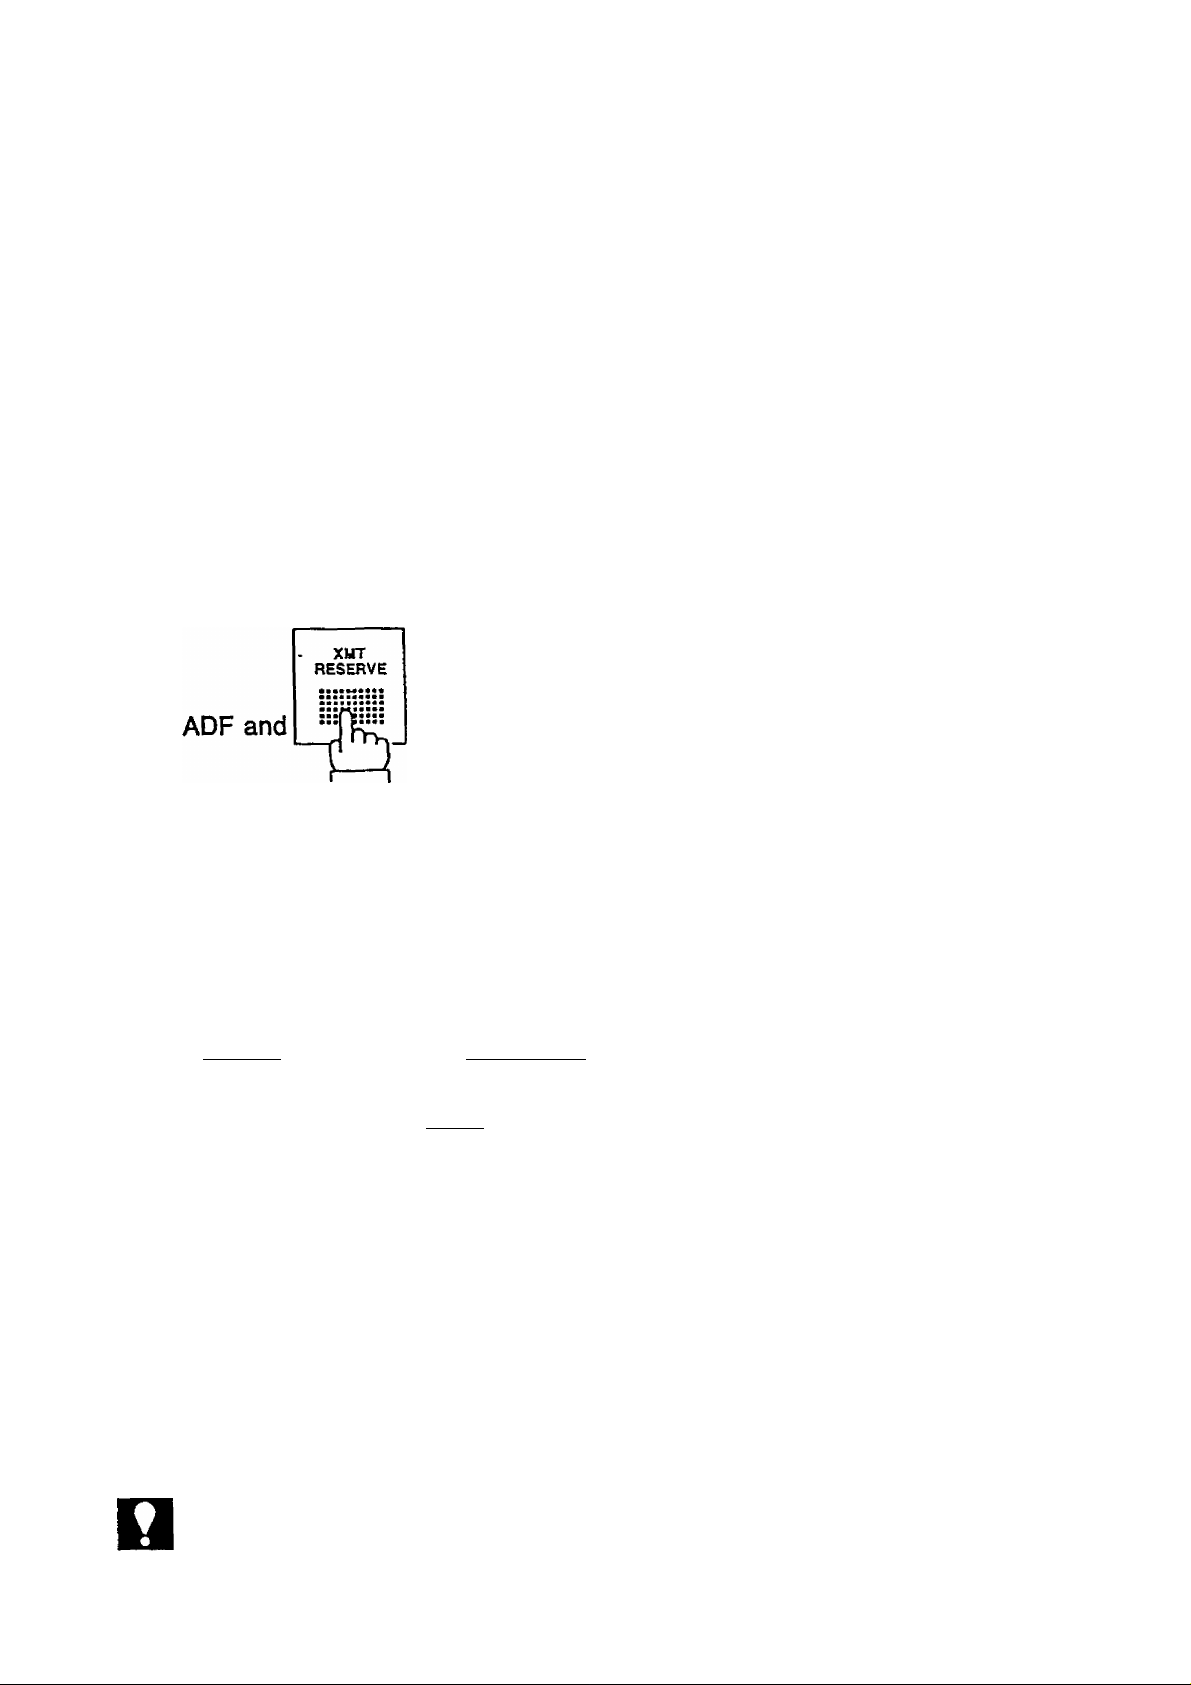
Reserving Your Machine for Transmission (XMT Reserve)
If you are in a hurry to send some documents, but your facsimile machine is
busy receiving documents, you can save time by “reserving” the machine for
transmission.
“Reserving” means presetting a One-Touch, Abbreviated Dialing, or full
telephone number. Then, when the machine has finished receiving, it will
automatically begin to dial the number you set.
1
Place documents face down on the
Adjust basic settings, e.g. Resolution
(see page 29 - 35).
Dial by pressing a One-Touch key,
ABBRI and 2 digits, or ITEL/DIAL
and a full number.
Ex: One-Touch key [ 151
XMT RESERVE
CALLED- STATION
XMT RESERVE
RESOLUTION=FINE
XMT RESERVE
[15] (Station name)
NOTC
START
XMT RESERVE cannot be used when the machine has been set for DEFERRED
COMMUNICATION (see pages 46 and 55).
44
ON LINE * RCV *
XMT RESERVED
Page 47
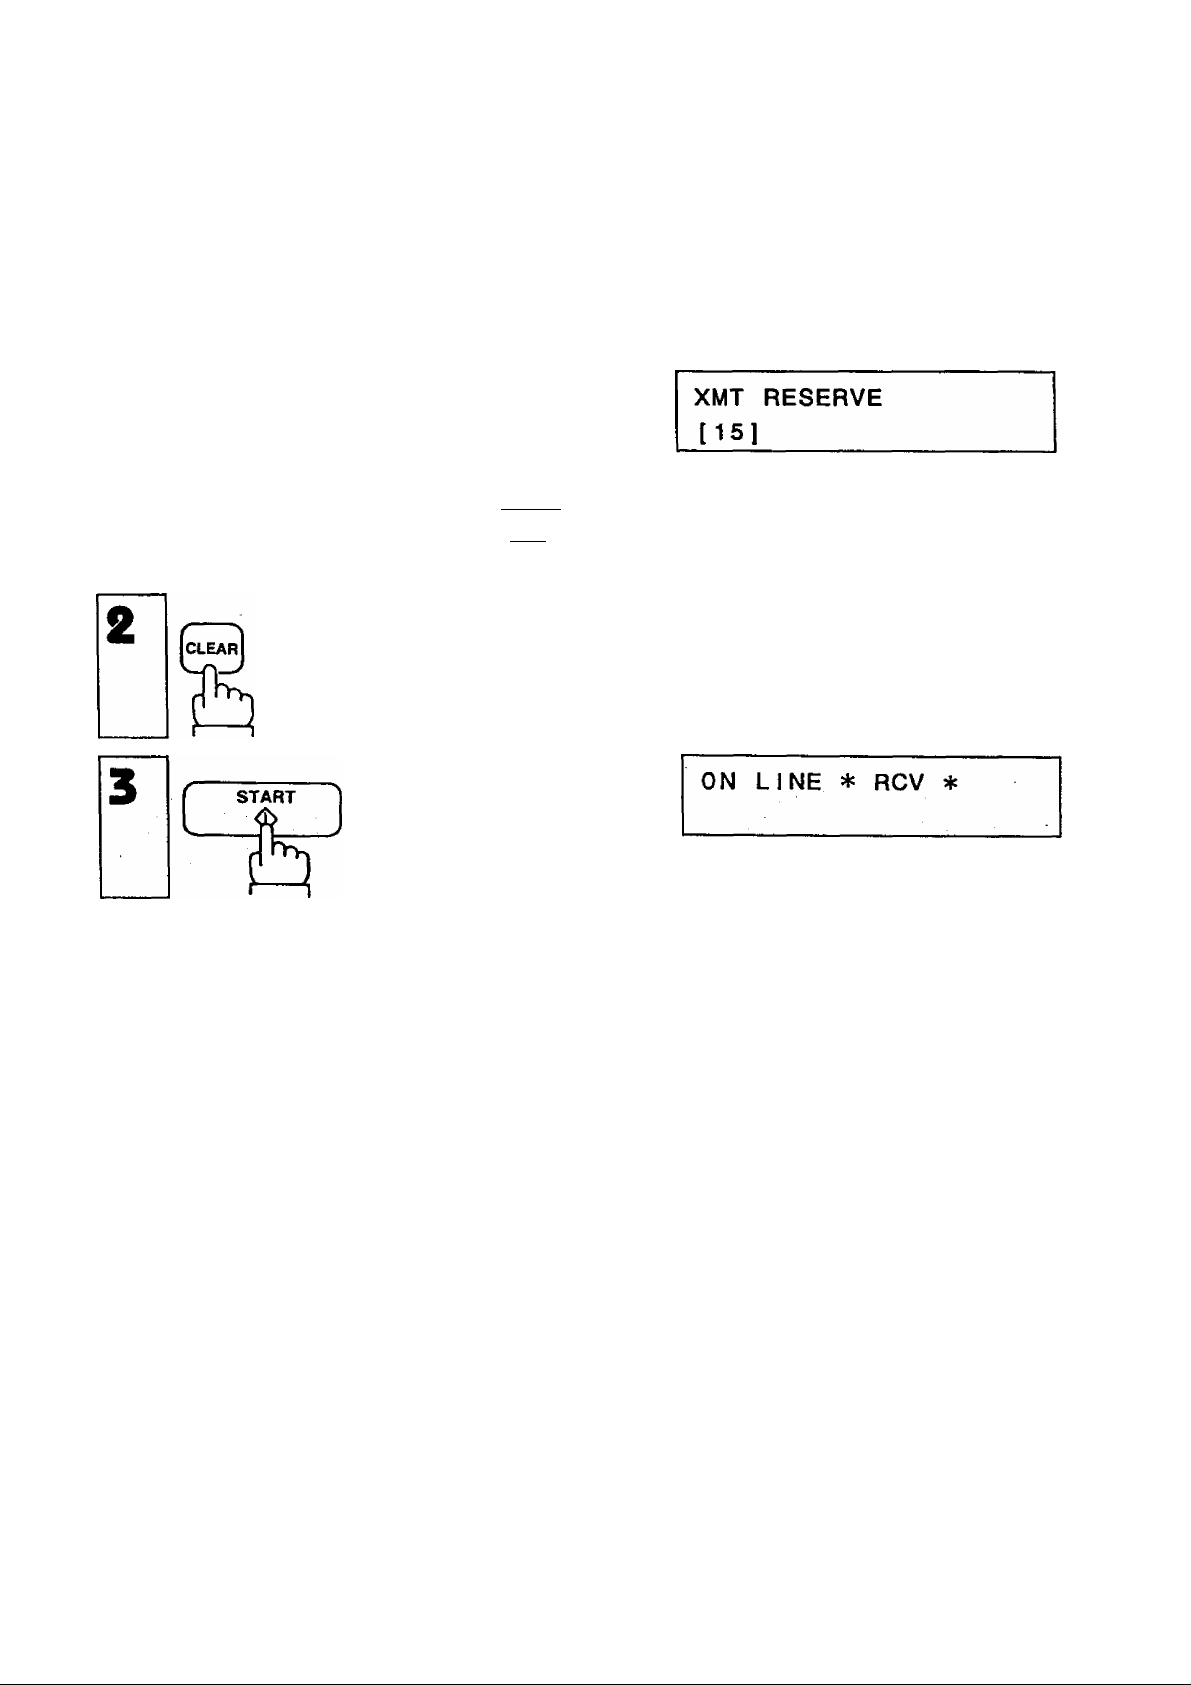
Cancelling XMT Reserve
If necessary, you can also cancel XMT RESERVE while your machine is still
busy receiving documents.
XMT
RESERVE
1
gJ
The number you reserved will appear
(e.g., One-Touch [T^).
XMT RESERVE
CALLED STATION
Now, when your machine finishes receiving documents it will automatically
return to standby.
45
Page 48

TRANSMISSION
USING THE TIMERS FOR TRANSMISSION
You can send documents to one station at any fixed time within 24 hours. Builtin timers make this DEFERRED TRANSMISSION possible. Note that both
Deferred Transmission and Deferred Polling (see page 55) can be set
independently to occur at different times.
Deferred Transmission
1
Place documents face down on the
ADF.
Adjust left and right Document Guides.
and
Select 1. XMT.
Enter start time from keypad.
(Use 4 digit, 24-hour clock.)
Ex: [T] [g [g (3 p.m.)
DOCUMENT SET
DEFERRED COMM. NO.=|
1:XMT 2:POLLING
START TIME I
CALLED STATIONS
START TIME 15:00
CALLED STATIONS
Dial by pressing a One-Touch key, or
ABBRI and 2 digits.
DEFERRED XMT 15:00
[10] (Station name)
Ex: One-Touch key 1101
DOCUMENT SET
DEFERRED XMT 15:00
[10] (Station name)
DOCUMENT SET display and Deferred XMT display will flash alternately until
transmission actually takes place.
NOT€
When you input a wrong number, press (I^LEARI , then reenter the right number.
__________
46
Page 49

How to Cancel or Change Timer Settings
DEFERRED COMM. N0.:=|
and
1:XMT 2:POLLING
START TIME
[10]
(Stat ion
Select 1: XMT
To cancel Deferred XMT
MODE
in step 1
CZZICZD
To change a station
To enter new number, use One-Touch key, or ABBR and two digits
ion, ПогО
then, pressJCLEAR
||5:00
name)
NOT€
1. When Deferred XMT is set, you can still send, poll, or copy documents. To send
or copy, remove documents (if any) from the ADF and set new documents. Then
follow normal procedure. To poll, simply follow normal procedure.
2. You cannot use Set Mode functions or XMT RESERVE when Deferred
Communication is set.
47
Page 50

TRANSMISSION
I
PROGRAM KEYS
How to Use Program Keys
Once you have recorded a number, or group of numbers under a Program Key
(see pages 19-25), you can use the key by following steps below.
To transmit documents using program keys,
1
2
Dialing automatically begins. (See Note)
-To poll documents using program keys,
1
Place documents face down on the
ADF.
Press program key:
Ex:fP2
Make sure no documents are on the
ADF.'
DOCUMENT SET
[P2J (Program name)
* DIALING *
[20] (Stat i on name)
Press program key:
Ex: |P3
Dialing automatically begins. (See Note)
NOTE
The display varies according to the entered mode settings.
01-JAN-1988 15:00
[P3] (Program name)
* DIALING *
[21] (Station name)
48
Page 51

VOICE CONTACT
Making Voice Contact after Sending
You may want to talk to the other person over the phone after sending
documents. To do so,
While you are sending
When sending is over you will hear a beep-beep-beep sound coming from your
machine.
ON LINE * XMT * TEL
OPERATOR CALLING
NOT€
SPACE
Lift the receiver A and
Talk. HELLO
To make voice contact while you are receiving documents, see page 57.
again.
What to Do When the Other Party is Set for Manual
Reception
If the Other party Is set for Manual Reception, you will hear a voice from the
speaker of your machine when you try to transmit documents. The voice is the
other party answering the phone. In this case, lift your receiver and press
STOP I. Tell the other party to prepare for reception. When you hear a beep
sound, press I START I.
49
Page 52

B
RECEIVING DOCUMENTS
AUTOMATIC RECEPTION
When your facsimile machine is preset to receive documents automatically, do
not answer the phone when it rings. The machine will soon begin receiving.
MANUAL RECEPTION
You may want to control the reception of an important document yourself. You
can do this by changing the reception setting from RCV = AUTO to
RCV= MANUAL
1
To return to RCV = AUTO press I SELECT I again
MODE
C3nr~T-)
fho-iih
until RCV = AUTO appears.
01-JAN-1988 15:00
RCV=AUTO
01-JAN-1988 15:00
RCV=MANUAL
01-JAN-1988 15:00
MANUAL RCV
50
Page 53

What to Do When Your Telephone Rings
If your machine is set for manual reception and the phone rings,
1
Lift the receiver. #
If you hear a beep ••• beep beep sound, it means someone wants to
send a fax. Or,if the caller answers and says he/she wants to send a fax,
then —
(Make sure no document is on the ADF.)
Hang up the receiver.
51
Page 54

RECEIVING DOCUMENTS
I
POLLING
How to Poll
The following procedure lets you poll one station, or up to 100 stations.
However, if you want to poll two or more stations, you must use One-Touch
dialing or Abbreviated dialing numbers.
Be sure to set the polling password before using the following procedure
(see page 16).
POLLING
CALLED STATIONS
and
Dial by pressing a One-Touch key,
ABBRI and 2 digits, or ITEL/DIAL
and a full number.
Ex: IABBRI and [3][5], or
TEUDjAL|[71[7][I][I
To add more stations, use One-Touch
keys, or IABBRI and two digits.
Ex: One-Touch key |l5l
3 4 5
POLLING
[351 (St a t i on name)
or
POLLING
7772345|
POLLING
[15] (Station name)
* DIALING ♦
[35] (Station name)
NOTC
1. To erase or change stations set in steps 2 or 3, press | CLEAR I. If you recorded
several, use MODE | or | + (to find the station you want. Then press
CLEAR I. Add new stations with One-Touch keys, or | ABBR ] and two digits.
2. If a polled station is busy, or does not answer, it will be skipped and the next
station will be polled. The skipped station(s) will be redialed twice after all
registered stations have been polled.
3. When polling ends, a Multi-Station Communication Journal is automatically
printed out. This journal lists the stations polled and indicates whether polling
was successful or not.
52
Page 55

Combined Transmission and Poiiing
(Turnaround Poiiing)
This procedure lets you do two operations with one call, automatically. First,
your machine will send a document to a station, and then it will poll the same
station.
Be sure to set the polling password before using the following procedure (see
page 16).
Place documents face down on the
1
ADF.
Adjust left and right Document Guides.
Document Guide
2
FUNCTION
I I
Dial by pressing a One-Touch key,
ABBR and 2 digits, or TEL/DIAL
and a full number.
Ex: One-Touch key lio I, or
and
TEMPjALllIltllillffltllLI]!!
START
c
n
XMT & POLLING
CALLED STATION
XMT & POLLING
[10] (Station name)
or
XMT & POLLING
5551234|
* DIALING *
[10] (Stat i on name)
or
* DIALING *
5551234
53
Page 56

RECEIVING DOCUMENTS
How to Prepare to be Polled
In order to let other stations poll your machine, you must set your machine as
described below. Note that you can still receive ordinary transmissions even
when set to be polled.
Be sure to set the polling password before using the following procedure (see
page 16). After polling, your machine will automatically return to the present
setting.
1
Place documents face down on the ADF.
Adjust left and right Document Guides.
MODE
CEDCZD
repeatedly.
Document Guide
DOCUMENT SET
POLLED=OFF
DOCUMENT SET
POLLED=ON
You are now set for POLLED = ON. if you press SELECT again, the setting
will return to POLLED = OFF.
54
Page 57

USING THE TIMERS FOR POLLING
You can poll documents from one or more stations at any fixed time within 24
hours. Built-in timers make this DEFERRED POLLING possible. Note that both
Deferred Transmission (see page 46) and Deferred Polling can be set
independently to occur at different times.
Deferred Polling
DEFERRED COMM. NO.=|
1:XMT 2:POLLING
and
START TIME I
CALLED STATIONS
Select 2. POLLING
Enter start time from keypad.
(Use 4-digit, 24-hour clock)
Ex:[3][l][0][0](3p.m.)
Dial by pressing a One-Touch key, or
ABBR1 and 2 digits.
Ex: One-Touch key [idI
To add more numbers (100
maximum), repeat step 4.
Ex; IaBBRI and Q] js] .
START TIME 15:00
CALLED STATIONS
DEFERRED POLL 15:00
[10] (Station name)
DEFERRED POLL 15:00
[15] (Station name)
01-JAN-1988 15:00
DEFERRED POLL 15:00
[10] (Station name)
The standby display and Deferred Poll display will flash alternately until polling
actually takes place.
55
Page 58

Page 59
PRINTOUT REPORTS AND LISTS
To help you maintain records of the documents you send and receive, as well
as lists of the numbers you record, your facsimile machine is equipped to print
out the following reports and lists: a Journal, One-Touch/ABBR. No. list,
Program list, and a FAX Parameter list.
Journal Printout
The “Journal” is a record of the last 32 transactions (a transaction is performed
each time you send or receive a document). It is printed out automatically after
every 32 transactions, but you can print it out manually in the following way;
and
i , or
MODE
CZDCZD
or)------{ repeatedly.
JOURNAL PRINT
* PRINTING *
JOURNAL PRINT
NOT€
Your machine is preset at the factory to permit you to send documents even when
there is no more recording paper in the machine, or when a mechanical error that
affects receiving (e.g. an overheated recording head) has occurred. With this
setting, however, some transactions might not be recorded on the Journal. To
change the setting (and ensure a complete Journal printout) see page 26.
58
Page 60

Sample Journal Printout
GR0UP2
)
(1) (2)
(9)
DATE
01-JAN
01-JAN
01-JAN
01-JAN
01-JAN 11:0i| 050280AC7800
01-JAN
01-JAN
(10)
TIME
10:i|l1 81101J80AC7800
10:115
10:ll7
10:53
10:57
11:07
c
)
(
)
12:32
(11)
DIAGNOSTIC
Al10l|80AC7800
010220200000
81I0H8OAC78OO
8llOi|80AC7800
8>JOtl80AC78OO
(:
)
8I(0il8OAC78OO
KHititiHMixxN UF-250 «»»»» -JOURHAL- «»*»«»»»x««** DATE Ol-JAN-1988 ***** TIME 15:00 »»x«**»»
(3)
NO.
01
02
03
0*1
05
06
07
(
)
32
(i|)
OK 02
OK 01
OK
OK
OK *02
iioT
(
)
OK
DOC
02
05/05
00
05/05
COM
S-OK 00
(5)
(6)
DURATION
00:0r06 XHT
00:00*20 XHT
00:03'19
00:01*07
00:02*38 XHT
00:01*09
00:00'i|6
C
)
(
)
00:02*52
(7)
X/R
RCV
XHT
RCV
■ XHT
(
XHT
IDENTIFICATION
iVl)
T
)
T
(8)
PARIS OFFICE 01-JAN
CENTRAL OFFICE
01J66 23 1689
LONDON B.O.
TOKJO B.O.
(
555 69>I9
(12)
-Panafax UF-250
««»»XXKXXXXRXXXIXXXKXXX -PANASONIC- x*x»x*xx*xx»xxxxxxxxx - 1231I5&7890123ll56709- xxrxxxk»»
03)
Sample Individual Transmission Journal
»Rxxxxsxxx UF-250 »x*** -JOURNAL- DATE Ol-JAN-1988 *x*»x TIME 15:00 ********
(3)
NO.
11
(11)
COM
OK 01
(5)
DOC
(6)
DURATION
00:00'5lJ
(7)
X/R
.XHT
(8)
IDENTIFICATION
LONDON B.O.
(1) (2)
(9)
DATE
01-JAN
(10)
TIME
10;l|ll
C001180207920
(
VOICE CONTACT REQUESTED.
«»xxxxxBKXXxxxxxxxxKx«» -PANASONIC- xx*****»*««««»«**»«*« - 123lJ567890123ll56789- xxx»x«x»x
(15)
(12)
-Panafax UF-250
( 13)
(11)
DIAGNOSTIC
59
Page 61

PRINTOUT REPORTS AND LISTS
Journal Printout Explanation
Printout date
(1)
Printout time
(2)
Communication number
(3)
(4) Communication result
Number of pages transmitted or received.
(5)
The two digit number is the number of pages successfully transmitted or
received. When the Total Page function is activated, two 2-digit numbers
will appear. The first 2-digit number represents the number ;of pages
successfully transmitted. The second 2-digit number represents the total
number of pages that were attempted to be transmitted.
An asterisk * indicates that the quality of some received copies was poor.
Duration of communication
(6)
Type of communication
(7)
(8) Remote station identification
(9) Communication date
(10) Communication start time
(11) Diagnostic
(12) LOGO
(13) ID number
(14) Dialing method
(15) Call back message
; Day-Month-Year
: HounMinute
: 1 ~ 32 (Does not always begin with 1
when printed out manually.)
: OK indicates the transmission was
successful.
S-OK : indicates that STOP was pressed
during communication,
Three-digit information code (see page 74)
appears when there was a problem.
Hours:Minutes’Seconds
XMT = Transmission
RCV = Reception
A name indicates station name recorded
in this machine. A number indicates
remote station’s ID number or Telephone
number. Group 2, 3 indicates that the
remote station was a CCITT G2, G3
machine.
Day-Month
Hour.Minute
For Panasonic service personnel only.
Up to 25 characters.
Up to 20 digits
“T” indicates direct dialing or
One-Touch/Abbreviated dialing with no
recorded station name.
Appears when voice contact was
requested.
60
Page 62

One-Touch/ABBR. Dialing Number List
To print out a list of all the facsimile numbers you recorded under OneTouch/ABBR. Dialing numbers,
FUNCTION
1
and
MODE
CZDCZED
iborfe
, or
repeatedly.
* PRINTING *
ONE - TOUCH/ABBR . NOS
Sample One-Touch/ABBR. Dialing Number List
-250 *****
{'0
ABOR.NO.
EOI]
[02]
E03J
[OU]
I05)
106)
107]
I08J
Ю9)
(lOj
E2HJ
E30J
OF STATIONS :: Ì2
1)И(КК»ЯКХ)1Я
ONE-TOUCH/ABBR.
STATION NAME
Tokoliama B.O. ОЧ563508ОЧ
Nagoya B.O. 0522627811
New York B.O.
ABC CO.,LTD И21-568-8523
TARIS OFFICE 5687611IJ
DONG KONG
XYZ gmbii
Tokyo B.O.
CENTRAL OFFICE 8765Ч32
EXPRESS TRANS
M.G.C.S.
(7)
NOS. «*** DATE OI-JAN-1988 *****
(5)
AAA CORF.
-PANASONIC- ********************* -123ii5678g0123*156789- ****
(6)
TELEPHONE NO.
51669956808
11210865
198765*1
03*1919191
2345678
8765432
0467856940
(1)
(8)
-ГапаГах UF-250
(9)
(2)
TIME 15:00 **■
(10)
2nd ЛВВП
130]
101]
(05J
[24]
_
(3)
61
Page 63

PRINTOUT REPORTS AND LISTS
One-Touch/ABBR. Dialing Number List Expianation
(1)
(2)
(3)
(4)
(5)
(6)
(7)
(8)
(9)
(10)
Printout date
Printout time
Printout page number
Abbreviated number or One-Touch number
Station name recorded in the machine
Telephone number recorded in the machine
Number of recorded ABBR and One-Touch numbers
LOGO : Up to 25 characters
ID number ; Up to 20 digits
Second Abbreviated Number
Day-Month-Year
Hour:Minute
: Up to 15 characters
: Up to 36 digits
- indicates a pause.
62
Page 64

Program List
To print out a list of all the dialing patterns stored under the program keys,
FUNCTION
1
C
and
MODE
CZUIZZD
, or
repeatedly.
* PRINTING ♦
PROGRAM LIST
Sample Program List
*’'«******» UF-250 ***** -PROGRAM LIST- »»»*»»*»» DATE Ol-JAN-1988 TIME 15:00 ***» P.l
(*1)
PROGRAM
[PI]
(PZ)
[P3J
(5)
PROGRAM NAME
EUROPE
U.S.A.
ASIA
(6)
COMM.TYPE
XMT
POLL
—
(7)
TIMER
23:«5
—
(8)
ABBR.NOS.
[01]
103), lOl], 107], 109U 19], I2I|), 1361,155]
l05MiOj,l62],(6Jn
(1) (2) (3)
c
)
(P8) JAPAN
XMT
-PANASONIC- - 123A567890I23A56789- »»»<»*«»«»
[06]
(9)
-Panafax UF-250
(10)
63
Page 65

PRINTOUT REPORTS AND LISTS
I
Program List Explanation
(1) Printout date :
(2) Printout time :
(3) Printout page number
(4) Program key
(5) Program name ;
(6) Type of communication :
(7) Timer
(8) Numbers recorded in the
program
(9) LOGO
(10) ID number
Day-Month-Year
Hour:Minute
P1-P8
Up to 15 characters
XMT indicates transmission
POLL indicates polling
---------Indicates the starting time
-----------------
One-Touch and ABBR humbers.
Up to 25 characters
Up to 20 digits
indicates the program key is
programmed as DIALING.
indicates the program key
contains “non-deferred”
program.
64
Page 66

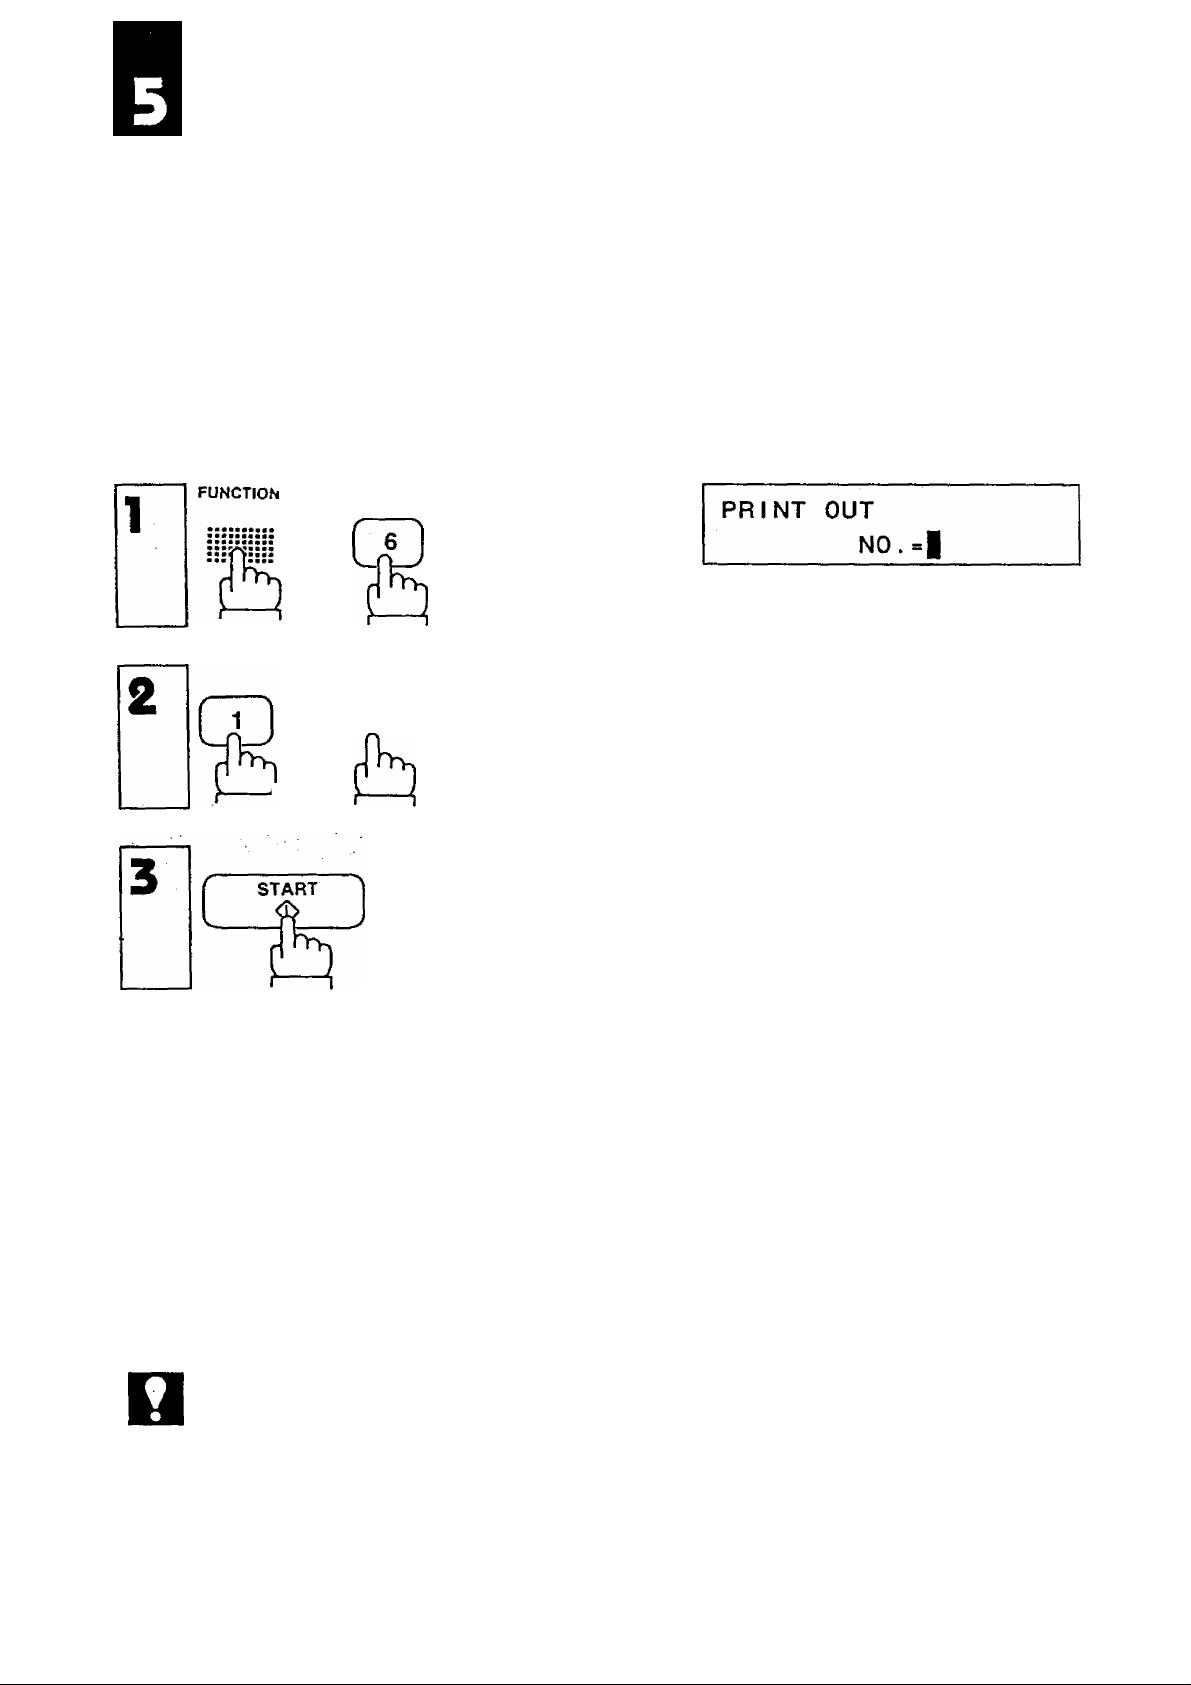
FAX Parameter List
To print out a list of the FAX Parameters (see page 28),
and
MODE
FAX PARAMETER LIST
CZZICID
ihorfo
START
repeatedly.
* PRINTING ♦
FAX PARAMETER LIST
Sample Fax Parameter List
********** UF-250 ***** -FAX PARAMETERS- »*»»»»» DATE OI-JAN-I988 ***** TIME 15:00 **«**»»*
(3)
PARAMETER
NUMBER
01
02
03
(
)
15
(M)
CURRENT
SETTING SETTING
t 1
2 1
1
(
)
2
(i) (2)
(5)
STANDARD
1
(
)
2
(6)
-Panafax UF-250
inMMniRVKKiliKaxxKxxitKxxit -PANASONIC- x***************-123*15678901231156789-
(7)
Fax Parameter List Exapianation
(1) Printout date : Day-Month-Year
(2) Printout time : Hour:Minute
(3) Parameter number
(4) Current setting
(5) Standard setting (see page 28)
(6) LOGO : Up to 25 characters
(7) ID number : Up to 20 digits
65
Page 67

H
PROBLEM SOLVING
HOW TO LOAD RECORDING PAPER
Your facsimile machine uses a roll of special recording paper, which the
serviceman may load for you when the machine is installed. However, you can
easily load paper yourself by following the steps below.
1. Open the Receiver Cover Unit (Control Panel) by depressing the latch button.
2. If there is an old roll inside, lift it out and set a new roll in its place. Be sure
the direction of the roll is as shown below. Draw out more than 5 cm of
recording paper between the guide plates of the cutter section until it projects
outside the unit.
66
Page 68

NOT€
1. The cutter section guide plate has marks indicating the width of the recording
paper.
When setting the recording paper, be sure to align the paper with the marks.
2. If the recording paper cannot pass between the guide plates, turn the Blue Cam
Wheel in the arrow direction untii you cannot turn.
Cutter Unit
Blue Cam Wheel
Recording Paper Width Marks (v)
3. Close the receiver cover unit carefully by pressing both ends gently until you
hear the cover lock into position.
The recording paper projecting from the unit will be cut automatically.
Remove this cut paper.
67
Page 69

PROBLEM SOLVING
CLEARING A DOCUMENT JAM
If a document becomes jammed in the machine, the display wili show the
information code 031.
To ciear the jam, follow the appropriate procedure below.
1. When you can still grab hold of the jammed paper,
(a) Open the Transmitting Guide Unit by pulling two tabs located on both
sides of the unit, and remove the jammed paper.
(b) Relock the Transmitting Guide Unit by pressing down.
2. When you cannot grab hold of the jammed paper,
(a) Open the Receiver Cover Unit.
Remove the Recording Paper Box by pressing the latches located on
both sides of the Recording Paper Box.
68
Page 70

(b) Remove the jammed paper by pulling two tabs located on both sides of .
the Transmitting Guide Unit,
(c) Relock the Transmitting Guide Unit and Recording Paper Box, and set a
recording paper. Then gently close the Receiver Cover Unit with both
hands.
69
Page 71
Illl^
PROBLEM SOLVING
REFILLING AND REPLACING THE VERIFICATION STAMP
The verification stamp contains ink. When the stamp appears faded or hard to
read, the stamp should be refilled \with ink or replaced.
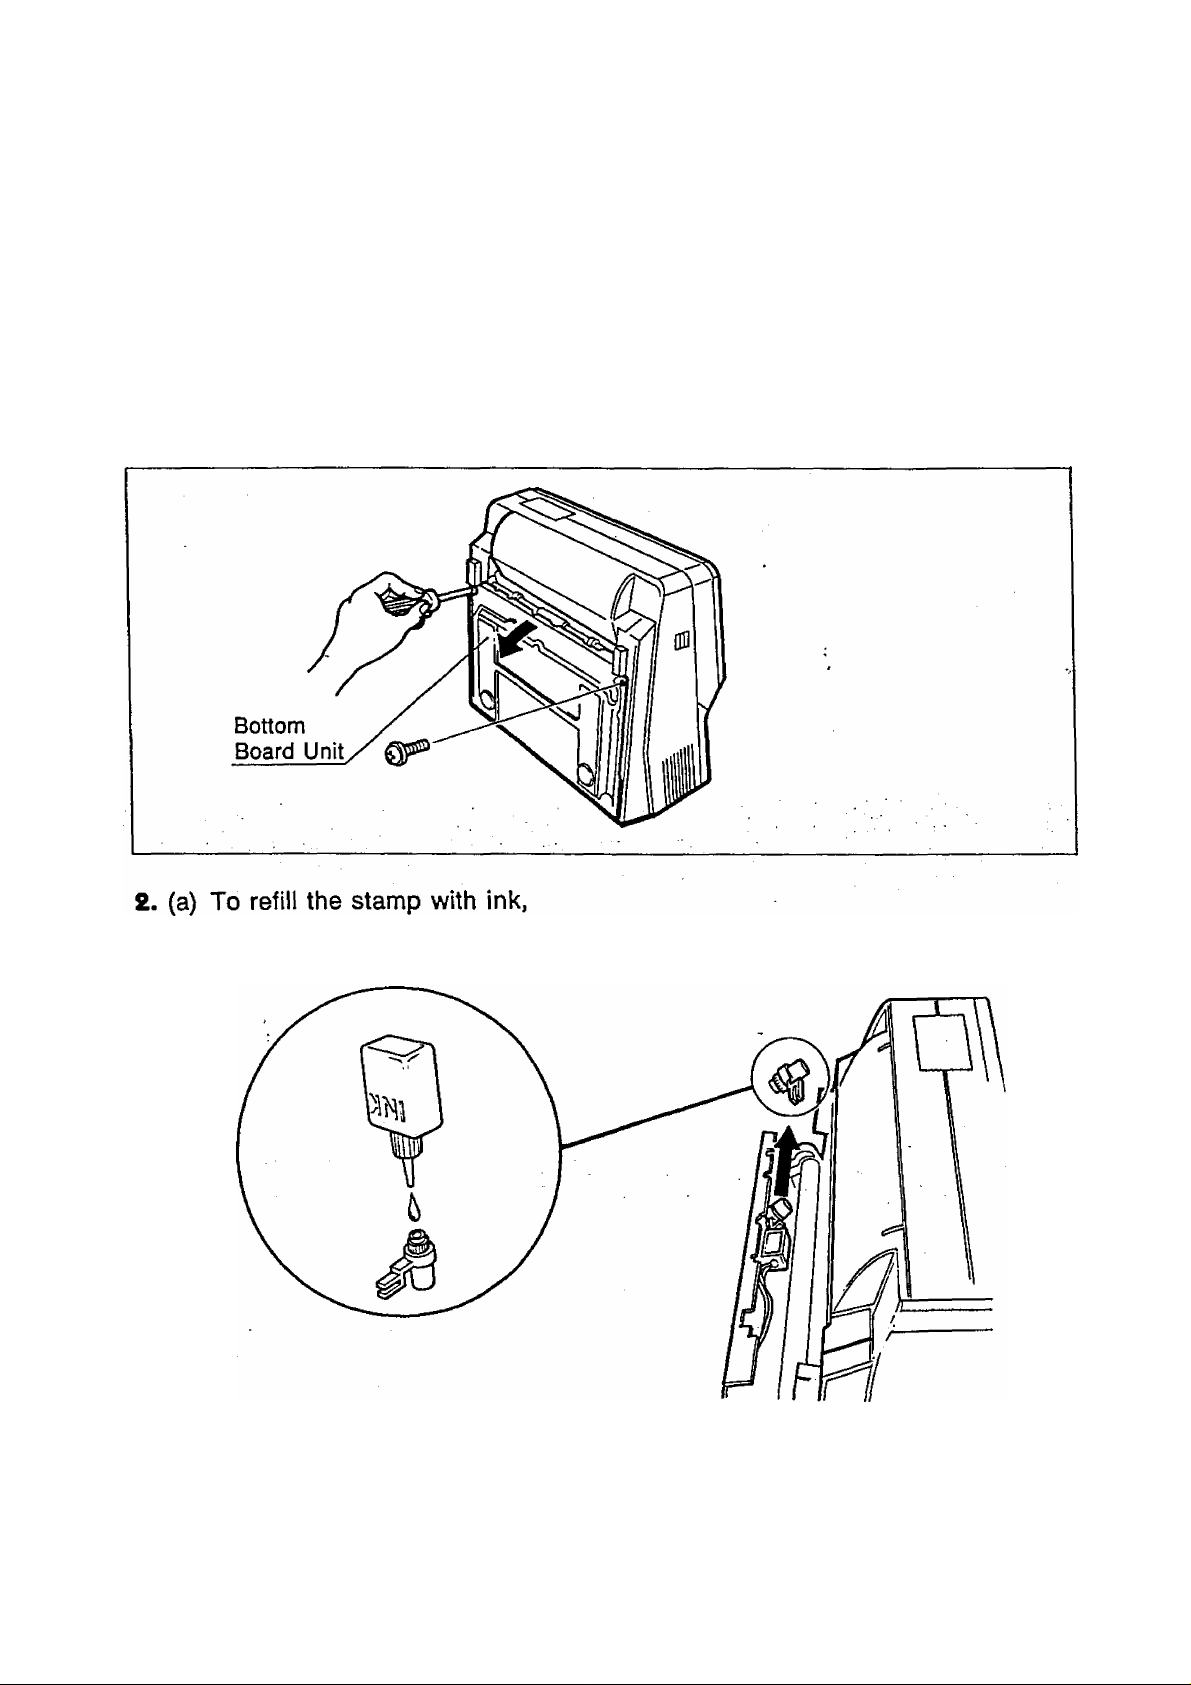
1. Turn the power 0FF(O). Remove the ADF tray and stand the unit up, then
remove the Bottom Board Unit Screws, and open the Bottom Board Unit
towards you.
remove the Verification Stamp Unit, and refill the stamp by placing a few drops
of specified ink into it. Leave it a few minutes as it is, enough to spread ink.
Make sure that ink does not spill from the stamp even if it is upset, and reset
the stamp unit.
Page 72

(b) To replace the stamp,
remove the Verification Stamp Unit, and replace the stamp with a new
one.
3. After the stamp unit has been refilled or replaced, close the Bottom Board
Unit and replace the screws. Turn the power ON (I).
NOTE--------------------------------------------------------------------------------------------
When the stamp unit is set as above, the stamp will appear on the front
side of each page.
If you want the stamp to appear on the back side of each page, ask your
service personnel to change the stamp unit.
71
Page 73
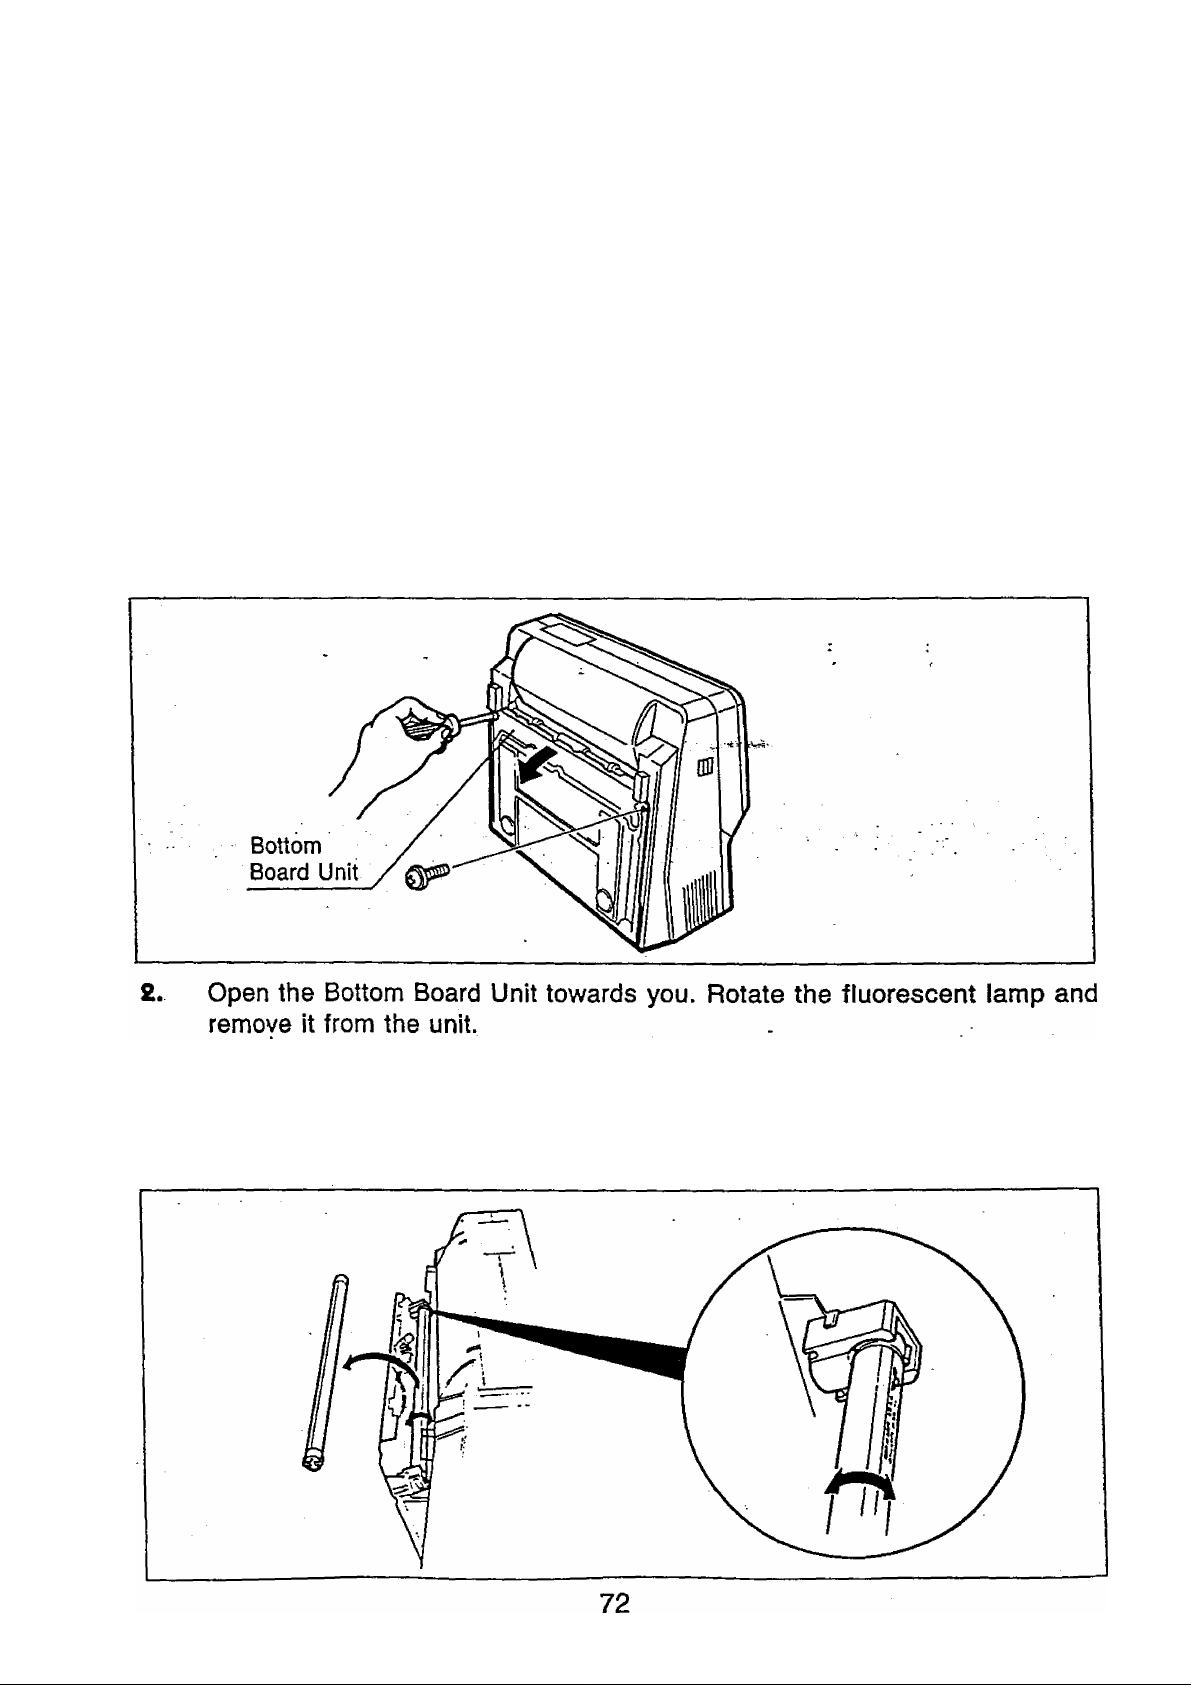
PROBLEM SOLVING
REPALCING THE FLUORESCENT LAMP
If the receiving party reports that the received documents were black, or
contained black bands, try making a copy on your unit. If the copy is black or
has black bands, the fluorescent lamp is probably defective and must be
replaced.
NOT€
The fluorescent lamp is very hot when the unit Is turned on. Wait 5 minutes or
H
more after turning the power switch OFF, before replacing the lamp.
1. Turn the power OFF (O).
Remove the ADF tray and stand the unit up, then remove the Bottom Board
Unit screws. •
Wheri inserting a new fluorescent lamp, make sure that the transparent
part faces you and the manufacturer’s mark is at the lefthand corner.
Replace the screws and return the unit to its original position.
Turn the power ON (I).
Page 74

CLEANING THE THERMAL HEAD
The thermal head in your machine needs to be cleaned occasionally to ensure
clear facsimile reproduction.
To clean the thermal head,
1. Open the Receiver Cover Uint by depressing the latch button on the right
side panel.
2. Wipe the surface of the thermal head unit gently with a soft cloth or gauze
soaked with ethyl alcohol. Be sure to use a clean cloth since the thermal
head unit can be easily scratched.
73
Page 75

PROBLEM SOLVING
INFORMATION CODES
When something unusual occurs, the display may show one of the information
codes below. These will help you identify the problem, if any.
Information
code
010
030
031
061
400 to 599
Meaning
No recording paper. See page 66.
Document is not set
properly.
Document is jammed or
document length exceeds
one meter.
Receiver Cover Unit and
Bottom Board Unit opened
during communication.
Communication trouble
due to:
• varying telephone line
conditions
• fax machine incompatibility
• problem at other party.
Reset the document
correctly.
Open the transmitting guide
unit and remove the
document. Then reset the
document (see page 68).
Close the Receiver Cover
Unit and Bottom Board Unit.
• Reset the docurtient and try
again.
• Check the other party
Response
Unable to dial and poll
621
623
630
638 Power failure occurred. Try the same operation
because of no recording
paper.
No document was on the
ADF when transmission
started after automatic
dialing operation.
Redialing was not
successful because of a
busy line or no response.
74
See page 66.
Place documents face down
on the ADF.
Redial manually.
again.
Page 76

APPENDIX
SUMMARY OF FUNCTION KEY FUNCTIONS
75
Page 77

Compatibility
Scanning method
TRANSMITTER
RECEIVER
CCITT Group 3
Group 2
Rat bed scanning with CCD type
image sensor
Flat bed scanning with solid state
thermal recording head
SPECIFICATIONS
Document size
Effective scanning width
Resolution
Coding scheme
Modem
Automatic Document
Feeder (ADF)
MAX. : 280 mm x 297 mm
280 mm x 1000 mm
(with operator’s
assistance)
MIN. : 148 mm x 73 mm
G3: 208 mm, 252 mm (Reduction)
G2: 205 mm, 240 mm (Reduction)
Horizontal : G3 8 pels/mm
G2 3.85 pels/mm
(Nominal)
Vertical : .G3 3.85 !ines/mm
(STD)
7.7 lines/mm
(FINE)
15.4 lines/mm
(SUPER FINE)
G2 3.85 lines/mm
(Nominal)
MH. MR, with MWS
Group 3 : V.29, V.27 ter with
fallback function, and
V.21
Group 2 : AM-PM-VSB
Built-in, up to 30 sheets
Power supply
Power consumption
Dimensions
Weight
Operating environment
76
100 V version : AC 97 V to 138 V
60/60 Hz,
Single Phase
200 V version
Standby
Transmission
Reception
Copy
161 mm (H) X 370 mm (W) x
335 mm (D) (excluding projections)
Approx. 8 kg
(excluding trays, recording paper,
power cord)
Temperature : 5 to 35®C
Relative humidity : 20 to 80%
AC 180 V to 264 V
50/60 Hz,
Single Phase
Approx. 20 W
Approx. 50 W
Approx. 50 W
(Black Ratio: 20o/o)
Approx. 70 W
(Black Ratio: 20%)
Page 78

¡mile Number Directory
Name Number
Page 79

Facsimile Number Directory
Name Number
Page 80

Facsimile Number Directory
Name Number
Page 81

Facsimile Number Directory
Name Number
Page 82

Matsushita Graphic Communication Systems, Inc.
CORPORATE OVERSEAS DIVISION: KyoBashi-National Bldg.,
2-13-10 Kyobashi, Chuo-ku, Tokyo, Japan 104
HEAD OFFICE: 2-3-8 Shimomeguro, Meguro-ku, Tokyo, Japan 153
Printed in Jap
(4B205)
 Loading...