

Page 1
Panafax
I 1^
Ur-loU
USER’S GUIDE
Panasonic
Page 2

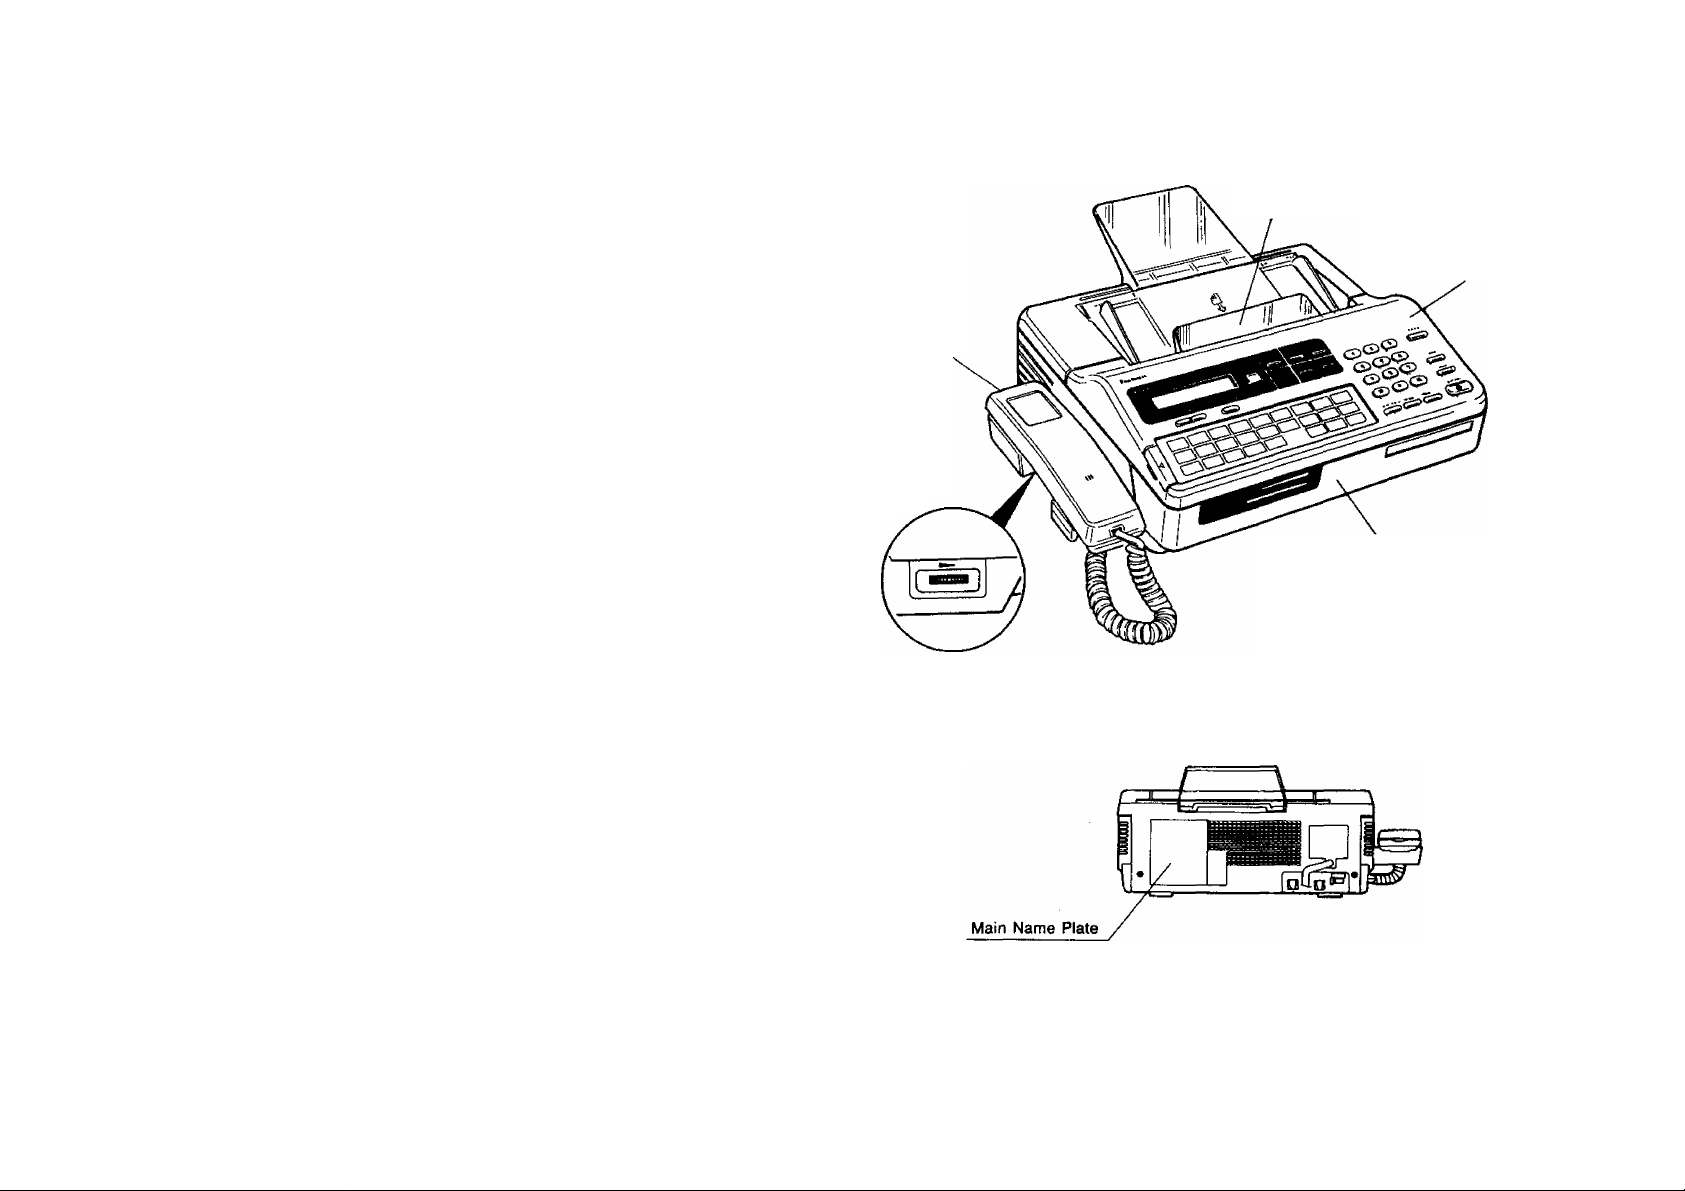
IMPORTANT INFORMATION------------------------------------------------------------------------When requesting information, supplies, or service always refer to the model and
serial number of your machine. The model and serial number's plate is located
on the rear of the machine.
For your convenience, space is provided below to record the information you
may need in the future.
MODEL NO. UF-160
SERIAL NO.
INTRODUCTION
The UF-160 is one of the most advanced models in the Panafax family of G3/G2
compatible, desktop facsimile machines. It features a full range of speed dialing
techniques designed to make sending faxes easier, faster and more economical.
Anyone can learn how to use the most frequently used features with a few minutes
of simple practice. However, because the UF-160 has the capacity to perform so many
different functions, not everyone will need to learn every feature.
Date of Purchase
Dealer
Address
Telephone Number
{ ) -
Supplies Telephone Number
( )
Service Telephone Number
( ) -
Main Name Plate
This User’s Guide will help you to use your UF-160 quickly and easily. The Table
of Contents shows where to find information on every feature. Although we recommend
that you at least review each section briefly, you may need to read only the sections
that concern the feature(s) you are interested in.
|— WARNING TO USERS----------------------------------------------------------------------------------
THIS EQUIPMENT IS NOT INTENDED FOR USE IN PARALLEL WITH OTHER
DEVICES.
USERS ARE ADVISED TO IMMEDIATELY DISCONNECT THE EQUIPMENT
SHOULD IT EVER SUFFER PHYSICAL DAMAGE WHICH RESULTS IN THE
INTERNAL PARTS BECOMING ACCESSIBLE IN NORMAL USE. IN THIS
INSTANCE USERS SHOULD HAVE THE EQUIPMENT REPAIRED OR
DISPOSED OF.
DISCONNECT THE TELECOM CONNECTION BEFORE DISCONNECTING THE
POWER CONNECTION PRIOR TO RELOCATING THE EQUIPMENT. AND
RECONNECT THE POWER FIRST.
Rear View
© 1990 by Matsushita Graphic Communication Systems, Inc.
All rights reserved.
Printed in Singapore.
The contents of this manual are subject to change without notice.
Page 3

CONTENTS
INTRODUCTION
1. GETTING TO KNOW YOUR UF-160
— External View.......................................................................................................................... 5
— Control Panel........................................................................................................................... 6
— Function Key........................................................................................................................... 8
2. INSTALLING YOUR MACHINE
— Caution.................................................................................................................................... 9
— Unpacking ............................................................................................................................ 10
— Installing Sub-Tray................................................................................................................ 11
— Installing Handset and Cradle
— Connecting the Power Supply Cord...................................................................................... 12
— Installing/Replacing Recording Paper................................................................................... 13
- — Setting the Dialing Method (Tone or Pulse)............................................................................ 15
— Lightning Precautions ........................................................................................................... 16
— Final Installation Test............................................................................................................ 17
3. SETTING UP YOUR MACHINE
CHARACTER KEY LAYOUT UNDER THE ONE-TOUCH KEYS............................................ 18
— How to Select Characters.................................................................................................... 19
USER PARAMETERS
— How to Set the Date and Time.............................................................................................. 20
— How to Set Your LOGO........................................................................................................ 21
— How to Set Your ID Number................................................................................................. 22
ONE-TOUCH/ABBREVIATED NUMBERS
— Entering One-Touch/Abbreviated Dialing Numbers ........................................................... 23
— Filling Out the Station Directory Sheet................................................................................. 25
FAX PARAMETERS
— Setting Fax Parameters........................................................................................................ 26
— Parameter Table................................................................................................................... 28
USING MUTE AND ADJUSTING VOLUMES
— Using Mute............................................................................................................................ 30
— Setting the Ringer Volume.................................................................................................... 30
— Setting the Speaker Volume ................................................................................................ 30
4. SENDING DOCUMENTS
LOADING DOCUMENTS ......................................................................................................... 31
— Documents You Can Send .................................................................................................. 31
— Documents You Cannot Send.............................................................................................. 31
— How to Use the Carrier Sheet.............................................................................................. 31
— Loading Documents ............................................................................................................. 32
BASIC TRANSMISSION SETTINGS
— Resolution ............................................................................................................................ 33
— Contrast (Original)................................................................................................................. 34
— Halftone................................................................................................................................. 35
— Verification Stamp ................................................................................................................ 36
— Total Pages........................................................................................................................... 37
..............................................................................................
11
— Error Correction Mode (ECM).............................................................................................. 38
— Automatic Individual Transmission Journal (XMT JRNL).................................................... 39
DIALING TECHNIQUES
— Direct Dialing (On-Hook Dialing)........................................................................................... 40
— Off-Hook Dialing ................................................................................................................... 42
— One-Touch Dialing................................................................................................................ 43
— Abbreviated Dialing............................................................................................................... 45
— Redialing .............................................................................................................................. 47
TRANSMISSION RESERVATION
— Setting Transmission Reservation........................................................................................ 48
— Canceling Transmission Reservation .................................................................................. 49
MAKING COPIES ...................................................................................................................... 50
RECEIVING DOCUMENTS
AUTOMATIC RECEPTION ....................................................................................................... 51
MANUAL RECEPTION ............................................................................................................. 51
— How to Set Manual Reception............................................................................................. 51
— What to Do When Your Telephone Rings ........................................................................... 52
7.
POLLING
— How to Set the Polling Password.......................................................................................... 53
— How to Prepare to be Polled................................................................................................. 54
— How to Poll............................................................................................................................. 55
— Turnaround Polling (Combined Transmission and Polling)
8.
USING YOUR UF-160 TELEPHONE
— Making a Regular Call........................................................................................................... 57
— Making Voice Contact after Sendtng/Receiving
— Answering a Voice Contact Request..................................................................................... 58
— What to Do when the Other Party is Set for Manual Reception
TIMER CONTROLLED COMMUNICATIONS
9.
— Deferred Transmission.......................................................................................................... 60
— Deferred Polling..................................................................................................................... 62
— How to Cancel or Change the Settings................................................................................. 63
10.
PROGRAMMED COMMUNICATION
— Setting Program Keys............................................................................................................ 65
— How to Erase or Change Program Key Settings................................................................... 70
— Program Key Programming Flowchart.................................................................................. 74
— Using Program Keys.............................................................................................................. 75
11.
PRINTOUT REPORTS AND LISTS
— Journal Printout...................................................................................................................... 76
— Individual Transmission Journal (XMT JRNL)....................................................................... 77
— One-Touch/ABBR, Dialing Number List................................................................................ 80
—- Program List.......................................................................................................................... 82
— Fax Parameter List................................................................................................................ 84
..................................................................
.................................................
..........................................
56
58
59
Page 4
GETTING TO KNOW YOUR UF-160
12. PROBLEM SOLVING AND DAILY CARE
— Information Codes ................................................................................................................ 06
— Clearing a Recording Paper Jam......................................................................................... 89
— Reloading a Recording Paper.............................................................................................. 90
— Clearing a Document Jam .............................................................................................. 92
— Adjusting the Automatic Document Feeder (ADF)............................................................... 94
— Refilling the Verification Stamp Unit..................................................................................... 95
— Cleaning the Thermal Recording Head................................................................................ 96
13. APPENDIX
a. RELAYED (MULTI-STATION) TRANSMISSION ................................................................. 97
— General Description............................................................................................................... 97
— UF-160 Compatibility with Other Machines........................................................................... 98
— Relay Network....................................................................................................................... 99
— Setting Up Your Machine for Relayed Transmission ......................................................... 103
— Sending Relayed Faxes...................................................................................................... 111
— Printouts and Reports.......................................................................................................... 113
b. CONFIDENTIAL COMMUNICATIONS
— General Description ............................................................................................................ 117
— UF-160 Compatibility with Other Machines
— Setting Up Your Machine for Confidential Communications
— Sending a Confidential Fax to a Relay Station
— Polling a Confidential Fax from a Relay Station
— Printouts and Reports.......................................................................................................... 125
c. PASSWORD COMMUNICATION ...................................................................................... 126
— Setting Transmission Password and Receiving Password..................................................127
— How to Start Password Transmission..................................................................................128
— How to Set Password Receiving..........................................................................................129
d. FAX ACCESS CODE.......................................................................................................... 130
— How to Set Fax Access Code............................................................................................. 131
— How to Use the Machine after You Set Fax Access Code
— How to Reset Fax Access Code......................................................................................... 133
14. SPECIFICATIONS ................................................................................................................... 134
..............................................................................
.........................................................................
...............................................
....................................................................
..................................................................
..................................................
117
118
119
123
124
132
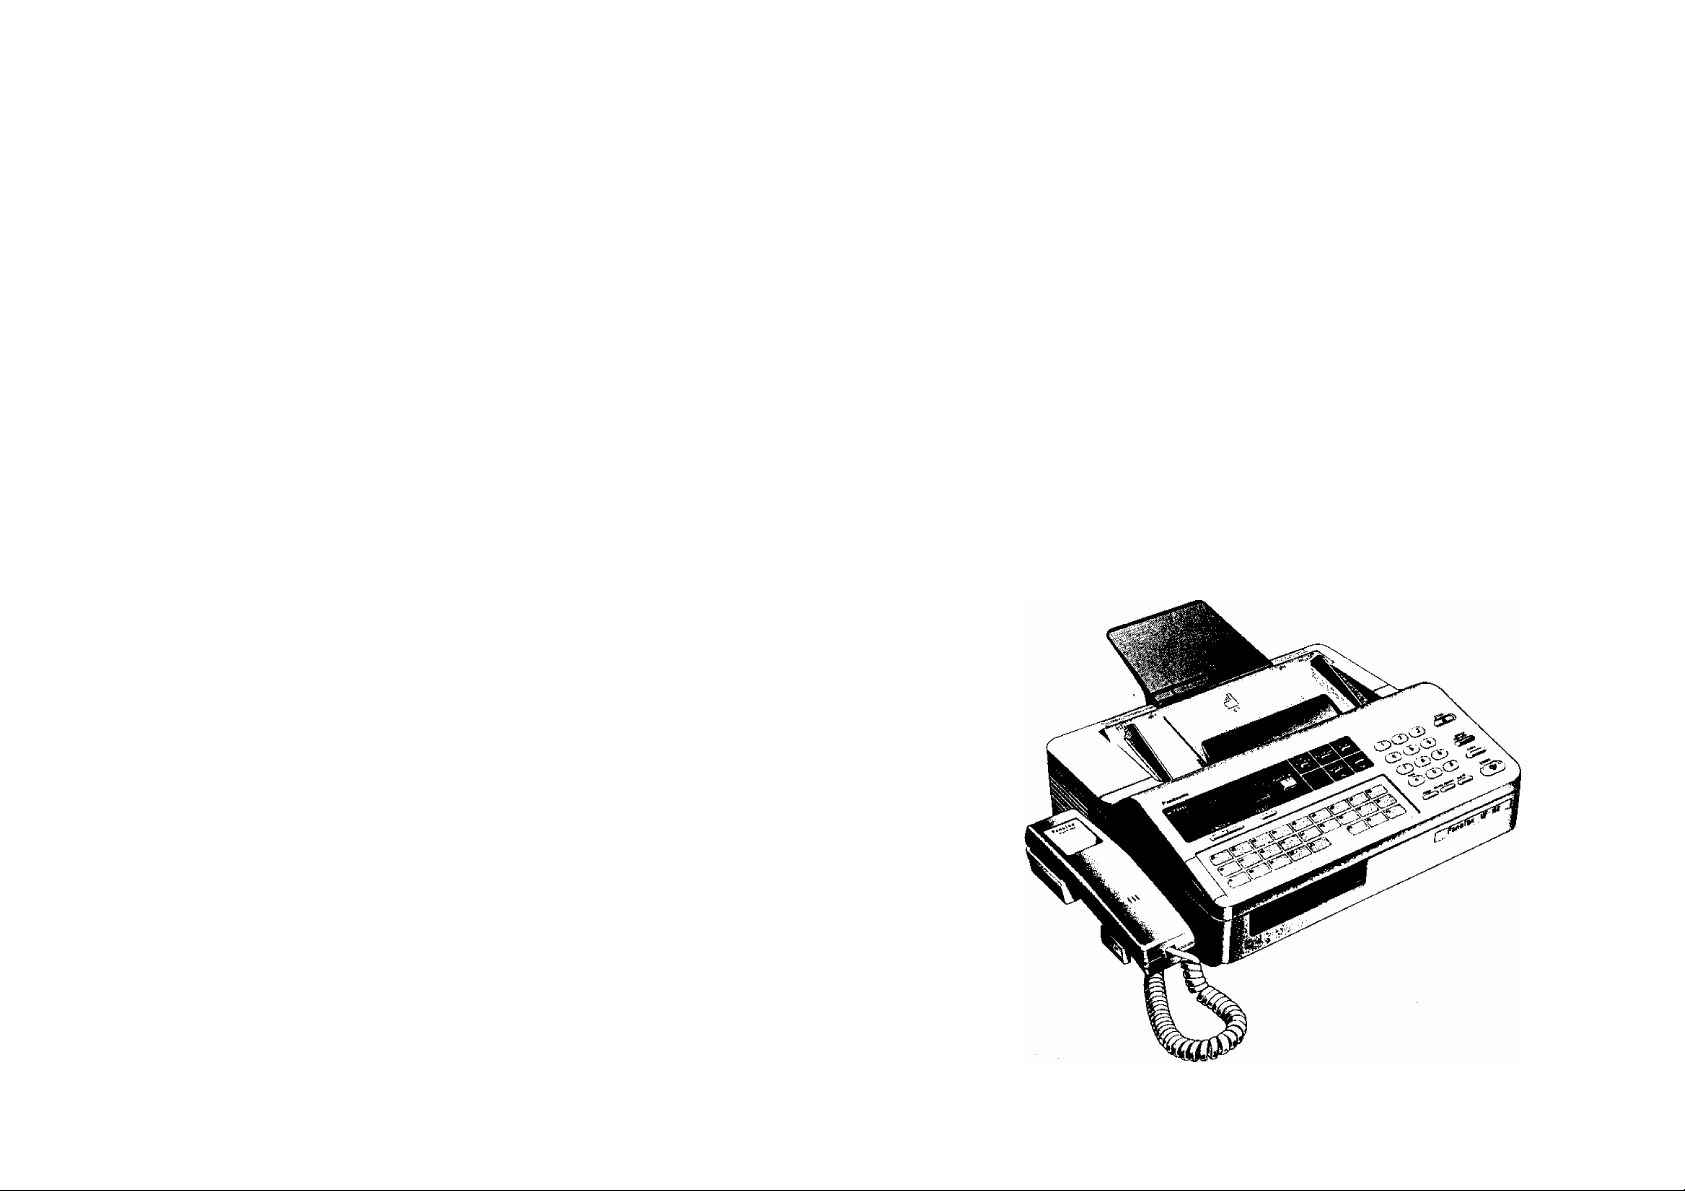
External View
ADF (Automatic Document Feeder)
Control Panel
Handset
Speaker
Volume
Control
Receiving Unit
Front View
Rear View
Page 5

J
Control Panel
- SELECT
Used to switch Basic Transmission
settings.
■ MODE ¡3] and
Used to set Total Pages, Individual
Transmission Journal, etc.
Also used to select Sub-functions (i.e.,
instead of pressirig the sub-function
number key, you can scroll in opposite
directions by pressing either key
repeatedly).
- Display
Shows Date and Time, or the current
operation.
Power Lamp
Lights when the power is ON.
Panasonic
Of 02
10 11
IS 20
____________________________________
^ -------------------------------------------------------------------------------------------------------------------
04
03
f3
12
21 22 23
1
FUNCTION
Used to start or sat the following functions and
sub-functions:
1 DEFERRED COMMUNICATION
2 RELAYED
3 POLLING
4 TRANSMISSION & POLLING
5 CONFIDENTIAL COMMUNICATION
6 PRINT OUT
Q) JOURNAL PRINT
@ ONE-TOUCH/ABBR. NOS.
@ PROGRAM LIST
XMT RESERVE
Used to reserve transmission when the
machine is still receiving.
HALF TONE
Provides ON and OFF settings for halftone
documents.
XMT
RESERVE
HALF TONE
CZ)
a
or
Ofi
QS
1£
14
If IT
PI
Of
P2
O
ORIGINAL
C®
c
09
IB
P3
i
>
STAMP
RESOLUTION
>
—
@ FAX PARAMETER LIST
® INDIVIDUAL TRANSMISSION JOURNAL
7 SET MODE
(T) USER PARAMETERS
@ RELAYED TRANSMISSION & CONF.
COMM. PARAMETERS
ONE-TOUCH/ABBR. NOS.
§
PROGRAM KEYS
FAX PARAMETERS
STOP
QDCDCD
®(D®
® ® ®
TONE
©®®
ABBn PAUSE/REOtAL CLEAR
D C
SPACE
TEUDIAL
COPY
czz>
START
cz>
NOTE
Any function can be started by first pressing
i FUNCTION land the function’s number key, or by
pressing I FUNCTION I repeatedly until the function
appears on the display.
-Keypad
Used for Direct Dialing, recording phone numbers, and
selecting functions.
STOP
Used to cafK»l operations. When it is pressed, the machirte
will return to standby.
SPACE
TELJDIAL
Used to start Direct Dialing, and to enter a space
in recorded telephone numbers.
-COPY
Used to make document copies.
-START
Used to start or set operations.
Program Keya (P1 -P3)
Used to record long dialing
procedures, Group Number
keys, and extra One-Touch
keys.
One-Touch/Character Keys (01 ~23)
Used for One-Touch Dialing and recording
letters and symbols.
ORIGINAL
Used to set Normal, Dark, or Light. Also
serves as an arrow key (<), together with
RESOLUTION {>). to rrtove the cursor over
recorded numbers and characters.
RESOLUTION
Used to set Normal, Fine, or Super-Fine. Also used as an arrow key (>), together
with ORIGINAL (<), to move the cursor
over recorded numb^s and characters.
STAMP
Used to set the Verification Stamp ON or OFF.
CLEAR
Used to erase the previously entered input.
REDIAL or PAUSE
Used to start Redialing, or to enter a pause when recording
or dialing a telephone number.
ABBR
Used to start Abbreviated Dialing.
Page 6

I
Function Key
— Setting Total Pages
t—~ir
t]o,h
— Automatic Individual Transmission Journal ON/OFF
Setting to be Polled
Setting Password Transmission ON/OFF (see Note)
~ Error Correction Mode ON/OFF
— Automatic Reception ON/OFF
—["^1 ] Deferred Communication
—[ 2 ] Relayed (Multi-Station) Transmission
—( 3 J Polling
—[ 4 ] Turnaround Polling
—[ 5 ] Confidential Communication (see Note)
Print Out
KI>
—( 1 ] Journal Print
—[ 2 ] One-Touch/Abbreviated
—[ * j FAX Parameter List
—[~6 ] Individual Transmission Journal
—[ 2 ] Relayed Transmission &
Dialing Number List
{ 3 j Program List
reuser
Parameters
Confidential Communication
Parameters (see Note)
—Date & Time
Logo
ID No.
Polling Password
(page 37)
(page 39)
(page 55)
(page 129)
(page 38)
(page 51)
(page 60)
(page 111)
(page 55)
(page 56)
(page 123)
(page 76)
(page 80)
(page 82)
(page 84)
(page 77)
(page 20)
(page 21)
(page 22)
(page 53)
(page 122)
B
INSTALLING YOUR MACHINE
Caution
1, Do not install the machine near
heating or air conditioning units.
-7 \
3. install the machine on a flat
surface, and leave at least 10 cm
of space between the machine and
other objects.
2. Avoid exposure to direct sunlight.
4, Do not block the ventilation
openings.
—[ 3 j One-Touch/Abbreviated Numbers
—[ * ] Program Keys
—[ 5 ] FAX Parameters
NOTC
If the Fax Parameter is not preset to Valid Position, which enables you to use the
function, the display will not show the function.
(page 23)
(page 65)
(page 26)
5. Do not place heavy objects, or spill
liquids on the machine.
Page 7
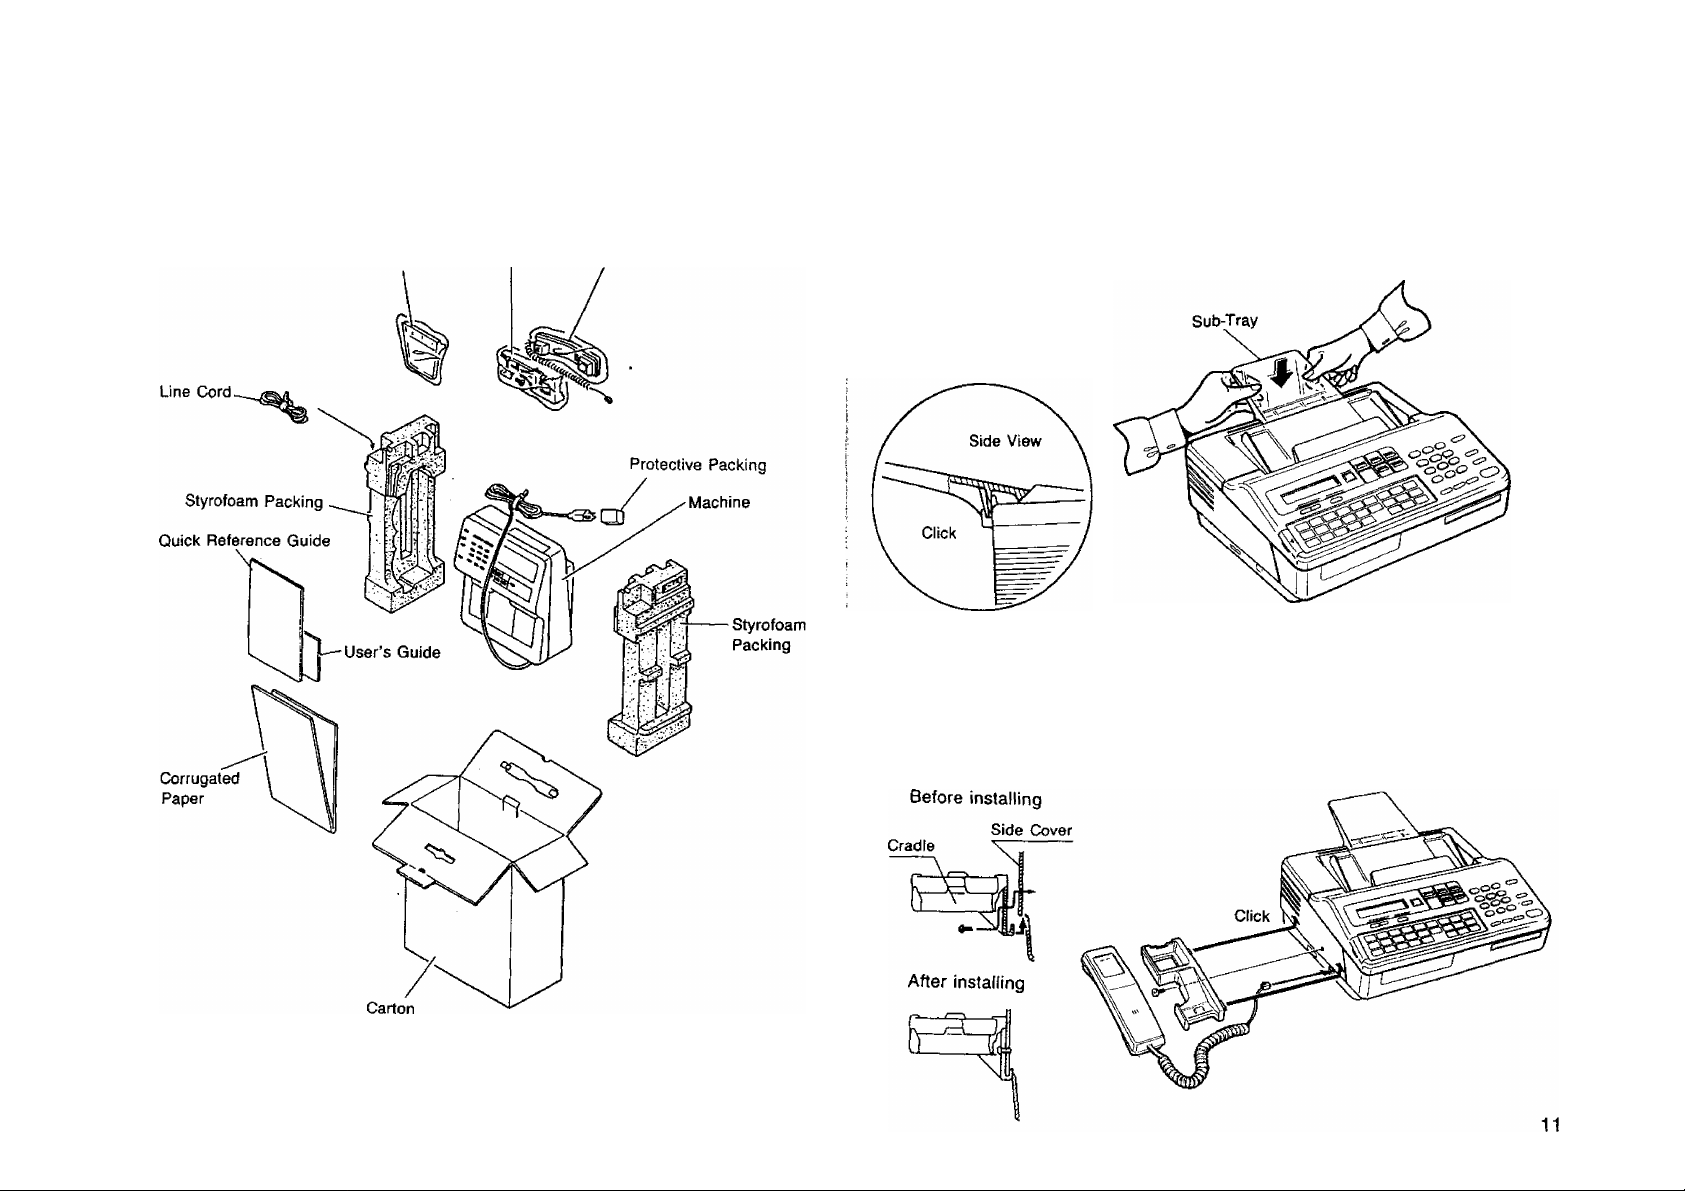
Unpacking
Installing Sub-Tray
Unpack the cardboard box referring to the illustration shown below. Inspect the I
machine for any shipping damage and check that you have all accessories illustrated. :
Sub Tray Cradle
Handset
The ADF tray is provided as a part of the upper cover of the machine.
Install the sub-tray by inserting its brackets into holes on rear side of the upper cover
and sliding it downwards until it locks into position. See the figure shown below.
I
Installing Handset and Cradle
1. Plug the telephone handset into the jack on the left side of the machine.
2. Insert the telephone cradle hooks into the two slots on the left side of the machine
and press down gently until it locks into place. Then insert the screw into the center
of the cradle and tighten with a phillips screwdriver.
NOTC
When you purchase the machine, the line cord is attached to the machine.
10
Page 8
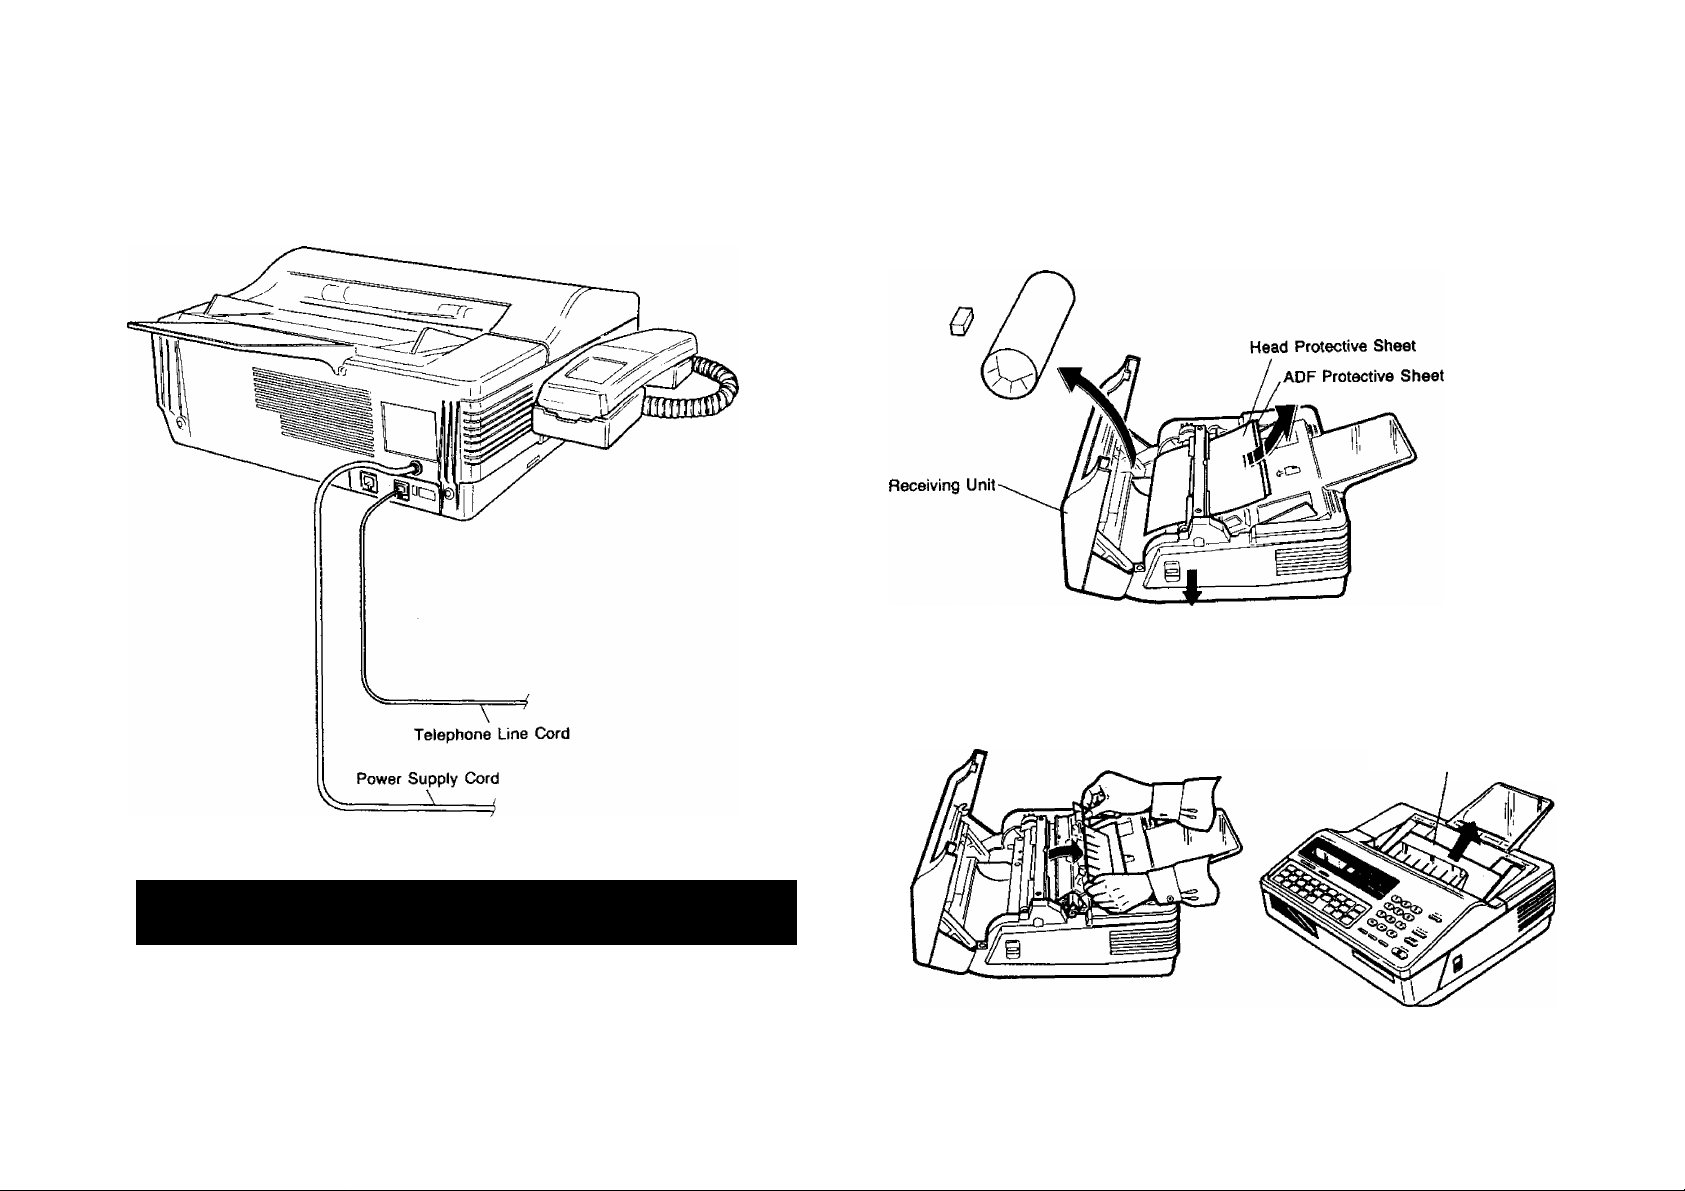
Connecting the Power Supply Cord
1. Plug the power supply cord into an ordinary AC outlet.
Installing/Replacing Recording Paper
1. Press the latch button down on the right side of the cover and open the Receiving
Unit.
(1) Remove the Head Protective Sheet.
(2) Unlock the ADF unit by gently pulling up both sides of the ADF. Remove the APF
Protective Sheet and then lock the ADF unit.
I
é
i
WARNING
When you operate this equipment, the socket-outside should be near the equipment
and be easily accessible.
NOTC
The built-in rechargeable battery requires 48 hours to be fully charged.
12
ADF Protective Sheet
13
Page 9
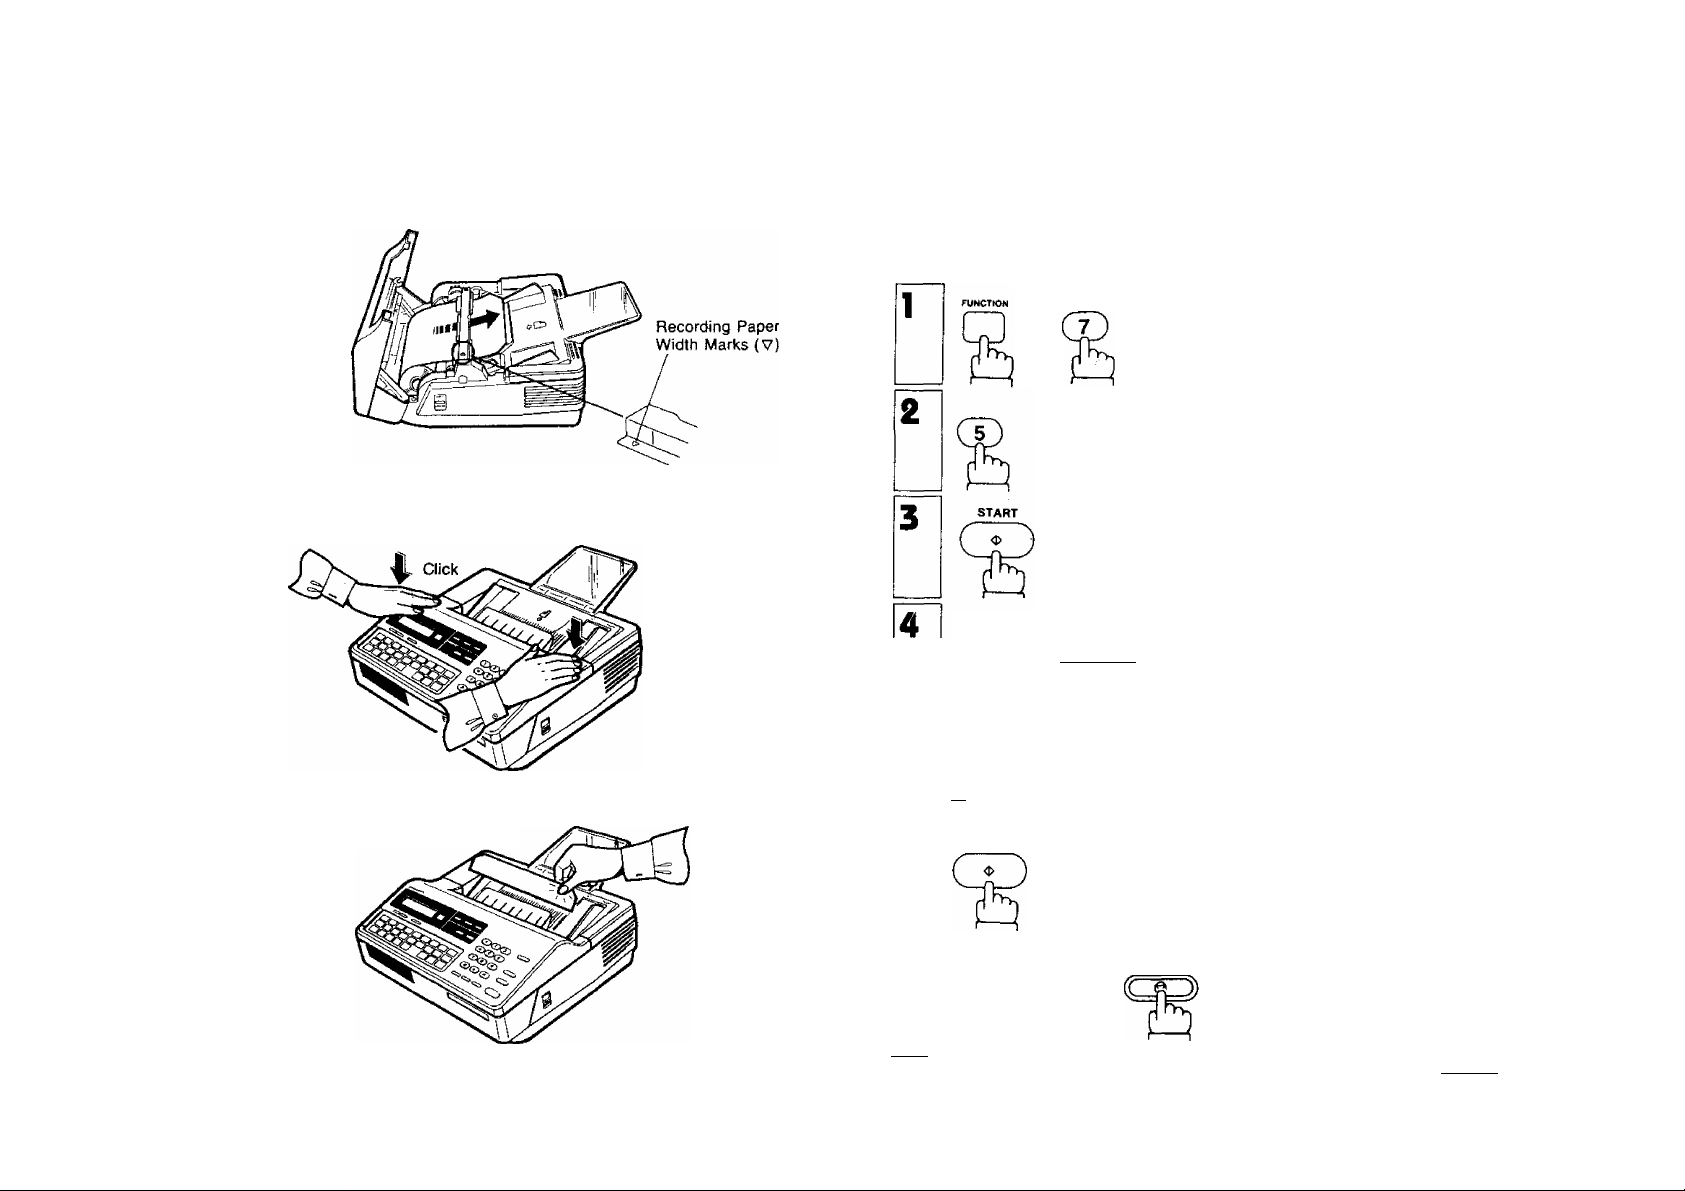
2. Set the recording paper into the unit and feed the leading edge of the paper
between the guide plates of the cutter unit until it projects out of the unit. Make
sure that the recording paper is set correctly as shown in the figure below. If it
is set incorrectly, the machine will not reproduce images.
3. Close the Receiving Unit carefully by pressing both corners down until the cover
locks into position (you will hear a “click” sound).
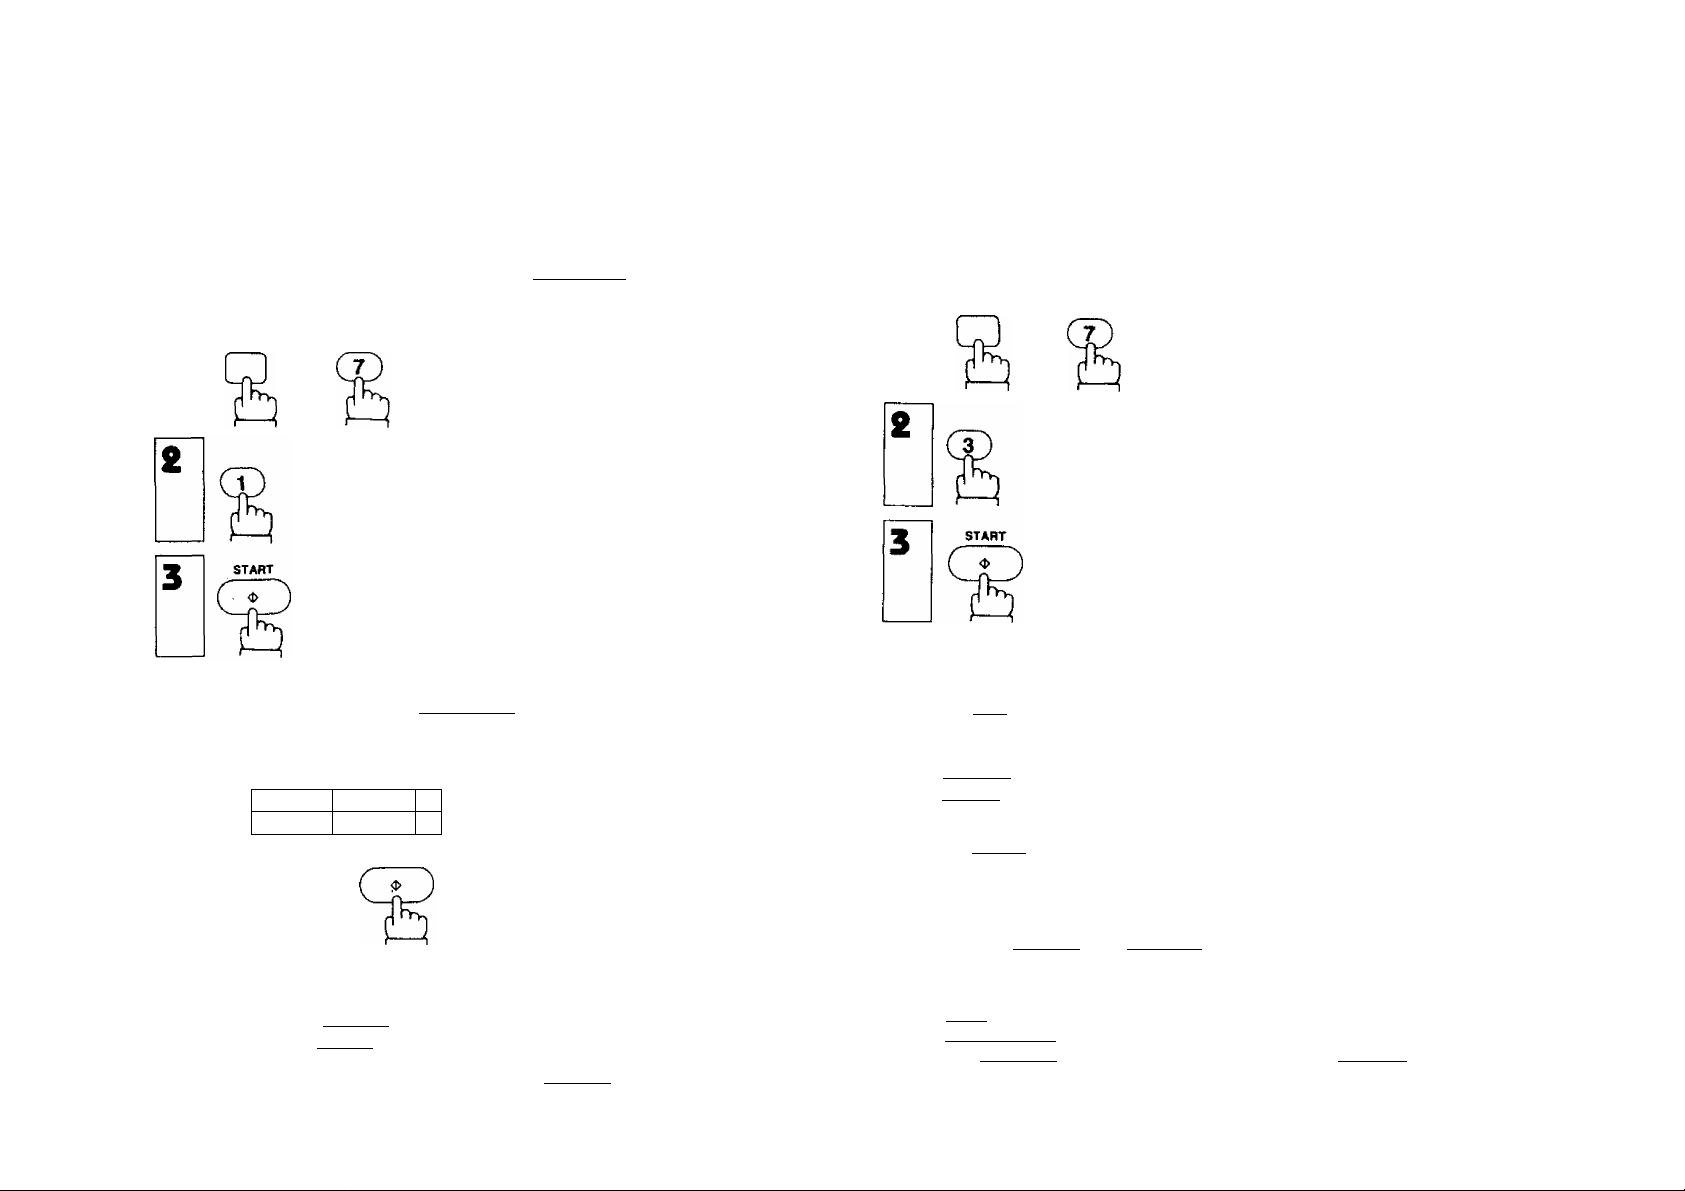
Setting the Dialing Method (Tone or Pulse)
Your facsimile machine can operate with either one of two dialing methods (Tone
or Pulse), depending on the type of telephone line you are connected to.
Your facsimile machine is preset at the factory for Pulse (Rotary) Dialing. If your
telephone line requires Tone Dialing, set your machine to Tone Dialing using the
following procedure.
SET MODE
NO. =1
and
FAX PARAMETERS
FAX PARAMETER
NO.-I
4. The recording paper projecting from the unit will be cut automatically. Remove
this cut paper.
NOTC
The top guide plate has marks indicating the width of the recording paper. When
setting the recording paper, be sure to align the paper with the marks, (v)
14
Enter the Fax parameter number.
Press [7] and I START I.
Enter the new setting value.
Press ¡T].
07 DIALING METHOD
I;PULSE
07 DIALING METHOD
3:TONE
rri changes to Pulse Dialing.
To return to Tone Dialing, press .
START
STOP
08 RELAY XMT REQUEST
3:VAL ID
01-DEC-1990 15:00
To return to standby.
NOTC
If you make a mistake entering the Fax parameter number, press |(^£Aft [, then
reenter the correct number.
_____
15
Page 10
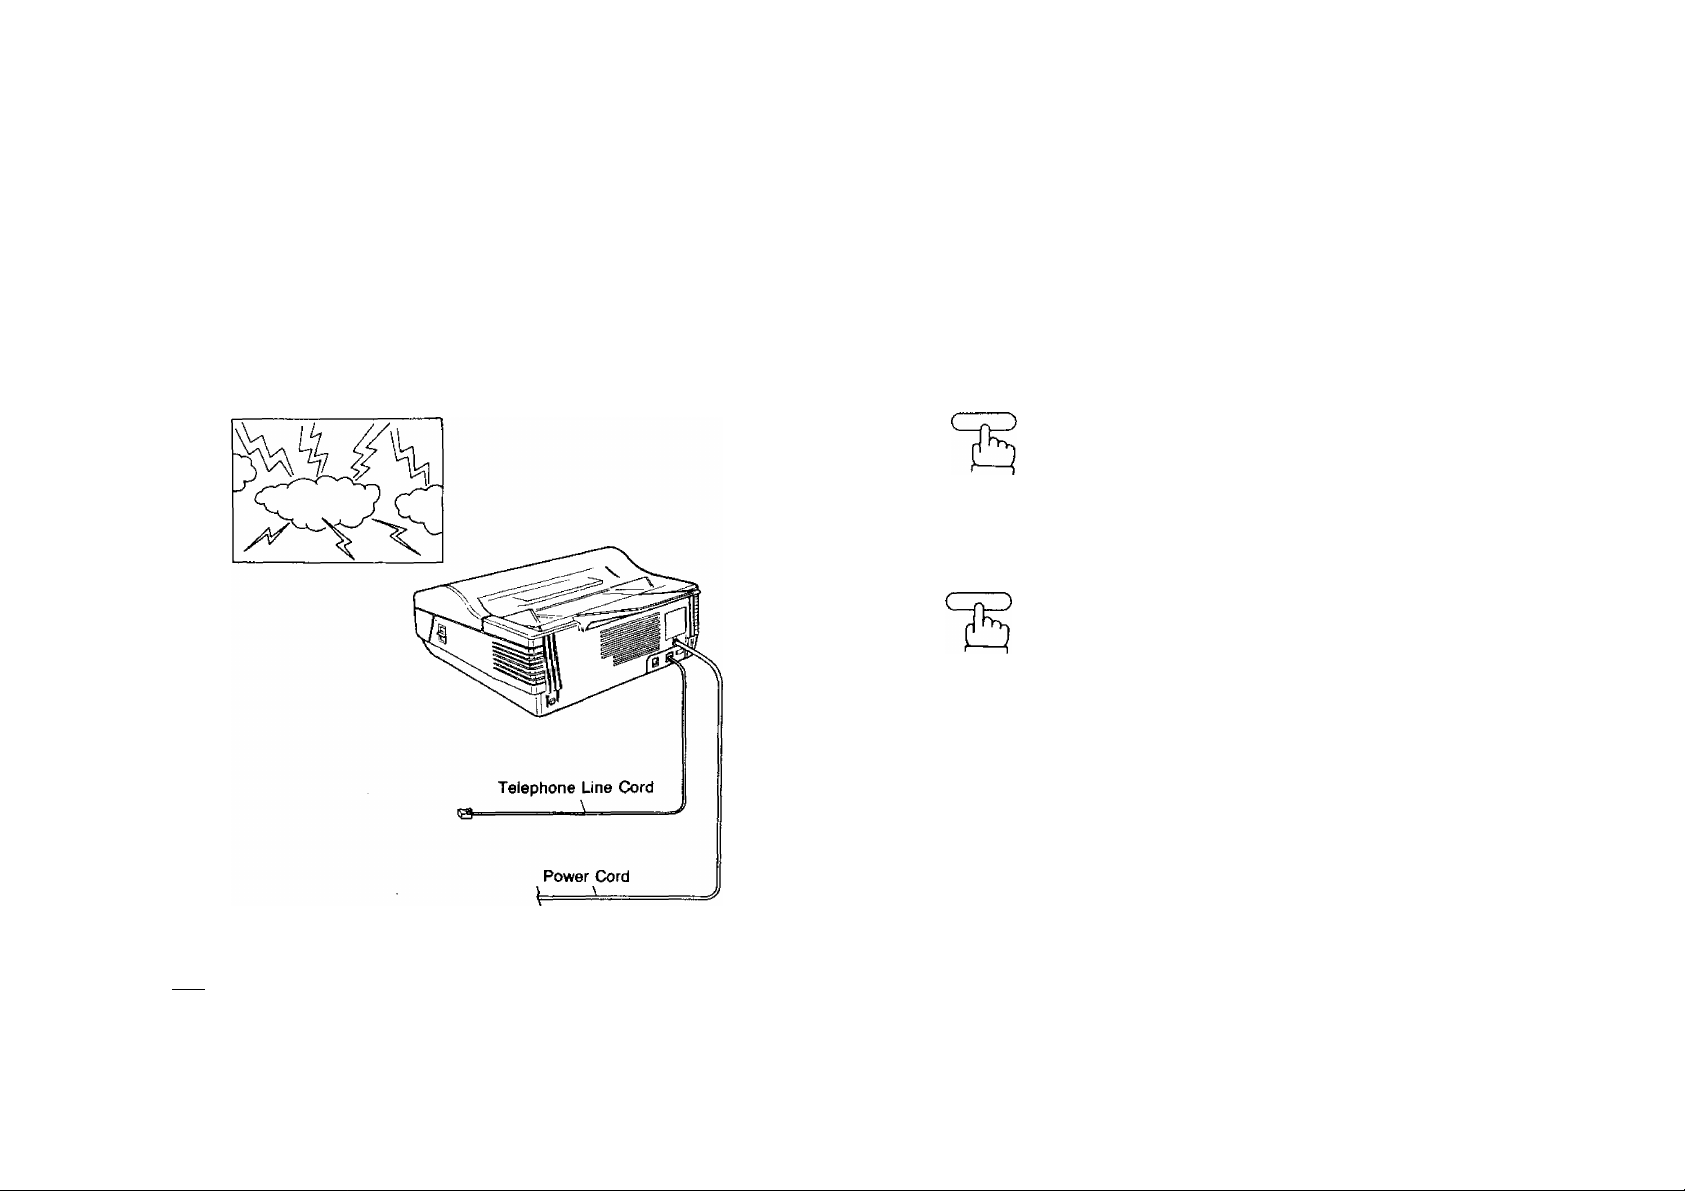
Lightning Precautions
To minimize the possibility of damage due to lightning, a surge protector is built into
your machine. Sometimes though this is not enough to protect the machine completely
when a strong lightning surge comes through the telephone line or AC power line.
To further protect the equipment when you know that a thunderstorm is coming, we
recommend that you:
• Unplug the power cord from the AC outlet.
• Unplug the telephone line cord from the telephone jack.
Finai instaliation Test
After installing your machine, it is advisable to make a copy or send a fax by direct
dialing to check if the machine is working properly.
Place a document face down on the
ADF. Adjust left and right Document
Guides.
DOCUMENT SET
Thunderstorm
NOT€
The built-in battery can back up the memory up to 7 days when fully charged. As soon
as the thunderstorm is over, plug In the AC cord and telephone line cord.
2q
(For more details, see page 50.)
SPACE
TEL/DIAL
2b
and a full number
Ех:[5][5]®Ш[2][з]И
(For more details, see page 40.)
* COPY +
* DIALING *
I
* DIALING *
5551234|
16
17
Page 11
SETTING UP YOUR MACHINE
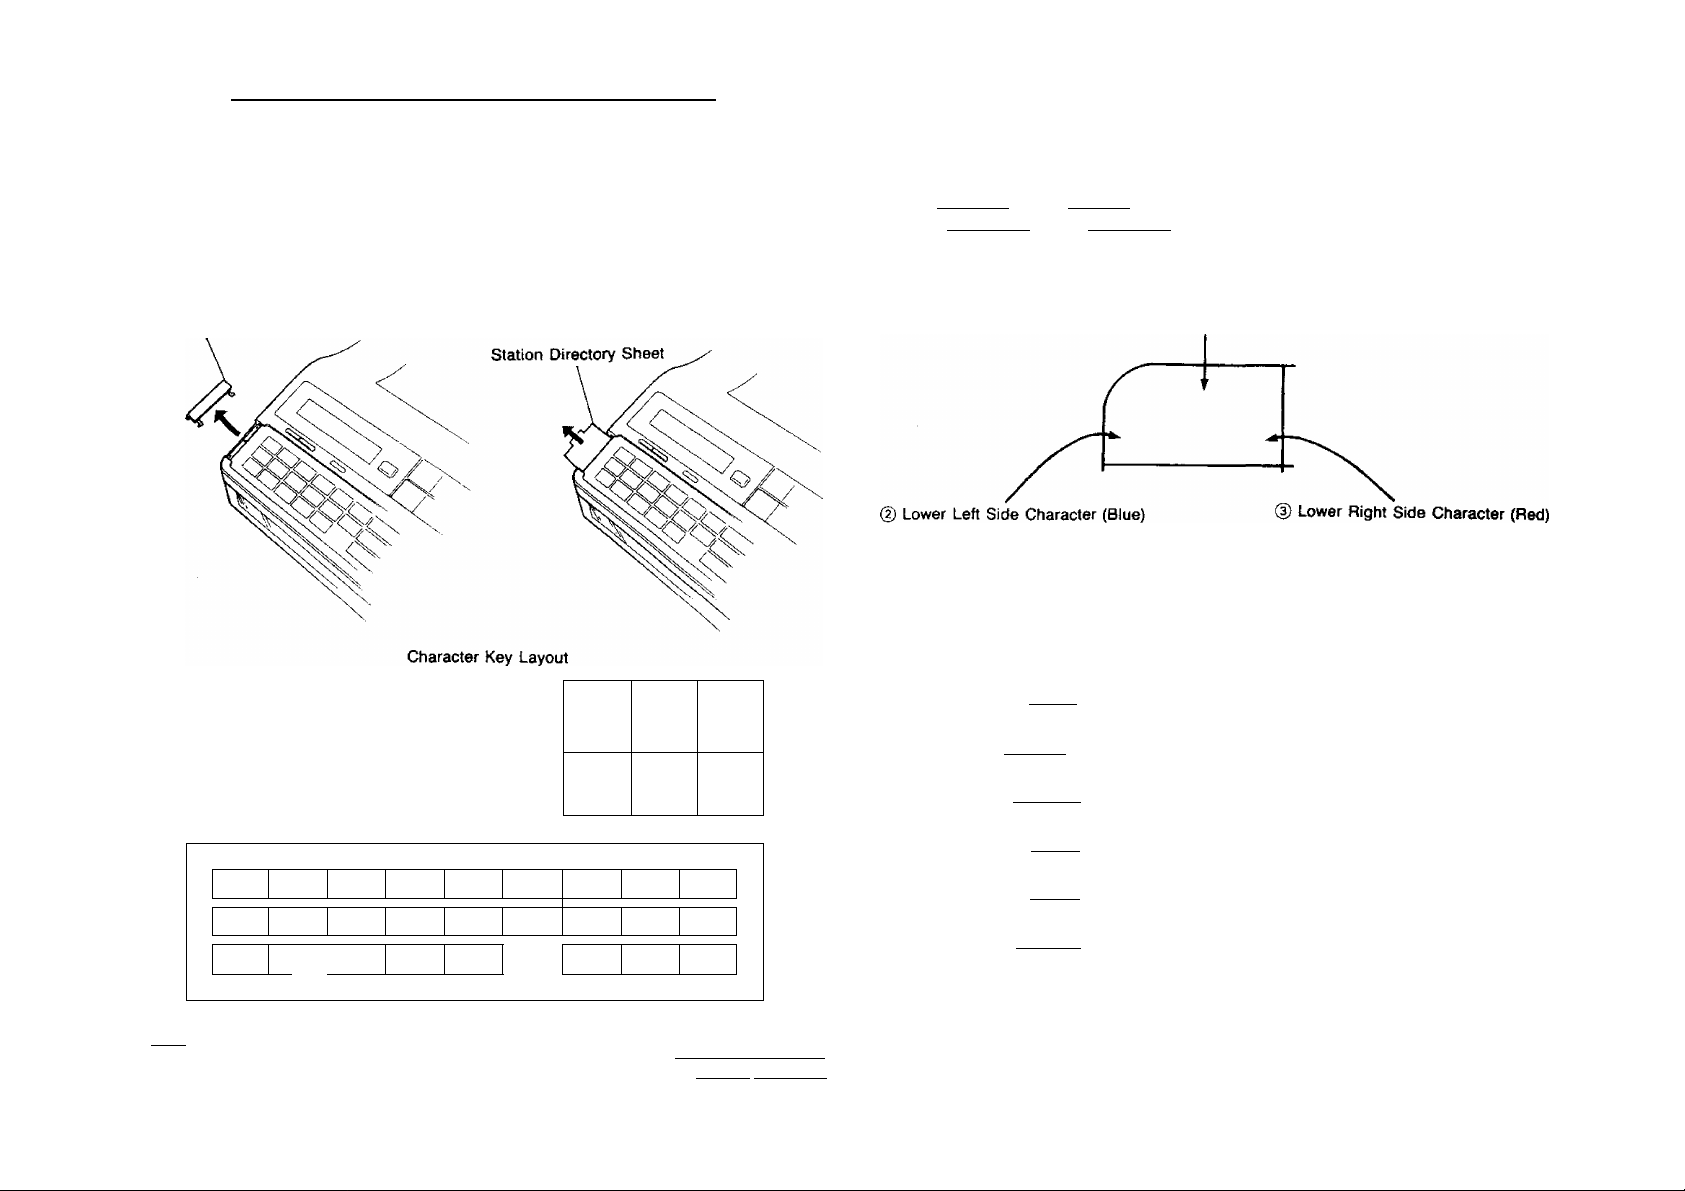
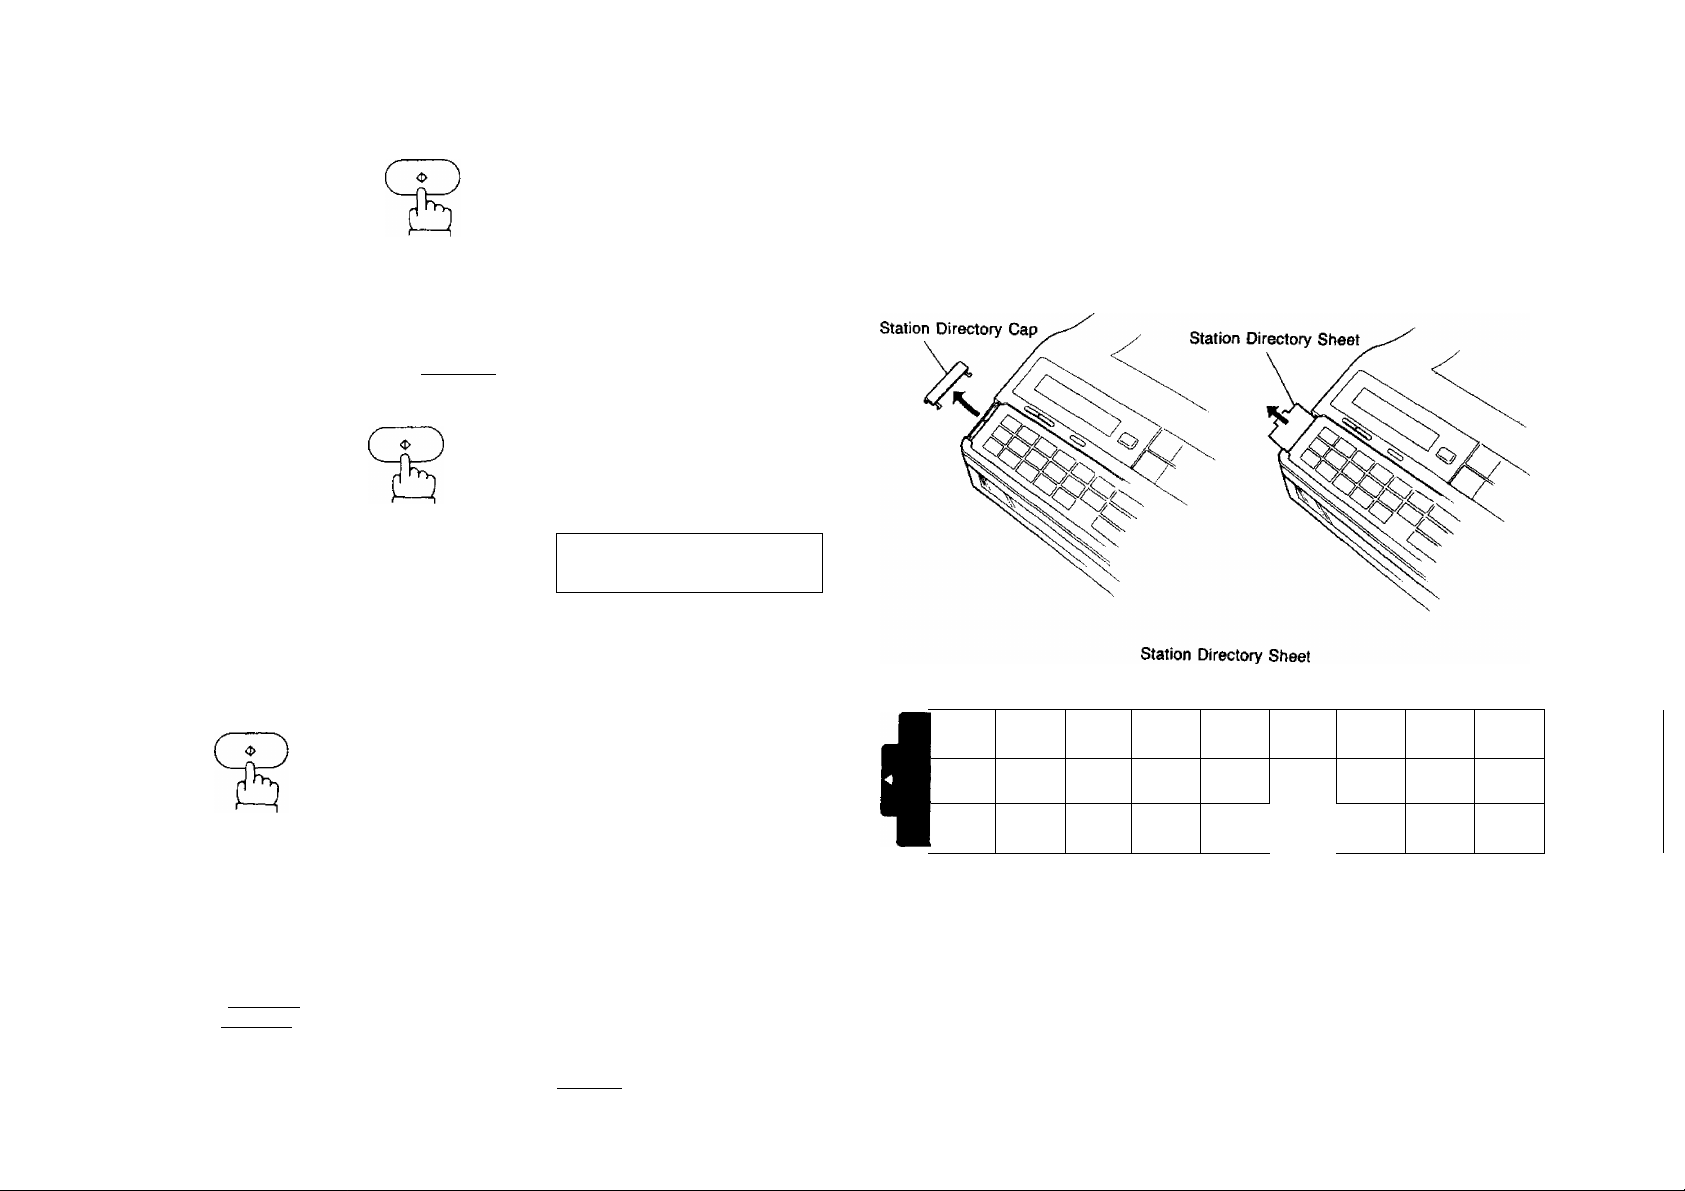
CHARACTER KEY LAYOUT UNDER THE ONE-
TOUCH KEYS
The One-Touch keys on the control panel also serve as character and symbol input
keys when you need to record your LOGO and other station names. This layout is
printed on the panel under the Station Directory Sheet, which can be pulled out as
shown below.
Station Directory Cap
-------
RESERVE
half tone
CD
□
rd
]? L
21 U 22 V
04 D
« *
13 M
05 E
b y
14 N
23 W
1
1 t
02
01 A
X
Y
T1
10 J
g
U
19 5
P
A
------
i
20
Ц
06 f
(5 0
d A
m 4
07 G
T6 P
SPACE
o
ORfGINAL
CD
06 H
* A
17 0 16 R
SHIFT1SHIFT
STAMP
CZZ)
RESOLUTION
CCD
<
>
}
09
’ 0
2
How to Select Characters
Whenever one-touch keys are changed to the character key mode (to record your
LOGO and other station names), upper characters are selected first.
Use the [ SHIFT 11 key or I SHIFT 21 key to select Lower right side characters or Lower
left side characters.
@ Upper Character (Black)
(D
-------
► ISHIFT l|
(D
------- ISHIFTlI
®
--------
► |SHIFT2| ► (D
CD
-------
► 6HiFT2| ► ®
@
--------
► |SHlFT2l ► ®
@
---------
^ ^ГFT~^\ ► @
Command
----------
-------
► @
Si
S2
S2
LCD
SI
S2
S2
SI
3
WOK
Whenever One-Touch keys are chemged to the character key mode (to record your LOGO
and other station names), capital letters are selected first. Use the|SHIFfTl/l SHlFT21
key to alternate to and from capital letters and small tetters.
18
19
Page 12
USER PARAMETERS
How to Set the Date and Time
You can set or reset the date and time when your machine is in standby, or when
you have already placed some documents on the ADF, To do so,
1
and
SET MODE
NO. =1
How to Set Your LOGO
The LOGO helps identify you to someone who receives yogr document.
To set your LOGO (25 characters max.), use the One-Touch/Character keys (see
page 18).
If you have just set the date and time and pressed [STARTi , skip to Step
4 below. If not, start from step 1.
1
SET MODE
NO. =1
The display will show the date and time.
Use the keypad to enter the new month
(two digits), day (two digits), year, and
time (24-hour clock).
Ex: 01. DEC, 1990 1.5:00
Hid]®®
If you make a mistake, use the
¡ORIGINAL
keys to move the cursor to the
incorrect number, and then enter the
new number over it.
To set the date and time.
I and I
RESOLUTION!
USER PARAMETERS
DATE & TIME
01 - 01 - 1 900 12:00
DATE & TIME
1 2-01 - 1 990 1 5:00
LOGO
I
and
MOOE
run
and
Enter each letter, number and/or symbol
in your LOGO using the One-Touch/
Character Keys.
Ex: for Panafax HQ
PIISHIFTI
X 11SHIFT2 i
If you enter more than 20 characters, the
display will not show the first 20 charac
ters.
To set the LOGO,
n a
k
[SPACE 1H
f
or
a
Q
SHIFT2 1
USER PARAMETERS
LOGO
I
LOGO
Panafax HQ|
ID NO.
20
Now you can go on and set the
LOGO, or return to standby with
I
STOP I.
01-DEC-1990 15:00
Now you can go on and set the ID, or
return to standby with [STOP 1.
01-DEC-1990 15:00
21
Page 13
How to Set Your ID Number
When you transmit, your fD will appear on the other person’s display. When you
receive documents, the sender’s ID will appear on your display. We suggest you use
your facsimile telephone number as your ID, but you may use any number up to 20
digits long.
If you have just set your LOGO and pressed I ST ART | , skip to step 4. If not,
start from Step 1.
1
SET MODE
NO. =1
ONE-TOUCH/ABBREVIATEO NUMBERS
Entering One-Touch/Abbreviated Dialing Numbers
One-Touch Dialing and Abbreviated Dialing are two fast ways of dialing full numbers.
To use these dialing methods, you must first enter the full numbers using the following
procedure.
1
and
SET MODE
NO. =1
and
and
repeatedly.
Enter the ID digits. Use 1 SPACE 1 to
enter a space. If you try to enter more
than 20 digits you will hear a pip-pip-pip
sound.
Ex:
#aceT
To set the ID,
Now you can go on and set the POLLING I oi,dec-i 990 i 5 ■ 00
PASSWORD (see page 53), or return to
standby with I STOP
NOTC
To erase the number you just entered, press I CLEAR
22
1 SPACE
lir^lT
START
or
1
ШШ
4
USER PARAMETERS
ID NO.
ID NO.
212 111 123
POLLING PASSWORD
nil
ONE -TOUCH/ABBR.NOS
ONE-TOUCH/ABBR.
To assign a One-Touch number, press
4o
one One-Touch key.
Ex: FotI
To assign an Abbreviated number, press
4b
f ABBrI and two keys on the keypad
to enter any code from 01 to 70.
Ex: iABBRir^iyj
Enter facsimile telephone number (up to
36 digits) including pauses and spaces.
Ex: I PAUSE Ifslfnisll SPACE im
07] TELEPHONE NO
62] TELEPHONE NO
[07] TELEPHONE
9-555 1234|
IIOlJE]
NOTC
1. If you a special access number to get an outside line, enter it first and then press
I PAUSE I. A hyphen is displayed for pause.
2. Use I SPACE I to enter a space between the numbers to make it easier to read.
3. When you input a wrong number in step 5, press | CLEAR I to erase the number
jwu iJi^uk «« nivriy IIUIIIWV» III iJf piVM |VLJCMnj lU OfCHW
before the cursor, then reenter the right number and press fsTART [.
............................................................
NO,
23
i
Page 14
6
To set the number,
START
[07] STATION NAME
Filling Out the Station Directory Sheet
Slide the Station Directory Cap to the left and pull it off. Then pull out the Station
Directory Sheet. Use a pencil or a bafl-point pen to fill in the station directory with
station names corresponding to the One-Touch number keys.
Enter receiving station’s name (up to 15
characters) using One-Touch/Character
keys (see page 18).
Ex: Panasonic-
нниож
START
8
To set the name,
If the receiving party has another
facsimile machine at the same location,
you can enter it here as an alternative
ABBR. NO. by pressing the One-Touch
or ABBR, key.
Ex;
To set the alternative ABBR. NO.
10
11
START
Repeat Steps 4 to 10 to record more
numbers, or, to return to standby press
Lstop! .
piisHiFTi ifnmfri
[07j STATION NAME
Panason i c|
[07] ALT. ABBR. NO.
I
[07] ALT .
[03]
ONE TOUCH/ABBR.
01 -DEC- 1 990 1 5:00
(St a t
ABBR. NO.
ion n ame)
02
11
20
03
12
21
04 05
13 14
22 23
06
15 16 17
07
^P1 P2 P3
06
09
18
f
ноте
1. If you want to go back and change anything, e.g., the telephone number, press
[ START I repeatedly to skip through the preceding steps. You do not need to reenter
everything again.
2. If your machine is set for Relayed Transmission and/or Confidential Faxes, the display
will show NETV\/ORK ADDRESS when you press j START | in Step 10.
3. To print out a One-Touch/ABBR. Dialing Number List, see page 80.
24
ноте
if you use a pen, be sure the ink is dry. If you use a pencil, remove any excess lead
before replacing the station directory.
25
Page 15

FAX PARAMETERS
Your facsimile machine has a variety of adjustable FAX parameters. These
parameters, listed in the Parameter Tabie, are normally preset for you and do not
need to be changed. If you do want to make a change, read the table carefully.
Some parameters, such as the Resolution, Contrast, and Verification Stamp
parameters, can be temporarily changed by simple key operations just before a
transmission is made. When the transmission ends, however, these parameters return
to their preset values. Other parameters can only be changed by the procedure
described below.
Setting FAX Parameters
START
You can now return to Step 4 to set the
next parameter, or, return to standby by
pressing {STOP I.
02 ORIGINAL
Q : NORMAL
01-OEC-1990 15:00
1
and
START
Enter a fax parameter number from the
Parameter Table {see pages 28 and 29).
Ex: [Tj and {START} for RESOLUTION.
Enter the new setting value.
Ex: [2] for FINE.
SET MODE
NO. =1
FAX PARAMETERS
FAX PARAMETER
NO. =1
01 RESOLUTION
0: STANDARD
01 RESOLUTION
g:F1NE
NOTC
1. To cancel any digit entered, press fCLEAR [ in step 5, and then start again from
Step 3.
2. To print out a Fax Parameter List, see page 84.
26
27
Page 16

Parameter Table
Parameter Table
Parameter
number
01
02
03
04
05
06
07
08
09
11
12
Parameter
Resolution
Contrast
(ORIGINAL)
Verification
Stamp
Polled
Automatic
Journal Print
Printout
Heading
Dialing
Method
Relayed XMT
Confidential Fax
Password XMT
Password RCV
Setting
Number
1
2
3
1
2
3
1
2 On
1
2
1
2
1
2
3
1
2
1
2
1
2
1
2
3 On
1
2
3
Automatic Print (On)
Inside copy area
Outside copy area
Setting
Standard
Fine
Super Fine
Normal
Dark
Light
Off
Off
On
Off
Not printed
Tone
Pulse
Invalid
Valid
Invalid
Valid
Invalid
Off
Invalid
Off
On
Standard
Setting
o
0
0
o
o
0
0
o
0
0
0
Parameter
number
19
20
32
Parameter
Automatic
Individual XMT
Journal
Fax Access
Code
Initial Operator
Cal!
FUNCTION
Setting
Number
1
2 On
1
2
1
2
Valid—^
Invalid
Setting
Off
Invalid
Valid
Off
On
On
Off
Standard
Setting
о
0
о
i
I
28
15
ECM
(Error Correction
Mode)
1
2
Off
On
NOTC
o
To use a function which has Valid/Invalid parameter, set the parameter in the Valid
position. You may then reset the function's standard setting to on or off.
29
Page 17
I
SENDING DOCUMENTS
USING MUTE AND ADJUSTING VOLUMES
Using Mute
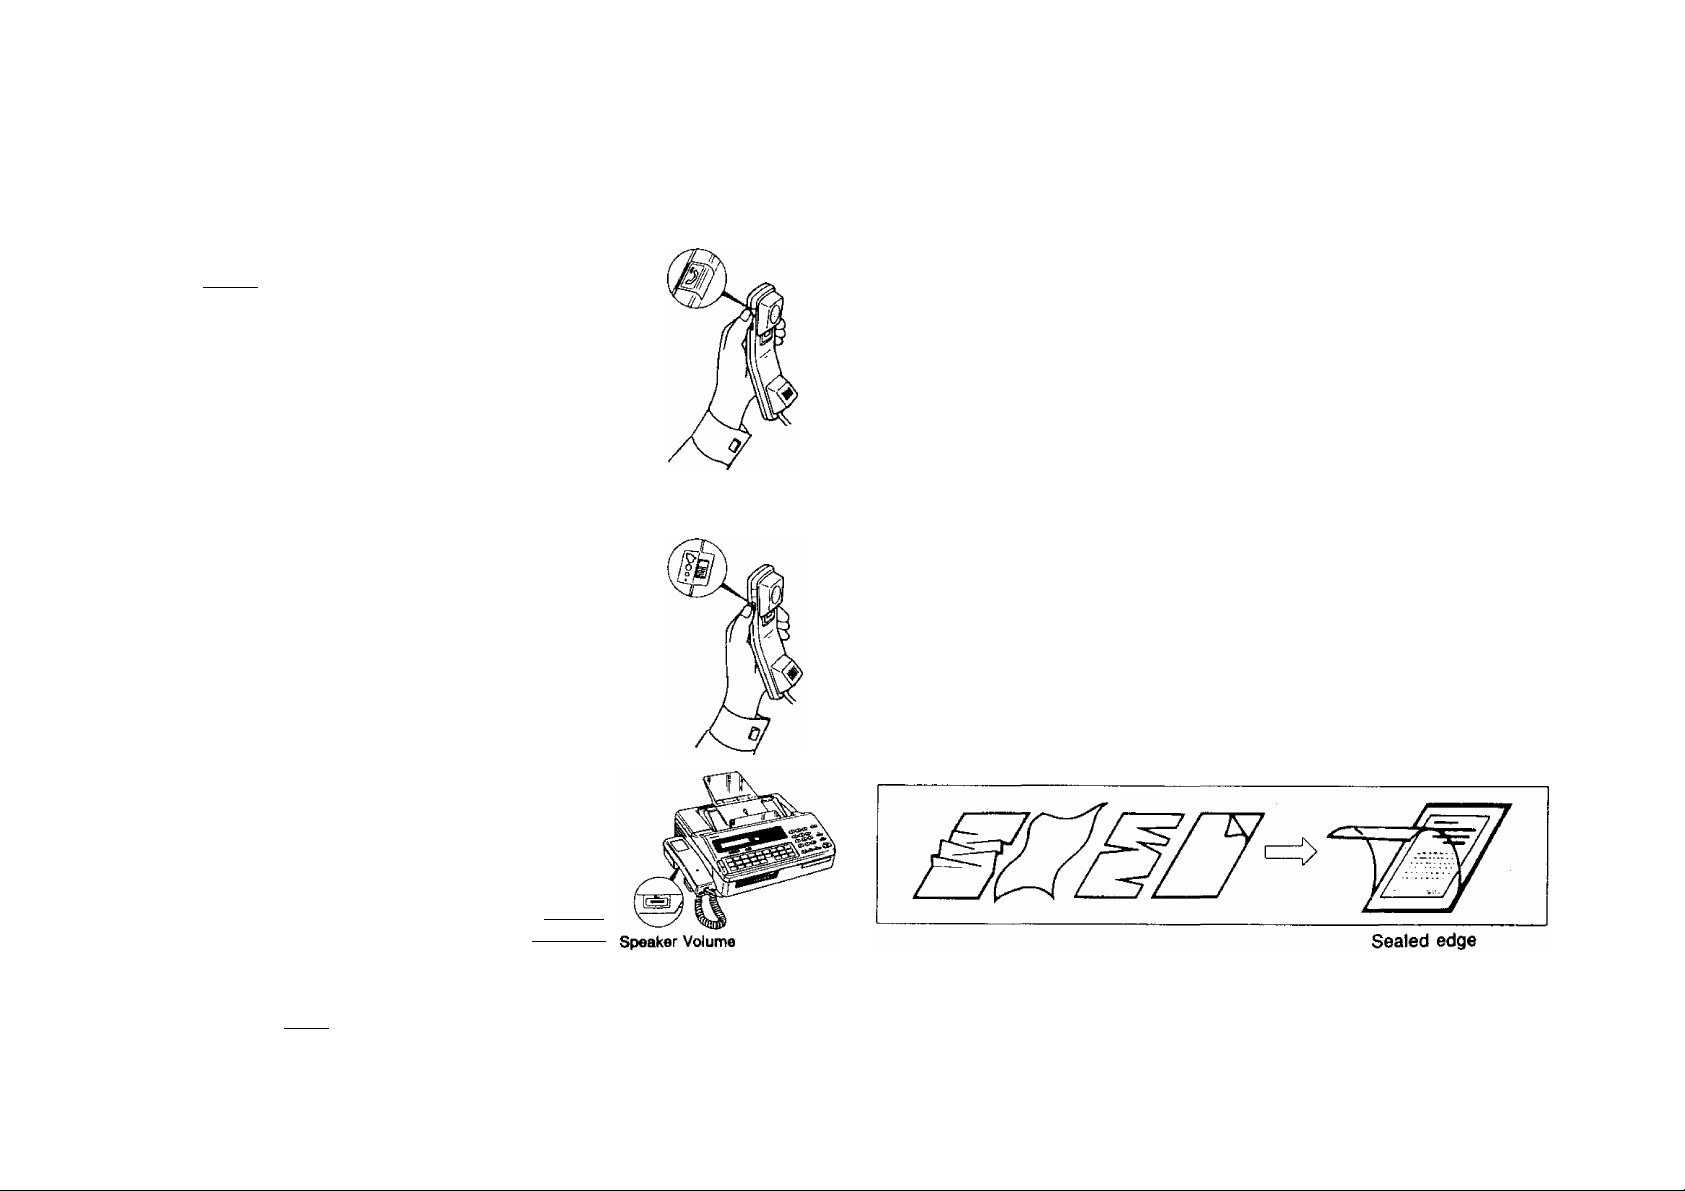
When you are using the fax machine’s built-in telephone,
you can temporarily turn off the microphone in the handset.
Press j 13-.^ I on the handset. As long as you hold down
this button, your caller cannot hear you.
Setting the Ringer Volume
You can adjust the RINGER VOLUME so the fax machine
rings at a comfortable level when it receives a call. Move
the ringer control on the handset to the level desired, either
normal or reduced.
Setting the Speaker Volume
When the fax machine is making a call, you hear the dial
tone, the dialing signals, and the ringing or busy signal
through the built-in speaker. Rotate the SPEAKER
VOLUME control on the right side of the unit to adjust the
volume to a comfortable level. You also hear the called
person’s voice through the speaker if the other station is
set to manual reception. In this case you can talk with the
called person by lifting the handset and pressing I STOP I
(see page 59).
Your handset may have a different type of Mute Button and Ringer Volume from the
ones shown above.
Mute ,Button I MUTE |
Ringer Volume
VOLUME
LOW o o HIGH
Mute Button
Ringer Volume
LOADING DOCUMENTS
Documents You Can Send
In general, your machine will send any document printed on A4-size or paper up to
B4 size.
Documents You Cannot Send
You must never try to send documents that are;
• Wet
• Covered with wet ink or paste
• Wrinkled, curled or folded
• Too thin (e.g. onionskin, airmail paper, pages from some magazines, etc.)
• Too thick (e.g. card, etc.)
• Chemically processed (e.g. pressure-sensitive paper, carbon-coated paper,
etc.)
• Coated (e.g. glossy paper, etc.)
• Smaller than 148 mm (W) x 73 mm (L)
• Made of cloth or metal
To transmit these kinds of documents, make a photocopy first, and then transmit
the copy instead.
How to Use the Carrier Sheet
If you send documents wrinkled, curled, folded, too thin, or smaller than 148 mm
(W) X 73 mm (L), you can send them using the Carrier Sheet. Put them in the Carrier
Sheet, and then place the carrier in the ADF with the sealed edge first.
NOTE
1. Document thickness
Single sheet: 0.06 to 0.15 mm
Multi-sheet i 0.08 to 0.13 mm
2. Transmitting documents longer than 297 mm up to 1000 mm requires operator’s
assistance.
3. You cannot load the carrier sheet and other documents together on the ADF.
30
31
Page 18
Г
Loading Documents
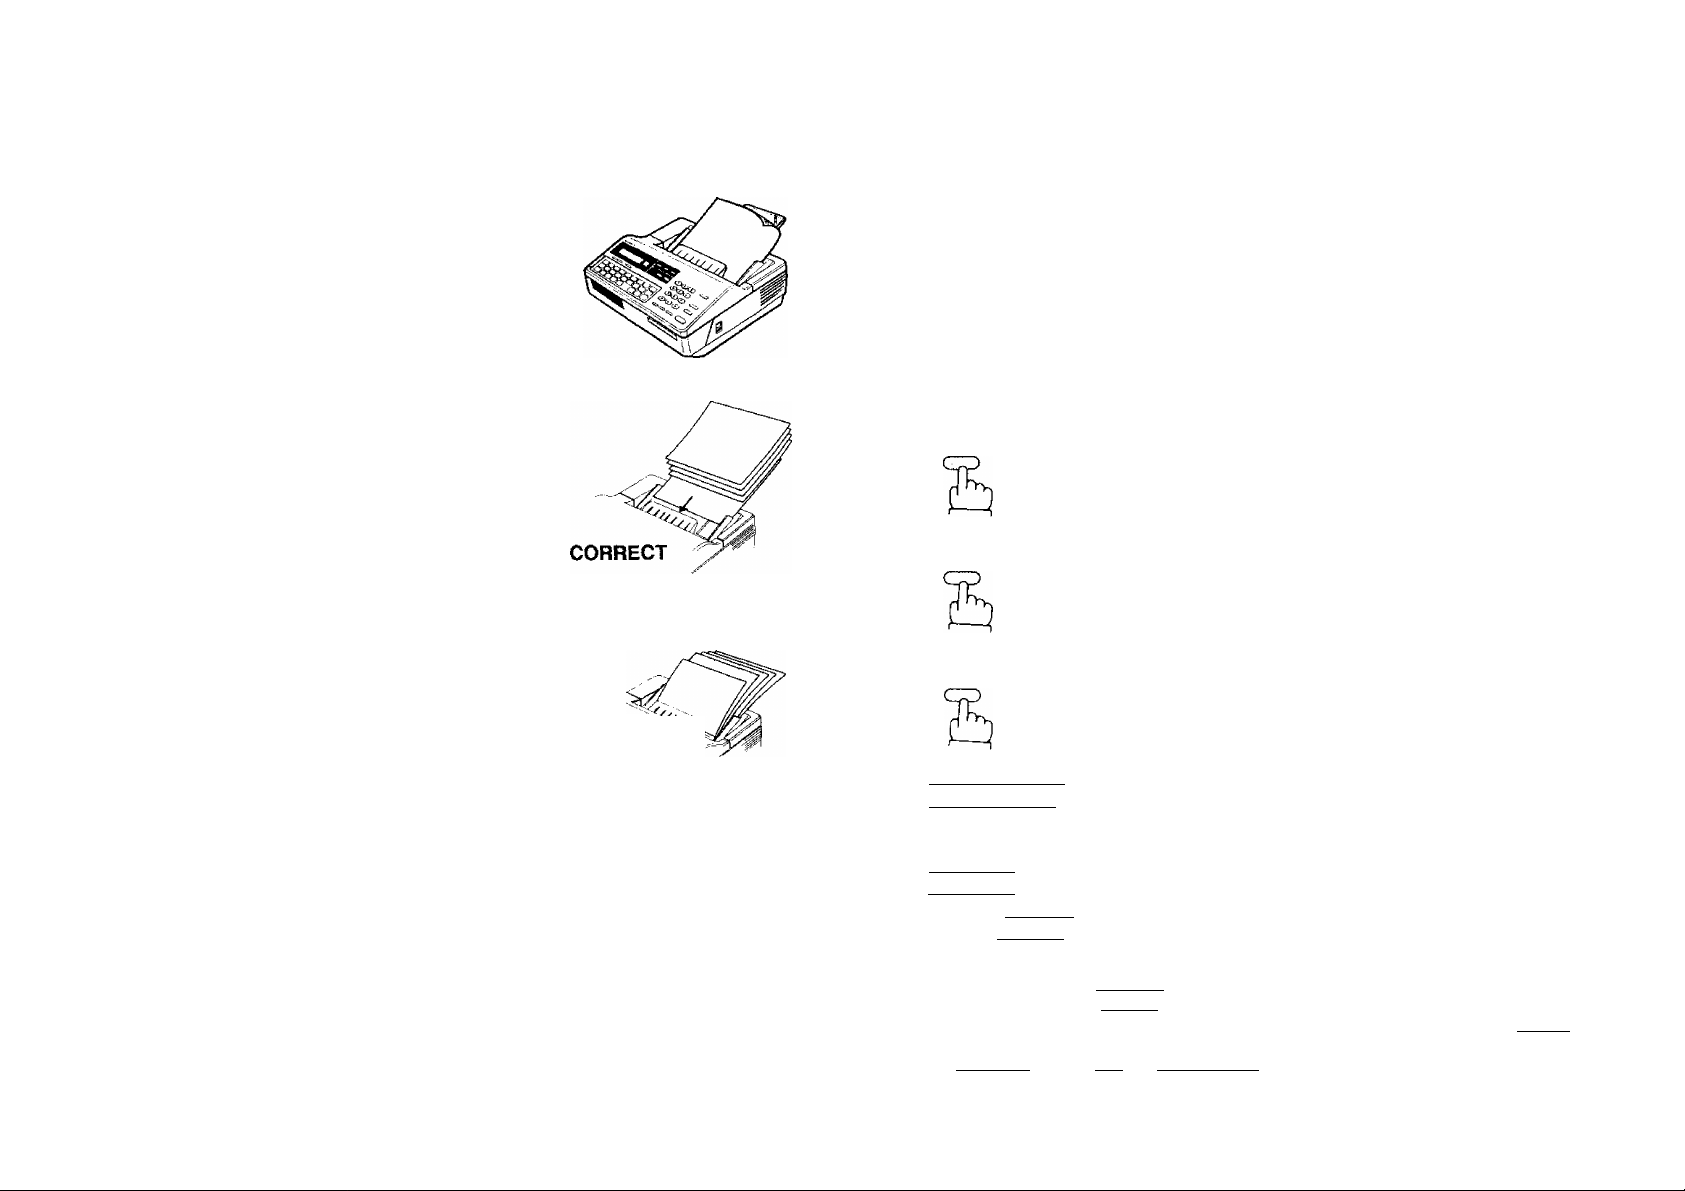
First, make sure that your document is free of
staples, paper clips, and is not torn, greased or
covered by any foreign objects.
Place the document face down on the Automatic
Document Feeder (ADF) with the top edge going
into the machine and slide forward until it stops.
Adjust the sliding document guides to ensure that
the document is centered on the ADF.
If you are sending two or more pages, make sure
that the bottom sheet enters first. You can also
stack up to 10 sheets on ADF at one time. If you
want to send more pages, you can place them
on top of the last page on the ADF once
transmission has started, as long as you do not
have more than 10 sheets on the ADF at any one
time.
When you set a document on the ADF the display
message will change from date and time
(standby) to DOCUMENT SET. You can now
make basic transmission settings, or begin the
dialing procedure.
INCORRECT
Face down
BASIC TRANSMISSION SETTINGS
You can temporarily change seven basic settings (Resolution, Contrast, Halftone,
Total Pages, Verification Stamp, individual Transmission Journal and Error Correction
Mode) before any ordinary transmission. These settings can be changed before or
after you place documents on the ADF. After you finish transmission, your machine
will automatically return to the preset settings. You can also change these settings
during transmission.
Resolution
Your machine is preset to Standard resolution, which is suitable for ordinary
documents. Use FINE or Super-FINE for very detailed documents.
1
RESOLUTION
2
RESOLUTION
If satisfied, go to Step 4.
To return to Standard, press
I RESOLUTIO'Ñl again.
DOCUMENT SET
RESOLUTION=STD
(STD = Standard)
DOCUMENT SET
RESOLUTION=FINE
DOCUMENT SET
RESOLUTION=S FINE
(S FINE = Super-FINE)
DOCUMENT SET
32
You can now dial by pressing
i
TEL/DIAL I and a full number,
a One-Touch key,
digits, or {REDIAL
NOTC
1. After changing the Resolution setting, you can
a) go to standby with ( STOP
b) make a copy of the document to test the new Contrast setting by pressing ICOPY
c) start a different series of settings by pressing | RESOLUTION I. | HALF TONE
rSTAMP I; MODE r^m , or [FUNCTION |.
2. To change the preset Resolution position, see page 26 - 29.
ABBR j and two
33
Page 19

Contrast (Original)
Your machine is preset to NORMAL contrast. If you have to send a document with
dark contrast, you may get better results by changing the setting to DARK, if you
have to send a document with light contrast, it may be wise to change the setting
to LIGHT. As a test, you can make a trial copy before transmitting (see page 50).
1
DOCUMENT SET
ORIGINAL=NORMAL
Halftone
The Halftone setting is useful when sending photographs or illustrations with gray
tones. Your machine is preset to HALF TONE = OFF. To switch to HALF TONE = ON,
1
Your display should show HALF
TONE = OFF.
DOCUMENT SET
HALF TONE=0FF
If satisfied, go to step 4.
To return to NORMAL, press I ORIGINAL
again.
You can now dial by pressing
ITEUDIALI and a full number.
a One-Touch key, [ ABBR] and two
digits, or 1 REDIAL
NOTC
1. After changing the Original setting, you can
a) go to standby with (STOP].
b) make a copy of the document to test the new Contrast setting by pressing \ COPY
c) start a different series of settings by pressing | RESOLUTION j. | HALF TONE
I STAMP I, MODE rn rn . of rFU^CTION [.
2. To change the preset Original position, see page 26 - 29.
DOCUMENT SET
ORIGINAL=DARK
DOCUMENT SET
ORIGINAL=LIGHT
2
HALF TOME
QO
DOCUMENT SET
HALF TONE=ON
S
In this case Resolution is automatically
set at FINE. If you wish to go to HALF
TONE = OFF, press I HALF TONE] again.
You can now dial by pressing [TEL/PIALi
and a full number, a One-Touch key,
I ABBR I and two digits, or I REDIAL I.
NOTC
After changing the Halftone setting, you can
a) return to standby with [STOP [.
b) make a copy of the document to test the new Halftone setting by pressing | COPY!.
c) start a different series of settings by pressing |ORIGINAL | . (STAMP} . MODE
s en . or I FUNCTION I.
34
35
Page 20

i.
Verification Stamp
The verification stamp helps you to confirm successful transmissions by stamping
the bottom of each successfully transmitted page with a small pink mark. Your
machine is preset to STAMP»ON. To set the Verification Stamp to OFF,
1
2
To return to STAMP = ON, press
1 STAMP I again.
You can now dial by pressing ITEL/PIALI
and a full number, a One-Touch key,
IABBR I and two digits, or I RjEDIAL ].
DOCUMENT SET
STAMP=ON
DOCUMENT SET
STAMP=OFF
Total Pages
The page number will be printed at the top of each page you send. You can also
set, however, the total number of pages you send so that it will be printed on each
page in addition to the page number, (e.g., 01/05. 02/05, etc.)
1
2
- НОТЕ
zne
or
Enter any number 1-99. If you make an
error, press | CLEAR I and reenter the
correct number.
repeatedly.
Ex:®
You can now dial by pressing ITEUDIAL
and a full number, a One-Touch key,
I ABBR I and two digits, or | REDIAL I.
DOCUMENT SET
TOTAL PAGES=|
DOCUMENT SET
TOTAL PA0ES=5|
I
ноте
1. After changing the Stamp setting, you can
a) return to standby with | STOPl.
b) start a different series of settings by pressing IflESOLUTI ON
I HALF TONE1. MODE PI PTI, or | FUNCTIOnT
2 .To change the preset Stamp position, see page 26 - 29.
36
ORIGINAL
NOTC
After changing the Total Pages setting, you can
a) return to standby with fSTOP |.
b) start a different series of settings by pressing
fSTAMP
HALF TONE I, MODE {ЗШ . oTIfUNCTIONT
----------
--------
RESOLUTION
I ORIGINAL!.
37
Page 21

Error Correction Mode (ECM)
ECM mode provides error free copy when your fax machine is connected with a
receiving fax machine which has ECM mode capability and your ECM mode is set
to ON. The transmission time required in the ECM mode is the same as the normal
G3 mode in most cases.
Automatic Individual Transmission Journal (XMT JRNL)
You may want to keep a separate record of each transmission you make to some
or all your clients. Your machine can save you the trouble of writing records by printing
out a Transmission Journal for you at the end of any particular transmission To set
XMT JRNL = ON,
Your machine is preset to ECM = ON. If the telephone line is poor, then the
transmission will take longer because the machine will have to retransmit the tines
that have errors. In the case where the transmission time is more important than the
quality of the received copy, you may set your fax machine to ECM = OFF. This
will inhibit the ECM mode for the transmission regardless of the capability of the
receiving machine. To set ECM = OFF,
1
C
------
- MODE 4
1C—)
repeatedly.
DOCUMENT SET
ECM=ON
DOCUMENT SET
ECM=OFF
В
To return to ECM = ON, press [ SELECT j
again.
You can now dial by pressing I TEL/DIALI
and a full number, a One-Touch key,
IABBR I and two digits, or 1 REDIAL | .
1
I
You can now dial by pressing [TEL/DIAL 1
and a full number, a, One-Touch key,
I ABBR I and two digits, or [REDIAL I.
‘ MODE 4
C
------
IIZZ
or
To return to XMT JRNL = OFF, press
SELECT! again.
repeatedly.
DOCUMENT SET
XMT JRNL=OFF
DOCUMENT SET
XMT JRNL=ON
I,
'’'I
Í;
11
NOT€
1, After changing the ECM setting, you can
a) return to standby with
b) start a different series of settings by pressing | RESOLUTION
I STAMP I, [HALF TONE I, MODEQQ- orlFUNCTIONT
2. To change the preset ECM position, see page 26 - 29.
STOP
38
i
ORIGINAL I
ноте
1. After changing the XMT JRNL setting, you can
a) return to standby with [ STOP j.
b) start a different series of settings by pressing [RESOLUTION I. ÍORIGINAL
[half T0N~e1 . [STAMP] MODE Pnrn , or [^NCTI^fTT
2. To charige the preset XMT JRNL position, see page 26 - 29.
39
Page 22

DIALING TECHNIQUES
This section explains how to perform the following:
• Direct Dialing
• One-Touch Dialing
• Abbreviated Dialing
• Redialing
Direct Dialing (On-Hook Dialing)
When transmission ends, the display
shows the number of pages sent.
If the line is busy, your machine will redial
the number for you up to twice with three
minute intervals.
If no contact is made, the display will
show an information code.
COMPLETED
TOTAL PA6ES=05
or
WAITING TO DIAL
5551234
INCOMPLETE
INFO C0DE=630
Place a document face down on the ADF.
1
Adjust left and right Document Guides.
SPACE
TEL/DIAL
Use the keypad to "dial" a number.
Ex: [I][5][5]-[I][I][3][4]
(See Note )
Your machine will dial the number. If the
line is free, your documents will be sent.
If the other station has an, ID, it will appear
on the display.
DOCUMENT SET
Document Guide
* DIALING
1
* DIALING
5551234|
ON LINE *
ON LINE *
1D: 51 6 555
Ч
*
XHT *
5551234
XMT ♦
1 234
NOTE
If you need a special access number to get an outside line, dial it first and then press
I PAUSE I to enter a pause (represented by a before dialing the full
number.
Example: felI PAUSE Ifsl[?][s] [Tj [T] [3]
40
NOTE
1. If the line is still busy after the fifth automatic try, you can start another round of
automatic dialing by pressing | REDIAL | (see page 47).
2. If you hear a voice speaking through the speaker, pick up the handset and pressISTOPl
to a talk to the other party.
______
41
Page 23

Off-Hook Dialing
Place a document face down on the ADF.
1
Adjust left and right Document Guides.
DOCUMENT SET
One-Touch Dialing
Place a document face down on the ADF.
1
Adjust left and right Document Guides.
I i
DOCUMENT SET
Document Guide
DOCUMENT SET
Lift the handset
Use the keypad to dial a number.
Ex: [Sllllillmdidlli]
When you hear a beep sound,
I
DOCUMENT SET
55512341
ON LINE * XMT *
5551234
START
Hang up the handset.
If the other station has an ID, it will appear
on the display.
When transmission ends, the display
shows the number of pages sent.
If the line is busy, hang up the handset.
Then try again several minutes later by
pressing I REDIAL j.
ноте
If you need a special access number to get an outside line, dial it first and then
press I pause] to enter a pause (represented by a hyphen before dialing the
press iPAUi
full number.
full number.
Example;
^ec
[sl
I PAUSE 1
[s1 [s1 fsl Rl [FI fT|
ON LINE * XMT +
10:516 555 1234
COMPLETED
TOTAL PAGES=05
+ DIALING +
5551234
2
Press a One-Touch key
Ex:
The display will show the ABBR. No. and
station name. The full number (e.g. 9-555
1234) will then be dialed and shown on
the display.
If the number dialed answers, document
transmission will start. If the other station
has an ID, it will appear on the display.
When transmission ends, the display will
show the number of pages sent.
When alternative ABBR. NO. Is set.
If the number is busy, the machine will
automatically dial the alternative ABBR.
NO. which you have already recorded,
Ex: 1 1 1 I (See page 24.)
If the alternative number is also busy, the
machine will wait three minutes and then
automatically redial the 1st number and
alternative number each up to twice in the
same way.
Document Guide
+ DIALING *
[ 07 I (Station name)
♦ DIALING *
9-555 1234
ON LINE * XMT *
ID:
COMPLETED
TOTAL PAGES.05
* DIALING *
[11] (Station name)
WAITING TO DIAL
[07] (Station name)
42
43
Page 24

When alternative ABBR. NO. is not set.
If the number is busy, the machine will
wait three minutes and then automatically
redial the same number up to twice.
WAITING TO DIAL
[07] (Station name)
Abbreviated Dialing
Place a document face down on the ADF.
1
Adjust left and right Document Guides.
DOCUMENT SET
If no contact is made, the display will
show an information code (e.g.,
CODE = 630 indicates the line was busy).
INCOMPLETE
INFO. CODE=630
The display will show the two-digit code
and station name. The full number (e.g.
555 1234) will then be dialed and shown
on the display.
If the number dialed answers, document
transmission will start. If the other station
has an ID, it wilt appear on the display.
When transmission ends, the display will
show the number of pages sent.
When alternative ABBR. NO. is set.
If the number is busy, the machine will
automatically dial the alternative ABBR.
NO. which you have already recorded.
Ex: (See page 24.)
Document Guide
* DIALING ♦
[30] (Station name)
* DIALING *
555 1234
ON LINE
ID:
COMPLETED
TOTAL PAGES=05
* DIALING ♦
[31] (Station name)
* XMT *
i
NOT€
1. To redial a busy number, see page 47.
2. The machine does not dial the alternative ABBR. No. when the document is sent by
Relayed Transmission.
3. If you hear a voice speaking through the speaker, pick up the handset to talk to the
other party.
44
If the alternative number is also busy, the
machine will wait three minutes and then
automatically redial the 1st number and
alternative number up to twice in the
same way.
WAITING TO
[30] (Stat
DIAL
on name)
45
Page 25

When alternative ABBR. NO. is not set.
If the number is busy, the machine will
wait three minutes and then automatically
redial the same number up to twice.
If no contact is made, the display will
show an information code (e.g.,
CODE = 630 indicates the line was busy).
WAITING TO DIAL
|30] (Station name)
NCOMPLETE
INFO, CODE=630
Redialing
If the number you dialed is busy or there is no
answer, your machine will wait three minutes and
then automatically redial the number for you up
to twice.
If no contact is made, the display will show an
information code.
In this case, you can redial the last number (e.g.
07) by simply pressing | REDIAL I.
You can use Redial after dialing a number using
one of the following.
One-Touch dialing
Abbreviated dialing
Direct dialing from the keypad
Redialing
Your machine will redial the last number a total
of three times.
Even if you make contact and succeed in sending
your documents, you can still use I REDIAL I to
contact the same number again.
mill I i
* DIALING +
[07](Stai ion name)
NOTC
1. To redial a busy number, see page 47.
2. The machine does not dial the alternative ABBR. No when the document is sent
by Relayed Transmission.
3. If you hear a voice speaking through the speaker, pick up the handset and then
press [stop I to talk to the other party.
46
47
Page 26

TRANSMISSION RESERVATION
If you are in a hurry to send some documents, but your facsimile machine is busy
receiving documents, you can save time by reserving the machine for transmission.
"Reserving” means presetting a One-Touch, Abbreviated Dialing, or full telephone
number. Then, when the machine has finished receiving, it will automatically begin
to dial the number you set.
Setting Transmission Reservation
Canceling Transmission Reservation (XMT RESERVED)
If necessary, you can also cancel XMT RESERVE while your machine is still busy
with receiving documents.
1
Remove the document from ADF.
ON LINE * RCV *
XMT RESERVED
Place a document face down on the ADF.
1
Adjust left and right Document Guides.
Adjust basic settings, e.g. Resolution
(see pages 33 - 39).
Dial by pressing a One-Touch key,
IABBR I and two digits, or j TEUDIAC
and a full number.
Ex: One-Touch key j 15 i
START
ON LINE + RCV *
XMT RESERVE
ENTER STATION
XMT RESERVE
RESOLUTION=FINE
XMT
RESERVE
I 15 (S t a t ion name)
ON LINE + RCV +
XMT RESERVED
The number you reserved will appear.
4
START
Now, when your machine finishes
receiving documents, it will automatically
return to standby.
XMT RESERVE
[15] (Station name)
XMT RESERVE
ENTER STATION
ON LINE * RCV ♦
I
48
49
Page 27

I
MAKING COPIES
I
RECEIVING DOCUMENTS
Before you send a document, you can make a copy of it to see what it will probably
look like to the person who receives it.
Place a document face down on the ADF.
1
Adjust left and right Document Guides.
If necessary, adjust iRESOLUtlONl ,
1 ORIGINAL 1 , and I HALF TONE
(review pages 33 - 35).
COPY
The machine begins making a copy.
DOCUMENT SET
Document Guide
* COPY +
AUTOMATIC RECEPTION
When your facsimile machine is preset to receive documents automatically, do not
answer the telephone when it rings. The machine will soon begin receiving.
MANUAL RECEPTION
How to Set Manual Reception
If there is only one telephone line in your office and you wish to use the telephone
line for both Fax and Voice, you may set the machine to Manual Reception.
1
wooc
ncr
or
To return to RCV = AUTO, press
¡SELECT I again.
repeatedly.
STOP
01-DEC* 1990 15 ; 00
RCV=AUTO
01-DEC-1990 15:00
RCV=MANUAL
01-DEC-1990 15:00
MANUAL RCV
I
NOTC
1. To stop the copy process, press | STOP |.
2. To make copies of more than 10 pages, add additional pages while at (east one page
still remains on the ADF.
3. When making a copy, your machine will automatically select Fine Resolution, unless
you change the setting.
50
To return to standby,
51
Page 28

H
POLLING
What to Do When Your Telephone Rings
If your machine is set for manual reception and the telephone rings,
1
Lift the handset.
If you hear a beep ••• beep ••• beep sound,
it means someone wants to send a fax.
Or,if the caller answers and says he/she
wants to send a fax, then
Remove any documents from the ADF.
START
Your machine starts receiving.
Hang up the handset.
If the other station has an ID, it will appear
on the display.
ON LINE * RCV *
LINE
ON
415
ID
+ RCV *
1 1 1 1234
Polling means calling other station{s) to retrieve the document. The other station must
know in advance that you will call, and must have a document set on the ADF. You
also need to set a polling password, shared by the other station, to ensure security.
How to Set the Polling Password
If you have just set your ID No. and pressed (START I , skip to step 3. If not
start from step 1.
1
and
SET MODE
NO.=|
USER PARAMETERS
POLLING PASSWORD
III!
and
Enter four-digit password.
Ex: ad]05]
POLLING PASSWORD
§876
52
To set the polling password,
START
STOP
To return to standby,
HOT€
1. Polling might not function with all fax machines. We suggest you attempt a trial polling
a
before you actually poll for important documents.
2. If you make a mistake in Step 4, use the ( < | or ( > | key to move the cursor to the
incorrect number, and then enter the new number over it. To erase the password,
press (CLEAR j.
3. If password is not set in the other station, you can poll the other station even though
your machine has a password.
DATE & TIME
01-12-1990 15:00
01-DEC-1990 15:00
53
Page 29

How to Prepare to be Polled
In order to let other stations poll your machine, you must set your machine with a
document on the ADF. Be sure to set the polling password (see page 53) before setting
the document on the ADF. After being polled, your machine will automatically return
to the preset setting.
How to Poll
The following procedure lets you poll one station, or up to 73 stations (70 One-Touch
or ABBR. stations, and 3 Direct Dialing stations). Multistation polling does not require
a Relay Station. Be sure to set the polling password before polling (see page 53).
Place a document face down on the ADF.
1
Adjust left and right Document Guides.
- WOOE *
crz3\
-------
)
}
-----
&
^ or )-------^ repeatedly.
В
You are now set for POLLED = ON. If you
press I SELECT ] again, the setting
will return to POLLED = OFF.
DOCUMENT SET
Document Guide
DOCUMENT SET
DOCUMENT SET
POLLEO=OFF
POLLED=ON
and
Dial by pressing a One-Touch key,
I
ABBR I and two digits, or [TEL/DIAL|
and a full number.
Ex: 1 ABBR I and
g] [^
, or
1.TEL/DI ALIE Ш Ш B] Ш Ш Ц]
To add more stations, use One-Touch
keys, or [ABBRI and two digits.
Ex: One-Touch key 1151
START
POLLING
ENTER STATtON(S)
POLLING
[ 35 ] (Station name)
or
POLLING
7772345|
POLLING
[15] (Station name)
* DIALING +
[15] (Station name)
t
NOTC
You can still receive ordinary transmissions even when set to be polled.
54
NOTC
1. To erase or change stations set in Steps 2 or 3, press j CLEAR |. If you recorded
several, use MODE | — | or j + | to find the station you want. Then press
I CLEAR I. Add new stations with One-Touch keys, or | ABBR 1 and two digits.
2. If a polled station is busy, or does not answer, it will be skipped and the next station
will be polled. The skipped station(s) will be redialed up to twice after all registered
stations have been polled.
3. When polling ends, a Multistation Communication Journal is automatically printed out.
This journal lists the stations polled and indicates whether polling was successful or not.
55
Page 30

<
USING YOUR UF-160 TELEPHONE
Turnaround Polling
(Combined Transmission and Polling)
This procedure lets you do two operations with one call, automatically. First, your
machine will send a document to a station, and then it will poll the same station.
Be sure to set the polling password before using the following procedure (see page 53).
Place a document face down on the ADF.
1
Adjust left and right Document Guides.
2
and
Dial by pressing a One-Touch key,
i ABB^ and two digits, or I TEL/PIAlTI
and a full number.
Ex: One-Touch key ilO I, or
I TEUDiALirilfsirsimiTIfairil
DOCUMENT SET
Document Guide
XMT & POLLING
ENTER STATION
XMT & POLLING
[10) (Station name)
or
XMT & POLUNG
5551234|
Making a Regular Call
You can use the handset on your UF-160 to make regular calls. To do so, lift the
handset and dial a full number just as you would using an ordinary telephone. If you
wish, you can also use One-Touch/ABBR. keys.
1
Remove any document from the ADF.
01-DEC-1990 15:00
* DIALING *
I
Lift the handset.
Dial by pressing a One-Touch key,
I ABBRjand two digits, or a full number.
Ex:
* DIALING *
[02] (Station name)
* DIALING *
555 1234|
8
56
+ DIALING *
[10] (Station name)
or
* DIALING *
5551234
57
Page 31

Making Voice Contact after Sending/Receiving
You may want to talk to the other person over the telephone after sending or receiving
documents. To do so, perform Step 1 while the machine is still sending or receiving.
What to Do When the Other Party is Set for Manual Reception
8
When sending When receiving
SPACE
TEUDIAL
When sending/receiving is over and the other party answers the Voice Contact
request, you will hear a beep-beep-beep sound coming through the monitor speaker.
2
Lift the handset.
SPACE
TEL/mAL
ON LINE * XMT * TEL
ON LINE * XMT * TEL ON LINE ♦ RCV + TEL
OPERATOR CALLING
©
ON LINE * RCV * TEL
OPERATOR CALLING
if the other person’s fax machine is set
for manual reception, you will hear a voice
through the speaker when you try to send
documents.
Lift the handset.
2
STOP
4
Tell the other person to prepare for
reception.
When you hear a beep.
The machine begins sending your
documents.
START
ON LINE * XMT *
ID:
Talk.
Answering a Voice Contact Request
When you hear a beep-beep-beep sound coming through the monitor speaker, it
means you are receiving a voice contact request. Reply by following the above
procedure from step 2.
58
Hang up the handset.
59
Page 32

Г
TIMER CONTROLLED
E
You can send a document to one or more stations at any fixed time within 24 hours,
this timer communication possible. Note that you cannot set more than one Deferred
Transmission and one Deferred Polling (see page 60). However, you can set Deferred
Transmission and Deferred Polling at the same time, as long as they start
independently at different times.
COMMUNICATIONS
Built-in timers, one for Deferred Transmission and other for Deferred Polling, make
Deferred Transmission
Place a document face down on the ADF,
Adjust left and right Document Guides.
and
DOCUMENT SET
DEFERRED COMM. NO.=|
1;XMT 2:POLLING
START TIME
START
The standby display and Deferred XMT
display will flash alternately until
transmission actually takes place.
01-DEC-1990 15:00
DEFERRED XMT 23:30
I 02] (Station name)
4
60
Select 1. XMT.
Enter start time from keypad.
(Use four-digit, 24-hour clock.)
Ex: Hi!]® mo 1:30 p.m.)
Dial by pressing a One-Touch key, or
IABBR i and two digits.
Ex: One-Touch key
START TIME 23:30
ENTER STATION(S) |
START TIME 23:30
[02] (Station name)|
NOT€
1. If you enter a wrong number in Step 4, press | CLEAR [, then reenter the right
number.
2. You cannot use Direct dialing in Step 5. All called stations for Timer Controlled
Communications must be set in advance in One-Touch/ABBR. keys.
3. When Timer Controlled Communication is set, you can still send, poll, or copy
documents. To send, poll, or copy, simply follow the normal procedure,
4. You cannot use SET MODE functions when Timer Controlled Communication is set.
5. To cancel or change the settings, see page 63.
61
Page 33

Deferred Polling
How to Cancel or Change the Settings
1
and
2
Select 2. POLLING
Enter start time from keypad.
(Use four-digit, 24-hour clock)
Ex:[0][I]|I]E(2:30 a.m.)
Dial by pressing a One-Touch key, or
1ABBR I and two digits.
Ex: One-Touch key |T61
To add more numbers (70 maximum),
repeat Step 4,
Ex:|ABBRiand[Tliy|.
DEFERRED COMM. NO.=|
1 :XMT 2;POLL ING
START TIME I :
START TIME 02:30
ENTER STATION(S) |
START TIME 02:30
[10] (S t a t ion name)|
START
(151
TIME
(Slat ton name)1
02 : 30
1
and
Select 1 or 2 depending on which function
you want to cancel or change.
To cancel or change, select 1.
To cancel Deferred XMT or Polling,
4q
}
_____
( START
To store the new setting,
DEFERRED COMM. NO.=|
1 :XMT 2;POLLING
DEFERRED
CHANGE? 1
DEFERRED
CHANGE? 1
START TIME |3:30
[02J (Station name)
START TIME
102]
01-DEC-1990 15:00
XMT
: YES
or
POL
: YES
(Slat ion
IS SET.
2 :NO
IS SET.
2 :NO
1
name)
62
STAHT
The standby display and Deferred Poll
display will flash alternately until polling
takes place.
01 - DEC- 1 990 1 5:00
DEFERRED POLL 02 : 30
[15] (Station name)
The machine returns to standby.
To change the starting time, set the
4b
document on the ADF again and enter the
new starting time over the old one.
Ex: BEE 0(9:00 p.m.)
To store the new setting,
START TIME 21:00
[02] (Station name)|
START
63
Page 34

LI PROGRAMMED COMMUNICATION
I
To delete or add stations, Reenter the
4c
starting time.
Ex: [2][3][3][o]{11:30 p.m.)
• To delete a station
- MODE +
icr
------
)
or f
------
1 repeatedly until the
display shows the station you want to
delete.
Ex;
To delete more stations, repeat the
procedure above.
• To add a station, enter a station
number by pressing a One-Touch key,
or lABBR I and two digits.
Ex:
To add more stations, repeat the
procedure above. stapt
START TIME 23:30
(02] (Station name)|
START TIME 23:30
[05] (Station name)|
START
[04]
START TIME 23:30
[06] (Station name)|
01-DEC-1990 15:00
TIME
(Sta t
23:30
on name)
Setting Program Keys
Your UF-160 fax machine has three Special Program Keys. These keys are useful
if you frequently need to send or poll the same group of numbers. You can use these
keys to store a sequence of stations to be polled, a deferred transmission or polling
sequence, or an additional One-Touch Key (One-Touch Group Key).
To set a number or a group of numbers in a Program key, follow the procedure below.
1
and
2
START
Press one of the Program Keys,
IE]'o[P3].
Ex:[FTI
SET MODE
NO,.I
PROGRAM KEYS
PROGRAM KEY
NO.-I (PII
1 :XMT/POL 2:ABBR/GRP
10
64
To store the new settings,
The standby display and Deferred XMT
display will flash alternately until
transmission actually takes place.
DEFERRED XMT 23:30
[02] (Station name)
Now you can choose one Program Key mode out of the following four modes.
• Deferred Transmission ; Go to step 5a.
• Polling Go to step 5b.
• Deferred Polling Go to step 5c.
• Group Dialing : Go to step 5d.
NOT«
XMT/POL means Transmission or Polling. ABBR/GRP means Group dialing.
65
Page 35

o
í, ■’
To set Deferred Transmission,
5a
cn
for XMT/POL
for XMT
Enter the starting lime in four digits.
Ex.: [2] [3] [S ® 01:30 p.m.)
Enter a station number by using a One-
Touch key, or IABBRI and two digits.
Ex: One-Touch key
If you find an error, press I CLEAR I to
erase the displayed station.
NO.=| (P1]
1:XMT/POL 2:ABBR/GRP
NO.=| iP1]
1:XMT 2:POLLING
START TIME I ;
START TIME 23:30
START TIME 23:30
ENTER STATION(S) |
START TIME 23 : 30
[02] (S t a ton name)
5b
To set Normal Polling,
92,
Í—I for XMT/POL
for Polling
for Normal Potting
Enter a station number by using a OneTouch key, or I ABBR | and two digits.
Ex; One-Touch key
Add more station numbers, if necessary.
You may use the MODE | - | or | -l |
key to review the entered station(s) before
going to the next step. If you find an error,
press I CLEAR [ to erase the displayed
station.
NO.=| [PI]
1:XMT/POL 2:ABBR/GRP
NO.=| [P1]
1:XMT 2:POLLING
DEFERRED POLL (PI]
1:YES 2:NO NO.=|
ENTER
1
ENTER
105] (S t a t ion
STN(S)
STN(S) [P1 ]
[PI 1
name )
10
To store the starting time and station
number,
START
Go to step 6 (page 69).
66
PROGRAM NAME [P1 ]
I
To store station numbers,
START
PROGRAM NAME |P1]
I
Go to Step 6 (page 69).
67
Page 36

To set Deferred Polling,
5c
NO.=| [P1I
1:XMT/POL 2;ABBR/GRP
5d
To set a group dialing,
NO.=| [PI]
1;XMT/POL 2:A8BR/GRP
s
for XMT/POL
for Polling
for Deferred Polling
Enter the starting time in four digits.
Ex.: [UEElo]00:00 p.m.)
Enter a polled station number by using
a One-Touch key, or IABBR [ and two
digits.
Ex; lABS^ and [T] [U
Add more station numbers, if necessary.
You may use the MODE 1 - | or I
key to review the entered station(s) before
going to the next step. If you find an error,
press 1CLEAI^ to erase the displayed
station.
To store the starting time and station
numbers,
NO.=| 1P1]
1 :XMT 2;POLL ING
DEFERRED POLL [P1)
1:YES 2:NO NO.=|
START TIME I :
START TIME 22:00
START TIME 22:00
ENTER STATION(S) |
START TIME
|12] ( S t a ton Пame)
PROGRAM NAME [Pt]
22 : 00
for ABBR/GRP.
Enter a station number by using a OneTouch key, or [ABBR i and two digits.
Ex: I ABBR I and mr^
Add more station numbers, if necessary.
You may use the MODE or [+3
key to review the entered station(s) before
going to the next step. If you find an error,
press [cLeAR I to erase the displayed
station.
To store station numbers,
START
Enter program name using One-
Touch/Character keys (see page 18).
Ex: PROG. A
START
ENTER
1
ENTER
[16]
PROGRAM NAME
1
PROGRAM NAME
PROG. A|
PROGRAM KEY
STN(S) [PI ]
STN(S)
(S t a t ion
name)
[PI]
|P1 ]
10
lllllllllllllllljlllll
[P1 I
■
1
Go to Step 6 (page 69).
68
You can now set another Program Key
repeating the procedures from Step 4, or
return to standby by pressing [STOP [.
NOTC
To print oui a Program List, see page ё2.
69
Page 37

How to Erase or Change Program Key Settings
To erase the settings in a Program key, either completely or partially, and/or add
new station numbers or a new program name, use the following procedure.
1
and
SET MODE
NO. =1
6b
To change the Program key function,
reset the parameter number 1 or 2, then
reenter all the rest of necessary settings.
Ex: Cancel Deferred polling.
DEFERRED POLL (P11
1:YES 2:NO NO.=fl
DEFERRED POLL
1:YES 2;NO
ENTER STN(S) [P11
(PI 1
NO. =S
10
2
^ START 1
1--IS
Press the Program key you want to erase
or change.
Ex: EU
shows the setting you want to erase or
change.
To erase the Program key,
6q
----
J
START
-I repeatedly until the display
PROGRAM KEYS
PROGRAM KEY |
no.=D {P1]
1:XMT/POL 2;ABBR/GRP
NO.= B [P1 I
1:XMT/POL 2:ABBR/GRP
6c
To erase and/or add the station number(s)
for timer programs, while the display
shows START TIME,
*
--------
* - liOD€ +
t
--------II____
n n
• To erase a station number,
- ¥ooe ♦
□C
the station you want to erase.
Ex: One-Touch key
Erase more stations, if necessary.
)
until the display shows
START
[02]
START TIME 23:30
[02] (Station name}|
START TIME 23:30
[05] (Station name}|
START TIME 23:30
[01] (Station name)|
TIME @3:30
(Slat ton name)
70
\
___
-
START
_
^ — J
NO. =1
1.XMT/POL 2:ABBR/GRP
PROGRAM KEY
71
Page 38

• To add a station number, press a OneTouch key or 1ABBR i and two digits,
while the cursor is blinking on lower
right corner of the display.
Ex: I ABBR I and HU]
Add more station numbers, if
necessary.
• To confirm the new stations
entered by pressing MODE[Hor[T].
To store the new station settings,
START
START TIME 23 : 30
[02] (Station n ame)|
START T t ME
[45]
(St a t
PROGRAM NAME [P1
0ROG. A
23 : 30
i on name)|
• To add a station number, press a OneTouch key or I ABBR I and two digits,
while the cursor is blinking on lower
right corner of the display.
Ex: I ABBR I and
fnr^
Add more stations, if necessary.
• To confirm the new stations entered by
pressing MODE [H or [T] ■
To store the new station settings,
START
ENTER STN(S)
(S t a t ion
102]
ENTER
145]
PROGRAM
0ROG. A
STN(S)
(S t a t ion
NAME
name )
name )
(P1 I
(PI i
[PI]
10
72
To erase and/or add the station number{s)
for normal Polling or Group Dialing
(ABBR/GRP), follow the procedure below,
• To erase a station number,
WOOE
or i
------
^ until the display
shows the station you want to erase.
Ex: One-Touch key
Erase more stations, if necessary.
ENTER STN(S) |P1
|02] (Station name)
ENTER
[05]
ENTER
102]
STN(S)
(S t a t ion
STN(S) [PI 1
(S t a t ion
(PI 1
name )
name )
To change the program name, while the
6e
display shows PROGRAM NAME, write
PROGRAM
0ROG. A
NAME
over the new program name using OneTouch/Character keys (see page 18).
Ex: EUROPE
To store the new name,
START
NOTC
To erase an extra character in Step 6e, move the cursor to it by pressing | > | or [ < |
and press (SPACE I.
PROGRAM
EUROPE
PROGRAM
NAME
KEY
(PI ]
[PI]
1
73
Page 39

Program Key Programming Flowchart
Using Program Keys
Once you have recorded a number, or group of numbers under a Program Key (see
pages 65 — 69), you can use the key by following steps below.
nn Deferred XMT
• Set Timer
[~n XMT/POLL
_n
_____________
___
1Ч Polling
• Set Timer
П__________
Deferred
and [ 7 I
0
START
XL
[T] POLLING
_^n
____________
___
Normal
I ^ I Polling
R
(T1aB8R/GRP
To transmit documents using Program Keys,
Place a document face down on the ADF.
Adjust left and right Document Guides.
2
Press program key.
Ex:
Dialing automatically begins (see Note).
To poll documents using Program Keys,
1
Make sure no documents are on the ADF.
10
DOCUMENT SET
Document Guide
DOCUMENT SET
[P2I (Program name
* DIALING *
[20] (Station name)
01 -DEC- 1990 15:00
74
Set Called Station(s)
START
0
Set Program Name
START
2
Press program key:
Ex:
Dialing automatically begins (see Note).
NOTC
The display varies according to the entered mode settings.
01-DEC-1990 15:00
[P3j (Program name)
+ DIALING *
[21] (Station name)
75
Page 40

lu
PRINTOUT REPORTS AND LISTS
To help you maintain records of the documents you send and receive, as well as
lists of the numbers you record, your facsimile machine is equipped to print out the
following reports and fists; a Journal, individual Transmission Journal, One-
Touch/ABBR. No. list. Program list, and a FAX Parameter list.
Journal Printout
The ‘‘Journal” is a record of the last 32 transactions (a transaction is performed each
time you send or receive a document). It is printed out automatically after every 32
transactions, but you can print it out manually in the following way;
PRINT OUT
NO. - I
and
JOURNAL PRINT
* PRINTING +
JOURNAL PRINT
The machine starts printing out Journal
(see page 78).
Individual Transmission Journal (XMT JRNL)
An Individual Transmission Journal is printed out automatically after each transmission
if you set XMT JRNL = ON in advance (see page 39). If necessary, it can also be
obtained manually by using the following procedure.
PRINT OUT
NO. =1
and
XMT JOURNAL
+ PRINTING *
XMT JOURNAL
The machine begins printing out an
Individual Transmission Journal (see
page 78).
11
76
NOT<
The Individual Transmission Journal contains information of the latest transmission. If
no transmission has been made within the last 32 transactions, an Individual Transmission
Journal with blank contents is printed out.
77
Page 41

c:
f'
Sample Journal Printout
O) (2)
GR0UP2 01-DEC
c
)
-UF-160 Tokyo
tH)
(3)
N0.
01 OK
S-OK
02
03
Oil OK
05
06
07
c
)
32
(5)
COM PAGES
02
00
OK
01
02
OK
05/05 00;02'38
OK ■02 00:01 '09
00
»107
c
c
)
)
OK
05/05
-JOURNAL-
(6) (T)
DURATION
00:01'06 XMT
00:00 '20 XMT 01-DEC
OO:03'19
00:01 '07
00:00'AScXMT
00;02'52)XMT
X/R
RCV
XMT
(I'D
XMT
T
RCV
)
(
T
DATE OI-DEC-iggO *»»« TIME 15:00
(8)
IDENTIFICATION
Paris orriee
Central Office
01166 23 1689
London B.O.
Tokyo B.O.
555 69'19
Sample Individual Transmission Journal
-JOURNAL- •••■ DATE 01-DEC-1990 f»»i TIME 15:00
(3)
N0.
11 OK
VOICE CONTACT REQUESTED.
(5)
(H)
COM
PAGES
01 00:00'5*1
(15)
(6)
DURATION
(7)
X/H IDENTIFICATION
XMT
(8)
London B.O.
-UF-160 Tokyo
(9)
DATE
01-DEC
01-DEC
01-DEC
01-DEC
01-DEC
01-DEC
(10)
TIME
I0:i|it 8'10 <180 AC 7 800
I0:H5
10:117
10:53
10:57
11:0ll
11:07
)
C
)
12: 32
(12)
03)
-212 111 123>t*
(1) (2)
(10)
(9)
DATE
01-DEC 10; HH
TIME
(12)
(13)
-212 111 123H‘
(11)
DIAGNOSTIC
A'10't80AC7800
010220200000
8 it OH 80 AC? 800
8ilOH8OAC78O0
0502SOAC7800
8i10't80AC7BOO
(
)
8't0'l8OAC78O0
(11)
DIAGNOSTIC
C00*180207920
Journal Printout Explanation
Printout date
(1)
Printout time
(2)
Communication number
(3)
(4) Communication result
Number of pages
(5)
transmitted or received
Duration of communication
(6)
Type of communication
(7)
(8) Remote station identification
(9) Communication date
(10) Communication start time
(11) Diagnostic
(12) Own LOGO
(13) Own ID number
(14) Dialing method
(15) Call back message
Day-Month-Year
HounMinute
1-32 (Does not always begin with 1
when printed out manually.)
"OK” indicates that the transmission was
successful.
”S-OK” indicates that STOP was pressed
during communication.
Three-digit information code (see page 87)
appears when there was a problem.
The two digit number is the number of
pages successfully transmitted or
received. When the Total Page function is
activated, two two-digit numbers will
appear. The first two-digit number
represents the number of pages
successfully transmitted. The second two-
digit number represents the total number
of pages that were attempted to be
transmitted.
An asterisk indicates that the quality
of some received copies was poor.
Hour: Minute Second
"XMT” means Transmission
“RCV” means Reception
A name indicates station name recorded
in this machine. A number indicates
remote station’s ID number or Telephone
number. Group 2, 3 indicates that the
remote station was a CCITT G2, G3
machine.
Day-Month
HounMinute
For service personnel only
Up to 25 characters
Up to 20 digits
"T” indicates direct dialing or
One-Touch/Abbreviated dialing with no
recorded station name.
Appears when voice contact was
requested.
11
78
79
Page 42

c.
One-Touch/ABBR. Dialing Number List
To print out a list of all the facsimile numbers you recorded under One-Touch/ABBR.
Dialing numbers,
1
and
START
The machine starts printing out a OneTouch/ABBR. Dialing Number List.
PRINT OUT
NO. =1
ONE - TOUCH/ABBR.NOS.
+ PRINTING *
ONE-TOUCH/ABBR.NOS
Sample One-Touch/ABBR. Dialing Number List
OK£-TOtiCH/AB0R.NOS.
(**) (5)
tBR.NO.
[on
[02]
[03]
[0«)
[05] Paris Office
[06]
[07] XY2 gmbH
[08]
[09] Central Office
[10]
[231 Express Trans 8765432
NO. OF STATIONS = 11
STATION NAME
Yokohama 3.0.
Nagoya 3.0.
New York 8,0.
ASC CO., LTD.
Hong fCorg 4210865
Tokyo B.O,
AAA CORP. 2345678
(7]
DATE 01-DEC-1990 TIHE 15.00
(6)
TELEPHONE HO.
0456350804
0522627811
51669956808
421-568-8523
5587644
1987654
034919191
8765432
(1) (2)
-OF-160 Tokyo
O)
-212 111 123*1-
(9)
One-Touch/ABBR. Dialing Number List Explanation
(1) Printout date
(2) Printout time
(3) Printout page number
(4) Abbreviated number or One-Touch number
(5) Station name recorded in the machine
(6) Telephone number recorded in the machine
(7) Number of recorded ABBR and One-Touch
numbers
(8) Own LOGO
(9) Own ID number
(10) Alternative Abbreviated Number
Day-Month-Year
Hour; Minute
Up to 15 characters
Up to 36 digits
indicates a pause.
Up to 25 characters
Up to 20 digits
(10)
ALT ABBR
[231
[01]
[05]
(3)
P.1
11
llllllllllllilllililljl
|l
80
81
Page 43

Program List
To print out a list of all the dialing patterns stored under the program keys,
1
and
PRINT OUT
NO. =1
PROGRAM LIST
Sample Program List
>«««>****» -PROGRAM LIST- DATE Ol-DEC-1990 *•#»« TIME 15.00 f»»»» p.l
(4)
PROGRAM PROGRAM NAME
:pi:
[P2] U.3.A.
[P3]
EUROPE
ASIA
(5)
(6) (7)
TYPE
XMT
POLL
ABBR/GRP
t1) (2) (3)
TIMER
23:45
—
(8)
ASBR.MOS.
[01]
[03].[04],[07],[09],[19],[24],[36],[55]
[05],[10],[62],[64]
-UF-160 Tokyo
(9)
-212 111 123<l-
11
OO)
START
The machine starts printing out a
Program List.
* PRINTING +
PROGRAM LIST
Program List Explanation
(1) Printout date
(2) Printout time
(3) Printout page number
(4) Program key
(5) Program name
(6) Type of communication
(7) Timer
(8) Numbers recorded in the
program
(9) Own LOGO
(10) Own ID number
Day-Month-Year
Hour;Minute
P1-P3
Up to 15 characters
“XMT” indicates transmission.
“POLL" indicates polling.
"ABBR/GRP" indicates that the program
key is programmed as a group key.
Indicates the starting time.
"
--------------------
” indicates that the program
key contains “non-deferred” program.
One-Touch and ABBR numbers
Up to 25 characters
Up to 20 digits
82
83
Page 44

FAX Parameter List
To print out a list of the FAX Parameters.
Sample Fax Parameter List
-FAX PARAMETERS- DATE 01-DEC-1990 TIME 15:00
O) (2)
!
and
The machine starts printing out a Fax
Parameter List.
* PRINTING *
FAX PARAMETER LIST
PABAMETEB NO. i PARAMETER
RES0L.UTI0N
01
02 ORIGINAL
STAMP
03
CW POLLED
JOURNAL PRINT
05
06
HEADER PRINT
DIALING METHOD
07
08
REUY XMT REQUEST (1: Invalid
confidential fax
09
n
PASSWORD XMT (1: Invalid
12 PASSWORD RCV
ECM
15
XMT JOURNAL
19
20
FAX ACCESS CODE (1:Invalid
INITIAL OPR. CALL (1:0rr
32
(3)
(1rStandard
{1: Nonaal 2:Dark 3: Light)
Cl:Off 2:On) 2
(1:0rr
(1:Off
0 : Inalde 2:Outslde 3: None)
(1;Tone 2:Pul3e) 1
(1: Invalid 2:Valid)
(1;lnvalld
Cl:0ff 2:On)
(1:0ff
2:Fine
2: On)
2:Automatic
2:Valid) 1
2; Off
2: Off
2: Automatic
2:Valid)
2;0n)
Fax Parameter List Explanation
Printout date : Day-Month-Year
(1)
Printout time : HourrMinute
(2)
Parameter number
(3)
Current setting
(4)
Standard setting (see pages 33 and 34)
(5)
Own LOGO
(6)
Own ID number
(7)
Up to 25 characters
Up to 20 digits
CURRENT STANDARD
SETTING SETTING
3:S.Fine)
Print) 2
3:0n)
3:0n)
Print)
(6)
-UF-160 Tokyo
(7)
-212 1 n 123*1-
c*f) (5)
2
1
1
1
1
1
1
2
1
1
1
1
1
2
1
2
1
2
)
1
1
1
2
I
1
1
11
84
85
Page 45

PROBLEM SOLVING AND DAILY CARE
_________________________
Information Codes
When something unusual occurs, the display may show one of the information codes
below. These will help you fix the problem.
Information
code
001
002
004
010 No recording paper or
020 Thermal Recording Head
030
031
039 STOP key was pressed
Recording paper jam.
Recording paper jam.
recording paper not set
properly.
temperature is too high.
Document misfeeding.
Document paper is too long
or jammed.
Document length exceeds 1
meter.
while sending/copying
documents and remains
more than one page on the
ADF.
Meaning
Remove jammed paper.
(See page 89)
Remove jammed paper.
(See page 89)
Reload recording paper.
(See page 90)
Open the receiving unit for
15 minutes to permit
cooling. When the
information code disappears
from the display, you may
continue the operation you
were performing. If the code
does not disappear, turn off
the power and call your
service man.
1. Reload the document
properly. (See page 32)
2. Remove document jam.
(See page 93)
3. Adjust ADF,
(See page 94)
1. Reload the document
properly. (See page 31)
2. Remove document jam.
(See page 92)
Remove the documents
on the ADF (press ISTOPI
when a document is bitten
at ADF). Reload the
document and try again.
Action
Information
code
060 Cover is open or door
opened during communi- Guide Unit and Receiving
cation.
400
464
402
404
405
432
403
407
468
469
408
409
410
411
' 414
412
415
416
417
418
419
436
490
420
During initial handshake,
receiving station did not
respond or communication
error occurred. and try again.
During initial handshake.
communication failure try again.
occurred.
No polling capability at the
remote side.
No confirmation from the
receiving station for the send again.
previous page sent.
Remote side confirmation of
previous page is illegible.
Invalid command received.
Polling password does not
match.
No data from the transmitting
side.
Polling transmission error.
Received data has too many
errors.
Machine goes to receiving
mode, but receives no
command from the
transmitting side.
Meaning
Action
Close the Transmission
Unit.
1. Check with the other
party.
2. Reload the document
Reload the document and
Ask remote side to set
“POLLED = ON”.
Wait a few minutes and
Wait a few minutes and
transmit again.
Check polling password.
Check with the other party.
Check polling password.
Check with the other party.
1. Remote side misdial.
2. Check with the other
party.
12
W
86
87
Page 46

information
code
422
427
430
434
459
492
493
494
552
553
554
555
Meaning
Interface is incompatible.
Communication error
occurred, while receiving.
Action
Check with the other party.
Check with the other party.
Clearing a Recording Paper Jam
If the recording paper becomes jammed in the machine, the display will show the
information code 001 or 002. To clear the jam, open the Receiving Unit and remove
the jammed recording paper as shown in the figure below. Then reset the recording
paper following the loading procedure on page 90.
12
451
458 disconnected.
495
550
457
540 Communication error
541
542
543
544
623 No document was on the
630
633 due to a busy line or no
Telephone line
Transmission failed. Remote
unit doesn’t have Relayed
Transmission and
Confidential Communication
capability.
occurred, while transmitting.
ADF.
Redial was not successful
response from the called
station.
Check with the other party.
Check with the other party.
Then remove the paper as shown in the figure below.
1. Reload the document
and try again.
2. Check with the other
party.
Reload the document and
try again.
Reload the document and
try again.
88
89
Page 47

Reloading a Recording Paper
Your facsimile machine uses a roll of special recording paper. You can easily load
paper yourself by following the steps below.
1. Open the Receiving Unit {Control Panel) by depressing the latch button.
2. If there is a used roll inside, lift it out and set a new roll in its place. Be sure the
direction of the roll is as shown below.
3. Close the receiving unit carefully by pressing both ends gently until you hear the
cover lock into position. The recording paper projected from the unit will be cut
automatically. Remove this cut paper.
12
ill
90
91
Page 48

Clearing a Document Jam
If a document becomes jammed in the machine, the display will show information
code 031.
To clear the Jam,
1. Open the Receiving Unit by depressing the latch button on the right side panel,
and swing the Receiving Unit forward.
S. Unlock the ADF unit by gently pulling up both sides of the ADF unit. When the
ADF unit springs open, raise it to release the jammed paper.
3. Remove the jammed paper.
12
W
4. Relock the ADF unit into place by pressing down on it gently. Then gently close
the Receiving Unit with both hands.
92
93
Page 49

Adjusting the Automatic Document Feeder (ADF)
If misfeeding of a document happens frequently, we suggest you adjust the ADF
following the procedure below.
Refilling the Verification Stamp Unit
The verification stamp unit contains ink. When the stamp appears faded or hard to
read, refill the stamp unit with ink.
1, Open the Receiving Unit by depressing the latch button.
2. Unlock the ADF unit by gently pulling up both sides of ADF.
To refill the stamp unit,
1. Open the Receiving Unit
by depressing the latch
button on the right side
panel, and swinging the
Receiving Unit forward.
3. Turn the Recording
Paper Guide Plate and
the Transmitting Eject
Guide Plate towards
you. You can now see
the verification stamp
unit.
2. Lift out the paper roll
inside. (Note carefully
the direction of the paper
so that you can replace
the roll correctly later
on.)
12
lllllllill!
5. Adjust the Pressure Plate. ‘
Position 4
Position 3
Position 2
Position 1
NOTC
Set to this position if the feed trouble does not improve at Position 3.
To prevent multiple feed trouble
Standard Position
To prevent non-feed trouble
If the feed trouble continues after setting to Position 4, please call your service
representative.
94
4. insert a flathead
screwdriver into the
groove of the unit and
slide the unit forward.
NOTC
When the stamp unit is set as above, the stamp will appear on the front side of each
page. If you want the stamp to appear on the back side of each page, ask your service
personnel to change the stamp unit. 95
S. Puli the stamp unit out
with a pair of tweezers.
placing one drop of ink
into the refill hole.
7. Replace the stamp unit
by following the above
instructions in the
reverse order.
Page 50

I
APPENDIX
Cleaning the Thermal Recording Head
The thermal head in your machine needs to be cleaned periodically to ensure clear
facsimile reproduction.
To clean the thermal head,
1, Open the Receiving Unit by depressing the latch button on the right side panel.
£. Wipe the surface of the thermal head unit gently with a soft cloth or gauze soaked
with ethyl alcohol. Be sure to use a clean cloth since the thermal head can be
easily scratched.
a. RELAYED (MULTI-STATION) TRANSMISSION
General Description
Relayed Transmission is a feature which can save you time and transmission costs
if you need to send the same document to several facsimile stations at the same
time. This is especially true if the transmissions are long distance.
To use Relayed Transmission, you must be part of a “Relay Network” built around
a “Relay Station.” That is, when you send a document by Relayed Transmission,
you actually send it to a Relay Station together with instructions to relay it to one
or more end receiving station(s). The Relay Station first receives the document in
its memory and then relays it to the end receiving station(s).
Example;
Initial Sending Station
New York Office I
RESULT REPORT
Relay Station
I
-------------------
End Receiving Stations
13
96
Local Call
NOT€
The number of end receiving stations that can be reached by a Relay Transmission is
limited by the memory capacity of the initial sending machine: i.e., your machine cannot
make a Relay Transmission to more than 70 end receiving stations. This is enough,
however, to allow more than one Relay Network to be set up.
Wellington
97
Page 51

UF-160 Compatibility with Other Machines
Table 1 shows the kinds of facsimile machines which can make up a Relay Network
used for Relayed Transmission. Note that the UF-160 can serve as an Initial Sending
Station or End Receiving Station.
Table 1 Relay Network Compatibility Requirements
Station
Initial Sending Station
Relay Station
End Receiving Station
Compatible Model
UF-140
UF-150
UF-160
UF-170
UF-250
UF-260
UF-620
UF-640
UF-750
UF-620
UF-640
CCITT G3/G2
compatible machines
Special Settings
Required. Please refer
to the individual User’s
Guides of each machine.
Not required.
Relay Network
A Relay Network is basically a group of facsimiles programmed to communicate with
each other via a Relay Station, In this case, the word programmed means that certain
numbers have been stored in the memory of each machine. These numbers, aiso
calied parameters, are needed to identify the machines in the network.
Since the UF-160 can only serve as an initial Sending Station or End Receiving Station
in a Relay Network, it is assumed that you will not have to establish the network
yourself. All you have to do is follow the setting up procedure described here, and
certain instructions provided by the network organizer {usuafiy the person controlling
the Relay Station). You should know, however, what kind of network you are going
to connect to, and how it works. Two sample networks are shown in Figures 1 and 2.
Figure 1 shows a sample network as seen from New York. London and Singapore
are Relay Stations connected to New York. Viewed from New York, Stockholm,
Geneva, Rome, Tokyo, Hong Kong, Sydney, and Wellington are End Receiving
Stations. (Note: Sample network A is merely an example and does not imply that
all of the countries shown can be connected in this kind of network.)
With this simple network using two Relay Stations, you can send a document with
one operation to any combination of stations in the network via the London Relay
Station and/or Singapore Relay Station, if New York only transmits to one station,
for example, then the document will go directly to the station or indirectly via the
Relay Station depending on the One Station XMT parameter you preset.
13
98
Figure 1 Sample Network A
99
Page 52

Tables 2, 3 and 4 are sample Parameter Tables for Network A.
Table 2 Sample Parameter Table for New York
One-Touch/
ABBR No.
01 London
02
03
04
05
06
07
08
09
One-Touch/
ABSR No.
01
02
03
04
One-Touch/
ABBR No.
01
02
03
04
05
Station Name
New York
Stockholm
Geneva
Rome
Singapore
Tokyo
Hong Kong
Sydney
Wellington
Table 3 Sample Parameter Table for London
Statinn Name
London
Stockholm
Geneva
Rome
New York
Table 4 Sample Parameter Table for Singapore
Station Name
Singapore
Tokyo
Hong Kong
Sydney
Wellington
New York
Telephone
Number
212 111 1234
011 44 1 1111234
oil 46 8 1111234
oil 41 22 1111234
011 39 6 1111234
oil 65 1111234
oil 81 3 1111234
Oil 852 5 1111234
Oil 61 2 1111234
011 64 4 1111234
Telephone
Number
1 111 1234
010 46 8 1111234
010 41 22 1111234
010 39 6 1111234
010 1 212 1111234
Telephone
Number
1111234
005 81 3 1111234
005 852 5 1111234
005 61 2 1111234
005 64 4 1111234
005 1 212 1111234
Relay
Address
—
20
20
20 NO 2002
20
30
30
30 NO 3002
30
30
Relay
Address
20
20
20 NO 2002
20 NO 2003
Relay
Address
30
30
30
30
30
—
Relay
Station
YES/NO
—
Network
Address
1000
YES 2000
NO 2001
NO 2003
YES
NO
3000
3001
NO 3003 Relay
NO
Relay
YES/NO
—
3004
Network
Address
2000
NO 2001
—
Relay
Station
YES/NO
—
1000
Network
Address
3000
NO 3001
NO 3002
NO 3003
NO 3004
—
1000
One
Station
XMT
Direct
Direct
Direct
Direct
Direct
Relay
Relay
Relay
13
Figure 2 Sample Network B
Figure 2 shows Sample Network B as seen from New York. London and Singapore
are both Relay Stations which are connected with New York in series. Viewed from
New York, the Singapore Relay Station is an End Receiving Station like the other
stations. This is a more complex network configuration using two Relay Stations in
which you may still send a document with one operation to any combination of stations
via the main Relay Station in London. (Note: Sample network B is merely an example
and does not imply that all of the countries shown can be connected in this kind of
network.)
However, in this case the End Receiving Stations, Tokyo, Hong Kong, Sydney and
Wellington will be served via the Singapore Relay Station. It should be noted that
the two Relay Stations will only be used when the Initial Sending Station in New York
specifies more than one End Receiving Station off the second Relay Station. If only
one End Receiving Station is specified, then this will automatically be included in
the broadcast via the first Relay Station. More than one Relay Network may be
configured within these constraints.
100
101
Page 53

Tables 5, 6 and 7 are sample Parameter Tables for Network B.
Table 5 Sample Parameter Table for New York
One-Touch/
ABBR No.
Station Name
New York
01
02
03
London
Stockholm
Geneva
04 Rome
05
Singapore
06 Tokyo
07 Hong Kong
08
09
Sydney
Wellington 011 64 4 1111234
Telephone
Number
212 1111234
011 44 1 1111234
011 46 8 1111234
011 41 22 1111234 20
011 39 6 1111234
011 65 1111234
oil 81 3 1111234
Oil 852 5 1111234
011 61 2 1111234 20 NO
Table 6 Sample Parameter Table for London
Relay
Address
—
20
20
20 NO
20 NO
20 NO
20 NO
20 NO
Relay
Station
YES/NO
—
YES
NO
NO
Network
Address
Station
XMT
1000
2000
2001
Direct
Direct
2002 Direct
2003 Direct
3000 Direct
3001
3002
3003
3004
Relay
Relay
Relay
Relay
One
Setting Up Your Machine for Relayed Transmission
To set up your machine for Relayed Transmission, use the procedures on the following
pages to set the eight parameters listed below. Some parameters (e.g., Relayed XMT
Fax Parameter) are only set once, but others must be set separately for each station
in the Relay Network.
1. Relayed XMT Fax Parameter;
This switches the Relayed XMT function ON or OFF.
2. Own Telephone Number:
The full telephone number should be entered.
3. Network Address;
End Receiving station telephone numbers set in an Initial Sending station may be
different from the numbers set in a Relay Station. To send a fax to an End Receiving
station via a Relay Station each station in the network must be identified with a certain
code which does not vary depending on where you call from. The code is the Network
Address, which consists of a four-digit number and is assigned to a One-Touch/ABBR
number.
13
One-Touch/
ABBR No.
Station Name
London
01
02
03
04
05
06
07
08
09
One-Touch/
ABBR No.
Stockholm
Geneva
Rome
Singapore
Tokyo
Hong Kong
Sydney
Wellington
New York
Table 7 Sample Parameter Table for Singapore
Station Name
Singapore
01
Tokyo
02 Hong Kong
03
04
05
102
Sydney
Wellington
New York
Telephone
Number
1 111 1234
010 46 8 1111234
010 41 22 1111234
010 39 6 1111234
010 65 1111234
010 81 3 1111234
010 852 5 1111234
010 61 2 1111234
010 64 4 1111234
010 1 516 1111234
Telephone
Number
1111234
005 81 3 1111234
006 852 5 1111234
005 61 2 1111234
Relay
Address
20
20 NO
20 NO
20
30 YES
30 NO
30 NO
30 NO
30 NO
— —
Relay
Address
30
30 NO 3001
30 NO
30
Relay
Station
YES/NO
—
NO
Relay
Station
YES/NO
—
NO
005 64 4 1111234 30 NO
005 1 212 1111234
— —
Network
Address
2000
2001
2002
2003
3000
3001
3002
3003
3004
1000
Network
Address
3000
3002
3003
3004
1000
4. Network Password:
A four-digit number which prevents unauthorized (outside) stations from accessing
the Relay Station and using its memory. Every station in the network should set the
same Network Password.
5. One-Touch/ABBR Numbers:
The One-Touch or ABBR number you set must represent the fax number of a particular
station in the network as seen from your station.
6. Relay Station Parameter (Yes/No):
Set ‘‘Yes*’ if the particular station you are recording is a Relay Station. If you are
connected to more than one Relay Station in series, set “YES” only for the first Relay
Station.
7. Relay Address:
A two-digit number which identifies the Relay Station your machine will use. Your
machine may be connected to more than one Relay Station in parallel, but when
you use Relayed XMT your machine will only send documents to the Relay Station
identified by the Relay Address.
8. One Station XMT (Relay/Dlrect) Parameter;
If you send a document to only one End Receiving Station, you can set your machine
to transmit directly to that station, without going through the Relay Station, by selecting
“Direct.” Set “Relay” if you always want to go through the Relay Station.
103
Page 54

To set the Relayed XMT Fax Parameters;
and
START
SET MODE
NO.=|
FAX PARAMETERS
13
FAX PARAMETER
NO . = II
104
Enter the fax parameter number 08.
START
and
STOP
To return to standby,
08 RELAY XMT REQUEST
1 : I NVALID
09 RELAY XMT REQUEST
2:VALID
09 CONFIDENTIAL FAX
1:INVALID
01-DEC'1990 15;00
Page 55

Enter the Substitute Relay Station
number using a One-Touch key or ABBR,
Ex: lABBRirnin
STAFIT
8
SUBSTITUTE RELAY STIM
[12] (Station name)
OWN TELEPHONE NO
Q 212 111 1234
To set a One-Touch/ABBR, Dialing Number, Network Address, Relay Station
Parameter (YES/NO) and One Station XMT (Relay/Direct) parameter;
SET MODE
NO. =1
and
ONE-TOUCH/ABBR. NOS.
9
To return to standby.
STOP
01 - DEC- 1 990 1 5:00
START
Press a One-Touch key or | ABBR | and
two-digit number.
Ex: One-Touch key [ 01 I
Enter called station's number.
Ex:
Mm
space!
START
Enter called station’s name.
Ex: SINGAPORE
To set the name,
space
1 T7TTT
START
11.2
as
13
ONE-TOUCH/ABBR. |
[01] TELEPHONE NO.
[01] TELEPHONE NO.
oil 65 111 1 2341
[01] STATION NAME
[01 ] STATION NAME
Si NGAPOREl
[01 I ALT. ABBR. NO
I
106
107
Page 56

If the receiving party has an alternative
facsimile telephone number, you can
enter it here as an alternative ABBR. NO.
by pressing the One-Touch or ABBR. key.
Ex: [15]
START
8
[01] ALT. ABBR. NO
[15] (Station name
01] NETWORK ADDRESS
nil
PRINT OUT
NO.=|
ONE-TOUCH/ABBR.
NÓS.
Enter four-digit Network Address.
Ex: SEE®
START
9
If the recorded station is the First Relay
Station, press [T] .
If not, press [|J7
Ex: [T]
Enter the two-digit Relay Address.
10
Ex: EE
START
11
In case the station you have just recorded
will be used for one-station transmission,
you can preset the transmission route.
n~l For transmission' via the Relay
Station
E Eor direct transmission
01] NETWORK ADDRESS
2000
[01 I RELAY STN NO.
1 : YES 2 : NO
[01] RELAY ADDRESS
II
[ 01 I RELAY ADDRESS
20
[07] ONE STN NO.=|
1 : RELAY 2 :DIRECT
* PRINTING *
ONE-TOUCH/ABBR.
13
NOS.
12
Repeat steps 4 through 11 to enter the
numbers for other stations, or return to
standby by pressing [STOP].
108
ONE-TOUCH/ABBR. |
109
Page 57

Sample One-Touch/ABBR. NOS. List
ONE-TOUCH/ABBR.NOS,
(4)
ABBR.
NO.
COl]
[02]
[03]
[04]
[05]
[06]
[07]
[08]
[09]
OWN NETWORK ADDRESS ^= 1000
SUBSTITITTE RELAr STH = (60 )
(5)
station
NAME
London
Stockholm
Geneva
Rooie 011
Singapore
Tokyo
Hong Kong
Sydney
Wellington
NO. OF stations = 09 (12)
OWN TELEPHONE
.NETWORK PASSWORD :
NO. :
DATE 01-DEC
(5)
TELEPHONE
NUMBER
44 1 1111234
on
46 3 1111 23 4
Oil
on
41 22 1111 23 4
39 6 1111 23 4
on 65 1111234 3 00 0
on 8 1 3 1 111 23 4
011
352 5 1111 23 4
on
61 2 1 11 123 4
on 54 4 11 112 34 3004
212 1111234
. 9999
(13)
(14)
05)
NETWORK
ADDRESS
2000
2001
2002
200 3 NO
300 1
300 2
300 3 NO
(7) (8)
0)
-1990 TIME 12,00 ***** P.1
RELAT
STATION
YES
NO
NO
YES
NO
NO
NO
-UF-160 Tokyo
(9)
RELAY ONE STN
ADDRESS XMT
20
20 DIRECT
20
20 DIRECT
30
30
30
30
30
05)
07}
-1 212 111 1234-
Sample One-Touch/ABBR. NOS. List Explanation
(2)
(10) (11)
DIRECT
DIRECT [20]
DIRECT
RELAY
RELAY
RELAY
RELAY
Sending Relayed Faxes
To send the same document to several places at the same time (Relayed
(3)
Transmission), you must be connected to a facsimile network using a Relay Station.
You must also set FAX Parameters and record network and station address
ALT
parameters in the memory of your machine. See Relayed XMT (Transmission) and
ABBR
Confidential Fax Network Features and Requirements in the Appendix for a detailed
description of the network and recording procedures. By setting the RELAYED XMT
function (see below) you will also be able to transmit to a single station via a fixed
[47]
route (leased line) which has been preset at the Relay Station.
Once you have set up your network and are connected to a Reiay Station , you can
send faxes with the foiiowing procedure.
Place documents face down on the ADF.
Adjust left and right Document Guides.
Document Guide
■‘i
(1) Printout date
(2) Printout time
(3) Printout page number
(4) Abbreviated number or One-Touch number
(5) Station name recorded in the machine
(6) Telephone number recorded in the machine
(7) Network Address
(8) Relay Station
(9) Relay Address
(10) One station XMT
(11) Alternative ABBR. Number
(12) Number of recorded ABBR. and
One-Touch numbers
(13) Own telephone number
(14) Own Network Address
(15) Network Password
(16) Own LOGO
(17) Own ID number
110
Day-Month-Year
Hour:Minute
Up to 15 characters
Up to 36 digits
Yes/No
Relay/Direct
Up to 25 characters
Up to 20 digits
2
and
Dial by pressing a One-Touch key, or
I ABBR I and 2 digits^;
Ex: One-Touch key ilO 1.
RELAYED XMT
ENTER STATIONS
RELAYED XMT
[10] (Station name)
__
111
Page 58

4
To add more One-Touch or ABBR
numbers {up to 100 maximum), repeat
step 3.
Ex:|ABBRiandi3Hy|.
START
(In this example Station No. 5
is the Relay Station.)
RELAYED XMT
[35] (Station name)
+ DIALING *
[05] (Station n ame)
Printouts and Reports
When you use Relayed Transmission, your machine will print out the following two
reports to help you check and keep track of your faxes (see pages 114-116 for
samples of these reports).
1.
Relay XMT Report (COMM. JOURNAL)
When your machine finishes transmitting to the Relay Station, it will print out a
RELAY XMT REPORT report telling you what it did and whether it was successful
or not.
^ Relay Station
Relay XMT Report (COMM. JOURNAL)
2. Result Report
When the Relay Station finishes transmitting the fax it received from you to the
end receiving station(s) in your network, and/or the Relay Station in another
network, it will print out a RELAY XMT RESULT report telling you what it did and
whether it was successful or not.
13
NOT<
To erase or change stations set in steps 3 or 4, press [ CLEAR~j, If you recorded several,
use MODEf-Tlorl + |to find the station you want. Then press] CLEAR |. Add new stations
with One-Touch keys, or | ABBR [ and two digits.
112
End Receiving Station
Copy of document
NOTC
If you transmit via more than one Relay Station, you will receive a separate Result Report.
113
Page 59

; I
■-'i
n
•1
1
Sample Relayed Transmission Report (COMM. JOURNAL)
O) (2) (3)
(6)
(13) (1*0
[011/2000
[0 1 1/2000
[01 1/3000
[011/3000
[011/3000
[01 1/3000
(15)
(16)
-1 212 n 1 123*1-
(12)
-UF-160 Tokyo
END ; 01-DEC 16:00
PROGRAM NAME RLY STN
[011/ 30 00
MODE : TRANSMISSION
(7)
caM
NO.
R-OK [01J/2000
01
R-OK [02]/2001 Stockholm
02
R-OK [03J/2002
03
fi-OK
0«
R-OK [051/3000 Singapore
05
fi-OK [061/3001 Tokyo
05
R-OK
07
08
INC
fi-OK [091/30011
09
(iO
(8)
(9)
ABBR/NTWK STATION NAME/
[0*11/2003
[071/3002
[081/3003
-COMM. JOURNAL- •»*»»• DATE 01-DEC-1990 t»»*t TIME 16:01 »••»« P.l
(5)
01)
PRC. NO.
01/01
01/01 [011/2000
01/01
01/01 [011/2000
01/01
01/01
01/01
00/01
01/0)
(10)
TELEPHONE NO.
London
Geneva
Rome
Hong Kong
Sydney
Wellington
START = 01-DEC 16:00
PACES
Sample Relayed Transmission Report Explanation
(1) Printout date
(2) Printout time
(3) Printout page number
(4) Indication of Transmission mode
(5) Starting time of transmission
(6) Ending time of transmission
(7) Communication number
(8) Communication result
(9) Abbreviated number and Network Address
(10) Station name
(11) Number of page transmitted
(12) Program number
(13) Program name
(14) Relay Station number
(15) LOGO
(16) ID number
114
Day-Month-Year
Hour:Minute
“R-OK” indicates that the
transmission to the Relay
Station was successful.
"INC” indicates that the
transmission to the Relay
Station was incomplete.
Up to 25 characters
Up to 20 digits
Sample Result Report (Relay XMT Result)
(1) (2)
1969-02-16 16:37 UF-6tl0 Singapore
UF-640 RELAY XHT RESULT
MODE = relay comm.
REQUEST RCVD TIME : 02-16 16:01 START = 02-16 16:03 END = 02-16 l6:36
DOC N0. s 002
(17) (18)
NO. COM
01 OK
02 OK 2001 20
03
0*t
05
06
07 OK 3002
08 OK
(8 )
(10) (11) 02>
(13) .
REQUESTING NETWORK ADDR. s 1000
REQUESTING TELEPHONE N0, : 212 111 123H
NETHORK/HELAY ADDR.
OWN
OK
OK
OK
INC 3 00 1 20
2002 20
2003
300 0
300 3
-PANA50NIC-
N0. OF PAGES s 01
(19)
RELAY/NETHORK ADDR. = 20/2000
20
20
20
20
(9)
(20)
DOC
01/01
01/01
01/01
01/01
01/01
01/01
01/01
01/01
(3) (*t)
65 1111 23 11 P.01/01
i DATE 1989-02-16 ••i*» TIME 16:36
(lilt
(15)
(16)
(5) (6 )
(2)
-UF-6*tO London
-01 1111231-
(3)
I 111123'!-
(22)
TOTAL P.Ot
(21)
(7)
P. 1
115
13
Page 60

Sample Result Report Explanation
(1) Printout date and time
(2) Relay Station’s LOGO
(3) Relay Station ID number
(4) Page number
(5) Transmitted date
(6) Transmitted time*
(7) Transmitted pages
(8) Function mode
(9) Relay Address/Network Address
of the Relay Station
(10) The time when the Relayed Faxes
are accepted by the Relay Station
(11) The time when the Initial Sending
Station transmitted Relay Faxes
(12) The time when the Relay Station
sent back the Relay XMT Result
to the initial Sending Station
(13) Document file number registered
in Relay Station’s memory
(14) Document file page number
(15) Network Address of the Initial
Sending Station
(16) Telephone number of the Initial
Sending Station
(17) Number of the End Receiving
Station
(18) Communication result
(19) Network Address/Relay Address
(20) Page number
(21) Relay Station’s telephone.number
(22) Number of total pages printed out
“OK” indicates that the transmission
was successful.
“INC” indicates that the
transmission was incomplete.
Number of pages sent/Total pages
Year-Month-Day
Number of pages sent/Total pages
Year-Month-Day
b. CONFIDENTIAL COMMUNICATIONS
General Description
This feature is a simple way to ensure that confidential information reaches the right
person without anyone else seeing it. When you send a normal fax, it is printed out
immediately by the receiving machine and almost anyone who uses the machine might
see the fax. When you use the Confidential Communication feature, however, the
fax is stored in the memory, of a designated machine (Relay Station) where only a
person with the right Confidential Code number can retrieve it.
Figure 1 illustrates how a Confidential fax can be sent via a Relay Station. First the
Initial Sending Station sends a confidential fax to the Relay Station together with a
Confidential Code. The fax will then be stored in the Relay Station’s memory until
polled by an End Receiving Station or printed out at Relay Station. The End Receiving
Station must know the Confidential Code attached to the fax and share the Polling
Password with the Relay Station. Note that your machine works as an Initial Sending
Station or End Receiving Station.
13
116
Page 61

UF-160 Compatibility with Other Machines
Table 1 shows how the UF-160 fits in with the compatibility requirements of the
different kinds of facsimile stations which make up a Relay Network for Confidential
Communications. It also shows whether or not special settings are required.
Table 1 Confidential Communication Requirements
Station
Initial Sending Station
Relay Station
End Receiving Station
(Closed User Group)
UF-140
UF-150
UF-160
UF-170
UF-250
UF-260
UF-620
UF-640
UF-750
UF-620
UF-640
UF-140
Panafax 145
UF-150
Panafax 155
UF-160
UF-170
UF-250
UF-260
UF-620
UF-640
UF-750
Model
Special Settings
Required. Please refer to
the individual User’s
Guides of each machine.
Setting Up Your Machine for Confidential
Communications
To use Confidential Communications you must first preset the Confidential
Communication Fax Parameter described below. Then, every time you actually send
a Confidential Fax you must set a Confidential Code.
1. Confidential Communications Fax Parameter:
This switches the Confidential Communications function ON or OFF.
2. Own Telephone Number:
The full telephone number should be entered.
3. Network Password and Polling Password
You may use Network Password and Polling Password to prevent outside
facsimile(s) from using the Confidential Communication network. The same
password must be provided to all the machines inside the network.
4. Confidential Code:
A four-digit code which you must assign to each Confidential Fax you send. It
identifies the fax when it is stored in the Relay Station. The receiving person must
know the code in order to poll the fax from the Relay Station.
13
If UF-620 is the Relay Station,, more than one document can be stored in the same
memory file using the same Confidential Code. That is, you can keep adding faxes
to the file, just like putting mail in a mailbox, until the memory is full, if UF-640 is
the Relay Station, you cannot add a fax to the title which has the same Confidential
Code attached with the titles already stored in the memory. Whichever station you
use you can also create more than one file, each with a different Confidential Code.
Note also that once you have polled or printed out the confidential fax from the Relay
Station, the fax is automatically erased from the memory.
118
NOT€
To set Polling Password, see page 53.
119
Page 62

To set the Confidential Comnnunications Fax Parameter;
SET MODE
NO.
To set your own Telephone Number, your own Network Address and the Network
Password,
SET MODE
NO.=|
V
■¿I
■
and
2
START
Enter the fax parameter number 09.
4
and
START
FAX PARAMETERS
FAX PARAMETER
NO. =0
09 CONFIDENTIAL FAX
1;INVALID
09 CONFIDENTIAL FAX
2:VAL ID
11 PASSWORD XMT
1:INVALID
and
(max. 36 digits).
Ex: 1 212 111 1234
START
Enter your Network Address (four digits).
Ex: 1000
RELAYED XMT &
CONF.COMM.PARAMETERS
13
OWN TELEPHONE NO.
OWN TELEPHONE NO.
1 212 111 1234|
OWN NETWORK ADDRESS
nil
OWN NETWORK ADDRESS
1 000
NETWORK PASSWORD
nil
NETWORK PASSWORD
9999
I
■ Í
4
To return to standby,
STOP
120
01-DEC-1990 15:00
Enter the Network Password (four digits)
6
and, START
SUBSTITUTE RELAY STN
121
Page 63

Enter the Substitute Relay Station
number using a One-Touch key or ABBR.
Ex: I ABBR I [T| [2]
SUBSTITUTE RELAY STN
[12] (Station name)
Sending a Confidential Fax to a Relay Station
Place a document face down on the ADF.
Adjust left and right Document Guides.
DOCUMENT SET
8
START
9
To return to standby,
STOP
OWN TELEPHONE NO
Q 212 111 1234
01-DEC-1990 15;00
2
and
Enter Confidential Code (four digits).
Ex: [2][2][3][il
Dial the Relay Station’s number by
pressing a One-Touch key. ¡ABBR \and
two digits, or I TEL/DIAlI and a full
number.
Ex: One-Touch key
START
Document Guide
CONFIDENTIAL COMM.
CONF.CODE= ■ III
CONFIDENTIAL COMM
CONF.CODE=2233
CONFIDENTIAL COMM
ENTER STATION
CONFIDENTIAL COMM.
[05] SINGAPORE
CONFIDENTIAL XMT
[05] SINGAPORE
13
* DIALING *
106 65 1111234
NOTC
You can skip Step 6 and Step 7 if not necessary.
If necessary, inform the receiving party
of the confidential Fax and tell them the
Confidential Code and the Relay Station
you sent the document to.
122 123
Page 64

Polling a Confidential Fax from a Relay Station
After you have been informed that someone has transmitted a confidential Fax to
a Relay Station, you can retrieve the Confidential Fax from the Relay Station’s memory
in the following way.
Printouts and Reports
When you send a Confidential Fax to the Relay Station by dialing its One-Touch or
ABBR. number, or the station’s full number, your machine will print out a Confidential
XMT Report, automatically, as soon as the transmission ends.
:|
1
■ 4
■i
1 Make sure no documents are on the ADF.
and
Enter Confidential Code (four digits).
Ex: millsH
Dial the Relay Station’s number by
pressing a One-Touch key, IABBR j and
two digits, or 1TEL/DIALI and a full
number.
Ex: One-Touch key 101 i
START
The machine begins dialing the Relay
Station and, when it answers, retrieves
the confidential fax.
124
CONFIDENTIAL COMM.
CONF.CODE= nil
CONFIDENTIAL COMM
CONF.CODE=2233
CONFIDENTIAL COMM
ENTER STATION
CONFIDENTIAL COMM.
[01] SINGAPORE
CONFIDENTIAL POLL
[01] SINGAPORE
+ DIALING *
Oil 65 111 1234
Sample Confidential XMT Report (COMM. JOURNAL)
-COMM. JOURNAL- »»«••• DATE 01-DEC-1990 TIME lO.aOAM
MODE = CONFIDENTIAL-XKT
(6)
(7)
N0.
COM
01 R-OK
CONFIDENTIAL CODE = 2233
(3)
(8)
ABBR/WTWK
[051/3000 Denver 01
(16)
(9)
STATION NAME
Sample Confidential XMT
(1) Printout date
(2) Printout time
(3) Indication of confidential
transmission mode
(4) Starting time of transmission
(5) Ending time of transmission
(6) Communication number
(7) Communication result
(8) Abbreviated number/
One-Touch/ABBR.
number/Network Address
(9) Station name
(10) Number of page transmitted
(11) Program number
(12) Program name
(13) Relay station number
(14) Own LOGO
(15) Own ID number
(16) Confidential Code
START = 01-DEC 10:20 END = 01-DEC 10:20
(10)
PAGES
(*0 (5)
(11)
PRO. NO.
Report Explanation
: Day-Month-Year
: HourrMinute
“R-OK” indicates that the transmission
to the Relay Station was successful.
“INC" indicates that the transmission to
the Relay Station was incompleted.
Up to 25 characters
Up to 20 digits
O) (2)
(12)
PROGRAM NAME
-UF-160 Tokyo
(14)
(15>
-1 312 in 1234-
(13)
HLY STH
[053/3000
13
125
Page 65

c. PASSWORD COMMUNICATION
Password Communications, including Password Transmission and Password
Receiving, prevent your machine from sending a fax to a wrong station or receiving
a fax from unauthorized stations. You can set Password Transmission and Password
Receiving independently, or set both together.
To use Password Transmission, you have to set Fax Parameter 11 to the valid position
(see pages 26-29) and set a four-digit Transmission Password in your machine in
advance. The password must be shared with the other UF-160 machine(s). If the
Transmission Password set in your machine does not match the Transmission
Password set in the other UF-160 machine(s), the transmission wiil fail. You can select
to use Password Transmission or not by setting PASSWD-XMT to on or off when
you send a document.
Setting Transmission Password and Receiving Password
Before setting Transmission Password and Receiving Password, be sure to set Fax
Parameters 11 and 12 to the OFF position (see pages 26~29),
To set Transmission Password and Receiving Password, follow the procedure below.
1
and
SET MODE
N0.=|
USER PARAMETERS
13
To use Password Receiving you have to set Fax Parameter 12 to the valid position
(see pages 26~29) and set a four-digit Receiving Password in your machine in
advance. The password must be shared with the other UF-160 station(s). If the
Receiving Password set in your machine does not match the Receiving Password
set in the other UF-160 machine(s), the reception will fail. Once you set Password
Receiving to on, it is valid until you change the setting to off.
You can communicate, using Password Transmission or Password Receiving, with
the following models UF-160, UF-170, UF-260 and UF-750.
repeatedly.
Enter a four-digit Transmission Password.
Ex; [EEEE
To set the Transmission Password,
START
6
Enter a four-digit Receiving Password.
Ex: EES®
To set the Receiving Password,
START
To return to standby, press fSTOP 1.
NOT€
The range of password you can enter is from 0001 to 9999.
XMT-PASSWORD
nil
XMT-PASSWORD
5000
RCV-PASSWORD
III!
RCV-PASSWORD
6000
DATE & TIME
1 2-01 - 1990 15:00
126
127
Page 66

How to Start Password Transmission
Password Transmission is preset to OFF in your machine.
How to Set Password Receiving
Password Receiving is preset to OFF in your machine.
To start Password Transmission, set PASSWD-XMT to ON following the procedure
below.
Place a document face down on the ADF.
Adjust left and right Document Guides.
MODE
Z2CZ
or
To turn PASSWD-XMT to OFF, press
( SELECT! again.
Dial by pressing a One-Touch key,
i ABBR I and two digits, or (TEL/DIALI
and a full number.
Ex: ABBR 4 5
If your machine’s Transmission Password
coincides with the other station’s, your
machine starts sending the document. If
not, the display shows an error code.
When transmission is completed,
PASSWD-XMT returns to standard
setting.
NOTC
1. You can send a document to multiple stations by using Password Transmission.
2. To change the Standard setting of Password Transmission, see page 28. Once you
set the standard setting to ON, turn PASSWD-XMT to OFF by pressing \ SELECT | when
you send a document, if necessary.
repeatedly.
DOCUMENT SET
DOCUMENT SET
PASSWORD-XMT=OFF
DOCUMENT SET
PASSWORD-XMT=ON
* DIALING +
{45] (Station name)
To set Password Receiving, change the standard setting of Password Receiving to
ON by following the procedure below.
1
and
START
Enter Parameter Number 12 by pressing
4
mil].
To set Password Receiving, press .
START
6
To return to standby, press j STOP
NOT€
Ohce you set Password Receiving, it is valid until you change the standard setting
to OFF. To do so, enter i in Step 5, then press j START |.
SET MODE
NO .
FAX PARAMETERS
FAX PARAMETER
NO.I
12 PASSWORD RCV
1 ; INVALID
1 2 PASSWORD RCV
3 :ON
15 ECM
2 :ON
13
128
129
Page 67

d. FAX ACCESS CODE
The Fax Access Code prevents an unauthori2ed user from operating the machine.
Once a four-digit Fax Access Code is registered, no one can operate the machine
without entering the correct access code. Automatic Receiving, however, is always
available. After you complete any operation, such as mode setting or transmission,
and the display returns to standby, you have to reenter the access code in order to
use the machine again. Registering the Fax Access Code does not affect the use
of the machine in any other way.
How to Set Fax Access Code
Before you use the Fax Access Code function, be sure to set Fax Parameter 20 to
the valid position {see pages 26 - 29).
1
and
SET MODE
NO. =1
USER PARAMETERS
FAX ACCESS CODE
III!
repeatedly.
13
130
Enter a four-digit Fax Access Code.
Ex:®®®®
FAX ACCESS CODE
5555
DATE & TIME
- 1 2-1990 15:00
01-DEC-1990 15:00
AC =
131
Page 68

How to Use the Machine after You Set Fax Access Code How to Reset Fax Access Code
:íi
■1
■■■I
1
Enter Fax Access Code.
Ex: [5][SSis
If the Fax Access Code you iust entered
coincides with the code set in the
machine, the display “AC= ” will
disappear. If not, the machine returns to
standby.
2
Now you can use the machine by normal
operation.
Ex; Set a document on the ADF.
After you complete any operation, the
machine will return to standby. To use the
machine again, reenter the Fax Access
Code.
01-DEC-1990 15:00
AC =
AC nil
01-DEC-1990 15:00
DOCUMENT SET
01-DEC-1990 15:00
AC =
Enter the Fax Access Code.
1
Ex: [5][UBill
2
and
repeatedly.
01*DEC-1990 15:00
AC=
01 -DEC- 1990 1 5:00
AC^IIII
01 -DEC- 1990 1 5:00
SET MODE
NO . =1
USER PARAMETERS
FAX ACCESS CODE
Í555
FAX ACCESS CODE
III!
13
START
•J
and
Si;
NOTC
When you enter the Fax Access Code in Step 1, the numbers are not displayed.
To return to standby,
STOP
132
DATE & TIME
01-12-1990 15:00
01-DEC-1990 15:00
133
Page 69

! ii?
SPECIFICATIONS
Compatibility
Scanning method
Document size
Document thickness
Effective scanning width
1
Recording paper size
Effective recording width
Resolution
Coding scheme
Modem
ADF capacity Built-in,up to 10 sheets
(Automatic Document Feeder)
Abbreviated dialing
memory capacity
:l
CCITT Group 3
Group 2
Transmitter; Flat bed scanning with CIS type image
sensor
Receiver; Solid state thermal recording head
MAX.: 280 mm x 297 mm
280 mm x 1000 mm
(with operator’s assistance)
MIN. ; 148 mm x 70 mm
Single page
Multiple pages
G3: 208 mm
252 mm
G2: 205 mm
240 mm
210 mm X 50 m
G3: 208 mm
G2; 205 mm
Horizontal: G3 8 pels/mm
Vertical ; G3 3.85 lines/mm (STANDARD)
MH, MR, with MWS
G3: V.29, V.27ter with fallback function, and V.21
G2: AM-PM-VSB
70 Stations (23 One-Touch keys and 3 Program
keys)
Each station can hold telephone numbers upto-36-digits long (including pauses and spaces).
Station names can be up to 15 characters.
0.06 mm to 0.15 mm
0.08 mm to 0.13 mm
G2 3.85 pels/mm
7.7 lines/mm (FINE)
15.4 tines/mm (SUPER FINE)
G2 3.85 lines/mm
Power supply
Power consumption
Dimensions
Weight
Operating environment
200V version: AC 200V to 240V, 50/60 Hz,
Single Phase
100V version: AC 110V to 120V, 50/60 Hz,
Single Phase
Standby: Approx. 10W
Transmission: Approx. 25W
Reception: Approx. 45W (Black Ratio: 10%)
Copy: Approx. SOW (Black Ratio: 10%)
MAX.: Approx. 95W
135 mm (H)x333 mm (W)x312 mm (D)
(excluding projections)
Approx. 6.5 kg
(excluding recording paper, power cord)
Temperature:
Relative humidity:
5 to 35“C
20 to 80%
14
i
134
135
 Loading...