

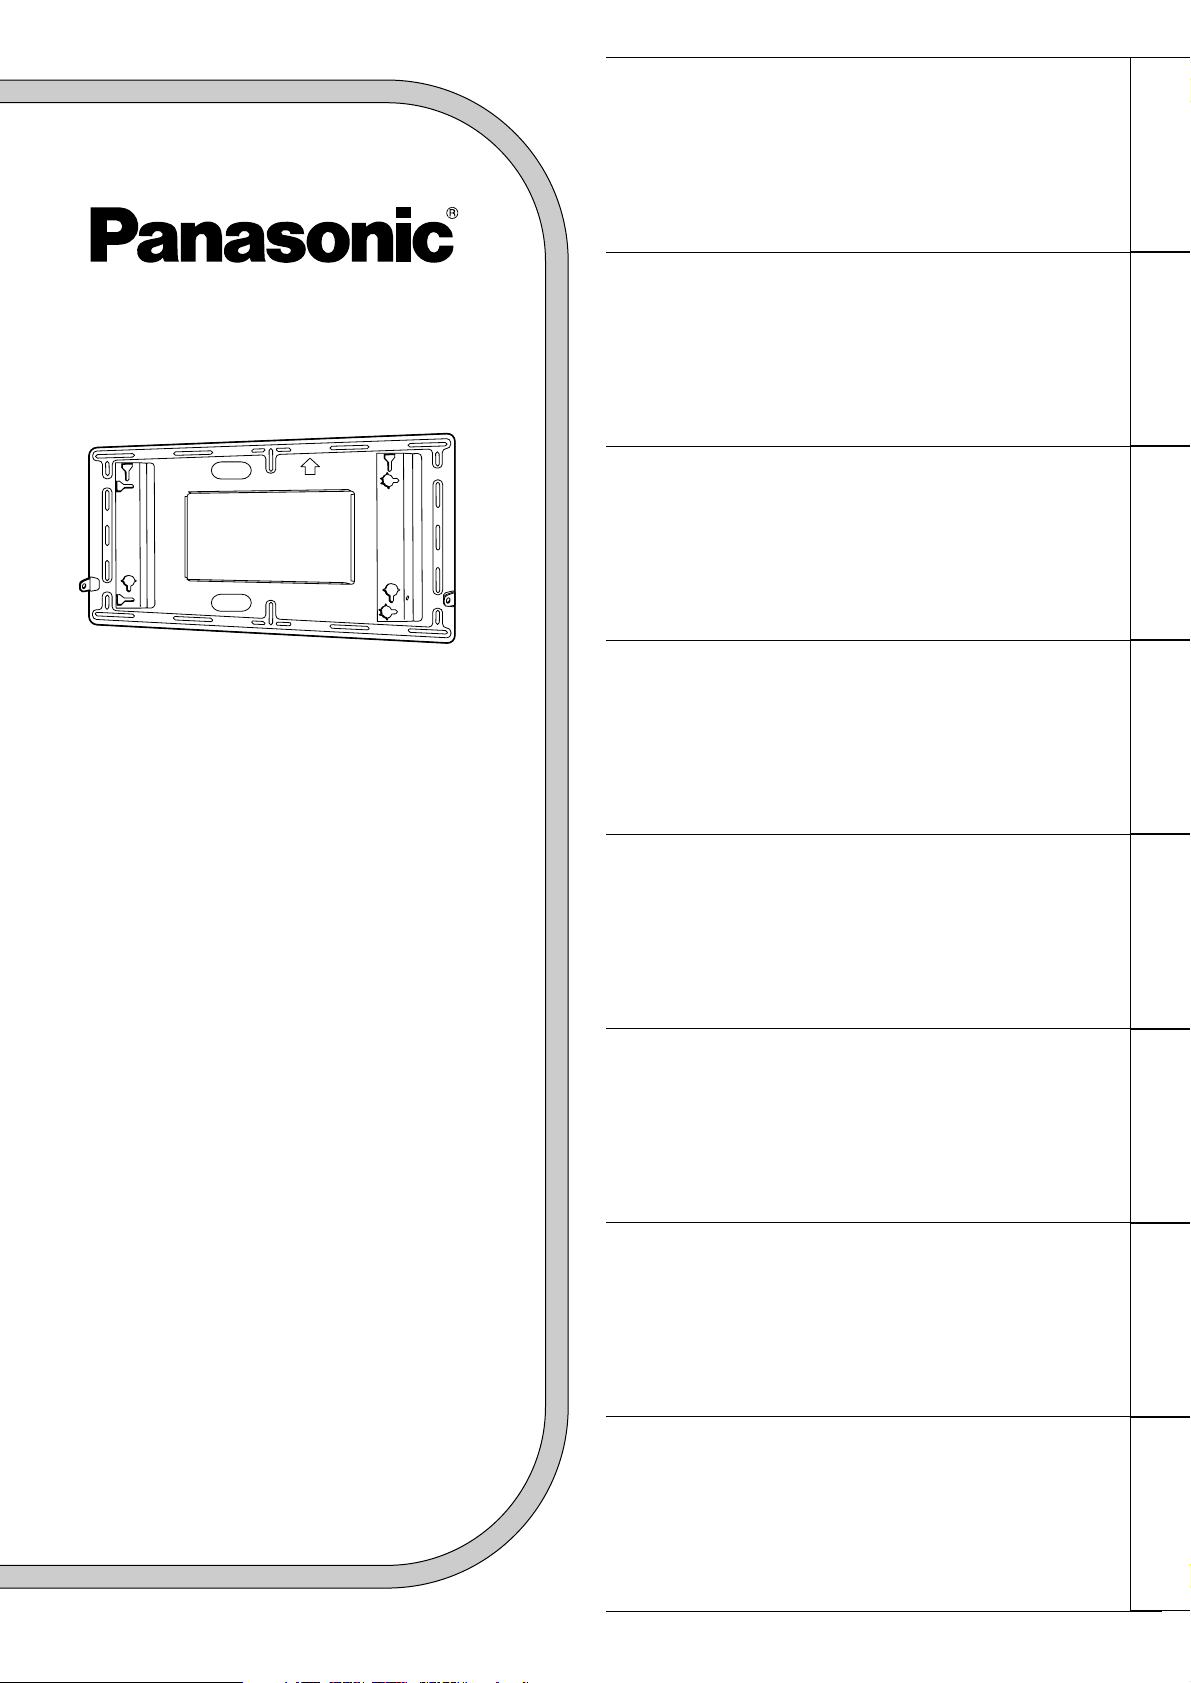
Page 1
Fäste för väggupphängning (lodrätt)
för bred plasma-monitor
Monteringsanvisningar
Läs dessa anvisningar noggrant innan du monterar samman
dessa tillbehör. Behåll häftet för framtida referens.
Vægbeslag (lodret) til
widescreen-plasmaskærm
Monteringsvejledning
Læs grundigt igennem denne vejledning inden du samler
disse tilbehør. Behold vejledningen for brug i fremtiden.
Abrazadera de suspensión de pared (vertical)
para pantalla Panarámica de Plasma
Instrucciones de instalación
Antes del instalar estis accesorios, lea cuidadosamente
estas instrucciones.
Guarde estas instrucciones para futuras referencias.
Applique de suspension au mur (verticale)
pour l’Ecran plasma 16/9ème
Manuel d’installation
Avant d’essayer d’assembler ces accessories, vauillez lire
ces instructions complètement.
Veuillez garder ce manuel pour une référence future.
Staffa per sospensione a parete (verticale)
per lo scheromo al Plasma-16:9
Instruzioni per I’installazione
Prima di iniziare a montare questi accessori, siete pregati di
leggere interamente le presenti istruzioni.
Siete inoltre pregati di conservare questo libro per future
consultazioni.
Muurbevestigingssteun (Vertikaal) voor
Breedbeeld Plasmadisplay Monitor
Installatiehandleiding
Lees deze handleiding zorgvuldig door alvorens u probeert
deze accessoires te monteren. Bewaar de handleiding voor
het geval dat u later iets wilt opzoeken.
Wandhängehalterung (Vertikal)
für Plasmadisplay
Installationsanleitung
Vor der Installation lesen Site bitte diese Anleitung sorgfaltig
durch. Diese Anleitung zum spateren Nachschlagen
aufbewahren.
Wall-hanging bracket (Vertical)
for Wide Plasma Display
Installation Instructions
Before attempting to assemble these accessories, please
read these instructions completely.
Please retain this book for future reference.
TY-WK42PV1
MODEL No.
English
Deutsch
Nederlands
Italiano
Français
Español
Svenska
Dansk
TQZH239-2
Page 2

2
English
Thank you very much for purchasing the Panasonic Wide Plasma Display
Wall-
hanging bracket
.
Installation work should only be carried out by a qualified technician.
•
If the bracket is installed incorrectly, the display may fall down and personal injury may result.
Precautions with regard to setting up
WARNING
Installation work should only be carried out by a qualified technician.
• If the bracket is installed incorrectly, the display may fall down and personal injury may result.
Make sure that all safety factors regarding strength of installation are observed.
• If the installation strength is insufficient, the display may fall down and personal injury may
result.
Do not install in places which are unable to bear loads.
• If the strength of the installation surface is insufficient, the display may fall down and personal
injury may result.
CAUTION
Do not install in places which are subject to humidity, dust, oil fumes, water vapour or
excessive heat.
• These can have adverse effects on Wide Plasma Display operation, and fire or electric shocks
may result.
Do not install the Wide Plasma Display face up, sideways or upside down.
• Doing so may cause heat to build up inside the display, and fire may result.
Two people are required to install and remove the display.
• If two people are not present, the display may be dropped, and personal injury may result.
Maintain a space of at least 10 cm((3
15
/
16
inches))at the top, bottom and sides of the
display, and at least 1.9 cm (
3
/4 inches) at the rear of the display.
• The display has air outlet holes at the top and air intake holes at the bottom and rear. These
holes must not be covered, otherwise fire may result.
Page 3
3
English
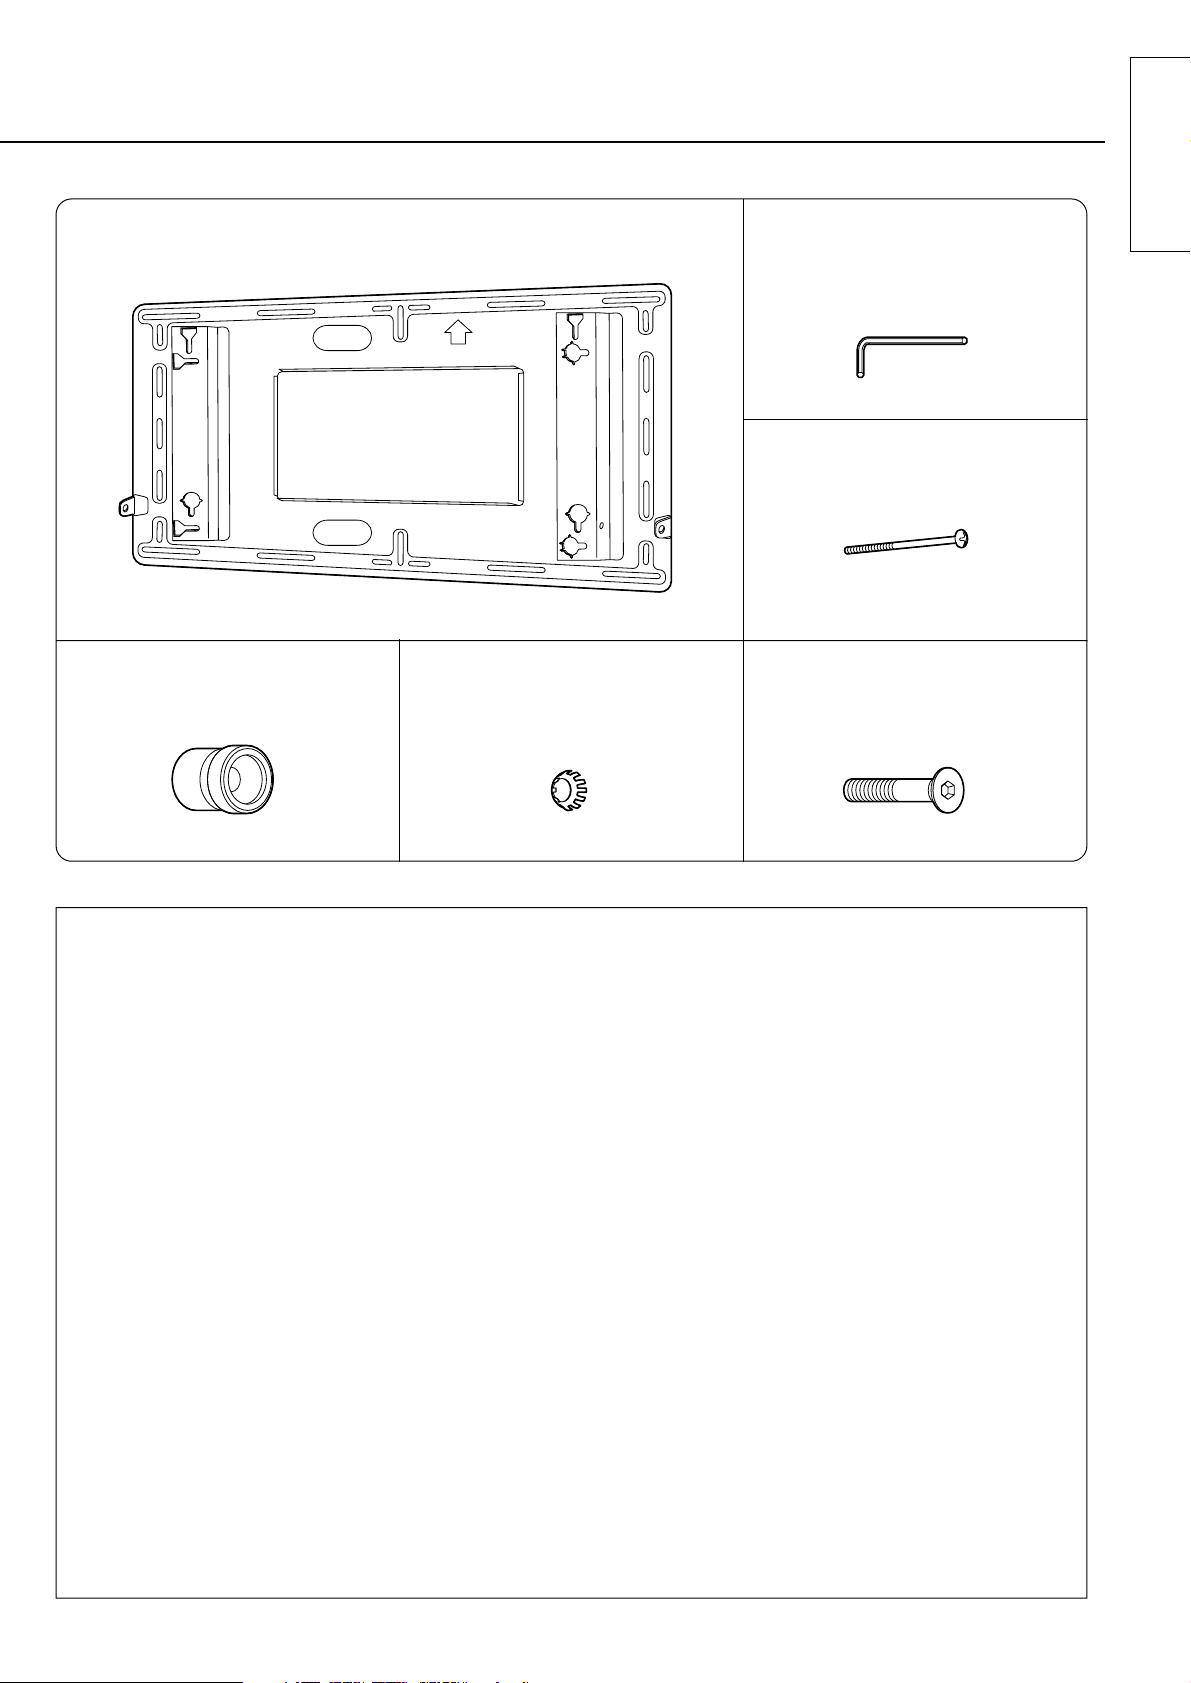
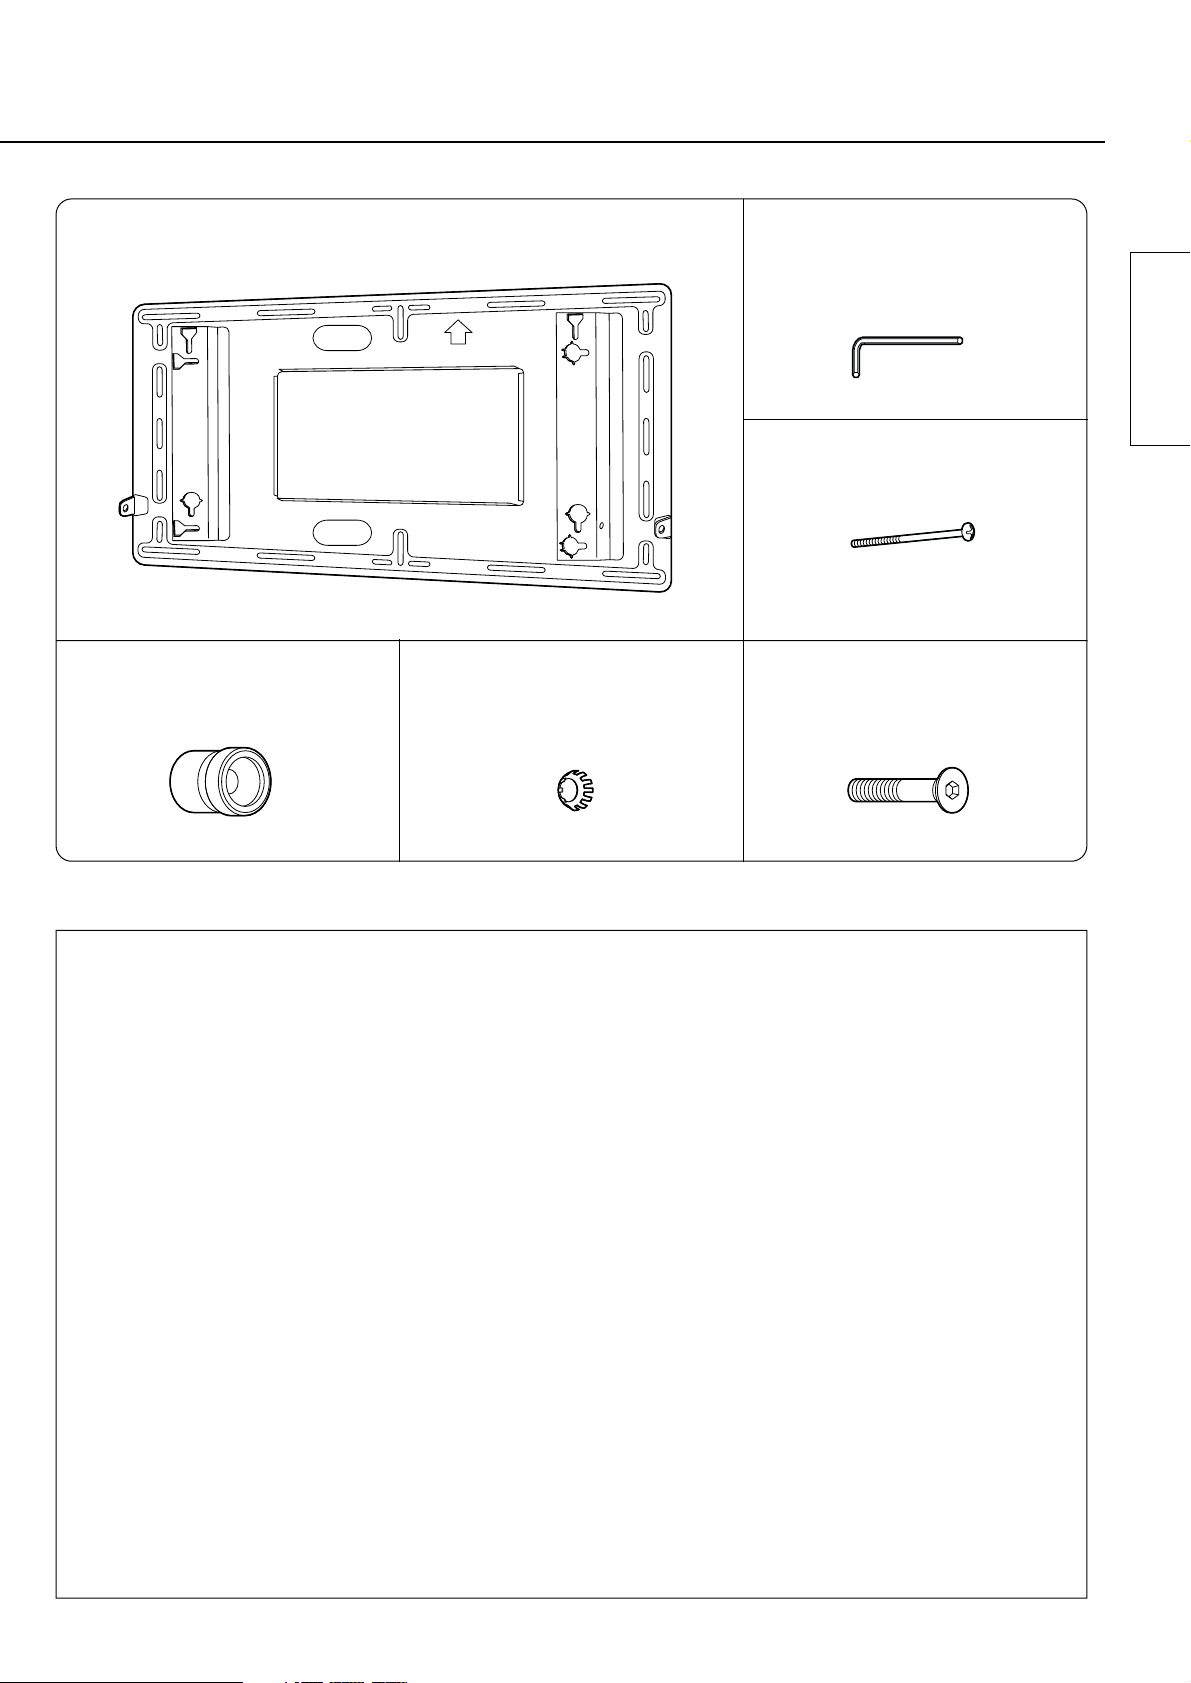
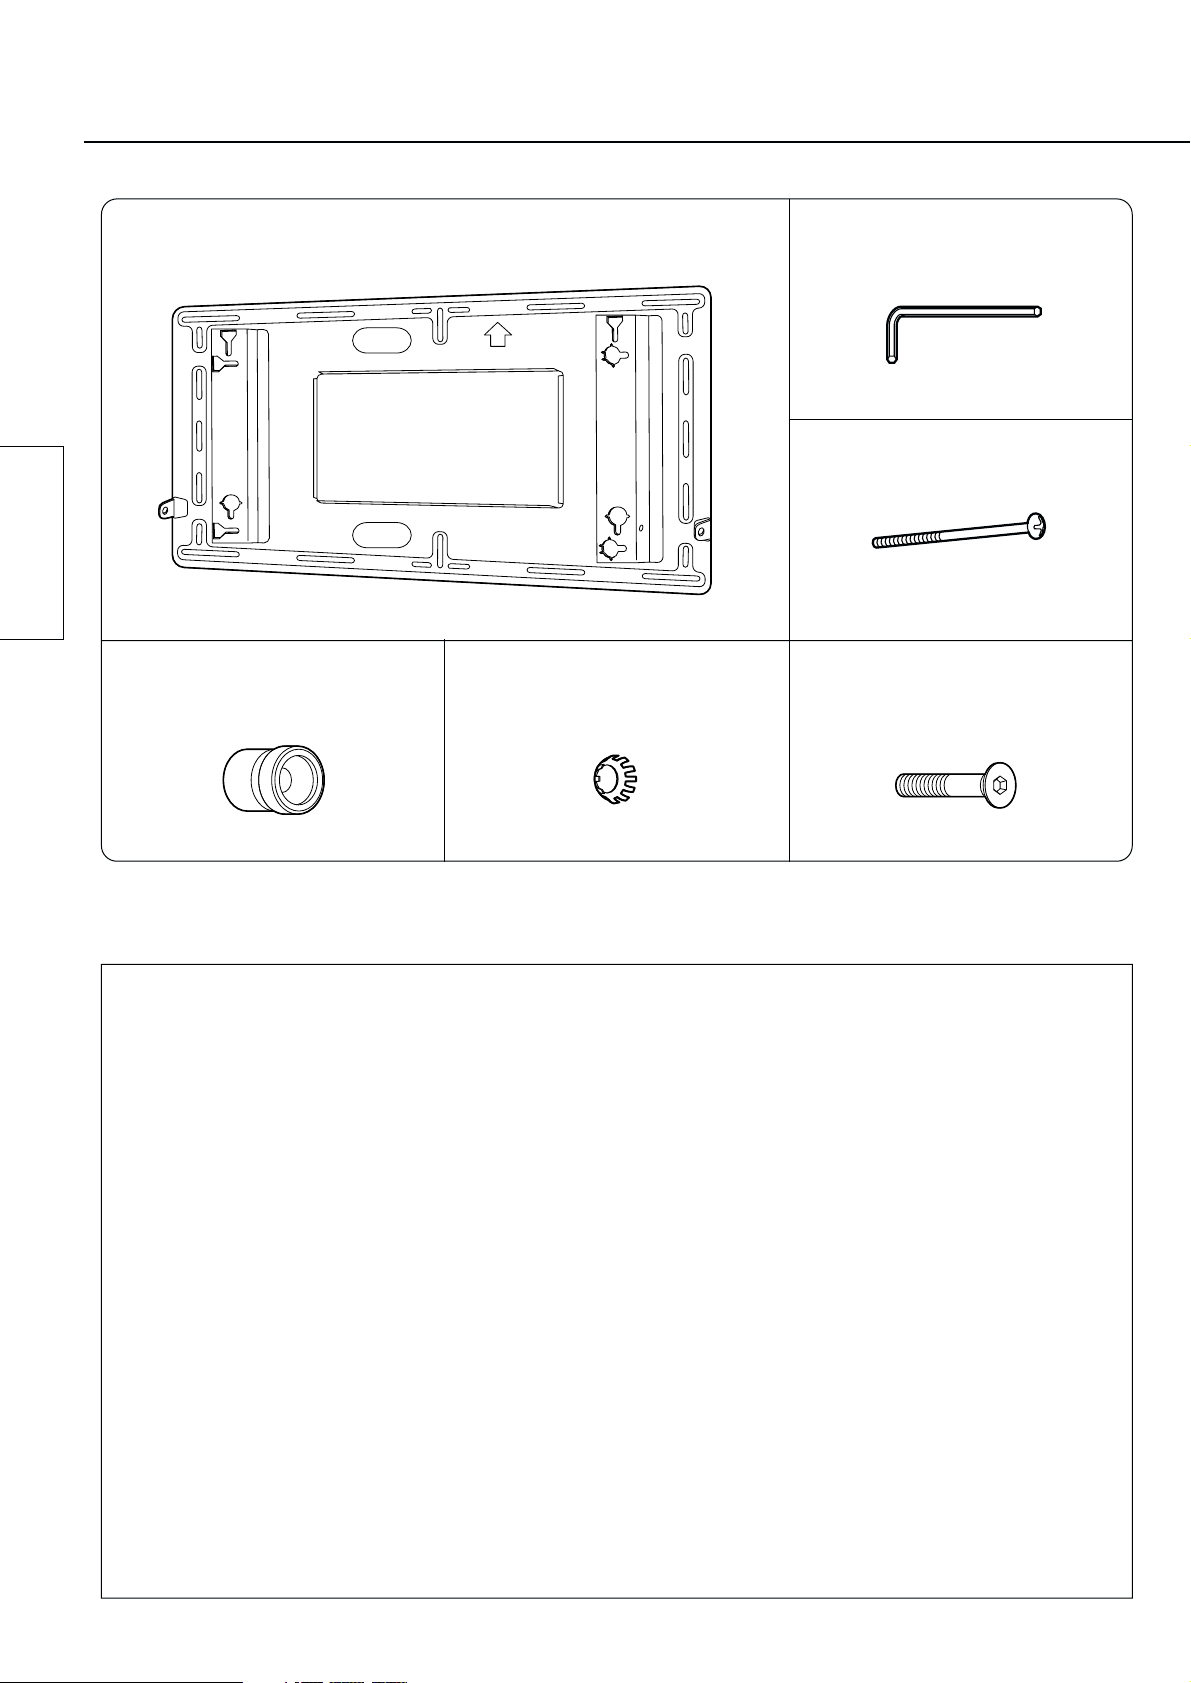
Components
Points to note during installation
•
The wall-hanging bracket is for use in installing the Wide Plasma Display to a vertical wall
for viewing purposes. Do not use it for any type of installation other than vertical wall
installation.
•
In order to ensure correct, problem-free operation of the Wide Plasma Display, do not
install the Display in any of the following places.
• Places which are next to sprinklers or sensors
• Places which are subject to vibration or shocks
• Places which are close to high-voltage wires or electric motors
• Places in direct contact with air from heaters
•
When installing this wall-hanging bracket unit, use a fixing method appropriate to the type
of wall.
•
Use an M6 bolt (sold separately) appropriate for the type of wall material (wood, steel
frame, concrete, etc.) the bracket is to be mounted on.
•
Keep retention screws and power cord away from any metallic parts or structures within
the wall.
•
Insert the power cord plug for the Wide Plasma Display into a wall outlet which is close
and easily accessible.
•
Provide adequate ventilation so that the temperature around the display does not rise
above 40°C (104 F°). If there is insufficient movement of the air inside display, heat may
build up inside the display, and fire may result.
Wall-hanging bracket unit..................................................1 Allen key (accessory) ......1
M5 screw .........................2
Insulating spacer
....................................4
Toothed pan washer
....................................4
Pan head bolt with
hex socket (M8-45) .........4
(Fixing screw)
Page 4
4
English
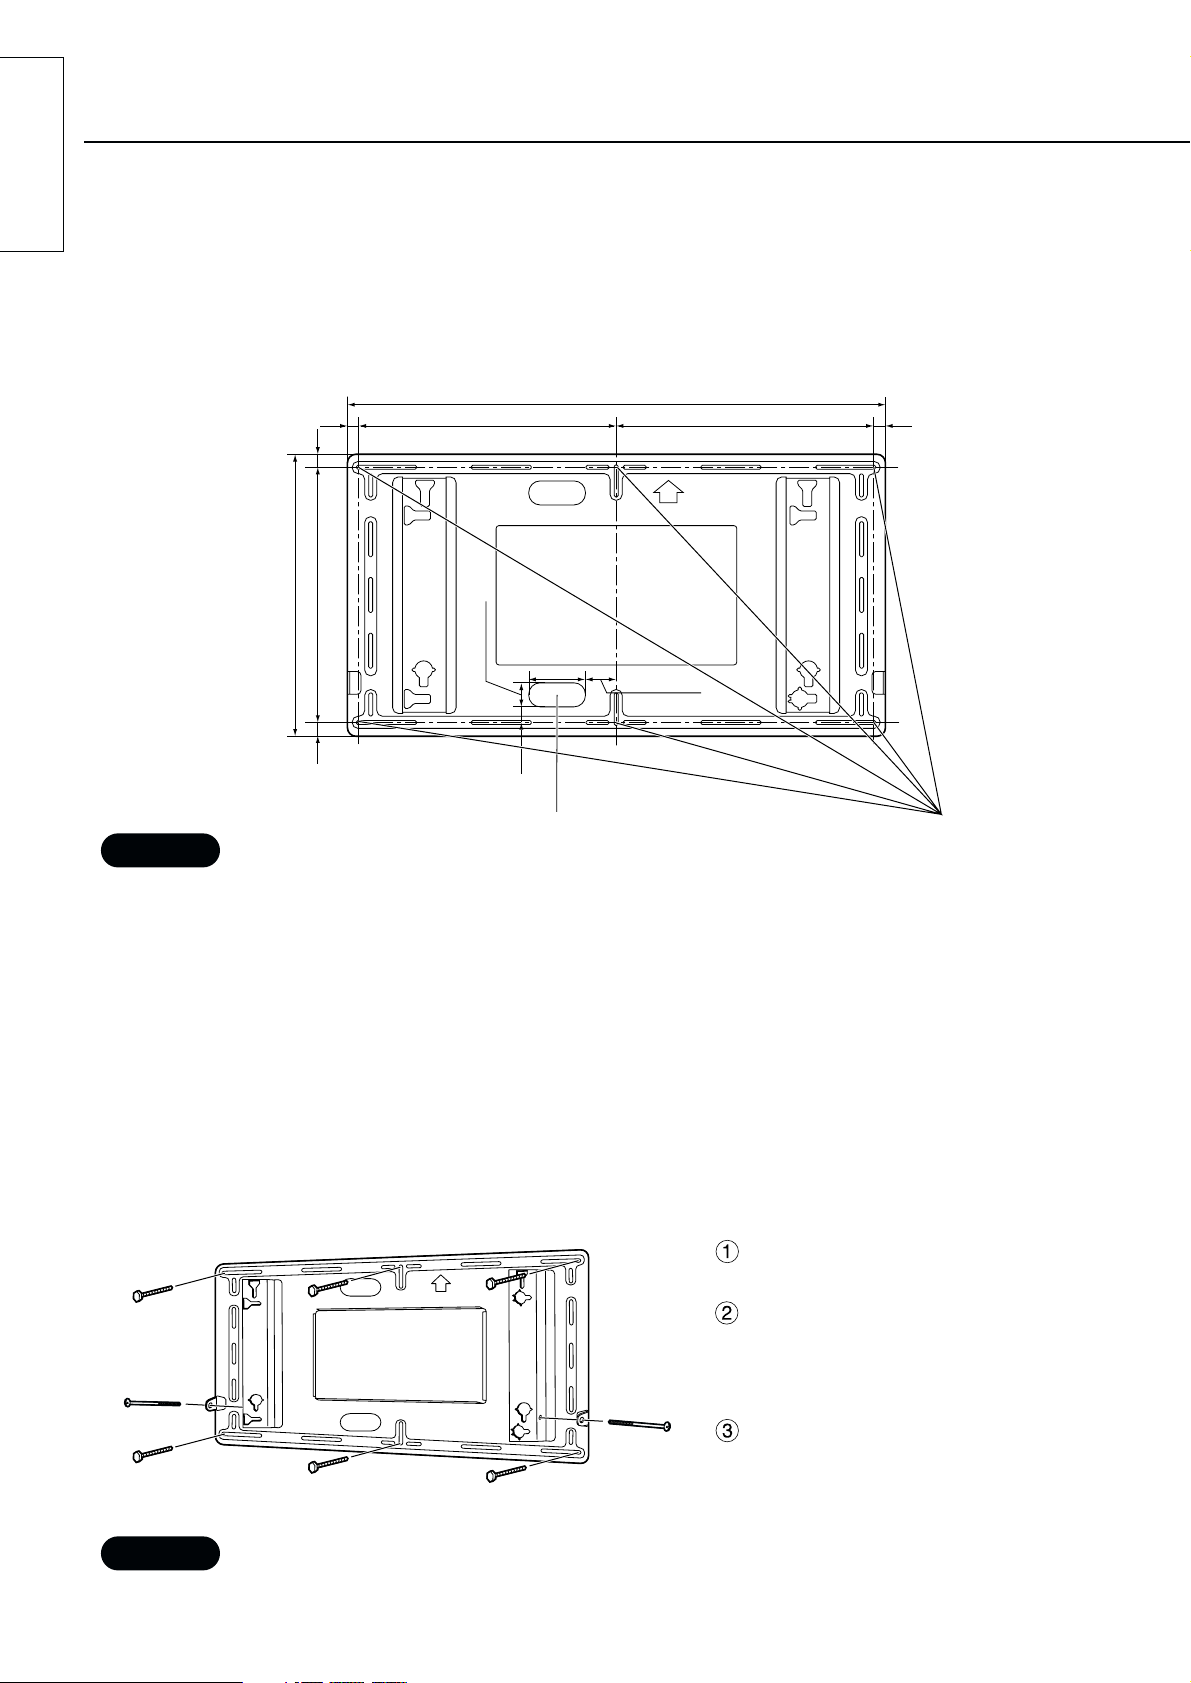
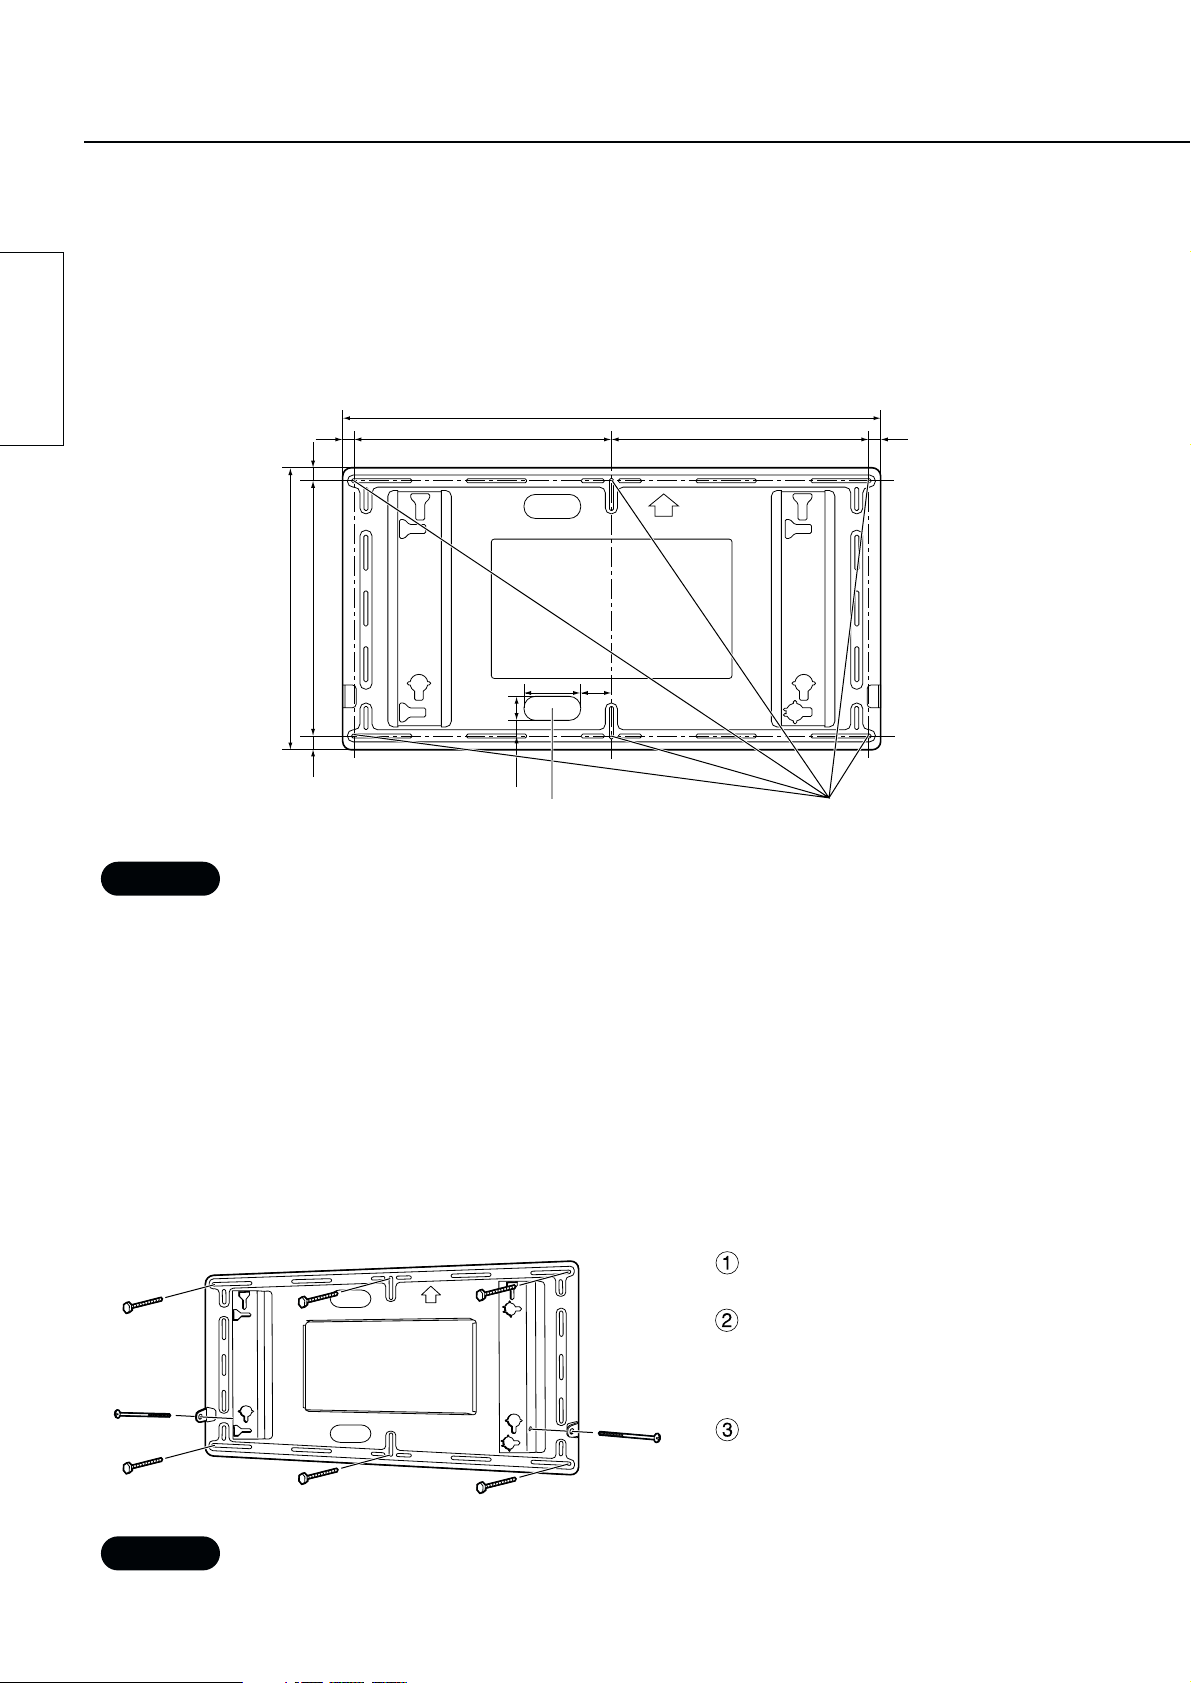
Installation procedure
The wall-hanging bracket weighs approximately 6 kg (13.23 lbs.), and the Wide Plasma Display unit weights
approximately 33 kg (72.8 lbs.) to 45 kg (99.2 lbs.).
While referring to the wall-hanging bracket installation dimensions in the diagram below, check the strength of
the wall in six installation locations, and add reinforcing if any of these locations are not strong enough.
• The wall-hanging bracket has installation holes provided in 24 locations.
if the wall material will not allow sufficient strength to be obtained from using six installation holes, use some of the spare holes.
However, depending on the construction material used at the place of installation, cracks may develop if the screws are
inserted too close to each other.
Note
Note
Note
Note
Installation procedure
First screw a bolt into the center-top
hole.
Use a level gauge to correct the
alignment of the wall-hanging
bracket, and then screw bolts into
the remaining five holes.
Provisionally tighten the fixing screws.
If the screws are inserted more than
5 mm (
13
/64inches), it will not be
possible to install the Wide Plasma
Display in the correct position.
1. Check the strength of the installation location.
2. Install the wall-hanging bracket to the wall.
Fixing screw
Fixing screw
• Install the Wall-hanging bracket so that the arrow shown on the bracket is pointing upwards.
• If it is necessary to embed bolts or nuts beforehand because the wall is made from concrete, use the bracket
itself to determine the correct installation hole positions, or use the dimension diagram to calculate the hole
positions. Then embed the M6 bolts or nuts into the holes. Furthermore, when embedding the bolts, allow the
bolts to protrude from the wall by 10 mm (13/32 inches) to 15 mm (19/32 inches).
930 (36 39/64)
490 (19
19
/64)
450 (17
23
/32)
30
2020
450 (17 23/32)450 (17 23/32)
100
50 (1
31
/32)
15 15
Used for routing wires behind a wall
Units : mm
( ) : inches
(19/32) (19/32)
(3
15
/16)
(
25
/32)(
25
/32)
(1
3
/16)
Wall installation holes (6 locations)
50 (1
31
/32)
• Use commercially-available M6 bolts which suit the wall materials for installation to the wall.
Page 5
5
English
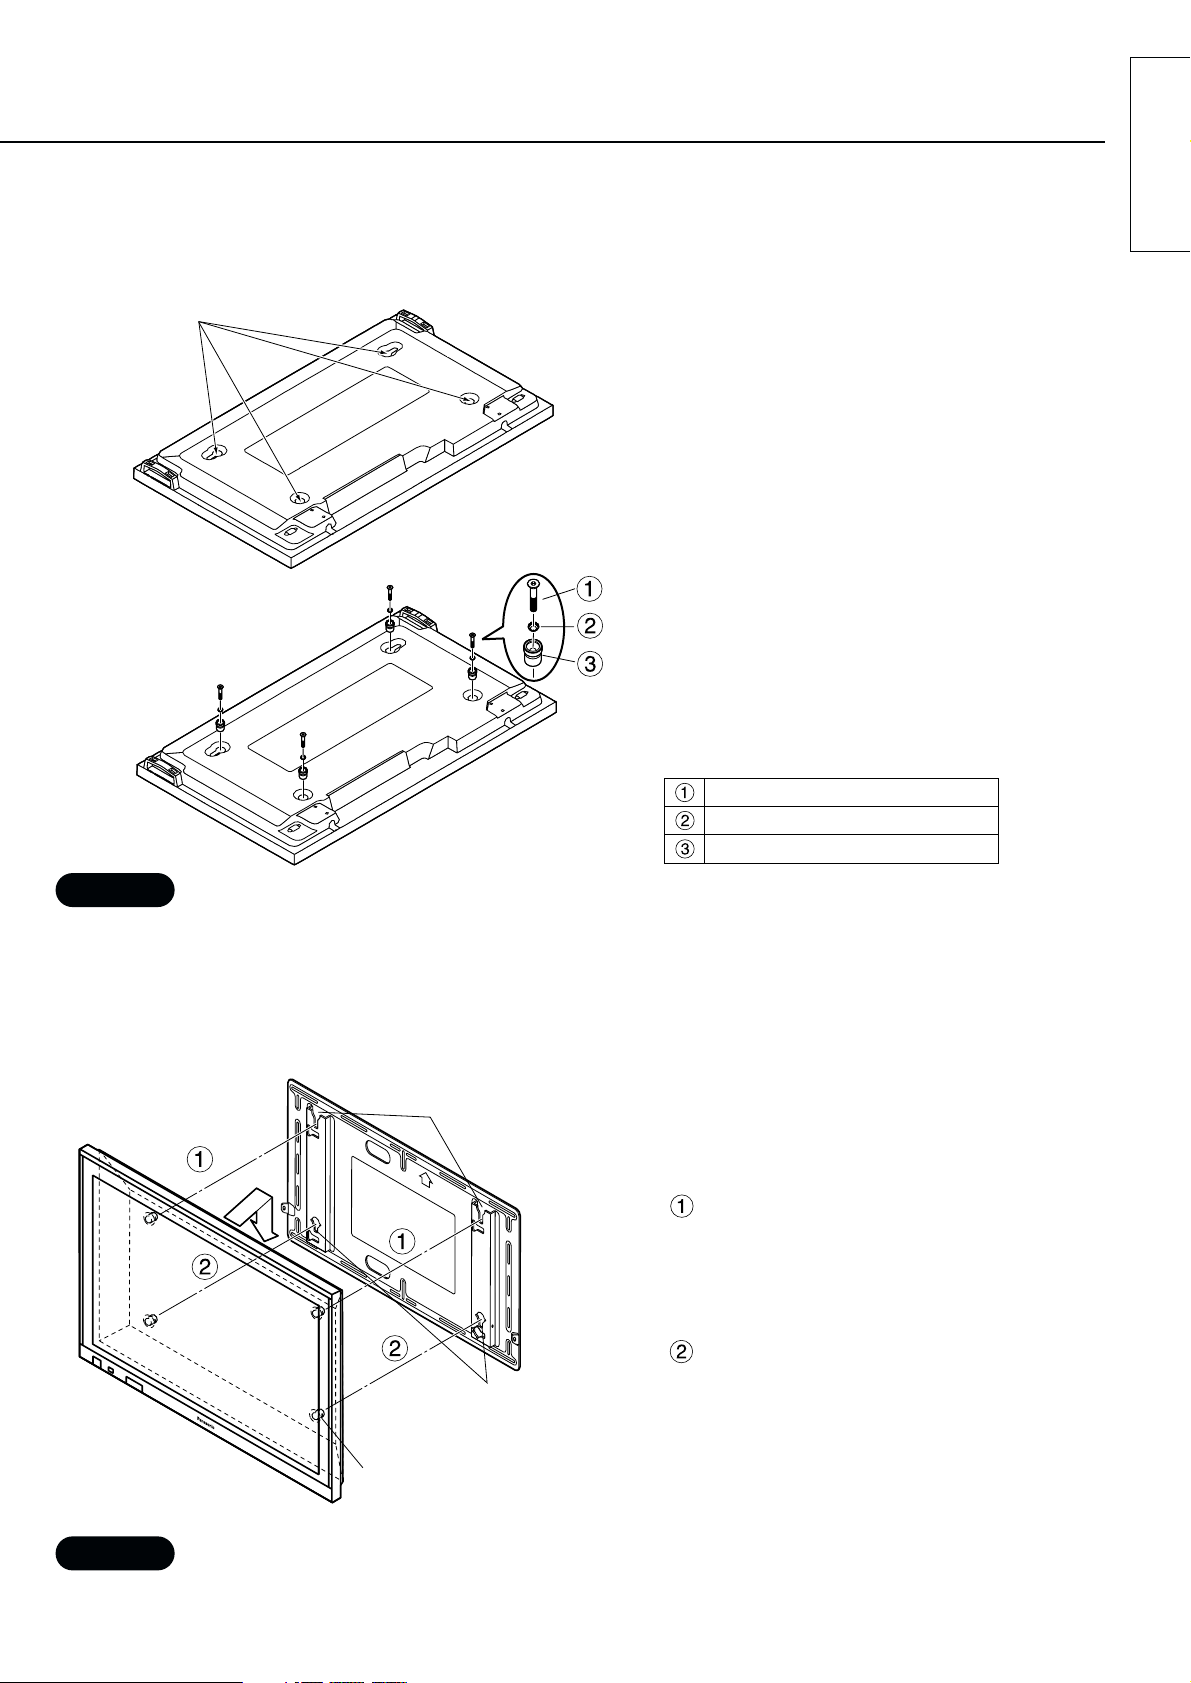
• Place the display face down on top of a cloth which is clean and free from other foreign particles, and then carry out the
procedure above.
Note
Note
• Do not Lift the display too high, otherwise it may become unhooked.
Note
Note
Installation procedure
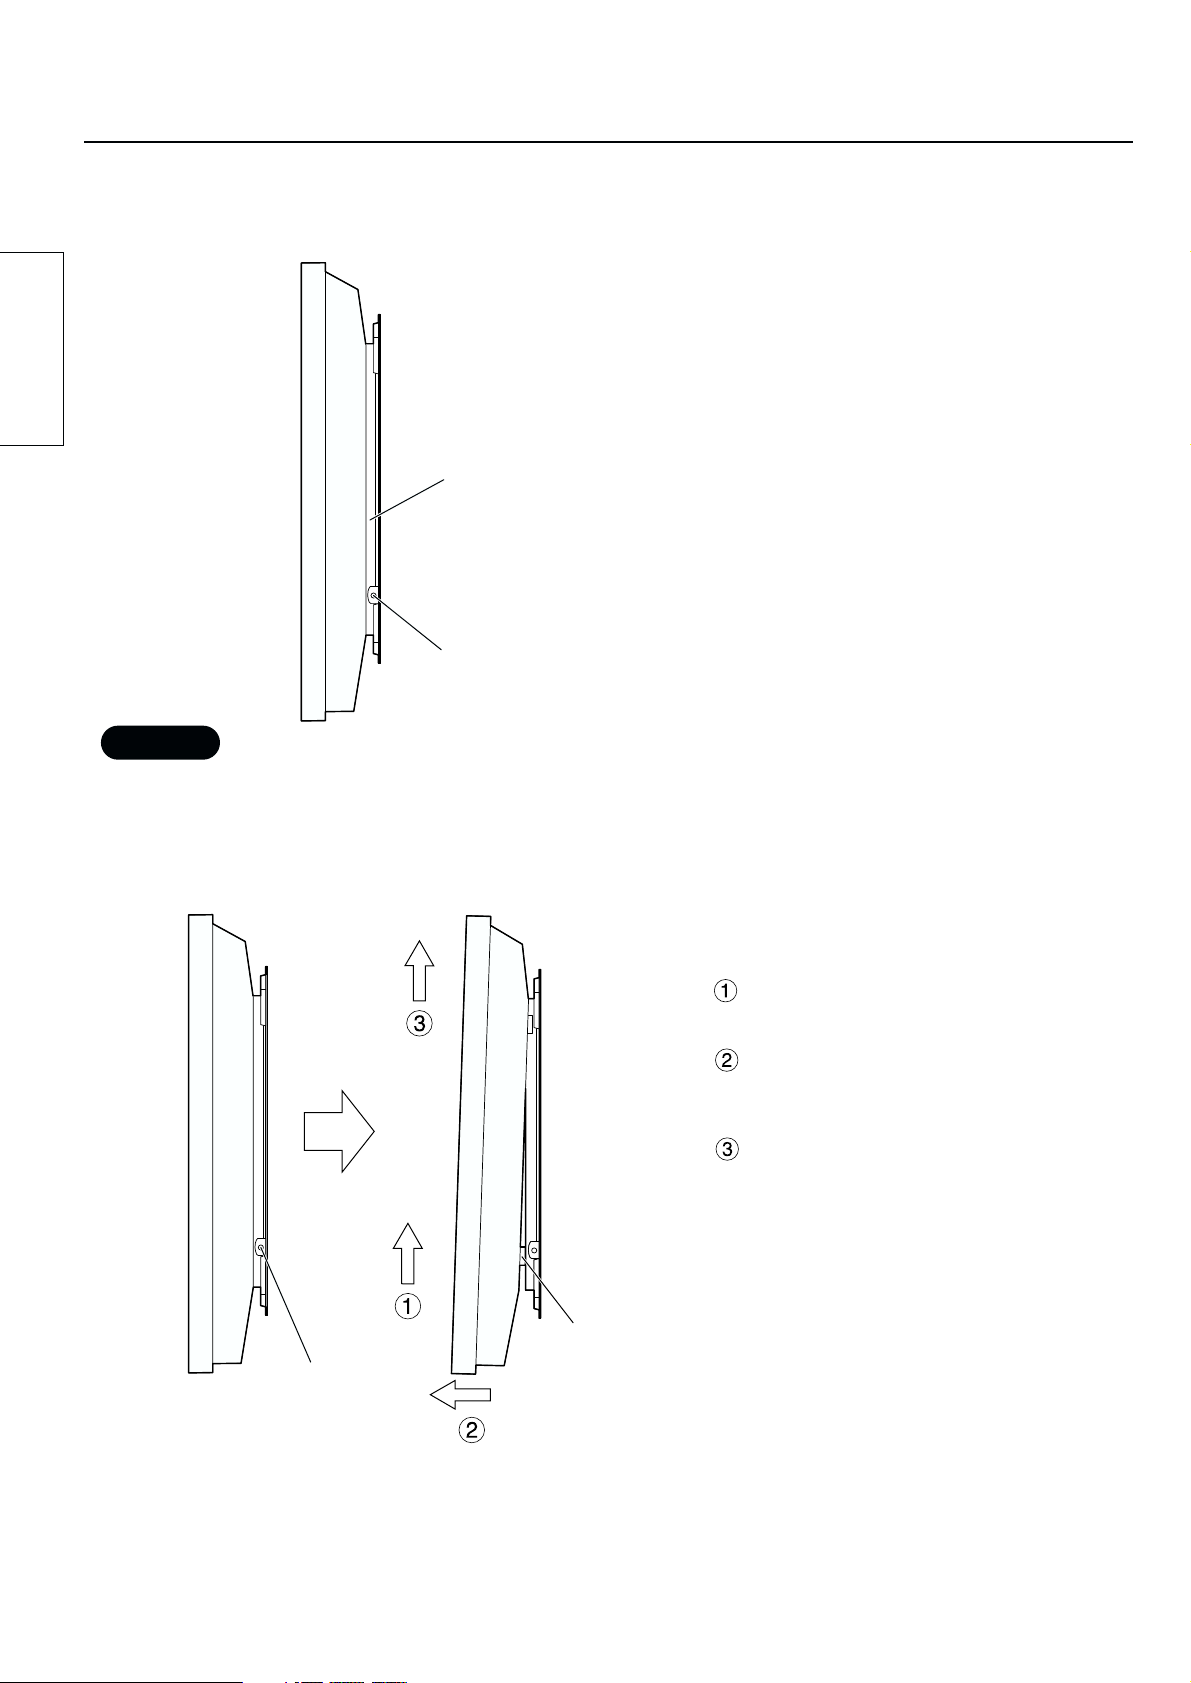
Push the upper insulating spacers
on the display into the notches at
the top of the wall-hanging bracket
until they are hooked in, and then
lower the display into place.
While lifting the display slightly,
insert the lower insulating spacers
on the display into the lower
horizontal hanging holes in the wallhanging bracket, and then lower the
display.
3. Prepare the Wide Plasma Display.
4. Install the display to the wall-hanging bracket.
Remove the four bolts.
Pan head bolt with hex socket
Toothed pan washer
Insulating spacer
1. Remove the four bolts from the display.
2. Use the accessory tool (Allen key) to
install the four accessory pan head
bolts with hex socket, toothed pan
washers and insulating spacers into the
holes where the four bolts used to be
as shown in the illustration.
• Attach the insulating spacers to the display.
Insulating spacer
Notches (for hanging horizontally)
Lower horizontal
hanging holes
Page 6

6
English
Installation procedure
5. Secure the Wall-hanging bracket.
6. Removing the display
1. Remove the two fixing screws which
are screwed into the wall-hanging
bracket.
2. While lifting up the bottom of the
display
Pull it forward to detach the
insulating spacers at the bottom
Then lift up the display.
• Tighten the fixing screws at left and
right.
Fixing screw mounts
(left and right)
Wall-hanging bracket
• Be sure to tighten the left and right fixing screws to prevent the display from detaching from the wall-hanging bracket.
Note
Note
Fixing screws
(left and right)
Insulating spacer
Page 7
7
English
(For U.S.A)
Panasonic Consumer Electronics Company
Division of Matsushita Electric Corporation
of America
One Panasonic Way
Secaucaus, NJ
07094
RACKS AND STANDS
Panasonic Consumer Electronics Company or Panasonic Sales Company (collectively referred to as “the
warrantor” ), will replace parts in case of defects in materials or workmanship, free of change, in the USA or
Puerto Rico, for ten (10) days from the date of the original purchase.
In-warranty parts in the USA can be obtained during the warranty period be contacting:
Panasonic Services Company (PASC)
20421 84th Avenue South
Kent, Washington 98032
Tel.:1-800-833-9626
Fax.:1-800-237-9080
(6 am to 5 pm Monday-Friday; 6 am to 10:30 am Saturday; PST)
Service in Puerto Rico can be obtained during the warranty period by calling the telephone number listed above.
This warranty is extended only to the original purchaser. A purchase receipt or other proof of the original
purchase is required for replacement parts under the warranty.
This warranty only covers failures due to materials and workmanship and does not cover normal wear. The
warranty does not cover damages which occurred in shipment or failures which result from accidents, misuse,
abuse, neglect, mishandling, misapplication, faulty installation, set-up adjustments, improper maintenance,
alteration, line power surge, lightning damage, modification,or commercial use, such as hotel, office,
restaurant, or other business or rental use of the product, or damage that is attributable to acts of God.
LIMITS AND EXCLUSIONS
There are no express warranties except as listed above.
PANASONIC SHALL NOT BE LIABLE FOR INCIDENTAL OR CONSEQUENTIAL DAMAGE RESULTING
FROM THE USE OF THIS PRODUCT, OR ARISING OUT OF ANY BREACH OF THIS WARRANTY. ALL
EXPRESS AND IMPLIED WARRANTIES. INCLUDING THE WARRANTIES OF MERCHANTABILITY, ARE
LIMITED TO THE APPLICABLE WARRANTY PERIOD SET FORTH ABOVE.
Some states do not allow the exclusion or limitation of incidental or consequential damages, or limitations on
how long an implied warranty lasts, so the above exclusions or limitations may not apply to you.
This warranty gives you specific legal rights and you may also have other rights which vary from state to state.
If a problem with this product develops during or after the warranty period, you may contact your dealer or call
the number listed above.
If the problem is not handled to your satisfaction, then write to the Customer Satisfaction Center at the
Panasonic Consumer Electronics Company address indicated above.
Panasonic Sales Company, Division of
Matsushita Electric of Puerto Rico, Inc.
AVE. 65 de Infanteria, Km 9.5
San Gabriel Industrial Park
Carolina, Puerto Rico 00985
Warranty
Page 8

8
Deutsch
Vielen Dank für den Kauf des Wandständers für das Plasmadisplay von Panasonic.
•
Vor der Installation des Ständers lesen Sie bitte diese Anleitung und die Bedienungsanleitung des Plasmadisplays
sorgfältig, um sicherzustellen, daß Ihnen bei der Aufstellung keine Fehler unterlaufen.
•
Übergeben Sie nach abgeschlossener Installation diese Anleitung dem Kunden, und bitten Sie den Kunden die
Anleitung durchzulesen und zum späteren Nachschlagen sorgfältig aufzubewahren. (Bei einem Umzug oder für
die Wartung ist es möglich, daß Sie diese Anleitung wieder benötigen.)
Vorsichtsmaßnahmen für die Aufstellung
WARNUNG
Die Installation darf nur von einem qualifizierten Fachmann ausgeführt werden.
• Bei fehlerhafter Montage kann das Display herunterfallen und Verletzungen verursachen.
Kontrollieren Sie die Sicherheit und ob eine ausreichende Festigkeit der Installation
gewährleistet ist.
• Bei unzureichender Festigkeit kann das Display herunterfallen und Verletzungen verursachen.
Die Wandhängehalterung darf nicht an Stellen montiert werden, die keine ausreichende
Tragfähigkeit für das Gewicht aufweisen.
• Bei unzureichender Tragfähigkeit kann das Display herunterfallen und Verletzungen
verursachen.
VORSICHT
Nicht an Orten installieren, an denen hohe Feuchtigkeit, Staub, Öldämpfe, Wasserdampf
oder hohe Temperaturen vorhanden sind.
• Solche Bedingungen sind für den Betrieb des Plasmadisplays ungeeignet und können einen
Brand oder elektrischen Schlag verursachen.
Installieren Sie das Plasmadisplay nicht nach oben oder unten gerichtet und nicht auf die
Seite gestellt.
• Unter solchen Bedingungen kann im Display ein Wärmestau auftreten, was zu einem
Brandausbruch führen kann.
Für das Aufhängen und das Abnehmen des Displays sind zwei Personen notwendig.
• Falls nicht zwei Personen zur Verfügung stehen, kann das Display herunterfallen und
Verletzungen verursachen.
Halten Sie einen freien Abstand von mindestens 100 mm oben, unten und seitlich am
Display und von mlndestens 19 mm an der Rückseite des Displays ein.
• An der Oberseite des Displays sind Luftaustrittsöffnungen und auf der Unter-und Rückseite sind
Lufteintrittsöffnungen vorhanden. Diese Öffnungen dürfen nicht abgedeckt werden, weil sonst
ein Brand verursacht werden kann.
Page 9
9
Deutsch
Einzelteile
Installationshinweise
•
Die Wandhängehalterung ist für die Installation des Plasmadisplay an einer vertikalen
Wand. Sie darf nicht für die Installation an einer nicht vertikalen Wand verwendet werden.
•
Um einen störungsfreien Betrieb zu gewährleisten, darf das Display nicht an folgenden
Orten installiert werden:
• Orte in dessen Nähe sich Sprinkler oder Sensoren befinden
• Orte, die Vibrationen oder Stößen ausgesetzt sind
•
Orte, die sich in der Nähe von Hochspannungskabeln oder elektrischen Motoren befinden
• Orte, die einem direkten Luftstom von einer Heizung ausgesetzt sind
•
Für die Struktur und das Material am Installationsort muß eine geeignete
Installationsmethode angewendet werden.
•
Verwenden Sie für die Installation an der Wand (Holz, Eisen, Beton) geeignete, im Handel
erhältliche M6-Schrauben.
•
Die Feststellschrauben und das Netzkabel von in der Wand vorhandenen Metallteilen oder
Metallgegenständen fern halten.
•
Schließen Sie den Netzstecker des Plasmadisplays an einer nahen und leicht
zugänglichen Steckdose an.
•
Es muß für eine ausreichende Raumbelüftung gesorgt werden, so daß die Temperatur in
der Nähe des Displays nicht auf über 40°C ansteigt. Bei unzureichender Luftzirkulation im
Display kann ein Wärmestau auftreten, was zu einem Brandausbruch führen kann.
Wandhängehalterung........................................................1 Innensechskantschlüssel
(Zubehör).........................1
M5-Schrauben.................2
Abstandhalter
....................................4
Zahnscheiben
....................................4
InnensechskantFlachkopfschrauben
(M8-45) ...........................4
(Schraube)
Page 10
10
Deutsch
Installation
Die Wandhängehalterung hat ein Gewicht von ungefähr 6 kg die Breit-Plasmadisplay-Einheit wiegt ca. 33 kg bis
45 kg. Beachten Sie die Installationsabmessungen für die Wandhängehalterung in der nachstehenden
Abbildung und kontrollieren Sie die Stärke der Wand an den sechs Stellen, an denen die Halterung befestigt
wird. Falls notwendig, müssen zu schwache Befestigungsstellen verstärkt werden.
• An der Wandhängehalterung sind Löcher an 24 Stellen vorhanden.
Falls die Wand an den sechs Stellen nicht genügend stark ist, verwenden einige der anderen Löcher. Beachten Sie, daß je
nach dem Wandmaterial Risse auftreten können, wenn sich zwei Schrauben nahe beieinander befinden.
Note
Hinweis
Note
Hinweis
• Verwenden Sie im Handel erhältliche M6-Schrauben, die für das Wandmaterial geeignet sind.
Installation
Schrauben Sie zuerst eine Schraube
in das Loch oben in der Mitte.
Richten Sie die
Wandhängehalterung exakt mit
einer Lehre aus und befestigen Sie
die anderen 5 Schrauben.
Ziehen Sie die Schrauben
provisorisch fest. Falls die Schrauben
mehr als 5 mm hineingedreht werden,
läßt sich das Plasmadisplay nicht in
der richtigen Position installieren.
1. Überprüfen Sie die Tragfahigkeit des Installtionsortes.
2. Bringen Sie die Wandhängehalterung an der Wand an.
Schraube
Schraube
• Montieren Sie die Wandhängehalterung so, daß die Pfeile auf der Halterung nach oben weisen.
• Falls bei einer Wand aus Beton die Schrauben vorher angebracht werden, können Sie die exakten
Lochpositionen mit Hilfe der Halterung oder anhand der angegebenen Abmessungen bestimmen und die M6Schrauben oder Muttern anbringen. Die Schrauben müssen 10 bis 15 mm an der Wand vorstehen.
930
490
450
5030
2020
450450
100 50
15 15
Falls die Kabel in der Wand verlegt werden Befestigungslöcher (6 Stellen)
Einheit: mm
Page 11
11
Deutsch
Note
Hinweis
Note
Hinweis
• Legen Sie das Display mit der Bildschirmseite nach unten gerichtet auf ein weiches sauberes Tuch, um die Schrauben
anzubringen.
• Heben Sie das Display nicht zu weit an, weil es sich sonst von der Halterung lösen kann.
Installation
Drücken Sie die Abstandhalter an
der Oberseite des Displays in die
Nuten an der Oberseite der
Wandhängehalterung, so daß sie
einhaken und senken Sie das
Display ab.
Heben Sie das Display etwas an,
um die Abstandhalter an der
Unterseite in die horizontalen
Aufhängungslöcher der
Wandhängehalterung einzusetzen
und senken Sie das Display ab.
3. Bereiten Sie das Plasmadisplay vor.
4. Montieren Sie das Display an der Wandhängehalterung.
Entfernen Sie die vier
Schrauben.
Innensechskant-Flachkopfshrauben
Zahnscheiben
Abstandhalter
1. Entfernen Sie die vier Schrauben am
Display.
2. Verwenden Sie den
Innensechskantschlüssel aus dem
Zubehör, um die vier InnensechskantFlachkopfschrauben, die Zahnscheiben
und die Abstandhalter an den Löchern
an, an denen die vier Schrauben vorher
befestigt waren, anzubrlngen.
• Bringen Sie die Abstandhalter am Display an.
Abstandhalter
Kerben (für die horizontale
Aufhängung)
untere Aufhängunglöcher
Page 12
12
Deutsch
5. Sichern Sie die Wandhängehalterung.
• Ziehen Sie die Schrauben auf der linken
und rechten Seite fest.
Schrauben
(links und rechts)
Wandhängehalterung
• Die Schrauben auf der linken und rechten Seite müssen festgezogen werden, um zu verhüten, daß sich das Display von
der Wandhängehalterung lösen kann.
Note
Hinweis
6. Abnehmen des Displays
1. Entfernen Sie die beiden Schrauben
aus der Wandhängehalterung.
2. Heben Sie die Unterseite des
Displays an.
Ziehen Sie das Display nach vorn
und entfernen Sie die Abstandhalter
an der Unterseite.
Heben Sie das Display ab.
Schrauben
(links und rechts)
Abstandhalter
Installation
Page 13

13
Nederlands
Dank u voor de aanschaf van de muurbevestigingssteun voor de Panasonic
Breedbeeld Plasmadisplay Monitor.
•
Lees deze Installatiehandleiding en de Bedieningshandleiding voor de Breedbeeld Plasmadisplay Monitor
zorgvuldig door, alvorens deze bevestigingssteun te installeren om het werk op de juiste wijze te kunnen
uitvoeren.
•
Overhandig na het voltooien van de installatie deze Installatiehandleiding aan de klant met het verzoek deze
zorgvuldig te lezen en op een veilige plaats te bewaren. (Bij verhuizing of in de toekomst uit te voeren onderhoud
is het van belang dat deze informatie weer beschikbaar is.)
Voorzorgsmaatregelen bij opstelling
WAARSCHUWING
De installatiewerkzaamheden dienen uitsluitend door een deskundige monteur uitgevoerd
te worden.
• Als de bevestigingssteun niet correct wordt gemonteerd, bestaat de kans dat het toestel komt te
vallen en verwondingen kan veroorzaken.
Zorg er voor dat alle veiligheidseisen betreffende de stevigheid van de installatie
toegepast worden.
• Als de stevigheid van de installatie onvoldoende is, bestaat de kans dat het toestel komt te
vallen en verwondingen kan veroorzaken.
De muurbevestigingssteun niet aanbrengen op plaatsen die geen gewicht kunnen dragen.
• Als de stevigheid van het montagevlak onvoldoende is, bestaat de kans dat het toestel komt te
vallen en verwondingen kan veroorzaken.
OPGELET
Niet installeren op plaatsen die onderhevig zijn aan vocht, stof, vettige dampen, stoom of
grote hitte.
• Dit kan een nadelige invloed hebben op het functioneren van de Breedbeeld Plasmadisplay
Monitor en brand of elektrische schokken tot gevolg hebben.
De Breedbeeld Plasmadisplay Monitor niet met de voorzijde omhoog, zijdelings of
ondersteboven installeren.
• Dit kan er toe leiden dat de hitte binnen in de display te hoog oploopt, waardoor brand kan
ontstaan.
Het installeren en verwijderen van de display dient door twee personen te worden
uitgevoerd.
• Als dit niet door twee personen wordt uitgevoerd, bestaat de kans dat de display komt te vallen
en verwondingen kan veroorzaken.
Laat een ruimte open van tenminste 100 mm aan de bovenzijde, onderzijde en aan de
linker-en rechterzijde van de display en 19 mm of meer aan de achterzijde van de display.
• De display beschikt over luchtuitlaatopeningen aan de bovenzijde en luchtinlaatopeningen aan
de onder- en achterzijde. Deze openingen mogen niet geblokkeerd worden, aangezien
daardoor brand kan ontstaan.
Page 14
14
Nederlands
Onderdelen
Belangrijke punten bij installatie
•
De muurbevestigingssteun dient voor gebruik van de Breedbeeld Plasmadisplay Monitor
voor kijkdoeleinden aan een vertikale muur. Gebruik deze niet voor installatie van een
ander type dan vertikale muurinstallatie.
•
Om verzekerd te zijn van een correct en probleemloos functioneren van de Breedbeeld
Plasmadisplay Monitor dient u deze niet op een van de volgende plaatsen te installeren.
• Plaatsen in de buurt van brandblussers ot sensors
• Plaatsen die onderhevig zijn aan trillingen of schokken
• Plaatsen in de nabijheid van hoogspanningsdraden of elektromotoren
•
Plaatsen die rechtstreeks blootstaan aan lucht die afkomstig is van verwarmingsbronnen.
•
De installatiemethode dient geschikt te zijn voor de structuur en de gebruikte materialen
op de plaats van de installatie.
•
Gebruik in de handel verkrijgbare M6 bouten die geschikt zijn voor de betreffende
muurmaterialen (hout, ijzer, beton) bij installatie aan de muur.
•
Houd de borgschroeven en het netsnoer uit de buurt van metalen delen en dergelijke die
in de muur zijn.
•
Steek de stekker van de Breedbeeld Plasmadisplay Monitor in een stopcontact, voorzien
van randaarde, dat dichtbij en gemakkelijk bereikbaar is.
•
Zorg voor voldoende ventilatie zodat de temperatuur rondom de display niet hoger wordt
dan 40°C. Als de luchtcirculatie binnen in de display niet voldoende is, bestaat de kans dat
de temperatuur binnen in de display te hoog oploopt, waardoor brand kan ontstaan.
Inbussleutel (accessoire)
....................................1
M5 schroef.......................2
Isolatietussenstuk
....................................4
Getande veerklem
....................................4
Inbusbout (M8-45)
....................................4
Muurbevestigingssteun .....................................................1
(Bevestigingsbout)
Page 15

15
Nederlands
Installatieprocedure
De muurbevestigingssteun weegt ongeveer 6 kg en de Breedbeeld Plasmadisplay Monitor weegt tussen 33 en
45 kg. Zie de installatieafmetingen van de muurbevestigingssteun in onderstaand schema en controleer de
stevigheid van de muur op de zes montagepunten en breng een extra versteviging aan in het geval deze punten
niet stevig genoeg zijn.
• De muurbevestigingssteun is op 24 punten voorzien van montagegaten.
Als door de aard van het materiaal van de muur het gebruik van zes montagegaten niet voldoende stevigheid biedt, kunnen
reservegaten gebruikt worden.
De kans bestaat echter dat afhankelijk van het constructiemateriaal op de plaats van de installatie scheuren ontstaan als
schroeven op een te korte afstand van elkaar gemonteerd worden.
Note
Opmerking
Note
Opmerking
•
Gebruik bij installatie aan de muur in de handel verkrijgbare M6 bouten die geschikt zijn voor het materiaal van de betreffende muur.
Installatieprocedure
Schroef eerst een bout in het gat
middenboven.
Gebruik een waterpas om de uitlijning
van de muurbevestigingssteun te
corrigeren en schroef vervolgens
bouten in de resterende vijf gaten.
Draai de bevestigingsschroeven
provisorisch vast.
Als de schroeven verder dan 5 mm
worden ingestoken, zal het niet
mogelijk zijn de Breedbeeld
Plasmadisplay Monitor in de correcte
positie te installeren.
1. Controleer de stevigheid van de montagepunten.
2. Bevestig de muurbevestigingssteun aan de muur.
Bevestigingsschroef
Bevestigingsschroef
• Bevestig de muurbevestigingssteun zodanig dat de aangegeven pijl op de steun omhoog wijst.
•
Als het noodzakelijk is de bouten of de moeren eerst te verankeren omdat de muur van beton vervaardigd is, de
steun zelf gebruiken om de juiste positie van de montagegaten te bepalen of het afmetingsschema gebruiken om de
posities van de gaten te berekenen. Veranker vervolgens de M6 bouten of moeren in de gaten. Zorg er verder bij het
verankeren van de bouten voor, dat de bouten over een afstand van 10 tot 15 mm uit de muur steken.
930
490
450
5030
2020
450450
100 50
15 15
Voor het achter de muur aanbrengen van de bedrading Muurmontagegaten (6 punten)
Eenheden: mm
Page 16

16
Nederlands
Note
Opmerking
• Leg de display met de voorzijde naar beneden op een doek die schoon en vrij is van overige voorwerpen en voer
vervolgens de hierboven aangegeven handelingen uit.
• De display niet te hoog optillen, aangezien de kans bestaat dat deze van zijn plaats wordt losgehaakt.
Installatieprocedure
Druk de bovenste
bevestigingsnokken op de display in
de uitsparingen aan de bovenzijde
van de muurbevestigingssteun, haak
deze goed vast en laat vervolgens de
display op zijn plaats zakken.
Til de display voorzichtig een klein
stukje omhoog en steek de
onderste bevestigingsnokken op de
display in de onderste horizontale
ophanggaten in de
muurbevestigingssteun, en laat de
display vervolgens zakken.
3. Maak de Breedbeeld Plasmadisplay Monitor gereed.
4. Monteer de display aan de muurbevestigingssteun.
Verwijder de vier bouten.
Inbusbout
Veerklem
Bevestigingsnok
1. Verwijder de vier bouten van de display.
2. Gebruik het bijgeleverd gereedschap
(inbussleutel).
Monteer de vier bijgeleverde
inbusbouten, de getande veerklemmen
en de bevestigingsnokken in de gaten
waar de vier bouten zich bevonden,
zoals aangegeven in de illustratie.
• Bevestig de bevestingsnokken aan de display.
bevestigingsnok
Uitsparingen (voor horizontale
ophanging)
Onderste horizontale
ophanggaten
Note
Opmerking
Installatieprocedure
Page 17

17
Nederlands
5. Zet de muurbevestigingssteun vast.
• Draai de bevestigingsschroeven aan de
linker en rechter zijde vast.
Muurbevestigingssteun
Schroefbevestigingspunten
(links en rechts)
• Niet vergeten de bevestigingsschroeven aan de linker en rechter zijde vast te draaien, om te voorkomen dat de display van
de muurbevestigingssteun los komt.
Note
Opmerking
6. Verwijderen van de display
1. Verwijder de twee
bevestigingsschroeven welke in de
muurbevestigingssteun bevestigd zijn.
2. Til de onderzijde van de display
omhoog.
Trek de display naar voren om de
bevestigingsnokken aan de
onderzijde los te maken.
Til de display vervolgens omhoog.
Bevestigingsschroeven
(links en rechts)
bevestigingsnok
Page 18

18
Italiano
Grazie per aver acquistato il supporto da parete per lo schermo al plasma-16:9
Panasonic.
•
Prima di installare questo supporto, leggere attentamente le istruzioni per l’installazione e il manuale operativo
dello schermo al plasma per accertarsi di svolgere correttamente ogni operazione.
•
Al termine dell’installazione, consegnare questo manuale di istruzioni al cliente, raccomandando di averne cura e
di leggere le informazioni che lo riguardano. (Il manuale, infatti, può rivelarsi utile per successive operazioni di
manutenzione o di trasporto.)
Precauzioni da adottare per l’installazione
AVVERTENZA
Le operazioni di installazione vanno eseguite esclusivamente da personale qualificato.
• Se la staffa è installata in modo errato, lo schermo può cadere e procurare danni a cose e
persone.
Accertarsi che siano osservate tutte le norme di sicurezza in materia di installazione.
• Se l’installazione non è corretta, lo schermo può cadere e procurare danni a cose e persone.
Non installare su pareti che non sono in grado di reggere carichi.
• Se la resistenza della superficie di installazione è insufficiente, lo schermo può cadere e
procurare danni a cose e persone.
ATTENZIONE
Non installare in ambienti soggetti a umidità, polvere, vapori oleosi, vapore acqueo o forti
fonti di calore.
• Tutte queste condizioni, infatti, possono avere effetti negativi sullo schermo al plasma-16:9 e
provocare incendi o corti circuiti.
Non installare lo schermo al plasma 16:9 posizionandolo verso l’alto, verso il basso o di
lato.
• Possono essere provocati dei surriscaldamenti con conseguente pericolo di incendio.
Per installare e rimuovere lo schermo sono richieste due persone.
• In caso contrario, si corre il rischio di far cadere lo schermo, procurando così danni a cose e
persone.
Lasciare uno spazio di almeno 100 mm in alto, in basso e ai lati dello schermo e di almeno
19 mm sul retro.
• Lo schermo dispone di fessure di ventilazione nella parte superiore e di prese d’aria sul retro e
nella parte inferiore. Non ostruire queste fessure per evitare surriscaldamenti interni.
Page 19

19
Italiano
Componenti
Note particolari durante l’installazione
•
La staffa per sospensione a parete (verticale) va utilizzata per l’installazione dello
schermo al plasma-16:9 su una parete verticale. Non utilizzarla per scopi diversi da
questo tipo di installazione.
•
Al fine di garantire un corretto funzionamento senza problemi dello schermo al plasma16;9, non installare l’unità in uno dei seguenti punti:
• Punti prossimi a irroratori o sensori
• Punti soggetti a vibrazioni o urti
• Punti prossimi a cavi di alta tensione o motori elettrici
• Punti esposti al diretto contatto di aria proveniente da impianti di riscaldamento
•
Il tipo di installazione deve essere appropriato alla struttura e ai materiali utilizzati
nell’ambiente di installazione.
•
Utilizzare viti M6 disponibili in commercio adatte al tipo di parete (legno, ferro, cemento)
sulla quale installare l’unità.
•
Non collocare le viti di fermo e il cavo di alimentazione a parti metalliche o a strutture
comprese nel muro.
•
Inserire la spina del cavo di alimentazione per lo schermo al plasma-16:9 in una presa
elettrica che sia vicina all’apparecchio e facilmente accessibile.
•
Fornire una ventilazione adeguata in modo da tenere la temperatura intorno allo schermo
al di sotto dei 40°C. Se la ventilazione all’interno dello schermo è insufficiente, si corre il
rischio di creare surriscaldamenti e di provocare incendi.
Staffa per sospensione a parete (verticale) ......................1 Chiave esagonale
(accessorio).....................1
Viti M5 con testa a esagono
incassato .........................2
Distanziatore isolante
....................................4
Rondella dentellata
....................................4
Vite con testa piatta a esagono
incassato (M8-45)
...............4
(Vite di fissaggio)
Page 20

20
Italiano
Procedura di installazione
La staffa per sospensione a parete pesa approssimativamente 6 kg ll peso de’ll unità Wide Plasma Display varia
circa tra i 33 e i 45 kg. Prendendo in considerazione le dimensioni della stafta nel diagramma riportato di
seguito, verificare la resistenza della parete nei sei punti di installazione e aggiungere dei rinforzi qualora uno dei
punti non fosse sufficientemente resistente.
• Sulla staffa per sospensione a parete (verticale) sono localizzati 24 fori per l’installazione.
Se la struttura della parete non dispone di una resistenza sufticiente procurata con soli sei fori per l’installazione, utilizzare
alcuni dei restanti fori.
Tuttavia, a seconda del materiale da costruzione impiegato per la parete sulla quale installare l’unità, possono svilupparsi
delle crepe se le viti vengono inserite troppo vicine le une alle altre.
Note
Nota
• Utilizzare viti M6 disponibili in commercio adatte al tipo di materiale da costruzione della parete sulla quale installare l’unità.
Note
Nota
Procedura di installazione
Avvitare la prima vite nel foro
centrale in alto.
Utilizzare una livella a bolla per
correggere l’allineamento del staffa
per sospensione a parete
(verticale), quindi avvitare le viti nei
restanti cinque fori.
Serrare le viti di fissaggio in modo
non definitivo. Se le viti sono
inserite per più di 5 mm, non sarà
possibile installare lo schermo al
plasma-16:9 nella posizione
appropriata.
1. Verificare la resistenza del punto di installazione.
2.
Installare la staffa per sospensione a parete (verticale) sulla parete.
Vite di
fissaggio
Vite di
fissaggio
• Installare la stafta per sospensione a parete (verticale) con la freccia riprodotta verso I’alto.
• Se è necessario praticare prima dei fori per fissare le viti in una parete in cemento, utilizzare la stafta per stabilire
la corretta posizione dei fori oppure utilizzare il diagramma delle dimensioni per calcolarne la posizione. Quindi,
inserire le viti M6 nei fori avendo cura che queste sporgano dalla parete di almeno 10-15 mm.
930
490
450
5030
2020
450450
100 50
15 15
Per I’utilizzo di cavi sulla parete Fori per I’installazione a parete (6 punti)
Unità: mm
Page 21

21
Italiano
• Posizionare lo schermo con la parte anteriore rivolta verso il basso su un panno pulito e privo di corpi estranei, quindi
procedere con i punti precedentemente descritti.
Note
Nota
• Non sollevare troppo in alto lo schermo, altrimenti può sganciarsi.
Note
Nota
Procedura di installazione
Spingere i distanziatori isolanti
superiori dello schermo all’interno
degli incavi posti nella parte
superiore della stafta per
sospensione a parete finchè non
restano agganciati, quindi
abbassare lo schermo.
Sollevando leggermente lo schermo,
inserire i distanziatori inferiori dello
schermo nei fori orizzontali posti
nella parte inferiore della staffa per
sospensione a parete, quindi
abbassare lo schermo.
3. Preparare lo schermo al plasma-16:9
4.
Installare lo schermo sulla staffa per sospensione a parete (verticale).
Rimouvere le quattro viti.
Vite con testa piatta a esagono incassato
Rondella dentellata
Distanziatore isolante
1.
Rimuovere le quattro viti dallo schermo.
2. Utilizzare la chiave accessoria (chiave
esagonale) per installare le quattro viti
con testa piatta a esagono incassato, le
rondelle dentellate e i distanziatori
isolanti nei fori in cui risiedevano le
quattro viti, come illustrato in figura.
• Inserire i distanziatori isolanti nello schermo.
Incavi (per il montaggio
in orizzontale)
Distanziatore isolante
Fori orizzontali inferiori
Page 22

22
Italiano
5. Fissare la staffa per sospensione a parete (verticale).
• Serrare le viti di fissaggio a sinistra e a
destra.
Punti di attacco delle viti di
fissaggio (sinistra e destra)
Staffa per sospensione
a parete (verticale)
• Accertarsi di serrare le viti di fissaggio a sinistra e a destra per impedire il distacco dello schermo al plasma-16:9 dalla staffa
per sospensione a parete (verticale).
Note
Nota
6. Rimozione dello schermo
1. Rimuovere le due viti di fissaggio dalla
staffa per sospensione a parete
(verticale).
2. Sollevare lo schermo verso l’alto
prendendolo dalla parte inferiore.
Tirarlo in avanti per staccare i
distanziatori isolanti nella parte
inferiore.
Sollevare lo schermo verso l’alto.
Viti di fissagio
(sinistra e destra)
Distanziatore isolante
Procedura di installazione
Page 23

23
Français
Précautions pour l’installation
AVERTISSEMENT
Les travaux d’installation doivent être confiés à un technicien qualifié seulement.
• Si l’applique n’est pas correctement installée, l’écran risque de tomber et de causer des
blessures.
Veillez à bien respecter toutes les consignes de sécurité relatives à la solidité de
l’installation.
• Si l’installation n’est pas assez solide, I’écran risquera de tomber et de causer des blessures.
N’installez pas l’appareil à un endroit dont la solidité n’est pas suffisante pour supporter
l’appareil.
• Si la surface d’installation n’est pas assez solide, l’écran risquera de tomber et de causer des
blessures.
ATTENTION
N’installez pas l’appareil à des endroits exposés à l’humidité, à la poussière, aux fumées
grasses, à la vapeur d’eau ou à une chaleur excessive.
• Ces conditions risquent d’affecter le fonctionnement de l’écran plasma 16/9ème et de causer un
incendie ou une électrocution.
N’installez pas l’ Ecran plasma 16/9ème en orientant sa face vers le haut, vers côté ou à
l’envers.
• Sinon, l’écran risquerait de surchaufter et de causer un incendie.
Pour poser ou déposer l’ Ecran, il faut le concours de deux personnes.
• Si deux personnes au moins ne sont pas présentes pour eftectuer l’installation, I’écran risquera
de tomber et de causer des blessures.
Laissez un espace d’au moins 100 mm en haut, en bas et sur les côtés de I’ècran, et de 19
mm ou plus à l’arrière de l’ Ecran.
• L’écran est doté d’orifices de sortie d’air sur son côté supérieur et d’orifices d’entrée d’air sur
ses côtés inférieur et arrière. Ces orifices ne doivent pas être couverts, sinon un incendie
pourrait en résulter.
Nous vous remercions d’avoir acheté le pied mural pour écran plasma 16/9ème de
Panasonic
•
Avant d’installer ce pied, veuillez lire attentivement ce manuel d’installation et le mode d’emploi de I’écran plasma
16/9ème afin de pouvoir réaliser correctement les travaux.
•
Une fois que l’installation est terminée, donnez ce manuel d’installation au client, et priez-le de le lire attentivement
et de le conserver soigneusement. (ll pourra avoir besoin de s’y reporter ultérieurement s’il déplace l’appareil ou
effectue des travaux d’entretien.)
Page 24

24
Français
Composants
Remarques pour I’installation
•
L’applique de suspension au mur (verticale) est utilisée pour installer l’ Ecran plasma
16/9ème sur un mur vertical pour le visionnement. Ne l’utilisez pas pour une installation
autre que l’installation sur un mur vertical.
•
Afin d’assurer un fonctionnement absolument correct de l’ Ecran plasma 16/9ème,
n’installez pas l’écran dans les endroits suivants.
• Endroits situés à proximité d’un extincteur ou d’un capteur
• Endroits sujets aux vibrations ou aux chocs
• Endroits situés à proximité de fils placés sous haute tension ou de moteurs électriques
• Endroits directement exposés au courant d’air d’appareils de chauftage
•
La méthode d’installation doit convenir à la structure et aux matériaux utilisés à
l’emplacement d’installation.
•
Utilisez des boulons M6 en vente dans le commerce qui conviennent aux matériaux du
mur (bois, fer, béton) pour l’installation sur un mur.
•
Veuillez ce que les vis de maintien et le cordon d'alimentation soient éloignés des pièces
et structures métalliques que peut porter le mur.
•
Insérez la fiche du cordon d’alimentation de l’ Ecran plasma 16/9ème dans la prise secteur
la plus proche et la plus facilement accessible.
•
Assurez une ventilation adéquate de manière que la température autour de l’écran ne
s’élève pas au-dessus de 40°C. Si l’air ne circule pas suffisamment dans l’écran, l’écran
risquera de surchauffer et de causer un incendie.
Applique de suspension au mur (verticale).......................1 Clé Allen (fournie)
....................................1
Vis M5
....................................2
Entretoises isolantes
....................................4
Rondelles à cuvette dentées
....................................4
Boulons à tête à cuvette avec
douille hexagonale (M8-45)
....................................4
(Vis de fixation)
Page 25

25
Français
Procédure d’installation
L’applique de suspension au mur pèse environ 6 kg, l’appareil d’Affichage Large à Plasma pèse
approximativement 33 kg à 45 kg. En vous reportant aux dimensions d’installation de I’applique de suspension
au mur indiquées sur le schéma ci-dessous, vérifiez la solidité du mur à six emplacements, et renforcez ces
emplacements s’ils ne sont pas assez solides.
• L’applique de suspension au mur (verticale) possède des trous d’installation placés à 24 endroits.
Si le matériau mural n’est pas assez solide pour garantir une installation sûre en utilisant six trous d’installation seulement,
utilisez aussi les autres trous.
Toutefois, selon le matériau de construction utilisé à l’emplacement d’installation, des fissures risquent de se former si les
vis sont placées trop près l’une de l’autre.
Note
Remarque
Note
Remarque
•
Utilisez des boulons M6 en vente dans le commerce qui conviennent aux matériaux du mur pour réaliser l’installation sur le mur.
Procédure d’installation
Vissez d’abord un boulon dans le
trou supérieur central.
Utilisez une jauge de niveau pour
corriger l’alignement de I’applique
de suspension au mur (verticale),
puis vissez les boulons dans les
cinq autres trous.
Serrez provisoirement les vis de
fixation.Si les vis sont insérées de
plus de 5 mm, il ne sera pas
possible d’installer l’ Ecran plasma
16/9ème à la position correcte.
1. Vérifiez la solidité de l’emplacement d’installation.
2.
Installez l’applique de suspension au mur (verticale) sur le mur.
Vis de
fixation
Vis de
fixation
• Installez l’applique de suspension au mur (verticale) de manière que la flèche marquée sur l’applique soit
orientée vers le haut.
• S’il est nécessaire d’encastrer les boulons ou les écrous préalablement parce que le mur est en béton, utilisez
I’applique lui-même pour déterminer la position des trous d’installation adéquate, ou utilisez le schéma de
dimension pour déterminer les positions des trous. Encastrez ensuite les boulons M6 ou les 6crous dans les
trous. En outre, lorsque vous encastrez les boulons, laissez les boulons dépasser de 10 à 15 mm hors du mur.
930
490
450
5030
2020
450450
100 50
15 15
Si vous faites passer les fils derrière le mur Trous d’installation au mur (6 emplacements)
Unités: mm
Page 26

26
Français
Note
Remarque
Note
Remarque
• Placez l’écran face vers le bas sur un tissu absolument propre et net, puis etfectuez la procédure ci-dessus.
• Ne soulevez pas I’écran trop haut, sinon il risquerait de se décrocher.
Procédure d’installation
Poussez les entretoises isolantes
supérieures de l’écran dans les
encoches situées en haut de
l’applique de suspension au mur
jusqu’à ce qu’elles soient accrochées,
puis abaissez l’ecran à sa place.
Tout en levant légèrement l’écran,
insérez les entretoises isolantes
inférieures de l’écran dans les trous
de suspension horizontaux inférieurs
de I’applique de suspension au mur,
puis abaissez l’écran.
3. Préparez I’ Ecran plasma 16/9ème.
4.
Installez l’écran sur l’applique de suspension au mur (verticale).
Retirez les quatre boulons.
Boulon à tête à cuvette avec douille hexagonale
Rondelle à cuvette dentée
Entretoise isolante
1. Retirez les quatre boulons de l’écran.
2. A l’aide de I’outil fourni (clé Allen),
installez les quatre boulons d’ancrage à
douille hexagonale fournis, les
rondelles dentées et les entretoises
isolantes dans les tours où les quatre
boulons se trouvaient, comme indiqué
sur I’illustration.
• Fixez les entretoises isolantes sur l’écran.
Entretoise isolante
Encoches (pour la suspension
horizontale)
Trous de suspension
horizontale inférieurs
Procédure d’installation
Page 27

27
Français
5. Fixez l’applique de suspension au mur (verticale).
• Serrez les vis de fixation à gauche et à
droite.
Fixations des vis de fixation
(gauche et droite)
Applique de suspension
au mur (verticale)
• Veillez à bien serrer les vis de fixation gauche et droite pour empêcher l’écran de se détacher de l’applique de suspension
au mur (verticale).
Note
Remarque
6. Dépose de l’écran
1. Retirez les deux vis de fixation qui sont
vissées dans I’applique de suspension
au mur (verticale).
2. Tout en soulevant le bas de l’écran
Tirez-le vers l’avant pour détacher
les entretoises d’isolation situées en
bas.
Ensuite, soulevez I’écran.
Vis de fixation
(gauche et droite)
Entretoise isolante
Page 28

28
Español
Precauciones para la instalación
ADVERTENCIA
El trabajo de instalación debe hacerlo un técnico cualificado.
• Si se instala incorrectamente la abrazadera, la pantalla puede caerse y sufrir daños.
Compruebe que se han respetado todos los factores para su seguridad sobre la fuerza de
la instalación.
• Si la fuerza de la instalación no es suficiente, la pantalla puede caerse y puede sufrir daños.
No instale en lugares que no puedan soportar cargas pesadas.
• Si la fuerza de la superficie de instalación no es suficiente, la pantalla puede caerse y puede
sufrir daños.
PRECAUCIÓN
No instale en lugares expuestos a la humedad, polvo, humo, aceite, vapor de agua o
excesivo calor.
• Pueden afectar adversamente a la Pantalla Panorámica de Plasma y provocar un incendio o
descarga daños.
No instale la Pantalla Panorámica de Plasma cara arriba, de lado o arriba abajo.
• Esto puede hacer que se acumule calor dentro de la pantalla y provocar un incendio.
Es necesaria la ayuda de dos personas para instalar y desmontar la pantalla.
• Si no tiene la ayuda de otra persona, la pantalla puede caerse y sufrir daños.
Deje un espacio de por lo menos 100 mm arriba, abajo y a los lados de la pantalla y 19
mm o más detrás la pantalla.
• La pantalla tiene orificios de salida de aire encima y orificios de entrada de aire abajo y atrás.
No tape estos orificios porque puede ser la causa de un incendio.
Muchas gracias por la compra del pedestal de pared para Pantalla Panorámica de
Plasma de Panasonic.
•
Antes de instalar este pedestal, lea las instrucciones de instalación y el manual de instrucciones de la Pantalla
Panorámica de Plasma cuidadosamente para garantizar que la instalación se realiza correctamente.
•
Entregue estas instrucciones de instalación al cliente después de completar la instalación y solicítele que las lea
cuidadosamente y que las guarde en un lugar seguro. (Puede ser necesario en caso de mudanza o para el
mantenimiento en el futuro.)
Page 29

29
Español
Componentes
Puntos a tener en cuenta durante la instalación
•
La abrazadera de suspensión de pared es para utilizar en la instalación de la Pantalla
Panorámica de Plasma en una pared vertical para ver las imágenes de la pantalla. No lo
utilice para ningún otro tipo de instalación que no sea la vertical en una pared.
•
Para un funcionamiento correcto o sin problemas de la Pantalla Panorámica de Plasma,
no instale la pantalla en los siguientes lugares.
• Lugares cerca de rociadores o sensores
• Lugares expuestos a vibraciones o golpes
• Lugares cerca de cables de alta tensión o motores eléctricos
• Lugares en contacto directo con el aire de la caletacción
•
El método de instalación debe ser apropiado a la estructura y materiales utilizados en el
lugar de la instalación.
•
Utilice pernos M6 de venta en los comercios, apropiados para el material de la pared
(madera, hierro, hormigón) para la instalación en la pared.
•
Mantenga los tornillos de retención y el cable de alimentación alejados de cualquier parte
o estructura metálica del interior de la pared.
•
Enchufe el cable eléctrico para la Pantalla Panorámica de Plasma en un enchufe cercano
y de fácil acceso.
•
Debe haber buena circulación de aire para que la temperatura alrededor de la pantalla no
suba encima de los 40°C. Si el aire no circula bien dentro de la pantalla puede
acumularse calor en el interior y provocar un incendio.
Unidad de abrazadera de suspensión de pared ...............1 Llave Allen (accesorio)
....................................1
Tornillo M5
....................................2
Espaciador de aislamiento
....................................4
Arandela de cazoleta
dentada ...........................4
Perno de cabeza cazoleta
con cubo hexagonal
(M8-45) ...........................4
(Tornillo de fijación)
Page 30

30
Español
Procedimiento de instalación
La abrazadera de suspensión de pared pesa aproximadamente 6 kg la unidad de visualización de plasma ancha
pesa aproximadamente de 33 kg a 45 kg. Consulte las dimensiones de instalación de la abrazadera de
suspensión de pared en el siguiente esguema y confirme la fuerza de la pared en seis lugares, agregando
refuerzos si alguno de estos lugares no es lo suficientemente fuerte.
• La abrazadera de suspensión de pared tiene orificios de instalación en 24 lugares. Si el material de la pared no es lo
suficientemente fuerte cuando se utilizan seis orificios de instalación, utilice algunos de los orificios adicionales.
Sin embargo, según el material de construcción utilizado en el lugar de la instalación, pueden aparecer grietas si se
colocan tornillos demasiado cerca entre sí.
Note
Nota
Utilice pernos M6 de venta en los comercios, apropiados para el material de la pared, para su instalación.
Note
Nota
Procedimiento de instalación
Atornille primero un perno en el
orificio superior central.
Utilice un calibre de nivel para
corregir la alineación de la
abrazadera de suspensión de pared
y atornille los pernos en los demás
cinco orificios.
Apriete temporalmente los tomillos
de fijación. Si se introducen los
tornillos más de 5 mm no será
posible instalar la Pantalla
Panorámica de Plasma en la
posición correcta.
1. Verifique la fuerza del lugar de instalación.
2. Instale la abrazadera en la pared.
Tomillo de
fijación
Tomillo de
fijación
• Instale la abrazadera de suspensión de pared para que la flecha en la abrazadera apunte hacia arriba.
• Si fuera necesario introducir los pernos o tuercas por adelantado porque la pared es de hormigón, utilice la
abrazadera en sí para determinar las posiciones correctas de orificio de instalación o utilice el esquema de
dimensiones para calcular las posiciones de los orificios. Introduzca los pernos o tuercas M6 en los orificios.
Además, cuando introduzca los pernos, deje que sobresalgan 10 a 15 mm de la pared.
930
490
450
5030
2020
450450
100 50
15 15
Si se pasan los cables detrás de la pared Orificios para instalación en
la pared (6 lugares)
Unidad: mm
Page 31

31
Español
• Coloque la pantalla cara abajo encima de un paño limpio y libre de partículas extrañas y realice el procedimiento anterior.
Note
Nota
• No levante la pantalla demasiado alto, de lo contrario puede desengancharse.
Note
Nota
Procedimiento de instalación
Empuje los espaciadores de
aislamiento en la pantalla en las
muescas de la parte superior de la
abrazadera de suspensión de pared
hasta que estén enganchados y
baje la pantalla en su lugar.
Mientras encaja ligeramente la
pantalla, inserte los espaciadores
de aislamiento inferior en los
orificios para colgar horizontales
inferiores en la abrazadera de
suspensión de pared, y baje la
pantalla.
3. Prepare la Pantalla Panorámica de Plasma.
4. Instale la pantalla en la abrazadera de suspensión de pared.
Saque los cuatro pernos.
Perno de cabeza cazoleta con cubo hexagonal
Arandela de cazoleta dentada
Espaciador de aislamiento
1. Saque los cuatro pernos de la pantalla.
2. Utilice la herramienta accesoria (Ilave
Allen) para instalar los cuatro pemos
de cabeza cazoleta con cubo
hexagonal, arandelas de cazoleta
dentada y espaciadores de aislamiento
en los orificios donde se utilizan los
cuatro pernos, tal como aparece en la
figura.
• Instale los espaciadores de aislación en la pantalla.
Espaciador de
aislamiento
Muescas (para colgar
horizontalmente)
Baje los orificios para
colgar horizontales
Page 32

32
Español
Procedimiento de instalación
5. Asegure la abrazadera de suspensión de pared.
• Apriete los tornillos de fijación en el lado
izquierdo y derecho.
Monturas de tornillo de fijación
(izquierda y derecha)
Abrazadera de suspensión
de pared
• Asegúrese de apretar los tornillos de fijación izquierdo y derecho para evitar que la pantalla se suelte de la abrazadera de
suspensión de pared.
Note
Nota
6. Desmontaje de la pantalla
1. Saque los dos tornillos de fijación
atornillados en la abrazadera de
suspensión de pared.
2. Mientras levanta la parte inferior de
la pantalla
Tire hacia adelante para soltar los
espaciadores de aislamiento en la
parte inferior
Levante la pantalla.
Tornillos de fijación
(izquierdo y derecho)
Espaciador de
aislamiento
Page 33

33
Svenska
Gratulerar till ditt val av fäste för väggupphängning för Panasonics’ breda plasma
monitor.
•
Läs denna monteringsanvisning och bruksanvisningen för Bred plasma-monitor noggrant innan du monterar fästet,
för att garantera att arbetet utförs på rätt sätt.
•
Ge denna monteringsanvisning till kunden sedan monteringen har slutförts och be dem läsa den noggrant och
förvara den på säker plats. (Den kan komma att behövas igen om flyttning eller underhåll utförs senare.)
Försiktighetsåtgärder vid montering
VARNING
Monteringen skall endast utföras av utbildad tekniker.
• Om fästet monteras på felaktigt sätt kan monitor falla ned och orsaka personskada.
Kontrollera att alla säkerhetsfaktorer som rör monteringens hållfasthet observeras.
• Om monteringens hållfasthet inte är tillräcklig kan monitor falla ned och orsaka personskada.
Montera inte fästet på platser som inte tål belastning.
• Om styrkan på monteringsytan inte är tillräcklig kan monitor falla ned och orsaka personskada.
FÖRSIKTIGT
Montera inte fästet på platser som utsätts för fukt, damm, petroleumångor, vattenånga
eller stark värme.
• Dessa kan ha skadlig inverkan på bred plasma-monitor funktion, vilket kan resultera i brand
eller elektriska stötar.
Montera inte den breda plasma-monitorn med framsidan vänd uppåt, åt sidorna eller upp
och ned.
• Vid sådan montering kan värme ackumuleras inuti monitor, vilket kan leda till brand.
Det behövs två personer för att montera eller avlägsna monitor.
• Om man hanterar monitor ensam kan man tappa monitor och personskada kan uppstå.
Upprätthåll ett avstånd på minst 100 mm mellan skärmen och tak, golv och sidor, och
minst 19 mm bakom skärmen.
• Monitor har luftutsläppshål i överkant och luftintagshål i underkant och på baksidan. För att
brand inte skall uppstå får dessa hål inte täckas.
Page 34

34
Svenska
Delar
Punkter att observera under monteringen.
•
Väggupphängning skall användas för montering av bred plasma-monitor på en vertikal
vägg för visning. Använd det inte för någon annan typ av montering än vertikalt på vägg.
•
För att garantera korrekt, problemfri drift av bred plasma-monitor skall monitor inte
monteras på någon av följande platser.
• Platser bredvid sprinklers eller sensorer.
• Platser som utsätts för vibrationer eller stötar.
• Platser nära högspänningskablar eller elmotorer.
• Platser i direkt kontakt med luft från värmeelement.
•
Monteringsmetoden skall vara lämplig för monteringsplatsen och det använda materialet.
•
Använd i handeln tillgängliga M6-skruvar som är lämpliga för väggmaterialet (trä, järn,
betong) vid montering på väggen.
•
Håll fästskruvarna och nätkabeln borta från metalldelar eller metallföremål inuti väggen.
•
Sätt in stickproppen på den breda plasma-monitorns anslutningskabel i ett närbeläget och
lättåtkomligt vägguttag.
•
Ombesörj tillräcklig ventilation så att temperaturen runt monitor inte stiger till över 40°C.
Om luftcirkulationen inuti monitor är otillräcklig kan värmen ackumuleras inuti monitor,
vilket kan resultera i brand.
Väggupphängning .............................................................1 Insexnyckel (tillbehör)
....................................1
M5-skruv
....................................2
Isolerande distans
....................................4
Konisk yttertandbricka
....................................4
Försänkt skruv med
sexkantshål (M8-45) .......4
(Fästskruv)
Page 35

35
Svenska
Monteringsprocedur
Fästet för väggupphängning väger ca. 6 kg och den breda plasma-monitorn väger ca. 33 till 45 kg. Se
monteringsmåtten för fästet för väggupphängning på nedanstående bild, kontrollera väggens styrka vid de sex
monteringspunkterna och utför förstärkningar om någon av dessa platser inte är tillräckligt stark.
• Väggupphängning har monteringshål på 24 platser.
Om väggmaterialet inte erbjuder tillräcklig styrka vid användning av sex monteringshål, använd några av reservhålen.
Beroende på byggnadsmaterialet på monteringsplatsen kan emellertid sprickor uppstå om skruvar monteras för nära
varandra.
Note
Observera
• Använd i handeln tillgängliga M6-skruvar som är lämpliga för väggmaterialet vid montering på väggen.
Note
Observera
Monteringsprocedur
Skruva först fast en skruv genom
mitthålet högst upp.
Använd ett vattenpass för att väga
av väggupphängning och skruva
sedan fast skruvar i de återstående
fem hålen.
Drag provisoriskt åt fästskruvarna.
Om skruvarna är inskruvade mer än
5 mm kommer det inte att vara
möjligt att montera den breda
plasma-monitorn på rätt sätt.
1. Kontrollera monteringsplatsens hållfasthet.
2. Montera väggupphängning på väggen.
Fästskruv
Fästskruv
• Montera väggupphängning så att pilen på fästet pekar uppåt.
• Om det är nödvändigt att plugga fast skruvar eller muttrar i förväg på grund av att väggen är av betong, använd
själva fästet för att bestämma rätt placering av hålen eller använd måttskissen för att beräkna hålens placering.
Plugga sedan fast M6-skruvarna eller muttrarna i hålen. När skruvarna pluggas fast skall skruvarna sticka ut 10
till 15 mm från väggen.
930
490
450
5030
2020
450450
100 50
15 15
Enhet: mm
Hål för väggmontering (6 platser) Vid ledningsdragning bakom väggen
Page 36

36
Svenska
• Placera monitor med bildsidan nedåt på ett rent tygstycke som är fritt från främmande partiklar och utför åtgärderna ovan.
Note
Observera
• Lyft inte monitor för högt, annars kan den hakas loss.
Note
Observera
Monteringsprocedur
Tryck in monitorns övre
isoleringsmellanlägg i hacken på
den övre delen av fästet för
väggupphängning tills de har hakats
fast, och sänk därefter ned monitorn
på plats.
Medan monitorn lyfts upp en aning,
skall du sätta in dess nedre
isoleringsmellanlägg i de nedre
vågräta upphängningshålen på fästet
för väggupphängning, och därefter
sänka ned monitorn på plats.
3. Förbered bred plasma-monitor.
4. Montera monitor på väggupphängning.
Avlägsna de fyra skruvarna.
Skruv med försänkt skalle med sexkantshål
Konisk yttertandbricka
Isolerande distans
1. Avlägsna de fyra skruvarna från
monitor.
2. Använd det medföljande verktyget
(nyckel för insexhål) för att montera de
tyra medföljande bultarna med konisk
skalle och sexkantshål, tandade
låsbrickor och isolerande mellanlägg i
de hål, där de fyra bultarna tidigare
satt, såsom bilden visar.
• Fäst de isolerande distanserna vid monitor.
Isolerande distans
Urtagningar (för horisontell
hängning)
Undre hål för horisontell
upphängning
Monteringsprocedur
Page 37

37
Svenska
5. Fäst väggupphängning.
• Drag åt fästskruvarna till vänster och
höger.
Väggupphängning
Hål för fästskruvar
(vänster och höger)
• Kontrollera att vänster och höger fästskruvar är åtdragna så att monitor inte kan lossna från väggupphängning.
Note
Observera
6. Att demontera monitor
1. Avlägsna de två fästskruvarna som är
fastskruvade i väggupphängning.
2. Lyft upp monitor underdel.
Drag den framåt för att lossa de
isolerande distanserna i
underkanten.
Lyft sedan upp monitor.
Fästskruvar
(vänster och höger)
Isolerande distans
Page 38

38
Dansk
Sikkerhed i forbindelse med brug af widescreenplasmaskærm
ADVARSEL
Montering må udelukkende foretages af en kvalificeret tekniker.
• Hvis beslaget monteres forkert, kan skærmen muligvis falde ned og medføre personskader.
Kontrollér, at alle sikkerhedsmæssige aspekter vedrørende minimumskrav for belastning
er overholdt.
• Hvis minimumskravene ikke overholdes, kan skærmen muligvis falde ned og medføre
personskader.
Montér ikke skærmen på steder, der ikke har den nødvendige belastningsevne.
• Hvis monteringsoverfladens belastningsevne ikke er tilstrækkelig, kan skærmen muligvis falde
ned og medføre personskader.
FORSIGTIG
Montér ikke skærmen i områder, der er udsat for fugtighed, støv, oliedampe, vanddamp
eller høje temperaturer.
• Sådanne forhold kan have en negativ indvirkning på widescreen-plasmaskærmens funktion og
eventuelt medføre brand eller elektrisk stød.
Montér ikke widescreen-plasmaskærmen, så skærmen vender opad, til én af siderne eller
nedad.
• I modsat fald kan der forekomme en overophedning inde i plasmaskærmen, hvilket kan medføre
brand.
Der skal to personer til at montere og afmontere skærmen.
• Hvis der ikke er to personer til stede ved dette arbejde, er der risiko for at tabe skærmen, hvilket
kan medføre personskader.
Hold en afstand på mindst 100 mm i toppen, i bunden og til højre og til venstre for
plasmaskærmen samt en afstand på 19 mm eller mere på bagsiden.
• Skærmen har lufthuller øverst (luftudledning) og lufthuller på under- og bagsiden (luftindtag).
Disse huller må under ingen omstændigheder tildækkes. I modsat fald kan der opstå brand.
Tak, fordi du har købt vægbeslaget til Panasonic Widescreen-plasmaskærm.
•
Af hensyn til korrekt montering anbefaler vi, at du læser denne monteringsvejledning samt betjeningsvejledningen
til widescreen-plasmaskærmen grundigt igennem, inden du monterer beslaget.
•
Giv installationsvejledningen til kunden, når beslaget er monteret, og bed kunden om at læse den grundigt
igennem og derefter opbevare den et sted, hvor den er let at finde. (Hvis plasmaskærmen skal flyttes eller til
service på et senere tidspunkt, kan der blive brug for vejledningen igen.)
Page 39

39
Dansk
Komponenter
Vigtige henvisninger i forbindelse med montering
•
Vægbeslaget er beregnet til montering af widescreen-plasmaskærmen på en lodret væg
af hensyn til optimale visningsmuligheder. Brug det ikke til andre former for montering end
lodret vægmontering.
•
For at sikre en korrekt og problemfri funktion af widescreen-plasmaskærmen bør skærmen
ikke monteres nogen af følgende steder:
• Steder, der er tæt på sprinkleranlæg eller sensorer
• Steder, hvor der er risiko for vibrationer og stød
• Steder, som er tæt på højspændingsledninger eller elektromotorer
• Steder, hvor der er direkte kontakt med luft fra varmeanlæg
•
Den valgte monteringsmetode skal passe til monteringsstedets struktur og materialer.
•
Brug gængse M6-skruer, som passer til vægmaterialet (træ, jern, beton), til monteringen
på væggen.
•
Anbring ikke holdeskruerne og netledningen i nærheden af metalliske dele eller strukturer
i væggen.
•
Sæt netkablet til widescreen-plasmaskærmen i en stikkontakt, der sidder tæt på og let
tilgængeligt i forhold til denne.
•
Sørg for god ventilation, så temperaturen omkring skærmen ikke kommer over 40°C. Hvis
luften inde i plasmaskærmen er for stillestående, kan der ske en overophedning, hvilket
kan medføre brand.
Vægbeslag ........................1 Unbraco-nøgle (tilbehør)
....................................1
M5-skruer
....................................2
Afstandstylle
....................................4
Sikringsskive
....................................4
Fladhovedet skruer med
indvendig, sekskantet kærv
(M8-45)
.............................4
(Monteringsskruer)
Page 40

40
Dansk
Vægbeslaget vejer ca. 6 kg, widescreen plasmaskærmen vejer ca. 33 til 45 kg. Brug diagrammet nedenfor over
vægbeslagets monteringsdimensioner, og kontrollér væggens belastningsevne på de seks steder, hvor beslaget
skal fastgøres til væggen. Forstærk et eller flere af disse steder, hvis belastningsevnen ikke er god nok.
• Vægbeslaget er forsynet med 24 monteringshuller.
Hvis vægmaterialets belastningsevne ikke er tilstrækkelig til at garantere en sikker montering ved hjælp af 6
monteringshuller, er det muligt at bruge nogle af reservehullerne.
Afhængigt af væggens konstruktionsmateriale på det sted, hvor beslaget skal monteres, kan der opstå revner, hvis skruerne
placeres for tæt på hinanden.
Note
Bemærk
• Brug gængse M6-skruer, som passer til vægmaterialet, til montering af beslaget på væggen.
Note
Bemærk
Monteringsprocedure
Skru først en skruer i det øverste
midterste hul.
Brug et vaterpas, så vægbeslaget
kommer til at hænge lige. Skru
derefter skruerne i de andre fem
huller.
Spænd midlertidigt monteringsskruer
fast. Hvis monteringsskruer er skruet
mere end 5 mm i, vil det ikke være
muligt at installere widescreenplasmaskærmen i den korrekte
1. Kontrollér monteringsstedets belastningsevne.
2. Montér vægbeslaget på væggen.
• Montér vægbeslaget, så pilen på beslaget peger opad.
•
Hvis det er nødvendigt at indsætte bolte eller dyvler før den egentlige montering, fordi væggen er lavet af beton,
anbefales det at bruge beslaget til at markere, hvor monteringshullerne skal være. Det er dog også muligt at
bruge oplysningerne i diagrammet til at beregne, hvor hullerne skal være. Indsæt derefter M6-skruerne eller
dyvlerne i hullerne. Sørg for, at skruerne stikker ca. 10 til 15 mm ud af væggen, når du sætter dem i.
930
490
450
5030
2020
450450
100 50
15 15
Måleenheder: mm
Vægmonteringshuller (6 steder)
Hvis der anvendes ledninger bag væggen.
Monteringsprocedure
Monteringsskruer
Monteringsskruer
Page 41

41
Dansk
• Anbring plasmaskærmen med skærmen nedad på en stykke stof, der er helt rent og frit for fremmedlegemer, og udfør
derefter ovenstående procedure.
Note
Bemærk
• Pas på ikke at løfte skærmen for højt op, i modsat fald bliver skærmen løftet af beslaget igen.
Note
Bemærk
Monteringsprocedure
Skub de øverste afstandstyller på
plasmaskærmen ind i hakkerne
øverst på vægbeslaget, indtil de går
i indgreb. Sænk derefter
plasmaskærmen på plads.
Vip skærmen en lille smule, og skub
samtidig de nederste afstandstyller
på plasmaskærmen ind i de
nederste vandrette monteringshuller
i vægbeslaget. Sænk derefter
skærmen.
3. Gør widescreen-plasmaskærmen klar.
4. Montér skærmen på vægbeslaget.
Fjern de fire skruer.
Fladhovedet skruer med indvendig, sekskantet kærv
Sikringsskive
Afstandstylle
1. Fjern de fire skruer fra skærmen.
2. Tag tilbehørsnøglen (unbraconøgle), og
montér de fire fladhovedede skruer
med indvendig, sekskantet kærv,
sikringsskiverne og afstandstyllerne i
de huller, hvor skruerne sad før som
vist på figuren.
• Sæt afstandstyllerne på skærmen.
Afstandstyller
Hakker (til vandret montering)
Nederste vandrette
monteringshuller
Page 42

42
Dansk
5. Fastgør vægbeslaget.
6. Afmontering af plasmaskærmen
• Spænd monteringsskruerne i venstre og
højre side fast.
Vægbeslag
Huller til monteringsskruer
(venstre og høfjre side)
• Husk at spænde de venstre og højre monteringsskruer, så skærmen ikke kan løsne sig fra vægbeslaget.
Note
Bemærk
1. Fjern de to monteringsskruer, som er
skruet ind i vægbeslaget.
2. Tag fat i skærmen under bunden, og
løft den en smule opad.
Tr æk den samtidig ud mod dig selv
for at frigøre de nederste
afstandstyller.
Løft derefter skærmen opad.
Monteringsskruer
(venstre og høfjre side)
Afstandstylle
Monteringsprocedure
Page 43

Page 44

Matsushita Electric Industrial Co., Ltd
Web Site : http://www.panasonic.co.jp/global/
Printed in Japan
M0600-2052
(Recycled paper)
 Loading...