

Panasonic TXP42C2L Operating Instructions

Operating Instructions
Plasma Television
Model No.
TX-P42C2L
Thank you for purchasing this Panasonic product.
Please read these instructions carefully before operating this product and retain them for future reference.
The images shown in this manual are for illustrative purposes only.
English
TQB0E0966
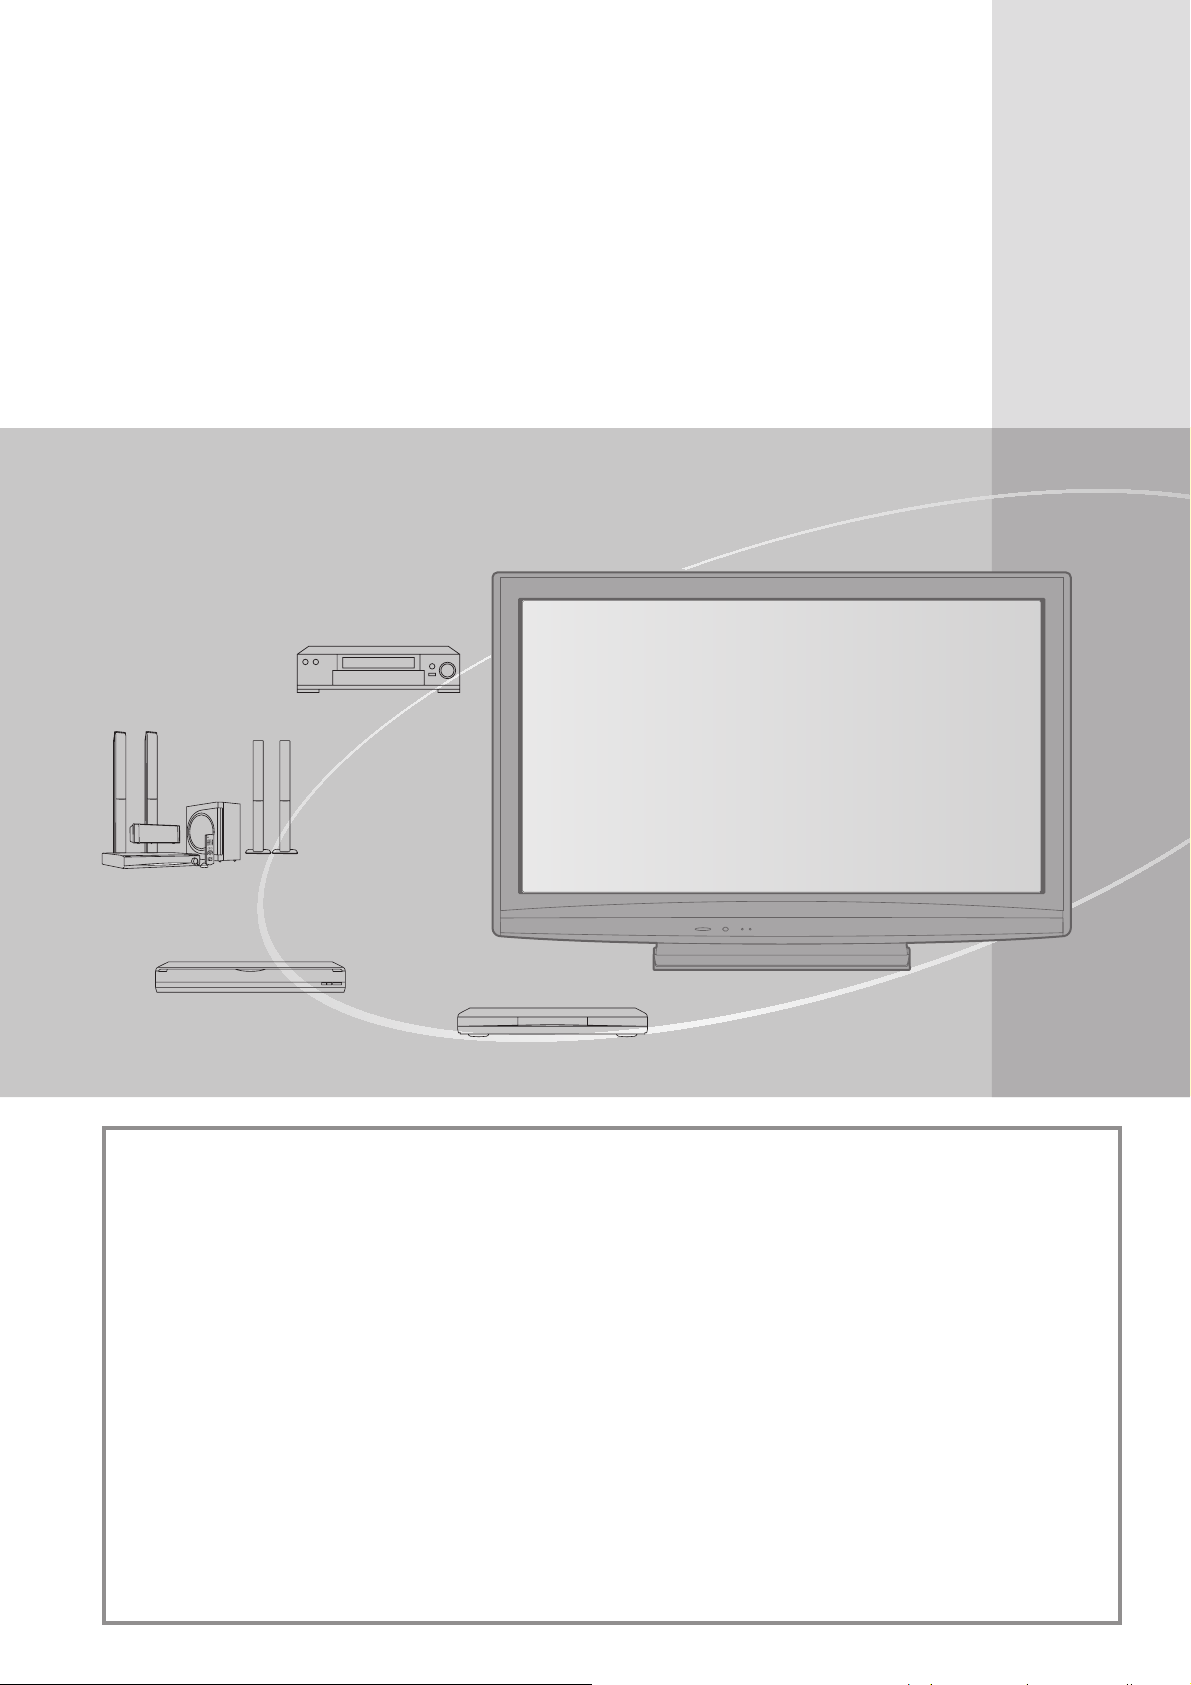
Experience an amazing level of
multimedia excitement
Enjoy rich multimedia
VCR
Amplifier with
Speaker system
DVD Recorder
DVD Player
Notice for DVB functions
This TV is designed to meet the standards (current as of August, 2009) of DVB-T
(MPEG2 and MPEG4-AVC
MPEG4-AVC
Consult your local dealer for availability of DVB-T services in your area.
Consult your cable service provider for availability of DVB-C services with this TV.
This TV may not work correctly with the signal which does not meet the standards of DVB-T
●
or DVB-C.
Not all the features are available depending on the country, area, broadcaster and service
●
provider.
Not all CI modules work properly with this TV. Consult your service provider about the
●
available CI module.
This TV may not work correctly with CI module that is not approved by the service provider.
●
Additional fees may be charged depending on the service provider.●
This TV does not support digital teletext (MHEG) functions.●
The compatibility with future DVB services is not guaranteed.●
Check the latest information on the available services at the following website. (English only)
●
http://panasonic.jp/support/global/cs/
(H.264)) digital cable services.
(H.264)) digital terrestrial services and DVB-C (MPEG2 and
2
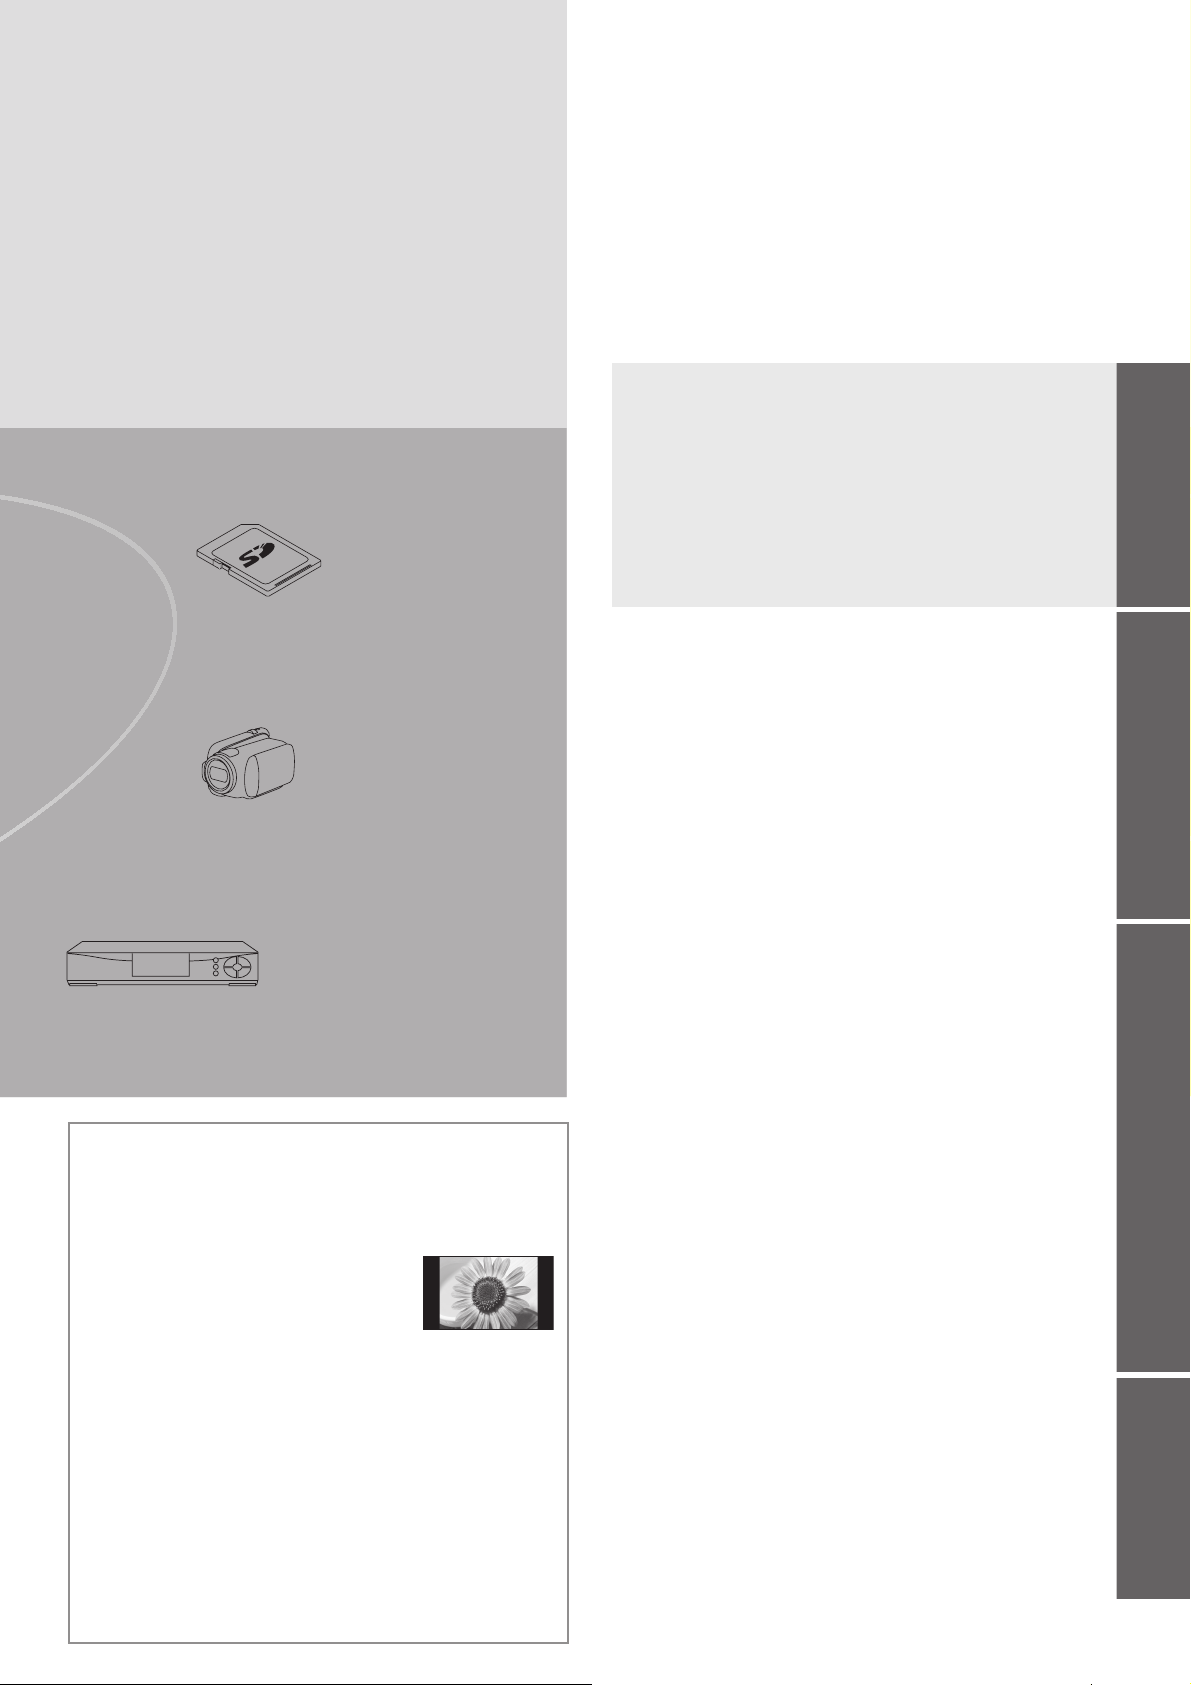
SD Card
Contents
Be Sure to Read
Safety Precautions (Warning / Caution) ● ················· 4
Quick Start Guide
Accessories / Options ● ·······························6
●
Identifying Controls
●
Basic Connection
●
Auto Setup
··············································12
Enjoy your TV!
···································8
···································· 10
Quick Start Guide
Camcorder
Set top box
Do not display a still picture for a long time■
This causes the image to remain on the plasma
screen (“image retention”).
This is not considered a malfunction and is not
covered by the warranty.
Typical still images
Chann ● el number and other logos
Image displayed in 4:3 mode ●
Video game ●
Compu ● ter image
To prevent image retention, contrast is lowered
automatically after a few minutes if no signals are
sent or no operations are performed. (p. 64)
Keep the TV away from these types of ■
equipment
Electronic equipment ●
In particular, do not place video equipment near
the TV. Electromagnetic interference may distort
images / sound.
Equipment with an infrared sensor ●
This TV also emits infrared rays. This may affect
operation of other equipment.
Basic Features
Watching TV ● ························································· 14
Using TV Guide ● ···················································· 18
Viewing Teletext ● ···················································· 20
Watching External inputs ● ······································ 22
How to Use VIERA TOOLS ● ·································· 24
How to Use Menu Functions ● ································ 25
Advanced Features
Retuning from Setup Menu ● ·································· 32
Tuning and Editing Channels (DVB) ● ····················· 34
●
Tuning and Editing Channels (Analogue)
●
Timer Programming
Child Lock ● ····························································· 40
Input Labels ● ·························································· 42
Using Common Interface ● ······································ 43
Shipping Condition ● ··············································· 44
Updating the TV Software ● ···································· 45
Using Media Player ● ·············································· 46
Link Functions ● ····················································· 50
(Q-Link / VIERA Link)
External Equipment ● ·············································· 58
·············································· 38
············· 36
FAQs, etc.
Technical Information ● ··········································· 60
●
FAQs
···································································· 64
●
Maintenance
Licence ● ································································· 66
Specifications ● ······················································· 67
························································· 66
Basic AdvancedQuick Start Guide
Basic
Advanced
FAQs, etc.
3
Safety Precautions
Warning
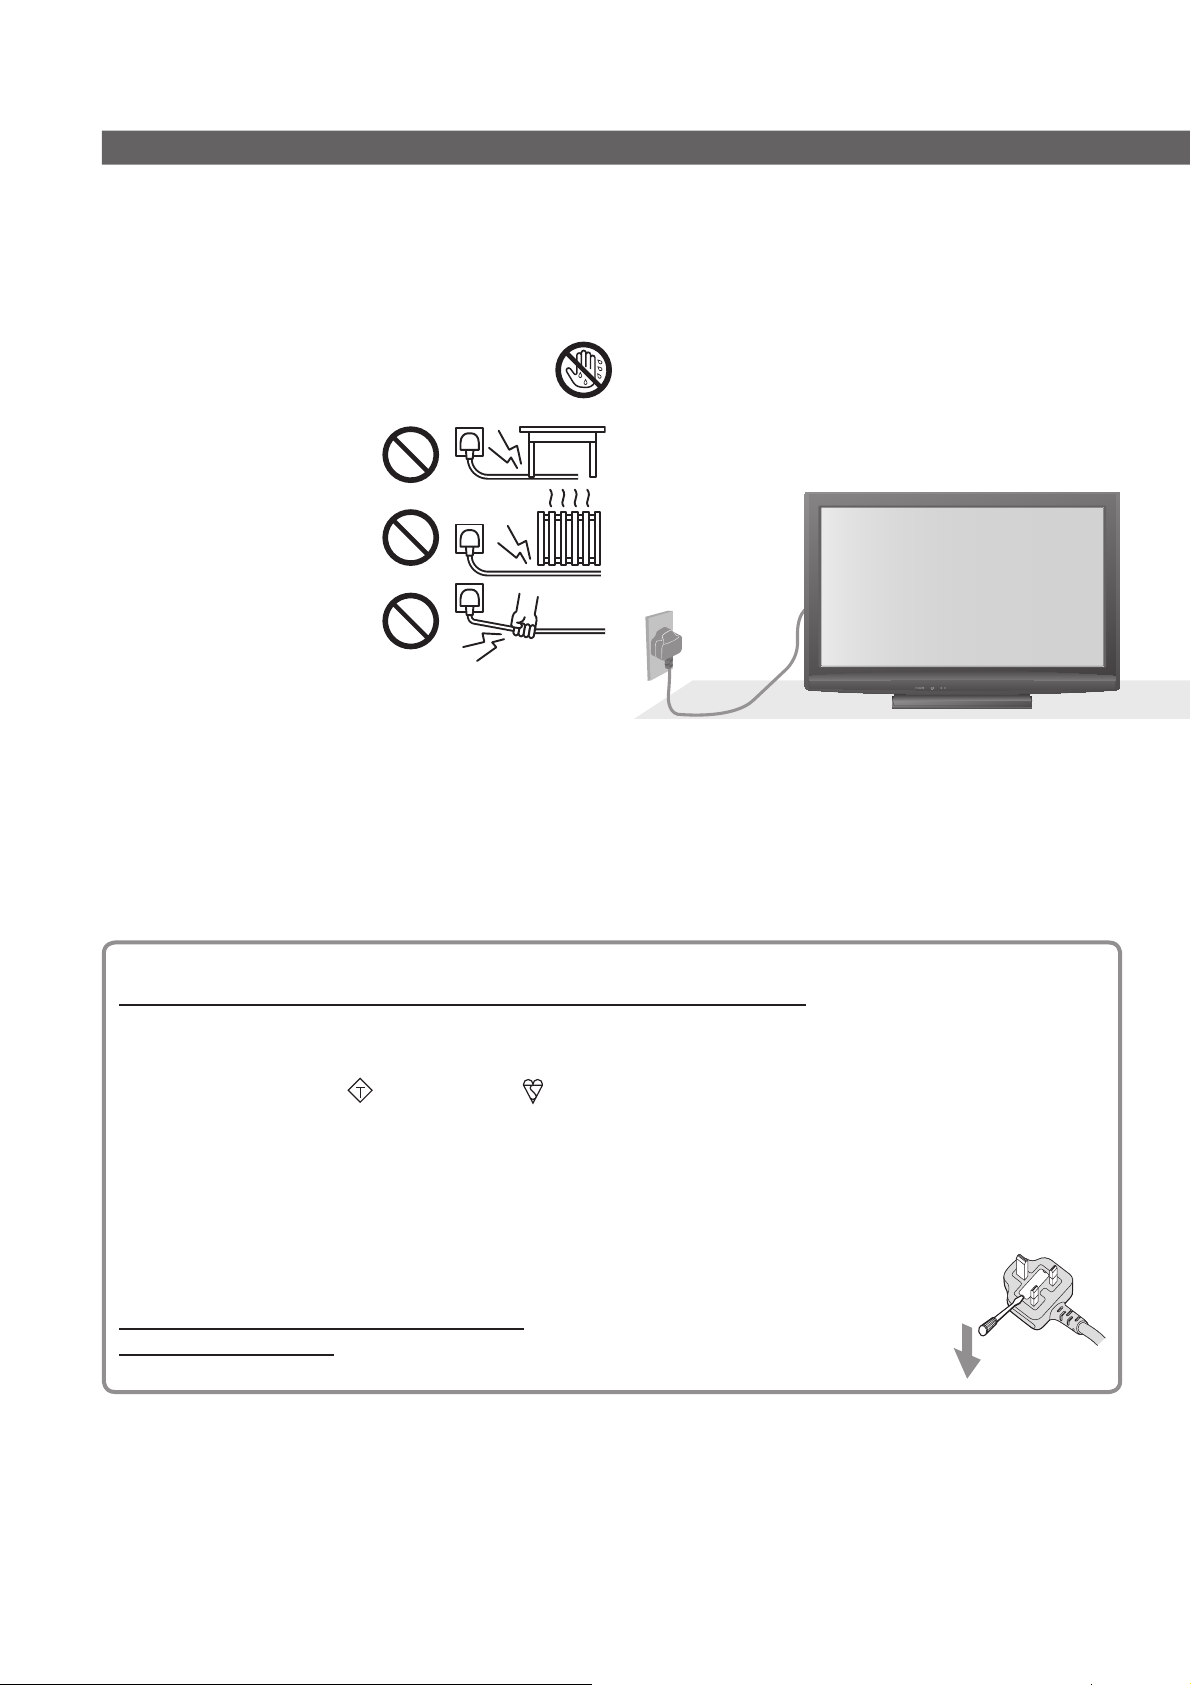
Mains plug and lead■
To help avoid risk of electrical shock, fire, damage or injury, please follow the warnings below:
This TV is designed to operate on AC 220-240 V, ●
50 / 60 Hz.
Insert the mains plug fully into the socket outlet. ●
Ensure that the mains plug is easily accessible. ●
Remove the mains plug when cleaning the TV. ●
Do not touch the mains plug with a wet hand. ●
Do not damage the mains lead. ●
Do not place a heavy •
object on the lead.
Do not place the lead •
near a high temperature
object.
Do not pull on the lead. •
Hold onto the mains plug
body when disconnecting
the plug.
Do not move the TV with the lead plugged into a •
socket outlet.
Do not twist the lead, bend it excessively or •
stretch it.
Do not use a damaged mains plug or socket outlet.•
Ensure the TV does not crush the mains lead.•
Do not use any mains lead other than that provided with this TV. ●
Ensure the earth pin on the mains plug is securely connected to prevent electrical shock. ●
An apparatus with CLASS I construction shall be connected to a mains socket outlet with a protective •
earthing connection.
If you detect anything unusual, immediately
switch off the mains supply switch and
remove the mains plug.
AC 220-240 V
50 / 60 Hz
IMPORTANT: THE MOULDED MAINS PLUG
FOR YOUR SAFETY, PLEASE READ THE FOLLOWING TEXT CAREFULLY.
This TV is supplied with a moulded three pin mains plug for your safety and convenience. A 10 amp fuse is
fitted in this mains plug. Shall the fuse need to be replaced, please ensure that the replacement fuse has a
rating of 10 amps and that it is approved by ASTA or BSI to BS1362.
Check for the ASTA mark
If the mains plug contains a removable fuse cover, you must ensure that it is refitted when the fuse is replaced.
If you lose the fuse cover the mains plug must not be used until a replacement cover is obtained.
A replacement fuse cover may be purchased from your local dealer.
Do not cut off the mains plug.
Do not use any other type of mains lead except the one supplied with this TV.
The supplied mains lead and moulded plug are designed to be used with this TV to avoid interference and for
your safety.
If the socket outlet in your home is not suitable, get it changed by a qualified electrician.
If the plug or mains lead becomes damaged, purchase a replacement from an authorized dealer.
WARNING: – THIS TV MUST BE EARTHED.
How to replace the fuse.
Open the fuse compartment with a screwdriver and replace the fuse.
or the BSI mark on the body of the fuse.
ASA
4
Warning
Take care■
To help avoid risk of electrical shock, fire, damage or injury, please follow the warnings below:
Do not remove covers and never modify the TV yourself as live parts are accessible when they are ●
removed. There are no user serviceable parts inside.
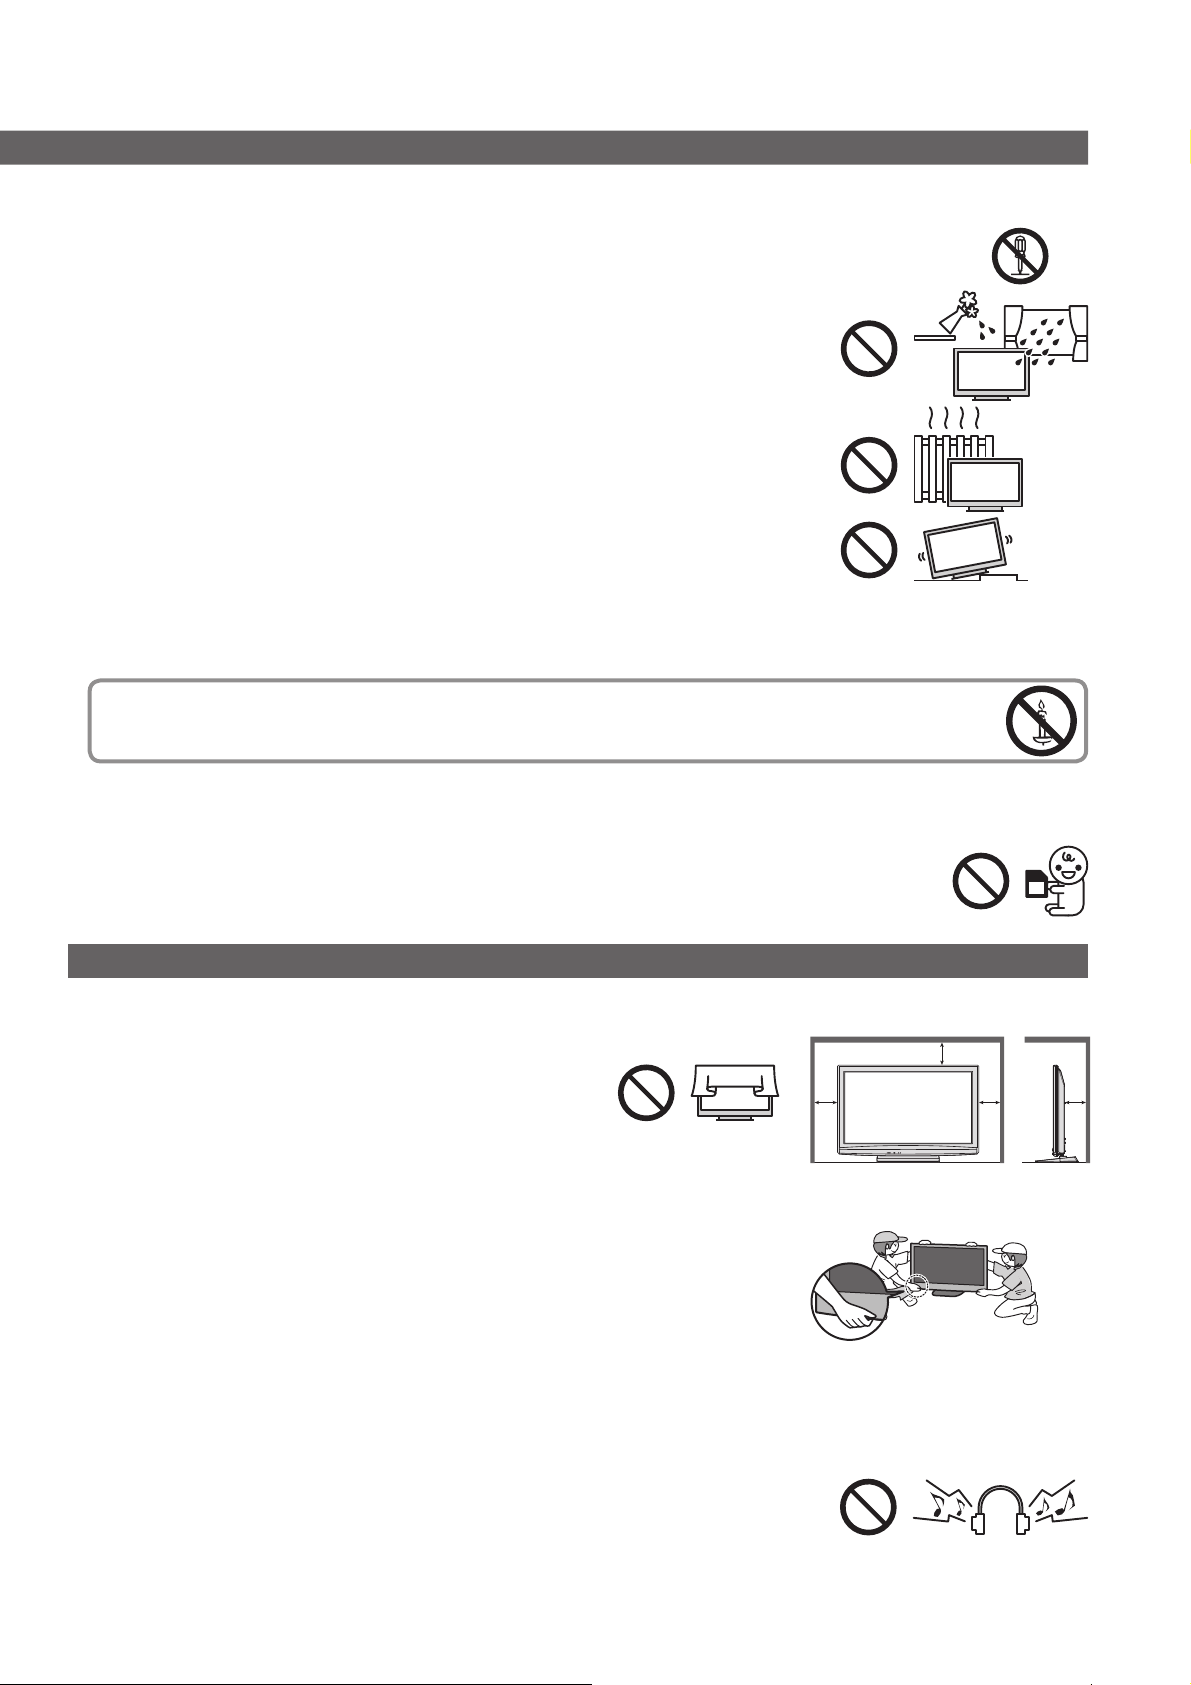
Do not expose the TV to rain or excessive moisture. This TV must not be exposed ●
to dripping or splashing water and objects filled with liquid, such as vases, must
not be placed on top of or above the TV.
Do not expose the TV to direct sunlight and other sources of heat. To prevent fire ●
never place any type of candle or naked flame on top or near the TV.
Do not place the TV on sloped or unstable surfaces.●
Do not insert foreign objects into the TV through the air vents.●
Do not use an unapproved pedestal / mounting equipment. Be sure to ask your local Panasonic dealer to ●
perform the setup or installation of approved wall-hanging brackets.
Do not apply strong force or impact to the display panel.●
To prevent the spread of fire, keep candles or other open
flames away from this product at all times
Small object■
This product contains possibly dangerous parts that can be breathed in or swallowed by young
children accidentally.
Keep the dangerous parts out of reach of young children.●
Do not allow children to handle SD Card. As with any small object, the SD Card could be ●
swallowed by young children. Please remove SD Card immediately after use and store out of
reach of young children.
Caution
Ventilation■
Allow sufficient space around the TV in order to help prevent excessive
heat, which could lead to early failure of some electronic components.
Ventilation should not be impeded by covering the ●
ventilation openings with items such as newspapers,
tablecloths and curtains.
Whether you are using the pedestal or not, always ensure the vents in the ●
bottom of the TV are not blocked and there is sufficient space to enable
adequate ventilation.
Moving the TV■
Before moving the TV, disconnect all cables.
The TV is heavy. Move the TV with at least two people. Support as shown to ●
avoid injury by the TV tipping or falling.
Transport only in upright position. Transporting the TV with its display panel ●
facing upward or downward may cause damage to the internal circuitry.
When not in use for a long time■
This TV will still consume some power even in the Off mode, as long as the mains plug is still
connected to a live socket outlet.
Remove the mains plug from the wall socket when the TV is not in use for a prolonged period of time.●
Excessive volume■
Do not expose your ears to excessive volume from the headphones.
Irreversible damage can be caused.
Minimum distance
10
10
10 7
(cm)
5
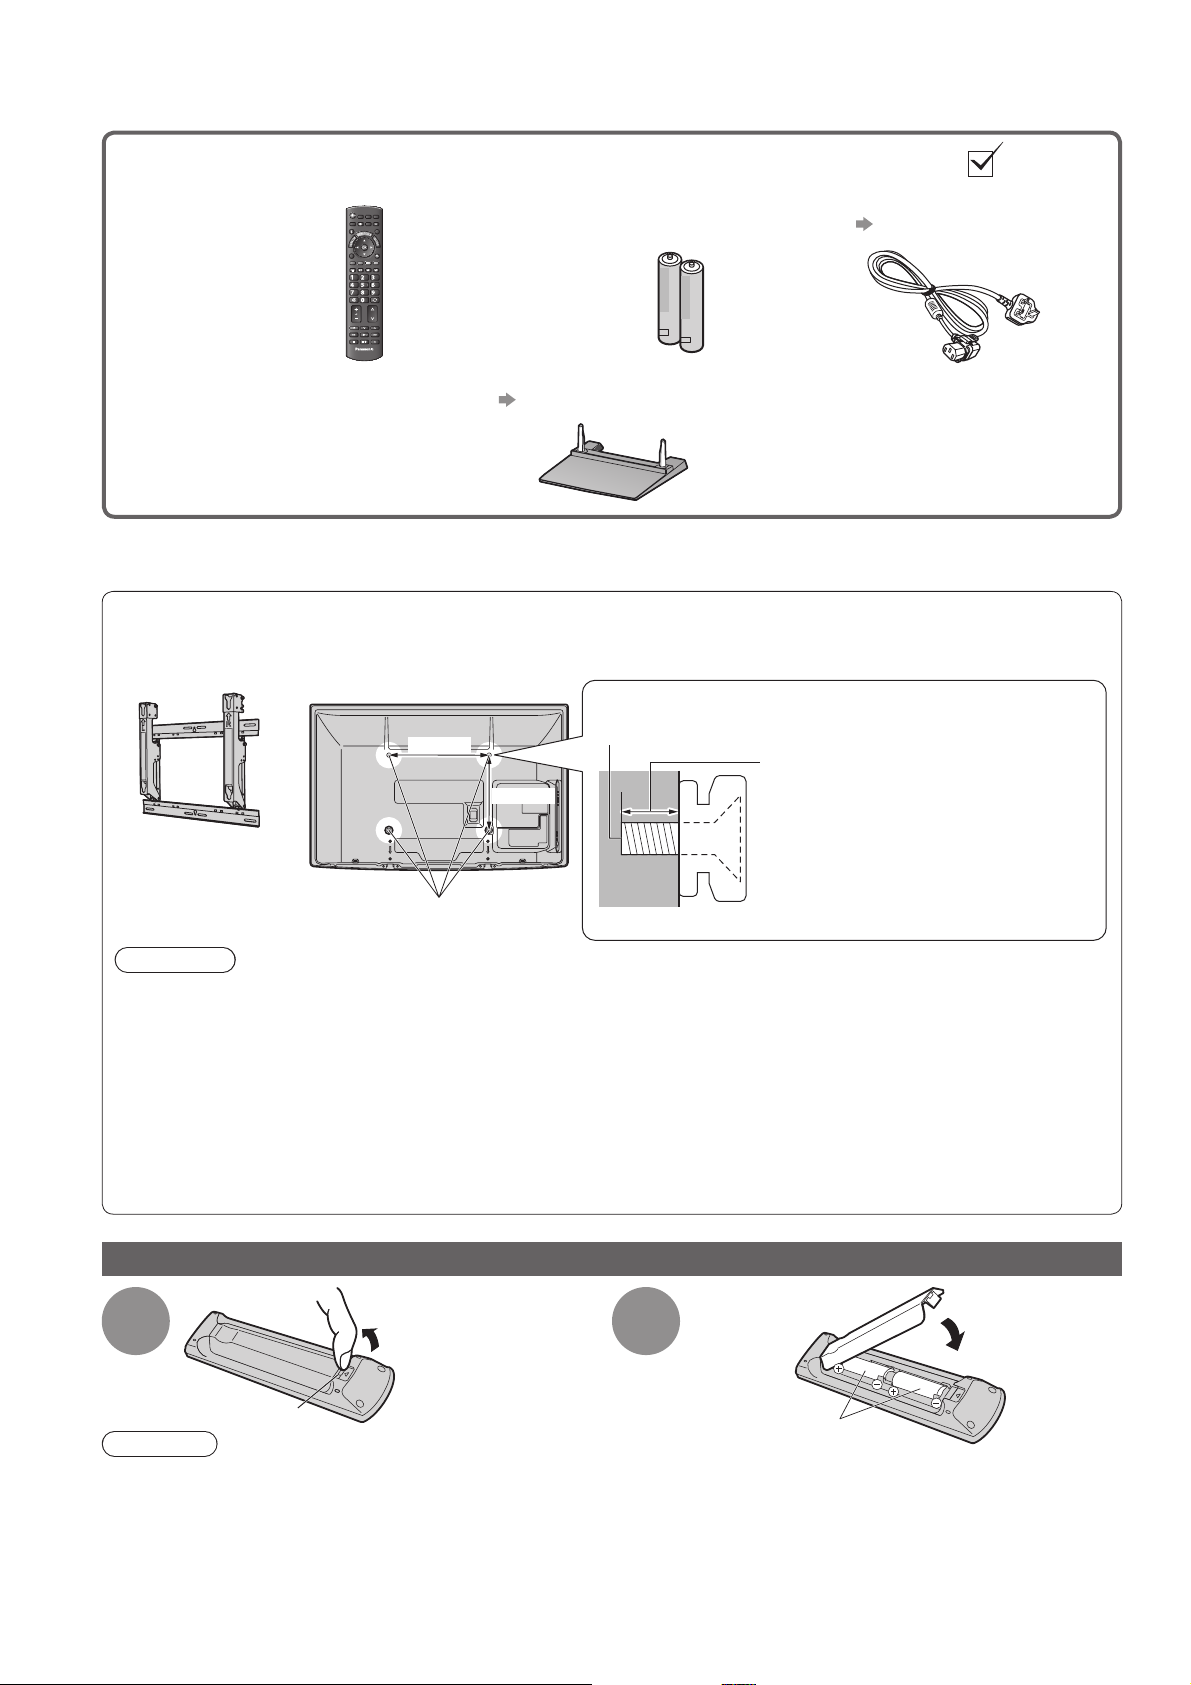
Accessories / Options
Standard accessories Check that you have the accessories and items shown
Remote Control □
N2QAYB000487●
TV AV
abc def
jkl
ghi
mno
tuvpqrs
wxyz
Batteries for the □
Remote Control (2)
R6 ●
Mains Lead □
p. 11
Operating Instructions □
TV
Pedestal □
p. 7
Product Registration Leaflet □
This product contains possibly dangerous parts (such as plastic bags), that can be breathed in or swallowed by ●
young children accidentally. Keep these parts out of reach of young children.
Optional accessories
Wall-hanging bracket
TY-WK4P1RW●
Rear of the TV
Please contact your nearest Panasonic dealer to purchase the recommended
wall-hanging bracket. For additional details, please refer to the wall-hanging
bracket installation manual.
Screw for fixing the TV onto the wall-hanging bracket
400 mm
300 mm
Holes for wall-hanging
bracket installation
(not supplied with the TV)
Depth of screw:
minimum 15 mm, maximum 30 mm
(View from the side)
Warning
Using other wall-hanging brackets, or installing a wall-hanging bracket by yourself have the risk of personal ●
injury and product damage. In order to maintain the unit’s performance and safety, be absolutely sure to ask
your dealer or a licenced contractor to secure the wall-hanging brackets. Any damage caused by installing
without a qualified installer will void your warranty.
Carefully read the instructions accompanying optional accessories, and be absolutely sure to take steps to ●
prevent the TV from falling off.
Handle the TV carefully during installation since subjecting it to impact or other forces may cause product ●
damage.
Take care when fixing wall brackets to the wall. Always ensure that there are no electrical cables or pipes in ●
the wall before hanging bracket.
To prevent fall and injury, remove the TV from its fixed wall position when it is no longer in use.●
6
Installing / removing remote’s batteries
Pull
1
Hook
Caution
Incorrect installation may cause battery leakage and corrosion, resulting in damage to the remote control.●
Do not mix old and new batteries.●
Do not mix different battery types (such as alkaline and manganese batteries).●
Do not use rechargeable (Ni-Cd) batteries.●
Do not burn or breakup batteries.●
Batteries must not be exposed to excessive heat such as sunshine, fire or the like.
Do not disassemble or modify the remote control.●
open
2
Note the correct
polarity (+ or -)
Close
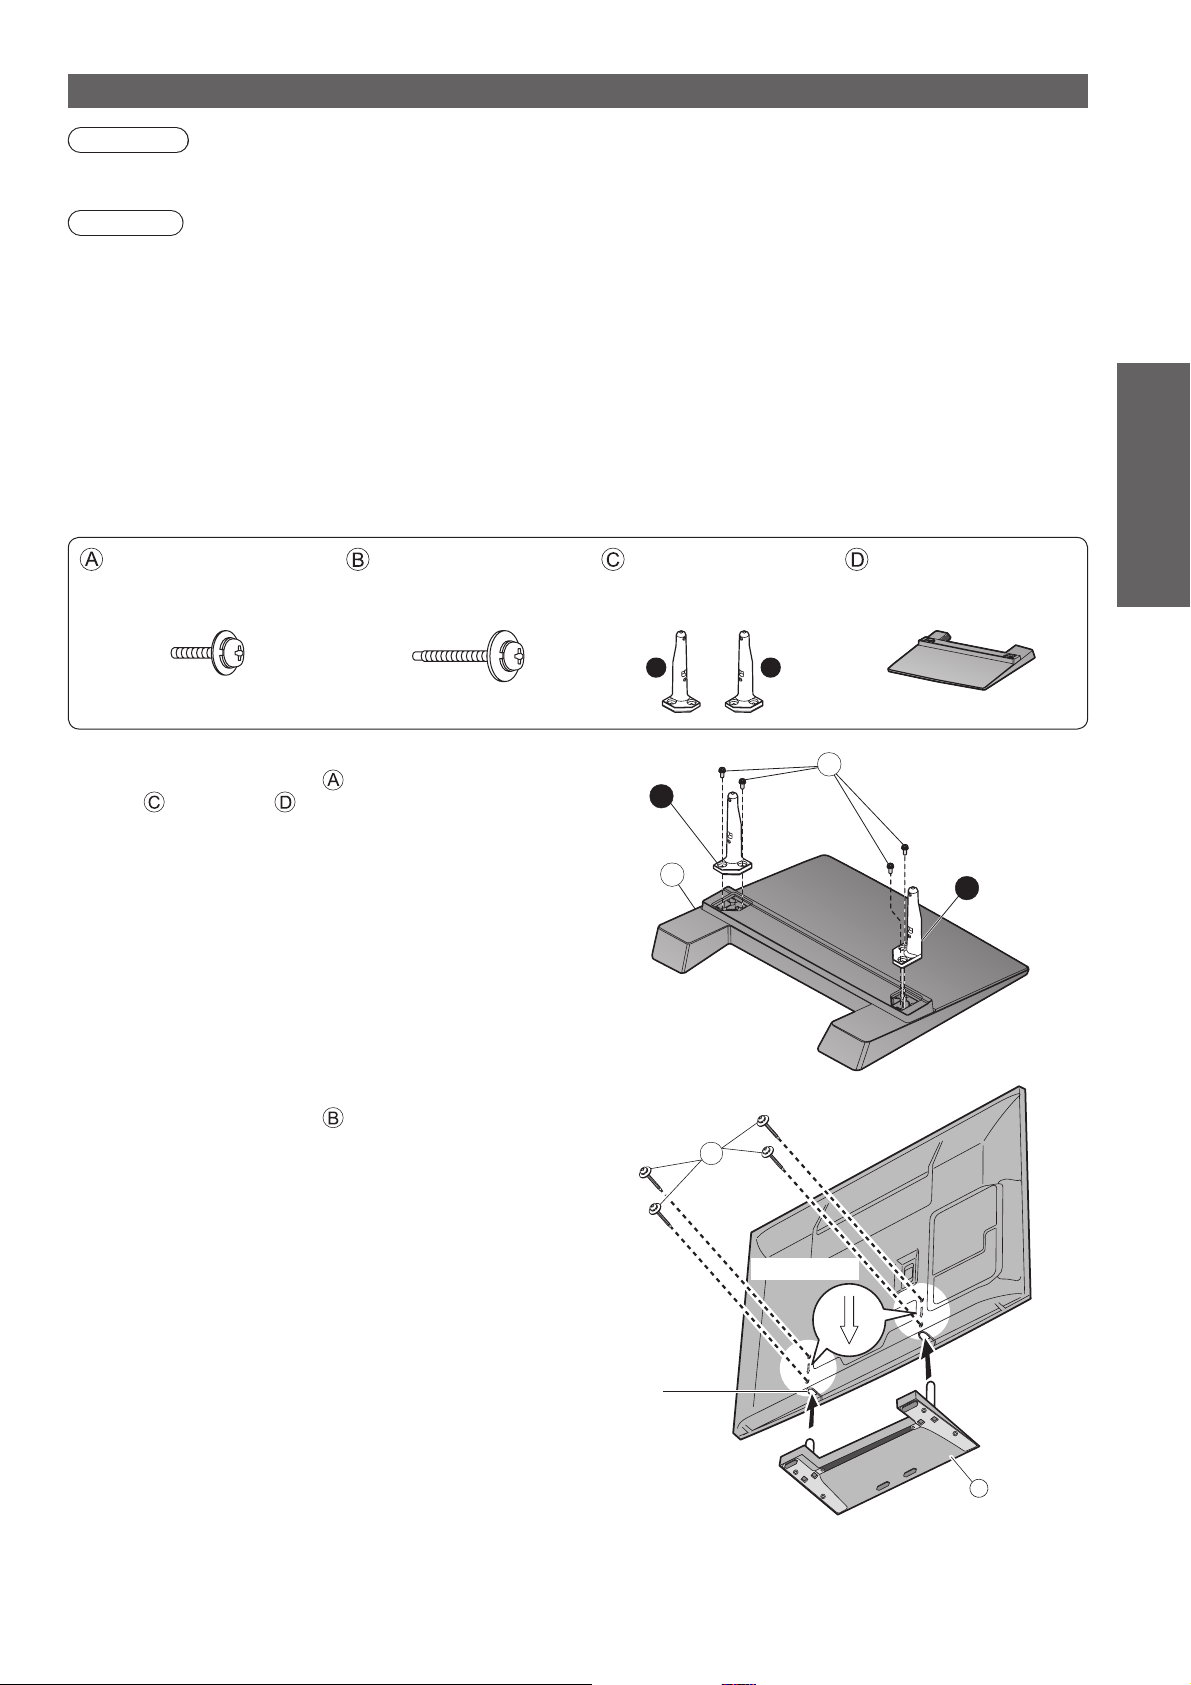
Attaching the pedestal
Warning
Do not disassemble or modify the pedestal.
Otherwise the TV may fall over and become damaged, and personal injury may result. ●
Caution
Do not use any other TV and displays.
Otherwise the TV may fall over and become damaged, and personal injury may result. ●
Do not use the pedestal if it becomes warped or physically damaged.
If you use the pedestal while it is physically damaged, personal injury may result. Contact your nearest Panasonic ●
dealer immediately.
During set-up, make sure that all screws are securely tightened.
If insufficient care is taken to ensure screws are properly tightened during assembly, the pedestal will not be ●
strong enough to support the TV, and it might fall over and become damaged, and personal injury may result.
Ensure that the TV does not fall over.
If the TV is knocked or children climb onto the pedestal with the TV installed, the TV may fall over and personal ●
injury may result.
Two or more people are required to install and remove the TV.
If two or more people are not present, the TV may be dropped, and personal injury may result. ●
Quick Start Guide
Assembly screw (4)
(silver)
M5 × 18
Assembly screw (4)
(black)
M5 × 30
Assembling the pedestal■
Use the assembly screws to fasten the left and right
poles to the base securely.
Make sure that the screws are securely tightened.●
Forcing the assembly screws the wrong way will strip ●
the threads.
“L” or “R” mark is stamped on the bottom of the pole.●
Securing the TV■
Use the assembly screws to fasten securely.
Make sure that the screws are securely tightened.●
Carry out the work on a horizontal and level surface.●
Pole (2)
R : TBLA3689 ●
L : TBLA3690 ●
R
D
Base
TBLX0136●
Accessories / Options ●
RL
A
Front
L
B
View from the bottom
Hole for pedestal installation
Arrow mark
D
7
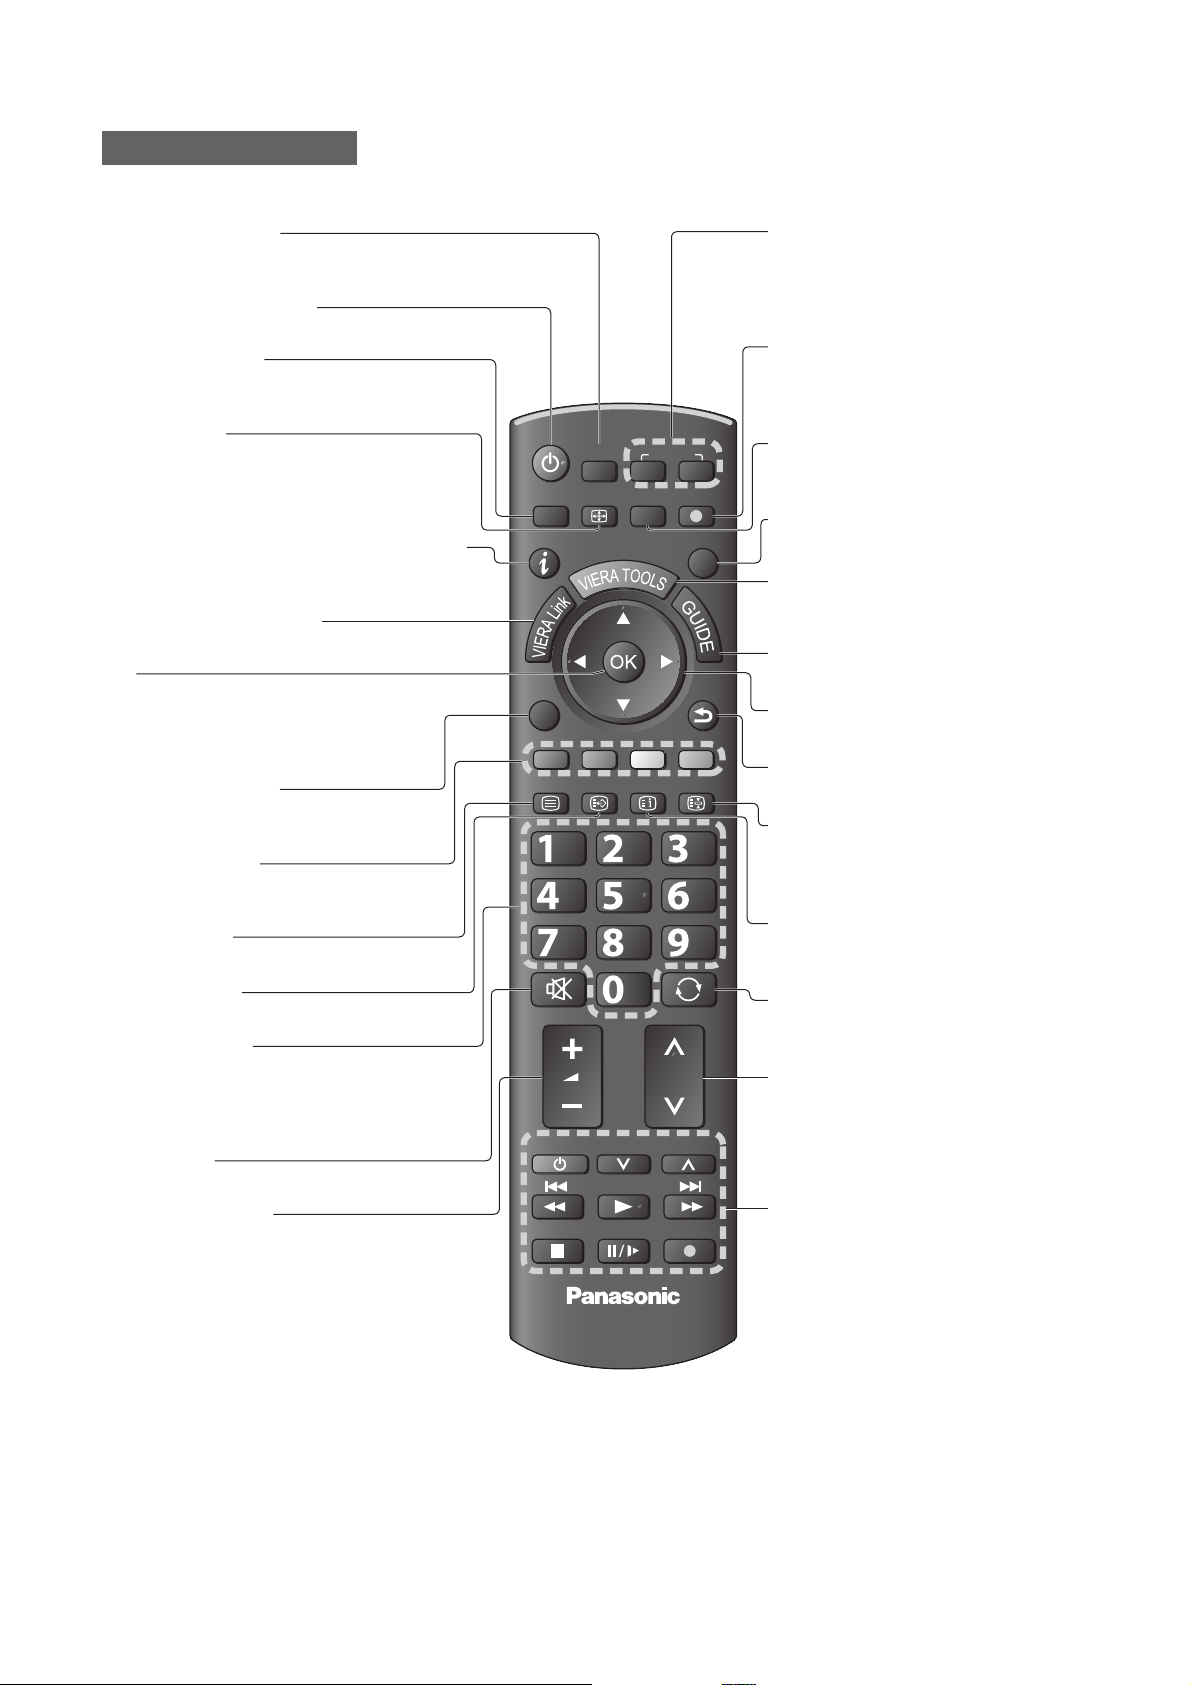
Identifying Controls
Remote Control
Media Player (p. 46)
Switches to SD Card viewing mode
●
(VIERA IMAGE VIEWER)
Standby On / Off switch
Switches TV On or Off standby●
Main Menu (p. 25)
Press to access Picture, Sound and
●
Setup Menus
Aspect (p. 16)
Changes aspect ratio from Aspect Selection
●
list
Also possible by pressing this button
●
repeatedly until you reach the desired aspect
Channel / Programme Information
Displays channel and programme
●
information
(p. 15)
VIERA Link Menu (p. 54)
Accesses VIERA Link Menu
●
OK
Confirms selections and choices●
Press after selecting channel positions ●
to quickly change channel
Displays the Channel List
●
Option Menu (p. 17)
Easy setting for viewing and
●
sound options
Coloured buttons
Used for the selection, navigation and ●
operation of various functions
Teletext (p. 20)
Switches to teletext mode
●
Subtitles (p. 16)
Displays subtitles
●
Numeric buttons
Changes channel and teletext pages●
Sets characters●
When in Standby mode, switches TV On ●
(Press for about 1 second)
Sound Mute
Switches sound mute On or Off●
Volume Up / Down
SD CARD
MENUNASPECT
OPTION
TEXT
STTL
ghi
INPUT
TV AV
DIRECT TV REC
EXIT
RETURN
INDEX HOLD
abc def
jkl
tuvpqrs
PROGRAMME
mno
wxyz
LAST VIEW
REC
Input mode selection
TV - switches DVB-C / DVB-T / Analogue ●
mode (p. 14)
AV - switches to AV input mode from Input
●
Selection list (p. 22)
Direct TV Recording (p. 52 and p. 54)
Records programme immediately in
●
DVD Recorder / VCR with Q-Link or
VIERA Link connection
Normalise (p. 25)
Resets picture and sound settings to their
●
default levels
Exit
Returns to the normal viewing screen●
VIERA TOOLS (p. 24)
Displays some special feature icons and
●
accesses easily
TV Guide (p. 18)
Displays TV Guide
●
Cursor buttons
Makes selections and adjustments●
Return
Returns to the previous menu / page●
Hold
Freeze / unfreeze picture (p. 15)●
Holds the current teletext page (teletext ●
mode) (p. 20)
Index (p. 21)
Returns to the teletext index page
●
(teletext mode)
Last view (p. 17)
Switches to previously viewed channel or
●
input mode
Channel Up / Down
Selects channel in sequence●
Connected equipment operations
(p. 23 and p. 56)
8
TV
Auto power standby function ■
The TV will automatically go to Standby mode in the following conditions: ●
no signal is received and no operation is performed for 30 minutes in Analogue TV mode•
“Off Timer” is active in the Setup Menu (p. 17)•
no operation is performed for the period selected in “Auto Standby” (p. 32)•
This function does not affect Ext Rec. of Timer Programming and Direct TV Recording. ●
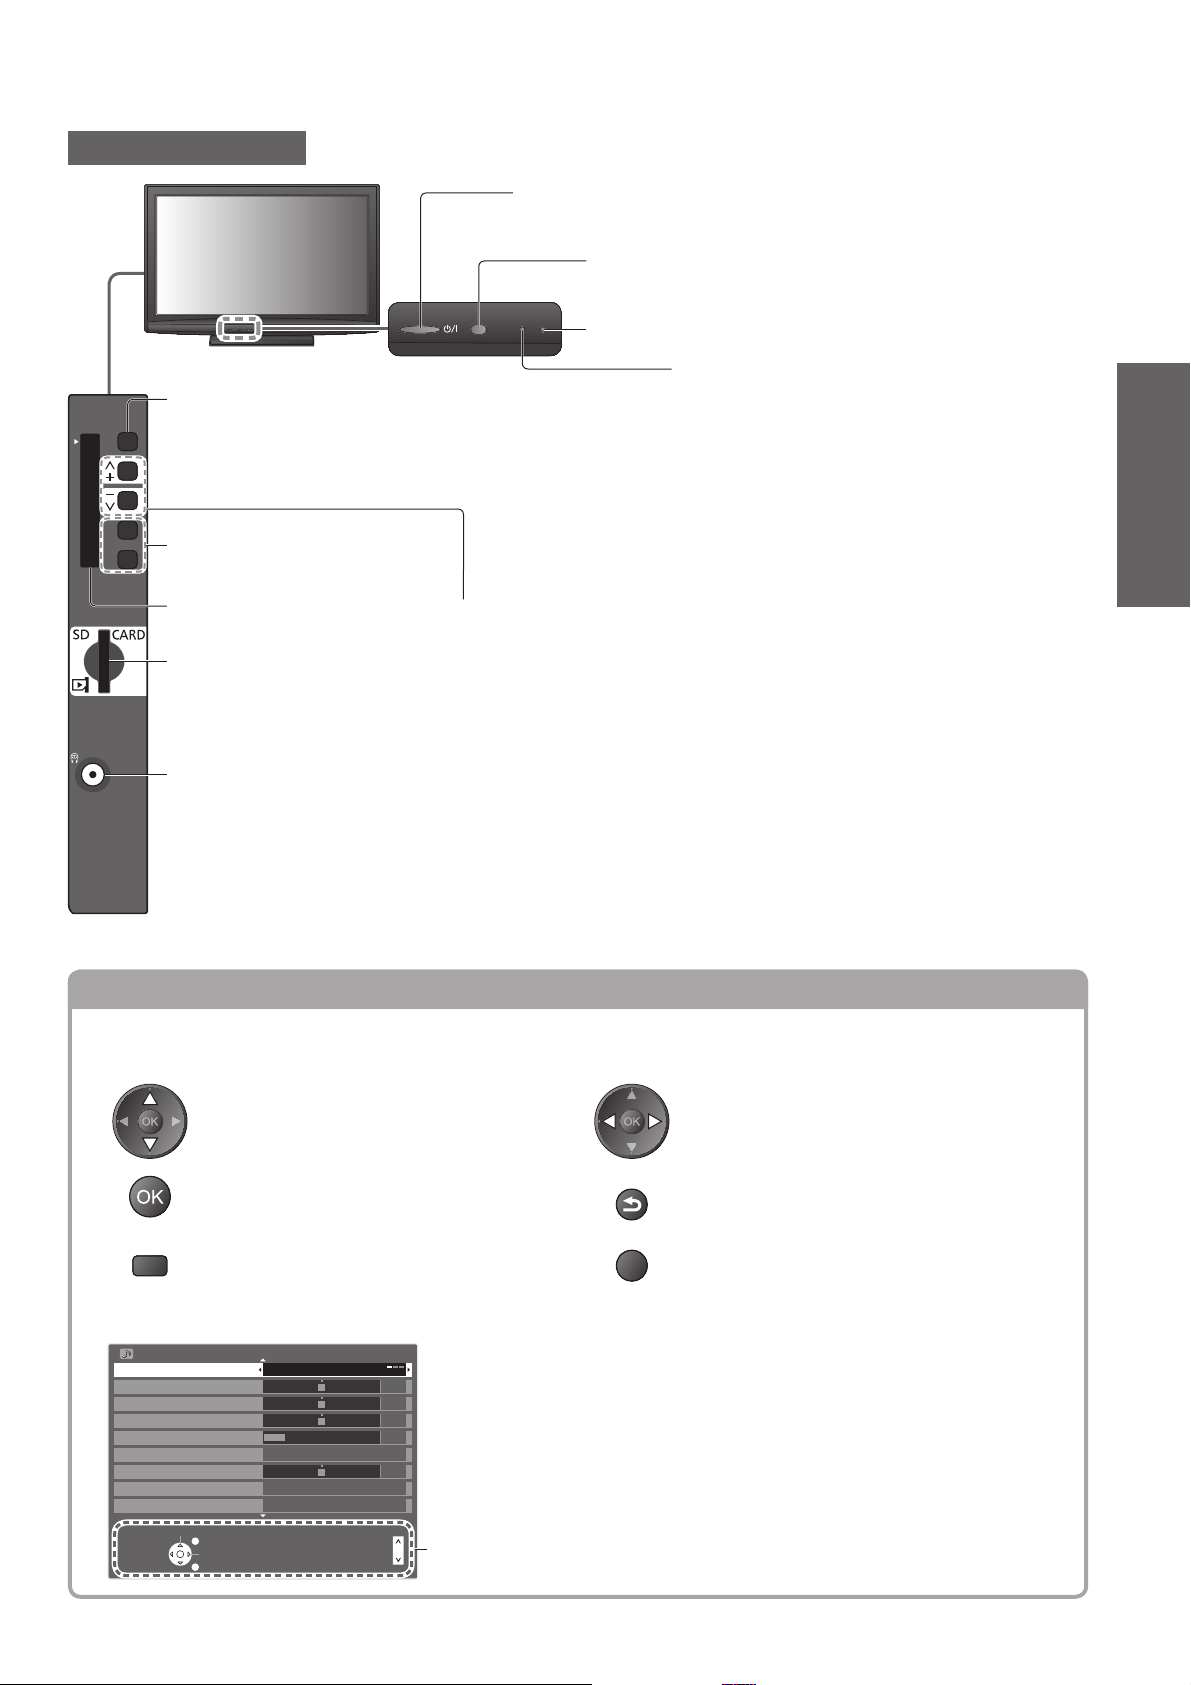
TV
Mains power On / Off switch
Switch On to turn on the TV or turn the TV to standby mode ●
by the remote control
Remote control signal receiver
Do not place any objects between the TV remote control ●
signal receiver and remote control.
This LED is not indicated for this model.
Common
Interface
Power and Timer LED
Function select
Volume / Contrast / Brightness / Colour / Sharpness / ●
F
Tint (NTSC signal) / Bass (“Music” or “Speech” mode in the
Sound Menu) / Treble (“Music” or “Speech” mode in the
Sound Menu) / Balance / Auto Setup (p. 32 and p. 33)
Standby: red●
On: green
Timer Programming On: orange
Timer Programming or
Direct TV Recording is in progress: orange (flash)
Standby with Timer Programming On or
Quick Start Guide
Direct TV Recording: red with orange flash
TV
AV
Changes the input mode
CI slot (p. 43)
Increases or decreases the channel position by one.
When a function is already displayed, press to increase or decrease
SD Card slot (p. 46)
the selected function.
When in Standby mode, switches TV On (Press for about 1 second).
When using the remote control, indicates the TV
●
has received a command.
Identifying Controls ●
Headphones jack (p. 59)
Using the On Screen Displays
Many features available on this TV can be accessed via the On Screen Display menu.
■
How to use remote control
Move the cursor / select the menu item
Access the menu / store settings after
adjustments have been made or options
have been set
MENU
Open the main menu
ON SCREEN HELP Instructions box - Operation guide■
Example (Sound Menu):
Sound Menu
Mode Music
Bass
Treble
Balance
Headphone Volume
Volume Correction
Speaker Distance to Wall Over 30cm
MPX
Select
EXIT
Change
RETURN
OffSurround
Stereo
Page up
Page down
RETURN
EXIT
1/2
0
0
0
11
0
Operation guide will help you.
Move the cursor / adjust levels / select from
a range of options
Return to the previous menu
Exit the menu system and return to the
normal viewing screen
9
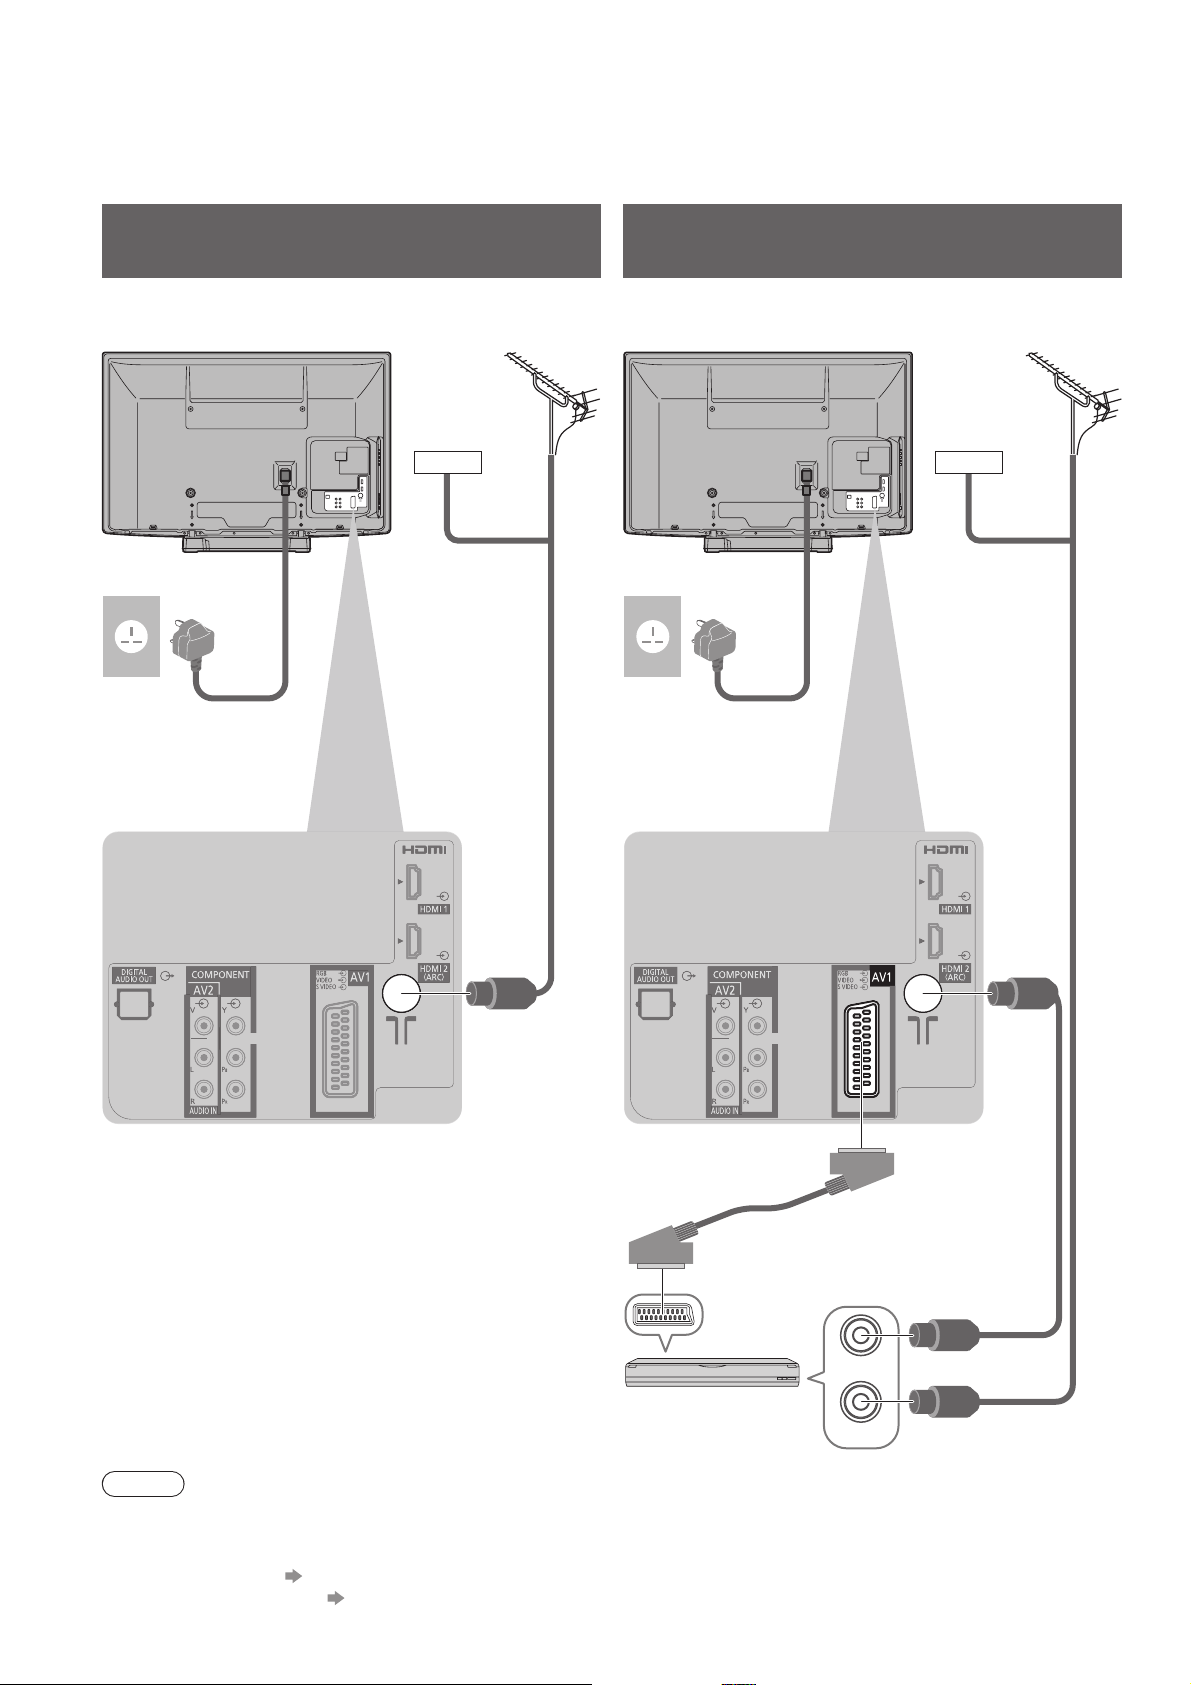
Basic Connection
External equipment and cables shown are not supplied with this TV.
Please ensure that the unit is disconnected from the mains socket before attaching or disconnecting any leads.
When disconnecting the mains lead, be absolutely sure to disconnect the mains plug at the socket outlet first.
Example 1
Connecting aerial
TV only TV, DVD Recorder or VCR
Rear of the TV Rear of the TV
Cable Cable
AC 220-240 V
50 / 60 Hz
Mains lead
(supplied)
Terrestrial
aerial
RF cable
Example 2
Connecting DVD Recorder / VCR
AC 220-240 V
50 / 60 Hz
Mains lead
(supplied)
Terrestrial
aerial
10
Note
Connect to the TV’s AV1 for a DVD Recorder / VCR supporting Q-Link (p. 52).●
For HDMI-compatible equipment, possible to connect to HDMI terminals (HDMI1 / HDMI2) by using HDMI cable ●
(p. 58).
Q-Link connection
● p. 50
● p. 50 and p. 51
VIERA Link connection
Please also read the manual of the equipment being connected.●
Fully wired
SCART cable
DVD Recorder or VCR
RF OUT
RF IN
RF cable
RF cable
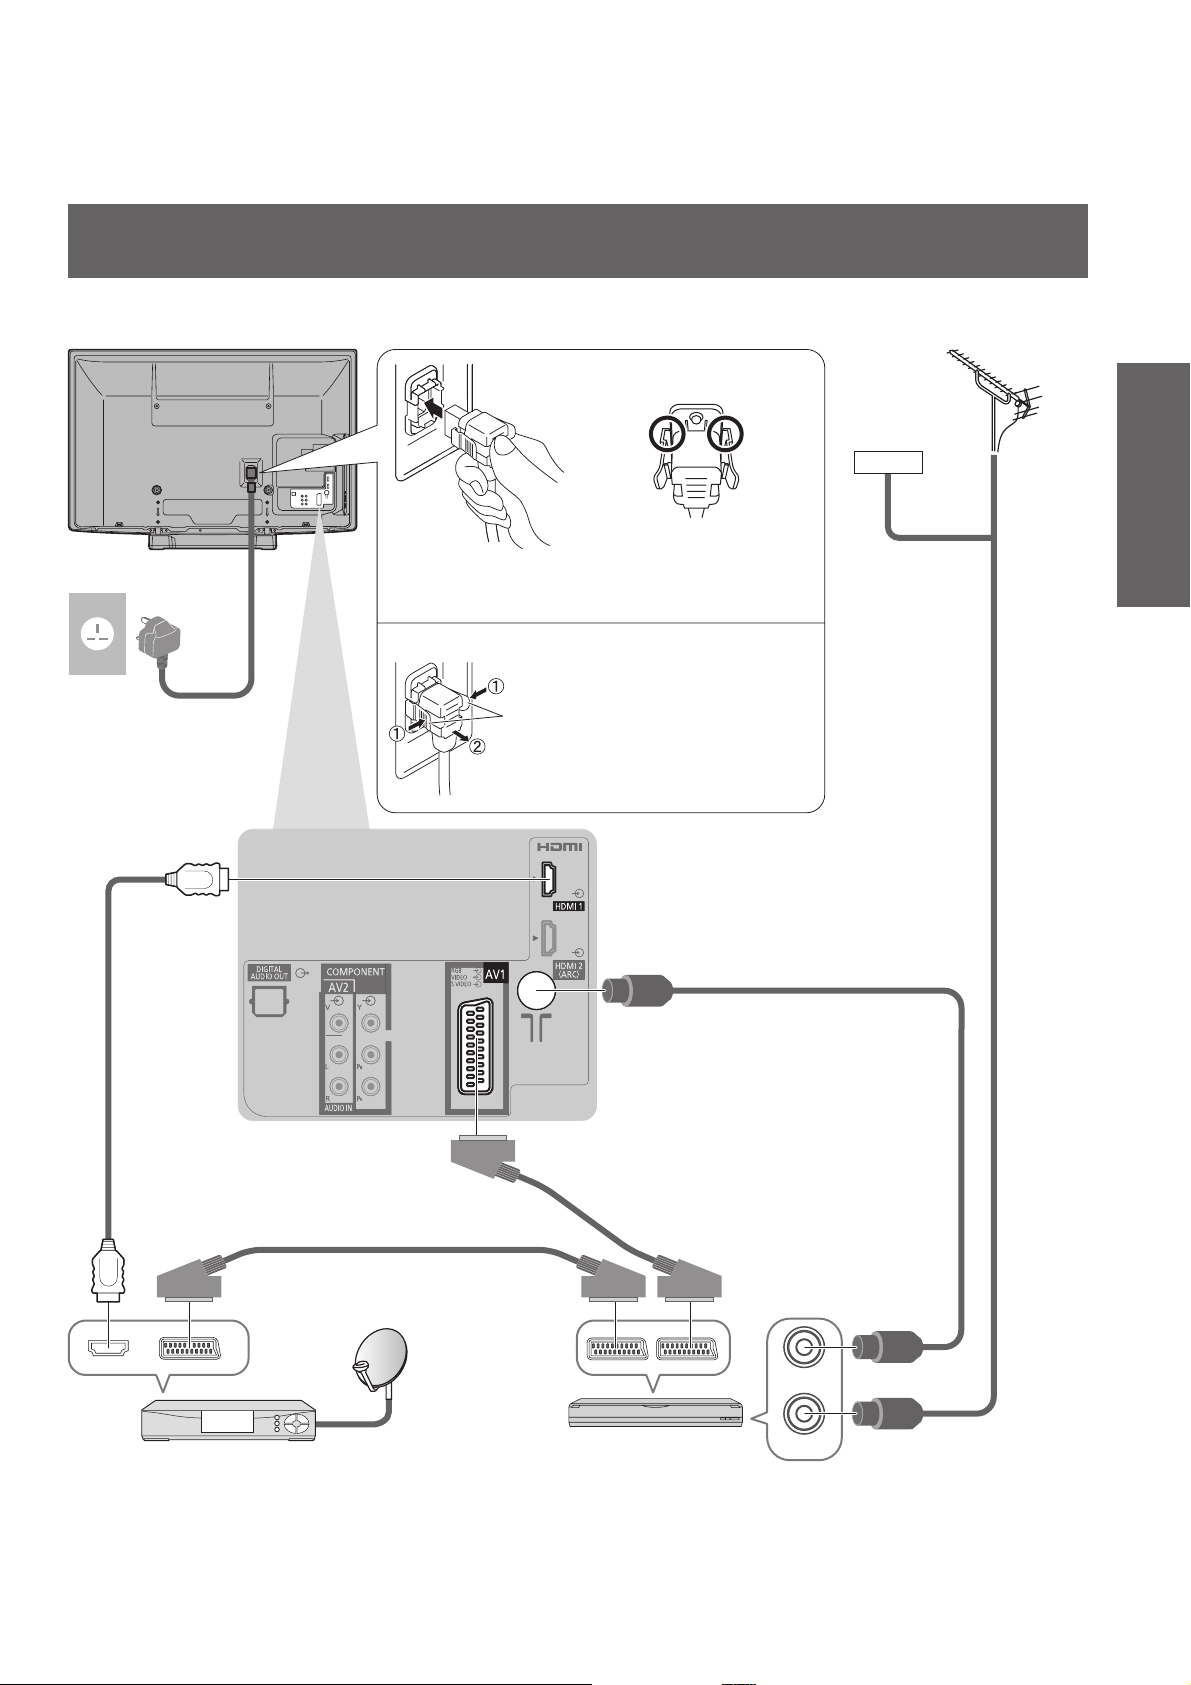
Example 3
Connecting DVD Recorder / VCR and Set top box
TV, DVD Recorder / VCR and Set top box
Rear of the TV
AC 220-240 V
50 / 60 Hz
Mains lead
(supplied)
Push until both side
tabs click
To remove from the TV:●
tabs
Make sure that
the mains lead is
securely fixed.
Press both tabs and pull on
mains connector to release
Cable
Terrestrial
aerial
Quick Start Guide
Basic Connection ●
Fully wired HDMI
compliant cable
Set top box
Fully wired
SCART cable
Fully wired
SCART cable
DVD Recorder or VCR
RF cable
RF OUT
RF IN
RF cable
11
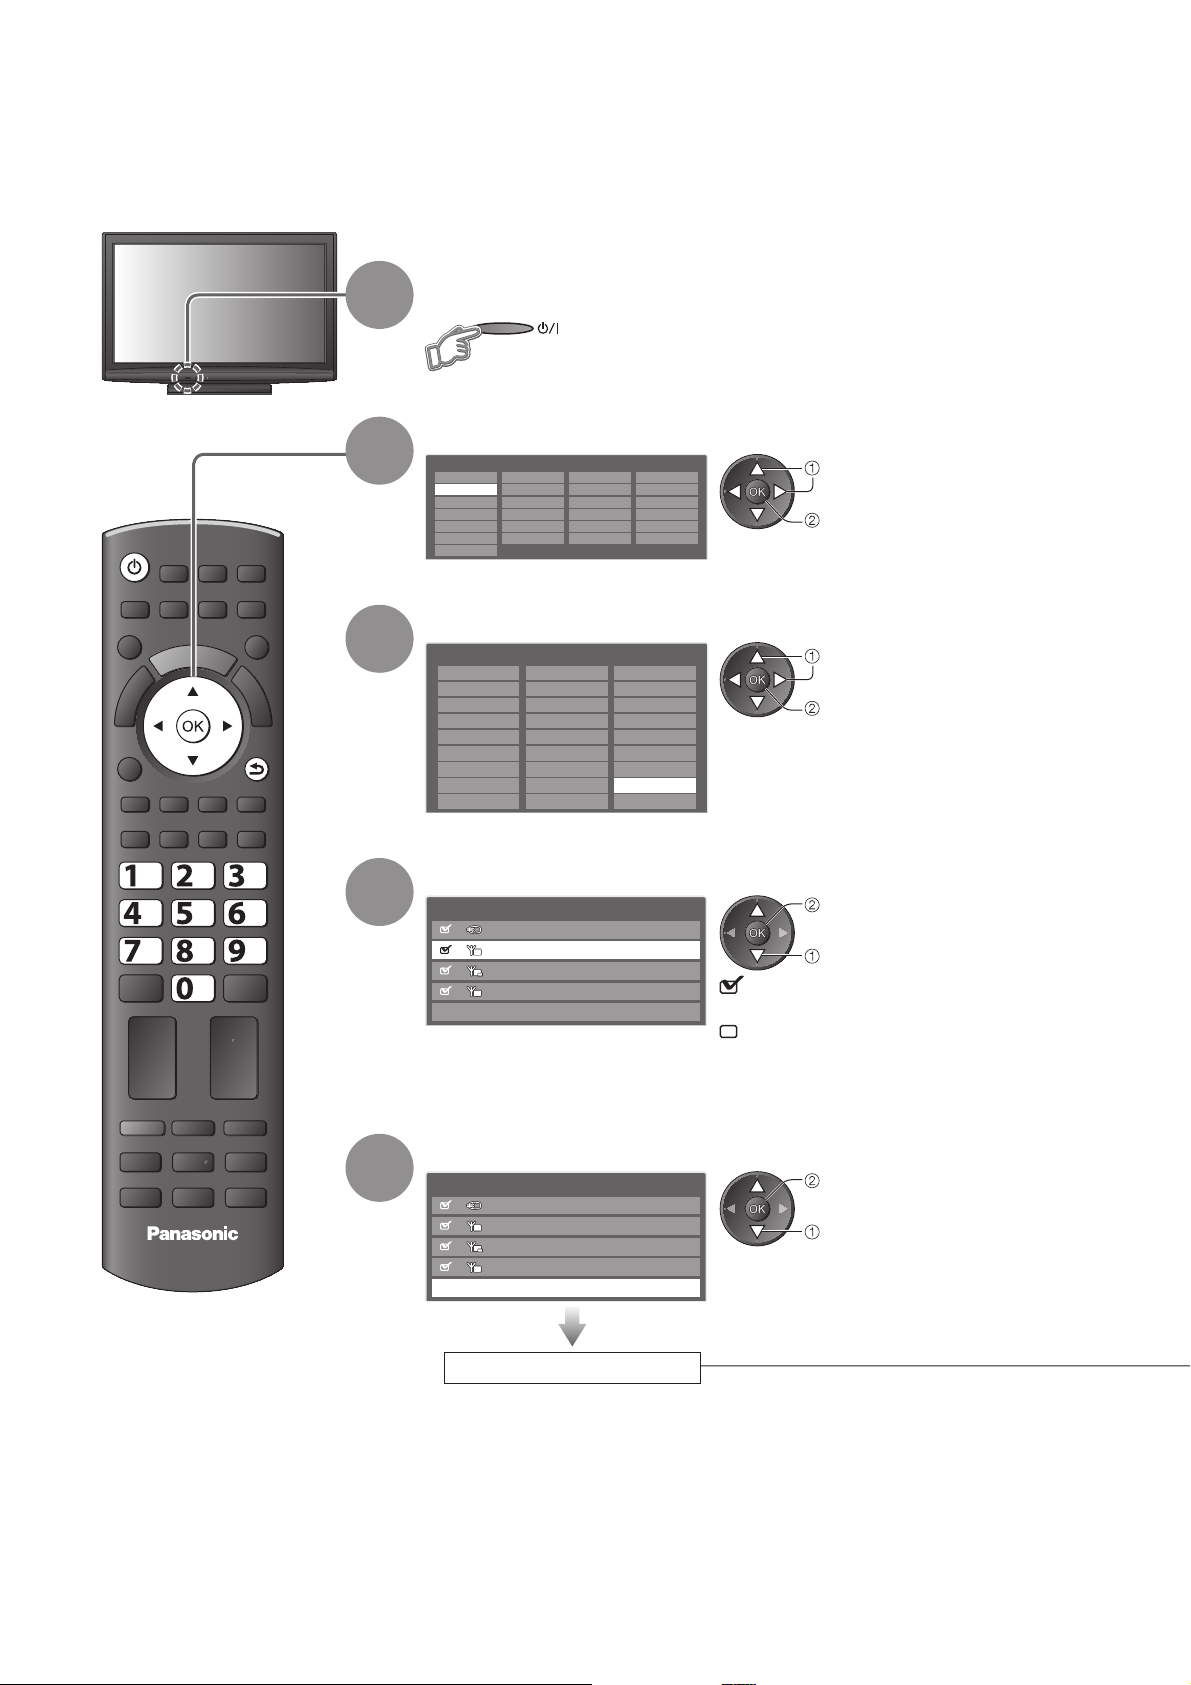
Auto Setup
Search and store TV channels automatically.
These steps are not necessary if the setup has been completed by your local dealer.●
Please complete connections (p. 10 and p. 11) and settings (if necessary) of the connected equipment before ●
starting Auto Setup. For details of settings for the connected equipment, read the manual of the equipment.
Plug the TV into mains socket and switch On
(Takes a few seconds to be displayed)
Select the language
OSD Language
Deutsch Dansk Polski Srpski
English Svenska čeština Hrvatski
Français Norsk Magyar Slovenščina
Italiano Suomi Slovenčina Latviešu
Español Türkçe Български eesti keel
Português
Nederlands
Еλληνικά Românǎ Lietuvių
Select your country
Country
Germany Denmark Poland
Austria Sweden Czech
France Norway Hungary
Italy Finland Slovakia
Spain Luxembourg Slovenia
Portugal
Switzerland
Malta
Andorra
Belgium Estonia
Netherlands Lithuania
Turkey
Greece
Ireland
Others
Depending on the country you select, you ●
may be required to select the Region. In
this case, select your region.
select
set
select
set
ASPECT
OPTION
TEXT STTL
INPUT
TV AV
DIRECT TV REC
N
RETURN
INDEX HOLD
1
2
3
ghi
abc def
jkl
tuvpqrs
PROGRAMME
TV
mno
wxyz
4
5
Select the mode you want to tune
TV Signal Selection
DVB-C
D
DVB-T
D
HD
DVB-T support for HD services
A
Analogue
Start Auto Setup
: tune (the mode will be tuned and
searched for the available channels)
: skip tuning
“DVB-C” may not appear depending on the ●
country you select (p. 67).
tune / skip tuning
select
Select “Start Auto Setup”
TV Signal Selection
DVB-C
D
DVB-T
D
HD
DVB-T support for HD services
A
Analogue
Start Auto Setup
Auto Setup starts
Auto Setup will start to search for TV ●
channels and store them.
The stored channels and sorted channel
order vary depending on the country, area,
broadcasting system and conditions of
signal reception.
If tuning has failed, check the connection
●
of the RF cable, and then, follow the on
screen instructions.
access
select
12

Auto Setup varies depending on the country you select.
●
DVB-C Network Settings
Enter the Home Frequency and
Network ID specified by your cable
provider.
And then, select “Start Auto Setup”.
DVB-C Network Settings
Frequency
Network ID 41001
362 MHz
Start Auto Setup
enter the frequency and network ID
abc def
jkl
ghi
tuvpqrs
Depending on the country you select, “Auto” is
mno
displayed and you do not have to enter them.
In this case, Home Frequency and Network ID
wxyz
will be set automatically.
access
select “Start Auto Setup”
DVB-C Auto Setup● DVB-T Auto Setup● Analogue Auto Setup●
DVB-C Auto Setup
Progress
This will take about 3 minutes.
No.
1 CBBC Channel
2 BBC Radio Wales
3E4
Free TV: 3 Pay TV: 0 Radio: 0
Channel Name
Searching
0% 100%
Free TV 10
Free TV 10
Free TV 10
Type Quality
DVB-T Auto Setup
Progress CH 21 68
This will take about 3 minutes.
CH Channel Name Type Quality
62 CBBC Channel Free TV 10
62 BBC Radio Wales Free TV 10
62 E4 Free TV 10
62 Cartoon Nwk Free TV 10
Free TV: 4
Pay TV: 0 Radio: 0
Searching
Depending on the country you select, the channel selection screen
will be displayed after DVB-T Auto Setup if multiple channels have
the same logical channel number. Select your preferred channel or
exit the screen for automatic selections.
Sending Preset Data
Please wait!
0% 100%
Remote control unavailable
If Q-Link, VIERA Link or similar technology (p. 52 and p. 53) ●
compatible recorder is connected, channel, language, country / region
settings are automatically downloaded to the recorder.
If downloading has failed, you can download later by the menu item.●
“Download” (p. 28)
Select “Home”
6
Please select your viewing environment.
Home Shop
Select “Home” ●
viewing environment
to use in your home
environment.
Auto Setup is now complete and
your TV is ready for viewing.
To check channel list at-a-glance ●
“Using TV Guide” (p. 18)
●
To edit or hide (skip) channels
“Tuning and Editing Channels” (p. 34 - 37)
select
set
“Shop” viewing environment ■
(for shop display only)
“Shop” viewing environment is the
demonstration mode to explain main
features of this TV.
Select “Home” viewing environment to
use in your home environment.
You can return to viewing environment ●
selection screen at the stage of Shop
confirmation screen and Automatic Demo
Off / On selection screen.
Return to viewing environment
selection screen
Shop
You have selected shop mode
Automatic Demo
Off On
Select “Home”
Please select your viewing environment.
Home Shop
Analogue Auto Setup
Scan
This will take about 3 minutes.
CH Channel Name
CH 29
CH 33 BBC1
Analogue: 2
CH 1 H: 21 4199
Searching
Quick Start Guide
Auto Setup ●
RETURN
select
set
Auto Setup is complete
To change viewing environment later on, ●
you will need to initialise all settings by
accessing Shipping Condition.
“Shipping Condition” (p. 44)
Note
If tuning has failed or to retune all channels ● “Auto Setup” (p. 32 and p. 33)
● “Add TV Signal” (p. 29)
To add the available TV mode later
To initialise all settings ● “Shipping Condition” (p. 44)
If you turned the TV Off during Standby mode last time, the TV will be in Standby mode when you turn the TV On
●
with Mains power On / Off switch.
13

Watching TV
Turn power on
1
(Press for about 1 second)
Mains power On / Off switch should be On. (p. 9)●
MENU
OPTION
TEXT
ASPECT
STTL
ghi
INPUT
AV
TV
DIRECT TV REC
N
EXIT
RETURN
INDEX
HOLD
abc def
jkl
mno
tuvpqrs
wxyz
LAST VIEW
PROGRAMME
Volume
2
3
Select the mode
TV Selection
TV
DVB-C
DVB-T
Analogue
The selectable modes vary depending on the stored channels (p. 12).●
If “TV Selection” menu is not displayed, press the TV button to switch the ●
mode.
1 BBC ONE WALES
Coronation Street
20:00 - 20:55
All DVB-T Channels
20:35
Change category
For info press
Now
Information banner appears whenever you select a
channel
For details ● p. 15
Also possible to select the mode pressing the TV button repeatedly on the ●
remote control or side panel of the TV. (p. 9)
Select a channel
up
down
or
abc def
jkl
ghi
mno
tuvpqrs
wxyz
To select a more than two-digit channel ●
position number, e.g. 399
access
select
wxyz
wxyz
def
14
To select from the Channel List■
TV
Note
To watch pay-TV ●
“Using Common Interface”
(p. 43)
All DVB-T Channels Sorting 123...
Cartoon Nwk
6
BBC Radio Wales
7
BBC Radio Cymru
8
BBC ONE Wales
1
BBC THREE
2
BBCi
3
CBBC Channel
4
To change the category ●
To sort channel names in alphabetical order ●
Select a channel using Information banner ■ (p. 15)
Possible to confirm the channel name and programme before changing channels.
Display Information banner if it is
not displayed
While the banner is displayed,
select the channel
select channel
watch
Possible to set display timeout in ●
“Banner Display Timeout” (p. 30).
Select a channel using TV Guide ■ (p. 18)
Possible to confirm the TV Guide (EPG) before changing channels.
Display
TV Guide
The postcode entry or update maybe required ●
depending on the country you select (p. 12).
Follow the on screen instructions.
Select the current
programme or channel
select
access
Select “View”
(DVB mode)
Das Erste
19:30- 20:00
To use Timer Programming ● p. 19
View
red
Timer Programming
select channel
watch
blue
select
watch
Other useful functions
■
Hold
Freeze / unfreeze picture
Display Information banner
Display Information banner
Also appears when changing a channel●
Channel position and name
Example (DVB):
1 ZDF
Programme
Programme
Start / Finish time
Example (Analogue):
3 ITV
itv1
CH23
Encrypted
Channel number
To confirm another tuned ●
channel name
To watch the channel listed in the banner ●
Coronation Street
20:00 - 20:55
Progress time indicator of the selected programme
Radio
19:35
SubtitlesAD
All Analogue Channels
For info press
HOLD
Category
To change the category ●
Channel type (if it is Radio or Data channel)
Current time
20:35Radio
Now
Encrypted Dolby D +
Features available / Message meanings
Stereo 45
Sound mute On
Bad signal
Poor TV signal quality
Encrypted
Scrambled programme
Dolby D +, Dolby D
Dolby Digital Plus or Dolby Digital audio track
blue
All DVB-T Channels
Change category
For info press
45
Basic
Watching TV ●
Information on the next programme ●
(DVB)
EXIT
To hide
●
Extra information ●
(DVB) (press again to hide the banner)
To set display timeout ●
“Banner Display Timeout” (p. 30)
Subtitle service available
Teletext service available
Multiple audio available
Multiple video available
Multiple audio and video available
Stereo, Mono
Audio mode
1 - 90
Off Timer remaining time
● p. 17
For settings
15
Watching TV
Display subtitles
Display / hide subtitles (if available)
To change the language for DVB (if available)●
STTL
“Preferred Subtitles” (p. 30)
Note
If you press the STTL button in Analogue mode, it switches to teletext service and calls up a favourite page ●
(p. 21). Press the EXIT button to return to TV mode.
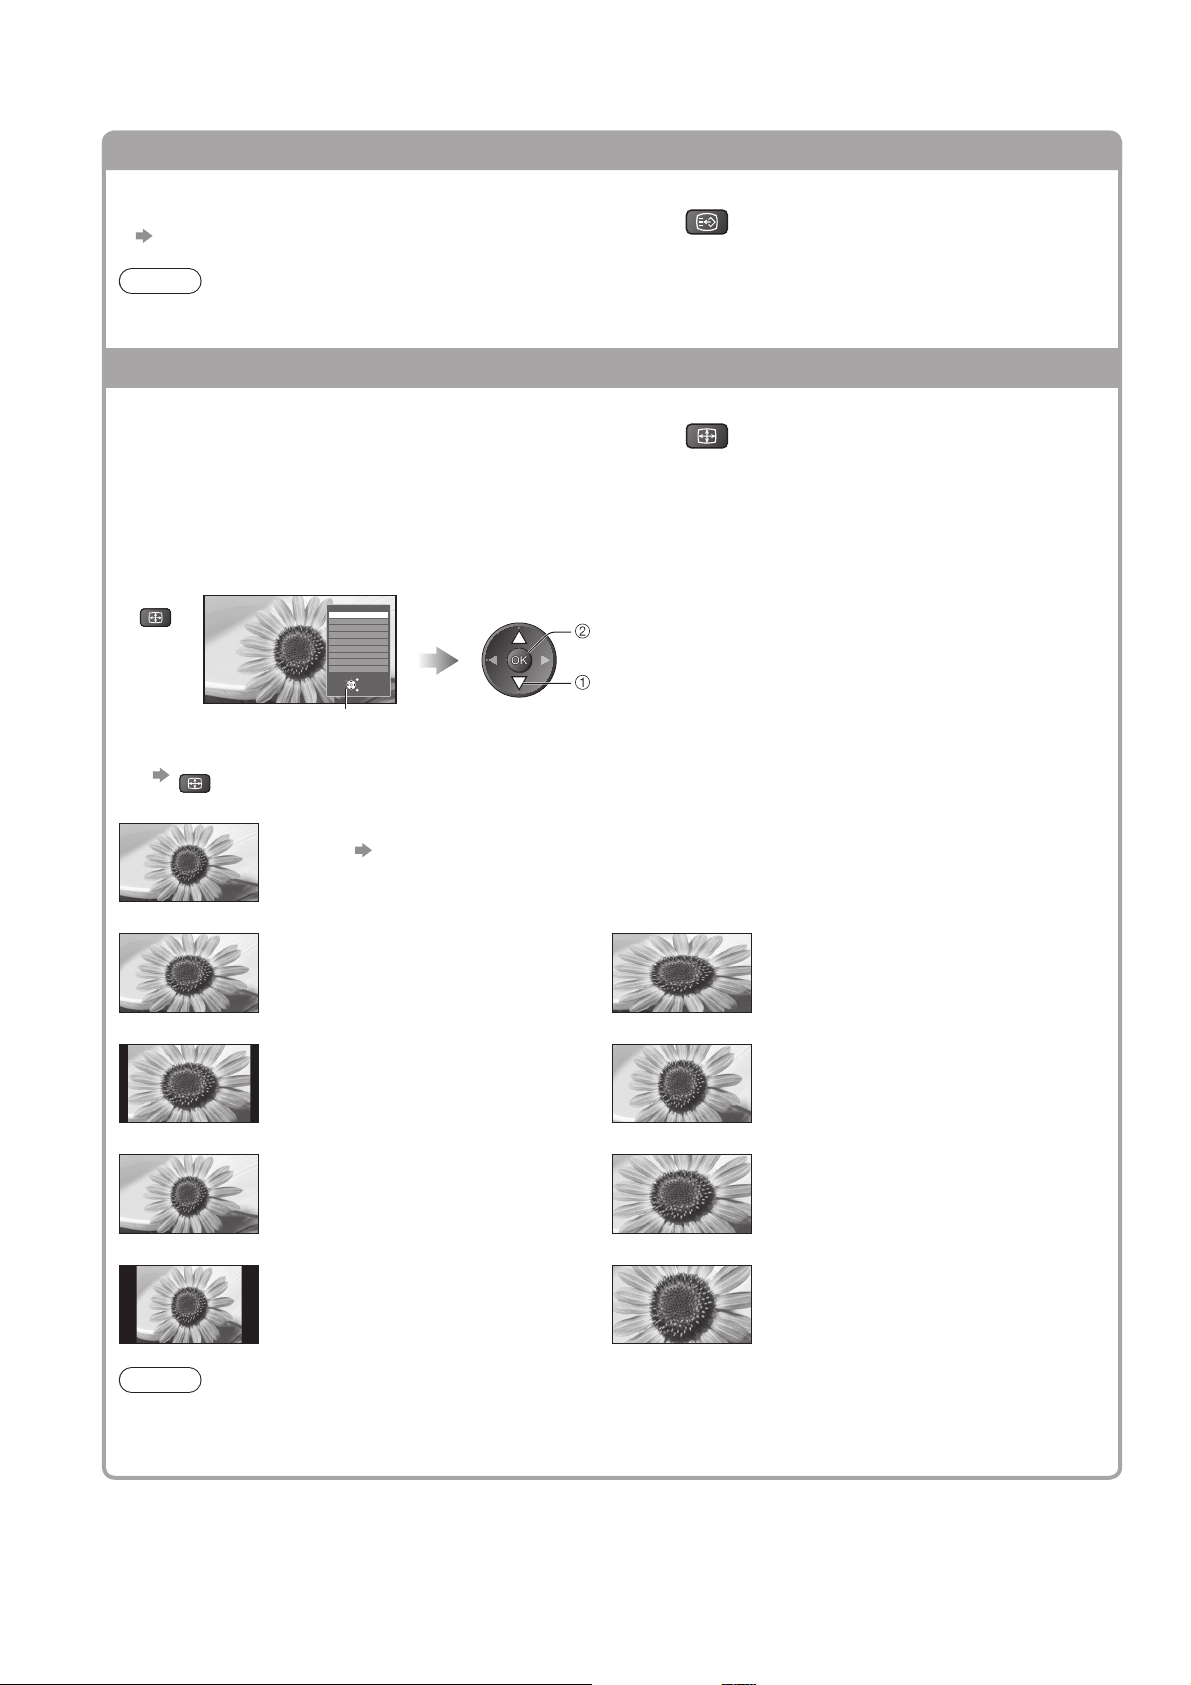
Aspect
Change the aspect ratio (image size)
Enjoy viewing the image at its optimum size and aspect.
Normally programmes have the Aspect Control Signal (Widescreen signal, etc.), and the TV will choose the
aspect ratio automatically according to the Aspect Control Signal (p. 60).
If you would like to change the aspect ratio manually■
Display Aspect Selection list While the list is displayed, select the mode
ASPECT
To change the mode using the ASPECT button only ●
ASPECT
Aspect Selection list
(Press repeatedly until you reach the desired mode)
Aspect Selection
Auto
16:9
14:9
Just
4:3
4:3 Full
Zoom1
Zoom2
Zoom3
Select
Change
EXIT
RETURN
store
select
ASPECT
Auto
The best ratio is chosen and the image expanded to fill the screen.
For details
16:9 4:3 Full
p. 60
Directly displays the image at 16:9
without distortion (anamorphic).
14:9 Zoom1
Displays the image at the standard 14:9
without distortion.
Just Zoom2
Displays a 4:3 image full-screen.
Stretching is only noticeable at the left and
right edges.
4:3 Zoom3
Displays the image at the standard 4:3
without distortion.
Note
Aspect is fixed to “16:9” when “Viewing Mode” is set to “Game” in the Picture Menu.●
Not available in teletext service.●
Aspect mode can be memorized separately for SD (Standard definition) and HD (High definition) signals.●
Displays a 4:3 image enlarged
horizontally to fit the screen.
HD signal only
●
Displays a 16:9 letterbox or 4:3 image
without distortion.
Displays a 16:9 letterbox (anamorphic)
image full-screen without distortion.
Displays a 2.35:1 letterbox (anamorphic)
image full-screen without distortion.
At 16:9, displays the image at its maximum
(with slight enlargement).
16
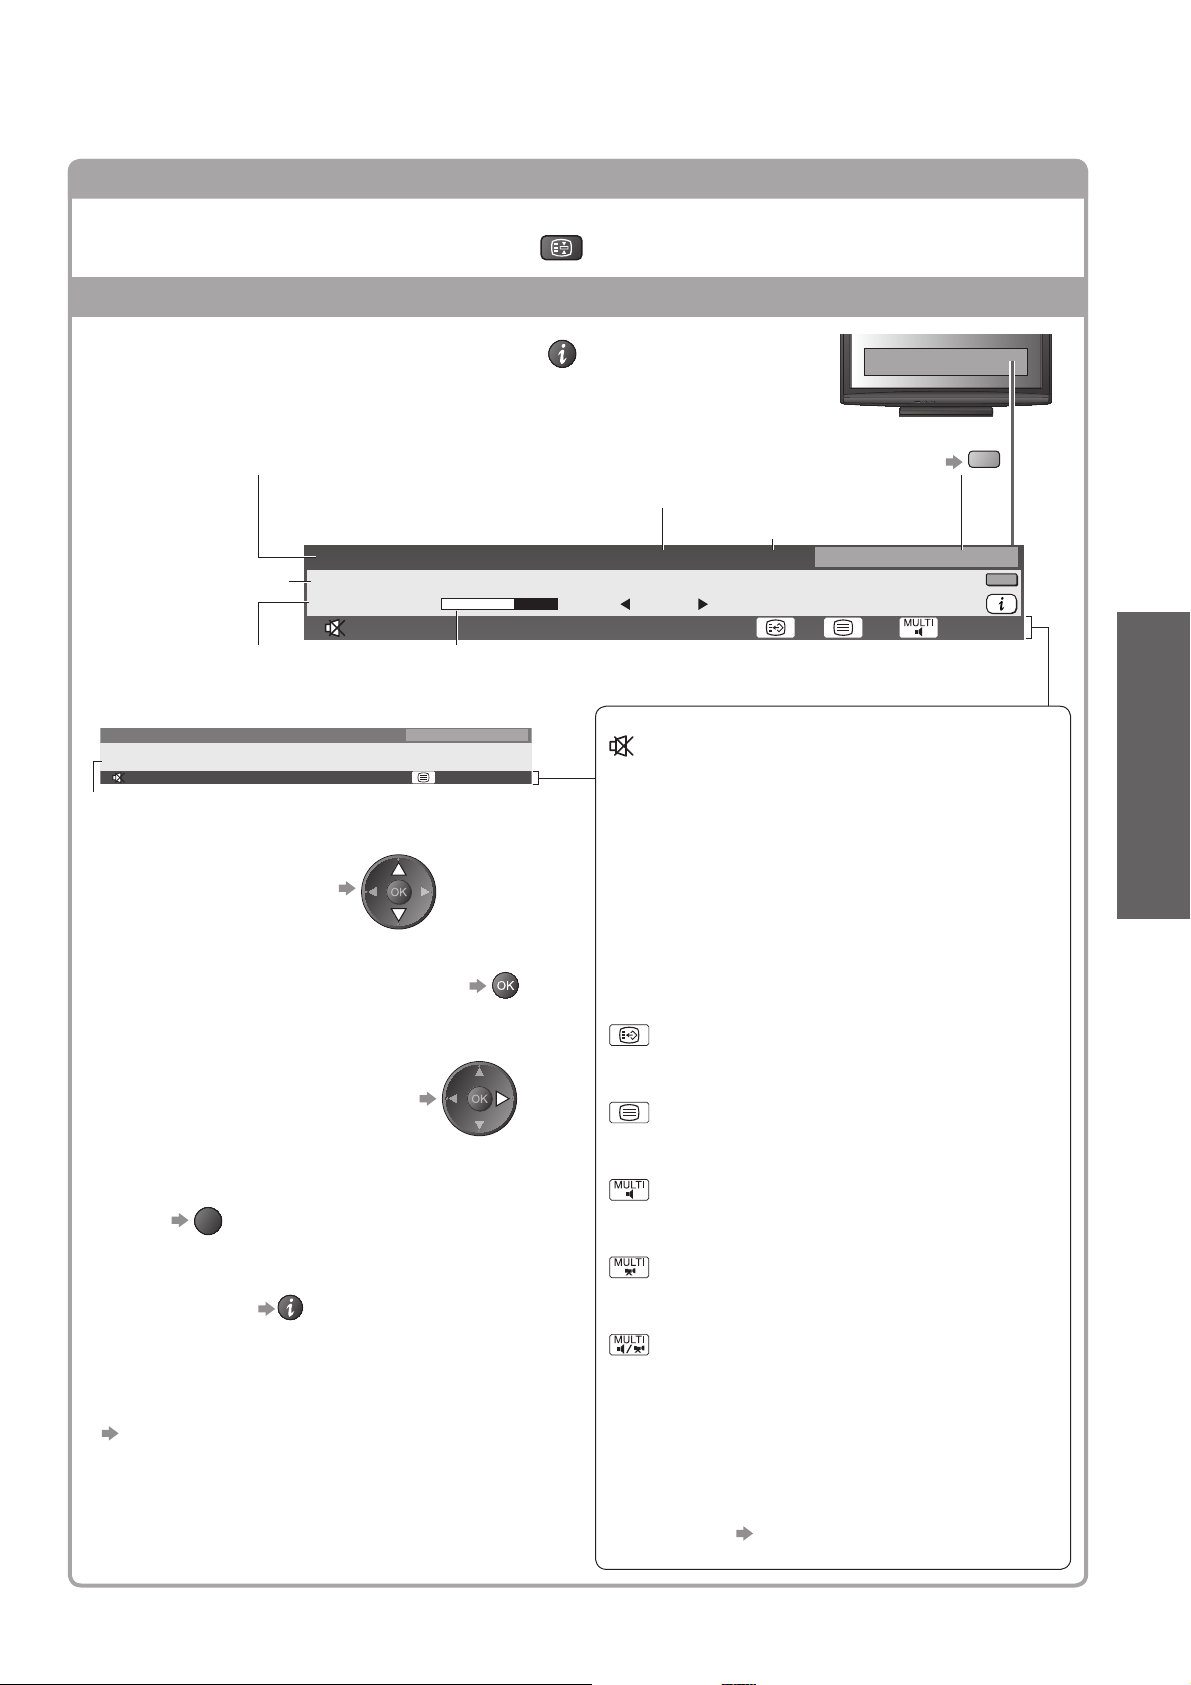
Display the selectable settings for the current programme
Check or change the current
OPTION
programme status instantly
Multi Video (DVB mode)
Allows you to select the image (if available)
Multi Audio (DVB mode)
Allows you to select between alternative language for
sound tracks (if available)
Dual Audio (DVB mode)
Allows you to select stereo / monaural (if available)
Sub Channel (DVB mode)
Allows you to select the multifeed programme - sub
channel (if available)
Subtitle Language (DVB mode)
Allows you to select the language in which subtitles
should appear (if available)
Last view
Switch to previously viewed
channel or input mode easily
LAST VIEW
To change ●
change
select
Teletext Character Set
Sets the teletext language
Setup Menu (p. 30)
Teletext Language (DVB mode)
Allows you to select between alternative language for
teletext (if available)
MPX (Analogue mode)
Selects multiplex sound mode (if available)
Sound Menu (p. 27)
Volume Correction
Adjusts volume of individual channel or input mode
Press again to return to the present view.●
Basic
Note
Switching channel is not available while Timer Programming or Direct TV Recording is in progress.●
Watching less than 10 sec. is not regarded as the previously viewed channel or input mode.●
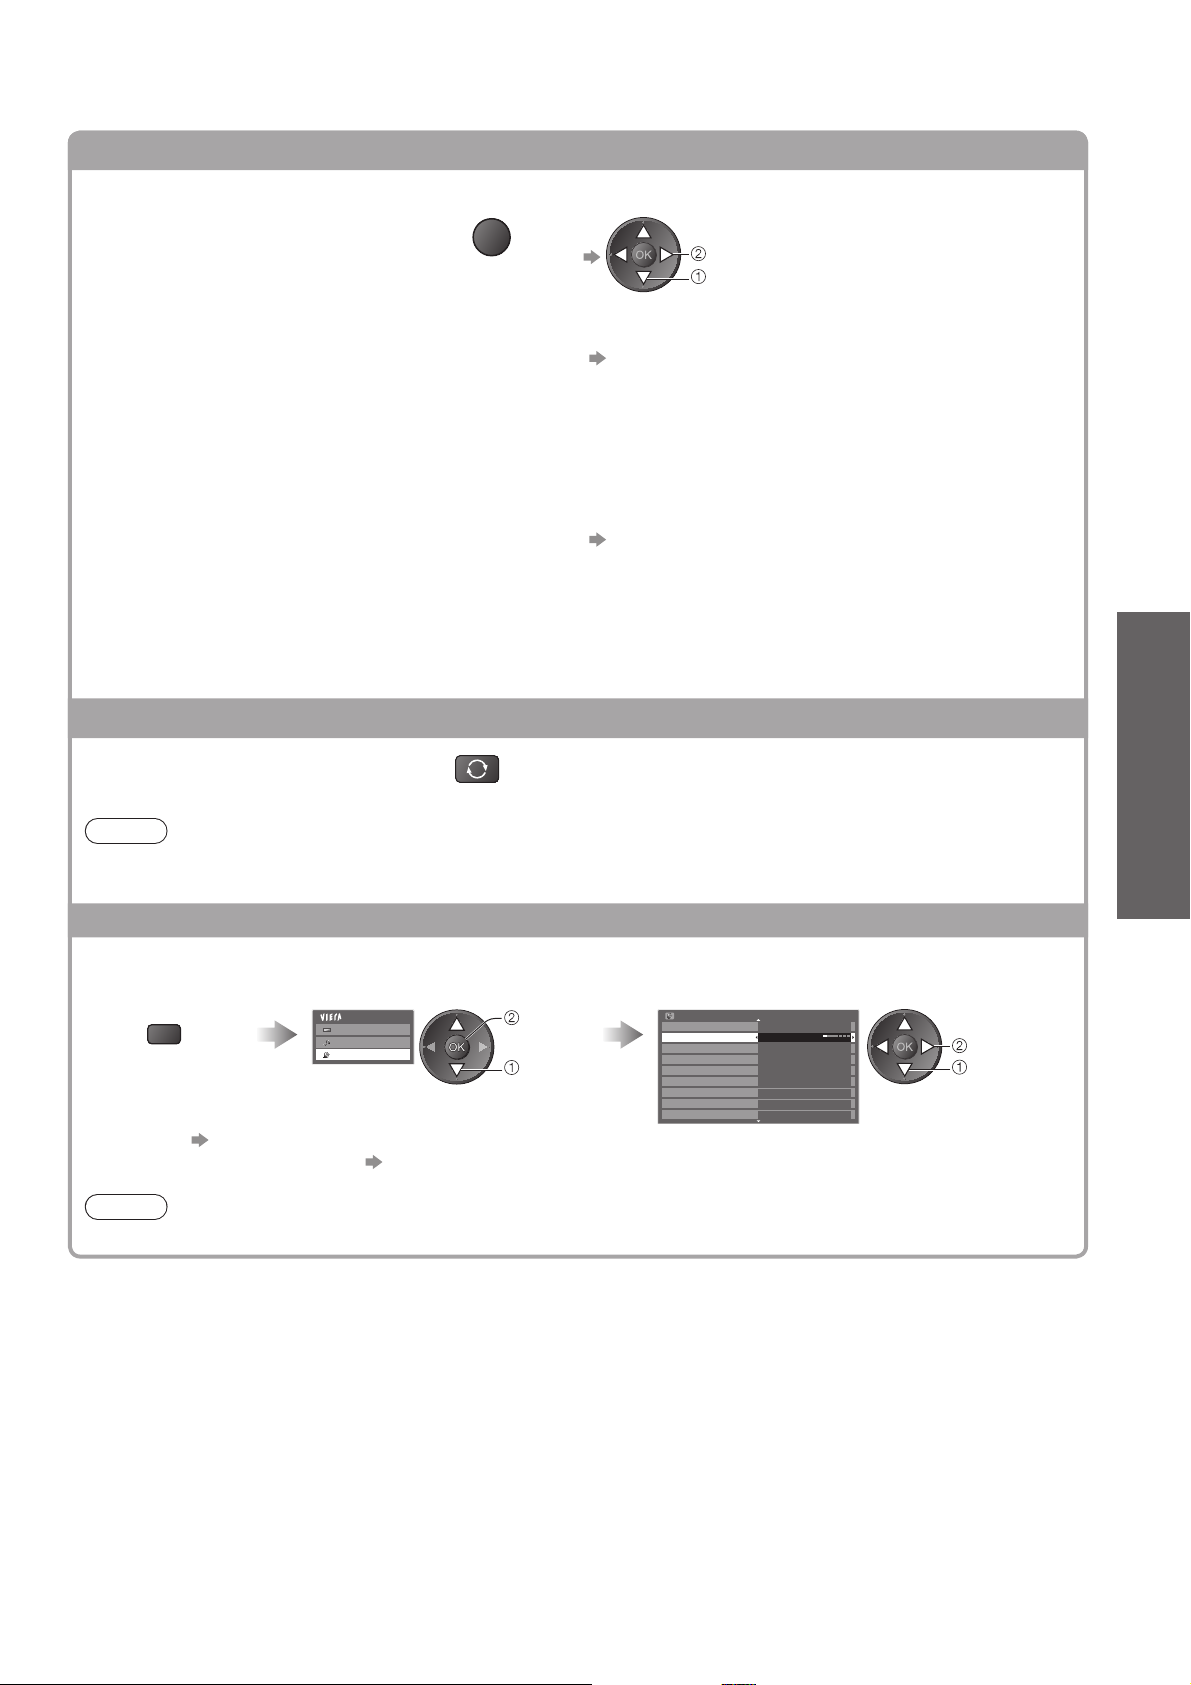
Off Timer
Turn the TV to Standby mode automatically after a fixed period
Display the menu Select “Setup” Select “Off Timer” and set the time
MENU
Main Menu
Picture
Sound
Setup
access
select
To cancel ● Set to “Off” or turn the TV off.
To display the remaining time● Information banner (p. 15)
Note
When the remaining time is within 3 minutes, the remaining time will flash on the screen.●
Setup Menu
Timer Programming
Off Timer Off
Link Settings
Child Lock
DVB-T Tuning Menu
Language
Display Settings
Common Interface
System Menu
1/2
Watching TV ●
set
select
17
Using TV Guide
TV Guide - Electronic Programme Guide (EPG) provides an on screen listing of the programmes
currently broadcast and the forthcoming broadcasts over the next seven days (depending on the
broadcasters).
This function varies depending on the country you select (p. 12).●
The postcode entry or update may be required to use the GUIDE Plus+ system depending on the country you ●
select. “View advertisement” (p. 19)
DVB-T and Analogue channels are displayed on the same TV Guide screen. ●
Analogue channels will be listed after DVB-T channels but there will be no programme listings. “D” means DVB-T
channel and “A” means Analogue channel.
When this TV is turned on for the first time, or the TV is switched off for more than a week, it may take some time ●
before the TV Guide is completely shown.
18
INPUT
TV
EXIT
OPTION
RETURN
To return to TV ■
EXIT
Depending on ■
the country you
select, you can
select the TV
Guide type
“Default Guide” in
“Display Settings”
(p. 30)
If you select “Channel
List”, the channel
list will appear when
the GUIDE button is
pressed.
All DVB-T Channels Sorting 123...
Cartoon Nwk
6
BBC Radio Wales
7
BBC Radio Cymru
8
BBC ONE Wales
1
BBC THREE
2
BBCi
3
CBBC Channel
4
(Channel list)
select
channel
watch
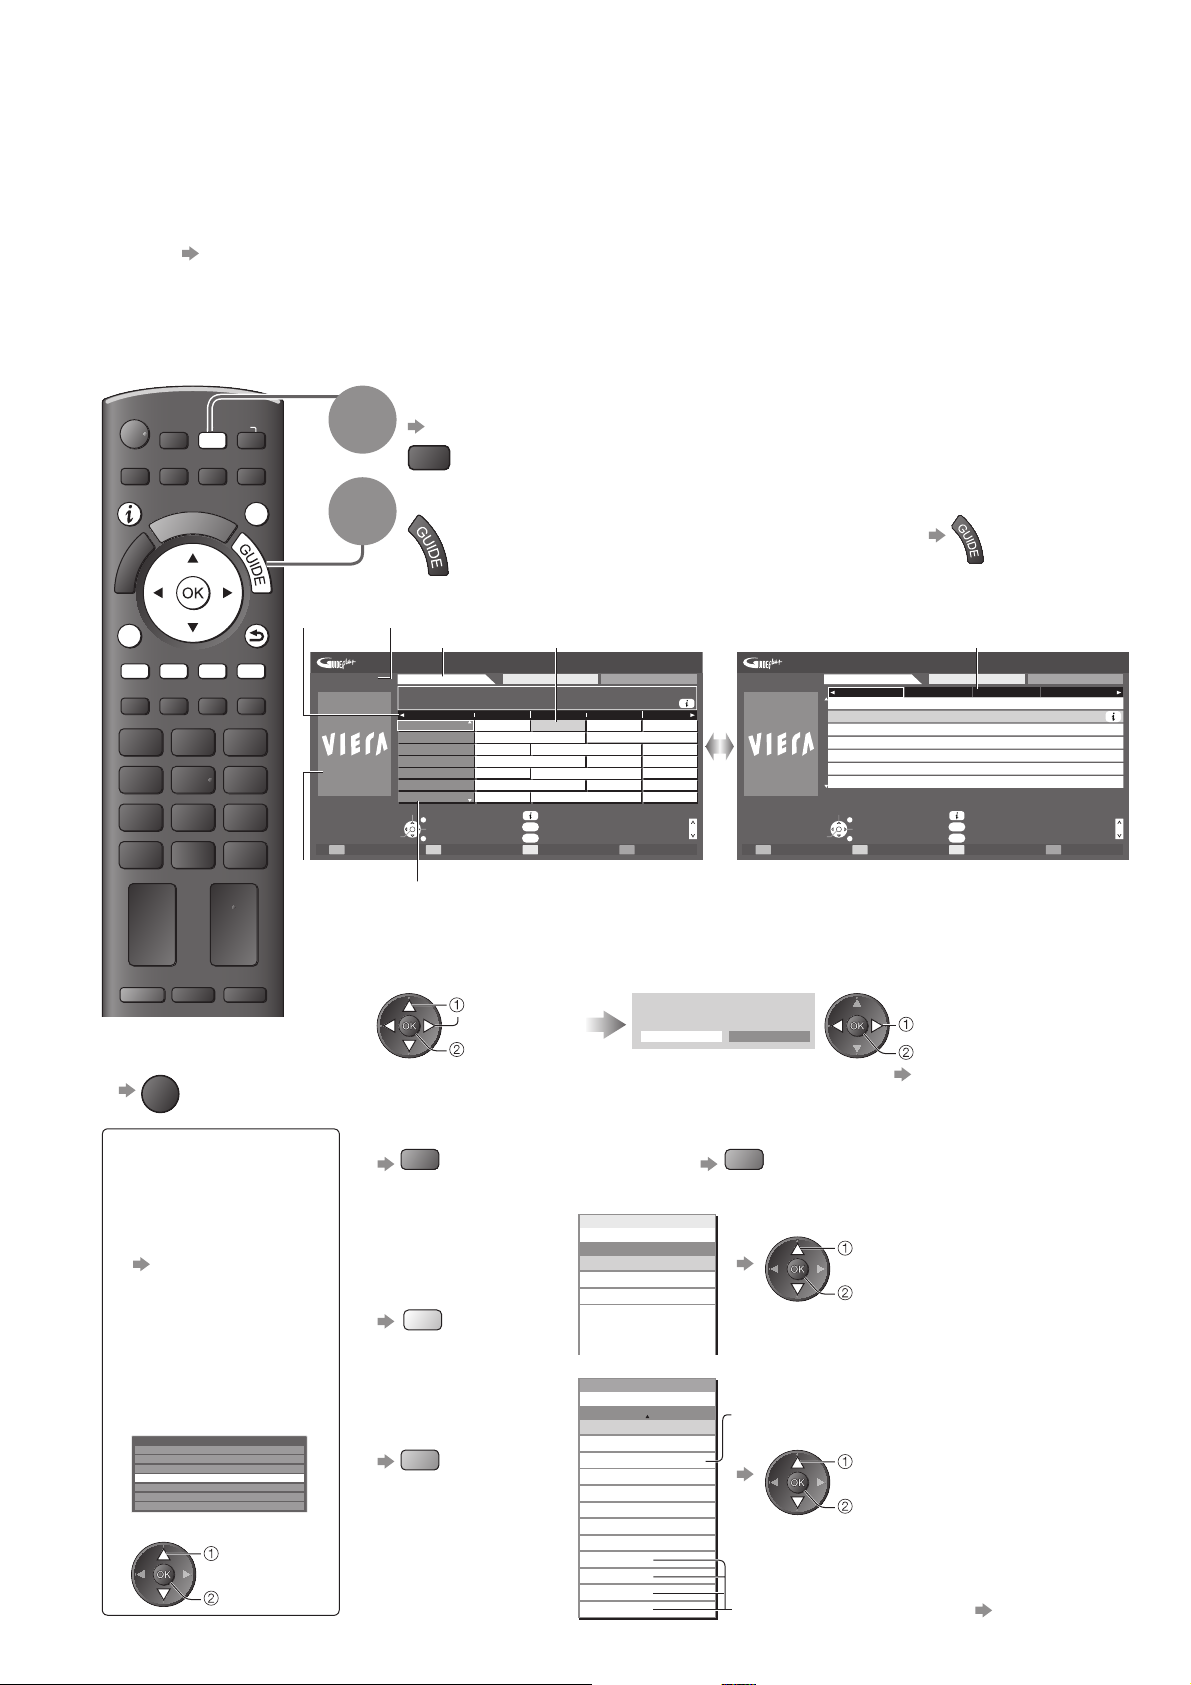
Select the mode
1
p. 14
TV
View TV Guide
2
TV Guide
time
Example:
Advertisement
Current date and time
TV Guide date
Wed 28.10.2009
10:46
Select channel
Timer Programming
-24 hours +24 hours Prog.Type Category
TV Guide: Landscape
Wed 28.10.2009
1 BBC ONE
20:00 - 20:30 DIY SOS : We open in the Battersbys
Time:
19:30 20:00 20:30 21:00
1
D
7
D
14
D
70
D
72
D
105
D
719
D Rugby 15 To 1 The Bill
Das Erste DIY SOS The Bill Red Cap
BBC ONE
BBC THREE
Hot Wars Holiday Program
E4 Emmerdal. Coronation Street The Bill
BBC FOUR 10 O’ clock News BBC Pepsi Char. Good bye
BBC 2W Panorama Spring watch Coast
BBCi I’ m A Celebrity Pop Idol News
BBC Radi
EXIT
Select programme
RETURN
Landscape (Displays by channel)
Channel position and name
To watch the programme■
Select the current
programme or channel
select
access
To the previous day ■
(DVB mode)
red
To view a ■
channel list of the
selected type
(DVB mode)
yellow
To view a ■
channel list of the
selected category
blue
To change the layout (Landscape / Portrait) ●
view “Landscape” to see many channels
view “Portrait” to see one channel at a time
Programme
All Types All Channels
Info
GUIDE
Change display mode
OPTION
Select Advert
Page up
Page down
Select “View”
(DVB mode)
Das Erste
19:30- 20:00
View
To use Timer Programming ● p. 19
Prog.Type
All Types
All Types
Movie
News
All Channels
All DVB-T Channels
All Analogue Channels
Free TV
Pay TV
HDTV
Free Radio
Pay Radio
Favourites1
Favourites2
Favourites3
Favourites4
.
.
.
.
.
Category
All Channels
Example:
Wed 28.10.2009
10:46
Timer Programming
Wed 28.10.2009
D 1 BBC ONE D
19:30-20:00
20:00-20:30
20:30-21:00
21:00-22:00
22:00-23:00
23:00-23:30
23:30-00:00
Select programme
EXIT
Select channel
RETURN
TV Guide: Portrait
Das Erste
DIY SOS
The Bill
Red Cap
Live junction
POP 100
Rugby
+24 hours Prog.Type Category
A: Analogue
All Types All Channels
7 BBC THREE
D 14 E4 D 70 BBC FOUR
Info
GUIDE
Change display mode
OPTION
Select Advert
Portrait (Displays by time)
D: DVB-T
Timer Programming
select
watch
To the next day ■
(DVB mode)
green
(Type list)
select type
view
(Category list)
Only Analogue channels are listed
select category
view
To list favourite channels ● p. 35
Page up
Page down
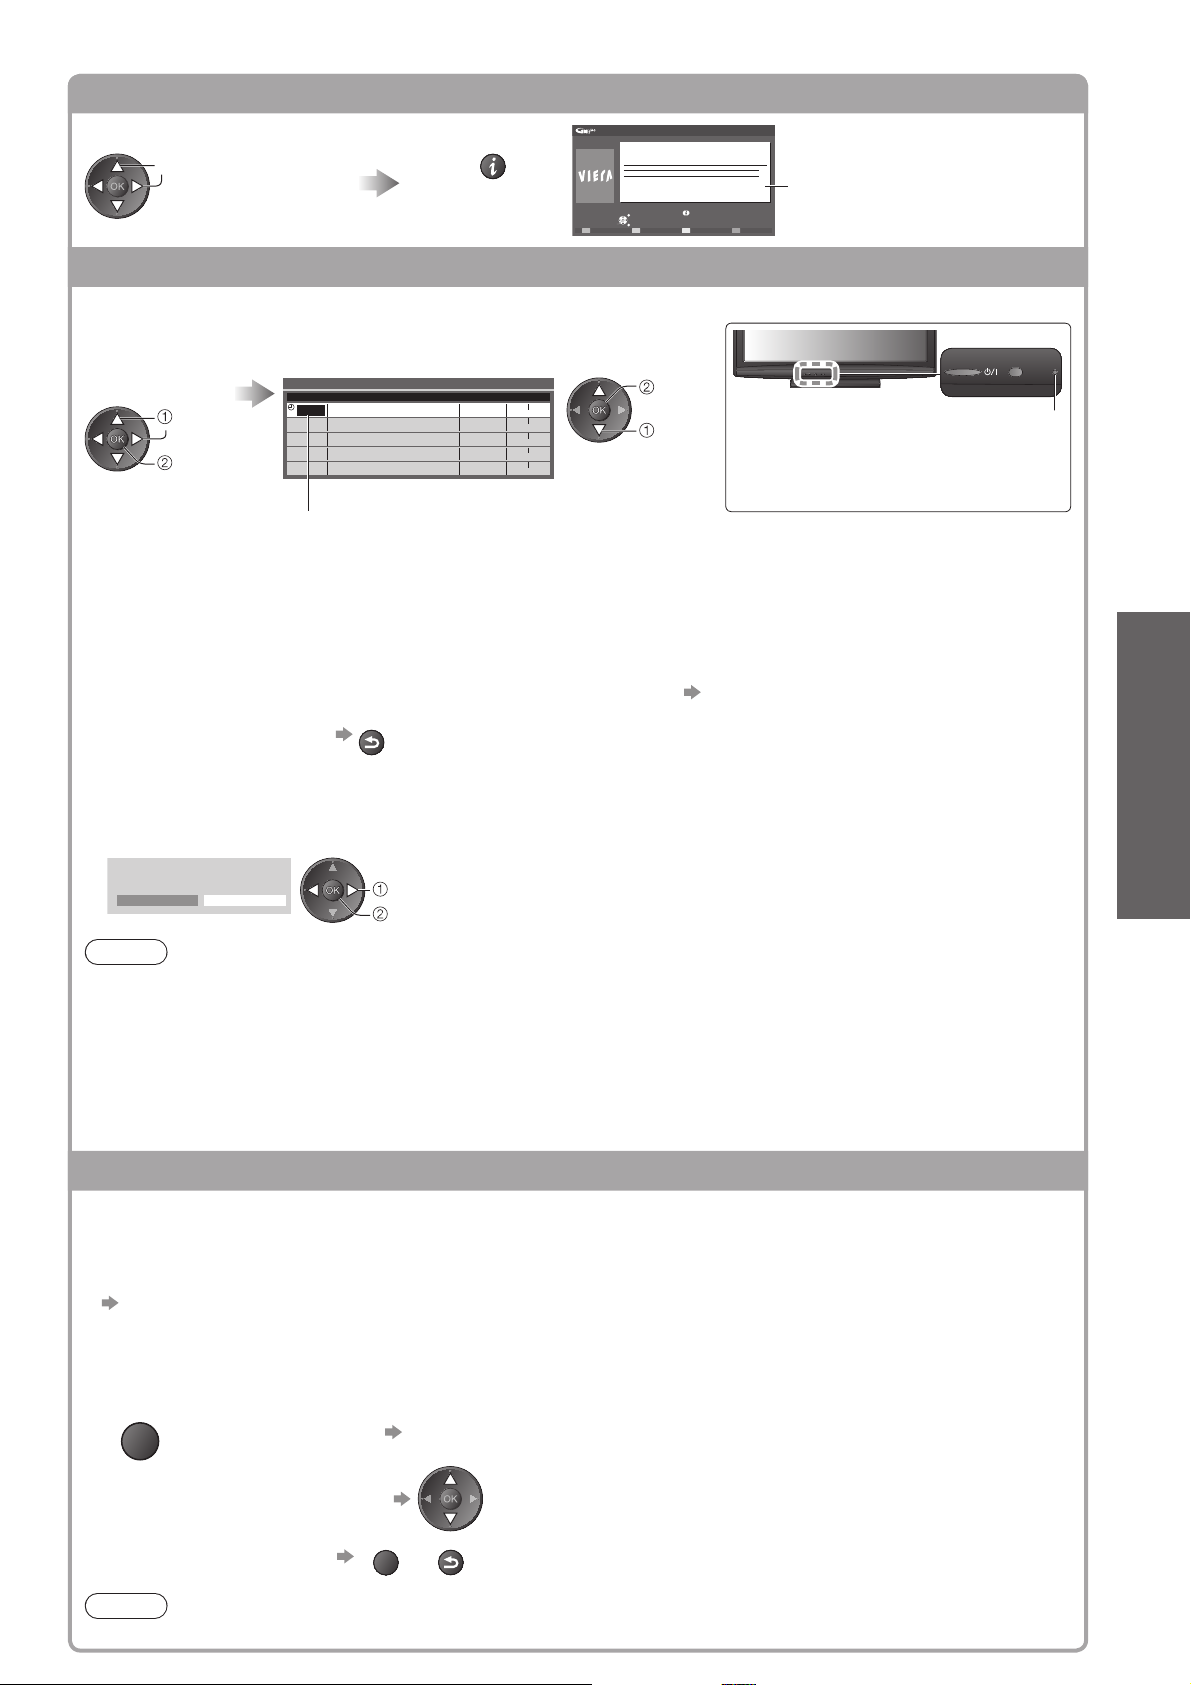
Other useful functions
■
View details of the programme (DVB mode)
Select the programme View details
select
Wed 28.10.2009
10:46
Timer Programming
TV Guide: Landscape
Wed 28.10.2009
DIY SOS
BBC ONE
20:00 - 20:30, 30 min.
EXIT
RETURN
Return to list
Details
Press again to return ●
to TV Guide.
Timer Programming (DVB mode)
Timer Programming is a timer to remind watching or record the programme to the external recorder.
Select the
forthcoming
programme
select
set
Select the function
(Reminder or Ext Rec.)
Timer Programming Wed 28.10.2009 10:46
Channel NameFunction No.
1D BBC ONE
Ext Rec.
<TIMER>
--- --/-- --:-- --:--
---
---
---
---
--- --/-- --:-- --:--
---
--- --/-- --:-- --:--
Date Start End
Wed 28.10.2009 20:00 20:30
(30 min.)
(--- min.)
--/-- --:-- --:--
--/-- --:-- --:-(--- min.)
(--- min.)
(--- min.)
(Timer Programming screen)
Ext Rec. : to record the programme to the recorder
When the start time comes, the channel will be switched automatically and
the video and audio signals will be output. 2 mins. before the starting time,
a reminder message appears if you are watching TV.
Reminder : to remind watching the programme
When you are watching TV, a reminder message appears 2 mins. before
the start time. Press the OK button to switch to the programmed channel.
store
select
LED will turn to orange if ●
Timer Programming is set.
(Orange LED will flash if Timer
Programming is in progress.)
LED
To check / change / cancel a Timer Programming event■ “Timer Programming” (p. 39)
To return to TV Guide ■
RETURN
If you select the current programme■
A confirmation screen whether you wish to watch or record it will appear.
Select “Timer Programming” and set “Ext Rec.” to record from the time you finish the timer programming
event setting.
Das Erste
19:30- 20:00
View
Timer Programming
select
access
Note
This function is not available in Analogue mode.●
Timer Programming only works reliably if correct time information is received via the signal from the ●
broadcaster or service provider.
No other channel can be selected while Ext Rec. of Timer Programming is in progress.●
When recording programmes, be sure to make the proper settings on the recorder connected to the TV.●
If a compatible recorder with Q-Link, VIERA Link or similar technologies is connected to the TV (p. 52 and
p. 53) and the “Link Settings” (p. 28) are completed, no setting of the recorder is required. Also read the
manual of the recorder.
View advertisement
Depending on the country you select, this TV supports the GUIDE Plus+ system in DVB-T or
Analogue mode
The postcode entry or update is required. Follow the on screen instructions.
Also possible to setup manually from the Setup Menu ●
“Update” / “Postcode” in “GUIDE Plus+ Settings” (p. 31)
●
Enter your postcode when using this function for the first time. If you enter an incorrect postcode for your
area, or no postcode is entered, advertisements may not be displayed correctly.
Display advertisement information
OPTION
To display the latest advertisement ●
“Update” in “GUIDE Plus+ Settings” (p. 31)
Basic
Using TV Guide ●
To change advertisements■
To return to TV Guide■
Note
To update the information continuously, the TV must be left in Standby mode at night.●
OPTION
or
RETURN
19
INPUT
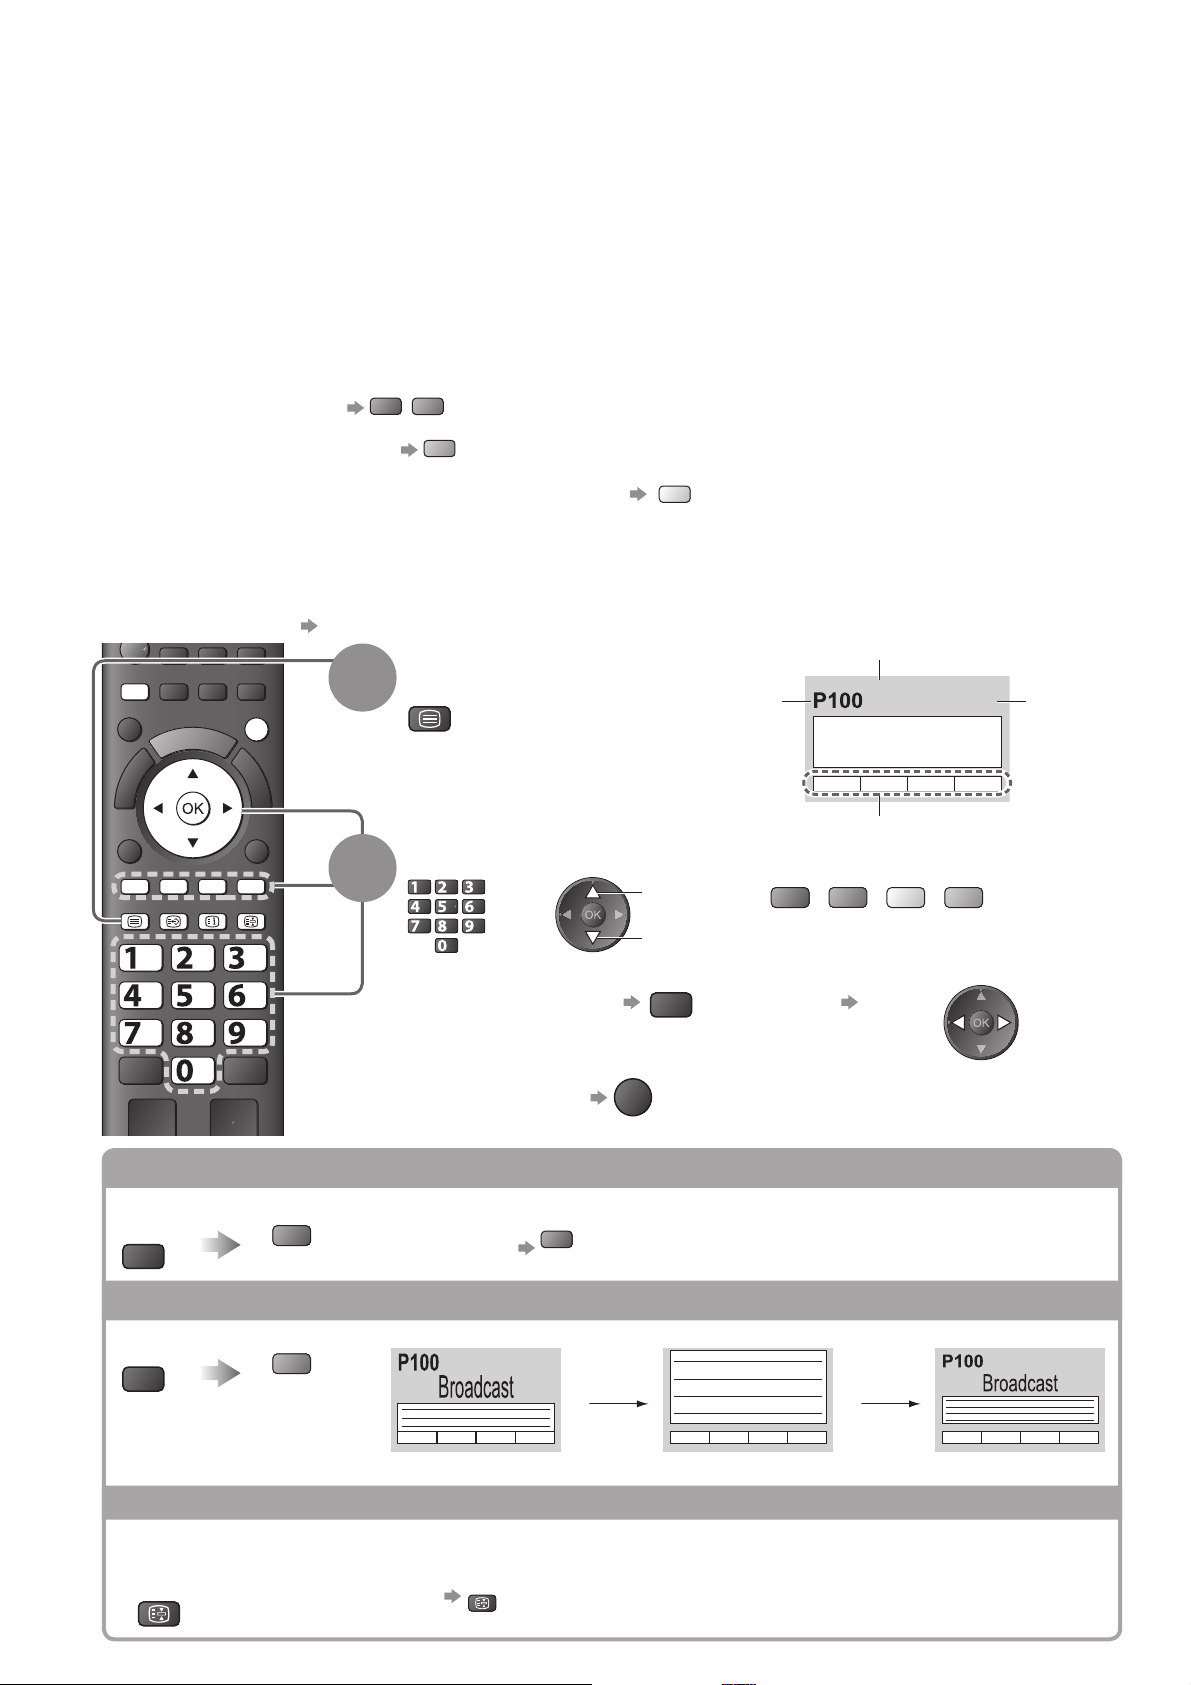
Viewing Teletext
Teletext services are the text information provided by the broadcasters.
The features may vary depending on the broadcasters.
What is FLOF (FASTEXT) mode?
In FLOF mode, four differently coloured subjects are situated at the bottom of the screen. To access more
information about one of these subjects, press the appropriately coloured button. This facility enables fast access to
information on the subjects shown.
What is TOP mode? (in case of TOP text broadcasting)
TOP is a particular improvement of the standard teletext service that results in an easier search and effective guide.
Fast overview of the teletext information available●
Easy to use step-by-step selection of the topical subject●
Page status information at the bottom of the screen●
Available page up / down
To select among subject blocks
To select next subject within the subject block
(After the last subject, it moves to the next subject block.)
What is List mode?
In List mode, four differently coloured page numbers are situated at the bottom of the screen. Each of these
numbers can be altered and stored in the TV’s memory. (“Store frequently viewed pages”, p. 21)
To change mode■ “Teletext” in the Setup Menu (p. 30)
TV AV
ASPECT
MENU
DIRECT TV REC
N
EXIT
1
red
green
blue
Switch to Teletext
TEXT
Displays the ●
index page
(content varies
depending on the
broadcasters)
yellow
Current
page
number
Sub page number
<< 01 02 03 04 05 06 07 >>
17:51 28 Feb
TELETEXT
INFORMATION
Time / date
OPTION
RETURN
Select the page
TEXT STTL
ghi
INDEX HOLD
abc def
jkl
mno
tuvpqrs
wxyz
2
abc def
jkl
ghi
tuvpqrs
To adjust contrast ■
To return to TV ■
Reveal hidden data
Reveal hidden words e.g. quiz page answers
MENU
red
To rehide ●
FULL / TOP / BOTTOM
MENU
green
Colour bar
mno
or
wxyz
up
down
MENU
green
red
or
(Corresponds to the colour bar)
yellow blue
As the blue bar is displayed
(press three times)
EXIT
red
(TOP) (BOTTOM) Normal (FULL)
20
(Expand the TOP half) (Expand the BOTTOM half)
HOLD
Stop automatic updating
(If you wish to hold the current page without updating)
HOLD
To resume ●
HOLD
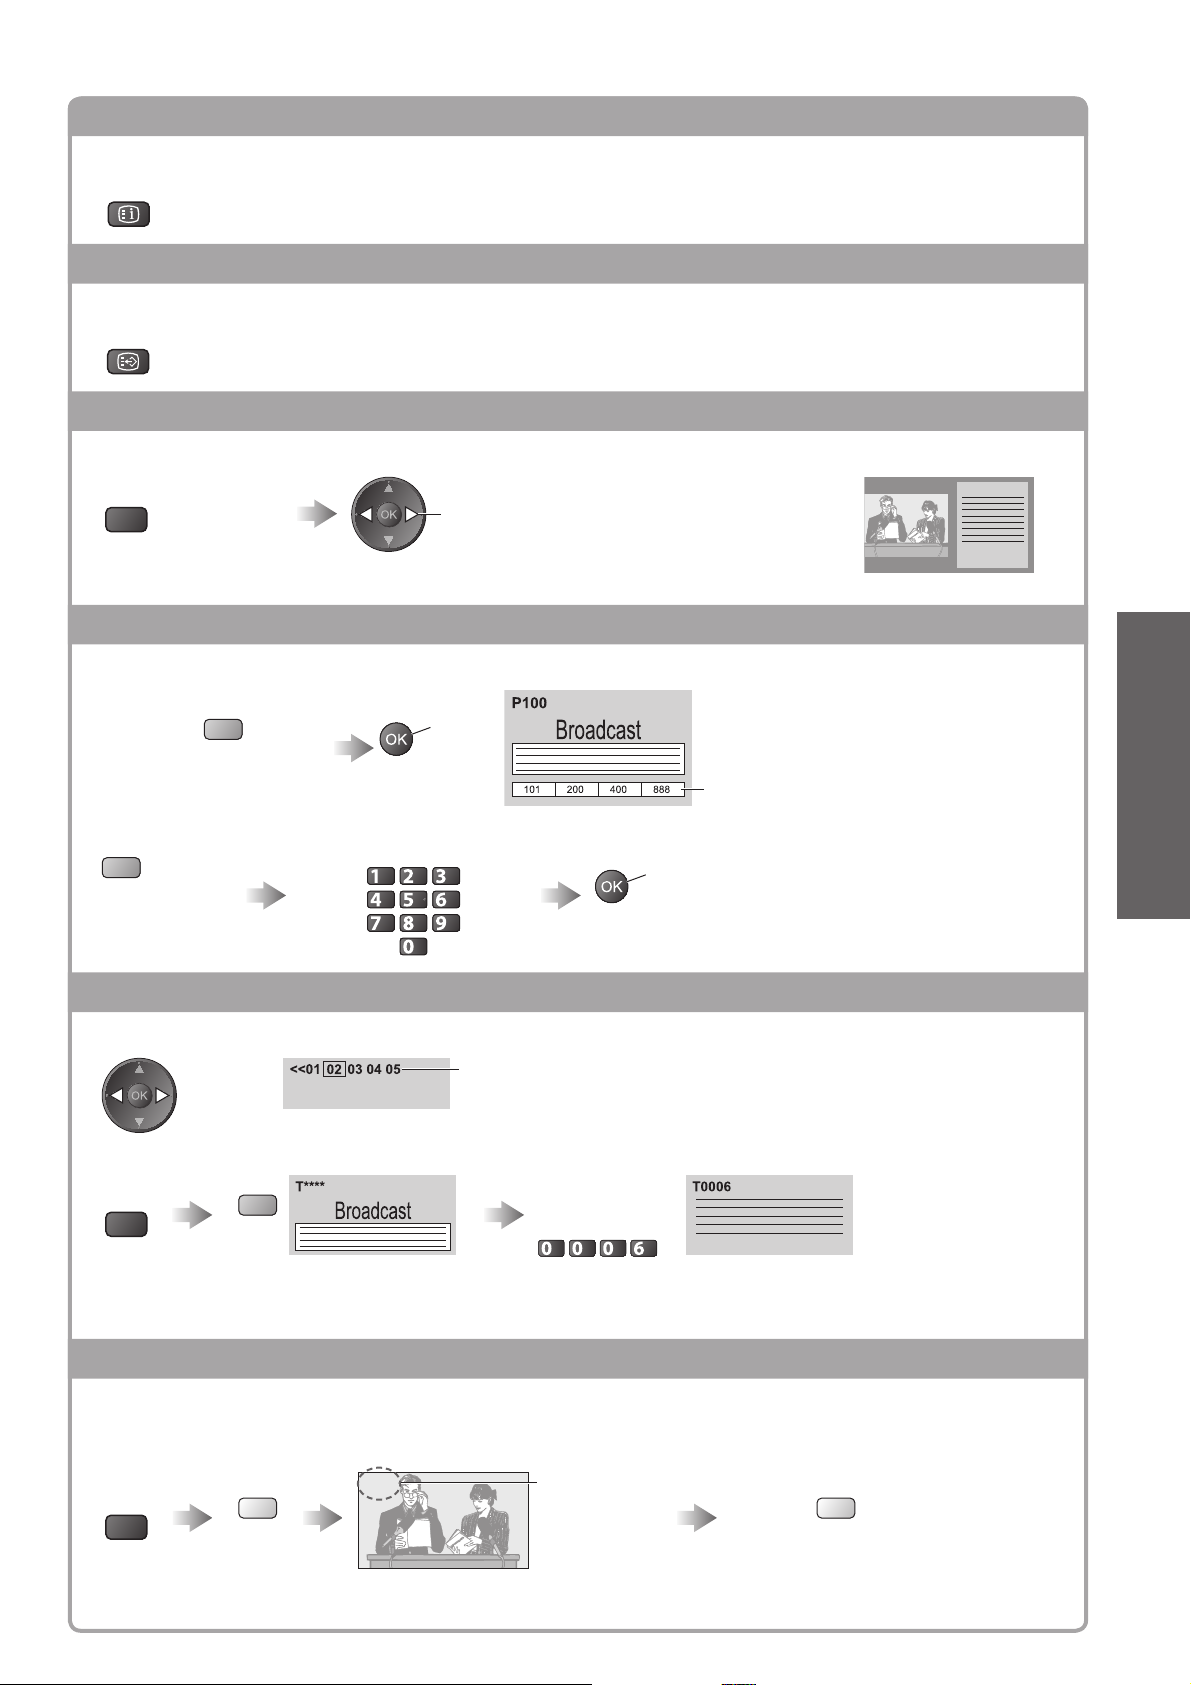
INDEX
Return to the main index page
INDEX
Call up a favourite page
View a favourite page stored
STTL
Call up the page stored on the blue button (List mode).●
Factory setting is “P888”.●
View in multi window
Watch TV and Teletext in two windows at once
MENU
(press twice)
Operations can be made only in Teletext screen.●
Select Picture and text On or Off
Store frequently viewed pages
Store frequently viewed pages in the colour bar
As page is
displayed
To change stored pages■
Coloured button
you want to
change
Corresponding
coloured button
Enter new page number
press
and
hold
The number changes to white.
abc def
jkl
ghi
mno
tuvpqrs
wxyz
press
and
hold
View sub page
View sub page (Only when teletext is more than one page)
Appears at top of
the screen
To view specific sub page■
Enter the
MENU
blue
Sub pages: ●
The number of sub pages varies depending on the broadcasters (up to 79 pages).
It may take some time for searching, during which time you can watch TV.
4-digit number
example: P6
mno
(List mode only)
Basic
Viewing Teletext ●
Watch TV while waiting for update
View the TV picture while searching for a teletext page
Teletext automatically updates itself when new information becomes available.
MENU
The news page provides a function that indicates arrival of latest news (“News Flash”).●
yellow
Changes to TV screen temporarily
P108
(You cannot change the channel.)
Appears when
updating is
completed
View the updated page
yellow
21
 Loading...