

Page 1
SD Audio Player
Operating Instructions
Model No. SV-SD80
Dear Customer
Thank you for purchasing this product. For optimum performance and
safety, please read these instructions carefully.
READ BEFORE USE
After checking the included accessories (see below), follow these steps to
record onto (checkout) the included SD Memory Card.
1. Install the driver software for the USB Reader/Writer and the
Panasonic Media Manager software from the included CD-ROM.
2. Connect the USB Reader/Writer to your personal computer.
3. Record (checkout) some music to the SD Memory Card with Panasonic
Media Manager.
Read the operating instructions for Panasonic Media Manager for details.
Before connecting, operating or adjusting this product, please
read these instructions completely. Please keep this manual for
future reference.
Panasonic Consumer Electronics Company, Division of
Matsushita Electric Corporation of America
One Panasonic Way Secaucus, New Jersey 07094
http://www.panasonic.com/sd
Panasonic Sales Company, Division of Matsushita Electric of
Puerto Rico, Inc. (“PSC”)
Ave. 65 de Infantería, Km. 9.5 San Gabriel Industrial Park,
Carolina, Puerto Rico 00985
Panasonic Canada Inc.
5770 Ambler Drive, Mississauga, Ontario L4W 2T3
www.panasonic.ca
C 2001 Matsushita Electric Industrial Co., Ltd.
RQT6116-P M0901YN0
Printed in Japan
PP
En
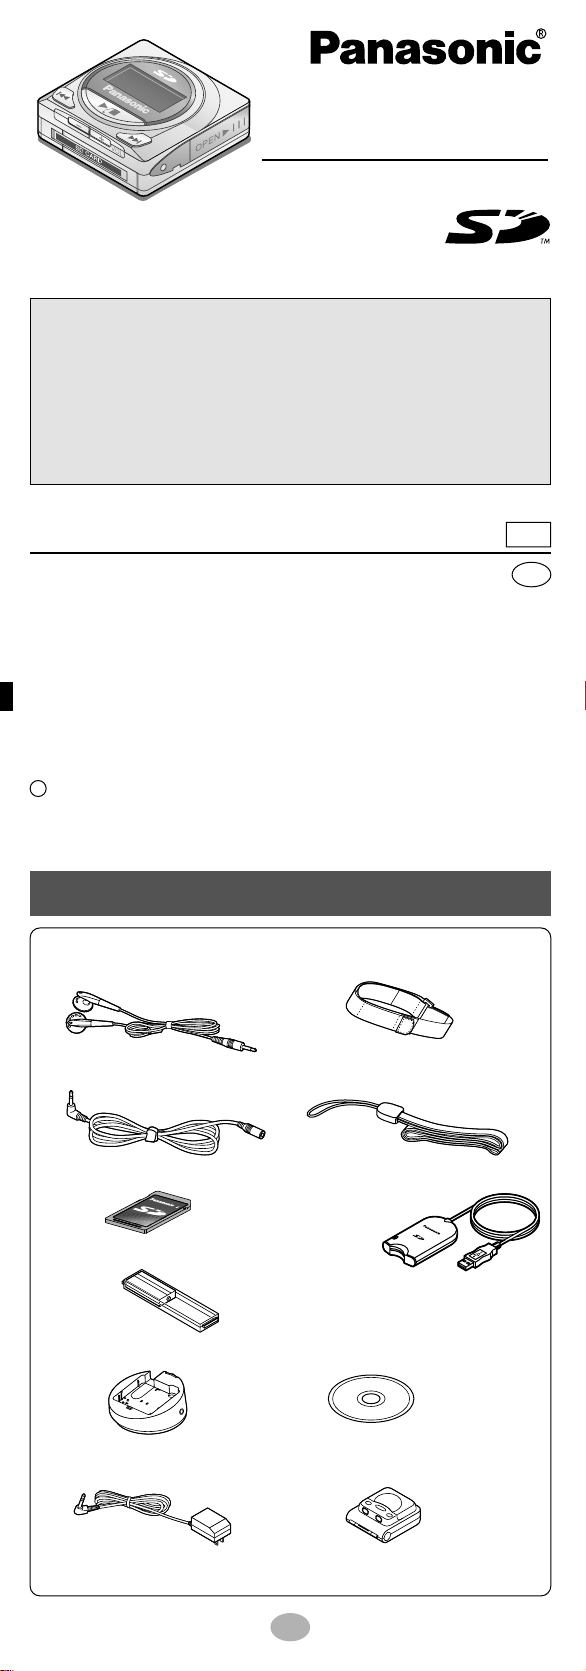
Supplied accessories
□ Stereo earphones □
(L0BAB0000162)—1pc.
□ Earphone extender □ Neck lanyard
(K2KC3AC00002)—1 pc. (RFA1876-Q)—1 pc.
*
SD Memory Card—1 pc. □ USB Reader / Writer
□
□*Rechargeable battery with case—1 pc.
□ Charger
(RFEB013G-K)—1 pc. □ CD-ROM—1 pc.
□ AC adaptor □ Battery case
(RFEA415C-1S)—1 pc. (RFA1801-A)—1 pc.
Armband (RFA1802-H)—1 pc
(RFA1869-H)—1 pc.
.
Use numbers indicated in parentheses when asking for replacement parts.
Refer to page 16 for the parts marked with an asterisk (*).
1
Page 2
PlugJack
Display panel
Battery lid
※
[–] and [+] VOLUME buttons
SD Memory Card cover
Earphone jack
Neck lanyard ring
Mode switch
Skip/search backward button
Skip/search forward button
※
※
※
Play/stop button
※The functions of buttons , ,
, and depend on the position
of the MODE switch. See the
operation guide on page 9 for details.
Text information/play time display
Play mode indicators
Operation display
Sound quality (EQ) indicators
Battery indicator
Playlist number display(see “Note” on page 6)
L (left)
R (right)
Plug
Anti-tangle slider
Slide up to prevent tangling when
the earphones are not in use.
The long cord is for your right ear.
Pass the cord behind your head.
Location of controls
Plug in
firmly.
Lock pins
Put into the
charger so
the lock pins
fit into their
holes and
the CHARGE
lamp lights.
Press in
and down
on the
minus end.
Full
Low
Recharge
or replace
Batteries
Main unit
Charging the rechargeable battery
Insert the rechargeable bat-
1
tery.
Connect the AC adaptor to
2
the charger.
AC 120 V60 Hz
Charger
Put the unit into the charger.
3
AC adaptor
■ Rechargeable battery
(included)
• Charge before initial use after
purchase or after an interval of
three months or longer.
• It takes approximately 3 hours to
fully charge the included battery.
• The included battery can be recharged about 300 times. The
battery has reached the end of
its life if play time dramatically
reduces after recharging.
• The battery may heat up while
charging, but this is normal.
• Replace the rechargeable battery within 30 seconds because
the clock stops while disconnecting the battery. If necessary,
see page 8 for setting the clock.
• Separate from radios while
charging as the charger can
cause interference.
• You can play the unit while
charging, but the battery cannot
be fully charged. Stop play to
charge fully.
• You cannot operate the unit if
the rechargeable battery is not
inserted, even if you put it into
the charger. The message “NO
BATTERY” appears on the display when you press [ ].
Stereo earphones
Earphone extender
Display panel
2
CHARGE lamp
While charging:blinks briefly
every two seconds.
When fully charged:lights
briefly every five seconds.
After 4 hours:goes out.
To remove the unit from
the charger
Press
unit out. (Do not try to remove
the unit while the lock pins are
engaged.)
(EJECT) and lift the
[]
Using the included
battery case
Alkaline battery
(LR03, AAA, AM-4)
■ Battery indicator
Note:
When the unit is not to be used for
a long time, turn it off and unplug
the AC adaptor from the household AC outlet.
The unit continues to consume
1 W even when you have pressed
[ ] to turn it off.
■ To use dry cell batteries
Insert an alkaline battery(LR03,
AAA, AM-4) into the battery
case along with the unit.
■ To extend play time
You can get up to 50 hours of
play by using the rechargeable
battery and dry cell battery
together.
3
Page 3
Listening
Operation display
Volume meter
Volume (0 to 25)
HOLD
MODE
NORMAL
1
2
Stereo earphones
3
HOLD
MODE
NORMAL
Plug in
firmly.
Earphone extender
Bottom view
Corner cut
Bottom
view
Set to NORMAL.
Connect the stereo earphones.
• You can connect the stereo earphones directly to the unit.
• See page 2 for more about using
the earphones.
Insert an SD Memory
Card with tracks
recorded (checked out).
Open the cover.
Note:
The following can occur if there is a problem with the card:
•“Now Busy” or “EMERGENCY STOP”
appear frequently (see page 13)
•“Please Wait” appears for 20 seconds or
longer
• No sound continues for 20 seconds or
longer after pressing [ ] to play
You can remedy the problem by formatting
the card with Panasonic Media Manager.
Before formatting the card, check in any
data on the card to your computer. See the
operating instructions for Panasonic Media
Manager for details.
4
5
Label
Insert the card so the label is facing up and the end with the corner cut off is facing in.
Push on the center of the card so it
locks into place and close the cover.
Press.
Immediately
after pressing
After about
two seconds
The unit comes on
and starts play.
Adjust the volume.
IncreaseReduce
Press and hold to adjust continuously.
To stop play and turn the
unit off
Press.
The unit turns off about
ten seconds later.
■ Resume
When you next press [ ], play
resumes from where you stopped it.
Play starts from track 1 if you replace
the card or battery.
To remove the SD
Memory Card
Bottom
view
After stopping play, open the card
cover (step 3, ), and push on the
center of the card to unlock it.
This function stops the unit from responding
when a button is pressed.
It prevents the following:
• The unit turning on unexpectedly, causing the
battery to go dead.
• Play being interrupted when a button is accidentally pressed.
Hold function
HOLD
45
Page 4

(Normal) (Add powerful bass)
(Further increases
the power of the bass)
(Reduces sounds that
may annoy others)
(1 track repeat)
no display
(Cancel)(All track repeat) (All tracks played
once in random order)
Other operations
HOLD
MODE
NORMAL
HOLD
MODE
NORMAL
HOLD
MODE
NORMAL
Preparation
Skipping tracks
Search
Direct play
Press during play.
Backward Forward
Press and hold during play.
Backward Forward
1 Press during play.
Play stops.
2 Select the track. 3 Play the track.
Backward Forward
Set the mode switch to NORMAL.
• In the all track repeat mode (see below), you can skip from the last
track to the first track.
• You cannot skip back to a track in random play (see below) if it has
been played.
• In the all track repeat mode (see below), you can search from the last
track to the first track.
• In random play (see below), you cannot search a track other than the
track that is being played.
• The operation display flashes during search (“ or ”).
• Tracks change faster if you
press and hold [ ] or [ ].
• If the unit is left stopped for
about ten seconds, even after
selecting a track, it turns off.
Preparation
Repeat play
Random play
Changing
sound quality
(EQ)
After changing
the mode
Set the mode switch to MODE.
Press during play.
Each time you press the button
VOLUME button
Press during play.
Each time you press the button
VOLUME button
Set the mode switch to NORMAL.
Note:
“” may be displayed at times. This refers to a feature that will be available in the future with the Panasonic Media Manager software.
Before this feature is available, all tracks are played and “” (default playlist) is displayed on the playlist number display.
67
Page 5

Setting the clock
Cut here
Cut here
※Keep this card in your wallet
or purse for quick reference.
SD Audio Player
Operation Guide
Model No. SV-SD80
Skip/search
backward
Play/stop
MODE switch
position
NORMAL
MODE
HOLD
Skip/search
forward
Reduce
volume
Increase
volume
Display
change
Play/stop
Sound
quality
(EQ)
Cancel
selection
Clock
Clock/playlist
setting mode
Repeat/
Random
change
Confirm
selection
Selection in
clock/playlist
setting mode
Using the supplied accessories
1
2
3
4
5
HOLD
MODE
VOLUME
VOLUME
VOLUME
NORMAL
During play, set to MODE.
If you want to stop the following operation partway, set to NORMAL.
Press.
This is the clock/playlist
setting mode.
Select “”.
This is the clock
Press.
Select the
display mode.
Press.
setting mode.
12 hour
clock
or
24 hour
clock
Set the
time.
Press.
The time flashes
The clock starts
■ Armband / Carrying case
Note:
To prevent the unit from falling,
do not swing the assembled unit
around.
■ Neck lanyard
Bottom view
Lanyard
ring
Attach the neck lanyard to the lanyard ring.
Note:
Take care that the lanyard does
not get caught and choke you.
Attach the carrying case to the
armband.
Undo the fabric fastener and
fit the armband onto your arm.
Do up the fabric fastener.
6
HOLD
MODE
NORMAL
• To display the clock, set the mode switch to HOLD during play or press
[ ] while the switch is set to HOLD.
• Adjust the clock regularly to maintain accuracy.
Set to NORMAL.
Adjusting and changing the display
Adjusting the contrast
1 During play, set the mode switch to HOLD.
While pressing and holding [ ], press [ ]
2
(darker) or [ ] (lighter) volume button.
Changing the display
1 During play, set the mode switch to MODE.
2 Press [ ] to change the display.
• Track titles, playlist titles, and artist information scroll from right to left if
they do not fit on the display.
• Titles including text data the unit doesn’t support cannot be displayed.
Track number Elapsed play time
A few seconds after
changing, the display returns to the
track title indication
automatically.
Press and hold if
you want to maintain the display.
※ Display when playing AAC audio data. The dis-
play when playing other data is shown at right.
3 Set the mode switch to NORMAL.
Track
title
Total number
of tracks
Playlist title
Total play time
8
Bitrate display※
Artist information
RQT6116
• SD logo is a trademark.
• Microsoft, Windows Media, and the
Windows Logo are trademarks or registered trademarks of Microsoft
Corporation in both the United States
and other countries.
• Other names of systems and products mentioned in these
instructions are usually the registered trademarks or trademarks of the manufacturers who developed the system or
product concerned. The (TM) and (R) marks are not used to
identify registered trademarks and trademarks in these
instructions.
9
Page 6

Write-protect
switch
Lock
Product service
Care and use
1. Damage requiring service
The unit should be serviced by qualified service personnel if:
(a) The AC power supply cord or AC adaptor has been damaged; or
(b) Objects or liquids have gotten into the unit; or
(c) The unit has been exposed to rain; or
(d) The unit does not operate normally or exhibits a marked change in
performance; or
(e) The unit has been dropped or the cabinet damaged.
2. Servicing
Do not attempt to service the unit beyond that described in these operating instructions. Refer all other servicing to authorized servicing personnel.
3. Replacement parts
When parts need replacing ensure the servicer uses parts specified by
the manufacturer or parts that have the same characteristics as the
original parts.
Unauthorized substitutes may result in fire, electric shock, or other hazards.
4. Safety check
After repairs or service, ask the servicer to perform safety checks to
confirm that the unit is in proper working condition.
■ Product information
For product information or assistance with product operation:
In the U.S.A., contact the Panasonic Customer Call Center at 1-800211-7262, or e-mail consumerproducts@panasonic.com. or web site
(http://www.panasonic.com/sd).
In Canada, contact Panasonic Canada Inc. Customer Care Centre at
905-624-5505, web site (www.panasonic.ca), or an authorized
Servicentre closest to you.
■ Main unit / Supplied accessories
• Keep the SD Memory Card and the rechargeable battery out of the
reach of children to prevent them from being swallowed.
• Leave some slack in the cord of the earphones, the earphone extender,
and the neck lanyard if you wind them around the unit.
Do not;
• disassemble, remodel, drop, or allow the unit to get wet.
• use or store in locations directly exposed to sunlight, a heat vent, or a
heating appliance.
• use or store in humid or dusty locations.
• use or store in locations exposed to corrosive gases.
• insert objects other than SD Memory Cards.
• use force to open the battery lid or card cover.
• use cracked or warped cards.
• short-circuit the power supply terminals of the unit, the charger, or the
battery case.
• detach the label on the card or attach other labels or stickers.
To protect your data
■
• Do not touch the metal terminals of the SD Memory Card with your
hands or metal objects.
• Use an oil-based felt pen to write on the
card. Do not use pencil or ballpoint pen
as these can damage the card.
• Take care to keep the metal terminals
free from ink.
• Switch the write-protect switch of the card
to “LOCK”. Unlock when you want to record
or edit the card again.
The model number and serial number of this product can be found
on either the back or the bottom of the unit.
Please note them in the space provided below and keep for future
reference.
MODEL NUMBER SV-SD80
SERIAL NUMBER
User memo :
DATE OF PURCHASE
DEALER NAME
DEALER ADDRESS
TELEPHONE NUMBER
10
■ Rechargeable battery / Dry cell battery
• Remove the battery if the unit is not to be used for a long time.
• Carry and store the rechargeable battery in the supplied rechargeable-
battery case to prevent contact with metal objects.
Do not;
• recharge ordinary dry cell batteries.
• disassemble, short-circuit, or put in a fire or water.
• peel off the cover or use if the cover has been peeled off.
Mishandling of batteries can cause electrolyte leakage which can damage items the fluid contacts and may cause a fire.
If electrolyte leaks from the battery, consult your dealer.
Wash thoroughly with water if electrolyte comes in contact with any part
of your body.
■ Listening caution
Do not play your headphones or earphones at a high volume. Hearing experts
EST. 1924
Do not use while operating a motorized vehicle. It may create a traffic
hazard and is illegal in many areas.
You should use extreme caution or temporarily discontinue use in potentially hazardous situations.
Even if your headphones or earphones are the open-air type designed to
let you hear outside sounds don't turn up the volume so high that you
can’t hear what’s around you.
Sound can be deceiving. Over time your hearing “comfort level” adapts to
higher volumes of sound. So what sounds “normal” can actually be loud
and harmful to your hearing.
Guard against this by setting your equipment at a safe level BEFORE
your hearing adapts.
To establish a safe level:
• Start your volume control at a low setting.
• Slowly increase the sound until you can hear it comfortably and clearly,
and without distortion.
Once you have established a comfortable sound level:
• Leave it there.
advise against continuous extended play.
If you experience a ringing in your ears,
reduce volume or discontinue use.
Maintenance
Clean with a soft, dry cloth.
Do not use any type of abrasive pad, scouring powder or solvent such as
alcohol or benzine.
11
Page 7

Troubleshooting guide
Before requesting service, make the below checks. If you are in doubt
about some of the check points, or if the remedies indicated in the chart
do not solve the problem:
In the U.S.A., contact the Panasonic Customer Call Center at 1-800211-7262, or e-mail consumerproducts@panasonic.com, or web site
(http://www.panasonic.com/sd).
In Canada, contact Panasonic Canada Inc. Customer Care Centre at
905-624-5505, web site (www.panasonic.ca), or an authorized
Servicentre closest to you.
Problems
No operation.
Cannot hear sound.
Play doesn’t start
from the first track.
There is a lot of
noise.
• Is the hold function on? (page 5)
• Did you insert a card? (page 5)
• Is the battery fully charged? (page 3)
(If so, try removing the battery and reinserting it.)
• Are the power supply terminals of the unit,
charger, and battery case dirty or are there
dust or obstacles on the terminals?
• Is the volume too low? (page 5)
• Are the earphone and earphone extender
plugs inserted correctly? (pages 5)
(Try plugging them in again.)
• Are the earphone and earphone extender
plugs dirty?
• Is the play mode set to RANDOM? (page 6)
• See “Resume”. (page 4)
• Are you using the unit near a television or
mobile phone?
Check points or causes
When one of the following messages appears on the display:
NO CARD
NotSDAUDIO
NO LIST
NO TITLE
NO INFO.
NO TRACK
UNFORMAT
DATA ERROR
LOCKED
NotPLAY
NotDISPLAY
NotSUPPORT
U01
NO BATTERY
ERROR
Now Busy
EMERGENCY STOP
• You haven’t inserted a card.
• There is no SD-audio data on the card.
• You haven’t created a playlist.
• The track or playlist doesn’t have a title.
• There is no information entered for the artist.
•
You haven’t checked out tracks for the playlist.
• The card isn’t formatted.
• The data format isn’t standard.
• The unit cannot play the card you inserted.
• Non-AAC,non-MP3, or non-WMA data is on
the card.(Appears during play.)
•
Text data the unit cannot display is on the card.
• Non-AAC,non-MP3, or non-WMA data is on
the card.(Appears on the bitrate display
described on page 8.)
• The battery is dead.
• You haven’t inserted the rechargeable battery
into the unit.
• An error has occurred.
Remove and reinsert the card. If this doesn’t
correct the display, turn the unit off and on
(page 4). If this still doesn’t correct the display, try removing and reinserting the battery.
• The unit is manipulating data. Wait a moment.
• Because the unit cannot manipulate irregular
data on the card, the power is turned off.
ONLY FOR U.S.A
12 13
Page 8

ONLY FOR U.S.A
14 15
Page 9

THE FOLLOWING APPLIES ONLY IN THE U.S.A.:
CAUTION:
This equipment has been tested and found to comply with the limits
for a Class B digital device, pursuant to Part 15 of the FCC Rules.
These limits are designed to provide reasonable protection against
harmful interference in a residential installation. This equipment generates, uses and can radiate radio frequency energy and, if not
installed and used in accordance with the instructions, may cause
harmful interference to radio communications. However, there is no
guarantee that interference will not occur in a particular installation. If
this equipment does cause harmful interference to radio or television
reception, which can be determined by turning the equipment off and
on, the user is encouraged to try to correct the interference by one or
more of the following measures:
• Reorient or relocate the receiving antenna.
• Increase the separation between the equipment and receiver.
• Connect the equipment into an outlet on a circuit different from that
to which the receiver is connected.
• Consult the dealer or an experienced radio/TV technician for help.
Any unauthorized changes or modifications to this equipment would
void the user’s authority to operate this device.
This device complies with Part 15 of the FCC Rules. Operation is sub-
ject to the following two conditions: (1) This device may not cause
harmful interference, and (2) this device must accept any interference
received, including interference that may cause undesired operation.
THE FOLLOWING APPLIES ONLY IN CANADA:
This Class B digital apparatus complies with Canadian ICES-003.
Optional accessories
■ SD Memory Card (as of September 1st, 2001)
• RP-SD064B (64 MB) • RP-SD032B (32 MB)
■ Rechargeable battery with case
Part number : HHF-AZ10A
■ Personal computer card adaptor
Part number : BN-SDABPU/1B
Specifications
Sampling rate: 32 kHz, 44.1 kHz, and 48 kHz
Compression/decompression: AAC, MP3 and WMA
No. of channels: Stereo, 2 channels
Frequency response: 20 Hz to 20,000 Hz (+0 dB, -6 dB)
Output terminal: M3 earphone jack
Output level: 3.5 mW + 3.5 mW (22 Ω)
Power supply:
Approximate play time: 18 hours (When the included recharge-
Maximum dimensions (WxHxD)
Cabinet dimensions (WxHxD)
Mass: 38 g (1.34 oz.) with battery
AC adaptor / Charger: Input : AC 120 V 60 Hz
DC 1.2 V (one rechargeable battery)
DC 1.5 V (one LR03, AAA, AM-4 battery)
able battery is fully charged)
32 hours (Panasonic alkaline battery)
50 hours (When the fully charged
rechargeable battery and alkaline battery are used together)
: 43.3 x 44.5 x 17.3 mm
11
/16" x 13/4" x 11/16")
(1
: 42.2 x 41.6 x 15.8 mm
(111/16" x 15/8" x 5/8")
26 g (0.92 oz.) without battery
Output: DC 2V, 220 mA
• Specifications are subject to change without notice.
• The play times shown depend on operating conditions.
• Mass and dimensions are approximate.
A nickel metal hydride battery
that is recyclable powers the
product you have purchased.
Please call 1-800-8-BATTERY
for information on how to recycle this battery.
This manual was printed
with soy based ink.
16
 Loading...