

Page 1
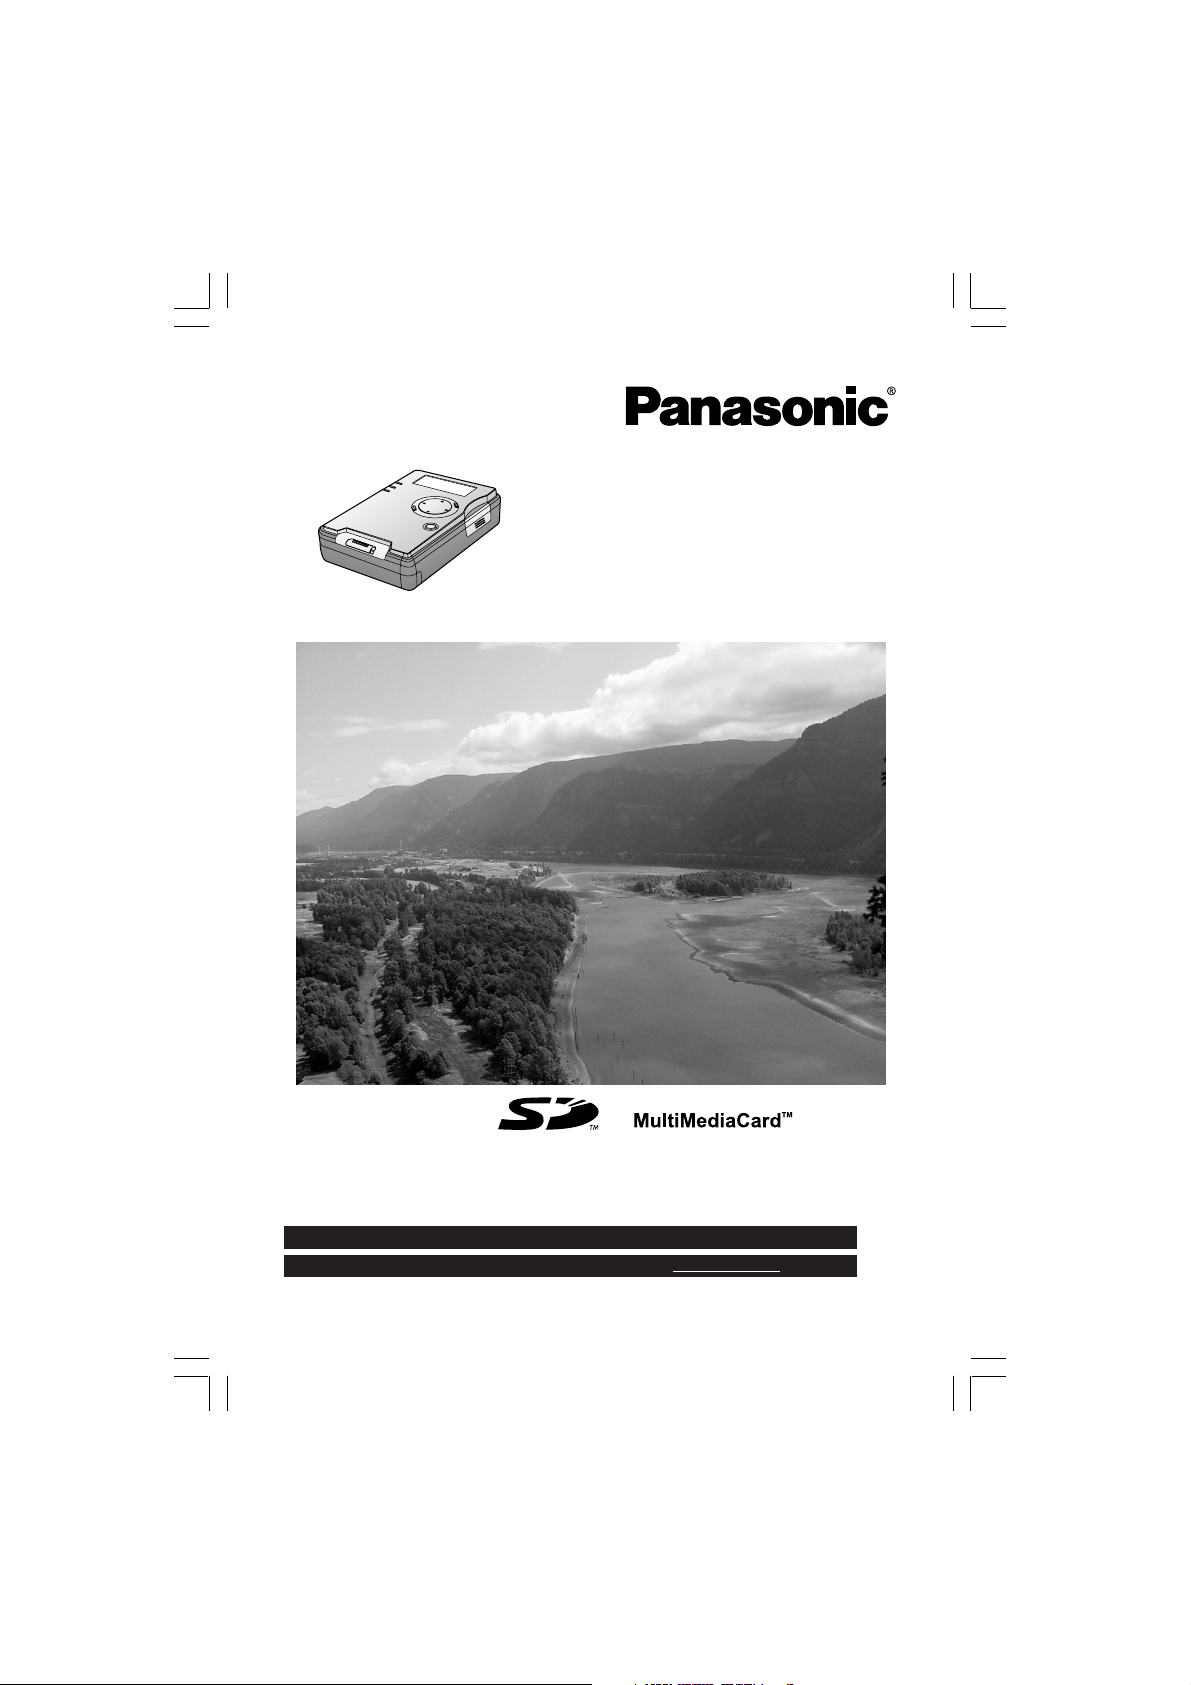
SD Media Storage
Operating Instructions
Model No. SV-PT1PP
Before attempting to connect, operate or adjust this product, please read
these instructions thoroughly.
For USA assistance, please call: 1-800-272-7033 or send e-mail to: digitalstillcam@panasonic.com
For Canadian assistance, please call: 1-800-561-5505 or visit us at www.panasonic.ca
PT1.p1-5.p65 2003/01/14, 12:361
LSQT0622A
Page 2

Information For Your Safety
Dear Customer,
We would like to take this opportunity to
thank you for purchasing this Panasonic
SD Media Storage. Please read these
Operating Instructions carefully and
keep them handy for future reference.
Information for
Your Safety
WARNING
TO REDUCE THE RISK OF FIRE OR
SHOCK HAZARD AND ANNOYING
INTERFERENCE, USE ONLY THE
RECOMMENDED ACCESSORIES
AND DO NOT EXPOSE THIS
EQUIPMENT TO RAIN OR
MOISTURE. DO NOT REMOVE THE
COVER (OR BACK); THERE ARE NO
USER SERVICEABLE PARTS INSIDE.
REFER SERVICING TO QUALIFIED
SERVICE PERSONNEL.
Carefully observe copyright laws.
Recording of pre-recorded tapes or
discs or other published or broadcast
material for purposes other than your
own private use may infringe
copyright laws. Even for the purpose
of private use, recording of certain
material may be restricted.
CAUTION
Danger of explosion if battery is
incorrectly replaced.
Replace only with the same or
equivalent type recommended by the
manufacturer.
Dispose of used batteries according to
the manufacturer’s instructions.
THE SOCKET OUTLET SHOULD BE
INSTALLED NEAR THE EQUIPMENT
AND SHOULD BE EASILY
ACCESSIBLE.
• Only use the supplied USB
cable and Video cable.
• Do not open and close the
HDD door or remove the
card while HDD or SD is
operating.
• Do not turn this unit upside
down when in operation.
• Please note that the actual controls and
components, menu items, etc. of your
SD Media Storage may look somewhat
different from those shown in the
illustrations in these Operating
Instructions.
• Other names, company names, and
product names printed in these
instructions are trademarks or
registered trademarks of the companies
concerned.
2
PT1.p1-5.p65 2003/01/14, 12:362
Page 3
Information For Your Safety
FCC Note: (U.S. only)
This equipment has been tested and
found to comply with the limits for a Class
B digital device, pursuant to Part 15 of
the FCC Rules. These limits are designed
to provide reasonable protection against
harmful interference in a residential
installation. This equipment generates,
uses, and can radiate radio frequency
energy and, if not installed and used in
accordance with the instructions, may
cause harmful interference to radio
communications. However, there is no
guarantee that interference will not occur
in a particular installation. If this
equipment does cause harmful
interference to radio or television
reception, which can be determined by
turning the equipment off and on, the user
is encouraged to try to correct the
interference by one or more of the
following measures:
• Reorient or relocate the receiving
antenna.
• Increase the separation between the
equipment and receiver.
• Connect the equipment into an outlet
on a circuit different from that to which
the receiver is connected.
• Consult the dealer or an experienced
radio/TV technician for help.
FCC Caution: To assure continued
compliance, follow the
attached installation
instructions and use
only shielded interface
cables with ferrite cores
when connecting to
computer or peripheral
devices.
Any changes or
modifications not
expressly approved by
the party responsible for
compliance could void
the user’s authority to
operate this equipment.
Trade Name: Panasonic
Model No.: SV-PT1
Responsible party:
Matsushita Electric
Corporation of
America One
Panasonic Way,
Secaucus, NJ 07094
Support Contact: Panasonic
Consumer Electronics
Company 1-800272-7033
This device complies with Part 15 of the
FCC Rules. Operation is subject to the
following two conditions: (1) This device
may not cause harmful interference, and
(2) this device must accept any
interference received, including
interference that may cause undesired
operation.
This Class [B] digital apparatus complies
with Canadian ICES-003.
Cet appareil numérique de la classe [B]
est conforme à la norme NMB-003 du
Canada.
SV-PT1
Before Use
PT1.p1-5.p65 2003/01/14, 12:363
3
Page 4

End User License Agreement
Before opening the CD-ROM package, please read the following.
End User License Agreement
You (“licensee”) are granted a license for the Software defined in this End User
License Agreement (“Agreement”) on condition that you agree to the terms and
conditions of this Agreement. If Licensee does not agree to the terms and conditions
of this Agreement, promptly return the Software to Matsushita Electric Industrial Co.,
Ltd. (“Matsushita”), its distributors or dealers from which you made the purchase.
Article 1 License
Licensee is granted the right to use the software, including the information recorded
or described on the CD-ROM, instruction manuals, and any other media provided to
Licensee (collectively “software”), but all applicable rights to patents, copyrights,
trademarks and trade secrets in the Software are not transferred to Licensee.
Article 2 Use by a Third Party
Licensee may not use, copy, modify, transfer or allow any third party, whether free of
charge or not, to use, copy or modify the Software, except as expressly provided for
in this Agreement.
Article 3 Restrictions on Copying the Software
Licensee may make a single copy of the Software in whole or in part, in machinereadable form, solely for back-up pur pose. Licensee must include, in such copy of the
software, the same copyright notice as included in the software.
Article 4 Computer
Licensee may use the Software only on one computer, and may not use it on more
than one computer. The Software may not be transferred or transmitted to, or shared
with, or accessed by other computers over or through computer networks and/or by
other means.
Article 5 Reverse Engineering, Decompiling or Disassembly
Licensee may not reverse engineer, decompile, or disassemble the Software, except
to the extent either of them is permitted under law or regulation of the country where
Licensee resides. Matsushita, or its distributors or dealers will not be responsible for
any defects in the Software or damage to Licensee caused by Licensee’s reverse
engineering, decompiling, or disassembly of the Software.
Article 6 Indemnification
The Software is provided “AS-IS” without warranty of any kind, either expressed or
implied, including, but not limited to, warranties of non-infringement, merchantability
and/or fitness for a particular purpose. Further, Matsushita does not warrant that the
operation of the Software will be uninterrupted or error free. Matsushita or any of its
distributors or dealers will not be liable for any damage suffered by Licensee arising
from or in connection with Licensee’s use of the Software.
Article 7 Export Control
Licensee agrees not to export or re-export to any country the Software in any form
without the appropriate export licenses under regulations of the country where
Licensee resides, if necessary.
Article 8 Termination of License
The right granted to Licensee hereunder will be automatically terminated if Licensee
contravenes any of the terms and conditions of this Agreement. In this event,
Licensee must destroy the Software and related documentation together with all the
copies thereof at Licensee’s own expense.
4
PT1.p1-5.p65 2003/01/14, 12:364
Page 5

Table of Contents
Before Use
Information For Your Safety .................................................................... 2
End User License Agreement ................................................................. 4
Things You Should Know ........................................................................ 7
Operating Precautions ............................................................................ 8
• Main Unit and Battery ............................................................................ 8
• Data Protection and PC Card HDD ....................................................... 9
• ScanDisk/CheckDisk ............................................................................. 9
Before Using
• Compatible Card ................................................................................. 10
• Folder Structure ................................................................................... 10
• Copying and Backup ........................................................................... 11
Selecting Modes [Copy/TV/PC] .............................................................. 13
Index Of Controls ................................................................................... 14
Carrying the Unit
• Attaching the Hand Strap .................................................................... 15
• Using the Carrying Case ..................................................................... 15
Recharging the Battery Pack ................................................................ 16
Inserting the Card .................................................................................. 17
Turning the Power On ............................................................................ 18
• HDD SAFETY Switch .......................................................................... 18
• Remaining Battery Life Display ........................................................... 18
Copy Mode
Display Indicator .................................................................................... 19
Menus ...................................................................................................... 20
Copying ................................................................................................... 21
Formatting Cards
• Format the SD Cards .......................................................................... 22
• Format the PC Card HDD ................................................................... 23
TV Mode
TV Mode Setup
• Setup (Connections)............................................................................ 24
TV Mode Functions (Initial Screen) ...................................................... 25
Display Information
• Displayable Image Formats ................................................................. 26
• Folders and Files ................................................................................. 26
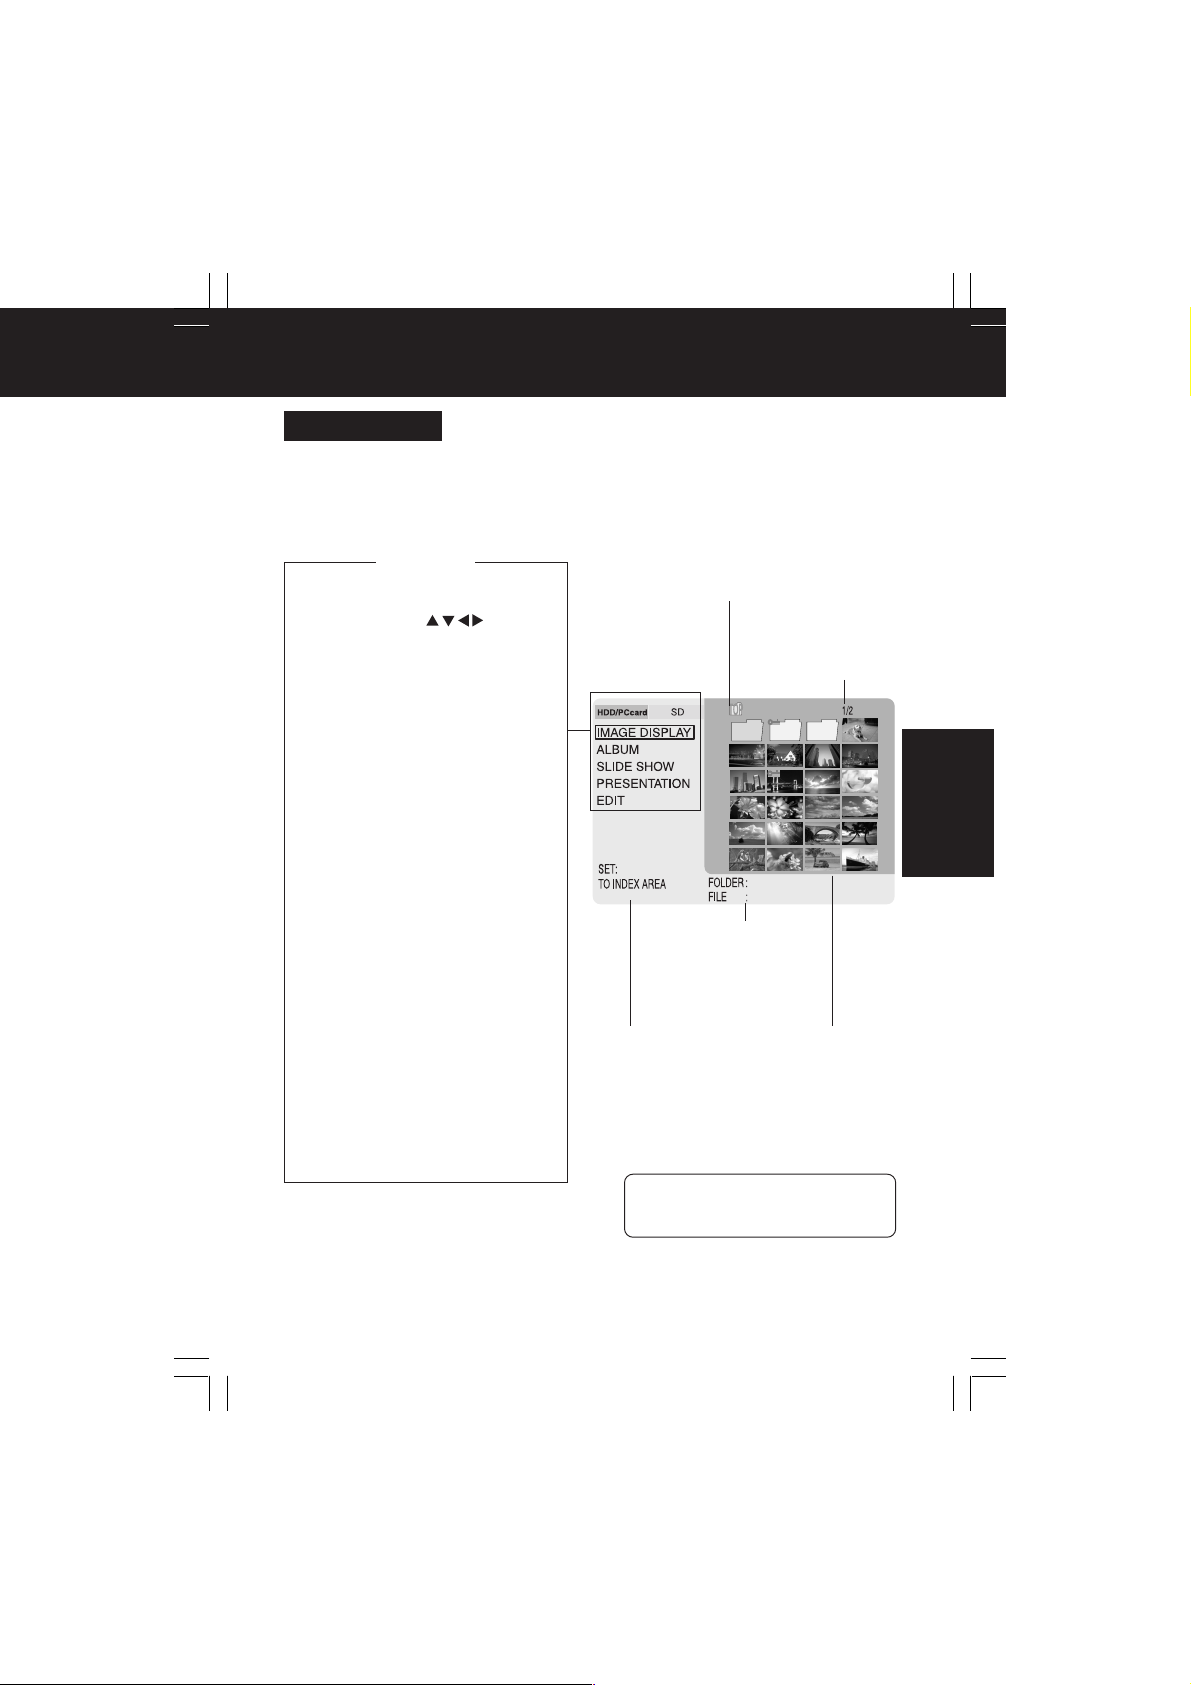
Image Display
• Viewing Images in the Index ............................................................... 27
• Using the Sub Menu ............................................................................ 27
Album ...................................................................................................... 28
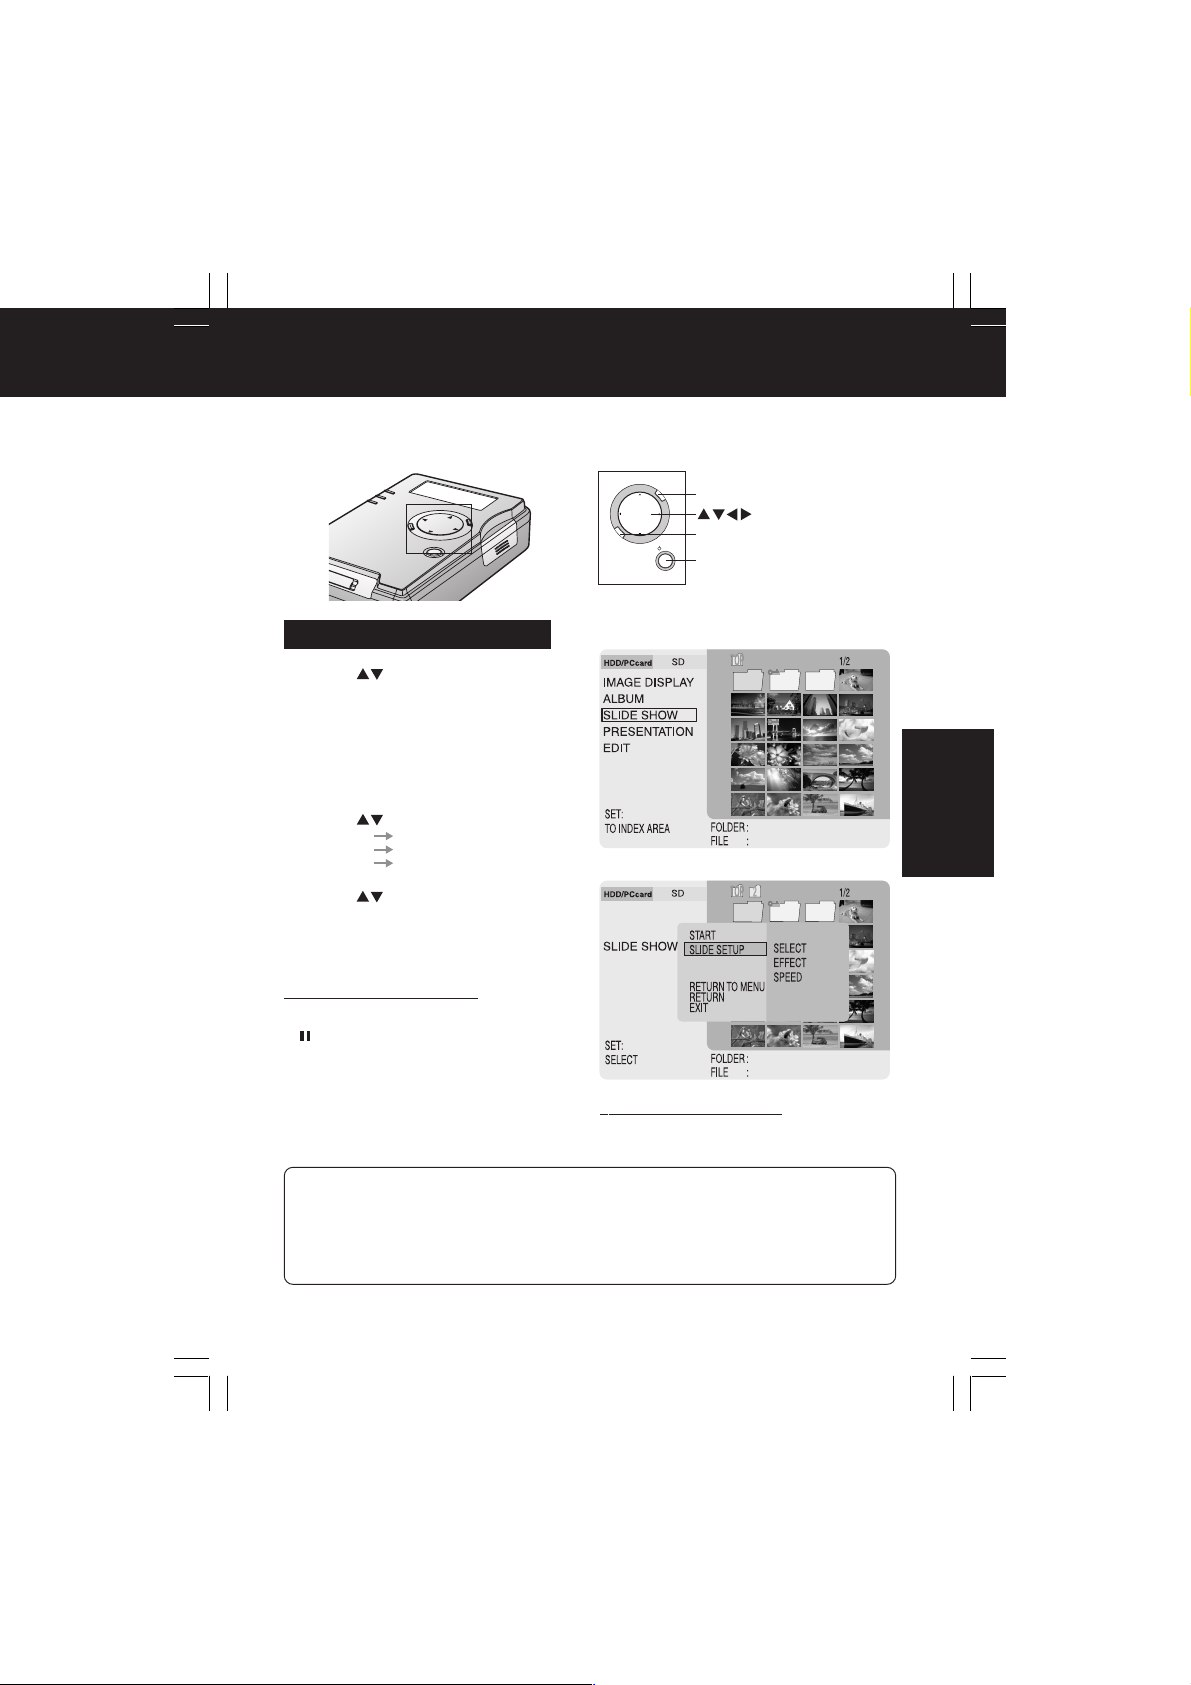
Slide Show
• Performing Slide Show ........................................................................ 29
Before UseBefore Use Copy Mode For Your InformationTV Mode PC Mode
5
PT1.p1-5.p65 2003/01/14, 12:365
Page 6

Table of Contents
Slide Show Settings
• Selecting Images ................................................................................. 30
• Setting Screen Transition Effects/Speed ............................................. 31
Presentation
• Performing Presentation ...................................................................... 32
• Selecting Presentation Content........................................................... 33
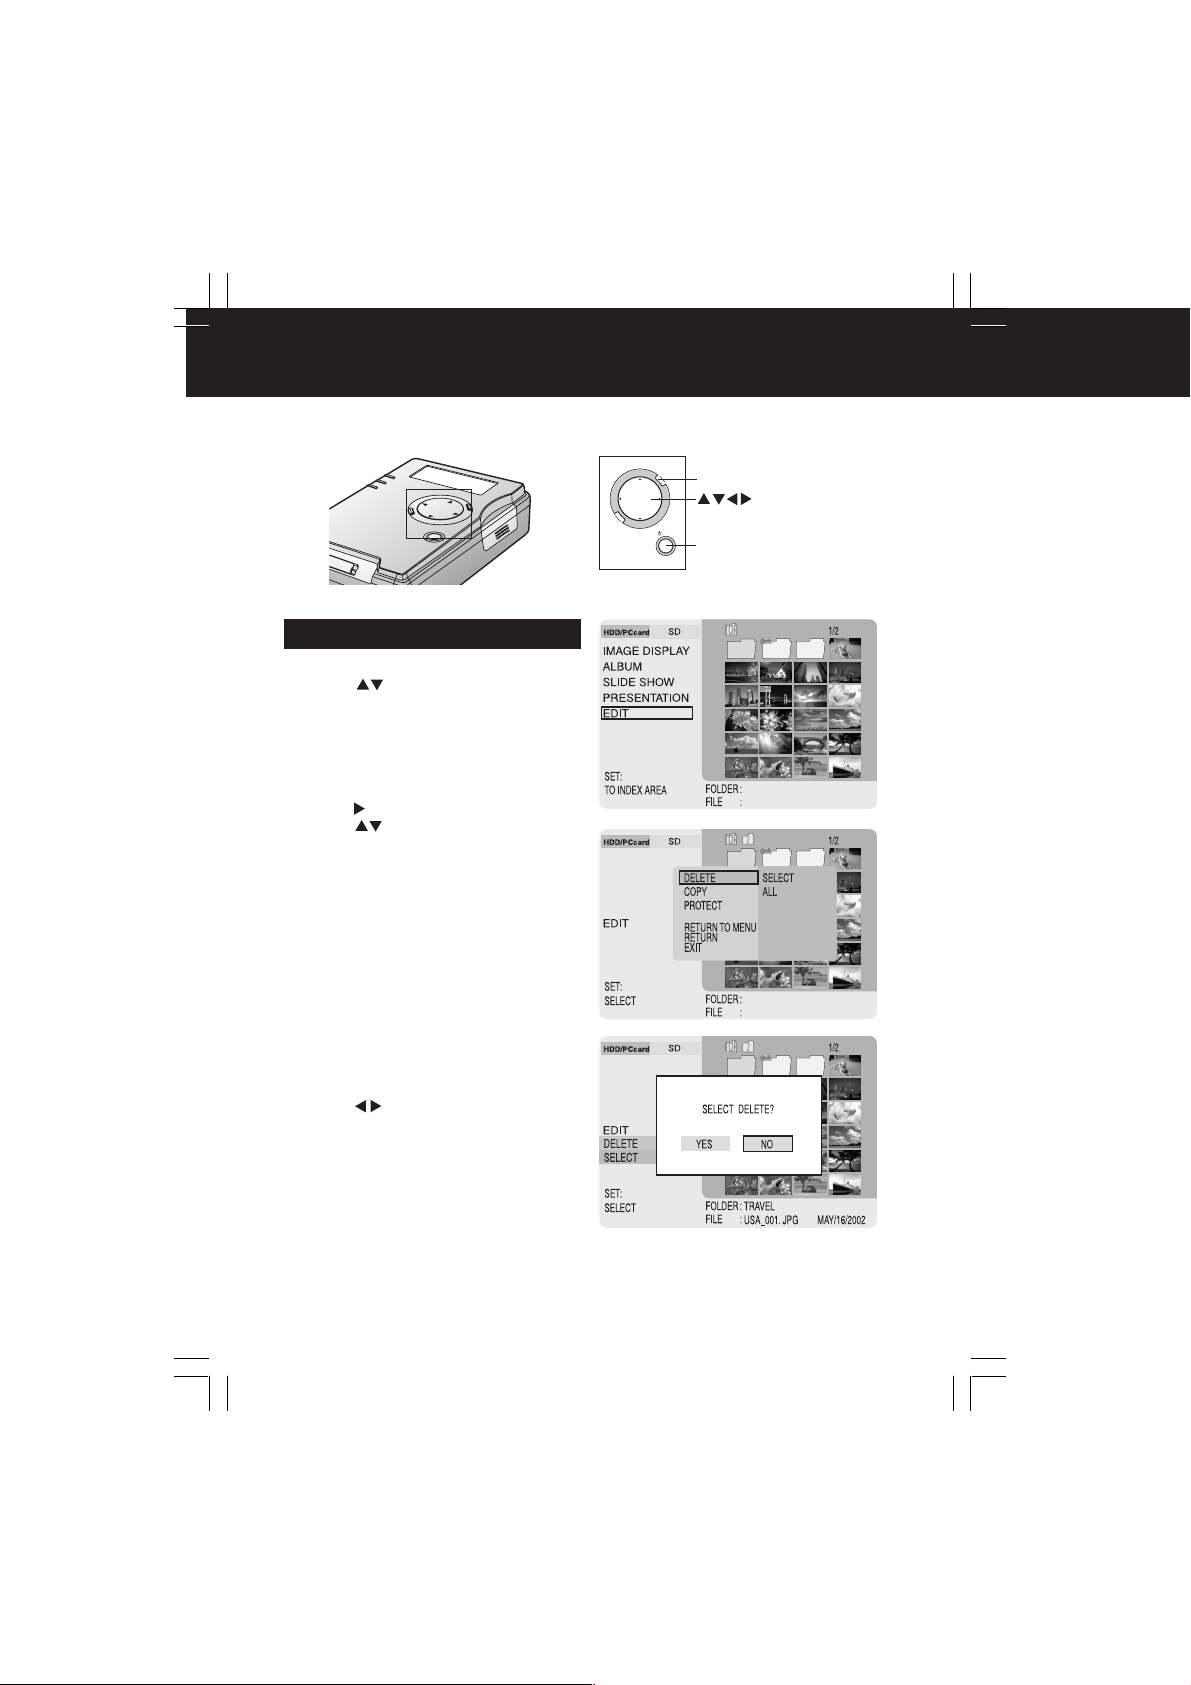
Editing
• Deleting Images (DELETE) ................................................................. 34
• Copying Images (COPY) ..................................................................... 35
• Protecting Images (PROTECT) ........................................................... 36
• How to Select Images ......................................................................... 37
Full Screen Playback
• Selecting Images ................................................................................. 38
• Displaying the Sub Menu .................................................................... 39
• Enlarging an Image (ZOOM) ............................................................... 39
• Rotating an Image (ROTATE) .............................................................. 40
• Processing Image Color (COLOR EFFECT) ....................................... 41
• Displaying Image Information (PROPERTIES) ................................... 41
PC Mode
PC Mode Setup
• System Requirements ......................................................................... 42
• Setup (Connections)............................................................................ 42
• Installing the USB Driver ..................................................................... 43
Operation with the PC
• File Operations .................................................................................... 44
• Disconnecting Unit from PC ................................................................ 45
Using the Applications
• Installation ........................................................................................... 46
• Presentation File Creation ................................................................... 47
Other
• Uninstalling JPEG Addin Software ...................................................... 48
• Reinstalling the Device Driver ............................................................. 48
• HDD SAFETY Switch Operation ......................................................... 49
For Your Information
Warning and Instruction Displays ........................................................ 50
Reset Function ....................................................................................... 52
Before Requesting Service ................................................................... 53
Specifications ......................................................................................... 55
Accessory Order Form .......................................................................... 57
Request for Service Notice ................................................................... 58
Customer Services Directory ............................................................... 59
Limited Warranty (U.S.A. only) .............................................................. 60
6
PT1.p6-9.p65 2003/01/14, 12:366
Page 7
Things You Should Know
Main Features
●●
● This unit is a compact, lightweight portable media storage unit.
●●
●●
● The generous 5 GB HDD allows ample storage for your still images.
●●
●●
● Stored images can be viewed and edited (delete, copy, etc.)
●●
on a TV at home or elsewhere.
●●
● This unit can serve as an external drive by connecting the USB
●●
port to your PC.
●●
● Still images can be played back from a variety of cards *
●●
to an SD Memory Card.
*1
Each type of card requires a compatible adaptor.
1
and copied
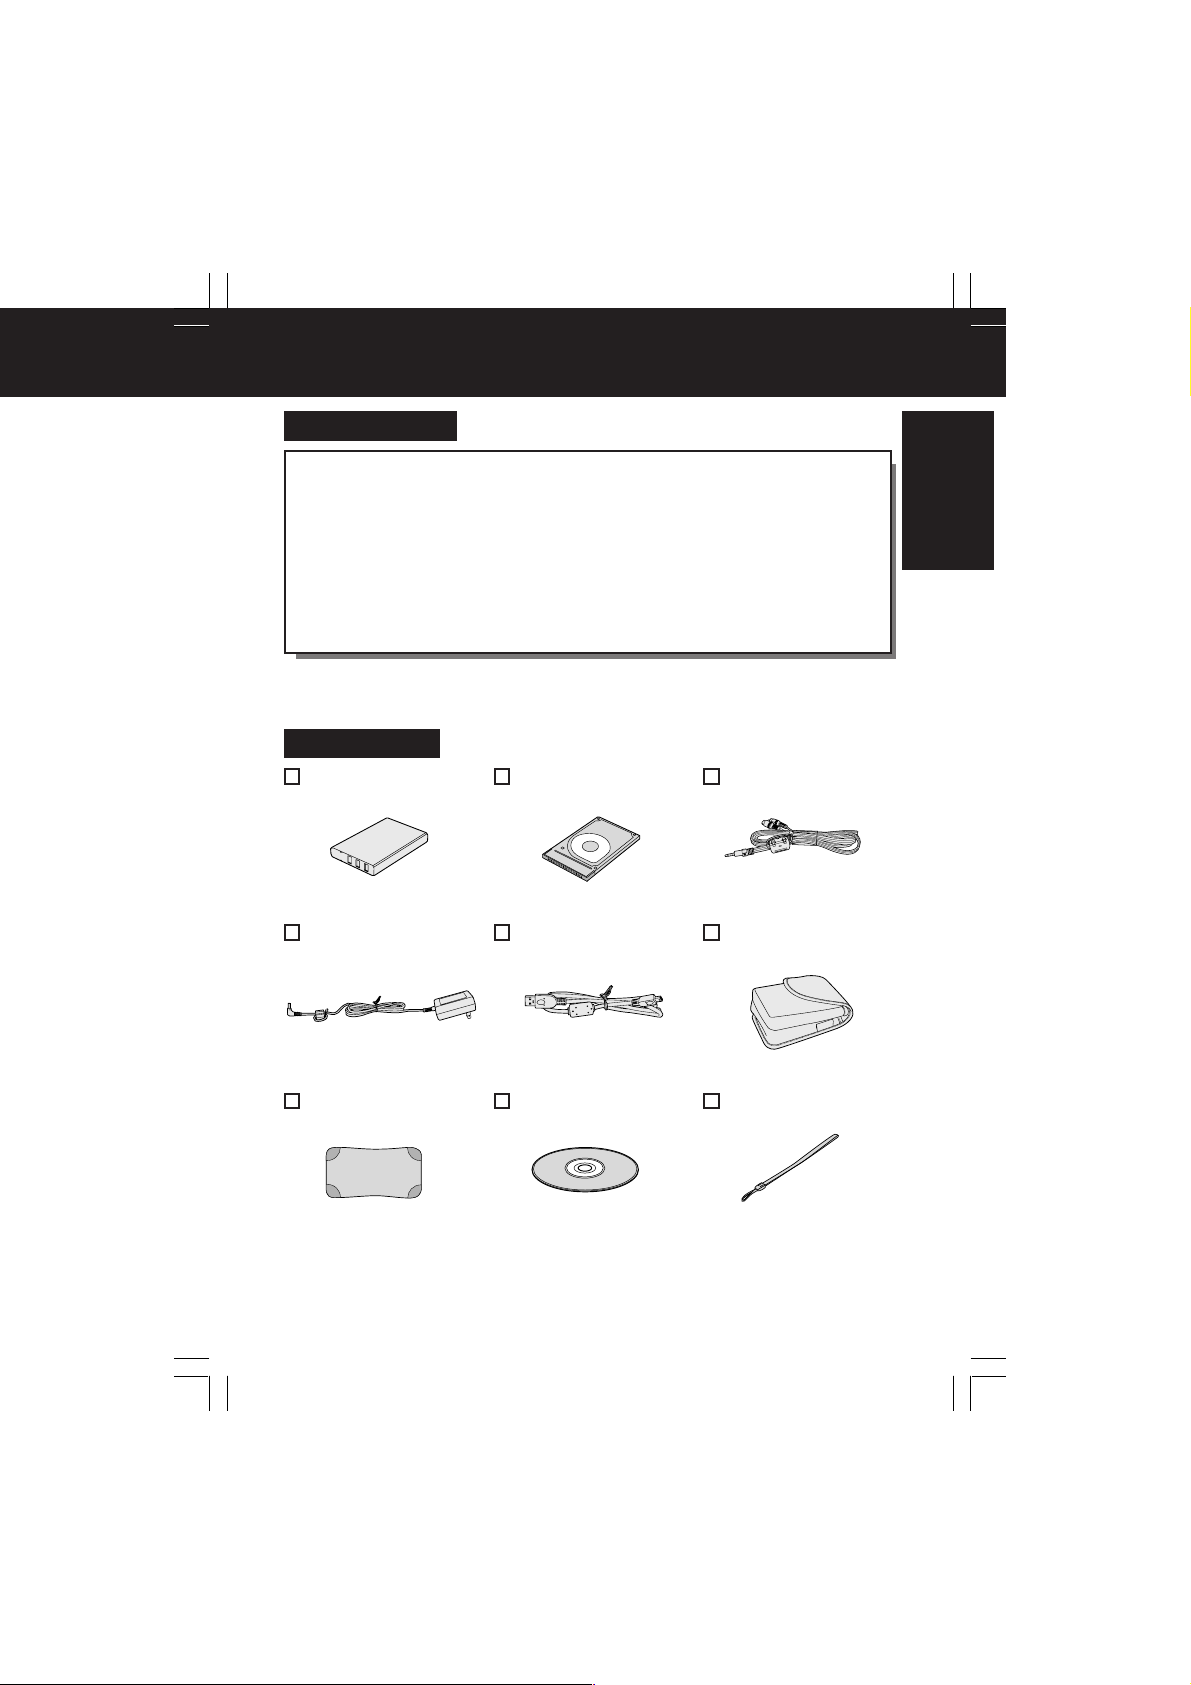
Accessories
Battery Pack
(CGA-S301A1)
AC Adaptor
(VSK0626C)
PC Card HDD
(RP-PH005A)
USB Cable
(LSEC0004)
Video Cable
(LSEC0003)
Carrying Case
(LSFC0019)
Before Use
PC Card HDD Case
(LSFC0020)
PT1.p6-9.p65 2003/01/14, 12:367
CD-ROM
(VFF0181)
Hand Strap
(VFC3803)
7
Page 8

Operating Precautions
Carefully read these precautions prior to use and strictly observe them during
unit operation. Failure to do so may result in product malfunction or damage.
Also, disregarding these precautions could cause damage to, or loss of, data
stored within the media.
• Do not leave this unit in direct sunlight, inside tightly closed vehicles, in extremely hot or cold
places, or near heaters or air conditioners. Avoid rapid temperature changes.
• Operate unit well away from magnetic or electromagnetic wave sources (e.g. microwave ovens,
TVs, game devices, portable telephones, etc.) as stored data may be lost or distorted.
• Do not let volatile substances, such as insecticides, come in contact with this unit as it could
seriously damage the unit’s exterior finish.
• Do not allow this unit to remain in dusty locations. If dust enters this unit, request an inspection
from the retail store where this unit was purchased.
• Ensure that this unit is protected from vibration and impact. Do not swing or drop this unit.
• Do not place objects on top of this unit and do not drop objects onto this unit.
• Do not attempt to twist or apply excess pressure to this unit.
• Do not use this unit’s jacks for pur poses other than those specifically designated for each jack.
Always ensure that the cables are properly connected.
• Do not insert foreign objects into this unit. The batter y and the storage media are the only
objects that may be inserted into this unit.
• This unit should be powered-up and operated at least once ever y 6 months.
• After each use, turn off the power and unplug the electrical cord from the outlet.
• Prior to performing maintenance, always unplug the electrical cord from the outlet and remove
the battery from this unit. Do not use benzene, thinners or alcohol to clean this unit. These
chemicals may cause deterioration, distortion and discoloration of the case. To clean this unit,
first use a soft, dry cloth to wipe off any dust. If this unit is extremely dirty, dilute a neutral
dishwashing detergent with water, moisten a clean cloth with this detergent mixture, remove any
excess liquid from the cloth, then wipe this unit clean. Finally, dr y this unit with a soft, dry cloth.
Precautions Pertaining to the Battery
Caution:
• Charge only with specified charger.
• Charge the Battery within an ambient temperature range of 50 F (10 °C) and 86 F (30 °C).
• The Battery may be warm after charging or just after use. This is normal.
• Do not use an insufficiently charged or worn out Battery.
• If charging is done in extreme low or high temperatures, Battery charge time increases.
Safety precautions:
• Do not place the Battery near, or dispose of in fire.
• Do not directly connect (short circuit) the positive (+) and negative (–) terminals.
• Never attempt to disassemble or reassemble the Battery.
To avoid damage to the Battery:
• Do not drop or jar the Battery.
• Use the Battery with specified models only.
• If the Battery is used in extremely high temperatures, a safety device will automatically prevent
operation.
To ensure longer battery life:
• While not in use, remove Battery from the unit and AC Adaptor and store in a cool, dark, dry
place. If you leave the Battery in the unit or on the AC Adaptor, the Battery will no longer be
rechargeable.
• Keep the Battery terminals clean.
U.S.A. CONSUMERS: ATTENTION:
A lithium ion/polymer battery that is recyclable powers the product
you have purchased. Please call 1-800-8-BATTERY for information
on how to recycle this battery.
8
PT1.p6-9.p65 2003/01/14, 12:368
Page 9

Operating Precautions
Card Data Protection
(Refer to page 10 for details on compatible cards.)
• Do not unplug the AC adaptor or disconnect the USB cable connecting a PC while this unit is in
operation.
• Do not remove the card while it is being accessed.
• Be sure the card does not contain important data before formatting it. Formatting irreversibly
deletes all data stored on the card.
• Do not touch the terminals on the back of the Memory Card.
• Electrical interference, electrostatic discharges and malfunctions of the unit or card may all result
in damage to the card or data loss. It is recommended that any impor tant data also be backed up
on a PC.
• Stored data should be periodically backed up as a protection against data corruption, data loss
or device malfunction. Please note that our company shall not accept any liability for damage or
loss of stored data.
• SD Memory Cards, Memory Sticks, Smart Media Cards and some CF Cards (when a PC Card
Slot is used) include a write-protect switch. When this switch is set to the “LOCK” position, it will
not be possible to write data to or delete data from the Memory Card or format Memory Card.
Handling the PC Card HDD
The PC Card HDD is a very small, high-precision hard disk drive. Be particularly careful when
handling this drive. Strictly observe the following to avoid HDD malfunction, damage, or data
loss.
• Do not subject the PC Card HDD to excessive vibration and strong impacts.
• Do not use the unit in areas of extreme temperature differences (where temperature changes
more than 15 °C in one hour). If the unit is suddenly moved from a cold place to a warm place or
vice versa, or if a room is quickly heated in wintertime or quickly cooled in summertime, or if a
cooler blows directly on the unit, etc., condensation (dew) may form. Using the unit in this
condition may cause serious damage to the HDD. If condensation occurs, turn the unit power off
and remove the PC Card HDD. Then leave this way for about 4 hours until the ambient
temperature equalizes. After confirming condensation is no longer present, you may use the unit.
• Do not twist the PC Card HDD or press down on the label surface, and do not write on the PC
Card HDD using a pen with a hard tip, as these actions may damage the PC Card HDD. When
holding the PC Card HDD, always hold it by the outside edges.
• Do not remove the label that is attached to the PC Card HDD. If this label is removed, you may
not be eligible for warranty service or other services.
• Before removing the PC Card HDD from its special carrying case, make sure that the side of the
case labeled “PC Card HDD” is facing upward. If the case cover is opened and the labeled side
is not facing upward, the PC Card HDD may fall out and be damaged.
• Always use the special carrying case to carry the PC Card HDD.
• Please note that our company shall not accept any liability for damage or loss of data stored within
the PC Card HDD due to inappropriate handling.
Before Use
ScanDisk
(“CheckDisk” for Windows 2000/XP users)
• Do not subject the PC Card HDD to excessive vibration or strong impacts. Also, do not turn off
the power supply or remove the card from the unit while it is in operation, otherwise data may be
corrupted. If a problem occurs, immediately use the computer’s ScanDisk/CheckDisk function to
check the media contents. (It takes several hours for ScanDisk/CheckDisk to finish checking the
PC Card HDD.) It is recommended that you then make a backup of the data on the media. See
page 42 on how to connect the unit to a computer. Refer to your computer manual regarding
ScanDisk/CheckDisk function.
PT1.p6-9.p65 2003/01/14, 12:369
9
Page 10
Before Using
• Photographs and printed materials may not be used except for personal and private
applications without authorization from the copyright owner.
: SD logo is a trademark.
•
• Microsoft
• Other product names, trade names and company used in this manual are trademarks or
• Any unauthorized copying or reproduction of the software from this product or distribution of the
• In this manual, “Memory Card” is used to refer to SD Memory Card and MultiMediaCard. In
• In this manual, the name “Windows 98SE” shall refer to “Microsoft
• In this manual, the name “Windows 2000” shall refer to “Microsoft® Windows® 2000 Professional”.
• In this manual, the name “Windows Me” shall refer to “Microsoft
• In this manual, the name “Windows XP” shall refer to “Microsoft
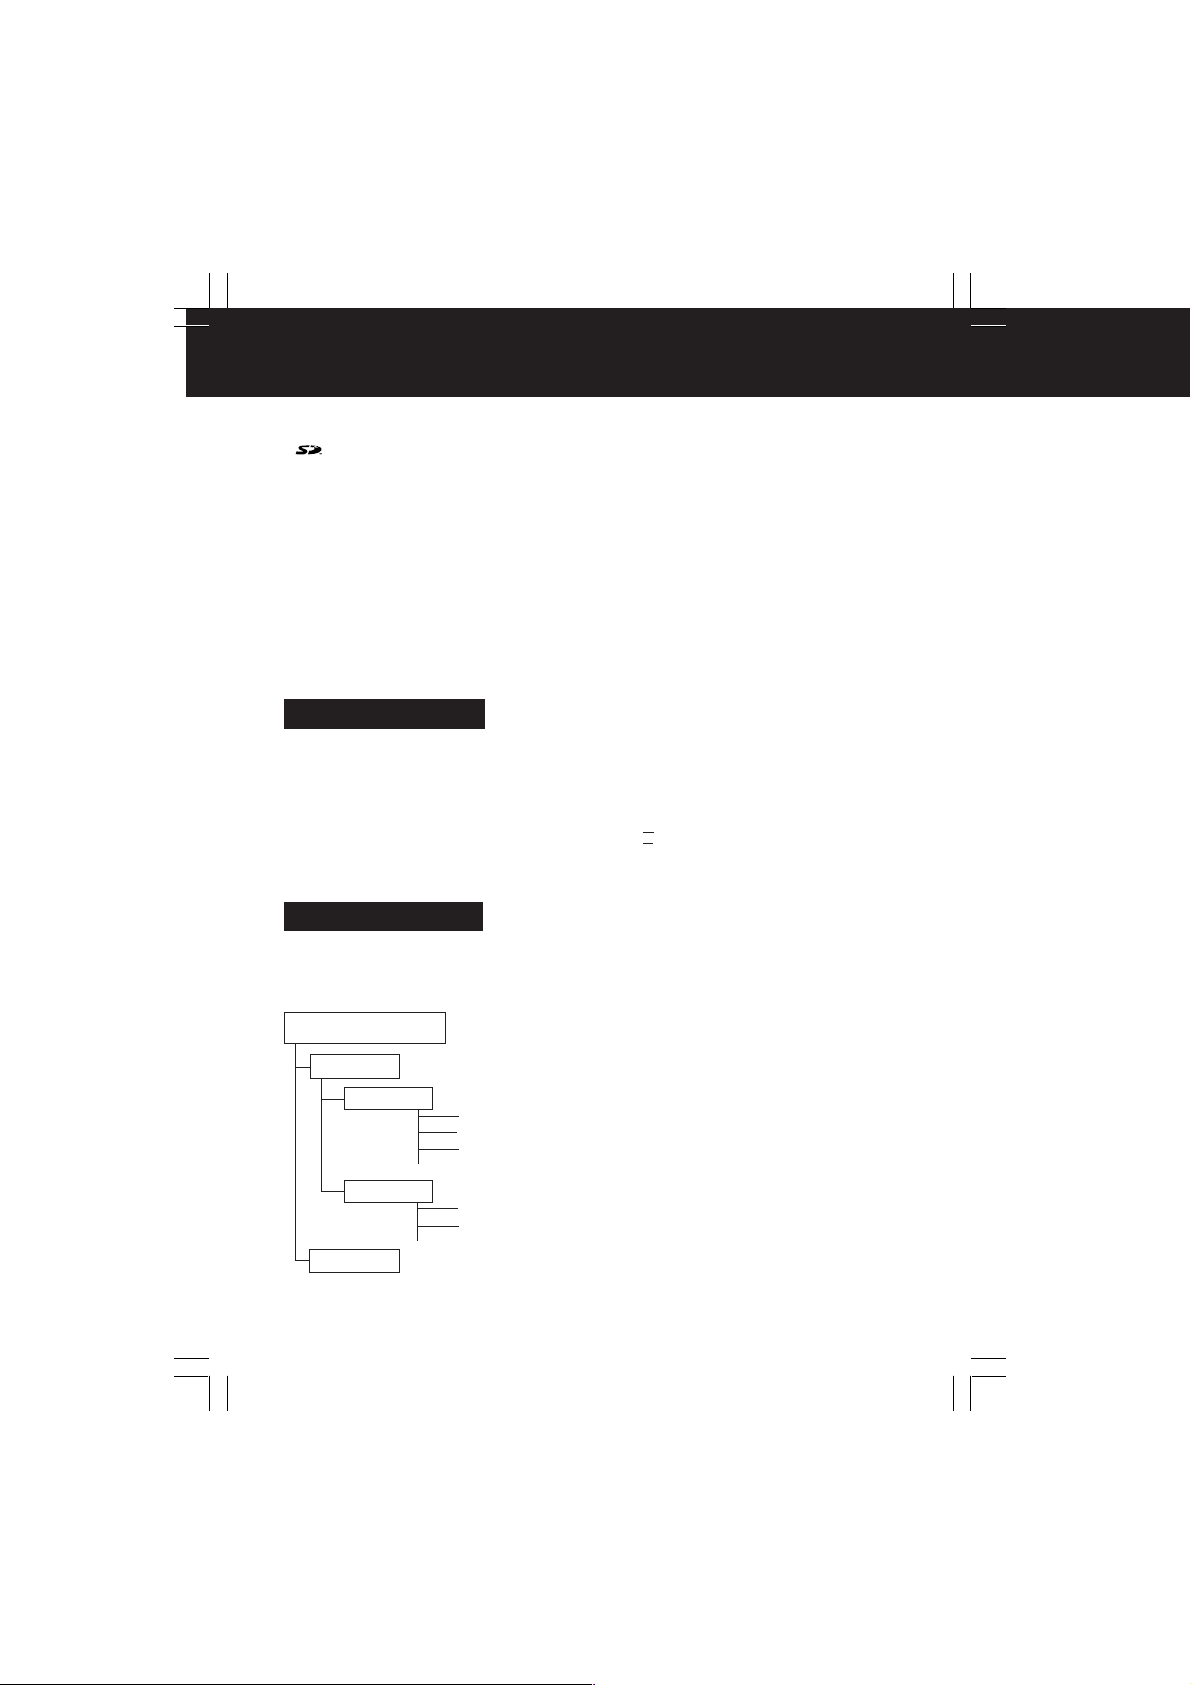
The following types of card can be used in this unit :
PC Card Slot
SD Memory Card Slot
Digital cameras that are compliant with DCF specifications use folders with a specific
structure. The following diagram shows an example of the folder structure. If these
folders are deleted, or if a folder name or file name is changed, the data may no
longer be readable by a digital camera.
®
States and other countries.
registered trademarks of their respective owners.
software over a network is strictly prohibited.
addition, “Card” is also used to refer to Memory Cards, the PC Card HDD and other types of
PC Cards.
EDITION”.
or “Microsoft
, Windows® and PowerPoint® are registered trademarks of Microsoft in the United
®
Windows® 98 SECOND
®
Windows® Millennium Edition”.
®
®
Windows® XP Professional”.
Windows® XP Home Edition”
Compatible Card
• PC Card HDD (2 GB, 5 GB) • Microdrive* • CF Card*
• SD Memory Card* • Memory Stick*
• MultiMediaCard* • Smart Media*
*Requires an ATA-compatible PCMCIA TYPE II adaptor for use, sold separately.
• SD Memory Card • MultiMediaCard
Folder Structure
DCIM Folder
SD Memory Card
DCIM
100_PANA
P1000001. JPG
P1000002. JPG
P1000003. JPG
101_PANA
P1010001. JPG
P1010002. JPG
MISC
The digital camera creates this folder
automatically.
100_PANA Folder
Folder names consist of a 3-digit folder number
which is followed by five arbitrar y characters.
Digital camera images are stored within these
folders.
P1000001.JPG: DCF File
File names consist of four arbitrary characters
followed by a 4-digit file number. DCF files are
image files (normally JPEG files) that have been
taken by a digital camera. (Other file extensions
such as TIF or THM may also be used.)
MISC Folder
The MISC folder contains the DPOF
configuration files that add print/slide information
to the images.
10
PT1.p10-13.p65 2003/01/14, 12:3610
Page 11

Before Using
Copying and Backup
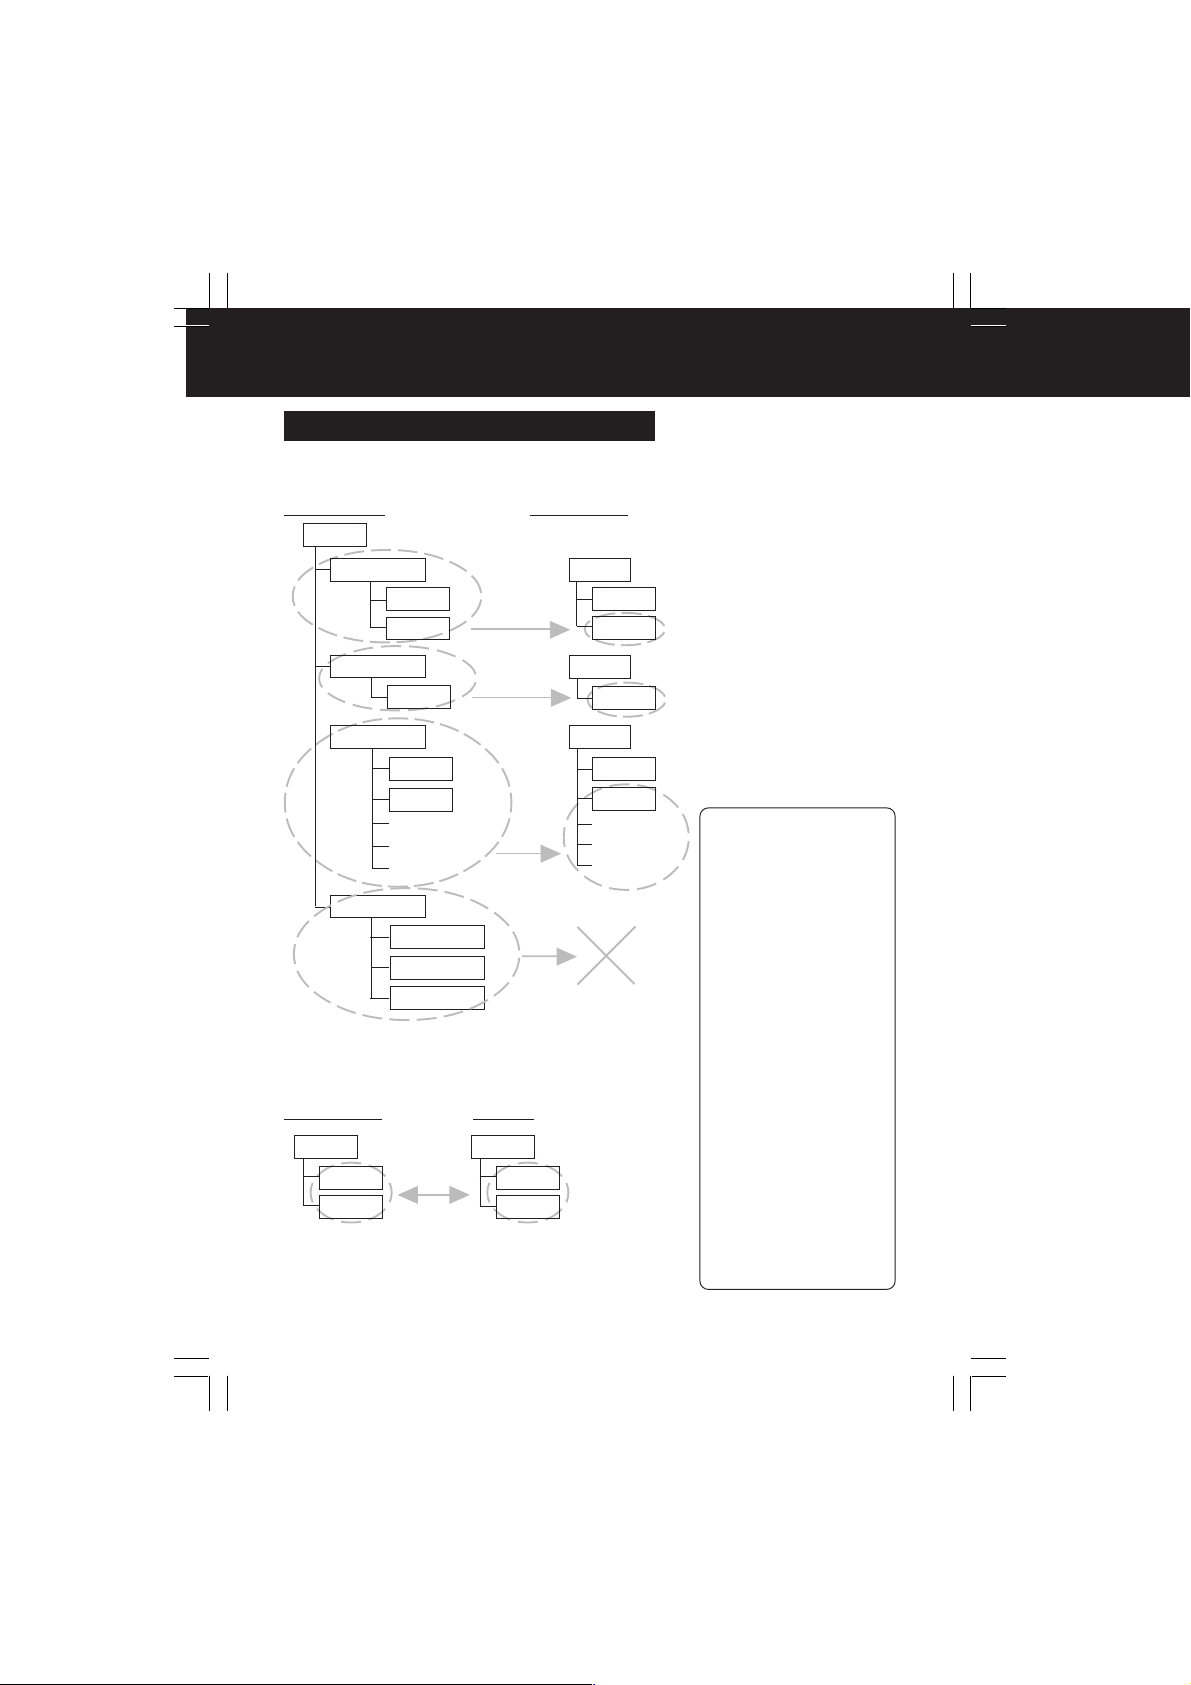
Copying: Memory Card -> PC Card HDD
When copying from a Memory Card to the PC Card HDD, create a folder entitled
“CARD****” for each copy and save Memory Card data into this folder. When BACKUP
is ON, the “CARD****” folder mentioned above is created in the “BACKUP” folder of
the PC Card HDD, and Memory Card data is copied into this folder. Thus, normal PC
Card HDD available space is reduced by half. See page 20 on how to turn the
BACKUP function ON and OFF.
Memory Card PC Card HDD
ROOT
ROOT
1
2
3
MISC
DCIM
ROOT
PHOTO
ROOT
MISC
DCIM
AAA. JPG
BBB. TXT
CCC. EXE
CARDA001
MISC
DCIM
CARDA002
PHOTO
CARDA003
MISC
DCIM
AAA. JPG
BBB. TXT
CCC. EXE
Delete
* Even after deletion,
the data will be
retained in the
[BACKUP] folder.
Before Use
BACKUP
CARDA001
CARDA002
CARDA003
See next page on how to copy from PC Card HDD to a Memory Card.
– Note –
• The contents of the BACKUP folder cannot be checked during TV mode. Use the computer to
check the contents at this time.
• Secure data files (audio files that include copyright restrictions) will not be copied.
• The **** portion of the “CARD****” folder name is assigned automatically in numerical order
within the range of “A001~A999, B001~Z999”. Because of this, please do not change the
file names yourself.
PT1.p10-13.p65 2003/01/14, 12:3611
11
Page 12
Before Using
Copying and Backup (Continued)
Copying: PC Card HDD -> Memory Card
The folder entitled “CARD****” will disappear and data will be copied according to the file
structure rules.
PC Card HDD
ROOT
CARDA001
MISC
DCIM
Memory Card
ROOT
MISC
DCIM
CARDA002
PHOTO
CARDA003
MISC
DCIM
AAA. JPG
BBB. TXT
CCC. EXE
ROOT
PHOTO
ROOT
MISC
DCIM
AAA. JPG
BBB. TXT
CCC. EXE
BACKUP
CARDA001
CARDA002
CARDA003
Data files will not
be copied.
Copying: Memory Card <-> PC Card
When copying from a PC Card to a Memory Card or vice
versa, the data can be copied directly.
Memory Card
ROOT
MISC
DCIM
• This operation is possible for all types of cards
except the PC Card HDD.
PC Card
ROOT
MISC
DCIM
– Note –
• BACKUP folder contents,
not displayable in TV mode,
can be copied/edited/
deleted on a computer.
• Secure data files (including
copyrighted audio files) will
not be copied.
• When copying data to a
Memory Card, reset the
DPOF settings on devices,
such as digital cameras,
digital video cameras, etc.
that allow you to do so. See
the device manual.
• If no MISC folder has been
created on the card to
which the data will be
copied, the MISC folder will
also be copied.
• When copying a DCIM
folder name, e.g.
“100_PANA”, and that
name already exists on the
card, change the name to
“101_PANA” before
copying.
• If an overwrite operation is
about to occur in a folder
other than the DCIM folder,
a message asking the user
to confirm the overwrite
operation will be displayed.
12
PT1.p10-13.p65 2003/01/14, 12:3612
Page 13
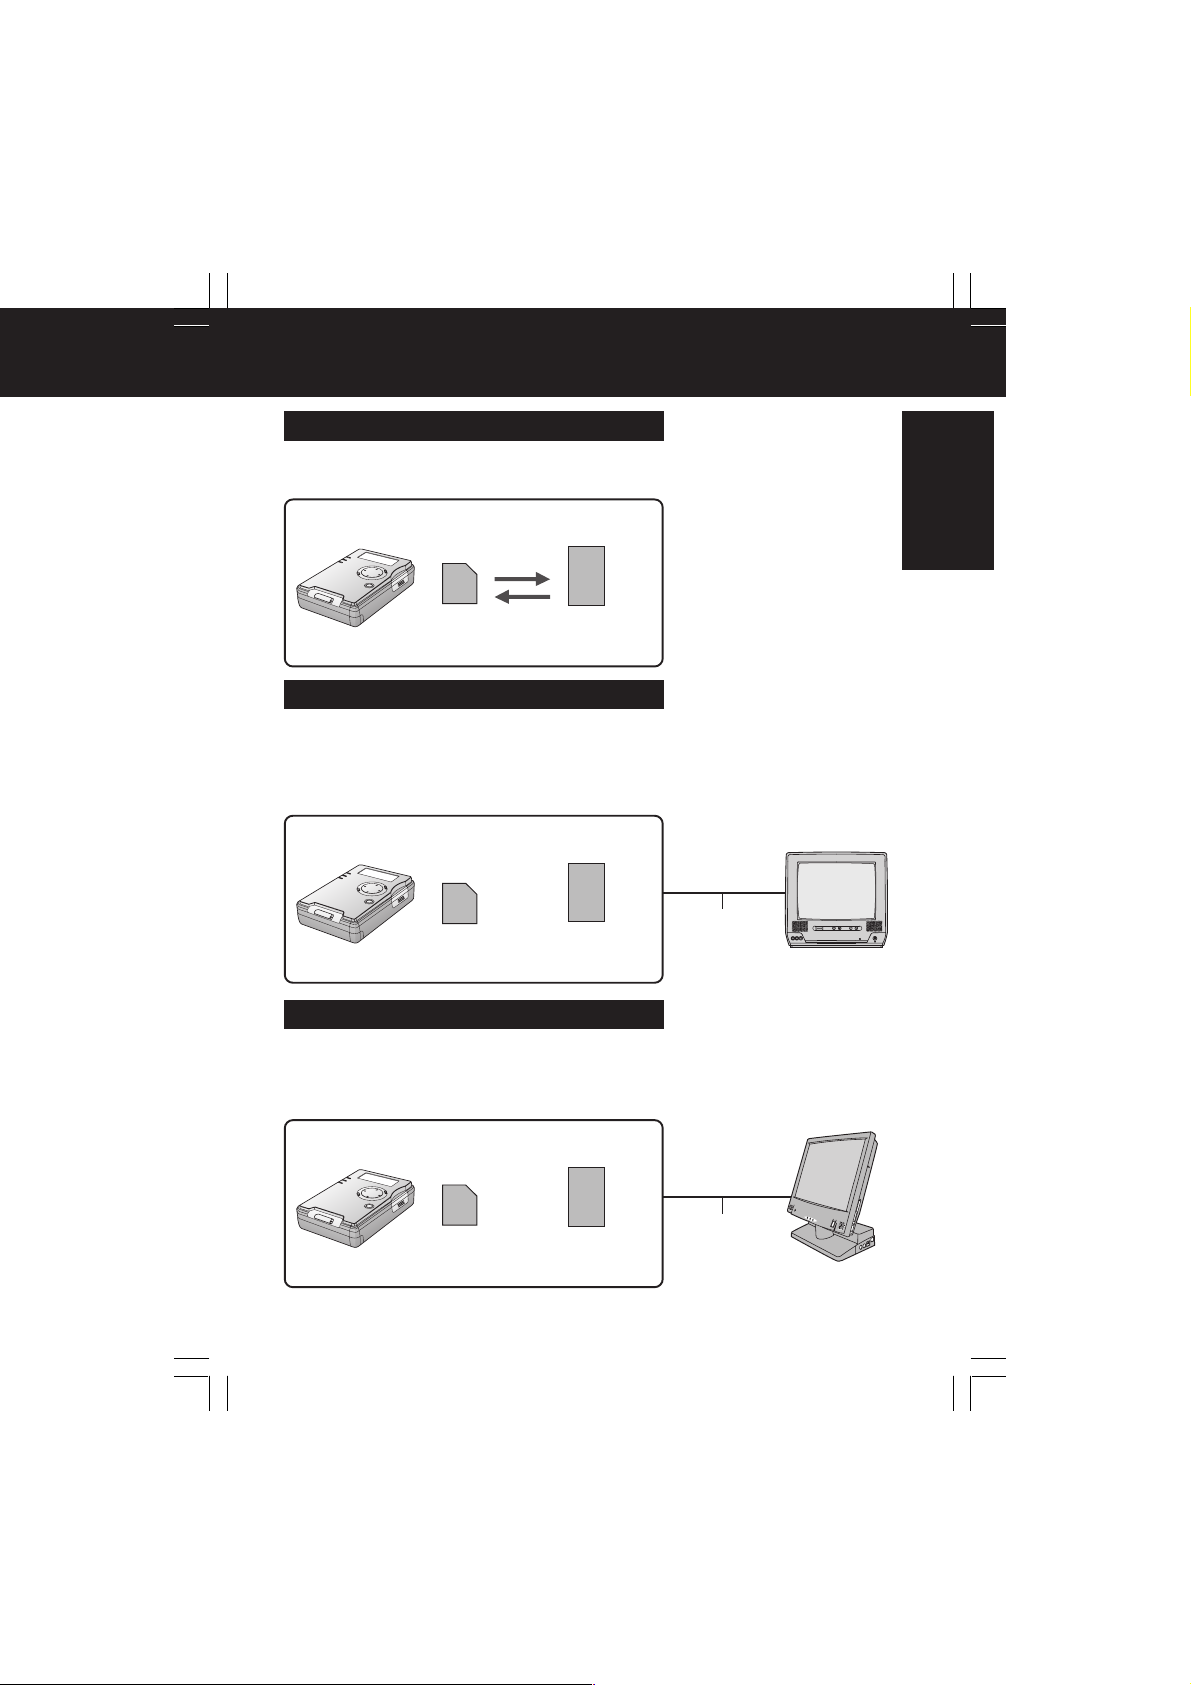
Selecting Modes
Copy Mode (pp. 19~23)
Copy mode is used to copy data from the inserted card to another card. In addition,
you can press MENU to carry out operations such as checking the card storage
capacity, making backup and TV format settings and formatting cards.
Memory Card PC Card HDD
(Or other card)
TV Mode (pp. 24~41)
In TV mode, you can connect the unit to a TV and then carry out playback and edit
operations (such as copying, deleting, protecting, zooming, rotating and enhancing
colors) for the data stored on a card while viewing the data on a TV screen.
* Only JPG, TIF, and MOV type files can be displayed. Other files require the unit to
be in PC Mode.
or
Memory Card PC Card HDD
(Or other card)
Video Cable
TV
Before Use
PC Mode (pp. 42~49)
In PC mode, the unit is connected to a computer using a supplied USB cable,
allowing the unit to function as an external disk drive. The data on the card inside the
unit can then be edited (copied and deleted, etc.), and the accessory software
application can be used to create files for presentations.
or
Memory Card PC Card HDD
PT1.p10-13.p65 2003/01/14, 12:3613
(Or other card)
USB Cable
PC
13
Page 14
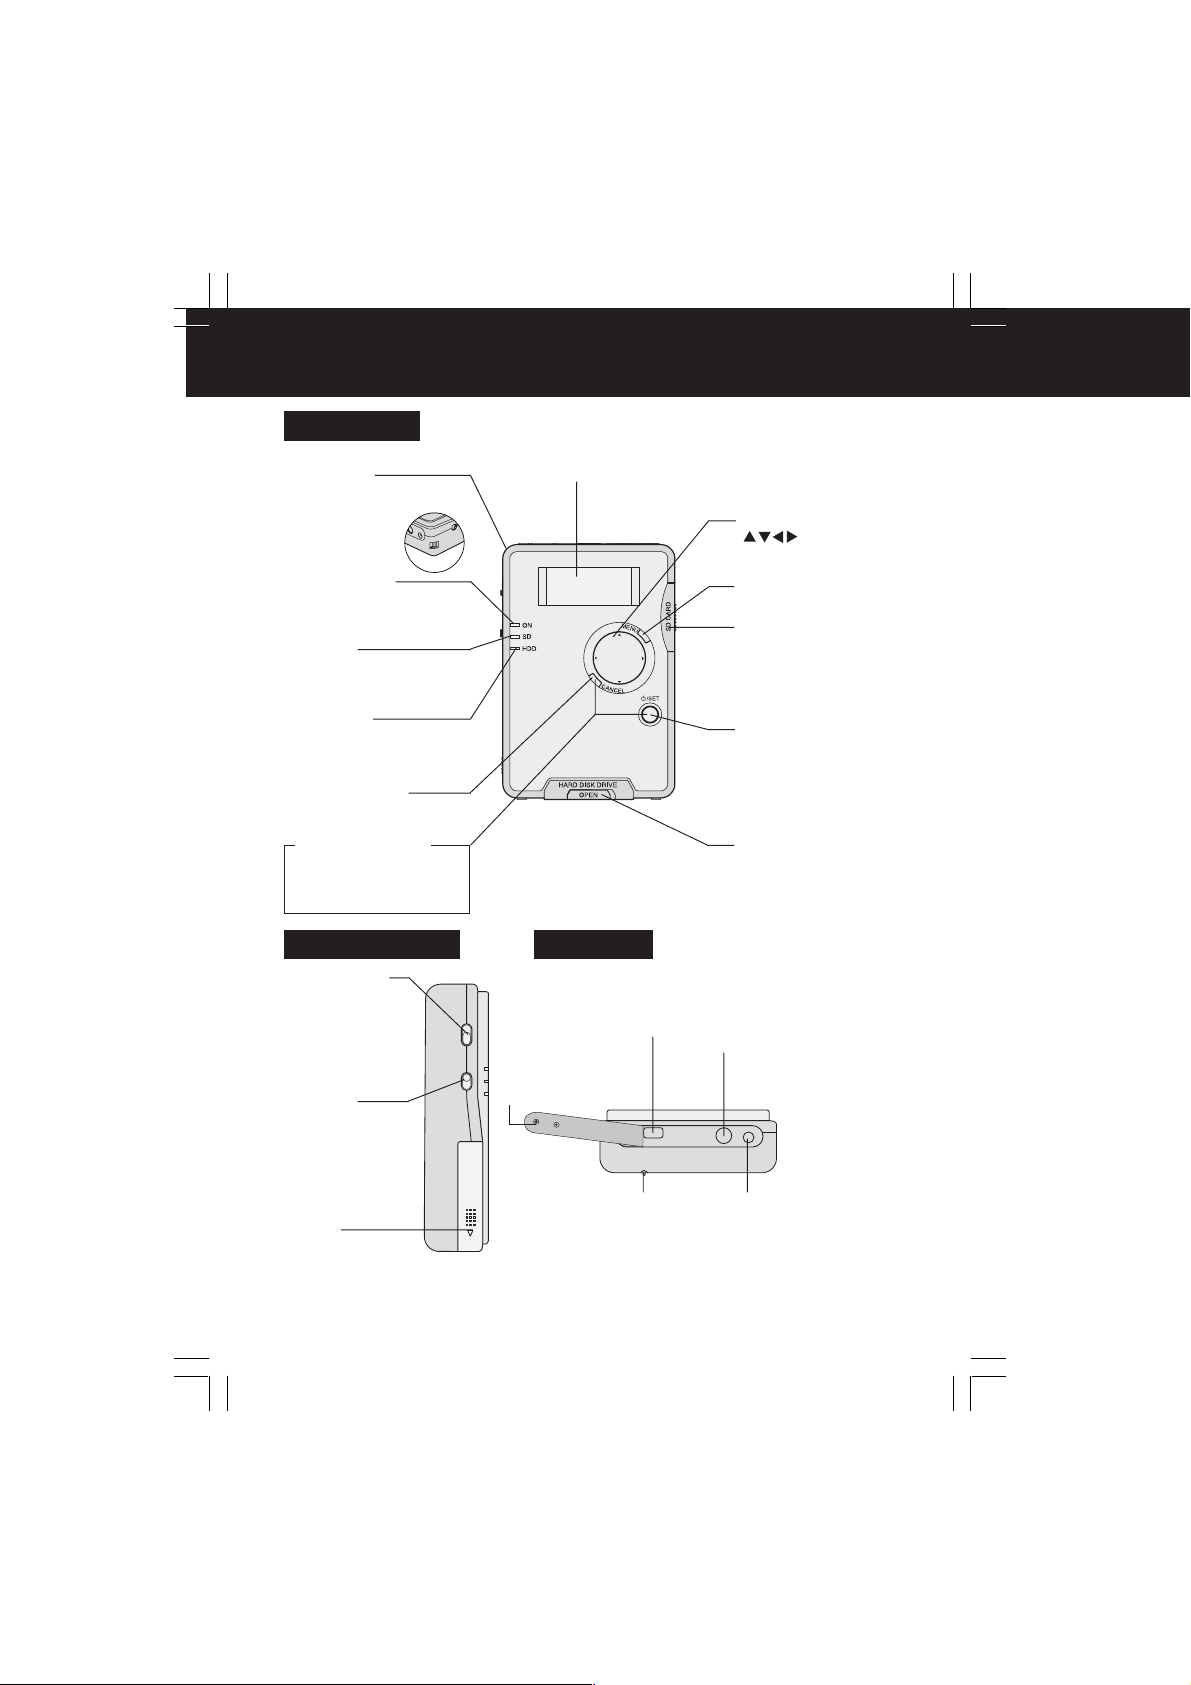
Index Of Controls
Front View
Hand Strap
Attachment Pin
Attach hand strap here.
(p. 15)
POWER Lamp
Lights when power is
ON. Flashes during
battery recharge.
SD Lamp
Lights when SD Memory
Card or MultiMediaCard
is accessed.
HDD Lamp
Lights when PC Card
HDD or PC Card is
accessed.
CANCEL Button
Cancels Slide Show and
presentations.
RESET Function
Press CANCEL and
STANDBY simultaneously
for 5 seconds to reset unit.
(p. 52)
Left Side View
HDD SAFETY
(ON/OFF)
Switch
Turns HDD
SAFETY function
ON/OFF. (p. 18)
COPY/TV
MODE Switch
Switches between
Copy and TV
operating mode.
(pp. 19, 24)
Battery
Compartment
Holds the battery.
14
Liquid Crystal Display
The LCD indicates the current operating (TV, Copy) mode.
• In Copy mode, displays battery level, data transfer progress,
and various menus. (pp. 18~23)
• With USB cable connection, displays card selection options.
(p. 44)
Cursor Buttons
( )
Moves the cursor up,
down, left and right.
MENU Button
Displays/Clears menu.
SD
HDD
SD Memory Card
Slot
Open to insert/remove SD
Memory Card or
MultiMediaCard. (p. 17)
STANDBY Button
Press this button for
approx. 2 seconds to tur n
power ON/OFF.
SET Button
Executes selected
operation.
PC Card HDD (PC
Card) Slot
Slide lever and open
cover to insert/remove
PC Card HDD or PC
Card. (p. 17)
End View
USB Terminal
By connecting this unit to a
HDD SAFETY
OFF ON
COPY TV
MODE
BATTERY OPEN
PC with the supplied USB
cable, it can function as an
external drive. (pp. 42~49)
Connector Cover
Protects the
connectors.
HDD SAFETY Detection
Switch
This switch pops out if the unit is
lifted up. In this case, the HDD
and all operations stop.
(p. 18)
USB
S/V Output Connector
You can use the supplied
video cable to connect this
unit to the S-Video or Video
terminals of a TV to view
images. (p. 24)
S/V OUT DC IN
DC Input Connector
(Power Supply)
This unit can be supplied
with external power by
connecting the AC adaptor
(supplied) to this connector.
(pp. 16, 24, 42)
PT1.p14-18.p65 2003/01/14, 12:3614
Page 15
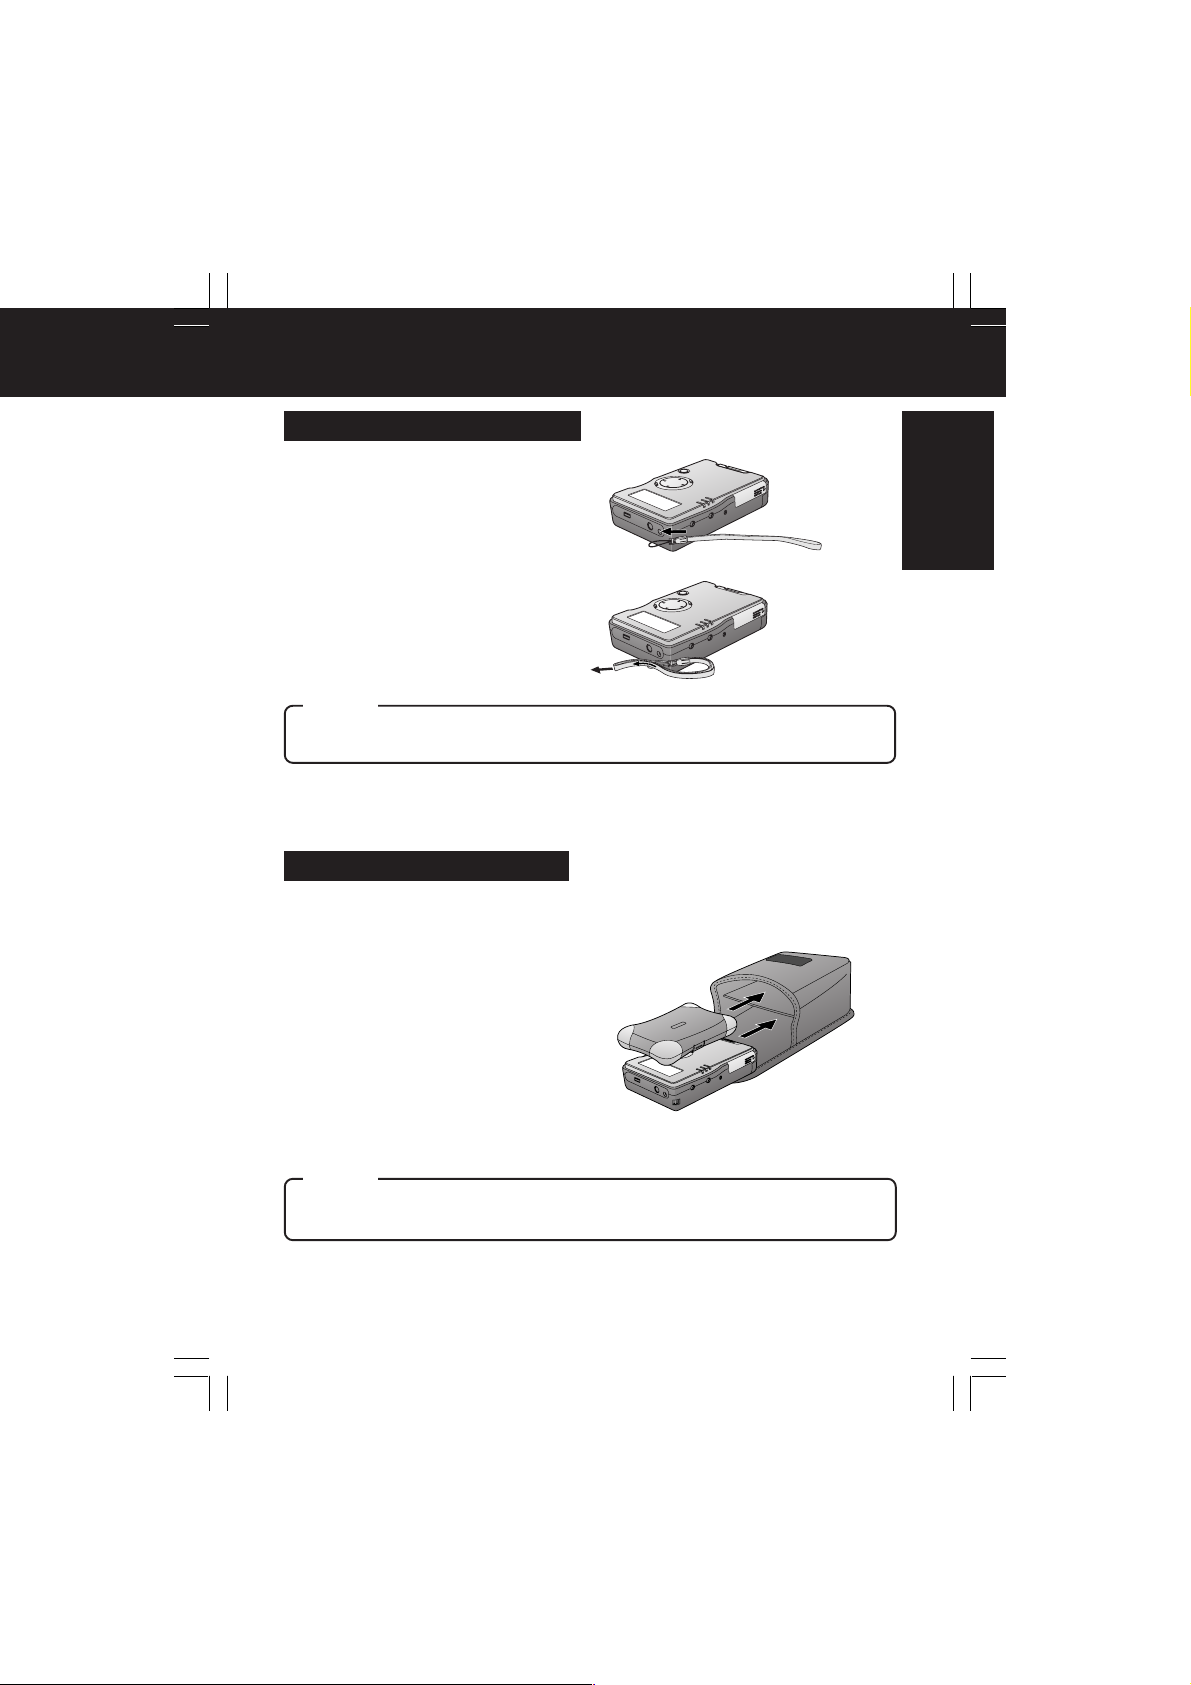
Carrying the Unit
Attaching the Hand Strap
1 Insert strap end loop into gap of
Attachment Pin.
2 Thread opposite end through the
end loop and pull strap tight in
the direction of arrow.
Caution
• This unit is a precision device. When carrying this unit, ensure that it does not swing
excessively. Do not drop this unit or subject it to strong impacts.
Using the Carrying Case
1 Open the carrying case.
2 Insert this unit into the lower
compartment.
Before Use
3 Insert the PC Card HDD case into
the upper compartment with the
“PC Card HDD” mark facing
upward.
4 Close the carrying case.
Caution
• When transporting the unit, always turn off the power and insert the PC Card HDD into its
case and then place the case inside the carrying case.
PT1.p14-18.p65 2003/01/14, 12:3615
15
Page 16

Recharging the Battery Pack
The battery pack can be recharged right inside this unit using the supplied AC
adaptor. Unit power must be turned OFF before recharging. Charging will stop if
unit power is turned on.
1 Slide the battery
cover slightly to the
right and swing open.
2 Insert the battery
(labeled side up) all the
way into the battery
compartment.
3 Close the cover.
1
2
To remove the Battery :
Use your fingertip to push
down on the catch.
Catch
4 Connect the DC plug
of the AC adaptor to
unit’s DC IN terminal,
then the AC adaptor
into a wall outlet.
• The POWER Lamp
flashes during
recharging.
1
5 Recharge is complete when POWER Lamp
goes out.
• A fully charged battery, given a temperature of 20 °C with
60 % humidity, will give about 80 minutes of operating time.
(Operating time may depend on the conditions of usage.)
2
Caution
• Remove battery if unit will not
be used for a long period.
• Do not install/remove battery
or plug in or unplug the AC
adaptor with unit power ON.
This may cause unit damage
or loss of data.
• Do not unplug AC adaptor
while recharging.
POWER Lamp Indications During Charging
During normal charging, the POWER Lamp flashes in approx. 1-second intervals. Charging usually
finishes in about 90 minutes. However, if the lamp flashes faster or slower than this (or if POWER
Lamp goes out before charging is finished), it means a problem has occurred. The flashing speed
can tell you what the problem may be. See below.
If you believe a problem has occurred, contact your nearest Servicenter.
Flashing rapidly (approx. 0.5-second intervals):
• Possible problem with the unit or batter y or the AC adaptor.
Flashing slowly (approx. 6 second intervals):
• Temperature of the battery or its surroundings is too high or low, or the battery is overdischarging. Charging can still continue under these conditions, but will take longer than
normal.
Lamp is OFF (charging is not yet finished):
• There may be a problem with the AC adaptor.
16
PT1.p14-18.p65 2003/01/14, 12:3616
Page 17
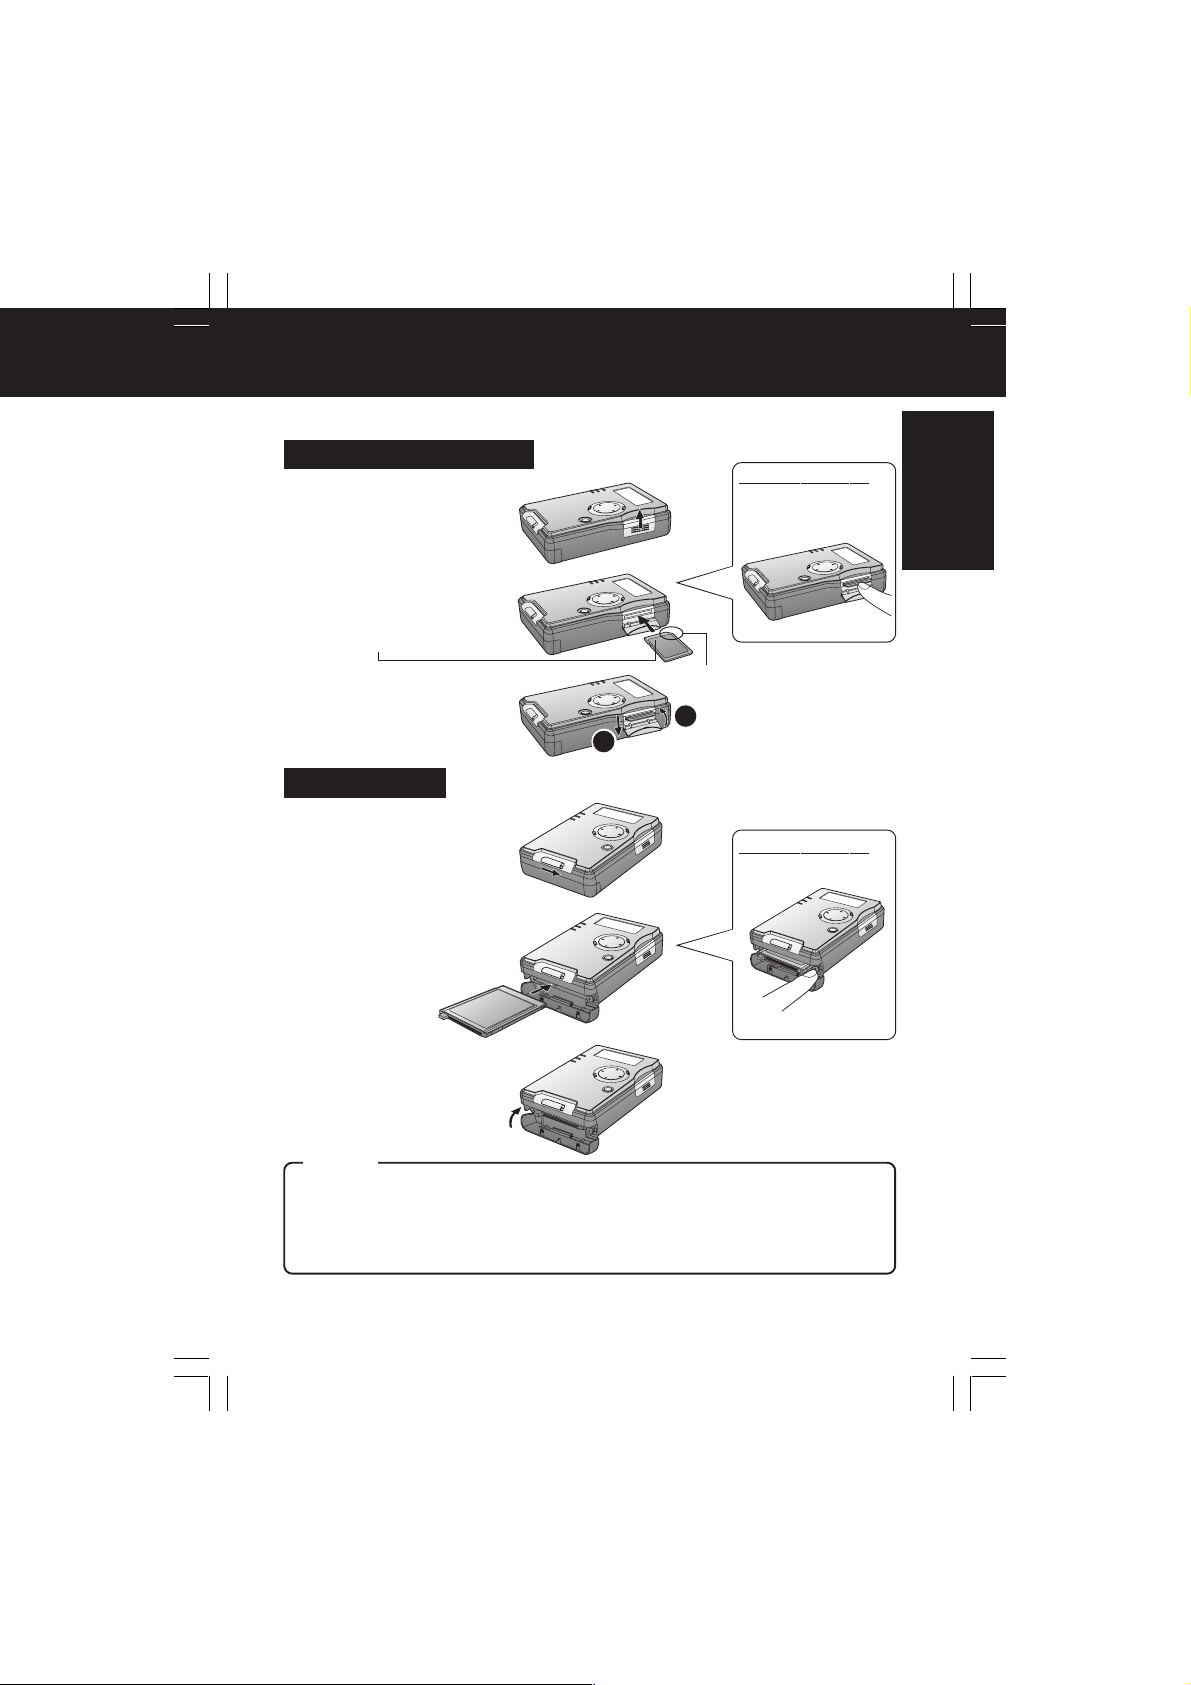
Inserting the Card
Set STANDBY to OFF when inserting or removing a Card.
SD Memory Card Slot
1 Push up slightly on card
door to swing open.
2 Insert the Memory Card
(labeled side up, cropped
corner right) and hold in
place until you hear a click.
cropped corner
3 Close the lid.
2
1
PC Card Slot
1 Slide the lever to open the
cover.
2 Insert the PC Card HDD or
PC Card all the way into
the slot.
To remove Card :
Open card door.
Press in lightly on
card then release.
To remove Card :
Press EJECT TAB
twice.
Before Use
3 Close the cover.
Caution
• Always insert card in the correct direction. Failure to do so may result in damage to the card
and this unit.
• The PC Card HDD and Memory Card are precision devices. Do not subject them to excessive
pressure or strong impacts.
• If the card door does not close completely, remove the card, check insertion orientation, and
reinsert. Also, confirm that EJECT TAB was fir mly pressed.
PT1.p14-18.p65 2003/01/14, 12:3617
17
Page 18
Turning the Power On
U
S
B
S
/V
O
U
T
D
C
IN
In case of a power outage, the unit utilizes the supplied battery as a backup
in order to protect the unit and the card data. If you are using the AC adaptor,
insert a sufficiently charged battery before turning on the power. The unit
cannot be used if only the AC adaptor is used.
1 Insert the battery and connect the AC adaptor. (p. 16)
• The unit can be operated using only the battery, but when using PC mode, the AC
adaptor must be connected, otherwise the unit will not turn on.
2 Place unit on a flat, level surface.
• If this is not done, the HDD SAFETY Switch may prevent the unit from operating.
(See below.)
3 Press STANDBY for approx. 2 seconds.
• The power comes on (POWER Lamp lights) and the
unit cycles through each operating mode in sequence.
(p. 13)
– Note –
• If using the unit on battery power only, the power will turn off automatically if no unit operations
are carried out for 5 minutes, in order to conserve battery power.
• The power cannot be turned off while the HDD SAFETY Detection Switch has been activated.
(See below.)
To turn this unit off :
Press STANDBY for approx.
2 seconds.
HDD SAFETY Switch
HDD SAFETY
Important: Keep unit on flat, level surface while in
use. If the unit is lifted up or placed on a surface that is
not flat and level, the PC card HDD operation will be
stopped by the HDD SAFETY Switch to protect it from
OFF ON
COPY TV
MODE
HDD SAFETY
(ON/OFF)
damage.
• If the unit receives a strong impact, the PC Card HDD data may
be corrupted. It is advisable to keep this switch ON.
(ON is the default setting.)
• If the HDD SAFETY Detection Switch, located under the unit, is
activated, unit operation will be stopped and a warning message
will appear on the TV screen and unit LCD. In this case, place
unit on a flat, level surface. Normal operation will resume. Any
copy operations resume from precise point where copying was
interrupted.
• If the HDD SAFETY Detection Switch is activated while the unit
is connected to a PC, “SAFETY MODE PUT IT DOWN” will
appear on the unit LCD. Copy operation in progress at this time
will be suspended, and computer errors may also occur.
HDD
SAFETY
Detection
HDD stops and all
operations are interrupted.
Remaining Battery Life Display
COPY MODE
When the BATT. and the battery icon start flashing, all buttons, except
power off, are inoperable. Connect the AC adaptor or recharge the battery. If the
battery completely runs down during copying, the copying is stopped and power is
shut off. It may not be possible to play back the data that was being copied at this
time.
It is advisable to fully charge the battery before using the unit. (p. 16)
COPY MODE
BATT.BATT.
COPY MODE
BATT.
COPY MODE
BATT.
BATTERY
LOW
18
PT1.p14-18.p65 2003/01/14, 12:3618
Page 19
V
POWER Lamp
COPY/TV
MODE
Copy Mode (Display Indicator)
In Copy mode, data can be copied from one
card to another. You can also check card
storage capacity, make backups, set TV
Liquid Crystal
Display
formats, and format cards.
If unit is on battery power only, power shuts off
automatically if you perform no operation for
5 minutes to conserve battery.
MODE
COPY T
M
E
N
U
C
A
N
C
E
L
/SET
Displaying Menu (Indicator Flowchart)
Follow these steps to display menus in COPY mode.
1 Set COPY/TV MODE to “COPY”.
2 Insert a Card. (p. 17)
3 Turn on this unit. (p. 18)
When using battery When using AC adaptor
Press SET
If a button is not pressed
within 10 seconds.
* When HDD SAFETY is
ON and is activated
(p. 18), the PC Card HDD
cannot be verified, so
always place unit on flat,
level surface.
Press MENU
*
(When a PC Card
HDD is inserted)
(When an SD Memory
Card is inserted)
*
(When a PC Card and SD
Memory Card are inserted)
MENU
STANDBY/SET
“Copying” (p. 21)
“Menus” (p. 20)
(When a PC Card
is inserted)
Copy Mode
– Note –
• Any cards that utilize adaptors other than the accessory PC Card HDD adaptor are displayed
as “PC CARD”.
19
PT1.p19-23.p65 2003/01/14, 12:3619
Page 20
Copy Mode (Menus)
M
C
A
N
C
E
L
E
N
U
/SET
V
COPY/TV MODE
Liquid Crystal
Display
COPY T
MODE
MENU
CANCEL
STANDBY/
PC Card HDD
(PC Card) Slot
SET
Memory Card Slot
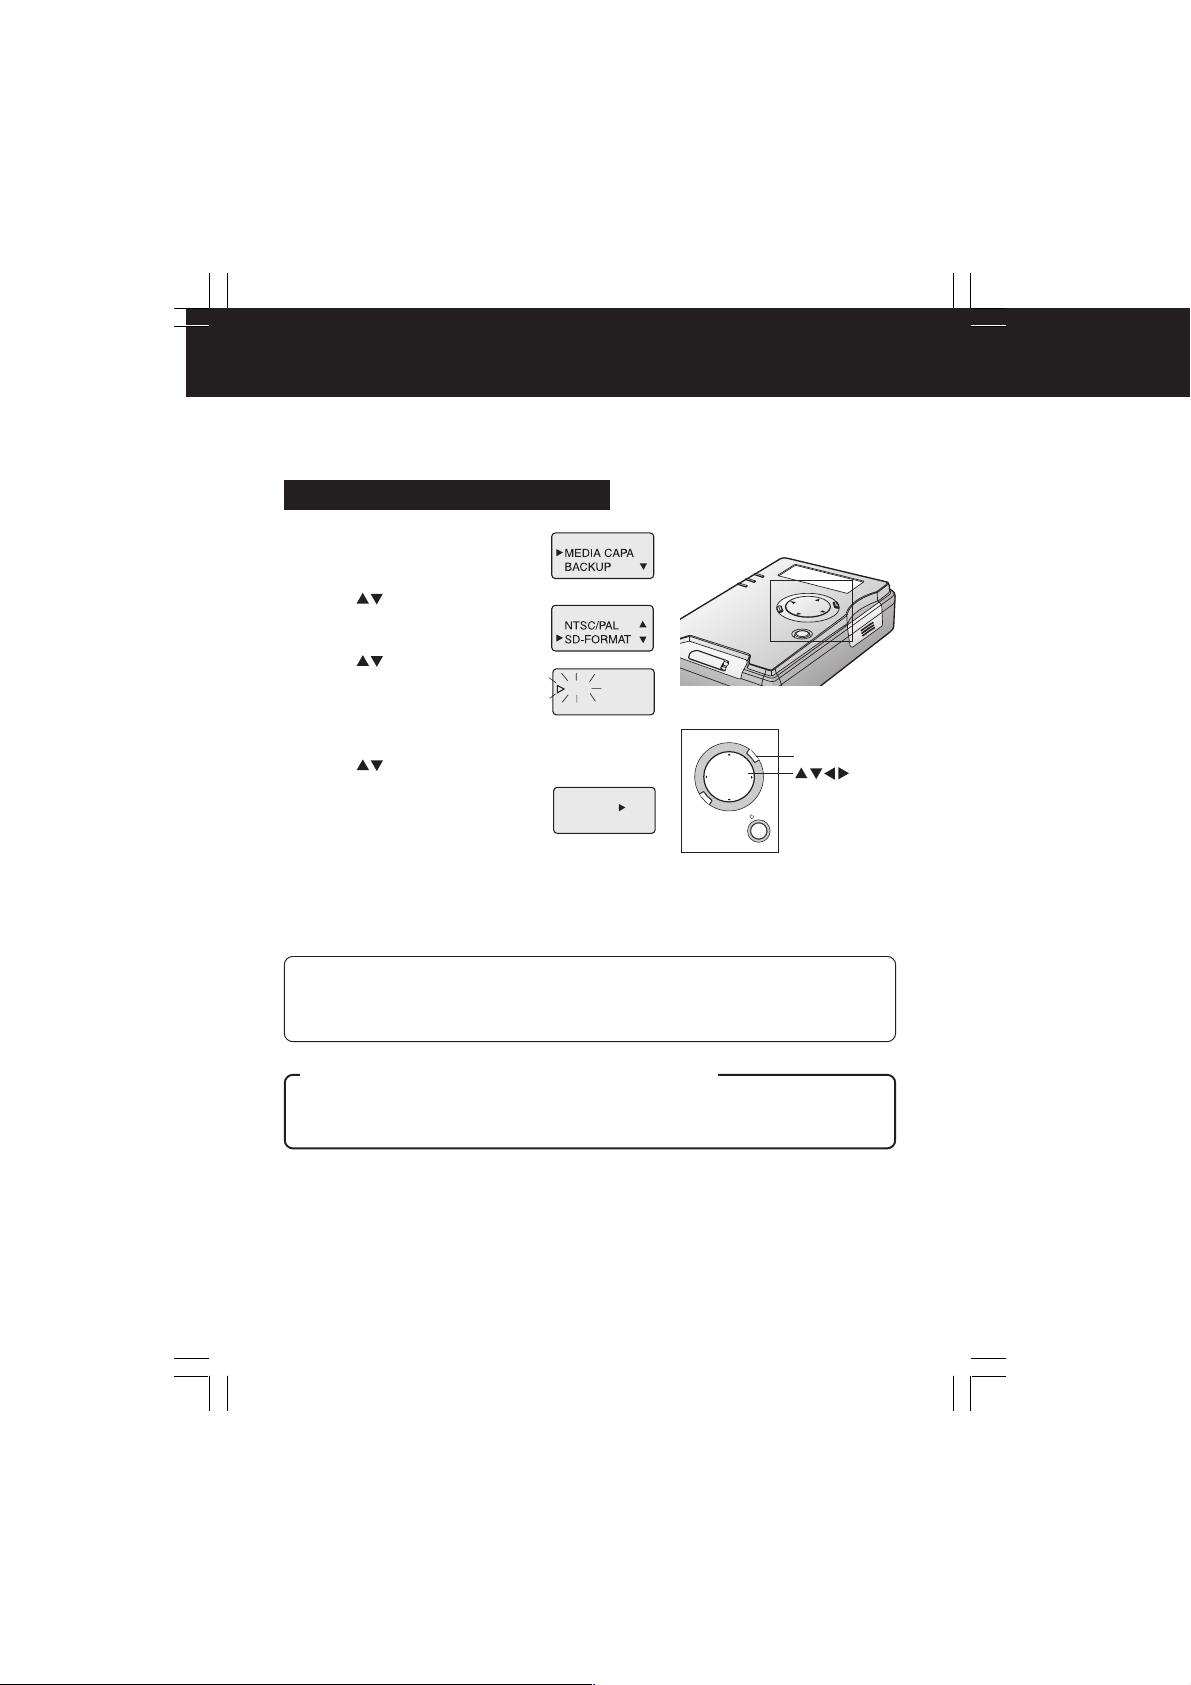
• Card Storage Capacity Check (MEDIA CAPACITY)
This lets you confirm card storage capacity.
• PC Card HDD available space is approx. 4.6 GB.
(Example)
• BACKUP (BACKUP ON/OFF)
Set to ON, a backup folder containing your data is automatically created when copying. Useful
where data may become accidentally deleted or corrupt. Backup folder contents are not displayed
in TV mode. A computer can be used to copy, edit, and delete files. (This unit is
factory shipped set to “OFF”.)
• TV Format Selection (NTSC/PAL)
This unit can be set to the TV format used in your country (NTSC or PAL). NTSC is the TV format
used in countries, such as the United States, Canada and Japan, and PAL is used in some
European countries and Oceania.
• Formatting Cards (SD-FORMAT) (HDD-FORMAT)
Formatting a card irreversibly erases all contained data.
1 Display the menu as described on
page 19.
• Press MENU again to exit.
2 Press to select a menu item, then
press SET.
• Refer to above for details on menus.
• Refer to pages 22 and 23 for details on formatting.
3 Press to select a function, then
press SET.
• Selection flashes until SET is pressed.
To make other settings:
Press MENU to return to Step 2.
20
PT1.p19-23.p65 2003/01/14, 12:3620
(To check storage capacity)
(To perform BACKUP)
(To select TV format)
Page 21
Copy Mode (Copying)
All the data can be copied from a Memory Card to the PC Card HDD (PC Card) in a
single operation. Also, data within specific folders can be copied from the PC Card
HDD (PC Card) to a Memory Card by selecting the desired folders to be copied.
Be sure both a PC Card HDD (PC Card) and a Memory Card are inserted.
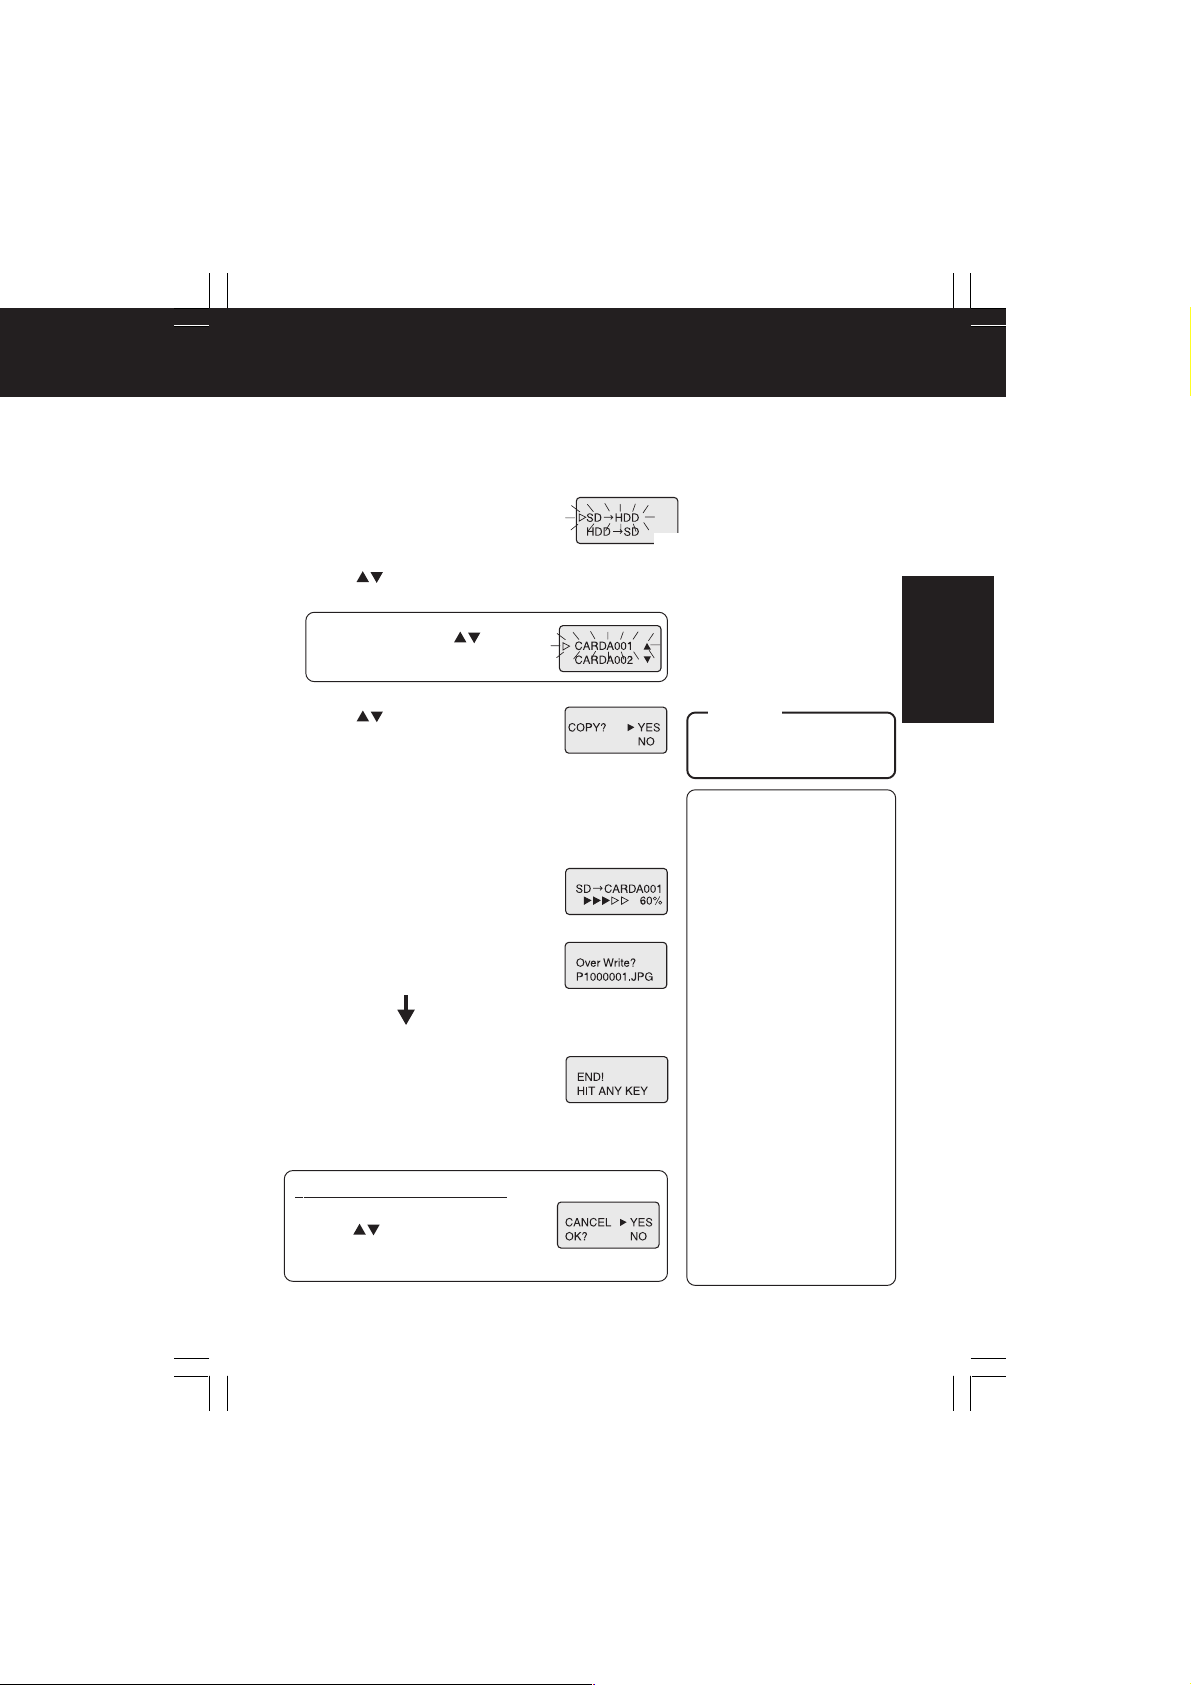
1 Display the Copy menu. (p. 19)
• Press MENU to display the menu. (p. 20)
2 Press to select the desired
menu item, then press SET.
If “HDD -> SD”, press ,
then SET to select a folder.
(When a PC Card HDD and SD
Memory Card are inserted)
Copy Mode
3 Press to select “YES”, then
press SET.
• After menu selection is made, card
capacity is checked. If “NO
CAPACITY” is displayed, Copy menu
will reappear. Replace card with one
containing sufficient space, then
repeat these steps from the
beginning.
Copying will be performed.
• Refer to “Copying and Backup”
(pp. 11, 12) for data copy details.
• If existing data is to be
overwritten, the message at right
appears. To overwrite, press SET.
To cancel, press CANCEL.
Copy completed!
• Press any button redisplays Copy
menu in Step 1.
To cancel copy in progress:
1. Press CANCEL.
2. Press
press SET to execute.
to select “YES” then
Example: SD -> HDD
Caution
• Never remove a card from
the unit while copying is in
progress.
– Note –
• If “SD -> HDD” has been
selected, a “CARD****”
folder will be created on the
HDD, and the data will be
copied into that folder. If a
card other than a PC Card
HDD is inserted, copy will be
done in the folder structure
of the Memory Card used.
• When copying from HDD ->
SD, only the “CARD****”
folder on the HDD can be
copied.
• When unit is on battery
power only, not pressing a
button for 10 seconds
changes display to show
battery life remaining. Press
SET to resume previous
operation.
• Copying cannot be done if
Memory card is writeprotected.
• Secure data (including files
with WMA, SA1 and MP3
extensions) will not be
copied.
• If copy is canceled in
progress, data copied to
that point will remain on the
destination card. If this data
is unwanted, select TV or
PC mode and delete it.
PT1.p19-23.p65 2003/01/14, 12:3621
21
Page 22
M
C
A
N
C
E
L
E
N
U
/SET
Formatting Cards
Normally you need not format (initialize) the SD Memory Card and PC Card HDD. An
SD Memory Card that has been formatted to FAT32* specifications cannot be used,
so transfer any important data to a PC, then format the card on this unit.
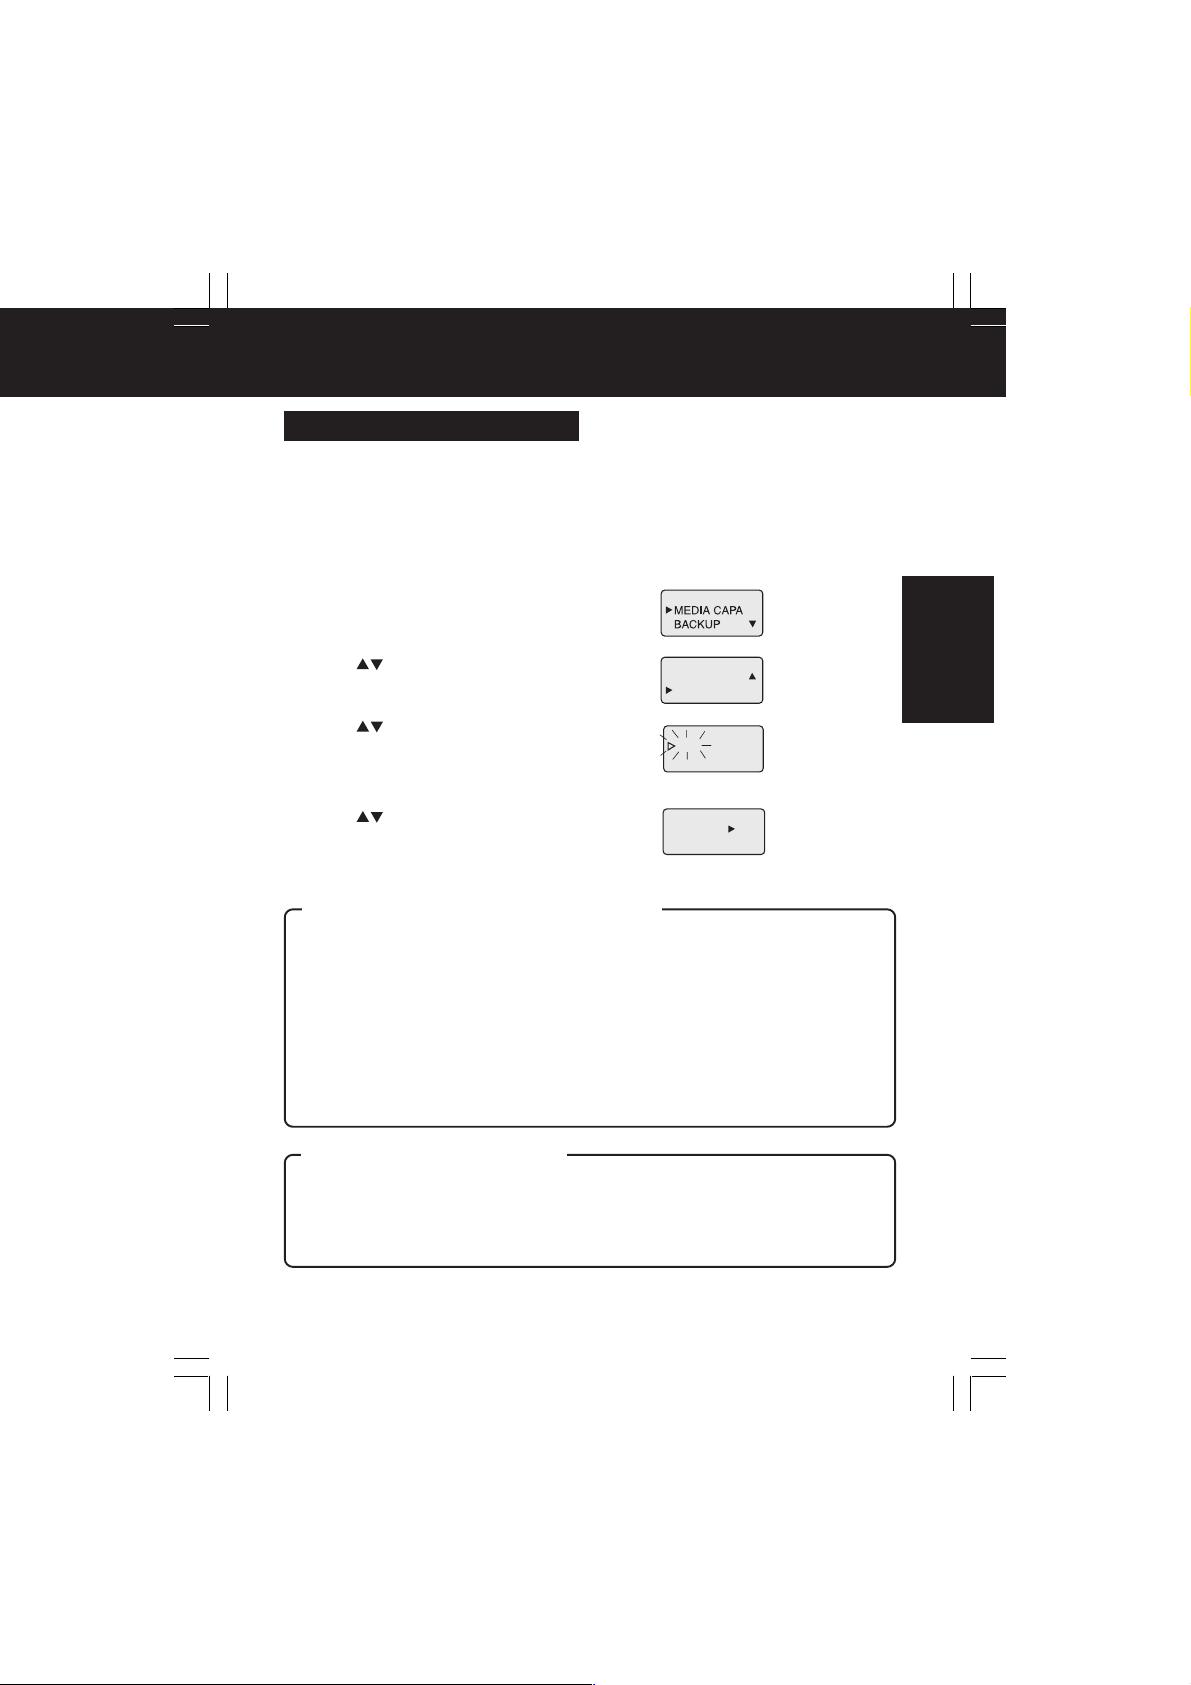
Format the SD Memory Card
1 Display the menu. (p. 19)
• See page 20 for menu details.
2 Press to select “SD-
FORMAT”, then press SET.
3 Press to select “YES”, then
press SET.
• Selected item flashes until SET is
pressed.
• Press MENU to redisplay menu.
YES
NO
4 Press to select “YES”, then
press SET.
• To cancel format, select “NO”.
* If an SD Memory Card formatted to FAT 32 specifications is
inserted, “CAN’T USE FAT32 SDCARD” will be displayed
followed by a format confirmation message.
FORMAT?
YES
NO
MENU
– Note –
• If “FORMAT ERROR” is displayed, remove the SD Memory Card and reinsert it. Then, repeat
formatting procedure. If error reoccurs, the SD Memory Card may be damaged.
• SD Memory Card can also be formatted on some digital cameras. Refer to digital camera
manual.
Caution regarding SD Memory Card Formatting
* SD Memory Cards formatted under Windows XP may be FAT 32 format because FAT 32 is the
default format selected for this OS. This unit and many digital camera types do not support
FAT 32. A FAT 32 formatted SD Memory Card should be reformatted on this unit or a digital
camera.
22
PT1.p19-23.p65 2003/01/14, 12:3622
Page 23
Formatting Cards
YES
NO
Format the PC Card HDD
The product numbers for cards that can be formatted using the unit are given below.
Card product numbers not listed cannot be formatted (as of Oct. 1, 2002).
Matsushita
•RP-PH005A
1 Display the menu. (p. 19)
• See page 20 for menu details.
Toshiba
•PAMHD002
•PAMHD005
Melco
•RHDC-2G
•RHDC-5G
Io Data
Devices
•PCHDT-2Gt
•PCHDT-5Gt
Logitech
•LPM-HD2G
•LPM-HD5G
Kingston
•DP-PCM2/
2GB
•DP-PCM2/
5GB
Copy Mode
2 Press to select “HDD-FORMAT”,
then press SET.
SD-FORMAT
HDD-FORMAT
3 Press to select “YES”, then
press SET.
• Selected item flashes until SET is pressed.
• Press MENU to redisplay menu.
4 Press to select “YES”, then
press SET.
• To cancel format, select “NO”.
FORMAT?
Caution regarding PC Card HDD Formats
• Formatting a PC Card HDD with this unit must be done in Copy mode, not PC mode (USB
connection). However, if the disk has multiple partitions created on a device, such as a
notebook PC, formatting on this unit will restore the disk to a single partition (factory default).
To avoid this, use the same device used previously to format the card.
• Windows 95/98 has a FDISK.EXE utility for managing disk partitions, but it must never be
used to partition a PC Card HDD. Otherwise, the storage capacity of the PC Card HDD will be
reported incorrectly, and it will no longer work properly. Also, do not use Windows 95/98 to
format a PC Card HDD that contains multiple partitions or data in other partitions of the disk
may become corrupted, and any saved data may become unusable.
• Only the first partition of a multi partition disk created on a separate device, such as a
notebook PC will be recognized.
• Also avoid formatting other types of PC Cards using PC mode (USB connection), otherwise
the format may not be mutually recognizable by the computer and the unit, or data corruption
may occur. Always use the unit to format PC Cards.
Caution regarding Formatting
• When a card is formatted, all data saved on the card is irreversibly deleted.
Check the card storage capacity and any data stored on the card, then copy important data
to another drive or card before formatting. Also, since some files types can only be displayed
on a PC, use a PC to check card contents.
• When using this unit to format cards, use only the correct type of card. Always check card
storage capacity and any stored data before formatting.
YES
NO
23
PT1.p19-23.p65 2003/01/14, 12:3623
Page 24
TV Mode (Setup)
You can view DSC photos and PC presentation files on a TV when it is connected to
this unit. Refer to next page for available functions in TV Mode.
Setup (Connections)
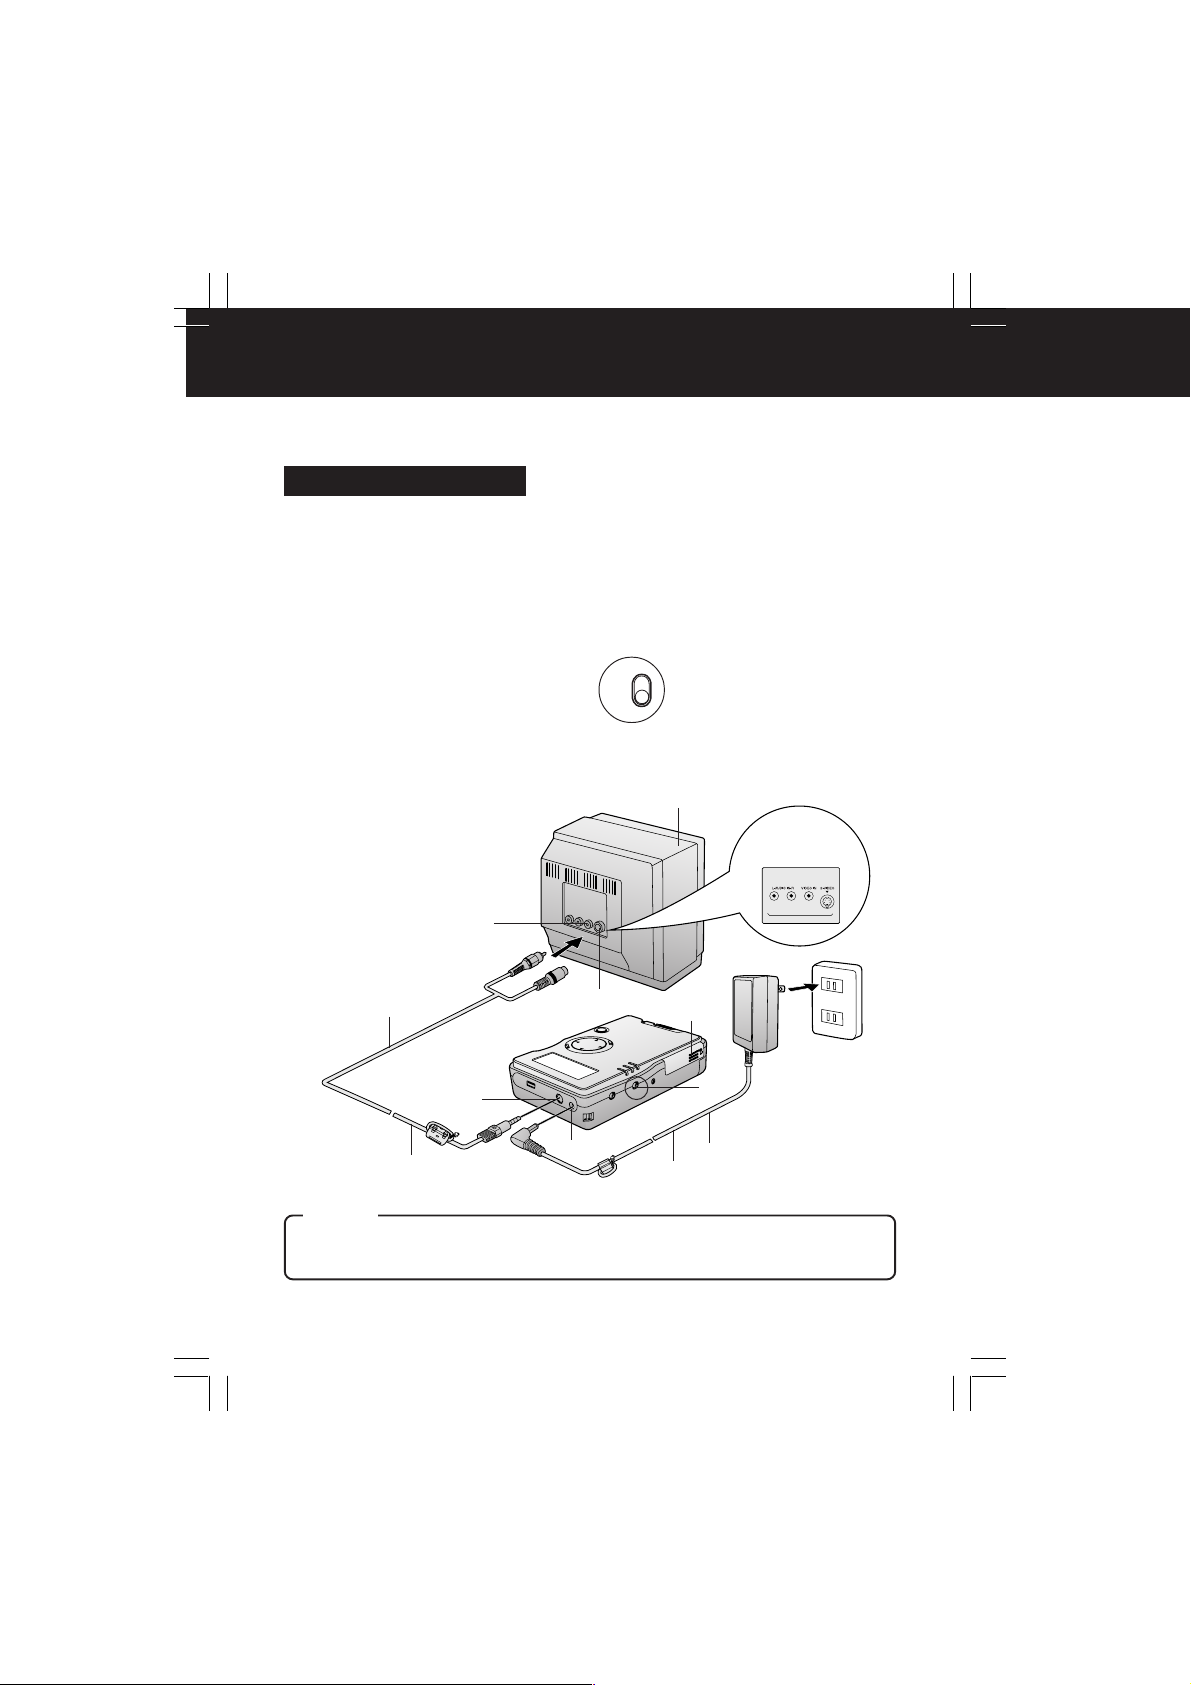
1 Connect the Video Cable.
• Connect this unit to either the S-Video or the video input
terminal of your TV.
2 Turn on the TV and set it to VIDEO mode.
• See your TV manual.
3 Insert the Card into the unit. (p. 17)
4 Set COPY/TV MODE to “TV”.
MODE
COPY TV
5 Insert the battery and connect the AC adaptor.
(p. 16)
6 Turn on this unit. (p. 18)
• If unit is on battery power only,
power shuts off automatically if
no operation is done for
5 minutes to conserve battery.
VIDEO IN
1
S/V OUT
Video Cable
(supplied)
Caution
• The USB cable must be disconnected from the unit to use TV Mode. Otherwise the unit
switches to PC Mode automatically.
• Always power down this unit before inser ting/removing the card.
S-VIDEO IN
DC IN
2
5
5
Example showing
TV input terminals
4
AC Adaptor
24
PT1.p24-28.p65 2003/01/14, 12:3624
Page 25
TV Mode (TV Mode Functions)
Initial Screen
The screen below is displayed when a card is inserted. If “NO CARD” appears,
confirm that a card is correctly inserted.
Folder Hierarchy Indicator
Menu Area
Card Selection
Choose card type, HDD/PC Card • SD
Memory Card. Press
card for display, then press SET.
to select
• When folders are opened within the
index, the number of these icons will
increase to indicate the level within the
hierarchy.
IMAGE DISPLAY
Image files stored on the card are displayed
in the Index Area. They can be searched by
image date. (p. 27) Images can be shown
full screen, and you can use the zoom,
rotate, add color effects, image information,
and delete functions.
(pp. 38~41)
ALBUM
Index area images can be displayed in
a 6 or 9-image album screen. (p. 28)
Also, when a single image is selected,
you can use the functions as described
in IMAGE DISPLAY, above.
SLIDE SHOW
You can set screen transition effects
and speeds for a Slide Show. (pp. 29~31)
PRESENTATION
This function allows presentations to be
performed. (pp. 32, 33)
Using the included JPEG Addin Software,
PowerPoint data created on a PC can be
converted into JPEG files and used for
presentations. (pp. 46, 47)
EDIT
You can delete, copy, and protect image
files. (pp. 34~37)
Folder/File Name
Area
• Names of selected
files and folders are
displayed here.
Message Area
• Operation prompts
are displayed here.
– Note –
• See page 26 regarding displayable
images, folders, and files.
Page Number
Index Area
• Folders and files
are displayed
here.
TV Mode
PT1.p24-28.p65 2003/01/14, 12:3625
25
Page 26
TV Mode (Display Information)
Displayable Image Formats
Images of the following formats can be displayed.
• DCF format 1.1 compliant
• Baseline JPEG format Y Cb Cr (compressed
format)
(Sampling ratios 4:4:4, 4:2:0, 4:2:2, 4:1:1)
(80 x 60 ~ 5120 x 3840 pixels)
• TIFF format RGB (RGB 8 bit non-compressed)
(This image format takes longer to be displayed.)
• The first image from Motion JPEG (QuickTime
format) files with a mov extension
– Note –
• JPEG files altered and saved on a PC as “grayscale”
format cannot be displayed.
• Some parts of an image may not be displayed or the
image may be displayed on a smaller scale depending
on the size of the image.
Folders and Files
Folders and files that are displayed in the Index Area (p. 25) are described in the table
below. Refer to page 10 for details on the folder structure.
Blue
Folder contains displayable images.
Folder
Pink
Folder contains presentation files (“PRES_***”).
Gray
Folder contains no displayable images.
M
E
N
U
MENU
C
A
N
C
E
L
/SET
SET
TIFF files take longer to be displayed in full screen and
Slide Show. In some cases, only TIFF icons appear in index
or album displays. Some files may not be displayed, or may
be displayed on a smaller scale.
TIFF
JPEG File
TIFF File
These are files with moving images or still images with
MOV File
Protect
audio content. Only the first frame of a moving image is
displayed. Rotated images cannot be saved.
Protected folders and files (p. 36) cannot be deleted.
– Note –
File and folder names will not be displayed correctly if...
• more than 8 characters are used.
• spaces and special symbols are used. Use care when changing file and/or folder names.
26
PT1.p24-28.p65 2003/01/14, 12:3626
Page 27
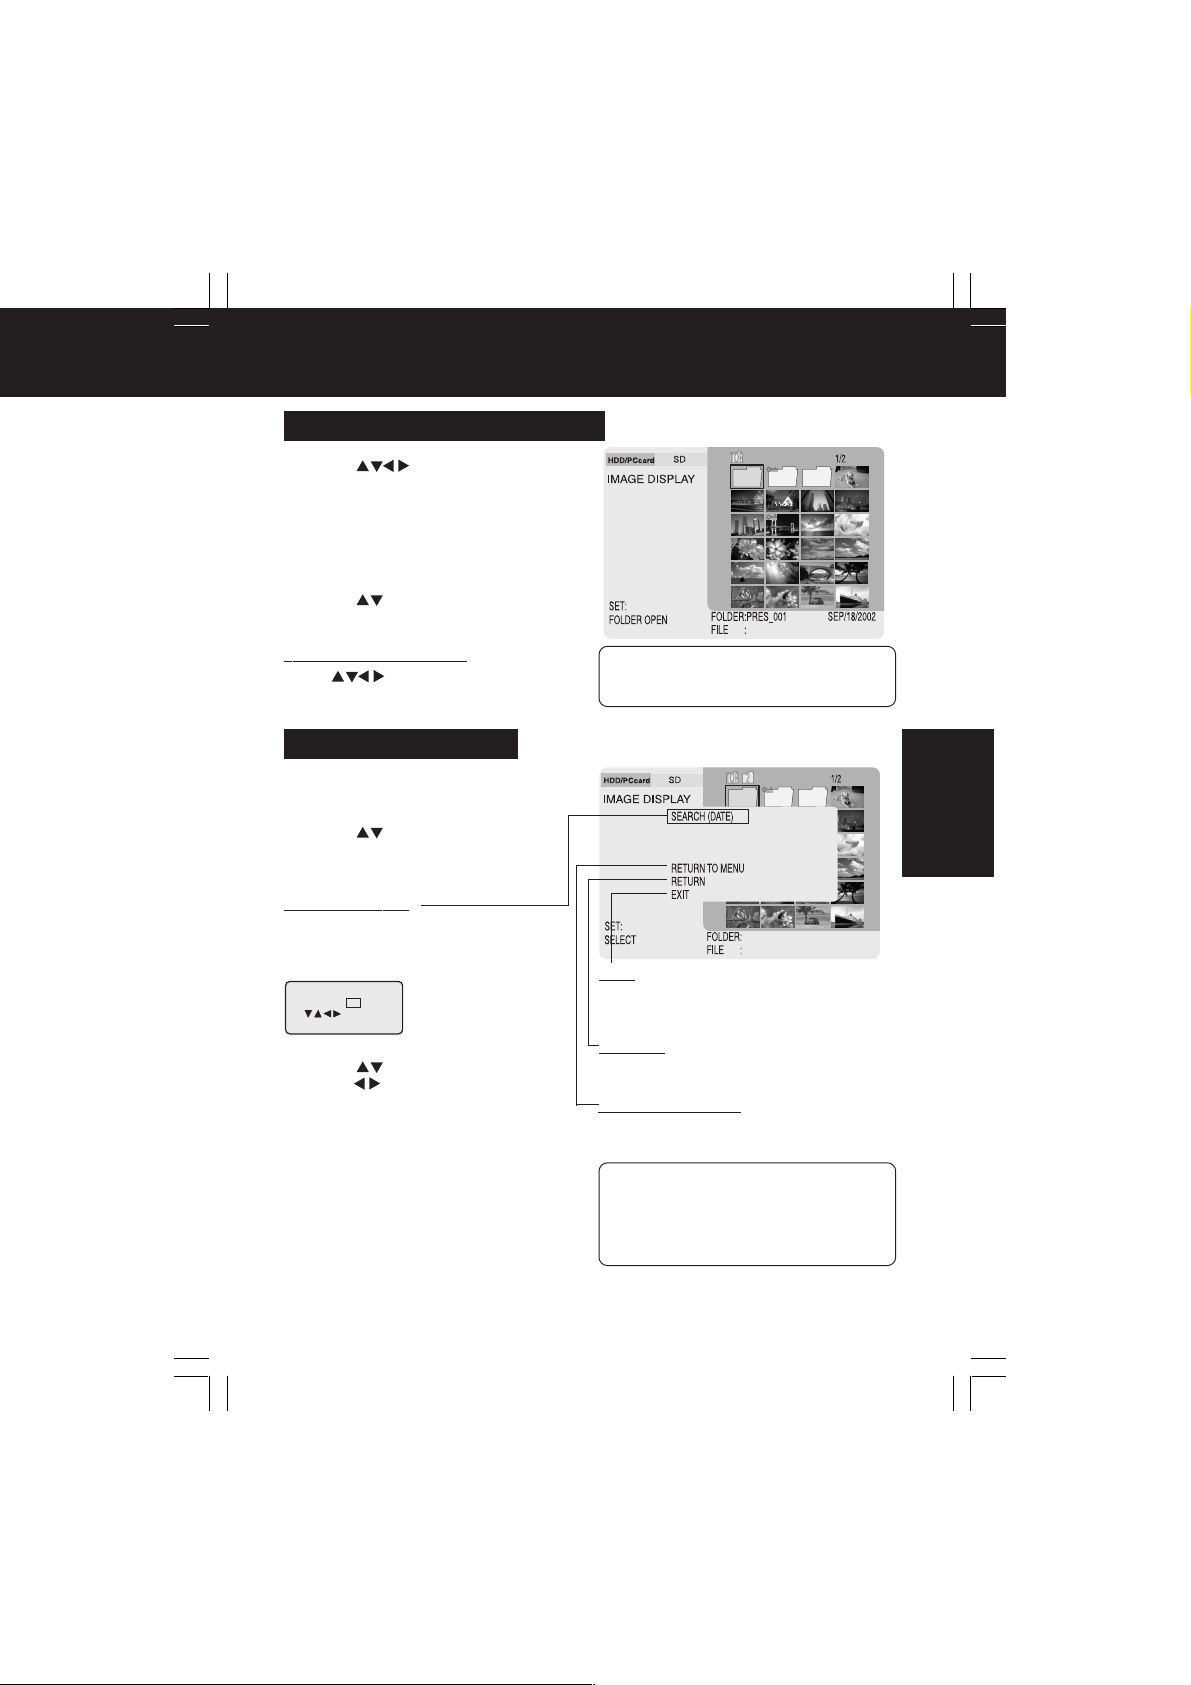
TV Mode (Image Display)
Viewing Images in the Index
1 Press to select the card
used, then press SET.
2 Select “IMAGE DISPLAY”, then
press SET.
• Index Area is displayed with cursor at first
position.
3 Press to scroll to other index
pages if necessary.
To view folder contents:
Press to move cursor to a folder,
then press SET.
Using the Sub Menu
1 Move cursor over the Index Area
and press MENU.
2 Press to select the item (refer
to the section below), then press
SET.
SEARCH (DATE)
This searches through the folders and files in
the Index Area by date. To search for files
within folders, display the images within the
folder and then start the search.
SEARCH (DATE)
START DATE JAN / 01 / 2002
: SELECT
[SET] : GO
a Press to select the year, then
press to move the cursor to the
next item. Now repeat to select
month and day.
b Press SET.
• A search begins for files created on or
after the specified date. Results are
displayed in the index in order beginning
with the oldest dated file.
• To clear search results, select “RETURN
TO MENU”.
– Note –
• To display images in full screen, move
cursor over a file and press SET. (p. 38)
EXIT
Returns the index display to the first level of the
hierarchy and moves the cursor to the Main
Menu.
RETURN
Returns the display back one step in the
hierarchy.
RETURN TO MENU
Returns the cursor to the Main Menu.
– Note –
• Pressing MENU with Sub Menu displayed
removes the Sub Menu.
• Normally, files and folders are displayed in
the Index Area in order beginning with
the most recent date.
TV Mode
PT1.p24-28.p65 2003/01/14, 12:3627
27
Page 28
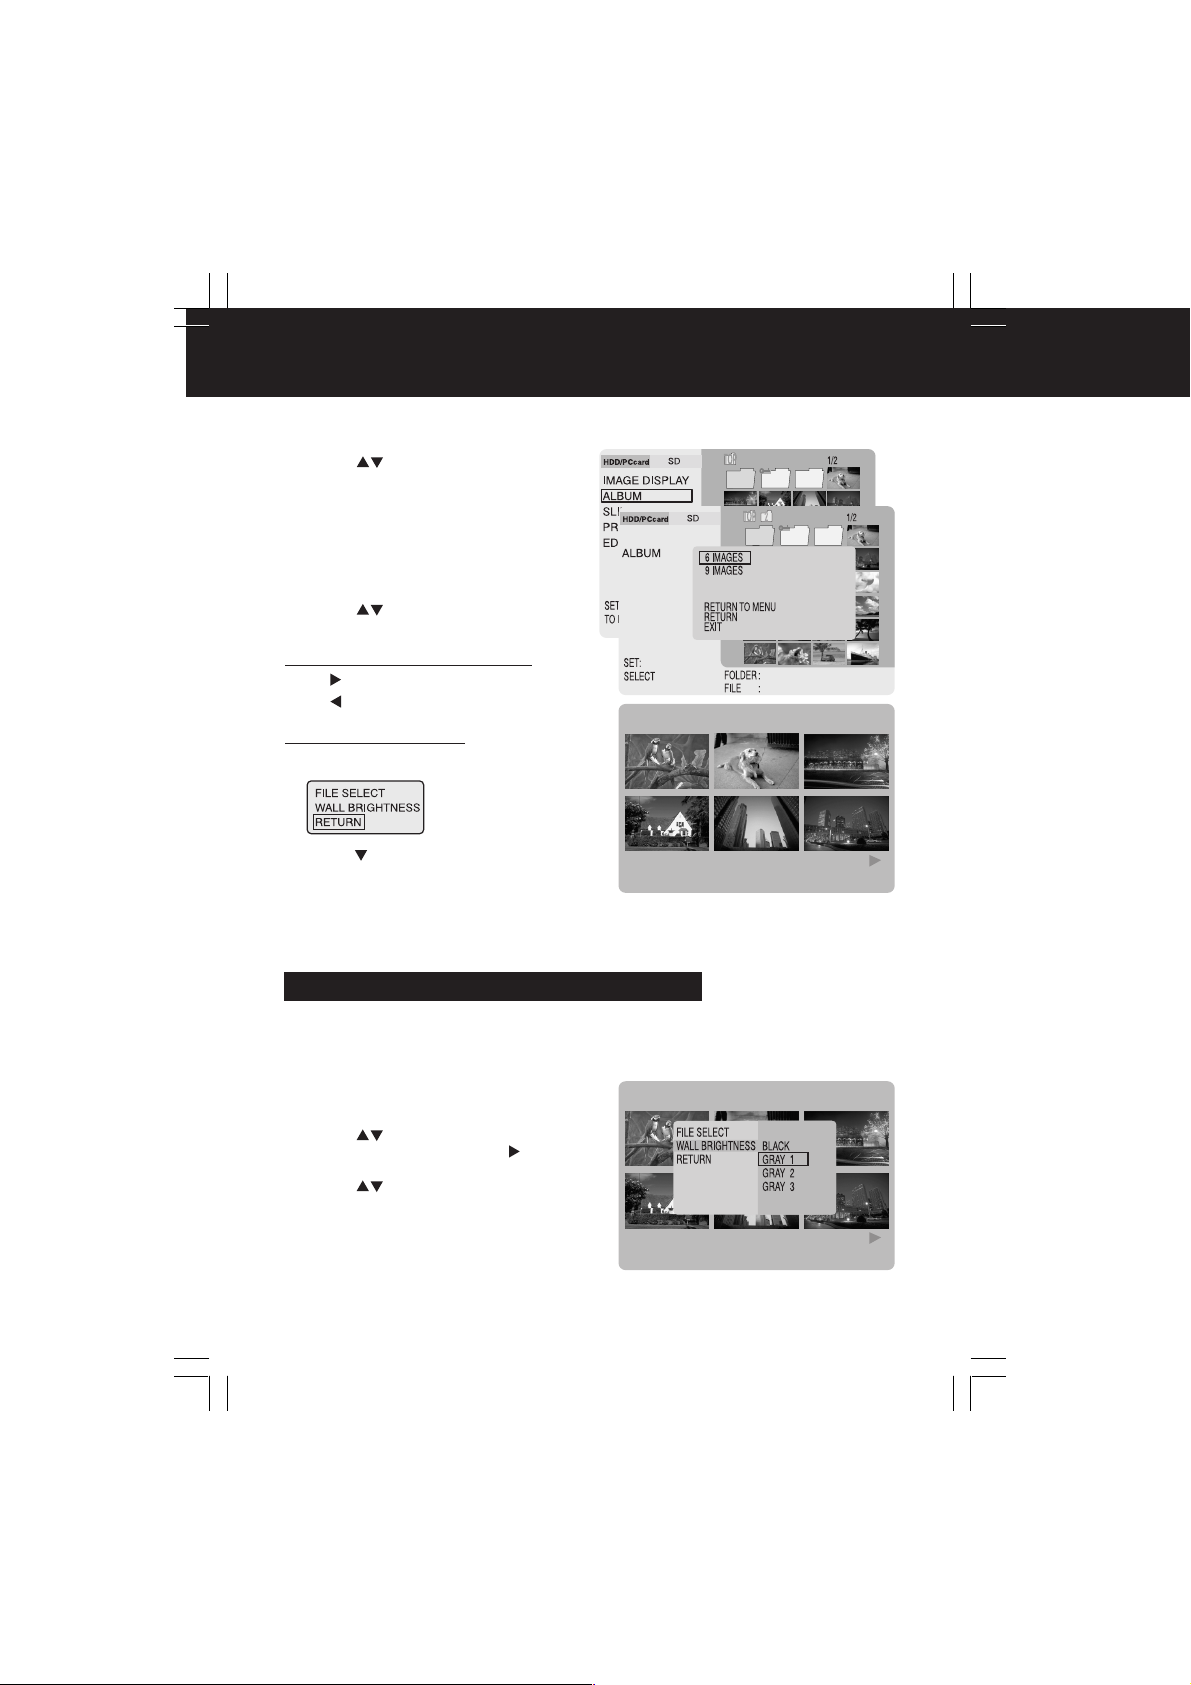
TV Mode (Album)
Images in the index can be displayed on a TV screen in groups of 6 or 9 at a time,
like a photo album.
1 Press to select “ALBUM”, then
press SET.
• Only images in the Index Area can be
displayed as an album. Images in a folder
must first be displayed in the index. (p. 27)
2 Press MENU.
• The menu screen will be displayed.
3 Press to select “6 IMAGES” or
“9 IMAGES”, then press SET.
To go to next or previous pages:
Press for next page.
Press for previous page.
To return to Index Area:
a Press MENU.
b Press and select “RETURN”, then
press SET.
• To display an image in full screen,
select “FILE SELECT,” then move cursor
over the image and press SET. (p. 38)
(When “6 IMAGES” is selected.)
Selecting the Background Brightness
When viewing images in Album, Full Screen (p. 38) or Slide Show (p. 29) mode on an
HDTV monitor, the monitors “Fill-Mode” may affect the image. If brightness is
compromised, follow the steps below.
1 Select Album display, then press
MENU.
2 Press to select “WALL
BRIGHTNESS”, then press .
3 Press to select “GRAY 1”,
“GRAY 2” or “GRAY 3”, and then
press SET.
• If using a normal TV, use the “BLACK”
setting.
28
PT1.p24-28.p65 2003/01/14, 12:3628
Page 29
TV Mode (Slide Show)
You can display selected images as a Slide Show in a variety of transition effects and
speeds.
M
E
N
U
MENU
C
Performing Slide Show
1 Press to select “SLIDE SHOW”,
then press SET.
• Only images in the Index Area are
displayed as a Slide Show. Images in a
folder must first be displayed in the index.
(p. 27)
2 Press MENU.
3 Press to select “SLIDE SETUP”.
“SELECT” (p. 30)
“EFFECT” (p. 31)
“SPEED” (p. 31)
4 Press to select “START”, then
press SET.
• Slide Show begins. It ends after the last
image.
A
N
C
CANCEL
E
L
/SET
SET
TV Mode
To pause the Slide Show:
Press SET.
• ( ) is displayed in top, left corner of screen.
• Press SET again to resume Slide Show.
• When the number of saved files is great, it
may take time to go into Pause/Stop mode.
To stop the Slide Show:
Press CANCEL.
– Note –
• The Sub Menu will disappear if MENU is pressed while the Sub Menu is displayed.
• Selecting “RETURN TO MENU” will redisplay the Main Menu.
Selecting “RETURN” changes the display back one level.
Selecting “EXIT” returns display to first level of hierarchy (p. 27).
• It may not be possible to display some types of TIFF files during album display.
• It will take a longer time to display TIFF files during Slide Show.
PT1.p29-33.p65 2003/01/14, 12:3629
29
Page 30
TV Mode (Slide Show Settings)
The SLIDE SETUP setting allows you to specify which images to display in a Slide
Show. (p. 29)
M
E
N
U
MENU
C
A
N
C
E
L
/SET
SET
Selecting Images
Specify the images in the index to be included in the Slide Show. If you wish to
include all images in the index, this procedure is not necessary.
1 Do Steps 1~3 on page 29. In Step 3,
press to select “SELECT”.
2 Press SET.
• The cursor will move to the beginning of
the index.
3 Press to select an image,
then press SET.
• Pressing SET again to cancel selection.
•“
” appears at the bottom, right corner of a
selected image.
• Repeat Step 3 until all images for the
Slide Show are selected. Images will be
displayed in the order selected.
• Images in a folder must first be displayed
in the index for selection. (p. 27)
4 Press MENU when selection is
complete.
5 Press to select “YES”,
“CONTINUE” or “CANCEL”, then
press SET.
YES : To exit setup.
CONTINUE : To continue selection.
CANCEL : To cancel image selection.
6 Press to return to “SLIDE SETUP”.
30
PT1.p29-33.p65 2003/01/14, 12:3630
Page 31

TV Mode (Slide Show Settings)
Setting Screen Transition Effects
1 Do Steps 1~3 on page 29. In Step 3,
press to select “SELECT”.
2 Press to select “EFFECT”, then
press SET.
3 Press for desired transition
effect, then press SET.
• NORMAL: images change one by one.
• WIPE : images change from top to
• SPLIT : images change from middle to
• BLIND : images change in a window
bottom.
each side.
blind fashion.
4 Press to return to “SLIDE SETUP”.
Setting Screen Transition Speed
1 Do Steps 1~3 on page 29. In Step 3,
press to select “SELECT”.
2 Press to select “SPEED”, then
press SET.
3 Press for desired transition
speed, then press SET.
• FAST : images change every
• NORMAL: images change every
• SLOW : images change every
* If larger file size images are included,
display takes longer and transition time
may exceed the selected setting.
2 seconds.
5 seconds.
10 seconds.
4 Press to return to “SLIDE SETUP”.
– Note –
• The Sub Menu will disappear if MENU is pressed while the Sub Menu is displayed.
• Selecting “RETURN TO MENU” will redisplay the Main Menu.
Selecting “RETURN” changes the display back one level.
Selecting “EXIT” returns display to first level of hierarchy (p. 27).
• If “RETURN” is selected or MENU is pressed from the “EFFECT” or “SPEED” menu, the
display returns to the previous sub menu.
TV Mode
PT1.p29-33.p65 2003/01/14, 12:3731
31
Page 32
TV Mode (Presentation)
Microsoft PowerPoint data created on a PC can be converted into JPEG files using
the supplied JPEG Addin Software and then presented on the TV.
See pages 46 and 47 on how to create presentation files.
M
E
N
U
MENU
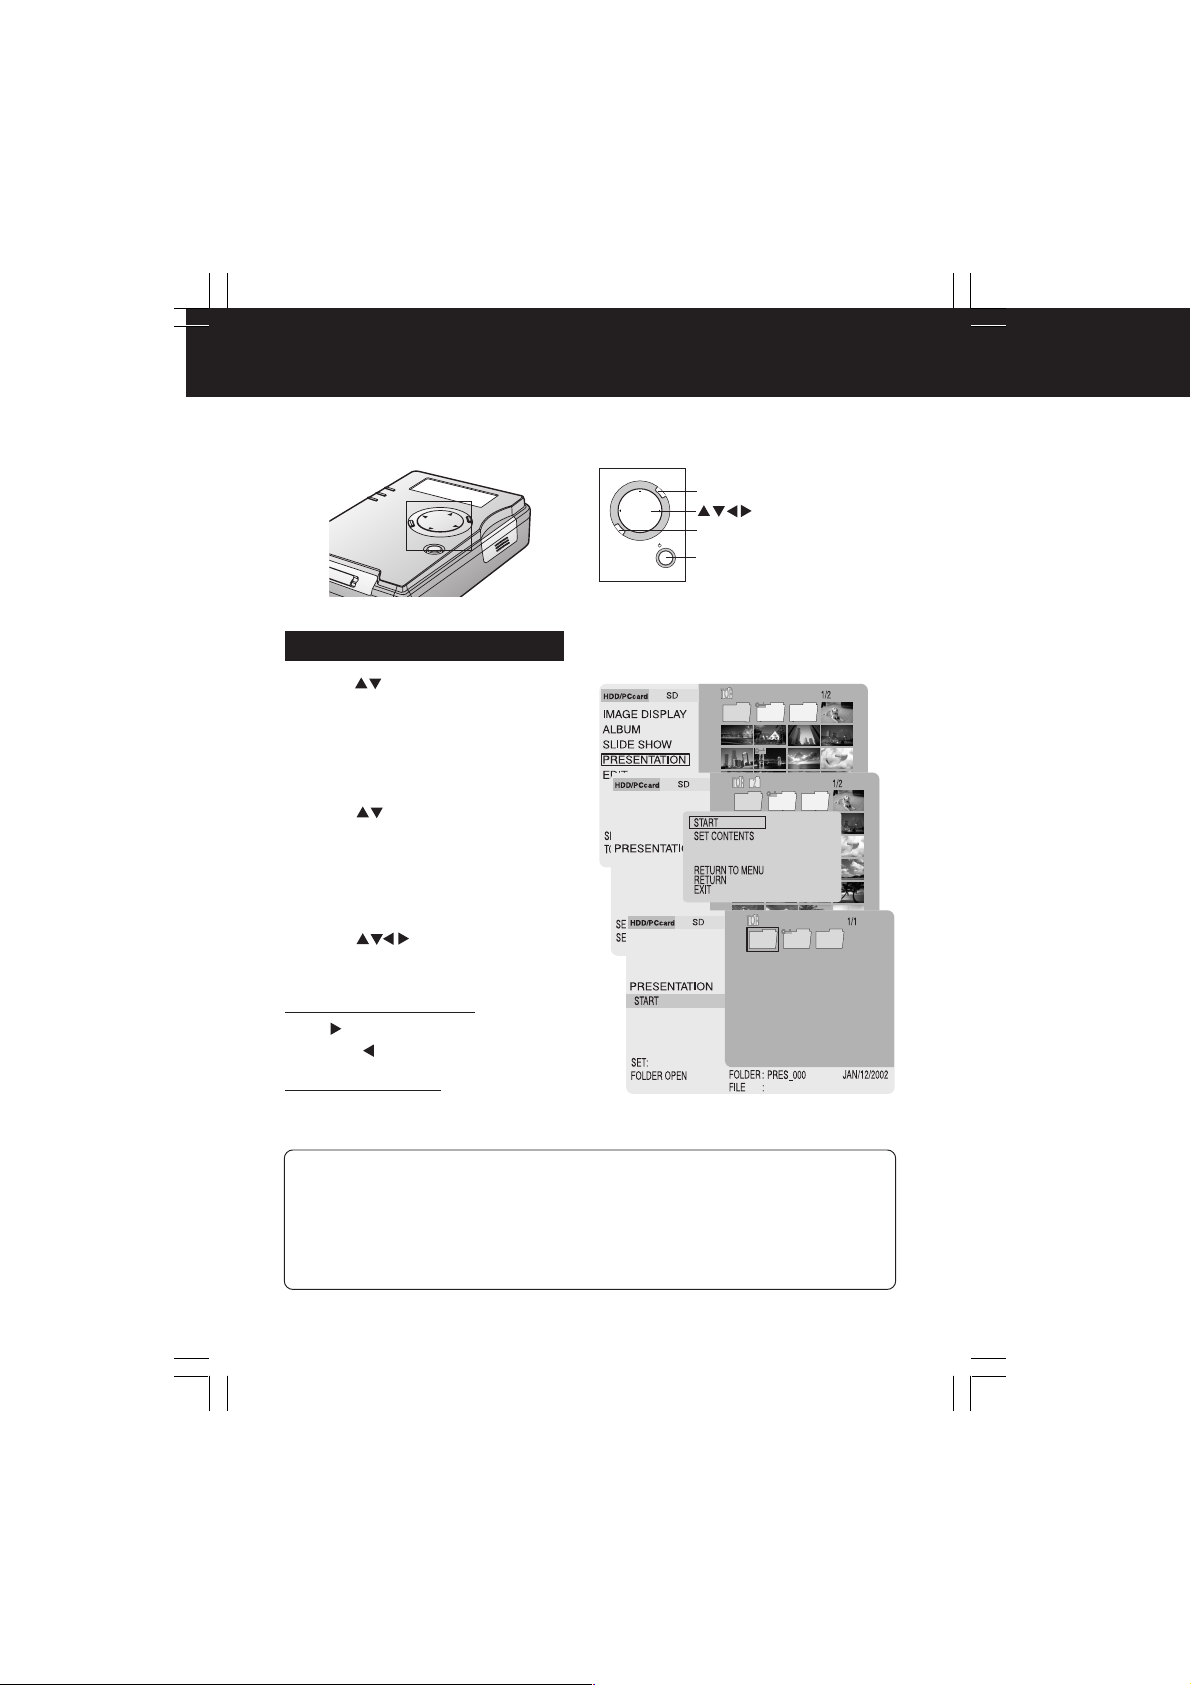
Performing Presentation
1 Press to select “PRESENTATION”,
then press SET.
• Make sure a folder (pink) containing
presentation files exists in the index.
2 Press MENU.
3 Press to select “START”, then
press SET.
• Only folders containing presentation files
will be displayed in the Index Area.
• To customize presentation data, press
MENU again, then select “SET
CONTENTS”. (p. 33)
4 Press to select a folder, then
press SET.
• The first slide is displayed.
To display the next slide:
Press .
• Pressing displays previous slide.
To exit presentation:
Press CANCEL.
C
A
N
C
CANCEL
E
L
/SET
SET
– Note –
• Selecting “RETURN TO MENU” will redisplay the Main Menu.
Selecting “RETURN” changes the display back one level.
Selecting “EXIT” retur ns display to first level of hierarchy (p. 27).
• Slides will be presented in the order they were selected. You can confirm presentation files
and the order in the index. This data is stored on the unit until selections are deleted. (p. 33)
• Only folders entitled “PRES_***” (last 3 digits “***” are variable) are recognized as
presentation folders. If you change the folder name on a PC, only change the last 3 digits,
otherwise, it will not be recognized.
32
PT1.p29-33.p65 2003/01/14, 12:3732
Page 33
TV Mode (Presentation)
Selecting Presentation Content
You can select specific slides from the index to be displayed. If you wish to include all
images in the index, this procedure is not necessary.
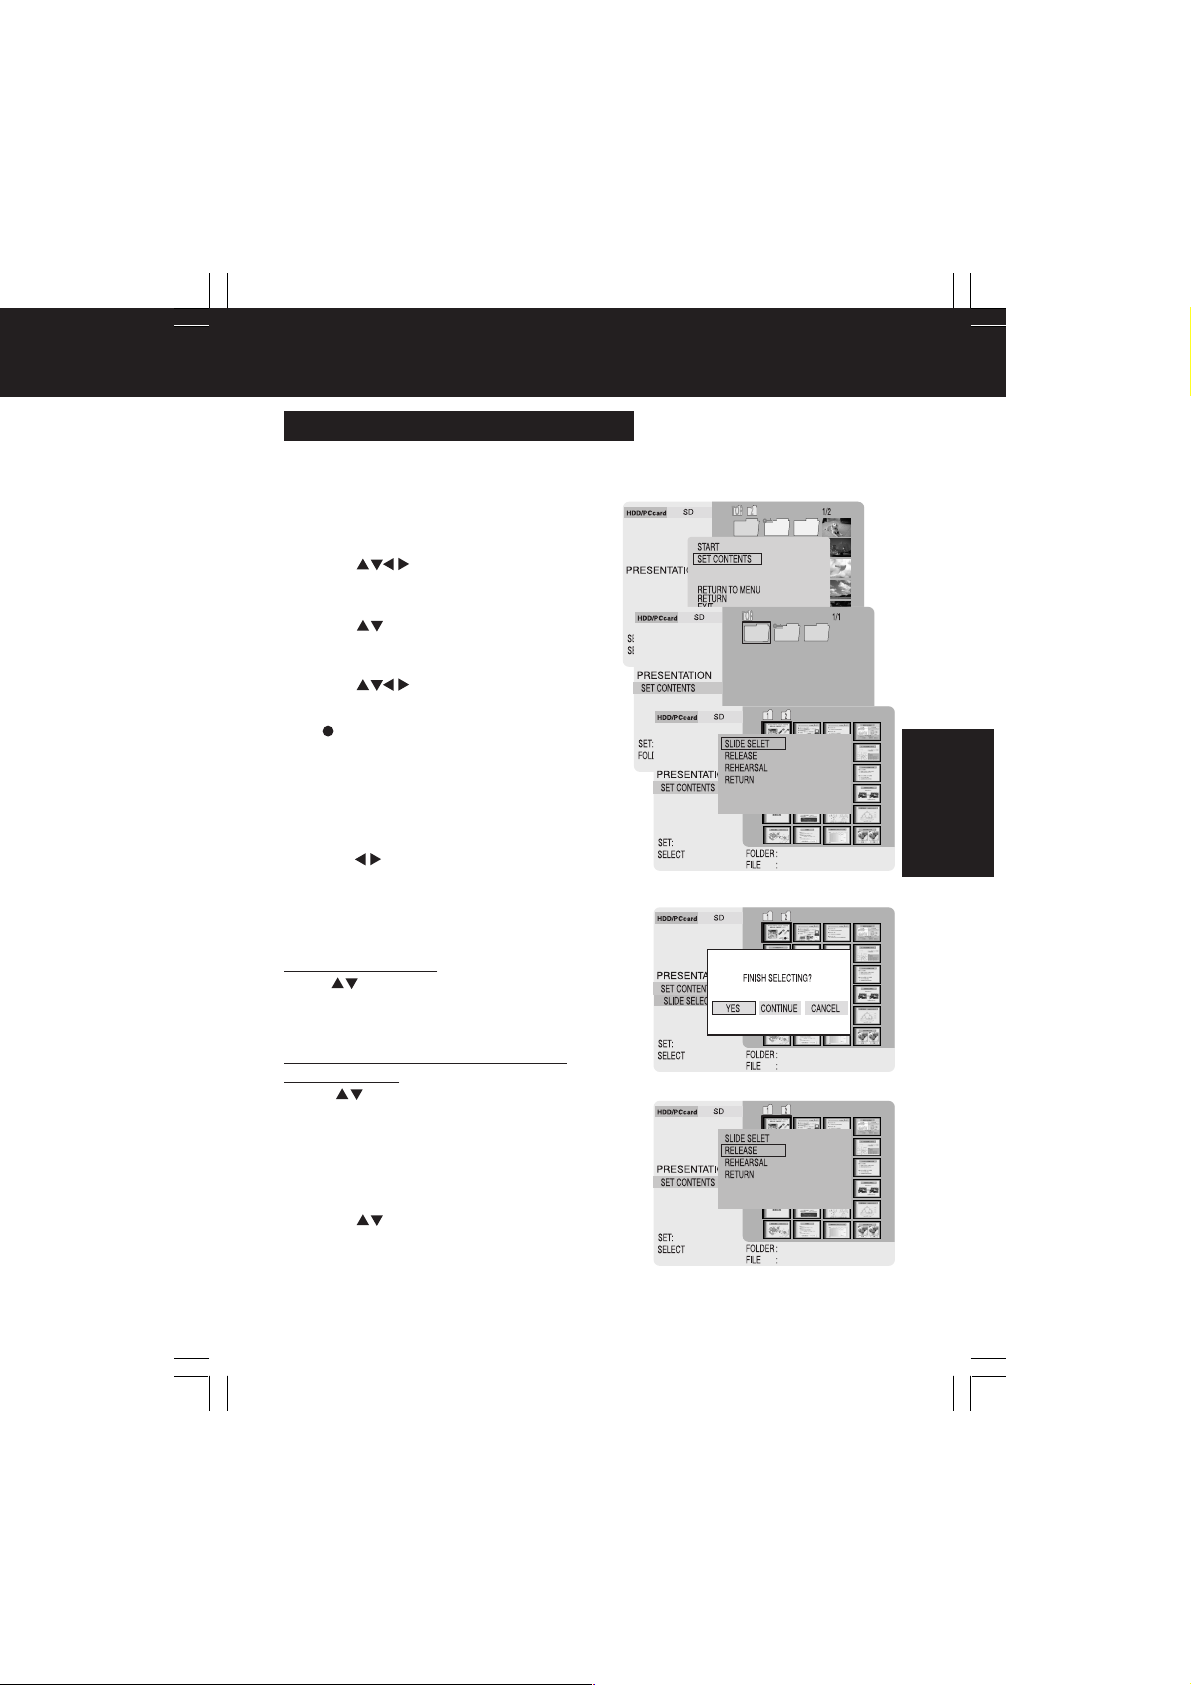
1 Do Steps 1~3 on page 32. In Step 3,
select “SET CONTENTS”, then press
SET.
2 Press to select a folder, then
press SET.
• Folder contents will be displayed.
3 Press to select “SLIDE SELECT”,
then press SET.
• Selecting “RETURN” displays previous slide.
4 Press to select a slide, then
press SET.
• Pressing SET again cancels selection.
” appears at bottom, right corner of a
•“
selected slide.
• Repeat Step 4 until all slides to be displayed
are selected. Presentation will be in the order
slides were selected.
5 Press MENU when selection is
complete.
6 Press to select “YES”, “CONTINUE”
or “CANCEL”, then press SET.
• YES : To finish selection.
• CONTINUE : To continue selection.
• CANCEL : To cancel selection and return
To unselect images:
Press to select “RELEASE”, then press
SET.
• The selected images are returned to the their
original state.
To preview the presentation contents
(REHEARSAL):
Press to select “REHEARSAL”, then
press SET.
• Each slide will appear approx. 2 seconds.
• Pressing CANCEL will cancel this operation.
• Pressing SET will pause this operation.
• When the number of saved files is great, it may
take time to go into Pause/Stop mode.
to menu.
TV Mode
7 Press to select “RETURN”, then
press SET.
• To proceed with presentation, return to
Step 3 on page 32.
PT1.p29-33.p65 2003/01/14, 12:3733
33
Page 34
TV Mode (Editing)
You can delete images from a card, copy data from one card to another, and protect
data from being deleted accidentally.
M
E
N
U
MENU
C
A
N
C
E
L
/SET
SET
Deleting Images (DELETE)
1 Press to select “EDIT”, then
press SET.
2 Press MENU.
• The Menu screen will be displayed.
3 Press to move the cursor to the right.
Press to select “SELECT” or “ALL”,
then press SET.
• SELECT : To select specific images
• ALL : To delete all images/folders
• Protected images cannot be deleted
unless protection is canceled. (p. 36)
• To select a file within a folder, it must
first be displayed in the index. (p. 27)
and folders to be deleted.
displayed in the index.
Those not displayed are not
deleted.
For “select delete”, follow “How to
Select Images” instructions on
page 37.
4 Press to select “YES”, then
press SET.
• The selected images will be deleted.
• To cancel the operation, select “NO”.
34
PT1.p34-37.p65 2003/01/14, 12:3734
(Example: when selecting “SELECT”)
Page 35
TV Mode (Editing)
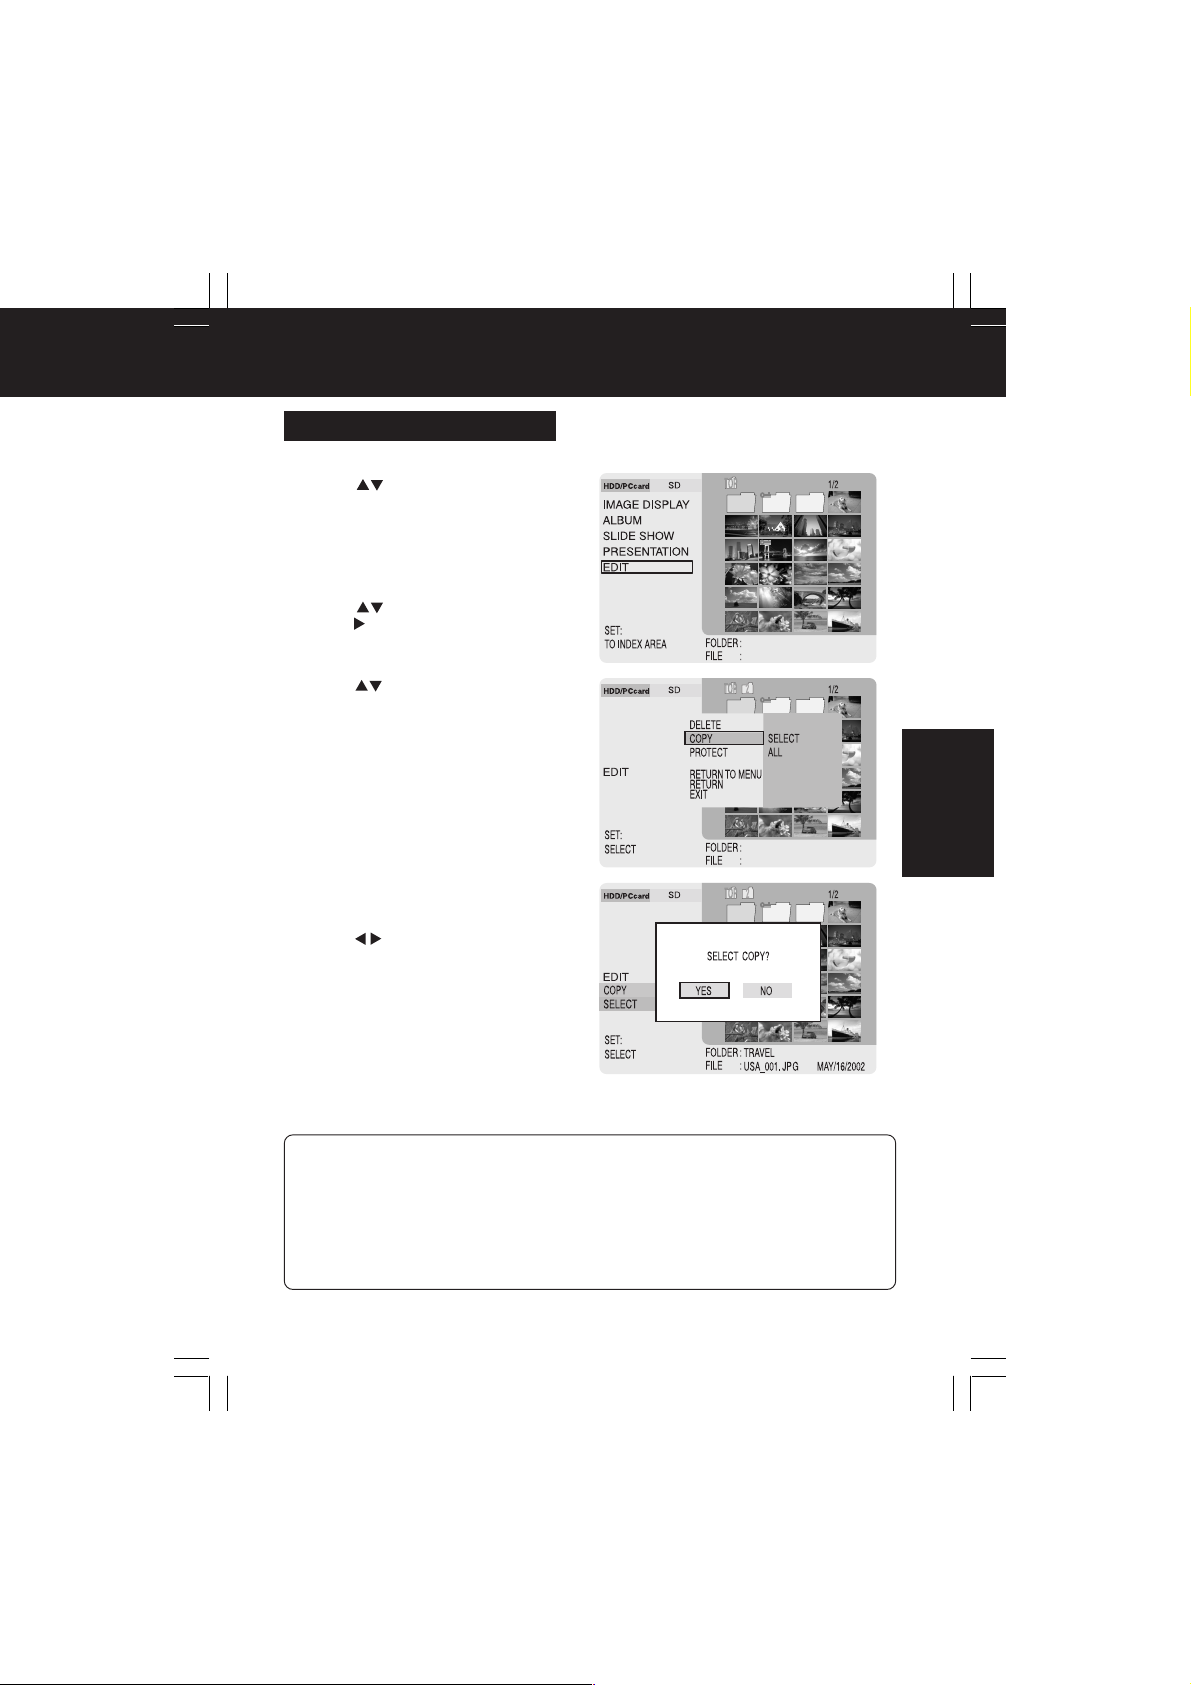
Copying Images (COPY)
Copy data from one card to another. A card to receive copied data must be inserted.
1 Press to select “EDIT”, then
press SET.
2 Press MENU.
• The Menu screen will be displayed.
3 Press to select “COPY”, then
press to move the cursor to the
right.
4 Press to select “SELECT” or “ALL”,
then press SET.
• SELECT : To select specific images
• ALL : To copy* all images/folders
* When a folder is copied, all contents
including non-image files are copied.
• To select a file within a folder, it must
first be displayed in the index. (p. 27)
For “select copy”, follow “How to
Select Images” instructions on
page 37.
5 Press to select “YES”, then
press SET.
• Images are copied to the other card.
• To cancel the operation, select “NO”.
and folders to be copied*.
displayed in the index.
TV Mode
(Example: when selecting “SELECT”)
– Note –
• The Sub Menu will disappear if MENU is pressed while the Sub Menu is displayed.
• Selecting “RETURN TO MENU” will redisplay the Main Menu.
Selecting “RETURN” changes display back one level.
Selecting “EXIT” returns display to first level of hierarchy (p. 27).
•“ALL” selection deletes all files within a folder, so check folder contents before proceeding.
Files/folders not displayed are not deleted.
• Gray folders contain no displayable files and cannot be deleted.
• Any files with the same first eight characters in their file names as those selected will be
copied or deleted as well.
PT1.p34-37.p65 2003/01/14, 12:3735
35
Page 36
TV Mode (Editing)
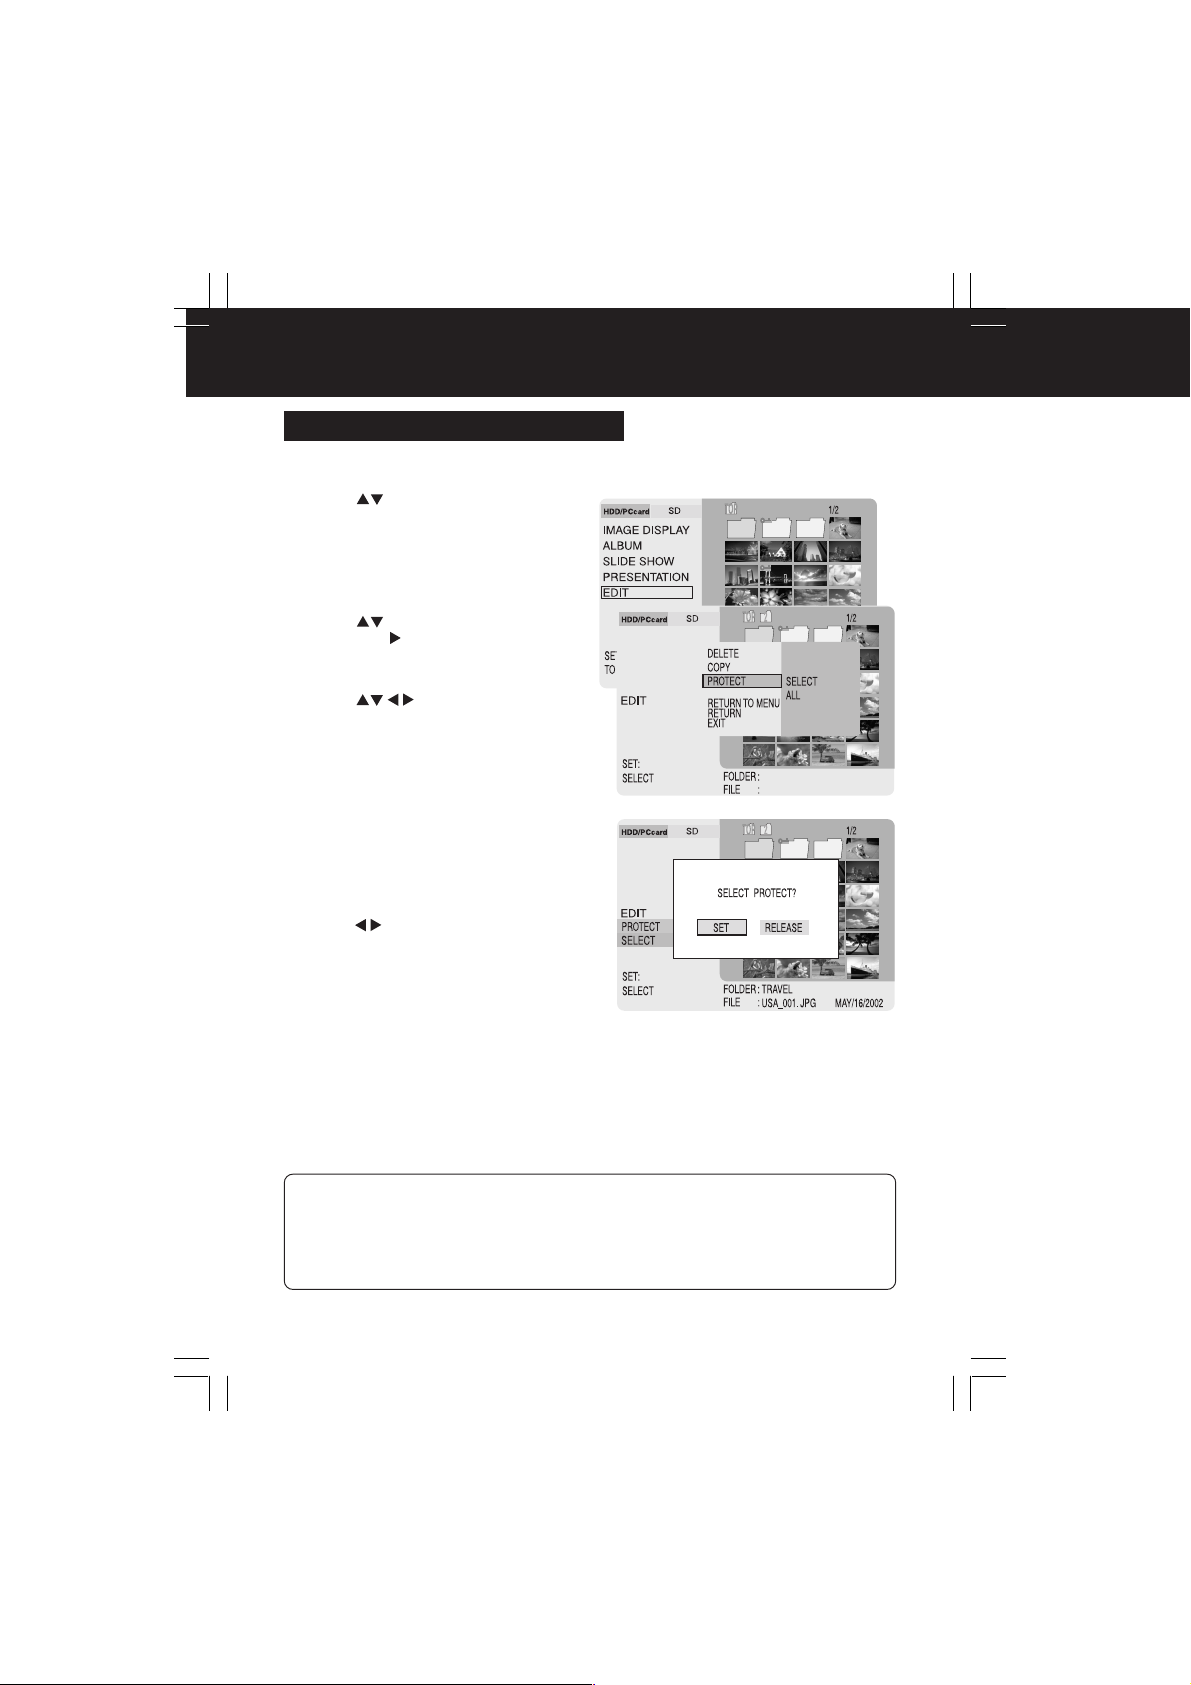
Protecting Images (PROTECT)
Important file data can be protected from accidental deletion.
1 Press to select “EDIT”, then
press SET.
2 Press MENU.
• The Menu screen will be displayed.
3 Press to select “PROTECT”,
then press to move the cursor to
the right.
4 Press to select “SELECT” or
“ALL”, then press SET.
• SELECT : To select specific images
• ALL : To protect* all images/folders
* When a folder is protected, all contents,
including non-image files, are protected.
For “select protect”, follow “How to
Select Images” instructions on
page 37.
5 Press to select “SET”, then
press SET.
• The image or folder will be protected.
• A “key” icon appears in the upper, left
corner of the image.
• To cancel protection of an image, select
“RELEASE”.
and folders to protect*.
displayed in the index.
– Note –
• The Sub Menu will disappear if MENU is pressed while the Sub Menu is displayed.
• Selecting “RETURN TO MENU” will redisplay the Main Menu.
Selecting “RETURN” changes display back one level.
Selecting “EXIT” retur ns display to first level of hierarchy (p. 27).
• Any files with the same first eight characters in their file names as those selected will be
protected as well.
36
PT1.p34-37.p65 2003/01/14, 12:3736
Page 37
TV Mode (Editing)
M
E
N
U
MENU
C
A
N
C
E
L
/SET
SET
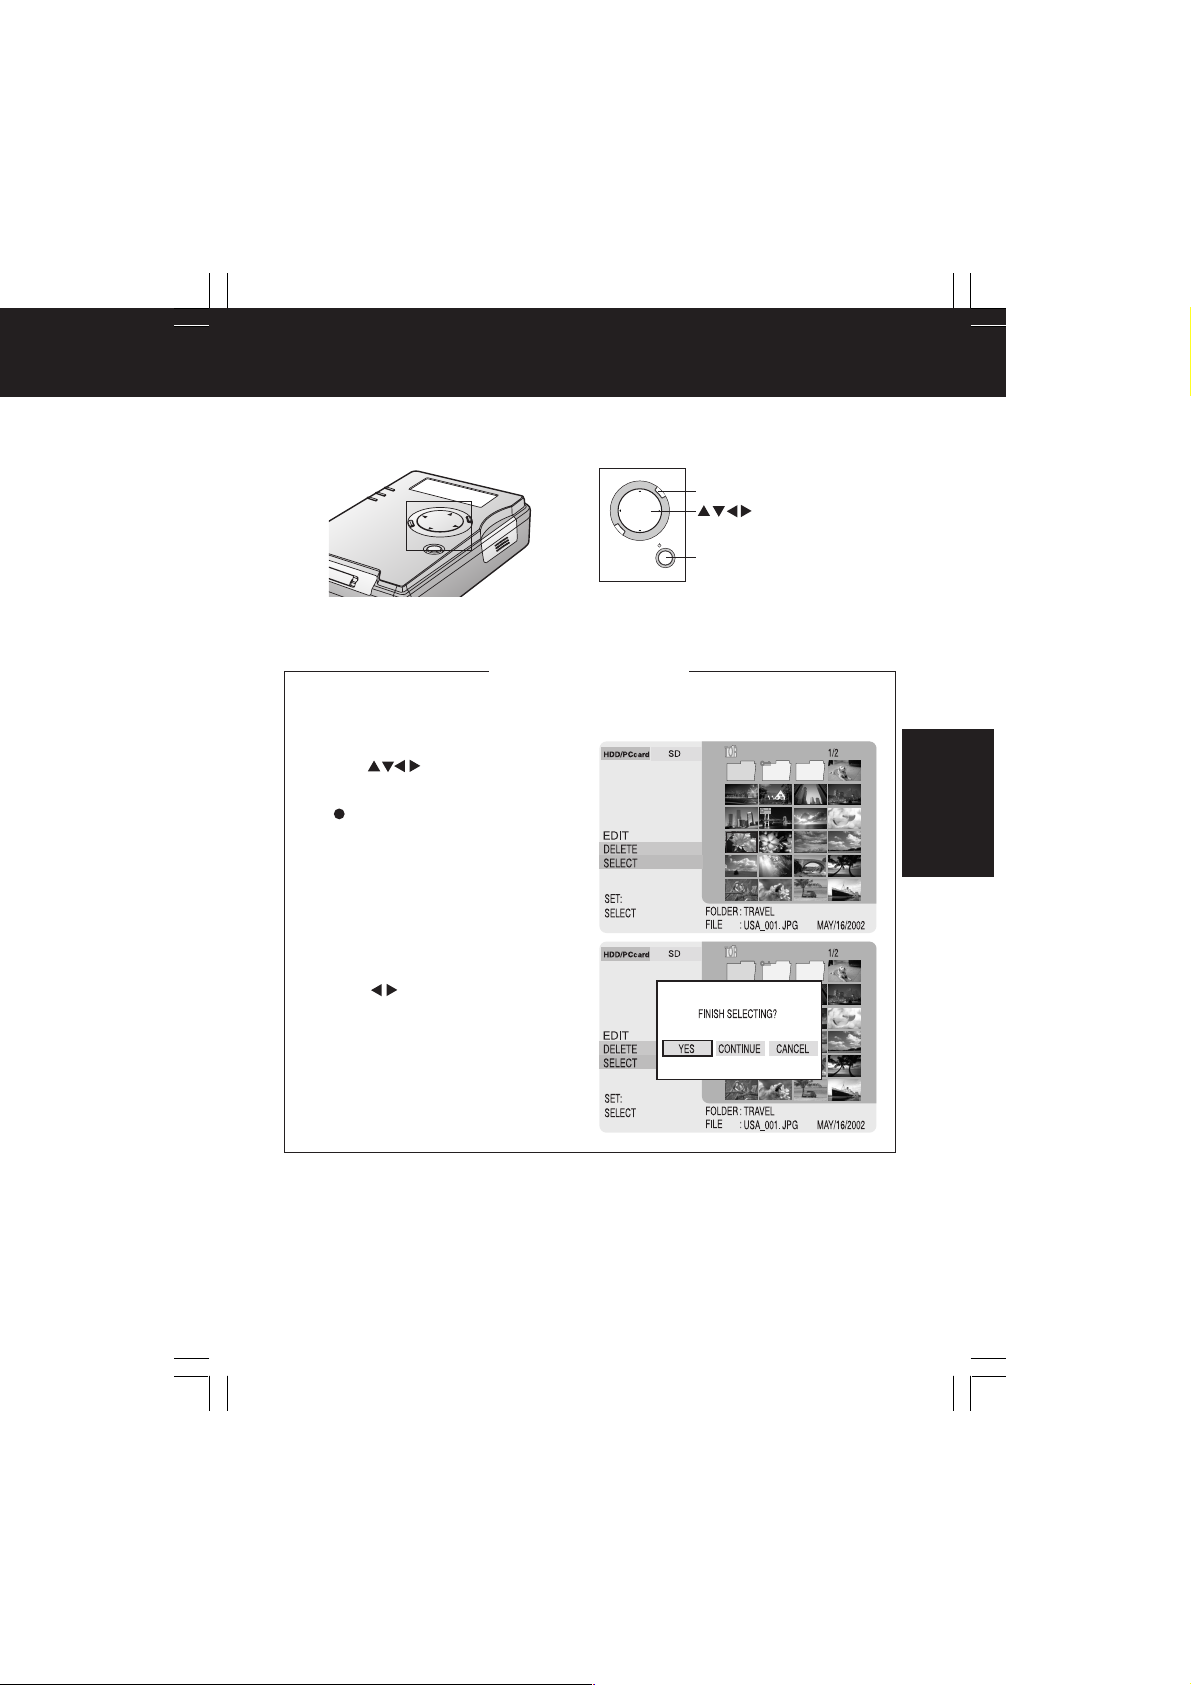
How to Select Images
Select image files for the DELETE, COPY, and PROTECT functions.
The example screens below depict deleting an image.
1 Press to select an image,
then press SET.
• Pressing SET again cancels selection.
•“
” appears in the bottom, right corner of
the selected image.
• Repeat Step 1 until all desired images are
selected.
2 Press MENU when image selection is
finished.
• Pressing MENU again resumes selecting
operation.
TV Mode
3 Press to select “YES”,
“CONTINUE” or “CANCEL”, then
press SET.
• YES : To finish selection.
• CONTINUE : To continue selection.
• CANCEL : To cancel selection and
PT1.p34-37.p65 2003/01/14, 12:3737
return to menu.
37
Page 38
TV Mode (Full Screen Playback)
When in image display or album mode, you can view an image full screen. Also, you
can use zoom, rotate, add color effects, display image information, and delete the
image.
M
E
N
U
MENU
C
A
N
C
E
L
/SET
SET
Selecting Images
Display an Image (from the index)
1 Display the index. (p. 27)
2 Press to select a file, then
press SET.
• Image is displayed in full screen.
To display the next image:
Press to display next image in the
current index.
• Press for previous image.
Display an Image (from an album)
1 Display an album. (p. 28)
2 Press MENU.
3 Press to select “FILE SELECT”
then press SET.
To display the next image:
Press to display next image in the
current album.
• Press for previous image.
38
PT1.p38-41.p65 2003/01/14, 12:3738
Page 39

TV Mode (Full Screen Playback)
With a full screen index or album image
displayed, you can zoom, rotate, add color
effects, and display image information.
Press MENU to display the sub menu for
function selection.
• Selecting “RETURN”, then pressing SET
redisplays the index or album.
• Sub menu functions are described on pages
39~41.
Before operating any function, press MENU for Sub Menu.
Enlarging an Image (ZOOM)
Displaying the Sub Menu
Images can be displayed 2 or 4 times their normal size.
1 Press to select “ZOOM” from the
sub menu, then press SET. (Refer to
the above section.)
2 Press to select “X 2” or “X 4”,
then press SET.
3 Press to select an area for
zooming, then press SET.
• To enlarge a X2 image to X4, press MENU
and select “X4”, then press SET. Now,
repeat Step 3.
• You can change the viewing area in a
zoomed image with
To return image to normal size:
Select “RETURN” from the zoom
menu, then press SET.
• Repeat above if image is X4.
To delete the image:
a Select “DELETE” from the zoom
menu, then press SET.
b Press to select “YES”, then
press SET.
.
TV Mode
– Note –
• Selecting “RETURN” redisplays previous menus, one by one.
• To temporarily exit the sub menu, press MENU. Pressing MENU again displays the menu
previous to the one just exited.
• Some images appear grainy when enlarged.
PT1.p38-41.p65 2003/01/14, 12:3739
39
Page 40
TV Mode (Full Screen Playback)
M
E
N
U
MENU
C
A
N
C
E
L
/SET
SET
Rotating an Image (ROTATE)
1 Press to select “ROTATE” from
the sub menu, then press SET.
(p. 39)
2 Press to select “LEFT” or
“RIGHT”, then press SET.
• LEFT : image is rotated 90°
• RIGHT : image is rotated 90° clockwise.
To save rotated images:
Select “SAVE” from the rotate menu,
then press SET.
• Image will hereafter be displayed in the
saved form.
counterclockwise.
(When “LEFT” is selected)
– Note –
• Selecting “RETURN” redisplays previous menus, one by one.
• To temporarily exit the sub menu, press MENU. Pressing MENU again displays the menu
previous to the one just exited.
• MOV files and some other types of rotated image files cannot be saved.
40
PT1.p38-41.p65 2003/01/14, 12:3740
Page 41

TV Mode (Full Screen Playback)
Processing Image Color (COLOR EFFECT)
You can change the image color.
1 Press to select “COLOR
EFFECT” from the sub menu, then
press SET. (p. 39)
2 Press to select “B/W” or
“SEPIA”, then press SET.
• The image color will change.
• Selecting “RETURN”, then pressing SET
restores image’s original coloration.
Displaying Image Information (PROPERTIES)
File name, date, and size are always displayed on all full screen images.
1 Press to select “PROPERTIES”
from the sub menu then press SET.
(p. 39)
• When a single image is displayed in a full
screen, the image information will remain
constantly displayed.
• Once this setting is made, information will
appear on any image displayed in full
screen while the unit is on. Properties is
canceled when unit is turned off.
To cancel properties display:
Repeat the above procedure.
TV Mode
41
PT1.p38-41.p65 2003/01/14, 12:3741
Page 42

PC Mode (Setup)
By connecting this unit to a PC via the supplied USB cable, it can be utilized as an
external drive.
System Requirements
System requirements are shown below.
Compatible PC Models
OS Compatibility
PC must come factory equipped with a USB port and preinstalled with one of the OS
listed above.
• For Windows 98SE, a CD-ROM drive is required to install the driver.
• If more than one USB device is connected to a PC, or if a USB hub or USB extension cable is
used, correct operation is not guaranteed.
• PC / AT compatible (PCs with USB port)
• Windows
®
98SE • Windows® 2000 • Windows® Me • Windows® XP
Setup (Connections)
1 Turn on the PC and start
Windows.
2 Install a fully charged
battery, then connect AC
adaptor, then turn this unit
on. (p. 18)
3 Connect unit to PC with
supplied USB cable.
• PC begins automatic hardware
detection. Messages displayed
depend on OS used.
• Windows 98SE requires a
dedicated driver. See next page
for the driver install procedure.
USB
Terminal
3
Caution
• Connect USB cable correctly, referring to the
symbol on the PC USB port. For more on USB
connection, see your PC manual.
• For PC connection, a fully charged battery must be
installed, followed by the AC adaptor. Without a
battery installed, power will not be supplied. It is
recommended that you charge the battery fully before
use.
• Never disconnect USB cable or AC adaptor during
communication between the unit and PC. Otherwise,
operation will terminate abnormally. If this happens,
restart the PC, immediately run ScanDisk/CheckDisk,
and make a backup of data. (p. 9) Data integrity
cannot be guaranteed, even if this procedure is
followed, so always place the unit on a stable, level
surface, and never disconnect USB cable or AC
adaptor during use. Refer to page 49 for what to do if
the HDD SAFETY is activated.
• Always start up the computer before connecting
the USB cable.
– Note –
• With USB cable connection, PC may take longer to detect this
unit. During this period, no operations can be performed from the
PC.
USB
Terminal
2
AC Adaptor
USB Cable
(supplied)
42
PT1.p42-45.p65 2003/01/14, 12:3742
DC IN
2
Page 43

PC Mode (USB Driver)
Installing the USB Driver
1 Make connections following “Setup
(Connections)” steps on page 42.
• The “Add New Hardware Wizard” screen is
displayed.
2 Insert the supplied CD-ROM into the
PC’s CD-ROM drive.
3 In the “This wizard searches for new
drivers for:” dialog box, click on
[Next].
1
4 With “Search for the best drive for your
device. [Recommended]” checked, click
2
on [Next].
5 With “CD-ROM drive” checked, click on
[Next].
3
• Uncheck the [Floppy disk drives] box.
6 In the “Windows driver file search for the
device:” dialog box, click on [Next].
• A file copy / driver information database will be
created.
4
7 With “Windows has finished installing the
software that your new hardware device
requires” displayed, click on [Finish].
If using Windows Me:
Depending on the PC, a message
window, such as the one on the right,
may appear during automatic recognition.
If so, click [Browse], select the
c:\windows\options\install folder from the
drop down list, then click [OK].
Afterwards, confirm that path
“c:\windows\options\install” appears in
the “Copy to (C)” box in the top window,
then click [OK].
5
(Only for Windows 98SE)
1
2
3
4
PC Mode
5
– Note –
• Selecting [Retur n] redisplays previous menus, one by one.
• Once the USB driver is installed successfully, it need not be installed again for USB
connection.
• After installation, double-click the “ My Computer” icon and confirm that a “Removable Disk”
icon was added to the drive icon list.
PT1.p42-45.p65 2003/01/14, 12:3743
43
Page 44

PC Mode (Operation with the PC)
When this unit is connected to a PC using the USB Cable provided (p. 42), it will be
recognized as a Removable Disk. You can then copy, move, delete, and display files
on this unit the same as with a normal disk drive.
SD Lamp
HDD Lamp
Liquid Crystal
Display
M
E
N
U
C
A
N
C
E
L
/SET
SET
File Operations
1 Make connections following “Setup (Connections)” steps on page 42.
2 Select and change to another card.
• With a USB cable connected, selecting another card will terminate
communication with the PC. Do Steps 1~4 of “Disconnecting Unit from PC” on
page 45, then proceed with the following operation.
Press to select “SD” or “HDD (PC Card)”,
then press SET.
• While the SD or HDD lamp is flashing, “CANNOT
CHANGE SLOT” is displayed and operation is not
possible. After the lamp goes out, press SET again.
(Liquid Crystal Display)
3 Double-click [My Computer], then
double-click [Removable Disk].
• Files contained on the card will be
displayed and normal PC operations can
be done.
• If no removable disk is found, refer to
“Reinstalling the Device Driver” on page 48.
– Note –
• Drive letters (e.g. “H:”) and method of opening My Computer may vary depending on the PC.
• With USB cable connected, the “Removable Disk” icon will not appear while the SD or HDD
Lamp flashes as the PC checks the connection. Check for the icon once the indicator goes
out. It may take several minutes for the PC to recognize the PC Card HDD device.
44
PT1.p42-45.p65 2003/01/14, 12:3744
Page 45

PC Mode (Operation with the PC)
Disconnecting Unit from PC
1 Confirm SD and HDD Lamps are out and card is not being accessed.
2 Click on [Safety Remove Hardware] icon in the desktop task tray.
3 Select [USB Mass Storage Device] and click [Stop].
• For Windows Me, “Unplug or eject hardware” will be displayed.
• The message “Stop a Hardware device” will be displayed.
• If this unit is disconnected from the PC while an application is running, an error message
may appear. In this case, close the application, then disconnect the unit.
4 Click on [OK].
• The USB cable can now be safely disconnected and the unit removed.
5 Disconnect the USB Cable from the PC.
Caution
• Never unplug USB cable while the card in this unit is being accessed. This may damage the
unit and the data. Always follow above procedure when removing USB cable.
• With Windows 98SE, there is no special “Safety Remove Hardware” operation. If using
Windows 98SE, do not repeatedly remove and connect the unit or repeatedly switch the
computer to standby or off while the unit is connected.
• PC Card HDD can be directly inserted into Card Slot of a PC and used as a disk drive.
However, always click on the PC card icon (Step 2 above) when removing the PC Card HDD.
PC Mode
– Note –
• Messages displayed by your PC may vary.
To change the Card:
Do Steps 1~4 of “Disconnecting Unit from PC” above, then change the card following step 2 on
page 44.
To replace the Card:
Do Steps 1~5 of “Disconnecting Unit from PC” above. Then, after first turning unit power off, replace
the card following the procedure on page 17.
To turn unit power off while PC is connected:
Do Steps 1~5 of “Disconnecting Unit from PC” above, then turn unit power off.
PT1.p42-45.p65 2003/01/14, 12:3745
45
Page 46

PC Mode (Using the Applications)
The included CD-ROM contains a “JPEG Addin Software” application which converts
Microsoft PowerPoint data created on a PC into JPEG files and creates a
presentation folder (p. 47) for TV screen presentation (pp. 32, 33).
• Recommended for use with a 300 MHz or higher CPU (or equivalent CPU) and at least 128 MB of
memory. Also, Microsoft
Installation
1 Turn on the PC and start Windows.
2 Load included CD-ROM into PC CD-ROM
drive.
• CD-ROM folder opens automatically. If not, open
from [My Computer].
3 In the [Setup] folder, double-click on
[Setup.exe] .
• The setup program will be executed.
• If PowerPoint has not been installed, a warning is
displayed. Click [OK], then install PowerPoint.
4 Click on [Next].
5 Confirm installation destination, then
click on [Next].
• To install into another folder, click on [Browse] and
select a folder.
®
PowerPoint® 97/2000/2002 must be installed prior to use.
6 Click on [Finish].
• If you do not want to restart the computer right
away, select “No, I will restart my computer later.”
7 Be sure CD-ROM access light is out
before removing the CD-ROM.
• This completes installation.
8 Start PowerPoint confirming that the
icon, right, is added.
• When PC restarts, if a message, such as “Please install a JPEG filter” appears,
install “JPEG File Interchange Format Import” provided with PowerPoint.
– Note –
• The way to open folders, shape of “Setup.exe” icon, double or single clicking, and PC messages
vary according to the PC and OS used.
46
PT1.p46-49.p65 2003/01/14, 12:3746
Page 47

PC Mode (Using the Applications)
Presentation File Creation
1 Install JPEG Addin Software (p. 46), then start PowerPoint on the PC.
2 Select [Open] from [File] menu to open a PowerPoint file for JPEG
conversion.
3 Connect PC using supplied USB cable. (p. 42)
4 Click in the upper, left corner. (p. 46)
• If “Drive not found.” appears, click [OK].
5 Select “Removable Disk” as the save
destination.
• Select “SD” or “HDD (PC Card)” as the save
destination, then specify the drive to be recognized
as the removable disk drive corresponding to the
connected unit. (p. 44)
To change an image name:
• Type in a five-character alphanumeric name.
Do not use spaces or special symbols.
• Default name is “sheet”.
To change the image size:
• Certain TV types may cut off image edges when
displayed on the screen. Thus, the default image
size value is set at 90 %. To enlarge, select 100 %.
About flicker reduction processing:
• Images are processed to reduce TV screen flicker.
It is advisable to leave this option checked.
6 Click on [Create].
• Conversion of PowerPoint files to JPEG files is
started. Afterward, “It was created.” is displayed.
7 Click on [OK].
PC Mode
8 Check the created folder.
a Confirm that a save destination folder was created on the PC.
b Disconnect the USB cable correctly. (p. 45)
c Switch to TV mode and confirm the folder color is pink. (pp. 24~26)
Caution
• Only folders entitled “PRES_***” (last 3 digits “*” are variable) are recognized as presentation
folders. If you change the folder name on a PC, only change the last 3 digits. Otherwise it will
not be recognized.
• For Windows 98SE/Me, a limited number of JPEG files can be created. If an error occurs
during conversion, restart the PC, then repeat this operation. The number of files that can be
converted will vary depending on PC environment, such as the number of open applications
and the number of resident programs.
PT1.p46-49.p65 2003/01/14, 12:3747
47
Page 48

PC Mode (Other)
Uninstalling JPEG Addin Software
For Windows XP, log in with the same username used when software was installed.
1 Click “Start”, “Settings”, and “Control Panel”.
• For Windows XP, Click “Star t” and “Control Panel”.
2 Double-click “Add/Remove Programs”.
• For Windows XP, click “Add or Remove Programs”.
• A list of the programs that are currently installed will be displayed.
3 Select “JPEG Addin Software”, then click [Add/Remove].
• For Windows Me/XP, click [Change/Remove].
4 Click on [OK].
• The JPEG Addin Software will then be uninstalled.
• To cancel, click [Cancel].
Reinstalling the Device Driver (Windows 98SE/Me)
If the unit device cannot be found on the PC, it may be due to incorrect device driver
installation. Reinstall the driver as follows.
1 Right-click the My Computer icon,
and then select “Properties”.
• The “System Properties” screen will be
displayed.
2 Click the “Device Manager” tab.
3 Select “Panasonic SD Media
Storage USB”, then click
[Remove].
4 Click on [OK].
5 Click on [Refresh].
• The Add New Hardware Wizard will start.
Refer to page 43 for details on installing
the driver.
48
PT1.p46-49.p65 2003/01/14, 12:3748
Page 49
PC Mode (Other)
HDD SAFETY Switch Operation
When using a USB connection, place the unit device on a flat, level surface. If the
HDD SAFETY switch is activated, carry out the following remedies.
●●
● For Windows 98SE/Me
●●
If the HDD SAFETY Detection Switch is activated while a PC Card HDD is being
accessed, the PC screen goes blue and the following message appears.
Error Reading Disk in Drive**:
Please Insert Disk ***
With Serial Number *** in Drive *:
Press ENTER for OK or ESC to Cancel : OK
a “SAFETY MODE PUT IT DOWN” appears on the unit LCD. Make sure that the
unit is always placed on a flat, level surface.
b When the unit LCD changes to “SD” or “HDD” selection screen, and the HDD Lamp
starts flashing, press [Enter].
• The PC screen will turn black momentarily and the unit will then continue the
operation that was in progress before the switch was activated. Wait for a short
period while the HDD Lamp flashes. If the HDD Lamp stays off and the PC
screen does not return to its previous state, press [Enter] once more. If this has
no effect, disconnect the USB cable and restart the computer.
• After processing is complete, check that the required operation has completed
normally. Repeat the operation if necessary.
●●
● For Windows 2000/XP
●●
If the HDD SAFETY Detection Switch is activated while the PC Card HDD is being
accessed in PC mode, the following message may appear.
[ For Windows 2000 ] [ For Windows XP ]
PC Mode
Place the unit on a flat, level surface, and then click [OK], [Cancel], [Try Again]
or [Continue].
• Processing will be interrupted, so repeat the operation.
– Note –
• If the HDD SAFETY switch was activated while the PC Card HDD was being accessed, it is
advisable to run ScanDisk/CheckDisk on the computer. (p. 9)
PT1.p46-49.p65 2003/01/14, 12:3749
49
Page 50
Warning and Instruction Displays
Copy Mode (Liquid Crystal Display)
Indications Condition
PLEASE
INSERT BATT.
NO CARD
NO DATA
INIT ERROR
FORMAT ERROR
NO CAPACITY
CARD PROTECT
COPY ERROR
HIT ANY KEY
SAFETY MODE
PUT IT DOWN
CAN’T USE
FAT32 SDCARD
CAN’T COPY
SECURE FILES
BATTERY LOW
COPY CANCEL
BATTERY LOW
PC CARD
CAN’T FORMAT
Insert battery. Power will not turn on without battery
inserted.
Insert the card.
No data is stored on the card.
An error has occurred during initialization of the
HDD/PC Card. Turn off the power, then reinsert the
card. If error occurs again, format the card (p. 23),
then reinsert it. If error still occurs, card may be
damaged.
An error occurred during card formatting.
Re-insert card and format again. (pp. 22, 23)
Insufficient free space on the copy destination disk.
Delete unnecessary files, or insert a card with
sufficient free space.
The card is protected. Cancel the protection to
resume operation. Refer to documentation provided
with the card.
An error occurred during copying. Press any key,
then reset the unit (p. 52), or turn the power off,
then back on again and repeat copying operation.
The HDD SAFETY Detection Switch has activated
and the HDD has stopped for protection. Place the
unit on a flat, level surface.
SD Memory Cards formatted to FAT32 specifications
cannot be used. “Format?” will be displayed. Transfer
desired files to PC, then format the card. (pp. 22, 23)
Secure data files (audio files that include copyright
restrictions) cannot be copied.
The battery is spent. Copy operation will stop and
power will turn off. Recharge the battery.
The battery is spent. The copy operation will be
canceled and the power will turn off. Then recharge
the battery.
The PC Card cannot be formatted.
50
PT1.p50-56.p65 2003/01/14, 12:3750
Page 51
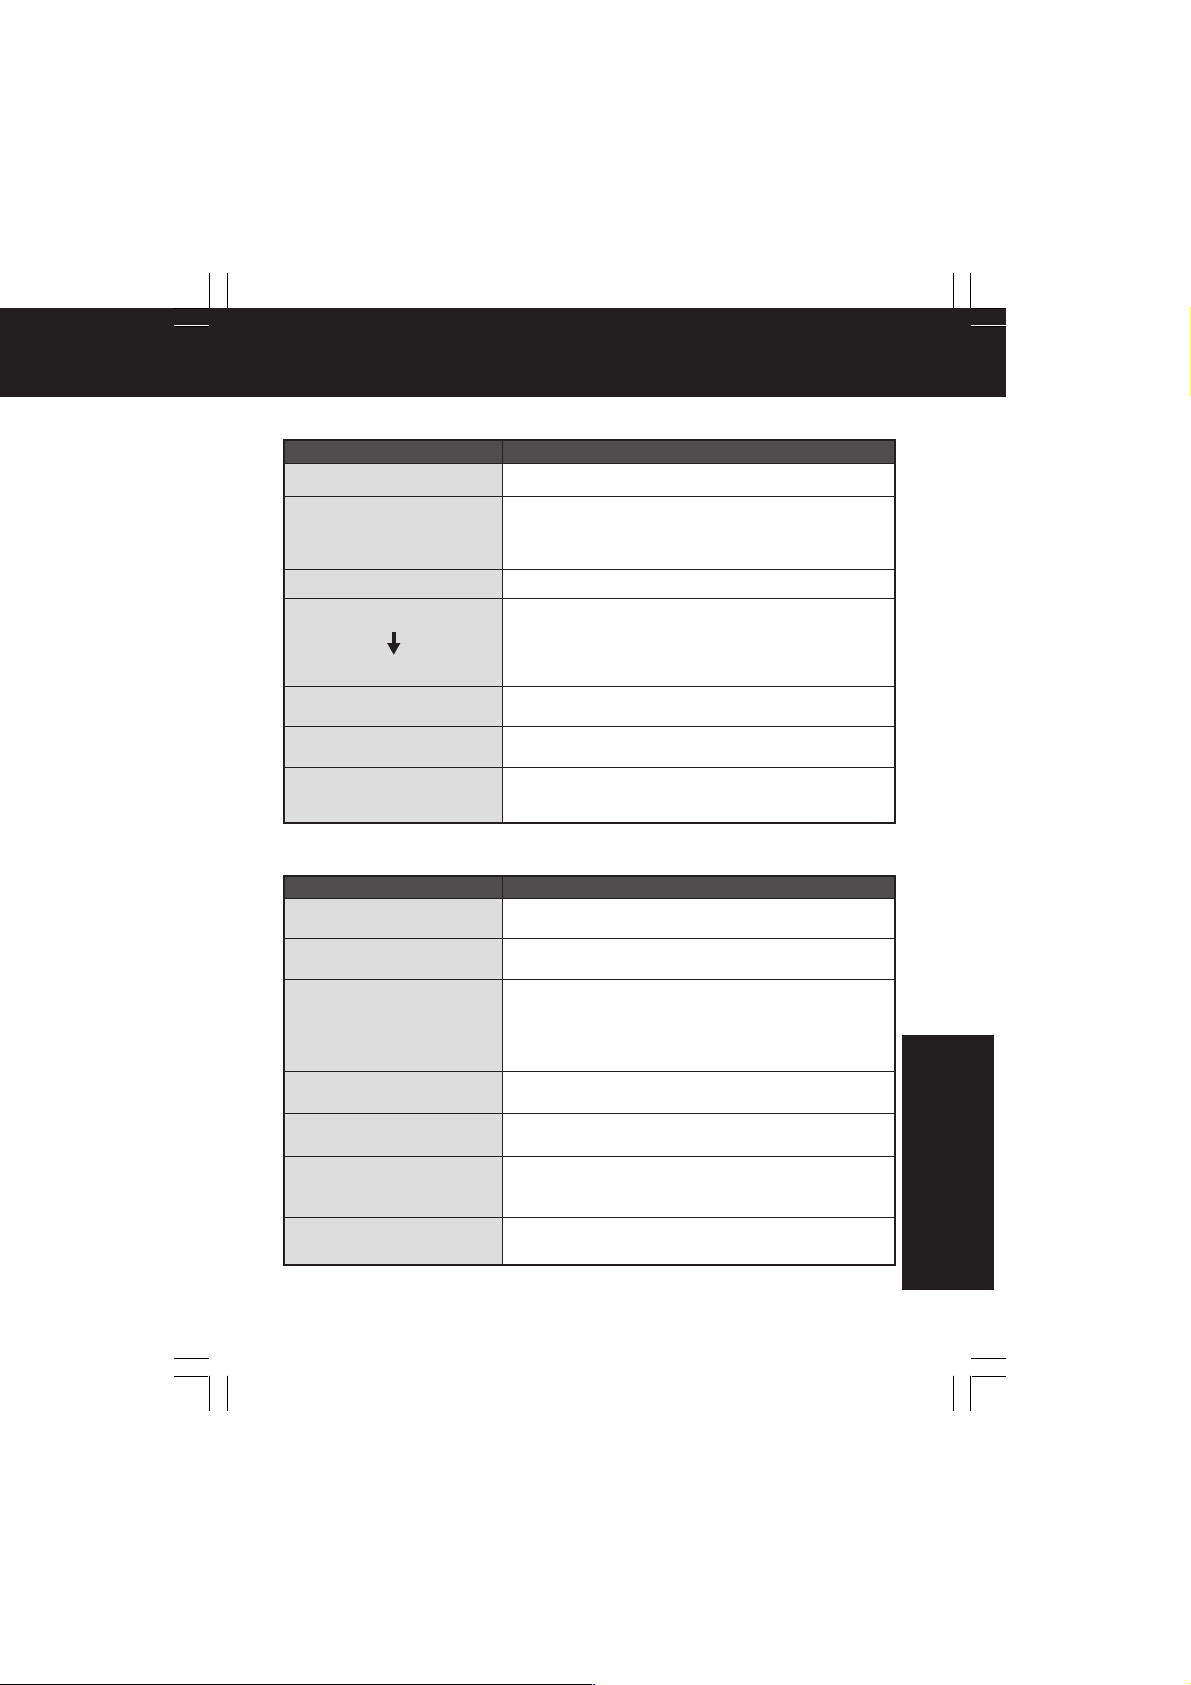
Warning and Instruction Displays
PC Mode (Liquid Crystal Display)
Indications Condition
CONNECT AC
CANNOT
CHANGE SLOT
INSERT BATT.
Connect the AC adaptor.
Selection cannot be changed between a PC Card
HDD/PC Card and an SD Memory Card during
data transfer between the unit and a PC. Wait for
transfer to finish, then make your selection.
Insert the battery.
DISCONNECT USB
PULL OUT USB CABLE
MODE CHANGE
PLEASE WAIT
POWER OFF
PLEASE WAIT
SAFETY MODE
PUT IT DOWN
Data transmission was interrupted. Disconnect the
USB cable. Check that the battery and AC adaptor
are connected correctly, then reconnect the USB
cable.
The mode is being changed. Please wait a moment.
After processing is finished, the power will turn off.
The HDD SAFETY Detection Switch has activated
and the HDD has stopped for protection. Place the
unit on a flat, level surface.
TV Mode (TV Screen Display)
Indications Condition
NO CARD
NO DATA
INITIALIZE ERROR
FORMAT ERROR
NO IMAGE FILE
NO CAPACITY
COPIED EXCEPT
SECURE FILES
Insert a card.
There is no data on the card or in the folder.
An error has occurred during HDD/PC Card
initialization. Turn power off, then reinsert the
card. If error is repeated, format the card (p. 23)
and reinsert it. If error persists, card may be
damaged.
An error occurred during formatting of the card. Reinsert the card and then reformat it. (pp. 22, 23)
There are no JPEG or TIFF files in the folder that
can be displayed.
Insufficient free space on the copy destination disk.
Delete unnecessary files, or insert a card with
sufficient free space.
Secure data files (audio files that include copyright
restrictions) cannot be copied.
For Your Information
(Continued on next page.)
PT1.p50-56.p65 2003/01/14, 12:3751
51
Page 52
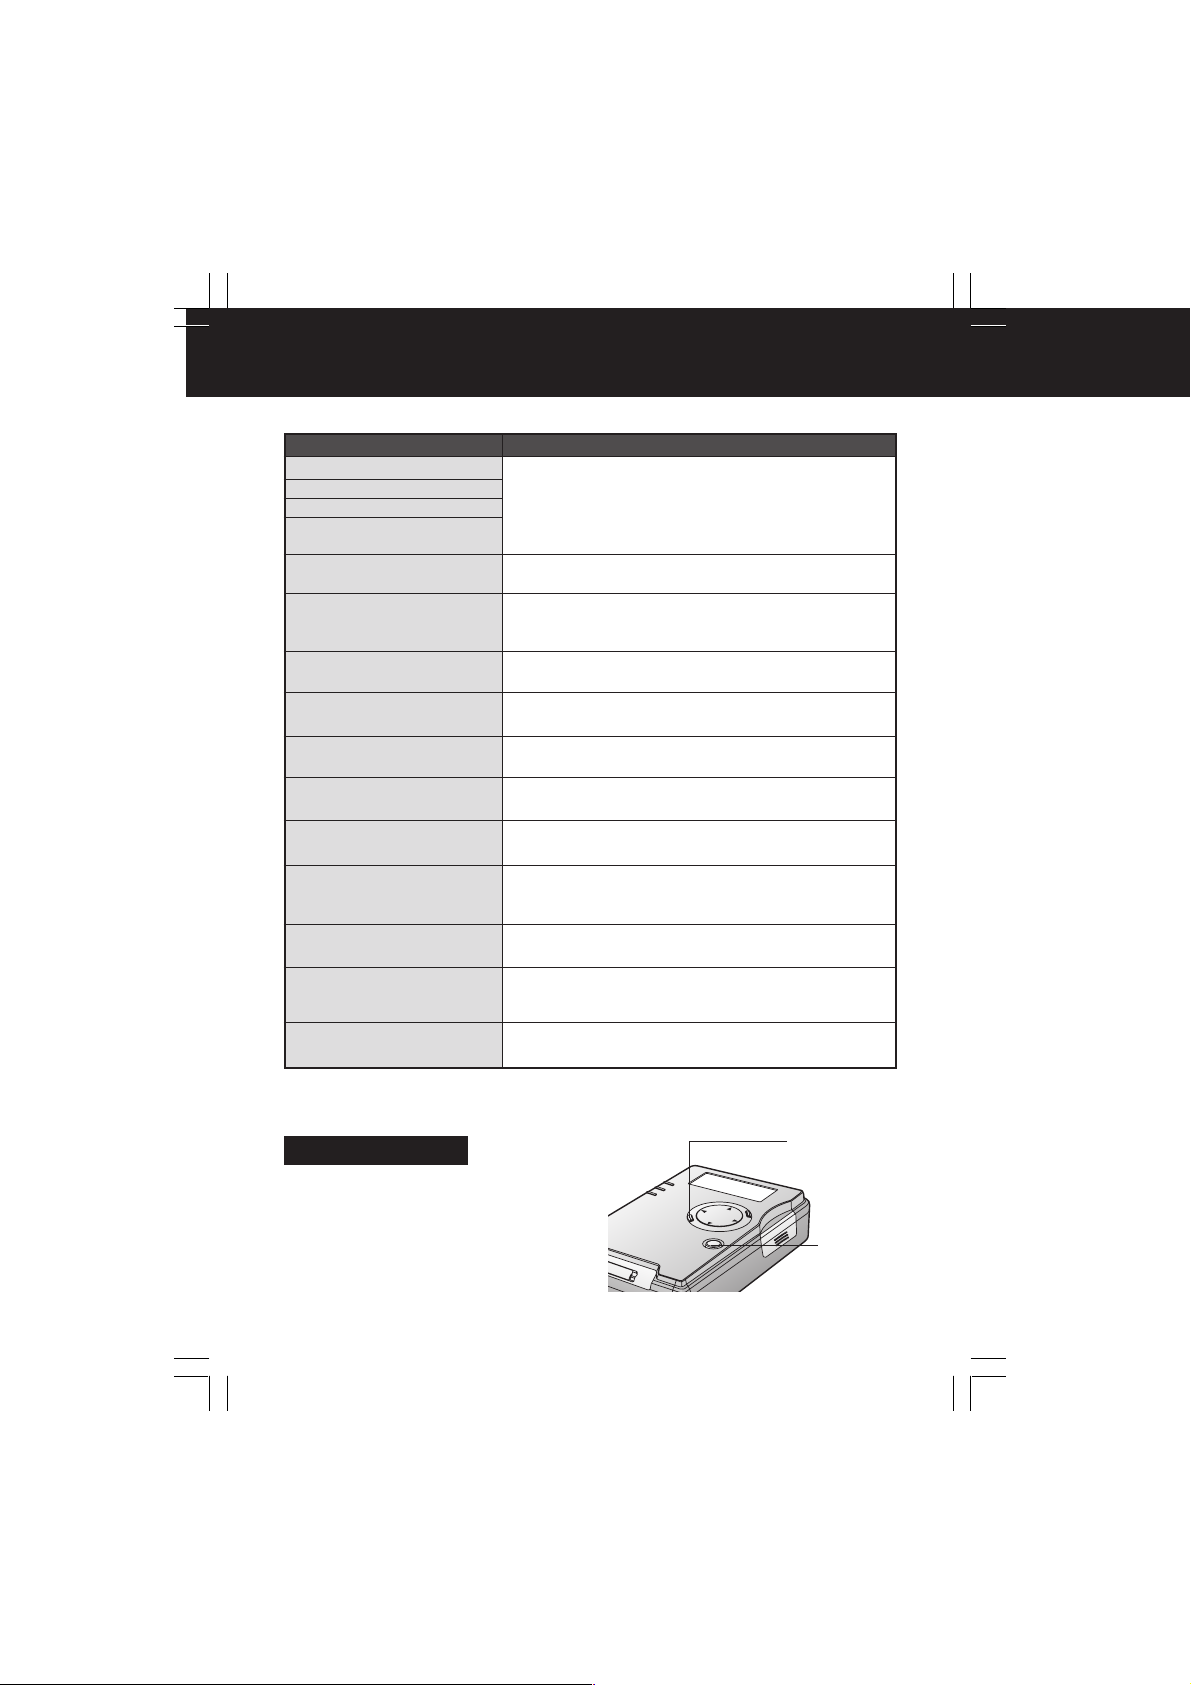
Warning and Instruction Displays
TV Mode (TV Screen Display)
Indications Condition
COPY ERROR
DELETE ERROR
PROTECT ERROR
CAN’T READ
SETTING FILE
CAN’T DISPLAY
FOR HDD SAFETY
PUT UNIT DOWN
THIS FILE ISN’T EXIF
CAN’T SAVE THIS FILE
NO SUPPORT
FAT32 SD CARD
CANNOT SELECT
BATTERY LOW
COPY CANCEL
BATTERY LOW
NOT SELECTED
BATTERY LOW
PLEASE POWER OFF
DELETE EXCEPT
PROTECT AND CAN’T
VIEW FILE
CARD IS WRITE
PROTECTED
The specified operation did not execute correctly.
Reset the unit (see below), or turn power off, then
back on and repeat the operation.
An image file could not be displayed. The file is
corrupt or the format is incompatible.
The HDD SAFETY Detection Switch has activated
and the HDD has stopped for protection. Place the
unit on a flat, level surface.
Rotated images cannot be saved.
SD Memory Cards that have been formatted to
FAT32 specifications cannot be used.
Folders cannot be selected for Slide Show. Open a
folder, then select files.
The battery is spent. Operation will be canceled and
power will turn off. Recharge the batter y.
The battery is spent. Copy operation will stop and
power will turn off. Recharge the batter y.
The operation timed out due to no selection during a
Slide Show, presentation, copying, deleting or file
protecting operation. Repeat the selection.
Battery level is getting low. Turn off the power and
recharge the battery.
Protected files and files that cannot be displayed
cannot be deleted.
Card or file is protected. To continue the operation,
remove the protection.
Reset Function
If an error occurs during an operation and
the unit no longer works, reset the unit as
follows.
Press CANCEL and STANDBY
simultaneously for 5 seconds.
• Unit is reset. Try operation again.
52
PT1.p50-56.p65 2003/01/14, 12:3752
CANCEL
STANDBY
Page 53

Before Requesting Service
If a problem should arise, you may be able to correct it yourself using the corrections
listed below. If the problem persists, contact your nearest Servicenter.
Symptom Correction
Unit does not power up...
Power is on, but unit turns off
after a short period...
Power turns off automatically...
Unit will not turn off...
Copying cannot be performed...
Files and folders cannot be
located...
• Be sure the battery and AC adaptor are
connected properly.
• Use a fully recharged battery.
• Press STANDBY for at least 2 seconds.
• Use a fully recharged battery.
• Always recharge battery within specified
temperature range. Battery will not recharge
at low temperatures under 23 F (-5 °C).
• If powering unit with battery only, power will shut
off if no operation is performed for 5 minutes.
Turn unit back on.
• Power will not turn off while files are being read
or copied. Turn unit off after SD/HDD access
Lamp goes out.
• Power will not turn off when HDD SAFETY
Detection Switch is activated. Place unit on flat,
level surface, then turn off the power.
• Insert card correctly.
• Be sure copy destination has sufficient free
space. Delete unnecessar y data to free up
space.
• If HDD SAFETY Detection Switch was
activated, place unit on flat, level surface.
• Secure data files (audio files that include
copyright restrictions) cannot be copied.
• If the SD Memory Card write-protect switch is
set to “LOCK”, data cannot be overwritten.
• In Copy or TV mode, when an SD Memory Card
is copied to a PC Card HDD, copied data will be
placed in a folder entitled, “CARD****”. Open this
folder and confirm data was copied.
• If all or selected data in a “CARD****” folder is
copied to an SD Memory Card, the “CARD****”
folder disappears and data is copied according
to file structure rules. See “Copying and
Backup” section on page 12.
For Your Information
PT1.p50-56.p65 2003/01/14, 12:3753
(Continued on next page.)
53
Page 54

Before Requesting Service
Symptom Correction
No images are displayed, even
though this unit is connected to
a TV...
Images cannot be displayed...
Video images cannot be played
back...
Data cannot be read or written
using USB connection...
PC Card HDD data cannot be
read or written...
Insufficient free space on card...
No presentation folders can be
found...
Computer does not start up...
• Set COPY/TV MODE to “TV.”
• Connect video cable properly.
• Set TV input to Video. See TV manual.
• The USB cable must be disconnected to view
images on a TV.
• Confirm that TV format is NTSC from Copy
mode.
• Insert card correctly.
• Files with extensions other than .JPG, .TIF and
.MOV, and files that contain corrupt data, cannot
be displayed.
• To view images within folders, open a folder,
then select .JPG, .TIF, and .MOV files.
• Some files take longer to display.
• Only the first frame of QuickTime format data
can be displayed.
• When the USB cable is connected, ensure that
the battery has been installed then connect the
AC adapter.
• Connect USB cable properly.
• Select a read or write destination card.
• Correctly install PC Card HDD in this unit.
• If HDD SAFETY Detection Switch was
activated, place unit on flat, level surface.
• The PC Card HDD is a precision hard disk
drive. If it is dropped or receives a strong
impact, malfunction, damage, and loss of stored
data could occur. If read/write errors occur or
operation is abnormal, a backup should be
performed immediately, using the ScanDisk/
CheckDisk function.
• Confirm card capacity on a PC as some data on
the card cannot be displayed using this unit.
• If Backup is set to on, available space is
reduced by half.
• For a PC Card HDD, be sure specified saving
destination name is in the form of “CARD****”.
• Do not change folders to unrecognizable
names.
• Be sure USB cable is not connected to the unit.
54
PT1.p50-56.p65 2003/01/14, 12:3754
Page 55

Specifications
Power Supply: DC 4.8 V (AC Adaptor) / DC 3.7 V (Battery)
Power Consumption: 2.2 W (AC Adaptor) (peak 3.4 W)
2.2 W (Battery) (peak 2.9 W)
Compatible Memory
Cards
SD Card Slot: SD Memory Card, MultiMediaCard
PC Card Slot: PC Card HDD (2 GB, 5 GB)
SD Memory Card *
MultiMediaCard *
CF Card*
Smart Media*
Memory Stick*
Microdrive (340 MB, 1 GB)*
* Each type of Memory Card requires a compatible adaptor.
Copyable Data: All files and folders except secure files (audio files that
include copyright restrictions)
Image Playback
Formats: Baseline JPEG, TIFF (RGB 8 bit non-compressed) and the
first screen of Motion JPEG files (QuickTime)
Image Sizes: 80 x 60 ~ 5120 x 3840 pixels
Copy Functions
Copy Mode: Copying of all data from SD Memory Card (MultiMediaCard)
-> PC Card HDD (PC Card)
Copying of selected folders from PC Card HDD (PC Card)
-> SD Memory Card (MultiMediaCard)
TV Mode: Copying of all data and selected files and folders from SD
Memory Card (MultiMediaCard) -> PC Card HDD (PC Card)
Copying of all data and selected folders from PC Card HDD
(PC Card) -> SD Memory Card (MultiMediaCard)
Playback Functions: Image Playback
Thumbnail display (4 x 6 display)
Album display (6 images or 9 images display)
Slide Show (automatic display)
Rotation, enlargement (x2, x4)
Presentation
Delete Functions: Selective deletion of files or folders, and deletion of all files
and folders
Protection Functions: PC card HDD protection using HDD SAFETY Detection
Switch
File backup protection
File protection against accidental deletion
For Your Information
PT1.p50-56.p65 2003/01/14, 12:3755
55
Page 56
Specifications
Video Output: Composite Output : NTSC format / PAL format, 1 V p-p,
Dimensions: 73 (W) x 25.8 (H) x 107.5 (D) mm
Weight: 5.63 oz / 160 g (Not including PC Card HDD and battery
Operating Weight: 8.8 oz / 250 g
Operating Temperature: 32 F ~ 95 F (0 °C ~ 35 °C)
Operating Humidity: 10 % ~ 80 %
Battery Life: Continuous use
PC Interface: USB1.1
OS Compatibility: Windows 98SE, Windows 2000, Windows Me, Windows XP
Compatible PC Models: IBM PC / AT compatible models
AC Adaptor (VSK0626C)
Power Supply: 110 - 240 V AC 50 / 60 Hz
Input Capacity: 0.12 A
Output: 4.8 V DC
Weight: 2.11 oz / 60 g
Dimensions: 50 (W) x 26 (H) x 70 (D) mm
Battery Pack (CGA-S301A1)
Maximum Voltage: 4.2 V
Nominal Voltage: 3.7 V
Rated Capacity: 1000 mAh
Weight: 0.98 oz / 28 g
Dimensions: 35 (W) x 7 (H) x 53 (D) mm
PC Card HDD (RP-PH005A)
Capacity: 5 GB
Input Voltage: 3.3 V / 5V
Interface: PCMCIA Type ll
Weight: 1.93 oz / 55 g
Dimensions: 54 (W) x 5 (H) x 86 (D) mm
75 ohm
S-Output : Y and C signals, NTSC format / PAL format,
1 V p-p, 75 ohm
2-14/16 (W) x 1 (H) x 4-4/16 (D) inch
pack)
Approx. 80 minutes in Copy mode
Approx. 80 minutes in TV mode
1-15/16 (W) x 1 (H) x 2-12/16 (D) inch
1-6/16 (W) x 2-12/16 (H) x 2-1/16 (D) inch
2-2/16 (W) x 1-15/16 (H) x 3-6/16 (D) inch
56
PT1.p50-56.p65 2003/01/14, 12:3756
Page 57
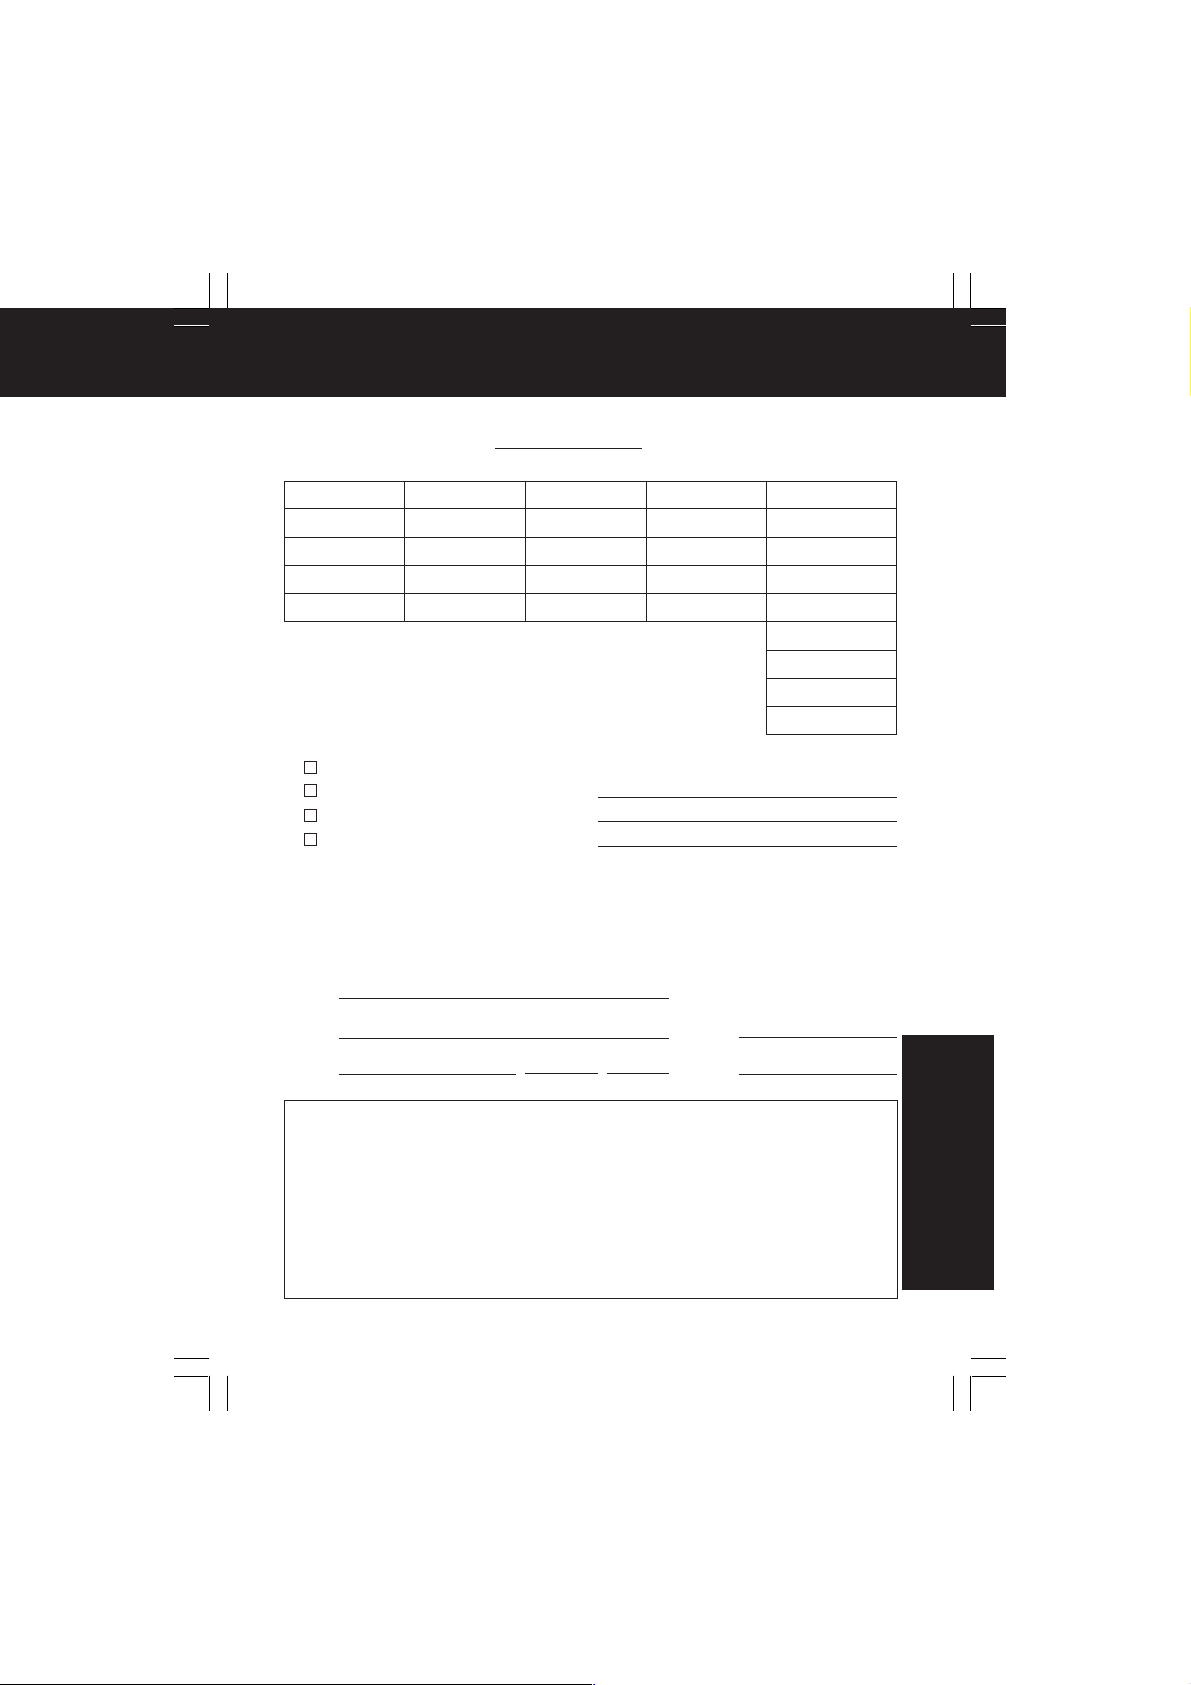
Accessory Order Form
Please photocopy this form when placing an order.
1. SD Media Storage Model #
2. Items Ordered
QuantityAccessory # Price EachDescription Total Price
Subtotal
Your State & Local Sales Tax
Shipping & Handling
Total Enclosed
3. Method of payment (check one)
Check or Money Order enclosed (NO C.O.D.SHIPMENTS)
VISA Credit Card #
MasterCard Expiration Date
Discover Customer Signature
Make Check or Money Order to: PANASONIC ACCESSORIES
(Please do not send cash)
4. Shipping information (UPS delivery requires complete street address)
Ship To:
Mr.
Mrs.
Ms.
First Last
Street Address
City State Zip
TO OBTAIN ANY OF OUR SD MEDIA STORAGE ACCESSORIES YOU CAN DO ANY OF
THE FOLLOWING:
VISIT YOUR LOCAL PANASONIC DEALER
OR
CALL PANASONIC’S ACCESSORY ORDER LINE AT 1-800-332-5368
[6 AM-5 PM M-F, 6 AM-10:30 AM SAT, PACIFIC TIME]
OR
MAIL THIS ORDER TO: PANASONIC SERVICES COMPANY ACCESSORY
ORDER OFFICE
20421 84th Avenue South Kent, WA. 98032
Phone #:
Day ( )
Night ( )
6.95
For Your Information
PT1.p57-62.p65 2003/01/14, 12:3757
57
Page 58

Request for Service Notice
Please photocopy this form when making a request for service notice.
In the unlikely event this product needs service.
Request for Service Notice:
(USA Only)
• Please include your proof of purchase.
(Failure to due so will delay your repair.)
• To further speed your repair, please provide an
explanation of what is wrong with the unit and
any symptom it is exhibiting.
Mail this completed form and your Proof of Purchase along with your unit to:
Panasonic Services Company
1705 N. Randall Road
Elgin, IL. 60123-7847
Attn: SD Media Storage Repair
58
PT1.p57-62.p65 2003/01/14, 12:3758
Page 59

Customer Serivces Directory
(For USA Only)
For Product Information, Operating Assistance, Literature Request, Dealer Locations, and
all Customer Service inquiries please contact:
1-800-272-7033,
Web Site: http://www.panasonic.com
You can purchase parts, accessories or locate your
nearest servicenter by visiting our Web Site.
Accessory Purchases:
1-800-332-5368 (Customer Orders Only)
Panasonic Services Company 20421 84th Avenue South, Kent, WA 98032
(6 am to 5 pm Monday - Friday; 6 am to 10:30 am Saturday; PST)
(Visa, MasterCard, Discover Card, American Express, Check)
Monday-Friday 8:30am-8pm EST.
Product Repairs
MAIL TO :
Please carefully pack and ship, prepaid and insured, to the Elgin Centralized Factory Servicenter.
Customer’s in Puerto Rico, please ship or carry in to location below
(“Service in Puerto Rico”).
Matsushita Electric of Puerto Rico, Inc. Panasonic Sales Company/ Factory Servicenter:
Ave. 65 de Infanteria, Km. 9.5, San Gabriel Industrial Park, Carolina, Puerto Rico 00985
Centralized Factory Servicenter
Panasonic Services Company
1705 N. Randall Road,
Elgin, IL 60123-7847
Attention: SD Media Storage Repair
Service in Puerto Rico
Phone (787) 750-4300 Fax (787) 768-2910
As of August 2002
59
For Your Information
PT1.p57-62.p65 2003/01/14, 12:3759
Page 60

Limited Warranty (For USA Only)
PANASONIC CONSUMER
ELECTRONICS COMPANY,
DIVISION OF MATSUSHITA
ELECTRIC CORPORATION OF
AMERICA, One Panasonic Way
Secaucus, New Jersey 07094
PANASONIC SALES COMPANY,
DIVISION OF MATSUSHITA
ELECTRIC OF PUERTO RICO INC.
Ave. 65 de Infanteria, Km. 9.5 San
Gabriel Industrial Park Carolina,
Puerto Rico 00985
Panasonic SD Products
Limited Warranty
Limited Warranty Coverage
If your product does not work properly because of a defect in materials or
workmanship, Panasonic Consumer Electronics Company or Panasonic Sales
Company (collectively referred to as “the warrantor”) will, for the length of the
period indicated on the chart below, which starts with the date of original
purchase (“warranty period”), at its option either (a) repair your product with
new or refurbished parts, or (b) replace it with a new or a refurbished product.
The decision to repair or replace will be made by the warrantor.
Product or Part Name
SD Multi A/V Device, SD Printer,
SD Media Storage
(Except items listed below)
CMOS Camera Assembly
Rechargeable Battery Pack,
SD Memory Card, AC Adaptor,
USB Reader-Writer (in exchange
for defective item)
Labor
One (1) year
Six (6) months
Ninety (90) days
Parts
Ninety (90) days
Ninety (90) days
N/A
During the “Labor” warranty period there will be no charge for labor. During
the “Parts” warranty period, there will be no charge for parts. You must carryin or mail-in your product during the warranty period. If non-rechargeable
batteries are included, they are not warranted. This warranty only applies to
products purchased and serviced in the United States or Puerto Rico. This
warranty is extended only to the original purchaser of a new product which
was not sold “as is”. A purchase receipt or other proof of the original purchase
date is required for warranty service.
60
PT1.p57-62.p65 2003/01/14, 12:3760
Page 61

Carry-In or Mail-In Service
For Carry-In or Mail-In Service in the United States call
1-800-272-7033.
For assistance in Puerto Rico call Panasonic Sales Company
(787)-750-4300 or fax (787)-768-2910.
Limited Warranty Limits And Exclusions
This warranty ONLY COVERS failures due to defects in materials or
workmanship, and DOES NOT COVER normal wear and tear or cosmetic
damage. The warranty ALSO DOES NOT COVER damages which occurred
in shipment, or failures which are caused by products not supplied by the
warrantor, or failures which result from accidents, misuse, abuse, neglect,
mishandling, misapplication, alteration, faulty installation, set-up
adjustments, misadjustment of consumer controls, improper maintenance,
power line surge, lightning damage, modification, or commercial use (such
as in a hotel, office, restaurant, or other business), rental use of the product,
service by anyone other than a Factory Servicenter or other Authorized
Servicer, or damage that is attributable to acts of God.
NOT LIABLE FOR INCIDENTAL OR CONSEQUENTIAL DAMAGES
RESULTING FROM THE USE OF THIS PRODUCT, OR ARISING OUT OF
ANY BREACH OF THIS WARRANTY.
(As examples, this excludes damages for lost time, travel to and from the
servicer, or loss of images, data or other memory content) The items listed
are not exclusive, but are for illustration only.) ALL EXPRESS AND IMPLIED
WARRANTIES, INCLUDING THE WARRANTY OF MERCHANTABILITY,
ARE LIMITED TO THE PERIOD OF THE LIMITED WARRANTY.
Some states do not allow the exclusion or limitation of incidental or
consequential damages, or limitations on how long an implied warranty
lasts, so the exclusions may not apply to you.
This warranty gives you specific legal rights and you may also have others
rights which vary from state to state. If a problem with this product develops
during or after the warranty period, you may contact your dealer or
Servicenter. If the problem is not handled to your satisfaction, then write to
the warrantor’s Consumer Affairs Department at the addresses listed for the
warrantor.
For Your Information
PARTS AND SERVICE WHICH ARE NOT COVERED BY THIS LIMITED
WARRANTY ARE YOUR RESPONSIBILITY.
PT1.p57-62.p65 2003/01/14, 12:3761
61
Page 62

Panasonic Consumer Electronics Company,
Division of Matsushita Electric Corporation of America
One Panasonic Way Secaucus, New Jersey 07094
Panasonic Sales Company (“PSC”),
Division of Matsushita Electric of Puerto Rico, Inc.
Ave. 65 de Infanteria, Km. 9.5 San Gabriel Industrial Park Carolina,
Puerto Rico 00985
Panasonic Canada Inc.
5770 Ambler Drive, Mississauga, ON, L4W 2T3
PT1.p57-62.p65 2003/01/14, 12:3762
P
Printed in Japan
LSQT0622A
S0103A0
Page 63

Mémoire à support SD
Manuel d’utilisation
Modèle SV-PT1PP
Il est recommandé de lire attentivement ce manuel avant d’utiliser l’appareil.
Conserver ce manuel.
Pour de l’aide, composez le 1-800-561-5505 ou visitez notre site Internet à www.panasonic.ca
LSQT0622A
PT1.f1-5.p65 2003/01/14, 12:381
Page 64

Précautions à prendre
À notre clientèle,
Nous tenons à vous remercier d’avoir
choisi cette mémoire à support SD
Panasonic.
Veuillez lire attentivement le présent
manuel et le conserver pour référence
ultérieure.
Précautions à
prendre
AVERTISSEMENT
AFIN DE RÉDUIRE LES RISQUES
D’INCENDIE, DE CHOCS
ÉLECTRIQUES ET D’INTERFÉRENCE,
N’UTILISER QUE LES ACCESSOIRES
RECOMMANDÉS ET ÉVITER
D’EXPOSER L’APPAREIL À LA PLUIE
OU À L’HUMIDITÉ. NE PAS RETIRER
LE COUVERCLE (OU LE PANNEAU
ARRIÈRE); AUCUNE PIÈCE INTERNE
NE PEUT ÊTRE RÉPARÉE PAR
L’UTILISATEUR. CONFIER TOUTE
RÉPARATION À UN TECHNICIEN
QUALIFIÉ.
Il importe de respecter les droits
d’auteur. L’enregistrement de bandes
ou de disques préenregistrés ou de
tout matériel publié ou diffusé pour un
usage autre que strictement personnel
peut enfreindre les lois sur les droits
d’auteur. L’enregistrement de certain
matériel, même à des fins
personnelles, peut aussi être interdit.
• Veuillez noter que les commandes et
les composants, les objets du menu,
etc. de votre mémoire à support SD
peuvent être quelque peu différents de
ceux indiqués dans les illustrations
contenues dans ce manuel d’utilisation.
• Les autres noms, raisons sociales et
appellations de produits cités dans ce
manuel sont des marques de
commerce ou des marques déposées
de leur détenteur respectif.
MISE EN GARDE
Une batterie mal installée peut
exploser. Ne remplacez qu’avec une
batterie identique ou d’un type
recommandé par le fabricant.
L’élimination et(ou) le recyclage des
batteries usées doit être fait
conformément aux instructions du
manufacturier.
LA PRISE DE COURANT DOIT SE
TROUVER À PROXIMITÉ DE
L’APPAREIL ET ÊTRE FACILEMENT
ACCESSIBLE.
• Utilisez uniquement le
câble vidéo et le câble USB
fournis.
• N’ouvrez pas et ne
refermez pas la porte du
disque dur, ou ne retirez
pas la carte pendant que le
disque dur ou le SD
fonctionne.
• Ne tournez pas cet appareil
sens dessus dessous
lorsqu’il fonctionne.
2
PT1.f1-5.p65 2003/01/14, 12:382
Page 65

Précautions à prendre
Cet appareil numérique de la classe [B]
est conforme à la norme NMB-003 du
Canada.
Préparatifs
PT1.f1-5.p65 2003/01/14, 12:383
3
Page 66

Contrat de licence avec l’utilisateur final
Avant d’ouvrir la boîte du CD-ROM, lisez attentivement ce qui suit.
À l’utilisateur une licence est accordée pour le logiciel défini dans ce contrat appelé
licence avec l’utilisateur final (“contrat”), à condition que l’utilisateur même accepte les
termes et les conditions de ce contrat. Si l’utilisateur n’accepte pas les termes et les
conditions de ce contrat, alors il devra restituer rapidement le logiciel à Matsushita
Electric Industrial Co., Ltd. (“Matsushita”), à ses distributeurs ou au revendeur chez qui
il l’a acheté.
Article 1 Licence
Le droit d’utiliser le logiciel y compris les informations enregistrées ou décrites sur le
CD-ROM, les manuels d’instructions et tout autre support fourni à l’utilisateur
(identifié collectivement comme “logiciel”) est accordé à l’utilisateur, mais aucun des
droits applicables à des brevets, copyright, marques et secrets du logiciel ne lui est
transféré.
Article 2 Utilisation par des tiers
L’utilisateur ne peut utiliser, copier, modifier, transférer, ni consentir à des tiers,
gratuitement ou non, d’utiliser, copier ou modifier le logiciel, exception faite pour les
cas expressément décrits ici.
Article 3 Restrictions sur la copie du logiciel
L’utilisateur peut faire une seule copie, partielle ou totale du logiciel, en format lisible par
ordinateur, seulement dans le but de posséder une copie de réserve. L’utilisateur doit
inclure dans cette copie du logiciel le même avis relatif au copyright contenu dans ce
logiciel.
Article 4 Ordinateur
L’utilisateur peut utiliser le logiciel seulement sur un PC, et ne peut l’utiliser sur plus
d’un PC. Le logiciel ne peut être transféré, transmis, partagé ou utilisé par d’autres
PC reliés au réseau et/ou de quelque autre manière.
Article 5 Ingénierie à rebours, décompilation ou désassemblage
L’utilisateur ne peut pratiquer l’ingénierie à rebours, la décompilation ou le
désassemblage du logiciel, si ce n’est dans la mesure consentie par la loi ou
conformément aux normes du pays où l’utilisateur réside. Matsushita ou ses
distributeurs ou revendeurs ne peuvent être tenus responsables des défauts du
logiciel ou des dommages causés à l’utilisateur à cause d’opérations d’ingénierie à
rebours, de décompilation ou de désassemblage de la part de l’utilisateur.
Article 6 Indemnisation
Le logiciel est fourni “tel quel”, sans garantie, expresse ou explicite, y compris les
garanties de non-infractions, de qualité marchande et/ou de conformité pour un but
précis. Matsushita ne garantit pas non plus que le fonctionnement du logiciel soit
sans interruption ou sans erreurs. Ni Matsushita ni aucun de ses distributeurs ne
peuvent être tenus responsables d’aucun dommage causé à l’utilisateur par ou à
cause de l’utilisation du logiciel par l’utilisateur.
Article 7 Contrôle d’exportation
L’utilisateur accepte de ne pas exporter ou réexporter dans d’autres pays le logiciel
sous n’importe quelle forme sans la licence d’exportation éventuellement demandée
par le pays où l’utilisateur réside.
Article 8 Résiliation de la garantie
Les droits concédés à l’utilisateur seront automatiquement révoqués si l’utilisateur
contrevient à n’importe quel des termes ou des conditions de ce contrat. Dans ce
cas, l’utilisateur doit détruire à ses frais le logiciel et la documentation de toutes les
copies.
4
PT1.f1-5.p65 2003/01/14, 12:384
Page 67

Table des matières
Préparatifs
Précautions à prendre ............................................................................. 2
Contrat de licence avec l’utilisateur final .............................................. 4
Renseignements ...................................................................................... 7
Précautions d’utilisation ......................................................................... 8
• Appareil principal et batterie ................................................................. 8
• Protection des données et disque dur de carte PC .............................. 9
• Balayage de disque/Vérification de disque ........................................... 9
Avant l’utilisation
• Carte compatible ................................................................................. 10
• Structure des dossiers ........................................................................ 10
• Copie et sauvegarde ........................................................................... 11
Sélection des modes [Copie/TV/PC] ..................................................... 13
Index des commandes .......................................................................... 14
Transport de l’appareil
• Fixation de la dragonne ....................................................................... 15
• Utilisation de l’étui de transport ........................................................... 15
Recharge de la batterie ......................................................................... 16
Insertion de la carte ............................................................................... 17
Mise sous tension .................................................................................. 18
• Interrupteur HDD SAFETY .................................................................. 18
• Affichage du temps de batterie restant ............................................... 18
Mode Copie
Indicateur d’affichage ............................................................................ 19
Menus ...................................................................................................... 20
Copie ....................................................................................................... 21
Formatage des cartes
• Formatage de la carte mémoire SD .................................................... 22
• Formatage du disque dur de carte PC ................................................ 23
Mode TV
Configuration du mode TV
• Configuration (connexions) ................................................................. 24
Fonctions du mode TV (Écran initial) ................................................... 25
Informations de l’affichage
• Formats d’images affichables ............................................................. 26
• Dossiers et fichiers .............................................................................. 26
Affichage d’images
• Visualisation d’images dans l’index .................................................... 27
• Utilisation du sous-menu ..................................................................... 27
Album ...................................................................................................... 28
Diaporama
• Exécution de diaporama ..................................................................... 29
PréparatifsPréparatifs Mode Copie RenseignementsMode TV Mode PC
5
PT1.f1-5.p65 2003/01/14, 12:385
Page 68

Table des matières
Réglages de diaporama
• Sélection des images .......................................................................... 30
• Réglage des effets/vitesse de transition d’écran ................................ 31
Présentation
• Exécution d’une présentation .............................................................. 32
• Sélection du contenu d’une présentation ............................................ 33
Édition
• Suppression d’images (DELETE) ....................................................... 34
• Copie d’images (COPY) ...................................................................... 35
• Protection d’images (PROTECT) ........................................................ 36
• Sélection d’images .............................................................................. 37
Lecture plein écran
• Sélection d’images .............................................................................. 38
• Affichage du sous-menu...................................................................... 39
• Agrandissement d’une image (ZOOM)................................................ 39
• Rotation d’une image (ROTATE) ......................................................... 40
• Traitement des couleurs de l’image (COLOR EFFECT) ..................... 41
• Affichage des informations d’image (PROPERTIES).......................... 41
Mode PC
Configuration du mode PC
• Environnement d’exploitation .............................................................. 42
• Configuration (connexions) ................................................................. 42
• Installation du pilote USB .................................................................... 43
Utilisation avec l’ordinateur personnel
• Opérations des fichiers ....................................................................... 44
• Déconnexion de l’appareil de l’ordinateur personnel .......................... 45
Utilisation des applications
• Installation ........................................................................................... 46
• Création de fichiers de présentation ................................................... 47
Autres
• Désinstallation du logiciel JPEG Addin Software ................................ 48
• Réinstallation du pilote de périphérique .............................................. 48
• Fonctionnement de l’interrupteur HDD SAFETY ................................. 49
Renseignements
Affichages d’avertissement et d’instruction ....................................... 50
Fonction de réinitialization ................................................................... 52
Guide de dépannage.............................................................................. 53
Spécifications ......................................................................................... 55
6
PT1.f6-9.p65 2003/01/14, 12:386
Page 69
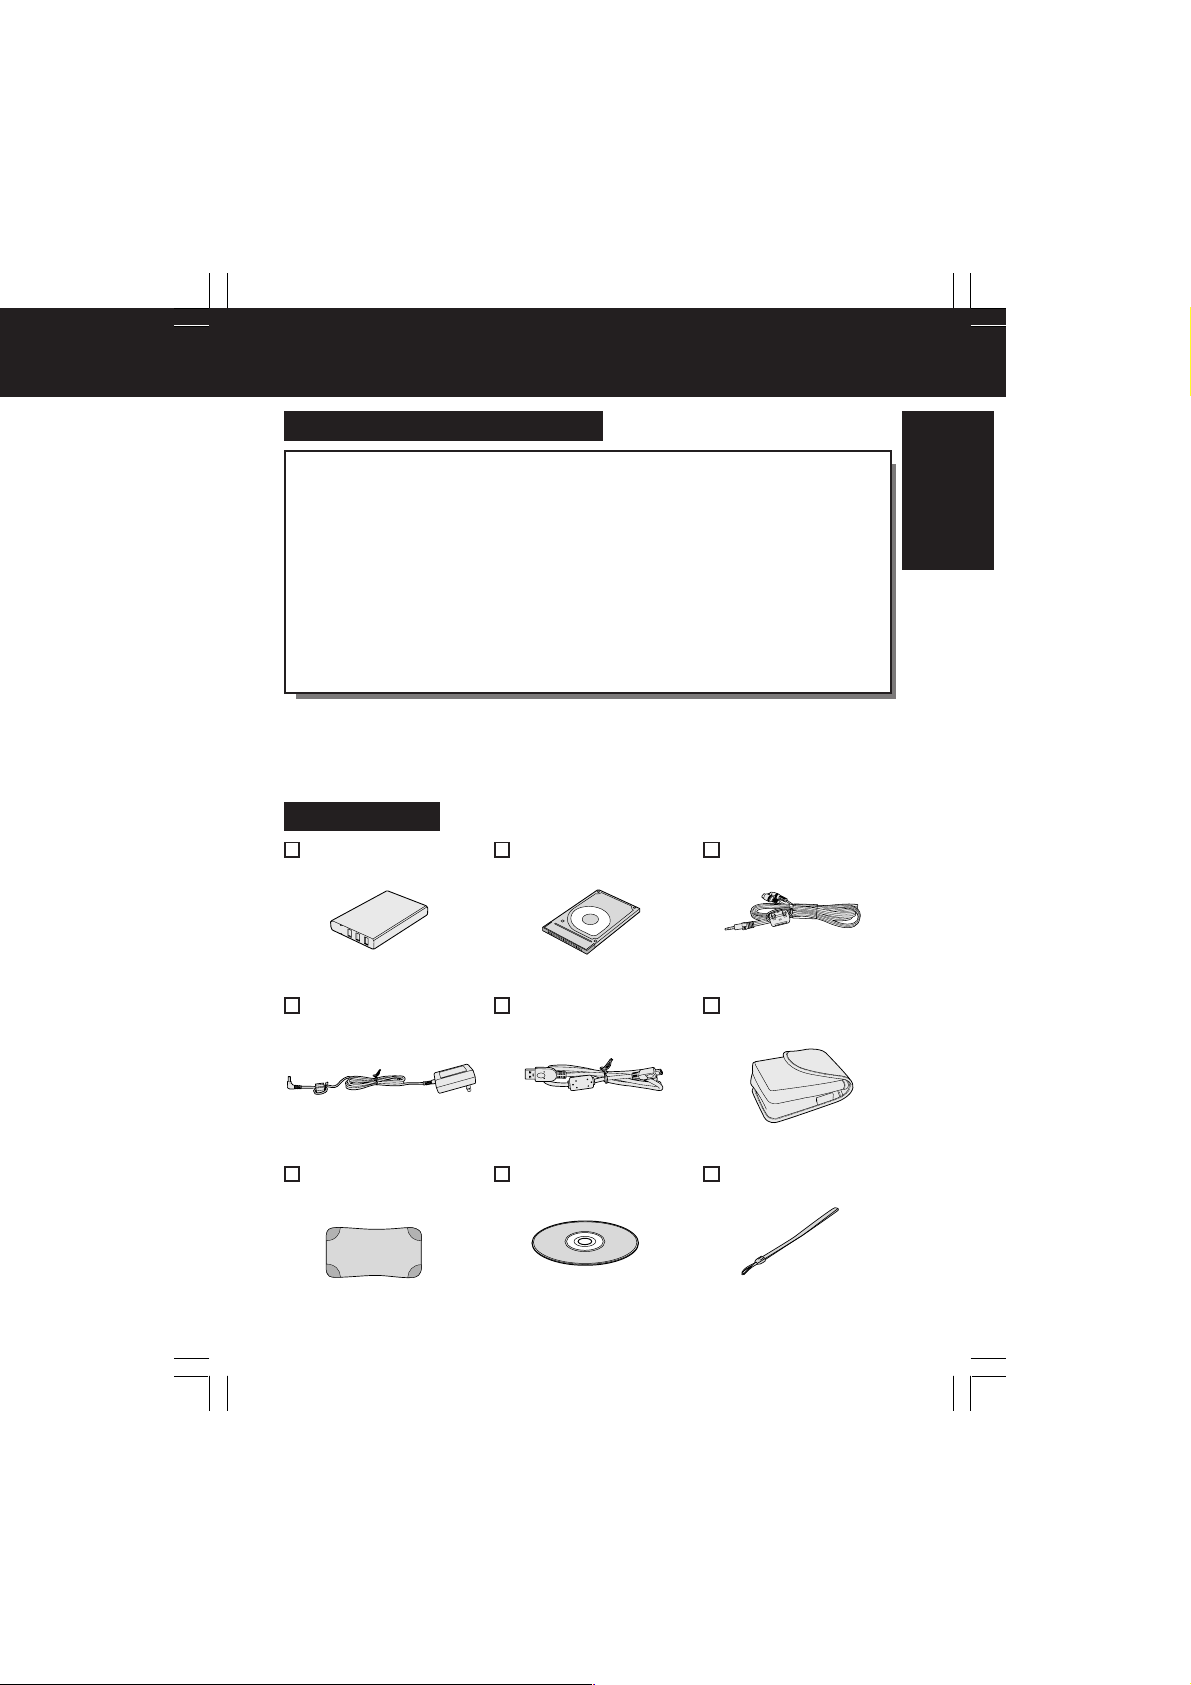
Renseignements
Caractéristiques principales
●●
● Cet appareil est une mémoire à support portable légère et
●●
compacte.
●●
● Le disque dur à grande capacité de 5 Go permet de mémoriser
●●
une grande quantité d’images fixes.
●●
● Vous pouvez visualiser et éditer (supprimer, copier, etc.) les images
●●
mémorisées sur un téléviseur chez vous ou autre part.
●●
● Vous pouvez utiliser cet appareil comme lecteur externe en
●●
connectant le port USB à votre ordinateur personnel.
●●
● Vous pouvez reproduire les images fixes à partir d’une grande
●●
variété de carte *
1
et les copier sur une carte mémoire SD.
*1
Il faut un adaptateur compatible pour chacun des types de carte.
Accessoires
Batterie
(CGA-S301A1)
Disque dur de carte
PC (RP-PH005A)
Câble vidéo
(LSEC0003)
Préparatifs
Adaptateur secteur
(VSK0626C)
Étui de disque dur
de carte PC
(LSFC0020)
PT1.f6-9.p65 2003/01/14, 12:387
Câble USB
(LSEC0004)
CD-ROM
(VFF0181)
Étui de transport
(LSFC0019)
Dragonne
(VFC3803)
7
Page 70

Précautions d’utilisation
Veuillez lire attentivement les présentes instructions avant d’utiliser l’appareil,
et les respecter rigoureusement pendant que l’appareil fonctionne. Sinon,
l’appareil risquera de tomber en panne ou d’être abîmé. En outre, si vous ne
respectez pas les précautions indiquées ici, les données mémorisées dans le
support risqueront d’être endommagées ou perdues.
• Ne laissez pas cet appareil sous les rayons directs du soleil, dans des véhicules fermés, dans des
endroits très chauds ou très froids, ou à proximité d’appareils de chauffage ou de climatisation.
Évitez de l’exposer à de brusques changements de température.
• Utilisez l’appareil suffisamment éloigné de sources d’ondes magnétiques ou électromagnétiques
(telles que fours à micro-ondes, téléviseurs, consoles de jeux, téléphones portables, etc.), sinon
les données mémorisées risqueraient d’être perdues ou déformées.
• Veillez à ce qu’aucune substance volatile telle que des insecticides n’entre en contact avec cet
appareil, car ces substances risquent d’abîmer gravement le fini du coffret de l’appareil.
• Ne laissez pas cet appareil dans des endroits poussiéreux. Si de la poussière pénètre dans cet
appareil, faites vérifier celui-ci par le magasin où vous l’avez acheté.
• Veillez à ce que cet appareil ne soit pas soumis à des chocs ou à des vibrations. Ne secouez pas
et ne laissez pas tomber cet appareil.
• Ne placez pas d’objets sur cet appareil, et ne laissez pas tomber d’objets sur celui-ci.
• Veillez à ne pas tordre cet appareil ni le soumettre à une pression excessive.
• N’utilisez pas les connecteurs de cet appareil pour des buts autres que ceux auxquels chaque
connecteur est destiné. Veillez à ce que les câbles soient toujours bien connectés.
• N’introduisez pas d’objets étrangers dans cet appareil. La batterie et le support de stockage sont
les seuls objets qui peuvent être introduits dans l’appareil.
• Il faut allumer et utiliser cet appareil au moins une fois tous les 6 mois.
• Après chaque utilisation, coupez l’alimentation électrique et retirez le cordon d’alimentation de la
prise de courant.
• Avant d’effectuer des opérations d’entretien, débranchez toujours le cordon d’alimentation de la
prise de courant, et retirez la batterie de l’appareil. N’utilisez pas de benzine, de diluants ou
d’alcool pour nettoyer cet appareil. Ces produits chimiques risquent d’abîmer, de déformer et de
décolorer le coffret. Pour nettoyer cet appareil, utilisez d’abord un chiffon doux et sec pour essuyer
la poussière. Si cet appareil est très sale, diluez un détergent pour vaisselle neutre dans de l’eau,
mouillez un chiffon propre avec cette solution de détergent, éliminez le liquide en excès du chiffon,
puis essuyez l’appareil jusqu’à ce qu’il soit bien propre. Enfin, faites sécher l’appareil en
l’essuyant avec un chiffon doux et sec.
Précautions concernant la batterie
Attention:
• N’utiliser que le chargeur recommandé.
• Recharger la batterie à une température ambiante entre 10 °C à 30 °C.
• Il est possible que la batterie soit chaude après la recharge ou l’utilisation. Ceci est normal.
• Ne pas utiliser une batterie insuffisamment chargée ou usée.
• Dans des conditions de température extrême (trop basse ou trop élevée), la recharge sera lente.
Mesures de sécurité:
• Ne pas jeter la batterie au feu.
• Ne pas relier directement les bornes positives (+) et négatives (–).
• Ne pas tenter de démonter ou de remonter la batterie.
Pour éviter les dommages:
• Ne pas laisser tomber la batterie et ne pas la soumettre à des chocs.
• N’utiliser la batterie qu’avec des appareils pour lesquels elle a été conçue.
• Un mécanisme de sécurité empêche le fonctionnement de la batterie à des températures très élevées.
Pour prolonger la vie de la batterie:
• Après l’utilisation, retirer la batterie de l’appareil ou de l’adaptateur secteur et la ranger dans
un endroit frais, sombre et sec. Sinon, la batterie ne pourra plus être rechargée.
• S’assurer que les bornes de la batterie sont propres.
ATTENTION:
L’appareil que vous vous êtes procuré est alimenté par une batterie
au lithium-ion/lithium-polymère. Pour des renseignements sur le
recyclage de la batterie, veuillez composer le 1-800-8-BATTERY.
8
PT1.f6-9.p65 2003/01/14, 12:388
Page 71

Précautions d’utilisation
Protection des données de la carte
(Pour plus de détails concernant les cartes compatibles, référez-vous à la page 10.)
• Ne débranchez pas l’adaptateur secteur, ne débranchez pas le câble USB raccordant l’appareil à
un ordinateur personnel pendant que cet appareil fonctionne.
• Ne retirez pas la carte en cours d’accès.
• Vérifiez que la carte ne contienne pas de données importantes avant de la formater. Le formatage
supprime irréversiblement toutes les données mémorisées sur la carte.
• Ne touchez pas les bornes situées au dos de la carte mémoire.
• Les interférences électriques, les décharges électrostatiques et les anomalies de fonctionnement
de l’appareil ou de la carte risquent d’endommager la carte ou de causer la perte des données.
Nous vous recommandons de sauvegarder les données importantes sur un ordinateur personnel.
• Les données mémorisées doivent être périodiquement sauvegardées par mesure de protection
contre l’endommagement des données, la perte des données ou les anomalies de
fonctionnement de l’appareil. Notez bien que notre société décline toute responsabilité concernant
des dommages ou des pertes de données mémorisées.
• Les cartes mémoire SD, les sticks de mémoire, les cartes Smart Media et certaines cartes CF
(lorsqu’une fente de carte PC est utilisée) sont équipées d’un interrupteur de protection contre
l’écriture. Lorsque cet interrupteur est mis sur la position de verrouillage “LOCK”, il n’est pas
possible d’écrire des données ou de supprimer des données de la carte mémoire, ou de formater
la carte mémoire.
Manipulation du disque dur de carte PC
Le disque dur de carte PC est un lecteur de disque dur de haute précision et de très petite
taille. Faites particulièrement attention lorsque vous manipulez ce lecteur. Observez
rigoureusement les instructions suivantes pour éviter de causer des anomalies de
fonctionnement du disque dur, des dommages ou des pertes de données.
• Ne soumettez pas le disque dur de carte PC à des vibrations excessives ou à des chocs puissants.
• N’utilisez pas l’appareil dans des endroits soumis à de très fortes différences de température (où
la température change de plus de 15 °C en une heure). Si vous déplacez l’appareil brusquement
d’un endroit froid à un endroit chaud ou vice versa, ou si vous chauffez rapidement une salle en
hiver ou que vous la refroidissez rapidement en été, ou si un appareil de refroidissement souffle
directement sur l’appareil, etc., de la condensation (rosée) risquera de se former. Si vous utilisez
l’appareil dans cet état, vous risquez d’endommager gravement le disque dur. Si de la condensation
se forme, éteignez l’appareil et retirez le disque dur de carte PC. Ensuite, laissez l’appareil dans cet
état pendant 4 heures jusqu’à ce que sa température devienne identique à la température ambiante.
Après avoir vérifié qu’il n’y a plus de condensation, vous pouvez utiliser l’appareil.
• Ne tordez pas le disque dur de carte PC et n’appuyez pas sur la surface de l’étiquette; n’écrivez
pas sur le disque dur de carte PC avec un stylo à pointe dure; sinon, vous risqueriez d’abîmer le
disque dur de carte PC. Lorsque vous tenez le disque dur de carte PC, tenez-le toujours par les
bords extérieurs.
• Ne retirez pas l’étiquette fixée au disque dur de carte PC. Si vous retirez cette étiquette, vous
risquez de ne plus pouvoir bénéficier des services de garantie et d’autres services.
• Avant de retirer le disque dur de carte PC de son étui de transport spécial, assurez-vous que le
côté de l’étui portant l’étiquette “Disque dur de carte PC” soit bien orienté vers le haut. Si vous
ouvrez l’étui lorsque le côté portant l’étiquette n’est pas orienté vers le haut, le disque dur de carte
PC risquera de tomber et d’être abîmé.
• Utilisez toujours l’étui de transport spécial pour transporter le disque dur de carte PC.
• Notez bien que notre société décline toute responsabilité en cas d’endommagement ou de pertes
de données mémorisées dans le disque dur de carte PC dus à une manipulation inadéquate.
Balayage de disque
(“Vérification de disque” pour les utilisateurs de Windows 2000/XP)
• Veillez à ce que le disque dur de carte PC ne soit pas soumis à des vibrations fortes ou à des chocs
puissants. En outre, ne coupez pas l’alimentation électrique ou ne retirez pas la carte de l’appareil
lorsque celui-ci fonctionne, sinon les données risqueraient d’être endommagées. Si un problème se
produit, utilisez immédiatement la fonction Balayage de disque/Vérification de disque de l’ordinateur
pour vérifier les données du support. (Il faut plusieurs heures pour accomplir la vérification du disque
dur de carte PC.) Nous vous conseillons d’effectuer ensuite une sauvegarde des données sur le
support. Pour plus de détails concernant la connexion de l’appareil à un ordinateur, référez-vous à la
page 42. Pour plus de détails concer nant la fonction de Balayage de disque/Vérification de disque,
référez-vous au mode d’emploi de votre ordinateur.
Préparatifs
PT1.f6-9.p65 2003/01/14, 12:389
9
Page 72
Avant l’utilisation
• Les photographies et les documents imprimés ne doivent pas être utilisés sans autorisation du
propriétaire des droits d’auteur, sauf pour des applications personnelles et privées.
: Le logo SD est une marque commerciale.
•
• Microsoft
• Les autres noms de produits, noms commerciaux et noms de sociétés utilisés dans ce manuel
• Toute copie ou reproduction non autorisée du logiciel de ce produit, ou toute distribution du
• Dans ce manuel, “Carte mémoire” désigne la carte mémoire SD et la MultiMediaCard. En outre,
• Dans ce manuel, le nom “Windows 98SE” désigne “Microsoft
• Dans ce manuel, le nom “Windows 2000” désigne “Microsoft
• Dans ce manuel, le nom “Windows Me” désigne “Microsoft
• Dans ce manuel, le nom “Windows XP” désigne “Microsoft
Les types de cartes suivants peuvent être utilisés dans cet appareil:
Fente de carte PC
Fente de carte mémoire SD
Les appareils photo numériques conformes aux spécifications DCF utilisent des
dossiers possédant une structure spéciale. Le schéma suivant montre un exemple de
structure de dossiers. Si ces dossiers sont supprimés, ou si un nom de dossier ou un
nom de fichier est changé, les données risqueront de ne plus pouvoir être lues par un
appareil photo numérique.
10
®
et dans les autres pays.
sont des marques commerciales ou des marques déposées de leurs propriétaires respectifs.
logiciel sur un réseau est rigoureusement interdite.
“Carte” désigne aussi les cartes mémoire, le disque dur de carte PC et les autres types de cartes
PC.
“Microsoft
, Windows® et PowerPoint® sont des marques déposées de Microsoft aux États-Unis
®
Windows® 98 Deuxième Édition”.
®
Windows® 2000 Professionnel”.
®
Windows® Millennium Edition”.
®
®
Windows® XP Professionnel”.
Windows® XP Édition Familiale” ou
Carte compatible
• Disque dur de carte PC (2 Go, 5 Go) • Microdrive* • Carte CF*
• Carte mémoire SD* • Stick mémoire*
• MultiMediaCard* • Smart Media*
*Il faut utiliser un adaptateur PCMCIA TYPE II ATA-compatible, vendu séparément.
• Carte mémoire SD • MultiMediaCard
Structure des dossiers
Dossier DCIM
L’appareil photo numérique crée ce dossier
Carte mémoire SD
DCIM
100_PANA
P1000001. JPG
P1000002. JPG
P1000003. JPG
101_PANA
P1010001. JPG
P1010002. JPG
MISC
automatiquement.
Dossier 100_PANA
Les noms de fichiers sont composés d’un
numéro de dossier à trois chiffres suivi de cinq
caractères arbitraires. Les images d’appareil
photo numérique sont mémorisées dans ces
dossiers.
P1000001.JPG: Fichier DCF
Les noms de fichiers sont composés de quatre
caractères arbitraires suivis d’un numéro de fichier
à 4 chiffres. Les fichiers DCF sont des fichiers
d’images (normalement, des fichiers JPEG) qui
ont été pris par un appareil photo numérique. (Les
autres extensions de fichiers telles que TIF ou THM
peuvent aussi être utilisées.)
Dossier MISC
Le dossier MISC contient les fichiers de
configuration DPOF qui ajoutent des informations
d’impression/diapositives aux images.
PT1.f10-13.p65 2003/01/14, 12:3810
Page 73

Avant l’utilisation
Copie et sauvegarde
Copie: Carte mémoire -> Disque dur de carte PC
Pour copier d’une carte mémoire sur le disque dur de carte PC, créez un dossier
intitulé “CARD****” pour chaque copie et sauvegardez les données de carte mémoire
dans ce dossier. Lorsque BACKUP est activée (ON), le dossier “CARD****”
mentionné ci-dessus est créé dans le dossier “BACKUP” du disque dur de carte PC,
et les données de la carte mémoire sont copiées dans ce dossier. L’espace disponible
du disque dur de carte PC normal et réduit de moitié. Pour plus de détails concernant
la mise en et hors circuit de la fonction BACKUP, référez-vous à la page 20.
Carte mémoire Disque dur de carte PC
ROOT
ROOT
1
2
3
MISC
DCIM
ROOT
PHOTO
ROOT
MISC
DCIM
AAA. JPG
BBB. TXT
CCC. EXE
CARDA001
MISC
DCIM
CARDA002
PHOTO
CARDA003
MISC
DCIM
AAA. JPG
BBB. TXT
CCC. EXE
Supprimer
*Même après la
suppression, les
données seront
conservées dans le
dossier [BACKUP].
Préparatifs
BACKUP
CARDA001
CARDA002
CARDA003
Pour plus de détails concernant la copie d’un disque dur de carte PC sur une
carte mémoire, référez-vous à la page suivante.
– Nota –
• Le contenu du dossier BACKUP ne peut pas être vérifié en mode TV. Pour vérifier le contenu
dans ce cas, utilisez l’ordinateur.
• Les fichiers de données sécurisés (fichiers audio comportant des limitations de droits d’auteur)
ne seront pas copiés.
• La partie **** du nom de fichier “CARD****” est assignée automatiquement en ordre numérique
dans la plage de “A001~A999, B001~Z999”. Pour cette raison, vous ne devez pas changer les
noms de fichiers vous-même.
PT1.f10-13.p65 2003/01/14, 12:3811
11
Page 74

Avant l’utilisation
Copie et sauvegarde (suite)
Copie: Disque dur de carte PC -> Carte mémoire
Le dossier intitulé “CARD****” disparaît et les données sont copiées conformément aux
règles des structures des fichiers.
Disque dur de carte PC
ROOT
CARDA001
MISC
DCIM
Carte mémoire
ROOT
MISC
DCIM
CARDA002
PHOTO
CARDA003
MISC
DCIM
AAA. JPG
BBB. TXT
CCC. EXE
ROOT
PHOTO
ROOT
MISC
DCIM
AAA. JPG
BBB. TXT
CCC. EXE
BACKUP
CARDA001
CARDA002
CARDA003
Les fichiers de
données ne
seront pas copiés.
Copie: Carte mémoire <-> Carte PC
Lorsque la copie est effectuée d’une carte PC sur une
carte mémoire ou vice versa, les données peuvent être
copiées directement.
Carte mémoire
ROOT
MISC
DCIM
• Cette opération est possible pour tous les types
de cartes, sauf le disque dur de carte PC.
Carte PC
ROOT
MISC
DCIM
12
– Nota –
• Les données du dossier
BACKUP, qui ne peuvent
pas être affichées en mode
TV, peuvent être copiées/
éditées/supprimées sur un
ordinateur.
• Les fichiers de données
sécurisés (y compris les
fichiers audio protégés par
droits d’auteur) ne seront
pas copiés.
• Lorsque vous copiez les
données sur une carte
mémoire, réinitialisez les
paramètres DPOF des
appareils, tels que les
appareils photo numériques,
les caméscopes numériques,
etc., sur lesquels ces
opérations sont possibles.
Référez-vous au mode
d’emploi de l’appareil.
• Si aucun dossier MISC n’a
été créé sur la carte sur
laquelle les données seront
copiées, le dossier MISC sera
aussi copié.
• Lorsque vous copiez un nom
de dossier DCIM, par ex.
“100_PANA”, et que ce nom
existe déjà sur la carte,
changez le nom à
“101_PANA” avant d’effectuer
la copie.
• Si une opération
d’écrasement est sur le point
d’être effectuée dans un
dossier autre que le dossier
DCIM, un message
demandant à l’utilisateur de
confirmer l’opération
d’écrasement sera affiché.
PT1.f10-13.p65 2003/01/14, 12:3812
Page 75

Sélection des modes
Mode Copie (p. 19 à 23)
Le mode Copie est utilisé pour copier les données de la carte insérée sur une autre
carte. En outre, vous pouvez appuyer sur MENU pour effectuer certaines opérations,
par exemple pour vérifier la capacité de stockage de la carte, sauvegarder les
données, effectuer les réglages du format TV et formater des cartes.
Carte mémoire Disque dur de
carte PC
(Ou autre carte)
Mode TV (p. 24 à 41)
En mode TV, vous pouvez connecter l’appareil à un téléviseur puis effectuer des
opérations de lecture et d’édition (par exemple copier, supprimer, protéger, agrandir
au zoom, tourner l’image et améliorer les couleurs) pour les données mémorisées sur
une carte, tout en visualisant les données sur un écran de téléviseur.
* Les fichiers de type JPG, TIF et MOV uniquement peuvent être affichés. Pour les
autres types de fichiers, l’appareil doit être en mode PC.
ou
Carte mémoire Disque dur de
carte PC
(Ou autre carte)
Câble vidéo
Téléviseur
Préparatifs
Mode PC (p. 42 à 49)
En mode PC, l’appareil est connecté à un ordinateur au moyen d’un câble USB, ce
qui permet de faire fonctionner l’appareil comme lecteur de disque externe. Les
données de la carte à l’intérieur de l’appareil peuvent alors être éditées (copiées et
supprimées, etc.), et l’application de logiciel fournie peut être utilisée pour créer des
fichiers pour les présentations.
ou
Carte mémoire Disque dur de
PT1.f10-13.p65 2003/01/14, 12:3813
carte PC
(Ou autre carte)
Câble USB
Ordinateur
personnel
13
Page 76

Index des commandes
Vue avant
Broche de fixation
de dragonne
Fixez la dragonne
ici. (p. 15)
Témoin d’alimentation
Il s’allume lorsque
l’alimentation électrique est
établie. Il clignote lorsque
vous chargez la batterie.
Témoin SD
Il s’allume lorsque la carte
mémoire SD ou la
MultiMediaCard est en cours
d’accès.
Témoin de disque dur
(HDD)
Il s’allume lorsque le disque
dur de carte PC ou la carte
PC est en cours d’accès.
Touche d’annulation
(CANCEL)
Annule les diaporamas et les
présentations.
Fonction de réinitialisation
(RESET)
Appuyez sur CANCEL et sur la touche
d’attente simultanément pendant 5
secondes pour réinitialiser l’appareil.
(p. 52)
Affichage à cristaux liquides
L’affichage à cristaux liquides indique le mode de fonctionnement
actuel (TV, Copie).
• En mode Copie, le niveau de la batterie, la progression du
transfert de données et différents menus sont affichés. (p. 18 à 23)
• Lorsqu’un câble USB est connecté, les options de sélection
de carte sont affichées. (p. 44)
Vue du côté gauche
Interrupteur de
sécurité de
disque dur (HDD
SAFETY ON/OFF)
Active/désactive la
fonction de sécurité
de disque dur. (p. 18)
HDD SAFETY
OFF ON
COPY TV
MODE
Interrupteur de
mode COPIE/TV
(COPY/TV MODE)
Fait passer l’appareil
du mode Copie au
mode TV et vice
versa.
(p. 19 et 24)
BATTERY OPEN
Compartiment
de la batterie
Il contient la
batterie.
14
SD
HDD
Vue arrière
Borne USB
Lorsque vous connectez cet
appareil à un ordinateur
personnel à l’aide du câble
USB fourni, il fonctionnera
comme un lecteur extérieur.
(p. 42 à 49)
Couvercle des
connecteurs
Il protège les connecteurs.
USB
Interrupteur de détection
de sécurité du disque dur
(HDD SAFETY)
Cet interrupteur sort lorsque vous
soulevez l’appareil. Le disque dur
et toutes les opérations sont alors
arrêtés. (p. 18)
Touches de curseur
( )
Pour déplacer le curseur
vers le haut, le bas, la
gauche et la droite.
Touche MENU
Affiche/efface les menus.
Fente de carte
mémoire SD
Ouvrez cette fente pour
insérer/retirer la carte
mémoire SD ou la
MultiMediaCard. (p. 17)
Touche d’attente
Maintenez cette touche
enfoncée pendant environ
2 secondes pour allumer ou
éteindre l’appareil.
Touche d’exécution (SET)
Exécute l’opération
sélectionnée.
Fente de disque dur
de carte PC (carte PC)
Faites glisser le levier et
ouvrez le couvercle pour
insérer/retirer le disque dur
de carte PC ou la carte PC.
(p. 17)
Connecteur de sortie S/V
Vous pouvez utiliser le câble
vidéo fourni pour connecter cet
appareil aux bornes S-Vidéo
ou Vidéo d’un téléviseur pour
visualiser les images. (p. 24)
S/V OUT DC IN
Connecteur d’entrée CC
(alimentation électrique)
Cet appareil peut être alimenté
par une source de courant
extérieure en connectant
l’adaptateur secteur (fourni) à
ce connecteur. (p. 16, 24 et 42)
PT1.f14-18.p65 2003/01/14, 12:3814
Page 77

Transport de l’appareil
Fixation de la dragonne
1 Insérez la boucle de l’extrémité de
la dragonne dans la broche de
fixation.
2 Faites passer l’extrémité opposée
par la boucle, et tirez la dragonne
bien fermement dans le sens de la
flèche.
Attention
• Cet appareil est un appareil de précision. Lorsque vous le transportez, veillez à ne pas le
balancer excessivement. Ne laissez pas tomber cet appareil, ne lui faites pas subir de
chocs violents.
Utilisation de l’étui de transport
1 Ouvrez l’étui de transport.
2 Insérez cet appareil dans le
compartiment inférieur.
Préparatifs
3 Insérez l’étui du disque dur de
carte PC dans le compartiment
supérieur en orientant la marque
“Disque dur de carte PC” vers le haut.
4 Refermez l’étui de transport.
Attention
• Lorsque vous transportez l’appareil, éteignez toujours l’appareil, insérez le disque dur
de carte PC dans son étui, puis placez l’étui dans l’étui de transport.
PT1.f14-18.p65 2003/01/14, 12:3815
15
Page 78

Recharge de la batterie
Vous pouvez recharger la batterie en laissant celle-ci à l’intérieur de l’appareil, en
utilisant l’adaptateur secteur fourni. Avant de charger la batterie, il faut éteindre
l’appareil. Si l’appareil est allumé, la charge sera arrêtée.
1 Faites glisser le
couvercle de la
batterie légèrement
vers la droite et ouvrezle en le faisant pivoter.
2 Insérez la batterie
(avec l’étiquette
orientée vers le haut)
bien à fond dans le
compartiment de la
batterie.
3 Refermez le couvercle.
1
2
Pour retirer la batterie :
Enfoncez le fermoir avec
le doigt.
Fermoir
4 Connectez la fiche CC
de l’adaptateur
secteur à la borne DC
IN de l’appareil, puis
branchez l’adaptateur
secteur à une prise
murale.
• Le témoin d’alimentation
clignote pendant la charge.
1
5 Lorsque la charge est terminée, le témoin
d’alimentation s’éteint.
• Une batter ie complètement chargée, sous une température
de 20 °C et 60 % d’humidité, permet de faire fonctionner
l’appareil pendant environ 80 minutes. (Le temps de
fonctionnement dépend des conditions d’utilisation.)
2
Attention
• Retirez la batterie si l’appareil ne
sera pas utilisé pendant une
longue période.
• Il ne faut pas installer/retirer la
batterie, ou brancher/débrancher
l’adaptateur secteur, lorsque
l’appareil est allumé. Sinon, vous
risquez d’endommager l’appareil
ou de perdre des données.
• Ne débranchez pas l’adaptateur
secteur pendant que la charge est
en cours.
Indications du témoin d’alimentation pendant la charge
Pendant la charge normale, le témoin d’alimentation clignote par intervalles de 1 seconde environ.
La charge est habituellement terminée en 90 minutes environ. Toutefois, si le témoin clignote plus
vite ou plus lentement que l’intervalle ordinaire, ou si le témoin d’alimentation s’éteint avant que la
charge soit terminée, alors un problème s’est produit. La vitesse de clignotement peut vous
indiquer la nature du problème. Voyez ci-dessous.
Clignotement rapide (par intervalles d’environ 0,5 seconde):
• Problème possible de l’appareil, de la batterie ou de l’adaptateur secteur.
Clignotement lent (par intervalles d’environ 6 secondes):
• La température de la batterie ou de la zone voisine de la batterie est trop élevée ou trop basse,
ou la batterie est très déchargée. La charge peut quand même continuer dans ces conditions,
mais elle durera plus longtemps que d’ordinaire.
Le témoin est éteint (la charge n’est pas encore terminée):
• Problème possible de l’adaptateur secteur.
16
PT1.f14-18.p65 2003/01/14, 12:3816
Page 79

Insertion de la carte
Mettez le mode d’attente hors circuit lorsque vous insérez ou que vous retirez
une carte.
Fente de carte mémoire SD
Pour retirer la carte:
1 Poussez la porte de la
carte légèrement vers le
haut pour l’ouvrir en la
faisant pivoter.
Ouvrez la porte de la
carte. Appuyez
légèrement sur la
carte, puis relâchez.
2 Insérez la carte mémoire
(avec l’étiquette orientée vers
le haut, coin coupé à droite),
et maintenez-la en place
jusqu’à ce que vous
entendiez un déclic.
3 Refermez le couvercle.
2
Coin coupé
1
Fente de carte PC
1 Faites glisser le levier pour
ouvrir le couvercle.
Pour retirer la carte:
Appuyez deux fois
sur la touche
d’éjection.
2 Insérez le disque dur de
carte PC ou la carte PC
bien à fond dans la fente.
Préparatifs
3 Refermez le couvercle.
Attention
• Insérez toujours la carte dans le sens correct. Sinon, vous risquez d’endommager la carte et cet
appareil.
• Le disque dur de carte PC et la carte mémoire sont des dispositifs de précision. Ne les pressez
pas trop fort, et ne les heurtez pas violemment.
• Si la porte de la carte ne se ferme pas complètement, retirez la car te, vérifiez l’orientation
d’insertion, et insérez à nouveau la carte. En outre, vérifiez si vous avez bien appuyé à fond sur
la touche d’éjection.
PT1.f14-18.p65 2003/01/14, 12:3817
17
Page 80
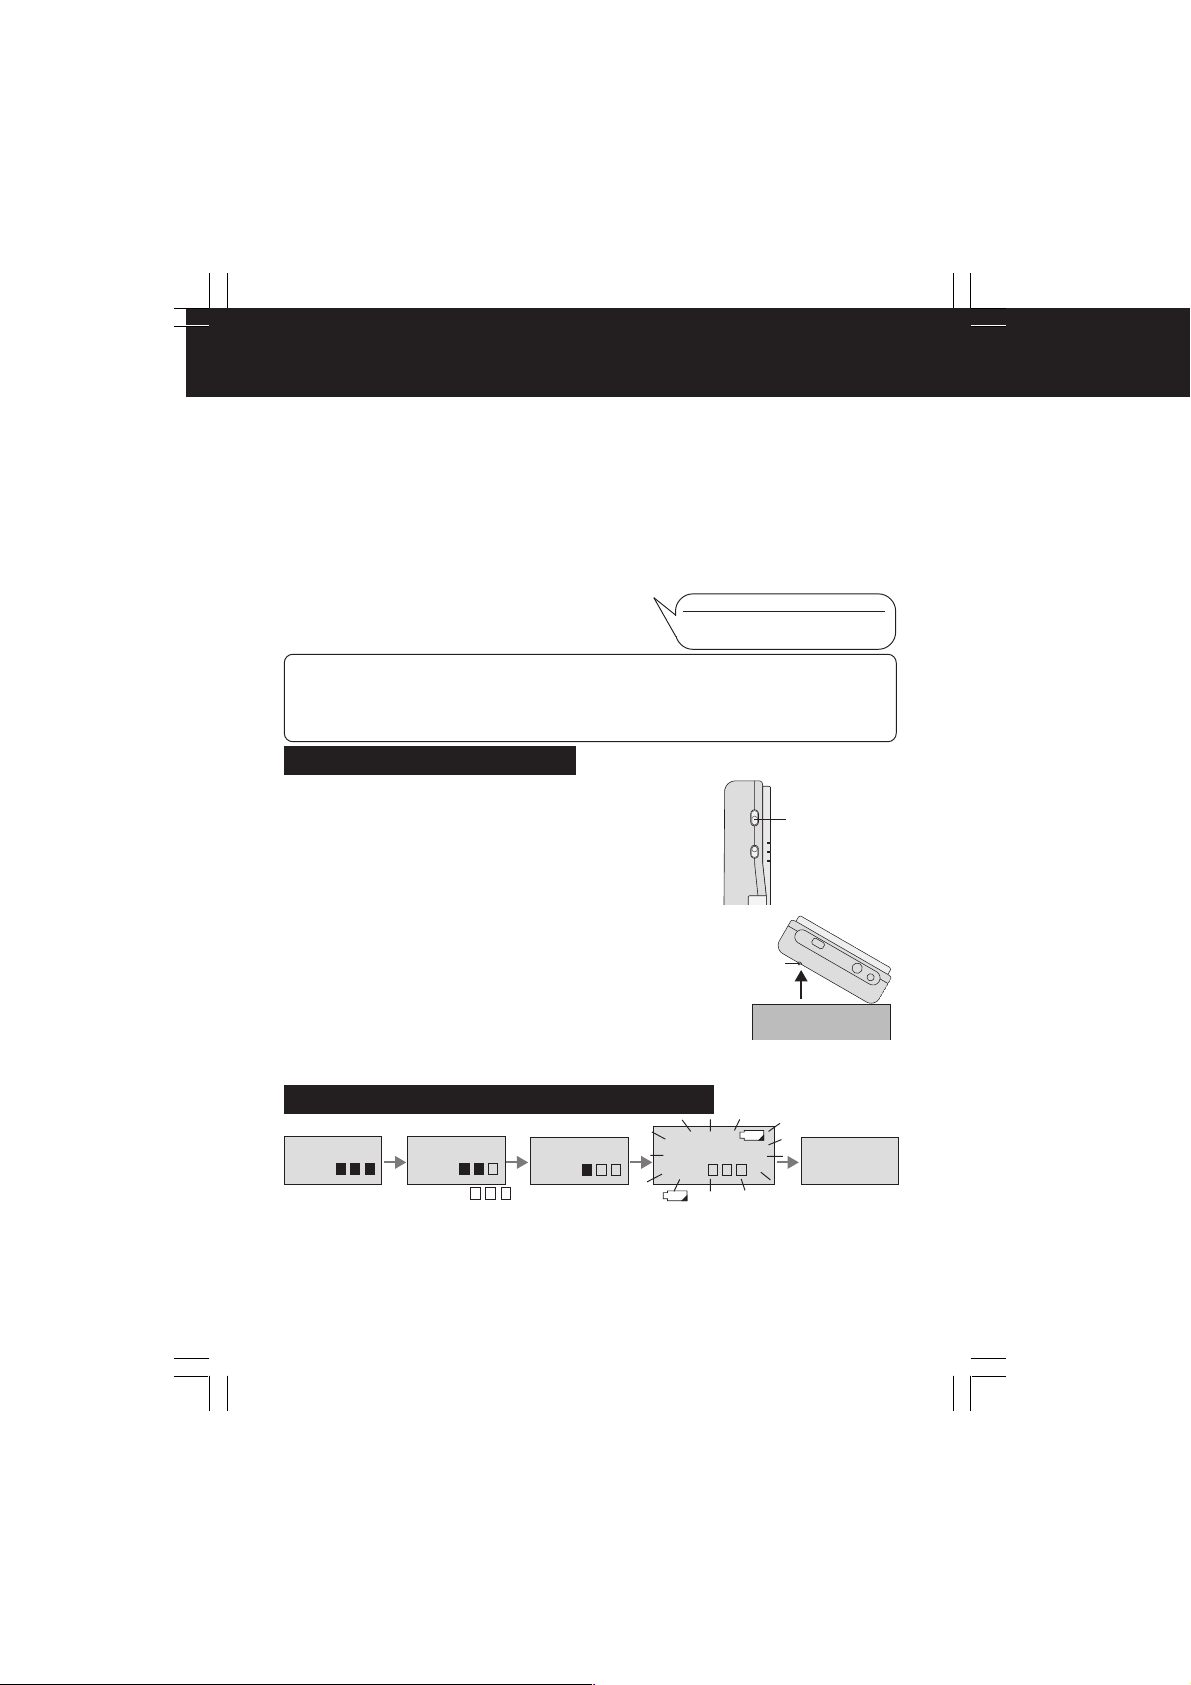
Mise sous tension
U
S
B
S
/V
O
U
T
D
C
IN
En cas de panne de courant, l’appareil utilise la batterie fournie comme alimentation de
secours pour protéger l’appareil et les données de la carte. Si vous utilisez l’adaptateur
secteur, insérez une batterie suffisamment chargée avant d’allumer l’appareil. L’appareil
ne peut pas être utilisé si l’adaptateur secteur seulement est utilisé.
1 Insérez la batterie et connectez l’adaptateur secteur. (p. 16)
• L’appareil peut fonctionner en utilisant simplement la batterie; toutefois, lorsque vous utilisez le
mode PC, il faut que l’adaptateur secteur soit connecte, sinon l’appareil ne s’allumera pas.
2 Placez l’appareil sur une surface plane et horizontale.
• Sinon, l’interrupteur de détection de sécurité de disque dur risque d’empêcher l’unité de
fonctionner. (Voyez ci-dessous.)
3 Appuyez sur la touche d’attente pendant environ 2 secondes.
• L’alimentation est établie (le témoin d’alimentation
s’allume) et l’appareil passe successivement à chaque
mode de fonctionnement dans l’ordre. (p. 13)
– Nota –
• Si vous utilisez l’appareil alimenté par la batterie seulement, l’appareil s’éteindra automatiquement si
vous n’effectuez aucune opération sur l’appareil pendant cinq minutes, afin d’économiser l’énergie de la
batterie.
• Il est impossible d’éteindre l’appareil pendant que l’interrupteur de détection de sécurité de disque dur
est activé. (Voyez ci-dessous.)
Interrupteur HDD SAFETY
Important: Placez l’appareil sur une surface plane et
horizontale lorsque vous l’utilisez. Si vous soulevez
l’appareil ou si vous le placez sur une surface qui n’est pas
plane et horizontale, le fonctionnement du disque dur de
carte PC sera arrêté par l’interrupteur HDD SAFETY pour
assurer sa protection.
• Si l’appareil reçoit un choc violent, les données du disque dur de carte
PC risquent d’être endommagées. Nous vous conseillons de laisser
cet interrupteur sur la position ON. (ON est le réglage par défaut.)
• Si l’interrupteur de détection de sécurité de disque dur, situé sous
l’appareil, est activé, le fonctionnement de l’appareil s’arrêtera et un
message d’avertissement apparaîtra sur l’écran du téléviseur et sur
l’affichage à cristaux liquides de l’appareil. Dans ce cas, placez
l’appareil sur une surface plane et horizontale. Le fonctionnement
normal sera rétabli. Les opérations de copie reprendront à partir du
point précis où la copie avait été interrompu.
• Si l’interrupteur de détection de sécurité de disque dur est activé
pendant que l’appareil est connecté à un ordinateur personnel, le
message “SAFETY MODE PUT IT DOWN” apparaîtra sur l’affichage à
cristaux liquides de l’appareil. L’opération de copie en cours à ce
moment sera interrompue, et des erreurs d’ordinateur risqueront aussi
de se produire.
Affichage du temps de batterie restant
Pour éteindre cet appareil:
Appuyez sur la touche d’attente
pendant environ 2 secondes.
HDD SAFETY
OFF ON
HDD SAFETY
(ON/OFF)
COPY TV
MODE
Détection
de sécurité
de disque
dur
Le disque dur s’arrête
et toutes les opérations
sont interrompues.
COPY MODE
Lorsque l’indication BATT. et l’icône de batterie se mettent à clignoter, toutes
les touches, à l’exception de la touche d’alimentation, sont inutilisables. Connectez
l’adaptateur secteur ou rechargez la batterie. Si la batterie s’épuise complètement pen-
dant la copie, la copie s’arrête et l’alimentation est coupée. Il pourrait être impossible
d’effectuer la lecture des données qui étaient en cours de copie à ce moment.
Nous vous conseillons de charger complètement la batterie avant d’utiliser
COPY MODE
BATT.BATT.
COPY MODE
BATT.
COPY MODE
BATT.
BATTERY
LOW
l’appareil. (p. 16)
18
PT1.f14-18.p65 2003/01/14, 12:3818
Page 81
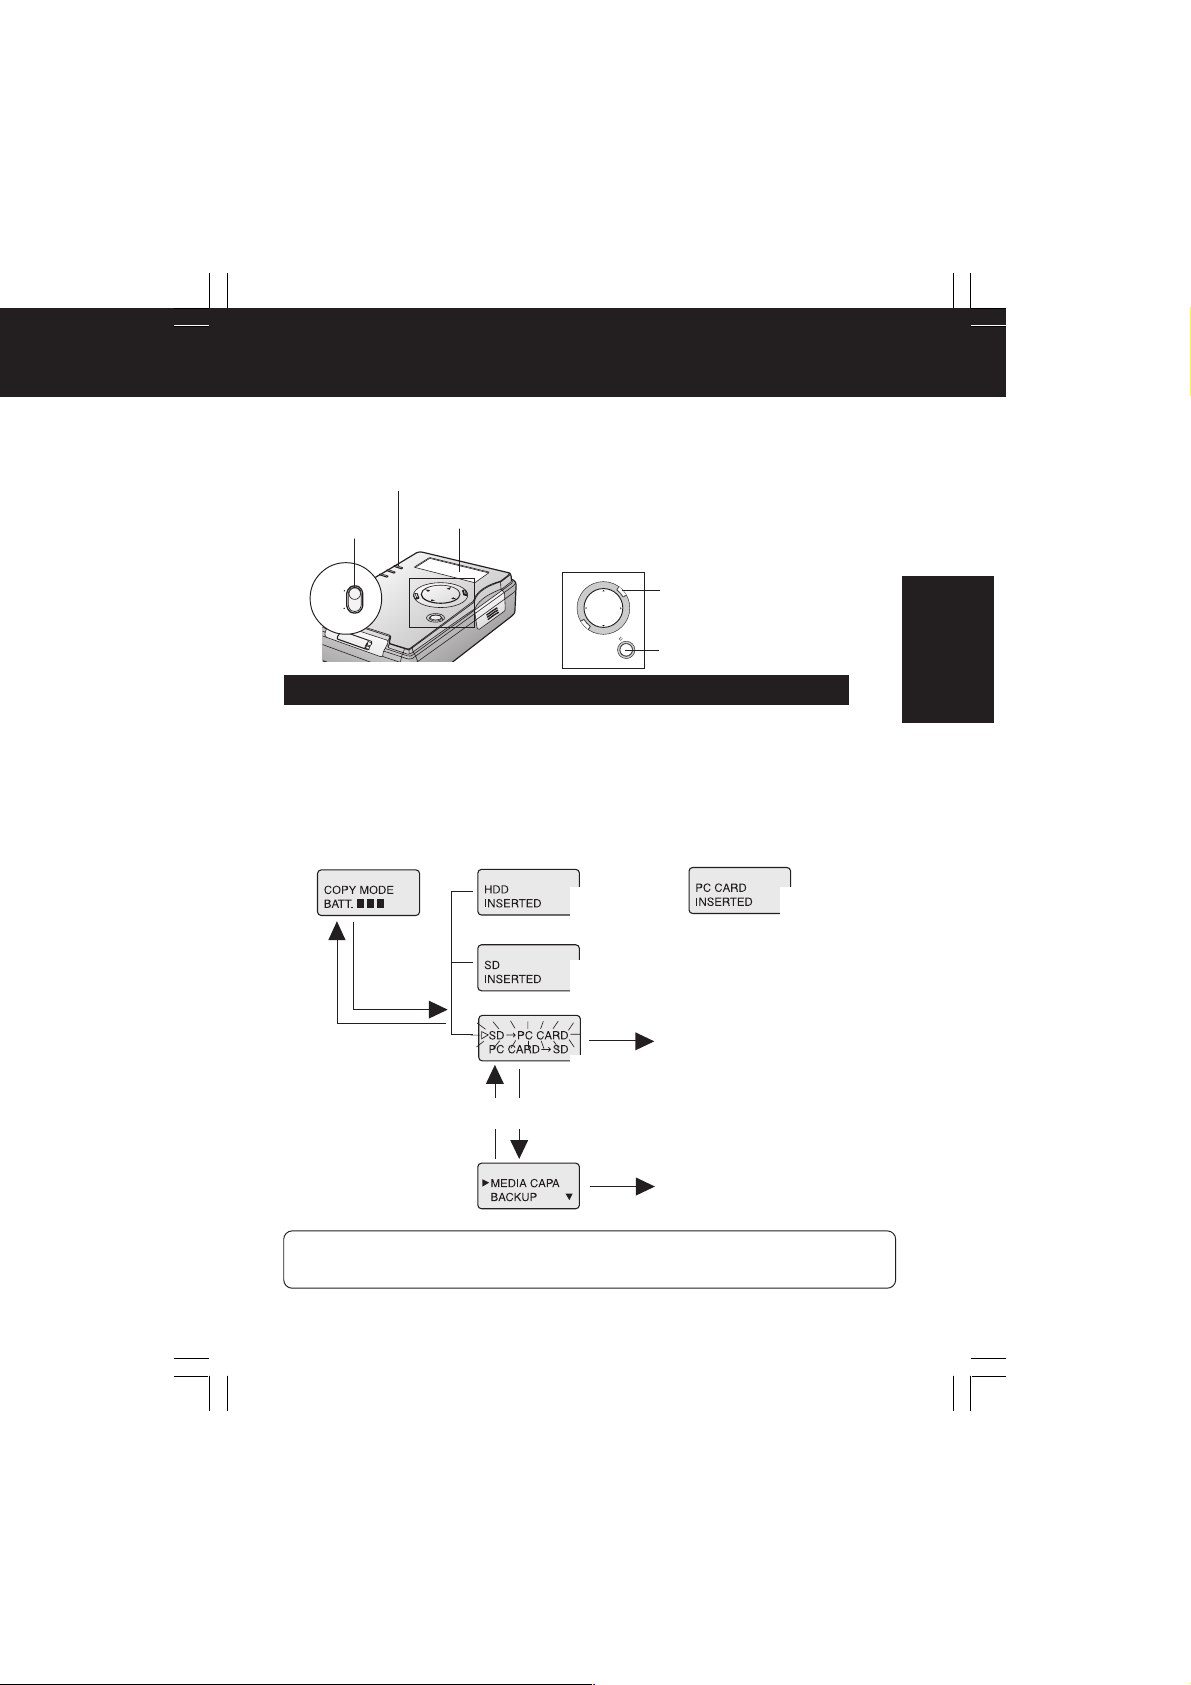
Mode Copie (Indicateur d’affichage)
V
En mode Copie, les données peuvent être
copiées d’une carte sur une autre. Vous
pouvez aussi vérifier la capacité de stockage
Témoin
d’alimentation
Affichage à
COPY/TV
cristaux liquides
MODE
COPY T
MODE
Affichage du menu (Organigramme des indications)
Pour afficher les menus en mode COPY (Copie), procédez comme suit.
1 Mettez le mode COPY/TV sur “COPY”.
2 Insérez une carte. (p. 17)
3 Allumez cet appareil. (p. 18)
Lorsque vous utilisez
la batterie
Lorsque vous utilisez
l’adaptateur secteur
de la carte, effectuer des sauvegardes, régler
les formats TV et formater les cartes.
Si l’appareil fonctionne sur l’alimentation de la
batterie seulement, l’appareil s’éteindra
automatiquement si vous n’effectuez aucune
opération sur l’appareil pendant cinq minutes
afin d’économiser l’énergie de la batterie.
M
E
N
U
MENU
C
A
N
C
E
L
/SET
STANDBY/SET
(Touche d’attente/d’exécution)
*
(Lorsqu’un disque
dur de carte PC
est inséré)
(Lorsqu’une carte
PC est insérée)
Mode Copie
Appuyez
sur SET.
(Lorsqu’une carte
mémoire SD est
insérée)
*
Si vous n’appuyez sur
aucune touche pendant
10 secondes.
* Lorsque l’interrupteur
HDD SAFETY est sur
ON et est activé (p. 18),
le disque dur de carte PC
ne peut pas être vérifié; il
faut donc toujours placer
l’appareil sur une
surface plane et
horizontale.
Appuyez sur
MENU.
(Lorsqu’une carte PC et une carte
mémoire SD sont insérées)
“Copie” (p. 21)
“Menus” (p. 20)
– Nota –
• Les cartes qui utilisent des adaptateurs autres que l’adaptateur de disque dur de carte PC sont
affichées comme “PC CARD”.
PT1.f19-23.p65 2003/01/14, 12:3819
19
Page 82
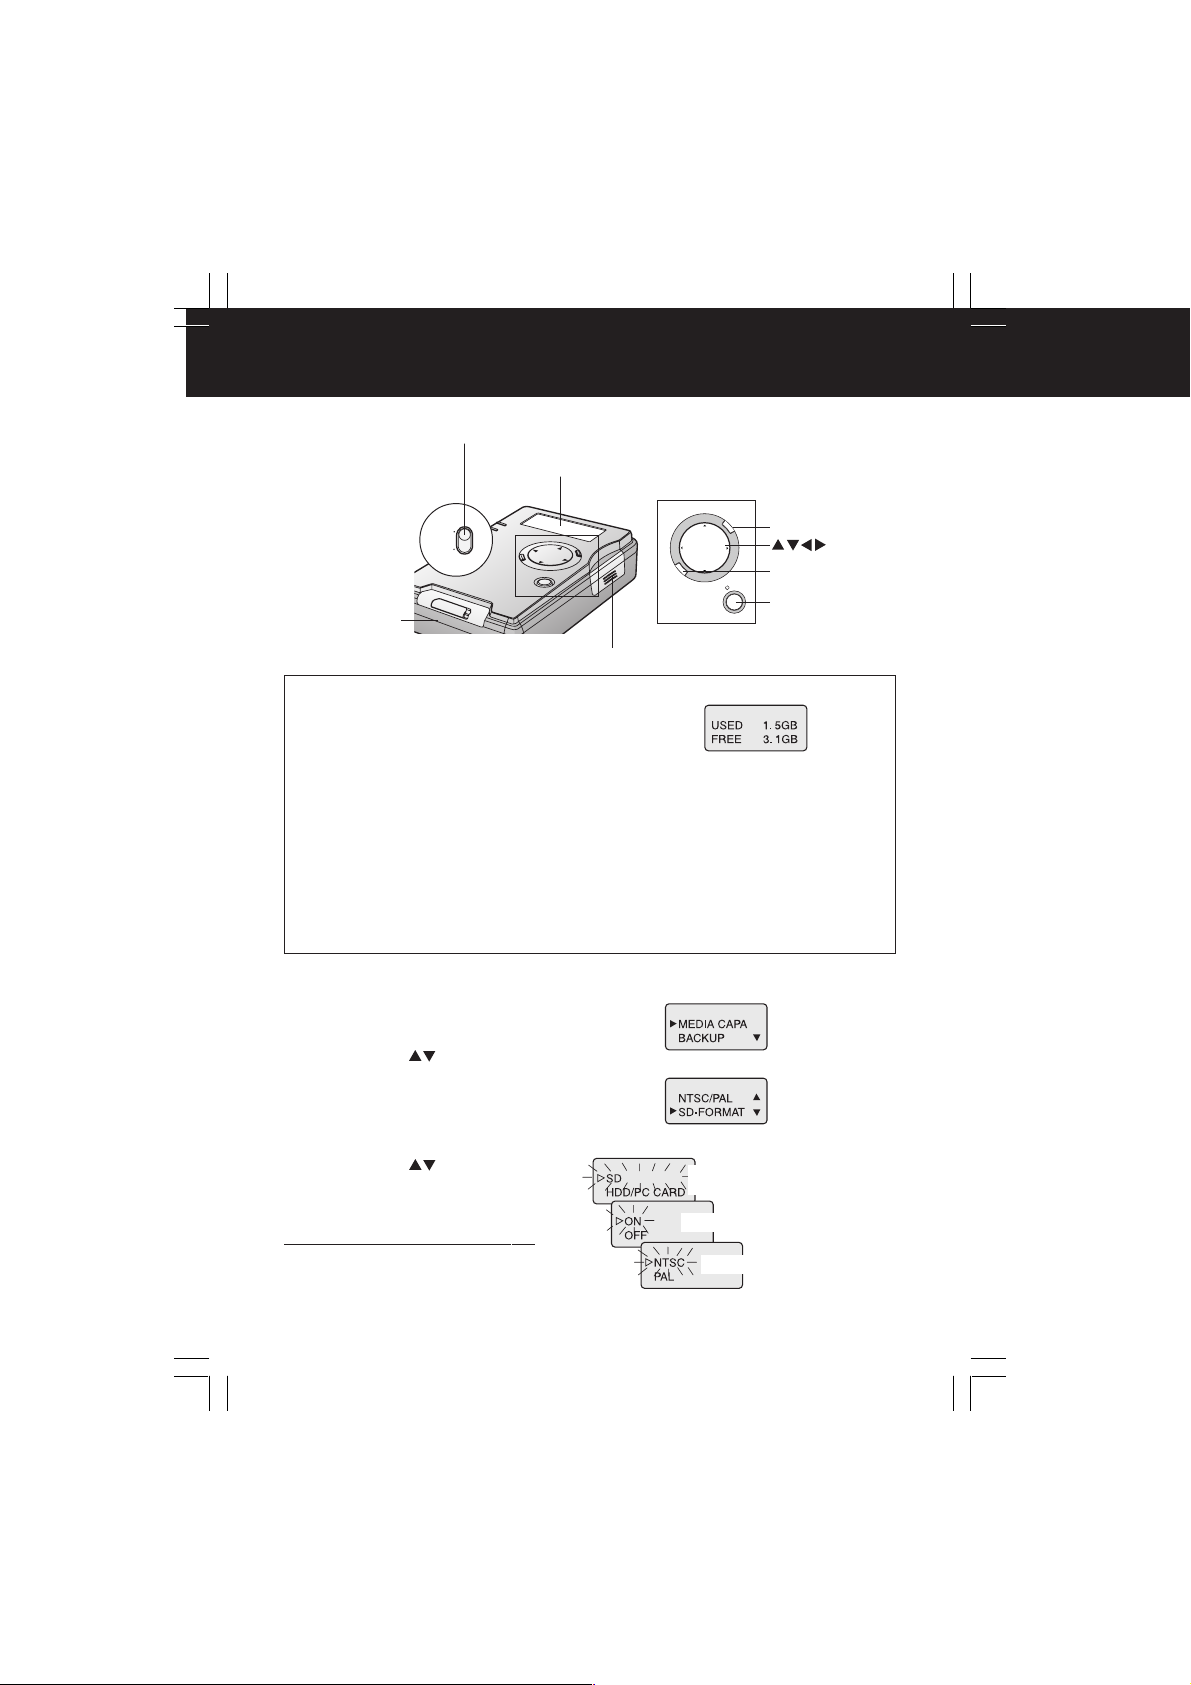
Mode Copie (Menus)
M
C
A
N
C
E
L
E
N
U
/SET
V
COPY/TV MODE
Affichage à cristaux
liquides
COPY T
MODE
MENU
CANCEL
STANDBY/SET
Fente de disque
dur de carte PC
(carte PC)
Fente de carte mémoire
(Touche
d’attente/
d’exécution)
• Vérification de la capacité de stockage de la carte (MEDIA CAPACITY)
Ceci vous permet de vérifier la capacité de stockage de la carte.
• L’espace disponible sur le disque dur de carte PC est
d’environ 4,6 Go.
• Sauvegarde (BACKUP ON/OFF)
Lorsque cet élément est mis sur ON, le dossier de sauvegarde contenant vos données est créé
automatiquement lors de la copie. Ceci est utile lorsque les données risquent d’être supprimées
ou endommagées par mégarde. Le contenu du dossier de sauvegarde n’est pas affiché en mode
TV. Un ordinateur peut être utilisé pour copier, éditer et supprimer les fichiers. (Cet appareil est
expédié de l’usine avec le réglage mis sur “OFF”.)
(Exemple)
• Sélection du format TV (NTSC/PAL)
Cet appareil peut être réglé sur le format TV utilisé dans votre pays (NTSC ou PAL). Le format
NTSC est le format TV utilisé dans les pays tels que les États-Unis et le Japon, et le format PAL
est utilisé dans certains pays européens et en Océanie.
• Formatage des cartes (SD-FORMAT) (HDD-FORMAT)
Lorsque vous formatez une carte, toutes les données qu’elle contient sont irréversiblement
supprimées.
1 Affichez le menu comme indiqué à la
page 19.
• Appuyez à nouveau sur MENU pour quitter.
2 Appuyez sur pour sélectionner un
élément de menu, puis appuyez sur SET.
• Pour plus de détails concernant les menus, voyez
ci-avant.
• Pour plus de détails concernant le formatage,
référez-vous aux pages 22 et 23.
3 Appuyez sur pour sélectionner
une fonction, puis appuyez sur SET.
• L’élément sélectionné clignote jusqu’à ce
que SET soit pressée.
Pour effectuer d’autres réglages:
Appuyez sur MENU pour retourner à
l’étape 2.
20
PT1.f19-23.p65 2003/01/14, 12:3820
(Pour vérifier la capacité de
stockage)
(Pour effectuer la sauvegarde)
(Pour sélectionner le format TV)
Page 83

Mode Copie (Copie)
Toutes les données peuvent être copiées d’une carte mémoire sur le disque dur de
carte PC (carte PC) en une seule opération. En outre, il est possible de copier les
données contenues dans des dossiers particuliers du disque dur de carte PC (carte
PC) sur une carte mémoire en sélectionnant les dossiers que vous voulez copier.
Veillez à ce qu’un disque dur de carte PC (carte PC) et une carte mémoire
soient tous deux insérés.
1 Affichez le menu Copie. (p. 19)
• Appuyez sur MENU pour afficher le
menu. (p. 20)
2 Appuyez sur pour sélectionner
l’élément de menu désiré, puis
appuyez sur SET.
Si “HDD->SD” apparaît, appuyez sur
, puis sur SET pour sélectionner
un dossier.
3 Appuyez sur pour
sélectionner “YES”, puis appuyez
sur SET.
• Après que le menu ait été sélectionné,
la capacité de la carte est vérifiée. Si
“NO CAPACITY” apparaît, le menu
Copie réapparaît. Remplacez la carte
par une carte disposant d’un espace
libre suffisant, puis répétez ces
opérations depuis le début.
La copie est alors effectuée.
• Pour plus de détails concernant la
copie des données, référez-vous à
la section “Copie et sauvegarde”
(p. 11 et 12).
• Si les données existantes doivent
être recouvertes, le message ci-
contre apparaît. Pour effectuer
l’écrasement, appuyez sur SET.
Pour annuler, appuyez sur
CANCEL.
La copie est terminée!
• Si vous appuyez sur n’impor te quelle
touche, le menu Copie réapparaît à
l’étape 1.
Pour annuler la copie en cours:
1. Appuyez sur CANCEL.
2. Appuyez sur
“YES”, puis appuyez sur SET pour
exécuter.
pour sélectionner
Exemple: SD -> HDD
(Lorsqu’un disque dur de carte PC et
une carte mémoire SD sont insérés)
Attention
• Ne retirez jamais une carte
de l’appareil pendant que la
copie est en cours.
– Nota –
• Si “SD->HDD” a été
sélectionné, un dossier
“CARD****” sera créé sur le
disque dur, et les données
seront copiées dans ce
dossier. Si une car te autre
qu’un disque dur de carte PC
est insérée, la copie sera
effectuée dans la structure de
dossier de la carte mémoire
utilisée.
• Lorsque la copie est effectuée
du disque dur -> SD, le dossier
“CARD****” seulement du
disque dur peut être copié.
• Lorsque l’appareil est alimenté
par la batterie seulement, si
vous n’appuyez pas sur une
touche pendant 10 secondes,
le temps de batterie restant
apparaîtra sur l’affichage.
Appuyez sur SET pour
reprendre l’opération
précédente.
• Il est impossible d’effectuer la
copie si la carte mémoire est
protégée contre l’écriture.
• Les données sécurisées (y
compris les fichiers dotés
d’extensions WMA, SA1 et
MP3) ne seront pas copiées.
• Si vous annulez la copie en
cours, les données copiées en
ce point seront conservées sur
la carte de destination. Si vous
ne voulez pas conserver ces
données , sélectionnez le
mode TV ou PC et supprimezles.
Mode Copie
21
PT1.f19-23.p65 2003/01/14, 12:3821
Page 84
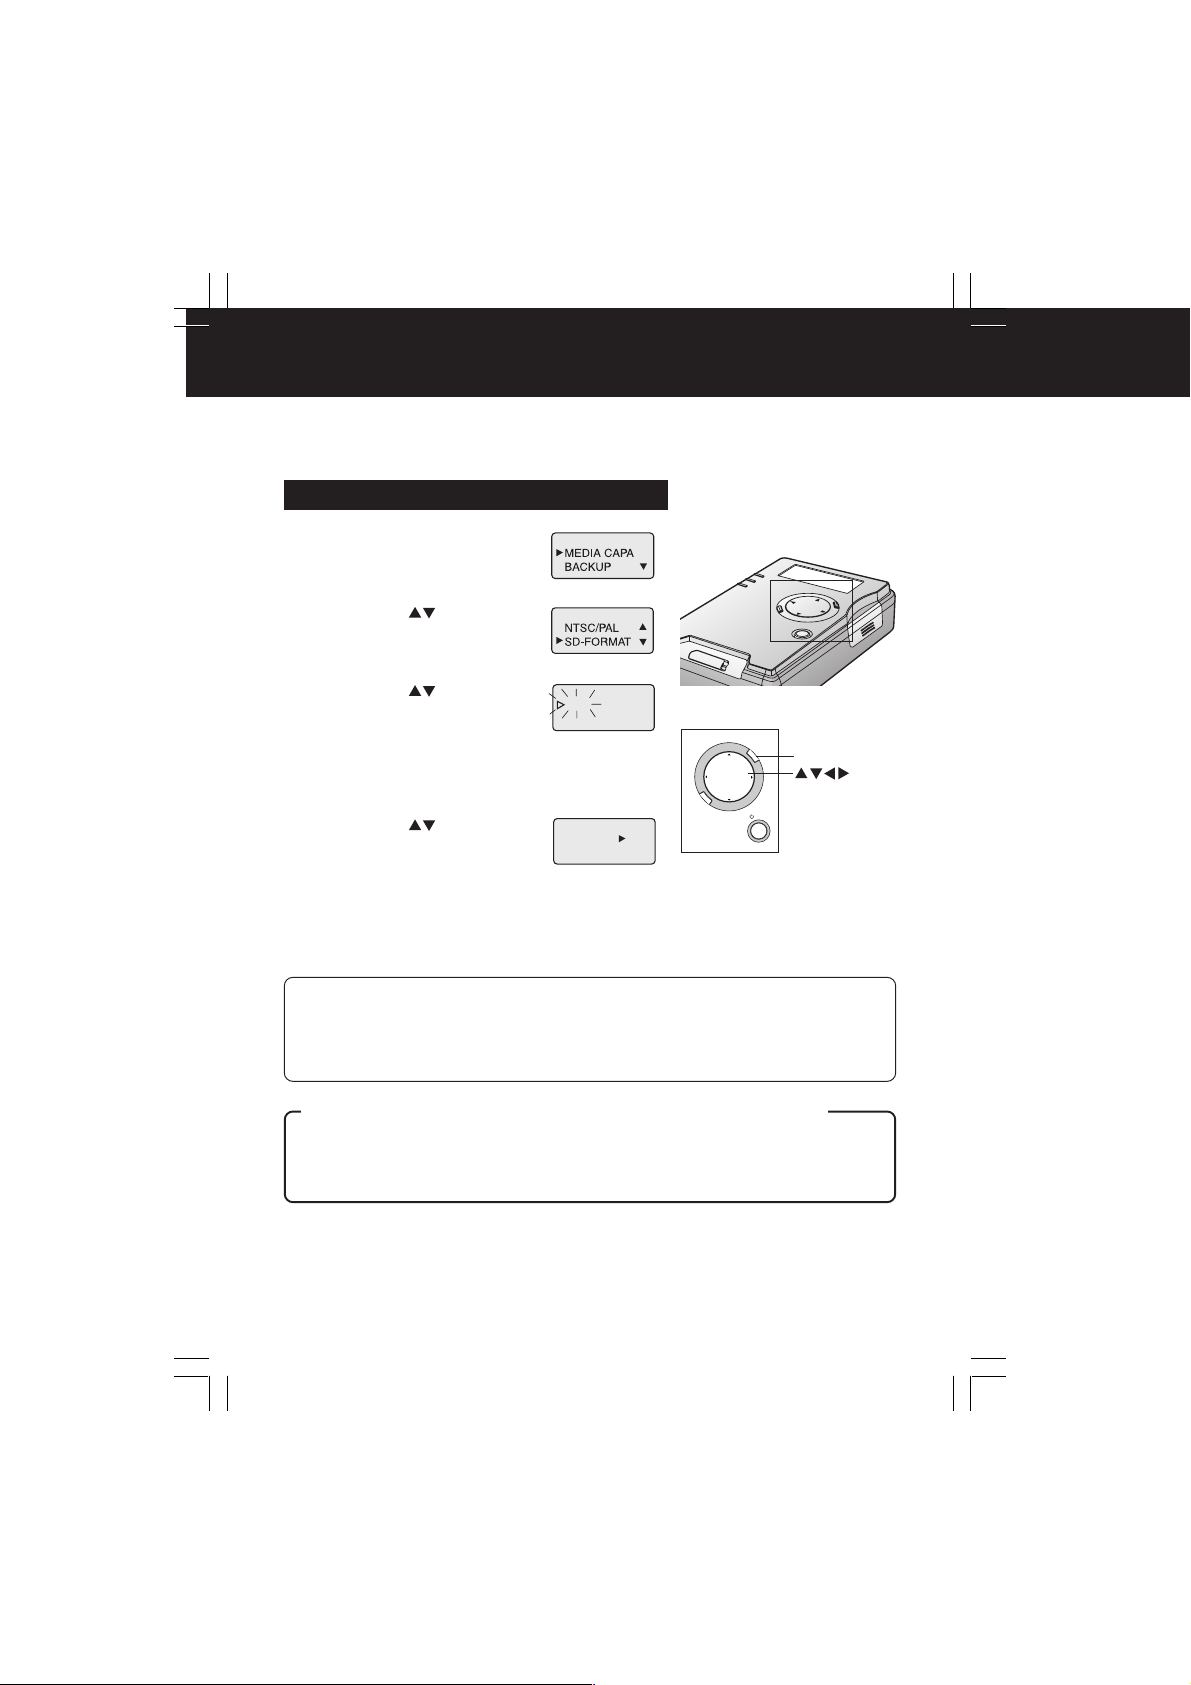
M
C
A
N
C
E
L
E
N
U
/SET
Formatage des cartes
Normalement, il est inutile de formater (initialiser) la carte mémoire SD et le disque
dur de carte PC. Une carte mémoire SD qui a été formatée aux spécifications FAT32*
ne peut pas être utilisée; vous devez donc transférer les données importantes sur un
ordinateur personnel puis formater la carte de cet appareil.
Formatage de la carte mémoire SD
1 Affichez le menu. (p. 19)
• Pour plus de détails concernant les
menus, référez-vous à la page 20.
2 Appuyez sur pour
sélectionner “SD-FORMAT”,
puis appuyez sur SET.
3 Appuyez sur pour
sélectionner “YES”, puis
appuyez sur SET.
• L’élément sélectionné clignote
jusqu’à ce que SET soit pressée.
• Appuyez sur MENU pour faire
réapparaître le menu.
4 Appuyez sur pour
sélectionner “YES”, puis
appuyez sur SET.
• Pour annuler le formatage,
sélectionnez “NO”.
* Si une carte mémoire SD formatée aux spécifications FAT 32
est insérée, le message “CAN’T USE FAT32 SDCARD”
s’affiche, suivi d’un message de confirmation de format.
YES
NO
FORMAT?
YES
NO
MENU
– Nota –
• Si “FORMAT ERROR” s’affiche, retirez la carte mémoire SD et insérez-la à nouveau.
Ensuite, refaites la procédure de formatage. Si l’erreur se produit à nouveau, il est possible
que la carte mémoire SD soit endommagée.
• La carte mémoire SD peut aussi être formatée sur certains appareils photos numériques.
Référez-vous au mode d’emploi de l’appareil photo numérique.
Précaution concernant le formatage des cartes mémoire SD
* Les cartes mémoire SD formatées sous Windows XP peuvent être en format FAT 32 car FAT
32 est le format par défaut sélectionné pour ce système d’exploitation. Cet appareil et de
nombreux types d’appareils photo numériques ne supportent pas le format FAT 32. Une carte
mémoire SD formatée en format FAT 32 doit être reformatée sur cet appareil ou sur un
appareil photo numérique.
22
PT1.f19-23.p65 2003/01/14, 12:3822
Page 85
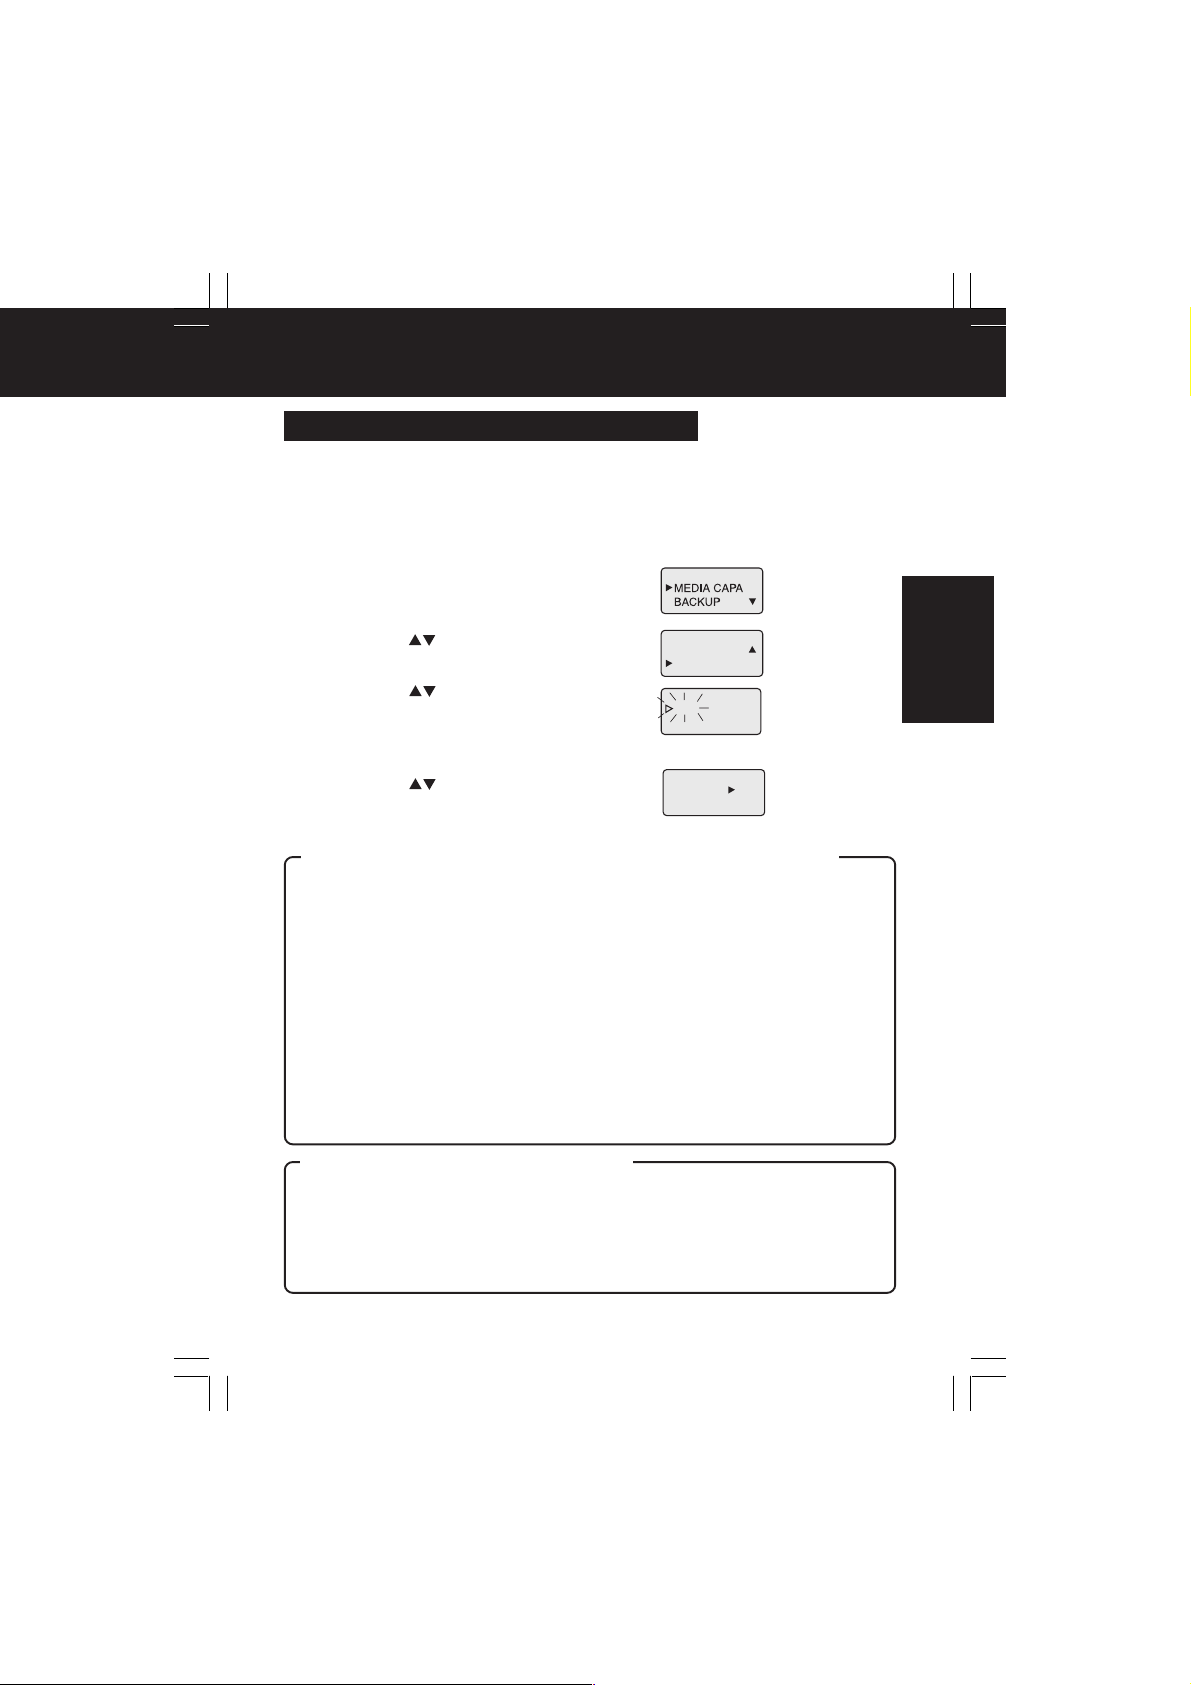
Formatage des cartes
YES
NO
Formatage du disque dur de carte PC
Les numéros de produit des cartes pouvant être formatées en utilisant l’appareil sont
indiqués ci-dessous. Les cartes dont les numéros de produit ne sont pas indiqués
dans la liste ne peuvent pas être formatées (en date du 1er oct. 2002).
Matsushita
•RP-PH005A
1 Affichez le menu. (p. 19)
• Pour plus de détails concernant les menus, référez-
vous à la page 20.
2 Appuyez sur pour sélectionner “HDD-
FORMAT”, puis appuyez sur SET.
3 Appuyez sur pour sélectionner “YES”,
puis appuyez sur SET.
• L’élément sélectionné clignote jusqu’à ce que SET
soit pressée.
• Appuyez sur MENU pour faire réapparaître le menu.
4 Appuyez sur pour sélectionner “YES”,
puis appuyez sur SET.
• Pour annuler le formatage, sélectionnez “NO”.
Précaution concernant les formats de disque dur de carte PC
• Sur cet appareil, le formatage d’un disque dur de carte PC doit être effectué en mode Copie,
et non en mode PC (connexion USB). Toutefois, si le disque possède plusieurs partitions
créées sur un périphérique, par exemple un ordinateur bloc-notes, si vous effectuez le
formatage sur cet appareil, le disque ne comportera plus qu’une seule partition (réglage par
défaut). Pour éviter ceci, utilisez le même périphérique que celui que vous avez utilisé
auparavant pour formater la carte.
• Windows 95/98 possède un utilitaire FDISK.EXE qui permet de gérer les partitions de disque,
mais celui-ci ne doit jamais être utilisé pour effectuer des partitions sur un disque dur de carte
PC. Sinon, la capacité de stockage du disque dur de carte PC sera indiquée incorrectement,
et le disque dur ne fonctionnera plus correctement. En outre, n’utilisez pas Windows 95/98
pour formater un disque dur de carte PC qui contient plusieurs partitions, sinon les données
dans d’autres partitions du disque risqueront d’être endommagées et les données
sauvegardées risqueront de devenir inutilisables.
• Seule la première partition d’un disque comportant plusieurs partitions créée sur un autre
périphérique, tel qu’un ordinateur bloc-notes, sera reconnue.
•Évitez aussi de formater d’autres types de cartes PC en utilisant le mode PC (connexion
USB), sinon le format pourrait ne plus être reconnu mutuellement par l’ordinateur et l’appareil,
ou les données risqueront d’être endommagées. Utilisez toujours l’appareil pour formater des
cartes PC.
Précautions concernant le formatage
• Lorsque vous formatez une carte, toutes les données sauvegardées dans la carte sont
supprimées irréversiblement. V érifiez la capacité de stockage de la carte et les données
mémorisées dans la carte, puis copiez les données importantes sur un autre lecteur ou sur une
autre carte avant d’effectuer le formatage. En outre, comme cer tains types de fichiers ne peuvent
être affichés que sur un ordinateur, utilisez un ordinateur pour vérifier le contenu de la carte.
• Lorsque vous utilisez cet appareil pour formater des cartes, utilisez uniquement le type correct
de carte. Vérifiez toujours la capacité de stockage de la carte et les données mémorisées avant
d’effectuer le formatage.
Toshiba
•PAMHD002
•PAMHD005
Melco
•RHDC-2G
•RHDC-5G
Io Data
Devices
•PCHDT-2Gt
•PCHDT-5Gt
Logitech
•LPM-HD2G
•LPM-HD5G
SD-FORMAT
HDD-FORMAT
FORMAT?
YES
NO
Kingston
•DP-PCM2/
2GB
•DP-PCM2/
5GB
Mode Copie
23
PT1.f19-23.p65 2003/01/14, 12:3823
Page 86
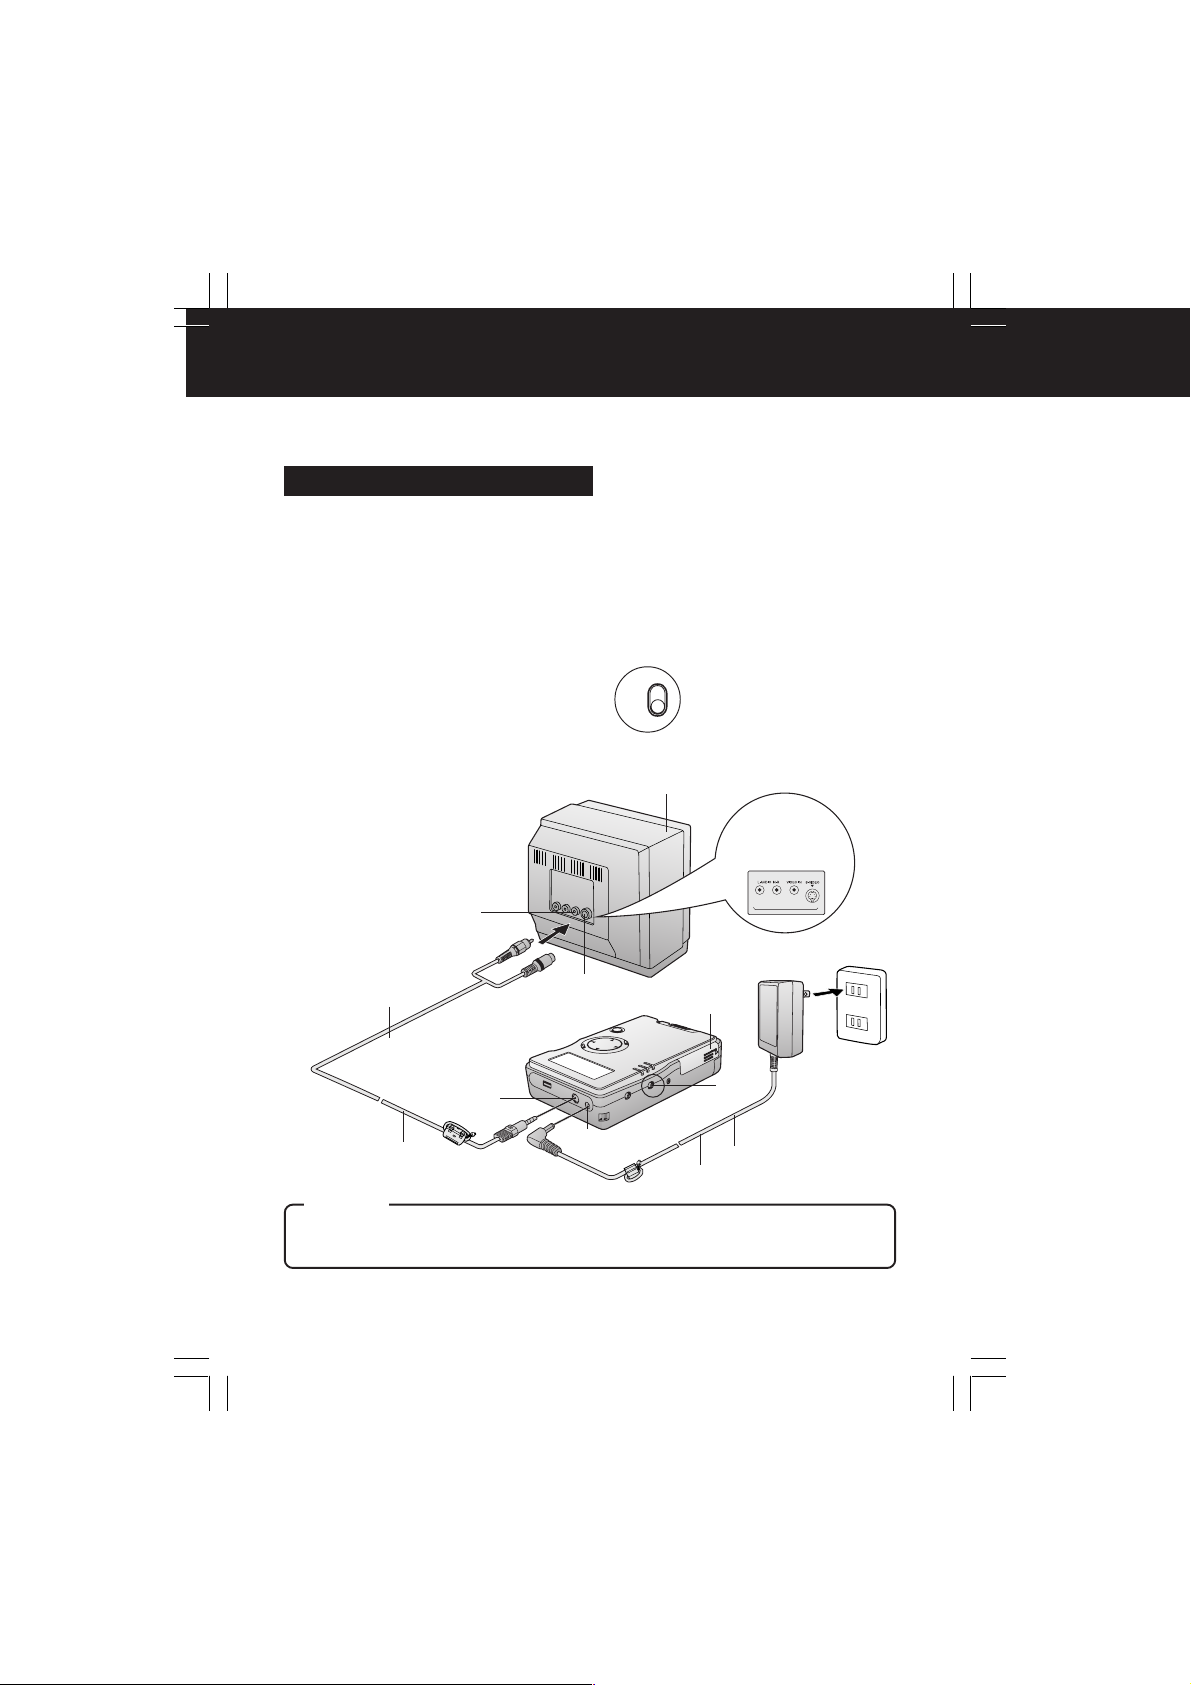
Mode TV (Configuration)
Vous pouvez visualiser les photos DSC et les fichiers de présentation PC sur un
téléviseur lorsque celui-ci est connecté à cet appareil. Pour plus de détails
concernant les fonctions disponibles en mode TV, référez-vous à la page suivante.
Configuration (connexions)
1 Connectez le câble vidéo.
• Connectez cet appareil à la borne d’entrée vidéo ou
S-Vidéo de votre téléviseur.
2 Allumez le téléviseur et mettez-le en mode
VIDEO.
• Référez-vous au mode d’emploi de votre téléviseur.
3 Insérez la carte dans l’appareil. (p. 17)
4 Faites passer le mode COPY/TV à “TV”.
MODE
COPY TV
5 Insérez la batterie et connectez l’adaptateur
secteur. (p. 16)
6 Allumez cet appareil. (p. 18)
• Si l’appareil est alimenté par la
batterie seulement, l’appareil
s’éteint automatiquement si
aucune opération n’est effectuée
pendant 5 minutes afin de
conserver l’énergie de la batterie.
Entrée vidéo
(VIDEO IN)
1
Sortie S/V
(S/V OUT)
Câble vidéo
(fourni)
Attention
• Pour qu’il soit possible d’utiliser le mode TV, le câble USB doit être déconnecté de l’appareil.
Sinon, l’appareil passera automatiquement au mode PC.
•Éteignez toujours cet appareil avant d’insérer ou de retirer la carte.
Entrée S-Vidéo
(S-VIDEO IN)
Entrée CC
(DC IN)
2
Exemple
montrant les
bornes d’entrée
du téléviseur
5
4
Adaptateur
secteur
5
24
PT1.f24-28.p65 2003/01/14, 12:3824
Page 87
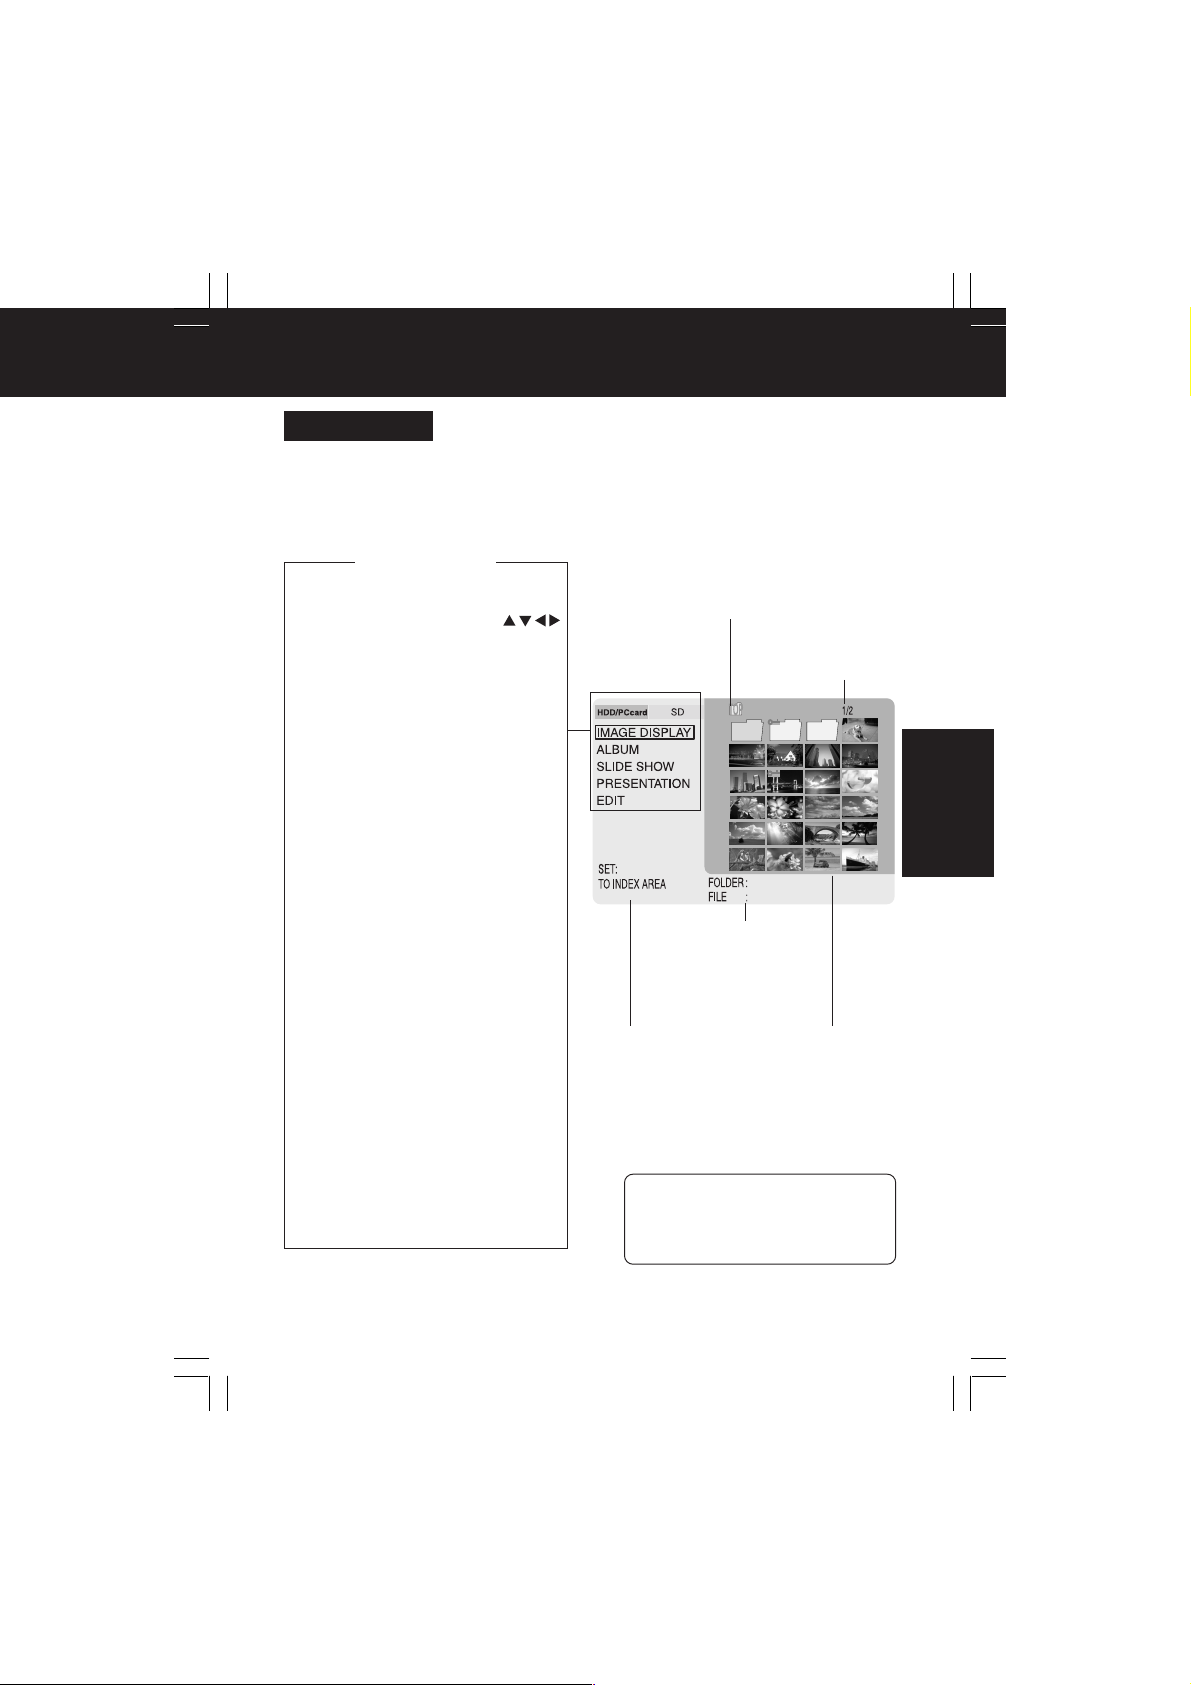
Mode TV (Fonctions du mode TV)
Écran initial
L’écran ci-dessous apparaît lorsqu’une carte est insérée. Si le message “NO CARD”
apparaît, vérifiez si la carte est correctement insérée.
Zone de menu
Sélection de la carte
Choisissez le type de carte, carte HDD/PC
• carte mémoire SD. Appuyez sur
pour sélectionner la carte à afficher, puis
appuyez sur SET.
IMAGE DISPLAY (Affichage de
l’image)
Les fichiers d’images mémorisés sur la
carte sont affichés dans la zone d’index. Ils
peuvent être recherchés par date d’image.
(p. 27) Les images peuvent être affichées
en plein écran, et vous pouvez utiliser le
zoom, tourner les images, ajouter des
effets de couleurs, des informations
d’images, et supprimer des images.
(p. 38 à 41)
ALBUM
Les images de zones d’index peuvent être
affichées sur un écran d’album de 6 ou 9
images. (p. 28)
En outre, lorsqu’une seule image est
sélectionnée, vous pouvez utiliser les
fonctions comme indiqué à la section
IMAGE DISPLAY ci-dessus.
SLIDE SHOW (Diaporama)
Vous pouvez régler des vitesses et des
effets de transition d’écrans pour un
diaporama. (p. 29 à 31)
PRESENTATION (Présentation)
Cette fonction permet d’effectuer des
présentations. (p. 32 et 33.)
En utilisant le logiciel d’ajout JPEG fourni,
les données PowerPoint créées sur un
ordinateur personnel peuvent être
converties en fichiers JPEG et utilisées
pour les présentations. (p. 46 et 47)
EDIT (Édition)
Vous pouvez supprimer, copier et protéger
des fichiers d’images contre l’effacement.
(p. 34 à 37)
Indicateur de hiérarchie des dossiers
• Lorsque des dossiers sont ouverts dans
l’index, le nombre de ces icônes augmentera
pour indiquer le niveau dans la hiérarchie.
Numéro de page
Zone de nom de
dossier/fichier
• Les noms des
fichiers et des
dossiers sélectionnés
sont affichés ici.
Zone de message
• Les invites des
opérations sont
affichées ici.
Zone d’index
• Les dossiers et les
fichiers sont
affichés ici.
– Nota –
• Pour plus de détails concernant les
images, les dossiers et les fichiers qui
peuvent être affichés, référez-vous à la
page 26.
Mode TV
PT1.f24-28.p65 2003/01/14, 12:3825
25
Page 88
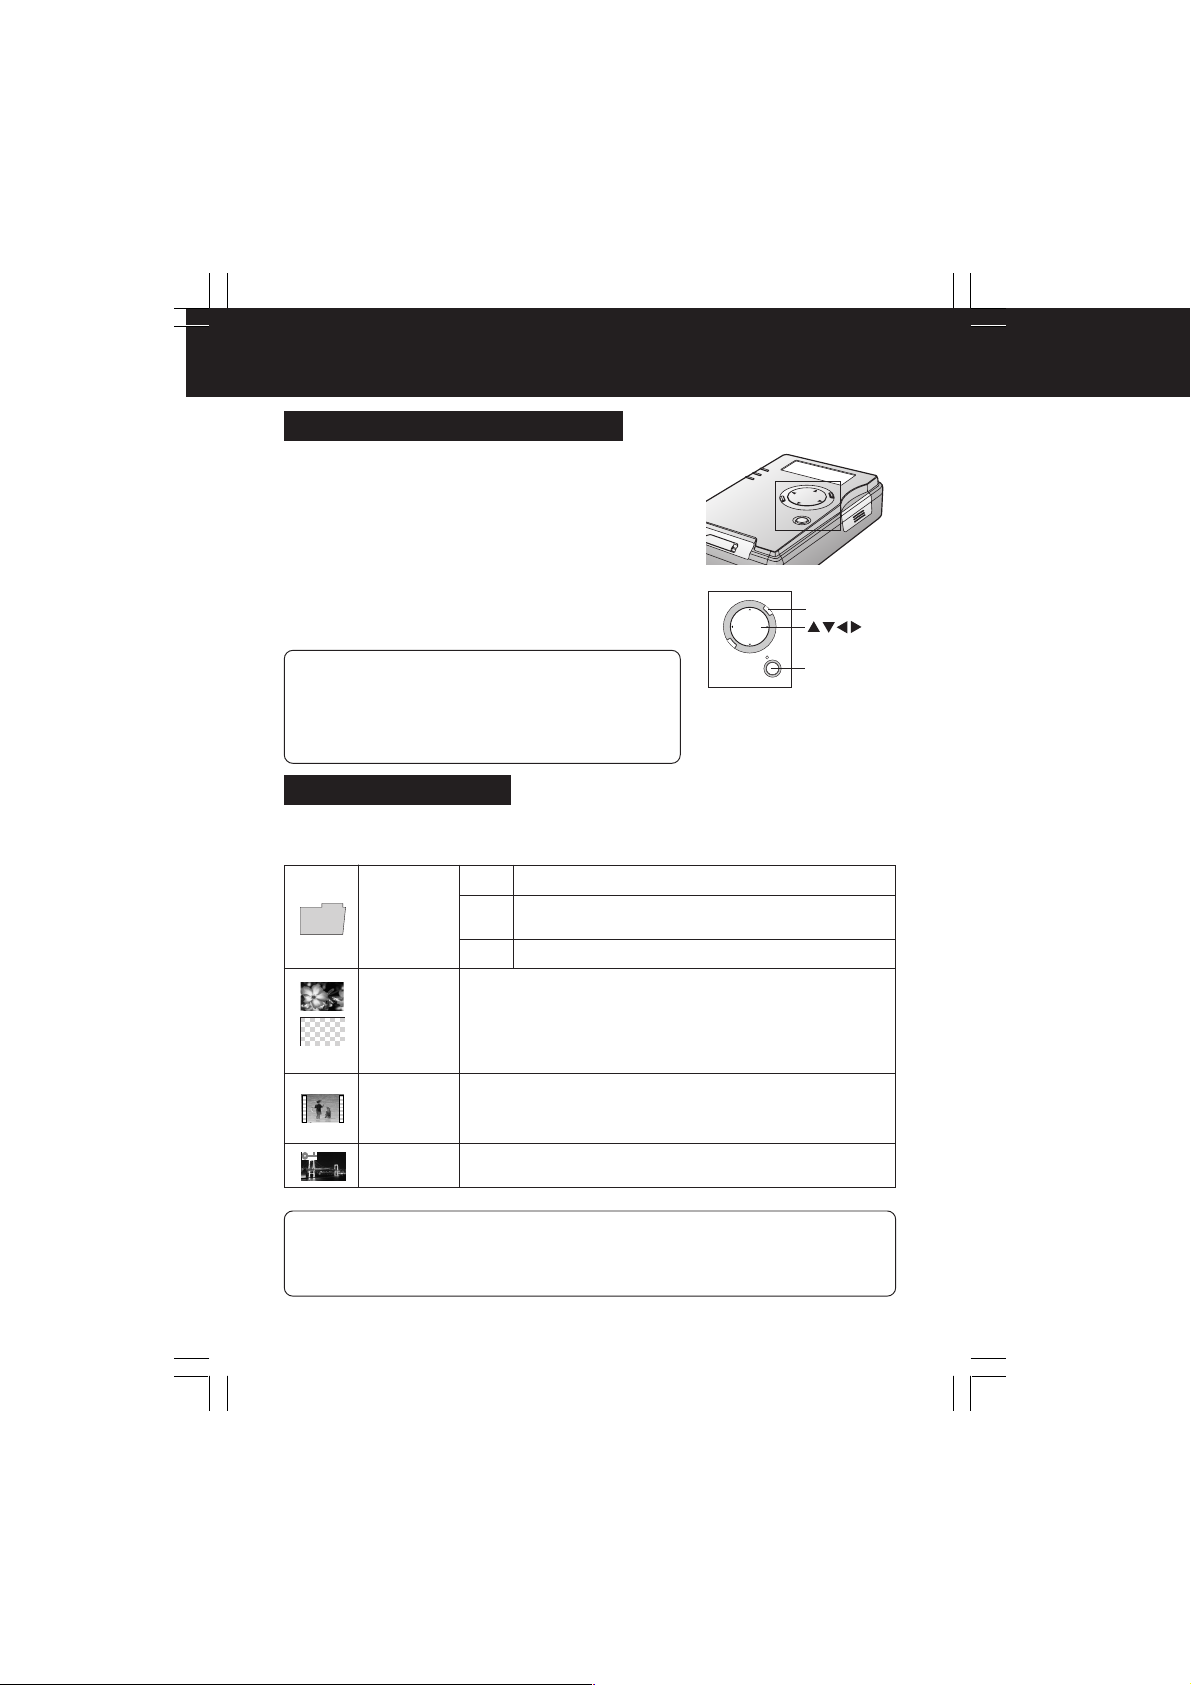
Mode TV (Informations de l’affichage)
Formats d’images affichables
Il est possible d’afficher les images des formats
suivants.
• Formats compatibles avec le format DCF 1.1
• Format JPEG de base Y Cb Cr (format compressé)
(Taux d’échantillonnage 4:4:4, 4:2:0, 4:2:2, 4:1:1)
(80 x 60 ~ 5120 x 3840 pixels)
• Format TIFF RGB (RGB 8 bits non compressé)
(Il faut plus de temps pour afficher ce format
d’image.)
• Première image des fichiers d’images animées JPEG
(format QuickTime) comportant une extension mov.
– Nota –
• Les fichiers JPEG modifiés et mémorisés sur un ordinateur
personnel en format “échelle des gris” ne peuvent pas être
affichés.
• Selon la taille de l’image, il est possible que certaines
parties d’une image ne puissent pas être affichées à une
échelle plus petite.
Dossiers et fichiers
Les dossiers et les fichiers qui sont affichés dans la zone d’index (p. 25) sont décrits
dans le tableau ci-dessous. Pour plus de détails concernant la structure des dossiers,
référez-vous à la page 10.
Bleu
Dossier contenant des images affichables.
Dossier contenant des fichiers de présentation
Rose
(“PRES_***”).
Gris
Dossier ne contenant pas d’images affichables.
Il faut plus de temps pour afficher les fichiers TIFF en plein
écran et en diapositives. Dans certains cas, les icônes
TIFF seulement apparaissent lors de l’affichage d’un index
ou d’un album. Il est possible que certains fichiers ne
soient pas affichés ou qu’ils soient affichés à une échelle
plus petite.
Ces fichiers comportent des images animées ou des
images fixes avec données audio. La première trame
seulement d’une image animée est affichée. Il est
impossible de sauvegarder les images tournées.
Il est impossible de supprimer les dossiers et les fichiers
protégés (p. 36).
TIFF
Dossier
Fichier JPEG
Fichier TIFF
Fichier MOV
Protection
M
E
N
U
MENU
C
A
N
C
E
L
/SET
SET
– Nota –
Les noms de fichiers et de dossiers ne seront pas affichés correctement si...
• plus de huit caractères sont utilisés.
• des espaces et des symboles spéciaux sont utilisés. Faites bien attention lorsque vous
changez un nom de fichier et/ou de dossier.
26
PT1.f24-28.p65 2003/01/14, 12:3826
Page 89
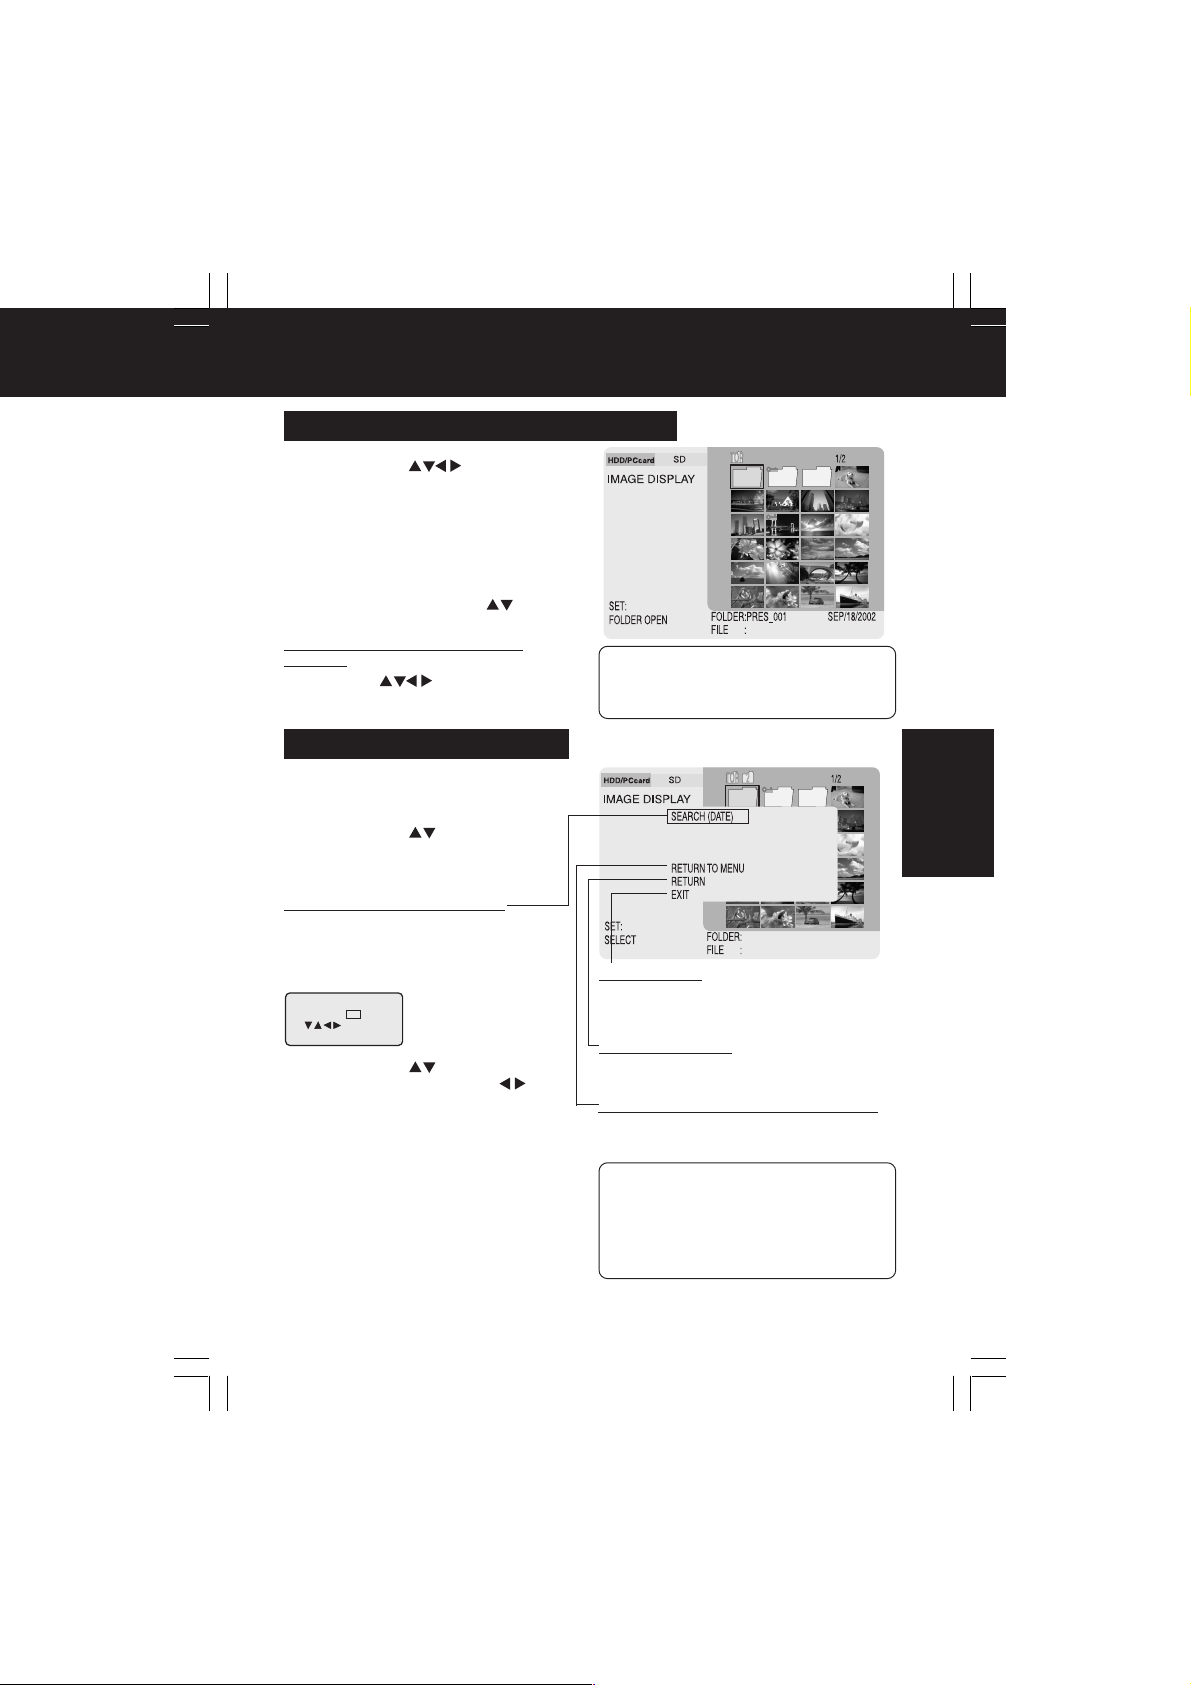
Mode TV (Affichage d’images)
Visualisation d’images dans l’index
1 Appuyez sur pour
sélectionner la carte utilisée, puis
appuyez sur SET.
2 Sélectionnez “IMAGE DISPLAY”,
puis appuyez sur SET.
• La zone d’index est affichée avec le
curseur placé à la première position.
3 Au besoin, appuyez sur pour
faire défiler d’autres pages d’index.
Pour visualiser le contenu d’un
dossier:
Appuyez sur pour placer le
curseur sur un dossier, puis appuyez sur
SET.
Utilisation du sous-menu
1 Placez le curseur sur la zone
d’index et appuyez sur MENU.
2 Appuyez sur pour sélectionner
l’élément (référez-vous à la section
ci-dessous), puis appuyez sur SET.
SEARCH (Recherche) (DATE)
Effectue la recherche parmi les dossiers et
les fichiers de la zone d’index par date. Pour
rechercher des fichiers à l’intérieur des
dossiers, affichez les images contenues dans
le dossier puis commencez la recherche.
SEARCH (DATE)
START DATE JAN / 01 / 2002
: SELECT
[SET] : GO
a Appuyez sur pour sélectionner
l’année, puis appuyez sur pour
placer le curseur sur l’élément
suivant. Répétez les opérations pour
sélectionner le mois et le jour.
– Nota –
• Pour afficher les images en plein écran,
placez le curseur sur un fichier et appuyez
sur SET. (p. 38)
EXIT (Quitter)
Remet l’affichage d’index au premier niveau de
la hiérarchie, et le curseur est placé sur le menu
principal.
RETURN (Retour)
Remet l’affichage au niveau précédent dans la
hiérarchie.
RETURN TO MENU (Retour au menu)
Remet le curseur sur le menu principal.
Mode TV
b Appuyez sur SET.
• Les fichiers créés à la date spécifiée ou
après sont alors recherchés. Les résultats
sont affichés dans l’index dans l’ordre, à
partir du fichier portant la date la plus
ancienne.
• Pour effacer les résultats de la recherche,
sélectionnez “RETURN TO MENU”.
PT1.f24-28.p65 2003/01/14, 12:3827
– Nota –
• Si vous appuyez sur MENU pendant que
le sous-menu est affiché, le sous-menu
disparaît.
• Normalement, les fichiers et les dossiers
sont affichés dans la zone d’index dans
l’ordre, à partir de la date la plus récente.
27
Page 90

Mode TV (Album)
Les images de l’index peuvent être affichées sur un écran de téléviseur par groupes
de 6 ou 9 simultanément, comme dans un album photo.
1 Appuyez sur pour sélectionner
“ALBUM”, puis appuyez sur SET.
• Les images contenues dans la zone d’index
seulement peuvent être affichées comme
album. Les images contenues dans un
dossier doivent d’abord être affichées dans
l’index. (p. 27)
2 Appuyez sur MENU.
• L’écran du menu apparaît alors.
3 Appuyez sur pour sélectionner
“6 IMAGES” ou “9 IMAGES”, puis
appuyez sur SET.
Pour aller à la page suivante ou
précédente:
Appuyez sur pour aller à la page
suivante.
Appuyez sur pour aller à la page
précédente.
Pour retourner à la zone d’index:
a Appuyez sur MENU.
b Appuyez sur et sélectionnez
“RETURN”, puis appuyez sur SET.
• Pour afficher une image en plein écran,
sélectionnez “FILE SELECT” puis placez
le curseur sur l’image et appuyez sur SET.
(p. 38)
(Lorsque “6 IMAGES” est sélectionné)
Sélection de la luminosité du fond
Lorsque vous visualisez les images d’un album, en plein écran (p. 38), ou en
diaporama (p. 29) sur un téléviseur HDTV, la fonction “adaptation à l’écran” (le nom
peut varier) du téléviseur peut être activée en fonction de la luminosité de l’image.
Pour régler la luminosité du fond, procédez comme suit.
1 Sélectionnez l’affichage d’album, puis
appuyez sur MENU.
2 Appuyez sur pour sélectionner
“WALL BRIGHTNESS”, puis appuyez
sur .
3 Appuyez sur pour sélectionner
“GRAY 1”, “GRAY 2” ou “GRAY 3”,
puis appuyez sur SET.
• Si vous utilisez un téléviseur normal,
utilisez le réglage “BLACK”.
28
PT1.f24-28.p65 2003/01/14, 12:3828
Page 91

Mode TV (Diaporama)
Vous pouvez afficher les images sélectionnées comme diaporama avec plusieurs
vitesses et effets de transition.
M
E
N
U
MENU
C
Exécution de diaporama
1 Appuyez sur pour sélectionner
“SLIDE SHOW”, puis appuyez sur
SET.
• Les images contenues dans la zone
d’index seulement sont affichées comme
diaporama. Les images contenues dans
un dossier doivent d’abord être affichées
dans l’index. (p. 27)
2 Appuyez sur MENU.
3 Appuyez sur pour sélectionner
“SLIDE SETUP”.
“SELECT” (p. 30)
“EFFECT” (p. 31)
“SPEED” (p. 31)
4 Appuyez sur pour sélectionner
“START”, puis appuyez sur SET.
• Le diaporama commence alors. Il se
termine après la dernière image.
A
N
C
E
CANCEL
L
/SET
SET
Mode TV
Pour interrompre momentanément le
diaporama:
Appuyez sur SET.
• ( ) s’affiche dans le coin supérieur gauche de
l’écran.
• Appuyez à nouveau sur SET pour continuer le
diaporama.
• Lorsque le nombre de fichiers mémorisés est
grand, un certain temps sera nécessaire pour
passer en mode de pause/arrêt.
– Nota –
• Le sous-menu disparaît si vous appuyez sur MENU pendant que le sous-menu est affiché.
• Si vous sélectionnez “RETURN TO MENU”, le menu principal réapparaît.
Si vous sélectionnez “RETURN”, l’affichage retourne au niveau précédent.
Si vous sélectionnez “EXIT”, l’affichage retourne au premier niveau de la hiérarchie (p. 27).
• Il pourrait être impossible d’afficher certains types de fichiers TIFF lorsqu’un album est affiché.
• Il faudra plus de temps pour afficher des fichiers TIFF pendant les diaporamas.
PT1.f29-33.p65 2003/01/14, 12:3829
Pour arrêter le diaporama:
Appuyez sur CANCEL.
29
Page 92

Mode TV (Réglages de diaporama)
Le réglage SLIDE SETUP vous permet de spécifier quelles images afficher dans un
diaporama. (p. 29)
M
E
N
U
MENU
C
A
N
C
E
L
/SET
SET
Sélection des images
Spécifiez les images de l’index que vous voulez inclure dans le diaporama. Si vous
voulez inclure toutes les images de l’index, il est inutile d’effectuer cette procédure.
1 Effectuez les étapes 1~3 à la page
29. À l’étape 3, appuyez sur pour
sélectionner “SELECT”.
2 Appuyez sur SET.
• Le curseur est alors placé au début de
l’index.
3 Appuyez sur pour
sélectionner une image, puis appuyez
sur SET.
• Pour annuler la sélection, appuyez à
nouveau sur SET.
•“
” apparaît dans le coin inférieur droit
d’une image sélectionnée.
• Répétez l’étape 3 jusqu’à ce que toutes
les images du diaporama aient été
sélectionnées. Les images seront
affichées dans l’ordre sélectionné.
• Les images d’un dossier doivent d’abord
être affichées dans l’index pour pouvoir
effectuer la sélection. (p. 27)
4 Appuyez sur MENU lorsque la
sélection est terminée.
5 Appuyez sur pour sélectionner
“YES”, “CONTINUE” ou “CANCEL”,
puis appuyez sur SET.
YES : Pour quitter la configuration.
CONTINUE : Pour continuer la sélection.
CANCEL : Pour annuler la sélection
d’image.
6 Appuyez sur pour retourner à
“SLIDE SETUP”.
30
PT1.f29-33.p65 2003/01/14, 12:3830
Page 93

Mode TV (Réglages de diaporama)
Réglage des effets de transition d’écran
1 Effectuez les étapes 1~3 à la page
29. À l’étape 3, appuyez sur pour
sélectionner “SELECT”.
2 Appuyez sur pour sélectionner
“EFFECT”, puis appuyez sur SET.
3 Appuyez sur pour choisir l’effet
de transition désiré, puis appuyez sur
SET.
• NORMAL: Les images changent une par
• WIPE : Les images changent de haut
• SPLIT : Les images changent du
• BLIND : Les images changent avec un
4 Appuyez sur pour retourner à
“SLIDE SETUP”.
Réglage de la vitesse de transition d’écran
1 Effectuez les étapes 1~3 à la page
29. À l’étape 3, appuyez sur pour
sélectionner “SELECT”.
2 Appuyez sur pour sélectionner
“SPEED”, puis appuyez sur SET.
3 Appuyez sur pour choisir la
vitesse de transition désirée, puis
appuyez sur SET.
• FAST : Les images changent toutes
• NORMAL: Les images changent toutes
• SLOW : Les images changent toutes
* Si des images à plus grande taille de
fichier sont incluses, l’affichage prendra
plus de temps et donc le temps de
transition pourrait alors être supérieur au
réglage sélectionné.
4 Appuyez sur pour retourner à
“SLIDE SETUP”.
– Nota –
• Le sous-menu disparaît si vous appuyez sur MENU pendant que le sous-menu est affiché.
• Si vous sélectionnez “RETURN TO MENU”, le menu principal réapparaît.
Si vous sélectionnez “RETURN”, l’affichage retourne au niveau précédent.
Si vous sélectionnez “EXIT”, l’affichage retourne au premier niveau de la hiérarchie (p. 27).
• Si vous sélectionnez “RETURN”, ou si vous appuyez sur MENU à partir du menu “EFFECT”
ou “SPEED”, l’affichage retourne au sous-menu précédent.
une.
en bas.
milieu vers chaque côté.
effet de rideau (store).
les 2 secondes.
les 5 secondes.
les 10 secondes.
Mode TV
PT1.f29-33.p65 2003/01/14, 12:3831
31
Page 94

Mode TV (Présentation)
Les données Microsoft PowerPoint créées sur un ordinateur personnel peuvent être
converties en fichiers JPEG à l’aide du logiciel d’ajout JPEG fourni, puis présentées
sur le téléviseur. Pour plus de détails concernant la création de fichiers de
présentation, référez-vous aux pages 46 et 47.
M
E
N
U
MENU
C
A
N
C
E
CANCEL
L
/SET
SET
Exécution d’une présentation
1 Appuyez sur pour sélectionner
“PRESENTATION”, puis appuyez sur
SET.
• Assurez-vous qu’un dossier (rose)
contenant des fichiers de présentation
existe dans l’index.
2 Appuyez sur MENU.
3 Appuyez sur pour sélectionner
“START”, puis appuyez sur SET.
• Les dossiers contenant des fichiers de
présentation seulement seront affichés
dans la zone d’index.
• Pour personnaliser les données de
présentation, appuyez à nouveau sur
MENU, puis sélectionnez “SET
CONTENTS”. (p. 33)
4 Appuyez sur pour
sélectionner un dossier, puis appuyez
sur SET.
• La première diapositive est affichée.
Pour afficher la diapositive suivante:
Appuyez sur .
• Si vous appuyez sur la diapositive
précédente est affichée.
Pour quitter la présentation:
Appuyez sur CANCEL.
– Nota –
• Si vous sélectionnez “RETURN TO MENU”, le menu principal réapparaît.
Si vous sélectionnez “RETURN”, l’affichage retourne au niveau précédent.
Si vous sélectionnez “EXIT”, l’affichage retourne au premier niveau de la hiérarchie (p. 27).
• Les diapositives seront présentées dans l’ordre dans lequel elles ont été sélectionnées. Vous
pouvez vérifier les fichiers de présentation et l’ordre dans l’index. Ces données sont
mémorisées dans l’appareil jusqu’à ce que les sélections soient supprimées . (p. 33)
• Les dossiers intitulés “PRES_***” (les 3 derniers chiffres “***” sont variables) seulement sont
reconnus comme dossiers de présentation. Si vous changez le nom de dossier sur un
ordinateur personnel, changez seulement les 3 derniers chiffres. Sinon, le dossier ne sera pas
reconnu.
32
PT1.f29-33.p65 2003/01/14, 12:3832
Page 95

Mode TV (Présentation)
Sélection du contenu d’une présentation
Vous pouvez sélectionner des diapositives particulières que vous voulez afficher à
partir de l’index. Si vous voulez inclure toutes les images de l’index, il est inutile
d’effectuer cette procédure.
1 Effectuez les étapes 1~3 à la page 32. À
l’étape 3, sélectionnez “SET CONTENTS”,
puis appuyez sur SET.
2 Appuyez sur pour sélectionner un
dossier, puis appuyez sur SET.
• Le contenu du dossier est alors affiché.
3 Appuyez sur pour sélectionner “SLIDE
SELECT”, puis appuyez sur SET.
• Si vous sélectionnez “RETURN”, la diapositive
précédente réapparaît.
4 Appuyez sur pour sélectionner une
diapositive, puis appuyez sur SET.
• Appuyez à nouveau sur SET pour annuler la
sélection.
” apparaît dans le coin inférieur droit d’une
•“
diapositive sélectionnée.
• Répétez l’étape 4 jusqu’à ce que toutes les
diapositives que vous voulez afficher aient été
sélectionnées. La présentation sera effectuée dans
l’ordre dans lequel les diapositives ont été
sélectionnées.
5 Appuyez sur MENU lorsque la sélection
est terminée.
6 Appuyez sur pour sélectionner “YES”,
“CONTINUE” ou “CANCEL”, puis appuyez
sur SET.
• YES : Pour terminer la sélection.
• CONTINUE: Pour continuer la sélection.
• CANCEL : Pour annuler la sélection et
Pour annuler une sélection d’images:
Appuyez sur pour sélectionner
“RELEASE”, puis appuyez sur SET.
• Les images sélectionnées retournent à leur état
d’origine.
Pour prévisualiser le contenu de la
présentation (REHEARSAL):
Appuyez sur pour sélectionner
“REHEARSAL”, puis appuyez sur SET.
• Chaque diapositive apparaît pendant environ
2 secondes.
• Si vous appuyez sur CANCEL, cette opération est
annulée.
• Si vous appuyez sur SET, cette opération est
momentanément interrompue.
• Lorsque le nombre de fichiers sauvegardés est grand,
il faudra plus de temps pour passer en mode de
pause/arrêt.
7 Appuyez sur pour sélectionner
“RETURN”, puis appuyez sur SET.
• Pour continuer la présentation, retournez à
l’étape 3 de la page 32.
retourner au menu.
Mode TV
33
PT1.f29-33.p65 2003/01/14, 12:3833
Page 96

Mode TV (Édition)
Vous pouvez supprimer des images d’une carte, copier des données d’une carte sur
une autre, et protéger des données contre l’effacement accidentel.
M
E
N
U
MENU
C
A
N
C
E
L
/SET
SET
Suppression d’images
(DELETE)
1 Appuyez sur pour sélectionner
“EDIT”, puis appuyez sur SET.
2 Appuyez sur MENU.
• L’écran menu apparaît alors.
3 Appuyez sur pour placer le curseur
vers la droite. Appuyez sur pour
sélectionner “SELECT” ou “ALL”,
puis appuyez sur SET.
• SELECT : Pour sélectionner des images
• ALL : Pour supprimer tous les
• Les images protégées ne peuvent être
supprimées que si la protection est
annulée. (p. 36)
• Pour sélectionner un fichier dans un
dossier, le fichier doit d’abord être affiché
dans l’index. (p. 27)
et des dossiers particuliers à
supprimer.
dossiers/images affichés dans
l’index. Ceux qui ne sont pas
affichés ne sont pas
supprimés.
Pour effectuer une suppression
sélective, procédez comme indiqué
dans la section “Sélection d’images” à
la page 37.
4 Appuyez sur pour sélectionner
“YES”, puis appuyez sur SET.
• Les images sélectionnées seront
supprimées.
• Pour annuler l’opération, sélectionnez
“NO”.
34
PT1.f34-37.p65 2003/01/14, 12:3834
(Exemple: lorsque vous sélectionnez
“SELECT”)
Page 97

Mode TV (Édition)
Copie d’images (COPY)
Copie les données d’une carte sur une autre. Une carte recevant les données
copiées doit être insérée.
1 Appuyez sur pour sélectionner
“EDIT”, puis appuyez sur SET.
2 Appuyez sur MENU.
• L’écran menu apparaît alors.
3 Appuyez sur pour sélectionner
“COPY”, puis appuyez sur pour
déplacer le curseur vers la droite.
4 Appuyez sur pour sélectionner
“SELECT” ou “ALL”, puis appuyez sur
SET.
• SELECT : Pour sélectionner les images
• ALL : Pour copier* tous les dossiers/
* Lorsqu’un dossier est copié, toutes les
données, y compris les fichiers sans
images, sont copiées.
• Pour sélectionner un fichier dans un
dossier, il faut d’abord que le fichier
apparaisse dans l’index. (p. 27)
Pour la copie sélective, procédez
comme indiqué dans la section
“Sélection d’images” à la page 37.
et les dossiers particuliers que
vous voulez copier*.
images affichés dans l’index.
Mode TV
5 Appuyez sur pour sélectionner
“YES”, puis appuyez sur SET.
• Les images sont copiées sur l’autre carte.
• Pour annuler l’opération, sélectionnez
“NO”.
(Exemple: lorsque vous sélectionnez
“SELECT”)
– Nota –
• Le sous-menu disparaît si vous appuyez sur MENU pendant que le sous-menu est affiché.
• Si vous sélectionnez “RETURN TO MENU”, le menu principal réapparaît.
Si vous sélectionnez “RETURN”, l’affichage retourne au niveau précédent.
Si vous sélectionnez “EXIT”, l’affichage retourne au premier niveau de la hiérarchie (p. 27).
• La sélection “ALL” supprime tous les fichiers contenus dans un dossier; veillez donc à vérifier
le contenu du dossier avant de continuer.
• Les dossiers grisés ne contiennent pas de fichiers pouvant être affichés, et ne peuvent pas
être supprimés.
• Les fichiers dont le nom de fichier comporte les mêmes huit premiers caractères que les
fichiers sélectionnés seront aussi copiés ou supprimés.
PT1.f34-37.p65 2003/01/14, 12:3835
35
Page 98
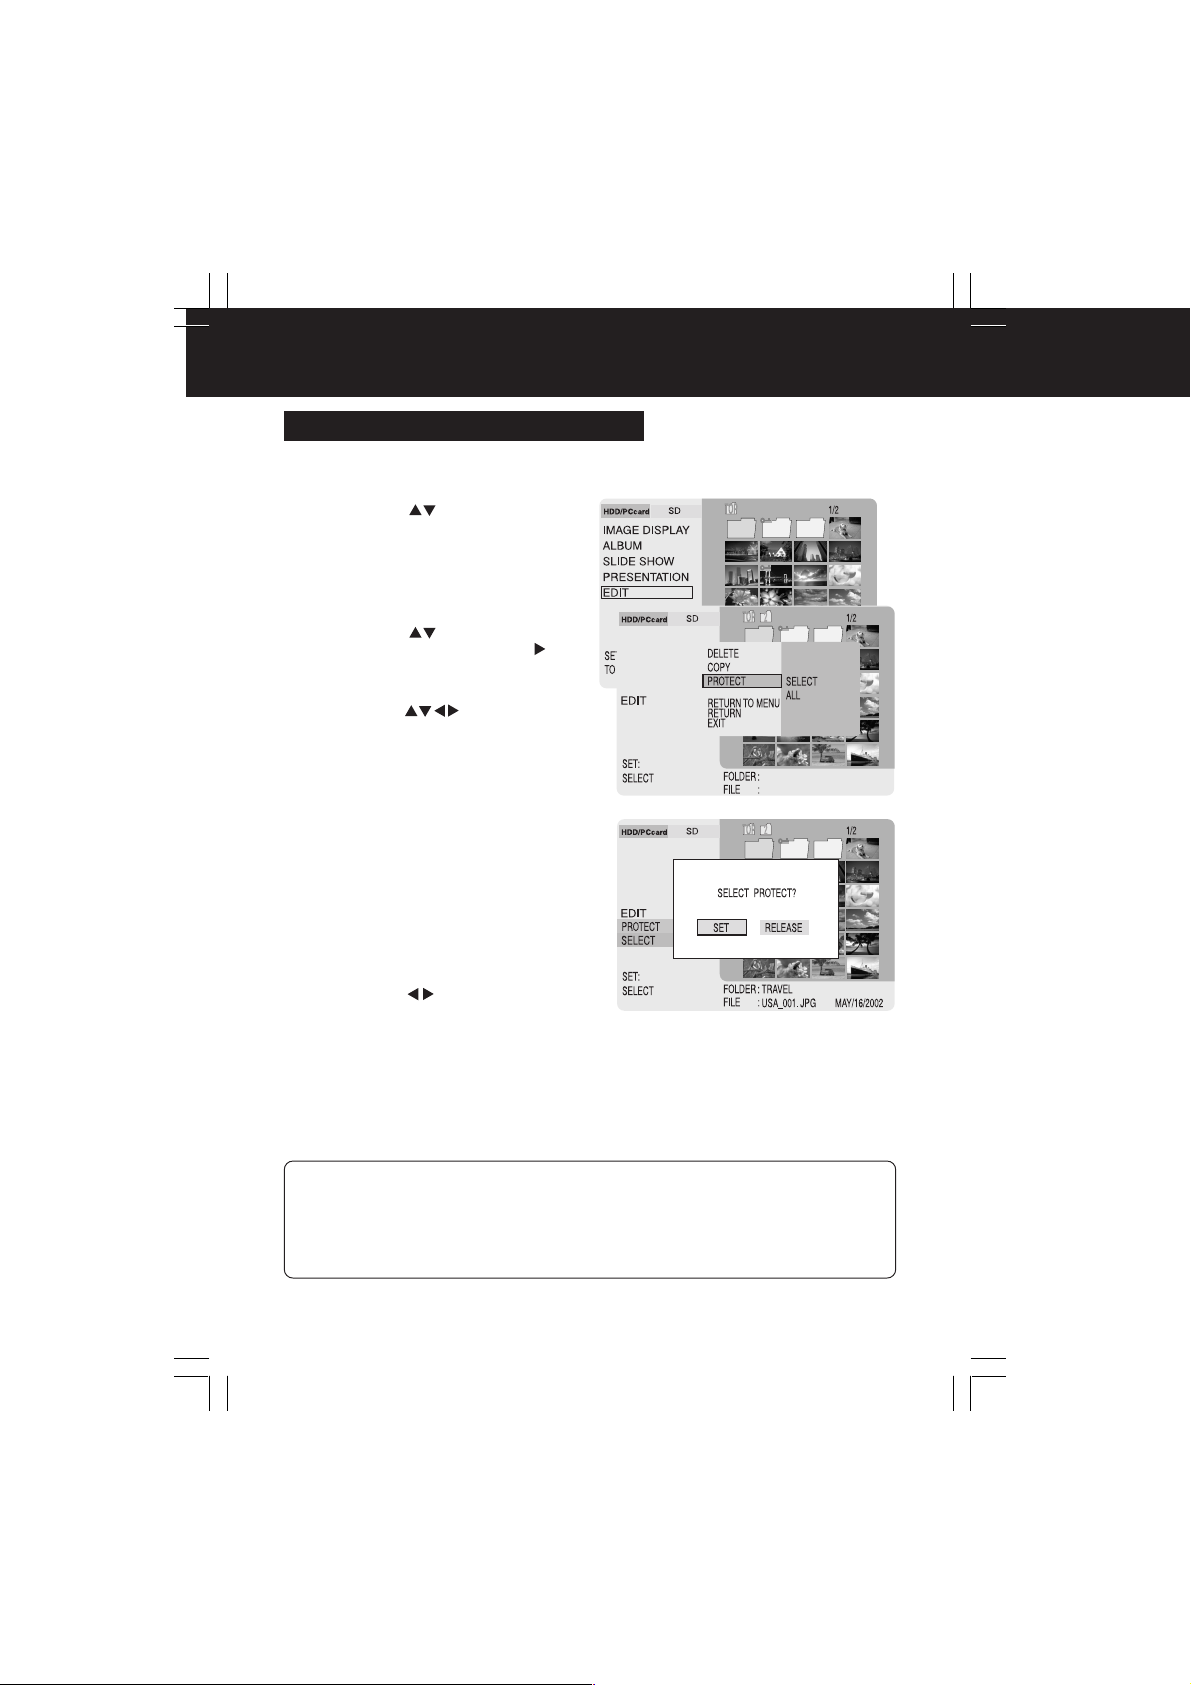
Mode TV (Édition)
Protection d’images (PROTECT)
Les données des fichiers importants peuvent être protégés contre un effacement
accidentel.
1 Appuyez sur pour sélectionner
“EDIT”, puis appuyez sur SET.
2 Appuyez sur MENU.
• L’écran menu apparaît alors.
3 Appuyez sur pour sélectionner
“PROTECT”, puis appuyez sur
pour déplacer le curseur vers la droite.
4 Appuyez sur pour sélectionner
“SELECT” ou “ALL”, puis appuyez sur
SET.
• SELECT : Pour sélectionner les images
• ALL : Pour protéger* tous les
* Lorsqu’un dossier est protégé, toutes ses
données, y compris les fichiers sans
images, sont protégées.
Pour la protection sélective, procédez
comme indiqué dans la section
“Sélection d’images” à la page 37.
et les dossiers particuliers que
vous voulez protéger*.
dossiers/images affichés dans
l’index.
5 Appuyez sur pour sélectionner
“SET”, puis appuyez sur SET.
• L’image ou le dossier sera protégé.
• Une icône en forme de clé apparaît dans
le coin supérieur gauche de l’image.
• Pour annuler la protection d’une image,
sélectionnez “RELEASE”.
– Nota –
• Le sous-menu disparaît si vous appuyez sur MENU pendant que le sous-menu est affiché.
• Si vous sélectionnez “RETURN TO MENU”, le menu principal réapparaît.
Si vous sélectionnez “RETURN”, l’affichage retourne au niveau précédent.
Si vous sélectionnez “EXIT”, l’affichage retourne au premier niveau de la hiérarchie (p. 27).
• Les fichiers dont le nom de fichier comporte les mêmes huit premiers caractères que les
fichiers sélectionnés seront aussi protégés.
36
PT1.f34-37.p65 2003/01/14, 12:3836
Page 99

Mode TV (Édition)
M
E
N
U
MENU
C
A
N
C
E
L
/SET
SET
Sélection d’images
Sélectionnez les fichiers d’images pour les fonctions DELETE, COPY, et
PROTECT. Les écrans donnés en exemples ci-dessous montrent comment
supprimer une image.
1 Appuyez sur pour
sélectionner une image, puis appuyez
sur SET.
• Si vous appuyez à nouveau sur SET, la
sélection est annulée.
•“
” apparaît dans le coin inférieur droit de
l’image sélectionnée.
• Répétez l’étape 1 jusqu’à ce que toutes
les images désirées soient sélectionnées.
2 Appuyez sur MENU lorsque la
sélection des images est terminée.
• Si vous appuyez à nouveau sur MENU,
l’opération de sélection continue.
Mode TV
3 Appuyez sur pour sélectionner
“YES”, “CONTINUE” ou “CANCEL”,
puis appuyez sur SET.
• YES : Pour terminer la sélection.
• CONTINUE : Pour continuer la sélection.
• CANCEL : Pour annuler la sélection et
PT1.f34-37.p65 2003/01/14, 12:3837
retourner au menu.
37
Page 100

Mode TV (Lecture plein écran)
Pendant que l’index ou qu’un album est affiché, si vous sélectionnez une image,
celle-ci sera affichée en plein écran. Vous pouvez aussi utiliser le zoom, tourner
l’image, ajouter des effets de couleurs, afficher des informations d’images, et
supprimer l’image.
M
E
N
U
MENU
C
A
N
C
E
L
/SET
SET
Sélection d’images
Affichage d’une image (de l’index)
1 Affichez l’index. (p. 27)
2 Appuyez sur pour
sélectionner un fichier, puis appuyez
sur SET.
• L’image est affichée en plein écran.
Pour afficher l’image suivante:
Appuyez sur pour afficher l’image
suivante de l’index actuel.
• Appuyez sur pour afficher l’image
précédente.
Affichage d’une image (d’un album)
1 Affichez un album. (p. 28)
2 Appuyez sur MENU.
3 Appuyez sur pour sélectionner
“FILE SELECT”, puis appuyez sur
SET.
Pour afficher l’image suivante:
Appuyez sur pour afficher l’image
suivante de l’album actuel.
• Appuyez sur pour afficher l’image
précédente.
38
PT1.f38-41.p65 2003/01/14, 12:3838
 Loading...