

Page 1
USA/CAN
Table of Contents
IMPORTANT
SAFEGUARDS
Safety Precautions
Parts identification
Control panel
•
Entire unit
•
................................. 6
................................... 6
Preparations
Functions
Quick Cook/Steam
•
White Rice • Keep Warm
•
Brown Rice
•
Porridge/Soup
•
Recipes
................................... 8
.................................. 10
........................... 12~13
Cleaning and
maintenance
Troubleshooting
Specifications
................. 6
............................. 7
........................ 8
............................. 11
......................... 14
................. 15
...................... 15
Cuiseur de riz électronique
español y coreano página 42~53,Índice en la página 41
스페인의 과 한국의 54~65페이지,P41의 목차
Table des matières
......................... 3............................. 2
..... 16~17
.......... 18
.................... 18
....... 18
............................... 19
............................... 20
.............. 20
Maintien au chaud
•
....................................... 22
............................ 23
......................... 24~25
................................... 26
......... 21
............ 27
....... 27
Avant l’utilisation
Utilisation
Problèmes de fonctionnement
4~5
.....
.............. 9
PRÉCAUTIONS
À PRENDRE
Before use Usage In Trouble
Consignes de sécurité
Identification des pièces
Panneau de commande
•
Vue d’ensemble de l’appareil
•
Préparatifs
Fonctions
Cuisson rapide/À la vapeur
•
Riz blanc
•
Riz brun
•
Porridge/Soupe
•
Recettes
Nettoyage et
entretien
Guide de dépannage
Caractéristiques techniques
Operating Instructions
Electronic Rice Cooker
Household Use Only
Mode d’emploi
Utilisation domestique
使用說明書
微型電腦飯煲 家庭用
Model No. 1.0L
N° de modèle
型號
安全注意事項
零件名稱
操作面板
•
本體
.............................................. 30
•
準備工作
.............................................. 32
功能
快速/蒸餸
•
白米 • 保溫
•
.............................................. 34
糙米
•
•
菜譜
.......................................... 35
稀飯/湯
..................................... 36~37
清潔保養
故障排除
規格
............................................. 39
SR-DF101
1.8L
SR-DF181
目錄
................ 28~29
.................................... 30
....................................... 30
.................................... 31
...................................... 32
.................................... 33
................................... 38
................................... 39
使用之前 用途 困惑時
Thank you for purchasing the Panasonic product.
• This product is intended for household use only.
• Please read these instructions carefully and follow safety precautions when using this product.
• Before using this product please give your special attention to “Safety Precautions” (Page 4~5).
• Please make sure the date and name of store of purchase are stamped and keep it with this Operating Instructions.
Save these documents
Merci d’avoir acheté ce produit Panasonic.
• Ce produit est conçu uniquement pour une utilisation domestique.
• Veuillez lire ces instructions attentivement et suivre les consignes de sécurité lors de l’utilisation de ce produit.
• Avant d’utiliser ce produit, Veuillez porter une attention particulière aux « Consignes de sécurité » (Pages 16~17).
• Assurez-vous que la date d’achat et le nom du magasin où vous avez acheté le produit sont indiqués et conservez ces
informations avec le mode d’emploi.
Conservez le mode d’emploi pour une utilisation ultérieure
感謝您購買Panasonic產品。
• 本產品只適合家庭用。
使用本產品時,請仔細閱讀本使用說明書並遵循安全注意事項。
•
•
使用本產品前,請特別留意「安全注意事項」(第28~29頁)。
請確認保修證已蓋好購買日期和購買店名戳章,並與本使用說明書放在一起。
•
保留備用
Page 2

IMPORTANT SAFEGUARDS
When using electrical appliances, basic safety precautions should always be followed
including the following:
1. Read all instructions.
2. Do not touch hot surfaces. Use handles or knobs.
3. To protect against electrical shock do not immerse cord, plugs, or Rice Cooker
except the pan in water or other liquid.
4. Close supervision is necessary when any appliance is used by or near children.
5. Remove plug from outlet when the appliance is not in use, before putting on or taking off
parts, and before cleaning. Allow to cool before handling.
6. Do not operate any appliance with a damaged cord or plug or after the appliance
malfunctions or has been damaged in any manner. Return appliance to the nearest
authorized service facility for examination, repair, or adjustment.
7. The use of accessory attachments not recommended by the appliance manufacturer may
cause injuries.
8. Do not use outdoors.
9. Do not let cord hang over edge of table or counter, or touch hot surfaces.
10. Do not place on or near a hot gas or electric burner, or in a heated oven.
11. Extreme caution must be used when moving an appliance containing hot oil or other hot
liquids.
12. Always attach plug to appliance before plugging cord into wall outlet.
To disconnect, turn the control to “off” , then remove plug from wall outlet.
13. Do not use appliance for other than intended use.
14. This product is intended for household use.
15. SAVE THESE INSTRUCTIONS.
NOTE
a) A short power-supply cord (or detachable power-supply cord) is to be provided to reduce
the risk resulting from becoming entangled in or tripping over a longer cord.
b) Longer detachable power-supply cords or extension cords are available and may be
used if care is exercised in their use.
c) If a longer detachable power-supply cord or extension cord is used,
1) The marked electrical rating of the cord set or extension cord should be at least as
great as the electrical rating of the appliance, and
2) The cord should be arranged so that it will not drape over the countertop or tabletop
where it can be pulled on by children or tripped over unintentionally.
This appliance has a polarized plug (one blade is wider than the other). To reduce the risk of
electric shock, this plug is intended to fit into a polarized outlet only one way. If the plug does
not fit fully into the outlet, reverse the plug. If it still does not fit, contact a qualified
electrician. Do not attempt to modify the plug in any way.
2
Page 3

PRÉCAUTIONS À PRENDRE
Lors de l’utilisation de tout appareil électrique, il est toujours recommandé de prendre
certaines précautions, dont les suivantes :
1. Lire toutes les instructions.
2. Éviter de toucher aux surfaces chaudes. Toujours utiliser les poignées ou les anses.
3. Afin de prévenir tout risque de choc électrique, ne pas immerger les cordons, les fiches
ou l’appareil dans l’eau ou tout autre liquide, à l’exception du panier et du couvercle
intérieur amovible.
4. Ne jamais laisser des enfants utiliser l’appareil sans surveillance.
5. Après usage et avant le nettoyage, toujours débrancher l’appareil. Laisser refroidir avant
de retirer des pièces ou de les remettre en place.
6. Ne jamais utiliser l’appareil si sa fiche ou son cordon est endommagé ou après avoir
constaté une défectuosité ou des dommages. Le cas échéant ce câble doit être remplacé
par le fabricant, son service après-vente ou une personne de qualification similaire afin
d’éviter tout danger!
7. L’utilisation d’accessoires non recommandés par le fabricant peut représenter un risque
de dommages.
8. Ne pas utiliser l’appareil à l’extérieur.
9. Ne pas laisser le cordon pendre d’une table ou d’un comptoir, ni le mettre en contact
avec une surface chaude.
10. Ne pas placer l’appareil sur le dessus ou à proximité d’un appareil de chauffage, ni dans
un four chaud.
11. S’assurer d’être extrêmement prudent lors du déplacement d’un appareil contenant de
l’huile chaude ou tout autre liquide chaud.
12. Toujours brancher le cordon d’alimentation à l’appareil avant d’en brancher la fiche dans
une prise secteur. Avant de débrancher, couper le contact, puis retirer la fiche de la prise
secteur.
13. N’utiliser l’appareil qu’aux fins recommandées.
14. Cet appareil a été conçu pour un usage domestique.
15. CONSERVER CE MANUEL
NOTA
a) Le cordon d’alimentation fourni est court (ou détachable) de manière à prévenir les
risques d’emmêlement et d’accidents.
b) Des rallonges ou des cordons plus longs sont disponibles. lls doivent être utilisés avec
prudence.
c) Si une rallonge ou un cordon long est utilisé:
1) La quissance électrique du cordon ou de la rallonge devrait être au moins aussi
élevée que celle de l’appareil.
2) Le cordon ou la rallonge ne devrait pas pendre du comptoir ou de la table afin
d’éviter que des enfants tirent dessus ou trébuchent.
Cet appareil est muni d’une fiche polarisée (fiche avec une lame plus large que l’autre).
Par mesure de sécurité, cette prise ne peut être insérée que dans un sens dans une prise
polarisée. Si la fiche ne peut être insérée dans la prise, en inverser le sens. Si la fiche ne
peut toujours être insérée, communiquer avec un électricien pour remplacer la prise de
courant. Ne pas tenter de contourner cette mesure de sécurité.
3
Page 4
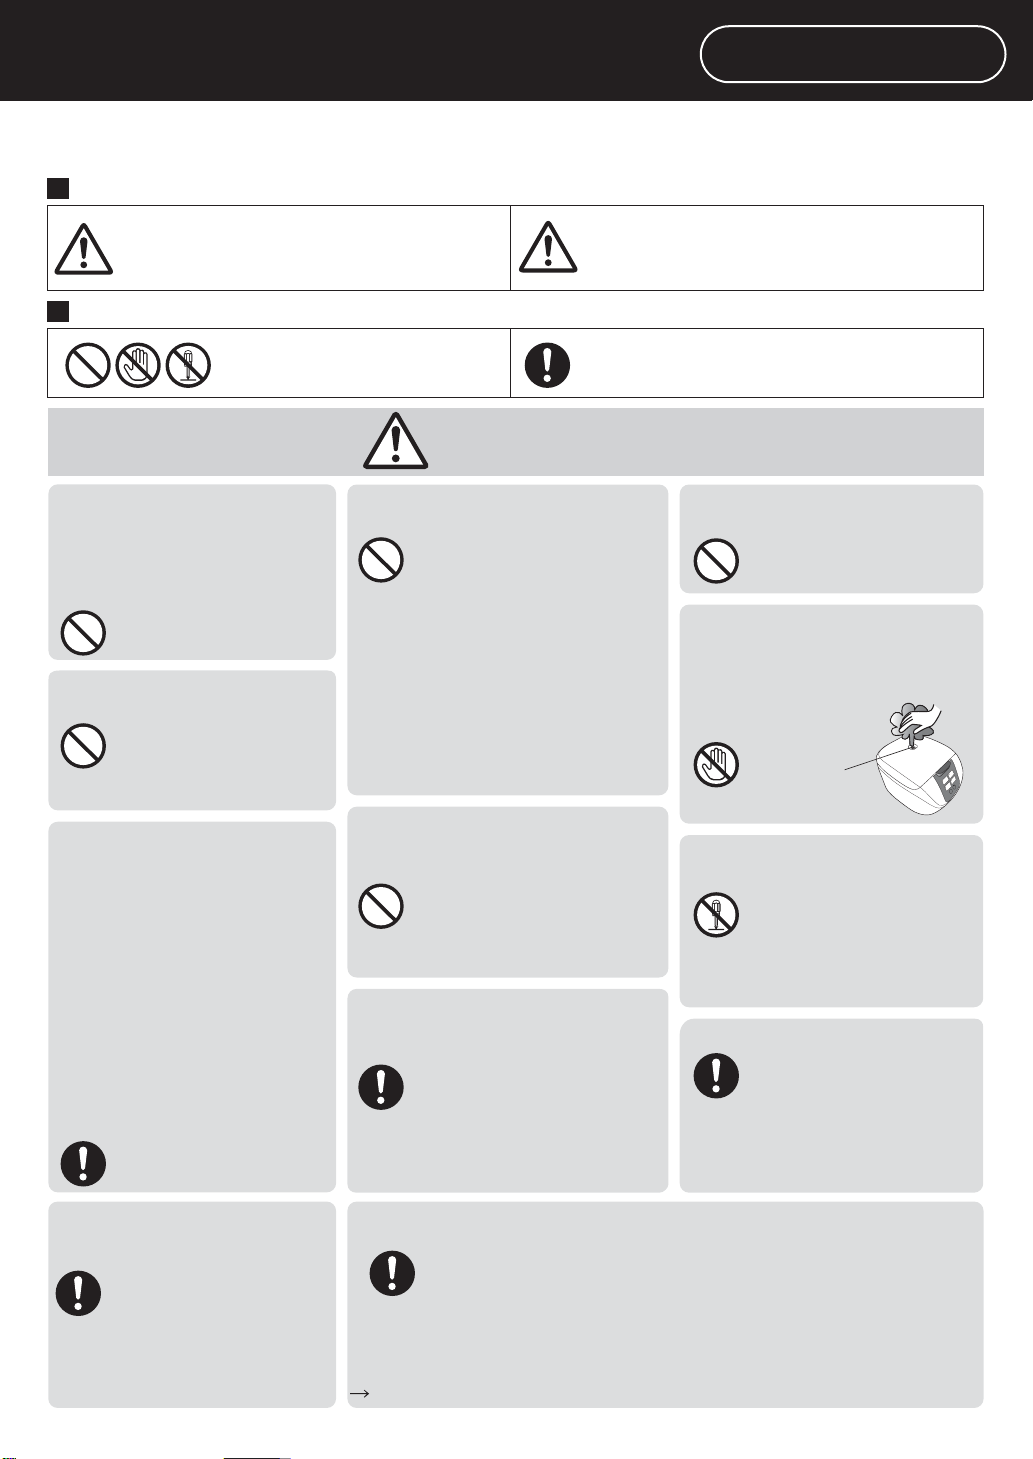
Safety Precautions
Must be followed!
In order to prevent accidents or injuries to the users, other people, and damage to
property, please follow the instructions below.
The following charts indicate the degree of damage caused by wrong operation.
Indicates hazard that may
cause personal injury or
property damage.
Warning:
Indicates hazard that
may cause death or
severe injury.
Caution:
The symbols are classified and explained as follows.
These symbols indicate
prohibition.
Do not use the appliance
■
if the power cord or
power plug is damaged
or the power plug is
loosely connected to the
power outlet.
(It may cause an electric
shock, short circuit or fire.)
Do not insert any objects
■
in the vent or gap.
Especially metal objects
such as pins or wires.
(It may cause an electric
shock or malfunction.)
This appliance is not
■
intended for use by
persons (including
children) with reduced
physical, sensory or
mental capabilities, or lack
of experience and knowledge, unless they have
been given supervision or
instruction concerning use
of the appliance by a
person responsible for
their safety. Children
should be supervised to
ensure that they do not
play with the appliance.
(It may cause burn or injury.)
This symbol indicates requirement
that must be followed.
Warning
Do not damage the power
■
cord or power plug.
Following actions are strictly
prohibited.
Modifying, placing near heating
elements, bending, twisting, pulling,
putting heavy objects on top, and
bundling the cord. (It may cause an
electric shock, short circuit or fire.)
• If the supply cord is damaged, it
must be replaced by the
manufacturer, its service agent or
similarly qualified persons in order
to avoid a hazard.
Do not immerse the
■
appliance in water or
splash it with water.
(It may cause a short
circuit or electric shock.)
•
Please enquire with an authorised
dealer if water gets inside the appliance.
■
Use only a power outlet rated
at a minimum of 10 amperes
and alternating electric
current at 120 volts.
(Plugging other devices
into the same outlet may
cause electric overheating,
which may cause a fire.)
• Use only an extended cord rated
at 10 amperes minimum.
Do not plug or unplug the
■
power plug with wet hands.
(It may cause an electric
shock.)
Do not get your face close
■
to the steam vent or touch
it with your hand. Keep the
steam vent out of reach of
small children.
Steam vent
(It may cause a burn.)
Do not modify, disassemble,
■
or repair this appliance.
(It may cause a fire,
electric shock or injury.)
• Please make enquiries at the
store or the repair department
of an authorised dealer.
Insert the power plug firmly.
■
(Otherwise it may cause an
electric shock and fire caused
by the heat that may generate
around the power
• Do not use a broken power plug
or a loose power outlet.
plug.)
Clean the power plug
■
regularly.
(A soiled power plug may
cause insufficient insulation
due to the moisture, and
may cause a fire.)
• Unplug the power plug, and
wipe it with a dry cloth.
4
Discontinue using the appliance immediately and unplug the power
■
connector in cases of abnormal situations or breaking
(It may cause smoking, a fire, or electric shock.)
The power plug and the power cord become abnormally hot.
•
•
(e.g. for abnormal
situations or
breaking down)
Please make enquiries at Panasonic authorized service center for inspection and repair immediately.
The power cord is damaged or power failure occurs when is touched.
• The main body is deformed or abnormally hot.
• The unit gives out smoke or scorching smell.
• There are cracks, looseness or wobbles of the appliance.
• The heating plate is warped or the pan is deformed.
down.
Page 5
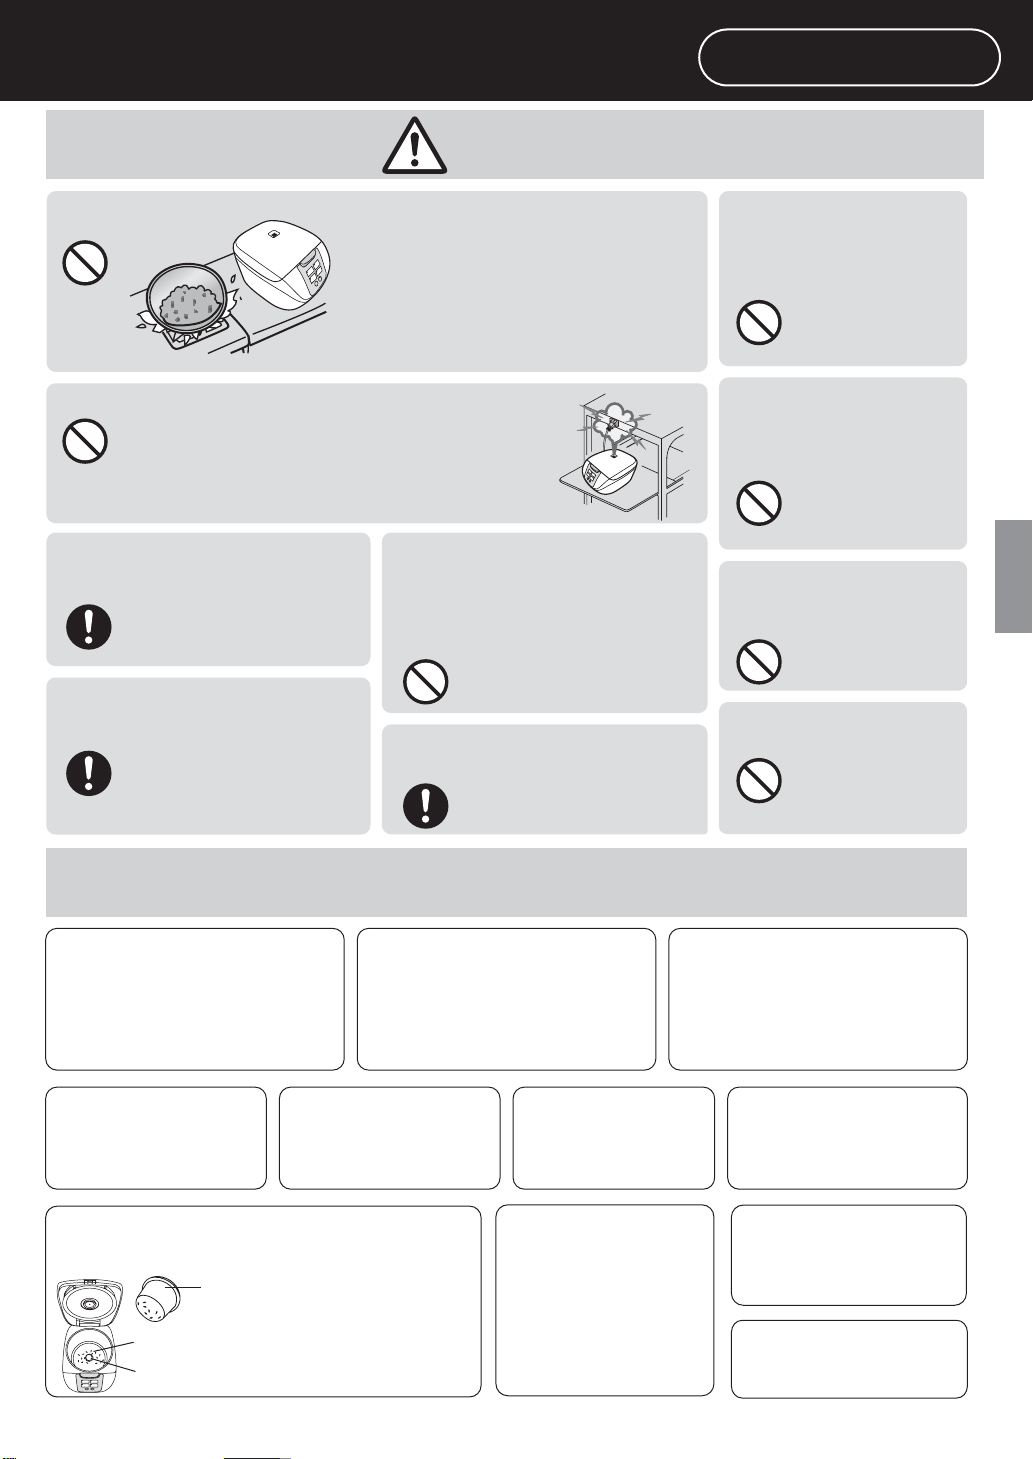
Safety Precautions
Caution
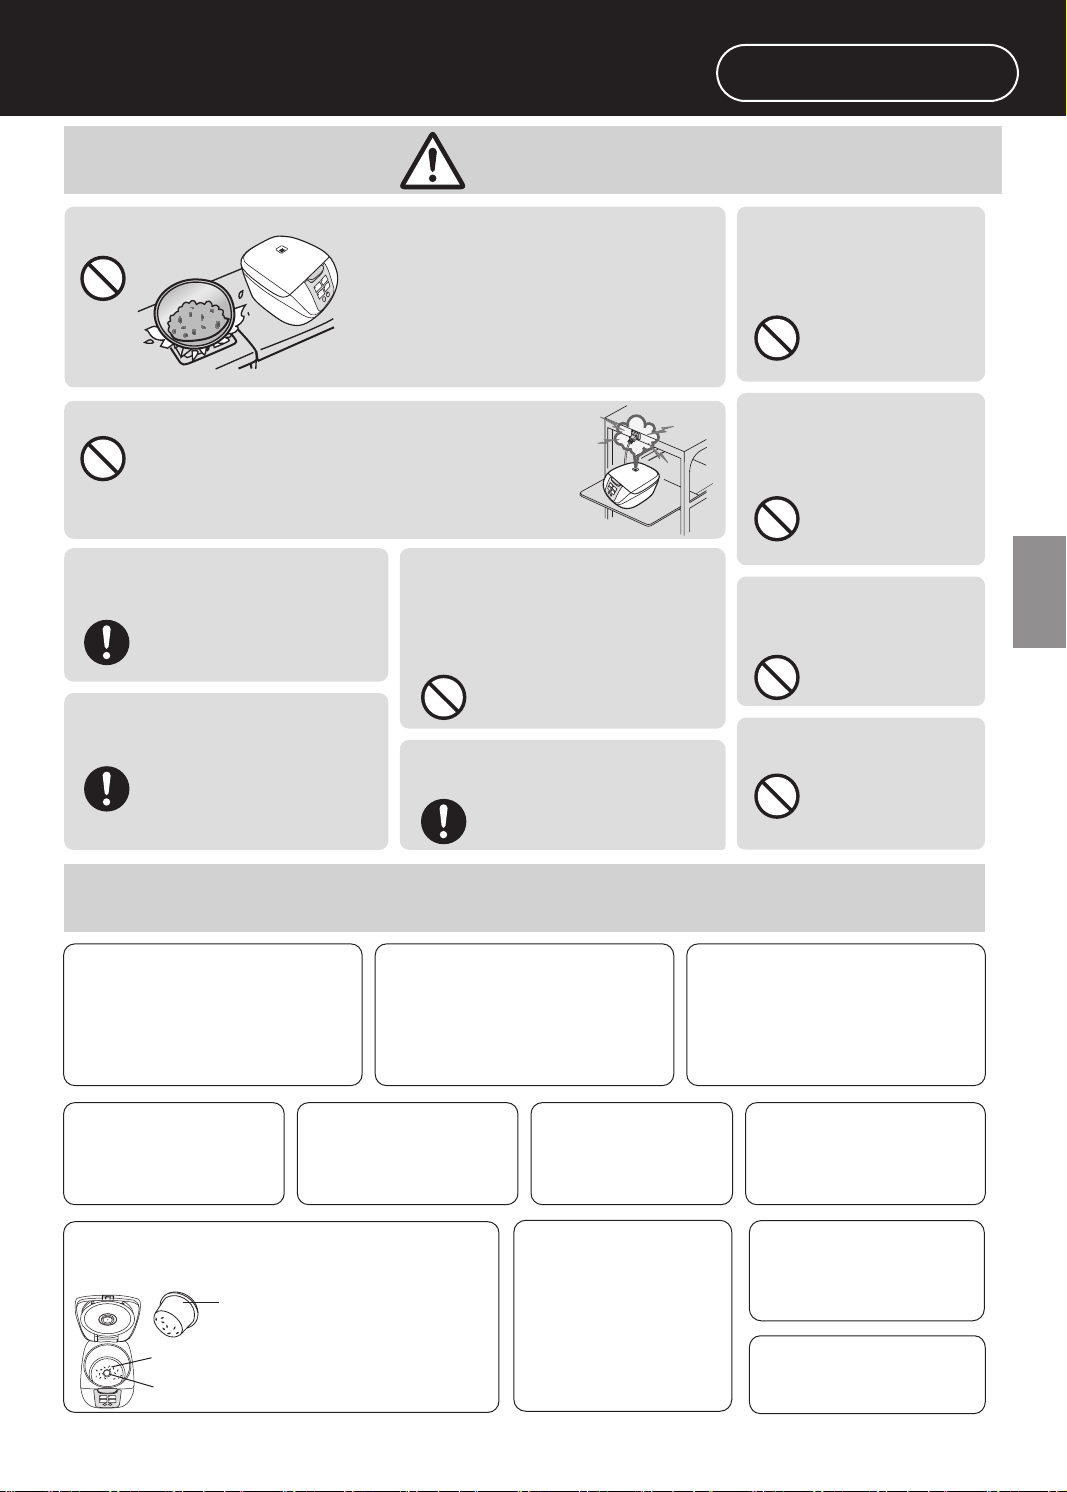
Do not use the appliance on following places.
■
• The place where it may be splashed with
water or near a heat source. (It may cause
an electric shock,electric leak or fire.)
• The place with an uneven surface or on non
-heat-resistant carpet. (It may cause a burn,
injury or fire.)
• Near a wall or furniture. (It may cause
discoloration or deformation.)
Do not expose the power plug to steam.
■
• Do not expose the power plug to steam when it
is plugged in. (It may cause a short circuit or fire.)
When using a cabinet with sliding table, use the
appliance where the power plug cannot be
exposed to steam.
Be sure to hold the power
■
plug when unplugging the
power plug.
(Otherwise it may cause an
electric shock, short circuit,
resulting in fire.)
Unplug the power plug from
■
the power outlet when the
appliance is not in use.
(Otherwise it may cause an
electric shock and fire caused
by a short circuit due to the
insulation deterioration.)
Do not use the cord set (for
■
instrument plug and power
plug) that is not specified for
use with this appliance. Also
do not transfer them.
(It may cause an electric
shock,electric leak or fire.)
Please allow the appliance to
■
cool down before cleaning it.
(Touching hot elements may
cause a burn.)
Must be followed!
Do not touch heating
■
elements while the
appliance is in use
or after cooking.
Especially the
heating plate (It may
cause a burn.)
Do not touch the
■
hook button while
moving the
appliance.
(It may cause the
outer lid to open,
resulting in a burn.)
Do not open the
■
outer lid while
cooking.
(It may cause a
burn.)
Do not use other pans
■
than the one specified.
(It may cause a
burn and injury due
to overheat or
malfunction.)
Before use
Precautions for Use
Please put in correct amount
of rice and water and select
functions correctly according
to the operating instructions.
(So as to avoid overflow of rice water,
half-cooked rice or scorched rice.)
Before using the appliance, remove
the protective bag on the pan and
the anti-tarnish paper between the
pan and the cast heater.
(So as to avoid poor cooking or fire.)
Please always clean the foreign objects such as rice
on the pan, cast heater and temperature sensor.
Pan
Cast heater
Temperature sensor
Do not cover the outer lid
with cloth or other objects
when the appliance is in use.
(So as to avoid deformation, color
change of the outer lid or failure.)
●
Do not tilt or overturn
the appliance.
●
Before cleaning, turn
off the power switch
and pull out the power
plug.
Do not put ingredients to be
cooked directly into the
appliance in which no pan is
placed.
(So as to prevent any impurities from
causing failure.)
Avoid using the
appliance under
direct sunlight.
(So as to avoid color change.)
When there is any overflow
of rice water from the steam
vent, pull out the power plug
immediately to disconnect
the power supply. Do not
resume the use until the rice
water on the power plug and
the instrument plug is
cleaned with a dry cloth.
Do not use the appliance on
any heat sensitive object such
as carpet, electric heating
carpet and tablecloth (made
of vinyl plastics), etc.
(So as to avoid poor cooking or fire.)
Do not serve out rice
with any metal object.
(So as to avoid scratching the
pan coating and causing peeling
of the coating.)
The appliance is for household use
only. Do not use it for any
commercial or industrial purposes
or any purposes other than cooking.
When power failure occurs during
the operation of the appliance, the
cooking result may be affected.
5
Page 6
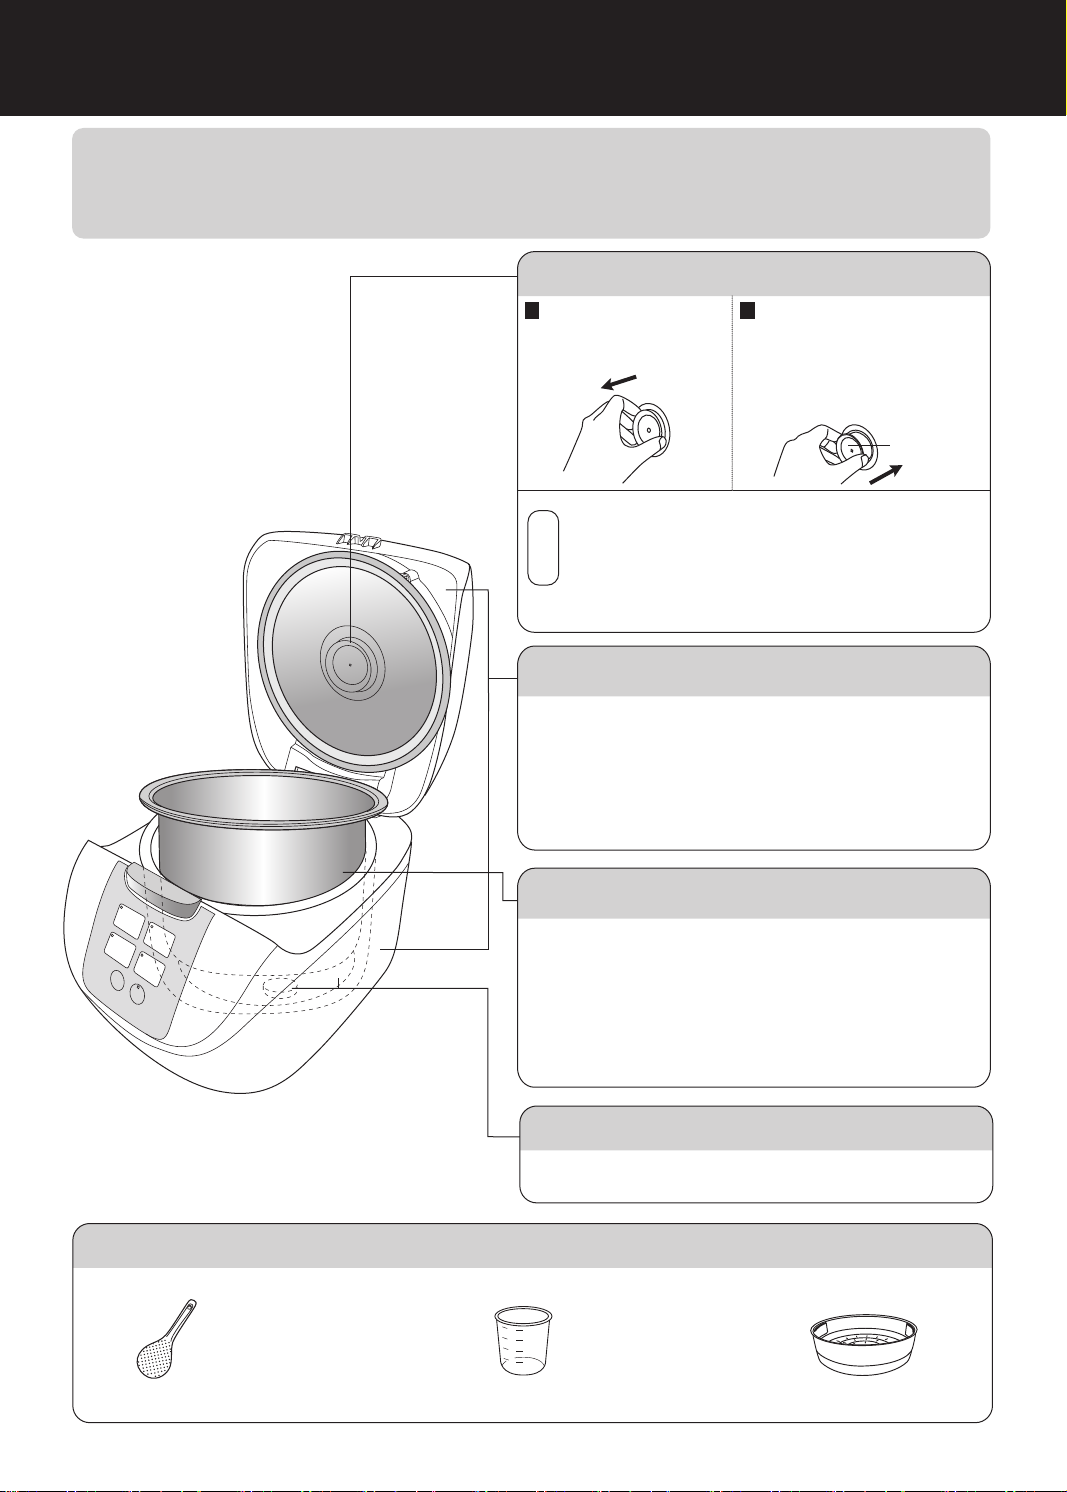
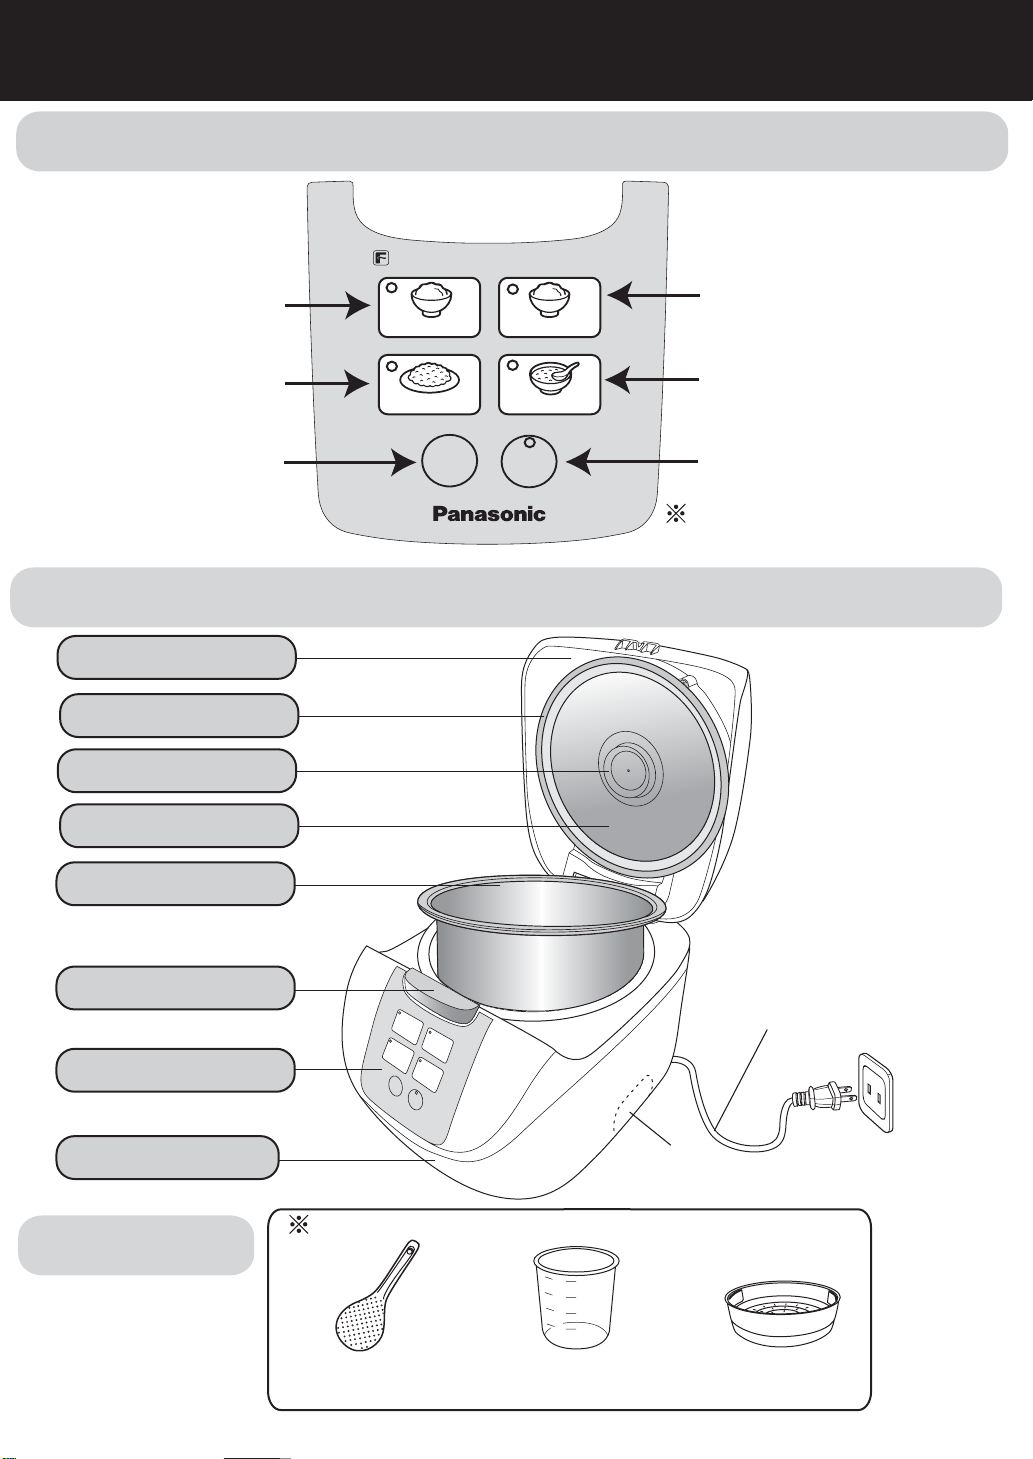
Parts identification
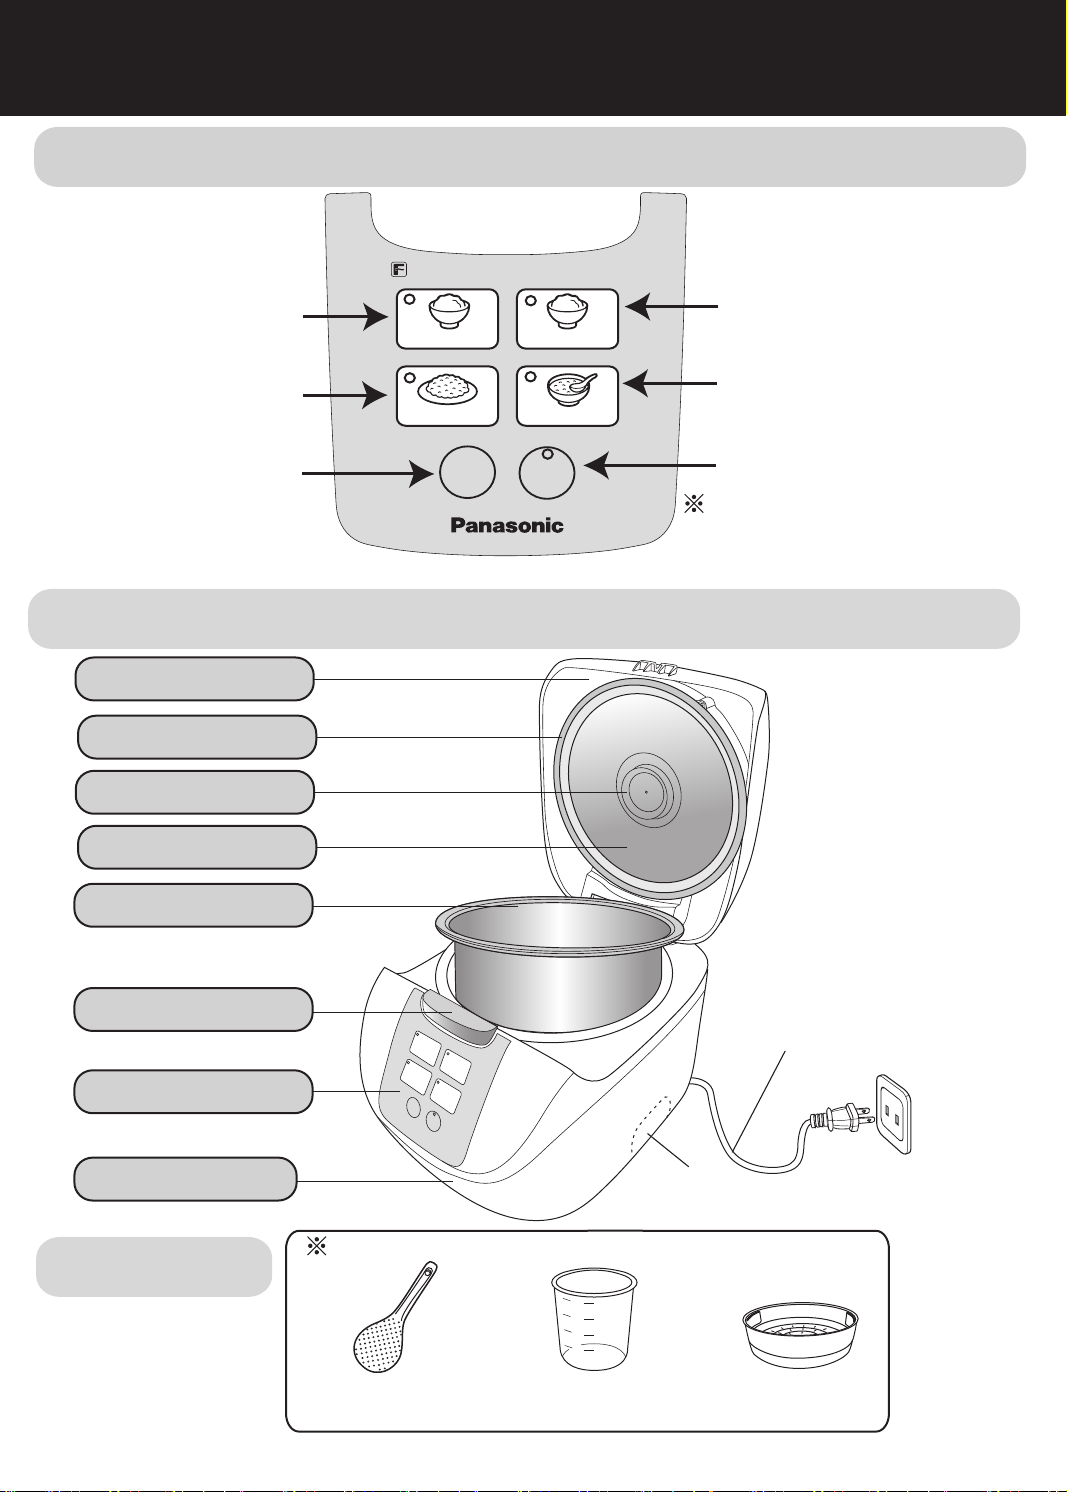
Control panel
FUZZY MICROCOMPUTER
Press this button for
quick cooking or steam
cooking.
Press this button for
cooking of brown rice.
Quick Cook/Steam
Brown Rice
White Rice
Porridge/Soup
Press this button for
cooking of white rice.
Press this button for
cooking of porridge
or soup.
Press this button to
cancel the previous
operation or stop keep
warm function.
Outer lid
Pan seal ring
Moisturizing cap
Heating plate
Pan
Hook button
Off
Keep
Warm
Entire unit
Press this button for
keep warm function.
Note:This unit does not produce
a beep sound when buttons
are pressed or at the end of
a cycle.
Control panel
Body
Accessories
6
Handle
(both sides)
Please clean the accessories before using.
160
120
80
40
Rice
scoop (1)
Measuring cup
(about 180 mL) (1)
Power cord
Steaming
basket (1)
Page 7
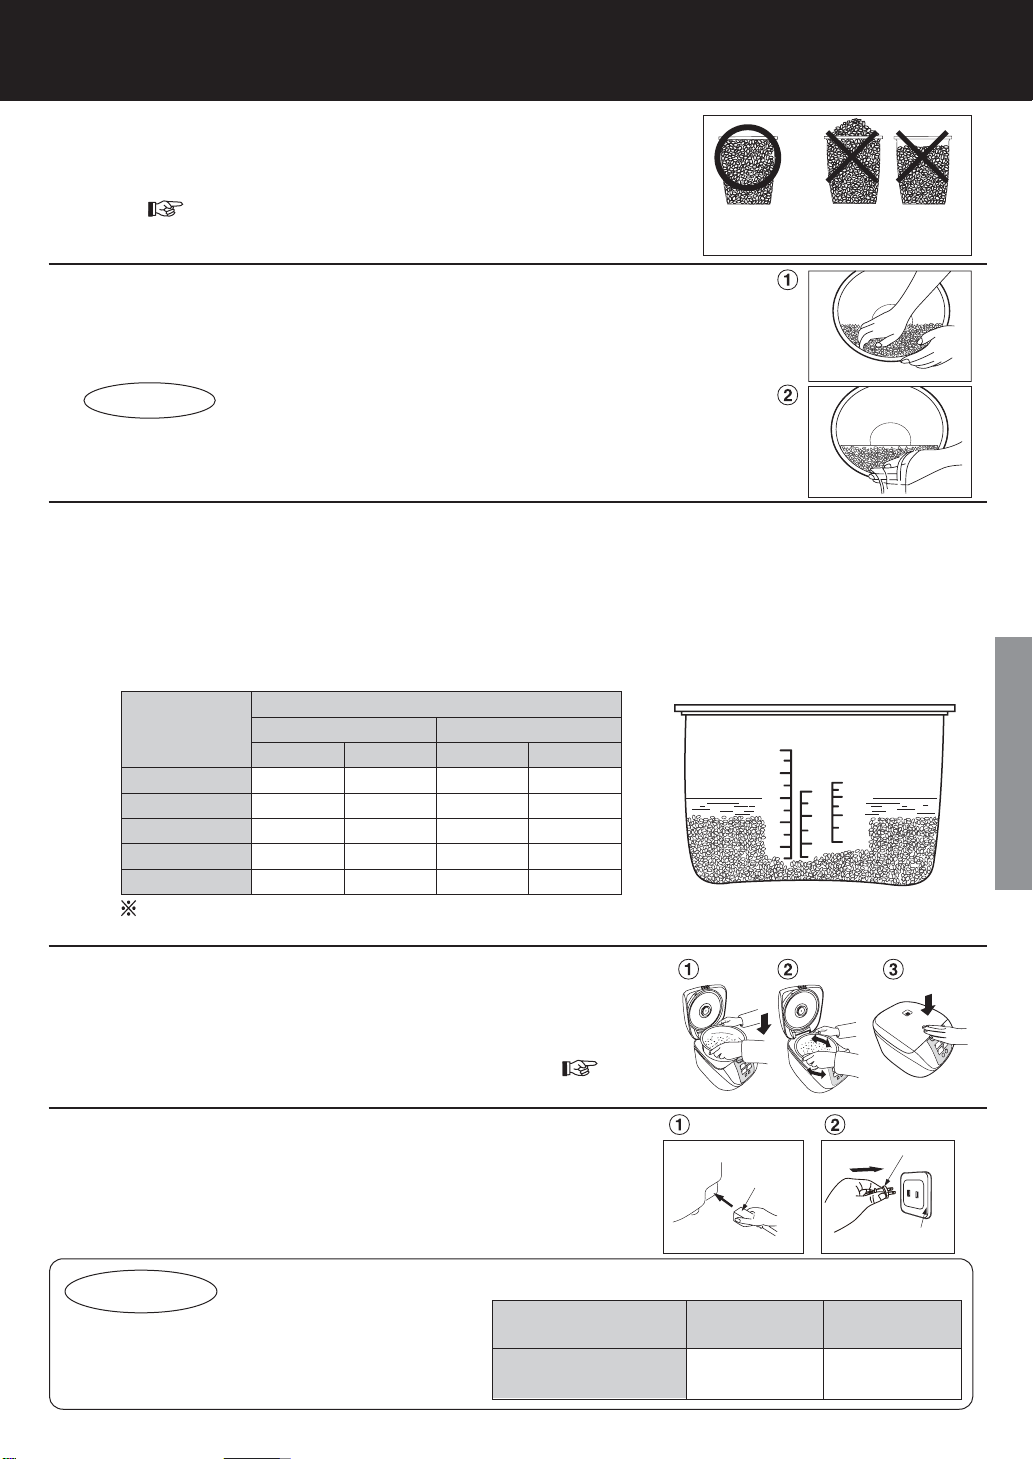
Preparations
Measure rice with the measuring cup provided
1
●
The volume of the measuring cup is about 180 mL (150 g).
●
Maximum quantity of rice to be cooked at once P15.
●
When using 1.8 L Model for quick cooking of rice or cooking of long-shaped
rice, please keep the maximum quantity of rice within 8 cups.
Wash the rice till the water turns relatively clear
2
①Wash the rice quickly with plenty of water and stirring the rice lightly to
wash it while changing water.
Repeat for several times [wash the rice→pour out water], till the water turns relatively clear.
②
Attentions
●
In order to avoid scratching the non-stick coating on the pan surface, do
not wash rice in the pan.
●
Wash the rice thoroughly. Otherwise, rice crust may appear and the residual rice
bran may affect the taste of the rice.
Place the washed rice into the pan
3
Add water until the corresponding waterline and dry the outside of the pan.
●
When adding water, pay attention to the scales at both
sides and keep them at the same height.
● When stewing soup, the total volume of ingredients and
water shall not exceed the maximum waterline for “PORRIDGE”.
●
When cooking mixed rice or glutinous rice, please add
water according to the following table.
Rice quantity
(measuring cups)
1
2
3
4
5
Water quantity (measuring cup provided)
Mixed rice Glutinous rice
1.0 L Model
1
2
4
---
---
1
/
2
3
/
4
1.8 L Model
1
/
1
2
3
/
2
4
4
5
1
/
6
4
1.0 L Model
1
/
1
4
2
3
---
---
1.8 L Model
1
2
3
4
5
The above water quantities can be increased
or decreased according to personal preference.
1
/
4
<Example>
(Example: 1.8 L Model)
Correct
The cooking result
may be affected
When the rice quantity is 6
measuring cups, wash the rice
and put into the pan, then add
water into the pan till the water
surface reaches scale “6” at
waterline of “WHITE RICE”.
WHITE RICE CUP
10
BROWN
RICE
PORRIDGE
2
6
1
4
1
1/2
2
1/2
8
6
4
2
Usage
Put the pan into the body and close the outer lid
4
●
In order that the pan bottom can be closely attached
to the cast heater, please rotate the pan along the
direction indicated by the arrow for 2 or 3 times.
●
Please check whether the moisturizing cap is correctly positioned. ( P14)
●
When closing the outer lid, please confirm that there is a “click” sound.
Connect the plugs
5
● Please connect the instrument plug to the body first
and then connect the power plug to the elecrtical outlet.
Make sure that both plugs are firmly connected.
Attentions
* When using the steaming basket while
cooking rice, please refer to the table
on the right for the maximum cooking
volumes.
Maximum cooking volume (measuring cup provided)
Model
Maximum
cooking volume
Body
Instrument
plug
1.0 L Model 1.8 L Model
2 5
Power plug
Outlet
7
Page 8
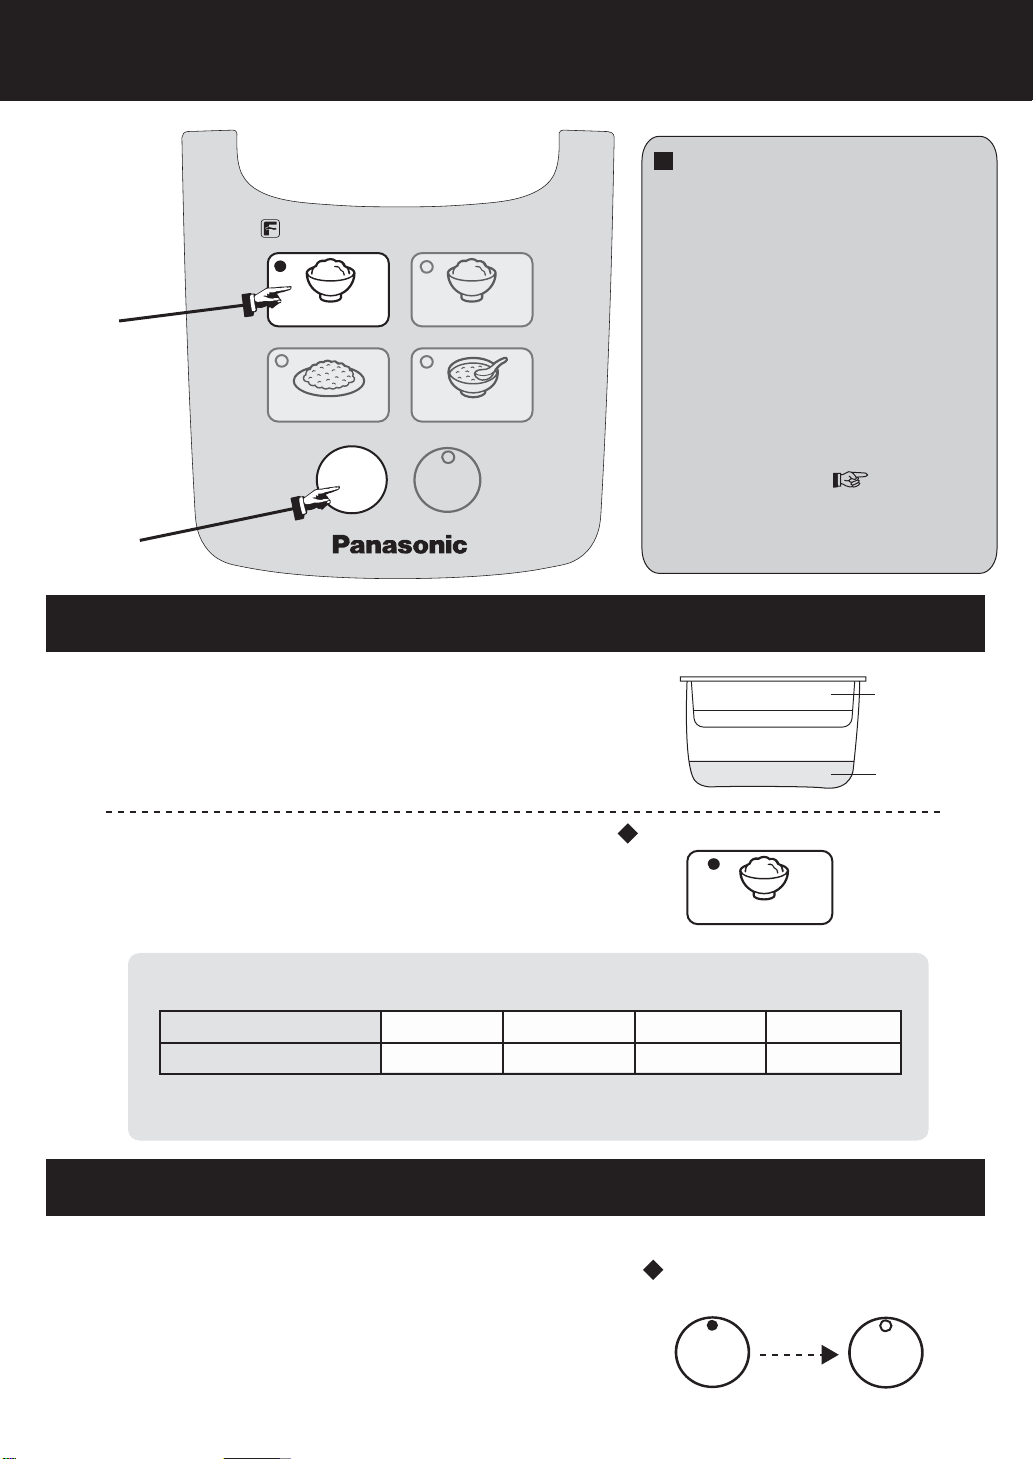
Functions Quick Cook/Steam
Kind reminder
●
When steaming food at same time as cooking
rice, please select [White Rice] function.
●
The time of steam shall be determined
according to the water quantity in the
pan. Please adjust the water quantity
according to the time required.
●
After the water gets boiled and fully
evaporated, the rice cooker will turn to
the keep warm function automatically.
●
If you want to stop steam function
during cooking, press [Off] button.
●
[Quick Cook/Steam] button can be used for
quick cooking rice, please refer to P9
[White Rice] for detailed operations. As the
cooking time is shortened, the rice may be
harder or there may be rice crust.
1
FUZZY MICROCOMPUTER
Quick Cook/Steam
Brown Rice
Off
White Rice
Porridge/Soup
Keep
Warm
2
Operations
●
Add a proper quantity of water (refer to the
(For example: steam with [Quick Cook/Steam] function)
following table).
●
Put the steaming basket into the pan.
●
Put the foods to be steamed into the steaming
basket.
●
Close the outer lid.
Press [Quick Cook/Steam]
1
button
●
The indicator for [Quick Cook/Steam] lights up
and the steaming starts.
Table of steaming time and water quantity. The entire duration from the start to
the end refers to the time shown in the following table.
Water quantity (approx.)
Steaming time (approx.)
The maximum time of steaming is about 70 minutes. When the time is up, no matter the water
*
is completely evaporated or not, the rice cooker will turn to keep warm function automatically.
The cooking is over
1
/2 Measuring cup
15 Minutes
1 Measuring cup 2 Measuring cups
Steaming
basket
Water
The indicator lights up
Quick Cook/Steam
3 Measuring cups
30 Minutes 50 Minutes 65 Minutes
●
After the water in the pan gets boiled and
fully evaporated, the steaming function is
ended and the rice cooker will turn to keep
warm function automatically.
Press [Off] button
2
● No sound when the cooking process is over.
● At this time, the steaming basket is very hot.
Please be careful when taking it out.
The indicator
lights up
Keep
Warm
The indicator
turns off
Keep
Warm
8
Page 9
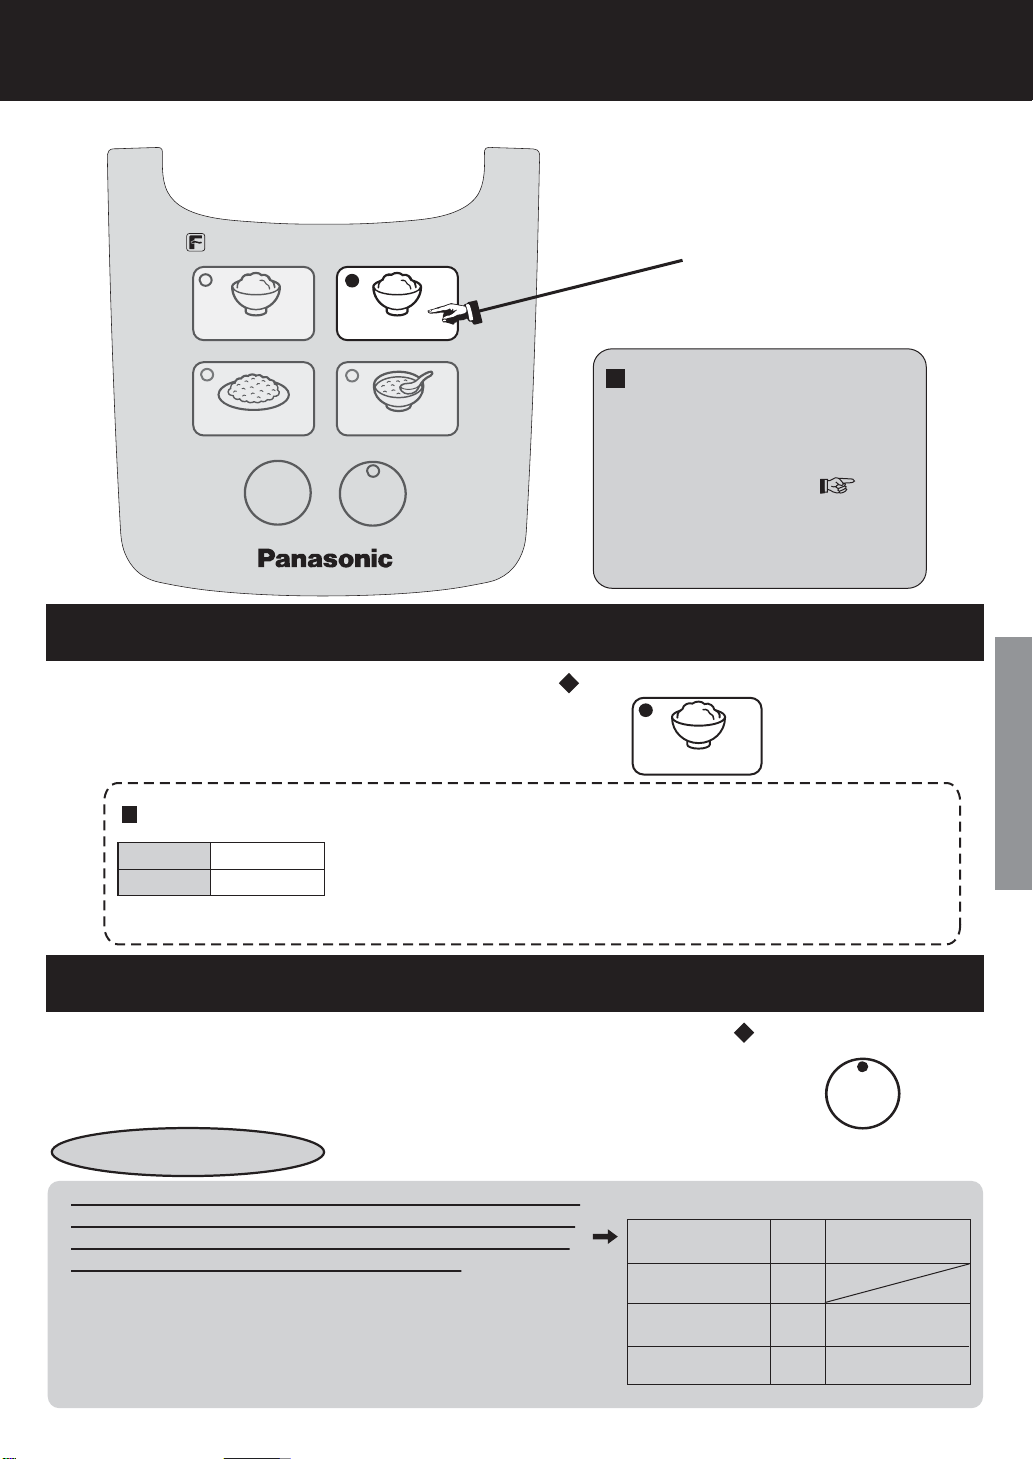
Functions White Rice • Keep Warm
FUZZY MICROCOMPUTER
1
Quick Cook/Steam
Brown Rice
Off
White Rice
Porridge/Soup
Keep
Warm
Kind reminder
●
When cooking mixed rice or
glutinous rice, please select
[White Rice] function. For water
quantity, please refer to P7.
●
Rice cooked with [White Rice]
function can be softer and has a
better taste.
Operations
( For example: cook rice with [White Rice] function)
The indicator lights up
Press [White Rice] button
1
●
The indicator for [White Rice] lights
up and the cooking starts.
●
Cooking time (reference)
Quick Cook
White Rice
About 30 minutes
About 38 minutes
The reference time required for cooking at the voltage of 120 V, the room temperature
of 20°C, the water temperature of 18°C and the medium rice quantity refers to the
time listed in the left table. (1.0 L Model: 3 cups, 1.8 L Model: 5 cups)
●
The cooking time may vary slightly according to different voltages, room
temperatures, water temperatures, water quantities, rice quantities and rice qualities.
●
The cooking time of mixed rice or glutinous rice may vary because
of the different ingredients added into the rice.
The cooking is over
Loosen the rice
●
When the cooking process is over, the rice cooker will turn to
keep warm function automatically. To prevent the rice from
sticking together, please loosen the rice after cooking.
●
No sound when the cooking process is over.
Keep Warm
●
When the cooking process is over, all functions will turn to keep
warm function automatically. But some functions are not
recommended to use keep warm function, please press [Off]
button after cooking.
●
You can enjoy the rice within 5 hours in keep warm function,
so as not to affect the taste or cause strange smell.
●
When in keep warm function, there may be some
droplets at the edge of the pan.
●
The rice taste may be affected if the rice scoop is left in
the rice cooker when the rice is in keep warm function.
White Rice
The indicator lights up
Menu
Quick Cook,
White Rice, Soup
Brown Rice, Mixed
rice, Glutinous rice
Porridge
Keep
Warm
Keep
warm
The result after
kept warm
○
Affects the taste or
×
causes strange smell
Causes porridge
×
to thicken
Usage
9
Page 10

Functions Brown Rice
FUZZY MICROCOMPUTER
1
Operations
1
Quick Cook/Steam
Brown Rice
Off
(For example: cook rice with [Brown Rice] function)
White Rice
Porridge/Soup
Keep
Warm
Press [Brown Rice] button
●
The indicator for [Brown Rice] lights up and
the cooking starts.
●
Cooking time
(reference)
Brown
Rice
About 1 hour
and 50 minutes
The reference time required for cooking at the voltage of 120 V,
the room temperature of 20°C, the water temperature of 18°C
and the medium rice quantity refers to the time listed in the left
table. (1.0 L Model: 2 cups, 1.8 L Model: 3 cups)
●
The cooking time may vary slightly according to different
voltages, room temperatures, water temperatures, water
quantities, rice quantities and rice qualities.
Kind reminder
●
Do not use keep warm function
for brown rice, so as not to
affect the taste.
●
Brown rice is a kind of rice which
is difficult to cook. In the course
of cooking,the rice shall be
soaked for about 1 hour first, so
that the rice grains can absorb
enough water to achieve a
satisfactory cooking effect.
The indicator lights up
Brown Rice
The cooking is over
Loosen the rice
●
When the cooking process is over,
the rice cooker will turn to keep warm
function automatically. However, keep
warm function is not recommended to
prevent from affecting the taste,
press [Off] button after cooking.
●
No sound when the cooking process
is over.
10
The indicator
lights up
Keep
Warm
The indicator
turns off
Keep
Warm
Page 11
Functions Porridge/Soup
FUZZY MICROCOMPUTER
1
Quick Cook/Steam
Brown Rice
Off
2
White Rice
Porridge/Soup
Keep
Warm
Kind reminder
●
Incorrect water quantity or rice quantity
may lead to overflow of liquids from the
steam vent.
●
When the outer lid is opened in cooking,
the amount of moisture condensation
may be increased.
●
When the porridge is kept in keep warm
function for an excessively long time, it
will get thicker.
●
Each time after use, take off and clean
the moisturizing cap so as to prevent
any strange smell.
Operations (For example: cook porridge with [Porridge/Soup] function)
Press [Porridge/Soup] button
1
●
The indicator for [Porridge/Soup] lights up and the
cooking starts.
●
Reference cooking time (approx.): 1 hour and 30 minutes.
When the maximum cooking volume of soup (ingredients and
water) exceeds the maximum waterline for “PORRIDGE”,
overflow or half-cooked soup may occur. (Refer to P15
for specifications)
Usage
The indicator lights up
Porridge/Soup
The cooking is over
Press [Off] button
2
●
When the cooking process is over, the
rice cooker will turn to keep warm
function automatically.
However, keep warm function is not
recommended to prevent from affecting
the taste, press [Off] button after cooking.
●
No sound when the cooking process is
over.
The indicator
lights up
Keep
Warm
The indicator
turns off
Keep
Warm
11
Page 12

Recipes
Caution: · Because of the different ingredients added into the rice, there may be
scorched rice at the bottom.
· In this recipe, the cooking volume is for 1.8 L Model. Please refer to the
specifications listed on P15 for cooking volumes for 1.0 L Model.
Ingredients: Seasoning:
Rice 3 measuring cups Cooking wine, soy sauce 20 mL each
Water 4 measuring cups Salt 3 g
Chicken 80 g, chopped into small pieces
Burdock 35 g, sliced
Mushroom 2 pieces, after soaking in water, remove
Fried bean curd 2 pieces, pour with hot water to remove
Carrot 40 g, shredded into strips
· 1 cup (measuring cup): about 150 g.
Mixed Chicken Rice
the base and shred into strips
grease and then shred into strips
Cooking method:
1) Boil the chicken and burdock in hot water quickly and drain them immediately.
2) Wash the rice, put into the pan and add 4 measuring cups of water.
3) Pour the seasoning into the pan, stir and put the remaining ingredients in. Close the outer lid.
4) Press [White Rice] button to start cooking. When the cooking process is over, you can enjoy
the meal.
Corn and Rib Soup
Ingredients: Seasoning:
Ribs 500 g, chopped into 5cm pieces Salt 6.5 g
Corn 2, about 450 g, cut into 5cm pieces
Water
Cooking method:
1) Put the ribs into boiling water to remove residual blood and drain them for later use.
2) Put all ingredients into the pan, add salt and close the outer lid.
3) Press [Porridge/Soup] button, and the cooking process will end after about 1 hour and 30 minutes.
(Other seasoning such as chicken powder can be added according to personal preference.)
5 measuring cups
12
Page 13

Recipes
Dim Sum (frozen)
Ingredients:
(A) Small pieces
Shrimp dumplings
Sumai
Cooking method:
1) Defrosting is not required. Just put the frozen Dim Sum on the steaming basket and spray some
water on the surface of Dim Sum.
2) Add 1/2 measuring cup of cold water into the pan.
3) Put the steaming basket into the pan and close the outer lid.
4) Press [Quick Cook/Steam] button, wait for about 10 minutes and then press [Off] button.
(B) Big pieces
Steamed BBQ pork buns
Steamed buns
Sticky rice in lotus leaf
Mung Bean and Lilium Porridge
Ingredients: Seasoning:
Mung bean 70 g Sugar According to personal preference
Sticky rice 70 g
Lilium 10 g
Cooking method:
1) Put the washed mung beans, sticky rice and lilium into the pan and add water until scale 1 of
waterline for “PORRIDGE”.
2) Close the outer lid and press [Porridge/Soup] button. The cooking process will end after
about 1 hour and 30 minutes.
3) Add some sugar according to personal preference and enjoy the meal.
Usage
13
Page 14
Cleaning and maintenance
Attentions
●
Before cleaning and maintenance, please pull out the power plug first. Do not clean the rice cooker until it cools down.
●
When cleaning the rice cooker, do not immerse it into water, or clean it with lacquer thinner, alcohol, cleaning powder or hard brush, etc.
●
Do not use dishwasher.
Moisturizing cap
Disassembling
Pull out from the
heating plate.
●
The moisturizing cap can be taken off directly.
Caution
Clean it after each use.
●
After cleaning, do not dry it with a dishwasher etc.;
otherwise deformation or crack may be caused.
●
●
●
When installing it after cleaning, please make
sure that the seal ring has been installed on the
moisturizing cap.
Entire unit ● Outer lid (sealed part)
Assembling
Insert into the hole on the
heating plate in a reverse
direction as disassembly.
Please fully insert it into the
hole to prevent falling off.
●
Seal ring
●
●
●
●
Accessories
Clean with diluted detergent and soft sponge.
Clean with a well-wrung cloth.
●
If foreign objects are not removed, the foreign objects on the
heating plate may stick to it and become difficult to remove.
Clean the heating plate after each use. As the metal parts
are heated, there may be color change or stripes on their
surfaces, which will not affect their normal functions.
●
Do not pull the pan seal ring.
Pan
●
Clean with diluted detergent and soft sponge. Wipe off any
water on the pan.
●
Color change or stripes may appear on the fluoridized
coating surface, which will not affect human health or
normal functions of the rice cooker.
●
Depending on the frequency of use, rubbing traces
may appear on the outside of the pan, which will not
affect the performance of the rice cooker.
Temperature sensor
●
When there is any foreign object adhering to such parts, gently
scrub it away with fine crocus paper (#600) or a dry cloth.
•
Cast heater
Rice scoop
14
160
120
80
40
Measuring cup
Steaming basket
Page 15
Troubleshooting
In the following events
Items for check
●
Incorrect rice quantity or water quantity
● Rice is not fully washed
● The pan bottom is uneven
There are foreign objects on the outside
●
of the pan or temperature sensor
● The outer lid is not correctly closed
The moisturizing cap is not correctly installed
●
● Grease is added when cooking the rice
After cooking is finished, the rice is not loosen
●
● Keep warm over 5 hours
The quantity of rice kept warm is too small
●
● The rice scoop is left in the rice cooker
when the rice is kept warm
● The cold rice is kept warm
● The outer lid is not firmly closed
● The pan is not cleaned
● While in cooking, the plug is pulled out
or the [Off] button is touched
● The wrong button is pressed
Rice
Harder
Half-
cooked
Softer
Please check the following items
Button
operations
Rice crust
scorched
Rice water
overflow
Rice kept warm
smell
Color
change
Strange
Dry
do not work
● ● ●
The plug is pulled out or gets loose.
appear
during the
use
drops at the bottom of the pan (outside) and gets
broken after being heated. This is not a malfunction.
When there
are
[pop] sounds in cooking, water
The
following
sounds
When there are [click] sounds in cooking, the
cast heater is adjusting the temperature, this
is not a malfunction.
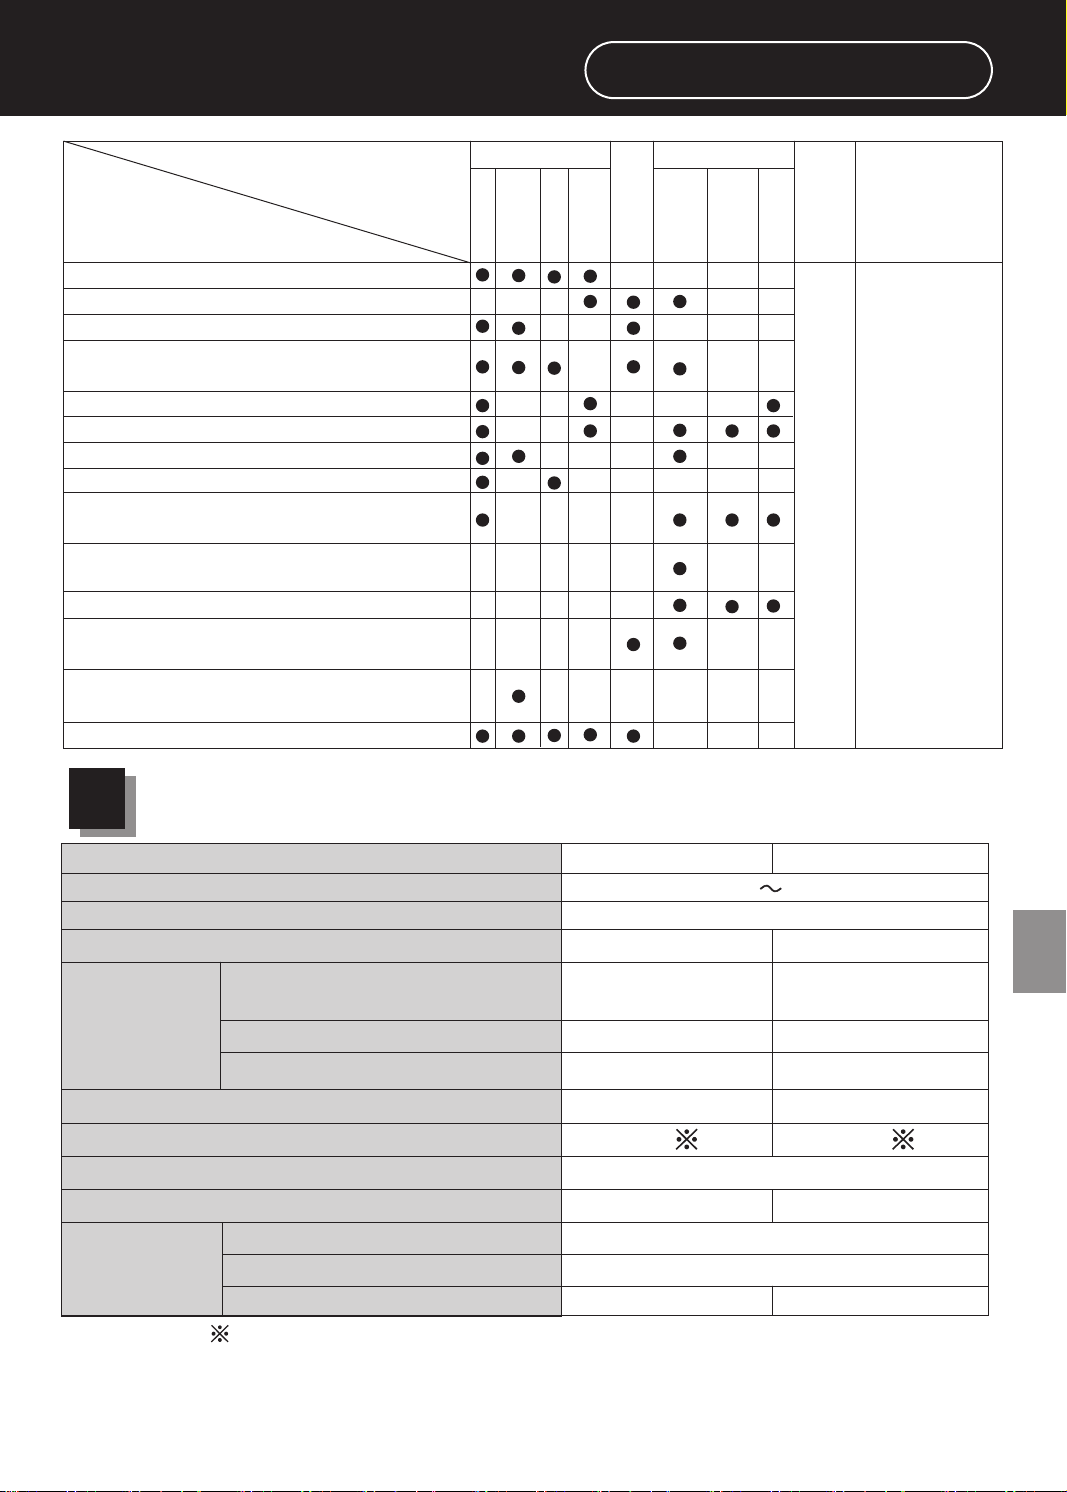
Specifications
Model No.
Power/rated frequency
Rated power (rice cooking)
Rated volume of pan L
Rice cooking
volume
(rice quantity) L
Porridge cooking volume (rice quantity) L
Maximum cooking volume (ingredients + water) for soup L
Power cord length (approx.) m
Product weight (approx.) kg
Dimensions
(approx.) cm
●
Marked with , it means that the maximum cooking volume for soup is the highest
waterline for “PORRIDGE”.
●
For power cord replacement and product repairing, please contact the authorized
service center of Panasonic.
●
The design and specifications are intended to change without prior notice.
White Rice/Quick Cook
Brown Rice
Mixed rice/Glutinous rice
Width
Length
Height
SR-DF101
120 V 60 Hz
750 W
3
0.18~1.0 [1~5.5 cups]
0.18~0.54
0.18~0.54
0.09~0.18
[1~3 cups]
[1~3 cups]
[1/2~1 cup]
1.5
1.0
2.5 2.8
24.5
33.9
19.9
SR-DF181
4.8
0.18~1.8 [1~10 cups]
Quick Cook [1~8 cups]
0.18~1.08
0.18~0.9
0.09~0.36
2.3
24.7
In Trouble
[1~6 cups]
[1~5 cups]
[1/2~2 cups]
15
Page 16
Consignes de sécurité
À suivre obligatoirement!
Pour éviter les accidents, les blessures aux utilisateurs ou autres personnes et les
dommages matériels, veuillez suivre les instructions ci-dessous.
Les tableaux suivants indiquent le niveau de dommage causé par une utilisation incorrecte.
Indique un danger pouvant
Avertissement :
entraîner une mort ou une
blessure grave.
Mise en garde :
Indique un danger pouvant
entraîner des blessures ou
des dommages matériels.
Les symboles sont classés et expliqués comme suit.
Ces symboles indiquent
une interdiction.
N’utilisez pas l’appareil si le
Ŷ
cordon ou la fiche d’alimentation
est endommagé(e) ou branché(e)
incorrectement à la prise de
courant.
(Cela pourrait causer une décharge
électrique, un court-circuit ou un incendie.)
N’introduisez pas d’objets dans
Ŷ
l’évent ou l’interstice.
Plus particulièrement des objets métalliques
tels que des broches ou des câbles.
(Cela pourrait causer une décharge
électrique ou une défaillance.)
Cet appareil n’est pas conçu pour
Ŷ
être utilisé par des personnes (y
compris les enfants) à capacités
physiques, sensorielles ou
mentales réduites ou manquant
d’expérience et de connaissances,
sauf si elles sont supervisées par
la personne responsable de leur
sécurité ou ont reçu les
instructions d’utilisation de celle-ci.
Surveillez les enfants pour vous
assurer qu’ils ne jouent pas avec
l’appareil.
(Ils risqueraient de se brûler ou de
se blesser.)
Ŷ
Modifier le cordon, le placer à proximité des éléments
chauffants, le plier, le tordre, le tirer, le placer sous des
objets lourds et l’enrouler. (Cela pourrait causer une
décharge électrique, un court-circuit ou un incendie).
Ŷ
Ŷ
Ce symbole indique une exigence
devant être respectée.
Avertissement
Ne branchez et ne débranchez pas le cordon
N’endommagez pas le cordon
d’alimentation ou la fiche d’alimentation.
Les actions suivantes sont
strictement interdites.
Si le cordon d’alimentation est endommagé,
il doit être remplacé par le fabricant, un de ses
techniciens ou une personne qualifiée afin
d’éviter tout danger.
N’immergez pas l’appareil dans l’eau
et ne l’éclaboussez pas.
(Cela pourrait causer un court-circuit
ou une décharge électrique.)
Si de l’eau s’introduit à l’intérieur de l’appareil,
contactez un détaillant autorisé.
Utilisez uniquement une prise de courant
d'un minimum de 10 ampères délivrant un
courant électrique alternatif de 120 volts.
(Le fait de brancher d’autres appareils
dans la même prise peut causer une
surchauffe électrique risquant de
provoquer un incendie.)
Utilisez uniquement une rallonge d’une valeur
de courant minimale de 10 ampères.
Ŷ
d’alimentation si vos mains sont humides.
N’approchez pas votre visage de l’évent
Ŷ
à vapeur et ne touchez pas à celui-ci.
Tenez l’évent à vapeur hors de la portée
des enfants.
(Cela pourrait causer des brûlures.)
Ne modifiez, ne démontez et ne
Ŷ
réparez pas cet appareil.
Veuillez communiquer avec votre magasin
ou le département de réparation d’un
détaillant autorisé.
Insérez fermement la fiche d’alimentation.
Ŷ
N’utilisez pas une fiche d’alimentation
endommagée ou une prise de courant en
mauvais état.
(Cela pourrait causer une décharge
électrique.)
Évent à vapeur
(Cela pourrait causer un incendie, une
décharge électrique ou des blessures.)
(Sinon, il pourrait y avoir un risque de
décharge électrique ou d’incendie causé
par la chaleur générée autour de la fiche
d’alimentation.)
Nettoyez la fiche d’alimentation
Ŷ
régulièrement.
(Une fiche d’alimentation comportant
des saletés pourrait causer une
isolation insuffisante en raison de
l’humidité et provoquer un incendie.)
Débranchez la fiche d’alimentation
et essuyez-la avec un chiffon sec.
16
Cessez immédiatement d’utiliser l’appareil et débranchez la fiche
Ŷ
d’alimentation en cas d’anomalie ou de panne.
(Cela pourrait causer de la fumée, un incendie ou une décharge électrique.)
La fiche et le cordon d’alimentation deviennent anormalement chauds.
(ex. : pour les
anomalies ou
pannes)
Veuillez communiquer immédiatement avec un centre de service autorisé par Panasonic pour faire examiner et réparer le produit.
Le cordon d’alimentation est endommagé ou une coupure de courant survient en cas de contact avec celui-ci.
Le boîtier principal de l’appareil est déformé ou anormalement chaud.
L’appareil produit de la fumée ou une odeur de brûlé.
L’appareil est fendillé, instable ou branlant.
La plaque chauffante est tordue ou le panier est déformé.
Page 17
Consignes de sécurité
À suivre obligatoirement!
Mise en garde
N’utilisez pas l’appareil dans les endroits suivants.
Ŷ
Les endroits où il pourrait être éclaboussé par de l’eau ou
à proximité d’une source de chaleur.(Cela pourrait causer
un choc électrique, une fuite électrique ou un incendie.)
Sur une surface irrégulière ou un tapis non résistant à la
chaleur.(Cela pourrait causer une brûlure, une blessure
ou un incendie.)
À proximité d’un mur ou d’un meuble. (Cela pourrait
causer une décoloration ou une déformation.)
N’exposez pas la fiche d’alimentation à la vapeur.
Ŷ
N’exposez pas la fiche d’alimentation à la vapeur lorsque celle-ci
est branchée. (Cela pourrait causer un court-circuit ou un incendie.)
Lors de l’utilisation d’un meuble équipé d’une table coulissante,
utilisez l’appareil à un endroit où la fiche d’alimentation n’est pas
exposée à la vapeur.
Tenez fermement la fiche
Ŷ
d’alimentation lorsque vous la
débranchez.
(Sinon, il pourrait y avoir un risque de
décharge électrique, de court-circuit ou
d’incendie.)
Débranchez la fiche d’alimentation
Ŷ
de la prise de courant lorsque vous
n’utilisez pas l’appareil.
(Sinon, il pourrait y avoir un risque de
décharge électrique ou d’incendie causé par
un court-circuit résultant de la détérioration
de l’isolation.)
N’utilisez pas un cordon d’alimentation
Ŷ
(pour fiche du cuiseur et fiche
d’alimentation) qui n’est pas conçu
pour l’utilisation avec cet appareil. De
plus, ne les transférez pas.
(Cela pourrait causer une décharge électrique,
une fuite électrique ou un incendie.)
Veuillez laisser l’appareil refroidir
Ŷ
avant de le nettoyer.
(Le contact avec des éléments
chauds pourrait causer des brûlures.)
Ne touchez pas aux éléments
Ŷ
chauffants pendant
l’utilisation de l’appareil ou
après la cuisson.
Ne touchez pas au bouton
Ŷ
d’ouverture pendant que
vous déplacez l’appareil.
N’ouvrez pas le couvercle
Ŷ
pendant la cuisson.
N’utilisez pas un panier
Ŷ
autre que celui spécifié.
Plus particulièrement la
plaque chauffante (cela
pourrait causer des brûlures).
(Cela pourrait provoquer
l’ouverture du couvercle
et causer des brûlures).
(Cela pourrait causer
des brûlures.)
(Cela pourrait causer des
brûlures ou des blessures
en raison d’une surchauffe
ou d’une défaillance.)
Avant l’utilisation
Précautions d’utilisation
Versez les quantités de riz et d’eau
appropriées, puis sélectionnez les
fonctions en respectant les instructions
du mode d’emploi.
(Pour éviter le débordement d’eau de riz, la cuisson
insuffisante du riz ou l’obtention d’un riz brûlé.)
Avant d’utiliser l’appareil, retirez le plastique
de protection du panier et le papier
anti-ternissement placé entre le panier et le
dispositif chauffant.
(Pour éviter une cuisson inadéquate ou un incendie.)
Nettoyez toujours les objets étrangers tels que le riz sur le
panier, le dispositif chauffant et le capteur de température.
Panier
Dispositif chauffant
Capteur de température
Ne recouvrez pas le couvercle avec
un chiffon ou d’autres objets lorsque
l’appareil est en cours d’utilisation.
(Pour éviter toute déformation, décoloration
du couvercle ou défaillance.)
Ɣ
Ne penchez ou ne retournez
pas l’appareil.
Ɣ
Avant le nettoyage, mettez
l'appareil hors marche et
débranchez la
fiche d’alimentation.
Ne placez pas les ingrédients à cuire
directement dans l’appareil sans y
avoir placé de panier.
(Pour éviter que des impuretés causent des
défaillances.)
Évitez d’utiliser l’appareil dans
un endroit exposé à la lumière
directe du soleil.
(Pour éviter toute décoloration.)
En cas de débordement d’eau de riz
au niveau de l’évent à vapeur,
débranchez immédiatement la fiche
d’alimentation afin de couper
l’alimentation. Ne réutilisez pas
l’appareil avant d’avoir essuyé l’eau
de riz se trouvant sur la fiche
d’alimentation et la fiche du cuiseur
à l’aide d’un chiffon sec.
N’utilisez pas l’appareil sur un
objet sensible à la chaleur tel
qu’un tapis, un tapis chauffant
électrique ou une nappe (en
plastique vinylique), etc.
(Pour éviter une cuisson inadéquate ou un incendie.)
Ne servez pas le riz avec
un objet métallique.
(Pour éviter d’égratigner le revêtement
du panier et causer le décollement de ce
dernier.)
Cet appareil est conçu uniquement pour
une utilisation domestique. Ne l’utilisez
pas pour des usages commerciaux ou
industriels, ni pour des tâches autres
que la cuisson.
Les coupures de courant survenant
pendant l’utilisation de l’appareil
peuvent affecter le résultat de la
cuisson.
17
Page 18
Identification des pièces
Panneau de commande
FUZZY MICROCOMPUTER
Appuyez sur cette touche pour
une cuisson rapide ou une
cuisson à la vapeur.
Appuyez sur cette touche pour
cuire du riz brun.
Quick Cook/Steam
Brown Rice
White Rice
Porridge/Soup
Appuyez sur cette touche pour
cuire du riz blanc.
Appuyez sur cette touche pour
cuire du porridge ou de la soupe.
Appuyez sur cette touche pour
annuler l’opération précédente
ou arrêter la fonction de maintien
au chaud.
Vue d’ensemble de l’appareil
Couvercle
Anneau d’étanchéité du panier
Capuchon d’humidité
Plaque chauffante
Panier
Bouton d’ouverture
Off
Keep
Warm
Appuyez sur cette touche pour
activer la fonction de maintien
au chaud.
Ce cuiseur ne produit aucun son lorsque
vous appuyez sur les touches ou que la
cuisson se termine.
Panneau de commande
Boîtier de l’appareil
Accessoires
18
Cordon d’alimentation
Poignée
(des deux côtés)
Veuillez nettoyer les accessoires avant l’utilisation.
160
120
80
40
Cuillère
à riz (1)
Verre gradué
(environ 180 mL) (1)
Panier
d'étuvage (1)
Page 19
Préparatifs
Mesurez le riz à l’aide du verre gradué fourni
1
Ɣ
Le volume du verre gradué est d’environ 180 mL (150 g).
Ɣ
Pour connaître la quantité maximale de riz pouvant être cuite en une
fois P27.
Ɣ
Lorsque vous utilisez le modèle de 1,8 L pour la cuisson rapide du riz ou la cuisson
Correct
du riz à long grain, ne dépassez pas la quantité maximale de 8 verres de riz.
Lavez le riz jusqu’à ce que l’eau devienne relativement claire
2
Ԙ
Lavez le riz rapidement avec une grande quantité d’eau et remuez le riz légèrement pour le laver
pendant que vous changez l’eau.
5pSpWH]O¶RSpUDWLRQSOXVLHXUVIRLV>ODYH]OHUL]ĺMHWH]O¶HDX@MXVTX¶jFHTXHO¶HDXGHYLHQQHUHODWLYHPHQWFODLUH
ԙ
Attention
Ɣ
Pour éviter d’égratigner le revêtement anti-adhésif sur la surface du panier, ne
lavez pas le riz dans le panier.
Ɣ
Lavez bien le riz. Sinon, de la croûte risque de se former et le risiduel du riz pourrait affecter
le goût du riz.
Versez le riz lavé dans le panier
3
Ajoutez de l’eau jusqu’au niveau d’eau requis et séchez l’extérieur du panier.
Ɣ
Lorsque vous ajoutez de l’eau, portez une attention particulière aux
échelles graduées des deux côtés et maintenez-les au même niveau.
Ɣ
Lorsque vous faites mijoter de la soupe, le volume total des ingrédients et de
l’eau ne doit pas dépasser le niveau d’eau maximum pour “ PORRIDGE ”.
Ɣ
Lorsque vous faites cuire du riz mélangé ou du riz gluant, veuillez ajouter
de l’eau en fonction du tableau suivant.
Quantité de riz
(verres gradués)
1
2
3
4
5
Quantité d’eau (verre gradué fourni)
Riz mélangé Riz gluant
Modèle de 1.0 L
1
2
4
---
---
1
3
/
2
/
4
Modèle de 1.8 L
1
/
1
2
3
/
2
4
4
5
1
/
6
4
Modèle de 1.0 L
1
/
1
4
2
3
---
---
Modèle de 1.8 L
1
2
3
4
5
Vous pouvez augmenter ou réduire les quantités d’eau
ci-dessus selon vos préférences personnelles.
1
/
4
<Exemple>
Lorsque la quantité de riz correspond
à 6 verres gradués, lavez le riz et
versez-le dans le panier, puis ajoutez
de l’eau dans le panier jusqu’à ce que
la surface de l’eau atteigne le niveau
“ 6 ” pour “ WHITE RICE (riz blanc) ”.
(Exemple : Modèle de 1.8 L)
Le résultat de la cuisson
peut être affecté
WHITE RICE CUP
10
BROWN
RICE
PORRIDGE
6
4
2
8
6
4
2
2
1
1
1/2
Utilisation
1/2
Placez le panier dans le boîtier de l’appareil et fermez le couvercle
4
Ɣ
Pour que le fond du panier puisse se fixer correctement au
dispositif chauffant, faites tourner le panier 2 ou 3 fois dans
le sens indiqué par la flèche.
Ɣ
Vérifiez si le capuchon d’humidité est correctement positionné. ( P26)
Ɣ
Lorsque vous fermez le couvercle, assurez-vous qu’il produise un « clic ».
Branchez les fiches
5
Ɣ
Veuillez brancher la fiche du cuiseur au boîtier de l’appareil en
Boîtier de l’appareil
Fiche du
cuiseur
Fiche d’alimentation
premier, puis la fiche d’alimentation. Assurez-vous de brancher
correctement les deux fiches.
Attention
*
Lorsque vous utilisez le panier d'étuvage pendant
Volume de cuisson maximal (verre gradué fourni)
la cuisson du riz, veuillez consulter le tableau de
droite pour connaître les volumes de cuisson
maximaux.
Modèle
Volume de
cuisson maximal
Modèle de 1.0 L Modèle de 1.8 L
25
Prise
19
Page 20
Fonctions
FUZZY MICROCOMPUTER
Quick Cook/Steam
1
Brown Rice
2
de cuisson rapide/À la vapeur (Quick Cook/Steam)
Rappel
Ɣ
Lorsque vous faites cuire des aliments à la vapeur en même
WHPSVTXHGXUL]YHXLOOH]VpOHFWLRQQHUODIRQFWLRQ>:KLWH5LFH@
Ɣ
La durée de la cuisson à la vapeur est déterminée
en fonction de la quantité d’eau dans le panier.
Veuillez adapter la quantité d’eau en fonction de
la durée requise.
Ɣ
Une fois l’eau portée à ébullition et totalement
évaporée, le cuiseur active automatiquement la
fonction de maintien au chaud.
Ɣ
Si vous souhaitez arrêter la fonction de vapeur
SHQGDQWODFXLVVRQDSSX\H]VXUODWRXFKH>2II@
Ɣ
/DWRXFKH>4XLFN&RRN6WHDP@SHUPHWGHFXLUHOHUL]
UDSLGHPHQWYHXLOOH]FRQVXOWHU3>:KLWH5LFH@SRXU
obtenir la marche à suivre détaillée. Si le temps de cuisson
est raccourci, le riz risque d’être plus dur ou de la croûte
peut se former sur le riz.
Off
White Rice
Porridge/Soup
Keep
Warm
Marche à suivre
Ɣ
Ajoutez la quantité d’eau nécessaire
(reportez-vous au tableau suivant).
Ɣ
Déposez le panier d'étuvage dans le panier.
Ɣ
Versez les aliments à cuire à la vapeur dans
le panier d'étuvage.
Ɣ
Fermez le couvercle.
Appuyez sur la touche
1
(Par exemple : cuisson à la vapeur avec la fonction [Quick Cook/Steam])
[Quick Cook/Steam]
Ɣ
/HYR\DQWGHODWRXFKH>4XLFN&RRN6WHDP@V¶DOOXPH
et la cuisson à la vapeur démarre.
Tableau indiquant la durée de cuisson à la vapeur et la quantité d’eau. La durée indiquée dans le
tableau suivant représente la durée de cuisson totale.
1
verre gradué
Quantité d’eau (approx.)
Durée de cuisson à la vapeur (approx.)
*
La durée maximale de la cuisson à la vapeur est d’environ 70 minutes. Lorsque le temps est écoulé,le cuiseur
active automatiquement la fonction de maintien au chaud, que l’eau soit totalement évaporée ou non.
/
2
15 minutes
La cuisson est terminée
Le voyant s’allume
Quick Cook/Steam
1 verre gradué 2 verres gradués
30 minutes 50 minutes 65 minutes
3 verres gradués
Panier
d'étuvage
Eau
20
Ɣ
Une fois l’eau du panier portée à ébullition et totalement
évaporée, la fonction de cuisson à la vapeur s’arrête et le
cuiseur active automatiquement la fonction de maintien
au chaud.
Appuyez sur la touche [Off]
2
Ɣ$XFXQVRQQ¶HVWpPLVORUVTXHODFXLVVRQVHWHUPLQH
ƔLe panier d'étuvage est très chaud après la cuisson.
Soyez prudent lorsque vous le retirez.
Le voyant
s’allume
Keep
Warm
Le voyant
s’éteint
Keep
Warm
Page 21
Fonctions
FUZZY MICROCOMPUTER
Quick Cook/Steam
Brown Rice
Off
White Rice
Porridge/Soup
Keep
Warm
de riz blancMaintien au chaud (White RiceKeep Warm)
1
Rappel
Ɣ
Lorsque vous faites cuire du riz mélangé ou du
riz gluant, veuillez sélectionner la fonction
>:KLWH5LFH@3RXUFRQQDvWUHODTXDQWLWpG¶HDX
nécessaire, veuillez consulter P19.
Ɣ
/HUL]FXLWjO¶DLGHGHODIRQFWLRQ>:KLWH5LFH@
est plus tendre et a meilleur goût.
Marche à suivre
(Par exemple : cuisson du riz à l’aide de la fonction [White Rice])
Le voyant s’allume
Appuyez sur la touche [White Rice]
1
Ɣ
/HYR\DQWGHODWRXFKH>:KLWH5LFH@
s’allume et la cuisson démarre.
Ɣ
Durée de cuisson (référence)
Quick Cook
White Rice
Environ 30 minutes
Environ 38 minutes
La durée de référence nécessaire à la cuisson avec une tension de 120 V, une température ambiante de 20 °C,
une température de l’eau de 18 °C et la quantité de riz moyenne correspond à la durée indiquée dans le tableau
de gauche. (Modèle de 1,0 L : 3 verres, Modèle de 1,8 L : 5 verres)
Ɣ
La durée de cuisson peut varier légèrement selon la tension, la température ambiante, la température de l’eau,
la quantité d’eau, la quantité de riz et la qualité du riz.
Ɣ
La durée de cuisson du riz mélangé ou gluant peut varier en fonction des différents ingrédients ajoutés au riz.
White Rice
La cuisson est terminée
Décollez le riz
Ɣ
Lorsque la cuisson se termine, le cuiseur active automatiquement la fonction de
maintien au chaud. Pour éviter que les grains de riz ne collent entre eux, décollez
le riz après la cuisson.
Ɣ
Aucun son n’est émis lorsque la cuisson se termine.
Le voyant s’allume
Maintien au chaud
Ɣ
Lorsque la cuisson se termine, toutes les fonctions passent automatiquement
en mode de maintien au chaud. Toutefois, il n’est pas recommandé d’utiliser la
fonction de maintien au chaud avec certaines fonctions lorsque la cuisson se
termine. Appuyez alors sur la touche [Off] après la cuisson.
Ɣ
Il est recommandé de consommer le riz dans les 5 heures suivant l’activation de la
fonction de maintien au chaud afin d’obtenir une saveur et un arôme optimaux.
Ɣ
Lorsque la fonction de maintien au chaud est activée, des gouttelettes
peuvent se former sur le bord du panier.
Ɣ
Pour éviter d’affecter le goût du riz, retirez la cuillère à riz du cuiseur lorsqu’il
est en mode de maintien au chaud.
Menu
Cuisson rapide,
Riz blanc, Soupe
Riz brun, Riz mélangé,
Riz gluant
Porridge
Maintien
au chaud
ż
×
×
Utilisation
Keep
Warm
Résultat après le
maintien au chaud
Affecte le goût ou cause
une odeur inhabituelle
Épaississement du riz
21
Page 22

Fonctions de riz brun (Brown Rice)
FUZZY MICROCOMPUTER
Rappel
Ɣ
N’utilisez pas la fonction de
maintien au chaud pour le
riz brun car cela pourrait en
altérer le goût.
Ɣ
Le riz brun est un type de riz
difficile à cuire. Faites d’abord
tremper le riz pendant une
heure en cours de préparation.
Les grains de riz pourront ainsi
absorber assez d’eau pour
cuire plus facilement.
1
Quick Cook/Steam
Brown Rice
Off
White Rice
Porridge/Soup
Keep
Warm
Marche à suivre (Par exemple : cuisson du riz à l’aide de la fonction [Brown Rice])
Le voyant s’allume
Appuyez sur la touche [Brown Rice]
1
Ɣ
/HYR\DQWGHODWRXFKH>%URZQ5LFH@V¶DOOXPH
et la cuisson démarre.
Durée de cuisson
(référence)
Brown
Rice
Environ 1 heure
et 50 minutes
Ɣ
La durée de référence nécessaire à la cuisson avec une tension de
120 V, une température ambiante de 20 °C, une température de l’eau
de 18 °C et la quantité de riz moyenne correspond à la durée indiquée
dans le tableau de gauche. (Modèle de 1,0 L: 2 verres, Modèle de
1,8 L: 3 verres)
Ɣ
La durée de cuisson peut varier légèrement selon la tension,
la température ambiante, la température de l’eau, la quantité
d’eau, la quantité de riz et la qualité du riz.
Brown Rice
La cuisson est terminée
Décollez le riz
Ɣ
Lorsque la cuisson se termine, le cuiseur active
automatiquement la fonction de maintien au
chaud. Toutefois, il n’est pas recommandé
d’utiliser la fonction de maintien au chaud car
cela pourrait altérer le goût. Appuyez sur la
WRXFKH>2II@DSUqVODFXLVVRQ
Ɣ
Aucun son n’est émis lorsque la cuisson
se termine.
22
Le voyant
s’allume
Keep
Warm
Le voyant
s’éteint
Keep
Warm
Page 23

Fonctions
FUZZY MICROCOMPUTER
de porridge/Soupe (Porridge/Soup)
1
Quick Cook/Steam
Brown Rice
Off
2
White Rice
Porridge/Soup
Keep
Warm
Rappel
Ɣ
Une quantité d’eau ou de riz incorrecte
peut entraîner un débordement de liquide
au niveau de l’évent à vapeur.
Ɣ
Le fait d’ouvrir le couvercle pendant la
cuisson peut augmenter la quantité de
condensation.
Ɣ
Lorsque le porridge demeure en mode de
maintien au chaud pendant une durée
excessivement longue, il finit par épaissir.
Ɣ
Après chaque utilisation, retirez le
capuchon d’humidité et nettoyez celui-ci
pour éviter toute odeur inhabituelle.
Marche à suivre (Par exemple : cuisson du porridge à l’aide de la fonction [Porridge/Soup])
Appuyez sur la touche [Porridge/Soup]
1
Ɣ
/HYR\DQW>3RUULGJH6RXS@V¶DOOXPHHWODFXLVVRQGpPDUUH
Durée de cuisson de référence (approx.) : 1 heure et 30 minutes.
Ɣ
Lorsque le volume de cuisson maximal de la soupe (l’eau et les ingrédients)
dépasse le niveau d’eau maximal pour “PORRIDGE”, vous risquez de provoquer
un débordement ou d’obtenir une cuisson insuffisante. (Consultez P27
pour les caractéristiques techniques)
Le voyant s’allume
Porridge/Soup
Utilisation
La cuisson est terminée
Appuyez sur la touche [Off]
2
Ɣ
Lorsque la cuisson se termine, le cuiseur active
automatiquement la fonction de maintien au chaud.
Toutefois, il n’est pas recommandé d’utiliser la
fonction de maintien au chaud car cela pourrait
causer un épaisissement du porridge. Appuyez
VXUODWRXFKH>2II@DSUqVODFXLVVRQ
Ɣ
Aucun son n’est émis lorsque la cuisson se
termine.
Le voyant
s’allume
Keep
Warm
Le voyant
s’éteint
Keep
Warm
23
Page 24

Recettes
Mise en garde :
· En raison des différents ingrédients ajoutés au riz, il est possible que le riz brûle au
fond du panier.
· Dans cette recette, le volume de cuisson correspond au modèle de 1,8 L. Veuillez vous
reporter aux caractéristiques techniques indiquées à la P27 pour connaître les
volumes de cuisson du modèle de 1,0 L.
· 1 verre (verre gradué) : environ 150 g.
Riz au poulet mélangé
Ingrédients : Assaisonnement :
Riz 3 verres gradués
4 verres graduésEau
Poulet 80 g, coupé en petits morceaux
Bardane
Champignons
Tofu frit
Carottes
35 g, tranché
2 pièces, trempez-les dans l’eau, puis
retirez la base et coupez-les en lanières
2 pièces, versez de l’eau chaude sur celles-ci pour
enlever la graisse, puis coupez-les en lanières
40 g, coupées en lanières
Méthode de cuisson :
Faites bouillir le poulet et la bardane rapidement dans de l’eau chaude, puis égouttez-les immédiatement.
1)
2)
Lavez le riz, versez-le dans le panier et ajoutez 4 verres gradués d’eau.
3)
Versez l’assaisonnement dans le panier, mélangez et ajoutez les ingrédients restants. Fermez le couvercle.
4)
$SSX\H]VXUODWRXFKH>:KLWH5LFH@SRXUGpPDUUHUODFXLVVRQ/RUVTXHODFXLVVRQVHWHUPLQHYRXVSRXYH]
savourer votre repas.
Vin de cuisson, sauce soja 20 mL de chaque
Sel 3g
Soupe au maïs et aux côtes de bœuf
Ingrédients : Assaisonnement :
Côtes de bœuf
Maïs
Eau
Méthode de cuisson :
1) Déposez les côtes de bœuf dans de l’eau bouillante pour enlever le sang résiduel, puis égouttez-les pour
l’utilisation ultérieure.
2) Versez tous les ingrédients dans le panier, ajoutez le sel et fermez le couvercle.
$SSX\H]VXUODWRXFKH>3RUULGJH6RXS@/DFXLVVRQVHWHUPLQHUDDSUqVHQYLURQKHXUHHWPLQXWHV
(Vous pouvez ajouter d’autres types d’assaisonnements, comme de la poudre à saveur de poulet, selon vos préférences
personnelles).
24
500 g, coupées en morceaux de 5 cm
2, environ 450 g, coupés en morceaux de 5 cm
5 verres gradues
Sel 6.5 g
Page 25

Recettes
Dim Sum (congelés)
Ingrédients :
(A) Petits morceaux
Quenelles aux crevettes
Shumai
Méthode de cuisson :
Il n’est pas nécessaire de décongeler. Déposez simplement les Dim Sum congelés sur le panier d'étuvage
1)
et versez un p
2) Ajoutez 1/2 verre gradué d’eau froide dans le panier.
3) Placez le panier d'étuvage dans le panier et fermez le couvercle.
4) $SSX\H]VXUODWRXFKH>4XLFN&RRN6WHDP@SDWLHQWH]HQYLURQPLQXWHVSXLVDSSX\H]VXUOD
WRXFKH>2II@
eu d’eau sur la surface des Dim Sum.
(B) Gros morceaux
Petits pains vapeur au porc laqué
Petits pains vapeur
Riz gluant dans une feuille de lotus
Porridge aux haricots mungo et pétales de lis
Ingrédients : Assaisonnement :
Haricots mungo 70 g
70 g Riz gluant
Pétales de lis 10 g
Méthode de cuisson :
Versez les haricots mungo lavés, le riz gluant et les pétales de lis dans le panier, puis ajoutez de l’eau
1)
jusqu’au niveau 1 pour “ PORRIDGE ”.
2)
)HUPH]OHFRXYHUFOHHWDSSX\H]VXUODWRXFKH>3RUULGJH6RXS@/DFXLVVRQVHWHUPLQHUDDSUqVHQYLURQ
1 heure et 30 minutes.
3) Ajoutez du sucre selon vos préférences personnelles et savourez votre repas.
Sucre Selon vos préférences personnelles
Utilisation
25
Page 26

Nettoyage et entretien
Attention
Ɣ
Avant de procéder au nettoyage ou à l’entretien, débranchez la fiche d’alimentation. Ne nettoyez pas le cuiseur avant qu’il n’ait refroidi.
Ɣ
Lorsque vous nettoyez le cuiseur, ne l’immergez pas dans l’eau et n’utilisez pas de diluant à laque, d’alcool, de poudre de nettoyage, de brosse rigide, etc.
Ɣ
N’utilisez pas le lave-vaisselle.
Capuchon d’humidité
Démontage
Retirez le capuchon
de la plaque chauffante.
Ɣ
Le capuchon d’humidité peut être retiré directement.
Mise en garde
Nettoyez-le après chaque utilisation.
Ɣ
Après l’avoir nettoyé, ne le mettez-pas au lave-vaisselle,
etc., car cela pourrait causer des déformations ou fissures.
Ɣ
Ɣ
Ɣ
Lors de l’assemblage après le nettoyage, assurez-vous
d’installer l’anneau d’étanchéité sur le capuchon d’humidité.
Appareil complet Couvercle (partie scellée)
Assemblage
Insérez le capuchon dans l’ouverture
de la plaque chauffante dans le sens
inverse du démontage.
Insérez-le complètement dans
l’ouverture pour éviter qu’il puisse
se détacher.
Anneau
Ɣ
d’étanchéité
Essuyez avec un chiffon bien essoré.
Ɣ
Si des objets étrangers ne sont pas retirés, ces derniers peuvent
coller à la plaque chauffante et devenir difficiles à déloger.
Nettoyez la plaque chauffante après chaque utilisation. Étant donné que
les pièces métalliques sont chauffées, leur surface peut être décolorée ou
présenter des bandes, ce qui n’affecte en rien leur fonctionnement.
Ɣ
Ne tirez pas sur l’anneau d’étanchéité du panier.
Ɣ
Ɣ
Ɣ
Ɣ
Ɣ
Nettoyez avec un détergent dilué et une éponge douce. Essuyez
toute l’eau présente sur le panier.
Ɣ
La surface de revêtement fluoré peut présenter une décoloration
ou des bandes, ce qui ne représente aucunement un danger
pour la santé et n’affecte en rien le fonctionnement du cuiseur.
Ɣ
Selon la fréquence d’utilisation, des traces de frottement
peuvent apparaître sur l’extérieur du panier, ce qui n’affecte
en rien le bon fonctionnement du cuiseur.
&DSWHXUGHWHPSpUDWXUH'LVSRVLWLIFKDXIIDQW
Ɣ
Lorsque des objets étrangers adhèrent à ces pièces, enlevez-les en
frottant doucement une laine d'acier extra fine (n° 600) ou un chiffon sec.
Accessoires
Nettoyez avec un détergent dilué et une éponge douce.
Panier
Cuillère à riz
26
160
120
80
40
Verre gradué
Panier d'étuvage
Page 27

Guide de dépannage
Dans les cas suivants
Éléments à vérifier
Ɣ
Quantité de riz ou d’eau incorrecte
Ɣ/HUL]Q¶HVWSDVFRPSOqWHPHQWODYp
ƔLe fond du panier est inégal
Des objets étrangers se trouvent à l’extérieur
Ɣ
du panier ou du capteur de température
Ɣ
Le couvercle n’est pas fermé correctement
Le capuchon d’humidité n’est pas installé correctement
Ɣ
Ɣ
De la graisse est ajoutée pendant la cuisson du riz
À la fin de la cuisson, le riz n’est pas d'étuvage
Ɣ
Ɣ
Maintien au chaud pendant plus de 5 heures
La quantité de riz maintenue au chaud est trop petite
Ɣ
Ɣ
La cuillère à riz est laissée dans le cuiseur
pendant que le riz est maintenu au chaud
ƔLe riz froid est maintenu au chaud
Ɣ
Le couvercle n’est pas fermé solidement
ƔLa panier n’est pas nettoyé
Ɣ/DILFKHHVWGpEUDQFKpHRXODWRXFKH
>2II@HVWHQIRQFpSHQGDQWODFXLVVRQ
ƔUne touche incorrect est enfoncée
Riz
Durci
Cuisson
insuffisante
Veuillez vérifier les éléments suivants
Croûte de
riz brûlée
Trop tendre
Débordement
de l’eau de riz
Les touches
ne fonctionnent
Riz maintenu au chaud
inhabituelle
Décoloration
Odeur
pas
Sec
ƔƔƔ
chaleur. Il ne s’agit aucunement d’une défaillance.
La fiche est débranchée ou branchée incorrectement.
Les sons
suivants sont
émis pendant
l’utilisation
8Q>FOLF@HVWpPLVSHQGDQWODFXLVVRQORUVTXHOHGLVSRVLWLI
chauffant règle la température; il ne s’agit aucunement d’une
défaillance.
8Q>SRS@HVWpPLVSHQGDQWODFXLVVRQORUVTXHGHO¶HDXV¶pFRXOH
dans le bas du panier (à l’extérieur) et s’évapore sous l’effet de la
Caractéristiques techniques
Modèle
Alimentation/fréquence nominale
Puissance nominale (cuisson du riz)
Volume nominal du panier en L
Volume de cuisson
du riz (quantité de
riz) en litres
Volume de cuisson du porridge (quantité de riz) en L
Volume de cuisson maximal (ingrédients + eau) pour la soupe en L
Longueur (approx.) du cordon d’alimentation en m
Poids (approx.) du produit en kg
Dimensions
(approx.) en cm
Ɣ
Le symbole signifie que le volume de cuisson maximal pour la soupe correspond au
niveau d’eau le plus haut pour “ PORRIDGE ”.
Ɣ
Pour faire remplacer le cordon d’alimentation ou réparer le produit, veuillez contacter
un centre de service autorisé par Panasonic.
Ɣ
La conception et les caractéristiques techniques peuvent être modifiées sans avis préalable.
Riz blanc/Cuisson rapide
Riz brun
Riz mélangé/Riz gluant
Largeur
Longueur
Hauteur
SR-DF101
120 V 60 Hz
750 W
3
a>aYHUUHV@
0,18~0,54 >aYHUUHV@
0,09~0,18 [1/2~1 verres@
1,5
1.0
2,5 2,8
24,5
33,9
19,9
SR-DF181
4.8
a>aYHUUHV@
&XLVVRQUDSLGH>aYHUUHV@
0,18~1,08 >aYHUUHV@0,18~0,54 >aYHUUHV@
0,18~0,9 >aYHUUHV@
0,09~0,36 >aYHUUHV@
2,3
24,7
Problèmes de fonctionnement
27
Page 28

安全注意事項
請務必遵守!
為防止造成人身傷害、財產損失,請務必遵守以下安全注意事項。
因錯誤操作所產生的損害程度,如下區分說明。
警告: 注意:
重伤害的危险。
希望遵守的內容分類,用下列圖標來區分說明。
表示可能导致死亡或严
這些圖標表示禁止的內容。
警告
如果電源線、電源插頭破
■
損,或是連接電源插座的
電源插頭鬆了,請勿使用
本產品。
(以免造成觸電、短路或
火災。)
請勿將任何物體插入散熱
■
孔或間隙中。
特別是金屬物,如針或電
線。(以免造成觸電或故
障。)
本產品並非設計給身體、感
■
官或心智功能不足者(包括
孩童),或缺乏經驗及知識
者使用,除非有負責他們安
全的人員給予監督或指導,
才能使用本產品。請注意避
免讓孩童戲玩本產品。
(以免造成燙傷或受傷。)
請勿損毀電源線或電源插頭。
■
嚴格禁止執行以下動作。
對電源線加工、置於加熱元件附近、
彎曲、扭曲、拉伸、將重物放在上面
或捆成一束。(可能造成觸電、短路或
火災。)
• 如果電源線損毀,必須由製造商、
服務代表或類似的合格人員更換,
以免發生危險。
■
禁止將本產品浸在水中或淋水。
(以免造成短路或觸電。)
• 如果本產品進水,請咨詢授權的經
銷商。
■
只能使用額定值10 A與120 V
交流電的電源插座。
(若與其它電器並用,可能
會因發熱而引起火災。)
• 只能使用額定值至少10 A的延長線。
表示可能造成人身伤害
或财产损失的危险。
此圖標表示務必執行的內容。
■
禁止濕手插或拔除電源插頭。
(以免導致觸電。)
請勿讓臉靠近或用手碰觸蒸
■
氣口。請勿讓蒸氣口位於兒
童能觸及的地方。
蒸氣口
(以免造成燙傷。)
■
請勿擅自改裝、拆分或修理
本產品。
(以免造成火災、觸電
或受傷。)
• 請咨詢購買店家或授權經銷商
的維修部。
■
將電源插頭插到底。
(否則可能會因電源插頭
附近產生的高溫,造成觸
電和火災。)
• 請勿使用損毀的電源插頭或鬆動
的電源插座。
■
定期清潔電源插頭。
(以免灰塵聚積在電源插
頭上,因濕氣導致絕緣不
良,從而引起火災。)
• 拔下電源插頭,並用乾布擦拭。
28
■
發生下列異常情況或故障時,請立即停止使用,並拔掉電源插頭。
(以免造成冒煙、火災或觸電。)
• 電源插頭和電源線異常發熱。
(如異常情
況或故障)
請立即前往Panasonic授權服務中心進行檢查及維修。
• 電源線損毀或碰到線後發生斷電。
• 本體發生變形或異常發熱。
• 本體冒煙或發出焦味。
• 產品破裂、鬆動或晃動。
• 放熱板翹曲或內鍋變形。
Page 29

安全注意事項
請勿在下列地方使用本產品。
■
• 可能會被淋水或接近熱源之處。(以免造
成觸電、漏電及火災。)
• 不平坦的表面或不耐熱的墊子上。(以免
造成燙傷、受傷或火災。)
• 靠近墻壁及家具。(以免發生變色或變
形。)
切勿使電源插頭接觸蒸氣。
■
• 切勿使插入的電源插頭接觸蒸氣。(以免造成短
路或火災。)
使用含有滑台的櫃子時,在電源插頭不會接觸到
蒸氣的地方使用本產品。
請務必遵守!
注意
本產品使用中或剛烹
■
調後,請勿碰觸加熱
元件。
特別是放熱板(可能
會造成燙傷。)
■
移動本產品時請勿碰觸
開蓋按鈕。
(以免導致外蓋打開
而造成燙傷。)
■
拔掉電源插頭時,務必握住電
源插頭。
(否則可能會造成觸電、短路
或火災。)
■
不使用本產品時,應從電源插
座拔下電源插頭。
(否則可能會因絕緣劣化而短
路,造成觸電和火災。)
請按使用說明書所示,正確
加入米量、水量並正確選擇
功能。
(以免引起米水溢出、飯煮不熟或
出現飯焦等。)
使用本產品之前務必去
掉內鍋保護袋及內鍋與
電熱板之間的防鏽紙。
(以免烹調不良或發生
火災。)
本產品使用中請勿將
布或其它物品蓋在外
蓋上。
(以免外蓋變形、變色
或發生故障。)
請勿使用非本產品專用的電源線
■
組(本體插頭、電源插頭),並
禁止把本電源線組轉用到其
它地方。
(以免造成觸電、漏電及火
災。)
■
在本產品冷卻後再進行清洗。
(接觸高溫元件可能會造成燙
傷。)
使用注意事項
請勿把需要烹調的食物直接倒
入沒放內鍋的電飯煲內。
(以免因雜質而引起故障。)
避免在陽光直射下
使用本產品。
(以免引起變色。)
■
請勿在烹調時打開外
蓋。
(以免造成燙傷。)
■
禁止使用非專用內鍋。
(以免因過熱或故
障而造成燙傷和受
傷。)
請勿在地毯、電熱地毯、台布
(乙烯塑料製)等不耐高溫的
物品上使用本產品。
(以免烹調不良或發生火災。)
請勿使用尖銳的金屬製
品盛飯。
(以免刮傷內鍋塗層,導
致塗層脫落。)
使用之前
請及時清潔內鍋、電熱板和溫度傳感器上的飯
粒等異物。
●
內鍋
電熱板
溫度傳感器
請勿將本產品傾斜
或翻轉。
●
進行清潔之前,請
關閉電源,並拔掉
插頭。
若米水從蒸氣口溢
出,請先拔掉電源
插頭,切斷電源。
用乾布擦去電源插
頭、本體插頭等部
位的米水後,方可
繼續使用。
本產品只供家庭用。請
勿用於商業或工業用途
以及烹調以外的其它用
途。
本產品使用中如發生停
電,則可能會影響烹調
效果。
29
Page 30

零件名稱
進行快速煮飯或蒸煮時,
按此按鈕。
操作面板
FUZZY MICROCOMPUTER
Quick Cook/Steam
烹調白米飯時,按此
按鈕。
White Rice
烹調糙米時,按此按
鈕。
要取消操作或停止保溫
功能時,按此按鈕。
外蓋
鍋墊圈
保濕裝置
放熱板
內鍋
Brown Rice
Off
Porridge/Soup
Keep
Warm
本體
烹調稀飯/湯時,按此
按鈕。
要啟動保溫功能時,
按此按鈕。
本電飯煲不設按鍵音或結束
提示音。
開蓋按鈕
操作面板
附屬品
30
機體
附屬品在使用前請進行清洗。
160
120
80
40
飯勺
(1個)
量杯(約180毫升)
(1個)
電源線
手柄
(兩側均有)
蒸籠
(1個)
Page 31

準備工作
用附屬的量杯量米
1
● 1量杯大約180毫升(約150克)。
● 一次可煮的米量 P39。
● 用1.8 L型進行快速煮飯或烹調長身米粒時,最大米量請控
制在8杯以內。
將米洗至水清
2
① 加入充分的水,快速搓洗後立即倒掉水。
② 重復數次[洗米→用水沖洗],將米洗至水清為止。
注意事項
●
為避免擦傷內鍋表面的不粘塗層,請勿直接用內鍋洗米。
●
請把米洗乾淨。否則可能產生飯焦,而且殘留的米糠會影響米飯的
味道。
將洗好的米放入內鍋
3
根據需要加水至相應的水位線,並擦乾內鍋外表面。
● 加水時要看左右兩邊的刻度,使其保持在同一高度。
●
燉湯時,材料加水的容量不能超過「PORRIDGE(稀飯)」
的最大水位線。
● 煮什錦飯、糯米飯時,按照下表加水。
米量(量杯)
1.0 L型
1
2
3
4
5
以上水量可根據個人喜好適當增減。
水量(附属的量杯)
什錦飯 糯米飯
1
2
---
---
1.8 L型
1
/
2
3
/
4
4
1
2
4
5
6
1.0 L型
1
/
2
3
/
4
1
/
4
1
2
3
---
---
1
1.8 L型
/
4
1
2
3
4
5
會影響煮飯效果正確
<例> 煮6量杯的白米飯時,將米淘洗
乾淨,把米加入內鍋,加水至
標有「WHITE RICE(白米)」
側的水位刻度「6」。
WHITE RICE CUP
10
BROWN
RICE
PORRIDGE
2
6
1
4
1
1/2
2
1/2
1
/
4
8
6
4
2
用途
(例如:1.8 L型)
將內鍋裝入本體後,蓋上外蓋
4
● 為使鍋底和電熱板能緊密貼附,請將內鍋按箭頭所示方
向轉動2-3次。
● 確認保濕裝置是否安裝到位。( P38)
● 蓋上外蓋時,請確認發出「咔嗒」一聲。
插上插頭
5
● 請先插上本體插頭,再插電源插頭,並確認兩者均已插
到底。
注意事項
最大烹調容量(附属的量杯)
* 在煮飯的同時使用蒸籠時,最大烹調容
量如右圖所示。
型號
最大烹調容量
本體
本體插頭
1.0 L型 1.8 L型
2 5
電源插頭
插座
31
Page 32

功能 快速/蒸餸(Quick Cook/Steam)
溫馨提示
●
煮飯的同時進行蒸煮時,請選擇
[White Rice]功能。
●
蒸煮的時間視內鍋中的水量而定。
請根據所需時間調節水量。
●
水沸騰並完全蒸發後,便自動轉為
保溫狀態。
●
若欲在中途停止蒸煮,請按[Off]按
鈕。
●
[Quick Cook/Steam]按鈕也可用於
快速煮飯,方法 P33 [White
Rice]。
因時間縮短,米飯會稍硬或有飯焦
產生。
1
FUZZY MICROCOMPUTER
Quick Cook/Steam
Brown Rice
Off
White Rice
Porridge/Soup
Keep
Warm
2
操作
(例如:用[Quick Cook/Steam]功能進行蒸煮時)
●
放入適量的水(參照下表)。
●
將蒸籠放入內鍋。
●
將需蒸煮的食物放入蒸籠。
●
蓋好外蓋。
按[Quick Cook/Steam]按鈕
1
●
[Quick Cook/Steam]指示燈亮起,開始蒸煮。
時間及水量表。下表的時間是指從開始到結束,全程的時間。
* 可蒸煮的最長時間約70分鐘。那時無論水有沒有完全蒸發,都將自動轉為保溫狀態。
烹調結束
水量(約)
蒸煮時間(約)
1
/2 量杯
15 分鐘
指示燈亮起
Quick Cook/Steam
1 量杯
30 分鐘 50 分鐘 65 分鐘
2 量杯 3 量杯
蒸籠
水
32
●
內鍋中的水沸騰並完全蒸發後,蒸餸程序結
束,並將自動轉為保溫狀態。
按[Off]按鈕
2
● 結束時不設提示音。
● 此時,蒸籠會非常熱。取出時請務必當心燙手。
指示燈亮起
Keep
Warm
指示燈熄滅
Keep
Warm
Page 33

功能
白米
FUZZY MICROCOMPUTER
Quick Cook/Steam
Brown Rice
Off
•
保溫(White Rice • Keep Warm)
White Rice
Porridge/Soup
Keep
Warm
1
溫馨提示
●
煮什錦飯、糯米飯時,請選擇[White
Rice]功能。水量 P31。
●
用[White Rice]功能煮出的米飯更鬆
軟可口。
操作
(例如:用[White Rice]功能煮飯時)
按[White Rice]按鈕
1
●
[White Rice]指示燈
烹調時間(參考)
Quick Cook
White Rice
約30分鐘
約38分鐘
亮起,開始烹調。
●
●
●
左表時間為電壓120 V、室溫20℃、水溫18℃、米量為中間量
時,烹調所需的參考時間。(1.0 L型:3杯,1.8 L型:5杯)
烹調時間會根據電壓、室溫、水溫、水量、米量、米質的不同
而變化。
什錦飯/糯米飯的烹調時間根據加入的材料而變化。
烹調結束
翻鬆米飯
●
烹調結束後,將自動轉為保溫狀態。為防止米飯粘在一起,
請盡快翻鬆米飯。
●
結束時不設提示音。
保溫
●
所有功能在烹調結束後都將自動轉為保溫狀態。但是一
部分功能不建議保溫,烹調結束後請盡快按[Off]按鈕。
● 米飯以在保溫5小時以內食用為佳,以免影響口感或有
異味。
● 保溫時,內鍋的邊緣部有時會出現少量水珠。
● 保溫時內鍋中如放有飯勺等盛飯用具則會影響米飯的味
道。
指示燈亮起
White Rice
快速,白米,湯
糙米飯,什錦飯,
糯米飯
稀飯
功能
指示燈亮起
Keep
Warm
保溫
保溫後的結果
○
×
影響口感或有異味
導致稀飯變稠
×
用途
33
Page 34

功能 糙米(Brown Rice)
FUZZY MICROCOMPUTER
1
操作
Quick Cook/Steam
Brown Rice
Off
(例如:用[Brown Rice]功能煮飯時)
按[Brown Rice]按鈕
1
●
[Brown Rice]指示燈亮起,開始烹調。
烹調時間(參考)
Brown
Rice
約1小時50分鐘
● 左表時間為電壓120 V、室溫20℃、水溫18℃、米量為中間量
時,烹調所需的參考時間。(1.0 L型:2杯,1.8 L型:3杯)
● 烹調時間會根據電壓、室溫、水溫、水量、米量、米質的不同
而變化。
White Rice
Porridge/Soup
Keep
Warm
溫馨提示
●
糙米飯請勿保溫,以免影響
口感。
●
糙米是一種比較難烹調的米
種,在烹飪過程中會有1小
時左右的浸米過程,使米粒
能充分吸水,達到理想的烹
調效果。
指示燈亮起
Brown Rice
烹調結束
翻鬆米飯
●
●
34
烹調結束後,將自動轉為保溫狀態。
但是為避免因保溫而影響口感,請盡
快按[Off]按鈕。
結束時不設提示音。
指示燈亮起
Keep
Warm
指示燈熄滅
Keep
Warm
Page 35

功能 稀飯/湯(Porridge/Soup)
FUZZY MICROCOMPUTER
1
Quick Cook/Steam
Brown Rice
Off
White Rice
Porridge/Soup
Keep
Warm
2
操作(例如:用[Porridge/Soup]功能煮稀飯時)
按[Porridge/Soup]按鈕
1
●
[Porridge/Soup]指示燈亮起,開始烹調。
●
烹調參考時間(約):1小時30分鐘。
湯的最大烹調量(材料+水)如超過「PORRIDGE(稀飯)」
的最大水位線,可能會造成溢出或不熟。( P39 規格)
溫馨提示
●
水量或米量不正確,可能會導致米水
從蒸氣口中溢出。
●
烹調中打開外蓋,會促使水滴凝結於
放熱板上。
●
如保溫時間過長,稀飯將會變稠。
●
每次使用完畢後,應取下保濕裝置進
行清洗,以免產生異味。
指示燈亮起
Porridge/Soup
用途
烹調結束
按[Off]按鈕
2
●
烹調結束後,將自動轉為保溫狀態。
但是為避免因保溫而影響口感,請盡快
按[Off]按鈕。
●
結束時不設提示音。
指示燈亮起
Keep
Warm
指示燈熄滅
Keep
Warm
35
Page 36

菜譜
注意:· 根據加入米飯內的不同材料,飯的底部可能有燒焦的現象。
· 本菜譜中的烹調量以1.8 L型為例。1.0 L型的烹調量 P39規格。
· 1杯(量杯):約150克。
什錦雞飯
材料: 調味料:
米 3量杯 料酒、醬油 各20毫升
水 4量杯 鹽 3克
雞肉 80克,切小塊
牛蒡 35克,削成小薄片
香菇 2個,泡發後,去蒂切細絲
油炸豆腐 2塊,淋熱水去油後,切細絲
紅蘿蔔 40克,切細絲
做法:
1) 將雞肉、牛蒡放入熱水汆一下後撈起。
2) 米洗淨,放入內鍋,加入4量杯的水。
3) 放入調味料攪拌後,放入剩餘的材料,並蓋上外蓋。
4) 按[White Rice]按鈕,開始烹調。結束後即可食用。
玉米排骨湯
材料: 調味料:
排骨 500克,切成5厘米的段 鹽 6.5克
玉米 2個,約450克,切成5厘米的段
水 5量杯
做法:
1) 將排骨放入沸水去掉血沫,撈起瀝乾備用。
2) 將所有材料放入內鍋,加入鹽,蓋上外蓋。
3) 按[Porridge/Soup]按鈕,約1小時30分鐘後,烹調結束。
(可根據個人喜好,加入雞粉等調味料。)
36
Page 37

菜譜
點心(急凍)
材料:
(A) 小點類
蝦餃
燒賣
做法:
1) 無需解凍,把點心放在蒸籠上,並在點心表面灑少許水。
2) 將1/2量杯涼水加入內鍋。
3) 將蒸籠放入內鍋後,蓋上外蓋。
4) 按[Quick Cook/Steam]按鈕,約過10分鐘後,按[Off]按鈕。
(B) 大點類
叉燒包
小籠包
糯米雞
綠豆百合稀飯
材料: 調味料:
綠豆 70克 糖 按個人口味
糯米 70克
百合 10克
做法:
1) 把洗好的綠豆、糯米和百合放入內鍋,加水至「PORRIDGE(稀飯)」的1刻度線。
2) 蓋上外蓋,按[Porridge/Soup]按鈕。約1小時30分鐘後,烹調結束。
3) 按個人口味加入適量的糖,即可食用。
用途
37
Page 38

清潔保養
注意事項
●
清潔保養前,務必拔掉電源插頭,等電飯煲冷卻後再進行清潔。
●
清潔時,切勿將電飯煲浸入水中,不要使用天拿水、酒精、去污粉、硬質刷等擦拭。
●
請勿使用洗碗機。
保濕裝置
拆卸方法
從放熱板上拔出。
●
保濕裝置可直接取下,每次使用後要及時擦洗乾
淨。
●
●
●
清洗後請勿使用洗碗機等烘烤,這樣會導致變形
或出現裂紋。
●
清洗後安裝時,請務必確認密封圈已安裝在保濕
裝置上。
安裝方法
以與拆卸時相反的方向,塞
入放熱板上的孔內。
請安裝到底,以防脫落。
●
密封圈
●
本體
用擰乾的抹布擦拭。
●
放熱板上的髒污如不及時洗淨,髒污將粘附到放熱
板,很難洗掉。每次使用後要及時擦乾淨。金屬部
品受熱,其表面可能會出現變色或斑紋現象,但不
影響正常運作。
●
●
請勿拉扯鍋墊圈。
外蓋(密封部)
內鍋
●
●
●
●
用稀釋後的洗滌劑和海綿清洗。擦乾內鍋上的水份。
●
塗氟面可能會出現變色或斑紋現象,但不影響健康或
電飯煲的正常運作。
●
根據使用頻率,內鍋外層會出現磨擦後產生的痕跡,
但這種情況並不影響使用性能。
●
溫度傳感器
●
有粘附物時,請用纖細砂紙(600號)輕拭或用乾布
擦拭。
電熱板
附屬品
用稀釋後的洗滌劑和海綿清洗。
飯勺
38
160
120
80
40
量杯
蒸籠
Page 39

故障排除
請檢查下列項目
發生下列情況時
檢查項目
● 米量或水量不正確
● 米未淘洗乾淨
● 內鍋底凹凸不平
● 內鍋外側、溫度傳感器上有異物
● 外蓋未蓋妥
● 保濕裝置未正確安裝
● 放入油脂烹調
● 烹調結束後,沒有翻鬆米飯
● 保溫5小時以上 ● 保溫的飯量過少
● 飯勺插於飯中保溫
● 冷飯保溫
● 沒有蓋緊外蓋 ● 內鍋沒有洗乾淨
● 烹調中拔掉插頭或碰觸了[Off]按鈕
● 錯按了按鈕
米飯 飯在保溫中
● ● ●
規格
型號
電源/額定頻率
額定功率(煮飯時)
內鍋的額定容量 升
煮飯容量
(米量)升
煮稀飯容量(米量)升
湯的最大烹調容量(材料+水量)升
電源線長度(約)米
產品重量(約)公斤
尺寸(約)
厘米
●
表示湯的最大烹調容量為「PORRIDGE(稀飯)」的最大水位線。
●
電源線的更換或產品的修理請與Panasonic授權服務中心聯繫。
●
設計和規格若有變更,恕不另行通知。
白米/快速
糙米
什錦飯/糯米飯
寬
長
高
SR-DF101
120 V 60 Hz
3
0.18~1.0 [1~5.5杯]
0.18~0.54
0.18~0.54
0.09~0.18
[1~3杯]
[1~3杯]
[1/2~1杯]
1.5
2.5 2.8
19.9
750 W
1.0
24.5
33.9
SR-DF181
4.8
0.18~1.8 [1~10杯]
快速 [1~8 杯]
0.18~1.08
0.18~0.9
0.09~0.36
[1~6杯]
[1~5杯]
[1/2~2杯]
2.3
24.7
困惑時
39
Page 40

PanasonicAppliancesRiceCooker(Hangzhou)Co.,Ltd.
Website:http://panasonic.net/
c
Panasonic Corporation 2012
RZ19AF12
S0812-0
Printed in China
Page 41

USA/CAN
Manual de instrucciones
Arrocera eléctrica
Uso doméstico
হଵৣࢥঢ়
թபଵத؈!ࣺ
Precauciones de seguridad
Identificación de las piezas
Panel de control
Unidad completa
Preparativos
Funciones
Cocción rápida/Vapor
Arroz blanco Mantener caliente
Arroz integral
Avena/Sopa
Recetas
.......................................................... 44
........................................................ 44
.......................................................... 45
............................................................... 46
................................................. 46
.............................................................. 48
................................................................ 49
.......................................................... 50~51
........................... 44
............................... 47
Limpieza y
mantenimiento
Solución de problemas
Especificaciones
.................................................... 52
.................................. 53
............................................... 53
Índice
.............42~43
Antes del uso
Uso
problemas
N.º de modelo 1.0L
ࢨ݆!
ᵟ‛ℓὯᣃⶄ
ժ!ࢥೊ
؈܉!ஃ
ଙ෪
................................................................................ 56
!হฑ
................................................................................... 58
؈܉
ഈಭহ0ౖ
ࣿ!!ଌ
.................................................................................... 60
ะ
.................................................................................. 61
0ן
ମࡦ
.................................................................... 62~63
౽!࣭!ୗׄࡦ
ࣄ!ฒ֩
෪!֥
.................................................54~55
...................................................................... 56
....................................................................... 56
...................................................................... 57
....................................................................... 58
....................................................................... 59
................................................... 64
...............................................................65
..............................................................65
SR-DF101
1.8L
SR-DF181
ዀ
হଵฉ؈!த૫
হଵฌ!ޣ
ࣄթ!ࣵซ!֮ଶ
Gracias por adquirir este producto Panasonic.
Este producto se ha diseñado exclusivamente para uso doméstico.
Lea estas instrucciones con atención y siga las precauciones de seguridad cuando utilice el producto.
Antes de utilizar este producto
Es muy importante que la fecha y el nombre del establecimiento de compra estén sellados y conserve el documento con este
manual de instrucciones.
Consérvelo para usarlo más adelante
Panasonic!෪ୣ!מฉ!৵ঢ়!հহฏܙ/
lea con atención la sección “Precauciones de seguridad”(página 42~43).
!෪ୢ!թபଵୠࠨࡰ!হଵฌ!!ܙ/
!ৣࢥঢ়࡞!୯!ؓ֜!ֵ!෪!হଵ!!த!୯!হฑୣ!ޙ߯!ଊ/
!෪ୣ!হଵฉ؈!த૫
ᵟ‛ℓὯᣃⶄa⮯ᾋ⇗ИᓛℓὯᆓهỏḃℓᬄḻ
.
מ!ڑఉ!࣭!מթ!ڑ୶ݥ!܂!ๆ୶ฉֵ!!হଵৣࢥঢ়ଗ!ฎض!ׄฉଊ/
ڌୣ!ฒ!ׄฌ!֕
Page 42

Precauciones de seguridad
¡Es imprescindible seguirlas!
Para evitar accidentes o que el usuario y otras personas puedan sufrir heridas o
causar daños, siga las instrucciones que se detallan a continuación.
A continuación se indica el grado de daño que puede provocarse por un uso incorrecto.
Indica un riesgo
Advertencia:
que puede resultar
mortal o muy grave.
Precaución:
Indica un riesgo que
puede provocar daños
personales o materiales.
Los símbolos se clasifican y se explican del modo siguiente.
Estos símbolos indican
una prohibición.
No utilice el aparato si el
Ŷ
cable de alimentación o
el enchufe están dañados
o si el enchufe no encaja
bien en la toma de pared.
(Podría provocar una descarga
eléctrica, un cortocircuito o
incluso un incendio.)
No inserte objetos en la salida
Ŷ
de ventilación o en el hueco.
Evite sobre todo que entren
objetos metálicos como
alfileres o cables. (Podría
provocar una descarga
eléctrica o averiar el aparato.)
Este aparato no está
Ŷ
diseñado para que lo utilicen
personas (incluso niños)
con capacidades físicas,
sensoriales o mentales
reducidas. Tampoco si no
tienen experiencia y
conocimiento, a no ser que
un adulto capaz les haya
facilitado supervisión o
instrucciones para utilizar el
aparato con total seguridad.
Los niños siempre deben
estar vigilados para que no
jueguen con el aparato.
(Si lo hacen, podrían
quemarse o herirse.)
Este símbolo indica un requisito
que debe seguirse.
Advertencia
No enchufe y desenchufe la unidad
No dañe el cable de
Ŷ
alimentación ni el enchufe.
Las siguientes acciones están
estrictamente prohibidas.
Modificar el cable, colocarlo cerca de
elementos que emitan calor, doblarlo, torcerlo,
ponerle objetos pesados encima o enrollarlo.
(Podría provocar una descarga eléctrica, un
cortocircuito o incluso un incendio.)
Si se daña el cable de alimentación,
debe cambiarlo por uno nuevo del
fabricante, siempre a cargo de un
técnico profesional o persona calificada
para evitar posibles riesgos.
No sumerja el aparato en
Ŷ
agua ni deje que le
salpique ningún líquido.
(Podría provocar un cortocircuito o una descarga eléctrica.)
Póngase en contacto con un distribuidor
autorizado si entra agua en el aparato.
Ŷ
Utilice solamente una toma de
pared con 10 A nominales y 120
V de corriente alterna.
(Si conecta otros dispositivos a la
misma toma, ésta se calentará y
podría provocar un incendio.)
Utilice solamente un cable prolongador
con 10 A nominales mínimos.
Ŷ
si tiene las manos húmedas.
No acerque la cara a la salida
Ŷ
de vapor ni la toque con las
manos. Evite que los niños
pequeños se acerquen a la
salida de vapor.
(Puede provocar quemaduras.)
No modifique, desmonte ni
Ŷ
repare el aparato.
Póngase en contacto con la tienda
o el departamento de reparación
de un distribuidor autorizado.
Inserte el enchufe con firmeza.
Ŷ
1RXWLOLFHHQFKXIHVURWRVQLWRPD
de pared sueltas.
(Podría provocar una
descarga eléctrica.)
Salida de vapor
(Podría provocar un incendio, una
descarga eléctrica o daños personales.)
(En caso contrario, podría
provocar una descarga eléctrica
o un incendio por el calor
generado alrededor del enchufe.)
Limpie el enchufe con
Ŷ
regularidad.
(Si el enchufe está sucio,
la humedad podría
debilitar el aislante y
provocar un incendio.)
'HVFRQHFWHHOHQFKXIH\
límpielo con un paño seco.
42
Deje de usar el aparato inmediatamente y desenchufe el
Ŷ
aparato si detecta un funcionamiento extraño o si se avería.
(p.ej.,
funcionamiento
extraño o
avería)
Acuda a un centro de asistencia técnica autorizado de Panasonic para
comprobarlo o solicitar la reparación inmediatamente.
(Podría provocar humo, fuego o una descarga eléctrica.)
El enchufe y el cable de alimentación se calientan mucho.
El cable de alimentación está dañado o se produce un fallo de alimentación al tocarlo.
(OFXHUSRSULQFLSDOHVWiGHIRUPDGRRPX\FDOLHQWH
/DXQLGDGGHVSUHQGHRORUDKXPRRDTXHPDGR
(ODSDUDWRWLHQHJULHWDVQRHVWiELHQILMDGRRHVLQHVWDEOH
La placa de calor está doblada o el recipiente está deformado.
Page 43

Precauciones de seguridad
¡Es imprescindible seguirlas!
Precaución
No utilice el aparato en los siguientes lugares.
Ŷ
/XJDUHVHQORVTXHSXHda salpicarle agua o cerca
de una fuente de calor.(Podría provocar una descarga
eléctrica, una fuga eléctrica o un incendio.
/XJDUHVFRQXQDVXSHUILFLHLQHVWDEOHRSURWHFWRUHV
no resistentes al calor.(Podría provocar quemaduras,
daños o un incendio.)
Cerca de una pared o de un mueble. (Podría
provocar decoloración o deformaciones.)
No exponga el enchufe a vapor.
Ŷ
1RH[SRQJDHOHQFKXIHa vapor si está conectado.
(Podría provocar un cortocircuito o fuego.)
Si utiliza un mueble con tablero deslizante, utilice el aparato
donde el enchufe no quede expuesto a vapor.
Es muy importante sujetar el
Ŷ
enchufe al desconectarlo de
la toma de pared.
(En caso contrario, podría provocar
una descarga eléctrica, un
cortocircuito o incluso un incendio.)
Desconecte el enchufe de la
Ŷ
toma de pared cuando no
vaya a utilizar el aparato.
(En caso contrario, podría
provocar una descarga eléctrica
o un incendio por cortocircuito
debido al deterioro del aislante.)
Ŷ
Ŷ
No utilice un cable para conectar
el aparato a la toma de corriente
eléctrica si no esta aprobado para
un uso con este aparato. No los
transfiera tampoco.
(Podría provocar una descarga eléctrica,
fugas o incluso un incendio.)
Deje que el aparato se enfríe
antes de limpiarlo.
(Si toca los elementos
calientes podría quemarse.)
No toque los elementos
Ŷ
calientes mientras el
aparato esté en uso o
justo después de cocinar.
Especialmente la
placa de calor
(podría quemarse.)
No toque el botón de
Ŷ
liberación mientras
mueva el aparato.
(Podría hacer que
la tapa externa se
abra y provocar
quemaduras.)
No abra la tapa
Ŷ
externa mientras
esté cocinando.
(Puede provocar
quemaduras.)
No utilice ningún otro recipiente
Ŷ
que no sea el especificado.
(Podría provocar
quemaduras y daños por
sobrecalentamiento o
errores de funcionamiento.)
Antes del uso
Precauciones de uso
Coloque la cantidad correcta de arroz
y de agua y seleccione las funciones
adecuadas según lo descrito en el
manual de instrucciones.
(Para evitar que se salga el agua de arroz, que
el arroz se hierva a medias o que quede duro.)
Antes de usar el aparato, quite el
plástico protector del recipiente y
el papel anti-manchas entre el
recipiente y el vaporizador.
(Para evitar que la cocción sea
defectuosa y posibles incendios.)
Limpie siempre los objetos extraños (como
el arroz) del recipiente, el vaporizador y el
sensor de temperatura.
Recipiente
Vaporizador
Sensor de temperatura
No cubra la tapa externa con
un paño ni con otro objeto si
el aparato está en uso.
(Para evitar deformaciones,
cambios de color en la tapa
externa o averias.)
Ɣ
No incline ni voltee el
aparato.
Ɣ
Antes de limpiarlo,
apague el interruptor
de encendido y
desenchufe la unidad.
No introduzca directamente
en la unidad los ingredientes
que quiera cocinar si no hay
ningún recipiente.
(Para evitar que las posibles
impurezas averíen la unidad.)
No utilice el aparato sobre ninguna
superficie difusora de calor, como una
alfombra, una manta eléctrica o un paño
(fabricado con plásticos de vinilo), etc.
(Para evitar que la cocción sea
defectuosa y posibles incendios.)
Evite utilizar el
aparato bajo la luz
solar directa.
(Para evitar la
decoloración.)
Si detecta exceso de cantidad
de agua de arroz en la salida
de vapor, tire inmediatamente
del enchufe para desconectar
la fuente de alimentación. No
vuelva a utilizar el aparato
hasta que haya limpiado y
secado con un paño suave el
agua de arroz de ambos
extremos del cable.
No sirva el arroz con
objetos metálicos y
afilados.
(Para evitar arañazos en el
recipiente y que no se pele el
revestimiento.)
Este aparato está diseñado
exclusivamente para uso
doméstico. No se debe utilizar
con fines comerciales o
industriales y para ninguna otra
finalidad que no sea cocinar.
Si se va la luz con el aparato
en marcha, el proceso de
cocción puede verse afectado.
43
Page 44

Identificación de las piezas
Panel de control
FUZZY MICROCOMPUTER
Pulse este botón para cocción
rápida o cocción al vapor.
Pulse este botón para cocinar
arroz integral.
Quick Cook/Steam
Brown Rice
White Rice
Porridge/Soup
Pulse este botón para
cocinar arroz.
Pulse este botón
para cocinar avena o
sopa.
Pulse este botón para
cancelar la operación
anterior o para detener la
función mantener caliente.
Tapa externa
Anillo de sellado del recipiente
Tapa de humedad
Placa de calor
Recipiente
Botón de liberación
Off
Keep
Warm
Unidad completa
Pulse este botón para la
función mantener caliente.
Este olla arrocera no tiene
sonido táctil ni indicador
audible de finalización.
Cable de alimentación
Panel de control
Cuerpo
Accesorios
44
Asa
(a ambos lados)
Limpie siempre los accesorios antes de utilizarlos.
160
120
80
40
Cuchara
para arroz (1)
Taza de medición
(aprox. 180 mL) (1)
Cesta vapor (1)
Page 45

Preparativos
Mida el arroz con el taza de medición suministrado
1
Ɣ
El volumen del taza de medición es aproximadamente de 180 mL (150 g).
Ɣ
Cantidad máxima de arroz que puede cocinarse de una vez P53.
Ɣ
Si se utiliza el Modelo 1,8 L para cocción rápida de arroz o cocción de arroz
entero, no ponga más de 8 tazas de arroz.
Lave el arroz hasta que el agua deje de estar sucia
2
Ԙ
Lave el arroz rápidamente con agua abundante, mueva el arroz para
lavarlo bien y cambie el agua.
5HSLWDHVWHSDVRHQYDULDVRFDVLRQHV>ODYDUHODUUR]ĺFDPELDUHO agua] hasta que el agua esté limpia.
ԙ
Atención
Ɣ
Para evitar arañar el recubrimiento anti-adherente de la superficie del
recipiente, no lave el arroz en el recipiente.
Ɣ
Lave bien el arroz. Si no lo hace, podría aparecer corteza de arroz y estos restos
pueden afectar al sabor del arroz cocinado.
Eche el arroz lavado en el recipiente
3
Añada agua hasta la línea correspondiente y seque el exterior del recipiente.
Ɣ
Cuando añada agua, preste atención a las marcas de
ambos lados y manténgalas a la misma altura.
Ɣ&XDQGRFRFLQHVRSDVHOYROXPHQWRWDOGHLQJUHGLHQWHV\
agua no debe superar la línea “PORRIDGE (AVENA)”.
Ɣ
Cuando cocine arroz mixto o arroz apelmazado,
añada agua según la tabla siguiente.
Cantidad de arroz
(tazas de medición)
1
2
3
4
5
Cantidad de agua (taza de medición suministrado)
Arroz mixto Arroz apelmazado
Modelo 1,0 L
1
2
4
---
---
1
/
2
3
/
4
Modelo 1,8 L
1
/
1
2
3
/
2
4
4
5
1
/
6
4
Modelo 1,0 L
1
2
3
---
---
1
/
4
Modelo 1,8 L
1
2
3
4
5
Las cantidades de agua anteriores se pueden
aumentar o reducir según las preferencias personales.
<
1
/
4
Correcto
Ejemplo>Si la cantidad de arroz es de 6
tazas de medición, lave el arroz
y échelo en el recipiente;
seguidamente, añada agua al
recipiente hasta que la superficie
llegue a la marca “6” de “WHITE
RICE (ARROZ BLANCO)”.
WHITE RICE CUP
10
(Ejemplo: Modelo 1,8 L)
El resultado de la cocción
podría verse afectado
BROWN
RICE
PORRIDGE
6
4
2
2
1
1
1/2
1/2
8
6
4
2
Uso
Ponga el recipiente en el cuerpo del
4
aparato y cierre la tapa externa
Ɣ
Para que la base del recipiente esté lo más en contacto posible con el vaporizador,
gire el recipiente en la dirección indicada por la flecha 2 o 3 veces.
Ɣ
Compruebe si la tapa de humedad está bien puesta. ( P52)
Ɣ
Cuando cierre la tapa externa, confirme que suena un “clic”.
Conecte el enchufe
5
Ɣ&RQHFWHHOHQFKXIHDOFXHUSRGHODSDUDWRHQSULPHUOXJDU
y luego conecte el enchufe a la toma de pared. Es muy
importante que ambos estén bien conectados.
Atención
* Cuando utilice la cesta vapor al cocinar
arroz, consulte la tabla de la derecha
para conocer los volúmenes máximos
de cocción.
Volumen máximo de cocción (taza de medición suministrado)
N.º de modelo
Volumen máximo
de cocción
Cuerpo
Enchufe
al aparato
Modelo 1,0 L Modelo 1,8 L
25
Enchufe de conexión
Toma de pared
45
Page 46

Funciones
FUZZY MICROCOMPUTER
Quick Cook/Steam
1
Brown Rice
Off
2
Cocción rápida/Vapor(Quick Cook/Steam)
Recordatorio
Ɣ
Cuando cocine comida al vapor al mismo tiempo
que arroz, seleccione la función [White Rice].
Ɣ
El tiempo de cocción está determinado
por la cantidad de agua del recipiente.
Ajuste la cantidad de agua en función
White Rice
Porridge/Soup
Keep
Warm
del tiempo necesario.
Ɣ
Una vez que el agua hierve y se evapora,
la olla arrocera pasa a la función
mantener caliente automáticamente.
Ɣ
Si quiere detener la función de vapor
durante la cocción, pulse el botón [Off].
Ɣ
El botón [Quick Cook/Steam] también se puede
utilizar para cocción rápida de arroz. Consulte la
P47 [White Rice] para saber más detalles.
Si el tiempo de cocción se acorta, el arroz puede
estar más duro o haber corteza de arroz.
Operaciones (Por ejemplo: cocción al vapor con la función [Quick Cook/Steam
Ɣ
Añada una cantidad adecuada de agua
(consulte la tabla siguiente).
Ɣ
Ponga la cesta vapor en el recipiente.
Ɣ
Ponga la comida que quiera cocinar al vapor
en la cesta vapor.
Ɣ
Cierre la tapa externa.
Pulse el botón [Quick
1
El indicador se ilumina
Cesta
vapor
Agua
Cook/Steam]
Ɣ
El indicador de [Quick Cook/Steam] se
ilumina y se inicia la cocción.
Tabla de tiempos y cantidad de agua para cocción al vapor. La duración total desde
el principio hasta el final hace referencia al tiempo mostrado en la siguiente tabla.
1
Cantidad de agua (aprox.)
Tiempo de cocción al vapor (aprox.)
*
El tiempo máximo de cocción al vapor es de unos 70 minutos. Una vez transcurrido el tiempo, se haya
evaporado completamente el agua o no, la olla arrocera pasa a la función mantener caliente automáticamente.
/2 taza de medición
15 minutos
1 taza de medición
30 minutos 50 minutos 65 minutos
Quick Cook/Steam
2 tazas de medición
3 tazas de medición
Ha terminado la cocción
]
)
46
Ɣ
Una vez que el agua del recipiente hierve y se ha
evaporado por completo, finaliza la función de
cocción al vapor y el olla arrocera pasa a la
función mantener caliente automáticamente.
Pulse el botón [Off]
2
Ɣ
No se escucha ningún sonido cuando termina la cocción.
Ɣ(QHVWHPRPHQWRODFHVWDYDSRUHVWiPX\FDOLHQWH
Tenga cuidado al sacarla.
El indicador
se ilumina
Keep
Warm
El indicador
se apaga
Keep
Warm
Page 47

Funciones
FUZZY MICROCOMPUTER
Quick Cook/Steam
Brown Rice
Off
White Rice
Porridge/Soup
Keep
Warm
Arroz blanco Mantener caliente
(
:KLWH5LFH.HHS:DUP)
1
Recordatorio
Ɣ
Si cocina arroz mixto o arroz
apelmazado, seleccione la función
[White Rice]. Para saber qué cantidad
de agua echar, consulte la P45.
Ɣ
El arroz cocinado con la función
[White Rice] está más suave y
sabe mejor.
Operaciones
(Por ejemplo: cocción de arroz con la función [White Rice])
El indicador se ilumina
Pulse el botón [White Rice]
1
Ɣ
El indicador de [White Rice] se ilumina
y se inicia la cocción.
Ɣ
Tiempo de cocción
(referencia)
Quick Cook
White Rice
Unos 30 minutos
Unos 38 minutos
El tiempo de referencia necesario para la cocción a 120 V, la temperatura ambiente de 20 ºC,
la temperatura del agua de 18 ºC y la cantidad media de arroz hacen referencia a los
tiempos incluidos en la tabla de la izquierda. (Modelo 1,0 L: 3 tazas; Modelo 1,8 L: 5 tazas)
Ɣ
El tiempo de cocción puede variar en función de los diferentes voltajes, temperaturas ambiente,
temperaturas del agua, cantidades de agua, cantidades de arroz y calidades del arroz.
Ɣ
El tiempo de cocción de arroz mixto/apelmazado puede variar por
los distintos ingredientes incorporados al arroz.
White Rice
Ha terminado la cocción
Mueva y separe el arroz
Ɣ
Cuando haya terminado el proceso de cocción, la olla arrocera
pasa a la función mantener caliente automáticamente. Para evitar
que el arroz se apelmace, muévalo y sepárelo tras la cocción.
Ɣ
No se escucha ningún sonido cuando termina la cocción.
El indicador se ilumina
Mantener caliente
Ɣ
Cuando haya terminado el proceso de cocción, todas las funciones se cancelan
para dejar automáticamente la función mantener caliente. No es recomendable
que algunas funciones estén activadas durante la función mantener caliente, así
que cuando haya terminado el proceso de cocción, pulse el botón [Off].
Ɣ
El arroz sigue caliente hasta durante 5 horas con la función mantener
caliente sin que se vea afectado el sabor ni el olor del arroz.
Ɣ
En la función mantener caliente, puede haber algunas
gotas en el borde del recipiente.
Ɣ
El sabor del arroz sí puede verse afectado si se deja la cuchara para
arroz dentro del olla arrocera durante la función mantener caliente.
Menú
Cocción rápida,
Arroz blanco, Sopa
Arroz integral, Arroz
mixto, arroz apelmazado
Avena
Mantener
caliente
ż
×
×
Keep
Warm
El resultado tras
mantener caliente
Afecta al
sabor/olor extraño
El arroz no se
engorda
Uso
47
Page 48

Funciones Arroz integral(Brown Rice)
1
Operaciones
1
FUZZY MICROCOMPUTER
Quick Cook/Steam
Brown Rice
Off
(Por ejemplo: cocción de arroz con la función [Brown Rice])
White Rice
Porridge/Soup
Keep
Warm
Pulse el botón [Brown Rice]
Ɣ
El indicador de [Brown Rice] se ilumina y
se inicia la cocción.
Recordatorio
Ɣ
No utilice la función Guarde
caluroso con arroz integral,
ya que si lo hace notará un
sabor extraño.
Ɣ
El arroz integral es un tipo
de arroz de cocción
particularmente difícil. Antes
de su preparación, es
recomendable dejar el arroz
en remojo durante 1 hora,
para que los granos absorban
suficiente agua y el resultado
de la cocción sea satisfactorio.
El indicador se ilumina
Brown Rice
Ɣ
Tiempo de cocción
(referencia)
Brown
Rice
Aprox. 1 hora
50 minutos
El tiempo de referencia necesario para la cocción a 120 V, la
temperatura ambiente de 20 ºC, la temperatura del agua de
18 ºC y la cantidad máxima de arroz hacen referencia a los
tiempos incluidos en la tabla de la izquierda. (Modelo 1,0 L:
2 vasos, Modelo 1,8 L: 3 vasos)
Ɣ
El tiempo de cocción puede variar en función de los diferentes
voltajes, temperaturas ambiente, temperaturas del agua,
cantidades de agua, cantidades de arroz y calidades del arroz.
Ha terminado la cocción
Mueva y separe el arroz
Ɣ
Cuando haya terminado el proceso de
cocción, la olla arrocera pasa a la función
mantener caliente automáticamente. Sin
embargo, la función mantener caliente no
se recomienda para evitar alterar sabores.
Pulse el botón [Off] tras la cocción.
Ɣ
No se escucha ningún sonido cuando
termina la cocción.
El indicador
se ilumina
Keep
Warm
El indicador
se apaga
Keep
Warm
48
Page 49

Funciones Avena/Sopa(Porridge/Soup)
FUZZY MICROCOMPUTER
1
Quick Cook/Steam
Brown Rice
Off
2
White Rice
Porridge/Soup
Keep
Warm
Recordatorio
Ɣ
Una cantidad incorrecta de agua o de
arroz puede hacer que el agua de arroz
se desborde por la salida de vapor.
Ɣ
Si se abre la tapa externa durante la
cocción, la cantidad de condensación de
humedad puede aumentar.
Ɣ
Si la avena se conserva con la función
mantener caliente durante demasiado
tiempo, se espesará.
Ɣ
Cada vez que termine de usar el
aparato, extraiga y lave la tapa de
humedad para evitar olores extraños.
Operaciones (Por ejemplo: cocción de avena con la función [Porridge/Soup])
Pulse el botón [Porridge/Soup]
1
Ɣ
El indicador de [Porridge/Soup] se ilumina y se inicia la
cocción.
Ɣ
Tiempo de cocción de referencia (aprox.): 1 hora y 30 minutos.
Si el volumen de cocción máximo de sopa (ingredientes y agua)
supera la marca máxima de “PORRIDGE (AVENA)”, es posible
que se desborde o que no se cocine del todo. (Consulte la
P53 para conocer las especificaciones)
El indicador se ilumina
Porridge/Soup
Uso
Ha terminado la cocción
Pulse el botón [Off]
2
Ɣ
Cuando haya terminado el proceso de
cocción, el olla arrocera pasa a la función
mantener caliente automáticamente.
Sin embargo, la función mantener caliente
no se recomienda para evitar alterar sabores.
Pulse el botón [Off] tras la cocción.
Ɣ
No se escucha ningún sonido cuando
termina la cocción.
El indicador
se ilumina
Keep
Warm
El indicador
se apaga
Keep
Warm
49
Page 50

Recetas
Precaución: · Debido a los distintos ingredientes añadidos al arroz, es posible que
encuentre arroz duro en la parte inferior.
· En esta receta, el volumen de cocción es para el Modelo 1,8 L.
Consulte las especificaciones de la P53 para conocer los
volúmenes de cocción del Modelo 1,0 L.
· 1 taza (taza de medición): unos 150 g.
Arroz con pollo
Ingredientes: Condimento:
Arroz 3 tazas de medición
Agua 4 tazas de medición Sal 3 g
Pollo 80 g, cortado en trozos pequeños
Bardana 35 g, en tiras
Setas 2 piezas tras haberlas empapado en agua,
quitado la base y cortado en tiras
Tofu frito 2 piezas, verter con agua caliente para
quitar la grasa y trocear en tiras
Zanahoria 40 g, cortadas en tiras
Vino para cocinar, salsa de soja
(20 mL de cada)
Método de cocción:
1) Cueza el pollo y la bardana en agua caliente rápidamente y cuélelo inmediatamente.
2) Lave el arroz, póngalo en el recipiente y añada 4 tazas de medición de agua.
3)
Ponga el condimento en el recipiente, remueva y eche el resto de ingredientes. Cierre la tapa externa.
4) Pulse el botón [White Rice] para iniciar la cocción. Cuando haya terminado el proceso de
cocción, podrá disfrutar de la comida.
Sopa de maíz y costillas
Ingredientes: Condimento:
Costillas 500 g, cortadas en piezas de 5 cm Sal 6.5 g
Maíz 2, unos 450 g, cortado en piezas de 5 cm
Agua 5 tazas de medición
Método de cocción:
Ponga las costillas en agua hirviendo para quitar la sangre que pueda quedar y sepárelas para usarlas luego.
1)
2) Eche todos los ingredientes en el recipiente, añada sal y cierre la tapa externa.
3)
Pulse el botón [Porridge/Soup] y el proceso de cocción finalizará en 1 hora y 30 minutos.
(Se puede agregar otro condimento, como una pastilla de caldo de pollo, según las preferencias personales.)
50
Page 51

Recetas
Dim Sum (congelado)
Ingredientes:
(A) Piezas pequeñas
Empanadillas chinas de gambas
Sumai
Método de cocción:
1) No es preciso descongelar. Basta con poner el Dim Sum congelado en la cesta vapor vapor y
rociar agua en la superficie del Dim Sum.
2) Añada 1/2 taza de medición de agua fría al recipiente.
3) Ponga la cesta vapor en el recipiente y cierre la tapa externa.
4) Pulse el botón [Quick Cook/Steam], espere unos 10 minutos y luego pulse el botón [Off].
(B) Piezas grandes
Empanadillas de barbacoa de cerdo al vapor
Empanadillas al vapor
Arroz compacto en hoja de loto
Avena de frijoles y lirios
Ingredientes: Condimento:
Frijoles 7070g Azúcar Al gusto
Arroz compacto g
Lirios 10 g
Método de cocción:
1) Coloque los frijoles lavados, el arroz compacto y los lirios en el recipiente. Añada agua
hasta la marca 1 para “PORRIDGE(AVENA)”.
2) Cierre la tapa externa y pulse el botón [Porridge/Soup]. El proceso de cocción finalizará
tras aproximadamente 1 hora 30 minutos.
3) Añada azúcar según sus preferencias y disfrute del plato.
Uso
51
Page 52

Limpieza y mantenimiento
Atención
Ɣ
Antes de limpiar o iniciar el mantenimiento, desenchufe el aparato. No limpie la olla arrocera hasta que no se haya enfriado.
Ɣ
Cuando limpie la olla arrocera, no lo sumerja en agua ni lo limpie con quita-esmalte, alcohol, polvos de talco, cepillos duros, etc.
Ɣ
No lo meta en el lavavajillas.
Tapa de humedad
Desmontaje
Tire de la placa
de calor.
Ɣ
La tapa de humedad se puede sacar
Precaución
directamente. Debe limpiarse tras cada uso.
Ɣ
Después de limpiarlo, no seque el aparato en el
lavavajillas; si lo hace, podría deformarlo o agrietarlo.
Ɣ
Ɣ
Ɣ
Cuando lo instale tras haberlo limpiado,
asegúrese de que el anillo de sellado está bien
puesto en la tapa de humedad.
Unidad completa
Montaje
Introdúzcala en el orificio de
la placa de calor en dirección
opuesta a la de desmontaje.
Introdúzcala totalmente en el
orificio para evitar que se caiga.
Ɣ
Anillo de sellado
Ɣ
Tapa externa (pieza sellada)
Limpie con un paño escurrido.
Ɣ
Si no se quitan los objetos extraños, los que queden en la placa de
calor podrían terminar quedando pegados y siendo difíciles de quitar.
Debe limpiar la placa de calor tras cada uso. Como las partes metálicas
se calientan, es posible que advierta cambios de color o franjas en la
superficie. Este hecho no afecta a su funcionamiento normal.
Ɣ
No tire del anillo de sellado del recipiente.
Ɣ
Ɣ
Ɣ
Ɣ
Ɣ
Limpie con detergente diluido y una esponja suave. Seque el
agua restante en el recipiente.
Ɣ
Es posible que aparezcan cambios de color o franjas en la
superficie del revestimiento fluoridizado. Esto no afecta a
la salud ni al funcionamiento normal del olla arrocera.
Ɣ
En función de la frecuencia de uso, es posible que
aparezcan marcas en la cara exterior del recipiente.
Esto no afecta al rendimiento del olla arrocera.
Sensor de temperatura
Ɣ
Si hay un objeto extraño adherido a estas piezas, frote con
suavidad con un papel fino (#600) o un paño seco.
Accesorios
Limpie con detergente diluido y una esponja suave.
Recipiente
Ɣ
Vaporizador
Cuchara para arroz
52
160
120
80
40
Taza de medición
Cesta vapor
Page 53

Solución de problemas
Corteza de
En los casos siguientes
Qué comprobar
Ɣ
Cantidad incorrecta de arroz o de agua
Ɣ(ODUUR]QRHVWiELHQODYDGR
Ɣ/DEDVHGHOUHFLSLHQWHQRHVXQLIRUPH
Hay objetos extraños en la cara exterior
Ɣ
del recipiente o del sensor de temperatura
Ɣ/DWDSDH[WHUQDQRHVWiELHQFHUUDGD
La tapa de humedad no está bien puesta
Ɣ
Ɣ6HKDDxDGLGRJUDVDDOFRFLQDUHODUUR]
Una vez finalizada la cocción, el arroz no está suelto
Ɣ
Ɣ
Mantener caliente durante más de 5 horas
Ɣ
La cantidad de arroz que se ha mantenido caliente es demasiado pequeña
Ɣ
La cuchara para arroz se ha dejado en el olla
arrocera mientras el arroz se mantenía caliente
Ɣ(ODUUR]IUtRVHPDQWLHQHFDOLHQWH
La tapa externa no está correctamente cerrada
Ɣ
Ɣ(OUHFLSLHQWHQRVHKDOLPSLDGR
Durante la cocción, se ha tirado del enchufe
Ɣ
o se ha tocado el botón [Off]
Ɣ6HKDSXOVDGRHOERWyQHTXLYRFDGR
Arroz
Más duro
Media
cocción
Más suave
arroz duro
Arroz mantenido caliente
Agua de arroz
rebosante
extraño
Verifique lo siguiente
Cambio
de color
Olor
Seco
Se pulsa el
botón pero
no funciona
ƔƔƔ
Se ha tirado del enchufe o está suelto.
durante el uso
desborda por el exterior del recipiente y sale tras la
cocción. No se trata de un fallo.
Se escuchan
los siguientes
sonidos
Si suena un [pup] durante la cocción, el agua se
Si suena un [clic] durante la cocción, el
vaporizador está ajustado la temperatura, no
se trata de un fallo.
Especificaciones
N.º de modelo
Voltaje/Frecuencia nominal
Potencia nominal (cocción de arroz)
Volumen nominal para recipiente L
Volumen de
cocción de arroz
(cantidad de arroz) L
Volumen de cocción de avena (cantidad de arroz) L
Volumen máximo de cocción (ingredientes + agua) para sopa L
Longitud del cable de alimentación (aprox.) m
Peso del producto (aprox.) kg
Dimensiones
(aprox.) cm
Ɣ
La marca significa que el volumen máximo de cocción para sopa es la marca más alta de “PORRIDGE (AVENA)”.
Ɣ
Si necesita cambiar el cable de alimentación o reparar el producto, póngase en contacto
con un centro de asistencia técnica autorizado de Panasonic.
Ɣ
El diseño y las especificaciones están sujetas a cambios sin previo aviso.
Arroz blanco/Cocción rápida
Arroz integral
Arroz mixto/Arroz apelmazado
Ancho
Largo
Alto
SR-DF101
120 V 60 Hz
750 W
3
0,18~1,0 [1~5,5 tazas]
[1~3 tazas]
0,18~0,54
0,09~0,18
[1~3 tazas]
[1/2~1 taza]
1,5
1,0
2,5 2,8
24,5
33,9
19,9
SR-DF181
4,8
0,18~1,8 [1~10 tazas]
Cocción rápida [1~8 tazas]
0,18~1,08 [1~6 tazas]0,18~0,54
0,18~0,9
0,09~0,36
[1~5 tazas]
[1/2~2 tazas]
2,3
24,7
problemas
53
Page 54

안전 주의 사항
반드시 지킬 것!
사고 및 사용자나 다른 사람의 부상을 방지하고 재산상의 손해를 막기 위하여 아래
지침을 따라 주십시오.
다음 표는 잘못된 조작으로 인한 손상 정도를 나타냅니다.
사망에 이르거나 심각한
경고:
부상을 입을 수 있는
위험을 나타냅니다.
이 기호는 다음과 같이 구분됩니다.
이 기호는 금지를
나타냅니다.
전원 코드 또는 전원 플러그를
전원 코드 또는 전원 플러그가
■
손상되었거나 전원 플러그가
콘센트에 느슨하게 연결된 경우
본 제품을 사용하지 마십시오.
(감전, 단락 또는 화재의
원인이 될 수 있습니다.)
배출구 또는 틈새에 이물질을
■
넣지 마십시오.
특히 핀 또는 전선과 같은 금속성
물체를 넣지 마십시오.
(감전 또는 고장의 원인이 될 수
있습니다.)
본 제품은 신체적, 지각적 또는
■
정신적 능력이 저하되었거나,
경험 및 지식이 부족한 사용자
(어린이 포함)가 사용자의
안전을 책임질 사람이 감독하거나
본 제품의 사용과 관련된 지침을
알려주지 않을 경우 사용하기에
적합하지 않습니다. 어린이가
본 제품을 가지고 놀지 않도록
주의를 기울여야 합니다.
■
손상시키지 마십시오.
다음과 같은 행동은 엄격히
금지됩니다.
개조, 발열체 근처에서 사용하기, 구부리기, 꼬기,
잡아 당기기, 무거운 물건 올려 놓기, 코드 묶기.
(감전, 단락 또는 화재의 원인이 될 수 있습니다.)
•
전원 코드가 손상된 경우 위험을 방지하려면
코드 교체는 제조업체나 대리점 또는 유자격
기술자가 해야 합니다.
본 제품을 물에 담가 놓거나 물을
■
뿌리지 마십시오.
(단락 또는 감전의 원인이 될 수
있습니다.)
•
제품 내부에 물이 들어갔을 경우 공인
대리점에 문의하십시오.
■
반드시 정격 10 A, 교류 120 V의
콘센트에서만 사용하십시오.
(동일한 콘센트에 다른 장치를
꽂으면 전기 과열의 원인이 되어
화재가 발생할 수 있습니다.)
주의:
경고
상해 또는 재산상 손실을
입을 수 있는 위험을
나타냅니다.
이 기호는 반드시 따라야 할
요구사항을 나타냅니다.
젖은 손으로 전원 플러그를 꽂거나
■
빼지 마십시오.
(감전의 원인이 될 수 있습니다.)
증기 배출구에 얼굴을 가까이 대거나
■
손으로 만지지 마십시오. 증기 배출구
근처에 어린이가 다가가지 않도록
하십시오.
증기 배출구
(화상을 입을 수 있습니다.)
본 제품을 개조, 분해 또는
■
수리하지 마십시오.
(화재, 감전 또는 부상의 원인이 될
수 있습니다.)
구입처 또는 공인 대리점의 제품 수리
•
담당에게 수리를 맡기십시오.
전원 플러그를 단단히 꽂으십시오.
■
(잘못 꽂으면 전원 플러그 주위에
열이 발생하여 감전 또는 화재의
원인이 될 수 있습니다.)
(화상 또는 부상을 입을 수
있습니다.)
전원 플러그를 정기적으로
■
청소하십시오.
(전원 플러그가 더러우면 습기
때문에 절연 효과가 떨어져서
화재의 원인이 될 수 있습니다.)
•
전원 플러그를 뽑아서 마른 행주로
닦아 주십시오.
54
•
•
최소한 정격 10 A의 연장 코드만
사용하십시오.
작동이 평소와 다르거나 고장난 경우에는 즉시 제품 사용을 중지하고
■
전원 커넥터를 뽑으십시오.
(연기, 화재 또는 감전의 원인이 될 수 있습니다.)
전원 플러그 및 전원 코드가 지나치게 뜨거워진다.
•
•
(작동이 평소와
다르거나 고장난
경우의 예)
Panasonic 공인 서비스 센터에 즉시 점검을 요청하여 수리를 받으십시오.
전원 코드가 손상되었거나 만졌을 때 전원이 나간다.
•
본체가 변형되었거나 지나치게 뜨겁다.
•
제품에서 연기나 타는 냄새가 난다.
제품에 균열이 있거나 헐거워지거나 흔들리는 곳이 있다.
•
•
열판이 뒤틀리거나 내솥이 변형된다.
파손된 전원 플러그 또는 헐거워진 전원
콘센트는 사용하지 마십시오.
Page 55

안전 주의 사항
주의
다음 장소에서 본 제품을 사용하지 마십시오.
■
•
물이 튀는 곳이나 열원 근처.(감전, 누전 및 화재의
원인이 될 수 있습니다.)
바닥이 평평하지 않거나 방열되지 않는 카펫이
•
깔린 곳.(화상 또는 부상을 입거나 화재가
발생할 수 있습니다.)
•
벽면이나 가구 근처. (변색 또는 변형의
원인이 될 수 있습니다.)
전원 플러그에 증기가 닿지 않게 하십시오.
■
•
전원 플러그를 꽂은 상태에서 증기가 닿지 않게 하십시오(단락
또는 화재의 원인이 될 수 있습니다). 밥솥을 올려놓는 받침을
서랍처럼 넣었다 뺐다 할 수 있는 보관장을사용하는 경우 전원
플러그에 증기가 닿지 않는 장소에서 제품을 사용하십시오.
전원 플러그를 뺄 때는 반드시
■
전원 플러그를 잡고 빼십시오.
(잘못 잡고 빼면 감전, 단락의 원인이
되어 화재가 발생할 수 있습니다.)
제품을 사용하지 않을 때에는 전원
■
콘센트에서 전원 플러그를 빼십시오.
(잘못하면 절연 기능이 저하되어
단락으로 인한 감전 및 화재가
발생할 수 있습니다.)
본 제품에 사용하도록 지정되지
■
않는 코드 세트(기기 플러그 및
전원 플러그)를 사용하지 마십시오.
이 세트를 바꿔 사용하지도 마십시오.
(감전, 누전 및 화재의 원인이
될 수 있습니다.)
제품 청소는 열이 식은 다음에
■
하십시오.
(뜨거울 때 만지면 화상을 입을
수 있습니다.)
반드시 지킬 것!
제품을 사용 중이거나
■
취사 후에 발열체를
만지지 마십시오.
특히 열판 접촉 금지
(화상을 입을 수 있습
니다.)
제품을 옮길 때 뚜껑 열림
■
버튼을 만지지 마십시오.
(뚜껑이 열려서 화상을
입을 수 있습니다.)
취사 중에 뚜껑을 열지
■
마십시오.
(화상을 입을 수
있습니다.)
지정한 내솥 이외의 다른
■
것을 사용하지 마십시오.
(과열 또는 오작동으로
인해 화상 및 부상을
입을 수 있습니다.)
사용하기 전에
사용 전 주의 사항
쌀과 물의 양을 정확하게 넣고
조작 지침에 따라 기능을 올바로
선택하십시오.
(밥물이 넘치거나, 밥이 설익거나,
타는 것을 방지.)
제품을 사용하기 전에 내솥의 보호
비닐을 제거하고 내솥과 주물 히터
사이의 변색 방지 용지를 제거하십시오.
(취사가 잘 안되거나 화재 예방.)
내솥, 주물 히터 및 온도 센서에 붙은 밥알 등의
이물질을 항상 깨끗이 청소하십시오.
내솥
주물 히터
온도 센서
제품 사용 중에 행주나
다른 물건으로 뚜껑을
덮지 마십시오.
(뚜껑의 변형, 변색 또는 고장 방지.)
●
본 제품을 기울이거나 뒤집지
마십시오.
●
청소하기 전에 전원 스위치를
끄고 전원 플러그를 빼십시오.
내솥을 넣지 않은 상태에서
취사할 음식 재료를 제품 안에
직접 넣지 마십시오.
(불순물로 인한 고장 방지.)
카펫, 전기 장판 및 테이블보
(비닐 재질) 등과 같이 열에
취약한 물체 위에서 제품을
사용하지 마십시오.
(취사가 잘 안되거나 화재 예방.)
본 제품을 직사광선
아래에서 사용하지
마십시오.
(변색 방지.)
증기 배출구에서 밥물이
넘칠 경우 즉시 전원
플러그를 빼고 전원을
차단하십시오. 전원
플러그 및 기기 플러그에
묻은 밥물을 마른 행주로
닦아낸 다음 다시
사용하십시오.
금속 물체로 밥을 푸지
마십시오.
(내솥 코팅의 흠집 방지 및 코팅
벗겨짐 방지.)
본 제품은 가정용입니다.
상업적 용도 또는 취사
이외의 다른 용도로
사용하지 마십시오.
본 제품의 작동 도중
정전될 경우 취사 결과에
영향을 줄 수 있습니다.
55
Page 56

각부 명칭
기능 조작부
FUZZY MICROCOMPUTER
쾌속취사 또는 찜 요리의
경우 이 버튼을 누릅니다.
현미 취사 시 이 버튼을
누릅니다.
이 버튼을 누르면 이전
조작이 취소되거나 보온
기능이 중지됩니다.
뚜껑
내솥 패킹
수분 캡
열판
Quick Cook/Steam
Brown Rice
Off
완제품
White Rice
Porridge/Soup
Keep
Warm
밥 취사 시 이 버튼을 누릅니다.
죽 또는 국 취사 시 이 버튼을
누릅니다.
보온 기능을 사용하려면 이
버튼을 누릅니다.
이 밥솥은 터치음 또는 종료음이
나지 않습니다.
내솥
뚜껑 열림 버튼
기능 조작부
본체
부속품
56
손잡이
(양쪽)
사용하기 전에 부속품을 씻어 주십시오.
160
120
80
40
계량컵
주걱(1)
(약 180mL)(1)
전원 코드
찜판(1)
Page 57

준비 사항
제공된 계량컵을 사용하여 쌀을 계량합니다.
1
●
계량컵 용량은 약 180mL(150g)입니다.
●
한 번에 취사할 수 있는 쌀의 최대 분량은 65페이지를 참조하십시오.
●
1.8리터 모델 사용 시 쾌속취사 또는 쌀알 모양이 긴 쌀을 취사할 경우
쌀의 최대 분량을 8컵 이내로 하십시오.
맑은 물이 나올 때까지 쌀을 씻습니다.
2
①쌀에 충분한 양의 물을 넣고 살살 휘저으면서 쌀을 씻습니다.
깨끗한 물이 나올 때까지 [쌀 씻기→물 버리기]를 몇 번 반복합니다.
②
주의
●
내솥 표면의 눌러붙음 방지 코팅에 흠집이 생기지 않도록 내솥에서
쌀을 씻지 마십시오.
●
쌀을 깨끗하게 씻으십시오. 그렇지 않으면 누룽지가 생기거나
남아있는 쌀겨가 밥맛에 영향을 줄 수 있습니다.
씻은 쌀을 내솥에 넣습니다.
3
해당 물 높이까지 물을 넣고 내솥 외부의 물기를 닦습니다.
●
물을 넣을 때 양쪽 눈금에 주의하여 높이가 같아지도록 하십시오.
●
국을 끓일 때는 재료와 물을 합한 총 분량이 "PORRIDGE"로 표시된
최대 물 높이를 넘지 않도록 하십시오.
●
잡곡밥 또는 찹쌀 취사 시에는 다음 표에 따라 물을 넣으십시오.
정확
취사 결과에 영향을
줄 수 있습니다.
<예>
쌀 분량이 6 계량컵일 경우,
쌀을 씻고 내솥에 넣은 다음
물 높이가 "WHITE RICE"의 "6"
눈금이 될 때까지 물을 넣습니다.
사용할 때
쌀 분량
(계량컵)
1
2
3
4
5
개인적인 입맛에 따라 위의 물 양을 늘리거나 줄일 수 있습니다.
내솥을 본체에 넣고 뚜껑을 닫습니다.
4
●
내솥 바닥이 주물 히터에 밀착되도록 내솥을 화살표
방향으로 2~3회 돌려 주십시오.
●
수분 캡의 위치가 올바른지 확인하십시오. ( 64페이지)
●
뚜껑을 닫을 때 "딸깍"하는 소리가 나는지 확인하십시오.
플러그를 꽂습니다.
5
먼저 기기 플러그를 본체에 연결한 다음 전원
●
플러그를 연결하십시오. 두 개의 플러그가 모두
단단히 연결되었는지 확인하십시오.
물 분량(제공된 계량컵)
잡곡 찹쌀
1.0 리터 모델
1
2
---
---
1
/
2
3
/
4
4
1.8 리터 모델
1
/
1
2
3
/
2
4
4
5
1
/
6
4
1.0 리터 모델
1
2
3
---
---
주의
*
찜판을 사용하여 취사하는 경우 오른쪽
표에서 최대 취사 분량을 참조하십시오.
1.8 리터 모델
1
/
4
최대 취사 분량(제공된 계량컵)
최대 취사 분량
1
/
1
4
2
3
4
5
모델 번호
(예: 1.8리터 모델)
본체
기기 플러그
1.0 리터 모델 1.8 리터 모델
2 5
WHITE RICE CUP
10
BROWN
RICE
PORRIDGE
6
4
2
8
6
4
2
2
1/2
1
1
1/2
전원 플러그
콘센트
57
Page 58

기능 쾌속취사/찜(Quick Cook/Steam)
알려드립니다
●
밥을 하면서 동시에 찜 요리를 할 경우
1
FUZZY MICROCOMPUTER
Quick Cook/Steam
Brown Rice
Off
White Rice
Porridge/Soup
Keep
Warm
[White Rice] 기능을 선택하십시오.
●
찌는 시간은 내솥의 물의 양에 따라
결정됩니다. 필요한 시간만큼 물의
양을 조정하십시오.
●
물이 끓어서 완전히 증발되면 취사가
자동으로 보온 기능으로 바뀝니다.
●
취사 중에 찜 기능을 중지하려면 [Off]
버튼을 누르십시오.
●
[Quick Cook/Steam] 버튼을 사용하여
쾌속취사를 할 수 있습니다. 자세한
조작 방법은 59페이지의 [White
Rice]를 참조하십시오. 취사 시간이
짧을수록 밥이 딱딱해지거나 누룽지가
생길 수 있습니다.
2
조작
(예: [Quick Cook/Steam] 기능을 사용하여 찌기)
●
적당한 양의 물을 넣습니다(아래 표 참조).
●
내솥 안에 찜판을 넣습니다.
●
찜판에 찔 재료를 넣습니다.
●
뚜껑을 닫습니다.
[Quick Cook/Steam]
1
버튼을 누릅니다.
●
[Quick Cook/Steam] 표시등이 켜지고 찜
기능이 시작됩니다.
다음 표는 찌는 시간 및 물의 양을 나타냅니다. 아래 표에 나타난 시간은 시작부터
끝날 때까지 걸리는 전체 시간입니다.
물의 양(대략)
찌는 시간(대략)
*
최대 찌는 시간은 약 70분 입니다. 시간이 다 지나면 물이 완전히 증발되었는지 여부에
상관없이 밥솥이 자동으로 보온 기능으로 바뀝니다.
취사 완료
1
/
계량컵
2
15 분
표시등 켜짐
Quick Cook/Steam
1 계량컵 2 계량컵
30 분 50 분 65 분
3 계량컵
찜판
물
58
●
내솥 안의 물이 끓어서 완전히 증발되면
찜 기능이 종료되고 밥솥이 자동으로 보온
기능으로 바뀝니다.
[Off] 버튼을 누릅니다.
2
● 취사 과정이 끝나도 신호음이 나지 않습니다.
● 이때 찜판은 매우 뜨겁습니다.
꺼낼 때 주의하십시오.
표시등 켜짐
Keep
Warm
표시등 꺼짐
Keep
Warm
Page 59

기능 백미 • 보온(White Rice • Keep Warm)
FUZZY MICROCOMPUTER
1
Quick Cook/Steam
Brown Rice
Off
White Rice
Porridge/Soup
Keep
Warm
알려드립니다
●
잡곡밥 또는 찰쌀밥을 할 때는
[White Rice]기능을 선택하십시오.
물의 양은 57페이지를
참조하십시오.
●
[White Rice] 기능으로 밥을 하면
밥이 부드럽고 밥맛이 좋아집니다.
조작
(예: [White Rice] 기능을 사용하여 밥짓기)
표시등 켜짐
[White Rice] 버튼을 누릅니다.
1
●
[White Rice] 표시등이 켜지고 취사가
시작됩니다.
취사 시간(참고용)
Quick Cook
White Rice
약 30분
약 38분
●
왼쪽 표에 나타난 시간은 전압은 120V, 실내 온도는 20°C, 수온은 18°C, 쌀
분량은 중간일 때 취사에 필요한 시간입니다. (1.0리터 모델: 3컵, 1.8리터
모델: 5컵)
●
취사 시간은 전압, 실내 온도, 수온, 물의 양, 쌀의 양 및 쌀의 품질에 따라
약간씩 다를 수 있습니다.
●
잡곡/찹쌀의 취사 시간은 쌀의 성분이 다르기 때문에 달라질 수 있습니다.
White Rice
취사 완료
뜸들이기
●
취사 과정이 끝나면 밥솥이 자동으로 보온 기능으로 바뀝니다.
밥이 질척해지는 것을 방지하기 위해 취사 후 뜸을 들이십시오.
●
취사 과정이 끝나도 신호음이 나지 않습니다.
보온
●
취사 과정이 끝나면 모든 기능이 자동으로 보온 기능으로 바뀝니다.
하지만 일부 기능은 보온을 사용하지 않는 것이 좋을 때도 있습니다.
이 경우 취사가 끝나면 [Off] 버튼을 누르십시오.
●
밥맛이 변하거나 이상한 냄새가 나지 않도록 하려면 5시간
이상 보온하지 마십시오.
●
보온 기능에서는 내솥 가장자리에 물방울이 생길 수 있습니다.
●
보온 기능을 사용 중일 때 밥솥에 주걱을 넣어두면 밥맛에
영향을 줄 수 있습니다.
쾌속취사,
백미, 국
현미, 잡곡밥,
찹쌀밥
죽
메뉴
표시등 켜짐
Keep
Warm
보온
보혼 후의 변화
○
밥맛 변화 또는
×
이상한 냄새
죽이 덩어리가 짐
×
사용할 때
59
Page 60

기능 현미(Brown Rice)
FUZZY MICROCOMPUTER
1
Quick Cook/Steam
Brown Rice
Off
조작
(예: [Brown Rice] 기능을 사용하여 밥짓기)
[Brown Rice] 버튼을 누릅니다.
1
●
[Brown Rice] 표시등이 켜지고 취사가
시작됩니다.
●
취사 시간
(참고용)
Brown
Rice
약 1시간
50분
왼쪽 표에 나타난 시간은 전압은 120V, 실내 온도는 20°C, 수온은
18°C, 쌀 분량은 중간일 때 취사에 필요한 시간입니다. (1.0리터
모델: 2컵, 1.8리터 모델: 3컵)
●
취사 시간은 전압, 실내 온도, 수온, 물의 양, 쌀의 양 및 쌀의
품질에 따라 약간씩 다를 수 있습니다.
White Rice
Porridge/Soup
Keep
Warm
알려드립니다
●
밥맛에 영향을 줄 수 있으므로
현미에서는 보온 기능을
사용하지 마십시오.
●
현미는 조리가 어려운 쌀입니다.
현미를 조리할 때는 밥이 잘
되도록 한 시간 정도 미리 물에
불려놓으십시오.
표시등 켜짐
Brown Rice
취사 완료
뜸들이기
●
취사 과정이 끝나면 밥솥이 자동으로 보온
기능으로 바뀝니다. 하지만 밥맛이 변하는
것을 막기 위해 보온 기능을 사용하지 않는
것이 좋을 경우 취사 후 [Off] 버튼을
누르십시오.
●
취사 과정이 끝나도 신호음이 나지 않습니다.
60
표시등 켜짐
Keep
Warm
표시등 꺼짐
Keep
Warm
Page 61

기능 죽/국(Porridge/Soup)
FUZZY MICROCOMPUTER
1
2
조작
Quick Cook/Steam
Brown Rice
Off
(예: [Porridge/Soup] 기능을 사용하여 죽 요리)
[Porridge/Soup] 버튼을 누릅니다.
1
●
[Porridge/Soup] 표시등이 켜지고 취사가 시작됩니다.
참조 요리 시간(대략): 1시간 30분.
●
국의 최대 취사 분량(재료와 물 포함)이 "PORRIDGE"의
최대 물 높이를 넘을 경우 국이 넘치거나 설익을 수
있습니다. (제품 규격은 65페이지 참조)
White Rice
Porridge/Soup
Keep
Warm
알려드립니다
●
물 분량 또는 쌀 분량이 정확하지 않으면
증기 배출구에서 밥물이 넘칠 수 있습니다.
●
취사 시 뚜껑이 열려 있으면 물방울이
많이 맺힐 수 있습니다.
●
죽을 장시간 보온 기능에서 보관하는 경우
죽이 덩어리가 질 수 있습니다.
●
사용 후에는 항상 이상한 냄새가 나지
않도록 수분 캡을 떼어내어 닦아 주십시오.
표시등 켜짐
Porridge/Soup
사용할 때
취사 완료
[Off] 버튼을 누릅니다.
2
●
취사 과정이 끝나면 밥솥이 자동으로
보온 기능으로 바뀝니다.
하지만 밥맛이 변하는 것을 막기 위해
보온 기능을 사용하지 않는 것이 좋을
경우 취사 후 [Off] 버튼을 누르십시오.
●
취사 과정이 끝나도 신호음이 나지
않습니다.
표시등 켜짐
Keep
Warm
표시등 꺼짐
Keep
Warm
61
Page 62

요리법
주의:
· 쌀의 성분이 다르기 때문에 바닥에 밥이 탈 수도 있습니다.
· 아래 요리법에서 요리 분량은 1.8리터 모델용입니다. 1.0리터 모델의 요리 분량에
대해서는 65페이지의 제품 규격을 참조하십시오.
g
· 1컵(계량컵): 약 150
.
치킨 라이스
재료: 양념:
쌀 3 계량컵
4 계량컵물
닭고기 80
우엉
버섯
유부
당근
35
2조각, 물에 담가 불린 후
밑동을 제거하고 잘게 찢기
2조각, 뜨거운 물을 끼얹어
기름기를 제거하고 채썰기
40
요리 방법:
g, 잘게 다짐
g, 채썰기
g, 채썰기
요리용 와인, 간장 각 20mL
소금 3
g
1) 닭고기와 우엉을 뜨거운 물에 재빨리 삶고 즉시 건져냅니다.
2) 쌀을 씻어서 내솥에 넣고 물을 4 계량컵 넣습니다.
3) 내솥에 양념을 넣고 남아 있는 재료를 넣고 저어줍니다. 외부 뚜껑을 닫습니다.
4) [White Rice] 버튼을 눌러 취사를 시작합니다. 취사가 끝나면 맛있게 드십시오.
옥수수와 갈비가 들어간 스프
재료: 양념:
갈비 500
옥수수
물
요리 방법:
1) 끓는 물에 갈비를 넣고 핏물을 제거한 다음 물을 따라 두었다가 나중에 사용합니다.
2) 모든 재료를 내솥에 넣고, 소금을 넣고 뚜껑을 닫습니다.
3) [Porridge/Soup] 버튼을 누르고, 약 1시간 30분이 지나면 취사 과정이 끝납니다.
(기호에 따라 치킨 파우더 같은 다른 양념을 추가할 수 있습니다.)
g, 5cm 크기로 썰기
2개, 약 450 g, 5cm 크기로 자름
5 계량컵
소금 6.5 g
62
Page 63

요리법
딤섬(냉동)
재료:
(A) 크기가 작은 것
새우 덤플링
슈마이
요리 방법:
1)
해동할 필요 없습니다. 냉동 딤섬을 찜판 위에 올려 놓고 딤섬 위에 물을 약간 뿌려줍니다.
2)
내솥에 물 1/2 계량컵을 넣습니다.
3)
찜판을 내솥 안에 넣고 뚜껑을 닫습니다.
4)
[Quick Cook/Steam] 버튼을 누르고, 10분 정도 기다린 다음 [Off] 버튼을 누릅니다.
(B) 크기기 큰 것
삶은 BBQ 돼지고기를 넣은 빵
찐빵
연잎으로 싼 찹쌀
녹두 백합 죽
재료: 양념:
녹두 70
백합 10
요리 방법:
1)
씻은 녹두, 찹쌀과 백합을 내솥에 넣고 "PORRIDGE"의 눈금 1이 될 때까지 물을 넣습니다.
2)
뚜껑을 닫고 [Porridge/Soup] 버튼을 누릅니다. 약 1시간 30분이 지나면 취사 과정이 완료됩니다.
3)
입맛에 따라 설탕을 첨가하여 맛있게 드십시오.
70
g
g 찹쌀
g
설탕 기호에 따라 다름
사용할 때
63
Page 64

청소 및 유지관리
주의
●
청소 및 유지관리를 하기 전에 먼저 전원 플러그를 빼십시오. 밥솥이 식은 다음에 청소하십시오.
●
밥솥을 청소할 때는 밥솥을 물에 담가 두거나, 래커 신너, 알코올, 청소용 파우더 또는 단단한 솔 등으로 닦지 마십시오.
●
식기 세척기를 사용하지 마십시오.
수분 캡
분리
열판에서 잡아
당깁니다.
●
수분 캡을 직접 떼어낼 수 있습니다. 사용할 때마다
주의
닦아 주십시오.
●
청소한 후에 식기 세척기 등으로 말리지 마십시오.
●
●
변형되거나 균열이 생길 수 있습니다.
●
청소한 후 설치할 때는 수분 캡에 패킹이 설치되어
있는지 확인하십시오.
완제품 • 뚜껑(밀폐된 부분)
조립
분리할 때와 반대 방향으로
열판의 구멍에 삽입합니다.
떨어지지 않도록 구멍에
완전히 삽입하십시오.
●
패킹
꽉 짠 행주로 닦으십시오.
●
이물질을 제거하지 않을 경우 이물질이 열판 위에
들러붙어 제거하기 어려워질 수 있습니다.
사용할 때마다 열판을 청소하십시오. 금속 부품에
열을 가하면 변색되거나 표면에 줄무늬가 생길 수
있지만 정상적인 기능에는 영향을 주지 않습니다.
●
내솥 패킹을 잡아 당기지 마십시오.
●
●
●
●
●
순한 세제 및 부드러운 스펀지로 닦아 주십시오. 내솥
위의 물기를 제거하십시오.
●
불소 코팅 표면에 변색 또는 줄무늬가 나타날 수 있지만
인체는 물론 밥솥의 정상적인 기능에도 아무런 영향을
주지 않습니다.
●
사용 빈도에 따라 내솥 바깥쪽에 문지른 자국이 나타날
수 있지만 밥솥 성능에는 영향을 주지 않습니다.
●
이 부분에 이물질이 들러붙어 있을 경우 고운 수세미(#600)
또는 마른 행주로 부드럽게 문질러서 제거하십시오.
부속품
순한 세제 및 부드러운 스펀지로 닦아 주십시오.
내솥
온도 센서 • 주물 히터
64
주걱
160
120
80
40
계량컵
찜판
Page 65

문제 해결
문제 발생
확인 항목
쌀 분량 또는 물 분량이 부정확합니다.
●
쌀을 충분히 씻지 않았습니다.
●
내솥 바닥이 고르지 않습니다.
●
내솥 바깥쪽 또는 온도 센서에
●
이물질이 있습니다.
●
뚜껑이 올바로 닫혀 있지 않습니다.
수분 캡이 올바로 설치되지 않았습니다.
●
밥을 지을 때 기름을 넣었습니다.
●
취사가 끝난 후 뜸을 들이지 않았습니다.
●
●
5시간 이상 보온 중입니다.
보온 중인 밥의 양의 너무 작습니다.
●
●
보온하는 동안 밥솥 안에 주걱을
넣어두었습니다.
●
찬밥을 보온 중입니다.
●
뚜껑이 완전히 닫히지 않았습니다.
내솥을 청소하지 않았습니다.
●
취사하는 동안 플러그를 뺐거나 [Off]
버튼을 눌렀습니다.
●
틀린 버튼을 눌렀습니다.
다음 항목을 확인하십시오.
밥 보온 상태
딱딱해짐
포슬포슬함
설익음
탄 누룽지
밥물 넘침
이상한
냄새
변색
버튼이 작동하지
않는다.
마름
● ● ●
플러그가 빠졌거나 느슨해졌습니다.
난다.
물방물이 열판에 떨어져서 타는 소리입니다. 이것은
고장이 아닙니다.
사용 중에
다음과
같은 소리가
취사 시 [딸깍]하는 소리가 나면 주물 히터가 온도를
조정하는 중입니다. 이것은 고장이 아닙니다.
취사 시 [찌지직] 소리가 나면 내솥 바닥(바깥쪽)의
제품 규격
모델 번호
전원/정격 주파수
정격 전원(취사)
내솥의 정격 용량 L
취사 용량
(쌀 분량) L
죽 취사 용량(쌀 분량) L
국의 최대 취사 용량(재료 + 물) L
전원 코드 길이(대략) m
제품 중량(대략) kg
외형치수
(대략) cm
●
표시가 있는 것은 국의 최대 취사 용량이 "PORRIDGE"의 최대 물 높이를 나타냅니다.
●
전원 코드 교체 및 제품 수리는 Panasonic 의 공인 서비스 센터에 문의하십시오.
●
디자인 및 주요 제원은 사전 통보 없이 변경될 수 있습니다.
백미/쾌속취사
현미
잡곡밥/찹쌀밥
너비
길이
높이
SR-DF101
120 V 60 Hz
750 W
3
0.18~1.0 [1~5.5 컵]
0.18~0.54 [1~3 컵]
0.09~0.18 [1/2~1 컵]
1.5
1.0
2.5 2.8
24.5
33.9
19.9
SR-DF181
4.8
0.18~1.8 [1~10 컵]
쾌속취사
[1~8 컵]
0.18~1.08 [1~6 컵] 0.18~0.54 [1~3 컵]
0.18~0.9 [1~5 컵]
0.09~0.36 [1/2~2
2.3
24.7
컵
문제가 발생한 경우
]
65
Page 66

PanasonicAppliancesRiceCooker(Hangzhou)Co.,Ltd.
Website:http://panasonic.net/
c
Panasonic Corporation 2012
RZ19AF12
S0812-0
Printed in China
Page 67

Page 68

Limited Warranty (ONLY FOR U.S.A. AND PUERTO RICO)
Panasonic Consumer Marketing Company of North America,
Division of Panasonic Corporation of North America
One Panasonic Way, Secaucus, New Jersey 07094
Panasonic Kitchen Appliance
Limited Warranty
Limited Warranty Coverage (For USA and Puerto Rico Only)
If your product does not work properly because of a defect in materials or
workmanship, Panasonic Consumer Marketing Company (referred to as
“the warrantor”) will, for the length of the period indicated on the chart
below, which starts with the date of original purchase (“warranty period”), at
its option either (a) repair your product with new or refurbished parts, (b)
replace it with a new or a refurbished equivalent value product, or (c)
refund your purchase price. The decision to repair, replace or refund will be
made by the warrantor.
Product or Part Name Labor Parts
Bread Maker, Rice Cookers (Fuzzy Logic),
Meat Grinder, Toaster Oven,
Large Capacity Rice Cookers
(SR-42 series)
During the “Labor” warranty period there will be no charge for labor. During
the “Parts” warranty period, there will be no charge for parts.
This warranty only applies to products purchased and serviced in the
United States or Puerto Rico. This warranty is extended only to the original
purchaser of a new product which was not sold “as is”.
1 yr. 1 yr.
6 Months 6 Months
Carry-In or Mail in Service:
To find a service center please visit
1-800-211-PANA (7262).
IF REPAIR IS NEEDED DURING THE WARRANTY PERIOD, THE
PURCHASER WILL BE REQUIRED TO FURNISH A SALES
RECEIPT/PROOF OF PURCHASE INDICATING DATE OF PURCHASE,
AMOUNT PAID AND PLACE OF PURCHASE. CUSTOMER WILL BE
CHARGED FOR THE REPAIR OF ANY UNIT RECEIVED WITHOUT
SUCH PROOF OF PURCHASE.
http://www.panasonic.com/help or call
Limited Warranty Limits And Exclusions
This warranty ONLY COVERS failures due to defects in materials or
workmanship, and DOES NOT COVER glass, plastic parts, temperature
probes (if included) and normal wear and tear or cosmetic damage. The
warranty ALSO DOES NOT COVER damages which occurred in shipment,
or failures which are caused by products not supplied by the warrantor, or
failures which result from accidents, misuse, abuse, neglect, bug
infestation, mishandling, misapplication, alteration, faulty installation, set-up
adjustments, maladjustment of consumer controls, improper maintenance,
power line surge, lightning damage, modification, or commercial use (such
as in a hotel, office, restaurant, or other business), rental use of the product,
service by anyone other than a factory service center or other authorized
servicer, or damage that is attributable to acts of God.
THERE ARE NO EXPRESS WARRANTIES EXCEPT AS LISTED UNDER
“LIMITED WARRANTY COVERAGE”.
THE WARRANTOR IS NOT LIABLE FOR INCIDENTAL OR
CONSEQUENTIAL DAMAGES RESULTING FROM THE USE OF THIS
PRODUCT, OR ARISING OUT OF ANY BREACH OF THIS WARRANTY.
(As examples, this excludes damages for lost time, travel to and from the
servicer, loss of or damage to media or images, data or other memory or
recorded content. The items listed are not exclusive, but for illustration
only.)
ALL EXPRESS AND IMPLIED WARRANTIES, INCLUDING THE
WARRANTY OF MERCHANTABILITY, ARE LIMITED TO THE PERIOD
OF THE LIMITED WARRANTY.
Some states do not allow the exclusion or limitation of incidental or
consequential damages, or limitations on how long an implied warranty
lasts, so the exclusions may not apply to you.
This warranty gives you specific legal rights and you may also have other
rights which vary from state to state. If a problem with this product
develops during or after the warranty period, you may contact your dealer
or Service Center. If the problem is not handled to your satisfaction, then
write to:
Consumer Affairs Department
Panasonic Consumer Marketing Company
661 Independence Pkwy
PARTS AND SERVICE, WHICH ARE NOT COVERED BY THIS LIMITED
WARRANTY, ARE YOUR RESPONSIBILITY.
Chesapeake, VA 23320
Customer Services Directory (United States and Puerto Rico)
Obtain Product Information and Operating Assistance;
locate your nearest Dealer or Service Center; purchase
Parts and Accessories; or make Customer Service and
Literature requests by visiting our Web Site at:
http://www.panasonic.com/help
or, contact us via the web at:
http://www.panasonic.com/contactinfo
You may also contact us directly at:
1-800-211-PANA (7262)
Monday-Friday 9am-9pm, Saturday-Sunday 10am-7pm EST
For hearing or speech impaired TTY users, TTY: 1-877-833-8855
Accessory Purchases (United States and Puerto Rico)
Purchase Parts, Accessories and Instruction Books online for all
Panasonic Products by visiting our Web Site at:
http://www.pstc.panasonic.com
Or, send your request by E-mail to:
npcparts@us.panasonic.com
You may also contact us directly at:
1-800-332-5368 (Phone) 1-800-237-9080 (Fax Only)
(Monday-Friday 9am-9pm EST)
Panasonic National Parts Center
20421 84th Avenue South
Kent, WA 98032
(We accept Visa, MasterCard, Discover Card, American
Express)
For hearing or speech impaired TTY users, TTY: 1-866-605-1277
As of Feb 2012
 Loading...