

Page 1

Page 2

IMPORTANT SAFEGUARDS
When using electrical appliances, basic safety precautions should always be followed
including the following:
1. READ ALL INSTRUCTIONS BEFORE USE.
2. Follow all warnings and instructions marked on the product.
3. Unplug this product from wall outlet when not in use and before cleaning.
Do not immerse appliance in water or other liquid. Use a soft sponge and mild
detergent when cleaning the inside of the pan or kneading blade. The cabinet may
be cleaned with a cloth, dampened with a mild soap and water solution.
4. Do not touch hot surfaces. Use mitts when handling hot materials, and allow metal
parts to cool before cleaning.
5. Close supervision is necessary when any appliance is used near children.
6. Do not allow anything to rest on power cord. Do not plug in cord where persons
may walk on, or trip over it.
7. Do not operate any appliance with a damaged cord or plug. Refer servicing of
appliance to an authorized Panasonic service center if the unit should malfunction or
be damaged in any manner.
8. This appliance is not intended for commercial use. It is for household use only.
9. The use of attachments not recommended by manufacturer may cause damage or
injury.
10. Avoid contacting moving parts.
11. Do not use outdoors. Do not use appliance for other than intended use.
12. Do not let cord hang over edge of table or counter, or touch hot surfaces.
13. Do not place on or near a hot gas or electric burner, or in a heated oven.
14. To disconnect, grip plug and pull from wall outlet. Never pull on cord.
15. The unit may vibrate or move during the kneading process. Do NOT place the
unit near the edge of a countertop. Place the unit securely where movement of the
unit will not cause it to fall off the countertop.
SAVE THESE INSTRUCTIONS
Note:
A. A short power-supply cord is provided to reduce the risk resulting from becoming
entangled in or tripping over a longer cord.
B. Extension cords are available and may be used if care is exercised in their use.
C. If extension cord is used:
(1) the marked electrical rating of the extension cord should be at least as great as
the electrical rating of the appliance,
and
(2) the longer cord should be arranged so that it will not drape over the countertop or
tabletop where it can be pulled on by children or tripped over unintentionally.
D. This appliance has a polarized plug (one blade is wider than the other). As a safety
feature, this plug will fit in a polarized outlet only one way. If the plug does not fit fully
in the outlet, reverse the plug. If it still does not fit, contact a qualified electrician.
Do not attempt to defeat this safety feature.
Page 3

Table of Contents
Basic principles when baking with ........................3
-Basic features ...........................................................................3
Baking programs.........................................................................4
Parts identification.......................................................................5
Control panel-display/functions...................................................6
How to use.............................................................................7—12
-To use the timer for baking loaves only
with the BAKE option................................................................10
-Using the BAKE RAPID option................................................ 10
-Using the DOUGH option.........................................................11
-Using the BAKE ONLY program.......................................11—12
How to clean..............................................................................12
Slicing and storing the bread ....................................................13
Leakage of bread ingredients from the bread pan...................13
Specifications............................................................................13
Display indications for abnormal conditions ...........................14
Before calling for service ....................................................15—16
¤
Ingredients...........................................................................17—18
Other ingredients used for flavored loaves.........................19
Tips for baking whole wheat & multigrain breads ....................19
Differences in baking results..................................................20
Recipes................................................................................21—33
Basic recipes.....................................................................21—23
Whole wheat recipes........................................................24—25
Multigrain recipes.....................................................................26
French recipes.........................................................................27
Dough recipes...................................................................28—30
Pizza dough recipes................................................................31
Bake only recipes............................................................. 32—33
Warranty....................................................................................34
Page 4

Basic Principles when baking with
Basic Features
MENU
BASIC. . . . . . . . . . . . .
WHOLE WHEAT. . . . .For loaves using whole wheat flour as the main ingredient.
MULTIGRAIN. . . . . . . For breads with cereals/grains such as rye, millet, soy, corn etc. mainly using
wholemeal strong flour.
FRENCH . . . . . . . . . . For loaves with crisp crust and open texture. The taste is crisp because sugar is
not included in the ingredients.
PIZZA . . . . . . . . . . . . . A rapid dough program for pizza, focaccia and other Italian breads.
BAKE ONLY . . . . . . . A program for baking cakes only.
SELECT
BAKE . . . . . . . . . . . . . The unit automatically mixes ingredients, kneads the dough, rises it and bakes it.
BAKE RAPID . . . . . . . The unit mixes ingredients, kneads the dough, rises it and automatically bakes it faster
than the standard BAKE option.
BAKE SANDWICH. . . The unit automatically makes a medium size loaf of bread with a soft crust suitable for
sandwich slices.
BAKE RAISIN . . . . . . .The unit automatically makes bread as in the BAKE option. A beeper sounds to let you
know when to add dried fruits, such as raisins. This is to prevent them from being
crushed during the kneading process.
DOUGH . . . . . . . . . . .
DOUGH RAISIN . . . . . The unit automatically prepares dough as in the DOUGH option. A beeper sounds to
let you know when to add dried fruits as in the BAKE RAISIN option.
A 13-hour timer allows you to prepare everything the night before and wake up to the aroma of freshly
baked bread. (Certain BAKE options only). The result may differ when the timer is used.
The beep sounds eight times when baking on the BAKE option or rising of dough on the DOUGH option is
completed.
The beep also sounds in the BAKE RAISIN and DOUGH RAISIN option, when the machine pauses for 1
minute during the kneading process to add the raisins, chopped dried fruits and / or nuts.
Bread programs available:
For producing loaves of bread using strong wheat flour (bread flour).
Baking options available:
The unit automatically prepares dough for pizzas, dinner rolls, donuts, croissants, etc.
SIZE CRUST
The choice of size and crust color is possible for the following options:
If not selected, the will automatically select XL size with a medium crust.
basic BAKE
basic BAKE RAPID
basic BAKE RAISIN
whole wheat BAKE
whole wheat BAKE RAPID
whole wheat BAKE RAISIN
Choicesand
Size Selection Crust Colour Selection
-
3
-
Page 5

Baking programs
NOTE:
BAKE options
P
r
o
c
e
s
s
Rest
Knead
Rise
Bake
Basic Bake
Basic Bake
Sandwich
30 ~ 60
min
15 ~ 30
min
1 hr 50 min ~
2 hr 20 min
50 min 50 min 50 min 50 min 55 min45 min35 min
Basic
Bake Rapid
-
15 ~ 20
min
approx.
1 hour
Basic
Bake Raisin
30 ~ 60
min
15 ~ 30
min
1 hr 50 min ~
2 hr 20 min
Whole Wheat
Bake
Whole Wheat
Bake Sandwich
Multigrain
Bake
60 ~ 90
min
15 ~ 25
min
2 hr 20 min ~
2 hr 50 min
Whole Wheat
Bake Rapid
15 min
15 ~ 25
min
approx.
1 hr 40 min
Whole Wheat
Bake Raisin
60 ~ 90
min
15 ~ 25
min
2 hr 20 min ~
2 hr 50 min
French Bake Bake Only
40 min ~
1 hr 55 min
10 ~ 20
min
2 hr 55 min ~
4 hr 10 min
-
-
-
30 ~ 90 min
Total
Timer
4 hours 1 hr 55min 4 hours 5 hours 3 hours 5 hours 6 hours
DOUGH options
Basic Dough
Basic Dough
Raisin
30 ~ 50
min
15 ~ 30
min
1 hr 10 min ~
1 hr 30 min
-
-
2 hr 20 min 3 hr 15 min 3 hr 35 min 45 min
P
r
o
c
e
s
s
Rest
Knead
Rise
Knead
Rise
Total
Timer
Whole Wheat
Dough
Whole Wheat
Dough Raisin
Multigrain
Dough
55 ~ 75
min
15 ~ 25
min
1 hr 40 min ~
2 hours
-
-
French Dough Pizza Dough
40 min ~
1 hr 35 min
10 ~ 20
min
1 hr 45 min ~
2 hr 40 min
-
-
-
10 ~ 15
min
10 ~ 15
min
Approx.
10 min
Approx.
10 min
30 ~ 90 min
-
4
-
Page 6
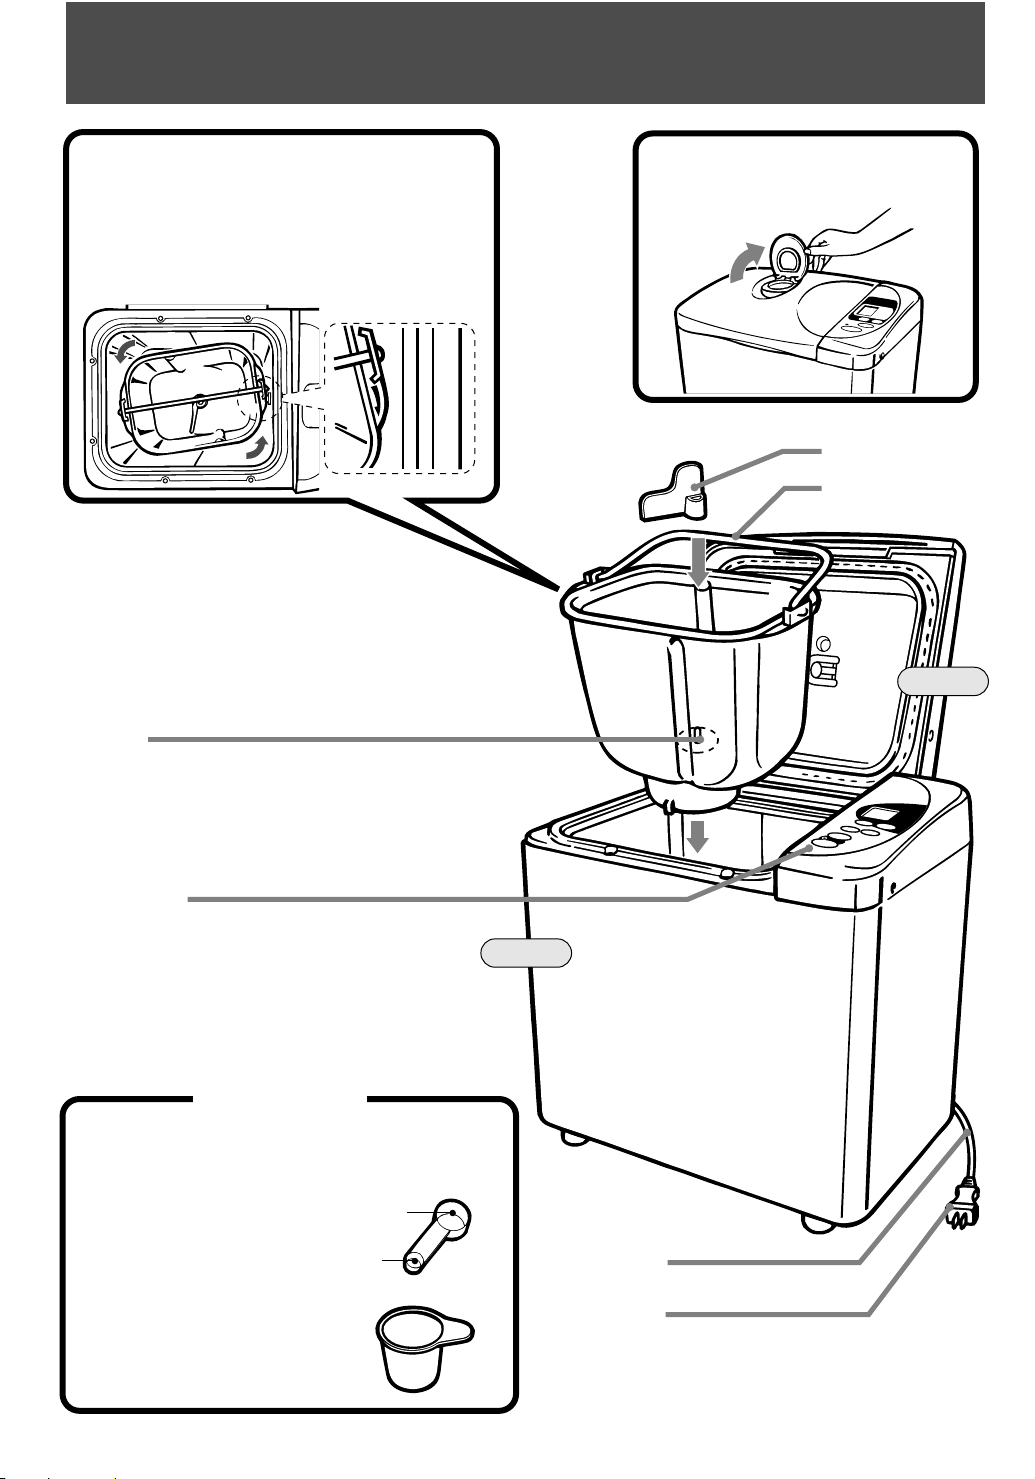
Parts identification
Bread pan
Slide in the pan to the correct position in
the unit.
Twist slightly counter-clockwise to remove.
To remove
Kneader
mounting shaft
Yeast dispenser
Located on the top of the lid.
Kneading blade
Handle
Lid
Control panel
Accessories
Measuring spoon
Use to measure sugar, salt, etc.
Tablespoon (approx. 1/2 fl.oz./15 mR)
Teaspoon (approx. 1/6 fl.oz./5 mR)
Measuring cup
Use to measure liquids.
(1 cup/8 fl. oz./240 mR)
Body
-
5
-
Cord
Plug
Page 7
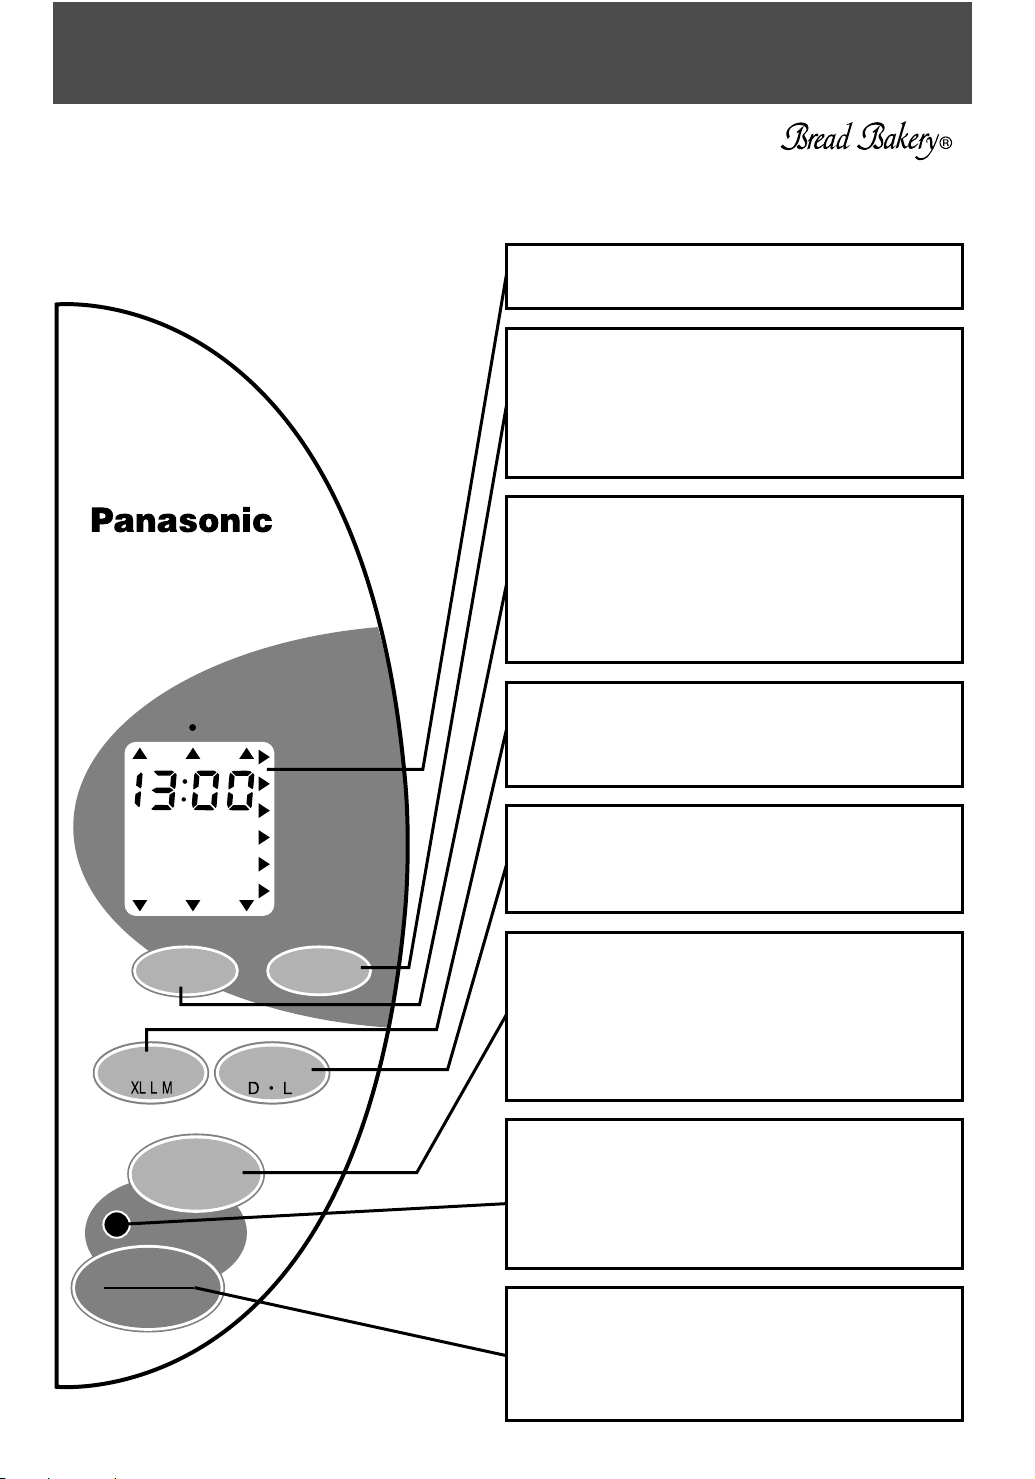
Control panel-display/functions
Be sure you understand the function of each pad before using the .
NOTE: The unit has a protective film overlay on the control panel to prevent scratching or marring
during shipping.
You may peel this film off and discard it.
Display window
All modes and indications are shown here for reference.
MENU
Press to select the type of bread: basic, whole wheat,
multigrain, french, pizza or bake only.
(It is not necessary to press this pad for basic. )
Each time the pad is pressed, the display will
change accordingly.
SELECT
Press to choose the bake option: BAKE, BAKE
SD-YD250
RAPID, BAKE SANDWICH, BAKE RAISIN,
DOUGH or DOUGH RAISIN.
(It is not necessary to press this pad for BAKE .)
Each time the pad is pressed, the display will
change accordingly.
DARK LIGHT
TEMP REST
RAISIN
BAKE DOUGH
RAPID ALERT
SANDWICH
XL L M
SELECT
SIZE CRUST
TIMER
START
BASIC
WHOLE WHEAT
MULTIGRAIN
FRENCH
PIZZA
BAKE ONLY
MENU
SIZE
Press this pad to select the size of the loaf for:
BAKE, BAKE RAPID & BAKE RAISIN options of
basic and wholewheat bread.
CRUST
Press this pad to select the color of the crust
for BAKE, BAKE RAPID & BAKE RAISIN options
of basic bread.
TIMER
Press this pad to set the timer and to set the
baking time for the bake only option.
The time will advance 10 minutes each time this pad
is pressed. (1 minute for the bake only option.)
The timer setting will change rapidly if constant
pressure is applied to the pad.
Indicator light
The red light will be lit when in operation.
It will flash when the bread baking or the dough
making is completed.
It will also flash in a different frequency when
operated in abnormal conditions.
STOP
START/STOP
Press this pad to start operation or begin the timer.
Press this pad to stop operation or cancel the timer setting.
To stop operation, the pad must be pressed and
held for 1 second.
-
6
-
Page 8

How to use
1
Steps Notes
Remove the bread pan from the unit.
Twist slightly counter-clockwise and pull
up, using the handle.
Mount the kneading blade on the shaft.
Make sure that the kneading blade and the
kneading shaft are free of bread crumbs.
The kneading blade is designed
to fit loosely on the shaft with
some room for turning.
2
3
4
Place all the ingredients
liquids and dry yeast
RAISIN modes only
You may place dried fruits later when
the beeper sounds to prevent them from
being crushed (see step 10.)
Pour water and other liquids, if any, into
the bread pan.
Place the bread pan inside the body.
Be sure the bread pan contacts the
bottom of the unit.
Turn the handle down.
except the
inside the bread pan.
See recipes on P. 21 33.
Flour, dry milk, salt, sugar,
butter, etc., first.
Wipe off any moisture or
foreign matter from the outside
of the bread pan before
placing it in the unit.
If the bread pan is not placed
correctly, the dough will not be
kneaded properly.
5
6
Yeast dispenser lid
Close the top lid.
Fill the yeast dispenser with the correct
amount of dry yeast.
After START/STOP is pressed, the
yeast will automatically drop into the
bread pan at the proper time.
Close the yeast dispenser lid.
Close the top lid.
Plug into a 120 volt outlet.
appears.
DO NOT press START at this stage (The
machine will default to an extra large basic
bread with medium crust, if START is
pressed now.). Select your program first.
-
7
-
If any moisture remains on
the dispenser, the yeast
may not drop completely.
Position the unit away from
edge of the table or countertop.
The unit may vibrate or move
during the kneading process.
Place the unit where it will not
fall off should the unit move
during the kneading process.
Page 9

Steps
Notes
7
8
DARK LIGHT
TEMP REST
RAISIN
BAKE DOUGH
RAPID ALERT
SANDWICH
XL L M
SELECT
DARK LIGHT
TEMP REST
RAISIN
BAKE DOUGH
RAPID ALERT
SANDWICH
XL L M
SIZE
XL L M
BASIC
WHOLE WHEAT
MULTIGRAIN
FRENCH
PIZZA
BAKE ONLY
MENU
BASIC
WHOLE WHEAT
MULTIGRAIN
FRENCH
PIZZA
BAKE ONLY
Select size.
Press select to choose the type of bread
indicated on the right of display.
Keep pressing the pad to move the
arrow down the list of bread types.
For basic, it is not necessary to press
this pad.
For bake only program,
refer to P.11 — 12 for instructions.
Press SELECT to choose BAKE RAPID,
BAKE SANDWICH, BAKE RAISIN,
DOUGH or DOUGH RAISIN.
SELECT
For BAKE, it is not necessary to press
this pad.
CRUST
MENU
Select crust color.
See P. 3 for choice of bread
programs.
See P. 3 for choice of baking
options.
The option you require will flash.
See availability of size and
color selection on P. 3.
9
10
START
STOP
DARK LIGHT
TEMP REST
RAISIN
BAKE DOUGH
RAPID ALERT
SANDWICH
XL L M
The above display is
for basic—BAKE,
XL size, medium colour.
RAISIN options only
DARK LIGHT
TEMP REST
RAISIN
BAKE DOUGH
RAPID ALERT
SANDWICH
XL L M
The above display
is for basic-BAKE
RAISIN, XL size,
light color.
BASIC
WHOLE WHEAT
MULTIGRAIN
FRENCH
PIZZA
BAKE ONLY
BASIC
WHOLE WHEAT
MULTIGRAIN
FRENCH
PIZZA
BAKE ONLY
In the last part of kneading, there will be
two sessions of beep sound. RAISIN on
display will blink and kneading will stop
for 3 minutes.
Add the dried fruits during this period to
prevent them from being crushed.
Close the lid and leave the unit.
When 3 minutes have passed, kneading
will begin again and the RAISIN will
stop blinking.
-
8
-
When TEMP blinks, see P.14.
There will be no mixing action
during resting.
A clicking noise may be heard
during operation. This is not a
malfunction.
For information of the process
of each option, see P. 4.
The time required for each of
the steps will vary according
to factors such as voltage
fluctuation and room
temperature.
The raisin beep will sound :
For basic: 42~72 minutes from
Start.
For whole wheat: 72~102 minutes
from Start.
Do not put your finger in the dough,
or touch the bread pan while adding
the dried fruits.
During operation, do not remove
the pan, nor unplug the power cord.
The timer cannot be used
for this option.
Page 10

11
Steps Notes
The beeper will sound eight times and
the indicating light will flash when the
bread is baked, or the dough is
completed.
12
13
14
Press START/STOP.
Promptly open the lid and remove the
bread pan using oven gloves.
Note: If the START/STOP is not pressed
and the bread pan is not removed, the
unit proceeds to keep the bread warm for
1 hour or until START/STOP is pressed
to prevent condensation of the steam.
For DOUGH options, follow each recipe
directions for further steps instructed in
the cook book.
Turn the pan upside down.
Shake the pan several times to release
the bread.
If the kneading blade comes out with
the bread, use a heat-resistant plastic
utensil to remove it.
For DOUGH options, when baking is
completed, remove from the oven,
using oven gloves.
Place the bread on a wire rack to cool
and allow the steam to escape.
The bread pan will be very
hot.
Do not place it on any plastic
surfaces. Handle carefully.
If the bread is left in the unit,
further browning of crust color
may occur.
The bread and the kneading
blade will be very hot.
A metal utensil may scratch
the finish of the kneading
blade.
See Slicing and storing the
bread on P. 13.
15
Unplug after use.
-
Allow at least 1 hour for the unit to cool down before the next use.
-
9
-
Page 11

To use the timer (BAKE option only)
Follow the same steps as in pages 7-9 except step 9.
For step 9, follow the instructions below.
TIMER
9:00 pm
start
9
6:30 am
finish
START
STOP
DARK LIGHT
TEMP REST
RAISIN
BAKE DOUGH
RAPID ALERT
SANDWICH
XL L M
The above display is for
basic-BAKE, XL size,
medium colour.
12
3
6
BASIC
WHOLE WHEAT
MULTIGRAIN
FRENCH
PIZZA
BAKE ONLY
Steps
Press TIMER to set the amount of time
in which you want the bread to be
ready.
Time may be set for any length of time
from 4 hours to 13 hours for BASIC,
from 5 hours to 13 hours for WHOLE
WHEAT and MULTIGRAIN,
from 6 hours to 13 hours for FRENCH.
Example:
If the present time is 9:00 pm, and you want the
bread to be finished at 6:30 am tomorrow morning,
set the timer to (9 hours and 30 minutes), the
time required until the completion of the bread.
(9 hours
and 30 minutes)
Press START/STOP.
The time remaining before the bread is
finished is displayed in hours and
minutes.
9:30
Notes
See P. 6 for further
explanation of the TIMER pads.
There will be no action while
the timer is working.
Using the BAKE RAPID option
Follow the previous steps 1-6. For step 7, choose either BASIC or WHOLE WHEAT (there is no BAKE
RAPID option for the MULTIGRAIN or FRENCH). For steps 8 & 9, follow the instructions below.
SELECT
START
STOP
MENU
Press SELECT pad to choose
BAKE RAPID.
Then select size and crust colour.
Press START pad.
-
10
-
DARK LIGHT
TEMP REST
RAISIN
BAKE DOUGH
RAPID ALERT
SANDWICH
XL L M
BASIC
WHOLE WHEAT
MULTIGRAIN
FRENCH
PIZZA
BAKE ONLY
The remaining
time is displayed
in hours and
minutes.
The above display is for BASIC-BAKE
(RAPID) option, XL size, medium color.
The timer cannot be used for this option.
Page 12

Using the DOUGH option
Follow the previous steps 1-7.
Steps Notes
8
9
10
SELECT
START
STOP
REST begins. After rest, the process to make the dough
will begin.
The remaining time is displayed in hours and minutes.
The beeper will sound eight times and the indicating light will flash
when the dough is completed. Press STOP pad when the beeper
stops. Remove the bread pan. Close the lid. Unplug after use.
START
STOP
Shape and give dough final rising before baking in a conventional
oven as per the recipes given.
Press SELECT to choose DOUGH or DOUGH
RAISIN.
Note: For PIZZA DOUGH, press select until the
arrow points at it. You do not have to press
SELECT.
Press Start pad.
DOUGH will stop flashing.
The display will go out when the beeper stops,
but the indicating light will flash until the STOP
pad is pressed.
Dough will flash.
The resting settles the
temperature of the bread pan
and ingredients.
11
1
2
3
When baking is completed, remove from the oven, using your
oven gloves and cool on a wire rack.
Using the bake only program
Steps Notes
Prepare cake in a separate mixing
bowl.
Place the mixture carefully into the
lined bread pan.
(The kneading blade must be
removed.)
MENU
Press select to choose BAKE ONLY.
— 11 —
The timer cannot be used
for this option.
Follow instructions in the
Cookbook for details.
Ensure that the bread pan is
lined with baking parchment
so the cake mixture does not
touch the sides.
Page 13

Page 14

Slicing and storing the bread
Cool the bread on a wire rack before slicing or storing.
Slicing homemade bread
Homemade bread can be cut with a bread knife.
Place the loaf on its side and cut with a sawing
motion.
Storing homemade bread
After cooling the bread completely at room
temperature, wrap it in a foil or a plastic bag
to preserve freshness.
To enjoy the taste of freshly baked homemade
bread, try to consume your bread as soon as
possible.
For longer storage, wrap well and store in the
freezer.
It is better to slice the loaf before freezing.
Leakage of bread ingredients from the bread pan
With extended use, a small quantity of ingredients may leak out from the outlet of the bread pan. This is
normal. The bread pan is designed so that the ingredients in the kneader mounting shaft unit may be
discharged to prevent rotation stoppage.
When the kneader mounting shaft does not rotate, it is necessary to replace the kneader mounting shaft unit
with a new one.
Consult with your authorised Panasonic Service Centre for servicing or for purchase of replacement parts.
Kneader mounting shaft
Outlet
Specifications
Power supply
Power consumed
Capacity
Timer
Protective device
Dimensions (H X W X D)
Weight
Accessories
Kneader mounting shaft unit
(Part No. ADA 29A115)
120V AC 60 Hz
550 W
max. 213/4 oz./620N of bread flour
min. 143/4 oz./400N of bread flour
Digital timer (up to 13 hours)
Self-resetting motor protector
approx. 14 X 131/3 X 9
Measuring cup, measuring spoon
-
13
-
approx. 15 lbs.
Page 15

Condition
TEMP
appears
on
display.
Reason/Cause
How to reset/restart
is on
display.
ALERT
is on
display.
Not baked at all, although
the operation appears to
have proceeded.
There has been a 10-minute or
less power cut. (The power plug
has been inadvertently pulled out or
the breaker has activated.)
Or there has been a slight change in
the power supplied to the machine.
Motor protection device has activated.
This only happens when the unit is
overloaded and an excessive force
is applied to the motor.
After about 30 minutes, the motor
automatically starts running again.
Motor protection device
If the interruption in the power supply is
momentary, the operation will not be affected.
If the power is restored within 10 minutes, the
bread maker will operate again. However, the
bread may not turn out well.
Remove the dough and start again using all
new ingredients.
Check to see if the kneader mounting shaft can
rotate.
Make sure you did not use
too much or too hard/heavy
ingredients, then start again
using all new ingredients.
Service will
be required.
If the unit is overloaded and an excessive force is applied to the motor, the protection device will
stop the motor. After approximately 30 minutes, the motor will automatically start running again. It is
recommended to restart with fresh ingredients.
If the kneading blade is restricted by hard dough, take out the dough. The
unit will restart 30 minutes later.
Check to see if the kneader mounting shaft of the bread pan can rotate.
Remedy 2
If it can rotate, restart the bread maker after 30 minutes. If it cannot rotate,
service will be required.
-
14
-
Page 16

Before calling for service
BAKING RESULTS:
Please check the following:
Unplugged.
Ingredient spilled on heater element.
Power interruption (display ).
Start/Stop pad was pressed after starting.
Top lid was open during operation.
Selection was wrong (DOUGH option was chosen).
Bread left in bread pan too long after baking.
Bread sliced just after baking (Steam was not
allowed to escape).
Neither the
indicating
light nor
the display
light up.
Smoke
emitted
from steam
vent.
Burning
smell.
Sides of
bread
collapse
and bottom
is damp.
Bread
rises
too
much.
Water added after kneading flour.
OPERATIONAL ERRORS
Kneading blade not installed properly in pan.
Not enough
Flour
Too much
Not enough
Yeast
Water
MEASUREMENT ERRORS
Ingredients used other than prescribed.
Flour
INGREDIENT PROBLEMS
Yeast
No sweetening agents
Old flour used.
Wrong type of flour used.
Yeast not placed in pan first, or liquids
touched yeast before kneading.
Old yeast used.
Too much
No yeast
Not enough
Too much
Wrong type of yeast used.
-
15
-
Page 17

Collapsed
after
over-rising.
Bread
doesn’t
rise
enough.
Unleavened or not leavened enough
Top of
bread
floured.
Underbrowned
and sticky.
Browned and
floured sides,
center sticky
and raw.
Sides
brown but
flour coated
bottom.
Not baked. Slices
unevenly
and is
sticky.
-
16
-
Page 18

Ingredients
Since the bread program on your Automatic is
completely computerised, the success of your loaf depends on the quantity
and quality of the ingredients
Flour:
Wheat flour provides the bulk and
structure of bread. Flour is classified
into two types, strong flours which are
milled from hard wheat and weak
flours which are milled from soft
wheat. The difference in the two types
of wheat is the content of proteins that form gluten
( gluten is the important constituent of bread which
provides its structure and its stretchy, chewy texture.
Gas which is released during fermentation is trapped
within the elastic network of gluten, thus making the
dough rise. Gluten development mostly takes place
during dough kneading).
Strong flours contain a high content of protein
necessary for the development of gluten. Always use
strong flour - labelled as suitable for bread making
when using the recipes in this book.
Weak flour such as cake flour and pastry flour, are
less in protein content and are suitable for products
which have a light, crumbly texture and do not require
much gluten development.
All purpose flour is used for many purposes, as the
name suggests, in home baking. It is slightly weaker
than bread flour. In our recipes, it is blended with the
bread flour and not used alone.
Self rising flour is a white flour to which baking
powder and sometimes salt have been added.
Weak flours, all purpose flour and self-rising flour may
not be substituted for bread flour in the included recipes.
Rye flour contains some proteins but these do not
form sufficient gluten. Therefore, bread baked with
rye flour will be dense and heavy. When a recipe in
this book calls for rye flour, do not use more than the
stated quantity, as it could overload the motor.
Other flour: Products milled from other grains are
occasionally used in bread. i.e. corn meal, rice, millet,
soy, oat, buckwheat and barley flours. These do not
contain protein that form sufficient gluten and
therefore they should not be substituted for bread
flour in the recipes. For gluten free bread making
see page 6. Do not add more than the stated amount
in the following recipes, otherwise a good result will
not be achieved.
Sugars:
Sugars or sweetening agents
have the following purposes in
bread making:
They add sweetness and flavour.
They add softness and fineness to
the texture.
They give crust colour.
They contribute to keeping
qualities by retaining moisture.
They provide food for yeast.
Besides granulated sugar or caster sugar, brown
sugar, honey and molasses can be substituted in the
recipes. Recipes including fruit generally require less
added sugar due to the high sugar content of the fruit.
Whole wheat flour is made by grinding the entire
wheat kernel, including the bran and germ. 100%
whole wheat bread or breads containing a high
percentage of whole wheat flour will be lower in
height and heavier in texture than bread baked with
a high percentage of bread flour. This is because the
gluten strands are cut by the edges of bran flakes
and the germ, rich in minerals, inhibits fermentation.
Fats:
The major purpose of fats in bread
baking are:
They tenderize the bread.
They add flavour and richness.
They contribute to keeping qualities
by retaining moisture.
Any fat can be used, however, we
recommend butter for the best flavour
and texture.
17
Page 19

Ingredients
Milk and milk products:
Their main purposes are:
They enhance flavour.
They increase the nutritional value
of bread.
Milk solids include protein, lactose
(milk sugar), and minerals.
Most recipes call for the use of milk powder.
NEVER use fresh milk on the overnight programme.
Otherwise it may sour during the rest time, spoiling
the final flavour.
Salt:
Salt has the following functions in
bread baking.
It strengthens gluten structure and
makes it more stretchable.
It inhibits yeast growth.
It enhances the flavour.
Therefore, too much salt will inhibit fermentation
whereas too little will result in weak gluten structure.
Both will result in a bread with low volume and poor
texture. Use ordinary table salt. DO NOT USE
coarsely GROUND SALT.
Liquid:
Cold tap water should be used.
(For BAKE RAPID, lukewarm water
should be used, especially during the
very cold winter months.)
Cold fresh milk can be substituted to
improve the keeping quality and
nutritional value of the loaf, which will have a softer
browner crust.
NEVER use fresh milk on the overnight program.
Always measure the liquid stated in the recipe
carefully, using the measuring cup provided.
TOO MUCH LIQUID will cause the dough to
collapse, giving a poor appearance.
Yeast:
Yeast is a living organism, a
microscopic plant which works as
a leavening agent in bread baking.
It acts on sugars and changes them
into carbon dioxide gas and alcohol.
This gas production causes the leavening or the rise
of yeast dough.
The alcohol evaporates during baking.
Yeast is available in two forms: fresh and dry. Dry
yeast is available in two types; the type that requires
preliminary fermentation and the type that is used dry
and may be mixed with other ingredients.
For , use the latter type.
fresh yeast or dry yeast that requires preliminary
fermentation.
instant or breadmachine yeast on the packet. Do
not dissolve yeast in water before use. It is placed dry
in the bread pan first, before all other ingredients.
As there is an optimum temperature for yeast to
activate, your incorporates a heat
sensor to keep the dough at the correct temperature
during the rising process.
We use the minimum quantity of yeast required in
our recipes to avoid spoiling the flavour of the finished
loaf.
Yeast must be stored in the refrigerator for short term
storage.
For longer storage, keep in the freezer.
Its reactions to temperature are as follows:
...............................Inactive
..................Slow action
..................Best growth (Fermentation
.................Yeast is killed
Chemical leaveners
Chemical leaveners are those that release gases
produced by chemical reactions. Chemical leaveners
used in this book are baking soda (sodium bicarbonate)
and baking powder.
Always use yeast marked active dry ,
and proofing temperatures for
bread growth)
Do not use
(Storage temperature)
18
Page 20

Other ingredients used for flavored loaves
Egg:
These are sometimes added to
nutritionally enrich the dough, they
also improve the keeping properties
and colour of the baked product.
Medium sized eggs are used.
Fruits:
Dried fruits are used in some of the
following recipes. Total weight of
dried fruits used should not exceed
recommendations in the recipes.
When using fresh fruit, use only as
directed in the following recipes, as
the water content of the fruit will
affect the loaf volume.
Bran:
Approximately 4—5 tbsp can be added to
boost the fibre content. (Do not use more
than this recommended amount as it will
affect the volume of the loaf).
Bran cereals may be used in more
quantities. Refer to recipes.
Wheat germ:
Approx 60 ml (4 tbsp) can be added
to give a nuttier flavour.
Vitamin C (Ascorbic Acid):
Ascorbic acid is a bread improver
i.e. it helps improve the volume of
the loaf. This is now incorporated
into the Fast Action Easy Bake
yeast and does not have to be
added as a separate ingredient,
although we recommend adding 1/4 tsp Vitamin C
powder to certain whole wheat loaves to improve
the rise.
Nuts:
Nuts may be used, but chop them
finely. Use no more than the recipe
recommends.
The height of bread when nuts are
used, may be low because the
chopped nuts will cut the gluten structure.
When adding nuts as well as dried fruit, their total
weight should not exceed that recommended in the
recipes. Remember to chop them finely as these
interfere with mixing.
Spices:
Spices are used to add
flavour to the bread. Only
small amounts (1 teaspoon
to 2 teaspoon) are required.
Herbs:
Herbs are used to add flavour to the bread.
These can be used fresh or dried. If using dried
herbs only small amounts (1—2 tsp) are required.
For fresh herbs follow the guidelines in the recipes.
Seeds:
These may be added to give flavour and texture to
the bread. Be careful if using larger seeds, that are
particularly hard, as they could scratch the non-stick
coating.
19
Page 21

Baking results differ according to several factors including the environmental conditions, electricity fluctuation,
choice of ingredients and their brands, measurement and quality. To avoid poor baking results, the following
should be remembered:
Bake at optimum temperature.
¥
Temperature is one of the most important factors in bread baking. Although the is designed
to sense the temperature and automatically control the heating system during the entire process of baking,
it should be remembered that fair results may be obtained only if the room temperature is 41¡F to 86¡F.
For optimum results, bake in a room between 68¡F to 77¡F.
Temperature of ingredients will also affect the bread result. Although it is best to have all the ingredients
the same temperature as the room temperature (that is, within the optimum temperature range), the
temperature of ingredients are often very difficult to control. The temperature of water is the easiest to
adjust. When using BAKE RAPID mode and the room temperature is very cold, between 41¡F—50¡F,
adjust water to approximately 68¡F.
Other environmental factors such as humidity and altitude may affect the bread result. In normal room
humidity, the effect may be slightly seen in the color and the luster of the crust. Experimentation will be
necessary regarding the correct amount of yeast to be used at different altitudes.
Measure the ingredients accurately.
¥
Accurate measurement is essential in achieving good baking results. Weighing the ingredients would be
more accurate than measuring them in cups. This is why in this book s recipes, many ingredients are given
in weight as well as in cup/spoon measurements.
The only ingredients that may be appropriate in measuring by volume, that is, by cups and spoons, are
liquids and very small quantities of dry ingredients, such as the yeast and spices. These are difficult to
weigh by a kitchen scale. Even in such instances, measure the amount accurately by scooping the
ingredient in the measuring cup or the spoon of the desired size until the measure is more than full.
Level the top with the straight edge of a metal spatula to remove the excess. Do not tap the bottom of the
cup or spoon on the table to hold another scoop.
Correct way to use
a measuring cup.
(Use provided measuring cup.)
1
Scoop the ingredient until
the cup is more than full.
2
Level the top with the straight edge of
a metal spatula to remove the excess.
20
Page 22

BAKE & BAKE RAPID mode
For BAKE RAPID mode, add extra 1 tsp of dry yeast.
Basic
C=cup(s), tsp=teaspoon(s), TBSP=Tablespoon(s)
<
Note for measuring flour
The amounts shown in ( ) are not as precise as weight measurements.
For better results, please use weight measurements. (1 cup = 4.92 oz.)
Basic White Bread
Bread flour
Salt
Dry milk
Butter
Sugar
Water
Dry yeast
C/TBSP/tsp oz./fl.oz.
(47/16 C)
2 TBSP
1
2
2 TBSP
1
2 tsp
/2 TBSP
3
/4 C
1
1
/2 tsp
XL
21
14 fl.oz.
Carrot Splce Bread
Bread flour
Salt
Dry milk
Butter
Carrots, grated
Allspice
Honey
Water
Dry yeast
C/TBSP/tsp oz./fl.oz.
(47/16 C)
2 TBSP
1
2
2 TBSP
1
2 tsp
/2 TBSP
1
/4 C
4 tsp
1
/2 C
1
1
/2 tsp
XL
12
21
1
Cranberry Bread
Bread flour
Salt
Dry milk
Butter
Sugar
Cranberry juice
Water
Dry yeast
C/TBSP/tsp oz./fl.oz.
(47/16 C)
2 TBSP
1
2
2 TBSP
1
2 tsp
/2 TBSP
3
/4 C
1 C
1
/2 tsp
XL
21
6 fl.oz.
8 fl.oz.
Egg Bread
2 tsp
/2 TBSP
2
3
1
/4 C
1
/2 tsp
XL
21
14 fl.oz.
C/TBSP/tsp oz./fl.oz.
Bread flour
(47/16 C)
Salt
Dry milk
Butter
Sugar
2 TBSP
1
2
2 TBSP
Egg
Milk with the egg*
Dry yeast
*Place the egg (s) inthe measuring cup, then add milk.
1
>
LM
3
/4 oz.
C/TBSP/tsp C/TBSP/tsp
(311/16 C)
2 tsp
2 TBSP
2 TBSP
3
/4 TBSP
1
1
1
/2 C
1
1
/4 tsp
oz./fl.oz. oz./fl.oz.
181/4 oz.
1
12
/4 fl.oz.
(3 C)
1
/2 tsp
1
1
1
/2 TBSP
1
1
/2 TBSP
1
1
/2 TBSP
1
1
/4 C
1 tsp
( ) : measurements not as precise as weight measurements.
LM
3
/4 oz.
/4 fl.oz.
C/TBSP/tsp C/TBSP/tsp
11
(3
/16 C)
2 tsp
2 TBSP
2 TBSP
1
/2 TBSP
2
1TBSP
2TBSP
7
1
/16 C
1
/4 tsp
1
oz./fl.oz. oz./fl.oz.
181/4 oz.
(3 C)
1
1
/2 tsp
1
1
/2 TBSP
1
1
/2 TBSP
2 TBSP
2 tsp
1
1
11
1
/4 fl.oz.
/2 TBSP
1
/8 C
1
1 tsp
( ) : measurements not as precise as weight measurements.
LM
3
/4 oz.
C/TBSP/tsp C/TBSP/tsp
(311/16 C)
2 tsp
2 TBSP
2 TBSP
3
/4 TBSP
1
5
/8 C
15
/16 C
1
1
/4 tsp
oz./fl.oz. oz./fl.oz.
181/4 oz.
5 fl.oz.
1
/4 fl.oz.
7
(3 C)
1
/2 tsp
1
1
1
/2 TBSP
1
1
/2 TBSP
1
1
/2 TBSP
1
/2 C
3
/4 C
1 tsp
( ) : measurements not as precise as weight measurements.
LM
3
/4 oz.
C/TBSP/tsp C/TBSP/tsp
(311/16 C)
2 tsp
2 TBSP
2 TBSP
3
/4 TBSP
1
2
1
1
/2 C
1
1
/4 tsp
oz./fl.oz. oz./fl.oz.
181/4 oz.
1
/4 fl.oz.
12
(3 C)
1
1
/2 tsp
1
1
/2 TBSP
1
1
/2 TBSP
1
1
/2 TBSP
11/4 C
1
1 tsp
( ) : measurements not as precise as weight measurements.
3
/4 oz.
14
10 fl.oz.
3
14
/4 oz.
9 fl.oz.
3
14
/4 oz.
4 fl.oz.
6 fl.oz.
3
14
/4 oz.
10 fl.oz.
Herb Bread
Bread flour
Salt
Dry milk
Butter
Dry parseley
Caraway seeds
Dill seeds
Water
Dry yeast
C/TBSP/tsp oz./fl.oz.
XL
3
(47/16 C)
21
/4 oz.
2 tsp
2 TBSP
1
/2 TBSP
2
1
/4 C
3 TBSP
3 TBSP
7
/8 C
1
1
1
/2 tsp
15 fl.oz.
C/TBSP/tsp C/TBSP/tsp
(311/16 C)
2 tsp
2 TBSP
2 TBSP
3 TBSP
2 TBSP
2 TBSP
7
/16 C
1
1
/4 tsp
1
oz./fl.oz. oz./fl.oz.
181/4 oz.
(3 C)
1
1
/2 tsp
1
1
/2 TBSP
1
1
/2 TBSP
14
2 TBSP
11
1
/4 fl.oz.
1 TBSP
1 TBSP
1
1
/8 C
9 fl.oz.
1 tsp
( ) : measurements not as precise as weight measurements.
-
21
-
LM
3
/4 oz.
Page 23

BAKE & BAKE RAPID mode
For BAKE RAPID mode, add extra 1 tsp of dry yeast.
C=cup(s), tsp=teaspoon(s), TBSP=Tablespoon(s)
<
Note for measuring flour
The amounts shown in ( ) are not as precise as weight measurements.
For better results, please use weight measurements. (1 cup = 4.92 oz.)
Milk Bread
Bread flour
Salt
Dry milk
Butter
Sugar
Milk
Dry yeast
Pepperoni & Cheese Bread
Bread flour
Salt
Dry milk
Sugar
Pepperoni, finely chopped
Provolone cheese, chopped
Parmesan cheese, grated
Garlic powder
Onion powder
Oregano
Olive oil
Water
Dry yeast
Rye Bread with Onions and Caraway
Bread flour
Rye flour
Salt
Dry milk
Sugar
Butter
Onions, chopped
Caraway seeds
Water
Dry yeast
Spicy Cheese
Bread flour
Salt
Dry milk
Sugar
Dry mustard
Black pepper
Butter
Cheddar cheese, shredded
Worcester sauce
Water
Dry yeast
Zucchini
Bread flour
Salt
Dry milk
Sugar
Cinnamon
Cloves, Powdered
Butter
Walnuts, finely chopped
Zucchini, grated
Water
Dry yeast
>
2 tsp
13
/16 C
1
/2 tsp
XL
14
21
3
/4 oz.
1
/2 fl.oz.
C/TBSP/tsp C/TBSP/tsp
11
(3
/16 C)
2 tsp
2 TBSP
2 TBSP
3
/4 TBSP
1
1
1
/2 C
1
1
/4 tsp
C/TBSP/tsp oz./fl.oz.
(47/16 C)
2 TBSP
1
/2 TBSP
2
2 TBSP
1
1
( ) : measurements not as precise as weight measurements.
2 tsp
3
/8 C
3
/16 C
/2 tsp
/2 tsp
/4 tsp
5
1
1
/2 tsp
/8 C
XL
3
21
/4 oz.
4 oz.
13 fl.oz.
C/TBSP/tsp C/TBSP/tsp
(311/16 C)
2 tsp
2 TBSP
3
/4 TBSP
1
1
/4 C
1
/8 C
1
/2 tsp
1
/2 tsp
1
/4 tsp
2 tsp
7
/16 C
1
1
/4 tsp
1
C/TBSP/tsp oz./fl.oz.
(47/16 C)
2 TBSP
2 TBSP
1
1
1
1 TBSP
1
( ) : measurements not as precise as weight measurements.
1
/4 C
2 tsp
3
/8 C
1
1
1
/2 tsp
/2 C
XL
12
21
3
/4 oz.
1
/4 fl.oz.
C/TBSP/tsp C/TBSP/tsp
1
/16 C)
(3
3
/16 C
2 tsp
2 TBSP
3
/4 TBSP
1
2 TBSP
1
/4 C
1 TBSP
3
/8 C
1
1
1
/4 tsp
C/TBSP/tsp oz./fl.oz.
(47/16 C)
2 TBSP
2 TBSP
1
/2 TBSP
2
1
/2 TBSP
1
1
( ) : measurements not as precise as weight measurements.
2 tsp
2 tsp
/2 tsp
3
/8 C
7
/8 C
1
/2 tsp
XL
3
/4 oz.
21
15 fl.oz.
C/TBSP/tsp C/TBSP/tsp
(31/16 C)
2 tsp
2 TBSP
3
/4 TBSP
1
1
/2 tsp
1
1
/2 tsp
2 TBSP
1
/4 C
1
/2 TBSP
1
9
/16 C
1
1
/4 tsp
1
C/TBSP/tsp oz./fl.oz.
(47/16 C)
2 TBSP
2 TBSP
1
1
/2 TBSP
2
2 TBSP
1
1
( ) : measurements not as precise as weight measurements.
2 tsp
2 tsp
1 tsp
5
/16 C
5
/16 C
1
1
/2 tsp
/2 C
XL
3
/4 oz.
21
12 fl.oz.
C/TBSP/tsp C/TBSP/tsp
(31/16 C)
2 tsp
2 TBSP
3
/4 TBSP
1
1
/2 tsp
1
1
/2 tsp
2 TBSP
1
/4 C
1
/4 C
5
/16 C
1
1
/4 tsp
1
C/TBSP/tsp oz./fl.oz.
(47/16 C)
2 TBSP
2 TBSP
1
/2 TBSP
2
1
1
( ) : measurements not as precise as weight measurements.
— 22 —
Basic
LM
oz./fl.oz. oz./fl.oz.
181/4 oz.
1
/4 fl.oz.
12
(3 C)
1
1
1
1
/2 TBSP
1
1
/2 TBSP
1
1
/2 TBSP
1
/2 tsp
1
/4 C
1 tsp
LM
oz./fl.oz. oz./fl.oz.
181/4 oz.
3 oz.
1
11
/2 fl.oz.
(3 C)
1
1
1
1
/2 TBSP
1
1
/2 TBSP
1
1
1
1
1
1 tsp
1
/2 tsp
/8 C
/16 C
/4 tsp
/4 tsp
/4 tsp
3
/16 C
1 tsp
LM
oz./fl.oz. oz./fl.oz.
1
1
/2 TBSP
1
1
1
/2 TBSP
1
1
/2 TBSP
1
(3 C)
1
/8 C
1
/2 tsp
1
/8 C
2 tsp
3
/16 C
181/4 oz.
11 fl.oz.
1 tsp
LM
oz./fl.oz. oz./fl.oz.
181/4 oz.
1
12
/2 fl.oz.
(3 C)
1
1
1
1
/2 TBSP
1
1
/2 TBSP
1 tsp
1
/4 tsp
1
1
/2 TBSP
3
1 TBSP
5
1
/2 tsp
/16 C
/16 C
1 tsp
LM
oz./fl.oz. oz./fl.oz.
181/4 oz.
1
10
/2 fl.oz.
(3 C)
1
1
1
1
/2 TBSP
1
/2 TBSP
1
1 tsp
1
1
1
/2 TBSP
3
3
1
/2 tsp
/4 tsp
/16 C
/16 C
1
/16 C
1 tsp
3
14
/4 oz.
10 fl.oz.
3
/4 oz.
14
2 oz.
1
9
/2 fl.oz.
143/4 oz.
1
9
/2 fl.oz.
3
/4 oz.
14
1
10
/2 fl.oz.
3
/4 oz.
14
3
8
/4 fl.oz.
Page 24

Basic Raisin
Basic Raisin
C/TBSP/tsp oz./fl.oz.
Bread flour
Salt
Dry milk
Butter
Sugar
Water
Dry yeast
Raisins
*If you find that the raisins do not get mixed into the dough but remain burnt on the surface of the loaf, which then come off
after being baked, increase 1—2 tablespoons of water to make the dough softer the next time.
Fruit Nut Bran
Bread flour
Salt
Dry milk
Butter
Sugar
Bran flakes
Sliced almonds
Water
Dry yeast
Dried fruit bits
(47/16 C)
2 tsp
2 TBSP
1
/2 TBSP
2
2 TBSP
3
/4 C
1
1
1
/2 tsp
C/TBSP/tsp oz./fl.oz.
(47/16 C)
2 tsp
2 TBSP
1
/2 TBSP
2
2 TBSP
1
/4 C
3
/8 C
3
/4 C
1
1
1
/2 tsp
Select BAKE RAISIN mode
C=cup(s), tsp=teaspoon(s), TBSP=Tablespoon(s)
Ingredients in
<
Note for measuring flour
The amounts shown in ( ) are not as precise as weight measurements.
For better results, please use weight measurements. (1 cup = 4.92 oz.)
XL
3
21
/4 oz.
14 fl.oz.
4.4 oz.
XL
3
/4 oz.
21
14 fl.oz.
1
3
/2 oz.
italics
should be added at the beep.
>
LM
C/TBSP/tsp C/TBSP/tsp
11
/16 C)
(3
2 tsp
2 TBSP
2 TBSP
3
/4 TBSP
1
1
1
/2 C
1
1
/4 tsp
oz./fl.oz. oz./fl.oz.
3
181/4 oz.
1
/4 fl.oz.
12
1
3
/2 oz.
(3 C)
1
1
/2 tsp
1
1
/2 TBSP
1
1
/2 TBSP
1
1
/2 TBSP
1
1
1 tsp
/4 C
14
10 fl.oz.
3 oz.
/4 oz.
( ) : measurements not as precise as weight measurements.
LM
C/TBSP/tsp C/TBSP/tsp
11
/16 C)
(3
2 tsp
2 TBSP
2 TBSP
3
/4 TBSP
1
1
/4 C
5
/16 C
1
1
/2 C
1
1
/4 tsp
oz./fl.oz. oz./fl.oz.
181/4 oz.
1
12
/4 fl.oz.
(3 C)
1
1
/2 tsp
1
1
/2 TBSP
1
1
/2 TBSP
1
1
/2 TBSP
1
/8 C
1
/4 C
1
1
/4 C
3
14
10 fl.oz.
1 tsp
3 oz.
2 oz.
/4 oz.
( ) : measurements not as precise as weight measurements.
Basic Sandwich
Basic Sandwich
C/TBSP/tsp oz./fl.oz.
Bread flour
Salt
Dry milk
Butter
Sugar
Water
Dry yeast
( ) : measurements not as precise as weight measurements.
(3 C)
11/2 tsp
1
/2 TBSP
1
1
/2 TBSP
1
1
/2 TBSP
1
1
1
1 tsp
/4 C
Select BAKE SANDWICH mode
C=cup(s), tsp=teaspoon(s), TBSP=Tablespoon(s)
These loaves are all one size. Size selection cannot be made.
<
Note for measuring flour
>
The amounts shown in ( ) are not as precise as weight measurements.
For better results, please use weight measurements. (1 cup = 4.92 oz.)
Walnut Cinnamon
3
14
/4 oz.
10 fl.oz.
Bread flour
Salt
Dry milk
Butter
Brown sugar
Cinnamon
Walnuts
Water
Dry yeast
( ) : measurements not as precise as weight measurements.
-
23
-
C/TBSP/tsp oz./fl.oz.
3
(3 C)
11/2 tsp
1
/2 TBSP
1
1
/2 TBSP
1
1
/2 TBSP
1
1 tsp
3
/16 C
1
1
/4 C
14
/4 oz.
10 fl.oz.
1 tsp
Page 25

BAKE & BAKE RAPID mode
For BAKERAPID mode, add extra 1 tsp of dry yeast
C=cup(s), tsp=teaspoon(s), TBSP=Tablespoon(s)
The amounts shown in ( ) are not as precise as weight measurements.
For better results, please use weight measurements. (1 cup = 4.92 oz.)
100% Whole Wheat
Whole wheat flour
Salt
Dry milk
Butter
Molasses
Water
Dry yeast
C/TBSP/tsp oz./fl.oz.
XL
(45/16 C)
21
3
/16 oz.
2 tsp
2 TBSP
1
2
/2 TBSP
2 TBSP
1
1
3
/4 C
1
/2 tsp
14 fl.oz.
C/TBSP/tsp C/TBSP/tsp
(311/16 C)
2 tsp
2 TBSP
2 TBSP
3
1
/4 TBSP
1
1
1
1
/4 tsp
( ) : measurements not as precise as weight measurements.
LM
/2 C
12
Honey Walnut
C/TBSP/tsp oz./fl.oz.
Whole wheat flour
(45/16 C)
Salt
Dry milk
Butter
2 TBSP
1
2
Walnuts, finely chopped
Honey
2 TBSP
Water
Dry yeast
1
2 tsp
/2 TBSP
1
/2 C
3
1
/4 C
1
/2 tsp
XL
3
/16 oz.
21
3
1
14 fl.oz.
C/TBSP/tsp C/TBSP/tsp
(311/16 C)
2 tsp
2 TBSP
2 TBSP
/4
3
/8 C
3
1
/4 TBSP
1
1
1
1
/4 tsp
( ) : measurements not as precise as weight measurements.
LM
/2 C
12
Nut Bran
Whole wheat flour
Bread flour
Salt
Dry milk
Almond slices
Bran flakes
Honey
Water
Dry yeast
C/TBSP/tsp oz./fl.oz.
XL
1
(21/8 C)
1
(2
/8 C)
10
10
/2 oz.
1
/2 oz.
2 tsp
2 TBSP
1
/2 C
1
/2 C
2 TBSP
3
1
/4 C
1
1
/2 tsp
14 fl.oz.
C/TBSP/tsp C/TBSP/tsp
(17/8 C)
7
(1
2 tsp
2 TBSP
3
/8 C
3
/8 C
3
1
/4 TBSP
1
1
1
1
/4 tsp
( ) : measurements not as precise as weight measurements.
LM
/8 C)
/2 C
12
Peanut Sesame
Whole wheat flour
Bread flour
Salt
Dry milk
Peanut butter
Brown sugar
Sesame seeds
Water
Dry yeast
C/TBSP/tsp oz./fl.oz.
XL
(21/8 C)
1
(2
/8 C)
10
10
1
/2 oz.
1
/2 oz.
2 tsp
2 TBSP
1
/4 C
2 TBSP
3
/8 C
13
/16 C
1
1
1
/2 tsp
14
1
2
/4 oz.
1
/2 fl.oz.
LM
C/TBSP/tsp C/TBSP/tsp
(17/8 C)
7
(1
/8 C)
2 tsp
2 TBSP
3
/16 C
1
/2 TBSP
1
1
/4 C
1
1
9
/16 C
1
/4 tsp
12
( ) : measurements not as precise as weight measurements.
Whole Wheat Yogurt
Whole wheat flour
Salt
Dry milk
Butter
Brown sugar
Sesame seeds
Yogurt (plain)
Water
Dry yeast
C/TBSP/tsp oz./fl.oz.
XL
(45/16 C)
21
3
/16 oz.
2 tsp
2 TBSP
1
2
/2 TBSP
2 TBSP
3
/8 C
1 C
15
1
/16 C
1
/2 tsp
1
7
/2 fl.oz.
C/TBSP/tsp C/TBSP/tsp
(311/16 C)
2 tsp
2 TBSP
2 TBSP
1
1
/2 TBSP
1
/4 C
3
/4 C
7
/8 C
1
1
/4 tsp
( ) : measurements not as precise as weight measurements.
— 24 —
LM
Whole Wheat
oz./fl.oz. oz./fl.oz.
181/4 oz.
1
/4 fl.oz.
(3 C)
11/2 tsp
1
1
/2 TBSP
1
1
/2 TBSP
1
1
/2 TBSP
1
1
/4 C
1 tsp
oz./fl.oz. oz./fl.oz.
181/4 oz.
1
1
/2 oz.
1
/4 fl.oz.
(3 C)
11/2 tsp
1
1
/2 TBSP
1
1
/2 TBSP
1
1
1
/2 TBSP
1
1
/4 C
/4 C
1 tsp
oz./fl.oz. oz./fl.oz.
91/8 oz.
1
9
/8 oz.
1
/4 fl.oz.
(11/2 C)
1
(1
11/2 tsp
1
1
/2 TBSP
1
/4 C
1
/4 C
1
1
/2 TBSP
1
1
/2 C)
/4 C
1 tsp
oz./fl.oz. oz./fl.oz.
91/8 oz.
1
9
/8 oz.
2 oz.
11
/2 fl.oz.
(11/2 C)
1
(1
/2 C)
11/2 tsp
1
1
/2 TBSP
1
/8 C
1 TBSP
1
1
/8 C
1
1
/4 C
1 tsp
oz./fl.oz. oz./fl.oz.
181/4 oz.
7 fl.oz.
(3 C)
11/2 tsp
1
1
/2 TBSP
1
1
/2 TBSP
1 TBSP
1
/8 C
1
/2 C
13
/16 C
1 tsp
3
/4 oz.
14
10 fl.oz.
3
/4 oz.
14
1
1
/4 oz.
10 fl.oz.
3
/8 oz.
7
3
/8 oz.
7
10 fl.oz.
3
/8 oz.
7
3
/8 oz.
7
1
1
/2 oz.
10 fl.oz.
143/4 oz.
1
6
/2 fl.oz.
Page 26

Select BAKE RAISIN mode
C=cup(s), tsp=teaspoon(s), TBSP=Tablespoon(s)
Whole Wheat Raisin
Ingredients in
<
Note for measuring flour
The amounts shown in ( ) are not as precise as weight measurements.
Whole Wheat Raisin
C/TBSP/tsp oz./fl.oz.
Whole wheat flour
Salt
Dry milk
Butter
Molasses
Water
Dry yeast
Raisins
*If you find that the raisins do not get mixed into the dough but remain burnt on the surface of the loaf, which then come off
after being baked, increase 1—2 tablespoons of water to make the dough softer the next time.
(41/4 C)
2 tsp
2 TBSP
1
2
/2 TBSP
2 TBSP
7
1
/8 C
1
1
/2 tsp
For better results, please use weight measurements. (1 cup = 4.92 oz.)
XL
21 oz.
15 fl.oz.
4.4 oz.
Apple Raisin
Basic flour
Whole wheat flour
Salt
Dry milk
Butter
Sugar
Cinammon
Apple, grated
Water
Dry yeast
Raisins
C/TBSP/tsp oz./fl.oz.
(21/8 C)
(2
2 TBSP
1
2
1
1
1
1
/8 C)
2 tsp
/2 TBSP
/2 TBSP
2 tsp
1
/2 C
3
1
/8 C
1
/2 tsp
XL
101/2 oz.
1
10
/2 oz.
3
/4 oz.
3
11 fl.oz.
4.4 oz.
Orange Anise
Basic flour
Whole wheat flour
Salt
Dry milk
Butter
Brown sugar
Anise
Orange juice
Water
Dry yeast
Orange zest, chopped
C/TBSP/tsp oz./fl.oz.
(21/8 C)
(2
2 TBSP
1
2
2 TBSP
1
1
/8 C)
2 tsp
/2 TBSP
3 tsp
3
/4 C
1 C
1
/2 tsp
3
/8 C
XL
101/2 oz.
1
10
/2 oz.
6 fl.oz
8 fl.oz
italics
should be added at the beep.
>
C/TBSP/tsp C/TBSP/tsp
(311/16 C)
2 tsp
2 TBSP
2 TBSP
3
1
/4 TBSP
1
1
1
LM
oz./fl.oz. oz./fl.oz.
(3 C)
1
1
/2 tsp
1
1
/2 TBSP
1
1
/2 TBSP
1
1
/2 TBSP
5
1
1 tsp
/16 C
143/4 oz.
3
/4 fl.oz.
10
3 oz.
5
/8 C
/4 tsp
181/4 oz.
13 fl.oz.
31/2 oz.
( ) : measurements not as precise as weight measurements.
LM
C/TBSP/tsp C/TBSP/tsp
(113/16 C)
13
(1
/16 C)
2 tsp
2 TBSP
2 TBSP
1 TBSP
1
1
/2 tsp
3
/8 C
1
1
/4 C
1
1
/4 tsp
oz./fl.oz. oz./fl.oz.
9 oz.
9 oz.
(11/2 C)
1
(1
1
1
/2 tsp
1
1
/2 TBSP
1
1
/2 TBSP
/2 C)
71/3 oz.
1
7
/3 oz.
2 tsp
3 oz.
10 fl.oz.
1
1
/4 C
1
/16 C
3
1
1
8
/2 fl.oz.
/4 oz.
1 tsp
1 tsp
31/2 oz.
3 oz.
( ) : measurements not as precise as weight measurements.
LM
C/TBSP/tsp C/TBSP/tsp
13
/16 C)
(1
13
(1
/16 C)
2 tsp
2 TBSP
2 TBSP
1
1
/2 TBSP
2 tsp
5
/8 C
15
/16 C
1
1
/4 tsp
1
/4 C
oz./fl.oz. oz./fl.oz.
9 oz.
9 oz.
(11/2 C)
1
(1
1
1
/2 tsp
1
1
/2 TBSP
1
1
/2 TBSP
/2 C)
7
7
1
/3 oz.
1
/3 oz.
1 TBSP
1 tsp
1
5 fl.oz
1
7
/4 fl.oz
/2 C
3
/4 C
4 fl.oz
6 fl.oz
1 tsp
2 TBSP
( ) : measurements not as precise as weight measurements.
Select BAKE SANDWICH mode
C=cup(s), tsp=teaspoon(s), TBSP=Tablespoon(s)
Whole Wheat Sandwich
These loaves are all one size. Size selection cannot be made.
<
Note for measuring flour
The amounts shown in ( ) are not as precise as weight measurements.
For better results, please use weight measurements. (1 cup = 4.92 oz.)
Whole Wheat Sandwich
C/TBSP/tsp oz./fl.oz.
Whole wheat flour
Salt
Dry milk
Butter
Molasses
Water
Dry yeast
(3 C)
11/2 tsp
1
1
/2 TBSP
1
/2 TBSP
1
1
1
/2 TBSP
1
1
1
1
/4 C
/4 tsp
( ) : measurements not as precise as weight measurements.
3
/4 oz.
14
10 fl.oz.
-
25
>
Whole Wheat Herb
C/TBSP/tsp oz./fl.oz.
Whole wheat flour
Salt
Dry milk
Butter
Brown sugar
Basil flakes
Parsley flakes
Garlic powder
Water
Dry yeast
( ) : measurements not as precise as weight measurements.
-
(3 C)
11/2 tsp
1
1
/2 TBSP
1
1
/2 TBSP
1
1
/2 TBSP
1 TBSP
1 TBSP
1
1
/2 tsp
1
1
/4 C
1
1
/4 tsp
3
/4 oz.
14
10 fl.oz.
Page 27

Select BAKE mode
C=cup(s), tsp=teaspoon(s), TBSP=Tablespoon(s)
These loaves are all one size. Size selection cannot be made.
<
Note for measuring flour
The amounts shown in ( ) are not as precise as weight measurements.
For better results, please use weight measurements. (1 cup = 4.92 oz.)
>
Multigrain
Anadama
C/TBSP/tsp oz./fl.oz.
2
Whole wheat flour
Salt
Dry milk
Butter
Cornmeal
Molasses
Water
Dry yeast
( ) : measurements not as precise as weight measurements.
(33/4 C)
2 tsp
2 TBSP
1
/2 TBSP
2
1
/4 C
2 TBSP
1
1
/2 tsp
18
13
/3 oz.
1
/2 fl.oz.
Ancient
C/TBSP/tsp oz./fl.oz.
2
Whole wheat flour
Salt
Dry milk
Butter
Brown sugar
Amaranth grains
Quinoa grains
Water
Dry yeast
( ) : measurements not as precise as weight measurements.
(33/4 C)
2 tsp
2 TBSP
1
/2 TBSP
2
3 TBSP
2 TBSP
2 TBSP
1
1
/2 tsp
18
13
/3 oz.
1
/2 fl.oz.
Cracked Wheat Sunflower
C/TBSP/tsp oz./fl.oz.
Whole wheat flour
Salt
Dry milk
Butter
Brown sugar
Cracked wheat cereal
Unsalted sunflower seeds
Honey
Water
Dry yeast
( ) : measurements not as precise as weight measurements.
(33/4 C)
2 tsp
2 TBSP
1
/2 TBSP
2
2 TBSP
1
/4 C
1
/4 C
2 TBSP
1
1
/2 tsp
18
13
2
1
/2 fl.oz.
Multigrain
C/TBSP/tsp oz./fl.oz.
Whole wheat flour
Bread flour
Soy flour
Cornmeal
Cracked wheat cereal
Oatmeal
Flax seeds
Salt
Dry milk
Butter
Molasses
Water
Dry yeast
( ) : measurements not as precise as weight measurements.
(13/4 C)
(2 C)
2 TBSP
2 TBSP
2 TBSP
1 TBSP
1 TBSP
2 tsp
2 TBSP
1
/2 TBSP
2
2 TBSP
1
1
/2 tsp
8
13
1
/2 oz.
10 oz.
1
/2 fl.oz.
/3 oz.
Bran & Sesame
C/TBSP/tsp oz./fl.oz.
Whole wheat flour
Salt
Dry milk
Butter
Brown sugar
Sesame seeds
Wheat bran cereal
Water
Dry yeast
( ) : measurements not as precise as weight measurements.
(33/4 C)
2 tsp
2 TBSP
1
/2 TBSP
2
2 TBSP
1
/4 C
1
/4 C
1
1
/2 tsp
18
13
2
/3 oz.
1
/2 oz.
1
/2 fl.oz.
Seven Grain
Whole wheat flour
Salt
Dry milk
Butter
7—grain cereal
Molasses
Water
Dry yeast
( ) : measurements not as precise as weight measurements.
— 26 —
C/TBSP/tsp oz./fl.oz.
2
(33/4 C)
18
/3 oz.
2 tsp
2 TBSP
1
/2 TBSP
2
3
/8 C
2 TBSP
1
1
/2 tsp
13
1
/2 fl.oz.
Page 28

French
Select BAKE mode
C=cup(s), tsp=teaspoon(s), TBSP=Tablespoon(s)
This loaf is one size. Size selection cannot be made.
<
Note for measuring flour
The amounts shown in ( ) are not as precise as
weight measurements.
For better results, please use weight measurements.
(1 cup = 4.92 oz.)
>
French Bread
C/TBSP/tsp oz./fl.oz.
Bread flour
Salt
Butter
Water
Dry yeast
( ) : measurements not as precise as weight measurements.
(3 C)
1
1
/2 tsp
1 TBSP
1 tsp
14
10
3
/4 oz.
1
/2 fl.oz.
Select DOUGH mode
C=cup(s), tsp=teaspoon(s), TBSP=Tablespoon(s)
This loaf is one size. Size selection cannot be made.
<
Note for measuring flour
The amounts shown in ( ) are not as precise as
weight measurements.
For better results, please use weight measurements.
(1 cup = 4.92 oz.)
>
Baguette (French sticks) (Yield 2)
C/TBSP/tsp oz./fl.oz.
3
Bread flour
sugar
Salt
Dry milk
Butter
Water
Dry yeast
Poppy seeds,
optional
( ) : measurements not as precise as weight measurements.
Make the dough according to instructions on
(3 C)
1 TBSP
1
/2 tsp
1
1 TBSP
2 TBSP
1
/2 tsp
1
3 TBSP
14
3
/4 fl.oz.
8
/4 oz.
1P.7—9.
Divide the dough into 2 equal portions. Roll
2 each portion into a ball.
Place the dough in a greased bowl. Cover.
3 Rest for about 20 minutes. (Place in the
refrigerator during the summer time.)
Roll each ball into a rectangle, using a rolling
4 pin.
Starting at one short edge, roll the dough up
5 tightly into a thin log, pinching the edges to
seal. Taper and round ends.
Place on a greased baking pan. Spray water
6 on
top. Proof at 90¡F for 60 minutes or until
nearly doubled.
Brush with water. With a sharp knife, make 3
7 or 4 diagonal cuts about
across top of the logs.
Sprinkle with poppy seeds if desired.
1
/4 inch deep
8
Bake in 375¡F oven for 25 to 30 minutes or
9 until golden brown.
If your oven allows for steaming, bake with
steam for first 10 minutes.
-
27
-
Page 29

Select DOUGH mode
C=cup(s), tsp=teaspoon(s), TBSP=Tablespoon(s)
<
Note for measuring flour
The amounts shown in ( ) are not as precise as weight measurements.
For better results, please use weight measurements. (1 cup = 4.92 oz.)
>
Dinner Rolls (Yield 18)
16 oz. (31/4 C) bread flour
1
/4 C sugar
11/2 tsp salt
3 TBSP dry milk
3 TBSP butter or margarine
71/2 fl.oz. (15/16 C) water
11/2 tsp dry yeast
1 egg, beaten
for brushing on top
3
/4 TBSP poppy seeds, optional for
sprinkling on top
3
/4 TBSP sesame seeds, optional
for sprinkling on top
Variation: Whole Wheat Dinner Rolls
Replace 11/2 cups bread flour with whole
wheat flour.
( ) : measurements not as precise as weight measurements.
Starting with
the wider end,
5
roll up the wedge
loosely towards the
narrower end.
Place seam
6 side down on a
greased baking
pan.
Basic
Make the dough according to instructions on
1 P.7—9.
Divide the
2 dough into 18
equal portions. Roll
each portion into a
ball. Cover with a
plastic wrap and
rest for 20 minutes.
Roll one end of
3 the ball on a
lightly floured
surface to make a
cone.
Roll each cone
4 into a wedge
shape,
approximately 1/4
inch thick, using a
rolling pin.
Spray water on
7 top. Proof at
90¡F for 30 to 50
minutes or until
nearly doubled.
Brush rolls with
8 beaten egg,
sprinkle with poppy
seeds or sesame
seeds if desired.
Bake in 350¡F
9 oven for 10 to
15 minutes or until
golden brown.
— 28 —
Page 30

Basic
C=cup(s), tsp=teaspoon(s), TBSP=Tablespoon(s)
<
Note for measuring flour
The amounts shown in ( ) are not as precise as weight measurements.
For better results, please use weight measurements. (1 cup = 4.92 oz.)
Croissants (Yield 18)
Select DOUGH mode
16 oz. (31/4 C) bread flour
2 TBSP sugar
3 TBSP dry milk
11/2 tsp salt
8 fl.oz. (1 C) water
2 TBSP butter or margarine
2 tsp dry yeast
7 oz. butter or margarine,
chilled for folding in the
dough
1 egg, beaten for brushing
on top
( ) : measurements not as precise as weight measurements.
Make the dough according to instructions
1 on P.7—9.
Place the dough in a greased bowl. Cover.
2 Rest the dough in the refrigerator for 30
minutes.
>
Fold the
6 remaining third
on top. Seal edges.
Rest the dough in
the refrigerator for
20 to 30 minutes.
Place the dough at
7 right angles to the
previous position in
#5. Roll out into
12 inch square. Fold
into thirds. Wrap and
place into refrigerator
for 20 to 30 minutes.
Fold and roll twice
more. Wrap and chill
after each rolling. After
the final folding, chill
several hours or
overnight.
Roll 7 oz. of
3 chilled butter
between two
sheets of waxed
paper into a 10X7
inch rectangle.
Place back in the
refrigerator. Chill at
least 1 hour.
Roll out the
4 dough on a
lightly floured
surface into a
12 inch square.
Place the rolled
5 out butter over
two-thirds of the
dough.
Fold the third
without butter over
the center third.
Cut dough
8 crosswise into
thirds. Cut each
third in thirds. Cut
each third
diagonally to form
two triangles.
Roll up each
9 triangle loosely,
starting from the
side opposite the
point. Curve ends.
Place seam
10 side down on
a greased baking
pan. Spray water
on top. Proof at
90¡F for 30 to 50
minutes or until
nearly doubled.
Brush with beaten egg. Bake in 375¡F oven
11 for 10 to 15 minutes or until golden brown.
-
29
-
Page 31

Select DOUGH mode
C=cup(s), tsp=teaspoon(s), TBSP=Tablespoon(s)
<
Note for measuring flour
The amounts shown in ( ) are not as precise as weight measurements.
For better results, please use weight measurements. (1 cup = 4.92 oz.)
>
Basic
Variation: Danish Pastries (Yield 8)
103/4 oz. (23/16 C) bread flour
51/4 oz. (11/8 C) cake flour
3 TBSP dry milk
1 tsp salt
2 oz. butter or margarine
6 fl.oz. (3/4 C) water
2 tsp dry yeast
7 oz. butter or margarine for
folding in the dough
1
Fillings
1/23
/4 C apricot jam or marmalade
1/41
/3 C
1/23
/4 C nut streusel
1/23
/4 C cheese filling
( ) : measurements not as precise as weight measurements.
Follow steps 1 to 6 on P.29. Follow step 7, but
egg, beaten for brushing on top
canned fruit filling or preserves
1 repeat the process of folding into thirds and
placing in tne refrigerator four times, instead of three.
Finally, wrap and chill for several hours or overnight.
Roll out the
2 dough into
14X17 inches.
Cut into 8 squares.
Roll each out into
about 7 inch square.
Place the filling of
3 your choice in the
center of each square.
Brush the four corners
lightly with water to
help them seal when
pressed together.
Fold two
4 opposite
corners over the
center.
Press down firmly
to seal together.
Brioche (Yield 12)
16 oz. (31/4 C) bread flour
2 TBSP sugar
11/2 TBSP dry milk
11/2 tsp salt
3 fl.oz. (3/8 C) water
3 oz. (1/2 C) butter or margarine
4 eggs
21/2 tsp dry yeast
1 egg, beaten for brushing
on top
12 brioche or cake cups
( ) : measurements not as precise as weight measurements.
Make the dough according to instructions on
1P.7—9.
Place the dough in a greased bowl. Cover.
2Rest the dough in the refrigerator for 30
minutes.
Divide the dough into 12 equal portions. Roll
3each portion into a ball. Cover with a plastic
wrap and rest for 20 minutes.
Using the edge
4 of the hand,
pinch off about
one-fourth of the
dough without
detaching it. Roll
the dough on the
bench so that both
parts are round.
Place the dough
Use the edge of the
hand and roll.
5 in the tin large-
end first.
With fingertips, press
the small ball around
its circumference into
the large one.
Fold the other two
5 corners over the
center and press all
four corners tightly
together.
Place on greased baking pan. Spray water
6 on top.
Proof, brush with beaten egg and bake as
7 croissants.
Place tins on
6
baking pan. Spray
water on top. Proof at
90¡F for 30 to 50
minutes or
larger ball rises
above the tin.
Brush with beaten egg.
until the
7 Bake in 350¡F oven for 10 to 15 minutes or
until golden brown.
— 30 —
Page 32

Pizza Dough
C=cup(s), tsp=teaspoon(s), TBSP=Tablespoon(s)
<
Note for measuring flour
The amounts shown in ( ) are not as precise as weight measurements.
For better results, please use weight measurements. (1 cup = 4.92 oz.)
>
Pizza (Use pizza program)
Ingredients: Makes 6 small or 2 large
1 tsp
163/4 oz. (33/8 C)
1 TBSP
13/4 TBSP
1 tsp
1 TBSP
113/4 fl.oz.
2
/3 cup tomato paste, for brushing on top
3 cups Mozzarella cheese, for sprinkling on top
( ) : measurements not as precise as weight measurements.
Press MENU until arrow points at pizza .
dry yeast
bread flour
milk powder
sugar
salt
butter
water
1 Press Start/Stop.
Knead dough on a lightly floured surface until
2 it becomes elastic and springs back when
touched.
Divide into 6 balls or 2 large balls, and place
3 in warm area for 10 minutes.
Shape each ball into a flat circle. Place the
4 circles on a baking tray and prick with a fork.
Let rest for 15 minutes at room
5 temperature.
Focaccia (Use pizza program)
Ingredients: Makes 1 large
2 tsp
3
/4 oz. (33/8 C)
16
2 TBSP
2 TBSP
2 tsp
2 TBSP
111/8 fl.oz.
1 tsp
Topping:
1
/4 C
1 TBSP
2 tsp
2 tsp
(1 cup bread flour, extra for kneading)
( ) : measurements not as precise as weight measurements.
Press MENU until arrow points at pizza .
dry yeast
bread flour
milk powder
sugar
salt
olive oil
water
bread improver, optional
olive oil
fine sea salt
dried oregano
dried basil
1 Press Start/Stop.
Knead dough on a lightly floured surface until
2 it becomes elastic and springs back when
touched.
Shape into a flat circle, place on a baking tray,
3 make holes with the end of a wooden spoon
5 cm apart over the surface of the dough.
Brush each circle with 2 tablespoons tomato
6 paste. Sprinkle with Mozzarella cheese.
Top with your favorite topping, such as sliced
onions, pepperoni, prochuto ham, olives.
Bake in a preheated 340…F oven for 15—20
7 minutes.
Cover and let rest in a warm place for 20—25
4 minutes until almost doubled in size.
Brush surface with olive oil, sprinkle with sea
5 salt, oregano and basil.
Bake in a preheated 340…F oven for 26—30
6 minutes.
— 31 —
Page 33

C=cup(s), tsp=teaspoon(s), TBSP=Tablespoon(s)
<
Note for measuring flour
The amounts shown in ( ) are not as precise as weight measurements.
For better results, please use weight measurements. (1 cup = 4.92 oz.)
This program can be used for baking cakes and tea breads. It is not suitable for all types of cake, such as
light sponge cakes, Chiristmas pudding, or those that require going into a hot oven.
Make sure that the kneading blade is removed from the pan and the bottom and sides of the bread pan are
lined with a waxed baking paper before the cake mixture is added.
Ensure that the cake mixture is kept inside the baking sheet.
The maximum baking time is 1 hour and 30 minutes.
>
BAKE ONLY
Banana Tea Loaf
8 oz. (15/8 C)
1
/4 tsp
1
/2 tsp
3 oz.
2 oz.
1 lb 2 oz.
1
Optional glaze: apricot jam
( ) : measurements not as precise as weight measurements.
Sieve flour, salt, bicarbonate of soda together
into a bowl.
1
Rub the butter into the flour until it resembles
fine breadcrumbs.
2
Stir in the sugar, bananas and the beaten egg,
mix well.
3
Remove the kneading blade from the bread
pan and line the bottom and sides with baking
4
parchment.
Place the mixture into the bread pan, being
careful to ensure that the mixture is inside the
5
baking parchment.
self raising flour
bicarbonate of soda
salt
butter
caster sugar
bananas (with skin), peel & mash
medium sized egg, beaten
walnut/banana chips
Fruity Cake
12 oz.
2 oz.
2 oz.
4 oz.
10 fl.oz.
3 oz.
3
9 oz. (1
1 tsp
1
2
3
4
13
/16 C)
( ) : measurements not as precise as weight measurements.
Place the fruit, dates, walnuts, cherries, water
and butter together and heat until the fat has
melted and the liquid is hot. This can be done
on the hob or in the microwave oven. (High
power for 4 — 5 minutes)
Allow to cool slightly, then add eggs, flour and
the bicarbonate of soda. Mix well.
Remove the kneading blade from the bread
pan and line the bottom and sides with baking
parchment.
Place the mixture into the bread pan, being
careful to ensure that the mixture is inside the
baking parchment.
mixed dried fruit
chopped dates
chopped walnuts
chopped cherries
water
butter
medium sized eggs, beaten
plain flour
bicarbonate of soda
(baking soda)
Select the bake only program and enter 45
minutes on the timer.
6
After baking, test with a skewer to see if the
cake is cooked. If the cake requires extra time,
7
select the bake only program again and enter
a further 3 — 5 minutes on the timer. If it is still
just slightly sticky, this will cook through during
the stand period.
Take the bread pan out of the bread maker
using oven gloves and leave to stand for 5 — 10
8
minutes before removing from the bread pan
and allowing to cool.
Glaze if desired. Soften the jam, spread over
the top of the warm teabread, and sprinkle with
9
walnut or banana chips.
— 32 —
Select bake only program and enter 55 minutes
on the timer.
5
After baking, test with a skewer to see if the
cake is cooked. If the cake requires extra time,
6
select the bake only program again and enter a
further 3 — 5 minutes on the timer. If it is still
slightly sticky, this will cook through during the
stand period.
Take the bread pan out of the bread maker
using oven gloves. Leave to stand for 5 — 10
7
minutes before removing from the bread pan
and allowing to cool.
Page 34

BAKE ONLY
C=cup(s), tsp=teaspoon(s), TBSP=Tablespoon(s)
<
Note for measuring flour
The amounts shown in ( ) are not as precise as weight measurements.
For better results, please use weight measurements. (1 cup = 4.92 oz.)
>
Gingerbread
1 oz.
3 oz.
2 oz.
3 oz.
8 oz. (15/8 C)
11/2 tsp
11/2 tsp
1
/2 tsp
1
/2 tsp
5 fi.oz.
1
( ) : measurements not as precise as weight measurements. ( ) : measurements not as precise as weight measurements.
Warm sugar, butter, golden syrup and treacle
together until just melted. This can be done on
1
the hob or in the microwave oven (High power
for 1 minute).
Stir in all of the sieved dry ingredients.
demerara sugar
butter
golden syrup
black treacle
plain flour
ground ginger
baking powder
bicarbonate of soda
salt
milk
medium sized egg, beaten
2
Mix in the milk and the beaten egg.
3
Beat thoroughly with a wooden spoon.
4
Marbled Chocolate & Vanilla Cake
8 oz.
3 oz.
4
8 oz. (15/8 C)
1 tsp
3 oz.
1 TBSP
1 TBSP
Cream together the butter and the sugar.
butter
caster sugar
medium sized eggs
self raising flour
vanilla essence
plain chocolate
milk
cocoa powder
1
Beat in the eggs gradually.
2
Fold in the flour, then divide the mixture into
two bowls.
3
Add the vanilla essence to one bowl and mix in.
4
Melt the chocolate with the milk and add to the
other bowl with the cocoa powder, mix well.
5
Remove the kneading blade from the bread
pan and line the bottom and sides with baking
5
parchment.
Place the mixture into the bread pan, being
careful to ensure that the mixture is inside the
6
baking parchment.
Select bake only program and enter 35 minutes
on the timer.
7
After baking, test with a skewer to see if the
cake is cooked. If the cake requires extra time,
8
select the bake only program again and enter a
further 3 — 5 minutes on the timer. If it is still just
slightly sticky, this will cook through during the
stand period.
Take the bread pan out of the bread maker
using oven gloves. Leave to stand for 5 — 10
9
minutes before removing from the bread pan
and allowing to cool.
Remove the kneading blade from the bread
pan and line the bottom and sides with baking
6
parchment.
Place alternate spoonfuls of the vanilla and
chocolate mixture into the bread pan, being
7
careful to ensure that the mixture is inside the
baking parchment. Then using a spoon lightly
swirl the two colours together so that they
combine but are not mixed.
Select the bake only program and enter 50
minutes on the timer.
8
After baking, test with a skewer to see if the
cake is cooked. If the cake requires extra time,
9
select the bake only program again and enter
a further 3 — 5 minutes on the timer. If it is still
just slightly sticky, this will cook through during
the stand period.
Take the bread pan out of the bread maker
using oven gloves. Leave to stand for 5 — 10
10
minutes before removing from the bread pan
and allowing to cool.
33
Page 35

Panasonic Consumer Electronics
Company, Division of Matsushita
Electric Corporation of America
One Panasonic Way
Secaucus, New Jersey 07094
Automatic Bread Maker Limited Warranty
Panasonic Sales Company, Division of Matsushita
Electric of Puerto Rico, Inc
Ave. 65 de Infanteria, Km. 9.5
San Gabriel Industrial Park,
Carolina, Puerto Rico 00985
PANASONIC
Panasonic Consumer Electronics Company or
Panasonic Sales Company (collectively referred to as
the Warrantor ) will repair or replace this product with
new or refurbished parts or equivalent product, free of
charge in the USA or Puerto Rico, for one (1) year from
the date of the original purchase in the event of a defect
in materials or workmanship.
Carry-in or mail-in service in the USA can be obtained
during the warranty period by contacting a Panasonic
Services Company (PASC) Factory Servicenter listed in
the Servicenter Directory. Or call, toll free, 1-800-2117262 to locate a PASC Authorized Servicenter.
Carry-in or mail-in service in Puerto Rico can be
obtained during the warranty period by calling the local
Panasonic Sales Company telephone number listed in
the Servicenter Directory.
This warranty is extended only to the original purchaser.
A purchase receipt or other proof of date of original
purchase will be required before warranty service is
rendered.
When shipping the unit carefully pack it and send it
prepaid, adequately insured and preferably in the
original carton. Include a letter detailing the complaint
and provide a day time phone number where you can
be reached.
Also, the purchaser will be responsible for shipping the
unit to a PASC Factory Servicenter or PASC Authorized
Servicenter.
This warranty only covers failures due to
defects in materials and workmanship which occur
during normal use. The warranty does not cover damage
which occurs in shipment, or failures which are caused
by products not supplied by the warrantor, or failures
which result from accident, misuse, abuse, neglect,
mishandling, faulty installation, misapplication, set-up
adjustments, improper operation or maintenance,
alteration, modification, introduction of sand, humidity
or liquids, power line surge, improper voltage supply,
lightning damage, maladjustment of consumer controls,
improper operation, commercial use such as hotel,
office, restaurant, or other business or rental use of the
product, or service by anyone other than a PANASONIC
SERVICES COMPANY authorized repair facility, or
damage that is attributable to acts of God.
LIMITS AND EXCLUSIONS
There are no express warranties except as listed above.
THE WARRANTOR SHALL NOT BE LIABLE FOR
INCIDENTAL OR CONSEQUENTIAL DAMAGES
RESULTING FROM THE USE OF THIS PRODUCTS,
OR ARISING OUT OF ANY BREACH OF THE
WARRANTY. ALL EXPRESS AND IMPLIED
WARRANTIES, INCLUDING THE WARRANTIES
OF MERCHANTABILITY AND FITNESS FOR
PARTICULAR PURPOSE, ARE LIMITED TO THE
APPLICABLE WARRANTY PERIOD SET FORTH
ABOVE
Some states do not allow the exclusion or limitation of
incidental or consequential damages, or limitations on
how long an implied warranty lasts, so the above
exclusions or limitations may not apply to you.
This warranty gives you specific legal rights and you
may also have other rights which vary from state to state.
If you have a problem with this product that is not handled to your satisfaction, then write to the Consumer Affairs
Department at the Company address indicated above.
34
Page 36

 Loading...