

Page 1
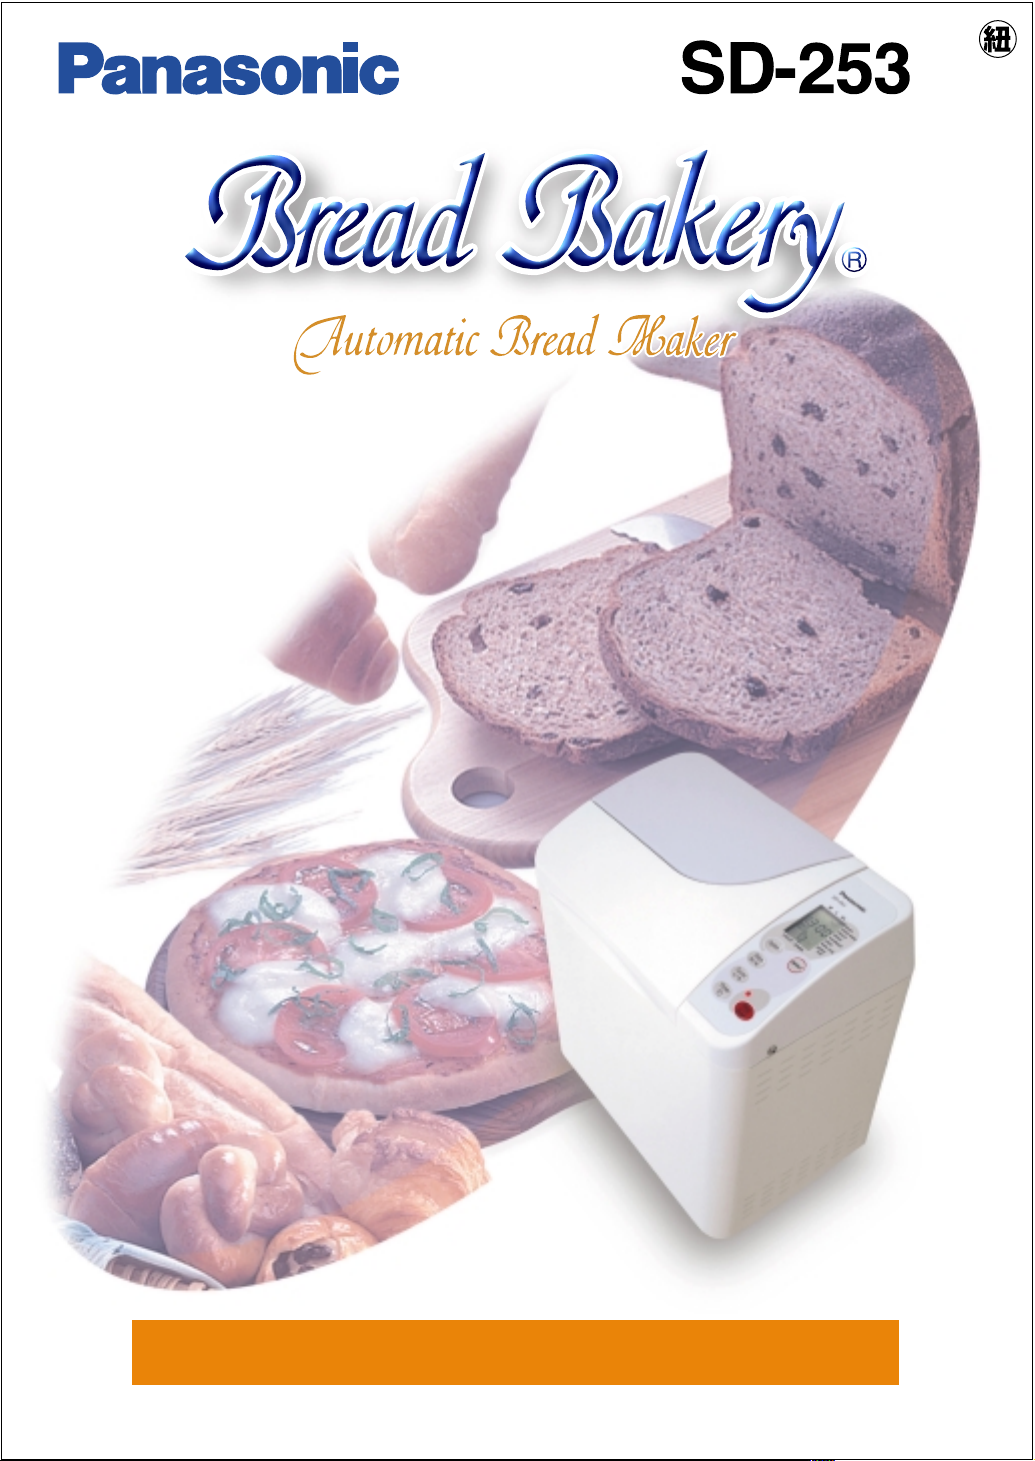
SD-253
Operating Instructions & Recipes
Page 2

Congratulations
Thank you for purchasing a Panasonic , SD-253.
¨
Successful bread making is an art, requiring good quality ingredients, time and energy due
to the importance of thorough kneading.
The Panasonic Automatic is ideal for anyone who has been discouraged from
¨
making their own bread in the past. Experienced bakers will also enjoy using this automatic
way of making their family favourites.
One of the main advantages is that the most tiresome element of bread making, i.e.
kneading, is completely automatic, leaving you time to spare with no dishes to wash.
The pre-programmed cycle takes place all in the same pan.
In addition, our automatic raisin nut dispenser will drop your choice of dried fruit/nuts into the
dough at the precise time during kneading, giving you an even spread throughout the loaf.
No further action is required after pressing the start pad.
Whether you use pre-packaged bread mixes, or the recipes we have developed for you,
or you develop your own favourite recipes, we hope you enjoy using your Panasonic
.
¨
Before operating the , please read the following instructions carefully.
¨
1
Page 3
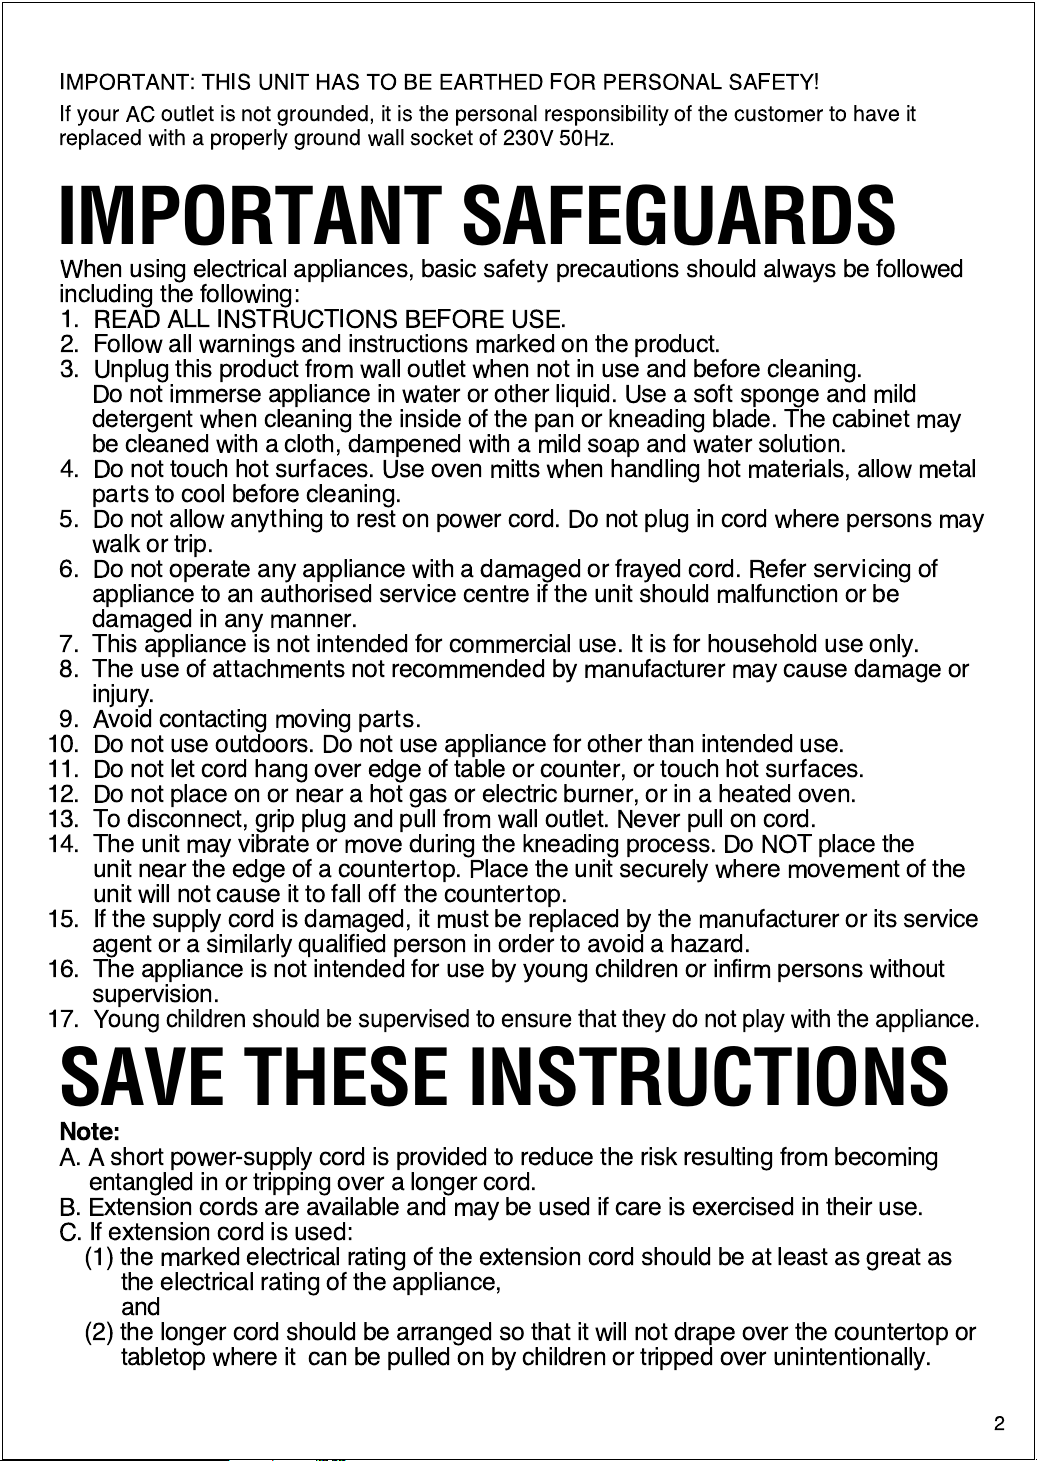
IMPORTANT: THIS UNIT HAS TO BE EARTHED FOR PERSONAL SAFETY!
If your AC outlet is not grounded, it is the personal responsibility of the customer to have it
replaced with a properly ground wall socket of 230V 50Hz.
IMPORTANT SAFEGUARDS
When using electrical appliances, basic safety precautions should always be followed
including the following:
1. READ ALL INSTRUCTIONS BEFORE USE.
2. Follow all warnings and instructions marked on the product.
3. Unplug this product from wall outlet when not in use and before cleaning.
Do not immerse appliance in water or other liquid. Use a soft sponge and mild
detergent when cleaning the inside of the pan or kneading blade. The cabinet may
be cleaned with a cloth, dampened with a mild soap and water solution.
4. Do not touch hot surfaces. Use oven mitts when handling hot materials, allow metal
partstocool before cleaning.
5. Do not allow anything to rest on power cord. Do not plug in cord where persons may
walk or trip.
6. Do not operate any appliance with a damaged or frayed cord. Refer servicing of
appliance to an authorised service centre if the unit should malfunction or be
damaged in any manner.
7. This appliance is not intended for commercial use. It is for household use only.
8. The use of attachments not recommended by manufacturer may cause damage or
injury.
9. Avoid contacting moving parts.
10. Do not use outdoors. Do not use appliance for other than intended use.
11. Do not let cord hang over edge of table or counter, or touch hot surfaces.
12. Do not place on or near a hot gas or electric burner, or in a heated oven.
13. To disconnect, grip plug and pull from wall outlet. Never pull on cord.
14. The unit may vibrate or move during the kneading process. Do NOT place the
unit near the edge of a countertop. Place the unit securely where movement of the
unit will not cause it to fall off the countertop.
15. If the supply cord is damaged, it must be replaced by the manufacturer or its service
agent or a similarly qualified person in order to avoid a hazard.
16. The appliance is not intended for use by young children or infirm persons without
supervision.
Young children should be supervised to ensure that they do not play with the appliance.
17.
SAVE THESE INSTRUCTIONS
Note:
A. A short power-supply cord is provided to reduce the risk resulting from becoming
entangled in or tripping over a longer cord.
B. Extension cords are available and may be used if care is exercised in their use.
C. If extension cord is used:
(1) the marked electrical rating of the extension cord should be at least as great as
the electrical rating of the appliance,
and
(2) the longer cord should be arranged so that it will not drape over the countertop or
tabletop where it can be pulled on by children or tripped over unintentionally.
2
Page 4
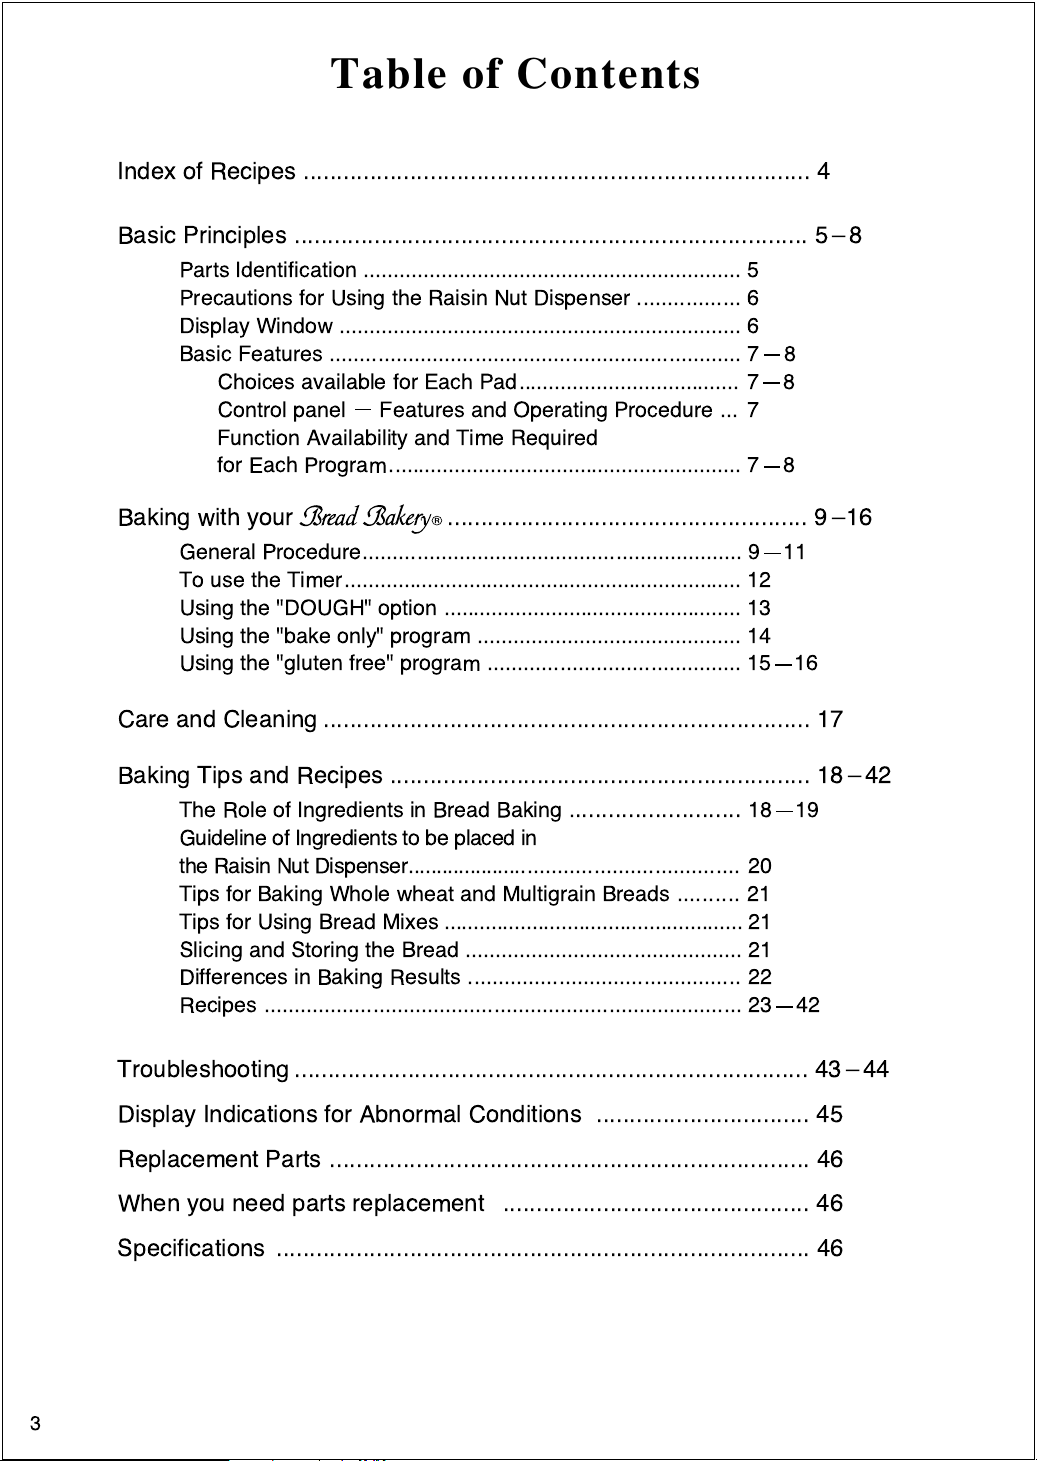
Table of Contents
Index of Recipes
Basic Principles
Parts Identification
Precautions for Using the Raisin Nut Dispenser
Display Window
Basic Features
Choices available for Each Pad
Control panelÑFeatures and Operating Procedure
Function Availability and Time Required
for Each Program
............................................................................. 5 Ð 8
Baking with your
General Procedure
To use the Timer
Using the "DOUGH" option
Using the "bake only" program
Using the "gluten free" program
Care and Cleaning
............................................................................ 4
............................................................... 5
................. 6
................................................................... 6
.................................................................... 7Ñ8
..................................... 7Ñ8
... 7
........................................................... 7Ñ8
¨
...................................................... 9 Ð16
............................................................... 9Ñ11
................................................................... 12
.................................................. 13
............................................ 14
.......................................... 15Ñ16
......................................................................... 17
Baking Tips and Recipes
The Role of Ingredients in Bread Baking
Guideline of Ingredients to be placed in
the Raisin Nut Dispenser
Tips for Baking Whole wheat and Multigrain Breads
Tips for Using Bread Mixes
Slicing and Storing the Bread
Differences in Baking Results
Recipes
Troubleshooting
............................................................................... 23Ñ42
............................................................................. 43 Ð 44
............................................................... 18 Ð 42
........................................................ 20
................................................... 21
.............................................. 21
............................................. 22
Display Indications for Abnormal Conditions
Replacement Parts
When you need parts replacement
Specifications
........................................................................ 46
.............................................. 46
................................................................................ 46
.......................... 18Ñ19
.......... 21
................................ 45
3
Page 5
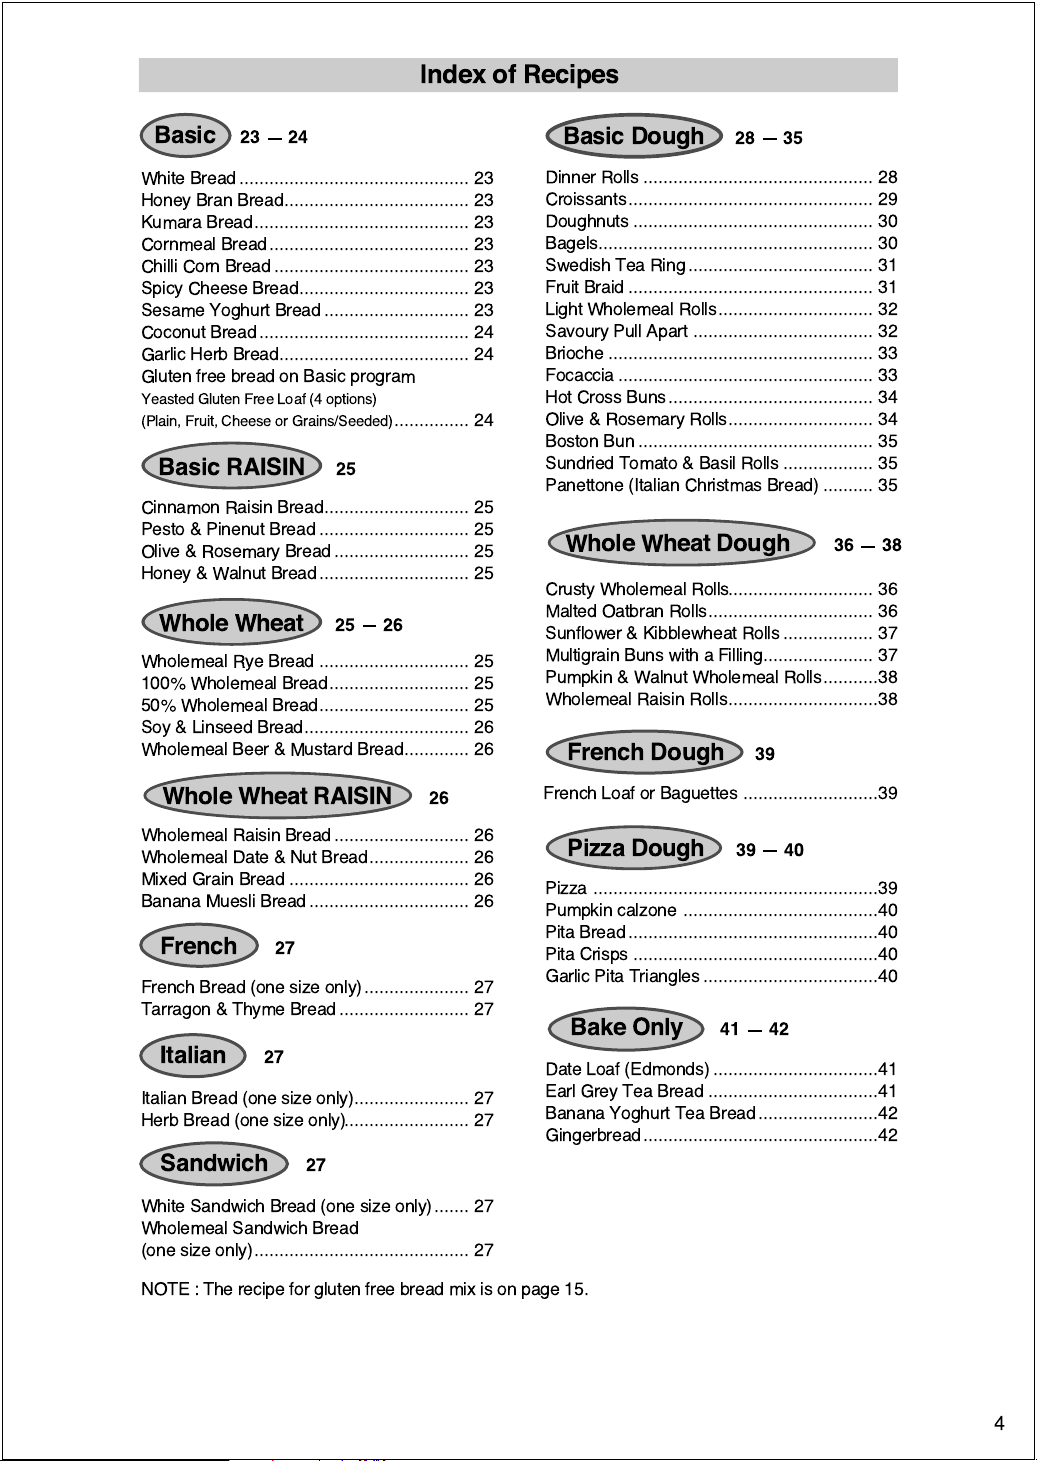
Index of Recipes
Basic 23Ñ24
White Bread
Honey Bran Bread
Kumara Bread
Cornmeal Bread
Chilli Corn Bread
Spicy Cheese Bread
Sesame Yoghurt Bread
Coconut Bread
Garlic Herb Bread
Gluten free bread on Basic program
Yeasted Gluten Free Loaf (4 options)
(Plain, Fruit, Cheese or Grains/Seeded)
.............................................. 23
..................................... 23
........................................... 23
........................................ 23
....................................... 23
.................................. 23
............................. 23
.......................................... 24
...................................... 24
............... 24
Basic RAISIN 25
Cinnamon Raisin Bread
Pesto & Pinenut Bread
Olive & Rosemary Bread
Honey & Walnut Bread
............................. 25
.............................. 25
........................... 25
.............................. 25
Whole Wheat 25Ñ26
Wholemeal Rye Bread
100% Wholemeal Bread
50% Wholemeal Bread
Soy & Linseed Bread
Wholemeal Beer & Mustard Bread
.............................. 25
............................ 25
.............................. 25
................................. 26
............. 26
Basic Dough 28 Ñ 35
Dinner Rolls
Croissants
Doughnuts
Bagels
Swedish Tea Ring
Fruit Braid
Light Wholemeal Rolls
Savoury Pull Apart
Brioche
Focaccia
Hot Cross Buns
Olive & Rosemary Rolls
Boston Bun
Sundried Tomato & Basil Rolls
Panettone (Italian Christmas Bread)
.............................................. 28
................................................. 29
................................................ 30
....................................................... 30
..................................... 31
................................................. 31
............................... 32
.................................... 32
..................................................... 33
................................................... 33
......................................... 34
............................. 34
............................................... 35
.................. 35
.......... 35
Whole Wheat Dough 36Ñ38
Crusty Wholemeal Rolls
Malted Oatbran Rolls
Sunflower & Kibblewheat Rolls
Multigrain Buns with a Filling
Pumpkin & Walnut Wholemeal Rolls
Wholemeal Raisin Rolls
............................. 36
................................. 36
.................. 37
...................... 37
...........38
..............................38
French Dough 39
Whole Wheat RAISIN 26
Wholemeal Raisin Bread
Wholemeal Date & Nut Bread
Mixed Grain Bread
Banana Muesli Bread
........................... 26
.................... 26
.................................... 26
................................ 26
French 27
French Bread (one size only)
Tarragon & Thyme Bread
..................... 27
.......................... 27
French Loaf or Baguettes
Pizza Dough 39 Ñ 40
Pizza
Pumpkin calzone
Pita Bread
Pita Crisps
Garlic Pita Triangles
Bake Only 41Ñ42
Italian 27
Italian Bread (one size only)
Herb Bread (one size only)
....................... 27
......................... 27
Date Loaf (Edmonds)
Earl Grey Tea Bread
Banana Yoghurt Tea Bread
Gingerbread
Sandwich 27
White Sandwich Bread (one size only)
Wholemeal Sandwich Bread
(one size only)
NOTE : The recipe for gluten free bread mix is on page 15.
........................................... 27
....... 27
...........................39
.........................................................39
.......................................40
..................................................40
.................................................40
...................................40
.................................41
..................................41
........................42
...............................................42
4
Page 6
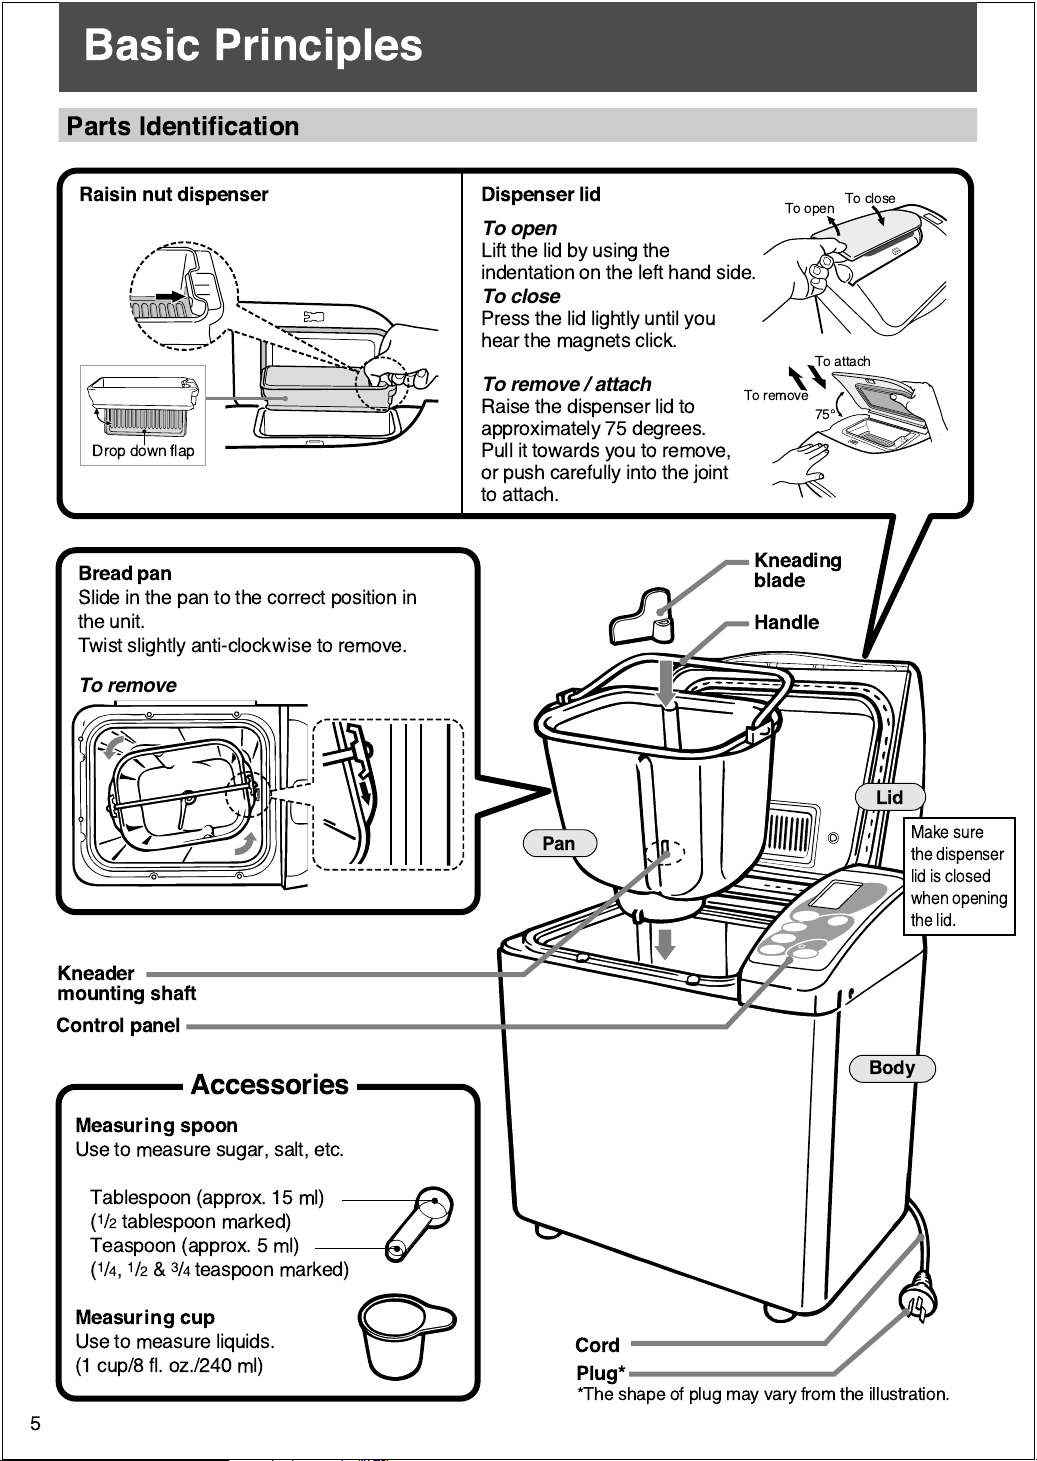
Basic Principles
Parts Identification
Raisin nut dispenser
Drop down flap
Bread pan
Slide in the pan to the correct position in
the unit.
Twist slightly anti-clockwise to remove.
To remove
Dispenser lid
To open
Lift the lid by using the
indentation on the left hand side.
To close
Press the lid lightly until you
hear the magnets click.
To remove / attach
Raise the dispenser lid to
approximately 75 degrees.
Pull it towards you to remove,
or push carefully into the joint
to attach.
To open
To remove
Kneading
blade
Handle
To close
To attach
75¡
Kneader
mounting shaft
Control panel
Accessories
Measuring spoon
Use to measure sugar, salt, etc.
Tablespoon (approx. 15 ml)
1
(
/2 tablespoon marked)
Teaspoon (approx. 5 ml)
(1/4,1/2 &3/4 teaspoon marked)
Measuring cup
Use to measure liquids.
(1 cup/8 fl. oz./240 ml)
5
Pan
Cord
Plug*
*The shape of plug may vary from the illustration.
Lid
Make sure
the dispenser
lid is closed
when opening
the lid.
Body
Page 7

Precautions for Using the Raisin Nut Dispenser
Never operate the appliance without the raisin nut dispenser in place, regardless of your
á
choice of programs.
To avoid damaging the raisin nut dispenser and the dispenser lid, they should be handled
á
carefully.
Do not apply undue pressure to the dispenser lid or
á
damaged.
When handling the dispenser lid, see the diagram on page 5.
á
The dispenser lid may fit quite tightly when removing or attaching it at first, this is normal.
á
Make sure the dispenser lid is always set in place before use.
á
Do not try to open or close the dispenser lid by force, as the joint may damage.
á
Do not
á
If the gasket is damaged, it may cause escape of steam or condensation.
rub or pull rubber gasket attached to the
dispenser lid as it may damage
drop down flap
as it can be deformed or
.
Control panel
The unit has a protective film overlay on the control panel to prevent scratching or marring
during shipping.
You may carefully peel this film off and discard it.
See page 7 for function and operation of each pad.
Display Window
TEMP :
REST :
indicates that the unit is hot and needs to cool down before reusing.
(See page 45.)
indicates that the temperature of the bread pan and ingredients is being settled
before kneading.
POWER ALERT :
Remaining Time :
the choice of "Crust"
indicates that there has been an interruption in the power supply.
(See page 45.)
indicates how much time is left until the operation is complete.
the choice of "Size"
indicated by an arrow.
the choice of "select"
indicated by an arrow.
the choice of "Option"
indicated by letters and a pictogram.
BAKE
BAKE RAPID
which has been/is being selected, indicated by an arrow.
which has been/is being selected,
which has been/is being selected,
which has been/is being selected,
BAKE RAISIN
DOUGH
DOUGH RAISIN
6
Page 8
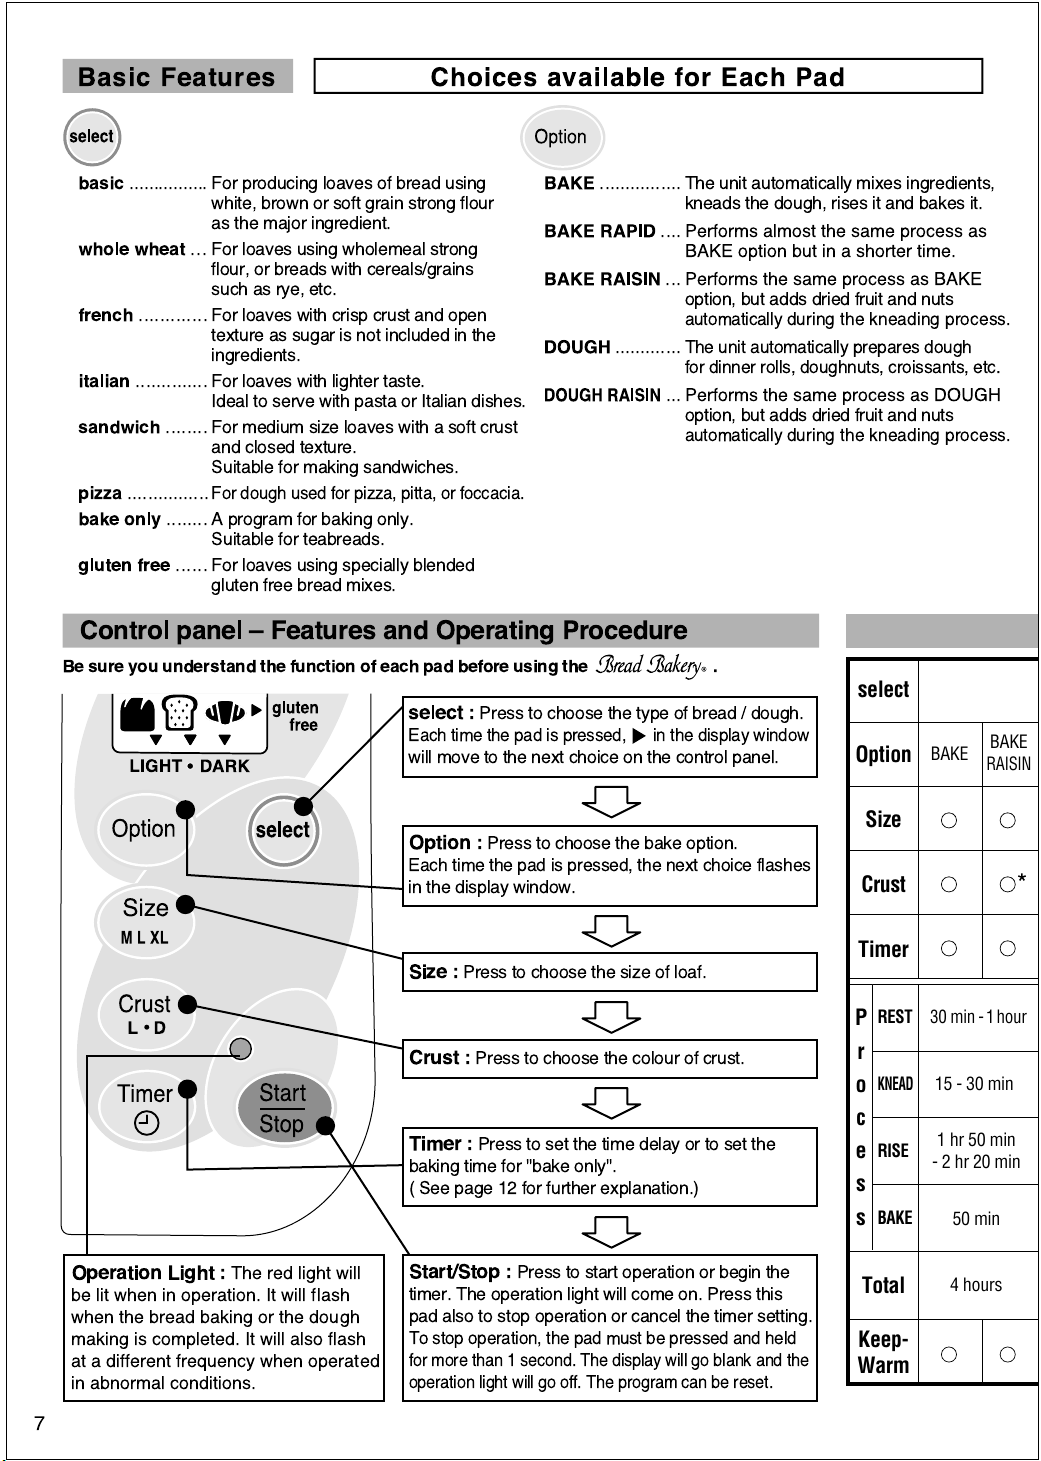
Basic Features Choices available for Each Pad
BAKE
basic
................
whole wheat
french
italian
sandwich
pizza
bake only
gluten free
.............
..............
........
................
........
For producing loaves of bread using
white, brown or soft grain strong flour
as the major ingredient.
...
For loaves using wholemeal strong
flour, or breads with cereals/grains
such as rye, etc.
For loaves with crisp crust and open
texture as sugar is not included in the
ingredients.
For loaves with lighter taste.
Ideal to serve with pasta or Italian dishes.
For medium size loaves with a soft crust
and closed texture.
Suitable for making sandwiches.
For dough used for pizza, pitta, or foccacia.
A program for baking only.
Suitable for teabreads.
For loaves using specially blended
......
gluten free bread mixes.
................
BAKE RAPID
BAKE RAISIN
DOUGH
DOUGH RAISIN
.............
The unit automatically mixes ingredients,
kneads the dough, rises it and bakes it.
....
Performs almost the same process as
BAKE option but in a shorter time.
...
Performs the same process as BAKE
option, but adds dried fruit and nuts
automatically during the kneading process.
The unit automatically prepares dough
for dinner rolls, doughnuts, croissants, etc.
...
Performs the same process as DOUGH
option, but adds dried fruit and nuts
automatically during the kneading process.
Control panel Ð Features and Operating Procedure
Be sure you understand the function of each pad before using the .
select :
Each time the pad is pressed, in the display window
will move to the next choice on the control panel.
Press to choose the type of bread / dough.
select
Option
BAKE
BAKE
RAISIN
Operation Light :
be lit when in operation. It will flash
when the bread baking or the dough
making is completed. It will also flash
at a different frequency when operated
in abnormal conditions.
The red light will
Option :
Each time the pad is pressed, the next choice flashes
in the display window.
Size :
Crust :
Timer :
baking time for ''bake only''.
( See page 12 for further explanation.)
Start/Stop :
timer. The operation light will come on. Press this
pad also to stop operation or cancel the timer setting.
To stop operation, the pad must be pressed and held
for more than 1 second. The display will go blank and the
operation light will go off. The program can be reset.
Press to choose the bake option.
Press to choose the size of loaf.
Press to choose the colour of crust.
Press to set the time delay or to set the
Press to start operation or begin the
Size
Crust
Timer
REST
P
r
KNEAD
o
c
RISE
e
s
BAKE
s
Total
KeepWarm
30 min - 1 hour
15 - 30 min
1 hr 50 min
- 2 hr 20 min
50 min
4 hours
*
7
Page 9
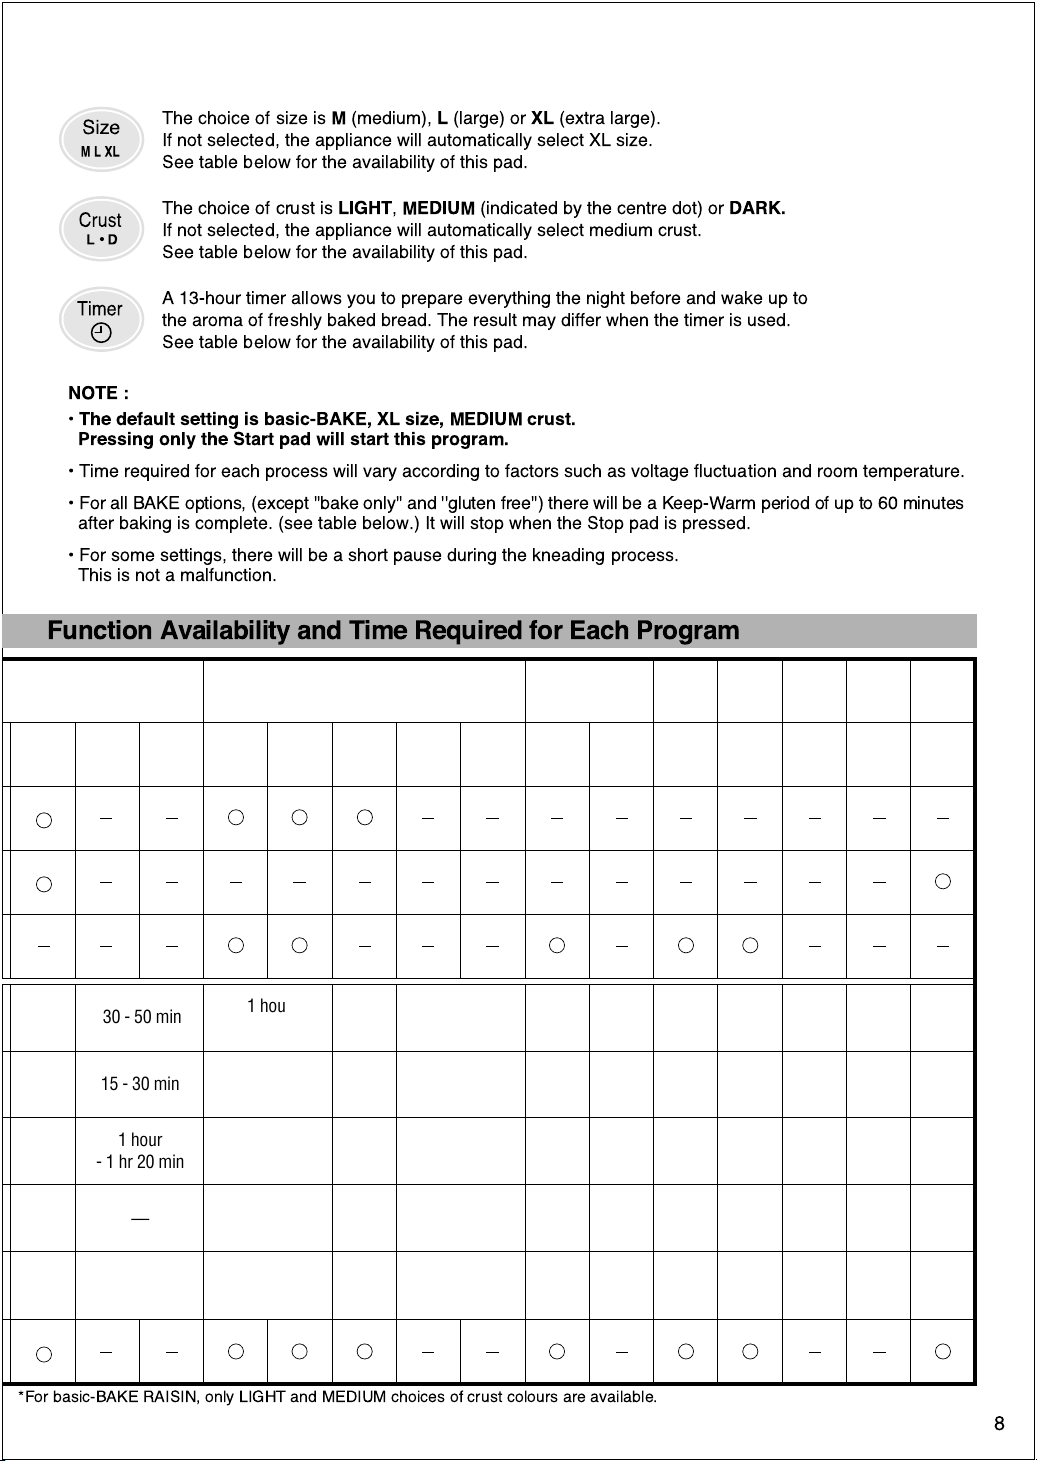
The choice of size isM(medium),L(large) orXL(extra large).
If not selected, the appliance will automatically select XL size.
See table below for the availability of this pad.
The choice of crust is
If not selected, the appliance will automatically select medium crust.
See table below for the availability of this pad.
A 13-hour timer allows you to prepare everything the night before and wake up to
the aroma of freshly baked bread. The result may differ when the timer is used.
See table below for the availability of this pad.
NOTE :
¥
The default setting is basic-BAKE, XL size, MEDIUM crust.
Pressing only the Start pad will start this program.
¥ Time required for each process will vary according to factors such as voltage fluctuation and room temperature.
¥ For all BAKE options, (except ''bake only'' and ''gluten free'') there will be a Keep-Warm period of up to 60 minutes
after baking is complete. (see table below.) It will stop when the Stop pad is pressed.
¥ For some settings, there will be a short pause during the kneading process.
This is not a malfunction.
LIGHT,MEDIUM
(indicated by the centre dot) or
DARK.
Function Availability and Time Required for Each Program
basic
BAKE
RAPID
DOUGH
RAISIN
whole wheat french italian
BAKE BAKE BAKE BAKE BAKE BAKE
BAKE
RAISIN
BAKE
RAPID
DOUGHDOUGH DOUGH DOUGH
DOUGH
RAISIN
sand-
wich
pizza
bake
only
gluten
free
—
15 - 20
min
approx.
1 hour
35 min
1 hr
55 min
*For basic-BAKE RAISIN, only LIGHT and MEDIUM choices of crust colours are available.
30 - 50 min
15 - 30 min
1 hour
- 1 hr 20 min
—
2 hr 20 min 5 hours 3 hours 3 hr 15 min 6 hours 5 hours 45 min
1 hour
- 1 hr 30min
15 - 25 min
2 hr 20 min
- 2 hr 50 min
50 min
15 min
15 - 25
min
approx.
1 hr
40 min
45 min
55 min
- 1 hr 15 min
15 - 25 min
1 hr 40 min
- 2 hours
—
40 min
55 min
10 - 20
min
55 min
10 min
55 min
- 1 hr
2 hr
- 4 hr
40 min
- 1 hr
35 min
10 - 20
min
1 hr
45 min
- 2 hr
40 min
—
3 hr
35 min
30 min
- 1 hour
10 - 15
min
2 hr
25 min
- 3 hours
50min
4 hr
30 min
1 hour
- 1 hr
30 min
15 - 25
min
2 hr
20 min
- 2 hr
50 min
50min
KNEAD
10 - 15
min
RISE
10 - 15
min
KNEAD
approx.
10 min
RISE
approx.
10 min
—
—
—
30 min
- 1 hr
30 min
30 min
- 1 hr
30 min
—
15 min
15 min
50 min
1 hour
20 min
8
Page 10
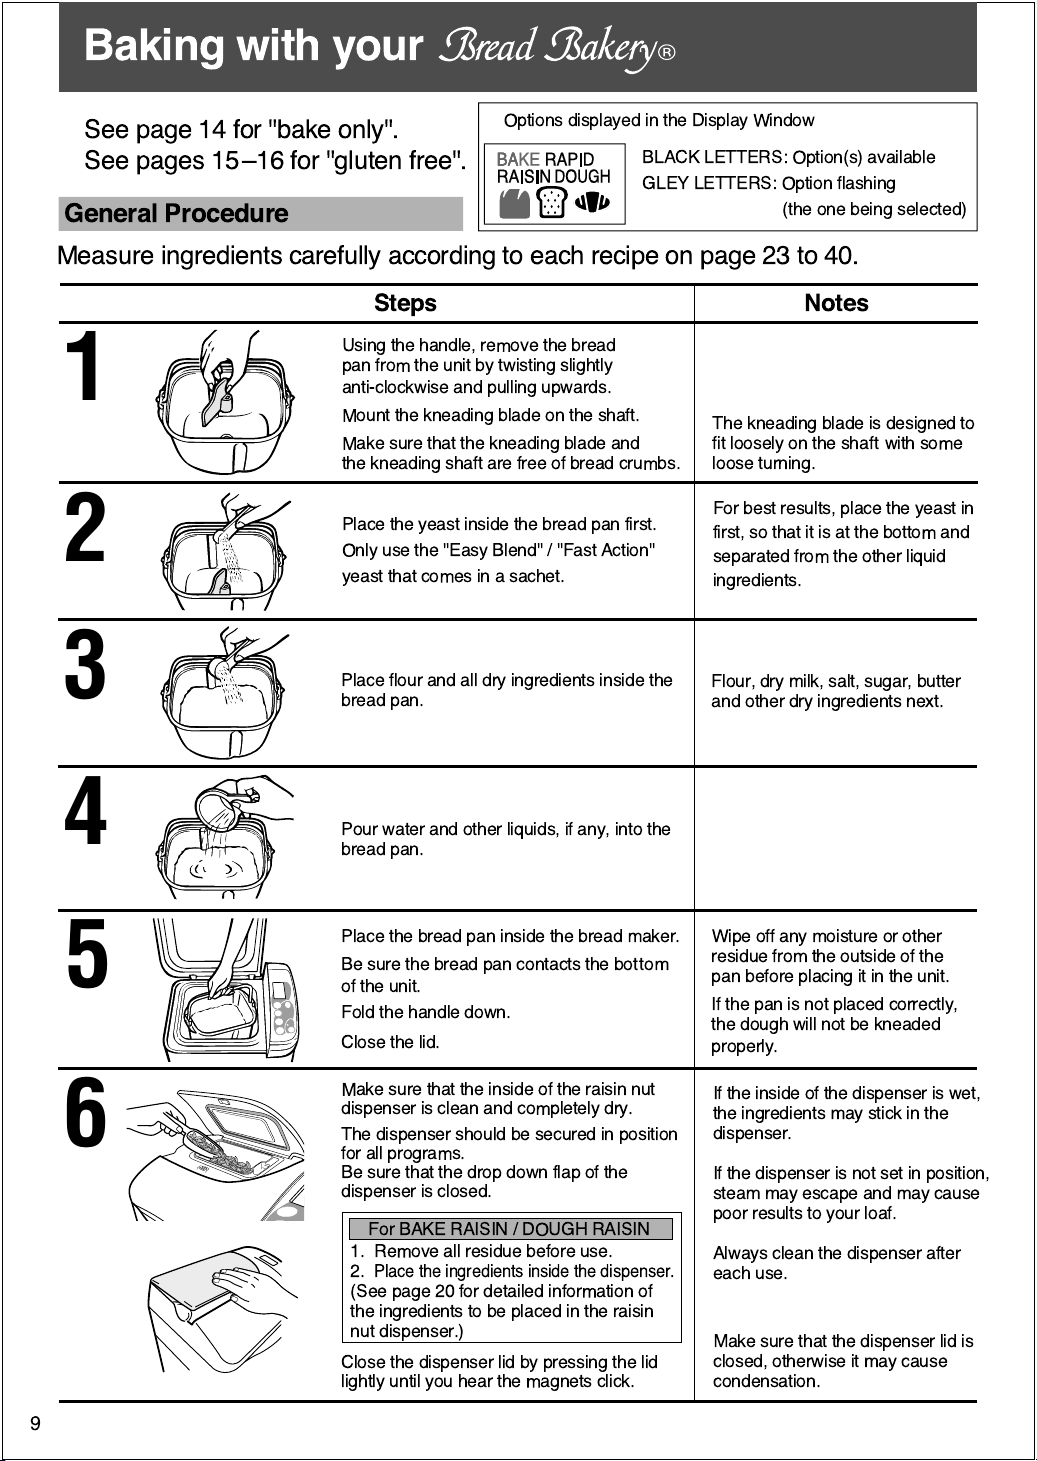
Baking with your
¨
See page 14 for "bake only".
See pages 15 Ð16 for "gluten free".
General Procedure
Options displayed in the Display Window
BLACK LETTERS: Option(s) available
GLEY LETTERS: Option flashing
(the one being selected)
Measure ingredients carefully according to each recipe on page 23 to 40.
Steps Notes
Using the handle, remove the bread
pan from the unit by twisting slightly
1
2
3
anti-clockwise and pulling upwards.
Mount the kneading blade on the shaft.
Make sure that the kneading blade and
the kneading shaft are free of bread crumbs.
Place the yeast inside the bread pan first.
Only use the "Easy Blend" / "Fast Action"
yeast that comes in a sachet.
Place flour and all dry ingredients inside the
bread pan.
The kneading blade is designed to
fit loosely on the shaft with some
loose turning.
For best results, place the yeast in
first, so that it is at the bottom and
separated from the other liquid
ingredients.
Flour, dry milk, salt, sugar, butter
and other dry ingredients next.
4
5
6
Pour water and other liquids, if any, into the
bread pan.
Place the bread pan inside the bread maker.
Be sure the bread pan contacts the bottom
of the unit.
Fold the handle down.
Close the lid.
Make sure that the inside of the raisin nut
dispenser is clean and completely dry.
The dispenser should be secured in position
for all programs.
Be sure that the drop down flap of the
dispenser is closed.
For BAKE RAISIN / DOUGH RAISIN
1. Remove all residue before use.
2.
Place the ingredients inside the dispenser.
(See page 20 for detailed information of
the ingredients to be placed in the raisin
nut dispenser.)
Close the dispenser lid by pressing the lid
lightly until you hear the magnets click.
Wipe off any moisture or other
residue from the outside of the
pan before placing it in the unit.
If the pan is not placed correctly,
the dough will not be kneaded
properly.
If the inside of the dispenser is wet,
the ingredients may stick in the
dispenser.
If the dispenser is not set in position,
steam may escape and may cause
poor results to your loaf.
Always clean the dispenser after
each use.
Make sure that the dispenser lid is
closed, otherwise it may cause
condensation.
9
Page 11
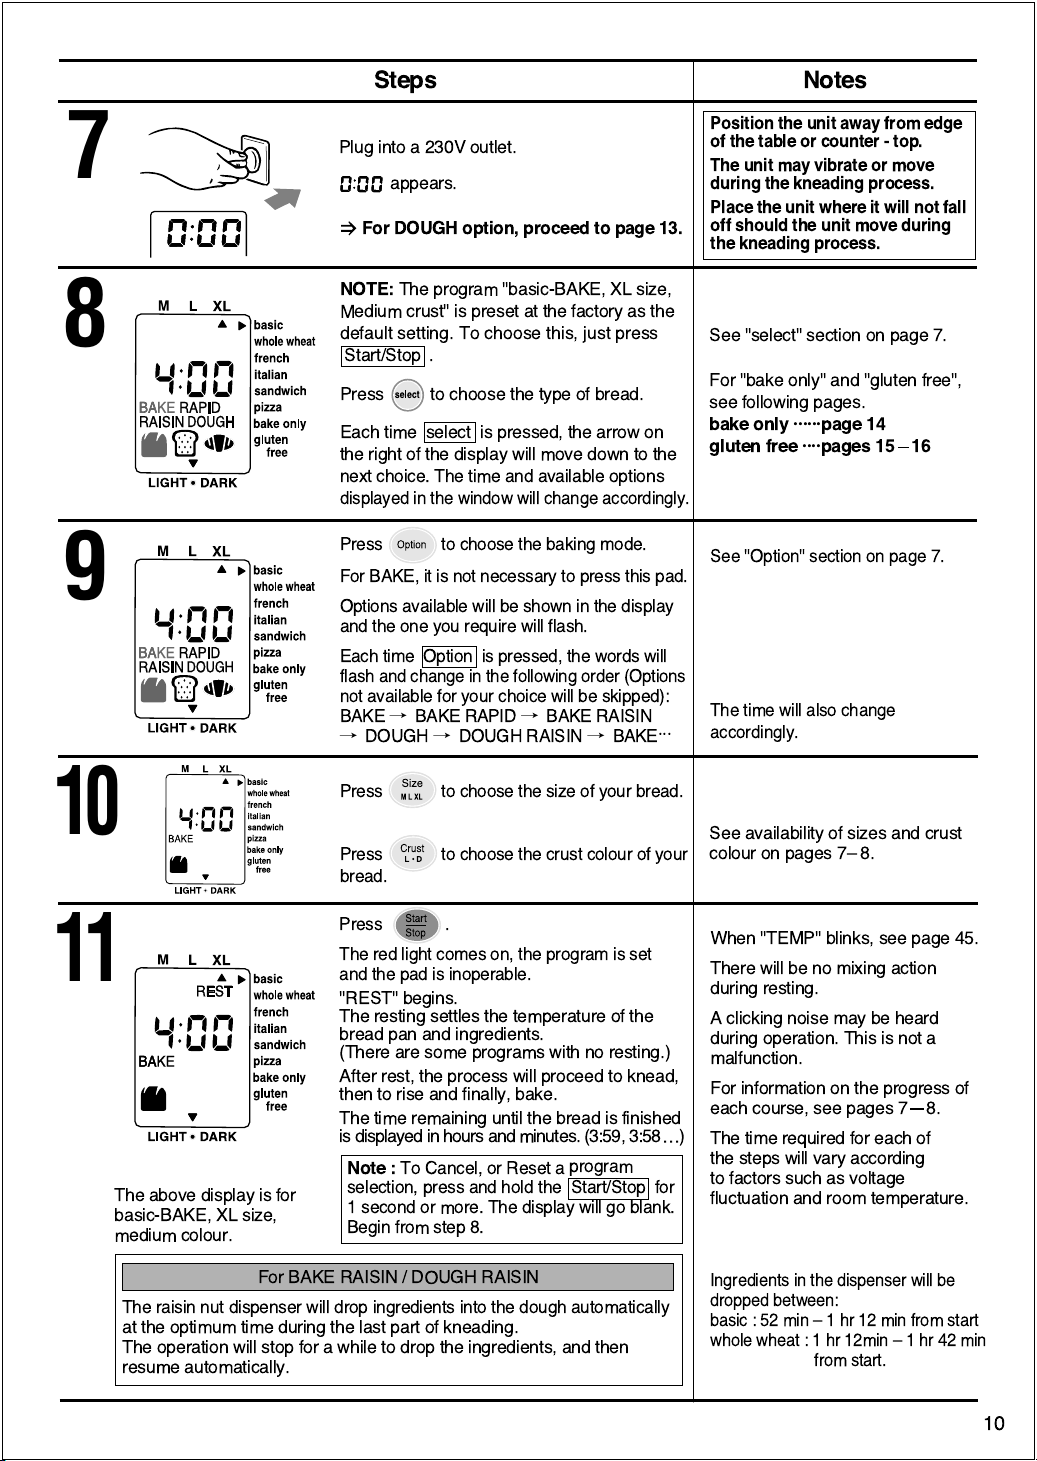
7
8
Steps
Plug into a 230V outlet.
appears.
For DOUGH option, proceed to page 13.
NOTE:
The program "basic-BAKE, XL size,
Medium crust" is preset at the factory as the
default setting. To choose this, just press
Start/Stop
Press to choose the type of bread.
Each time select is pressed, the arrow on
the right of the display will move down to the
next choice. The time and available
displayed in the window will change accordingly.
.
options
Notes
Position the unit away from edge
of the table or counter - top.
The unit may vibrate or move
during the kneading process.
Place the unit where it will not fall
off should the unit move during
the kneading process.
See "select" section on page 7.
For "bake only" and "gluten free",
see following pages.
bake only ббббббpage 14
gluten free áááápages 15
Ñ
16
9
10
11
The above display is for
basic-BAKE, XL size,
medium colour.
Press to choose the baking mode.
For BAKE, it is not necessary to press this pad.
Options available will be shown in the display
and the one you require will flash.
Each time Option is pressed, the words will
flash and change in the following order (Options
not
available for your choice will be skipped):
BAKE/ BAKE RAPID/ BAKE RAISIN
/
DOUGH/ DOUGH RAISIN/ BAKE
Press to choose the size of your bread.
Press to choose the crust colour of your
bread.
Press .
The red light comes on, the program is set
and the pad is inoperable.
"REST" begins.
The resting settles the temperature of the
bread pan and ingredients.
(There are some programs with no resting.)
After rest, the process will proceed to knead,
then to rise and finally, bake.
The time remaining until the bread is finished
is displayed in hours and minutes. (3:59, 3:58É)
Note :
To Cancel, or Reset a
selection, press and hold the
1 second or more. The display will go blank.
Begin from step 8.
program
Start/Stop
ááá
for
See "Option" section on page 7.
The time will also change
accordingly.
See availability of sizes and crust
colour on pages 7Ð 8.
When "TEMP" blinks, see page 45.
There will be no mixing action
during resting.
A clicking noise may be heard
during operation. This is not a
malfunction.
For information on the progress of
each course, see pages 7Ñ8.
The time required for each of
the steps will vary according
to factors such as voltage
fluctuation and room temperature.
For BAKE RAISIN / DOUGH RAISIN
The raisin nut dispenser will drop ingredients into the dough automatically
at the optimum time during the last part of kneading.
The operation will stop for a while to drop the ingredients, and then
resume automatically.
Ingredients in the dispenser will be
dropped between:
basic : 52 minÐ1hr12minfrom start
whole wheat:1hr12minÐ1hr42min
from start.
10
Page 12
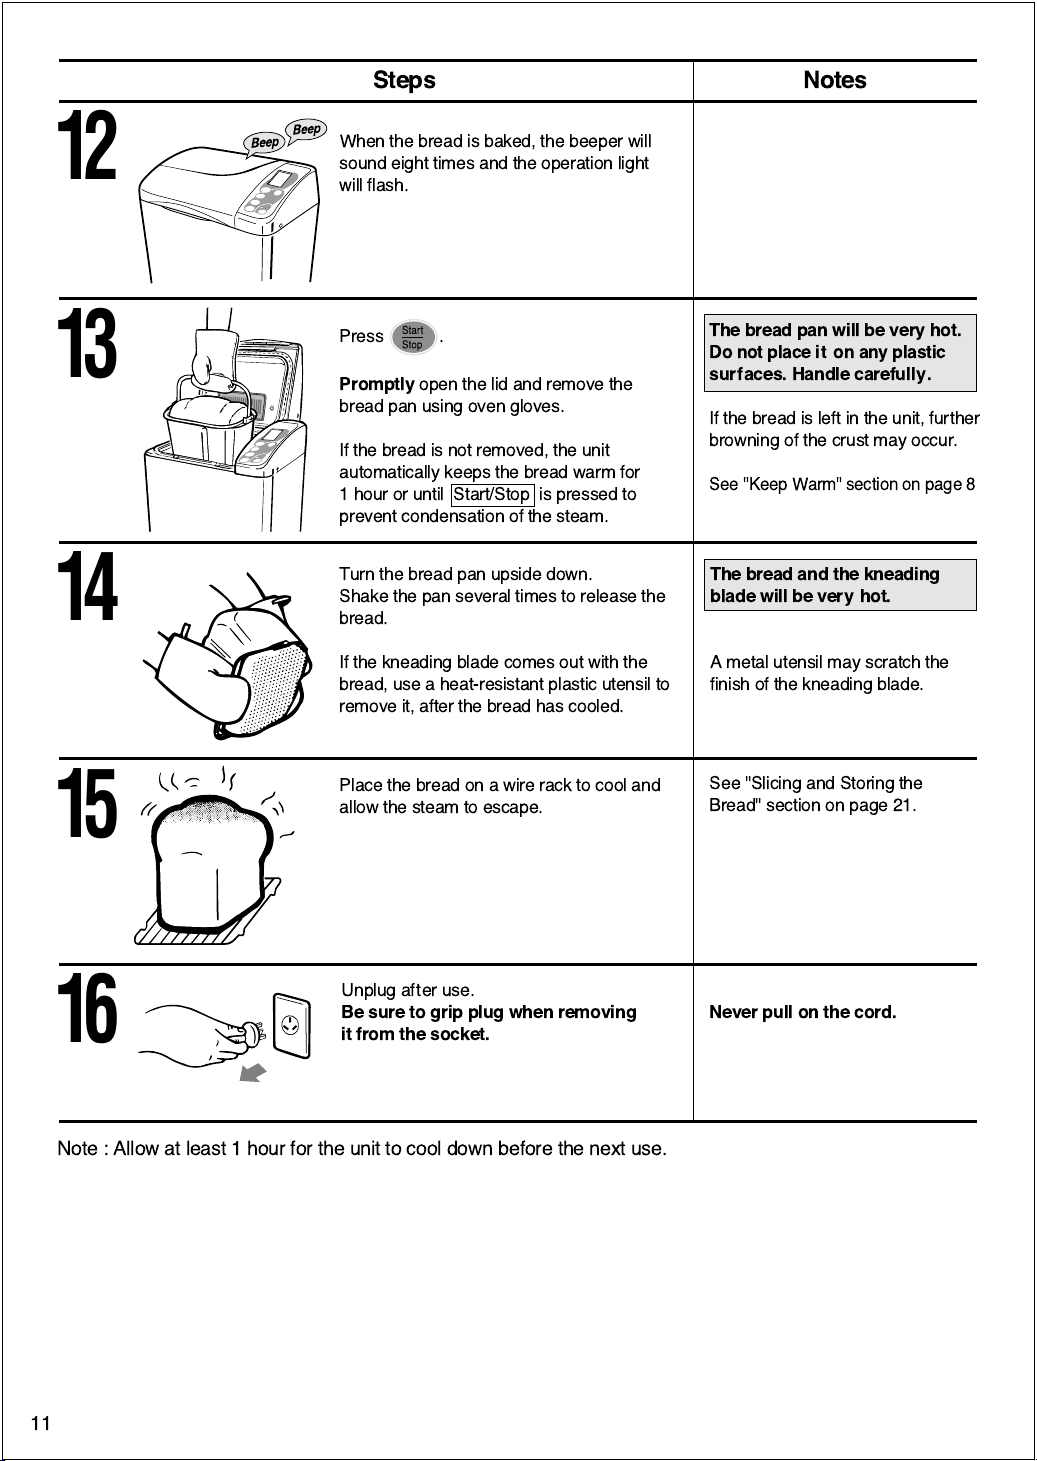
12
Steps Notes
When the bread is baked, the beeper will
sound eight times and the operation light
will flash.
13
14
15
Press .
Promptly
bread pan using oven gloves.
If the bread is not removed, the unit
automatically keeps the bread warm for
1 hour or until Start/Stop is pressed to
prevent condensation of the steam.
Turn the bread pan upside down.
Shake the pan several times to release the
bread.
If the kneading blade comes out with the
bread, use a heat-resistant plastic utensil to
remove it, after the bread has cooled.
Place the bread on a wire rack to cool and
allow the steam to escape.
open the lid and remove the
The bread pan will be very hot.
Do not place it on any plastic
surfaces. Handle carefully.
If the bread is left in the unit, further
browning of the crust may occur.
See "Keep Warm" section on page 8
The bread and the kneading
blade will be very hot.
A metal utensil may scratch the
finish of the kneading blade.
See "Slicing and Storing the
Bread" section on page 21.
Unplug after use.
Be sure to grip plug when removing
16
Note : Allow at least 1 hour for the unit to cool down before the next use.
11
it from the socket.
Never pull on the cord.
Page 13

To use the Timer
The timer to delay the start of the operation may only be used for the following
programs.
See table below.
Duration of Time
Timer may be set for any length of time within the following ranges.
basic whole wheat french italian sandwich
Setting
Range
BAKE BAKE BAKE BAKE
BAKE
RAISIN
BAKE
4-13 hours 5-13 hours 6-13 hours 5-13 hours
BAKE
RAISIN
4 hrs 30min
-13 hours
Follow the same steps on pages 9-11 up to step 10.
For step 11, follow the instructions below.
Steps
Press to set the length of time
required for when you want the bread to
be ready.
For the timer delay available, see the
table above.
Example:
If the present time is 9:00 pm, and you want the bread to be finished at 6:30 am tomorrow
morning, set the timer to
of the bread.
12
(9 hours and 30 minutes), the time required until the completion
9:30
12
Each time Timer is pressed,
the time will advance 10
minutes.
The time will change rapidly
if constant pressure is
applied to the pad.
Notes
9
9:00 pm
present time
The above display is for
-
BAKE, XL size,
basic
medium colour.
3
9 hours
6
Press .
The time remaining until the baking is
finished is displayed in hours and minutes.
(9:29, 9:28,
30 minutes
¥¥¥
)
9
6
6:30 am
finish time setting time
3
When "TEMP" blinks, see
page 45.
There will be no action while
the timer is working.
12
Page 14
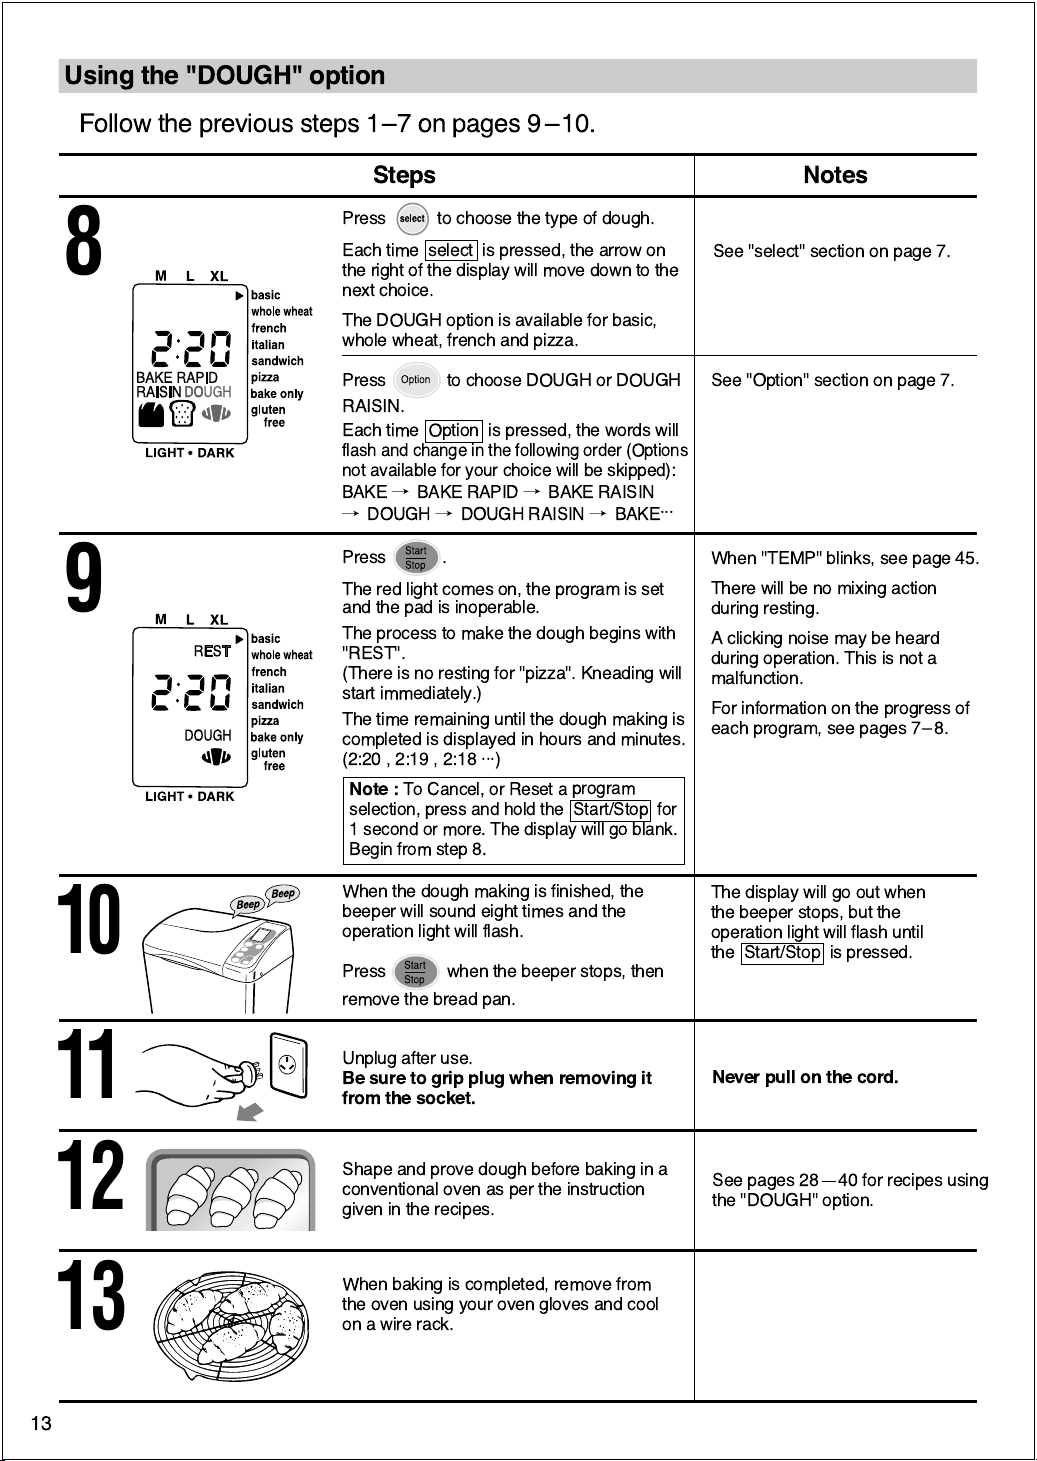
Using the "DOUGH" option
Follow the previous steps 1Ð7 on pages 9 Ð10.
Steps Notes
Press to choose the type of dough.
8
Each time select is pressed, the arrow on
the right of the display will move down to the
next choice.
The DOUGH option is available for basic,
whole wheat, french and pizza.
See "select" section on page 7.
9
10
Press to choose DOUGH or DOUGH
RAISIN.
Each time Option is pressed, the words will
flash and change in the following order (Options
not available for your choice will be skipped):
BAKE/ BAKE RAPID/ BAKE RAISIN
/
DOUGH/ DOUGH RAISIN/ BAKE
Press .
The red light comes on, the program is set
and the pad is inoperable.
The process to make the dough begins with
"REST".
(There is no resting for "pizza". Kneading will
start immediately.)
The time remaining until the dough making is
completed is displayed in hours and minutes.
(2:20 , 2:19 , 2:18
Note :
To Cancel, or Reset a
selection, press and hold the
1 second or more. The display will go blank.
Begin from step 8.
When the dough making is finished, the
beeper will sound eight times and the
operation light will flash.
Press when the beeper stops, then
remove the bread pan.
ááá
)
program
Start/Stop
ááá
for
See "Option" section on page 7.
When ''TEMP'' blinks, see page 45.
There will be no mixing action
during resting.
A clicking noise may be heard
during operation. This is not a
malfunction.
For information on the progress of
each program, see pages 7Ð 8.
The display will go out when
the beeper stops, but the
operation light will flash until
the Start/Stop is pressed.
11
12
13
13
Unplug after use.
Be sure to grip plug when removing it
from the socket.
Shape and prove dough before baking in a
conventional oven as per the instruction
given in the recipes.
When baking is completed, remove from
the oven using your oven gloves and cool
on a wire rack.
Never pull on the cord.
See pages 28Ñ40 for recipes using
the "DOUGH" option.
Page 15
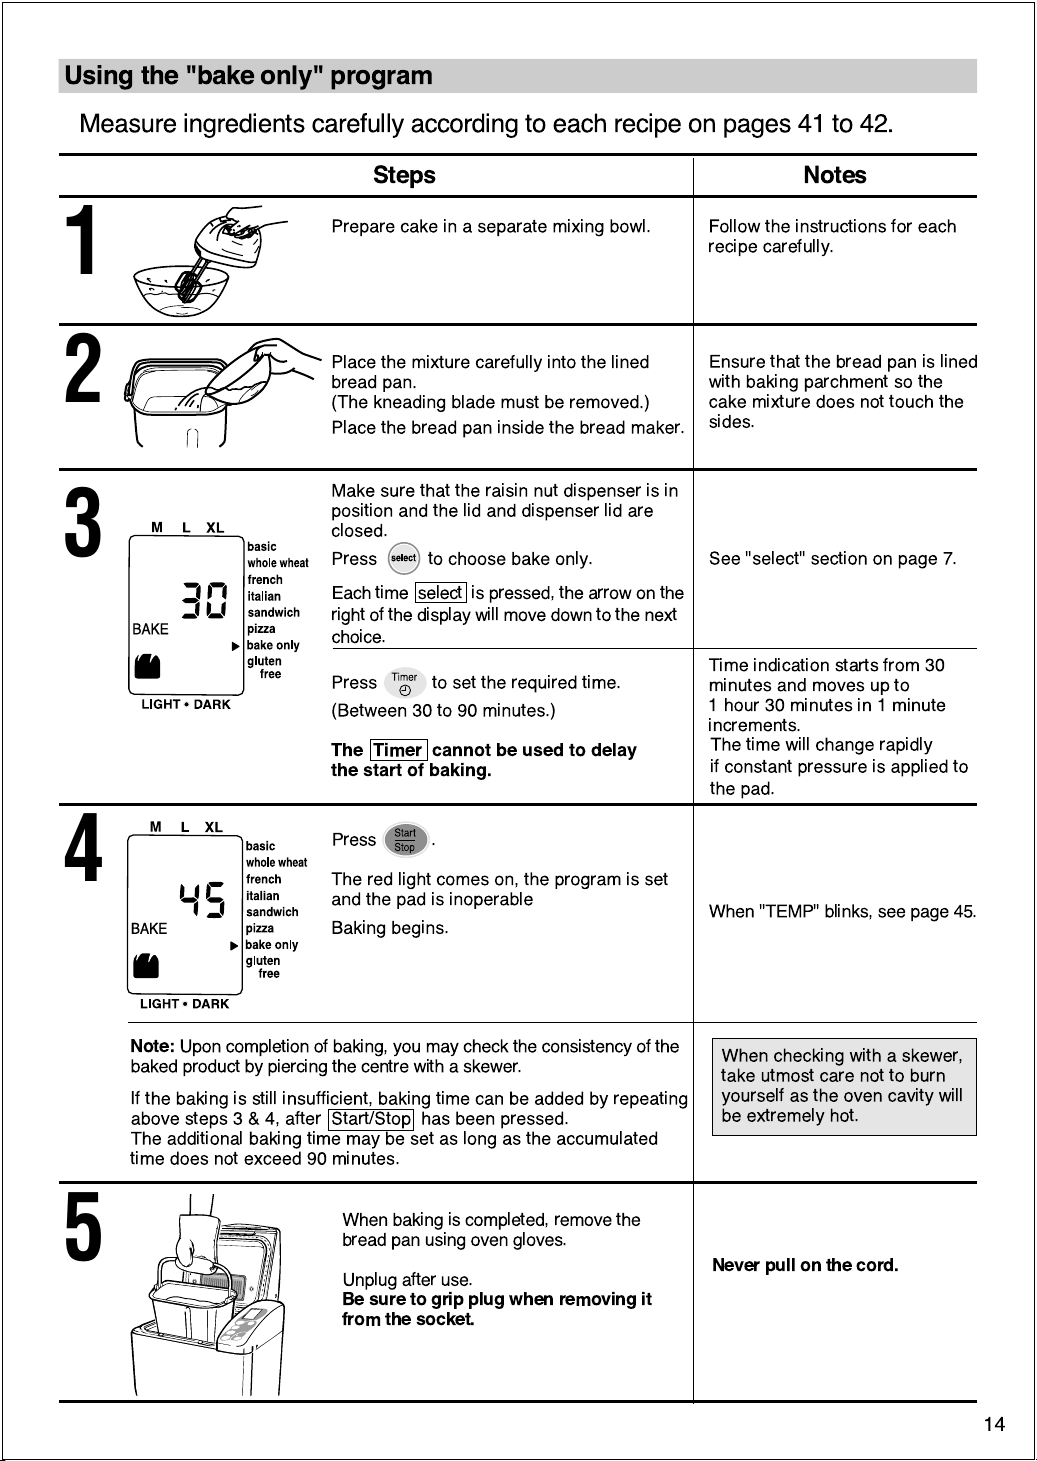
Using the "bake only" program
Measure ingredients carefully according to each recipe on pages 41 to 42.
Steps Notes
1
2
3
Prepare cake in a separate mixing bowl. Follow the instructions for each
Place the mixture carefully into the lined
bread pan.
(The kneading blade must be removed.)
Place the bread pan inside the bread maker.
Make sure that the raisin nut dispenser is in
position and the lid and dispenser lid are
closed.
Press to choose bake only.
Each time select is pressed, the arrow on the
right of the display will move down to the next
choice.
Press to set the required time.
(Between 30 to 90 minutes.)
The Timer cannot be used to delay
the start of baking.
recipe carefully.
Ensure that the bread pan is lined
with baking parchment so the
cake mixture does not touch the
sides.
See "select" section on page 7.
Time indication starts from 30
minutes and moves up to
1 hour 30 minutes in 1 minute
increments.
The time will change rapidly
if constant pressure is applied to
the pad.
4
5
Press .
The red light comes on, the program is set
and the pad is inoperable
Baking begins.
Note:
Upon completion of baking, you may check the consistency of the
baked product by piercing the centre with a skewer.
If the baking is still insufficient, baking time can be added by repeating
above steps3&4,after Start/Stop has been pressed.
The additional baking time may be set as long as the accumulated
time does not exceed 90 minutes.
When baking is completed, remove the
bread pan using oven gloves.
Unplug after use.
Be sure to grip plug when removing it
from the socket.
When ''TEMP'' blinks, see page 45.
When checking with a skewer,
take utmost care not to burn
yourself as the oven cavity will
be extremely hot.
Never pull on the cord.
14
Page 16

Using the "gluten free" program
Making gluten free bread is very different from the normal way of producing bread in the
.
¨
It is very important if you are making gluten free bread for health reasons that you have
consulted your doctor and follow the guidelines below.
¥ This program has been developed especially for certain gluten free mixes, therefore using
your own mix in this program may not produce such good results.
¥ When "gluten free" is selected, the details for the recipe on this page and the procedure on
page 16 must be followed carefully. (Otherwise, the bread may not turn out well.)
¥ The gluten free recipe on this page has been developed using commercially prepared
ORGRAN's Easy Bake gluten free bread mix.
It is advisable to use this mix for best results.
This is available through most large supermarket chains nationally and also through health
food stores or by mail order.
¥ The results may differ according to the type of mix.
Occasionally a loaf may have some flour remaining on the side.
¥ The bread should be stored in a cool dry place and used within 2 days. If you will not be able
to finish the loaf within that time it can be put into freezer bags, in convenient sized
portions, and frozen.
¥ It is very important to avoid cross contamination with flours that contain gluten if bread is being
made for dietary reasons. Particular attention must be paid to the cleaning of the bread pan
and blade as well as any utensils that are used.
Using ORGRAN gluten free mix
Water
Oil
Bread mix
430 ml
1 Tbsp
450
N
Panasonic recommends the use of ORGRAN gluten free bread flour mix.
For more information on ORGRANÕs gluten free bread mixes, please contact the address below:
NATURAL FOODS
Division of Roma Food Products, 47-53 Aster Avenue, Carrum Downs, Victoria 3201 Australia
NOTE: For gluten free bread on basic program, see page 24.
15
Page 17

Measure ingredients carefully according to each recipe on page 15.
Steps Notes
Remove the bread pan from the unit.
1
2
Twist slightly anti-clockwise and pull
up, using the handle.
Mount the kneading blade on the shaft.
Make sure that the kneading blade and
the kneading shaft are free of bread
crumbs.
Place the ingredients into the bread pan in
the following order
free flour is mixed to a batter more efficiently.
Water/oil/gluten free mix
(If you need to add yeast, it should be placed
in the pan last.)
to ensure that the gluten
The kneading blade is designed
to fit loosely on the shaft with
some loose turning.
The order for placing the
ingredients is different from
other programs.
The results may be poor, if the
ingredients are not placed in
the order stated.
Measure the ingredients accurately,
as this affects the baking results
considerably.
3
4
5
Place the bread pan inside the bread maker.
Be sure the bread pan contacts the bottom
of the unit. Fold the handle down.
Close the lid.
Make sure that the raisin nut dispenser is
in position and the dispenser lid is closed.
Press to choose gluten free.
Each time select is pressed, the arrow on
the right of the display will move down to the
next choice.
Press to choose the crust colour of
your bread.
NOTE
: We recommend dark crust for most
gluten free breads.
Press .
Kneading begins immediately.
Wipe off any moisture or foreign
matter from the outside of the
bread pan before placing it in the
unit.
If the bread pan is not placed
correctly, the dough will not be
kneaded properly.
See "select" section on page 7.
When ''TEMP'' blinks, see page 45.
IMPORTANT NOTE:
The ingredients are mixed to a thick batter automatically, but gluten free flour is very different to ordinary strong bread flour.
For best results and to reduce the chances of flour remaining on the sides, follow the instructions below.
Between 5 and 10 minutes after kneading starts, stir in the flour that may be stuck around the edges of the bread pan,
using a
plastic
spatula.
When stirring, be careful not to touch the kneading blade.
Proceed to step 12 on page 11.
16
Page 18

Care and Cleaning
Before cleaning the unit, unplug and allow the unit to cool.
Body and lid
Body and lid should be wiped clean with a damp cloth.
á
Use only mild liquid detergent.
á
For baked-on materials, use a non scratch scourer and detergent
á
on the interior.
Do not use cleansers, steel wool pads, or other abrasive materials.
á
Do not use benzine, thinner, alcohol, etc.
á
Temperature sensor
Wipe gently and avoid deforming the temperature sensor.
á
Dispenser lid
Dispenser lid will be very hot after baking. Only remove the lid after it
á
cools down completely.
To clean, remove the dispenser lid and wash gently with soft sponge.
á
Do not rub or pull the rubber gasket.
Rubbing and pulling roughly may damage the rubber gasket attached
to the dispenser lid. Inner lid section is not removable.
Do not use any abrasive materials.
á
If the gasket becomes damaged the dispenser lid should be replaced,
á
as this will cause the leakage of steam, condensation, or deformation.
(See page 46 for replacement.)
This part is not dishwasher safe.
á
Raisin nut dispenser
The dispenser will be very hot after baking. Remove the dispenser
á
after it cools down completely.
Do not use any harsh cleansers, steel wool pads, or other abrasive
á
materials or utensils, especially on the non-stick coated surface.
It may scratch the surface and cause ingredients to stick.
Clean the dispenser after each use to avoid build up of residue of
á
ingredients.
This part is not dishwasher safe, as it may become damaged.
á
Temperature
sensor
Inner lid section
Lid
Body
Bread pan and kneading blade
If the kneading blade cannot be easily removed from the pan by
á
twisting the mounting shaft, pour warm water into the cooled pan and
leave aside for 5Ð10 minutes. Remove the blade.
Always remove the blade and wash the pan with mild, liquid detergent
á
after each use.
DO NOT SUBMERGE THE PAN IN WATER.
á
Do not use other abrasive materials or otherwise, the pan may be
á
scratched.
Kneader mounting shaft
1. Be sure that the unit and the bread pan have dried completely before storing.
2. On the interior of the body some discolouration may occur with use.
17
These parts are not dishwasher safe.
á
Measuring cup and spoon
Rinse and wipe dry.
á
These parts are not dishwasher safe.
á
Page 19

Baking Tips and Recipes
The Role of Ingredients in Bread Baking
The ingredients used in bread baking all play an important part in the quality of the
bread produced.
Below we briefly discuss the role that each ingredient plays in the bread baking
process. It is important to follow the recipes and weigh or measure carefully to
ensure the correct balance of ingredients for successful bread baking.
Flour:
Most bread is made from wheat flour.
The quantity and quality of the gluten
forming proteins in the flour determines
its suitability for good bread making.
High grade flours have a consistently
higher protein content than some of the lower grades
available and these will generally give a more
successful result.
If lower grade flours are used, the addition of
1 tablespoon of gluten flour will improve performance.
All flour starts off as brown flour and is milled and
refined until it becomes white.
In wholemeal flour, the wheat grain has not been
removed so breads made with wholemeal flour have
a coarser, more crumbly texture.
Breads made with wholemeal flour only will have a
reduced volume due to the reduced availability of
gluten forming proteins. To enhance the volume in
these loaves a proportion of white flour can be used
and additional gluten flour may also give improved
results.
Flour milled from cereals such as oats, rice, barley
and rye contain little or no gluten. Therefore these
loaves have a low rise and a dense structure.
Panasonic recommend the use of
HIGH GRADE FLOUR.
Sugar:
Sugar used in bread making comes
in a variety of formsÑthese include
white sugar, brown sugar, molasses,
treacle, honey and golden syrup.
Sugar in some form is essential in
all breads as sugar provides food
for yeastÑit helps the yeast to begin
to ferment and then promotes continued yeast action.
Sugar also provides sweetness and aids browning
during baking.
Artificial sweeteners cannot be successfully used as
a substitute for sugarÑthey do not provide the
carbohydrates required for fermentation.
Salt:
Salt is very important in bread making as
it gives the bread a more even texture.
It also controls action of the yeast by
inhibiting enzyme activity, thus
controlling the amount of carbon dioxide
produced. Bread with reduced salt will have a weak
gluten structure and a more open texture, too
much salt inhibits fermentation.
Salt also contributes to the flavour.
Fats:
The main purpose of fats in
bread baking is to tenderise and
soften the bread and to enhance
the flavour and richness. Although the
addition of fat is not essential, breads
made without fat will have less flavour and will not
keep as well.
The best flavour is achieved when butter is usedÑ
it should be softened to help mixing.
Other fats can be used. These include vegetable oil,
margarine or shortening. Remember that these may
alter the flavour and texture.
Milk and milk products:
These enhance the flavour and help
increase the nutritional value of the
bread. The recipes included in this
book use dry milk because it is
convenient to use.
If fresh milk is used, reduce the quantity of water by
the same amount.
Fresh milk is not suitable if timer is being used.
Vitamin C (Bread Improver):
Vitamin C is a "bread improver"
i.e. it helps improve the volume of
the loaf.
You do not need to add this when
using Surebake yeast as it already
includes vitamin C.
18
Page 20

The Role of Ingredients in Bread Baking
Liquids:
Liquids are important in bread baking,
a small change in the quantity may affect
the height and the texture of the bread.
Liquid is needed to form the bread,s
gluten framework.
Too much will cause the dough to collapse, too little
prevents the gluten from stretching enough.
Liquid temperature is importantÑgenerally a tepid
liquidÑone that feels neither hot nor cold, is best.
(For the BAKE RAPID options, however, lukewarm
water should be used, especially during the very
cold winter months.)
If a recipe specifies water onlyÑpart of this may be
replaced with fresh milk but remember that this will
affect the fat content of the bread.
Fresh milk is not suitable if timer is being used.
Egg:
These are sometimes added to
nutritionally enrich the dough, they
also improve the keeping properties
and colour of the baked product.
Nuts:
Nuts may be used, but chop them
finely. Use no more than 1cup.
The height of bread when nuts are
used, may be low because the
chopped nuts will cut the gluten
structure.
When adding nuts as well as dried fruit, their total
weight should not exceed 1 cup. Remember to chop
them finely as these interfere with mixing.
Loaves with nuts may be lower in volume because
the nuts may disrapt the gluten network in the dough.
Use the BAKE/DOUGH RAISIN option to prevent this
from happening.
Spices:
Spices are used to add
flavour to the bread. Only
small amounts (1 teaspoon
to 2 teaspoon) are required.
Fruits:
Dried fruits are used in some of the
following recipes. Total weight of
dried fruits used should not exceed
1 cup. When using fresh fruit, use
only as directed in the following recipes, as the
water content of the fruit will affect the loaf volume.
Yeast:
Yeast is a form of plant lifeÑit will
grow and multiply when the
conditions are favourable.
In bread baking the yeast ferments
the sugar and forms a gas (carbon dioxide).
This gas causes the dough to rise, the fermentation
softens the gluten, and makes it elastic.
Kneading then develops this softened gluten and
spreads the gas cells evenly through the dough to
give a fine textured product.
When bread is baked, the initial heat increases the
yeast actionÑthe gas cells expand and the loaf rises.
The yeast is killed and the loaf cooks to have crisp
brown crust and a soft moist even crumb.
Yeast in the following forms can be used in
the :
Active Dry YeastÐyellow lid
Surebake YeastÐred lid
Surebake is active yeast mixed with additives to
enhance the action of the yeastÑthese additives
include wheat starch, wheat flour, emulsifiers 481,
472e and vegetable oil (to strengthen the gluten and
improve texture), ascorbic acid, sugar and enzymes.
These additives accelerate the strengthening of the
gluten. Generally when using Surebake, there will be
no need to add extra ascorbic acid. Gluten flour will
only be needed when using grains with a low gluten
content such as oats, rice, barley and rye.
Yeast should be refrigerated for storageÑwatch use
by dates! A temperature of 30Ñ35¼C provides the
best conditions for rising of yeast products.
Important
¥ Place yeast in bread pan before all other ingredients,
this gives more consistent results.
¥ Do not use compressed yeast or dry yeast that
requires preliminary fermentation.
¥ Do not dissolve yeast in warm water before use.
¨
Bran:
Approx 60 ml (4 Tbsp) can be added
to boost the fibre content. (Do not use
more than this recommended amount
as it will affect the volume of the loaf).
Wheatgerm:
Approx 60 ml (4 Tbsp) can be added
to give a nuttier flavour.
19
Page 21

Guideline of Ingredients to be placed in the Raisin Nut Dispenser
In general, ingredients that are in small pieces and are completely dry may be placed in the raisin nut
dispenser to be dropped automatically into the bread pan during the breadmaking process.
Ingredients that are wet or sticky on the surface are not suitable to use in the dispenser, as these may not
drop completely into the bread pan but remain in the dispenser.
Ingredients should be placed in the dispenser after it has been placed in position in the bread maker,
otherwise the small ingredients such as sesame seeds may escape from the gap.
Main Examples
= May be placed in the raisin nut dispenser
= Should not be placed in the raisin nut dispenser
Ingredients Notes
Dried fruits
Nuts
Cereals
Seeds
Herbs
Bacon, Salami
Raw fruits
Chocolate chips
Cheese
The results will vary according to the condition of ingredients, circumstances such as room temperature or
the use of the timer. For example, sugar coated mixed fruits which may be dry on the surface at first, will
have sticky surfaces when cut into small pieces, plus the sugar could melt in the dispenser during the hot
summer months if left in the dispenser too long.
Chop dried fruits roughly, as if ingredients are too small they may stick to the dispenser and will not be added
to the loaf or dough.
Dried fruits soaked in syrup or liquor, or chopped into very small pieces may
stick to the dispenser surface and may not drop completely into the bread pan.
Bacon with high oil content may not drop completely into the bread pan.
These ingredients have a high water content so that they may stick to the
dispenser surface.
These ingredients may melt in the dispenser before being dropped, or may
have sticky surfaces, therefore may not drop completely from the dispencer.
These ingredients should be placed in the bread pan with other ingredients
at the beginning.
Maximum amount
Ingredients to be placed in the raisin nut dispenser should not be more than those stated in the recipes.
Carefully place the ingredients in the raisin nut dispenser.
Do not press down as you may damage the dispenser, and the ingredients will then not be added to the
loaf or dough.
20
Page 22

Tips for Baking Whole wheat & Multigrain Breads
The result of breads, such as whole wheat breads
and multigrain breads, are affected greatly by the
quality of ingredients, especially the flour. The flour
quality is affected by the keeping methods, the
temperature, humidity, etc. Another important factor
about the flour is that its quality also differs from year
to year, season to season. This is due to the quality
of the wheat crop being affected by the weather.
Sometimes due to bad weather conditions, the crop
may not grow with as much gluten forming properties
as it would require to produce flour for making
excellent breads.
When the quality of flour is poor, the bread may not
rise, or collapse after rising due to weak gluten.
In such cases, take the following measures to obtain
better results.
1. At least 150Nof the flour should be white bread
flour, rather then whole wheat flour.
and/ or
2. Reduce 15 ml to 30 ml of water from the
regular amount.
If the above still does not solve the problem,
1
3. Reduce the amount of dry yeast to
(2N)
The loaf produced by above methods may be low
or small.
/2 teaspoon.
Tips for Using Bread Mixes
When using ready prepared bread mixes where the yeast is already in the packet, use the basic bake rapid
option of 1 hour 55 minutes for all varieties of mix.
Select the correct size for the quantity of mix used.
XL (Extra Large) Ð 600Npacket
L (Large) Ð 500Npacket
Put the packet mix in the bread pan, and add the recommended quantity of water from the recipe on the
packet.
Select basic bake rapid option of 1 hour 55 minutes and press Start.
We do not know how much yeast is in the packet, and therefore how high the bread will rise. We recommend
that you should add/lessen the mix you use according to the baking results.
For ready prepared mixes, where the yeast is supplied in a separate sachet, select the program according to
the type of flour in the mix.
For example white and brown mixes use the basic program (4 hours) and wholemeal the wholemeal
program (5 hours), and follow the recipe proportion in our book for yeast and water quantities to use.
Slicing and Storing the Bread
Slicing the Bread
Cool the bread on a wire rack before slicing.
Cutting the bread fresh from the oven, especially gluten free,
may be difficult.
Storing the bread
1. Let the bread cool completely at room temperature.
2. Wrap it in a foil or a plastic bag to preserve freshness.
3. To enjoy the taste of freshly baked homemade bread,
try to consume your bread as soon as possible.
4. For longer storage, wrap well and store in the freezer.
It is better to slice the loaf before freezing.
21
Page 23

Differences in Baking Results
Baking results differ according to several factors including environmental conditions, electricity fluctuation,
choice of ingredients, their brands, measurements and quality. To avoid poor baking results the following
should be remembered.
1. Bake at optimum temperature.
Temperature is one of the most important factors in bread baking. Although the is
designed to sense the temperature and automatically control the heating system during the entire
process of baking, it works best in a room temperature between 20¡C (68¡F) to 25¡C (77¡F), a slight
difference in volume may be noticed when the BAKE RAPID option is used or during winter months
when an overnight programme is used.
2. Electricity Fluctuations will affect the height, the texture and the colour of bread.
The incorporates a 10 minute memory which means that if the electricity supply is interrupted
¨
for 10 minutes or less the bread machine will automatically restart.
3. Measure the ingredients accurately.
Accurate measurement is essential in achieving good baking results.
Liquids should be measured in the measuring cup and yeast, salt, sugar and milk powder using the
measuring spoon provided.
Flour must be weighed accurately on scales either using the metric (grammes) or imperial (ozs). Do not
exceed the stated weight of flour as this could damage your machine.
Ñ
For measuring fat (butter) the 15
25Nrecommended in the recipes is a guideline for the quantity to use.
The yeast should be measured carefully using the teaspoon end of the measuring spoon. It is marked
inside with a quarter, half and three quarter level for your convenience.
4. Order of Ingredients. (For "gluten free", the order listed on page 16 must be followed.)
Always place yeast first, then all other dry ingredients into the bread pan, followed by the liquid so that
the yeast is at the bottom and not in contact with the liquid. N.B. Never let the yeast touch liquid before
kneading.
5. Always use fresh ingredients.
Check the date on the flour packet before purchase and use the flour before it is out of date. After
opening the packet reseal and store in a cool dry place.
6. Experimenting.
Take care to follow the guidelines when adding additional ingredients, as if added in excess, these
affect the final loaf volume. For loaves with poor volume, extra sugar e.g. for white loaves extra
1
/2Ñ1 Tbsp should be added, as this helps the rise for poorer quality strong white flours.
Additional water eg 10Ñ20 ml will give a lighter textured loaf.
7. Maximum Load.
Do not attempt to increase the quantities in the recipes given as overloading may damage your machine.
¨
8.
When using ideas from other recipe books we recommend that you follow our proportions of flour, water
and yeast as a guide and add the other ingredients accordingly.
22
Page 24

Basic
Recipes
tsp=teaspoon Tbsp=tablespoon
White Bread
Medium Large
Surebake yeast
White flour
Sugar
Salt
Butter
Milk powder
Water
2 tsp
350
1 tsp
1 tsp
1 Tbsp
1 Tbsp
260 ml
Honey Bran Bread
Medium Large
Surebake yeast
White flour
Bran flakes
Honey
Butter
Milk powder
Salt
Water
2 tsp
350
4 Tbsp
1 Tbsp
1 Tbsp
1 Tbsp
1 tsp
260 ml
Kumara Bread
Medium Large
Surebake yeast
White flour
Mashed kumara
Honey
Butter
Milk powder
Salt
Water
2 tsp
350
1
/3 cup
1 Tbsp
1 Tbsp
1 Tbsp
1 tsp
250 ml
N
N
N
3 tsp
450
N
1 tsp
1 tsp
2 Tbsp
2 Tbsp
320 ml
3 tsp
450
N
5 Tbsp
1 Tbsp
2 Tbsp
2 Tbsp
1 tsp
320 ml
3 tsp
450
N
1
/2 cup
1 Tbsp
2 Tbsp
2 Tbsp
1 tsp
300 ml
Extra Large
3 tsp
600
N
2 tsp
1 tsp
2 Tbsp
3 Tbsp
400 ml
Extra Large
3 tsp
600
N
6 Tbsp
2 Tbsp
2 Tbsp
3 Tbsp
1 tsp
400 ml
Extra Large
3 tsp
600
N
2
/3 cup
1 Tbsp
2 Tbsp
3 Tbsp
1 tsp
380 ml
Chilli Corn Bread
Medium Large
Surebake yeast
White flour
Brown sugar
Olive oil
Milk powder
Polenta, cornmeal
Minced chilli
Salt
Corn kernels
Water
2 tsp
350
N
1 Tbsp
1 Tbsp
1 Tbsp
2 Tbsp
1
/2 tsp
1 tsp
1
/3 cup
260 ml
Spicy Cheese Bread
Medium Large
Surebake yeast
White flour
Sugar
Butter
Milk powder
Salt
Dry mustard
Worchester sauce
Fine grated cheese
Water
2 tsp
350
N
1 tsp
1 Tbsp
1 Tbsp
1 tsp
1 tsp
1 Tbsp
1
/2 cup
250 ml
3 tsp
450
N
1 Tbsp
1 Tbsp
2 Tbsp
4 Tbsp
1 tsp
1 tsp
1
/2 cup
320 ml
3 tsp
450
N
1 tsp
2 Tbsp
2 Tbsp
1 tsp
1 tsp
1 Tbsp
3
/4 cup
300 ml
Extra Large
3 tsp
600
N
2 Tbsp
2 Tbsp
3 Tbsp
6 Tbsp
1 tsp
1 tsp
1 cup
400 ml
Extra Large
3 tsp
600
N
2 tsp
2 Tbsp
3 Tbsp
1 tsp
2 tsp
2 Tbsp
1 cup
400 ml
Cornmeal Bread
Surebake yeast
White flour
Coarse cornmeal
or polenta
Golden syrup
Olive oil
Milk powder
Salt
Water
23
Medium Large
2 tsp
350
N
40
N
1 Tbsp
1 Tbsp
1 Tbsp
1 tsp
260 ml
3 tsp
450
N
50
N
1 Tbsp
2 Tbsp
2 Tbsp
1 tsp
320 ml
Extra Large
3 tsp
600
N
60
N
1 Tbsp
2 Tbsp
3 Tbsp
1 tsp
400 ml
Sesame Yoghurt Bread
Medium Large
Surebake yeast
White flour
Sugar
Butter
Milk powder
Salt
Sesame seeds
Plain yoghurt
Water
2 tsp
350
N
1 tsp
1 Tbsp
1 Tbsp
1 tsp
2 Tbsp
1
/2 cup
150 ml
3 tsp
450
N
1 tsp
2 Tbsp
2 Tbsp
1 tsp
3 Tbsp
3
/4 cup
150 ml
Extra Large
3 tsp
600
N
2 tsp
2 Tbsp
3 Tbsp
1 tsp
4 Tbsp
1 cup
250 ml
Page 25

Basic
tsp=teaspoon Tbsp=tablespoon
Coconut Bread
Surebake yeast
White flour
Shredded coconut
Sugar
Salt
Butter
Coconut milk
powder
Water
Medium Large
2 tsp
350
N
1
/2 cup
1 tsp
1 tsp
1 Tbsp
1 Tbsp
260 ml
3 tsp
400
N
1 cup
1 tsp
1 tsp
2 Tbsp
2 Tbsp
320 ml
Extra Large
3 tsp
550
N
11/2 cup
2 tsp
1 tsp
2 Tbsp
3 Tbsp
400 ml
Garlic Herb Bread
Surebake yeast
White flour
Sugar
Salt
Butter
Milk powder
Crushed garlic
Fresh herbs,
chopped
Water
Gluten free bread on Basic program
Use basic BAKE RAPID program (Size-XL, Crust-Dark) for this recipe.
Program Time 1 hr 55 min.
Yeasted Gluten Free Loaf (4 options)
(Plain, Fruit, Cheese or Grains/Seeded)
Ingredients:
430Ñ450ml/
Ñ
450
1
/3 cup
3
1 tsp
Dry Ingredients:
1 cup
1 cup
1 cup
1
/2 cup
1
/2 cup
2 Tbsp
1 Tbsp
1
Ñ
11/2 tsp
2 tsp
Options:
FruitÑ1 cup Dried fruits, 1 tsp Cinnamon,
Cheese
Grains
á Mix these into dry ingredients.
á 3 Tbsp milk powder can be added to any of these recipes.
N
Water (Plain/ Fruit/ Cheese Loaf)
N
480ml/
3 Tbsp Brown sugar
Ñ
1 cup Grated cheese,
(or/and
Ñ
3 Tbsp Mixture sunflower, poppy,
pepitas(green) sesame,
soy grit, course polenta(corn),
linseed meal (L.S.A.)
1
(Grains (Seeded) Loaf)
Oil (Canola/ Sunflower)
Medium eggs (60N)
White vinegar (not malt)
Brown rice flour
White rice flour
Arrowroot or Tapioca flour
Besan (chick pea) flour or Soya flour
White or Brown rice flour
Sugar
Xantan gum
Salt
Dry yeast (not rapid rise)
/2 cup Dried tomatoes )
Important Notes:
1. Do not leave gluten free bread in for keep warm.
Remove bread from Machine when baking is
complete.
Always assist kneading 5Ñ10 mins into kneading
2.
process. Lift lid (do not turn machine off), with
spatula mix to ensure all wet and dry ingredients
are combined, scrape down sides. Test dough
by lifting some on spatula. Dough should fall
slowly
rice flour. If too thick, add 1
(It should look like a thick cake mix or stiff mashed
potato).
3. Yeast responds to protein by adding cheese
and/ or milk powder, therefore the loaf will rise
more.
Flour fluctuates in refining therefore water content
4.
differs considerably. Very refined flour (e.g. rice
flour labeled rice starch) will not need as much
water as a more course flour (e.g. McKenzies).
you may need to cut water back 20
finer flour.
from spatula. If too thin add 2Ñ4 Tbsp of
Medium Large
2 tsp
350
N
1 tsp
1 tsp
1 Tbsp
1 Tbsp
1 tsp
2 Tbsp
260 ml
3 tsp
450
N
1 tsp
1 tsp
2 Tbsp
2 Tbsp
2 tsp
3 Tbsp
320 ml
Ñ
3 Tbsp of water.
Extra Large
3 tsp
600
2 tsp
1 tsp
2 Tbsp
3 Tbsp
2 tsp
3 Tbsp
400 ml
Ñ
30 ml for
N
24
Page 26

Basic RAISIN
tsp=teaspoon Tbsp=tablespoon
Use BAKE RAISIN for recipes below.
Ingredients in italics may be placed in the raisin nut dispenser.
This prevents the ingredients from being crushed and
also produces a better loaf.
Cinnamon Raisin Bread
Medium Large
Surebake yeast
White flour
Cinnamon
Sugar
Butter
Milk powder
Salt
Water
Raisins
2 tsp
350
N
2 tsp
1 tsp
1 Tbsp
1 Tbsp
1 tsp
260 ml
1
/2 cup
Pesto & Pinenut Bread
Medium Large
Surebake yeast
White flour
Sugar
Basil pesto
Oil
Milk powder
Salt
Water
Pinenuts
2 tsp
350
N
1 tsp
1 tsp
1 Tbsp
1 Tbsp
1 tsp
260 ml
1
/4 cup
3 tsp
450
N
3 tsp
1 tsp
2 Tbsp
2 Tbsp
1 tsp
320 ml
1 cup
3 tsp
450
N
1 tsp
2 tsp
1 Tbsp
2 Tbsp
1 tsp
320 ml
1
/3 cup
Extra Large
3 tsp
600
N
3 tsp
2 tsp
2 Tbsp
3 Tbsp
1 tsp
400 ml
1 cup
Extra Large
3 tsp
600
N
2 tsp
2 tsp
2 Tbsp
3 Tbsp
1 tsp
400 ml
1
/2 cup
Olive & Rosemary Bread
Medium Large
Surebake yeast
White flour
Sugar
Olive oil
Milk powder
Fresh rosemary,
chopped
Salt
Water
Pitted black olives,
quartered
2 tsp
350
N
1 tsp
1 Tbsp
1 Tbsp
1 Tbsp
1 tsp
260 ml
1
/3 cup
Honey & Walnut Bread
Medium Large
Surebake yeast
White flour
Honey
Butter
Milk powder
Salt
Water
Chopped walnuts
2 tsp
350
N
1 Tbsp
1 Tbsp
1 Tbsp
1 tsp
260 ml
1
/3 cup
3 tsp
450
N
1 tsp
2 Tbsp
2 Tbsp
1 Tbsp
1 tsp
320 ml
1
/2 cup
3 tsp
450
N
1 Tbsp
2 Tbsp
2 Tbsp
1 tsp
320 ml
1
/2 cup
Extra Large
3 tsp
600
N
2 tsp
2 Tbsp
3 Tbsp
2 Tbsp
1 tsp
400 ml
3
/4 cup
Extra Large
3 tsp
600
N
2 Tbsp
2 Tbsp
3 Tbsp
1 tsp
400 ml
1 cup
Whole Wheat
Wholemeal Rye Bread
Medium Large
Surebake yeast
Wholemeal flour
White flour
Rye flour
Treacle
Oil
Cocoa
Salt
Water
25
2 tsp
100
200
50
N
1 Tbsp
1 Tbsp
1 Tbsp
1 tsp
280 ml
N
N
3 tsp
100
N
250
N
100
N
1 Tbsp
2 Tbsp
2 Tbsp
1 tsp
340 ml
Extra Large
3 tsp
150
N
300
N
150
N
2 Tbsp
2 Tbsp
3 Tbsp
1 tsp
420 ml
100% Wholemeal Bread
Medium Large
Surebake yeast
Wholemeal flour
Gluten flour
Treacle
Milk powder
Butter
Salt
Water
2 tsp
350
N
1 Tbsp
1 Tbsp
1 Tbsp
1 Tbsp
1 tsp
280 ml
50% Wholemeal Bread
Medium Large
Surebake yeast
Wholemeal flour
White flour
Treacle
Milk powder
Butter
Salt
Water
2 tsp
175
N
175
N
1 Tbsp
1 Tbsp
1 Tbsp
1 tsp
280 ml
3 tsp
450
N
2 Tbsp
1 Tbsp
2 Tbsp
2 Tbsp
1 tsp
340 ml
3 tsp
225
N
225
N
1 Tbsp
2 Tbsp
2 Tbsp
1 tsp
340 ml
Extra Large
3 tsp
600
N
3 Tbsp
2 Tbsp
3 Tbsp
2 Tbsp
1 tsp
420 ml
Extra Large
3 tsp
300
N
300
N
2 Tbsp
3 Tbsp
2 Tbsp
1 tsp
420 ml
Page 27

Whole Wheat
tsp=teaspoon Tbsp=tablespoon
Soy & Linseed Bread
Medium Large
Surebake yeast
Wholemeal flour
White flour
Soy flour
Ground linseed
Sugar
Salt
Butter
Milk powder
Water
2 tsp
75
N
275
N
25
N
25
N
2 tsp
1 tsp
1
/2 Tbsp
1
1
/2 Tbsp
1
290 ml
3 tsp
100
N
300
N
50
N
50
N
2 tsp
1 tsp
2 Tbsp
2 Tbsp
360 ml
Extra Large
3 tsp
150
N
350
N
50
N
50
N
1 Tbsp
1 tsp
2 Tbsp
2 Tbsp
430 ml
Wholemeal Beer & Mustard Bread
Surebake yeast
Wholemeal flour
White flour
Brown sugar
Wholegrain mustard
Butter
Milk powder
Salt
Beer
Use BAKE RAISIN for recipes below.
Ingredients in italics may be placed in the raisin nut dispenser.
This prevents the ingredients from being crushed and
also produces a better loaf.
Wholemeal Raisin Bread
Medium Large
Surebake yeast
Wholemeal flour
White flour
Cinnamon
Treacle
Butter
Milk powder
Salt
Water
Raisins
2 tsp
175
N
175
N
2 tsp
1 Tbsp
1 Tbsp
1 Tbsp
1 tsp
280 ml
1
/2 cup
3 tsp
225
N
225
N
2 tsp
1 Tbsp
2 Tbsp
2 Tbsp
1 tsp
340 ml
1 cup
Extra Large
3 tsp
300
N
300
N
3 tsp
2 Tbsp
2 Tbsp
3 Tbsp
1 tsp
420 ml
1 cup
Wholemeal Date & Nut Bread
Surebake yeast
Wholemeal flour
White flour
Brown sugar
Butter
Milk powder
Salt
Chopped dates
Water
Chopped walnuts
Medium Large
2 tsp
175
N
175
N
1 Tbsp
1 Tbsp
1 Tbsp
1 Tbsp
1 tsp
280 ml
3 tsp
225
N
225
N
1 Tbsp
1 Tbsp
2 Tbsp
2 Tbsp
1 tsp
340 ml
Extra Large
3 tsp
300
N
300
N
2 Tbsp
2 Tbsp
2 Tbsp
3 Tbsp
1 tsp
420 ml
Whole Wheat RAISIN
tsp=teaspoon Tbsp=tablespoon
Medium Large
2 tsp
175
N
175
N
1 Tbsp
1 Tbsp
1 Tbsp
1 tsp
1
/4 cup
280 ml
1
/4 cup
3 tsp
225
N
225
N
1 Tbsp
2 Tbsp
2 Tbsp
1 tsp
1
/2 cup
340 ml
1
/2 cup
Extra Large
3 tsp
300
N
300
N
2 Tbsp
2 Tbsp
3 Tbsp
1 tsp
1
/2 cup
420 ml
1
/2 cup
Mixed Grain Bread
Medium Large
Surebake yeast
Wholemeal flour
White flour
Oatmeal
Buckwheat groats
Cornmeal
Brown sugar
Butter
Milk powder
Salt
Water
Whole linseed
Toasted sunflour
seed
2 tsp
80
N
250
40
N
40
N
20
N
1 Tbsp
1
/2 Tbsp
1
1
/2 Tbsp
1
1 tsp
300 ml
2 tsp
2 tsp
N
3 tsp
100
N
300
N
50
N
50
N
30
N
1 Tbsp
2 Tbsp
2 Tbsp
1 tsp
370 ml
1 Tbsp
1 Tbsp
Extra Large
3 tsp
150
N
350
N
50
N
50
N
30
N
1
/2 Tbsp
1
2 Tbsp
2 Tbsp
1 tsp
450 ml
11/2 Tbsp
1
1
/2
Tbsp
Banana Muesli Bread
Medium Large
Surebake yeast
Wholemeal flour
White flour
Toasted muesli
Honey
Butter
Milk powder
Salt
Water
Banana chips,
chopped
2 tsp
100
N
250
N
50
N
1
/2 Tbsp
1
/2 Tbsp
1
1
/2 Tbsp
1
1 tsp
280 ml
N
30
3 tsp
130
N
300
N
70
N
1 Tbsp
2 Tbsp
2 Tbsp
1 tsp
350 ml
N
40
Extra Large
3 tsp
150
N
350
N
100
N
1 Tbsp
2 Tbsp
2 Tbsp
1 tsp
420 ml
N
50
26
Page 28

French
tsp=teaspoon Tbsp=tablespoon
French Bread (one size only)
Surebake yeast
White flour
Butter
Salt
Water
2 tsp
450
N
1 tsp
1 tsp
320 ml
Italian
Italian Bread (one size only)
Surebake yeast
White flour
Salt
Olive oil
Water
2 tsp
450
N
1 tsp
2 Tbsp
280 ml
Tarragon & Thyme Bread (one size only)
Surebake yeast
White flour
Butter
Salt
Tarragon
Thyme
Water
2 tsp
450
N
1 tsp
1 tsp
2 tsp
2 tsp
320 ml
Herb Bread (one size only)
Surebake yeast
White flour
Salt
Olive oil
Basil
Water
2 tsp
450
N
1 tsp
2 Tbsp
1 Tbsp
280 ml
Sandwich
White Sandwich Bread (one size only)
Surebake yeast
White flour
Suger
Salt
Butter
Milk powder
Water
27
2 tsp
350
N
1 tsp
1 tsp
1 Tbsp
1 Tbsp
260 ml
Wholemeal Sandwich Bread (one size only)
Surebake yeast
Wholemeal flour
Gluten flour
Treacle
Salt
Butter
Milk powder
Water
2 tsp
350
N
1 Tbsp
1 Tbsp
1 tsp
1 Tbsp
1 Tbsp
280 ml
Page 29

Basic Dough
tsp=teaspoon Tbsp=tablespoon
Dinner Rolls
Ingredients:
3 tsp
450
N
11/2 tsp
1 tsp
3 Tbsp
4 Tbsp
250 ml
1
Method:
Make dough according to instructions on
1 P.9
Ñ
Divide the dough
2 into 12
portions. Roll each
portion into a ball.
Place on a greased
tray and leave to
rest for 20 minutes.
Surebake yeast
white flour
sugar
salt
milk powder
butter
water
egg, beaten
poppy or sesame seeds
10 and 13.
Ñ
16 equal
Starting with the
5 wide end, roll up
the wedge loosely
towards the narrower
end.
Place seam side
6 down on a
greased oven tray.
Prove at 30Ñ35¡C
7
for 30Ñ50 minutes
or until doubled in
size. If an oven for
proving is not availa-
ble, cover with plastic
wrap and leave to
rise in a warm place
of approximately this
temperature.
Roll one end of
3 the ball on a
lightly floured surface
to make a cone.
Roll each cone
4 into a wedge
shape, approximately
1
/2 cm thick, using a
rolling pin.
Brush rolls with
8 beaten egg and
sprinkle with poppy
or sesame seeds if
desired.
Bake in a
9 preheated 175¡C
oven for 10Ñ15
minutes or until
golden brown.
28
Page 30

Basic Dough
Croissants
Ingredients:
3 tsp
450
N
2 Tbsp
3 Tbsp
1 tsp
50
N
240 ml
250
N
1
surebake yeast
bread flour
sugar
milk powder
salt
butter
water
chilled butter extra
egg, beaten for brushing
on top
Method:
Make the dough according to instructions
1 on P.9
Ñ
10 and 13.
Roll 250Nof
2 chilled butter
between two sheets
of plastic wrap into a
17X25 cm rectangle.
Chill at least 1 hour.
tsp=teaspoon Tbsp=tablespoon
Fold the
6 remaining third
on top. Seal edges.
Rest the dough in
the refrigerator for
20 to 30 minutes.
Place the dough at
7 right angles to the
previous position in
#5. Roll out into
30 cm square. Fold
into thirds. Wrap and
place into refrigerator
for 20 to 30 minutes.
Roll and fold twice
more. Wrap and chill
after each folding. After
the final folding, chill
several hours or
overnight.
Spread the dough
8 for the final time
into 30 cm square.
Cut dough into 9 equal
squares. Cut each
square diagonally to
form two triangles.
Turn the dough into a greased bowl. Place in
3 the refrigerator for 30 minutes.
Roll out the
4 dough on a
lightly floured
surface into a
30cm square.
Place the rolled
5 out butter over
two-thirds of the
dough.
Fold the third
without butter over
the centre third.
29
Roll up each
9 triangle loosely,
starting from the
side opposite the
point. Curve ends.
Place seam
10 side down on
a greased baking
pan. Cover and place
in warm area for 30
50 minutes or until
almost doubled in
size.
Brush with beaten egg. Bake in a preheated
Ñ
11 200¡C oven for 15 to 20 minutes or until
golden brown.
Page 31

Basic Dough
tsp=teaspoon Tbsp=tablespoon
Doughnuts
Use Dinner Rolls dough recipe on page 28.
1
Divide the dough into equal portions.
2 Roll each portion into a ball.
Place on a lightly floured surface.
3 Cover with a plastic wrap and leave to
rise for 20 minutes.
Shape each ball as desired, in a ring, twisted,
4 or in an oval shape. Place on a greased tray.
Leave to rise at 30¡C for 30 minutes.
5
Deep fry the doughnuts until golden brown.
6
Roll in a mixture of sugar and cinnamon or
7 cool and use other toppings as desired.
Makes 12Ñ16 doughnuts dependent on size
8 and shape selected.
Bagels
Ingredients:
3 tsp
450
N
1 Tbsp
2 Tbsp
2 Tbsp
1 tsp
250 ml
1
Method:
Make dough according to instructions on
1 P.9
Ñ
Divide dough into 12Ñ16 equal portions.
Surebake yeast
white flour
sugar
butter or oil
milk powder
salt
water
egg, lightly beaten
poppy or sesame seeds
10 and 13.
2
Roll each portion into a log approximately 20 cm
3 long.
Form into a ring, sealing both ends together
4 tightly. Place on a lightly greased tray and cover
with glad wrap. Leave to rise at 30Ñ35¡C for 30
minutes.
Bring a large saucepan of water to the boil.
5 Using a slotted spoon place 3
the water at a time. Boil for 1 minute turning
once. Lift out and drain well.
Brush with the beaten egg and sprinkle over
Ñ
4 bagels into
6 seeds.
Bake at 200¡C for 20Ñ30 minutes.
7
30
Page 32

Basic Dough
tsp=teaspoon Tbsp=tablespoon
Swedish Tea Ring
Ingredients:
3 tsp
450
N
4 Tbsp
4 Tbsp
3 Tbsp
1 tsp
230 ml
Method:
Make dough according to instructions on
1 P.9
Ñ
Roll or pat the dough into a rectangle
Surebake yeast
white flour
sugar
butter
milk powder
salt
water
10 and 13.
2 (50 X 30 cm).
2 tsp
2 tsp
1
/2 cup
1
Brush over surface of the dough with melted
melted butter
cinnamon
brown sugar
egg, beaten
3 butter.
Fruit Braid
Use plain white dough as in Dinner Rolls on page
28 or sweet white dough as in Swedish Tea Ring
on the left.
After dough is completed, roll out into a
1 rectangle (50 X 30 cm).
Lift this rectangle onto a greased tray.
2 Lightly mark the rectangle in thirds.
Filling
1 cup
Glaze
1
Spread the filling down the centre third of the
fruit mincemeat
egg, beaten
3 rectangle of dough.
Cut the outer third into 2.5 cm diagonal strips.
6
Starting at the top end, cross left and right
7 strips over the filling overlapping at the centre.
Mix cinnamon and brown sugar and sprinkle
4 over butter.
Roll up like a swiss roll starting from the long
5 side.
Press edges firmly underneath.
6
Join ends to make a circle, pinch edges
7 together and place on a greased oven tray.
Cut nearly through to the centre of the ring at
8 2.5 cm intervals, turning each section so that it
faces cut side up.
Cover with plastic wrap and leave to rise in a
9 warm place (30
Brush with beaten egg.
Ñ
35¡C) for 30 minutes.
10
Bake in a preheated 180¡C oven for 15Ñ25
11 minutes or until golden brown.
Other fillings such as dried fruit, jam,
12 mincemeat, nuts etc can be used.
This tea ring can be iced with a vanilla icing if
13 desired.
Continue until all the filling is covered and all
8 the strips are in place.
Cover with plastic wrap and leave to rise in a
9 warm place (30
Brush with beaten egg.
Ñ
35¡C) for 30 minutes.
10
Bake in a preheated 180¡C oven for 15Ñ25
11 minutes or until golden brown.
31
Page 33

Basic Dough
tsp=teaspoon Tbsp=tablespoon
Light Wholemeal Rolls
Ingredients:
3 tsp
350
N
100
N
1 tsp
2 Tbsp
2 Tbsp
1 tsp
250 ml
1
Surebake yeast
white flour
wholemeal flour
sugar
butter
milk powder
salt
water
egg, beaten
poppy or sesame seeds
Method:
Make dough according to instructions on
1 P.9
Ñ
10 and 13.
Turn the dough out into a greased bowl.
2 Cover and let the dough rest for 20 minutes
in the refrigerator.
Divide the dough into 12Ñ16 equal portions.
3 Shape into rolls and place on a greased
baking tray. Cover and leave to rise in a warm
place (30Ñ35¡C) for 30 minutes or until doubled
in size.
Brush with beaten egg and sprinkle with
4 seeds.
Bake in a preheated 200¡C oven for 15
Ñ
5 25 minutes or until golden brown.
Savoury Pull Apart
Ingredients:
3 tsp
450
N
1 tsp
2 Tbsp
2 Tbsp
1 tsp
250 ml
Surebake yeast
white flour
sugar
butter
milk powder
salt
water
Method:
Make dough according to instructions on
1 P.9
Ñ
10 and 13.
Divide into 10 even sized pieces. Shape these
2 as you would for bread rolls and then squeeze
them into a lightly greased large loaf pan or round
cake tin.
Cover with a plastic wrap and leave to rise in a
3 warm place until well risen.
1
/4 cup
2
1 cup
When risen, sprinkle with the above.
fresh herbs, chopped spring
onions, sliced grated cheese
other savoury ingredients such
as ham, salami, sun dried
tomatoes, olives etc
4
Bake at 200¡C for approximately 25 minutes.
5 (This is dependent on the size and shape of
the tin used).
Serve as an accompaniment for soup or
6 other dishes.
32
Page 34

Basic Dough
tsp=teaspoon Tbsp=tablespoon
Brioche
Ingredients:
3 tsp
420
N
3 Tbsp
100
N
1 tsp
3
70 ml
1
Method:
Make dough according to instructions on
1 P.9
Ñ
Cover and let the dough rest in the refrigerator
2 in a greased bowl for 20
Use a lightly floured work surface and hands
Surebake yeast
white flour
sugar
butter
salt
eggs (size 6)
milk
egg, lightly beaten
10 and 13.
Ñ
30 minutes.
3 to shape brioche.
Divide into 12 equal portions. Make into balls.
4 Divide each ball into one large and one small
ball.
Place each large ball in a greased brioche or
5 muffin cup. With floured fingers, dimple the top
of each large ball. Place the small ball in each
indentation.
Cover and leave to rise in a warm place
6 (30
doubled in size.
7 preheated 200¡C oven for 10
until light golden brown.
Ñ
35¡C) for 30 minutes or until
Brush brioche with beaten egg. Bake in a
Ñ
15 minutes or
Focaccia
Ingredients:
2 tsp
450
N
1 tsp
1 Tbsp
1 Tbsp
1 tsp
300 ml
Method:
Make dough according to instructions on
1 P.9
Ñ
Roll the dough into a 1 large or 2 small
Surebake yeast
white flour
sugar
butter
milk powder
salt
water
10 and 13.
2 rectangles.
Dimple the top every 6cm by pressing your
3 finger well into the dough.
Place on a lightly greased tray, cover and leave
4 to rise in a warm place (30
2 Tbsp
1
/2 tsp
1 tsp
1 tsp
1 tsp
Combine the above and brush the surface of
olive oil
salt
dried basil
dried rosemary
dried thyme
Ñ
35¡C) for 30 minutes.
5 the dough.
Bake in a preheated 200¡C oven for 20Ñ25
6 minutes or until golden brown.
Variations
Add finely chopped bacon and onion to the
7 herbs and olive oil and spread over bread,
do not add salt.
33
Add bacon and onion to the dough ingredients.
8 Make dough and then top with the herb mixture.
Add olives and rosemary to the dough using
9 the raisin dough option and then top with the
oil and herb topping.
Page 35

Use DOUGH RAISIN for recipes below.
Ingredients in italics may be placed in the raisin nut dispenser.
This prevents the ingredients from being crushed and
also produces a better loaf.
Basic Dough
tsp=teaspoon Tbsp=tablespoon
Hot Cross Buns
Ingredients:
3 tsp
450
N
3 Tbsp
6 Tbsp
2 Tbsp
1
/2 tsp
3 tsp
1 Tbsp
1
200 ml
3
/4 cup
Surebake yeast
white flour
brown sugar
butter
milk powder
salt
allspice
orange rind
egg
water
sultanas
Method:
Make dough according to instructions on
1 P.9
2 plastic wrap and leave to rise for 20
minutes.
Ñ
10 and 13.
Place dough in a greased bowl. Cover with a
Ñ
30
Shape into 10 or 12 buns depending on the
3 size required.
Cover and leave to rise in a warm place
4 (30
size.
Ñ
35¡C) for 30 minutes or until doubled in
Put on crosses.
5
Crosses
1
/2 cup
2 Tbsp
Mix flour and oil, then add water to make a stiff
paste. Pipe into the shape of crosses Ñ if a
piping bag is not available, use a small plastic
bag with a corner cut off.
flour
oil
water to mix
Olive & Rosemary Rolls
Ingredients: (Makes 2)
3 tsp
450
N
1 tsp
1 Tbsp
2 Tbsp
1 Tbsp
1 tsp
260 ml
50
N
1
Surebake yeast
white flour
sugar
olive oil
milk powder
fresh rosemary, chopped
salt
water
pitted black olives, quartered
egg, lightly beaten
poppy or sesame seeds
Method:
Make dough according to instructions on
1 P.9
Ñ
10 and 13.
Turn the dough out into a greased bowl.
2 Cover and let the dough rest for 20 minutes
in the refrigerator.
Divide the dough into 12Ñ16 equal portions
3 or into 2 long loaves and place on a greased
baking tray. Cover and leave to rise in a warm
place (30Ñ35¡C) for 30 minutes or until doubled in
size.
Brush with beaten egg and sprinkle with seeds.
4
Bake in a preheated 200¡C oven for 15Ñ25
5 minutes or until golden brown.
Bake in a preheated 200¡C oven for 15Ñ25
6 minutes or until golden brown. Brush over the
glaze.
Glaze
3 Tbsp
3 Tbsp
Boil together until syrupy Ñ brush over cooked
buns when they are removed from the oven.
milk
castor sugar
34
Page 36

Basic Dough
tsp=teaspoon Tbsp=tablespoon
Use BAKE RAISIN for recipes below.
Ingredients in italics may be placed in
the raisin nut dispenser.
This prevents the ingredients from being crushed
and also produces a better loaf.
Boston Bun
Ingredients:
3 tsp
450
N
2 tsp
4 Tbsp
3 Tbsp
1 tsp
260 ml
3
/4 cup
Surebake yeast
white flour
sugar
butter
milk powder
salt
water
sultanas
Method:
Make dough according to instructions on
1 P.9
2 plastic wrap and leave to rise for 20
minutes.
Ñ
10 and 13.
Place dough in a greased bowl. Cover with a
Ñ
30
Shape the dough into a large round, place on
3 a lightly greased oven tray and leave to rise at
30Ñ35¡C until doubled in size.
Bake in a preheated 200¡C oven for 15Ñ25
4 minutes or until golden brown.
Cool on a cooling rack and then ice with pink
5 icing and sprinkle with coconut.
Sundried Tomato & Basil Rolls
Ingredients:
3 tsp
450
N
1 tsp
1 tsp
1 Tbsp
2 Tbsp
2 Tbsp
250 ml
1
/4 cup
Surebake yeast
flour
salt
sugar
olive oil
freshly chopped basil
grated parmesan cheese
water
chopped sundried tomatoes
Method:
Make dough according to instructions on
1 P.9
Ñ
10 and 13.
Turn the dough out into a greased bowl.
2 Cover and let the dough rest for 20 minutes.
Divide into 12 equal portions. Shape into rolls
3 and place on a greased baking tray. Cover
and leave to rise in a warm place (30Ñ35¡C) for
30 minutes or until doubled in size.
Bake in a pre-heated 200¡C oven for 15Ñ20
4 minutes or until goldenbrown.
Panettone (Italian Christmas Bread)
Ingredients:
35
3 tsp
450
N
1 tsp
3 Tbsp
3 Tbsp
50
N
1
1
/2 tsp
1
/2 Tbsp
220 ml
1
/4 cup
1
/4 cup
2 Tbsp
Surebake yeast
white flour
salt
sugar
milk powder
butter
egg
crushed aniseed
grated rind lemon
water
sultanas
mixed peel
pinenuts or chopped almonds
Method:
Make dough according to instructions on
1 P.9
Ñ
10 and 13.
Grease a souffl dish or a round cake tin with
2 the height of the sides extended using a collar
of baking paper.
Place dough in container cover and allow to
3 rise until almost doubled in size.
Brush with melted butter and bake at 190¡C
4 for 30
Ñ
45 minutes.
Page 37

Whole Wheat Dough
tsp=teaspoon Tbsp=tablespoon
Crusty Wholemeal Rolls
Ingredients:
3 tsp
450
N
2 Tbsp
3 Tbsp
3 Tbsp
1 Tbsp
2 Tbsp
2 Tbsp
1 tsp
300 ml
1
Surebake yeast
wholemeal flour
gluten flour
kibbled wheat
sesame seeds
treacle
butter
milk powder
salt
water
egg, lightly beaten
poppy seeds
Method:
Make dough according to instructions on
1 P.9
Ñ
10 and 13.
Turn the dough out into a greased bowl.
2 Cover and let the dough rest for 20 minutes in
the refrigerator.
Divide the dough into 12Ñ16 equal portions.
3 Shape into rolls and place on a greased
baking tray. Cover and leave to rise in a warm
place (30Ñ35¡C) for 30Ñ50 minutes or until
doubled in size.
Brush the tops with beaten egg, then
4 sprinkle with seeds.
Bake in a preheated 200¡C oven for 20Ñ30
5 minutes or until golden brown.
Malted Oatbran Rolls
Ingredients:
3 tsp
450
N
2 Tbsp
1
/4 cup
2 Tbsp
2 Tbsp
2 Tbsp
2 tsp
300 ml
1
Surebake yeast
wholemeal flour
gluten flour
oatbran
Maltexo
butter
milk powder
salt
water
egg, lightly beaten
poppy or sesame seeds
Method:
Make dough according to instructions on
1 P.9
Ñ
10 and 13.
Turn the dough out into a greased bowl.
2 Cover and let the dough rest for 20 minutes in
the refrigerator.
Divide the dough into 12Ñ16 equal portions.
3 Shape into rolls and place on a greased baking
tray. Cover and leave to rise in a warm place
(30Ñ35¡C) for 30Ñ50 minutes or until doubled in
size.
Brush the tops with beaten egg, then sprinkle
4 with seeds.
Bake in a preheated 200¡C oven for 20Ñ30
5 minutes or until golden brown.
36
Page 38

Whole Wheat Dough
tsp=teaspoon Tbsp=tablespoon
Sunflower & Kibblewheat Rolls
Ingredients:
3 tsp
225
N
225
N
1
/4 cup
1
/4 cup
1 tsp
2 Tbsp
2 Tbsp
1 tsp
300 ml
1
Surebake yeast
white flour
wholemeal flour
sunflower seeds
kibbled wheat
sugar
butter
milk powder
salt
water
egg, lightly beaten
Method:
Make dough according to instructions on
1 P.9
Ñ
10 and 13.
Divide the dough into 12Ñ16 equal portions.
2 Shape into smooth balls and place on a lightly
greased baking tray. Cover and leave to rise in a
warm place (30Ñ35¡C) for 60 minutes or until
doubled in size.
Brush the tops with beaten egg, then sprinkle
3 with seeds.
Bake in a preheated 200¼C oven for 20Ñ30
4 minutes or until golden brown.
Multigrain Buns with a Filling
Ingredients:
3 tsp
165
N
285
N
1 Tbsp
2 Tbsp
2 Tbsp
1 tsp
1
/3 cup
1
/3 cup
330 ml
1 Tbsp
or
1 tsp
Surebake yeast
white flour
wholemeal flour
honey
butter
milk powder
salt
bran flakes
All Bran
water
small raisins per bun
raspberry jam per bun
Method:
Make dough according to instructions on
1 P.9
Ñ
10 and 13.
Divide the dough into 12Ñ16 equal portions.
2 Wrap raisins or jam in each portion of dough.
Shape into a smooth ball.
3
Place on a greased baking tray. Cover and
4 leave to rise in a warm place (30
60 minutes or until doubled in size.
Ñ
35¡C) for
37
Bake in a preheated 200¡C oven for 20Ñ30
5 minutes or until golden brown.
Page 39

Use DOUGH RAISIN for recipes below.
Ingredients in italics may be placed in the raisin nut dispenser.
This prevents the ingredients from being crushed and
also produces a better loaf.
Whole Wheat Dough
tsp=teaspoon Tbsp=tablespoon
Pumpkin & Walnut Wholemeal Rolls
Ingredients:
3 tsp
255
N
255
N
1 Tbsp
2 Tbsp
2 Tbsp
1 tsp
1
/2 cup
250 ml
1
/2 cup
Surebake yeast
white flour
wholemeal flour
brown sugar
oil
milk powder
salt
mashed cooked pumpkin
water
chopped walnuts
Method:
Make dough according to instructions on
1 P.9
Ñ
10 and 13.
Turn the dough out into a greased bowl. Cover
2 and let the dough rest for 20 minutes.
Divide into 12 equal portions. Shape into rolls
3 and place on a greased baking tray. Cover
and leave to rise in a warm place (30Ñ35¡C) for 30
minutes or until doubled in size.
Bake in a pre-heated 200¡C oven for 15Ñ20
4 minutes or until golden brown.
Wholemeal Raisin Rolls
Ingredients:
3 tsp
225
N
225
N
3 Tbsp
4 Tbsp
2 Tbsp
1 tsp
2 tsp
1
/2 cup
*100 ml
2 Tbsp
1 Tbsp
1
/4 cup
Surebake yeast
white flour
wholemeal flour
brown sugar
butter
milk powder
salt
allspice
grated orange rind
2 eggs + water*
raisins, small
sugar (to sprinkle over top)
sliced almonds for garnishing
*Break 2 eggs into the provided 240 ml
measuring cupÑfill to the top with water.
Method:
Make dough according to instructions on
1 P.9
Ñ
10 and 13.
Divide the dough into 16 equal portions.
2 Shape each portion into a roll.
Place on a greased baking tray, cover and
3 leave to rise at 30
Ñ
35¡C for 60 minutes.
Brush rolls with egg, sprinkle with sugar and
4 sliced almonds.
Bake at 200¡C for 20Ñ30 minutes.
5
38
Page 40

French Dough
Pizza Dough
tsp=teaspoon Tbsp=tablespoon
French Loaf or Baguettes
Ingredients:
2 tsp
450
N
1 tsp
1 tsp
250 ml
2 Tbsp
1
/2 tsp
Method:
Make dough according to instructions on
1 P.9
Ñ
Place the dough in a greased bowl, cover and
Surebake yeast
white flour
butter
salt
water
water
salt
10 and 13.
2 let rest for 15 minutes.
Shape dough into one oval loaf or divide
3 and roll into long rolls (baguettes).
Place on baking tray, cover and let rise for
4 about 1 hour or until doubled in size.
Brush loaves with salt and water, slash
5 diagonally along the top.
Bake in 220¡C oven for 15Ñ20 minutes.
6
Pizza
Ingredients:
3 tsp
450
N
1 tsp
5 Tbsp
1 tsp
230 ml
Method:
Make dough according to instructions on
1 P.9
Ñ
Place the dough in a greased bowl, cover
Surebake yeast
white flour
sugar
oil
salt
water
10 and 13.
2 and leave to rest.
Shape dough into two large or four smaller
3 pizza bases.
Leave at room temperature for 10 minutes.
4
Top the bases with your choice of toppings.
5
Bake in a pre-heated 220¡C oven for about
6 15
Ñ
20minutes or until golden brown.
39
Page 41

Pizza Dough
tsp=teaspoon Tbsp=tablespoon
Pumpkin calzone
Ingredients:
Use the Pizza Dough on P.39.
Filling
2 cups
1 small
2 Tbsp
4 large
1 tsp
1
/2 tsp
or
1 Tbsp
1
/2 cup
Method:
Saut onion and pumpkin in oil. Add cumin
finely diced pumpkin cubes
(cooked until tender)
red onion finely chopped
oil-from sundried capsicums/
tomatoes
sundried capsicums/tomatoes
cumin
coriander
fresh coriander
grated parmesan cheese
salt and pepper
1and coriander then roughly chopped sundried
capsicum or tomatoes and cheese.
Season to taste and leave to cool.
Divide dough into eight balls and roll out into
2 circles.
Pita Bread
Ingredients:
2 tsp
340
N
1
/2 tsp
1
/2 tsp
220 ml
Method:
Make dough according to instructions on
1 P.9
Ñ
Use lightly floured work surface and hands to
Surebake yeast
white flour
sugar
salt
water
10 and 13.
2 shape pita breads.
Divide the dough into 8 equal portions. Make
3 into flat oval shapes, approximately 0.5 cm thick.
Place on a greased tray, cover and leave to
4 rise for 30
Lightly grease heavy pan, fry each pita until it
Ñ
50 minutes.
5 puffs-turn, cook until golden brown.
Split and fill with your choice of hot or cold
6 fillings.
Pita Crisps
An alternative to potato or corn chips
Place pumpkin mixture on half of dough, wet
3 edges of dough then fold over other half to
enclose filling. Seal edges.
Brush with oil and leave for 5Ñ10 minutes.
4
Place in oven 220¡C for 15Ñ20 minutes.
5
Ingredients:
Use the same ingredients as Pita Bread.
Method:
Split pita breads, cut into triangles 6cm x 4cm.
1
Brush with oil and bake in a pre-heated 120¡C
2 oven for 20
Serve with salsa or guacamole.
Ñ
30 minutes until crisp.
3
Garlic Pita Triangles
Ingredients:
Use the same ingredients as Pita Bread.
Method:
Spread the inside of whole split pita breads
1 with garlic or herb butter.
Heat in a preheated 180¡C oven until butter
2 melts.
Cut in quarters and serve as an accompaniment
3 to soups or pasta dishes.
40
Page 42

Bake Only
tsp=teaspoon Tbsp=tablespoon
Date Loaf (Edmonds)
Ingredients:
1 cup
1 cup
1 tsp
1 Tbsp
1 cup
1
1
/2 tsp
1 cup
250
N
1 tsp
Method:
Remove kneading blade from bread pan and
dates, chopped
boiling water
baking soda
butter
brown sugar
egg
vanilla essence
walnuts, chopped
flour
baking powder
1 line the bottom with baking paper, cut to allow
shaft to protrude.
Cover dates with boiling water. Add baking
2 soda and butter, stir and then leave to soak
for one hour.
Stir in brown sugar, egg, vanilla and walnuts.
3
Add sifted flour and baking powder, stir until
4 well mixed.
Pour the loaf mixture into the pan.
5
Set into the and select BAKE
¨
6 ONLY by pressing the select pad.
Press Timer and set for one hour.
7
Earl Grey Tea Bread
Ingredients:
1 cup
1 cup
1 cup
200
N
Method:
Soak sultanas and brown sugar in cold Earl
sultanas
cold Earl Grey tea
brown sugar
self raising flour
1 Grey tea for several hours, preferably overnight.
Add self raising flour, stir until well mixed.
2
Remove kneading blade from bread pan and
3 line the bottom with baking paper, cut to allow
shaft to protrude.
Place mixture into the breadpan.
4
Set into the and select BAKE
¨
5 ONLY by pressing the select pad.
Press Timer and set for 50 minutes.
6
When the beep sounds on completion, test the
7 centre with a skewer. If additional baking is
required select BAKE ONLY program again and
press Timer to set a further 5 minutes.
Remove the bread pan and leave to stand for
8 5 minutes before removing loaf.
When the beep sounds on completion, test the
8 center with a skewer. If additional baking is
required select BAKE ONLY program again and
press Timer to set a further 5 minutes.
Remove the bread pan and leave to stand for
9 5 minutes before removing loaf.
41
Page 43

Bake Only
tsp=teaspoon Tbsp=tablespoon
Banana Yoghurt Tea Bread
Ingredients:
200
N
2 tsp
1
/2 tsp
1
/2 cup
50
N
2
1
/4 cup
2
Method:
Remove kneading blade from bread pan and
flour
baking powder
baking soda
brown sugar
butter, melted
eggs
plain yoghurt
bananas, mashed
1 line the bottom with baking paper, cut to allow
shaft to protrude.
Sift flour, baking powder and baking soda.
2 Add brown sugar.
In a separate bowl mix together eggs, yoghurt
3 and mashed banana.
Add the liquid ingredients and the cooled
4 melted butter to the dry ingredients. Stir quickly
and lightly.
Place mixture into the breadpan.
5
Set into the and select BAKE
¨
6 ONLY by pressing the select pad.
Press Timer and set for 50 minutes.
7
Gingerbread
Ingredients:
75
N
100
N
2 Tbsp
2 Tbsp
225
N
2 tsp
11/2 tsp
1
/2 tsp
1
/2 tsp
150 ml
1
Method:
Remove kneading blade from bread pan and
butter
sugar
treacle
golden syrup
flour
ground ginger
baking powder
baking soda
salt
milk
egg, beaten
1 line the bottom with baking paper, cut to allow
shaft to protrude.
Warm butter, sugar, treacle and syrup together
2 until just melted.
Sift dry ingredients and add together with milk
3 and beaten egg.
Beat thoroughly with a wooden spoon.
4
Place mixture into the breadpan.
5
Set into the and select BAKE
¨
6 ONLY by pressing the select pad.
When the beep sounds on completion, test the
8 centre with a skewer. If additional baking is
required select BAKE ONLY program again and
press Timer to set a further 5 minutes.
Remove the bread pan and leave to stand for
9 5 minutes before removing loaf.
Press Timer and set for 50 minutes.
7
When the beep sounds on completion, test the
8 centre with a skewer. If additional baking is
required select BAKE ONLY program again and
press Timer to set a further 5 minutes.
Remove the bread pan and leave to stand for
9 5 minutes before removing loaf.
42
Page 44

Troubleshooting
BAKING RESULTS:
Please check the following:
Unplugged.
Ingredient spilled on heater element.
Power interruption (display ).
Start/Stop pad was pressed after starting.
Top lid was open during operation.
Selection was wrong (DOUGH option was chosen).
Bread left in bread pan too long after baking.
Bread sliced just after baking (Steam was not
allowed to escape).
Water added after kneading flour.
OPERATIONAL ERRORS
Kneading blade not installed properly in pan.
0:00
Neither the
indicating
light nor
the display
light up.
Smoke
emitted
from steam
vent.
Burning
smell.
Sides of
bread
collapse
and bottom
is damp.
Bread
rises
too
much.
Not enough
Flour
Too much
Not enough
Yeast
Water
MEASUREMENT ERRORS
Ingredients used other than prescribed.
Flour
INGREDIENT PROBLEMS
Yeast
Temperature of water was either too hot or too cold.
(Not within optimum temperature range of 20 ± 5ûC.)
No sweetening agents
Old flour used.
Wrong type of flour used.
Yeast not placed in pan first, or liquids
touched yeast before kneading.
Old yeast used.
Wrong type of yeast used.
Too much
No yeast
Not enough
Too much
43
Page 45

Collapsed
after
over-rising.
Bread
doesn't
rise
enough.
Top of
bread
floured.
Unleavened or not leavened enough
Under-
browned
and sticky.
Browned and
floured sides,
center sticky
and raw.
Sides
brown but
flour coated
bottom.
Not baked
partially /
completely
Slices
unevenly
and is
sticky.
44
Page 46

Display Indications for Abnormal Conditions
Condition
TEMP
appears
on
display.
POWER ALERT
is on
display.
is on
display.
Not baked at all, although
the operation appears to
have proceeded.
Reason/Cause
The unit is hot (above 40ûC/105ûF).
This may occur during repetitive use.
You must allow the unit to cool down
before reusing.
There has been a 10-minute or
less power cut. (The power plug
has been inadvertently pulled out or
the breaker has activated.)
Or there has been a slight change in
the power supplied to the machine.
There has been a power cut for a
certain period of time. (The length of
time may differ according to the
circumstances.) (Possible causes:
power failure, unplugging of the power
cord, or a malfunctioning of household
fuse or breaker).
Motor protection device has activated.
This only happens when the unit is
overloaded and an excessive force
is applied to the motor.
After about 30 minutes, the motor
automatically starts running again.
How to reset/restart
Leave the unit as it is.
When the unit has cooled to below 40ûC/105ûF,
TEMP
will disappear from the display window
and the flashing red operation light will go out.
This indicates that the unit is now ready to use.
If the interruption in the power supply is
momentary, the operation will not be affected.
If the power is restored within 10 minutes,
the bread maker will operate again.
However, the bread may not turn out well.
Remove the dough and start again using all
new ingredients.
Check to see if the kneader mounting shaft can
rotate.
Yes
Make sure you did not use
too much or too hard/heavy
ingredients, then start again
using all new ingredients.
No
Service will
be required.
Motor protection device
If the unit is overloaded and an excessive force is applied to the motor, the protection device will
stop the motor. After approximately 30 minutes, the motor will automatically start running again. It is
recommended to restart with fresh ingredients.
Remedy 1
Remedy 2
45
If the kneading blade is restricted by hard dough, take out the dough. The
unit will restart 30 minutes later.
Check to see if the kneader mounting shaft of the bread pan can rotate.
If it can rotate, restart the bread maker after 30 minutes. If it cannot rotate,
service will be required.
Page 47

Leakage of Bread Ingredients from the Bread Pan
With extended use, a small quantity of ingredients may leak out from the outlet of the bread pan. This is
normal. The bread pan is designed so that the ingredients in the kneader mounting shaft unit may be
discharged to prevent rotation stoppage.
When the kneader mounting shaft does not rotate, it is necessary to replace the kneader mounting shaft
unit with a new one.
Kneader mounting shaft
Outlet
Kneader mounting shaft unit
(Part No. ADA 29A115)
Replacement Parts
Consult your authorised Panasonic Service Centre for servicing or for purchase of replacement parts.
Specifications
Power supply
Power consumed
Capacity
Timer
Protective device
Dimensions (HXWXD)
Weight
Accessories
Measuring cup, measuring spoon
230V AC 50 Hz
550 W
max. 600Nflour
min. 350Nflour
Digital timer (up to 13 hours)
Self-resetting motor protector
approx. 37.0 X 34.0X 26.0 cm
approx. 7.5O.
46
Page 48

Matsushita Electric Industrial Co., Ltd.
Web Site: http://www.panasonic.co.jp/global/
DZ50N142
0702T1112 Printed in PRC
 Loading...