

Page 1
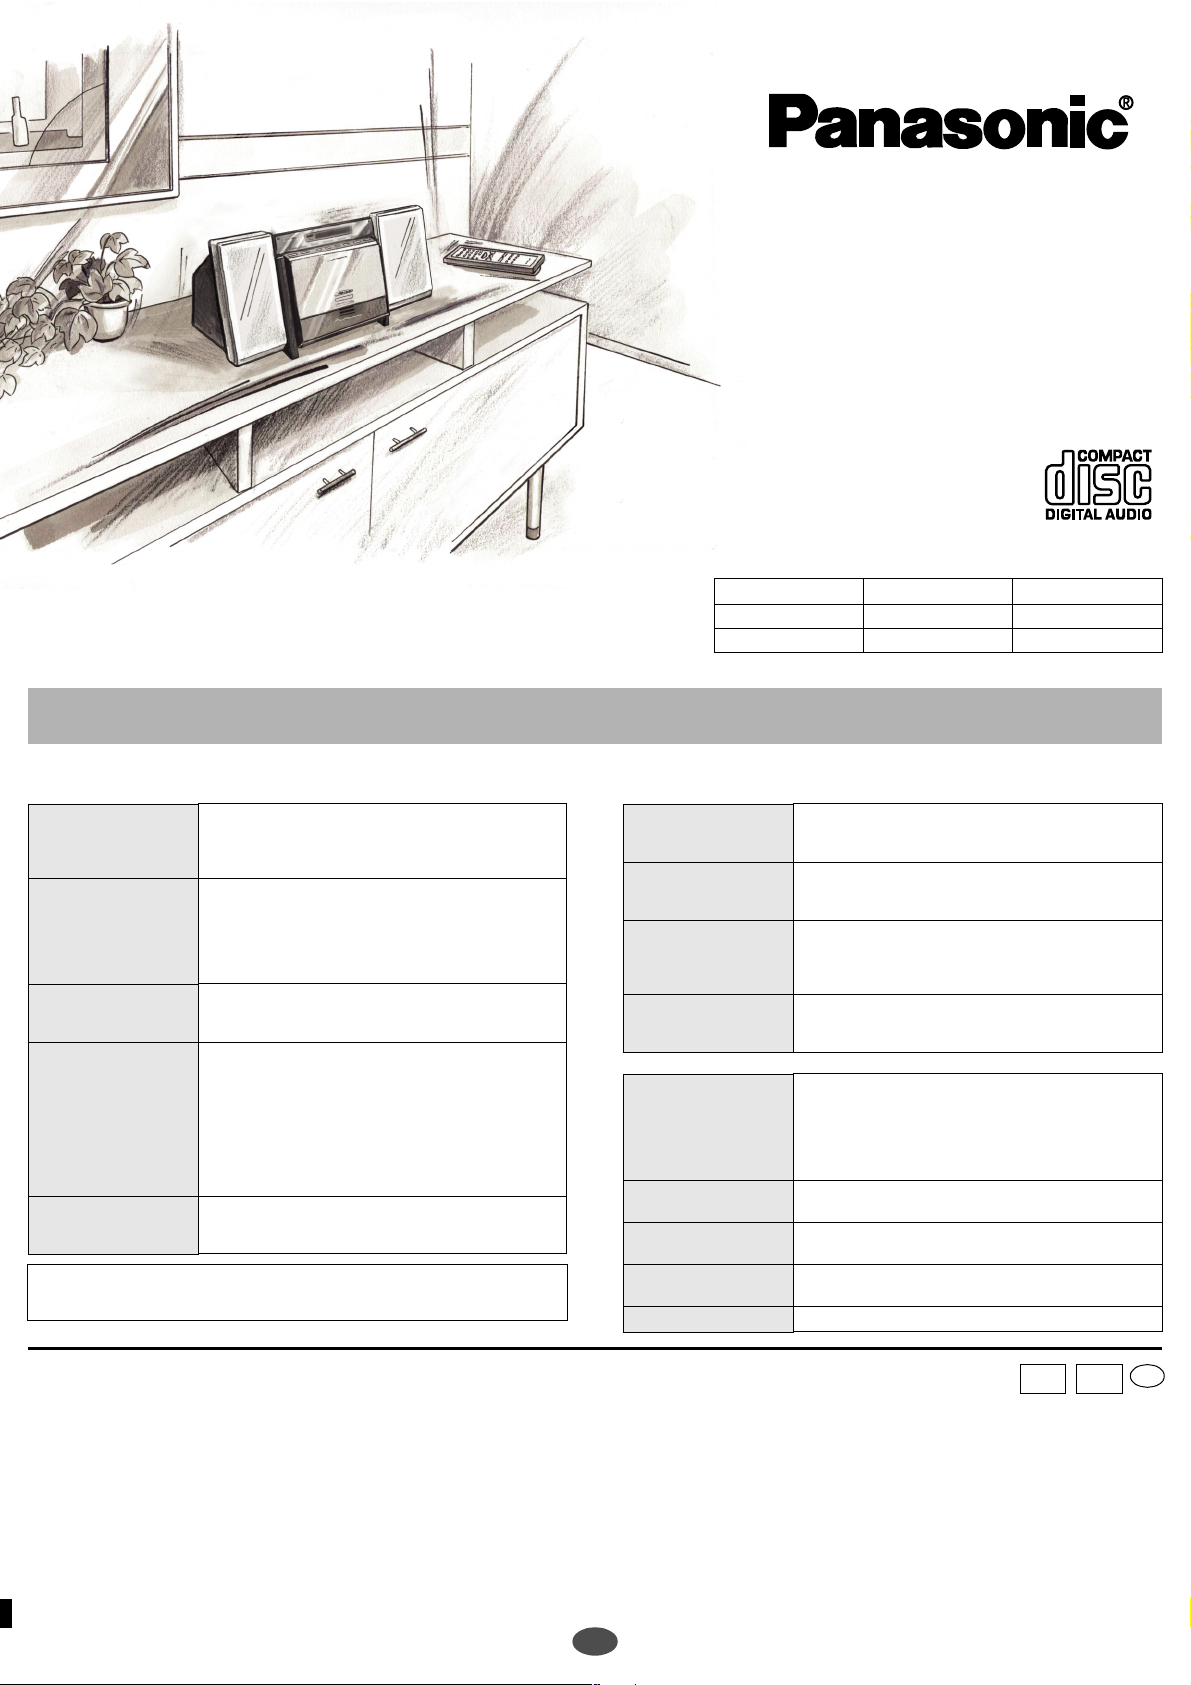
Operating Instructions
CD Stereo System
Model No. SC-EN17
SC-EN15
These instructions are applicable to the following systems.
Dear Customer
Thank you for purchasing this product.
Before connecting, operating or adjusting this product, please read these
instructions completely.
Please keep this manual for future reference.
System SC-EN17 SC-EN15
Main unit SA-EN17 SA-EN15
Speakers SB-EN17 SB-EN15
SC-EN17 is used in the illustrations unless otherwise mentioned.
Troubleshooting guide
Before requesting service, make the following checks. If you are in doubt about any of the check points, or if the solutions indicated in the chart do not solve the problem,
refer to the "Customer Services Directory" on page 8 if you reside in the U.S.A., or refer to the "Product information" on page 7 if you reside in Canada.
In other areas, consult your dealer.
• The disc isn’t correctly set.
No play.
MP3 cannot be read
(SC-EN17).
Sound is unfixed,
reversed or comes
from one speaker only.
No sound or there is a
lot of noise.
Humming heard during
play.
This product may receive radio interference caused by mobile telephones during use.
If such interference is apparent, please increase separation between the product and
the mobile telephone.
• The disc is scratched or dirty. (Tracks skipped.)
• There is moisture on the lens. Wait for about an hour
and then try again.
• You may not be able to play MP3 if you have copied a
multi-session disc that has no data between sessions.
• When creating a multi session disc, it is necessar y to
close the session.
• The amount of data on the disc is too small. Set the
amount of data to greater than approximately 5MB.
• Check the speaker connections. (→ page 2)
• Noise may occur when playing MP3 if recording quality
is poor (SC-EN17).
• Keep this unit away from mobile telephones.
• Turn the volume up.
• Switch the unit off, deter mine and correct the cause,
then switch the unit on. Causes include shorting of the
positive and negative speaker wires, straining of the
speakers through excessive volume or power, and
using the unit in a hot environment.
• An AC power supply cord or fluorescent light is near the
cords. Keep other appliances and cords away from this
unit’s cords.
A beat sound is heard
while receiving a radio
broadcast.
A low hum or noise is
heard during AM
broadcasts.
The picture on the
television near the set
disappears or stripes
appear on the screen.
Remote control
doesn’t work.
• Switch the TV off or separate it from the unit.
• Keep the antenna away from other cables and cords.
• Keep the AM antenna away from the unit.
• The location and orientation of the antenna are
incorrect.
• The TV antenna wire is too close to the unit. Separate
the antenna wire of the TV set from the unit.
• Check that the batteries are inser ted correctly. (→ page
2)
• Replace the batteries if they are worn.
Display
• You plugged the AC power supply cord in for the first
– –:– –
PGM FULL
NOT MP3
ERROR
F76 • There is a power supply problem. Consult the dealer.
time or there was a power failure recently. Set the time.
(→ page 5)
• The total programmed play time is more than 200
minutes.
Tracks can still be programmed and played.
• The number of programmed tracks is limited to 24. No
further tracks can be programmed.
• A CD-ROM disc that is not CD-DA or MP3 format is inserted.
It cannot be played.
• Incorrect operation performed. Read the instructions
and try again.
Panasonic Consumer Electronics
Company, Division of Panasonic
Corporation of North America
One Panasonic Way Secaucus,
New Jersey 07094
http://www.panasonic.com
© 2004 Matsushita Electric Industrial Co., Ltd.
Printed in China
Panasonic Sales Company,
Division of Matsushita Electric of
Puerto Rico, Inc. (“PSC”)
Ave. 65 de Infantería, Km. 9.5
San Gabriel Industrial Park, Carolina,
Puerto Rico 00985
1
Panasonic Canada Inc.
5770 Ambler Drive
Mississauga, Ontario
L4W 2T3
www.panasonic.ca
P PC
En
RQT7890-P
M1104SM0
Page 2
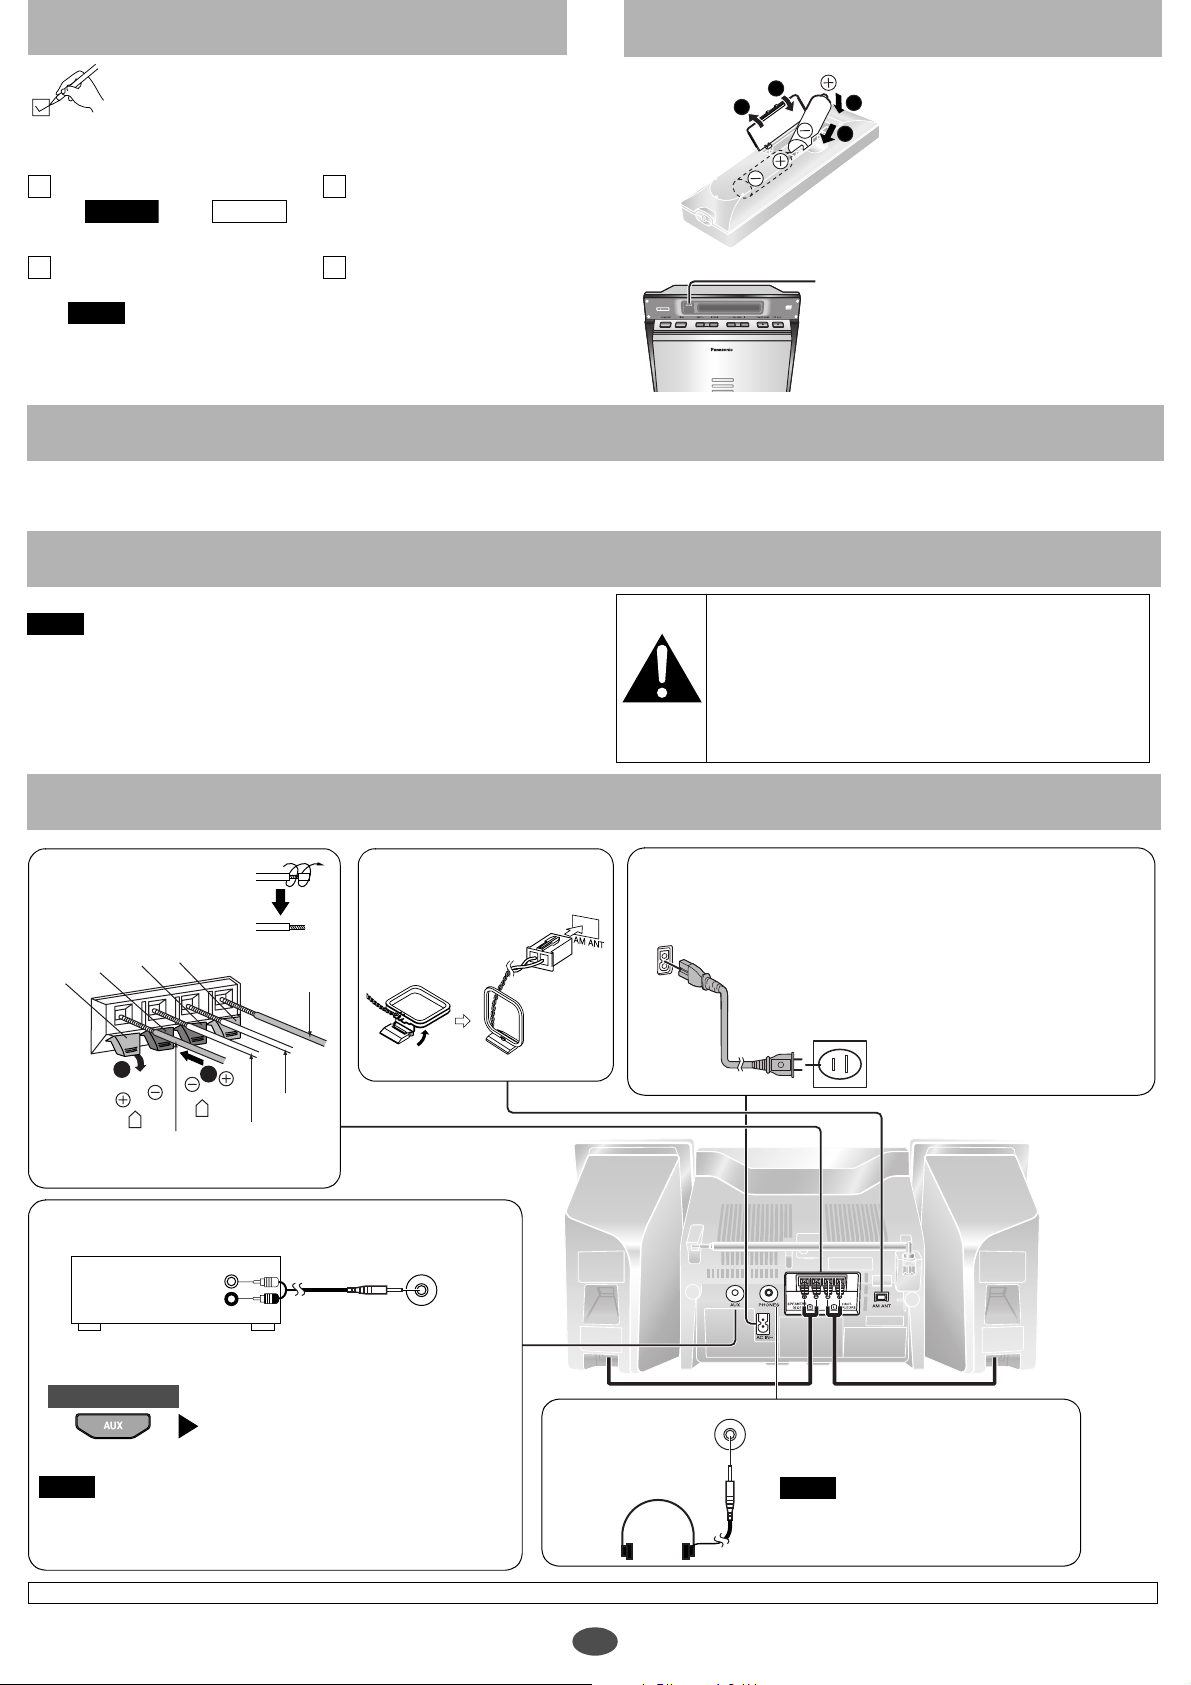
Supplied accessories
g
The remote control
Use the numbers indicated in parentheses when asking for
replacement parts.
In U.S.A. to order accessories, refer to "Accessory Purchases" on page
8.
1 Remote control
SC-EN17 SC-EN15
(EUR7711170) (EUR7711180)
1 AC power supply cord
(RJA0065-1D)
Note
The included AC power supply cord is for use with this unit only. Do not
use it with other equipment.
2 Batteries
1 AM loop antenna
(G0ZZ00002036)
Batteries
g Use
Maintenance
To clean this unit, wipe with a soft, dry cloth.
• Never use alcohol, paint thinner or benzine to clean this unit.
• Before using chemically treated cloth, read the instructions that came with the cloth carefully.
Placement of speakers
You can remove the speaker cover.
Note
• Keep your speakers at least 10 mm (13/32") away from the system for proper ventilation.
• These speakers do not have magnetic shielding. Do not place them near
televisions, personal computers or other devices easily influenced by
magnetism.
• To avoid damage to the speakers, do not touch the speaker cones if you
have taken the covers off.
4
1
3
2
(R6, AA)
Remote control signal sensor
• Aim at the sensor, avoiding obstacles, at a
maximum range of 7 m directly in front of the
unit.
• Operation can be affected by strong light
sources, such as direct sunlight, and the
glass doors on cabinets.
• Insert so the poles (+ and –)
match those in the remote
control.
• Do not use rechargeable type
batteries.
Caution
• Use the speakers only with the recommended system.
Failure to do so may lead to damage to the amplifier
and/or the speakers, and may result in the risk of fire.
Consult a qualified service person if damage has
occurred or if you experience a sudden change in
performance.
• Do not attach these speakers to walls or ceilings.
Connections
1 Speakers
Before connecting, twist off
the tip.
Red
Black
Black
Red
1
R
Copper (+)
L
Copper (+)
2
Silver (–)
Silver (–)
Other equipment
(Cords and equipment not included.)
OUT
(L)
(R)
Tape deck, etc.
Use
Remote control
Start Playback from the other
Select “AUX”
Note
• An analog player with a built-in phono equalizer can be
connected.
• For details, refer to the instruction manual of the other equipment.
source.
2 AM loop antenna
Stand the antenna up on its base.
AUX
Plug type:
3.5 mm (
1
/8″ ) stereo
3
AC power supply cord
Connect the AC power supply
cord only after all other
connections have been made.
Headphones
(Not included)
Household AC
outlet (AC 120
V/ 60 Hz)
PHONES
Conserving power
The unit consumes 3.4 W even when
it is turned off with [POWER
save power when the unit is not to be
used for a long time, unplug it from the
household AC outlet.
If the unit is left unplugged for longer
than approximately two weeks, all
settings will revert to the factory
settings. Remember to reset the radio
stations and any other memory items
before using the unit again.
Reduce the volume before connection.
Plug type: 3.5 mm (
Note
Avoid listening for prolonged periods of
time to prevent hearing damage.
1
/8″ ) stereo
8
]. To
The socket outlet shall be installed near the equipment and easily accessible or the mains plug or an appliance coupler shall remain readily operable.
2
Page 3
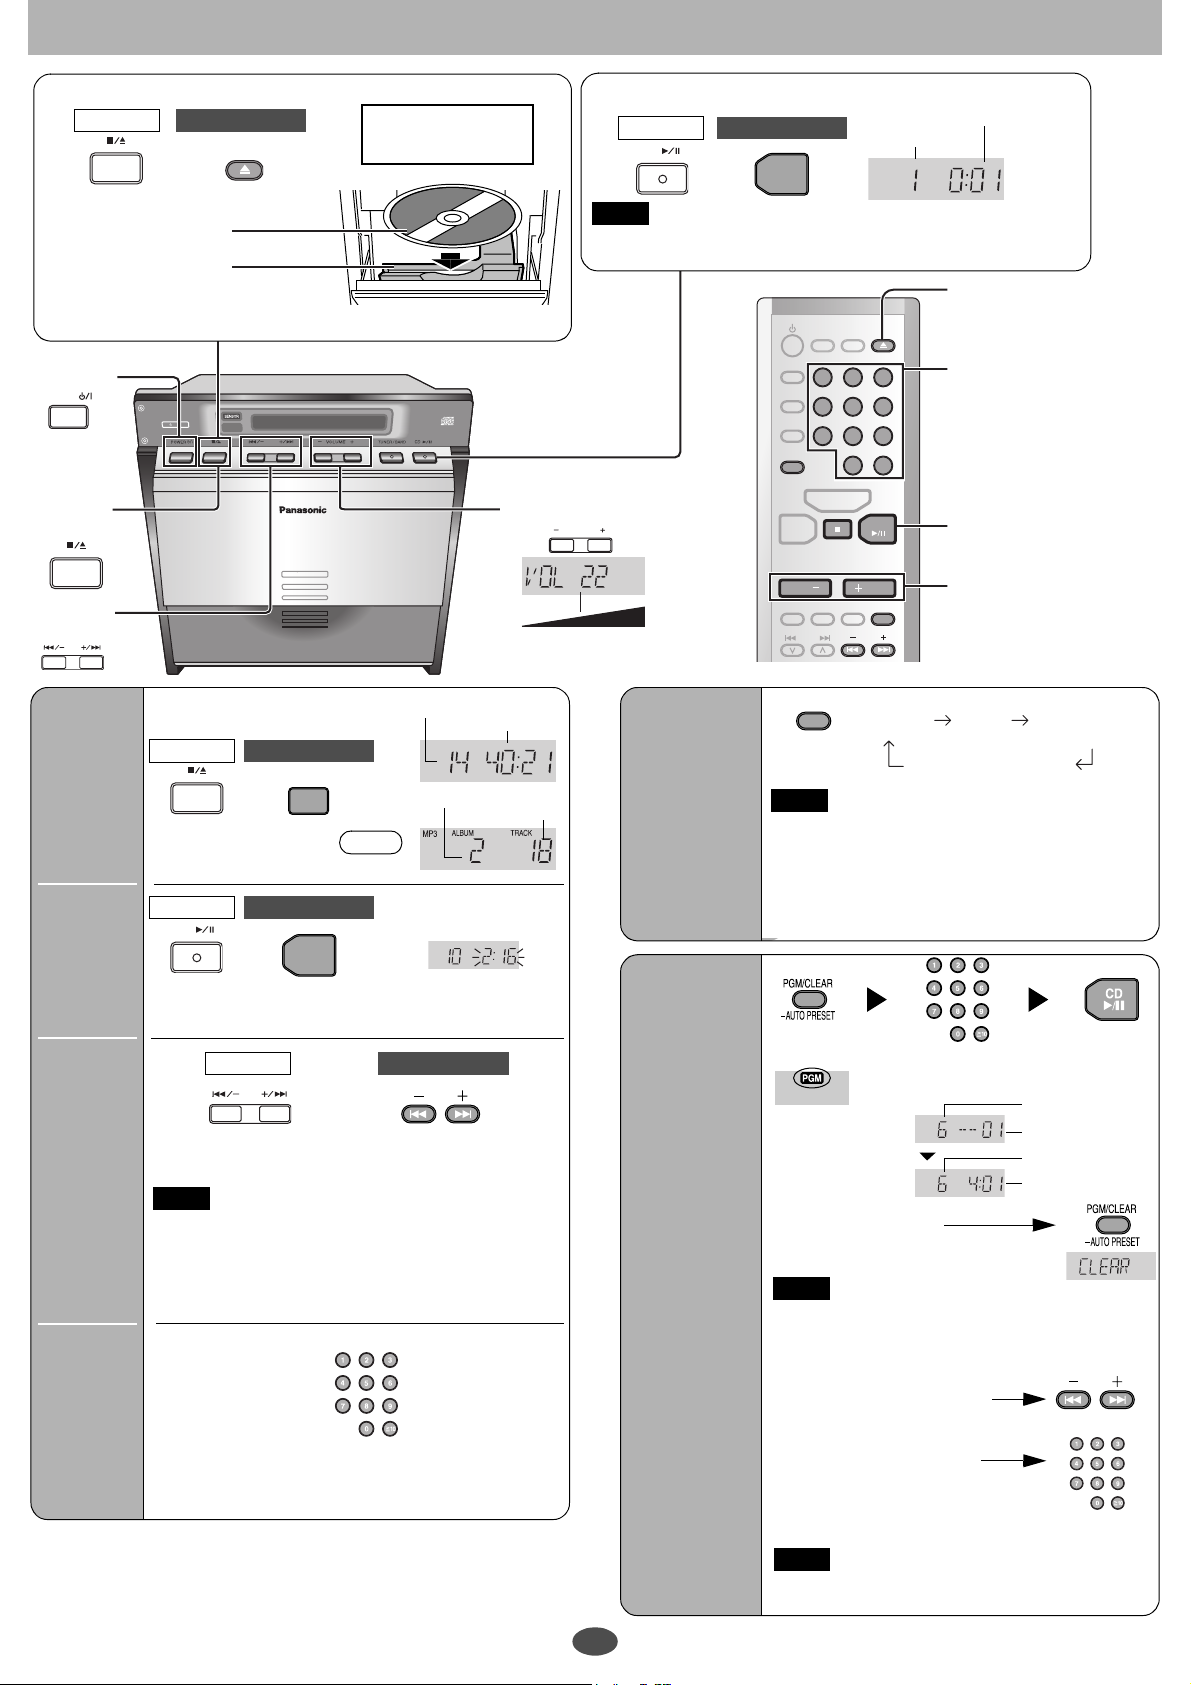
CD operations
=
>=>
=
1 Insert the CD.
Main unit
The unit comes on and the CD lid opens.
Label must face outward.
Put the CD in the pocket.
Press [;] again to close.
Keep fingers away from the CD lid when it is closing to avoid
possible minor injury.
To turn on
the unit
POWER
To s t o p
play
To skip/
search
Remote control
OPEN/
CLOSE
You cannot use
an 8 cm (3
") disc.
2 Start play.
If the CD is already in the unit, the unit comes on and play begins.
(One touch play)
To adjust the volume
VOLUME
0
(Minimum)
Note
CD
50
(Maximum)
Remote controlMain unit
CD
q/h
Elapsed playing time of track
Track number
1
OPEN/
DISPLAY
LIGHT
CLOSE
SLEEP
CLOCK/
TIMER ADJ
TIMER
SET/CHECK
PGM/CLEAR
-
AUTO PRESET
TUNER/
BAND
VOL
EXTRA
D.BASS
ALBUM
123
4
5
8
7
>
0
=
AUX
CD
VOL
SOUNDEQLIVE
VIRTUALIZER
PLAY
MODE
6
9
10
Input using the
numbered buttons
To select a 2-digit number
e.g. 16: [ 10] → [1] → [6]
To select 3-digit number
e.g. 226:
[ 10] → [ 10]
→ [2] → [2] → [6]
>
2
To adjust the volume
Stop
Pause
Skip/
Search
Direct
access
play
Play starts
with the track
you select.
Number of tracks
Total play time
Main unit
Remote control
g
Number of albums
Number of tracks
MP3
(SC-EN17)
Main unit
CD
Remote control
CD
q/h
Press again to resume play.
Main unit Remote control
Press to skip/
Press and hold to search
Note
• You can search during play or while paused.
• You cannot search through MP3 files (SC-EN17).
• You can only search within the current track during
program play, one track repeat, and random play.
Select the desired track
Repeat play/
random play
1-&:
One track
repeat
& : All track
repeat
RND: Random
play
Program
play
This function
allows you to
program up to
24 tracks.
PLAY MODE
Select the
play mode
• Each time you press the button:
1-&
& RND
(While stopped)
No display (Canceled)
Note
• During random play, you cannot skip to the previous
track.
• You cannot select “RND” while playing MP3 (SCEN17).
• You cannot use random play and program play at
the same time.
Press while
stopped
Select tracks
Start play
(Maximum 24 tracks)
Track number
Sequence number
Track number
(CD only)
Total play time
• Erase a program
(While stopped)
Note
Program contents are stored in the unit’s memory
even after changing to a different function or turning
the unit off. All program contents are erased by
pressing [PGM/CLEAR] or by opening the CD lid.
• Confirm a programmed
(While stopped)
track
• Add a program track
(While stopped)
Refer to page 6 regarding MP3 play (SC-EN17 only).
Select the track
Note
you want to add
• You cannot use random play and program play at
the same time.
3
Page 4
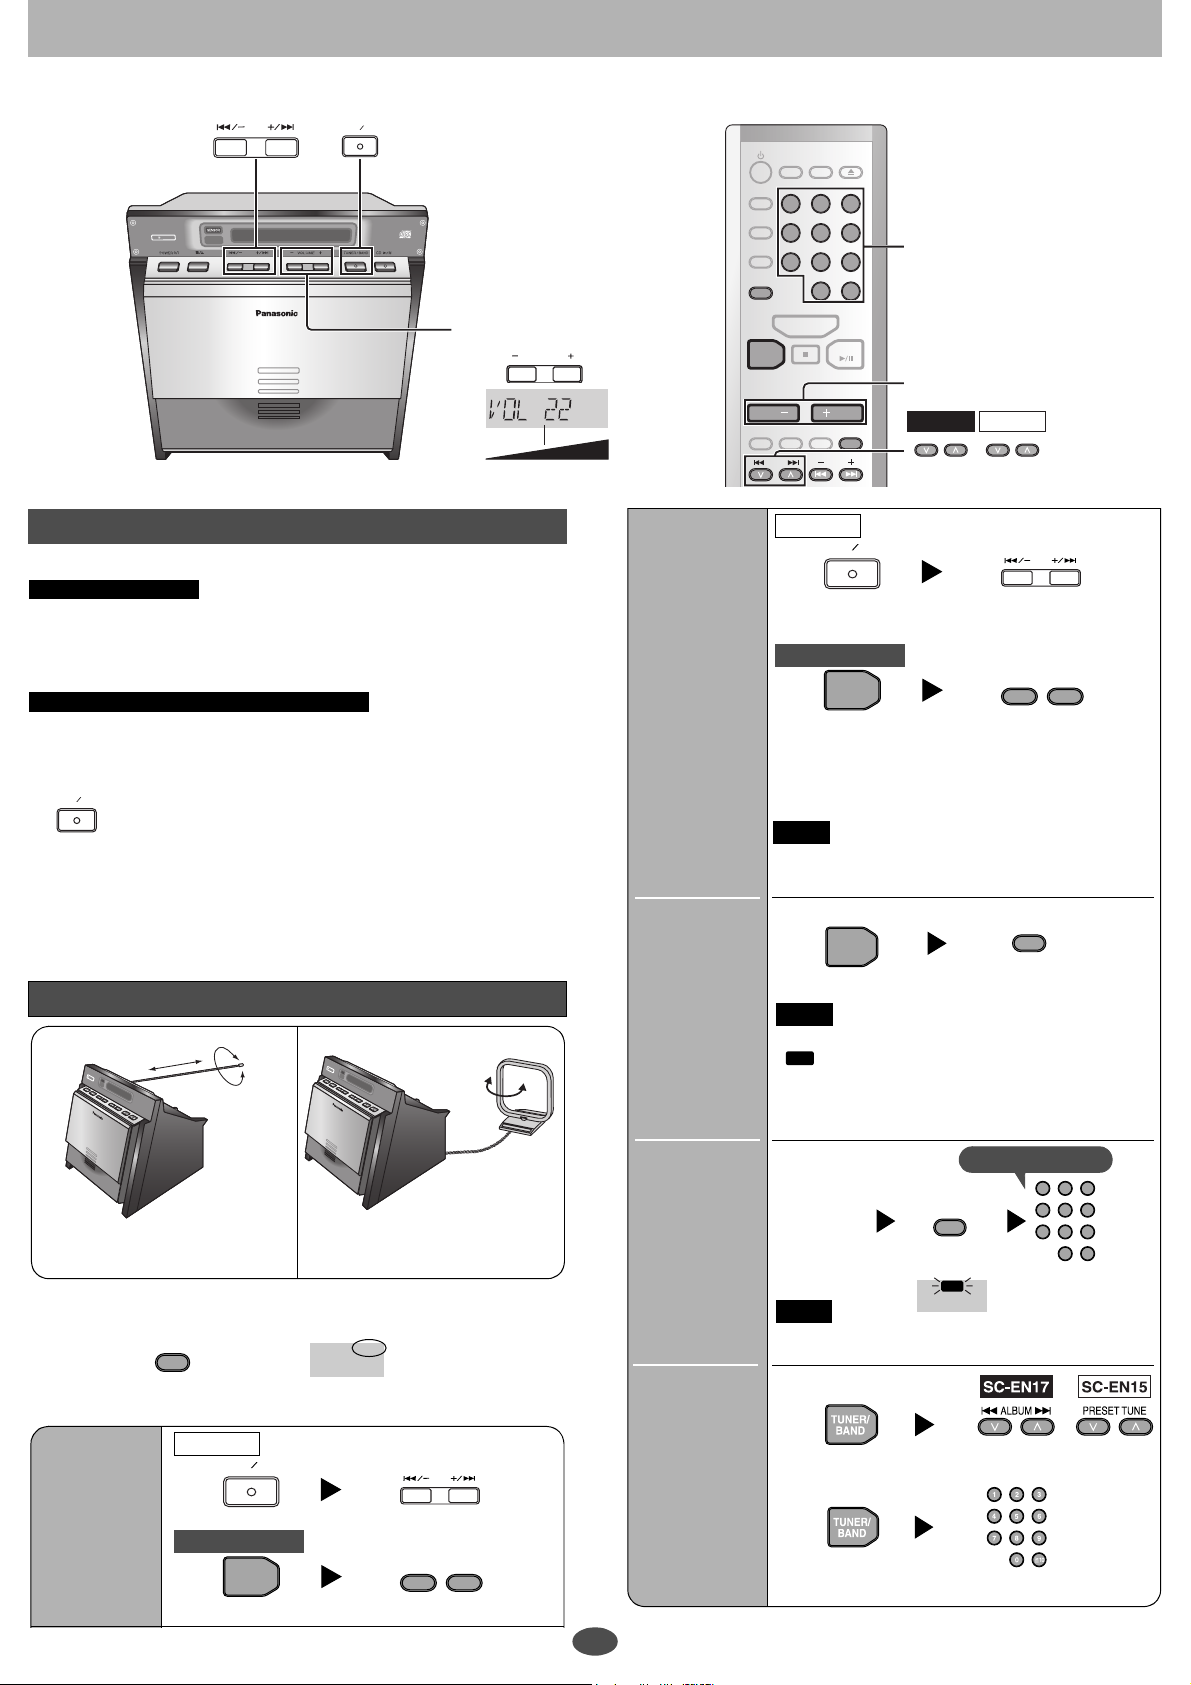
Radio operations
=
Radio stations can be tuned manually by selecting the station’s frequency or they can be preset into channels to make it easy to tune.
You can preset up to 20 FM channels and up to 12 AM channels.
TUNER BAND
OPEN/
DISPLAY
CLOSE
LIGHT
SLEEP
123
CLOCK/
TIMER ADJ
To adjust the volume
VOLUME
0
(Minimum)
50
(Maximum)
TIMER
SET/CHECK
PGM/CLEAR
-
AUTO PRESET
TUNER/
BAND
VOL
EXTRA
D.BASS
ALBUM
4
SOUNDEQLIVE
7
AUX
5
8
0
VOL
VIRTUALIZER
6
9
>
=
CD
PLAY
MODE
Input using the numbered
buttons
10
To select a 2-digit number
e.g. 11: [ 10] → [1] → [1]
To adjust the volume
u
ALBUM
i
>
SC-EN15SC-EN17
PRESET TUNE
Allocation settings
Each country allocates broadcast bands according to their particular system.
For U.S.A. and Canada
You can change the FM step. The step is factory-set to 0.2 MHz, but you can
change it to receive broadcasts allocated 0.1-MHz steps.
Any FM frequencies preset in channels will be changed by this procedure.
Preset them again.
For units with PX printed on the outer packaging
You can change the AM step. The step is factory-set to 10 kHz, but you can
change it to receive broadcasts allocated 9-kHz steps.
Any AM frequencies preset in channels will be changed by this procedure.
Preset them again.
TUNER BAND
1. Select the opposite band from the one you are going to change
with [TUNER/BAND].
2. Press and hold [TUNER/BAND] on the unit.
After a few seconds the display changes to show the current minimum
frequency. Continue to hold the button down. The minimum frequency
changes and the step is changed.
To return to the original step, repeat the above steps.
To improve reception
FM AM
Auto
tuning
Automatic
presetting
The tuner
presets all the
stations it can
receive into
channels in
ascending order.
Main unit
TUNER
BAND
Select“FM” or “AM”
Press and hold until the
frequency starts changing
Remote control
TUNER/
BAND
Select “FM” or “AM”
rapidly
4
3
ui
Press and hold until the
frequency starts changing
rapidly
• Auto tuning stops when it finds a station.
• To cancel auto tuning press the same button again.
Note
• Auto tuning may not function when there is
excessive interference.
Perform once for FM stations and once for AM stations.
TUNER/
BAND
Select “FM” or “AM”
PGM/CLEAR
-
AUTO PRESET
Press and hold until
“AUTO” appears
Note
During automatic presetting, the memory indicator
( ) flashes and the frequency scrolls. The
PGM
memory indicator and channel numbers are
displayed for a second when a station is preset.
The first station to be preset is displayed when
presetting finishes.
Extend the whip antenna and
adjust its direction.
Change the direction and location
of the AM loop antenna.
If noise is excessive in FM
You can improve FM reception by switching reception to monaural.
PLAY MODE
Press to turn the MONO
mode ON/OFF
Manual
tuning
Main unit
TUNER
BAND
Select“FM” or “AM”
Remote control
TUNER/
BAND
Select “FM” or “AM”
MONO
Select the frequency
3
ui
Select the frequency
Within 10 seconds
Manual
presetting
Preset the
stations one at a
time.
Tune to
the signal
you want
to set as
the preset.
PGM/CLEAR
-
AUTO PRESET
Enter preset mode
PGM
123
4
6
5
8
9
7
>
10
0
=
Select a channel
Note
The station occupying a channel is erased if another
station is preset over that channel.
Selecting
channels
Select “FM” or “AM”
4
Select “FM” or “AM”
Select a channel
Select a channel
4
Page 5
Timers and others
OPEN/
DISPLAY
CLOSE
123
4
7
AUX
6
5
8
9
>
10
0
=
CD
SLEEP
CLOCK/
TIMER ADJ
TIMER
SET/CHECK
PGM/CLEAR
-
AUTO PRESET
TUNER/
BAND
LIGHT
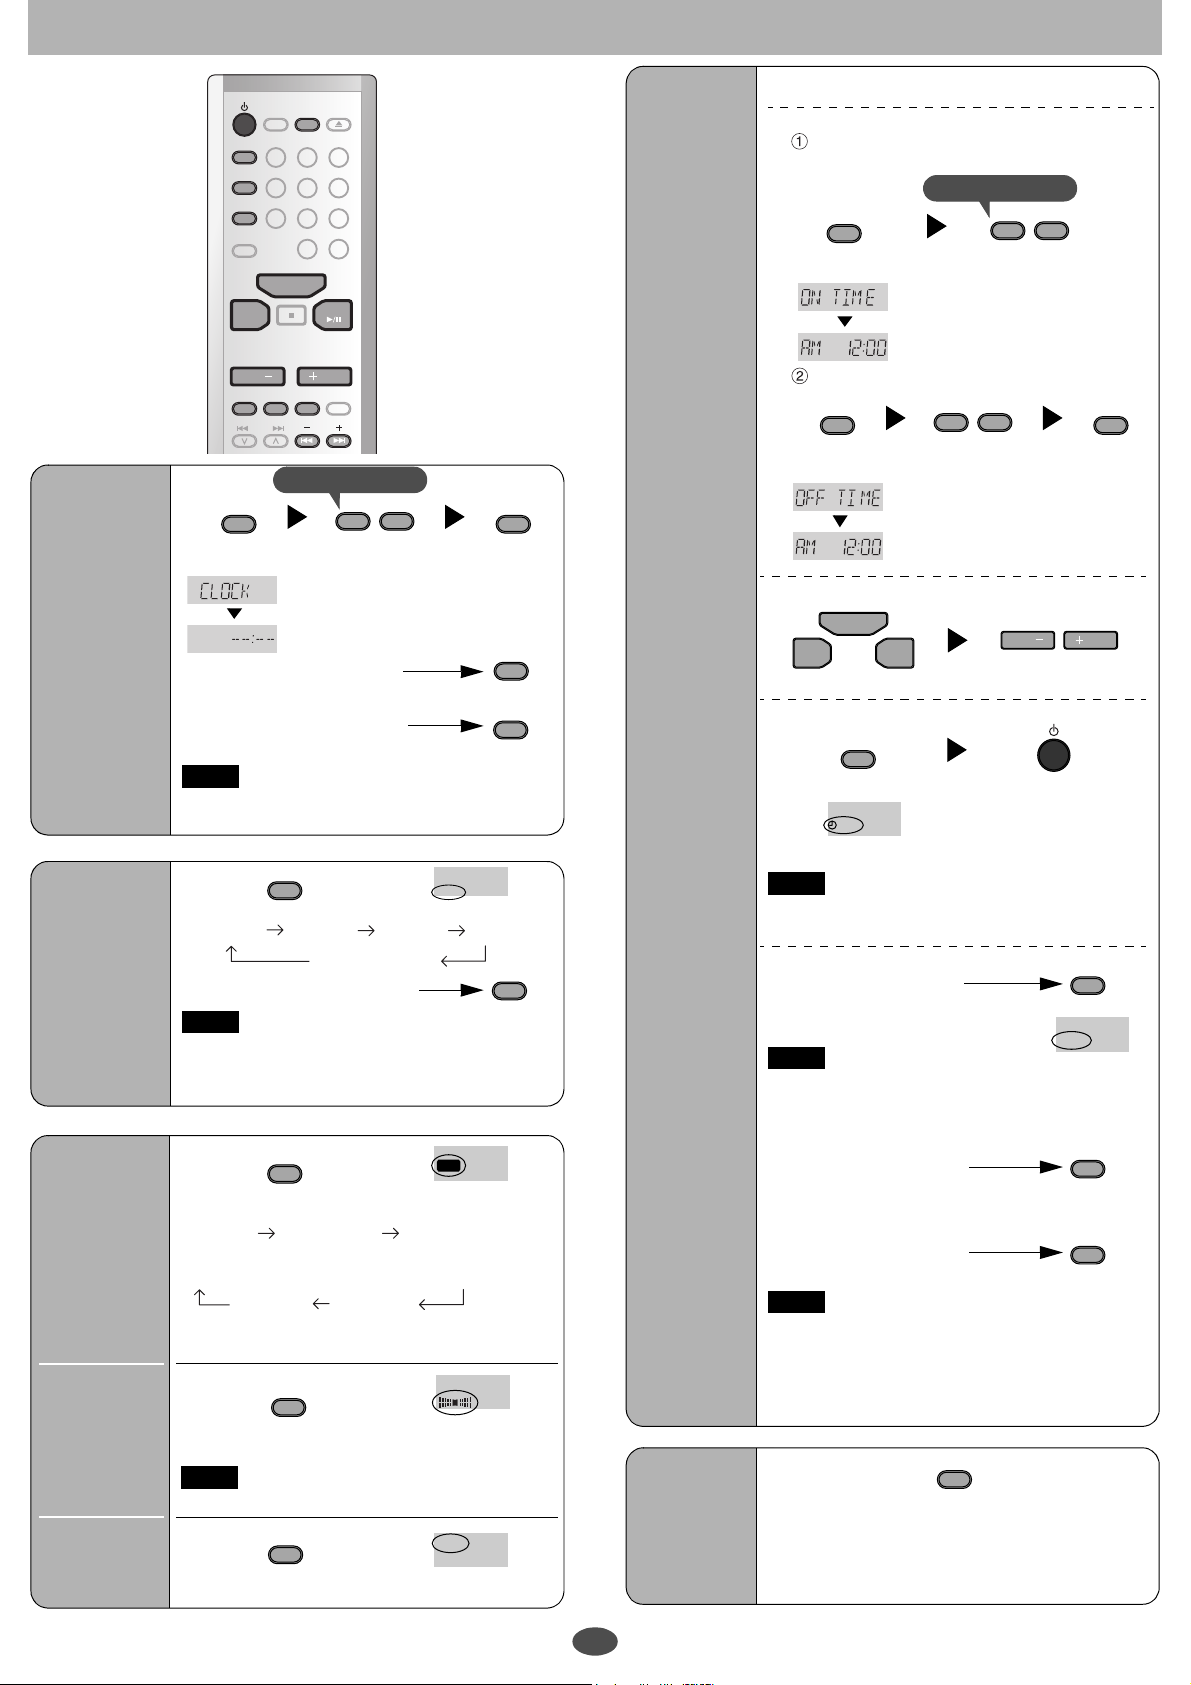
Play timer
This timer starts
play of the
selected source
at the selected
time.
Preparation: Set the clock (see left).
1 Perform timer settings
Set the start time
While the time is displayed
CLOCK/
TIMER ADJ
Select “ON
TIME”
Within 10 seconds
3
ui
Select the start time
• Press and hold to
change the time
faster.
4
Setting
the time
This is a 12-hour
clock.
SLEEP
timer
The SLEEP
timer can turn
the unit off after
a set time.
Sound
quality
You can choose
one of four types
of sound quality.
Live
Virtualizer
You can create a
three-dimensional
sound field when
listening to stereo
sound.
Extra
D.Bass
Boosts the bass.
VOL
EXTRA
D.BASS
ALBUM
SOUNDEQLIVE
VIRTUALIZER
VOL
PLAY
MODE
Within 10 seconds
CLOCK/
TIMER ADJ
Select
“CLOCK”
4
3
ui
Select the time
• Press and hold to
CLOCK/
TIMER ADJ
change the time faster.
CLOCK/
TIMER ADJ
• To display the clock when
the unit is on
• To check the time when the
TIMER
SET/CHECK
unit is off
Note
The clock is accurate to within ±60 seconds a month.
Readjust if necessary.
SLEEP
SLEEP
• Each time you press the button:
SLEEP 30 SLEEP 60 SLEEP 90 SLEEP 120
OFF (Canceled)
• To check the remaining time
Note
SLEEP
Press once
The play timer and sleep timer can be used together.
The sleep timer always has priority. Be sure not to
overlap timer settings.
SOUND
EQ
EQ
Select the sound quality
• Each time you press the button:
XBS
(Adds punch
to rock)
↑
EQ-OFF
(Turns the sound
quality off)
VIRTUALIZER
CLEAR
(Clarifies higher
sounds)
VOCAL
(Adds gloss to
vocal)
LIVE
SOFT
(For background
music)
Press to turn the Live
Virtualizer ON/OFF
Note
The actual effect depends on the source played.
EXTRA
D.BASS
D.BASS
Press to turn Extra
D. Bass ON/OFF
Display
You can change
the display.
5
Set the end time
CLOCK/
TIMER ADJ
Select “OFF
TIME”
4
3
ui
Select the end time
• Press and hold to
CLOCK/
TIMER ADJ
change the time faster.
2 Select the source and adjust the volume
TUNER/
BAND
AUX
CD
q/h
VOL
4 VOL
3
Adjust the volumeSelect the source
3 Turn the timer on
TIMER
SET/CHECK
Turn the unit offDisplay “zPLAY”
PLAY
The unit must be off for the timer to operate.
Note
You can enjoy any sources while the play timer is set.
TIMER
• To cancel the timer
while the unit is on
Note
The timer function will be canceled, but the settings
stay in the memory.
The timer comes on every day if the timer is on.
• To change the timer
• To check the setting
while the unit is off
Note
• If you turn the unit off and on again while the timer
is functioning, the finish time setting will not be
activated.
• When the “AUX” source is selected, set the timer
on the connected equipment to the same time.
DISPLAY
The following types of information are displayed.
• Original display
• MP3 album title display (SC-EN17)
• MP3 track title display (SC-EN17)
• Time display
SET/CHECK
Clear “zPLAY”
TIMER
SET/CHECK
Clear “zPLAY” and
set the timer again
TIMER
SET/CHECK
RQT7890
Page 6
Control guide
>
=
OPEN/
DISPLAY
LIGHT
CLOSE
SLEEP
123
CLOCK/
TIMER ADJ
4
6
VOL
SOUNDEQLIVE
ALBUM
7
AUX
5
8
0
VOL
VIRTUALIZER
>
=
CD
PLAY
MODE
9
10
TIMER
SET/CHECK
PGM/CLEAR
-
AUTO PRESET
TUNER/
BAND
EXTRA
D.BASS
SC-EN15SC-EN17
i
PRESET TUNE
u
ALBUM
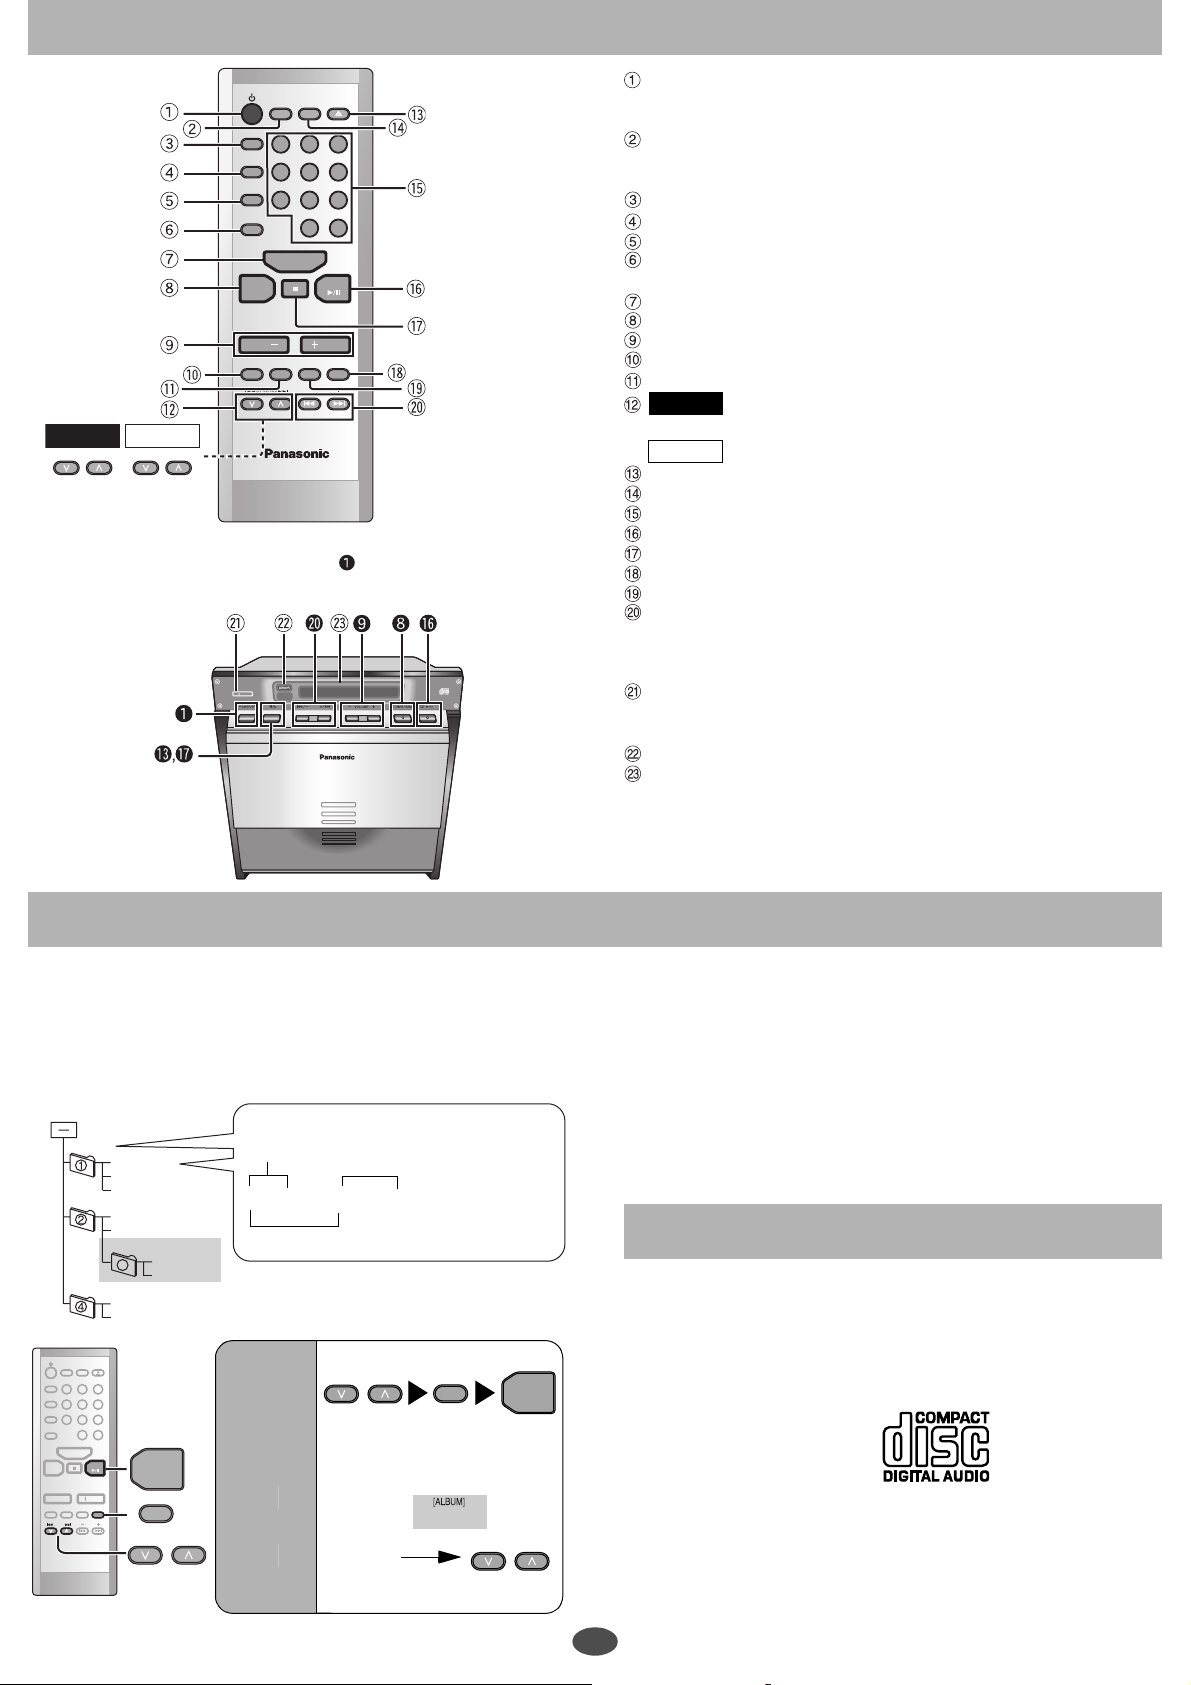
The shaded buttons, such as , function in the
same way as the buttons on the remote control.
Standby/on switch [^, POWER ^/l] ...................................................... 3
Press to switch the unit from on to standby mode or vice versa.
In standby mode, the unit is still consuming a small amount of power.
Light button [LIGHT]
Turn on and off the light of display for better viewing in a darkened room.
The factory setting is ON.
SLEEP timer button [SLEEP] ............................................................... 5
Clock/timer adjust button [CLOCK/TIMER ADJ] ................................ 5
Timer set/check button [TIMER SET/CHECK]..................................... 5
CD program/clear, tuner preset button
[PGM/CLEAR, –AUTO PRESET]....................................................... 3, 4
AUX button [AUX].................................................................................. 2
Tuner/band select button [TUNER/BAND] .......................................... 4
Volume buttons [VOL –, + VOL, – VOLUME +] .................................... 3
Extra D.Bass button [EXTRA D.BASS] ................................................ 5
Sound EQ button [SOUND EQ]............................................................ 5
SC-EN17
Album skip, preset channel select buttons
[2, 1, u ALBUM i]..................................................................... 4, 6
SC-EN15
Preset channel select buttons [2, 1, PRESET TUNE].... 4
CD open/close button [;, OPEN/CLOSE] ........................................... 3
Display button [DISPLAY]..................................................................... 5
Numbered buttons [1–9, 0, 10]........................................................... 3
CD play/pause button [q/h CD]........................................................... 3
CD stop button [g]................................................................................ 3
Play mode button [PLAY MODE].................................................. 3, 4, 6
Live virtualizer button [LIVE VIRTUALIZER]....................................... 5
CD skip/search, frequency select, time adjust buttons
[u, i, –, +, u/–, +/i] ......................................................... 3, 4, 5
MP3 operations (SC-EN17 only)
This unit can play MP3, a method of compressing audio without overtly
hurting audio quality.
When creating MP3 files to play on this unit
• Maximum number of tracks and albums: 999 tracks and 256 albums.
• Compatible compression rate: Between 64 kbps and 320 kbps (stereo).
• Disc formats: ISO9660 level 1 and level 2 (except for extended formats).
• It is better not to create folders (album) within folders (004album below).
CD-ROM drive
001album
001track.mp3
002track.mp3
003track.MP3
002album
004track.mp3
005track.mp3
004album
008track.MP3
3
006track.mp3
007track.MP3
6
9
>
10
=
PLAY
009track.MP3
CD
q/h
PLAY MODE
u
ALBUM
i
SLEEP
CLOCK/
TIMER ADJ
TIMER
SET/CHECK
PGM/CLEAR
-
AUTO PRESET
TUNER/
BAND
EXTRA
D.BASS
003album
LIGHT
123
4
7
AUX
VOL
SOUNDEQLIVE
ALBUM
DISPLAY
5
8
0
VIRTUALIZER
OPEN/
CLOSE
CD
VOL
MODE
128 kbps (stereo) is recommended.
Naming tracks and albums
Prefix with 3-digit numbers in the order you
want to play
Extension
001track.mp3 (or.MP3)
Up to 31 characters for tracks and albums
If you created an album such as 004album on
the left, the files may not play in order.
The albums would play in the order À, Á, Â, Ã.
Album
play
You can
listen to
tracks within
albums.
[ALBUM]
Album play
[ALBUM]
Album
repeat
:
&:
u
ALBUM
i
Select the
album
• Skip the
album
PLAY MODE
Select
[ALBUM]
“” or
[ALBUM]
“ &”
u
Start
ALBUM
CD
q/h
play
i
Standby indicator
When the unit is connected to the AC mains supply, this indicator lights
up in standby mode and goes out when the unit is turned on.
Remote control signal sensor
Display
Limitations on MP3
• This unit is compatible with multi-session but if there are a lot of sessions it
takes more time for play to start. Keep the number of sessions to a
minimum to avoid this.
• This unit cannot play files recorded using packet write.
• If the disc includes both MP3 and normal audio data (CD-DA), the unit
plays the type recorded in the inner part of the disc.
If the disc includes both MP3 and other types of audio data (e.g. WMA or
WAV), the unit plays only the MP3.
• Depending on how you create MP3 files, they may not play in the order you
numbered them or may not play at all.
• Upper case alphanumeric characters and an underbar “_” can be displayed
on this unit. Lower case characters are converted to upper case.
Regarding CDs
Note on CD-R and CD-RW
This unit can play CD-R and CD-RW recorded with CD-DA or MP3 (MP3:
SC-EN17 only). Use an audio recording disc for CD-DA and finalize it when
you finish
the condition of the recording.
∗A process performed after recording that enables CD-R/CD-RW players
Caution
Choose discs with this mark:
Do not;
• use irregularly shaped CDs.
• attach extra labels and stickers.
• use CDs with labels and stickers that are coming off or with adhesive
• attach scratch-proof covers or any other kind of accessory.
• write anything on the CD.
• clean CDs with liquids (Wipe with a soft, dry cloth.).
∗
recording. The unit may not be able to play some discs due to
to play audio CD-R and CD-RW.
exuding from under labels and stickers.
6
Page 7
IMPORTANT SAFETY INSTRUCTIONS
Read these operating instructions carefully before using the unit. Follow the safety instructions on the unit and the applicable safety instructions listed below. Keep
these operating instructions handy for future reference.
1) Read these instructions.
2) Keep these instructions.
3) Heed all warnings.
4) Follow all instructions.
5) Do not use this apparatus near water.
6) Clean only with dry cloth.
7) Do not block any ventilation openings. Install in accordance with the
manufacturer’s instructions.
8) Do not install near any heat sources such as radiators, heat registers,
stoves, or other apparatus (including amplifiers) that produce heat.
9) Do not defeat the safety purpose of the polarized or grounding-type
plug. A polarized plug has two blades with one wider than the other. A
grounding-type plug has two blades and a third grounding prong. The
wide blade or the third prong are provided for your safety. If the provided
plug does not fit into your outlet, consult an electrician for replacement
of the obsolete outlet.
10) Protect the power cord from being walked on or pinched particularly at
plugs, convenience receptacles, and the point where they exit from the
apparatus.
11) Only use attachments/accessories specified by the manufacturer.
12) Use only with the cart, stand, tripod, bracket, or table
specified by the manufacturer, or sold with the
apparatus. When a cart is used, use caution when
moving the cart/apparatus combination to avoid injury
from tip-over.
13) Unplug this apparatus during lightning storms or when unused for long
periods of time.
14) Refer all servicing to qualified service personnel. Servicing is required
when the apparatus has been damaged in any way, such as powersupply cord or plug is damaged, liquid has been spilled or objects have
fallen into the apparatus, the apparatus has been exposed to rain or
moisture, does not operate normally, or has been dropped.
Listening caution
EST. 1924
Selecting fine audio equipment such as the unit you’ve just purchased is only the
start of your musical enjoyment. Now it’s time to consider how you can maximize
the fun and excitement your equipment offers. This manufacturer and the
Electronic Industries Association’s Consumer Electronics Group want you to get
the most out of your equipment by playing it at a safe level. One that lets the
sound come through loud and clear without annoying blaring or distortion–and,
most importantly, without affecting your sensitive hearing.
We recommend that you avoid prolonged exposure to excessive noise.
Sound can be deceiving. Over time your hearing “comfort level” adapts to higher
volumes of sound. So what sounds “normal” can actually be loud and harmful to
your hearing.
Guard against this by setting your equipment at a safe level BEFORE your
hearing adapts.
To establish a safe level:
• Start your volume control at a low setting.
• Slowly increase the sound until you can hear it comfortably and clearly, and
without distortion.
Once you have established a comfortable sound level:
• Set the dial and leave it there.
Taking a minute to do this now will help to prevent hearing damage or loss in the
future. After all, we want you listening for a lifetime.
User memo:
DATE OF PURCHASE
DEALER NAME
DEALER ADDRESS
TELEPHONE NUMBER
Product Service
1. Damage requiring service —
service personnel if:
(a) The AC power supply cord or the plug has been damaged; or
(b) Objects or liquids have gotten into the unit; or
(c) The unit has been exposed to rain; or
(d) The unit does not operate normally or exhibits a marked change in
performance; or
(e) The unit has been dropped or the cabinet damaged.
2. Servicing —
these operating instructions. Refer all other servicing to authorized servicing
personnel.
3. Replacement parts —
parts specified by the manufacturer or parts that have the same
characteristics as the original parts. Unauthorized substitutes may result in
fire, electric shock, or other hazards.
4. Safety check —
checks to confirm that the unit is in proper working condition.
The servicer will require all components to service your system.
Therefore, should service ever be necessary, be sure to bring the entire system.
Do not attempt to service the unit beyond that described in
When parts need replacing ensure the servicer uses
After repairs or service, ask the servicer to perform safety
Product information
For product information or assistance with product operation:
In the U.S.A., refer to "Customer Services Directory" on page 8.
In Canada, contact the Panasonic Canada Inc. Customer Care Centre at
905-624-5505, or visit the website (www.panasonic.ca), or an authorized
Servicentre closest to you.
The model number and serial number of this product can be found on
either the back or the bottom of the unit.
Please note them in the space provided below and keep for future
reference.
MODEL NUMBER
The unit should be serviced by qualified
Specifications
g Main unit
Radio
Frequency rang e
FM 87.9–107.9 MHz (200 kHz steps)
AM 520–1710 kHz (10 kHz steps)
CD player
Sampling frequency 44.1 kHz
Decoding 16 bit linear
Beam source
Number of channels 2 channel, stereo
Wow an d fl utt er
87.5–108.0 MHz (100 kHz steps)
Semiconductor laser (wavelength 780 nm)
Less than possible mesurement data
SERIAL NUMBER
D/A converter
Terminals
Input AUX: 3.5 mm stereo (27 kΩ)
Output PHONES: 3.5 mm stereo (32 Ω)
General
Power supply AC 120 V, 60 Hz
Power consumption 28 W
Dimensions (W×H×D) 206 mm×204 mm×214 mm
Mass
With speakers 4.0 kg (8 lb. 13 oz.)
Without speakers 2.4 kg (5 lb. 5 oz.)
MASH (1 bit DAC)
1
/8″ ×81/32″ ×87/16″ )
(8
7
g Speakers
Full range 8 cm (31/8″ ), 6 Ω×2
Ceramic tweeter 1.52 cm (
Dimensions (W×H×D) 115 mm×211 mm×215 mm
Power consumption in standby mode: 3.4 W
Note
Specifications are subject to change without notice.
Mass and dimensions are approximate.
MPEG Layer-3 audio decoding technology
licensed from Fraunhofer IIS and Thomson
multimedia.
17
/32″ ×85/16″ ×815/32″ )
(4
19
/32″ ) ×2
Page 8
WARNING:
TO REDUCE THE RISK OF FIRE, ELECTRIC SHOCK OR
PRODUCT DAMAGE, DO NOT EXPOSE THIS APPARATUS
TO RAIN, MOISTURE, DRIPPING OR SPLASHING AND
THAT NO OBJECTS FILLED WITH LIQUIDS, SUCH AS
VASES, SHALL BE PLACED ON THE APPARATUS.
CAUTION!
• DO NOT INSTALL OR PLACE THIS UNIT IN A BOOKCASE, BUILT-IN
CABINET OR IN ANOTHER CONFINED SPACE. ENSURE THE UNIT IS
WELL VENTILATED. TO PREVENT RISK OF ELECTRIC SHOCK OR FIRE
HAZARD DUE TO OVERHEATING, ENSURE THAT CURTAINS AND ANY
OTHER MATERIALS DO NOT OBSTRUCT THE VENTILATION VENTS.
• DO NOT OBSTRUCT THE UNIT'S VENTILATION OPENINGS WITH
NEWSPAPERS, TABLECLOTHS, CURTAINS, AND SIMILAR ITEMS.
• DO NOT PLACE SOURCES OF NAKED FLAMES, SUCH AS LIGHTED
CANDLES, ON THE UNIT.
• DISPOSE OF BATTERIES IN AN ENVIRONMENTALLY FRIENDLY
MANNER.
CAUTION!
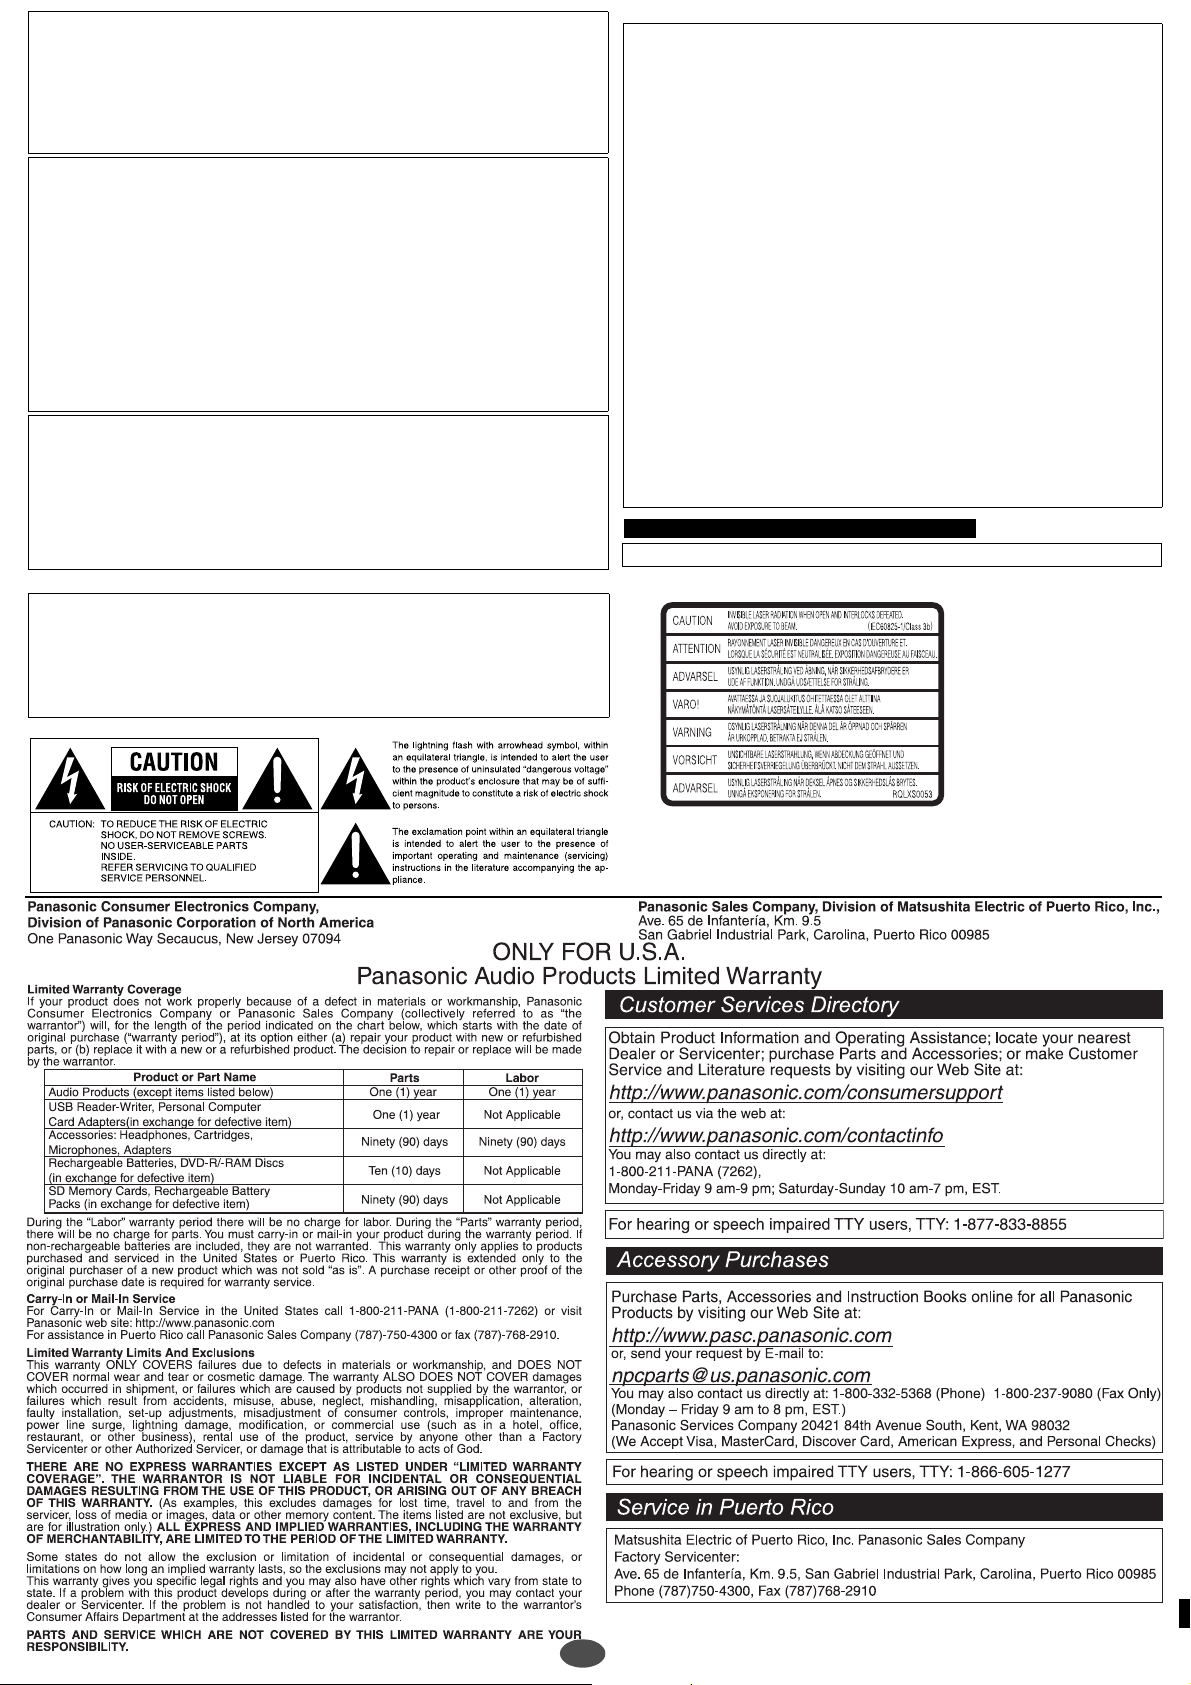
THIS PRODUCT UTILIZES A LASER.
USE OF CONTROLS OR ADJUSTMENTS OR PERFORMANCE OF
PROCEDURES OTHER THAN THOSE SPECIFIED HEREIN MAY RESULT IN
HAZARDOUS RADIATION EXPOSURE.
DO NOT OPEN COVERS AND DO NOT REPAIR YOURSELF. REFER
SERVICING TO QUALIFIED PERSONNEL.
THE FOLLOWING APPLIES ONLY IN THE U.S.A.
Notice:
This product has parts that contains a small amount of mercury.
Disposal of these materials may be regulated in your community due to
environmental considerations.
For disposal or recycling information please contact your local authorities, or
the Electronics Industries Alliance: <http://www.eiae.org.>
THE FOLLOWING APPLIES ONLY IN THE U.S.A. AND CANADA
THE FOLLOWING APPLIES ONLY IN THE U.S.A.
CAUTION:
This equipment has been tested and found to comply with the limits for a
Class B digital device, pursuant to Part 15 of the FCC Rules.
These limits are designed to provide reasonable protection against
harmful interference in a residential installation. This equipment
generates, uses and can radiate radio frequency energy and, if not
installed and used in accordance with the instructions, may cause
harmful interference to radio communications. However, there is no
guarantee that interference will not occur in a particular installation. If this
equipment does cause harmful interference to radio or television
reception, which can be determined by turning the equipment off and on,
the user is encouraged to try to correct the interference by one or more of
the following measures:
• Reorient or relocate the receiving antenna.
• Increase the separation between the equipment and receiver.
• Connect the equipment into an outlet on a circuit different from that to
which the receiver is connected.
• Consult the dealer or an experienced radio/TV technician for help.
Any unauthorized changes or modifications to this equipment would void
the user’s authority to operate this device.
This device complies with Part 15 of the FCC Rules. Operation is subject
to the following two conditions: (1) This device may not cause harmful
interference, and (2) this device must accept any interference received,
including interference that may cause undesired operation.
For units with PX printed on the outer packaging
THIS UNIT IS INTENDED FOR USE IN MODERATE CLIMATES.
ONLY FOR CANADA
(Inside of product)
8
8
 Loading...