

Owner’s Manual
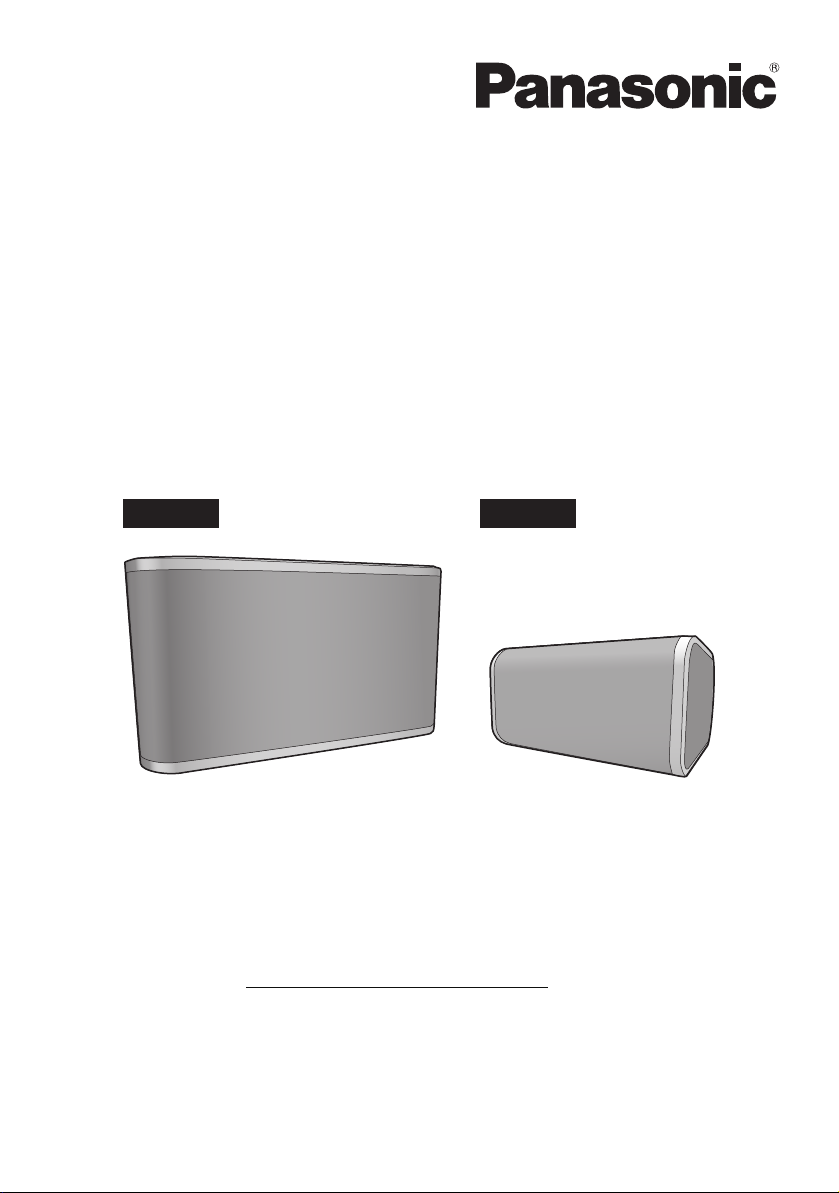
SC-ALL8 SC-ALL3
<Full version>
Wireless Speaker System
Model No. SC-ALL8
SC-ALL3
Thank you for purchasing this product.
Please read these instructions carefully before using this product,
and save this manual for future use.
Register online at www.panasonic.com/register (U.S. customers only)
SQT0179
Table of contents
Accessories............................................................................................. 3
Unit care.................................................................................................. 4
Control reference guide........................................................................... 5
Indicator illumination ............................................................................... 6
Installation .................................................................................. 9
Connections .......................................................................................... 10
Network settings.................................................................................... 12
Enjoying music ...................................................................................... 20
Firmware updates ................................................................................. 24
Others ................................................................................................... 25
Attaching to a wall (optional) .................................................... 27
Troubleshooting..................................................................................... 30
Specifications ........................................................................................ 33
How to use this manual
Click/Tap this icon to jump to “Table of contents”.
≥ Pages to be referred to are indicated as “l ±±”. You can jump to the
corresponding page by clicking/tapping this.
- 2 -
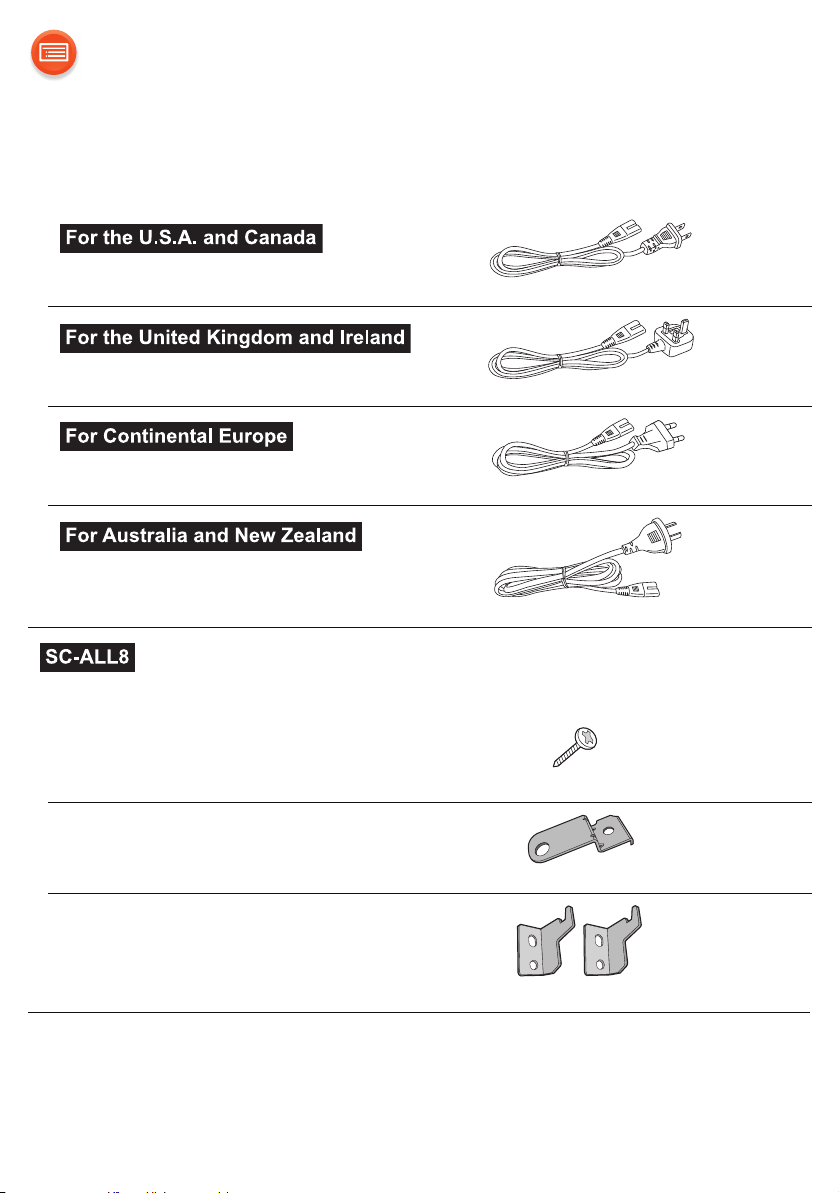
Accessories
1 AC power supply cord (AC mains lead)
(K2CB2CB00022)
(K2CT2YY00097)
(K2CQ2YY00119)
(K2CJ2YY00101)
Wall mounting accessories
1 Screw
(XTB3+8JFJK-J)
1 Safety holder
(RSC1266)
2 Wall mount brackets
(RSC1262-1)
≥ Do not use AC power supply cord (AC mains lead) with other equipment.
≥ Product numbers provided in this owner’s manual are correct as of May 2014.
These may be subject to change.
- 3 -
Unit care
Clean this unit with a soft, dry cloth.
≥ When cleaning the speaker covers, use a fine cloth. Do not use tissues or
other materials that can fall apart. Small pieces may get stuck inside the
speaker cover.
≥ Never use alcohol, paint thinner or benzine to clean this unit.
≥ Before using chemically treated cloth, carefully read the cloth’s instructions.
∫ To dispose or transfer this unit
The unit may keep the user settings information in the unit. If you discard
this unit either by disposal or transfer, then follow the procedure to return
all the settings to the factory defaults to delete the user settings.
(l 30, “To return all settings to the factory defaults”)
≥ The operation history may be recorded in the memory of this unit.
Disposal of Old Equipment
Only for European Union and countries with recycling
systems
This symbol on the products, packaging, and/or
accompanying documents means that used electrical and
electronic products must not be mixed with general household
waste.
For proper treatment, recovery and recycling of old products,
please take them to applicable collection points in accordance
with your national legislation.
By disposing of them correctly, you will help to save valuable
resources and prevent any potential negative effects on
human health and the environment.
For more information about collection and recycling, please
contact your local municipality.
Penalties may be applicable for incorrect disposal of this
waste, in accordance with national legislation.
- 4 -
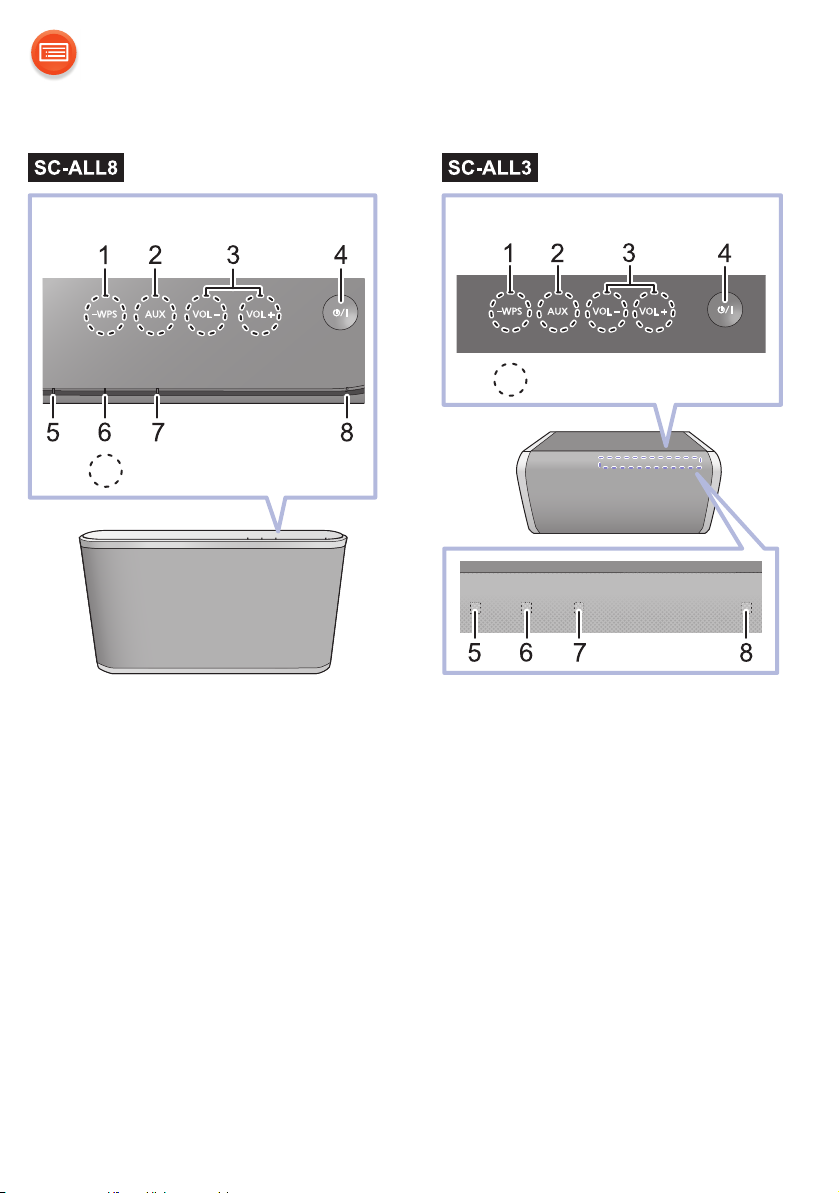
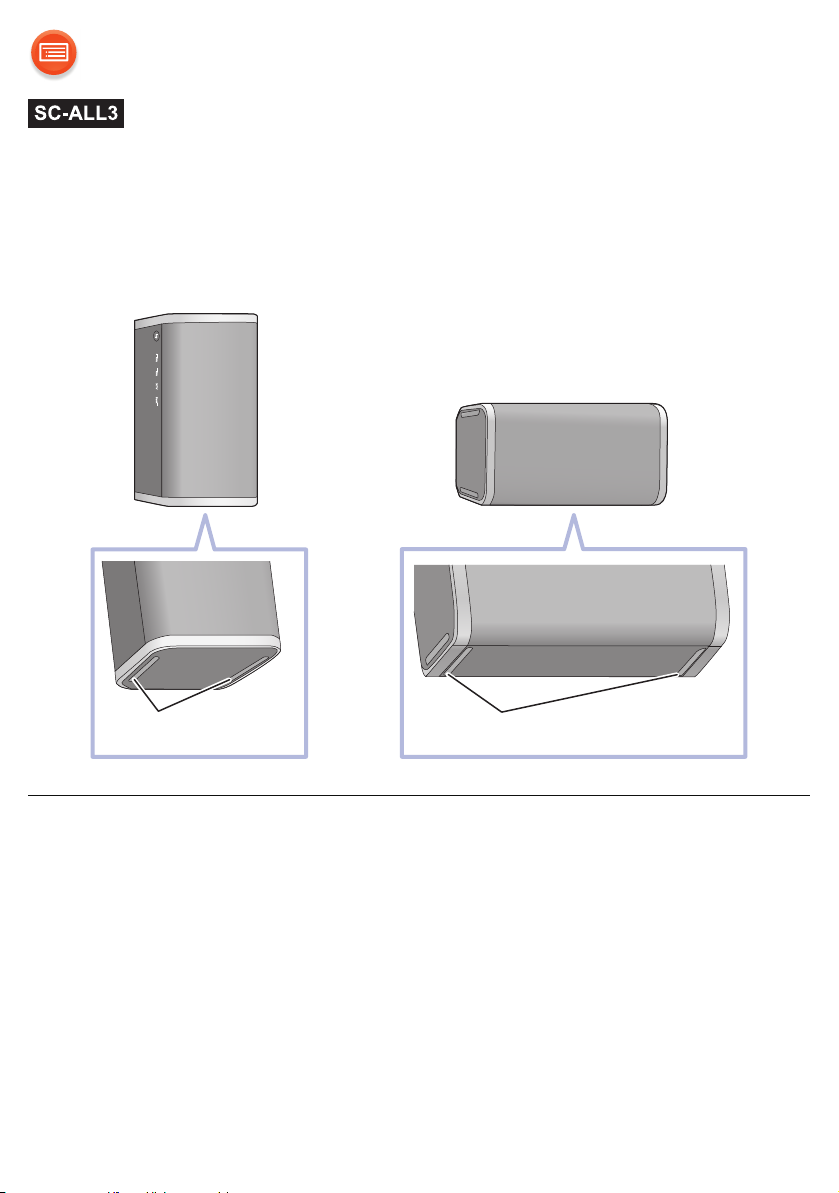
Control reference guide
Top view
: Touch area
Top v i ew
: Touch area
1 WPS pairing switch [-WPS]
Enter WPS pairing mode (l 17) / firmware update mode (l 24)
2 Selector switch [AUX]
Select AUX as the audio source (l 23)
3 Volume control switch [VOL –]/[VOL +]
4 Standby/on switch [Í/I]
5 Mode indicator (amber)
Touch to switch the unit from on to standby mode or vice versa. In standby
mode, the unit is still consuming a small amount of power.
6 Network indicator (blue/red)
7 AUX indicator (green)
8 Operation indicator (amber)
- 5 -
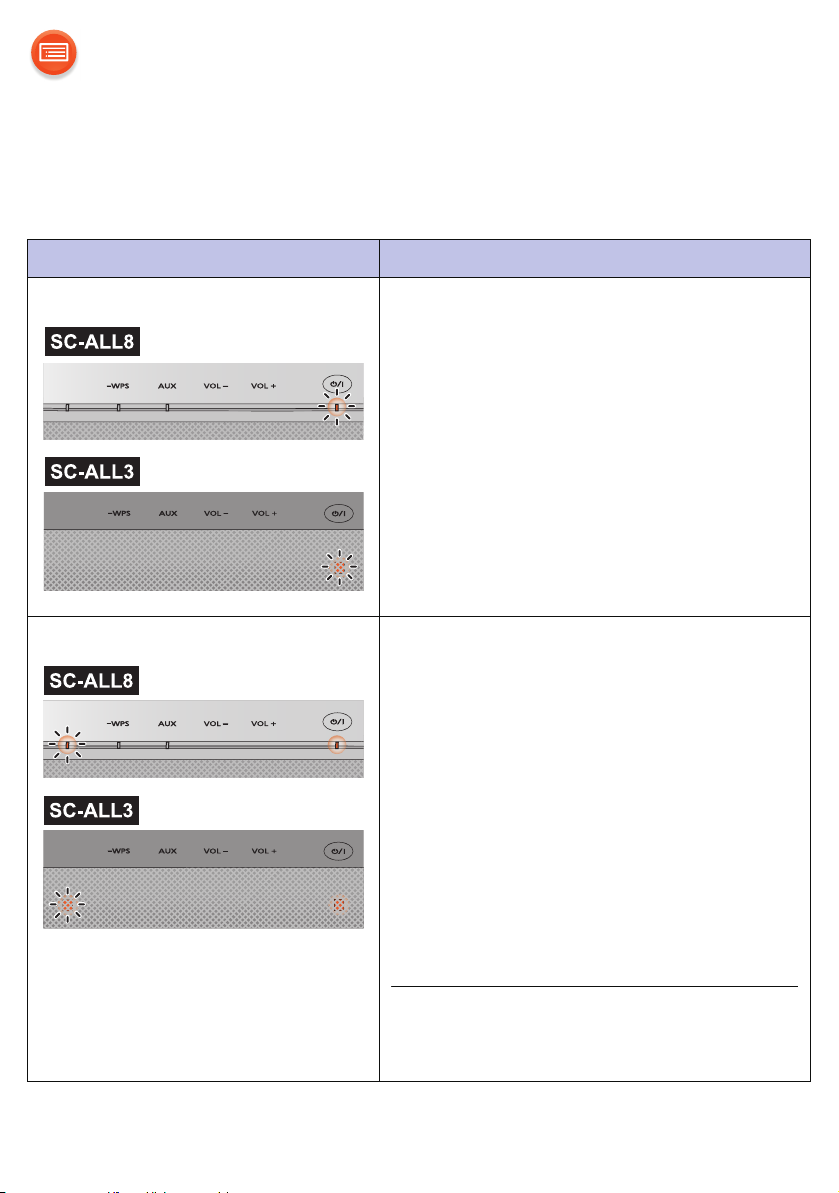
Indicator illumination
The indicator patterns illustrated below are displayed during normal
operational conditions.
Indicator Description
Operation indicator (amber) Blinks once
≥ The unit detects the switch touched.
Blinks twice
≥ The unit detects a valid operation
performed by touching and holding
the switch.
Blinks
≥ Automatic standby mode is
activated. (l 10)
Mode indicator (amber) Blinks once
≥ The following setting is turned on.
“Network standby” (l 16)
“Operation sound setting” (l 25)
– When the setting is turned off, it blinks
twice.
Blinks
≥ The unit is in process of turning to
standby mode.
– Do not disconnect the AC power
supply cord (AC mains lead). Doing
so may cause malfunction or
damage.
≥ The mode indicator also blinks when
the volume is changed.
- 6 -
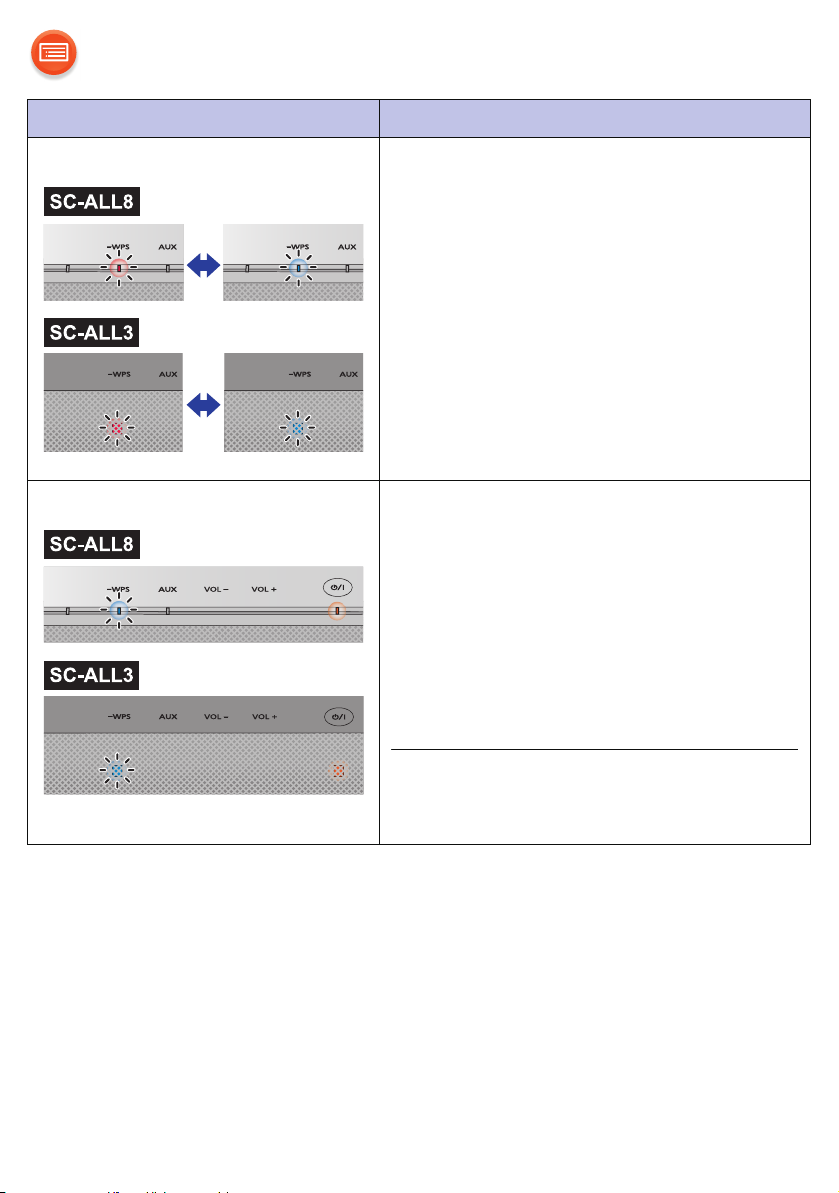
Indicator Description
Network indicator (blue/red) Blinks alternately
≥ The unit is carrying out an internal
process.
– Wait for approximately 60 seconds
before the blinking stops.
– Do not disconnect the AC power
supply cord (AC mains lead). Doing
so may cause malfunction or
damage.
Network indicator (blue) Blinks slowly
≥ The unit is ready for network setup.
(l 12)
Blinks
≥ The unit is waiting for the WPS
connection. (l 17)
Blinks fast
≥ The unit is waiting for the WPS PIN
code connection. (l 17)
≥ The volume cannot be changed during
the blinking.
- 7 -
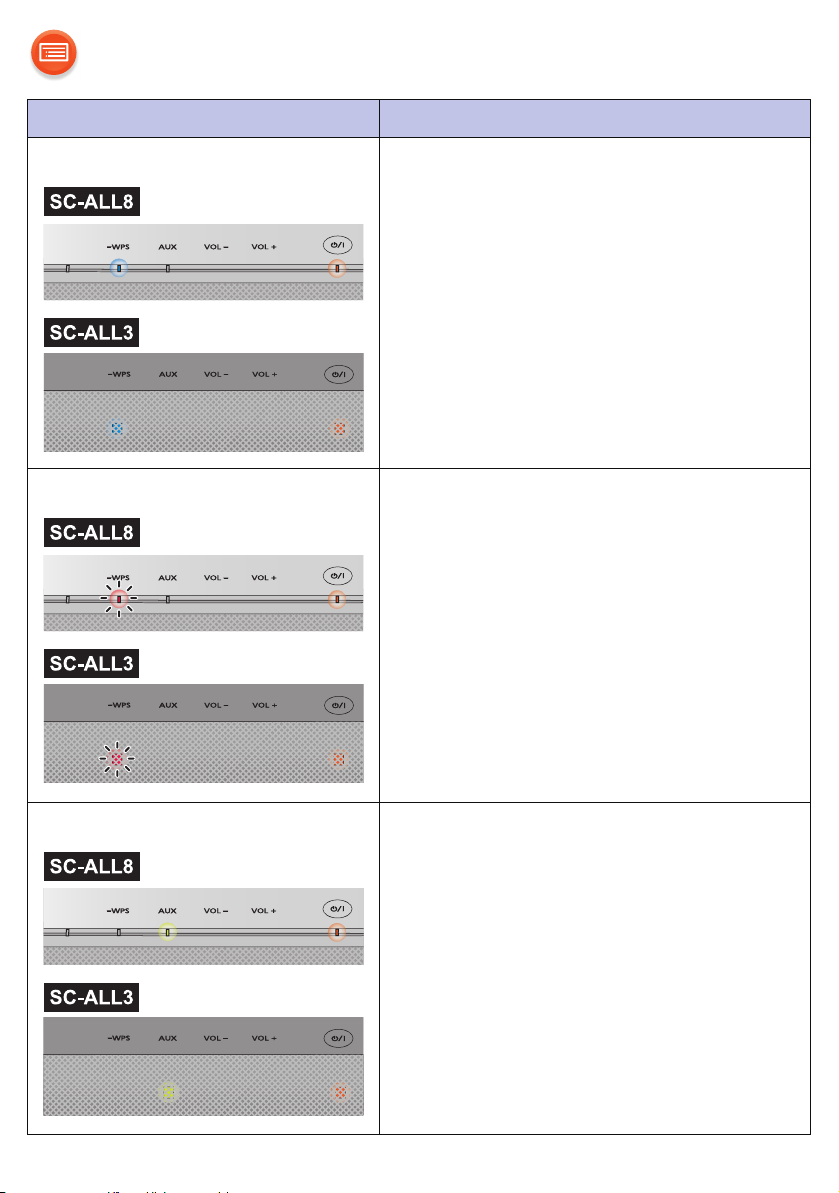
Indicator Description
Network indicator (blue) Lights up
≥ The unit is connected to the
network.
Network indicator (red) Blinks
≥ The unit is connecting to the
network.
– When the network connection cannot
be established, the blinking keeps
going. Check the network connection.
(l 12)
AUX indicator (green) Lights up
≥ AUX is selected as the audio
source. (l 23)
- 8 -
Installation
Vertical Horizontal
Speaker feet Speaker feet
This unit can be installed either vertically or horizontally.
Install the unit with the speaker feet side down as shown below.
≥ The output sound will be automatically adjusted depending on the installation
style.
- 9 -
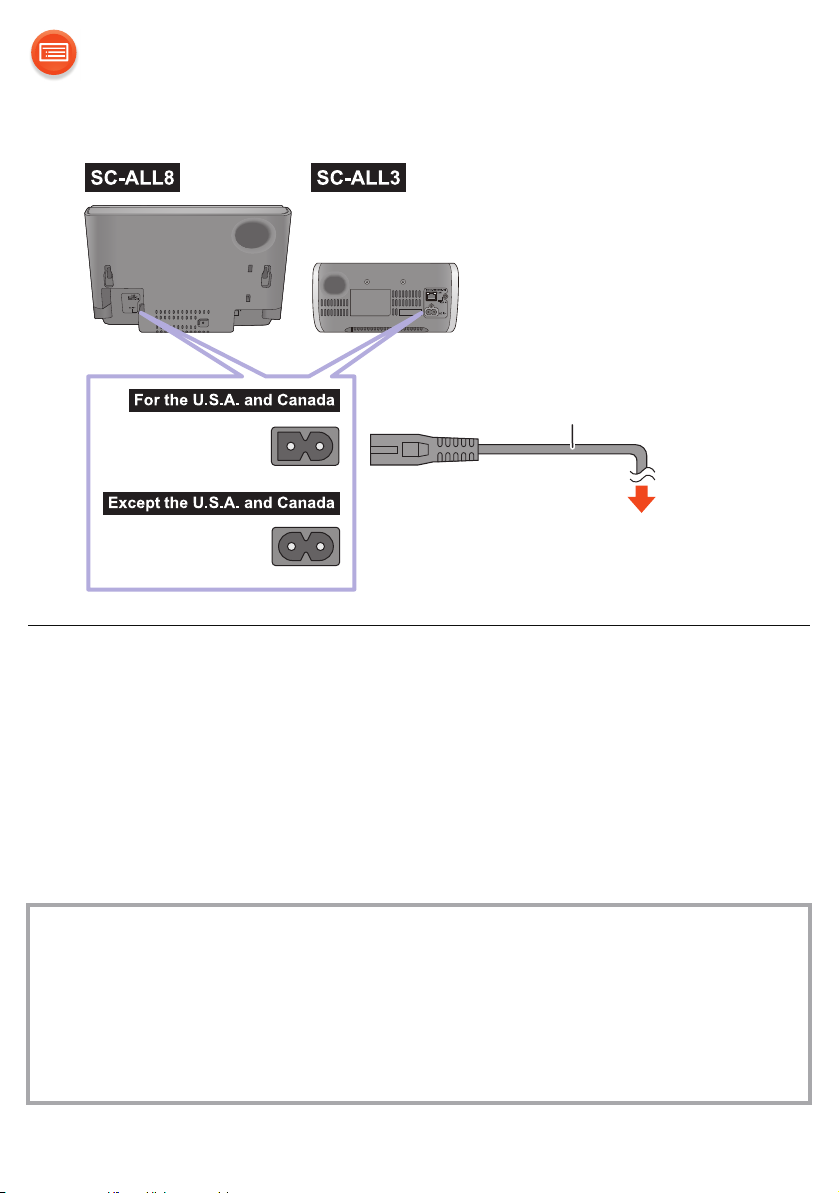
Connections
To an AC outlet
AC power supply cord
(AC mains lead)
(supplied)
≥ This unit consumes a small amount of AC power (l 33, 38) even when turned
off.
≥ For the purpose of power conservation, the unit can be disconnected if you will
not be using it for extended period of time.
≥ These speakers do not have magnetic shielding. Do not place them near a TV,
PC or other magnetic devices.
≥ Do not disconnect the AC power supply cord (AC mains lead) when the unit is
on. Doing so may cause malfunction or damage.
Automatic standby mode
This unit is designed to conserve its power consumption and save
energy.
The unit will turn to standby mode automatically if there is no sound and
it is not being used for approximately 20 minutes.
≥ The operation indicator (amber) blinks for approximately 1 minute before the
unit turns to standby mode. Touch any switch to cancel it.
- 10 -
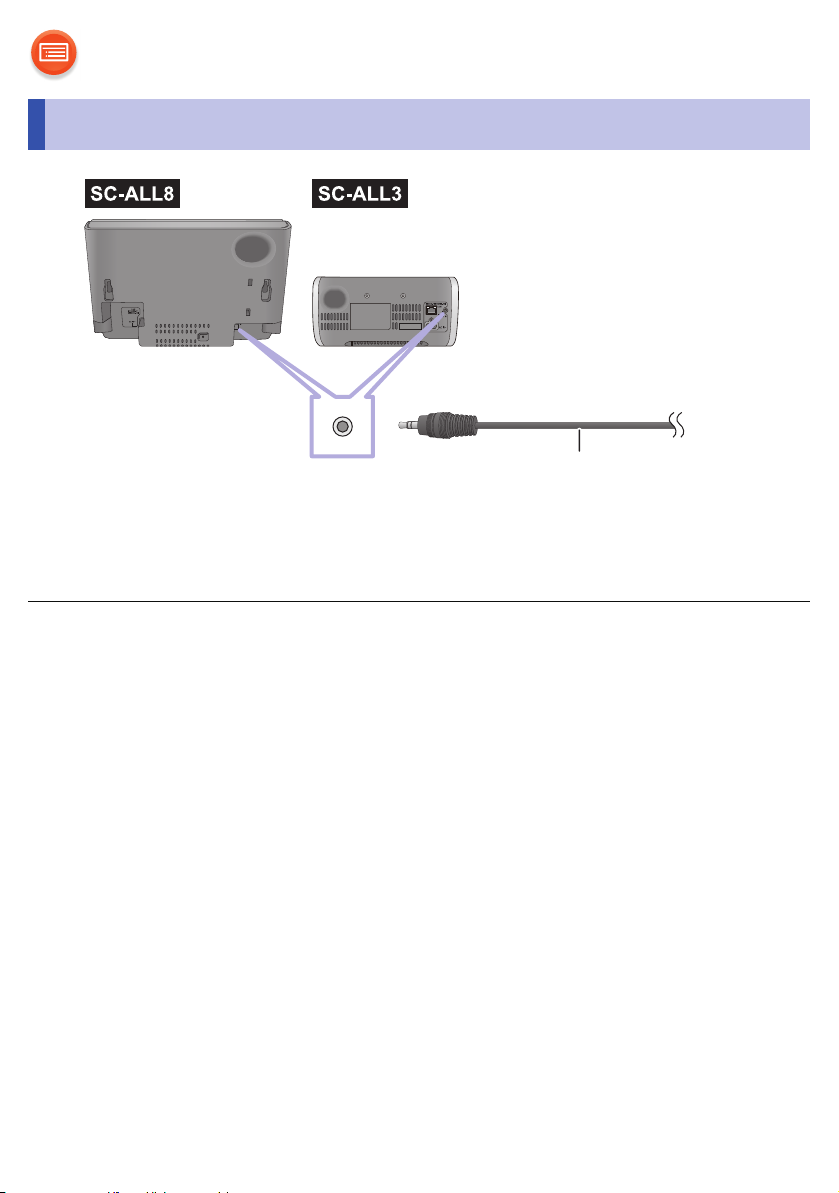
Connection of an external device
Audio cable (not supplied)
Plug type:
‰3.5 mm (1/8q) stereo
≥ For details, refer to the operating instructions of the device.
- 11 -
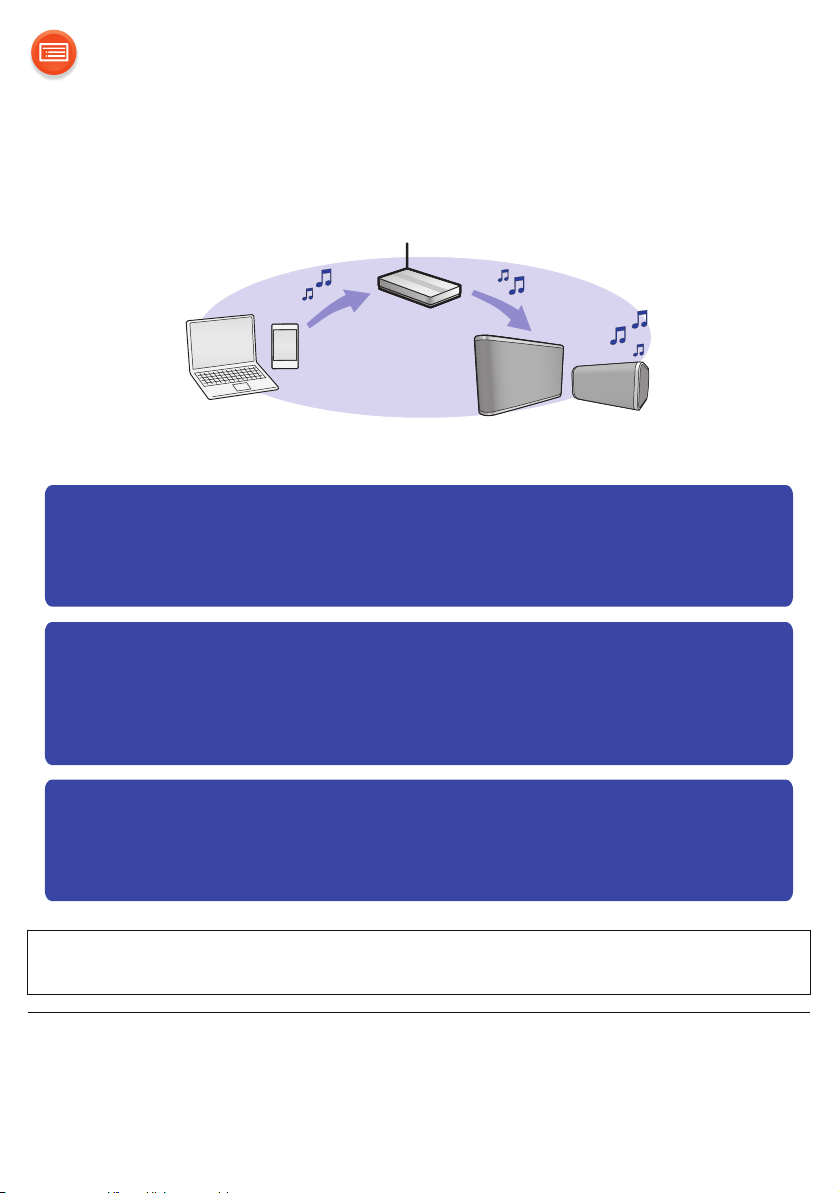
Network settings
“Using an Internet browser” (l 13)
≥ You can access this unit’s network settings from the Internet
browser on your smartphone or PC, etc.
“Using WPS (Wi-Fi Protected Setup™)” (l 17)
≥ If your wireless router supports WPS, you can set up a
connection by either pressing the WPS button, or entering the
WPS PIN code.
“Using a LAN cable” (l 18)
≥ You can make a stable connection to the network with a LAN
cable.
You can stream music from a device on the network by using the
Qualcomm® AllPlay™ smart media platform or DLNA feature. To use
these features, this unit must join the same network as the device.
Choose a network setting method from the following.
Turn the network standby on (l 16) after the network connection has
been set up.
≥ The setting will be canceled after the set time limit. In that case, try the setting
again.
≥ To cancel this setting in the middle, touch [Í/I] to turn off the unit.
- 12 -

Using an Internet browser
Settings Wi-Fi settings
Wi-Fi
≥ The following steps are based on a smartphone.
≥ Do not connect a LAN cable. Doing so will disable the Wi-Fi® function.
1 Turn this unit on.
2 Go to Wi-Fi
≥ Proceed to the next step after the network indicator changes from blinking in
blue and red to blinking in blue.
– The blinking in blue starts after approximately 60 seconds. If the blinking
in blue does not start, restore the factory defaults. (l 30)
≥ Make sure that DHCP is enabled for the network settings on the device.
®
settings on the device.
3 Select “AllPlay XXXXXX_AJ” to connect to this unit.
≥ “X” stands for a digit that is unique to each set.
- 13 -
4 Start the Internet browser on the device to display the settings
My room
page.
≥ [iOS] : The settings page will be automatically displayed.
≥ [Except_iOS] : Once you open the Internet browser, the settings page will be
displayed
– If the settings page is not displayed, type “http://172.19.42.1/” into the
URL address field.
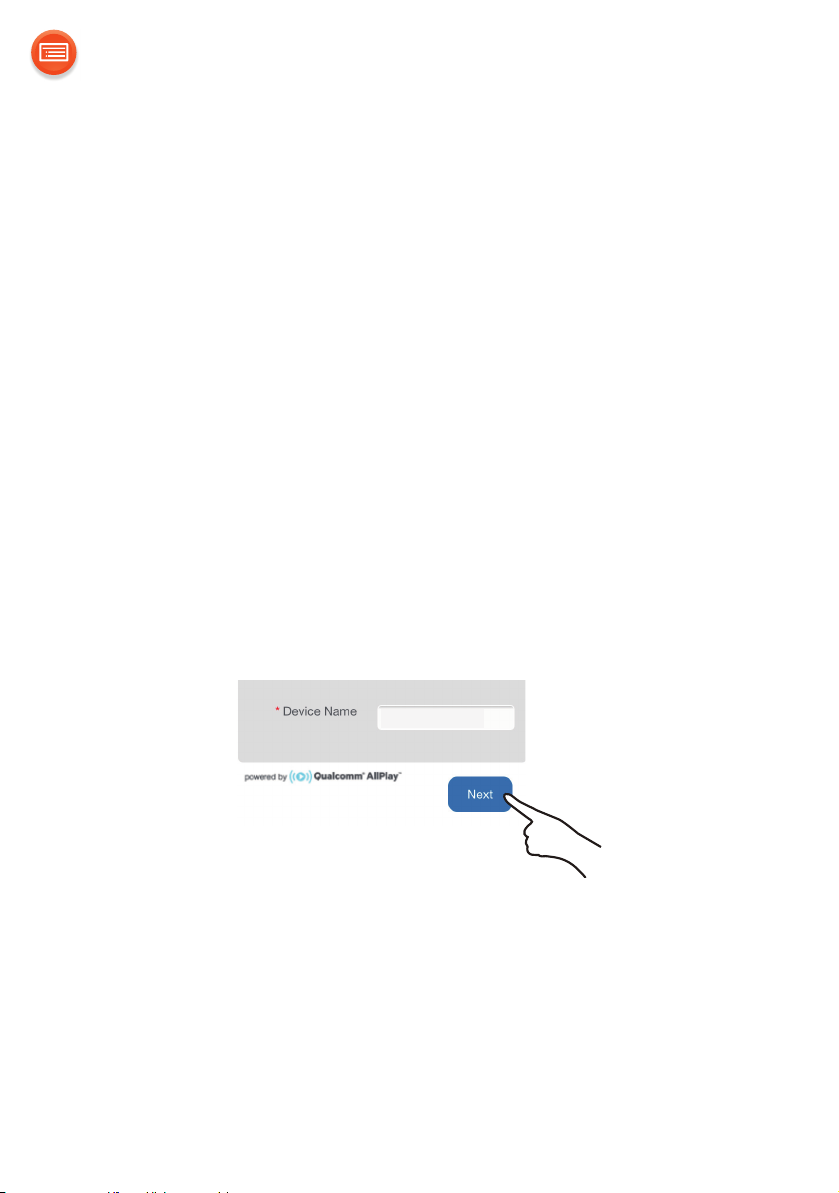
5 Type a device name and then select “Next”.
≥ The device name will be displayed as this unit’s name on the network.
≥ The guaranteed limit is 32 characters.
≥ The device name is set when “Next” is selected.
≥ You can also change the device name after the network connection is set
up. (l 19)
- 14 -
 Loading...