

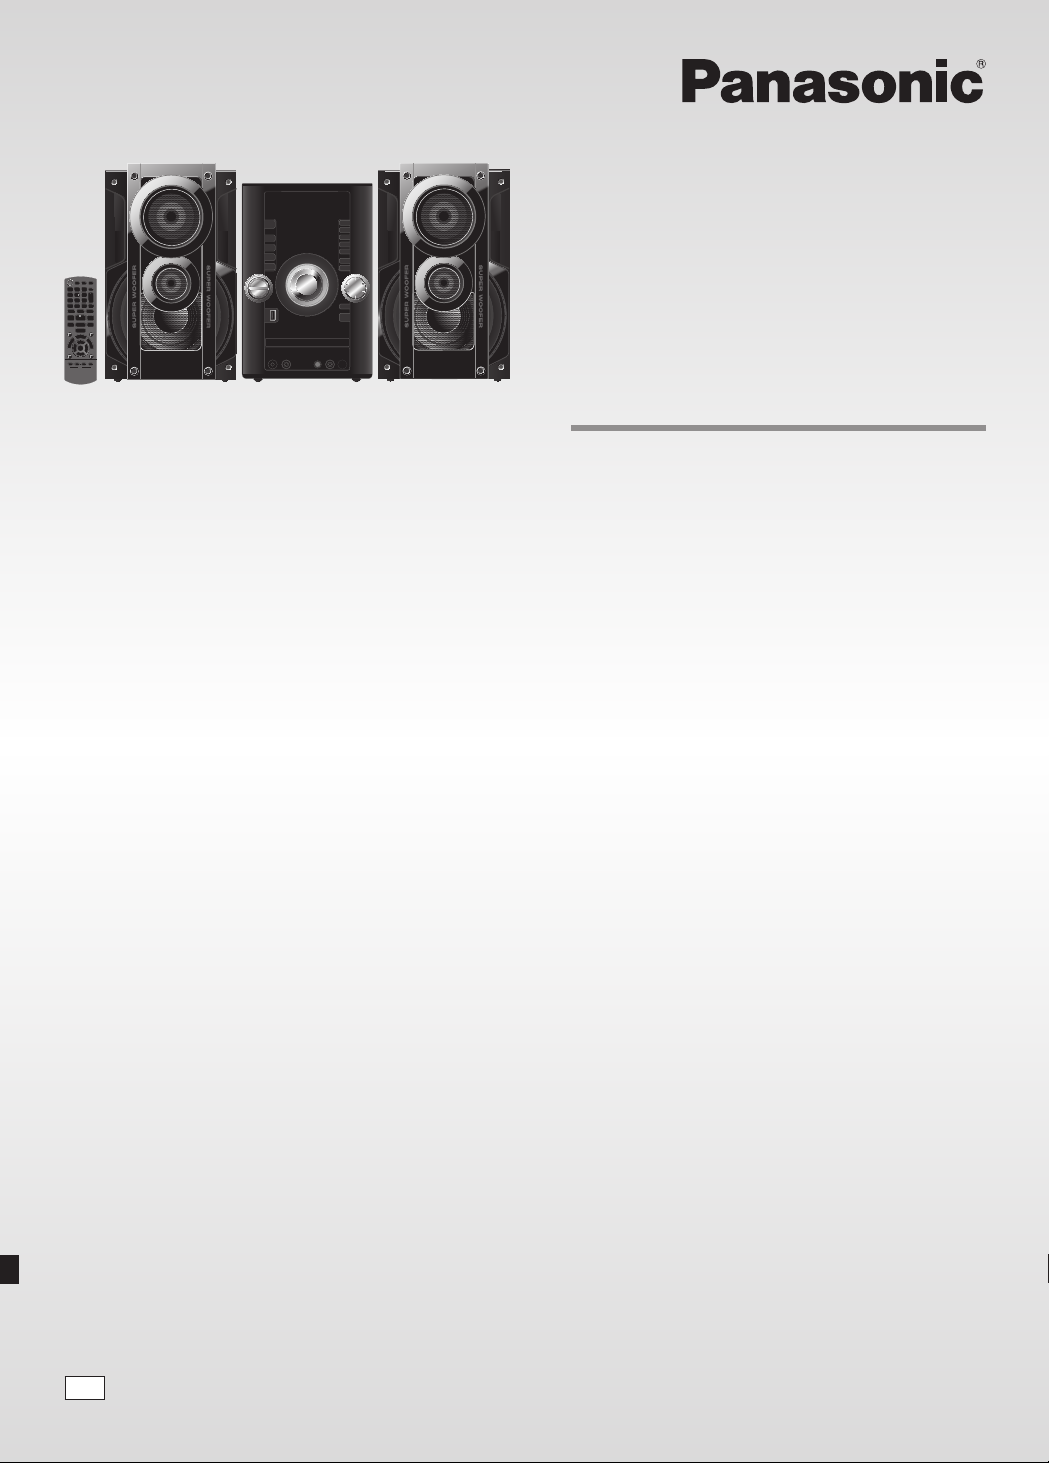
Page 1
Dear Customer
Thank you for purchasing this system.
For optimum performance and safety, read these instructions fully
before you connect, operate or adjust this system.
Keep this manual for future reference.
Your system and the illustrations can look differently.
Drogi Kliencie
Dziękujemy za zakupienie tego zestawu.
W celu zapewnienia optymalnej jakości odbioru i bezpieczeństwa,
przed podłączeniem, uruchomieniem lub zmianą ustawień
urządzenia należy dokładnie zapoznać się z niniejszą instrukcją
obsługi.
Prosimy o zachowanie niniejszej instrukcji obsługi.
Zakupione urządzenie może różnić się od przedstawionego na
ilustracjach.
Niniejsza instrukcja została opracowana na podstawie oryginalnej
publikacji firmy Panasonic Corporation.
Operating Instructions
Instrukcja obsługi
Návod k obsluze
CD Stereo System
Zestaw stereo z CD
Stereosystém s CD
Model No. SC-AKX52
Vážený Zákazníku
Děkujeme za zakoupení tohoto systému.
Pro optimální využití a bezpečnost si před připojováním, používáním
nebo nastavováním tohoto systému tento návod pečlivě přečtěte.
Uschovejte si prosím tento návod k obsluze.
Váš systém a obrázky se mohou lišit.
EG
RQTX1298-E
Page 2
ENGLISH
Do the procedures with the remote control. You can also use the
buttons on the main unit if they are the same.
These operating instructions are applicable to the following system.
SC-AKX52
SA-AKX52
SB-AKX52
Inside of product
ENGLISH
System
Main unit
Speakers
Back of product
CAUTION!
THIS PRODUCT UTILIZES A LASER.
USE OF CONTROLS OR ADJUSTMENTS OR PERFORMANCE
OF PROCEDURES OTHER THAN THOSE SPECIFIED HEREIN
MAY RESULT IN HAZARDOUS RADIATION EXPOSURE.
DO NOT OPEN COVERS AND DO NOT REPAIR YOURSELF.
REFER SERVICING TO QUALIFIED PERSONNEL.
WARNING:
TO REDUCE THE RISK OF FIRE, ELECTRIC SHOCK OR
PRODUCT DAMAGE,
• DO NOT EXPOSE THIS APPARATUS TO RAIN, MOISTURE,
DRIPPING OR SPLASHING AND THAT NO OBJECTS FILLED
WITH LIQUIDS, SUCH AS VASES, SHALL BE PLACED ON
THE APPARATUS.
• USE ONLY THE RECOMMENDED ACCESSORIES.
• DO NOT REMOVE THE COVER (OR BACK); THERE ARE NO
USER SERVICEABLE PARTS INSIDE. REFER SERVICING TO
QUALIFIED SERVICE PERSONNEL.
CAUTION!
• DO NOT INSTALL OR PLACE THIS UNIT IN A BOOKCASE,
BUILT-IN CABINET OR IN ANOTHER CONFINED SPACE.
ENSURE THE UNIT IS WELL VENTILATED. TO PREVENT
RISK OF ELECTRIC SHOCK OR FIRE HAZARD DUE TO
OVERHEATING, ENSURE THAT CURTAINS AND ANY OTHER
MATERIALS DO NOT OBSTRUCT THE VENTILATION VENTS.
• DO NOT OBSTRUCT THE UNIT’S VENTILATION OPENINGS
WITH NEWSPAPERS, TABLECLOTHS, CURTAINS, AND
SIMILAR ITEMS.
• DO NOT PLACE SOURCES OF NAKED FLAMES, SUCH AS
LIGHTED CANDLES, ON THE UNIT.
• DISPOSE OF BATTERIES IN AN ENVIRONMENTALLY
FRIENDLY MANNER.
Information for Users on Collection and Disposal of Old
Equipment and used Batteries
These symbols on the products, packaging, and/or
accompanying documents mean that used electrical
and electronic products and batteries should not be
mixed with general household waste.
For proper treatment, recovery and recycling of old
products and used batteries, please take them to
applicable collection points, in accordance with your
national legislation and the Directives 2002/96/EC and
2006/66/EC.
By disposing of these products and batteries correctly,
you will help to save valuable resources and prevent
any potential negative effects on human health and
the environment which could otherwise arise from
inappropriate waste handling.
For more information about collection and recycling of
old products and batteries, please contact your local
municipality, your waste disposal service or the point
of sale where you purchased the items.
Penalties may be applicable for incorrect disposal of
this waste, in accordance with national legislation.
For business users in the European Union
If you wish to discard electrical and electronic
equipment, please contact your dealer or supplier for
further information.
[Information on Disposal in other Countries
outside the European Union]
These symbols are only valid in the European Union.
If you wish to discard these items, please contact
your local authorities or dealer and ask for the correct
method of disposal.
Note for the battery symbol (bottom two symbol
examples):
This symbol might be used in combination with a
chemical symbol. In this case it complies with the
requirement set by the Directive for the chemical
RQTX1298
involved.
2
2
The socket outlet shall be installed near the equipment and easily
accessible.
The mains plug of the power supply cord shall remain readily
operable.
To completely disconnect this apparatus from the AC Mains,
disconnect the power supply cord plug from AC receptacle.
This product may receive radio interference caused by mobile
telephones during use. If such interference is apparent, please
increase separation between the product and the mobile telephone.
THIS UNIT IS INTENDED FOR USE IN MODERATE CLIMATES.
MPEG Layer-3 audio coding technology licensed from Fraunhofer IIS
and Thomson.
Page 3

ENGLISH
Safety precautions
Table of contents
Placement
Set the system up on an even surface away from direct sunlight, high
temperatures, high humidity, and excessive vibration. These conditions
can damage the cabinet and other components, thereby shortening the
service life of the system.
Place it at least 15 cm away from wall surfaces to avoid distortion and
unwanted acoustical effects.
Do not place heavy items on the system.
Voltage
Do not use high voltage power sources. This can overload the system
and cause a fire.
Do not use a DC power source. Check the source carefully when
setting the system up on a ship or other place where DC is used.
AC mains lead protection
Ensure the AC mains lead is connected correctly and not damaged.
Poor connection and lead damage can cause fire or electric shock. Do
not pull, bend, or place heavy items on the lead.
Grasp the plug firmly when unplugging the lead. Pulling the AC mains
lead can cause electric shock.
Do not handle the plug with wet hands. This can cause electric shock.
Foreign matter
Safety precautions ...........................................3
Supplied accessories .......................................3
Preparing the remote control ..........................4
Placement of speakers.....................................4
Making the connections ...................................5
Overview of controls ........................................ 6
Discs .................................................................. 8
USB and internal memory................................9
Radio ................................................................11
Clock and timers.............................................12
Sound effects ..................................................12
Using a microphone ....................................... 13
Remote control code ......................................13
External equipment ........................................13
Troubleshooting guide ...................................14
Maintenance ....................................................14
Specifications ................................................. 15
ENGLISH
Do not let metal objects fall inside the system. This can cause electric
shock or malfunction.
Do not let liquids get into the system. This can cause electric shock or
malfunction. If this occurs, immediately disconnect the system from the
power supply and contact your dealer.
Do not spray insecticides onto or into the system. They contain
flammable gases which can ignite if sprayed into the system.
Service
Do not attempt to repair this system by yourself. If sound is interrupted,
indicators fail to light, smoke appears, or any other problem that is
not covered in these instructions occurs, disconnect the AC mains
lead and contact your dealer or an authorised service centre. Electric
shock or damage to the system can occur if the system is repaired,
disassembled or reconstructed by unqualified persons.
Extend operating life by disconnecting the system from the power
source if it is not to be used for a long time.
Supplied accessories
Please check and identify the supplied accessories.
1 x AC mains lead
1 x AM loop antenna
1 x FM indoor antenna
1 x Remote control battery
1 x Remote control
(N2QAYB000637)
RQTX1298
3
3
Page 4
ENGLISH
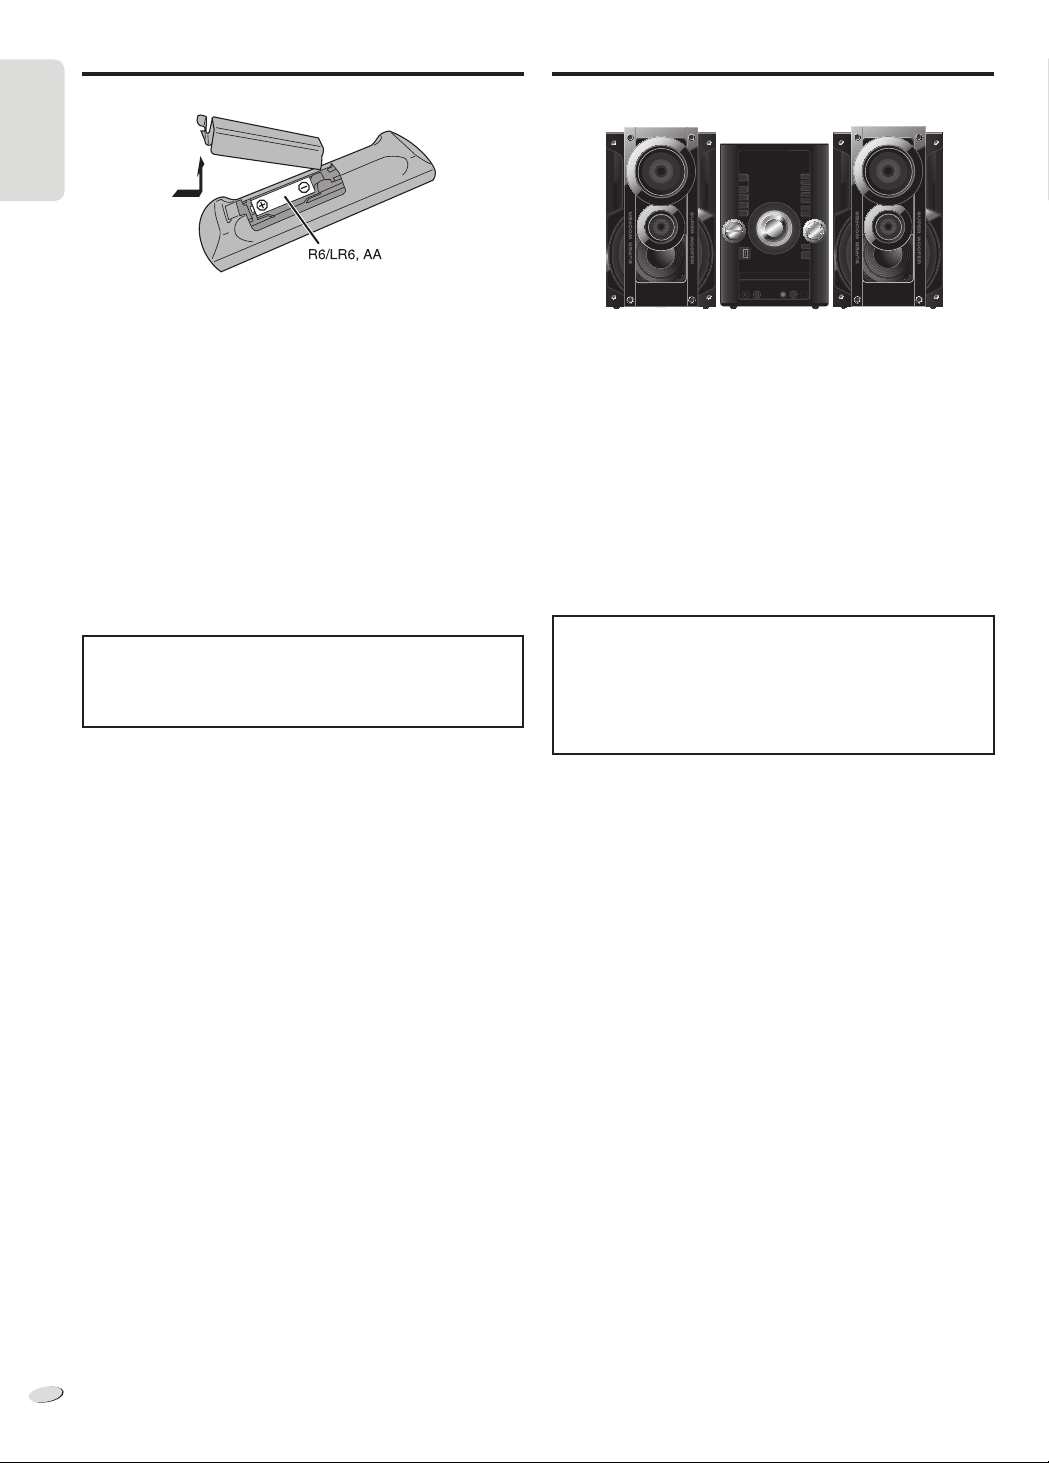
Preparing the remote control
ENGLISH
Placement of speakers
The right and left speakers are the same.
Use alkaline or manganese battery.
Install the battery so that the poles (+ and –) align with those in the
remote control.
Point the remote control at the remote control sensor (Z 7), away from
obstacles, at a maximum range of 7 m directly in front of the main unit.
CAUTION!
• Do not break open or short-circuit the battery.
• Do not charge the alkaline or manganese battery.
• Do not use the battery if the cover has peeled off.
• Do not heat or expose to flame.
• Do not leave the battery(ies) in an automobile exposed to direct
sunlight for a long period of time with doors and windows closed.
• Mishandling of battery can cause electrolyte leakage, which can
cause a fire.
• Remove the battery if you do not use the remote control for a long
period of time. Keep in a cool, dark area.
CAUTION!
Danger of explosion if battery is incorrectly replaced. Replace
only with the same or equivalent type recommended by the
manufacturer. Dispose of used batteries according to the
manufacturer’s instructions.
You cannot remove the net of the speakers.
Use only the supplied speakers.
The combination of the main unit and speakers give the best sound.
You can cause damage to the system and decrease the sound quality
if you use other speakers.
Note:
• Keep your speakers more than 10 mm from the main unit for
ventilation.
• Put the speakers on a flat safe surface.
• These speakers do not have magnetic shielding. Do not put them
near TVs, PCs or other equipment easily influenced by magnetism.
• When you play at high levels for a long period, it can cause damage
to the system and decrease the life of the system.
• Decrease the volume in these conditions to prevent damage:
– When you play distorted sound.
– When you adjust the sound quality.
CAUTION!
• Use the speakers only with the recommended system. If not,
you can cause damage to the amplifier and speakers and
can cause a fire. Consult an approved service personnel if
damage occurs or if there is a sudden apparent change in
performance.
• Do the procedures included in these instructions when you
attach the speakers.
RQTX1298
4
4
Page 5

ENGLISH
Making the connections
Connect the AC mains lead only after all the other connections have been made.
Conserving power
The system consumes approximately 0.3 W when it is in standby mode. Disconnect the power supply if you do not use the system. Some settings
will be lost after you disconnect the system. You have to set them again.
Connect the antennas
Place the antenna where reception is best.
FM indoor antenna
Adhesive tape
Connect the speakers
SPEAKERS
AM loop antenna
Click!
ENGLISH
HIGH
(5:)
L
LOW
(4:)
HIGH
(5:)
R
LOW
(4:)
TO SB-AKX52 TO SB-AKX52
Connect the AC mains lead
Use the included AC mains lead with this
system only.
Do not use an AC mains lead from other
equipment.
To household mains socket
Refer to “Using the auxiliary input”
(Z 13) for more information on AUX
connection.
RQTX1298
5
5
Page 6

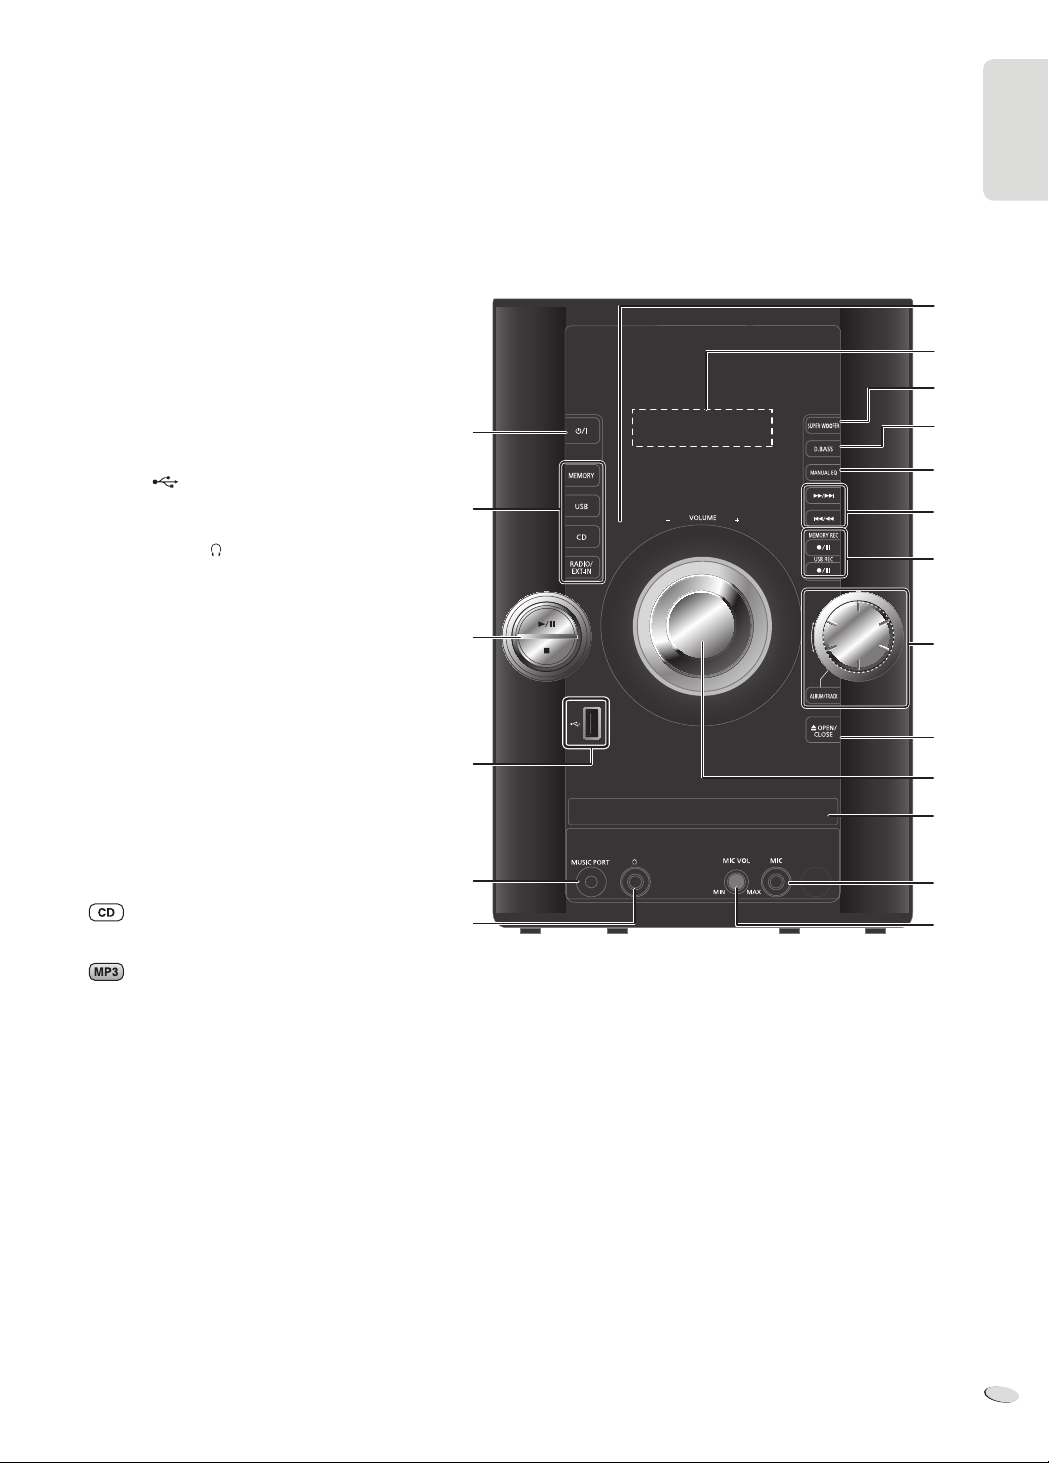
ENGLISH
Overview of controls
ENGLISH
A
B
C
D
E
F
G
H
I
GHI
P
QRS
MEMORY
D.BASS
E
S
E
L
T
I
T
DISPLAY
DIMMER
HI-SPEED
CD
SLEEP
AUTO OFF
R
H
C
R
A
USB
ABC
JKL
TUV
SOUND
M
O
I
D
A
MEMORY
REC
PLAY/
REC
DEF
MNO
W
XYZ
E
N
U
EXT-IN
RADIO
PRESET EQ
P
L
A
Y
L
I
S
T
EDIT
MODE
MODE
J
K
L
M
N
O
P
Q
R
S
A Standby/on switch [`], [1] (Z 12, 14)
Press to switch the unit from on to standby mode or vice versa.
In standby mode, the unit is still consuming a small amount of
power.
B Alphanumeric buttons
To set a 2-digit number
Example: 16: [≧10] → [1] → [6]
To set a character
Example: B: [2] → [2]
C Delete a programmed track (Z 8)
Delete a selected track in a playlist (Z 10)
D Select source
[MEMORY, USB]: Select internal memory or USB (Z 9)
[MEMORY]: Select internal memory
[USB]: Select USB
[CD]: Select disc (Z 8)
[RADIO, EXT-IN]: Select radio, USB, music port or AUX
E Basic operation
[4/9]: Playback or pause operation
[8]: Stop playback or recording
[2], [6]: Skip track
[3], [5]: Search track
[2/3], [5/6]: Skip and search track
F Select the sound effects (Z 12, 13)
G Start the title search (Z 10)
H View the information shown on the display panel
Decrease the brightness of the display panel
Press and hold the button to use this function.
To cancel, press and hold the button again.
I Recording operation for USB and internal memory (Z 9)
[CD HI-SPEED REC]: CD high-speed recording
[7/9, USB REC]: USB recording
[7/9, MEMORY REC]: Internal memory recording
[REC MODE]: Set the record mode
J Set the play timer and record timer (Z 12)
K Set the clock and timer (Z 12)
L Set the sleep timer (Z 12)
Automatically switch off the system
When you are in disc, USB or internal memory source, the
auto off function switches off the system if you do not use the
system for 30 minutes.
Press and hold the button to use this function.
To cancel, press and hold the button again.
M Set the program function (Z 8, 11)
N Adjust the volume of the system
(Z 11, 13)
Select preset radio station
Tune in to the radio station
Select preset radio station
RQTX1298
6
6
Page 7
ENGLISH
O Mute the sound of the system
Press the button again to cancel.
“MUTE” is also cancelled when you adjust the
volume or when you switch off the system.
P Set the play menu item (Z 8)
Set the radio menu item (Z 11)
Q Make playlist (Z 10)
R [R, T]: Skip album
Adjust clock setting
[Y, U]: Select the item in the menu
[OK]: Confirm the setting
S Set the edit mode for USB or internal memory
(Z 11)
T USB port ( )
U Music port
V Headphones jack ( )
Plug type: Ø 3.5 mm stereo (not included)
• Avoid listening for prolonged periods of time to
prevent hearing damage.
• Excessive sound pressure from earphones and
headphones can cause hearing loss.
• Listening at full volume for long periods may
damage the user’s ears. Be sure to use the
supplied or recommended headphones or
earphones.
W Remote control sensor
X Display panel
Y Set Super Woofer function (Z 12)
Z Set D.Bass function (Z 13)
a Set the Manual EQ effect (Z 12)
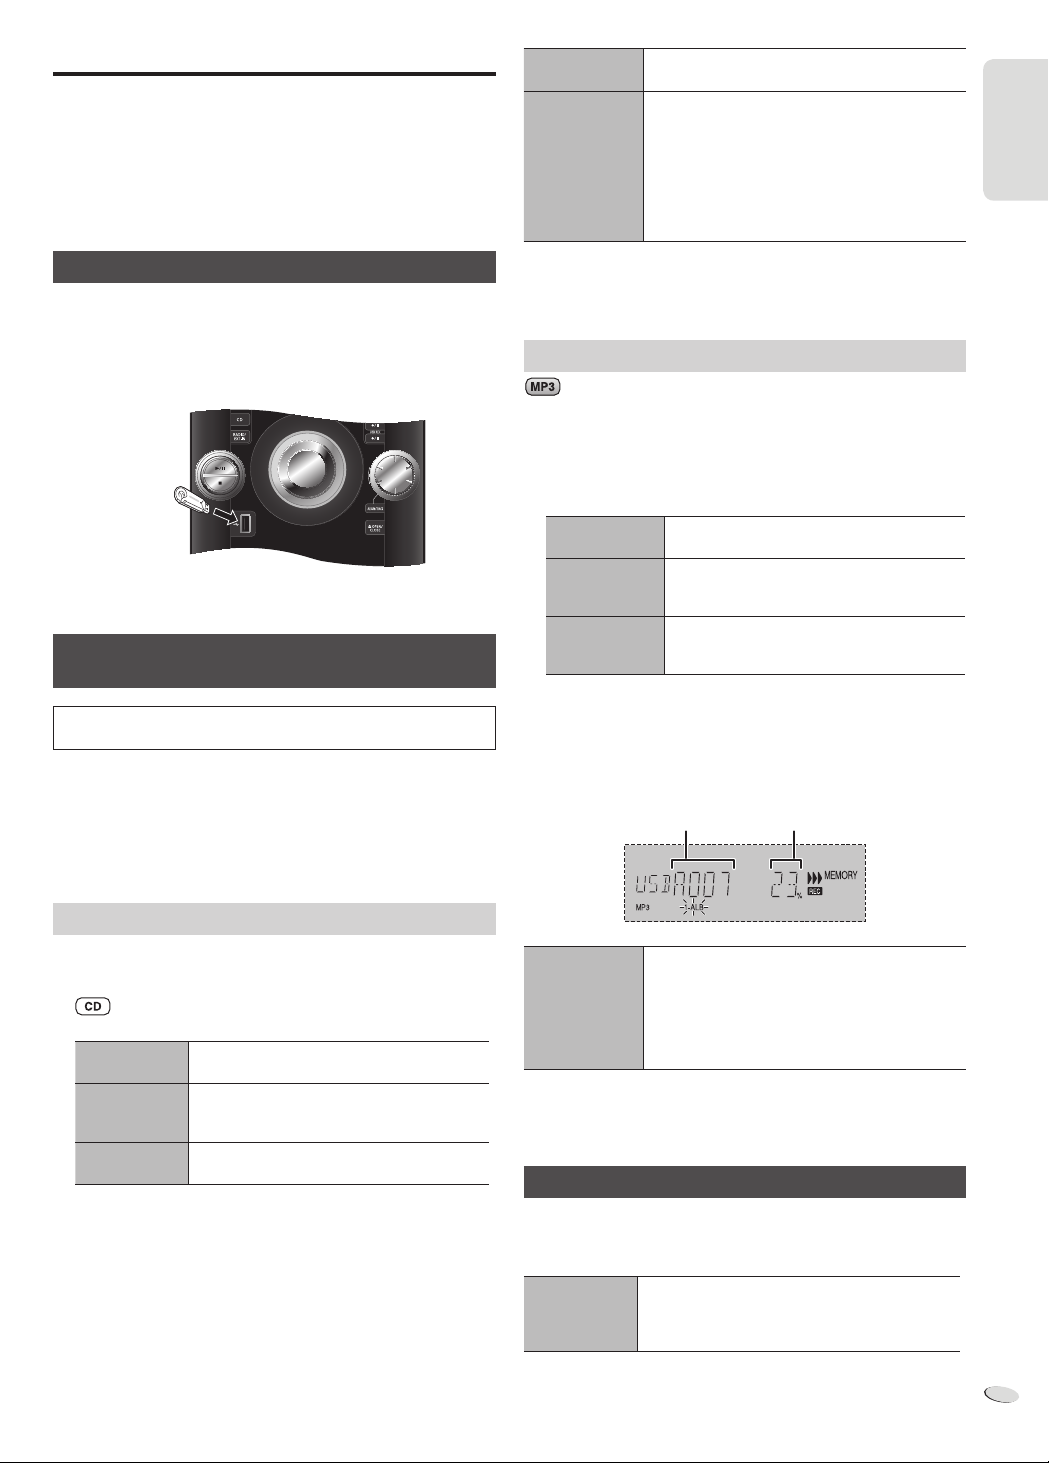
b Browse tracks or albums
Turn the knob to browse track.
Press [4/9] to start playback from the selection.
A
D
E
T
U
V
W
X
Y
Z
a
E
I
b
c
N
d
e
f
ENGLISH
Press [ALBUM/TRACK] to select album or track and
turn the knob to browse.
Press [4/9] to start playback from the selection.
c Open or close the disc tray
d Disc tray
e Microphone jack (Z 13)
f Adjust the volume of the microphone
RQTX1298
7
7
Page 8
ENGLISH
Discs
Program playback
Playing discs
1
Press [x, OPEN/CLOSE] on the main unit to open the disc
tray.
ENGLISH
Put in a disc with the label facing up.
Press [x, OPEN/CLOSE] again to close the disc tray.
2
Press [CD] and then press [4/9] to start playback.
Stop
playback
Pause
playback
Skip album
Skip track
Search
through
track
Press [8] during playback.
Press [4/9] during playback.
Press again to continue playback.
Press [R, T].
Press [2] or [6] (main unit: [2/3] or
[5/6]).
Press and hold [3] or [5] (main unit: [2/3]
or [5/6]).
Playmode function
1
Press [PLAY MENU] to select “PLAYMODE”.
2
Press [Y, U] and then press [OK] to select the desired mode.
OFF
PLAYMODE
1-TRACK
1-TR
1-ALBUM
1-ALB
RANDOM
RND
1- ALBUM
RANDOM
1-ALB RND
Note:
• This function does not work with “Program playback”.
• The setting returns to the default “OFF PLAYMODE” when you open
the disc tray.
Play all tracks.
Play one selected track on the disc.
Press the alphanumeric buttons to select the track.
Playback starts from the selected track.
Play one selected album on the disc.
Press [R, T
Play a disc randomly.
Play all tracks in one selected album randomly.
Press [R, T
]
to select the album.
]
to select the album.
This function allows you to program up to 24 tracks.
1
Press [PROGRAM] in the stop mode.
“PGM” is shown.
2
Press the alphanumeric buttons to select the desired track.
Do this step again to program other tracks.
3
Press [4/9] to start playback.
1
Press [PROGRAM] in the stop mode.
2
Press [R, T] to select the desired album.
3
Press [6] and then press the alphanumeric buttons to select
the desired track.
4
Press [OK].
Do steps 2 through 4 again to program other tracks.
5
Press [4/9] to start playback.
Cancel
program mode
Replay the
program
Check program
contents
Clear the last
track
Clear all
programmed
tracks
Note:
The program memory is cleared when you open the disc tray.
Note on CDs
• This system can access up to 99 tracks.
• This system can play MP3 files and CD-DA format audio CD-R/RW
that have been finalised.
• This system can fail to play some CD-R/RW because of the condition
of the recording.
Press [PROGRAM] in the stop mode.
Press [PROGRAM] and then press [4/9].
Press [2] or [6] when “PGM” is shown in the
stop mode.
To check while programming, press [PROGRAM]
two times after “PGM” is shown, then press [2]
or [6].
Press [DEL] in the stop mode.
Press [8] in the stop mode. “CLR ALL” is shown.
Within 5 seconds, press [8] again.
Repeat playback
You can repeat “Program playback” or other selected “Playmode
function”.
1
Press [PLAY MENU] to select “REPEAT”.
2
Press [Y, U] to select “ON REPEAT” and then press [OK].
” is shown.
“
To cancel, select “OFF REPEAT”.
Viewing available information
You can view the available information on the display panel.
Press [DISPLAY].
Note:
• Maximum characters that can be shown: approximately 32
• This system supports ver. 1.0 and 1.1 ID3 tags.
• Text data that the system does not support can show differently.
RQTX1298
8
8
Note on MP3s
• Files are treated as tracks and folders are treated as albums.
• This system can access up to 999 tracks, 255 albums and 20
sessions.
• Disc must conform to ISO9660 level 1 or 2 (except for extended
formats).
• To play in a certain order, prefix the folder and file names with 3-digit
numbers in the order you want them to play.
Limitations on MP3 playback
• If you have recorded MP3s on the same disc as CD-DA, only the
format recorded in the first session can be played.
• Some MP3s cannot be played because of the condition of the disc or
recording.
• Recordings will not necessarily be played in the order you recorded
them.
Page 9
ENGLISH
USB and internal memory
You can connect and play music tracks from your USB mass storage
device.
You can also record sound or music tracks into the 2 GB internal
memory in MP3 format.
This system can play or record up to 800 folders (maximum 999 tracks
in an album) or a total of 8000 tracks, depending on the available
storage capacity.
Stop recording
Pause recording
Press [8].
“WRITING” is shown.
Press [7/9, USB REC] or [7/9, MEMORY REC]
during recording.
Press again to continue recording.
Note:
You can pause during recording from the radio,
music port or AUX (except in SYNCHRO mode).
A track mark (Z 10, “Adding track marks”) is
added every time you pause.
ENGLISH
Connecting a USB mass storage device
Preparation
Before you connect a USB mass storage device to the system, make
sure you do a backup of the data.
Do not use a USB extension cable. The system cannot recognise USB
mass storage device connected through a cable.
USB mass
storage device
(not included)
Decrease the volume and connect the USB mass storage device
to the USB port.
Recording to a USB mass storage device or the
internal memory
Panasonic cannot be held responsible on the action of consumer to
record copyrighted contents which can cause copyright infringement.
Note:
• All recordings are in .mp3 format.
• You cannot do recording when you are using random playback mode.
• Repeat playback mode is off during recording.
• A new album is added each time you do a recording.
• The sequence of album can change after the recording.
• The recordings are kept in a folder named “REC_DATA” in the USB
mass storage device.
Note:
• “RENAME” and “ALBUM” is shown when the system rearranges and
renames the folders in ascending order.
• USB recording indicator blinks during USB recording.
Recording MP3 tracks
You can record MP3 tracks in a disc to a USB mass storage device or
the internal memory.
You can also record MP3 tracks from a USB mass storage device to
the internal memory, or vice versa.
1
Prepare the source you want to record.
Record all
tracks
Record
programmed
tracks
Record
specified album
or track
2
Press [7/9, USB REC] or [7/9, MEMORY REC] to start
recording.
Example: Recording an album from the USB mass storage device
to the internal memory.
Select “OFF PLAYMODE”
(Z 8, “Playmode function”).
Program the tracks you want
(Z 8, “Program playback”).
Select “1-ALBUM” or “1-TRACK”
(Z 8, “Playmode function”).
Album being
recorded
Percentage of the
recording process
Basic recording
1
Select the source you want to record.
Radio:
Tune in to the radio station.
:
Prepare the disc playback mode.
Record all
tracks
Record
programmed
tracks
Record a single
track
Make sure the disc is stopped.
External equipment:
Connect and play the equipment (Z 13, “External equipment”).
2
Press [7/9, USB REC] or [7/9, MEMORY REC] to start
recording.
The name of the folder that keeps the recording is shown.
Select “OFF PLAYMODE”
(Z 8, “Playmode function”).
Program the tracks you want
(Z 8, “Program playback”).
Select “1-TRACK”
(Z 8, “Playmode function”).
Stop recording
Note:
• Some tracks can use a longer time to record.
• Some MP3 tracks cannot be recorded because of the condition of the
source.
Press [8].
Recording stops at the last fully recorded track in
the album.
Example: If you stop recording during the fourth
track, only the first three tracks are
recorded. “NO FILE RECORDED” is
shown if no track is recorded.
Basic playback
1
Press [MEMORY, USB] to select “MEMORY” or “USB”.
2
Press [4/9] to start playback.
Stop playback
For other operations, refer to “Discs” (Z 8).
Press [8] during playback.
Press [4/9] to continue playback.
OR
Press [8] two times to stop the playback fully.
RQTX1298
9
9
Page 10
ENGLISH
Viewing available information
You can view the available information on the display panel.
Press [DISPLAY].
In the stop mode Available storage space or remaining recording
ENGLISH
During recording Information that is related to recording.
During playback
or pause
time of USB mass storage device or internal
memory.
Information of the current track.
Title search
You can search for the desired track in the internal memory with title
search.
1
Press [TITLE SEARCH].
” indicator blinks.
“
2
Press the alphanumeric buttons or [R, T] to select the desired
character then press [U] to select next character.
To delete a character, press [DEL].
3
Press [OK].
Press [Y, U] to search for previous or next match.
“NOTFOUND” is shown if there is no match.
4
Press [OK] to confirm and play the track.
To cancel, press [TITLE SEARCH].
Note:
• This function skip tracks that are created with basic recording
(Z 9, “Basic recording”).
• This function does not work with random or program playback.
• The character is not case sensitive.
• A same track title display will be shown for tracks with the same title.
Playlist
You can keep up to 10 playlists in the internal memory. Each playlist
can keep up to 99 tracks.
1
Press [PLAYLIST].
2
Press [R, T] to select the desired playlist.
3
Press [OK] to confirm.
“PL01 EMPTY” is shown if there is no track in the “PL01” playlist.
4
Press [R, T] to select the desired album.
Press [2] or [6] to select the desired track.
5
Press [OK].
Press [EDIT MODE] and then do steps 4 and 5 again to add other
tracks.
6
Press [4/9] to start playback.
Cancel the
playlist
Select other
playlist
Add tracks In the stop mode, press [EDIT MODE] and then
RQTX1298
View contents of
the playlist
10
10
Press [PLAYLIST] until “
Press [PLAYLIST] and then [R, T] to select the
playlist.
do steps 4 and 5 again to add other tracks.
Press [2] or [6] in the stop mode.
” has cleared.
Clear a single
track
Clear all tracks
in a playlist
In the stop mode, press [2] or [6] to select
the desired track you want to clear then press
[DEL], “DELETE?” is shown. Within 5 seconds,
press [OK].
Press [8] in the stop mode, “CLEAR?” is shown.
Within 5 seconds, press [OK].
Advanced recording functions
High-speed recording
Recording speed:
CD : Four times (4x) the normal speed.
CD-RW : Two times (2x) the normal speed.
1
Put in the disc you want to record.
2
Press [CD].
3
Press [CD HI-SPEED REC] and [7/9, USB REC] or
[7/9, MEMORY REC] together to start recording.
Note:
• If you cannot record at high-speed because of the condition of the
disc, record the CD at normal speed.
• The sound is muted during high-speed recording.
Recording from CD using analogue format
You can change your recording mode from digital recording to
analogue recording.
1
Press [CD].
2
Press and hold [EDIT MODE] to select “ANALOG-REC”.
ANALOG-REC
(analogue recording)
Note:
• The recording mode returns to the default “DIGITAL-REC” after an
analogue recording is completed.
• You cannot do high-speed recording in analogue recording mode.
Recording mode
You can select the desired recording mode before you start a basic
recording (Z 9, “Basic recording”).
Press [REC MODE] to select the desired setting.
128 KBPS Long play mode
192 KBPS Standard quality mode
320 KBPS High quality mode
Adding track marks
When recording from radio or external equipment, you can divide
tracks using various modes.
Before recording
Press [EDIT MODE] to select the desired setting.
MANUAL Add a track mark manually.
TIME MARK A track is automatically divided at 5-minute
SYNCHRO
(For music port
or AUX source)
Note:
• During recording, if you press [OK] or pause recording while using
TIME MARK mode, the 5-minute counter is reset.
• You cannot add track marks manually in SYNCHRO mode.
Press [OK] during recording to add a track
mark.
intervals.
Recording starts automatically when the other
equipment starts to play.
Recording pause when it detects silence for 3
seconds.
DIGITAL-REC
↔
(digital recording)
Page 11
ENGLISH
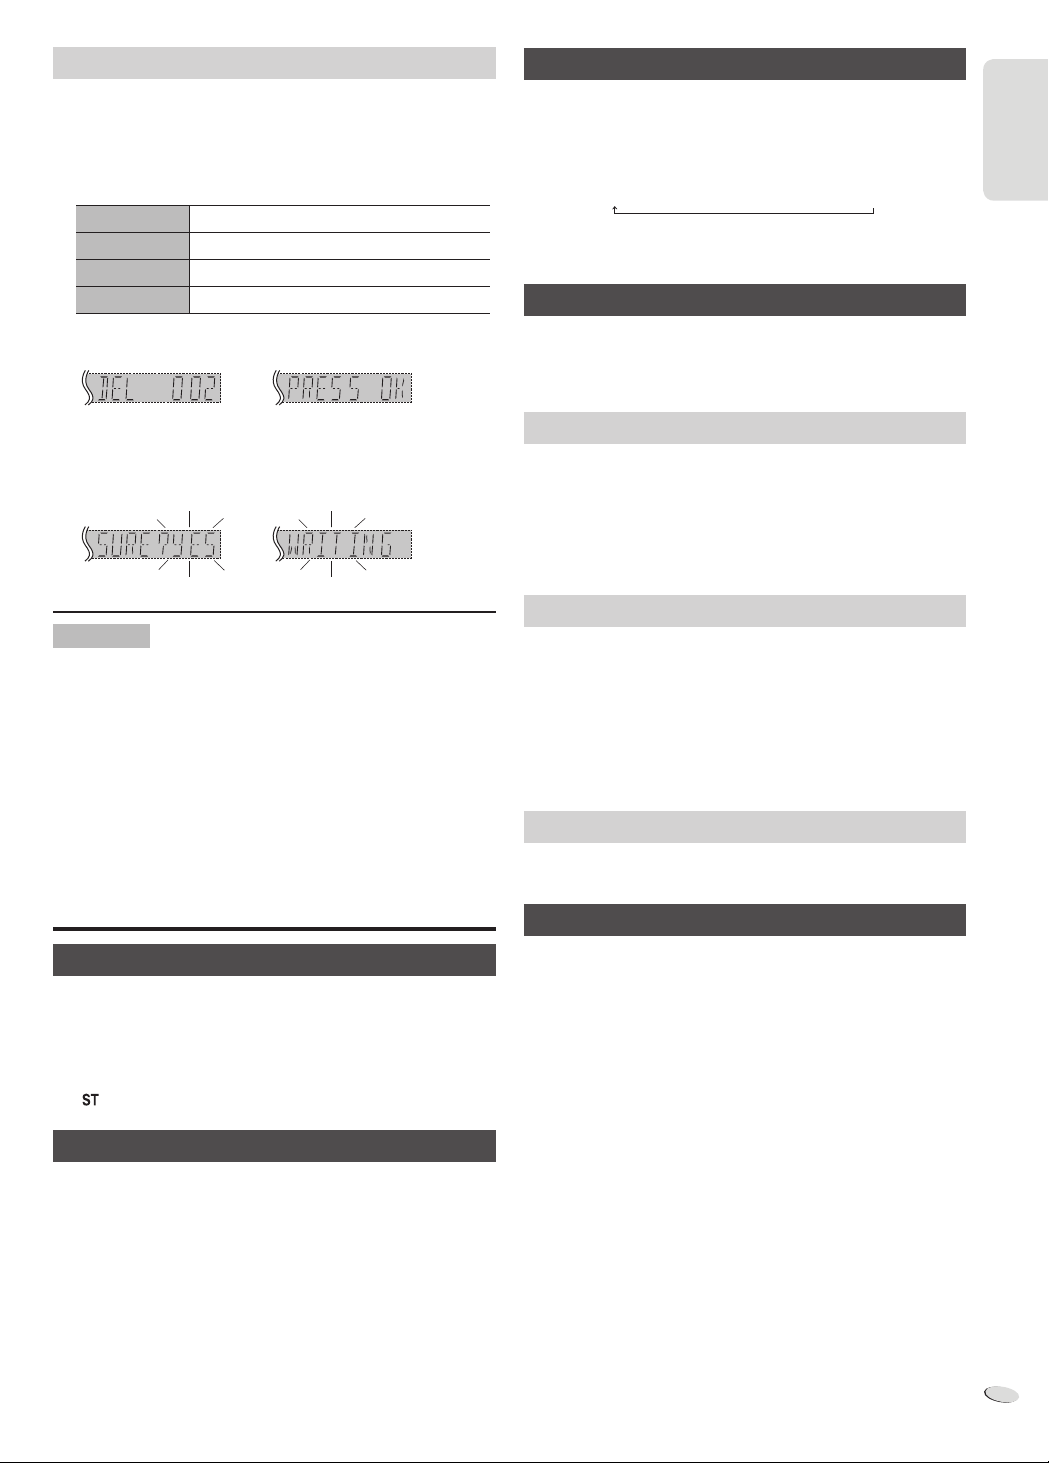
Deleting the recorded tracks
RDS broadcasting
1
Press [MEMORY, USB] to select “MEMORY” or “USB”.
2
Press [R, T] to select the desired album.
Press [2] or [6] to select the desired track.
3
Press [EDIT MODE] to select the desired mode.
TRACKDEL Delete a single track
ALBUMDEL Delete one album (maximum 999 tracks)
FORMAT Format the USB mass storage device
ALL DEL Delete all albums in the internal memory
4
Press [OK].
The selected item to be deleted is shown.
5
Press [OK].
“SURE?NO” is shown.
6
Press [Y, U] to select “YES” or “NO” and then press [OK].
Select “YES” to confirm the deletion. “WRITING” is shown.
Note on USB
Compatible devices
• USB mass storage devices that support bulk-only transfer.
• USB mass storage devices that support USB 2.0 full speed.
Supported format
• Folders are defined as album.
• Files are defined as track.
• Tracks must have the extension “.mp3” or “.MP3”.
• CBI (Control/Bulk/Interrupt) is not supported.
• NTFS file system is not supported (only FAT 12/16/32 file system is
supported).
• Depending on the sector size, some files can fail to work.
This system can show the text data transmitted by the radio data
system (RDS) available in some areas.
Press [ DISPLAY].
PS
(Station name)
Note:
RDS may not be available if reception is poor.
→
PTY
(Program type)
→
(Frequency)
FREQ
Memory presetting
30 FM and 15 AM stations can be preset.
Preparation
Press [RADIO, EXT-IN] to select “FM” or “AM”.
Automatic presetting
1
Press [OK] to select “LOWEST” or “CURRENT” frequency.
2
Press [RADIO MENU] to select “A.PRESET” and then press
[OK].
“START?” is shown.
3
Press [OK] to start presetting.
Manual presetting
1
Press [3] or [5] to tune in to the station.
2
Press [PROGRAM].
3
Press the alphanumeric buttons to select a preset number.
The new station replaces any station that occupies the same preset
number.
4
Do steps 1 through 3 again to preset more stations.
Selecting a preset station
Press the alphanumeric buttons, [2] or [6] (main unit:
[2/3] or [5/6]) to select the preset station.
ENGLISH
Radio
Manual tuning
1
Press [R ADIO, EXT-IN] to select “FM” or “AM”.
2
Press [3] or [5] to select the frequency of the required
station.
To tune automatically, press and hold the button until the frequency
starts changing quickly.
” is shown when a stereo FM broadcast is being received.
“
To improve the sound quality
When “FM” is selected
1
Press [R ADIO MENU] to select “FM MODE”.
2
Press [Y, U] to select “MONO” and then press [OK].
To cancel, select “ST”.
• “MONO” is also cancelled when you change the frequency.
• Turn off “MONO” for normal listening.
When “AM” is selected
1
Press [R ADIO MENU] to select “B.PROOF”.
2
Press [Y, U] to select “BP 1” or “BP 2” and then press [OK].
AM allocation setting (by main unit only)
This system can also receive AM broadcasts allocated in 10 kHz steps.
1
Press [R ADIO, EXT-IN] to select “FM” or “AM”.
2
Press and hold [RADIO, EXT-IN].
After a few seconds, the display panel shows the current minimum
radio frequency. Release the button when the minimum frequency
changes.
• To go back to the initial setting, do the above steps again.
• After you change the setting, preset frequencies are erased.
RQTX1298
11
11
Page 12
ENGLISH
Clock and timers
Setting the clock
This is a 24-hour clock.
1
Press [CLOCK/TIMER] to select “CLOCK”.
ENGLISH
2
Within 10 seconds, press [R, T] to set the time.
3
Press [OK].
Press [CLOCK/TIMER] to show the clock for a few seconds.
Note:
Reset the clock regularly to maintain accuracy.
Sleep timer
The sleep timer switches off the system after the set time.
Press [SLEEP] to select the setting (in minutes).
To cancel, select “OFF”.
30 MIN OFF→120 MIN→→ 60 MIN→90 MIN
To show the remaining time
Press [SLEEP].
Note:
• The sleep timer can be used together with the play timer or record
timer.
• The sleep timer always comes first. Be sure not to set an overlap of
timers.
Play and record timers
You can set the timers to come on at a certain time to:
- Wake you up (play timer).
- Record from the radio or the external equipment (record timer).
Play timer and record timer cannot be used together.
Switch on the system and set the clock.
Play timer Prepare the music source you want to listen to (disc,
Record
timer
1
Press [CLOCK/TIMER] to select the timer.
#PLAY : to set the play timer
#REC : to set the record timer
2
Within 10 seconds, press [R, T] to set the start time.
3
Press [OK].
4
Do steps 2 and 3 again to set the end time.
5
Press [R, T] to select the source you want to play or record.
6
Press [OK].
For play timer proceed to step 9.
For record timer continue from step 7.
7
Press [R, T] to select “USB” or “MEMORY” to keep the
recording.
8
Press [OK].
RQTX1298
USB, internal memory, radio or external equipment) and
set the volume.
Connect the USB mass storage device (for USB
recording) and tune to the radio station (Z 11, “Radio”)
or select the external equipment (Z 13, “External
equipment”).
CLOCK
Original display
# PLAY
# REC
12
12
To start the timer
9
Press [#, PLAY/REC] to start the timer.
10
Press [`] to switch off the system.
The system must be switched off for the timer to operate.
Change the
settings
Change the
volume
Check the
settings
Cancel
Note:
• The play timer starts at a low volume and increases gradually to the
preset level.
• The record timer starts 30 seconds before the set time with the
volume muted.
• The timer comes on at the set time every day if the timer is on.
• If you switch off the system and switch on again while a timer is in
operation, the timer will not stop at the end time.
Do steps 1 through 8 and 10 again (Z left and
above).
1) Press [#, PLAY/REC] to remove the timer
indicator on the display panel.
2) Change the volume.
3) Do steps 9 and 10.
Press [CLOCK/TIMER] to select “#PLAY” or
“#REC”.
Press [#, PLAY/REC] to remove the timer indicator
on the display panel.
Sound effects
Changing the sound quality
1
Press [SOUND] to select a sound ef fect.
2
Press [Y, U] to select the desired setting.
BASS -4 to +4
MID
TREBLE
SURROUND “ON SURROUND” or “OFF SURROUND”
INPUT LEVEL
(For music port source)
SUPERWOOFER “OFF”, “SW1”, “SW2” or “SW3”
RE-MASTER
By main unit only
1
Press [MANUAL EQ] to select “BASS”, “MID” or “TREBLE”.
2
Press [2/3] or [5/6] to adjust the level.
Preset EQ
Press [PRESET EQ] to select a setting.
HEAVY Adds punch to rock
SOFT For background music
CLEAR Clarifies higher frequencies
VOCAL Adds gloss to vocal
FLAT Cancels the sound effect
“NORMAL” or “HIGH”
Note:
Alternatively, press [SUPER WOOFER]
on the main unit to select a setting.
"ON RE-MASTER" or “OFF RE-MASTER”
Page 13
ENGLISH
D.BASS
Press [D.BASS] to select “D.BASS”, “AUTO D.BASS” or
“OFF D.BASS”.
D.BASS Enhances bass effect
AUTO D.BASS Automatically adjusts the bass effect according
OFF D.BASS Cancels the function
to the sound or music track
Using a microphone
Preparation
Decrease the volume of the system to its minimum before you connect
or disconnect a microphone.
1
Connect a microphone (not included) to the microphone
jack.
Plug type : Ø 3.5 mm monaural
2
Turn [MIC VOL, MIN/MAX] on the main unit to adjust the
volume of the microphone.
If you want to use the microphone with background music.
3
Play the music source and adjust the volume of the system.
Note:
• If a strange noise (howling) is emitted, move the microphone away
from the speakers, or decrease the volume of the microphone.
• When you do not use the microphone, disconnect it from the
microphone jack, and decrease the volume of the microphone level
to “MIN”.
External equipment
Preparation
• Disconnect the AC mains lead.
• Switch off all equipment and read the appropriate operating
instructions.
Note:
Components and cables are sold separately.
Using the music port
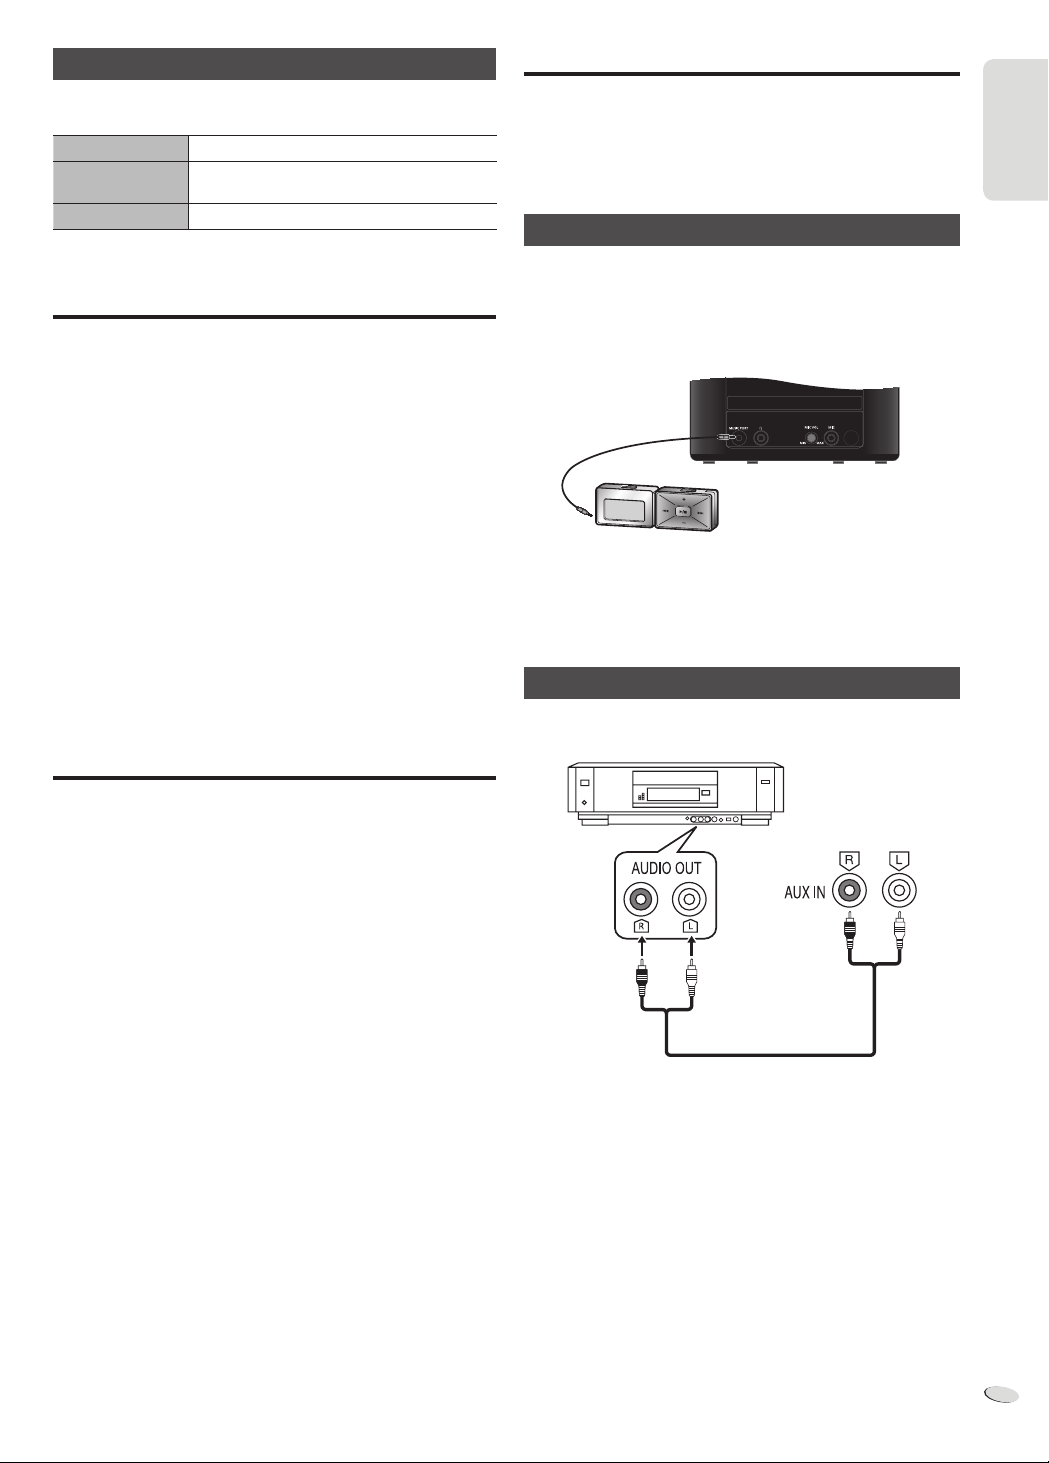
You can play music from a portable audio equipment.
Preparation
Switch off the equaliser (if any) of the portable audio equipment to
prevent sound distortion.
Decrease the volume of the system and the portable audio equipment
before you connect or disconnect the portable audio equipment.
Audio cable
(not included)
Portable audio equipment
(not included)
1
Connect the portable audio equipment.
Plug type: Ø 3.5 mm stereo
2
Press [RADIO, EXT-IN] to select “MUSIC PORT”.
3
Play the portable audio equipment.
ENGLISH
Remote control code
When other Panasonic equipment responds to the remote control of
this system, change the remote control code for this system.
Preparation
Press [RADIO, EXT-IN] to select “AUX”.
To set the code to “REMOTE 2”
1
Press and hold [RADIO, EXT-IN] on the main unit and [2] on the
remote control until “REMOTE 2” is shown.
2
Press and hold [OK] and [2] for a minimum of 4 seconds.
To set the code to “REMOTE 1”
1
Press and hold [RADIO, EXT-IN] on the main unit and [1] on
the remote control until “REMOTE 1” is shown.
2
Press and hold [OK] and [1] for a minimum of 4 seconds.
Using the auxiliary input
You can connect a VCR, DVD player etc. and listen to the audio
through this system.
VCR
(not included)
Rear panel of
this main unit
Audio cable
(not included)
1
Connect the external equipment.
2
Press [RADIO, EXT-IN] to select “AUX”.
3
Play the external equipment.
Note:
• If you want to connect equipment other than those described, refer
to the audio dealer.
• Sound distortion can occur when you use an adaptor.
RQTX1298
13
13
Page 14

ENGLISH
Troubleshooting guide
Before requesting service, make the following checks. If you are in
doubt about some of the check points, or if the solutions indicated do
not solve the problem, consult your dealer for instructions.
ENGLISH
■
Common problems
The display panel lights up and changes continuously in standby
mode.
• Press and hold [8] on the main unit to select “DEMO OFF”.
No operations can be done with the remote control.
• Examine that the battery is installed correctly.
Sound is distorted or no sound.
• Increase the volume.
• Switch off the system, determine and correct the cause, then switch
the system on again. It can be caused by straining of the speakers
through excessive volume or power, and when using the system in a
hot environment.
A “humming” sound can be heard during playback.
• An AC mains lead or fluorescent light is near the cables. Keep other
appliances and cords away from the cables of this system.
■
Discs
Display not shown correctly.
Playback does not start.
• You have not put in the disc correctly. Put it in correctly.
• Disc is dirty. Clean the disc.
• Replace the disc if it is scratched, warped, or non-standard.
• There is condensation. Let the system dry for 1 to 2 hours.
The total number of tracks shown is incorrect.
The disc cannot be read.
Distorted sound is heard.
• You put in a disc that the system cannot play. Change to a playable
disc.
• You put in a disc that has not been finalised.
■
Radio
Sound is distorted.
The stereo indicator flickers or does not light.
• Use an optional FM outdoor antenna. The antenna should be
installed by a competent technician.
A beat sound is heard.
• Switch off the TV or move it away from the system.
• Set to “BP 1” or “BP 2” when in AM tuner mode.
A low hum is heard during AM broadcasts.
• Move the antenna away from other cables and cords.
■
USB
The USB mass storage device or the contents in it cannot be read.
• The format of the USB mass storage device or the contents in it is/
are not compatible with the system.
• USB mass storage devices with storage capacity of more than 32 GB
cannot work in some conditions.
Slow operation of the USB mass storage device.
• Large content size or large memory USB mass storage device takes
longer time to read.
“ERROR”
• An incorrect operation was done. Read the instructions and try again.
“ERROR” (during recording)
• You cannot select other playback source (example: radio, USB etc.)
or press [2] or [6] during recording.
Stop the recording function.
• You cannot open disc tray when recording from AM source.
• Select a suitable recording mode (128 kbps or 192 kbps) and
continue recording.
“PLAYERROR”
• You played an unsupported MP3 file. The system will skip that track
and play the next one.
“VBR–”
• The system cannot show the remaining play time for variable bit rate
(VBR) tracks.
“NORMAL”
• The “INPUT LEVEL” of music port source automatically changes
from “HIGH” to “NORMAL” when the system detects distorted music
sounds.
“HI-SPEED CAN’T REC”
• You cannot do high-speed recording while using analogue mode.
Change to digital mode or do normal recording.
“DEVICE FULL”
• You cannot do recording because the remaining recording time of
the USB mass storage device is less than the total time of the music
source.
Change to a USB mass storage device which has enough recording
time and do the recording again.
“USB OVER CURRENT ERROR”
• The USB mass storage device is drawing too much power.
Disconnect the USB mass storage device. Switch off the system and
then switch it on again.
“NODEVICE”
• The USB mass storage device is not connected. Examine the
connection.
“NO TRACK”
• There is no album or track in the USB mass storage device or the
internal memory.
System memory reset (Initialisation)
When the following situations occur, refer to the instructions below
to reset the memory:
• There is no response when buttons are pressed.
• You want to clear and reset the memory contents.
To reset the system memory
1
Disconnect the AC mains lead.
(Wait 3 minutes before you continue with step 2.)
2
While you press and hold [1] on the main unit, connect the
AC mains lead again.
“– – – – – – – –” shows on the display panel.
3
Release [1].
All the settings are set back to the factory preset.
It is necessary to set the memory items again.
■
Main unit displays
“NO PLAY”
“UNSUPPORT”
• Examine the content. You can only play supported format.
• The files in the USB mass storage device can be corrupted. Format
the USB mass storage device and try again.
“F61”
• Examine and correct the speaker cords connection.
• Disconnect the USB mass storage device. Switch off the system and
then switch it on again.
RQTX1298
14
14
Maintenance
To clean this system, wipe with a soft, dry cloth.
• Never use alcohol, paint thinner or benzine to clean this system.
• Before using chemically treated cloth, read the instructions that came
with the cloth carefully.
Page 15

ENGLISH
Specifications
Amplifier section
RMS output power stereo mode
Front high ch (both ch driven)
145 W per channel (5
Front low ch (both ch driven)
180 W per channel (4
Total RMS stereo mode power 650 W
), 1 kHz, 10% THD
), 1 kHz, 10% THD
FM/AM tuner, terminals section
Preset station FM 30 stations
AM 15 stations
Frequency modulation (FM)
Frequency range 87.50 MHz to 108.00 MHz (50 kHz step)
Antenna terminals 75
Amplitude modulation (AM)
Frequency range 522 kHz to 1629 kHz (9 kHz step)
520 kHz to 1630 kHz (10 kHz step)
Headphones jack
Terminal Stereo, 3.5 mm jack
Output level (CD, 1 kHz, –20 dB) 0.5 mW + 0.5 mW, 32
Mic jack
Sensitivity 0.7 mV, 1.1 k
Terminal Mono, 3.5 mm jack (1 system)
Music port (front)
Sensitivity 100 mV, 4.7 k
Terminal Stereo, 3.5 mm jack
AUX input RCA pin jack
(unbalanced)
(max)
Disc section
Disc played (8 cm or 12 cm)
(1) CD-Audio (CD-DA)
(2) CD-R/RW (CD-DA, MP3
(3) MP3
MPEG-1 Layer 3
Pick up
Wavelength 790 nm (CD)
Audio output (Disc)
Number of channels 2 ch (FL, FR)
FL = Front left channel
FR = Front right channel
formatted disc)
Memory section
Memory
Memory size 2 GB
Media file format support MP3 (
Memory recording
Bit rate 128 kbps, 192 kbps, 320 kbps
Memory recording speed 1x , 4x (CD only)
Recording file format MP3 (
Capacity of total songs recorded 510 songs
(Use 128 kbps, approximately 1 song = 4 mins)
.mp3)
.mp3)
Speaker section
Type 3 way, 3 speaker system (bass reflex)
Speaker unit(s)
Super Woofer 20 cm cone type
Woofer 10 cm cone type
Tweeter 6 cm cone type
Impedance 5
Output sound pressure 86 dB/W (1 m)
Frequency range 48 Hz to 26 kHz (–16 dB)
66 Hz to 20 kHz (–10 dB)
Dimensions (W x H x D) 250 mm x 414 mm x 301 mm
Mass 5.5 kg
(high), 4 (low)
General
Power supply AC 220 to 240 V, 50 Hz
Power consumption 118 W
Dimensions (W x H x D) 220 mm x 334 mm x 249 mm
Mass 3.4 kg
Operating temperature range 0°C to +40°C
Operating humidity range 35% to 80% RH (no condensation)
Power consumption in standby mode 0.3 W (approximate)
Note:
1. Specifications are subject to change without notice.
Mass and dimensions are approximate.
2. Total harmonic distortion is measured by the digital spectrum
analyser.
ENGLISH
USB section
USB port
USB Standard USB 2.0 full speed
Media file format support MP3 (
USB device file system FAT 12, FAT 16, FAT 32
USB port power 500 mA (max)
Bit rate 16 kbps to 320 kbps (playback)
USB recording
Bit rate 128 kbps, 192 kbps, 320 kbps
USB recording speed 1x, 4x (CD only)
Recording file format MP3 (
.mp3)
.mp3)
RQTX1298
15
15
Page 16

POLSKI
Opisane procedury należy wykonać za pomocą pilota zdalnego
sterowania. Można również użyć przycisków na panelu przednim
urządzenia, jeśli są identyczne.
Niniejsza instrukcja obsługi ma zastosowanie do następującego zestawu.
Zestaw
SC-AKX52
Urządzenie główne SA-AKX52
Głośniki SB-AKX52
POLSKI
Panel tylny urządzenia
Wewnątrz urządzenia
Informacja dla użytkowników o gromadzeniu i pozbywaniu się
zużytych urządzeń i baterii
Niniejsze symbole umieszczane na produktach,
opakowaniach i/lub w dokumentacji towarzyszącej
oznaczają, że nie wolno mieszać zużytych urządzeń
elektrycznych i elektronicznych oraz baterii z innymi
odpadami domowymi.
W celu zapewnienia właściwego przetwarzania,
utylizacji oraz recyklingu zużytych produktów i baterii,
należy oddawać je do wyznaczonych punktów
gromadzenia odpadów zgodnie z przepisami prawa
krajowego oraz postanowieniami Dyrektyw 2002/96/
WE i 2006/66/WE.
Prawidłowe pozbywanie się w/w produktów i baterii
pomaga oszczędzać cenne zasoby naturalne i
zapobiegać potencjalnemu negatywnemu wpływowi na
zdrowie człowieka oraz stan środowiska naturalnego,
który towarzyszy niewłaściwej gospodarce odpadami.
Więcej informacji o zbiórce oraz recyklingu zużytych
produktów i baterii można otrzymać od władz
lokalnych, miejscowego przedsiębiorstwa oczyszczania
lub w punkcie sprzedaży, w którym użytkownik nabył
przedmiotowe towary.
Za niewłaściwe pozbywanie się powyższych odpadów
mogą grozić kary przewidziane przepisami prawa
krajowego.
Dotyczy użytkowników firmowych działających na
terenie Unii Europejskiej
Chcąc w odpowiedni sposób pozbyć się urządzeń
elektrycznych lub elektronicznych, należy
skontaktować się ze sprzedawcą lub dostawcą, który
udzieli dalszych informacji.
[Informacje o pozbywaniu się w/w urządzeń w
państwach trzecich]
Niniejsze symbole obowiązują wyłącznie na
terenie Unii Europejskiej. Chcąc pozbyć się w/w
urządzeń elektrycznych lub elektronicznych, należy
skontaktować się z władzami lokalnymi lub sprzedawcą
w sprawie właściwego sposobu wyrzucania tego
rodzaju przedmiotów.
Dotyczy symbolu baterii (symbole przykładowe):
Ten symbol może występować wraz z symbolem
pierwiastka chemicznego. W takim przypadku spełnia
RQTX1298
on wymagania Dyrektywy w sprawie określonego
środka chemicznego.
2
16
UWAGA!
PRODUKT WYKORZYSTUJE PROMIEŃ LASERA.
STEROWANIE, REGULACJE LUB POSTĘPOWANIE W
SPOSÓB TUTAJ NIE OKREŚLONY GROZI NIEBEZPIECZNYM
NAŚWIETLENIEM PROMIENIAMI LASERA.
PROSIMY NIE OTWIERAĆ OBUDOWY I NIE DOKONYWAĆ
NAPRAW SAMODZIELNIE. PROSIMY POWIERZYĆ NAPRAWY
WYKWALIFIKOWANEMU PERSONELOWI.
OSTRZEŻENIE:
ABY OGRANICZYĆ NIEBEZPIECZEŃSTWO POŻARU,
PORAŻENIA PRĄDEM LUB USZKODZENIA URZĄDZENIA,
• NIE NALEŻY WYSTAWIAĆ URZĄDZENIA NA DZIAŁANIE
DESZCZU, WILGOCI, KAPANIE LUB ZACHLAPANIE;
PONADTO NA URZĄDZENIU NIE NALEŻY USTAWIAĆ
ŻADNYCH NACZYŃ ZAWIERAJĄCYCH PŁYNY, TAKICH JAK
WAZONY.
• NALEŻY STOSOWAĆ TYLKO ZALECANE AKCESORIA.
• NIE ZDEJMOWAĆ POKRYWY (LUB PANELU TYLNEGO);
WEWNĄTRZ URZĄDZENIA NIE MA CZĘŚCI
PRZEZNACZONYCH DO WYMIANY PRZEZ UŻYTKOWNIKA.
SERWIS NALEŻY ZLECIĆ W AUTORYZOWANYM PUNKCIE
SERWISOWYM.
UWAGA!
• NINIEJSZEGO URZĄDZENIA NIE NALEŻY INSTALOWAĆ
LUB UMIESZCZAĆ W BIBLIOTECZCE, WBUDOWANEJ
SZAFCE LUB INNEJ OGRANICZONEJ PRZESTRZENI. ABY
ZAPEWNIĆ PRAWIDŁOWĄ WENTYLACJĘ NALEŻY UPEWNIĆ
SIĘ, ŻE ZASŁONY I INNE MATERIAŁY NIE ZASŁANIAJĄ
OTWORÓW WENTYLACYJNYCH TAK, ABY ZAPOBIEC
RYZYKU PORAŻENIA PRĄDEM LUB POŻARU W WYNIKU
PRZEGRZANIA.
• NIE ZASŁANIAJ OTWORÓW WENTYLACYJNYCH
URZĄDZENIA GAZETAMI, OBRUSAMI, ZASŁONAMI I
PODOBNYMI PRZEDMIOTAMI.
• NIE UMIESZCZAĆ NA URZĄDZENIU ŹRÓDEŁ OTWARTEGO
OGNIA, JAK NP. ZAPALONE ŚWIECE.
• ZUŻYTE BATERIE UTYLIZOWAĆ W SPOSÓB NIE
ZAGRAŻAJĄCY ŚRODOWISKU NATURALNEMU.
Gniazdo zasilania powinno znajdować się blisko urządzenia i być
łatwo dostępne.
Wtyczka przewodu zasilania podłączona do gniazdka powinna być
łatwo dostępna.
Aby całkowicie odłączyć urządzenie od źródła zasilania, należy
wyjąć wtyczkę przewodu zasilania z gniazdka.
To urządzenie może odbierać zakłócenia wywołane użyciem
telefonu komórkowego. Jeżeli takie zakłócenia wystąpią, wskazane
jest zwiększenie odległości pomiędzy urządzeniem a telefonem
komórkowym.
URZĄDZENIE JEST PRZEZNACZONE DO UŻYWANIA W
KLIMACIE UMIARKOWANYM.
Technologia kodowania dźwięku MPEG Layer-3 podlega licencji
firmy Fraunhofer IIS i Thomson.
Page 17

POLSKI
Środki ostrożności
Spis treści
Ustawienie urządzenia
Urządzenie należy ustawić na równej powierzchni, z dala od
miejsc bezpośrednio nasłonecznionych, w których panuje wysoka
temperatura, duża wilgotność lub występują nadmierne drgania. Takie
warunki mogą doprowadzić do uszkodzenia obudowy i innych części i
przez to skrócić czas prawidłowego działania urządzenia.
Aby uniknąć zniekształcenia i innych niekorzystnych efektów
akustycznych, ustawiać urządzenie w odległości przynajmniej 15 cm
od ścian.
Na urządzeniu nie wolno umieszczać żadnych ciężkich przedmiotów.
Napięcie
Nie wolno stosować źródeł zasilania o wysokim napięciu. Można w ten
sposób doprowadzić do przeciążenia urządzenia i spowodować pożar.
Nie wolno stosować zasilania prądem stałym. Przed podłączeniem
urządzenia do zasilania na statku lub w innym miejscu, gdzie
stosowane jest zasilanie prądem stałym, należy sprawdzić dokładnie
parametry źródła zasilania.
Ochrona przewodu zasilania
Należy sprawdzić, czy przewód zasilania jest dobrze podłączony i czy
nie jest uszkodzony. Złe podłączenie lub uszkodzenie przewodu może
być przyczyną pożaru lub porażenia prądem. Nie wolno ciągnąć za
przewód, zginać go ani kłaść na nim ciężkich przedmiotów.
Przy odłączaniu przewodu należy chwycić mocno za wtyczkę.
Ciągnięcie za przewód zasilania grozi porażeniem prądem
elektrycznym.
Nie wolno dotykać wtyczki mokrymi rękoma. Grozi to porażeniem
prądem elektrycznym.
Środki ostrożności ............................................ 3
Dostarczone wyposażenie ................................ 3
Przygotowanie pilota zdalnego sterowania .... 4
Rozmieszczenie głośników .............................. 4
Podłączenie ........................................................ 5
Opis elementów sterowania ............................. 6
Płyty kompaktowe ............................................. 8
USB i pamięć wewnętrzna ................................ 9
Radio ................................................................. 11
Zegar i timer ..................................................... 12
Efekty dźwiękowe ............................................ 12
Używanie mikrofonu ........................................13
Kod zdalnego sterowania ............................... 13
Urządzenia zewnętrzne ................................... 13
Rozwiązywanie problemów ............................ 14
Konserwacja .................................................... 14
Dane techniczne .............................................. 15
POLSKI
Obce przedmioty i substancje
Należy uważać, aby do wnętrza urządzenia nie dostały się metalowe
przedmioty. Mogą one być przyczyną porażenia prądem elektrycznym
lub nieprawidłowej pracy urządzenia.
Należy uważać, aby do wnętrza urządzenia nie dostały się substancje
płynne. Mogą one być przyczyną porażenia prądem elektrycznym
lub nieprawidłowej pracy urządzenia. Jeśli do tego dojdzie, należy
natychmiast odłączyć urządzenie od źródła zasilania i skontaktować
się ze sprzedawcą.
Nie wolno rozpylać na powierzchnię urządzenia lub do jego wnętrza
środków owadobójczych. Zawierają one łatwopalne gazy, które mog
zapalić się, jeżeli środek dostanie się do wnętrza urządzenia.
ą
Naprawa
Użytkownik nie powinien podejmować się naprawy urządzenia na
własną rękę. Jeśli dźwięk jest przerywany, wskaźniki nie świecą,
pojawia się dym lub wystąpi problem, który nie został omówiony w
niniejszej instrukcji, należy odłączyć przewód zasilania i skontaktować
się ze sprzedawcą lub autoryzowanym punktem serwisowym.
W przypadku napraw, demontażu lub przeróbek wykonywanych
przez osoby niewykwalifikowane może dojść do porażenia prądem
elektrycznym lub uszkodzenia urządzenia.
Czas eksploatacji urządzenia można wydłużyć odłączając je od źródła
zasilania, kiedy nie jest ono używane przez dłuższy okres.
Dostarczone wyposażenie
Sprawdzić i znaleźć poszczególne elementy dostarczonego
wyposażenia.
1 x Przewód zasilania
1 x Antena pętlowa AM
1 x Antena zewnętrzna FM
1 x Bateria do pilota zdalnego
sterowania
1 x Pilot zdalnego sterowania
(N2QAYB000637)
RQTX1298
3
17
Page 18

POLSKI
Przygotowanie pilota zdalnego sterowania
Rozmieszczenie głośników
Zestawy głośnikowe prawy i lewy są identyczne.
Należy stosować baterie alkaliczne lub manganowe.
Załóż baterię tak, aby jej bieguny (+ i –) były zgodne z oznaczeniami
POLSKI
wewnątrz obudowy pilota zdalnego sterowania.
Skieruj pilota w stronę czujnika (Z 7). Maksymalny zasięg, z przodu
urządzenia, wynosi 7 m, gdy na drodze sygnału nie ma żadnych
przeszkód.
UWAGA!
• Nie wolno zwierać biegunów baterii ani jej rozbierać.
• Nie ładować baterii alkalicznych ani manganowych.
• Nie wolno używać baterii, z których została zdjęta warstwa ochronna.
• Nie zbliżać baterii do źródeł ciepła lub ognia.
• Baterii nie należy pozostawiać przez dłuższy czas, w pojeździe
z zamkniętymi drzwiami i oknami, narażonym na bezpośrednie
promieniowanie słoneczne.
• Niewłaściwe obchodzenie się z bateriami, może spowodować wyciek
elektrolitu, co może być przyczyną
• Jeśli pilot ma nie być używany przez dłuższy czas, należy wyjąć z
niego baterię. Przechowywać w chłodnym, ciemnym miejscu.
UWAGA!
Istnieje niebezpieczeństwo wybuchu w przypadku, gdy baterie
zostaną nieprawidłowo założone. Baterie należy wymieniać na
takie same lub na baterie równorzędnego typu, zalecane przez
producenta. Zużytych baterii należy pozbywać się zgodnie z
instrukcjami producenta.
pożaru.
Maskownice głośników nie są zdejmowalne.
Prosimy używać tylko zestawów głośnikowych znajdujących się w
wyposażeniu.
Najlepszą jakość dźwięku pozwoli uzyskać stosowanie zestawów
głośnikowych z urządzeniem, do którego są przeznaczone.
Użycie innych zestawów głośnikowych grozi uszkodzeniem urządzenia
i pogorszeniem jakości dźwięku.
Uwaga:
• Aby zapewnić odpowiednią wentylację, należy zachować
przynajmniej 10 mm odstępu między zestawami głośnikowymi a
urządzeniem głównym.
• Zestawy głośnikowe należy ustawić na płaskim, stabilnym podłożu.
• Niniejsze zestawy g
Nie należy ich umieszczać w pobliżu odbiorników telewizyjnych,
komputerów ani innych urządzeń wrażliwych na oddziaływanie pola
magnetycznego.
• Długotrwałe odtwarzanie przy dużym poziomie głośności może
spowodować uszkodzenie urządzenia i skrócić jego żywotność.
• Aby uniknąć uszkodzenia urządzenia, w następujących przypadkach
należy zmniejszyć głośność:
– Podczas odtwarzania zniekształconych dźwięków.
– Podczas regulacji brzmienia dźwięku.
UWAGA!
• Zestawów głośnikowych należy używać wyłącznie z
zalecanym urządzeniem. W przeciwnym wypadku może dojść
do uszkodzenia wzmacniacza, zestawów głośnikowych i
do pożaru. W przypadku uszkodzenia urządzenia lub nagłej
zmiany w jakości odtwarzania należy zwrócić się po radę do
wykwalifikowanego specjalisty.
• W celu podłączenia zestawów głośnikowych należy
zastosować procedury opisane w niniejszej instrukcji.
łośnikowe nie mają ekranu magnetycznego.
RQTX1298
4
18
Page 19

TO S
POLSKI
Podłączenie
Przewód zasilania podłaczyć do gniazdka sieciowego dopiero po wykonaniu wszystkich
pozostałych połączeń.
Oszczędzanie energii
System zużywa około 0,3 W energii w trybie spoczynku. Gdy system nie jest używany, należy go odłączać od zasilania. Po odłączeniu systemu od
zasilania niektóre ustawienia zostaną utracone. Konieczne będzie ich ponowne ustawienie.
Podłącz antenę
Antenę należy zainstalować w miejscu zapewniającym najlepszy odbiór.
Antena zewnętrzna FM
Ta śma klejąca
Podłącz głośniki
SPEAKERS
Antena pętlowa AM
Kliknięcie!
POLSKI
HIGH
(5:)
L
LOW
(4:)
HIGH
(5:)
R
LOW
(4:)
TO SB-AKX52
B-AKX52
Podłącz przewód zasilania
Do zasilania tego systemu należy stosować
wyłącznie dołączony przewód sieciowy.
Nie stosować przewodów zasilania,
pochodzących z innych urządzeń.
Do domowego gniazdka zasilającego
Więcej informacji na temat gniazda AUX
można znaleźć w rozdziale „Korzystanie
z wejścia dodatkowego (AUX)” (Z 13).
RQTX1298
5
19
Page 20

POLSKI
Opis elementów sterowania
PLAY/
SLEEP
AUTO OFF
REC
A
DEF
ABC
B
POLSKI
GHI
P
QRS
JKL
TUV
MNO
W
XYZ
C
D
MEMORY
EXT-IN
RADIO
E
F
G
D.BASS
E
L
T
I
T
DISPLAY
DIMMER
SOUND
O
I
D
A
R
H
C
R
A
E
S
M
E
PRESET EQ
N
U
P
L
A
Y
L
I
S
T
EDIT
MODE
H
CD
MEMORY
MODE
USB
HI-SPEED
I
REC
J
K
L
M
N
O
P
Q
R
S
A Przełącznik „STANDBY/ON” [`], [1] (Z 12, 14)
Naciśnij ten przycisk, aby wyłączyć urządzenie (przełączyć je w
stan gotowości) lub włączyć je z powrotem. W stanie gotowości
urządzenie nadal pobiera pewną niewielką moc.
B Przyciski alfanumeryczne
Aby wprowadzić numer 2-cyfrowy
Przykład: 16: [≧10] → [1] → [6]
Aby wprowadzić znak
Przykład: B: [2] → [2]
C Usuwanie zaprogramowanej ścieżki (Z 8)
Usuwa wybrany utwór z listy odtwarzania (Z 10)
D Wybór źródła
[MEMORY, USB]: Wybór pamięć wewnętrzna lub USB (Z 9)
[MEMORY]: Wybór pamięć wewnętrzna
[USB]: Wybór USB
[CD]: Wybór płyty CD (Z 8)
[RADIO, EXT-IN]: Wybór radia, USB, port muzyczny lub AUX
E Podstawowe czynności obsługowe
[4/9]: Odtwarzanie i wstrzymywanie odtwarzania (pauza)
[8]: Zatrzymuje odtwarzanie lub nagrywanie
[2], [6]: Pominięcie utworów
[3], [5]: Wyszukaj ścieżkę
[2/3], [5/6]: Pomiń i przeszukaj ścieżkę
F Wybierz charakterystykę dźwięku (Z 12, 13)
G Uruchamia wyszukiwanie tytułu (Z 10)
H Wyświetlanie informacji na panelu
Zmniejszanie jasności wyświetlacza
Naciśnij i przytrzymaj przycisk, aby włączyć funkcję.
Ponownie naciśnij i przytrzymaj przycisk, aby anulować wybór.
I Operacja nagrywania do USB i pamięci wbudowanej (Z 9)
[CD HI-SPEED REC]: Szybkie nagrywanie CD
[7/9, USB REC]: Nagrywanie USB
[7/9, MEMORY REC]: Nagrywanie do pamięci wbudowanej
[REC MODE]: Wybór trybu nagrywania
J Ustawienie timera odtwarzania i timera nagrywania (Z 12)
K Ustawianie zegara i timera (Z 12)
L Ustawianie timera wyłączającego (Z 12)
Automatyczne wyłączanie systemu
Gdy aktywne źródło sygnału to płyta, USB lub pamięć
wbudowana, funkcja automatycznego wyłączania wyłączy
system, gdy nie jest on używany przez 30 minut.
Naciśnij i przytrzymaj przycisk, aby włączyć funkcję.
Ponownie naciśnij i przytrzymaj przycisk, aby anulować wybór.
M Ustawianie funkcji programu (Z 8, 11)
N Regulacja głośności systemu
(Z 11, 13)
Wybór zaprogramowanej stacji radiowej
Dostrój odbiornik do stacji radiowej
Wybór zaprogramowanej stacji
radiowej
RQTX1298
6
20
Page 21

POLSKI
O Wyciszanie dźwięku
Ponownie naciśnij przycisk, aby anulować wybór.
„MUTE” można wyłączyć również przez regulowanie
głośności lub wyłączając system.
P Ustawienia elementów menu odtwarzania (Z 8)
Ustawienia elementów menu radia (Z 11)
Q Tworzenie listy odtwarzania (Z 10)
R [R, T]: Ominięcie albumu
Regulacja ustawień zegara
[Y, U]: Wybór elementu menu
[OK]: Potwierdzenie ustawień
S Wybór trybu edycji dla USB lub pamięci wbudowanej
(Z 11)
T Gniazdo USB ( )
U Gniazdo muzyczne
V Gniazdo słuchawek ( )
Typ wtyku: średnicy Ø 3,5 mm, stereo (nie należy do
wyposażenia)
• Należy unikać długotrwałego słuchania, aby
zapobiec uszkodzeniu słuchu.
• Nadmierne ciśnienie akustyczne dźwięku
wydobywającego się ze słuchawek czy słuchawek
nagłownych może powodować utratę słuchu.
• Głośne słuchanie przez dłuższy okres czasu może
doprowadzić do uszkodzeń w uchu wewnętrznym.
Należy używać dołączonych lub polecanych
słuchawek.
W Czujnik zdalnego sterowania
X Wyświetlacz
Y Włącza funkcję Super Woofer (Z 12)
Z Włącza funkcję D.Bass (Z 13)
a Ręczne ustawienie korektora dźwięku (Z 12)
b Poruszanie się po utworach lub albumach
A
D
E
T
U
V
W
X
Y
Z
a
E
I
b
c
N
d
e
f
POLSKI
Przekręć pokrętło, aby przeglądnąć utwór.
Naciśnij [4/9] aby rozpocząć odtwarzanie od
wybranej pozycji.
Naciśnij [ALBUM/TRACK], aby wybrać album lub
utwór i przekręć pokrętło, aby go przeglądnąć.
Naciśnij [4/9] aby rozpocząć odtwarzanie od
wybranej pozycji.
c Otwieranie lub zamykanie kieszeni napędu płyt
d Kieszeń napędu płyt
e Gniazdo mikrofonu (Z 13)
f Regulacja głośności mikrofonu
RQTX1298
7
21
Page 22

POLSKI
Płyty kompaktowe
Odtwarzanie zaprogramowane
Odtwarzanie płyt
1
Naciśnij [x, OPEN/CLOSE] na urządzeniu, aby otworzyć
kieszeń napędu płyt.
Włóż płytę etykietą do góry.
Naciśnij ponownie [x, OPEN/CLOSE], aby zamknąć kieszeń
napędu płyt.
2
Naciśnij [CD], następnie naciśnij [4/9], aby rozpocząć
odtwarzanie.
Zatrzymywanie
odtwarzania
Wstrzymywanie
odtwarzania
Ominięcie
POLSKI
albumu
Pominięcie
utworów
Wyszukiwanie w
utwór
Podczas odtwarzania naciśnij [8].
Podczas odtwarzania naciśnij [4/9].
Naciśnij ponownie, aby kontynuować odtwarzanie.
Naciśnij [R, T].
Naciśnij [2] lub [6] (na urządzeniu:
[2/3] lub [5/6]).
Naciśnij i przytrzymaj [3] lub [5]
(na urządzeniu: [2/3] lub [5/6]).
Funkcja trybu odtwarzania
1
Naciśnij [PLAY MENU], aby wybrać „PLAYMODE”.
2
Naciśnij [Y, U], następnie naciśnij [OK], aby wybrać żądany
tryb.
OFF
PLAYMODE
1-TRACK
1-TR
1-ALBUM
1-ALB
RANDOM
RND
1-ALBUM
RANDOM
1-ALB RND
Uwaga:
• Funkcja ta nie działa z włączoną opcją „Odtwarzanie
zaprogramowane”.
• Nastawa ta powraca do domyślnej opcji „OFF PLAYMODE” z chwilą
odtwarcia kieszeń napędu płyt.
Odtwarzanie wszystkich utworów.
Odtwarzaj jeden wybrany utwór z płyty.
Naciskając odpowiednie przyciski alfanumeryczne
wybierz żądany utwór.
Odtwarzanie rozpocznie się od wybranegoj utworu.
Odtwarzaj jeden wybrany album z płyty.
Naciśnij [R, T
Odtwarzaj losowo wybraną płytę.
Odtwarzaj losowo wszystkie utwory w jednym
wybranym albumie.
Naciśnij [R, T
]
, aby wybrać album.
]
, aby wybrać album.
Ta funkcja pozwala zaprogramować do 24 utworów.
1
Naciśnij [PROGRAM] w trybie zatrzymanym.
Wyświetlony zostanie symbol „PGM”.
2
Za pomocą odpowiednich przycisków alfanumerycznych
wybierz żądany utwór.
Aby zaprogramować nowe utwory należy powtórzyć ten krok.
3
Naciśnij [4/9] aby rozpocząć odtwarzanie.
1
Naciśnij [PROGRAM] w trybie zatrzymanym.
2
Naciśnij [R, T], aby wybrać album.
3
Naciśnij [6], następnie za pomocą odpowiednich
przycisków alfanumerycznych wybierz żądany utwór.
4
Naciśnij [OK].
Aby zaprogramować nowe utwory należy powtórzyć kroki od 2 do 4.
5
Naciśnij [4/9] aby rozpocząć odtwarzanie.
Wyłączyć tryb
odtwarzania
zaprogramowanych
utworów
Powtórzyć program Naciśnij [PROGRAM], następnie naciśnij
Sprawdzić
zawartość
programu
Usunąć ostatni
zaprogramowany
utwór
Usunąć wszystkie
zaprogramowane
utwory
Uwaga:
Pamięć programu zostanie skasowana po otworzeniu podajnika płyt.
Uwaga dotycząca płyt CD
• Urządzenie moż
• To urządzenie może odtwarzać pliki w formacie MP3 oraz płyty audio
CD-R/RW formatu CD-DA poddane finalizacji.
• System ten może nie odtwarzać niektórych płyt CD-R/RW z uwagi na
jakość ich nagrania.
Naciśnij [PROGRAM] w trybie zatrzymanym.
[4/9].
Naciśnij [2] lub [6] gdy w trybie
zatrzymania odtwarzania wyświetlany jest
komunikat „PGM”.
Aby sprawdzić obecny stan podczas
programowania, należy dwukrotnie naciśnij
[PROGRAM] po wyświetleniu komunikatu
„PGM”, następnie naciśnij [2] lub [6].
Naciśnij [DEL] w trybie zatrzymanym.
W trybie zatrzymania naciśnij [8]. Wyświetlony
zostanie symbol „CLR ALL”. W ciągu 5 sekund
naciśnij ponownie [8].
e odtwarzać do 99 utworów.
Odtwarzanie z powtórzeniem
Można powtarzać „Odtwarzanie zaprogramowane” lub inną wybraną
„Funkcja trybu odtwarzania”.
1
Naciśnij [PLAY MENU], aby wybrać „REPEAT”.
2
Naciśnij [Y, U], aby wybrać „ON REPEAT” następnie naciśnij
[OK].
Wyświetlony zostanie symbol „
Aby anulować, wybierz „OFF REPEAT”.
”.
Wyświetlanie dostępnych informacji
Dostępne informacje można wyświetlać na panelu wyświetlacza.
Naciśnij [DISPLAY].
Uwaga:
• Maksymalna liczba wyświetlanych znaków: około 32
RQTX1298
• Urządzenie obsługuje etykiety w formacie 1.0 i 1.1 ID3.
• Dane tekstowe nieobsługiwane przez system mogą być wyświetlane
8
odmiennie.
22
Uwaga dotycząca MP3
• Pliki są traktowane jako utwory, a foldery jako albumy.
• Urządzenie może odtwarzać do 999 utworów, 255 albumów i
20 sesji.
• Płyty muszą być zgodne ze standardem ISO9660 poziom 1 lub 2 (z
wyjątkiem formatów rozszerzonych).
• Aby odtwarzać w określonej kolejności, poprzedź nazwy folderów i
plików 3-cyfrowymi numerami, zgodnymi z zamierzoną kolejnością
odtwarzania.
Ograniczenia dotyczące odtwarzania plików MP3
• Jeżeli pliki w formacie MP3 zostały nagrane na tej samej płycie, na
której nagrano dźwięk w formacie CD-DA, tylko format nagrany w
pierwszej sesji będzie odtwarzany.
• Niektóre utwory MP3 mogą nie być odtwarzane z uwagi na stan płyty
lub nagrania.
• Nagrania nie zawsze odtwarzane są w kolejności nagrywania.
Page 23

POLSKI
USB i pamięć wewnętrzna
System umożliwia odtwarzanie plików muzycznych z urządzenia
zewnętrznego USB.
Można również nagrywać dźwięk lub utwory muzyczne w formacie
MP3 do pamięci wbudowanej o pojemności 2 GB.
Istnieje także możliwość odtwarzania lub zapisu do 800 folderów
(maksymalnie 999 utworów w albumie), lub całościowo 8000 utworów
w zależności od pojemności pamięci.
Podłączanie urządzenia pamięci masowej USB
Przygotowanie
Przed podłączeniem zewnętrznego urządzenia pamięci masowej USB
do systemu pamiętaj, aby wykonać kopię zapasową danych.
Nie należy używać przedłużacza USB. Nie są obsługiwane urządzenia
pamięci masowej USB podłączane za pomocą przewodu.
Urządzenie
pamięci
masowej USB
(nie należy do
wyposażenia)
Zmniejszyć poziom głośności i podłącz urządzenie pamięci
masowej USB do portu USB.
Nagrywanie na urządzenie pamięci masowej USB
lub pamięci wewnętrznej
Firma Panasonic nie ponosi odpowiedzialności za działania klientów
związane z kopiowaniem treści chronionych prawem autorskim i
ewentualnym naruszeniem tym praw.
Uwaga:
• Wszystkie nagrania zapisywane są w formacie .mp3.
• Nie można włączyć nagrywania w trybie odtwarzania losowego.
• Podczas nagrywania tryb powtarzania odtwarzania jest wyłączony.
• Za każdym razem, gdy używana jest funkcja nagrywania, tworzony
jest nowy album.
• Kolejność albumów można zmienić po zakończeniu nagrywania.
• Nagrania są przechowywane w folderze o nazwie „REC_DATA” na
urządzeniu pamięci masowej USB.
Zatrzymaj
nagrywanie
Wstrzymaj
nagrywanie
Uwaga:
• Jeśli system przesunie i zmieni nazwy folderów w kolejności
rosnącej, wyświetlony zostanie komunikat „RENAME” i „ALBUM”.
• Wskaźnik nagrywania na USB świeci światłem przerywanym podczas
nagrywania na urządzenie USB.
Naciśnij [8].
Wyświetlony zostanie symbol „WRITING”.
Nacisnij [7/9, USB REC] lub [7/9, MEMORY REC]
podczas nagrywania.
Naciśnij ponownie, aby kontynuować nagrywanie.
Uwaga:
Funkcja wstrzymywania może być użyta tylko
podczas nagrywania ścieżki dźwiękowej z radia,
przez gniado muzyczne lub wejście AUX (z
wyjątkiem przypadku, gdy ustawiony jest tryb
SYNCHRO). Każde wstrzymanie nagrania powoduje
wstawienie znacznika utworu (Z 10, „Dodawanie
znaczników utworu”).
Nagrywanie utworów MP3
Utwory z płyty można kopiować w formacie MP3 na urządzenie
pamięci masowej USB lub do pamięci wbudowanej.
Utwory MP3 można nagrywać również z urządzenia pamięci masowej
USB do pamięci wbudowanej lub w odwrotnym kierunku.
1
Przygotuj źródło nagrywania.
Nagrywanie
wszystkich utworów
Nagraj
zaprogramowane
utwory
Nagrywanie
określonego albumu
lub utworu
2
Nacisnąć [7/9, USB REC] lub [7/9, MEMORY REC], aby
rozpocząć nagrywanie.
Przykład: Przegrywanie albumu z urządzenie pamięci masowej
USB do pamięci wewnętrznej.
Nagrywany album
Wybór „OFF PLAYMODE”
(Z 8, „Funkcja trybu odtwarzania”).
Zaprogramuj utwory, które chcesz nagrać
(Z 8, „Odtwarzanie zaprogramowane”).
Wybór „1-ALBUM” lub „1-TRACK”
(Z 8, „Funkcja trybu odtwarzania”).
Procent ukonczenia nagrywania
POLSKI
Podstawowe nagrywanie
1
Wybierz źródło nagrywania.
Radio:
Dostrój odbiornik do stacji radiowej.
:
Wybierz tryb odtwarzania płyty.
Nagrywanie
wszystkich
utworów
Nagraj
zaprogramowane
utwory
Nagrywanie
jednego utworu
Upewnij się, że płyta jest zatrzymana.
Urządzenia zewnętrzne:
Podłącz urządzenie zewnętrzne i włącz odtwarzanie (Z 13,
„Urządzenia zewnętrzne”).
2
Nacisnąć [7/9, USB REC] lub [7/9, MEMORY REC], aby
rozpocząć nagrywanie.
Wyświetlona zostanie nazwa folderu, w którym przechowywane są
nagrania.
Wybór „OFF PLAYMODE”
(Z 8, „Funkcja trybu odtwarzania”).
Zaprogramuj utwory, które chcesz nagrać
(Z 8, „Odtwarzanie zaprogramowane”).
Wybór „1-TRACK”
(Z 8, „Funkcja trybu odtwarzania”).
Zatrzymaj
nagrywanie
Uwaga:
• Nagrywanie niektórych utworów może potrwać dłużej.
• Niektórych utworów MP3 nie można nagrać z powodu stanu źródła.
Naciśnij [8].
Nagrywanie jest zatrzymywane po zapisaniu
ostatniego utworu w albumie.
Przykład: W przypadku zatrzymania nagrywania
podczas nagrywania czwartego utworu,
zapisane zostaną tylko trzy pierwsze.
Jeśli żaden utwór nie zostanie nagrany,
wyświetlony zostanie komunikat
„NO FILE RECORDED”.
Odtwarzanie podstawowe
1
Nacisnąć [MEMORY, USB] aby wybrać „MEMORY” lub „USB”.
2
Naciśnij [4/9] aby rozpocząć odtwarzanie.
Zatrzymywanie
odtwarzania
Pozostałe czynności obsługowe - zobacz sekcję „Płyty
kompaktowe” (Z 8).
Podczas odtwarzania naciśnij [8].
Naciśnij [4/9] aby kontynuować odtwarzanie.
LUB
Naciśnij dwukrotnie [8], aby całkowicie zatrzymać
odtwarzanie.
RQTX1298
9
23
Page 24

POLSKI
Wyświetlanie dostępnych informacji
Dostępne informacje można wyświetlać na panelu wyświetlacza.
Naciśnij [DISPLAY].
W trybie
zatrzymania
W trakcie
nagrywania
Podczas
odtwarzania lub w
stanie wstrzymania
Dostępna ilość wolnego miejsca lub pozostały
czas nagrania na urządzeniu pamięci masowej
USB lub w pamięci wbudowanej.
Informacja dotycząca nagrywania.
Informacja o bieżącym utworze.
Wykasuj jeden
utwór
Kasowanie
wszystkich
utworów na liście
odtwarzania
W trybie zatrzymania naciśnij [2] lub [6],
aby wybrać utwór, który chcesz usunąć,
a następnie naciśnij [DEL], Wyświetli się
„DELETE?”. W ciągu 5 sekund naciśnij [OK].
W trybie zatrzymania naciśnij [8], wyświetlony
zostanie komunikat „CLEAR?”. W ciągu
5 sekund naciśnij [OK].
Zaawansowane funkcje nagrywania
Szybkie nagrywanie
Wyszukiwanie po tytule
POLSKI
Za pomocą funkcji wyszukiwania tytułów można wyszukać żądany
utwór w pamięci wbudowanej.
1
Naciśnij [TITLE SEARCH].
Miga wskaźnik „
2
Przyciskami alfanumerycznymi lub [R, T] wybierz żądany
znak, następnie naciśnij [U], aby wybrać następny znak.
Aby usunąć znak, naciśnij [DEL].
3
Naciśnij [OK].
Przyciskami [Y, U] można wyszukać poprzednie lub następne
dopasowania.
W przypadku braku wyników wyszukiwania wyświetlony zostanie
komunikat „NOTFOUND”.
4
Naciśnij [OK], aby potwierdzić i odtworzyć utwór.
Aby anulować, naciśnij [TITLE SEARCH].
Uwaga:
• Funkcja ta nie uwzględnia utworów stworzonych dzięki nagrywaniu
podstawowemu (Z 9, „Podstawowe nagrywanie”).
• Ta funkcja nie działa w trybie odtwarzania losowego ani w trybie
programowania odtwarzania.
• Wielkość liter przy wyszukiwaniu nie ma znaczenia.
• Utwory o takiej samej nazwie zostaną wyświetlone w taki sam sposób.
”.
Lista odtwarzania
W pamięci wbudowanej można przechowywać maksymalnie 10 list
odtwarzania. Każda lista odtwarzania może zawierać maksymalnie
99 utworów.
1
Naciśnij [PLAYLIST].
2
Naciśnij [R, T], aby wybrać żądaną listę odtwarzania.
3
Naciśnij [OK], aby potwierdzić.
Jeśli lista odtwarzania „PL01” nie zawiera żadnych utworów,
wyświetlony zostanie komunikat „PL01 EMPTY”.
4
Naciśnij [R, T], aby wybrać album.
Naciśnij [2] lub [6], aby wybrać żądany utwór.
5
Naciśnij [OK].
Naciśnij [EDIT MODE] i powtórz krok 4 i 5, aby dodać inne utwory.
6
Naciśnij [4/9] aby rozpocząć odtwarzanie.
Anuluj listę
odtwarzania
Wybierz inną listę
odtwarzania
Dodaj utwory W trybie zatrzymania naciśnij [EDIT MODE] i
Wyświetl
zawartość listy
RQTX1298
odtwarzania
10
24
Naciśnij [PLAYLIST] na tak długo, aż zniknie
symbol „
Naciśnij [PLAYLIST], a następnie [R, T], aby
wybrać listę odtwarzania.
powtórz krok 4 i 5, aby dodać inne utwory.
W trybie zatrzymania naciśnij [2] lub [6].
”.
Prędkość nagrywania:
CD : Prędkość czterokrotnie (4x) wyższa od standardowej.
CD-RW : Prędkość dwukrotnie (2x) wyższa od standardowej.
1
Włóż płytę, którą chcesz nagrać.
2
Naciśnij [CD].
3
Naciśnij jednocześnie [CD HI-SPEED REC] i [7/9, USB REC]
lub [7/9, MEMORY REC], aby rozpocząć nagrywanie.
Uwaga:
• Jeśli z powodu stanu płyty nie jest możliwe nagrywanie w trybie
wysokiej prędkości, nagraj płytę z normalną prędkością.
• Podczas szybkiego nagrywania dźwięk zostanie wyciszony.
Nagrywanie z płyty CD w formacie analogowym
Tryb nagrywania można zmienić z cyfrowego na analogowy.
1
Naciśnij [CD].
2
Naciśnij i przytrzymaj [EDIT MODE], aby wybrać
„ANALOG-REC”.
ANALOG-REC
(nagrywanie analogowe)
Uwaga:
• Po zakończeniu nagrywania analogowego zostanie przywrócony
domyślny tryb nagrywania „DIGITAL-REC”.
• W trybie analogowym nie można korzystać z funkcji szybkiego
nagrywania.
DIGITAL-REC
↔
(nagrywanie cyfrowe)
Tryb nagrywania
Przed rozpoczęciem nagrywania podstawowego można wybrać
pożądany tryb nagrywania (Z 9, „Podstawowe nagrywanie”).
W celu wybrania odpowiedniego trybu naciśnij [REC MODE].
128 KBPS Tryb długiego odtwarzania
192 KBPS Tryb jakości standardowej
320 KBPS Tryb wysokiej jakości
Dodawanie znaczników utworu
Podczas nagrywania z radia lub urządzenia zewnętrznego, można
dzielić nagranie na utwory używając różnych trybów.
Przed rozpoczęciem nagrywania
W celu wybrania odpowiedniego trybu naciśnij [EDIT MODE].
MANUAL Dodaj znacznik utworu ręcznie.
TIME MARK Utwór jest dzielony automatycznie w odstępach
SYNCHRO
(Dotyczy gniazda
muzycznego i
źródła AUX)
Uwaga:
• Podczas nagrywania, po naciśnięciu [OK] lub wstrzymania
nagrywania, gdy używany jest tryb TIME MARK, 5-minutowy licznik
zostaje wyzerowany.
• Nie można dodawać ręcznie znaczników utworu w trybie SYNCHRO.
Naciśnij [OK], aby dodać znacznik utworu.
5-minutowych.
Nagrywanie jest włączane automatycznie,
gdy zostaje włączone odtwarzanie z innego
urządzenia.
Nagrywanie jest wstrzymywane, gdy wykryta
zostanie cisza trwająca 3 sekundy.
Page 25

POLSKI
Usuwanie nagranych utworów
Odbiór RDS
1
Nacisnąć [MEMORY, USB] aby wybrać „MEMORY” lub „USB”.
2
Naciśnij [R, T], aby wybrać album.
Naciśnij [2] lub [6], aby wybrać żądany utwór.
3
W celu wybrania odpowiedniego trybu naciśnij [EDIT MODE].
TRACKDEL Usuń jeden utwór
ALBUMDEL Usuń jeden album (maksymalnie 999 utworów)
FORMAT Formatuj urządzenie pamięci masowej USB
ALL DEL Usuń wszystkie albumy z pamięci wbudowanej
4
Naciśnij [OK].
Wyświetlona zostanie pozycja do usunięcia.
5
Naciśnij [OK].
Wyświetlony zostanie symbol „SURE?NO”.
6
Naciśnij [Y, U], aby wybrać „YES” lub „NO” następnie naciśnij
[OK].
Wybierz opcję „YES”, aby potwierdzić usunięcie. Wyświetlony
zostanie symbol „WRITING”.
Uwagi dotyczące USB
Urządzenia kompatybilne
• Urządzenia pamięci masowej USB obsługujące tryb transferu
„bulk-only”.
• Urządzenia pamięci masowej USB obsługujące tryb pracy USB 2.0
„full speed”.
Obsługiwane formaty
• Foldery są zdefiniowane jako album.
• Pliki są zdefiniowane jako utwór.
• Utwory powinny mieć rozszerzenie „.mp3” lub „.MP3”.
• CBI (arg. Control/Bulk/Interrupt) nie jest obsługiwany.
• System plików NTFS nie jest obsługiwany (obsługiwany jest
wyłącznie system plików FAT 12/16/32).
• W zależności od rozmiaru sektorów, niektóre pliki mogą nie być
dostępne.
Radio
Urządzenie to może wyświetlać dane tekstowe nadawane przez
rozgłośnie radiowe (RDS) dostępny w niektórych rejonach.
Naciśnij [DISPLAY].
PS
(Nazwa stacji)
Uwaga:
Informacje RDS mogą być niedostępne, jeżeli odbiór jest słaby.
→
PTY
(Typ programu)
FREQ
→
(Częstotliwość)
Programowanie stacji
Można zaprogramować 30 stacji FM i 15 stacji AM.
Przygotowanie
Naciśnij [RADIO, EXT-IN], aby wybrać pasmo „FM” lub „AM”.
Automatyczne programowanie
1
Aby wybrać „LOWEST” (najniższą) lub „CURRENT”
(aktualną) częstotliwość, naciśnij [OK].
2
Naciśnij [RADIO MENU], aby wybrać „A.PRESET” następnie
naciśnij [OK].
Wyświetlony zostanie symbol „START?”.
3
Naciśnij [OK], aby rozpocząć programowanie.
Ręczne programowanie stacji
1
Naciśnij [3] lub [5], aby dostroić radio do żądanej
stacji.
2
Naciśnij [PROGRAM].
3
Wybierz żądaną zaprogramowaną stację przyciskiem
alfanumeryczne.
Nowa stacja zastąpi wcześniej zaprogramowaną pod tym samym
numerem.
4
Aby zaprogramować więcej stacji, wykonaj ponownie koki od
1 do 3.
Wybieranie zaprogramowanej stacji
Naciśnij przyciski alfanumeryczne, [2] lub [6]
(na urządzeniu: [2 /3] lub [5/6], aby wybrać
zaprogramowaną stację.
POLSKI
Strojenie ręczne
1
Naciśnij [RADIO, EXT-IN], aby w ybrać pasmo „FM” lub „AM”.
2
Naciśnij [3] lub [5], aby wybrać częstotliwość stacji.
Aby uruchomić automatyczne strojenie, należy nacisnąć i
przytrzymać ten przycisk, aż do momentu, gdy wyświetlana
częstotliwość zacznie szybko się zmieniać.
Podczas odbioru stereofonicznego w paśmie FM wyświetlany
zostanie symbol „
”.
W celu poprawy brzmienia dźwięku
Jeśli wybrano pasmo „FM”
1
Naciśnij [RADIO MENU], aby wybrać „FM MODE”.
2
Naciśnij [Y, U], aby wybrać „MONO” następnie naciśnij [OK].
Aby anulować, wybierz „ST”.
• Tryb „MONO” jest również anulowany z chwilą zmiany częstotliwości.
• Podczas słuchania w normalnych warunkach tryb „MONO” powinien
być wyłączony.
Jeśli wybrano pasmo „AM”
1
Naciśnij [RADIO MENU], aby wybrać „B.PROOF”.
2
Naciśnij [Y, U], aby wybrać „BP 1” lub „BP 2” następnie
naciśnij [OK].
Ustawianie stacji w paśmie AM
(tylko poprzez urządzenie główne)
Ten system jest w stanie odbierać stacje radiowe w paśmie AM w
krokach co 10 kHz.
1
Naciśnij [RADIO, EXT-IN], aby w ybrać pasmo „FM” lub „AM”.
2
Naciśnij i przytrzymaj [RADIO, EXT-IN].
Po kilku sekundach wyświetlona zostanie bieżąca minimalna
częstotliwość radiowa. Zwolnij przycisk po zmianie minimalnego
zakresu częstotliwości.
• Aby powrócić do ustawień początkowych, należy wykonać ponownie
powyższe kroki.
• Po zmianie ustawień, zaprogramowane częstotliwości zostaną
usunięte.
RQTX1298
11
25
Page 26

POLSKI
Zegar i timer
Ustawianie zegara
Jest to zegar 24-godzinny.
1
Naciśnij [CLOCK/TIMER], aby wybrać „CLOCK”.
2
W ciągu 10 sekund naciśnij [R, T] aby ustawić czas.
3
Naciśnij [OK].
Aby wyświetlić zegar na kilka sekund, naciśnij [CLOCK/TIMER].
Uwaga:
Zegar należy regularnie nastawiać, aby zawsze była ustawiona
dokładna godzina.
Aby uaktywnić timer
9
Naciśnij [#, PLAY/REC], aby uruchomić timer.
10
Naciśnij [`], aby wyłączyć urządzenie.
Aby timer działał, urządzenie musi być wyłączone.
Zmiany
ustawień
Wybranie
innej
głośności
Sprawdzanie
ustawień
Anulowanie
Powtórz kroki od 1 do 8 i 10 (Z patrz lewej i wyżej).
1) Naciśnij [#, PLAY/REC] tak, aby symbol timera
przestał być wyświetlany.
2) Wybranie innej głośności.
3) Wykonaj kroki 9 i 10.
Naciśnij [CLOCK/TIMER] aby wybrać „#PLAY” lub
„#REC”.
Naciśnij [#, PLAY/REC] tak, aby symbol timera
przestał być wyświetlany.
Timer wyłączający
POLSKI
Timer wyłącza system po upływie ustawionego czasu.
Naciśnij [SLEEP], aby wybrać żądane ustawienie (w minutach).
Aby anulować, wybierz „OFF”.
30 MIN OFF→120 MIN→→ 60 MIN→90 MIN
Aby wyświetlić pozostały czas
Naciśnij [SLEEP].
Uwaga:
• Timer wyłączenia systemu może być używany łącznie z timerem
odtwarzania lub nagrywania.
• Timer wyłączający ma zawsze priorytet. Należy pamiętać, aby czasy
timerów się nie nakładały.
Timery odtwarzania i nagrywania
Timery można ustawić w taki sposób, aby o określonej godzinie
urządzenie:
- Budziło użytkownika (timer odtwarzania).
- Nagrywało dźwięk z radia lub urządzenia zewnętrznego (timer
nagrywania).
Nie można jednocześnie używać timera odtwarzania i nagrywania.
Włącz urządzenie i ustaw zegar.
Timer
odtwarzania
Timer
nagrywania
1
Naciśnij [CLOCK/TIMER], aby wybrać żądany timer.
#PLAY : aby ustawić timer odtwarzania
#REC : aby ustawić timer nagrywania
2
W ciągu 10 sekund naciśnij [R, T] aby ustawić czas
rozpoczęcia.
3
Naciśnij [OK].
4
Powtórz kroki 2 i 3, aby ustawić godzinę zakończenia.
5
Naciśnij [R, T], aby wybrać żądane źródło odtwarzania lub
nagrywania.
6
Naciśnij [OK].
W przypadku timera odtwarzania przejdź do punktu 9.
W przypadku timera nagrywania kontynuuj od punktu 7.
7
Przyciskami [R, T] wybierz miejsce zapisywania nagrania:
„USB” lub „MEMORY”.
RQTX1298
8
Naciśnij [OK].
Przygotuj źródło dźwięku do odsłuchu (płyta,
USB, pamięć wewnętrzna, radio lub urządzenia
zewnętrzne) i ustaw głośność.
Podłącz urządzenie pamięci masowej USB (aby
nagrywać przez USB) i dostrój radio do żądanej
stacji (Z 11, „Radio”) lub wybierz urządzenie
zewnętrzne (Z 13, „Urządzenia zewnętrzne”).
CLOCK
Pierwotna zawartość
wyświetlacza
#PLAY
#REC
12
26
Uwaga:
• Timer odtwarzania rozpoczyna odtwarzanie z niskim poziomem
głośności, który stopniowo rośnie do ustawionego poziomu.
• Timer nagrywania włączy się 30 sekund przed ustawionym czasem z
wyciszonym dźwiękiem.
• Jeśli timer jest aktywny, zadziała codziennie o ustawionej godzinie.
• W przypadku wyłączenia systemu i włączenia go ponownie podczas
pracy timera, timer nie zatrzyma się z chwilą upływu ustawionego
czasu.
Efekty dźwiękowe
Zmiana brzmienia dźwięku
1
Naciśnij [SOUND], aby wybrać żądany efekt dźwiękowy.
2
Naciśnij [Y, U], aby wybrać żądane ustawienie.
BASS -4 do +4
MID
TREBLE
SURROUND „ON SURROUND” lub „OFF SURROUND”
INPUT LEVEL
(Dotyczy źródła z
gniazda muzycznego)
SUPERWOOFER „OFF”, „SW1”, „SW2” lub „SW3”
RE-MASTER
Tylko poprzez urządzenie główne
1
Naciśnij [MANUAL EQ] aby wybrać „BASS”, „MID” lub
„TR EBLE”.
2
Naciśnij [2/3] lub [5/6 ], aby wyregulować poziom.
Zaprogramowany korektor (Preset EQ)
Naciśnij [PRESET EQ], aby wybrać jedno z ustawień.
HEAVY Poprawa brzmienia rocka
SOFT Muzyka w tle
CLEAR Czystsze brzmienie wysokich częstotliwości
VOCAL Poprawa brzmienia śpiewu
FLAT Wyłącza efekt dźwiękowy
„NORMAL” lub „HIGH”
Uwaga:
Alternatywnie, naciśnij [SUPER WOOFER]
na urządzeniu, aby wybrać żądane
ustawienie.
„ON RE-MASTER” lub „OFF RE-MASTER”
Page 27

POLSKI
D.BASS
Naciśnij [D.BASS], aby wybrać „D.BASS”, „AUTO D.BASS” lub
„OFF D.BASS”.
D.BASS Poprawia brzmienie niskich tonów
AUTO D.BASS Automatycznie dopasowuje brzmienie niskich
OFF D.BASS Anuluje funkcję
tonów do odtwarzanego dźwięku lub utworu
Używanie mikrofonu
Przygotowanie
Przed podłączeniem lub odłączeniem mikrofonu zmniejsz głośność
systemu do minimum.
1
Podłącz mikrofon (nie należy do wyposażenia) do gniazda
mikrofonowego.
Typ wtyku: Ø 3,5 mm jednouszny
2
Za pomocą pokrętła [MIC VOL, MIN/MAX] na urządzeniu ustaw
głośność mikrofonu.
Aby użyć mikrofonu z podkładem muzycznym.
3
Włącz odtwarzanie muzyki i wyreguluj poziom głośności
systemu.
Uwaga:
• Jeśli słyszany jest dziwny, nieprzyjemny dźwięk (sprzęganie), odsuń
mikrofon od głośników lub zmniejsz poziom głośności mikrofonu.
• Kiedy mikrofon nie jest używany, odłącz go od gniazda i zmniejsz
poziom głośności mikrofonu do „MIN”.
Urządzenia zewnętrzne
Przygotowanie
• Odłącz przewód zasilania.
• Wyłącz wszystkie urządzenia i zapoznaj się z odpowiednimi
instrukcjami obsługi.
Uwaga:
Podzespoły i przewody są sprzedawane oddzielnie.
Używanie gniazda muzycznego
System umożliwia odtwarzanie muzyki z przenośnych urządzeń
dźwiękowych.
Przygotowanie
Należy wyłączyć korektor dźwięku urządzenia zewnętrznego (o ile jest
włączony), aby zapobiec zniekształceniom dźwięku.
Zmniejsz głośność systemu i urządzenia zewnętrznego przed ich
podłączeniem lub rozłączeniem.
Przewód audio
(nie należy do
wyposażenia)
Przenośne urządzenie audio
(nie należy do wyposażenia)
1
Podłącz zewnętrzne urządzenie dźwiękowe.
Typ wtyku: średnicy Ø 3,5 mm, stereo
2
Naciśnij [RADIO, EXT-IN], aby wybrać pasmo „MUSIC PORT”.
3
Odtwórz przenośne urządzenie audio.
POLSKI
Kod zdalnego sterowania
Jeśli na pilota zdalnego sterowania tego systemu reagują inne
urządzenia firmy Panasonic, należy zmienić kod zdalnego sterowania
dla tego systemu.
Przygotowanie
Naciśnij [RADIO, EXT-IN], aby wybrać pasmo „AUX”.
Aby zmienić kod na „REMOTE 2”
1
Naciśnij i przytrzymaj [RADIO, EXT-IN] na urządzeniu i [2]
na pilocie zdalnego sterowania tak długo, aż wyświetlony
zostanie komunikat „REMOTE 2”.
2
Naciśnij i przytrzymaj [OK] i [2] przynajmniej przez 4 sekundy.
Aby zmienić kod na „REMOTE 1”
1
Naciśnij i przytrzymaj [RADIO, EXT-IN] na urządzeniu i [1]
na pilocie zdalnego sterowania tak długo, aż wyświetlony
zostanie komunikat „REMOTE 1”.
2
Naciśnij i przytrzymaj [OK] i [1] przynajmniej przez 4 sekundy.
Korzystanie z wejścia dodatkowego (AUX)
Umożliwia podłączenie i odsłuch zewnętrznych źródeł dźwięku, takich
jak VCR, DVD itp.
VCR
(nie należy do wyposażenia)
Tylny panel urządzenia
głównego
Przewód audio
(nie należy do
wyposażenia)
1
Podłącz urządzenie zewnętrzne.
2
Naciśnij [RADIO, EXT-IN], aby wybrać pasmo „AUX”.
3
Uruchom odtwarzanie w urządzeniu zewnętrznym.
Uwaga:
• Aby podłączyć urządzenia innego typu niż opisane w tej instrukcji,
skonsultuj się ze sprzedawcą.
• W przypadku korzystania z przejściówek, może dojść do
zniekształcenia dźwięku.
RQTX1298
13
27
Page 28

POLSKI
Rozwiązywanie problemów
Przed oddaniem urządzenia do naprawy należy przeprowadzić
następujące kontrole. W przypadku wątpliwości, co do niektórych
punktów kontrolnych lub jeśli podane rozwiązania nie eliminują
problemu, należy zwrócić się po wskazówki do sprzedawcy.
■
Typowe problemy
W trybie spoczynku wyświetlacz jest włączony a wyświetlane
informacje stale się zmieniają.
• Nacisnąć i przytrzymać [8] w panelu urządzenia głównego, w celu
wyboru „DEMO OFF”.
Nie działa pilot zdalnego sterowania.
• Sprawdź, czy bateria została prawidłowo włożona.
Dźwięk jest zniekształcony lub brak dźwięku.
POLSKI
• Wyregulować poziom głośności.
• Wyłączyć urządzenie określić i usunąć przyczynę, następnie
włączyć urządzenie ponownie. Może to być spowodowane przez
odkształcenia głośników poprzez nadmierny poziom głośności lub
zasilanie albo użytkowanie urządzenia w gorącym otoczeniu.
Podczas odtwarzania słychać „buczenie”.
• Blisko urządzenia znajdują się przewody zasilania prądem
przemiennym lub oświetlenie fluorescencyjne. Utrzymywać
przewody tego urządzenia z dala od innych urządzeń lub przewodów
zasilających.
■
Płyty kompaktowe
Błędne informacje na wyświetlaczu.
Nie uruchamia się odtwarzanie.
• Płyta nie została włożona prawidłowo. Włóż prawidłowo płytę.
• Płyta jest zabrudzona. Wyczyść plytę.
• Użyj innej płyty, jeśli jest zarysowana, wygięta lub niestandardowa.
• Nastąpiło skroplenie pary wodnej. Odczekaj 1 - 2 godziny, aż
skroplona para wodna odparuje.
Całkowita liczba wyświetlanych utworów jest nieprawidłowa.
Płyta nie może być odczytywana.
Słyszalny zniekształcony dźwięk.
• Włożona płyta nie jest obsługiwana przez system. Zmień płytę.
• Włożona płyta nie jest sfinalizowana.
■
Radio
Zniekształcenia dźwięku.
Wskaźnik stereo miga lub nie włącza się.
• Zastosować opcjonalnie zewnętrzną antenę FM. Montaż anteny
należy zlecić fachowcowi.
Słychać dudnienie.
• Wyłącz telewizor lub odsuń go od urządzenia.
• Wybierz tryb „BP 1” lub „BP 2” tunera AM.
Podczas odbioru w paśmie AM słychać przydźwięk o niskiej
częstotliwości.
• Odsuń antenę od innych kabli i przewodów.
■
USB
Nie można odczytać urządzenia pamięci masowej USB lub jego
zawartości.
• Format urządzenia USB lub jego zawartość nie jest obsługiwana
przez system.
• W niektórych przypadkach nie będą obsługiwane urządzenia pamięci
masowej USB o pojemności większej niż 32 GB.
Wolna praca urządzenia pamięci masowej USB.
• Pliki o dużych rozmiarach lub urządzenia pamięci masowej USB z
dużą ilością pamięci wymagają dłuższego czasu wczytywania.
„F61”
• Sprawdź i popraw podłączenie kabli głośników.
• Odłącz urządzenie pamięci masowej USB. Wyłącz urządzenie, a
następnie włącz je ponownie.
„ERROR”
• Wykonano niewłaściwą operację. Przeczytaj instrukcję i spróbuj
ponownie.
„ERROR” (w trakcie nagrywania)
• Nie można wybrać innego źródła odtwarzania (na przykład radio,
USB itp.) ani naciskać przycisków [2] lub [6] podczas
nagrywania.
Zatrzymaj nagrywanie.
• Nie można otworzyć napędu płyt podczas nagrywania ze źródła AM.
• Wybierz odpowiedni tryb nagrywania (128 kbps lub 192 kbps) i
wznów nagrywanie.
„PLAYERROR”
• Próba odtworzenia nieobsługiwanego pliku MP3. Urządzenie pominie
ten utwór i odtworzy następny.
„VBR–”
• Urządzenie nie może wyświetlić pozostałego czasu odtwarzania dla
utworów o zmiennej prędkości strumienia bitów (VBR – variable bit
rate).
„NORMAL”
• Poziom dźwięku „INPUT LEVEL” źródła gniazdo muzyki
automatycznie zmienia czułość z „HIGH” (wysoka) na „NORMAL”
(normalna) w przypadku wykrycia zniekształceń dźwięku.
„HI-SPEED CAN’T REC”
• W trybie analogowym nie można korzystać z funkcji szybkiego
nagrywania. Zmień ustawienie na tryb cyfrowy lub użyj nagrywania z
normalną prędkością.
„DEVICE FULL”
• Nie można użyć funkcji nagrywania, ponieważ pozostały całkowity
czas zapisu na urządzeniu pamięci masowej USB jest krótszy od
całkowitego czasu źródła muzyki.
urządzenie pamięci masowej USB na takie, które posiada
Zmień
odpowiednią ilość wolnego miejsca i uruchom ponownie nagrywanie.
„USB OVER CURRENT ERROR”
• Urządzenie pamięci masowej USB pobiera zbyt dużo prądu. Odłącz
urządzenie pamięci masowej USB. Wyłącz urządzenie, a następnie
włącz je ponownie.
„NODEVICE”
• Nie podłączono zewnętrznego urządzenia pamięci masowej USB.
Sprawdź zawartość.
„NO TRACK”
• W urządzeniu pamięci masowej USB lub w pamięci wbudowanej brak
zapisanych albumów lub utworów.
Resetowanie pamięci systemu (Inicjalizacja)
W następujących sytuacjach należy zapoznać się z poniższymi
instrukcjami, aby wyzerować pamięć:
• Brak reakcji po naciśnięciu przycisków.
• Chęć wyczyszczenia i wyzerowania zawartości pamięci.
Aby zresetować pamięć systemu
1
Odłącz przewód zasilania.
(Odczekaj 3 minuty przed przejściem do kroku 2.)
2
Naciskając i przytrzymując [1] na urządzeniu głównym,
podłącz ponownie przewód zasilania.
Na wyświetlaczu pojawi się symbol „– – – – – – – – ”.
3
Zwolnij [1].
Przywrócone zostaną wszystkie ustawiania fabryczne.
Konieczne będzie ponowne zaprogramowanie pamięci.
■
Wyświetlacz urządzenia
„NO PLAY”
„UNSUPPORT”
• Sprawdź zawartość. Odtwarzać można wyłącznie utwory o
obsługiwanym formacie.
RQTX1298
• Pliki urządzenia pamięci masowej USB mogą być uszkodzone.
14
Sformatuj urządzenie pamięci masowej USB i spróbuj ponownie.
28
Konserwacja
W celu oczyszczenia urządzenia należy przetrzeć je miękką, suchą
szmatką.
• Do czyszczenia urządzenia nie należy stosować alkoholu,
rozcieńczalnika ani benzyny.
• Przed użyciem chusteczki nasączonej środkiem chemicznym należy
zapoznać się z dołączoną do niej instrukcją.
Page 29

POLSKI
Dane techniczne
Sekcja wzmacniacza
Całkowita wyjściowa moc skuteczna w trybie stereo
Kanał przedni wysoki (przy użyciu obu kanałów)
145 W na kanał (5
zniekształcenia harmonicznego (THD)
Kanał przedni niski (przy użyciu obu kanałów)
180 W na kanał (4
zniekształcenia harmonicznego (THD)
Całkowita moc skuteczna w trybie stereo 650 W
), 1 kHz, 10% całkowitego
), 1 kHz, 10% całkowitego
Tuner FM/AM, sekcja złączy
Zaprogramowane stacje FM 30 stacji
AM 15 stacji
Modulacja częstotliwościowa (FM)
Zakres częstotliwości
87,50 MHz do 108,00 MHz (w krokach co 50 kHz)
Gniazda antenowe 75
Modulacja amplitudowa (AM)
Zakres częstotliwości
522 kHz do 1629 kHz (w krokach co 9 kHz)
520 kHz do 1630 kHz (w krokach co 10 kHz)
Gniazdo słuchawek
Złącze Stereo, złącze 3,5 mm
Poziom wyjściowy (CD, 1 kHz, –20 dB)
0,5 mW + 0,5 mW, 32
Gniazdo mikrofonu
Czułość 0,7 mV, 1,1 k
Złącze Mono, gniazdo 3,5 mm (1 system)
Gniazdo muzyczne (przód)
Czułość 100 mV, 4,7 k
Złącze Stereo, złącze 3,5 mm
Gniazdo AUX Wtyczka RCA
(niezrównoważone)
(maks.)
Sekcja odtwarzacza płyt CD
Sekcja pamięci
Pamięć
Rozmiar pamięci 2 GB
Obsługiwane formaty plików multimedialnych MP3 (
Nagrywanie do pamięci
Przepustowość w bitach 128 kbps, 192 kbps, 320 kbps
Prędkość nagrywania do pamięci 1x, 4x (tylko dla płyt CD)
Format nagrywanego pliku MP3 (
Pojemność dla nagrywanych utworów 510 utworów
(Przy 128 kbps, 1 utwór = ok. 4 minuty)
.mp3)
.mp3)
Zestawy głośnikowe
Typ System 3-drożny, 3-głośnikowy (bass-reflex)
Głośnik
Super woofer 20 cm stożkowy
Niskotonowy 10 cm stożkowy
Wysokotonowy 6 cm stożkowy
Impedancja 5
Wyjściowe ciśnienie akustyczne 86 dB/W (1 m)
Zakres częstotliwości 48 Hz do 26 kHz (–16 dB)
66 Hz do 20 kHz (–10 dB)
Wymiary (szer. x wys. x głęb.) 250 mm x 414 mm x 301 mm
Masa 5,5 kg
(wysoki), 4 (niska)
Dane ogólne
Zasilanie Prąd przemienny 220 do 240 V, 50 Hz
Pobór mocy 118 W
Wymiary (szer. x wys. x głęb.) 220 mm x 334 mm x 249 mm
Masa 3,4 kg
Zakres temperatur roboczych 0°C do +40°C
Zakres wilgotności roboczych
Od 35% do 80% RH (bez kondensacji)
POLSKI
Odtwarzane płyty (8 cm lub 12 cm)
(1) CD-Audio (CD-DA)
(2) CD-R/RW (CD-DA, płyta formatowana jako MP3
(3) MP3
MPEG-1 Layer 3
Przechwytywanie
Długość fali 790 nm (CD)
Wyjście audio (Płyta)
Liczba kanałów 2 kanały (FL, FR)
FL = Przedni lewy kanał
FR = Przedni prawy kanał
)
Sekcja USB
Gniazdo USB
Standard USB Standard USB 2.0 pełnej prędkości
Obsługiwane formaty plików multimedialnych MP3 (
System plików urządzenia USB FAT 12, FAT 16, FAT 32
Pobór mocy portu USB 500 mA (maks.)
Przepustowość w bitach 16 kbps do 320 kbps (odtwarzanie)
Nagrywanie USB
Przepustowość w bitach 128 kbps, 192 kbps, 320 kbps
Prędkość nagrywania USB 1x, 4x (tylko dla płyt CD)
Format nagrywanego pliku MP3 (
.mp3)
.mp3)
Pobór mocy w trybie gotowości 0,3 W (około)
Uwaga:
1. Dane techniczne mogą ulec zmianie bez powiadomienia.
Masa i wymiary podane są w przybliżeniu.
2. Wartość całkowitych zniekształceń harmonicznych została
zmierzona przy użyciu cyfrowego analizatora widma.
RQTX1298
15
29
Page 30

ČESKY
Ovládejte dálkovým ovladačem. Jsou-li stejné, můžete rovněž
použít tlačítka na hlavním přístroji.
Tento návod k obsluze platí pro následující systém.
Systém
Hlavní jednotka
Reproduktory
Zadní strana přístroje
SC-AKX52
SA-AKX52
SB-AKX52
POZOR!
TENTO VÝROBEK PRACUJE S LASEROVÝM PAPRSKEM.
PŘI NESPRÁVNÉM POUŽITÍ OVLÁDACÍCH PRVKŮ,
STEJNĚ JAKO PŘI PROVÁDĚNÍ JINÝCH POSTUPŮ, NEŽ
JSOU POPSÁNY V TOMTO NÁVODU, MŮŽE DOJÍT K
NEBEZPEČNÉMU VYZAŘOVÁNÍ.
NIKDY NESNÍMEJTE VNĚJŠÍ KRYT A PŘÍSTROJ
SAMI NEOPRAVUJTE. SERVIS PŘENECHTE POUZE
KVALIFIKOVANÝM OSOBÁM V AUTORIZOVANÝCH
OPRAVNÁCH.
UPOZORNĚNÍ:
ABYSTE SNÍŽILI NEBEZPEČÍ VZNIKU POŽÁRU, ÚRAZU
ELEKTRICKÝM PROUDEM NEBO POŠKOZENÍ PŘÍSTROJE:
• NEVYSTAVUJTE TOTO ZAŘÍZENÍ DEŠTI, NADMĚRNÉ
VLHKOSTI, KAPAJÍCÍ VODĚ A POSTŘÍKÁNÍ. NA ZAŘÍZENÍ BY
NEMĚLY BÝT UMISŤOVÁNY ŽÁDNÉ OBJEKTY NAPLNĚNÉ
VODOU, JAKO JSOU NAPŘÍKLAD VÁZY.
• POUŽÍVEJTE POUZE DOPORUČENÉ PŘÍSLUŠENSTVÍ.
• NEODSTRAŇUJTE KRYT PŘÍSTROJE (NEBO JEHO
ZADNÍ STRANU); UVNITŘ NEJSOU ŽÁDNÉ SOUČÁSTI,
JEJICHŽ OPRAVU BY MĚL PROVÁDĚT UŽIVATEL. OPRAVY
PŘENECHEJTE KVALIFIKOVANÝM PRACOVNÍKŮM
SERVISU.
ČESKY
Uvnitř přehrávače
Informace pro spotřebitele o sběru a likvidaci odpadu z
elektrických a elektronických zařízení a použitých baterií z
domácností
Tyto symboly na výrobcích, obalech nebo v průvodní
dokumentaci znamenají, že použitá elektrická a
elektronická zařízení a baterie nepatří do běžného
domácího odpadu.
Správná likvidace, recyklace a opětovné použití jsou
možné jen pokud odevzdáte tato zařízení a použité
baterie na místech k tomu určených, za což neplatíte
žádné poplatky, v souladu s platnými národnímu
předpisy a se Směrnicemi 2002/96/EU a 2006/66/EU.
Správnou likvidací přístrojů a baterií pomůžete šetřit
cenné suroviny a předcházet možným negativním
účinkům na lidské zdraví a na přírodní prostředí, které
jinak mohou vzniknout při nesprávném zacházení s
odpady.
Další informace o sběru, likvidaci a recyklaci starých
přístrojů a použitých baterií Vám poskytnou místní
úřady, provozovny sběrných dvorů nebo prodejna, ve
které jste toto zboží zakoupili.
Při nesprávné likvidaci odpadu vám hrozí pokuta v
souladu s národní legislativou a místními předpisy.
Informace pro právnické osoby se sídlem v
zemích Evropské Unie (EU)
Pokud chcete likvidovat elektrická nebo elektronická
zařízení, obraťte se na prodejce nebo dodavatele s
žádostí o další informace.
[Informace o likvidaci v zemích mimo Evropskou
Unii (EU)]
Tyto symboly platí jen v zemích Evropské unie. Pokud
chcete likvidovat tento produkt, obraťte se na místní
úřady nebo prodejce a informujte se o správném
způsobu likvidace.
Poznámka k symbolu baterie (symboly uprostřed
a dole):
Tento symbol může být použit v kombinaci s
RQTX1298
2
30
chemickým symbolem. V tomto případě splňuje tento
symbol legislativní požadavky, které jsou předepsány
pro chemickou látku obsaženou v baterii.
POZOR!
• ABYSTE ZAJISTILI DOBRÉ VENTILAČNÍ PODMÍNKY,
NIKDY NEINSTALUJTE TENTO PŘÍSTROJ V KNIHOVNĚ,
VESTAVĚNÉ SKŘÍNI NEBO JINÉM UZAVŘENÉM PROSTORU.
ZAJISTĚTE, ABY ZÁVĚSY A VŠECHNY OSTATNÍ MATERIÁLY
NEBRÁNILY V DOBRÉ VENTILACI, ABYSTE PŘEDEŠLI
NEBEZPEČÍ ÚRAZU ELEKTRICKÝM PROUDEM NEBO
NEBEZPEČÍ POŽÁRU, KTERÉ BY MOHLO VZNIKNOUT
PŘEHŘÁTÍM PŘÍSTROJE.
• NEBLOKUJTE VENTILAČNÍ OTVORY PŘÍSTROJE NOVINAMI,
UBRUSY, ZÁVĚSY A JINÝMI MATERIÁLY.
• NEPOKLÁDEJTE ZDROJE OTEVŘENÉHO OHNĚ, JAKO
NAPŘÍKLAD HOŘÍCÍ SVÍČKY, NA PŘÍSTROJ.
• ZBAVTE SE BATERIÍ SPRÁVNÝM ZPŮSOBEM S OHLEDEM
NA ŽIVOTNÍ PROSTŘEDÍ.
Zásuvka by měla být poblíž zařízení a snadno dostupná.
Zástrčka sít’ového přívodu by měla zůstat snadno obsluhovatelná.
Abyste přístroj zcela odpojili od sítě, odpojte zástrčku sít’ového
přívodu ze zásuvky.
Tento výrobek může být během používání rušen rádiovou
interferencí, která je způsobena mobilním telefonem. Jestliže k
takovéto interferenci dojde, zajistěte prosím větší vzdálenost mezi
tímto výrobkem a mobilním telefonem.
TENTO PŘÍSTROJ JE KONSTRUOVÁN PRO POUŽITÍ V MÍRNÉM
KLIMATU.
Technologie audio kódování MPEG Layer-3 licencovaná od
Fraunhofer IIS and Thomson.
Page 31

ČESKY
Bezpečnostní upozornění
Obsah
Umístění
Umístěte systém na vodorovný povrch mimo dosah přímého
slunečního záření, vysokých teplot, vlhkosti a přílišných vibrací. Takové
prostředí by mohlo poškodit skříňku přístroje nebo jiné komponenty a
zkrátit tak životnost systém.
Zařízení umístěte nejméně 15 cm od stěny, abyste předešli zkreslení a
nechtěným zvukovým efektům.
Na systém nepokládejte těžké předměty.
Napětí
Nepoužívejte pro napájení zásuvky s vysokým napětím. To může vést
k přetížení systém a způsobit požár.
K napájení nepoužívejte stejnosměrný zdroj. Zkontrolujte pečlivě zdroj,
zapojujete-li systém na lodi nebo podobném místě, kde se používá
stejnosměrný proud.
Ochrana přívodu střídavého proudu
Přesvědčte se, že je síťový kabel řádně zapojen, a že není poškozen.
Špatné připojení nebo poškození kabelu může zapříčinit požár nebo
úraz elektrickým proudem. Za kabel netahejte, neohýbejte ho a
neumísťujte na něj těžké předměty.
Při odpojování kabelu vždy uchopte pevně zástrčku. Tahání za kabel
může způsobit úraz elektrickým proudem.
Nezacházejte s kabelem mokrýma rukama. To může zapříčinit úraz
elektrickým proudem.
Bezpečnostní upozornění ................................3
Dodávané příslušenství ................................... 3
Příprava dálkového ovladače .......................... 4
Umístění reprosoustavy...................................4
Provedení zapojení ...........................................5
Přehled ovládání ...............................................6
Disky .................................................................. 8
USB a interní paměť ......................................... 9
Rádio ................................................................11
Hodiny a časovače ......................................... 12
Zvukové efekty................................................12
Použití mikrofonu ........................................... 13
Kód dálkového ovládání ................................ 13
Externí vybavení ............................................. 13
Odstraňování závad .......................................14
Údržba .............................................................14
Specifikace ......................................................15
ČESKY
Cizí předměty
Zabraňte vniknutí kovových předmětů do systém. To může zapříčinit
úraz elektrickým proudem nebo poruchu.
Zabraňte vniknutí kapaliny do systém. To může zapříčinit úraz
elektrickým proudem nebo poruchu. Pokud se tak stane, okamžitě
odpojte systém ze sítě a kontaktujte vašeho prodejce.
Obsahují hořlavý plyn, který by mohl ve styku s přístrojem vzplanout.
Nerozprašujte žádné insekticidy na systém ani do něj.
Servis
Nepokoušejte se systém opravit sami. Pokud přístroj přestane
hrát, kontrolky přestanou svítit, objeví se kouř nebo dojde k jinému
problému, který není popsán v těchto instrukcích, odpojte přístroj ze
sítě a kontaktujte vašeho prodejce nebo autorizovaný servis. Pokud se
nekvalifikovaná osoba snaží rozebrat nebo opravit systém, může dojít
k úrazu elektrickým proudem nebo k poškození systém.
Pokud systém delší dobu nepoužíváte, odpojte ho ze sítě, prodloužíte
tak jeho životnost.
Dodávané příslušenství
Zkontrolujte si prosím a identifikujte dodávané příslušenství.
1 x Kabel přívodu střídavého
proudu
1 x AM smyčková anténa
1 x FM pokojová anténa
1 x Baterie dálkového ovládání
1 x Dálkové ovládání
(N2QAYB000637)
RQTX1298
3
31
Page 32

ČESKY
Příprava dálkového ovladače
Umístění reprosoustavy
Pravý a levý reproduktor je stejný.
Použijte alkalické nebo manganové baterie.
Vložte baterii tak, aby se póly (+ a –) shodovaly s těmi v dálkovém
ovládání.
Zamiřte na čidlo signálu dálkového ovládání (Z 7) tak, aby v cestě
nebyly překážky, z maximální vzdálenosti 7 m přímo před přístrojem.
POZOR!
• Nerozebírejte ani nezkratujte baterie.
• Manganové nebo alkalické baterie nedobíjejte.
• Nepoužívejte baterie, u nichž se loupe obal.
• Nevystavujte teplu nebo ohni.
• Nenechávejte baterie v automobilu vystavené přímému slunečnímu
světlu po delší dobu, když jsou zavřené dveře a okna.
ČESKY
• Špatné zacházení s bateriemi může způsobit vytékání elektrolytu a
požár.
• Jestliže dálkové ovládání nebudete používat delší dobu, vyjměte z
něj baterie. Skladujte na chladném a tmavém místě.
POZOR!
V případě nesprávné výměny baterie hrozí nebezpečí výbuchu.
Vyměňujte pouze za stejný nebo rovnocenný typ, který doporučuje
výrobce. Použité baterie likvidujte podle pokynů výrobce.
Síť nemůžete odpojit od reproduktorů.
Použijte pouze reproduktory dodávané s přístrojem.
Kombinace hlavní jednotky a reproduktorů poskytuje nejlepší zvuk.
Jestliže použijete jiné reproduktory, můžete systém poškodit a snížit
kvalitu zvuku.
Poznámka:
• Reproduktory umístěte více než 10 mm od hlavního zařízení, kvůli
ventilaci.
• Reproduktory umístěte na rovný bezpečný povrch.
• Tyto reproduktory nemají magnetické stínění. Nepokládejte do
blízkosti TV, PC nebo jiného zařízení snadno ovlivnitelného
magnetismem.
• Dlouhodobé přehrávání při vysoké hlasitosti může systém poškodit a
snížit životnost systému.
• Za těchto podmínek snížení hlasitosti předchází poškození:
– Je-li zvuk zkreslený.
– Při nastavování kvality zvuku.
POZOR!
• Reproduktory používejte pouze s doporučovaným systémem.
Pokud ne, můžete poškodit zesilovač a reproduktory a
způsobit tak požář. Kontaktujte kvalifikovaného servisního
pracovníka, pokud došlo k poškození nebo ucítíte zjevnou
změnu ve výkonu přístroje.
• Při připojování reproduktorů postupujte podle zde uvedených
pokynů.
RQTX1298
4
32
Page 33

TO SB
-AKX5
2
ČESKY
Provedení zapojení
Připojte síťové napájení až poté, co byla provedena všechna ostatní zapojení.
Napájení
Systém v pohotovostním režimu spotřebuje přibližně 0,3 W. Jestliže systém nepoužíváte, napájení odpojte. Některá nastavení se mohou po
odpojení systému ztratit. Musíte je nastavit znovu.
Zapojte antény
Umístěte anténu tam, kde je příjem nejlepší.
FM pokojová anténa
Izolační páska
Zapojte reproduktory
SPEAKERS
AM smyčková anténa
Cvak!
ČESKY
L
R
TO SB-AKX52
Zapojte přístroj do sítě
S tímto systémem používejte pouze
napájení AC, které je jeho součástí.
Nepoužívejte napájecí kabely jiného
zařízení.
HIGH
(5:)
LOW
(4:)
HIGH
(5:)
LOW
(4:)
Pro domácí síťovou zásuvku
Další informace o připojení AUX
naleznete v části „Používání přídavného
vstupu“ (Z 13).
RQTX1298
5
33
Page 34

ČESKY
Přehled ovládání
PLAY/
SLEEP
AUTO OFF
REC
A
DEF
ABC
B
GHI
P
QRS
JKL
TUV
MNO
W
XYZ
C
D
MEMORY
EXT-IN
RADIO
E
ČESKY
F
G
D.BASS
E
L
T
I
T
DISPLAY
DIMMER
SOUND
O
I
D
A
R
H
C
R
A
E
S
M
E
PRESET EQ
N
U
P
L
A
Y
L
I
S
T
EDIT
MODE
H
CD
MEMORY
MODE
USB
HI-SPEED
I
REC
J
K
L
M
N
O
P
Q
R
S
A Tlačítko pro vypnutí do pohotovostního režimu/zapnutí [`],
[1] (Z 12, 14)
Stisknutím tohoto tlačítka se přístroj zapíná z pohotovostního
režimu nebo naopak vypíná. V pohotovostním režímu
(standby) přístroj stále spotřebovává malé množství el. proudu.
B Alfanumerická tlačítka
Vybrat 2-ciferné číslo
Příklad: 16: [≧10] → [1] → [6]
Vybrat znak
Příklad: B: [2] → [2]
C Smazat naprogramovanou stopu (Z 8)
Smazat vybranou skladbu v seznamu přehrávání (Z 10)
D Vybrat zdroj
[MEMORY, USB]: Vybrat interní paměť nebo USB (Z 9)
[MEMORY]: Vybrat interní paměť
[USB]: Vybrat USB
[CD]: Vybrat disk (Z 8)
[RADIO, EXT-IN]: Vybrat rádio, USB, hudebního portu nebo
E Základní operace
[4/9]: Přehrávání nebo pauza
[8]: Zastavit přehrávání nebo nahrávání
[2], [6]: Přeskakování skladeb
[3], [5]: Vyhledat stopu
[2/3], [5/6]: Přeskočit a vyhledat stopu
F Volba zvukových efektůc (Z 12, 13)
G Spustit vyhledávání titulků (Z 10)
H Zobrazit informace zobrazené na displeji
Snížit jas displeje
Stiskněte a přidržte tlačítko pro aktivaci této funkce.
Stiskněte a přidržte tlačítko znovu pro zrušení.
I Nahrávání pro USB a interní paměť (Z 9)
[CD HI-SPEED REC]: Vysokorychlostního nahrávání CD
[7/9, USB REC]: Nahrávání na USB
[7/9, MEMORY REC]: Nahrávání interní paměti
[REC MODE]: Nastavit režim nahrávání
J Nastavit časovač nahrávání a přehrávání (Z 12)
K Používání hodin a časovače (Z 12)
L Použití automatického vypnutí (Z 12)
Systém automaticky vypnout
Jestliže používáte disk, USB nebo zdroj interní paměť,
systém se v případě, že ho nepoužíváte po dobu 30 minut,
automaticky vypne.
Stiskněte a přidržte tlačítko pro aktivaci této funkce.
Stiskněte a přidržte tlačítko znovu pro zrušení.
M Nastavení programové funkce (Z 8, 11)
N Nastavení hlasitosti systému
AUX (Z 11, 13)
Vybrat přednastavenou rozhlasovou stanici
Naladit rozhlasovou stanici
Vybrat přednastavenou rozhlasovou
stanici
RQTX1298
6
34
Page 35
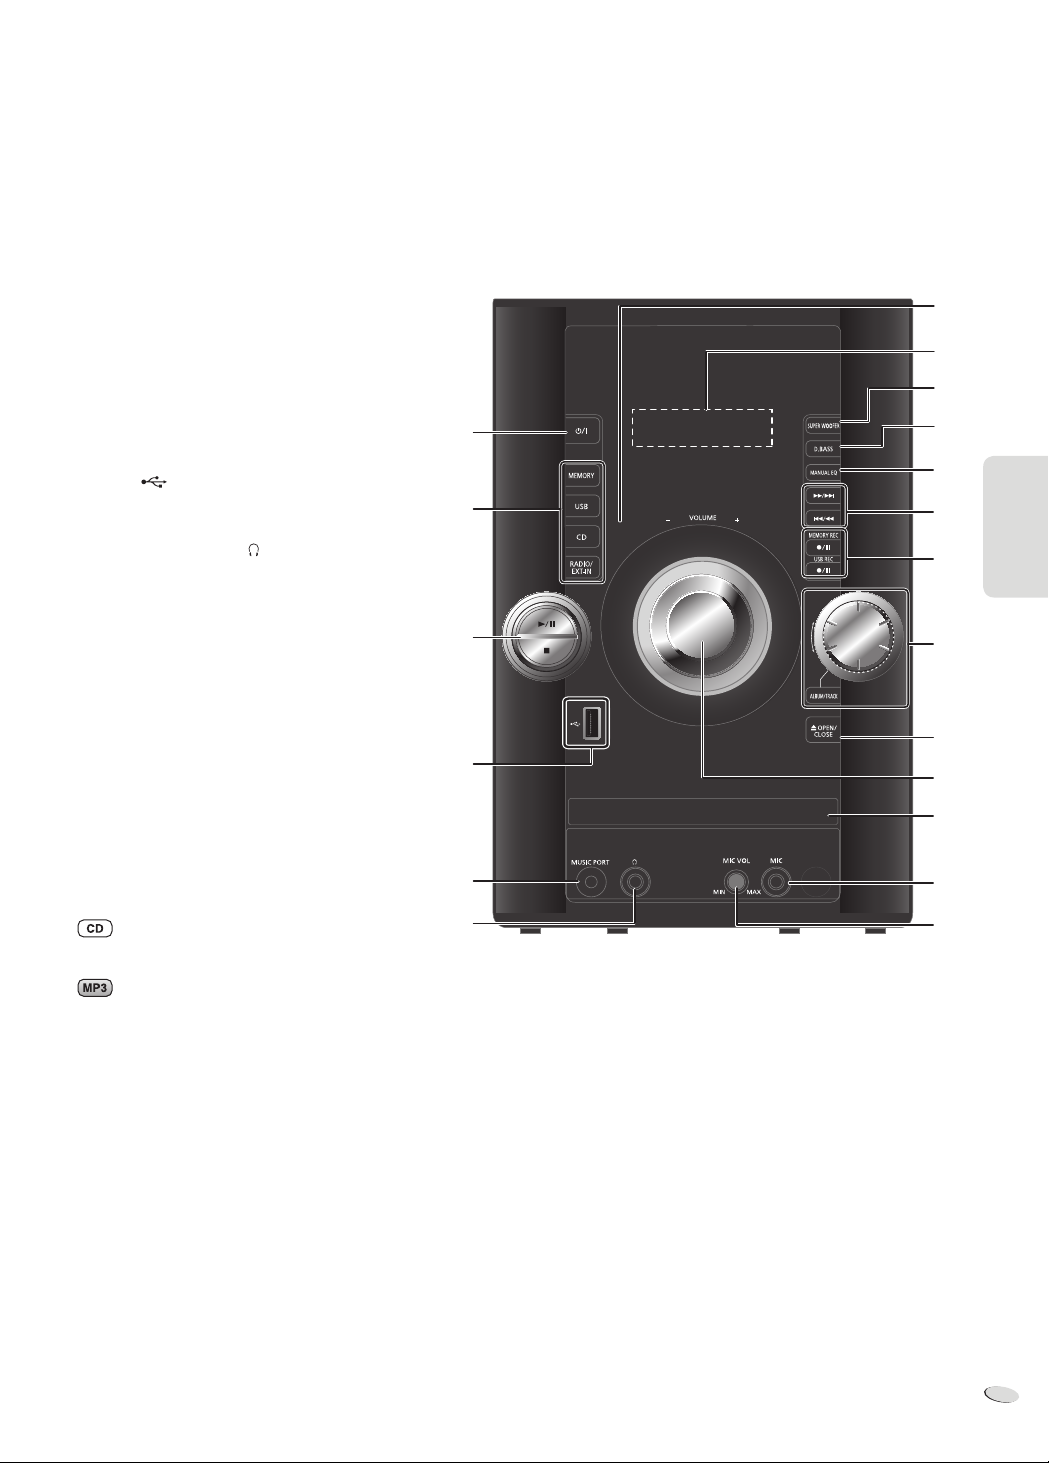
ČESKY
O Ztlumit zvuk systému
Stiskněte tlačítko znovu pro zrušení funkce.
„MUTE“ se rovněž zruší když nastavíte hlastitost nebo
když systém vypnete.
P Nastavení menu přehrávání (Z 8)
Nastavení rozhlasového menu (Z 11)
Q Vytvořit seznam přehrávání (Z 10)
R [R, T]: Přeskočit album
Nastavení hodin
[Y, U]: Výběr položky z menu
[OK]: Potvrdit nastavení
S Nastavit režim editace pro USB nebo interní paměť
(Z 11)
T USB port ( )
U Hudebního portu
V Konektory pro sluchátka ( )
Typ konektoru: stereofonní, souosý o průměru
Ø 3,5 mm (není v příslušenství)
• Vyvarujte se poslechu na delší dobu, abyste předešli
poškození sluchu.
• Příliš hlasitá reprodukce ze sluchátek může způsobit
ztrátu sluchu.
• Poslouchání na maximální hlasitost po delší dobu
může poškodit sluch uživatele. Ujistěte se, že
používáte dodávaná nebo doporučená sluchátka na
uši nebo do uší.
W Čidlo dálkového ovladače
X Panel displeje
Y Nastavit funkci Super Woofer (Z 12)
Z Nastavit funkci D.Bass (Z 13)
a Nastavit manuální efekty EQ (Z 12)
b Procházet skladby nebo alba
Chcete-li procházet skladby, otočte knoflíkem.
Pro spuštění přehrávání z výběru stiskněte [4/9].
A
D
E
T
U
V
W
X
Y
Z
a
E
I
b
c
N
d
e
f
ČESKY
Pro výběr alba nebo skladby stiskněte [ALBUM/TRACK]
a otočením knoflíku spustíte procházení.
Pro spuštění přehrávání z výběru stiskněte [4/9].
c Otevřete nebo zavřete zásuvku disku
d Zásuvky na disku
e Konektor pro mikrofon (Z 13)
f Nastavení hlasitosti mikrofonu
RQTX1298
7
35
Page 36

ČESKY
Disky
Naprogramované přehrávání
Přehrávání disků
1
Stisknutím tlačítka [x, OPEN/CLOSE] na hlavní jednotce
zásuvku disku otevřete.
Vložte disk, potiskem nahoru.
Chcete-li zavřít zásuvku, znovu stiskněte [x, OPEN/CLOSE].
2
Stiskněte [CD] a potom pro spuštění přehrávání stiskněte
[4/9].
Zastavení
přehrávání
Pozastavení
přehrávání
Přeskočit
album
Přeskakování
skladeb
Vyhledávání
mezi
skladbami
Stiskněte [8] během přehrávání.
Stiskněte [4/9] během přehrávání.
Pro pokračování přehrávání stiskněte znovu.
Stiskněte [R, T].
Stiskněte [2] nebo [6] (hlavní přístroj:
[2/3] nebo [5/6]).
Stiskněte a přidržte [3] nebo [5] (hlavní
přístroj: [2/3] nebo [5/6]).
Funkce režimu přehrávání
ČESKY
1
Stiskněte [PLAY MENU] pro volbu „PLAYMODE“.
2
Pro výběr požadovaného režimu stiskněte [Y, U] a potom [OK].
OFF
PLAYMODE
1-TRACK
1-TR
1-ALBUM
1-ALB
RANDOM
RND
1-ALBUM
RANDOM
1-ALB RND
Poznámka:
• Tato funkce nefunguje v „Naprogramované přehrávání“.
• Při otevření zásuvku disku se nastavení vrací do výchozího
„OFF PLAYMODE“.
Přehrát všechny skladby.
Přehraje jednu zvolenou skladbu na disku.
Stiskněte alfanumerická tlačítka pro výběr skladeb.
Přehrávání se spustí od vybrané skladeb.
Přehraje jedno zvolené album na disku.
Stiskněte [R, T
Přehraje jeden disk v náhodném pořadí.
Přehraje všechny skladby na jednom vybraném
albu v náhodném pořadí.
Stiskněte [R, T
]
pro výběr alba.
]
pro výběr alba.
Tato funkce vám umožní naprogramovat až 24 skladeb.
1
Stiskněte [PROGRAM] v režimu zastavení.
Zobrazí se „PGM“.
2
Pro výběr požadované skladby stiskněte alfanumerická
tlačítka.
Opakujte tento krok pro naprogramování dalších skladeb.
3
Stiskněte [4/9] pro zahájení přehrávání.
1
Stiskněte [PROGRAM] v režimu zastavení.
2
Stiskněte [R, T] pro výběr požadovaného alba.
3
Pro výběr požadované skladby stiskněte [6] a potom
alfanumerická tlačítka.
4
Stiskněte [OK].
Pro naprogramování ostatních skladeb opakujte kroky 2 až 4.
5
Stiskněte [4/9] pro zahájení přehrávání.
Zrušení
programovacího
režimu
Opětovné
přehrání
programu
Kontrolu
programových
obsahů
Smazání poslední
skladby
Smazání všech
naprogramovaných
skladeb
Poznámka:
Paměť programu se vymaže po otevření zásuvky disku.
Poznámka k CD
• Tento systém může zpřístupnit až 99 skladeb.
• Tento systém může přehrávat soubory MP3 a CD-DA ve formátu
audio CD-R/RW, které byly ukončeny.
• Tento systém nemůže přehrávat CD-R/RW, a to kvůli stavu nahrávky.
Stiskněte [PROGRAM] v režimu zastavení.
Stiskněte [PROGRAM] a potom stiskněte
[4/9].
Stiskněte [2] nebo [6] pokud se zobrazí
„PGM“ v režimu zastavení.
Pro kontrolu během programování stiskněte po
zobrazení „PGM“ dvakrát [PROGRAM], potom
stiskněte [2] nebo [6].
Stiskněte [DEL] v režimu zastavení.
Stiskněte [8] v režimu stop. Zobrazí se
„CLR ALL“. Během 5 sekund stiskněte znovu
[8].
Opakované přehrávání
Můžete opakovat „Naprogramované přehrávání“ nebo jinou vybranou
„Funkce režimu přehrávání“.
1
Stiskněte [PLAY MENU] pro volbu „REPEAT“.
2
Stiskněte [Y, U] pro výbĕr „ON REPEAT“ a potom stiskněte
[OK].
Zobrazí se „
Pro zrušení, vyberte „OFF REPEAT“.
“.
Zobrazení dostupné informace
Dostupnou informaci lze zobrazit na displeji.
Stiskněte [DISPLAY].
Poznámka:
• Maximální počet znaků, které lze zobrazit: přibližně 32
• Tento systém podporuje verzi 1.0 a 1.1 ID3 tags.
• Textové údaje, které systém nepodporuje, se mohou zobrazit různě.
RQTX1298
8
36
Poznámka k MP3
• Soubory odpovídají skladbám a složky se považují za alba.
• Tento systém má přístup až k 999 skladbám, 255 albům a 20 sekcím.
• Disk musí odpovídat normě ISO9660 úrove
rozšířených formátů).
• Složce a souborům přiřaďte názvy s trojcifernou předponou v pořadí,
v jakém je chcete přehrát.
Omezení pro přehrávání MP3
• Nahrajete-li MP3 na stejný disk jako CD-DA, bude možné přehrávat
pouze první nahranou skladbu.
• Některé MP3 nelze přehrávat kvůli stavu disku nebo nahrávky.
• Nahrávky nemusí být přehrávány v pořadí, v jakém byly pořízeny.
ň 1 nebo 2 (kromě
Page 37

ČESKY
USB a interní paměť
Skladby můžete připojit a přehrávat ze svého paměťového zařízení
USB.
Rovněž můžete hudbu nebo zvuky nahrávat do 2 GB interní paměti ve
formátu MP3.
Tento přístroj může přehrávat nebo nahrávat až 800 složek (maximálně
999 skladeb na albu) nebo celkem 8000 skladeb.
Připojení velkokapacitního paměťového zařízení
USB
Příprava
Než k systému připojíte paměťového zařízení USB, zkontrolujte, že
provedete zálohování dat.
Nepoužívejte prodlužovací USB kabel. Systém nedokáže rozpoznat
paměťového zařízení USB připojené kabelem.
Paměťového
zařízení USB
(není v příslušenství)
Snižte hlasitost a připojte paměťové paměťového zařízení USB k
USB portu.
Nahrávání na velkokapacitní paměťového zařízení
USB nebo interní paměť
Panasonic není zodpovědný za činy spotřebitele při nahrávání
obsahu chráněného copyrightem, který může poškodit porušení
copyrightu.
Poznámka:
• Všechny nahrávky jsou ve formátu mp3.
• Nahrávat nemůžete při výběru režimu náhodného přehrávání.
• Režim přehrávání opakujte během nahrávání.
• Po každém nahrávání se vytvoří nové alba.
• Sekvenci alba lze po nahrání změnit.
• Nahrávky jsou uloženy ve složce s názvem „REC_DATA“ na
paměťového zařízení USB.
Zastavení
nahrávání
Pozastavení
nahrávání
Poznámka:
• „RENAME“ a „ALBUM“ se zobrazí, když se systém přeuspořádá a
složky se přejmenují ve vzestupném pořadí.
• Během nahrávání na USB bliká indikátor nahrávání USB.
Stiskněte [8].
Zobrazí se „WRITING“.
Stiskněte [7/9, USB REC] nebo
[7/9, MEMORY REC] během nahrávání.
Stiskněte znovu pro obnovení nahrávání.
Poznámka:
Pozastavení může být provedeno pouze během
nahrávání z rádia, hudebního portu nebo AUX
(s výjimkou režimu SYNCHRO). Značka skladby
(Z 10, „Přidávání značek skladby“) se přidá při
každém zastavení.
Nahrávání MP3 skladeb
Můžete nahrávat skladby MP3 z disku do USB nebo do interní paměti.
Rovněž můžete do interní paměti nahrávat skladby MP3 z USB nebo
obráceně.
1
Připravte zdroj, který chcete nahrávat.
Nahrajte všechny
skladeb
Nahrávání
naprogramovaných
skladeb
Nahrávání
konkrétních alb
nebo skladby
2
Stiskněte [7/9, USB REC] nebo [7/9, MEMORY REC] pro
zahájení nahrávání.
Příklad: Nahrávání alba ze paměťového paměťového zařízení USB
do interní paměti.
Album se nahrává
Vybrat „OFF PLAYMODE“ (Z 8, „Funkce
režimu přehrávání“).
Naprogramujte skladeb, které chcete
nahrát (Z 8, „Naprogramované
přehrávání“).
Vybrat „1-ALBUM” nebo „1-TRACK” (Z 8,
„Funkce režimu přehrávání“).
Procenta nahrávání
ČESKY
Základní nahrávání
1
Vyber te zdroj, který chcete nahrávat.
Rádio:
Naladit rozhlasovou stanici.
:
Připravte režim přehrávání disku.
Nahrajte všechny
skladeb
Nahrávání
naprogramovaných
skladeb
Nahrávací jedné
skladby
Zkontrolujte, zda je disk zastavený.
Externí vybavení:
Připojte a spusťte zařízení (Z 13, „Externí vybavení“).
2
Stiskněte [7/9, USB REC] nebo [7/9, MEMORY REC] pro
zahájení nahrávání.
Zobrazí se název složky, do které se nahrávky ukládají.
Vybrat „OFF PLAYMODE“ (Z 8, „Funkce
režimu přehrávání“).
Naprogramujte skladby, které chcete
nahrát (Z 8, „Naprogramované
přehrávání“).
Vybrat „1-TRACK“ (Z 8, „Funkce režimu
přehrávání“).
Zastavení
nahrávání
Poznámka:
• Nahrávání některých stop může trvat déle.
• Některé MP3 skladby nelze nahrávat kvůli stavu zdroje.
Stiskněte [8].
Nahrávání se zastaví po poslední skladbě alba.
Příklad: Jestliže zastavíte nahrávání během
čtvrté stopy, budou nahrány pouze první
tři stopy. „NO FILE RECORDED“ se
zobrazí, jestliže není nahrána žádná
stopa.
Základní přehrávání
1
Stiskněte [MEMORY, USB] pro výběr „MEMORY“ nebo
„USB“.
2
Stiskněte [4/9] pro zahájení přehrávání.
Zastavení
přehrávání
Další operace viz „Disky“ (Z 8).
Stiskněte [8] během přehrávání.
Stiskněte [4/9] pro pokračování přehrávání.
NEBO
Pro zastavení přehrávání dvakrát stiskněte [8].
RQTX1298
9
37
Page 38

ČESKY
Zobrazení dostupné informace
Dostupnou informaci lze zobrazit na displeji.
Stiskněte [DISPLAY].
V režimu zastavení Dostupný prostor nebo zbývající délka
Během nahrávání Informace, které se týkají nahrávání.
Během přehrávání
nebo pauzy
nahrávání v paměťového zařízení USB nebo
interní paměti.
Informace o aktuálním stavu.
Smazání jedné
skladby
Vymazání všech
skladeb ze
seznamu skladeb
V režimu zastavení stiskněte [2] nebo [6] pro
výběr požadované skladby, kterou chcete vymazat,
a potom stiskněte [DEL]. Zobrazí se dotaz
„DELETE?“. Během 5 sekund stiskněte [OK].
Stiskněte [8] v režimu zastavení, zobrazí se
„CLEAR?“. Během 5 sekund stiskněte [OK].
Rozšířené funkce nahrávání
Vysokorychlostní nahrávání
Hledání titulu
V interní paměti můžete vyhledat požadovanou stopu.
1
Stiskněte [TITLE SEARCH].
Bliká ukazatel „
2
Pro výběr požadovaného znaku stiskněte alfanumerická tlačítka
nebo [R, T], potom stiskněte pro výběr dalšího znaku [U].
Chcete-li smazat znak, stiskněte [DEL].
ČESKY
3
Stiskněte [OK].
Pro každý předchozí nebo následující výsledek stiskněte [Y, U].
„NOTFOUND“ se zobrazí, jestliže nedojde k žádné shodě.
4
Stiskněte [OK] pro potvrzení a přehrání této skladby.
Pro zrušení, stisknĕte [TITLE SEARCH].
Poznámka:
• Tato funkce přeskočí skladby, které byly vytvořeny pomocí
základního nahrávání (Z 9, „Základní nahrávání“).
• Tato funkce nefunguje, když je zvolen režim náhodného přehrávání
nebo přehrávání podle programu.
• U znaků nerozhoduje velikost.
• Stejný titul skladby bude zobrazen pro skladby stejného titulu.
“.
Seznam přehrávání
Do interní paměti můžete uložit až 10 seznamů přehrávání. V každém
seznamu přehrávání může být až 99 skladeb.
1
Stiskněte [PLAYLIST].
2
Stiskněte [R, T] pro výběr požadovaného seznamu
přehrávání.
3
Stiskněte [OK] pro potvrzení.
„PL01 EMPTY“ se zobrazí, když v playlistu „PL01“ není žádná
skladba.
4
Stiskněte [R, T] pro výběr požadovaného alba.
Stiskněte [2] nebo [6] pro výběr své požadované skladby.
5
Stiskněte [OK].
Stiskněte [EDIT MODE] a potom opakujte krok 4 až 5 pro uložení
dalších skladeb.
6
Stiskněte [4/9] pro zahájení přehrávání.
Zrušit seznam
přehrávání
Vybrat jiný
seznam
přehrávání
Přidání skladeb V režimu zastavení stiskněte [EDIT MODE] a
RQTX1298
Zobrazit seznam
přehrávání
10
38
Stiskněte [PLAYLIST] dokud se „
Stiskněte [PLAYLIST] a potom [R, T] pro výběr
seznam přehrávání.
potom opakujte krok 4 až 5 pro uložení dalších
skladeb.
Stiskněte [2] nebo [6] v režimu zastavení.
“ nesmaže.
Rychlost nahrávání:
CD : Čtyřikrát (4x) rychleji než normální rychlostí.
CD-RW : Dvakrát (2x) rychleji než normální rychlostí.
1
Vložte disk, který chcete nahrávat.
2
Stiskněte [CD].
3
Pro zahájení nahrávání stiskněte současně [CD HI-SPEED REC]
a [7/9, USB REC] nebo [7/9, MEMORY REC].
Poznámka:
• Jestliže nemůžete nahrávat při rychlé rychlosti kvůli stavu disku,
nahrajte CD při normální rychlosti.
• Během vysokorychlostního nahrávání je zvuk ztlumen.
Nahrávání z CD pomocí analogového formátu
Můžete změnit režim nahrávání z výchozího digitálního na analogové.
1
Stiskněte [CD].
2
Stiskněte a přidržte [EDIT MODE] pro výběr „ANALOG-REC“.
ANALOG-REC
(analogové nahrávání)
Poznámka:
• Režim nahrávání se vrací do výchozího „DIGITAL-REC“ poté co je
analogové nahrávání dokončeno.
• Při používání analogového režimu nemůžete použít vysokorychlostní
nahrávání.
DIGITAL-REC
↔
(digitální nahrávání)
Režim nahrávání
Požadovaný režim nahrávání můžete vybrat před spuštěním
základního nahrávání (Z 9, „Základní nahrávání“).
Stiskněte [REC MODE] pro výběr požadovaného nastavení.
128 KBPS Režim dlouhého přehrávání
192 KBPS Režim standardní kvality
320 KBPS Režim vysoké kvality
Přidávání značek skladby
Při nahrávání z rádia nebo externího zařízení můžete skladby rozdělit s
použitím různých režimů.
Před nahráváním
Stiskněte [EDIT MODE] pro výběr požadovaného nastavení.
MANUAL Přidejte značku skladby manuálně.
TIME MARK Skladba se automaticky rozdělí do 5 minutových
SYNCHRO
(Pro hudební
port nebo zdroj
AUX)
Poznámka:
• Pokud stisknete [OK] nebo pozastavit nahrávání, když během
nahrávání použijete režim TIME MARK, vynuluje se 5 minutové
počítadlo.
• V režimu SYNCHRO nemůžete vložit značky skladeb.
Pro přidání značek skladby během nahrávání
stiskněte [OK].
intervalů.
Nahrávání se spustí automaticky, když další
zařízení začne hrát.
Nahrávání se pozastaví, když je přibližně na
3 sekundy zjištěn prázdný záznam.
Page 39

ČESKY
Mazání nahraných skladeb
RDS vysílání
1
Stiskněte [MEMORY, USB] pro výběr „MEMORY“ nebo
„USB“.
2
Stiskněte [R, T] pro výběr požadovaného alba.
Stiskněte [2] nebo [6] pro výběr své požadované skladby.
3
Stiskněte [EDIT MODE] pro výběr požadovaného režimu.
TRACKDEL Smazání jedné skladby
ALBUMDEL Smazání jednoho alba (maximálně 999 skladeb)
FORMAT Formát paměťového zařízení USB
ALL DEL Smazání všech alb v interní paměti
4
Stiskněte [OK].
Zobrazí se položka vybraná ke smazání.
5
Stiskněte [OK].
Zobrazí se „SURE?NO“.
6
Stiskněte [Y, U] pro výbĕr „YES“ nebo „NO“ a potom stiskněte
[OK].
Pro potvrzení smazání vyberte „YES“. Zobrazí se „WRITING“.
POZNÁMKA k USB
Kompatibilní zařízení
• Paměťového zařízení USB, která podporují pouze hromadný přenos.
• Paměťového zařízení USB, která podporují formát USB 2.0.
Podporované formáty
• Složky jsou definované jako album.
• Soubory jsou definované jako skladba.
• Skladba musí mít příponu „.mp3“ nebo „.MP3“.
• CBI (v angličtině, Control/Bulk/Interrupt) není podporováno.
• Souborový systém NTFS není podporován (podporován je pouze
souborový systém FAT 12/16/32).
• V závislosti na velikosti sektoru nemusí některé soubory fungovat.
Tento systém může zobrazovat textové údaje přenášené rozhlasovým
datovým systémem (RDS), který je v určitých oblastech k dispozici.
Stiskněte [DISPLAY].
PS
(Název stanice)
Poznámka:
RDS nemusí být dostupný, pokud bude příjem slabý.
→
(Typ program)
PTY
→
(Frekvence)
FREQ
Předvolba paměti
Předvoleno může být 30 FM a 15 AM stanic.
Příprava
Stiskněte [RADIO, EXT-IN] pro volbu „FM“ nebo „AM“.
Automatická předvolba
1
Pro výběr „LOWEST“ (nejnižší) nebo „CURRENT“ (aktuální)
frekvence stiskněte [OK].
2
Stiskněte [RADIO MENU] pro výbĕr „A.PRESET“ a potom
stiskněte [OK].
Zobrazí se „START?“.
3
Stiskněte [OK] pro zahájení předvolby.
Manuální předvolba
1
Pro naladění požadované stanice stiskněte [3] nebo [5].
2
Stiskněte [PROGRAM].
3
Pro výběr skladby stiskněte alfanumerická tlačítka.
Stanici, která má stejné číslo předvolby nahradí nová stanice.
4
Pro nastavení dalších stanic zopakujte kroky 1 až 3.
Volba přednastavení stanice
Stiskněte alfanumerická tlačítka, [2] nebo [6] (hlavní
přístroj: [2 /3] nebo [5/6 ]) pro výběr předvolby stanice.
ČESKY
Rádio
Ruční ladění
1
Stiskněte [R ADIO, EXT-IN] pro volbu „FM“ nebo „AM“.
2
Stiskněte [3] nebo [5] pro výběr frekvence požadované
stanice.
Pro automatické ladění tlačítko stiskněte a přidržte dokud se
frekvence nezačne rychle měnit.
“ zobrazí se, když je přijímáno FM vysílání.
„
Pro zlepšení kvality zvuku
Když je vybráno „FM“
1
Stiskněte [R ADIO MENU] pro výběr „FM MODE“.
2
Stiskněte [Y, U] pro výbĕr „MONO“ a potom stiskněte [OK].
Pro zrušení, vyberte „ST“.
• „MONO“ se při změně frekvence také změní.
• Vypněte „MONO“ pro normální poslech.
Když je vybráno „AM“
1
Stiskněte [R ADIO MENU] pro výběr „B.PROOF“.
2
Stiskněte [Y, U] pro výbĕr „BP 1“ nebo „BP 2“ a potom
stiskněte [OK].
Nastavení přiřazení AM (pouze pomocí hlavní jednotky)
Tento systém může rovněž přijímat vysílání AM v krocích po 10 kHz.
1
Stiskněte [R ADIO, EXT-IN] pro volbu „FM“ nebo „AM“.
2
Stiskněte a přidržte [RADIO, EXT-IN].
Po několika sekundách se na displeji zobrazí aktuální minimální
rozhlasová frekvence. Když se minimální frekvence změní, uvolněte
tlačítko.
• Abyste se vrátili zpět na původní nastavení, zopakujte výše uvedené
kroky.
• Po změně nastavení jsou přednastavené frekvence vymazány.
RQTX1298
11
39
Page 40

ČESKY
Hodiny a časovače
Nastavení hodin
Toto jsou hodiny s 24 hodinovým ukazatelem.
1
Stiskněte [CLOCK/TIMER] pro výbĕr „CLOCK“.
2
Během 10 sekund stiskněte [R, T] pro nastavení času.
3
Stiskněte [OK].
Pro zobrazení hodin na pár sekund stiskněte [CLOCK/TIMER].
Poznámka:
Pro zachování přesného času provádějte pravidelně opravu času.
Automatického vypnutí
Časomíra vypne systém po uplynutí nastavené doby.
Stiskněte [SLEEP] opět pro výběr požadovaného času (v
minutách).
Pro zrušení, vyberte „OFF“.
30 MIN OFF→120 MIN→→ 60 MIN→90 MIN
Pro zobrazení zbývajícího času
Stiskněte [SLEEP].
ČESKY
Poznámka:
• Časovač automatického vypnutí lze použít společně s časomírou
přehrávání nebo nahrávání.
• Časovač automatického vypnutí má vždy přednost. Zkontrolujte, že
nenastavíte překrývání časovačů.
Pro spuštění časovače
9
Pro spuštění časovače stiskněte [#, PLAY/REC].
10
Pro vypnutí systému stiskněte [`].
Systém musí být pro nastavení časovače vypnutý.
Změnu
nastavení
Změnu
zdroje nebo
hlasitosti
Zkontrolujte
nastavení
Zrušení Pro odebrání ukazatele na displeji stiskněte
Poznámka:
• Časovač přehrávání spustí přehrávání s nízkou hlasitostí a ta se
postupně zvyšuje na nastavenou úroveň.
• Časovač nahrávání začne 30 vteřin před zvoleným časem s
vypnutým zvukem.
• Časovač se spustí každý den ve stejný čas, pokud je zapnutý.
• Jestliže systém vypnete a znovu zapnete během doby, kdy je
časovač spuštěný, časovač se v době ukončení nezastaví.
Opakujte kroky 1 až 8 a 10 (Z viz vlevo a výše).
1) Pro odebrání ukazatele na displeji stiskněte
[#, PLAY/REC].
2) Změňte hlasitost.
3) Proveďte kroky 9 a 10.
Stiskněte [CLOCK/TIMER] pro výběr „#PLAY“ nebo
„#REC“.
[#, PLAY/REC].
Zvukové efekty
Přehrát a nahrát časovače
Můžete nastavit časovač, který zajistí zapnutí v určitou dobu jako
budík.
- Budíček (časovač přehrávání).
- Nahrávání z rádia nebo externího zařízení (časovač nahrávání).
Časovač přehrávání a časovač nahrávání nemohou být použity
najednou.
Zapněte systém a nastavte hodiny.
Časovač
přehrávání
Časovač
nahrávání
1
Opakovaně stiskněte [CLOCK/TIMER] pro zvolení časovače.
#PLAY : pro nastavení časovače přehrávání
#REC : pro nastavení časovače záznamu
2
Během 10 sekund stiskněte [R, T] pro nastavení času zapnutí.
3
Stiskněte [OK].
4
Pro nastavení konečného času opakujte kroky 2 a 3.
5
Stiskněte [R, T] pro výběr požadovaného zdroje pro časovač
přehrávání nebo nahrávání.
6
Stiskněte [OK].
Pro časovač přehrávání přejděte ke kroku 9.
Pro časovač nahrávání pokračujte krokem 7 dále.
7
Stiskněte [R, T] pro výběr „USB“ nebo „MEMORY“ pro
uložení nahrávky.
8
Stiskněte [OK].
RQTX1298
Připravte zdroj hudby, který chcete poslouchat (disk,
USB, interní paměť, radio nebo externí vybavení) a
nastavte hlasitost.
Připojte USB (pro USB nahrávání) a nalaďte
rozhlasovou stanici (Z11, „Rádio“) nebo vyberte
externí zařízení (Z 13 , „Externí zařízení“).
CLOCK
Původní displej
# PLAY
# REC
12
40
Změna kvality zvuku
1
Pro výběr zvukového efektu stiskněte [SOUND].
2
Stiskněte [Y, U] pro výběr požadovaného nastavení.
BASS -4 až +4
MID
TREBLE
SURROUND „ON SURROUND“ nebo „OFF SURROUND“
INPUT LEVEL
(Pro hudební port)
SUPERWOOFER „OFF“, „SW1“, „SW2“ nebo „SW3“
RE-MASTER
Pouze pomocí hlavní jednotky
1
Stiskněte [MANUAL EQ] pro výběr „BASS“, „MID“ nebo
„TR EBLE“.
2
Stiskněte [2/3] nebo [5/6] pro nastavení úrovně.
„NORMAL“ nebo „HIGH“
Poznámka:
Nebo pro výběr nastavení stiskněte
[SUPER WOOFER] na hlavní jednotce.
„ON RE-MASTER“ nebo „OFF RE-MASTER“
Předvolba EQ (Preset EQ)
Pro výběr nastavení stiskněte [PRESET EQ].
HEAVY Přidává údernost rocku
SOFT Pro hudební pozadí
CLEAR Vyjasňuje vyšší frekvence
VOCAL Přidává zřetelnost zpěvu
FLAT Zruší zvukový efekt
Page 41

ČESKY
D.BASS
Stiskněte [D.BASS] pro výběr „D.BASS“, „AUTO D.BASS“ nebo
„OFF D.BASS“.
D.BASS Zvyšuje basový efekt
AUTO D.BASS Automaticky nastaví basový efekt podle
OFF D.BASS Zruší funkci
zvukové nebo hudební skladby
Použití mikrofonu
Příprava
Snížení hlasitosti systému na minimální hodnotu před připojením nebo
odpojením mikrofonu.
1
Připojte mikrofonu (není v příslušenství) do vstupu pro
mikrofonu.
Typ konektoru: souosý o průmeru Ø 3,5 mm mono
2
Zapněte [MIC VOL, MIN/MAX] na hlavní jednotce a nastavte
hlasitost mikrofonu.
Chcete-li použít mikrofon s podbarvením.
3
Přehrání zdroje hudby a nastavení hlasitosti v systému.
Poznámka:
• Pokud během používání vychází podivný zvuk (pískání), oddalte
mikrofon od uživatele nebo ztlumte hlasitost mikrofonu.
• Když mikrofon nepoužíváte, odpojte ho a snižte hlasitost mikrofonu
na „MIN“.
Externí vybavení
Příprava
• Odpojte přístroj od sítě.
• Vypněte všechna zařízení a přečtěte si příslušné provozní pokyny.
Poznámka:
Komponenty a kabely se prodávají odděleně.
Použití hudebního portu
Hudbu můžete přehrávat z přenosného audio zařízení.
Příprava
Abyste předešli zvukové nevyváženosti, vypněte ekvalizér (existuje-li).
Než připojíte nebo odpojíte přenosné audio zařízení snižte hlasitost
systému a přenosného audio zařízení.
Audio kabel
(není v příslušenství)
Přenosné audio zařízení
(není v příslušenství)
1
Přehrávání na přenosném audio zařízení.
Typ konektoru: stereofonní, souosý o průměru Ø 3,5 mm
2
Stiskněte [RADIO, EXT-IN] pro výbĕr „MUSIC PORT“.
3
Přehrávání na přenosném audio zařízení.
Používání přídavného vstupu
ČESKY
Kód dálkového ovládání
Když další zařízení Panasonic reaguje na dálkový ovladač tohoto
systému, změňte kód ovladače pro tento systém.
Příprava
Stiskněte [RADIO, EXT-IN] pro volbu „AUX“.
Nastavení kódů na „REMOTE 2“
1
Stiskněte a přidržte [RADIO, EXT-IN] na hlavním zařízení a [2]
na dálkovém ovladači dokud se nezobrazí „REMOTE 2“.
2
Stiskněte a přidržte [OK] a [2] nejméně na 4 sekundy.
Nastavení kódů na „REMOTE 1“
1
Stiskněte a přidržte [R ADIO, EXT-IN] na hlavním zařízení a [1]
na dálkovém ovladači dokud se nezobrazí „REMOTE 1“.
2
Stiskněte a přidržte [OK] a [1] nejméně na 4 sekundy.
Můžete připojit VCR, DVD přehrávač, atd. a prostřednictvím tohoto
systému poslouchat zvuk.
VCR
(není v příslušenství)
Zadní panel
hlavní jednotky
Audio kabel
(není v příslušenství)
1
Připojte externí zařízení.
2
Stiskněte [RADIO, EXT-IN] pro výbĕr „AUX“.
3
Přehrajte externí zařízení.
Poznámka:
• Chcete-li připojit zařízení jiné než popsané, obraťte se na prodejce.
• Při použití adaptéru může dojít ke zkreslení zvuku.
RQTX1298
13
41
Page 42

ČESKY
Odstraňování závad
Před žádostí o servis proveďte následující kontroly. Jste-li na
pochybách ohlednì nìkteré z níže uvedených kontrol, nebo pokud
řešení uvedená problém nevyřeší, vyžádejte si pokyny od svého
prodejce.
■
Běžné problémy
Displej se rozsvítí a plynule přejde do pohotovostního režimu.
• Stiskněte a přidržte [8] na hlavní jednotce pro výběr „DEMO OFF“.
S dálkovým ovladačem nelze provést žádnou operaci.
• Zkontrolujte, zda jsou baterie vloženy správně.
Zvuk je nevyvážený nebo se neozývá žádný zvuk.
• Nastavte hlasitost.
• Vypněte systém, zjistěte a odstraňte příčinu a poté systém
znovu zapněte. Může být způsobeno přetěžováním reproduktorů
nadměrnou hlasitostí nebo výkonem a používáním systému v
prostředí s příliš vysokou teplotou.
Během přehrávání je slyšet hučení.
• V blízkosti přístroje je vedení střídavého proudu nebo zářivkové
osvětlení. Udržujte jiná zařízení a kabely mimo systém.
■
Disky
Displej nezobrazuje správně.
Přehrávání se nespouští.
ČESKY
• Disk jste nevložili správně. Vložte ho správně.
• Disk je špinavý. Vyčistěte disk.
• Vyměňte disk, pokud je poškrábaný, zdeformovaný nebo
nestandardní.
• Došlo ke kondenzaci. Nechte systém schnout po dobu 1 až 2 hodin.
Celkový počet zobrazených skladeb je nesprávný.
Disk nelze číst.
Je slyšen zkreslený zvuk.
• Vložili jste disk, který systém nemůže přehrát. Vyměňte ho za
přehrávatelný disk.
• Vložili jste disk, který nebyl dokončen.
■
Rádio
Zkreslený zvuk.
Bliká ukazatel stereo nebo nesvítí vůbec.
• Použijte volitelnou venkovní FM anténu. Ponechte rámovou anténu
připojenou.
Je slyšet dunění.
• Vypněte televizor nebo jej odsuňte od systému.
• Nastavte na „BP 1“ nebo „BP 2“ v režimu ladění AM.
Ozývá se slabé bzučení během vysílání v pásmu AM.
• Oddělte anténu od dalších kabelů.
■
USB
Nelze přečíst paměťového zařízení USB nebo jeho obsah.
• Formát paměťového zařízení USB nebo jeho obsah není kompatibilní
se systémem.
• Paměťového zařízení USB s kapacitou vyšší než 32 GB nemůže
fungovat za stejných podmínek.
Pomalá činnost paměťového zařízení USB.
• Velké soubory nebo paměťového zařízení USB s velkou kapacitou se
mohou dlouho načítat.
■
Displej hlavního zařízení
„NO PLAY“
„UNSUPPORT“
• Zkontrolujte obsah. Můžete přehrávat pouze podporovaný formát.
• Soubory v paměťového zařízení USB mohou být poškozené.
Naformátujte paměťového zařízení USB a zkuste to znovu.
„F61“
• Zkontrolujte a opravte zapojení kabelových přívodů reproduktorů.
• Odpojte paměťového zařízení USB. Vypněte a znovu zapněte
RQTX1298
přístroj.
14
42
„ERROR“
• Byla provedena nesprávná operace. Přečtěte si instrukce a zkuste
to znovu.
„ERROR“ (během nahrávání)
• Během přehrávání můžete vybrat jiný zdroj (přiklad: rádio, USB) nebo
stiskněte [2] nebo [6].
Zastavení nahrávání.
• Při nahrávání ze zdroje AM nemůžete disk otevřít.
• Vyberte vhodný režim nahrávání (128 kbps nebo 192 kbps) a
obnovte nahrávání.
„PLAYERROR“
• Přehráli jste nepodporovaný soubor MP3. Přístroj danou skladbu
přeskočí a přehrává další.
„VBR–“
• Jednotka nemůže zobrazit zbývající čas přehrávání u skladeb s
proměnnou přenosovou rychlostí skladby (VBR).
„NORMAL“
• Jestliže systém detekuje zkreslené zvuky, „INPUT LEVEL“ zdroj pro
hudební port se automaticky změní z „HIGH“ (vysoký) na „NORMAL“
(normální).
„HI-SPEED CAN’T REC“
• Při používání analogového režimu nemůžete použít vysokorychlostní
nahrávání. Změňte je na digitální režim nebo použijte normální
nahrávání.
„DEVICE FULL“
• Nemůžete nahrávat, protože zbývající nahrávací čas celého
paměťového zařízení USB je menší než celkový čas hudebního
zdroje.
Změňte na paměťového zařízení USB, které má dostatečnou dobu
nahrávání a nahrávání proveďte znovu.
„USB OVER CURRENT ERROR“
• Paměťového zařízení USB spotřebovává příliš vysoký výkon.
Odpojte paměťového zařízení USB. Vypněte a znovu zapněte
přístroj.
„NODEVICE“
• Paměťového zařízení USB není připojeno. Zkontrolujte obsah.
„NO TRACK“
• Paměťového zařízení USB nebo interní paměti není žádné album ani
stopa.
Znovunastavení paměti systému
(Inicializace)
Pokud dojde k následujícím situacím, obraťte se na níže uvedený
postup pro znovunastavení paměti:
• Není žádná reakce na stisknutí tlačítek.
• Chcete vymazat a znovunastavit obsah paměti.
Znovunastavení paměti systému
1
Odpojte přístroj od sítě.
(Než budete pokračovat s krokem 2 počkejte 3 minuty.)
2
Při stisknutém [1] na hlavní jednotce připojte přístroj
znovu k síti.
Na displeji se zobrazí „– – – – – – – –“.
3
Uvolněte [1].
Všechna nastavení se vrátí na původní tovární nastavení.
Je třeba znovu nastavit položky paměti.
Údržba
K vyčištění přístroje použijte jemný a suchý hadřík.
• Nikdy nepoužívejte k čištění systému alkohol, ředidlo nebo technický
benzín.
• Před použitím chemicky impregnované látky si pročtěte instrukce
přiložené k látce.
Page 43

ČESKY
Specifikace
Sekce zesilovače
Výstupní výkon RMS ve stereo režimu
Přední kanál hlasitý (oba kanály napájeny)
145 W na kanál (5
Přední kanál tichý (oba kanály napájeny)
180 W na kanál (4
Celkový výstupní výkon RMS 650 W
), 1 kHz, 10 % THD
), 1 kHz, 10 % THD
FM/AM tuner, část svorek
Přednastavení stanic 30 stanic FM
15 stanic AM
Frekvenční modulace (FM)
Frekvenční rozsah 87,50 MHz až 108,00 MHz (50 kHz krok)
Anténní konektor 75
Amplitudová modulace (AM)
Frekvenční rozsah 522 kHz až 1629 kHz (9 kHz krok)
520 kHz až 1630 kHz (10 kHz krok)
Konektory pro sluchátka
Konektor Stereo, konektor 3,5 mm
Výstupní úroveň (CD, 1 kHz, –20 dB)
0,5 mW + 0,5 mW, 32
Konektor pro mikrofon
Citlivost 0,7 mV, 1,1 k
Konektor Mono, konektor 3,5 mm (1 systém)
Hudebního portu (přední)
Citlivost 100 mV, 4,7 k
Konektor Stereo, konektor 3,5 mm
Vstup AUX Konektory RCA
(nesymetrický)
(max.)
Sekce cd přehrávače
Přehrávaný disk (8 cm nebo 12 cm)
(1) CD-Audio (CD-DA)
(2) CD-R/RW (CD-DA, formátované disky MP3
(3) MP3
MPEG-1 Layer 3
Čtení
Vlnová délka 790 nm (CD)
Audio výstup (disk)
Počet kanálů 2 kanálů (FL, FR)
FL = Přední levý kanál
FR = Přední pravý kanál
)
Část paměti
Paměť
Velikosti paměti 2 GB
Podporované formáty souborů médií MP3 (
Nahrávání do paměti
Přenosová rychlost přehrávání 128 kbps, 192 kbps, 320 kbps
Rychlost nahrávání do paměti 1x, 4x (pouze pro CD)
Formát nahrávání souboru MP3 (
Kapacita celkového počtu nahraných písničkek 510 písniček
(Při 128 kbps přibližně platí, že 1 písnička = 4 minuty)
.mp3)
.mp3)
Sekce reproduktorů
Typ 3-pásmový, 3-reproduktorový systém (bass reflex)
Reproduktor(y)
Super woofer 20 cm kónický
Woofer 10 cm kónický
Výškový 6 cm kónický
Impedance 5
Výstupní akustický tlak 86 dB/W (1 m)
Frekvenční rozsah 48 Hz až 26 kHz (–16 dB)
66 Hz až 20 kHz (–10 dB)
Rozměry (Š x V x H) 250 mm x 414 mm x 301 mm
Hmotnost 5,5 kg
(vysoký), 4 (nízký)
Všeobecně
Napájení AC 220 až 240 V, 50 Hz
Spotřeba 118 W
Rozměry (Š x V x H) 220 mm x 334 mm x 249 mm
Hmotnost 3,4 kg
Rozsah provozních teplot 0°C až +40°C
Rozsah provozní vlhkosti 35% až 80% RH (bez kondenzace)
Spotřeba v pohotovostním režimu (standby) 0,3 W (přibližně)
Poznámka:
1. Technické údaje podléhají změnám bez předchozího upozornění.
Hmotnost a rozměry jsou přibližné.
2. Celkové harmonické zkreslení je měřeno digitálním spektrálním
analyzátorem.
ČESKY
Sekce USB
USB port
Norma USB USB 2.0 plná rychlost
Podporované formáty souborů médií MP3 (
Souborový systém USB zařízení FAT 12, FAT 16, FAT 32
Napájení USB portu 500 mA (max.)
Přenosová rychlost přehrávání
16 kbps nebo 320 kbps (přehrávací)
Nahrávání na USB
Přenosová rychlost přehrávání 128 kbps, 192 kbps, 320 kbps
Rychlost nahrávání na USB 1x, 4x (pouze pro CD)
Formát nahrávání souboru MP3 (
.mp3)
.mp3)
RQTX1298
15
43
Page 44

EU
Panasonic Corporation
Web Site: http://panasonic.net
Pursuant to at the directive 2004/108/EC, article 9(2)
Panasonic Testing Centre
Panasonic Marketing Europe GmbH
Winsbergring 15, 22525 Hamburg, Germany
En Po Cz
RQTX1298-E
L0311CH0
 Loading...