

Page 1

For U.S.A.
As an ENERGY STAR® Partner, Panasonic has determined
that this product meets the ENERGY STAR® guidelines for
energy effi ciency.
Table of contents
Listening caution .....................................2
IMPORTANT SAFETY INSTRUCTIONS ..3
Getting started .........................................4
Placement of speakers ............................5
Overview of controls ...............................6
Discs .........................................................7
Cassette tape – Play and record ..........10
Radio .......................................................12
Timer .......................................................13
Sound adjustment .................................14
External unit ...........................................15
Product Service .....................................15
Maintenance ...........................................15
When moving the unit ...........................15
Troubleshooting guide ..........................16
Specifi cations ........................................17
Limited Warranty
(ONLY FOR U.S.A.) ............................18
Limited Warranty
(ONLY FOR CANADA) .......................19
Operating Instructions
CD Stereo System
Model No. SC-AK640
SUPPLIED ACCESSORIESSUPPLIED ACCESSORIES
Please check and identify the supplied accessories.
Use numbers indicated in parentheses when asking for
replacement parts. (As of December 2005)
In the U.S.A. to order accessories, refer to “Accessory
Purchases” on page 18.
1 x AC power supply cord
(K2CB2CB00018)
1 x FM indoor antenna
(RSA0006-L)
1 x Remote Control
2 x Remote control batteries
1 x AM loop antenna
(N1DAAAA00001)
• Silver (N2QAHB000064)
For U.S.A.
• Black (N2QAYB000029)
only
EspañolEspañol
Preparativos iniciales ............................20
Colocación de los altavoces ................21
Controles ................................................22
Discos .....................................................23
Cintas de casete –
reproducción y grabación ................24
Radio .......................................................25
Temporizador .........................................26
Before connecting, operating or adjusting this product,
please read the instructions completely.
Please keep this manual for future reference.
PPC
Operations in these instructions are described mainly using
remote control, but you can do the operations on the main
unit if the controls are the same.
Unless otherwise indicated, illustrations in these operating
instructions are for the U.S.A.
Your unit may not look exactly the same as illustrated.
La guía rápida en español se encuentra en la página 20 -
27.
RQTV0071-1P
Page 2
Dear customer
Thank you for purchasing this product.
For optimum performance and safety, please read these
instructions carefully.
These operating instructions are applicable to the following
system.
System
Main unit
Front speakers
Subwoofer
SC-AK640
SA-AK640
SB-AK640
SB-WAK640
Listening caution
%34
LANG - 5 LANG - 4 FRANÇAIS DANSK ENGLISH
2
RQT8043
RQTV0071
Page 3

IMPORTANT SAFETY INSTRUCTIONS
CAUTION: TO REDUCE THE RISK OF ELECTRIC
SHOCK, DO NOT REMOVE SCREWS.
NO USER-SERVICEABLE PARTS
INSIDE.
REFER SERVICING TO QUALIFIED
SERVICE PERSONNEL.
The lightning flash with arrowhead symbol,
within an equilateral triangle, is intended to
alert the user to the presence of uninsulated
dangerous voltage within the product s
enclosure that may be of sufficient
magnitude to constitute a risk of electric
shock to persons.
The exclamation point within an equilateral
triangle is intended to alert the user to the
presence of important operating and
maintenance (servicing) instructions in the
literature accompanying the appliance.
Except for U.S.A.
Inside of product
LANG - 5 LANG - 4 FRANÇAIS DANSK ENGLISH
RQTV0071
3
RQT8043
Page 4
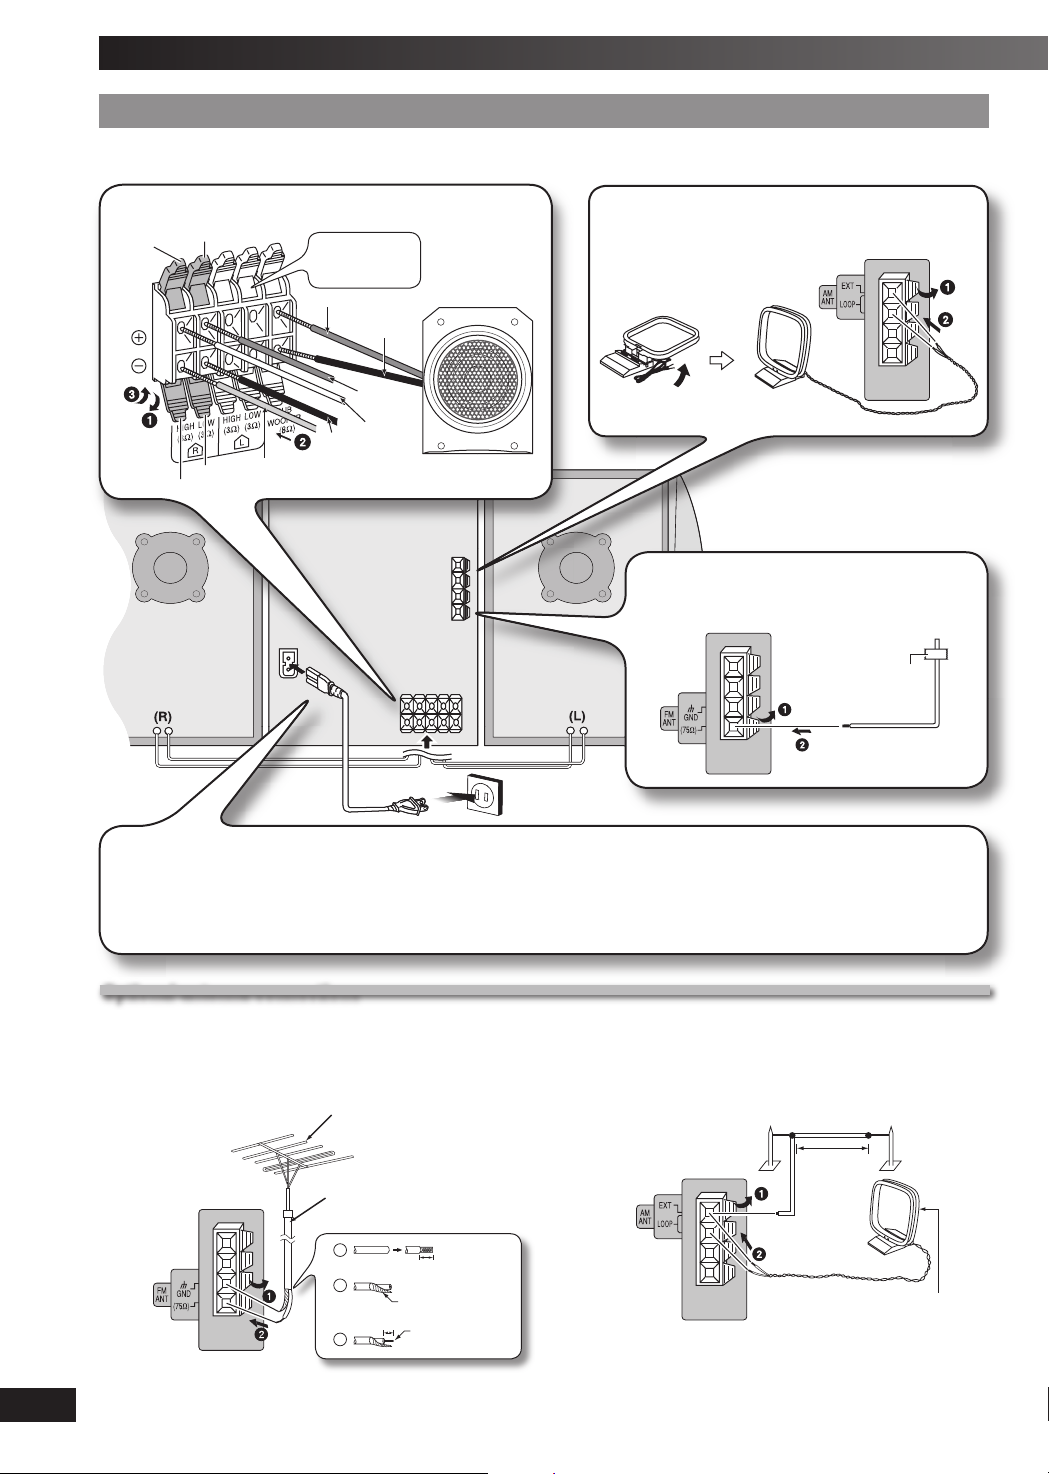
Getting started
Step 1Step 1
Connect the AC power supply cord only after all other connections have been made.
1
- Making the connections - Making the connections
Connect the speaker cords.
Red
Gray
(R)
Blue
Black
Blue (–)
Connect the left
(L) side in the
same way
Red (+)
Black (–)
Red (+)
Gray (+)
Black (–)
Subwoofer
(SB-WAK640)
2
Connect the AM loop antenna.
Stand the antenna
up on its base.
3
Connect the FM indoor antenna.
Tape the antenna where reception is best
(L)
Adhesive
tape
LANG - 5 LANG - 4 FRANÇAIS DANSK ENGLISH
4
RQT8043
4
Connect the AC power supply cord.
For your reference
To save power when the unit is not to be used for a long
time, unplug it from the household AC outlet. You will need
to reset some memory items after plugging in the unit.
Note:
The included AC power supply cord is for use with this unit only.
Do not use it with other equipment.
Optional antenna connectionsOptional antenna connections
Use outdoor antenna if radio reception is poor.
Note:
Disconnect the outdoor antenna when the unit is not in use. Do not use the outdoor antenna during a lightning storm.
FM outdoor antenna AM outdoor antenna
FM outdoor antenna
(not included)
75 Ω coaxial cable
(not included)
Rear panel
of this unit
RQTV0071
• Disconnect the FM indoor antenna.
• The antenna should be installed by a competent
technician.
15 mm (
19
/32˝)
30 mm (1 3/16˝)
Shield braid
Core wire
Rear panel
of this unit
• Run a piece of vinyl wire horizontally across a window or
other convenient location.
• Leave the loop antenna connected.
AM outdoor antenna (not included)
5-12 m
(16 - 40 ft.)
AM loop antenna
(included)
Page 5

Step 2Step 2
- Inserting batteries into the remote control - Inserting batteries into the remote control
AA/R6/LR6
■ Batteries
• Insert so the poles (+ and –) match those in the remote control.
• Remove if the remote control is not going to be used for a long period of time.
Store in a cool, dark place.
• Replace if the unit does not respond to the remote control even when held
close to the front panel.
• Do not use rechargeable type batteries.
• Mishandling of batteries in the remote control can cause electrolyte leakage,
which may cause a fi re.
• If electrolyte leaks from the batteries, consult your dealer.
Wash thoroughly with water if electrolyte comes in contact with any part of
your body.
Do not:
• mix old and new batteries.
• use different types at the same time.
• heat or expose to fl ame.
• take apart or short circuit.
• attempt to recharge alkaline or manganese batteries.
• use batteries if the covering has been peeled off.
• put heavy objects on the remote control.
• spill liquids onto the remote control.
■ Use
Aim at the remote control sensor, avoiding obstacles, at a maximum range
of 7 m (23 feet) directly in front of the unit.
Refer to page 6 for the remote control sensor position.
Step 3Step 3
- DEMO function - DEMO function
When the unit is fi rst plugged in, a demonstration of its functions may be shown
on the display.
If the demo setting is off, you can show a demonstration by selecting “DEMO
ON”.
Press and hold [DISPLAY, –DEMO].
The display changes each time the button is held down.
NO DEMO (off) Ô DEMO ON (on)
While in standby mode, select “NO DEMO” to reduce power consumption.
Note:
DEMO function cannot be turned on when DIMMER is on.
Placement of speakers
Place the
subwoofer on the
fl oor or a sturdy
shelf so that it will
not cause vibration.
Front speaker
(left)
Front speakers
• Place the front speakers so that the tweeter is on the
inside.
• You cannot take the front net off the speakers.
Main
unit
Subwoofer
TweeterTweeter
Front speaker
(right)
Use only the supplied speakers.
The combination of the main unit and speakers provide the
best sound. Using other speakers can damage the unit and
sound quality will be negatively affected.
Note:
• Keep your speakers at least 10mm (13/32˝) away from the system for
proper ventilation.
• These speakers do not have magnetic shielding. Do not place
them near televisions, personal computers or other devices easily
infl uenced by magnetism.
• You can damage your speakers and shorten their useful life if you
play sound at high levels over extended periods.
• Reduce the volume in the following cases to avoid damage.
– When playing distorted sound.
– When adjusting the sound quality.
Caution
•
Use the speakers only with the
recommended system. Failure to do so
can damage the amplifi er and speakers,
and can cause fi re. Consult a qualifi ed
service person if damage occurs or
if a sudden change in performance is
apparent.
• Do not attach these speakers to walls
or ceilings.
LANG - 5 LANG - 4 FRANÇAIS DANSK ENGLISH
RQTV0071
5
RQT8043
Page 6

Overview of controls
Main unitMain unit
Refer to the numbers in parentheses for page reference.
This indicator lights when the unit is connected
1 Standby/on switch [y/l, POWER] (10, 16)
Press to switch the unit from on to standby
mode or vice versa. In standby mode, the unit is
still consuming a small amount of power.
Disc skip/search, tape fast-forward/rewind,
AC supply indicator [AC IN]
to the AC power supply.
Multiple discs change (8)
2 Subwoofer selection (14)
Display panel
3 Volume control
4 Tuner/Band selection (12)
5 Music port selection (15)
Music port jack (15)
Deck 1 open (10)
tune/preset channel selection,
time adjustment (11)
Record (11, 15)
Display, demonstration (5)
6 H.BASS selection (14)
Deck 1 cassette holder (10)
Remote control signal
sensor
Disc trays
Disc tray open/close (7)
Single disc change (8)
Disc direct play (8)
7 Disc play/pause (7)
Headphone jack
(PHONES)
Avoid listening for
prolonged periods of
time to prevent hearing
damage.
Plug type: 3.5 mm (
stereo (not included)
8 Tape play (10)
Deck 2 open (10)
Stop (11)
Deck selection (11)
Deck 2 cassette holder
(10)
1
/8˝)
Remote controlRemote control
Buttons such as 1 function the same as the controls on the main unit.
1
Sleep timer (14),
Auto off
Disc (7)
Program (8, 12)
Play mode (7, 11, 12)
Repeat (9)
Delete (9)
4
5
Album selection (7)
LANG - 5 LANG - 4 FRANÇAIS DANSK ENGLISH
Intro selection (9)
Marker memory/recall (9)
To select the desired display during play mode.
Each time you press the button:
Normal = Refl ection = (off)
Dimmer,
Play timer/record timer (13)
Display (8),
Clock/timer (13)
Numeric, characters (7, 9, 12)
allows you to turn off the unit in
disc or tape mode only after left
7
Stop/program clear (7, 9)
8
3
Disc skip/search, tape fastforward/rewind, tune/preset
channel selection, time
adjustment, cursor
(7, 9, 11, 12, 13)
Enter (8)
Title search (9)
unused for 10 minutes.
• Press and hold [–AUTO OFF] to
activate the function.
• Press and hold [–AUTO OFF]
again to cancel.
• The setting is maintained even if
the unit is turned off.
panel.
This auto off function
To dim the display
6
RQT8043
RQTV0071
2
6
Muting
Preset EQ (14)
• Press the button to activate.
To mute the sound.
• Press again to cancel.
Page 7

Discs
Numeric
buttons
Basic playBasic play
Press [0, OPEN/CLOSE] on the main unit to open
1
the tray.
The unit turns on, load a disc in the current tray with the
label facing up.
Press [0, OPEN/CLOSE] to close the tray.
Press [6, CD] to start play.
2
You can also press [DISC] and then [1] ~ [5] to select and
play the other loaded discs.
Current disc indicator
To Ac tion
stop play Press [ 7 , CLEAR] during play.
Display when in the stop mode:
Example: “MP3” indicates the disc contains MP3
fi l e s .
skip tracks Press [4, REW / ] or [¢, / FF].
search
through
tracks
• During random play (\ see below, “Play Mode
function”), you cannot skip to tracks which have
been played.
During 1-ALBUM and 1-ALBUM RANDOM mode,
track skipping can only be done within the current
album.
Press and hold [4, REW / ] or [¢, / FF ] durin g
play or pause to search.
• During program play (\ page 8), or random play
(\ see below, “Play Mode function”), you can
search only within the track.
Play Mode function Play Mode function
You can listen to specifi c discs and tracks.
Preparation
Select and play your desired disc.
Press [PLAY MODE] to select the desired mode.
Mode To play
1-DISC
1 DISC
1-DISC RANDO M
1 DISC RND
ALL-DISC
ALL DISC
ALL-DISC RANDOM
ALL DISC RND
1-SO NG
1-SON G
1-ALBUM
1-ALBU M
one selected disc.
one selected disc randomly.
all loaded discs in succession from the
selected disc to the fi nal disc.
Example: 4→5→1→2→3.
all loaded discs randomly.
one selected track on the selected disc.
Press the numeric buttons to select the
track in the current disc.
Play starts from the selected track.
Press [ALBUM ( or )] to select the
album.
Press the numeric buttons to select the
track in the current album.
Play starts from the selected track.
one selected album on the selected disc.
Press [ALBUM (
album.
or )] to select the
Total number
of albums
pause play Press [ 6 , CD] during play.
skip album
Press again to resume play.
Press [ALBUM ( or )] to select the desired
album during play or when in stop mode.
Display when selecting in stop mode (example):
Current album
Number of tracks
in current album
• This function does not work during 1-DISC
RANDOM and ALL-DISC RANDOM mode. It is
applicable only during program stop mode.
Total number
of tracks
1- ALBUM RANDOM
1-ALBU M RND
all tracks in one selected album
randomly.
Press [ALBUM (
album.
or )] to select the
When playback ends
The current play mode will be retained in memory until it is
changed even if the unit is turned off.
Note:
You cannot use program mode together with “Play Mode function”.
LANG - 5 LANG - 4 FRANÇAIS DANSK ENGLISH
RQTV0071
7
RQT8043
Page 8

Discs (Continued)
Numeric
buttons
Changing multiple discs (MULTI CHANGE)Changing multiple discs (MULTI CHANGE)
By main unit only
Press [0, MULTI CHANGE] to open the trays.
1
Press the button repeatedly to check and change
2
multiple discs.
Note:
• The tray with a disc being played will not open.
• If the player is stopped, all trays will open. To close the remaining
trays simultaneously, press [0 , OPEN/CLOSE].
Changing a single disc (SINGLE CHANGE)Changing a single disc (SINGLE CHANGE)
By main unit only
While one disc is playing, you can change the discs in other
trays.
Press [0, SINGLE CHANGE].
1
Press [1 3~ 5 3] to select the desired tray.
2
Change the disc.
3
Press [0, SINGLE CHANGE] again to close the tray.
4
Note:
• When track number 25 or greater is playing, remaining play time
display shows “– –:– –”.
• When a title is longer than 9 characters, it will scroll across the
display. The scrolling will start after every 3 seconds.
• “NO TAG” is displayed if titles with tags have not been entered.
• Maximum number of displayable characters: approximately 32
• This unit can display album, track and artist name with WMA tags
and MP3 ID3 tags (version 1.0 and 1.1).
• Titles containing text data that the unit does not support cannot be
displayed.
• ID3 is a tag embedded in MP3 track to provide information about
the track.
• Titles entered with 2-byte code cannot be displayed correctly on
this unit.
Advanced playAdvanced play
Program play Program play
This function allows you to program up to 24 tracks.
Press [6, CD] and then [7, CLEAR].
1
Press [PROGRAM].
2
“PGM” appears.
Press [DISC] and then [1] ~ [5] to select the disc.
3
Press the numeric buttons to select your desired
4
track.
Repeat steps 3 to 4 to program other tracks.
Press [6, CD] to start play.
5
Press [DISC] and then [1] ~ [5] to select the disc.
1
Press [7, CLEAR].
2
Press [PROGRAM].
3
Press [ALBUM ( or )] to select your desired
4
album.
To select an album directly, press the numeric
buttons after pressing [ALBUM ( or )].
Press [4, REW / ] or [¢, / FF] to select the
5
track.
To select a track directly, press the numeric buttons
after pressing [4, REW / ] or [¢, / FF].
Press [ENTER].
6
Repeat steps 4 to 6 to program other tracks.
Press [6, CD] to start play.
7
For two-digit track, press [
For three-digit track, press [h10] twice then the three digits.
h
10] once then the two digits.
LANG - 5 LANG - 4 FRANÇAIS DANSK ENGLISH
8
RQT8043
Checking the track information Checking the track information
You can select a desired disc display mode.
Press [DISPLAY] during play or pause.
Elapsed play time Remaining play time
Elapsed
play time
Tag (Artist)
RQTV0071
➞
➞
➞
Tag (Track)
Remaining
play time
➞
➞
Tag (Album)➞Track Name
Album Name
To Ac tion
cancel
program mode
replay the
program
add to the
program
➞
Press [PROGRAM] in the stop mode.
Press [PROGRAM] then [ 6 , CD] in the stop
mode.
Repeat steps 3 to 4 in the stop mode.
Repeat steps 4 to 6 in the stop mode.
Page 9

To Ac tion
check program
contents
clear the last
track
clear all
programmed
tracks
Press [4, REW / ] or [¢, / FF ] when
“PGM” is displayed in the stop mode.
The track number, program order and disc
number are displayed:
Program orderTrack number
The program order is displayed followed by the
album number and track number.
Press [DEL] in the stop mode.
Press [ 7 , CLEAR] in the stop mode. “CLEAR
ALL” is displayed. Within 5 seconds, press the
button again to clear all tracks.
Note:
• You cannot program CD-DA together with MP3 or WMA tracks.
• The program memory is cleared when you change a disc or open
the disc tray.
• You cannot program more than one disc for MP3 or WMA.
Repeat play Repeat play
You can repeat program play or other selected play mode.
Press [REPEAT].
” is displayed.
“
To cancel
Press [REPEAT] again.
” is cleared.
“
Note:
You can use repeat mode with “Program play” (\ page 8) and “Play
Mode function” ( \ page 7).
Marking a track Marking a track
Enables you to mark one track for each loaded disc so that
you can directly play the track later.
During play, press and hold the [MARKER] until “STORING”
blinks on the display to mark your favorite track.
Press [MARKER] during play or stop mode to recall and
play a marked track.
Note:
•
“NO MARKER” indicates that the marker in the current disc is empty.
• The marker memory is cleared when you open the disc trays except
for the current disc which is in play or pause mode.
• This function does not work during any random/program mode.
Advanced function (Advanced function ( only) only)
Album scanAlbum scan
This function allows you to fi nd an album by listening to the fi rst
track of all albums in the current disc for 10 seconds each.
Press [6, CD] and then [7, CLEAR].
1
Press [INTRO] to start the intro function.
2
While your desired album is playing, press [6, CD].
3
Intro mode is canceled and the playback continues.
INTRO function is canceled after playing the fi rst track in
the last album.
To stop during the process, press [INTRO] or [7, CLEAR].
Note:
This function does not work during any random/program mode.
Album/Track title searchAlbum/Track title search
This function enables you to search your desired album or
track.
Press [6, CD] and then [7, CLEAR].
1
For album title search, press [TITLE SEARCH] once.
2
For track title search, press [TITLE SEARCH] twice.
Press the numeric buttons repeatedly to select your
3
desired character then press [CURSOR ] to key in
the next character.
• You can enter up to 8 characters.
• To edit, press [CURSOR ( or )] to revise any
characters.
• To delete, move the cursor over the character and then
press [DEL].
Numbered
buttons
h
Press [ENTER].
4
Press [4, REW / ] or [¢, / FF] to search for
previous or next match.
The match title is displayed.
Album title search
Blinks to indicate album title search mode
Track title search
Characters Numbered
buttons
1 1 6 M N O 6
2 A B C 2 7 P Q R S 7
3 D E F 3 8 T U V 8
4 G H I 4 9 W X Y Z 9
5 J K L 5 0 0
10 space ! ” # $ % & ’ ( ) ∗ + , – . / : ; < = > ? _
Matched album title
Matched track title
Characters
`
Blinks to indicate track title search mode
Press [6, CD] to start play from the album/track
5
found.
Note:
This function does not work during any random/program mode.
LANG - 5 LANG - 4 FRANÇAIS DANSK ENGLISH
RQTV0071
9
RQT8043
Page 10

Discs (Continued)
NOTE on CDs
• This unit can access up to 99 tracks.
• Choose disc with this mark.
• This unit can play MP3 or WMA fi les and CD-DA format audio
CD-R/RW that have been fi nalized.
• It may not be able to play some CD-R/RW due to the condition of
the recording.
• Do not use irregularly shaped disc.
• Do not use disc with labels and stickers that are coming off or with
adhesive exuding from under labels and stickers.
• Do not attach extra labels or stickers on the disc.
• Do not write anything on the disc.
Using DualDiscs
The “CD” sides of DualDiscs do not meet the CD-DA standard so it
may not be possible to play them on this unit.
Not doing the following will cause damage to the unit.
Removing the power plug
• Press [y /I, POWER] to turn off the unit and then remove the
power plug only after all the displays have disappeared.
Tray caution
• Always press [0 , OPEN/CLOSE] to insert or remove a disc.
• Do not push or pull out the tray by hand as this will cause an
accident.
Inserting a disc
Limitations on MP3 or WMA play
• If you have recorded MP3 or WMA on the same disc as CD-DA,
only the format recorded in the fi rst session can be played.
• Some MP3 or WMA may not be played due to the condition of the
disc or recording.
• Due to differences and variations of WMA tags, some fi les may not
play or display the tags’ information properly.
• Recordings will not necessarily be played in the order you recorded
them.
MPEG Layer-3 audio decoding technology licensed from
Fraunhofer IIS and Thomson multimedia.
Windows Media, and the Windows
logo are trademarks, or registered
trademarks of Microsoft Corporation
in the United States and/or other
countries.
WMA is a compression format
developed by Microsoft Corporation.
It achieves the same sound quality
as MP3 with a fi le size that is smaller
than that of MP3.
Cassette tape – Play and record
LANG - 5 LANG - 4 FRANÇAIS DANSK ENGLISH
10
RQT8043
• Place the disc correctly label-up as shown in the diagram.
• Insert one disc into the tray.
NOTE on MP3 or WMA
• Files are treated as tracks and folders are treated as albums.
• This unit can access up to 999 tracks, 255 albums and 20
sessions.
• Disc must conform to ISO9660 level 1 or 2 (except for extended
formats).
To play in a certain order, prefi x the folder and fi le names with 3-digits
•
numbers in the order you want to play them.
When “NOT MP3/ERROR1” appears on the display, an unsupported
MP3 format is being played. The unit will skip that track and play the
next one.
• Noise may occur when playing WMA fi les.
• This unit cannot play WMA fi les that are copy protected.
RQTV0071
Numeric
buttons
The buttons described for “Cassette tape – Play and
record” are mainly for the main unit unless indicated
otherwise.
Basic playBasic play
You can use either DECK 1 or DECK 2 for tape playback.
Use normal position tapes.
High position and metal position tapes can be played, but
the unit will not be able to do full justice to the characteristics
of these tapes.
Press [3, TAPE].
1
The unit turns on.
If a cassette was loaded, play starts automatically (One
touch play).
Page 11

Cassette tape – Play and record (Continued)
Press [0 OPEN] for DECK 1 or [OPEN 0] for DECK 2
2
and insert the cassette.
Insert with the side to be played facing towards you
and the exposed tape facing down. Close the holder by
hand.
Front
side
Press [3, TAPE] to start play.
3
To Ac tion
stop tape playback Press [ 7 , STOP].
fast-forward and
rewind
select between
loaded decks
Press [4 / REW / ] or [ / FF / ¢].
Press [DECK 1/2] (remote control :
[PLAY MODE]).
Note:
• Tape playback is momentarily interrupted if you open the other
deck.
• Tapes exceeding 100 minutes are thin and can break or get caught
in the mechanism.
• Tape slack can get caught up in the mechanism and should be
wound up before the tape is played.
• Endless tapes can get caught up in the deck’s moving parts if used
incorrectly.
RecordingRecording
Selection of tapes for recording
Use normal position tapes.
High position and metal position tapes can be used, but this
unit will not be able to record or erase them correctly.
Preparation
Wind up the leader tape so recording can begin
immediately.
Press [OPEN 0] for DECK 2 and insert the cassette
1
to be recorded.
Insert with the side to be recorded facing towards you
and the exposed tape facing down.
Select the source to be recorded.
2
Radio recording:
Tune in the station. (\ page 12)
Disc recording:
➀ Insert the disc(s) you want to record.
Press [6, CD] and then [7 , STOP].
➁ Prepare the desired disc recording mode.
To Ac tion
record
programmed
tracks
Perform steps 2 to 4 in “Program play”
(\ page 8).
Perform steps 3 to 6 in “Program play”
(\ page 8).
By remote control only
record
specifi c
discs/tracks
1) Press [DISC] and then [1] ~ [5] to select
the disc.
Ensure disc is stopped.
2) Press [PLAY MODE] to select the desired
mode (\ page 7).
3)
For 1-ALBUM mode and 1-SONG mode:
Press [ALBUM (
album.
For 1-SONG mode:
Press [4, REW / ] or [¢, / FF] to
select the track.
or )] to select the
Tape-to-tape recording:
➀ Press [3, TAPE] and then [7, STOP].
➁ Press [0 OPEN] for DECK 1 and insert the cassette
to record.
Press [¶, REC] to start recording.
3
Other basic operationsOther basic operations
To Ac tion
stop recording Press [7 , STOP].
record on the other
side of the tape
erase a recorded
sound
Turn the cassette over and press [¶ , REC].
1) Press [3, TAPE] and then [ 7 , STOP].
2) Insert the recorded cassette into
DECK 2. Ensure there is no cassette in
DECK 1.
3) Press [¶, REC].
Note:
• Changes to volume and sound adjustments quality do not affect
recording.
• You cannot open DECK 1 while recording.
• You cannot fast-forward or rewind one deck while recording with
the other.
Erasure preventionErasure prevention
The illustration shows how to remove the tabs to prevent
recording. To record on the tape again, cover as shown.
Side A
Tab for side ATab for side B
To re-record
Normal cassette
Adhesive tape
LANG - 5 LANG - 4 FRANÇAIS DANSK ENGLISH
RQTV0071
11
RQT8043
Page 12

Radio
Numeric
buttons
Manual tuningManual tuning
Press [TUNER, BAND] to select “FM” or “AM”.
1
Press [PLAY MODE] to select “MANUAL”.
2
Press [4, REW / ] or [¢ , / FF] to select the
3
frequency of the required station.
” is displayed when a stereo FM broadcast is being
• “
received.
• “TUNED” is displayed when a radio station is tuned.
To tune automatically
Press and hold [4, REW / ] or [¢ , / FF] until t he
frequency starts changing rapidly. The unit begins auto
tuning, stopping when it fi nds a station.
• Auto tuning may be interrupted when there is excessive
interference.
• To cancel auto tuning, press [4, REW / ] or
[¢ , / FF] once again.
To improve FM sound qualityTo improve FM sound quality
Press and hold [PLAY MODE] to display “MONO”.
To cancel
Press and hold [PLAY MODE] again until “MONO”
disappear.
• MONO is also canceled if the frequency is changed.
• Turn off “MONO” for normal listening.
FM allocation settingFM allocation setting
By main unit only
This system can also receive FM broadcasts allocated in
0.1 MHz steps.
To change the step to 0.1 MHz
Press and hold [TUNER, BAND].
1
After a few seconds the display changes to a fl ashing
display of the current minimum frequency.
Continue to hold down [TUNER, BAND].
2
• When the minimum frequency changes, release the
button. To return to the original step, repeat the above
steps.
• After changing the setting, previously preset frequency
will be cleared.
Memory presetMemory preset
Up to 15 stations each can be set in the FM and AM bands.
Preparation
Press [TUNER, BAND] to select “FM” or “AM”.
Automatic presettingAutomatic presetting
Tune to the frequency where pre-setting is to begin.
1
Press and hold [PROGRAM] to start presetting.
2
The tuner presets all the stations it can receive into the
channels in ascending order. When fi nished, the last station
memorized is tuned in.
Manual presettingManual presetting
Press [PLAY MODE] to select “MANUAL”.
1
Press
2
3
4
[4, REW / ] or [¢ , / FF]
required station.
Press [PROGRAM].
Press the numeric buttons to select a channel.
For channels 10 to 15 press [h10], then the two digits.
The station occupying a channel is erased if another
station is preset in that channel.
Selecting a preset stationSelecting a preset station
Press the numeric buttons to select the channel.
to tune to the
LANG - 5 LANG - 4 FRANÇAIS DANSK ENGLISH
12
RQT8043
RQTV0071
OR
Press [PLAY MODE] to select “PRESET”.
1
Press [4, REW / ] or [¢ , / FF] to select the
2
channel.
Page 13

Timer
Setting the clockSetting the clock
This is a 12-hour clock.
Press and hold [– CLOCK/TIMER] to select “CLOCK”.
1
Each time you press and hold the button:
(
Within 8 seconds or so
2
CLOCK
˚ PLAY
➞
Original display
)
➞
˚ REC
Press [4, REW / ] or [¢ , / FF] to set the time.
Press
3
and hold [– CLOCK/TIMER] to finish setting the
time.
Displaying the clock
Press and hold [– CLOCK/TIMER] once when the unit is on or
in standby mode.
The time is displayed for a few seconds.
Note:
Reset the clock regularly to maintain accuracy.
Using the play or record timerUsing the play or record timer
You can set the timer to come on at a certain time to wake
you up (play timer) or to record from the radio or music port
source (record timer).
Play timer and record timer cannot be used together.
Turn the unit on and set the clock.
Timer Action
Play timer Prepare the music source you want to listen to;
Record
timer
Press
1
function.
Each time you press and hold the button:
˚PLAY : to set the play timer
˚REC : to set the record timer
(Proceed to the next step
Press [4, REW / ] or [¢ , / FF] to set the
2
starting time.
cassette (DECK 2 has the priority), disc number
(1~5), radio or music port source, and set the
volume.
Check the cassette’s erasure prevention tabs
\ page 11), insert the cassette in DECK 2 and
(
tune to the radio station (
music port source (
and hold [
– CLOCK/TIMER] to select the timer
CLOCK
➞
Original display
\ page 12) or select the
\ page 15).
˚ PLAY
➞
within 8 seconds
Play timer indicator
˚ REC
)
Repeat steps 2 to 3 to set the finishing time.
4
Finish time
To activate the timer
Press and hold [– ˚PLAY/REC] to turn on your desired
5
timer.
Press [y] to turn off the unit.
6
The unit must be off for the timers to operate.
˚ PLAY
no display (off)
➞
˚ REC
Other basic operationsOther basic operations
To Ac tion
change the
settings
change the
source or
volume
check the
settings
cancel Press and hold [– ˚PLAY/REC] to clear the
Repeat steps 1 to 4 and 6 (
above).
1) Press and hold [– ˚PLAY/REC] to clear the
timer indicator from the display.
2) Make changes to the source or volume.
3) Do steps 5 to 6 (
Press and hold [– CLOCK/TIMER] successively
to select ˚PLAY or ˚REC.
timer indicators from the display.
If you use the unit after the timers are set
After using, check that the correct tape/disc are loaded
before turning the unit off.
Note:
• The play timer will start at the preset time with volume increasing
gradually to preset level.
• The record timer will start 30 seconds before the set time with the
volume muted.
• The timer comes on at the set time everyday if the timer is on.
• The unit must be in the standby mode for the timer to function.
• If you turn the unit off and on again while a timer is functioning, the
fi nish time setting will not be activated.
• If MUSIC PORT is selected as the source when the timer comes on,
the system turns on and engages MUSIC PORT as the source. If
you wish to playback or record from the portable audio equipment,
just activate the equipment’s play mode and increase the volume.
(See the portable audio equipment’s instruction manual.)
\ see left and
\ see above).
Start time
Record timer indicator
Press and hold [– CLOCK/TIMER] to confirm.
3
LANG - 5 LANG - 4 FRANÇAIS DANSK ENGLISH
RQTV0071
13
RQT8043
Page 14

Timer (Continued)
MUSIC
PORT
jack
Using the sleep timerUsing the sleep timer
This function enables you to turn off the unit automatically
after the set time.
Press [SLEEP] to select your desired time.
SLEEP 30 SLEEP 60 SLEEP 90
SLEEP 120SLEEP OFF
Sleep timer indicator
To cancel
Press [SLEEP] to select “SLEEP OFF”.
Changing the remaining time
Press [SLEEP] to show the remaining time and press
[SLEEP] again to select your desired time.
Note:
• The play and sleep timer or the record and sleep timer can be used
together.
• The sleep timer always has priority. Be sure not to overlap timer
settings.
• The sleep timer turns off when you perform the record function.
Sound adjustment
Selecting sound effectsSelecting sound effects
Preset EQPreset EQ
Press [PRESET EQ] repeatedly to select your desired
setting.
HEAVY SOFT
➞
FLAT (off) HALL LIVE
Setting Effect
HEAVY Adds punch to rock
SOFT For background music
CLEAR Clarifi es higher frequencies
VOCAL Adds gloss to vocal
DISCO Produces sound with the same kind of lengthy
LIVE Makes vocals more alive
HALL Adds an expansiveness to the sound to produce the
FLAT No effect
reverberations heard at a disco
atmosphere of a great concert hall
CLEAR➞VOCAL
➞
➞➞
Enhancing the bass soundEnhancing the bass sound
You can enhance low-frequency sound so that heavy bass
sound can be heard clearly, even if the acoustics of your
room are not optimal.
To a ctivate
Press [H.BASS].
To c ancel
Press [H.BASS] again.
Note:
The actual effect depends on the disc.
Boosting the subwooferBoosting the subwoofer
Press [S.WOOFER] (main unit: [SUBWOOFER]) repeatedly
to select your desired setting.
(off)
➞
MAX (high)
MID (medium)
Note:
This function is not applicable when a headphone is connected.
➞
DISCO
LANG - 5 LANG - 4 FRANÇAIS DANSK ENGLISH
14
RQT8043
RQTV0071
Page 15

External unit
Connecting to a portable audio equipmentConnecting to a portable audio equipment
This feature enables you to enjoy music from a portable
audio equipment.
Portable audio equipment
(not included)
Audio cord
(not included)
Product Service
1. Damage requiring service - The unit should be serviced
by qualifi ed service personnel if:
(a) The AC power supply cord or the plug has been
damaged; or
(b) Objects or liquids have gotten into the unit; or
(c) The unit has been exposed to rain; or
(d) The unit does not operate normally or exhibits a
marked change in performance; or
(e) The unit has been dropped or the cabinet damaged.
2. Servicing - Do not attempt to service the unit beyond that
described in these operating instructions. Refer all other
servicing to authorized servicing personnel.
3. Replacement parts - When parts need replacing ensure
the servicer uses parts specifi ed by the manufacturer or
parts that have the same characteristics as the original
parts. Unauthorized substitutes may result in fi re, electric
shock, or other hazards.
Playing from a portable audio equipmentPlaying from a portable audio equipment
Switch off the equalizer function (if there is any) of the
portable audio equipment before you plug into the MUSIC
PORT jack. Otherwise, sound from the speaker may be
distorted.
Plug the audio cord into the MUSIC PORT jack and
1
press [MUSIC P.].
Play the portable audio equipment. (See the portable
2
audio equipment’s instruction manual.)
Recording fromRecording from a a portable audio portable audio equipmentequipment
Press [MUSIC P.].
1
Play the portable audio equipment.
2
Press [¶, REC] on the main unit to start recording.
3
Note:
All peripheral components and cables are sold separately.
4. Safety check - After repairs or service, ask the servicer to
perform safety checks to confi rm that the unit is in proper
working condition.
The servicer will require all components to service your
system.
Therefore, should service ever be necessary, be sure to
bring the entire system.
Product information
For product information or assistance with product
operation:
In the U.S.A., refer to “Customer Services Directory” on
page 18.
In Canada, contact the Panasonic Canada Inc. Customer
Care Centre at 905-624-5505, or visit the website
(www.panasonic.ca), or an authorized Servicentre closest
to you.
Maintenance
If the surfaces are dirtyIf the surfaces are dirty
To clean this unit, wipe with a soft, dry cloth.
• Never use alcohol, paint thinner or benzine to clean this
unit.
• Before using chemically treated cloth, read the instructions
that came with the cloth carefully.
When moving the unit
Remove all discs.
1
Press [y /I, POWER] to turn the unit off.
2
Disconnect the AC power supply cord.
3
For a cleaner crisper sound (cassette deck)For a cleaner crisper sound (cassette deck)
Clean the heads regularly to assure good quality playback
and recording. Use a cleaning tape (not included).
LANG - 5 LANG - 4 FRANÇAIS DANSK ENGLISH
RQTV0071
15
RQT8043
Page 16

Troubleshooting guide
Before requesting service, make the following checks. If you are in doubt about some of the check points, or if the
remedies indicated in the chart do not solve the problem, refer to the “Customer Services Directory” on page 18 if you
reside in the U.S.A., or refer to the “Product information” on page 15 if you reside in Canada.
Reference pages are shown as black circled numbers 4.
Common problems
Although the unit is in standby mode, the
display lights up and changes continuously.
No sound.
Sound stops.
Sound is unfi xed, reversed or comes from
one speaker only.
Humming heard during play.
“ERROR” is displayed.
“– –:– –” appears on the display at
standby mode.
“F61” is displayed.
Listening to the radio
Noise is heard.
The stereo indicator fl ickers or doesn’t light.
Sound is distorted.
A beat sound is heard.
A low hum is heard during AM broadcast.
Turn off the demo function. 5
If you set the clock, demo function will be turned off automatically. $
Turn the volume up.
Switch off the unit, determine and correct the cause, then switch the unit on. Causes include
shorting of the positive and negative speaker wires, straining of the speakers through excessive
volume or power, and using the unit in a hot environment.
Check the speaker connections. 4
An AC power supply cord or fl uorescent light is near the cables. Keep other appliances and cords
away from this unit’s cables.
Incorrect operation performed. Read the instructions and try again.
You plugged the AC power supply cord in for the fi rst time or there was a power failure recently.
Set the time. $
Check and correct the speaker cords connection. 4
If this does not fi x the problem, there is a power supply problem. Consult the dealer.
Use an outdoor antenna. 4
Turn the TV off or separate it from the unit.
Separate the antenna from other cables and cords.
When there is a television set nearby
The picture on the TV disappears or
stripes appear on the screen.
Using the cassette deck
Poor quality sound.
Recording is not possible.
Playing discs
The display is wrong or play won’t start.
The total number of tracks displayed
differs each time the same disc is inser ted.
Unusual sound is heard.
CD-RW cannot be read.
“VBR–” is displayed instead of the
remaining play time.
Disc trays
Disc tray(s) cannot open.
“CHGR ERR ” is displayed.
Remote control
Remote control doesn’t work.
The location and orientation of the antenna are incorrect. If you are using an indoor antenna,
change to an outdoor antenna.
The TV antenna wire is too close to the unit. Separate the antenna wire of the TV set from the unit.
Clean the heads. &
If the erasure prevention tabs have been removed, cover the holes with adhesive tape. "
The disc may be upside down. !
Wipe the disc.
Replace the disc if it is scratched, warped, or non-standard.
Condensation may have formed inside the unit due to a sudden change in temperature. Wait for
about an hour for it to clear and try again.
The disc may be scratched, or its data may be defective. Replace the disc.
The disc was incompletely formatted. Use the recording equipment to fully format the disc before
recording.
The unit cannot display the remaining play time for variable bit rate (VBR) tracks.
Press [y/I, POWER] to release the jammed tray(s) as the unit will switch off. Switch it on again and
the tray(s) will initialize to the previous tray(s) condition.
If this still does not fi x the problem, please consult the dealer.
Check that the batteries are inserted correctly. 5
Replace the batteries if they are worn.
LANG - 5 LANG - 4 FRANÇAIS DANSK ENGLISH
16
RQT8043
Memory reset (Initialization)
When the following situations occur, refer to the instructions below to reset the memory:
• There is no response when buttons are pressed.
• You want to clear and reset the memory contents.
To reset memory
1 Disconnect the AC power supply cord. (Wait at least 3 minutes before proceeding to step 2)
2 While pressing and holding down [y /I, POWER] on the main unit, reconnect the AC power supply cord.
RQTV0071
“– – – – – – – – –” appears on the display.
3 Release [y /I, POWER].
All the settings are returned to the factory preset.
You will need to reset the memory items.
Page 17

Specifi cations
AMPLIFIER SECTION
FTC Output power
THD 10%
100 Hz to 3 kHz
(Low channel-both channels driven) 75 W per channel (3 Ω)
3 kHz to 12 kHz
(High channel-both channels driven) 75 W per channel (3 Ω)
40 Hz to 100 Hz
(Subwoofer channel) 150 W (8 Ω)
Total FTC power 450 W
RMS output power
THD 10%
1 kHz
(Low channel-both channels driven) 90 W per channel (3 Ω)
10 kHz
(High channel-both channels driven) 90 W per channel (3 Ω)
60 Hz
(Subwoofer channel) 180 W (8 Ω)
Total output power 540 W
FM/AM TUNER, TERMINALS SECTION
Preset station FM 15 stations
AM 15 stations
Frequency Modulation (FM)
Frequency range 87.9 to 107.9 MHz (200 kHz steps)
87.5 to 108.0 MHz (100 kHz steps)
Sensitivity 4.0 µV (IHF)
S/N 26
Antenna terminal(s) 75 Ω (unbalanced)
dB 2.2 µV
Amplitude Modulation (AM)
Frequency range 520 to 1710 kHz (10 kHz steps)
Sensitivity
S/N 20 dB (at 1000 kHz) 560 µV/m
Music Port input jack
Terminal Stereo, 3.5 mm (
Sensitivity 100 mV, 4.7 kΩ
Phone jack
Terminal Stereo, 3.5 mm (
1
/8˝) jack
1
/8˝) jack
CASSETTE DECK SECTION
Track system 4 track, 2 channel
Heads
Record/playback Solid permalloy head
Erasure Double gap ferrite head
Motor DC servo motor
Recording system AC bias 100
Erase system AC erase 100
Tape speed 4.8
Overall frequency response (+3 dB, –6 dB) at DECK OUT
NORMAL 35 Hz to 14 kHz
S/N Ratio 50 dB (A weighted)
Wow and fl utter 0.18% (WRMS)
Fast forward and rewind time
Approx. 120 seconds with C-60 cassette tape
kHz
kHz
cm/s (17/8 ips)
SPEAKER SECTION
Front speakers SB-AK640
Type 3 way, 3 speaker system (Bass refl ex)
Speaker(s)
Woofer 16 cm (6
Tweeter 6
1
/2˝) cone type
cm (23/8˝) cone type
Super tweeter Piezo type
Impedance
HIGH 3 Ω
LOW 3 Ω
Input power (IEC)
HIGH 105 W (Max)
LOW 105 W (Max)
Output sound pressure level 83 dB/W (1.0 m)
Cross over frequency 2 kHz, 10 kHz
Frequency range 37 Hz to 23 kHz (–16 dB)
44 Hz to 22 kHz (–10 dB)
Dimensions (WxHxD) 247 x 330 x 221 mm
(9
Mass 3.0 kg (6.6 Ib.)
Subwoofer SB-WAK640
23
/32˝ x 13˝ x 811/16˝)
Type 1 way, 1 speaker system (Bass refl ex)
Speaker(s)
Subwoofer 16 cm (6
Impedance 8 Ω
Input power (IEC) 180
Output sound pressure level 80 dB/W (1.0 m)
1
/2˝) cone type
W (Max)
Frequency range 40 Hz to 220 Hz (–16 dB)
45 Hz to 180 Hz (–10 dB)
Dimensions (WxHxD) 248 x 330 x 256 mm
(9
Mass 3.6 kg (7.9 Ib.)
3
/4˝ x 13˝ x 103/32˝)
GENERAL
Power supply AC 120 V, 60 Hz
Power consumption 132 W
Dimensions (WxHxD) 250 x 330 x 343 mm
(9
Mass 6.6 kg (14.6 Ib.)
Operating temperature range +5 to +35 °C (+41 to +95°F)
Operating humidity range 5 to 90 % RH (no condensation)
Power consumption in standby mode: 0.28 W
Note:
1. Specifi cations are subject to change without notice.
Mass and dimensions are approximate.
2. Total harmonic distortion is measured by the digital spectrum
analyzer.
3. The labels “HIGH” and “LOW” on the rear of the speakers refer to
High frequency and Low frequency.
27
/32˝ x 13˝ x 131/2˝)
DISC SECTION
Disc played [8 cm (3˝ ) or 12 cm (5˝ )]
(1) CD-Audio (CD-DA)
(2) CD-R/RW (CD-DA, MP3, WMA formatted disc)
(3) MP3/WMA
Bit rate
MP3, WMA 32 kbps to 320 kbps
Sampling frequency
MP3/WMA 32 kHz, 44.1 kHz, 48 kHz
CD-DA 44.1 kHz
Decoding 16 bit linear
Digital fi lter 8 fs
D/A converter MASH (1 bit DAC)
Pick up
Wavelength 780 nm
Beam Source Semiconductor laser
Audio output (Disc)
Number of channels 2(Stereo) (FL, FR)
LANG - 5 LANG - 4 FRANÇAIS DANSK ENGLISH
RQTV0071
17
RQT8043
Page 18

Limited Warranty (ONLY FOR U.S.A.)
Panasonic Consumer Electronics Company,
Division of Panasonic Corporation of North America
One Panasonic Way Secaucus, New Jersey 07094
Panasonic Audio Products
Limited Warranty
Limited Warranty Coverage
If your product does not work properly because of a defect in materials or
workmanship, Panasonic Consumer Electronics Company or Panasonic
Puerto Rico, Inc. (collectively referred to as “the warrantor”) will, for the
length of the period indicated on the chart below, which starts with the
date of original purchase (“ warranty period”), at its option either (a) repair
your product with new or refurbished parts, or (b) replace it with a new or
a refurbished product. The decision to repair or replace will be made by
the warrantor.
Product of Part Name Parts Labor
Audio Products (except items listed
below)
USB Reader-Writer, Personal
Computer Card Adapters
(in exchange for defective item)
Accessories: Headphones,
Cartridges, Microphones, Adapters
Rechargeable Batteries,
DVD-R/-RAM Discs (in exchange for
defective item)
SD Memor y Cards, Rechargeable
Battery Packs (in exchange for
defective item)
During the “Labor” warranty period there will be no charge for labor.
During the “Parts” warranty period, there will be no charge for parts. You
must carry-in or mail-in your product during the warranty period. If nonrechargeable batteries are included, they are not warranted. This warranty
only applies to products purchased and serviced in the United States or
Puerto Rico. This warranty is extended only to the original purchaser of a
new product which was not sold “as is”. A purchase receipt or other proof
of the original purchase date is required for warranty service.
One (1) year One (1) year
One (1) year Not
Ninety (90)
days
Ten (10) days Not
Ninety (90)
days
Applicable
Ninety (90)
days
Applicable
Not
Applicable
Panasonic Puerto Rico, Inc.
Ave. 65 de Infantería, Km. 9.5
San Gabriel Industrial Park, Carolina, Puerto Rico 00985
Carry-In or Mail-In Service
For Carry-In or Mail-In Ser vice in the United States call 1-800-211-PANA
(1-800-211-7262) or visit Panasonic web site: http://www.panasonic.com
For assistance in Puerto Rico call Panasonic Puerto Rico, Inc.
(787)-750-4300 or fax (787)-768-2910.
Limited Warranty Limits And Exclusions
This warranty ONLY COVERS failures due to defects in materials or
workmanship, and DOES NOT COVER normal wear and tear or cosmetic
damag e. The warran ty ALSO DOES NOT C OVER damages wh ich occu rred
in shipment, or failures which are caused by products not supplied by
the warrantor, or failures which result from accidents, misuse, abuse,
neglect, mishandling, misapplication, alteration, faulty installation, set-up
adjustments, misadjustment of consumer controls, improper maintenance,
power line surge, lightning damage, modifi cation, or commercial use
(such as in a hotel, offi ce, restaurant, or other business), rental use of
the product, service by anyone other than a Factory Servicenter or other
Authorized Servicer, or damage that is attributable to acts of God.
THERE ARE NO EXPRESS WARRANTIES EXCEPT AS LISTED UNDER
“LIMITED WARRANTY COVERAGE”. THE WARRANTOR IS NOT LIABLE
FOR INCIDENTAL OR CONSEQUENTIAL DAMAGES RESULTING FROM
THE USE OF THIS PRODUCT, OR ARISING OUT OF ANY BREACH OF
THIS WARRANTY. (As examples, this excludes damages for lost time,
travel to and from the servicer, loss of media or images, data or other
memory content. The items listed are not exclusive, but are for illustration
only.) ALL EXPRESS AND IMPLIED WARRANTIES, INCLUDING THE
WARRANTY OF MERCHANTABILITY, ARE LIMITED TO THE PERIOD
OF THE LIMITED WARRANTY.
Some states do not allow the exclusion or limitation of incidental or
consequential damages, or limitations on how long an implied warranty
lasts, so the exclusions may not apply to you.
This warranty gives you specifi c legal rights and you may also have
other rights which vary from state to state. If a problem with this product
develops during or after the warranty period, you may contact your dealer
or Servicenter. If the problem is not handled to your satisfaction, then
write to the warrantor’s Consumer Affairs Department at the addresses
listed for the warrantor.
PARTS AND SERVICE WHICH ARE NOT COVERED BY THIS LIMITED
WARRANTY ARE YOUR RESPONSIBILITY.
LANG - 5 LANG - 4 FRANÇAIS DANSK ENGLISH
18
RQT8043
Customer Services DirectoryCustomer Services Directory
Obtain Product Information and Operating Assistance; locate your nearest Dealer or Servicenter; purchase Parts and Accessories;
or make Customer Service and Literature requests by visiting our Web Site at:
http://www.panasonic.com/consumersupport
or, contact us via the web at:
http://www.panasonic.com/contactinfo
You may also contact us directly at:
1-800-211-PANA (7262),
Monday-Friday 9 am-9 pm; Saturday-Sunday 10 am-7 pm, EST.
For hearing or speech impaired TTY users, TTY: 1-877-833-8855
Accessory PurchasesAccessory Purchases
Purchase Parts, Accessories and Instruction Books online for all Panasonic Products by visiting our Web Site at:
http://www.pasc.panasonic.com
or, send your request by E-mail to:
npcparts@us.panasonic.com
You may also contact us directly at:
1-800-332-5368 (Phone) 1-800-237-9080 (Fax Only) (Monday-Friday 9 am to 8 pm, EST.)
Panasonic Services Company
20421 84th Avenue South, Kent, WA 98032
(We Accept Visa, MasterCard, Discover Card, American Express, and Personal Checks)
For hearing or speech impaired TTY users, TTY: 1-866-605-1277
Service in Puerto RicoService in Puerto Rico
Panasonic Puerto Rico, Inc.
RQTV0071
Ave. 65 de Infantería, Km. 9.5, San Gabriel Industrial Park, Carolina, Puerto Rico 00985
Phone (787)750-4300, Fax (787)768-2910
Page 19

Limited Warranty (ONLY FOR CANADA)
Panasonic Canada Inc.
PANASONIC/TECHNICS PRODUCT – LIMITED WARRANTY
Panasonic Canada Inc. warrants this product to be free from defects in material and workmanship and agrees to remedy any
such defect for a period as stated below from the date of original purchase.
Technics Audio Product One (1) year, parts and labour
Panasonic Audio & DVD Product One (1) year, parts and labour
Accessories including rechargeable batteries Ninety (90) days
In-home Service will be carried out only to locations accessible by roads and within 50 km of an authorized Panasonic
service facility.
LIMITATIONS AND EXCLUSIONS
This warranty does not apply to products purchased outside Canada or to any product which has been improperly installed,
subjected to usage for which the product was not designed, misused or abused, damaged during shipping, or which has
been altered or repaired in any way that affects the reliability or detracts from the performance, nor does it cover any product
which is used commercially. Dry cell batteries are also excluded from coverage under this warranty.
This warranty is extended to the original end user purchaser only. A purchase receipt or other proof of date of original
purchase is required before warranty service is performed.
THIS EXPRESS, LIMITED WARRANTY IS IN LIEU OF ALL OTHER WARRANTIES, EXPRESS OR IMPLIED, INCLUDING
ANY IMPLIED WARRANTIES OF MERCHANTABILITY AND FITNESS FOR A PARTICULAR PURPOSE.
IN NO EVENT WILL PANASONIC CANADA INC. BE LIABLE FOR ANY SPECIAL, INDIRECT OR CONSEQUENTIAL
DAMAGES.
In certain instances, some jurisdictions do not allow the exclusion or limitation of incidental or consequential damages, or the
exclusion of implied warranties, so the above limitations and exclusions may not be applicable.
WARRANTY SERVICE
FOR PRODUCT OPERATION ASSISTANCE, please contact:
Our Customer Care Centre: Telephone #: (905) 624-5505
1-800 #: 1-800-561-5505
Fax #: (905) 238-2360
Email link: “Contact Us” on www.panasonic.ca
FOR PRODUCT REPAIRS, please locate your nearest Authorized Servicentre at www.panasonic.ca:
Link : “Servicentres
Panasonic Factory Service:
Richmond British Columbia Mississauga Ontario
Panasonic Canada Inc.
12111 Riverside Way
Richmond BC V6W 1K8
Tel: ( 604 ) 278 - 4211
Fax: (604) 278-5627
Carefully pack and send prepaid, adequately insured and preferably in the original carton.
Include details of the defect claimed, and proof of date of original purchase.
TM
locator” under “Customer support”
Panasonic Canada Inc.
5770 Ambler Drive
Mississauga ON L4W 2T3
Tel: ( 905) 624-8447
Fax: (905) 238-2418
IF YOU SHIP THE PRODUCT TO A SERVICENTRE
LANG - 5 LANG - 4 FRANÇAIS DANSK ENGLISH
RQTV0071
19
RQT8043
Page 20

Referencia
• Las conexiones del equipo descritas sirven en concepto de ejemplo.
• Los equipos periféricos y los cables opcionales se venden por separado si no está indicado de otro modo.
Preparativos iniciales
PasoPaso 11
Conecte el cable de alimentación de CA sólo después de haber hecho todas las demás conexiones.
- Conexiones - Conexiones
ENGLISH
1
DANSK
Conecte los cables de los altavoces.
Rojo
Gris
Azul
Negro
Azul (–)
Conecte de la
misma forma en el
lado izquierdo (L)
Rojo (+)
Negro (–)
Rojo (+)
Gris (+)
Negro (–)
Altavoz de
subgraves
(SB-WAK640)
2
Conecte la antena de cuadro de AM.
Ponga la antena
en posición vertical
sobre su base.
3
Conecte la antena interior de FM.
Fije la antena donde la recepción sea major.
(L)(R)
FRANÇAIS
Cinta
adhesiva
ESPAÑOL LANG - 4
20
RQT8043
4
Conecte el cable de alimentación de CA
Para su referencia
Para ahorrar energía cuando no utiliza el aparato durante
mucho tiempo, desenchúfelo de la toma de CA.
Después de enchufar el aparato tendrá que reponer algunos
elementos de la memoria.
PPasoaso 2 2
RQTV0071
- Introducción de pilas en el mando a distancia
R6/LR6, AA
■ Pilas
• Inserte los polos (+ y –) de la forma que se indica en el mando a distancia.
• Retire las pilas si no va a utilizar el mando a distancia durante un periodo de
tiempo largo. Guárdelas en un lugar fresco y oscuro.
• Reemplace las pilas si el aparato no responde al mando a distancia a pesar
de utilizarlo cerca del panel delantero.
• No utilice baterías recargables.
• Un mal manejo de pilas en el control remoto puede provocar fugas
electrolíticas, que pueden provocar fuego.
• Si las pilas tienen fugas de electrólito, consulte a su distribuidor.
Si el electrólito entra en contacto con cualquier parte de su cuerpo, lave la
parte afectada con agua abundante.
No:
• mezcle nunca pilas viejas y nuevas.
• utilice nunca pilas de diferentes tipos a la vez.
• caliente nunca las pilas ni las exponga a las llamas.
• desmonte nunca las pilas ni las cortocircuite.
• intente nunca recargar pilas alcalinas o de manganeso.
• utilice nunca pilas cuya cubierta protectora esté levantada.
• ponga nunca objetos pesados encima del mando a distancia.
• derrame nunca líquidos sobre el mando a distancia.
■ Utilización
Diríjalo al sensor del mando a distancia, evitando los obstáculos, desde
una distancia máxima de 7 m (23 pies) directamente frente al aparato.
Consulte la página 22 para ver la posición del sensor de la señal del
mando a distancia.
Nota:
El cable de alimentación de CA incluido es para ser usado con
este aparato solamente.
No lo utilice con otro equipo.
Page 21

PasoPaso 3 3
- Función de demostración - Función de demostración
Colocación de los altavoces
Ponga el altavoz
de subgraves
en el suelo o en
una estantería
fuerte para
que no cause
vibración.
Cuando el aparato se enchufe por primera vez puede aparecer en el
visualizador una demostración de sus funciones.
Si el ajuste de demostración está desactivado, usted podrá activarlo
seleccionando “DEMO ON”.
Mantenga pulsado [DISPLAY, –DEMO].
La visualización cambia cada vez que se pulsa el botón.
NO DEMO (desactivación) Ô DEMO ON (activación)
Durante el modo de espera, seleccione “NO DEMO” para reducir el consumo
de energía.
Nota:
La función DEMO no se puede activar cuando la función DIMMER está activada.
AgudosAgudos
Utilice solamente los altavoces suministrados.
La combinación de la unidad principal y los altavoces
proporciona el mejor sonido. Utilizando otros altavoces se
puede estropear la unidad y el sonido quedará afectado
negativamente.
Nota:
• Mantenga sus altavoces alejados un mínimo de 10mm (13/32˝)
del sistema para disponer de una ventilación apropiada.
• Estos altavoces no disponen de blindaje magnético. No los ponga
cerca de televisores, ordenadores personales y otros dispositivos a
los que afecte fácilmente el magnetismo.
• Si reproduce el sonido con niveles altos durante largos periodos de
tiempo podrá dañar los altavoces y reducir su duración.
• Reduzca el volumen para evitar daños en los casos siguientes.
– Cuando reproduzca sonido distorsionado.
– Cuando ajuste la calidad del sonido.
ENGLISH
DANSK
FRANÇAIS
Altavoz
delantero
(izquierdo)
Aparato
principal
Altavoz de
subgraves
Altavoz
delantero
(derecho)
Altavoces delanteros
• Coloque los altavoces delanteros de forma que el altavoz
de agudos quede en la parte interior.
• No quite la red frontal de los altavoces.
Precaución
• Use los altavoces sólo con el sistema
recomendado. De lo contrario, se
podrían dañar el amplificador y los
altavoces, y se podría ocasionar
un incendio. Consulte a un técnico
de servicio especializado si se ha
producido algún daño o si se ha
producido un cambio repentino en su
funcionamiento.
• No instale estos altavoces en paredes ni
techos.
ESPAÑOL LANG - 4
RQTV0071
21
RQT8043
Page 22

Controles
Aparato principalAparato principal
Los números entre paréntesis indican la página de referencia.
Indicador de alimentación de CA [AC IN]
Este indicador se encenderá cuando el aparato
ENGLISH
1 Interruptor de alimentación en espera/
modo de alimentación conectada al modo de
alimentación en espera o viceversa. En el modo
de alimentación en espera el aparato consume
2 Selección de altavoz de subgraves (14)
4 Selector de sintonizador/banda (25)
DANSK
Omitir/buscar disco, avance rápido de cinta
/rebobinar, sintonizar/selección de canal
esté conectado a la red de CA.
conectada [y/l, POWER] (10, 16)
Pulse este interruptor para cambiar del
una pequeña cantidad de corriente.
Cambiar múltiples discos (8)
Visualizador
3 Control de volumen
5 Selección de puerto de música (15)
Conector de puerto de música (15)
Apertura de la platina 1 (24)
presintonizado, ajuste de tiempo (24)
Grabación (15, 24)
Visualización, demostración (21)
6 Selección H.BASS (14)
Portacinta de la platina 1 (24)
FRANÇAIS
Mando a distanciaMando a distancia
Los botones como el 1 funcionan del mismo modo que los botones del aparato principal.
Sensor de señal del
mando a distancia
Bandeja de discos
Abrir/cerrar bandeja de
disco (23)
Cambiar un sólo disco (8)
Reproducción directa de
disco (8)
7 Reproducción/pausa
de disco (23)
Toma de auriculares
(PHONES)
Procure evitar utilizarlos
mucho rato con el fi n de
evitar lesiones auditivas.
Tipo de clavija: estéreo de
1
3,5 mm (
(no suministrada)
8 Reproducción de la
cinta (24)
Apertura de la platina
2 (24)
Paro (24)
Selección de platina (24)
Portacinta de la platina
2 (24)
/8˝)
ESPAÑOL LANG - 4
22
RQT8043
Temporizador para dormir (14),
Apagado automático
Disco (23)
Programas (8, 12)
Selector del modo de
reproducción (23 ~ 25)
Repetición (9)
Borrado (9)
Selección de àlbum (7)
Selección de intro (9)
Marcación de memoria/
recuperación (9)
RQTV0071
1
4
5
2
6
Reducción de la iluminación
del visualizador,
Temporizador de
reproducción/grabación (26)
Visualizador (8),
Reloj/temporizador (26)
Numerados, caracteres
(9, 23, 25)
7
Parada/cancelación de
programas (9, 23)
8
3
Omitir/buscar disco,
avance rápido de cinta,
sintonizar/selección de canal
presintonizado, ajuste de
tiempo, cursor (9, 23, 25, 26)
Introducir (8)
Búsqueda de títulos
Silenciamiento
Ecualizador preajustado (14)
(9)
apagado automático le permite
Esta función de
apagar el aparato en modo disco o
cinta, sólo después de 10 minutos
sin utilizarlo.
• Mantenga pulsado [–AUTO OFF]
para activar esta función.
• Mantenga pulsado [–AUTO OFF]
de nuevo para cancelar.
• El ajuste se mantiene aunque el
aparato esté apagado.
Para reducir la
iluminación del visualizador.
Para silenciar el
sonido.
• Pulse el botón para activarlo.
• Vuélvalo a pulsar para cancelar.
Page 23

Discos
Botones
numéricos
Reproducción básicaReproducción básica
Pulse [0, OPEN/CLOSE] en la unidad principal para
1
abrir la bandeja.
El aparato se enciende, carga un disco en la bandeja
actual con la etiqueta hacia arriba.
Pulse [0, OPEN/CLOSE] para cerrar la bandeja.
Pulse [6, CD] para iniciar la reproducción.
2
También puede pulsar [DISC] y a continuación
[1] ~ [5] para seleccionar y reproducir los otros discos
cargados.
Indicador del disco actual
Para Acción
parar
reproducción
interrumpir la
reproducción
saltar álbum
Pulse [7 , CLEAR] durante la reproducción.
Visualización en el modo de parada:
Ejemplo: “MP3” indica que el disco contiene
Pulse [6 , CD] durante la reproducción.
Vuelva a pulsar para reanudar la reproducción.
Pulsar [ALBUM ( o )] para seleccionar el
album deseado durante la reproducción o en el
modo de paro.
Mostrar al seleccionarlo en modo de paro
(ejemplo):
archivos MP3.
Número total
de álbumes
Número total
de pistas
Álbum actual
saltar pistas Pulse [4, REW / ] o [¢, / FF] .
buscar por
pistas
• Durante la reproducción aleatoria (\ ver abajo,
“Función de modo de reproducción” ), no se
puede saltar a pistas que ya han sido
reproducidas.
Durante el modo 1-ALBUM y 1-ALBUM RANDOM,
el salto de pista sólo puede realizarse dentro del
álbum actual.
Mantenga pulsado [4, REW / ] o [¢, / FF]
durante la reproducción o la pausa para buscar.
• Durante la reproducción programada
(\ página 8), o la reproducción aleatoria
(\ ver abajo, “Función de modo de
reproducción”), usted sólo puede buscar dentro
de la pista.
Función de modo de reproducción Función de modo de reproducción
Puede escuchar discos específi cos y pistas.
Preparación
Seleccione y reproduzca sus discos deseados.
Pulse [PLAY MODE] para seleccionar el modo deseado.
Modo Para reproducir
1-DISC
1 DISC
1-DISC RANDO M
1 DISC RND
ALL-DISC
ALL DISC
ALL-DISC RANDOM
ALL-DISC RND
1-SO NG
1-SON G
1-ALBUM
1-ALBU M
1- ALBUM RANDOM
1-ALBU M RND
Cuando termine la reproducción
El modo de reproducción actual se retendrá en la memoria,
aunque se apague el aparato, hasta que se cambie.
un disco seleccionado.
un disco seleccionado aleatoriamente.
todos los discos cargados en sucesión
del disco seleccionado al último disco.
Ejemplo: 4→5→1→2→3.
todos los discos cargados en orden
aleatorio.
una melodía seleccionada del disco
seleccionado.
Pulse los botones numéricos para
seleccionar la pista en el disco actual.
La reproducción empieza desde la pista
seleccionada.
Pulse [ALBUM ( o )] para
seleccionar el álbum.
Pulse los botones numéricos para
seleccionar la pista en el álbum actual.
La reproducción empieza desde la pista
seleccionada.
un álbum seleccionado del disco
seleccionado.
Pulse [ALBUM (
seleccionar el álbum.
todas las pistas de un álbum
seleccionado aleatoriamente.
Pulse [ALBUM (
seleccionar el álbum.
o )] para
o )] para
ENGLISH
DANSK
FRANÇAIS
Número de pistas
del álbum actual
• Esta función no funciona en modo 1-DISC
RANDOM y ALL-DISC RANDOM. Es aplicable
únicamente durante el modo paro del
programa.
ESPAÑOL LANG - 4
RQTV0071
23
RQT8043
Page 24

Cintas de casete – reproducción y grabación
ENGLISH
Botones
numéricos
DANSK
Los botones descritos para “Cintas de casete –
reproducción y grabación” son principalmente para la
unidad a no ser que se indique lo contrario.
GrabaciónGrabación
Selección de las cintas para la grabación
Use cintas de posición normal.
Pueden usarse cintas de posición alta y de metal, pero el
aparato no las grabará ni las borrará correctamente.
Preparación
Rebobine la cinta original para que la grabación pueda
comenzar de inmediato.
Pulse [OPEN 0] para la platina 2 (DECK 2) e inserte
1
la cinta que hay que grabar.
Inserte con el lado que va a grabar hacia usted y con la
cinta expuesta hacia abajo.
Seleccione la fuente que va a grabar.
2
Grabación de disco:
➀ Inserte el(los) CD(s) que desee grabar.
Pulse [ 6 , CD] y luego [ 7 , STOP].
➁ Prepare el modo de grabación del disco deseado.
Para Acción
Mando a distancia solamente
grabación
1-DISC/
ALL-DISC
Pulse [¶, REC] para iniciar la grabación.
3
Otras operaciones básicasOtras operaciones básicas
1) Pulse [DISC] y luego [1]~[5] para
seleccionar el disco.
Asegúrese de que el disco esté
parado.
2) Pulse [PLAY MODE] para seleccionar
el modo deseado (\ página 23).
Reproducción básicaReproducción básica
Puede utilizar la platina 1 (DECK 1) o platina 2 (DECK 2)
FRANÇAIS
para reproducir cintas.
Use cintas de posición normal.
Las cintas de posición alta y de posición metal pueden
reproducirse, pero el aparato no podrá reproducir
perfectamente las características de estas cintas.
Pulse [3, TAPE].
1
El aparato se enciende.
Si ya se introdujo una cinta de casete, la reproducción
empezará automáticamente (Reproducción de un
toque).
Pulse [0 OPEN] para la platina 1 (DECK 1) o
2
[OPEN 0] para la platina 2 (DECK 2) e insertar la
cinta.
Inserte con el lado que va a reproducirse hacia usted y
con la cinta expuesta hacia abajo. Cierre el portacasete
con la mano.
Lado
delantero
Pulse [3, TAPE] para iniciar la reproducción.
3
ESPAÑOL LANG - 4
Para Acción
detener la
reproducción
avanzar rápidamente
o rebobinar
seleccionar entre las
platinas cargadas
RQTV0071
Pulse [7 , STOP].
Pulse [4 / REW / ] o [ / FF / ¢].
Pulse [DECK 1/2] (mando a distancia :
[PLAY MODE]).
Para Acción
detener la grabación Pulse [7, STOP].
grabar en la otra cara
de la cinta
Dé la vuelta a la cinta de casete y pulse
[¶, REC].
24
RQT8043
Page 25

Radio
Sintonización manualSintonización manual
Pulse [TUNER, BAND] para seleccionar “FM” o “AM”.
1
Pulse [PLAY MODE] para seleccionar “MANUAL”.
2
Pulse [4, REW / ] o [¢ , / FF] para seleccionar
3
la frecuencia de la emisora requerida.
• Se visualizará “ ” cuando esté siendo recibida una
emisora estéreo por FM.
• Se visualizará “TUNED” cuando se sintonice con
precisión una emisora de radio.
Para sintonizar automáticamente
Mantenga pulsado [4, REW / ] o [¢ , / FF] hasta que
la frecuencia empiece a cambiar rápidamente. El aparato
inicia la sintonización automática y se detendrá cuando
encuentre una emisora.
• La sintonización automática tal vez se interrumpa cuando
las interferencias sean excesivas.
• Para cancelar la sintonización automática, pulse una vez
más [4, REW / ] o [¢ , / FF].
Para mejorar la calidad del sonido de FMPara mejorar la calidad del sonido de FM
Mantenga pulsado [PLAY MODE] para visualizar
“MONO”.
Para cancelar
Pulse y mantenga pulsado [PLAY MODE] otra vez hasta
que “MONO” desaparezca.
• MONO también se cancelará si se cambia la frecuencia.
• Deje “MONO” apagado para la escucha normal.
Ajuste de la asignación de FMAjuste de la asignación de FM
Aparato principal solamente
Este sistema le permite recibir emisiones de FM asignadas
en pasos de 0,1 MHz.
Para cambiar el paso a 0,1 MHz
Mantenga pulsado [TUNER, BAND].
1
Después de unos segundos, la visualización cambiará a
una visualización parpadeante de la frecuencia mínima
actual.
Continúe pulsando [TUNER, BAND].
2
• Si la frecuencia mínima cambia, suelte el botón. Para
volver al paso original, repita los pasos anteriores.
• Después de cambiar el ajuste de “asignación”, las
frecuencias previamente preajustadas en la memoria
se borrarán.
Grabación de emisoras en memoriaGrabación de emisoras en memoria
Se puede presintonizar un máximo de 15 emisoras en cada
banda, FM y AM.
Preparación
Pulse [TUNER, BAND] para seleccionar “FM” o “AM”.
Presintonización automáticaPresintonización automática
Sintonice la frecuencia desde la que quiere
1
comenzar a presintonizar.
Mantenga pulsado [PROGRAM] para iniciar la
2
presintonización.
El sintonizador presintonizará en los canales, en orden
ascendente, todas las emisoras que pueda recibir. Cuando
termine, se sintonizará la última emisora memorizada.
Presintonización manualPresintonización manual
Pulse [PLAY MODE] para seleccionar “MANUAL”.
1
Pulse
2
3
4
[4, REW / ] o [¢ , / FF]
emisora deseada.
Pulse [PROGRAM].
Pulse los botones numéricos para seleccionar el
canal.
Para los canales 10 a 15 pulse [h10] y luego los dos
dígitos.
La emisora que ocupa un canal se borrará si se
presintoniza otra emisora en ese canal.
SelecSelección de ción de una emisora presintonizadauna emisora presintonizada
Pulse los botónes numéricos para seleccionar el canal.
O
Pulse [PLAY MODE] para seleccionar “PRESET”.
1
Pulse [4, REW / ] o [¢ , / FF] para seleccionar
2
el canal.
para seleccionar la
ENGLISH
DANSK
FRANÇAIS
ESPAÑOL LANG - 4
RQTV0071
25
RQT8043
Page 26

Temporizador
ENGLISH
DANSK
Puesta en horaPuesta en hora
Éste es un reloj de sistema de 12 horas.
Mantenga pulsado [– CLOCK/TIMER] para
1
seleccionar “CLOCK”.
Cada vez que pulse y mantenga pulsado el botón:
CLOCK
(
Entre 8 segundos después
2
Pulse [4, REW / ] o [¢ , / FF] para ajustar la
hora.
Mantenga pulsado [–
3
FRANÇAIS
poner la hora.
Visualización del reloj
Mantenga pulsado una vez [– CLOCK/TIMER] cuando la
unidad esté encendida o en modo de espera.
La hora se muestra durante unos pocos segundos.
Nota:
Vuelva a poner en hora el reloj con frecuencia para mantener su
precisión.
˚ PLAY
➞
Visulización original
CLOCK/TIMER]
➞
)
˚ REC
para terminar de
UtilizaciUtilizacióón del temporizador de n del temporizador de
reproduccireproduccióón/grabacin/grabacióónn
Puede ajustar el temporizador para que se encienda a
una hora determinada para despertarle (temporizador de
reproducción) o para grabar la radio o fuente de puerto de
música (temporizador de grabación).
El temporizador de reproducción no puede utilizarse en
combinación con el temporizador de grabación.
Encienda el aparato y ponga en hora el reloj.
Temporizador Acción
Temporizador
de
reproducción
Temporizador
ESPAÑOL LANG - 4
de grabación
Prepare la fuente de música que desea
escuchar (la platina 2 [DECK 2] tiene
prioridad), número de disco (1~5), radio
o fuente de puerto de música y ajuste el
volumen.
Compruebe las lengüetas de prevención de
borrado del casete (
casete en la platina 2 (DECK 2) y sintonice la
emisora de radio (
fuente del puerto de música (
\ página 11), inserte el
\ página 12) o seleccione la
\ página 15).
Mantenga pulsado
1
seleccionar la función del temporizador.
Cada vez que pulse y mantenga pulsado el botón:
CLOCK
˚PLAY : para ajustar el temporizador de reproducción
˚REC : para ajustar el temporizador de grabación
(Vaya al paso siguiente
Pulse [4, REW / ] o [¢ , / FF] para ajustar la
2
hora de inicio.
Mantenga pulsado
3
Repita los pasos 2 a 3 para ajustar la hora de
4
finalización.
Para activar el temporizador
Mantenga pulsado
5
temporizador deseado.
Pulse [y] para apagar el aparato.
6
El aparato debe estar apagado para que funcionen los
temporizadores.
Indicador del temporizador de reproducción
[–
CLOCK/TIMER] para
˚ PLAY
➞
Visulización original
antes de que pasen 8 segundos
Hora de inicio
Indicador del temporizador de grabación
[–
CLOCK/TIMER] para confirmar.
Hora de fi nalización
[– ˚PLAY/REC]
˚ PLAY
Ninguna visualización (desactivado)
➞
˚ REC
➞
para encender el
˚ REC
)
26
RQT8043
RQTV0071
Page 27

Otras operaciones básicasOtras operaciones básicas
Para Acción
cambiar la
confi guración
cambiar la fuente o
el volumen
compruebe la
confi guración
cancelar Mantenga pulsado [– ˚PLAY/REC] para
Si utiliza el aparato después de haber ajustado los
temporizadores
Tras la utilización del aparato, compruebe que la cinta/disco
correcto esté introducido antes de apagar el aparato.
Repetir los pasos de 1 a 4 y 6
(\ página 26).
1) Mantenga pulsado [ – ˚PLAY/REC]
para cancelar el temporizador
indicador del visualizador.
2) Cambie la fuente o el volumen.
3) Realice los pasos 5 a 6 (\ página 26).
Mantenga pulsado [– CLOCK/TIMER]
repetidamente para seleccionar ˚PLAY
o ˚REC.
cancelar el temporizador indicadores del
visualizador.
Nota:
• El temporizador de reproducción se pondrá en marcha a la hora
programada y el volumen aumentará gradualmente hasta el nivel
seleccionado.
• El temporizador de grabación de registro comenzará 30 segundos
antes del tiempo del sistema con el volumen silenciado.
• Si el temporizador está activo, se encenderá todos los días a la
hora fi jada.
• El aparato debe estar en modo de espera para que el temporizador
funcione.
• Si apaga el aparato y lo vuelve a encender mientras esté
funcionando un temporizador, no se activará el ajuste de tiempo
de terminación.
• Si se selecciona el puerto música (MUSIC PORT) como fuente
cuando el temporizador avance, el sistema se enciende y utilice el
pu er to d e músi ca (MUS IC P ORT) co mo f uent e. S i dese a rep ro ducir
o grabar desde el equipo reproductor portátil de audio, solo ha de
activar el modo reproducir del equipo reproductor y aumentar el
volumen. (Ver el manual de instrucciones del reproductor portátil
de audio.)
ENGLISH
DANSK
FRANÇAIS
ESPAÑOL LANG - 4
RQTV0071
27
RQT8043
Page 28

Panasonic Consumer Electronics
Company, Division of Panasonic
Corporation of North America
One Panasonic Way Secaucus,
New Jersey 07094
http://www.panasonic.com
© 2005 Matsushita Electric Industrial Co., Ltd.
Printed in Malaysia
Panasonic Puerto Rico, Inc.
Ave. 65 de Infantería, Km. 9.5
San Gabriel Industrial Park, Carolina,
Puerto Rico 00985
Panasonic Canada Inc.
5770 Ambler Drive
Mississauga, Ontario
L4W 2T3
www.panasonic.ca
RQTV0071-1P
En
Sp
L1205KE1125
 Loading...