

Page 1
CD Stereo System
s>
CDjiMMMasM
0^\ \fl (jA^
SC-AK50
Operating Instructions
JJuuiH oIjUujI
liiliiSllftii
MS
SM" "S"' S
'
■ ' i' " " " ' " ■ ■: •' . ■ ' .■ ■ ' ■
'
'--' M
COMPACT
DIGITAL AUDIO
. ■■. ■■ S-' 1:::..™ ■ i-. .:^ X' .;. . J .■ ■' . '■ ’ ' ■ ■-.'
. .J^.■t.Г;^^■-S'." .
■''■ S
1 liUiiiA Jf1
L lyMiSSa
ISIgHIgTI
RQT3936-G
Page 2
(Back of product)
(lipii'.iVtiifii '
Dear customer
Thank you for purchasing this system.
For optimum performance and safety, please read these instruction
carefully.
These operating instructions are applicable to the following system
System
Main unit
Speakers
Table of contents
INVISIBLE LASER RADIA I ION WHEN OPEN
DANGER
AVOID DIRECT EXPOSURE TO BEAM
USTNlIS lasers FBAliNGV£D№NII(G «AR SIHKEBREDSAEBRYDERf
AOVAfiSEL
EflUOEAfEiiNKIlOH UNTXauOSinEUEfOflSIRHElNG
AVAHAESSA JA SUOJAEUriTUS OHIlETTAESSA OLET ALITIINA
VARO'
NAKYMAIONIA LASEflSATElUlLE ALA KAISO SATEE3EEN
OSYNLIG LASERSTRALNIAIG NAROENNAML AROPPNAO OCH
VARNING
SPARREN AR (JRKOPPLAO BEIRAKIA EJ STSALEN
USrNLIG LASERSIRALIMG NAB DEKSEl APNES (K SIAKERHEOSLAS
ADVARSEL
BRTTES UNNGAEASBONERINGFORSTBALEN
UNSIChIBASE LASEKIBAHIUNG. wenn ABOECAUNG GEOFFMEI
VORSICHT
NOIOEMSIRAHLAUSSEIZEN
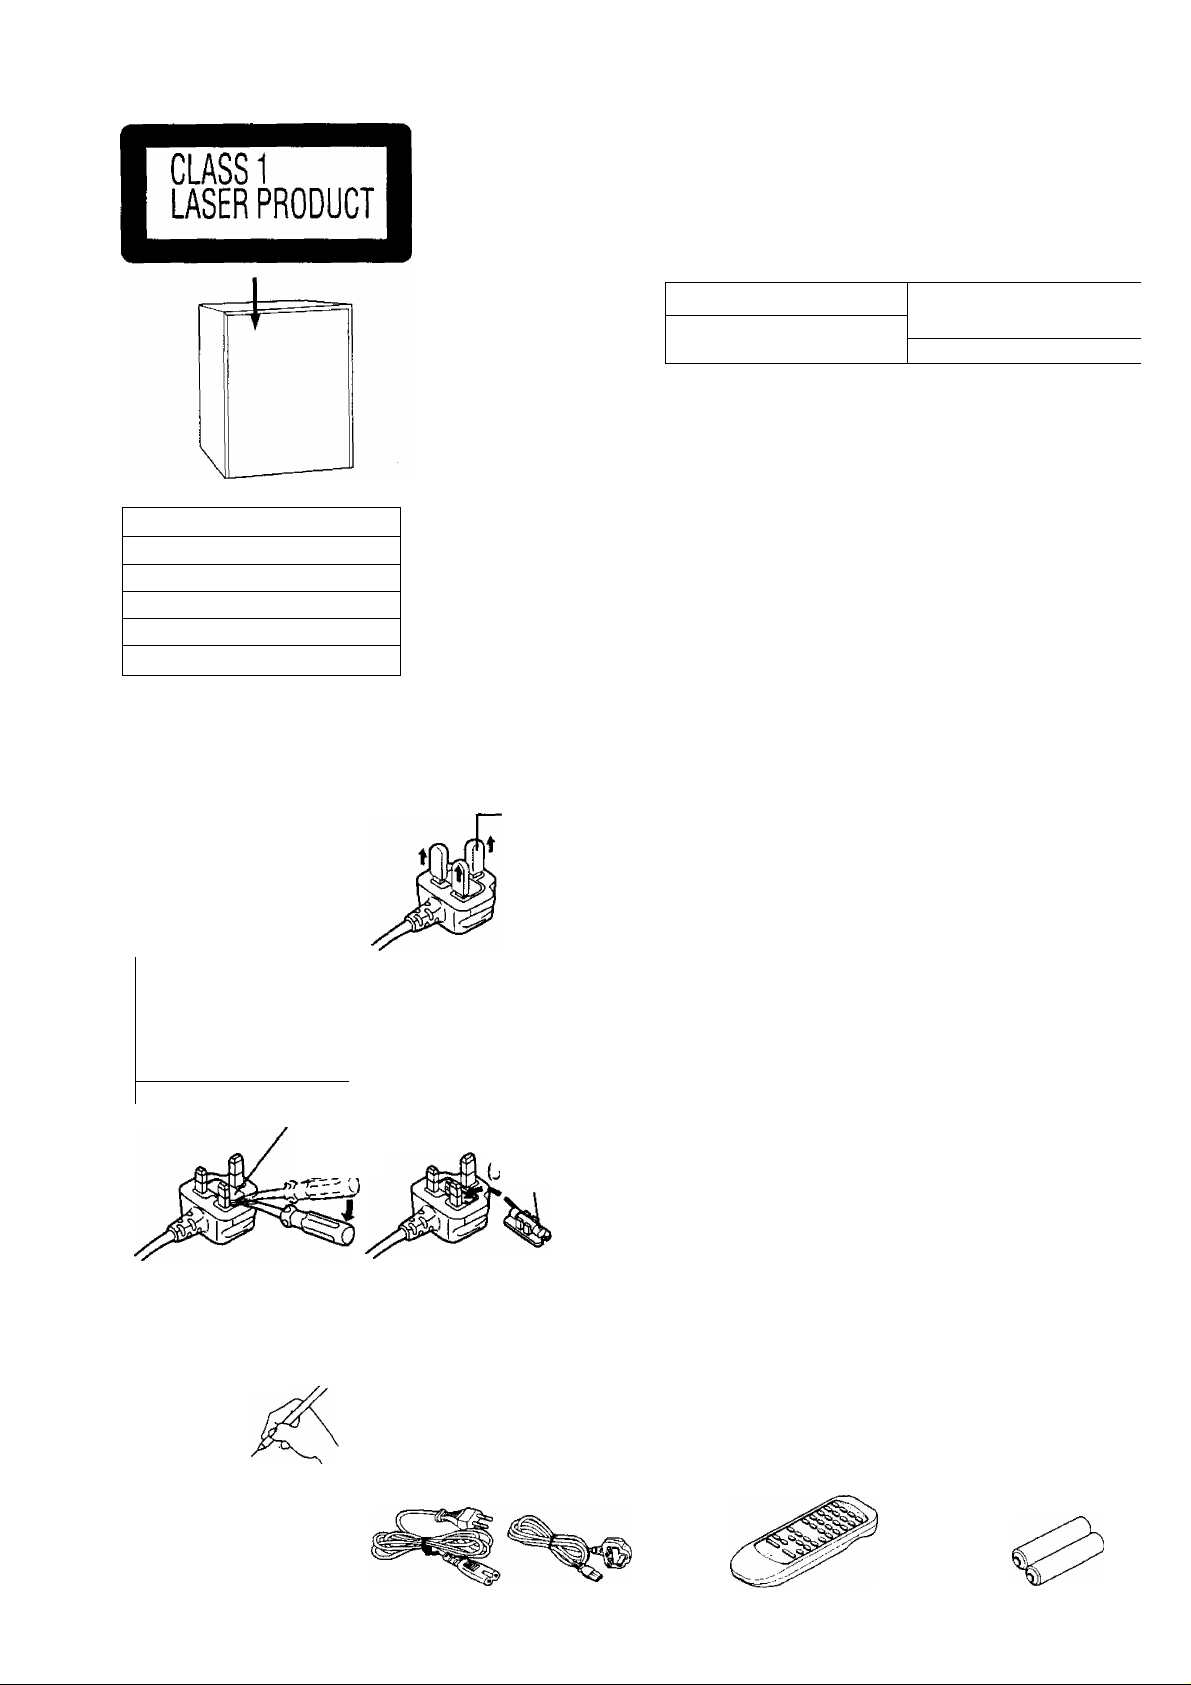
Note on AC power supply cord (For Hong kong)
Before use
Remove the connector cover
as follows.
(iP T Ifr >T' ' il f T' fS ¿ri
How to replace the fuse
JI<lUui| 3 iftl'S
1. Remove the fuse cover
with a screw driver.
, ^ jjI
Fuse cover
>oJI t-llnf
(Inside of product)
(Indersiden at apparateti
(Tuotteen sìsàlla)
(Apparatens insida)
(Produktets innside)
(Im Inneren des Gerätes)
Connecter
cover
WMil i
J.bOjXl >Uai£.
2. Replace the fuse and
attach the fuse cover.
2.
Cii > irtJl J . T
. Lf)LL¿
Fuse (5 ampere)
Supplied accessories
Suggestions for safety............................................................................^
Concerning the remote control...............................................................e
Placement of speakers...........................................................................e
Connections............................................................................................8
Front panel controls..............................................................................12.
Demo function........................................................................................
Setting the time.....................................................................................14
Presetting radio broadcasts
.............................................................................
.................................................................
Listening to radio broadcasts.............................................18
Listening to compact discs
Listening to tapes
..............................................................
Before recording (Deck 2 only)
Recording from radio broadcasts
Recording from compact discs
Tape-to-tape recording.......................................................46
Sound quality, field, etc........................................................................48
Using the play timer............................................................................:,50
Using the record timer..........................................................................54
Using the sleep timer............................................................................58
To use two timers together...................................................................58
Convenient functions............................................................................60
Using an external unit...........................................................................60
Singing along with KARAOKE..............................................................62
Remote control buttons and functions..................................................64
Concerning compact discs...................................................................66
Concerning cassette tapes...................................................................66
Troubleshooting guide..........................................................................68
Maintenance.........................................................................................69
Technical specifications........................................................................74
Before moving or shipping this system
________
SC-AK50
_________
SA-AK50
SB-AK90
...............................................
...........................................
.......................................
..........................................
................................................
2
16
2G
32
36
38
40
74
Supplied accessories
El
Please check and identify
the supplied accessories.
oLLa-UI
□ .
AC power supply cord
AC
.........................................................
........... jLlJI
A
(For others) (For Hong Kong)
Ufl/ii K'Ctfttaa-.i ) 1
(lilijS jIbLìaU)
...............
1 pc,
1 i'h
□
Remote control transmitter
........................................
^
....
JJU
äUifclj
(EUR644379)
................
□
1 pc.
Remote control
batteries
1 fh
¿jbjdai........................ -1;^ I
(R6/l.Kf., AA, UM-3)
...................
ijC. ~wJl jlnii iia
..............
2 pcs. j
2 0i-
Page 3

Suggestions for safety
Placement
Avoid piiicin^ the unit in ureas ot :
• direct sunlight
• high temperature
• high humidity
• excessive vibration
• uneven surfaces (Place the unit on a flat
level surface.)
Such conditions might damage the cabinet
and/or other component parts and thereby
shorten the unit's service life.
To protect the unit against sound distortion
and acoustical effects, please place the unit
at least 15 cm awav from wall surfaces etc.
Stacking
Never place heavy items on top of the unit
or the power cord.
Voltoge
• It is very dangerous to use an AC power
source of high voltage such as for an air
conditioner.
A fire might be caused by such a con
nection.
• A DC power source can not be used.
Be sure to check the power source care
fully, especially if on a ship or other place
where DC is used.
Power cord protection
• Avoid cuts, scratches or poor connection
of the AC main cord, as this may result
in fire or electric shock.
Excessive bending, pulling or slicing of
the cord should also be avoided.
• Do not puli on the cord when you are
disconnecting the power, as this could
cause iin electric shock. Grasp the plug
firmly when you disconnect the power
supply.
• Never touch the plug with w^et hands or
a serious electric shtKk could result.
Foreign moteriols SSîi
• Ensure that no foreign objects, such as
needles, coins, screwdrivers etc., acciden
tally fall into the unit or through the ven
tilation holes.
Otherwise, a serious electric shock or
malfunction could occur.
• Be extremely careful about spilling wa
ter or liquid on/into the unit, as a fire or
electric shock could occur.
(Disconnect the power plug and contact
your dealer immediately if this tKcurs.)
'iv. --t:m Iff • ,Vi m.iiri 'K (fii w-15cm w ±
• Avoid spraying insecticides onto the unit
as they contain flammable gases which
can be ignited.
• Insecticides, alcohol, paint thinner and
similar chemicals should never be used
to dean the unit as they can cause flak
ing or cloudiness to the cabinet finish.
Service
• fi' ni 411 l’If ) n ff-j ff.'i m AC -t fiâi ' i
• Never attempt to repair, disassemble or
reconstruct the unit if there seems to be
• friti'imDC'.iiï));;-
a problem.
A serious electric shock could result if
you ignore this precautionary measure.
• If a problem occurs during operation (the
sound is interrupted, indicators fail to
light up, smoke is detected, etc.) contact
your dealer or Authorized Service
Center immediately.
• Disconnect the power supply if the unit
will not be used for a long time. Other
wise the operation life could be short
ened.
CAUTION!
THIS PRODUCT UTILIZES A LASER.
USE OF CONTROLS OR ADJUST
MENTS OR PERFORMANCE OF PRO
CEDURES OTHER THAN THOSE
SPECIFIED HEREIN MAY RESULT IN
HAZARDOUS RADIATION EXPO
SURE.
DO NOT OPEN COVERS AND DO NOT
REPAIR YOURSELF. REFER SERVIC
ING TO QUALIFIED PERSONNEL.
№ j'i; ft; ■ [' /11 I'ir :
i* *t'. 4'f
i>ij im
au
T' T /< ifii ( .ill ^ ^ {£ T fü. fj'j /
fili “ )
Ji-'.'il fefèif'J °
ìli f r i/i ffil lY'J f'Ji ÎÎ • "I nt ) I .SI ■ .'.t ÿi "
№i|] »
vu
fk ai '.t m itf % it
M i
1:
m m
•=
CAUTION!
DO NOT INSTALL OR PLACE THIS UNIT
IN A BOOKCASE, BUILT IN CABINET
OR IN ANOTHER CONFINED SPACE IN
ORDER TO KEEP WELL VENTILATED
CONDITION. ENSURE THAT CURTAINS
AND ANY OTHER MATERIALS DO NOT
OBSTRUCT THE VENTILATION CON
DITION TO PREVENT RISK OF ELEC
TRIC SHOCK OR RRE HAZARD DUE
TO OVERHEATING.
CAUTION:
The AC voltage is different according
to the area.
Be sure to set the proper voltage in
your area before use.
(For details, please refer to the page
8.)
Page 4
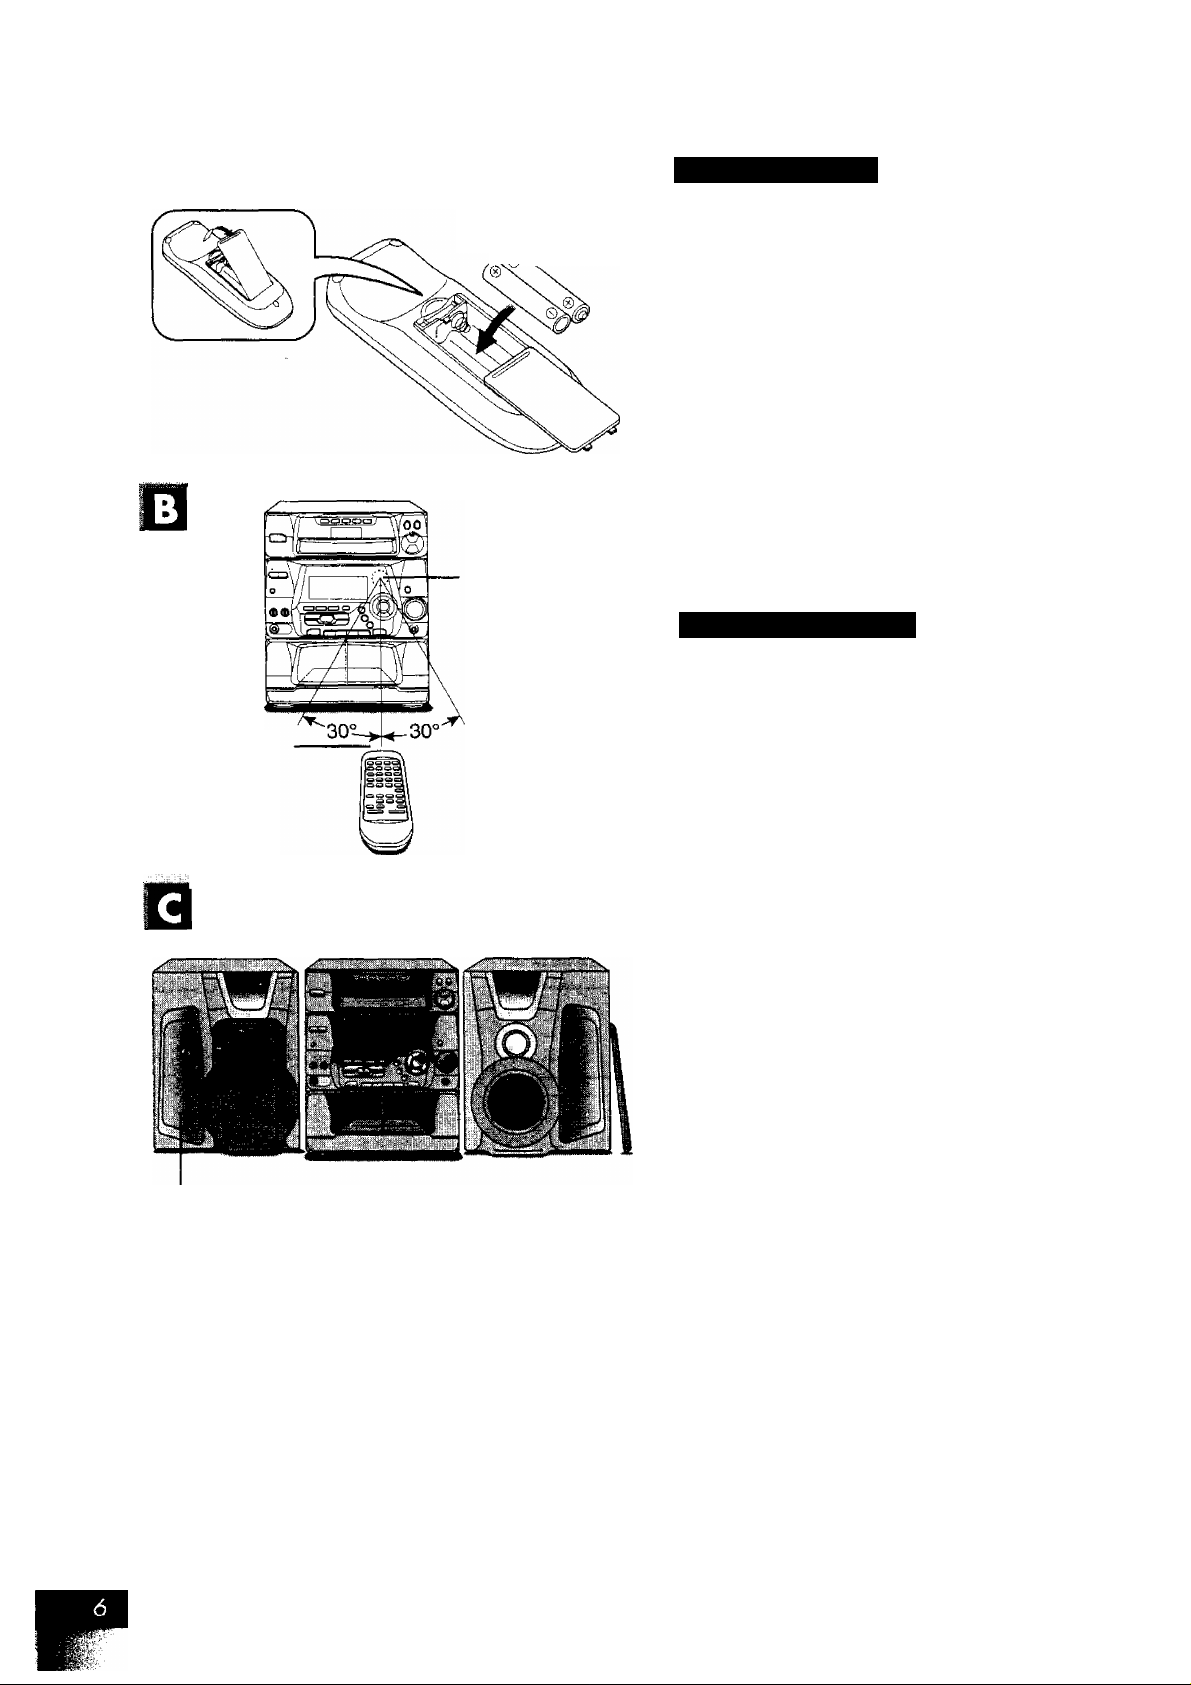
Insert the batteries in the correct polarities ( ©, 0),
ujUaALi ijikjl
Concerning the remóle control
Bottery installation
Transmission
window
Î^iHïïi “
JL-jVI SliU
j;;
...................
R6/LR6, A A, UM-3
Remote control signal
sensor
JJLi jfciaJiJl
About 7 meters in
front of the signal
sensor
7m"
jfcLal jllal V
SjLiVl
Use of batteries
Do not mix old and new batteries, or batteries of different types
{manganese and alkaline, etc,).
Never subject batteries to excessive heat or flame; do not attempt
to disassemble them; and be sure they are not short-circuited.
If the remote control is not to be used for a long period of time,
remove the batteries and store them in a cool, dark place.
Do not attempt to recharge alkaline or manganese batteries.
Do not use rechargeable type batteries.
Battery life
The battery life is about one year.
The batteries should be replaced if commands from the remote control
transmitter do not operate the unit even when the transmitter is held
close to the front panel.
Correct method of use
Operations notes
Do not place obstacles between the remote control signal sensor
and remote control unit.
Do not expose the remote control signal sensor to direct sunlight
or to the bright light of an invertor fluorescent light.
Take care to keep the remote control signal sensor and end of the
remote control unit free from dust.
If this system is installed in a rack with glass doors, the glass
doors' thickness or color might make it necessary to use the remote
control a shorter distance from the system.
Metal net
iuill-e 4¡Í,iaaáu
To prevent damage
• Never place heavy items on top of the unit.
• Do not disassemble or reconstruct the unit.
• Do not spill water or other liquids into the unit.
Place the speakers so that the metal net is on the outside. Q
For your reference
• You can take the front net off speakers.
• For your listening pleasure, keep your speakers from touching the
system.
Page 5
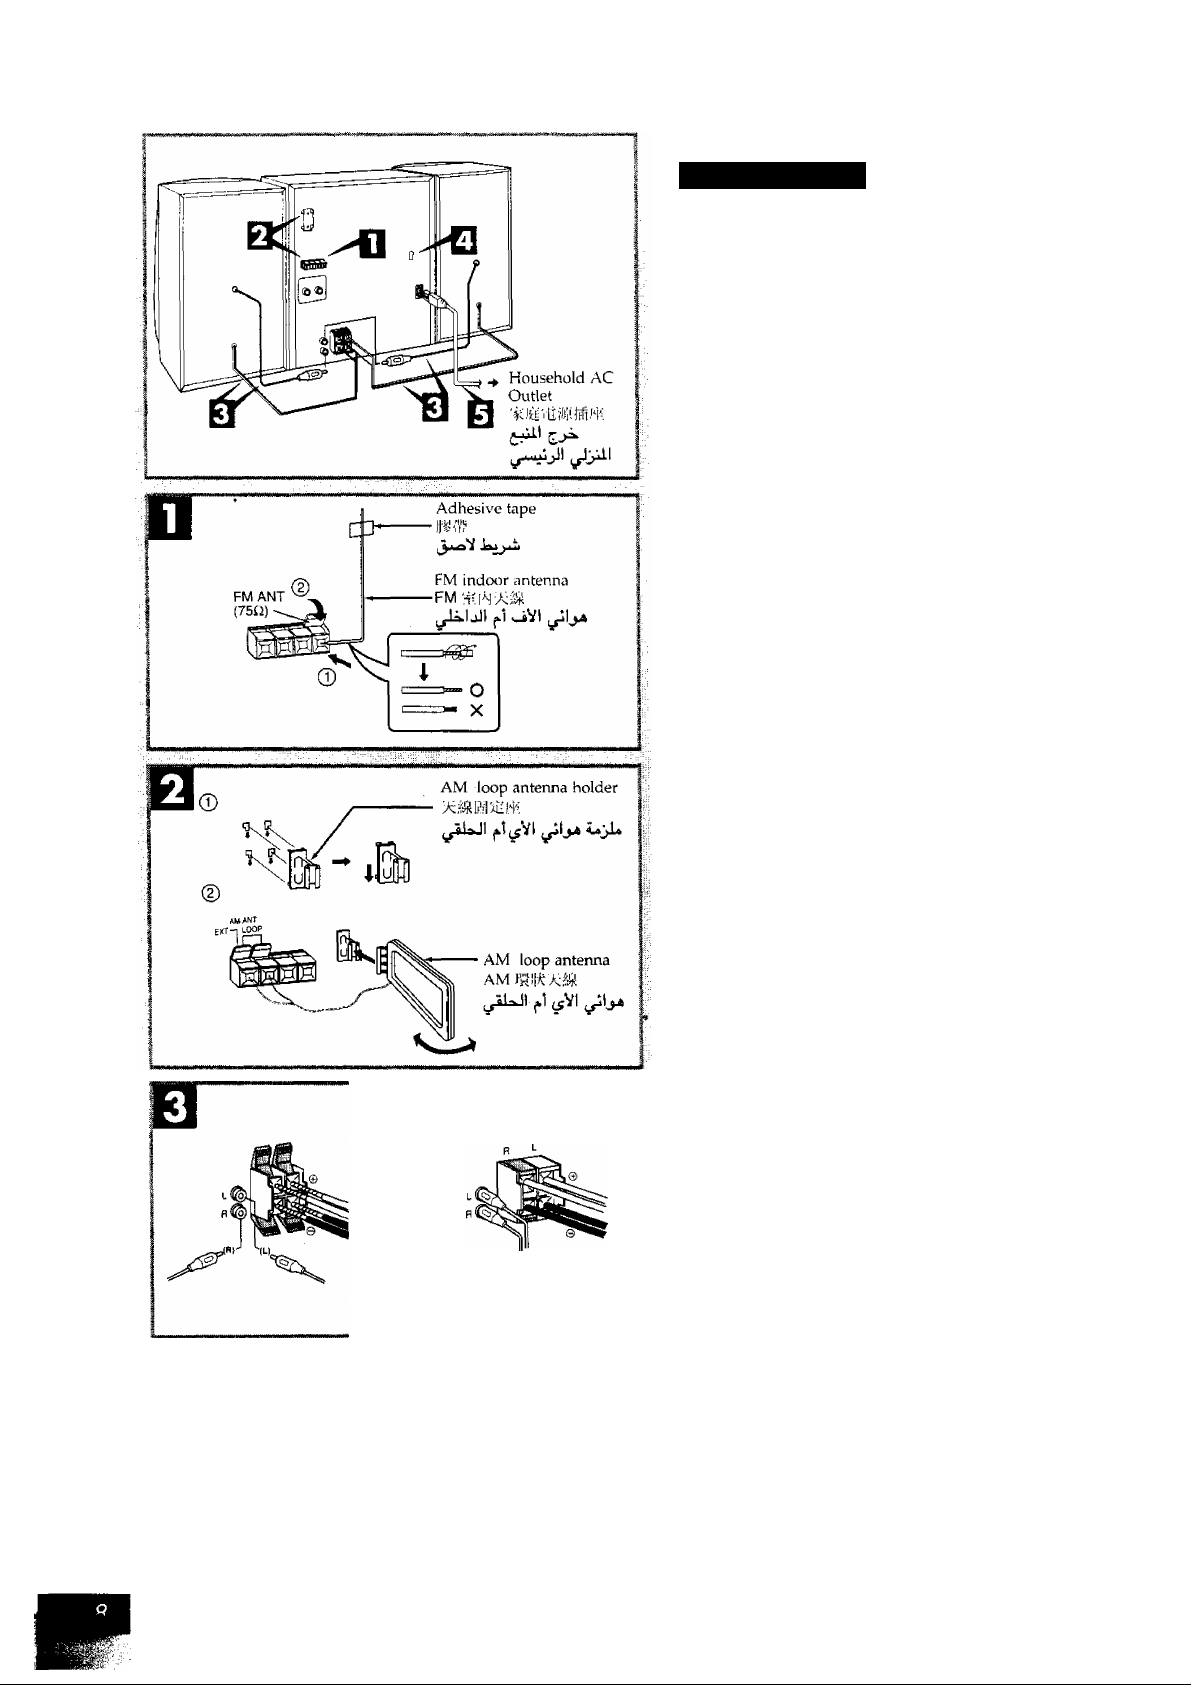
ConnecHons
Basic connections
Plug the AC power cord into a household AC outlet only after ah
other connections have been made.
FM indoor antenna
Tape the antenna to a wall or column, in a position where
radio signals are received with the least amount of interference
For best reception sound quality:
An FM outdoor antenna is recommended, {See page 10.)
AM loop antenna
After attaching the antenna, turn on the system and tune in a
broadcast station. Then, turn the antenna to the angle of best
reception and least interference.
0 Connect the right (R) and left (L) speaker cords
(pin type).
0 Connect the right (R) and left (L) speaker cables.
• To prevent damage to circuitry, never short-circuit positive
(-h) and negative (-) speaker wires.
• Be sure to connect only positive (red) wires to positive (-i-)
terminals and negative (black) wires to negative (-) terminals,
Red {+)
^i;fe (+)
(+)
Black H
(Only when your system has VOLT ADJ)
Set the voltage.
Use a flat-head screwdriver to turn the voltage selector on the
rear panel to the appropriate position for the area in which this
system is used.
If the power supply in your area is 115 V or 120 V, please set
the voltage selector as follows:
• For 115 V; Set to llOV.
• For 120 V; Set to 127V.
AC power supply cord
(For areas except Hong Kong).
If the power plug does not fit your socket, use the power
plug adaptor (included) Q
Caution
Use the speakers only with the recommended system.
Failure to do so may lead to damage to the amplifier and/or the
speakers, and may result in the risk of fire.
Consult a qualified service person if damage has occurred or if
you experience a sudden change in performance.
H
ET
VOLT ^DJ
110V 127V <-► 220V 230-240V
Page 6
Connections
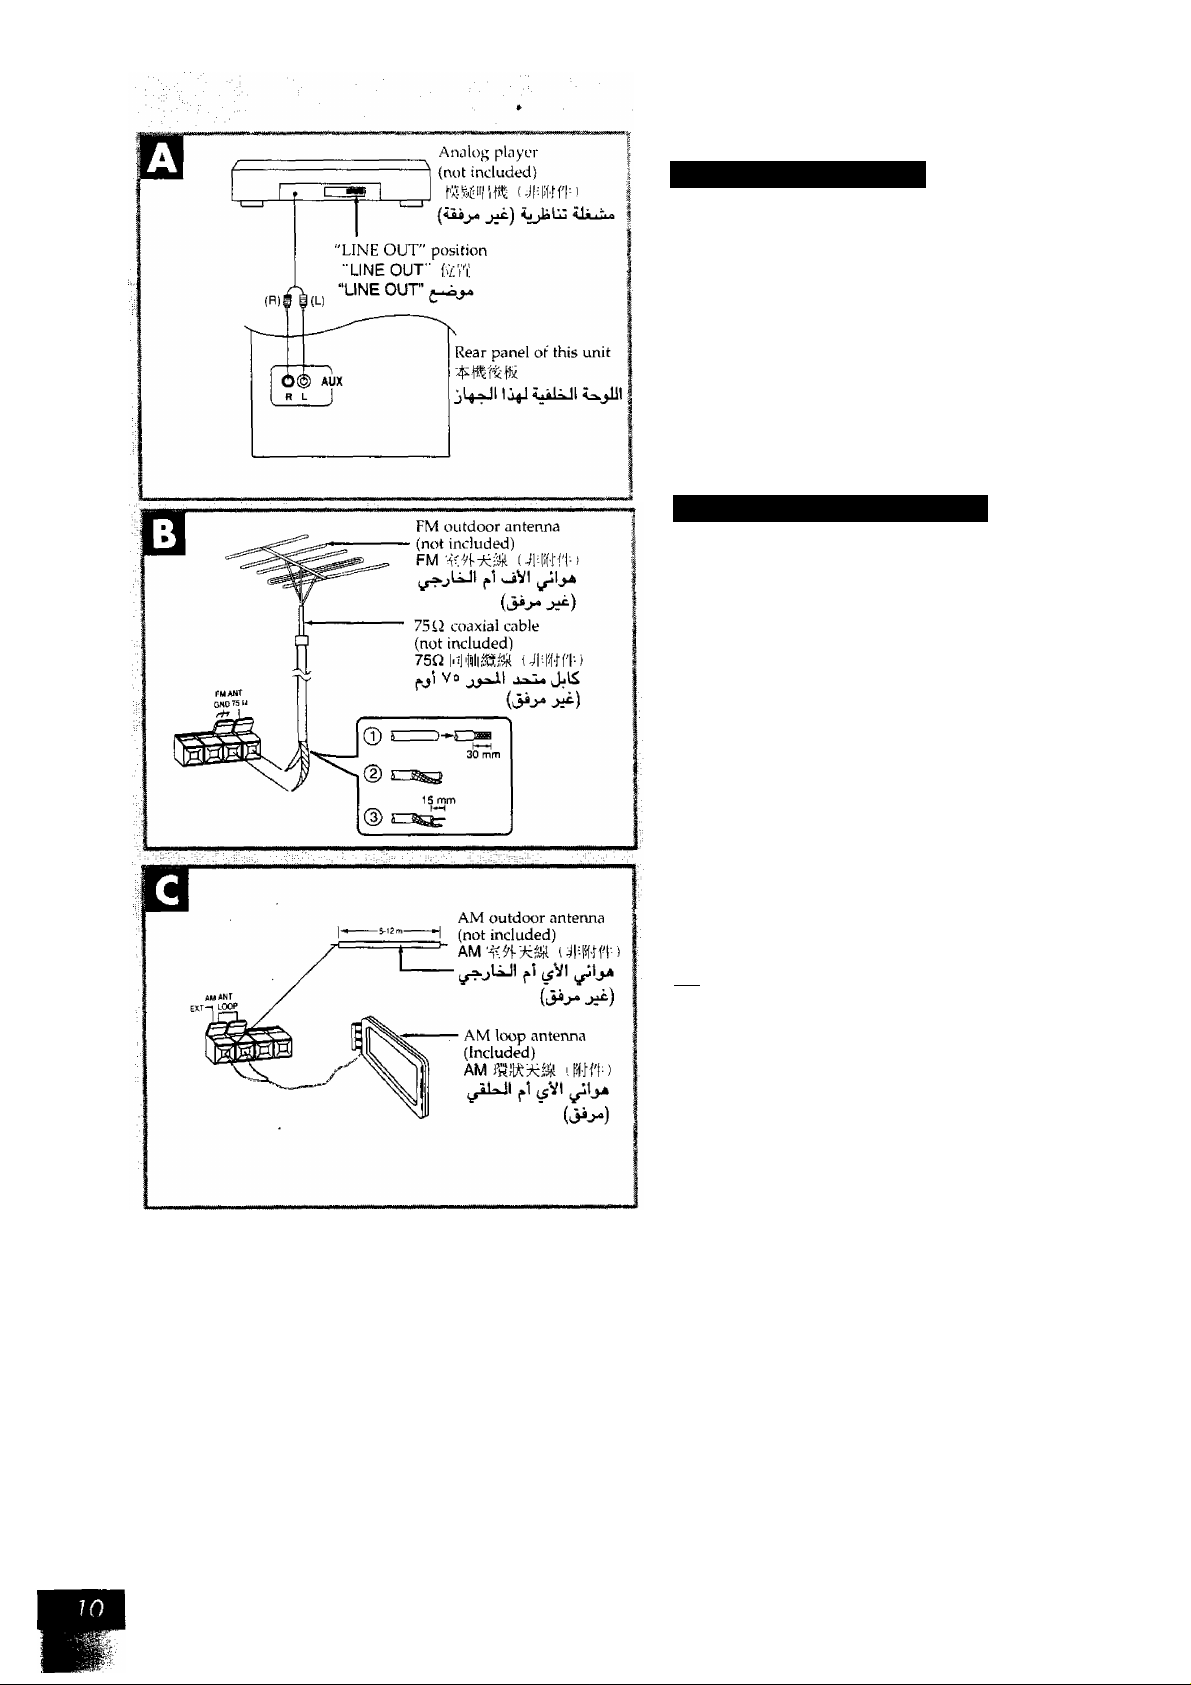
Extemol unit connection
• For details, refer to the instruction manual of the units which are
to be connected.
• This example shows how to connect the analog player with the
PHONO OUT/LINE OUT switch.
• When units other than those described below are to be connected,
please consult with your audio dealer.
• Only an analog player with a built-in phono equalizer can be con
nected,
• Set the switch to the "LINE OUT" position at the back of the analog
player.
a
0|3tional antenne connections
You may need an outdoor antenna if you use this system in a moun
tainous region or inside a reinforced-concrete building, etc.
FM outdoor antenna Ш
Disconnect the FM indoor antenna if an FM outdoor antenna is in
stalled.
ПНЯ
An outdoor antenna should be installed by a competent technician
only.
AM outdoor antenna Q
Connect the outdoor antenna without removing the AM loop an
tenna. Run 5 to 12 m of vinyl-covered wire horizontally along a win
dow or other convenient location.
rwn
When the unit is not in use, disconnect the outdoor anterma to pre
vent possible damage that may be caused by lightning. Never use an
outdoor antenna during an electrical storm.
Page 7
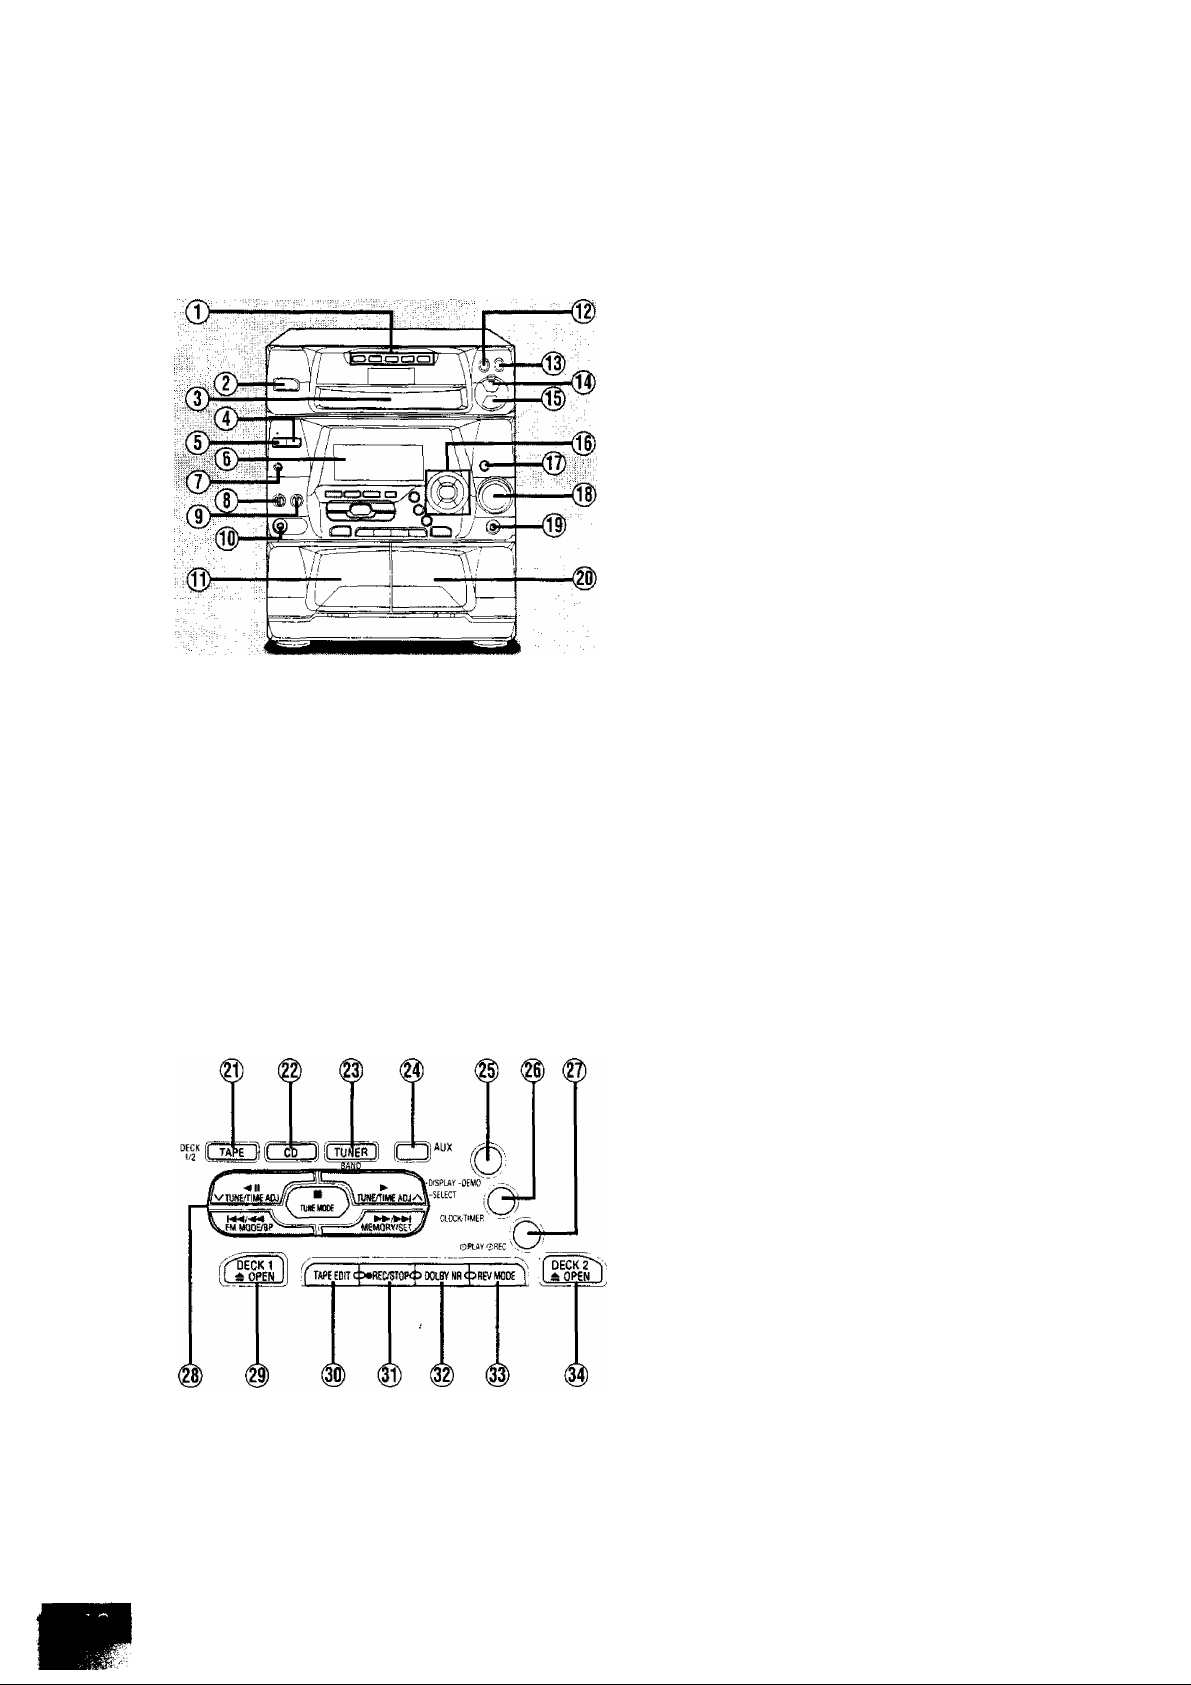
Front panel controls
0 Disc select buttons and indicators (DISC 1-DISC 5)
® Power "STANDBY O/ON" switch
(POWER, STANDBY (!)/ON)
Press to switch the unit from on to standby mode or vice \’ersa. li
standby mode, the unit is still consuming a small amount of po\\'er
(3) Disc tray
(D Super woofer level select button (LEVEL)
(D Super woofer ON/OFF button (SUPER WOOFER)
(6) Display
(7) Karaoke button (KARAOKE)
d) Microphone volume control (MIC VOL)
(D Echo volume control (ECHO)
(1§) Microphone jack (MIXING MIC)
(0) Deck 1 cassette holder
@ Disc tray open/close button (± OPEN/CLOSE)
® Disc check open button (OPEN, -NEXT/-AUTO)
(Q) CD manager button (CD MANAGER)
® Random play button (RANDOM)
® 3D space EQ button (3D SPACE EQ)
(0) Muting button (MUTING)
@ Volume control (VOLUME)
® Headphone jack (PHONES)
Deck 2 cassette holder
@ Tape/deck select button (TAPE, DECK 1/2)
(g) CD button (CD)
® Tuner/band select button (TUNER/BAND)
@ AUX button (AUX)
@ Display select/demonstration button
(-DISPLAY/-DEMO)
(g) Clock/timer button (CLOCK/TIMER)
@ Play timer/record timer button (©PLAY/OREC)
@ Basic operating buttons
Buttons change according to the source,
(g) Deck 1 open button (DECK 1, ^ OPEN)
® Tape edit button (TAPE EDIT)
(|i) Recording start/stop button (• REC/STOP)
® Dolby noise reduction button (DOLBY NR)
® Reverse mode select button (REV MODE)
@ Deck 2 open button (DECK 2, A OPEN)
Page 8

Demo function
The demo function changes the display to an air plane taking ott from
an airport.
Turning the demo function ON/OFF
Press POWER and hold down -DISPLAY/-DEMO.
Every time you hold down the button;
DEMO (ON) ^ > NO DEMO (OFF)
When the demo function is ON, the demo is played automaticalh' in
the following cases.
• When power is ON
If the input source is set to CD or tape, and the system is left on
standby for more than 2 minutes.
• When power is OFF
If the clock has not been set.
Setting the time
This is a 24-hour display cluck.
This example in the figure shows how to set the time for 16:25 (4:25
p.m.).
Switch on the power.
CD Press CLOCKmMER to select CLOCK.
B
To display the time when power is ON
Press CLOCK/TIMER to select "CLOCK".
The time will be displayed for about 5 seconds and then the display
will return to whate\'er was previously displayed.
Every time you press the button;
CLOCKS OREC — ©PLAY
c
-------
Previous display -•
(2) (within 5 seconds or so)
----------
]
Press MEMORY/SET.
(D Press V or A to select the hour,
d) Press MEMORY/SET.
(3) Press V or A to select the minutes.
(4) Press MEMORY/SET to finish setting the time.
The display will return to whatever was displayed before
vou set the time.
Page 9
%\\ \ ^ / ///
)“ H A J~( ~l r J”L,
t" t ) )_l I. _l i^r
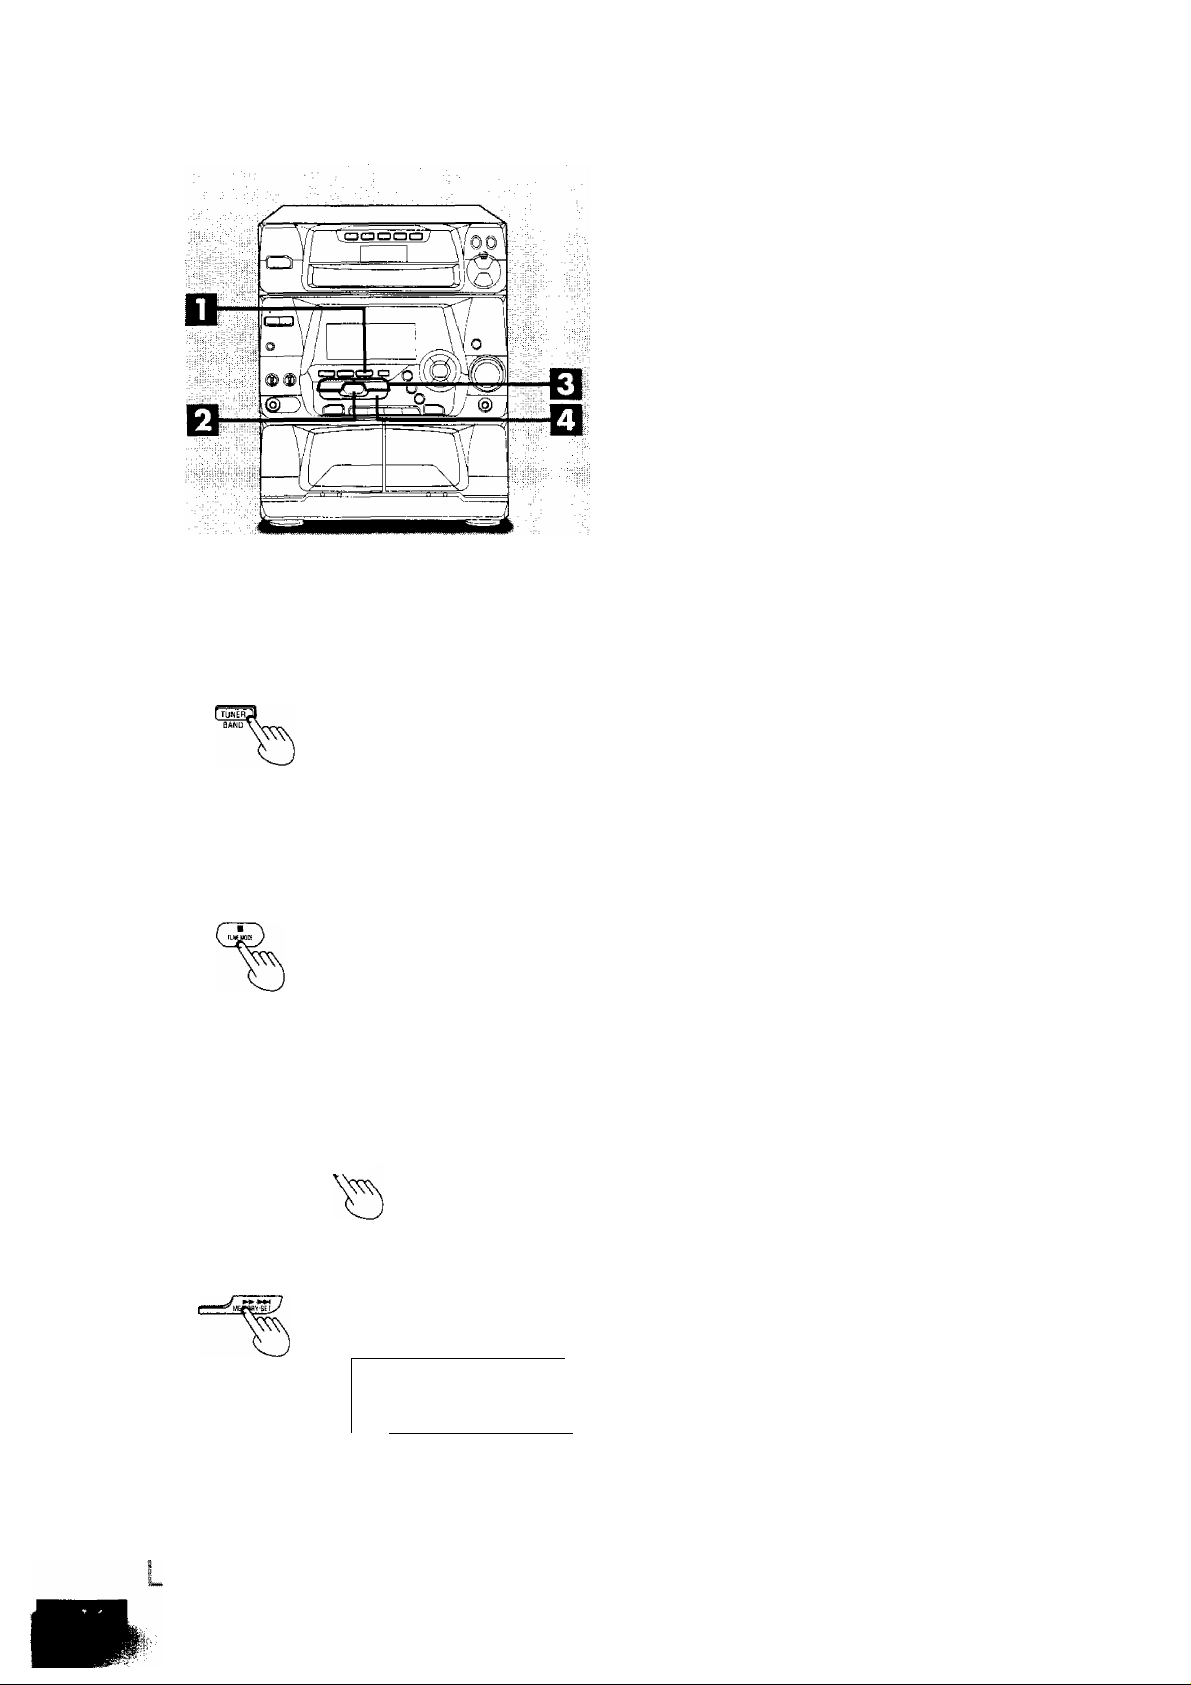
Presetting radio broadcasts
Up to 12 stations can be set in each band with the automatic oi
manua! memory presetting.
If broadcast frequencies are preset in the memory, vou can easilv
tune in any of these frequencies from the system or remote control
unit.
You can preset just those stations you tike. (See "Presetting only
your favorite stations" below.)
Press TUNER BAND to select band.
1
The power will come on automatically.
Every time you press the button; FM + AM.
Press TUNE MODE to select “MANUAL”.
Every time you press the button; MANUAL PRESET,
Press V or A until the display shows the frequency
from which you want to begin automatic memory
presetting.
Tips on tuning in radio stations
® Hold down either arrow button until the frequency numbers
start scrolling.
(2) When near to the frequency you are looking for, press the
button repeatedly until tuning the broadcast in.
Press and hold MEMORY/SET until the frequency begins to change.
This will start presetting automatically. When finished, the radio
will tune in last station memorized.
If auto presetting is not possible because radio signáis are weak
or for some other reason, do the following.
iü I #//
Preset channel
'j‘“‘tl L.,
lUJ
1 t 1
\\V
1 t i
J_U
PRGM
IwH Nt I I It II
I I ("i III i_i |■■( I
i:.
V
tt m-.
n ¡\ A
, 1 1
-j t
l”( l~
S.'
^ ^ ^ WHí
■V.- C
( 1 luu.
i^Mñj
GaFi
/MBR i
Presetting only your favorite stations
Preset the stations one at a time.
1. Perform above steps 1 and 2. Then, select a station with V and
A, and press MEMORY/SET. "PRGM" will flash on the display.
2. While "PRGM" is flashing, select a preset channel with V or A,
and press MEMORY/SET againi "PRGM" will go out and the station
will be stored in memory.
Memory retention
Your preset frequencies are retained in memory for about 2 weeks
while the system is unplugged.
AM allocation settings:
This system comes equipped with an electronic digital tuner that
divides the broadcast band into many small steps. These steps match
the assignable broadcast frequencies and intervals in between.
Each country allocates broadcast bands according to their particular needs.
By adjusting the allocation, you can enable the tuner to receive AM
broadcasts allocated in 10 kHz steps.
1. Press TUNER BAND to select AM.
I
2. Press and hold TUNER BAND. As the flashing display will show
the minimum frequency of the AM band after 5 seconds, continue
to hold TUNER BAND for 5 more seconds.
3. When the display stops flashing and indicates a different frequency
number, release TUNER BAND.
Station
VuTi
To return to the original frequency indication, repeat steps 1 to 3
above.
GES
After changing the "allocation" setting, the frequencies you pre\ iously
preset in the memory will be cleared.
Page 10
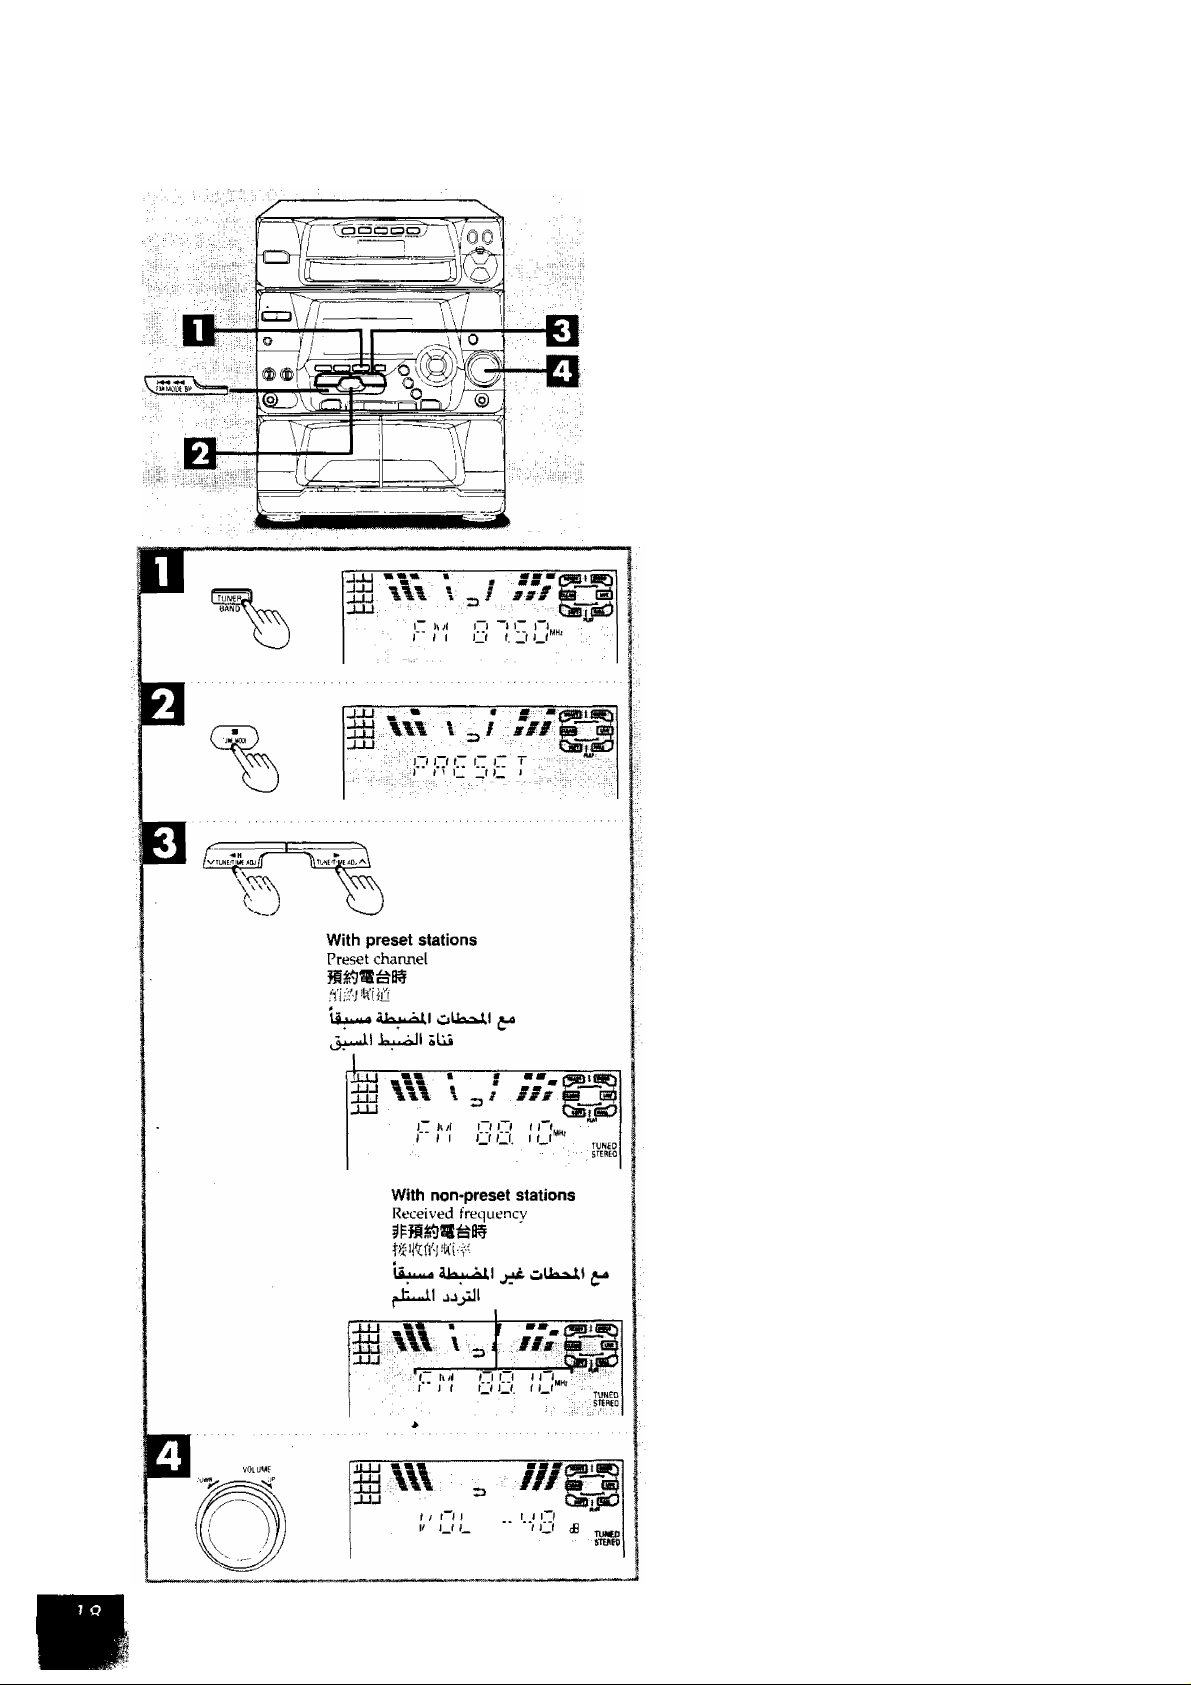
Ustening to mdimhroadeasts
Press TUNER BAND to select band.
The power will come on automatically.
Every time you press the button; FM ’ ► AM .
Press TUNE MODE to select “PRESET” or “MANUAL”.
Every time you press the button; MANUAL + >■ PRESET.
PRESET; For preset stations
MANUAL: For non-preset stations
Press V or A to select the desired broadcast.
"STEREO" lights when an FM stereo broadcast is being
received. "TUNED" lights when you precisely tune in a
broadcast station.
Adjust the volume level.
Auto tuning
Auto tuning is an easy way to tune in non-preset stations {"MANUAL"
is displayed).
Hold down either V or A, and release the button when the
frequency starts ecrolling.
The radio will stop automatically on the first station it picks up.
• When there is outside interference, the radio may stop on a non
broadcast frequency. Hold down either V or A to resume auto
tuning.
To stop auto tuning
Press either V or A again.
If noise is excessive in the FM stereo mode
Press FM MOOE/BP.
"MONO" will light up.
Sound will be produced in monaural, but this also reduces noise.
Press the button again to cancel. "MONO" will go out.
Normally, you'll want to listen in stereo, so leave "MONO" off. This
way, you can listen to stereo broadcasts in stereo, and monaural
broadcasts in mono,
• If you preset stations in memory, you can tune in a preset station
bv simply selecting the preset channel with the numeric buttons
on the remote control,
• Sound is momentarily interrupted if you load/unload tapes while
listening to an AM broadcast.
•
Page 11
Listening to compact discs
Loading and checking CDs
Always stop the changer before loading or changing CDs. You cannot
change CDs while a disc is playing.
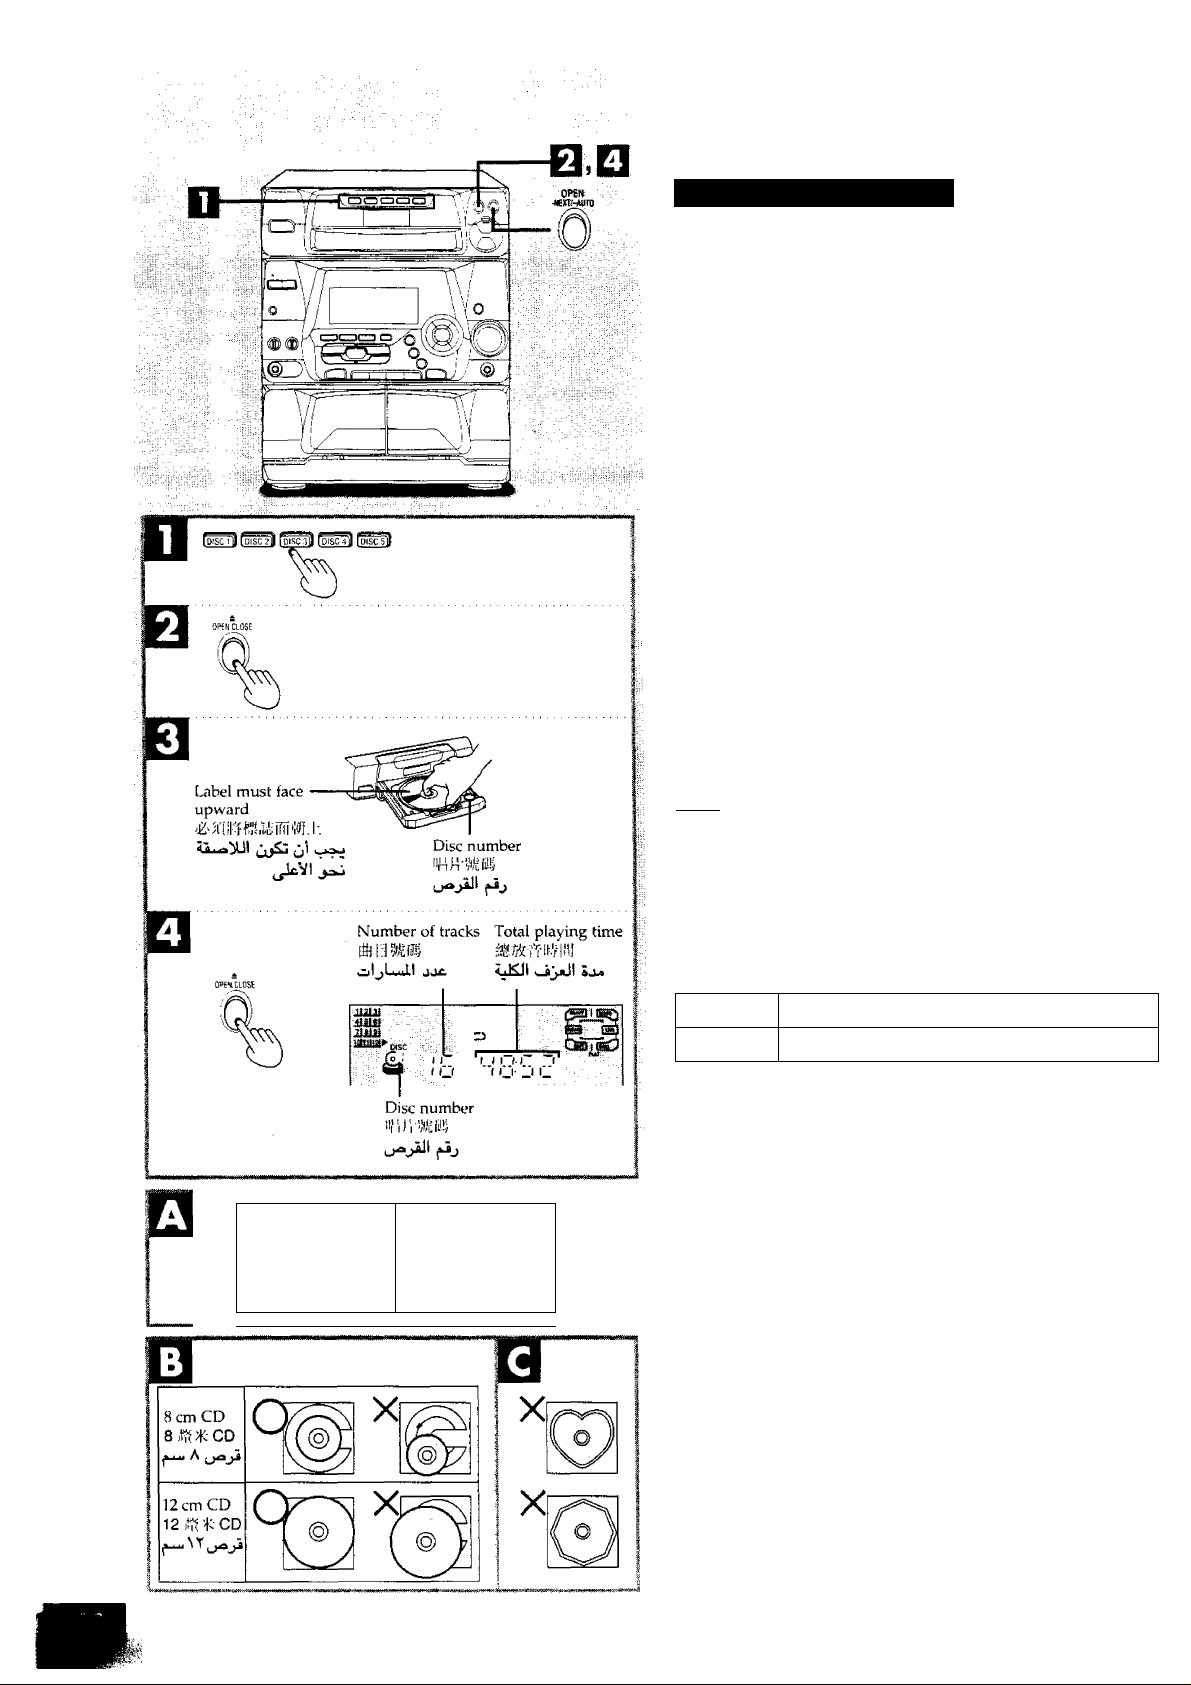
How to load CDs
Press DISC 1-DISC 5, whichever you want to open. Press ^ OPEN/CLOSE.
Set CD in the tray.
Press ± OPEN/CLOSE.
The tray will close and the disc No,, track No, and total plaving
time will be shown on the display.
To load several CDs consecutively
Press OPEN -NEXT/-AUTO.
Every time you press the button, the next tray will open. After load
ing all the CDs you want, press ± OPEN/CLOSE and close the travs.
How to check which trays have discs
Hold down OPEN -NEXT/-AUTO.
All trays will open and close automatically, in order, one at a time,
IJWTjl
Do not try loading or changing CDs while the trays are opening and
closing.
Disc indicators (DISC 1-DISC 5)
Disc indicators turn the below colors whether the said tray is loaded
or not.
Green
Orange
When selected (When in the playing position)
In all other cases
To prevent damage
Always observe the following points,
• Load only 1 CD per tray. Q
• Load CDs as shown in figure |0 •
The adapter is not needed with 8 cm CDs (singles).
• Set the system on a flat, level surface.
Do not set it on top of magazines, inclined surfaces, etc.
• Do not move the system while trays are opening/closing, or when
loaded.
Always unload ail CDs and set the system "shipping mode" (
page 74) before moving the system,
• Do not put anything except CDs in trays.
• Do not use cleaning CDs or CDs which are badly warped or
cracked.
• Do not use CDs with pcxiriy attached labels or stickers.
Adhesive protruding from underneath stickers or left over from
peeled off stickers can cause your stereo to malfunction.
• Do not use irregular shape CDs {heart-shape, octagonal, etc.). B
Page 12
Listening to compact discs
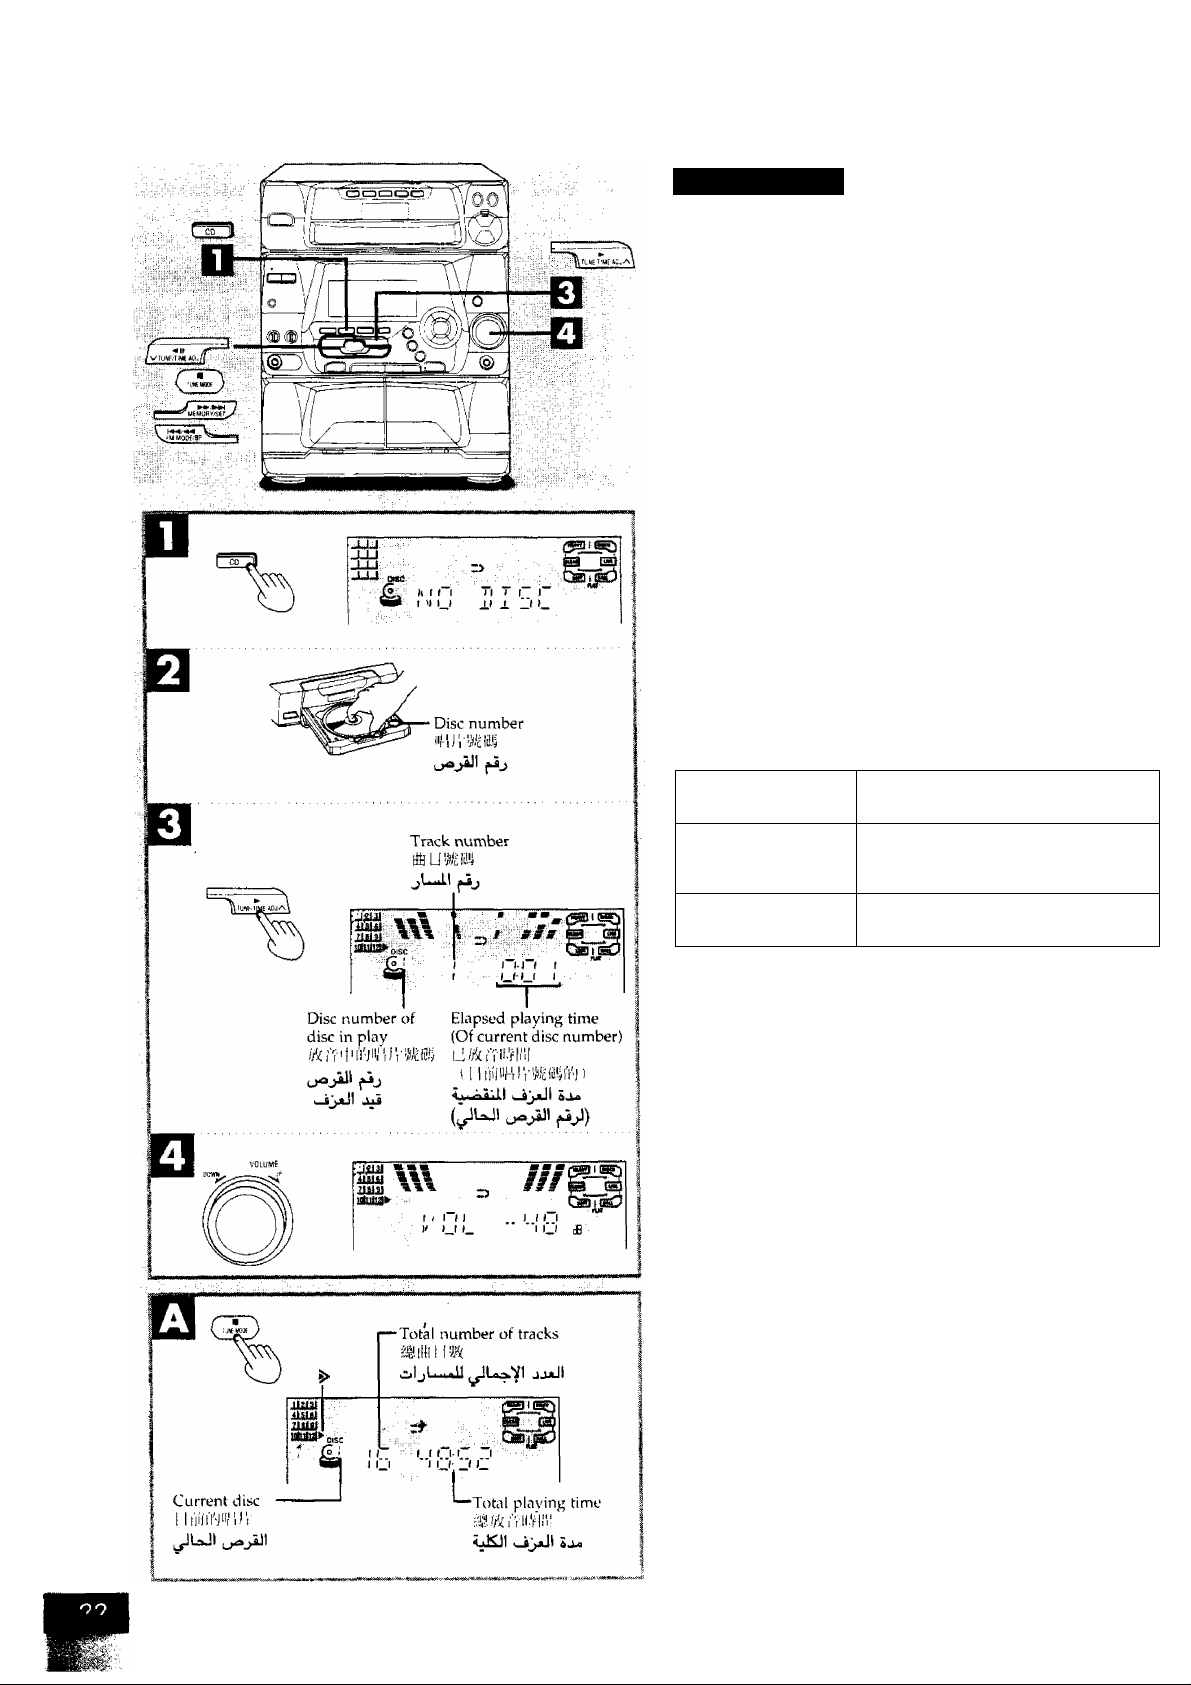
Sequential play
Press CD.
The power will come on automatically.
Insert CDs in the trays.
E3
(For details, see page 20.)
Press ►.
Play will start from the first track on the disc shown on the
display, and will continue until playing the last track of the
final disc (see below).
71 Adjust the volume level.
To stop the disc play □
Press■.
When “ > ” appears on the display
It indicates there are 13 or more tracks on the disc at the playing
position.
What is meant by “tinal disc"?
For example, if play starts from disc 4, disc 3 will be the "final disc".
Order of progression:
Disc 4-*5—►l~>2-*3
To pause Press II during playback.
To search forward/
backward (Search)
To skip forward/
backward
• During random play (page 24), you carmot skip to tracks which
have already been played out.
• During program play (page 26) or random play, you can search
forward or backward only within the current track.
• During program play, skipping is alwavs in the programmed order,
whether forward or backward.
One-touch play
When power is OFF, playing starts automatically when vou press CD.
To resume playback, press ►.
Hold down (backward)
or ►►/►►) (forward) during
playback.
Press (backward) or
►►/►►1 (forward) during playback.
Page 13

Listening to comp€Kt discs
Direct access play
To listen to a favorite CD O
Press DISC 1 - DISC 5, whichever disc you want.
The setected CD will be played from the first track to the last track of
the final disc (page 22).
To listen to a fovorite track d
In/ R’iJioh’ c un tm l on li/
Press CD.
Press DISC.
(within 10 seconds or so)
Press 1-5, whichever disc you want.
Press the numeric button to select the desired track
number.
The CD will be played from the selected track to the last track
of the final disc (page 22).
To select a two-digit track
Press >10 and then the two numbers you want within 10 seconds or
so.
For example
Track no. 20: >10-*2-»0
Track no. 35: >10-*3-*5
Repeat play
In/ rein oh’ control onli/
Press REPEAT before or during play. Q
All tracks on the loaded CD are repeated.
To cancel repeat play
Press REPEAT once again.
To repeat programmed tracks
1. Program the track you want (page 26),
2. Press REPEAT and make sure "O" is displayed.
3. Press ►. Playback will start.
To repeat just one track
Set the 1-TRACK mode (page 28), press REPEAT before or during
playback, and make sure "O" is displayed.
Random play
Press RANDOM. Q
All tracks on the loaded CD will be played in random order. Playback
will stop automatically when all tracks have been played.
To cancel random play
Press RANDOM once again.
You can use random play with your program. Only the programmed
tracks will be played, but in random order.
Page 14

Ustening to compoct discs
Program play
b}/ control onh/
You can program up to 24 track.
m Press CD.
Press PROGRAM. Press DISC.
(within 10 seconds or so)
Press 1-5, whichever disc you want.
Press the numeric button to seiect the desired track.
Repeat steps 3 through 5 until you have programmed
ail the tracks you want.
□
Press ► .
Play will start in the programmed sequence.
To cancel program play mode
Press PROGRAM in the stop mode.
Programmed contents will be saved in memory.
Pressing ■ will cancel program play, but it will also erase the entire
program.
To select a two-digit track
Press 510 and then the two numbers you want.
For example
Track no. 20: >10—*2—*0
Track no. 35: S10-+3—*5
When “CD FULL” appears
The number of programmed tracks is limited to 24. No further tracks
can be programmed.
You can do the following during program mode Q
• Check program contents.
Press or
Everytime you press one of the buttons, the track and program
No. are shown on the display.
• Add to the program.
Repeat steps 3 through 5.
• Cancel entries.
From the last pro
grammed track.
A specified track
only.
All tracks.
Memory retention
Your program is retained in memory for about 2 weeks while the
system is unplugged.
To replay your program
If vou turn OFF your program with PROGRAM, you can play it
again as explained below.
1. Press PROGRAM.
2. Press ►.
Press CANCEL,
Select the track with or ►►/
►►1, and press CANCEL within 3
seconds.
Press ■.
If you program a track not on your CDs
The track is initially programmed, but during program plav, the player
will skip that track and will continue playing from the next
programmed item.
Page 15

Ustening to compact discs
To listen to special CDs and tracks
(CD Manoger function)
This function makes it easier for you to select special CDs and tracks
from amongst those loaded in the player.
You can use this function to make recordings as well.
There are 3 CD/track selection modes.
• For playing back 1 track only from all loaded CDs
1-Track mode (1-TRACK)
• For playing back 1 CD only from all loaded CDs
1-Disc mode (1-DISC)
• For playing back 1 track on all loaded CDs
1-Track All-Disc mode (1-ALL)
To listen to 1 track only (1-TRACK)
Press CD.
Press CD MANAGER to select “1-TRACK”.
Every time you press the button;
1-TRACK—1-DISC — 1-ALL
NORMAL
(OFF)
■n Press DISC 1-OISC 5, whichever disc you want.
1
Previous display
The button lamp of the selected CD will not change color until
playback starts.
Press or ►►/►►! to select the desired
track.
□
Press ►.
The selected track will start
To listen to 1 CD only (1-DfSC)
Press CD.
m
2 I Press CD MANAGER to select “1-DISC”.
Every time you press the button;
p 1-TRACK — 1 -DISC — 1 -ALL
NORMAL
(OFF)
3 Press DISC 1-DISC 5, whichever disc you want.
The button tamp of the selected CD will not change color imtii
playback starts.
Press ►.
The selected CD will be played from the first track to the last.
1
Previous displav
(Contituied on next page)
Page 16

Usfening to compact discs
To listen to special CDs and tracks
(CD Manager function)
To listen to Hie same numbered track on all CDs (V ALL) □
Press CD.
Press CD MANAGER to select “1-ALL”.
Every time you press the button;
1 -TRACK — 1 -DISC — 1 -ALL
NORMAL
(OFF)
Press either \«l
sired track.
press ►.
The same numbered track on CDs 1 through 5 will be played
in order from CD \ to CD 5.
When playback ends |0
"NORMAL" will appear on the display for about 3 seconds, then
the CD MANAGER function will turn OFF automatically.
1
Previous display
or
to select the de
To stop play
Press ■.
When you select the wrong CD or track
• 1-TRACK mode
To reselect a track on the same CD
Press either or ►► /
To reselect a track on another CD
Press DISC on the remote control and, within 10 seconds, select
a CD No. between 1 and 5. Then, select the track with the
numeric buttons.
• 1-DISC mode
Reselect a CD with DISC 1—DISC 5.
• 1-ALL mode
Reselect the track with the numeric buttons on the remote
control.
to select the track.
in/ rem ot e co otr ol oa h j
mm
• You can use the repeat function (page 24) and random play
(page 24) at the same time. Howe\ er, onlv the repeat function
is available for 1-TRACK mode.
• During 1-ALL mode, you cannot skip to a disc which has
already finished,
• During 1-ALL mode, if the selected track is not found on a
certain CD, the player automatically skips that CD and continues
playing from the next CD.
Page 17

Listening to tapes
Type of tape which can be played correctly:
The unit automatically identifies the type of tape.
NORMAL POSmON/TYPE 1
HIGH POSITION/TYPE II
METAL POSITION/TYPE IV
You can use either deck 1 or deck 2 for tape playback,
Press TAPE DECK 1/2.
The power will come on automatically.
□
Press DECK 1 ± OPEN or DECK 2 ± OPEN, and
then insert the tape.
Insert the tape with the exposed tape facing down.
Close the holder by hand.
Press DOLBY NR.
You have to turn DOLBY NR ON/OFF according to the type
of recording you made.
Every time you press the button: p □□ nr (OFF) —|
Press REV MODE to select the reverse mode.
Every time you press the button;
_______о_______
z:> -* cz^
j
* ; One side is played, then playback stops automatically.
■ Both sides (front side reverse side) are played one
time each, then playback stops automatically.
: Both sides are played 8 times each, then playback stops
automatically.
О !
О
i
Press or ^ to start playback.
: The forward side (front side) will play.
: The reverse side will play.
Adjust the volume level.
To stop tape playback
Press ■.
To change the deck to be used Q
Press TAPE DECK 1/2 to select the deck you want to use when you
load cassettes into both decks.
To listen to 2 tapes consecutively
Load a tape into each deck and select Both tapes will be played
8 times each.
сна
Playback is interrupted while playing back tapes, if you open the
other deck.
One-touch play
When power is OFF, playing starts automatically when you press
TAPE DECK 1/2.
Page 18

Listening to tapes
To fast-forward or rewind the tape
Press \«i-« or ►►/►►I in the stop mode.
Tape direction
To rewind
To fast-forward
To find the beginning of a program (TPS: Tape Program Sensor)
Press or ►►/►►! during play.
Tape
direction
The TPS function searches for silent parts of about 4 seconds in length
which are normally found between tunes. As a result, it may not
function properly in the following cases
• With short silent parts
• When noise occurs between tunes
• With silent parts found within tunes
To play the current tune
from the beginning from the beginning
\^l«
To play the next tune
About Dolby noise-reduction system
The Dolby noise-reduction system is designed to effectively reduce
the annoying high-frequency "hissing" noise typical of cassette tapes.
During recording, the system functions to increase the high-frequency
sound level, the sound, and then, during playback, that same portion
is weakened to bring it back to the previous level.
The DOLBY NR effect is obtained using a Dolby type makes record
ing and playback the same.
This unit includes the Dolby B NR-tvpe.
Dolby B NR-type
Noise is reduced to about one-third.
Dolby noise reduction manufactured under license from Dolby
Laboratories Licensing Corporation.
"DOLBY" and the double-D symbol 00 are trademarks of Dolby
Laboratories Licensing Corporation.
Page 19

Before recording (Oeck 2 only}
Type of tape which can be recorded correcriy
The unit automatically identilies the type of tape.
NORMAL POSITION/TYPE 1
HIGH POSmON/TYPE II
METAL POSITION/TYPE IV X
This system cannot make a recording or erasing correctly, if metal
position tapes are used.
To record from the beginning of the tape Q
You cannot record on the leader part of the tape. Before recording,
wind the tape past the leader to a point where recording can start
immediately.
How volume, sound quality/field and Super
woofer affect recording
The tape you are recording is not affected whatever by changes in
volume, sound quality/field or super woofer.
• [n recording, sound quality/field are set automatically to "FLAT".
• You can change volume and super woofer effect for the plavback
sound.
To erase a recorded sound |3
Disconnect the microphones.
0
0
* •
Press TAPE DECK 1/2.
Insert the recorded tape into deck 2.
>71 Press DOLBY NR so that the Dolby NR indicator
goes off.
Press REV MODE to select reverse mode.
Press • REC/STOP.
□
You cannot open the deck 1 while recording.
You cannot fast-forward or rewind one deck while recording with
the other.
Page 20

Recording from radio broadcasts
Press DECK 2 ± OPEN, and then insert the tape.
Close the holder by hand.
Tape direction is automatically set to
Press DOLBY NR.
You have to turn Dolby NR ON/OFF according to the type ot
recording you want to make.
Every time you press the button; r-.T-f
Press REV MODE to select the reverse mode.
Every time you press the button;
C
^ ; One side is recorded, then recording stops auto-
Select a radio station. Perform steps 1 through 3 on
□
page 18.
Press • REC/STOP to start recording.
If you selected in step 3, the direction will automaticallv
change to ^3 when recording starts.
^ p DP NR — OFF -|
- - CZ5
J
matically.
: Both sides (front side ' reverse side) are recorded,
then recording stops automatically.
To stop recording
Press • REC/STOP again.
Recording can also be stopped by pressing ■.
To start recording on reverse side
Load a tape and change the tape direction as explained here below,
1, Press TAPE DECK 1/2 and select tape deck 2.
2. Press and immediately thereafter ■. The tape direction will be
shown as
To record from a specific point on a tape
Before recording, advance the tape to the point from where you want
to start recording.
To cut an unnecessary part while recording
1, Press • REC/STOP when hearing an unnecessary part. The cassette
deck will go into the stop mode.
2. Press • REC/STOP when wanting resume recording again.
Recording will continue in the same direction as before.
When recording an AM broadcast, volume is momentarilv interrupted
when you start and stop the recording.
To reduce the noise while AM recording (Beat proof function) O
Press FM MODE/BP while recording.
Each time you press the button, "BP 1" and "BP 2" will be displayed
alternately.
Select the position where there is less noise.
Page 21

Itecoixff ng from comfmcf <iiscs
Press DECK 2 ± OPEN, and then insert the tape.
CEose the holder by hand.
Tape direction is automatically set to
Press DOLBY NR.
You have to turn Dolby NR ON/OFF according to the tvpe oi
recording you want to make.
Every time you press the button; qq (OFF)
Press REV MODE to select the reverse mode.
Every time you press the button;
z - cr>
c
* : One side is recorded, then recording stops auto
matically,
: Both sides (front side * * reverse side) are recorded,
then recording stops automatically.
Press CD.
Load CDs into each of the trays.
(See page 20).
1
1
Press DISC 1 - DISC 5 whichever disc you want.
Pressing ■ will stop playback.
Press • REC/STOP to start recording.
• If you selected in step 3, the direction will automatically
change to when recording starts,
• The recording will proceed from the first track on the selected
CD and will continue on through the last track of the final
disc (page 22).
• The tape deck stops automatically when the CD is finished.
To stop recording
• To add a 4 second silent inter\'al before stopping
Press ■. The CD will stop automatically too,
• To stop recording without a silent inter\'al
Press • REC/STOP. The CD will stop automatically too.
To Start recording on reverse side
Load a tape and change the tape direction as explained here below.
1. Press TAPE DECK 1/2 and select tape deck 2.
2, Press and immediately thereafter I. The tape direction will be
shown as '‘-M".
To record from a specific point on a tape
Before recording, advance the tape to the point from where you want
to start recording.
To record programmed tracks
1. After step 5, program the track you want (performs steps 2~6 on
page 26.)
2, Press • REC/STOP to start recording.
Page 22

Recording from comfмc^ discs
To record special CDs and tracks
(CD Manager function)
This function makes it easier for you to select special CDs and tracks
from amongst those loaded in the player,
• While recording, if a track is cut off in the middle at the end of the
front side, it is re-recorded from the beginning, on the reverse side.
• Recording is interrupted definitively at the end of reverse side.
Before recording
Prepare the tape you want to use. Performs steps 1 through 3 on page
40.
To record 1 track only {1 -TRACK)
Press CD.
Press CD MANAGER to select “1-TRACK”.
Every time you press the button;
1-TRACK -* 1-DISC-— 1-ALL
c
NORMAL
(OFF)
Press DISC 1-DtSC 5, whichever disc you want.
1
Previous display
The button lamp of the selected CD will not change color until
playback starts.
Press track.
Press • REC/STOP.
The selected track will be recorded.
To record 1 CD only (1-DISC)
pjp| Press CD.
Press CO MANAGER to select “1-OISC".
2
Every time you press the button;
p 1-TRACK -DISC-* 1-ALL
NORMAL
(OFF)
Press DISC 1-DISC 5, whichever disc you want.
or ►►/►►! to select the desired
4
Previous display
mm
The button lamp of the selected CD will not change color until
playback starts.
Press • REC/STOP.
The selected CD will be recorded.
(CoMfmiierf on next page)
Page 23

Recording from compact discs
To record special CDs and tracks (CD
Manager function)
To record the same numbered track on ail CDs (1ALL)Q
Press CD.
Press CD MANAGER to select “1-ALL”.
Every time you press the button;
1-TRACK 1-DISC — 1-ALL
NORMAL
(OFF)
Press
or ►►/►►! to select the desired
track.
Press • REC/STOP.
The same numbered track on CDs 1 through 5 will be recorded
in order from CD 1 to CD 5.
1
Previous display
When recording ends |0
"NORMAL" will appear on the display for about 3 seconds, then
the CD MANAGER function will turn OFF automatically.
To stop recording
• To add a 4 second silent interv'al before stopping
Press ■. The CD will automatically stop too.
• To stop recording without a silent interval
Press • REC/STOP. The CD will stop automatically too.
When you select the wrong CD or track
The same reselection procedure is used with all three modes.
Perform this procedure before recording starts.
• To reselect a CD
Reselect the CD with DISC 1 ~ DISC 5.
• To reselect a track
Reselect the track with or ►► /1
For your reference
During 1-ALL mode, if the selected track is not found on a certain
CD, the player automatically skips that CD and continues recording
from the next CD.
Page 24

Tdpe~fo^t€fpe recorcfing
The recording ievel and the Dolby effect wiJl be recorded as they are
on the tape being played back.
n Press TAPE DECK 1/2.
Press ± OPEN on both decks, and then insert the
tapes.
For playback: Into deck 1
For recording: Into deck 2
Close each deck's holder by hand.
Tape direction is automatically set to
Press REV MODE to select the reverse mode.
Every time you press the button;
J inn
I I ( I ■ l_
Cl
^ : One side is recorded, then recording stops auto
matically,
*5,C*3: Both sides (front side " reverse side) are recorded,
then recording stops automatically.
1
Press TAPE EDIT to start recording.
• If you selected C*3 in step 3, the direction will automaticallv
change to when recording starts.
To stop recording:
Press ■,
Both decks will stop.
To start recording on reverse side
Load a tape and change the tape direction as explained here below.
1. Press TAPE DECK 1/2 and select tape deck 2.
2. Press and immediately thereafter ■. The tape direction will be
shown as
To record from a specific point on a tape
Before recording, advance the tape to the point from where you want
to start recording.
Tape'direction of the tape you
are recording onto
S \w4v--''/^///
■ :.r l..t
T o oc
I I* (i t_
Page 25

Sound quality^ fields etc«
Selecting sound quality and field Q
Base your selection on the type of music and how you want to listen
to it.
Press 3D SPACE EQ.
"FLAT" goes out.
Select sound quality and field with <, and A.
Rotation changes with each button as shown below.
IHEAVY|-4H DISCO!
▼
A
lCLEARl-=
▼
A
i SOFT|-=
HEAVY: Use to add "punch" to rock and other music.
CLEAR: Use to clarify the treble range of jazz, etc.
SOFT : Use to listen to background music, etc,
DISCO : Use to reproduce a long reverberating sound like
LIVE : Use primarily for vocal pieces to add gloss to the
HALL ; Use to impart a deep bass and spread which will
A T
-luyej
A ▼
H HALL I
that heard in discotheques.
vocals.
make you feel as if you were in a large concert hall.
IMi
In recording, the sound quality/field will set automatically to "FLAT"
To cancel the mode:
Press 3D SPACE EQ and check "FLAT" lights up.
To boost boss
You can adjust bass below 120 Hz to 5 different levels.
Press SUPER WOOFER.
(The indicator lights up.)
□
Press LEVEL to select the desired level.
Each time you press the button, the level indication will change
consecutively from "LEVEL 1" through to "LEVEL 5".
To cancel the mode:
Press SUPER WOOFER again.
Page 26

Using the play timer
Select this timer when you w¿^nt to use the timer iis on olorm clock.
You can wake up with listening to music {CD, tuner, tope or oux) at a
desired volume level and time.
Preparations
• Make sure that you have completed "Setting the time" on page 14,
• Switch on the power.
The figure shows how to set the play timer for playing a CD from 6:30
to 7:40.
Press CLOCK/TIMER to select "©PLAY".
® Every time you press the button;
□
p CLOCK — ©REC ^ ©PLAY -i
'
----------
Previous display '
@ (Within 10 seconds or so)
Press MEMORY/SET.
'ON" time setting
(T) Press V or A to select the starting hour.
@ Press MEMORY/SET.
(3) Press V or A to select the starting minutes.
® Press MEMORY/SET.
'OFF" time setting
® Press V or A to select the ending hour.
CD Press MEMORY/SET.
(D Press V or A to select the ending minutes.
® Press MEMORY/SET.
Source selection
Select the desired source and then prepare for playing.
When you play CD(s)
Press CD and insert CD(s).
If more than 1 CD is loaded
Press DISC 1 ~ DISC 5 to select the CD you want to hear first,
and press ■.
When you play tape(s)
Press TAPE DECK 1/2 and insert tape(s).
If tapes are loaded in both decks, playback will start from deck
2.
When you play the radio
Press TUNER BAND and tune in the desired station.
When you play a unit connected to the “AUX" terminals
Press AUX.
Ploy volume setting
Set the playback volume.
(Contimied on next page)
"n
Page 27

Using the play Hmar^j
Press ©PLAY/OREC to select “0PLAY”.
Every time you press the button;
©REC — ©PLAY
c
----
Out (OFF) -•
Power will shut OFF automatically in a few seconds.
The timer play will start at the preset time with volume
increasing gradually up to the volume level you preset.
To switch the timer OFF: Q
Press ©PLAY/OREC and check "©PLAY" goes out.
If you set the timer wrongly Q
Press ©PLAY/OREC so that "©PLAY" goes out. Then, repeat the
procedure from step 1.
To check settings
Press CLOCK/TIMER to select "©PLAY". □
Two seconds later, the display will change in the following order.
® Play start time
(2) Play end time
(3) Play source and playback volume
You can check settings even when power is OFF.
-----
J
To enjoy the desired source after the timer setting is completed
Even if you change the volume level or music source, the timer play
will start with the preset condition.
1. Following step 6, turn ON the power and start playing the desired
source.
When you select a CD as the program source
After the CD finishes, if more than 2 CDs are loaded in the player,
reset the programmed CD with DISC 1 - DISC 5, and press ■.
2. Press POWER to standby mode after enjoying the play, and confirm
CD(s) or tape(s) has (have) been inserted.
Turning the timer ON/OFF
As long as "©PLAY" is displayed, the play timer will come ON
everyday as set.
You can turn the timer ON/OFF by pressing ©PLAY/OREC while
power is OFF.
Remember that when "©PLAY" is displayed, the timer is ON. When
not displayed, the timer is OFF,
• If the power is on, the timer will not function. The system must be
in the standby mode.
• If you switch the power to the standby mode while the play timer
is functioning, the OFF time setting will not be activated.
• If AUX is selected as the source, when the timer comes ON, the
system will turn ON and will engage "AUX" as the source. If you
want playback from the connected component to start, set the
component's timer to the same time. (See the instruction manual
that came with the component.)
Page 28

Using the record flnter
Select this timer when you want to use the timer to record a midnight
program or while you are out.
Preparations
• Make sure that you have completed "Setting the time" on page 14.
• Switch on the power.
Set the timer at least 2 minutes before you want to start recording.
The figure shows how to set the record timer for recording FM
broadcasts from 18:30 to 20:00.
Press CLOCKH’IMER to select “OREC”.
(T) Every time you press the button;
D
I* CLOCK ^ ®REC — ©PLAY -i
I
---------
Previous display ^'
(2) (Within 10 seconds or so)
Press MEMORY/SET.
'ON" time setting
® Press V or A to select the starting hour.
(2) Press MEMORY/SET.
(D Press V or A to select the starting minutes.
® Press MEMORY/SET.
'OFF" time setting
(D Press V or A to select the ending hour.
(2) Press MEMORY/SET.
d) Press V or A to select the ending minutes.
(4) Press MEMORY/SET.
Source selection
□
Select the desired source and then prepare for recording.
When you record from the radio
Press TUNER BAND to select the band and tune in the desired
station.
When you record from a unit connected to the “AUX”
terminals
Press AUX.
Prepare for recording.
1. Insert a tape into deck 2 with the side on which the recording
will start facing you.
2. Select Dolby NR.
3. Select the reverse mode.
g Press ©PLAY/0REC to select “©REC".
Every time you press the button;
OREC — ©PLAY
c
— (OFF)
-
-----
1
Power will shut OFF automatically in a few seconds.
About 30 seconds before the set time, the stereo mutes all siiund
automatically. Recording will start from front side ("►").
(Contintivii on next pn^e)
Page 29

Using the record ftmar
To switch the timer OFF; Q
Press ©PLAY/0REC and check "©REC" goes out.
If you set the timer wrongly Q
Press ©PLAY/®REC so that "0REC" goes out. Then, repeat the
procedure from step 1.
To check settings
Press CLOCK/TIMER to select "©REC". Q
Two seconds later, the display will change in the following order.
CD Recording start time
® Recording end time
(D Recording source
You can check settings even when power is OFF.
To enjoy the desired source after the timer setting is completed.
Even if you change the music source, the timer recording will start
with the preset condition.
1. Following step 6, turn ON the power and start playing the desired
source.
2. Press POWER to standby mode after enjoying the plav, and
confirm a tape is inserted in deck 2.
Turning the timer ON/OFF
As long as "®REC" is displayed, the record timer will come OX
everyday as set.
You can turn the timer ON/OFF by pressing "©PLAY/©REC" while
power is OFF.
Remember that when "®REC" is displayed, the timer is ON. When
not displayed, the timer is OFF.
mm
• If the power is ON, the timer will not function. The system must
be in the standby mode.
• If you switch the power to the standby mode while the record
timer is functioning, the OFF time setting will not be activated.
• If AUX is selected as the source, when the timer comes ON, the
system will turn ON, will engage "AUX" as the source and will
start recording. If you want to record from the connected
component, set the component's timer to the same time. (See the
instruction manual that came wdth the component.)
Page 30

Using thB sleep timer M
This timer turns power to your system OFF at the set time (Max, 2
hours, settable at 30 minute intervals). It lets you fall asleep while
listening to music.
23:30
(iJiXlEIXlEpO
Listening to CD
Pxrr CD [i.'f
SLEEP
o
Check "SLEEP" is displayed.
“SLEEP" j£. ^
0:00 0:30
^LoluiVt
“SLEEP" ■
/
: SLEEP (
't n
i l_J
Time setting
1:00
Recording an FM program
^WFM0[iLJli^
(J*ai**u
b\f I'cmoh' control onl}/
Preparations
• Make sure that you have completed "Setting the time" on page 14.
• Switch on the power.
The figure shows how to set the system to standby mode after 30
minutes.
While enjoying the desired source:
Press SLEEP to select the desired time.
Every time you press the button;
30 — 60 — 90 —120 — OFF
1
The system is turned off after the set time has elapsed.
To cancel the sleep timer:
Press SLEEP to select "OFF".
To confirm the remaining time:
(only while power is ON)
Press SLEEP.
To change the time remaining during operation:
Press SLEEP to show the remaining time then press SLEEP to select
the desired time.
ES n
The sleep timer turns OFF automatically the moment you attempt to
edihrecord a CD using CD Manager function.
To use two timers together
The sleep timer always has priority.
Be sure not to overlap timer settings.
Record timer and sleep timer 13
To go to sleep listening to a compact disc, and then to make a timer
recording from a radio broadcast.
Program the record timer.
Follow steps 1-6 on page 54.
{2) Switch on the power.
Start your CD and set the volume.
® Set the sleep timer .
Be sure to set the sleep timer to off before the timer recording
begins.
Play timer and sleep timer B
To go to sleep listening to an FM broadcast, and wake up the next
morning listening to a compact disc,
■X> Program a CD for play timer,
Follow steps 1-6 on page 50 and 52.
(2) Switch on the power.
(i) Tune in the station and set the volume.
® Set the sleep timer.
For your reference
Tht' plav timer cannot be used in combination with the record timer.
Page 31

Convenient functions
To mute rile volume Q
This feature is convenient when you have a telephone call, etc.
Press MUTING.
To cancel
Press MUTING once again.
“MUTING" goes out.
Muting can also be cancelled by lowering the volume all the way (dB),
When the system is turned off, the muting operation will be auto
matically cancelled.
Switching displays 10
Press -DISPLAY/-DEMO.
Every time you press the button, the spectrum analyzer will change
as shown on the left.
Il«f^ 011 mxfernai unit M
Listening to an external source
(See page 10 for external unit connection)
1. Press AUX.
The power will come on automatically.
2. Start playback from the external source. (For details, refer to the
owner's manual of the equipment.)
Recording from an external source
1. Follow steps 1-3 on page 38.
2. Press AUX.
3. Press • REC/STOP (recording starts).
4. Start playback from the external source, (For details, refer to the
owner's manual of the equipment.)
Listening with headphones
Reduce the volume level, and connect the headphones.
Plug type: 3.5 mm stereo
Avoid listening for prolonged periods of time to pre\’ent hearing dam
age.
Page 32

Singing aiong with KARAOKB
This unit lets you enjoy the karaoke fun with audio CDs and audio
tapes.
First, lower volume with MIC VOL, then, connect the microphone to MIXING MIC.
Plug type: 3.5 mm monaural
Press KARAOKE to select the voice mode .
Every time you press the button;
'iV O : Appropriate
• : For practice, etc
O : niS
•:
kpjiiiitx« o
\ Software
\
Voice \
modes \
■-¿Jb •
Sound multiplex
Karaoke
OK
Stereo
Non-karaoke
OK
V.MUTE
r
MONO.L
(OFF)
MONO.R
1
Voice mode selection:
If you want to play with the karaoke function, check first
whether or not your software is formatted for karaoke and
then select the voice mode. Q
mm
A bar is indicated in the table when the voice mode is least
effective. It is better to av'oid using the mode in such cases.
V.MUTE function;
The voice portion of the track is blocked out but not the back
ground music. You need software recorded in stereo sound if
wanting to use the voice mute function. Voice and/or static
may be reproduced with the following types of software.
• Software recorded monaural
• Classic music, or works performed by a limited number of
instruments
• Chorus works or duets
Start the source (CD, etc.)-
^ Adjust volume with VOLUME and MIC VOL and sing
along.
To cancel the karaoke:
Press KARAOKE to select "(OFF)" mode.
To activate the echo effect:
Turn ECHO to adjust the level,
msm
• If strange noise (squealing or howling) is emitted during use, move
the microphone far away from the speakers, or turn down the
microphone volume.
• When you are not using the microphone, disconnect it from MIXING
MIC, and turn down the microphone volume level to MIN.
• Sound field cannot be used with karaoke nor can the radio.
OFF
V.MUTE
MONO.L
MONO.R
\
•
(Background music
+ Voice)
-1-
- -
0
(Biickground music)
•
(Voice)
. 'lliVi? 1
To record your “KARAOKE” performance
0
•
(For singing along)
1. Connect the microphone to the MIXING MIC jack.
2. Press Deck 2 ± OPEN, and then insert a tape. (Close the holder.)
3. Press KARAOKE to select a mode.
4. Start recording
When singing off CDs
Press CD and then • REC/STOP.
O
When singing off tapes
Press TAPE DECK 1/2 and then TAPE EDIT.
>
5. Start "KARAOKE" performance.
-
• To playback the recorded tape, be sure to press KARAOKE to
-
-
select the "(OFF)" mode.
• You cannot record sound field or bass effect with KARAOKE, or
radio-backed KARAOKE.
Page 33

Reinóte control buttons and functions
(jjfc
Reference pages given as black circled numbers.
.t.l4>uj 4jl^I^I qIAliiio
Button
m
JÜ ■ ■
Radio
CD
CD
1
Tape
mw
Other
cumponents
iaj^
laavwu SLEEP $UPEftVrO(liEfl LEVEL
CD CD Q Q
±:> cdIc
4
---5-
CD 0> CD CD
CD CD O CD
PROGRAM CANCEL REPEAT RANOCM
TAPE CD TUNER AUX
MUTI^G *0* ^ M- M4
CD CO <0
DtSC
Q QQ
f
T a 4 a
CD Q (O <0
jospwec
CD
CO to Q Q
VOLUME +
Panasonic
OSESShEI
"d>
SLEEP
CD
►/A
... . cz:) . ..
:■■ ,CZ> ■,
^ a ^
CD CD
Turns the unit ON/OFF.
Sjill ¿kij/Ji-ajj
For setting sleep timer ®
)í!^'/^,r¿CIHTtllL^CIí■.ni^f ° ©
Playback { ►) ®
For preset station
Ik u ( ► ) ©
selection ©
Mfii ©
SjiLa-6 <JaA-o .I^VN
LLljiit^d
Pause (II ) ©
®{||)ii;ljl
© , © . á.áj-ll
• Searching forward /
•Skipping forward/
•l^Ji'l*) / ©
-
•!£i)i)i) /
/^LaVI L.L.~I1 •
( II ) ®
Stop ©,©
®, ©
backward ©
backward ®
/^LaVI dl •
©DUJl
m. iiLii
Playback ►) ©
¡k ¡:'t' (► t ©
(■^1^) 4^Jvl.^1 SjLciVI
©
• Fast- forward/Rewind
(While stopped) ©
• Finding the beginning
of a tune ©
•Ym / MW {/tTV'ii-.
'p) ©
•■^‘H.l(^'EffiIlHyTi©
^ 111! ^ j
© {DSijUl JiLk)
©
-
-
-
-
-
" ' ——.$—^ .8
CD Co CD CD ■
^ 7 * ^ 8 9 ^ ^ 0 ^
otsc
• CD selection (1~5)
• Track selection
For preset station
selection ©
***"•-* >. ■ d L.~l'i*V
©, ©, ©
• CD^P/(1~5)
©, ©,©
-
-
jl.i.gl.l ■ 1I4.T.I •
©.©<©
CD select mode
©, ©, ©
o
-
CD
©, ©, ©
i_)La^1 <L1L^
-
-
©.©.©ciUjS
'
Page 34

CD
CiSLw^
Engages program
input. ©
®
Cancels program
contents. ©
For selecting repeat
playback mode. ©
A ©
ajLc.'yi , .lA^V.V
Random playback. ©
6jU.I
Input source selection ®, ®, ®, ®
• When power OFF
One-touch playback begins by pressing TUNER, CD or TAPE.
• When power ON
Band can be switched with TUNER, and tape deck switched with TAPE.
ilA'fiiKiiiHi ©, ®, ®, ®
ii TUNER ' CD i'lc TAPE 111 ■ ,'Y .
)T1 TUNER Mi ' TAPE UttfJT/lM'l'ii-RlT:
‘ ‘ Jih jll ^J n .
.TAPE j1 CD jl TUNER LmaHu a>JL
JI •
.TAPE Jaj jdCtJl alj ij TUNER 4ia>wl^ U¿)^ * ‘
Sound quality /field ON/OFF and selection ©
For setting super woofer le\ el. ©
Ci.Ljd
Mutes volume temporarily. ©
® CjJ nail ^^Ic>
For setting volume ©, ©, ©
!|1 ■' ®, ®,®
© I © I © jJc. JauMjal
Page 35

Concerning compact discs
X
How to remove CDs
CD
CiSl^jS ¿Âj i*¿iS
Press on center piece and
lift from both sides.
How to return CDs to their case
US CD îS[5Iâ43№;Î
I^ tIC' ^1 CiSLwjS ¿^j! ^
Face label upwards and
press downward from
above.
,^>V1 ^ Ji^VI
How to hold CDs
CD â^SfiSîTïîi
Crtli>4^ jdi ¿lu*4 3 *<
Do not touch the recorded
X
surface,
L: • № ['K -
ii í^élíli "
ÉMM ^
Í df
With this player, you can only play compact
discs having this mark.
However, do not use irregular shape CDs (heart-shape, octagonal,
etc.). CDs of the sort can damage the unit. Q
(llDi®
DIGITAL AUDIO
Handling precautions
Handle CDs as shown on the left ( El ~ 13 )-
• If you are taking the disc from a cold to a warm environment,
moisture may form on the disc. Wipe this off with a soft, dry, lintfree cloth before using the disc.
• Do not write on the label side with a ball-point pen or other writ
ing instrument.
• Do not use record cleaning sprays, benzine, thinner, static electric
ity prevention liquids or any other solvent,
• Do not attach labels or stickers to CDs. (Do not use CDs with
exposed adhesive from tape or left over peeled off stickers.)
• Do not use scratch-proof protectors or covers other than those
specified for use with this system.
Storage precautions
Be sure to store discs in their cases to protect them from dust, scratches,
and warping.
Do not place or store discs in the following places
• Locations exposed to direct sunlight
• Humid or dusty locations
• Locations directly exposed to a heat vent or heating appliance
• In the glove compartment or on the rear deck of an automobile
How to clean CDs
CO â^î*:]K:^;i
olii li ‘ Í .<
How to take up tape slack
»lisjjVI ijA jc%l^~iJI ìià^s
Wipe from inside outward.
Conciémr^g çassettetapes
Selection of cassette tapes
Tapes can get caught on the capstans. Use caution with the following
types of tapes.
Cassette tapes exceeding 100 minutes
Tapes are made of a thin film material. Do not repeatedly advance
and stop the tape, fast-forward it or rewind it.
Endless-tapes
For this unit, it is recommended to use the tape which is appropriate
to the auto reverse mechanism.
Always read the instructions pro\ ided with your tapes.
Tape slack
Tape slack may cause the tape to break.
Use a pencil or similar object to take up the slack.
Erasure prevention Qj
Use a screwdriver or similar object to break out the tab.
To re-record on a protected cassette
Cover the hole with adhesive tape
Do not cover the detection hole on hi-position tapes
Storage precautions
Do not place or store tapes in the following places;
• In high temperature (35°C or higher) or high humidity (80% or
higher) areas
• In a strong magnetic field (near a speaker, on top of a TV, etc.) This
can erase a recording.
• Locations exposed to direct sunlight
Page 36

Troubleshooting guide
fk'turt' requesting service for this unit, check the chtirt belew for possible cause of the problem you are experiencing. Some simple checks or a
minor adjustment on your part may eliminate the problem and restore proper operation.
If you are in doubt about some of the check points, or if the remedies indicated in the chart do not solve the problem, refer tt^ the directory of
Authorized Service Centers (enclosed with this unit) to locate a convenient service center, or consult your dealer for instructions.
Problem
Problems common to all systems
There is no sound when the
Volume is set too low.
power is ON.
The location of the various
musical instruments is not
The (+) and {-) cormections to one of the
speakers are reversed.
well defined.
The left and right sounds are
reversed.
When listening to the
external unit, the left and
The left and right connections to the
speaker are reversed.
The left and right connections to the
external unit are reversed.
right sounds are reversed.
Only one speaker is emitting
sound.
There is no sound when a
source is being played.
“ERROR" message appears
One of the wires of the speaker cord is
disconnected.
The {+) and (-) wire of the speaker
cords are shorted.
Wrong operation has been done.
on the display.
““ : appears on the
display
• You plugged the power cord in for the
first time.
• There was a power failure recently.
Probable cause(s)
Suggested remedy
Adjust the volume level with the volume
control.
Connect the speaker cords correctly.
Connect the speaker cords correctly.
Connect the external unit's cord correctly.
Connect the speaker cord correctly.
Switch the system to the standby mode,
and reconnect the speaker cords so that thev
are not shorted. Then switch on the power.
Operate the unit correctly by following the
operating instructions.
Set the time.
Reference
page(s)
18, 22, 32
8
8
10
8
8
14
While listening to FM broadcasts
There is a “rushing noise”
The transmitting station is a long distance.
during a stereo broadcast
which is not audible during
a monaural broadcast.
You hear excessive noise
during a stereo broadcast,
The installation location and orientation of
the antenna are unsuitable.
and occasionally the sound
disappears.
The stereo indicator
{“STEREO”) flickers and
does not light completely.
The sound during a stereo
broadcast is highly distorted.
' ' 1 M 1 ^
While listening to AM broadcasts
................................................ ,
You hear an unusual beat
sound.
You hear a low-frequency
The transmitting station is a long distance.
The power of the TV set or VCR is ON.
There is a building or mountain nearby.
[Distortion is caused by interference
between the signal from the transmitting
station (direct wave) and the signal
reflected from the building or mountain
(reflected wave).]
You are using the system at the same time
you are playing a TV set.
Tht?*antenna wire is near the power cord.
hum.
-------------------------
If you are using an indoor antenna, change
to an outdoor antenna.
Try switching off the TV set or VCR.
Use a high*grade outdoor antenna, and
install it in a good location, height, and
orientation for reception.
, —.1.
Switch off the TV set, or use the system
further away from it.
Separate the antenna wire from the power
cord.
10
10
Page 37

Problem
When there is a television set nearby
The picture on the TV
disappears or stripes appear
on the screen.
When listening to tapes
Sound is low, intermittent,
poor quaiity, noisy, scratchy,
or unsteady.
The deck does not enter the
recording mode.
While listening to compact discs
The display does not show
the correct indication. Disc
play does not start when
you press the play button.
A certain music passage
The location and orientation of the antenna
are incorrect.
The wiring at the back of the system is
unsuitable
Heads are dirty.
Dolby-NR is wrongly set.
The erase-prevention tabs are remo\ ed
from the cassette.
The disc label is upside down.
The disc is dirty.
The disc is scratched.
The disc is badly warped.
The disc is a nonstandard one.
There is condensation inside the CD
changer.
The disc is dirty.
can’t be played correctly.
Probable cause(s)
Suggested remedy
If you are using an indwr antenna, change
to an outdoor anteruia.
Separate the antenna wire of the TV set
from the system.
Clean the heads.
Match Dolby-NR ON/OFF according to
the type of recording you made.
Attach tape to cover the space left by
removal of the erase-prevention tabs.
Set the disc with the label facing upward.
Wipe the disc with a soft cloth. 66
Replace the disc with a new one.
Replace the disc with a different one.
Wait for 60 minutes before using the CD
player.
Wipe the disc with a soft doth.
Reference
page(s)
It)
69
32
66
20
66
66
While using the remote control
The system cannot be
operated with the remote
control.
iHafnfen0ncé
The batteries are installed in the reverse
polarity.
The batteries are run-down.
If the surfaces are dirty
To clean this unit, wipe with a soft, dry cloth.
If the surfaces are extremely dirty, use a soft cloth dipped in a siwpand-water solution or a weak detergent solution.
• Never use alcohol, paint thiriner, benzine, or chemically treated
cloths to clean this unit,
• Before using chemically impregnated doth, read the instructions
that came with the cloth carefully.
•
Re-insert the batteries in the correct
polarity.
Replace the batteries with new batteries.
6
6
For a cleaner crisper sound
We recommend that you periodically clean parts (the shaded portion
in the figure below) the tape contacts like the heads.
Do not use any solution other than alcohol for head cleaning.
Page 38

Technical specifícafions
AMPLIFIER SECTION
RMS power output
THD 10%, both channels driven
LOW
HIGH
Total BI-AMP power
PMPO
Total harmonic distortion
Half power at 1 kHz
Input sensitivity and impedance
AUX
MIC
Tone controls
6 EQ SPACE HEAVY, CLEAR,
Load impedance
FM TUNER SECTION
Frequency range
87.50-108.00 MHz {50 kHz steps)
Sensitivity
Total harmonic distortion
MONO
STEREO
S/N
MONO
Image rejection at 98 MHz
Stereo separation at 1 kHz
Antenna terminal(s)
92 W per channel (6 ii)
38 W per channel (6 ii)
130 VV per channel
2000 W (6 ii)
LOW 0.03 "/<. (6 ii)
HIGH 0.15 'Ii. (6 ii)
250 mV, 57 kii
0.6 mV, 680 ii
SOFT, HALL, LIVE, DISCO
6ii
23.3 dBf (4.0 pv, IHF'58)
0.3 %
0.5 %
60 dB
35 dB
35 dB
75 ii (unbalanced)
SPEAKER SECTION
Type
4 way speaker system
Speaker(s)
Super Woofer
Woofer
Midrange
Tweeter
Impedance
Input power
LOW 200 W (MUSIC), 100 W (DESI)
Output sound pressure level
Cross over frequency
Frequency range
Dimensions (WxHxD)
Weight
HIGH 80 W (MUSIC), 40 W (DIN)
17 cm cone h’pe
12 cm cone type
6 cm cone ty'pe
6 cm cone type
HIGH (6ii), LOW (6ii)
87dB/W (1.0 m)
120 Hz, 4 kHz, 8 kHz
38 Hz-22 kHz (-16 dB)
45 Hz-20 kHz (-10 dB)
285 X 345 X 326 mm
6.2 kg
GENERAL
Power consumption 165 W
Power supply AC 110 V/127 V/220 V/230-240 V, 50/60 Hz
Dimensions (WxHxD) 270 x 345 x 314 mm
Weight 8.25 kg
Notes:
1. Specifications are subject to change without notice.
Weight and dimensions are approximate.
2. Total harmonic distortion is measured by the digital spectrum
analyzer.
AM TUNER SECTION
Frequency range
Sensitivity (for 500 mW)
(at 999 kHz)
CASSETTE DECK SECTION
Track system
Heads
Record/playback
Erasure
Motor
Recording system
Erasing system
Tape speed
Frequency response
[(+3 dB, -6 dB) at deck out]
NORMAL
HIGH
(HIGH)
Dolby NR off
Dolby NR on
Wow and flutter
Fast forward and rewind time
CD SECTION
Sampling frequency
Decoding
Beam source/wave length
Number of channels
S/N
CD UNIT OUT
Wow and flutter
Digital filter
0/A converter
531 - 1602 kHz (9 kHz steps)
530 - 1600 kHz (10 kHz steps)
250 pV/m
4 track, 2 channel
Solid permalloy head (Rotary head)
Double gap ferrite head
DC servo motor
AC bias 100 kHz
AC erase 100 kHz
4.8 cm/s
35 Hz - 14 kHz
35 Hz - 14 kHz
50 dB (A weighted)
60 dB (CCIR)
0.18 % (WRMS)
Approx. 120 seconds
with C-60 cassette tap«
44.1 kHz
I 16 bit linear
Semiconductor laser/780 nm
Stereo
95 dB aiS.A)
, Below measurable limit
8 fs
MASH {1 bit DAC)
MASH is a trademark of NTT.
Prepare the system as described below to prevent damage to the
mechanism.
1. Remove all CDs.
2. Press CD.
3. Press ■ for 5 seconds.
The display will change from "WAIT" to "LOCKED" to "GOOD
BYE" and finally "7.77" Then, the unit will be turned OFF
automatically. (This will set the so-called "shipping mode".)
4. Unplug the stereo.
The shipping mode will turn OFF automatically when you turn
the power ON the next time.
 Loading...