

Panasonic RX-ED50A User Manual
123
456≥10
7890
TPS
PORTABLE STEREO CD SYSTEM
Portable Stereo CD System
Operating Instructions
/
RX-ED50
RX-ED50A
EB
Note:
The “ EB ” indication shown on the packing case indicates United Kingdom.
Before connecting, operating or adjusting this product, please read these instructions completely.
Please keep this manual for future reference.
GN
RQT5142-1MB

CLASS 1
LASER PRODUCT
Dear customer
Thank you for purchasing this product.
For optimum performance and safety, please read these
instructions carefully.
Table of contents
Before use
CAUTION!
THIS PRODUCT UTILIZES A LASER.
USE OF CONTROLS OR ADJUSTMENTS OR
PERFORMANCE OF PROCEDURES OTHER THAN
THOSE SPECIFIED HEREIN MAY RESULT IN
HAZARDOUS RADIATION EXPOSURE.
DO NOT OPEN COVERS AND DO NOT REPAIR
YOURSELF. REFER SERVICING TO QUALIFIED
PERSONNEL.
WARNING:
TO REDUCE THE RISK OF FIRE, ELECTRIC
SHOCK OR PRODUCT DAMAGE,
• DO NOT EXPOSE THIS APPARATUS TO RAIN,
MOISTURE, DRIPPING OR SPLASHING AND
THAT NO OBJECTS FILLED WITH LIQUIDS,
SUCH AS VASES, SHALL BE PLACED ON THE
APPARATUS.
•
USE ONLY THE RECOMMENDED ACCESSORIES.
• DO NOT REMOVE THE COVER (OR BACK);
THERE ARE NO USER SERVICEABLE PARTS
INSIDE. REFER SERVICING TO QUALIFIED
SERVICE PERSONNEL.
THIS UNIT IS INTENDED FOR USE IN MODERATE
CLIMATES.
The socket outlet shall be installed near the
equipment and easily accessible.
The mains plug of the power supply cord shall
remain readily operable.
To completely disconnect this apparatus from the
AC Mains, disconnect the power supply cord plug
from AC receptacle.
(Back of product)
(Inside of product)
Before use
Caution for AC mains lead . . . . . . . . . . . . . . . . . . . . . 3
Supplied accessories . . . . . . . . . . . . . . . . . . . . . . . . . . 4
Precautions . . . . . . . . . . . . . . . . . . . . . . . . . . . . . . . . . . 4
Power sources . . . . . . . . . . . . . . . . . . . . . . . . . . . . . . . 5
Memory back-up batteries . . . . . . . . . . . . . . . . . . . . . . 5
Location of controls . . . . . . . . . . . . . . . . . . . . . . . . . . . 6
The remote control . . . . . . . . . . . . . . . . . . . . . . . . . . . . 7
Setting the time . . . . . . . . . . . . . . . . . . . . . . . . . . . . . . . 8
Compact disc operations
CDs . . . . . . . . . . . . . . . . . . . . . . . . . . . . . . . . . . . . . . . . . 9
Other modes of play . . . . . . . . . . . . . . . . . . . . . . . . . 10
Radio operations
The radio: manual tuning . . . . . . . . . . . . . . . . . . . . . 12
The radio: preset tuning . . . . . . . . . . . . . . . . . . . . . . 13
Presetting radio stations . . . . . . . . . . . . . . . . . . . . . . 13
Selecting channels . . . . . . . . . . . . . . . . . . . . . . . . . . . 13
Cassette deck operations
Cassettes . . . . . . . . . . . . . . . . . . . . . . . . . . . . . . . . . . . 14
Recording operations
Before recording . . . . . . . . . . . . . . . . . . . . . . . . . . . . . 16
Recording CDs . . . . . . . . . . . . . . . . . . . . . . . . . . . . . . 17
Automatic CD recording . . . . . . . . . . . . . . . . . . . . . . 18
AUTO . . . . . . . . . . . . . . . . . . . . . . . . . . . . . . . . . . . . . 18
1-REC . . . . . . . . . . . . . . . . . . . . . . . . . . . . . . . . . . . . 18
Recording the radio . . . . . . . . . . . . . . . . . . . . . . . . . . 19
Recording tape-to-tape . . . . . . . . . . . . . . . . . . . . . . . 19
Timer operations
Using the timer . . . . . . . . . . . . . . . . . . . . . . . . . . . . . . 20
The sleep timer . . . . . . . . . . . . . . . . . . . . . . . . . . . . . . 21
The timer fader . . . . . . . . . . . . . . . . . . . . . . . . . . . . . . 22
Reference
Sound quality . . . . . . . . . . . . . . . . . . . . . . . . . . . . . . . 22
Creating a three dimensional sound field with S.Virtualizer
Using auxiliary equipment . . . . . . . . . . . . . . . . . . . . 23
Using headphones . . . . . . . . . . . . . . . . . . . . . . . . . . . 23
Maintenance . . . . . . . . . . . . . . . . . . . . . . . . . . . . . . . . 23
Troubleshooting . . . . . . . . . . . . . . . . . . . . . Back cover
Technical specifications . . . . . . . . . . . . . . Back cover
22
2
RQT5142
Caution for AC mains lead
(For United Kingdom)
(“EB” area code model only)
For your safety, please read the following text
carefully.
This appliance is supplied with a moulded
three pin mains plug for your safety and convenience.
A 5-ampere fuse is fitted in this plug.
Should the fuse need to be replaced please
ensure that the replacement fuse has a rating
of 5-ampere and that it is approved by ASTA or
BSI to BS1362.
Check for the ASTA mark m or the BSI mark
o on the body of the fuse.
If the plug contains a removable fuse cover you
must ensure that it is refitted when the fuse is
replaced.
If you lose the fuse cover the plug must not be
used until a replacement cover is obtained.
A replacement fuse cover can be purchased
from your local dealer.
WARNING: DO NOT CONNECT EITHER
WIRE TO THE EARTH TERMINAL WHICH IS
MARKED WITH THE LETTER E, BY THE
EARTH SYMBOL n OR COLOURED
GREEN OR GREEN/YELLOW.
THIS PLUG IS NOT WATERPROOF—KEEP
DRY.
Before use
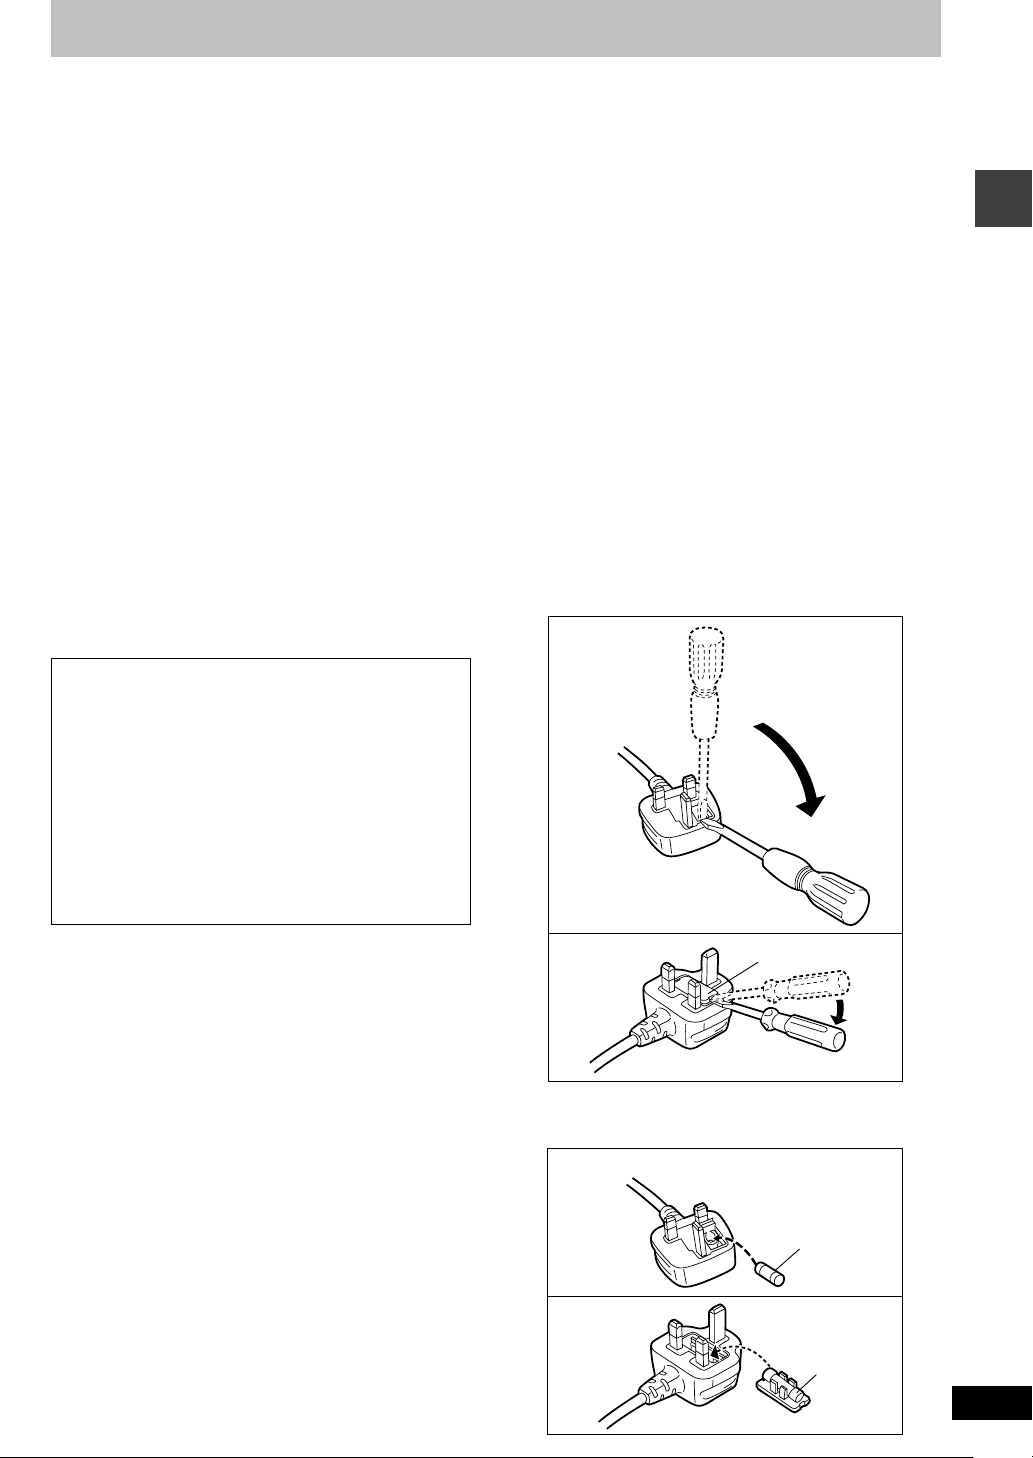
Remove the connector cover.
How to replace the fuse
The location of the fuse differ according to the
type of AC mains plug (figures A and B). Confirm the AC mains plug fitted and follow the instructions below.
Illustrations may differ from actual AC mains
plug.
1. Open the fuse cover with a screwdriver.
Figure A
Before use
CAUTION!
IF THE FITTED MOULDED PLUG IS
UNSUITABLE FOR THE SOCKET
OUTLET IN YOUR HOME THEN THE
FUSE SHOULD BE REMOVED AND THE
PLUG CUT OFF AND DISPOSED OF
SAFELY.
THERE IS A DANGER OF SEVERE
ELECTRICAL SHOCK IF THE CUT OFF
PLUG IS INSERTED INTO ANY 13AMPERE SOCKET.
If a new plug is to be fitted please observe the
wiring code as stated below.
If in any doubt please consult a qualified electrician.
IMPORTANT
The wires in this mains lead are coloured in
accordance with the following code:
Blue: Neutral, Brown: Live.
As these colours may not correspond with the
coloured markings identifying the terminals in
your plug, proceed as follows:
The wire which is coloured Blue must be connected to the terminal which is marked with the
letter N or coloured Black or Blue.
The wire which is coloured Brown must be connected to the terminal which is marked with the
letter L or coloured Brown or Red.
Figure B
Fuse cover
2. Replace the fuse and close or attach the
fuse cover.
Figure A
Fuse
(5 ampere)
Figure B
Fuse
(5 ampere)
3
RQT5142

Before use
4
RQT5142
Excessive sound pressure from earphones and headphones
can cause hearing loss.
Do not leave the batteries in an automobile exposed to
direct sunlight for a long period of time with doors and
windows closed.
CAUTION
Danger of explosion if battery is incorrectly replaced.
Replace only with the same or equivalent type
recommended by the manufacturer.
Dispose of used batteries according to the manufacturer’s
instructions.
This product may receive radio interference caused by
mobile telephones during use. If such interference is
apparent, please increase separation between the
product and the mobile telephone.
Supplied accessories
Please check and identify the supplied accessories.
Use numbers indicated in parentheses when asking for replacement parts.
Remote control (EUR644864) . . . . . . . . . . . . . . 1 pc.
AC mains lead . . . . . . . . . . . . . . . . . . . . . . . . . . . 1 pc.
(For United Kingdom: VJA0733)
(For Australia and New Zealand: RJA0035-A)
The included AC mains lead is for use with this unit only. Do
not use it with other equipment.
Precautions
•Avoid using or placing this unit near sources of heat. Do
not leave it in an automobile exposed to direct sunlight for
a long time with the doors and windows closed as this
may deform the cabinet.
•Avoid cuts, scratches, or poor connections in the AC mains
lead, as they may result in possible fire or electric shock
hazard. Also, excessive bending, pulling or splicing of the
cord should be avoided.
•
Do not unplug the AC
do so may cause premature failure or shock hazard.
•Do not operate this unit on AC power in a bathroom, as a
potential shock hazard may result.
•When not in use, disconnect the AC mains lead from the
household mains socket.
CAUTION!
•DO NOT INSTALL, OR PLACE THIS UNIT, IN A BOOKCASE, BUILT-
IN CABINET OR IN ANOTHER CONFINED SPACE. ENSURE THE
UNIT IS WELL VENTILATED. TO PREVENT RISK OF ELECTRIC
SHOCK OR FIRE HAZARD DUE TO OVERHEATING, ENSURE THAT
CURTAINS AND ANY OTHER MATERIALS DO NOT OBSTRUCT THE
VENTILATION VENTS.
•DO NOT OBSTRUCT THE UNIT’S VENTILATION OPENINGS WITH
NEWSPAPERS, TABLECLOTHS, CURTAINS, AND SIMILAR ITEMS.
•DO NOT PLACE SOURCES OF NAKED FLAMES, SUCH AS LIGHT-
ED CANDLES, ON THE UNIT.
•DISPOSE OF BATTERIES IN AN ENVIRONMENTALLY FRIENDLY
MANNER.
Use of batteries
•If this unit is not used for a long period of time or is
used only from an AC power source, remove all the
batteries to prevent potential damage due to possible
battery leakage.
•Do not use rechargeable type batteries.
•Do not mix old and new batteries or batteries of different
types (e.g. manganese and alkaline).
•Remove worn out batteries promptly and dispose of them
properly.
•Do not heat or expose to flame.
•Do not disassemble.
•Do not short circuit.
•If a battery leaks, remove all the batteries and dispose of
them properly. Thoroughly clean the battery compartment
before inserting new batteries.
•If battery fluid comes in contact with skin or clothes, flush
with water immediately.
•Keep out of reach of children.
•
Do not attempt to recharge alkaline or manganese batteries.
•
Batteries installed incorrectly can leak and damage the unit.
mains lead
by pulling on the cord. To
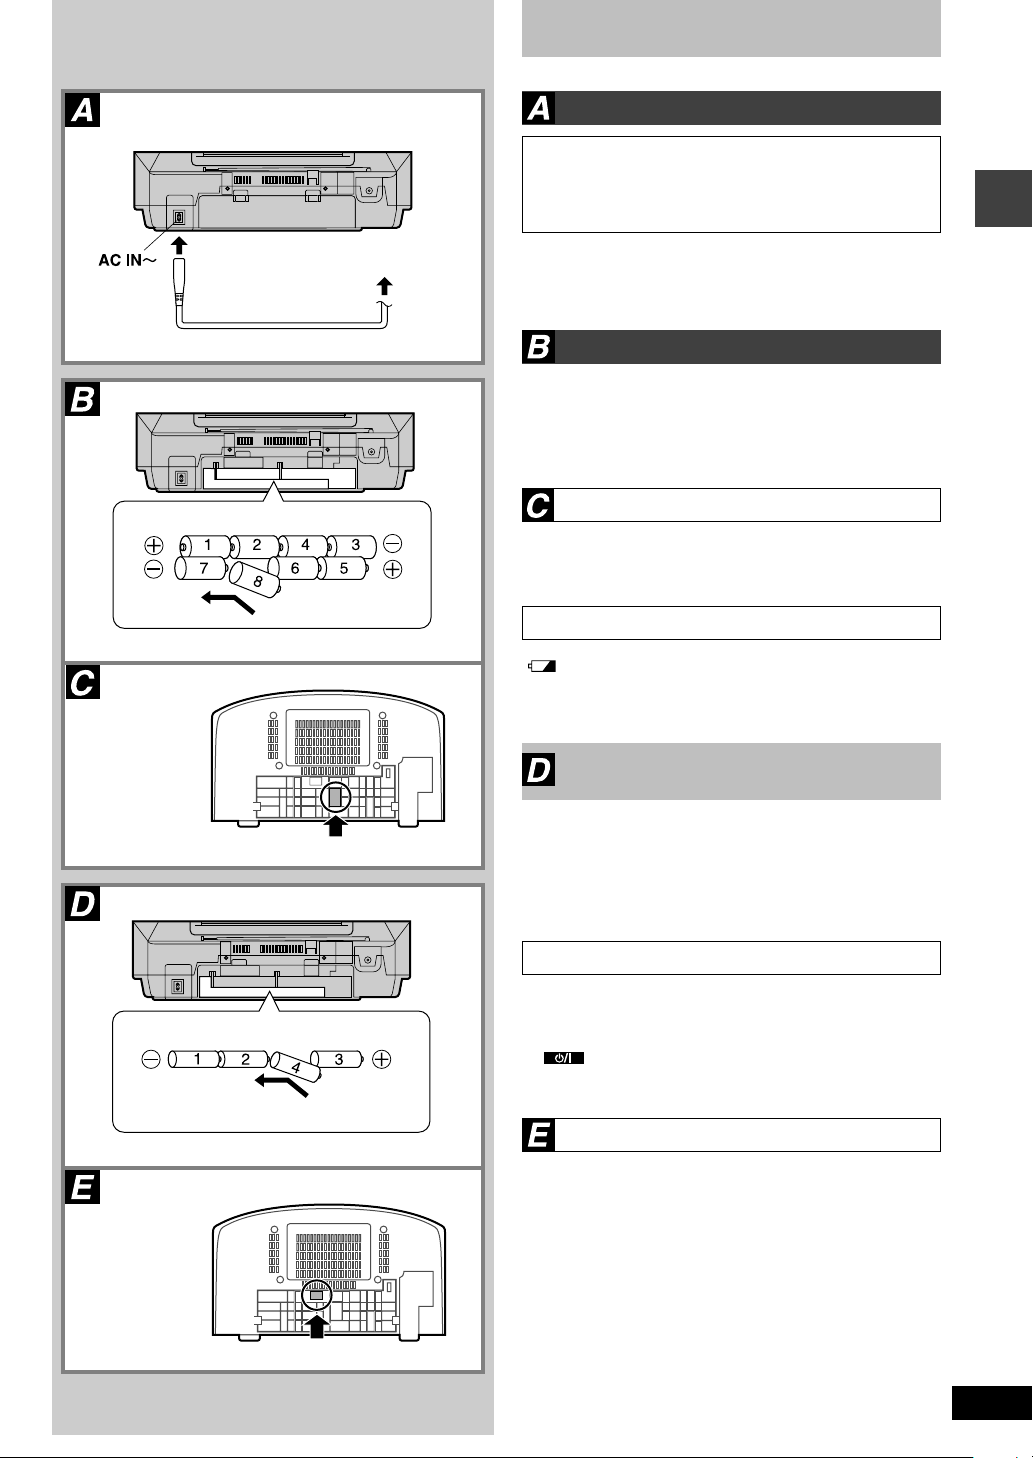
Power sources
Operating the unit on AC power
To household mains socket
AC mains lead
(R20,D,UM-1)
BE SURE TO READ THE CAUTION FOR THE
FOR UNITED KINGDOM ONLY
AC MAINS LEAD ON PAGE 3 BEFORE CONNECTION.
Connect the AC mains lead.
The AC mains lead must be disconnected from the unit if
you intend to power the unit with batteries.
Using batteries (not included)
The unit cannot be powered by batteries if the AC mains
lead is connected.
The remote control cannot turn the unit on when batteries
are used.
Removing the batteries
Open the battery cover, insert a finger into the hole in the
bottom of the unit and push out.
Battery life
“ ”
lights when the batteries are running down. Replace
all the batteries with new ones.
Before use
(R6,AA,UM-3)
Memory back-up batteries
(not included)
Insert these batteries to save the information contained in
the memory, such as the clock and timer settings, if there is
an interruption to the power supply.
These batteries do not power the unit.
Replacing the batteries
•The memory batteries last about one year.
•
Connect the unit to AC power before replacing the batteries.
•
Extend the life of the memory batteries by always pressing
[ ] to turn the unit off before disconnecting the unit
from the AC power source or replacing the power batteries.
Removing the batteries
Open the battery cover, insert a finger into the hole in the
bottom of the unit and push out.
RQT5142
5
Before use
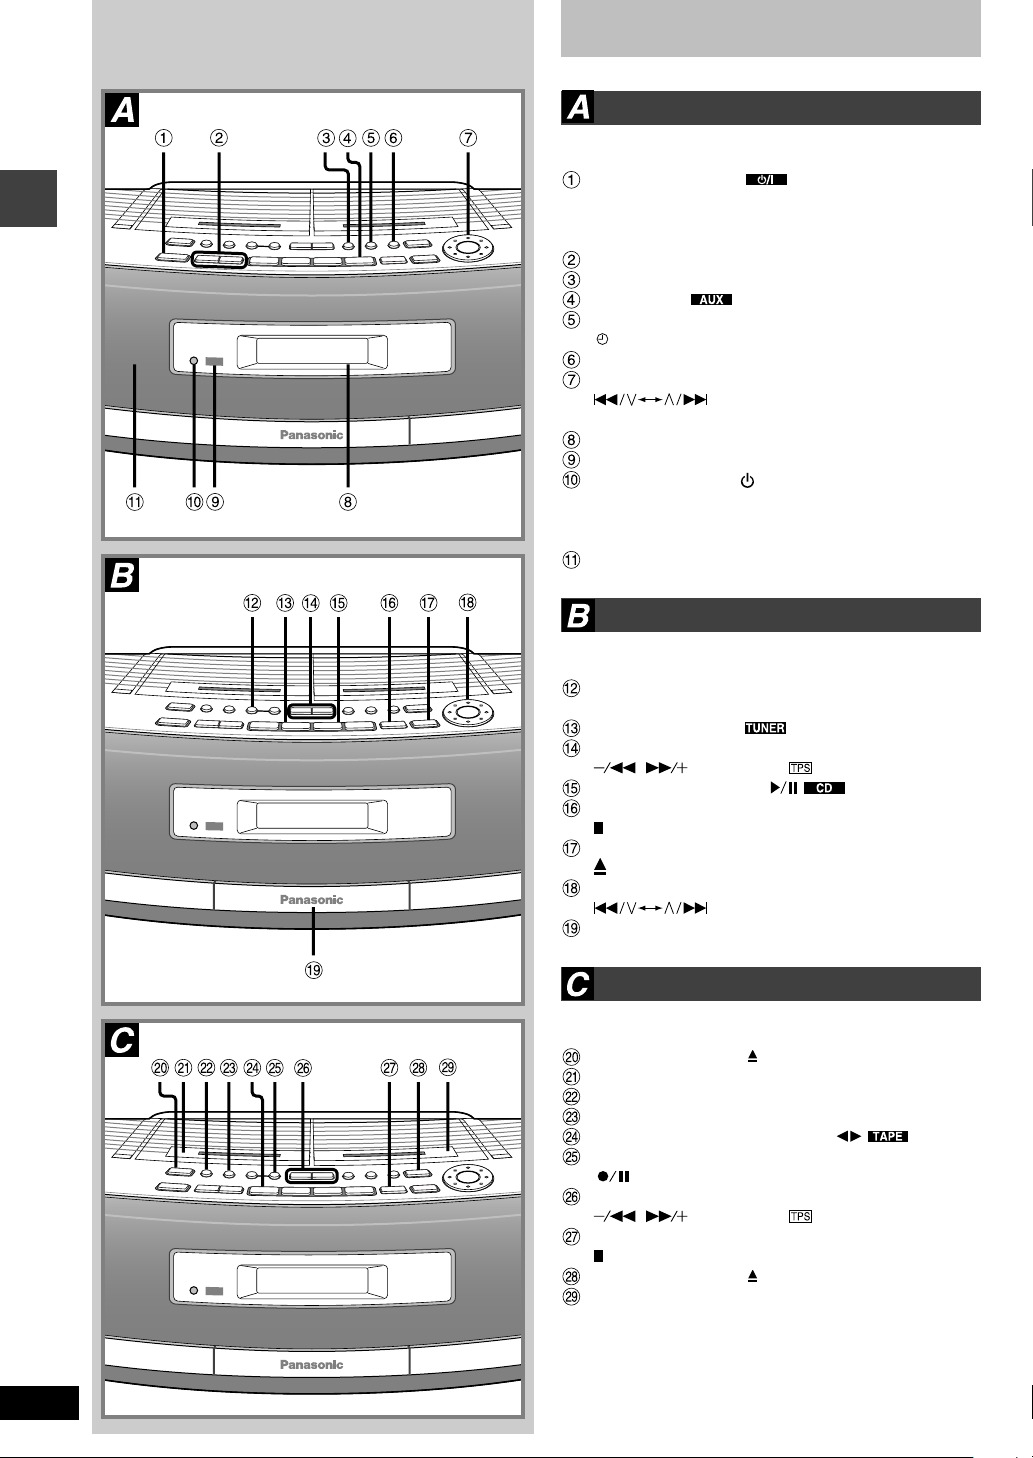
Location of controls
Basic controls
Number Designation Reference Page
Standby/on switch (
Press to switch the unit from on to standby mode or
vice versa. In standby mode, the unit is still consuming
a small amount of power.
Volume control buttons (–,+ VOLUME) . . . 9,12,14
Preset EQ button (PRESET EQ) . . . . . . . . . . . . . 22
AUX button ( ) . . . . . . . . . . . . . . . . . . . . . . . 23
Play timer/record timer button
( PLAY/REC) . . . . . . . . . . . . . . . . . . . . . . . . . . . . 20
Clock/timer button (CLOCK/TIMER) . . . . . . . . . 8,20
Time adjust/preset tuning/CD track select dial
(
. . . . . . . . . . . . . . . . . . . . . . . . . . . . . . . . . . . 8,9,13,20
Display panel
Remote control signal sensor (SENSOR) . . . . . . 7
Standby indicator (
When the unit is connected to the AC mains supply, this
indicator lights up in standby mode and goes out when
the unit is turned on.
Speaker
TIME/PRE.TUNE/CD
) . . . . . . . . . . . . . . . . . . 8
)
)
Tuner/CD controls
Number Designation Reference Page
CD recording mode button
(CD REC MODE) . . . . . . . . . . . . . . . . . . . . . . . . . . . .
Band button (BAND ) . . . . . . . . . . . . . . . 12,13
Tuning/CD search buttons
( , REW–TUNE/ –FF) . . . . . . . . . . 9,12
CD play/pause button ( ) . . . . . . . . . . . . 9
Stop, TAPE/CD mode select button
( TAPE/CD) . . . . . . . . . . . . . . . . . . . . . . . . . . . . . . 9
CD tray open/close button
( CD OPEN/CLOSE) . . . . . . . . . . . . . . . . . . . . . . . . .
Preset tuning/CD track select/skip dial
(
CD tray
TIME/PRE.TUNE/CD
) . . . . . . . . . 9,13
18
Cassette deck controls
Number Designation Reference Page
Deck 1 eject button ( DECK 1) . . . . . . . . . . . . . 14
Deck 1
Deck 1/2 select button (DECK 1/2) . . . . . . . . . . . 15
Tape edit button (TAPE EDIT) . . . . . . . . . . . . . . . 19
Cassette play/direction button ( ) . . . . 14
Record/record pause button
( ) . . . . . . . . . . . . . . . . . . . . . . . . . . . . . . . 17–19
Rewind/fast forward TPS buttons
( , REW–TUNE/ –FF) . . . . . . . . 14–15
Stop, TAPE/CD mode select button
( TAPE/CD) . . . . . . . . . . . . . . . . . . . . . . . . . . . 14,19
Deck 2 eject button ( DECK 2) . . . . . . . . . . . 17,19
Deck 2
9
6
RQT5142
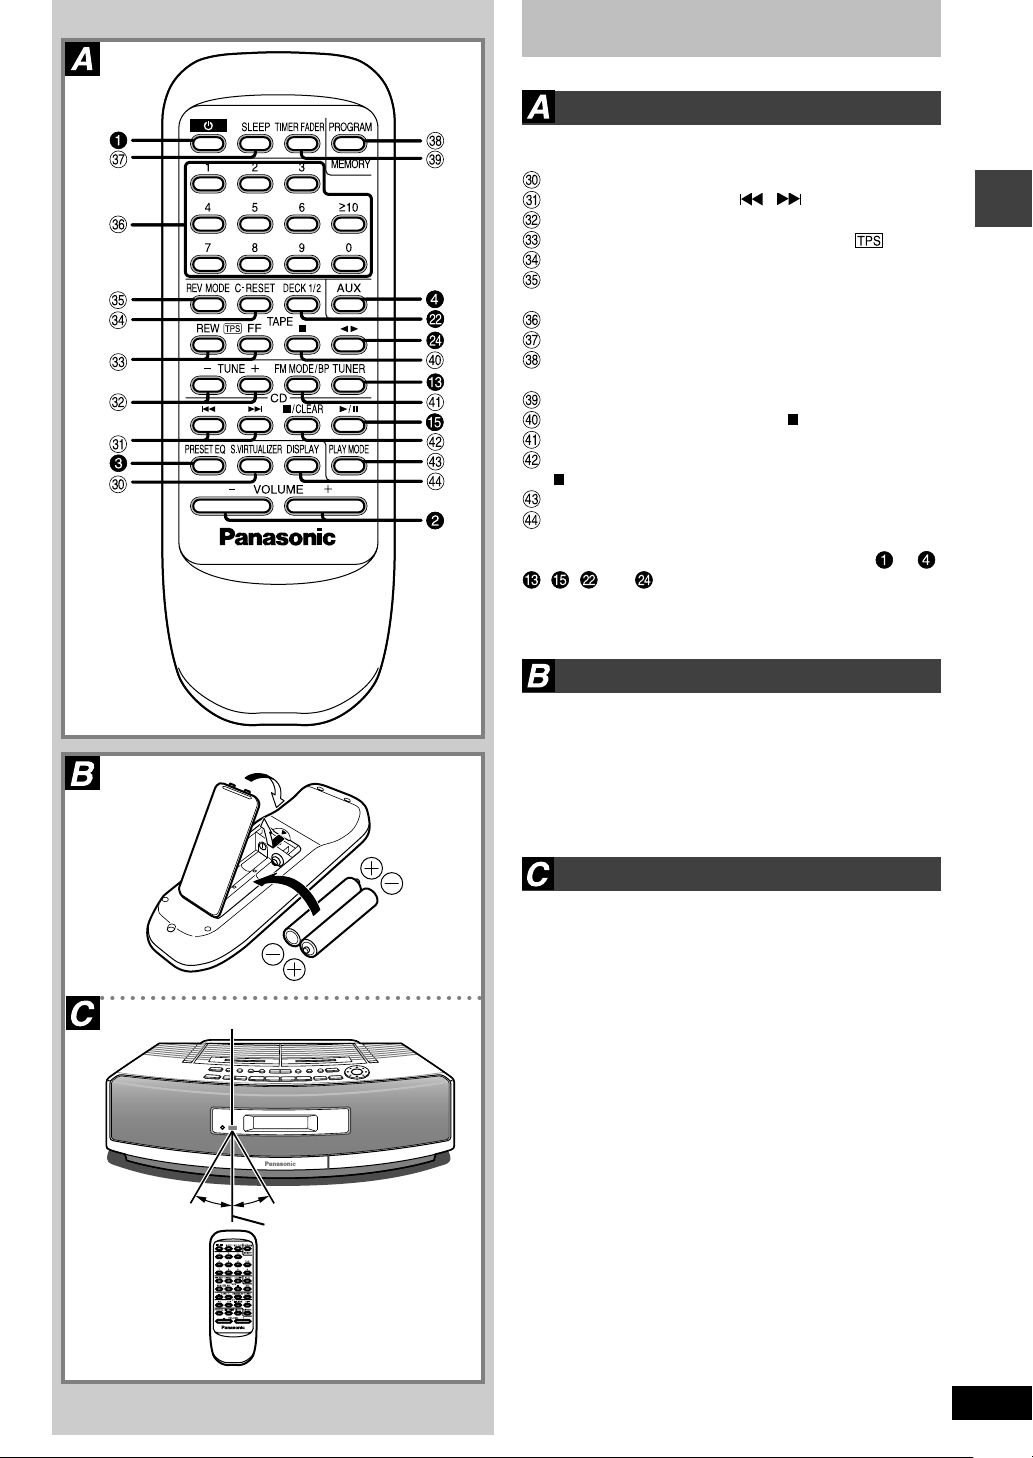
The remote control
Buttons
Number Designation Reference Page
Sound virtualizer button (S.VIRTUALIZER) . . . . 22
CD skip/search buttons ( , ) . . . . . . . . . . . . 11
Tuning buttons (–TUNE+)
Rewind/fast forward TPS buttons (REW FF)
Tap e counter reset button (C-RESET) . . . . . . . . 16
Reverse mode select button
(REV MODE) . . . . . . . . . . . . . . . . . . . . . . . . . . 15–16
Numbered buttons . . . . . . . . . . . . . . . . . . . 10–11,13
Sleep timer button (SLEEP) . . . . . . . . . . . . . . . . . 21
Program memory button
(PROGRAM MEMORY) . . . . . . . . . . . . . . . . . . . 11,13
Timer fader button (TIMER FADER) . . . . . . . . . . 22
Tape stop/mode select button ( ) . . . . . . . . . . . 15
FM mode BP button (FM MODE/BP) . . . . . . . . 12,19
CD stop/program clear/mode select button
( /CLEAR) . . . . . . . . . . . . . . . . . . . . . . . . . . . . 10–11
CD play mode button (PLAY MODE) . . . . . . . . . . 10
Display select button (DISPLAY) . . . . . . . . . . . 8,16
Before use
PORTABLE STEREO CD SYSTEMPORTABLE STEREO CD SYSTEM
SENSOR
(R6,AA,UM3)
When the unit is supplied with AC power, buttons to ,
, , and function in the same way as the controls
on the main unit. To save power, the unit cannot be turned
on from the remote control when batteries are used.
Batteries (not included)
Insert so the poles (+ and –) match those in the remote control.
Remove if the remote control is not going to be used for a
long period of time. Store in a cool, dark place.
Replace if the unit does not respond to the remote control
even when held close to the front panel.
Use
Aim at the sensor, avoiding obstacles, at a maximum range
of 7 meters directly in front of the unit.
•Keep the transmission window and the unit’s sensor free
from dust.
•Operation can be affected by strong light sources, such
as direct sunlight, and the glass doors on cabinets.
Do not;
•put heavy objects on the remote control.
•take the remote control apart.
•spill liquids onto the remote control.
PORTABLE STEREO CD SYSTEM
30˚30˚
7m
7
RQT5142
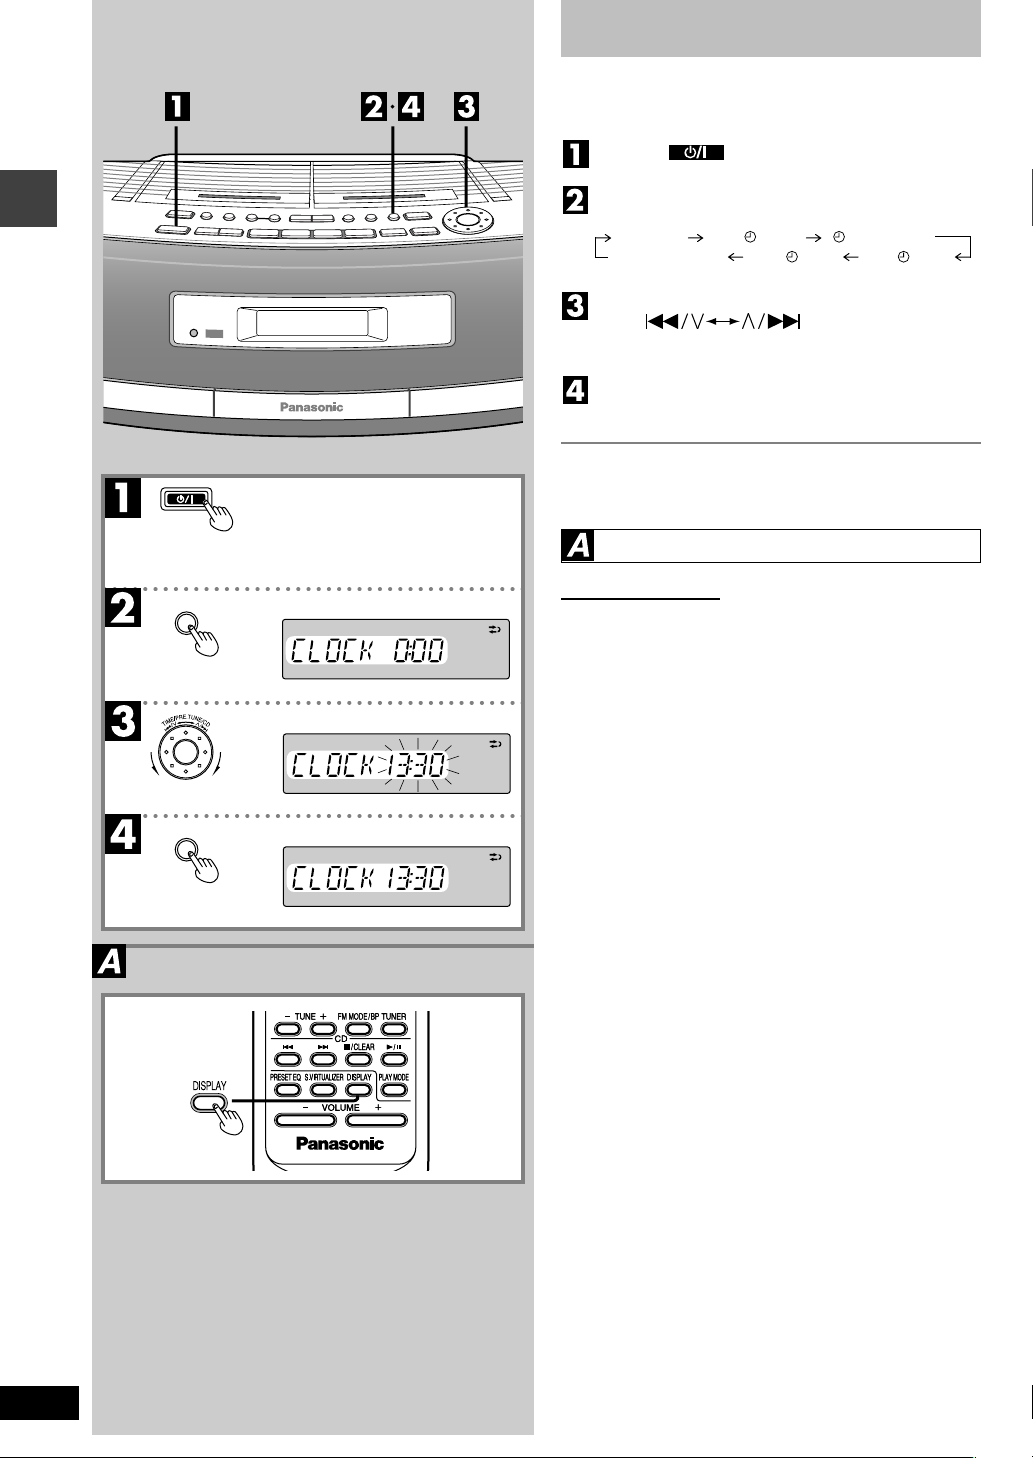
Setting the time
This is a twenty-four hour clock.
The example shows how to set the clock to 13:30.
Before use
CLOCK/TIMER
Press [
] to turn the unit on.
Press [CLOCK/TIMER] to select “CLOCK”.
Each time the button is pressed:
“CLOCK” “ON
Original display “OFF
Within 10 seconds
PLAY” “
REC” “ON
PLAY OFF”
REC”
Turn [ TIME/PRE.TUNE/CD]
to set the time.
Press [CLOCK/TIMER] to start the clock.
The original display is restored shortly after.
When batteries are used
The unit cannot be turned on with the remote control.
Displaying the clock
Remote control only
Press [DISPLAY].
8
RQT5142
CLOCK/TIMER
PORTABLE STEREO CD SYSTEMPORTABLE STEREO CD SYSTEM
 Loading...