

Page 1
電源
スリープ
123
456≥10
7890
反転モード
カウンターリセット
巻戻し 早送りTPS
選局
S.バーチャライザー
音質
PORTABLE STEREO CD SYSTEM
Portable Stereo CD System
Operating Instructions
タイマーフェーダー
プログラム
・メモリー
ラジオオート
プリセット
デッキ1/2
AUX
テープ
FMモード/BP
FM/AM
クリアー
/
/
表示切換
プレイモード
音量
RX-ED50
EB
Note:
The “ EB ” indication shown on the packing case in-dicates United Kingdom.
Before connecting, operating or adjusting this product, please read these instructions completely.
Please keep this manual for future reference.
GN
RQT5142-B
Page 2
CLASS 1
LASER PRODUCT
Dear customer
Thank you for purchasing this product.
For optimum performance and safety, please read these
instructions carefully.
Table of contents
Before use
INVISIBLE LASER RADIATION WHEN OPEN.
DANGER
AVOID DIRECT EXPOSURE TO BEAM.
USYNLIG LASERSTRÅLING VED ÅBNING, NÅR SIKKERHEDSAFBRYDERE
ADVARSEL
ER UDE AF FUNKTION. UNDGÅ UDSÆTTELSE FOR STRÅLING.
AVATTAESSA JA SUOJALUKITUS OHITETTAESSA OLET ALTTIINA
VARO!
NÄKYMÄTÖNTÄ LASERSÄTEILYLLE. ÄLÄ KATSO SÄTEESEEN.
OSYNLIG LASERSTRÅLNING NÄR DENNA DEL ÄR ÖPPNAD OCH
VARNING
SPÄRREN ÄR URKOPPLAD. BETRAKTA EJ STRÅLEN.
USYNLIG LASERSTRÅLING NÅR DEKSEL ÅPNES OG SIKKERHEDSLÅS
ADVARSEL
BRYTES. UNNGÅ EKSPONERING FOR STRÅLEN.
UNSICHTBARE LASERSTRAHLUNG, WENN ABDECKUNG GEÖFFNET.
VORSICHT
NICHT DEM STRAHL AUSSETZEN.
CAUTION!
THIS PRODUCT UTILIZES A LASER.
USE OF CONTROLS OR ADJUSTMENTS OR
PERFORMANCE OF PROCEDURES OTHER THAN
THOSE SPECIFIED HEREIN MAY RESULT IN
HAZARDOUS RADIATION EXPOSURE.
DO NOT OPEN COVERS AND DO NOT REPAIR
YOURSELF. REFER SERVICING TO QUALIFIED
PERSONNEL.
WARNING:
TO REDUCE THE RISK OF FIRE, ELECTRIC
SHOCK OR PRODUCT DAMAGE, DO NOT
EXPOSE THIS APPLIANCE TO RAIN, SPLASHING,
DRIPPING OR MOISTURE.
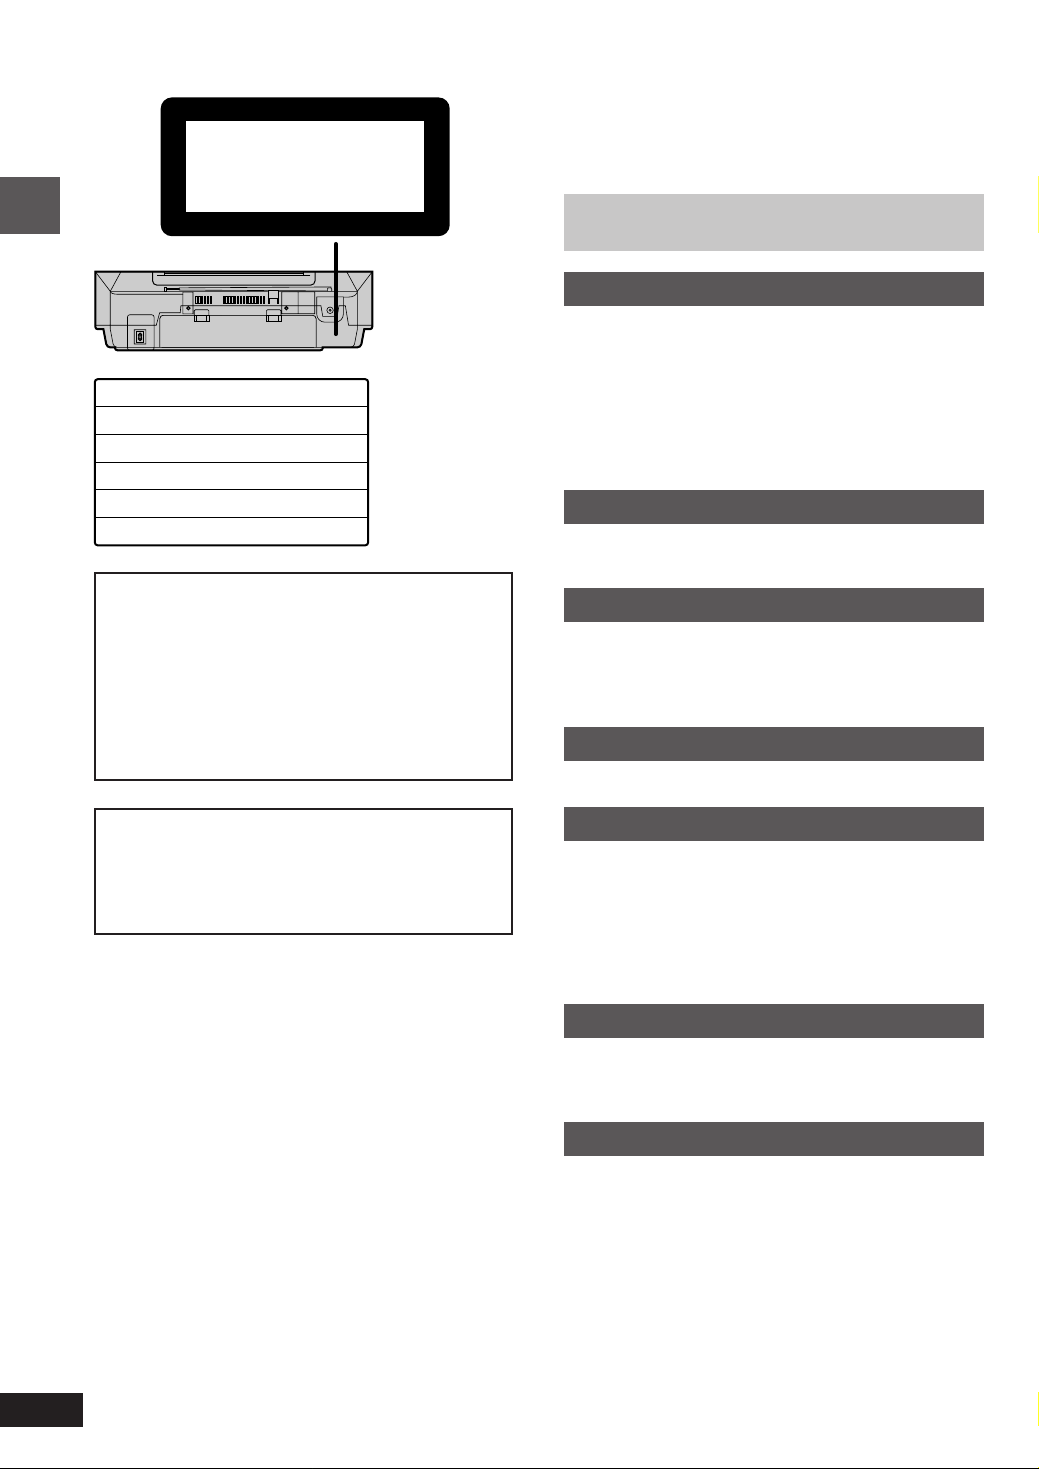
(Back of product)
(Inside of product)
(Indersiden at apparatet)
(Tuotteen sisällä)
(Apparatens insida)
(Produktets innside)
(Im Inneren des Gerätes)
Before use
Caution for AC mains lead . . . . . . . . . . . . . . . . . . . . 3
Supplied accessories . . . . . . . . . . . . . . . . . . . . . . . . . . 4
Precautions . . . . . . . . . . . . . . . . . . . . . . . . . . . . . . . . . . 4
Power sources . . . . . . . . . . . . . . . . . . . . . . . . . . . . . . 5
Memory back-up batteries . . . . . . . . . . . . . . . . . . . . . 5
Location of controls . . . . . . . . . . . . . . . . . . . . . . . . . . 6
The remote control . . . . . . . . . . . . . . . . . . . . . . . . . . . 7
Setting the time . . . . . . . . . . . . . . . . . . . . . . . . . . . . . . 8
Compact disc operations
CDs . . . . . . . . . . . . . . . . . . . . . . . . . . . . . . . . . . . . . . . . 9
Other modes of play . . . . . . . . . . . . . . . . . . . . . . . . 10
Radio operations
The radio: manual tuning . . . . . . . . . . . . . . . . . . . . 12
The radio: preset tuning . . . . . . . . . . . . . . . . . . . . . . 13
Presetting radio stations . . . . . . . . . . . . . . . . . . . . . . 13
Selecting channels . . . . . . . . . . . . . . . . . . . . . . . . . . . 13
Cassette deck operations
Cassettes . . . . . . . . . . . . . . . . . . . . . . . . . . . . . . . . . . . 14
Recording operations
Before recording . . . . . . . . . . . . . . . . . . . . . . . . . . . . 16
Recording CDs . . . . . . . . . . . . . . . . . . . . . . . . . . . . . 17
Automatic CD recording . . . . . . . . . . . . . . . . . . . . . . 18
AUTO . . . . . . . . . . . . . . . . . . . . . . . . . . . . . . . . . . . . 18
1-REC . . . . . . . . . . . . . . . . . . . . . . . . . . . . . . . . . . . . 18
Recordng the radio . . . . . . . . . . . . . . . . . . . . . . . . . . 19
Recording tape-to-tape . . . . . . . . . . . . . . . . . . . . . . . 19
2
RQT5142
Timer operations
Using the timer . . . . . . . . . . . . . . . . . . . . . . . . . . . . . . 20
The sleep timer . . . . . . . . . . . . . . . . . . . . . . . . . . . . . . 21
The timer fader . . . . . . . . . . . . . . . . . . . . . . . . . . . . . . 22
Reference
Sound quality . . . . . . . . . . . . . . . . . . . . . . . . . . . . . . . 22
Creating a three dimensional sound field with S.Virtualizer
Using auxiliary equipment . . . . . . . . . . . . . . . . . . . . 23
Using headphones . . . . . . . . . . . . . . . . . . . . . . . . . . . 23
Maintenance . . . . . . . . . . . . . . . . . . . . . . . . . . . . . . . . 23
Troubleshooting . . . . . . . . . . . . . . . . . . . . . Back cover
Technical specifications . . . . . . . . . . . . . . Back cover
22
Page 3
Caution for AC mains lead
(For United Kingdom)
(“EB” area code model only)
For your safety, please read the following text
carefully.
This appliance is supplied with a moulded
three pin mains plug for your safety and convenience.
A 5-ampere fuse is fitted in this plug.
Should the fuse need to be replaced please
ensure that the replacement fuse has a rating
of 5-ampere and that it is approved by ASTA or
BSI to BS1362.
Check for the ASTA mark m or the BSI mark
o on the body of the fuse.
If the plug contains a removable fuse cover you
must ensure that it is refitted when the fuse is
replaced.
If you lose the fuse cover the plug must not be
used until a replacement cover is obtained.
A replacement fuse cover can be purchased
from your local dealer.
WARNING: DO NOT CONNECT EITHER
WIRE TO THE EARTH TERMINAL WHICH IS
MARKED WITH THE LETTER E, BY THE
EARTH SYMBOL n OR COLOURED
GREEN OR GREEN/YELLOW.
THIS PLUG IS NOT WATERPROOF— KEEP
DRY.
Before use
Remove the connector cover.
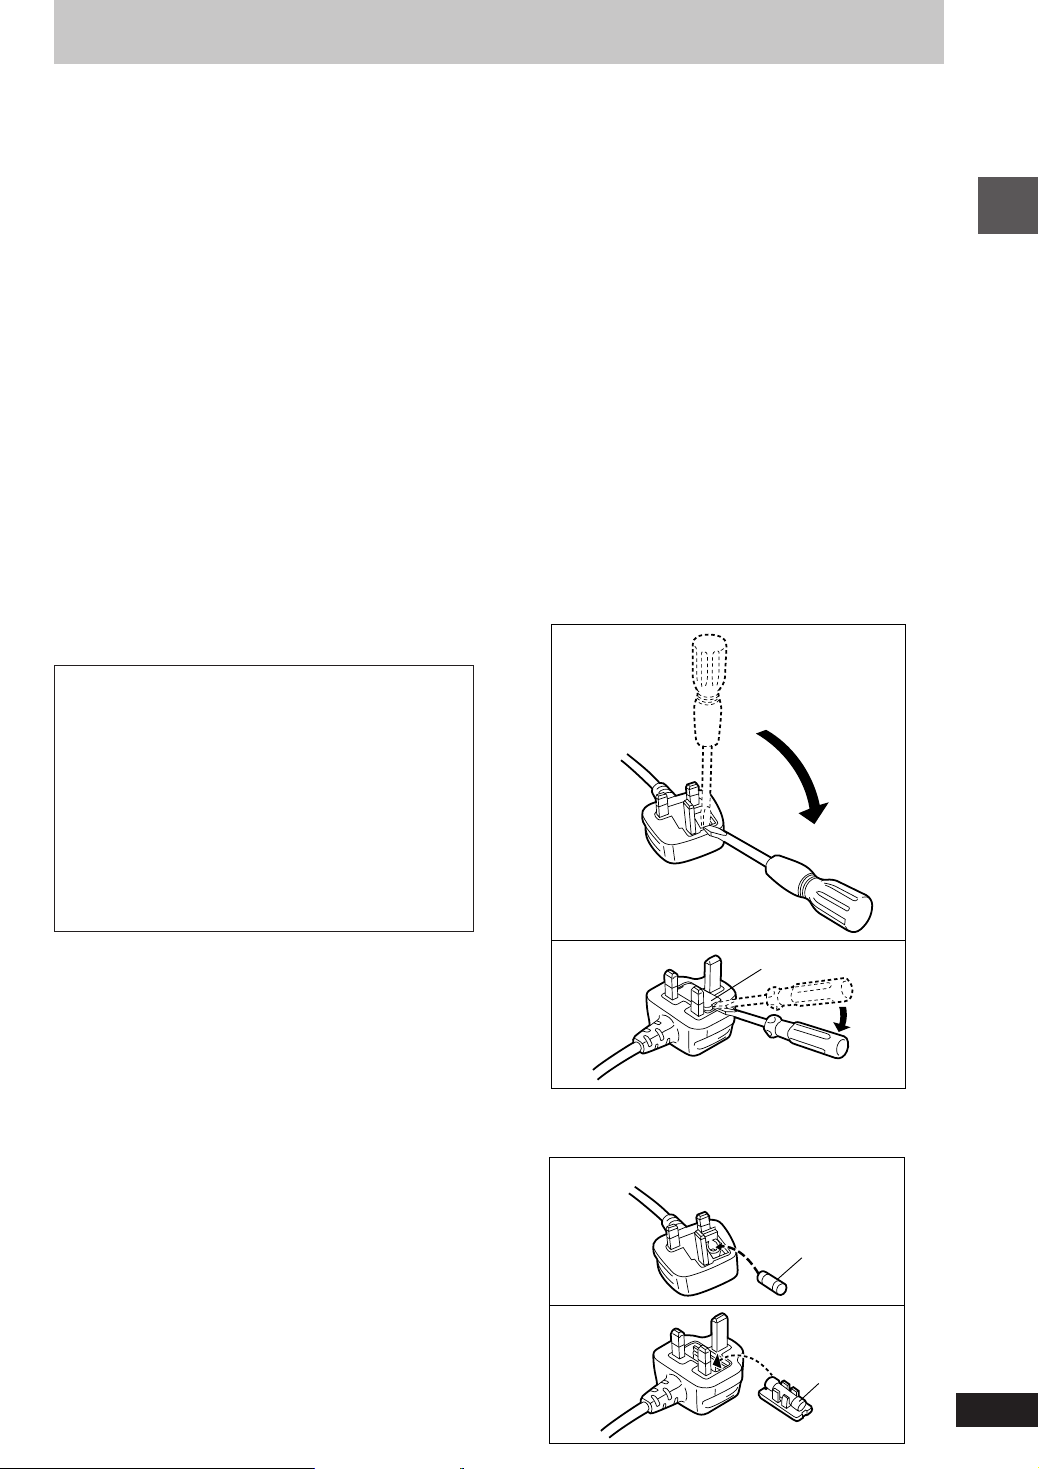
How to replace the fuse
The location of the fuse differ according to the
type of AC mains plug (figures A and B). Confirm the AC mains plug fitted and follow the instructions below.
Illustrations may differ from actual AC mains
plug.
1. Open the fuse cover with a screwdriver.
Figure A
Before use
CAUTION!
IF THE FITTED MOULDED PLUG IS
UNSUITABLE FOR THE SOCKET
OUTLET IN YOUR HOME THEN THE
FUSE SHOULD BE REMOVED AND THE
PLUG CUT OFF AND DISPOSED OF
SAFELY.
THERE IS A DANGER OF SEVERE
ELECTRICAL SHOCK IF THE CUT OFF
PLUG IS INSERTED INTO ANY 13AMPERE SOCKET.
If a new plug is to be fitted please observe the
wiring code as stated below.
If in any doubt please consult a qualified electrician.
IMPORTANT
The wires in this mains lead are coloured in
accordance with the following code:
Blue: Neutral, Brown: Live.
As these colours may not correspond with the
coloured markings identifying the terminals in
your plug, proceed as follows:
The wire which is coloured Blue must be connected to the terminal which is marked with the
letter N or coloured Black or Blue.
The wire which is coloured Brown must be connected to the terminal which is marked with the
letter L or coloured Brown or Red.
Figure B
Fuse cover
2. Replace the fuse and close or attach the
fuse cover.
Figure A
Fuse
(5 ampere)
Figure B
Fuse
(5 ampere)
3
RQT5142
Page 4
Before use
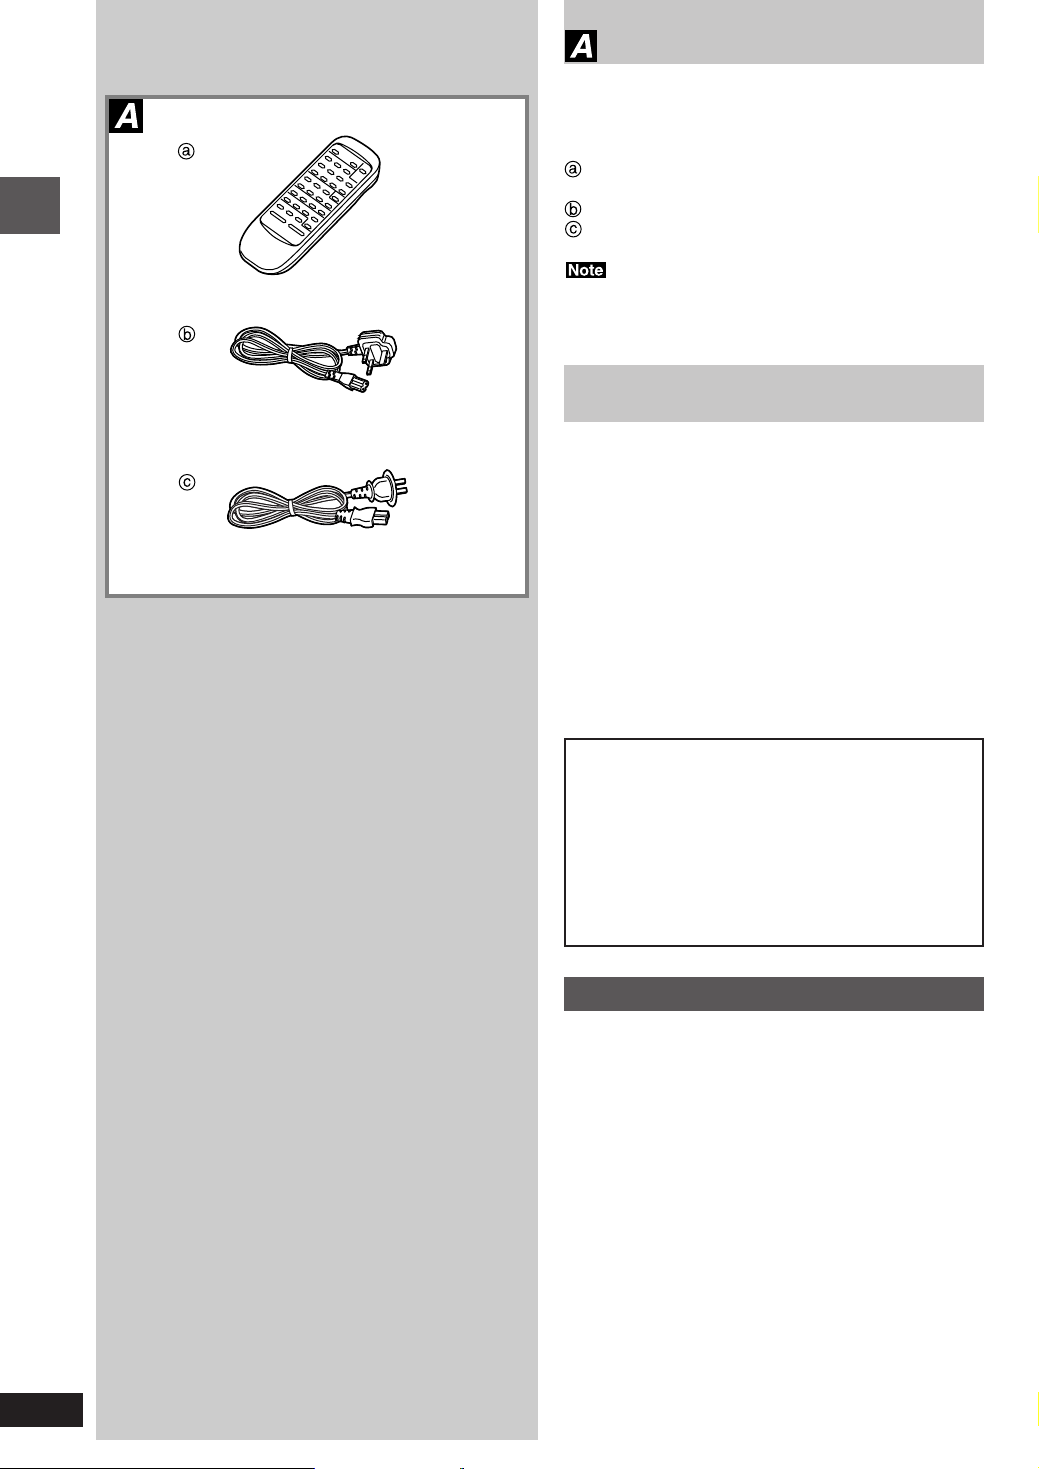
Supplied accessories
Please check and identify the supplied accessories.
Use numbers indicated in parentheses when asking for replacement parts.
Remote control (EUR644864) . . . . . . . . . . . . . . 1 pc.
AC mains lead . . . . . . . . . . . . . . . . . . . . . . . . . . . 1 pc.
(For United Kingdom: RJA0038-1U)
(For Australia and New Zealand: RJA0035-A)
The included AC mains lead is for use with this unit only. Do
not use it with other equipment.
Precautions
•Avoid using or placing this unit near sources of heat. Do
not leave it in an automobile exposed to direct sunlight for
a long time with the doors and windows closed as this
may deform the cabinet.
•Avoid cuts, scratches, or poor connections in the AC mains
lead, as they may result in possible fire or electric shock
hazard. Also, excessive bending, pulling or splicing of the
cord should be avoided.
•
Do not unplug the AC
do so may cause premature failure or shock hazard.
•Do not operate this unit on AC power in a bathroom, as a
potential shock hazard may result.
•When not in use, disconnect the AC mains lead from the
household mains socket.
mains lead
by pulling on the cord. To
4
RQT5142
CAUTION!
DO NOT INSTALL OR PLACE THIS UNIT IN A
BOOKCASE, BUILT IN CABINET OR IN ANOTHER
CONFINED SPACE. ENSURE THE UNIT IS WELL
VENTILATED. ENSURE THAT CURTAINS AND
ANY OTHER MATERIALS DO NOT OBSTRUCT
THE VENTILATION TO PREVENT RISK OF
ELECTRIC SHOCK OR FIRE HAZARD DUE TO
OVERHEATING.
Use of batteries
•If this unit is not used for a long period of time or is
used only from an AC power source, remove all the
batteries to prevent potential damage due to possible
battery leakage.
•Do not use rechargeable type batteries.
•Do not mix old and new batteries or batteries of different
types (e.g. manganese and alkaline).
•Remove worn out batteries promptly and dispose of them
properly.
•Do not expose to heat or flame.
•Do not disassemble.
•Do not short circuit.
•If a battery leaks, remove all the batteries and dispose of
them properly. Thoroughly clean the battery compartment
before inserting new batteries.
•If battery fluid comes in contact with skin or clothes, flush
with water immediately.
•Keep out of reach of children.
•
Do not attempt to recharge alkaline or manganese batteries.
•
Batteries installed incorrectly can leak and damage the unit.
Page 5
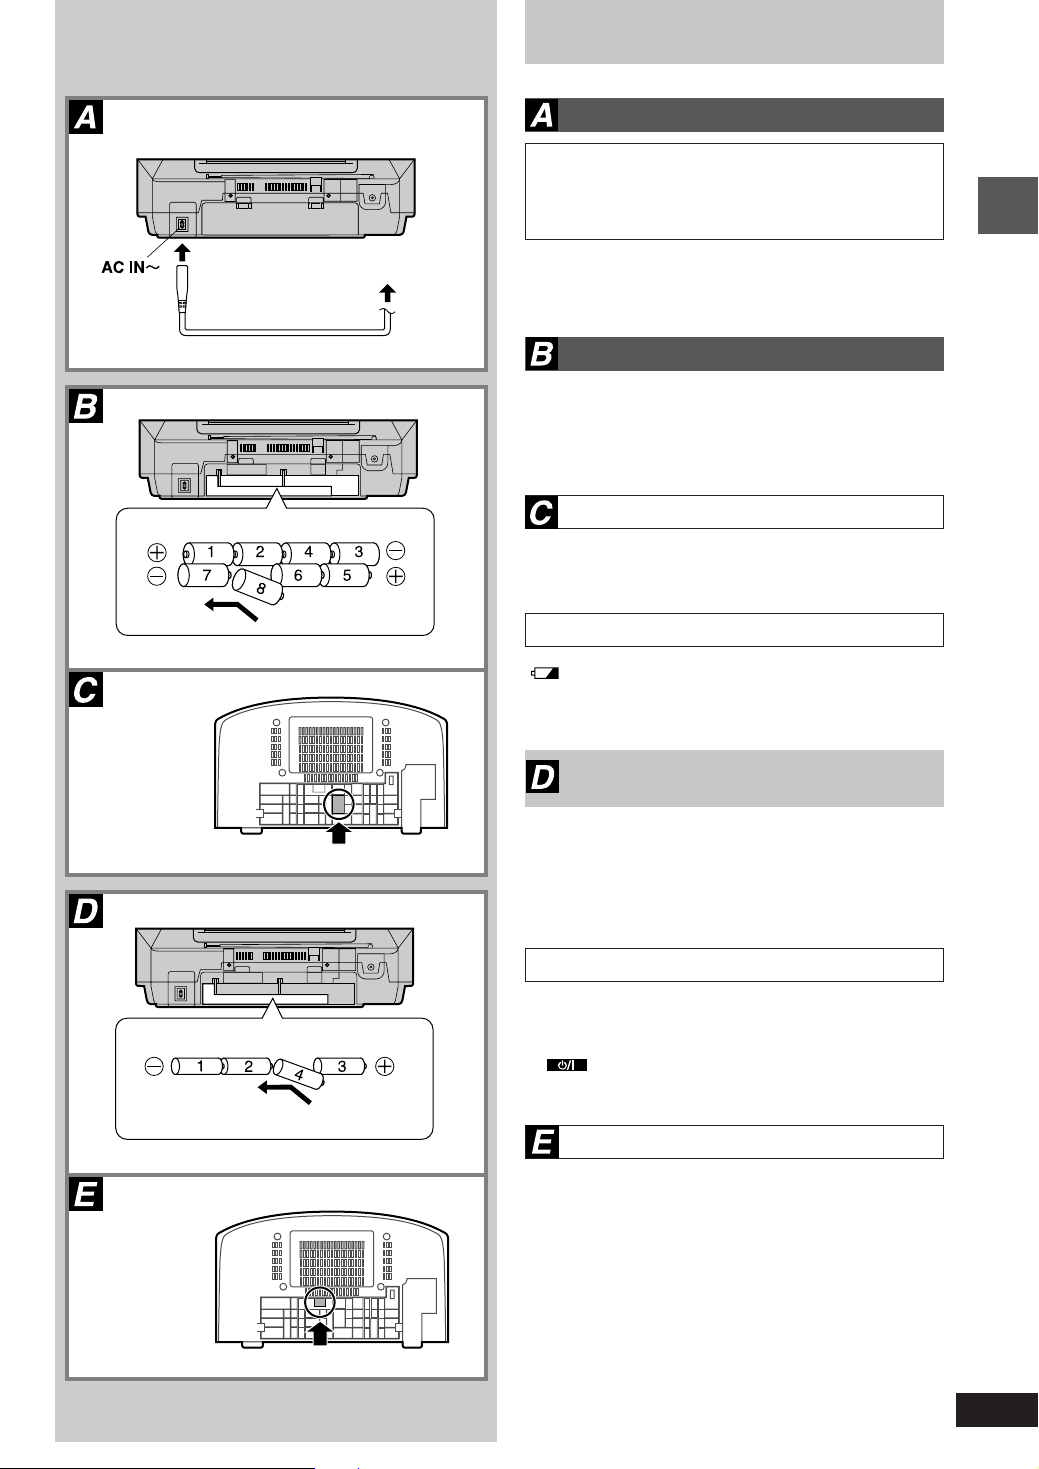
Power sources
Operating the unit on AC power
To household mains socket
AC mains lead
(R20,D,UM-1)
BE SURE TO READ THE CAUTION FOR THE
FOR UNITED KINGDOM ONLY
AC MAINS LEAD ON PAGE 3 BEFORE CONNECTION.
Connect the AC mains lead.
The AC mains lead must be disconnected from the unit if
you intend to power the unit with batteries.
Using batteries (not included)
The unit cannot be powered by batteries if the AC mains
lead is connected.
The remote control cannot turn the unit on when batteries
are used.
Removing the batteries
Open the battery cover, insert a finger into the hole in the
bottom of the unit and push out.
Battery life
“ ”
lights when the batteries are running down. Replace
all the batteries with new ones.
Before use
(R6,AA,UM-3)
Memory back-up batteries
(not included)
Insert these batteries to save the information contained in
the memory, such as the clock and timer settings, if there is
an interruption to the power supply.
These batteries do not power the unit.
Replacing the batteries
•The memory batteries last about one year.
•
Connect the unit to AC power before replacing the batteries.
•
Extend the life of the memory batteries by always pressing
[ ] to turn the unit off before disconnecting the unit
from the AC power source or replacing the power batteries.
Removing the batteries
Open the battery cover, insert a finger into the hole in the
bottom of the unit and push out.
RQT5142
5
Page 6
Before use
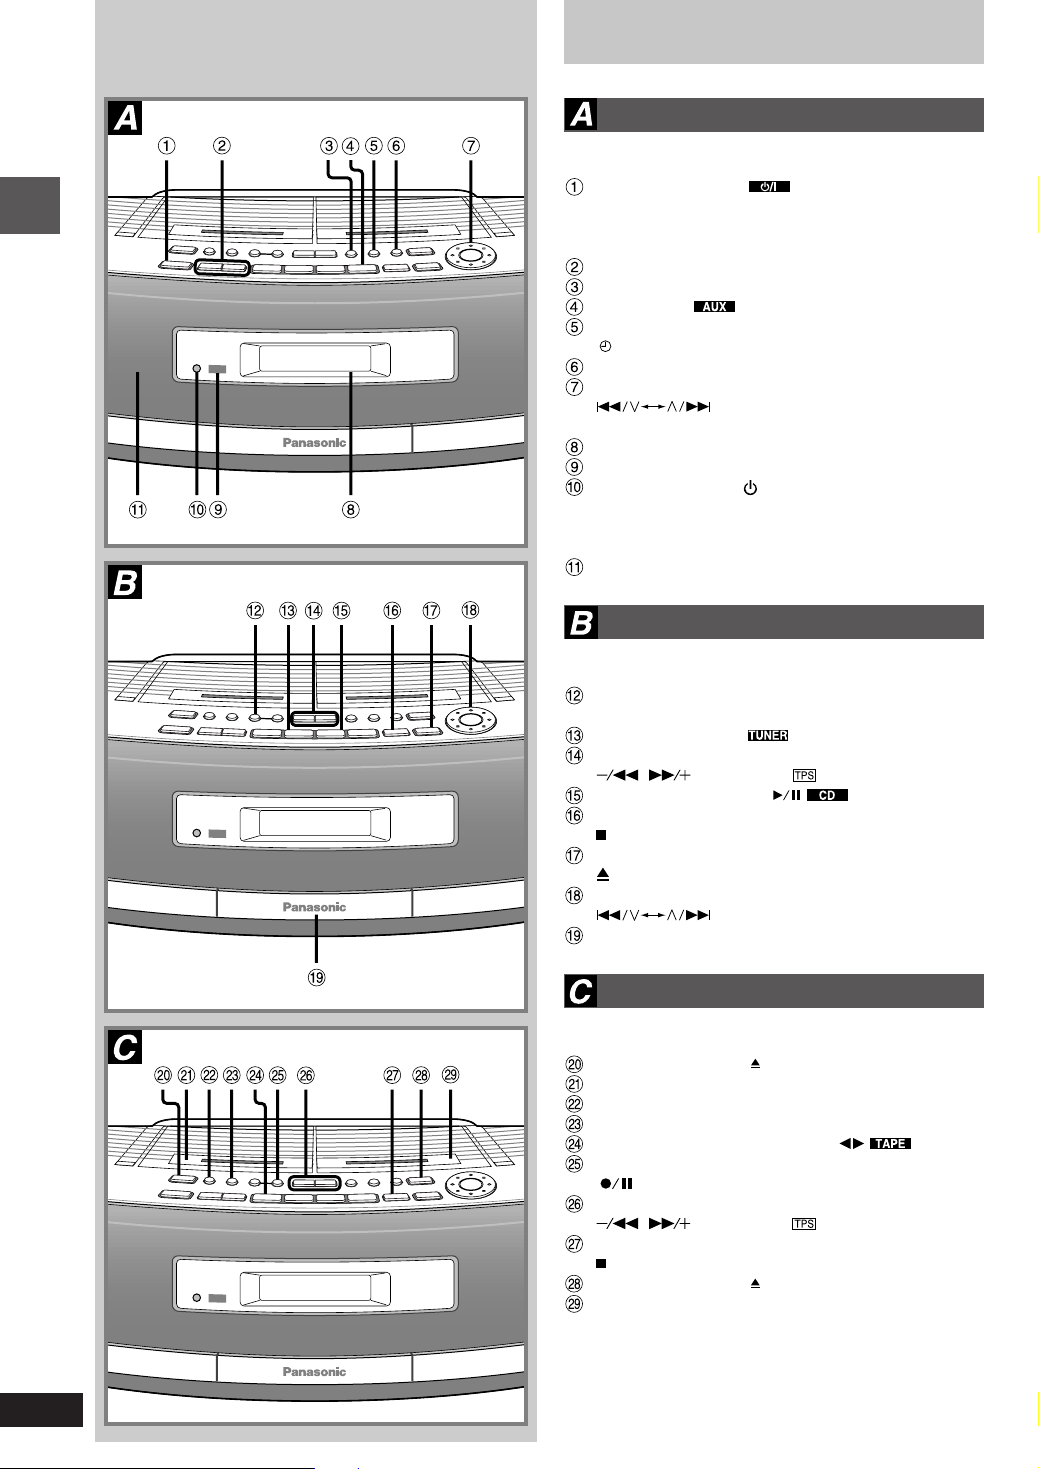
Location of controls
Basic controls
Number Designation Reference Page
Standby/on switch (
Press to switch the unit from on to standby mode or
vice versa. In standby mode, the unit is still consuming
a small amount of power.
Volume control buttons (–,+ VOLUME) . . . 9,12,14
Preset EQ button (PRESET EQ) . . . . . . . . . . . . . 22
AUX button ( ) . . . . . . . . . . . . . . . . . . . . . . . 23
Play timer/record timer button
(
PLAY/REC) . . . . . . . . . . . . . . . . . . . . . . . . . . . . 20
Clock/timer button (CLOCK/TIMER) . . . . . . . . . 8,20
Time adjust/preset tuning/CD track select dial
(
. . . . . . . . . . . . . . . . . . . . . . . . . . . . . . . . . . . 8,9,13,20
Display panel
Remote control signal sensor (SENSOR) . . . . . . 7
Standby indicator (
When the unit is connected to the AC mains supply, this
indicator lights up in standby mode and goes out when
the unit is turned on.
Speaker
TIME/PRE.TUNE/CD
) . . . . . . . . . . . . . . . . . . 8
)
)
Tuner/CD controls
Number Designation Reference Page
CD recording mode button
(CD REC MODE) . . . . . . . . . . . . . . . . . . . . . . . . . . . .
Band button (BAND ) . . . . . . . . . . . . . . . 12,13
Tuning/CD search buttons
( , REW–TUNE/
CD play/pause button ( ) . . . . . . . . . . . . 9
Stop, TAPE/CD mode select button
( TAPE/CD) . . . . . . . . . . . . . . . . . . . . . . . . . . . . . . 9
CD tray open/close button
( CD OPEN/CLOSE) . . . . . . . . . . . . . . . . . . . . . . . . .
Preset tuning/CD track select/skip dial
(
CD tray
TIME/PRE.TUNE/CD
–FF) . . . . . . . . . . 9,12
) . . . . . . . . . 9,13
18
Cassette deck controls
Number Designation Reference Page
Deck 1 eject button ( DECK 1) . . . . . . . . . . . . . 14
Deck 1
Deck 1/2 select button (DECK 1/2) . . . . . . . . . . . 15
Tape edit button (TAPE EDIT) . . . . . . . . . . . . . . . 20
Cassette play/direction button ( ) . . . . 14
Record/record pause button
( ) . . . . . . . . . . . . . . . . . . . . . . . . . . . . . . . 17–19
Rewind/fast forward TPS buttons
( , REW–TUNE/
Stop, TAPE/CD mode select button
( TAPE/CD) . . . . . . . . . . . . . . . . . . . . . . . . . . . 14,19
Deck 2 eject button ( DECK 2) . . . . . . . . . . . 17,19
Deck 2
–FF) . . . . . . . . 14–15
9
6
RQT5142
Page 7
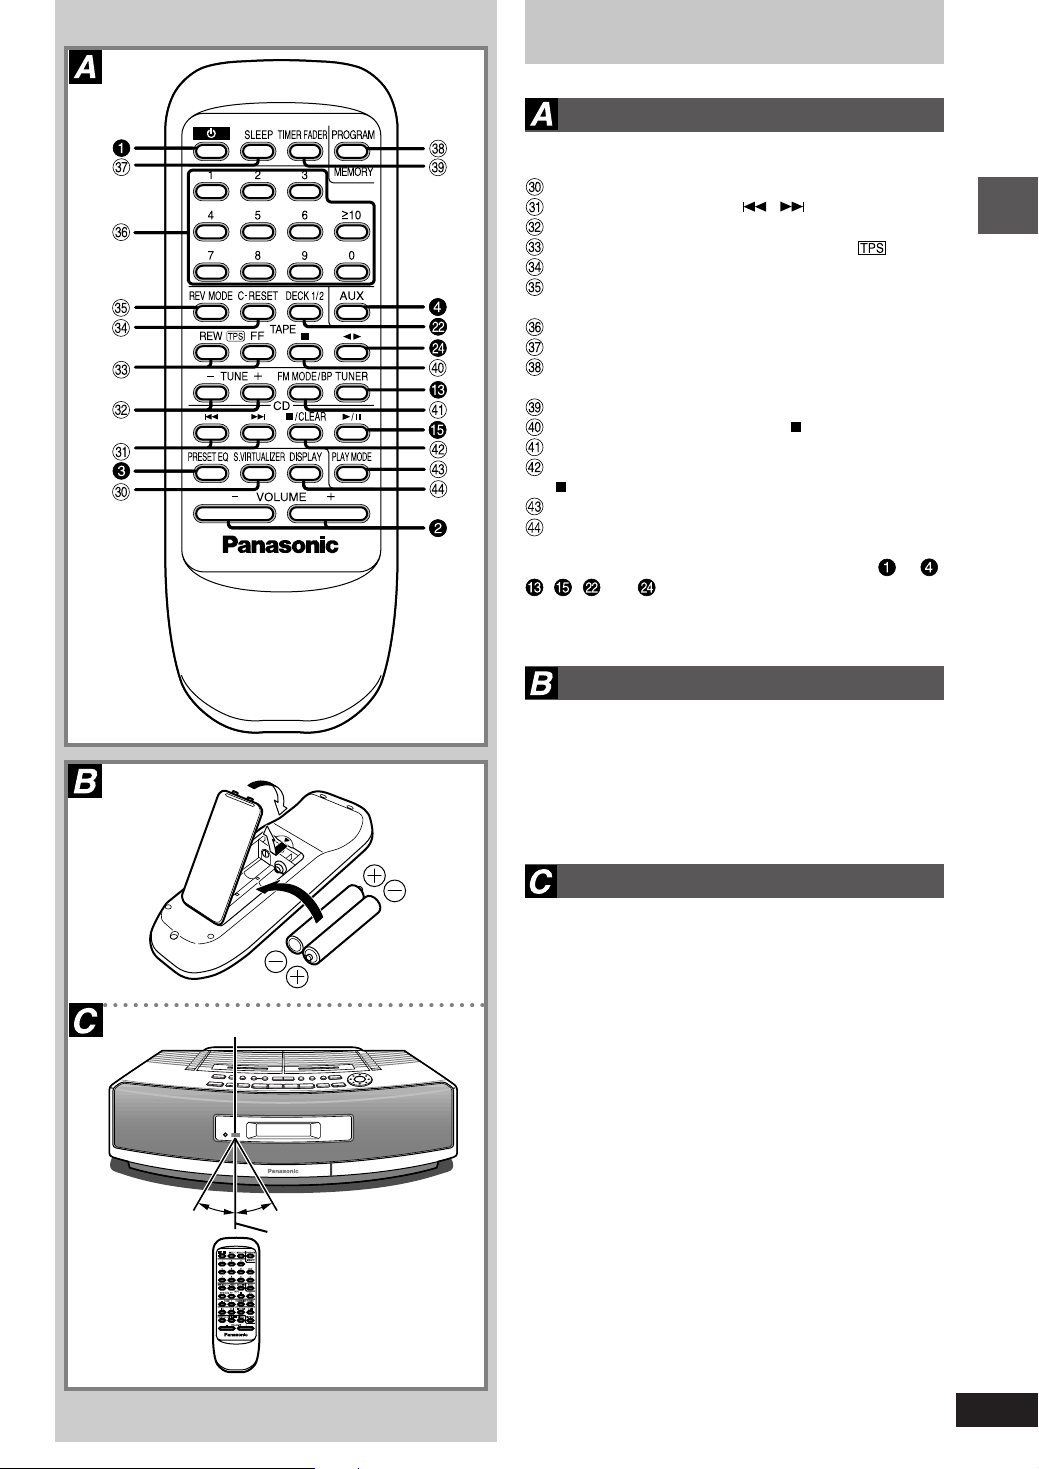
The remote control
Buttons
Number Designation Reference Page
Sound virtualizer button (S.VIRTUALIZER) . . . . 22
CD skip/search buttons ( , ) . . . . . . . . . . . .11
Tuning buttons (–TUNE+)
Rewind/fast forward TPS buttons (REW
Tape counter reset button (C-RESET) . . . . . . . . 16
Reverse mode select button
(REV MODE) . . . . . . . . . . . . . . . . . . . . . . . . . . 15–16
Numbered buttons . . . . . . . . . . . . . . . . . . . 10–11,13
Sleep timer button (SLEEP) . . . . . . . . . . . . . . . . . 21
Program memory button
(PROGRAM MEMORY) . . . . . . . . . . . . . . . . . . . 11,13
Timer fader button (TIMER FADER) . . . . . . . . . . 22
Tape stop/mode select button ( ) . . . . . . . . . . . 15
FM mode BP button (FM MODE/BP) . . . . . . . . 12,19
CD stop/program clear/mode select button
( /CLEAR) . . . . . . . . . . . . . . . . . . . . . . . . . . . . 10–11
CD play mode button (PLAY MODE) . . . . . . . . . . 10
Display select button (DISPLAY) . . . . . . . . . . . 8,16
FF)
Before use
PORTABLE STEREO CD SYSTEMPORTABLE STEREO CD SYSTEM
SENSOR
(R6,AA,UM3)
When the unit is supplied with AC power, buttons to
,
, and
on the main unit. To save power, the unit cannot be turned
on from the remote control when batteries are used.
function in the same way as the controls
,
Batteries (not included)
Insert so the poles (+ and –) match those in the remote control.
Remove if the remote control is not going to be used for a
long period of time. Store in a cool, dark place.
Replace if the unit does not respond to the remote control
even when held close to the front panel.
Use
Aim at the sensor, avoiding obstacles, at a maximum range
of 7 meters directly in front of the unit.
•Keep the transmission window and the unit’s sensor free
from dust.
•Operation can be affected by strong light sources, such
as direct sunlight, and the glass doors on cabinets.
Do not;
•put heavy objects on the remote control.
•take the remote control apart.
•spill liquids onto the remote control.
PORTABLE STEREO CD SYSTEM
30˚30˚
7m
7
RQT5142
Page 8
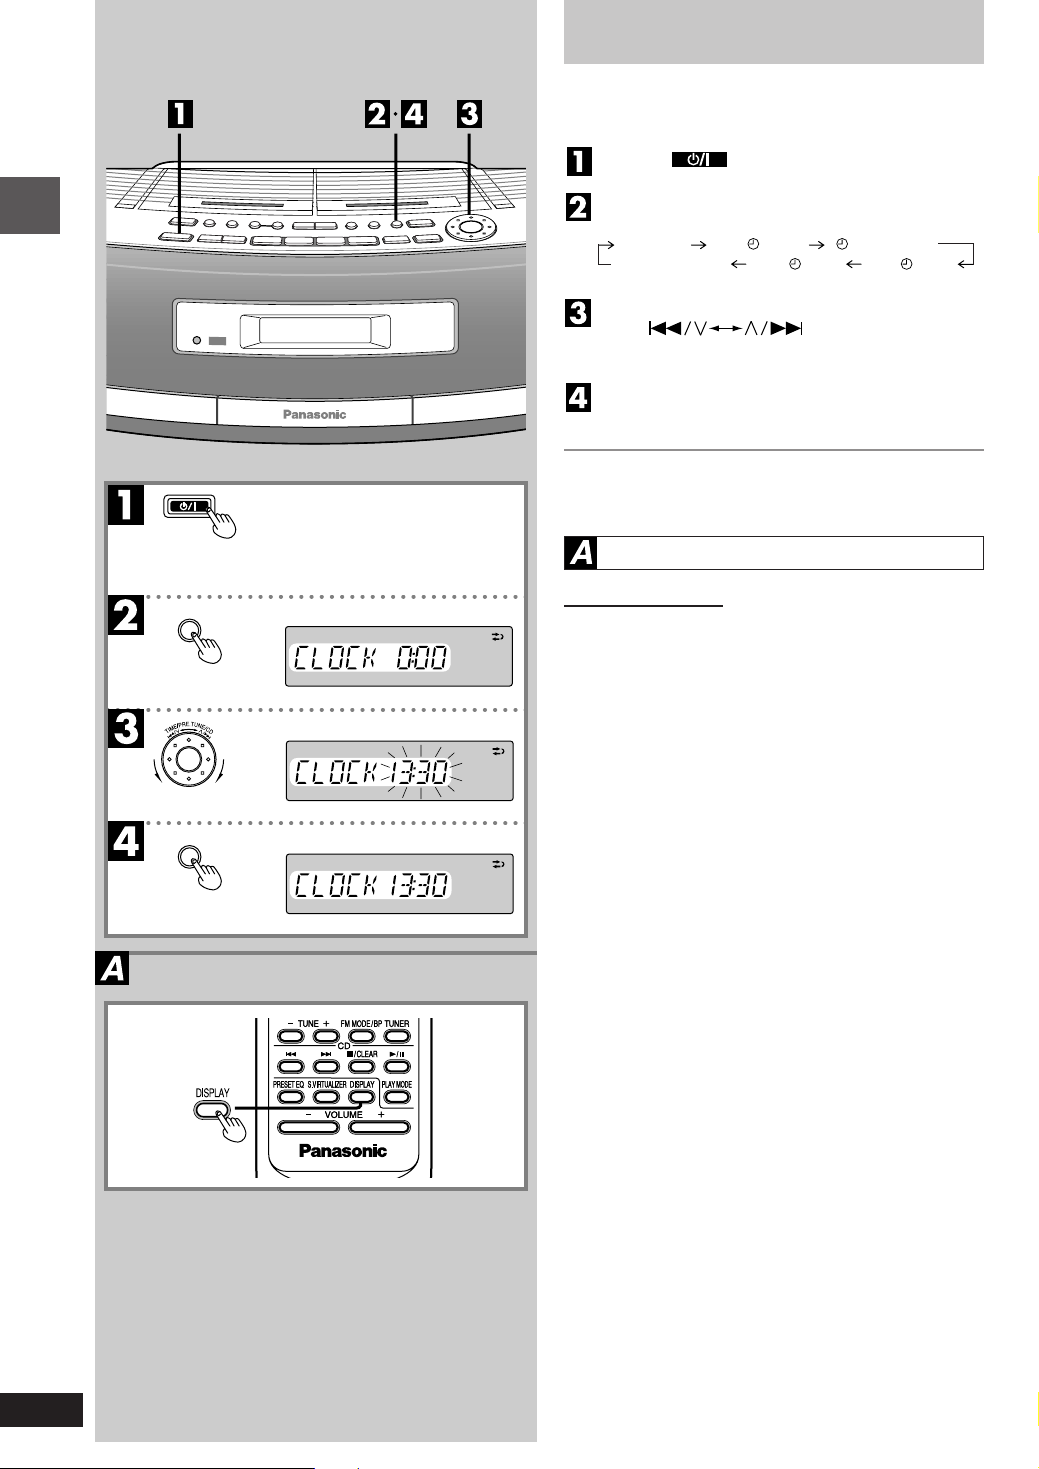
Setting the time
This is a twenty-four hour clock.
The example shows how to set the clock to 13:30.
Before use
CLOCK/TIMER
Press [
] to turn the unit on.
Press [CLOCK/TIMER] to select “CLOCK”.
Each time the button is pressed:
“CLOCK” “ON
Original display
Within 10 seconds
Turn [
PLAY” “
“OFF
REC”
PLAY OFF”
“ON
TIME/PRE.TUNE/CD]
REC”
to set the time.
Press [CLOCK/TIMER] to start the clock.
The original display is restored shortly after.
When batteries are used
The unit cannot be turned on with the remote control.
Displaying the clock
Remote control only
Press [DISPLAY].
8
RQT5142
CLOCK/TIMER
PORTABLE STEREO CD SYSTEMPORTABLE STEREO CD SYSTEM
Page 9

REW
TUNE
FF
CDs
Preparation: (when using batteries) Press [ ].
Press [ T APE/CD] to switch to CD mode.
(Unit comes on when using AC power.)
Each time the button is pressed
TAPE
CD
Press [ CD OPEN/CLOSE] to open the
tray, load a CD, and press [ CD OPEN/
CLOSE] to close the tray.
Press [ ] to start play.
Plays to the end of the CD and stops.
Press [–,+ VOLUME] to adjust the volume.
To stop play
Press [ T APE/CD].
Displayed when CD not loaded.
Label
Number of tracks
Track playing Elapsed time
Total playing time
One touch play (When using AC power)
When a CD is loaded, press [ ].
The unit comes on and play starts.
To pause play
Press [ ] during play.
Press again to resume play.
To skip tracks
Turn [ TIME/PRE.TUNE/CD] clockwise (forward) or counterclockwise (backward).
Searching through tracks
Press and hold [ REW–TUNE/
[ TUNE/
If this unit causes interference to other equipment (radios
and televisions) separate it from the equipment.
–FF] (forward) during play.
] (backward) or
CD selection
Choose discs with this mark: ( )
Do not
•use irregularly shaped discs ( ).
•use discs with labels and stickers that are coming off or
with adhesive exuding from under labels and stickers. ( )
•
attach scratch-proof covers or any other kind of accessory.
•write anything on the CD.
•clean CDs with liquids. (Wipe with a soft, dry cloth.)
Compact disc operations
RQT5142
9
Page 10

CDs
Other modes of play
Preparation:
Press [ /CLEAR] to switch to CD mode.
PORTABLE STEREO CD SYSTEM
Compact disc operations
Numbered
buttons
Remote control only
Direct access play
Starts normal play from a selected track
Select the track with the numbered buttons.
For tracks numbered 10 and over, press [≥10] then the two
digits.
Repeat play
Plays a track or all tracks repeatedly
Press [PLAY MODE] before or during play to
select the mode.
Each time the button is pressed
: One track repeated
: All tracks repeated
No display (canceled)
To repeat selected tracks
Start program play ( page 11).
Press [PLAY MODE] to select “ ”.
To cancel
Press [PLAY MODE] until “ ” and “ ” are cleared.
The mode is also canceled if the CD tray is opened.
Random play
Plays the tracks once each in random order
Press [PLAY MODE] before or during play to
select
Each time the button is pressed
To cancel
Press [PLAY MODE] to clear
If canceled during play, play continues to the end of the
disc.
The mode is also canceled if the CD tray is opened.
•Random play does not work when “ ” is displayed (press
•Tracks cannot be selected with the numbered buttons.
•You cannot skip to tracks already played.
•Search can be done within tracks only.
“
No display (canceled)
[ /CLEAR] first).
”.
“ ”
.
10
RQT5142
Page 11

CDs
Program play:
Select up to 36 tracks to play in the order you choose
Preparation:
Press [ /CLEAR] to switch to CD mode.
Remote control only
Press [PROGRAM].
Enter the track number with the num-
bered buttons.
For tracks numbered 10 and over, press [≥10] then the
two digits.
Repeat this step to program the tracks in the required
order.
PORTABLE STEREO CD SYSTEM
Press [ ].
All the tracks are played in the selected order.
The program remains intact even if play is stopped or the
unit is turned off. “Cd-P” appears when play is stopped to
indicate the contents are in the memory.
To cancel
Press [ /CLEAR] while stopped.
“CLEAR” is displayed, all the tracks are cleared, and program mode is canceled.
The mode is also canceled if the CD tray is opened.
“FULL” is displayed
If 36 tracks have been programmed.
“-- --:-- --” is displayed
If the total play time of the program exceeds 100 minutes.
You can still program and play tracks.
To check the contents of the program
While stopped
Press [ ] or [ ].
Each time one of the buttons is pressed, a track and its
order in the program are displayed.
Program play does not work when “ ” is displayed
(press [PLAY MODE] to clear it) ( page 10).
Search can be done within tracks only.
Compact disc operations
11
RQT5142
Page 12

The radio: manual tuning
Radio operations
Frequency
Preparation: (when using batteries) Press [
].
Press [BAND ] to select FM or AM.
(Unit comes on when using AC power.)
Each time the button is pressed
AM
FM
Press [ , REW–TUNE/
–FF]
to select a station.
“
” is displayed during FM stereo broadcasts.
Press [–,+VOLUME] to adjust the volume.
Auto-tuning
Press and hold [ , REW–TUNE/
the frequency starts changing rapidly.
Stops when it finds a station. (Interference may also cause
it to stop. Start auto-tuning again if this occurs.)
To stop auto-tuning
Press [ , REW–TUNE/
–FF].
To improve reception
FM: Change the length and position of the antenna.
AM: Change the facing of the unit.
•AM reception is briefly interrupted if a tape deck is operated.
•To improve reception when using the unit in a building or
vehicle use it near a window.
–FF] until
FM AM
If noise is excessive in FM
Remote control only
Press [FM MODE/BP] to display
This mode improves sound quality if reception is weak for some
reason but broadcasts are heard in monaural (“ ” goes
out).
Press [FM MODE/BP] again to cancel the mode.
“
”.
12
RQT5142
Page 13

The radio: preset tuning
Presetting radio stations
Remote control only
Tuning is simpler if you preset stations.
You can preset 12 FM and 12 AM stations.
Preset the stations one at a time.
Preparation: Tune to the station you want to preset
Press [PROGRAM].
While
“ ”
is flashing
Press the numbered buttons to enter the
station into a channel (1 to 12).
•To enter channels 10, 11, and 12
Press ≥10, then the two digits.
•If
“ ”
stops flashing
Press [PROGRAM] again.
The station occupying a channel is erased if another station is preset in that channel.
Selecting channels
On the main unit
Press [BAND ] to select FM or AM.
Turn
[
to select the channel.
On the remote control
Press [TUNER] to select FM or AM.
Press the numbered buttons to select the channel (1 to
12) the station is in.
Preset channel
To select channels 10, 11, and 12
Press ≥10, then the two digits.
Canceling a preset channel
e.g. If channel 3 is not needed.
Select channel 3.
Press [PROGRAM].
Within 10 seconds
Turn [
is displayed.
Press [PROGRAM].
Now, when [
turned, channel 3 is skipped.
The channel can still be selected with the remote control.
TIME/PRE.TUNE/CD]
TIME/PRE.TUNE/CD] so “-- --”
TIME/PRE.TUNE/CD] is
Radio operations
13
RQT5142
Page 14

Cassettes
You can play cassettes in either deck 1 or deck 2. Deck
1 is used in this example.
Displayed when cassette not loaded.
Preparation: (when using batteries) Press [
Press [ TAPE/CD] to switch to TAPE
mode.
(Unit comes on when using AC power.)
Press [ DECK 1] to open the deck and
load a cassette.
Play starts from the side facing up
Close deck by hand.
(Play direction automatically switches to “ ” when the
deck is closed.)
Press [ ] to start play.
: Side facing up played
: Side facing down played
Press [–,+VOLUME] to adjust the volume.
To stop play
Press [ TAPE/CD].
One touch play (When using AC power)
When a cassette is loaded, press [ ].
The unit comes on and play starts.
To change sides
Press [ ] during play.
Each time the button is pressed
].
Insert inside the guides
Cassette deck operations
Tape counter
Tape facing out
Selected deck
Play direction
Fast-forward and rewind
While stopped
Press [ REW–TUNE/
TUNE/
–FF] (forward).
] (backward) or [
Cassette tape selection and care
The unit can play normal, high, and metal position tapes. It
identifies the type automatically.
•Tapes exceeding 100 minutes are thin and can break or
get caught in the mechanism.
•T ape slack can get caught up in the mechanism and should
be taken up before the tape is played.
•Endless tapes can get caught up in the deck’s moving
parts if used incorrectly. Use tapes appropriate to this unit’ s
auto-reverse mechanism.
14
RQT5142
Page 15

TUNE
REW
Current track
FF
Number of tracks skipped
Number of times the
button is pressed
321123
Cassettes
Tape Program Sensor (TPS)
TPS finds the beginning of a track and resumes play from
there.
During play
Press [ REW–TUNE/
or [ TUNE/
Each press increases the number of tracks skipped (up to 9).
TPS may not operate correctly in the following situations:
•If the interval between tracks is less than 4 seconds.
•If there is noise between tracks.
•If there are silent parts within tracks.
TPS stops if you start play, rewind or fast-forward on the
other deck.
–FF] (forward).
] (backward)
To switch decks
Press [DECK 1/2].
The deck currently selected is displayed.
1234567
Play from this point
Current deck
•The unit automatically selects the deck when a cassette
is loaded.
•Operations on the current deck stop when an operation is
started on the other deck.
Selecting reverse mode
Remote control only
Press [REV MODE].
Each time the button is pressed
: Plays top side to bottom side then stops
: Plays continuousy until [ ] is pressed
: Plays one side only
To play two cassettes in succession
Press [REV MODE] so “ ” is displayed.
Press [ ] to start play.
Play continues until [ ] is pressed
You can also press [DECK 1/2] to select the deck to play
first.
Cassette deck operations
15
RQT5142
Page 16

Side A
Before recording
Use household AC power or new batteries when recording
to avoid poor recordings caused by the batteries running
down.
Televisions can cause interference to recordings made on
this unit if the two are too close to each other.
Selection of tapes for recording
The unit automatically identifies the type of tape.
Normal position/TYPE O.K.
High position/TYPE O.K.
Metal position/TYPE NO
Metal position tapes can be used, but the unit will not be
able to record or erase them correctly.
Volume and sound quality in recording
•Recording level is set automatically.
•Recordings are unaffected by changes to sound quality.
Selecting reverse mode
Remote control only
Press [REV MODE].
and : Both sides record (top side bottom side).
: One side only records.
Tab for side “B” Tab for side “A”
Normal tape
Recording operations
Present state (e.g., elapsed play time of CD)
Present time
Tape counter
To re-record
Hi-position tape
Detection hole
Erasing recordings
Insert the cassette with the side to be erased facing up.
Press [ TAPE/CD] to switch to TAPE mode.
Press [ ].
Erasure prevention
The illustration shows how to remove the tabs to prevent
recording. To record on the tape again, cover as shown, being careful not to cover the high position discrimination hole.
To display the tape counter while recording
Remote control only
Press [DISPLAY].
Each time the button is pressed in CD, Radio, or AUX mode
To reset the tape counter
Press [C-RESET].
The counter resets to “000”.
Your attention is drawn to the fact that recording prerecorded tapes or discs or other published or broadcast
material may infringe copyright laws.
16
RQT5142
Page 17

Recording tape
Leader tape
Recording CDs
Preparation:
•Insert a CD ( page 9).
•To record from the beginning of the tape
Wind on the leader tape.
•Select the reverse mode.
(Deck 2 only)
Press [ DECK 2] to open the deck and
load a cassette.
Recording starts from the side facing up
Close deck by hand.
(Play direction automatically switches to “ ” when
the deck is closed.)
Press [ T APE/CD] to switch to CD mode.
Each time the button is pressed
TAPE
CD
Press [ ] to start recording.
CD play and recording start at the same time.
The cassette stops when the CD finishes.
: Recording top side
: Recording bottom side
Deck 1 cannot be operated during recording.
To stop recording
Press [ TAPE/CD].
Tape facing out
Insert inside the guides
Recording direction
Lights
To pause recording
Press [ ].
Press again to resume recording.
To continue recording from another CD on the
same tape
Press [ CD OPEN/CLOSE] and insert the other CD.
Press [ ].
Recording begins from where it stopped.
To record selected tracks
Do step , then program the tracks ( Program play
steps to on page 11).
Press [ ].
To skip unwanted tracks
Press [ ] to pause recording. (The CD also pauses.)
Turn [
next track you want to record is displayed.
Press [ ] to resume recording.
TIME/PRE.TUNE/CD] so the
Recording operations
17
RQT5142
Page 18

Automatic CD recording
Y ou can record the whole CD (AUTO) or a selected track(1REC). If a track is interrupted at the end of the side facing
up, it is recorded again on the side facing down.
AUTO
Recording begins from the side facing up and the reverse
mode is set to “ ”.
Preparation: Insert a CD ( page 9)
Press [ T APE/CD] to switch to CD mode.
Press [CD REC MODE] so “AUTO” is dis-
played.
Each time the button is pressed
AUTO 1-REC OFF
The display shows the length of tape needed.
“C-- -- -- --” indicates the tape needed exceeds 100
minutes. You can still record, but some tracks may not
be recorded if the tape isn’t long enough.
Press [ DECK 2] to open the deck and
load a cassette.
Close deck by hand.
Press [ ] to start recording.
The unit rewinds the tape, records 10 seconds of silence, and then starts recording.
Recording operations
To stop recording
Press [ TAPE/CD]. The CD also stops.
To record selected tracks
Program tracks ( steps and on page 11).
Do steps to .
You cannot use AUTO with repeat or random play
( page 10).
1-REC
Preparation:
Insert a CD ( page 9) and a cassette.
Wind the tape to where you want to start recording.
Press [ T APE/CD] to switch to CD mode.
Press [CD REC MODE] so “1-REC ” is dis-
played.
T urn [
TIME/PRE.TUNE/CD
to select the track you want to record.
Press [ ] to start recording.
CD play and recording start at the same time.
To stop recording
Press [ TAPE/CD]. The CD also stops.
]
18
RQT5142
To continue recording from another CD
Press [ CD OPEN/CLOSE] and insert the other CD.
Do steps and .
To record a track while it is being played
Press [CD REC MODE] so “1-REC ” is displayed.
Press [ ].
Recording starts from the beginning of the track and stops
when the track finishes.
Page 19

Recording the radio
Preparation:
•Wind on the leader tape.
•To record from part way through the tape
Wind the tape on to where you want to start recording.
•Select the reverse mode.
Press [ DECK 2] to open the deck and
load a cassette.
T une to the station ( pages 12 and 13).
Press [ ] to start recording.
Lights
Recording direction
To stop recording
Press [ TAPE/CD].
To pause recording
Press [ ].
Press again to resume recording.
Reducing noise when recording AM (Beat Proof
function)
Remote control only
Press [FM MODE/BP] while recording.
Each time the button is pressed
bP1
bP2
Choose the setting with the least noise.
Recording tape-to-tape
Preparation:
•Prepare the cassettes
Wind on the leader tape.
•Select the reverse mode.
Press [ TAPE/CD] to switch to TAPE
mode.
Press [ DECK 1] and insert the playback cassette.
Press [ DECK 2] and insert the recording cassette.
The tapes can be different types.
Recording operations
Deck 2 direction
Lights (flashes when recording is paused)
Press [TAPE EDIT] to start recording.
To stop recording
Press [ TAPE/CD].
To pause recording
Press [ ]. Both decks pause.
Press [TAPE EDIT] to resume recording.
19
RQT5142
Page 20

Start Finish Start Finish
Using the timer
The timer has two functions. It can be set to come on at a
certain time to wake you up, or it can be set to record the
radio. Be aware that weak batteries can cause the timers to
malfunction. Use household AC power for best operation.
Preparations:
•Turn the unit on and set the clock ( page 8).
•For the play timer, prepare the music source you want to
listen to; tape, CD or radio, and set the volume.
•For the record timer, insert the tape in deck 2, select the
reverse mode ( page 16), tune to the radio station
( pages 12 and 13) and set the volume.
Setting the start and finish times
Press [CLOCK/TIMER] to select the timer
function.
Each time the button is pressed:
“CLOCK” “ON
Previous display
These indicators flash on the display for about 10 seconds.
Proceed to step before the indicators stop flashing.
ON
PLAY: to set the play timer
ON
REC: to set the record timer
Dial
[
to set the start time.
Press [CLOCK/TIMER].
PLAY” “
“OFF
PLAY OFF”
REC”
“ON
REC”
TIME/PRE.TUNE/CD]
Timer operations
Dial
[
TIME/PRE.TUNE/CD]
to set the finish time.
Press [CLOCK/TIMER].
The start and finish times are now set.
Turning the timers on
Press [
Each time the button is pressed:
PLAY: to turn the play timer on
REC: to turn the record timer on
(The indicator doesn't appear if the start and finish times
haven't been set.)
“E”
appears if the clock hasn't been set.
PLAY/REC].
PLAY
REC off (no display)
Press [ ] to turn the unit off.
The unit must be off for the timers to operate.
The record timer comes on about 30 seconds earlier
than the set time.
(Continued on next page)
20
RQT5142
Page 21

Using the timer
To cancel the timer
Press [
display.
The timers come on at the same time everyday until they
are canceled.
Checking the settings
Press [CLOCK/TIMER] when the unit is off.
The settings are shown in the following order.
Start time, Finish time Source Volume Clock
To change the settings
To change the times
Do steps , , , and .
To change the source
Turn the unit on, choose the source and press [
to turn the timer on ( step ).
You can enjoy other sources after you have set
the timer.
The timer will come on under the same conditions the unit
was in when [
( step ). Before turning the power off, check tape direction if you played cassettes.
PLAY/REC] to clear the timer indicator from the
PLAY/REC]
PLAY/REC
] is pressed to turn the timer on
The sleep timer
Remote control only
Set the unit to stop and turn off after a certain time.
While listening to a CD, a cassette, or the radio.
Press [SLEEP] to select the time (in minutes).
Each time the button is pressed
SLEEP 30 SLEEP 60 SLEEP 90
SLEEP OFF
To cancel
Press [SLEEP] to select “SLEEP OFF”.
To check the remaining time
Press [SLEEP] once.
The remaining time is shown for about 5 seconds.
To change the time.
Press [SLEEP] to select the new time.
The sleep timer can be used in combination with the play
and record timers. Make sure the unit is off before the play
or record timer's set start time.
SLEEP 120
Timer operations
21
RQT5142
Page 22

XBS
Clear
The timer fader
Remote control only
Volume fades in gradually when a timer turns the unit on and
fades out gradually when the sleep timer turns the unit off.
Press [TIMER FADER].
Press again to cancel.
All timers are affected by this function whenever “ ” is
on the display. Recordings made with the record timer are
unaffected.
Sound quality
You can choose one of four types of sound quality.
XBS: Adds punch to rock
Clear: Clarifies higher sounds
Soft: Use this setting for background music
Vocal: Adds gloss to vocals
Press [PRESET EQ].
The current setting is displayed.
Within 2 seconds
Press [PRESET EQ] to select a setting.
Each time the button is pressed
XBS Clear Soft Vocal
EQ OFF (canceled)
Timer operations
Soft
Vocal
PORTABLE STEREO CD SYSTEMPORTABLE STEREO CD SYSTEM
Recordings are unaffected by changes to sound quality.
Creating a three dimensional sound field with S.Virtualizer
Remote control only
Use when playing stereo sources.
Press [S.VIRTUALIZER].
Press again to cancel.
Recordings are unaffected by this feature.
The actual effect depends on the source played.
22
RQT5142
Page 23

AUX IN
Using auxiliary equipment
You can play or record sound from other equipment through
this unit's AUX IN terminal.
Plug type: 3.5 mm stereo
OUT
Playback
Preparation: (when using batteries) Press [
].
Press [ ] to switch to AUX mode.
Start playback on the equipment.
Recording
Do steps and as described above.
Press [ ].
When this unit and the other equipment are connected to
each other, do not set input on both unit's to “AUX”. This
can cause feedback noise to occur.
Using headphones
(not included)
Reduce volume before connection.
Avoid listening for prolonged periods of time to prevent hearing damage.
Plug type: 3.5 mm stereo
PHONES
Maintenance
If the surfaces are dirty
To clean this unit, wipe with a soft, dry cloth.
If the surfaces are extremely dirty, use a soft cloth dipped in
a soap-and-water solution or a weak detergent solution.
•
Never use alcohol, paint thinner , or benzine to clean this unit.
•Before using chemically treated cloth, read the instructions
that came with the cloth carefully.
For a cleaner crisper sound
Clean the
and recording. Use a cleaning tape (not included).
heads regularly to assure good quality playback
Reference
23
RQT5142
Page 24

Troubleshooting
Before requesting service, make the below checks. If you can’t fix the system as described below, or if something not listed
here occurs, refer to the enclosed directory to locate an Authorized Service Center convenient to you or contact your dealer.
Reference pages are shown as black circled numbers
Common problems
“E”
is displayed
“
UO1” is displayed
“
UO2” is displayed
Indicates incorrect operation. Read the instructions.
Replace the batteries or use household AC power.
Batteries haven't been inserted. Insert batteries or use household AC
power. (“UO2” appears only if you have inserted memory batteries.)
CD
CD won't play or CD display is incorrect
Clean the CD
Wait for about an hour for condensation to clear and try again.
Make sure the label is facing up.
Replace the CD if it is scratched, warped, or irregularly shaped.
Cassette deck
Recording not possible
Poor sound quality
Have the cassette's tabs been removed? Cover the holes with tape.
Clean the heads.
Radio
A lot of noise or difficult to tune
Remote control
The remote control doesn't work.
The unit can't be turned on from the remote
control.
Interference may be caused by other equipment. Turn the other equipment
off or separate this unit from them.
Interference may occur if a remote control from other equipment is used.
Check the batteries are inserted correctly.
Replace the batteries if they are worn.
Use the power button on the main unit if you are using batteries to power
the unit.
.
Technical specifications
Radio
Frequency range
FM 87.50–108.00 MHz (50 kHz steps)
AM 522–1629 kHz (9 kHz steps)
CD player
Sampling frequency 44.1 kHz
Decoding 16 bit linear
Beam source
No. of channels 2 channel, stereo
Wow and flutter Below measurable limit
D/A converter MASH (1 bit DAC)
Semiconductor laser (wavelength 780 nm)
Tape recorder
Track system 4 track, 2 channel, stereo
Monitor system Variable sound monitor
Recording system AC bias
Erasing system AC erase
Frequency range
Normal position 30 Hz–16 kHz
High position 30 Hz–17 kHz
Matsushita Electric Industrial Co., Ltd.
Osaka 542-8588, Japan
General
Speakers
Full Range 8 cm 6.0 ΩX2
Jacks
Output PHONES: 3.5 mm stereo (16-64 Ω)
Input AUX IN: 3.5 mm stereo
Power requirement
AC 230–240 V, 50 Hz
Battery
Memory back-up for computer/clock
Dimensions (WXHXD) 490 × 142 × 291 mm
Weight About 5 kg
Specifications are subject to change without notice.
Weight and dimensions are approximate.
Power consumption: 30 W
12 V (Eight R20, D, UM-1 batteries)
6V (Four R6, AA,UM-3 batteries)
without batteries
En
RQT5142-B
M1099X0
 Loading...