

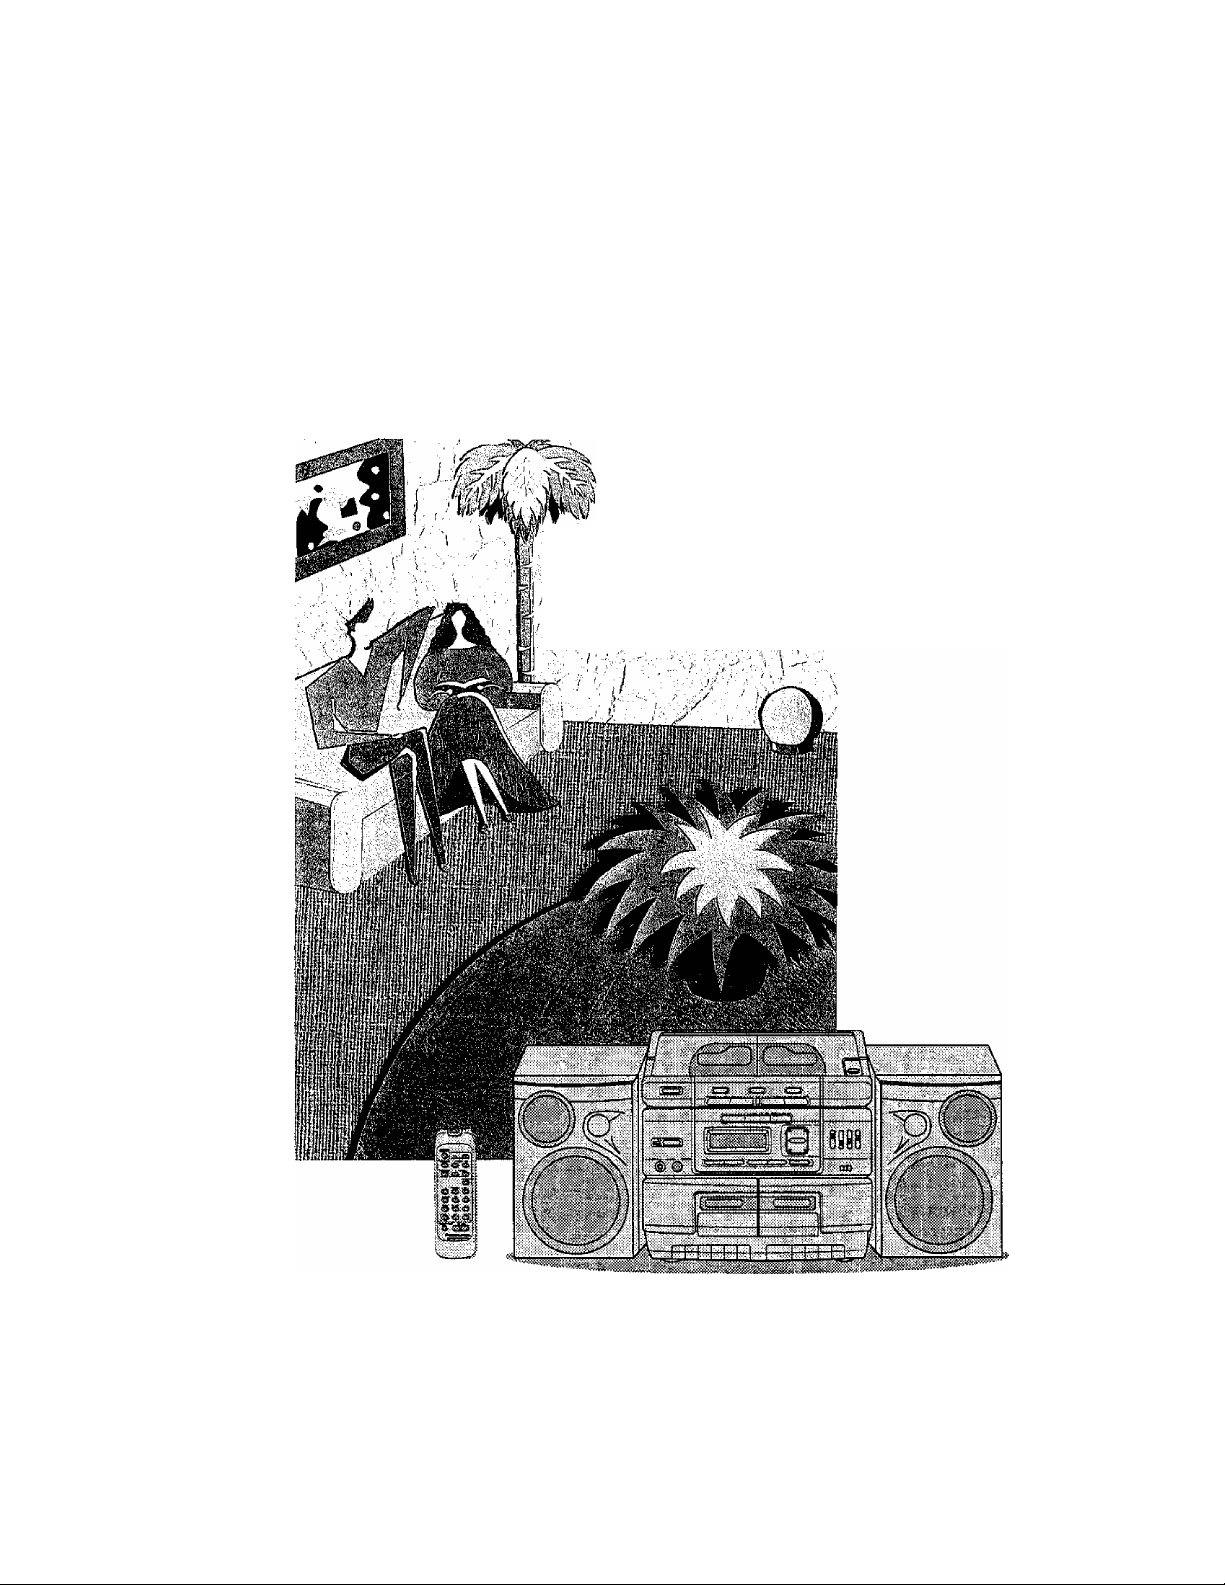
Panasonic RX-DT770 User Manual
Panasonic"
Portable Stereo Component System
RX-DT770
Operating Instructions
¡\ ■
/■ '
1 ■ "
i ,
v:
)\ V .■ ,
; ■
V
■ ’ '/
\ . ‘V
i n ■ V L
y'' :
■ ■■ ■
■ ■■
ir
'i. y
Before connecting, operating or adjusting this product, please read
these instructions completely. Please save this manual.
GN
COMPACT
[So
DIGITAL AUDIO
RQT3289-B

Dear Customer
Table of Contents
Thank you for purchasing this product.
For optimum performance and safety, please read these instructions
carefully.
CAUTION!
THIS PRODUCT UTILIZES A LASER.
USE OF CONTROLS OR ADJUSTMENTS OR PER
FORMANCE OF PROCEDURES OTHER THAN
THOSE SPECIFIED HEREIN MAY RESULT IN HAZ
ARDOUS RADIATION EXPOSURE.
DO NOT OPEN COVERS AND DO NOT REPAIR
YOURSELF. REFER SERVICING TO QUALIFIED
PERSONNEL.
WARNING:
TO PREVENT THE RISK OF FIRE OR ELECTRIC
SHOCK, DO NOT EXPOSE THIS APPLIANCE TO
DRIPPING OR SPLASHING.
Before use
Precautions
Supplied Accessories
Power Sources ...................................................
Memory Back-up Batteries
Concerning the Remote Control
Using Headphones................................................... 5
Selecting the Dispiay
Speaker System Connection
Location of Controis................................................
...............................................................
...............................................
.4
..........
.............................
.............................
...............................................
................................... 6
3
5
5
7
Listening
Listening to Tapes.................................................. 9
Listening to CDs
Programming Broadcast Stations
Listening to Radio Broadcasts
.........
.............................................10
........................
..............................
14
15
Timer
Using the Sleep Timer..............
...............................
16
3
4
iHVlSBlf LiSER WaAIÜN OPEN ««(NlEflUJCK DEFEATID.
DANGER
AVOID DffiCTEXPOSlK TO awi.
(ISYTIUG U№mliLJ№ VED №l№.Wln SIKKeiHEDSAFEimBIE
ADVAflSEL
EftUDEAffWiTION. WJEßlUDSinastfOiSIHiU'E.
AVAHAESSA JA SifflJALUKITlfS OHUETTAESSA DIET ALITllMA
VAROI
miW/liIflNTÄLASEflSÄT0LYliL ilS KAISO SÄTEESffiJ.
OSVNUS LASERSTRALNING fttS OeWA DEL An OFWIM OCH
VARNING
SPteREHÄRUflKO№L№, BETÄAtaAEJSTRAlfN,
USWiLlG LASEFSIRÄUHG fiin OEKSaiPttfS OG StKKEHHSäAS
ADVARSEL
BflrrES. WJÜHSPOfaiNSFOflSTlto.
UNSICHISARE LAaRGIRAHUHG, WENNABDECKIJHG GEÖfFNET
VORSICHT
UND S(CHEFHarsV51fliEGELUNG ÜBESmCKT.
NICHT DEM SIBAHLAUSSEIffl,
(Inside of product)
(Indersiden at apparatet)
(Tuotteen sisältä)
(Apparatens Insida)
(Produktets innside)
(1m Inneren das Gerätes)
Recording
Recording from CD............................................... 17
Recording Radio Programs
Recording Tape to Tape
...................................
........................................
20
21
General information
Concerning Compact Discs...................................22
Concerning Cassette Tapes
Quick Reference of Remote Control
Operations
.......................................................
Troubleshooting Guide
Maintenance.......................................................... 26
Technical Specifications.................................
..................................
........................................
......27
22
23
25
Precautions
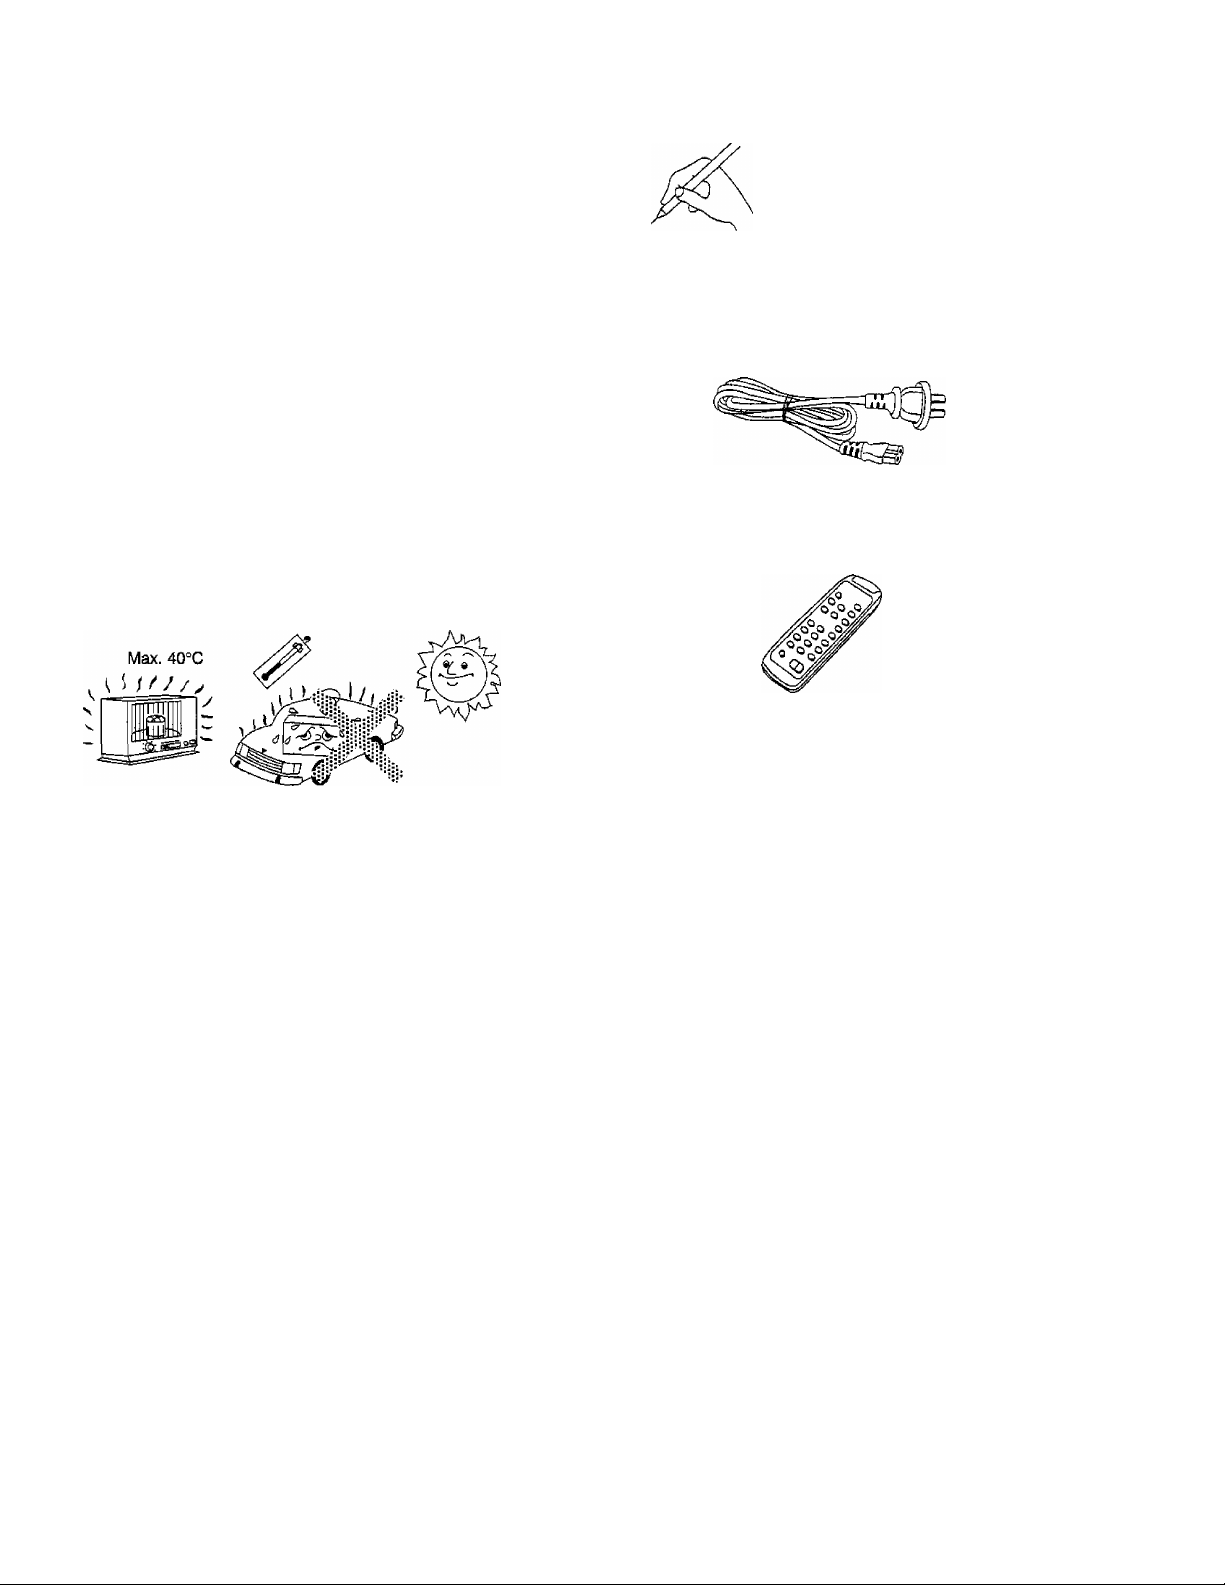
(f this unit is not used for a long period of time or is used
only from an AC power source, remove all the batteries to
prevent potential damage due to possible battery leakage.
Avoid using or placing this unit near sources of heat. Do not leave
it in an automobile exposed to direct sunlight for a long time with
the doors and windows closed as this may deform the cabinet,
Avoid cuts, scratches, or poor connections in the AC power cord,
as they may result in possible fire or electric shock hazard. Also,
excessive bending, pulling or splicing of the cord should be
avoided.
Do not unplug the AC power cord by pulling on the cord. To do so
may cause premature failure or shock hazard.
Do not operate this unit on AC power in a bathroom, as a poten
tial shock hazard may result.
When not in use, disconnect the AC power cord from the house
hold AC outlet
In these operating instructions, “unit off is defined as the
following mode.
“Standby” when AC power is used.
“Battery power off when batteries are used.
Supplied Accessories
Q
Please check and identify the supplied accessories.
CH AC power cord................................................
(RJA0035-K)
D Remote control transmitter
ÍEUR643824)
1 pc.
1 pc.
Use numbers indicated in parentheses when asking for replace
ment parts.
Use of batteries
• Do not mix old and new batteries, or batteries of different types
(manganese and alkaline, etc.).
• Always remove old, weak or worn-out batteries promptly and
dispose of them properly.
• Never subject batteries to excessive heat or flame; do not attempt
to disassemble them; and be sure they are not short-circuited.
• if the unit is not to be used for a long period of time, remove the
batteries and store them in a cool, dark place.
• If a battery leaks, remove all batteries and dispose of them
properly.
• Thoroughly clean the battery compartment before inserting new
batteries.
• If the electrolyte comes into contact with skin or clothes, flush with
water immediately.
Keep batteries out of reach of children.
Do not use rechargeable type batteries.
Do not attempt to recharge alkaline or manganese batteries.
Batteries installed with incorrect polarities may leak and damage
the unit.
* •
Power Sources
Memory Back-up Batteries
To Operate on AC power
Connect the included AC power cord to the AC socket of this unit
and your household AC outlet.
To operate on battery power
Battery installation
Unplug the AC power cord from the household AC outlet and the AC
socket of the unit.
Insert eight R20/LR20 (UM-1) size batteries {not included) into the
battery compartment, making sure that the batteries are installed in
the designated numerical order and that the proper polarities are
maintained.
It is recommended that the memory back-up batteries are installed
before you install R20/LR20 (UM-1) size batteries (see right of this
page).
It Is recommended that the memory back-up batteries (not included)
be installed first to prevent the memory contents from being lost
when the power fails, the power cable has been disconnected or
the batteries have become flat.
Battery installation
Insert four R6/LR6 (UM-3) batteries (not included) in the order num
bered in the illustration below.
Battery removal
Remove as shown in the figure below.
Inner row ©CDdD©
©(4](5](iDe
outer row 0CD[T)(T)©
Battery life
When the display of the front panel starts to flash, replace
all the batteries with new ones.
Insert your finger and push out the batteries.
Battery life
• The service life of these batteries is approximately one year.
To preserve the memory contents, connect the power cable to the
household AC outlet before replacing all the back-up batteries
with new ones.
• When disconnecting the power cable, first turn the unit off by
pressing POWER.
The service life of the memory back-up batteries is reduced if the
power cable is disconnected from the household AC outlet with
the power still supplied.
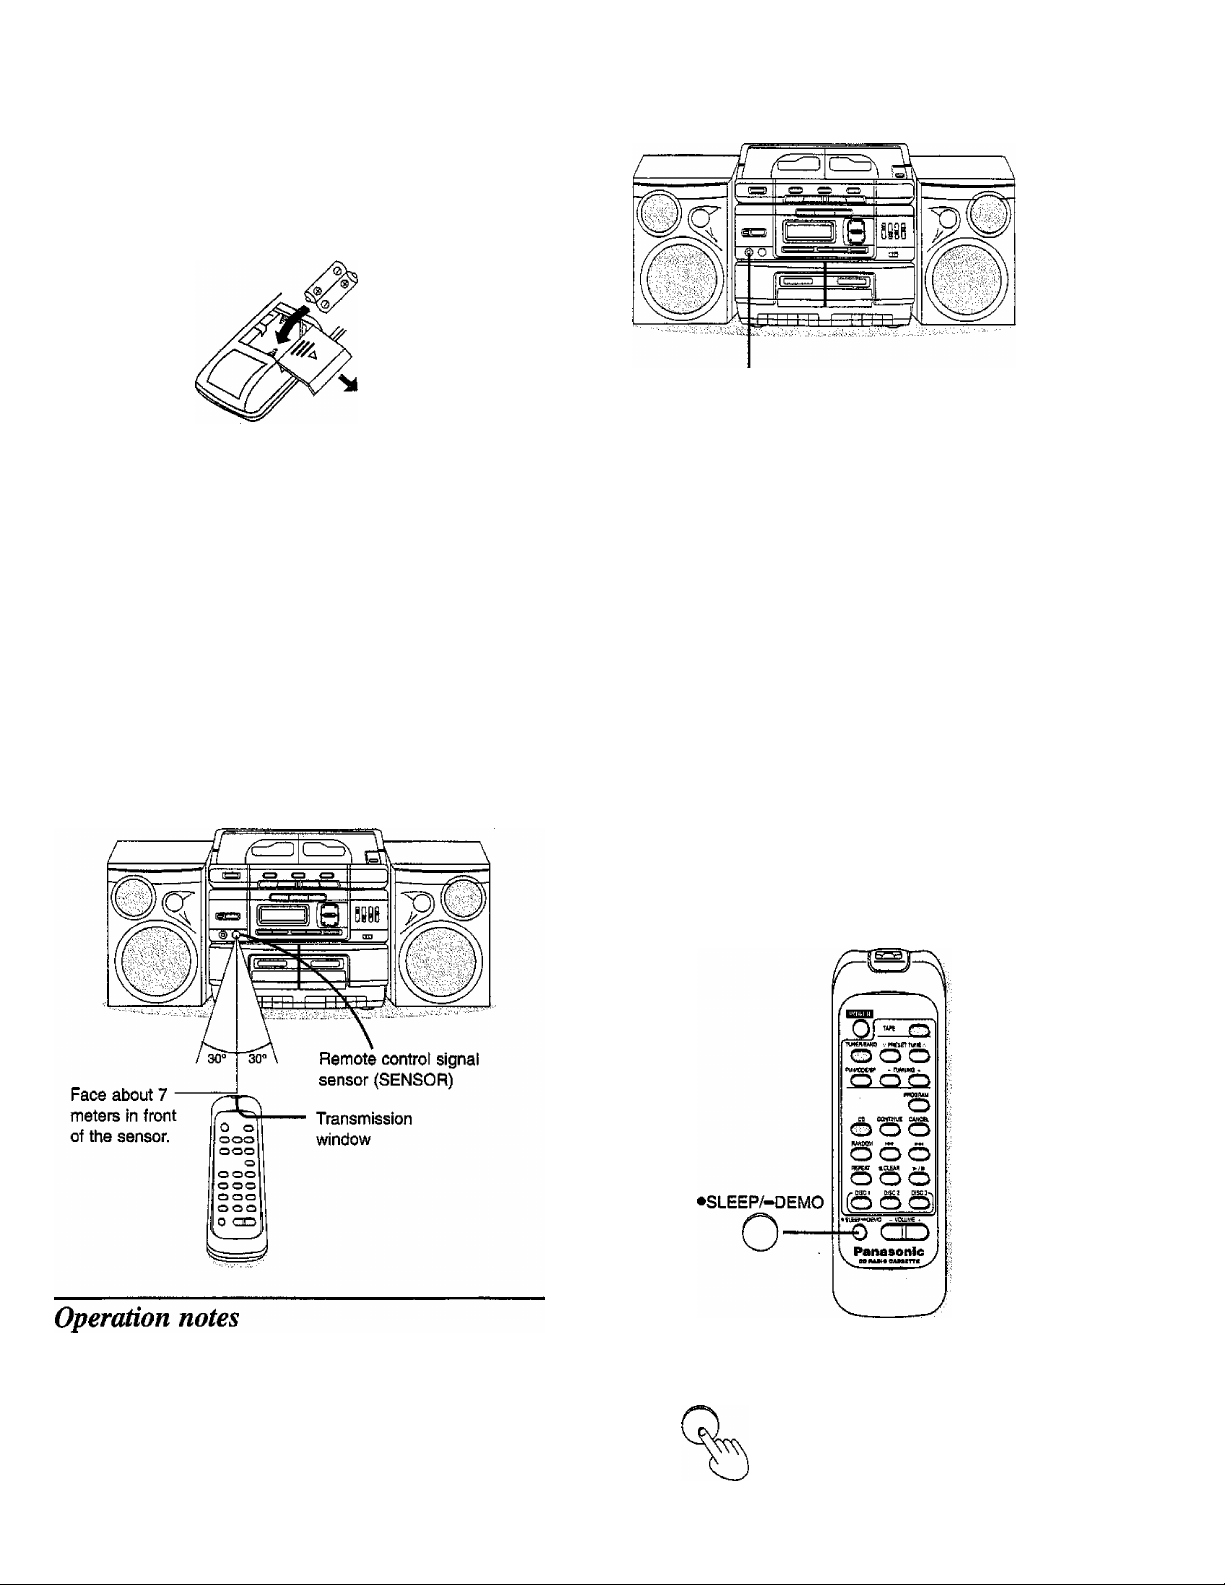
Concerning^
Control
Battery installation
Insert two R03/LR03 (UM-4) batteries (not included) in the correct
polarities as illustrated.
To remove the batteries, pull out the ® side.
Battery life
Using Hecidpkones
PHONES
(|)
Headphones (not inciuded)
Plug type: stereo mini
(-0
The battery life is about one year.
Although the battery life varies depending on how often the device
is used, the batteries should be replaced about once every year on
the average.
The batteries should be replaced if commands from the remote
control transmitter do not operate the unit even when transmitter is
held close to the front panel.
Correct method of use
Lower the volume when con
necting or disconnecting the
headphones.
Avoid listening for prolonged periods of
time to prevent hearing damage.
Selecting thc Display
(Available only from the remote control)
• Do not place obstacles between the remote control signal sensor
and remote control unit.
• Do not expose the remote control signal sensor to direct sunlight
or to the bright light of an inverter fluorescent light.
• Take care to keep the remote control signal sensor and end of the
remote control unit free from dust.
• Do not disassemble or remodel the unit.
• Do not place heavy objects on top of it.
• Do not leave it where it will be exposed to direct sunlight.
• Do not spill beverages or other liquids over it.
•SŒEP/-DEMO
Press and hold «SLEEP/DEMO.
The display starts demonstration.
To resume normal display, press CD,
TAPE, TUNER/BAND as desired.
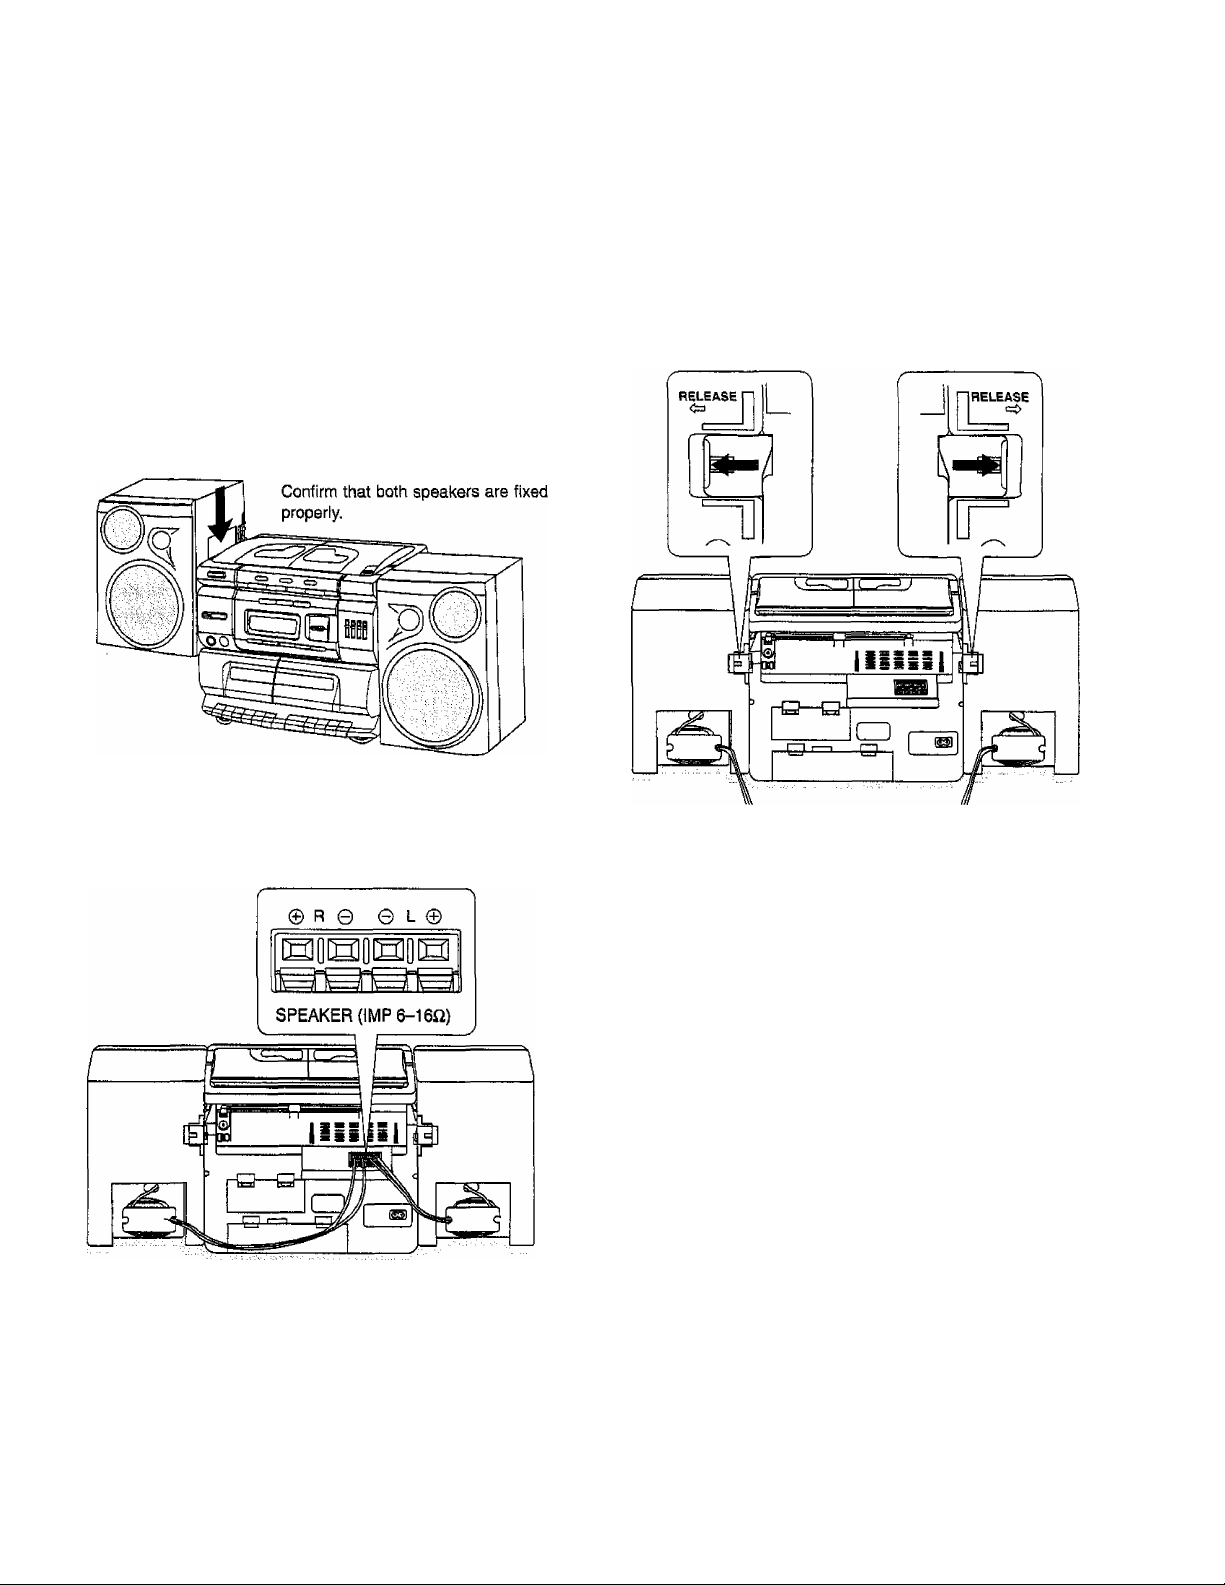
Speaker System Connection
This unit can be used as a one-piece portabie stereo CD system, or
a three-piece component system, by attaching or detaching the
speaker system.
Before attaching or detaching the speakers, be sure to disconnect
the speaker cabies from the speaker terminals. Be sure to press
POWER to turn off the unit before connecting/disconnecting the
speaker cabies.
Attaching the speakers
1. Align the speaker with the main unit as shown
in the figure, interlock the grooves and press
down.
Detaching the speakers
1. Unlock the speaker release levers by pulling
them in the direction shown beiow, and slide
each speaker up.
2. Connect the speaker cables to the speaker
terminals.
2. Connect the colored speaker cable to the same
colored speaker terminals.
3. When using the unit with the speakers attached,
wind the speaker cables as shown above.
Since a strong magnet is used for the speaker, keep magnetized
commuter passes, tickets or personal credit cards, recorded tapes,
watches, etc. away from the set. The speaker magnet in the set
may damage them.
Caution
Use the speaker(s) only with the recommended system.
Failure to do so may lead to damage to the amplifier and/
or the speaker, and may result In the risk of fire.
Consult a qualified service person if damage has oc
curred or if you experience a sudden change In perfor
mance.

Location of Controls
Basic/Tuner controls
No. Name
© Power “STANDBY (!) (AC)/ON" switch
r¡POWER], STANDBY CD (ACyON]
Press to switch the unit from on to standby mode
or vice versa. In standby mode, the unit is still
consuming a small amount of power.
@ Standby indicator [STANDBY CD (ACyON]
When the unit is connected to the AC mains
supply, this indicator lights up in standby mode and
goes out when the unit is turned on.
© Preset tuning buttons
(V PRESET TUNING A)
© Display panel
© Tuner/Band select button
(TUNER/BAND)
© Volume control (VOLUME +, -)
® XBS control (I
® Graphic equalizer
I )
Ref. page
15
14
No. Name
© Headphones jack (PHONES)
@ Remote control signal sensor (SENSOR)
® Tuning buttons (-TUNING +)
® Memory button (MEMORY)
Ref page
5
5
14
14
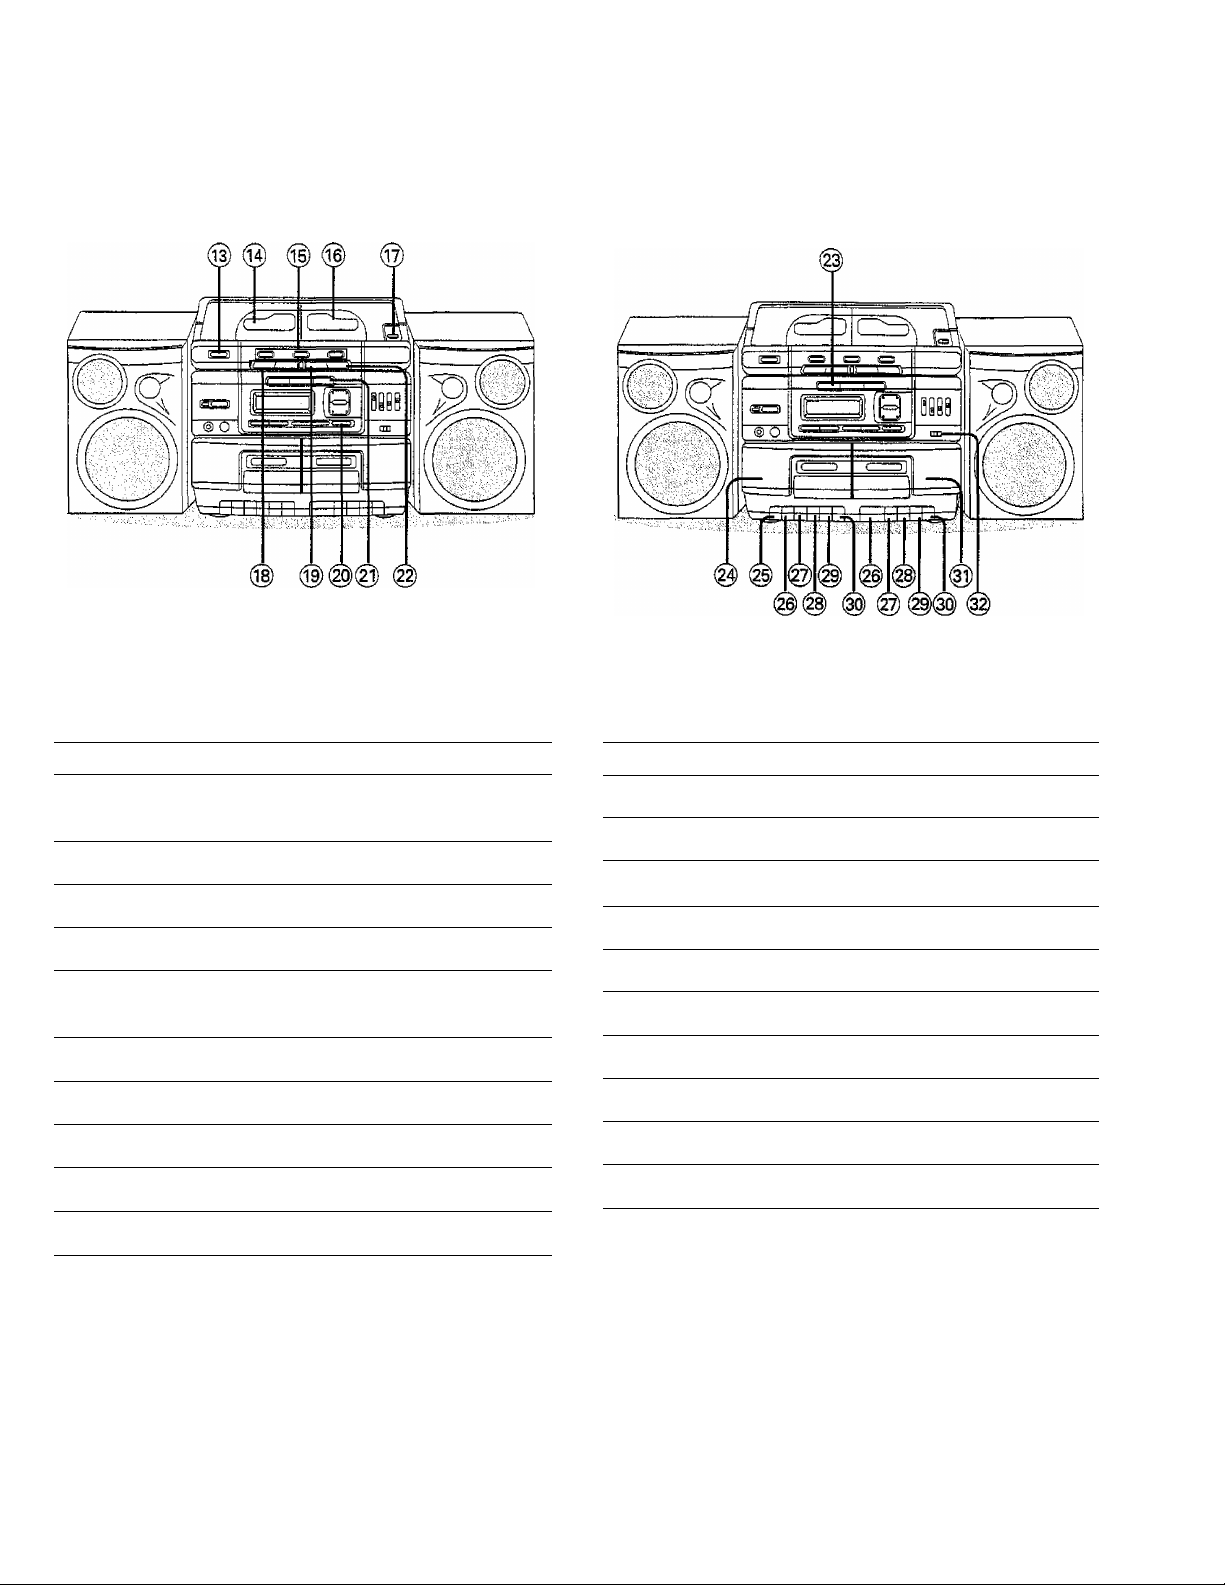
Location of Controls
CD controls
Cassette deck controls
No. Name
@ Disc tray open button (for playing)
(A CD EJECT)
@ Playing position (CD PLAYER)
® Disc select buttons (DISC 1-3)
@ Disc storage (CD STORAGE)
@ Disc storage open button
(^, CD EJECT)
® Skip/Search buttons (H4h4, p>h)
@ Stop/clear button (B/CLEAR)
@ Program button (MEMORY)
@ CD button (CD)
(22) CD Play/pause button (►/!!)
Ref. page
10
10
10
10
11
11
10
12
10
10
No. Name
(§) Tape button (TAPE)
@ Deck 1 cassette holder
@) Recording button ( •[RECI ) 18,20,21
@ Playback button (> PLAY)
(§) Rewind/review button {mm REW/REV)
Fast forward/cue button (►► FF/CUE)
(i) Stop/eject button (h/^ STOP/EJECT)
® Pause button (ii PAUSE)
Deck 2 cassette holder 9,21
(||) Tape Speed Edit button (TAPE EDIT)
Ref page
9
9,21
9
9
9
9
9
21
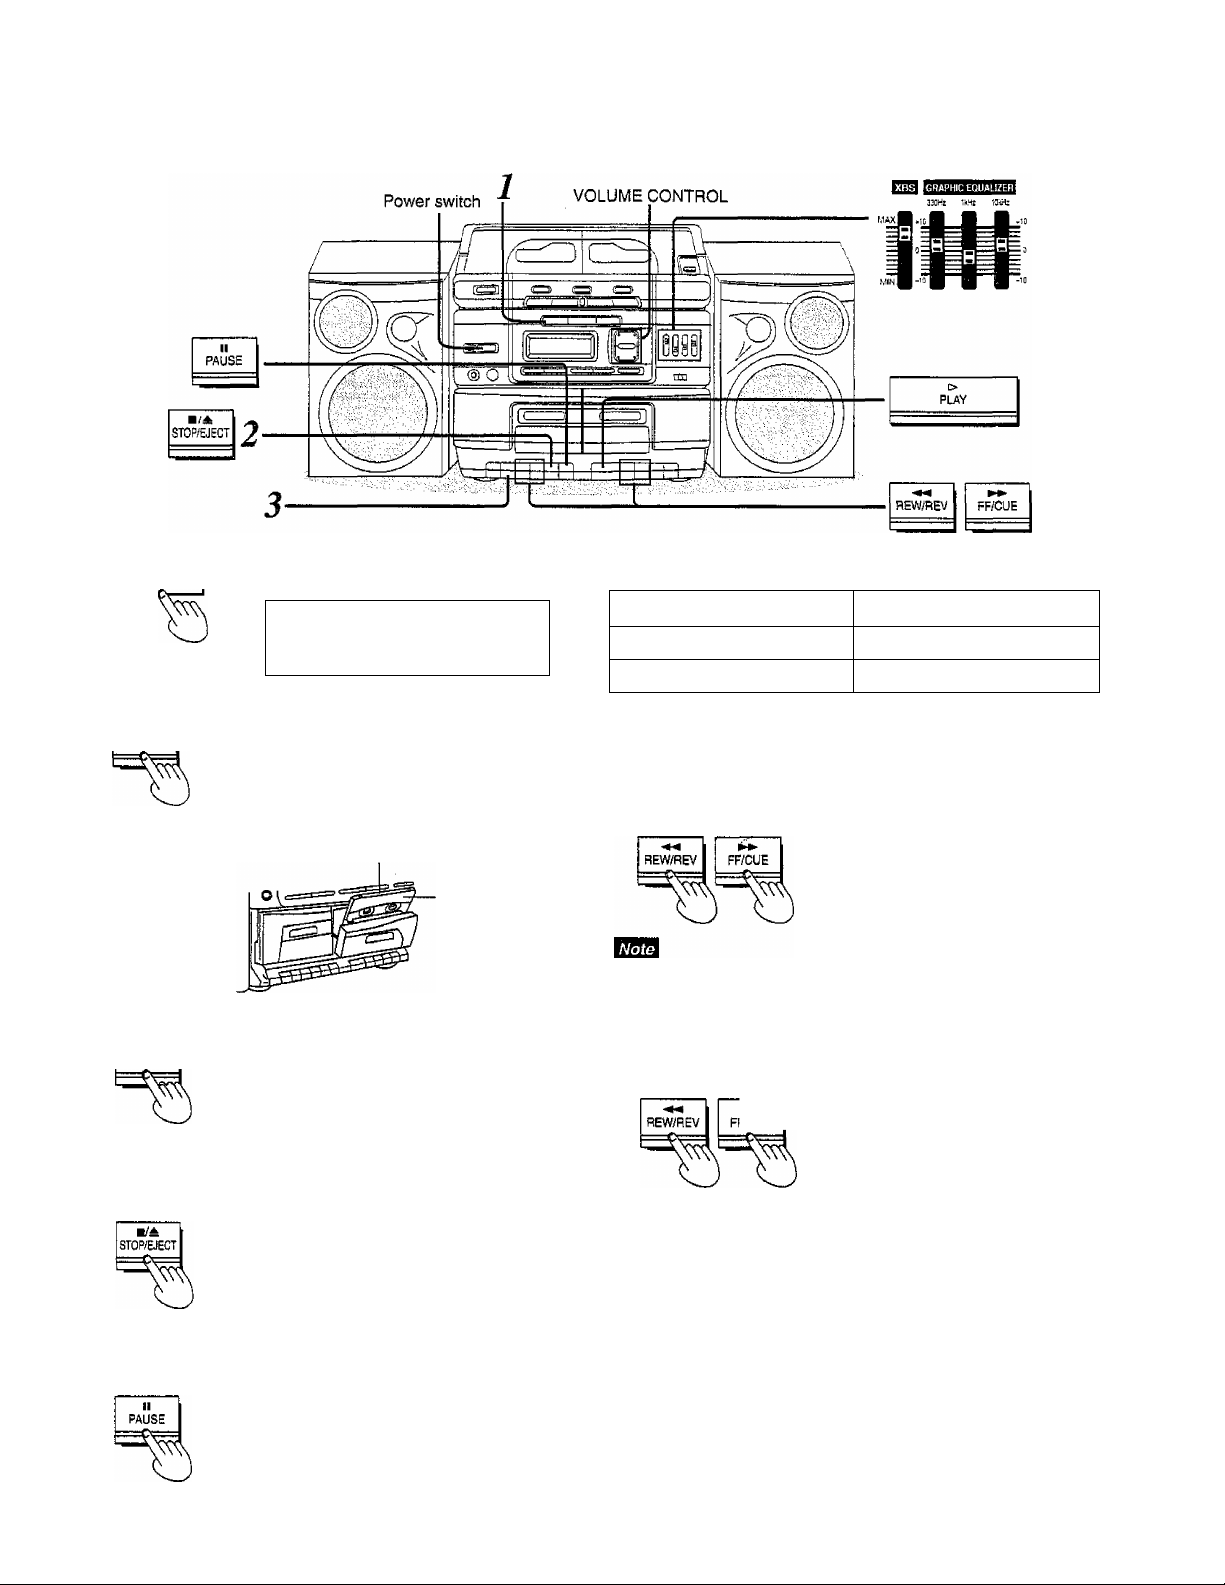
listening to Tapes
Only norma! tapes (TYPE I) can be used with this unit. This unit has a dual cassette system, which means that a tape can be played back with
both Deck 1 and Deck 2. This page shows an example using deck 1.
TAPE
■/A
STOP/EJECT
>
PUY
To stop play:
Press TAPE.
<J)c^ T HPb
3
1 .
_ _ _ _ _ _ _ _ _
Press STOP/EJECT, load the tape and close the cassette lid.
Load the tape with the side on which
playback is to commence facing you.
Reverse side
Top side
Press PLAY to start play.
Type of tape which can be played on this unit:
Normal position/TYPE I
High position/TYPE II
Metat position/TYPE IV
This unit will not be able to do full justice to characteristics of highposition tapes and metal position tapes even if they are played
back.
О
X
X
To rewind or fast forward the tape
In the stop mode, press REW/ REV or FF/CUE.
Do not press PLAY during rewinding or fast fonwarding, as this may
jam the tape. Be sure to press STOP/EJECT before proceeding to
the next operation.
To search a particular spot on a tape
\ During playback, press REW/
/CUE I pgy FF/CUE,
Tape play is resumed when the button
is released.
Press STOP/EJECT.
To temporarily stop play:
Press PAUSE.
To resume play:
Press PAUSE again.
Automatic playback relay
(Deck 2 to Deck 1 )
When Deck 2 playback has finished. Deck 1 playback starts auto
matically.
1 Insert the playback tapes into Deck 1 and Deck 2.
2 Press Deck 2 PLAY.
3 Press Deck 1 PAUSE, then press PLAY.
Full autostop
During playback, recording, fast fonvard or rewind when the tape
reaches its end, the automatic stop system wilt release the opera
tion buttons.
 Loading...