

Page 1
Operating
Instructions
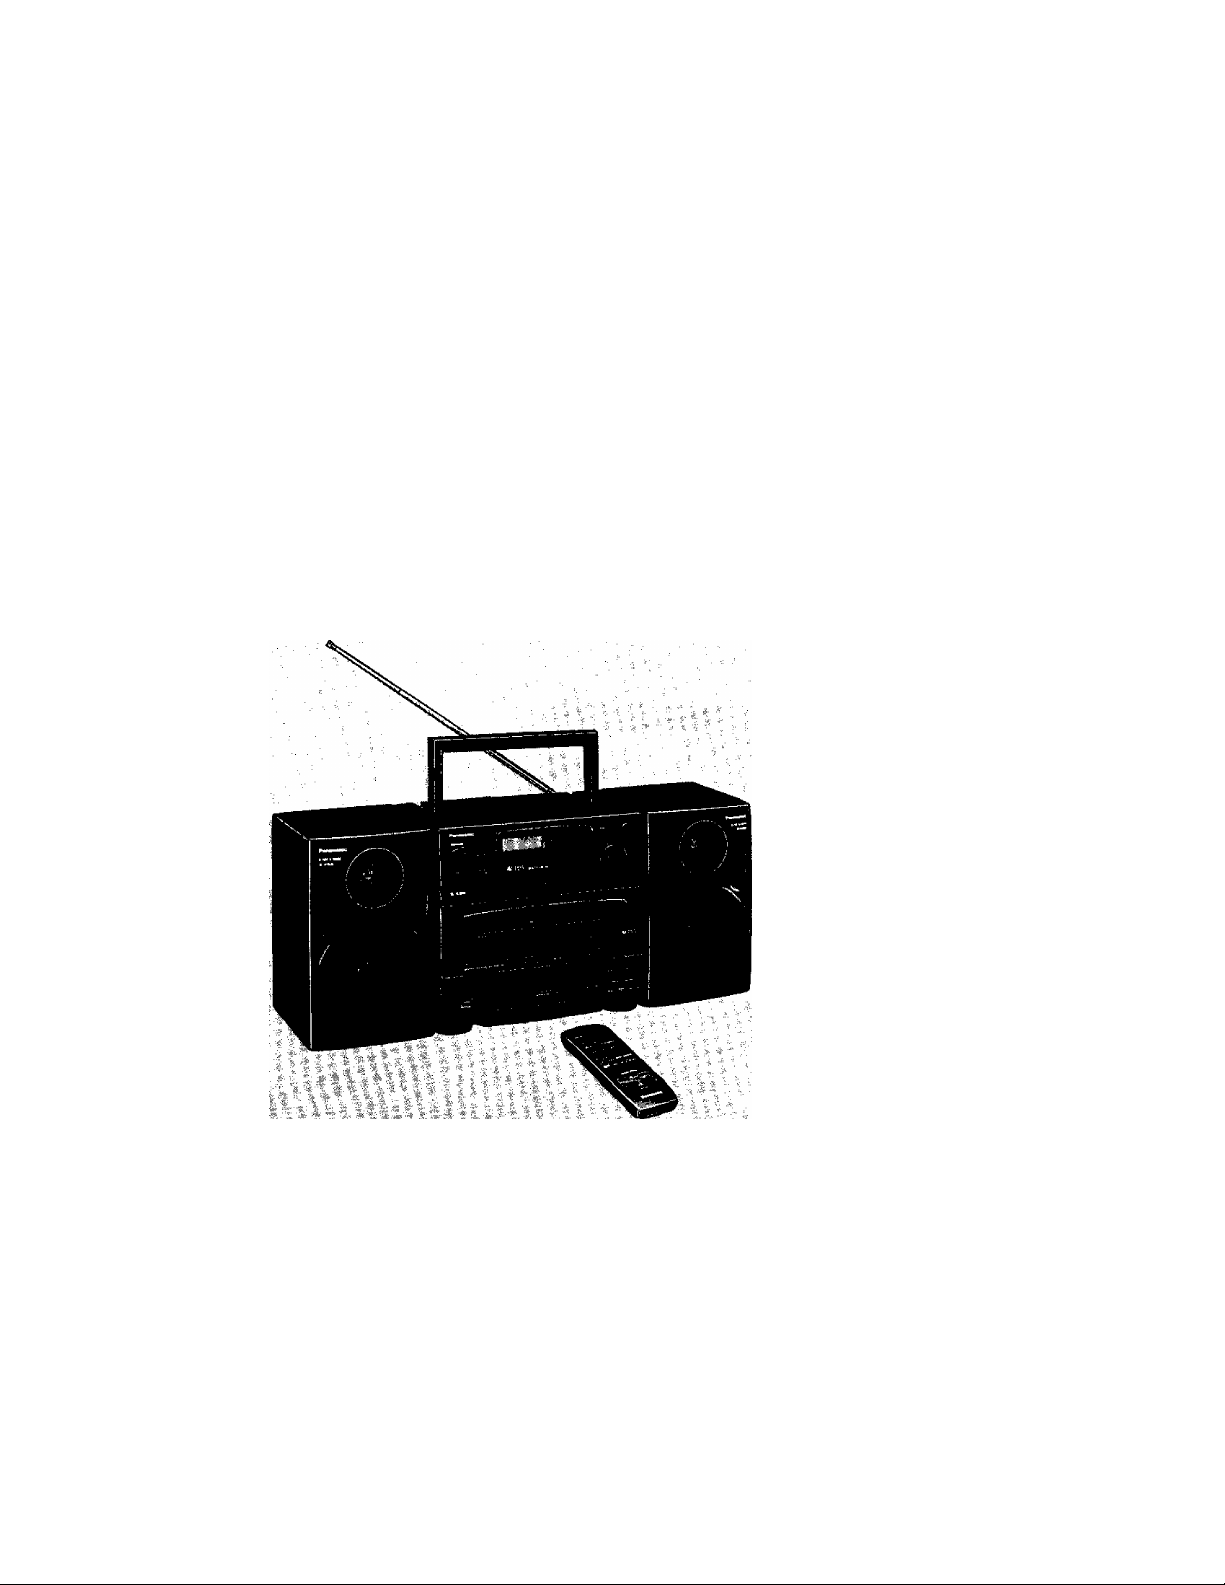
Portable Stereo Component System
RX-DT670
GN
Panasonic
Before connecting, curating or adjusting this product,
please read these instructions completely.
RQT1927-B
Page 2
Dear Customer
Thank you for purchasing this product.
For optimum performance and safety, please read these instructions carefully.
CAUTION!
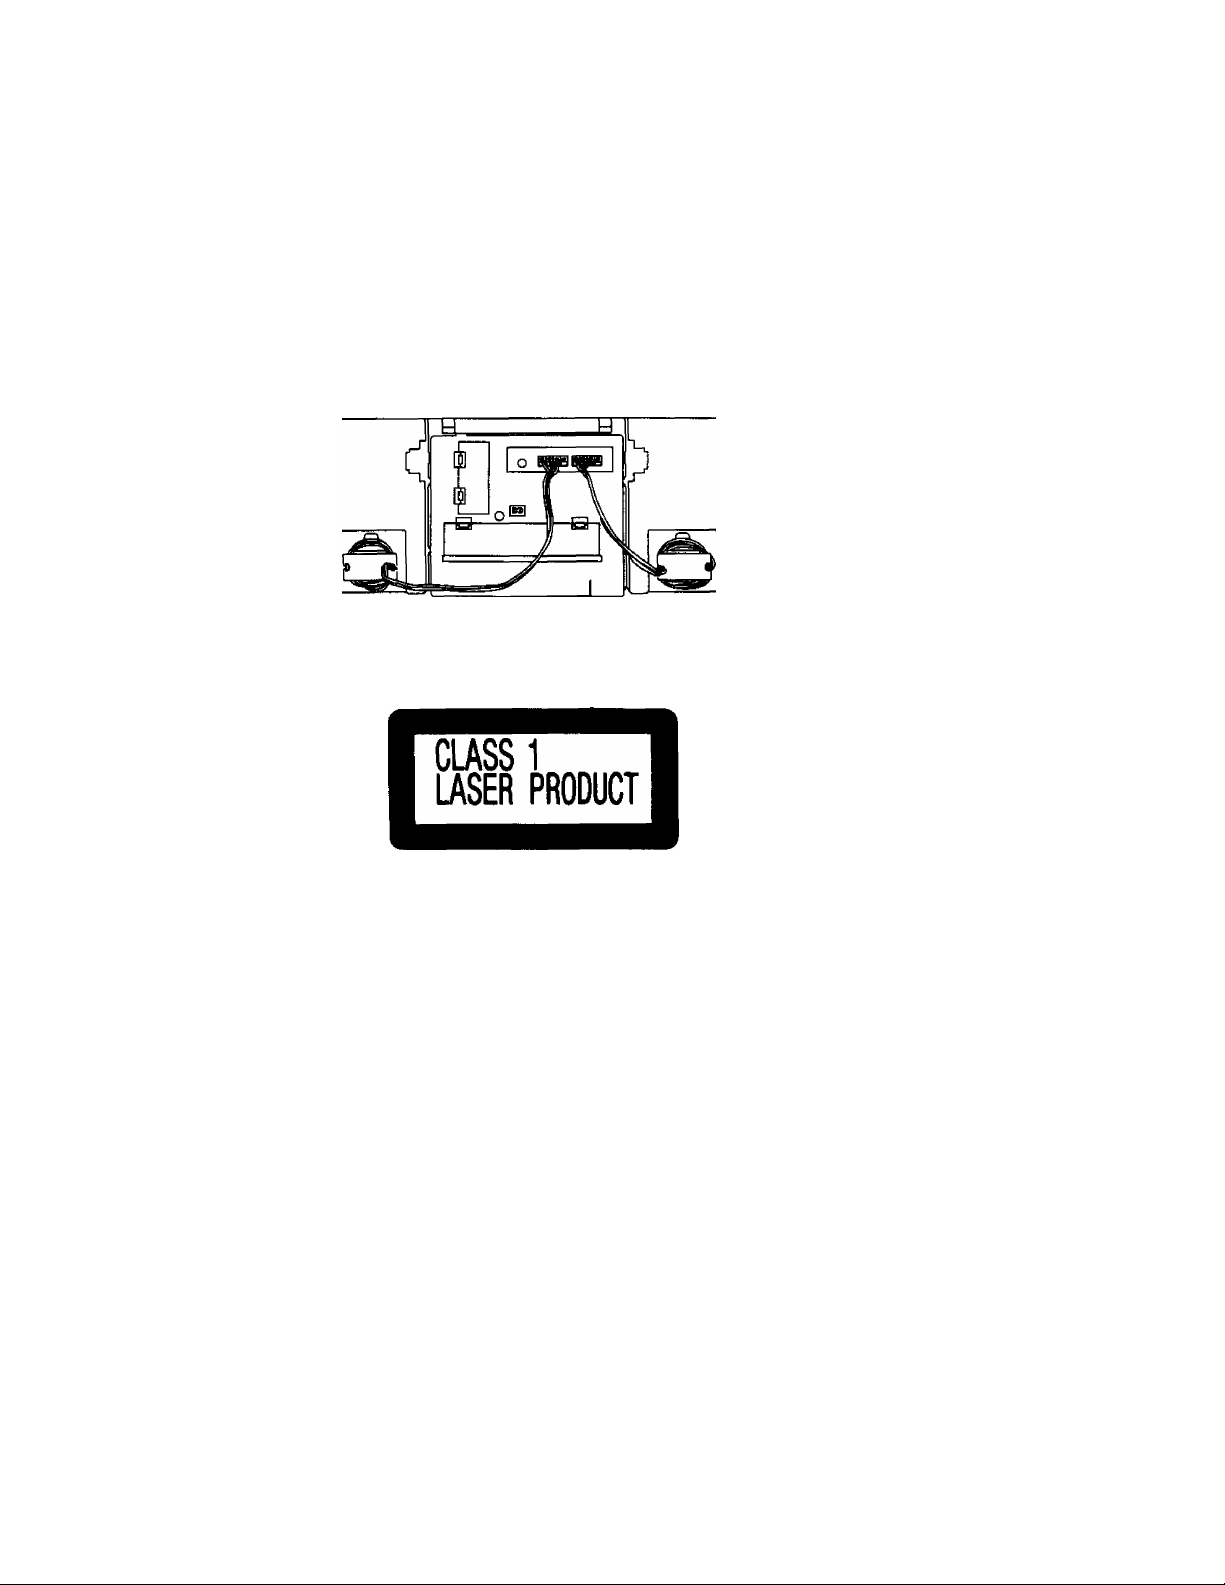
THIS PRODUCT UTILIZES A LASER.
USE OF CONTROLS OR ADJUSTMENTS OR
PERFORMANCE OF PROCEDURES OTHER
THAN THOSE SPECIFIED HEREIN MAY RESULT
IN HAZARDOUS RADIATION EXPOSURE.
DO NOT OPEN COVERS AND DO NOT REPAIR
YOURSELF. REFER SERVICING TO QUALIFIED
PERSONNEL.
DANGER-tnviiiM«
laser radiation whan
AVOiO DIRECT EX
POSURE TO BEAM.
(Irwideot product)
Page 3
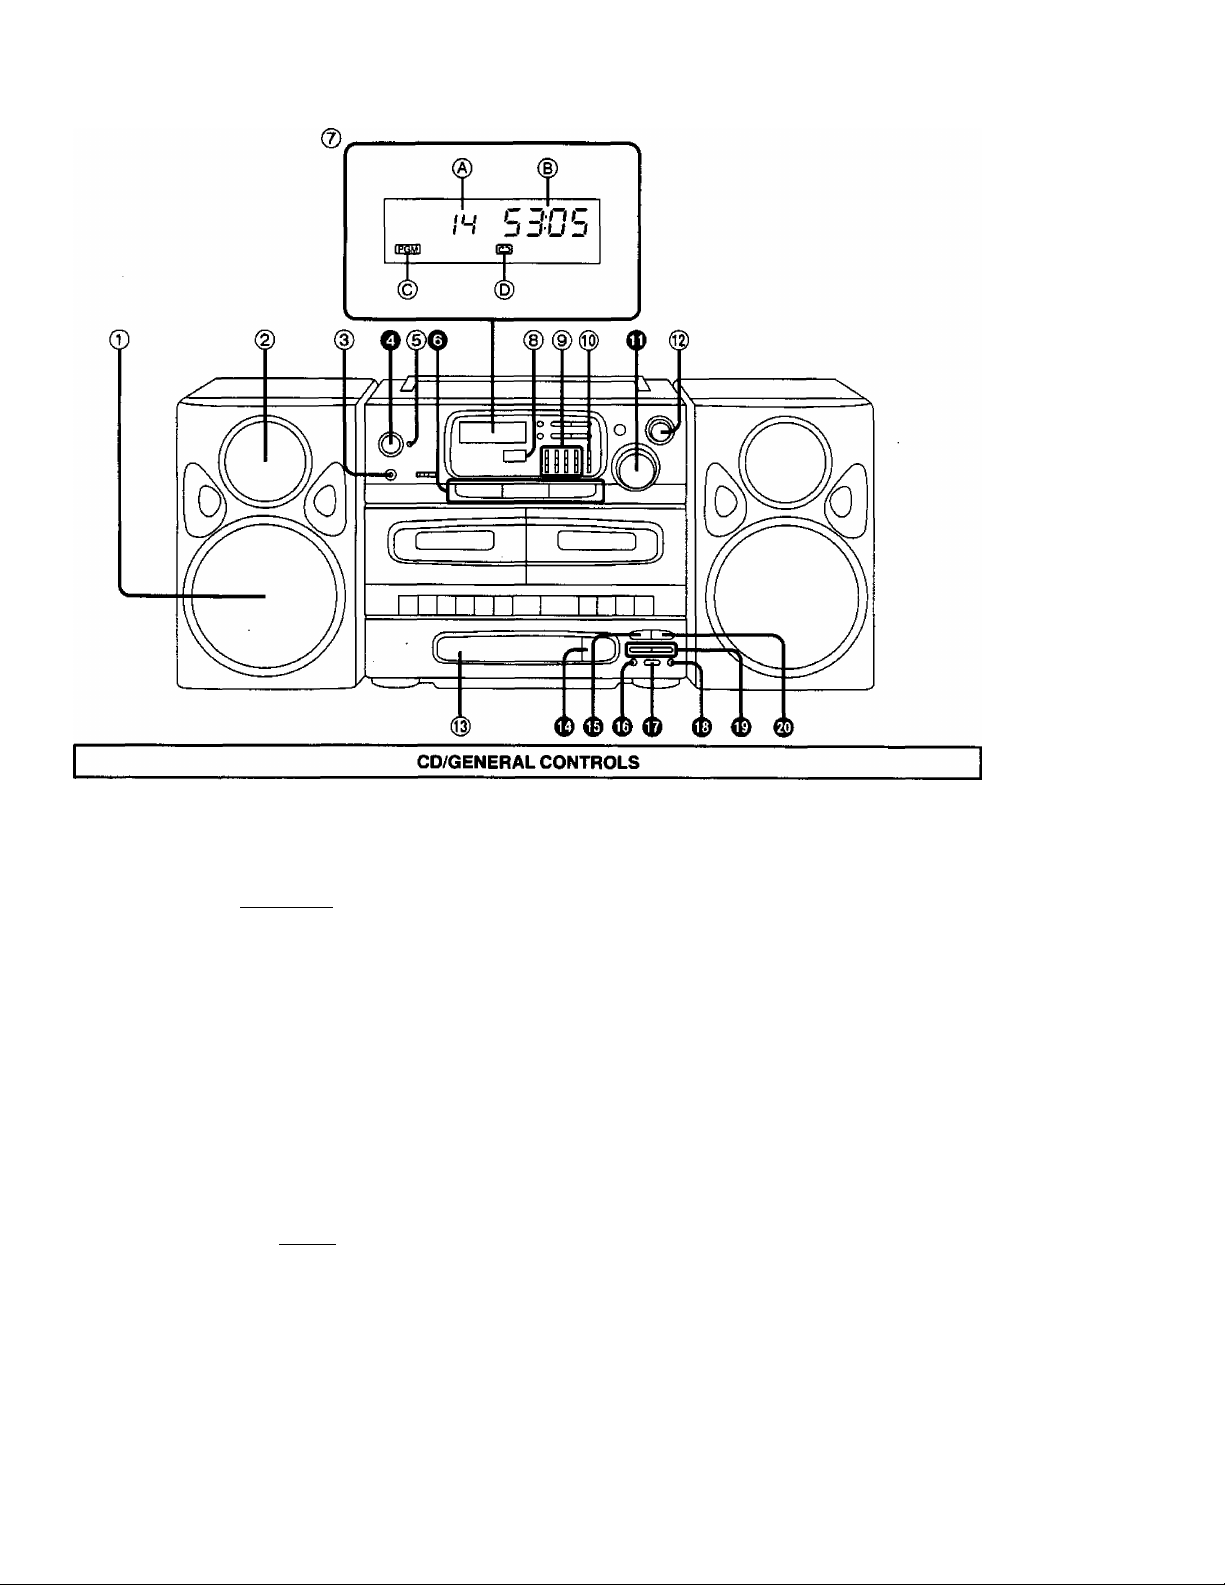
LOCATION OF CONTROLS
The functions indicated by the numbers with black back
ground (for example O) also be activated from the
remote control transmitter. (See page 6.)
(D
Speakers (Woofer)
© Speakers (Tweeter)
@ Headphones jack (PHONES)
O Operation switch (i operation i)
(D
Operation/battery check/AC connection indi
cator (OPR/BATT-STDBYCI))
The indicator lights green when the unit is turned on.
When the AC power supply is used, it functions as an AC
connection indicator. (The indicator colour changes to
red when the unit is turned off.)
When the unit is operated on batteries, it functions as a
battery check indicator. (See page 9.)
O Function select buttons (TAPE • TUNER * CD)
© Display section
When using AC power or car battery cord, the backlight
of the display will be on.
A: Track display
B: Playing time display
C: Program indicator ((NSKTI)
D: Repeat indicator ()
© Remote control sensor (SENSOR)
(g) Graphic equalizer controls
(GRAPHIC EQUALIZER)
% Balance control (BALANCE)
(D Volume control (VOLUME)
® S-XBS level control (S-XBS LEVEL)
® Disc tray
<E) CD open/close button (^ OPEN/CLOSE)
® Play/pause button (P^/l I)
Press this button to start the disc play or stop the disc
play temporarily.
(D Repeat button (REPEAT)
Memory/recall button (MEMORY/RECALL)
Press this button to program the desired track(s) and to
confirm the programmed content(s).
(D Edit pause button (EDIT PAUSE)
(El Skip/searchbuttons(M)
Press either button to skip (backward or forward) the
tracks, or to search (backward or forward) the desired
portion of the disc.
® Stop/clear button (a/CLEAR)
Press this button to stop the disc play or to clear the
programmed track(s) and sequence.
Page 4
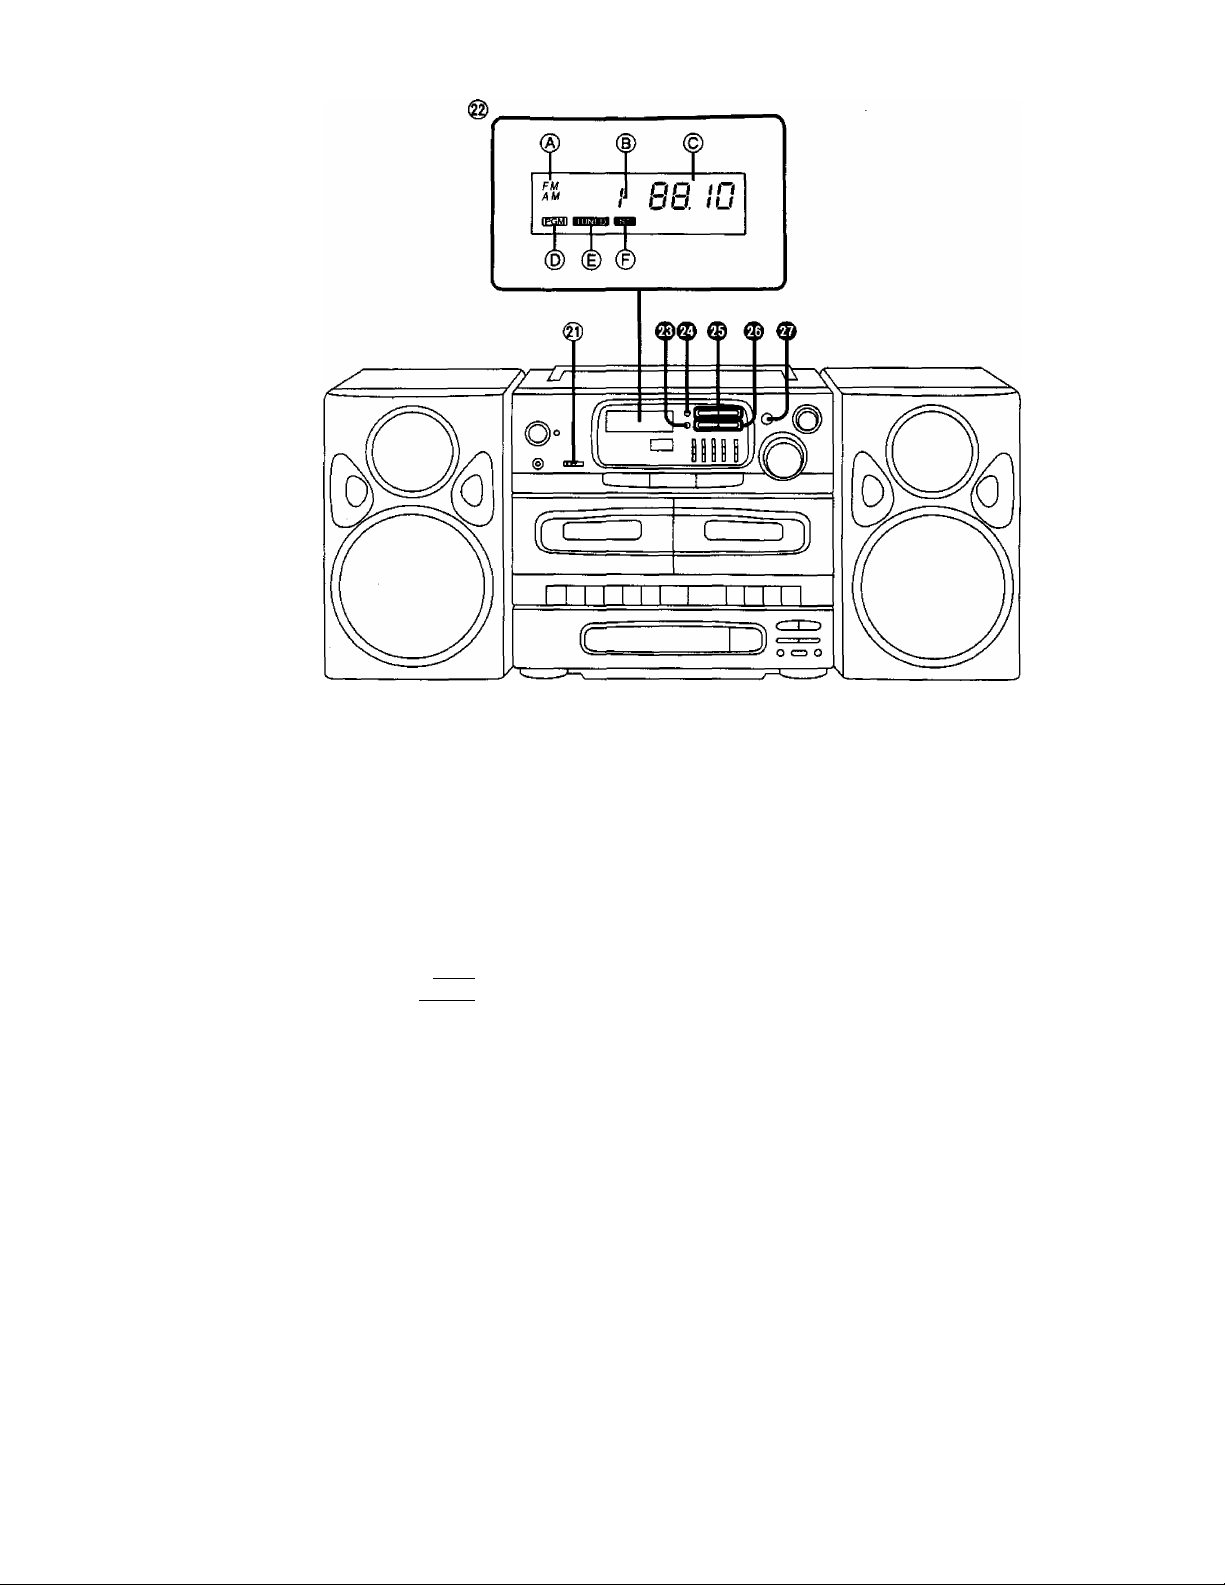
LOCATION OF CONTROLS
® Edit recording speed/beat proof selector
(EDIT MODE/BP)
Set the selector to reduce "beat" signal.
@ Display section
A: Band indicator (FM, AM)
B: Preset channel indicator
C: Frequency display
D: Program indicator ( ITSmI )
E: Tuning indicator ( ■iw«aii )
F; Stereo indicator (si)
This indicator does not appear when the FM mode
button is pressed to monaural mode.
® Memory button (MEMORY)
Press this button to memorize a broadcast frequency
into the preset memory.
® FM mode button (FM MODE)
Press this button to select the stereo reception or
manual reception.
TUNER CONTROLS
® Preset memory channel buttons (PRESET)
If you memorize the broadcast staion, you can select the
preset channel by pressing one of these buttons.
® Tuning buttons (TUNING MANUAL)
These buttons are used to tune the radio to the desired
broadcast frequency.
0 Band button (BAND)
Press this button to select the desired radio band.
Page 5
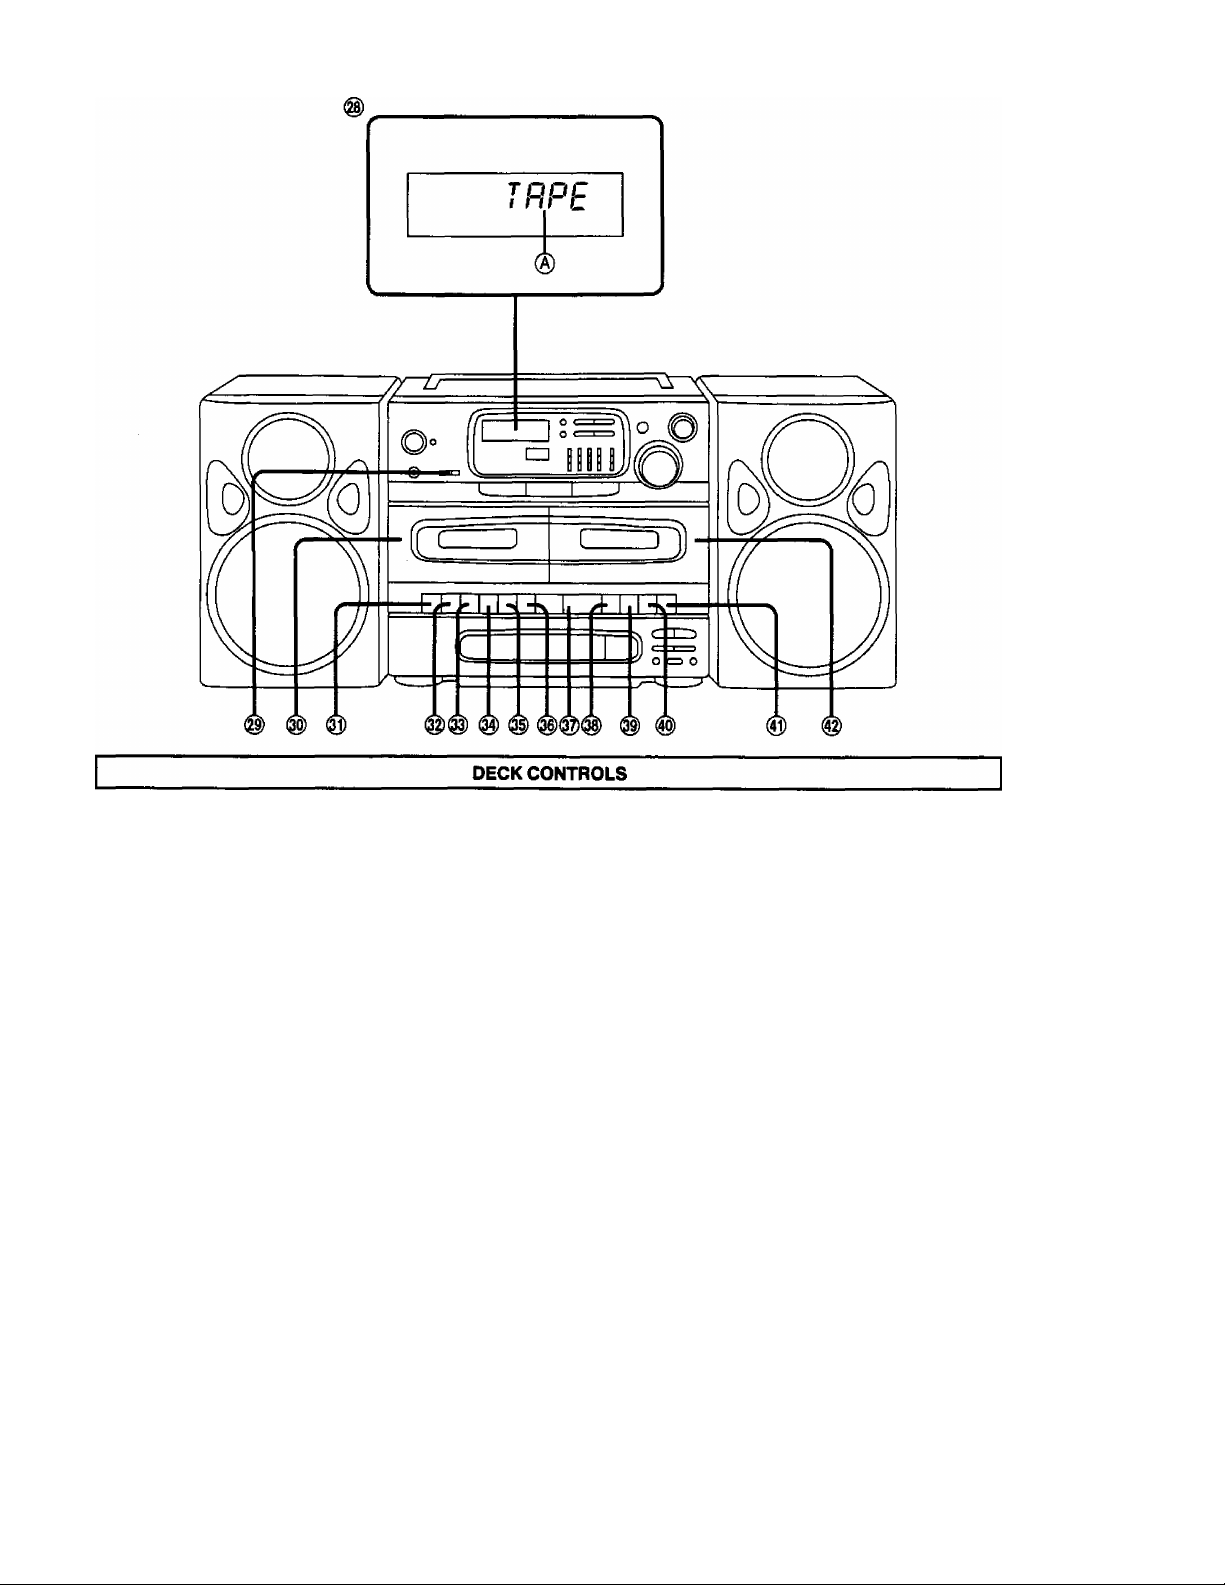
LOCATION OF CONTROLS
@) Display section
A; Tape mode indicator (TAPE)
@ Edit recording speed/beat proof selector
(EDIT MODE/BP)
NOR/1: Normal speed
HIGH/II: Highspeed
® Deck 1 cassette compartment cover
@) Record button (• REC)
Press this button to record a tape.
(g) Playback button (P^ PLAY)
Press this button to playback a tape.
igi Rewind/revlew button (^<^/REV)
Press this button to rewind the tape during stop condi
tion, or to search the desired portion (backward) during
playback.
® Fast forward/cue button (CUE/P-P-)
Press this button to fast forward the tape during stop
condition, or to search the desired portion (fonivard)
during playback.
® Stop/eject button (5 STOP/EJECT)
Press this button to stop the tape during tape movement,
and to open the cassette compartment cover during tape
stop condition.
® Pause button (I I PAUSE)
Press this button to stop the tape temporarily.
@ Playback button (^ PLAY)
® Rewind/revlew button (^^/REV)
ig) Fast forward/cue button (CUE/P>^)
® Stop/eject button (B STOP/EJECT)
® Pause button (I I PAUSE)
® Deck 2 cassette compartment cover
Page 6
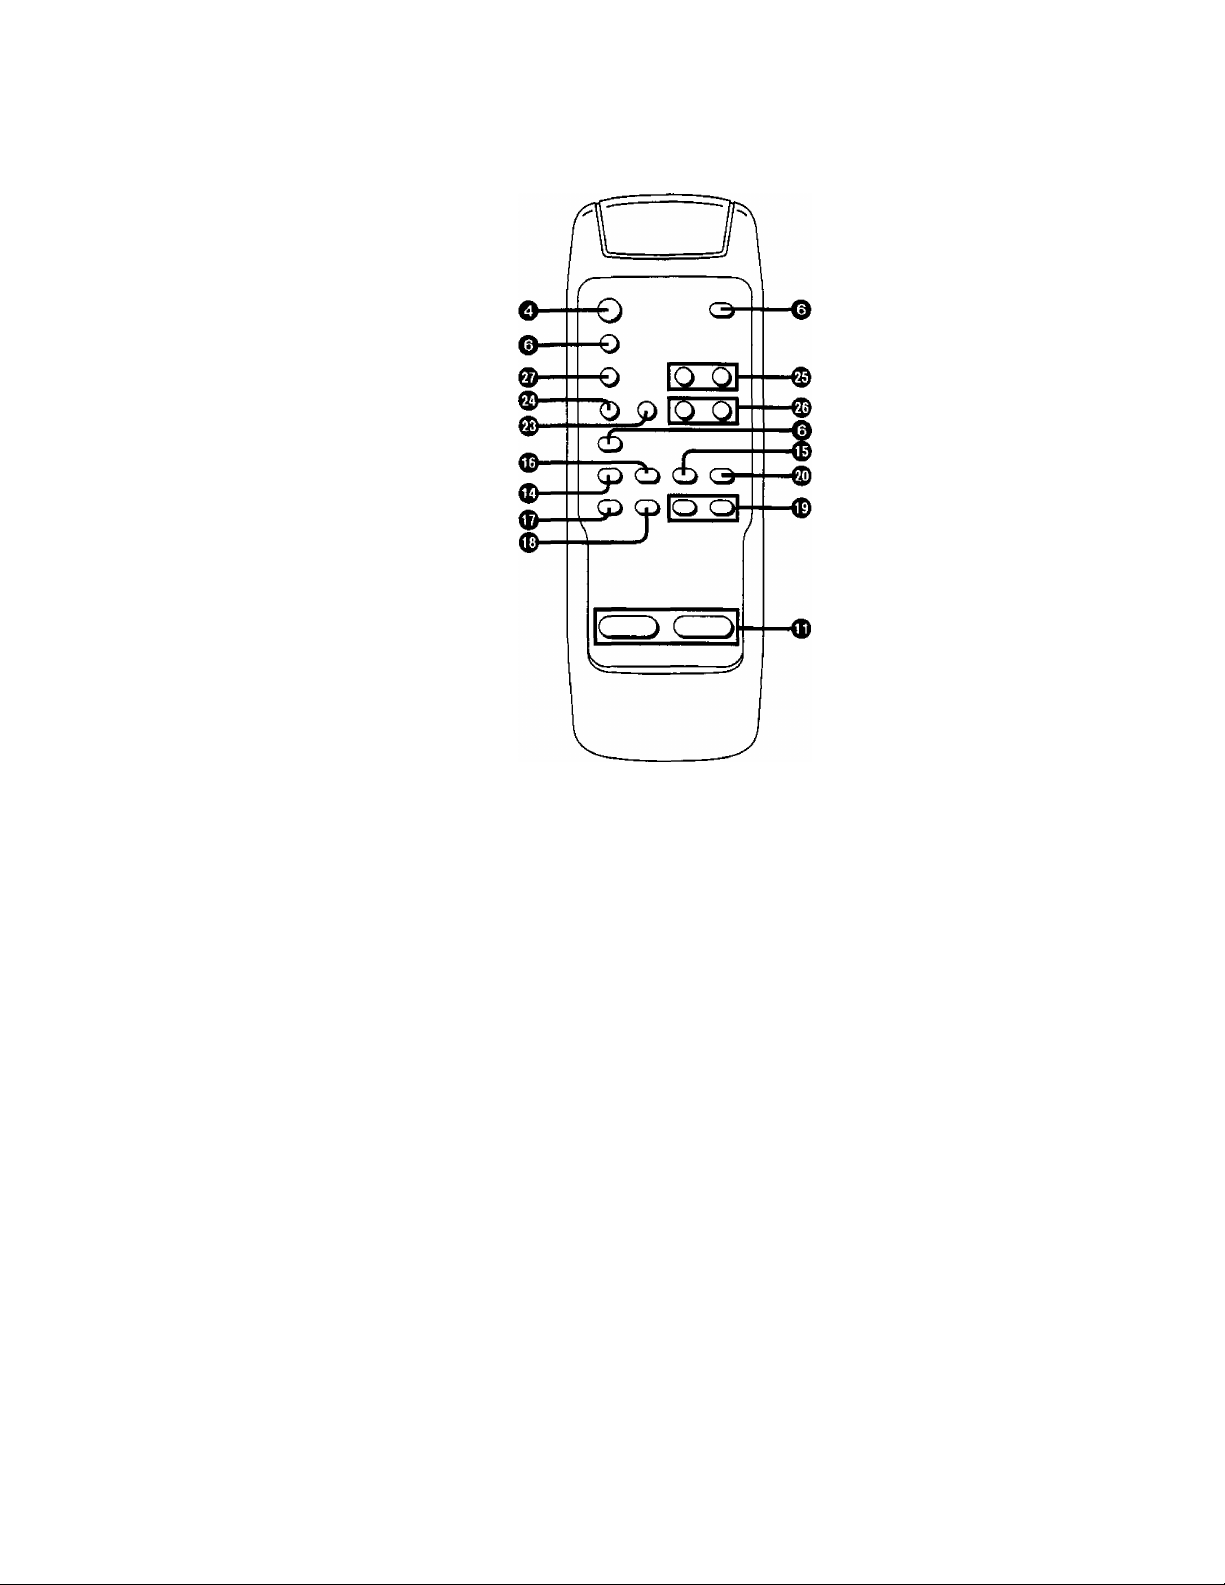
REMOTE CONTROL OPERATION
•The receiving angle is approx. 60° (30° in each of the left, right, up, and down directions).
•The maximum usable distance in about 7 m when the remote control transmitter is aimed directly at the remote control sensor.
The functions of buttons 0> 0> (Df (D> ®< ID< (Dt
“LOCATION OF CONTROLS” on pages 3 and 4.
® and ® are identical to those described under
Page 7
REMOTE CONTROL OPERATION
■ Operations
The following operations can be performed using the remote
control transmitter.
They are identical to the operations performed using the
main unit controls.
•Operation Switch
Turn the unit on and off.
{When using the battery power, you can only turn off.)
•CD operation
Selection of CD mode, sequential play, program play, direct
access play, repeat play, skip function, search function,
program clear, pause, stop, disc tray open/close.
•Radio operation
Selection of tuner mode, band switching, manual tuning, FM
auto tuning, memory presetting, memory tuner operation,
FM mode selection.
•Tape operation
Selection of tape mode.
•Volume control
Volume up/down
When operating the unit using the remote control
transmitter press the buttons on the remote control
transmitter slowly and accurately.
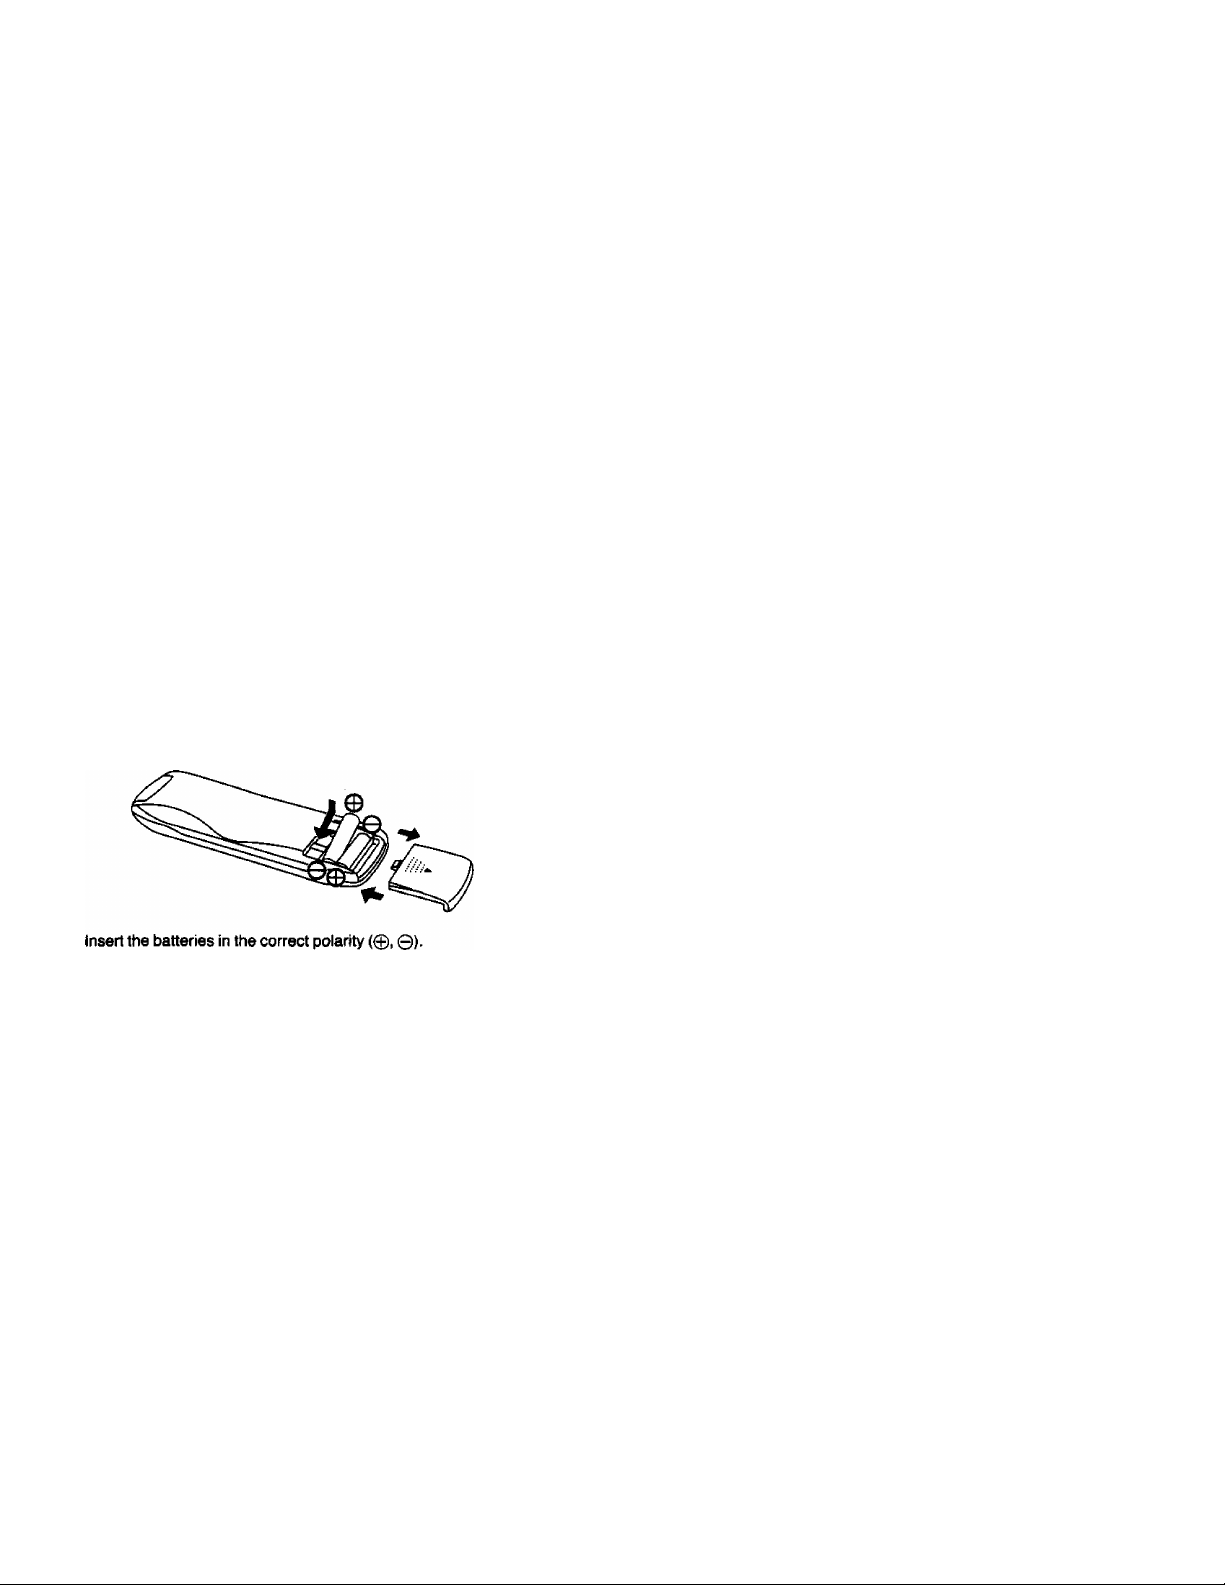
■ Inserting the remote control transmitter bat
teries
1. Open the cover of the battery case.
2. Insert the batteries.
Batteries used: Two R03//LR03 (UM-4 or equivalent, not
included).
■ Replacement interval of remote control trans
mitter batteries
Although the life of the batteries will vary depending upon
the number of times that the remote control transmitter is
used, the average life based on the used of the batteries is
about 1 year.
If the remote control transmitter fails to operate when it is
held near the unit, replace the batteries with new batter
ies, even if one year has not elapsed.
Precautions for using the remote control trans
mitter
•If the unit is exposed to direct sunlight, the remote
control transmitter may sometimes fail to function.
Be sure, therefore, to keep the unit out of direct
sunlight. In such case, the maximum range of the
remote control transmitter (approx. 7 m) may some
times be reduced.
• If strong light falls on the remote control sensor of
the unit (e.g. high frequency type fluorescent lamp),
the signals from the remote control transmitter may
fail to be received by the unit. In such a case, take
steps to prevent strong light from falling onto the
unit.
• if there is an obstacle between the remote control
transmitter and the unit, the signals from the remote
control transmitter will be blocked off, preventing
the unit from operating.
Use the remote control transmitter In a position
directiy in front of the unit so that the remote control
sensor can be seen.
•Even if the remote control transmitter is not aimed
at the unit, the unit may sometimes operate when a
button on the remote control transmitter is pressed.
This is caused by the infra-red beam being reflected
off a wall, ceiling, floor, or furniture, and striking the
remote control transmitter of the unit.
•Do not operate the remote control transmitter of this
unit near a unit which is designed to operate using a
different remote control transmitter.
•Do not simultaneously use this remote control transmit
ter and one or more remote control transmitters in
tended either for the same type of unit or for another
type of unit, such as a television set.
•If you operate the remote control transmitter near the
unit when listening to an AM broadcast, noise may be
heard. In such a case, hold the remote control transmit
ter at a sufficient distance from the unit so that noise is
not heard.
•Do not disassemble the remote control transmitter or
touch any of the components inside it.
Do not place a heavy object on the remote control
transmitter or leave it exposed to direct sunlight or in a
hot location.
•Do not spill liquids on the remote control transmitter.
This may cause damage to the remote control trans
mitter.
Page 8
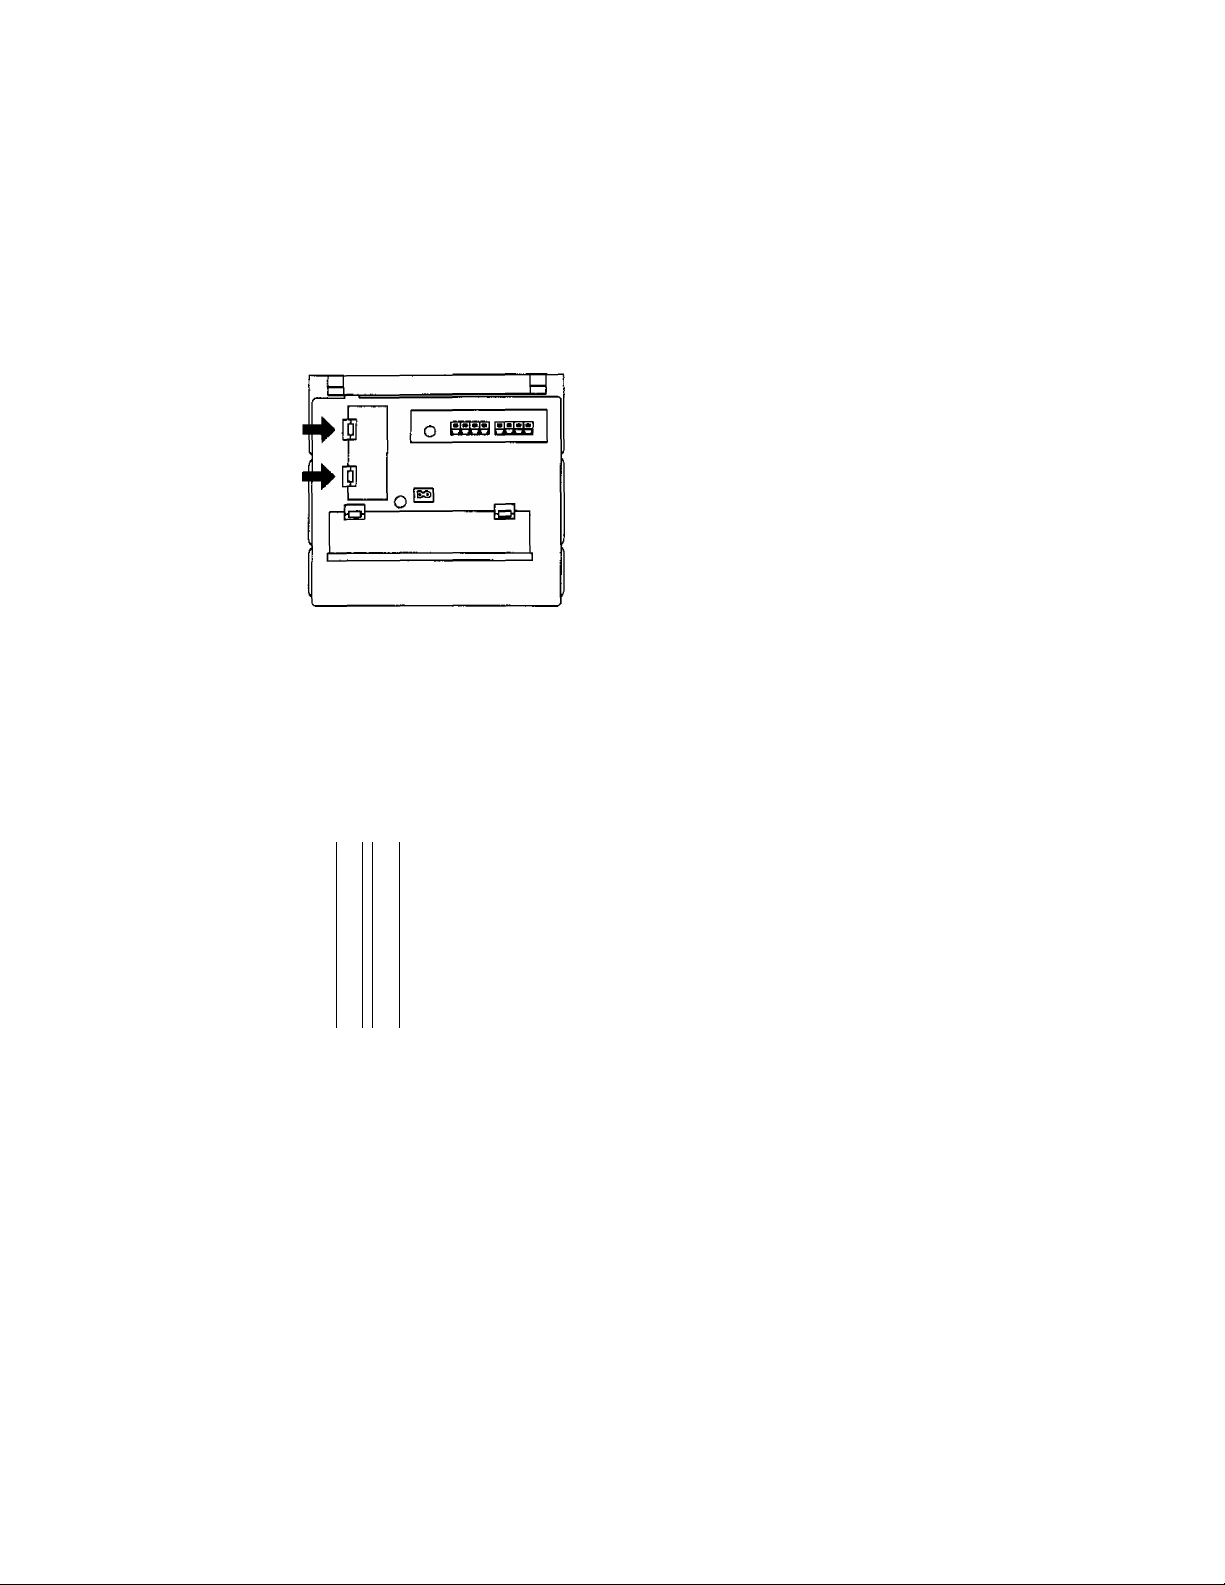
INSTALLING THE DRY BATTERIES FOR MEMORY BACK-UP
This is a function which preserves the preset memory and most-recent memory functions, (n the event of a power failure, or if the
AC mains cord is disconnected from the household AC mains outlet (during AC operation), or should the batteries fail, the memory
back-up batteries will preserve the preset memory and the most-recent memory functions of this unit.
■ Memory back-up batteries (four R6/LR6)
1. Open the memory back-up battery compartment cover,
2. Insert four “R6/LR6" size (UM-3 or equivalent, not included) batteries into the battery compartment, making sure that the
batteries are installed in the designated numerical order and that the proper polarities are maintained,
3. Close the cover.
The life of the memory back-up batteries is about one year.
While exchanging the memory back-up batteries, be sure to connect the AC mains cord both to the unit and household AC
mains outlet.
•To prevent erasing the memory
In case the memory back-up batteries are not used, power
failure (when using AC mains) or the following operations
cause the erasure of the memory:
When using AC mains: unplugging the AC mains cord from
the household AC mains outlet.
When using battery power (“R20/LR20"): inserting the AC
mains cord only into the AC socket of this unit.
If one of the above cases occurs, enter the program into
the memory again,
in order to avoid the accidental erasure of the program in
the memory, using the memory back-up batteries (4 “R6/
LR6" size, UM-3 or equivalent, not included) is recom
mended.
© ©
' '
3 2
4 1
® e
n
•Battery removal
Press the © side of the no. 4’s battery.
o
8
Page 9

POWER SOURCE
■ Battery operation (ten R20/LR20)
Insert ten “R20/LR20" size (UM-1 or equivalent, not included) batteries into the battery compartment, making sure that the
batteries are installed in the designated numerical order and that the proper polarities are maintained.
о
■DC IN
•AC IN-
prrm
© (8]®(T0KT) 0
i=b
0 сю®®® ©
©(UQD©
•Battery life
The amount of light provided by the operation/battery check/
AC connection indicator is a good indication as to how much
longer the batteries can be used.
• Press the operation switch to turn on the unit.
When the operation/battery check/AC connection indicator
goes out or dims, replace all batteries with new ones.
\ i /
/ t \
Important note;
If you cannot open the cassette compartment cover and
eject the cassette tape when running this unit on batteries,
replace the batteries with new ones, or use the AC power
source, and then perform the operation once again.
•Battery removal
Remove as shown in the figure below.
UpperSh.l( iQèZ^CDCZ)
LowprsiHrit (^CZXZZiCZ)
I
NORMAL
^ REPLACE
■ AC power operation
Connect the included AC mains cord to the AC socket in the
unit and your household AC mains outlet.
•The operation/battery check/AC connection indicator will
light during AC mains operation.
AC power cord
AC IN-
(Back of product)
Note:
To operate on battery power, unplug the AC mains
cord from the household AC mains outlet and the AC
socket on the unit.
AC power outlet
■>©
■ Car Battery Operation
1. Insert the plug of the car battery cord into the DC Input
Jack.
2. Plug the other end into the cigarette lighter socket in your
car.
Upon plugging the car battery cord into the DC Input
Jack, the unit will automatically switch from internal
battery to car battery operation.
DC IN 13.2 V
©
(12-15 V)
Bottom Shelf
Car battery cord
(not included)
0
^Cig
Cigarette
lighter
liah
socket
Page 10

PRECAUTIONS
•If the set Is not used for a long period of time or Is
used only from an AC mains source, remove all the
batteries to prevent potential damage due to possible
battery leakage.
•Avoid using or placing this unit near sources of heat. Do
not leave it in an automobile exposed to direct sunlight for
a long time with the doors and windows closed as this may
deform the cabinet.
•Avoid cuts, scratches, or poor connections in the AC
mains cord, as they may result in possible fire or electric
shock hazard. Also, excessive bending, pulling or splicing
of the cord should be avoided.
•Do not unplug the AC mains cord by pulling on the cord. To
do so may cause premature failure or shock hazard.
•Do not operate the set on AC mains in a bathroom, as a
potential shock hazard may result.
To prevent possible damage to this unit
•Load new batteries with their polarities (0 and 0)
aligned correctly.
•Do not apply heat to batteries, or internal shortcircuit may occur.
•If this unit is not to be used for a long period of time,
or used on AC mains supply, remove all batteries
and store them in a cool and dry place.
• Remove spent batteries immediately.
•Do not use old and new batteries together. Also
never use an alkaline battery with a manganese
battery.
•When not in use, disconnect the AC mains cord from the
AC mains outlet.
Max. 40'C
Operation switch (OPR/BATT-STDBY (!))
Press to switch the unit from on to standby mode or vice
versa. In standby mode, the unit is still consuming a small
amount of power.
WARNING:
TO REDUCE THE RISK OF FIRE OR ELECTRIC
SHOCK, DO NOT EXPOSE THIS APPLIANCE TO
RAIN OR MOISTURE.
BASIC OPERATING PROCEDURE
■ XBS system (Extra bass system)
When the XBS level control is adjusted, the level of the
dynamic low frequency sound range is boosted.
Using this system with the tone control helps you to get
more dynamic sounds.
■ Graphic equalizer
It allows you to tailor the frequency response of the unit to
compensate for room acoustics and other factors which
affect frequency response. The overall tone can be altered
by adjusting the controls which control the following fre
quency bands:
330 Hz, 1 kHz, 3.3 kHz, 10 kHz.
Positioning the control to the "-t-" side of the detent will
amplify the corresponding frequency band; theside will
attenuate it.
■ After use
Be sure to reduce the volume level, and turn off by pressing
the operation switch.
Headphones connection
(not included)
•Avoid listening for prolonged periods of time to prevent
hearing damage.
•Speakers are automatically cut off when the headphones
are connected.
10
Page 11

SPEAKER SYSTEM CONNECTION
This unit can be used as a one-piece portable stereo radio cassette recorder, or a three-piece component system, by attaching or
detaching the speaker system.
•Before attaching or detaching the speakers, be sure to disconnect the speaker cables from the speaker terminals.
•Be sure to press the operation switch to turn off the unit before connecting/disconnecting the speaker cables.
■ Attaching the speakers
1. Align the speaker with the main unit as shown in the
figure, interlock the grooves and press down.
2. Connect the colored speaker cables to the same colored
speaker terminals.
■ Detaching the speakers
1. Unlock the speaker release levers by pulling them in the
direction shown below, and slide up each speaker.
2. Connect the speaker cables to the speaker terminals.
When using the unit with the speakers attached, wind
the speaker cables as shown.
Note:
Since a strong magnet is used for the speaker, keep
magnetized commuter passes, tickets or personal
credit cards, recorded tapes, watches, etc. away
from the set. The speaker magnet in the set may
damage them.
11
Page 12

PLAYING A DISC
■ Sequential play
1. Press the operation switch to turn on the unit.
2. Press the “CD” button of the function select buttons.
CD mode indicator will appear.
d li
(VO
“No disc” is displayed if the disc has not been loaded.
3. Press the CD open/close button and load a disc. Press
the CD operVcIose button to close the disc tray.
When the disc tray is closed, the disc rotates, and both
the total number of tracks and the total playing time
appear on the display.
Total number of tracks Total playing time
If you press the play button instead of the CD open/close
button after inserting a disc, the tray will close and play
will start directly from the track 1. But the total number of
tracks and total playing time will not be displayed.
4. Press the play/pause button.
The first track on the disc will start to play.
The track number being played will appear on the
display.
Notes:
•When playing a compact disc near a tuner or TV, it
may cause noise in the broadcast, or disturbance of
the TV picture. When it occurs, separate the unit
from the TV or tuner set as far as possible.
•Do not place any object in front of this unit as it may
hinder the opening and closing of the disc tray.
•When pressing the operation switch while the disc
tray is open, the unit automatically closes the disc
tray, and then switches the power off (auto close
function).
■ Direct access play
A disc can be played from a specific track to the end of the
last track.
1. Press the skip/search button or^P-/^H) to
specify the desired track number.
Press the skip/search button repeatedly until the desired
track appears.
2. Press the play/pause button.
Play will begin.
nn I
UU I
Track number Playing time per track
1
1 n 'n (
1 UU t
5. Adjust the volume and balance.
6. Adjust the graphic equalizer and S-XBS level controls to
desired setting.
•To temporarily stop the disc
Press the play/pause button during disc play.
The playing time display will start to flash.
Playing time display flashes
When the play/pause button is pressed again, disc play will
resume from where it was previously stopped.
•To stop disc play
Press the stop/clear button.
The disc will automatically stop when all the tracks have
been played.
12
Page 13

c
■ Program play
up to 16 tracks can be programmed.
1, Press the skip/search button or ►►/►►!) to
specify the desired track number.
Press the skip/search button repeatedly until the desired
track appears.
2. Press the memory/recall button.
The play sequence is first indicated and after about
2 seconds, the time of the whole play sequence is
displayed.
□ - n /
IPGtil
Program indicator
Total playing time for specified tracks
3
n
3
U (
f*U Q
t-n J
PLAYING A DISC
•To confirm the programmed track
The tracks which have been programmed and the play
sequence can be checked for about 1 second when the
memory/recall button is pressed in the stop mode.
M Clearing a program
•Clearing all the programmed tracks
(Cancelling the programmed play mode)
1. Press the memory/recall button in the stop mode.
The program indicator will start to flash on the display for
several seconds.
2. Press the stop/clear button while the program indicator is
flashing.
The program indicator goes out and the programming is
cleared.
•Clearing only the track programmed last
Press the stop/clear button in the stop mode.
Each time the button is pressed, the track programmed last
can be cleared in sequence.
Example; When tracks 3, 5 and 7 have been programmed,
the tracks will be cleared in the sequence of 7, 5 and 3 each
time the stop/clear button is pressed.
The programmed mode will be cancelled if you open the
disc tray.
3. Repeat the steps 1 -2 to be played in sequence.
ono
f
IPflMl
"—:—” appears on the time display when the total play
time of the programmed tracks exceeds 120 min 0 sec,
or track no. 21 and above have been programmed.
"FULL" appears and flashes on the display when the
program memory is already full. This is to indicate that no
more additionai track can be programmed.
4. Press the play/pause button.
Play starts in the programmed sequence.
IPflUi
•To stop the program play
Press the stop/clear button.
Play will stop automatically when all the programmed tracks
have been played.
p
IP6MI 1
(Play will stop and the programmed memory will be
retained.)
J‘U o
nn 1
I
U'U t
Jub
Note:
It is not possible to clear only a track located in the
middle of the program (such as the third of 5 tracks).
13
Page 14

PLAYING A DISC
■ Skip function
During disc play, press one of the skip/search buttons
momentarily until the desired track has been located.
•When you wish to listen from the beginning of the
track being played...
Press the button once.
For example, if you press the button while the
track 3 is being played, the disc will be played from the
beginning of the track 3.
•When you wish to skip the track being played and
listen to the next track...
Press the button once.
For example, if you press the button while the
track 3 is being played, the disc will be played from the
beginning of the track 4.
3
tnn
tub
m Search function
While the track and time are displayed, press and hold
one of the skip/aearch buttons during the disc play.
Release the button when the desired point has been
reached.
►►/►N : Pickup moves forward,
: Pickup moves backward.
The pickup moves slowly at first and then rapidly if the
button is held down for more than about 1.5 seconds.
Notes:
•During program play, you can only search the track
being played.
•If you release the button immediately, the unit will
go into the skip function.
■ Repeat play
This function repeats playing all of the tracks.
In the program play mode, the tracks are played again in the
programmed sequence.
Press the repeat button and then press the play/pause
button.
The repeat indicator appears on the display.
4^
nn t
UU f
•When you wish to skip several tracks...
Repeatedly press the skip/search button. (Check the track
number on the display.)
During programmed play
The tracks are skipped in the programmed sequence.
Repeat indicator
•Playing one track repeatedly
First select the track with the programmed play function and
press the repeat button and then play/pause button.
•Clearing the repeat play function
Press the repeat button again.
(The repeat indicator goes out.)
14
Page 15

i:
■ Manual tuning
Use tuning buttons to tune the radio to the desired broad*
cast frequency. The frequency changes up or down, each
time the or button is pressed, respectively. The
increment of each step is determined by the band selected.
1. Press the operation switch to turn on the unit.
2. Press “TUNER” button of the function select buttons.
3. Press the band button to select the desired radio band
(FM or AM).
The corresponding band indicator will appear.
FM
4. Tune in the radio station using the tuning buttons.
Press the “+” or button for each step required until
the desired frequency appears on the display.
When tuning the station, the frequency display will
change as follows:
FM: 50 kHz step
AM: 9 kHz step
For FM reception, press the FM mode button to select
the “ST” (stereo). The stereo indicator will appear on the
display when the FM stereo broadcast is being received.
P ■»£
o :
Hu
RADIO
■ FM auto tuning
By pressing the tuning button (- or +) down for a few
seconds then releasing, the microprocessor automatically
tunes into the next station with a strong frequency.
1. Follow the same procedures as described in steps 1-3
of “Manual tuning".
2. Press the or tuning button for more then
1 second.
While tuning (the display is changing), the muting oper
ates and the sounds cannot be heard.
If the correct reception cannot be done by the FM auto
tuning, the manual tuning is recommended.
3. Follow the same procedures as described in steps 5-6
of “Manual tuning".
tf FM stereo reception is poor (excessive noise, the
stereo indicator flickers), press the FM mode button to
change to the monaural position (the stereo indicator
disappears). This will reduce the noise and provide clear
reception. However, the broadcast cannot be heard in
stereo.
Tuning indicator Stereo indicator
The stereo indicator disappears in monaural mode.
5. Adjust the volume and balance.
6. Adjust the graphic equalizer and S-XBS level controls to
the desired setting.
15
Page 16

■ Memory presetting
You can memorize the broadcast frequencies for up to
14 radio stations into the unit's preset memory.
1. Tune to the desired broadcast using the manual tuning or
FM auto tuning.
2.
Press the memory button.
The program indicator in the display, will flash for several
seconds. If the program indicator stops flashing, repeat
this step, otherwise the broadcast frequency will not be
stored in the next step.
3. Press one of the preset memory channel buttons to
select the channel number.
4. Press the memory button again.
The program indicator will stop flashing and the selected
channel number will indicate on the display.
RADIO
™ / 88.
msamsm
5. Repeat steps 1 -4 to program a station into each of the
remained memory channels.
When a new frequency has been programmed, the
frequency previously programmed in the channel will be
cancelled,
tn
tu
■ Memory tuner operation
Press one of the preset memory channel buttons to receive
your desired radio station.
■ Antennas
FM:
Pull out the telescopic antenna and adjust its length and
angle for optimum reception.
AM:
The sensitive ferrite core antenna inside the set will provide
excellent AM reception in most areas. For optimum recep
tion, turn the set in the direction which gives the best results
since the ferrite core antenna is directional.
■ Most recent memory
The most recent memory system “remembers" the broad
cast station last tuned to when the radio is switched “OFF”
or another function is selected. The station will be automaticaily tuned when the unit is switched "ON” or the radio
function is selected.
16
Page 17

TAPE PLAYBACK
This unit has a dual cassette system, which means that a
tape can be played back with both deck 1 and deck 2.
Use nomnal type of cassette tape only.
■ Single tape playback
1. Open the cassette compartment cover by pressing the
stop/eject button. Insert the tape, and then close the
cassette compartment cover.
Note:
Make sure the exposed part of the cassette tape
is face down. If it is upside down, the cassette
compartment cannot be ciosed. Do not try to force
it shut.
2. Press the operation switch to turn on the unit.
3. Press "TAPE” button of the function select buttons.
Tape display will appear on the display.
4. Press the playback button to begin the playback.
5. Adjust the volume and balance.
6. Adjust the graphic equalizer and S-XBS level controls to
desired setting.
Note:
If you press deck 1 and deck 2 playback buttons
simultaneously, deck 2 has priority. Consequent
ly, when playing back deck 1, check that the deck
2 playback button is not pressed.
■ Automatic playback relay (deck 2 to deck 1 )
When deck 2 playback has finished, deck 1 playback starts
automatically.
1. Insert the playback tapes into deck 1 and deck 2.
2. Press the deck 2 playback button.
3. Press the deck 1 pause button, then press the deck 1
playback button.
■ Full auto-stop
During playback, recording, fast forward or rewind when the
tape reaches its end, the automatic stop system will release
the operation buttons.
■ Fast forward and rewind
The tape will move rapidly fonvard when the fast forward/cue button is pressed.
The tape will rewind rapidly when the rewind/review button
is pressed.
Note:
Do not press the playback button during fast forward
or rewind, as this may jam the tape. Always press the
stop/eject button first, between functions.
■ Cue and review
If the fast forward/cue button (or rewind/review button) is
pressed during playback, the recorded sound on the tape
can be monitored at a fast speed.
When the button is released, playback will resume.
•To stop the playback
Press the stop/eject button.
•To Stop the playback temporarily
Press the pause button.
To resume tape playback, press the pause button again.
17
Page 18

RECORDING (0eck1)
■ Edit pause recording
(Pauses disc play at the end of side A during edit recording)
The edit pause function will prevent recording part of one
track on side A and the rest of the track on side B. For
example, when recording on a 46 min, tape, tracks recorded
on side A and B are not to exceed 23 min. each. (The unit
displays the total time of the tracks programmed.) The unit
will stop recording between sides A and B to allow you to
change tape sides.
The edit pause function cannot be used together with CD
repeat play.
This function does not operate during the tape playback
mode.
Before operation:
Use normal type of cassette tape only.
Check that the tape’s record prevention tabs are intact.
Take up the leader tape in advance.
1. Press the operation switch to turn on the unit.
2. Press the “CD" button of the Kjnction select buttons.
3. Press the CD open/close button to load the CD. Press
the CD open/close button to close the disc tray.
4. Press the stop/eject button of the deck 1 to insert the
recording tape, then close the cover.
5. Press one of the skip/search buttons to specify the
desired track to record on side A, then press the
memory/recali button.
The program indicator will appear and total pla^ng time
will be displayed.
"—;—'' appears on the display when track no. 21 and
above have been programmed.
6. Repeat the step 5 for as long as the recording time on
one side of the tape is not exceeded.
Try reserving one more track to see whether it will fit in.
If it exceeds the recording time on one side of the tape,
press the stop/clear button to cancel the track reserved
last.
f
D DD
Í
IMUl
7. Press the edit pause button (the pause indicator will
appear), and then press the memory/recali button.
8. Press one of the skip/search buttons to specify the
desired track to record on side B, then press the
memory/recali button.
The total time for the tracks to be recorded on side B of
the tape is displayed next.
Repeat this step as long as the recording time on one
side of the tape is not exceeded.
9. Press the record button of the Deck 1.
The disc play will begin in selected sequence, and
recording will begin. The CD player is automatically set
to the pause mode when the tracks resenred on tape
side A have been played through. The tape continues in
the recording mode (although no sound is recorded)
until its end.
J CC
Pause indicator
• fC
18
Program indicator Total playing time
tn
lU
IPflUl
10, Press the stop/eject button to turn over the tape, and
then press the record button.
A non-reoorded passage of about 13 seconds will be
automatically created. Then, the disc play of the tracks
resenred on tape side B will start and recording will
continue.
nn /
U‘U 1
•To stop the recording
Press the stop/eject button of deck 1 and the stop/clear
button of the CD section.
•Synchro etart function
This unit is provided with a synchro-start function which
starts disc play when the record button is pressed.
Page 19

RECORDING
• Recording from CD without edit pause func
tion
t. Press the operation switch and then press the “CD"
button of the function select buttons.
2. Press the CD open/close button to insert a CD. And
press the CD open/close button to close the disc tray,
3. Press the stop/eject button of the deck 1 to insert the
recording tape.
4. Press the record button.
The recording and disc play will begin.
Do not press the skip/search button during recording.
Monitor sound will be also recorded.
■ Recording radio broadcasts
1. Follow the procedure described in "RADIO".
(See pages 15 and 15.)
2. Press the stop/eject button of the deck 1 to insert the
recording tape, then close the cover.
3. Press the record button.
Recording will begin.
To stop the recording, press the stop/eject button.
The "taiiored" frequency response, as set by the S*XBS
and graphic equalizer controls, is not recorded onto the
tape. This allows you to listen to the tape on different
systems and in different environments, and still be able
to tailor the playback frequency response of the tape.
•Edit recording speed/beat proof selector
When an AM broadcast is recorded, the edit recording
speed/beat proof selector can be used to reduce unwanted
“beat" signals (whistle) which are sometimes present. Set
the selector according to whichever position ("NOR/1 ” or
“HIGH/II) beat reduces these “beat" signals.
■ Automatic recording level
This unit has an automatic level control (the recording level
is automatically adjusted).
■ Pause button
The pause button can be used to temporarily stop the tape
movement during recording or playback.
Before beginning a recording, first press and lock the pause
button. Then, press the record button. (The tape will not
move.) When ready to record, press the pause button to
release it. This will start tape movement for immediate
recording.
■ To erase recorded sound
When recording, previously recorded sound on the tape will
be erased automatically.
To erase a tape without re-recording, use the following
procedure.
Be sure to disconnect the mixing microphone from the
mixing microphone jack before following the steps.
1. Press the operation switch to turn on the unit.
2. Press the “TAPE” button of the function select buttons.
3. Insert the tape to be erased into the deck 1 by pressing
the stop/eject button.
4. Press the record button.
■ Synchronized editing (from deck 2 to deck 1)
When the deck 1 pause and record buttons are pressed,
tape editing starts by pressing the deck 2 playback button.
1. Insert the playback tape into deck 2 and the editing tape
into deck 1.
2. Follow the procedure described in steps 2 and 3 of
"Single tape playback". (See page 17.)
3. Select the editing speed by setting the edit recording
speed/beat proof selector.
NOR/1: Normal speed
HIGH/II: Highspeed
4. Press the deck 1 pause button, then press the record
button.
5. Press the deck 2 playback button.
Editing is started by means of the synchro start function.
Do not press the "CD" or “TUNER" button of the func
tion select buttons during editing.
Do not change the editing speed during editing or the
playback sound may flutter.
Some TV sets generate noise that could be recorded
during editing. To prevent the possibility of this, do not
use this unit closer than 1.5 m to a TV set.
•To stop the editing
Press the deck 1 and deck 2 stop/eject buttons.
Note:
Do not use the pause button to stop the tape for a
long period of time.
■ Monttoring
The monitor system enabies you to listen, through the
speakers or headphones, to the sound as it is being
recorded.
If it is necessary to adjust the volume level of the sound
being monitored, do so by using the volume control.
19
Page 20

MIC MIXING CASSETTE TAPES
Mixing is the combination of a voice or instrumental sound
(through a microphone connected to the mixing microphone
jack) and the sound from a CD, tape or radio.
■ Mixing playback
1. Connect the mixing microphone to the mixing micro
phone jack.
2. Set the desired source to playback mode.
■ Mixing recording
•with cassette tape
1. Connect the microphone to the mixing microphone jack
after reducing the voiume level.
2. Insert a tape for recording in deck 1, and a tape for
playback in deck 2.
3. Press the “TAPE" button of the function select buttons.
4. Set the edit recording speed/beat proof selector to
“NOR".
5. Follow the procedure described in steps 4-5 of “Syn
chronized editing”. (See page 19.)
•With other source
1. Connect the microphone to the mixing microphone jack
after reducing the volume level.
2. Insert a tape for recording in deck 1.
3. Set the desired source playback mode.
4. Press the record button.
•Recording through mixing microphone
1. Connect the microphone to the mixing microphone jack
after reducing the volume level.
2. Insert a tape for recording in deck 1.
3. Set the edit recording speed/beat proof selector to
“NOR”.
4. Press the "TAPE” button of the function select buttons.
5. Press the record button.
■ Cassette tapes exceeding 90 minutes
These tapes are handy for their long playback and recording
time but be careful about repeatedly stopping and starting,
rewinding and fast forwarding these tapes in short intervals
as they are thin, tend to stretch and may become entangled
in the machine.
If the tape loosens, take up
the slack by turning the reel
in the proper directions.
Do not handle, or pull the
tape out of the cassette.
Notes:
• Use normal types of cassette tapes only. If other
tapes are used, you may not obtain optimum per
formance.
•Cassettes, both recorded and unrecorded, should
not be stored in locations with high temperature,
high humidity or direct sunlight. Never place a
recorded cassette near a magnetic source, such as
a magnet or a TV set as this may affect tape
performance.
RECORD PREVENTION TABS
Cassettes are provided with plastic tabs (as illustrated) to
prevent accidental erasing of a recording.
Recordings can be made only when the tab is intact. There
is one tab for each side (track) of the tape. To presen/e a
valuable recording, the tab(s) should be broken off with a
small screwdriver.
If you want to record on a track whose tab has already been
broken off, use attach tape to cover the hole, and record.
Notes:
•When not using a microphone, disconnect it from
the microphone jack.
•While using the microphone, howling or squealing
may sometimes occur. When it occurs, separate
the microphone from the speaker, or decrease the
volume level.
•When the compact disc play stops or pauses while
enjoying the microphone mixing, the voice from the
speaker also stops.
20
Attach tape
Page 21

NOTES FOR CD OPERATION
• Do not attempt to take this unit apart or
attempt repairs yourself.
This unit is a very intricate device that uses a laser pickup to
retrieve information from the surface of compact discs. The
laser is carefully shielded so that its rays remain inside the
cabinet. Therefore, never try to disassemble the player or
alter any of its parts since you may be exposed to laser rays
and dangerous voltages.
Laser products:
Wave Length—780 nm
Laser Power—No hazardous radiation is emitted
with safety protection.
■ The top and rear panels of the unit become
warm while a disc Is being played.
This Is one way in which the unit dissipates heat and is not a
malfunction.
■ Handle this unit with care when carrying or
storing, do not subject it to any strong bumps
or impacts.
Always remove the disc before storing the unit for any
period of time.
CONCERNING COMPACT DISCS
■ Turn down the volume control.
Compact discs have much less noise and a much wider
dynamic range. Consequently, you may turn the volume up
too high if you adjust it by trying to listen to surface noise as
you might with a phonograph record. To prevent this prob
lem, turn the volume down, raising it as desired only after
the music has started playing.
■ Time displayed by this unit may differ slightly
from the track time in the disc liner note.
The liner note included with each compact disc lists the
playing times of each track. Since the times calculated by
this unit include pause intervals, the displayed time may
differ from the liner note time by this amount.
■ Do not place this unit near a tuner or tele
vision.
This unit uses high frequency signals and can cause
interference with other radio and television reception. If this
occurs, move this unit further away from the radio or
television or change from an interior to an exterior television
antenna.
Observe the following precautions to enjoy the same out
standing performance from your compact discs for many
years.
n COMPACT
■ Handling precautions
Only compact discs having this mark
can be used with this player. DIGITAL AUDIO
• Hold compact discs by the edges so the surface is not
soiled with fingerprints.
•Be careful not to scratch the surface with fingernails or
other sharp objects, particularly when inserting and remov
ing discs from their cases.
•Do not bend the disc.
•Do not use record cleaning sprays or static electricity
prevention liquids.
•Do not wipe with benzine, thinner or any other solvent. If
the surface is soiled, wipe gently with a soft, damp (water
only) cloth.
•When wiping discs, always move the cloth directly outward
from the center of the disc, not in a circular motion as with
standard phonograph records.
X
(In compact discs, circular scratches along a line of pits
are more likely to cause errors than straight scratches
across many lines of pits.)
•If the disc is brought from a cold environment into a warm
room, dew may form on the disc. Wipe this off with a soft,
dry cloth before using the disc.
• Do not try to dry discs with a hair dryer.
• Do not write on the labei side with a bail-point pen, hard
pencil or other writing utensil.
■ Storage precautions
•Be sure to store discs in their cases to protect them from
dust, scratches and warping.
•Do not place or store discs in the following places:
1. Locations exposed to direct sunlight
2. Locations with high humidity or a lot of dust
3. Locations directly exposed to a heat outlet or heating
appliance
4. in the glove compartment or rear ledge of an auto
mobile
21
Page 22

MAINTENANCE
ABOUT DEW
Dew is often seen as water built-up on the inside of
the windows in a warm room on a cold winter day.
Dew can also form inside this unit in a similar manner
in the following cases:
•Immediately after a heater has been turned on.
• In a steamy or very humid room.
•When the unit is suddenly moved from a cold
environment to a warm place.
If dew forms inside this unit, it may not operate
properly. To correct this problem, turn on the opera
tion and wait about 1 hour for the dew to go away.
■ Cleaning of tape heads
The head assembly, capstans, and pinch rollers are in
constant contact with the tape. If these parts are dirty, the
sound quality will be impaired. Get into the habit of cleaning
the parts regularly (after every 10 hours or so of use) in
accordance with the procedure outlined below.
1. Press the operation switch to turn off the unit.
2. Open the cassette compartment covers by pressing the
stop/eject buttons.
3. Clean them with a cotton swab.
Notes:
• If the heads are extremely dirty, clean them with a
cotton swab dampened with a little alcohol.
•Do not bring any type of mental objects or tools
such as magnetic screwdrivers in contact with the
head assembly.
•Do not clean the plastic cabinet with benzine or
thinner. Clean it with a solution of soap and water.
•Avoid spray-type insecticides. Some insecticides
contain chemicals that could cause cabinet defonnation.
22
Page 23

£2
01Л131Л1
Page 24

SPECIFICATIONS
■ Radio
Frequency Range:
FM; 87.50-108.00 MHz
AM; 522-1611 kHz
a Disc Player
Sampling Frequency:
Decoding:
Beam Source:
No. of Channels:
Frequency Response:
S/N;
Dynamic Range:
Wow and Flutter: Unmeasurable
D/A converter: MASH (1 BIT DAC) HEADPHONES; 320
44.1 kHz
16-bit linear
Semiconductor laser
(wave length 780 nm)
2 channel, stereo
20 Hz-20 kHz (0/-2 dB)
67 dB (1 kHz)
86 dB
■ Tape Recorder
Track System:
Recording System:
Erasing System:
Monitor System:
Frequency Range:
Normal;
4 track, 2 channel, stereo
AC bias Speakerbox; 170x271x188mm
AC erase
Variable sound monitor
20-14000 Hz
■ General
Power Requirement:
Power Output:
Speakers: 2 Woofer; 12 cm
Jacks:
Input;
Output;
Dimensions
(WxHxD);
Weight:
AC; 230-240 V, 50 Hz
Power consumption; 52 W
Battery; 15 V (Ten R20/LR20,
UM-1 batteries)
Memory Back-up for Computer;
6 V (Four R6/LR6, UM-3 batteries)
SOW... PM PO
2 Tweeter; 8 cm
MIC; 4 mV (2000)
SPEAKER; Woofer 2.7-80
Tweeter 8-160
641x272x207 mm
Main unit ; 300 X 272 x 207 mm
8.4 kg without batteries
Note:
Specifications are subject to change without notice.
Weight and dimensions are approximate.
MASH is a trademark of NTT.
Printed in Singapore
Matsushita Electric Industrial Co., Ltd.
Central P.O. Box 288, Osaka 530-91, Japan
RQT1927-B
F0493QO
 Loading...