

Page 1

Operating
Instructions
Stereo Radio Cassette Player
MODEL NO. RQ-V180
IGNI
Panasonic
Before connecting, operating or adjusting this product,
please read these instructions completely.
Page 2
[aI location of controls
Page 3

PRECAUTIONS
B
CASSETTE TAPES
O X
POWER SOURCE
D
B Battery Operation
DC IN3V
@4»
Two UM-3,
“R6/LR6” batteries
(not included)
3-
AC adaptor
(RP-AC33, optional)
Page 4

E CASSETTE INSERTION
BELT CUP
® Attaching
Clip to
your belt
-4-
®To remove
Page 5
MAINTENANCE
G
PLAY
-5-
Page 6

Thank you for purchasing the Stereo Radio Cassette Player
RQ-V180.
For optimum performance and safety, please read these instructions
carefully.
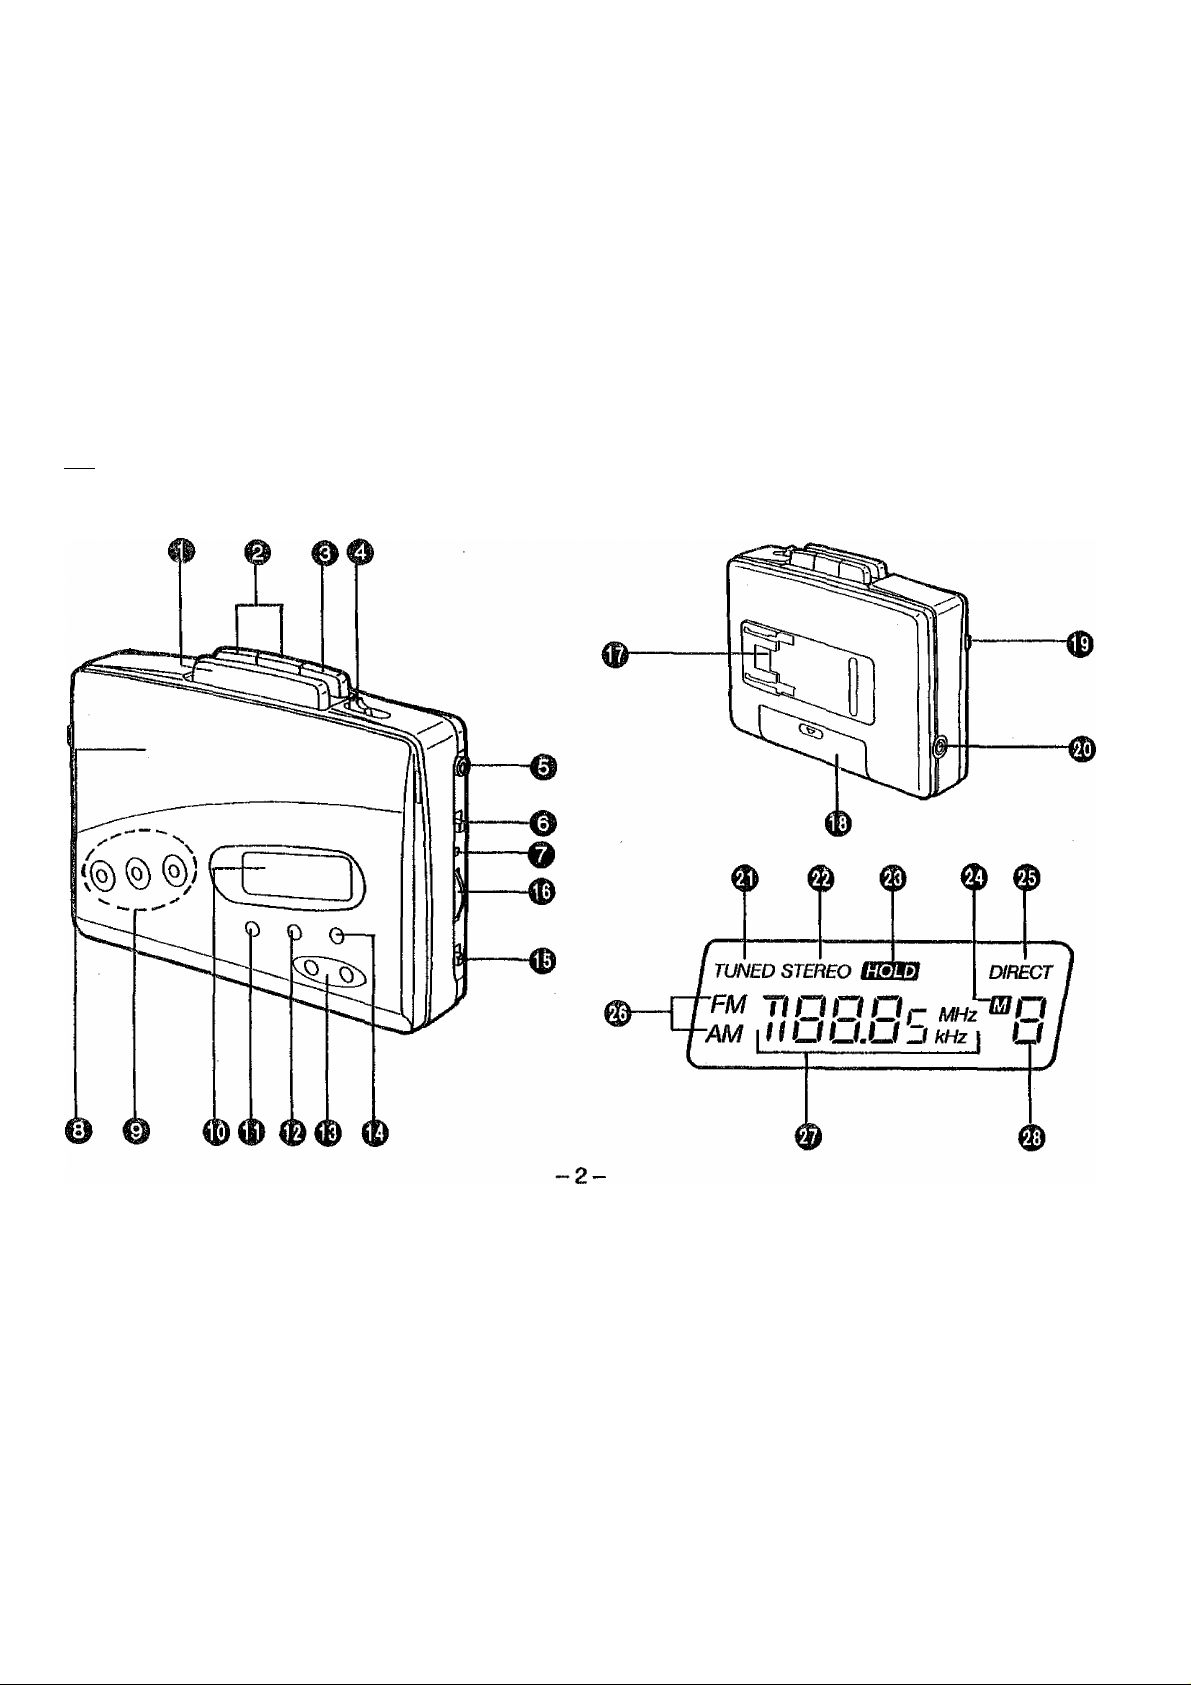
LOCATION OF CONTROLS (^o0)
0 Playback button (PLAY/^^)
© Fast buttons {fAS J/« • ►►)
© Stop button (STOP/H)
© Direction selector (DIR)
© Headphones jack ( f))
© Function selector (SELECTOR)
© Operation/battery check indicator
(OPR/BATT)
© Cassette compartment cover
m Direct tuning buttons (1,2,3)
© Display section
© ft/lemory select/memory scan button
(•M.SELECT/-M.SCAN)
0 Band select button (FM/AM)
© Tuning buttons (TUNING)
© Memory button (MEMORY)
© FM mode/tape selector
(FM MODE/TAPE)
© Volume control (VOLUME)
© Belt clip receptacle
© Battery compartment cover
© Hold switch (IholdI)
© DC input Jack (DC IN 3 V )
© Tuning Indicator (TUNED)
© Stereo indicator (STEREO)
© Hold indicator (|hold|)
© Memory Indicator ([p)
© Direct tuning Indicator (DIRECT)
© Band Indicators (FM/AM)
© Multi indicator
© Memory channel indicator
-6
Page 7

PRECAUTIONS {mm)
•If the set is not used for a long period of time
or is used only from an AC power source,
remove all the batteries to prevent potential
damage due to possible battery leakage.
•Avoid using or placing this unit near sources of
heat. Do not leave it in an automobile exposed
to direct sunlight for a long period of time with
the doors and windows closed, as this may
deform the cabinet.
•When not in use, disconnect the AC adaptor
from the AC power outlet.
CASSETTE TAPES (mm)
Cassette tapes, both recorded and unrecorded,
should not be stored in locations with high
temperature, high humidity or direct sunlight.
Never place a recorded cassette near a magnetic
source such as a magnet or a TV set as this may
affect tape performance.
Precautions for Listening with the
Headphones
•Do not play your headset at a high volume.
Hearing experts advise against continuous
extended play.
•If you experience a ringing in your ears,
reduce volume or discontinue use.
•Do not use while operating a motorized
vehicle, it may create a traffic hazard and is
illegal in many areas.
•You should use extreme caution or tempo
rarily discontinue use in potentially hazar
dous situations.
•Even if your headset is an open-air type
designed to let you hear outside sounds,
don’t turn up the volume so high that you
can’t hear what’s around you.
-7-
Page 8

POWER SOURCE (^^0)
•Battery removal
Press battery toward the 0 battery terminal
and remove it.
•Battery life
When the batteries are weak, the OPR/BATT
(operalion/batlery check) indicator will become
dim or turn off during operation, and this unit will
turn off to protecting the memorized contents.
Replace the new batteries. When replacing the
batteries, replace them within 30 seconds. (If not,
memorized contents will cancelled.)
When the power is turned off soon after increas
ing the volume, pressing the operation button or
turning on the radio, replace the batteries.
•AC Power Operation {m 0)
Connect the AC adaptor (Use only Panasonic AC
adaptor, RP-AC33, optional) as shown in the
figure.
Note:
To operate on battery power unplug the AC
adaptor unit from the household AC power outlet
and the DC input jack on the unit.
•If you leave the AC adaptor jack connected to
the DC input jack while disconnecting the AC
adaptor unit from the AC power outlet, the
memorized contents for radio will be cleared.
•When the Battery Indicator dims and you wish
to use the AC adaptor, be sure to connect the
AC adaptor after removing the spent batteries.
To Prevent Possible Damage to this Unit
•Load new battery with their polarities (0 and
0) aligned correctly.
•Do not apply heat to batteries, or internal
shortcircuit may occur.
•If this unit is not to be used for a long period
of time, or used on AC power source,
remove the batteries and store them in a
cool and dry place.
•Remove spent batteries immediately,
•Do not use old and new batteries together.
Also never use an alkaline battery with a
manganese battery.
8-
Page 9

Hold operation
Setting the hold switch to *‘HOLD” position will
hold the present condition, and reject the opera
tion of the front panel buttons.
This is useful to prevent unexpected operation.
(The hold indicator will appear on the display.)
Before operating the front panel button, be sure to
release the hold condition. (The hold indicator will
disappear.)
5. Press the + or - button to tune In your
favorite station.
The frequency display will change.
(AM step by 9 kHz, FM step by 0.05 MHz.)
When you listen to the FM broadcast, set the
FM mode selector to the proper position.
6. Adjust the volume using the volume con
trol.
To turn off the radio, set the function selector to
TAPE”.
1. Release the hold condition.
2. Connect the included stereo earphones
to the headphones jack.
3. Set the function selector to *‘RADIO”.
The OPR/BATT indicator will illuminate and
the frequency display will appear.
4. Press the band select button to select the
desired radio band (FM or AM).
B FM Mode Selector
To receive FM stereo broadcasts, set the FM
mode selector to “ST”. If reception is poor
(excessive noise), set to “MONO”. This will
reduce the noise and provide clear reception,
however, the broadcast will not be heard in
stereo.
•When receiving the FM stereo broadcasts, the
stereo indicator will appear.
-9-
Page 10

m
Antennas
FM:
The stereo earphones cord serves as the FM
antenna, hence be sure to have it extended, not
coiled.
AM:
The built-in ferrite core AM antenna is directional.
It may be neccessary to turn the unit to obtain
optimum reception.
Be sure to have the set in an horizontal position
when you listen to AM broadcasts. If you use the
radio in a upright position, it may not function
adequately.
■ How to memorize the broadcasting
station
To memorize into direct tuning buttons
3 stations FM and AM can be memorized.
1. Receive the station to be memorized.
2. Press the memory button.
•The memory indicator will flash on and off for
10 seconds.
3. During flashing (for 10 seconds), press one
of the direct buttons to be memorized.
(Two beeps will be emitted.)
•The direct indicator and memory channel
number will appear.
•The memory indicator will light.
10-
Page 11

To memorize Into memory channels from 1 to
6
12 stations can be memorized (6-FM and 6-AM
stations).
1. Receive the station to be memorized.
2.
Press the memory button.
•The memory indicator will flash on and off for
10 seconds.
3.
During flashing (for 10 seconds), press the
memory select button to select the memory
channel (1-6) to be memorized.
•The memory channel number will appear
and each time the memory select button is
pressed, the memory channel number will
change from 1 to 6 and return.
4.
Press the memory button to enter the
memory.
(Two beeps will be emitted.)
•The memory indicator will light.
The previous memory will be cleared when
the new memory is entered into the same
memory channel.
■ How to tune in the memorized station
Direct tuning
1. Set the function selector to “RADIO”.
2. Release the hold condition.
3. Press one of the direct tuning buttons to
receive your desired station.
4. Adjust the volume using the volume con
trol. .
Memory channel tuning
1. Set the function selector to
2. Release the hold condition.
3. Select the desired radio band using the
band select button.
4. Press the memory select button until the
desired memory channel number appears.
5. Adjust the volume using volume control.
*RADIO’
11
Page 12

Memory scan
Once the stations have been preset into the
memory select button for channels 1 through 6,
the programs of each of those stations can be
heard for several seconds in turn simply by
pressing the memory scan button. This function
comes in handy for checking out what kind of
broadcasts are now being beamed by the preset
stations.
1. Press the memory scan button. (For more than 1 second.)
The channel will change in order 1->2—>
>6—j-l—>to each broadcasting for
about a few seconds, (display flashes)
2. When your desired memory channel is
displayed^ press the memory scan button
once again.
Last station recall
This memory functions when the radio is off.
When the radio is turned on, the frequency
received before it was turned off is tuned in again.
TAPE PLAYBACK
1. Open the cassette compartment cover with
your hand. Insert a cassette as shown In
the figure, and then close the cassette
compartment cover. (^[|D
2. Connect the included stereo earphones
to the headphones jack.
3. Set the function selector to “Iof^ TAPE”.
4. Press the playback button, and playback
will begin.
5. Adjust the volume control.
•To stop the playback, press the stop button.
Notes:
•Do not open the cassette compartment
cover during playback.
•If you set the function selector to “RADIO”
during playback, the playback button wilt not
be released although the motor has stopped.
Press the stop button to release the play
back button.
-12
Page 13

S
Fast Forward and Rewind
The tape will rapidly advance in the forward or
reverse direction when one of the fast buttons is
pressed.
Notes:
•When the tape reaches the end by pressing
one of the fast buttons, the tape movement
stops, but the unit is not turned off. Do not
leave the set in this condition. Be sure to
press the stop button.
•Do not press the playback button during fast
forward or rewind, as this may jam the tape.
Always press the stop button first, between
functions.
H Tape Selector
Set the selector to the appropriate position
according to the type of tape being used.
CrOz fMTq: Metal tape/high bias chromium tape
or equivalent
NOR: Low bias ferric oxide tape
m
Auto Reverse (Continuous Playback)
When the tape comes to the end of its travel, the
auto reverse system functions, and the tape
direction changes automatically to start playing
the opposite side of the tape.
•The cassette tape will run continuously, chang
ing from forward to reverse, then back again,
etc., until the stop button is pressed.
n Manual Reverse
Select the playback side, forward or reverse, by
setting the direction selector to “FWD" or "REV”.
13
Page 14

BELT CUP (^E)
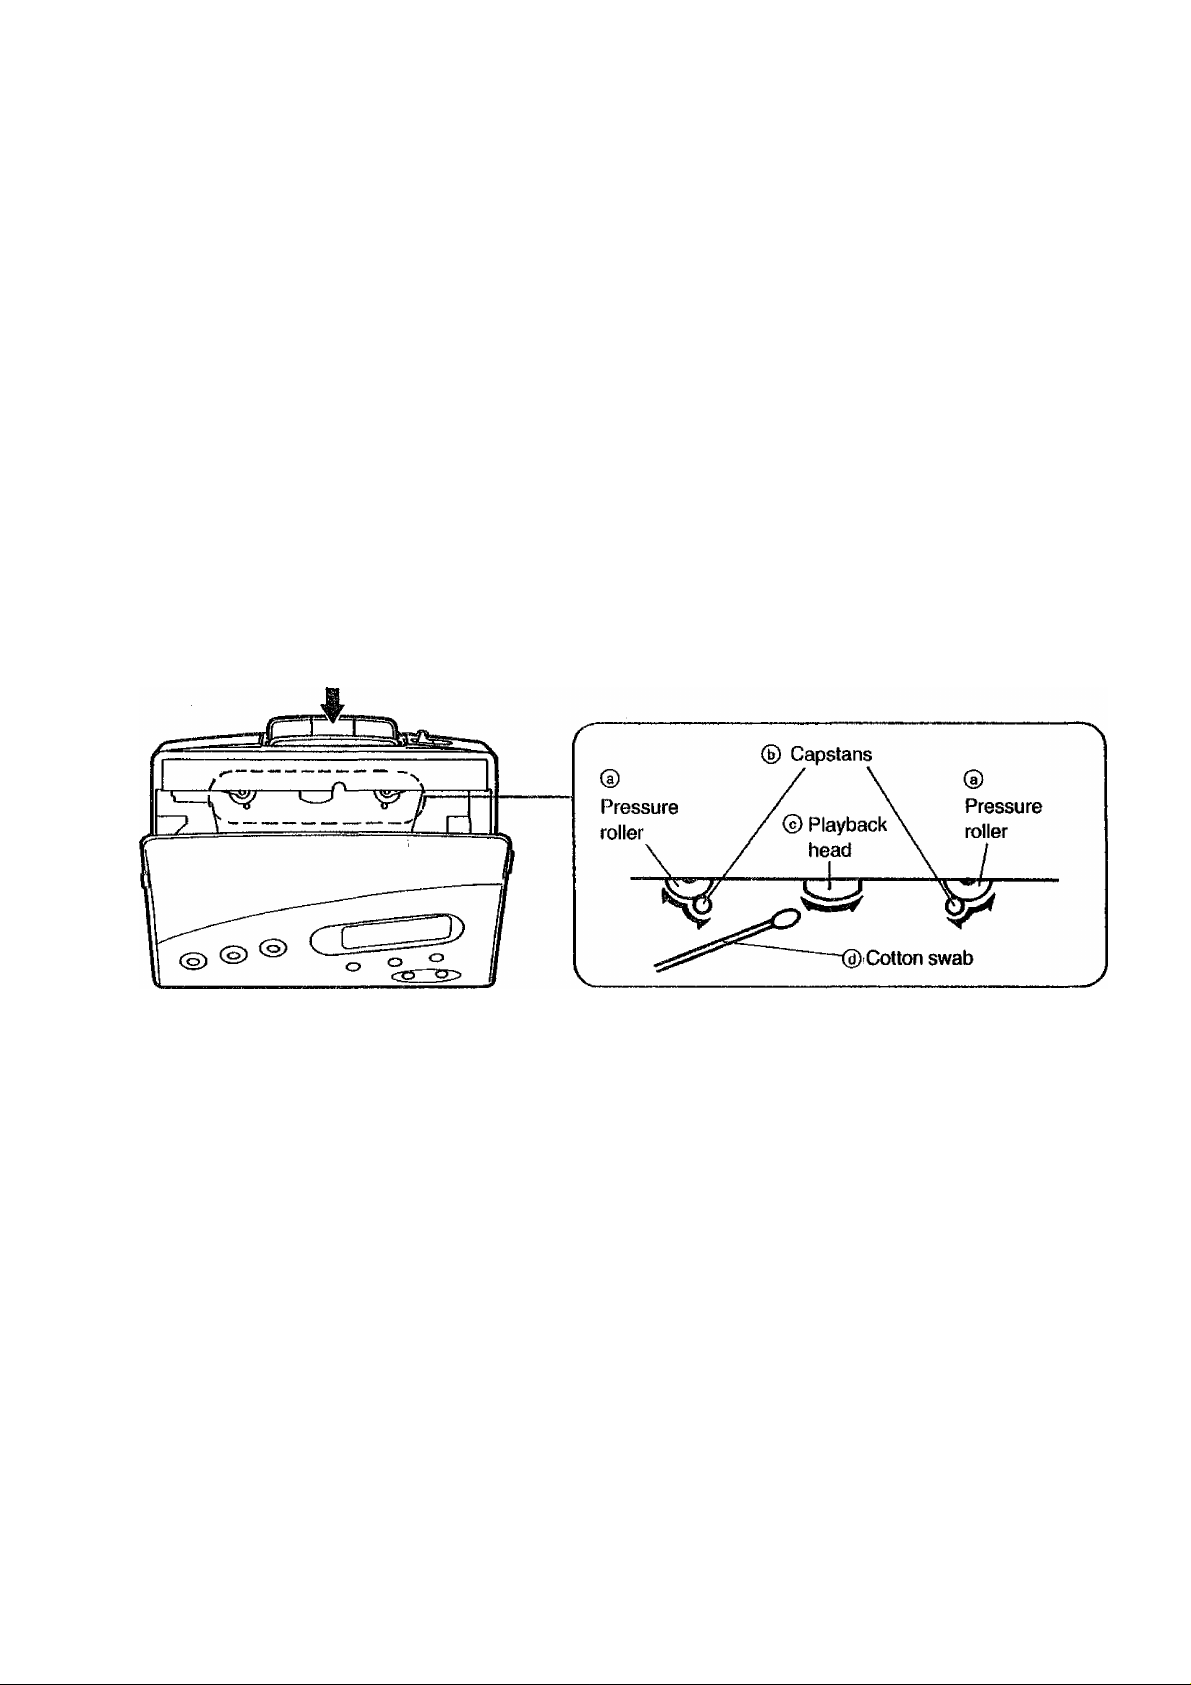
MAINTENANCE (^E)
•If the head assembly is extremely dirty, clean
them with a soft cloth dampened with a little
alcohol.
•Do not bring any type of metal objects or tools
such as magnetic screwdrivers in contact with
the head assembly.
•Do not clean the plastic cabinet with benzine or
thinner. Clean it with a solution of soap and
water.
•Avoid spray-type insecticides. Some insecti
cides contain chemicals that could cause cabi
net deformation.
14-
Page 15

r
■ SPECIFICATIONS
Radio Frequency Range:
Power Requirement:
Power Output:
Frequency Range:
Tape Speed:
Jacks:
Input;
Output;
Dimensions:
(WxHxD)
Weight:
Design and specifications are subject to change without notice.
FM; 87.5-108 MHz
AM; 522-1611 kHz
Battery; 3 V (two UM-3,“R6/LR6” batteries)
AC; with optional AC adaptor RP-AC33
30 mW (15 mWx 2)... RMS (max.)
40-14,000 Hz (Normal, CrOz/Metal)
4.8 cm/s
DC IN; 3V
EARPHONES
86.5x121.2x33.6 mm
265 g without batteries
15-
 Loading...