

Page 1
D
C
b
RL
Plug type: 3.5 mm stereo
A
OPEN
1
3
2
Two R6/LR6, AA, UM-
batteries (not included
-
-
+
+
1
2
STEREO RADIO CASSETTE PLAYER
Extra
Heavy Duty
SIZE
D
Alkaline
SIZE
Heavy Duty
SIZE
D
RQ-SX58VA
FM/AM
TUNER
AUTO
REVERSE
S
T
E
RE
O
RA
D
IO
C
ASSETTE
PLA
Y
E
R
X
B
S
1
T
A
P
E
/
OFF/
/REW
HOLD
XBS
P
R
E
SE
T
2
3
4
5
/ FF
OPEN
RQ-SX58VA
Operating Instructions
Instrucciones de funcionamiento
Nhctpykunr go ˙kcgjyataunn
OPEN
Before connecting, operating or adjusting this product, please read these
instructions completely. Please keep this manual for future reference.
Supplied Accessories
≥Stereo earphones
Specifications
Radio frequency range:
FM: 87.50–108.00 MHz (0.05 MHz steps)
AM: 522–1629 kHz (9 kHz steps)
Power output: 6 mWi6 mW (RMS…max.)
Frequency range
(Normal, High/Metal): 40–18000 Hz
Tape speed: 4.8 cm/s
Jack:
Output: PHONES: 16 ≠
Power requirement:
Battery: DC 3 V
Dimensions (WtHtD):
Mass (without battery): 140 g
Matsushita Electric Industrial Co., Ltd. pry |
Web Site: http://www.panasonic.co.jp/global/
520–1630 kHz (10 kHz steps)
(j6 dB)
(Two R6/LR6, AA, UM-3 batteries)
111.7k80.1k26.7 mm
Play time:
(When used in hold mode, at 25 oC, on a
flat, stable surface)
Panasonic alkaline dry
cell battery: Tape: About 30 hours
The play time may be less depending on
the operating conditions.
Note
Specifications are subject to change without
notice.
Mass and dimensions are approximate.
Radio: About 45 hours
RQTT0511-1G
F1202TJ2014
ONLY FOR AUSTRALIA/NEW ZEALAND
1. The product is warranted for labour and parts for twelve (12) months from the date of purchase.
2. This Warranty is for normal domestic use only and excludes any defect or injury caused by or resulting from
misuse, abuse, neglect, accidental damage, improper voltage, vermin infestation or any alteration which affects the reliability or performance of the unit, not attributable to faulty manufacture, parts and labour.
3. This warranty does not cover the following items unless fault or defect being complained of existed at the
time of purchase.
(a) Video or Audio Tapes. (c) Shaver Heads or Cutters.
(b) Video or Audio Heads and Stylus resulting (d) Cabinet parts.
from wear and tear in normal use. (e) Batteries.
4. If warranty service is required you should:
≥Contact your nearest Panasonic Authorised Service Centre.
≥Enclose a copy of your purchase receipt as proof of date of purchase.
≥Send or bring the product to Panasonic Authorised Service Centre. Warranty does not include any freight
to and from the user or insurance so please arrange this yourself.
≥Note that home service is available for following products in the Metropolitan area or the normal operating
areas of the nearest Authorised Service Centres.
≥Television Receivers (screen size greater than 39 cm)
≥Electronic Organs or Pianos
≥Microwave Ovens
≥Washing Machines
≥Air Conditioners
5. The warranties hereby conferred do not extend to any costs associated with the delivery, handling, freight-
ing or transportation of the product or any part thereof or replacement of and do not extend to any damage
or loss occurring during, or associated with, transit.
Unless otherwise specified to the consumer the benefits conferred by this express warranty are additional to all
other conditions, warranties, guarantees, rights and remedies expressed or implied by the Trade Practices Act
1974 and similar consumer protection provisions contained in legislation of the States and Territories and all
other obligations and liabilities on the part of the manufacturer or supplier and nothing contained herein shall
restrict or modify such rights, remedies, obligations or liabilities.
THIS WARRANTY CARD SHOULD BE RETAINED BY THE CUSTOMER AT ALL TIMES
IF YOU REQUIRE ASSISTANCE REGARDING WARRANTY CONDITIONS,
OR ANY OTHER ENQUIRIES, PLEASE TELEPHONE:
PANASONIC CUSTOMER CARE CENTRE 132 600
PANASONIC AUSTRALIA PTY. LIMITED OFFICE LOCATIONS:
NEW SOUTH WALES
P.0. Box. 505 Frenchs Forest N.S.W. 2086
VICTORIA
Private Mail Bag 13, South Eastern Mail Centre VIC. 3176
SOUTH AUSTRALIA
P.0. Box. 500 Welland 5007
WESTERN AUSTRALIA
P.0. Box. 376 Welshpool 6986
QUEENSLAND
P.0. Box. 260 Nundah QLD. 4012
WARRANTY
GC
Cn
Plug in firmly.
Enchufe a fondo.
Gjotho
golcoelnhnte.
MONO/HIGH
NOR
FM MODE/TAPE
ST/
VOL
RQ-SX58VA
L
T
M
PYCCKNÆ
Ncto≠hnk gntahnr A
BctabjrØte cha≠aja otpnuatejvhsm
gojdcom.
Nhlnkatop Îaprla °atapeek B
Ítot nhlnkatop gorbjretcr gpn
gpocjywnbahnn kaccet njn palno.
Ljr gpobepkn b bskjd≠ehhom gojoÒehnn
HaÒmnte [PRESET, ].
Nhlnkatop Îafopaetcr gpn°jnÎntejvho ha
5 cekyhl.
Kofla °atapeØkn cja°se
a Nhlnkatop °ylet mnfatv.
≥Ecjn octabntv yctpoØctbo b ˙tom
coctorhnn, colepÒahne gamrtn cotpetcr.
≥„ameha °atapeek b te≠ehne gocjelydqnx
30 cekyhl goÎbojnt coxpahntv bhecehhyd
b gamrtv nhiopmaund.
≥Nhlnkatop moÒet gokaÎsbatv °ojee
hnÎknØ ypobehv Îaprla gpn ncgojvÎobahnn
ogpelejehhsx iyhkunØ.
Gepel ha≠ajom ˙kcgjyataunn
∫ Golcoelnhehne
ctepeohaywhnkob
Ecjn cjsweh ckpng, cotpnte ÎafprÎhehne
co wtekepa.
∫ Iyhkunr °joknpobkn D
Íta iyhkunr gpelotbpaqaet haÒatne
opfahob ygpabjehnr yctpoØctba go own°ke.
b B coctorhnn °joknpobkn
c Paΰjoknpobatv
C
Meps gpeloctopoÒhoctn
≥Gpabnjvho cobmeqaØte gojdcs + n -
gpn bctabke °atapeØkn.
≥Bshvte bce °atapeØkn, ecjn yctpoØctbo
he °ylet ncgojvÎobatvcr b te≠ehne
ljntejvhofo gepnola bpemehn.
≥He cmewnbaØte ctapse n hobse °atapeØkn
njn paÎjn≠hse tngs °atapeek.
≥He chnmaØte o°ojo≠ky °atapeek n he
ncgojvÎyØte °atapeØkn co chrtoØ
o°ojo≠koØ.
Hegpabnjvhoe o°paqehne c °atapeØkoØ
moÒet bsÎbatv yte≠ky ˙jektpojnta,
kotopsØ, gpn cogpnkochobehnn c letajrmn,
moÒet nx gobpelntv, a takÒe moÒet
bsÎbatv boÎfopahne.
Gpn hajn≠nn yte≠kn ˙jektpojnta nÎ
°atapeØkn gpokohcyjvtnpyØtecv co cbonm
lnjepom.
Gpn gogalahnn ha jd°yd ≠actv bawefo
teja ˙jektpojnta tqatejvho cmoØte efo
boloØ.
≥Gpn ncgojvÎobahnn gepeÎaprÒaemsx
°atapeek pekomehlyetcr gojvÎobatvcr
°atapeØkamn gponÎbolctba Panasonic.
≥He cjywaØte Îagncn ≠epeÎ haywhnkn njn
fojobhse tejeiohs ha °ojvwoØ
fpomkoctn.
≥Bo nΰeÒahne gobpeÒlehnr nÎlejnr he
golbepfaØte efo boÎleØctbnd loÒlr,
bols njn lpyfnx ÒnlkocteØ.
≥NΰefaØte ncgojvÎobahnr njn
paÎmeqehnr ˙tofo yctpoØctba boÎje
ncto≠hnkob tegja. He octabjrØte efo b
abtomo°nje, golbepÒehhom boÎleØctbnd
gprmsx cojhe≠hsx jy≠eØ b te≠ehne
ljntejvhofo gepnola bpemehn c
Îakpstsmn lbeprmn n okhamn.
≥Gpekpatnte gojvÎobahne yctpoØctbom,
ecjn bs ncgstsbaete lnckomiopt ot
haywhnkob njn jd°sx lpyfnx ≠acteØ,
kotopse hegocpelctbehho kacadtcr
baweØ koÒn. Ljntejvhoe ncgojvÎobahne
moÒet bsÎsbatv gorbjehne csgn njn
lpyfnx ajjepfn≠ecknx peakunØ.
≥Íto nÎlejne moÒet gpnhnmatv palno
gomexn, o°ycjobjehhse gepehochsmn
tejeiohamn. Ecjn takne gomexn
rbjrdtcr o≠ebnlhsmn, ybejn≠vte,
goÒajyØcta, pacctorhne meÒly nÎlejnem
n gepehochsm tejeiohom.
Page 2
B
D
RQ-SX58VA
FM/AM
TUNER
AUTO
REVERSE
STEREO
RADIO
CASSETTE
PLAYER
XBS
1
TAPE/
OFF/
/REW
HOLD
XBS
PRESET
2
3
4
5
/ FF
OPEN
b
c
HOLD
XBS
RADIO ON
/ BAND
RQ-SX58VA
FM/AM
TUNER
AUTO
REVERSE
STEREO
RADIO
CASSETTE
PLAYER
X
B
S
1
TAPE/
OFF/
/REW
HOLD
XBS
PRESET
2
3
4
5
/ FF
OPEN
a
PRESET
FULL
EMPTY
RADIO ON
/ BAND
+
ENGLISH
Press and hold.
Mantenga pulsado.
HaÒmnte n lepÒnte haÒatoØ.
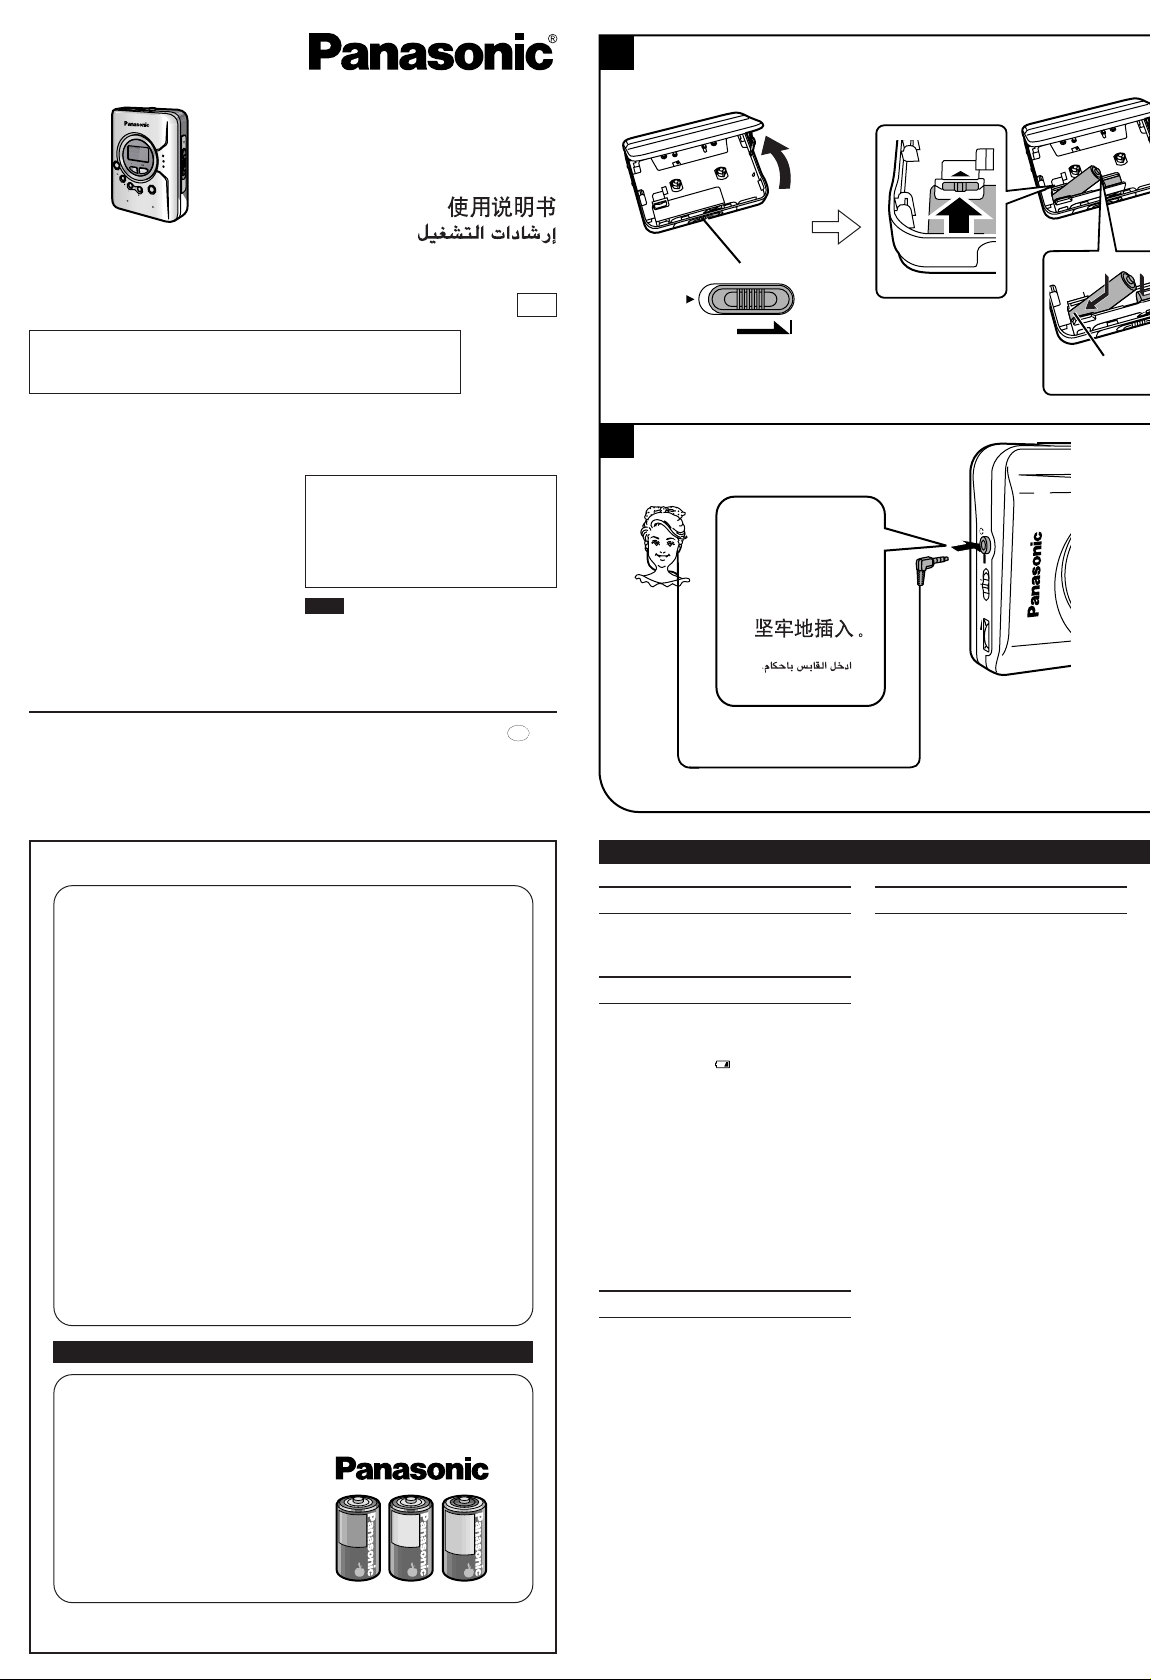
Power Source A
Press in and down towards the minus end.
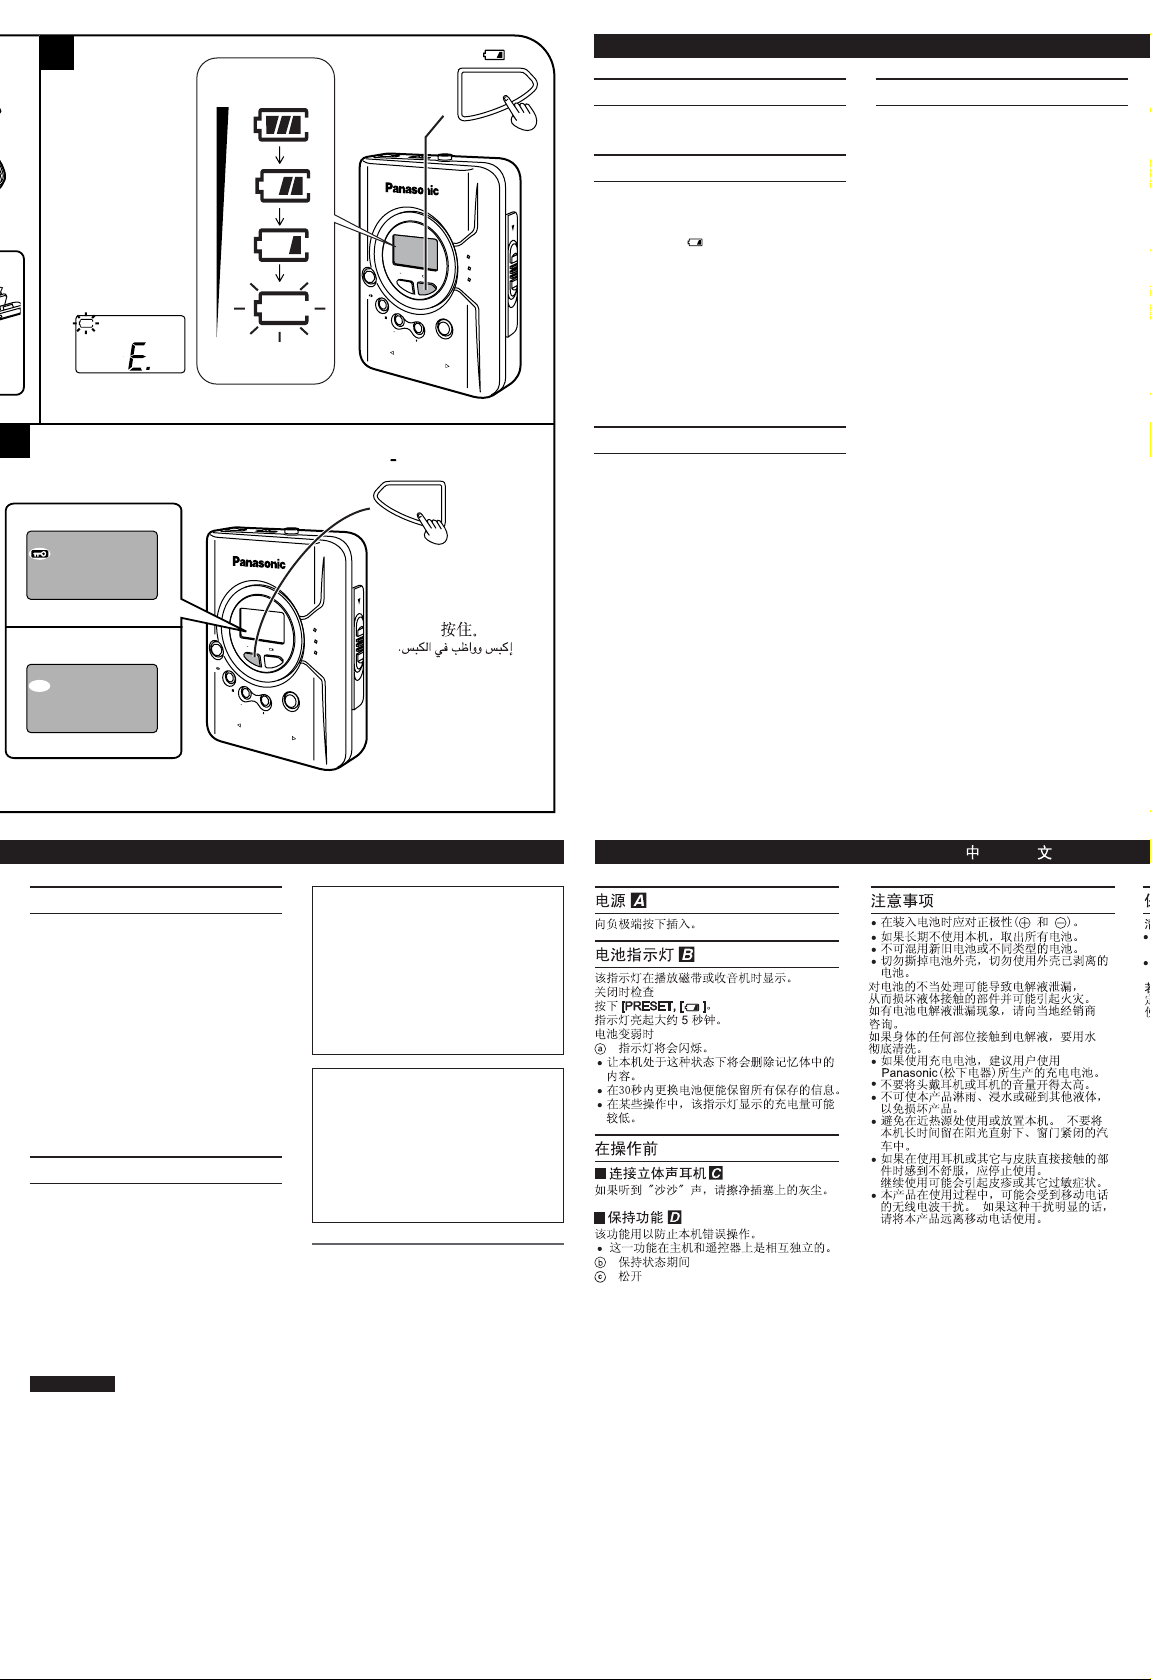
Battery indicator B
This indicator is displayed when listening to
tapes or the radio.
To check while off
Press [PRESET, ].
The indicator lights for about 5 seconds.
When the batteries are weak
a The indicator will flash.
≥Leaving the unit in this condition erases the
contents of the memory.
≥Replacing the batteries within 30 seconds will
retain any stored information.
≥The indicator may show a lower amount of
charge during some operations.
Before Operation
∫ Connecting the stereo earphones
C
If a gritty noise is heard, wipe away the dirt on
the plug.
∫ Hold function D
This function prevents the unit from operating
in error.
b During hold state
c Release
Cautions
≥Align + and - properly when inserting the
batteries.
≥Remove all the batteries if you are not going
to use the unit for a long time.
≥Do not mix old and new batteries or different
types of batteries.
≥Do not peel off the covering on batteries and
do not use if the covering has been peeled
off.
Mishandling of battery can cause electrolyte
leakage which can damage items the fluid
contacts and may cause a fire.
If electrolyte leaks from the battery, consult
your dealer.
Wash thoroughly with water if electrolyte
comes in contact with any part of your body.
≥If rechargeable batteries are to be used,
rechargeable batteries manufactured by
Panasonic are recommended.
≥Do not play your headphones or earphones
at a high volume.
≥To avoid product damage, do not expose this
product to rain, water or other liquids.
≥Avoid using or placing this unit near sources
of heat. Do not leave it in an automobile
exposed to direct sunlight for a long period of
time with doors and windows closed.
≥Discontinue use if you experience discomfort
with the earphones or any other parts that
directly contact your skin.
≥Continued use may cause rashes or other
allergic reactions.
≥This product may receive radio interference
caused by mobile telephones during use. If
such interference is apparent, please
increase separation between the product and
the mobile telephone.
Yxol
Ljr o≠nctkn lahhofo yctpoØctba
ncgojvÎyØte mrfkyd cyxyd tkahv.
≥Hnkofla he ncgojvÎyØte cgnpt,
pactbopntejv ljr kpackn njn °ehÎnh ljr
≠nctkn yctpoØctba.
≥Gepel ncgojvÎobahnem xnmn≠eckn
o°pa°otahhoØ tkahn bhnmatejvho
gpo≠ntaØte nhctpykunn go gpnmehehnd
˙toØ tkahn.
¨to°s Îbyk octabajcr ≠nctsm
Pefyjrpho o≠nqaØte fojobkn, ≠to°s
o°ecge≠ntv xopowee ka≠ectbo
bocgponÎbelehnr. NcgojvÎyØte ≠nctrqyd
kaccety (he gpnjafaetcr).
Texhn≠eckne xapaktepnctnkn
LnagaÎoh ≠actot palno:
FM: 87,50± 108,00 MFu (wafn 0,05 MFu)
AM: 522± 1629 kFu (wafn 9 kFu)
Bsxolhar moqhoctv: 6 mBti6 mBt
Tpe°obahnr k ˙jektpogntahnd:
øatapeØka: GoctorhhsØ tok 3 B
PaÎmeps (WtBtF): 111,7k80,1k26,7 mm
Bec (°eÎ °atapeØkn): 140 f
Gpnme≠ahne
Texhn≠eckne xapaktepnctnkn mofyt °stv
nÎmehehs °eÎ ybelomjehnr.
Bec n paÎmeps lahs gpn°jnÎntejvho.
520± 1630 kFu (wafn 10 kFu)
(2 °atapeØka tnga
R6/LR6, AA, UM-3)
(RMS makc.)
Ljr Poccnn
“YctahobjehhsØ gponÎbolntejem b
goprlke g. 2 ct. 5 Ielepajvhofo
„akoha PI “O Îaqnte gpab
gotpe°ntejeØ” cpok cjyÒ°s nÎlejnr
pabeh 7 folam c lats gponÎbolctba gpn
ycjobnn, ≠to nÎlejne ncgojvÎyetcr b
ctpofom cootbetctbnn c hactorqeØ
nhctpykuneØ go ˙kcgjyataunn n
gpnmehnmsmn texhn≠ecknmn
ctahlaptamn.”
Gpnmep mapknpobkn:
±±1 A ±±±±±±±
Íjemehts kola:
„-nØ cnmboj– fol nÎfotobjehnr
(1± 2001 f., 2± 2002 f., 3± 2003 f., …);
4-sØ cnmboj– mecru nÎfotobjehnr
(A± rhbapv, B± iebpajv, …, L± leka°pv)
PacgojoÒehne mapknpobkn:
Bhytpehhrr ctopoha kpswkn
kaccethofo otceka
Palno kaccethsØ ctepeogponfpsbatejv
Mauywnta Íjektpnk Nhlactpnaj Ko.,
Jtl.
1006 Kaloma, Ocaka, Rgohnr
Clejaho b TaØbahe
Page 3

ESPAÑOL
Maintenance
To clean this unit, wipe with a soft, dry
cloth.
≥Never use alcohol, paint thinner or benzine to
clean this unit.
≥Before using chemically treated cloth, read
the instructions that came with the cloth
carefully.
For a cleaner crisper sound
Clean the heads regularly to assure good
quality playback. Use a cleaning tape (not
included).
Fuente de alimentación A
Presione hacia adentro y hacia abajo en
dirección al polo negativo.
Indicador de pila B
Este indicador se visualiza durante la escucha
de cintas en la radio.
Para la comprobación mientras está apagada
Pulse [PRESET, ].
El indicador se ilumina durante
aproximadamente 5 segundos.
Cuando las pilas estén poco cargadas.
a El indicador parpadeará.
≥Dejar el aparato en estas condiciones borra
los contenidos almacenados en memoria.
≥Sustituir las pilas dentro de un plazo de
30 segundos, mantendrá toda información
almacenada.
≥Es posible que el indicador muestre una
carga menor durante determinadas
operaciones.
Antes de su utilización
∫ Conexión de los auriculares
Si se oye un ruido áspero, limpie la suciedad
de la clavija.
∫ Acerca de la función de bloqueo D
Esta función evita que el aparato se ponga en
funcionamiento por error.
b Durante el estado de bloqueo
c Suelte
estéreo
C
Precauciones
≥Alinee correctamente los polos + y - al
introducir la pila.
≥Quite todas las pilas si el aparato no se va a
utilizar durante un largo período de tiempo.
≥No mezcle pilas nuevas con viejas o
diferentes tipos de pilas.
≥No desprenda el recubrimiento protector de
las pilas y no las utilice si se ha desprendido
el recubrimiento.
Un manejo inadecuado de las pilas puede
causar un derrame del electrolito lo que, a su
vez, puede dañar los objetos con los que entre
en contacto e incluso provocar un incendio.
Si se produce un derrame del electrolito de la
pila, consulte con su distribuidor.
Si el electrolito entra en contacto con alguna
parte de su cuerpo, lave con agua abundante.
≥Si van a utilizarse baterías recargables, se
recomiendan las fabricadas por Panasonic.
≥No escuche música por los auriculares a un
volumen excesivo.
≥Para evitar que el aparato se deteriore, no lo
exponga a la lluvia, ni deje que entre en
contacto con agua o cualquier otro líquido.
≥Evite utilizar o colocar este aparato cerca de
fuentes de calor. No lo deje en el interior de
un automóvil con las puertas y ventanillas
cerradas expuesto a la luz directa del sol
durante mucho tiempo.
≥Deje de utilizarlo si experimenta molestias
con los auriculares o con otras partes que
estén en contacto directo con la piel.
≥El uso continuo puede producir erupciones u
otras reacciones alérgicas.
≥Este producto puede tener interferencias
causadas por teléfonos móviles durante su
utilización. Si tales interferencias resultan
evidentes, aumente la separación entre el
producto y el teléfono móvil.
Mantenimiento
Utilice un paño suave y seco para limpiar
este aparato.
≥Para limpiar este aparato, no utilice nunca
alcohol, diluyente de pintura ni bencina.
≥Antes de utilizar un paño impregnado
químicamente, lea con atención las
instrucciones suministradas con él.
Para obtener un sonido más claro
Limpie los cabezales con frecuencia para
garantizar una reproducción de calidad. Utilice
una cinta limpiacabezales (no incluida).
Page 4

B
RQ-SX58V
F
M/
A
M
T
UN
E
R
A
U
T
O
R
E
V
E
RS
E
STE
R
E
O
R
A
D
IO
C
A
S
S
E
T
T
E
PLAYER
XBS
1
T
A
P
E
/
OFF/
/R
E
W
H
O
L
D
X
B
S
PR
E
S
E
T
2
3
4
5
/ F
F
OFF/
VOL
2
1
3
2
4
RADIO ON
/ BAND
/REW
3
A
b
c
RQ-SX58VA
FM/AM
TUNER
AUTO
REVERSE
STEREO
RADIO
CASSETTE
PLAYER
X
B
S
1
TAPE/
OFF/
/REW
HOLD
XBS
PRESET
2
3
4
5
/ FF
OPEN
1
TAPE/
OFF/
/REW
VOL
FM MODE/TAPE
ST/
NOR MONO/HIGH
HOLD
XBS
/ FF
MTL
FM MODE/TAPE
ST/
NOR MONO/HIGH
MTL
XBS
F
5
2
4
3
OPEN
RADIO ON
/ BAND
1
a
D
AM
FM
RQ-SX58VA
FM/AM
TUNER
AUTO
REVERSE
STEREO
RADIO
CASSETTE
PLAYER
X
B
S
1
TAPE/
OFF/
/REW
HOLD
XBS
PRESET
2
3
4
5
/ FF
OPEN
FM MODE/TAPE
ST/
NOR MONO/HIGH
MTL
RADIO ON
/ BAND
E
HOLD
XBS
RQ-SX58VA
FM/AM
TUNER
AUTO
REVERSE
STEREO
RADIO
CASSETTE
PLAYER
XBS
1
TAPE/
OFF/
/REW
HOLD
XBS
PRESET
2
3
4
5
/ FF
OPEN
XBS
RADIO ON
/ BAND
Play back side
Lado de reproducción
Ctopoha bocgponÎbelehnr
Press and hold.
Mantenga pulsado.
HaÒmnte n lepÒnte haÒatoØ.
BocgponÎbelehne kaccets A
CjelyØte gyhktam 1±5
B gyhkte 1 jehta abtomatn≠eckn
hatrfnbaetcr gpn Îakpsbahnn kpswkn, n
RQ-SX58VA
OPEN
yctpoØctbo fotobo ha≠atv bocgponÎbelehne
c jnueboØ ctopohs.
a Jnuebar ctopoha
B gyhkte 4
HIGH [MTL]: Kaccets metajjnÎnpobahhofo n
NOR: Kaccets hopmajvhofo tnga
Abtopebepc
Ecjn bs he octahabjnbaete
bocgponÎbelehne, yctpoØctbo
bocgponÎbolnt makcnmym 3 ctopohs.
¨to°s octahobntv bocgponÎbelehne:
∫ ¨to°s gomehrtv ctopohs
Bo bpemr bocgponÎbelehnr
HaÒmnte [TAPE/21].
∫ ¨to°s gepemotatv kaccety
b HaÎal: HaÒmnte [s/REW]
c Bgepel: HaÒmnte [r/FF]
Gpnme≠ahne
He otkpsbaØte kpswky kaccetolepÒatejr
gpn pa°ote kaccets.
bscoko≠actothofo tnga
HaÒmnte [OFF/∫].
Page 5

C
O
P
E
N
“FM”
“AM”
5
HOLD
XBS
1
2
RADIO ON
/ BAND
R
Q
S
X
5
8
V
A
S
T
E
R
E
O
R
A
D
I
O
C
AS
SE
TT
E
P
LAYE
R
X
B
S
1
T
A
P
E
/
O
F
F
/
/REW
H
O
L
D
X
B
S
P
R
E
S
E
T
2
3
4
5
/ FF
O
P
E
N
FM
M
1
TAPE /
OFF/
/REW
2
3
4
5
/ FF
R
A
D
I
O
O
N
/
B
A
N
D
RADIO ON
/ BAND
d
e
R
Q
-S
X
5
8
V
A
MM
S
T
E
R
E
O
R
A
D
I
O
C
A
SS
E
T
TE
P
LAY
ER
X
B
S
1
T
A
P
E
/
O
F
F
/
/REW
H
O
L
D
X
B
S
P
R
E
S
E
T
2
3
4
5
/ FF
O
P
EN
1
TAPE /
OFF/
/REW
2
3
4
5
/ FF
R
A
D
I
O
O
N
/
B
A
N
D
RADIO ON
/ BAND
FM
M
+
5
PRESET
PRESET
+
4
/ FF
ENGLISH
+5
+5
M
M
M
M
M
M+5M
M
+5
M
M+5M
M
+5
Press and hold.
Mantenga pulsado.
HaÒmnte n lepÒnte haÒatoØ.
Tape Playback A
Follow steps 1–5
In step 1, tapeslack when you close the cover
and play is ready to start from the forward side.
a Forward side
In step 4
HIGH [MTL]: Metal and high position tapes
NOR: Normal position tapes
Auto reverse
The tape plays up to 3 sides unless you stop it.
Stop: Press [OFF/∫].
∫ Change sides
During play
Press [TAPE/21].
∫ Fast-foward and rewind
b Backward: Press [s/REW].
c Forward: Press [r/FF].
Note
Do not open the cassette compartment cover
during tape operation.
Listening to the Radio B
Follow steps 1–4
To turn the radio off: Press [OFF/∫].
∫ Preset tuning C
Frequencies of up to 20 radio stations (10 each
for AM and FM) can be stored in memory.
Memory presetting
1. Tune in the station to be stored.
2. Select the Memory channel (1–10).
2. d Memory channels 1 to 5
2. Press [PRESET, ] so “ ” flashes,
then press and hold a numeric button
([1]–[5]) for about 2 seconds.
2. e Memory channels 6 to 10
2. Press [PRESET, ] twice so “ ”
and “ ” flash, then press and hold a
numeric button ([1] for 6–[5] for 10) for
about 2 seconds.
2. Three beeps can be heard, and presetting is
finished.
To recall a preset station
≥Memory channels 1 to 5
≥Press [PRESET, ] so “ ” flashes, then a
numeric button ([1]–[5]).
≥Memory channels 6 to 10
≥Press [PRESET, ] twice so “ ” and “ ”
flash, then press a numeric button ([1] for
6–[5] for 10).
PYCCKNÆ R„SK
Gpocjywnbahne palno B
CjelyØte gyhktam 1±4
¨to°s bskjd≠ntv palno: HaÒmnte
∫ HactpoØka c gpelyctahobkoØ C
B gamrtv mofyt °stv bhecehs ≠actots
makcnmym 20 palnoctahunØ (go 10 ljr AM,
FM).
Gpelyctahobka b gamrtn
1. HactpoØtecv ha ctahund, kotopyd
xotnte bbectn b gamrtv.
2. Bs°epnte kahaj gamrtn (1± 10).
2. d Kahajs gamrtn 1± 5
2. HaÒmnte [PRESET, ], ≠to°s
2. e Kahajs gamrtn 6± 10
2. HaÒmnte [PRESET, ] lbaÒls,
2. Kofla gpelyctahobka Îabepweha, bs
ycjswnte tpn Îymmephsx cnfhaja.
¨to°s bsÎbatv gpelyctahobjehhyd
ctahund
≥Kahajs gamrtn 1± 5
≥HaÒmnte [PRESET, ], ≠to°s Îamnfaj
Îha≠ok “”, Îatem haÒmnte khogky c
homepom ([1]–[5]).
≥Kahajs gamrtn 6± 10
≥HaÒmnte [PRESET, ] lbaÒls, ≠to°s
Îamnfajn “”n “”, Îatem haÒmnte
khogky c homepom ([1] Ljr 6–[5] Ljr 10).
Îamnfaj Îha≠ok “”, Îatem haÒmnte
n ylepÒnbaØte khogky c homepom
([1]–[5]) gpn°jnÎntejvho 2 cekyhls.
≠to°s Îamnfajn “”n “”, Îatem
haÒmnte n ylepÒnbaØte khogky c
homepom ([1] Ljr 6–[5] Ljr 10)
gpn°jnÎntejvho 2 cekyhls.
[OFF/∫].
∫ NÎmehehne wafa hactpoØkn b
lnagaÎohe AM
GpeÒle ≠em bectn gpnem palnogepela≠ b
lnagaÎohe AM, o°rÎatejvho bs°epnte
gpabnjvhyd yctahobky wafa pacgpelejehnr
≠actot (9 kFu jn°o 10 kFu),
cootbetctbydqyd Îohe gpnema.
Gpn gpocjywnbahnn palno
HaÒmnte ha khogky [PRESET, ] n he
otgyckaØte gpnmepho 3 cekyhls.
≥Ha lncgjee oto°paÎntcr nhlnkaunr
yctahobkn nÎmehehhofo pacgpelejehnr.
Gpnme≠ahne
Gpeo°paÎobahhoe pacgpelejehne ctnpaet
ctahunn, gpelyctahobjehhse b gamrtv
pahee.
∫ ¨to°s gojy≠ntv °ojee xopownØ
D
gpnem
AM: Gpobepvte paÎjn≠hse hagpabjehnr,
≠to°s gojy≠ntv ogtnmajvhsØ gpnem.
FM: Pacgpabvte whyp haywhnkob.
Ljr gpnema ctepeogpofpamm b lnagaÎohe
FM yctahobnte [FM MODE/TAPE] b
[ST/NOR]. Ecjn gpnem gjoxoØ (cnjvhse
gomexn), yctahobnte b [MONO/HIGH [MTL]].
Íto ymehvwnt gomexn n o°ecge≠nt ≠nctsØ
gpnem, olhako gpn ˙tom palnogpofpamma he
°ylet gpocjywnbatvcr b peÒnme ctepeo.
¨to°s ybejn≠ntv
hnÎko≠actothsØ lnagaÎoh E
Gpn gpocjywnbahnn kaccets njn palno
haÒmnte [XBS, –HOLD].
≥Ecjn Îbyk nckaÒaetcr, y°abvte fpomkoctv.
≥Gpn gokygke yctpoØctba ˙ta iyhkunr yÒe
bkjd≠eha, oha bkjd≠aetcr takÒe gocje
Îamehs °atapeek.
Page 6

20
M
M
+5
+5
M
M
∫ How to change AM step
M
M+5M
M
+5
Before receiving AM broadcasts, be sure to
select the correct allocation setting (either
9 kHz or 10 kHz) according to your area.
While playing the radio
Press and hold [PRESET, ] for about
3 seconds.
≥The changed allocation settings will appear
on the display.
Note
Converting the allocation erases the stations
previously stored in memory.
∫ To obtain better reception D
AM: Try various directions to obtain optimum
reception.
FM: Extend the earphone cord.
To receive FM stereo broadcasts, set
[FM MODE/TAPE] to [ST/NOR]. If the
reception is poor (excessive noise), set to
[MONO/HIGH [MTL]]. This will reduce noise
and provide clear reception, but the broadcast
will not be heard in stereo.
To boost the low frequency
range E
While playing a tape or radio, press [XBS,
–HOLD].
≥If sound distortion occurs, turn down the
volume.
≥This is on at the time of purchase and after
you change the batteries.
Reproducción de cinta A
Siga los pasos 1–5
En el paso 1, al cerrar la tapa se rebobina
automáticamente la cinta y la reproducción
estará lista para empezar desde el lado de
avance.
a Lado de avance
En el paso 4
HIGH [MTL]: Citas de metal y de alta
NOR: Cintas de tipo normal
Cambio automático de cara
La cinta reproduce hasta 3 caras a menos que
usted la interrumpa.
Parar: Pulse [OFF/∫].
∫ Para cambiar de cara
Durante la reproducción
Pulse [TAPE/21].
∫ Para rebobinar la cinta
b Retroceso: Pulse [s/REW].
c Avance: Pulse [r/FF].
Nota
No abra el compartimento del casete durante
el funcionamiento de la cinta.
polarización
ESPAÑOL
Escucha de la Radio B
Siga los pasos 1–4
Para apagar la radio: Pulse [OFF/∫].
∫ Presintonización de emisoras C
Se pueden almacenar en memoria frecuencias
de hasta 20 emisoras de radio (10 de AM, FM
respectivamente).
Preajuste de memoria
1. Sintonice la emisora a almacenar.
2. Seleccione el Canal de memoria (1–10).
2. d Canales de memoria 1a 5
2. Pulse [PRESET, ] de manera que
“” parpadee, a continuación
mantenga pulsado un botón numérico
([1]–[5]) durante aproximadamente
2 segundos.
2. e Canales de memoria 6 a 10
2. Pulse [PRESET, ] dos veces de
manera que “ ” y “ ” parpadeen, a
continuación mantenga pulsado un
botón numérico ([1] para 6–[5] para
10) durante aproximadamente
2 segundos.
2. Se oyen tres pitidos, esto indica que la
presintonización ha terminado.
Para recuperar una emisora presintonizada
≥Canales de memoria 1 a 5
≥Pulse [PRESET, ] de manera que “ ”
parpadee, y a continuación un botón
numérico ([1]–[5]).
≥Canales de memoria 6 a 10
≥Pulse [PRESET, ] de manera que “ ” y
“” parpadeen, y a continuación un botón
numérico ([1] para 6–[5] para 10).
∫ Cómo cambiar el paso de
frecuencia de AM
Antes de recibir radiodifusiones de AM,
cerciórese de seleccionar la posición de
asignación correcta (bien 9 kHz o 10 kHz) de
acuerdo a su zona de residencia.
Mientras que toca la radio
Mantenga oprimido [PRESET, ] durante
unos 3 segundos.
≥Los ajustes de asignación cambiados
aparecerán en el visualizador.
Nota
El cambio de la asignación borra las emisoras
almacenadas en la memoria.
∫ Para obtener una mejor recepción
D
AM: Pruebe varias direcciones para obtener
una recepción óptima.
FM: Alargue el cable de los auriculares.
Para recibir emisiones FM en estéreo, ajuste
[FM MODE/TAPE] a [ST/NOR]. Si la recepción
es pobre (ruido en exceso), ajuste a
[MONO/HIGH [MTL]]. Esto reducirá el ruido y
proporcionará una recepción clara, pero la
emisión no se oirá en estéreo.
Para amplificar la gama de
frecuencias bajas E
Durante la reproducción de una cinta o de la
radio, pulse [XBS, –HOLD].
≥Si se produce distorsión sonora, baje el
volumen.
≥Esto es aplicable en el momento de la
compra y tras cambiar la baterías.
RQTT0511
 Loading...