

Page 1

TOSHIBA
Pocket PC (RG4-E02)
User Manual
Version 1.0
1
Page 2

Contents
NETWORK SERVICES.................................5
TOSHIBA CORPORATION ..........................6
LICENSES TBD............................................ 10
DECLARATION OF CONFORMITY........12
CARE AND MAINTENANCE TBD............12
CARE AND MAINTENANCE ............................12
USING THE USB HOST CABLE TBD..............13
REST ARTING YOUR TOSHIBA PHONE .............13
RESETTING YOUR TOSHIBA PHONE ............... 13
INITIALISING YOUR TOSHIBA PHONE.............14
BACKUP YOUR DATA ....................................14
SAFETY INSTRUCTIONS ..........................14
WIRELESS LAN SECURITY ...........................14
BLUETOOTH SECURITY.................................14
FCC NOTICE.................................................15
INFORMATION TO USER.................................15
GETTING STARTED TBD..........................16
TODAY SCREEN............................................. 19
START MENU................................................20
INSTALLING THE SIM CARD, BATTERY AND
MINI
SD CARD...............................................25
PULL OUT / PUT IN THE STYLUS.....................27
USING THE STYLUS.......................................27
CHARGING THE BA TTERY..............................28
SWITCHING THE POWER ON AND OFF ............29
SYNCHRONIZING ..........................................30
CALL FUNCTIONS......................................32
MAKING A CALL............................................32
RECEIVING A CALL........................................34
IN-CALL OPTIONS..........................................34
SPECIAL DIALING REQUIREMENTS.................36
VIDEO TELEPHONY .......................................37
MESSAGING.................................................38
MESSAGING OPTIONS ...................................38
TEXT (SMS) MESSAGING..............................39
E-MAIL .........................................................41
MMS MESSAGING.........................................46
WINDOWS LIVE MESSENGER........................49
TEXT INPUT.................................................50
INPUT METHODS............................................50
BLOCK RECOGNIZER.....................................50
KEYBOARD...................................................51
LETTER RECOGNIZER ...................................51
TRANSCRIBER...............................................52
SEARCHING...................................................57
SETTINGS......................................................58
REASSIGNING BUTTON FUNCTIONS ...............58
INPUT METHOD SETTING ...............................59
SECURITY SETTINGS......................................59
CUSTOMIZING YOUR START MENU................61
OWNER INFORMATION ..................................61
PHONE SETTINGS ..........................................61
SOUNDS AND NOTIFICA T IONS.......................63
CUSTOMIZING YOUR TODAY SCREEN ............64
VIDEO CALL SETTINGS..................................65
VIEWING THE ABOUT DETAILS ......................65
BACKLIGHT SETTING ....................................66
CERTIFICATES ...............................................66
CLOCK & ALARM SETTINGS ..........................67
2
Page 3

CUSTOMER FEEDBACK..................................67
ENCRYPTION ................................................68
ERROR REPORTING.......................................68
EXTERNAL GPS SETTING..............................69
MASTER CLEAR............................................69
MANAGING MEMORY...................................69
CHANGING POWER MANAGEMENT SETTINGS 70
CHANGING REGIONAL SETTINGS...................70
REMOVING PROGRAMS ................................ 70
SCREEN ADJUSTING......................................71
ADJUSTING THE SCROLL SPEED.....................71
WINDOWS UPDATE.......................................72
SIMLOCK SETTINGS.....................................72
CONNECTIVITY..........................................72
MANUAL SET UP OF YOUR DATA CONNECTIONS
.....................................................................72
CONNECTING TO THE INTERNET ...................72
BLUETOOTH .................................................76
BEAMS .........................................................78
WIRELESS MANAGER...................................80
USB TO PC...................................................80
USB MASS STORAGE ....................................81
INTERNET SHARING ......................................95
JAVA..............................................................95
MESSAGING..................................................97
NOTES ..........................................................97
OPERA BROWSER..........................................97
PHONE ..........................................................98
PICSEL VIEWER.............................................98
PICTURES & VIDEOS.....................................98
SEARCH ......................................................100
SIM MANAGER...........................................100
SIM TOOLKIT .............................................101
TASKS .........................................................101
WINDOWS LIVE MESSENGER......................102
WINDOWS LIVE ..........................................102
WINDOWS MEDIA PLAYER..........................103
WINDOWS UPDATE .....................................107
TELEPORT...................................................107
TIPTALK .....................................................109
GOLDKEY...................................................112
ZOOM .........................................................112
SPECIFICATION........................................114
TROUBLESHOOTING ..............................117
APPLICATIONS AND MULTIMEDIA.....82
GAMES ......................................................... 83
OFFICE MOBILE............................................83
ACTIVESYNC................................................ 84
CALCULATOR ...............................................84
CALENDAR...................................................85
CAMERA....................................................... 87
CONTACTS....................................................89
FILE EXPLORER............................................92
FINGER LAUNCHER ......................................93
HELP ............................................................93
INTERNET EXPLORER ...................................93
HEALTH AND SAFETY............................119
GENERAL....................................................119
OPERATING ENVIRONMENT ........................120
ELECTRONIC DEVICES ................................121
BATTERY SAFETY........................................121
AC ADAPTER AND CABLE SAFETY ...............122
EMERGENCY CALLS ....................................123
FCC RF EXPOSURE INFORM ATION..............123
BODY-WARM OPER AT ION ............................124
EUROPEAN RF EXPOSURE INFORMATION....124
PURCHASE RECORDS...................................126
3
Page 4

MENU TREE...............................................127
4
Page 5

Network services
To use your Toshiba phone you must have service from a wireless service provider. Many of the features
in your Toshiba phone depend on features in the wireless network to function. These Network Services
may not be available on all networks or you may have to make specific arrangements with your service
provider before you can utilise Network Services. Your service provider may need to give you additional
instructions for their use and explain what charges will apply. Some networks may have limitations that
affect how you can use Network Services. For instance, some networks may not support all language-dependent
characters and services.
This phone is a 3GPP GSM Release 99 terminal supporting GPRS service, and is designed to support
also Release 97 GPRS networks. However, there may be some compatibility issues when used in some
Release 97 GPRS networks. For more information, contact your service provider.
The availability of particular products may vary by region. Please check with the dealer nearest to you.
5
Page 6

Toshiba Corporation
IMPORTANT NOTE: PLEASE READ BEFORE
USING YOUR MOBILE PHONE BY ATTEMPTING
TO USE ANY SOFTWARE ON THE SUPPLIED
PHONE CONSTITUTES YOUR ACCEPTANCE
OF THESE EULA TERMS. IF YOU REJECT OR
DO NOT AGREE WITH ALL THE TERMS OF THIS
EULA, PLEASE DO NOT ATTEMPT TO ACCESS
OR USE THE SUPPLIED SOFTWARE.
End User License Agreement
This End User License Agreement ("EULA") is a
legal agreement between you (as the user) and
TOSHIBA CORPORATION ("Toshiba") with regard
to the copyrighted software installed in a Toshiba
3G mobile phone supplied to you (the "Phone").
Use or employment of any software installed in the
Phone and related documentations (the "Software")
will constitute your acceptance of these terms,
unless separate terms are provided by the Software
supplier on the Phone, in which case certain
additional or different terms may apply. If you do not
agree with the terms of this EULA, do not use or
employ the Software.
1. License Grant. Toshiba grants to you a
personal, non-transferable and non-exclusive
right to use the Software as set out in this EULA.
Modifying, adapting, translating, renting,
copying, making available, transferring or
assigning all or part of the Software, or any
rights granted hereunder, to any other persons
and removing any proprietary notices, labels or
marks from the Software is strictly prohibited,
except as expressly permitted in this EULA.
Furthermore, you hereby agree not to create
derivative works based on the Software.
2. Copyright. The Software is licensed, not sold.
You acknowledge that no title to the intellectual
property in the Software is or will be transferred
to you. You further acknowledge that title and
full ownership rights to the Software will remain
the exclusive property of Toshiba, Toshiba's
affiliates, and/or their suppliers, and you will not
acquire any rights to the Software, except as
expressly set out in this EULA. You may keep a
backup copy of the Software only so far as
necessary for its lawful use. All copies of the
Software must contain the same proprietary
notices as contained in the Software and are
subject to the terms of this EULA. All rights not
expressly granted under this EULA are
6
Page 7

reserved to Toshiba, Toshiba's affiliates and/or
their suppliers.
3. Reverse Engineering. You agree that you will
not attempt, and if you are a business
organisation, you will use your best efforts to
prevent your employees, workers and
contractors from attempting to reverse
engineer, decompile, modify, translate or
disassemble the Software in whole or in part
except to the extent that such actions cannot be
excluded by mandatory applicable law and only
if those actions are taken in accordance with
such applicable law. Any failure to comply with
the above or any other terms and conditions
contained herein will result in the automatic
termination of this license and the reversion of
the rights granted hereunder to Toshiba.
4. LIMITED WARRANTY. Only during the
warranty period for the Phone, Toshiba,
Toshiba's affiliate, its suppliers or its authorized
service company will repair or replace, at
Toshiba's sole discretion, defective Software
unless such defect results from acts or
incidences beyond the reasonable control of
Toshiba. EXCEPT AS PROVIDED IN THIS
EULA: (A) TOSHIBA, TOSHIBA'S AFFILIATES,
AND THEIR SUPPLIERS DISCLAIM ALL
WARRANTIES, CONDITIONS OR OTHER
TERMS (WHETHER EXPRESS OR IMPLIED),
INCLUDING BUT NOT LIMITED TO
WARRANTIES, CONDITIONS AND TERMS
OF SATISFACTORY QUALITY,
MERCHANTABILITY, FITNESS FOR A
PARTICULAR PURPOSE AND NONINFRINGEMENT
OF THIRD-PARTY RIGHTS;
AND (B) THE ENTIRE RISK AS TO THE
QUALITY AND PERFORMANCE OF THE
SOFTWARE IS WITH YOU. YOU ACCEPT
THAT SOFTWARE MAY NOT MEET YOUR
REQUIREMENTS AND NO WARRANTY CAN
BE GIVEN THAT OPERATION OF THE
SOFTWARE WILL BE UNINTERRUPTED OR
ERROR-FREE.
5. LIMITATION OF LIABILITY. TO THE
FULLEST EXTENT LEGALLY PERMITTED, IN
NO EVENT SHALL TOSHIBA, TOSHIBA'S
AFFILIATES OR THEIR SUPPLIERS BE
LIABLE TO YOU FOR ANY DAMAGES FOR
(A) LOST BUSINESS OR REVENUE,
BUSINESS INTERRUPTION, LOSS OF
BUSINESS DATA; OR (B) CONSEQUENTIAL,
SPECIAL, INCIDENTAL OR INDIRECT
DAMAGES OF ANY KIND (WHETHER UNDER
CONTRACT, TORT OR OTHERWISE)
7
Page 8

ARISING OUT OF: (I) THE USE OR INABILITY
TO USE THE SOFTWARE, EVEN IF TOSHIBA,
TOSHIBA'S AFFILIATES OR THEIR
SUPPLIER HAS BEEN ADVISED OF THE
POSSIBILITY OF SUCH DAMAGES; OR (II)
ANY CLAIM BY A THIRD PARTY. SAVE AS
SET OUT IN THIS SECTION, TOSHIBA'S
ENTIRE LIABILITY UNDER THIS EULA SHALL
NOT EXCEED THE PRICE PAID FOR THE
SOFTWARE, IF ANY. THE ABOVE
DISCLAIMER AND LIMITATION DOES NOT
EXCLUDE OR LIMIT (A) LIABILITY FOR
DEATH OR PERSONAL INJURY CAUSED BY
NEGLIGENCE; OR (B) ANY
MANDATORY LEGAL RIGHT OR LIABILITY
TO THE EXTENT THAT IT CANNOT BE
LAWFULLY EXCLUDED OR LIMITED UNDER
APPLICABLE LAW.PLEASE MAKE AND
RETAIN A COPY OF ALL DATA YOU HAVE
INSERTED INTO YOUR PRODUCT, FOR
EXAMPLE NAMES, ADDRESSES, PHONE
NUMBERS, PICTURES, RINGTONES ETC,
BEFORE SUBMITTING YOUR PRODUCT
FOR A WARRANTY SERVICE, AS SUCH
DATA MAY BE DELETED OR ERASED AS
PART OF THE REPAIR OR SERVICE
PROCESS.
6. Laws. This EULA will be governed by the laws
of England and Wales. All disputes arising out of
this EULA shall be subject to the exclusive
jurisdiction of the English Courts.
7. Export Laws. Any use, duplication or
employment of the Software involves products
and/or technical data that may be controlled
under the export laws of applicable countries or
region and may be subject to the approval of the
applicable governmental authorities prior to
export. Any export, directly or indirectly, in
contravention of the export laws of applicable
countries or region is prohibited.
8. Third Party Beneficiary. You agree that certain
suppliers of the Software to Toshiba have a right
as a third party beneficiary to enforce the terms
of this EULA against you as a user.
9. Transfers. The Software may be transferred
only as installed on the Phone to a lawful third
party user, where that party accepts the terms of
this EULA which will continue to apply.
10. IF YOU ARE DEALING AS A CONSUMER IN
THE UK & THE SOFTWARE QUALIFIES AS
'GOODS', YOUR STATUTORY RIGHTS
UNDER APPLICABLE LAW ARE NOT
AFFECTED.
8
Page 9

EU Warranty
Your Toshiba phone contains no user serviceable
parts. For further information on service please
contact your retailer or service provider.
9
Page 10

Licenses TBD
Licensed by QUALCOMM Incorporated under one
or more of the following United States Patents and/
or their counterparts in other nations:
4,901,307 5,504,773 5,109,390 5,535,239
5,267,262 5,600,754 5,416,797 5,778,338
5,490,165 5,101,501 5,511,073 5,267,261
5,568,483 5,414,796 5,659,569 5,056,109
5,506,865 5,228,054 5,544,196 5,337,338
5,657,420 5,710,784
Microsoft, MS-DOS, Windows, Windows NT,
Windows Server, Windows Mobile, ActiveSync,
Excel, Internet Explorer, MSN, Outlook,
PowerPoint, and Word are either registered
trademarks or trademarks of Microsoft Corporation
in the United States and/or other countries.
XT9 is trademark of Tegic Communications, Inc.
Tegic Communications, an AOL Company.
Java™ and all Java-based marks are trademarks or
registered trademarks of Sun Microsystems, Inc.
Bluetooth™ is a trademark of Bluetooth SIG,
Inc.USA.
10
Page 11

This miniSDTM logo is a Trademark.
Wi-Fi CERTIFIED is a Certification Mark of the
Wi-Fi Alliance
Picsel, Picsel Powered, Picsel Viewer, Picsel File
Viewer, Picsel Document Viewer , Picsel PDF
Viewer and the Picsel cube logo are trademarks or
registered trademarks of Picsel Technologies and/
or its affiliates.
ArcSoft and the ArcSoft logo are registered
trademarks of ArcSoft, Inc. in the United States,
P. R. China, EU, and Japan.
Opera is a trademark or registered trademark of
Opera Software ASA.
Read more about Opera at http://www.opera.com/.
11
Page 12

Declaration of conformity
Care and Maintenance TBD
Care and maintenance
You can greatly enhance the life span of your
Toshiba phone, and the parts and accessories, by
following the suggestions below.
TIP: Maintaining your Toshiba phone, and
the parts and accessories, in a good
condition will help you fulfil the warranty
obligations
• Keep your Toshiba phone and all the parts and
accessories out of the reach of small children or
pets.
• Keep your Toshiba phone dry, as moisture of
any kind can contain minerals that will corrode
the electronic circuits. The manufacturer's
warranty may become invalid if our phone or
battery were to get wet due to misuse.
• Do not use or store your Toshioba phone in
dusty or dirty locations as the moving parts of
the phone can be damaged.
• Do not use or store your Toshiba phone in hot
areas. High temperatures will shorten the life
span of the phone, damage the battery or warp/
melt internal circuits.
• Do not store your Toshiba phone in cold areas.
A big difference between room temperature and
the temperature in the phone can cause
condensation to form inside the phone, causing
damage to the electronic circuits.
• Do not keep your Toshiba phone in, or near,
heat sources such as a radiator or microwave
oven - this can cause the battery inside the
phone to overheat and explode.
• Do not open your Toshiba phone unless
absolutely necessary.
• Do not mishandle or abuse your Toshiba phone.
Dropping the phone, knocking or shaking it can
damage the internal circuits.
• Do not use harsh chemicals, strong detergents,
12
Page 13

or cleaning solvents to clean your Toshiba
phone. Use a soft, clean, dry, lint-free cloth to
clean the phone.
• Do not use water to clean the Touch screen.
• Keep the Touch screen and tip of the Stylus clean for
avoiding permanent damage.
• Do not tap with strong power on Touch screen, it may
cause permanent damage to Touch screen.
• Do not apply paint or other such substances to
your Toshiba phone.
• If your Toshiba phone, or any of the accessories,
are not working as they should, please consult
your dealer who can provide you with the expert
assistance you require.
• Do not use excessive volume levels when using
headphones.
• If your Toshiba phone has a flash unit, do not
operate the flash too close to a person’s eyes this may cause damage to their eyes.
• Interference may affect the performance of your
Toshiba phone. This is normal and the phone
should operate as usual once you move away
from the source of the interference.
• Do not attempt to disassemble your Toshiba
phone. Only Toshiba authorised personnel
should service the phone.
Using the USB Host cable TBD
When use USB host cable, can provide
maximum ???mA. When your Toshiba phone’s battery
over the supplied current, stop to supply.
When your Toshiba phone’s battery less than ??%,
can not use USB Host cable without battery
recharging.
Restarting your Toshiba phone
If you have any problem as deadlock or freeze, press
and hold the Power key.
If you restart your Toshiba phone while a
program is running, data that you have not
saved will be lost.
Resetting your Toshiba phone
After you tried restarting your Toshiba phone, if it still
deadlock or freeze, press the Reset button.
Even it still deadlock or freeze, remove the battery
13
Page 14

(refer Getting Started section for instructions) and
re-insert the battery turn your Toshiba phone on (refer
Getting Started section for instructions).
If you reset your Toshiba phone, the data
that you have saved might be lost.
Initialising your Toshiba phone
You should only use this procedure as a last resort.
If you are experiencing a problem with an application, it
is most likely a result of a conflict between installed
programs. We recommend uninstalling the most
recently added program first.
Also verify that the program is designed to be run on
your Toshiba phone by comparing the requirements
to the information provided with your phone - select
Start > Settings > About to view this information.
To initialise your phone, refer to Master clear setting
section.
phone.
Safety instructions
Wireless LAN security
It is possible for an outside party to easily gain
unlawful access to your Toshiba phone via Wireless
LAN if the security function is not used.
Without this security, your Toshiba phone carries
the risk of unlawful access, wiretapping, and loss or
destruction of data.
You should set up your Toshiba phone to use the
authentication and encryption features (WEP,
WPA) in order to prevent such access.
When using a public Wireless LAN access point,
your Toshiba phone should be protected from
unlawful access by the Windows firewall of
Windows Security Centre and the anti-virus
software within the firewall feature.
Bluetooth security
Backup your Data
We recommend that you are advised to frequently
back up all your data before initialising your Toshiba
14
Although your Toshiba phone has security features
compliant with the Bluetooth standard specification,
this security might not work properly when using
your Toshiba phone in a non-secure environment.
Page 15
Please take care when using the Bluetooth feature.
FCC notice
This device complies with Part 15 of the FCC rules.
Operation is subject to the following two conditions:
(1) This device may not cause harmful interference,
and (2) This device must accept any interference
received, including interference that may cause
undesired operation.
Changes or modifications not expressly approved
by the party responsible for compliance could void
the user’s authority to operate the equipment.
Information to user
This equipment has been tested and found to
comply with the limits of a Class B digital device,
pursuant to Part 15 of the FCC Rules. These limits
are designed to provide reasonable protection
against harmful interference in a residential
installation. This equipment generates, uses and
can radiate radio frequency energy and, if not
installed and used in accordance with the
instructions, may cause harmful interference to
radio communications. However, there is no
guarantee that interference will not occur in a
particular installation; if this equipment does cause
harmful interference to radio or television reception,
which can be determined by turning the equipment
off and on, the user is encouraged to try to correct
the interference by one or more of the following
measures:
1. Reorient/relocate the receiving aerial.
2. Increase the separation between the
equipment and receiver.
3. Connect the equipment into an outlet on a
circuit different from the outlet the receiver is
currently connected.
4. Consult the dealer or an experienced radio/TV
technician for help.
WARNING: Changes or modifications not
expressly approved by the manufacturer
responsible for compliance could void the
user’s authority to operate the equipment.
15
Page 16

Getting started TBD
Unpacking
Please ensure that the contents of your sales pack
include:
• Your Toshiba phone
• Stylus
• AC adapter
• AC cable
• Battery pack
• USB Client cable
• USB Host cable
• Earphones
• User guide
• CD
16
Page 17

Phone layout and functions
Program button 4
17
1
2
16
15
3
14
5
13
12
11
6
Program button 1,2
(left ,right)
7
17
10
9
8
Program button initial settings
Program button 1 = Contacts
Program button 2 = Messaging
Program button 3 = Camera
Program button 4 = Internet
4
Program
button 3
1. Earpiece
2. Front camera
3. Touch screen
4. Side key - adjusts the volume.
5.
6. End key - ends calls/operations and returns to Today screen.
7. Stylus
8. Cable and phone charging connector
9. Microphone
10. Handstrap hole
11. Navigation key/Action key - moves the cursor up, down, left or
right, confirms operations and accesses shortcuts. The Action key is
used to open the selected operation.
12. Send key - launches the phone pad mode. makes and answers
calls.
13. Start key – open the start menu.
14. Right and Left Softkey - performs operations indicated on the main
display.
15. miniSD card slot
16. Headset connector
17. Power LED - bi-colour LED Power indicator, battery charging
status.
key - confirm your data entries, or exit the program in use.
Page 18
24
18
19
20
22 23
21
18
26
27
28
25
18. Fingerprint sensor
19. Cover lock button - locks and unlocks battery cover.
20. Power key - press and hold to turns power on/off. Press to enter to suspend
mode / wakeup from suspend mode.
21. Battery cover
22. Flash light
23. Rear camera
24. Right and Left Softkey - performs operations indicated on the main display.
25. Keyboard - enters phone numbers and characters.
26. Fn key – press this key and press the overlaid key to select overlay function.
27. Start key/Wireless LAN (Overlay function)
28. key/Bluetooth (Overlay function)
29. Reset button
29
Page 19
Today screen
You can access the Today screen from any menu
by pressing the End key. Important information such
as date, time, status indicators, appointments and
profile are displayed on the Today screen. You can
open a program directly by selecting the relevant icon
and pressing the Action key.
1
7
2
3
5
9
4
6
8
10
NOTE: Access the Settings > Personal >
Today menu to change the Today screen
layout.
1. Title bar
2. Displays the time and date.
3. Displays the name of your wireless service
provider.
4. Owner information
5. Tap to read new text messages.
6. Display tasks.
7. Displays appointments.
8. Display Device lock status
9. Displays the connection status indicators.
10. Command bar. The name of this button is dynamic
and depends on previous activity on the phone.
19
Page 20
Start Menu
1. From the Today screen, tap Start.
2. Tap a program with the stylus.
1. Today
2. Pinned applications.
3. Most Recent Program (Maximum 10 items)
4. Programs.
5. Settings
6. Help.
1
2
3
4
5
6
NOTE: The Pinned applications and Help can be
selected from a list of items in the menu Control
Panel application.
For more information please refer to the Settings
section.
20
Page 21
Display indicators
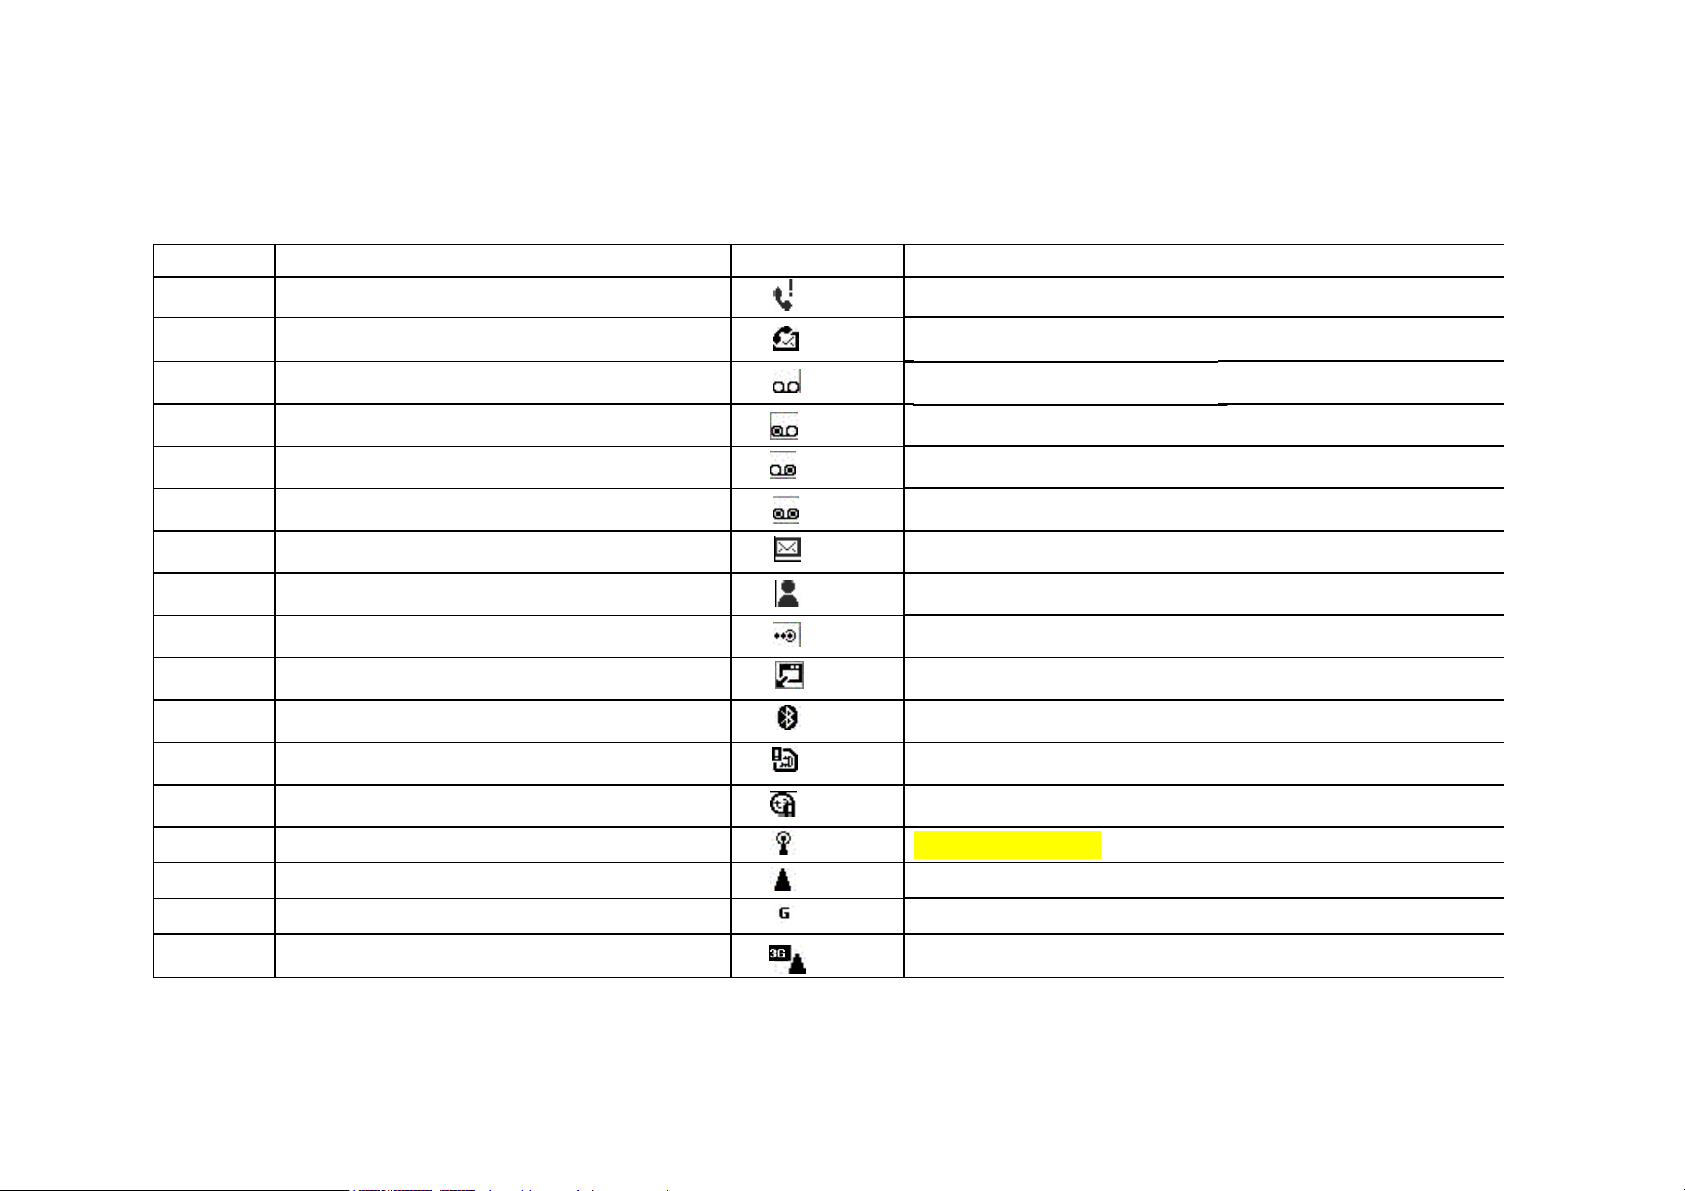
Slot Type Icon Descr iption
1 Notification icons
2 Roaming icons
Missed call
New Voice mail(s) (*1)
New Voice mail(s) (* 1) TBD
no voicemail (* 1) TBD
New Voice mail(s) (*1)
voice mail at line1
Voice mail at line2
*
Voice mail at both lines
New e- mail(s) or t ext message(s)
New inst ant message(s)
Incoming beam
New OTA(OTA: Over The Air)
ologiquement
Bluetooth
SIM Error
Sync error
Wi - F i d a t a c a l l TBD
Roaming
GPRS in range
GPRS Roaming
21
Page 22
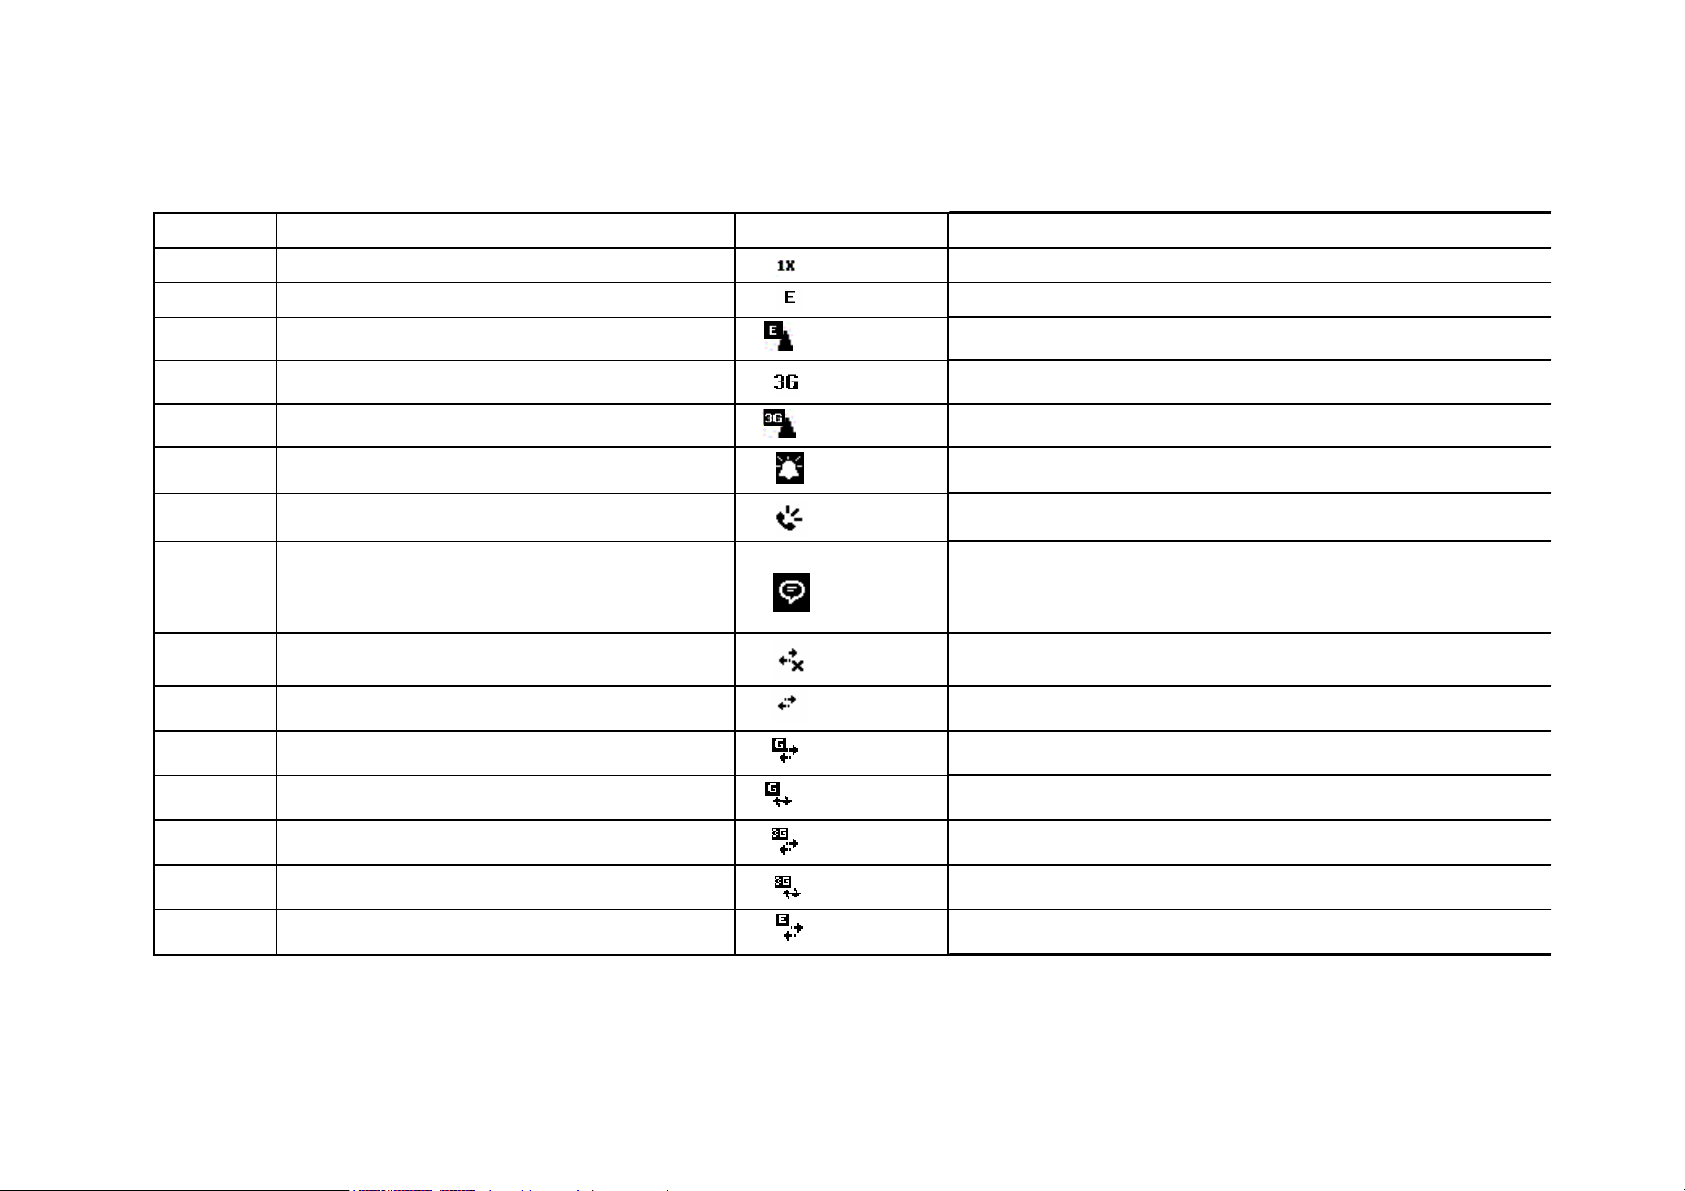
Slot Type Icon Description
Alarm icon
Speakerphone icon
Caution
3 Data icons
CDMA in range (Not supported)
EDGE in range
EDGE Roaming
3G in range
3G Roaming
Pending Alarm
Speakerphone is on
Duplication of not ifications
Data call Off
Data call connect ed
GPRS in progress
ActiveSync over GPRS in use
3G in progress
ActiveSync over 3G in use
EDGE connect ed
22
Page 23
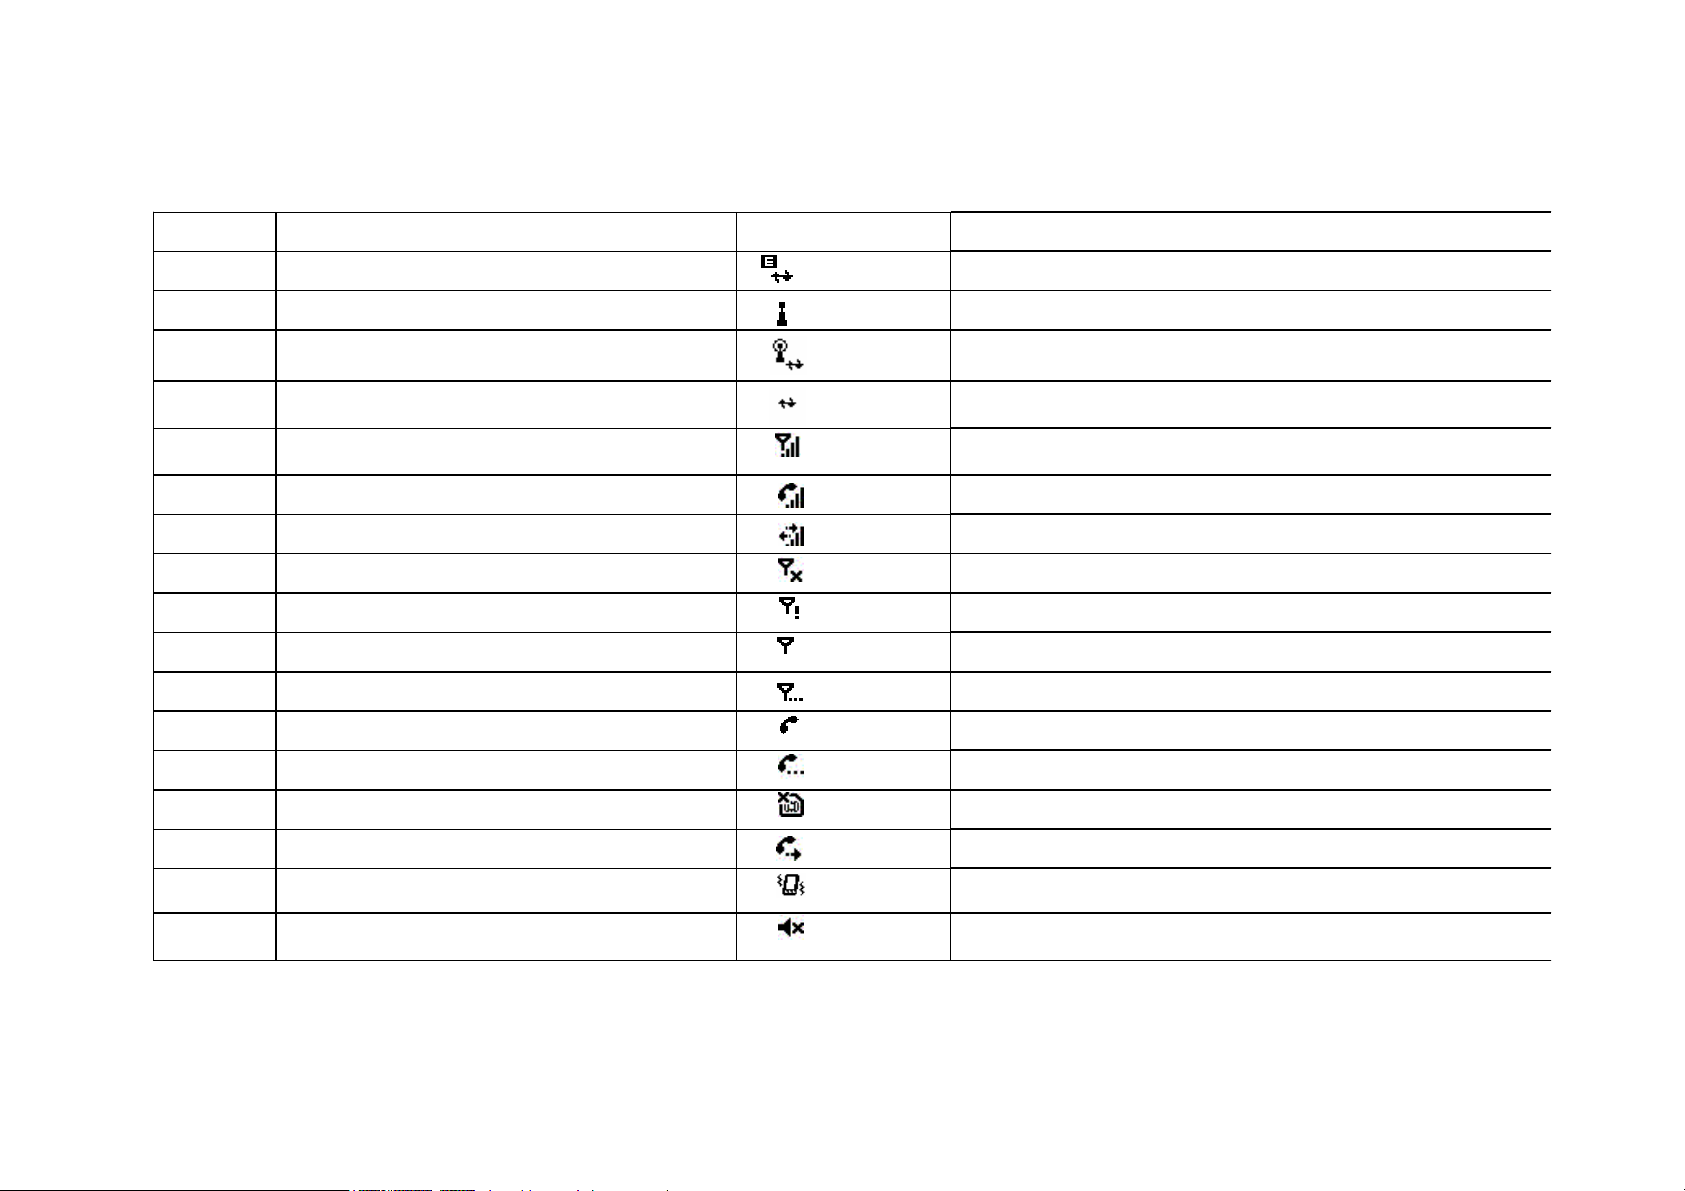
Slot Type Icon Descript ion
4 Signal strengt h icons
5 Volume icons
ActiveSync over EDGE in use
Wi - F i o n
Act iveSync over Wi- Fi in use
ActiveSync in progress
Signal st rength
Voice/ Video Call in progress
Data call in progress
Radio off
Radio no service
Radio connected
Radio lost signal
Dialling
Call on hold
No SIM card inst alled
Call forwarded
Vibrate
Ringer Off
23
Page 24
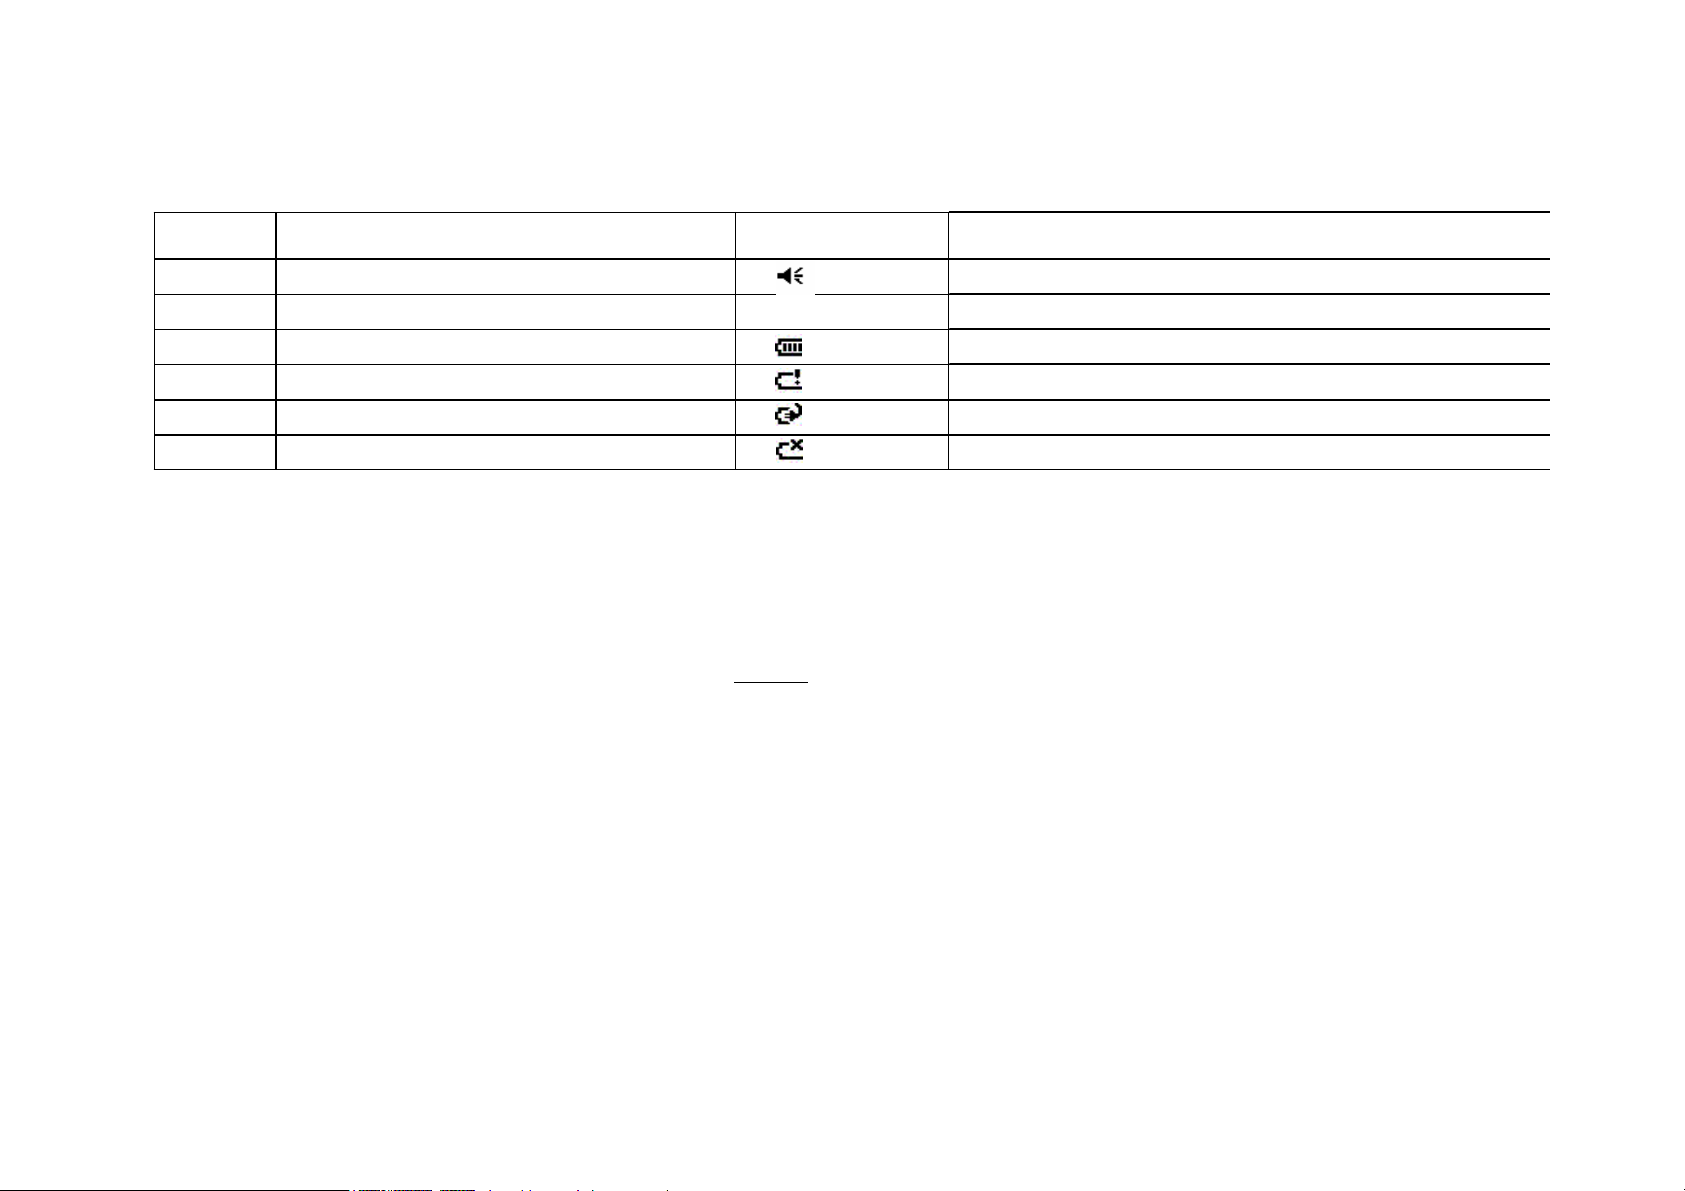
Slot Type Icon Description
Battery strength icons (*2)
6 Mini t ime - -
*1: Missed Call Notification icon is depended on the
Network Provider.
st
1
“New voicemail” is displayed when the network
supports the voicemail Mailbox status in SMS.
The other case displays 2
nd
“New voicemail”. (TBD)
*2: When “Mini time” is displayed in title bar, the
“Battery strength” icon is displayed in Slot1
Ringer on
Battery level
Bat t ery alert
Battery charging
Low battery
24
Page 25
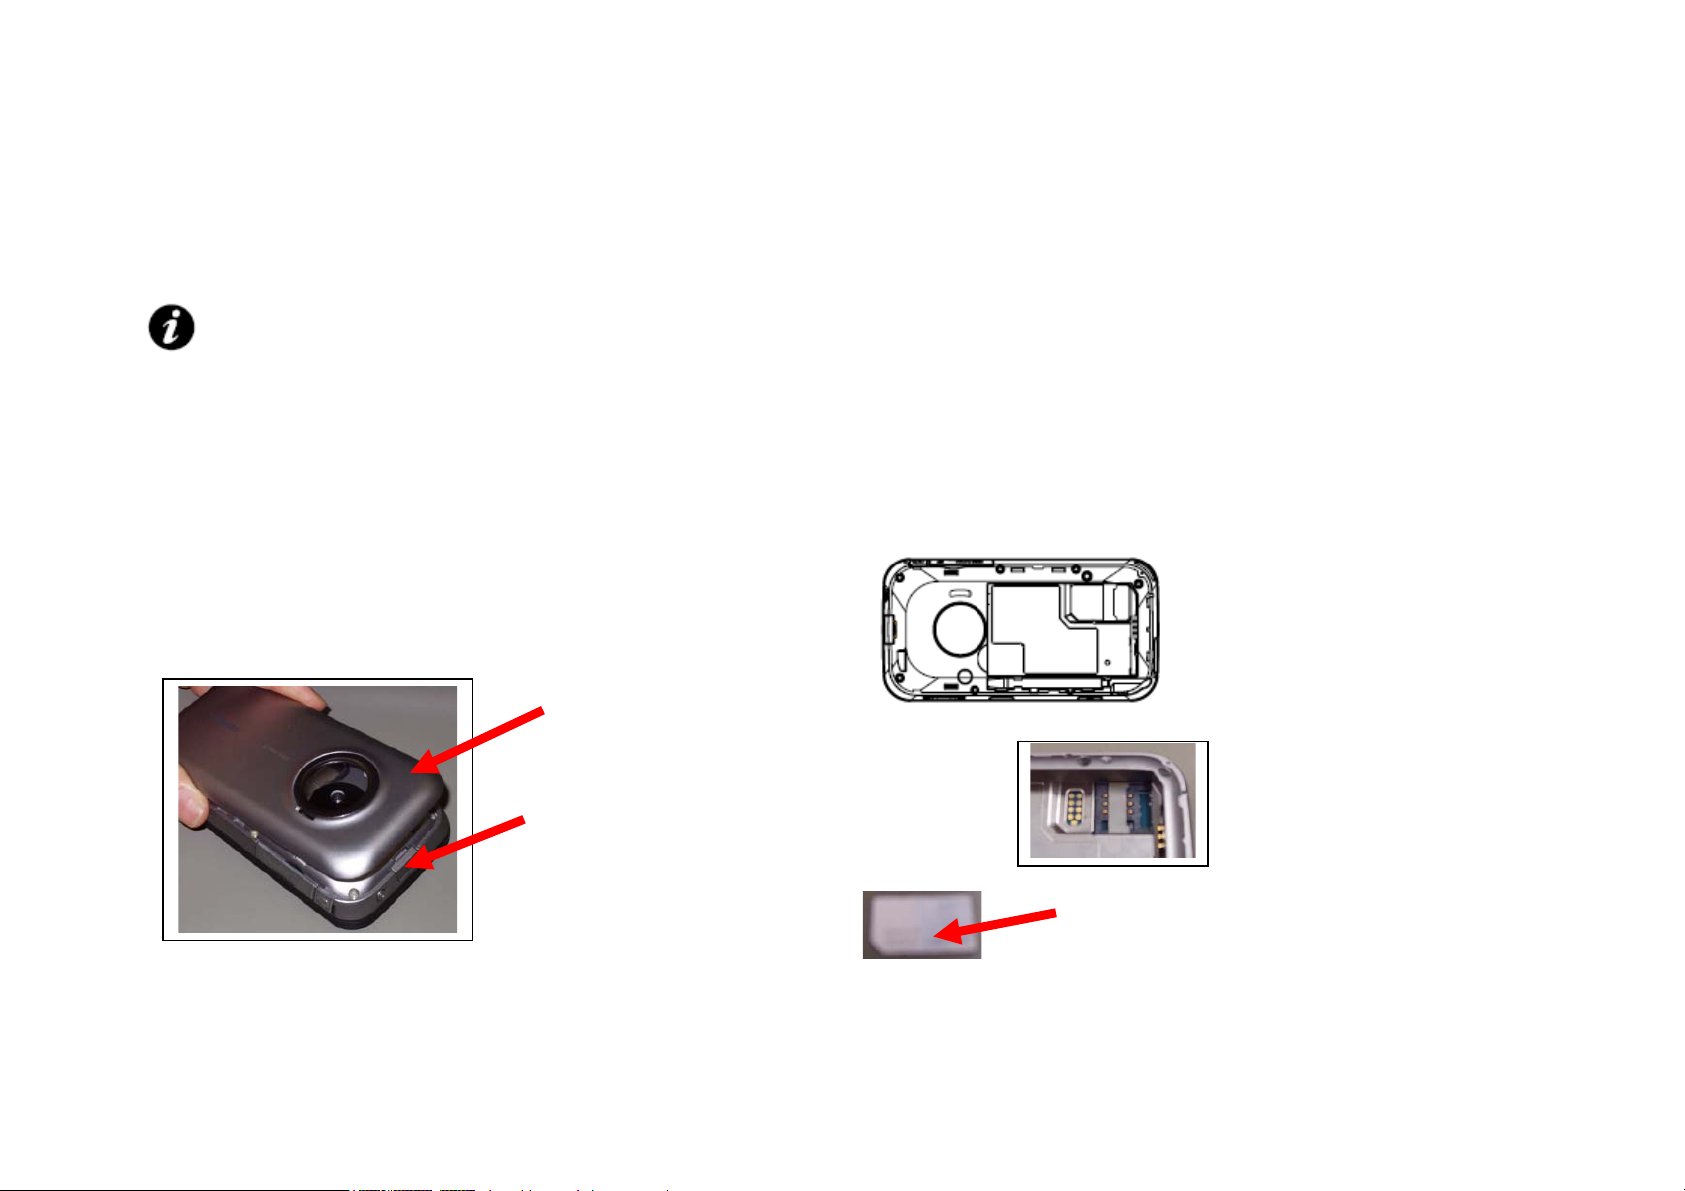
Installing the SIM card, battery and miniSD
card
IMPORTANT: The SIM card is easily damaged
into by scratching and bending, so take care with
handling it.
• Press the Cover Lock button (1) down, lift the
battery cover (2) upwards and remove the
battery from the battery compartment.
2
1
• With the gold connectors facing downwards,
align the bevelled corner of the SIM card with
the bevelled corner in the SIM card holder.
Push down lightly and slide the SIM card (3)
3
25
Page 26
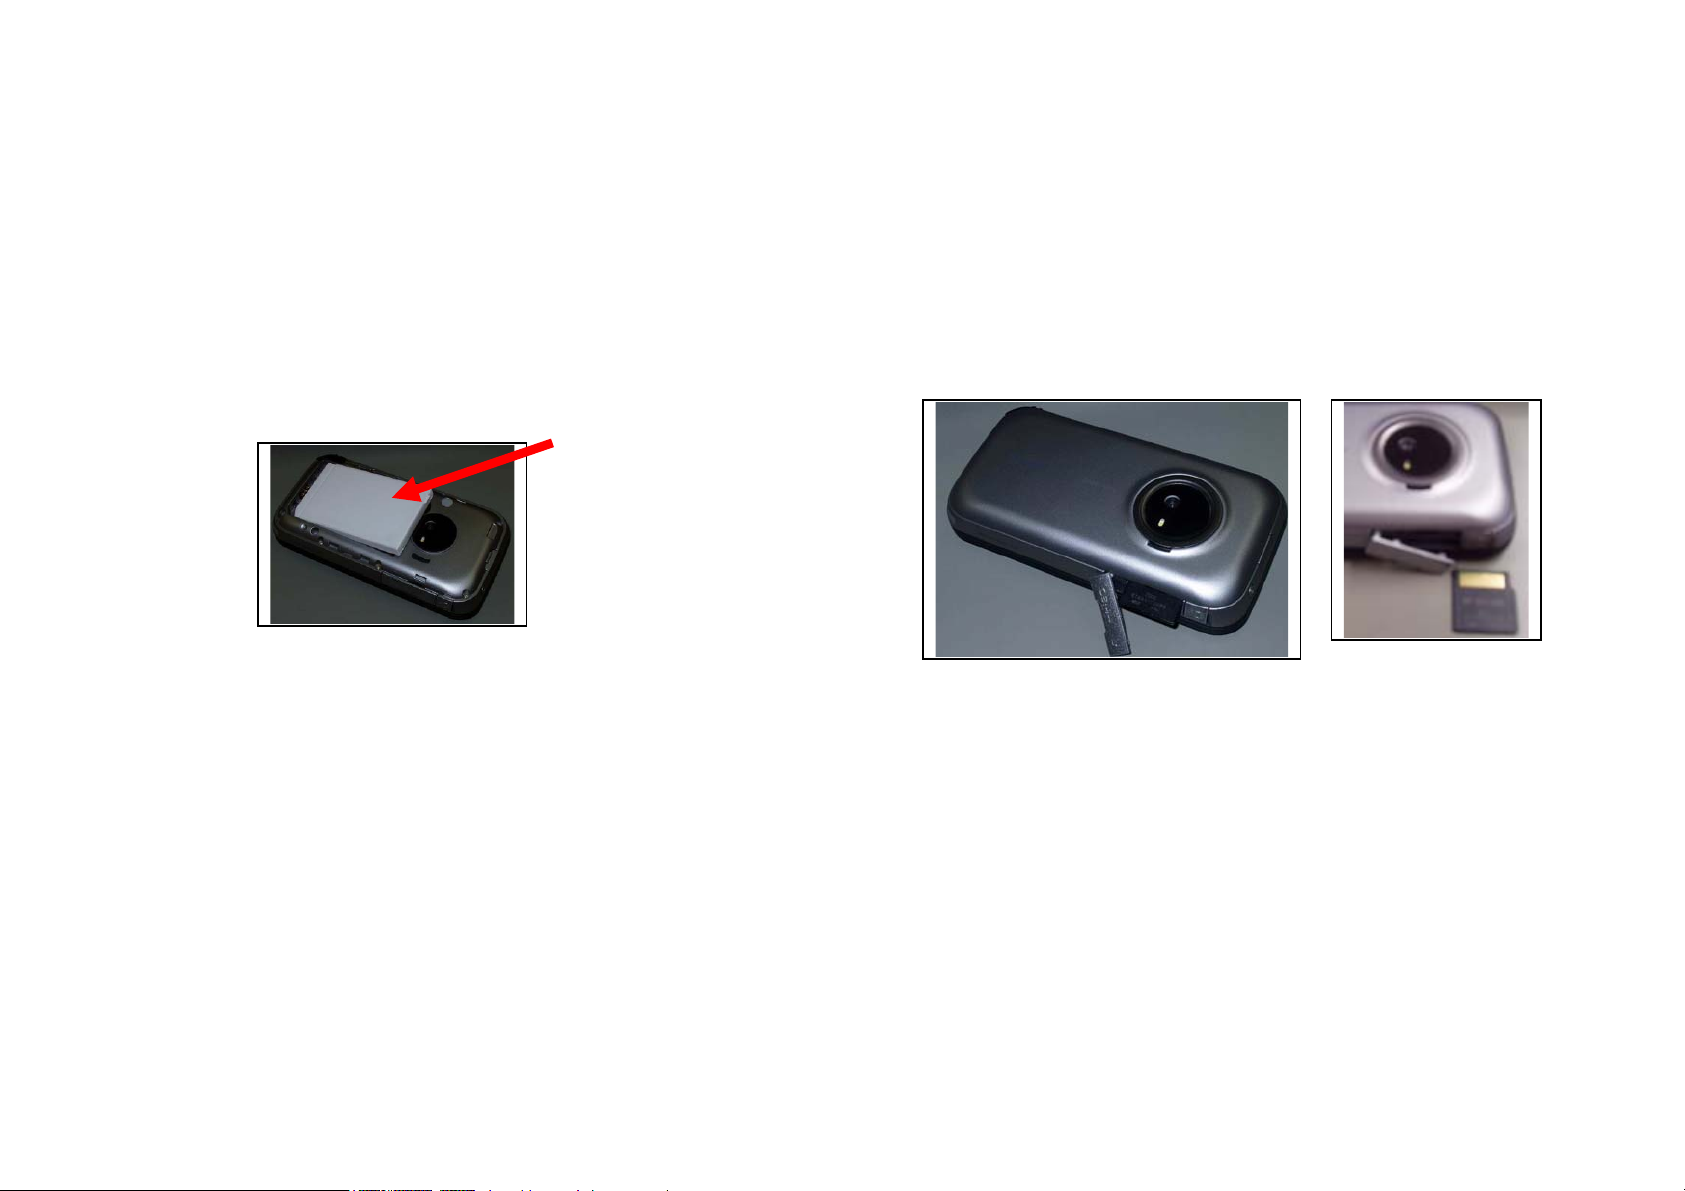
• Insert the battery into the battery compartment
with the gold connectors facing downwards.
Gently push down to snap into place.
4
• Gently click battery cover (2) into position.
• Open the memory card slot cover. Slide the miniSD
card into the miniSD slot (5).
• To remove, press miniSD card inwards (5). The
miniSD card will pop out (6).
Close the memory card
slot cover.
26
Page 27
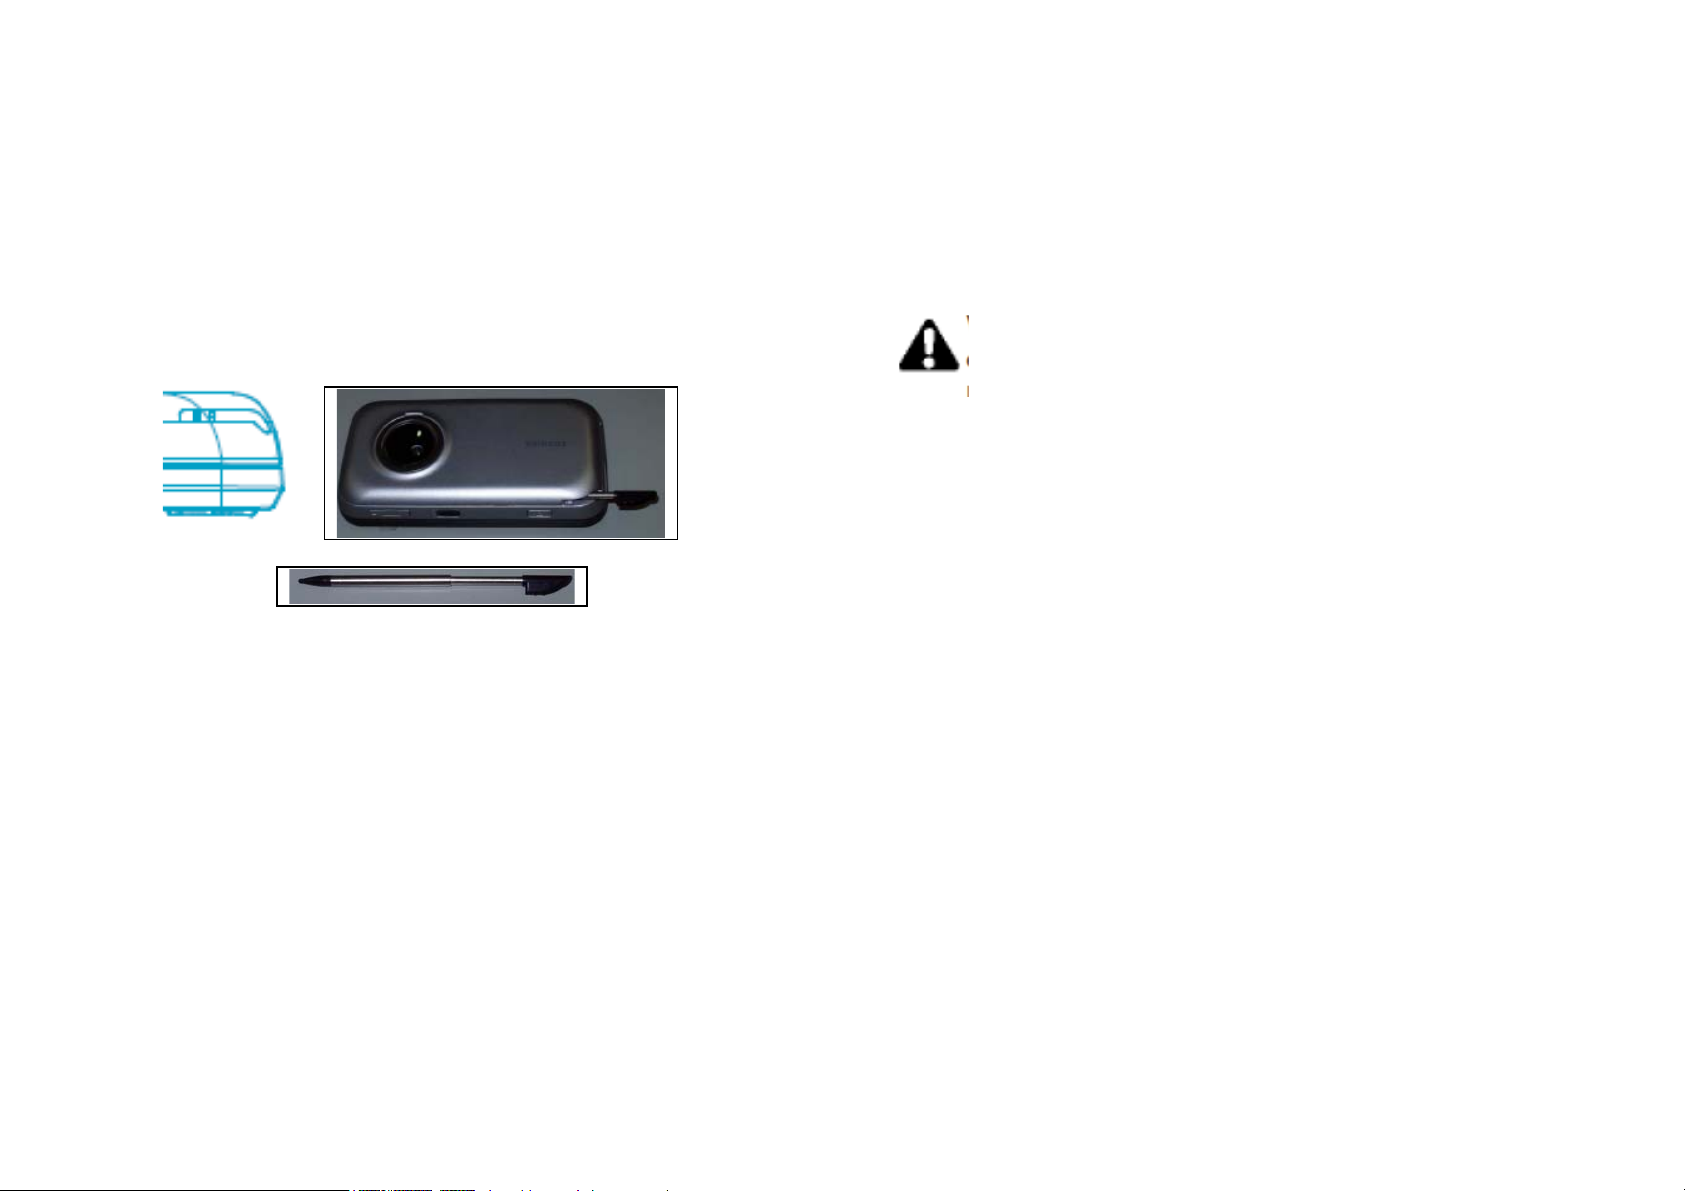
Pull out / put in the stylus
Pull out the stylus from stylus slot (7).
Put in the stylus to stylus slot (7).
Using the stylus
The stylus is used for menu selection or data input on
the Touch screen of your Toshiba phone.
• Tap : Touch the screen once with the stylus to open
items and select options.
• Drag : Hold the stylus on the screen and drag it
across to select text and images. Drag in a list
to select multiple items.
• Tap and hold : Tap and hold the stylus on an item to
see a list of actions available for that item.
On the pop-up menu that appears, tap the
action you want to perform.
WARNING: When you operate the touch
screen of your Toshiba phone, use the
bundled stylus. If the tip of the stylus is
damaged, do not use it. If you operate the
Touch screen with a damaged stylus, a
ballpoint pen or other sharply peaked pen,
the Touch screen may be damaged. When
the stylus is damaged, please purchase a
new one.
27
Page 28

Charging the battery
You need to fully charge the battery before you can
switch your Toshiba phone on for the first time.
The battery will only achieve optimum performance
after two or three complete charges.
You can charge your battery in the following two
ways:
1. Plug the AC adapter into an AC outlet and
connect to the charger connector on your
Toshiba phone. When the battery is fully
charged, unplug the AC adapter from the AC
outlet and disconnect it from the phone charger
connector by gripping tightly and pulling gently.
Or
2. .Connect your Toshiba phone to a PC with the
USB cable. Ensure that your Toshiba phone is
on before connecting it to your PC.
TIP: To check your battery status, refer to
Changing power management settings
section.
Low battery indicator
When the battery charge level is running low, a
warning tone sounds and the Battery Low message
is displayed repeatedly. If the battery charge level
runs too low for normal operation, your Toshiba
phone will automatically switch off.
Battery information
Battery performance depends on many factors,
such as your Service Provider's network
configuration, signal strength, the temperature of
the environment in which you operate your Toshiba
phone, the features and/or settings you select and
use, items attached to your phone's connecting
ports, and your voice, data, and other program
usage patterns.
It is recommended that you save your
memory data to a PC or storage card.
The manufacturer is not responsible for data
lost or altered due to battery discharge.
28
Page 29

Optimizing the power performance
Refer to Changing power management settings and
Backlight setting sections.
Managing a low battery
When the low battery warning is displayed, do the
following:
1. Save your current data.
2. Charge the battery as soon as possible.
3. Turn your Toshiba phone off.
There is a danger of explosion if the battery
is incorrectly replaced. To reduce risk of fire
or burns, do not disassemble, crush,
puncture, short external contacts, expose to
temperature above 60°C (140°F), or dispose
of battery in fire or water. Replace only with
specified batteries according to the local
regulations.
Switching the power on and off
To switch your Toshiba phone on:
1. Press and hold down the Power key. The
standby screen is displayed.
2. If a PIN or security code is requested, enter the
code.
To switch your Toshiba phone off, press and hold
down the Power key.
NOTE: The PIN code activates the services
in your Toshiba phone and should be
provided in the documentation supplied by
your service provider.
29
Page 30

Synchronizing
ActiveSync allows you to create a synchronization
relationship between your Toshiba phone and PC,
and between your Toshiba phone and your
Exchange server. This means that the shared data
is always consistent. If you make a change, it is
automatically made to the corresponding
information on the other computer. This is an
effective way of keeping your data up-to-date.
You can connect to your PC using the USB cable or
Bluetooth connection. You can also use ActiveSync
to connect your Toshiba phone to other resources
through your PC. However, you cannot synchronize
remotely to a PC using a modem or network
connection. The synchronization relationship is
created to manage the data that is copied between
your Toshiba phone and PC.
You can connect to your Exchange server using a
cellular connection, or you can connect your
Toshiba phone to your PC as a way of connecting
back to the Internet.
Installing and setting up ActiveSync
You can either install ActiveSync from your
Windows Mobile Getting Started CD or you can
download a copy of ActiveSync HomePage.
Once the software has been installed and your
Toshiba phone is connected to your PC, via the
USB cable, the ActiveSync Setup Wizard is started.
Simply follow the onscreen instructions.
NOTE: If you have a PC which is already
fully synchronized with your Exchange
server, you should synchronize your
Toshiba phone to your PC rather than
synchronizing your Toshiba phone with the
Exchange server. Data will be downloaded
via your PC, saving you the charges for
traffic volume. In addition, synchronizing via
your mobile phone network will take longer
than it would with your local PC.
If you are not synchronizing directly with a Microsoft
Exchange server, do not select the option to
synchronize directly with a server. The alternative is
to synchronize your Toshiba phone with your PC.
You cannot do both at the same time.
30
Page 31

Changing ActiveSync settings
Once you have set up synchronization using the
ActiveSync Setup Wizard on the PC, you can
change your synchronization settings at a later
stage:
• If you want to change ActiveSync settings for
synchronizing with a PC, use ActiveSync on the
PC. For more information, see "Changing the
amount of information synchronized" in
ActiveSync Help on the PC.
• If you want to change ActiveSync settings for
synchronizing with an Exchange server, use
ActiveSync on your Toshiba phone, as
described in "Change settings for an information
type."
NOTE: Disconnect your Toshiba phone
from your PC before changing the
synchronization settings.
Starting/stopping synchronization
1. On the Today screen, tap Start > Programs
ActiveSync.
2. To start synchronization, tap Sync.
3. To stop synchronizing, tap Stop.
Synchronizing Media
Your Toshiba phone can synchronize media from
your PC, such as music and video files. This is
described in detail in Applications & Multimedia.
NOTE: You can only start/stop
synchronization if your Toshiba phone
already has a synchronized relationship with
a PC or Exchange server.
31
Page 32

Call functions
Making a call
You can make calls from the Today screen, Phone
screen, Contacts, SIM contacts or Call history
menus, or via speed dial.
Before making a call, ensure that your Toshiba
phone is switched on, that there is a valid SIM card
installed, and that the signal is sufficiently strong.
To make a call, enter the phone number from the
Today screen using the numeric keypad, or press
the Send key and scroll down the list to the required
number.
Press the Send key to dial.
Making an emergency call
You can make calls to emergency service numbers
under almost any circumstances, even if you have
locked your Toshiba phone or if you have not
enabled your SIM.
Making a call by entering a contact name
1. From the Today screen, enter the initial letters
of the contact name.
2. A list of contacts matching your keystrokes is
displayed. Select the relevant contact and press the
Send key once or the Action key twice.
Making a call from an open contact
1. From the Today screen, tap Contacts.
2. Select the contact and relevant phone number.
3. Press the Send or Action key
Making a call from Contacts
1. From the Today screen, tap Contacts.
2. Select the contact, and press the Send key.
TIP: If you have a long list of contacts, you can
use a shortcut to find the contact you want: enter
the first few letters of the contact's name.
The phone searches through the contact list and
displays the name.
To call the contact, press the Send key.
32
Page 33

Assigning the number
You can assign a work phone number (w), mobile
phone number (m) and a home phone number (h)
to a contact. The mobile phone number is dialled by
default, unless you expand the list and scroll down
to the phone number required.
Making a call from Call History
Call History displays calls you have made, received,
and missed recently.
1. From the Phone screen, tap Call History.
2. Select the relevant name or phone number.
3. Press the Send key or tap Call.
Making a call using a recently dialed phone
number
1. From the Today screen, press the Send key.
2. Select the relevant name or phone number tapping
the up/down arrow.
3. Press the Send key or tap Talk.
Dialling the last number called
From the Today screen, press the Send key twice.
Creating a speed dial
You can create a speed dial for a phone number.
e
-mail address or web page address that is stored
in your Contacts directory.
To create a speed dial entry:
1. From the Today screen, tap Contacts.
2. Select the contact.
3. Select the phone number, e
message, or web page address.
-mail address, text
4. Tap Menu > Add to Speed Dial.
5. In Location, select the speed dial number.
6. Tap ok. The speed dial entry is created.
NOTE: The digit 0 is reserved to bring up the
+ symbol in international dial strings when
you press and hold 0. The digit 1 is reserved
for calling your voice mail box as a speed
dial option.
NOTE: You can create a speed dial for phone
numbers only with Pocket PC.
33
Page 34

Voice mail speed dial
The voice mail speed dial is normally pre-configured. If
it is not pre-configured, you can save your voice mail
number by taping Phone > Speed Dial > Voice mail
and create a speed dial entry, as explained above.
Contact your Service Provider to access the voice mail
number.
Using a speed dial
From the Today screen, press and hold the speed
dial number you want to call. If the speed dial contains
two digits, press the first digit, then press and hold the
second digit. Your Toshiba phone dials the phone
number, displays the new e
-mail message, or opens
the desired web page.
Editing a speed dial
1. From the Today screen, tap Phone > Speed Dial.
2. Scroll to the relevant speed dial, tap Menu > Edit.
3. Make the necessary changes and tap ok.
Deleting a speed dial
1. From the Today screen, tap Phone > Speed Dial.
2. Scroll to the relevant speed dial and tap Menu >
Delete.
Receiving a call
Answering or ignoring a call
• To answer an incoming call, press the Send key
or tap Answer.
• To ignore an incoming the call, press the End
key or tap Ignore.
NOTE: If you choose to ignore a call, the
caller will be connected to your voice mail,
provided you have subscribed to this
service.
In-call options
Answering or postponing a second call
To answer or postpone a second call, you need to
first enable the call waiting option by doing the
following:
34
Page 35

1. From the Today screen, tap Start > Settings
> Phone > Service tab > Call Waiting
2. Tap Get Settings.... A tick is placed in the box.
3. Tap ok.
Once the call waiting option has been enabled on your
Toshiba phone and the settings have automatically
been sent and accepted by your Service Provider, you
will receive an audible and visual notification on your
Toshiba phone if another call comes in during your
current call.
• To put the first call on hold and answer the second
call, press the Send key. To switch between calls, tap
Swap.
• To avoid answering the call, tap Ignore. The second
call will either be disconnected or diverted to voice
mail, if you have subscribed to this service.
Making a second call while already in a call
1. Whilst in a call, tap Hold to place the call on hold.
2. Dial the second number and press the Send key.
Your first call will remain on hold.
3. To swap between the two calls, tap Swap.
Joining two or more calls together in a conference
call
1. With two calls active on your Toshiba phone, one
active and the other on hold, tap Menu >
Conference. The two calls will be joined together
and each party will be able to hear the other.
Adding an additional party to the call
1. To add another party to the conference call, dial
another person, again tapping Menu > Conference.
Having a private conversation with a party
1. To do this you will need to split the conference
call up. With the conference call running, tap
Menu > Private.
2. Select the party with whom you wish to have the
private conversation and press the Action key.
NOTE: The conference call feature depends
on your Network Provider supporting it. Please
check with your Network Provider to ensure you
can use this feature.
Placing a call on speakerphone
1. Whilst in a call, tap Menu > Speakerphone On. The
35
Page 36

speakerphone is activated.
2. To switch the speakerphone off, tap Menu >
Speakerphone Off.
NOTE: The speakerphone mode will not be
automatically enabled in your next call, even if
you left the function switched on in the previous
call
.
Placing a call on hands free mode
When the hands free equipment is attached the phone,
hands free mode option will be enabled.
Special dialing requirements
Inserting a manual pause in a dialing sequence
Calls to certain networks may require a pause between
the dialled digits. To do this:
1. From the Today screen, tap Contacts.
2. Select the contact number in which you want to
insert a pause and tap Menu > Edit.
3. Place the cursor where you want to insert the pause.
4. Tap w. The letter w is displayed where the manual
pause will occur in the dialling sequence.
5. Tap ok.
Inserting an automatic pause in a dialling
sequence
Some international calls may require a pause in the
dialling sequence.
1. From the Today screen, tap Contacts.
2. Select the contact number in which you want to
insert a pause and tap Menu > Edit.
3. Place the cursor where you want to insert the pause.
4. Tap p. The letter p appears where the automatic
pause will occur in the dialling sequence.
5. Tap ok.
Inserting an international country code
To make an international call, you must include a
country code at the beginning of the dialing sequence.
To enter the country code, press and hold 0 to create +
sign and then enter the rest of the phone number.
NOTE: Similarly, you can insert a + sign when
saving a contact's phone number or dial it directly
36
Page 37

from the keypad.
Video telephony
Video calls allow you to enjoy live ‘face-to-face’
conversations with friends, family and colleagues.
Making a video call
Before making a video call, you must confirm that the
person you are video calling also has a video enabled
phone. To make a video call:
1. From the Today screen, tap Phone.
2. Enter the phone number.
3. Tap Video. The video call is made.
Answering or ignoring a video call
• To answer an incoming call with video enabled, tap
Answer.
• To answer an incoming call with video blocked, press
the Send key. An image will be sent according to the
current Video Call Settings
(refer to the Settings section for further information).
• To ignore an incoming the call, press the End key or
tap Ignore.
NOTE: Video call and Wireless LAN (Wi-Fi) do
not work simultaneously.
1 .You can't receive the video call while Wi-Fi
on.
Incoming video call is treated as a missed call.
2. You cannot turn on Wi-Fi while video calling.
37
Page 38

Messaging
This chapter describes how you can create, send,
receive, organise, delete and store the following
message types on your Toshiba phone:
• Text (SMS, Short Message Service) message
• Outlook email
• Multimedia message (MMS)
You can also use the instant messaging application,
Windows Live Messenger, from your Toshiba phone.
This application enables online over-the-air chat, as
well as providing access to your MSN Hotmail email
account.
Messaging Options
You can customize the settings of your accounts,
message, address and storage by tapping
Messaging > Menu > Options
• Accounts tab: Tap account to change setti ng of each
account. For example, tap text messages to change
Request delivery notification and Use Unicode when
necessary. Tap New account to set up a new account.
Creating and adding a signature to an
message
For each account in Messaging, you can specify a
signature to be automatically inserted into messages
that you send.
1. From the
tap an account.
2.
Tap Menu > Options… and Signatures in the
Account tab.
Tap to Select the account for which you are creating
3.
the signature.
4. Tap the box in Use signature with this account.
5. To insert a signature in every message you send,
tap the box in Use when replying and forwarding.
Otherwise, a signature is inserted in new messages
only.
6. Tap the Signature box, enter your signature.
7. Tap OK.
Check Display account picker when opening
Messaging if you would like to select the messaging
account when you open Messaging (???? I am not
Today screen, tap Start > Messaging and
email the
38
Page 39

sure)
• Message tab: Set up the following messaging
features ; when replying to e-mail, include body, keep
copies of sent items in sent folder, and the display after
deleting or moving a message feature.
• Address tab: Select whether to get E-mails from all
the contacts with E-mail from all the contacts with
E-mail addresses; alternatively, you can verify names
by defining their E-mail addresses.
• Storage tab: Check the memory space of your phone,
storage card and attachments, and also it enable you
to store attachments on storage card and specify how
you want to empty your deleted items.
Text (SMS) messaging
Creating a Text (SMS) message
Text messaging, or the Short Message Service
(SMS), allows you to exchange text messages with
other phones. For details on text messages, contact
your Service Provider. Your Toshiba phone supports
the sending of more than the standard 160-character
limit. If you enter more than 160 characters, the
message is split into linking SMS messages. You can
send multiple linked SMS messages at one time.
To create and send a Text message:
1. From the Today screen, tap Start > Messaging >
Text message > Menu > New.
2. Tap an existing contact by tapping Menu >
Add Recipient.
TIP: To enter phone numbers quickly from
your contact list, simply press the Action
key while the cursor is in the To: field.
Alternatively, enter the mobile phone number of the
recipient/s in the To: field. Use a semicolon to
separate multiple recipients.
3. After you have selected your recipient/s, scroll down
to the message area and enter your message.
4. Tap Send. The Text message is sent.
TIP: To delete
cancel a message, tap Menu >
Cancel Message whilst in the Text Message
creation screen.
39
Page 40

Delivery notification
To request Delivery notification:
1. Tap Menu > Message Options whilst in the
Text Message creation screen.
2. Tap the box in the Request message delivery
notification field.
3. Tap OK. Your request is sent to your Service
Provider.
Inserting predefined text into a message
To save time when entering text, you can insert
predefined text into a message:
1. From the
Today screen, tap Start > Messaging >
Text message > Menu > New > Tap Menu > My
Text whilst in the Text Message creation screen.
2. Tap the text you want to insert.
Replying to a message
1. From an open message, tap Reply.
If you are replying to a number of recipients, tap
Menu > Reply All.
2. Enter your message in the message area.
3. Tap Send. The Text message/s is sent.
Forwarding a message
1. From an open message, tap Menu > Reply >
Forward.
2. Tap an existing contact by tapping Menu >
Add Recipient.
TIP: To enter phone numbers quickly from
your contact list, simply press the Action
key while the cursor is in the To: field.
Alternatively, enter the mobile phone number of the
recipient/s in the To: field. Use a semicolon to
separate multiple recipients.
3. If necessary, enter a message in the message area.
4. Tap Send. The Text message is sent.
Deleting a message
1. From the Today screen, tap Start > Messaging >
Text Message.
2. Open the folder and select Tap
the message you
40
Page 41

want to delete and tap Delete Menu> Delete.
E-mail
Before you can send or receive emails, you need to set
up an email account. Your Toshiba phone supports the
following types of email accounts (all of which are
covered in this section):
• Internet email (POP3/IMAP)
• Exchange server (Outlook)
Setting up an email account automatically
1. From the Today screen, tap Start > Messaging >
New Account.
2. Tap Enter e-mail address: field to enter your email
address for this account.
3. Tap the box in the Try to get e-mail server
settings from the internet field.
4. Tap Next.
5. If the account is set up successfully, you are
prompted to send and receive email.
If the account is not set up successfully, you must
tap Next and set up the account manually, as
described in the following section.
Setting up an email account manually
1. Enter a
your name (the name you want displayed
when you send email) in the Your name: field.
2. Enter Account display name in the Account
display name field and tap Next
3. Enter the name of the incoming server in the
Incoming mail: field, select the Account type
(POP3 or IMAP4) and tap Next
4. Enter a user name in the User name: field. This is
usually the first part of your email address, which
appears before the sign ‘@’ sign
5. Enter a password in the Password: field.
TIP: Choose a strong password - strengthen
the security of your password by selecting a
combination of word and number characters.
6, Tap the box in the Save password field. if you wish
to save your password to your Toshiba phone
This may or may not be required. Contact your
Internet Service Provider for more information.
41
Page 42

WARNING: If you save your password and
then lose your Toshiba phone, you run the risk of
someone else being able to access your email
account.
7. Tap Next.
8. Enter the name of your outgoing email server
(SMTP).
9. Tap the box in the Outgoing mail requires
authentication if the outgoing server requires
authentication.
10. Tap the Advanced Server Setting to set
additional settings if you want.
Tap the box in the Require SSL connection if you
wish to enable the SSL connection.
IMPORTANT: The SSL connection enables
you to receive personal information more
securely. Please note that if you select this
option and your ISP does not support an SSL
connection, you will not be able to connect and
receive email.
IMPORTANT: Before you set up your
Internet email account, ensure that you
have the necessary information, as listed
above.
Network Connection field enable you to select the
network to which your email server connects.
11. Tap Done when you finish Advanced Server
Setting
12. Enter Outgoing Settings field.
13. Tap the box in Outgoing Server requires
authentication if your outgoing server requires it.
IMPORTANT:If authentication is required, your
user name and
password (as specified above) will be needed.
Contact your Service Provider for more
information.
14. Tap the box in Use the same user name and
42
Page 43

password for sending e-mail when you want.
15. Tap Next.
16. Select the frequency to send and receive your
e-mail from Automatic Send/Receive field
17. Download messages field enables you to set
download message range from the server..
18. Tap the Advanced Setting to set additional
settings if you want.
Tap the box in the Send/receive when I click
Send to set when tapping send menu
automatically send/receive.
Tap the box in the Use automatic send/receive
schedule when roaming to synchronize
automatically when roaming, which may result in
additional changes.
When deleting messages: field enables you to
select the deleting option
Tap Done when you finish setting Advanced
Setting
19. Tap Next.
20. Tap the Message format: field to select the
sending message type (HTML/Plain text).
21. Tap the Download size limit: field to select the
download size limitation.
22. Tap Finish.
Setting up an Outlook email account
An Outlook email account is created and managed
by Microsoft's Exchange server. You must have this
account set up before continuing with the other
steps described in this section.
To send or receive email messages with your
exchange server, Tap Start > Programs >
ActiveSync.
Once the ActiveSync completes successfully, Tap
Start > Messaging > Outlook Email > Menu > Go to
> Folders…. The email folders are similar to the
Outlook client in a PC.
43
Page 44

Viewing your Inbox message list
From the Today screen, Tap Start > Messaging,
and tap an account. The Inbox message list
displays your received messages.
Create an email message
1. From the Today screen, tap Start > Messaging.
2. Tap an email account.
3. Tap Menu > New.
4. In the To, Cc, and/or Bcc field, enter the recipient/s
email address/es. Insert a semicolon between
multiple addresses.
5. Enter a subject in the Subject field.
6. Enter a message.
7. Tap Send. Email messages are stored in your
Outbox and are sent to recipients the next time you
synchronize or connect to your email server.
TIP: You can quickly enter email addresses
from your contact list. Whilst in the To field,
press the Action key and select a recipient
from the list. Select the recipient's email
address. The semicolon separator is
automatically inserted if you enter multiple
recipients.
To set the priority of the email, Tap Menu
> Message Options.
To cancel a message, Tap Menu > Cancel
Message.
Inserting predefined text into an email message
Please refer to the Text (SMS) messaging section
for details on how to use this facility. It can be used
when creating a new message or replying to an email.
Replying to an email message
1. From an open message, tap Reply or, if replying to
multiple recipients, tap Menu > Reply > Reply All.
2. Enter a message in the message area.
3. Tap Send.
TIP: If you are replying to an email in the
Outlook Email account, you will send less
data if you do not edit the original message.
This may reduce data transfer costs based
on your rate plan.
44
Page 45

Sending and receiving email messages
1. From the Today screen, tap Start > Messaging.
2. Tap the email account that you want to send and
receive messages.
3. Tap Menu > Send/Receive. Your Toshiba phone
connects to your Internet email server and sends
and receives your messages.
Downloading a complete email message
1. From the Today screen, tap Start > Messaging and
tap an account.
2. Tap the message to download.
NOTE: To stop this process, tap Menu >
Stop Send/Receive.
3. Tap Menu > Download Message. The complete
message is retrieved the next time you synchronize
or connect to your email server to send/receive
email.
Downloading an email attachment
In an open message with an attachment to download,
tap the attachment. The attachment is downloaded the
next time you synchronize or connect to your email
server and send/receive email.
NOTE: Alternatively, you can scroll down to
the bottom of the email message and select
Get the rest of this message.
Viewing an attachment
In an open message containing a downloaded
attachment, tap the attachment.
Adding a picture to an email message
1. In the message area of an email message, tap
Menu > Insert > Picture.
2. Tap the picture you want to add.
NOTE: You can only view attachments for
file types that are supported by your Toshiba
phone.
Switching between email folders and accounts
1. Tap Start > Messaging > Outlook Email >
Menu > Go to > Folders….
45
Page 46

2. Tap the new folder you wish to view.
MMS messaging
The Multimedia Messaging Service (MMS) allows
you to exchange multimedia messages containing
data such as text, pictures, sounds, animation and
video clips. You can send MMS messages to other
mobile phones or to email addresses. For details on
MMS, and to enable your account for this service,
contact your Service Provider.
An MMS can be made of many pages, also known as
'slides'. Each slide can hold an image, a sound and
text, but you do not need to set all of these for each
message. The maximum amount of content that can
be sent in a message is set by your Service Provider.
Creating an MMS
1. From the Today screen, tap Start > Messaging and
tap the MMS option.
2. On the MMS main screen, tap Menu > New to
create a new MMS.
3. Tap a MMS from given templates or tap Custom to
customize your MMS.
4. Add a recipient.
You can enter a phone number directly into the To:
field, or you can select a contact from your contact
list. To choose a contact
>
Add. by tapping Menu>Add Recipient while the
tap Menu > Recipient…
cursor is in the To: field.
The MMS composer is able to deliver the
message to more than one user. When delivering to
multiple recipients, input a semicolon between
recipients.
Adding a Picture or Video
To add an image to the message:
1. Tap the Insert Picture/Video area. The preview of
all pictures and videos in the Picture the c
urrent
folder is displayed.
2. Tap one of the pictures to add. in the current folder
.
To launch the camera application, tap Menu
> Capture > Picture (or Video).
3. Once you have selected a picture or video, the main
message creation screen is displayed.
NOTE: If you add a video to the message, you
cannot add any further audio to the slide.
46
Page 47

Adding text to the MMS message
Tap the Insert Text here area and enter your
message. To use predefined text, tap Menu > Insert
Media > My Text.
Using/creating templates
Tap Menu > Template > New From Template… and
choose a template to use or create a new one yourself.
Selecting a message background
colour
To choose the message background colour,
Menu
displayed.
> Options > Background. A list of colours is
tap
Selecting a message background, text size, colour,
text background
To choose the message background colour, tap
Menu > Options > background, text size, text
colours or text background which you want to
change. A list of each colour or size item
is displayed.
Tap the colour or size you want to applyt
Additional items
Just as for email, you may add recipient/s in copy (cc)
or blind copy (bcc) to your message. You may also set
the priority of the message, a delivery time delay for
the sending of the message, an expiry time for the
message, and request delivery and read report/s.
To set these requirements, go to Menu > Options
> Send Options... and set all these options as
required
Receiving MMS messages
Your Toshiba phone will alert you when a new MMS
arrives. Depending on your settings, the MMS
contents may download a few moments later when
the message will be ready to view in your MMS Inbox.
The MMS Inbox functions in an identical way to your
email and text message inboxes.
MMS settings
47
Page 48

• New: create new message.
• Reply: replies to all and forwards current message.
• Mark as read/unread: marks current item as
unread/read.
• Move: moves current message into another folder.
• Go to: switches to other folder (including Drafts,
Outbox, Inbox, Sent Items and Deleted Items) and
between Text Message, Outlook Email and MMS.
• Tools: the followings can do;
- sorting the listed messages
- managing the folder for MMS
- emptying all the items in the deleted item folder
- clearing all MMS messages
- creating a new account for email
- changing the account option for the text message,
email and MMS
• Download Messages: if you have chosen only to
take notification of MMS messages, and not to
download the whole MMS message, you can mark a
message for download. The MMS message will be
downloaded when you next send or receive a
message.
• Send/Receive: forces a send/receive of MMS
messages that are pending.
Setting up the MMS account
If your Toshiba phone has not been preconfigured,
you will need to manually enter the details of the MMS
account. This is a two-stage process: in the first stage
you must set up the data connection, and in the
second stage you must define the address of the MMS
server on the Internet.
Setting up a data connection
You will need the name of the MMS APN and any
associated username, password, IP address and DNS
setting in the connection settings.
Defining the server
1. From the Today screen, tap Start > Messaging.
2. Highlight the MMS entry, and tap Menu > Options.
3. Tap MMS in the Account tab and tap New in the
server tab.
4. Enter the following details:
•Server Name: enter a name for the server details.
•Gateway: enter the WAP gateway to be
used for this connection, as supplied by your
Service Provider.
•Port number: enter the port number.
48
Page 49

•Server address: enter the address of the server, as
supplied by your Service Provider.
•Connect Via: point the MMS server towards the
correct connection point. If you set up the MMS
using the Secure WAP network setting, you must
select the Secure WAP network setting here.
•Max sending size: please contact your Service
Provider to obtain this value.
5. Tap OK.
6. Tap Set As Default if you want set it as default.
7. Tap OK. Your Toshiba phone is now configured for
MMS.
Windows Live Messenger
Windows Live Messenger is the next model of MSN
messenger, and provides new messaging service.
Windows Live Messenger on your Toshiba phone
provides instant access to your contact list, emoticons,
and friends. This service is currently free of charge.
Windows Live Messenger offers new features to you:
• Easier-to-manage contact list and conversation
inbox.
• View and participate in up to 5 active conversations
at one time.
• No more idle conversation experience: Messenger
for mobile can now maintain current conversation
history and reestablish an idle conversation in the
background.
• Emoticons are now displayed as graphics within
display names and conversations.
• Easily change your display name and status, and
even set status before you sign in.
• Sort and find contacts more quickly and easily
(search, filter by group, and hide offline contacts).
• Call or send e-mail to contacts directly from their
contact cards.
• Converse with temporary contacts (new people
who don't yet appear on your list of Messenger
contacts), and receive the option to add them to
your contact list.
• To use it, tap Start > Programs > Windows Live
Messenger.
NOTE: You need to have either a
Microsoft.NET Passport
(
www.passport.com) or a Hotmail account
(www.hotmail.com) to use Windows Live
Messenger. In addition, your Toshiba phone
must be connected to the Internet.
49
Page 50

To obtain a Passport, go to:
http://www.passport.com.
To create a Hotmail account, go to:
http://www.hotmail.com.
Windows Live Messenger overview
With Windows Live Messenger you can send instant
messages to your contacts' mobile device or PC.
To use Windows Live Messenger, you need Microsoft
Passport Network credentials. After obtaining the
credentials, complete the following tasks:
1. Set up a connection to the Internet with your
Toshiba phone.
2. Get a Windows Live ID.
3. Sign in to Windows Live Messenger.
To access Windows Live Messenger:
1. From the Today screen, tap Start > Programs >
Windows Live Messenger.
2. Tap the left or right arrow to select status, and tap
Sing in.
3. Enter the following instruction on the screen to sign.
Microsoft Passport Network credentials or Hotmail
account is needed to sign in.
NOTE: Signing in to an account may take
several minutes, depending on your
connection speed and how busy your mobile
network is.
Text input
Input methods
Your Toshiba phone has three text input methods:
• Typing: Using the input panel or the keyboard
• Writing: Using the stylus, write directly on the screen
• Drawing: Using the stylus, draw directly on the screen
Input Panel provides various input methods, including
Block Recognizer, Keyboard, Letter Recognizer and
Transcriber.
By default, the Input Panel icon appears on the menu
bar to indicate which input method is currently selected.
Tap the arrow beside you can select other input
methods.
Block Recognizer
With Block Recognizer, you use a single stroke to
50
Page 51

write individual letters, numbers and punctuation,
which are then converted into typed text.
To use Block Recognizer, Tap the Selector arrow,
and tap Block Recognizer.
The handwriting area is divided into two designated
parts: abc, and 123 (both dimmed).
Write characters, numbers, symbols, and punctuation
in separate area:
• Write in the abc area to enter lowercase letters.
• Write in the 123 area to enter numbers.
• Tap the box in the right corner labeled “@$*” to
open table of symbols and punctuation.
NOTE: Block Recognizer is available when
text entry is possible.
TIP:
For help with using Block Recognizer, tap
“?” in the right corner to see demo.
Keyboard
Switch to on-screen keyboard, and then use stylus to
tap on the smart keyboard to enter characters.
TIP:
Tap áü to enter miscellaneous vowels or
symbols.
To use keyboard option,
1. Tap the selector arrow and tap Options.
2. Tap Keyboard in the Input Method box.
3. Select to;
• Tap the circle before “Large keys” to enlarge the
smart keyboard.
• Check the Use gestures for the following keys
box to enable gesture command.
Letter Recognizer
With Letter Recognizer, you can write individual
letters, numbers and punctuation, which are then
converted into typed text.
To use Letter Recognizer, tap the Selector arrow, and
tap Letter Recognizer.
The handwriting area is divided into three designated
parts: ABC, abc, and 123 (all dimmed).
51
Page 52

Write characters, numbers, symbols, and punctuation
in separate area:
• Write in the ABC area to enter capital letters.
•
Write in the abc area to enter lowercase letters.
• Write in the 123 area to enter numbers.
• Tap the box in the right corner labeled “@$*” to
open table of symbols and punctuation.
NOTE: Letter Recognizer is available when
text entry is possible.
For help with using Letter Recognizer, tap
TIP:
“?” in the right corner to see demo.
Transcriber
Transcriber is a handwriting recognition program that
allows you to write in cursive, print, or a combination of
both. Transcriber works transparently in the
background of programs, recognizing words with its
integrated dictionary. When transcriber is turned on, it
interprets stylus movement anywhere on the screen as
handwriting input. For more information about using
Transcriber, see Help on your device:
• Start a program such as Word Mobile.
• Tap the Input Panel icon at the bottom center of the
screen and tap the Input Selector arrow. Tap
Transcriber. The Transcriber introductory screen
appears.
To start Transcriber
Because Transcriber works transparently in the
background of programs that accept user input, you
must have one of these programs open to use
Transcriber.
1. Start a program such as Word Mobile.
2. Tap the Input Panel icon at the bottom center of the
screen and tap the Input Selector arrow.
3. Tap Transcriber.
The Transcriber introductory screen appears.
To use Transcriber keyboard
Transcriber comes with an on-screen keyboard that
provides an easy way to add punctuation or a special
symbol to existing text.
• From a program, tap
on the Transcriber
52
Page 53

toolbar.
The keyboard remains visible until you tap the
button again.
TIP: To reposition the keyboard, tap and hold
the title bar, and then drag to the desired
location.
When no text is selected, you can also open the
keyboard by doing the
gesture.
To edit text
1. In a program, draw a line across the text you want to
edit.
2. After you lift the stylus from the screen, the line will
disappear and the selected text will be highlighted.
3. Do either of the following:
• Rewrite the text.
• Use gestures to capitalize letters, insert a space,
and so on. For information about using gestures,
see “Transcriber Gestures” in this chapter.
To use gesture in Transcriber
Use quick strokes of the stylus to edit your text. Do the
Enter, Space, and Tab gestures while writing text to
insert returns, spaces, or tabs.
Do To
Insert a paragraph return at the
cursor.
The horizontal portion of the gesture
must be at least two times longer than
the vertical portion.
Insert a space at the cursor.
The horizontal portion of the gesture
must be at least two times longer than
the vertical portion.
Move the cursor one space back and
erase any text.
Do the gesture by drawing a line from
right to left.
Open the menu of alternate words if a
word is selected or the on-screen
Transcriber keyboard if no text is
selected.
Do the gesture by drawing a line
straight down and back up.
53
Page 54

Change the capitalization of a
selected letter, word, or block of text.
Do the gesture by drawing a line
straight up.
TIP: You can also use the Enter, Space, and
Backspace buttons on the Transcriber toolbar.
To write with Transcriber
Undo the last action.
Do the gesture by drawing a line
straight up and back down.
Copy the selected text.
Do the gesture by drawing a line from
left to right and back.
Cut the selected text.
Do the gesture by drawing a line from
right to left and back.
Transcriber allows you to write in cursive, print, or a
combination of both.
1. From a program, position the cursor where you want
text to appear.
2. Use the stylus to write anywhere on the screen.
The handwriting will be converted to text shortly after
you lift the stylus from the screen.
Paste copied or cut text.
Do the gesture by drawing a line from
the lower left of the screen diagonally
up toward the right and back down to
the right.
Insert a tab.
The horizontal portion of the gesture
must be at least two times longer than
the vertical portion.
To optimize handwriting recognition for
Transcriber
If Transcriber does not recognize your handwriting as
accurately or quickly as you'd like, there are some
things you can do to optimize handwriting recognition.
• Select the Writing Direction picture that best
matches the slant of your handwriting.
• Use Letter Shapes to eliminate letter shapes that
54
Page 55

you do not use or to learn methods of writing
characters that will make them easier for
Transcriber to recognize.
• Try writing in another format. If you have been
printing, try writing cursive, or if you have been
writing in both cursive and print, try printing alone.
• Adjust the speed at which Transcriber returns text
after you write.
• Add a user dictionary that contains special terms
you may be using, such as medical or legal terms.
Verify that you are using your Letter Shapes user
profile.
NOTE: The next time you write the shorthand
text, the appropriate program will open.
To show or hide the Transcriber toolbar
The Transcriber toolbar, which appears at the bottom
of the screen when Transcriber is open, provides easy
access to several tools, Enter, Space, and Backspace
buttons, and Left and Right arrow buttons.
• From a program, tap the Transcriber icon at the
bottom of the screen.
Tap To
Open the Options dialog box, where
Open Letter Shapes, where you can
Use the miniature keyboard to quickly
Change the character recognition
• a mode. This is the default for
• 123 mode. Numbers and some
• A mode. All letters are
If you are in A or 123 mode,
you can set options such as writing
direction, text entry, and shorthand.
set your personal writing styles to
maximize recognition.
enter numbers, punctuation, and
other symbols.
mode.
optimum handwriting recognition.
letters are allowed and the
calculator is activated.
automatically capitalized.
recognition returns automatically to
55
Page 56

the default mode once you lift the
stylus.
Insert a space at the cursor.
Insert a paragraph return at the
cursor.
Move the cursor one space to the left.
Move the cursor one space to the
right.
Move the cursor one space back and
erase any text.
Open the Transcriber Help.
Drawing and Writing on the Screen
Drawing on the Screen
With your Toshiba Phone, you can draw directly on the
screen, or write on the screen and save notes in your
own handwriting. To do this, you must set the input
mode in Notes to Writing. If you prefer to use
handwriting or frequently add drawings to your notes,
you may find it helpful to set Writing as the default
input mode. If you prefer typed text, set Typing as the
default input mode.
To set the input mode for Notes
1. Tap Start > Programs > Notes.
2. In the note list, tap Menu > Options.
3. In the Default mode box, tap one of the following:
• Writing if you want to draw or enter handwritten
text in a note.
• Typing if you want to create a typed note.
4. Tap OK.
To handwrite a note
1. Tap Start > Programs > Notes.
2. In the note list, tap New.
3. Tap Menu > Draw, write your text on the screen.
4. When finished, tap OK to return to the note list.
NOTE: If a letter crosses three ruled lines, it is
treated as a drawing rather than text.
56
Page 57

To draw a note
To draw on the screen, use the stylus.
1. Tap Start > Programs > Notes.
2. In the note list, tap New.
3. Tap Menu > Draw, and cross at least three ruled
lines.
4. A selection box labeled Drawing appears around
your drawing.
5. When finished, tap OK to return to the note list.
NOTE: To select a drawing (for example, to
copy or delete it), tap and hold the drawing
briefly. When you lift the stylus, the drawing is
selected.
Searching
You can search for files and other items stored on your
device in the My Documents folder or on a storage
card.
You can search by file name or by key words located in
the item. For example, you can search E-mail
messages, notes, appointments, contacts, and tasks
as well as in online Help.
To search for a file or an item
1 Tap Start > Programs > Search.
2 In Search for, enter the file name, word, or other
information you want.
3 If you have searched for an item before, tap the
arrow in Search for to find it in the searching history.
4 In Type, select a data type to help narrow your
search area.
5 Type Search.
In the Results list, tap the item you want.
NOTE: The My Documents folder and its
subfolders are included in the search area.
NOTE: Results found on a storage card is
indicated by an icon.
57
Page 58

Settings
Reassigning button functions
There already are programs that assigned to the
hardware buttons, however, you may not satisfied with
some assignments as you want those often-in-use
programs to replace the ones rarely run.
To reassign a button:
1. From the Today screen, tap Start > Settings
> Personal tab > Buttons.
buttons and their current assignments.
2. Tap a button you want to reassign, and then in
Assign a program selection box, select a program
for this button.
NOTE: There is an icon representing the
original functions of a button. It helps you
identify a button and restore its default at any
time.
3. Tap OK.
You see the names of
58
Page 59

Input method setting
1. From the Today screen, tap Start > Settings
> Personal tab > Input.
2. On the Input method tab, tap a desired input
method. On the Word Completion tab, tap a
desired setting for word completion. On the Options
tab, tap the desired options for writing and recording.
These options apply to any program on the device
where you can record or write.
NOTE: You can also change input options by
tapping the selector arrow and options.
NOTE: you can select enable or disable of
XT9 feature by checking on/off the box of
Suggest words when entering text in the
Word Completion tab.
Security settings
It is advisable to apply certain security features in the
event that your Toshiba phone is lost or stolen.
In addition, some security features can be applied to
prevent unauthorised use.
You can apply the following security:
• Phone lock with a PIN - prevents unauthorised
use of your SIM card in any phone.
• Device lock with a password - prevents
unauthorised use.
To protect your phone with a PIN
Be sure to make a note of your personal identification
number (PIN). When the SIM PIN is disabled, you
must provide this PIN to enable the SIM. The PIN is
provided with the SIM card.
1. From the Today screen, tap Phone > Menu >
Options > Phone tab.
2. Tap Require PIN when phone is used.
To change
the PIN at any time, tap Change PIN.
TIP: Emergency calls can be placed at any
time, without requiring a PIN.
To protect your device with a password
You can help keep your data more secure by requiring
59
Page 60

a password every time the device is turned on.
1. From the Today screen, tap Start > Settings
> Personal tab > Lock.
2. Tap the Prompt if device unused for check box,
and in the box to the right, select how long your
device must be turned off before a password is
required. In the Password type box, select the type
of password you would like to use. Enter the
password and, if necessary, confirm the password. If
your device is configured to connect to a network,
use a strong password to help protect network
security.
3. Tap OK.
The next time the device is turned on, you
will be prompted to enter your password.
NOTE: Each time a wrong password is
entered, the time the device takes to
respond will get longer and longer until the
device appears to be not responding. If you
forget your password, you must follow the
instructions in your owner’s manual to clear
memory before you can access your device.
To change your password
1. From the Today screen, tap Start > Settings >
Personal tab > Lock. You will be prompted to enter
your current password.
2. In the Password box, enter your new password.
3. Tap OK.
Enabling Fingerprint
The Fingerprint feature helps provide additional
security on your Toshiba phone, by protecting it from
unauthorised use.
To enable the Fingerprint feature:
1. From the Today screen, tap Start > Settings
> Personal tab > Fingerprint.
2. Tap the finger you want to enrol from the list, and
press the Action key.
3. Swipe the finger three times to enrol it to the
fingerprint sensor.
4. Click OK.
Disabling Fingerprint
1. From the Today screen, tap Start > Settings
> Personal tab > Fingerprint.
2. Tap Delete from the menu with focused finger list
60
Page 61

item.
3. Tap OK.
Customizing your Start Menu
You can select/deselect items/programs in the combo
box to let it appear on/disappear from the Start Menu.
1. From the Today screen, Tap Start > Settings >
Personal tab > Menus.
NOTE: Only 7 programs are allowed on the
Start Menu. If you selected any items in
Programs category, the icons are disappeared
from Programs.
Owner information
Entering owner information could allow someone to
return your Toshiba phone to you if it becomes lost.
1. From the Today screen, tap Start > Settings >
Owner information
2. Enter your information on the Identification tab.
can also take important notes on the Notes tab, or
choose to display them when your device is tuned
Besides, in Option tab, you can set to display
on.
Identification information or Notes when the device
is turned on.
TIP: If you have selected to show owner
information on the Today screen, just tap the
section there to edit.
3. Tap OK.
on the Personal tab.
You
Phone settings
Ring tone Settings
1. From the Today screen, tap Start > Settings >
Personal tab > Phone > Phone tab.
TIP: In Sounds, using different ring types,
you can change the way you are notified of
incoming calls.
61
Page 62

2. Tap the Ring type box to find the type (ring, vibration,
or combination of both) you preferred.
3. Tap the Ring tone box to select a tune you like. You
can tap the control buttons to listen to the sample.
TIP: you can also use custom *.wav, *.mid,
*.mp3, or *.wma files as ring tones.
Please see Help topics on Change the ring tone &
ActiveSync for detailed instructions.
TIP: In Keypad, you can select Long
tones/Short tones/Off when you tap and
hold the buttons on the phone keypad.
Setting call barring
Call barring allows you to screen incoming and
outgoing calls.
To set call barring:
1. From the Today screen, tap Start > Settings >
Personal tab > Phone > Service tab.
2. Focus on Call barring service type, and tap the Get
Settings button to retrieve settings from network;
you can also change them here.
3. Tap OK.
Setting call forwarding
1. From the Today screen, tap Start > Settings >
Personal tab > Phone > Service tab.
2. Focus on Call forwarding service type, and tap the
Get Settings button to retrieve settings from
network; you can also change them here.
3. Tap OK.
Setting call waiting
When you are in another call, the call waiting feature
will notify you of an incoming call.
To set call waiting:
1. From the Today screen, tap Start > Settings >
Personal tab > Phone > Service tab.
2. Focus on Call waiting service type, and tap the Get
Settings button to retrieve settings from network;
you can also change them here.
3. Tap OK.
Configuring Caller ID
Configuring Caller ID allows selected callers to view
your name and phone number information on their
62
Page 63

phone when you call them.
To configure Caller ID:
1. From the Today screen, tap Start > Settings >
Personal tab > Phone > Service tab.
2. Focus on Caller ID service type, and tap the Get
Settings button to retrieve settings from network;
you can also change them here.
3. Tap OK.
Voice Mail and Text Messages
1. From the Today screen, tap Start > Settings >
Personal tab > Phone > Service tab.
2. Focus on Voice Mail and Text Messages service
type, and tap the Get Settings button to retrieve
settings from network; you can also change them
here.
3. Tap OK.
Fixed Dialing
1. From the Today screen, tap Start > Settings >
Personal tab > Phone > Service tab.
2. Focus on Fixed Dialing service type, and tap the
Get Settings button to retrieve settings from
network; you can also change them here.
3. Tap OK.
Network
You can view available wireless networks, or assign
another network to connect if the current one turns
unavailable. In addition, you can choose to
manually/automatically select the network. For more
information on network settings. Please see Help
topics related.
To change network provider:
1. From the Today screen, tap Start > Settings >
Personal tab > Phone > Network tab.
• Current network - By default, your device displays
the current network name here; however, you can
choose a preferred one.
• Network selection - By default, the Network
selection box is set to Automatic. Tap Manual
and wait for it to search for all available network
providers. Choose one to register.
• Set Networks - Tap one and press Move up or
Move down to arrange the order.
2. Tap OK.
Sounds and Notifications
63
Page 64

You can set a different sound for different events. The
sound can be set the different type every event.
TIP: You can copy sounds to your phone
from your PC using ActiveSync. Sound files
can be in either midi, wma, mp3, amr or wav
file format. For notifications or reminders, use
either midi, wma, mp3, amr or wav files.
Specifying the sound for an event
1. From the Today screen, tap Start > Settings
> Sounds & Notifications.
2. On the Sounds tab, tap the check box to enable
sounds for events and programs, or choose a
soft/loud sound for screen taps and hardware button
presses.
3. Tap OK.
Specifying the notification for an event
1. From the Today screen, tap Start > Settings
> Sounds & Notifications.
2. On the Notifications tab, tap one from the various
events in the selection box, and then choose a
sound for it. In the following check box, select the
way you want this event to be notified (Some may be
dimmed according to the event).
3. Tap OK.
TIP: Disabling sounds and flash light
helps conserve battery power.
Customizing your Today screen
You can customize your Today screen using:
• A picture file (.bmp,.jpg, png or.gif).
• A pre-packaged file that includes a picture, a
colour scheme and a new layout (.hme or.cab).
TIP: You can copy an image to your
Toshiba phone from your PC using
ActiveSync.
1. From the Today screen, tap Start > Settings
> Personal tab > Today.
2. On the Appearance tab, tap a theme you desire for
the Today screen.
Setting a picture as the background
1. Tap the Use this picture as the background check
64
Page 65

box. Tab Browse to view the picture files.
2. Tap the file name of the picture you choose.
3. Tap OK.
Setting appointment display in Calendar Options
1. On the Items tab, tap Calendar then tap the
Options… button.
2. On the Options screen, tap the followings;
• Tap Next appointment to only display the next
appointment on schedule.
• Tap Upcoming appointments to display the
appointments you have not done yet.
• Tap the Display all day events check box to
display all events (Both done or not) today.
3. Tap OK.
Setting task display in Tasks Options
1. On the Items tab, tap Tasks then tap the Options…
button.
2. On the Options screen, tap the followings;
• Tap the box of Display number of to display the
task you want to.
• Tap Category to select the task category you want
to display.
3. Tap OK.
Video call settings
To set the video call settings
1. From the Today screen, tap Start > Settings
> Personal tab > Video Call.
2. Tap the Hold tab to set the icon when holding a
video call. You can choose Default Icon or Custom
Images from pictures.
3. Tap the Block Video tab to set the icon for block
video. You can choose Default Icon or Custom
Images from pictures.
4. Tap the Services tab to access settings for a
service, select it from the given list and tap Get
Settings to set the corresponding item.
5. Tap OK.
Viewing the About details
Viewing the OS version
65
Page 66

1. From the Today screen, tap Start > Settings
> System tab > About.
2. On the Version tab, you see information on version,
copyright, and hardware.
3. Tap OK.
Changing Device ID
1. From the Today screen, tap Start > Settings
> System tab > About.
2. On the Device ID tab, here it shows you what
Device ID is and what it is used for. Note that your
Device ID should start with a letter and contains only
letters from A to Z, numbers from 0 to 9, underscore,
and hyphen.
NOTE: The device name is used to identify your
device in following situations:
• Synchronizing with PC
• Connecting to a network
• Restoring information from a backup
3. Tap OK.
Backlight setting
If your device supports it, you can set the backlight to
dim after a specific amount of time has elapsed.
1. From the Today screen, tap Start > Settings
> System tab > backlight.
2. Tap the Battery power tab to turn on/off the
backlight when using battery power, and specify the
time delay.
3. Tap the External power tab to turn on/off the
backlight when using external power, and specify
the time delay.
4. Tap the Brightness tab to adjust the brightness
level.
5. Tap OK.
Certificates
This item displays the name of the certificate issue and
the expiration date.
1. From the Today screen, tap Start > Settings
> System tab > Certificates. You can see the
details every tab.
66
Page 67

Clock & alarm settings
Setting the date and time
1. From the Today screen, tap Start > Settings
> System tab > Clock & Alarm > Time tab.
2. In Home, you set the time zone, current time and
date in your homeland.
3. While in Visiting, you set the same object of a
country you are visiting.
4. Tap OK.
NOTE: Synchronization will update the time on
your phone with that on a PC.
NOTE: These settings are only lost if you
manually reset your Toshiba phone. Your
settings are preserved if you power off the
phone, or if the battery is fully discharged.
Setting the alarm
1. From the Today screen, tap Start > Settings
> System tab > Clock & Alarm > Alarms tab.
2. Tap Description; use the Keyboard to define a
clock type.
3. Tap the uppercase letters below to arrange the days
on which you need the alarm.
4. Tap the time display at the end to set a time for this
alarm.
5. Tap the bell icon to select the reminder mode: Play
sound, Flash light, Vibrate, etc.
If you have the
Play sound check box selected, tap the sound
selection box beside to select an alarm ring you like.
6. Tap OK.
Customer feedback
You can make Windows Mobile software better by
participating in the Customer Experience Improvement
Program. If you participate, anonymous information
about how you use Windows Mobile software will be
sent to Microsoft. This helps identify trend and usage
patterns in order to improve the software.
1. From the Today screen, tap Start > Settings
> System tab > Customer Feedback.
2. Tap the radio button of Send Feedback or Don’t
Send Feedback you wish.
3. Tap OK.
NOTE: This feature doesn’t collect your name,
67
Page 68

address, or any other personally identifiable
information. You will not incur any data changes
to send the information.
Encryption
This feature allows you to secure sensitive information
on your Toshiba phone’s removable storage card.
data is only accessible when the card is installed in
their particular mobile device. If the card is ever lost or
stolen, their information remains secure because no
one else can access the card's contents because it is
encrypted.
1. From the Today screen, tap Start > Settings
> System tab > Encryption.
2. Tap the box of Encrypt files placed on storage
card field.
3. Tap OK.
WARNING: Anyone in possession of the
encryption key can decrypt and access the
sensitive information stored on the card.
The
Error Reporting
Turning Error Reporting on/off
Error Reporting sends data from your Toshiba phone
to technical support groups, who use the data to
diagnose a program error for a device running
Windows Mobile software. A text file is created
whenever an error is detected, and can be delivered to
support personnel if you choose to send it. If a
program error occurs, Error Reporting starts
automatically. The information Microsoft receives is
used by programming groups at Microsoft. The data is
used for quality control and will not be used for tracking
individual users, installations or for any marketing
purpose.
1. From the Today screen, tap Start > Settings
> System tab > Error Reporting.
2. Tap the radio button to select either Enable or
Disable of error report.
3. Tap OK.
68
Page 69

External GPS setting
1. From the Today screen, tap Start > Settings
> System tab > External GPS.
2. On the Programs tab, you can choose the port that
your Toshiba phone will use to obtain GPS data.
3. On the Hardware tab, you can specify the hardware
port to which your GPS device is connected.
Settings include GPS hardware port: field and
Baud rate: field.
4. On the Access tab, you can activate Manage GPS
automatically (recommended). You are strongly
advised to activate this feature; doing so will enable
Windows Mobile to manage access to your GPS
device, and allows multiple programs to obtain GPS
data simultaneously.
5. Tap OK.
Master Clear
To hard reset your phone:
1. From the Today screen, tap Start > Settings >
System tab > Master Clear.
2. Enter the reset code in the Code: field, and f
ollow
the on-screen instructions and tap Reset to reset
you phone.
3. Your phone will restart after it has been reset.
WARNING: After resetting, your Toshiba
phone will be resumed to its default factory
settings. All the user data and programs on
the your Toshiba phone will be formatted.
Please enter the confirmation code: 1234 and
push reset button, system will auto-reboot to
complete the operation.
Managing Memory
Ensuring memory details on your Toshiba phone
To ensure a good performance of your device, it’s
necessary to maintain a sufficient memory.
To see the memory available:
1. From the Today screen, tap Start > Settings
> System tab > Memory.
2. Tap Main tab, you can see the details of Storage
and Program.
3. Tap Storage Card tab, you can see the memory
available on the storage card.
69
Page 70

To end a program
You can close programs manually to release more
memory.
1. From the Today screen, tap Start > Settings
> System tab > Memory > Running Program tab.
2. In the Running Programs list, tap the program you
want to close, and tap Stop or Stop All to stop all
running programs.
NOTE: if you want to restore a program, focus
on a program you want and tap Activate.
Changing power management settings
Use Power Management to check the battery status
and configure settings that prolong battery life.
1. From the Today screen, tap Start > Settings
> Power on the system tab.
2. On the Battery tab, display the current battery
remaining, and on the Advanced tab, adjust the
following:
On battery power - Tap the box of Turn off device if
not used for: field, select the time period for the
phone to be idle before the device turns off.
On external power - Tap the box of Turn off device
if not used for: field, select the time period for the
phone to be idle before the device turns off when
using external power.
3. Tap OK.
Changing regional settings
Regional settings specify the style in which numbers,
currency, dates, and times are displayed.
1. From the Today screen, tap Start > Settings >
Regional settings
on the System tab, to select your
region.
2. To set the details up, tap other tabs (Number,
Currency, Time, and Date).
Removing Programs
This feature removes additionally installed software
70
Page 71

programs.
Removing a program
NOTE: Programs that come with your
Toshiba phone cannot be removed.
1. From the Today screen, tap Start > Settings
> System tab > Remove Programs.
2. Choose the program to remove
In the Programs in
storage memory list.
3. Tap Remove.
• On the Text Size tab, you can adjust the text size
to see more content or increase the readability in
many programs. You can see an example on the
Example field.
2. Tap OK.
To align the screen
1. From the Today screen, tap Start > Settings
> System tab > Screen.
2. Tap the radio button of Orientation you want to
adjust and align the screen’s orientation.
3. Tap OK.
Screen Adjusting
To align the screen
1. From the Today screen, tap Start > Settings
> System tab > Screen, do the followings:
• On the General tab, you can adjust the screen’s
orientation and align the screen.
• On the ClearType tab, you can select Enable Clear
Type to smooth the edge of screen fonts for many
programs.
71
Adjusting the scroll speed
The scroll speed is about how fast you scroll through
items on a list.
To adjust scroll speed:
1. From the Today screen, tap Start > Settings
> Personal tab > Buttons > Up/Down Control tab.
• Delay before first repeat - tap and pin the slider,
and move it to adjust time it responds scroll.
• Repeat rate - move the slider to adjust the time it
takes to scroll one item from another.
Page 72

2. Tap OK.
Windows Update
You can use Window Update to update the Microsoft
programs on your Toshiba phone.
1. From the Today screen, tap Start > Settings >
System tab > Windows Update.
You can select the check way on your Toshiba phone
for important updates or optional updates from the
Menu > Change Schedule.
SIMLock settings
To activate the SIM Lock
1. From the Today screen, tap Start > Settings >
Connections tab > More... >
2. Check the Prompt if SIM unused for box.
3. Enter and confirm a password with 8 digits.
4. Tap Done.
NOTE: Please make a note of your password.
SIMLock.
NOTE: If you activate the SIMLock, you will
only be able to use the SIM card used when
you activated SIMLock in your Toshiba phone.
NOTE: To disable this feature, enter your 8
digit password and uncheck the Prompt if SIM
unused for box.
Connectivity
Manual set up of your data connections
Connecting to the Internet
Your device is equipped with powerful networking
functions that enable you to connect to the Internet
through a General Packet Radio Service (GPRS) or
Universal Mobile Telecommunications System (UMTS)
network. You can set up connections to the Internet or
to a corporate network to browse the Internet, and
exchange e-mail or instant messages.
Your device has two groups of connection settings: My
ISP (Internet Service Provider) and My Work Network.
The My ISP settings are used to connect to the
72
Page 73

Internet, while My Work Network settings can be used
to connect to any private, corporate network.
NOTE: Before you begin, obtain the following
information:
• From your cellular phone service provider:
data connectivity plan information, access point
name, and PAP/CHAP security settings.
• From your Internet service provider (ISP) or
wireless service provider: access point name,
user name, and password and other security
information.
NOTE: If you connect to the Internet using
your Service Provider's data network, the
service may be provided through a GPRS
connection (fast, but generally billed by
volume of data transferred), or through a
Circuit Switched connection (slow, but
generally billed by amount of time connected).
You should check with your Service Provider
which connection you will using on their
network.
Creating a GPRS connection
GPRS is a packet-based wireless communication
service which allows users to send and receive
data, with their mobile phones, in functions such as
e-mail and web-browsing. Normally, your Service
Providers will charge for this service based on the
data traffic volume. But, every network connection
is different. You should gather all the relevant data
you need from your Service Provider.
To create a GPRS connection:
1. From the Today screen, tap Start > Settings
> Connections tab > Connections.
2. Tap Add a new modem connection of the group
you will connect.
3. Enter a name for the connection.
4. Tap the Cellular Line (GPRS) in the Select a
modem: list, tap Next.
5. Enter Access point name and tap Next.
6. Enter the following information:
User name - enter your user name for the
GPRS network, if required.
Password - enter your password, if required.
Primary DNS - enter the primary Domain
Name System (DNS) address, if required.
Domain - enter the domain name, if required.
NOTE: if you need to specify the details, tap
73
Page 74

Advances…. And enter the followings
information:
Use server-assigned IP address – check
the radio button on if you automatically
configure IP address.
Use specific IP address – check the radio
button on, and enter manually IP address.
Use software compression – check the
box on if you use.
Use IP header compression – Check the
box on if you use.
Use server-assigned address – check the
radio button on if you automatically
configure.
Use specific server address – check the
radio button on if you manually configure,
and enter the DNS, Alt DNS, WINS, Alt
WINS.
7. Tap OK and Finish.
Your Toshiba phone uses this connection when you
connect to the Internet.
Creating a dial-up connection
NOTE: Every network connection is
different. You should gather all the relevant
information you need for this service from
your Service Provider.
To create a dial-up connection:
1. From the Today screen, tap Start > Settings
> Connections tab > Connections.
2. Tap Add a new modem connection of the group
you will connect.
3. Enter a name for the connection.
4. Tap the Cellular Line in the Select a modem: list,
tap Next.
5. Enter a dialed number and tap Next.
6. Enter the relevant information (refer to Creating
GPRS connection).
7. Tap OK and Finish.
Creating a proxy connection
Depending on your Service Provider's
configuration, you may need to add a proxy
connection to allow your Toshiba phone to access
the Internet or WAP services. Every network
connection is different and your Service Provider
will be able to advise if you need to create a proxy
connection. You should gather all the relevant
information you need, from your Service Provider,
74
Page 75

before creating a proxy connection.
To create a proxy connection:
1. From the Today screen, tap Start > Settings
> Connections tab > Connections.
2. Tap Set up my proxy server in the My Work
Network.
3. Check the box of This network connects to the
Internet on, and enter the Proxy server:.
4. Tap OK.
Creating a VPN connection
IMPORTANT: Please ensure that you have
setup a successful GPRS connection before
trying to create a VPN connection - the VPN
connection uses the GPRS connection to
connect to your Work network. You should
gather all the relevant information you need
before creating a VPN connection.
1. From the Today screen, tap Start > Settings
> Connections tab > Connections.
2. Tap Add a new VPN server connection in the My
Work Network.
3. Enter the following information:
Name: - enter a name for the connection.
Host name/ IP: - enter the VPN server name.
VPN type - select the VPN type.
Tap Next.
NOTE: If you select IPSec/L2TP in the VPN
type:, select the Pre-Shared Key or
Certificate of authentication type.
4. Enter the relevant informations (refer to Creating
GPRS connection).
5. Tap OK and Finish.
Using a specific connection to
connect to the chosen networks
You must define a specific connection to the chosen
networks, to connect your Toshiba phone to the
correct access point for a particular data transfer
type.
To use a specific connection to connect to chosen
networks:
1. From the Today screen, tap Start > Settings
> Connections tab > Connections.
2. Tap Set up my proxy server in the My Work
Network, and tap Advanced…
3. Tap proxy type you want to change, and enter the
relevant information.
4. Tap OK.
75
Page 76

NOTE: Similarly, select the connection you
wish to use for the WAP network.
NOTE: The Work Network connection is
used if you are planning to use a
Virtual Private Network connection.
Bluetooth
Bluetooth has three modes: Off, On and Visible.
When Bluetooth is set to On, your Toshiba phone
will be connected to the devices it is already paired
with, but will not be visible to new devices. In
Visible mode your Toshiba phone will perform in
the On state, but it will also be visible to new
devices within range, and you will also be able to
receive data from other devices.
Turning Bluetooth on and off
By default Bluetooth is turned off. If you turn it on,
and then turn your Toshiba phone off, Bluetooth will
also be turned off. But when you turn on your phone
again, Bluetooth will turn on automatically.
To turn Bluetooth on/off:
1. From the Today screen, tap Start > Settings
> Connections tab > Bluetooth.
2. Check the Turn on Bluetooth box on the Mode tab
to activate Bluetooth. Uncheck to deactivate.
3. Check the Make this device visible to other
devices box if you want your phone to be
visible to other devices within range.
Creating a Bluetooth partnership
Before creating a Bluetooth partnership:
• Ensure that your Toshiba phone and the device
you are connecting to are within close range.
• Your Toshiba phone has Bluetooth turned On
and that the device you are connecting to is in
Discoverable mode.
To create a Bluetooth partnership:
1. From the Today screen, tap Start > Settings
> Connections tab > Bluetooth > Add new device.
Your Toshiba phone searches for other
Bluetooth-enabled devices and displays them in the
list.
2. Tap the device and tap Next.
3. In Pass code, If you want to use a pass code
76
Page 77

(recommended for enhanced security), enter
an alphanumeric pass code, between 1 and 16
characters in length, and tap Next.
Alternatively, leave the pass code blank, and
tap Next.
4. Enter the same pass code on the partnering
device and respond to any prompts.
Ending a Bluetooth partnership
1. From the Today screen, tap Start > Settings
> Connections tab > Bluetooth > Devices tab.
2. Tap and hold the Bluetooth partnership you want to
end. You can see option menu, and tap delete and
OK.
Making your Toshiba phone visible to
other Bluetooth devices
Your Toshiba phone must be set to Visible to:
• Receive data
• Allow other Bluetooth devices to detect your
Toshiba phone.
• Offer services to other devices, such as Internet
Sharing.
To make your Toshiba phone visible to other
devices:
1. From the Today screen, tap Start > Settings
> Connections tab > Bluetooth > Mode tab.
2. Check the Make this device visible to other
devices box after check the Turn on Bluetooth box.
3. Tap OK.
Other Bluetooth-enabled devices can now detect
your Toshiba phone.
Accepting a Bluetooth partnership
1. Ensure that Bluetooth is turned on and that your
Toshiba phone is visible to other Bluetooth enabled
devices.
2. When prompted to accept a Bluetooth
partnership with another device, tap Yes.
3. If you want to use a pass code (recommended
for enhanced security), enter an alphanumeric
pass code, between 1 and 16 characters in
length in the Pass code field, and tap Next.
4. Enter the same pass code on the partnering
device and respond to any prompts. The
Bluetooth partnership is created. You can now
77
Page 78

exchange data with the other device.
Setting up an outgoing Bluetooth
COM port
Some programs can only establish a connection
through a serial (COM) port, even if the device itself
is Bluetooth-enabled. To make it possible for such
programs to use a Bluetooth connection, you must
set up a virtual COM port. Once created, this virtual
port can be used like any other COM port. You can
use a virtual COM port for programs that, for
example, connect to a GPS receiver, or to connect
to a Bluetooth-enabled printer.
The New Outgoing Port menu command is
available only if one or more Bluetooth-connected
devices support serial (COM) connections.
1. Ensure that your Toshiba phone is currently
connected to the other device via Bluetooth.
2. From the Today screen, tap Start > Settings
> Connections tab > Bluetooth > COM
Ports tab > New Outgoing Port.
3. Tap the device you want to add, and tap Next.
4. Tap a numbered COM port from the list.
5. To use this COM port to communicate only with
devices with which your Toshiba phone has a
Bluetooth partnership, check the Secure
Connection box.
6. Tap Finish.
Beams
The term ‘beam’ is used to describe the short range
transfer of data between two devices via a
Bluetooth connection.
Beaming an item
To beam Calendar, Contacts, Notes, Tasks, and
Pictures & Videos files and data to other devices
using Bluetooth:
1. Tap the item you want to beam, such as an
appointment in Calendar, a task in Tasks, a
contact in Contacts, or a picture in Pictures &
Videos.
2. Tap Menu > Beam Appointment. If you are
beaming a contact, tap Menu > Send Contact >
Beam.
3. Tap the device to which you want to send the
data to send.
Configuring your Toshiba phone to
78
Page 79

receive beamed data
1. From the Today screen, tap Start > Settings
> Connections tab > Beam > Receive incoming
Beams box.
2. Tap OK.
Receiving beamed data
For security reasons, your Toshiba phone is set by
default not to receive beamed data.
To receive beamed data:
1. Ensure the Make this device visible to other
devices setting is enabled, and that your
Toshiba phone is within range of the device
beaming the data.
2. You are notified when data is being received on
your Toshiba phone.
3. Once the data has transferred, tap Yes to
save, or No to discard.
Checking for a Wireless LAN
signal
Before you start a Wi-Fi connection, you must verify
that your Toshiba phone has access to a Wireless
LAN channel signal. You can check the current
wireless connection status from the following three
screens on your phone.
• Today screen: If your Toshiba phone detects a
Wireless LAN network connection, the Wireless
LAN connection icon is displayed at the top of
the Today screen.
• Wireless LAN Main screen: The current
connection status and signal quality for each
specific wireless channel is displayed on the
Wireless LAN Manager screen with the current
configuration.
• Configure Wireless Networks screen:
Displays the wireless networks currently
available and allows you to add new ones if
available.
NOTE: Wireless LAN (Wi-Fi) is the default
wireless channel setting for your Toshiba
phone. However, GPRS starts by default if
your phone does not detect a Wi-Fi signal.
Connecting to a Wi-Fi network
1. From the Today screen, tap Start > Settings >
Connections tab > Wireless Manager. You can see
79
Page 80

the current Wi-Fi status displayed in this screen.
2. Highlight Wi-Fi, and then tap Menu > Wi-Fi
Settings to configure wireless networks.
3. When the networks are detected, select a
network from the list displayed.
To configure the network adaptor:
1. On the Wi-Fi settings screen, tap Network
adaptors tab.
2. Tap the adaptor in you want to configure.
3. On the IP Address tab, Check Use
server-assigned IP address or Use specific IP
address.
4. On the Name servers tab, specify DNS, Alt DNS,
WINS and Alt DNS.
5. Tap OK.
NOTE: Once some networks are detected, it
pops up a list from the bottom asking you to
select one to connect.
Wireless Manager
The Wireless Manager allows you to easily switch
the Bluetooth and Telephony functionality on/off.
To start the Wireless Manager:
• From the Today screen, tap Start > Settings
> Connections tab > Wireless Manager.
Active items are coloured white. Inactive items are
displayed with a cross.
Turning the telephony element on/off
Switch the telephony radio transmission element of
your Toshiba phone off by selecting the Phone icon.
When a cross is displayed next to the receiver icon,
your phone is in 'flight mode' for the telephony
element. You will not be able to make/receive
telephone calls or use your data network. You can
still use Bluetooth however, if activated.
To turn the telephony element back on, select the
option again.
USB to PC
Setting the USB to PC
1. From the Today screen, tap Start > Settings
80
Page 81

> Connections tab.
2. Tap USB to PC.
3. Tap the relevant box to enable advanced
network functionality.
4. Tap OK.
USB mass storage
Change the type of USB connection.
1. From the Today screen, tap Start > Settings > >
Connections tab.
2. Tap USB mass storage.
3. Tap the relevant box to enable USB mass storage
function.
4. Tap OK.
81
Page 82

Applications and multimedia
Your Toshiba phone is installed with the following
applications:
• Games
• Office Mobile
• ActiveSync
• Calculator
• Calendar
• Camera
• Contacts
• File Explorer
• Finger Launcher
• Help
• Internet Explorer
• Internet Sharing
• Java
• Marketplace
• Messaging
• Notes
• Opera Browser
• Phone
• Picsel Viewer
• Pictures & Videos
• Search
• SIM Manager
• Tasks
• SIM Toolkit
• Windows Live Messenger
• Windows Live
• Windows Media Player
• Windows Update
• Teleport
• TIPtalk
• GoldKey
• Zoom
82
Page 83

Games
To access the games on your Toshiba phone:
1. From the Today screen, tap Start > Programs >
Games.
2. Select the game to play.
Office Mobile
To access the Office Mobile on your Toshiba phone:
1. From the Today screen, tap Start > Programs >
Office Mobile
2.Tap the selected office applications
Word Mobile
Excel Mobile
PowerPoint
Word Mobile
You can open*.psw files in Word Mobile;
however, if you edit a file, you will need to save it
in *.doc, *.rtf, *.txt, or *.dot format
Excel Mobile
Excel workbooks created on your PC can be opened
and edited on your device. However, Excel Mobile
does not fully support some features, such as formulas
and cell comments.
WARNING: Some data and formatting may be
lost when you save the workbook on your
device. Note the following regarding these
Excel Mobile formatting considerations:
PowerPoint Mobile
Word documents created on your PC can be opened
and edited on your device. However, Word Mobile
does not fully support some features, such as revision
marks and password protection.
WARNING: Some data and formatting may be
lost when you save the document on your device.
83
With PowerPoint Mobile, you can open and view slide
show presentations created on your PC. Whether the
presentation is opened from an e-mail message,
downloaded from a file share or the Internet, copied to
the device via a storage card, or obtained by
synchronizing with your PC, slide shows created in
Page 84

*.ppt and *.pps format with PowerPoint '97 and later
can be viewed on your device.
Many presentation elements built into the slide shows
such as slide transitions and animations will play back
on the device. If the presentation is set up as a timed
slide show, one slide will advance to the next
automatically. Links to URLs are also supported.
Calculator
To access the calculator:
From the Today screen, tap Start > Programs >
Calculator.
Use the Calculator buttons or Input Panel to enter
numbers and perform calculations.
WARNING: PowerPoint features not supported
on the device include:
• Notes: Notes written for slides will not be visible.
• Rearranging or editing slides: PowerPoint Mobile
is a viewer only.
• File formats: Files created in *.ppt format earlier
than PowerPoint '97 and HTML files in *.htm and
*.mht formats are not supported.
ActiveSync
For more information, please refer to the
Synchronizing section.
To Tap
Clear the current calculation or the
displayed number
Clear the last digit entered in a
multi-digit entry
Clear memory
Calculate the reciprocal of a
number
Perform operations with
percentages
Calculate the square root of a
number
Change a number from positive to
negative and back
Display the number stored in
memory.
Add the displayed number to the
number to the number already
tored in memory.
C
The Back arrow to the right of the
entry box
MC
1/X
%
The square root symbol (√)
+/-
MR
M+
84
Page 85

Calendar
The Calendar application works like an electronic
diary, allowing you to organize your events. Your
entries can then be displayed as reminders on your
Toshiba phone. Also, if you also use Outlook on
your PC, you can synchronize the information
between your PC and your phone.
Scheduling an appointment
1. From the Today screen, tap Start > Programs >
Calendar > Menu > New Appointment.
2. Enter information about the appointment.
3. Tap ok.
NOTE: All day events do not occupy blocks
of time in the Calendar - instead they are
displayed as banners at the top of the
calendar.
Making a recurring appointment
1. From the Today screen, tap Start > Programs
>Calendar.
2. Tap the appointment to edit.
3. Tap Menu > Edit
4. Tap Occurs field and select one of the recurrence
options.
5. Tap ok.
Updating an appointment
1. From the Today screen, select Start > Programs
>Calendar.
2. Tap the appointment to update.
3. Tap Menu > Edit.
4. If the appointment is recurring, select One to edit
only the current occurrence, or tap All to edit the
series.
5. Make your changes, and tap ok.
Deleting an appointment
1. From the Today screen, tap Start > Programs
>Calendar.
2. Tap the appointment to delete in Agenda view.
3. Tap
Menu > Delete Appointment.
4. If the appointment is recurring, select All to
delete the series, or select One to delete only the
current occurrence.
85
Page 86

NOTE: When you delete a Calendar
appointment on your Toshiba phone, it is
also deleted on your PC the next time you
synchronize. But if the appointment has not
been synchronized with a PC, it will only be
deleted from your phone.
TIP: To cancel a deletion, select Back.
Changing the work week display
1. From the Today screen, tap Start > Programs
>Calendar > Menu > Tools >Options and do one
of the following:
on the General tab:
To specify the first day of the week, in the First
day of week field, select Sunday or Monday.
To specify the number of days you want
displayed in a week, in the Week view field,
select 5-day week, 6-day week or 7-day week.
2. Tap ok.
Changing the reminder time
By default, the reminder time is set to 15 minutes
prior to an appointment.
1. From the Today screen, tap Start > Programs >
Calendar > Menu > Tools >Options >
Appointments tab.
2. Tap Set reminders for new items to check and
change the time.
3. Tap ok.
Viewing today's agenda
1. From the Today screen, tap Start > Programs
>Calendar > Menu
> Go to Today.
2. From Week or Month view, tap Menu > Go to
Today.
TIP: To view previous or approaching dates,
scroll left or right, or select Menu > Go to
Date.
Viewing your agenda for a specific Date
1. From the Today screen, tap Start > Programs
>Calendar > Menu > Go to Date.
2. Tap the date on the Calendar.
86
Page 87

Viewing your schedule for the month
From the Today screen, tap Start > Programs
>Calendar > Menu > View > Month.
Camera
Your Toshiba phone is equipped with a digital
camera which can be used to capture photos and
video clips.
Capturing a photograph
You can launch the camera application in the
following ways:
• Tap Start > Programs > Camera.
or
• Press the Camera key on the side of your
Toshiba phone.
You can also activate Camera from the Today screen,
tap Start > Programs > Pictures & Videos.>Camera
Taking a picture
Aim the camera at the subject and either:
• Select the Left Softkey.
or
• Press the Camera key on the side of your
Toshiba phone.
Camera settings
You can set the Camera settings from the Menu on the
Right Softkey or icons on the Camera screen
When using the icon to change, tap the icon that you
want to change.
• Capt. Mode: sets the camera mode. Select from:
Photo - select from Single, Timer and Burst.
( / / )
Video - record videos. ( )
NOTE: The Burst setting allows you to take
multiple rapid-fire shots with one touch of the
Left Softkey or Camera key. This is a very
useful feature when shooting subjects in
motion.
• Pict. & Videos: launches the Pictures & Videos
feature, where you can review the images you
have captured.
• Zoom: selects different zoom levels. The zoom
87
Page 88

level depends on the size of the picture being taken.
( )
• Landscape: captures photos or videos in a
wide-angle view, in a way that the longer side runs
from side to side. ( )
• Portrait: captures photos or videos in a way that the
longer side runs from top to bottom. ( )
• Front camera: takes photos or videos with the
camera lens facing you. ( )
• Rear camera: takes photos or videos with the
outside camera lens. ( )
• Environment: sets the colour correction of the
camera to show the best effect at the current light.
You may also choose to manually set up the
correction.
• Effect: select the photo effect, such as Normal,
Black & White,Ancient, Cool Color or Warm Color.
• Options...: sets the following items;
General Settings tab: set Store Position, Spark
Frequency, Mobile Light off ( )and Preview
after capture.
Single tab: set Format, Picture Quality and
Resolution ( ).
Timer tab: set Format, Picture Quality, Resolution
and Self-timer.
Burst tab: set Format, Picture Quality Resolution
and Burst .
Video tab: set Format, Picture Quality Resolution
Capture Time and Audio Capture.
• About: provides information about the camera.
• Exit: exits the Camera application.
Capturing a video
Your Toshiba phone can also capture videos that
you can play back with Windows Media Player
Mobile.
Starting the video recorder
1. Press the Camera key on the side of your
Toshiba phone.
2. Tap Right Softkey > Capt. Mode > Video and
press
Left Softkey to start recording.
3. Press the Left Softkey to stop the recording.
IMPORTANT: Before taking the video,
ensure that you have adequate free memory
to store your video.
Storing pictures and videos
All pictures and video files taken with your Toshiba
88
Page 89

phone are saved on the phone memory by default.
But, you can set your phone to save pictures and
video files to your miniSD card.
To store pictures and videos on your miniSD card:
1. Ensure that a miniSD card has been inserted into
your Toshiba phone (refer to the Getting started
section for installation instructions).
2. From within the Camera application, tap Menu >
Options > General Settings tab.
3. Tap either Device or Storage Card in the
Store position field.
Precautions when using the camera
• Fingerprints or grease sticking to the lens may result
in problems such as picture blurring. You should wipe
the lens clean with a lens tissue.
• Try to maintain a steady hand when capturing
pictures. Any movement of your Toshiba phone may
lead to picture blurring.
• Avoid aiming the camera at bright light sources as
this will affect the quality of the picture.
• Please consider the privacy of others when capturing
pictures with your Toshiba phone.
Contacts
You can customize each contact by adding a picture or
a ring tone to uniquely identify the person who is
calling you.
Creating a new contact
1. From the Today screen, tap Start > Programs >
Contacts > New.
2. Select a contact type Outlook Contact or SIM
Contact and tap.
3. Enter the information for the new contact.
4. Tap ok.
TIP: If someone who isn't in your list of
contacts, calls you or sends you a message,
you can create a contact for that person from
Call History or from the message by selecting
Menu > Save to Contacts.
Creating a SIM contact
Contacts can be created and stored on a subscriber
identity module (SIM.) If you move the SIM to
another phone, your SIM contacts are moved as
89
Page 90

well.
1. From the Today screen, tap Start > Programs >
Contacts > New.
2. Tap SIM Contact.
3. Enter the contact's information.
4. Tap ok.
TIP: To save an existing contact to your SIM,
select the contact and tap Menu > Save to
SIM.
WARNING: The USIM phone book does not
support email addresses or additional
numbers.
Find a contact
1. From the Today screen, select Start > Programs >
Contacts.
2. Tap the Enter a name....
3. Enter the first letter of name for searching the
contact.
4. Tap the contact that you search to watch.
NOTE: You can select the searching item
between name and company.
To change the searching item
1. From the Today screen, select Start > Programs >
Contacts.
2. Tap Menu > View By.
3. Tap Name or Company.
Viewing and editing a contact
1. From the Today screen, select Start > Programs >
Contacts.
2. Tap the contact.
3. To edit the contact, tap Menu > Edit.
4. Edit the contact.
5. Tap ok.
To set the Viewing filter
1. From the Today screen, select Start
> Programs >
Contacts.
2. Tap Menu > Filter.
3. Tap the filer item that you want to set in the list.
NOTE: To show all contact again, tap All
Contacts in the list
90
Page 91

Deleting a contact
1. From the Today screen, tap Start > Programs >
Contacts.
2. Tap the contact.
3. Tap Menu > Delete Contact.
Adding a picture to a contact
1. From the Today screen, tap Start > Programs >
Contacts.
2. Tap the contact.
3. Tap Menu > Edit > Picture on Details tab.
4. Either select the picture you want to add, or
tap Camera and take a picture.
5. Tap ok.
Removing a picture from a contact
1. From the Today screen, tap Start > Programs >
Contacts.
2. Tap the contact.
3. Tap Menu > Edit > Menu > Remove Picture.
4. Tap Yes on the Confirm screen.
Assigning a ring tone to a contact
To easily identify who is calling you by the ring tone,
you can assign a custom ring tone to each contact.
1. From the Today screen, tap Start > Programs >
Contacts.
2. Tap the contact.
3. Tap Menu > Edit > ring tone and select the ring
tone you want.
4. Tap ok.
Sending contact information
Using a text message, you can quickly send
someone information about a contact in your
contact list.
To send contact information:
1. From the Today screen, tap Start > Programs >
Contacts.
2. Tap the contact.
3. Tap Menu > Send Contact > Text Message.
4. Select the contact information that you want to send
and Tap Done.
5. In the new text message, enter the phone number of
the person to whom you are sending the contact
91
Page 92

information and tap Send.
NOTE: You can send the contact information
using BEAM .
Assigning a category to a contact
You can use categories to help organize your
contacts.
To assign a category to a contact:
1. From the Today screen, tap Start > Programs >
Contacts.
2. Tap the contact.
3. Tap Menu > Edit > Categories.
4. Tap the category that you set.
5. Tap ok.
NOTE: Categories are shared between your
appointments, contacts, and tasks. A
category will remain in the list of shared
categories as long as it is assigned to at least
one appointment, contact, or task.
File Explorer
Use the File Explorer tool to view and manage files
saved in your Toshiba phone, or on the memory card.
1. From the Today screen, tap Start > Programs >
File Explorer. File Explorer screen is displayed.
2. Tap the folder in which the files are saved.
Menu items on the My Documents Screen
From the Today screen, tap Start > Programs > File
Explorer > Menu.
The following menu items are displayed in the My
Documents screen:
• My Document: display files saved in My Document.
• Open Path: create anew path to open file.
• Send...: sends the selected file via email or MMS.
• Beam File...: sends the file to a contact via Bluetooth.
• Refresh: refresh the document screen.
• Show All Files: show all the stored files.
• New Folder: create a new folder.
• Rename: rename a file.
• Delete: delete the selected file.
• Edit: allows you to manage the file list by using
Undo, Cut, Copy, Paste, Paste Shortcut, and
Select All.
To sort files
From the File Explorer screen, tap Sort by and
select a sorting method: Name,Date,Size and Type.
92
Page 93

applications.
Finger Launcher
The Finger Launch application helps ensure the
security of the data on your Toshiba phone.
To access the Finger Launch application:
1. From the Today screen, tap Start > Programs>
Finger Launcher. The Fingerprint Launcher screen
is displayed.
2. Tap Options.
3. Tap the finger to swipe.
4. Swipe the finger three times to enrol.
Help
From the Today screen, tap Start > Programs > Help.
The Help window consists of a content area and a
navigation toolbar. You can use the following function
of Help.
Button Function
Contents
Displays the Help table of contents,
which includes both task-based links to
Help and a list of links to Help for other
installed Windows Mobile-based
Search
Opens the Search dialog box to search
for Help content.
Back arrow
Displays the previously viewed Help
topic.
Forward arrow
Displays the next topic in a sequence of
previously viewed Help topics.
Internet Explorer
Open Internet Explorer
From the Today screen, tap Start > Programs >
Internet Explorer.
Go to a link
1. From the Today screen, tap Start > Programs
Internet Explorer.
2. Tap Favorites, History to view all available links.
3. Tap the link.
Go to a web page
93
Page 94

1. From the Today screen, tap Start > Programs
Internet Explorer.
2. Enter the address.
3. Tap Search icon.
Changing the Home pages
1. While on a web page, tap Menu > Tools > Options
> General tab.
2. Select the home you want.
Use Current: use the displayed page as your Home
page.
Use Default: use the default Home page.
Changing the text size on web pages
1. While on a web page, tap Menu > View > Text Size.
2. Select the size you want.
Accessing a web page from history
1. While on a web page, tap History.
2. Tap the web page.
Showing or hiding web page pictures
While on a web page, tap Menu > View > Show
Pictures.
Viewing a favorite
While on a web page, tap Favourites.
Clearing history, cookies, or temporary files
Following frequent use of the Internet, your Toshiba
phone may accumulate data that uses up the
storage capacity. It is advisable to delete certain
files to free up the storage on your phone.
To clear history or temporary files:
1. While on a web page, tap Menu > Tools >
Options > Memory tab.
2. Tap the Clear History or Delete Files to clear or
delete.
To clear cookies:
1. While on a web page, tap Menu > Tools >
Options > Security tab.
2. Tap the Clear Cookies to clear.
Changing cookies and security settings
94
Page 95

Internet Explorer Mobile supports the protocols used
by Secure Sockets Layer (SSL). A connection that
uses SSL helps you to send personal information more
safely.
Cookies are small files containing information about
your identity and preferences so that a page can tailor
information to your needs. The page sends the file,
and it is stored on your mobile device.
1. While on a web page, tap Menu > Tools >
Options > Security tab.
2. Tap the check boxes for the options you want, and
tap ok.
Sending a link via email
1. Go to the web page you want to send.
2. Tap Menu > Tools > Send Link....
3. Select Text Message, MMS or New E-mail
Account. A new message is created with the page
address inserted in the message body.
WARNING: Only .wav files are supported for
online playback.
Internet Sharing
Internet Sharing is a customized tool for connecting
to a PC or Network.
1. From the Today screen, tap Start > Programs >
Internet Sharing.
2. Tap the PC Connection status.
3. Scroll to the Network Connection and tap the
Network Connection status.
4. Tap Connect.
Java
Your Toshiba phone supports Java applications
(know as MIDlets) that are written especially for
mobile devices. Java applications include games
and utilities.
Starting the Java application
From the Today screen, tap Start > Programs > Java.
After a brief pause, main screen is displayed.
The menu provides the following options:
• Actions
• Install
95
Page 96

• Activate
• Pending Install
• New Folder
• Options
• Uninstall All
• Certificates
• About
• Exit
Installing a Java application
From the Today screen, tap Start > Programs > Java
> Menu > Install.
You must now select where to access the MIDlets
from:
• To install from a website tap Browser. This will
launch Internet Explorer Mobile. Navigate to the
website where the Java MIDlet is kept. Select the file.
It is loaded into the Java application.
• To install from a specific URL, tap URL. If the URL
has already been entered, select it and select Go. If
the URL has not been entered, select Add, and
enter the URL description followed by the web
address.
• To install from your Toshiba phone, select Local
Files. All unloaded MIDlets stored in the Mobile
Device folder are displayed. Select one from this list
to install.
Selecting the Jad or Jar
The details of the MIDlet you are proposing to install
are displayed. Select Continue to proceed with the
installation.
Once the file has downloaded, you will be asked
where you wish to store the download. For ease of
use, you should choose to save the file in <root>,
the base folder for your Toshiba phone.
Running a Java MIDlet
Once you have successfully installed the MIDlet,
using one of the methods described above, the
installed files are displayed on the Java main screen.
Scroll down to the desired MIDlet and press the Action
key to run the Java MIDlet.
Exiting the Java application
From the main Java screen, tap Menu > Exit.
96
Page 97

Messaging
For more information, please refer to the Messaging
section.
Notes
Notes is a tool to capture thought, questions,
reminders, to-do lists and meeting notes by
handwriting, typing or recording the voice.
To set the default input mode
1. From the Today screen, tap Start > Programs >
Notes > Menu > Options.
2. Tap the item that you want to change the default.
Default mode: Writing or Typing
Default template: Blank note, Meeting note, Memo,
Phone memo or ToDo.
Save to: Main memory or Storage card
3. Tap ok.
To create a note
1. From the Today screen, tap Start > Programs >
Notes > New
2. Tap the input Method icon on the menu bar.
3. Tap the strings you want to enter or tap Input
sector arrow to select the Input Method.
4. Tap ok after finishing the input.
NOTE: When you want to record a voice, use
the Recording toolbar.
If this bar is not displayed on the note screen,
tap Menu > View Recording Toolbar.
Viewing a note
1. From the Today screen, tap Start > Programs >
Notes.
2. Tap the title that you want to view or play.
Opera Browser
The Opera Browser tool helps connect your Toshiba
phone to the Internet.
Opening the Opera Browser
1. From the Today screen, tap Start > Programs >
> Opera Browser.
2. Scroll to view all available links.
97
Page 98

3. Tap the desired link.
Menu items on the Opera Browser
To access the Opera Browser menu items, from the
Today screen, tap Start > Programs > Opera
Browser > Menu.
The Opera Browser has the following menu items:
• Windows: manages the window.
• Display: changes the windows viewer.
• Tools: manages bookmarks and displays useful
information.
• Exit: exits the Opera Browser.
Phone
Phone is the shortcut of Phone screen.
For more information of Phone screen, please refer to
the Call Fnctions section.
Picsel Viewer
Picsel Viewer is the tool used to view PDFs
Opening Picsel Viewer
1. From the Today screen, tap Start > Programs >
Picsel Viewer.
2. Tap the file that you want to view.
3. Press the Action key.
Menu items on the Picsel Viewer screen
From the Today screen, tap Start > Programs >
Picsel Viewer > Menu.
The Picsel Viewer has the following menu items:
• Open File: opens the selected file.
• Recent: shows the recent selected file list.
• Page: rotates the window, from Portrait to
Landscape or vice versa.
• Settings: allows you to manage preferences, file
types, help and file information.
• Close: exits Picsel Viewer.
Pictures & Videos
Your Toshiba phone is equipped with a digital
camera which can be used to capture photos and
video clips.
For more information about capturing photos and
video clips, please refer to the Camera section.
Viewing pictures and videos
98
Page 99

You can view pictures and videos stored on your
Toshiba phone or miniSD card using the Pictures
& Videos application.
You can also set a picture to be your Today screen
background, or you can send an image to a contact.
To view pictures and videos, from the Today screen,
tap Start > Programs > Pictures & Videos.
Use the Navigation key and press Action Key to
preview the pictures.
Pictures & Videos functions
From within the Pictures & Videos application, focus
on the picture and tap Menu to view the available
options:
• Send: sends pictures to other recipients via MMS or
E-mail.
• Beam: transfers pictures to other devices via
Bluetooth.
• Save to Contact: sets a picture as an icon
representing a specified contact, shown within
the details of the contact.
• Delete: deletes the tapped
selected picture.
• Edit: enables you to move and copy picture and
video files between folders.
• Properties: Enables you to rename and View the
detail of the selected picture.
• Play Slide Show: view all pictures in the current
folder as a slide show.
• Set as Today Background: Set the selected
picture as Today background.
• Options:
General tab - set the photo size and rotated degree.
Slide show tab - Change the slide show setting
• Send to your space: Send the selected picture to
your live space.
Finding and listing pictures
From within the Pictures & Videos application, tap My
Pictures and select a folder from the drop-down
menu.
Sort pictures and video clips
From within the Pictures & Videos application, tap the
sort list and select the item you want to sort by.
You can sort by Name, Date and Size.
Opening a picture
99
Page 100

From within the Pictures & Videos application, tap a
picture.
Sending a picture
1. From within the Pictures & Videos application, tap
Menu > Send.
2. Select the sending method.
3. Enter the destination number and tap Send.
Tap Menu for a list of additional options.
When viewing a picture, tap Menu to access the
following settings:
• Zoom: zooms in or out of the selected picture.
• Play slide show: view all pictures as a slide show.
• Set as Today background: sets the selected picture
as wallpaper for the Today screen.
• Beam picture: sends pictures via Bluetooth.
• Save: associate a picture with a phone contact or
rename the picture.
• Edit: edits pictures.
• Properties: displays picture properties, such as file
name and size.
• Options: set the photo size and rotated degree.
• Send to your space: Send the selected picture to
your live space.
Search
For more information, please refer to the Searching
section in the Text input capture.
SIM Manager
SIM manager enables you to copy your contacts'
information from your Toshiba phone to your SIM card
or from your SIM card to your Toshiba phone.
1. From the Today screen, tap Start > Programs >
SIM Manager.
2. Tap SIM or Phone that you wan to show the
Contacts.
3. The selected Contacts List is displayed .Tap Menu
to edit the contacts.
• Delete Selected: delete the selected contacts data.
• Copy to SIM/Phone: copy the selected contacts sata
to the other.
100
 Loading...