

Page 1
Operating Instructions
MODEL PV-HS2000
HARD DISK RECORDER
Please read these instructions carefully before attempting to connect,
operate or adjust this product. Please save this manual.
For assistance,
1-888-843-9788 http://www.panasonic.com/videoPhone
Web
e-mail
Consumerproducts@Panasonic.com
Page 2

Important Safeguards
Please read all these instructions regarding your the Hard Disk
Recorder and retain for future reference.
Follow all warnings and instructions marked on the Hard Disk Recorder.
Read instructions All the safety and operating instructions
should be read before the product is operated.
Retain instructions The safety and operating instructions should
be retained for future reference.
Heed warnings All warnings on the product and in the operating
instructions should be adhered to.
Follow instructions All operating and use instructions should be
followed.
Cleaning Unplug this product from the wall outlet bef ore cleaning. Do
not use liquid cleaners or aerosol cleaners. Use a damp cloth f or cleaning.
Attachments Do not use attachments not recommended by the
product manufacturer as they may cause hazards .
Water and moisture Do not use this product near water — f or
example, near a bath tub, wash bo wl, kitchen sink, or laundry tub, in a
wet basement, or near a swimming pool, and the like.
Do not expose the product to rain or inclement conditions.
Accessories Do not place this product on an unstable cart, stand,
tripod, bracket, or table. The product ma y f all, causing serious injury to a
child or adult, and serious damage to the product. Use only with a cart,
stand, tripod, bracket, or table recommended by the manufacturer , or
sold with the product. An y mounting of the product should follow the
manufacturer’s instructions, and should use a mounting accessory
recommended by the manufacturer .
Moving a product-and-cart combination
A product-and-cart combination should be moved
with care. Quic k stops, excessiv e f orce, and une ve n
surfaces may cause the product-and-cart
combination to overturn.
Ventilation Slots and openings in the cabinet
are provided for ventilation and to ensure reliable
operation of the product and to protect it from overheating,
and these openings must not be block ed or covered.
The openings should never be bl ocked by placing the product on a bed,
sofa, rug, or other similar surface. This product should not be placed in a
built-in installation such as a bookcase or rack unless proper ventilation
is provided or the manufacturer’s instructions ha ve been adhered to.
Power sour ces This product should be operated only from the type
of power source indicated on the marking label. If you are not sure of the
type of power supply to your home, consult your product dealer or local
power company. For products intended to operate from battery power or
other sources, refer to the operating instructions.
Grounding or polarization This product ma y be equipped with
a polarized alternating-current line plug (a plug having one blade wider
than the other). This plug will fit into the power outlet only one w ay.
This is a safety feature. If y ou are unable to insert the plug fully into the
outlet, try reversing the plug. If the plug should still f ail to fit, contact
your electrician to replace your obsolete outlet. Do not def eat the saf ety
purpose of the polarized plug.
Power-cord protection Po wer-supply cords should be routed so
that they are not likely to be walk ed on, rolled over or pinched by items
placed upon or against them or otherwise subject to abuse, paying
particular attention to cords at plugs, convenience receptacles, and the
point where they exit from the product.
Outdoor antenna grounding
If an outside antenna or cable
system is connected to the
product, be sure the antenna or
cable system is grounded so
as to provide some protection
against voltage surges and
built-up static charges. Article
810 of the National Electrical
Code, ANSI/NFPA 70, provides
information with regard to proper
grounding of the mast and supporting structure,
grounding of the lead-in wire to an antenna discharge unit, size of
grounding conductors, location of antenna-discharge unit, connection
to grounding electrodes, and requirements for the grounding electrode.
Lightning For added protection for this product during a lightning
storm, or when it is left unattended and unused for long periods of
time, unplug it from the wall outlet and disconnect the antenna or cable
system. This will prevent damage to the product due to lightning and
power-line surges.
Power lines An outside antenna system should not be located in the
vicinity of overhead power lines or other electric light or power circuits,
or where it can fall into such power lines or circuits. When installing an
outside antenna system, extreme care should be taken to keep from
touching such power lines or circuits as contact with them might be fatal.
NEC
- NATIONAL
ELECTRICAL CODE
ELECTRIC
SERVICE
EQUIPMENT
GROUND
CLAMP
ANTENNA
LEAD IN
WIRE
ANTENNA
DISCHARGE UNIT
(NEC SECTION 810-20)
GROUNDING CONDUCTORS
(NEC SECTION 810-21)
GROUND CLAMPS
POWER SERVICE GROUNDING
ELECTRODE SYSTEM
(NEC ART 250, PART H)
2
Overloading Do not overload wall outlets, extension cords, and
integral convenience receptacles as this can result in a risk of fire or
electric shock.
Object and liquid entry Never push objects of any kind into this
product through openings as they may touch dangerous voltage points
or short-out parts that could result in a fire or electric shock. Never spill liquid
of any kind on the product.
Servicing Do not attempt to service this product yourself as opening
or removing covers may expose y ou to dangerous voltage or other
hazards. Ref er all servicing to qualified service personnel.
Damage requiring service Unplug this product from the wall
outlet and refer servicing to qualified service personnel under the
following conditions:
1 When the power-supply cord or plug is damaged.
2 If liquid has been spilled, or objects have fallen into the product.
3 If the product has been exposed to rain or water.
4 If the product does not operate normally by following the operating
instructions. Adjust only those controls that are covered b y the
operating instructions as an improper adjustment of other controls
may result in damage and will often require extensive work by a
qualified technician to restore the product to its normal operation.
5 If the product has been dropped or damaged in any way.
6 When the product exhibits a distinct change in performance — this
indicates a need for service.
Replacement Parts When replacement parts are required, be
sure the service technician has used replacement parts specified by the
manufacturer or hav e the same characteristics as the original part.
Unauthorized substitutions may result in fire, electric shock or other
hazards.
Safety chec k Upon completion of an y se rvice or repairs to this
product, ask the service technician to perform safety checks to
determine that the product is in proper operating condition.
Heat The product should be situated awa y from heat sources such as
radiators, heat registers, stoves, or other products (including amplifiers)
that produce heat as well as direct sunlight. If the product experiences
sudden changes in temperature, moisture may form inside the product.
Protect the power cord Do not damage the power cord. Damage
to the power cord may cause a fire or shock hazard. When unplugging
the power cord, please hold it by the plug and remove it carefully.
Do not place heavy objects on the Hard Disk Recorder
Heavy objects placed on the Hard Disk Recorder will cause damage.
(This does not mean your cable box). The top of the Hard Disk Recorder
is also slotted to provide ventilation. Do not obstruct these ventilation
slots.
Avoid extremely hot locations Do not place the Hard Disk
Recorder over or near any kind of heater or regulator, in direct sunlight,
inside a closed vehicle, etc.
Avoid sudden temperature changes Do not move the
Hard Disk Recorder suddenly between areas of extreme temperature
variation. If the Hard Disk Recorder is suddenly moved from a cold
place to a warm place, moisture may condense in the unit.
Protect the hard disk Do not apply any shock to the Hard Disk
Recorder at all times in order to avoid damage to the hard disk.
This equipment has been tested and found to comply with the limits for a
Class B digital device, pursuant to Part 15 of the FCC Rules. These limits
are designed to provide reasonable protection against harmful
interference in a residential installation. This equipment generates, uses,
and can radiate radio frequency energy and, if not installed and used in
accordance with the instructions, may cause harmful interference to radio
communications. Ho we ver , there is no guarantee that interf erence will not
occur in a particular installation. If this equipment does cause harmful
interference to radio or television reception, which can be determined by
turning the equipment off and on, the user is encouraged to try to correct
the interference by one or more of the f ollowing measures:
• Reorient or relocate the receiving antenna;
• Increase the separation between the equipment and receiver;
• Connect the equipment into an outlet on a circuit different from that to
which the receiver is connected;
• Consult the dealer or an experienced radio/TV technician for help.
Changes or modifications not expressly approved by the party responsible
for compliance could void the user’ s authority to operate the equipment.
If necessary, the user should consult the dealer or an e xperienced radio/
television technician for additional suggestions . The user ma y find the
following booklet prepared by the Feder al Communications Commission
helpful:
“How to Identify and Resolve Radio-TV Interf erence Problems.”
This booklet is available from the US Gov ernment Printing Office,
Washington, D .C ., 20402, Stock No .004-000-00345-4.
Information
Page 3

Precautions
CAUTION
RISK OF ELECTRIC SHOCK
DO NOT OPEN
CAUTION: TO REDUCE THE RISK OF ELECTRIC SHOCK,
DO NOT REMOVE COVER (OR BACK)
NO USER-SERVICEABLE PARTS INSIDE
REFER SERVICING TO QUALIFIED SERVICE PERSONNEL
IMPORTANT: Recording of copyrighted television programs may violate copyright law.
WARNING: To reduce the risk of fire or electric shock, do not expose this appliance to rain or moisture.
NOTE TO CATV SYSTEM INSTALLER: This reminder is provided to call the CATV system installer’s attention to article 820-
40 of the NEC that provides guidelines for proper grounding and, in particular, specifies that the cable ground shall be
connected to the grounding system of the building, as close to the point of cable entry as practical.
IMPORTANT: Carefully read and follow all the “Important Safety Information” beginning on page 2 before proceeding further.
FCC Warning: Any unauthorized changes or modifications to this equipment would void the user’s authority to operate.
The lightning flash with arrowhead symbol, within an equilateral triangle, is
intended to alert the user to the presence of uninsulated “dangerous voltage”
within the product’s enclosure that may be of sufficient magnitude to constitute
a risk of electric shock to persons.
The exclamation point within an equilateral triangle is intended to alert the user
to the presence of important operating and maintenance (servicing) instructions
in the literature accompanying the product.
Copyright and Disclaimer
© 2000 Panasonic. All rights reserved.
This document contains confidential and proprietary information of Panasonic (the “Company”). No part of this document may
be copied, reproduced, transmitted, distributed, transcribed, stored in a retrieval system, modified or translated into any other
language or computer language, or sublicensed, in any form or by any means - electronic, mechanical, magnetic, optical,
chemical, manual or otherwise - without the prior written consent of the Technical Support Manager at the Company. Further,
this document may not be disseminated (or otherwise made available) using telecommunications lines or frequencies except
in a Limited Access Environment and only to persons authorized by the Company to receive and use this document and the
information contained therein. For purposes of this copyright, the term “Limited Access Environment” shall mean a computer
network (including, without limitation, a local area network, a wide area network or an intranet) that restricts access to
personnel in a reliable fashion (which, at a minimum, shall require each user to enter a unique password in order to access
the network) that can reasonably be expected to prevent access to the document by persons other than authorized users. In
addition the training and instructional procedures described in this document are confidential and proprietary intelligence of
the Company and may not be copied or used except as permitted by the Company. Any unauthorized or otherwise improper
use of this document or any of its material by any person will subject that person to liability for damages.
The Company shall not be liable for any errors contained herein or for any damages arising out of or related to this document or
the information contained therein, even if the Company has been advised of the possibility of such damages.
This document is intended for informational and instructional purposes only. The Company reserves the right to make changes
in the specifications and other information contained in this document without prior notification.
* ReplayTV Service, ReplayZones, and QuickSkip are trademarks of ReplayTV, Inc.
LSQT0269B
This product incorporates copyright protection technology that is protected by U.S. patents and other intellectual property
rights. Use of this copyright protection technology must be authorized by Macrovision, and is intended for home and other
limited consumer uses only unless otherwise authorized by Macrovision. Reverse engineering or disassembly is prohibited.
U.S. patent Nos. 4,631,603.4,577,216.4,819,098 and 4,907,093.
3
Page 4

Table of Contents
Welcome to the Hard Disk Recorder...............................................5
Purchasing Information....................................................................5
Package Contents.............................................................................5
Before Using .................................................................................. 6, 7
• Installing the Batteries ............................................................................. 6
• Watching the Welcome Video ................................................................. 6
• Hard Disk Recorder Feature Updates ..................................................... 6
Before
Using!
Use
Now!
• Using the Main Menu .............................................................................. 7
Basic Connections (Antenna, TV, Telephone) .................................... 8, 9
Advanced Connections ..........................................................10 ~ 17
• Planning, A/B Cable Systems, Satellite Receiver, Cable Box, Television ... 10
• Cable Box Connection, VHF/UHF Jack Only Connections ..................11
• Cable Box and A/V Receiver Connections ...........................................12
• Satellite Receiver and A/V Receiver (Using S-Video) Connections .... 1 3
• Cable Box, Satellite Receiver, and VCR Connections .........................14
• Cable Box, Satellite Receiver, A/V Receiver, and VCR Connections .. 1 5
• Watching One Show While Recording Another ....................................16
• Attaching Satellite Receiver and Cable Box (IR Blaster Setup) ..... 16, 17
Initial Setup..............................................................................18 ~ 21
• Changing Your Setup Later On.............................................................20
• Input Options.......................................................................................... 2 1
• Completing the IR Blaster Setup ...........................................................21
Controlling Live Television ....................................................22 ~ 25
• Viewing Live Television ......................................................................... 22
• Using Instant Replay..............................................................................22
• Pausing Live Television and Recorded Shows ..................................... 23
• Using Rewind and Fast Forward ........................................................... 23
• Using Slow Motion ................................................................................. 24
• Using Frame Advance ........................................................................... 24
• Using Quick Skip................................................................................... 24
• Copy Protection Information ................................................................. 25
Recording Shows....................................................................26 ~ 34
• Selecting a Show .................................................................................. 26
• Watching and Recording a Show That is Currently Airing.................... 27
• Recording a Single Upcoming Show .................................................... 27
• Recording Multiple Episodes of One Show ......................................... 28
• Setting the Recording Options ............................................................. 29
• Recording From Show Categories ....................................................... 30
• Recording Shows Based On a Theme You Choose ........................... 31
• Record, Create, Cancel........................................................................ 32
• Finding Shows ...................................................................................... 33
• Find All Episodes of a Show................................................................. 34
Watching Your Recorded Shows ..........................................35 ~ 39
• Seeing What a Replay Channel Will Record........................................ 3 6
• Watching a Show................................................................................... 3 7
• Preserve a Show ...................................................................................38
• Saving Shows to Videotape ..................................................................39
Managing Recording Space .....................................................40, 41
• Priorities, Guaranteed, Non-Guaranteed Recording ............................ 40
• Guaranteed, Space-available Record .................................................. 41
• Recording Space Management Tips .................................................... 4 1
Universal Remote Control......................................................42 ~ 44
• Changing Volume Lock ......................................................................... 42
• Setting Up Your Components ...............................................................42
• Searching for Your Component’s Code ................................................43
• Learning the Codes Programmed into the Remote ..............................44
• Re-assigning Component Mode Buttons .............................................. 4 4
Code Numbers For Your Components .................................45 ~ 49
Other
Information!
4
Troubleshooting......................................................................50 ~ 52
Specifications and Information......................................................53
Software License Agreement ........................................................54
Warranty ..........................................................................................55
Service Center List ........................................................................ 56
Regulatory Notices for the U.S......................................................56
Location of Controls...............................................................57 ~ 59
Page 5
Welcome to the Hard Disk Recorder
Congratulations on your purchase of the Hard Disk Recorder. Once you’ve experienced the exciting new world of
personal television right in your very own home, you’ll never want to watch plain old television again. Read on and
see what the Hard Disk Recorder can do. No videotape. No hassles. No compromises. If this sounds like the
television experience you’ve always dreamed of … it is!
• The Hard Disk Recorder gives you the ability to easily find
and automatically record your favorite television shows,
then watch them whenever you want.
On your schedule … not somebody else’s.
You will never miss your favorite TV shows again!
• Create personal Replay Channels based on your favorite
television shows or themes—like actors, directors,
sports teams or hobbies. These channels will automatically
record each new episode of your favorite shows, or constantly
search for and record shows that match your interests.
• Check out the exciting television shows in ReplayZones™
—all of your favorites organized by topic, and all in one easy-to-find area.
• You have the power to control live television. You can pause, rewind, play in slow motion, see an instant replay
and more without missing a single scene.
• Instantly jump over undesired recorded television scenes with QuickSkip™.
• Unsure of what channel or time a show is on? Looking for a specific show title, actor, director, topic?
Use Find Shows—a real-time, keyword search function.
Purchasing Information
• Date of Purchase • Dealer Phone No.
• Dealer Purchased From • Model No.
• Dealer Address • Serial No.
PV-HS2000
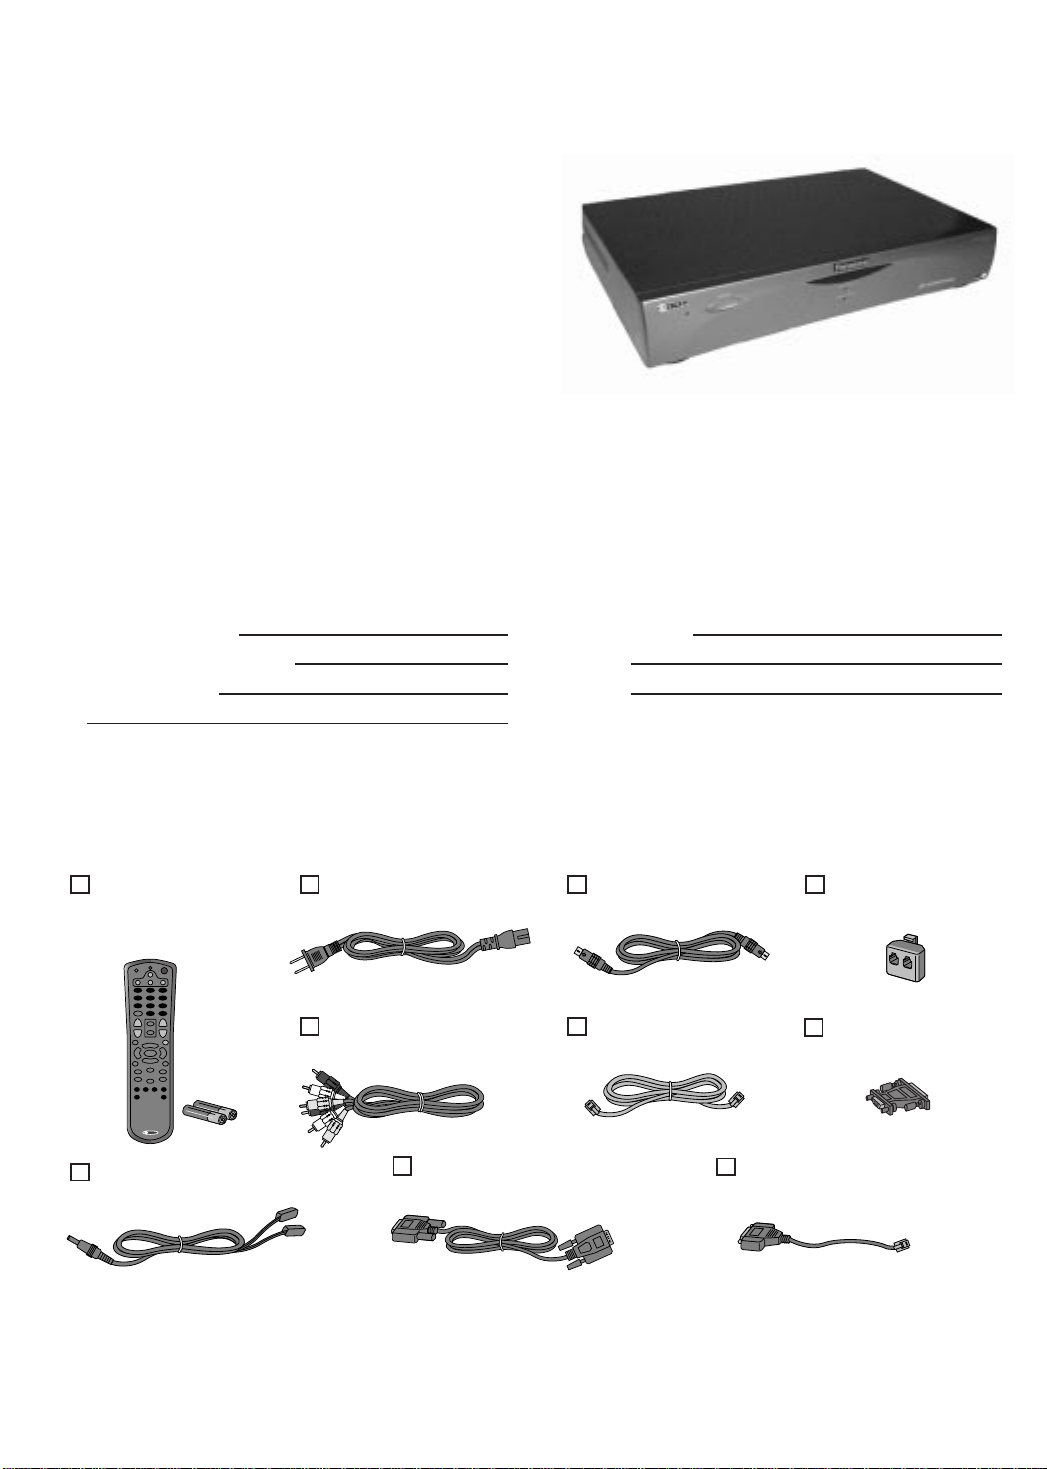
Package Contents
As you unpack the Hard Disk Recorder, make sure the following items were included. If any of these items are
missing, call Customer Orders at 1-800-332-5368.
Remote Control
(2000010)
with 2 AA Batteries
(2300002)
IR Blaster (See page 17.)
(2000008)
Do the following before you connect the Hard Disk Recorder to your television.
• Save the box and packing material that the Hard Disk Recorder came in. The Hard Disk Recorder should
always be transported in the box.
• File your sales receipt in a safe place.
• Thoroughly review the safety information and strictly follow all setup and operating procedures contained
throughout this guide.
Power Cord
(2100032)
Audio/Video Cable
(2100010)
Serial Cable
(2100015)
S-Video Cable
(2100011)
Telephone Cord
(2100029)
Telephone Splitter
(1700034)
9 to 15 pin Adapter
(1700038)
RJH to 9-pin Adapter
(1700039)
5
Page 6

Before Using
Installing the Batteries
The Hard Disk Recorder remote control requires two (2) new AA alkaline batteries.
1.On the back of the Hard
Disk Recorder remote,
pull back on the tab and
lift the battery cover off.
2.Match the + and - marks on
the batteries to the + and marks in the battery case,
then insert the batteries.
NOTE: Removing the batteries will not require you to re-program your remote control.
3.Press the battery cover
back into place.
AA
AA
4.Test the unit by pressing POWER.
If the batteries are inserted
correctly, the red light will blink.
Watching the Welcome Video
Make sure you have completed all the connections. (See pages 8~17.)
An instructional video is waiting for you to play directly from the Hard Disk
Recorder’s Replay Guide. To watch the video:
1.Once you complete the on-screen setup,
press REPLAY GUIDE on the remote.
2.Using the arrow buttons on the remote,
highlight the video titled “Welcome to Panasonic SHOWSTOPPER.”
3.Press PLAY on the remote.
You may use all of the Hard Disk Recorder’s television control features,
such as pause and rewind, while watching this video. All of the features
covered in the instructional video are also referenced in this guide.
After you watch the video and are comfortable with the Hard Disk Recorder’s features, you may want to
save the video onto a videotape and delete the video from the Replay Guide. This will make more room for
recording shows. See “Saving Shows to Videotape” on page 39 for instructions on connecting the Hard Disk
Recorder to a VCR.
Hard Disk Recorder Feature Updates
Occasionally, new features are added to the Hard Disk Recorder. These features are updated directly over
the telephone line you connect to the Hard Disk Recorder. As features change, you may encounter features
that perform differently from those in this guide. In general, follow the on-screen instructions if a feature is
not documented in this guide.
6
Page 7

Using the Main Menu
Make sure you have completed all the connections. (See pages 8~17.)
Use the Main Menu to change information you provided during the on-screen setup of the Hard Disk Recorder, and
to use some of the Hard Disk Recorder’s main features.
Press the MENU button on the Hard Disk Recorder remote control to display the Main Menu.
Basic Connection
Replay Zones
Go here to record special
television programming
organized in categories for you.
In this frequently updated area,
you’ll find the best of what’s on in
an easy-to-use lineup.
Messages
You’ll receive a welcome message after completing
the on-screen setup of the Hard Disk Recorder for the
first time. Messages occasionally appear to inform you
of special occurrences while using the Hard Disk
Recorder. If you see that a new message has been
received, highlight Message and press SELECT. Read
the new message and take the appropriate action.
Replay Guide
Go here to watch your recorded
shows. Every show that the Hard
Disk Recorder records is stored in
the Replay Guide until you delete
it or it’s replaced by the next
recorded show. Also listed are the
upcoming recordings you have
set.
Find Shows
Select Find Shows to quickly locate a show for recording
using a keyword search. After the Hard Disk Recorder
searches for you, you can set a show for recording, or
create a theme channel based on your search.
Channel Guide
To record any show that is available to
you, start from the Channel Guide. The
Channel Guide is an interactive, onscreen program guide that lists seven
days of television information for all of
the channels you currently receive.
Setup
Add or Remove Channels: Here you can add or remove channels from the Hard Disk Recorder Channel Guide. This
is handy for removing channels you don’t subscribe to, or channels that are inappropriate for some audiences.
Change Default Record Options: Change the current recording options that the Hard Disk Recorder uses to record
shows.
Change Display Brightness: You can use this feature to adjust the brightness of the Hard Disk Recorder screens.
Change Dialing & Input Settings: Here you can change the information you provided during the on-screen setup
process if you later add or remove video equipment, or change the telephone number used to connect to the
ReplayTV Service™. See “Changing Your Setup Later On” on page 20 for more on the setup process.
Important Notes:
• The Hard Disk Recorder does not record copy protected programs. A warning screen will appear if you try to
playback a copy-protected program.
• There is no monthly free for the Channel Guide service. Local access numbers are available in most areas,
however telephone charges may apply in certain areas. If you have a question, please call the Panasonic
Call Center at 1-888-843-9788 or email consumerproducts@panasonic.com
• Updates to the software will become available periodically, so please refer to our website at http://
www.panasonic.com/video or call 1-888-843-9788 for the latest updates to the Operating Instructions.
• The contents of the Replay Guide may change without notice.
7
Page 8
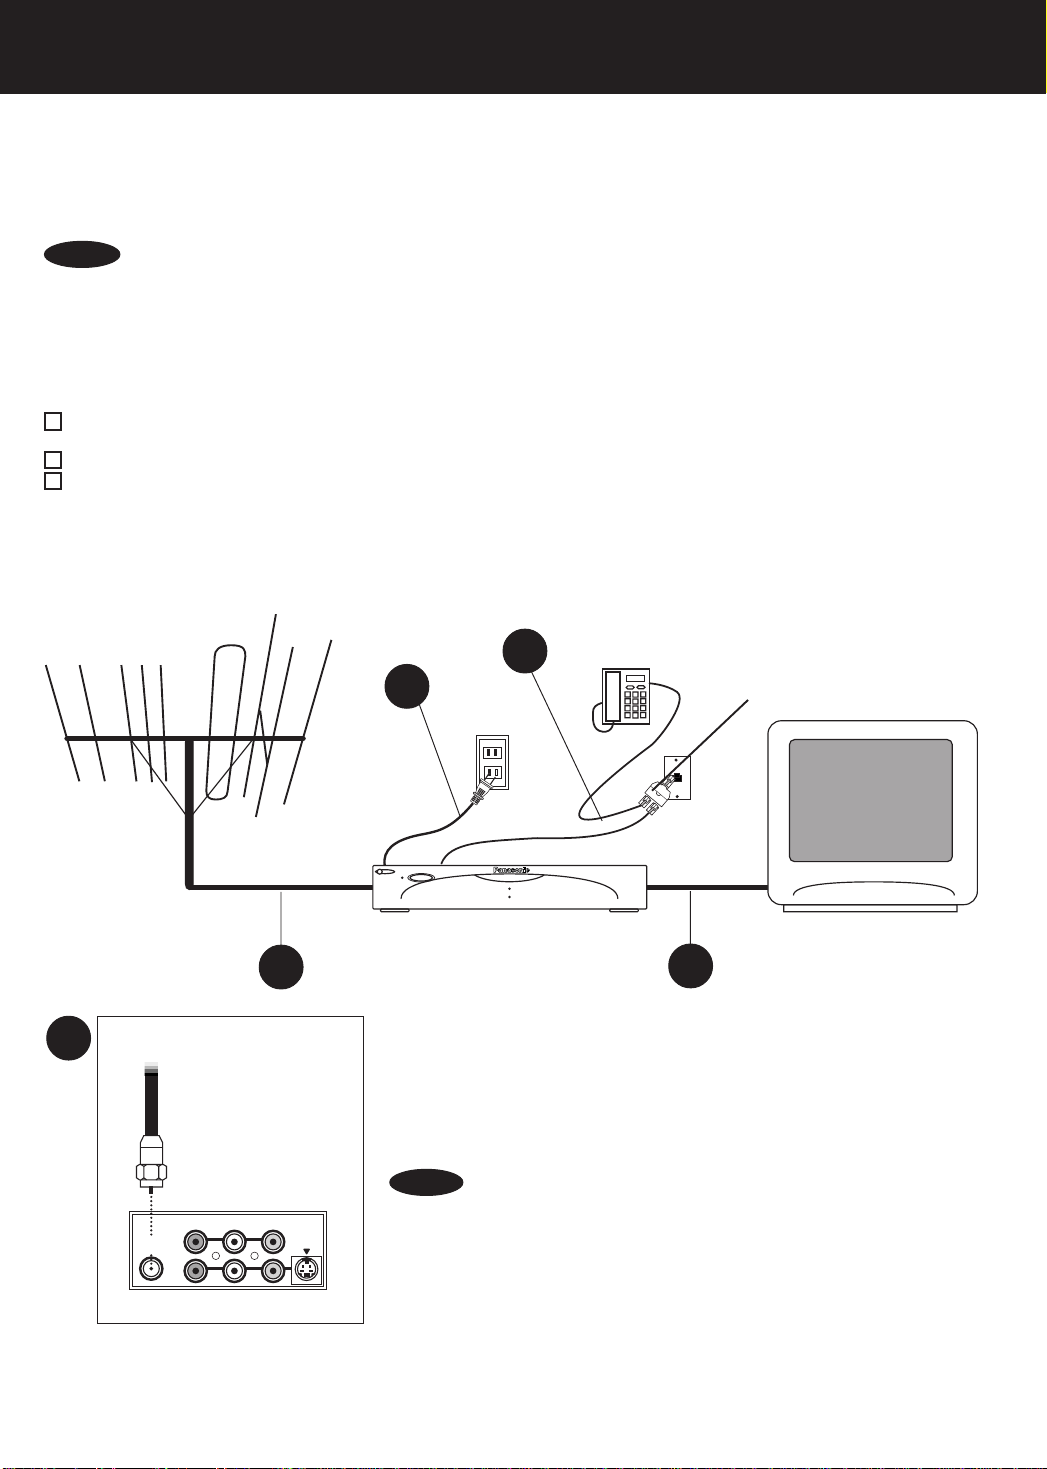
Basic Connections
The jacks on the back of the Hard Disk Recorder connect to your television, telephone line, and TV signal. You
need at least one input connection, one output connection and a telephone line.
If you receive TV signals from multiple sources, such as cable and satellite, you should connect the Hard Disk
Recorder to all. That way you’ll have easy access to all the channels from all your sources.
For more connections, see pages 10~17.
NOTES
You must complete the on-screen setup before using the Hard Disk Recorder. See “Initial Setup” on pages 18~21.
Before you connect any device to the Hard Disk Recorder:
Be sure there is nothing covering the heat ventilation slots on top of the Hard Disk Recorder. Heat build-up could
interfere with the Hard Disk Recorder’s performance.
Be sure both the Hard Disk Recorder and any connected devices are turned off and unplugged.
Put the Hard Disk Recorder in a place where there is a direct path to the user of the remote control.
Using wireless phone jacks
If there is no phone jack conveniently located near where you have placed the Hard Disk Recorder, consider using
a wireless phone jack system. Wireless phone jacks convert ordinary electrical outlets into phone jacks. They are
available from Panasonic or at electronics stores, and can be installed with no additional wiring or tools.
Be sure to purchase a wireless phone jack that operates at the highest modem speed available (at least 33.6 kbps, V.34).
• Do not connect any component to the INPUT jacks on the Hard Disk Recorder other than a satellite receiver,
direct cable line (or cable box), or a regular antenna signal. You can, however, connect the Hard Disk Recorder to
your VCR to save programs long-term.
• Do not connect video game machines to the Hard Disk Recorder. It is not designed to receive non-standard video
signals like the ones from these devices.
• A DVD player should be connected directly to your television, not to the Hard Disk Recorder.
A
From Antenna
or Cable
A
C
D
replay
POWER
RECORDING
NEW CONTENT
Connecting the incoming television signal
The ANT/CATV IN jack on the Hard Disk Recorder is reserved for a
Personal Television Server
ReplayTV 2000
Telephone Splitter
(supplied)
B
regular antenna, or the RF cable from a cable system source. The cable
system source can be either the actual cable coming from the wall (cable
direct) or from the OUTPUT jack of a cable box. If your cable box has
RF Cable
Audio and composite Video output, connect an A/V cable to the LINE
INPUTs on the Hard Disk Recorder. Select the appropriate setup from
the connection options on pages 10~17.
• When using “Nut type” RF coaxial cables, tighten with fingers only.
Overtightening may damage the terminals.
INPUT
R
AUDIO VIDEOL
1
ANT/CATV
IN
LINE
2
Hard Disk Recorder
S-VIDEO
IN
NOTE
Modifying an older type antenna
If your regular antenna does not have an RF cable and compatible
connector, like the one illustrated (for example, your antenna is 300-ohm
flat twin leads, or separate UHF and VHF antennas) you will need an
adapter or combiner to connect it to the Hard Disk Recorder. These
adapters can be found at most electronics stores.
Input connections from satellite receivers and cable boxes
You can connect the Hard Disk Recorder to a satellite receiver or a cable box that has either S-Video output or
regular composite video output. You can connect two such devices, one S-Video and one composite or,
alternatively, two composites. If you have a choice, use S-Video. It provides a sharper image. See pages 12~15.
8
Page 9
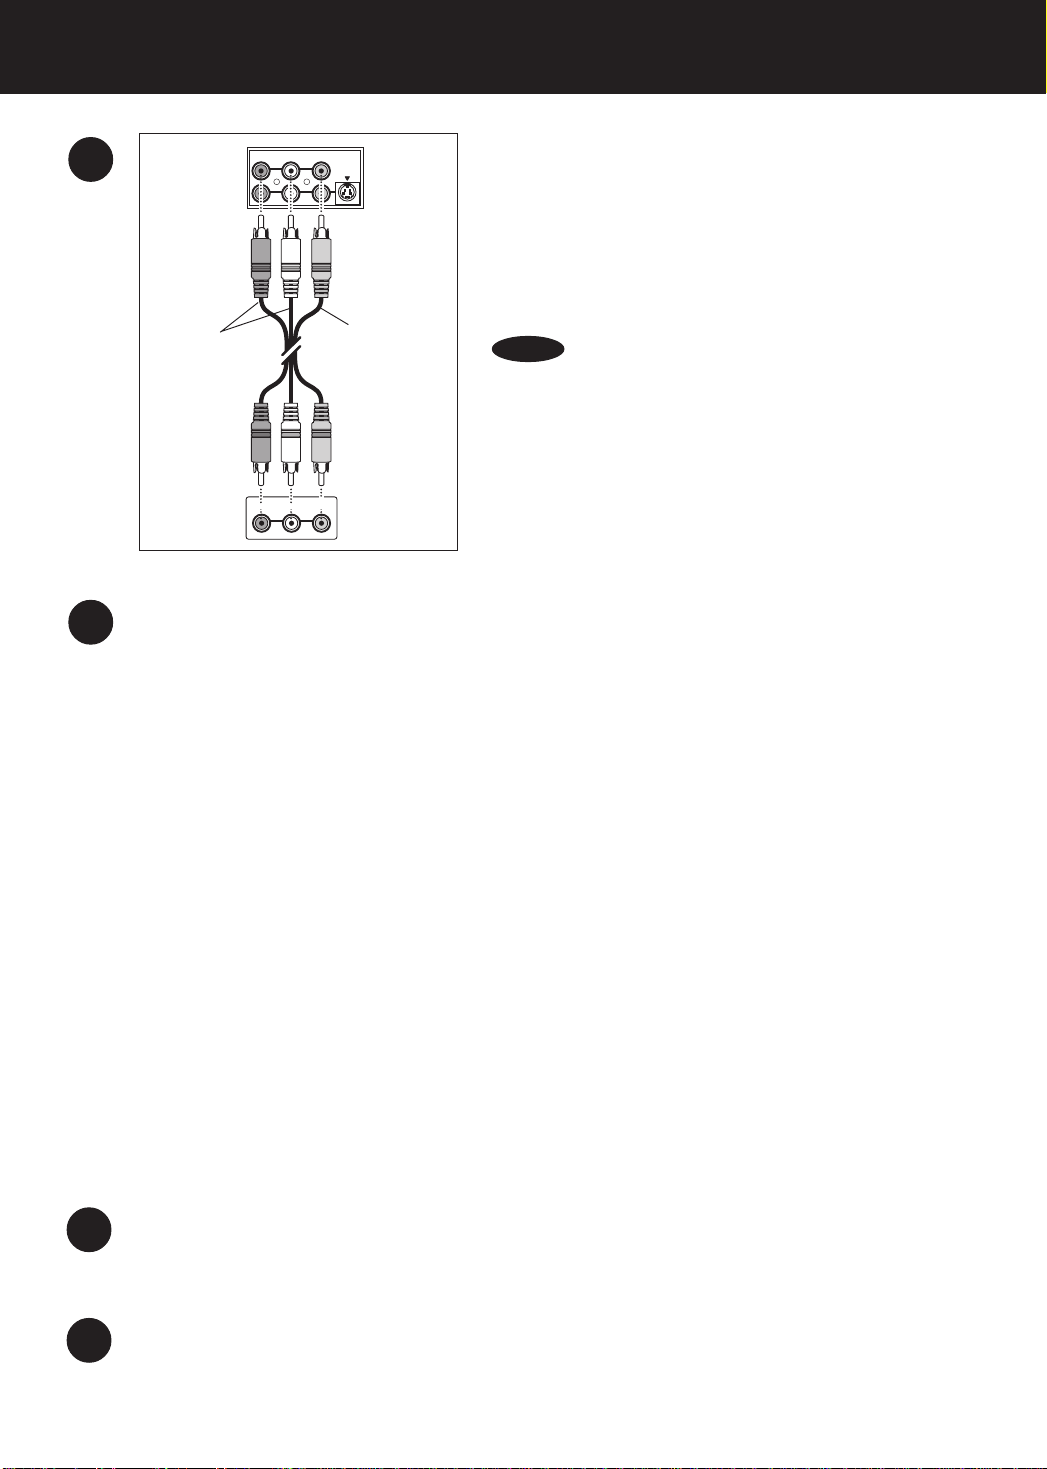
OUTPUT
B
R AUDIO VIDEOL
S-VIDEO
OUT
Hard Disk
Recorder
Connecting a composite-video television
1. Connect the yellow video cable from one of the yellow
VIDEO terminals in the LINE OUT cluster on the Hard Disk
Recorder to the yellow VIDEO IN terminal on your
television.
2. Connect one end of the red and white audio cables to the
AUDIO terminals in the LINE OUT cluster on the Hard Disk
Recorder that are in line with the yellow video terminal you
used. For example, if you used LINE 1 for video, use LINE 1
for audio.
NOTES
• If your TV has only one AUDIO IN jack, use the white plug and
leave the red plug unattached on both the Hard Disk Recorder and
your television. You may purchase an adapter that combines the
two audio cables and then connect it to the TV’s available AUDIO
jack.
• If your television has an S-video terminal, see page 13.
• If your TV has a VHF/UHF jack only, you need to purchase an RF
modulator. You will only get mono audio this way. However, you can
avoid using an RF modulator by connecting the Hard Disk Recorder
to a VCR. See “Connecting the Hard Disk Recorder to a TV That
Has a VHF/UHF Jack Only” on page 11.
• Refer to your TV’s operating instructions for more information on
connecting devices to your TV.
AUDIO
IN
VIDEO
IN
L
Video Cable
Television
Audio Cables
R
C
Connecting the telephone line
You need to connect the Hard Disk Recorder to a telephone jack to communicate with the ReplayTV Service. The
telephone connection is used nightly by the Hard Disk Recorder to receive updates to the Channel Guide and other Hard
Disk Recorder enhancements. The phone connection is also used to update the Hard Disk Recorder with new features,
as they become available.
The Hard Disk Recorder may not be used on coin services provided by the telephone company, and you may not
be able to use the Hard Disk Recorder if you are on a party line or if you use a pulse telephone. Contact your local
telephone company with regard to these matters. If you have an older, 4-prong telephone wall jack, you need a
modular 4-prong adapter (USOC RJA1X).
Connect the supplied telephone cord from the telephone wall jack in your home to the TEL LINE jack on the Hard
Disk Recorder. If the wall jack is being used, plug the supplied telephone splitter into the wall jack. Then plug both
phone lines into the splitter.
Interrupted phone signal
On some phone lines, such as those with voice mail, the normal continuous dial tone can be interrupted. The Hard
Disk Recorder can use a line only when the tone is uninterrupted. If you can’t clear the tone (for example, by
clearing new voice mail messages), you need a different line for the Hard Disk Recorder.
Using the telephone while the Hard Disk Recorder is calling the ReplayTV Service
If you need to use the phone while the Hard Disk Recorder is using the phone line, you’ll need to stop the Hard
Disk Recorder phone call and wait for the dial tone to return. To stop the phone call and return the dial tone:
1. Pick up the handset and wait 5 seconds.
2. Put back the handset and wait 5 seconds.
3. Repeat steps 1 and 2.
4. Pick up the handset and wait 5 more seconds.
5. At this point, you should hear the dial tone. Enter a phone number within 8 seconds; otherwise,
the Hard Disk Recorder will automatically reconnect to the service.
D
Connecting the AC Power cord
Connect the supplied AC power cord to the AC-IN jack on the Hard Disk Recorder and to an electrical outlet.
E
Complete the on-screen setup
See “Initial Setup” on pages 18~21.
9
Page 10

Advanced Connections
Planning Input and Output Connections
• S-Video connections provide the best picture quality. If your cable box or satellite receiver has an S-Video OUT
jack, use an S-Video cable to connect the device to the Hard Disk Recorder’s S-VIDEO IN jack (regardless of
whether your television has an S-Video IN jack).
• If your cable box or satellite receiver does not have an S-Video OUT jack or an RF OUT jack, use either the LINE 1
or LINE 2 INPUTS with A/V cables to connect to the Hard Disk Recorder.
• If your television has an S-Video IN jack, use an S-Video cable to connect it to the Hard Disk Recorder’s S-VIDEO
OUT jack.
• If you want to use both an antenna and cable as inputs, use a cable box with A/V or S-Video output for cable.
• If your TV does not have A/V inputs, you may need to purchase an RF modulator.
Using the Hard Disk Recorder with A/B Cable
Systems
If an A/B cable switch is present in your setup, the Hard Disk Recorder does not know if the switch is set to A or B.
The Hard Disk Recorder will record shows assuming that the switch is set correctly. Make sure the switch is set to
the proper side, A or B, before recording shows with the Hard Disk Recorder.
Connecting DIRECTV™ receivers
If you are connecting a DIRECTV receiver to one of the Hard Disk Recorder’s inputs and the receiver has a serial
port, use a serial control cable. Otherwise, use the IR (infrared) blaster.
If your DIRECTV receiver has a 15-pin serial connector, use the supplied 15-pin to 9-pin adapter and connect it to
the serial cable. Refer to your DIRECTV owner’s manual regarding connecting to its serial port.
If the remote control for your DIRECTV receiver has a “UHF” label, or if there is a small antenna on the back of your
DIRECTV receiver, you have radio frequency control. Check your receiver owner’s manual to see if serial or
infrared control is supported.
NOTE
• The Hard Disk Recorder does not support radio frequency (RF) control devices. At this time, only the SERIAL
CONTROL port works with DIRECTV.
Connecting Satellite Receivers
If you are connecting a satellite receiver to one of the Hard Disk Recorder’s inputs and the receiver has a serial
port, use a serial control cable. Otherwise, use the IR (infrared) blaster.
If your satellite receiver has a 15-pin serial connector, use the supplied 15-pin to 9-pin adapter and connect it to the
serial cable.
If the remote control for your satellite receiver has a “UHF” label, or if there is a small antenna on the back of your
satellite receiver, you have radio frequency control. You can check your satellite receiver owner’s manual to verify
that serial or infrared control is supported.
NOTE
• The Hard Disk Recorder does not support radio frequency (RF) control devices. At this time, the SERIAL
CONTROL port works with Satellite.
Satellite Receiver and Cable Box Controllers
If you connect a satellite receiver or a cable box to the Hard Disk Recorder, you need to attach a controller cable so
the Hard Disk Recorder can change the channels on these devices, and control recording and viewing of satellite
or cable programming. The controller, either a serial data cable or an IR blaster cable, acts as a remote control for
these devices, sending the same signals that their remote controls do. See “Connecting a Serial Cable” on page 16
if your satellite receiver has a serial connector. If your satellite receiver does not have a serial connector, see
“Connecting and Setting Up the IR Blaster” on page 17.
Output Connections to the Television
You can connect the Hard Disk Recorder to a television that accepts S-Video or composite-video input. Use SVideo, if possible, to obtain a better image. If your television has a VHF/UHF jack only, you must use an RF
modulator or connect the Hard Disk Recorder to your VCR. See “Connecting the Hard Disk Recorder To a TV That
Has a VHF/UHF Jack Only” on page 11, or refer to the Quick Setup Guide.
10
Page 11
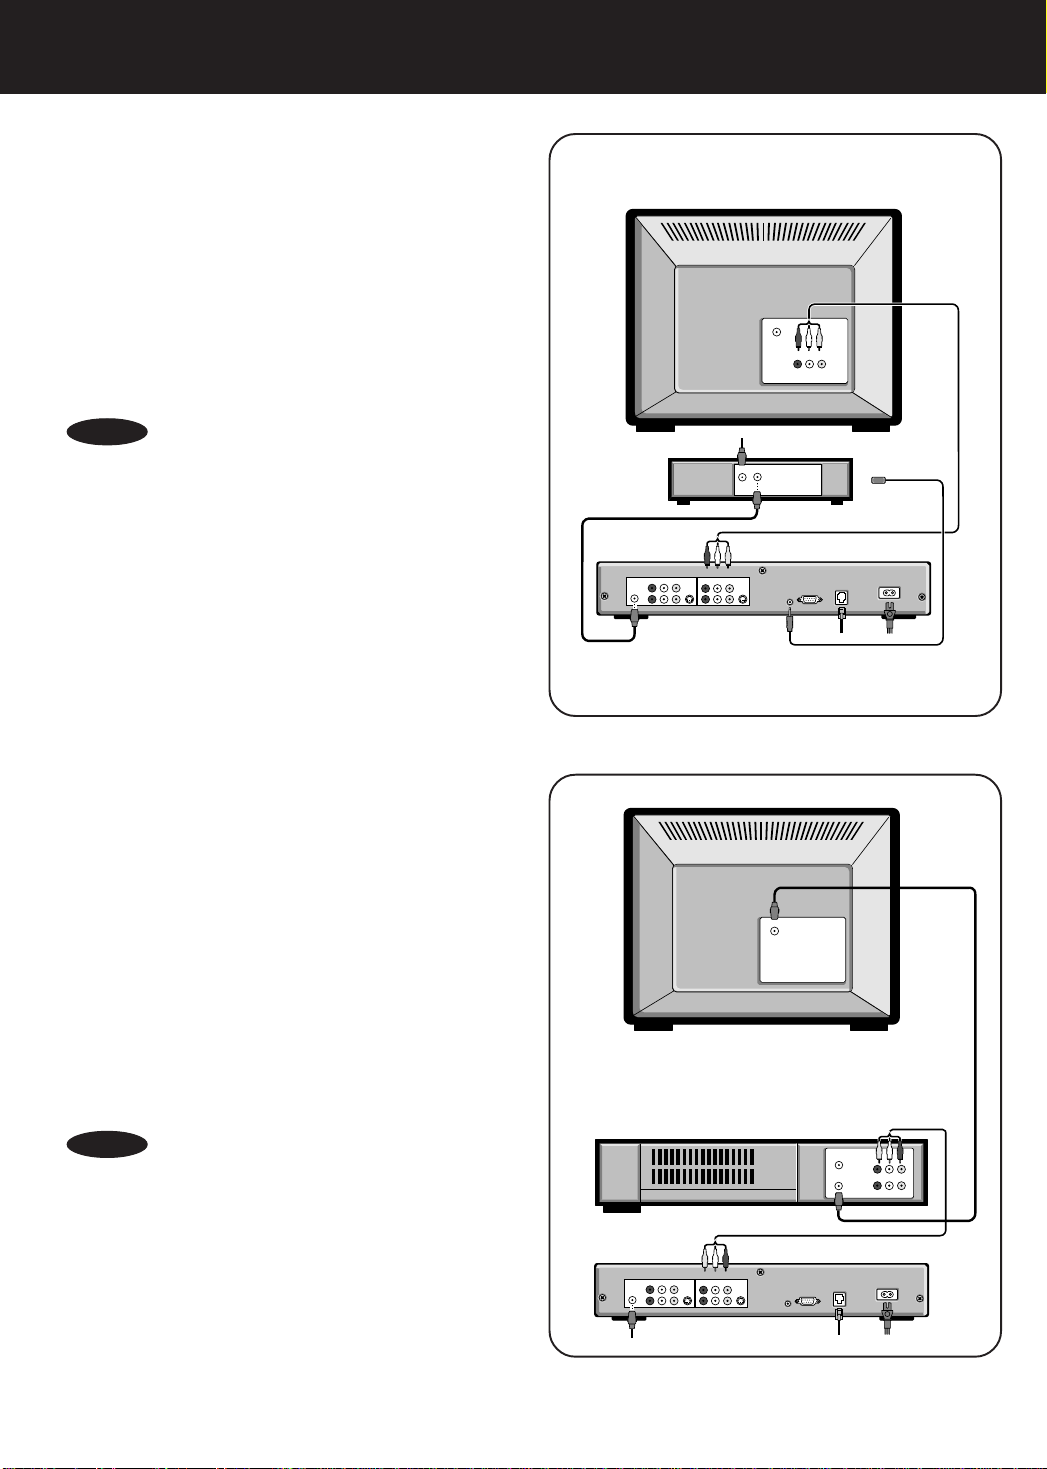
Connecting a Cable Box to
the Hard Disk Recorder
1. Connect the incoming television signal to the IN
jack on your cable box.
2. Connect the RF cable from the OUT jack on your
cable box to the ANT/CATV IN jack on the Hard
Disk Recorder.
3. Attach the cable box controller. See “Satellite
Receiver and Cable Box Controllers” on page 10.
4. Follow the B ~ E instructions on page 9 for A/V
connection, telephone connection, AC power
connection, and setup.
VHF/UHF
TV
AUDIO VIDEORL
IN
NOTES
• If your cable box has A/V OUT jacks, connect an A/V
cable from these jacks to the INPUT jacks on the
Hard Disk Recorder instead of using the RF cable.
• Refer to your TV or cable box owner’s manual for more
information on connecting to these components.
Connecting the Hard Disk
Recorder to a TV That Has
a VHF/UHF Jack Only
Use this option if you have a television with a VHF/UHF jack only.
If you do not have a VCR, you will need to purchase and use an
RF modulator.
1. Connect the incoming television signal to the ANT/
CATV IN jack on the Hard Disk Recorder.
2. Connect an A/V cable from the OUTPUT jacks on the
Hard Disk Recorder to the AUDIO/VIDEO IN jacks on
your VCR, matching like colors.
3. Connect the RF cable from the OUT jack on your VCR
to the VHF/UHF jack on your television.
4. Follow the C ~ E instructions on page 9 for telephone
connection, AC power connection, and setup.
INPUT
AUDIO
VIDEO
RLAUDIO VIDEORL
ANT/CATV
1
IN
LINE
2
Cable Box
IN OUT
Hard Disk Recorder
OUTPUT
S-VIDEO
S-VIDEO
IN
OUT
SERIAL
IR
CONTROL
BLASTER
PORT
AC-IN
TEL LINE
TV
VHF/UHF
NOTES
• This setup is not recommended for viewing copy-protected
programming. Passing the signal through a VCR may reduce
video quality.
• You will only get mono audio this way. If you need to
purchase an RF modulator, follow the connection instructions
that come with the modulator.
• To use the Hard Disk Recorder with this option, you will need
to set the input on your VCR to display the output from the
Hard Disk Recorder. To do this, press the Input Select or TV/
VTR (TV/VCR) button on your VCR.
• You may also need to tune your TV to the channel that
displays auxiliary input.
• Refer to your TV or VCR owner’s manual for more
information on connecting to these components.
VCR
INPUT
AUDIO
VIDEO
R L AUDIO VIDEORL
ANT/CATV
1
IN
LINE
2
IN
IN
AUDIO VIDEORL
OUT
OUT
Hard Disk Recorder
OUTPUT
S-VIDEO
S-VIDEO
IN
OUT
SERIAL
IR
CONTROL
BLASTER
PORT
AC-IN
TEL LINE
11
Page 12
Advanced Connections (continued)
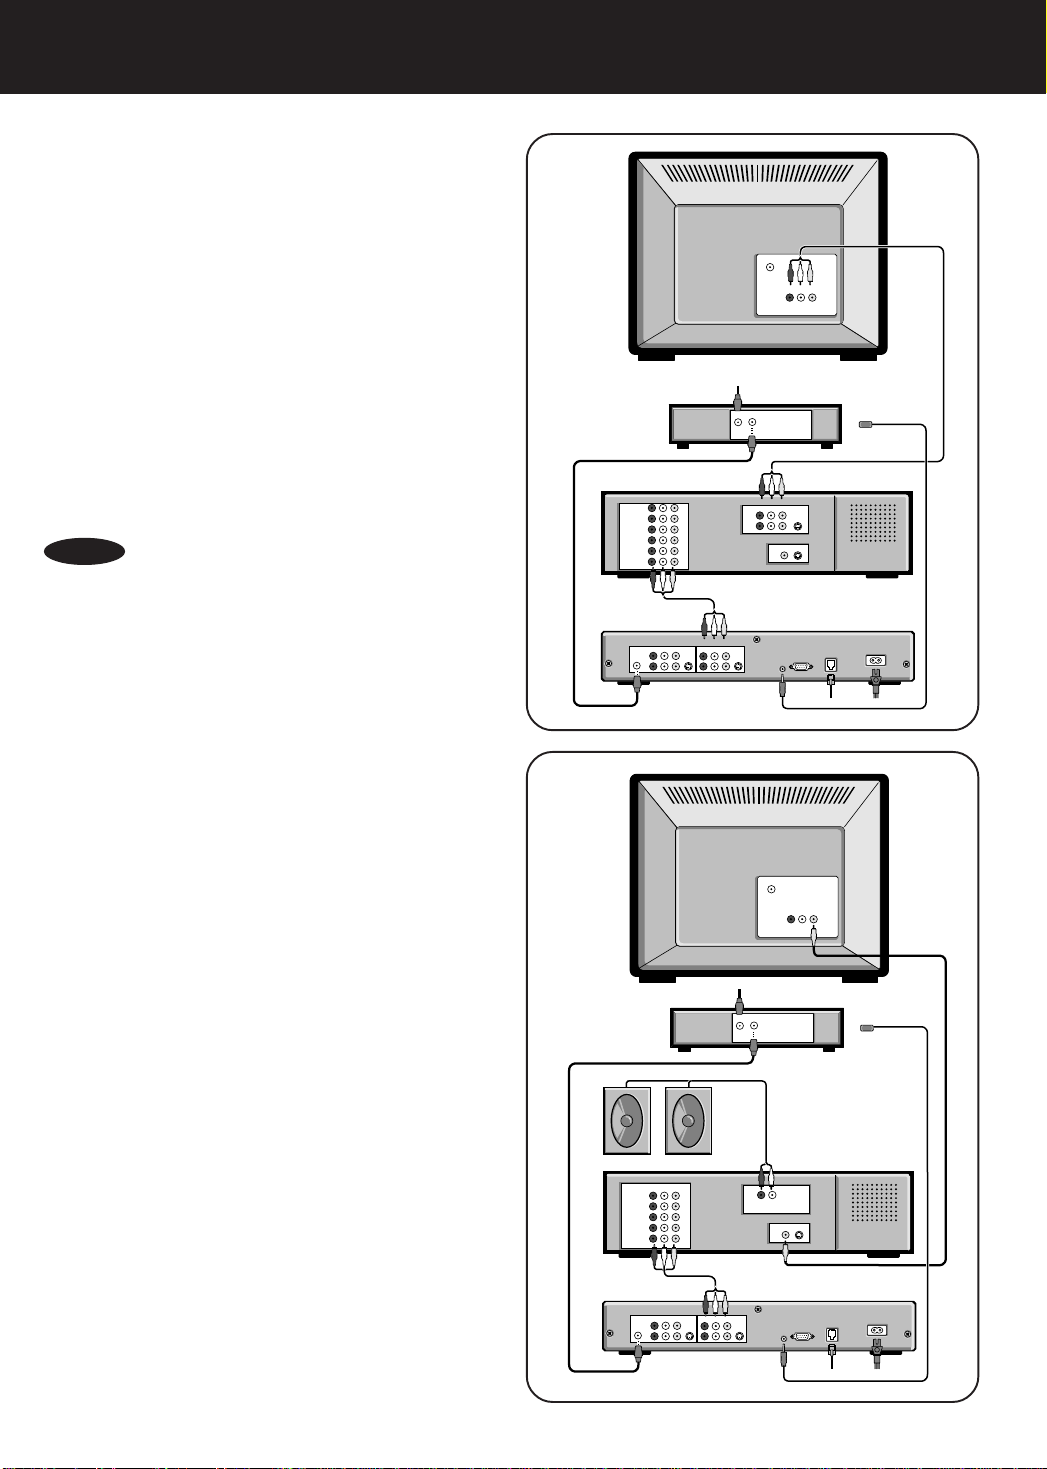
Connecting a Cable Box and
an A/V Receiver to the Hard
Disk Recorder
1. Connect the incoming television signal to the IN jack on
your cable box.
2. Connect the RF cable from the OUT jack on your cable
box to the ANT/CATV IN jack on the Hard Disk
Recorder.
3. Connect an A/V cable from the OUTPUT jacks on the
Hard Disk Recorder to the IN jacks on your A/V
receiver, matching like colors.
4. Connect an A/V cable from the OUTPUT jacks on your
A/V receiver to the AUDIO/VIDEO IN jacks on your TV,
matching like colors.
5. Attach the cable box controller. See “Satellite Receiver
and Cable Box Controllers” on page 10.
6. Follow the C ~ E instructions on page 9 for telephone
connection, AC power connection, and setup.
NOTES
• If your cable box has A/V OUT jacks, connect an A/V cable
from these jacks to the INPUT jacks on the Hard Disk
Recorder instead of using the RF cable.
• Refer to your TV, cable box or A/V receiver owner’s manual for
more information on connecting to these components.
LINE IN
AUDIO
VCR1
VCR2
DSS
CD
DVD
AUX1
ANT/CATV
1
IN
LINE
2
OUTPUT
INPUT
AUDIO
VIDEO
R L AUDIO VIDEORL
S-VIDEO
IN
VHF/UHF
AUDIO VIDEORL
IN
Cable Box
IN OUT
S-VIDEO
MONITOR OUT
S-VIDEO
A/V Receiver
LINE OUT
AUDIO
1
2
Hard Disk Recorder
S-VIDEO
OUT
TEL LINE
SERIAL
IR
CONTROL
BLASTER
PORT
TV
AC-IN
If you have separate speakers, do the
following steps instead of step 4 above.
a. Connect the Audio cable from the AUDIO OUT jacks
on your A/V receiver to the speakers.
b.Connect the Video cable from MONITOR OUT jack on
your A/V receiver to the VIDEO IN jack on your
television.
LINE IN
AUDIO
VCR
DSS
CD
DVD
AUX1
ANT/CATV
1
IN
LINE
2
OUTPUT
INPUT
AUDIO
VIDEO
R L AUDIO VIDEORL
S-VIDEO
IN
VHF/UHF
AUDIO VIDEORL
IN
Cable Box
IN OUT
A/V Receiver
SPEAKER OUT
AUDIO
1
MONITOR OUT
S-VIDEO
Hard Disk Recorder
S-VIDEO
OUT
TEL LINE
SERIAL
IR
CONTROL
BLASTER
PORT
TV
AC-IN
12
Page 13
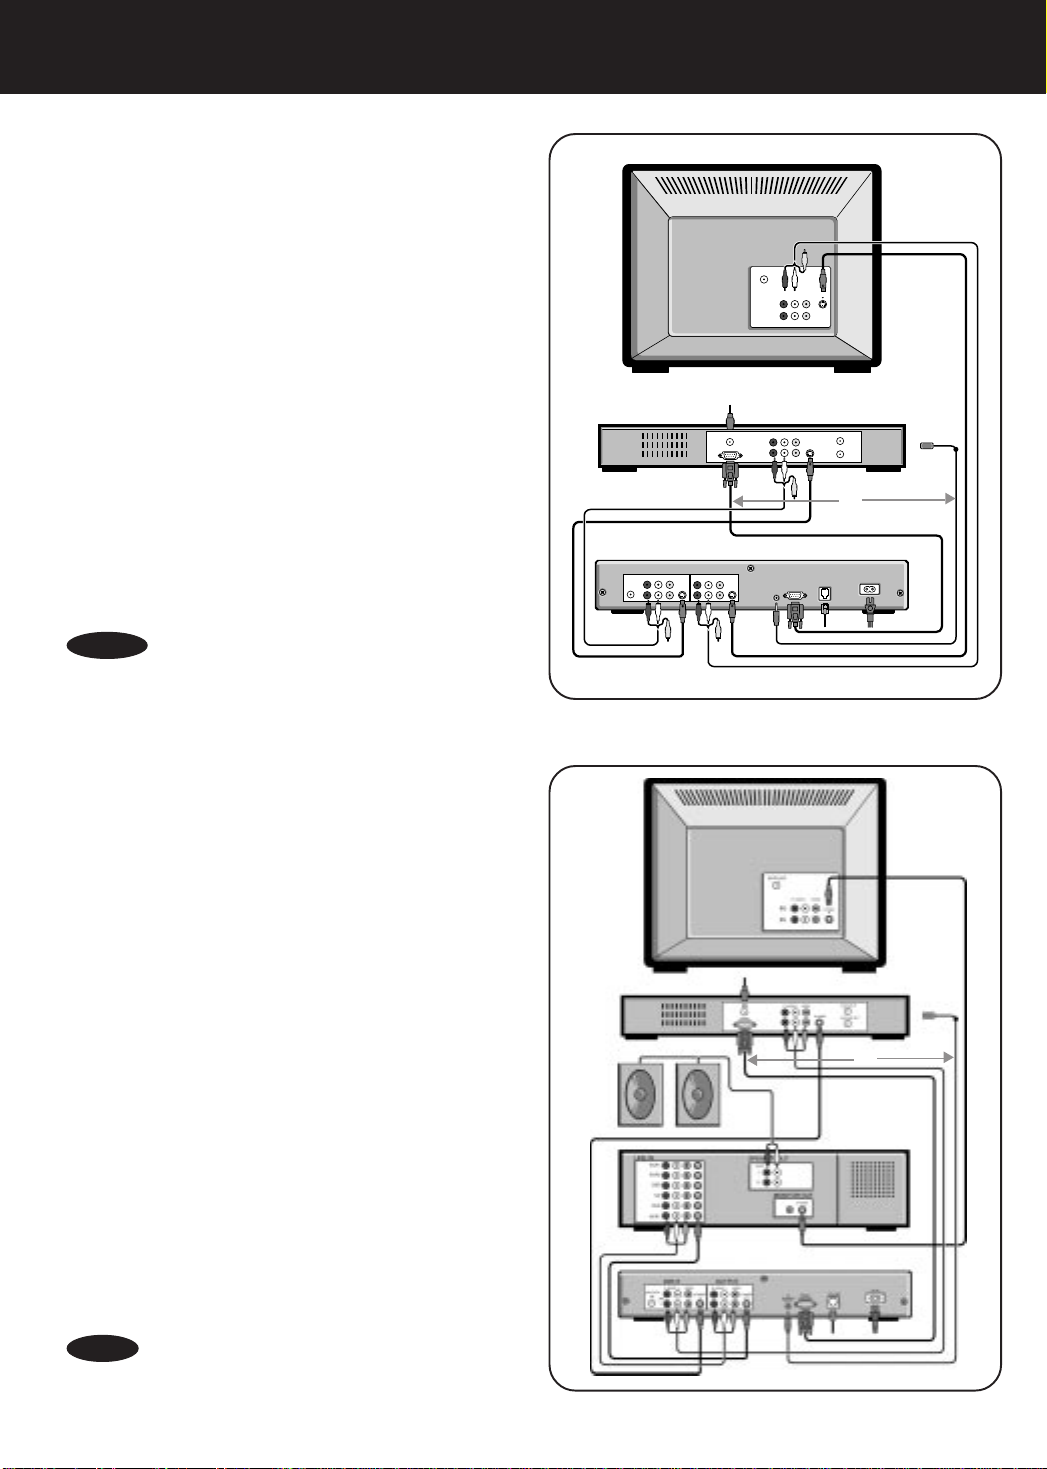
Connecting a Satellite
Receiver to the Hard Disk
Recorder (Using S-Video)
1. Connect the incoming television signal to the IN jack
on your satellite receiver.
2. Connect the red and white Audio plugs of an A/V
cable from the AUDIO OUT jacks on your satellite
receiver to the LINE 2 INPUT jacks on the Hard Disk
Recorder, matching like colors.
3. Connect an S-Video cable from the S-VIDEO OUT
jack on your satellite receiver to the S-VIDEO IN jack
on the Hard Disk Recorder.
4. Connect the red and white Audio plugs of an A/V
cable from the LINE 2 OUTPUT jacks on the Hard
Disk Recorder to the AUDIO IN jacks on your
television, matching like colors.
6. Connect an S-Video cable from the S-VIDEO OUT
jack on the Hard Disk Recorder to the S-VIDEO IN
jack on your television.
7. Attach the satellite receiver controller. See “Satellite
Receiver and Cable Box Controllers” on page 10.
8. Follow the C ~ E instructions on page 9 for telephone
connection, AC power connection, and setup.
NOTES
• Leave the yellow video cable unattached on your satellite
receiver, the Hard Disk Recorder and television.
• Refer to your TV or satellite receiver owner’s manual for more
information on connecting to these components.
INPUT
VIDEO
R L AUDIO VIDEORL
AUDIO
ANT/CATV
1
IN
LINE
2
TV
VHF/UHF
AUDIO VIDEORL
S-VIDEO
IN
IN
Satellite Receiver
IN
SERIAL
S-VIDEO
VHF/UHF OUT
VHF/UHF IN
AUDIO VIDEORL
OR
Hard Disk Recorder
OUTPUT
S-VIDEO
S-VIDEO
IN
SERIAL
IR
OUT
CONTROL
BLASTER
PORT
AC-IN
TEL LINE
Connecting a Satellite Receiver
and A/V Receiver to the Hard
Disk Recorder (Using S-Video)
1. Connect the incoming television signal to the IN jack
on your satellite receiver.
2. Connect an A/V cable from the AUDIO OUT jacks on
your satellite receiver to the LINE 2 INPUT jacks on
the Hard Disk Recorder, matching like colors.
3. Connect an S-Video cable from the S-VIDEO OUT
jack on your satellite receiver to the S-VIDEO IN jack
on the Hard Disk Recorder.
4. Connect the Audio cable from the AUDIO OUT jacks
on your A/V receiver to the speakers. Then, connect
the S-Video cable from MONITOR OUT jack on your
A/V receiver to the S-VIDEO IN jack on your
television. (Note: If you do not have separate
speakers, see step 4 on page 12.)
5. Connect an S-Video cable from the S-VIDEO OUT
jack on the Hard Disk Recorder to the S-VIDEO IN
jack on your A/V receiver.
6. Connect an A/V cable from the AUDIO OUT jacks on
the Hard Disk Recorder to the IN jacks on your A/V
receiver, matching like colors.
7. Attach the satellite receiver controller. See “Satellite
Receiver and Cable Box Controllers” on page 10.
8. Follow the C ~ E instructions on page 9 for telephone
connection, AC power connection, and setup.
NOTE
• Refer to your TV, satellite receiver, or A/V receiver owner’s
manual for more information on connecting to these components.
TV
Satellite Receiver
OR
A/V Receiver
Hard Disk Recorder
13
Page 14
Advanced Connections (continued)
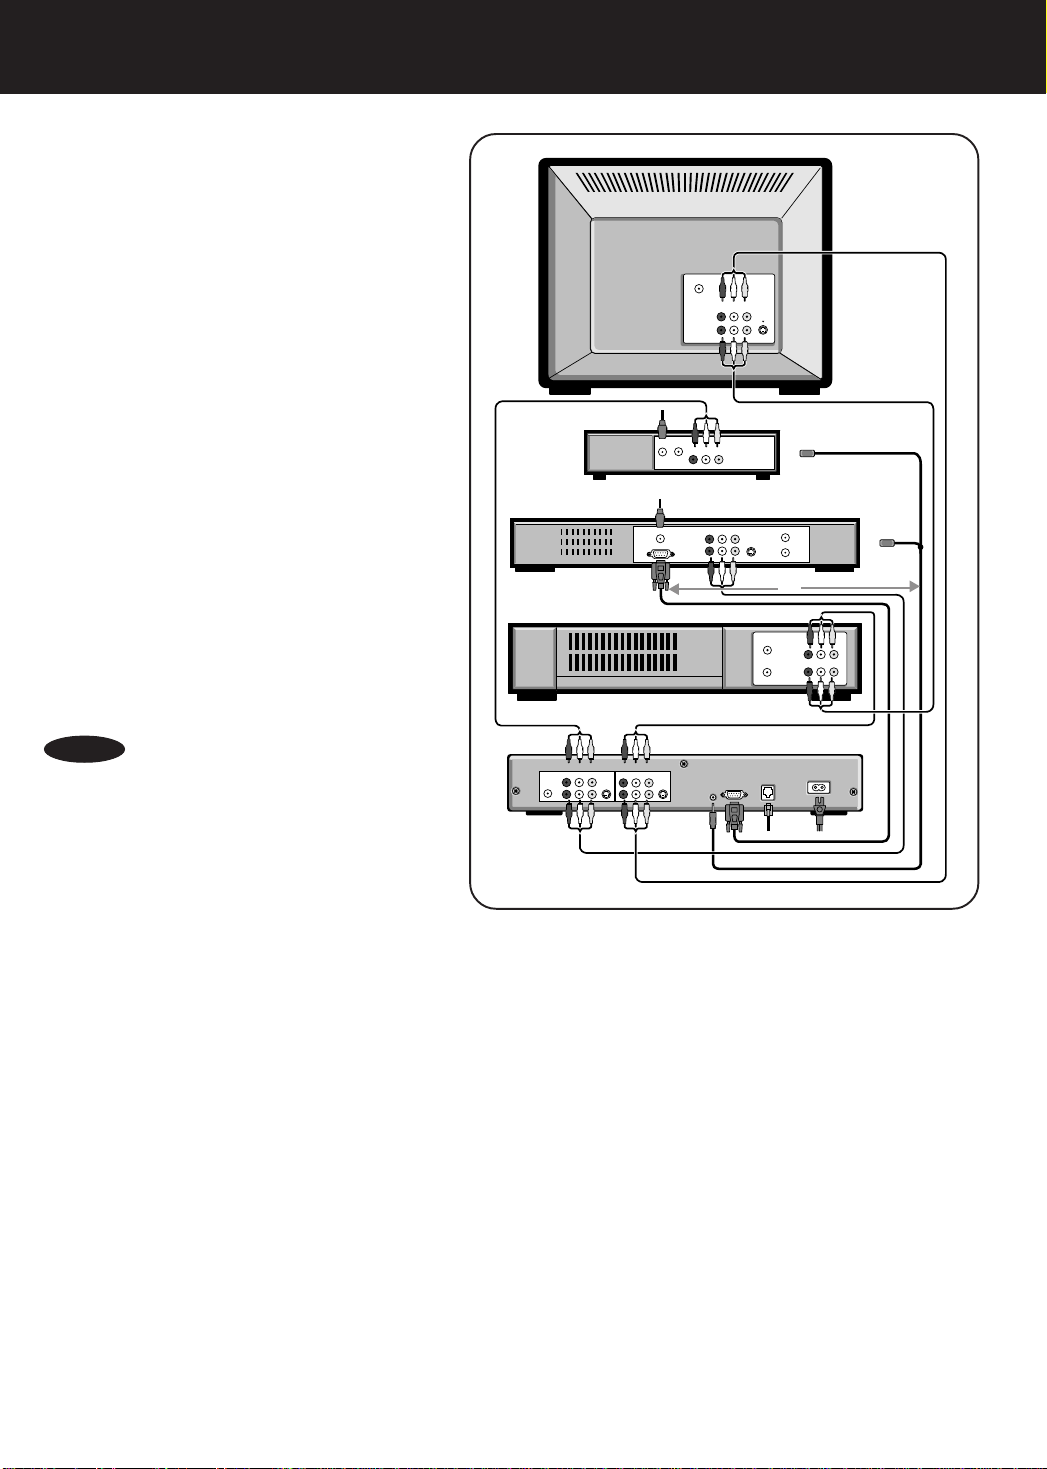
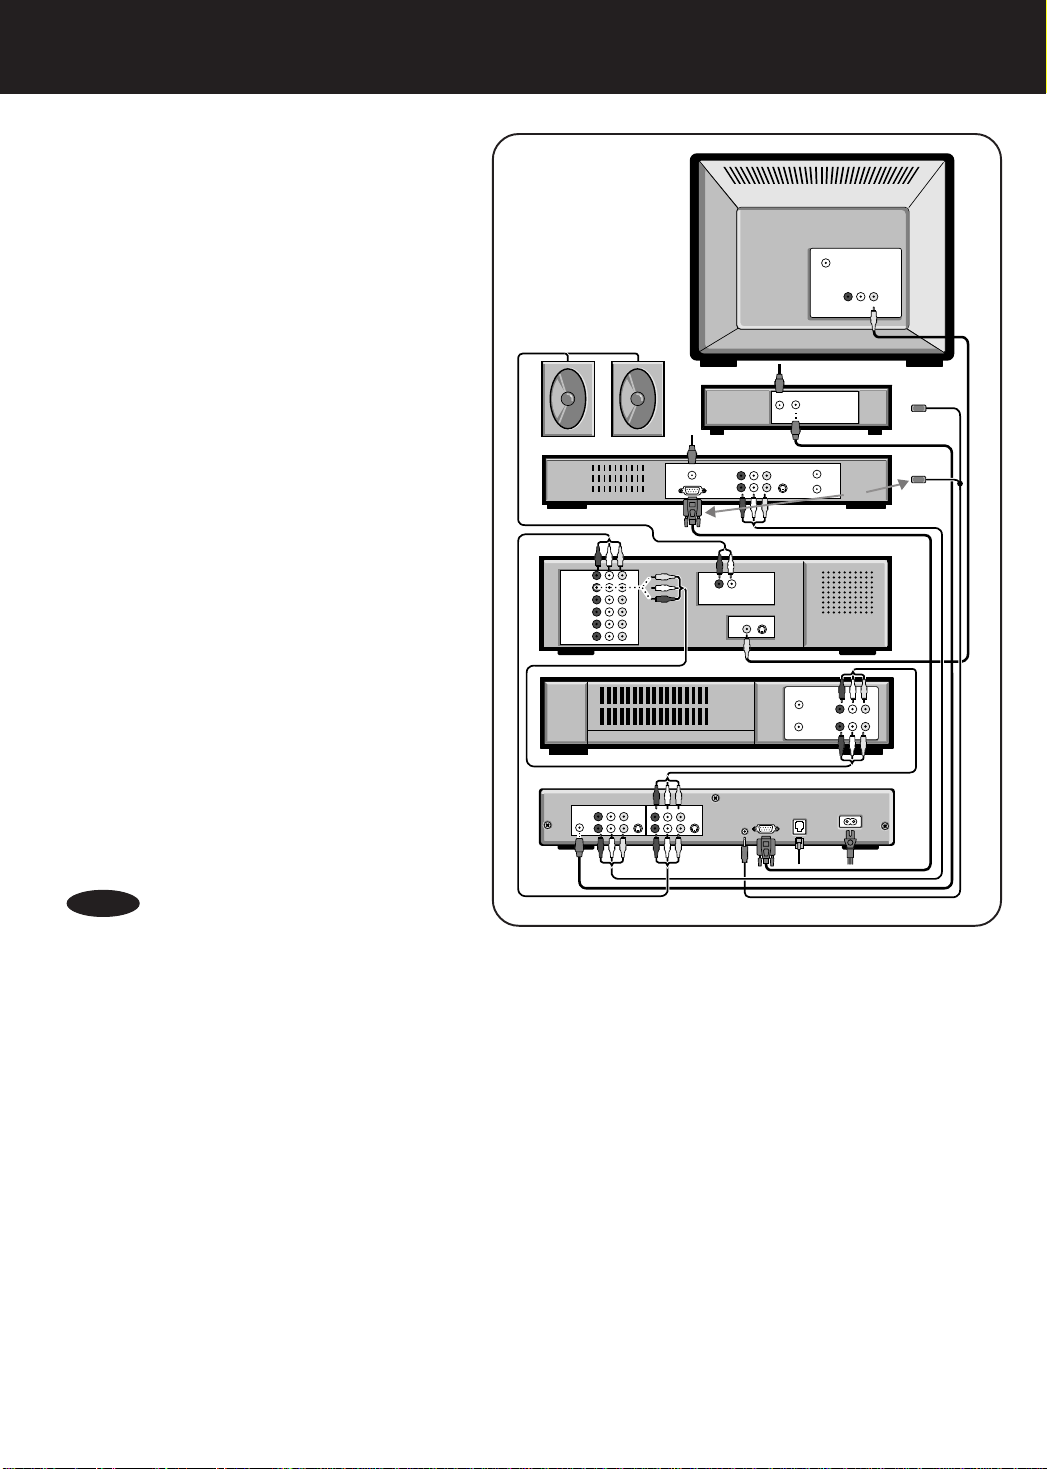
Connecting a Cable Bo x,
Satellite Receiver, and VCR
to the Hard Disk Recorder
1. Connect an A/V cable from the AUDIO/VIDEO
OUT jacks on your cable box to the INPUT jacks
on the Hard Disk Recorder, matching like colors.
2. Connect an A/V cable from the AUDIO/VIDEO
OUT jack on your satellite receiver to the INPUT
jack on the Hard Disk Recorder, matching like
colors.
3. Connect an A/V cable from the OUTPUT jacks
on the Hard Disk Recorder to the AUDIO/VIDEO
IN jacks on your VCR, matching like colors.
4. Connect a second A/V cable from the OUTPUT
jacks on the Hard Disk Recorder to the AUDIO/
VIDEO IN jacks on your television, matching like
colors.
5. Connect an A/V cable from the OUTPUT jacks
on your VCR to the AUDIO/VIDEO IN jacks on
your television, matching like colors.
6. Attach your cable box and satellite receiver
controllers. See “Satellite Receiver and Cable
Box Controllers” on page 10.
7. Follow the C ~ E instructions on page 9 for
telephone connection, AC power connection,
and setup.
Cable Box
Satellite Receiver
VCR
IN OUT
IN
SERIAL
VHF/UHF
IN
IN
AUDIO VIDEORL
AUDIO VIDEORL
AUDIO VIDEORL
TV
S-VIDEO
VHF/UHF IN
S-VIDEO
VHF/UHF OUT
OR
IN
IN
AUDIO VIDEORL
OUT
OUT
NOTES
• If your cable box does not have A/V OUT jacks,
connect an RF cable from the OUT jack to the
ANT/CATV IN jack on the Hard Disk Recorder.
• Refer to your TV, cable box, satellite receiver, or
VCR owner’s manual for more information on
connecting to these components.
INPUT
AUDIO
VIDEO
R L AUDIO VIDEORL
ANT/CATV
1
IN
LINE
2
Hard Disk Recorder
OUTPUT
S-VIDEO
S-VIDEO
IN
OUT
SERIAL
IR
CONTROL
BLASTER
PORT
AC-IN
TEL LINE
14
Page 15
Connecting a Cable Bo x,
Satellite Receiver, A/V
Receiver, and VCR to the
Hard Disk Recorder
1. Connect an RF cable from the OUT jack on your
cable box to the ANT/CATV IN jack on the Hard
Disk Recorder.
2. Connect an A/V cable from the AUDIO/VIDEO
OUT jacks on your satellite receiver to the
INPUT jacks on the Hard Disk Recorder,
matching like colors.
3. Connect an A/V cable from the OUTPUT jacks
on the Hard Disk Recorder to the AUDIO/VIDEO
IN jacks on your VCR, matching like colors.
4. Connect a second A/V cable from the OUTPUT
jacks on the Hard Disk Recorder to the AUDIO/
VIDEO IN jacks on your A/V receiver, matching
like colors.
5. Connect the Audio cable from the AUDIO OUT
jacks on your A/V receiver to the speakers.
Then, connect the Video cable from the
MONITOR OUT jack on your A/V receiver to the
VIDEO IN jack on your television. (Note: If you
do not have separate speakers, see step 4 on
page 12.)
6. Connect an A/V cable from the AUDIO VIDEO
OUT jacks on your VCR to the AUDIO/VIDEO IN
jacks on your A/V receiver, matching like colors.
7. Attach your cable box and satellite receiver
controllers. See “Satellite Receiver and Cable
Box Controllers” on page 10.
8. Follow the C~E instructions on page 9 for
telephone connection, AC power connection,
and setup.
LINE IN
AUDIO
VCR1
VCR2
DSS
CD
DVD
AUX1
INPUT
R L AUDIO VIDEORL
AUDIO
ANT/CATV
1
IN
LINE
2
TV
VHF/UHF
AUDIO VIDEORL
IN
Cable Box
IN OUT
AUDIO VIDEORL
IN
SERIAL
VHF/UHF IN
S-VIDEO
VHF/UHF OUT
OR
Satellite Receiver
SPEAKER OUT
AUDIO
1
MONITOR OUT
A/V Receiver
S-VIDEO
VCR
IN
IN
AUDIO VIDEORL
OUT
OUT
Hard Disk Recorder
OUTPUT
VIDEO
S-VIDEO
S-VIDEO
IN
OUT
SERIAL
IR
CONTROL
BLASTER
PORT
AC-IN
TEL LINE
NOTE
• Refer to your TV, cable box, satellite receiver, A/V
receiver, or VCR owner’s manual for more information
on connecting to these components.
15
Page 16
Advanced Connections (continued)
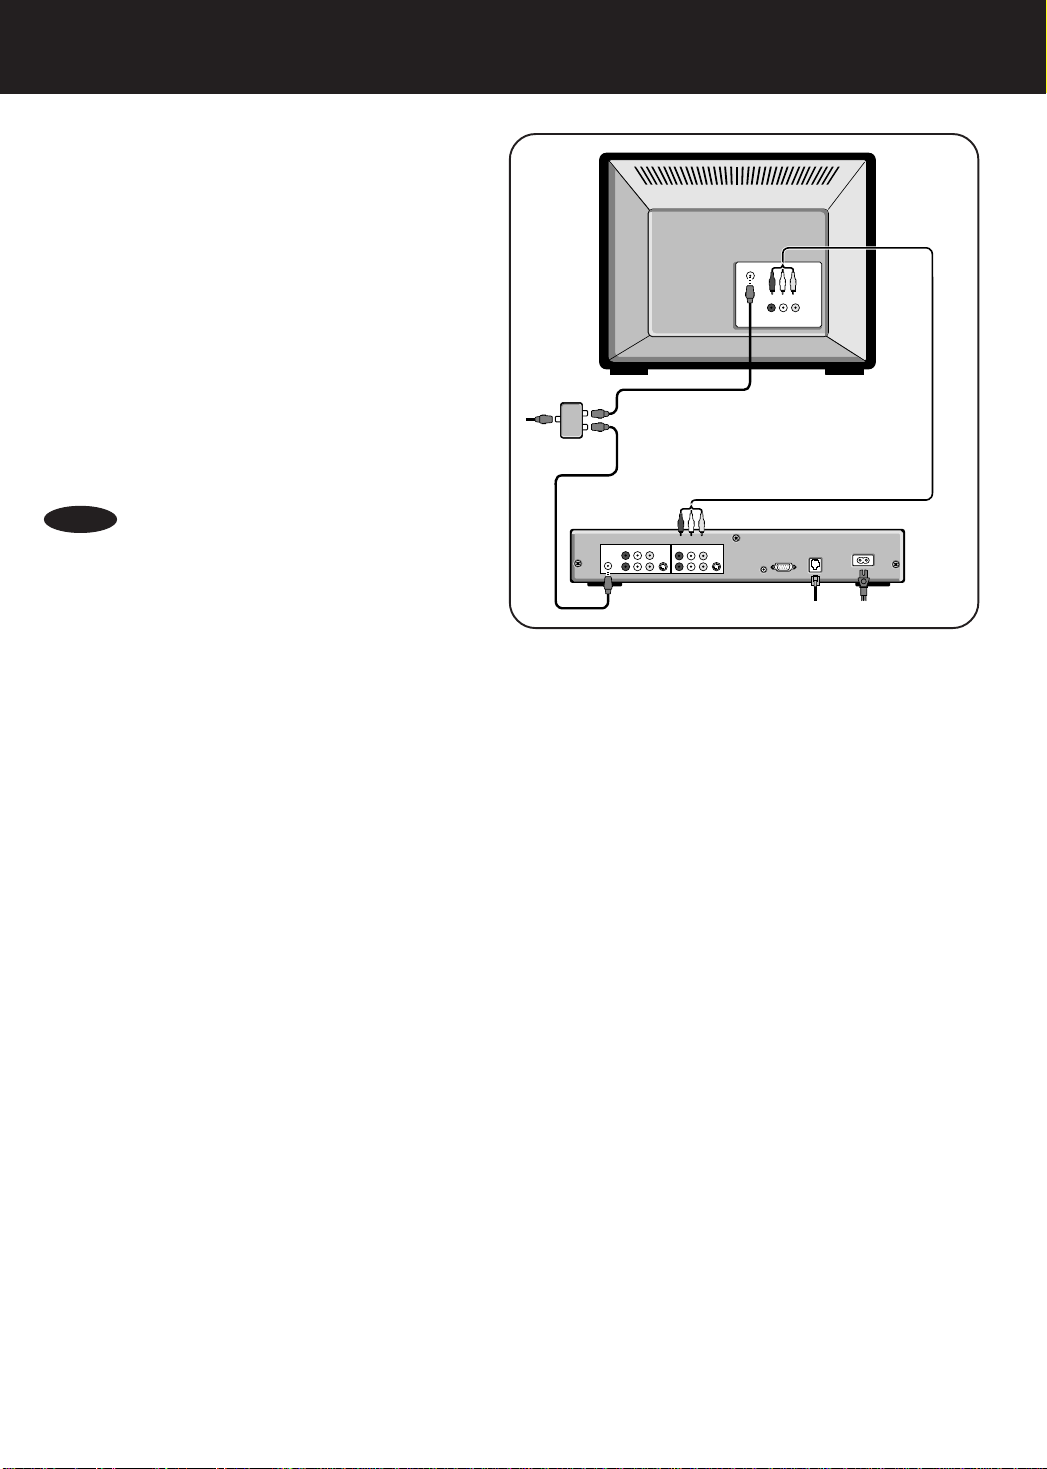
W atching One Show While
Recording Another on the
TV
Hard Disk Recorder
Use a cable splitter and attach RF cables to both the Hard
Disk Recorder and your television if you want to watch one
show while recording another show on the Hard Disk
Recorder.
1. Connect the incoming RF cable from the wall to the
VHF/UHF
AUDIO VIDEORL
IN
IN jack on the 2-way splitter.
2. Connect an RF cable from one OUT jack on the 2-way
splitter to the ANT/CATV IN jack on the Hard Disk
Recorder.
3. Connect another RF cable from the other OUT jack
on the 2-way splitter to the VHF/UHF jack on your
television.
IN
Cable
OUT OUT
Splitter
4. Follow the C ~ E instructions on page 9 for telephone
connection, AC power connection, and setup.
NOTE
• Refer to your TV owner’s manual for more information
on making connections to your television.
INPUT
AUDIO
VIDEO
RLAUDIO VIDEORL
ANT/CATV
1
IN
LINE
2
OUTPUT
S-VIDEO
IN
Hard Disk Recorder
S-VIDEO
OUT
SERIAL
IR
CONTROL
BLASTER
PORT
AC-IN
TEL LINE
Attaching Satellite Receiver and Cable Box Controllers
If you connect a satellite receiver or a cable box to the Hard Disk Recorder, you need to attach a controller cable so the Hard Disk
Recorder can change the channels on these devices. The controller, either a serial cable or an IR blaster cable, acts as a remote
control for these devices. When you press the Channel Up and Channel Down buttons on the Hard Disk Recorder remote control,
the channel is changed on your other device. See “Connecting a Serial Cable” if your satellite receiver has a serial connector. If
your satellite receiver or cable box does not have a serial connector, see “Connecting and Setting Up the IR Blaster” on page 17.
Connecting a Serial Cable
If the device you want the Hard Disk Recorder to control has a serial connector, use the
supplied serial cable instead of the supplied IR blaster.
1. Connect the serial cable to the SERIAL CONTROL port on the Hard Disk
Recorder. If your receiver has a 15-pin serial connector, use the supplied
15-pin to 9-pin adapter.
2. Connect the other end of the serial cable to the serial port on your other device.
16
Page 17
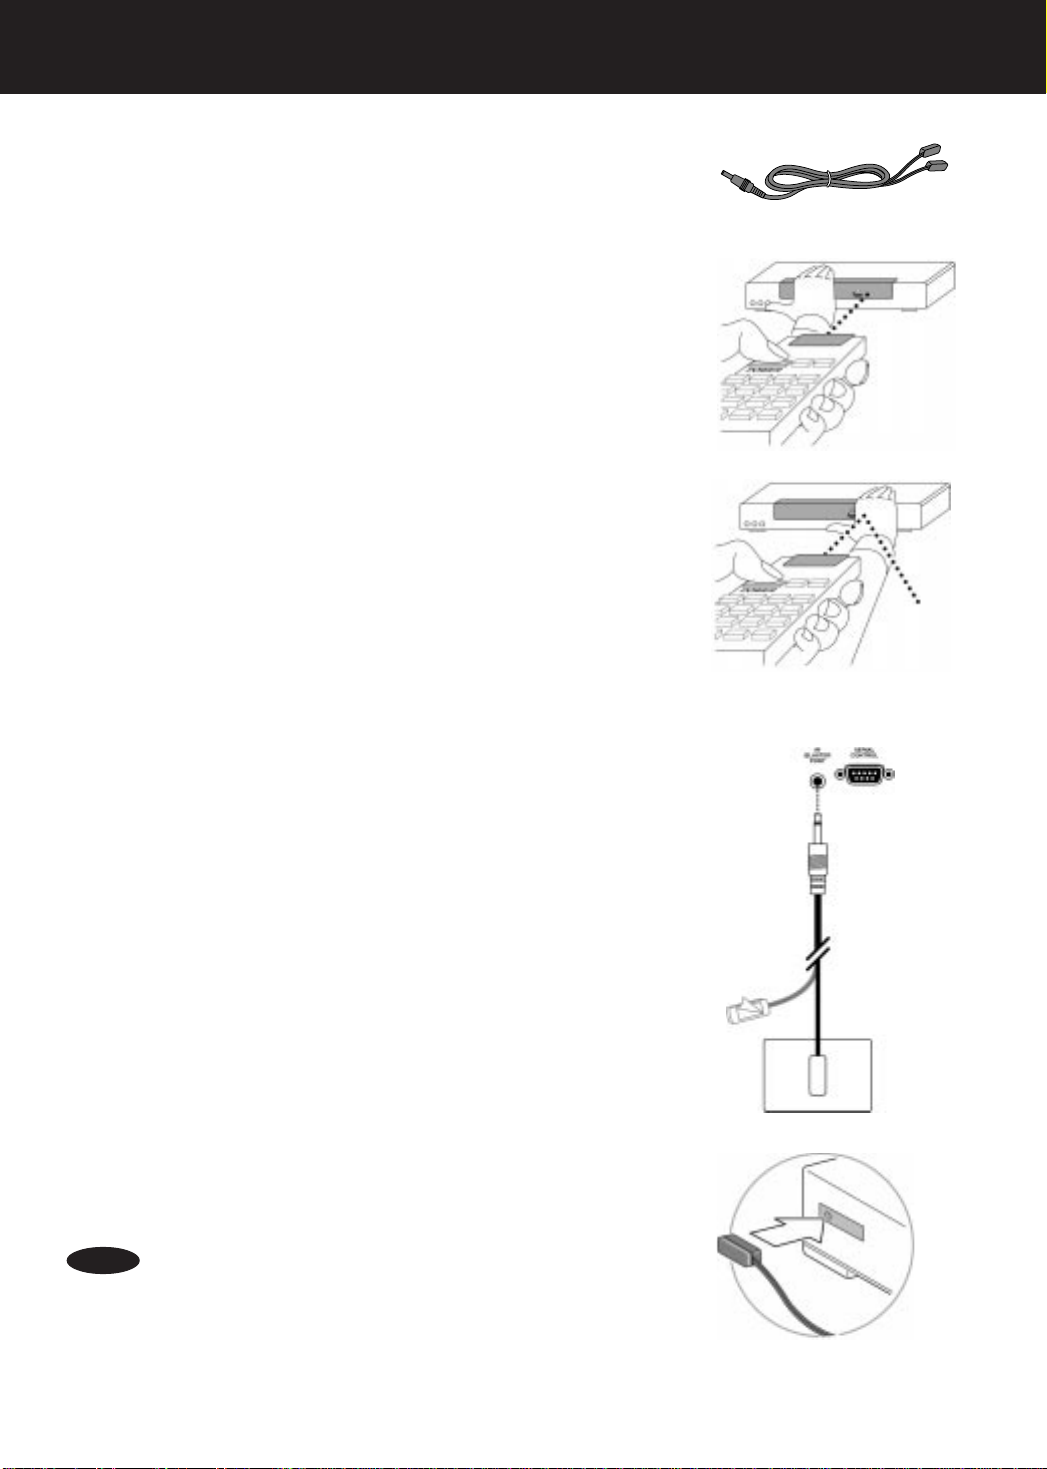
Connecting and Setting Up the IR Blaster
If your satellite receiver has a serial connector, use the serial connector instead of
the IR blaster. The IR blaster acts as a remote control for your other device. Before
attaching the IR blaster, you must find the infrared detector on the device the Hard
Disk Recorder will control.
Locating the Infrared Detector On the Other Device
The emitter on the end of the IR blaster must be placed directly over the infrared
detector on the other device. The infrared detector is the area that receives the
signals from the remote control. Some infrared detectors are labeled. If the detector
on your other device is not labeled, it is usually behind a dark, nearly opaque plastic
area on the front of the device.
If the infrared detector on the other device is labeled, see “Connecting and Affixing
the IR Blaster” below.
If the infrared detector on the other device is not labeled, follow
these steps.
Refer to the owner’s manual of your cable box or satellite receiver. It may be
shown there.
1. Look for an area of dark, nearly opaque plastic on the front of the other
device. If you find this area, look closely into it. You may be able to see
the infrared detector behind it. If it’s visible, you should see a small
square frame with a reddish area in the center.
This is the infrared detector. If you see the detector, skip to “Connecting
and Affixing the IR Blaster” below.
2. Turn on and start the other device.
3. Shine a flashlight through the dark plastic area on the front of the
device. If you see the infrared detector, skip to “Connecting and Affixing
the IR Blaster” below.
4. Using the remote control for your cable box or satellite receiver, turn the
power on and off. Don’t use the Hard Disk Recorder remote control.
5. With the remote control in one hand, place the other hand over one
section of the front of the unit.
6. Try to turn the power on and off again. If you succeed, your hand is not
covering the infrared detector.
7. Move your hand to a different place on the front of the unit and repeat
steps 5 and 6. Keep repeating in this way until you can’t turn the power
on and off. At this point, your hand is covering the infrared detector.
8. Look closely for the infrared detector at the spot your hand is covering.
Even if you are not sure you have found the infrared detector, you have
likely found the spot.
Connecting and Affixing the IR Blaster
1. Plug the IR blaster cable into the IR BLASTER PORT on the back of
the Hard Disk Recorder.
2. Peel off the protective cover from one of the emitters on the IR blaster.
This will expose the adhesive material on the emitter for placement on
your other device.
3. Affix the adhesive side of the emitter to the dark plastic area, directly
over the center of the infrared detector.
NOTE
• If you have only one device you want the Hard Disk Recorder to
control, hide the unused emitter behind the equipment, away from
any detectors.
17
Page 18
Initial Setup
Be sure you’ve connected the Hard Disk Recorder to your television and other equipment. (See pages 8~17.)
You can follow the on-screen instructions to complete the setup. This setup process includes:
• providing a phone number for the nightly connection to the ReplayTV Service
• entering your ZIP code to receive the available channels for your local area
• setting up the video inputs to the Hard Disk Recorder
• providing the setup codes for your satellite receiver or cable box, if you have connected one of these devices to the Hard Disk Recorder
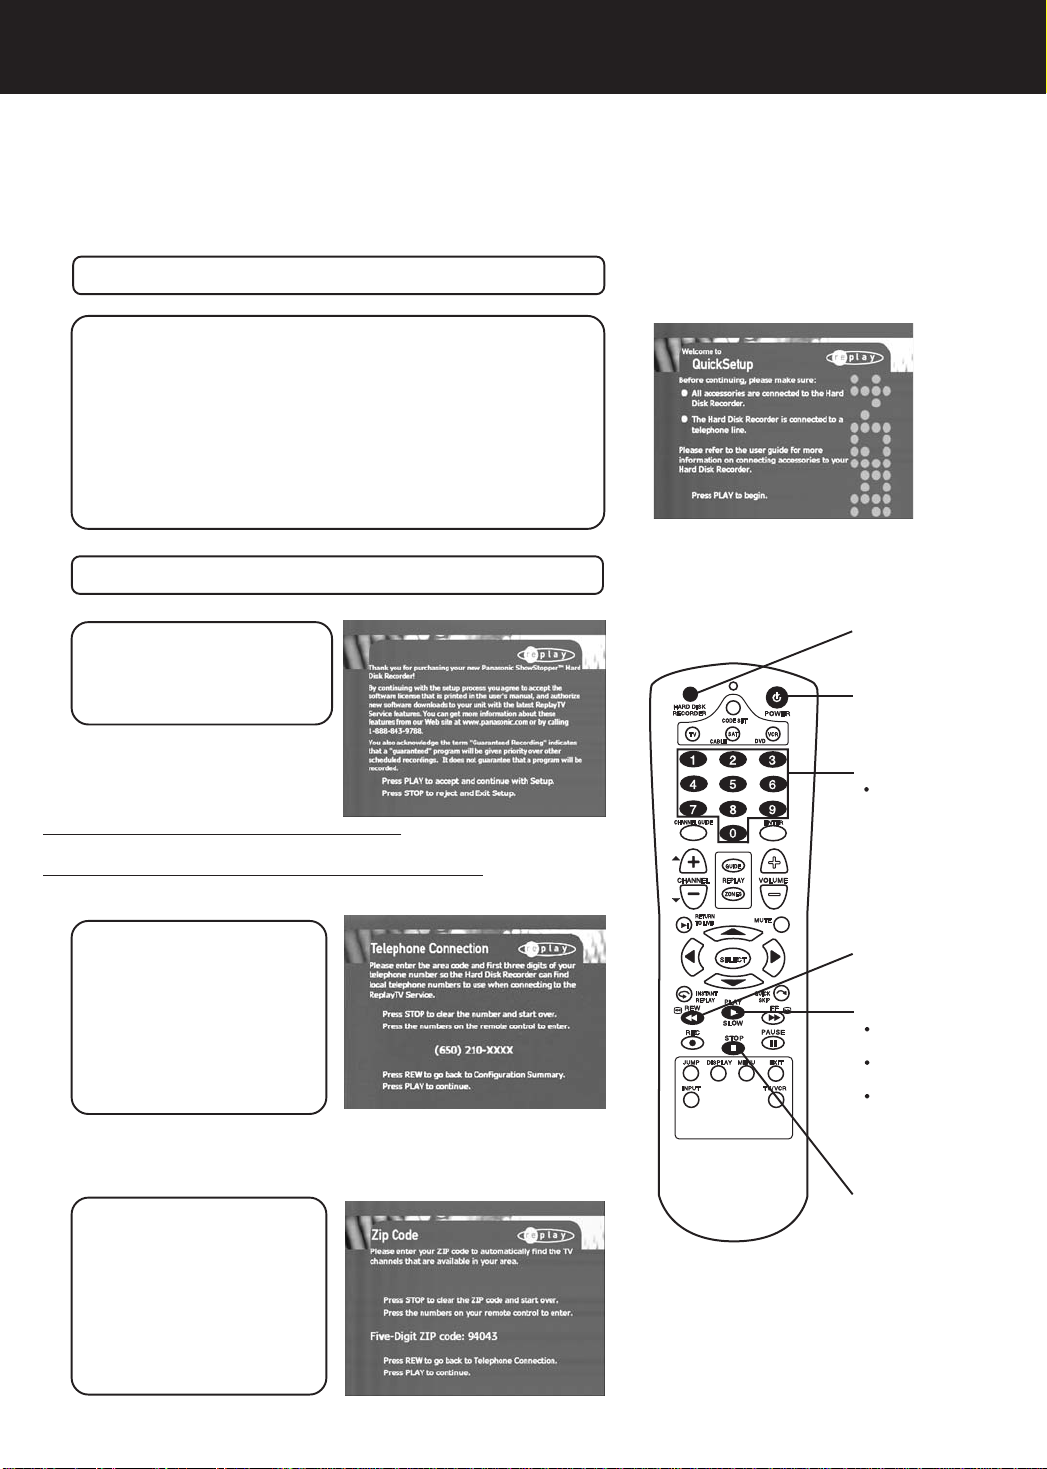
Turn on the television.
1
Press HARD DISK RECORDER, then press
2
POWER to turn on the Hard Disk Recorder.
• You can also press POWER on the front of the unit to turn the
Hard Disk Recorder on.
• The QuickSetup screen appears.
• If you can’t see the QuickSetup screen, press the TV/VIDEO
button on your television remote until you do. Your television
may also need to be on a specific channel to display input
from other devices. See “Troubleshooting” on pages 50~52 if
you still can’t see the QuickSetup screen.
Press PLAY to start the setup process.
3
HARD DISK
Press PLAY to accept
4
and continue with
Setup, or press STOP
to reject and exit setup.
2
RECORDER
POWER
2
If you make a mistake on any setup screen,
Press REW to return to the previous screen and start over.
If you make a mistake on any number-input screen,
Press STOP to clear the numbers and re-enter.
Press Number buttons
5
to enter the area code,
then press PLAY to
move to the next screen.
• Each night, a phone call is
made to the ReplayTV
Service to update current
channel guide listings for
your area.
• To receive the latest information from the ReplayTV Service, make
sure the telephone cable is always connected to the Hard Disk
Recorder.
Press Number buttons
6
to enter your five-digit
ZIP Code, then press
PLAY to move to the
next screen.
• The Hard Disk Recorder uses
your zip code to provide you
with listings for the channels
available in your local area.
Number
5
buttons
6
REW
PLAY
3
4
5
6
4
STOP
18
Page 19

Press Number buttons
7
to enter the dialing prefix,
then press PLAY to
move to the next screen.
• Press DISPLAY for *;
press ENTER for #; and
press PAUSE for ,.
• Some telephone systems must dial a special number prior to
placing a phone call, to disable call waiting for example. If your
phone system requires a special number, enter it on this screen.
The Hard Disk Recorder calls the ReplayTV Service
8
to retrieve local telephone numbers and TV channels.
• You are notified of the progress of the connection, and if any
errors occur during the connection.
• This connection to the ReplayTV Service lasts about 5 minutes.
• The internal Hard Disk Recorder clock and time zone are set
during this connection.
• This connection also provides the Hard Disk Recorder with TV
channel information for your local area.
If the connection failed,
Press PLAY to try connecting again.
Or, press REW repeatedly to return to the previous screen and
confirm each setting item. Then, re-enter the correct information.
Press / to select
9
your local number, then
press PLAY to move to
the next screen.
• The ReplayTV Service
finds local phone numbers
based on the information
you provided.
• You can change the number later by pressing MENU and
selecting “Setup” and then “Change Dialing & Input Settings.”
Press / to select
10
the dialing method, then
press PLAY to move to
the next screen.
• Choose the dialing method
for your area. For example,
a direct call, or if you need
to dial a prefix and/or area
code.
Press / to select
11
the device you have
connected to the LINE
1 input, then press
PLAY to move to the
next screen.
• If nothing is connected to
LINE 1, just press PLAY.
If you select any components, the setup screen appears.
Refer to “Completing the IR Blaster Setup” section on page 21.
7
ENTER
9
10
11
7
9
10
11
PAUSE
REW
MENU
DISPLAY
NOTE
• “Other” is reserved for future devices
that may be connected to the Hard
Disk Recorder.
Continued on the next page.
Number
buttons
/
buttons
PLAY
19
Page 20

Initial Setup (continued)
Complete all the remaining input settings.
12
You will be asked to provide information about all the remaining devices
that you have connected to the Hard Disk Recorder.
• Once you get the hang of the first screen, you should be able
to complete the following screens on your own.
• See “Input Options” on page 21 for information on the choice
on each configuration.
Once you have completed all of the setup screens, you will see the Setup
Summary screen. This screen allows you to make changes if necessary.
To change a setting...
13
a. Press / to select the option, then press PLAY
to display the screen that you want to change.
b.After your change is finished, press PLAY to
finish the setup.
If you do not want to make any changes...
Press / to select “Keep all settings,” then
press PLAY to move to the next screen.
The Hard Disk Recorder connects to the ReplayTV Service to
complete the setup. This connection lasts approximately 20
minutes, during which the Hard Disk Recorder receives
channel and program information for your local area.
Once the connection is completed, you will be able to use the
Hard Disk Recorder.
Press PLAY to begin
14
the Hard Disk
using
Recorder.
• To select shows to watch
from an on-screen guide,
press CHANNEL GUIDE.
• The Replay Guide is an onscreen collection of all the
shows you record. There
aren’t any recorded shows
now. Though, you can watch
an instructional video by
going to the Replay Guide.
Press REPLAY GUIDE.
Changing Your Setup Later On
CHANNEL
GUIDE
REPLAY
GUIDE
/
13
buttons
SELECT
PLAY
13
14
MENU
If you move, add another telephone service, change video equipment, or do
something else that requires updating the information you provided during firsttime setup, you may change the information at any time.
1.Press MENU.
2.Select “Setup” from the Main
Menu.
3.Select “Change Dialing & Input
Settings” from the Setup screen.
4.Select an option to change by
pressing
/
and SELECT.
20
NOTE
• The internal Hard Disk Recorder
clock is set during the initial
connection to the ReplayTV Service
to ensure that the shows you choose
to record are recorded completely.
Page 21

Input Options
Cable
If you have cable television but no cable box, select your cable service provider. If your cable service is not listed on
the screen, send mail to Consumerproducts@Panasonic.com or call 1-888-843-9788.
Cable box
If you have a cable box connected to the Hard Disk Recorder, select your cable service provider. You will also need
to connect and position the IR blaster that came with the Hard Disk Recorder. This is required so the Hard Disk
Recorder can change the channels on your cable box. Once the IR blaster is positioned, you will need to enter the
proper setup code for your cable box. See “Connecting and Setting Up the IR Blaster” on page 17.
DIRECTV
If you are not using a serial connector, you will need to connect and position the IR blaster that came with the Hard
Disk Recorder. This is required so the Hard Disk Recorder can change the channels on your DIRECTV receiver. Once
the IR Blaster is positioned, you will need to enter the proper setup code for your DIRECTV receiver. If you will be using
the supplied IR blaster to control your receiver, see “Connecting and Setting Up the IR Blaster” on page 17.
DISH Network™
If you have a DISH Network receiver connected to the Hard Disk Recorder, you will need to connect and position
the IR blaster that came with the Hard Disk Recorder. This is required so the Hard Disk Recorder can change the
channels on your DISH Network receiver. Once the IR blaster is positioned, you will need to enter the proper setup
code for your DISH Network receiver. See “Connecting and Setting Up the IR blaster” on page 17.
Completing the IR Blaster Setup
After you have connected the IR blaster, you need to provide the Hard Disk
Recorder with the setup code for your cable box or satellite receiver. This is
the final step in ensuring the Hard Disk Recorder and your cable box or
satellite receiver work together. Setup codes can be found in “Code
Numbers For Your Components” on pages 47 and 48.
Make sure the cable box or satellite receiver
1
power is on.
Find the setup code for your cable box or
2
satellite receiver in “Code Numbers For Your
Components” on pages 47 and 48.
• If more than one code is listed, use the first one.
Press / to select your cable providers, then
3
press PLAY twice to move to the next screen.
Press Number buttons
4
to enter the code for
your device.
Press DISPLAY to
5
test if the code is
correct for your device.
• The cable box or
satellite receiver will turn
off if the code is correct.
• If the code does not
work, try each additional
code for your device.
Press PLAY to use the code you select and
6
move to the next screen.
Number
4
buttons
/
3
buttons
PLAY
3
6
DISPLAY
5
21
Page 22

Controlling Live Television
Before you begin...
You must have connected the Hard Disk Recorder to your
television and completed the on-screen setup.
Viewing Live Television
You use the Hard Disk Recorder remote control to watch television just
like you normally would using your television remote control.
Press TV, then press POWER to turn on
1
your television.
• See “Universal Remote Control” on page 42~44 if you
have not programmed the Hard Disk Recorder remote
control to operate your television.
Press HARD DISK RECORDER, then press
2
POWER to turn on the Hard Disk Recorder.
Press CHANNEL GUIDE to display the
3
Channel Guide.
• You can also select “Channel Guide” from the Main Menu.
Press / /
4
(light blue listing) in the Channel Guide, then
press SELECT.
Browse Preset Channels
Press CHANNEL + (up) or CHANNEL - (down).
(Note: If the Hard Disk Recorder is currently recording a
show, you’ll need to stop the recording by pressing STOP on
the remote before browsing channels.)
/
to select a current show
HARD DISK
2
RECORDER
POWER
1
2
TV
1
Number Buttons
3
CHANNEL
GUIDE
ENTER
CHANNEL
RETURN TO
b
LIVE
4
buttons
4
SELECT
INST ANT
a
REPLAY
EXIT
STOP
+ /-
/ / /
Select a Channel by Number Button(s)
Press Number Buttons to select a channel
Switch Quickly between Two Channels
Press JUMP to switch to the last show you were
watching, and JUMP again to switch back to the first
show. This can also be between two pre-recorded
shows, and between a live show and a recorded show.
Get Information on a Show You’re Viewing
Press DISPLAY to get program information—a synopsis
of the current program you’re watching, and information
about the length of the show. Press DISPLAY again or
EXIT to dismiss the information, or it will fade away in
15 seconds.
NOTE
• Whenever you start watching a live show, the Hard Disk
Recorder automatically starts recording the show, and the
recording is temporarily preserved in the Hard Disk Recorder’s
recording space. Even if you delay viewing by using the pause
and rewind features, recording continues. Recording stops if
you change to a live or pre-recorded show.
22
DISPLAY
JUMP
Using Instant Replay
The Instant Replay feature lets you skip back
seven seconds during a live or recorded show.
It’s the perfect way to ensure you don’t miss a
single word of dialogue in your favorite movie, or
any of the important action in a game.
Press INSTANT REPLAY
a
while you’re watching a live or
recorded show.
• You’ll instantly skip back seven
seconds and begin watching again
from there.
• You can repeatedly press INSTANT
REPLAY and move back in seven
second increments.
Press RETURN TO LIVE
b
when you want to go back to the
live broadcast.
Page 23

Pausing Live Television and
Recorded Shows
The Hard Disk Recorder’s pause feature lets you attend to
interruptions without missing a moment of your favorite television
shows. You can pause whatever you’re watching: recorded Replay
shows or live television.
Press PAUSE while you’re watching a live
1
television show or a recorded show.
• An on-screen message notifies you how much pause
time remains.
• Press DISPLAY to see how far you are behind the live
show. To avoid screen burn in, press EXIT to dismiss
the on-screen displays. See “Screen Burn In” on page
53 for more information.
When you return from your interruption,
2
press PLAY to resume watching from
where you left off.
• You can also press RETURN TO LIVE if you want
to catch up with the live broadcast.
Using Stop
Stop works very much like pause. You can use stop while
watching a live television broadcast or when watching a
Replay show. Pressing STOP displays a Hard Disk Recorder
screen, rather than “freezing” the image of the show you’re
watching. Even though you press STOP, you can still return
to where you left off in the live broadcast or Replay show by
pressing PLAY, or press RETURN TO LIVE to catch up
with a live broadcast.
NOTES
• When you pause a live broadcast, it continues to record
on the hard disk.
• When recording begins, the pause screen is cancelled.
RETURN TO
LIVE
REW
a
(Rewind)
PLA Y
2
FF
b
(Fast Forwar d)
PAUSE
1
Using Rewind and Fast Forward
The Hard Disk Recorder records what you want it to record. It also
records live television when you start watching a show. If you’re
watching a live show, you can rewind to the point where you first
started watching. Then, turn around and quickly move ahead using
Fast Forward.
Press REW (Rewind) after you have
a
watched a show for a while.
• Press REW multiple times to select one of five rewind
levels (level 1, which displays the rewind symbol on
the screen, followed by 2x, 4x, 16x, and 20x).
• The show will begin playing when you reach the point
where you started watching the show.
• Rewinding stops when you press PLAY, STO P, or FF.
Press FF (Fast Forward) to go forward in the
b
show.
• Press FF multiple times to select one of five fast-forward
levels (level 1, which displays the fast forward symbol
on the screen, followed by 2x, 4x, 16x, and 20x).
• The Live symbol will display on your screen when you
have caught up with the live show.
EXIT
STOP
DISPLAY
23
Page 24

Controlling Live Television (continued)
Using Slow Motion
You can play your recorded Replay shows and even live
television in slow motion with a couple remote control button
presses.
Press PLAY/SLOW with a Replay show
1
or live broadcast playing.
• The slow motion symbol in the lower right of
the screen indicates that the show is now
playing in slow motion.
Press FF (Fast Forward) to increase the
2
speed of slow motion.
• Press FF (Fast Forward) twice or three times to
speed up slow motion.
• Press REW (if in 2x or 3x slow motion) to move
back one slow motion speed.
RETURN TO
3
LIVE
d
INSTANT REPLAY
1
PLA Y/SLO W
3
Press PLAY/SLOW to watch the show at
3
normal speed or press RETURN TO
LIVE to catch up with a live broadcast.
Using Frame Advance
Frame advance lets you watch a Replay show or a live
broadcast in a frame-by-frame manner. This is a great feature
to use with fast-moving scenes, when you want to slow things
down so you can see every second of the action.
Press PAUSE with a Replay show
a
or live broadcast playing.
• The PAUSE symbol displays on the screen and
the show remains on screen in a paused mode.
Press FF (Fast Forward) with the show
b
paused.
• Notice that as you press FF the show moves
forward by a single frame.
• The show then pauses until you press FF
again, or another button to cancel the frame
advance feature.
d
QUICK SKIP
A
FF
2
(Fast Forwar d)
b
c
PAUSE
a
REW (Rewind)
Using QuickSkip
(Bypassing unwanted programming)
The QuickSkip feature automatically skips 30 seconds
ahead in the show you’re watching. Use it to skip past
undesired scenes, or, use it like a Fast Forward button.
QuickSkip works for a live show only if you have used
Pause or Rewind, and you are watching a show delayed.
Repeatedly press FF (Fast Forward) to
c
move ahead frame by frame.
Press PLAY to watch the show at normal
d
speed or press RETURN TO LIVE to
catch up with a live broadcast.
24
Press QUICK SKIP while you’re
A
watching a delayed live show or a
Replay show.
• You will instantly skip ahead 30 seconds in
the show.
• Press it repeatedly to skip in 30-second
segments. Use the INSTANT REPLAY
button to quickly correct for overshoot.
Page 25

Copy Protection Information
When Macrovision or CGMS-A (Copy Generation Management System-Analog) copy protected signals are
available for TV broadcasting, the show is NOT viewable in LIVE TV mode, nor can it be recorded. To
view copy protected material, split the RF signal. The following illustration shows how to split the signal.
Viewing copy protected programming
Switch between A and B below by pressing the INPUT button on the TV remote.
TV
A: Macrovision/CGMS-A viewable
B: Macrovision/CGMS-A not viewable
Cable Box
Splitter
For further assistance, call
e-mail to
NOTE
Consumerproducts@Panasonic.com
Unauthorized copying of copy protected material constitutes copyright infringement.
1-888-843-9788
or go to:
Hard Disk Recorder
http://www.panasonic.com/video
or send
25
Page 26

Recording Shows
To record any show that’s on now or in the next several days, start from the Channel Guide. The Channel Guide is an interactive,
on-screen program guide that lists seven days of television information for all of the channels you currently receive.
While the Hard Disk Recorder does not need to be on for recording, cable boxes and satellite receivers must remain on.
Selecting a Show
You can also go back 24 hours within the Channel Guide to see what
programs have already aired. (See below.) So, if you missed a show,
you can select it in the Channel Guide and have the Hard Disk
Recorder search for all the episodes that have not yet aired. Then,
have the Hard Disk Recorder record a future airing of the show.
Press CHANNEL GUIDE to display the
1
Channel Guide.
• You can also select “Channel Guide” from the Main Menu.
Press / /
2
• Press to move back in the Channel Guide to see
what has already aired. Then, search for episodes of a
show that are upcoming.
• As you move around, notice that the program
information changes to the show you have selected.
To jump ahead 12 hours, press FF.
To go back 12 hours, press REW.
To move up and down one screen at a time,
press CHANNEL +/-.
To watch a channel in the Channel Guide,
select a show that’s on now and press SELECT.
To go to a channel,
press Number Buttons, then press SELECT.
• For example, press 9 - 0, then press SELECT to go to channel 90.
/
to move around the guide.
From the Channel Guide you can:
• scroll through listings for shows you want
to watch in the next seven days
• select shows to watch or record
• tune to a specific channel
Number Buttons
1
CHANNEL
GUIDE
CHANNEL
2
buttons
SELECT
FF (Fast Forward)
+/-
/ / /
NOTES
• If you are using a cable or an antenna input and want to watch
a live show while recording another on
you should consider using a cable splitter.
See “Watching One Show While Recording Another on the
Hard Disk Recorder” on page 1 6.
• Channel Guide information is sent to the Hard Disk Recorder
from the ReplayTV Service each night. As long as you keep an
active phone line plugged into
always have seven days of the most up-to-date listings available.
the Hard Disk Recorder, you’ll
the Hard Disk Recorder,
Channel Guide Screen
Program
Information
Channels
Past Shows
(
gray)
Current Shows
(light blue)
Later Shows
(
dark blue)
26
Channel Guide
Popup Menu Items
Find all episodes:
Tune to channel:
go directly to the
channel.
find more episodes of
this show. See page 34.
REW (Rewind)
Record this show:
set the recording
options for this show
then record it. See
page 29.
Page 27

Watching and Recording a Show
That Is Currently Airing
Light blue listings indicate shows that are on now.
Press CHANNEL GUIDE to display the
1
Channel Guide.
• You can also select “Channel Guide” from the Main Menu.
Press / /
2
blue listing) in the Channel Guide, then press
SELECT.
• Unless a show is recording on another channel, the Hard
Disk Recorder will tune directly to the channel you’ve
selected.
• The popup menu appears if you press ENTER after you
select the channel using / /
Press REC to record the show.
3
• The Record Options screen will display.
Press REC a second time to accept the
4
current recording settings.
Adjust the settings on the Record Options screen,
then press REC to accept the settings.
• See “Setting the Recording Options” on page 29 for more
information on the Record Options screen.
/
to select a current show (light
/
.
Or
CHANNEL
1
GUIDE
a
ENTER
/ / /
2
buttons
b
SELECT
2
REC
3
4
b
Recording a Single Upcoming Show
Follow these instructions if you want to record a single show using the
current recording settings. To change the recording settings, see
“Setting the Recording Options” on page 29.
Press CHANNEL GUIDE to display the
a
Channel Guide.
Press / /
b
(dark blue listing) in the Channel Guide, then
press REC.
• A solid red dot is placed next to the show you selected.
This means that just this one show, or episode, will be
recorded. To view the show after it has been recorded,
go to the Replay Guide. See “Watching a Show” on
page 37.
• If you want to change recording options of a show before
it begins recording, select the show in the Channel
Guide and select “Change options” from the popup menu.
NOTE
• To cancel the recording, see “Cancelling a Recording” on
page 28.
/
to select an upcoming show
Extending Recording Time
If you want to record a show that may
extend beyond its scheduled length,
record the show immediately following
the event. This is handy when recording
a sporting event, which may go into
extra innings or overtime.
Indication of Red Dots
In the Channel Guide, solid red dots
indicate guaranteed recording. Hollow
dots indicate non-guaranteed recording.
Guaranteed recording
Non-guaranteed recording
One dot appears on the Channel Guide
listing if you’re recording only one
episode; two dots appear if you’re
recording all episodes.
• See “Managing Recording Space” on
pages 40 and 41 for more information on
guaranteed and non-guaranteed recordings.
27
Page 28

Recording Shows (continued)
Recording Multiple Episodes of
One Show
If you have a favorite show that airs once a week, or daily, you can
set the Hard Disk Recorder to record every episode.
This is called a Show-based Replay channel. See “Show-based
Replay Channels” and “Theme-based Replay Channels” on page 34.
Follow these instructions to record each episode of a show using the
current recording settings. To change the recording settings, see
“Setting the Recording Options” on page 29.
Press CHANNEL GUIDE to display the
1
Channel Guide.
• You can also select “Channel Guide” from the Main Menu.
Press / /
2
(dark blue) you wish to record in the Channel
Guide, then press REC
• Two solid red dots are placed next to the show you
selected. This means that
continuously record the most current episode of this show.
• To view an episode of the show after it has been
recorded, go to the Replay Guide. See “Watching a
Show” on page 37.
/
to select an upcoming show
twice.
the Hard Disk Recorder will
Cancelling a Recording
(Recording is not in progress)
You can cancel a recording in the Channel Guide at any time
before the show starts.
a
Press CHANNEL GUIDE to display the
Channel Guide.
• You can also select “Channel Guide” from the Main Menu.
Press / /
b
to cancel in the Channel Guide.
• You’ll know it’s set to record because it has at least one
red dot next to the show.
/
to select the show you want
CHANNEL
1
GUIDE
a
/ / /
2
buttons
b
d
SELECT
c
d
STOP
REC
2
c
Press SELECT.
• The popup menu displays.
Press / to select
d
“Turn off record,” then
press SELECT.
• The red dot disappears.
To Cancel a Recording
(Recording is in progress)
With the show recording, quickly press STOP twice.
28
To Cancel a Recording from the
Channel Guide...
(Recording is in progress)
You can also cancel a recording in the
Channel Guide by selecting the show and
pressing REC once or twice.
• The red dots are removed.
Page 29

Setting the Recording Options
There may be times when you want to adjust the record settings for
the show you want to record. For example, you might want to record
movies or sporting events at higher quality than movies.
Follow these instructions to adjust the recording options of a show
before you record it. To change the current record options for every
show you select to record, see “Setup” on page 7.
Press CHANNEL GUIDE to display the
1
Channel Guide.
• You can also select “Channel Guide” from the Main Menu.
Press / /
2
(dark blue) that you would like to record, then
press SELECT.
Press / to select
3
“Record this show,” then
press SELECT.
• The Record Options screen
displays.
Press / to select an option you want to
4
change. (See “Record Options Settings” below.)
Press SELECT or / to change a setting.
5
• Repeat steps 4 and 5 until you have completed your
changes.
• See below for more information on the Record Options.
Press / to select “Done,” then press
6
SELECT to apply your changes.
• You can also press REC to apply your changes.
• The show will be recorded based on the settings you
selected.
/
to select an upcoming show
CHANNEL
1
GUIDE
/ / /
2
buttons
3
4
5
6
2
SELECT
3
5
6
REC
Record Options Settings
Recording Level
“High” quality offers the best picture but takes up more space. “Extended”
offers the most recording time but sacrifices picture quality. “Medium” offers
a balance of the two. Notice that the recording space (hours and minutes
available) changes as you adjust the record quality. The higher the recording
quality, the less space available for other shows. To conserve space, use the
High setting sparingly—for recording fast-action shows, for example.
Guaranteed
Choices are Yes and No. Guaranteed means space is reserved for this show.
Non-guaranteed means the show will be recorded if there is space available
(after space is reserved for Show-based Replay channels). See “Guaranteed
and Non-guaranteed Recording” on page 40.
Record All Episodes
Choices are Yes and No. Selecting Yes will record all episodes of this show—daily or weekly. No means only this
episode will be recorded.
Keep
If you select to record all episodes, here you can tell the Hard Disk Recorder how many you want to keep (up to 7)
before the most current episode replaces the oldest episode.
If you are setting up a theme-based recording, you can select the recording time between 1/2 hour and 10 hours.
29
Page 30

Recording Shows (continued)
Recording From Show Categories
Visit ReplayZones to create channels from topical television categories
collected by the ReplayTV Service. Zones can be organized in topics
like romantic comedies, sitcoms, action-adventure, cartoons, talk shows.
ReplayZones change regularly, so check them out often to
record the best of what’s on TV.
Press REPLAY
1
ZONES to display the
ReplayZones screen.
• You can also select
“Replay Zones” from the
Main Menu.
Press / to search
2
for your topic of
interest, then press
SELECT with your
topic selected.
• The Zone you select
displays, with its
zone channels listed.
• You can go to the next
Zone screen using
CHANNEL +/-.
Press / to select a Zone channel, then press
3
SELECT to select it.
• The Hard Disk Recorder searches your channel listings for
shows matching the category.
• If you like the shows the Hard Disk Recorder found, you can create
a Zone channel which will be stored in the Replay Guide. This
means that whenever a show in this Zone category airs, the Hard
Disk Recorder will record it for you. You can also select to record
individual shows from the list.
To Record One of the Shows...
To Create a Show-based Replay Channel...
To Cancel Recording of a Show...
See page 32.
CHANNEL
+/-
REPLAY
1
ZONES
/
2
buttons
3
2
SELECT
3
30
Page 31

Recording Shows Based On a
Theme You Choose
The Hard Disk Recorder lets you record shows based on any theme you
choose. Themes can be topics such as golf, news, pets, even your favorite
actor or director. For more information on themes, see “Show-based Replay
Channels” and “Theme-based Replay Channels” on page 34.
Press REPLAY ZONES to display the
1
ReplayZones screen.
• You can also select “Replay Zones” from the Main Menu.
Press / to select
2
“Create a Theme,”
then press SELECT
to select it.
• The on-screen keyboard
displays.
Press / /
3
to type, then press SELECT to enter.
• Repeat this step until you have typed the complete keyword.
• The letter you selected is entered in the text area near the
top of the screen.
To make corrections,
Press /
Then, repeat step 3.
To add a space between words,
Press /
Press / /
4
when you have finished entering your keyword.
From the following screen, choose the categories that will be searched.
5
Press / to select a category you want to change,
then,
• Repeat this step until you have completed your changes.
Press / to select “Done,” then press SELECT to
6
apply your changes.
• The Hard Disk Recorder searches through the 7 days of
Channel Guide listings for shows that match the keyword you
typed and the search settings you selected.
To go back and re-enter
your keyword and start over...
a.Press
“Change search options,”
then press SELECT.
b.Repeat steps 3 and 4 above
to re-enter your keyword.
To create a Theme-based Replay channel for your keyword,
a.Press
channel,” then press SELECT.
b.See “Setting the Recording Options” steps 4, 5, and 6 on
page 29 to adjust the recording settings.
/
to select the letter you would like
/ /
/ /
/ / /
/ / /
to select “Back,” then press SELECT.*
to select “Space,” then press SELECT.*
/
to select “Done,” then press SELECT
/
to change a setting.
to select
to select “Create the ‘keyword’ Theme
REPLAY
1
ZONES
/ / /
2
buttons
3
4
5
6
2
SELECT
3
4
6
FF
(Fast Forward)
REW
(Rewind)
* You can remove a character you
typed by pressing REW, and also
insert a space by pressing FF.
NOTES
• The Hard Disk Recorder searches
only for an entire phrase, not for the
separate words in a phrase.
• Use multiple-word themes if they help
avoid confusion. For example, use
“Harrison Ford” rather than “Ford” if
you want movies with the actor but not
shows about cars.
31
Page 32

Recording Shows (continued)
To Record One of the Shows...
1. Press / to select the show you want to record.
2. Press REC to record the show.
• One red dot is placed next to the episode you select.
If you want to adjust the record options...
a. Press SELECT to display the popup menu.
b. Press / to select “Record this show.”
c. See “Setting the Recording Options” steps 4, 5, and 6
on page 29 to adjust the recording settings.
• This single-record show will be stored in the Replay Guide.
To Create a Show-based Replay Channel...
Or
1. Press / to select the show you want to record.
2. Press REC twice to record the show.
• Two red dots are placed next to the episode you select.
Or
If you want to adjust the record options...
Repeat steps a, b, and c above.
• This Show-based channel will be stored in the Replay Guide.
To Cancel Recording of a Show...
1. Press / to select the show you want to cancel,
then press SELECT.
2. Press / to select “Turn off record,” then press
SELECT.
• The red dot disappears.
NOTE
• If there’s enough recording space, you can select to record more
than one of the shows on this screen. Or, set one show as a
guaranteed record and another as non-guaranteed.
The non-guaranteed show will be recorded if space allows.
/
buttons
SELECT
REC
32
Page 33

Finding Shows
To quickly find the exact show you’re looking for, use Find Shows. This is a
great feature if there’s a particular show you’re looking for but don’t know what
time or channel it’s on.
Press MENU to
1
display the Main
Menu.
Press / /
2
press SELECT.
• The on-screen keyboard displays.
See “Recording Shows Based on a Theme You
3
Choose” section on page 31 to type your keyword.
Press / to select
4
the categories you
want to change.
Press SELECT or /
5
to change a setting.
• Repeat steps 4 and 5
until you have completed
your changes.
Press / to select “Done,” then press SELECT
6
to apply your changes.
• You can also apply your changes by pressing REC on the
remote.
• The Hard Disk Recorder searches through the 7 days of
Channel Guide listings for your show based on the keyword
you chose and the search settings you selected.
• The search results are presented in the order that they’re
airing. You have a few options on this screen. (See below.)
/
to select “Find Shows,” then
2
buttons
4
5
6
2
SELECT
5
6
REC
MENU
1
/ / /
To go back and re-enter
your keyword and start over...
a.Press
“Change search options,”
then press SELECT.
b.Repeat steps 3, 4, 5, and 6
above to re-enter your
keyword.
To create a Theme-based Replay channel for the show,
a.Press
channel,” then press SELECT.
b.Repeat “Setting the Record Options” steps 4, 5, and 6 on
page 29 to adjust the recording settings.
/ / /
/ / /
to select
to select “Create the ‘keyword’ Theme
To Record One of the Shows...
To Create a Show-based Replay
Channel...
To Cancel Recording of a Show...
See page 32.
33
Page 34

Recording Shows (continued)
Finding All Episodes of a Show
You can find every episode of a show that exists in the 7 days of Channel
Guide information. This is a great feature if you want to see what each
episode is about, then select which episode you would like to record.
Press CHANNEL
1
GUIDE to display the
Channel Guide.
• You can also select
“Channel Guide” from
the Main Menu.
Press / /
2
select the show you
want, then press
ENTER.
• The popup menu displays.
Press / to select “Find all episodes,” then
3
press SELECT.
• The Hard Disk Recorder searches through the 7 days of
Channel Guide listings for every episode of the show.
• The search results are presented in the order that they’re airing.
/
to
CHANNEL
1
GUIDE
ENTER
2
/ / /
2
buttons
3
To create a Theme-based Replay channel for the show,
a.Press
channel,” then press SELECT.
/ / /
to select “Create the ‘keyword’ Theme
b.See “Setting the Recording Options” steps 4, 5, and 6 on
page 29 to adjust the recording settings.
To Record One of the Shows...
To Create a Show-based Replay Channel...
To Cancel Recording of a Show...
NOTE
• If there’s enough recording space, you can select to record more
than one of the shows on this screen. Or, set one show as a
guaranteed record and another as non-guaranteed.
The non-guaranteed show will be recorded if space allows.
Show-based Replay Channels
You can set the Hard Disk Recorder to record a recurring
show (daily or weekly) in the same time slot on the same
channel.
Show-based recordings should be used to create Replay
Channels that contain episodes of your favorite shows.
They can be created from first run network channels or
from syndicated channels. If you don’t know what channel
a particular show is on or want to capture all episodes
regardless of what channel it is aired on, you can create a
Theme-based Replay channel using the name of the
show as the theme. For example, a Show-based channel
created from “The X-Files” on Sunday night at 9PM will
only record episodes that broadcast at or around that time
on that particular channel. A Theme-based channel with
the theme of “The X-Files” will record any episode of The
X-Files from any channel on at any time.
See page 32.
Theme-based Replay Channels
If you create a Theme-based channel using the keyword
“Friends,” the Hard Disk Recorder will look for and record
programs with the word “Friends” on all channels—new
Friends episodes and reruns, even “Barney & Friends.”
Theme-based channels can be created using any theme
that you are interested in. For example, an actor, director or
category name can be used. The theme you create will
dictate the shows that are recorded. Theme-based channels
are great for recording shows that change time slots a lot.
By creating a Theme-based channel, all episodes are
recorded, regardless of what time they air. (Of course, you
have to have enough recording space allocated to your
channel.) Show-based channels take priority over Themebased channels if there is a time conflict. Theme-based
channels are lots of fun—you never know what the Hard
Disk Recorder will find and record for you.
3
SELECT
all
34
Page 35

W atching Your Recorded Shows
Every show that the Hard Disk Recorder records is stored in
the Replay Guide. Any upcoming recordings you set are also
listed here. This is where you go to watch your shows.
Replay Guide Screen
Program
Information
Replay
Channels
Replay Shows (light blue)
Changing Replay Channel
Characteristics
You can change the characteristics of a Replay channel
at any time (changing the recording quality from
Extended to High, for example). The available menu
items for the Replay channels you set up depends on the
type of Replay channel.
Single record channels and Show-based
channels contain the following choice:
Theme-based Replay channels contain the
following choices:
Zone-based Replay channels contain the
following choices:
--------> Change record options
--------> Change record options
--------> Change search options
--------> Find matching shows
--------> Change record options
--------> Find matching shows
Four Types of Replay Channels
The Replay Guide stores all your recorded shows and
the shows set to record.
• Single record Replay channels: one episode or
show.
• Show-based Replay channels: a series of
episodes.
• Theme-based Replay channels: shows based on
a Theme you select.
• Zone-based Replay channels: shows from
ReplayZones.
From the Replay Guide you can:
• See a list of shows the Hard Disk Recorder has
recorded for you.
• Play recorded shows—from the beginning, or
wherever you last left off.
• Delete shows you have previously recorded, or
have scheduled to record.
To display the popup menu...
Select a Replay channel or a Replay show
using
/ / /
buttons, then press SELECT.
Replay Channel Popup Menu Items
Change record options: change the channel’s recording options. See page 29.
Change search options: re-type your search keyword. See page 33.
Find matching shows: see the shows that fit the characteristics of the Replay
channel you have set up. See page 36.
Delete: permanently remove the channel.
Replay Show P opup Menu Items
Play: play the show from where you left off. See page 37.
Play from beginning: play the show from the start. See page 37.
Preserve this episode: save a show in the Replay Guide so it is not
replaced by the next episode. See page 38.
Save to VCR: save shows to videotape for long-term archiving. See page 39.
Delete: permanently remove the show.
You can’t change the recording revel of a Replay show
after it has been recorded.
35
Page 36

Watching Y our Recorded Shows (continued)
Seeing What a Replay Channel Will
Record
To quickly see the types of shows that will be recorded for a Theme-based
or a Zone-based channel, use the Find matching shows feature. This is a
great way to verify that the shows the channel finds are what you want to
see. If the shows are not exactly what you want, you can go back to the
Replay Channel and adjust the channel’s characteristics.
Press REPLAY GUIDE to display the Replay Guide.
1
• You can also select “Replay Guide” from the Main Menu.
Press / /
2
Zone-based channel, then press SELECT.
• The popup menu displays.
Press / to select
3
“Find matching shows,”
then press SELECT.
• The Hard Disk Recorder
searches through the 7
days of Channel Guide
listings for shows that
match the characteristics
of the Replay channel.
• The shows that you see are shows that match the
ReplayZones or Theme channel settings. These shows will be
recorded if there’s space available and no recording conflicts
exist (a guaranteed show, for example).
If you want to adjust the channel’s characteristics...
a.Press
back to the Replay Guide.
b.Press
/
to select one of the menu choices.
• See “Changing Replay Channel Characteristics” on page 35.
/
to select a Theme-based or
/
to select “Exit,” then press SELECT to go
/ / /
to select the Replay channel, then press
REPLAY
1
GUIDE
2
buttons
3
2
SELECT
3
/ / /
To Record One of the Shows...
To Create a Show-based Replay Channel...
To Cancel Recording of a Show...
NOTES
• If there’s enough recording space, you can select to record more
than one of the shows on this screen. Or, set one show as a
guaranteed record and another as non-guaranteed.
The non-guaranteed show will be recorded if space allows.
• If you select to record a single show or create a Show-based
Replay channel, you may want to delete the Theme-based or
Zone-based channel from the Replay Guide. This way, you will
record the exact shows you want and eliminate the recording
space taken by the Theme-based or Zone-based Replay channel.
See page 32.
36
Page 37

If you want to delete a Replay channel...
a.Press
screen, then press SELECT. The popup menu displays.
b.Press
delete the Replay channel.
If you want to delete a Replay show...
a.Press
screen, then press SELECT. The popup menu displays.
b.Press
delete the Replay show.
/
to select the
/
to select “Delete,” then press SELECT to
/ / /
/
to select the
to select “Delete,” then press SELECT to
channel
show
on the Replay Guide
on the Replay Guide
Watching a Show
Watching a show that the Hard Disk Recorder has recorded for you is easy.
Press REPLAY GUIDE to display the Replay Guide.
1
• You can also select “Replay Guide” from the Main Menu.
Press / /
2
select the recorded
show (light blue) you
want to watch, then
press SELECT.
• The popup menu displays.
/
to
CHANNEL
+/-
REPLAY
1
GUIDE
/ / /
2
buttons
3
2
SELECT
3
Press / to select “Play” or “Play from beginning,”
3
then press SELECT.
• Select “Play” to watch the show from where you last left off.
• Select “Play from beginning” to watch the show from the start.
• The show will begin playing. All of the Hard Disk Recorder’s
television control features (Stop, Fast Forward, Rewind, Pause,
Slow Motion, Frame Advance, QuickSkip, Instant Replay) are
available when you play recorded shows. See “Controlling Live
Television” on pages 22~24 for more on these features.
Programming blocked by V-Chip technology
The Hard Disk Recorder supports V-Chip technology, but your TV controls the actual settings. Your TV
may display a message that the current program is blocked. If you want to watch or record a show that is
blocked, you need to unlock the parental control on your TV as you normally would. Refer to your television
owner’s manual for more information.
NOTE
• If you are watching a show that is blocked, you can go to another channel by pressing CHANNEL +/-
on the remote.
Watching shows with closed-captioning
The Hard Disk Recorder records closed caption information. To view the closed captioning for a live or
recorded show, enable the feature as you normally would on your TV.
37
Page 38

Watching Your Recorded Shows (continued)
Preserving a Show
You can preserve an episode of a show recorded in a Replay channel.
Older episodes of Show-based and Theme-based Replay channels are
deleted to make room for new episodes. Use this feature if you don’t want
a particular episode to be replaced.
Press REPLAY GUIDE to display the Replay Guide.
1
• You can also select “Replay Guide” from the Main Menu.
Press / to select the show you want to save in
2
the Replay Guide, then press SELECT.
• The popup menu displays.
REPLAY
1
GUIDE
2
buttons
3
/ / /
3 Press
“Preserve this
episode,” then press
SELECT.
• If there is enough
guaranteed space to
accommodate the
length of the show, it is
removed from its current
Replay channel and
moved into a new
single-record
guaranteed channel.
/
to select
2
SELECT
3
38
Page 39

Saving Shows to Videotape
For long-term archiving, or if you want to save a show permanently, you can
save shows recorded by the Hard Disk Recorder to videotape. This way, you
reserve more space for the Hard Disk Recorder to record other shows. The
Hard Disk Recorder is not intended to be used as a long-term storage device.
Before you begin...
Make sure your VCR is properly connected to
Recorder. This is done by connecting cables from the OUTPUT jacks
on the Hard Disk Recorder to the INPUT jacks on your VCR. The
cables you use for this connection depend on the types of
on your VCR. See page 14 and 15 for more on connecting a VCR to
the Hard Disk Recorder.
Insert a rewound videotape and turn on your VCR.
1
Press REPLAY GUIDE to display the Replay Guide.
2
• You can also select “Replay Guide” from the Main Menu.
Press / to select the show you want to save,
3
then press SELECT.
• The popup menu displays.
the Hard Disk
input
jacks
REPLAY
GUIDE
Press / to select “Save to VCR,” then press
4
SELECT.
Press SELECT with
5
“Continue” highlighted
to start the on-screen
countdown.
Press the Record
6
button on your VCR
before the on-screen
countdown reaches 1.
To delete the show once it’s done recording to
videotape,
a.Press REPLAY GUIDE to display the Replay Guide.
b.Press
the show that was recorded
to a videotape, then press
SELECT.
c.Press
then press SELECT.
d.Press
“Yes,” then press SELECT.
• The show is permanently
removed from the Replay Guide,
freeing up more recording space.
/ / /
/
/
to select
to select “Delete,”
to select
/ / /
3
buttons
4
SELECT
3
4
5
NOTES
• Don’t press any buttons on the remote
while the show is being saved to
videotape or the on-screen displays
will be recorded.
• Press the RECORD button on your
VCR before the countdown reaches 1
if you want to record the information
about the show. This will show you
what the program is about when you
watch the videotape later.
• Some VCRs take longer than others
to begin recording. You may want to
experiment to see when to begin
recording on your VCR.
39
Page 40

Managing Recording Space
The Hard Disk Recorder manages recording space based on priorities. The priorities are set when you select to record a single
show, or create a Show-based, Theme-based or Zone-based Replay channel. The capacity of the Hard Disk Recorder’s recording
space is also determined by the level of recording quality you select. “High” quality takes more space than “Extended” quality.
NOTE
Recording Priorities
Guaranteed recordings take priority over non-guaranteed recordings;
Show-based Replay channels take priority over Theme-based Replay
channels. At the top of the priority list, guaranteed recording sets aside
disk space to ensure that your show will be recorded. Think of it as a
parking space: guaranteed shows have a reserved spot, always there
for your show; non-guaranteed shows do not. If the guaranteed show is
about to be recorded and space is needed, your non-guaranteed show
may be removed, and the guaranteed show will take its reserved space.
NOTE
• Non-guaranteed shows that you choose to record appear in
the Replay Guide even though they may not be recorded.
• Your Hard Disk Recorder provides 30 hours of extended-quality recording, 15 hours of mediumquality recording, and 10 hours of high-quality recording. Several minutes of recording space are
always reserved for the show you are currently viewing live.
Indication of Guaranteed or
Non-guaranteed recording
In the Channel Guide, solid dots indicate
guaranteed recording. Hollow dots
indicate non-guaranteed recording.
One dot appears on the Channel Guide
listing if you’re recording only one
episode; two dots appear if you’re
recording all episodes.
Guaranteed recording
How to tell if a show is guaranteed
Non-guaranteed recording
You guarantee a show for recording using the Record Options
screen. You’ll know a show is guaranteed when one or two solid
red dots appear next to the show in the Channel Guide.
You can also tell by selecting the channel in the Replay Guide or
in the Channel Guide (select the channel, then look in the show
information at the top of the screen).
How Show-based Replay channels are represented
A Show-based Replay channel is created when you select to
record episodes of a show on an on-going basis—a weekly
sitcom, for example. Show-based Replay channels are
represented by two red dots next to the show in the channel guide.
Solid red dots indicate a guaranteed Show-based channel; hollow
red dots indicate a non-guaranteed Show-based channel. You
can also tell by choosing the channel in the Replay Guide.
How Theme-based Replay channels are represented
A Theme-based Replay channel is created when you enter a
keyword for a favorite show topic. Theme-based Replay channels
are stored in the Replay Guide. Theme-based recordings aren’t
visible in the Channel Guide (there are no red dots) because
shows are only recorded if they fit the criteria you specified.
Guaranteed and Non-guaranteed Recording
When setting up your own personal Replay channels, consider the following. Show-based and Theme-based
channels can be created as guaranteed or non-guaranteed recordings. A guaranteed recording will allocate
recording space for the duration of the show or multiple shows, depending on the number of episodes you selected
to be recorded. A non-guaranteed recording will only record the show if there is sufficient storage space.
For example, if you create an “NYPD Blue” channel and used a guaranteed record setting, you have set aside one
hour of recording space for NYPD Blue. When NYPD Blue airs it will be recorded in its allocated space. If you also
have set up a Show-based “Seinfeld” channel as a non-guaranteed record, when a Seinfeld episode airs, it will be
recorded only if storage space permits.
So, how do you know if sufficient space is available? Say NYPD Blue airs on Tuesday nights at 10:00PM. After you
watch the episode, you delete it from the Replay Guide. Since NYPD Blue is a guaranteed record, the hour of time
that is reserved for the next episode can be used for non-guaranteed shows until the next episode of NYPD Blue is
broadcast. Non-guaranteed shows can borrow the space reserved for guaranteed channels if the guaranteed
channels don’t have episodes recorded in them.
40
Page 41

Guaranteed Record and Space-available Record
When you guarantee recording of a future show, recording space is immediately set aside. For this reason, the
size of your recording space limits the number of shows you can guarantee. A guaranteed record places solid
red dots next to the show-based recording in the Channel Guide.
When you don’t guarantee a future show for recording, the show uses whatever space is available at the time it
is recorded. If there is no unused space available at the time, the show may not be recorded. A non-guaranteed
(space-available) record places hollow red dots next to the show in the Channel Guide. There is no limit to the
number of non-guaranteed recordings you can set.
To increase the likelihood of your non-guaranteed shows being recorded, delete viewed shows from the
Replay Guide after you have watched them. The time that is reserved for the Show-based channel that you just
deleted can be used for non-guaranteed shows. Although, if another episode of the guaranteed show is about
to air, it will reclaim its reserved recording space that was borrowed by the non-guaranteed recording.
Recording Space Management Tips
Here are some space saving tips to make sure the Hard Disk Recorder records what you want.
Use the Guaranteed record setting for your can’t-miss shows
Use the Guaranteed setting for the shows you can’t afford to miss. Then, go ahead and use the non-guaranteed
setting for other shows. By using the guaranteed setting for every show, you may eliminate recording of other
shows you’d like to watch. If you maintain your Replay Guide regularly, there should always be enough space to
record guaranteed and non-guaranteed shows.
Use the High record quality setting sparingly
The High quality setting provides the best picture for the shows you record. This also takes up the most recording
space of the three record quality settings. You might want to use the High setting for sporting events, fast-action
movies and other shows where quality is vital.
Keep space available for pausing
If you need to pause live TV for longer than 10 minutes, keep more recording space free for the added pause
time.
Save shows you want to keep long-term to videotape
For shows you want to keep permanently, connect a VCR to the Hard Disk Recorder and transfer recordings to
videotape. See “Saving Shows to Videotape” on page 39. And see page 14 and 15 for connections.
Review your Replay Guide regularly to delete any unwanted shows
Every show you record remains in your Replay Guide—even after you
watch it. As more shows are recorded, available space begins
to run out. Rather than leave an old episode in your Replay Guide, delete the
show after you watch it. That way, you make space available so that other shows
can be recorded, rather than tie that space up from week to week. Check your
Replay Guide on a regular basis and delete shows you have already watched.
To delete a show from the Replay Guide:
1.Go to the Replay Guide.
2.Select the show you want to delete.
3.Select Delete from the menu.
To delete a show after you watch it:
1. An on-screen message displays when the Hard Disk Recorder has
reached the end of a Replay show. When the on-screen message
appears, press SELECT.
2.Select Yes from the following screen to delete the show.
This show is removed from the Replay Guide.
41
Page 42

Universal Remote Control
Changing Volume Lock
The Hard Disk Recorder remote is set to control volume through your Hard
Disk Recorder while in the CABLE, SAT(ellite), DVD, TV, or VCR modes. If
your TV is not remote controllable, or you want to control volume through a
different component, you can change the volume lock setting to control
volume through a different mode (for example through a cable box while in
TV mode). You can set the volume lock to another mode.
Hold down CODE SET until the remote’s red
1
LED blinks twice, then release.
Press 9 - 9 - 3, then press any mode button
2
(except TV).
• The red LED will blink twice.
Now, whenever you press VOLUME +/- or MUTE, volume will be
controlled by your mode choice.
To change the volume lock setting back to TV mode...
Repeat steps 1 and 2 and substitute the TV mode button.
Red LED
1
CODE SET
c
POWER
e
b
VCR/DVD
SA T/CABLE
b
TV
b
Setting Up Your Components
Locate the brand name of your component in the code lists on pages
45~49. The brands are listed in alphabetical order with the most popular
codes for each brand listed first. You will use one of these codes to
program the Hard Disk Recorder remote to operate your components.
Turn on your component with the Hard Disk
a
Recorder off.
Press TV or SAT/CABLE or VCR/DVD* to
b
select your components.
*If you want to operate TV or TV/VCR Combo volume
control, press TV. If Satellite or Cable Box, press SAT/
CABLE. If VCR, TV/VCR Combo, or DVD, press VCR/DVD.
Hold down CODE SET until the remote’s red LED
c
blinks twice, then release.
Press Number Buttons to enter the first four digit
d
code of your component brand on pages 45~49.
• If you perform this procedure correctly, the red LED will
blink twice when you enter the final digit of your code.
e Point the Hard Disk Recorder remote at your
component, then press POWER.
should turn off.
• If your component does not respond, repeat steps b-e,
trying each code listed for your brand until you find the
one that operates your component.
Your component
Number
2
Buttons
d
VOLUME +/-
MUTE
NOTES
• Remember, if you want to use your
Hard Disk Recorder remote to
operate your component, press the
component’s mode button first. For
example, press TV first if you want to
operate your TV.
• The remote control will not operate all
components made by manufactures
listed. If you get no response, your
particular brand cannot be controlled.
42
Page 43

Searching for Your
Component’s Code
If your component does not respond to the Hard Disk Recorder remote
after trying all of the codes listed for your brand, or if your brand is
not listed, try searching for your code.
For example, if you try all of the codes for your TV and cannot get the
Hard Disk Recorder remote to operate your TV, follow steps below.
Turn on your TV with the Hard Disk
1
Recorder off.
Press TV.
2
Hold down CODE SET until the remote’s red
3
LED blinks twice, then release.
Press 9 - 9 - 1.
4
Slowly alternate between pressing POWER*
5
and TV until your TV turns OFF.
• Make sure that the Hard Disk Recorder remote is
aimed at your TV during the search.
• You may have to press this sequence of buttons
(POWER* then TV) up to 100 times to search the
entire library of codes.
*If you are searching for your VCR, or DVD player code,
you may want to use PLAY instead of POWER to search
for your code. When your VCR starts to play, press CODE
SET to lock in your code.
When your TV turns OFF, press CODE SET
6
to lock in the code for your TV.
• Your Hard Disk Recorder remote is now
programmed to operate your TV.
Red LED
CODE SET
3
6
POWER
5
VCR/DVD
SA T/CABLE
TV
2
5
Number
4
Buttons
PLA Y
NOTE
• To search for the codes of your other components, repeat
steps 1~6, and substitute the appropriate device button (TV,
SAT/CABLE, or VCR/DVD) for the component.
43
Page 44

Universal Remote Control (continued)
Learning the Codes Programmed Into the Remote
If you set up the Hard Disk Recorder remote by following “Searching for Your
Component’s Code” on page 43, you may want to figure out which four-digit
code is operating your equipment. Use this procedure after you set up your
components to find out which four-digit code is operating your equipment.
For example, to find out which code is operating your TV after setting up
your TV, follow steps below.
Press TV.
1
Hold down CODE SET until the remote’s red
2
LED blinks twice, then release.
Press 9 - 9 - 0.
3
Learn your code.
4
1) For the first digit of your four-digit code, press 1 and
count the number of times the red LED blinks on the
remote.
2) For the second digit, press 2 and count the number
of times the red LED blinks on the remote.
3) For the third digit, press 3 and count the number of
times the red LED blinks on the remote.
4) For the fourth and final digit, press 4 and count the
number of times the red LED blinks on the remote.
• If the LED does not blink, the digit is zero.
Red LED
2
CODE SET
a
VCR/DVDc
SAT/CABLE
TV1
Number
3
buttons
4
b
NOTE
• To find out the code for your other components, repeat steps
1~4, and substitute the appropriate device button (TV, SAT/
CABLE, or VCR/DVD) for the component code you wish to learn.
Re-assigning Component Mode
Buttons
You can program the Hard Disk Recorder remote component mode
buttons (TV, SAT/CABLE, or VCR/DVD) to control other home
entertainment components.
For example, to control a TV, a cable box, and a DVD player, you will need to
re-assign the VCR button to operate the DVD player, follow the steps below.
Hold down CODE SET until the remote’s red
a
LED blinks twice, then release.
Press 9 - 9 - 2. The red LED will blink twice.
b
c
Press VCR/DVD twice. The red LED will blink twice.
You can now program the VCR/DVD button for your DVD player.
See “Setting Up Your Components” on page 42.
d
To reassign other component mode buttons...
Repeat steps a~d by substituting the button sequence from
the list of popular components at right.
Reassigning device keys
TV as 2nd
VCR button
TV as 2nd
CABLE button
TV back to TV
VCR as 2nd
TV button
VCR as 2nd
CABLE button
VCR back to VCR
Press:CODE SET
Press:CODE SET
Press:CODE SET
Press:CODE SET
Press:CODE SET
Press:CODE SET
9-9-2-VCR-TV
9-9-2-CABLE-TV
9-9-2-TV-TV
9-9-2-TV-VCR
9-9-2-CABLE-VCR
9-9-2-VCR-VCR
44
Page 45

Code Numbers For Y our Components
TVs
AOC .............................................................. 0030, 0019
Admiral .................................................................. 0093
Aiko ........................................................................ 0092
Akai ........................................................................ 0030
Alaron ..................................................................... 0179
Allegro .......................................................... 0720, 0774
Ambassador .......................................................... 0177
Ampro .................................................................... 0751
Anam ..................................................................... 0180
Audiovox ...................................0451, 0180, 0092, 0623
Aumark .................................................................. 0060
Baysonic ................................................................ 0180
Belcor ..................................................................... 0019
Bell & Howell ............................................... 0154, 0016
Bradford ................................................................. 0180
Brockwood ............................................................. 0019
Broksonic ..................................................... 0236, 0463
CXC ........................................................................ 0180
Candle ......................................................... 0030, 0056
Carnivale ............................................................... 0030
Carver .................................................................... 0054
Celebrity ................................................................. 0000
Cineral ......................................................... 0451, 0092
Citizen ........................... 0060, 0030, 0056, 0039, 0092
Concerto ................................................................ 0056
Contec ................................................................... 0180
Craig ...................................................................... 0180
Crosley .................................................................. 0054
Crown .......................................................... 0180, 0039
Curtis Mathes .......................... 0047, 0054, 0154, 0051
...................................... 0451, 0093, 0060, 0030, 0145
.................. 0056, 0016, 0039, 0166, 0466, 1147, 1347
Daewoo .............. 0451, 0019, 0039, 0092, 0623, 0624
Daytron ........................................................ 0019, 0039
Denon .................................................................... 0145
Dumont ........................................................ 0017, 0019
Dwin ............................................................. 0720, 0774
Electroband ........................................................... 0000
Emerson ....................... 0154, 0236, 0463, 0180, 0282
.................. 0178, 0019, 0179, 0039, 0177, 0623, 0624
Envision ................................................................. 0030
Fisher ..................................................................... 0154
Fujitsu .................................................................... 0179
Funai .................................................. 0180, 0179, 0171
Futuretech .............................................................. 0180
GE ............................................0047, 0051, 0451, 0093
............................ 0282, 0178, 0021, 0135, 1147, 1347
Gibralter ............................................. 0017, 0030, 0019
Go Video ................................................................ 0060
GoldStar........................ 0030, 0178, 0019, 0056, 0039
Gradiente..................................................... 0053, 0056
Grunpy ......................................................... 0180, 0179
Hallmark ................................................................ 0178
Harley Davidson .................................................... 0179
Harman/Kardon ..................................................... 0054
Harvard .................................................................. 0180
Hitachi ................................................ 0145, 0056, 0151
Infinity ..................................................................... 0054
Inteq ....................................................................... 0017
JBL ......................................................................... 0054
JCB ........................................................................ 0000
JVC ........................................................................ 0053
KEC ........................................................................ 0180
KTV ....................................................0180, 0030, 0039
Kenwood ..................................................... 0030, 0019
LG .......................................................................... 0056
LXI ............. 0047, 0054, 0017, 0154, 0156, 0178, 1347
Logik ...................................................................... 0016
Luxman .................................................................. 0056
MGA .......................................... 0150, 0030, 0178, 0019
MTC..........................................0060, 0030, 0019, 0056
Magnavox ........................................... 0054, 0030, 0179
Majestic .................................................................. 0016
Marantz ........................................................ 0054, 0030
Matsushita ................................................... 0051, 0250
Megatron ...................................................... 0178, 0145
Memorex ... 0154, 0250, 0150, 0060, 0178, 0056, 0016
Midland ......................... 0047, 0017, 0051, 0039, 0135
Minutz ..................................................................... 0021
Mitsubishi ................................ 0093, 0150, 0178, 0019
Motorola ................................................................. 0093
Multitech ................................................................. 0180
NAD ....................................................0156, 0178, 0166
NEC ................................................... 0030, 0019, 0056
NTC........................................................................ 0092
Nikko 0047, 0017, 0154, 0156, 0030, 0178, 0092, 1347
Onwa ..................................................................... 0180
Optimus ............................................. 0154, 0250, 0166
Optonica ...................................................... 0093, 0165
Orion .................................................. 0236, 0463, 0179
Panasonic .................................................... 0250, 0051
Penney ......................... 0047, 0156, 0051, 0060, 0030
.................. 0178, 0021, 0019, 0056, 0039, 0135, 1347
Philco ............................ 0054, 0463, 0030, 0145, 0019
Philips ................. 0054, 0017, 0000, 0021, 0019, 0039
Pilot .................................................... 0030, 0019, 0039
Pioneer .................................................................. 0166
Portland ............................................. 0019, 0039, 0092
Prism ..................................................................... 0051
Proscan ............................................. 0047, 0030, 1347
Proton .......................................................... 0178, 0466
Pulsar .......................................................... 0017, 0019
Quasar ............................................... 0051, 0250, 0165
RCA ..........................................0047, 0051, 0093, 0019
............................ 0090, 0135, 1047, 1147, 1247, 1347
Radio Shack ............................ 0047, 0154, 0165, 0180
...................................... 0030, 0178, 0019, 0056, 0039
Realistic ............................................. 0154, 0165, 0180
...................................... 0030, 0178, 0019, 0056, 0039
45
Page 46

Code Numbers For Your Components
(continued)
TVs (continued)
Runco ................................................ 0017, 0030, 0603
SSS .............................................................. 0180, 0019
Sampo ......................................................... 0030, 0039
Samsung ............ 0060, 0030, 0178, 0019, 0056, 0039
Samsux .................................................................. 0039
Sansei ................................................................... 0451
Sansui ................................................................... 0463
Sanyo ..................................................................... 0154
Scimitsu ................................................................. 0019
Scotch .................................................................... 0178
Scott .............................. 0236, 0180, 0178, 0019, 0179
Sears 0047, 0054, 0154, 0156, 0178, 0179, 0056, 0171
Semivox ................................................................. 0180
Semp ..................................................................... 0156
Sharp ................................................. 0093, 0165, 0039
Shogun .................................................................. 0019
Signature ............................................................... 0016
Sony ....................................................................... 0000
Soundesign ....................................... 0180, 0178, 0179
Squareview ............................................................ 0171
Starlite .................................................................... 0180
Supreme ................................................................ 0000
Sylvania ........................................................ 0054, 0030
Symphonic ............................................................. 0171
TMK .................................................... 0178, 0056, 0177
Tandy ..................................................................... 0093
Technics ....................... 0047, 0017, 0051, 0250, 1347
Technol Ace ........................................................... 0179
Techwood .................................................... 0051, 0056
Teknika ....................................0054, 0180, 0150, 0060
............................ 0019, 0179, 0056, 0016, 0039, 0092
Telefunken............................................................. 0056
Toshiba ..............................................0154, 0156, 0060
Totevision .............................................................. 0039
Universal ............................................................... 0021
Vector Research .................................................... 0030
Victor ...................................................................... 0053
Vidikron .................................................................. 0054
Vidtech ......................................................... 0178, 0019
Wards ........................... 0054, 0156, 0165, 0030, 0178
............................ 0021, 0019, 0179, 0056, 0016, 0135
White Westinghouse ................................... 0623, 0624
Yamaha ....................................................... 0030, 0019
Zenith ................................................. 0017, 0016, 0092
VCRs
Admiral .................................................................. 0048
Adventura ............................................................... 0000
Aiko ........................................................................ 0278
Aiwa ............................................................. 0037, 0000
Akai ........................................................................ 0041
American High ....................................................... 0035
Asha ....................................................................... 0240
Audiovox ................................................................. 0037
Beaumark .............................................................. 0240
Bell & Howell ......................................................... 0104
Broksonic ................................. 0184, 0121, 0209, 0002
CCE ............................................................. 0072, 0278
Calix ....................................................................... 0037
Canon .................................................................... 0035
Carver .................................................................... 0081
Cineral ................................................................... 0278
Citizen .......................................................... 0037, 0278
Colt ........................................................................ 0072
Craig ............................. 0037, 0047, 0240, 0072, 0271
Curtis Mathes .......................... 0060, 0035, 0041, 0162
Cybernex................................................................ 0240
Daewoo ....................................................... 0045, 0278
Denon .................................................................... 0042
Dynatech ................................................................ 0000
Electrohome .......................................................... 0037
Electrophonic ......................................................... 0037
Emerex .................................................................. 0032
Emerson ............................................ 0037, 0184, 0000
...................................... 0121, 0043, 0209, 0002, 0278
Fisher ........................................................... 0047, 0104
Fuji ............................................................... 0035, 0033
Funai ...................................................................... 0000
GE............................................0060, 0035, 0048, 0240
Garrard .................................................................. 0000
Go Video ................................................................ 0526
GoldStar ....................................................... 0037, 0038
Gradiente ............................................................... 0000
HI-Q ........................................................................ 0047
Harley Davidson .................................................... 0000
Harman/Kardon ........................................... 0081, 0038
Harwood ................................................................ 0072
Headquarter .......................................................... 0046
Hitachi ................................................ 0000, 0042, 0041
JVC .............................................................. 0067, 0041
Jensen ................................................................... 0041
KEC .............................................................. 0037, 0278
KLH ........................................................................ 0072
Kenwood .................................0067, 0041, 0038, 0046
Kodak ........................................................... 0035, 0037
LXI .......................................................................... 0037
Lloyd’s ................................................................... 0000
Logik ...................................................................... 0072
MEI ......................................................................... 0035
MGA.............................................................. 0240, 0043
46
Page 47

VCRs (continued)
MGN Technology ................................................... 0240
MTC .............................................................. 0240, 0000
Magnasonic ........................................................... 0278
Magnavox ...................... 0035, 0039, 0081, 0000, 0149
Magnin ................................................................... 0240
Marantz ..............................................0035, 0081, 0038
Marta ...................................................................... 0037
Matsushita ......................................... 0035, 0162, 0454
Memorex....................... 0035, 0037, 0048, 0039, 0047
............................ 0240, 0000, 0104, 0046, 1162, 1262
Minolta ................................................................... 0042
Mitsubishi .......................................... 0048, 0067, 0043
Motorola ....................................................... 0035, 0048
Multitech ....................................................... 0000, 0072
NAP............................... 0035, 0037, 0039, 0042, 0033
NEC ......................................... 0104, 0067, 0041, 0038
Nikko ...................................................................... 0037
Noblex .................................................................... 0240
Olym pus ................................................................ 0035
Optimus ............................................. 0037, 0048, 0104
...................................... 0162, 0454, 1062, 1162, 1262
Orion ............................................................ 0184, 0002
Panasonic ................................ 1162, 0035, 0162, 0454
Penney ......................... 0035, 0037, 0240, 0042, 0038
Pentax .................................................................... 0042
Philco ........................................................... 0035, 0209
Philips.......................................................... 0035, 0081
Pilot ........................................................................ 0037
Pioneer .................................................................. 0067
Profitronic ............................................................... 0240
Proscan ................................................................. 0060
Protec ..................................................................... 0072
Pulsar .................................................................... 0039
Quarter ................................................................... 0046
Quartz ..................................................................... 0046
Quasar ..................................... 0035, 0162, 0454, 1162
RCA ..................... 0060, 0035, 0048, 0240, 0042, 0149
Radio Shack .......................................................... 0000
Radix ...................................................................... 0037
Randex .................................................................. 0037
Realistic ....0035, 0037, 0048, 0047, 0000, 0104, 0046
Runco .................................................................... 0039
STS ........................................................................ 0042
Samsung ..................................................... 0240, 0045
Sanky ........................................................... 0048, 0039
Sansui ..................................... 0000, 0067, 0041, 0271
Sanyo .......................................0047, 0240, 0104, 0046
Scott ......................................... 0184, 0045, 0121, 0043
Sears ........ 0035, 0037, 0047, 0000, 0042, 0104, 0046
Semp ..................................................................... 0045
Sharp ..................................................................... 0048
Shintom ................................................................. 0072
Shogun .................................................................. 0240
Signature ............................................................... 0035
Singer .................................................................... 0072
Sony .........................................0035, 0032, 0000, 0033
Sylvania ....................................0035, 0081, 0000, 0043
Symphonic ............................................................. 0000
TMK ........................................................................ 0240
Tatung .................................................................... 0041
Teac ............................................................. 0000, 0041
Technics .................................. 0060, 0035, 0039, 0162
Teknika .............................................. 0035, 0037, 0000
Thomas ................................................................. 0000
Toshiba ........................................................ 0045, 0043
Totevision .................................................... 0037, 0240
Unitech .................................................................. 0240
Vector ..................................................................... 0045
Vector Research .................................................... 0038
Video Concepts ..................................................... 0045
Videosonic ............................................................. 0240
Wards ........................... 0060, 0035, 0048, 0047, 0081
............................ 0240, 0045, 0000, 0042, 0072, 0149
White Westinghouse ............................................. 0278
XR-1000.............................................0035, 0000, 0072
Yamaha ....................................................... 0041, 0038
Zenith ................................................. 0039, 0000, 0033
Satellite Receivers
AlphaStar ............................................................................0772
Echostar ............................................................................. 0775
Expressvu ..........................................................................0775
General Instrument........................................ 0627, 0361, 0869
HTS ..................................................................................... 0775
Hitachi .................................................................................0819
Hughes Network Systems ................................................. 0749
JVC ..................................................................................... 0775
Jerrold ...................................................................... 0627, 0361
Magnavox ................................................................ 0724, 0722
Memorex .............................................................................0724
Next Level...........................................................................0869
Panasonic ........................................................................... 0701
Philips ....................................................................... 0724, 0722
Primestar.................................................................. 0627, 0361
Proscan .............................................................................. 0566
RCA ................................................................ 0566, 0143, 0855
Radio Shack............................................................. 0566, 0869
Sony....................................................................................0639
Star Choice ......................................................................... 0869
Toshiba ............................................................................... 0790
Uniden ...................................................................... 0724, 0722
Zenith..................................................................................0856
47
Page 48

Code Numbers For Your Components
(continued)
Cable Boxes
ABC...........0003, 0008, 0014, 0017, 0007, 0011, 0013
Allegro .......................................................... 0153, 0315
Archer ........................................................... 0153, 0797
Bell & Howell ......................................................... 0014
Century .................................................................. 0153
Citizen .......................................................... 0153, 0315
Comtronics ............................................................ 0040
Contec ................................................................... 0019
Eastern .................................................................. 0002
Emerson ................................................................ 0797
Everquest ..................................................... 0015, 0040
Focus ..................................................................... 0400
Garrard .................................................................. 0153
Gemini ................................................................... 0015
General Instrument ................. 0476, 0276, 0011, 0810
GoldStar ....................................................... 0144, 0040
Goodmind .............................................................. 0797
Hamlin .....................................0020, 0259, 0009, 0034
Hitachi .................................................................... 0011
Hytex ...................................................................... 0007
Jasco .................................................0015, 0153, 0315
Jerrold ................................................0003, 0012, 0476
...................................... 0276, 0014, 0015, 0011, 0810
Magnavox ............................................................... 0014
Memorex ................................................................ 0000
Movie Time ............................................................ 0063
NAP........................................................................ 0007
NSC ....................................................................... 0063
Oak .............................................................. 0019, 0007
Optimus ................................................................. 0021
Panasonic .................................................... 0107, 0021
Paragon ................................................................. 0000
Philips.................................................................... 0153
Pioneer ........................................................ 0144, 0533
Popular Mechanics................................................ 0400
Proscan ................................................................. 0021
Pulsar .................................................................... 0000
Quasar................................................................... 0000
RCA........................................................................ 0021
Radio Shack ............................0015, 0315, 0797, 0883
Recoton ................................................................. 0400
Regal ........................................................... 0020, 0259
Regency ................................................................. 0002
Rembrandt ............................................................ 0011
Runco .................................................................... 0000
SL Marx .................................................................. 0040
Samsung..................................................... 0144, 0040
Scientific Atlanta ......................0008, 0477, 0017, 0877
Signal ........................................................... 0015, 0040
Signature ............................................................... 0011
Sprucer .................................................................. 0021
Starcom ....................................................... 0003, 0015
Stargate ............................................. 0015, 0040, 0797
Starquest ............................................................... 0015
TV86....................................................................... 0063
Teleview................................................................. 0040
Tocom .......................................................... 0012, 0013
Toshiba.................................................................. 0000
Tusa ....................................................................... 0015
Unika ..................................................................... 0153
United Artists ......................................................... 0007
Universal ..................................................... 0153, 0191
Viewstar ................................................................. 0063
Zenith ....................................... 0008, 0000, 0015, 0525
Zentek .................................................................... 0400
Note
If you are having trouble changing channels for cable box
or satellite receiver using Hard Disk Recorder remote after
you have set them by listed code number, try the following.
1. If your unit required 2 digits to tune a one-digit channel,
enter the code for your unit but replace the first digit with
the number 6. If you are still having trouble, try entering
the number 7. (For example: 0020 ---> 6020 or 7020)
2. If your unit required 3 digits to tune a one-digit channel,
enter the code for your unit but replace the first digit with
the number 8. If you are still having trouble, try entering
the number 7. (For example: 0020 ---> 8020 or 9020)
DVD Players
Harman/Kardon ..................................................... 0582
JVC ........................................................................ 0558
Kenwood ............................................................... 0534
Magnavox .............................................................. 0503
Mitsubishi............................................................... 0521
Onkyo..................................................................... 0503
Optimus.................................................................. 0525
Panasonic.............................................................. 0490
Philips .......................................................... 0503, 0539
Pioneer ........................................................ 0525, 0571
Proscan .................................................................. 0522
RCA ....................................................................... 0522
Samsung ............................................................... 0573
Sony ....................................................................... 0533
Technics ................................................................ 0490
Theta Digital .......................................................... 0571
Toshiba .................................................................. 0503
Yamaha ....................................................... 0490, 0545
Zenith ........................................................... 0503, 0591
Laser Disks
Denon .................................................................... 0059
Mitsubishi .............................................................. 0059
NAD ........................................................................ 0059
Pioneer .................................................................. 0059
Sony ............................................................. 0193, 0201
48
Page 49

TV/VCR Combos
American High ...................................................... 0035*
Brocksonic ................................................... 0002, 0294
Colt ........................................................................ 0072
Curtis Mathes ....................................................... 0035*
Daewoo ................................................................ 0278*
Emerson ............................................0002, 0294, 0479
Funai ...................................................................... 0000
GE ....................................... 0035*, 0060*, 0048*, 0240
Hitachi ......................................................... 0035*, 0000
HQ .......................................................................... 0000
Lloyds .................................................................... 0000
Magnavox ........................................ 0000, 0035*, 0081*
Magnin ................................................................... 0240
Memorex ..................................................... 0037, 0162*
MGA........................................................................ 0240
Mitsubishi ............................................................. 0048*
Orion .................................................. 0002, 0294, 0479
Panasonic ..................................... 1162*, 0035*, 0162*
Penney’s ......................................... 0035*, 0240, 0162*
Quasar ...................................................... 0035*, 0162*
RCA .................................... 0035*, 0060*, 0048*, 0240
Sansui .......................................................... 0000, 0479
Sanyo ..................................................................... 0240
Sears ........................................................... 0000, 0037
Sony ...................................................................... 0032*
Symphonic ............................................................. 0000
Zenith ..................................................................... 0000
Important Note
If your TV/VCR Combo is working on one of the above codes highlighted with an asterisk (*), you may need
to program a separate TV code in order to control the volume. Check the list of codes below and follow the
instructions detailed in the “Setting Up Your Components” section to program the supplied TV code.
TV/VCRs working on VCR code 0032 may require TV code 0000 for volume control.
TV/VCRs working on VCR code 0035 may require TV code 0051 for volume control.
TV/VCRs working on VCR code 0048 may require TV code 0093 for volume control.
TV/VCRs working on VCR code 0060 may require TV code 0047 for volume control.
TV/VCRs working on VCR code 0081 may require TV code 0054 for volume control.
TV/VCRs working on VCR code 0162 may require TV code 0250 for volume control.
TV/VCRs working on VCR code 1162 may require TV code 0250 for volume control.
TV/VCRs working on VCR code 0278 may require TV code 0451 for volume control.
49
Page 50

Troubleshooting
Please note that the Panasonic Web site at www.panasonic.com is also a great place to ask operational and troubleshooting
questions. If, after reading the troubleshooting information on our Web site and in this manual, you find you still have
unanswered questions, please contact Technical Support by phone at 1-888-843-9788.
PROBLEM
When attempting to connect to the
ReplayTV Service in Setup, I get one
of the following error messages: “no
dial tone,” “modem timed out,” “no
response from modem,” or “network
connection error.”
The Hard Disk Recorder is connected
to my TV, but I don’t see the Hard Disk
Recorder introduction screen.
SOLUTION
• Confirm that there is no dial tone on the line by hooking up a phone
to it and listening for the dial tone.
• If you have call waiting, confirm that it has been disabled by
entering the correct telephone prefix number in Setup. Contact your
phone company to obtain the correct dialing prefix information.
• The Hard Disk Recorder cannot connect to the ReplayTV Service if
your phone line has a stutter dial tone. If you have a message
service that enables a stutter dial tone when you have messages,
you will need to delete/save all of your messages in order to
disable the stutter dial tone.
• Confirm that the line that you are dialing out on is an analog line.
• Remove the AC (power) cable from the rear of the Hard Disk
Recorder. Wait 15 seconds, then re-attach the AC cable (the Hard
Disk Recorder will reboot itself). Once the Hard Disk Recorder has
rebooted, press the POWER button on the Hard Disk Recorder
remote control to exit standby mode. Proceed as instructed by the
on-screen instructions.
• Confirm that the correct line input is selected on your TV.
• Confirm that the Hard Disk Recorder is not in “standby mode” by
pressing the POWER button on the remote control. Verify that the
green POWER light on the unit is illuminated.
• If you are using an A/V receiver in your setup, verify that the input
source is the same as the output source going to your television.
For example, if you are using an S-Video output on the Hard Disk
Recorder going to an A/V receiver, you will need to output an SVideo signal from your A/V receiver to your TV. This is a limitation of
most A/V receivers.
When setting up my Hard Disk
Recorder, the correct cable company
does not appear as a menu item in
Setup.
When entering my phone number in
Setup, I am only able to enter the first
6 digits.
The red light on the Hard Disk
Recorder remote does not blink when
I press a button on the remote control.
The Hard Disk Recorder remote
control does not operate my home
entertainment components, or is not
performing commands properly.
50
• Contact the Panasonic Technical Support department by phone at
1-888-843-9788. Please provide the following information: 1)
Complex name (if applicable), 2) Community, 3) State, 4) Cable
Provider Name, 5) Cable Provider contact information, and 6)
Problem description. In most cases, the correct information can be
added to the ReplayTV Service database within 48 hours.
• This is correct! The Hard Disk Recorder only needs the first 6 digits
of your phone number. The last four (4) numbers will appear as
follows: XXXX
• Replace the batteries in the remote control with 2 new AA alkaline
batteries.
• Make sure you’re pointing the Hard Disk Recorder remote control
directly at the component, and that there is nothing blocking the
path of the infrared signal between the remote control and the unit.
If that doesn’t work, try all of the codes listed for your brand of home
entertainment component in the “Code Numbers For Your
Components” section of this guide. Many setup codes may allow for
partial functionality, however, only one code will operate your home
entertainment component correctly. Make sure that all of the
components you are setting up can be operated with an infrared
remote control.
Page 51

PROBLEM
SOLUTION
When viewing show content through
the Hard Disk Recorder, shows appear
to be in black and white.
When I select a channel in the
Channel Guide, the channel number
does not change on my satellite
receiver or cable box.
When I select a channel in the
Channel Guide, I get a blue screen
that states “no video source.”
When selecting a show in the Channel
Guide, I get a solid blue screen.
When selecting a show from the
Channel Guide, I get a screen that
fades to black.
• This condition will exist if you have a composite input source going
into the Hard Disk Recorder on LINE 2, but the input source in Setup
(on LINE 2) is set to S-Video. Go to Setup to correct the information.
• If you’re using an IR blaster connection to control channel changing,
verify that you have affixed the IR blaster directly in front of the IR
detector on your cable box or satellite receiver.
• Confirm that you have selected the correct IR code for your cable
box or satellite receiver. (Refer to “Cable Numbers For Your
Components” on pages 47 and 48 for a list of codes.)
• Confirm that you subscribe to the channel in question.
• Verify that the A/V connections going from your cable box/satellite
receiver to the Hard Disk Recorder are correct.
• Verify that all your components are turned on.
• Confirm that you have the correct input source specified in Setup.
(Note: Press the MENU button on the Hard Disk Recorder remote
control. Highlight Setup and press SELECT. Highlight Change Dialing
& Input Settings and press SELECT. Use the ARROW buttons on the
remote control to highlight each input and verify that it is configured
correctly. Press SELECT when you’ve found the correct inputs.
• Typically, this is caused by a weak video source. Contact Technical
Support for further suggestions by phone at 1-888-843-9788. Phone
support personnel answer calls between 6:00 AM and 6:00 PM
(PST), Monday through Friday.
After purchasing the Hard Disk
Recorder, I discovered that I have a
television without composite or SVideo inputs.
While setting up the Hard Disk
Recorder, I realized that the nearest
phone outlet is too far away to connect
to the Hard Disk Recorder directly.
Currently, the only phone line near my
Hard Disk Recorder is being used by
my satellite receiver/cable box.
I’m having problems programming my
TV/VCR combination component.
The VCR is not recording.
Channel +/- and JUMP features are
not working for my RCA TV.
• You can purchase an RF modulator, which will convert a composite
video signal into an RF signal. RF modulators can be found at most
electronics stores.
• Refer to“Connecting the Hard Disk Recorder to a TV That Has a VHF/
UHF jack only” on page 11.
• If you do not have a phone jack near the Hard Disk Recorder, you
can use a wireless phone jack instead. In particular, the Phonex
Wireless Modem Jack (Part # PX-421) has been qualified to work
with the Hard Disk Recorder. It operates at speeds up to 33.6 baud.
Wireless phone jacks can be found at most electronics stores.
• The Hard Disk Recorder ships with a telephone splitter. This will allow
you to plug the Hard Disk Recorder and your cable box/satellite
receiver into the same phone line.
• Try the VCR setup codes for your brand. Some combo units may
require both a TV code for volume control and a VCR code for the
remaining functions.
• As a safety feature on the Hard Disk Recorder remote, you must
press the REC button twice.
• Due to RCA design (1983-1987), only the original remote control
will operate these functions.
51
Page 52

Troubleshooting (continued)
PROBLEM
I’m having problems changing
channels.
Only one device’s volume control
code is sent regardless of which
mode I have put the remote control in.
I’m using an IR blaster to control my
cable box or satellite receiver and I’m
having trouble changing channels
using the Hard Disk Recorder remote.
SOLUTION
• If your original remote control required an Enter button press when
changing channels, press the ENTER button on the Hard Disk
Recorder remote control after you enter the channel number.
• Refer to “Changing Volume Lock” on page 42 and unlock the volume
controls.
• This may be dependent on how many digits you needed to enter to
tune to a specific channel using the remote control for your cable box or
satellite receiver, prior to hooking up the Hard Disk Recorder. For
example, if you needed to enter 0 - 5 to tune to channel 5, you need to
“tell” the Hard Disk Recorder this information during the on-screen
setup. To update this information, go back to Setup to adjust the
code for your cable box or satellite receiver.
1. Press the MENU button on the Hard Disk Recorder remote.
2. Choose Setup from the Main Menu, then choose Change Dialing &
Input Settings.
3. From the Setup Summary screen, choose the input that your cable
box or satellite receiver is connected to.
4. Proceed through the steps to configure your box until you reach the
screen that asks for your cable box or satellite receiver setup code.
5. Press the
A. If your unit required 2 digits to tune to a one-digit channel, enter
the code for your unit but replace the first digit with the number 6.
B. If your unit required 3 digits to tune to a one-digit channel, enter
the code for your unit but replace the first digit with the number 8.
Refer to “Code Numbers For Your Components” on pages 47 and 48
to find your code.
6. Continue through the remaining screens and complete the setup.
7. Once you have completed setup, try changing the channels on
your cable box or satellite receiver.
8. If you are still having trouble changing channels, repeat step 5
above with the following changes:
• If you used step 5A, replace the number 6 with the number 7.
• If you used step 5B, replace the number 8 with the number 9.
button to clear the setup code:
My cable box sometimes fails to
change channels when using the
Hard Disk Recorder remote control.
The Hard Disk Recorder does not
respond when I press buttons on the
remote control. Or, the image on my
television screen is “frozen.”
52
• If you are using the IR blaster, your cable box receives IR commands
from both the Hard Disk Recorder remote and the IR blaster. Some
cable boxes can be confused by this. You can prevent your cable box
from receiving the commands from the Hard Disk Recorder remote
control by affixing an opaque covering around the area where you
have placed the IR emitter on your cable box. Don’t cover the IR
emitter.
• Press and hold the power button on the front of the unit for 10
seconds, then release. The Hard Disk Recorder will start up in a few
moments.
• Unplug the power cord for 15 seconds then plug it back in. The Hard
Disk Recorder will restart and power on in a few moments.
Page 53

Specifications & Information
Specifications
General
Operating voltage 120VAC 60Hz
Power Consumption 28W (Power On)
19W (Power Off)
Tuner
MTS
Input Connectors
Tuner Type F
Composite Phono x 2
Audio Phono (L+R) x 2
S-Video 4-pin miniature DIN
Output Connectors
Composite Phono x 2
Audio Phono (L+R) x 2
S-Video 4-pin miniature DIN
Telephone RJ-11, 2wire
Serial Control DB-9
IR Blaster
Dimensions/Weight
Height 76mm
Width 430mm
Depth 290mm
Weight (net) 5.9kg
Audio/Video Signals
Audio output level 2.0Vp-p
Video output level 1.0Vp-p
Video output impedance 75 ohm
Resetting Hard Disk Recorder
If the Hard Disk Recorder does not respond
when you press buttons on the remote, press
and hold the POWER button on the front of
the unit for 10 seconds. The Hard Disk
Recorder will start up in a few moments.
The Hard Disk Recorder’s green power LED
does not need to be lighted to record shows.
If you have a cable box or a satellite receiver,
however, these device must remain on for the
Hard Disk Recorder to record from them.
Screen Burn In
When any image is displayed on a television
screen for an extended period of time, a
permanent mark can remain even after the
image is changed. This is called “screen burn
in.” Projection TVs are the most susceptible to
screen burn in. To prevent this, don’t leave the
Channel Guide, or any other screen displayed
when you don’t need to use them. You can
also adjust the brightness of the Hard Disk
Recorder screens to help prevent this. See
“Change Display Brightness” on page 7.
NOTE
• To dismiss the Pause on-screen image from your TV
screen and keep a show paused, press the EXIT
button on the remote control.
Operating/Storage Conditions
Operating temp. range +5°C to +40°C
Storage temp. range -20 °C to +55°C for 100 hours
Record
HDD Capacity 20.4GB
Video compression format MPEG2
Audio compression format MPEG1 layer2
Recording level Extended/Medium/High
Recording time 30H/15H/10H*
MODEM
Speed 56kbps
* Actual available recording time is not maximum because the
“Welcome Video” is already recorded in the Replay Guide.
To make the most of the available recording time, delete the
welcome video from the Replay Guide or save it to a
videotape.
53
Page 54

Software License Agreement
IMPORTANT — READ CAREFULLY: By pressing “PLAY” and accepting to continue with the setup process to begin using the
software in your Hard Disk Recorder Product (“Product”), you agree to be bound by the terms of this ReplayTV Software
License Agreement (this “Agreement”). If you do not agree to the terms of this Agreement, you may promptly return the Product
to the point of purchase for a refund of your purchase price or you may contact Panasonic for instructions on where to ship the
Product, at Panasonic’s cost, for a full refund of the purchase price after inspection.
1. License Grant; Restrictions.
Subject to the terms of this Agreement, ReplayTV grants you a non-exclusive, non-transferable license, without the right to
sublicense, to use all software included with the Product or subsequently provided to you, and related documentation
(together, “Software”) solely for your internal, noncommercial use and solely in connection with your use of the Product and
access to the ReplayTV Service (“RTVS”). You acknowledge and agree that ReplayTV may periodically update, modify or
enhance the Software remotely through the RTVS. You further agree that: (a) use of the Software or the Product with any third
party service competitive with the RTVS is a violation of this Agreement and is grounds for ReplayTV’s termination thereof; (b)
you will not to attempt to modify, enhance, disassemble, decompile, reverse engineer or otherwise attempt to gain access to
the source code to the Software; and (c) you will not attempt to remove or unbundle the Software from the Product. Any resale
or transfer of the Product by you will be subject to the terms and conditions of this Agreement.
2. Ownership.
ReplayTV and its licensors own and retain all proprietary rights, including all patent, copyright, trade secret, trademark and
other intellectual property rights, in and to the Software and any corrections, bug fixes, enhancements, updates or other
modifications to the Software. You acknowledge that the license granted under this Agreement does not provide you with title
to or ownership of the Software, but only a right of limited use under the terms and conditions of this Agreement.
3. Confidential Information.
You agree that the Software contains confidential information, including trade secrets, know-how and other information, that is
the exclusive property of ReplayTV. You agree to keep this information confidential and to not use or disclose this information
to any third party except as authorized by this Agreement.
4. No Warranties.
TO THE MAXIMUM EXTENT PERMITTED BY LAW, ReplayTV MAKES NO WARRANTIES, EXPRESS OR IMPLIED, WITH
RESPECT TO THE SOFTWARE OR THE RTVS, INCLUDING WITHOUT LIMITATION ANY IMPLIED WARRANTY OF
MERCHANTABILITY, FITNESS FOR A PARTICULAR PURPOSE, NON-INFRINGEMENT OF THIRD PARTY RIGHTS AND
THOSE ARISING FROM A COURSE OF DEALING OR USAGE OF TRADE. NO WARRANTY IS MADE THAT USE OF THE
SOFTWARE OR THE RTVS WILL BE ERROR FREE OR UNINTERRUPTED, THAT ANY ERRORS OR DEFECTS WILL BE
CORRECTED, OR THAT THE FUNCTIONALITY OF THE SOFTWARE OR THE RTVS WILL MEET YOUR REQUIREMENTS.
BECAUSE SOME STATES/JURISDICTIONS DO NOT PERMIT ALL DISCLAIMERS OF WARRANTY, THESE LIMITATIONS
MAY NOT APPLY TO YOU.
5. Limitation of Liability.
THE ENTIRE RISK ARISING OUT OF THE USE OR PERFORMANCE OF THE SOFTWARE AND THE PRODUCT REMAINS
WITH YOU. TO THE MAXIMUM EXTENT PERMITTED BY APPLICABLE LAW, ReplayTV AND ITS SUPPLIERS OR
LICENSORS WILL NOT BE LIABLE FOR ANY CONSEQUENTIAL, INCIDENTAL, INDIRECT, SPECIAL, PUNITIVE, OR
OTHER DAMAGES WHATSOEVER (INCLUDING, WITHOUT LIMITATION, DAMAGES FOR LOSS OF PROFITS, BUSINESS
INTERRUPTION, LOSS OF INFORMATION OR DATA, OR OTHER PECUNIARY LOSS) ARISING OUT OF THIS
AGREEMENT OR THE USE OF OR INABILITY TO USE THE SOFTWARE OR THE RTVS, EVEN IF ReplayTV OR ITS
SUPPLIERS OR LICENSORS HAVE BEEN ADVISED OF THE POSSIBILITY OF SUCH DAMAGES. BECAUSE SOME
STATES/JURISDICTIONS DO NOT ALLOW THE EXCLUSION OR LIMITATION OF LIABILITY FOR CONSEQUENTIAL OR
INCIDENTAL DAMAGES, THE ABOVE LIMITATION MAY NOT APPLY TO YOU.
6. Termination.
This Agreement and the licenses granted hereunder shall terminate automatically if you fail to comply with the limitations
described in this Agreement. No notice will be required from ReplayTV to effectuate such termination. On termination of this
Agreement, you must destroy all copies of the Software and accompanying documentation. Sections The obligations of
ReplayTV and You in Sections 2, 3, 4, 5, 6, 7 and 8 shall survive termination of this Agreement. Nothing in this Section 6 shall
limit any other remedies that ReplayTV may have for your breach of this Agreement.
7. Export Controls; Government Restricted Rights.
You acknowledge and agree that none of the Software or underlying information or technology may be downloaded or
otherwise exported or re-exported (i) into (or to a national or resident of) Angola, Cuba, Iran, Iraq, Libya, North Korea, Sudan,
Syria, or any other country to which the U.S. has embargoed goods; or anyone on the U.S. Treasury Department’s list of
Specially Designated Nationals or the U.S. Commerce Department’s Table of Denial Orders. By using the Software, you
represent and warrant that you are not a national or resident of any such country or on any such list.
The Software is a commercial product, developed at private expense, and provided with restricted rights. Use, reproduction,
release, modification or disclosure of the Software, or any part thereof, including technical data, by the Government is
restricted in accordance with Federal Acquisition Regulation (“FAR”) 12.212 for civilian agencies and Defense Federal
Acquisition Regulation Supplement (“DFARS”) 227.7202 for military agencies.
8. Miscellaneous.
This Agreement shall in all respects be governed by the laws of the State of California without reference to its principles of
conflicts of laws. The United Nations Convention on Contracts for the International Sales of Goods shall not apply to this
Agreement. You hereby agree that all disputes arising out of this Agreement shall be subject to the exclusive jurisdiction of and
venue in the federal and state courts within Santa Clara County, California, and you hereby consent to the personal and
exclusive jurisdiction and venue of these courts. If any of the provisions of this Agreement are held to be invalid under any
applicable statute or rule of law, they are, to that extent, deemed omitted. The waiver of any breach or default, or any delay in
exercising any rights shall not constitute a waiver of any subsequent breach or default. This Agreement constitutes the
complete and exclusive agreement between you and ReplayTV with respect to the subject matter hereof, and supersedes all
prior oral or written understandings, communications or agreements. This agreement may not be modified except in writing
duly signed by an authorized representative of ReplayTV.
54
Page 55

W arranty
Panasonic Consumer Electronics
Company, Division of Matsushita
Electric Corporation of America
One Panasonic Way Secaucus,
New Jersey 07094
Panasonic Hard Disk Recorder Products
Limited Warranty
Panasonic Consumer Electronics Company (referred to as “the Warrantor”) warrants the Hard Disk Recorder
against defects in materials or workmanship as follows :
1. LABOR: For a period of 90 days from the date of original purchase, if Hard Disk Recorder is determined to be
defective, Panasonic will repair or replace the unit, with new or refurbished product at its option, at no charge.
2. PARTS: In addition, Panasonic will supply replacement parts for a period of one (1) year. After one (1) year
from the date of original purchase.
To obtain warranty service, please contact a Technical Support Representative at 1-888-843-9788 Monday
through Friday from 9:00 AM to 9:00 PM Eastern Time or Saturday and Sunday from 9:00 AM to 7:00 PM Eastern
Time.
This warranty is extended only to the original purchaser. A purchase receipt or other proof of the date of the original
purchase is required before warranty service is rendered.
This warranty only covers failures due to defects in materials and workmanship which arise during normal use. This
warranty does not cover damage which occurs in shipment, or failures which are caused by products not supplied by
the Warrantor, or failures which result from accident, misuse, abuse, neglect, mishandling, misapplication, alteration,
modification, faulty installation, set-up adjustments, improper antenna, inadequate signal pickup, maladjustment of
consumer controls, improper operation, power line surge, improper voltage supply, lightning damage, commercial
use such as hotel, office, restaurant, or other business or rental use of the product, or service by anyone other than a
Hard Disk Recorder authorized repair facility, or damage that is attributable to acts of God.
LIMITS AND EXCLUSIONS
There are no express warranties except as listed above. THE WARRANTOR SHALL NOT BE LIABLE FOR
INCIDENTAL OR CONSEQUENTIAL DAMAGES (INCLUDING, WITHOUT LIMITATION, DAMAGE TO
RECORDING MEDIA) RESULTING FROM THE USE OF THIS PRODUCTS, OR ARISING OUT OF ANY BREACH
OF THE WARRANTY. ALL EXPRESS AND IMPLIED WARRANTIES, INCLUDING THE WARRANTIES OF
MERCHANTABILITY AND FITNESS FOR PARTICULAR PURPOSE, ARE LIMITED TO THE APPLICABLE
WARRANTY PERIOD SET FORTH ABOVE. Some states do not allow the exclusion or limitation of incidental or
consequential damages, or limitations on how long an implied warranty lasts, so the above exclusions or limitations
may not apply to you.
This warranty gives you specific legal rights and you may also have other rights which vary from state to state.
If the problem is not handled to your satisfaction, then write to the Customer Satisfaction Center at the Panasonic
Consumer Electronics Company address above.
SERVICE CALLS WHICH DO NOT INVOLVE DEFECTIVE MATERIALS OR WORKMANSHIP AS DETERMINED
BY THE WARRANTOR, IN ITS SOLE DISCRETION, ARE NOT COVERED. COSTS OF SUCH SERVICE CALLS
ARE THE RESPONSIBILITY OF THE PURCHASER.
55
Page 56

Service Center List
Panasonic
PRODUCT INFORMATION·OPERATION ASSISTANCED·LITERATURE REQUEST·DEALER LOCATIONS
For all Customer Service Inquires please call: 1-888-843-9788
Monday – Friday 9am-9pm EST, Saturday-Sunday 9am-7pm EST (including Holidays).
PANASONIC WEB SITE
http://www.panasonic.com/video
You can purchase parts and accessories by visiting our Web Site
PRODUCT SUPPORT – PRODUCT REPAIR
Should you require assistance with installation, operating information, or service for your Hard Disk Recorder,
Please contact the Panasonic Customer Call Center at:
1-888-843-9788
Monday – Friday 9am-9pm EST,
Saturday-Sunday 9am-7pm EST
(including Holidays).
PRODUCT SUPPORT – ACCESSORIES
For Accessory Purchases (Customer Orders Only) Please Call:
1-800-332-5368
Panasonic Service Company 20421 84th Avenue South, Kent, WA 98032
Monday – Friday 6am – 5pm PST
Saturday 6am – 10:30am PST
Regulatory Notices for the U.S.
FCC Requirements
1. The Federal Communications Commission (FCC) has established Rules which permit this device to be directly
connected to the telephone network. Standardized jacks are used for these connections. This equipment should
not be used on party lines or coin phones.
2. If this device is malfunctioning, it may also be causing harm to the telephone network; this device should be
disconnected until the source of the problem can be determined and until repair has been made. If this is not
done, the telephone company may temporarily disconnect service.
3. The telephone company may make changes in its technical operations and procedures; if such changes affect
the compatibility or use of this device, the telephone company is required to give adequate notice of the
changes. You will be advised of your right to file a complaint with the FCC.
4. If the telephone company requests information on what equipment is connected to their lines, inform them of:
a. The telephone number to which this unit is connected.
b. The ringer equivalence number: REN: 0.4B
c. The USOC jack required: RJ11C
d. The FCC Registration Number: 6HAUSA-27667-DT-T
Items (b) and (d) are indicated on the label. The Ringer Equivalence Number (REN) is used to determine how
many devices can be connected to your telephone line. In most areas, the sum of the REN’s of all devices on any
one line should not exceed five (5.0). If too many devices are attached, they may not ring properly.
56
Page 57

Location of Controls
Front View of the Hard Disk Recorder
Power LED
Solid green indicates the
Hard Disk Recorder is on.
RECORDING LED
Lights red when the Hard Disk
Recorder is recording a show.
Power Button
Manually switch between
On and Standby modes.
POWER
Rear View of the Hard Disk Recorder
INPUT LINE 1
Audio(L/R)/video input connector
with conventional (composite) video.
OUTPUT LINE 1
Audio(L/R)/video output
connector with conventional
(composite) video.
ANT/CATV IN
Antenna/Cable
input terminal.
RECORDING
NEW CONTENT
S-VIDEO OUT
S-Video output
connector for
LINE2.
NEW CONTENT LED
Lights green when the Hard Disk Recorder
has completed recording a show.
PV-HS2000
SERIAL CONTROL*
Serial port for linking a Satellite
Receiver with a serial port.
AC IN
AC Power plug
connector.
ANT/CATV
IN
INPUT LINE 2
Audio(L/R)/video
input connector with
(composite) video.
INPUT
R
AUDIO
1
LINE
2
VIDEOL
S-VIDEO
IN
S-VIDEO IN
S-Video input
connector for
LINE2.
OUTPUT
R AUDIO VIDEOL
S-VIDEO
OUT
OUTPUT LINE 2
Audio(L/R)/video
output connector with
(composite) video.
IR BLASTER PORT*
Infrared (IR) jack for
controlling a satellite or
cable box with IR control.
BLASTER
PORT
SERIAL
IR
CONTROL
* Serial and IR controls are used only with Satellite receiver equipment and cable boxes.
Serial control can be used only with a Satellite receiver that has a serial port.
TEL LINE
AC~IN
TEL LINE
Telephone jack
(required) for connecting
to the ReplayTV Service.
57
Page 58

Location of Controls (continued)
Remote Control Buttons
1 CODE SET
2 HARD DISK RECORDER
3 TV
4 NUMBER BUTTONS
5 CHANNEL GUIDE
6 REPLAY GUIDE
7 CHANNEL UP/ DOWN
8 RETURN TO LIVE
9 SELECT LEFT
18
RED LED
19
POWER
20
SAT/CABLE
21
VCR/DVD
22
ENTER
23
REPLAY ZONES
24
VOLUME UP/ DOWN
25
MUTE
26
SELECT UP
10
SELECT DOWN
11
INSTANT REPLAY
12
REWIND
13
RECORD
14
PLAY/ SLOW
15
JUMP
16
INPUT
17
DISPLAY
27
SELECT RIGHT
28
SELECT
29
QUICK SKIP
30
FF (Fast Forward)
32
EXIT
33
34
STOP
31
PAUSE
TV/ VCR
35
MENU
58
Page 59

1
Code Set
Used to program the remote control to operate
additional home entertainment components. See
“Setting Up Your Components” on page 42.
2
Hard Disk Recorder
Puts the remote control in the Hard Disk Recorder
mode, giving you control of the Hard Disk
Recorder features and functions.
3
4
5
6
7
8
9
11
12
34
15
16
20
TV SAT/CABLE VCR/DVD
Puts the remote control in a particular mode—to
operate your television, satellite receiver, cable
box, VCR, DVD, TV/VCR Combo, or laser disk. If a
component does not respond when you press a
remote control button (or responds incorrectly),
press the appropriate device button (HARD DISK
RECORDER, TV, SAT/CABLE, VCR/DVD) first to
choose which component to operate.
Number buttons
Use the keypad (0-9) to directly select channels
(for example, 09 or 31).
Channel Guide
Displays the Channel Guide, an on-screen guide
of all the channels you receive.
Replay Guide
Displays the Replay Guide, a menu of the shows
the Hard Disk Recorder has recorded for you.
Channel Up/Down
Enable you to select the next higher (or lower)
television channel.
Return to Live
Return to live television after using PAUSE, REW,
FF or STOP.
Select Left Right Up Down
Control navigation (move the yellow highlight bar)
around on-screen menus.
Instant Replay
Skips back 7 seconds in a live or recorded show.
REW PLAY/SLOW FF REC
STOP PAUSE
Used to control the similar functions on your video
components.
Jump
Similar to a “Last Channel” or “Recall” button on a
television remote control, allowing you to quickly
jump back to the channel you were watching
previously.
Input
Press INPUT to switch the input of the chosen
component. If you have more than one component
connected to your television, you may have to
scroll through several inputs to find the one that
corresponds to the component you want to see on
the screen.
27 26
14
31
21
30
10
13
17
Display
Activates the on-screen display function for each
of your home entertainment components.
18
Red LED
Flashes red to indicate that the remote control is
working and sending a signal.
19
POWER
Turns on or off the currently selected video
component (Hard Disk Recorder, TV, VCR, cable
box, or a re-assigned video component).
22
Enter
Operates the same way as the Enter button on
your original television remote control. If your
television remote control required you to use an
Enter button to change channels, use the ENTER
button on the Hard Disk Recorder remote control
after entering the appropriate channel number.
23
Replay Zones
Takes you to the screen where you can create a
Theme-based Replay channel and channels from
topical television categories collected by the
ReplayTV Service.
24
Volume Up/Down
Raises or lowers the sound volume on your
television.
25
Mute
Turns television sound on or off.
28
Select
Use to choose options from a selected
component’s menu or guide.
29
QuickSkip
Skips forward 30 seconds in a recorded show,
allowing you to jump ahead through unwanted
parts of the show. Also works for a live broadcast if
you have used the STOP, PAUSE, or REW
buttons.
32
Exit
Exit a selected component’s on-screen menu or
guide.
33
TV/VCR
This button works the same way as the TV/VCR
button on your original VCR remote control. It also
controls the following functions in other modes:
TV mode = TV/VIDEO; CABLE mode = A/B.
35
Menu
Press MENU to access the menu of your chosen
component.
Location of Controls
59
Page 60

Panasonic Consumer Electronics Company,
Division of Matsushita Electric Corporation of America
One Panasonic Way Secaucus,
New Jersey 07094
Printed in U.S.A.
LSQT0269B
P
 Loading...