

Panasonic NV-SJ530EU, NV-SJ530AU, NV-SJ530AM User Manual
Video Cassette Recorder
Model No.
NV-SJ530 Series
Operating Instructions
Contents Page
Warning and Important Information 2
Controls and Components 3
Connections 5
Tuning the TV to Your VCR 6
Storing TV Broadcasts in Your VCR 7
Language Setting of the On Screen Display 10
Setting the Clock of Your VCR 10
Settings Using the On Screen Display 11
Option Setting 12
Playback 13
Recording 15
Timer Recording 18
Search Functions 20
Before Requesting Service 22
Specifications 24
VQT9646
Before attempting to connect, operate or adjust this
product, please read these instructions completely.

Warning and Important
Information
As this equipment gets hot during use, operate it
in a well ventilated place; do not install this
equipment in a confined space such as a book
case or similar unit.
WARNING:
To reduce the risk of fire electric shock or
product damage, do not expose this equipment
to rain, moisture, dripping or splashing and
ensure that no objects filled with liquids, such as
vases, shall be placed on the equipment.
Important
Your attention is drawn to the fact that the recording of
pre-recorded tapes or discs or other published or broadcast
material may infringe copyright laws.
For your safety
Do not remove outer cover.
Touching internal parts of the VCR is dangerous, and may
seriously damage it.
To prevent electric shock, do not remove cover. There are no
user serviceable parts inside. Refer all servicing to qualified
service personnel.
Inserting Remote Control Batteries
Insert the batteries with the polarity (+ and -) correctly
aligned.
+
+
Notes:
The service life of the batteries is approximately 1 year.
However, it varies considerably depending on the frequency
of use.
– When they are exhausted, replace them with two AA, UM3,
or R6 size batteries.
– When the batteries are exhausted, remove them
immediately and dispose of them correctly.
– Make sure that the batteries are inserted with the polarity
(+ and -) correctly aligned.
– Do not mix old battery with new battery.
– Do not mix different battery types, i.e. Alkaline and
Manganese.
– Do not use rechargeable (Ni-Cd) batteries.
– Do not heat or short-circuit the batteries.
– When you do not use the remote control for a long time,
take out the batteries and store them in a cool, dry place.
Longrun Head System
This longrun head system enables approximately 8,000 hours
of recording/playback with high quality images.
Newly developed head cylinder with narrower head windows
and tapered cylinder design effectively protects heads from
dust and prevents head clogging.
Plus, [Alumina] Head Cleaner further enhanced cleaning
efficiency.
– Based on in-house tests with Panasonic video cassettes.
Actual head life may vary according to conditions of use,
tape type, temperature, humidity, etc.
Cautions before you operate this VCR
Avoid:
– Humidity and dust.
– Covering the ventilation holes with soft materials such as
cloth or paper.
– Extreme heat such as direct sunlight.
– Magnets or electromagnetic objects.
– Touching internal parts of the VCR.
– Water or some other liquid.
– Lightning. (Disconnect the aerial plug from the VCR during
lightning storms.)
– Anything heavy on the VCR.
– Connecting or handling the equipment with wet hands.
– Using a cell phone near the VCR because doing so may
cause noise to adversely affect the picture and sound.
Do:
– Wipe the VCR with a clean and dry cloth.
– Install the VCR in a horizontal position.
– Keep the VCR, TV and other equipment switched off until
you have finished all connections.
Condensation may form in the following cases:
– The VCR is brought from cold surroundings into a
well-heated room.
– The VCR is suddenly brought from cool surroundings, such
as an air-conditioned room or car, to a place which is hot
and humid.
Note:
– In any of the above-mentioned conditions, do not operate
the VCR for at least 1 hour.
This VCR is not equipped with a dew sensor.
Press the POWER button 1 to switch the VCR from on the
standby mode or vice versa. In the standby mode, the VCR is
still connected to the mains.
Plug in Auto Tuning
Aerial
1 Connect the
aerial cable.
Setting image illustration
TV
2 Connect the
mains lead.
3 Press the POWER
button 1.
All broadcasting stations that can be received in the area
are automatically tuned and stored in memory.
– Do not turn off the VCR halfway. (See page 7.)
2
On Screen Display
AUTO TUNING
IN PROGRESS,
PLEASE WAIT.
CH 22 SEARCH
END: MENU
21
Plug in Auto
Tuning is
completed.
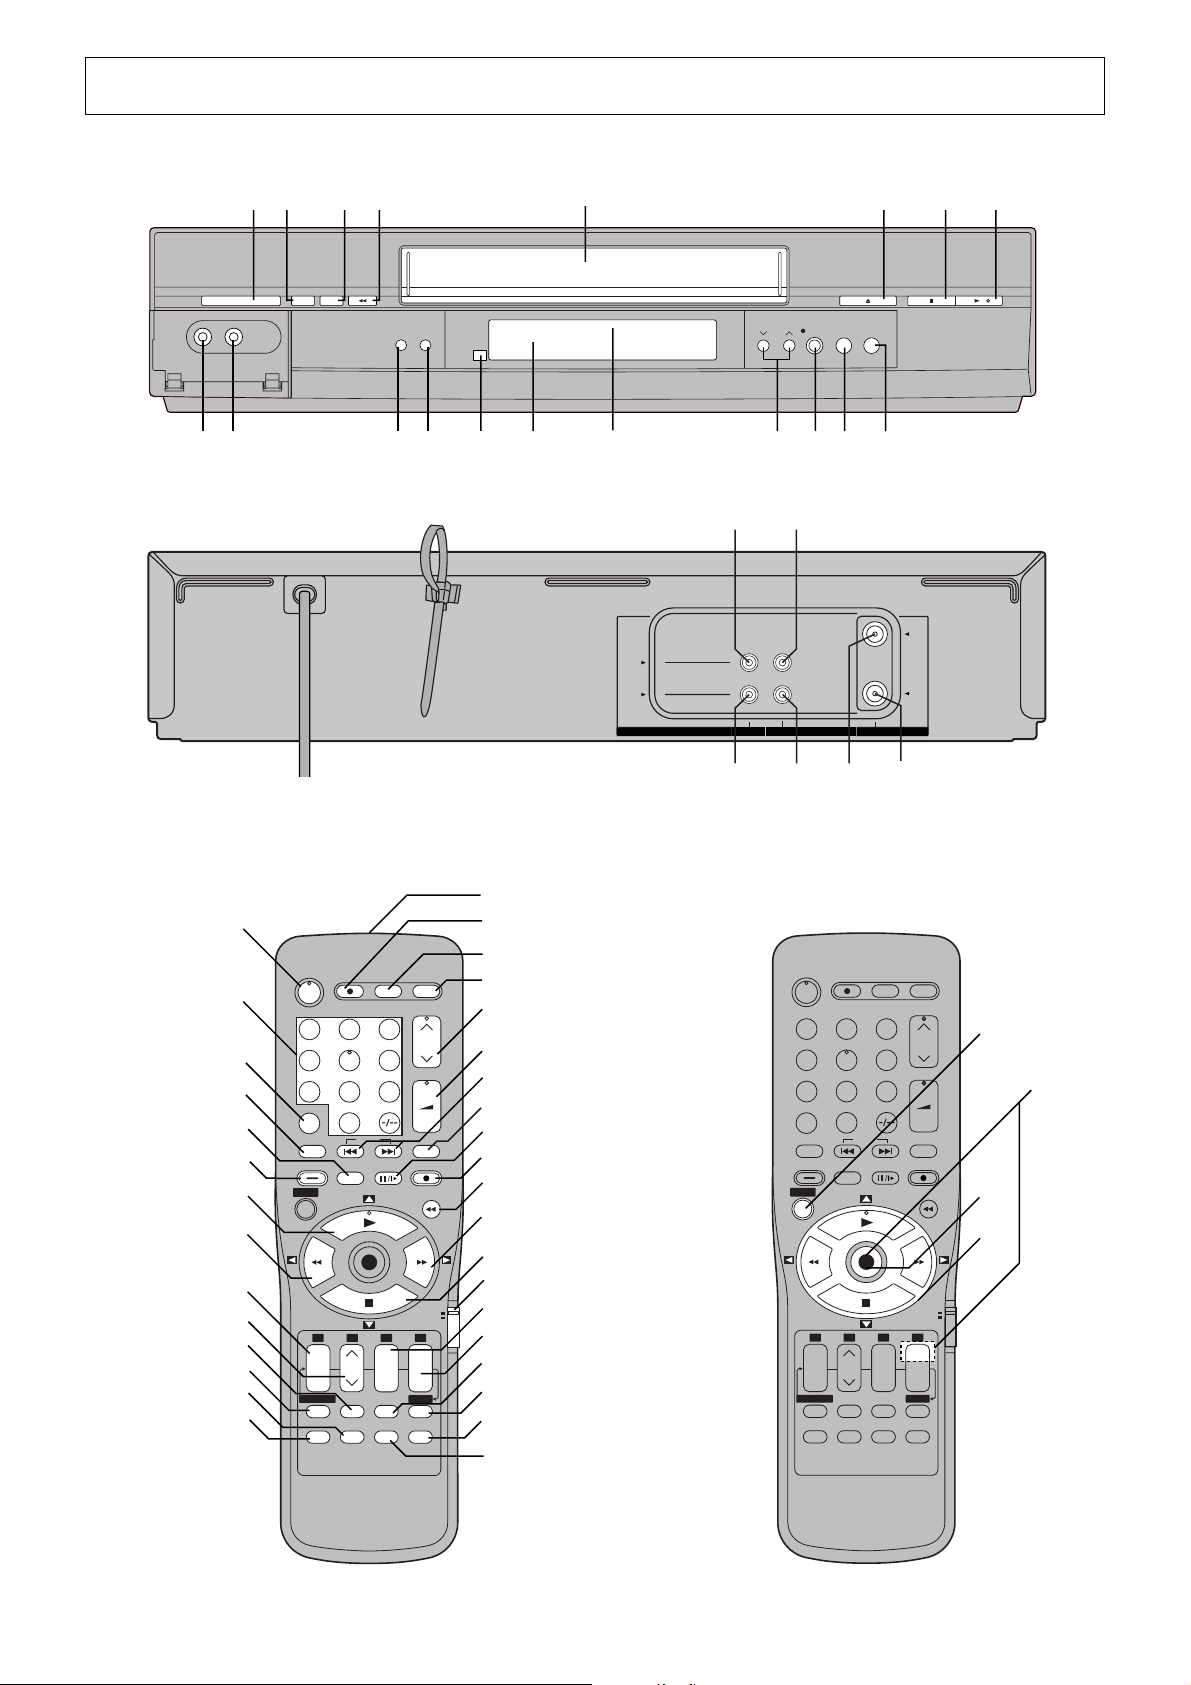
Controls and Components
Y
1
POWER
Í/ I Á
Z
A
TIMER REC
SEARCH
6
JET REW
H
REFRESH
[
6
8
d
X
EJECT
5
5/
/6
G
W
TAP E
PICTURE
MODE
]^ _
\
5
CVC
REC/OTR
N
IN (AV1
a
)
OUT
c
`
VIDEO
AUDIO
b
RF
e
F
STOP PLAY
IN
OUT
7
1
2
3
4
5
6
7
8
9
:
;
<
=
>
POWER
DIRECT REC
Í
123
4
7809
AV
NAVI
SEARCH
MENU
1 2 3 4
++–+
DATE
–
PROG. / CHECK
DISPLAY
REPEAT
5
INDEX
PICTURE MODE
OK
ON OFF
CH
CANCEL
SPEED
RESET AUDIO
6
INPUT SELECT
VOLUME
+
–
REC
JET REW
VCR
TV
–
TIMER
Á
OSD
R
Q
P
O
N
M
L
K
J
I
H
G
F
E
D
C
B
A
@
?
POWER
DIRECT REC
Í
123
4
7809
AV
NAVI
SEARCH
MENU
1 2 3 4
++
DATE
–
PROG. / CHECK
DISPLAY
REPEAT
5
INDEX
PICTURE MODE
OK
ON OFF
CH
––
CANCEL
SPEED
RESET AUDIO
6
INPUT SELECT
VOLUME
+
–
REC
JET REW
VCR
TV
+
TIMER
Á
OSD
U
V
T
S
3

VCR Operation
– Set the VCR/TV switch E to [VCR].
1 POWER button
2 Numeric buttons
To select the programme positions (1– 99).
Example:
To enter numbers for various settings.
3 AV button
4 NAVI button
5 PICTURE MODE button
6 SEARCH button
7 Play button
8 Rewind button
9 DATE button
: CH button
; CANCEL button
< PROG./CHECK button
= RESET button
> DISPLAY button
? AUDIO button
This button dose not operate on this VCR.
@ OSD button
A TIMER (REC) button
B SPEED button
C OFF button
D ON button
E VCR/TV switch
F Stop button
G Fast Forward button
H JET REW button
I REC button
J Pause/Slow button
K No function
L INDEX button
M VOLUME button
N Channel button
O INPUT SELECT button
P REPEAT button
Q DIRECT REC button
R Infra-red transmitter
S Cursor buttons
T OK button
U MENU button
9:
19:
9
1
9
V Child Lock Function buttons
(Convenient function to prevent unauthorized use)
This function deactivates all buttons on the VCR and the
remote control. Use this function, when you do not want
other people to operate the VCR.
To Activate the Child Lock Function:
1 Hold down the OK and the OFF (i) buttons V
simultaneously until the [!" hold] indication appears in
the VCR display.
– If you press a button while the Child Lock function is on,
the [!" hold] indication appears in the VCR display to
inform you that no operation is possible.
To Cancel the Child Lock Function:
1 Hold down the OK and the OFF (i) buttons V
simultaneously until the [!" hold] indication
disappears.
W Cassette compartment
X EJECT button
Y VIDEO IN (AV2)
Z AUDIO IN (AV2)
[ TAPE REFRESH button
\ Infra-red Remote Control Receiver window
] VCR display
^ CVC indicator
The crystal view control function ensure that you always
obtain the optimum picture quality so that you get the best
picture automatically.
While the VCR is turned on, the CVC indication ^ is
always displayed to show that the Crystal View Control is
activated.
_ REC/OTR button
` VIDEO IN socket
a VIDEO OUT socket
b AUDIO IN socket
c AUDIO OUT socket
d RF IN socket
e RF OUT socket
TV Operation
– Set the VCR/TV switch E to [TV].
1
You can use the POWER 1°
VOLUME M°
4
and Channel N°5 button for your TV operation.
(See page 5.)
1
To switch the TV on from standby mode (OFF) or vice
°
versa.
On some TVs it is only possible to switch the TV to
standby mode (OFF) with this button, but not on. In this
case, try to turn the TV on with one of the following
buttons:
Numeric buttons 2
AV button 3
Channel button N
2
To select the programme positions (1– 99) on the TV.
°
3
To select desired AV input on the TV.
°
4
To adjust the volume of the TV.
°
5
°
To select the desired programme position (TV station) on
the TV.
, Numeric 2°2, AV 3°3,
4
Setting the Remote Control to Operate
Your TV
Connections
You can operate the TVs of the manufacturers listed below
with the remote control after setting it.
This setting procedure allows you to operate the TVs of some
manufacturers using the supplied remote control.
Preparation
– Set the VCR/TV switch E to [TV].
Operations
1 Find the manufacturer number of your TV while
referring to the following table.
2 While holding down the POWER button 1, use the
Numeric buttons 2 to enter the manufacturer number.
This completes the settings for the TV manufacturer.
– Be sure to enter the number in two digits.
Example: 1 ) 01
3 To confirm the correct settings were made, check
whether the TV can be operated properly.
– When a manufacturer has multiple numbers in the
following table, try entering other numbers if the TV
operations cannot be performed properly, and then
select the optimal number.
This section shows you how to connect the VCR to an aerial,
TV, etc.
When the VCR is turned on after unpacking and
connecting the aerial cable and the mains lead, Plug in
Auto Tuning starts automatically.
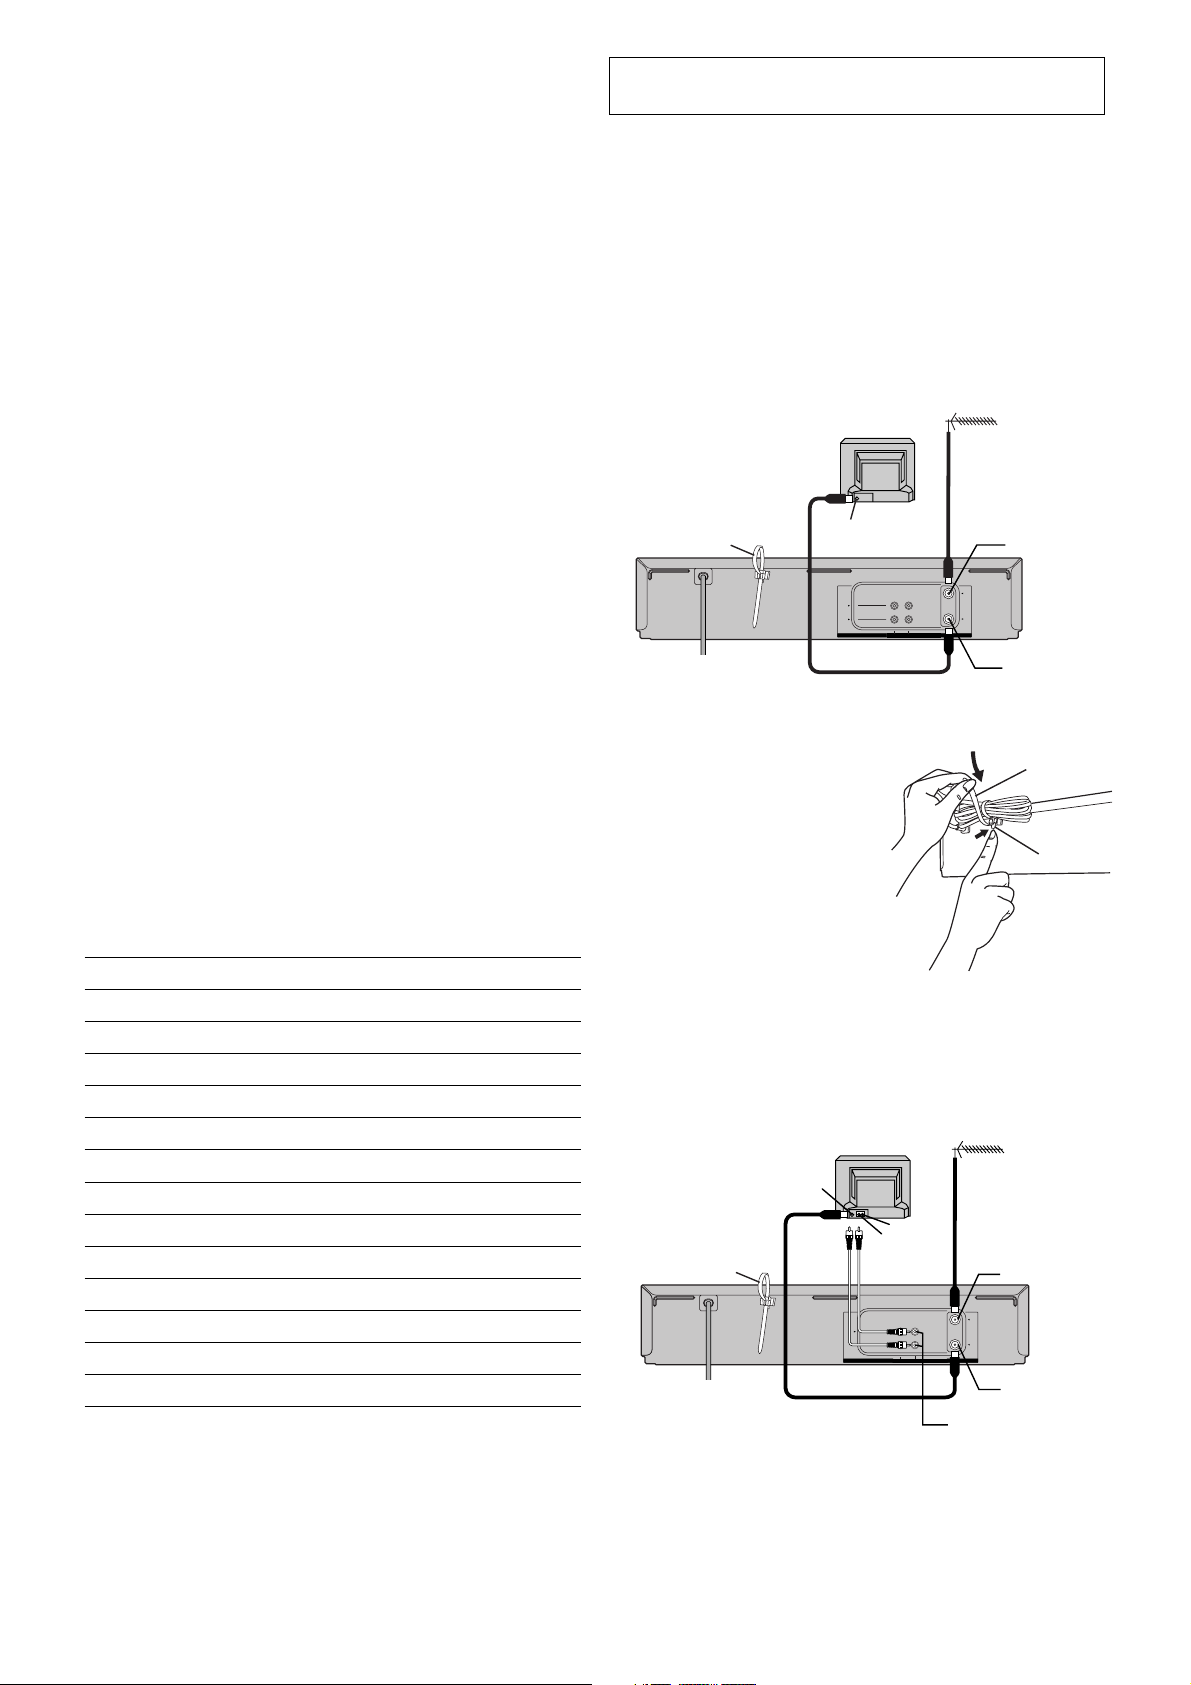
Basic Connections
The following connections are required to record and play
back the video cassette through the TV.
Aerial (Not supplied)
TV Set (Not supplied)
1
Cable Strap
To mains supply
2
Aerial Connector
VIDEO
AUDIO
)
OUT
IN (AV1
3
Aerial Input
socket d
IN
OUT
RF
Aerial Output
socket e
Notes:
– If you are using a Panasonic TV, this setting has already
been made, and so you do not need to perform the above
setting procedure. However, this remote control may not
work with some Panasonic TVs.
– Some TV models cannot be operated using this remote
control (including all TVs non-remote compatible).
List of TVs Compatible with the VCR’s Remote Control
[Brand] [Code]
Panasonic/National 01– 04
SONY 05
TOSHIBA 06
JVC 07
HITACHI 08
MITSUBISHI 09, 10
SHARP 11
PHILIPS, SAMSUNG 12
NEC 13
SANYO 14
GOLDSTAR/LG 15, 16
SAMSUNG 17, 18
SANYO 19
∫ To loose a Cable Strap
Push up a strap in the direction of
Cable Strap
the arrow, pushing a Lock Tab.
Lock Tab
Connection to a TV using the Audio/Video Input Socket:
Set the RF output channel of the VCR to [ss] (RF OFF)
when the VCR is connected to the TV via the Audio/Video
cable. (See page 6.)
Aerial (Not supplied)
VIDEO IN
)
OUT
IN (AV1
1
Aerial Input
socket d
IN
OUT
RF
Aerial Output
socket e
VIDEO OUT a /
AUDIO OUT c
Aerial Connector
Cable Strap
To mains supply
TV Set (Not supplied)
2
3
(Not supplied)
VIDEO
AUDIO
AUDIO IN
4
5

Tuning the TV to Your VCR
21
ss
69
The VCR supplies a signal to the TV via the RF coaxial cable
on channel E21-E69.
It is possible to view the video picture on your TV in the same
way that you watch TV broadcasts.
If you have connected the VCR to the TV through the Audio/
Video input sockets, then you do not need to follow the
procedure below.
When the VCR is turned on after unpacking and
connecting the aerial cable and the mains lead, Plug in
Auto Tuning starts automatically.
To Change the RF output Channel
In some rare cases after tuning the TV to your VCR,
interference may be visible on the picture. To get rid of this
interference, you can manually adjust the RF output channel
a few channels up and down from the current setting. The
procedure is described below.
Operations
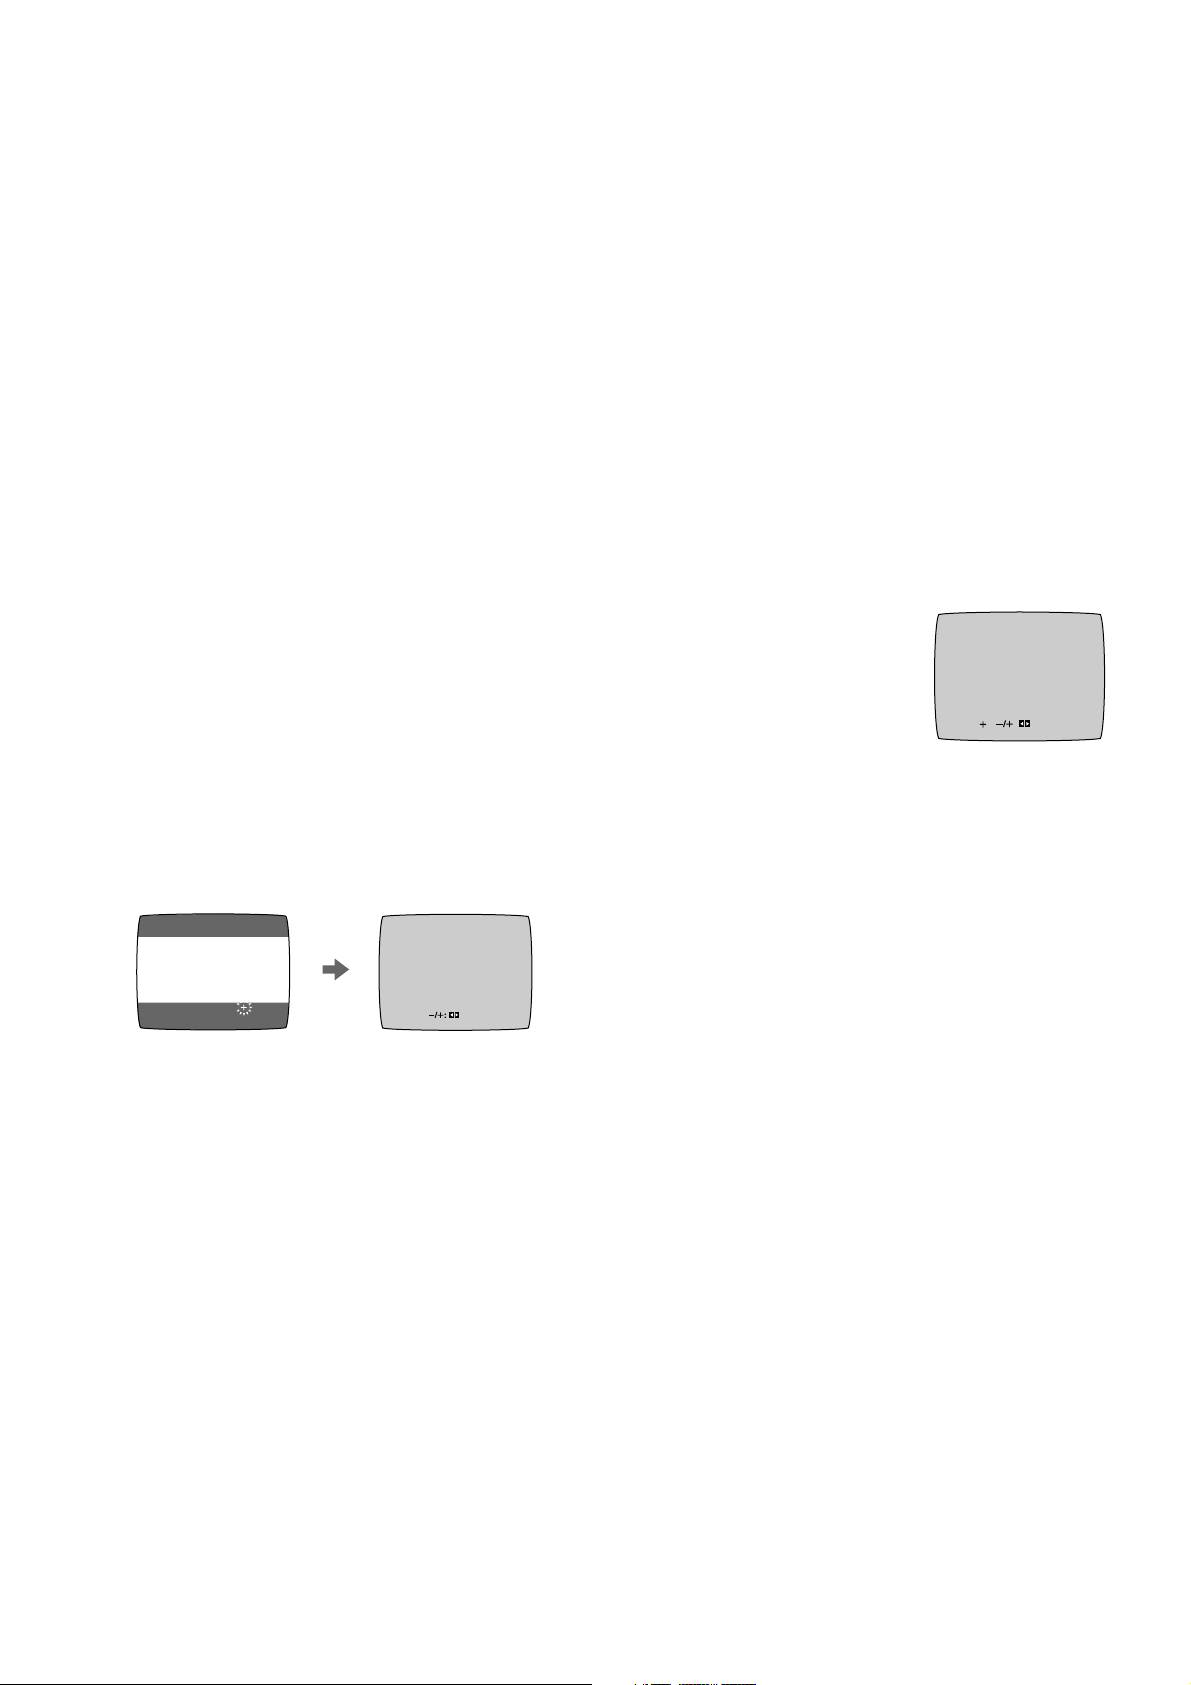
1 Hold down MENU button U for 5 seconds or more.
– The VCR display changes as shown below and the VCR
picture on the TV displays this pattern.
VCR display
Panasonic VCR
Notes:
– If the VCR is turned on with the aerial not connected, all
channels are skipped. Therefore, firmly connect the aerial
and then turn the VCR off and on again to execute Auto
Tuning.
– When Auto Tuning is cancelled halfway, Auto Tuning is not
executed even if the VCR is turned off and then turned on
again. In this case, see page 7 [To Restart Plug in Auto
Tuning].
Operations
1 Turn on the TV and the VCR.
2 Set the TV to an unused position which you wish to
use for your video playback.
– Tune the TV until the display shown below appears on
the screen. (Please refer to the TV manufacturers
operating instructions regarding tuning.)
– Set [RF SELECT] by pressing the Cursor buttons (21)
S to select the colour TV system used by the TV set to
be connected.
BG: PAL B.G.H/SECAM B.G
I: PAL I
DK: PAL D/SECAM D.K.K1
On Screen Display
AUTO TUNING
IN PROGRESS,
PLEASE WAIT.
CH 22 SEARCH
END: MENU
21
AUTO TUNING IS
COMPLETED.
RF SELECT ≥ BG I DK
END: MENU
RF SELECT:
RF SELECT ≥ BG I DK
END: MENU
RF SELECT:
2 Enter the desired channel number (E21-E69) by the
Numeric buttons 2 or the Channel button N.
– Ensure that the VCR/TV switch E is set to [VCR].
– Set the RF output channel of the VCR to [ss] (RF OFF)
when the VCR is connected to the TV via the Audio/
Video cable.
Press the Channel button N to display [ss].
(RF OFF)
– It is also possible to select by pressing the Numeric
buttons 2.
2 8
Example:
28:
3 Press the MENU button U to finish the setting mode.
4 Retune your TV to the new RF channel for the VCR.
Note:
– Even if the RF output channel has been changed, it is not
necessary to perform Auto Tuning.
During Plug in Auto Tuning After Plug in Auto Tuning
3 Press the MENU button U.
6
Storing TV Broadcasts in Your
VCR
The VCR is fitted with its own tuner (just like a normal TV) and
can be preset to receive up to 99 TV broadcast stations.
Plug in Auto Tuning
When the VCR is turned on after connecting the aerial cable
and the mains lead, Auto Tuning starts.
Auto Tuning Using the On Screen Display
Introduction
The VCR is tuned automatically by Plug in Auto Tuning.
However, Auto Tuning using the On Screen Display should
be performed according to the following method if necessary.
Preparations
– Confirm that the TV is on and the VCR viewing channel is
selected.
– Turn on the VCR and select any programme position
except A1 or A2.
– Set the VCR/TV switch E to [VCR].
AUTO TUNING
IN PROGRESS,
PLEASE WAIT.
CH 22 SEARCH
END: MENU
21
Auto tuning searches for TV stations from VHF minimum to
UHF maximum and memorizes every tuned programme
position.
– If you turn the VCR off during Auto Tuning, Auto Tuning will
stop halfway.
– If the VCR starts playback during Auto Tuning, Auto Tuning
will stop halfway.
To Cancel Auto Tuning Mid-Operation:
Press the MENU button U during Auto Tuning. Auto Tuning
is cancelled.
To Restart Plug in Auto Tuning:
1 Press the EJECT button X and remove the video
cassette.
2 Keep the Channel buttons N
on the VCR pressed
simultaneously for 3 seconds or more during the VCR on.
– The channel displayed on the VCR display disappears
for a moment then changes to 1.
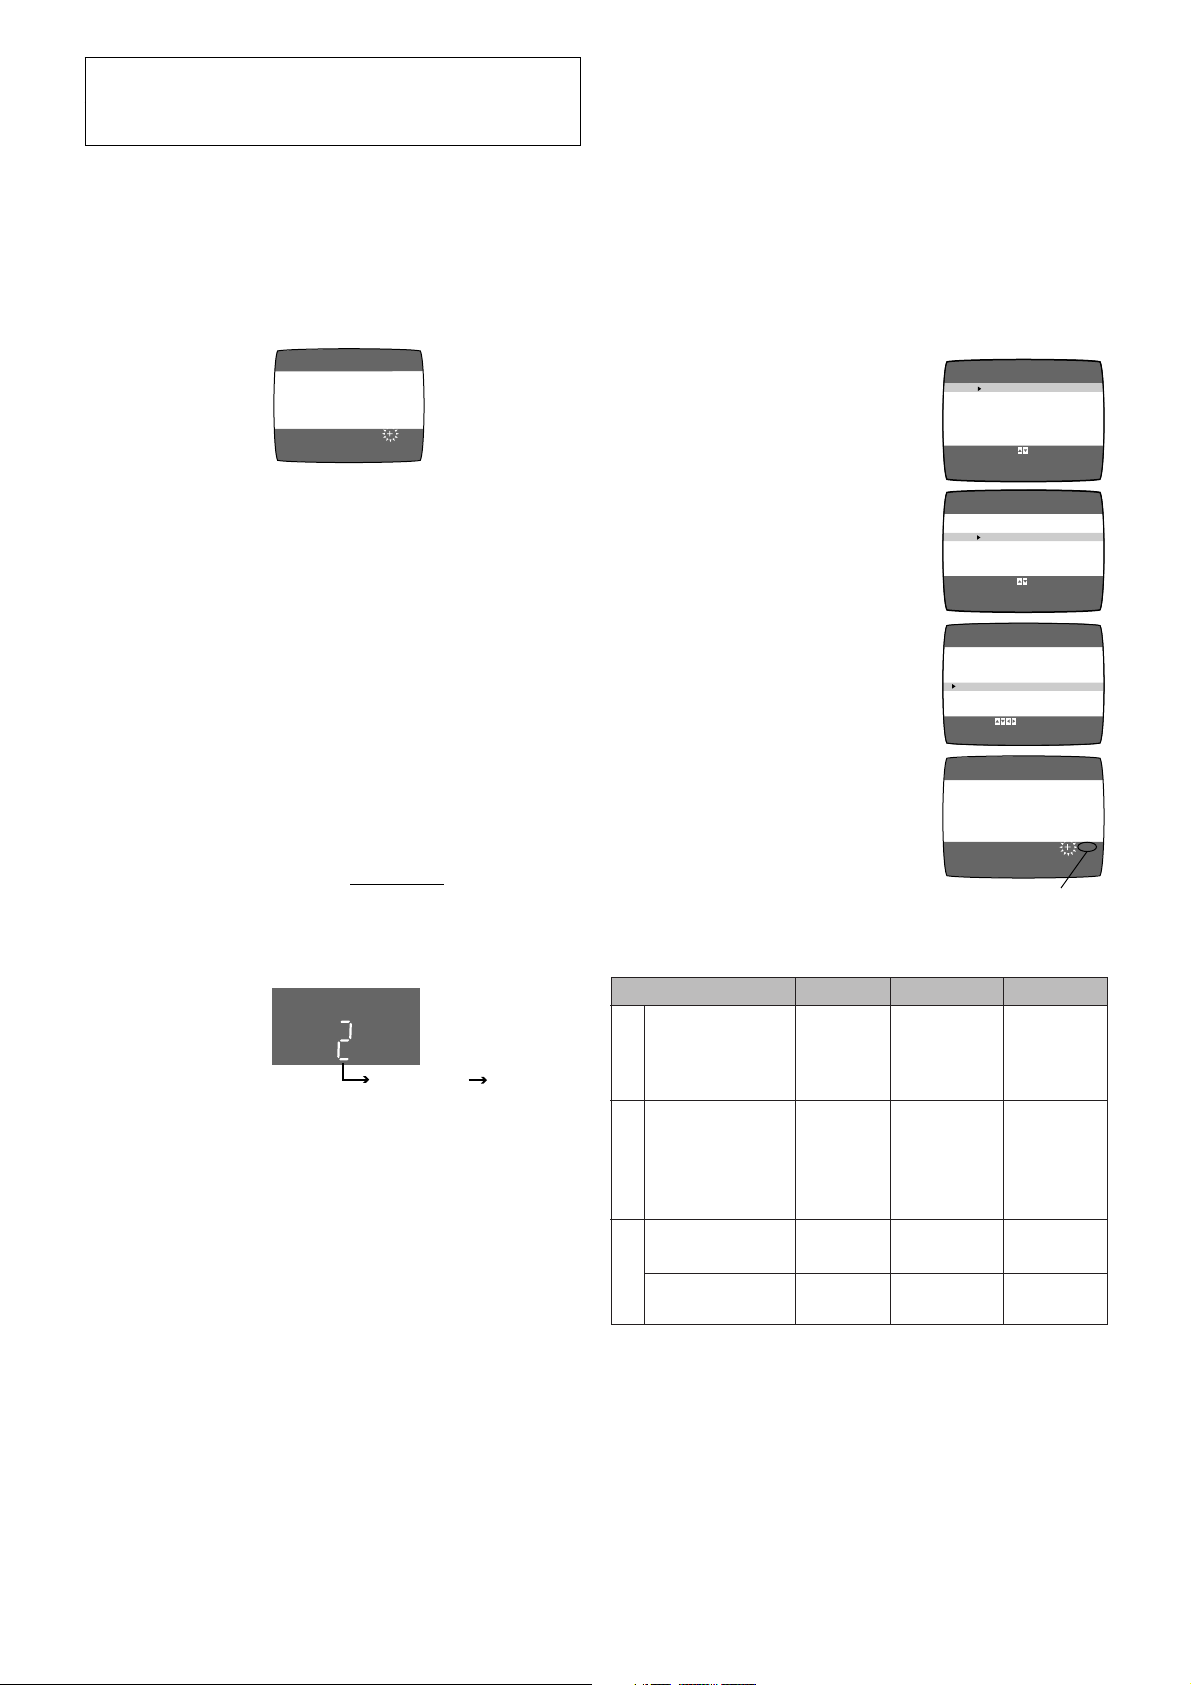
Operations
1 Press the MENU button U to display
the Main menu on the TV screen.
2 Press the Cursor buttons (
3434
34) S
3434
to select [TUNER PRESET] then
press OK button T.
3 Press the Cursor buttons (
3434
34) S
3434
to select [AUTO TUNE] then press
the Cursor buttons (
2121
21) S to start
2121
the Auto Tuning.
– When Auto Tuning is completed,
the On Screen Display disappears
and programme position 1 is
selected.
Channels that can be Received
MENU
LANGUAGE
CLOCK SET
TUNER PRESET
CH ADD&DELETE
SYSTEM
OPTION
SELECT
: , O K
END
:MENU
MENU
LANGUAGE
CLOCK SET
TUNER PRESET
CH ADD&DELETE
SYSTEM
OPTION
SELECT
: , O K
END
:MENU
TUNER PRESET
CH 1
CLEAR
AUDIO SYSTEM
COLOUR SYSTEM[AUTO
AUTO TUNE
SEARCH
FINE
SELECT:
AUTO TUNING
IN PROGRESS,
PLEASE WAIT.
CH 1
END: MENU
The number displayed here
is the number of channels
still to be auto tuned.
SEARCH
[
OFF
END :MENU
[BG]
[3]
100
]
]
Disappears
1
3 Disconnect the mains lead and then reconnect it.
4 Turn off the VCR and then turn it on.
– Auto Tuning commences.
If Auto Tuning stops halfway by turning the VCR off,
playback or a power failure:
1 Disconnect the mains lead and then reconnect it.
2 Turn off the VCR and then turn it on.
– Auto Tuning commences.
SYSTEM
VHF
CATV
UHF
S01–S05
B
CCIR Standard
G
(B.G.H)
E2–E12
M1–M10
U1–U10
E21–E69
S21–S41
Hong Kong
Special
I
Administrative
––
E21–E69
Region of China,
UK (I)
East Europe
(D.K.K1)
D
K
China
(D)
C1–C12
44–470MHz
E21–E69R1–R12
C13– C57Z1–Z35
Notes:
– Auto Tuning searches for TV stations from VHF minimum to
UHF maximum and memorizes every tuned programme
position. Other programme positions are skipped.
– Auto Tuning takes five or more minutes to complete its
search.
– If the VCR is not correctly tuned by Auto Tuning, follow the
procedure on page 8.
7
Manual Tuning Procedure
Direct Tuning
1 Press the MENU button U to display the Main menu on
the TV screen.
2 Press the Cursor buttons (34) S to select [TUNER
PRESET] then press OK button T.
3 Press the Cursor buttons (34) S to select [CH] then
select the channel number you want tuned by pressing
the Cursor buttons (21) S.
4 Confirm that [CLEAR] is set to [OFF].
5 Press the Cursor buttons (34) S to select [AUDIO
SYSTEM] then select the broadcasting system by
pressing the Cursor buttons (21) S.
– BG: PAL B.G.H/SECAM B.G
– I: PAL I
– DK: PAL D/SECAM D.K.K1
6 Press the Cursor buttons (34) S to select [COLOUR
SYSTEM] then select [AUTO] by pressing the Cursor
buttons (21) S.
– The VCR automatically distinguishes between PAL and
SECAM broadcasts.
– If the picture lacks colour when [AUTO] is selected,
select [MESECAM] or [PAL].
7 Press the Cursor buttons (34) S to select [SEARCH]
then press the Cursor buttons (21) S to start the
Manual Tuning.
– If the desired TV station has not been tuned, press the
Cursor buttons (21) S again.
– Press the MENU button U and repeat steps 3–7 for
each programme position you want to tune to a station.
On Screen Display
CH 2
SEARCH
END: MENU
CH 2 SEARCH 74
END: MENU
Follow steps 1 to 3 of Manual Tuning Procedure.
4 Confirm that [CLEAR] is set to [OFF].
5 Press the Cursor buttons (34) S to select [SEARCH].
6 Press the Numeric buttons 2 to enter the number of the
desired programme position.
– For other channels that require tuning, repeat
steps 3– 6.
7 Press the MENU button U twice to exit the On Screen
Display.
Fine Tuning Procedure
Follow steps 1 to 3 of Manual Tuning Procedure.
4 Press the Cursor buttons (34) S to select [FINE] then
press the Cursor buttons (21) S to obtain the best
tuning condition.
– Press the OK button T to return the tuning to its former
state.
5 Press the MENU button U to exit
the On Screen Display.
CH 2 AFC: OK
FINE : END: MENU
Blanking of Unused Programme Positions
Follow steps 1 to 3 of Manual Tuning Procedure.
4 Press the Cursor buttons (34) S to select [CLEAR] then
press the Cursor buttons (21) S to select [ON].
– Repeat steps 3– 4 for other unused programme
positions to skip during the selection of programme
positions.
– To cancel the blanking of a programme position select
that programme position then set [CLEAR] to [OFF].
8 Press the MENU button U three times to exit the On
Screen Display.
5 Press the MENU button U twice to exit the On Screen
Display.
8
 Loading...