


Video Cassette Recorder Line Recording
Model No.
NV-SJ50AM
Operating Instructions
Contents
Precautions 3
Connections 4
Tuning the TV to your
VCR (Line Recording) 4
Menu Setting 5
Playback 6
Play-Off Timer 8
Recording and Editing 9
Other Functions 12
Before Requesting Service 14
VQT9788
Specifications 15
Before attempting to connect, operate or adjust
this product, please read these instructions
completely.
As this equipment gets hot during use,
operate it in a well ventilated place; do
not install this equipment in a confined
space such as a book case or similar
unit.
WARNING:
To reduce the risk of fire, electric shock
or product damage, do not expose this
equipment to rain, moisture, dripping or
splashing and ensure that no objects
filled with liquids, such as vases, shall be
placed on the equipment.
IMPORTANT
Your attention is drawn to the fact that
recording of pre-recorded tapes or discs or
other published or broadcast material may
infringe copyright laws.
On Colour system
This unit is designed to play back programmes
based on the PAL (B/G and D/K) and SECAM (B/
G and D/K) colour systems.
• Tapes recorded with the French SECAM colour
system can be played back on this unit but the
picture displayed will be black and white.
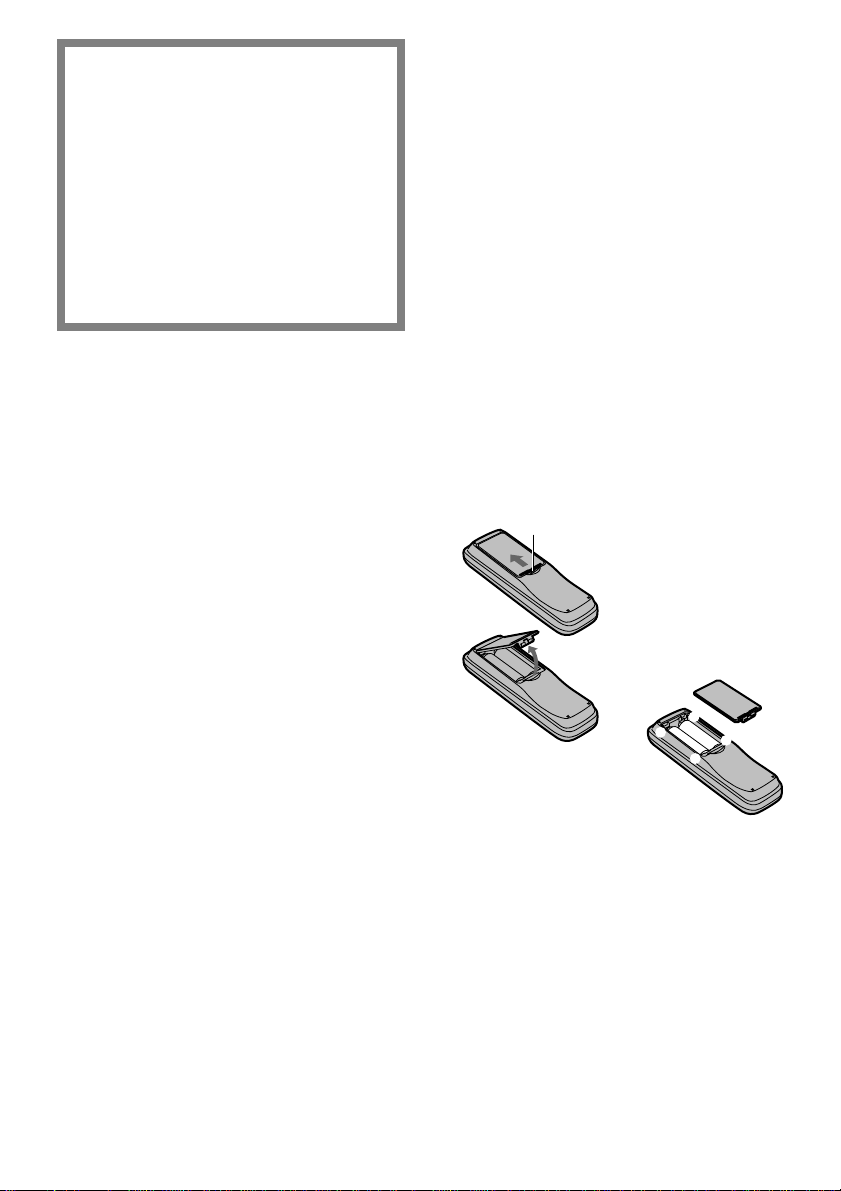
Infrared Remote Control
Power Source for the Remote Control
The remote control is powered by 2 UM3 or R6
size batteries. The life of the batteries is about
one year, although this depends on the
frequency of use.
Precautions for Battery Replacement
• Load the new batteries with their polarity (+
and -) aligned correctly.
• Do not apply heat to the batteries, or an internal
short-circuit may occur.
• If you do not intend to use the remote control
for a long period of time, remove the batteries
and store them in a cool and dry place.
• Remove spent batteries immediately and
dispose of them.
• Do not use an old and a new battery together,
and never use an alkaline battery with a
manganese battery.
• Do not use rechargeable batteries.
Opening the cover
A
1 While pressing the
indentation A in the
direction indicated by
the arrow...
FOR YOUR SAFETY
DO NOT REMOVE OUTER COVER.
To prevent electric shock, do not remove cover.
No user serviceable parts inside. Refer servicing
to qualified service personnel.
Longrun Head System
This longrun head system enables approximately
8,000 hours of recording/playback with high
quality images. Newly developed head cylinder
with narrower head windows and tapered
cylinder design effectively protects heads from
dust and prevents head cloging. Plus, “Alumina”
Head Cleaner further enhanced cleaning
efficiency.
• Based on in-house tests with Panasonic video
cassettes. Actual head life may vary according
to conditions of use, tape type, temperature,
humidity, etc.
2
2 Lift the cover up.
+
-
Loading the batteries
-
+
Precautions
Please read these precautions before you
operate this VCR (Line Recording).
Avoid:
• Humidity and dust.
• Extreme heat such as direct sunlight.
• Magnets or electromagnetic objects.
• Touching internal parts of the VCR (Line
Recording).
• Water or some other liquid.
• Lightning. Disconnect the aerial plug from the
VCR (Line Recording) during lightning storms.
• Anything heavy on the VCR (Line Recording).
• Connecting or handling the equipment with wet
hands.
• Using a cell phone near the VCR (Line
Recording) because doing so may cause noise
to adversely affect the picture and sound.
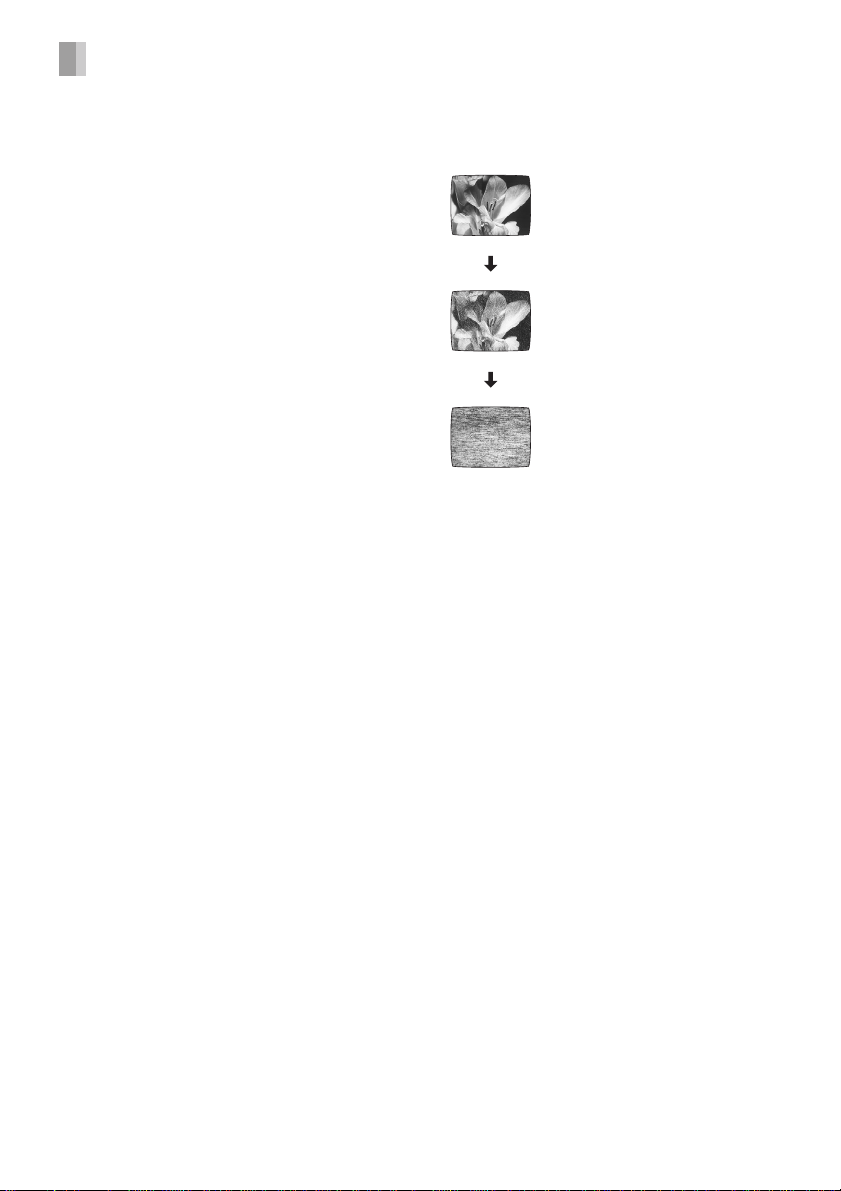
Dirt on the Video Heads
If the video heads get dirty, pictures will not be
recorded or played back clearly.
(See the following conditions.)
Normal picture
Small amount
of dirt
Large amount
of dirt
Do:
• Wipe the VCR (Line Recording) with a clean
and dry cloth.
• Install the VCR (Line Recording) in a horizontal
position.
• Keep the VCR (Line Recording), TV and other
equipment switched off until you have finished
all connections.
Condensation may form in the following
cases:
• The VCR (Line Recording) is brought from cold
surroundings into a well-heated room.
• The VCR (Line Recording) is suddenly brought
from cool surroundings, such as an
air-conditioned room or car, to a place which is
hot and humid.
Note:
• In any of the above-mentioned conditions, do
not operate the VCR (Line Recording) for at
least 1 hour. This VCR (Line Recording) is not
equipped with a dew sensor.
If this happens, clean the video heads with a
commercially available cleaning cassette.
If the problem still persists after performing the
above, contact qualified service personnel to
request assistance.
3
Connections
B.G.H
D.K.K1
CH ADJ.
RF SELECT
OUT
IN
AUDIO
VIDEO
RF OUT
RF IN
A-2
A-3
A-1
(1)
(2)
(3)
B.G.H
D.K.K1
CH ADJ.
RF SELECT
OUT
IN
AUDIO
VIDEO
RF OUT
RF IN
B-2
B-1
(1)
(2)
(3)
(4)
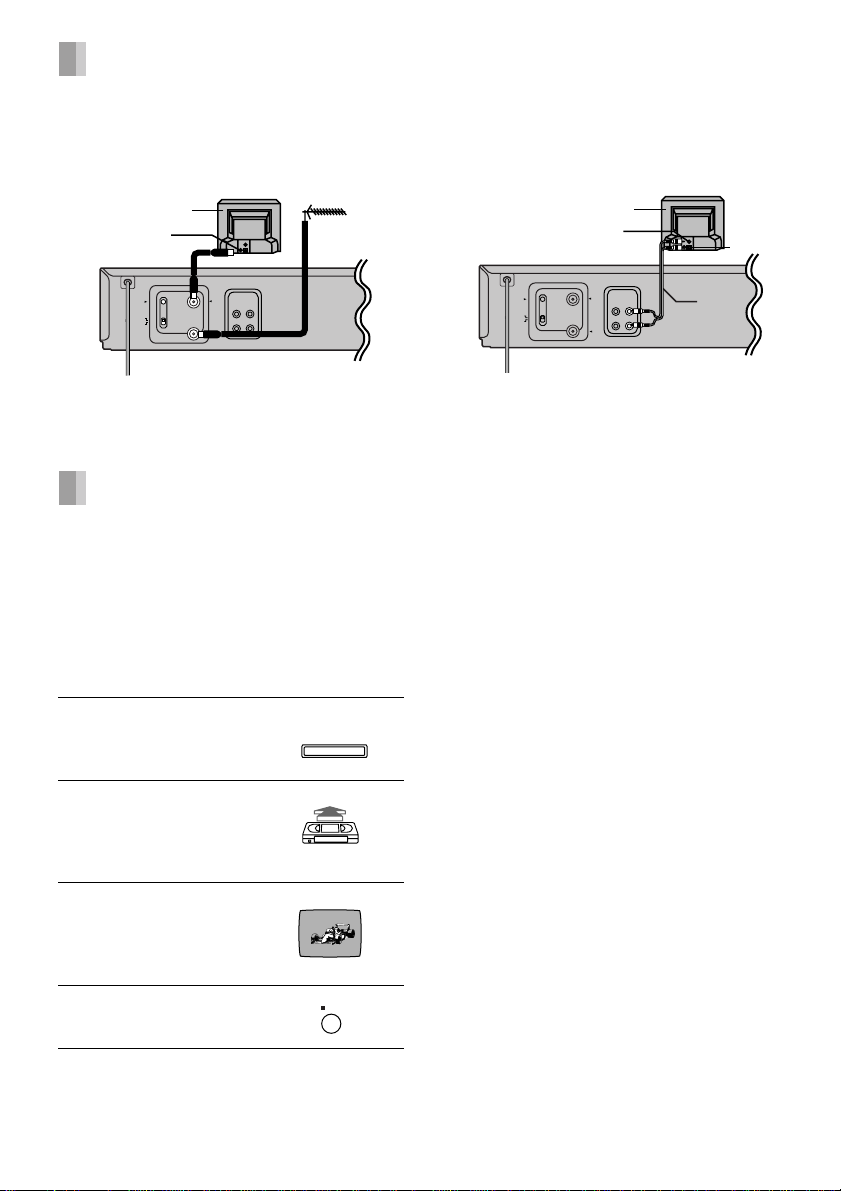
A: Basic Connections
(1) TV Set (Not Supplied)
(2) Aerial Connector
(3) Aerial (Not Supplied)
Tuning the TV to your VCR (Line Recording)
It is possible to view the video picture on your TV
in the same way that you watch TV broadcasts.
If you have connected the VCR (Line
Recording) to the TV through the Audio/Video
Input Sockets, then you do not need to follow
the procedure below.
Operations
1 Turn on the TV and
VCR (Line Recording).
2 Insert a recorded video
cassette tape.
• To start playback, see
page 6.
3 Select the TV channel on
which the playback picture is
viewed.
• UHF channel E38
4 Stop playback.
4
POWER Í/ I
STOP
B: Connection to a TV using the
Audio/Video Input Socket
(1) TV Set (Not Supplied)
(2) VIDEO IN
(3) AUDIO IN
(4) AV Cable (Not Supplied)
The playback picture is transmitted on channel
E38 of the broadcasting channels. If you are
encountering interference from another
broadcast on the video channel, you may
readjust to a free channel by using [CH ADJ.]
screw. Note that if [CH ADJ.] screw is used, then
you will have to re-tune your TV to the playback
picture following steps 2–4.
RF SELECT
Use [RF SELECT] to select the colour TV system
used by the TV to be connected.
B.G.H: PAL B.G.H./SECAM B.G.
D.K.K1: PAL D/SECAM D.K.K1
POWER Í/I Button
Press to switch the VCR (Line Recording) from
on to the standby mode or vice versa. In the
standby mode, the VCR (Line Recording) is still
connected to the mains. When the VCR (Line
Recording) is turned off, the [STANDBY]
indicator (on the front panel) is lit. When the VCR
(Line Recording) is turned on, the [120] indicator
(on the front panel) is lit.

Menu Setting
POWER PICTURE
SPEED
SEARCH
TRACKING/V-LOCK
MENU
PLAY
REW
1,4
JET REW
INDEX
STOP
DISPLAY
LANGUAGE
1 Press [MENU].
2 Select [LANGUAGE].
3 Select one of the two
languages displayed:
English and Arabic.
4 Press [MENU] to make the on screen display
disappear.
2
3
RESET
FF
OSD
MENU
LANGUAGE
[¡ENGLISH ]
TAPE SELECT [AUTO]
SYSTEM [AUTO]
NTSC INPUT SELECT [AUTO]
NTSC PB SELECT [onPALTV]
SELECT:
dF«WO
END :MENU
[AUTO]:
Allows PAL, MESECAM or NTSC signals to be
distinguished automatically.
Normally set at this position. If the picture
lacks colour when [AUTO] is set, set to [PAL],
[MESECAM] or [NTSC].
[PAL]:
Use when recording or playback in the PAL
system.
[MESECAM]:
Use when recording or playback in the
MESECAM system.
[NTSC]:
Use when recording or playback in the NTSC
system.
[B/W]:
Use when recording or playback in the black
and white.
4 Press [MENU] to make the on screen display
disappear.
TAPE SELECT
Select the corresponding video cassette tape
length to display the approximate remaining tape
time.
1 Press [MENU].
2 Select [TAPE SELECT].
3 Select the corresponding video cassette tape
length.[AUTO]:
The VCR automatically distinguishes E30, -60,
-90, -120, -150, -180, and -240 tapes.
[E195]:
For E195 tape
[E260]:
For E260 tape
[E300]:
For E300 tape
• The remaining tape time may not be
displayed correctly depending on the tape
used.
4 Press [MENU] to make the on screen display
disappear.
SYSTEM
1 Press [MENU].
2 Select [SYSTEM].
3 Select [AUTO], [PAL], [MESECAM], [NTSC] or
[B/W].
NTSC INPUT SELECT
1 Press [MENU].
2 Select [NTSC INPUT SELECT].
3 Select [AUTO], [4.43] or [3.58].
[AUTO]:
Allows NTSC 4.43 or 3.58 signals to be
distinguished automatically.
[4.43]:
Use when recording NTSC 4.43 signals.
[3.58]:
Use when recording NTSC 3.58 signals.
4 Press [MENU] to make the on screen display
disappear.
NTSC PB SELECT
1 Press [MENU].
2 Select [NTSC PB SELECT].
3 Select [on PAL TV], [4.43] or [3.58].
[on PAL TV]:
Use when playing back a tape recorded in the
NTSC system on PAL TV.
[4.43]:
Use when playing back a tape recorded in the
NTSC system in 4.43 mode.
[3.58]:
Use when playing back a tape recorded in the
NTSC system in 3.58 mode.
4 Press [MENU] to make the on screen display
disappear.
5

Playback
POWER Í/ I
TAPE REFRESH
PICTURE MODE
EJECT
JET REW
REC/OTR
3125
3
SPEED
RESET
FF
DISPLAY
OSD
AUDIO OUT
1
2
5
¢
4
¢
POWER PICTURE
SEARCH
60
120
30
LP(EP)
REC/
STANDBY
240
OFFÁ/
STOP PLAY
180
¢
No Function
5
6
5/
/6
MENU
REW
JET REW
TRACKING/V-LOCK
PLAY
STOP
INDEX
REC
Preparation
Insert a recorded video cassette tape.
Operations
1 Start viewing the picture by
pressing [PLAY].
• When playing back a tape
which was recorded in the
60
REC/
STANDBY
120
30
LP or NTSC EP mode, the
[LP (EP)] indicator is lit.
• When playing back a tape which was
recorded in the PAL EP mode, the [LP (EP)]
indicator flashes.
2 Search forward by tapping
[FF]. (Cue Playback)
• To change back to normal
playback, press [PLAY].
3 Search backward by tapping
[REW]. (Review Playback)
• To change back to normal
playback, press [PLAY].
4 View a still picture by
pressing [PAUSE/SLOW].
(The picture may not be in
colour.)
60
60
REC/
STANDBY
30
60
REC/
STANDBY
REC/
STANDBY
30
120
120
30
120
• To view a slow motion
picture, keep [PAUSE/
SLOW] pressed for 2
seconds.
60
REC/
STANDBY
30
120
The indicator rotates slowly.
• To continue normal playback, press [PLAY].
Hints:
• To fast forward the tape: Press [FF].
• To rewind the tape: Press [REW].
• If you keep [FF] or [REW] pressed in step 2 or
3, Cue or Review Playback is activated while
180
LP(EP)
240
the button is pressed, and operation returns to
normal playback when the button is released.
For High Speed Cue or Review
Playback (JET SEARCH)
During playback, tap [FF] or [REW] twice.
To Obtain a Higher Speed
Rewind (Jet Rewind)
180
LP(EP)
240
180
LP(EP)
240
180
LP(EP)
240
180
LP(EP)
240
Press [JET REW].
The [J : REW] indication appears on the TV
screen. (If [OSD] is not pressed, [J : REW] is not
displayed on TV screen. See page 13.)
• Depending on a cassette or an operating
condition, the rewind speed may change
somewhat.
• The tape counter is reset to [0:00.00] when the
tape is rewound to the beginning.
5 Stop viewing the picture by pressing [STOP].
6

To Eject the Video Cassette
Using the Remote Control
Keep pressing [STOP] for at least 3 seconds.
VCR (Line Recording)-off playback
When the VCR (Line Recording) is off, an
inserted video cassette tape can be played back
by pressing [PLAY].
To Play back the Recorded
Section Repeatedly
Keep [PLAY] on the remote
pressed for 5 seconds or
control
more.
The [R 1] display appears on the
TV screen. (If [OSD] is not
pressed, [R 1] is not displayed on TV screen.
See page 13.)
• Press [STOP] to release the Repeat Playback
mode.
60
REC/
STANDBY
120
180
LP(EP)
30
240
NTSC Playback on PAL TV
Tapes recorded in the NTSC system can be
played back with this VCR (Line Recording) via a
PAL system TV set.
• Set [NTSC PB SELECT] to [on PAL TV]. (See
page 5.)
Automatic Functions
Automatic switching on
When a video cassette tape is inserted, the VCR
(Line Recording) turns itself on automatically.
Automatic playback
When a video cassette tape without an intact
erasure prevention tab is inserted, the VCR (Line
Recording) starts playback automatically.
Automatic rewinding
When the tape reaches its end during recording
or playback, it will automatically be rewound to
the beginning. During OTR or Fast Forwarding,
this function will not work.
Automatic switching off and ejection
When the VCR (Line Recording) is switched off,
an inserted video cassette tape can be ejected
simply by pressing [EJECT]. The VCR (Line
Recording) will eject the video cassette tape and
automatically turn itself off again.
Notes:
• During any playback mode other than normal
playback, the picture may have some noise
bars, the colour may be unstable, or a black
and white picture may appear. However, this is
not a malfunction.
• Depending on the TV set used, the playback
picture may roll up or down during special
playback (Cue, Review, Still or Slow Playback
mode). However, this is not a malfunction.
• Cue or Review Playback will be automatically
released after 10 minutes, Still Playback after 5
minutes and Slow Playback after 10 minutes.
• In the LP or EP mode, when playing back a
tape which was recorded on another VCR (Line
Recording), it may be necessary to adjust the
Tracking Control. In some cases the picture
quality may still be inferior.
• When you play back a tape recorded in the LP
or EP mode, the picture may be in black and
white. However, this is not a malfunction.
• When you play back a tape recorded in the EP
mode, the picture and the sound may be
unstable. However, this is not a malfunction.
7

Tracking/V-Lock
For manual tracking adjustment
The i and j buttons on the remote control are
used to adjust the tracking when, for example,
noise bars on the picture during normal playback
are better removed manually than by automatic
digital tracking control.
Press both buttons down at the same time to
return to automatic digital tracking control.
For slow tracking adjustment
When noise bars appear during Still or Slow
Playback, switch over to slow playback and
adjust with the i or j button to reduce the noise
bars.
For vertical locking adjustment
Use the i and j buttons to minimize any vertical
jitter during still picture playback.
To Playback in the Desired
Picture Quality (Picture Mode)
This function reproduces optimum playback
picture from various kind of recorded tapes and
contents.
Press [PICTURE] and select the corresponding
Picture Mode as follows.
Example:
[STANDARD]:
The normal picture. For the TV programme
recorded.
[DYNAMIC]:
The clear and vivid picture. For the scenery or
sports.
[SOFT]:
The mild picture. For the rental soft tape.
[CARTOON]:
The delicate picture. For the cartoon.
Play-Off Timer
OFFÁ/
STOP PLAYEJECT
to put the
60
REC/
STANDBY
30
60
120
30
LP(EP)
REC/
STANDBY
240
180
120
180
LP(EP)
240
POWER Í/ I
5
6
5/
TAPE REFRESH
PICTURE MODE
/6
JET REW
REC/OTR
1,2
Whenever you are playing back a tape and
wish to stop the tape automatically, simply
set the playback duration up to 240 minutes
using [PLAY/OFF].
Preparation
Insert a recorded cassette.
Operations
1 During playback, press [PLAY/OFF] on the
main unit for more than 2 seconds
main unit in the Play-Off Timer mode.
2 Press [PLAY/OFF] on the main unit repeatedly
to select the desired playback duration.
• At the press of the button,
indicators of selected timer
duration flash.
• At every press of the button,
flashing indicators change as
follows:
30 (min.)
180 (min.)
playback mode)
• The VCR (Line Recording) will automatically
switch off when Play-Off Timer is completed.
To turn the VCR (Line Recording) on again,
press [POWER].
>
60 (min.) > 120 (min.) >
>
240 (min.) > No flash (normal
• Pressing [PICTURE] once makes the on
screen display appear; after that, pressing it
repeatedly changes the indication in the
following order:
STANDARD
(Initial Setting)
CARTOON
DYNAMIC
SOFT
8
Notes:
• If the tape reaches the end during Play-Off
Timer, the VCR (Line Recording) will
automatically be rewound to the beginning and
turn itself off.
• To stop Play-Off Timer part-way, press [STOP]
or [POWER].

Recording and
Editing
5
(1)
60
120
30
LP(EP)
REC/
STANDBY
240
OFFÁ/
180
STOP PLAYEJECT
POWER Í/ I
6
5/
/6
JET REW
REC/OTR
VIDEO
AUDIO
OUT
IN
RF SELECT
TAPE REFRESH
PICTURE MODE
CH ADJ.
B.G.H
D.K.K1
RF OUT
RF IN
(2)
(1) VIDEO/AUDIO IN
(2) Other VCR or Video Movie Camera
POWER PICTURE
SPEED
SEARCH
TRACKING/V-LOCK
MENU
RESET
REW
JET REW
INDEX
PLAY
STOP
REC
FF
DISPLAY
OSD
AUDIO OUT
2
1
Recording
Preparations
• Connect a movie camera or another VCR to
this VCR (Line Recording) as shown.
• Insert a video cassette tape with an intact
erasure prevention tab.
• Set [SYSTEM]. (See page 5.)
To Interrupt Recording
Press [PAUSE/SLOW] during
recording.
Press it again to continue
recording.
60
REC/
STANDBY
120
180
LP(EP)
30
240
To Select the Desired Tape
Speed
Press [SPEED] before recording.
Repeatedly pressing this button changes the
tape speed in the following order.
PAL: SP
NTSC: SP
EP mode means Super Long Play (SLP).
• When LP or NTSC EP mode is selected, the
[LP (EP)] indicator is lit.
• When PAL EP mode is
selected, the [LP (EP)] indicator
flashes.
Notes:
• The Recording Pause mode will be
automatically released after 5 minutes.
• It is not possible to record via the RF input
Socket because this VCR (Line Recording) is
not equipped with a TV tuner.
• When playing back a cassette recorded in the
LP or EP mode, some picture and sound
distortion may occur. However, this is not a
malfunction.
• The tape recorded in the EP mode on this VCR
(Line Recording) cannot be played back on the
other VCR without EP mode function.
>
LP > EP > SP
>
EP > SP
60
REC/
STANDBY
120
180
LP(EP)
30
240
Operations
1 Start recording by pressing
[REC].
2 Stop recording by pressing [STOP].
60
REC/
STANDBY
120
180
LP(EP)
30
240
9

2,4
POWER PICTURE
SEARCH
TRACKING/V-LOCK
MENU
PLAY
REW
JET REW
STOP
INDEX
REC
SPEED
RESET
FF
DISPLAY
OSD
AUDIO OUT
5
(1)
(2)
3
CH ADJ.
B.G.H
RF SELECT
D.K.K1
(1) VIDEO OUT
(2) AUDIO OUT
RF OUT
L
VIDEO
R
AUDIO
RF IN
OUT
IN
Editing
Various contents from other sources can be
recorded as a series into a single tape.
Preparations
• Connect a movie camera or another VCR to
this VCR (Line Recording) as shown on page 9.
• Insert a video cassette tape with an intact
erasure prevention tab.
• Set [SYSTEM]. (See page 5.)
Operations
1 Search for the end of the previous recording.
2 Press [PAUSE/SLOW] at the end.
3 Set the new recording by pressing [REC].
4 Start the new recording by pressing [PAUSE/
SLOW] again.
5 Stop recording by pressing [STOP].
To Record a TV Programme
TV programmes can be recorded by connecting
this VCR (Line Recording) to a TV with Audio/
Video output sockets.
Preparation
Connect this VCR (Line Recording) and a TV as
shown.
Operations
1 Turn on the TV and VCR (Line Recording).
2 Insert a video cassette tape with an intact
erasure prevention tab.
3 Select TV station which you want to record.
4 Start recording by pressing [REC].
5 Stop recording by pressing [STOP].
10

POWER Í/ I
TAPE REFRESH
PICTURE MODE
60
12
30
0
LP(EP)
REC/
STANDBY
240
OFFÁ/
5
6
5/
/6
JET REW
REC/OTR
180
STOP PLAYEJECT
POWER Í/ I
TAPE REFRESH
PICTURE MODE
5
6
5/
/6
JET REW
REC/OTR
60
12
30
0
LP(EP)
REC/
STANDBY
240
OFFÁ/
180
STOP PLAYEJECT
1,2
One-Touch Recording (OTR)
Whenever you are in a hurry to start a timer
recording with automatic stop in your
absence, simply set the recording duration
up to 240 minutes with [REC/OTR].
Preparations
• Connect a movie camera or another VCR to
this VCR (Line Recording) as shown on page 9.
• Insert a video cassette tape with an intact
erasure prevention tab.
• Set [SYSTEM]. (See page 5.)
Operations
1 Start recording by pressing [REC].
2 Press [REC/OTR] on the main unit repeatedly
to select the recording duration.
• At the press of the button,
indicators of selected timer
duration flash.
• At every press of the button,
flashing indicators change as
follows:
>
30 (min.)
180 (min.)
60 (min.) > 120 (min.) >
>
240 (min.) > No flash (normal
recording mode)
• The VCR (Line Recording) will automatically
switch off when OTR is completed.
To turn the VCR (Line Recording) on again,
press [POWER].
Notes:
• When the tape reaches its end during OTR, the
VCR (Line Recording) will turn itself off.
• To stop OTR part-way, press [STOP] or
[POWER].
60
REC/
STANDBY
120
180
LP(EP)
30
240
2,3
To delete all of a cassette's
contents
(Tape Refresh Function)
You can delete all of a cassette's contents (the
picture, the sound data) all at once.
Operations
1 Insert a cassette that you want to delete the
cassette's contents.
2 Press [TAPE
REFRESH] for 5
seconds or more to
put the VCR (Line
Recording) in tape
refresh standby mode.
3 Within 8 seconds after
tape refresh standby
mode starts, press
[TAPE REFRESH] for
2 seconds or more to
start the tape refresh
function.
The tape is rewound to the beginning, and it is
fast-forwarded with the tape refresh function.
When the tape reaches the end, the VCR (Line
Recording) automatically rewinds it to the
beginning.
Note:
• When a video cassette with a broken off
erasure prevention tab is inserted, this function
is not activated.
TAPE REFRESH
START:TAPE REFRESH
END:STOP
TAPE REFRESH
5
END:STOP
11

Other Functions
POWER PICTURE
SPEED
SEARCH
TRACKING/V-LOCK
MENU
RESET
PLAY
REW
FF
DISPLAY
JET REW
STOP
INDEX
OSD
AUDIO OUT
REC
VHS Index Search System
It is very easy to find the beginning of each
recording automatically, because a special index
signal is automatically recorded at the start of
each recorded segment on the tape.
Up to 5 index signals can be searched for in both
directions.
Preparation
Insert a recorded cassette with index signals.
For example:
Searching for the 2nd recorded segment in the
forward direction.
Operation
Press [INDEX 9] twice.
• After finding the specific
recorded segment, playback starts
automatically.
• For the reverse direction, press [INDEX :].
• Up to 5 index signals can be searched for in
both directions.
• The INDEX function only works in the stop
mode or during playback.
• When the opposite button is pressed, the
number of lit indicators decreases 1.
• The number of lit indicators decreases by 1
each time an index signal is found.
60
REC/
STANDBY
120
180
LP(EP)
30
240
Searching while checking the
video cassette contents
(Intro-Jet Scan)
The approximate beginnings of each recorded
programme are played in succession at the high
speed so that the programme to be viewed can
be located easily.
Preparation
Insert the recorded cassette.
Operations
1 Press [SEARCH].
120
180
60
LP(EP)
REC/
STANDBY
30
240
This operation is performed while the VCR
(Line Recording) is off or while the VCR (Line
Recording) is in the stop mode or normal
playback mode.
• The tape is rewound to the start, and played
for about 10 seconds at the high speed. It is
then fast forwarded, the VISS (VHS Index
Search System) signals are searched in
succession, and each time the signals are
found, the tape is played for about 10
seconds at the high speed.
2 When the programme to be viewed is reached,
press [PLAY].
• Normal playback now commences.
To stop the operation at any time
Press [STOP].
Note:
• This function may not work properly when
recorded programmes run for 15 minutes or
less.
INTRO-JET SCAN
55
Recording Index Signals
Index signals are recorded in the following case.
• When a recording is started by pressing [REC
(REC/OTR)].
Note:
• The search function will only work correctly if
the index signals are spaced at least 5 minutes
apart.
12

Settings Using the On Screen
Display
Press [OSD].
• The on screen display
appears during
playback or AV external
recording or playback.
• Press [OSD] again to
make the on screen
display disappear.
1 Remaining tape time
• Select the corresponding video cassette
tape length. (See page 5.)
• The remaining tape time may not be
displayed when inserting a cassette.
• The remaining tape time may not be
displayed correctly.
2 Tape running display
3 Tape counter/OTR indication/Index search/
Play-Off Timer/Jet Rewind
Information Display
Tape counter j2:35.47
OTR indication OTR 60
Index search S 01
Play-Off Timer OFF 60
Jer Rewind J : REW
1234
REMAIN 4:00
0:00.22
SP
MESECAM
STANDARD
5
6
7
Example:
STANDARD:
For TV programme recorded
DYNAMIC:
For Scenery, Sports
SOFT:
For Rental soft tape
CARTOON:
For Cartoon
Press [RESET] to reset the tape counter
(elapsed time) to [0:00.00].
• The tape counter is automatically reset to
[0:00.00] when a video cassette is inserted.
4 Tape speed indicator (SP/LP/EP)
5 Cassette-in indicator
6 Colour system indicator
7 Picture mode indicator
• At each press of [PICTURE], the selected
picture mode is set and following picture
mode indicators appear.
13

Before Requesting
Service
Before requesting service, check the following
points again.
VCR (Line Recording) will not operate.
[Mains lead not connected.]
• Reconnect mains lead to mains outlet.
[Safety devices operating.]
• Disconnect mains lead and wait for 1 minute.
Reconnect mains supply and check functions.
[An unknown language appears on the screen.]
• Select the desired language. See page 5.
Picture noisy or not in colour.
Horizontal bars or lines run down the screen.
[TV not tuned to VCR (Line Recording).]
• Check TV tuning. See page 4.
[Video heads clogged or worn.]
• Condensation may have formed, or a faulty
tape has been used. See page 3.
Do not operate VCR (Line Recording) for
1 hour, then insert a new tape (original may be
faulty) and play back for a few minutes. If fault
does not clear, consult your dealer for further
advice.
Remote control does not operate correctly.
[Remote control transmitter beam not reaching
VCR (Line Recording).]
• Ensure that remote control is pointed at VCR
(Line Recording) and transmitter beam is not
obstructed.
[Distance is too far.]
• Use remote control within 7 m of VCR (Line
Recording). If this range is not possible,
replace batteries.
[Batteries exhausted.]
• Replace batteries with UM3 or R6 type
available from your dealer. Note precautions for
replacement on page 2.
[Batteries incorrectly fitted with reversed.]
• Fit batteries correctly as shown on page 2.
[Tape defective due to surface damage or wear.]
• Check another tape to see if noise-free and
replace defective tape.
VCR (Line Recording) rewinds automatically
during playback.
[Tape end detector works during playback due to
damaged tape.]
• Replace defective tape.
14

Specifications
Power Source: 110–240 V AC 50/60 Hz
Power Consumption: 9 W
Video Recording System: 2 rotary heads, helical scanning system
Video Heads: 4 heads
Tape Speed: PAL; 23.39 mm/s (SP), 11.7 mm/s (LP), 7.8 mm/s (EP)
Tape Format: VHS tape
Record/Playback Time: SP; 240 min with NV-E240
FF/REW Time: Approx. 60 s with NV-E180 (FF/REW)
VIDEO
Television System: CCIR; 625 lines, 50 fields, PAL colour signal
Modulation System: Luminance; FM azimuth recording
Input Level: VIDEO IN (PHONO); 1.0 Vp-p, 75 ohm, terminated
Output Level: VIDEO OUT (PHONO); 1.0 Vp-p, 75 ohm, terminated
AUDIO
Input Level: AUDIO IN (PHONO); j6 dBV, more than 47 kohm
Output Level: AUDIO OUT (PHONO); j6 dBV, less than 1 kohm
Video Horizontal Resolution: Colour; more than 240 lines (SP)
Signal-to-Noise Ratio: Video; more than 43 dB (SP)
Audio Frequency Response: 80 Hz–8 kHz (SP)
Operating Temperature: 5 oC–40 oC
Operating Humidity: 35 %–80 %
Weight: 3 kg
Dimensions: 320 (W)k89 (H)k278 (D) mm
Standard Accessories: 1 pc. Coaxial Cable
NTSC; 33.3 mm/s (SP), 11.1 mm/s (EP)
LP; 480 min with NV-E240
EP; 720 min with NV-E240
Approx. 43 s with NV-E180 (Jet Rewind)
EIA; Standard (525 lines, 60 fields), NTSC colour signal
Colour signal; converted subcarrier phase shift recording
RF modulated; UHF channel E38 (E32–40), 75 ohm
Audio; more than 43 dB (SP)
1 pc. Remote Control
2 pcs. R6 size batteries
Weight and dimensions shown are approximate.
Specifications are subject to change without notice.
Note to electrical appliance dealers only
To Demonstrate Drive Indicator
1 Eject a cassette tape, if it has been inserted.
2 Turn on the VCR (Line Recording).
3 Keep [EJECT] pressed for 3 seconds or more.
4 Press [STOP] to cancel Demonstration mode.
60
REC/
STANDBY
120
180
LP(EP)
30
240
15

Matsushita Electric Industrial Co., Ltd.
Web Site : http://www.panasonic.co.jp/global/
 Loading...