

Panasonic NV-SJ412EE User Manual

Video Cassette Recorder
NV-SJ412EE
Operating Instructions
Instrukcja obsługi
VQT8525
Before attempting to connect, operate or adjust this product,
please read these instructions completely.

Dear Customer
May we take this opportunity to thank you for purchasing this Panasonic Video Cassette Recorder.
We would particularly advise that you carefully study the Operating Instructions before attempting to operate the unit and that
you note the listed precautions.
Contents
Before Use
Controls and Components .................................................. 3
Preparing the Remote Control ............................................ 4
Warning and Important Information ................................... 5
Setting the Remote Control to Operate Your TV...............6
Connecting and Setting Up
Connecting and Preparations for a TV Equipped with
the Q Link Function ..........................................................8
Connecting and Preparations for a TV Not Equipped with
the Q Link Function ........................................................10
Playback
Playback ............................................................................. 13
Recording
Recording ........................................................................... 15
≥ To Immediately Record the Same TV Programme That
You Are Viewing on the TV (Direct TV Recording) .......15
≥ To Select the Recording Duration and
Perform Timer Recording (OTR Recording) ................. 16
Advanced Operations
Search Functions ............................................................... 22
≥ To Quickly Find the Beginning of a Desired Programme
(VISS=VHS Index Search System) ............................... 22
≥ To Search for a Desired Programme While
Checking the Recorded Contents on a Cassette
(Intro-Jet Scan) ............................................................. 22
Editing .................................................................................23
¡ Assemble Editing .......................................................... 23
¡ Album Function ............................................................. 24
¡ Audio Dubbing .............................................................. 25
Connecting the VCR to a Decoder ................................... 26
Connecting the VCR to a Satellite Receiver or Digital
Receiver...........................................................................27
Various Settings
Tuning and Assigning the TV Stations Available in Your
Area to the Programme Positions (Manual Tuning) .... 30
Restarting the Auto Setup or Download/
Resetting the VCR to the Shipping Condition ............. 33
Setting the VCR’s Clock ....................................................34
Other Convenient Functions (Various Settings) ............. 35
≥ Settings for the Main Menu Item “Display” .................... 35
≥ Settings for the Main Menu Item “Functions” ................ 36
≥ Language Setting .......................................................... 37
≥ Country Setting ............................................................. 37
Timer Recording
Timer Recording ................................................................ 17
≥ To Programme with the On Screen Display (OSD) ...... 17
≥ To Programme with the ShowView Function ................18
Other Timer Recordings and Convenient Functions ..... 19
≥ To select a Timer-Recorded Programme from the List
and Quickly Locate Its Beginning for Automatic Playback
(Programme List Search) .............................................. 21
Helpful Hints
Glossary .............................................................................. 38
Before Requesting Service ............................................... 40
≥ Adjusting the Playback Picture ..................................... 42
Cautions .............................................................................. 43
Specifications.....................................................................44
2
AC IN~
SECTEUR~
AV2 (DECODER/EXT)AV1 (TV
)
RF
IN
RF
OUT
e
f
g
ih
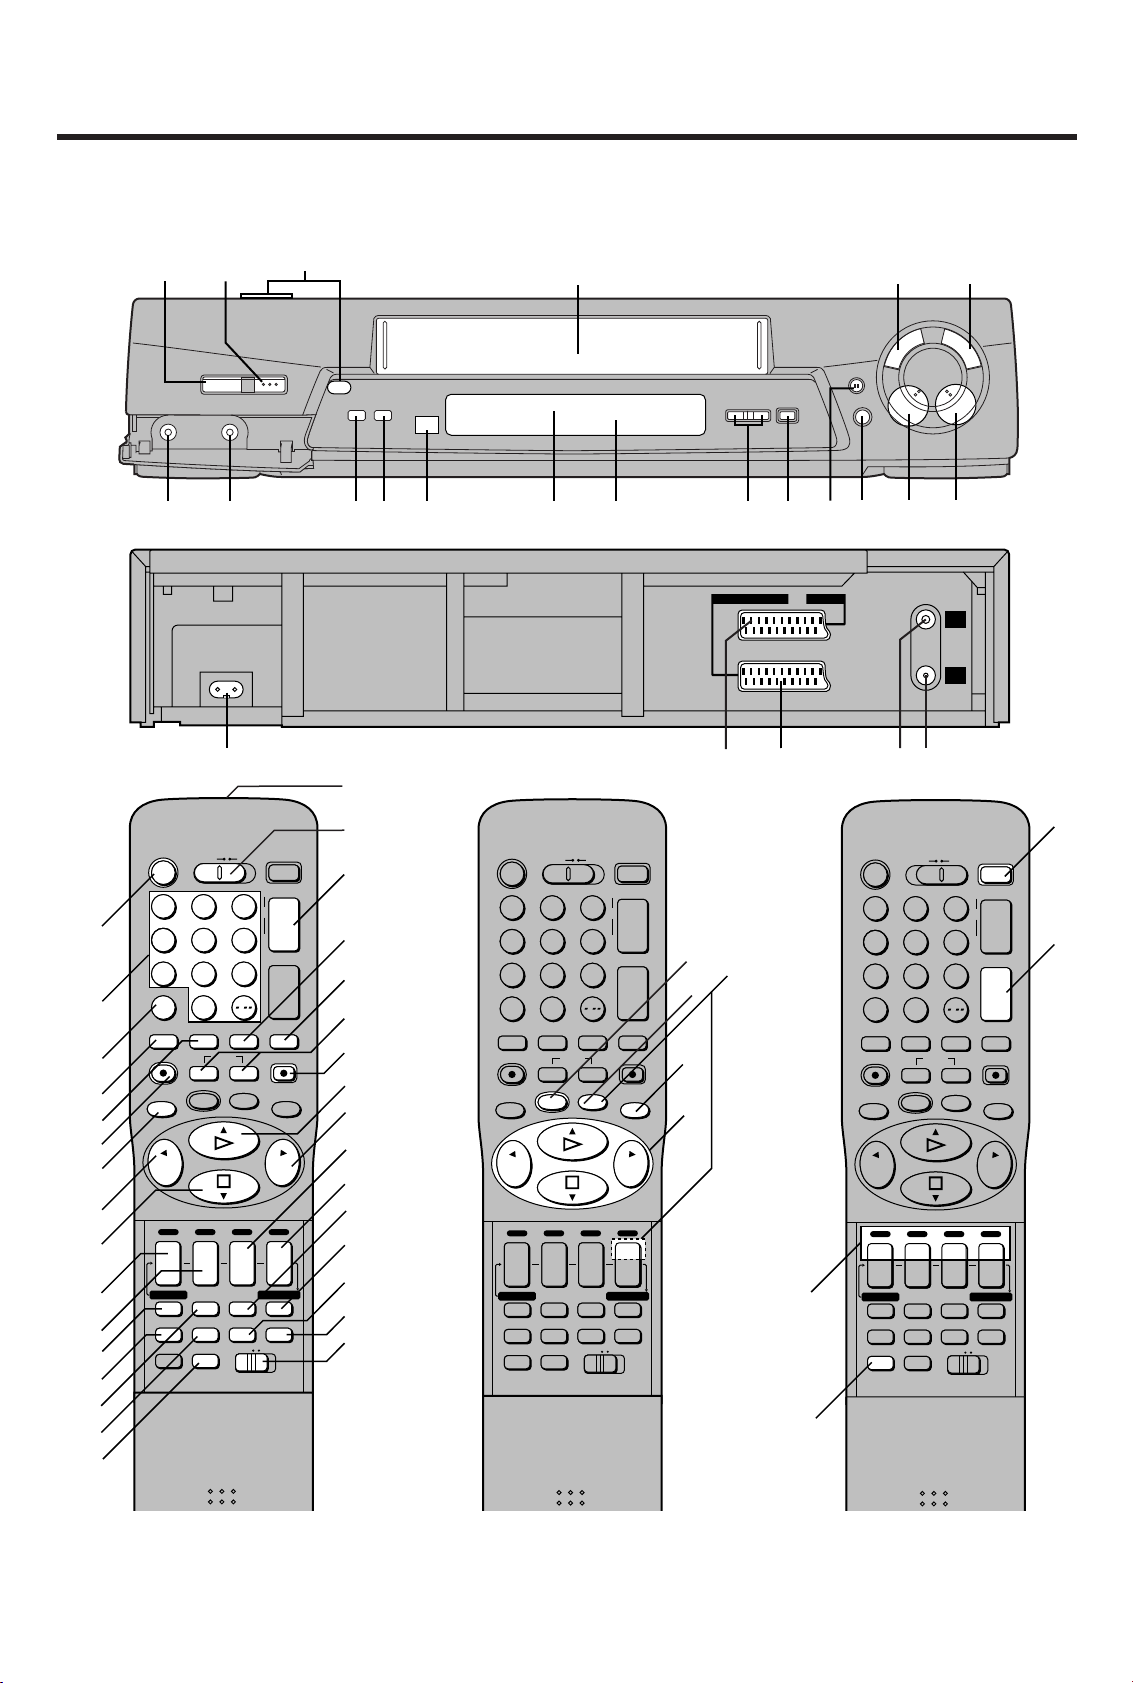
Controls and Components/Regulatory i komponenty
Keep this page open as you read through the Operating Instructions. Refer to it for the control and component names and
numbers which appear in the text.
Trzymaj tą stronę otwartą w trakcie czytania niniejszej instrukcji obsługi. Odwołuj się do niej dla sprawdzenia nazw
regulatorów i komponentów, które pojawiają się w tekście.
1
]
Z
Í
^
[
/
I
<
EJECT
DIRECT
A.DUB
TV REC
_
6
°`
CVC
a
°\
°b
CD
°°N
¥
REC/OTR
c
d
TIMER RECÁ
D
9
∏
6
6
8
H
I
!
5
5
°°1
°/°°2
°°3
4
5
6
7
8
9
:
o
p
°=
>
°?
@
VCR
Í
23
1
456
789
INPUT SELECT
SAT
AV
0
REPLAY
OSD/DISPLAY
DIRECT TV REC
PROG./CHECK
;/D
6
J
I
TV ASPECT
INDEX
KL
MENU OK
r
DATE
s
CANCEL
AUDIORESET
STILL ALBUM
TV/TEXT
TV
TRACKING/V-LOCK
o
J
p
I
VOLUME
N
/
SEARCH
SHOW VIEW
r
r
ON
OFF
s
s
SP/LP
TIMER REC
Á
TAPE AV LINK
VCR
12
r
s
REC
EXIT
6
°P
O
°°N
M
L
K
J
I
H
G
F
E
D
C
B
°A
VCR
Í
23
1
456
789
INPUT SELECT
SAT
AV
0
REPLAY
OSD/DISPLAY
DIRECT TV REC
;/D
PROG./CHECK
TV ASPECT
6
J
I
INDEX
KL
MENU OK
r
DATE
s
CANCEL
AUDIORESET
STILL ALBUM
TV/TEXT
TV
TRACKING/V-LOCK
o
J
p
I
VOLUME
N
/
SEARCH
SHOW VIEW
REC
r
r
ON
OFF
s
s
SP/LP
TIMER REC
Á
TAPE AV LINK
VCR
12
r
s
EXIT
6
T
S
R
Q
°U
°°V
°°W
VCR
Í
23
1
456
789
INPUT SELECT
SAT
AV
0
REPLAY
OSD/DISPLAY
DIRECT TV REC
PROG./CHECK
KL
;/D
MENU OK
6
J
rrr
DATE
I
sONs
CANCEL
AUDIORESET
STILL ALBUM
TV ASPECT
INDEX
TV/TEXT
TV
TRACKING/V-LOCK
J
o
p
I
VOLUME
N
/
SEARCH
SHOW VIEW
OFF
s
SP/LP
TIMER REC
Á
TAPE AV LINK
VCR
12
°°Y
°°X
r
s
REC
EXIT
6
° See page 4. (VCR Operation)
°° See page 6. (TV Operation)
° Patrz strona 47. (Sterowanie magnetowidem)
°° Patrz strona 50. (Sterowanie odbiornikiem TV)
3
Preparing the Remote Control
VCR Operation
When you want to operate the VCR, set the VCR/TV switch
O to “VCR”.
°2 Numeric buttons
To select the programme positions (1–99) of the VCR.
Example:
To select the satellite programme positions
Example:
SAT 9:
SAT19:
SAT129:
≥ 3-digit programme positions can be selected with this
remote control only in case of a satellite receiver that
is marked with (°
satellite receivers.
To enter a ShowView number.
To enter numbers for various settings.
°= Tape Counter Reset button
To reset the tape counter (elapsed time) to “0:00.00”.
≥ The tape counter is automatically reset to “0:00.00”
when a video cassette is inserted.
°? AUDIO button
This button does not operate on this VCR.
°A VCR 1/2 switch
Set to the “VCR 2” position when using two Panasonic
VCRs. (See page 37.)
°P Infra-red transmitter
°U Child Lock Function buttons
(Convenient function to prevent unauthorized use)
This function deactivates all buttons on the VCR and the
remote control. Use this function, when you do not want
other people to operate the VCR.
To Activate the Child Lock Function:
1 Hold down the OK and the OFF (i) buttons U
simultaneously until the “!" hold” indication appears
in the VCR display.
≥ If you press a button while the Child Lock function is
on, the “!" hold” indication appears in the VCR
display to inform you that no operation is possible.
To Cancel the Child Lock Function:
1 Hold down the OK and the OFF (i) buttons U
simultaneously until the “!" hold” indication
disappears.
≥ If you disconnect the power cable, the Child Lock
function is automatically cancelled after the power
backup time of approximately 60 minutes has
elapsed.
≥ If you cannot cancel the Child Lock function, press
the EXIT button R and perform the operation step 1.
°\ Cassette compartment
°` Infra-red Remote Control Receiver window
°b VCR display
09:
19:
9
1
SAT
0
SAT
0
SAT
0
SAT
0
1
1
1
) on the enclosed list of compatible
9
9
9
2
9
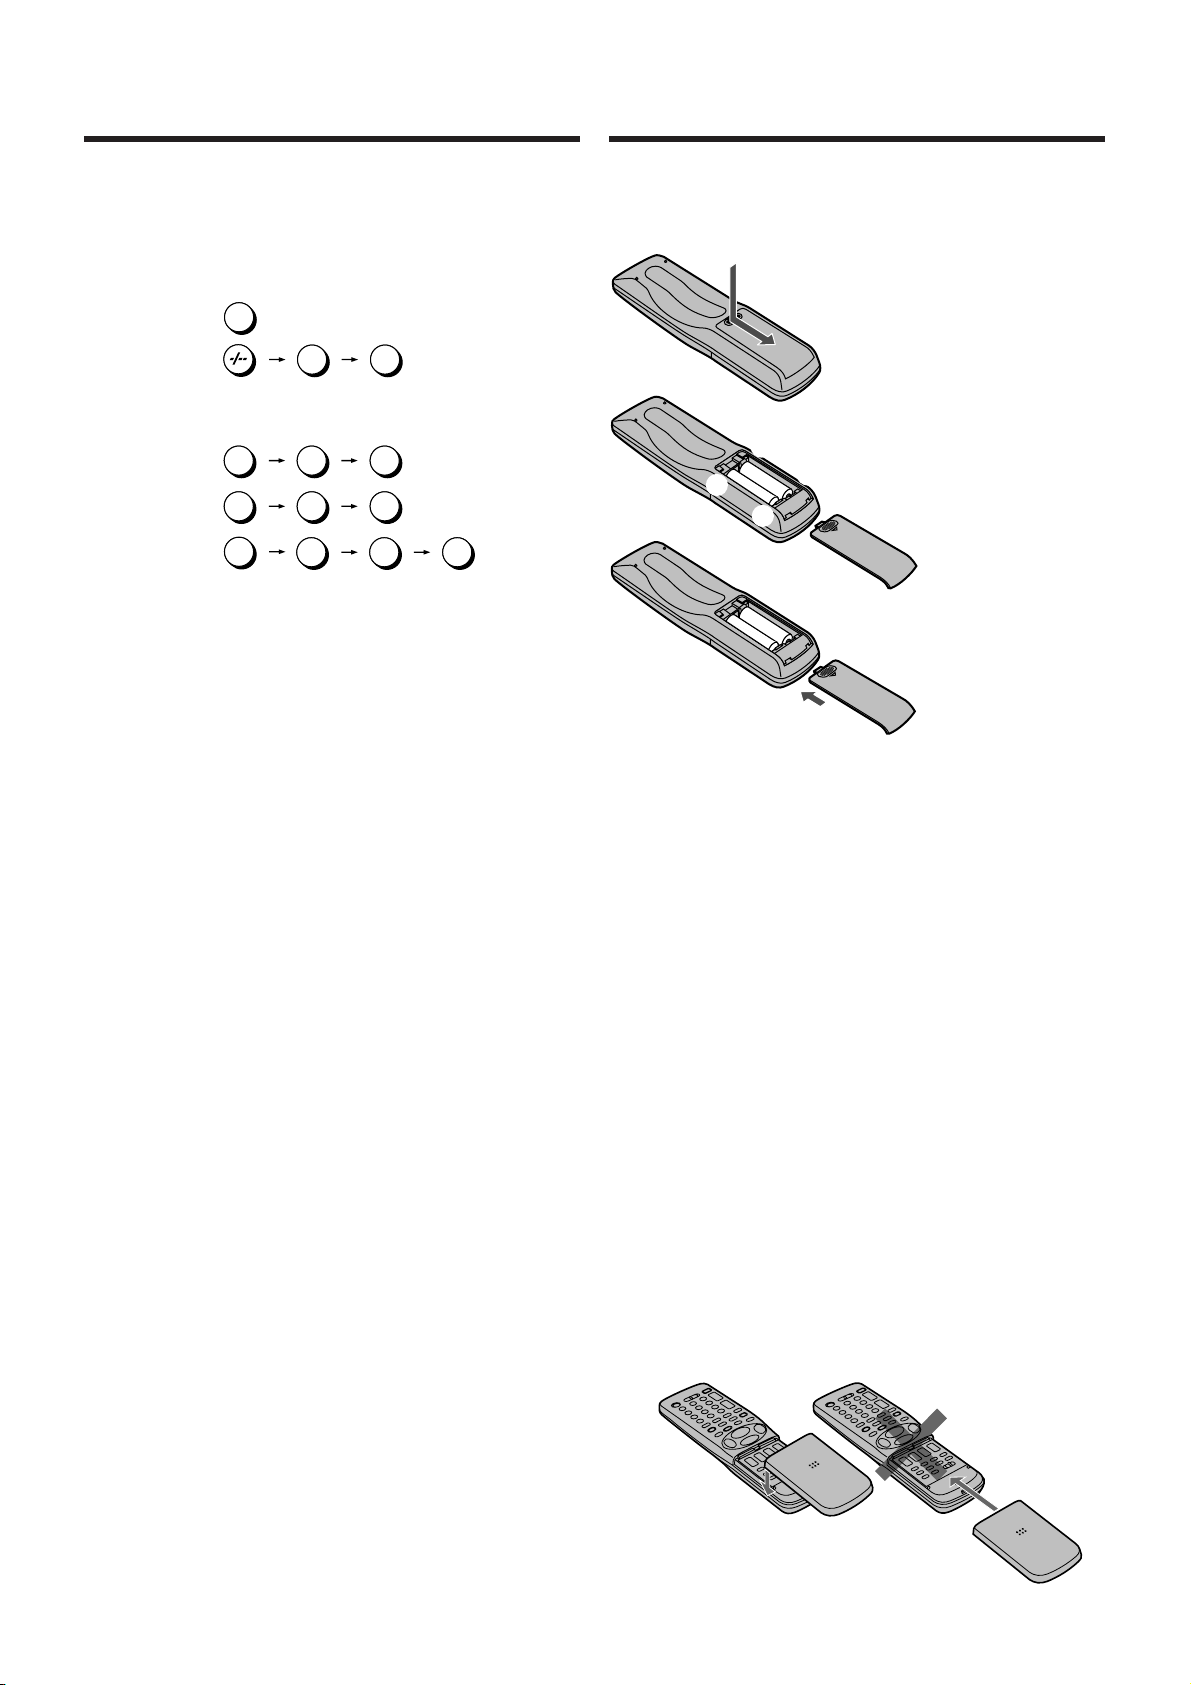
Inserting Remote Control
Batteries
1
2
-
+
3
Notes for Battery Replacement:
≥ The service life of the batteries is approximately 1 year.
However, it varies considerably depending on the
frequency of use.
≥ When they are exhausted, replace them with two AA, UM3,
or R6 size batteries.
≥ When the batteries are exhausted, remove them
immediately and dispose of them correctly.
≥ Make sure that the batteries are inserted with the polarity
(+ and -) correctly aligned.
≥ Do not mix old battery with new battery.
≥ Do not mix different battery types, i.e. Alkaline and
Manganese.
≥ Do not use rechargeable (Ni-Cd) batteries.
≥ Do not heat or short-circuit the batteries.
≥ When you do not use the remote control for a long time,
take out the batteries and store them in a cool, dry place.
-
If the Sliding Cover of the Remote Control
Becomes Detached
If the sliding cover of the remote control becomes detached
accidentally, fit it securely in place by placing it on the top of
the remote control at the position shown in the illustration
below, and pushing it down until it clicks into position.
≥ It is not possible to fit the sliding cover in place by pushing
or sliding it on from the bottom end of the remote control.
Correct
1 Slide off the battery cover.
2 Insert the batteries with the
polarity (+ and -) correctly
aligned.
+
3 Replace the battery cover.
Wrong
4

Warning and Important Information
As this equipment gets hot during use, operate it in a
well ventilated place; do not install this equipment in
a confined space such as a book case or similar unit.
ENGLISH
IMPORTANT
Your attention is drawn to the fact that the recording of
pre-recorded tapes or discs or other published or
broadcast material may infringe copyright laws.
WARNING
TO REDUCE THE RISK OF FIRE OR SHOCK HAZARD, DO
NOT EXPOSE THIS EQUIPMENT TO RAIN OR MOISTURE.
FOR YOUR SAFETY
ªª
ª DO NOT REMOVE OUTER COVER.
ªª
To prevent electric shock, do not remove cover. There are
no user serviceable parts inside. Refer all servicing to
qualified service personnel.
Remarks
1. This VCR is also capable of receiving SECAM type
broadcasting programmes (SECAM B/G) and recording/
playing back its colour television signals.
2. When a cassette which has been recorded on this VCR
is played back on a SECAM VCR, the picture may be
reproduced in black and white. When it is played back
on a PAL VCR without SECAM capability, the picture
may not be reproduced in normal colour.
3. When cassettes recorded on a SECAM VCR or SECAM
pre-recorded cassettes are played back on this VCR, the
picture may be reproduced in black and white.
4. This VCR is not designed for use in France, where a
SECAM VCR should be used instead.
Before Use
Press the VCR-ON/OFF
to standby mode or vice versa. In the standby mode, the VCR
is still connected to the mains.
S
HOWVIEW is a trademark of Gemstar Development
Corporation. The S
under licence from Gemstar Development Corporation.
button 1 to switch the VCR from on
HOWVIEW system is manufactured
5

Setting the Remote Control to Operate Your TV
This setting procedure allows you to operate the TVs of most
brands using the remote control supplied with this VCR.
≥ Some TV models cannot be operated with this remote
control.
1
Set the VCR/TV switch O to “TV”.
2 Look up your TV’s manufacturer in the list of TVs
compatible with the VCR’s remote control on the next
page.
3 While keeping the TV-ON/OFF button 1 pressed, use
the Numeric buttons 2 to enter the manufacturer’s code.
If there is more than one code listed for that
manufacturer, try the first code.
Be sure to enter the code in two digits.
Example: 01
4 Check whether you can operate the TV correctly with the
VCR’s remote control.
If the TV cannot be operated properly:
In step 3, enter the other code listed for that manufacturer and
repeat step 4.
TV Operation
The explanations below show you what functions individual
buttons have when the VCR/TV switch O is set to “TV”.
°°1 TV-ON/OFF button
To switch the TV on from standby mode (OFF) or vice
versa.
On some TVs it is only possible to switch the TV to
standby mode (OFF) with this button, but not on. In this
case, try to turn the TV on with one of the following
buttons:
Numeric buttons 2
AV button 3
Channel button N
°°2 Numeric buttons
To select the programme positions (1s99) on the TV.
°°3 AV button
To select the desired AV input on the TV.
°°N Channel button
To select the desired programme position (TV station) on
the TV.
The 3 Methods for Switching
to the AV Input on Your Panasonic TV
Your Panasonic TV uses one of three different methods for
switching between TV reception and the AV input(s). Perform
the operations steps listed for the switching methods A, B and
C below to determine which one your Panasonic TV uses.
A 1 Set the VCR/TV switch O to “TV”.
2 Press the AV button 3 to switch to the AV Input.
Each press of the AV button 3 switches between
“TV reception” and “AV Input(s)”.
B 1 Set the VCR/TV switch O to “TV”.
2 Press the AV button 3.
Colour bars for selecting the AV Input appear on
the TV screen.
3 Follow the instructions displayed on the TV screen
to select the desired AV Input from the displayed
colour bars for the AV Input by pressing the
corresponding colour button @ (red) :, DATE
(green) ;, ONi (yellow) G or OFFi (blue) F on
the remote control.
C 1 Set the VCR/TV switch O to “TV”.
2 Press the AV button 3.
The last previously selected AV Input indication
appears on the TV screen. The indications for
selecting another AV Input also appear,
but they disappear a few seconds later.
3 Before the indications for selecting another AV
Input disappear, press the ? button :, DATE
button ;, ON
select the desired AV input.
With the following four buttons, you can move and
select as follows:
? :: Move left
pp
DATE
p ;: Move down
pp
pp
ON
p G: Move up
pp
pp
OFF
p F: Move right
pp
p p
p button G or OFF
p p
pp
p button F to
pp
i
pp
p
pp
°°V Teletext buttons
If your TV is equipped for Teletext reception, you can use
these buttons to change the teletext information
displayed on the screen and select desired information.
For details, refer to your TV’s operating instructions.
°°W TV ASPECT button
To switch the screen format between the wide-screen
and other formats.
°°X VOLUME button
To adjust the volume of the TV.
°°Y TV/TEXT button
To switch between normal TV mode and teletext mode.
6

List of TVs Compatible
with the VCR’s Remote Control
Manufacturer Code
Panasonic 01–04
AIWA 35
AKAI 27, 30
BLAUPUNKT 09
BRANDT 10, 15
BUSH 05, 06
CURTIS 31
DESMET 05, 31, 33
DUAL 05, 06
ELEMIS 31
FERGUSON 10
GOLDSTAR/LG 31
GOODMANS 05, 06, 31
GRUNDIG 09
HITACHI 22, 23, 31, 40, 41, 42
INNO HIT 34
IRRADIO 30
ITT 25
JVC 17, 39
LOEWE 07
METZ 28, 31
MITSUBISHI 06, 19, 20
MIVAR 24
NEC 36
NOKIA 25–27
NORDMENDE 10
ORION 37
PHILIPS 05, 06
PHONOLA 31, 33
PIONEER 38
PYE 05, 06
RADIOLA 05, 06
SABA 10
SALORA 26
SAMSUNG 31, 32
SANSUI 05, 31, 33
SANYO 21
SBR 06
SCHNEIDER 05, 06, 29, 30, 31
SELECO 06, 25
SHARP 18
Manufacturer Code
SIEMENS 09
SINUDYNE 05, 06, 33
SONY 08
TELEFUNKEN 10– 14
THOMSON 10, 15
TOSHIBA 16
WHITE WESTINGHOUSE 05, 06
Before Use
7
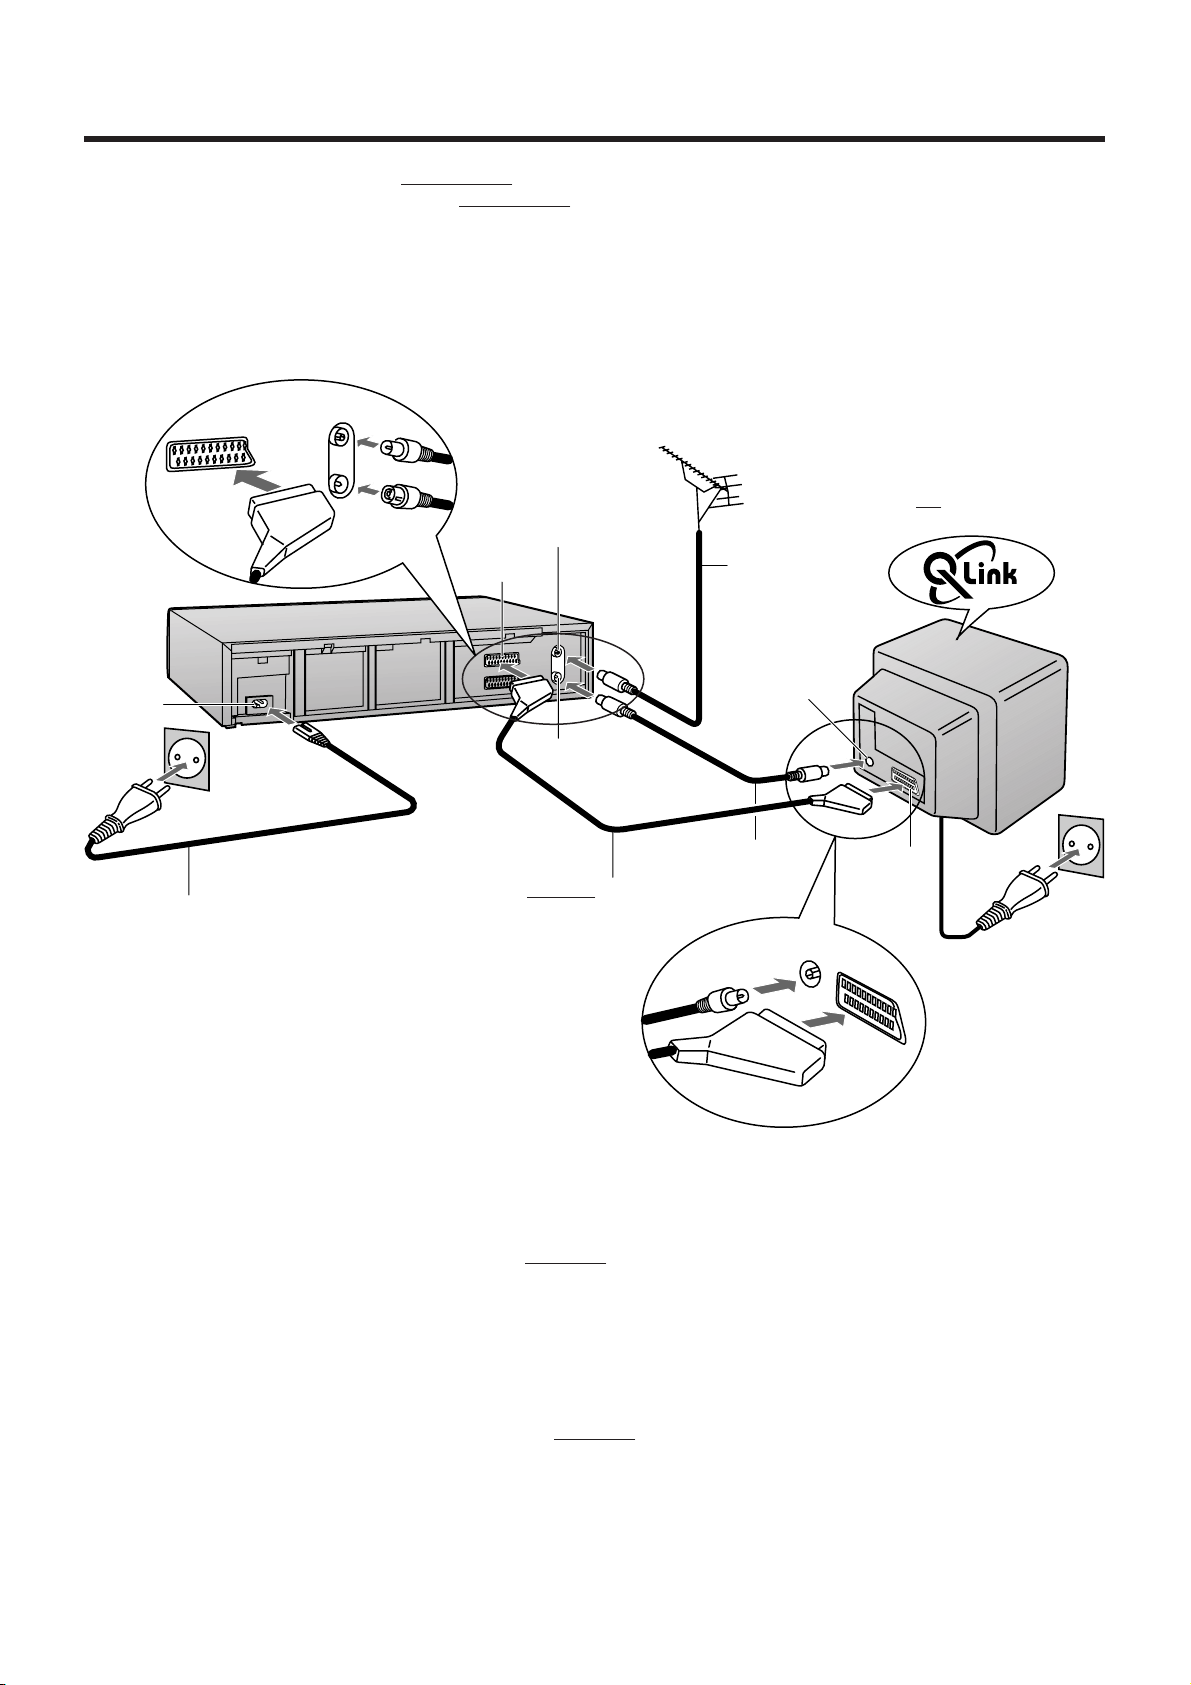
Connecting and Preparations for a TV Equipped with
the Q Link Function
Connections and preparations for a TV equipped with the “Q Link°1” function and equipped with a 21-pin Scart socket.
For the connections and preparations for a TV
“SMARTLINK°
5
” function and with a 21-pin Scart socket, also read from this page.
For details about the connections, also read TV’s operating instructions.
Be sure to keep both the TV and VCR switched off until all connections have been made.
For your safety, be sure not to connect or handle the equipment with wet hands.
equipped with the “DATA LOGIC°2”, “Easy Link°3”, “Megalogic°4” or
Aerial (not supplied)
with Q Link function
TV
(not supplied)
f
h
Aerial lead
(not supplied)
AC Input
socket
e
Aerial Input
socket
i
AC mains lead
(supplied)
RF coaxial cable
(supplied)
Fully-wired 21-pin Scart
cable (not supplied)
21-pin Scart
socket
To AC mains socket
Hints:
≥ Q Link is an advanced system that offers a range of convenient functions such as automatic copying of the tuning position of
all available TV stations (in the same order as they are programmed on the TV) into your VCR’s memory (this is called
Download) if you connect the VCR to your TV with a
fully-wired 21-pin Scart cable (not supplied). Depending on the
manufacturer, the equivalent of the Q Link function has a different name and may not work exactly the same.
1
°
“Q Link” is a registered trademark of Panasonic.
2
°
“DATA LOGIC” is a registered trademark of Metz.
3
°
“Easy Link” is a registered trademark of Philips.
4
°
“Megalogic” is a registered trademark of Grundig.
5
°
“SMARTLINK” is a registered trademark of Sony.
For details, refer to your TV’s operating instructions or consult your dealer.
≥ Unlike in most commercially sold 21-pin Scart cables, in
fully-wired 21-pin Scart cables all 21 pins of one plug are connected
to the matching pin of the plug on the other end of the cable. This type of cable is necessary for the Preset Download
function to work.
8
Preset Download Function
Download
Download in
progress,
please wait.
Position 67
The Preset Download function automatically copies the tuning
position of all available TV stations into the VCR’s memory
when you connect the VCR using a
cable to a TV
equipped with the Q Link function.
To Simultaneously Set Up this VCR with a
New TV
Perform the following operation steps exactly as described to
ensure that the Preset Download function works correctly.
√
First of all, make sure that the VCR is switched off.
1 Switch the TV on.
The TV starts to tune all available TV stations and to
adjust the clock.
(This is called Auto Setup function.)
√ When the TV has finished its
own auto setup, the VCR is
automatically switched on, and
the downloading of the setup
data from the TV to the VCR
starts. (Applicable to TVs with
“Q Link” or “DATA LOGIC”
function)
If your TV is equipped with the
“Easy Link”, “Megalogic” or
“SMARTLINK” function, the
Country setting menu appears
on the TV screen before
downloading. Press the Cursor
buttons (3421) Q to select
the desired country. Then,
press the OK button S and the
downloading automatically
starts.
√ The VCR’s Auto Setup (Downloading) is complete when
the programme position and the current time appear in
the VCR display.
fully-wired 21-pin Scart
On Screen Display
Download
Download in
progress,
please wait.
Position 67
Indication during downloading
Country
Deutschland
Česká Rep.
Magyarország
Menu for Country setting
VCR display
CVC
Polska
others
SP
Hint:
≥ If you use a Panasonic TV and perform the operation step
1, starting the downloading of the setup data will
automatically display the “Download” indication. However,
in case of a TV of another make, the “Download” indication
may not appear. In this case, select the AV input on your
TV if you want to see the “Download” indication.
To Set Up this VCR with a TV Already in
Use
1 Switch the TV on.
2 Select the AV input on your TV.
3 Set the VCR/TV switch O to “VCR”.
4 Press the VCR-ON/OFF button
1 to switch the VCR on.
Downloading of the setup data
starts automatically.
(Applicable to TVs with
“Q Link” or “DATA LOGIC”
function)
If your TV is equipped with the
“Easy Link”, “Megalogic”or
“SMARTLINK” function, the
Country setting menu appears
on the TV screen before
downloading. Press the Cursor
buttons (3421) Q to select
the desired country. Then,
press the OK button S and the
downloading automatically
starts.
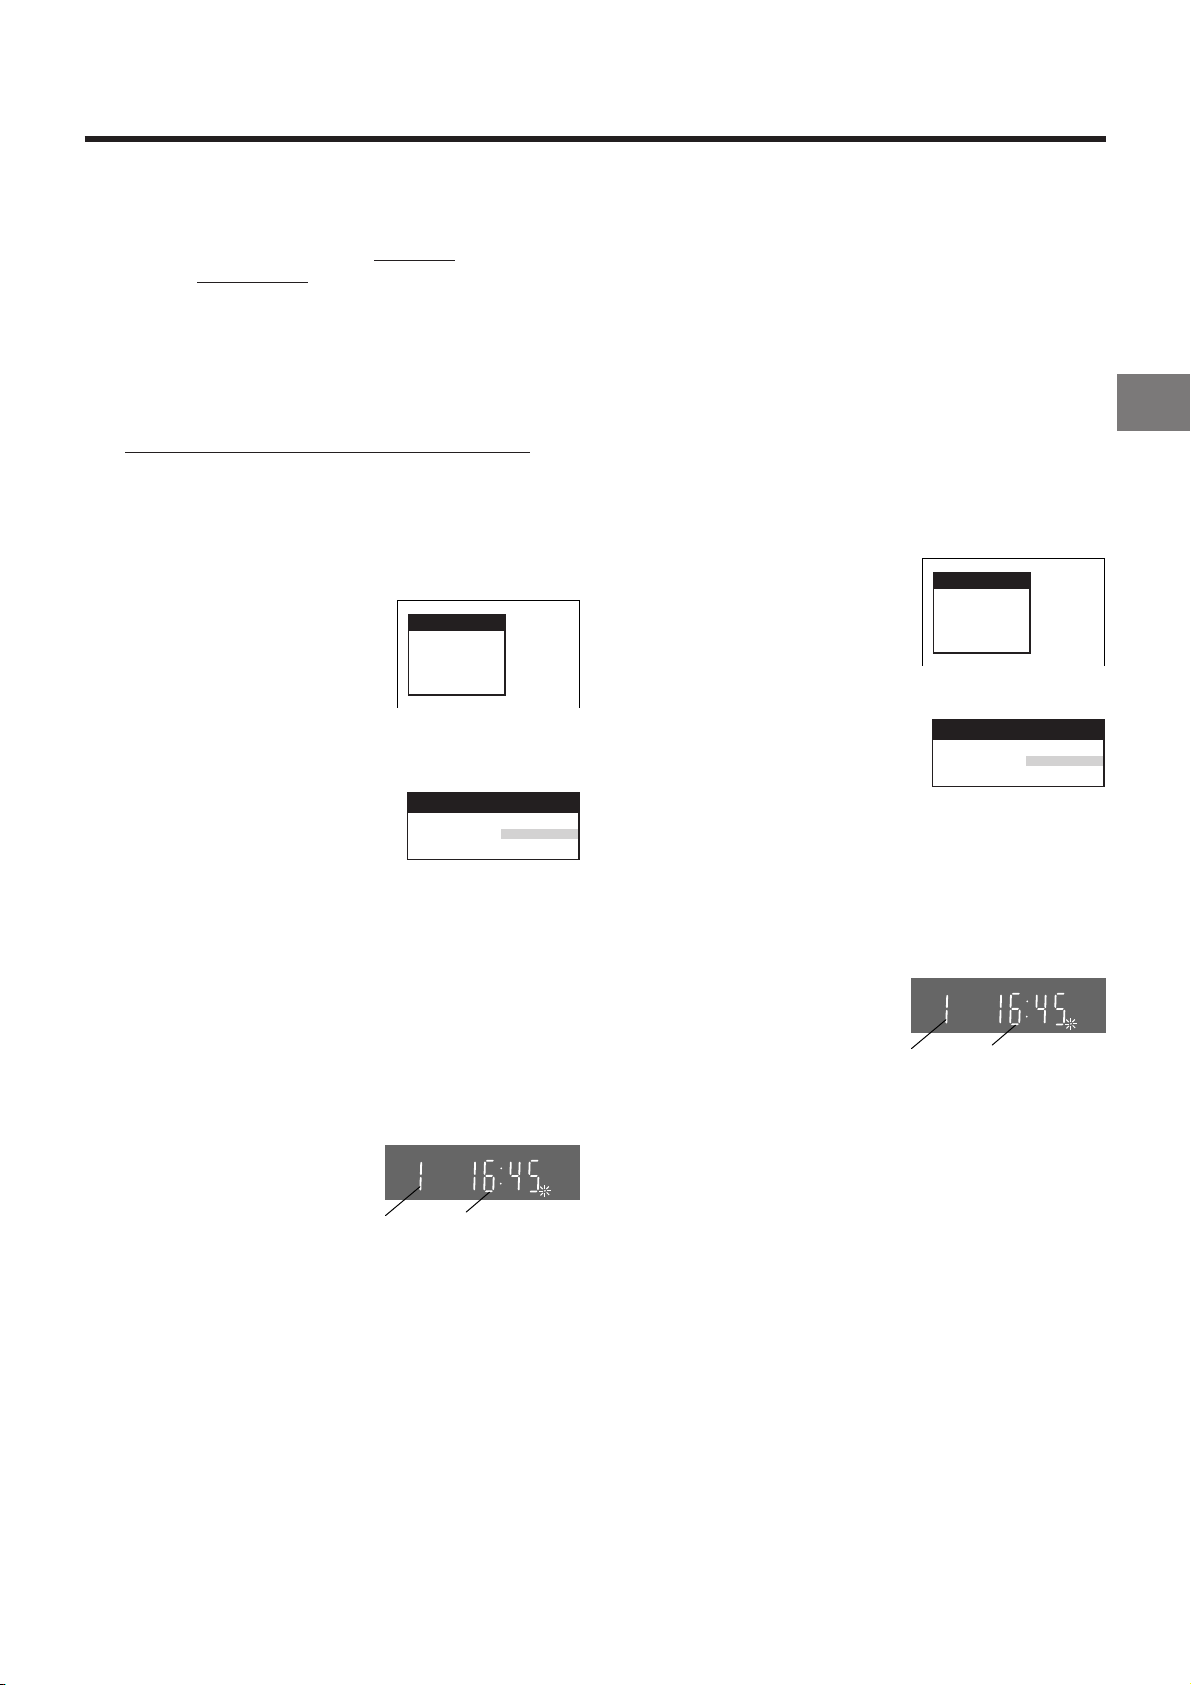
√ When the programme position
and the current time appear in
the VCR display, the VCR’s
Auto Setup (Downloading) is
complete.
Indication during downloading
Country
Deutschland
Česká Rep.
Magyarország
Menu for Country setting
CVC
Programme
position
Polska
others
Indication when the
current time is 16:45
SP
Connecting and Setting Up
Programme
position
Indication when the
current time is 16:45
Note:
≥ If you accidentally switch on the VCR before the TV,
downloading of the setup data from the TV may not be
performed correctly. In this case, follow the operation steps
below.
1 Wait until the Auto Setup is complete on both the TV and
the VCR.
2 Press the MENU button T to display the OSD Main
menu on the TV screen.
3 Press the Cursor buttons (3421) Q to select
“Tuning” and then “Download”.
4 Press the OK button S twice. Downloading of the setup
data from the TV to the VCR starts.
5 When the programme position and the current time
appear in the VCR display, downloading is complete.
9
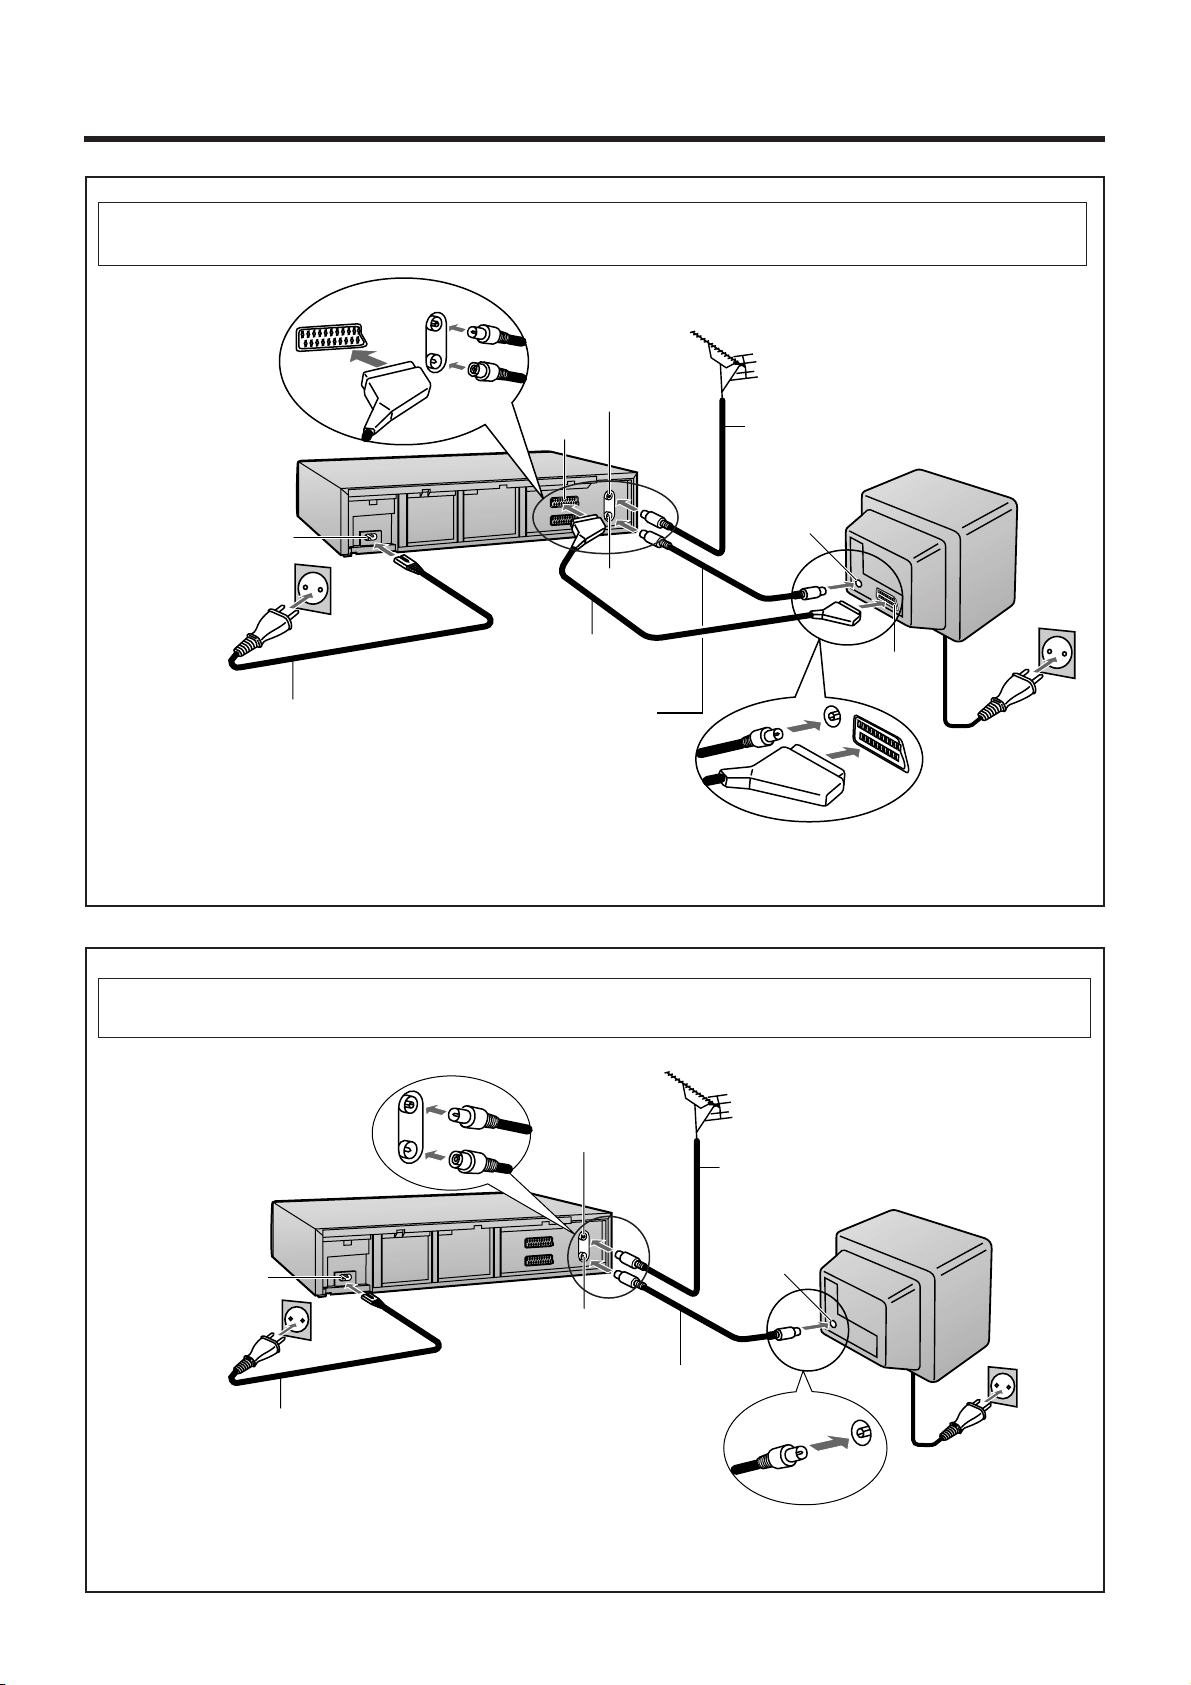
Connecting and Preparations for a TV Not Equipped with the
Q Link Function
Method 1.
AC Input
socket
e
AC Mains lead
(supplied)
If you are connecting your VCR to a TV using RF coaxial cable and 21-pin Scart cable, then
follow the steps below. (AV Connection)
Aerial (not supplied)
h
f
Aerial lead
(not supplied)
TV (not supplied)
Aerial Input
socket
i
21- Scart cable to AV1
(not supplied)
RF Coaxial cable (supplied)
≥Must be connected to
watch TV channels even if
21-pin Scart cable is used
to connect VCR to TV.
21-pin Scart
socket
To AC
Mains
socket
After completing the above connections, proceed to the Auto Setup page (Page 11).
If you are connecting your VCR to a TV using only RF coaxial cable, then follow the
or Method 2.
steps below. (RF Connection)
Aerial (not supplied)
h
Aerial lead
(not supplied)
AC Input
socket
e
Aerial Input
socket
i
RF Coaxial cable (supplied)
≥Must be connected to
AC Mains lead (supplied)
watch TV channels.
TV (not supplied)
To AC
Mains
socket
After completing the above connections, proceed to the Auto Setup page (Page 12).
10
If you are connecting your VCR to a TV using Method 1,
s s s s s s s s
s s s s s s s s
s s s s s s s s
s s s s s s s s
s s s s s s s s
s s s s s s s s
s s s s s s s s
follow the operations explained below.
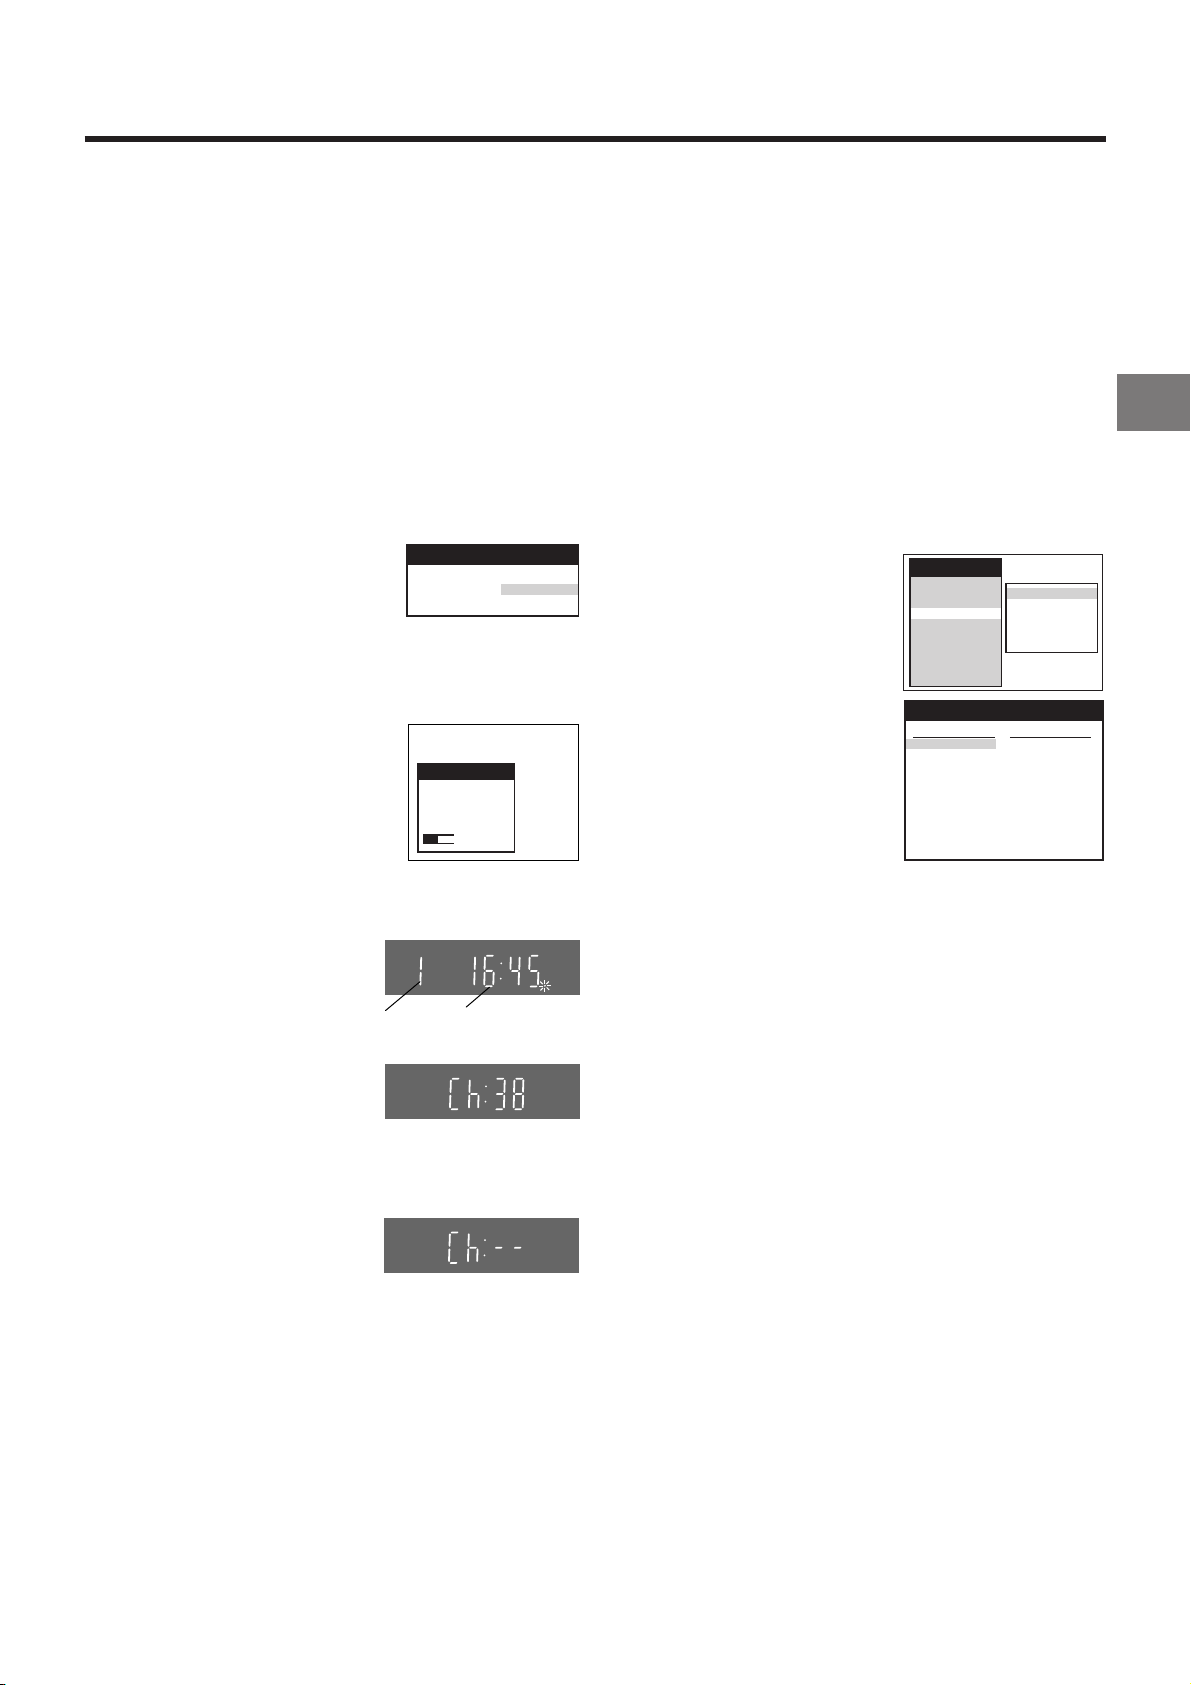
When the clock setting menu appears after Auto Setup
has finished:
Auto Setup Function
The Auto Setup function automatically tunes all available TV
stations and sets the VCR’s clock to the current date and
time. If the tuning and time/date settings are not correct,
performing timer recordings is not possible.
11 Switch the TV on.
12 Select the AV input on your TV.
13 Set the VCR/TV switch O to “VCR”.
14 Press the VCR-ON/OFF button
1 to switch the VCR on.
The Country setting menu
appears on the TV screen.
15 Press the Cursor buttons
(3421) Q to select the
country where you are using the
VCR.
16 Press the OK button S and the
VCR’s Auto Setup automatically
starts and tunes all available TV
stations and also sets the clock.
This takes about 5 minutes.
17 When the indication shown
on the right appears on the
VCR display, the Auto Setup
is complete.
Programme
position
On Screen Display
Country
Deutschland
Česká Rep.
Magyarország
Menu for Country setting
Auto-Setup
Auto-Setup
in progress,
please wait.
Indication during Auto Setup
VCR display
CVC
Polska
others
Ch 21
SP
Indication when the
current time is 16:45
1 Press the Cursor buttons (3421) Q to set the correct
time and date.
2 Press the OK button S to conclude the setting.
3 Press the EXIT button R to exit the On Screen Display.
To Confirm that the TV Stations Have Been
Tuned Correctly by the Auto Setup
Function
1 Press the MENU button T to
display the OSD Main menu
on the TV screen.
2 Press the Cursor buttons
(3421) Q to select
“Tuning” and “Manual” in this
order.
3 Press the OK button S to
display the list of tuned TV
stations and confirm that all
available TV stations have
been set correctly.
4 Press the EXIT button R to exit the On Screen Display.
Main menu
Timer record
Display
Tuning
Clock
Functions
Language
Country
Satellite
Tuning
Pos Name Ch
1 ARD 1
2 ZDF 2
3N3 19
4 HR3 26
5 BR3 18
6 RB3 3
7 SFB3 36
8SW3 29
9 WDR3 17
10 MDR3 32
List of tuned TV stations
(example)
Manual
Auto-Setup Restart
Download
Shipping condition
Pos Name Ch
11 ORB 35
12 RTL+ 4
13 SAT1 5
14
15
16
17
18
19
20
Connecting and Setting Up
18 Press the MENU button T
for more than 5 seconds so
that the RF output channel
number appears on the VCR
display.
Indication when the RF output
channel is 38 (example)
The initial setting is channel 38.
c9 Press the Numeric button “0”
2 so that the displayed RF
output channel number
changes to “– –”.
Indication after changing the RF
output channel to “– –”
10 Press the OK button S to conclude the setting.
√ To Cancel the Auto Setup Before It Has Finished
Press the EXIT button R.
When the station names and/or channel numbers have
not been set correctly:
See page 30 for details.
11
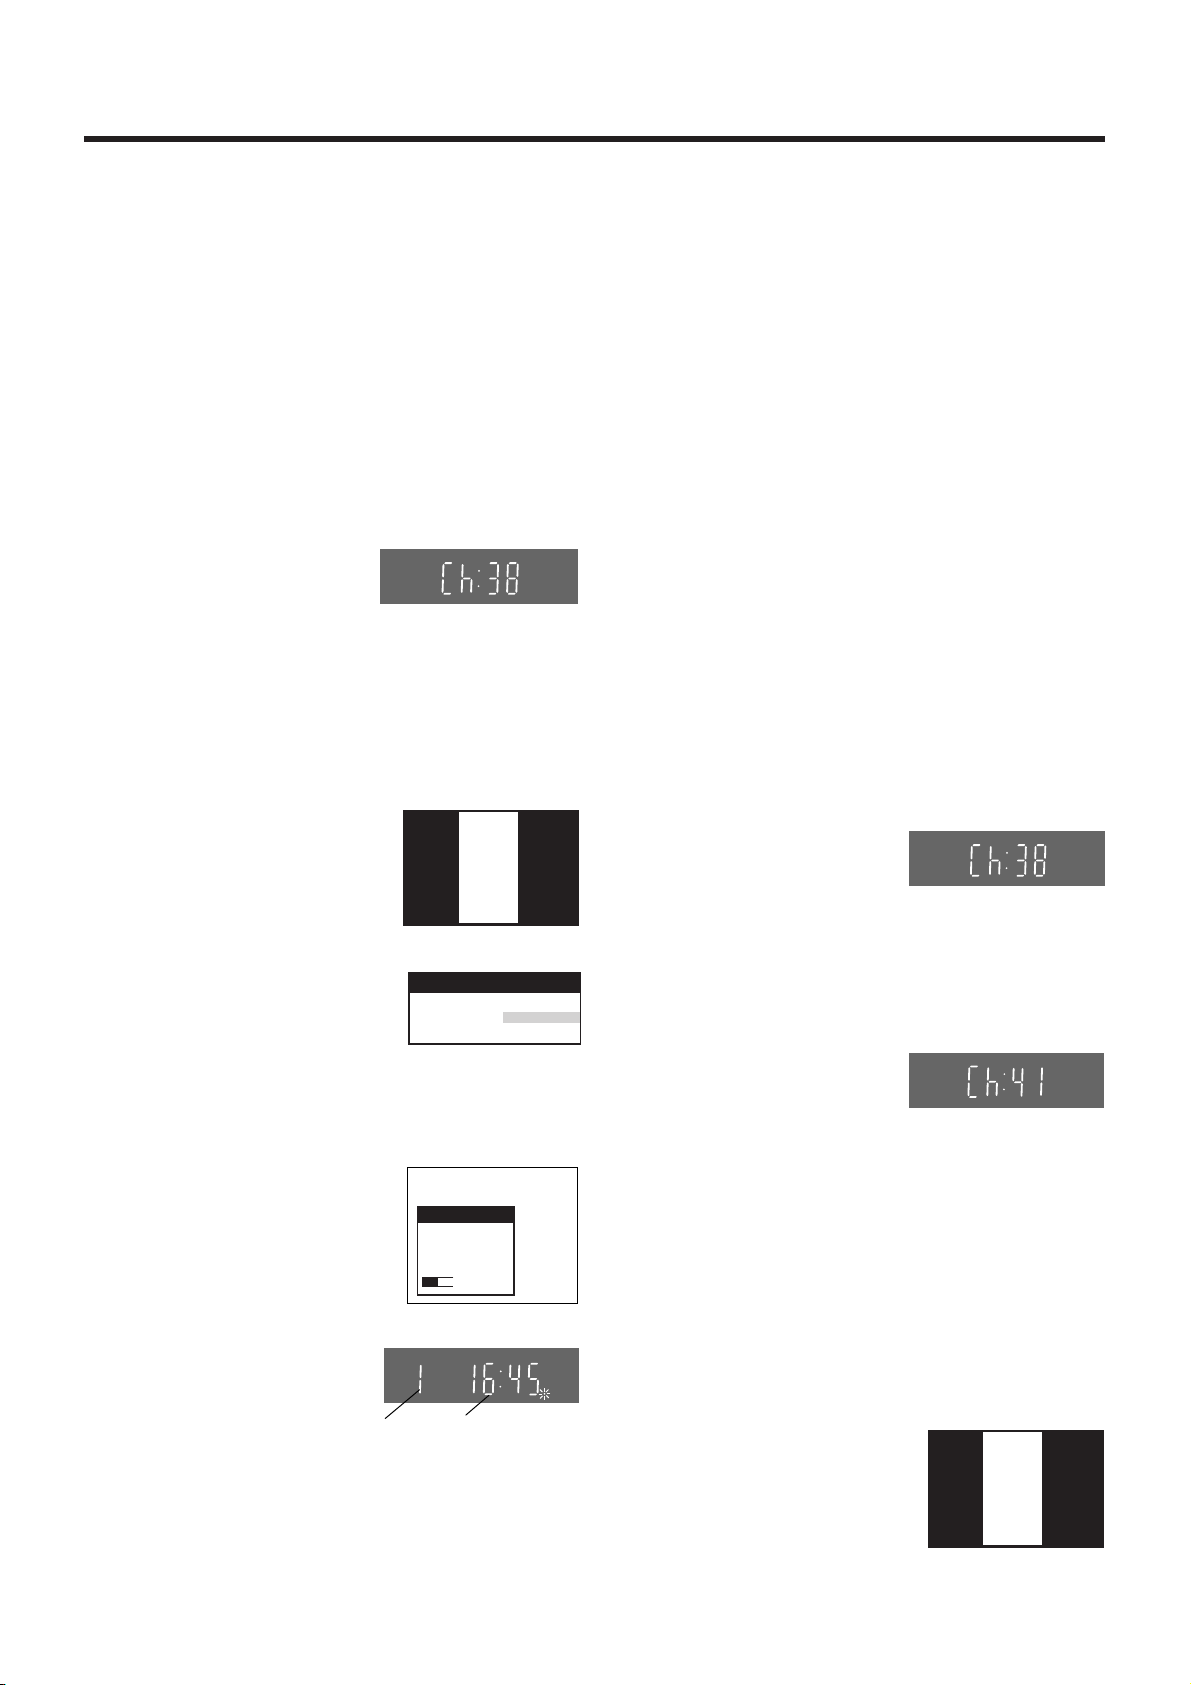
If you are connecting your VCR to a TV using Method 2,
Panasonic
VCR
Ch:41
follow the operations explained below.
To be able to watch the VCR picture on the TV, RF
connection requires the video playback channel to be set on
the TV.
01 Switch the TV on.
02 Select an unoccupied programme position (which is
not tuned to a TV station).
If you are using a Panasonic TV, select programme
position “0”.
03 Set the VCR/TV switch O to “VCR”.
04 Press the VCR-ON/OFF button 1 to switch the VCR
on.
05 Press the MENU button T
VCR display
for more than 5 seconds.
The number of the RF
output channel appears on
the VCR display.
The initial setting is
Indication when the RF output
channel is 38 (example)
channel 38.
When the clock setting menu appears after Auto Setup
has finished:
See page 11.
RF select:
Set the VCR’s RFC system the same as the TV system of the
connected TV. (See page 37.)
To Confirm that the TV Stations Have Been
Tuned Correctly by the Auto Setup
Function
See page 11.
If the Picture on the TV’s Video Playback
Channel Is Distorted
If, after setup, you select the video playback channel
on the TV and view a TV programme on a programme
position selected on the VCR, some interference may
occur in certain cases. If this happens, you can minimise
the distortion by changing the RF output channel on the
VCR to another number. Follow the operations below.
06 Tune your TV until the test pattern shown on the right
appears on the TV screen.
Now, the setting of the RF output channel is
complete.
≥ As the tuning method
differs depending on the
TV you are using, refer
On Screen Display
Panasonic
VCR
Ch:38
to your TV’s operating
instructions for details
about tuning.
07 Press the OK button S.
The Country setting menu
appears on the TV screen.
08 Press the Cursor buttons
(3421) Q to select the
Indication of the test pattern
Country
Deutschland
Česká Rep.
Magyarország
Menu for Country setting
Polska
others
country where you are
using the VCR.
09 Press the OK button S
and the VCR’s Auto Setup
automatically starts and
tunes all available TV
stations and also sets the
clock. This takes about
5 minutes.
10 When the indication
shown on the right
Auto-Setup
Auto-Setup
in progress,
please wait.
Ch 21
Indication during Auto Setup
CVC
SP
appears on the VCR
display, the Auto Setup is
complete.
Programme
position
Indication when the
current time is 16:45
√ To Cancel the Auto Setup Before It Has Finished
Press the EXIT button R.
1 Set the VCR/TV switch O to “VCR”.
2 Press the MENU button T for more than 5 seconds.
The number of the RF output channel appears on the
VCR display.
The initial setting is
channel 38.
Indication when the RF output
channel is 38 (example)
3 Press the numeric buttons 2 to change the RF
output channel.
Enter a channel number which differs by 2 or 3 from
the one initially set number. For example, as the
original number is 38, enter 41.
Indication after changing the RF
output channel to 41 (example)
4 Press the OK button S to conclude the setting.
Note When You Have Changed the RF Output Channel:
After changing the RF output channel to a different number,
be sure to retune your TV to the VCR’s new RF output
channel. (For details about tuning, refer to your TV’s
operating instructions.)
1 Press the MENU button T for more than 5 seconds.
2 When the test pattern
shown on the right appears
sharp and clear on the TV
screen, the tuning is
complete.
12
Test pattern indication
3 Press the EXIT button R to exit the On Screen
Display.
Playback
Preparations
≥ Confirm that the VCR is on.
≥ Confirm that the TV is on and the VCR viewing channel is
selected.
≥ Insert a recorded video cassette.
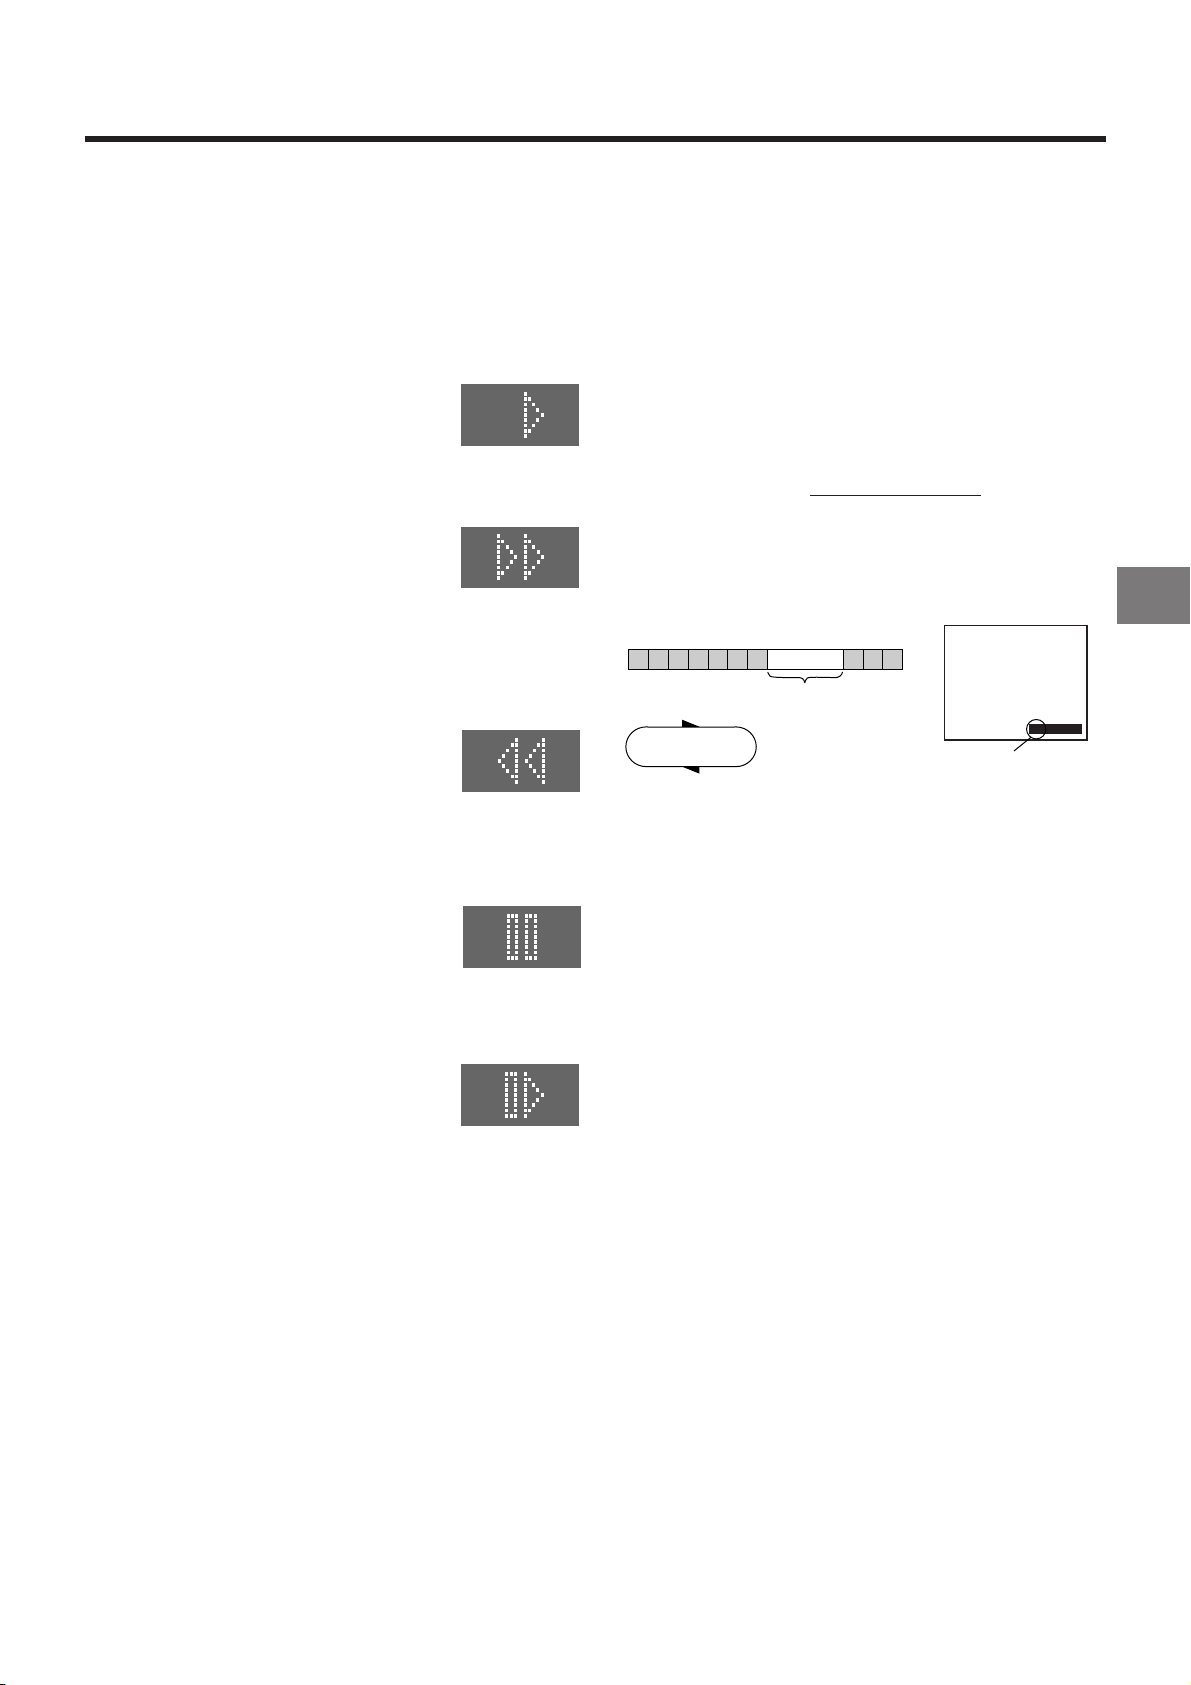
For Normal Playback:
Press the Play button I.
VCR display
For Cue Playback:
During playback, tap the Fast Forward button H.
≥ To return to normal playback, press the
Play button I.
≥ If you press and hold down the Fast
Forward button H, cue playback
continues for as long as you keep the
button pressed.
For Review Playback:
During playback, tap the Rewind button 8.
≥ To return to normal playback, press the
Play button I.
≥ If you press and hold down the Rewind
button 8, review playback continues for
as long as you keep the button pressed.
For Still Playback:
During playback, press the Pause/Slow button 7.
≥ To return to normal playback, press the
Play button I or the Pause/Slow button
7.
For Slow Playback:
During playback, keep the Pause/Slow button 7 pressed
for 2 seconds or more.
≥ To return to normal playback, press the
Play button I.
Fast-forwarding or Rewinding the Tape:
To fast-forward the tape:
Press the Fast Forward button H in the stop mode.
To rewind the tape:
Press the Rewind button 8 in the stop mode.
≥ To stop fast-forwarding or rewinding, press the Stop button
9.
≥ To briefly view the picture during fast-forwarding or
rewinding, press and hold down the corresponding button.
To Stop Playback
Press the Stop button 9.
Notes:
≥ Cue, review or slow playback will be automatically
cancelled after 10 minutes, and still playback after
5 minutes.
≥ During playback function other than normal playback,
horizontal noise bars may appear in the picture, the colour
of the picture may be unstable, or the picture may be
otherwise distorted.
When you play back a tape recorded in the LP mode, the
picture may be in black and white. However, these are not
malfunctions.
To Play Back a Recorded Part Repeatedly
Press the Play button I on the remote control for more than
5 seconds.
The “R” indication appears on the On Screen Display.
≥ If “OSD” is set to “OFF” (See page 35), the “R” indication
will not appear in repeat playback mode.
Beginning
of Tape
Repeat Playback
PLAY
REWIND
To Cancel the Repeat Playback Mode:
Press the Stop button 9.
End of
Recorded Part
Control Signal
Interruption
(at least 5 sec.)
0:00.29
R
Indication of the Repeat
Playback mode
To rewind the tape a little to view the same
scene again
(Replay Function)
If you want to view the same scene again, for example
because you could not catch clearly what a person said,
simply press the REPLAY button 4, to rewind the tape a little
from its present position and play it back again.
The direction in which the tape is rewound depends on what
playback mode the VCR is in when you press the REPLAY
button 4.
≥ If you press the REPLAY button 4 when the VCR is in the
stop, rewind, fast-forward, slow playback, or standby (Off)
mode, the Replay function does not work.
During Normal Playback, Cue Playback and Still
Playback:
When you press the REPLAY button 4, the VCR switches
over to the review playback mode for a few seconds and then
resumes normal playback.
During Review Playback:
When you press the REPLAY button 4, the VCR briefly
switches over to Cue playback and then plays back at normal
speed in forward direction from the point where the REPLAY
button 4 was pressed.
Playback
13

To Stop Playback Automatically
(Playback Off Timer Function)
If you set the playback duration, the playback will stop
automatically.
After the set playback time has elapsed, the VCR
automatically stops playback and switches off.
To Activate the Playback Off Timer Function:
During normal playback, press the Play button I
for more than 2 seconds to put the VCR in the Playback Off
Timer mode.
After that, press the Play button I on the VCR repeatedly until
the desired playback duration is displayed on the VCR display.
on the VCR
Convenient Automatic Functions
VCR Auto Power On
When you insert a video cassette, the VCR switches on
automatically.
Auto Playback Start
When you insert a video cassette with a broken erasure
prevention tab, playback start automatically without having to
press the Play button I.
VCR-off Playback
When the VCR is off, an inserted cassette can be played
back by pressing the Play button I.
≥ Repeatedly pressing this button changes the indication in
the following order:
Counter display
(normal playback mode)
240
(min.)
To Stop Midway:
Press the Stop button 9.
30
(min.)
180
(min.)
60
(min.)
120
(min.)
To Play Back NTSC Video Cassettes on
Your PAL TV
(Quasi-NTSC Playback Function)
This VCR allows playback of tapes recorded in the NTSC
system on a normal PAL system TV with the same operations
as usual.
On some TVs, however, the playback picture may roll up or
down.
≥ If your TV has a V-HOLD control or equivalent adjustment
function, use it to try to stop the picture movement.
Auto Rewind
When the tape reaches the end, the VCR automatically
rewinds it to the beginning.
≥≥
≥This function does not work during timer recording and
≥≥
OTR.
Automatic Switching Off and Ejection
When the VCR is switched off, and inserted cassette can be
ejected simply by pressing the EJECT button Z. The VCR
will eject the cassette and automatically turn itself off again.
VCR-off Search
When the VCR is off, the VCR starts intro-jet scan of an
inserted cassette by pressing the SEARCH button M.
To Eject the Video Cassette Using the
Remote Control
Keep pressing Stop button 9 for at least 3 seconds.
14
 Loading...