

Page 1
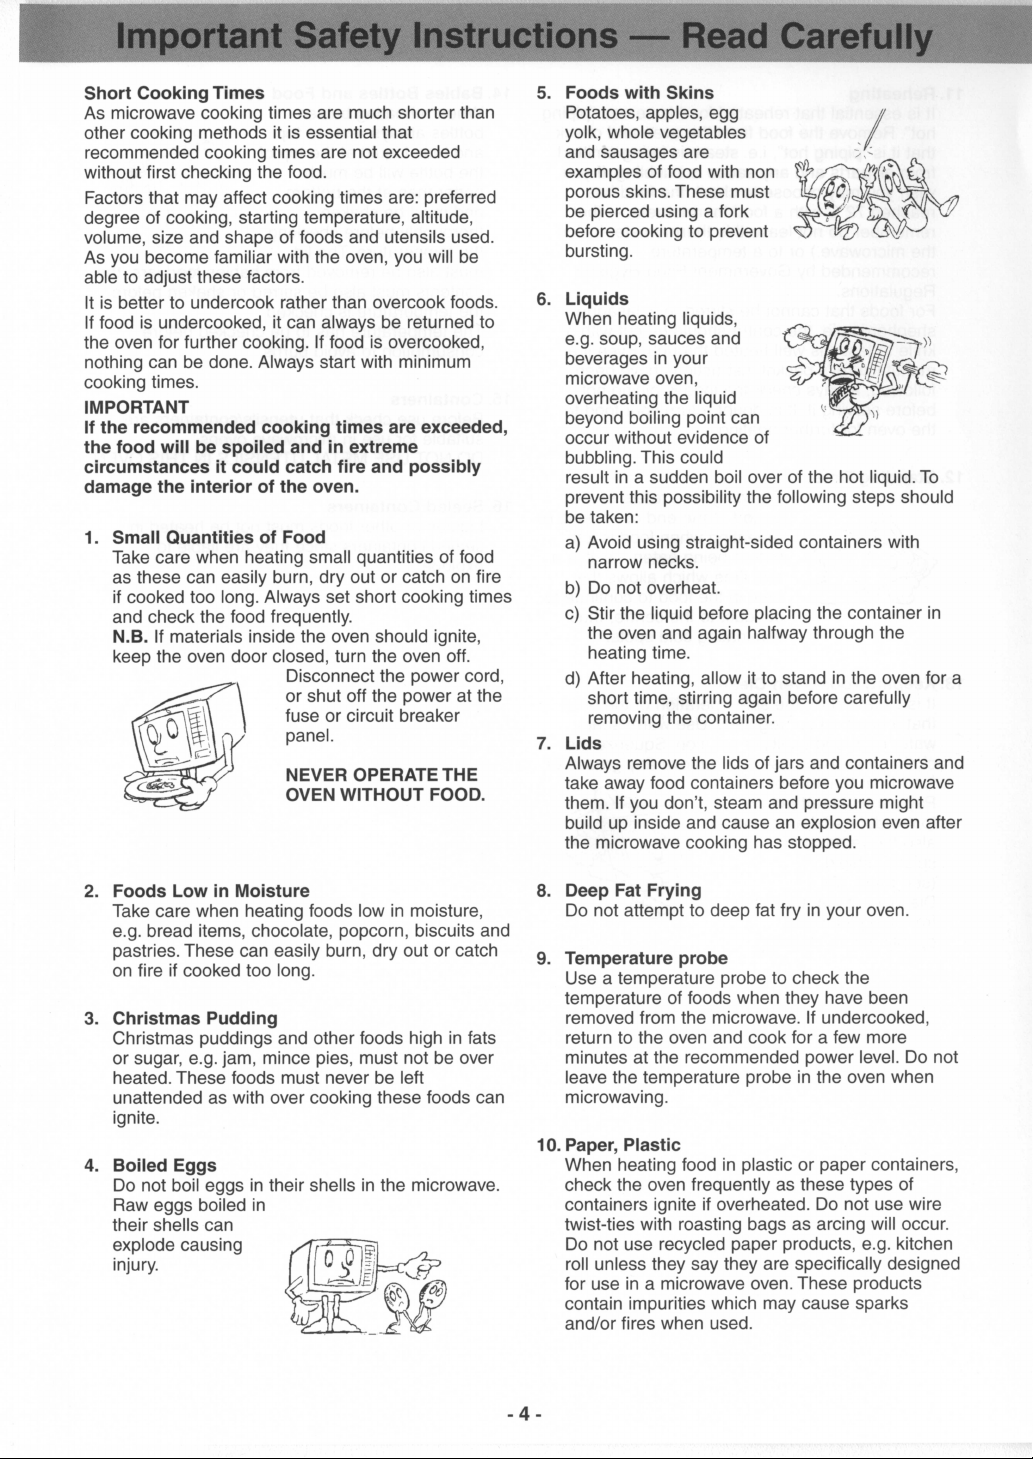
NE-1856-2
Except for
NE-1856-2
A
B
x2
1
234
x3
567
8
90
x2
1
A
2
B
3
x3
4
5
6
7
8
9
0
Page 2
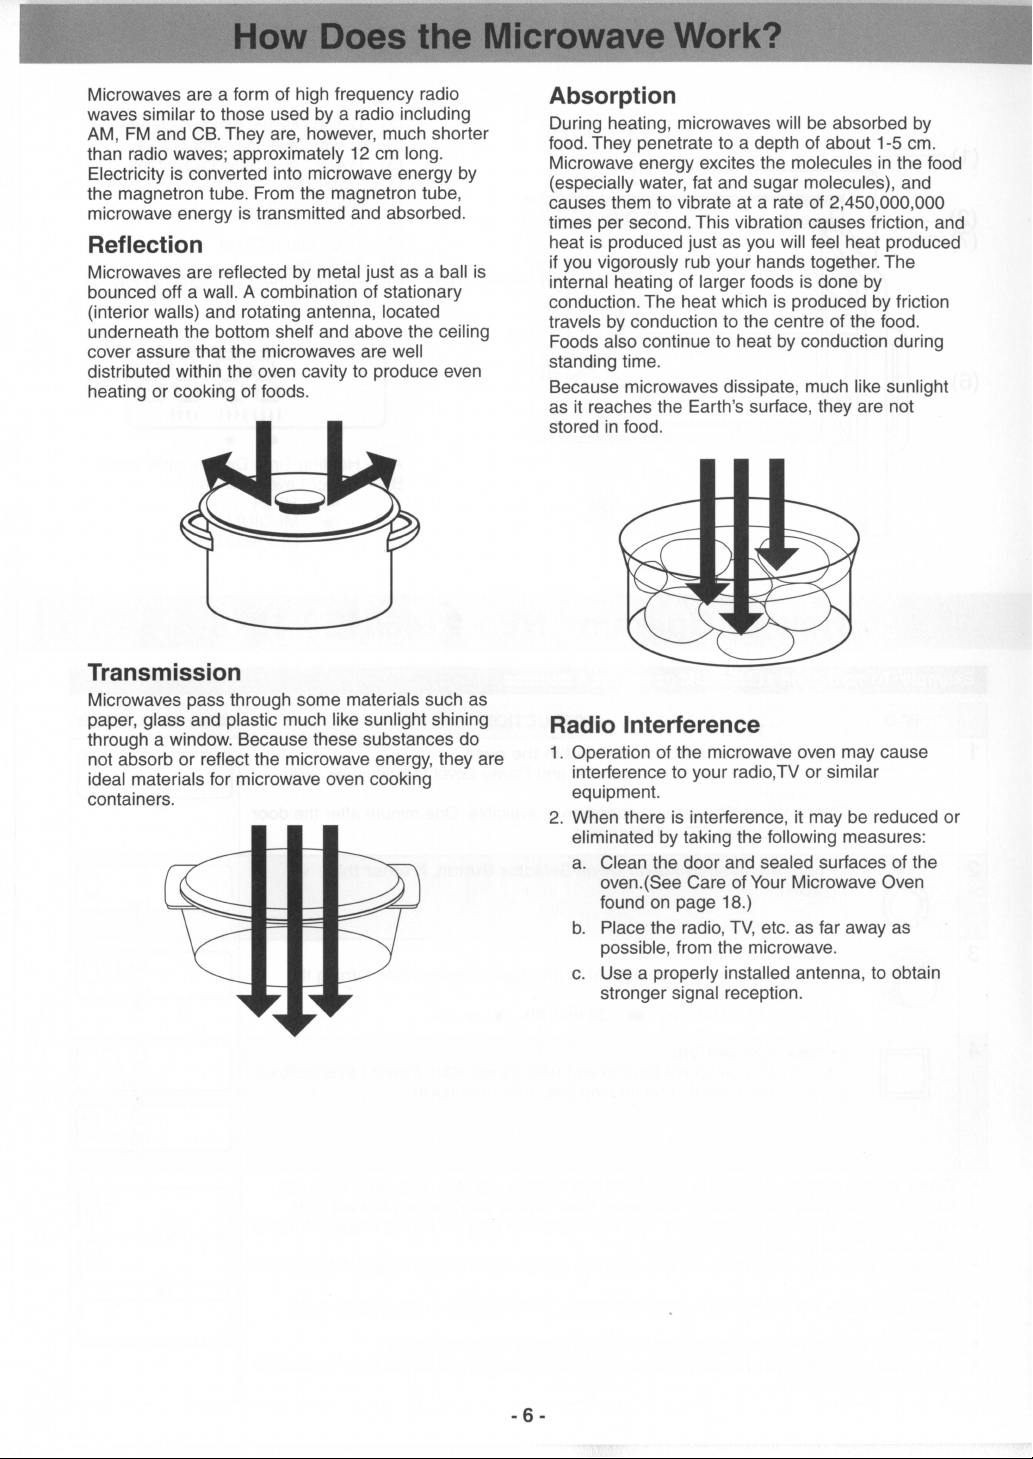
Page 3
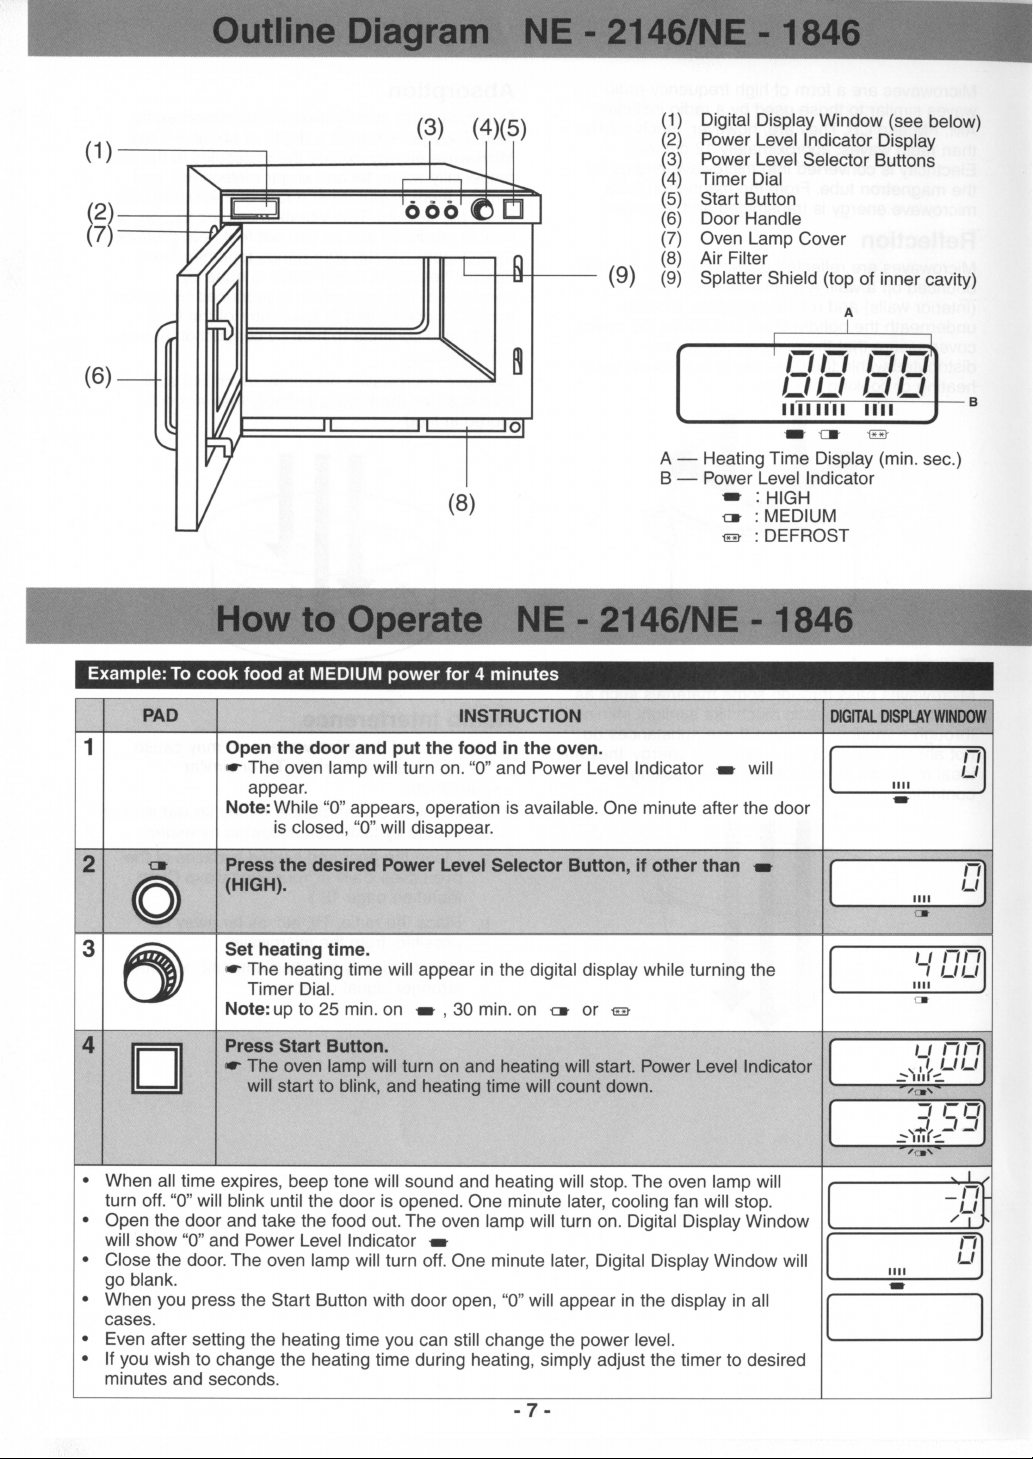
Page 4
Page 5
Page 6
Page 7
Page 8
Page 9

- 8 -
(1) Digital Display Window (see below)
(2) Power Level Indicator Display
(3) Program pad
(4) Shift (A/B) pad
(5) Power Level Selector pad
(6) Double Quantity pad
(7) Treble Quantity pad
(8) Number/Memory pads
(9) Stop/Reset pad
(10) Start pad
(11) Oven Lamp Cover
(12) Door Handle
(13) Air Filter
(14) Splatter Shield (top of inner cavity)
(15) Middle Shelf (NE-1856-2 only)
A –– Program Display
B –– Heating Time Display (min. sec.)
C –– Memory Pad Number Display
D –– 1st Stage Heating Indicator
E –– 2nd Stage Heating Indicator
F –– 3rd Stage Heating Indicator
G –– Power Level Indicator
:
HIGH
: MEDIUM
: DEFROST
A
1234567890
B
(13)
(11)
(12)
(14)
(15)
(8)
(1) (2)
(3)(4) (5) (6)(7)
(9)
(10)
x 2
x 3
PROG
231
AB
C
DE F
G
This oven is preset at the factory for the following:
◆ Manual operation
◆ Number/Memory pads preset HIGH power at the indicated heating times for single stage heating
1 = 10 sec. 2 = 20 sec. 3 = 30 sec. 4 = 40 sec. 5 = 50 sec.
6 = 1 min. 7 = 1 min. 15 sec.8 = 1 min. 30 sec.9 = 1 min. 45 sec.0 = 2 min.
(There are two sides, A and B. Only A-side is preset.)
◆ Program Unlock
◆ Cycle Counter set to “0” on all pads
If you wish to change these times, please consult the operating instructions to find how to program them.
Outline Diagram NE - 2156/NE - 1856/NE - 1856-2/NE - 1456
Page 10

- 9 -
A. MANUAL HEATING –– single stage heating ––
Example: To cook food at HIGH power for 2 minutes
INSTRUCTION
DIGITAL DISPLAY WINDOW
PAD
2
Press Power Level Selector pad once.
☛ The selected power level will be indicated and 1st Stage Heating
Indicator “1” will start to blink.
Note: To select HIGH power, press once. To select MEDIUM power, press
twice. To select DEFROST power, press three times.
3
Press Number/Memory pads “2”,“0” and “0”.
☛ The set heating time will appear.
Note: up to 15 min. on HIGH or MEDIUM power, 30 min. on DEFROST
2 0 0
1
4
Press Start pad.
☛ The oven lamp will turn on and heating will start. Power Level Indicator
will start to blink, and heating time will count down.
• When all time expires, beep tone will sound and heating will stop. The oven lamp will
turn off. “0” will blink until the door is opened. One minute later, cooling fan will stop.
• Open the door and take the food out. The oven lamp will turn on. Digital Display Window
will show the originally selected time and power.
• Close the door. The oven lamp will turn off. One minute later, Digital Display Window will
go blank.
1
1
Open the door and put the food in the oven.
☛ The oven lamp will turn on and “0” will appear.
Note: While “0” appears, operation is available. One minute after the door
is closed, “0” will disappear.
How to Operate NE - 2156/NE - 1856/NE - 1856-2/NE - 1456
1
1
1
Page 11

- 10 -
A. MANUAL HEATING –– 2 or 3 stages heating ––
INSTRUCTION
DIGITAL DISPLAY WINDOW
PAD
Follow steps 1 to 3 on page 9.
1
4
Press Power Level Selector pad three times.
☛ The selected power level will be indicated and 2nd Stage Heating
Indicator “2” will start to blink.
5
Press Number/Memory pads “1”,“0” and “0”.
☛ The set heating time will appear.
Note: up to 15 min. on HIGH or MEDIUM power, 30 min. on DEFROST
0 01
21
6
Press Start pad.
☛ The oven lamp will turn on. The total time for both stages will appear
and start to count down. 1st Stage Heating Indicator “1” and Power
Level Indicator for the first stage heating will start to blink.
• After the first stage heating, beep tone will sound. 2nd Heating Stage Indicator “2” and
Power Level Indicator for the second stage heating will start to blink and the remaining
heating time will count down.
• When all time expires, beep tone will sound and heating will stop. The oven lamp will
turn off. “0” will blink until the door is opened. One minute later, cooling fan will stop.
• Open the door and take the food out. The oven lamp will turn on. Digital Display Window
will show the originally set time and power.
• Close the door. The oven lamp will turn off. One minute later, Digital Display Window will
go blank.
2
21
Note: For 3 stages heating, select a power level once again after step 5 and set a heating time.
SPECIAL NOTE: For both single and 2 stages heating
1. While heating, one touch on Stop/Reset pad stops the operation. You can restart it by pressing Start pad or a
second touch on Stop/Reset pad will cancel the selected program.
2. While not heating, one touch on Stop/Reset pad cancels the selected program.
Repeat Feature
• You can repeat the last manually selected heating time by pressing the Start pad A , If the oven is used within
1 minute.
• After 1 minute of non-use with the door closed, the Repeat Feature will be cancelled. The display goes blank.
Example: To cook food at HIGH power for 2 minutes and at DEFROST power for 1 minute
How to Operate NE - 2156/NE - 1856/NE - 1856-2/NE - 1456
21
21
21
Page 12

- 11 -
C. PROGRAMMING NUMBER/MEMORY PADS –– single stage heating ––
INSTRUCTION
DIGITAL DISPLAY WINDOW
PAD
2
Press Program pad.
☛ “PROG” will start to blink.
THE OVEN CAN NOT BE PROGRAMMED WHEN PROGRAM LOCK IS ACTIVATED! (see page 13-14)
DO NOT OPEN THE DOOR WHILE PROGRAMMING!
Example: To program cooking at DEFROST power for 1 minute into Number/Memory pad “5”
1
Keep the door closed.
☛ Digital Display Window must be blank.
B. PROGRAMMED HEATING
INSTRUCTION
DIGITAL DISPLAY WINDOW
PAD
2
Press the desired Number/Memory pad “3”.
☛ The currently programmed information will be indicated.
3
Press Start pad.
☛ The oven lamp will turn on and heating will start. The heating time will
count down.
PROG
1
◆
In Program Unlock Mode:
• When all time expires, beep tone will sound and heating will stop. The oven lamp will
turn off. “0” will blink until the door is opened. One minute later, cooling fan will stop.
• Open the door and take the food out. The oven lamp will turn on.
• Close the door. The oven lamp will turn off. One minute later, Digital Display Window will
go blank.
◆
In Program Lock Mode:
Just press the desired Number/Memory pad. Heating will automatically start without pressing Start pad.
◆ For Double (or Treble) Quantity heating:
Press Double (or Treble ) Quantity pad before pressing the desired Number/Memory pad.
Example: To select Number/Memory pad “3” at A side in which your desired heating program (at HIGH
power for 3 min., single stage heating) is set
1
Open the door and put the food in the oven.
☛ The oven lamp will turn on and “0” will appear.
Note: While “0” appears, operation is available. One minute after the door
is closed, “0” will disappear.
Note:
• When you want to select the number at B side, press Shift (A/B) pad before pressing the desired
Number/Memory pad.
How to Operate NE - 2156/NE - 1856/NE - 1856-2/NE - 1456
x 2
x 3
3
PROG
1
PROG
Page 13

- 12 -
6
Press Power Level Selector pad once.
☛ The power level for 2nd stage will be indicated, 2nd Stage Heating
Indicator “2” will start to blink, and Heating Time Display will go blank.
7
Press Number/Memory pads “2”,“0” and “0”.
☛ The set heating time will appear.
Note: up to 15 min. on HIGH or MEDIUM power, 30 min. on DEFROST
2 0 0
PROG
21
8
Press Prog pad.
☛ “PROG” and 2nd Stage Heating Indicator “2” will stop blinking. The
total time for both stages will appear. This means that you have
completed programming.
• Three seconds later, Digital Display Window will go blank.
Note:
• Program the remaining Number/Memory pads as desired by repeating steps above.
• When “PROG” is blinking in Digital Display Window, the program can be cancelled and/or one touch on
Stop/Reset pad erases the programmed Number/Memory pad number.
• When you want to program the B side, press Shift (A/B) pad before pressing Number/Memory pad.
C. PROGRAMMING NUMBER/MEMORY PADS –– 2 or 3 stages heating ––
INSTRUCTION
DIGITAL DISPLAY WINDOW
PAD
Follow steps 1 to 5 above.
PROG
1
Example: To program cooking at DEFROST power for 1 minute and at HIGH power for 2 minutes into Number/Memory pad “5”
THE OVEN CAN NOT BE PROGRAMMED WHEN PROGRAM LOCK IS ACTIVATED! (see page 13-14)
DO NOT OPEN THE DOOR WHILE PROGRAMMING!
4
Press Power Level Selector pad three times.
☛ The selected power level will be indicated, 1st Stage Heating Indicator
“1” will start to blink, and Heating Time Display will go blank.
5
Press Number/Memory pads “1”,“0” and “0”.
☛ The set heating time will appear.
Note: up to 15 min. on HIGH or MEDIUM power, 30 min. on DEFROST
0 01
PROG
1
6
Press Program pad.
☛ “PROG” and 1st Stage Heating Indicator “1” will stop blinking.
This means that you have completed programming.
• Three seconds later, Digital Display Window will go blank.
Note:
• Program the remaining Number/Memory pads as desired by repeating steps 1-6 above.
• When “PROG” is blinking in Digital Display Window, the program can be cancelled and/or one touch on
Stop/Reset pad erases the programmed Number/Memory pad number.
• When you want to program the B side, press Shift (A/B) pad before selecting the desired Number/Memory pad.
3
Press Number/Memory pad “5”.
☛ The selected pad number will appear and currently programmed
information will be indicated.
5
PROG
1
How to Operate NE - 2156/NE - 1856/NE - 1856-2/NE - 1456
PROG
1
PROG
1
PROG
21
PROG
21
Page 14

- 13 -
E. PROGRAM LOCK
INSTRUCTION
DIGITAL DISPLAY WINDOW
PAD
1
Keep the door closed.
☛ Digital Display Window must be blank.
2
Press Prog pad until “PROG”, “P” and “L” appear. (more than five
seconds)
☛ “PROG”, “P” and “L” will appear.
In Program Lock mode:
• The oven is started by pressing the desired Number/Memory pad. There is no need to press Start pad.
• Opening the door cancels the remaining time on the program.
• The oven can not be programmed or run manually until the program lock is released.
◆
To Activate Program Lock:
INSTRUCTION
DIGITAL DISPLAY WINDOW
PAD
2
Press Prog pad.
☛ “PROG” will start to blink.
4
Press Double Quantity pad.
☛ The currently programmed magnification number will appear.
Note: 1.6 times is preset at factory.
5
Press Number/Memory pads “1” and “5”.
☛ The programmed magnification number will appear.
1
5
PROG
6
Press Prog pad.
☛ “PROG” will stop blinking.
This means that you have completed programming.
• Three seconds later, Digital Display Window will go blank.
Note:
• If you want to program your desired magnification number for treble quantity, repeat as above, using Treble
Quantity pad instead of Double Quantity pad.
3
Press Number/Memory pad “5”.
☛ The selected pad number will appear and currently programmed
information will be indicated.
5
PROG
1
Example: To program 1.5 times of heating time for double quantity into Number/Memory pad “5”
1
Keep the door closed.
☛ Digital Display Window must be blank.
D. PROGRAMMING DOUBLE OR TREBLE QUANTITY PAD
THE OVEN CAN NOT BE PROGRAMMED WHEN PROGRAM LOCK IS ACTIVATED! (see below)
DO NOT OPEN THE DOOR WHILE PROGRAMMING!
How to Operate NE - 2156/NE - 1856/NE - 1856-2/NE - 1456
x 2
PROG
PROG
PROG
PROG
Page 15

- 14 -
F. BEEP TONE
The loudness of beep tone and the length of beep tone
at the end of heating cycle can be set.
There are four levels of the loudness. The level is
indicated by a number followed by the word “bEEP”.
3bEEP = loudest
2bEEP = middle
1bEEP = quietist
0bEEP = silent
There are two options of the length of beep tone at the
end of heating cycle. The length is indicated by 1 st or
2 nd Stage Heating Indicator.
1 = 3 beeps
2 = short beeps for 60 seconds
The loudest level and 3 beeps are preset at the factory.
◆
To Select Loudness Level and Length “3 beeps”:
INSTRUCTION
DIGITAL DISPLAY WINDOW
PAD
1
Open the door and leave it open.
☛ The oven lamp will turn on and “0” will appear.
2
Press Prog pad.
3
Press Number/Memory pad “0” once.
☛ The tone will sound at its loudness level and the loudness level “3”
followed by the word “bEEP” will appear. “PROG” will start to blink and
1st Stage Heating Indicator “1” (the length of beep tone “3 beeps”) will
be indicated.
Note: Repeating to press the pad “0” will lower the loudness all the way
to silent. (3 bEEP –– loudest, 2 bEEP –– middle,
1 bEEP –– quietest, and 0 bEEP –– silent)
0
PROG
1
4
Press Prog pad.
☛ “PROG” will stop blinking. That means that you have completed
program.
Three seconds later, “0” will appear.
• Close the door. One minute later, Digital Display Window will go blank.
Example: To select loudest beep tone
In Program Unlock mode:
• Oven reverts to a two-touch operating mode (Number/Memory pad + Start pad).
• Repeat and interrupt feature are operational.
• Number/Memory pads can be programmed.
• Tone loudness control and length control are operational.
◆
To Release Program Lock:
INSTRUCTION
DIGITAL DISPLAY WINDOW
PAD
1
Open the door and leave it open.
☛ The oven lamp will turn on, and “0” will appear.
2
While pressing Stop/Reset pad, press Prog pad until “PROG” and
“P” appear. (more than five seconds)
☛ “PROG” and “P ” will appear.
+
How to Operate NE - 2156/NE - 1856/NE - 1856-2/NE - 1456
PROG
PROG
1
Page 16

- 15 -
H. CYCLE COUNTER
◆ For selecting length of tone “short beeps for 60 seconds”:
INSTRUCTION
DIGITAL DISPLAY WINDOW
PAD
Follow step 1-4 on page 14.
DO NOT CLOSE THE DOOR!
PROG
1
5
Within three seconds after pressing Prog pad at step 4, press
Number/Memory pad “0” once.
☛ “PROG” will start to blink and 2nd Stage Heating Indicator “2” (the
length of beep tone “short beeps for 60 seconds”) will be indicated.
6
Press Prog pad.
☛ “PROG” will stop blinking. This means that you have completed
programming.
Three seconds later, “0” will appear.
PROG
2
• Close the door. One minute later, Digital Display Window will go blank.
G. PROGRAM LIST
INSTRUCTION
DIGITAL DISPLAY WINDOW
PAD
1
Open the door and leave it open.
☛ The oven lamp will turn on and “0” will appear.
2
While pressing Stop/Reset pad, press Start pad.
☛ All currently programmed information (the program set into each
Number/Memory pad (A/B sides), Beep Tone, and Program Lock
information) will continuously appear.
+
Example: To select short beeps for 60 seconds
INSTRUCTION
DIGITAL DISPLAY WINDOW
PAD
1
Open the door and leave it open.
☛ The oven lamp will turn on and “0” will appear.
2
While pressing Stop/Reset pad, press Number/Memory pad “3”.
☛ The times that the pressed Number/Memory pad has been used will
appear.
+
◆
To Read The Number of Times Each Memory Pad Has Been Used:
Example: To read times of Number/Memory pad “3” at A side (6666 times used)
Note:
• When you want to read the times of each pad at B side, press Shift (A/B) pad while the display is still showing
the number of cycles in step 2.
How to Operate NE - 2156/NE - 1856/NE - 1856-2/NE - 1456
0
PROG
2
e.g.
PROG
1
PROG
1
PROG
2
PROG
3
e.g.
Page 17

- 16 -
I. AIR FILTER
INSTRUCTION
DIGITAL DISPLAY WINDOW
PAD
1
Open the door and leave it open.
☛ The oven will turn on and “0” will appear.
2
While pressing Start pad, close and open the door.
3
Press Number/Memory pad “3”.
☛ The currently programmed hour will appear.
3
e.g.
4
Press Number/Memory pads “6”,“0” and “0”.
☛ The programmed hour will appear.
Note: up to 9999 hours
5
Press Prog pad.
☛ Three seconds later, “0” will appear.
To check the total number of hours used,
◆ Open the door and leave it open.
◆ Press Number/Memory pad “3” while pressing Start pad.
◆ The total number of hours used and “H” will appear in Digital Display Window.
e.g. If the oven has been used for 20 hours,
Three seconds later, “0” will appear in Digital Display Window.
Note: If the oven cuts out after short operation, check if Air Filter is clean before calling an engineer.
Note: When “FILT” sign appears in Digital Display Window, remove Air FIlter and clean it with soapy water. Press
Stop/Reset pad to clear the display.
Example: To program cleaning Air Filter every 600 hours
3
Close the door while the display is still showing the number of
cycles that each pad has been used.
☛ The total cumulative cycles that the oven has been used in
Number/Memory pads at A/B sides and manual mode will appear.
◆
To Read Total Cumulative Cycles That The Oven Has Been Used:
INSTRUCTIONPAD
DIGITAL DISPLAY WINDOW
◆
To Read The Number of Cycles That The Oven Has Been Used In Manual Mode:
INSTRUCTIONPAD
4
Open the door and leave it open.
☛ The oven lamp will turn on and “0” will appear.
5
While pressing Stop/Reset pad, press Power Level Selector pad.
☛ The times that the oven has been used in manual mode will appear.
+
DIGITAL DISPLAY WINDOW
How to Operate NE - 2156/NE - 1856/NE - 1856-2/NE - 1456
e.g.
0 06
e.g.
Page 18

- 17 -
IMPORTANT
1. Disconnect or unplug all units from the wall socket
before attempting to stack.
2. For stacking installation, you must use the
PANASONIC Joining Plate which is enclosed with
this unit.
3. The following PANASONIC models only are suitable
for stacking:
NE-1057, NE-1457, NE-1247, NE-1747, NE-1047,
NE-1447, NE-1257, NE-1757, NE-1442, NE-1856,
NE-1456, NE-1846, NE-1446, NE-2156, NE-2146,
NE-1856-2
4. The maximum stacking height is the total heights of
two units.
PREPARATION
Be sure the oven cavity is empty.
INSTALLATION
1. Stack the units and remove five screws (a) as shown in Fig.1.
2. Loosen the screw (b).
3. Projection on Joint Plate must face away from the oven. Place Joining Plate on the screw (b).
4. Attach and tighten five screws (a) and the screw (b). See Fig.2.
5. Ensure the top oven is at a safe and workable height.
This oven monitors its operation and displays a Failure Code in Digital Display Window when a problem occurs.
What to do when a Failure Code appears: Disconnect the oven from the electricity supply and wait more than
ten seconds before reconnecting. If normal operation does not resume, follow the next chart.
CODE
F01
F33-34
F05
F81-82
F86-87
F44
PROBLEM
Too high temperature of
exhausted air
Defective thermistor circuit
Defective memory IC
Defective relay circuit
Defective relay circuit
Defective control panel
WHAT TO DO
The oven shuts off automatically. Disconnect the appliance from the electricity
supply. The oven beeps continuously and resets for operation when cool. Move
the oven to a cooler location. If the problem persists, call service agent.
The oven shuts off automatically. If the problem persists, call service agent.
If the problem persists, call service agent. The oven will operate even if Failure
Code appears, just not as designed. If the problem occurs during memory
heating, press Stop/Reset pad. Then other memory program and manual heating
will be possible.
If the problem persists, call service agent. The oven will operate even if Failure
Code appears, just not as designed. Press Stop/Reset pad and try again.
The oven shuts off automatically. If the problem persists, call service agent.
The oven shuts off automatically. If the problem persists, call service agent.
Note: Above codes shown in Digital Display Window do not indicate all possible failures on the unit.
(b)
Joining Plate
Projection
(a)
Fig. 1
Joining Plate
Projection
Fig. 2
Installation Instructions for Stacking
Self Diagnostics Failure Code Explanation
Page 19

- 18 -
1. Disconnect the appliance from the electricity supply
before cleaning.
2. Keep the inside of the oven [and Middle shelf
(NN-2146-2/2156-2 only)] clean. If pieces of food or
spilled liquids stick to the oven walls, or between
door seal and door surface, they will absorb
microwaves and may cause arcing or sparks. Wipe
up all spills with a damp cloth. Kitchen detergent or
Food Sanitizer Solution may be used if the oven
gets very dirty. Do not use harsh detergents or
abrasives. The middle shelf can be washed either in
hot soapy water or in the dishwasher.
3. The outside surface of this microwave oven should
be cleaned with soap and water, then dried with a
soft cloth. Make sure that water does not get into
the back ventilation or control panel, since this can
damage the unit.
4. The window of the door should be washed with
very mild soap and water. Be sure to use a soft
cloth. Never use window cleaner. The front door can
be scratched by harsh soap or detergents.
CLEANING OF THE
SPLATTER SHIELD
1. Locate the snap-in stoppers at the front corners of
the splatter shield with both hands and pull them in
and down. Take the splatter shield out of the oven
cavity.
CAUTION
Never operate the oven without the splatter shield
securely in place. To do so will permanently
damage the antenna in the roof of the oven.
CLEANING AIR FILTER
Cleaning the Air Filter regularly according to the
following instructions. The oven may overheat if the Air
Filter becomes clogged with dust and grease.
1. Remove Air Filter from the front bottom skirt by
returning the right screw to the left. Then slide the
filter to the right and lift it off the post at the left.
2. Rinse splatter shield in soapy water or Food
Sanitizer Solution. Dry.
3. Be sure to replace the shield before using the oven.
Locate the pegs at the rear of the cavity first. Lift
the front edge into place and the side stoppers
should click into place.
screw
post
2. Wash this filter in warm soapy water.
3. Be sure to replace Air Filter before using the oven.
Care of Your Microwave Oven
Page 20

- 19 -
COOKWARE
1. Heat-proof glassware, such as Pyroceram and
Pyrex, is best suited for use in the microwave oven.
2. Do not use metal ware, ceramics trimmed with gold
or silver, or any container with a metal content.
3. If “arcing” should occur, check the cookware
carefully again for metal.
4. You may use ordinary glassware, chinaware,
plastic-ware and paper-ware, when cooking food
that requires a low temperature. Using this type of
cookware for high temperature cooking may cause
cracking or warping.
5. You can cook steamed vegetables in special “see-
through” wrapping film, such as Saran Wrap, or wax
paper. Do not cook in a plastic bags.
6. Before using the oven always check that containers
are suitable. DO NOT MICROWAVE sealed
containers as they may explode.
N.B. Always check manufacturer’s instructions as
some food manufacturers are producing food in
containers that do not require piercing.
7. DO NOT leave the appliance unattended if paper,
plastic or other combustible containers are used.
Do not use re-cycled paper products, as they may
contain impurities which may cause sparks and/or
fires when used, unless packaging states they are
specifically designed for MICROWAVE use.
CAUTION
Do not use METAL UTENSILS in this oven.
OTHER HELPFUL
INSTRUCTIONS
FOR BEST RESULTS
1. When determining heating time for particular foods,
always select minimum time and check occasionally
during cooking for progress. The microwave oven
cooks so quickly, therefore it is easy to overcook
foods.
2. Be careful of the cooking time for small quantities of
foods, or foods with low water content. They may
burn if cooked too long.
3. Do not use the oven for drying kitchen towels or
napkins. They may burn if heated too long.
4. Do not try to boil eggs in the oven.
5. When you cook an egg be sure to pierce the yolk
membrane prior to placing into the oven to prevent
the egg bursting.
6. To achieve more even cooking result, give the dish
a half-turn, or turn the food over.
DEFROSTING FROZEN
FOODS
1. If you try to completely defrost frozen foods in the
microwave oven, uneven defrosting may occur due
to the differences in the thickness and shape of the
food. Drip may also result, and sometimes a part of
the food cooks although other parts still remain
frozen. In actual usage of frozen foods, you should
not normally defrost them 100%. 70% defrosting in
the microwave oven is ideal and helpful for the next
cooking operation.
2. To defrost evenly, turn over or rearrange the food
during defrosting.
3. To defrost fatty meat, heat it in the microwave oven
for a short time and leave it to stand at room
temperature, or heat it intermittently until defrosted.
4. When you defrost a whole chicken, or any frozen
food of irregular shape, wrap legs or thin parts with
aluminum foil. Otherwise thin parts will be defrosted
faster and sometimes cooked before other parts
have properly defrosted. For big pieces of meat,
wrap the sides with aluminum foil so that they will
be uniformly thawed by vertical microwaves only.
5. Ice should be removed during defrosting.
TWO LEVEL COOKING
(NN-1856-2 only)
When heating, one item always place the container in
the centre of the bottom shelf.
When using the microwave mainly for reheating one
item at a time, remove the middle shelf and work on
the bottom shelf.
When reheating two items at a time place both dishes
on the bottom shelf side by side, unless the
containers are too large and then place one on the
shelf.
When heating more than two plates, place the dishes
evenly on the two shelves.
Allow some space between each plate, do not cram
too much food into the oven.
If the middle shelf is not used, it should be stored
outside the oven and must not be put on the bottom
shelf.
Cooking Instructions
Page 21

Page 22

- 21 -
The times given in the chart below are a guideline only. Many factors eg starting temperature of the food can
affect the final heating time required. The cooking and defrosting times must be adjusted when necessary.
All times are tested using foods at
starting temperatures as below;
Chilled foods . . . . . .Approx. +5˚C
Frozen foods . . . . . .Approx. -18˚C
Always check for the correct core temperature with a temperature probe to comply with current Government Food
Hygiene Regulations.
Function
Food Weight
Power
Level
Approx.Time
NE-2156/2146
NE-1856/1846
NE-1446
NE-1856-2
Defrosting
Fish Fillets
Minced Beef
Whole Chicken
Composite Dish
Multi portion
Single portion
Apple Pie
Gateau
Bread Rolls
500 g
500 g
1.36 kg
1.36 kg
275 g
1 portion
1 portion
1 portion 50 g
8 min 8 min 8 min
5 min 5 min 5 min
25 min 25 min 25 min
20 min 20 min 20 min
8 min 8 min 8 min
1 min 15 s 1 min 15 s 1 min 15 s
2 min 2 min 2 min
30 s 30 s 30 s
Cooking from
Chilled Raw
Food
Scrambled Egg
Broccoli
Fish Fillets
Bacon
Chicken Portions
2 eggs + 2 tbsp. milk
500 g
500 g
2 rashers
500 g
20-25 s 25-30 s 40-50 s
3 min 3 min 30 s 4 min 30 s
2 min 20 s 2 min 45 s 3 min 30 s
40 s 50 s 1 min 10 s
4 min 4 min 45 s 6 min
Cooking and/or
Reheating from
Frozen
Peas
Cooked Rice
Cooked Sausages
Cooked Wings of
Fire
Cooked Boxed
Cheeseburger
Chocolate Fudge
Cake
500 g
167 g
x 3 (50 g each)
x 7 pieces
75 g
1 portion
3 min 20 s 4 min 5 min 10 s
1 min 20 s 1 min 40 s 2 min 10 s
50 s 1 min 1 min 15 s
1 min 20 s 1 min 40 s 2 min 10 s
50 s 1 min 1 min 15 s
30 s 30 s 30 s
Reheating from
Cooked Chilled
Lasagne
Chilli
Apple Pie
Pepper Sauce
Baked Beans
Soup
325 g
325 g
1 portion
100 ml
100 ml
125 ml
3 min 20 s 4 min 5 min 30 s
2 min 30 s 3 min 3 min 30 s
14 s 16 s 20 s
40 s 50 s 1 min
40 s 50 s 1 min
48 s 56 s 1 min 20 s
HINTS:•Do not cook/reheat/defrost directly onto the base of the oven –– use a suitable container.
•
When defrosting multi portions of foods, turn over and break apart halfway through defrost time to
allow better penetration of microwave energy.
•
Solid/dense foods should not be cooked from frozen as they will be overcooked round the edges
before the centre has reached the required temperature.
•
Cover dishes where appropriate during cooking/reheating. This will retain moisture and prevent
splashing/spillages.
•
Loosen lids/pierce clingfilm before cooking/reheating covered foods.
•
Stir or shake foods halfway through cooking/defrosting time to distribute the heat evenly.
•
Allow a Stand Time before food temperature is checked and/or offered for consumption.
Cooking/Defrosting Guide
Page 23

Technical Specifications
Power Source
Required Power
Output
Frequency
Outer Dimensions
(W x D x H)
Cavity Dimensions
(W x D x H)
Net Weight
Timer
NE-1456
10.2 A, 2270 W
HI 1400 W
d
a MED 700 W
b DEF 340 W
NE-1456 / NE-1856 / NE-1856-2 / NE-2156
Maximum programable time for single heating
NE-1856 / NE-1846 /
NE-1856-2
NE-2156 / NE-2146
230 - 240 V, 50 Hz, single phase
12.3 A, 2830 W
*
HI 1800 W
d
a MED 900 W
b DEF 340 W
*
13.7 A, 3160 W
HI 2100 W
d
a MED 1050 W
b DEF 340 W
2450 MHz
422 mm x 508 mm x 337 mm
5
/8" x 20" x 133/16")
(16
330 mm x 310 mm x 175 mm
(13" x 12
3
/32" x 67/8")
30 kg
30 min. (digital) / 10 touch pads
HI and MED power = 15 min.
DEF power = 30 min.
NE-1846 / NE-2146
HI power = 25 min.
MED and DEF power = 30 min.
* IEC Test Procedure
Specifications subject to change without notice.
*
337 mm
26 mm
908 mm
9 mm
422 mm
x
2
1234567890
x
3
A
B
404 mm
38 mm
508 mm
482 mm
437 mm
Front View Side View Side View with Opened Door
- 22 -
463 mm
Page 24

Matsushita Electric Industrial Co., Ltd.
Cooking Systems Division
800 Tsutsui-cho, Yamatokoriyama City, Nara 639-1188, Japan
Web Site: http://www.panasonic.co.jp/global/
A00033A83BP
F0701-3015
Printed in Japan
 Loading...