

Page 1

KX-UTG300
<KX-UTG300>
SIP Phone
Thank you for purchasing this Panasonic product.
Please read this manual carefully before using this product and save this manual for future use.
KX-UTG300: Software File Version 1.131 or later
Document Version: 2014-04
Operating Instructions
Model No.
Page 2

Introduction
Introduction
Feature Highlights
Easy Operation
You can easily access features using the Navigator key, fixed buttons, and soft buttons.
Also, the Message/Ringer lamp will inform you when you have an incoming call or a message waiting.
High-quality Voice Communication
This unit supports the standard SIP protocol and the G.722 codec, enabling reliable and high-quality voice
communication.
ECO Mode
Enabling ECO mode allows you to use this unit while reducing the amount of electricity consumed
(Page 45).
Compatible with Electric Hook Switch (EHS) Headsets
This unit supports EHS headsets (Page 58).
Compatible with Bluetooth® Wireless Headsets
This unit supports Bluetooth wireless headsets (Page 58).
Outline
This manual describes information about the installation and operation of the unit.
Related Documentation
Getting Started
Briefly describes basic information about the installation of the unit.
Administrator Guide
Describes information about the programming and maintenance of the unit.
Manuals and supporting information are provided on the Panasonic Web site at:
http://www.panasonic.com/sip
Note
• The contents and design of the software are subject to change without notice.
2 Operating Instructions Document Version 2014-04
Page 3

Introduction
Other Information
Trademarks
• The Bluetooth
use of such marks by Panasonic System Communications Company of North America is under license.
• Plantronics is a trademark or registered trademark of Plantronics, Inc.
• Jabra is a registered trademark of GN Netcom A/S.
• All other trademarks identified herein are the property of their respective owners.
When you ship the product
Carefully pack and send it prepaid, adequately insured and preferably in the original carton. Attach a
postage-paid letter, detailing the symptom to the outside of the carton.
DO NOT send the product to the Executive or Regional Sales offices. They are NOT equipped to make repairs.
Product Service
Panasonic factory service centers for this product are listed in the service center directory.
Consult your authorized Panasonic dealer for detailed instructions.
®
word mark and logos are registered trademarks owned by the Bluetooth SIG, Inc. and any
Document Version 2014-04 Operating Instructions 3
Page 4

MODEL NO.
SERIAL NO.
DATE OF PURCHASE
NAME OF DEALER
DEALER'S ADDRESS
DEALER'S TEL. NO.
MAC ADDRESS
Introduction
For Future Reference
Record the information in the space below for future reference.
Note
• The serial number and MAC address of this product may be found on the label affixed to the bottom
of the unit. You should note the serial number and MAC address of this unit in the space provided and
retain this manual as a permanent record of your purchase to aid in identification in the event of theft.
4 Operating Instructions Document Version 2014-04
Page 5

Table of Contents
Important Information ..............................................................................8
Data Security .....................................................................................................................8
Additional Information ......................................................................................................9
Before Operating the Telephone ..........................................................11
Accessory Information ...................................................................................................11
Location of Controls .......................................................................................................12
Screens ............................................................................................................................15
Icons .................................................................................................................................16
Soft Button List ...............................................................................................................18
Basic Operations .............................................................................................................20
Confirming Your Extension Number ...............................................................................20
Going off- and on-hook ...................................................................................................20
Adjusting the Volume .....................................................................................................20
Feature Operations ................................................................................21
Making Calls ....................................................................................................................21
Making a Call ..................................................................................................................21
Making a Call from the Phonebook List ..........................................................................21
Dialing by Using Call Logs .............................................................................................21
Redialing the Last Number You Dialed (Redial, Last Number) ......................................21
One-touch Dialing ...........................................................................................................22
Intercom .........................................................................................................................22
Multicast Paging (Push To Talk) ....................................................................................22
Receiving Calls ................................................................................................................23
Receiving a Call .............................................................................................................23
Rejecting Calls ...............................................................................................................23
Ignoring Calls .................................................................................................................24
Holding a Call ..................................................................................................................24
Receiving a Second Call (Answering Call Waiting) .....................................................25
Talking to Two Parties Alternately (Call Splitting) .......................................................25
Transferring a Call (Call Transfer) .................................................................................26
To Transfer with a Flexible Button ..................................................................................26
To Transfer with Flexible Buttons on the KX-UTA336 ....................................................26
Mute ..................................................................................................................................27
Conference Call ...............................................................................................................27
Making a Conference Call ..............................................................................................27
Removing a Party from the Conference .........................................................................27
Ending a Conference Call ..............................................................................................27
Checking Messages ........................................................................................................28
Checking New Messages ...............................................................................................28
Checking Missed Calls ...................................................................................................28
Erasing All Call Logs in a Log Category .......................................................................28
Call Forwarding/Do Not Disturb .....................................................................................29
Optional Group Features ................................................................................................29
SCA (Shared Call Appearance) ......................................................................................29
Services ...........................................................................................................................29
Flexible Buttons ..............................................................................................................30
Using Flexible Buttons with the KX-UTA336 ..................................................................31
IM&P (Instant Messaging & Presence) ..........................................................................33
Logging in to IM&P .........................................................................................................33
Presence ........................................................................................................................34
Table of Contents
Document Version 2014-04 Operating Instructions 5
Page 6

Table of Contents
Contacts .........................................................................................................................34
Sending Messages to Contacts ......................................................................................35
Calling Contacts .............................................................................................................35
Making Conference Calls ...............................................................................................35
Customizing the Telephone ..................................................................36
Phonebook List ...............................................................................................................36
Adding a New Phonebook Entry ....................................................................................36
Adding a Phonebook Entry from the Call Log ................................................................36
Editing a Phonebook Entry .............................................................................................36
Searching for a Phonebook Entry ..................................................................................37
Deleting a Phonebook Entry ...........................................................................................37
Export/Import Phonebook Entries ..................................................................................37
User Settings ...................................................................................................................39
Accessing the Settings ...................................................................................................39
Available Settings ...........................................................................................................39
Settings Details ..............................................................................................................42
Entering Characters ........................................................................................................52
Web User Interface Programming .................................................................................54
Local Phonebook .........................................................................................................37
LDAP Phonebook ........................................................................................................37
Enterprise Phonebook .................................................................................................37
Basic Phone Settings ..................................................................................................42
Basic Call Features .....................................................................................................45
Information Display ......................................................................................................46
Network Settings .........................................................................................................47
Application Settings .....................................................................................................50
Network Test ...............................................................................................................51
Reset ...........................................................................................................................51
Restart .........................................................................................................................51
Installation and Setup ............................................................................55
Attaching/Removing the Stand ......................................................................................55
Connections ....................................................................................................................58
Installing the KX-UTA336 ...............................................................................................61
Wall Mounting ..................................................................................................................63
Hooking the Handset ......................................................................................................66
Using a Headset ..............................................................................................................68
USB Devices ....................................................................................................................68
USB Headsets ................................................................................................................69
USB Hubs .......................................................................................................................69
Setting Up the Unit ..........................................................................................................69
Maintaining the Unit ........................................................................................................69
Resetting the Unit ...........................................................................................................69
Restarting the Unit ..........................................................................................................69
Cleaning the Unit ............................................................................................................70
Open Source Software ...........................................................................71
Appendix .................................................................................................86
Specifications ..................................................................................................................86
Troubleshooting ..............................................................................................................88
Common Issues and Solutions .......................................................................................88
Error Messages ..............................................................................................................92
6 Operating Instructions Document Version 2014-04
Page 7

Table of Contents
Index..............................................................................................................93
Document Version 2014-04 Operating Instructions 7
Page 8

Important Information
Important Information
Data Security
We recommend observing the security precautions
described in this section, in order to prevent the
following:
– loss, disclosure, falsification, or theft of user
information
– unauthorized use of the unit
– interference or suspension of use caused by an
unauthorized party
We cannot be responsible for damages resulting
from the misuse of this product.
User information is defined as the following:
– Phonebook names, phone numbers, and IP
addresses
– Forwarding destination numbers
– Numbers stored in One-touch Dialing buttons
– Passwords used to log in to the Web user interface
– Call logs
Preventing Data Loss
• Keep a copy of all important data (such as the
phonebook list) in case the machine malfunctions
and data cannot be recovered.
• There is a risk that data stored or saved on the unit
may be changed or deleted when, for instance, the
unit is being repaired. To protect important data
from unexpected damage, see Data Security
(Page 8).
Preventing Data Disclosure
• When user information is sent from the unit to a PC
or other external device, the confidentiality of that
information becomes the responsibility of the
customer. Before disposing of the PC or other
external device, ensure that data cannot be
retrieved from it by formatting the hard disk and/or
rendering it physically unusable.
Preventing Data Disclosure Over the
Network
• To ensure the security of private conversations,
only connect the unit to a secure network.
• To prevent unauthorized access, only connect the
unit to a network that is properly managed.
• Make sure all personal computers that are
connected to the unit employ up-to-date security
measures.
Security Information
• Security settings, such as passwords, cannot be
undone at Panasonic service centers. Take
measures to prevent passwords from being lost or
forgotten.
• If a password is forgotten, initialize the unit and
configure the settings again. For details, consult
your administrator or dealer.
• For best security, set passwords that cannot be
guessed easily, and change passwords
periodically.
• If using SSL authentication, an NTP server must
also be specified. Furthermore, if SSL
authentication is performed without specifying an
NTP server, authentication will be unconditionally
validated without confirming the validity of the SSL
certificate.
• Store backups in a secure location.
• Do not store sensitive personal information in the
unit.
• Personal information (such as the phonebook list
and call log) can be registered and/or saved on this
unit. To prevent data leakage or unexpected
damages, make a record of necessary user
information, etc., and initialize the unit to return it to
its factory settings in the following cases.
– When passing on or disposing of the unit
– When lending the unit
– When having the unit repaired
• Make sure the unit is serviced by only a certified
technician.
8 Operating Instructions Document Version 2014-04
Page 9

Important Information
Additional Information
FCC and Other Information
This equipment has been tested and found to comply
with the limits for a Class B digital device, pursuant to
Part 15 of the FCC Rules. These limits are designed to
provide reasonable protection against harmful
interference in a residential installation. This equipment
generates, uses, and can radiate radio frequency
energy and, if not installed and used in accordance with
the instructions, may cause harmful interference to
radio communications. However, there is no guarantee
that interference will not occur in a particular installation.
If this equipment does cause harmful interference to
radio or television reception, which can be determined
by turning the equipment off and on, the user is
encouraged to try to correct the interference by one or
more of the following measures:
• Reorient or relocate the receiving antenna.
• Increase the separation between the equipment
and receiver.
• Connect the equipment into an outlet on a circuit
different from that to which the receiver is
connected.
• Consult the dealer or an experienced radio/TV
technician for help.
CAUTION
Any changes or modifications not expressly
approved by the party responsible for compliance
could void the user’s authority to operate this
device.
FCC Declaration of Conformity
Trade Name: Panasonic
Model Number: KX-UTG300
Responsible Party:
Panasonic Corporation of North America
Two Riverfront Plaza
Newark, NJ 07102-5490 U.S.A.
Telephone No.: 1-800-211-PANA (7262)
This equipment complies with Part 68 of the FCC rules
and the requirements adopted by the ACTA. On the
bottom of the cabinet of this equipment is a label that
contains, among other information, a product identifier
in the format
US:ACJ.......
If requested, this number must be provided to the
telephone company.
If trouble is experienced with this equipment, for repair
or warranty information, please contact:
Panasonic National Service Center
1615 Dundee Avenue Dock G
Elgin, IL 60120
1 (847) 888-7000
Connection to party line service is subject to state tariffs.
Contact the state public utility commission, public
service commission or corporation commission for
information.
If your home has specially wired alarm equipment
connected to the telephone line, ensure the installation
of this equipment does not disable your alarm
equipment. If you have questions about what will
disable alarm equipment, consult your telephone
company or a qualified installer.
WHEN PROGRAMMING EMERGENCY NUMBERS
AND (OR) MAKING TEST CALLS TO EMERGENCY
NUMBERS:
a. Remain on the line and briefly explain to the
dispatcher the reason for the call.
b. Perform such activities in the off-peak hours, such
as early morning or late evenings.
This equipment is hearing aid compatible.
When you hold the phone to your ear, noise might be
heard in your Hearing Aid. Some Hearing Aids are not
adequately shielded from external RF (radio frequency)
energy. If noise occurs, use the speakerphone option
(if applicable) when using this phone. Consult with your
audiologist or Hearing Aid manufacturer about the
availability of Hearing Aids which provide adequate
shielding to RF energy commonly emitted by digital
devices.
This unit features a built-in Bluetooth module that
can be used to wirelessly connect a Bluetooth
headset to the unit.
Radio Frequency Exposure Requirements
This product complies with FCC radiation exposure
limits set forth for an uncontrolled environment. To
comply with FCC RF exposure requirements, it must be
installed and operated in accordance with provided
instructions. The unit requires minimum 20 cm (8 in)
spacing must be provided between antennas and all
person’s body (excluding extremities of hands, wrists
and feet) during wireless modes of operation. This
transmitter must not be co-located or operated in
conjunction with any other antenna or transmitter.
Document Version 2014-04 Operating Instructions 9
Page 10

T
Compatible with
Hearing Aid T-Coil
TIA-1083
Important Information
Compliance with TIA-1083 standard
Telephone handsets identified with
this logo have reduced noise and
interference when used with T-Coil
equipped hearing aids and cochlear
implants.
10 Operating Instructions Document Version 2014-04
Page 11
Before Operating the Telephone
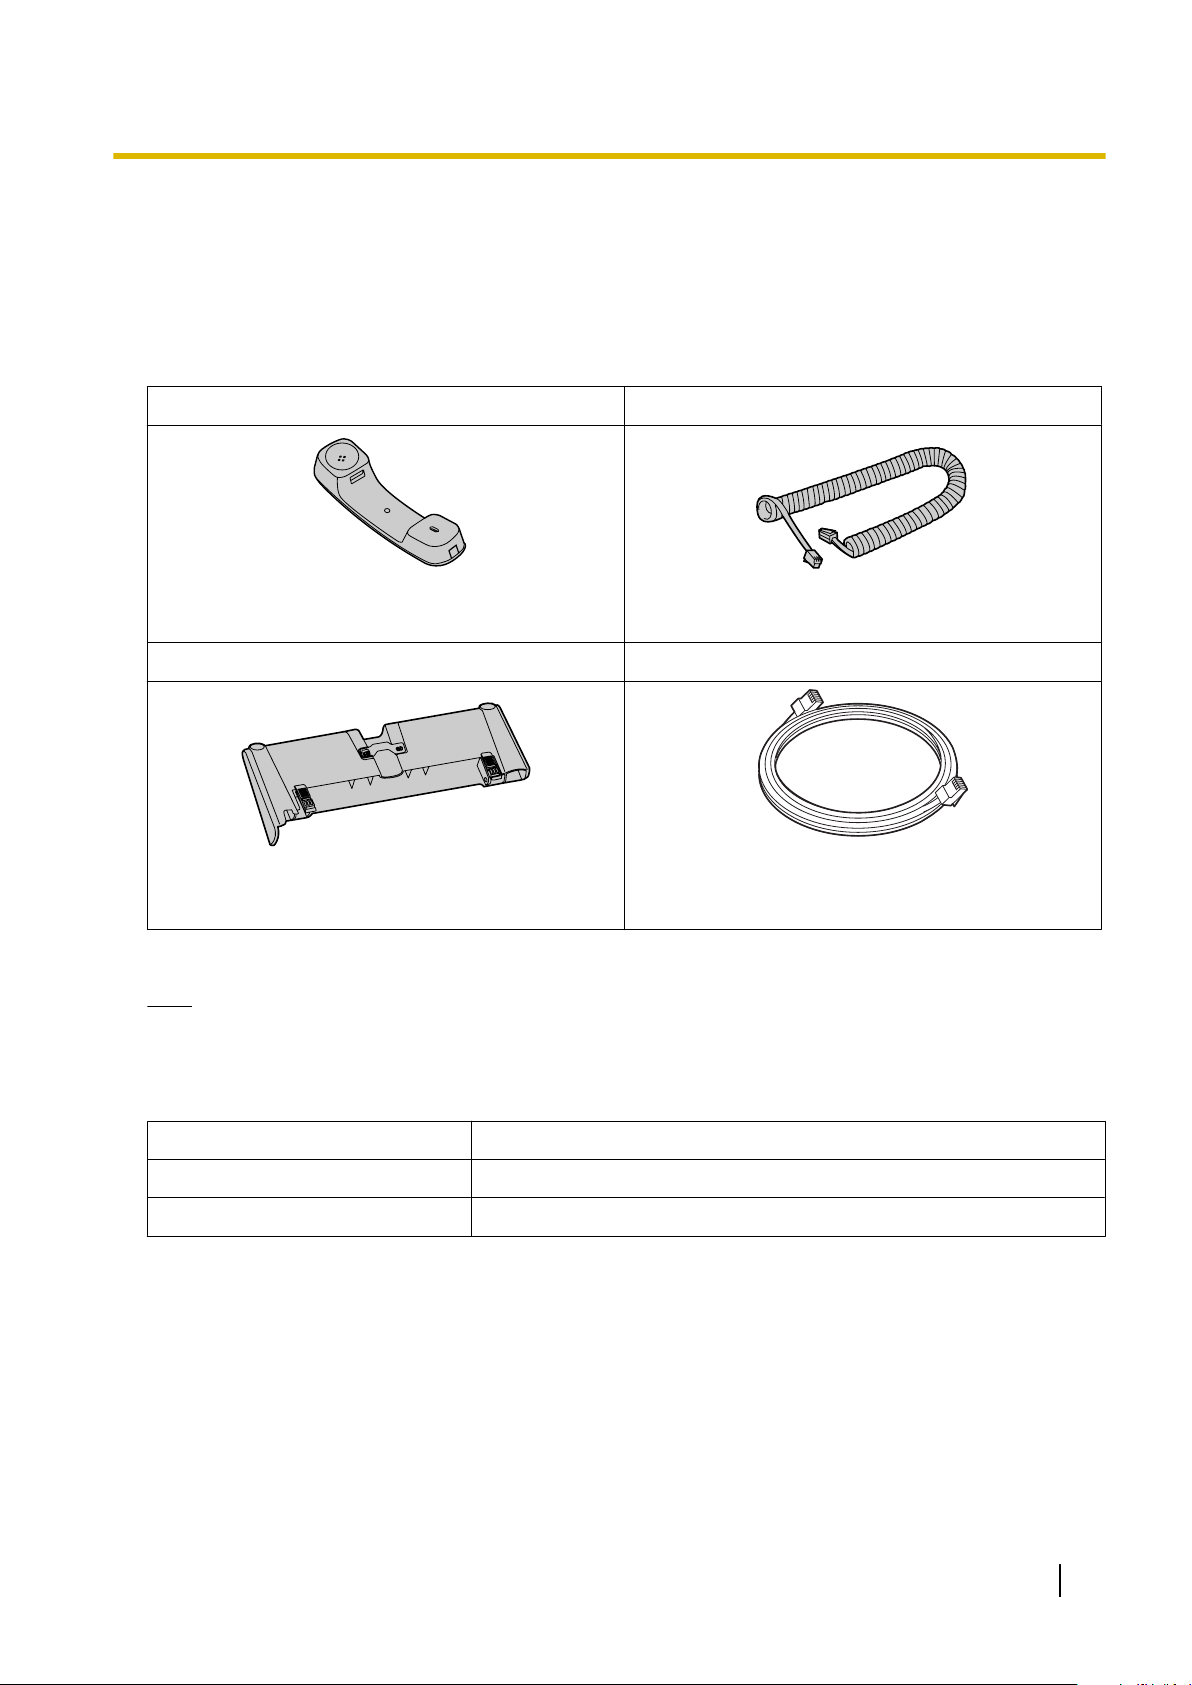
Accessory Information
Before Operating the Telephone
Included Accessories
Handset (1) Handset Cord (1)
[Part No.]
95.1204T00
Stand (1) Ethernet cable (1)
[Part No.]
467.00209.005
*1
[Part No.]
371.00447.005
[Part No.]
371.00473.005
*1
For extra orders for the accessories, call toll-free: 1-800-332-5368.
Note
• The illustrations may differ from the appearance of the actual product.
Optional Accessories
AC Adaptor
Wall Mount Kit
Add-on key module
• DSA-42D-48 2 480063 (P/N: 381.00398.005)
• KX-A433
• KX-UTA336
Document Version 2014-04 Operating Instructions 11
Page 12
EF IJKLMNOP
A BC
DGH
Before Operating the Telephone
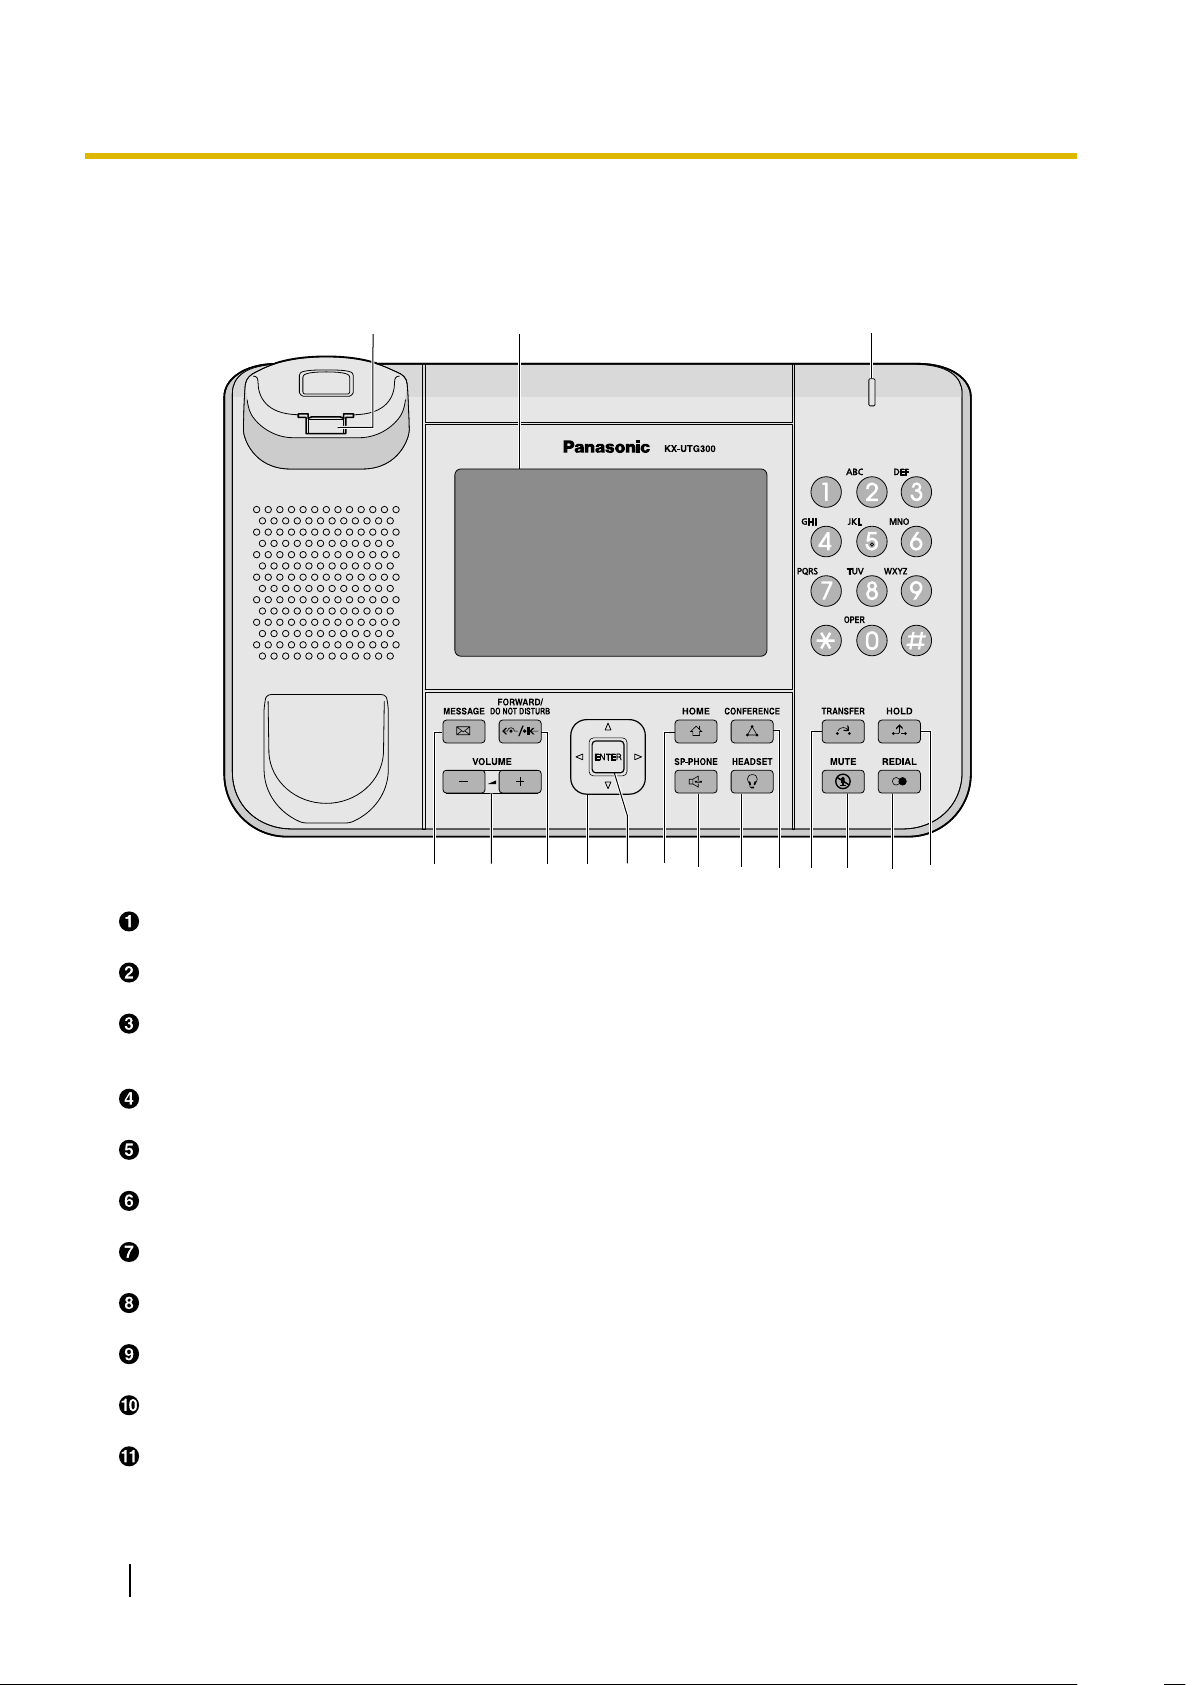
Location of Controls
Front View
Handset Hook
Keeps the handset stable when the unit is mounted on a wall.
LCD (Liquid Crystal Display)
The unit is equipped with a 5.0-inch color LCD touch screen and LCD backlight.
Message/Ringer Lamp
When you receive a call, the lamp flashes red.
When someone has left you a message, the lamp stays on red.
MESSAGE
Used to access your voice mailbox.
VOLUME
Used to adjust the volume.
FORWARD/DO NOT DISTURB
Used to set Call Forwarding or Do Not Disturb on your extension.
Navigator Key
Used to select desired items.
ENTER
Used to assign the selected item.
HOME
Used to return the display to the home screen.
SP-PHONE (Speakerphone)
Used for performing hands-free operations. When the SP-PHONE is used, its lamp turns red.
HEADSET
Used when using a headset. When the HEADSET is used, its lamp turns red.
12 Operating Instructions Document Version 2014-04
Page 13
CONFERENCE
A
B
Used to establish a three-way conference.
TRANSFER
Used to transfer a call to another party.
MUTE
Used to mute the microphone/handset/headset during a conversation. When the MUTE is used, its lamp
turns red.
REDIAL
Used to redial the last dialed number.
HOLD
Used to put a call on hold.
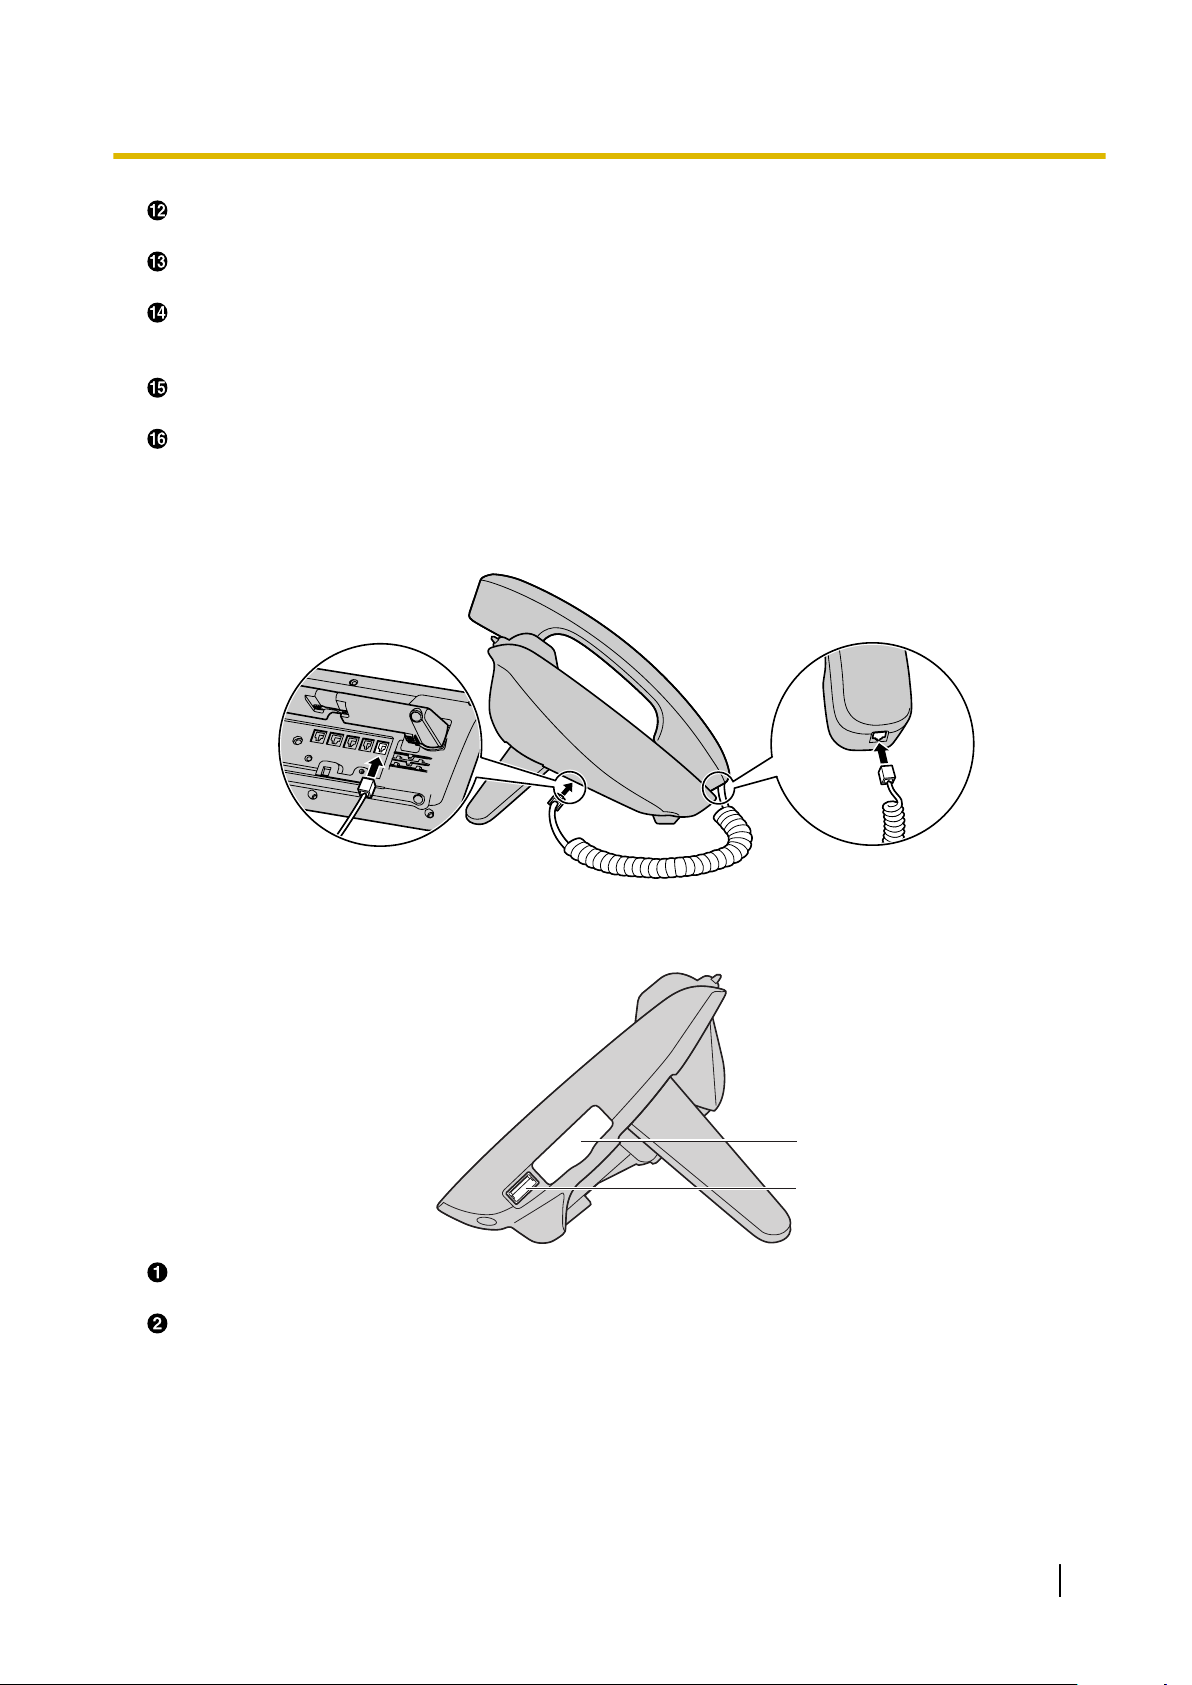
Left Side View
Before Operating the Telephone
Right Side View
Add-on Key Module Slot Cover
Remove the Add-on key module slot cover when connecting an Add-on key module to the unit.
USB Port
Connect a USB headset or other USB device.
Document Version 2014-04 Operating Instructions 13
Page 14
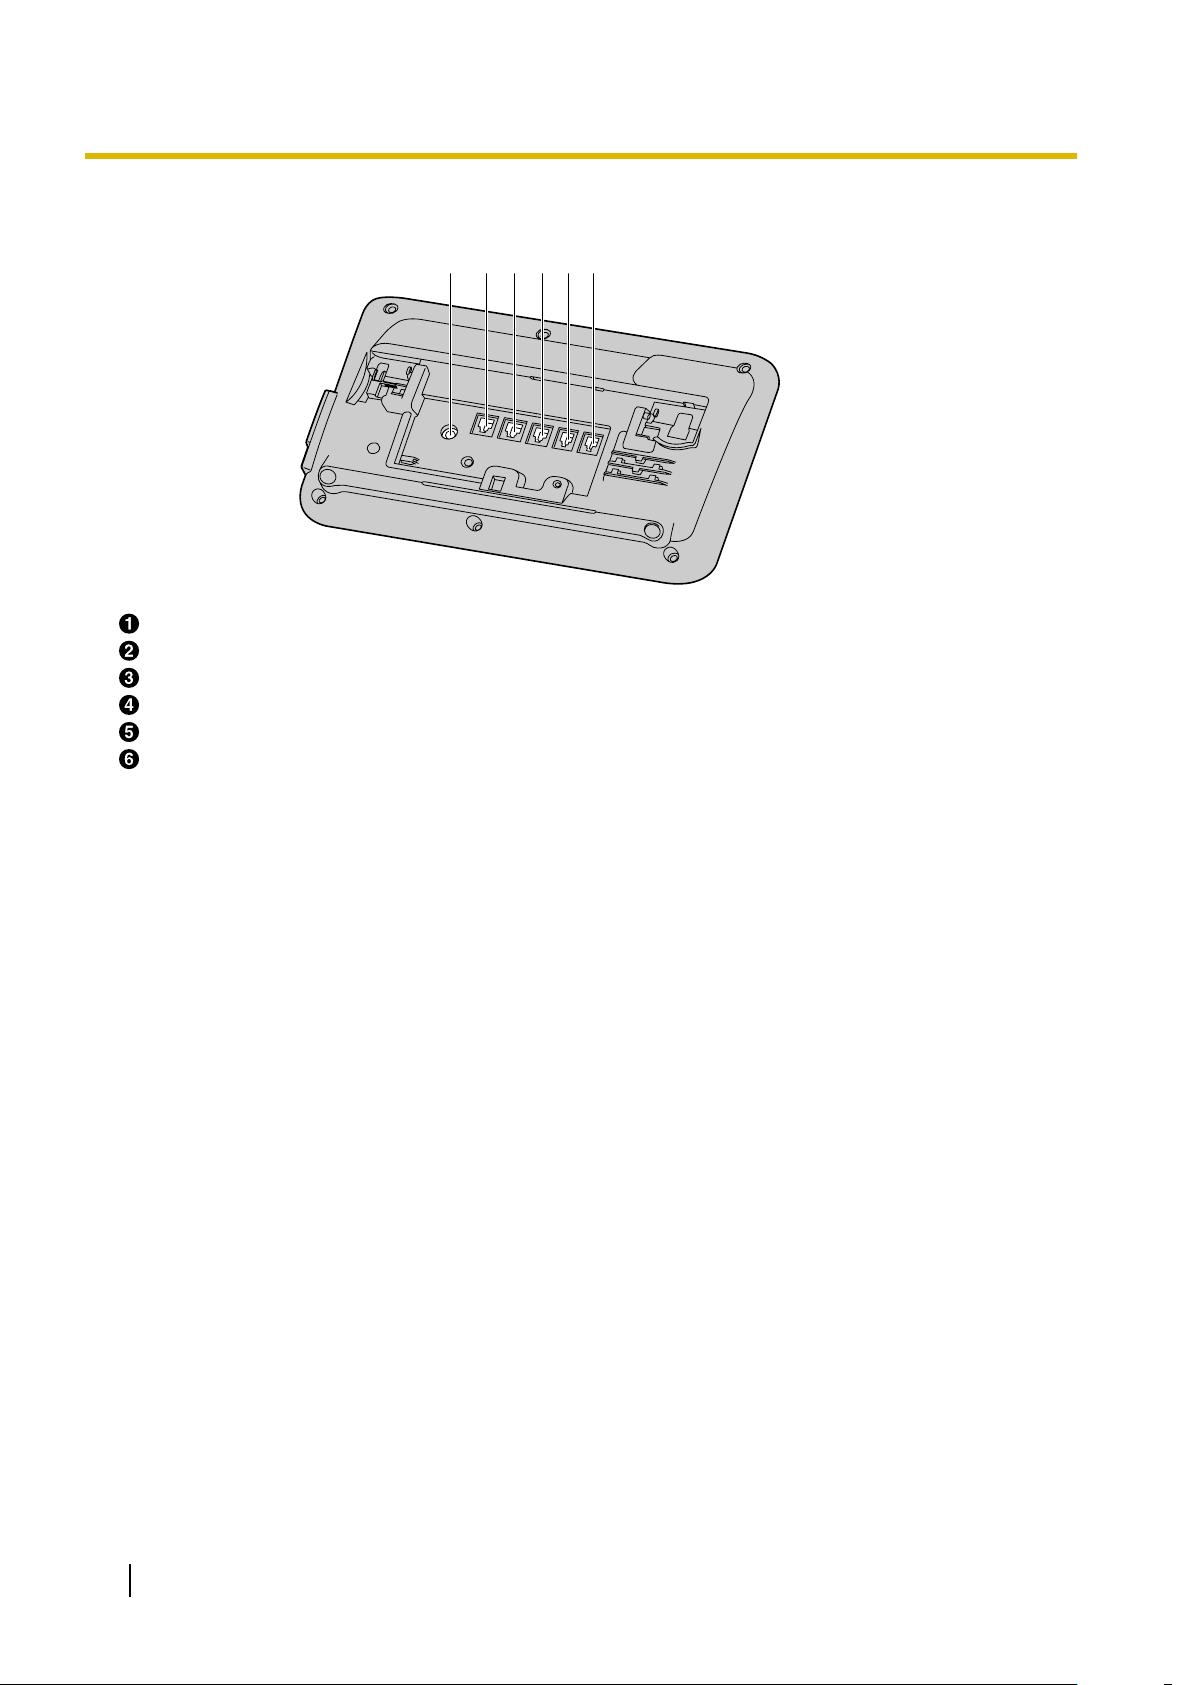
CDE FBA
Before Operating the Telephone
Bottom View
DC Jack
LAN Port
PC Port
EHS Jack
Headset Jack
Handset Jack
14 Operating Instructions Document Version 2014-04
Page 15
A
C
B
Before Operating the Telephone
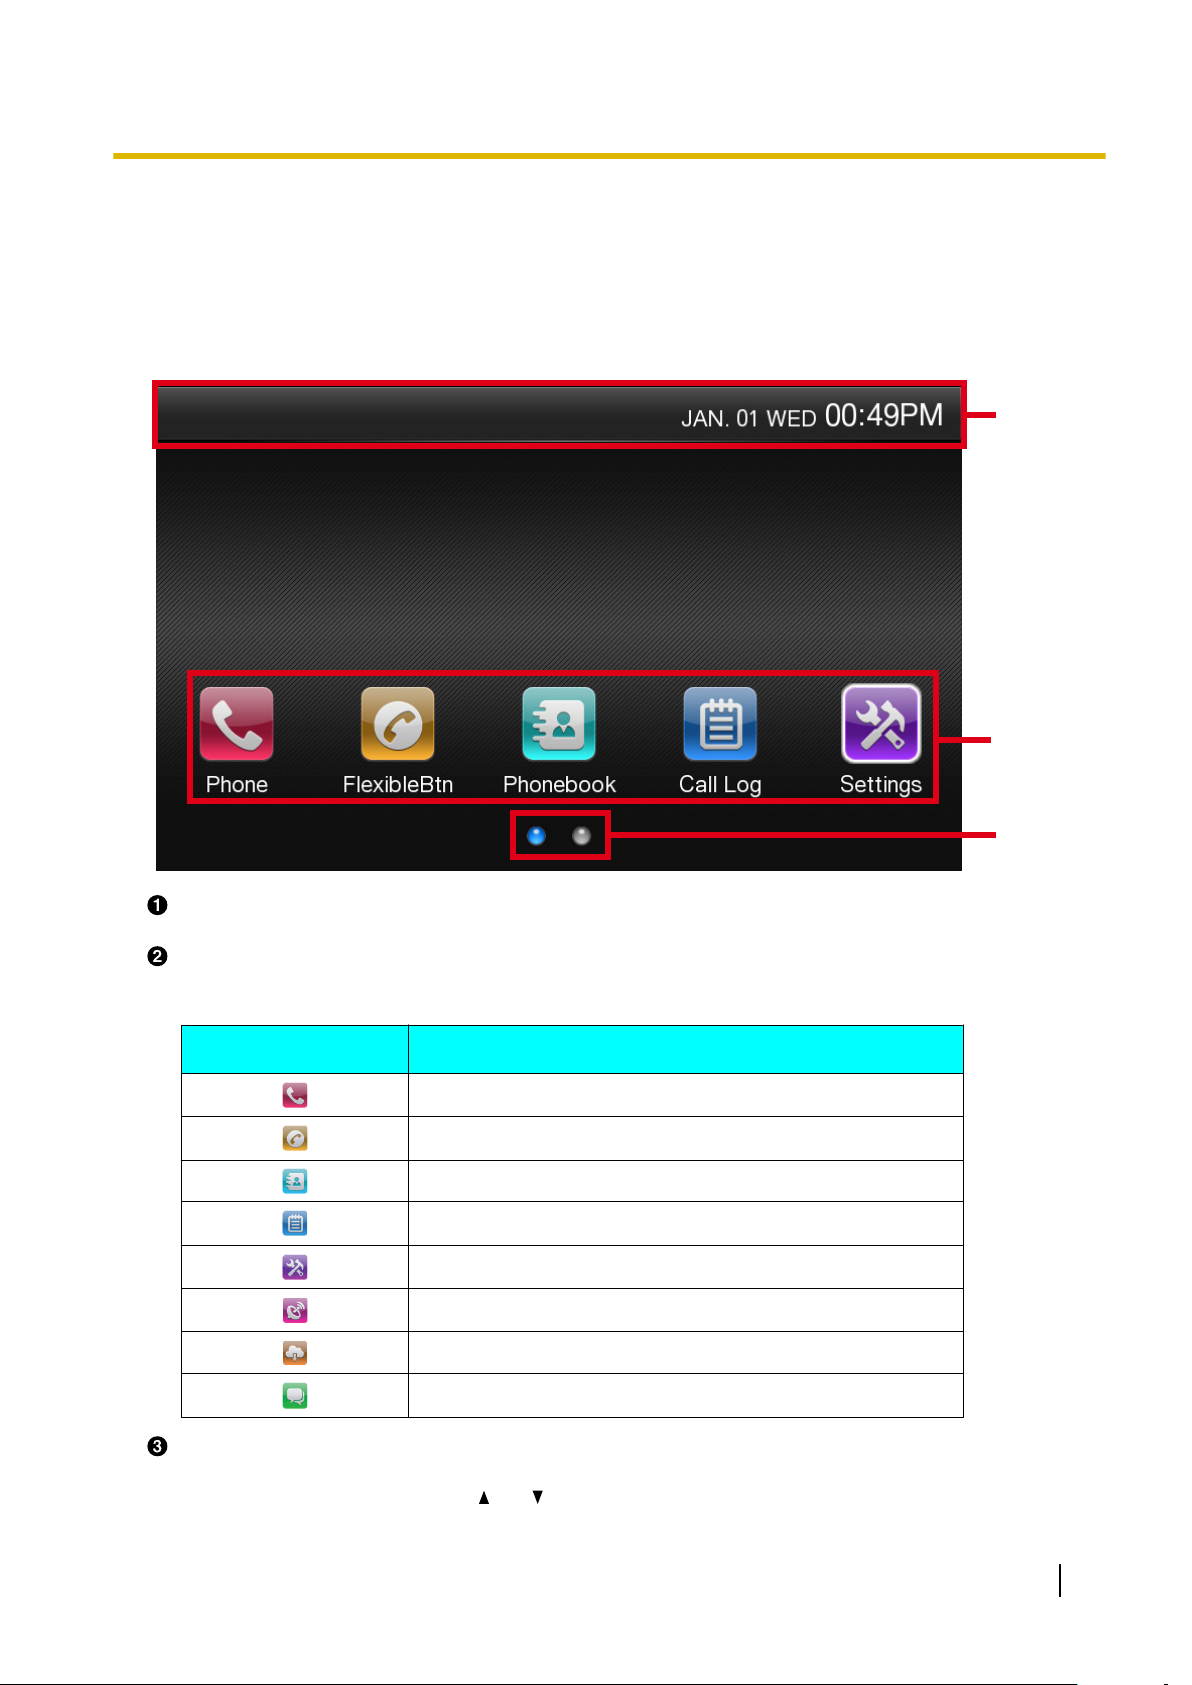
Screens
This section explains the screens, and the buttons and icons that appear on the display.
Home Screen
Status Bar
Indicates the status of various features (Page 16) as well as information such as the date and time.
Home Screen Icons
The Home screen icons can be used to access various functions and screens on the phone. You can select
Home screen icons by touching them.
Icon
Access the Phone screen. (Page 20)
Access the Flexible button screen. (Page 30)
Access the phonebook. (Page 36)
Access the call log. (Page 21)
Access the user setting menus. (Page 39)
Access the paging screen. (Page 22)
Access the service screen. (Page 29)
Access Instant Messaging and Presence. (Page 33)
Page Buttons
Indicates how many pages are available for the Home screen and which page is currently displayed. If
other pages are available, press [
] or [ ] to display the other page.
Description
Document Version 2014-04 Operating Instructions 15
Page 16

A
B
C
More
Before Operating the Telephone
Phone Screen
Line Buttons
Line buttons are used to access the lines registered to the unit. Line buttons can be selected by touching
them or by pressing [ ] or [ ]. A maximum of 6 lines can be registered to the unit. The status of line buttons
can be confirmed with the displayed line icons (Page 17).
Call Buttons
Call buttons are used to select calls to or from the unit. Call buttons can be selected by touching them or
by pressing [ ] or [ ]. The status of call buttons can be confirmed with the displayed call icons
(Page 17).
Soft Buttons
Soft buttons are displayed for functions that can be used depending on the screen displayed and the state
of the unit. If
Page 18 for a list of commonly used soft buttons.
is displayed, you can touch it to display other available soft buttons. See
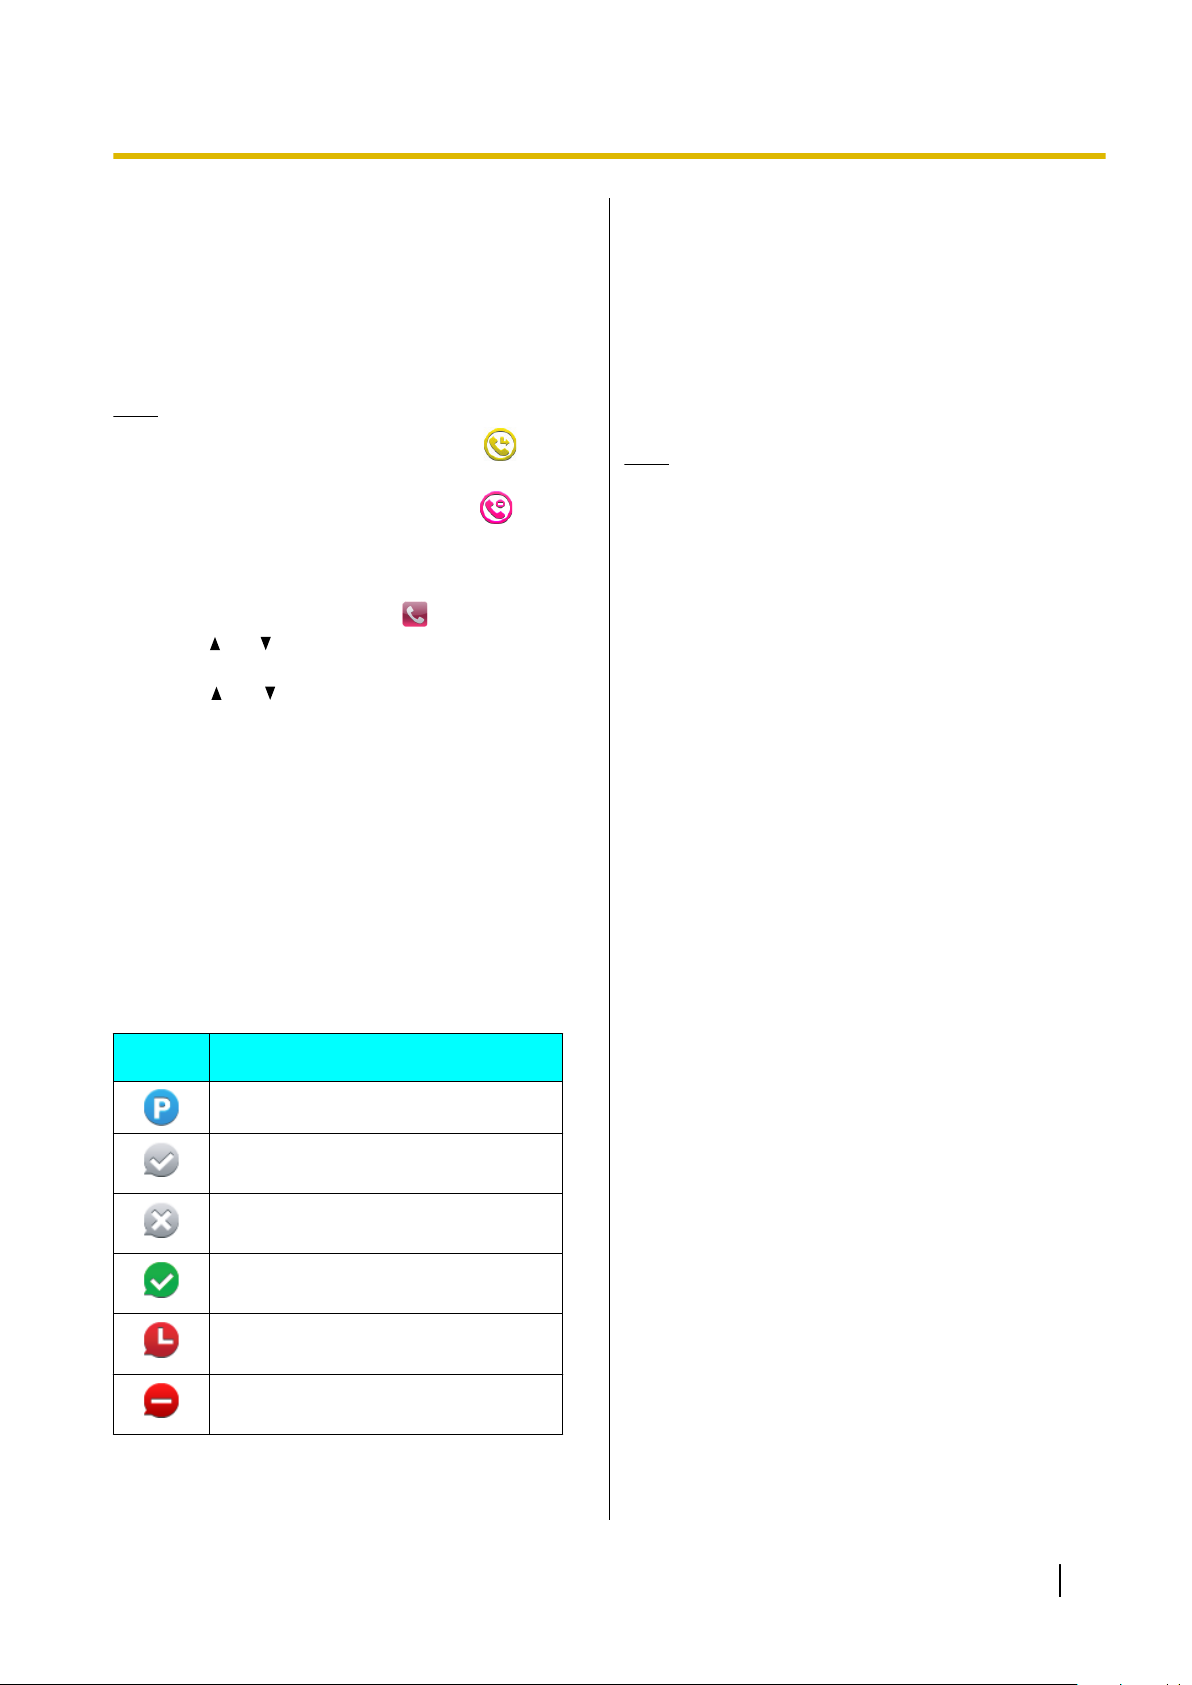
Icons
Status Icons
Status icons indicate the status of the unit and are displayed at the top of the screen in the status bar.
Icon
Displayed when the ringer is turned off (Page 20).
Displayed when [HEADSET] is pressed.
Description
Displayed when the connection to the LAN is lost. If this icon is displayed, check
the Ethernet cable connection.
Displayed when the Bluetooth feature is activated but not connected to a device.
(Page 68).
16 Operating Instructions Document Version 2014-04
Page 17
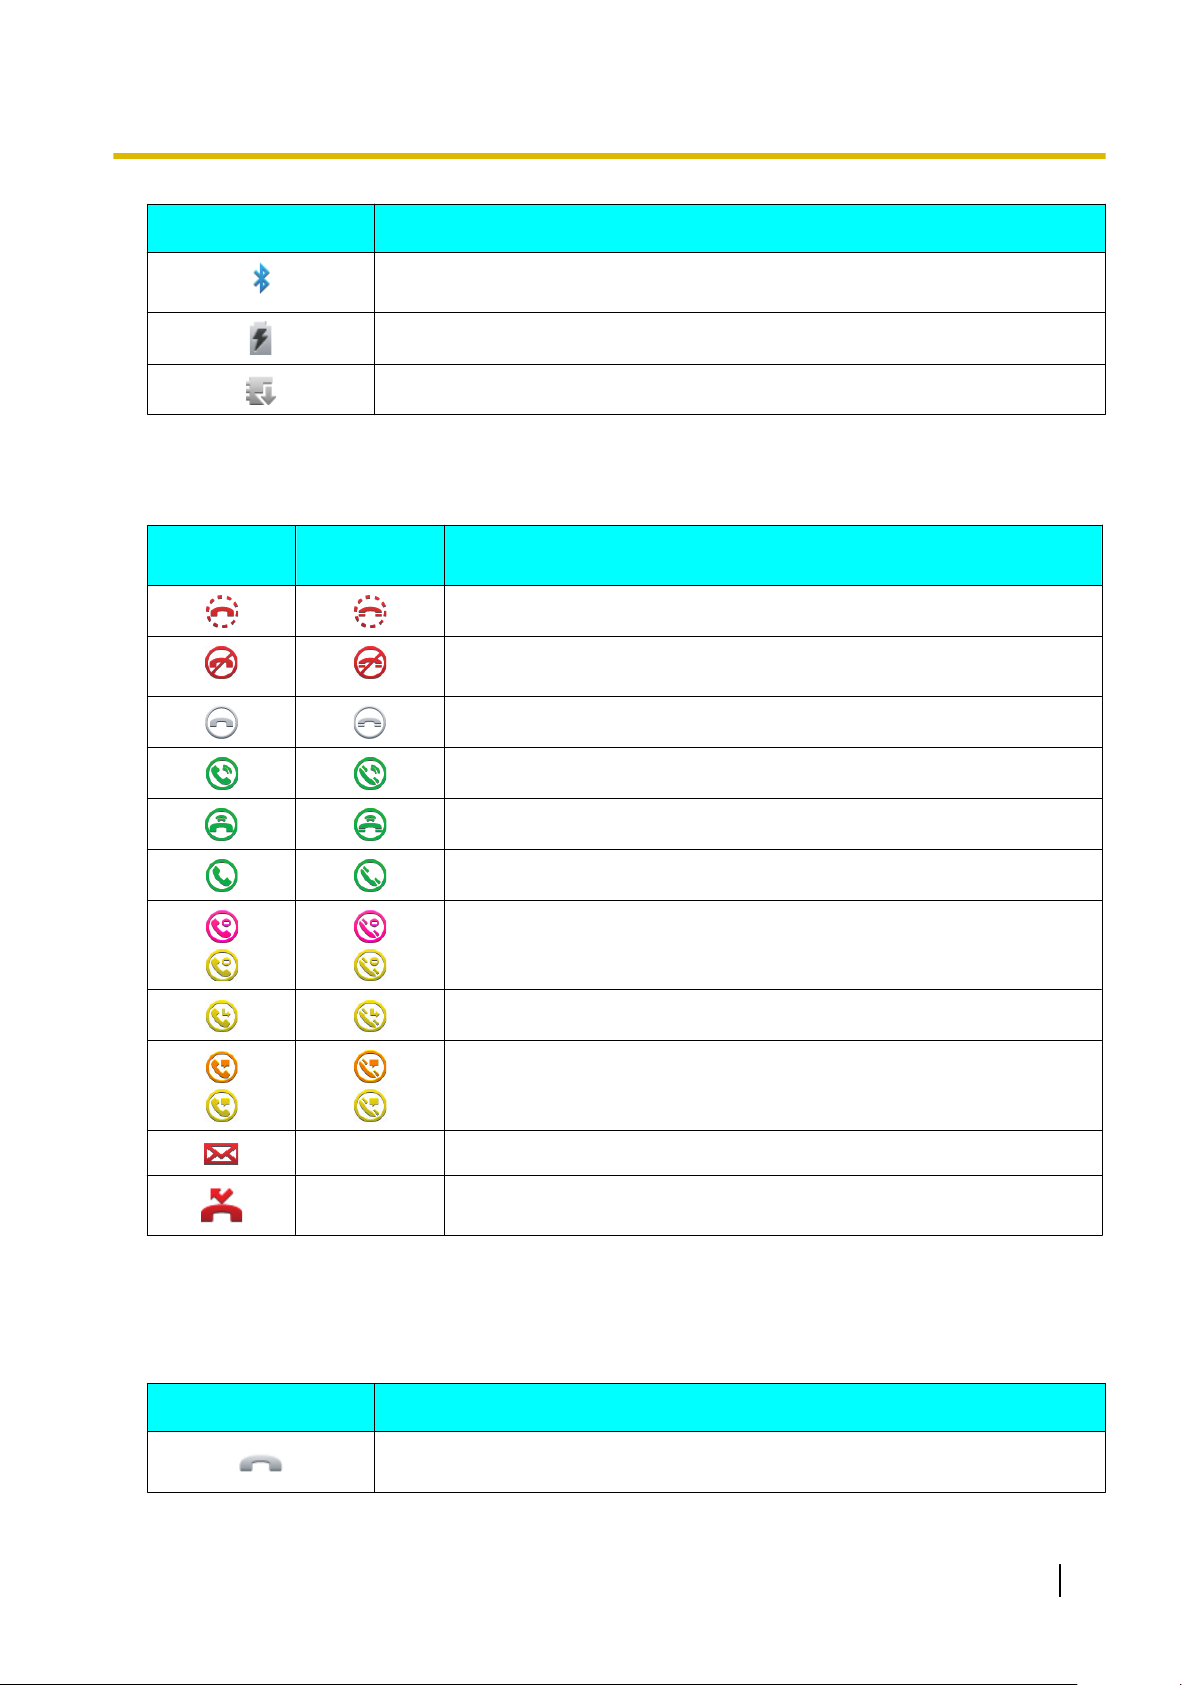
Icon Description
Displayed when the Bluetooth feature is activated and connected to a device.
(Page 68).
Displayed when ECO mode is enabled.
Displayed when a firmware upgrade is available.
Line Icons
Line icons indicate the status of lines in the Phone or Call log screens.
General Line
Icon
Shared Line
Icon
*1
Displayed when registering to the SIP server.
Displayed when registration to the SIP server has been lost. If this icon
is displayed, consult your administrator or dealer.
Before Operating the Telephone
Description
Indicates the line is registered to the SIP server.
Displayed when the line is on a call.
Displayed when the line has an incoming call.
Displayed when the line has a call on hold.
Indicates that DND (Do not Disturb) settings are active for the line.
Indicates that call forwarding settings are active for the line.
Indicates that auto answer settings are active for the line.
— Displayed next to lines that have new messages (Page 28).
— Indicates that there was a missed call. This icon also indicates a missed
call in the call log.
*1
Shared line is an optional feature and may not be supported on your phone system. See Page 29 for information.
Call Icons
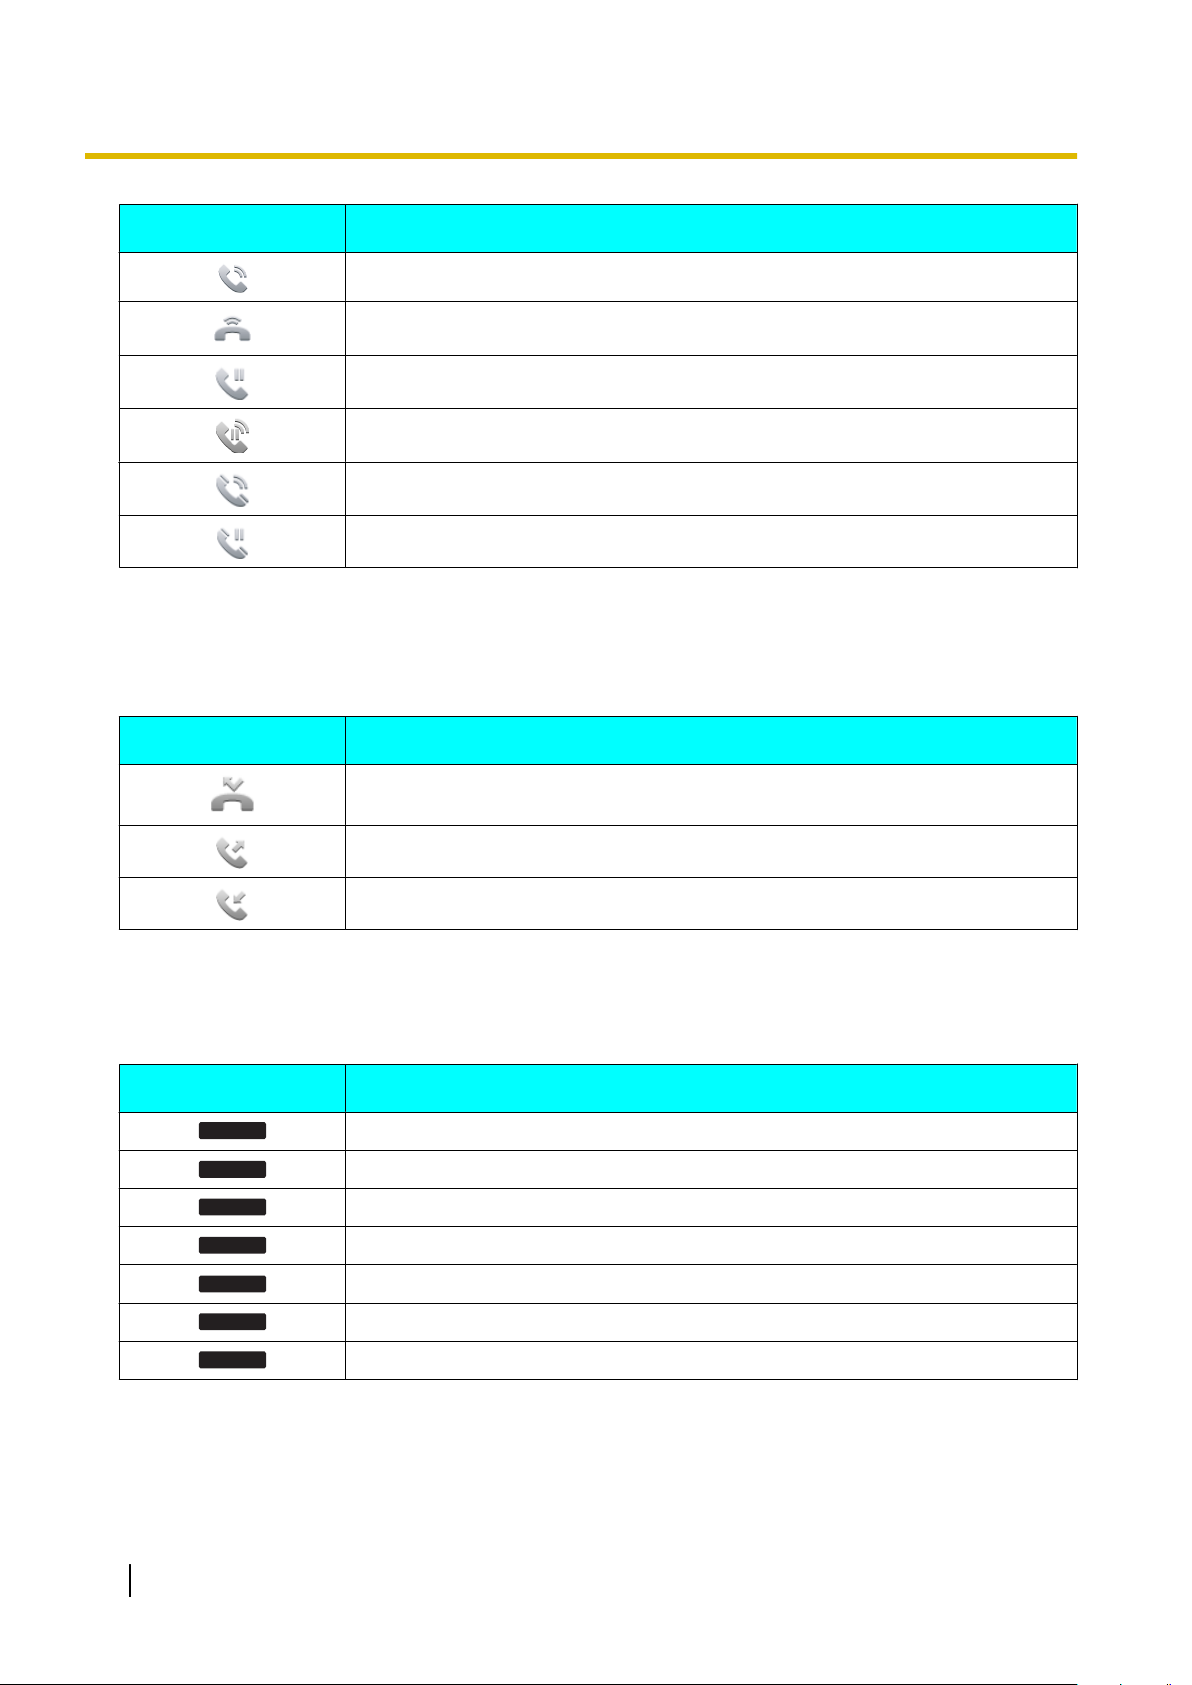
Call icons indicate the status of calls and lines in the Phone screen.
Icon
Displayed when dialing on-hook.
Document Version 2014-04 Operating Instructions 17
Description
Page 18
Back
Call Log
Phonebook
Cancel
Backspace
Search
End Call
Before Operating the Telephone
Icon Description
Displayed when dialing off-hook, or when on an active incoming or outgoing call.
Displayed when there is an incoming call.
Displayed when a call is on hold.
Displayed when an incoming call is on hold.
Displayed when another phone on a shared line*1 is on call.
Displayed when another phone on a shared line*1 is on hold.
*1
Shared line is an optional feature and may not be supported on your phone system. See Page 29 for information.
Call Log Icons
Call log icons indicate the type of call displayed in the call log.
Icon
Indicates a missed call.
Indicates a placed call.
Indicates a received call.
Soft Button List
The following is a list of commonly used soft buttons.
Button
Return to the previous screen.
Access the call log (Page 21).
Access the phonebook (Page 36).
Cancel the operation.
Erase the number or character to the left of the cursor (Page 21).
Description
Description
Search for a phonebook entry (Page 21).
End a call.
18 Operating Instructions Document Version 2014-04
Page 19
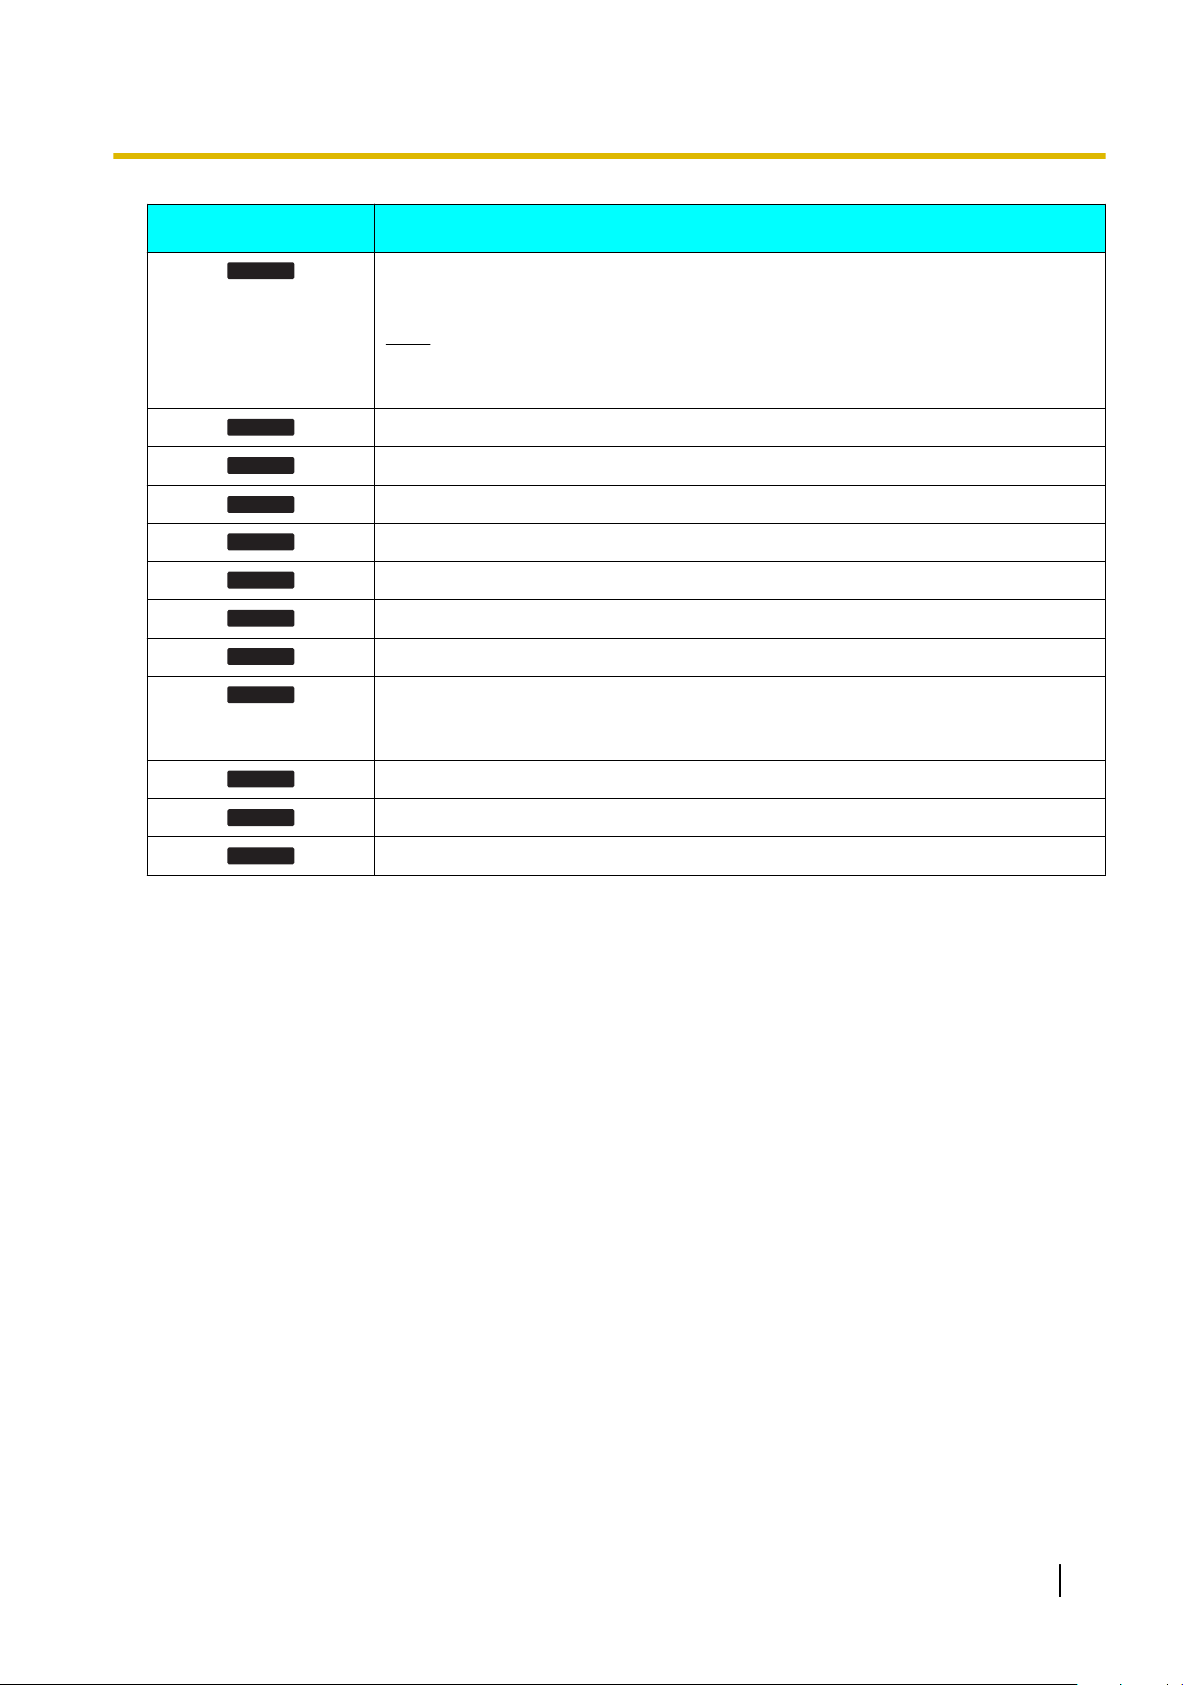
Button Description
Enter
More
Answer
Reject
Blind
Save
Send
Edit
Prefer
FlexibleBtn
Resume
New Call
Save or confirm the information shown on the display, or enter into the next
screen.
Note
• You can also use the physical [ENTER] button to perform the same
operation as this soft button.
Display other available soft buttons.
Answer an incoming call (Page 20).
Reject an incoming call (Page 23).
Perform a blind transfer (Page 26).
Save the information shown on the display (Page 23, Page 36).
Make a call (Page 21).
Edit the information shown on the display (Page 23, Page 36).
Assign the preferred number to dial among multiple registered phone numbers in
the same phonebook entry, when making a call using the phonebook
(Page 36).
Before Operating the Telephone
Access the Flexible button screen.
Resume a call that has been put on hold.
Initiate a new call.
Document Version 2014-04 Operating Instructions 19
Page 20

Answer
Answer
Before Operating the Telephone
Basic Operations
This section explains the basics of using the unit.
Confirming Your Extension Number
In stand-by mode (i.e., when you do not have any active
calls on the Phone screen), you can view the extension
number and name registered to the unit.
Going off- and on-hook
There are several ways to go off-hook and on-hook:
• Using the handset
• Using the [SP-PHONE/HEADSET] button
• Using the soft buttons
Going off-hook
In this manual, when you see the phrase "go off-hook",
it means to do any of the following:
• Lift the handset off of its cradle.
• Press [SP-PHONE/HEADSET] while the handset is
on its cradle. This enables hands-free mode.
• Press [SP-PHONE/HEADSET] when using a
headset.
Note
• Certain soft buttons, such as
like the [SP-PHONE] button.
, function
• In stand-by mode, press [SP-PHONE].
• During a conversation while using the handset,
press [SP-PHONE]. You can then return the
handset to its cradle.
• When receiving an incoming call, touch
Canceling hands-free mode
You can cancel hands-free operation simply by lifting
the handset off its cradle.
.
Adjusting the Volume
You can adjust the ringer, handset, headset, and
speaker volume using [–] and [+] on the VOLUME key.
Adjusting the ringer volume
When receiving a call or when the handset or headset
are not in use, press [–] or [+].
Note
• When the ringer volume is turned all the way
down, " " is displayed.
Adjusting the handset/headset/
speaker volume
Press [–] or [+] during a conversation when using the
handset, headset, or when you are in hands-free mode.
Going on-hook
In this manual, when you see the phrase "go on-hook",
it means to do any of the following:
• Replace the handset on its cradle.
• Press [SP-PHONE/HEADSET] when using a
headset or when you are in hands-free mode.
Hands-free Mode
In hands-free mode, you can talk and hear the other
party in a conversation without using the handset. This
mode is useful for performing other tasks during a
conversation, such as writing.
Enabling hands-free mode
You can enable hands-free mode in one of the following
ways:
20 Operating Instructions Document Version 2014-04
Page 21
Send
Backspace
Details
Search
Details
Edit Dial
Feature Operations
Feature Operations
Making Calls
This section explains the basic methods for making a
call.
Making a Call
1. In stand-by mode, go off-hook.
2. Enter the number you want to call.
3. Touch
number to be dialed.
4. To end the call, go on-hook.
Note
• If more than one line is available at your unit,
you can touch an idle line button assigned to the
line you want to use before entering the
number. For details about line buttons, see
"Flexible Buttons (Page 30)".
You can also select a line by pressing [ ] or
[ ].
• To delete a number you entered, touch
Making a Call from the
, or wait a few seconds for the
.
5. Go off-hook.
6. To end the call, go on-hook.
Note
• For details about entering characters, see
"Entering Characters (Page 52)".
• In step 4, if multiple phone numbers are stored
for the entry, you can touch
select the phone number to call.
and then
Dialing by Using Call Logs
The last 300 missed, received, and placed calls are
stored in their respective logs, in order of newest to
oldest call.
Missed, received, and placed calls appear in the All
Calls call log in addition to their respective call logs.
You can make calls to the numbers listed in the call logs.
1. On the Home screen, select .
2. Press [ ] or [ ] to select the call log type, and then
press [ENTER].
3. Press [ ] or [ ] to select the desired entry.
4. Go off-hook.
5. To end the call, go on-hook.
Note
• You can add a call log entry to the phonebook.
See "Adding a Phonebook Entry from the Call
Log (Page 36)".
• See Page 18 for information on call log icons.
Phonebook List
Scrolling through all entries
1. On the Home screen, select .
2. Press [
3. Go off-hook.
4. To end the call, go on-hook.
Note
• In step 2, if multiple phone numbers are stored
Searching by name
1. On the Home screen, select .
2. Touch
3. Enter the name (max. 20 characters) you want to
search for.
• The entries that match your search are
4. Press [
] or [ ] to select an entry.
for the entry, you can touch
select the phone number to call.
.
displayed.
] or [ ] to select the desired entry.
and then
Editing a phone number before
dialing from the call log
You can edit a phone number in the incoming or missed
call log before using it to dial.
1. On the Home screen, select
2. Press [
[ENTER].
] or [ ] to select the log type, and then press
.
3. Press [ ] or [ ] to select the desired entry.
4. Touch
.
5. Edit the number, and then go off-hook.
6. To end the call, go on-hook.
Redialing the Last Number You Dialed (Redial, Last Number)
You can redial the last phone number that you dialed.
1. Go off-hook.
Document Version 2014-04 Operating Instructions 21
Page 22
Start
Stop
Pause
Play
Feature Operations
2. Press [REDIAL].
3. To end the call, go on-hook.
Note
• To select a line to use to redial, touch the
appropriate line button before you press
[REDIAL]. For details about line buttons, see
"Flexible Buttons (Page 30)".
You can also select a line by pressing [ ] or
[ ].
One-touch Dialing
You can make a call with a One-touch operation if a
One-touch Dialing button has been created for the
desired party. One-touch Dialing buttons can also be
configured to access features of your phone system, if
available.
1. On the Home screen, select .
2. Touch the One-touch Dialing button.
3. To end the call, go on-hook.
Note
• A BLF (Busy Lamp Field) button can also be
used to call an extension simply by touching the
button. For details, consult your administrator or
dealer.
• For details about flexible buttons such as
One-touch Dialing buttons and BLF buttons,
see "Flexible Buttons (Page 30)".
2. Press [ ] or [ ] to select the page group, and then
touch
.
3. Make the announcement.
4. To end the announcement, touch
.
Receiving multicast paging announcements
When a multicast paging announcement is received, it
is automatically played. By default, announcements are
played through the speaker.
Note
• To pause received announcements, go
on-hook, press [SP-PHONE], or touch
.
To start playing messages again, touch
.
• If Paging DND is enabled, all incoming pages
are rejected except for priority 1 pages.
Multicast Paging Icons
Multicast paging icons indicate the status of pages and
the multicast paging groups registered to the unit.
Icon
Indicates an outgoing page.
Indicates an incoming page.
Indicates the paging group is idle.
Description
Indicates the incoming page is paused.
Intercom
If the SIP server supports the Intercom feature, you can
use it to make intercom announcements to other
phones. For details, consult your administrator or
dealer.
Indicates the incoming page is being
played after being paused.
Multicast Paging (Push To Talk)
Multicast paging enables you to send a one-way
announcement to a preconfigured page group. To use
multicast paging, the Enable Multicast Paging setting
must be enabled through Web user interface
programming (Page 54). For details, consult your
administrator or dealer.
Sending multicast paging announcements
1. On the Home screen, select .
22 Operating Instructions Document Version 2014-04
Page 23
AutoAns
AutoAns
Reject
On
Add
Save
Save
Yes
Feature Operations
Receiving Calls
This section explains the basic methods for receiving a
call.
Receiving a Call
1. Go off-hook.
2. To end the call, go on-hook.
Auto answer
You can have the unit automatically answer a received
call. The call is connected after a programmed number
of rings.
• To enable Auto Answer:
On the Phone screen, touch
"Auto-answer is turned on" is displayed.
• To disable Auto Answer:
On the Phone screen, touch
"Auto-answer is turned off" is displayed.
Note
• When Auto Answer is enabled, appears on
the line button it was enabled for.
.
.
4. Touch
Note
.
• Rejected phone numbers will not be stored in
the incoming or missed call log.
• Depending on the line a call is arriving on, the
call may not be rejected.
Rejecting specific calls
You can set the unit to reject specific phone numbers.
Note
• Rejected phone numbers will not be stored in
the incoming or missed call log.
Adding a phone number
You can store a maximum of 30 phone numbers you
want to reject in the rejection list of the unit.
1. On the Home screen, select
2. Press [ ] or [ ] to select "Basic Phone Settings",
and then press [ENTER].
3. Press [ ] or [ ] to select "Call Block", and then
press [ENTER].
4. Touch
.
5. Enter the telephone number (max. 32 digits), and
then touch
.
.
Rejecting Calls
You can reject a received call at your unit or set the unit
to reject certain calls.
Rejecting receiving calls
1. When receiving a call, touch
Rejecting anonymous calls
You can set the unit to reject calls when the unit
receives a call without a phone number.
To reject anonymous calls, the Block Anonymous Call
setting must be enabled through Web user interface
programming (Page 54). For details, consult your
administrator or dealer.
If the Block Anonymous Call setting is enabled through
Web user interface programming, you must configure
the unit to block anonymous calls.
1. On the Home screen, select .
2. Press [ ] or [ ] to select "Basic Call Features", and
then press [ENTER].
3. Press [ ] or [ ] to select "Block Anonymous Call".
.
Note
• To register additional telephone numbers,
repeat the procedure from step 4.
Adding a phone number from the call log
You can add a phone number by referring to the call log.
1. On the Home screen, select
.
2. Press [ ] or [ ] to select the log type, and then press
[ENTER].
3. Press [ ] or [ ] to select the entry with the phone
number you want to reject.
4. Touch
5. Press [
press [ENTER].
6. Touch
Note
.
] or [ ] to select "Call Block", and then
.
• You cannot perform this operation in "Placed
Calls" or on placed calls in "All Calls".
Editing a stored phone number
1. On the Home screen, select .
2. Press [
and then press [ENTER].
] or [ ] to select "Basic Phone Settings",
Document Version 2014-04 Operating Instructions 23
Page 24

Edit
Save
Delete
Yes
Ignore
Answer
Reject
Close
Feature Operations
3. Press [ ] or [ ] to select "Call Block", and then
press [ENTER].
4. Press [ ] or [ ] to select the phone number you
want to edit, and then touch
.
5. Edit the phone number as necessary, and then
touch
.
Deleting a stored phone number
1. On the Home screen, select .
2. Press [ ] or [ ] to select "Basic Phone Settings",
and then press [ENTER].
3. Press [ ] or [ ] to select "Call Block", and then
press [ENTER].
4. Press [ ] or [ ] to select the phone number you
want to delete, and then touch
5. Touch
.
.
Ignoring Calls
You can ignore incoming calls at your unit. The ringer
is muted when a call is ignored.
1. When receiving a call, touch
• To answer an ignored call, touch
• To reject an ignored call, touch
• To close the incoming call dialog, touch
.
.
.
.
Holding a Call
You can put a call on hold by holding the call at your
extension.
To hold the current call
1. Press [HOLD], and then go on-hook.
To retrieve a call on hold at your extension
1. Press [HOLD], and then go off-hook.
Note
• If a call is not retrieved within a specified time,
you will hear an alarm as a reminder.
• If Automatic Call Hold is enabled on your unit,
the call will also be put on hold if you touch a
flexible button other than the one for the current
call. For details, consult your administrator or
dealer.
24 Operating Instructions Document Version 2014-04
Page 25

New Call
Feature Operations
Receiving a Second Call (Answering Call Waiting)
During a conversation, if a second call arrives, you will
hear a call waiting tone.
You can answer the second call by disconnecting or
holding the current call.
To disconnect the current call and then talk to
the new party
1. Go on-hook while hearing the call waiting tone.
2. Go off-hook.
To hold the current call and then talk to the new
party
1. Touch the call button for the current call, and then
press [HOLD].
2. Touch the call button for the new call.
Note
• If Automatic Call Hold is enabled on your unit,
the call will also be put on hold if you touch a
flexible button other than the one for the current
call. For details, consult your administrator or
dealer.
• For details about call buttons, see Page 16.
Talking to Two Parties Alternately (Call Splitting)
When you are talking to one party and have another
party on hold, you can switch the call on hold and the
current call.
1. Press [HOLD] during a conversation.
2. Touch
3. Press [HOLD] and touch the call button that
corresponds to the other party on hold.
Note
• For details about call buttons, see "Flexible
Buttons (Page 30)".
• If a call is not received within a specified amount
of time, you will hear an alarm as a reminder.
and call the second party.
Document Version 2014-04 Operating Instructions 25
Page 26

Blind
FlexibleBtn
Feature Operations
Transferring a Call (Call Transfer)
You can transfer a call to another destination (extension
or outside party).
To transfer
1. Press [TRANSFER] during a conversation.
2. Call the party you want to transfer the call to.
3. Wait until the other party answers to announce the
transfer.
4. Press [TRANSFER].
Note
• If unscreened transfers are supported on your
phone system, step 3 can be omitted. For
details, consult your administrator or dealer.
To do a blind transfer
1. Touch
2. Call the party you want to transfer the call to.
3. Go on-hook.
during a conversation.
3. Wait until the other party answers to announce the
transfer.
4. Press [TRANSFER].
5. Go on-hook.
Note
• For details about flexible buttons on the
KX-UTA336, see "Using Flexible Buttons with
the KX-UTA336 (Page 31)".
To Transfer with a Flexible Button
1. Touch
2. Touch the desired flexible button.
3. Press [ ] or [ ] to select "Transfer", and then press
[ENTER].
4. Wait until the other party answers to announce the
transfer.
5. Go on-hook.
Note
• If unscreened transfers are supported on your
phone system, step 4 can be omitted. For
details, consult your administrator or dealer.
• For details about flexible buttons, see "Flexible
Buttons (Page 30)".
during a conversation.
To Transfer with Flexible Buttons on the KX-UTA336
If the optional KX-UTA336 is installed, you can transfer
calls using its flexible buttons.
1. Press [TRANSFER] during a conversation.
2. Press the desired flexible button on the
KX-UTA336.
26 Operating Instructions Document Version 2014-04
Page 27

End Call
Feature Operations
Mute
You can mute your voice during a conversation. While
the mute feature is turned on, you will be able to hear
the other party, but the other party will not be able to
hear you.
The built-in microphone, handset, and headset are all
muted when the mute feature is turned on.
To mute/unmute
1. Press [MUTE].
Conference Call
During a conversation, you can add an additional party
to your call and establish a conference call.
Notice
• Your phone system may support advanced
conference features, such as conference calls
with four or more parties. In this case, the
procedures for handling a conference call may
be different from those explained in this section.
For details about your phone system, consult
your administrator or dealer.
Making a Conference Call
1. Press [CONFERENCE] to put the current call on
hold.
2. Call the party you want to add to the conversation.
3. After the called party answers, press
[CONFERENCE] to begin the conference call.
Removing a Party from the Conference
During a conference, you can remove other parties from
the conference. However, this operation is available
only during conference calls you initiate.
1. Touch the call button that corresponds to the party
you want to disconnect.
2. Touch
• The party is disconnected.
• You can continue the conversation with the
remaining party.
Note
• For details about call buttons, see "Flexible
Buttons (Page 30)".
.
Ending a Conference Call
1. Go on-hook during a conference.
Document Version 2014-04 Operating Instructions 27
Page 28
Clear List
Yes
Feature Operations
Checking Messages
Checking New Messages
When you receive a voice message,
on the line button that received the call, and the
Message/Ringer lamp turns red.
You can check your new messages by accessing your
mailbox.
1. Press [MESSAGE].
2. If the unit has multiple lines, touch the line button on
which is displayed, and then go off-hook.
is displayed
Checking Missed Calls
When there are new missed calls, appears in the
Phone screen.
1. On the Home screen, select .
2. Press [ ] or [ ] to select "Missed Calls", and then
press [ENTER].
3. Press [ ] or [ ] to select the missed call.
Note
• In the "All Calls" and "Missed Calls" logs,
is displayed for missed calls.
• For details about making calls from the call log,
see "Dialing by Using Call Logs (Page 21)".
Erasing All Call Logs in a Log Category
1. On the Home screen, select .
2. Press [
press [ENTER].
3. Touch
• All call logs for the selected category will be
] or [ ] to select the log category, and then
, and then touch
erased.
.
28 Operating Instructions Document Version 2014-04
Page 29
Feature Operations
Call Forwarding/Do Not Disturb
You can have received calls automatically forwarded to
another destination. You can also have received calls
rejected (Do Not Disturb).
Note
• When Call Forwarding is enabled, appears
on the line button it is enabled for.
When Do Not Disturb is enabled,
on the line button it is enabled for.
To access the FWD/DND settings
1. On the Home screen, select
2. Press [ ] or [ ] to select the desired line button, and
then press [FORWARD/DO NOT DISTURB].
3. Press [ ] or [ ] to select the type of FWD or DND
setting to apply.
4. Configure the settings as necessary (Page 45).
.
appears
SCA (Shared Call Appearance)
SCA (Shared Call appearance) or shared line is a
feature that allows multiple units to use a shared line.
This is an optional feature and may not be supported on
your phone system. For more information consult
consult your administrator or dealer.
Note
• See Page 17 for information on the statuses of
shared lines.
Services
The Services function enables you to access interactive
services, such as stock and weather information, and
phone related services, such as Enterprise phonebook.
The Application Settings (Page 50) must be
configured in order to use Services. For information
about the required settings and available services,
consult your administrator or dealer.
Optional Group Features
The unit supports the optional ACD (Automatic Call
Distribution), Call Pickup, Direct Call Pickup, Call Park,
and Call Retrieve optional group features. If the SIP
server supports these features, the following icons will
be displayed in the Phone screen depending on the
status of the groups. Consult your administrator or
dealer for more information.
Icon
Indicates there is a parked call.
Indicates that the line is signing in to
an ACD group.
Indicates that the line is signing out of
an ACD group.
Indicates that ACD is available for the
line.
Indicates that ACD is not available for
the line.
Indicates that ACD for the line is in
wrap up mode.
Description
Document Version 2014-04 Operating Instructions 29
Page 30
FlexibleBtn
A
C
B
Feature Operations
Flexible Buttons
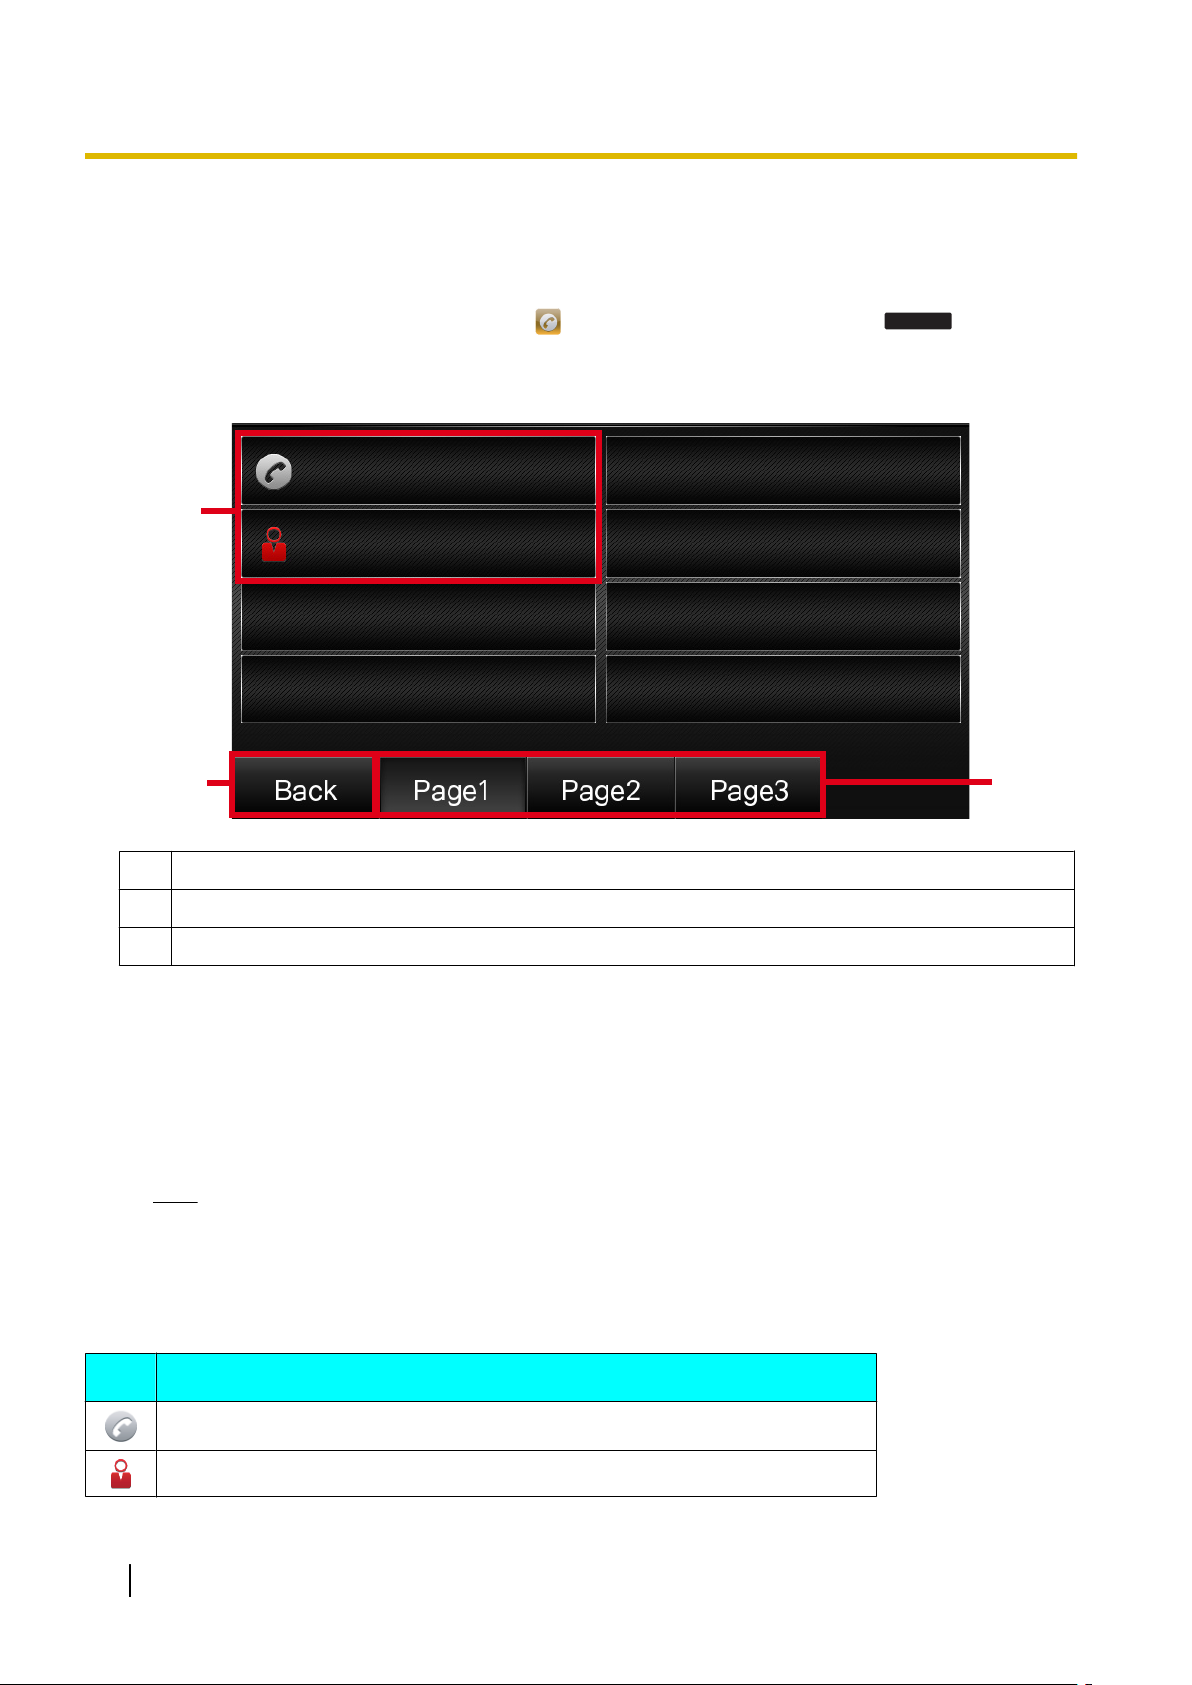
The flexible buttons on the unit can be customized to be used to make or receive calls or as feature buttons.
These buttons are configured by your administrator or dealer.
Access the Flexible button screen by selecting on the Home screen or by touching
screen.
Flexible Button Screen
on the Phone
A Shows the available flexible buttons. Touch the flexible buttons to select them.
B Touch to return to the previous screen.
C Touch to display other flexible button pages.
The following types of flexible buttons are available:
One-Touch
Calls the party or accesses a feature assigned to the button. See "One-touch Dialing (Page 22)".
BLF (Busy Lamp Field)
Calls the extension assigned to the button. During a conversation, a BLF button can be used to transfer
calls to the assigned extension ("To Transfer with a Flexible Button (Page 26)").
A BLF button’s icon shows the current status of the assigned extension.
Note
• BLF (Busy Lamp Field) is an optional feature and may not be supported on your phone system.
Flexible Button Icons
Flexible button icons indicate the type and status of the flexible buttons in use.
Icon
Indicates a one-touch flexible button.
Description
Indicates a BLF flexible button is subscribing.
30 Operating Instructions Document Version 2014-04
Page 31

A
C
B
D
Feature Operations
Icon Description
Indicates a BLF flexible button is idle.
Indicates a BLF flexible button is busy.
Indicates a BLF flexible button is alert.
Indicates a call with BLF flexible button is parked.
Using Flexible Buttons with the KX-UTA336
The optional KX-UTA336 allows 36 additional flexible buttons (3 pages of 12) to be used with the unit. The available
flexible buttons (Page 30) and their icons (Page 30) are the same as for the unit.
No.
A Shows the available flexible buttons.
B Indicates how many pages are available and which page is currently selected. (A maximum of 3 pages
are available.)
C Press [ ] or [ ] to change the displayed page.
Document Version 2014-04 Operating Instructions 31
Description
Page 32

Feature Operations
No. Description
D Press these buttons to select the corresponding flexible buttons.
32 Operating Instructions Document Version 2014-04
Page 33

A
C
B
D
E
Login
Login
Feature Operations
IM&P (Instant Messaging & Presence)
IM&P (Instant Messaging & Presence) is a service that enables you to send short messages and call other
users registered to the service. In order to use IM&P, you must have a user account. For more information,
consult your administrator or dealer.
Logging in to IM&P
When you first use IM&P you must log in by entering the server address, user name, and password.
IM&P Login Screen
A Enter the server address.
B Enter the user name.
C Enter the password.
D Select when secure connections are required.
E Select to log in to IM&P automatically.
Logging in for the first time
1. On the Home screen, select .
2. Touch the desired field and enter the server address, user name, and password.
• If a secure connection is required, select "Use SSL".
3. Touch
.
• The IM&P screen is displayed.
Logging in subsequent times
1. On the Home screen, select .
• The login screen is displayed with the configured server address, user name, and password already
entered.
• If you want to log in with a different account, change the settings as required.
2. Touch
.
Document Version 2014-04 Operating Instructions 33
Page 34

Logout
Select
Feature Operations
• The IM&P screen is displayed.
Logging out
1. On the IM&P screen, touch
.
Presence
Presence is used to show the status of users. You can check if other users are available by checking the presence
displayed next to their names. Other users can also check if you are available by checking your presence. The
following types of presences can be used.
Presence
Available Indicates that the user is online and is able to communicate.
Busy Indicates that the user is online but is not able to communicate.
Away Indicates that the user has been idle or is away.
Offline Indicates that the user is offline.
Description
Setting your Presence
1. On the IM&P screen, press [
] or [ ] to select "My Status".
2. Press [ ] or [ ] to select "Presence State".
3. Press [ ] or [ ] to select the desired presence, and then touch
.
Contacts
Contacts are IM&P users registered to your IM&P account who you can send messages to or call. Addition, editing,
or deletion of contacts cannot be performed on the unit and must be performed on the SIP server. For more
information, consult your administrator or dealer.
Contact Type
All Contacts Contains a list of all the contacts registered to the unit.
Description
Groups Contains a list of contacts organized into separate groups.
You can only send a message or call individual contacts within a group. You
cannot send messages or call all contacts in a group simultaneously.
Non-IM&P contacts Contains a list of contacts not related to IM&P.
Conferences Contains a list of special groups configured for conference calls. By selecting a
conference group, you can have a conference call with members of the conference
group.
Favorites Contains a list of favorite contacts.
34 Operating Instructions Document Version 2014-04
Page 35

Contact Type List Screen
A
C
B
D
Chat
Send
Call
Call
The following screen is an "All Contacts" screen.
A Contact type
B Contacts
C Available actions
Feature Operations
D Status of contacts
Sending Messages to Contacts
You can send instant messages to your contacts. Messages can be a maximum of 128 characters in length.
Sending Messages
1. On the IM&P screen, press [ ] or [ ] to select the contact type.
• If "Groups" is selected, select the group after selecting the contact type.
2. Press [
] or [ ] to select the contact, and then touch
3. Enter the message (max. 128 characters), and then touch
.
.
Calling Contacts
You can use IM&P to make calls with your contacts.
Calling Contacts
1. On the IM&P screen, press [ ] or [ ] to select the contact type.
• If "Groups" is selected, select the group after selecting the contact type.
2. Press [
] or [ ] to select the contact, and then touch
.
Making Conference Calls
You can use IM&P to make conference calls.
Making Conference Calls
1. On the IM&P screen, press [ ] or [ ] to select "Conferences".
2. Press [ ] or [ ] to select the conference group, and then touch
Document Version 2014-04 Operating Instructions 35
.
Page 36

Add
Set
Save
Prefer
Save
Save
Save
Prefer
Search
Edit
Save
Prefer
Customizing the Telephone
Customizing the Telephone
Phonebook List
Adding a New Phonebook Entry
You can add a maximum of 1,000 phonebook entries to
the unit.
To make a call from the phonebook, see "Making a Call
from the Phonebook List (Page 21)".
1. On the Home screen, select
2. Touch
.
3. Enter a name (max. 24 characters).
4. Press [ ] or [ ] to select the phone number type
(A to E) or "Ringtone".
5. Do one of the following, depending on your
selection in the previous step:
If you selected a phone number type
• Enter the phone number (max. 32 digits).
If you selected "Ringtone"
• Press [ENTER], press [ ] or [ ] to select the
desired ringtone, and then touch
6. To add another phone number to the entry, repeat
the procedure from step 4.
7. Touch
Note
.
• If you store multiple phone numbers in the entry,
you can assign the preferred number to use
when you call this party. In step 4, select the
desired number, and then touch
Adding a Phonebook Entry from the Call Log
You can add new phonebook entries from the call log.
1. On the Home screen, select .
2. Press [
press [ENTER].
3. Press [ ] or [ ] to select the desired call log entry,
and then touch
4. Do one of the following, depending on your
selection in the previous step:
If you selected a placed call
• Go to step 5.
If you did not select a placed call
] or [ ] to select the call log type, and then
.
.
.
.
• Press [ ] or [ ] to select "Phonebook", and then
press [ENTER].
5. Enter a name (max. 24 characters).
6. Press [ ] or [ ] to select the phone number type
(A to E) or "Ringtone".
7. Do one of the following, depending on your
selection in the previous step:
If you selected a phone number type
• Enter the phone number (max. 32 digits).
If you selected "Ringtone"
• Press [ENTER], press [ ] or [ ] to select the
desired ringtone, and then touch
.
8. To add another phone number to the entry, repeat
the procedure from step 6.
9. Touch
Note
.
• If a name is stored in the call log, it is
automatically entered in step 5.
• If you store multiple phone numbers in the entry,
you can assign the preferred number to use
when you call this party. In step 6, select the
desired number, and then touch
.
Editing a Phonebook Entry
You can edit the information stored in phonebook
entries.
1. On the Home screen, select
2. Press [
(Page 37).
3. Touch
] or [ ] to display the desired entry, or touch
and search for the desired entry
.
4. Press [ ] or [ ] to select the item you want to edit.
5. Edit the item as necessary.
6. Touch
Note
.
• If you store multiple phone numbers in the entry,
you can assign the preferred number to use
when you call this party. In step 4, select the
desired number, and then touch
.
.
36 Operating Instructions Document Version 2014-04
Page 37

Search
Search
Delete
Yes
Call
Search
Customizing the Telephone
Searching for a Phonebook Entry
You can search the phonebook for the desired entry.
1. On the Home screen, select .
2. Touch
.
3. Enter the name you want to search for.
Deleting a Phonebook Entry
You can delete phonebook entries.
1. On the Home screen, select
.
2. Press [ ] or [ ] to display the desired entry, or touch
and search for the desired entry (Page 37).
3. Touch
, and then touch
.
Export/Import Phonebook Entries
You can export the phonebook entries through the Web
user interface to your computer. This makes it possible
to add and edit phonebook entries using a spreadsheet
application or text editor on your computer. After editing,
the file should be imported into the unit.
Also, phonebook entries exported from one unit can be
imported into another, which makes it easy to share
phonebook entries.
For information on exporting, importing, and editing
entries, consult your administrator or dealer.
Note
• If you export the phonebook, delete some
entries on your computer, and then import the
phonebook to the unit, the entries deleted on
your computer will not be deleted from the
unit’s phonebook. To erase unnecessary
entries, use the unit’s interface and not the Web
user interface.
• If you import a phonebook with more than 1,000
entries, an error message is displayed and only
the first 1,000 entries in the phonebook are
imported.
• Phone calls cannot be made or received while
phonebook entries are being imported or
exported.
Local Phonebook
The phonebook stored on the unit is referred to as Local
Phonebook. If other types of phonebooks, such as
LDAP phonebook, are available, use the steps below to
access the local phonebook.
1. On the Home screen, select .
2. Press [ ] or [ ] to select "Local Phonebook", and
then press [ENTER].
LDAP Phonebook
LDAP phonebook is a phonebook linked with an LDAP
server. If your unit is configured to use LDAP, you can
access phonebook entries on the LDAP server. LDAP
phonebook entries cannot be added, edited, or deleted
from the unit. LDAP is an optional feature and may not
be available. For more information, consult your
administrator or dealer.
Making a Call from the LDAP Phonebook List
1. On the Home screen, select .
2. Press [ ] or [ ] to select "LDAP Phonebook", and
then press [ENTER].
3. Press [ ] or [ ] to select the entry.
4. Touch
.
Searching for an LDAP Phonebook Entry
1. On the Home screen, select .
2. Press [ ] or [ ] to select "LDAP Phonebook", and
then press [ENTER].
3. Touch
.
Enterprise Phonebook
Enterprise phonebook is a server based phonebook
that can be accessed through the Services function.
The Application Settings (Page 41) must be
configured in order to use Enterprise phonebook.
Enterprise phonebook entries cannot be added, edited,
or deleted from the unit. Enterprise phonebook is an
optional feature and may not be available. For
information about availability and the required settings,
consult your administrator or dealer.
Making a Call from the Enterprise Phonebook
List
1. On the Home screen, select .
2. Press [ ] or [ ] to select "Directories", and then
press [ENTER].
3. Press [ ] or [ ] to select the entry.
Document Version 2014-04 Operating Instructions 37
Page 38

Call
Search
Customizing the Telephone
4. Touch
.
Searching for an Enterprise Phonebook Entry
1. On the Home screen, select
.
2. Press [ ] or [ ] to select "Directories", and then
press [ENTER].
3. Touch
.
38 Operating Instructions Document Version 2014-04
Page 39

User Settings
You can configure various settings to customize the behavior of the unit.
This section explains how to configure the settings using the unit.
Accessing the Settings
1. On the Home screen, select .
2. Press [ ] or [ ] to select the desired setting category, and then press [ENTER].
3. Configure the settings as necessary.
Available Settings
Basic Phone Settings
Customizing the Telephone
Menu Item
Date and Time Date Page 42
Date Template Page 42
Time Page 42
Use 12-hour Format Page 42
Ringtone — Page 43
Language —
Brightness — Page 43
Hotline Enable Hotline Page 43
Phone Number Page 43
Delay Time (0-10) Page 43
Call Block — Page 44
Display Lock — Page 44
Key Click Tone —
ECO Mode — Page 45
Bluetooth Enable Bluetooth Page 45
Setting Ref.
Page 43
Page 44
Basic Call Features
Menu Item
FWD/DND Setting Do Not Disturb Page 45
Enable FWD All Page 45
FWD All Number Page 45
Document Version 2014-04 Operating Instructions 39
Setting Ref.
Page 40

Customizing the Telephone
Menu Item Setting Ref.
Enable FWD Busy Page 45
FWD Busy Number Page 45
Enable FWD No Ans Page 46
FWD No Ans Number Page 46
FWD No Ans Ring Count Page 46
Block Anonymous Call — Page 46
Information Display
Displays a variety of information about the unit. See Page 46 for more information.
Network Settings
Menu Item
Network IP Address Mode — Page 47
IPv4 Enable DHCP Page 47
IPv6 Enable IPv6 DHCP Page 47
Setting Sub-Setting Ref.
IP Address Page 47
Subnet Mask Page 47
Default Gateway Page 47
Auto DNS Page 47
DNS1 Page 47
DNS2 Page 47
Allow Auto Configuration Page 47
Enable IPv6 Privacy Page 47
IPv6 Address Page 47
IPv6 Prefix Length Page 47
IPv6 Default Gateway Page 48
IPv6 Auto DNS Page 48
LLDP Settings Enable LLDP — Page 48
LLDP-MED Interval timer — Page 48
CDP Settings Enable CDP — Page 48
CDP Interval timer — Page 48
40 Operating Instructions Document Version 2014-04
IPv6 DNS1 Page 48
IPv6 DNS2 Page 48
Page 41

Customizing the Telephone
Menu Item Setting Sub-Setting Ref.
VLAN Settings Enable IP Phone VLAN — Page 48
IP Phone VLAN ID — Page 48
Enable PC VLAN — Page 48
PC VLAN ID — Page 48
802.1x Enable 802.1x — Page 49
Authentication Protocol — Page 49
Authentication ID — Page 49
Authentication Password — Page 49
Speed/Duplex LAN Port — Page 49
PC Port — Page 49
Embedded Web — — Page 49
Port Mirroring — — Page 49
HTTP Authentication User ID — Page 50
Password — Page 50
Provisioning Enable Provisioning — Page 50
Multicast Paging Paging DND — Page 50
Provision Server — Page 50
User ID — Page 50
Password — Page 50
Enable SIP PnP — Page 50
DHCP Options Enable Option 160 Page 50
Enable Option 159 Page 50
Enable Option 66 Page 50
DHCPv6 Options Enable Sub Option 1 Page 50
Application Settings
Menu Item
Setting Ref.
Enable Application — Page 50
Application Server — Page 50
Service URL — Page 51
User ID — Page 51
User Password — Page 51
Document Version 2014-04 Operating Instructions 41
Page 42

Customizing the Telephone
Network Test
Menu Item Setting Ref.
IP Address — Page 51
IPv6 Address — Page 51
Reset
Menu Item
Exclude Private Settings — Page 51
Exclude Network Settings — Page 51
Setting Ref.
Restart
The unit can be restarted as necessary. See Page 51 for more information.
Settings Details
Basic Phone Settings
Date and Time
Setting
Date Set the date. — 2013/10/02
Date Template Set the date format. mm/dd
Description Value Range Default
dd/mm
dd/mm/yyyy
dd/mm/yy
mm/dd/yyyy
mm/dd/yy
yyyy/mm/dd
yy/mm/dd
mm/dd
Time Set the time. — 10:01
Use 12-hour Format Set the time format to 12-hour or
24-hour time. Select "Yes" to use
12-hour time and "No" to use 24-hour
time.
Note
Yes, No Yes
• Daylight-saving time can be set through Web user interface programming. For details, consult your
administrator or dealer.
42 Operating Instructions Document Version 2014-04
Page 43

Ringtone
Play
Customizing the Telephone
Setting Description Value Range Default
Ringtone Select a ringtone to play when you
receive a call. If multiple lines are
configured on your unit, you must first
select which line to use the ringtone
for. You can assign a different
ringtone to each line.
If you select "Automatic", the ringtone
assigned through Web user interface
programming (Page 54) will be
used.
Touch
highlighted ringtone.
Note
to listen to the
• Ringtones can also be assigned to individual entries in the phonebook list (Page 36).
Language
Setting
Language Select the language to use for the
display.
Description Value Range Default
Automatic, Silence,
Ringtone 1–
Ringtone 9
English(US) English(US)
Automatic
Brightness
Setting
Brightness Press [ ] or [ ] to adjust the
brightness.
Description Value Range Default
Level 1 to 14 Level 7
Hotline
Setting
Enable Hotline Enable or disable the hotline. On, Off Off
Phone Number Enter the hotline phone number. 1-32 digits —
Delay Time (0-10) Select the delay time. 0-10 5
Description Value Range Default
Document Version 2014-04 Operating Instructions 43
Page 44

Add
Save
Edit
Save
Delete
Yes
Customizing the Telephone
Call Block
Setting Description Value Range Default
Call Block Register telephone numbers so that
calls received from those numbers
are blocked. You can also delete
registered numbers.
To register
1. Touch
.
2. Enter the telephone number to
block, and then touch
.
To edit
1. Press [ ] or [ ] to select the
blocked telephone number to
edit.
2. Touch
.
3. Edit the number as necessary,
and then touch
.
To delete
1. Press [ ] or [ ] to select the
blocked telephone number to
delete.
2. Touch
3. Touch
.
.
— —
Display Lock
Setting
Display Lock Lock access to your call log and
phonebook list by entering your
extension PIN (Personal
Identification Number).
Note
• The extension PIN can be configured through Web user interface programming. For details, consult
your administrator or dealer.
Description Value Range Default
Key Click Tone
Setting
Key Click Tone Select the volume of the tone that is
heard in response to key presses.
Description Value Range Default
On, Off Off
High, Middle, Low,
Off
High
44 Operating Instructions Document Version 2014-04
Page 45

ECO Mode
Customizing the Telephone
Setting Description Value Range Default
ECO Mode Enabling this mode reduces the
amount of electricity consumed by
the unit.
Note
• When ECO mode is enabled, the Speed/Duplex setting (Page 49) for LAN Port and PC Port changes
as follows:
– Speed/Duplex: "10M-Full"
– PC port cannot be used.
• When the ECO mode setting is changed, the unit will restart.
• When ECO mode is enabled, is displayed in the status bar at the top of the screen.
Bluetooth
Setting
Enable Bluetooth Enable or disable Bluetooth for use
with Bluetooth devices.
Description Value Range Default
Basic Call Features
On, Off Off
On, Off Off
FWD/DND Setting
If multiple lines are available at your unit, press [ ] or [ ] to select the line to apply the settings to when you
select "FWD/DND Setting" and "Block Anonymous Call".
Setting
FWD/DND Setting Do Not Disturb Enable DND (Do Not Disturb)
Sub-Setting Description Value Range Default
On, Off Off
to reject all incoming calls.
Enable FWD All Enable or disable forwarding
of all incoming calls to a
specified destination.
FWD All Number Specify the number to forward
calls to when "Enable FWD
All" is enabled.
Enable FWD Busy Enable or disable forwarding
of incoming calls to a specified
destination when you are on a
call.
FWD Busy Number Specify the number to forward
calls to when "Enable FWD
Busy" is enabled.
On, Off Off
1-32 digits —
On, Off Off
1-32 digits —
Document Version 2014-04 Operating Instructions 45
Page 46

Customizing the Telephone
Setting Sub-Setting Description Value Range Default
Enable FWD No Ans Enable or disable forwarding
of incoming calls to a specified
destination if you do not
answer after a specified
number of rings.
Block Anonymous
Call
FWD No Ans Number Specify the number to forward
calls to when "Enable FWD No
Ans" is enabled.
FWD No Ans Ring
Count
— Enable or disable blocking of
Specify the number of times
the unit will ring before
forwarding the call.
all anonymous calls.
Information Display
Setting
Information Display View a variety of information about
the unit. Press [ ] and [ ] to display
the various settings. The following
settings can be viewed:
• Firmware Version
• KEM 1 Firmware version (if an
optional KX-UTA336 is
installed)
• KEM 2 Firmware version (if a
second optional KX-UT336 is
installed)
• MAC Address
• Line status
• IP Address
• Subnet Mask
• Default Gateway
• DNS1
• DNS2
• IPv6 Address
• IPv6 Prefix Length
• IPv6 Default Gateway
• IPv6 DNS1
• IPv6 DNS2
• IP Phone VLAN ID
• PC VLAN ID
• IEEE802.1X Status
• Display Lock
Description Value Range Default
*1
*1
On, Off Off
1-32 digits —
0, 2-20 3
On, Off Off
— —
*1
"KEM" refers to the KX-UTA336 Add-on Key Module in this manual.
46 Operating Instructions Document Version 2014-04
Page 47

Network Settings
IMPORTANT
We recommend configuring these settings with your administrator or dealer. Network settings can also be
configured through Web user interface programming (Page 54). Contact your administrator or dealer for
further information.
Network
Customizing the Telephone
Setting
IP Address Mode — Specify the IP address mode
IPv4 Enable DHCP Enable or disable DHCP for
Sub-Setting Description Value Range Default
to use.
IPv4.
IP Address If DHCP is not enabled, you
must specify the IP address.
Subnet Mask If DHCP is not enabled, you
must specify the subnet
mask.
Default Gateway If DHCP is not enabled, you
must specify the default
gateway.
Auto DNS Enable or disable Auto DNS
for IPv4.
DNS1 If Auto DNS is not enabled,
you can specify the primary
DNS server IP address.
DNS2 If Auto DNS is not enabled,
you can specify the
secondary DNS server IP
address. Leave blank if a
secondary DNS server is not
used.
IPv4 only
IPv6 only
Dual stack
Yes, No Yes
xxx.xxx.xxx.xxx —
xxx.xxx.xxx.xxx —
xxx.xxx.xxx.xxx —
Yes, No Yes
xxx.xxx.xxx.xxx —
xxx.xxx.xxx.xxx —
Dual
stack
IPv6 Enable IPv6
DHCP
Document Version 2014-04 Operating Instructions 47
Allow Auto
Configuration
Enable IPv6
Privacy
IPv6 Address If DHCP is not enabled, you
IPv6 Prefix
Length
Enable or disable DHCP for
IPv6.
Enable or disable auto
configuration for IPv6.
Enable or disable privacy for
IPv6.
must specify the IP address.
If DHCP is not enabled, you
must specify the prefix length.
Yes, No Yes
Yes, No Yes
Yes, No No
1-46 characters —
1-128 —
Page 48

Customizing the Telephone
Setting Sub-Setting Description Value Range Default
IPv6 Default
Gateway
IPv6 Auto DNS Enable or disable Auto DNS
IPv6 DNS1 If IPv6 Auto DNS is not
IPv6 DNS2 If IPv6 Auto DNS is not
If DHCP is not enabled, you
must specify the default
gateway.
for IPv6.
enabled, you can specify the
primary DNS server IP
address.
enabled, you can specify the
secondary DNS server IP
address. Leave blank if a
secondary DNS server is not
used.
1-46 characters —
Yes, No Yes
1-46 characters —
1-46 characters —
LLDP Settings
Setting
Enable LLDP Enable or disable LLDP*1. Yes, No No
LLDP-MED Interval timer Specify the LLDP-MED*1 interval
timer.
Description Value Range Default
5-3600 seconds 30
*1
LLDP: Link Layer Discovery Protocol, MED: Media Endpoint Discovery
CDP Settings
Setting
Enable CDP Enable or disable CDP. Yes, No No
CDP Interval timer Specify the CDP interval timer. 5-3600 seconds 30
Description Value Range Default
VLAN Settings
Setting
Enable IP Phone VLAN Enable or disable VLAN (Virtual
LAN) settings.
IP Phone VLAN ID Specify the VLAN ID. NULL, 0-4094 2
Enable PC VLAN Enable or disable PC over a VLAN
(Virtual LAN).
PC VLAN ID Specify the PC VLAN ID. NULL, 0-4094 1
Description Value Range Default
Yes, No No
Yes, No No
48 Operating Instructions Document Version 2014-04
Page 49

Customizing the Telephone
802.1x
Setting Description Value Range Default
Enable 802.1x Enable or disable 802.1x. Yes, No No
Authentication Protocol Select the authentication
protocol.
Authentication ID Enter the authentication ID. 1-127 characters —
Authentication Password Enter the authentication
password.
EAP-MD5
EAP-TLS
EAP-FAST
EAP-PEAP-GTC
EAP-PEAP-MSCHAPv2
EAP-TTLS-GTC
EAP-TTLS-MSCHAPv2
1-127 characters —
Speed/Duplex
Select the connection mode (combination of link speed and duplex mode) of the LAN port and PC port.
Setting
LAN Port Select the connection mode of the
LAN port.
Description Value Range Default
Auto
10M-Half
10M-Full
100M-Half
100M-Full
1000M-Full
EAP-MD5
Auto
PC Port Select the connection mode of the
PC port.
Auto
10M-Half
10M-Full
100M-Half
100M-Full
1000M-Full
Embedded Web
Setting
Embedded Web Enable or disable Web User
Interface Programming.
Description Value Range Default
On, Off Off
Port Mirroring
Setting
Port Mirroring Enable or disable port mirroring. On, Off Off
Description Value Range Default
Auto
Document Version 2014-04 Operating Instructions 49
Page 50

Customizing the Telephone
HTTP Authentication
Setting Description Value Range Default
User ID Enter the authentication ID. 1-127 characters —
Password Enter the authentication password. 1-127 characters —
Provisioning
Setting
Enable Provisioning — Enable or disable
Provision Server — Enter the provisioning
User ID — Enter the provisioning
Password — Enter the provisioning
Enable SIP PnP — Enable or disable SIP
DHCP Options Enable Option
DHCPv6 Options Enable Sub
Sub-Setting Description Value Range Default
provisioning.
server’s URL.
ID.
password.
PnP.
Enable or disable DHCP
160
Enable Option
159
Enable Option66Enable or disable DHCP
Option 1
Option 160.
Enable or disable DHCP
Option 159.
Option 66.
Enable or disable Sub
Option 1.
Yes, No Yes
1-1024 characters —
1-127 characters —
1-127 characters —
Yes, No Yes
Yes, No Yes
Yes, No Yes
Yes, No Yes
Yes, No Yes
Multicast Paging
Setting
Paging DND Enable or disable paging DND. On, Off Off
Description Value Range Default
Application Settings
Setting
Enable Application Enable or disable application
settings.
Application Server Select the type of application server. Broadsoft
50 Operating Instructions Document Version 2014-04
Description Value Range Default
Yes, No No
Broadsoft
Switchvox
Page 51

Ping
Ping
Customizing the Telephone
Setting Description Value Range Default
Service URL Enter the service URL. 1-128 characters —
User ID Enter the user ID. 1-64 characters —
User Password Enter the user password. 1-64 characters —
Network Test
Confirm whether other network devices (e.g., SIP server, routers, switching hubs) respond to network requests.
If a device does not respond, first check the unit's network settings, and then check the device's network
settings and connection.
Setting
IP Address Enter the IPv4 address of the device
to which you want to test the
connection, and then touch
IPv6 Address Enter the IPv6 address of the device
to which you want to test the
connection, and then touch
Description Value Range Default
Reset
Setting
Exclude Private Settings Reset all settings excluding private
settings (Page 69). Private settings
include ringtone volume, brightness,
phonebook, and call history.
Exclude Network Settings Reset all settings excluding network
settings (Page 69). Private settings
and Bluetooth settings are also reset
when Exclude Network Settings is
executed.
Description Value Range Default
xxx.xxx.xxx.xxx —
.
1-46 characters —
.
— —
— —
Restart
Setting
Restart Restart the unit (Page 69). — —
Document Version 2014-04 Operating Instructions 51
Description Value Range Default
Page 52

Display:
Input:
(right)
ddep sjkdd dde de des des
Backspace
d e s k
d e s
Backspace
Backspace
Backspace
d e s
k
d e
k
d e
k
d e c
k
Customizing the Telephone
Entering Characters
The dial keys are used to enter characters and numbers. Each dial key has multiple characters assigned to it.
(For example, a, b and c are assigned to the 1 key.)
To enter a character, press the corresponding dial key until the character you want appears. To enter another
character that is assigned to the same key, first press [ ] to move the cursor to the right.
Example
To enter "desk", press the keys as follows:
For details about the characters assigned to each key, see "Character Table (Page 52)".
Deleting characters
Touch
to delete the last character entered.
Modifying entered text
Use [
• Touch
] and [ ] to move the cursor to where you want to modify the text. Then, modify the text as follows:
to delete the character to the left of the cursor.
• Press a dial key to insert a character at the cursor’s location.
Note
• Depending on the type of information you are entering, you cannot enter certain characters. For
example, when you are entering a phone number, only numeric characters can be entered.
Character Table
Button
Characters
/ . @ 1 : ; = ? - _ & %
a b c 2 A B C
d e f 3 D E F
52 Operating Instructions Document Version 2014-04
Page 53

Button Characters
g h i 4 G H I
j k l 5 J K L
m n o 6 M N O
p q r s 7 P Q R S
t u v 8 T U V
w x y z 9 W X Y Z
<Space> 0 , ! ^ ’ " |
+ * ~ ‘ < >
# $ \ ( ) { } [ ]
Customizing the Telephone
Document Version 2014-04 Operating Instructions 53
Page 54

Customizing the Telephone
Web User Interface Programming
The unit provides a Web-based interface for configuring
various settings and features, including some that are
not programmable directly from the unit. The following
list contains some useful features that are
programmable through the Web user interface.
For details, consult your administrator or dealer.
• Basic network settings
• User password (for access to Web user interface)
• HTTP authentication settings
• Date and time settings
• Default outgoing line
• Call rejection phone numbers
• Block caller ID
• Block anonymous calls
• Do Not Disturb
• Call forward
*1
*1
(Page 45)
• Flexible button settings (Page 30) (One-Touch,
BLF, etc.)
• Key click tone
• Extension PIN
• Phonebook import and export (Page 37)
*1
These settings can also be configured directly through the unit.
*1
(Page 40)
*1
(Page 42)
(Page 45)
*1
(Page 44)
Notice
• Each time you want to access the Web user
interface, you must enable Web programming
(Page 49).
• Available settings depend on the user level and
configuration file settings used.
54 Operating Instructions Document Version 2014-04
Page 55

1
A
Installation and Setup
Installation and Setup
Notice
• Panasonic assumes no responsibility for injuries or property damage resulting from failures arising out of
improper installation or operation inconsistent with this documentation.
Attaching/Removing the Stand
Attaching the Stand
Notice
• If you place the display face down when you attach the stand, be sure to place a soft cloth under the
display. Failure to do so may result in damage to the display.
1. Insert the catches (
2. Gently push the stand in the direction indicated until it locks into place.
The stand will be mounted in the high position.
) of the stand into hooks located in the unit.
Removing the Stand
1. Hold the stand with both hands.
2. Gently rotate the stand in the direction indicated until it is released.
Document Version 2014-04 Operating Instructions 55
Page 56

B
Installation and Setup
Adjusting from High to Low Position
1. Tilt the stand in the direction indicated while pushing the PUSH mark with both hands as shown until it
locks into the low position (2).
Adjusting from Low to High Position
56 Operating Instructions Document Version 2014-04
Page 57

A
Installation and Setup
1. Tilt the stand in the direction indicated while pushing the PUSH mark with both hands as shown until it
locks into the high position (1).
Document Version 2014-04 Operating Instructions 57
Page 58

To a switching hub (Ethernet cable)
To a PC (Ethernet cable)
To an EHS
Optional AC adaptor
AC adaptor
Clamp
Handset
Headset
To a handset jack
(handset)
To a headset
Installation and Setup
Connections
This section explains the ports and connectors on the unit.
Connections for AC Adaptor/LAN/PC
CAUTION
Optional AC Adaptor
• Use the following AC adaptor:
– DSA-42D-48 2 480063 (P/N: 381.00398.005)
• The AC adaptor is used as the main disconnect device. Ensure that the AC outlet is installed near
the unit and is easily accessible.
When connecting a headset
• Ensure that the headset cord has slack and is not pulled tight during use to prevent damage to the
connectors.
• Cords used to connect devices to the EHS jack or headset jack must be less than 3 m (9.8 ft) in
length.
Notice
• The following headsets can be used with this unit. (Not all operations with the headsets can be
guaranteed.)
– EHS headsets/USB headsets
Selected Plantronics®-brand headsets
Selected Jabra®-brand headsets
– Bluetooth headsets
For up-to-date information about headsets that have been tested with this unit, refer to the
following web site:
http://www.panasonic.com/sip
58 Operating Instructions Document Version 2014-04
Page 59

Ethernet cableEthernet cable
60 mm (2
3/8 in)
or less
Incorrect Correct
Installation and Setup
When connecting the Ethernet cable
• Connect the cables as shown in the following illustration.
• Use the included Ethernet cable.
When connecting to a switching hub
• If PoE is available, an AC adaptor is not needed. An AC adaptor must be used when the KX-UTA336
Add-on key module is installed to the unit.
• This unit complies with the PoE Class 2 standard.
When connecting a PC
• Only a PC can be connected to the PC port. Other SIP phones, or network devices such as routers
or switching hubs, cannot be connected.
• The PC port does not support PoE for connected devices.
When connecting cables and the AC adaptor
• Ensure that the Ethernet cables and the AC adaptor cord are clamped to prevent damage to the
connectors.
When registering a Bluetooth headset
• One Bluetooth headset can be registered to this unit. For details, see "Connecting the Bluetooth
headset (Page 68)".
Document Version 2014-04 Operating Instructions 59
Page 60

Installation and Setup
Connections for Handset
60 Operating Instructions Document Version 2014-04
Page 61

A
B
A
C
D
Installation and Setup
Installing the KX-UTA336
The optional KX-UTA336 allows 36 additional flexible buttons (3 pages of 12) to be used with the unit. These
flexible buttons are used to make calls or receive calls, or perform a feature that has been assigned to the
button. Flexible buttons for the KX-UTA336 are configured and used in the same way as flexible buttons for
the unit. See Page 30 for more information. A maximum of 2 KX-UTA336 Add-on key modules can be
connected to the unit.
Notice
• An AC adaptor must be used to supply power when the KX-UTA336 Add-on key module is installed to
the unit.
1. Remove any devices or cords connected to the USB port.
2. Remove the Add-on key module slot cover (A).
3. Connect the KX-UTA336 (A) to the unit (B) by inserting the connector (C) into the Add-on key module
slot (D).
Document Version 2014-04 Operating Instructions 61
Page 62

Installation and Setup
4. Secure the KX-UTA336 to the KX-UTG300 by inserting the 2 screws supplied with the KX-UTA336 into
the rear of the KX-UTG300.
62 Operating Instructions Document Version 2014-04
Page 63

Installation and Setup
Wall Mounting
Before Mounting on a Wall
To mount the unit, it is necessary to remove the stand. For details, see "Removing the Stand (Page 55)".
Mounting the Unit
WARNING
• Do not mount the unit in a manner other than that described in this section.
• Make sure that the wall that the unit will be attached to is strong enough to support the unit. If not, it is
necessary for the wall to be reinforced. For information about the weight of the unit, see "Specifications
(Page 86)".
• Only use the optional wall mount kit with the unit. The wall mount kit includes the necessary screws,
washers, and wall mounting adaptor.
• When driving the screws into the wall, be careful to avoid touching any metal laths, wire laths, or metal
plates in the wall.
• When this unit is no longer in use, make sure to detach it from the wall.
CAUTION
• Make sure the cables are securely fastened to the wall.
Notice
• If you place the display face down when you attach the wall mounting adaptor, be sure to place a soft
cloth under the display before attaching the adaptor. Failure to do so may result in damage to the
display.
1. Insert the 5 tabs of the wall mounting adaptor into the designated openings in the base, and then slide the
wall mounting adaptor in the direction of the arrow until it clicks.
Document Version 2014-04 Operating Instructions 63
Page 64

40 mm (1
37/64 in)
or less
Ethernet cables
AC adaptor
Installation and Setup
2. Fasten the wall mounting adaptor to the base with 1 screw. (Recommended torque: 0.4 N·m [4.08 kgf·cm/
3.54 lbf·in] to 0.6 N·m [6.12 kgf·cm/5.31 lbf·in])
3. Connect the cables to the unit, and run the cables through the wall mounting adaptor, as shown in the
illustration below.
For details about connecting the cables, see "Connections (Page 58)".
Note
• The cables can also be run from the bottom of the unit.
64 Operating Instructions Document Version 2014-04
Page 65

83 mm
(3
1/
4
in)
100 mm
(3
15/
16
in)
Washer
Drive the screw
to this point.
Installation and Setup
4. Drive the 2 screws into the wall either 83 mm (3
the wall.
1
/4 in) or 100 mm (3 15/16 in) apart, and mount the unit on
Note
• You can find a wall mounting template at the end of this manual.
• For information about locking the handset, see "Hooking the Handset (Page 66)".
Document Version 2014-04 Operating Instructions 65
Page 66

Installation and Setup
Hooking the Handset
You can hook the handset with the following operations.
To Hook the Handset During a Conversation
1. Hook the handset over the top edge of the unit.
To Lock the Handset Hook when the Unit is Wall Mounted
1. Remove the handset hook from the slot.
2. Turn it upside-down.
3. Slide the handset hook back into the slot until it locks.
66 Operating Instructions Document Version 2014-04
Page 67

4. Handset is safely hooked when it is in the cradle.
Installation and Setup
Document Version 2014-04 Operating Instructions 67
Page 68

On
Scan
Connect
Disconnect
Delete
Yes
Installation and Setup
Using a Headset
If a headset is connected, you must enable Headset
mode by pressing [HEADSET].
Note
• The Headset button light shows the current
status as follows:
Off: Headset mode off
Red: Headset mode on
For a Bluetooth Headset User
A Bluetooth headset can be used with the unit. Before
using the Bluetooth headset, you must enable
Bluetooth and connect the headset.
Connecting the Bluetooth headset
1. On the Home screen, select
2. Press [ ] or [ ] to select "Basic Phone Settings",
and then press [ENTER].
3. Press [
press [ENTER].
] or [ ] to select "Bluetooth", and then
4. Press [ ] or [ ] to select "Enable Bluetooth", and
then touch
5. Touch
.
.
6. A list of available Bluetooth devices is displayed.
Press [ ] or [ ] to select the desired Bluetooth
headset, and then touch
Note
• is displayed in the Status bar when
Bluetooth is enabled.
• is displayed in the Status bar when
Bluetooth is enabled and a Bluetooth device
is connected.
Receiving a call with the Bluetooth headset
1. Press [HEADSET].
2. To end the call, press [HEADSET] again.
Disconnecting the Bluetooth headset
1. On the Home screen, select
2. Press [ ] or [ ] to select "Basic Phone Settings",
and then press [ENTER].
3. Press [ ] or [ ] to select "Bluetooth", and then
press [ENTER].
4. Press [ ] or [ ] to select the Bluetooth headset, and
then touch
.
.
.
.
Deleting the Bluetooth headset
Delete the Bluetooth headsets that are no longer used
from the unit.
1. On the Home screen, select
.
2. Press [ ] or [ ] to select "Basic Phone Settings",
and then press [ENTER].
3. Press [ ] or [ ] to select "Bluetooth", and then
press [ENTER].
4. Press [ ] or [ ] to select the Bluetooth headset,
touch
, and then touch
.
Switching from your Bluetooth headset to the
handset during a call
1. Lift the handset off of its cradle.
Operating Distance
Please keep units containing Bluetooth modules 3 m or
more apart from each other. Also, if a Bluetooth headset
is in use near a telephone containing a Bluetooth
module other than the one it is registered to, noise may
be heard. To improve the signal, move away from the
telephone and closer to the one it is registered to.
Noise
Signals are transmitted between the unit and the
Bluetooth headset using radio waves. For maximum
distance and noise free operation, it is recommended
that the unit is situated away from electrical appliances
such as faxes, radios, personal computers, or
microwaves.
• Systems using the 2.4 GHz ISM (Industrial,
Scientific and Medical) band may interfere with this
product. Examples of such systems are cordless
telephones, wireless LAN, Home RF, microwave
ovens and other ISM devices. These systems may
cause minor noise.
Notice
Operation is subject to the following two conditions:
1. this unit may not cause interference, and
2. this unit must accept any interference, including
interference that may cause undesired
operation of the unit. Privacy of
communications may not be ensured when
using the unit.
USB Devices
USB devices, including USB headsets and hubs, can
be connected to the USB port on the right side of the
unit (Page 13). If the KX-UTA336 is installed to the unit,
68 Operating Instructions Document Version 2014-04
Page 69

Yes
No
Yes
No
Yes
No
Installation and Setup
USB devices can be connected to the KX-UTA336
(Page 61).
USB Headsets
USB headsets can be used with the unit. See
Page 58 for information on supported headsets.
Note
• Only 1 USB headset can be connected to the
unit at a time.
USB Hubs
A USB hub can be connected to the unit in order to
expand the number of devices that can be connected
to the unit. All supported USB devices can be
connected to the unit through a USB hub.
Note
• Only 1 USB hub can be connected to the unit.
• Depending on the number and type of devices
connected to a USB hub, an AC adaptor may
have to be connected to the USB hub in order
to power the connected devices.
Setting Up the Unit
The user settings can be used to setup the unit by
configuring the settings as required. See Page 39 for
information about the settings.
Maintaining the Unit
Resetting the Unit
Resetting all settings except for private
settings
Executing "Exclude Private Settings" resets all settings
except for private settings. Private settings include
ringtone volume, brightness, phonebook, and call
history.
1. On the Home screen, select .
2. Press [ ] or [ ] to select "Reset", and then press
[ENTER].
3. Press [ ] or [ ] to select "Exclude Private
Settings", and then press [ENTER].
4. Touch
• To cancel, touch
Resetting all settings except for network
settings
Executing "Reset Excluding Network Settings" resets
all settings except for network settings. Private settings
and Bluetooth settings are reset in this case. Network
settings include IPv4, IPv6, LLDP Settings, CDP
Settings, VLAN Settings, Speed/Duplex, and Port
Mirroring.
1. On the Home screen, select .
2. Press [
[ENTER].
3. Press [ ] or [ ] to select "Reset Excluding Network
Settings", and then press [ENTER].
4. Touch
• To cancel, touch
.
.
] or [ ] to select "Reset", and then press
.
.
Restarting the Unit
When some of the settings on the unit have been
changed via Web user interface programming or
configuration file programming, the unit must be
restarted.
1. On the Home screen, select .
2. Press [ ] or [ ] to select "Restart", and then press
[ENTER].
3. Touch
• To cancel, touch
Document Version 2014-04 Operating Instructions 69
.
.
Page 70

Installation and Setup
Cleaning the Unit
Clean the unit periodically by wiping it with a soft and
dry cloth.
When cleaning the unit, observe the following
precautions.
When cleaning the display
• Wipe the display with only the following types of
materials:
– A soft and dry cloth.
– A soft cloth with a very small quantity of neutral
detergent or ethyl alcohol.
• Do not press or rub the display with too much force.
When cleaning the body
• To avoid damaging the unit, disconnect the
Ethernet cable and all other cables from the unit
before cleaning. If the unit is powered with an AC
adaptor, disconnect the AC adaptor from the unit
and power outlet before cleaning.
• If the unit becomes particularly dirty, apply a light
kitchen cleanser to a soft cloth, wring the cloth
thoroughly, and then wipe the unit. When finished,
dry the unit with a soft and dry cloth.
• To avoid damage or discoloration, do not clean the
unit with any of the following materials or with
cleaners that contain any of the following materials:
– Petroleum
– Scouring powder
– Alcohol
– Paint thinner
– Benzene
– Wax
– Hot water
– Powdered soap
• When using chemical cleansers, follow the
instructions on the label carefully.
70 Operating Instructions Document Version 2014-04
Page 71

Open Source Software
<<dropbear-0.52>>
Copyright (c) 2002-2013 Matt Johnston
Portions copyright (c) 2004 Mihnea Stoenescu
A
ll rights reserved.
Permission is hereby granted, free of charge, to any person obtaining a copy
of this software and associated documentation files (the "Software"), to deal
in the Software without restriction, including without limitation the rights
to use, copy, modify, merge, publish, distribute, sublicense, and/or sell
copies of the Software, and to permit persons to whom the Software is
furnished to do so, subject to the following conditions:
The above copyright notice and this permission notice shall be included in all
copies or substantial portions of the Software.
THE SOFTWARE IS PROVIDED "AS IS", WITHOUT WARRANTY OF ANY KIND, EXPRESS OR
IMPLIED, INCLUDING BUT NOT LIMITED TO THE WARRANTIES OF MERCHANTABILITY,
FITNESS FOR A PARTICULAR PURPOSE AND NONINFRINGEMENT. IN NO EVENT SHALL THE
A
UTHORS OR COPYRIGHT HOLDERS BE LIABLE FOR ANY CLAIM, DAMAGES OR OTHER
LIABILITY, WHETHER IN AN ACTION OF CONTRACT, TORT OR OTHERWISE, ARISING FROM,
OUT OF OR IN CONNECTION WITH THE SOFTWARE OR THE USE OR OTHER DEALINGS IN THE
SOFTWARE.
=====
LibTomCrypt and LibTomMath are written by Tom St Denis, and are Public Domain.
=====
sshpty.c is taken from OpenSSH 3.5p1,
Copyright (c) 1995 Tatu Ylonen <ylo@cs.hut.fi>, Espoo, Finland
All rights reserved
"As far as I am concerned, the code I have written for this software
can be used freely for any purpose. Any derived versions of this
software must be clearly marked as such, and if the derived work is
incompatible with the protocol description in the RFC file, it must be
called by a name other than "ssh" or "Secure Shell". "
=====
loginrec.c
loginrec.h
atomicio.h
atomicio.c
and strlcat() (included in util.c) are from OpenSSH 3.6.1p2, and are licensed
under the 2 point BSD license.
loginrec is written primarily by Andre Lucas, atomicio.c by Theo de Raadt.
strlcat() is (c) Todd C. Miller
=====
Import code in keyimport.c is modified from PuTTY's import.c, licensed as
follows:
PuTTY is copyright 1997-2003 Simon Tatham.
Portions copyright Robert de Bath, Joris van Rantwijk, Delian
Delchev, Andreas Schultz, Jeroen Massar, Wez Furlong, Nicolas Barry,
Justin Bradford, and CORE SDI S.A.
Parts of this product use Open Source Software. Relevant conditions apply to this software. Panasonic cannot
accept inquiries regarding the content of the following copyright and license information.
Open Source Software
Document Version 2014-04 Operating Instructions 71
Page 72

Permission is hereby granted, free of charge, to any person
obtaining a copy of this software and associated documentation files
(the "Software"), to deal in the Software without restriction,
including without limitation the rights to use, copy, modify, merge,
publish, distribute, sublicense, and/or sell copies of the Software,
and to permit persons to whom the Software is furnished to do so,
subject to the following conditions:
The above copyright notice and this permission notice shall be
included in all copies or substantial portions of the Software.
THE SOFTWARE IS PROVIDED "AS IS", WITHOUT WARRANTY OF ANY KIND,
EXPRESS OR IMPLIED, INCLUDING BUT NOT LIMITED TO THE WARRANTIES OF
MERCHANTABILITY, FITNESS FOR A PARTICULAR PURPOSE AND
NONINFRINGEMENT. IN NO EVENT SHALL THE COPYRIGHT HOLDERS BE LIABLE
FOR ANY CLAIM, DAMAGES OR OTHER LIABILITY, WHETHER IN AN ACTION OF
CONTRACT, TORT OR OTHERWISE, ARISING FROM, OUT OF OR IN CONNECTION
WITH THE SOFTWARE OR THE USE OR OTHER DEALINGS IN THE SOFTWARE.
=====
curve25519-donna:
/* Copyright 2008, Google Inc.
* All rights reserved.
*
* Redistribution and use in source and binary forms, with or without
* modification, are permitted provided that the following conditions are
* met:
*
* * Redistributions of source code must retain the above copyright
* notice, this list of conditions and the following disclaimer.
* * Redistributions in binary form must reproduce the above
* copyright notice, this list of conditions and the following disclaimer
* in the documentation and/or other materials provided with the
* distribution.
* * Neither the name of Google Inc. nor the names of its
* contributors may be used to endorse or promote products derived from
* this software without specific prior written permission.
*
* THIS SOFTWARE IS PROVIDED BY THE COPYRIGHT HOLDERS AND CONTRIBUTORS
* "AS IS" AND ANY EXPRESS OR IMPLIED WARRANTIES, INCLUDING, BUT NOT
* LIMITED TO, THE IMPLIED WARRANTIES OF MERCHANTABILITY AND FITNESS FOR
* A PARTICULAR PURPOSE ARE DISCLAIMED. IN NO EVENT SHALL THE COPYRIGHT
* OWNER OR CONTRIBUTORS BE LIABLE FOR ANY DIRECT, INDIRECT, INCIDENTAL,
* SPECIAL, EXEMPLARY, OR CONSEQUENTIAL DAMAGES (INCLUDING, BUT NOT
* LIMITED TO, PROCUREMENT OF SUBSTITUTE GOODS OR SERVICES; LOSS OF USE,
* DATA, OR PROFITS; OR BUSINESS INTERRUPTION) HOWEVER CAUSED AND ON ANY
* THEORY OF LIABILITY, WHETHER IN CONTRACT, STRICT LIABILITY, OR TORT
* (INCLUDING NEGLIGENCE OR OTHERWISE) ARISING IN ANY WAY OUT OF THE USE
* OF THIS SOFTWARE, EVEN IF ADVISED OF THE POSSIBILITY OF SUCH DAMAGE.
*
* curve25519-donna: Curve25519 elliptic curve, public key function
*
* http://code.google.com/p/curve25519-donna/
*
* Adam Langley <agl@imperialviolet.org>
*
* Derived from public domain C code by Daniel J. Bernstein <djb@cr.yp.to>
*
* More information about curve25519 can be found here
* http://cr.yp.to/ecdh.html
*
* djb's sample implementation of curve25519 is written in a special assembly
* language called qhasm and uses the floating point registers.
*
* This is, almost, a clean room reimplementation from the curve25519 paper. It
Open Source Software
72 Operating Instructions Document Version 2014-04
Page 73

* uses many of the tricks described therein. Only the crecip function is taken
* from the sample implementation.
*/
<<curl-7.31.0>>
COPYRIGHT AND PERMISSION NOTICE
Copyright (c) 1996 - 2014, Daniel Stenberg, <daniel@haxx.se>.
A
ll rights reserved.
Permission to use, copy, modify, and distribute this software for any purpose
with or without fee is hereby granted, provided that the above copyright
notice and this permission notice appear in all copies.
THE SOFTWARE IS PROVIDED "AS IS", WITHOUT WARRANTY OF ANY KIND, EXPRESS OR
IMPLIED, INCLUDING BUT NOT LIMITED TO THE WARRANTIES OF MERCHANTABILITY,
FITNESS FOR A PARTICULAR PURPOSE AND NONINFRINGEMENT OF THIRD PARTY RIGHTS. IN
NO EVENT SHALL THE AUTHORS OR COPYRIGHT HOLDERS BE LIABLE FOR ANY CLAIM,
DAMAGES OR OTHER LIABILITY, WHETHER IN AN ACTION OF CONTRACT, TORT OR
OTHERWISE, ARISING FROM, OUT OF OR IN CONNECTION WITH THE SOFTWARE OR THE USE
OR OTHER DEALINGS IN THE SOFTWARE.
Except as contained in this notice, the name of a copyright holder shall not
be used in advertising or otherwise to promote the sale, use or other dealings
in this Software without prior written authorization of the copyright holder.
<<c-ares-1.9.1>>
Copyright 1998 by the Massachusetts Institute of Technology.
Permission to use, copy, modify, and distribute this software and its
documentation for any purpose and without fee is hereby granted, provided that
the above copyright notice appear in all copies and that both that copyright
notice and this permission notice appear in supporting documentation, and that
the name of M.I.T. not be used in advertising or publicity pertaining to
distribution of the software without specific, written prior permission.
M.I.T. makes no representations about the suitability of this software for any
purpose. It is provided "as is" without express or implied warranty.
<<expat-1.95.2>>
Copyright (c) 1998, 1999, 2000 Thai Open Source Software Center Ltd
and Clark Cooper
Copyright (c) 2001, 2002, 2003, 2004, 2005, 2006 Expat maintainers.
Permission is hereby granted, free of charge, to any person obtaining
a copy of this software and associated documentation files (the
"Software"), to deal in the Software without restriction, including
without limitation the rights to use, copy, modify, merge, publish,
distribute, sublicense, and/or sell copies of the Software, and to
permit persons to whom the Software is furnished to do so, subject to
the following conditions:
The above copyright notice and this permission notice shall be included
in all copies or substantial portions of the Software.
THE SOFTWARE IS PROVIDED "AS IS", WITHOUT WARRANTY OF ANY KIND,
EXPRESS OR IMPLIED, INCLUDING BUT NOT LIMITED TO THE WARRANTIES OF
MERCHANTABILITY, FITNESS FOR A PARTICULAR PURPOSE AND NONINFRINGEMENT.
IN NO EVENT SHALL THE AUTHORS OR COPYRIGHT HOLDERS BE LIABLE FOR ANY
CLAIM, DAMAGES OR OTHER LIABILITY, WHETHER IN AN ACTION OF CONTRACT,
TORT OR OTHERWISE, ARISING FROM, OUT OF OR IN CONNECTION WITH THE
SOFTWARE OR THE USE OR OTHER DEALINGS IN THE SOFTWARE.
<<openssl-0.9.8x>>
LICENSE ISSUES
==============
Open Source Software
Document Version 2014-04 Operating Instructions 73
Page 74

The OpenSSL toolkit stays under a dual license, i.e. both the conditions of
the OpenSSL License and the original SSLeay license apply to the toolkit.
See below for the actual license texts. Actually both licenses are BSD-style
Open Source licenses. In case of any license issues related to OpenSSL
please contact openssl-core@openssl.org.
OpenSSL License
---------------
/
* ====================================================================
* Copyright (c) 1998-2011 The OpenSSL Project. All rights reserved.
*
* Redistribution and use in source and binary forms, with or without
* modification, are permitted provided that the following conditions
* are met:
*
* 1. Redistributions of source code must retain the above copyright
* notice, this list of conditions and the following disclaimer.
*
* 2. Redistributions in binary form must reproduce the above copyright
* notice, this list of conditions and the following disclaimer in
* the documentation and/or other materials provided with the
* distribution.
*
* 3. All advertising materials mentioning features or use of this
* software must display the following acknowledgment:
* "This product includes software developed by the OpenSSL Project
* for use in the OpenSSL Toolkit. (http://www.openssl.org/)"
*
* 4. The names "OpenSSL Toolkit" and "OpenSSL Project" must not be used to
* endorse or promote products derived from this software without
* prior written permission. For written permission, please contact
* openssl-core@openssl.org.
*
* 5. Products derived from this software may not be called "OpenSSL"
* nor may "OpenSSL" appear in their names without prior written
* permission of the OpenSSL Project.
*
* 6. Redistributions of any form whatsoever must retain the following
* acknowledgment:
* "This product includes software developed by the OpenSSL Project
* for use in the OpenSSL Toolkit (http://www.openssl.org/)"
*
* THIS SOFTWARE IS PROVIDED BY THE OpenSSL PROJECT ``AS IS'' AND ANY
* EXPRESSED OR IMPLIED WARRANTIES, INCLUDING, BUT NOT LIMITED TO, THE
* IMPLIED WARRANTIES OF MERCHANTABILITY AND FITNESS FOR A PARTICULAR
* PURPOSE ARE DISCLAIMED. IN NO EVENT SHALL THE OpenSSL PROJECT OR
* ITS CONTRIBUTORS BE LIABLE FOR ANY DIRECT, INDIRECT, INCIDENTAL,
* SPECIAL, EXEMPLARY, OR CONSEQUENTIAL DAMAGES (INCLUDING, BUT
* NOT LIMITED TO, PROCUREMENT OF SUBSTITUTE GOODS OR SERVICES;
* LOSS OF USE, DATA, OR PROFITS; OR BUSINESS INTERRUPTION)
* HOWEVER CAUSED AND ON ANY THEORY OF LIABILITY, WHETHER IN CONTRACT,
* STRICT LIABILITY, OR TORT (INCLUDING NEGLIGENCE OR OTHERWISE)
* ARISING IN ANY WAY OUT OF THE USE OF THIS SOFTWARE, EVEN IF ADVISED
* OF THE POSSIBILITY OF SUCH DAMAGE.
* ====================================================================
*
* This product includes cryptographic software written by Eric Young
* (eay@cryptsoft.com). This product includes software written by Tim
* Hudson (tjh@cryptsoft.com).
*
*/
Original SSLeay License
-----------------------
/
* Copyright (C) 1995-1998 Eric Young (eay@cryptsoft.com)
Open Source Software
74 Operating Instructions Document Version 2014-04
Page 75

* All rights reserved.
*
* This package is an SSL implementation written
* by Eric Young (eay@cryptsoft.com).
* The implementation was written so as to conform with Netscapes SSL.
*
* This library is free for commercial and non-commercial use as long as
* the following conditions are aheared to. The following conditions
* apply to all code found in this distribution, be it the RC4, RSA,
* lhash, DES, etc., code; not just the SSL code. The SSL documentation
* included with this distribution is covered by the same copyright terms
* except that the holder is Tim Hudson (tjh@cryptsoft.com).
*
* Copyright remains Eric Young's, and as such any Copyright notices in
* the code are not to be removed.
* If this package is used in a product, Eric Young should be given attribution
* as the author of the parts of the library used.
* This can be in the form of a textual message at program startup or
* in documentation (online or textual) provided with the package.
*
* Redistribution and use in source and binary forms, with or without
* modification, are permitted provided that the following conditions
* are met:
* 1. Redistributions of source code must retain the copyright
* notice, this list of conditions and the following disclaimer.
* 2. Redistributions in binary form must reproduce the above copyright
* notice, this list of conditions and the following disclaimer in the
* documentation and/or other materials provided with the distribution.
* 3. All advertising materials mentioning features or use of this software
* must display the following acknowledgement:
* "This product includes cryptographic software written by
* Eric Young (eay@cryptsoft.com)"
* The word 'cryptographic' can be left out if the rouines from the library
* being used are not cryptographic related :-).
* 4. If you include any Windows specific code (or a derivative thereof) from
* the apps directory (application code) you must include an acknowledgement:
* "This product includes software written by Tim Hudson (tjh@cryptsoft.com)"
*
* THIS SOFTWARE IS PROVIDED BY ERIC YOUNG ``AS IS'' AND
* ANY EXPRESS OR IMPLIED WARRANTIES, INCLUDING, BUT NOT LIMITED TO, THE
* IMPLIED WARRANTIES OF MERCHANTABILITY AND FITNESS FOR A PARTICULAR PURPOSE
* ARE DISCLAIMED. IN NO EVENT SHALL THE AUTHOR OR CONTRIBUTORS BE LIABLE
* FOR ANY DIRECT, INDIRECT, INCIDENTAL, SPECIAL, EXEMPLARY, OR CONSEQUENTIAL
* DAMAGES (INCLUDING, BUT NOT LIMITED TO, PROCUREMENT OF SUBSTITUTE GOODS
* OR SERVICES; LOSS OF USE, DATA, OR PROFITS; OR BUSINESS INTERRUPTION)
* HOWEVER CAUSED AND ON ANY THEORY OF LIABILITY, WHETHER IN CONTRACT, STRICT
* LIABILITY, OR TORT (INCLUDING NEGLIGENCE OR OTHERWISE) ARISING IN ANY WAY
* OUT OF THE USE OF THIS SOFTWARE, EVEN IF ADVISED OF THE POSSIBILITY OF
* SUCH DAMAGE.
*
* The licence and distribution terms for any publically available version or
* derivative of this code cannot be changed. i.e. this code cannot simply be
* copied and put under another distribution licence
* [including the GNU Public Licence.]
*/
<<mcabber-0.10.2>>
Copyright \(C) 2005-2012 Mikael Berthe and others. +
Free use of this software is granted under the terms of the GNU General Public
License (GPL).
Specific permission is granted for the GPLed code in this distribution
to be linked to OpenSSL without invoking GPL clause 2(b).
----------------------------------------------------------------------
Open Source Software
Document Version 2014-04 Operating Instructions 75
Page 76

GNU GENERAL PUBLIC LICENSE
Version 2, June 1991
Copyright (C) 1989, 1991 Free Software Foundation, Inc.
59 Temple Place, Suite 330, Boston, MA 02111-1307 USA
Everyone is permitted to copy and distribute verbatim copies
of this license document, but changing it is not allowed.
Preamble
The licenses for most software are designed to take away your
freedom to share and change it. By contrast, the GNU General Public
License is intended to guarantee your freedom to share and change free
software--to make sure the software is free for all its users. This
General Public License applies to most of the Free Software
Foundation's software and to any other program whose authors commit to
using it. (Some other Free Software Foundation software is covered by
the GNU Library General Public License instead.) You can apply it to
your programs, too.
When we speak of free software, we are referring to freedom, not
price. Our General Public Licenses are designed to make sure that you
have the freedom to distribute copies of free software (and charge for
this service if you wish), that you receive source code or can get it
if you want it, that you can change the software or use pieces of it
in new free programs; and that you know you can do these things.
To protect your rights, we need to make restrictions that forbid
anyone to deny you these rights or to ask you to surrender the rights.
These restrictions translate to certain responsibilities for you if you
distribute copies of the software, or if you modify it.
For example, if you distribute copies of such a program, whether
gratis or for a fee, you must give the recipients all the rights that
you have. You must make sure that they, too, receive or can get the
source code. And you must show them these terms so they know their
rights.
We protect your rights with two steps: (1) copyright the software, and
(2) offer you this license which gives you legal permission to copy,
distribute and/or modify the software.
Also, for each author's protection and ours, we want to make certain
that everyone understands that there is no warranty for this free
software. If the software is modified by someone else and passed on, we
want its recipients to know that what they have is not the original, so
that any problems introduced by others will not reflect on the original
authors' reputations.
Finally, any free program is threatened constantly by software
patents. We wish to avoid the danger that redistributors of a free
program will individually obtain patent licenses, in effect making the
program proprietary. To prevent this, we have made it clear that any
patent must be licensed for everyone's free use or not licensed at all.
The precise terms and conditions for copying, distribution and
modification follow.
GNU GENERAL PUBLIC LICENSE
TERMS AND CONDITIONS FOR COPYING, DISTRIBUTION AND MODIFICATION
0. This License applies to any program or other work which contains
a notice placed by the copyright holder saying it may be distributed
under the terms of this General Public License. The "Program", below,
refers to any such program or work, and a "work based on the Program"
means either the Program or any derivative work under copyright law:
that is to say, a work containing the Program or a portion of it,
Open Source Software
76 Operating Instructions Document Version 2014-04
Page 77

either verbatim or with modifications and/or translated into another
language. (Hereinafter, translation is included without limitation in
the term "modification".) Each licensee is addressed as "you".
A
ctivities other than copying, distribution and modification are not
covered by this License; they are outside its scope. The act of
running the Program is not restricted, and the output from the Program
is covered only if its contents constitute a work based on the
Program (independent of having been made by running the Program).
Whether that is true depends on what the Program does.
1. You may copy and distribute verbatim copies of the Program's
source code as you receive it, in any medium, provided that you
conspicuously and appropriately publish on each copy an appropriate
copyright notice and disclaimer of warranty; keep intact all the
notices that refer to this License and to the absence of any warranty;
and give any other recipients of the Program a copy of this License
along with the Program.
You may charge a fee for the physical act of transferring a copy, and
you may at your option offer warranty protection in exchange for a fee.
2. You may modify your copy or copies of the Program or any portion
of it, thus forming a work based on the Program, and copy and
distribute such modifications or work under the terms of Section 1
above, provided that you also meet all of these conditions:
a) You must cause the modified files to carry prominent notices
stating that you changed the files and the date of any change.
b) You must cause any work that you distribute or publish, that in
whole or in part contains or is derived from the Program or any
part thereof, to be licensed as a whole at no charge to all third
parties under the terms of this License.
c) If the modified program normally reads commands interactively
when run, you must cause it, when started running for such
interactive use in the most ordinary way, to print or display an
announcement including an appropriate copyright notice and a
notice that there is no warranty (or else, saying that you provide
a warranty) and that users may redistribute the program under
these conditions, and telling the user how to view a copy of this
License. (Exception: if the Program itself is interactive but
does not normally print such an announcement, your work based on
the Program is not required to print an announcement.)
These requirements apply to the modified work as a whole. If
identifiable sections of that work are not derived from the Program,
and can be reasonably considered independent and separate works in
themselves, then this License, and its terms, do not apply to those
sections when you distribute them as separate works. But when you
distribute the same sections as part of a whole which is a work based
on the Program, the distribution of the whole must be on the terms of
this License, whose permissions for other licensees extend to the
entire whole, and thus to each and every part regardless of who wrote it.
Thus, it is not the intent of this section to claim rights or contest
your rights to work written entirely by you; rather, the intent is to
exercise the right to control the distribution of derivative or
collective works based on the Program.
In addition, mere aggregation of another work not based on the Program
with the Program (or with a work based on the Program) on a volume of
a storage or distribution medium does not bring the other work under
the scope of this License.
3. You may copy and distribute the Program (or a work based on it,
Open Source Software
Document Version 2014-04 Operating Instructions 77
Page 78

under Section 2) in object code or executable form under the terms of
Sections 1 and 2 above provided that you also do one of the following:
a) Accompany it with the complete corresponding machine-readable
source code, which must be distributed under the terms of Sections
1 and 2 above on a medium customarily used for software interchange; or,
b) Accompany it with a written offer, valid for at least three
years, to give any third party, for a charge no more than your
cost of physically performing source distribution, a complete
machine-readable copy of the corresponding source code, to be
distributed under the terms of Sections 1 and 2 above on a medium
customarily used for software interchange; or,
c) Accompany it with the information you received as to the offer
to distribute corresponding source code. (This alternative is
allowed only for noncommercial distribution and only if you
received the program in object code or executable form with such
an offer, in accord with Subsection b above.)
The source code for a work means the preferred form of the work for
making modifications to it. For an executable work, complete source
code means all the source code for all modules it contains, plus any
associated interface definition files, plus the scripts used to
control compilation and installation of the executable. However, as a
special exception, the source code distributed need not include
anything that is normally distributed (in either source or binary
form) with the major components (compiler, kernel, and so on) of the
operating system on which the executable runs, unless that component
itself accompanies the executable.
If distribution of executable or object code is made by offering
access to copy from a designated place, then offering equivalent
access to copy the source code from the same place counts as
distribution of the source code, even though third parties are not
compelled to copy the source along with the object code.
4. You may not copy, modify, sublicense, or distribute the Program
except as expressly provided under this License. Any attempt
otherwise to copy, modify, sublicense or distribute the Program is
void, and will automatically terminate your rights under this License.
However, parties who have received copies, or rights, from you under
this License will not have their licenses terminated so long as such
parties remain in full compliance.
5. You are not required to accept this License, since you have not
signed it. However, nothing else grants you permission to modify or
distribute the Program or its derivative works. These actions are
prohibited by law if you do not accept this License. Therefore, by
modifying or distributing the Program (or any work based on the
Program), you indicate your acceptance of this License to do so, and
all its terms and conditions for copying, distributing or modifying
the Program or works based on it.
6. Each time you redistribute the Program (or any work based on the
Program), the recipient automatically receives a license from the
original licensor to copy, distribute or modify the Program subject to
these terms and conditions. You may not impose any further
restrictions on the recipients' exercise of the rights granted herein.
You are not responsible for enforcing compliance by third parties to
this License.
7. If, as a consequence of a court judgment or allegation of patent
infringement or for any other reason (not limited to patent issues),
conditions are imposed on you (whether by court order, agreement or
otherwise) that contradict the conditions of this License, they do not
excuse you from the conditions of this License. If you cannot
Open Source Software
78 Operating Instructions Document Version 2014-04
Page 79

distribute so as to satisfy simultaneously your obligations under this
License and any other pertinent obligations, then as a consequence you
may not distribute the Program at all. For example, if a patent
license would not permit royalty-free redistribution of the Program by
all those who receive copies directly or indirectly through you, then
the only way you could satisfy both it and this License would be to
refrain entirely from distribution of the Program.
If any portion of this section is held invalid or unenforceable under
any particular circumstance, the balance of the section is intended to
apply and the section as a whole is intended to apply in other
circumstances.
It is not the purpose of this section to induce you to infringe any
patents or other property right claims or to contest validity of any
such claims; this section has the sole purpose of protecting the
integrity of the free software distribution system, which is
implemented by public license practices. Many people have made
generous contributions to the wide range of software distributed
through that system in reliance on consistent application of that
system; it is up to the author/donor to decide if he or she is willing
to distribute software through any other system and a licensee cannot
impose that choice.
This section is intended to make thoroughly clear what is believed to
be a consequence of the rest of this License.
8. If the distribution and/or use of the Program is restricted in
certain countries either by patents or by copyrighted interfaces, the
original copyright holder who places the Program under this License
may add an explicit geographical distribution limitation excluding
those countries, so that distribution is permitted only in or among
countries not thus excluded. In such case, this License incorporates
the limitation as if written in the body of this License.
9. The Free Software Foundation may publish revised and/or new versions
of the General Public License from time to time. Such new versions will
be similar in spirit to the present version, but may differ in detail to
address new problems or concerns.
Each version is given a distinguishing version number. If the Program
specifies a version number of this License which applies to it and "any
later version", you have the option of following the terms and conditions
either of that version or of any later version published by the Free
Software Foundation. If the Program does not specify a version number of
this License, you may choose any version ever published by the Free Software
Foundation.
10. If you wish to incorporate parts of the Program into other free
programs whose distribution conditions are different, write to the author
to ask for permission. For software which is copyrighted by the Free
Software Foundation, write to the Free Software Foundation; we sometimes
make exceptions for this. Our decision will be guided by the two goals
of preserving the free status of all derivatives of our free software and
of promoting the sharing and reuse of software generally.
NO WARRANTY
11. BECAUSE THE PROGRAM IS LICENSED FREE OF CHARGE, THERE IS NO WARRANTY
FOR THE PROGRAM, TO THE EXTENT PERMITTED BY APPLICABLE LAW. EXCEPT WHEN
OTHERWISE STATED IN WRITING THE COPYRIGHT HOLDERS AND/OR OTHER PARTIES
PROVIDE THE PROGRAM "AS IS" WITHOUT WARRANTY OF ANY KIND, EITHER EXPRESSED
OR IMPLIED, INCLUDING, BUT NOT LIMITED TO, THE IMPLIED WARRANTIES OF
MERCHANTABILITY AND FITNESS FOR A PARTICULAR PURPOSE. THE ENTIRE RISK AS
TO THE QUALITY AND PERFORMANCE OF THE PROGRAM IS WITH YOU. SHOULD THE
PROGRAM PROVE DEFECTIVE, YOU ASSUME THE COST OF ALL NECESSARY SERVICING,
REPAIR OR CORRECTION.
Open Source Software
Document Version 2014-04 Operating Instructions 79
Page 80

12. IN NO EVENT UNLESS REQUIRED BY APPLICABLE LAW OR AGREED TO IN WRITING
WILL ANY COPYRIGHT HOLDER, OR ANY OTHER PARTY WHO MAY MODIFY AND/OR
REDISTRIBUTE THE PROGRAM AS PERMITTED ABOVE, BE LIABLE TO YOU FOR DAMAGES,
INCLUDING ANY GENERAL, SPECIAL, INCIDENTAL OR CONSEQUENTIAL DAMAGES ARISING
OUT OF THE USE OR INABILITY TO USE THE PROGRAM (INCLUDING BUT NOT LIMITED
TO LOSS OF DATA OR DATA BEING RENDERED INACCURATE OR LOSSES SUSTAINED BY
YOU OR THIRD PARTIES OR A FAILURE OF THE PROGRAM TO OPERATE WITH ANY OTHER
PROGRAMS), EVEN IF SUCH HOLDER OR OTHER PARTY HAS BEEN ADVISED OF THE
POSSIBILITY OF SUCH DAMAGES.
END OF TERMS AND CONDITIONS
How to Apply These Terms to Your New Programs
If you develop a new program, and you want it to be of the greatest
possible use to the public, the best way to achieve this is to make it
free software which everyone can redistribute and change under these terms.
To do so, attach the following notices to the program. It is safest
to attach them to the start of each source file to most effectively
convey the exclusion of warranty; and each file should have at least
the "copyright" line and a pointer to where the full notice is found.
<one line to give the program's name and a brief idea of what it does.>
Copyright (C) <year> <name of author>
This program is free software; you can redistribute it and/or modify
it under the terms of the GNU General Public License as published by
the Free Software Foundation; either version 2 of the License, or
(at your option) any later version.
This program is distributed in the hope that it will be useful,
but WITHOUT ANY WARRANTY; without even the implied warranty of
MERCHANTABILITY or FITNESS FOR A PARTICULAR PURPOSE. See the
GNU General Public License for more details.
You should have received a copy of the GNU General Public License
along with this program; if not, write to the Free Software
Foundation, Inc., 59 Temple Place, Suite 330, Boston, MA 02111-1307 USA
A
lso add information on how to contact you by electronic and paper mail.
If the program is interactive, make it output a short notice like this
when it starts in an interactive mode:
Gnomovision version 69, Copyright (C) year name of author
Gnomovision comes with ABSOLUTELY NO WARRANTY; for details type `show w'.
This is free software, and you are welcome to redistribute it
under certain conditions; type `show c' for details.
The hypothetical commands `show w' and `show c' should show the appropriate
parts of the General Public License. Of course, the commands you use may
be called something other than `show w' and `show c'; they could even be
mouse-clicks or menu items--whatever suits your program.
You should also get your employer (if you work as a programmer) or your
school, if any, to sign a "copyright disclaimer" for the program, if
necessary. Here is a sample; alter the names:
Yoyodyne, Inc., hereby disclaims all copyright interest in the program
`Gnomovision' (which makes passes at compilers) written by James Hacker.
<signature of Ty Coon>, 1 April 1989
Ty Coon, President of Vice
This General Public License does not permit incorporating your program into
Open Source Software
80 Operating Instructions Document Version 2014-04
Page 81

proprietary programs. If your program is a subroutine library, you may
consider it more useful to permit linking proprietary applications with the
library. If this is what you want to do, use the GNU Library General
Public License instead of this License.
<<net-snmp-5.7.2>>
---- Part 1: CMU/UCD copyright notice: (BSD like) -----
Copyright 1989, 1991, 1992 by Carnegie Mellon University
Derivative Work - 1996, 1998-2000
Copyright 1996, 1998-2000 The Regents of the University of California
All Rights Reserved
Permission to use, copy, modify and distribute this software and its
documentation for any purpose and without fee is hereby granted,
provided that the above copyright notice appears in all copies and
that both that copyright notice and this permission notice appear in
supporting documentation, and that the name of CMU and The Regents of
the University of California not be used in advertising or publicity
pertaining to distribution of the software without specific written
permission.
CMU AND THE REGENTS OF THE UNIVERSITY OF CALIFORNIA DISCLAIM ALL
WARRANTIES WITH REGARD TO THIS SOFTWARE, INCLUDING ALL IMPLIED
WARRANTIES OF MERCHANTABILITY AND FITNESS. IN NO EVENT SHALL CMU OR
THE REGENTS OF THE UNIVERSITY OF CALIFORNIA BE LIABLE FOR ANY SPECIAL,
INDIRECT OR CONSEQUENTIAL DAMAGES OR ANY DAMAGES WHATSOEVER RESULTING
FROM THE LOSS OF USE, DATA OR PROFITS, WHETHER IN AN ACTION OF
CONTRACT, NEGLIGENCE OR OTHER TORTIOUS ACTION, ARISING OUT OF OR IN
CONNECTION WITH THE USE OR PERFORMANCE OF THIS SOFTWARE.
---- Part 2: Networks Associates Technology, Inc copyright notice (BSD) -----
Copyright (c) 2001-2003, Networks Associates Technology, Inc
A
ll rights reserved.
Redistribution and use in source and binary forms, with or without
modification, are permitted provided that the following conditions are met:
* Redistributions of source code must retain the above copyright notice,
this list of conditions and the following disclaimer.
* Redistributions in binary form must reproduce the above copyright
notice, this list of conditions and the following disclaimer in the
documentation and/or other materials provided with the distribution.
* Neither the name of the Networks Associates Technology, Inc nor the
names of its contributors may be used to endorse or promote
products derived from this software without specific prior written
permission.
THIS SOFTWARE IS PROVIDED BY THE COPYRIGHT HOLDERS AND CONTRIBUTORS ``AS
IS'' AND ANY EXPRESS OR IMPLIED WARRANTIES, INCLUDING, BUT NOT LIMITED TO,
THE IMPLIED WARRANTIES OF MERCHANTABILITY AND FITNESS FOR A PARTICULAR
PURPOSE ARE DISCLAIMED. IN NO EVENT SHALL THE COPYRIGHT HOLDERS OR
CONTRIBUTORS BE LIABLE FOR ANY DIRECT, INDIRECT, INCIDENTAL, SPECIAL,
EXEMPLARY, OR CONSEQUENTIAL DAMAGES (INCLUDING, BUT NOT LIMITED TO,
PROCUREMENT OF SUBSTITUTE GOODS OR SERVICES; LOSS OF USE, DATA, OR PROFITS;
OR BUSINESS INTERRUPTION) HOWEVER CAUSED AND ON ANY THEORY OF LIABILITY,
WHETHER IN CONTRACT, STRICT LIABILITY, OR TORT (INCLUDING NEGLIGENCE OR
OTHERWISE) ARISING IN ANY WAY OUT OF THE USE OF THIS SOFTWARE, EVEN IF
A
DVISED OF THE POSSIBILITY OF SUCH DAMAGE.
Open Source Software
Document Version 2014-04 Operating Instructions 81
Page 82

---- Part 3: Cambridge Broadband Ltd. copyright notice (BSD) -----
Portions of this code are copyright (c) 2001-2003, Cambridge Broadband Ltd.
A
ll rights reserved.
Redistribution and use in source and binary forms, with or without
modification, are permitted provided that the following conditions are met:
* Redistributions of source code must retain the above copyright notice,
this list of conditions and the following disclaimer.
* Redistributions in binary form must reproduce the above copyright
notice, this list of conditions and the following disclaimer in the
documentation and/or other materials provided with the distribution.
* The name of Cambridge Broadband Ltd. may not be used to endorse or
promote products derived from this software without specific prior
written permission.
THIS SOFTWARE IS PROVIDED BY THE COPYRIGHT HOLDER ``AS IS'' AND ANY
EXPRESS OR IMPLIED WARRANTIES, INCLUDING, BUT NOT LIMITED TO, THE
IMPLIED WARRANTIES OF MERCHANTABILITY AND FITNESS FOR A PARTICULAR
PURPOSE ARE DISCLAIMED. IN NO EVENT SHALL THE COPYRIGHT HOLDER BE
LIABLE FOR ANY DIRECT, INDIRECT, INCIDENTAL, SPECIAL, EXEMPLARY, OR
CONSEQUENTIAL DAMAGES (INCLUDING, BUT NOT LIMITED TO, PROCUREMENT OF
SUBSTITUTE GOODS OR SERVICES; LOSS OF USE, DATA, OR PROFITS; OR
BUSINESS INTERRUPTION) HOWEVER CAUSED AND ON ANY THEORY OF LIABILITY,
WHETHER IN CONTRACT, STRICT LIABILITY, OR TORT (INCLUDING NEGLIGENCE
OR OTHERWISE) ARISING IN ANY WAY OUT OF THE USE OF THIS SOFTWARE, EVEN
IF ADVISED OF THE POSSIBILITY OF SUCH DAMAGE.
---- Part 4: Sun Microsystems, Inc. copyright notice (BSD) -----
Copyright © 2003 Sun Microsystems, Inc., 4150 Network Circle, Santa Clara,
California 95054, U.S.A. All rights reserved.
Use is subject to license terms below.
This distribution may include materials developed by third parties.
Sun, Sun Microsystems, the Sun logo and Solaris are trademarks or registered
trademarks of Sun Microsystems, Inc. in the U.S. and other countries.
Redistribution and use in source and binary forms, with or without
modification, are permitted provided that the following conditions are met:
* Redistributions of source code must retain the above copyright notice,
this list of conditions and the following disclaimer.
* Redistributions in binary form must reproduce the above copyright
notice, this list of conditions and the following disclaimer in the
documentation and/or other materials provided with the distribution.
* Neither the name of the Sun Microsystems, Inc. nor the
names of its contributors may be used to endorse or promote
products derived from this software without specific prior written
permission.
THIS SOFTWARE IS PROVIDED BY THE COPYRIGHT HOLDERS AND CONTRIBUTORS ``AS
IS'' AND ANY EXPRESS OR IMPLIED WARRANTIES, INCLUDING, BUT NOT LIMITED TO,
THE IMPLIED WARRANTIES OF MERCHANTABILITY AND FITNESS FOR A PARTICULAR
PURPOSE ARE DISCLAIMED. IN NO EVENT SHALL THE COPYRIGHT HOLDERS OR
CONTRIBUTORS BE LIABLE FOR ANY DIRECT, INDIRECT, INCIDENTAL, SPECIAL,
EXEMPLARY, OR CONSEQUENTIAL DAMAGES (INCLUDING, BUT NOT LIMITED TO,
PROCUREMENT OF SUBSTITUTE GOODS OR SERVICES; LOSS OF USE, DATA, OR PROFITS;
OR BUSINESS INTERRUPTION) HOWEVER CAUSED AND ON ANY THEORY OF LIABILITY,
Open Source Software
82 Operating Instructions Document Version 2014-04
Page 83

WHETHER IN CONTRACT, STRICT LIABILITY, OR TORT (INCLUDING NEGLIGENCE OR
OTHERWISE) ARISING IN ANY WAY OUT OF THE USE OF THIS SOFTWARE, EVEN IF
A
DVISED OF THE POSSIBILITY OF SUCH DAMAGE.
---- Part 5: Sparta, Inc copyright notice (BSD) -----
Copyright (c) 2003-2009, Sparta, Inc
A
ll rights reserved.
Redistribution and use in source and binary forms, with or without
modification, are permitted provided that the following conditions are met:
* Redistributions of source code must retain the above copyright notice,
this list of conditions and the following disclaimer.
* Redistributions in binary form must reproduce the above copyright
notice, this list of conditions and the following disclaimer in the
documentation and/or other materials provided with the distribution.
* Neither the name of Sparta, Inc nor the names of its contributors may
be used to endorse or promote products derived from this software
without specific prior written permission.
THIS SOFTWARE IS PROVIDED BY THE COPYRIGHT HOLDERS AND CONTRIBUTORS ``AS
IS'' AND ANY EXPRESS OR IMPLIED WARRANTIES, INCLUDING, BUT NOT LIMITED TO,
THE IMPLIED WARRANTIES OF MERCHANTABILITY AND FITNESS FOR A PARTICULAR
PURPOSE ARE DISCLAIMED. IN NO EVENT SHALL THE COPYRIGHT HOLDERS OR
CONTRIBUTORS BE LIABLE FOR ANY DIRECT, INDIRECT, INCIDENTAL, SPECIAL,
EXEMPLARY, OR CONSEQUENTIAL DAMAGES (INCLUDING, BUT NOT LIMITED TO,
PROCUREMENT OF SUBSTITUTE GOODS OR SERVICES; LOSS OF USE, DATA, OR PROFITS;
OR BUSINESS INTERRUPTION) HOWEVER CAUSED AND ON ANY THEORY OF LIABILITY,
WHETHER IN CONTRACT, STRICT LIABILITY, OR TORT (INCLUDING NEGLIGENCE OR
OTHERWISE) ARISING IN ANY WAY OUT OF THE USE OF THIS SOFTWARE, EVEN IF
A
DVISED OF THE POSSIBILITY OF SUCH DAMAGE.
---- Part 6: Cisco/BUPTNIC copyright notice (BSD) -----
Copyright (c) 2004, Cisco, Inc and Information Network
Center of Beijing University of Posts and Telecommunications.
A
ll rights reserved.
Redistribution and use in source and binary forms, with or without
modification, are permitted provided that the following conditions are met:
* Redistributions of source code must retain the above copyright notice,
this list of conditions and the following disclaimer.
* Redistributions in binary form must reproduce the above copyright
notice, this list of conditions and the following disclaimer in the
documentation and/or other materials provided with the distribution.
* Neither the name of Cisco, Inc, Beijing University of Posts and
Telecommunications, nor the names of their contributors may
be used to endorse or promote products derived from this software
without specific prior written permission.
THIS SOFTWARE IS PROVIDED BY THE COPYRIGHT HOLDERS AND CONTRIBUTORS ``AS
IS'' AND ANY EXPRESS OR IMPLIED WARRANTIES, INCLUDING, BUT NOT LIMITED TO,
THE IMPLIED WARRANTIES OF MERCHANTABILITY AND FITNESS FOR A PARTICULAR
PURPOSE ARE DISCLAIMED. IN NO EVENT SHALL THE COPYRIGHT HOLDERS OR
CONTRIBUTORS BE LIABLE FOR ANY DIRECT, INDIRECT, INCIDENTAL, SPECIAL,
EXEMPLARY, OR CONSEQUENTIAL DAMAGES (INCLUDING, BUT NOT LIMITED TO,
PROCUREMENT OF SUBSTITUTE GOODS OR SERVICES; LOSS OF USE, DATA, OR PROFITS;
OR BUSINESS INTERRUPTION) HOWEVER CAUSED AND ON ANY THEORY OF LIABILITY,
WHETHER IN CONTRACT, STRICT LIABILITY, OR TORT (INCLUDING NEGLIGENCE OR
OTHERWISE) ARISING IN ANY WAY OUT OF THE USE OF THIS SOFTWARE, EVEN IF
A
DVISED OF THE POSSIBILITY OF SUCH DAMAGE.
Open Source Software
Document Version 2014-04 Operating Instructions 83
Page 84

---- Part 7: Fabasoft R&D Software GmbH & Co KG copyright notice (BSD) -----
Copyright (c) Fabasoft R&D Software GmbH & Co KG, 2003
oss@fabasoft.com
A
uthor: Bernhard Penz
Redistribution and use in source and binary forms, with or without
modification, are permitted provided that the following conditions are met:
* Redistributions of source code must retain the above copyright notice,
this list of conditions and the following disclaimer.
* Redistributions in binary form must reproduce the above copyright
notice, this list of conditions and the following disclaimer in the
documentation and/or other materials provided with the distribution.
* The name of Fabasoft R&D Software GmbH & Co KG or any of its subsidiaries,
brand or product names may not be used to endorse or promote products
derived from this software without specific prior written permission.
THIS SOFTWARE IS PROVIDED BY THE COPYRIGHT HOLDER ``AS IS'' AND ANY
EXPRESS OR IMPLIED WARRANTIES, INCLUDING, BUT NOT LIMITED TO, THE
IMPLIED WARRANTIES OF MERCHANTABILITY AND FITNESS FOR A PARTICULAR
PURPOSE ARE DISCLAIMED. IN NO EVENT SHALL THE COPYRIGHT HOLDER BE
LIABLE FOR ANY DIRECT, INDIRECT, INCIDENTAL, SPECIAL, EXEMPLARY, OR
CONSEQUENTIAL DAMAGES (INCLUDING, BUT NOT LIMITED TO, PROCUREMENT OF
SUBSTITUTE GOODS OR SERVICES; LOSS OF USE, DATA, OR PROFITS; OR
BUSINESS INTERRUPTION) HOWEVER CAUSED AND ON ANY THEORY OF LIABILITY,
WHETHER IN CONTRACT, STRICT LIABILITY, OR TORT (INCLUDING NEGLIGENCE
OR OTHERWISE) ARISING IN ANY WAY OUT OF THE USE OF THIS SOFTWARE, EVEN
IF ADVISED OF THE POSSIBILITY OF SUCH DAMAGE.
---- Part 8: Apple Inc. copyright notice (BSD) -----
Copyright (c) 2007 Apple Inc. All rights reserved.
Redistribution and use in source and binary forms, with or without
modification, are permitted provided that the following conditions
are met:
1. Redistributions of source code must retain the above copyright
notice, this list of conditions and the following disclaimer.
2. Redistributions in binary form must reproduce the above
copyright notice, this list of conditions and the following
disclaimer in the documentation and/or other materials provided
with the distribution.
3. Neither the name of Apple Inc. ("Apple") nor the names of its
contributors may be used to endorse or promote products derived
from this software without specific prior written permission.
THIS SOFTWARE IS PROVIDED BY APPLE AND ITS CONTRIBUTORS "AS IS" AND
A
NY EXPRESS OR IMPLIED WARRANTIES, INCLUDING, BUT NOT LIMITED TO,
THE IMPLIED WARRANTIES OF MERCHANTABILITY AND FITNESS FOR A
PARTICULAR PURPOSE ARE DISCLAIMED. IN NO EVENT SHALL APPLE OR ITS
CONTRIBUTORS BE LIABLE FOR ANY DIRECT, INDIRECT, INCIDENTAL,
SPECIAL, EXEMPLARY, OR CONSEQUENTIAL DAMAGES (INCLUDING, BUT NOT
LIMITED TO, PROCUREMENT OF SUBSTITUTE GOODS OR SERVICES; LOSS OF
USE, DATA, OR PROFITS; OR BUSINESS INTERRUPTION) HOWEVER CAUSED AND
ON ANY THEORY OF LIABILITY, WHETHER IN CONTRACT, STRICT LIABILITY,
OR TORT (INCLUDING NEGLIGENCE OR OTHERWISE) ARISING IN ANY WAY OUT
OF THE USE OF THIS SOFTWARE, EVEN IF ADVISED OF THE POSSIBILITY OF
SUCH DAMAGE.
---- Part 9: ScienceLogic, LLC copyright notice (BSD) -----
Copyright (c) 2009, ScienceLogic, LLC
A
ll rights reserved.
Open Source Software
84 Operating Instructions Document Version 2014-04
Page 85

Redistribution and use in source and binary forms, with or without
modification, are permitted provided that the following conditions are
met:
* Redistributions of source code must retain the above copyright notice,
this list of conditions and the following disclaimer.
* Redistributions in binary form must reproduce the above copyright
notice, this list of conditions and the following disclaimer in the
documentation and/or other materials provided with the distribution.
* Neither the name of ScienceLogic, LLC nor the names of its
contributors may be used to endorse or promote products derived
from this software without specific prior written permission.
THIS SOFTWARE IS PROVIDED BY THE COPYRIGHT HOLDERS AND CONTRIBUTORS
``AS IS'' AND ANY EXPRESS OR IMPLIED WARRANTIES, INCLUDING, BUT NOT
LIMITED TO, THE IMPLIED WARRANTIES OF MERCHANTABILITY AND FITNESS FOR
A
PARTICULAR PURPOSE ARE DISCLAIMED. IN NO EVENT SHALL THE COPYRIGHT
HOLDERS OR CONTRIBUTORS BE LIABLE FOR ANY DIRECT, INDIRECT,
INCIDENTAL, SPECIAL, EXEMPLARY, OR CONSEQUENTIAL DAMAGES (INCLUDING,
BUT NOT LIMITED TO, PROCUREMENT OF SUBSTITUTE GOODS OR SERVICES; LOSS
OF USE, DATA, OR PROFITS; OR BUSINESS INTERRUPTION) HOWEVER CAUSED AND
ON ANY THEORY OF LIABILITY, WHETHER IN CONTRACT, STRICT LIABILITY, OR
TORT (INCLUDING NEGLIGENCE OR OTHERWISE) ARISING IN ANY WAY OUT OF THE
USE OF THIS SOFTWARE, EVEN IF ADVISED OF THE POSSIBILITY OF SUCH
DAMAGE.
Open Source Software
Document Version 2014-04 Operating Instructions 85
Page 86

Appendix
Appendix
Specifications
Item Specifications
LCD Display
LCD Size
LCD Brightness
Flexible Buttons
VoIP Connection
Method
VoIP Audio Codec
Ethernet Interface
IP Address Mode
Speaker
Microphone
Ethernet Port (LAN)
USB Port
Headset Jack
EHS Jack
Bluetooth
Color, WVGA
5.0 inch
14 levels
24 (Three pages of eight flexible buttons are shown on the display)
SIP
G.711A, G.711U, G.729AB, G.722, G.726
10Base-T/100Base-TX/1000Base-T
Dual stack, IPv4 only, IPv6 only
1
1
2 (RJ45)
1 (USB 2.0 Host)
1 (RJ9)
1 (RJ11)
1 (Bluetooth wireless technology 2.0)
Dimensions
(Width ´ Depth ´ Height;
handset on cradle, stand
attached)
Weight (with handset,
handset cord and stand)
PoE
Power Consumption PoE
Maximum Power
Consumption
86 Operating Instructions Document Version 2014-04
267 mm ´ 170 mm ´ 180 mm
267 mm ´ 187 mm ´ 155 mm
IEEE 802.3af Class 2 standard compliant
"High" position:
(10.5 in ´ 6.69 in ´ 7.09 in)
"Low" position:
(10.5 in ´ 7.36 in ´ 6.10 in)
1130 g (2.49 lb)
Stand-by: approx. 3.31 W
Talking: approx. 3.65 W
AC Adaptor
Stand-by: approx. 3.26 W
Talking: approx. 3.6 W
6.3 W
Page 87

Item Specifications
Appendix
Operating Environment
0 °C to 40 °C (32 °F to 104 °F)
Document Version 2014-04 Operating Instructions 87
Page 88

Appendix
Troubleshooting
Common Issues and Solutions
General Use
Issue
The display is blank.
The display is not shown
well.
The unit is not performing
properly.
is displayed on the
screen.
Possible Cause & Solution Reference
• The unit is not receiving power.
→ The unit is not designed to function when there is a power
failure. Make sure that the device supplying PoE is
receiving power and that the Ethernet cable is properly
connected. If an AC adaptor is connected, confirm that the
AC adaptor is connected and receiving power.
• The display's brightness is too low.
→ Adjust the display's brightness.
• Cables or cords are not connected properly.
→ Check all connections.
• Your connection settings are incorrect.
→ Consult your administrator to confirm that your settings are
correct.
→ If the problem persists, consult your dealer.
• An error has occurred.
→ Restart the unit.
• Registration to the SIP server has been lost.
→ Consult your administrator or dealer.
Page 58
Page 43
Page 58
Page 39
Page 69
—
I cannot hear a dial tone.
I cannot cancel the display
lock.
I forgot my PIN number.
The date and time are not
correct.
The Message/Ringer lamp
is lit.
• Confirm that the LAN cable is properly connected.
• The PIN number you entered was incorrect.
→ Consult your administrator or dealer.
• Consult your administrator or dealer.
• Adjust the date and time of the unit.
• You received a voice message while you were on the phone
or away from your desk.
→ Check the voice message.
Page 58
—
—
Page 42
Page 28
88 Operating Instructions Document Version 2014-04
Page 89

Making and Receiving Calls
Issue Possible Cause & Solution Reference
Appendix
I cannot make calls.
I cannot make long
distance calls.
The unit does not ring
when a call is received.
• Your phone system/service has disabled service for your unit.
→ On the Information Display screen (Page 40), if "Not
registered" is displayed for the lines registered to your
phone, consult your administrator or dealer.
• The phone number was entered incorrectly.
→ Confirm that you have entered the phone number of the
other party correctly.
→ Consult your administrator or dealer.
• The unit is downloading a firmware update.
→ You cannot make calls while the unit is downloading
updates. Wait for the update to finish, and then try making
a call.
• The phonebook list is being imported or exported.
→ Wait a few minutes for the operation to complete.
→ Confirm with your administrator or dealer.
• Your telephone service does not allow you to make long
distance calls.
→ Make sure that you have subscribed to your telephone
company’s long distance service.
• The ringer volume is turned off.
→ Press [+] on the VOLUME key.
—
Page 21
—
—
—
Page 20
While talking to an outside
party, the line is
disconnected.
Sound Quality
Issue
The other party cannot
hear my voice.
• Your phone system/service may impose a time limit on outside
calls.
→ Consult your dealer to extend the time limit, if necessary.
Possible Cause & Solution Reference
• The unit is muted.
→ Press [MUTE] to turn off the mute feature.
• If you are using the speakerphone, objects may be obstructing
the microphone.
→ Do not obstruct the unit's microphone during calls. Keep
your hands, as well as common objects such as folders,
cups, and coffee pots away from the unit during calls.
—
Page 27
—
Document Version 2014-04 Operating Instructions 89
Page 90

Appendix
Issue Possible Cause & Solution Reference
Sound cuts out; I can hear
myself through the
speaker.
• You are too far away from the microphone.
→ Try speaking closer to the microphone.
• The environment is not suited to speakerphone calls.
→ Do not use the unit within 2 m (6.6 ft) of projectors, air
conditioning devices, fans, or other audible or electrical
noise emitting devices.
→ If using the unit in a room with windows, close the curtains
or blinds to prevent echoes.
→ Use the unit in a quiet environment.
• The unit was moved during a call.
→ Do not move the unit while on a call.
• Objects are obstructing the microphone.
→ Do not obstruct the unit during calls. Keep your hands, as
well as common objects such as folders, cups, and coffee
pots away from the unit during calls.
• The other party is using a half-duplex speakerphone.
→ If the other party is using a half-duplex speakerphone,
sound may cut out occasionally during calls. For best
performance, the other party should use a full-duplex
speakerphone.
• Just after a call begins, the unit may not have yet adjusted
itself to the call’s environment.
→ Just after a call begins, take turns with the other party
talking to each other. The unit will adjust itself in
accordance with the call environment so that both you and
the other party can hear each other as clearly as possible.
—
—
—
—
—
—
Phonebook List
Issue
I cannot add or edit entries
to the phonebook list.
• The phonebook list is full.
→ Delete any unnecessary entries. The maximum number of
entries in the phonebook list is 1,000.
Possible Cause & Solution Reference
Page 36
Bluetooth Headset
Issue
I cannot have a
conversation using the
Bluetooth headset.
90 Operating Instructions Document Version 2014-04
• Make sure that the headset is properly registered to the unit.
• Make sure that the headset is properly charged by following
the instructions in the headset's documentation.
Possible Cause & Solution Reference
—
Page 91

USB Devices
Issue Possible Cause & Solution Reference
Appendix
The USB device I
connected does not work.
• You connected a USB device that this unit does not support.
→ Consult your administrator or dealer for information on
supported devices.
• The maximum number of connected devices has been
exceeded.
→ Only 1 USB headset and 1 USB hub can be connected to
the unit at a time.
—
Document Version 2014-04 Operating Instructions 91
Page 92

Appendix
Error Messages
During operation, error messages might appear on the unit. The following table lists these messages and
possible causes and solutions.
Message Possible Cause & Solution Reference
IP Address, Subnet Mask and Default
Gateway are not matched.
Default Gateway is not matched with
the IP Address and Subnet Mask
IP Address: Invalid Value
Maximum save count limit reached.
• The unit’s network settings are incorrect.
→ Consult your system administrator or dealer.
• A new entry for the phonebook or call block list
cannot be stored because the phonebook or call
block list is full.
→ Erase unneeded entries.
—
Page 37
92 Operating Instructions Document Version 2014-04
Page 93

Index
Index
Numerics
802.1x (setting) 49
A
AC adaptor 11
Connection 58
Accessories 11
Add-on key module 11, 61
Add-on key module slot cover 13
Application Server (setting) 50
Application Settings 50
Authentication ID (setting) 49
Authentication Password (setting) 49
Authentication Protocol (setting) 49
Auto answer 23
B
BLF flexible button 30
Block Anonymous Call (setting) 46
Bluetooth (setting) 45
Bluetooth Headset 58
Brightness (setting) 43
Busy Lamp Field ® BLF 30
C
Call Block (setting) 44
Call buttons 16
Call Forwarding 29
Call Icons 17
Call Log Icons 18
Call Rejection Phone Numbers List (setting) 44
Call Splitting 25
Call Transfer 26
Call Waiting 25
Calls
From call logs 21
From phonebook list 21
Holding 24
Making 21
Missed 28
Receiving 23
Redialing 21
Rejecting 23
CDP Interval timer (setting) 48
CDP Settings (setting) 48
Character entry 52
Cleaning 70
CONFERENCE button 13
Conference call 27
Connections 58
Controls 12
Bottom view 14
Front View 12
Left view 13
Right side view 13
D
Date (setting) 42
Date and Time (setting) 42
Date Template (setting) 42
DC jack 14
Delay Time (0-10) (setting) 43
DHCP Options (setting) 50
Dialing 21
Display 12
Display Lock (setting) 44
Do Not Disturb 29
E
ECO Mode (setting) 45
EHS headsets 58
EHS jack 14
Electronic Hook Switch ® EHS 58
Embedded Web (setting) 49
Enable 802.1x (setting) 49
Enable Application (setting) 50
Enable Bluetooth (setting) 45
Enable CDP (setting) 48
Enable Hotline (setting) 43
Enable IP Phone VLAN (setting) 48
Enable LLDP (setting) 48
Enable PC VLAN (setting) 48
Enable SIP PnP (setting) 50
ENTER key 12
Enterprise Phonebook 37
Erasing All Call Logs 28
Error messages 92
Ethernet cable 11
Exclude Network Settings (setting) 51
Exclude Private Settings (setting) 51
Extension number 20
F
Flexible Button Icons 30
Flexible Button Transfer 26
Flexible Button Transfer with KX-UTA336 26
Flexible buttons 30
KX-UTA336 31
FORWARD/DO NOT DISTURB button 12
Forwarding 29
FWD/DND (setting) 45
FWD/DND Setting 45
H
Handset 11
Connections 60
Hooking 66
Volume 20
Handset cord 11
Handset Hook 12
Handset jack 14
Hands-free mode 20
Headset 58
Using 68
Volume 20
HEADSET button 12
Document Version 2014-04 Operating Instructions 93
Page 94

Index
Headset jack 14
Hold 24
HOLD button 13
HOME 12
Home screen 15
Home screen icons
Icons 15
Hotline (setting) 43
HTTP Authentication (setting) 50
I
Icons 16
Ignoring Calls 24
IM&P
Calling Contacts 35
Contacts 34
Logging in to IM&P 33
Making Conference Calls 35
Presence 34
Sending Messages 35
IM&P (Instant Messaging & Presence) 33
Information Display 46
Information Display (setting) 46
Installation 55
Installing the KX-UTA336 61
Intercom 22
IP Address Mode (setting) 47
IP Phone VLAN ID (setting) 48
IPv4 (setting) 47
IPv6 (setting) 47
K
Key Click Tone (setting) 44
L
LAN connection 58
LAN port 14
LAN Port (setting) 49
Language (setting) 43
Last Number Redial 21
LCD (Liquid Crystal Display) 12
LDAP Phonebook 37
Line Buttons 16
Line Icons 17
LLDP Settings (setting) 48
LLDP-MED Interval timer (setting) 48
Local Phonebook 37
MUTE button 13
N
Navigator Key 12
Network (setting) 47
Network Test 51
Network Test (setting) 51
O
One-touch Dialing 22
One-Touch flexible button 30
Optional Group Features 29
P
Paging DND (setting) 50
Password (setting) 50
PC connection 58
PC port 14
PC Port (setting) 49
PC VLAN ID (setting) 48
Phone Number (setting) 43
Phone screen 16
Phonebook list
Adding 36
Deleting 37
Editing 36
Export 37
Import 37
Searching 21, 37
Port Mirroring (setting) 49
Programming, web user interface 54
Provision Server (setting) 50
Provisioning (setting) 50
Push To Talk 22
R
Receiving calls 23
Redial 21
REDIAL button 13
Rejecting calls 23
Reset 51, 69
Restart 51, 69
Restart (setting) 51
Ringer
Volume setting 20
Ringer/Message Lamp 12
Ringtone (setting) 43
M
Maintenance 69
Making calls 21
Calling 21
MESSAGE button 12
Message/Ringer Lamp 12
Messages, checking 28
Missed calls 28
Multicast Paging 22
Multicast Paging (setting) 50
Multicast Paging Icons 22
Mute 27
94 Operating Instructions Document Version 2014-04
S
SCA 29
Search, phonebook list 21
Service URL (setting) 51
Services 29
Settings 39
Accessing 39
Setup 55
Initial settings 69
Shared Call Appearance 29
Soft buttons 18
Page 95

Icons 15, 16
Speaker
Volume 20
Speakerphone (SP-PHONE) button 12
Specifications 86
Speed/Duplex (setting) 49
SP-PHONE (Speakerphone) button 12
Stand 11
Adjusting 56
Attaching 55
Removing 55
Status bar 15
Status Icons 16
T
Time (setting) 42
Transfer 26
TRANSFER button 13
Troubleshooting 88
U
USB devices 68
USB headsets 69
USB hubs 69
USB port 13
Use 12-hour Format (setting) 42
User ID (setting) 50, 51
User Password (setting) 51
User settings 39
Index
V
VLAN Settings (setting) 48
Volume 20
VOLUME button 12
W
Wall mount kit 11
Wall mounting 63
Web user interface programming 54
Document Version 2014-04 Operating Instructions 95
Page 96

83 mm (3
1
/
4
in)
100 mm (3
15
/
16
in)
One screw here
One screw at either point
WALL MOUNTING TEMPLATE
1. Drive the screws into the wall as indicated.
2. Hook the unit onto the screw heads.
Note:
Make sure to set the print size to
correspond with the size of this page. If the
dimensions of the paper output still deviate
slightly from the measurements indicated
here, use the measurements indicated
here.
Page 97

Notes
Document Version 2014-04 Operating Instructions 97
Page 98

Notes
98 Operating Instructions Document Version 2014-04
Page 99

Notes
Document Version 2014-04 Operating Instructions 99
Page 100

Copyright:
Panasonic System Communications Company of North America 2014
This material is copyrighted by Panasonic System Communications Company of North America, and may be
reproduced for internal use only. All other reproduction, in whole or in part, is prohibited without the written
consent of Panasonic System Communications Company of North America.
PNQX6602ZA CC0414MJ0
Two Riverfront Plaza, Newark, NJ 07102-5490
http://www.panasonic.com/sip
 Loading...