

Page 1

Operating Instructions
Smart Desk Phone
Model No. KX-UT670
Thank you for purchasing this Panasonic product.
Please read this manual carefully before using this product and save this manual for future use.
KX-UT670: Software File Version 01.030 or later
In this manual, the suffix of each model number is omitted unless necessary.
Document Version: 2012-02
Page 2

Contacts Network Camera Viewer
Phone Call Logs
Introduction
Introduction
Feature Highlights
7-inch Color Touch Display
You can directly interact with the unit in a way only possible with a touch display: Swipe your finger to scroll
through your contacts to find the desired party, or tap an entry in the call log to call that person back.
Support for High-quality Audio
The wide-band (7 kHz) audio provides high voice quality in conversations.
Applications on Your Phone
can use a variety of applications, such as a web browser, calendar, e-mail, photo gallery, music, and more
You
(Page 71).
Synchronization with Your Google™ Account
By registering your Google account, your contacts and calendar will be synchronized between this unit and
your Google account (Page 128).
2 Operating Instructions Document Version 2012-02
Page 3

Network Camera Integration
Introduction
Registering network cameras allows you to use the phone to view those cameras’ video feeds (Page 43
If a network camera is associated with a phone number (paging number), you can call that number while viewing
the camera’s video feed (Page 66).
Also, if a network camera’s information is registered to a contact, when you begin a conversation with that
contact, Network Camera Viewer starts automatically and you can view the camera’s video feed during the
conversation (Page 58).
For the most recent information about network cameras that have been tested with this unit, refer to the
following web site:
http://www.panasonic.com/sip
http://panasonic.net/pcc/support/sipphone
(for users in the United States)
(for users in Canada)
).
Compatible with Electric Hook Switch (EHS) Headsets
You can connect an EHS headset and use it to talk to other parties (Page 106).
Document Version 2012-02 Operating Instructions 3
Page 4

Introduction
Other Information
Documentation for This Unit
The documentation for this unit consists of the following three manuals:
Getting Started
Briefly describes basic information about the installation of the unit.
Operating Instructions (this manual)
Describes the parts of the unit, operation procedures, maintenance, etc.
Administrator Guide
Describes information about programming the unit.
Manuals and supporting information are provided on the Panasonic web site at:
http://www.panasonic.com/sip (for users in the United States)
http://panasonic.net/pcc/support/sipphone (for users in Canada)
Note
• The contents and design of the software are subject to change without notice.
Conventions Used in This Manual
• SD memory cards that can be used with this unit are collectively referred to as "SD cards" (Page 126).
• Buttons on the key sheet (Page 19) are shown as . Other text that appears on the screen is
enclosed in square brackets and is shown in a bold typeface: [Text].
Trademarks
• SDXC logo is a trademark of SD-3C, LLC.
• Google is a trademark of Google Inc.
• vCard is a trademark of Internet Mail Consortium.
• Plantronics is a trademark or registered trademark of Plantronics, Inc.
• All other trademarks identified herein are the property of their respective owners.
4 Operating Instructions Document Version 2012-02
Page 5

Introduction
Copyright Notices
• The preset melodies in this product are used with permission of © 2009 Copyrights Vision Inc.
• iWnn IME © OMRON SOFTWARE Co., Ltd. 2010 All Rights Reserved.
• Parts of this product use Open Source Software supplied based on the conditions of the Free Software
Foundation’
Therefore, please read license information about GPLs and LGPLs, and information about other Open
Source Software available from this product.
To view this information, press
® [About phone] ® [Legal information].
At least three (3) years from delivery of products, Panasonic System Networks Co., Ltd. will give to any
third party who contacts us at the contact information provided below, for a charge of no more than the
cost of
code and the copyright notices covered under GPL and LGPL. Please note that software licensed under
GPL and LGPL is not under warranty.
http://www.panasonic.net/corporate/global_network/
• Do not attach copyright-protected files, such as graphics or music files, to e-mail messages if you do not
hold the copyrights to those files. With the exception of duplicating or quoting for personal use as permitted
by law, you may not duplicate, alter, publicly transmit, repurpose, or distribute such works without the
consent of the copyright holder.
s GPLs and/or LGPLs and other conditions. Relevant conditions apply to this software.
when the Home screen is displayed, and then tap [Settings]
physically distributing source code, a complete machine-readable copy of the corresponding source
When you ship the product (For users in the United States only)
Carefully pack and send it prepaid, adequately insured and preferably in the original carton. Attach a
postage-paid letter, detailing the symptom to the outside of the carton.
DO NOT send the product to the Executive or Regional Sales offices. They are NOT equipped to make repairs.
Product Service (For users in the United States only)
Panasonic factory service centers for this product are listed in the service center directory.
Consult your authorized Panasonic dealer for detailed instructions.
Document Version 2012-02 Operating Instructions 5
Page 6
MODEL NO.
SERIAL NO.
DATE OF PURCHASE
NAME OF DEALER
DEALER'S ADDRESS
DEALER'S TEL. NO.
MAC ADDRESS
Introduction
For Future Reference
Record the information in the space below for future reference.
Note
• The serial number and MAC address of this product may be found on the label affixed to the bottom
unit. You should note the serial number and MAC address of this unit in the space provided and
of the
retain this manual as a permanent record of your purchase to aid in identification in the event of theft.
6 Operating Instructions Document Version 2012-02
Page 7
For Your Safety
WARNING
CAUTION
WARNING
To reduce the risk of injury, loss of life, electric shock,
fire, malfunction,
always observe the following safety precautions.
Explanation of symbols
The following symbols are used to classify and describe
the level of hazard and injury caused when the
denotation is disregarded and improper use is
performed.
Denotes a potential hazard that could result in
serious injury or death.
and damage to equipment or property,
For Your Safety
General Safety
Do not disassemble this unit. Dangerous
electrical shock could result. The unit must
only be disassembled and repaired by
qualified service technicians.
Never attempt to insert wires, pins, etc. into
the vents or other holes of this unit.
To prevent possible fire or electric shock, do
not expose this unit to rain or moisture.
Do not splash water on the AC adaptor or the
power cord, nor get them wet.
Doing so can result in fire, electric shock, or
injury. If they do get wet, immediately
disconnect the AC adaptor and power cord,
and contact an authorized service center.
Denotes a hazard that could result in minor injury or
damage to the unit or other equipment.
The following symbols are used to classify and describe
the type of instructions to be observed.
This symbol is used to alert users to a specific
operating procedure that must not be
performed.
This symbol is used to alert users to a specific
operating procedure
order to operate the unit safely.
that must be followed in
Do not touch the AC adaptor for extended
periods of time. Doing so can lead to
low-degree burns.
Do not use the power cord with other
products. Doing
shock.
Unplug this unit from the AC outlet and have
the unit serviced by qualified service
personnel in the following cases:
so can result in fire or electric
A. When the power supply cord or plug is
damaged or frayed.
B. If liquid has been spilled on the unit.
C. If the unit has been exposed to rain or
water.
D. If the unit does not work normally by
the
following
covered by the manual. Improper
adjustment may require repair by an
authorized service center.
manual. Adjust only controls
E. If the unit has been dropped, or damaged.
F. If the unit’s performance deteriorates.
If damage to the unit exposes any internal
parts, immediately disconnect the cable or
cord. If
to the Smart Desk Phone
[Power-over-Ethernet], disconnect the
Ethernet cables. Otherwise, disconnect the
AC adaptor cord. Then return this unit to an
authorized service center.
the power is supplied from the network
Document Version 2012-02 Operating Instructions 7
Page 8

CAUTION
For Your Safety
This handset earpiece is magnetized and may
retain small ferrous objects.
The use of excessive sound volume through
earphones, headphones, or headsets may
cause hearing loss.
Disconnect this unit from power outlet/the
Ethernet
smell, or makes unusual noise. These
conditions can cause fire or electric shock.
Confirm that smoke has stopped and contact
an authorized service center.
Installation
Do not make power connections that exceed
the ratings for the AC outlet or power
equipment. If the power rating of a surge
protector, etc.
due to heat buildup.
Do not bundle up the AC adaptor cord. The
cord may become damaged, which can lead
to a fire, electric shock, or electric short.
The unit should only be connected to a power
supply of the type as shown on the label on
the unit.
Completely insert the AC adaptor into the AC
outlet. Failure to do so may cause electric
shock and/or
Placement
Care should be taken so that objects do not
fall onto, and liquids are not spilled into, the
unit. Do not subject this unit to excessive
smoke, dust, moisture, mechanical vibration,
shock, or direct sunlight.
Do not place heavy objects on top of this unit.
cables
if it emits smoke, an abnormal
is exceeded, it can cause a fire
excessive heat resulting in a fire.
Only use the optional wall mount kit with the
unit. The wall mount kit includes the
necessary screws, washers, and wall
mounting adaptor.
When driving the screws into the wall, be
careful to
laths or metal plates in the wall.
When this unit is no longer in use, make sure
to detach it from the wall.
Keep the unit away from heating appliances
and devices that generate electrical noise,
such as fluorescent lamps, motors and
televisions. These
with the performance of the unit. It also should
not be placed in rooms where the temperature
is less than 0 °C (32 °F) or greater than
40 °C (104 °F).
Wipe the unit with a soft cloth. Do not clean
the unit with abrasive powders or with
chemical agents such as benzine or thinner.
The SD card, the SD card slot cover, and the
handset hook pose a choking hazard. Keep
the SD card, the SD card slot cover, and the
handset hook out of reach of children.
When left unused for a long period of time,
disconnect the unit from the AC outlet. When
the unit receives power from a PoE power
supply, disconnect the Ethernet cables.
When the unit is mounted on a wall, make
sure the cables are securely fastened to the
wall.
avoid touching any metal laths, wire
noise sources can interfere
Place this unit on a flat surface.
Allow 10 cm (3 15/16 in) clearance around the
unit for proper ventilation.
Wall Mounting
Do not mount the unit in a manner other than
that described in this manual.
Make sure that the wall that the unit will be
attached to is strong enough to support the
unit (approx. 1.3 kg [2.9 lb]). If not, it is
necessary for the wall to be reinforced.
8 Operating Instructions Document Version 2012-02
Notice
• If the
unit does not operate properly, disconnect
the AC adaptor cord and Ethernet cables and
then connect again.
• If you are having problems making calls,
disconnect the Ethernet cables and connect a
known working Smart Desk Phone. If the known
working Smart Desk Phone operates properly,
have the defective Smart Desk Phone repaired
by an authorized service center. If the known
working Smart Desk Phone does not operate
properly, check the SIP server and the Ethernet
cables.
Page 9

For Your Safety
• Under power failure conditions, the Smart Desk
Phone may not operate. Please ensure that a
separate telephone, not dependent on local
power, is available for use in remote sites in
case of emergency.
• For information regarding network setup of the
Smart Desk Phone such as IP addresses,
please see page
115.
• If an error message is shown on your display,
consult your phone system dealer or the
network administrator.
• Use only the correct Panasonic handset.
Data Security
We recommend observing the security precautions
described in this section, in order to prevent the
following:
– loss, disclosure, falsification, or theft of user
information
– unauthorized use of the unit
– interference or suspension of use caused by an
unauthorized party
We cannot be responsible for damages resulting
from the misuse of this product.
User information is defined as the following:
– Contacts’ names, phone numbers, and IP
addresses
– Forwarding destination numbers
– Numbers stored in One-touch Dialing buttons
used
– Passwords
– Call logs
Preventing Data Loss
to log in to the Web user interface
• Use a personal computer to make periodic backups
of recordings stored on the SD card.
• Keep a copy of all important data (such as contact
lists) in case the machine malfunctions and data
cannot be recovered.
• There is a risk that data stored or saved on the unit
may be changed or deleted when, for instance, the
unit is being repaired. To protect important data
from unexpected damage, see Data Security
(Page 9).
Preventing Data Disclosure
• Do not leave memory devices (e.g., SD cards) that
contain important information unattended. Do not
leave the unit unattended while an SD card is
inserted.
• Do not leave the unit in a location where it can be
access or removed without authorization.
• To avoid improper usage by a third party, engage
the screen lock (Page 94) when you are away
from your seat or otherwise leave the unit
unattended.
• Store backups in a secure location.
• Do not store sensitive personal information in the
unit.
• Personal information (such as the contact list and
call log) can be registered and/or saved on this unit.
To prevent data leakage or unexpected damages,
Document Version 2012-02 Operating Instructions 9
Page 10

For Your Safety
make a record of necessary user information, etc.,
and initialize
in the following cases (Page 129).
Also, remove the SD card from the unit.
the unit to return it to its factory settings
– When passing on or disposing of the unit
– When lending the unit
– When having the unit repaired
• Make sure the unit is serviced by only a certified
technician.
Preventing Data Disclosure Over the
Network
• To prevent unauthorized access, only connect the
unit to a network that is properly managed.
• Make sure all personal computers that are
connected to the unit employ up-to-date security
measures.
Security Information
• Security settings, such as passwords, cannot be
undone at Panasonic service centers. Take
measures to prevent passwords from being lost or
forgotten.
• If a password is forgotten, initialize the unit and
configure the settings again. (See page 129 for
initialization procedures.)
• For best security, set passwords that cannot be
guessed easily, and change passwords periodically
(Page 118, Page 119).
• Take care that the unlock pattern, PIN, or password
for the unit are not seen by a third party while being
input or otherwise become known by an
unauthorized party.
Privacy and Right of
Publicity
By
installing
for maintaining the privacy and usage rights of images
and other data (including sound picked up by the
microphone). Use this device accordingly.
• Privacy is generally said to be, "A legal guarantee
and right not to have the details of one’s personal
life unreasonably publicized, and the right to be able
to control information about oneself. In addition,
right of publicity is a right not to have a likeness of
one’s face or figure photographed and publicized
without consent".
• When the Automatic Answer feature is enabled,
transmission begins as soon as a call is received.
The receiver will begin transmitting as soon as the
call is received at any time, from any caller. Please
be aware when the Automatic Answer feature is
enabled, there is a risk that due to an unexpected,
automatically answered call, privacy rights may be
violated or sensitive information may be transmitted
to unauthorized parties.
and using this device, you are responsible
10 Operating Instructions Document Version 2012-02
Page 11

Additional Information
SAVE THESE INSTRUCTIONS
Important Safety Instructions
When using this unit, basic safety precautions should
always be followed to reduce the risk of fire, electric
shock and injury to persons, including the following:
use the unit near water, for example, near a
1. Do
2. Avoid using a telephone (other than a cordless type)
3. Do not use the telephone to report a gas leak in the
FCC and Other Information
This equipment has been tested and found to comply
with the limits for a Class B digital device, pursuant to
Part 15
provide reasonable protection against harmful
interference in a residential installation. This equipment
generates, uses, and can radiate radio frequency
energy and, if not installed and used in accordance with
the instructions, may cause harmful interference to
radio communications. However, there is no guarantee
that interference will not occur in a particular installation.
If this equipment does cause harmful interference to
radio or television reception, which can be determined
by turning the equipment off and on, the user is
encouraged to try to correct the interference by one or
more of the following measures:
• Reorient or relocate the receiving antenna.
• Increase the separation between the equipment
• Connect the equipment into an outlet on a circuit
• Consult the dealer or an experienced radio/TV
CAUTION
FCC Declaration of Conformity
Trade Name: Panasonic
not
bathtub, washbowl, kitchen sink, or laundry tub, in
a wet basement, or near a swimming pool.
during an electrical storm. There may be a remote
risk of electric shock from lightning.
vicinity of the leak.
of the FCC Rules. These limits are designed to
and receiver.
different from that to which the receiver is
connected.
technician for help.
Any changes or modifications not expressly
approved by the party responsible for compliance
could void the user
device.
’s authority to operate this
Additional Information
Model Number: KX-UT670
Responsible Party:
Panasonic Corporation of North America
One Panasonic Way
Secaucus, NJ 07094 U.S.A.
Telephone No.: 1-800-211-PANA (7262)
equipment complies with Part 68 of the FCC rules
This
and the requirements adopted by the ACTA. On the
bottom of the cabinet of this equipment is a label that
contains, among other information, a product identifier
in the format
US:ACJ.......
If requested, this number must be provided to the
telephone company.
If trouble is experienced with this equipment, for repair
or warranty information, please contact:
Panasonic Service and Technology Company-BTS
Center
415 Horizon Drive Bldg. 300 Ste. 350-B
Suwanee, GA 30024-3186
Connection to party line service is subject to state tariffs.
Contact the state public utility commission, public
service commission or corporation commission for
information.
If your home has specially wired alarm equipment
connected to the telephone line, ensure the installation
of this equipment does not disable your alarm
equipment. If you have questions about what will
disable alarm equipment, consult your telephone
company or a qualified installer.
WHEN PROGRAMMING EMERGENCY NUMBERS
AND (OR) MAKING TEST CALLS TO EMERGENCY
NUMBERS:
a. Remain on the line and briefly explain to the
dispatcher the reason for the call.
b. Perform such activities in the off-peak hours, such
as early morning or late evenings.
This equipment is hearing aid compatible.
When you hold the phone to your ear, noise might be
heard in your Hearing Aid. Some Hearing Aids are not
adequately shielded from external RF (radio frequency)
energy. If noise occurs, use the speakerphone option
(if applicable) when using this phone. Consult with your
audiologist or Hearing Aid manufacturer about the
availability of Hearing Aids which provide adequate
shielding to RF energy commonly emitted by digital
devices.
Document Version 2012-02 Operating Instructions 11
Page 12
T
Compatible with
Hearing Aid T-Coil
TIA-1083
Additional Information
For users in Canada only
• This Class B digital apparatus complies with
Canadian ICES-003.
• This
product meets the applicable Industry Canada
technical specifications.
Compliance with TIA-1083 standard
Telephone handsets identified with
this logo have reduced noise and
interference when used with T-Coil
equipped
implants.
hearing aids and cochlear
About the touch screen
• Do not use commercially available display
protection film. (The touch screen may function
incorrectly.)
• The touch screen is easily damaged. Touch it only
with your fingers.
• Do not
edge or tip, such as a ballpoint pen, or the tip of your
finger nail.
• Do not press the touch screen with too much force.
• Do not rub the touch screen too strongly or
otherwise handle it roughly.
• Do not place heavy items on the touch screen.
• If the unit is subject to a sudden change in
temperature, such as immediately after turning on
an air conditioner or heater, condensation may form
on the inside of the touch screen and cause the
screen to function incorrectly. In this case, cease
operation and let the unit sit for 1 or 2 hours before
using it again.
• The touch screen may become warm during
operation, but this is normal.
touch the touch screen with a hard or sharp
may contain viruses or may be able to access
location data or personal data etc. stored on the
unit. This
and used improperly.
data may then be leaked onto the Internet
• Panasonic cannot accept any responsibility if an
installed application causes performance problems
or losses of any kind to the user or a third party.
Other
• This device is designed to be operated solely
• Sufficiently check the source and operations of all
12 Operating Instructions Document Version 2012-02
through the touch screen. Therefore, we highly
recommend you have a secondary communication
device available in case the touch screen is
damaged.
applications before installing. You may not be able
to install or operate some applications, depending
on the application. Also, be aware that applications
Page 13

Table of Contents
Unit Overview .........................................................................................17
Included Accessories .....................................................................................................17
Optional Accessories .....................................................................................................17
Location of Controls .......................................................................................................18
Before Operating the Telephone ..........................................................23
Touch Display Operations ..............................................................................................23
Basic Telephone Operations ..........................................................................................24
Entering Text ...................................................................................................................25
Using the On-screen Keyboard ......................................................................................25
Using a USB Keyboard ..................................................................................................29
Emergency Number Registration ..................................................................................30
The Display and Icons ...........................................................................31
The Display ......................................................................................................................31
Home Screen .................................................................................................................31
Application Screen .........................................................................................................34
Phone Screen .................................................................................................................35
Calling Screen ................................................................................................................37
Call Log Screen ..............................................................................................................40
Contacts Screen .............................................................................................................41
Flexible Button Screen ...................................................................................................42
Network Camera Viewer ................................................................................................43
Lock Screen ...................................................................................................................44
Icons .................................................................................................................................46
Table of Contents
Phone ......................................................................................................51
Making Calls ....................................................................................................................51
Confirming a Number Before Dialing (Pre-dialing) .........................................................51
Redialing ........................................................................................................................51
Calling from the Contacts Screen ...................................................................................51
Calling from the Call Log ................................................................................................52
Calling Using a Flexible Button Set as a One-touch Dialing Button ...............................52
Calling an Emergency Number ......................................................................................52
Receiving Calls ................................................................................................................53
Selecting from Multiple Incoming Calls ..........................................................................53
Answering a Call While on a Call (Answering Call Waiting) ...........................................53
Rejecting Calls ...............................................................................................................53
Holding a Call ..................................................................................................................54
Transferring a Call ..........................................................................................................55
Three-party Conference Call ..........................................................................................55
Mute ..................................................................................................................................56
Checking Voice Messages .............................................................................................56
Contacts ..................................................................................................57
Adding Contacts .............................................................................................................57
Adding a New Contact ....................................................................................................57
Adding a Contact from the Call Log ...............................................................................58
Adding Network Camera Information to a Contact .........................................................58
Editing a Contact .............................................................................................................59
Deleting a Contact ...........................................................................................................59
Searching for a Contact ..................................................................................................60
Document Version 2012-02 Operating Instructions 13
Page 14

Table of Contents
Changing How Contacts are Displayed ........................................................................60
Joining/Separating Contacts .........................................................................................61
Saving/Loading Contact Information to/from an SD Card ..........................................61
Save Format for Contact Data ........................................................................................61
Sending Contact Information as an E-mail Attachment ..............................................62
Assigning Ringtones to Specific Contacts ...................................................................63
Network Camera .....................................................................................64
Registering a Network Camera ......................................................................................64
Selecting a Network Camera ..........................................................................................65
Controlling a Network Camera .......................................................................................65
Calling a Phone Number Associated with a Camera ...................................................66
Switching Automatically among Multiple Cameras .....................................................67
Using Network Camera Presets .....................................................................................67
Adding a Preset to Your Favorites .................................................................................67
Editing a Preset’s Name .................................................................................................68
Configuring Display Properties .....................................................................................68
Adjusting the Brightness of the Picture ..........................................................................68
Automatic Mode .............................................................................................................68
Receiving Alarms from Network Cameras ....................................................................69
Configuring an Alarm Notification ...................................................................................69
Built-in Applications ..............................................................................71
Clock ................................................................................................................................71
Displaying the Date and Time ........................................................................................71
Setting an Alarm .............................................................................................................71
Deleting an Alarm ...........................................................................................................72
Stopping an Alarm ..........................................................................................................72
Activating and Canceling Snooze ...................................................................................72
Using Alarm Clock’s Menu ..
Browser ............................................................................................................................74
Displaying a Web Page in Browser ................................................................................74
Using Bookmarks ...........................................................................................................74
Opening and Closing Windows ......................................................................................74
Setting the Home Page ..................................................................................................75
Going Back to the Previous Page ..................................................................................75
Using Browser’s Menus ..................................................................................................75
Calculator .........................................................................................................................77
Using Calculator’s Menu ................................................................................................77
Calendar ...........................................................................................................................78
Displaying Calendar .......................................................................................................78
Adding an Event .............................................................................................................78
Checking an Event .........................................................................................................79
Editing an Event .............................................................................................................79
Deleting an Event ...........................................................................................................79
Canceling a Notification/Activating Snooze ....................................................................79
Configuring Calendar’s Settings .....................................................................................80
Email .................................................................................................................................81
Setting Up an E-mail Account ........................................................................................81
Creating and Sending a New E-mail Message ...............................................................81
Reading E-mail ...............................................................................................................82
Viewing an Attachment ...................................................................................................82
Forwarding an E-mail Message ......................................................................................82
Displaying a List of Folders ............................................................................................83
Deleting All Messages in the Trash ................................................................................83
...........................................................................................73
14 Operating Instructions Document Version 2012-02
Page 15

Table of Contents
Adding an Account .........................................................................................................83
Deleting an Account .......................................................................................................84
Changing Account Settings ............................................................................................84
Gallery ..............................................................................................................................85
Displaying an Image .......................................................................................................85
Viewing Images as a Slideshow .....................................................................................85
Deleting an Image ..........................................................................................................85
Using Gallery’s Menu ..
Music ................................................................................................................................87
Playing Music .................................................................................................................87
Making a Playlist ............................................................................................................87
Editing a Playlist .............................................................................................................88
Search for Related Content in Browser ..........................................................................88
Using the Music Application’s Menu ...............................................................................88
...................................................................................................86
Advanced Settings .................................................................................90
Forward/Do Not Disturb ..................................................................................................90
Automatic Answer ...........................................................................................................91
Customizing Flexible Buttons ........................................................................................91
Using a Headset ..............................................................................................................93
Activating the Screen Lock ............................................................................................94
Customizing the Phone .........................................................................95
Changing the Wallpaper .................................................................................................95
Adding and Deleting Shortcuts, Widgets and Folders ................................................96
Displaying Your Schedule on the Phone Screen .........................................................97
Setting a Ringtone ..........................................................................................................98
Using Music on an SD Card as the Ringtone ...............................................................98
Web User Interface Programming .................................................................................99
Accessibility .........................................................................................100
Keyboard Operation ......................................................................................................100
Connections and Installation ..............................................................102
Attaching the Stand (Adjusting the Angle of the Unit) ..............................................102
Connections ..................................................................................................................104
Wall Mounting ................................................................................................................108
Configuration ........................................................................................111
Making Settings .............................................................................................................111
Setting Items ..................................................................................................................111
Setting Item Details .......................................................................................................115
Miscellaneous Information ..................................................................126
Updating the Firmware .................................................................................................126
Using an SD Card ..........................................................................................................126
Setting up a Google Account for Synchronizing .......................................................128
Initializing the Unit ........................................................................................................129
Data Backup and Restore .............................................................................................129
Cleaning the Unit ...........................................................................................................130
Enabling Cleaning Mode ..............................................................................................130
Troubleshooting ...................................................................................131
Specifications .......................................................................................139
Document Version 2012-02 Operating Instructions 15
Page 16

Table of Contents
Revision History ...................................................................................140
Software File Version 01.030 ........................................................................................140
Index............................................................................................................141
16 Operating Instructions Document Version 2012-02
Page 17
Unit Overview
Unit Overview
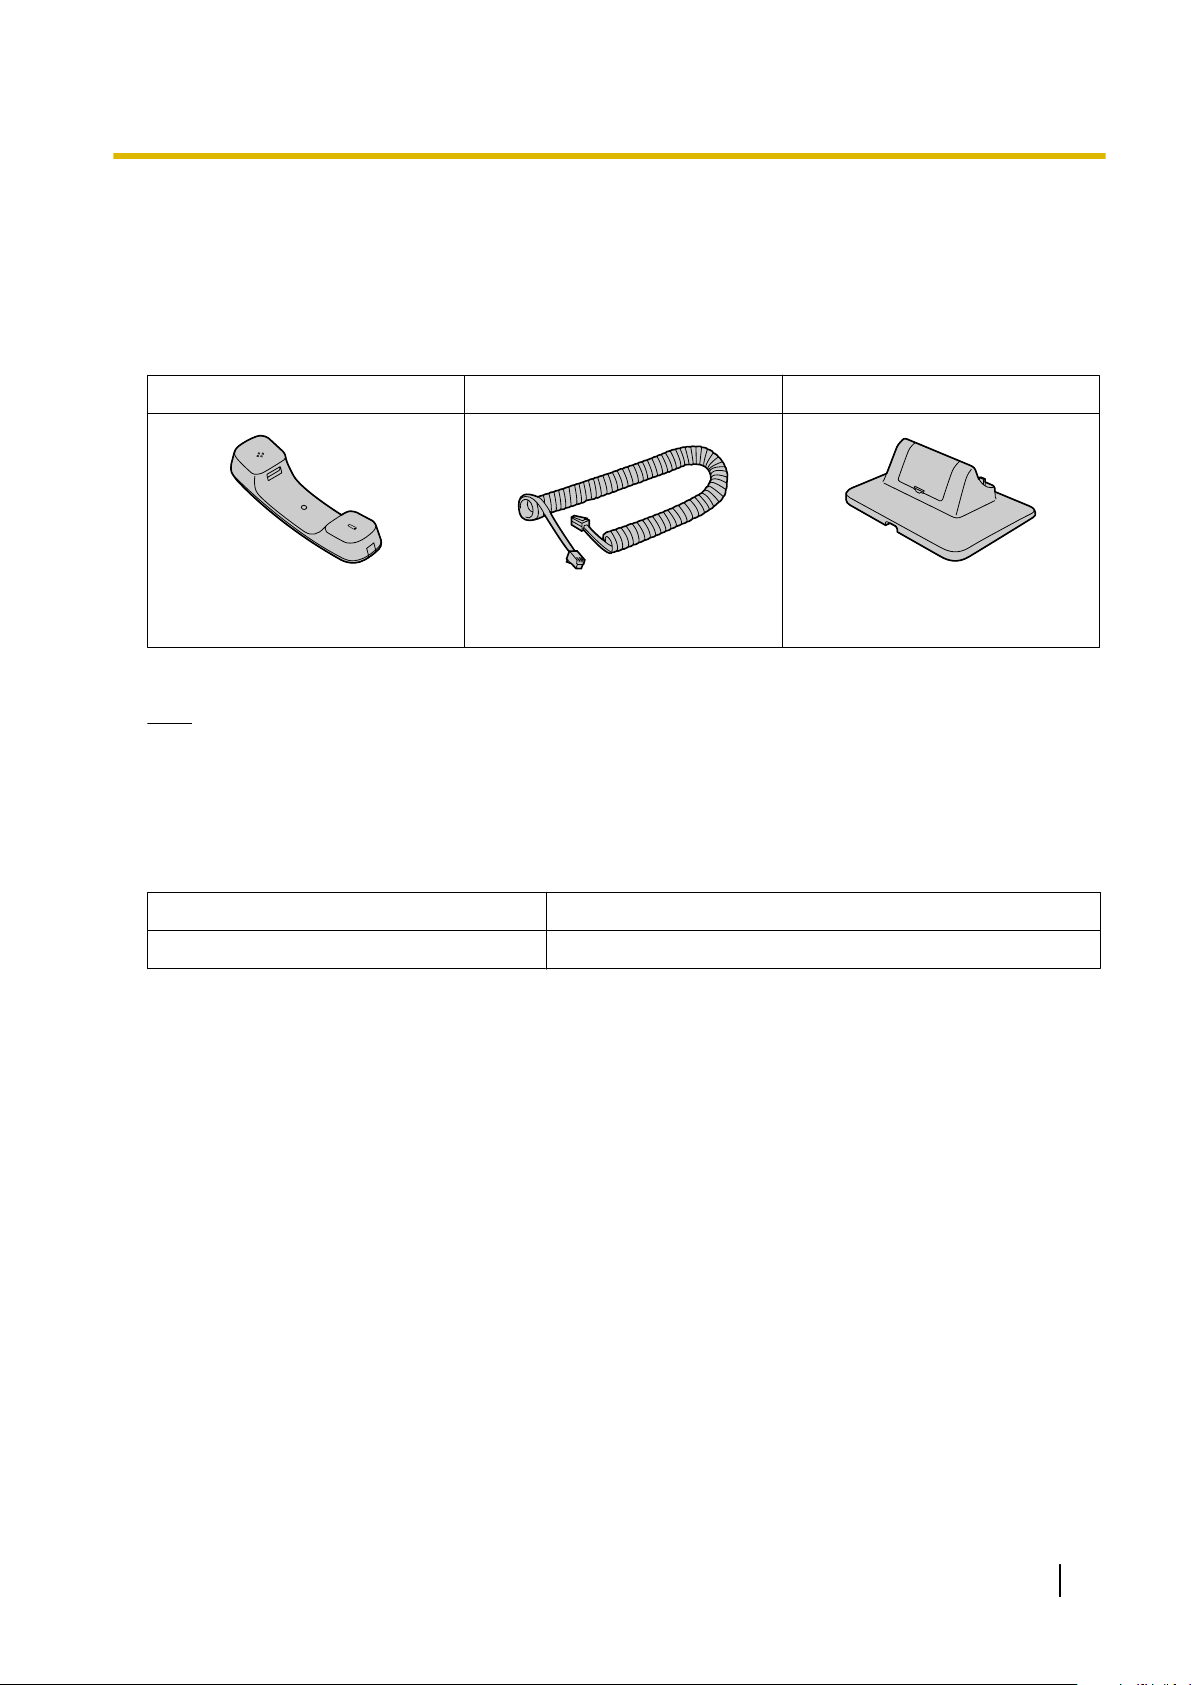
Included Accessories
If any parts are missing or have other problems, contact your dealer.
Handset (1) Handset Cord (1) Stand (1)
[Part No.]
PNLXQ1001Z
*1
For extra orders for the accessories, call toll-free: 1-800-332-5368. (For users in the United States only)
Note
*1
[Part No.]
PNJA1068Z
• The illustrations may differ from the appearance of the actual product.
Optional Accessories
The following optional accessories are available for purchase:
AC Adaptor
*1
KX-A422 (PNLV228)
[Part No.]
PNYLUT670M
Wall Mount Kit KX-A434
*1
To order an optional AC adaptor, please order using the "KX-A422" model number.
Document Version 2012-02 Operating Instructions 17
Page 18

A B C
E
D
G
F
Unit Overview
Location of Controls
Front View
Touch Display (Page 23)
Ambient Light Sensor
Detects the brightness of the ambient light and adjusts the brightness of the display accordingly
(Page 117).
Message/Ringer Lamp
The color of the lamp shows the unit’s status as follows:
Color (state) Unit Status
Green (flashing rapidly) Receiving a call
Red (steady on)
Green (flashing slowly) Cleaning mode (for wiping the screen)
Green (steady on) Missed calls
Key Sheet (Page 19)
Microphone
Used for hands-free conversation.
Handset Hook
Keeps the handset stable when the unit is mounted on a wall (Page 108).
Speaker
Or, new voice message and missed calls
New voice message
18 Operating Instructions Document Version 2012-02
Page 19
Key Sheet
FCD EBA
IHG
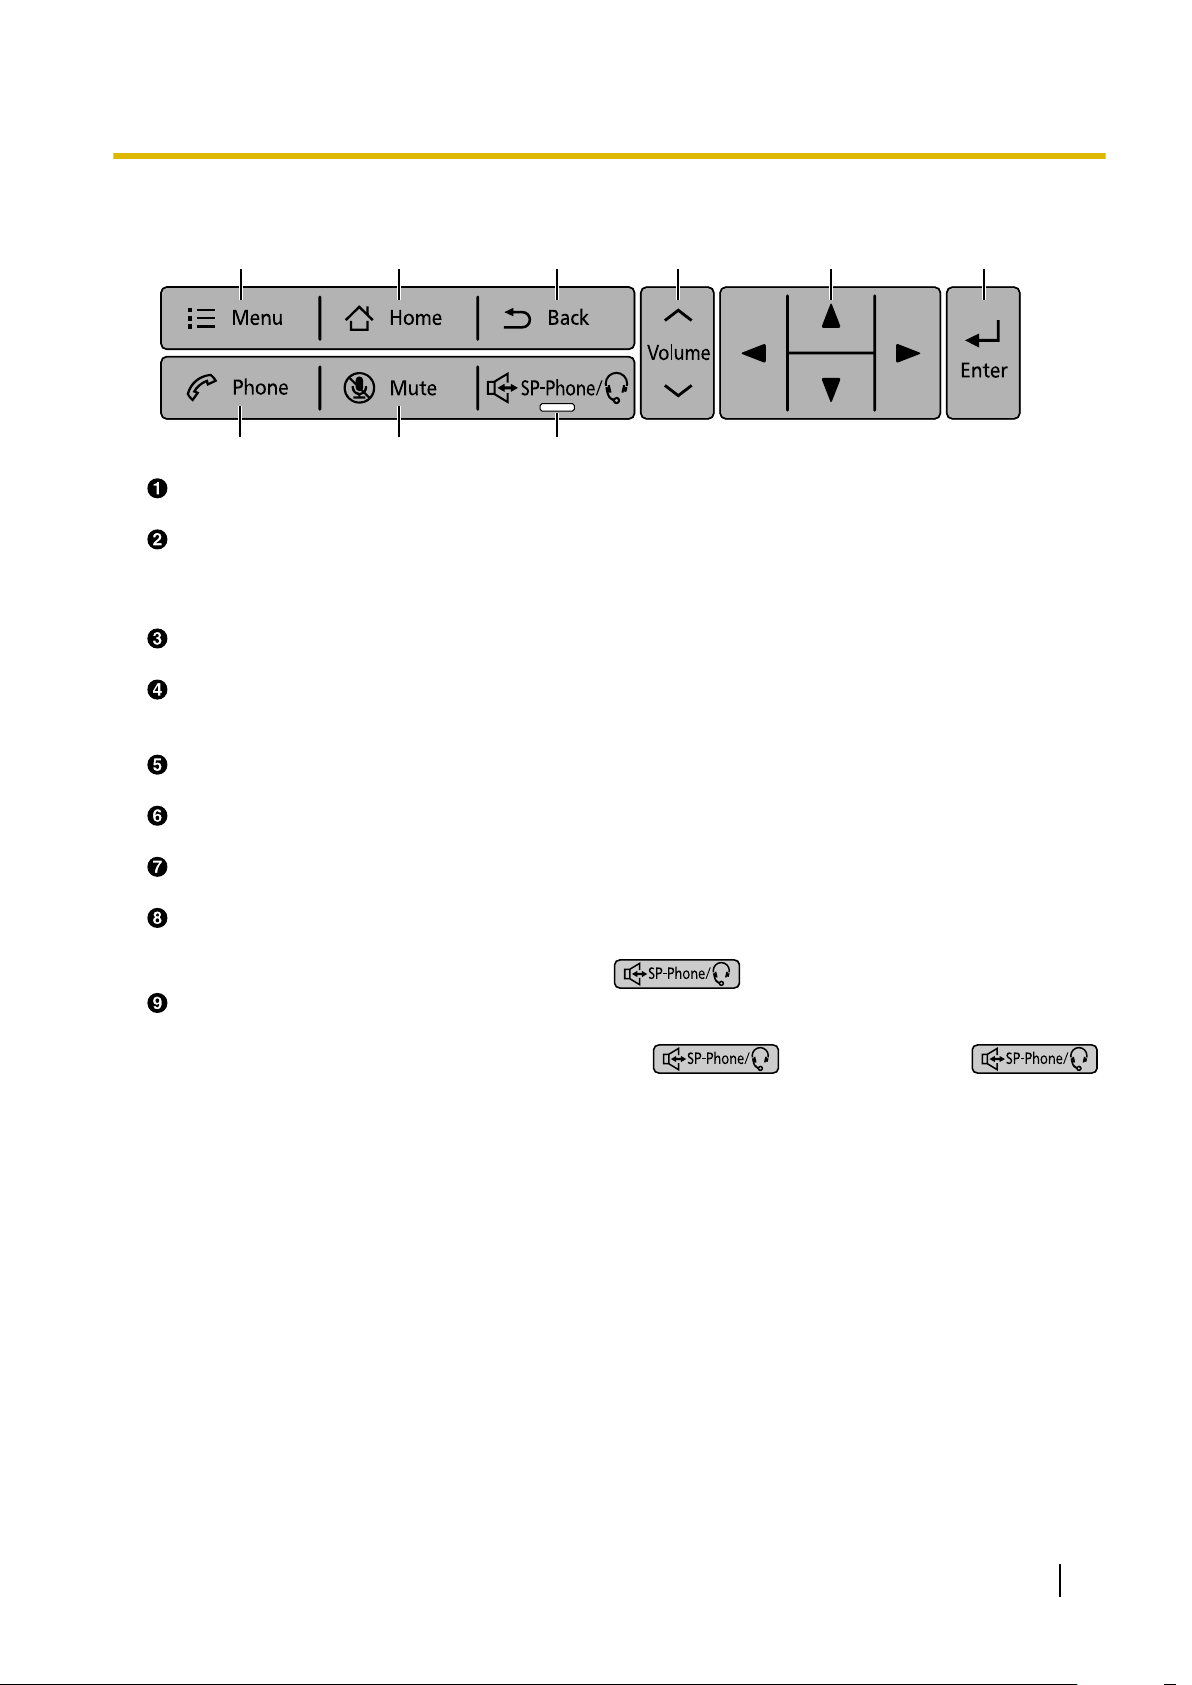
Menu
Display the menu. The contents of the menu differ depending on the current screen or application.
Home
Return to the Home screen (Page 31). Pressing and holding this button displays the icons of the
applications you have used since the unit started up. You can tap on an icon to switch to that application
(Page 71).
Back
Return to the previous screen.
Volume
Adjust the volume. You can adjust the ringer and notification volume, the handset/speaker volume
(available during a conversation), and the playback volume of the music application.
Navigation Key
Select items on the screen, such as when searching for a contact or configuring settings.
Enter
Confirms and accepts entered text or a changed setting value.
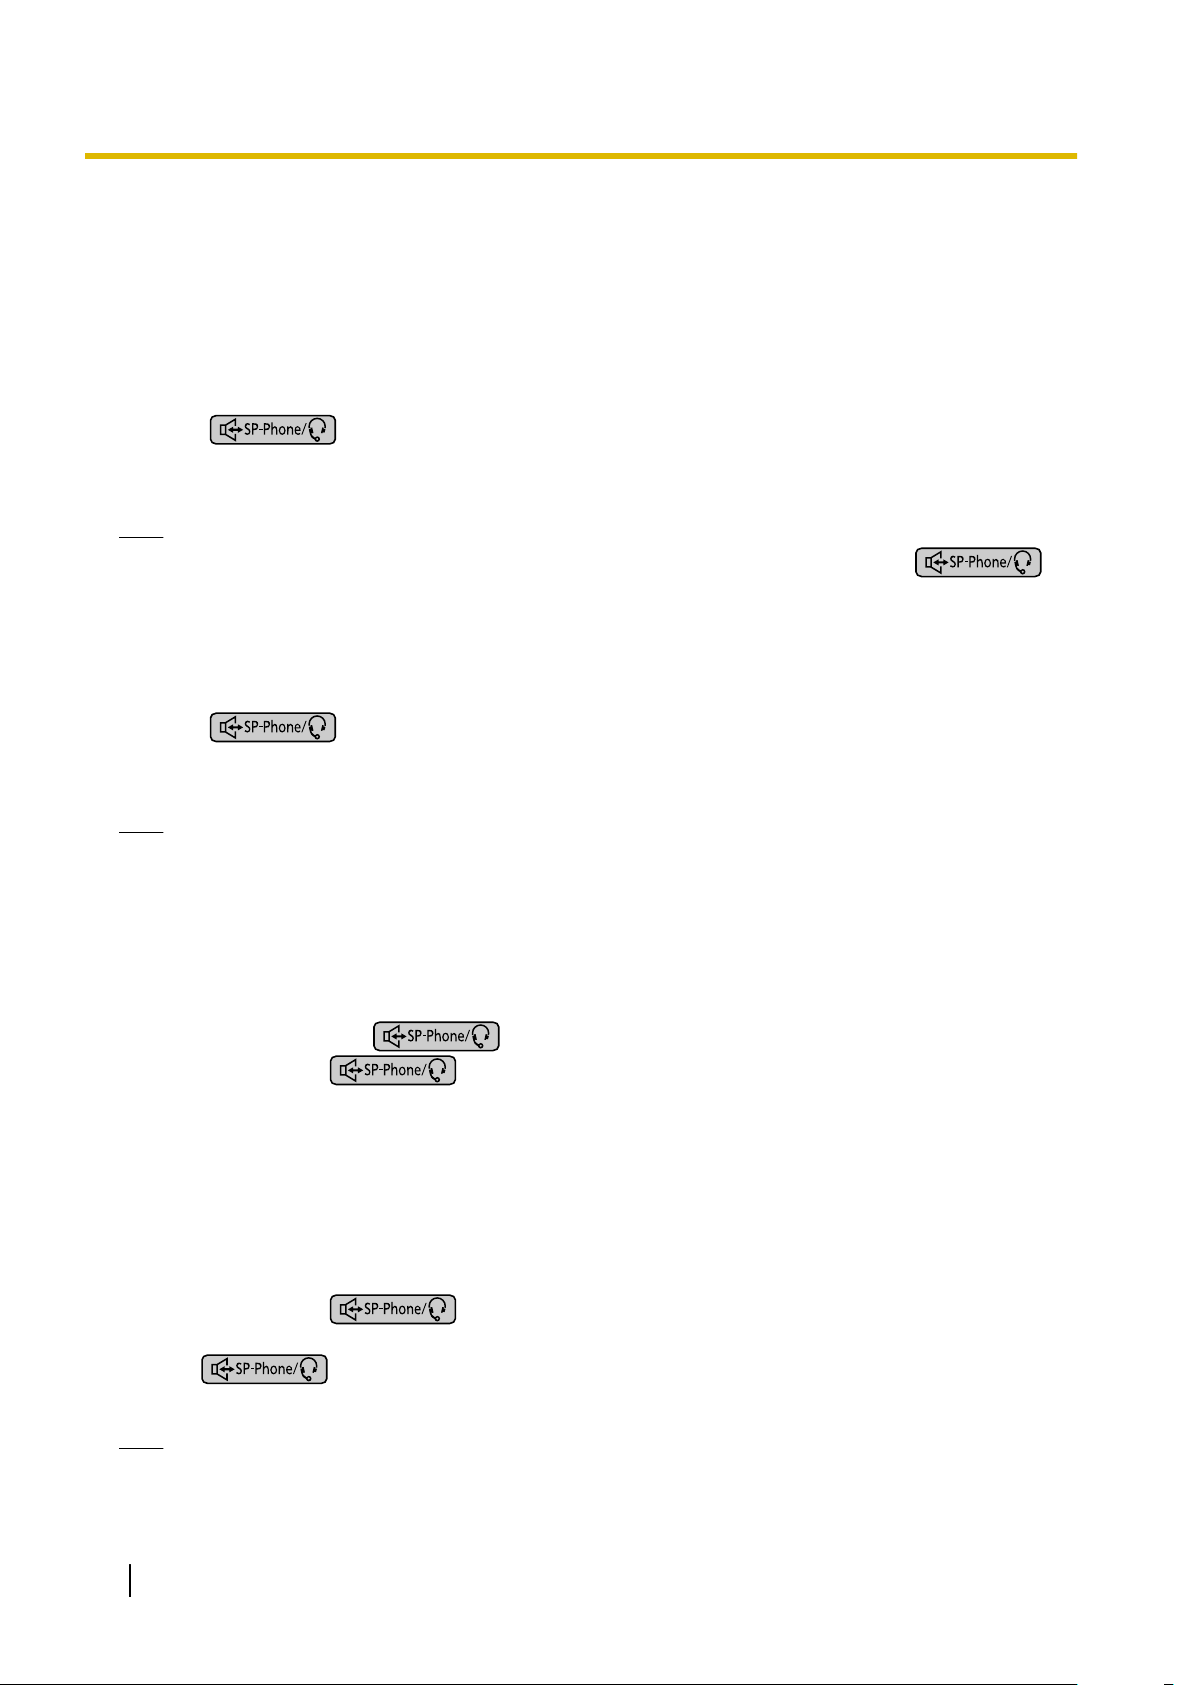
Phone
Switch to the Phone screen (Page 35).
Mute
During a conversation, mute the handset’s and the unit’s microphone so that the other party cannot hear
you. While the microphone is muted, the light on
SP-Phone (Speakerphone)/Headset
Make and receive calls without using the handset. If you are using a headset, pressing this button allows
you to have a conversation using the headset. When
lights red.
Unit Overview
flashes red.
is active, the light on
Document Version 2012-02 Operating Instructions 19
Page 20
A
B
C
Unit Overview
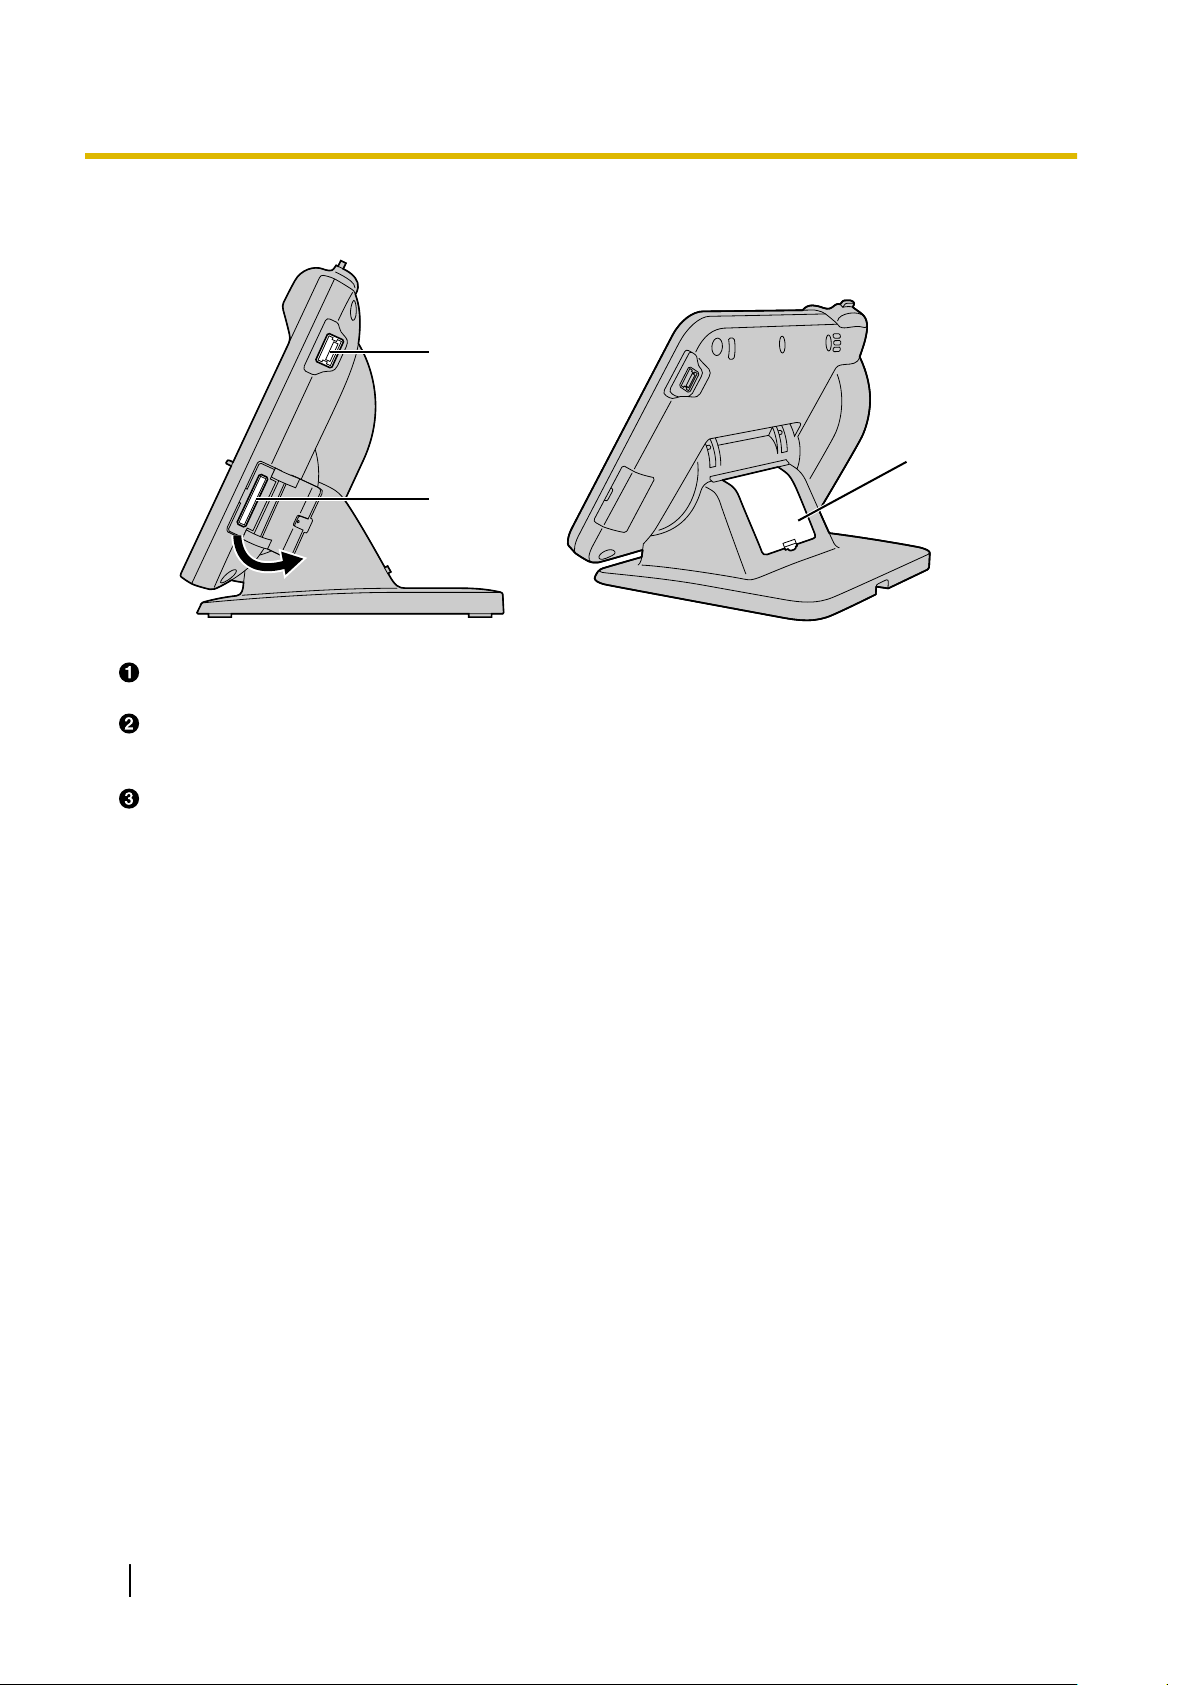
Right Side View
USB Port
Connect a USB keyboard (Page 107).
SD Card Slot
an
Insert
list, and for loading information onto the unit (Page 126).
Cable Cover
If the distance from the Ethernet cable connector to where the cable bends is greater than 30 mm
(1 3/
SD card. An SD card can be used for saving information stored on the unit, such as your contacts
16 in), remove the cable cover (Page 105).
20 Operating Instructions Document Version 2012-02
Page 21

Left Side View
B
C
A
Unit Overview
Modular Handset Jack
EHS Jack
Used to connect an EHS headset (Page 106).
Headset Jack (Page 106)
Document Version 2012-02 Operating Instructions 21
Page 22
C GFED
A B
BB
Unit Overview
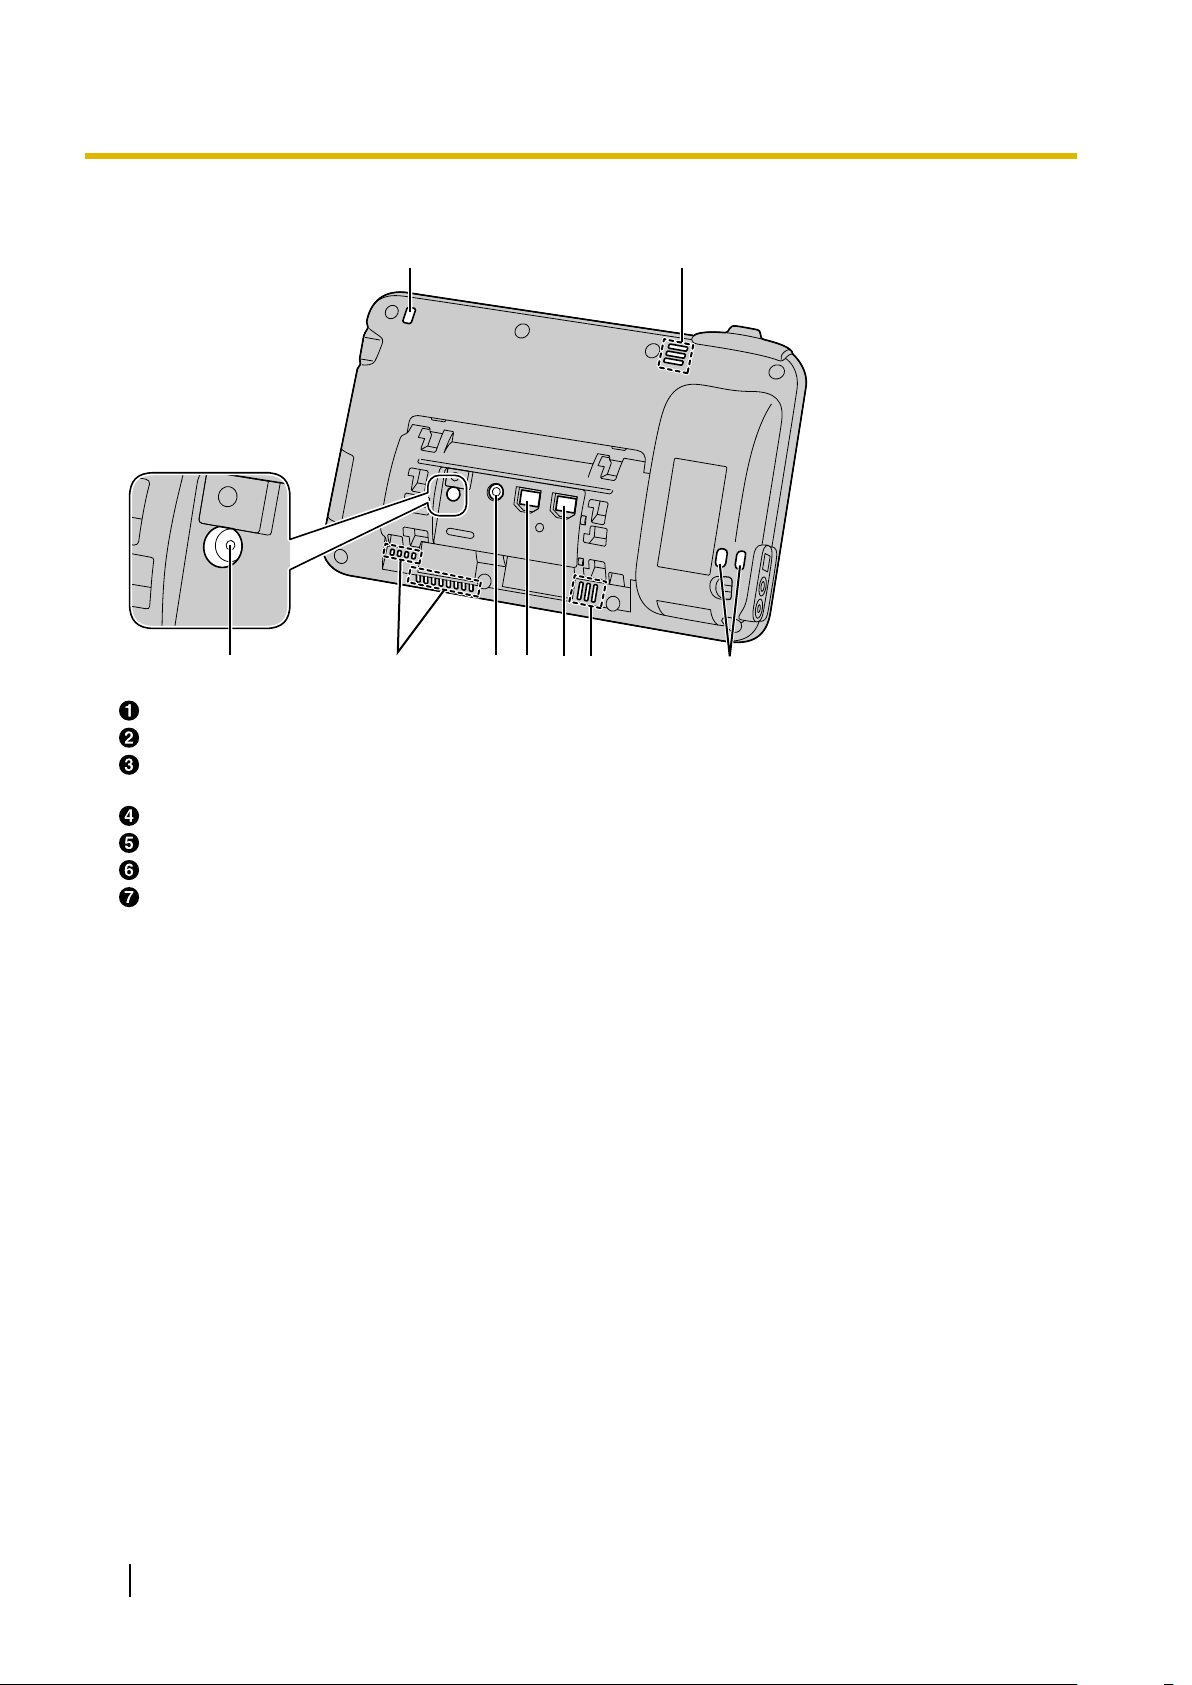
Rear View
Message/Ringer Lamp (Page 18)
Ventilation Opening (4 locations)
RESET Button
Reinitializes the unit’s settings (Page 129).
DC Jack
LAN Port
PC Port
Wire Openings
For attaching an anti-theft cable or wire.
22 Operating Instructions Document Version 2012-02
Page 23
Before Operating the Telephone
Touch Display Operations
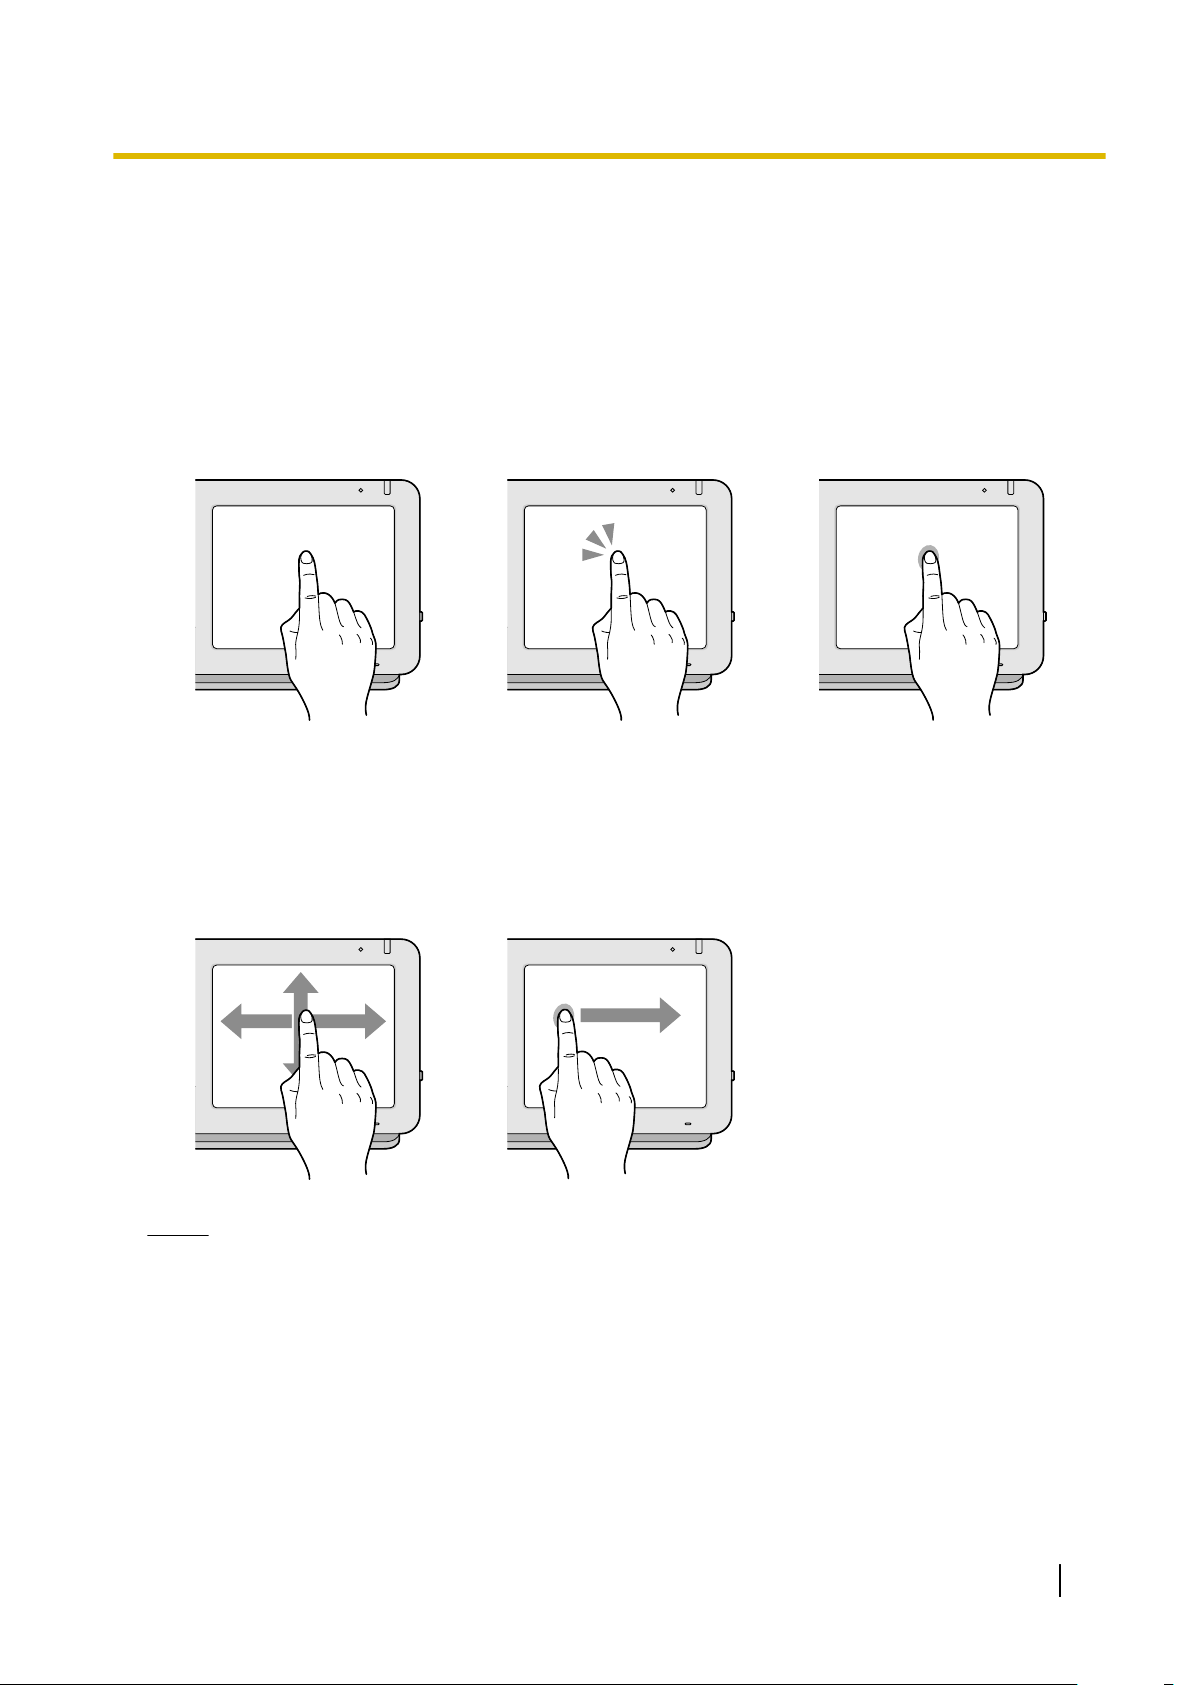
In this manual, touch operations are explained using the following terminology:
Before Operating the Telephone
Touch
Touch the display with your
finger.
Swipe
Slide your finger across the
display vertically or
horizontally, and
finger off the display.
then lift your
Tap
Touch the display only
briefly.
Drag
To move an object like an
icon, touch and hold it with
your finger, and then move it
across the display. When you
reach the destination, lift your
finger.
Touch and hold
Touch the display and keep
your finger there.
Notice
• When you use the touch display, use only one finger. Touching the display with more than one finger
can result in unexpected behavior.
Document Version 2012-02 Operating Instructions 23
Page 24
Before Operating the Telephone
Basic Telephone Operations
With this unit, there are several ways to make and answer calls.
Going Off
In this manual, when you see the phrase
-hook
"go off-hook", you can do any of the following:
• Lift the handset off of its cradle.
• Press
.
• On the Phone screen, tap a flexible button assigned as a DN (Directory Number) button.
• If a USB keyboard is connected, press the [F3] key.
Note
• If [Answer] is displayed on the screen, tapping [Answer] is the same as pressing .
Going On-hook
In this manual, when you see the phrase
• Replace the handset on its cradle.
• Press
• If a
Note
USB keyboard is connected, press the [End] key, or if you are in hands-free mode, you can also press
the [F4] key.
• If [Disconnect] is
off-hook (i.e., you will hear a dial tone).
, if you are in hands-free mode.
displayed on the screen, tapping [Disconnect] ends the current call, but you remain
"go on-hook", you can do any of the following:
Hands-free Mode
The following actions enable hands-free mode, where you can talk to and hear the other party without using
the handset.
• In stand-by mode, press
, and then make a call.
• During a call, press , and then replace the handset on its cradle.
• In stand-by mode on the Phone screen, tap a flexible button assigned as a DN button.
• If a USB keyboard is connected, press the [F3] key.
Lifting the handset off its cradle cancels hands-free mode.
Off-hook Monitor
The following action allows other people to listen to the conversation through the speaker while you continue
the conversation using the handset.
• During a call, press .
• If a USB keyboard is connected, press the [F3] key.
Pressing again cancels off-hook monitor.
also cancels off-hook monitor.
Note
• While off-hook monitor is enabled, replacing the handset on its cradle enables hands-free mode.
If a USB keyboard is connected, pressing the [F4] key
24 Operating Instructions Document Version 2012-02
Page 25

Before Operating the Telephone
Entering Text
With this unit, you can enter text and other characters using either the on-screen software keyboard or an
external USB keyboard (available commercially).
1. Tap the text box in which you want to enter text.
2. Use the keyboard to enter text.
Note
• When you tap a text box, the on-screen keyboard is displayed.
• If you
• For details about the on-screen keyboard, see page 25.
• For details about USB keyboards, see page 29.
Using the On-screen Keyboard
This section explains how to use the on-screen keyboard to enter text.
Two keyboards are available on this unit: the "iWnn IME keyboard" and the "Android keyboard". The "iWnn
IME keyboard" provides additional features such as Japanese input.
touch and hold a text box, editing options such as [Select text], [Copy all] and [Paste] become
available.
Selecting a Keyboard
1. Touch and hold a text box.
2. Tap [Input method].
3. On the [Select input method] screen, select [iWnn IME] or [Android keyboard].
Displaying/Hiding the On-screen Keyboard
To hide the on-screen keyboard
1. While the on-screen keyboard is displayed, press
To display the on-screen keyboard again
1. Tap the text box.
Or, touch and hold
.
.
Using the iWnn IME Keyboard
This section explains how to use some of the features of the iWnn IME keyboard.
Sample screen shot of the keyboard
Document Version 2012-02 Operating Instructions 25
Page 26
Before Operating the Telephone
Note
• Depending on the input mode, the appearance of the keyboard may differ.
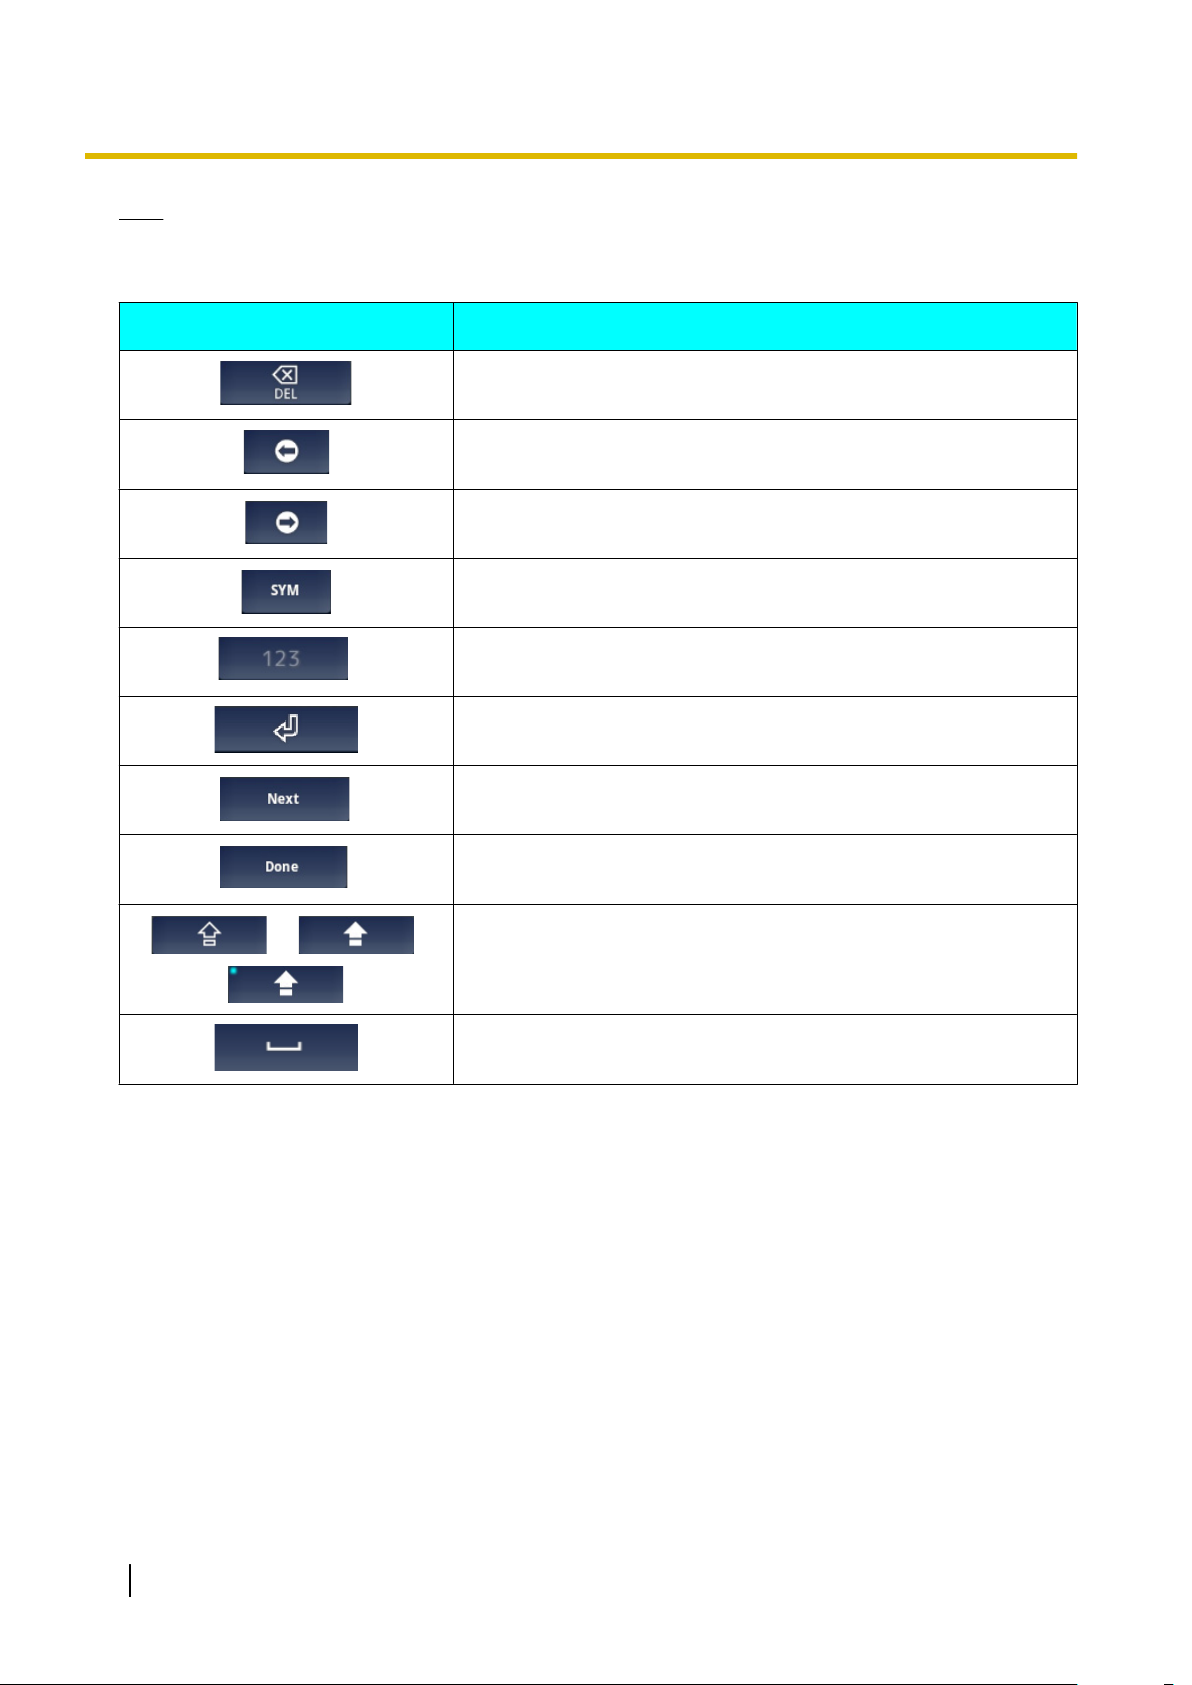
Function keys
Key Description
Deletes the character in front of the cursor.
Moves the cursor one character to the left.
Moves the cursor one character to the right.
Displays the Symbol/Emoticon input screen.
Switches to numeric and symbol input.
/ /
Inserts a line break, accepts the currently entered text, etc.
Accepts the entered text and moves to the next text box.
Finishes input.
Tapping once switches between uppercase and lowercase input.
Tapping twice in a row enables caps-lock.
Inserts a single space.
26 Operating Instructions Document Version 2012-02
Page 27

Using the Android Keyboard
This section explains how to input letters and numbers using the Android keyboard.
Sample screen shot of the keyboard
Note
• Depending on the input mode, the appearance of the keyboard may differ.
Function keys
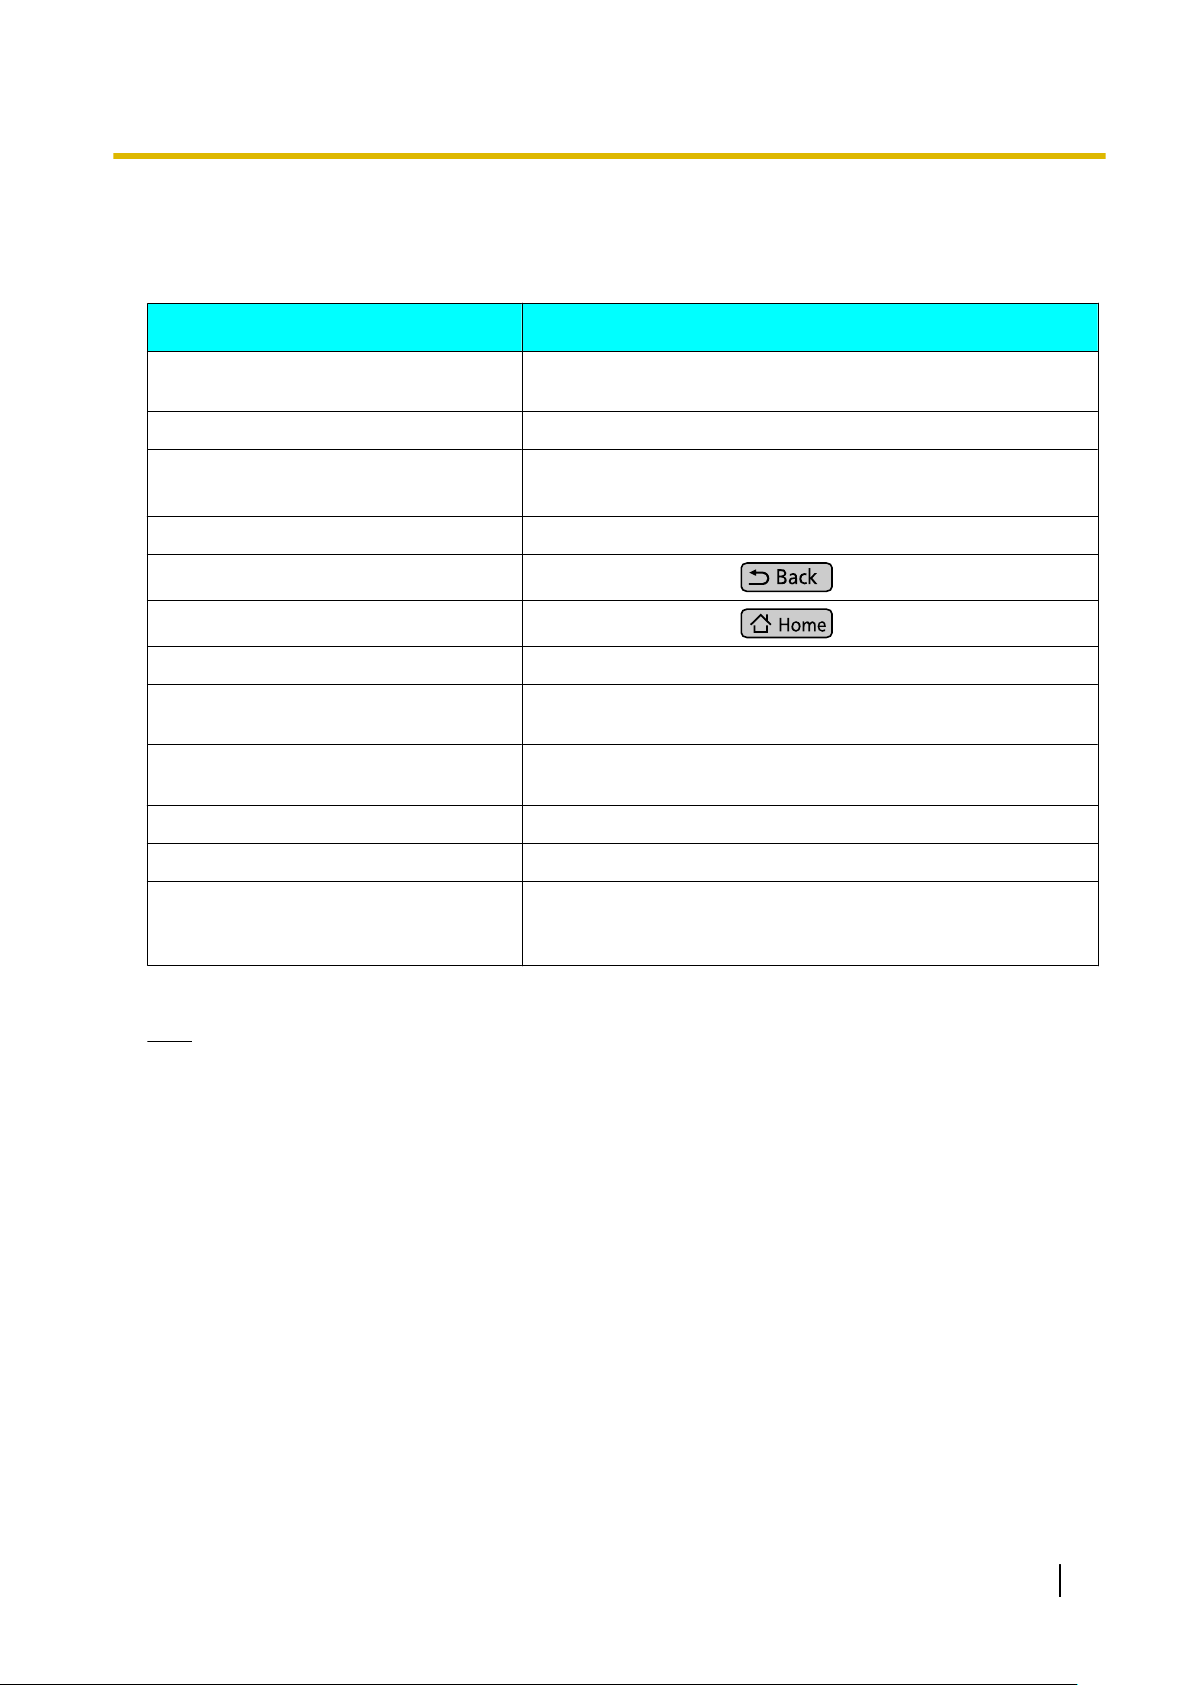
Key Explanation
Before Operating the Telephone
/ /
Tapping once switches between uppercase and lowercase input.
Tapping twice in a row enables caps-lock.
Deletes the character in front of the cursor.
Accepts the entered text and moves to the next text box.
Switches to numeric and symbol input.
Inserts a single space. If multiple keyboard languages are enabled
(Page 123), touching and holding this key and then swiping left or
right changes the keyboard language.
Switches to alphabetic input.
Displays additional symbols.
Inserts a line break, accepts the currently entered text, etc.
Switches to symbol input.
Finishes input.
Begins a search using the entered text. This key is displayed in the
Search widget (Page 96).
Document Version 2012-02 Operating Instructions 27
Page 28

Before Operating the Telephone
Note
• For details about Android keyboard settings, see Page 123.
28 Operating Instructions Document Version 2012-02
Page 29
Before Operating the Telephone
Using a USB Keyboard
You can connect a standard USB keyboard and use it instead of the on-screen keyboard to enter text.
The following keys can be used:
Key Explanation
Alphanumeric characters and symbols
Used in the same way as input keys on the on-screen keyboard.
(including the numeric keypad)
[Back space] key
Arrow keys
], [¬], [®])
([↑], [¯
[Enter] key
[Esc] key Functions the same as
Deletes the character in front of the cursor.
Move the cursor up, down, left, and right.
Inserts a line break, accepts the currently entered text, etc.
on the key sheet.
[Home] key Functions the same as on the key sheet.
[Tab] key
[Shift] key
[Alt] key
[AltGr] key
Space bar
*1
Moves the cursor a fixed number of characters to the right.
Used in combination with other keys or to switch between
uppercase and lowercase letters.
Used in combination with other keys. If an [AltGr] key is present
on your keyboard, this key functions the same as [AltGr].
Used in combination with other keys.
Inserts a single space.
Moves the cursor to the quick-search box. On the Contacts
Application key
screen, the cursor is moved to the Contact search box
(Page 60).
*1
Depending on your locality, this key may not be present on your keyboard.
Note
• When
entering
accented characters by combining the accent with a letter (e.g., by first entering "^" and
then "e" to produce "ê") using a USB keyboard, be sure that the Android keyboard is selected
(Page 25).
• To enter capital letters, use the [Shift] key. The [Caps Lock] key is not supported.
• This unit supports PC mode for Russian keyboards.
If Russian is specified as your language locale and you are using a USB keyboard, you can enter Latin
characters by holding down the [Alt] or [AltGr] key while entering characters. For details about the
language locale setting, see page 121.
• The functions of some keys may differ depending on whether accessibility mode is enabled
(Page 100).
• For details about connecting a USB keyboard, page 107.
Document Version 2012-02 Operating Instructions 29
Page 30

Before Operating the Telephone
Emergency Number Registration
Registering emergency numbers allows you to select and call these numbers while the screen lock is active.
Up to 5 emergency numbers can be registered.
1. On the Phone screen, press .
2. On the [Menu] screen, tap [Edit Emergency Number].
3. Enter values in [Label] and [Phone Number].
4. When you have finished entering the values, tap [OK].
Note
• For details about dialing emergency numbers, see page 52.
• For details about entering text, see page
• For details about activating the screen lock, see page 94.
25.
30 Operating Instructions Document Version 2012-02
Page 31

The Display and Icons
C
B
D
E
A
The Display
Home Screen
The Display and Icons
The Home
screen.
Status bar (Page 32)
Swipe left or right on the screen to display another Home screen. The Home screen is comprised of three
screens, and you can freely position shortcuts, etc., on each screen.
Tap here to display the Application screen (Page 34).
Tap here to hide or show the application dock.
Application dock
You can place frequently used applications in the application dock. Up to 7 applications can be placed
here.
(For details about assigning applications to the application dock, see page 97.)
screen is initially displayed when the unit is turned on. Also, pressing
displays the Home
Document Version 2012-02 Operating Instructions 31
Page 32

ABCD
The Display and Icons
Status Bar
The status bar displays the status of the unit and is displayed on all screens. Tapping the status bar displays
the notification screen.
Displays the status of unit settings, new mail notifications, etc.
Displays the user’s name and the unit’s phone number.
If multiple lines are configured on your unit, the phone number of the default line is displayed.
Displays the status of phone features.
Displays the current date and time.
(For details about setting the date and time, see page 124.)
Note
• For details about the notification screen, see page 33.
32 Operating Instructions Document Version 2012-02
Page 33

Notification Screen
A
B
C
D
You can tap the items on the notification screen to display additional information.
The Display and Icons
Clears all notifications.
Displays settings and status information for the unit.
You can tap each item to display additional information, change settings, etc.
Displays current notifications.
Tap each item to launch the related application.
Tap here to close the Notification screen.
Document Version 2012-02 Operating Instructions 33
Page 34

A
B
The Display and Icons
Application Screen
The Application screen displays the applications installed on the unit. This screen is displayed when you tap
on the Home screen.
Displays the applications installed on the unit (Page 71).
Tap here to close the Application screen.
34 Operating Instructions Document Version 2012-02
Page 35

A
B
D
FEGH
C
I
The Display and Icons
Phone Screen
After the unit is turned on and the Home screen is displayed, the Phone screen is displayed automatically.
You can also press
Dial Key display
or tap on the Home screen to display the Phone screen.
Schedule display
Document Version 2012-02 Operating Instructions 35
Page 36

The Display and Icons
Displays the wallpaper (Page 95).
Displays your contacts (Page 41).
Displays the call log (Page 40).
The number
your unit, the total number of missed calls on all lines is displayed.
Checks your voice messages (Page 56).
The number of new messages is displayed in square brackets (e.g., [26]). If multiple lines are configured
on your unit, the total number of new messages on all lines is displayed.
Redials the last dialed phone number (Page 51).
Temporarily changes the screen between the Dial Key display and the Schedule display.
(To display the Schedule display by default, see page 97.)
Dial keys
Flexible buttons (Page 42, Page 91)
Displays up to 3 of the next upcoming events.
Tap an event to edit it. New events can be added by starting the Calendar application from the Home
screen.
of missed calls is displayed in square brackets (e.g., [44]). If multiple lines are configured on
36 Operating Instructions Document Version 2012-02
Page 37

Calling Screen
E
BA
G
F
H I J
CD
During a call, the [Current] tab is displayed.
The Display and Icons
[Current] tab
Displays information about the call in progress.
[Hold] tab
Displays information about calls on hold.
Personal information
If the other party is registered in your contacts, that person’s information will be displayed.
[Incoming] tab
Displays information about incoming calls.
Displays information about the line being used (number, name, etc.).
Displays the duration of the call.
Soft keys (Page 38)
Buttons are displayed for features that can be used during a call.
Redials the last dialed phone number (Page 51).
Displays your contacts (Page 41).
Displays the dial keys.
Document Version 2012-02 Operating Instructions 37
Page 38

The Display and Icons
Soft Keys
Key Description
Deletes the last digit entered.
Cancels pre-dialing and returns to the Phone screen (Page 51).
Answers a call.
Puts the current call on hold (Page 54).
Retrieves a call on hold and resumes the call (Page 54).
Transfers the call (Page 55).
Cancels a transfer and resumes the call (Page 55).
Connects a call to the transfer destination, and then hangs up (Page 55).
When a call has been established with the transfer destination (second
party), switches back to the first party (Page 55).
Performs a blind transfer (Page 55).
Adds a 3rd party to a 2-party call (Page 55).
Begins a 3-party conference call (Page 55).
Without you going on-hook, ends the current call but remains off-hook, or
ends a 3-party conference call and returns to a 2-party call (Page 55).
Rejects an incoming call (Page 53).
This key is not displayed for Hold Recall or if the call is on a shared line.
Note
• A shared line is a line that can be used by multiple units. This is an
optional feature and may not be supported on your phone system.
38 Operating Instructions Document Version 2012-02
Page 39

Key Description
Functionality depends on your phone system. For details, consult your
administrator or dealer.
The Display and Icons
Document Version 2012-02 Operating Instructions 39
Page 40

A
D
C
F
G
B
E
The Display and Icons
Call Log Screen
Tapping [Call Log] on the Phone screen displays the Call Log screen.
The Call
records are kept for each type of call log.
Log screen displays the outgoing call log, incoming call log, and missed call log. The most recent 100
[Outgoing Call] tab
Displays the outgoing call log.
[Incoming Call] tab
Displays the incoming call log, including missed calls.
[Missed Call] tab
Displays only missed calls.
Displays the line that was used when the call was made or received.
(Displayed only when multiple lines are configured on your unit.)
Call records
Display registered contact information, such as names and phone numbers. If there is no registered contact
information, only the phone number is displayed.
Displays the date and time of the call.
The icon indicates the type of call (Page 48).
Tap to call the phone number associated with the call record.
If multiple lines are configured on your unit, the call is made from the line on which the original call was
made or received.
Note
• If the registered information for a contact changes, the information will be reflected in the call log the
next time the Call Log screen is opened.
• If the international dial code (+) is attached, the number will be displayed in the call log with a "+"
attached.
• If an anonymous call is received, only [Anonymous Call
call cannot be returned to an anonymous caller.
] and the time of the call will be displayed. A
40 Operating Instructions Document Version 2012-02
Page 41

Contacts Screen
F
A
BDC
G
E
The Display and Icons
Tapping [Contacts] on
Displays all contacts.
Displays only contacts set as favorites (Page 57).
Enter a name to search for contacts (Page 60).
Add a new contact (Page 57).
Displays the number of contacts in the currently displayed list.
Photo
Tapping a photo displays the "quick contact" popup (Page
Images stored on the SD card can be used for pictures (Page 57).
Displays registered names and telephone numbers.
If multiple phone numbers are registered to a contact, the default number is displayed.
(For details about default numbers, see page
the Phone screen or tapping
57.)
on the Home screen displays the Contacts screen.
51).
Document Version 2012-02 Operating Instructions 41
Page 42

B
C
A
B
A
The Display and Icons
Flexible Button Screen
Single-row display
Full-screen display
Tapping a button activates the feature assigned to the flexible button.
Switches between single-row display and full-screen display.
Displays the next column.
Note
• For details about assigning features to flexible buttons, see page 91.
42 Operating Instructions Document Version 2012-02
Page 43

Network Camera Viewer
A
E
D
C
B
The Display and Icons
Tapping
You can view the video feeds of network cameras connected to the network.
Displays the video feed of the network camera.
Displays the camera name as registered in the [Camera Registration] screen (Page 64).
Returns to the camera’s set home position (Page 66).
Tap to zoom in and to zoom out (Page 65).
Calls the phone number (paging number) associated with the network camera (Page 66).
on the Home screen starts Network Camera Viewer.
Note
• For details about adding network cameras, see page 64.
Document Version 2012-02 Operating Instructions 43
Page 44

A
B
A
B
The Display and Icons
Lock Screen
When someone taps the display while the screen lock is activated, the following screen is displayed.
When using a pattern
When using a PIN
44 Operating Instructions Document Version 2012-02
Page 45

When using a password
A
B
The Display and Icons
Call an emergency number (Page 52).
Trace the unlock pattern, enter the PIN, or enter the password to unlock the screen (Page 94).
Note
• For details about activating the screen lock, see page 94.
Document Version 2012-02 Operating Instructions 45
Page 46

The Display and Icons
Icons
Home Screen (Page 31)
Icon Description
Status Bar (Page 32)
Icon Description
Displays the Application screen.
Hides or displays the application dock.
Closes the Application screen.
Drag unneeded shortcuts, widgets, or folders to this icon to delete them
(Page 97).
/
/
/
/
Displays the status of headset mode.
: On
: Off
Displays the Call Forwarding (FWD) or Do Not Disturb (DND) status.
If multiple lines are configured on your unit, the
FWD or DND is enabled on any of the lines.
: Set
: Not set
Displays the Auto Answer setting status.
: Enable
: Disable
Displays the status of the calling service and the network.
If multiple lines are configured on your unit, the
displayed if there is a connection error on any of the lines.
: Connected without problems
: Connection error
Displayed when an SD card inserted in the unit can be safely removed (i.e.,
has been successfully unmounted).
Displayed while an SD card is inserted in the unit and ready to be used.
"set" icon is displayed when
"connection error
" icon is
Displayed when there is not enough free space available in the unit.
When this icon is displayed, delete contacts, schedule items, or e-mails to
make more space available.
Displayed when an e-mail is received.
Displayed while music is playing.
46 Operating Instructions Document Version 2012-02
Page 47

Icon Description
Displayed when an event’s notification time is reached.
Displayed as an alert for the following events:
• The SD card has been removed.
• An unsupported USB device has been connected to the unit.
• The USB hub pass-through limit has been exceeded.
• The demand for power from the USB port is too high.
Displays the number of icons not being displayed on the status bar.
Displayed when the alarm snooze feature is active.
Displayed when an alarm is set (Page 71).
The Display and Icons
/
Phone Screen (Page 35)
Icon Description
Displays the status of the current call tab.
: In use (displayed when making a call, during a call, when in a conference
call, etc.)
: Not in use (displayed when the line is idle, when receiving a call, etc.)
Displayed when the ring volume is set to "0" (Page 116).
When this icon is displayed, notification sounds are also muted.
Displayed when a file download is completed.
Displayed when an alarm is received from a network camera (only when status
bar notification
port (Page 69).
Displayed while contact or calendar synchronization is being performed
(Page 128). If both are being synchronized, the icon is displayed twice.
Displayed when contact or calendar synchronization has failed.
Displays your contacts (Page 41).
is specified) or when there is a setting error regarding the alarm
/
Document Version 2012-02 Operating Instructions 47
Displays the call log (Page 40).
: No missed calls.
: There are one or more missed calls.
When the [Missed Call
to .
] tab is opened,
on the Phone screen will change
Page 48

The Display and Icons
Icon Description
/
/
Calling Screen (Page 37)
Icon Description
Indicates whether there are new voice messages (Page 56).
: No new messages.
: There are one or more new messages.
Redials the last dialed phone number (Page 51).
Displays the schedule.
Displays the dial keys.
Switches between the single-row display and the full-screen display or flexible
buttons.
Displays the next column of flexible buttons in single-row display mode.
The
column
with a border around it is the currently displayed row (for example:
).
A row displayed in red indicates that the key currently being used is located
in that row.
Call Log Screen (Page 40)
Icon Description
Displays information about the current call.
Displays information about calls on hold.
Displays information about incoming calls.
Displayed for outgoing calls.
Displayed for incoming calls that were answered.
Displayed for missed calls that have been checked.
Displayed for missed calls that have not been checked.
When you tap the call record to display details about the call, or tap to
return the call, the icon changes to .
48 Operating Instructions Document Version 2012-02
Page 49

Icon Description
Contact Screen (Page 41)
Icon Description
The Display and Icons
Calls the other party.
Enter a name to search for a contact (Page 60).
Adds a new contact (Page 57).
Calls the contact’s default phone number.
Sends an e-mail to the contact’s default e-mail address.
Displays the details screen for the selected contact.
Sets the selected contact as a favorite.
Calls the selected phone number.
Write an e-mail to the selected e-mail address.
Indicates the default phone number or e-mail address.
Assigns an image stored in the SD card to a contact.
Adds the selected editable item.
Deletes the selected editable item.
Network Camera Viewer (Page 43)
Icon Description
Returns the network camera’s angle, zoom level, and brightness to the
camera-side defaults (Page 66).
/
/
Document Version 2012-02 Operating Instructions 49
Zoom in/zoom out the network camera’s video feed (Page 65).
Brighten/darken the network camera’s video feed (Page 68).
Page 50

The Display and Icons
Icon Description
Dials the phone number (paging number) associated with the network camera
(Page 66).
Lock Screen (Page 44)
Icon Description
Call an emergency number (Page 52).
Accounts & sync settings screen (Page 128)
Icon Description
Displayed if automatic synchronization is enabled.
Displayed if automatic synchronization is disabled.
Displayed while synchronization is being performed.
50 Operating Instructions Document Version 2012-02
Page 51

Phone
Making Calls
1. Go off-hook.
2. Enter the phone number.
3. To end the call, go on-hook.
Note
• You can enter up to 32 digits for the phone
number.
• If the dialed number is registered to a contact,
the contact’s information is displayed.
• If a network camera is registered in the called
party’s contact information, Network Camera
Viewer will start, and you can view the video
feed from the camera.
Confirming a Number Before Dialing (Pre-dialing)
You can
it is dialed.
1. Enter the phone number with the handset still on its
2. Lift the handset, or press
3. To end the call, go on-hook.
confirm the phone number you entered before
cradle.
.
Note
• In step 1, tapping [Redial] without going
off-hook enables hands-free mode.
Calling from the Contacts Screen
Calling Using
1. Go off-hook.
2. On the Phone screen, tap [Contacts].
3. Tap the photo of the party you want to call.
4. Tap
5. To end the call, go on-hook.
Note
• When multiple numbers are registered to a
• If you use "quick contact" with a contact for
.
contact, the number specified as the contact’s
default number is dialed.
which a default number is not specified, the
following screen is displayed. Selecting the
[Remember
phone number you select to be registered as
the contact’s default number.
"Quick Contact"
this choice] check box causes the
Phone
Note
• Tapping deletes the last digit
entered.
• Using the navigation keys ( and ),
you can move the cursor left and right.
• Tapping [Cancel] returns you to the Phone
screen.
• You can enter up to 32 digits for the phone
number.
Redialing
You can redial the last phone number that you dialed.
1. Go off-hook.
2. Tap [Redial].
3. To end the call, go on-hook.
• If you tap a contact method other than
telephone, the application associated with that
contact method will start.
Selecting from Multiple Numbers
Registered to a Contact
1. Go off-hook.
2. On the Phone screen, tap [Contacts].
3. Tap the name of the party you want to call.
4. Tap the phone number you want to call.
5. To end the call, go on-hook.
Document Version 2012-02 Operating Instructions 51
Page 52

Phone
Calling from the Call Log
1. Go off-hook.
2. Tap [Call Log].
3. Select the [Outgoing Call]
Call] tab, or the [Missed Call] tab.
4. Tap the record for the party you want to call.
5. To end the call, go on-hook.
Note
• If you want to call a different phone number
registered to the contact or use a different
contact method, stay on-hook, tap the record,
and then select [View contact].
You can then select a different phone number
or contact method on the contact’s details
screen.
Editing a Phone Number before
Calling
1. On the Phone screen, tap [Call Log].
2. Select the [Outgoing Call
Call] tab, or the [Missed Call] tab.
3. Touch and hold the record for the party you want to
call.
4. Tap [Edit number before calling].
5. Edit the phone number, and then go off-hook.
tab, the [Incoming
tab, the [Incoming
]
Calling Using a Flexible Button Set as a One-touch Dialing Button
You can use a flexible button configured as One-touch
Dialing button to easily make calls.
1. Go off-hook.
2. Tap a flexible button configured as a One
Dialing button.
-touch
3. To end the call, go on-hook.
Note
• A flexible button configured as a BLF (Busy
Lamp Field) button can also be used to call a
local phone (
• For
details about registering One-touch buttons
and BLF buttons, see page 91.
Page 92).
Calling an Emergency Number
While the screen lock is active, you can call an
emergency number you registered beforehand.
1. Go off-hook.
2. Tap
3. On the [Select] screen, tap the contact whom you
want to call.
.
Note
• For details about pre-dialing, see page 51.
Deleting Records from the Call Log
To delete 1 record from the call log
1. On the Phone screen, tap [Call Log].
2. Select the [Outgoing Call] tab, the [Incoming
Call] tab, or the [Missed Call] tab.
3. Touch and hold the record you want to delete.
4. Tap [Remove from call log].
To delete all records from the call logs
1. On the Phone screen, tap [Call Log].
2. Press
3. Tap [Clear all call log].
4. On the [Clear] screen, tap [OK].
Note
• All records in the outgoing call log, the incoming
call log, and the missed call log will be deleted.
.
Note
• While you are on a call, incoming calls will not
be received.
• For details about registering an emergency
number, see page 30.
• For
details about activating the screen lock, see
page 94.
52 Operating Instructions Document Version 2012-02
Page 53

Phone
Receiving Calls
1. Go off-hook.
2. To end the call, go on-hook.
Note
• Enabling Automatic Answer allows you to
answer an
(Page 91).
• If a network camera is registered in the caller’s
contact information, Network Camera Viewer
will start, and you can view the video feed from
the camera.
• When you receive a call while using another
application, the [Incoming Call] window is
displayed.
incoming call without going off-hook
Disconnecting the Current Call and
Answering the Second Call
1. When you hear the call waiting tone, go on-hook.
2. Go off-hook.
Holding the Current Call and
Answering the Second Call
1. On the
2. On the [Current] tab, tap [Hold].
3. Tap the DN button (flexible button) of the incoming
call (flashing green rapidly).
Note
• If automatic call hold is enabled through
[Incoming Call] window, tap [Close].
configuration file programming, simply tapping
[Answer] on the [Incoming Call] window will
put the current call on hold and answer the
second call. For details, contact your
administrator or dealer.
Selecting from Multiple Incoming Calls
When you have incoming calls from multiple parties at
the same time, you can select which one to answer.
1. On the [Incoming] tab, select the call you want to
answer.
2. Tap [Answer].
Note
• The number of incoming calls is displayed on
the [Incoming] tab.
• In the [Incoming] tab, incoming calls are
displayed from the top in the order of oldest to
newest.
Answering
Call While on a Call
a
(Answering Call Waiting)
When you receive a second call while on another call,
you can answer the second call after either putting the
current call on hold or disconnecting it.
Rejecting Calls
You can reject an incoming call at your unit or set the
unit to reject certain calls.
Rejecting a Call While Receiving
1. When receiving an incoming call, tap
Rejecting Anonymous Calls
You can set the unit to reject calls when the unit
receives a call without phone number.
To reject anonymous calls, the Block Anonymous Call
setting must be enabled through Web user interface
programming (Page
administrator or dealer.
Note
• Rejected phone numbers will not be stored in
the incoming call log.
• Depending on the line an incoming call is
arriving on, the call may not be rejected.
99). For details, consult your
.
Rejecting Specific Calls
You can set the unit to reject specific phone numbers.
Document Version 2012-02 Operating Instructions 53
Page 54

Phone
Note
• Rejected phone numbers will not be stored in
the incoming call log.
Adding a phone number
You can store a maximum of 30 phone numbers you
want to reject in the rejection list of the unit.
1. On the Phone screen, press
.
2. Tap [Call Block setting].
3. Enter the phone number (max. 32 characters).
4. Tap [OK].
Note
• To register additional telephone numbers,
repeat the procedure from step 3.
Adding
phone number from the incoming call
a
log
You can add a phone number by referring to the
incoming call log.
1. On the Phone screen, tap [Call Log].
2. Select the [Incoming Call] tab or the [Missed
Call] tab.
3. Tap the phone number you want to reject calls from.
4. Tap [Add to Call Block list].
Editing a stored phone number
1. On the Phone screen, press
.
2. Tap [Call Block setting].
3. Select the phone number you want to edit.
4. After you enter the phone number, tap [OK].
Holding a Call
1. On the [Current] tab, tap [Hold].
Note
• When a call has been left on hold for a certain
length of
and you will hear the recall tone.
• If Automatic Call Hold is enabled through
configuration file programming, simply tapping
a flexible button assigned as a DN button
(Page 91) will put the call on hold. For details,
contact your administrator or dealer.
Retrieving a Call on Hold
1. On the [Hold] tab, select the call you want to
retrieve.
2. Tap [Retrieve].
Note
• The number
[Hold] tab.
• In the [Hold] tab, calls on hold are displayed
from the top in the order of oldest to newest.
Calls on hold waiting to be transferred or for a
conference to start are displayed at the top of
the list.
time, the [Recall] window is displayed
of calls on hold is displayed on the
Deleting a stored phone number
1. On the Phone screen, press
.
2. Tap [Call Block setting].
3. Select the phone number you want to delete.
4. Clear the displayed number.
5. Tap [OK].
54 Operating Instructions Document Version 2012-02
Page 55

Phone
Transferring a Call
Transferring after the Destination
Answers
1. During a call, tap [Transfer] on the [Current] tab.
2. Call the
3. When the destination party answers, tap [Transfer
Complete].
Note
• For details about making a call, see page 51.
• In
• If On-hook Transfer is enabled at your unit, you
• In step 3, instead of tapping [Transfer
• If the transfer destination does not answer,
• In step 3, the call will still be transferred even if
party to whom you want to transfer the call.
step 1, instead of tapping [Transfer], you can
tap a flexible button assigned as a BLF button
to call the transfer destination.
can simply go on-hook in step 3 instead of
tapping [Transfer Complete]. For details,
consult your administrator or dealer.
Complete], you can tap [Swap] to put the
transfer destination on hold and talk to the party
you are transferring. Tapping [Swap] again
returns you to the transfer destination.
either tapping [Transfer Cancel] or tapping the
DN flexible button for the call on hold (flashing
green slowly) returns you to the original call.
you go on-hook before the transfer destination
answers.
Three-party Conference Call
During a two-party call, you can add a third party and
establish a conference call.
1. During a call, tap [Conference] on the [Current]
tab.
2. Call the party you want to add to the call.
3. When the third party answers, tap [Start
Conference], and the three-party conference
begins.
Note
• For details about making a call, see page 51.
• If party you are adding to the call does not
answer,
on hold (flashing green slowly) returns you to
the two-party call.
Removing a Party from the
Conference
To hold one party and talk with the other
You can put one of the parties on hold and establish a
two-party call with the other party. It is also possible to
return to the three-party conference.
1. During a three-party conference call, select the
party you want to put on hold on the [Current] tab.
2. Tap [Hold].
tapping the DN flexible button of the call
Transferring without Waiting for a
Response from the Destination
(Blind Transfer)
You can transfer a call to the transfer destination
directly, without waiting a response from the
destination.
1. During a call, tap [Blind Transfer] on the
[Current] tab.
2. Enter the transfer destination’s phone number, and
then press
3. Go on-hook.
Note
• For details about making a call, see page 51.
• In step 2, tapping [Transfer Cancel] before
pressing returns you to the original
call.
.
Note
• You can
tapping [Start Conference] after step 2.
return to the three-party conference by
• If you tap [Hold] without selecting a party, both
of them are put on hold.
To disconnect one party and continue talking
with the other
You can remove one of the parties from the conference
and return to a two-party call.
1. During a three-party conference call, select the
party you want to remove on the [Current] tab.
2. Tap [Disconnect].
Ending a Conference Call
1. Go on-hook.
Document Version 2012-02 Operating Instructions 55
Page 56

Phone
Mute
During a
other party cannot hear you. You will still be able to hear
the other party, but they cannot hear you.
The unit’s microphone, the handset, and a connected
headset will all be muted.
1. Press
Note
call, you can mute the microphone so that the
.
• Pressing again cancels mute.
• While mute is active, the light on
flashes red.
Checking Voice Messages
When you have unheard voice messages, the
[Message] icon appears as
Also, the Message/Ringer lamp lights red.
1. On the Phone screen, tap [Message].
2. Follow the voice guidance.
Note
• To use this feature, the voice mail access
number must
file programming. For details, contact your
administrator or dealer.
be enabled through configuration
• If you are required to enter a password to listen
to your voice messages, use the dial keys to
enter the password. Tap [Dial] to display the
dial keys, and then enter your password
(Page 35).
• If multiple lines are configured on your unit,
select the line on which you want to check voice
messages after step 1.
on the Phone screen.
56 Operating Instructions Document Version 2012-02
Page 57

Contacts
Contacts
The Contact screen is displayed when you tap
[Contacts] on the Phone screen or tap on the
Home screen.
Adding Contacts
Adding a New Contact
You can register multiple phone numbers and e-mail
addresses to a single contact.
1. On the Phone screen, tap
2. Tap
.
3. Enter information as necessary.
Photo
Tap
The file formats that can be used are JPEG,
BMP, GIF, and PNG.
First and Last Name
Add a first and last name. Tap to add a
name prefix, a middle name, a phonetic name,
etc.
Phone
Add a phone number. Tap
phone numbers.
Email
Add an
e-mail addresses.
Postal address
Tap
Organization
Tap to add departmental information.
More
Tap to add a note, nickname, or a network
camera or web site to the contact.
to add a photo stored on an SD card.
e-mail address. Tap
to add an address.
4. When you finish entering information, tap [Done].
Note
• For details about entering text, see page
• Tap to delete the selected editable item.
• If you synchronize your contacts with a Google
account (Page 128), note the following:
– Photos in your contacts are not
synchronized.
[Contacts].
to add multiple
to add multiple
25.
– Contacts with the same name on your unit
and in your Google account are
automatically joined.
– Existing contacts and any contacts you add
will be added to the Google account.
Designating a Default Phone
Number or E-mail Address
When multiple phone numbers or e-mail addresses
have been added to a contact, a frequently used phone
number or e-mail address can be designated for use
with the "quick contact" feature to quickly contact
another party.
1. On the Phone screen, tap [Contacts].
2. On the Contact screen, tap the name of the contact.
3. Touch and hold the phone number or e-mail
address to be used as the default.
4. Tap [Make default number].
Note
• For making calls using "quick contact", see
page 51.
Deleting the Default Designation for
a Phone Number or E-mail Address
1. On the Phone screen, tap
2. On the Contact screen, tap the name of the contact.
3. Press
.
4. Tap [Edit contact].
5. Press .
6. Tap [Clear Default].
[Contacts].
Setting Favorites
setting
By
that contact’s information.
1. On the Phone screen, tap [Contacts].
2. Tap the name of the contact you want to set as a
3. Tap
Note
a contact as a favorite, you can easily access
favorite.
.
• Tapping [Favorite] on the Contact screen will
display the contacts registered as favorites
(Page 41).
Document Version 2012-02 Operating Instructions 57
Page 58

Contacts
Adding a Contact from the Call Log
You can
the call log.
1. On the Phone screen, tap [Call Log].
2. Select the [Outgoing Call] tab, the [Incoming
3. Tap the record with the phone number you want to
4. Tap [Create new contact].
5. Enter information as necessary.
6. When you finish entering information, tap [Done].
Note
Adding a Phone Number to an
Existing Contact
1. On the Phone screen, tap
2. Select the [Outgoing Call] tab, the [Incoming
3. Tap the call record with the number you want to add.
4. Tap [Add to contacts].
5. Select the contact to add the phone number to.
6. Enter information as necessary.
7. When you finish entering information, tap [Done].
add contacts from phone numbers recorded in
Call] tab, or the [Missed Call] tab.
add.
• For details about the entry items, see page 57.
[Call Log].
Call] tab, or the [Missed Call] tab.
Note
• For details about entering text, see page 25.
Note
• For details about the entry items, see page 57.
Adding Network Camera Information to a Contact
A
network camera that has been configured to connect
to this unit can be added to a contact’s information. The
video feed of a registered network camera can be
viewed during a conversation.
1. On the Phone screen, tap [Contacts].
2. On the Contacts screen, tap the contact you want
to add a network camera to.
3. Press
4. Tap [Edit contact].
5. Tap in [More].
6. Tap next to the [Network camera/Website].
7. Tap
8. Select a network camera.
9. When you finish entering information, tap [Done].
.
.
58 Operating Instructions Document Version 2012-02
Page 59

Contacts
Editing a Contact
You can edit the information registered to a contact.
1. On the Phone screen, tap [Contacts].
2. Tap the name of the contact you want to edit.
3. Press .
4. Tap [Edit contact].
5. When you finish entering information, tap [Done].
Note
• For details about entering text, see page 25.
Deleting a Contact
Deleting One Contact
You can delete a contact.
1. On the Phone screen, tap [Contacts].
2. Tap the name of the contact you want to delete.
3. Press .
4. Tap [Delete contact].
5. On the confirmation window, tap [OK].
Note
• If Google account synchronization is enabled,
deleting contacts on the unit also deletes them
from your Google account.
Deleting All Contacts
1. On the Phone screen, tap [Contacts].
2. Press
3. Tap [Delete all].
4. Tap [OK].
Note
• If Google account synchronization is enabled,
deleting contacts on the unit also deletes them
from your Google account.
.
Document Version 2012-02 Operating Instructions 59
Page 60

Contacts
Searching for a Contact
You can search for a contact within your registered
contacts.
1. On the Phone screen, tap [Contacts].
2. Tap , and enter the name of the
contact you are searching for.
3. Tap one of the search results.
Note
• Each time you enter a letter, the search results
list is refreshed.
• The search is not case-sensitive.
• You can
among registered e-mail addresses.
• For details about entering text, see page 25.
also enter an e-mail address to search
Changing How Contacts are Displayed
You can change how contacts are displayed in the
contact list.
1. On the Phone screen, tap [Contacts].
2. Press .
3. Tap [Display options].
4. Select the display method.
Only contacts with phones
Display only
is registered.
Sort list by
Sort the list by first name (First name) or last name
(Last name).
View contact names as
Select whether to display contacts’ first name first
(First name first) or their last name first (Last
name first).
contacts to whom a telephone number
60 Operating Instructions Document Version 2012-02
Page 61

Contacts
Joining/Separating Contacts
You can join the information of two separate contacts
into a single contact, and you can separate joined
contacts.
Joining Contacts
1. On the Phone screen, tap [Contacts].
2. Tap the name of one of the contacts you want to
join.
3. Press
4. Tap [Edit contact].
5. Press .
6. Tap [Join].
7. Select the other contact you want to join with the
first.
8. Tap [Done].
Note
• When you load contact information from the SD
card, if the name used already exists as a
registered contact, the contacts will be
automatically joined.
.
Saving/Loading Contact Information to/from an SD Card
You can
or load (import) contact information from an SD card.
Notice
Note
Save Format for Contact Data
The
loaded, is in the vCard™ format (file extension: .vcf).
The vCard standard is defined by the IMC (Internet Mail
Consortium). For details on the vCard standard refer to
the following web site.
http://www.imc.org/
Data in this format can be sent as an e-mail attachment
using the contact sharing feature.
save (export) contact information to an SD card
• While contacts
you cannot make or receive calls.
• For details about using an SD card, see
page 126.
contact
data that is saved to an SD card, or can be
are being imported or exported,
Separating a Contact
1. On the Phone screen, tap [Contacts].
2. Tap the name of the contact you want to separate.
3. Press
4. Tap [Edit contact].
5. Press .
6. Tap [Separate].
7. Tap [OK].
.
vCard format example (for one contact)
BEGIN:VCARD
VERSION:2.1
N:White;Andy;;;
FN:Andy White
TEL;HOME;FAX:000-000-0000
EMAIL;HOME:andy@st.org
URL:http//www.matu.net/
URL:http//www.matu.or.jp
SOUND;X-RINGTONE;NUM:1
END:VCARD
Notice
• When editing vCard files on your computer
using a text editor, be sure to save the file using
the UTF-8 character encoding.
Saving to an SD Card
1. On the Phone screen, tap [Contacts].
2. On the Contacts screen, press
3. Tap [Import/Export].
4. Tap [Export to SD card].
.
Document Version 2012-02 Operating Instructions 61
Page 62

Contacts
5. On the [Confirm export] screen, tap [OK].
Note
• Tapping [Cancel] returns you to the Contacts
screen.
Loading from an SD Card
1. On the Phone screen, tap [Contacts].
2. On the Contacts screen, press .
3. Tap [Import/Export].
4. Tap [Import from SD card].
5. On the [Confirm import
back up the data.
6. Tap [OK].
7. On the [Select vCard file] screen, select an import
type.
Import one vCard file
Import one specified file.
Import multiple vCard files
Select multiple files and import them.
Import all vCard files
Import all files.
8. Tap [OK].
9. On the [Select vCard file] screen, select the files
to import.
10. Tap [OK].
Note
• Tapping [Cancel] returns you to the Contact
screen.
• If [Import all vCard files] is selected in step
steps 9 and 10 are omitted.
• If there is only 1 file on the SD card, steps 7
through 10 are omitted.
• If you have registered a Google account, any
contacts you import from an SD card are
automatically added to your Google account.
• For details about registering a Google account,
see page 128.
] screen, select whether to
7,
Sending Contact Information as an E-mail Attachment
You can send contact information as an e-mail
attachment.
Notice
• If an e-mail account has not been set up, first
start the
account (Page 81).
Sending all contact information as an e-mail
attachment
1. On the Phone screen, tap [Contacts].
2. Press
3. Tap [Import/Export].
4. Tap [Share visible contacts].
5. When the Email application has started, enter the
recipient’s address, a subject, and a message.
6. Tap [Send].
Note
• For details about entering text, see page 25.
Sending
attachment
1. On the Phone screen, tap [Contacts].
2. Tap the contact whose information you want to
send.
3. Press
4. Tap [Share].
5. When the Email application has started, enter the
recipient’s address, a subject, and a message.
6. Tap [Send].
Note
• For details about entering text, see page 25.
Email application and set up an e-mail
.
one contact’s information as an e-mail
.
62 Operating Instructions Document Version 2012-02
Page 63

Assigning Ringtones to Specific Contacts
You
can
assign different ringtones to specific contacts.
1. On the Phone screen, tap [Contacts].
2. On the Contacts screen, tap the name of the contact
to which you want to assign a ringtone.
3. Press
4. Tap [Options].
5. Tap [Ringtone].
6. Select a ringtone on the [Ringtone] screen.
7. Tap [OK].
Note
you
• If
specify a ringtone that is stored on an SD
card and the SD card is removed, ringtone 1 will
be used in place of the specified ringtone. When
the SD card is re-inserted, the previously
specified ringtone will be used.
.
Contacts
Document Version 2012-02 Operating Instructions 63
Page 64

Network Camera
Network Camera
On the
Viewer.
Note
Home screen, tap
For up-to-date information about network cameras
that have been tested with this unit, refer to the
following web site:
http://www.panasonic.com/sip (for
States)
http://panasonic.net/pcc/support/sipphone (for users
in Canada)
• To view
unit, the network camera must be configured to
use H.264 as its video codec.
a network camera’s video feed from this
• Depending on the camera model, some
operations may not be available.
Registering a Network Camera
You can register up to 16 network cameras connected
to the network.
1. On the Home screen, tap
2. In Network Camera Viewer, press .
3. Tap [Camera Registration].
4. In the [Camera Registration] list, tap the number
of the entry you want to register the camera in.
5. Enter the necessary information.
Camera Name
Specify the camera’s name. You can enter up
to 20 characters.
Camera Address
Enter the camera’s IP address or FQDN (Fully
Qualified Domain Name).
Port No.
User ID
*1
Enter the network camera’s port number (1 to
65535).
The factory default value is 80.
the
Enter
the network camera (max. 32 alpha-numeric
characters).
*1
user name to use when connecting to
to start Network Camera
users in the United
.
Password
Enter the password to use when connecting to
the network camera (max. 32 alpha-numeric
characters).
Paging No.
Enter the phone number associated with the
camera (max. 32 characters).
Position of image
Specify
Network Camera Viewer. This unit supports
VGA and 720p. If the network camera's video
feed is currently being received,
indicates the current resolution (VGA or 720p).
Stream
If the camera is configured to output multiple
streams, select which stream from the video
camera to view (Stream 1/Stream 2). For
details, refer to your camera’s documentation.
*1
Required item.
the crop area for the image displayed in
6. When you have finished entering the necessary
items, tap [OK].
Note
• If a network camera is registered to a contact,
you can view the video feed from the network
camera while
(Page 58).
you are on a call with that contact
• In the [Camera Registration] list, a check mark
is displayed on numbers to which a camera is
already registered. The camera’s name is also
displayed, if one was specified.
• Tapping [Cancel] returns you to the [Camera
Registration] list.
• For details about entering text, see page 25.
64 Operating Instructions Document Version 2012-02
Page 65

Network Camera
Selecting a Network Camera
1. On the Home screen, tap .
2. In Network Camera Viewer, press .
3. Tap [Camera Select]
4. Tap a camera’s name in the [Camera Select] list.
5. Tap [Close].
Note
• If a name is not specified for a camera, a
number is displayed in the [Camera
Registration] list instead (e.g., Camera 1).
• The next time you start Network Camera
Viewer, the video feed of the camera that was
selected the previous time is displayed.
.
Controlling a Network Camera
Changing the View Area
1. On the Home screen, tap
2. Swipe across the network camera’s video-feed
display.
.
Note
• If you swipe quickly, the view may continue to
move even after you release your finger.
Zooming In and Out
1. On the Home screen, tap
2. In Network Camera Viewer, tap (zoom in) or
(zoom out).
.
Document Version 2012-02 Operating Instructions 65
Page 66

Network Camera
Centering the View on a Tap
1. On the Home screen, tap .
2. Tap the
display where you want to center the view.
Calling a Phone Number Associated with a Camera
You can call a phone number that is associated with a
network camera, called a paging number. The number
is dialed from Network Camera Viewer while the
camera’s video feed is being displayed. The Phone
screen is not displayed.
1. On the Home screen, tap
2. In Network Camera Viewer, tap .
3. When you hear the confirmation tone, or the other
party answers, begin speaking.
4. To end the call, press .
Note
• For details about registering a paging number,
see page 64.
.
Returning the View to Home Position
(set in the camera)
1. On the Home screen, tap .
2. In Network Camera Viewer, tap .
Note
• The zoom and brightness settings are also
returned to their "home" settings.
66 Operating Instructions Document Version 2012-02
Page 67

Network Camera
Switching Automatically among Multiple Cameras
You can have the unit cycle through the registered
network cameras and display each video feed in turn.
1. On the Home screen, tap .
2. In Network Camera Viewer, press .
3. Tap [Camera Select]
4. In the [Camera Select] list, tap [Sequential].
5. Tap [Close].
Note
• When automatic
selected network camera’s video feed is
displayed first, and then video feeds are
displayed in the order in which cameras are
listed in the [Camera Select] list.
• Selecting a network camera in the [Camera
Select] list ends automatic switching.
• If you touch the display, automatic switching will
temporarily stop on the current video feed. To
resume switching, tap [Sequential] again.
While switching is temporarily stopped, doing
other operations such as selecting a network
camera ends automatic switching.
Setting the Switching Interval
You can change the length of time video feeds are
displayed before being switched.
1. On the Home screen, tap
2. In Network Camera Viewer, press .
3. Tap [Camera Select]
4. Press
5. Tap [Sequential Interval].
6. Tap the desired length of time.
.
switching begins, the currently
.
.
.
Using Network Camera Presets
You can select a viewing position that has been
registered
These are called "presets".
1. On the Home screen, tap
2. In Network Camera Viewer, press .
3. Tap [Preset].
4. After you tap [Preset], select the camera position
5. Tap [Close].
Note
Adding a Preset to Your Favorites
1. On the Home screen, tap .
2. In Network Camera Viewer, press
3. Tap [Preset].
4. In the [Preset] list, touch and hold the preset you
5. Tap [Add to Favorites].
Note
Deleting from Your Favorites
in
the network camera’s settings beforehand.
.
you want to view.
• You can view all the registered presets by
scrolling the list up and down.
• Tapping [Favorite] in step 4 displays the
presets registered as favorites.
.
want to add to your favorites.
• Tapping [Cancel] returns you to the [Preset]
list.
Note
• The factory default value is [10 seconds].
• If automatic switching is already enabled, you
can skip step 4.
Document Version 2012-02 Operating Instructions 67
1. On the Home screen, tap .
2. In Network Camera Viewer, press .
3. Tap [Preset].
4. In the [Preset] list, tap [Favorite].
5. Touch and hold the preset you want to delete from
your favorites.
6. Tap [Remove From Favorites].
Note
• Tapping [Cancel] returns you to the [Preset]
screen.
Page 68

Network Camera
Editing a Preset’s Name
1. On the Home screen, tap
2. In Network Camera Viewer, press .
3. Tap [Preset].
4. In the [Preset]
name you want to edit.
5. Tap [Edit Preset Name].
6. Edit the preset’s name as necessary, and then tap
[OK].
Note
• Tapping [Cancel] returns you to the [Preset]
screen.
• For details about entering text, see page 25.
list, touch and hold the preset whose
Deleting a Preset’s Name that You
Edited
1. On the Home screen, tap .
2. In Network Camera Viewer, press .
3. Tap [Preset].
4. In the [Preset]
name you want to delete.
5. Tap [Delete Preset Name].
list, touch and hold the preset whose
.
Configuring Display Properties
You can adjust the brightness of the network camera
and set up automatic mode.
Adjusting the Brightness of the Picture
1. On the Home screen, tap
2. In Network Camera Viewer, press .
3. Tap [Camera Settings].
4. Tap [Brightness].
5. Tap (brighter) or (darker) to adjust the
brightness.
6. Tap [Close] to save the setting.
Note
• Tapping [Reset] in step 5
the value specified in the camera’s settings.
Automatic Mode
.
returns the setting to
Note
• Deleting a preset’s name returns it to its default
value (Preset).
• Tapping [Cancel] returns you to the [Preset]
screen.
Auto Pan
The camera can be set to pan horizontally (left–right)
over its entire viewing range repeatedly.
1. On the Home screen, tap
2. In Network Camera Viewer, press .
3. Tap [Camera Settings].
4. Tap [Auto Mode].
5. On the [Auto Mode] screen, tap [Auto Pan].
Note
• Tapping [Cancel] returns you to the [Camera
Settings] screen.
.
Preset Sequence
You can have the camera cycle through and display
viewing positions registered as presets.
1. On the Home screen, tap
2. In Network Camera Viewer, press .
3. Tap [Camera Settings].
4. Tap [Auto Mode].
.
68 Operating Instructions Document Version 2012-02
Page 69

Network Camera
5. On the [Auto Mode] screen, tap [Preset
Sequence].
Note
• Tapping [Cancel] returns you to the [Camera
Settings] screen.
Automatic Tracking
You can
object.
1. On the Home screen, tap
2. In Network Camera Viewer, press .
3. Tap [Camera Settings].
4. Tap [Auto Mode].
5. On the [Auto Mode] screen, tap [Auto Tracking].
Note
have the camera automatically follow a moving
.
• Tapping [Cancel] returns you to the [Camera
Settings] screen.
Canceling Automatic Mode
1. On the Home screen, tap
2. In Network Camera Viewer, press .
3. Tap [Camera Settings].
4. Tap [Auto Mode].
5. On the [Auto Mode] screen, tap [Off].
Note
• Changing the viewing direction in Network
Camera Viewer, such as by swiping or tapping
also cancels automatic mode.
• If another user accesses the same network
camera and cancels automatic mode or
changes the
will be canceled for everyone.
viewing direction, automatic mode
.
Receiving Alarms from Network Cameras
When an alarm from a network camera (movement
detection, error, abnormality, etc.) is detected, this unit
can
display
the alarm.
Configuring an Alarm Notification
1. On the Home screen, press
2. Tap [Settings].
3. Tap [Network Camera]
4. Tap [Alarm notification].
5. Select a notification method:
Pop up live screen
Pop up live screen or status bar notification
Status bar notification
6. Tap [OK].
Note
• To prevent the Network Camera Viewer from
• The video
• The video feed displayed in Network Camera
the video feed from the camera that issued
.
.
A notification alarm will sound, and the video
feed from the camera that issued the alarm will
be displayed.
A notification alarm will sound, and then one of
the following will occur:
a. If you are viewing a video feed from any
camera, the camera name +
displayed in the status bar.
will be
b. Otherwise, the video feed from the camera
that issued the alarm will be displayed.
A notification alarm will sound, the camera
name +
switching too frequently between video feeds
when several alarms are issued in a short time
span, an alarm disarm time is set (default: 2
seconds). For details about the alarm disarm
time, see page 125.
is detected is the current video feed, not the
feed from the time the alarm was issued.
Viewer when an alarm is issued does not
automatically close, even after some time has
passed.
will be displayed in the status bar.
feed that is displayed when an alarm
Document Version 2012-02 Operating Instructions 69
Page 70

Network Camera
• If you are viewing the video feed from a camera
when it issues an alarm, only a notification
alarm will sound.
• Notifications on the Notification screen are
displayed in order, newest first. New
notifications from a network camera overwrite
previous
the most recent notification from any given
camera is displayed.
notifications from that camera, so only
• If an error occurs regarding the alarm port
number, such as a port number conflict,
displayed in
alarm port setting, see page 125.
the status bar. For details about the
Disabling an Alarm Notification
is
1. On the Home screen, press
2. Tap [Settings].
3. Tap [Network Camera].
4. Tap [Alarm notification].
5. Select [Off].
6. Tap [OK].
.
70 Operating Instructions Document Version 2012-02
Page 71

Built-in Applications
This unit comes with a number of built-in applications you can use.
Starting an Application
1. On the Application screen, tap the icon of the application you want to start.
Clock
The unit can be used as a desktop alarm clock.
Displaying the Date and Time
When you start the Clock application, the current date and time are displayed prominently.
1. On the Application screen, tap
.
Built-in Applications
Buttons and icons displayed on the Clock application’s main screen
Displays the alarm list
Displays the Gallery application (Page 85)
Displays the Music application (Page 87)
Returns to the Home screen
Dims the display. The display returns to its normal brightness at the next user action, such
as touching the screen or lifting the handset.
Note
• On the Clock application’s main screen, the day and time of the next alarm, if any is set, is displayed
in the upper-left area. Tapping this displays the list of alarms.
Setting an Alarm
When an alarm is set, is displayed in the status bar, and the alarm notification screen will be displayed
at the time specified.
Adding a new alarm
1. On the Application screen, tap
2. Tap
3. Tap [Add alarm], and then specify the time for the alarm.
4. Tap [Set].
Document Version 2012-02 Operating Instructions 71
.
.
Page 72

Built-in Applications
5. Specify the alarm tone or other items as necessary.
6. Tap [Done].
Editing an alarm
1. On the Application screen, tap
2. Tap .
3. Tap the alarm you want to edit.
4. Change the time, alarm tone or other items as necessary.
5. Tap [Done].
Turning an alarm on or off
1. On the Application screen, tap .
2. Tap .
3. Tap the icon next to the alarm you want to turn on or off.
•
• : The alarm is on; tap this to turn it off.
Note
• On the [Alarms] screen (displayed after tapping ), tapping displays the Clock application’s
: The alarm is off; tap this to turn it on.
main screen.
.
Deleting an Alarm
1. On the Application screen, tap .
2. Tap .
3. Tap the alarm you want to delete.
4. Tap [Delete].
5. Tap [OK].
Note
• On the [Alarms] screen (displayed after tapping ), tapping displays the Clock application's
main screen.
Stopping an Alarm
At the specified time, the alarm’s tone will sound and the alarm notification screen will be displayed.
1. On the alarm notification screen, tap [Dismiss].
Activating and Canceling Snooze
Activating Snooze
When snooze is activated, the alarm will sound again after a specified length of time.
1. On the alarm notification screen, tap [Snooze].
72 Operating Instructions Document Version 2012-02
Page 73

Canceling Snooze
1. Tap the status bar.
2. On the notification screen, tap [Alarm (snoozed)].
Using Alarm Clock’s Menu
1. On the Application screen, tap .
2. Tap .
Built-in Applications
3. Press
You can configure the following settings:
Desk clock
Add alarm
Settings
.
Alarm volume
Snooze duration
Volume button
behavior
Displays the clock over the entire display.
Add and set a new alarm.
Set the alarm’s volume.
Specify the length of time before the alarm sounds again when
you tap [Snooze] on the alarm notification screen.
Select the action that occurs when you press the volume keys
( , ) while the alarm is sounding.
You can select [None], [Snooze], or [Dismiss].
Document Version 2012-02 Operating Instructions 73
Page 74

Built-in Applications
Browser
You can browse and view web pages.
Displaying a Web Page in Browser
1. On the Application screen, tap
2. Tap the URL input box, and then enter a URL or some text to search the web for.
3. Tap [Go].
Note
• If you
• You can use
• For details about entering text, see page 25.
entered search text in step 2, select the web page you want to view from the search results that
are displayed.
is displayed at the bottom of the screen when you scroll.
.
to enlarge ( ) or shrink ( ) the text on the screen.
Using Bookmarks
Adding a Bookmark
1. On the Application screen, tap
2. Display the web page that you want to bookmark.
3. Press .
4. Tap [Bookmarks].
5. Tap [Add].
6. Change the title of the bookmark as necessary, and then tap [OK].
.
Displaying a Web Page from the Bookmark List
1. On the Application screen, tap .
2. Press .
3. Tap [Bookmarks].
4. Tap the web site you want to view.
Opening and Closing Windows
Opening a New Window
1. On the Application screen, tap
2. On the web page currently displayed in the browser, touch and hold a link to a page you want to view.
3. Tap [Open in new window]
74 Operating Instructions Document Version 2012-02
.
.
Page 75

Closing a Window
1. While viewing a web page in the browser, press .
2. Tap [Windows].
3. Tap
in the row of the window you want to close.
Setting the Home Page
You can set which web page is displayed when you open a new window.
1. On the Application screen, tap
2. Press .
3. Tap [More].
4. Tap [Settings].
5. Tap [Set home page].
6. Enter the URL of the web page you want to set as the home page.
7. Tap [OK].
.
Built-in Applications
Going Back to the Previous Page
You can return to the web page you were viewing before the current web page.
1. While you are viewing a page in Browser, press
Note
• To display
[Forward].
the web page you were viewing before going back a page, press
.
Using Browser’s Menus
Using the Menu Displayed by Touching and Holding a Link
1. On the Application screen, tap
2. While viewing a page in Browser, touch and hold a link.
The following actions are available:
Open
Open in new window
Bookmark link
Save link
Share link
*1
.
Open the link.
Open the link in a new window.
Bookmark the web page pointed to by the link.
Save the contents of the music, URL, document, etc. that is
pointed to by the link to an SD card.
Send the URL pointed to by the link in an e-mail message.
, and then tap
Copy link URL
Save image
Document Version 2012-02 Operating Instructions 75
Copy the URL pointed to by the link.
Save the image pointed to by the link to an SD card. This
action is available only if the link points to an image file.
Page 76

Built-in Applications
View image
*1
This item is displayed only if an e-mail account is configured. (To configure an e
Display the image pointed to by the link. This action is
available only if the link points to an image file.
-mail account, see page 81.)
Using the Menu Displayed by Pressing the Menu Button
1. On the Application screen, tap
2. While viewing a page in the web browser, press .
The following actions are available:
New window
Bookmarks
Windows
Stop
Refresh
Forward
.
Display a new window.
The bookmark screen is displayed where you can add new
bookmarks and display bookmarked pages.
Display a list of currently open windows.
Stop loading the web page. This action is available only while
a page is loading.
Reload the information for the current web page. This action
is available only after a web page has finished loading.
Go forward one page when you are viewing a page displayed
by pressing
.
Add a bookmark for the current web page.
Search for text within the current web page.
Select and copy text on the current web page.
Display information about the current web page.
Send the URL of the current web page in an e-mail
More
Add bookmark
Find on page
Select text
Page info
Share page
*1
View a list of files (images, music, URLs, documents, etc.)
Downloads
you downloaded from web sites using the [Save link]
[Save image] commands.
Settings
*1
This item is displayed only if an e-mail account is set up. (To set up an e-mail account, see page
Configure settings such as text size and security.
message.
or
81.)
76 Operating Instructions Document Version 2012-02
Page 77

Calculator
You can use the calculator application to perform mathematic calculations.
1. On the Application screen, tap .
Note
• Touching and holding in the calculation field shows editing options such as [Select text], [Copy all],
and [Paste].
• Tapping [CLEAR] deletes the character in front of the cursor.
Touching and holding [CLEAR] deletes the entire calculation.
Using Calculator’s Menu
1. On the Application screen, tap .
2. Press .
The following actions are available:
Built-in Applications
Clear history
Advanced panel
Basic panel
Delete the calculation history.
Switch from the basic arithmetic pad to the advanced function pad.
Switch from the advanced function pad to the basic arithmetic pad.
Document Version 2012-02 Operating Instructions 77
Page 78

Built-in Applications
Calendar
You can add and manage events.
Events
a notification set for an event is activated,
Displaying Calendar
1. On the Application screen, tap .
2. Press .
3. Tap [Day], [Week], [Month], or [Agenda] to change the view.
Note
that
you have registered are displayed in the Schedule display on the Phone screen (Page 35). When
is displayed in the status bar.
• Pressing and then tapping [Today]
you to quickly change the view to display today.
allows
• Tapping a day in Month view displays either Day view or Agenda view, depending on whichever was
displayed more recently.
• If Google account synchronization is enabled, tapping [More] ® [Calendars] after step 2 displays the
Google account you are synchronizing with. You can switch whether to display and synchronize the
calendar by tapping the account:
Synchronize the calendar and display the synchronized calendar’s events.
Synchronize the calendar but do not display the synchronized calendar’s events.
Do not synchronize the calendar and do not display events from the Google
account’s calendar.
Adding an Event
1. On the Application screen, tap .
2. Press .
3. Tap [More].
4. Tap [New event].
5. Enter a name, the date and time, the location, details, etc. for the event.
6. In [Reminders], select how long before the start of the event you want to be notified of the event.
7. Tap [Done].
Note
• In step 6, tapping allows you to add additional reminders.
• For details about entering characters, see page 25.
• If you synchronize your calendar with a Google account (
you add will be added to the Google account.
78 Operating Instructions Document Version 2012-02
Page 128), existing events and any events
Page 79

Checking an Event
Built-in Applications
1. On the Application screen, tap
2. Press .
3. Tap [Day], [Week], [Month] or [Agenda] to change the view.
4. Tap the event you want to check.
.
Editing an Event
1. On the Application screen, tap .
2. Press .
3. Tap [Day], [Week], [Month] or [Agenda] to change the view.
4. Tap the event you want to edit.
5. Press .
6. Tap [Edit event].
7. Enter the new information as necessary, and then tap [Done].
Note
• For details about entering text, see page 25.
Deleting an Event
1. On the Application screen, tap .
2. Tap .
3. Tap [Day], [Week], [Month] or [Agenda] to change the view.
4. Tap the event you want to delete.
5. Tap .
6. Tap [Delete event].
7. Tap [OK].
Note
• If Google account synchronization is enabled, deleting events on the unit also deletes them from the
Google account.
Canceling a Notification/Activating Snooze
When a notification is set for an event,
Follow the procedure below to cancel the notification or to activate snooze.
1. Tap the status bar.
2. Tap the notification.
3. Tap either [Dismiss all] or [Snooze all].
Dismiss all
Cancels the notifications of all events.
is displayed in the status bar on the specified date and time.
Snooze all
Document Version 2012-02 Operating Instructions 79
The notifications of all events will be reactivated after 5 minutes.
Page 80

Built-in Applications
Configuring Calendar’s Settings
1. On the Application screen, tap
.
2. Press .
3. Tap [More].
4. Tap [Settings].
5. Configure the settings as necessary.
Select the notification method.
Alert:
and the Notification screen is also displayed. If a notification ringtone is
Set alerts &
Select notification
sound
Default reminder time
notifications
set, it is played.
Status bar notification: At the specified date and time, is displayed
in the status bar. If a notification ringtone is set, it is played.
Off: Notifications are not performed.
Select the ringtone to be played when a notification occurs.
Specify the number of minutes notifications should occur before the
beginning of an event.
At the specified date and time,
is displayed in the status bar,
80 Operating Instructions Document Version 2012-02
Page 81

You can compose e-mail messages. You can also attach photos to messages.
Setting Up an E-mail Account
Built-in Applications
1. On the Application screen, tap
.
2. Enter an e-mail address and its associated password.
3. Tap [Next].
4. Following the on-screen instructions, configure the settings.
Note
• For details about entering text, see page 25.
Creating and Sending a New E
1. On the Application screen, tap
.
-mail Message
2. Press .
3. Tap [Compose].
4. Enter the recipient, subject, and body.
5. Tap [Send].
Note
• You can create an e-mail message from the Contacts screen. On the Contacts screen, select the
contact you want to send the e-mail to, and then tap the e-mail address. When the message
composition screen
address using the contact search box (Page 60).
is displayed, follow steps 4 and 5 above. It is also possible to search for an e-mail
• Entering the first few characters of an e-mail address in the recipient field displays e-mail addresses
registered in your contacts that match the entered text.
• Tapping the icon next to the To, Cc, or Bcc fields lets you select an address from your contacts.
• If you have configured multiple accounts and you want to send an e-mail from an account other than
your default account, select an account after step 1.
• To add a Cc or Bcc field, in step 4 press
• To attach a file, in step 4 press , tap [Add attachment], and then select a file. The only
files you can attach are image files (JPEG, GIF, PNG, BMP). Use the Music application to attach an
audio file (Page 88), and use Contacts to attach contact information (Page
The maximum size of a file you can send or receive as an attachment is 5 MB.
• Use only half-width alphanumeric characters in the file names of files you attach to e-mail messages.
Using other characters (such as full-width characters used in Japanese) may result in the file names
becoming garbled.
• For details about entering text, see page 25.
, and then tap [Add Cc/Bcc].
62).
Notice
• Do not
those files.
Document Version 2012-02 Operating Instructions 81
attach copyright-protected graphic files to e-mail messages if you do not hold the copyrights to
Page 82

Built-in Applications
Reading E-mail
1. On the Application screen, tap
.
2. Tap the e-mail message you want to read.
Note
• If you have configured multiple accounts, select an account after step 1.
• To manually receive e
• You can tap
while viewing your inbox, and then tapping [Accounts] ® [Starred] (Page 83).
-mail, tap [Load more messages].
to mark a message as starred. You can view a list of starred messages by pressing
Using the Menu while Viewing a Message
While viewing an e-mail message, tapping displays the following actions:
Delete
Forward
Reply
Reply all
Mark as unread
Move the current e-mail message to the trash.
Forward the current e-mail message.
Reply to the current e-mail message.
Reply to the sender and all recipients of the current e-mail message other than
yourself.
Mark the current e-mail message as unread.
Viewing an Attachment
1. On the Application screen, tap
2. Tap the e-mail message you want to read.
3. Tap [Open], located next to the attachment.
Saving an Attachment to an SD Card
You can save attachments in received messages to an SD card.
1. On the Application screen, tap
2. Tap the e-mail message you want to read.
3. Tap [Save], located next to the attachment.
Note
• When the
file has been saved, the message [Attachment saved to SD card as "****.***".] is displayed.
.
.
Forwarding an E-mail Message
1. On the Application screen, tap
2. Tap the e-mail message you want to forward.
3. Press , and then tap [Forward].
4. Enter the address you want to forward the message to.
5. Tap [Send].
.
82 Operating Instructions Document Version 2012-02
Page 83

Note
• Attachments cannot be forwarded. When forwarding an e-mail message that has an attachment, first
save the attachment to an SD card, and then attach it in step 4 to the message you are forwarding.
details about saving an attachment to an SD card, see page 82. For details about attaching a file
(For
to an e-mail message, see page 81.)
Displaying a List of Folders
You can display and view the contents of folders such as your inbox, sent messages, drafts, etc.
1. On the Application screen, tap
.
2. Press .
3. Tap [Folders].
Note
• If you have configured multiple accounts, you must select an account after step 1.
Deleting All Messages in the Trash
Built-in Applications
IMPORTANT
• Deleting all messages from the trash permanently removes them from the unit. This action cannot be
undone.
1. On the Application screen, tap .
2. Press .
3. Tap [Folders].
4. Press .
5. Tap [Empty trash].
6. Tap [OK].
Note
• If you have configured multiple accounts, you must select an account after step 1.
Adding an Account
1. On the Application screen, tap .
2. Press .
3. Tap [Accounts].
4. Press .
5. Tap [Add account].
6. Enter an e-mail address and its associated password.
7. Tap [Next].
8. Follow the on-screen instructions.
Note
• If you have configured multiple accounts, steps 2 to 3 are unnecessary.
• For details about entering text, see page
Document Version 2012-02 Operating Instructions 83
25.
Page 84

Built-in Applications
Deleting an Account
1. On the Application screen, tap
.
2. Press .
3. Tap [Accounts].
4. Touch and hold the account you want to delete.
5. Tap [Remove account].
6. Tap [OK].
Note
• If you have configured multiple accounts, steps 2 to 3 are unnecessary.
Changing Account Settings
1. On the Application screen, tap
2. Press .
3. Tap [Accounts].
4. Touch and hold the account you want to change.
5. Tap [Account settings].
You can change the following settings:
Account name
Your name
.
Change the account name.
Change the sender name.
Signature
Email check frequency
Default account
Email notifications
Select ringtone
Incoming settings
Outgoing settings
Note
Enter some text to append to the end of e-mail messages, such as your
name.
Specify whether to automatically check for new messages. Also, if you
enable automatic checking, specify the frequency at which to check.
Set this account as the preferred account.
Select whether to display a notification in the status bar when a new
message arrives.
If you enabled [Email notifications], select the ringtone to play when a
new
message
specified for [Notification ringtone] (Page 117).
Configure the incoming mail server settings.
Configure the outgoing mail server settings.
• If you have configured multiple accounts, steps
arrives. This ringtone has a higher precedence than the one
2 to 3 are unnecessary.
84 Operating Instructions Document Version 2012-02
Page 85

Gallery
You can display and edit (rotate, crop, delete) images saved on an SD card.
Displaying an Image
Built-in Applications
1. On the Application screen, tap
2. Select an image folder.
3. Tap the image you want to view.
.
Icons Displayed while Viewing an Image
perform the following operations by using the icons that are displayed while you are viewing an image.
can
You
Delete the current image.
Display the previous image in the image folder.
Display the next image in the image folder.
Zoom in on ( ) and out of ( ) the current image.
Viewing Images as a Slideshow
1. On the Application screen, tap .
2. Touch and hold the folder that contains the images you want to view as a slideshow.
3. Tap [Slideshow].
Note
• Tapping the display during a slideshow ends the slideshow.
Deleting an Image
IMPORTANT
• Deleted images cannot be restored from the trash.
1. On the Application screen, tap .
2. Select an image folder.
3. Tap the image you want to delete.
4. Tap .
5. Tap [OK].
Document Version 2012-02 Operating Instructions 85
Page 86

Built-in Applications
Using Gallery’s Menu
When you press
Image Folder View
Settings
Thumbnail View
Slideshow
Multiselect
Settings
Single Image View
Rotate
Delete
Crop
while viewing an image, the following actions are available.
Configure various settings, such as the display size for thumbnail
images and slideshow settings.
Play a slideshow.
Select multiple images, which you can then delete.
Configure various settings, such as the display size for thumbnail
images and slideshow settings.
Rotate the current image to the right or to the left.
Delete the current image.
Crop the current image.
Details
Slideshow
Settings
Display details about the current image.
Begin a slideshow starting with the current image.
Configure various settings, such as the display size for thumbnail
images and slideshow settings.
86 Operating Instructions Document Version 2012-02
Page 87

Music
You can play music that was attached to an e-mail message or is saved on an SD card.
Playing Music
Built-in Applications
1. On the Application screen, tap
2. Select the [Artists], [Albums], [Songs], or [Playlists] tab.
3. Select an item as necessary, and then tap the song you want to play.
Note
• If you receive or make a call while music is playing, the music will stop automatically.
• If you start playing music during a call, normally the other party will not be able to hear it. However, if
the playback volume is loud, sound from the speaker can be picked up by the microphone, and the
other party may be able to hear the music.
.
Icons Displayed while Playing Music
You can perform the following operations by using the icons that are displayed while you are playing music.
Display the songs in the current playback list.
Shuffle the songs in the current playback list.
Loop playback. Tapping this button cycles through the loop modes as follows:
[Repeating all songs.] ® [Repeating current song.] ® [Repeat is off.]
Skip to the previous song in the playback list. This button will also return you to the
start of the current song.
Pause the current song.
When a song is paused, tapping resumes playing it.
Skip to the next song in the playback list.
Pausing the Current Song
If you are viewing another screen while playing music, you can pause the music from the status bar.
1. Tap the status bar.
2. Tap the song on the notification screen.
3. Tap
.
Making a Playlist
You can organize songs you like by creating playlists.
1. On the Application screen, tap
2. Select the [Artists], [Albums], [Songs], [Playlists], or [Now playing] tab.
Document Version 2012-02 Operating Instructions 87
.
Page 88

Built-in Applications
3. Select an item as necessary, and then touch and hold a song you want to add to a playlist.
4. Tap [Add to playlist].
5. Select the playlist you want to add the song to.
Note
• If you select [New] in step 5, enter a name for the playlist.
Editing a Playlist
1. On the Application screen, tap
.
2. Tap the [Playlists] tab.
3. Touch and hold the playlist you want to edit.
The following actions are available:
Play
Delete
Rename
Edit
Note
Begin playing the selected playlist.
Delete the selected playlist.
Change the name of the selected playlist.
Set the period for which items are displayed in [Recently added].
• If the only available playlist is [Recently added], then some actions will not be available.
Search for Related Content in Browser
A search will be performed in Browser based on the selected song
1. On the Application screen, tap
.
2. Select the [Artists], [Albums], [Songs], [Playlists], or [Now playing] tab.
3. Touch and hold a song title or item as necessary.
4. Tap [Search].
5. Tap [Browser].
’s artist, album, and title.
Note
• If you selected [Now playing] in step 2, step 4 is omitted.
Using the Music Application
1. On the Application screen, tap
’s Menu
.
2. Select the [Artists], [Albums], [Songs], [Playlists], or [Now playing] tab.
3. Press .
The following actions are available:
Play all
Party shuffle
88 Operating Instructions Document Version 2012-02
Play the songs in the selected list.
A list will be created from the songs on the SD card, and the songs will be
played in a random order. You may change the order of songs, and add
and remove songs as you like.
Page 89

Built-in Applications
Shuffle all
Library
Add to playlist
Set to ringtone list
Delete
Share
Note
Play through all the songs on the SD card in a random order.
Display the screen that was displayed before you started playing music.
Add the selected song to a playlist.
Add the selected song as a selection for incoming ringtones (Page 98).
Delete the selected song.
Send the currently playing song as an attachment to an e-mail message.
• Depending on the selected tab, some actions may not be available.
• While playing a party shuffle, tapping
songs in the list, remove songs, etc.
Notice
on the [Now playing] tab lets you change the order of
• Do not attach copyright-protected music files to e-mail messages if you do not hold the copyrights to
those files.
Document Version 2012-02 Operating Instructions 89
Page 90

Advanced Settings
Advanced Settings
Forward/Do Not Disturb
Enabling
from ringing at your unit when you are away from your
seat or otherwise unavailable to answer calls.
Forwarding allows you to have incoming calls
forwarded to a specified destination when you are away
from your seat.
1. Tap the status bar.
2. Tap [Forward/DND].
3. Select the setting to configure.
All
Busy
No Answer
Do Not Disturb
4. When you have finished, tap [OK].
Not Disturb (DND) prevents incoming calls
Do
Forward all calls.
If you select this setting, you must also specify
the number to forward calls to.
Forward calls that arrive while you are on a call.
If you enable this setting, you must also specify
the number to forward calls to.
Forward calls after you do not answer for a
specified length of time.
If you enable this setting, you must also specify
the number to forward calls to and the number
of times the unit rings before the call is
forwarded.
Prevent calls from ringing at your unit.
Canceling FWD/DND
1. Tap the status bar.
2. Tap [Forward/DND].
3. Deselect the check box.
4. Tap [OK].
Note
• FWD/DND can be enabled only when the unit
is idle or during pre-dialing.
• If multiple lines are configured on your unit,
select the tab of the line to configure after step
2.
• You can enable multiple settings
simultaneously.
If multiple settings are enabled, the priority of
the settings is as follows:
1. Call Block, Block Anonymous Call
2. All
3. Do Not Disturb
4. Busy
5. No Answer
• You
90 Operating Instructions Document Version 2012-02
cannot enable FWD/DND on a shared line.
Page 91

Advanced Settings
Automatic Answer
Enabling Automatic Answer allows you to answer calls
without having to manually go off
useful when you use a headset.
1. Tap the status bar.
2. Tap
[Auto Answer].
3. Tap [Enable].
Note
• Automatic Answer can be enabled only when
the unit is idle or during pre-dialing.
• With Automatic Answer enabled, the unit will
automatically
during pre-dialing.
answer calls only while it is idle or
Canceling Automatic Answer
1. Tap the status bar.
2. Tap [Auto Answer].
3. Tap [Disable].
-hook. This feature is
Customizing Flexible Buttons
You
can
assign applications or telephone functions you
frequently use to flexible buttons.
Doing so allows you to access these items with one
touch and avoid multi-step procedures.
You can assign the following items to flexible buttons:
Phone function
Assign functions for making and handling phone
calls to the flexible button. For details about the
different types of phone functions, see page 92.
Applications
Assign an application to a flexible button.
Tapping the flexible button will start the specified
application.
Bookmark
Assign a web page’s URL to the flexible button.
Tapping the flexible button will start Browser and
then load the page at the specified URL.
Network Cameras
Assign a network camera to a flexible button.
Tapping the flexible button allows you to view the
video feed from the specified network camera.
Note
• Some flexible
functions assigned to them through
configuration file programming. These buttons
cannot be modified. For details, consult your
administrator or dealer.
buttons may already have phone
• If a phone function is assigned through
configuration file programming to a button to
which an application, bookmark, or network
camera had previously been assigned, the
phone function will override the previous
setting. For details, consult your administrator
or dealer.
Assigning a Function to a Flexible
Button
1. On the Phone screen, tap
2. Press .
3. Tap [Start Flexible Button Prog Mode]
4. Tap the desired key.
5. On the [Select] screen, select the function you want
to assign.
6. Follow the on-screen instructions.
.
.
Document Version 2012-02 Operating Instructions 91
Page 92

Advanced Settings
Note
• During steps 4 to 6, if you do not perform any
operations for 1 minute the unit returns to
full-screen display.
• The name and icon of the flexible button will
change according
to the function assigned to it.
• For details about entering text, see page 25.
Removing the Function Assigned to
a Flexible Button
1. On the Phone screen, tap
2. Press
.
3. Tap [Start Flexible Button Prog Mode]
4. Tap the flexible button whose function you want to
remove.
5. On the [Select] screen, tap [Clear].
Note
• During steps 4 to 5, if you do not perform any
operations for 1 minute, the unit will return to
full-screen display.
.
.
Color (State) Line Status
Green (flashing
rapidly)
Green (flashing slowly) Call on hold
Red (steady on) For a shared line, in
Red (flashing slowly) For a shared line, has a
Parameter
Incoming call
use or has a call on
private hold by another
unit
call on hold by another
unit
• Ringtone: Select the ringtone to play when a
call arrives
specified for the line through phone settings
(Page 116), this option is unavailable.
at this button. If a ringtone is already
• Phone Number: If multiple lines are configured
on your unit, select the line to associate this DN
button with. If only one line is configured, this
setting is unavailable. For details, consult your
administrator or dealer.
Phone Function Types
The following phone functions can be assigned to
flexible buttons.
When assigning a phone function, you must specify the
following three settings:
Type
The type of phone function to assign to the flexible
button (DN, One-touch, Headset, BLF).
Parameter
Specify the settings necessary for the type of phone
function.
Label name
Enter the label to display on the flexible button.
DN
Seizes the line assigned to the key, and also shows the
status of the line.
Tapping a flexible button set as a DN (Directory
Number) button answers calls arriving at that button,
retrieves calls held at that button, etc.
Color (State) Line Status
Off Idle
Green (steady on) Dialing/On a call
Note
• If a call is on private hold (red, steady on),
the
unit that put the call on hold.
cannot be retrieved except from the
call
One-Touch
Dials the number assigned to the button.
Parameter
Enter the number to dial when this button is tapped
(max. 32 characters).
Headset
Switches headset mode on or off.
Color (State) Headset Mode
Off Off
Red (steady on) On
Parameter
None
BLF
Shows the
use a flexible button set as a BLF (Busy Lamp Field)
button to call or transfer a call to the phone assigned to
the button.
status of another local phone’s line. You can
92 Operating Instructions Document Version 2012-02
Page 93

Advanced Settings
When a call arrives at the phone assigned to a BLF
button, tapping
instead of the original recipient. (This feature requires
the Direct Call Pickup setting to be specified. For
details, consult your administrator or dealer.)
Color (State) Line Status
Off Idle
Red (steady on) On a call
Red (flashing) Incoming call
Parameter
Enter the number of the local phone to monitor
(max. 32 characters).
the button allows you to answer the call
Using a Headset
To use a headset, you must enable headset mode.
Enabling Headset Mode
1. Tap the status bar.
2. Tap [Headset mode].
3. Tap [On].
Note
• You can also use a flexible button set as a
headset button to switch [Headset mode]. For
details about configuring flexible buttons, see
page 91.
• For details about connecting a headset, see
page 104.
Disabling Headset Mode
1. Tap the status bar.
2. Tap [Headset mode].
3. Tap [Off].
Making a Call Using a Headset
1. Press .
2. Enter a phone number.
3. To end the call, press .
Receiving a Call Using a Headset
1. Press .
2. To end the call, press .
Document Version 2012-02 Operating Instructions 93
Page 94

Advanced Settings
Activating the Screen Lock
When
you
activate the screen lock, you can lock access
to normal phone functions and to applications. This
feature is useful for preventing unwanted use of the unit
while you are away from your seat.
Phone numbers set beforehand as emergency
numbers can still be dialed, and calls can still be
received.
Notice
• If an unlock pattern, PIN, or password has not
been set, the screen lock cannot be activated,
so be sure to set one beforehand (Page 118).
1. Tap
[Screen lock now] in the application dock.
• The screen lock will be activated and the screen
saver will start.
Note
• To dial an emergency number, see page 52.
Unlocking the Screen Lock
1. Touch the display or key sheet, or press an
alphanumeric or symbol key on an attached USB
keyboard.
Or, lift the handset off its cradle.
2. Trace
Note
the unlock pattern, enter the PIN, or enter the
password.
• The lock is activated according to the method
you selected for [Set up screen lock] in the
[Security] settings (Page 118).
• If you selected [Pattern] in the lock settings,
trace the unlock pattern in a single stroke
without lifting your finger off the display.
• If the unlock pattern, PIN, or password is input
incorrectly 5 times in a row, a message will be
displayed, and
unit for 30 seconds.
you will not be able to unlock the
94 Operating Instructions Document Version 2012-02
Page 95

455
pixels
800 pixels
Approx. 39 pixels Approx. 39 pixels
Logo
800 pixels
45 pixels
160 pixels
45 pixels
240 pixels
455
pixels
Customizing the Phone
Customizing the Phone
Changing the Wallpaper
You can change the wallpaper (background image) of
the Home screen and the Phone screen.
Changing the Home Screen
Wallpaper
1. On the Home screen, press
2. Tap [Wallpaper].
3. Select the image to set as the wallpaper.
Select built-in wallpaper
Select from images included on the unit.
Select wallpaper from Gallery
Select from images saved on an SD card.
4. Do one of the following, depending on your
selection:
Select built-in wallpaper
Tap [Set wallpaper].
Select wallpaper from Gallery
Move the border and change the crop size as
necessary, and then tap [Save].
Note
• The size of the wallpaper is 800
On the Home screen, the wallpaper will be
displayed in the area indicated by the dotted line
in the following figure:
.
´ 455 pixels.
• The following file formats can be used for the
Home screen wallpaper: JPEG, BMP, GIF,
PNG.
• Depending on configuration file programming,
you may not be able to change the wallpaper.
For details, consult your system administrator
or dealer.
Changing the Phone Screen
Wallpaper
1. On the
area in the upper left of the display.
2. Select the image to set as the wallpaper.
Select wallpaper from Gallery
Select built-in wallpaper
Bright screen
Dark screen
Phone screen, touch and hold the wallpaper
Select from images saved on an SD card.
Select from images included on the unit.
the
Change
to a bright color.
Change the color of the wallpaper and dial keys
to a dark color.
color of the wallpaper and dial keys
• For the Home screen wallpaper, make an image
that is 800
640 ´ 480 pixels using an image editor. If you
try to use the image without resizing it, it may
not be displayed correctly.
Document Version 2012-02 Operating Instructions 95
´ 455 pixels, and then resize it to
Note
• For
that is 800 ´ 455 pixels. To place your logo on
the wallpaper, refer to the following figure:
Phone screen wallpaper, use an image
the
Page 96

Customizing the Phone
• The following file formats can be used for the
Phone screen wallpaper: JPEG, GIF, PNG.
• Depending on configuration file programming,
you may not be able to change the wallpaper.
For details, consult your system administrator
or dealer.
Adding and Deleting Shortcuts, Widgets and Folders
You can add widgets and shortcuts to applications to
the Home screen and place frequently used
applications in the application dock.
The following shortcuts, widgets and folders can be
added.
Shortcuts
• Applications (Page 71)
• Bookmarks
• Contact
• Direct dial
• Email
• Music playlist
– Play all
– Recently added
• Settings
– Cleaning mode
– Screen lock now
Widgets
• Analog clock
• Calendar
• Music
• Picture frame
• Search
Folders
• New folder
• All contacts
• Contacts with phone numbers
• Starred contacts
Adding a Shortcut, Widget or Folder
1. On the Home screen, press
tap [Add].
Or, touch
no icons.
2. Select [Shortcuts], [Widgets], or [Folders].
3. Tap the item you want to add.
and hold on the Home screen a spot with
, and then
Moving a Shortcut, Widget or Folder
1. On the Home screen, touch and hold a shortcut,
widget or folder, and then drag it to the spot you
want to move it to.
96 Operating Instructions Document Version 2012-02
Page 97

Customizing the Phone
Deleting a Shortcut, Widget or Folder
1. On the Home screen, touch and hold the shortcut,
widget or folder you want to delete.
2. Drag the item to .
Adding to the Application Dock
1. On the Application screen, touch and hold the
application you want to add.
2. Drag the
want to place it.
Note
• Up to 7 applications can be added.
• Widgets and folders cannot be added to the
item to the spot in the application dock you
application dock.
Displaying Your Schedule on the Phone Screen
On the Phone screen, you can change the area where
the dial keys are displayed to display your schedule
instead.
1. On the Phone screen, press .
2. On the [Menu] screen, tap [Phone screen
setting].
3. Tap [Schedule].
Note
• Initially, the unit is set to display the dial keys.
• To return the display to the dial keys, select
[Dial] in step 3.
• The Schedule/Dial Key display can also be
changed temporarily (
Page 36).
Document Version 2012-02 Operating Instructions 97
Page 98

Customizing the Phone
Setting a Ringtone
You can change the ringtone that plays when the unit
receives a call.
1. On the Home screen, press .
2. Tap [Settings].
3. Tap [Sound].
4. Tap [Phone ringtone].
5. Select a ringtone.
6. Tap [OK].
Note
• If multiple
can set a different ringtone for each line.
• In step 5, if you select [Automatic], the ringtone
assigned to the DN button (flexible button) at
which a call arrives will be used. Ringtones
specified here override the DN button settings
(Page 92).
• Even if the ringer volume is off, you can still
select and listen to the available ringtones.
• You can also select from music on an SD card.
To select a ringtone from an SD card, you must
configure some settings beforehand
(Page 98).
• For music on an SD card, "(SD)" is displayed in
front of the title.
• When a music file on the SD card is set as the
ringtone and you remove the SD card,
"Ringtone 1" will be used as the ringtone. If you
reinsert the SD card, the file you had previously
specified will be used again as the ringtone.
lines are configured on your unit, you
Using Music on an SD Card as the Ringtone
You can use music on an SD card as the ringtone.
Notice
• Do not
1. On the Home screen, tap
2. Tap the [Songs] tab.
3. Touch and
as the ringtone.
4. Tap [Set to ringtone list].
5. Press
6. On the Home screen, press .
7. Tap [Settings].
8. Tap [Sound].
9. Tap [Melody for phone ringtone].
10. Select the ringtone you want to change, and then
tap [Change].
11. On the [Ringtone List (Music on SD)] screen,
select the file you want to add as the ringtone.
12. Tap [OK].
13. On the [Melody for phone ringtone] screen, tap
[Cancel].
Note
• Ringtones
• The following music file formats are supported
• For details about setting a ringtone, see
• For details about setting a ringtone for an
remove the SD card while performing the
following procedure.
.
hold the title of the song you want to set
to return to the Home screen.
add are stored in ringtones 10 to
you
32, overwriting the factory default ringtone.
by this unit:
– 3GPP (.3gp)
– MPEG-4 (.mp4, .m4a)
– MP3 (.mp3)
– MIDI (.mid)
– RTTTL/RTX (.rtttl)
– iMelody (.imy)
– Ogg (.ogg)
– WAVE (.wav)
page 98.
individual contact, see page 63.
Resetting Ringtones to Their Factory
Settings
1. On the Home screen, press
2. Tap [Settings].
98 Operating Instructions Document Version 2012-02
.
Page 99

Customizing the Phone
3. Tap [Sound].
4. Tap [Melody for phone ringtone].
5. Select the ringtones you want to reset to their
factory settings, and then tap
[Reset to default].
Web User Interface Programming
The
unit
provides a Web-based interface for configuring
various settings and features, including some that are
not programmable directly from the unit. The following
list contains some useful features that are
programmable through the Web user interface.
For details, consult your administrator or dealer.
• Basic network settings
• User password (for access to Web user interface)
• HTTP authentication settings
• Default outgoing line
• Call rejection phone numbers
• Block caller ID
• Block anonymous calls
• Do Not Disturb
• Call forward
*1
These settings can also be configured directly through the unit.
Notice
*1
*1
(Page 90)
• Each time you want to access the Web user
interface, you must enable Web programming
(Page 116).
*1
(Page 115)
(Page 90)
*1
(Page 53)
Document Version 2012-02 Operating Instructions 99
Page 100

Accessibility
Accessibility
For users
operation of phone functions with a USB keyboard. Most navigation features are available simply by connecting
a USB keyboard. However, by enabling Accessibility mode (Page 124), more functions can be accessed
directly with the keyboard.
with difficulties operating the touch display directly, this unit supports navigation of the interface and
Keyboard Operation
Navigation of the user interface is done primarily with the arrow keys ([↑], [¯], [¬] and [®]) and the [Enter] key.
The following table shows the functions of other keys, both when Accessibility mode is on and off:
Key Accessibility Mode On Accessibility Mode Off
[↑], [¯],
[¬], [®]
[Enter] Performs the action equivalent to tapping the highlighted item.
[Esc] On the Phone screen
Moves the cursor/highlight up, down, left or right.
Navigates back one
• During pre-dialing: Equivalent to
tapping [Cancel].
screen.
• Ignored otherwise.
On other screens/applications
• Navigates back one screen.
Key Sheet
Equivalent
, ,
,
[Home] Returns to the Home screen.
[End] Ends the current call if you are using the handset. (This operation does
not end calls in hands-free mode.)
Application
key
[F1]
[F2] Volume down. (no function)
[F3] Activates the speakerphone or headset mode (Page 24).
[F4] Cancels the speakerphone or headset mode (Page 24).
[F5] Activates Mute (Page 56).
[F6] Cancels Mute (Page 56). (no function)
[F7] Enables Automatic Answer (Page 91).
Moves the cursor to the quick-search box. On the Contacts screen, the
cursor is moved to the Contact search box (Page
Volume up. Opens the menu.
When you press this key, a confirmation
tone (single) is heard.
When you press this key, a confirmation
tone (single) is heard.
60).
(no function)
(no function) —
—
—
100 Operating Instructions Document Version 2012-02
 Loading...