

Page 1

ilte.
tT"
Panasonic
y.4CiH.z Cordlt;-;i; vSffition Ui’iH:
Model No. KX-TGA420B
Pulijft-ftr-l/’jiiH OiilliKii capability
Operating Instructions
KX'rGA42jOB can aiiily v/grk wlHh
PanasonKc. 0-TG20tM>8/KX-TQ4000A
curcilwfe pitonc syfitam.
please read before use ano save.
Charga ih« btittery for about ft h^urv before Initial uaa.
ParxaMnic. Wurid wurin atfcKrciia: M&ipr//ww\v.p{vnason^c.ctifii
for rutlomorc In 111« UiJA (V > viflfto iftlce
Caller ID Compaiible! ]
Page 2

Before Initial Use
Please read IMPORTANT SAFETY
INSTRUCTIONS on page 72 before use.
Read and understand all instructions.
Thank you for purchasing your new Panasonic cordless telephone.
[Caller ID and Call Waiting Service, where available, are telephone company
I services After subscribing to Caller ID, this phone will display a caller’s name
I and phone number Cali Waiting Caller ID, which displays a second caller’s
! name and phone number while the user is on another call on the same tine,
I requires a subscription to both Caller ID and Cali Waiting Please make sure
I from the telephone company that Call Waiting Cailer ID service is activated
I Attach your purchase receipt here. |
For your future reference
Serial No____________________
(found on the bottom of the unit)
Name and address of dealer
Date of purchase
Accessories (included) For extra orders, call 1-800-332-5368
□ AC Adaptor (p 9)
Order No PQLV1Z
one
□ Battery (p 8)
Order No HHR-15F2G1
□ Handset {p 8)
Order No PQJXF01132
one
□ Battery Cover (p 8)
Order No PQKK10123Z1
□ Handset Cord (p 8)
Order No PQJA212N
one
□ Wall Mounting
Adaptor (p 62)
Order No PQKL24Z0
1
one one
This model KX-TGA420B is one of the stations (extensions) and must be used
with a KX-TG4000B/KX-TG2000B base unit (operator) It is necessary to
register this station unit to the base unit before use (p 12, 13) The station unit
does not work without the base unit
one
Page 3
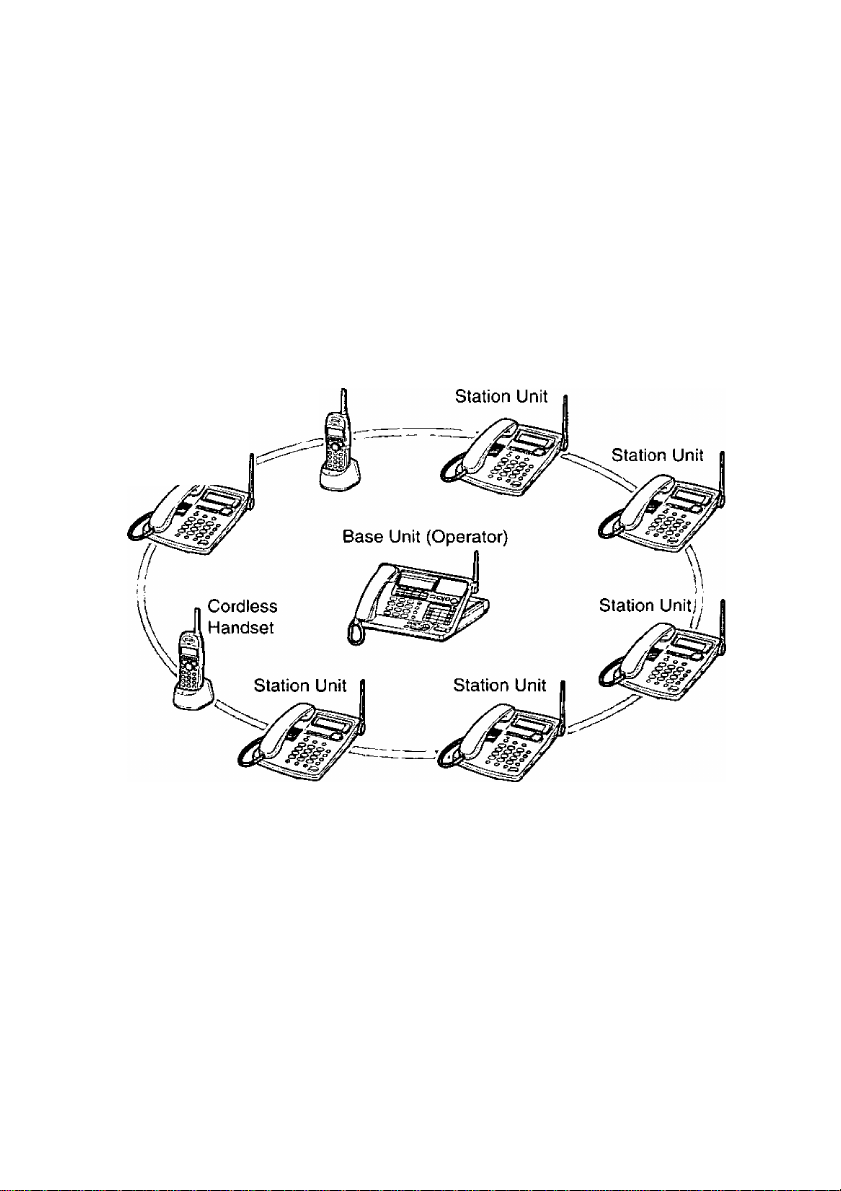
An Introduction to the Station Unit
How the station unit takes part in the system
The station unit KX-TGA420B is one of the stations (extensions) of the
KX-TG4000B/KX-TG2000B base unit, the same as the cordless handsets*.
A maximum of 8 stations in any combination of the station units and the
cordless handsets can be installed to the base unit (the first station will be
the handset included with the base unit).
*The handset is included with the base unit and is also the optional cordless
handset KX-TGA400B/KX-TGA200B.
Example: 8 stations (extensions) consist of 6 station units and 2 cordless
handsets.
Cordless
Handset
Station Unit
• The illustration of the base unit is KX-TG4000B, and the illustrations of the
cordless handsets are those included in KX-TG4000B, and KX-TGA400B.
Portability (using the battery power mode)
Calls are transmitted between the station unit and the base unit using radio
waves, the same as the cordless handset.
The station unit can be used with the AC adaptor connected to the power
outlet (AC power mode, p. 9). However, if you want to use the station unit
in a remote location away from the power outlet, a rechargeable Nickel-
Metal Hydride (Ni-MH) battery will supply power (Battery power mode).
You need to install the battery and charge it for about 8 hours before initial
use (p. 8, 9, 10).
For assistance, please call: 1-800-211-PANA(7262)
Page 4

Contents
Location of Controls 6
Display
Installation 8
Installing the Battery
Connecting the Handset 8
Connecting the AC Adaptor
Battery Charge (To Use the Battery Power Mode)
Registration 12
Registering the Station Unit Using the PIN
Programmable Settings
Programming Guidelines
Function Menu Table
Selecting the Ringer Volume 16
7
8
9
10
13
14
14
15
Making Calls
Answering Calls
Using Other Lines During a Conversation
Intercom
Making Intercom Calls
Answering Intercom Calls
Transferring a Call
Conference
Using the Directory
Storing Names and Numbers in the Directory 25
Dialing from the Directory
Editing an Item m the Directory
Erasing an Item in the Directory
Caller ID Service 29
Using the Caller List
Viewing the Caller List
Calling Back from the Caller List
Editing the Caller’s Phone Number
Storing Caller List Information in the Directory
Erasing Caller List Information
17
20
21
22
22
22
23
24
25
27
28
28
30
30
31
31
32
33
(SiEiiSarS
Special Features
How to Use the PAUSE Button
{For Analog PBX Line/Long Distance Service Users)
For Cal! Waiting Service Users
FLASH Button
34
34
34
34
Page 5

Temporary Tone Dialing (For Rotary or Pulse Service Users)
Other Programmable Settings
Selecting the Ringer Pattern.....................................................................35
Calling Line Selection...............................................................................36
Incoming Call Tone
Erasing the Directory, Caller List and Redial List
Clearing Settings......................................................................................38
Canceling Registration.............................................................................39
Voice Maii System.......................................................................................40
Setting the Mailbox Password
Automated Attendant System......................................................................42
How Automated Attendant System Works...............................................42
Setting the Answer Mode.........................................................................43
Recording a Personal Greeting Message................................................44
Call Transfer Status..................................................................................45
Cali Operator Status.................................................................................46
Listening to Messages.................................................................................48
Transferring a Message
Erasing a Message...................................................................................50
Listening to Messages in the General Delivery Mailbox..........................50
Delivering Your Own Memo Message........................................................51
Other Voice Mail System Features..............................................................52
Transferring a Call to Other Person’s Mailbox
Message Menu Mode...............................................................................52
Remote Operation from a Touch Tone Phone............................................53
How to Access the Voice Mail System.....................................................53
Pager Call....................................................................................................56
Storing a Pager Number...........................................................................56
Storing the Pager Display Number
Setting the Unit to Call a Pager................................................................58
..................................................................................
.....................................................................
....................................
.................................................................
...........................................................................
.........................................
..........................................................
................
35
35
37
38
41
50
52
57
mwxDMnmssssa)
Battery Replacement...................................................................................59
Using an Optional Headset
Wall Mounting..............................................................................................62
Error Messages...........................................................................................64
Before Requesting Help..............................................................................67
Irhportant Safety Instructions
FCC and Other Information........................................................................ 74
Index............................................................................................................75
For assistance, please call: 1-800-211-PANA(7262)
.........................................................................
......................................................................
60
72
Page 6
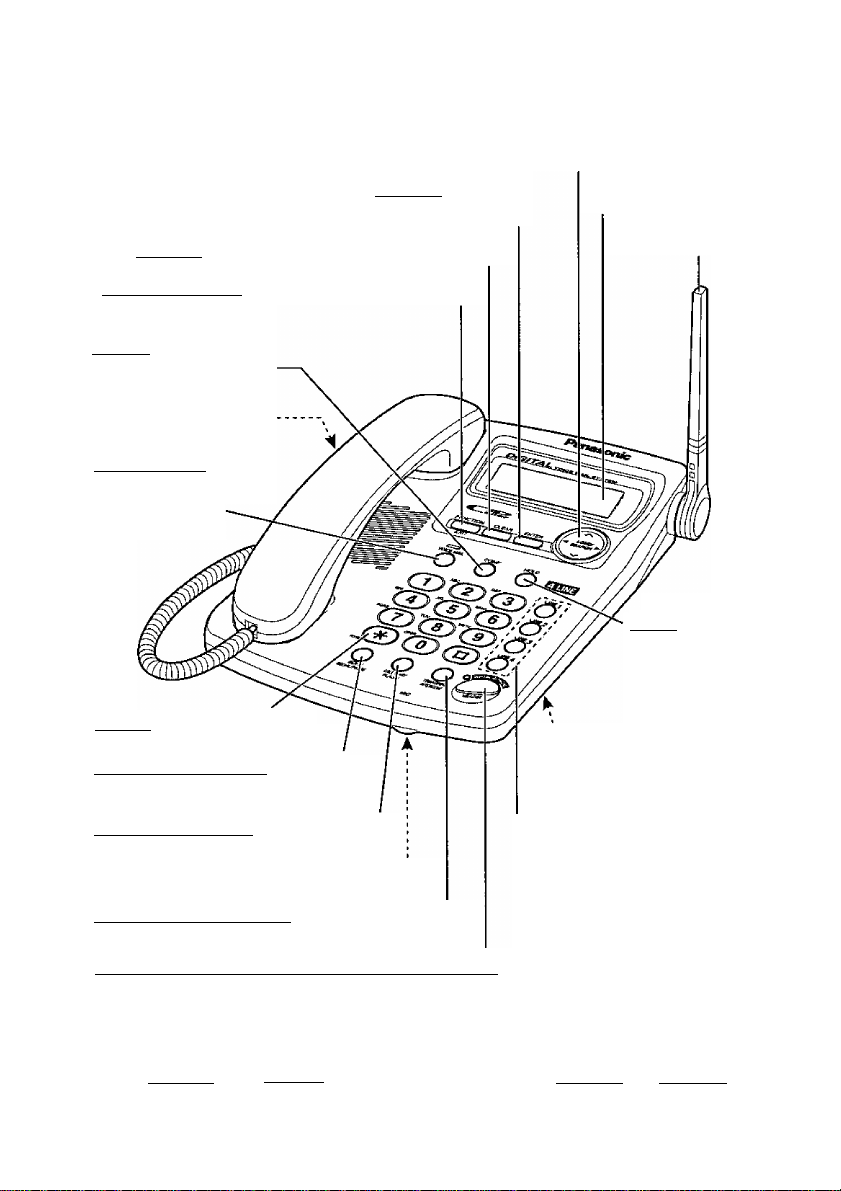
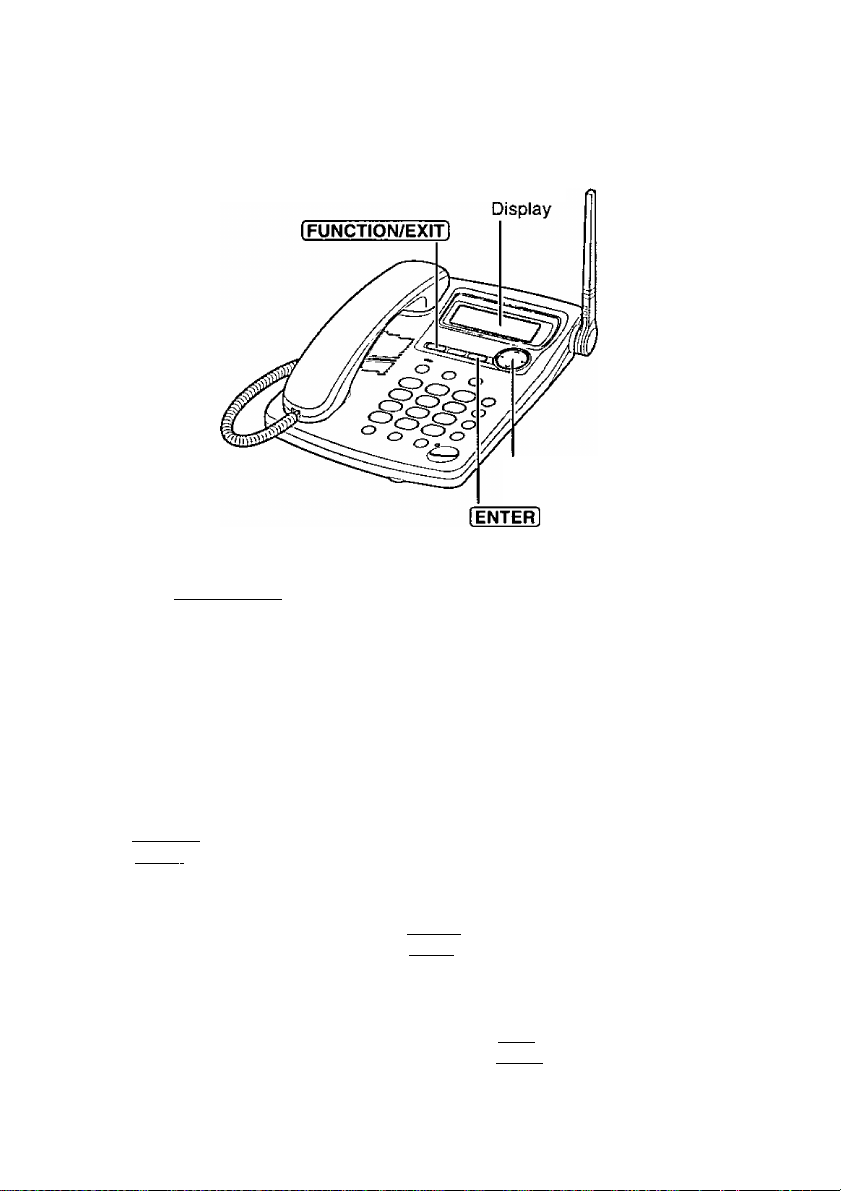
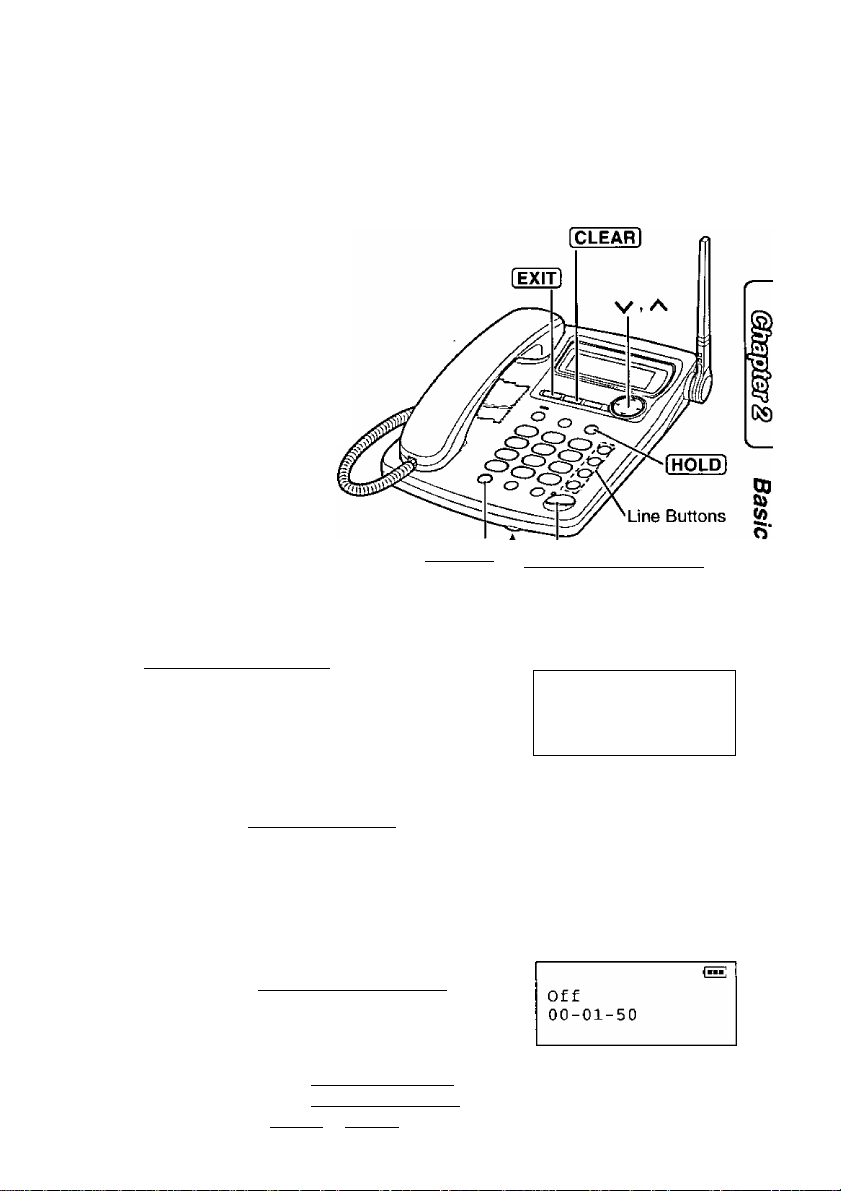
Location of Controls
Navigator Key (v. A, ►)
{p. 12, 14, 19, 27, 30, 49)
1 enter! Button
(p. 13, 14, 25, 32)
[CLEAR] Button (p. 25, 28, 33, 38, 39, 50)
IFUNCTION/EXITI Button (p. 12, 14, 27, 30)
(CONFl (Conference)
Button (p. 24)
Headset Jack (p. 60)
[VOICE MAIL] Button
and Indicator (p. 43,
44, 48, 51, 52)
[TONE] Button (p. 35)
[EPIT/REDIAUPAUSEl Button
(p. 19, 28, 31, 34)
Display {p. 7, 64)
Antenna (p. 9)
[hold! Button
(p. 19,21)
'Battery Compartment
(p- 8, 59)
(CALL WAIT/FLASHI Button (p. 34)
Line Buttons (p. 17, 20, 21)
MIC (Microphone) (p. 17, 20, 22, 44)
ITRANSFER/INTERCOMI Button (p. 22, 23)
[digital SP-PHONE (Speakerphone)/headset]
Button and indicator (p. 17, 20, 22, 60)
If your unit is registered to KX-TG2000B:
The [LINE 3l and [line 4| buttons are inoperative. If [LINE 3l or [LINE 4]
is pressed, “Line not available” will be shown on the display.
Page 7

Display
©Voice Mail Icon ©Line Status Icon
I
-F
[SI wwi gyi fgi Hna»:
©Battery Icon
©The voice mail icon flashes if there is at least one new message in your
mailbox (p. 48). During playback, it will be displayed.
©The line status icons function as follows. (If your unit is registered to
KX-TG2000B, “BE*” and “Ki” will not be displayed.)
Off (invisible)
On The line is being used.
Flashing
Flashing quickly
©The battery icon indicates the battery strength (p. 10).
©“ [ - ] ” is displayed in the standby mode if the station unit is not registered
to the base unit. At registration the unit will be assigned the extension
number, and the number will display in square brackets in the standby
mode (p. 12, 13).
The display shows the dialed number, call status, programming options
and directory items etc. If you subscribe to a Caller ID service, caller
information will be displayed (p. 29).
The line is free.
A call is on hold. The Automated Attendant System or
Answering System is responding to a call (p. 40, 42).
A call is being received.
Backlit LCD display
■S
s
o'
3
While the AC adaptor is connected (AC power mode, p. 9) and you are
operating the unit, the display will remain lit. However, while the unit is
powered by the battery (battery power mode, p. 10), the display will not
light.
For assistance, please call; 1-800-211-PANA(7262)
Page 8
Installation
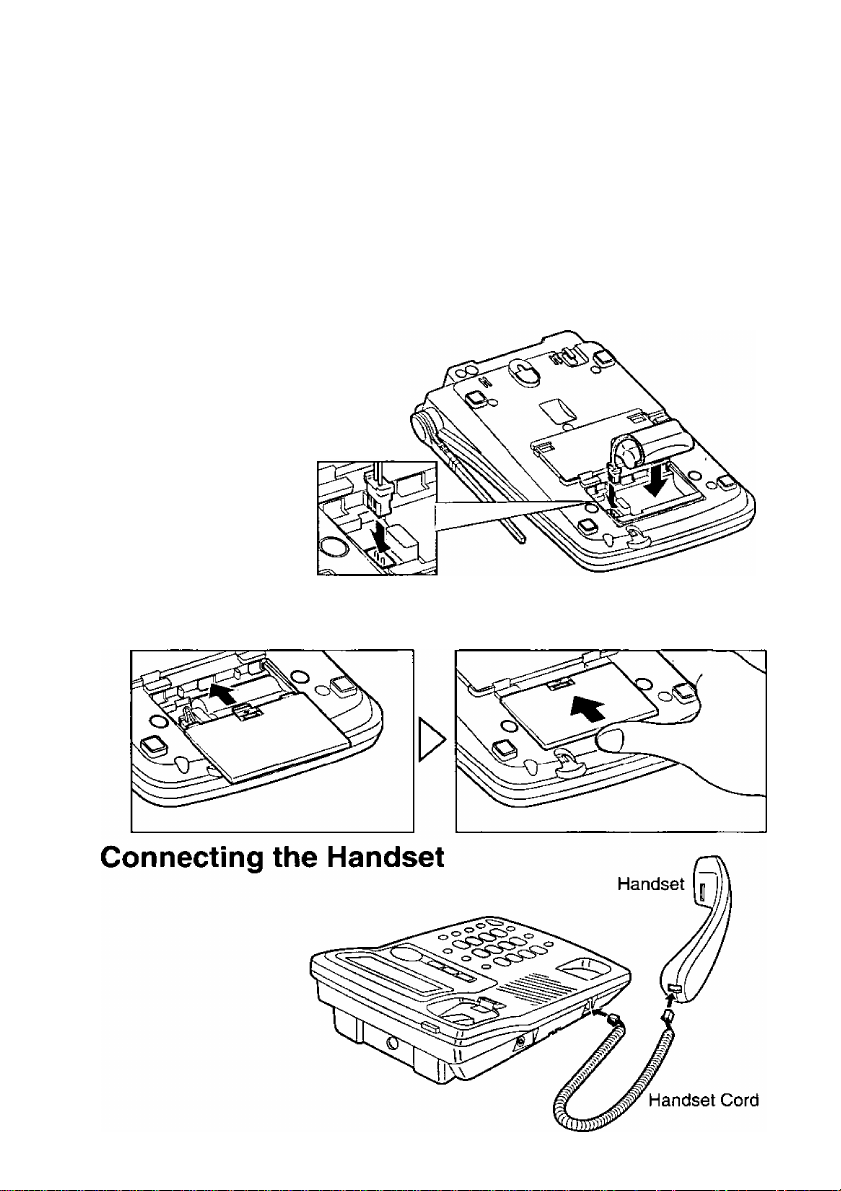
Installing the Battery
If you want to use the station unit in a remote location from the power
outlet, a rechargeable Nickel-Metal Hydride (Ni-MH) battery will power the
unit (Battery power mode). The battery will also work as emergency power
during a power failure.
The battery is charged in the battery compartment while the AC adaptor is
connected (p. 9). It takes about 8 hours to charge fully. For details about
battery charge and battery information, see pages 10 and 11.
Install the battery in the
1
battery compartment.
Be sure wires are free from
being pressed by the battery
body or battery cover.
2 Close the battery cover: Slide the battery cover, and push it forward as
shown until it locks into place.
' Use only a Panasonic Handset for the KX-TGA420B.
8
Page 9
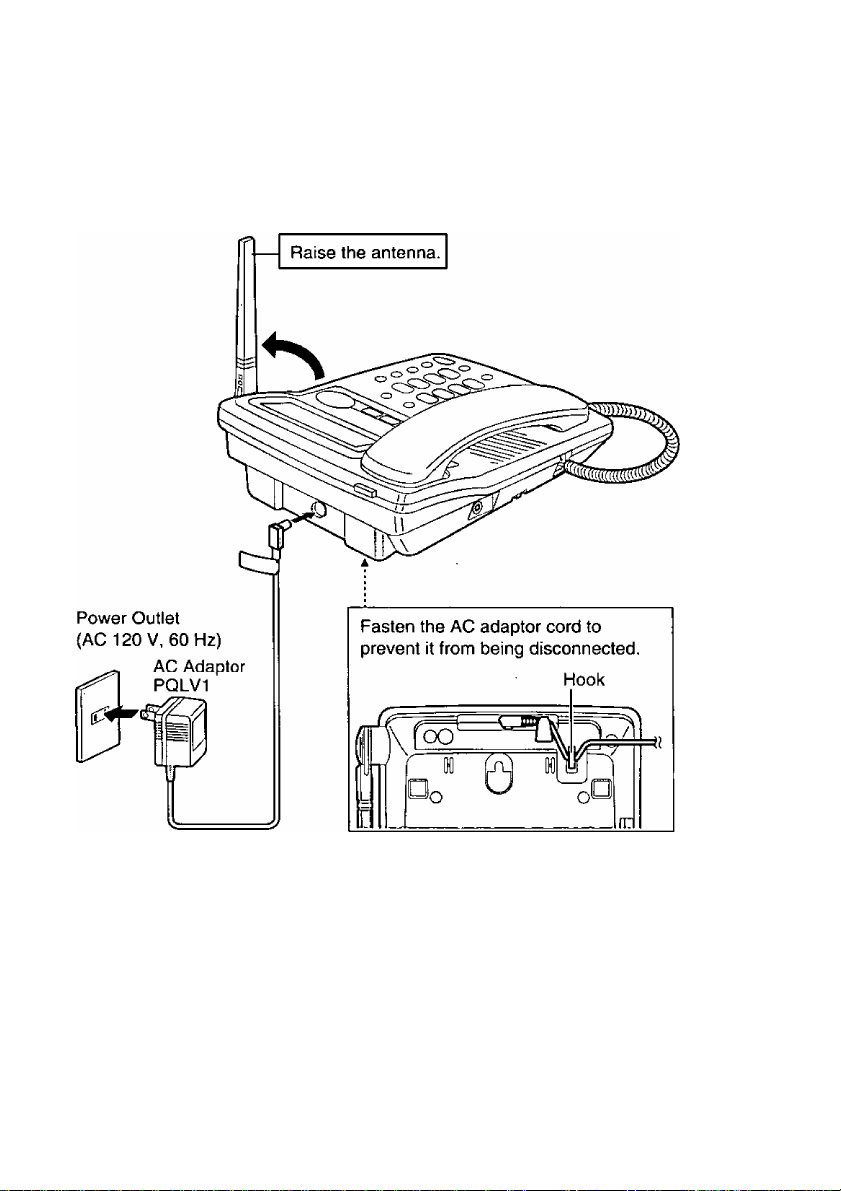
Connecting the AC Adaptor
The station unit is powered by the AC power while the AC adaptor is
connected (AC power mode). At the same time the battery is being
charged in the battery compartment (p. 8).
' USE ONLY WITH Panasonic AC ADAPTOR PQLV1 (Order No. PQLV1Z).
'The AC adaptor must remain connected in the AC power mode (while charging
the battery). (It is normal for the adaptor to feel warm during use.)
For noise-free operation:
Calls are transmitted between the station unit and the base unit using radio
waves, the same as the cordless handset.
—If you use the station unit near a microwave oven which is being used, noise
may be heard from the receiver. Move away from the microwave oven and
locate the station unit near the base unit.
— If you use the station unit near another phone’s base unit, noise may be
heard. Move away from the cordless phone’s base unit and locate the station
unit near the base unit.
For assistance, please call: 1-800-211-PANA(7262)
Page 10
Installation
Battery Charge (To Use the Battery Power Mode)
The station unit can be used with the AC adaptor connected {AC power
mode). However, if you want to move the station unit with the AC adaptor
disconnected for your convenience, charge for about 8 hours before initial
use. Make sure the battery is installed properly and the AC adaptor is
connected (p. 8, 9).
Battery strength
You can check the battery strength on the display.
The battery strength is shown as in the chart below.
Display prompt
^hih;
i bhI
Battery strength
Fully charged
Medium
Low
i
• If you do not install the battery with the AC adaptor connected, “■[115 ” will flash
and “Install battery” will be displayed. However the unit will work with the
AC power.
(flashing)
Needs to be recharged.
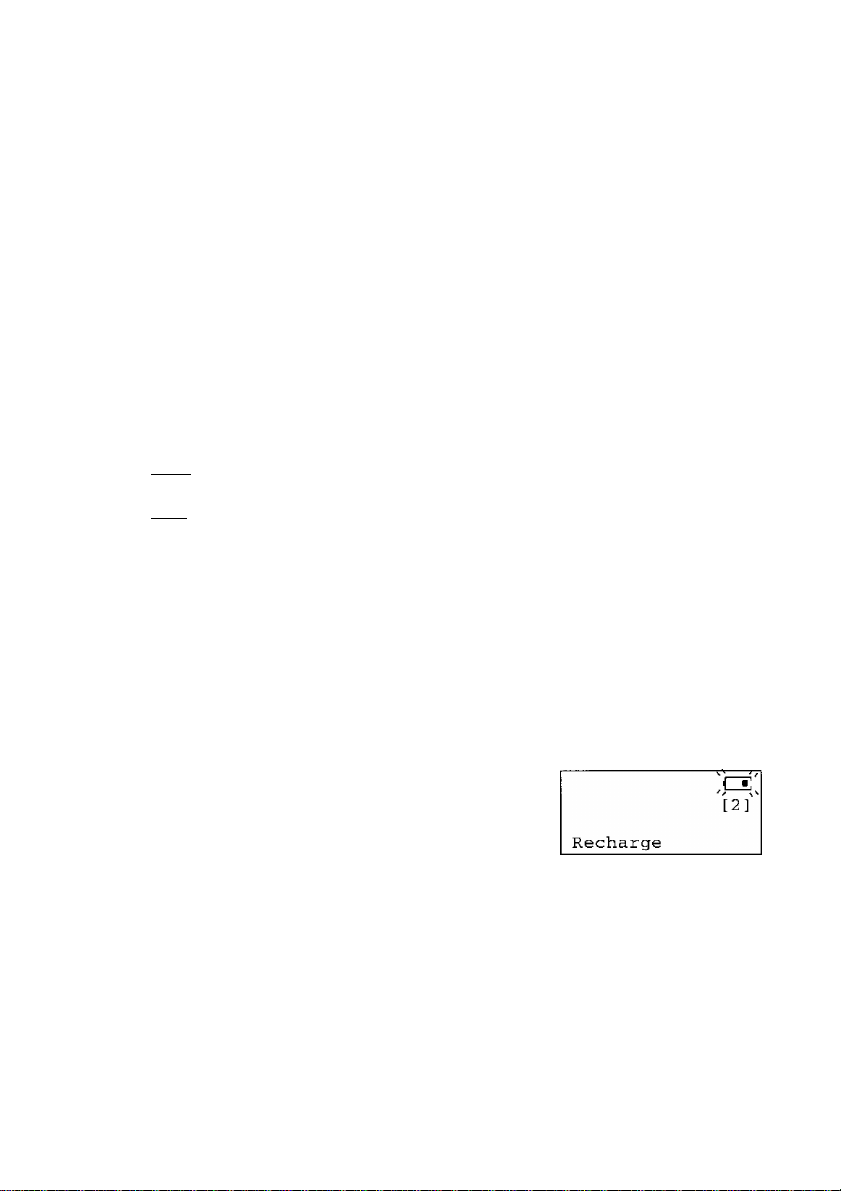
Recharge
Connect the AC adaptor to recharge the battery
when:
— “Recharge” is displayed,
flashes on the display, or
— the station unit beeps intermittently while it is in use.
• If you DO NOT recharge the battery for more than 15 minutes, the display will
keep indicating “Recharge” and/or “ tZH ” will continue to flash.
• After the battery is fully charged, you can disconnect the AC adaptor and move
the unit to your convenient place.
• If you charge the discharged battery, it will be charged quickly. In that case the
area of the battery may feel warm. This is normal.
10
Page 11

Battery information
After your Panasonic battery is fully charged {p 10)
Operation
Operating time
with the handset 8 hours
While in use (TALK)
with the speakerphone
While not in use (Standby)
'The battery operating time may be shortened depending on usage conditions and
ambient temperature
' If the battery is fully charged and you use the unit in the battery power mode, you
do not have to charge the battery until “Recharge” is displayed and/or “ ”
flashes This will maximize the battery life
• The battery cannot be overcharged
4 hours
4 days
•§
Q)
S
5*.
O*
3
For assistance, please call 1 -800-211 -PANA{7262)
11
Page 12

Registration
This station unit must be registered at the KX-TG4000B/KX-TG2000B base
unit. The station unit will be assigned the extension number at registration.
Only one unit can be registered at a time using the base unit. If the PIN
has been stored, see page 13.
Make sure that the base unit and station unit are in the standby mode.
Registration must be completed within 1 minute.
J Base unit:
Press I FUNCTION I.
2 Press V or A until the arrow points
to “Registration”, and press ►.
3 Press V or A until the arrow points
to “HS registration”.
4 Press ►.
5 station unit:
Press [ FUNCTION I.
^ Press V or A until the arrow points
to “Registration”, and press ►.
^ While “HS registration” is at the
arrow, press ►.
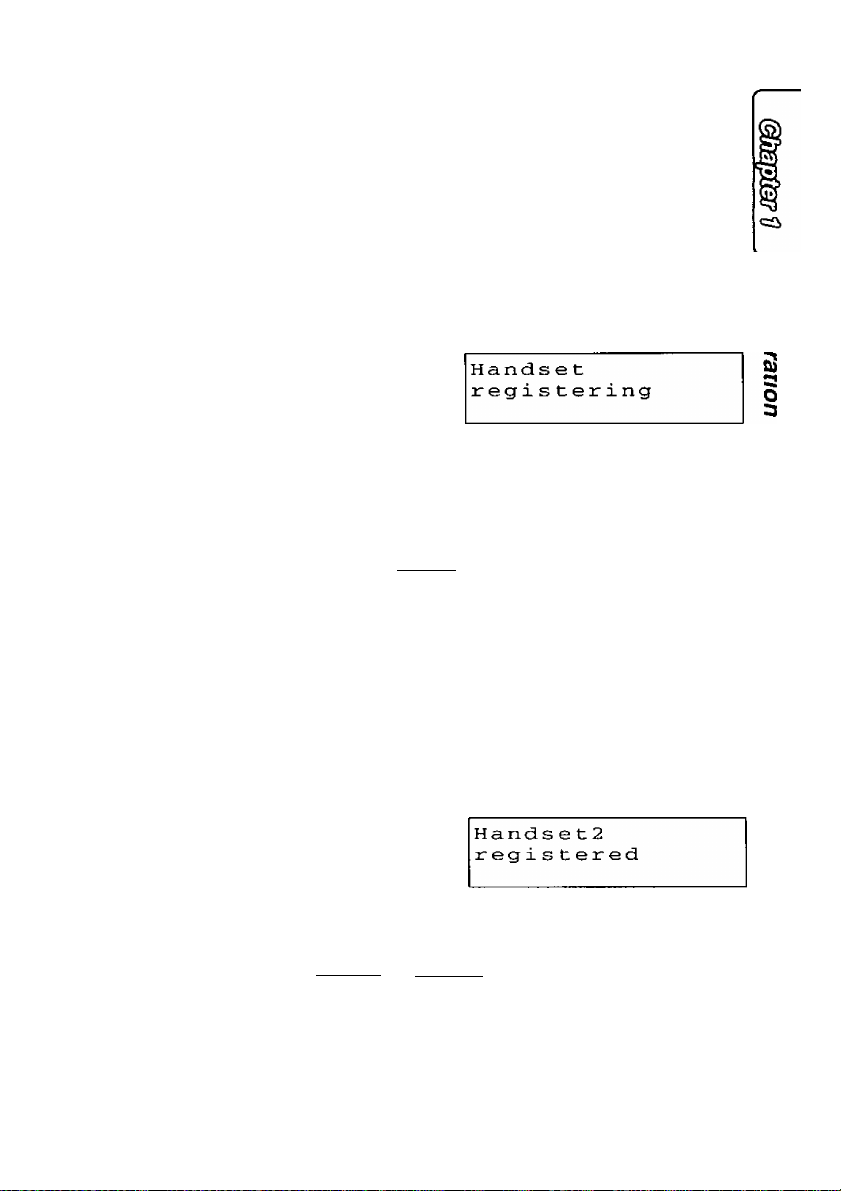
3 Base unit/station unit:
Wait until a beep sounds on the base
unit and station unit and until both of
the displays show the assigned
extension number.
Ex. Extension number is 2.
• To return to the standby mode, press
(exE).
• The extension number will be displayed
on the station unit.
Pager setting
► Registration
initialization
Set PIN
► HS registration
Deregistration
Handset
registering
Voice mail
Pager setting
►Registration
►HS registration
Deregistration
VA ►=Set
Handset
registering
Station unit
Handset2
registered
Base Unit
Handset2
regis tered
72
If the station unit displays “Enter PIN” in step 8, follow steps 3 to 5 on next
page.
Page 13
Registering the Station Unit Using the PIN
If the PIN (Personal Identification Nunnber) has been stored with the base
unit to prevent unauthorized persons from registering and using an
extension unit (station unit/cordless handset) (see page 52 in the
KX-TG4000B/KX-TG2000B Operating Instructions), you are required to
enter it at registration,
Only one unit can be registered at a time by using the base unit.
Make sure that the base unit and station unit are in the standby mode.
Registration must be compieted within 1 minute.
J Base unit:
Follow steps 1 to 4 on page 12.
2 Station unit:
Repeat the steps 5 to 7 on page 12.
3 Enter the PIN.
If you enter the wrong PIN, press [CLEAR),
and enter the PIN again.
4 Press (ENTER].
Base unit/station unit:
Wait until a beep sounds on the base unit
and station unit and until both of the
Handset
registering
HS registration
Enter PIN:D
HS registration
Enter PIN;123D
Station unit
Handset2
registered
displays show the assigned extension
number.
Base Unit
Ex. Extension number is 2.
• To return to the standby mode, press
(Hii).
• The extension number will be displayed on
the station unit.
If registered to KX-TG2000B, the [LINE 3| and [LINE 4| buttons on the station
unit will be inoperative.
---
ENTER=Set
ENTER=Set
For assistance, please call: 1-800-211-PANA(7262)
13
Page 14
Programmable Settings
Programming Guidelines
This station unit has programmable functions. Most of them are selected
from the function menu on the display (p. 15).
Navigator Key
(V. A.
How to select a function item from the menu
1. Press 1 FUNCTION I while in the standby mode. The main menu is
displayed (see next page).
2. You can scroll through the menu by
pressing v or ^. Find the desired item
and point the arrow to the item by pressing
V
or y\ .
3. Press ► to select the item.
4. If the selected item has a sub-menu, it will be displayed. Select the
sub-menu item by pressing v or a , and press ►.
5. You can then select the desired setting.
• [enter] is used to select or save a programming setting,
6. When programming is complete, a confirmation tone sounds. The
display will return to the main menu or the sub-menu (if the function item
is in the sub-menu). You can continue programming other items. To
return to the standby mode, press lEXITl.
Ex. “Ringer setting" is at
the arrow.
Save directory
►Ringer setting
Line selection
Useful information:
• You can go back to the previous display by pressing ◄ except when entering
characters or numbers. To return to the main menu from the sub-menu, press ◄.
• You can exit the programming mode any time by pressing (EXIT).
• If you do not press any buttons for 60 seconds, the unit will return to the standby
mode.
• If the unit detects a problem, an error message will be displayed (p. 64).
14
Page 15

Function Menu Table
You can use the following functions to customize your unit according to
your needs. After pressing 1 functionI. the main menu is displayed. Most
items in the main menu have a sub-menu. The sub-menu is shown after
selecting the item in the main menu.
See the corresponding pages for function details.
Main menu items are written in bold and sub-menu items are under each
main menu item in the shaded box.
Save directory
Ringer setting
Ringer volume...
Ringer pattern
Incoming call...
Iiine selection...
Voice mail
Set password.
Message menu
Pager setting
Pager number
Pager on/off
Pager display #
Calling pager........................
Registration
I
HS registration
w Deregistration..
Initialization
j.]
u
Function
Dial data
......
......................
........................
...............................
..............................
Stores an item in the directory (p. 25).
Selects the ringer volume (p. 16).
Selects the ringer pattern (p. 35).
Turns on/off the incoming call tone
(p. 37).
Selects the calling line selection (p. 36).
Sets the mailbox password (p. 41).
Turns on/off the message menu mode
(p. 52).
Stores the pager number (p. 56).
Turns on/off the pager mode (p. 58).
Stores the pager display no. (p. 57).
Sets the unit to call a pager (p. 57).
Registers the unit (p. 12, 13).
Cancels the registration (p. 39).
Clears settings (p. 38).
Erases all entries in the directory, Caller
List and redial list (p. 38).
■8
ta
5
o'
o
For assistance, please call; 1-800-211-PANA(7262)
15
Page 16

Programmable Settings
Selecting the Ringer Voiume
You can set the nnger volume to HIGH, LOW or OFF
Your phone comes from the factory set to HIGH
Make sure that the station unit is in the standby mode
J Press I FUNCTION I
2 Press V or A until the arrow points to
“Ringer setting”
3 Press ►
While “Ringer volume” is at the arrow,
press ►
• The current volume is displayed
HIGH
5 Press A to increase or press v to
decrease the volume
• Each time you press v or A, the volume
will change and ring
• It IS norma! that 7 bars change to 2 bars when
the ringer volume is set from HIGH to LOW
• To turn the ringer OFF, press and hold v
until a beep sounds “Ringer off” will be
displayed and the station unit will not ring for
all the lines
-To turn off the ringer for one of the lines, you can do so by setting Ring group
feature at Ringer setting on the base unit (See page 23 in the
KX-TG4000B/KX-TG2000B Operating Instructions) When “Ringer off is set
for an individual line by the ring group feature on the base unit, “Ringer
off” will not be displayed on the station unit The line status icon (p 7) will
flash on the station unit when a call is coming
• To return to the standby mode, press [EXIT]
LOW
OFF
Save directory
►Ringer setting
Line selection
►Ringer volume
Ringer pattern
Incoming call
Ringer volume
Low IBEflHHB High
VA
A 1
1 V
Ringer volume
Low fl B
VA
A f
High
1 V
Ringer off
VA
To turn the ringer ON, press a in step 5
• The ringer will sound at the LOW level
> You can also select the ringer volume while a call is being received Press v
A while the unit is ringing
>To change the ringer pattern, see page 35
16
or
Page 17
Making Calls
For users registered to KX-TG4000B: Four calls can be handled
simultaneously on separate telephone lines by 4 units.
For users registered to KX-TG2000B: Two calls can be handled
simultaneously on separate telephone lines by 2 units.
Using the handset
When you lift the handset off the
cradle to make a call, the station
unit will automatically select a
free line. (To change the line
selection, see page 36.) Dial a
phone number. To hang up,
replace the handset on the
cradle.
(REDIALJ 1 I digital SP-PHONE]
and Indicator
Using the digital duplex speakerphone
J Press I DIGITAL SP-PHON^.
• The indicator lights.
• A free line is automatically selected and
the line status icon is displayed.
Ex. Line 1 is selected.
ED
Talk Linei
2 Dial a phone number.
• The dialed number is displayed.
• If you misdial, press [DIGITAL SP-PHONEl.
and start again from step 1.
• After a few seconds, the display will show
the length of the call.
Talk Line!
1112222
Talk Linei
00-00-00
3 When the other party answers, talk into
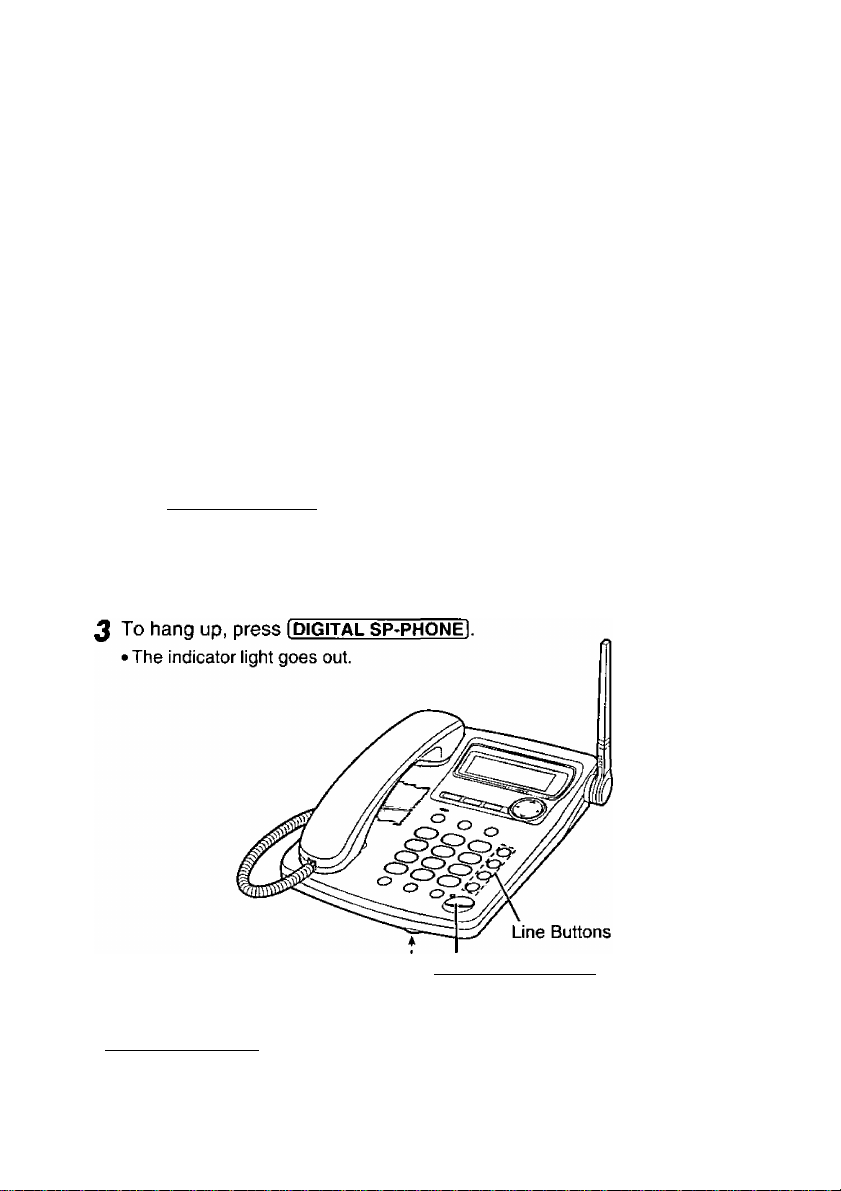
the MIC (microphone).
To hang up, press (DIGITAL SP-PHONEl.
• The indicator light goes out and the line
status icon disappears.
In step 1, you can select a line by pressing a line button whose line status icon is
not displayed, instead of pressing [DIGITAL SP-PHONEl. if registered to
KX-TG2000B, do not press [LINE 3| or [LINE 4].
For assistance, please call: 1 -800-211 -PANA(7262)
17
Page 18
Making Calls
• If the unit detects a problem, an error message will be displayed (p. 64).
• For users registered to KX-TG4000B:
If 4 other units are in use, you may not be able to make a call. When you try to
make a call, “System is busy. Please try again laterwill be
displayed.
« For users registered to KX-TG2000B:
—If more than one unit is in use, you may not be able to make a call. When you
try to make a call, “System is busy. Please try again laterwill be
displayed;
—If (LINE 3l or (line 4| is pressed, “Line not available” will be displayed.
To dial after confirming the entered number
I Enter a phone number.
• If you misdial, press [CLEARl. Digits are erased
from the right.
• To cancel, press (EXIT].
2 Lift the handset off the cradle or press
(DIGITAL SP-PHONE1.
• You can press a line button instead of pressing
(DIGITAL SP-PHONII.
• After a few seconds, the display will show the
length of the call.
3 When the other party answers, talk into the
handset or MIC.
__________
1 112222 D
Ex. Line 1 is selected.
Talk
1 112222
Talk Linei
00-00-00
fnE,
jsis;
Linei
4 To hang up, replace the handset on the cradle
or press (DIGITAL SP-PHONEl.
Hands-free Digital Duplex Speakerphone
For best performance, please note the following:
• Talk alternately with the caller in a quiet room,
• If the other party has difficulty hearing you, press v to decrease the speaker
volume.
• If the other party’s voice from the speaker cuts in/out during a conversation,
press V to decrease the speaker volume.
• You can switch to the handset by lifting it up off the cradle. To switch back to
the speakerphone, press I DIGITAL SP-PHON^.
18
Page 19

To adjust the handset volume (High, Medium or Low) or the speaker volume (8 levels)
Press or V while talking.
• Each time you press A or V, the volume level will
change.
Ex. Handset volume: High
Loud
Low H High
Ex. Speakerphone volume: 8
Loud
Lowl 1111111 High
To redial the last number dialed
Lift the handset off the cradle or press ¡digital sp-phone|, and press
(REDIAL).
To redial using the redial list
The last 10 phone numbers dialed with the station unit are stored in the
redial list.
1. Press IREDIALI. (The last number dialed is displayed.)
2. Press iREDIALl until the desired number is displayed.
• You can scroll between numbers by pressing v of .
• To exit the list, press I EXIT).
3. Lift the handset off the cradle or press (DIGITAL SP-PHONE).
• To erase an item, repeat steps 1 and 2, and press [CLEAR!.
• If “No items stored” is displayed, the list is empty.
To put a call on hold
Press [HOLD],
• The line status icon flashes.
• If using the handset, you can replace it on the cradle.
• If a call is kept holding for 3 minutes, a warning tone
will sound. After 2 additional minutes on hold the
automated attendant will respond to the caller and he/she can call the operator
(base unit) or another extension (cordless handset/station unit), or leave a
message following the Incomplete Call Handling Menu (p. 46).
To release the hold
Press the line button whose status icon is flashing.
• The hold can be released from the base unit, a cordless handset or another
station unit by pressing the line button. If another phone is connected on the same
line, the hold will also be released by lifting its handset.
For assistance, please call: 1-800-211-PANA(7262)
19
Page 20
Answering Calls
When a call is being received, the station unit rings and “incoming call”
is displayed. The called line status icon flashes quickly on the display. The
line is automatically selected when you answer the call.
If you subscribe to a Caller ID service, the calling party information will be
displayed after the first ring {p. 29). In order to view the Caller ID
information, please wait until the second ring to answer a call.
For users registered to KX-TG4000B: Four calls can be handled
simultaneously by 4 units.
For users registered to KX-TG2000B: Two calls can be handled
simultaneously by 2 units.
Using the handset
You can answer a call by simply lifting the handset off the cradle. To hang
up, replace the handset on the cradle.
Using the digital duplex speakerphone
J Press I DIGITAL SP-PHO^.
• The indicator lights.
• The called line status icon stops flashing.
2 Talk into the MIC (microphone).
Hfljc (DIGITAL SP-PHONEl and Indicator
I You can answer a call by pressing the called line button instead of pressing
I^GITAL SP-PHONEl.
> To transfer the call that you took, to another person, see page 23. To
transfer the call to another person’s mailbox to allow the caller to leave a
message there, see page 52.
'When the ringer volunnes is set to OFF, the station unit will not ring (p. 16).
20
Page 21

Using Other Lines During a
Conversation
During a conversation, if an incoming call is being received on another line,
you will hear two tones and the line status icon on the display will flash
quickly. You can answer the second call while holding the first call. You
can also make a call without terminating the first call.
If you subscribe to a Caller ID service, the second caller’s information will
be displayed when a call is being received on another line (p. 29).
You can delete the two tones (incoming call tone). See page 37.
Ex. If you are using LINE 1
Press [HOLD] to put the first call (LINE 1) on
hold.
• The line status icon flashes on the display.
For users registered to KX-TG4000B:
Press another line button (LINE 2, 3 or 4) to
make or answer a second call.
;oi^
V V
Hold Linei
V V
Talk Line2
Hold Line!
For users registered to KX-TG2000B:
Press the other line button (LINE 2) to make
or answer a second call. (Do not press
[LINE3lorrUNE4].)
To return to the first call (LINE 1), press the
line button for the first call (LINE 1).
• The second call is terminated.
'To hold the second call in step 3, press I HOLD] before pressing the line button for
the first call.
' For users registered to KX-TG4000B;
Pressing [HOLD] puts the current call on hold while keeping the previously held
calls. You can make or answer another call by pressing a line button whose line is
not in use. You can handle up to 4 calls at a time.
to
Talk Linei
For assistance, please call; 1-800-211-PANA(7262)
21
Page 22

Intercom
You can talk to the operator (base unit user) or another extension user
(cordless handset user or another station unit user) using the intercom line.
The extension number is assigned at registration to the station unit
(p. 12, 13). The base unit has the number “0”.
Making Intercom Calls
I Press (INTERCOM 1.
Press extension
No. to call
2 To page the operator (base unit), enter ®
To page another extension (cordless
handset/another station unit), enter the
number ({T| to [s)).
• The paged unit rings.
• To stoD Daaina. press lINTERCOMl.
• After the paged party answers, the display will
show the length of the call.
3 When the other party’s voice is heard, lift
the handset off the cradle or talk into the
MIC (microphone).
4 To end the intercom, replace the handset
on the cradle or press [digital sp-phone1.
Answering Intercom Calls
After the rings, lift the handset off the cradle or
press [DIGITAL SP-PHONEl.
To end the intercom, replace the handset on the
cradle or press (digital sp-phone1.
Ex. Ext.2 paging Base Unit
Calling [ 2 ] -> [ 0 ]
Intercom
00-00-00
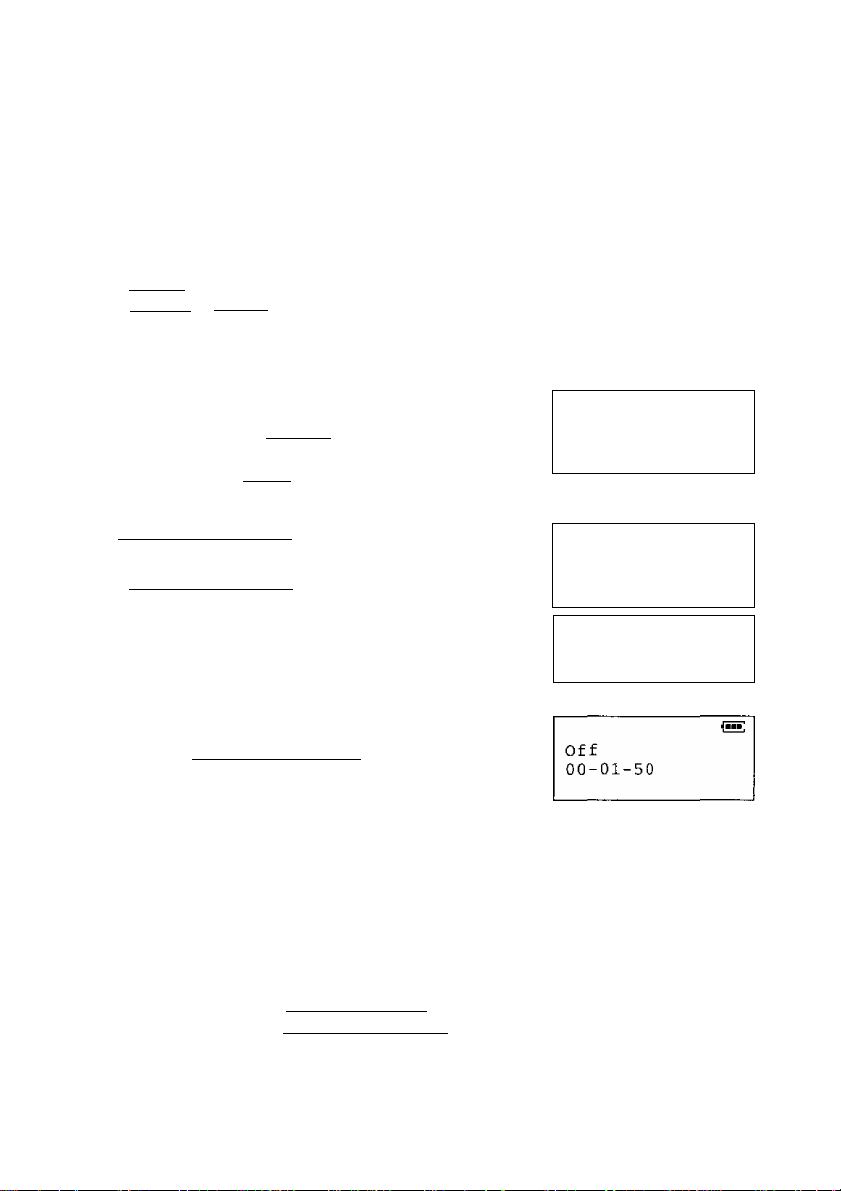
Off
00-07-15
Ex. Base Unit paging
Extension 2
(aE
Call[2]t-[0]
During an intercom call:
• If an incoming call is being received, you will hear two tones (incoming call
tone, p. 37). To answer, press the relevant line button.
• If the unit detects a problem, an error message will be displayed (p. 64).
► When the ringer volumes is set to OFF, the station unit will not ring (p. 16).
22
Page 23

Transferring a Call
You can transfer an external call to the operator {base unit) or another
extension (cordless handset/another station unit).
J During a call, press ¡TRANSFERI.
• The call is put on hold.
~l^r
Press extension
No . to
Hold
transfer
To page the operator (base unit), enter (STo page another extension (cordless handset/another station unit),
enter the number ((T) to (8)).
If required, wait for the paged party to answer, and you can announce
the transfer. If not required, go to step 4.
• If the paged party does not answer, press the relevant line button.
4 To complete the transfer, press [DIGITAL SP-ph0Ne1 or replace the
handset on the cradle.
To answer a transferred call:
Lift the handset off the cradle or press 1 DIGITAL SP-PHONEl after the rings.
• After the paging party hangs up, you can talk to the outside caller.
• You can press the relevant line button instead of pressing (DIGITAL SP-PHONE)
to talk to the outside caller.
' If the paged party does not answer within 30 seconds after you hang up, the
transferred call will be returned to you with a sounding tone from the unit. If you
still do not answer the caller’s call within 2 minutes, the automated attendant will
respond to the caller (p. 42), You may answer the caller by pressing the relevant
line button before the sounding tone or before the start of the automated
attendant. You may also transfer the caller into the caller’s intended extension
mailbox by performing the three procedures:
1) telling the caller the intended extension number with the # sign,
2) your pressing the IVOICE MAIL) button, and
3) your hanging up the line, so the intended extension mailbox will be presented to
the caller (p. 52), If the incoming call is answered by the operator or a cordless
handset, the call can also be transferred to other mailbox by the same procedures.
► The operator (base unit) or another extension user (cordless handset/another
station unit user) can take a transferred call by pressing the relevant line button
on their unit.
Linei
For assistance, please call: 1-800-211-PANA(7262)
23
Page 24

Conference
This feature allows you to join two other calls to make a conference call. At
least one of the other two parties should be on an external line.
Conference with two
external calls
J Press IHOLDI to put the first call
on hold.
2 For users registered to
KX-TG4000B:
Press another line button (LINE
2, 3 or 4) to make or answer a
second call.
For users registered to
KX-TG2000B:
Press the other line button (LINE
2) to make or answer a second
call. (Do not press I LINE 3l or
(LINE 41.
2 When the second call is
connected, press (CONFI to
make a conference call.
Conference
00-00-50
(Ex. Conference with LINE1 & 2)
• To hang up both lines, replace the
handset on the cradle or press
iDIGITAL SP-PHOi^E I.
• To hang up only one line, press the
line button for the party with which you
want to continue talking.
• To put both lines on hold, press
(hold I.
To talk with only one caller, press the
corresponding line button.
To resume both lines, press ICONFl.
Conference with an external call and intercom call
J Press ITRANSFER) to put the
call on hold.
2 To page the operator (base
unit), enter (o].
To page another extension
(cordless handset/another
station unit), enter the number
(0 to [8]).
2 When the paged party answers,
press iCONFl to make a
conference call.
Conference
00-00-50
• To hang up only the intercom call,
press the line button.
• To leave the conference, replace the
handset on the cradle or press
(DIGITAL SP-PHONEI. The two other
parties can continue the conversation.
•
• A maximum of 3 parties can take part in a conference call.
24
Page 25

Using the Directory
You can store names and phone numbers in the directory. The station unit
can store up to 50 items. Ail directory items are sorted by the first word in
alphabetical order. Using the directory, you can make a call by selecting a
name on the display.
storing Names and Numbers in the Directory
Make sure that the station unit is in the standby mode.
J Press I FUNCTION I.
^ While “Save directory” is at the arrow,
press ►.
• The display shows the number of items, and
“Enter name”.
Enter a name, up to 16 characters, using the
dialing buttons (p. 26).
• To move the cursor, press ◄ or ►.
• If a name is not required, go to step 4.
4 Press [ENTERl.
5 Enter a phone number, up to 22 digits.
• If you misdial, press [CLEAR). Digits are erased
from the right. To erase all digits, press and hold
ICLEA^.
5 Press I ENTER I.
• A beep sounds.
• To store other items, repeat from step 2^
• To return to the standby mode, press [EXIT],
►Save directory
Ringer setting
Line selection
Directory=
0 item
Enter name:
□
■<► ENTER=Kext
Enter name:
Tom JoneQ
4k ENTER=Next
Enter phone No.:
0987654321D
ENTER=Save
Tom Jones
0987654321
____
' If a pause is required for dialing, [PAUSE] can be stored in a phone number in
step 5. This counts as one digit (p. 34).
> If the display shows “Memory is full" in step 2, press [EXITl and erase other
stored items from the directory (p. 28).
For assistance, please call; 1-800-211-PANA(7262)
25
Page 26

Using the Directory
Selecting characters to enter names
The dialing buttons (® to (9]) can be used to enter letters and symbols.
The letters are printed on the dialing buttons. Pressing each button selects
a character as shown below.
Keys
1 2 3 4 5 6
0]
(2
m
s
[g
(S
m
©
©
<
►
ICLEARl
If you make a mistake while entering a name:
# &
A B
D E
G H
J K
M N 0 m n
P
Q
T U V
w
X
Blank
0
Moves the cursor to the left.
Moves the cursor to the right. (To enter another character using the
same number key, move the cursor to the next space.)
Erases characters.
Number of times key is pressed
7
9
(
c
a
F
d e f 3
I
g
L
j
R
S
t
Y
Z
*
)
b
c
h i 4
k I 5
0
P
q
u v 8
w X
,
2
6
r s
y
8 9 10 11
-
z 9
/
7
1
Press ◄ or ► to move the cursor to the incorrect character, press ICLEARl
to delete, and enter the correct character. Each time you press (CLEAR) a
character is erased from the right. To erase all characters, press and hold
ICLEARl.
For example, to enter “Tom Jones”:
1. Press ®.
2. Press © six times, then press ►.
3. Press © four times, then press ► twice.
4. Press ©, press © six times, then press ►.
5. Press © five times, press © five times, then
press @ eight times.
26
Top
Tom □
Tom JoO
Tom JoneQ
Page 27

Dialing from the Directory
J Press ◄ or ► to enter the directory.
2 Press V or A to find the desired
item.
• All directory items are sorted in the
order shown on the right.
3 Lift the handset off the cradle or
press I DIGITAL SP-PHONEl.
• The number is dialed automatically.
• You can press a line button instead
of pressing (DIGITAL SP-PHONEl. If
registered to KX-TG200QB, do not
press [LINE 3] or [LINE 4].
To search for a name by initial
J Press ◄ or ► to enter the directory.
Directory list
VA
►=Caller's list
§
Ql
CO
o'
5
o'
o
2 Press the dialing button for the first letter of the
desired name until any name with the same
initial is displayed (see table on page 26).
Ex. To find “Frank”, press (3) until the first item
under “F” is displayed.
3 Press V until the name is displayed.
4 Lift the handset off the cradle or press
[DIGITAL SP-PHONEl.
• The number is dialed automatically.
-You can press a line button instead of pressing (DIGITAL SP-PHONEl. If
registered to KX-TG2000B, do not press I LINE 3] or (LINE 4l.
' You can leave the directory any time by pressing [EXITl.
'If “No items stored” is displayed in step 1, the directory is empty.
• In step 1, you can go to the Caller List by pressing ► (p. 30).
For assistance, please call: 1 -800-211 -PANA(7262)
CDTD“CD
XDXDTD
XDXDTD
27
Page 28

Using the Directory
Editing an Item in the Directory
Make sure that the station unit is in the standby mode.
J Press ◄ or ► to enter the directory.
2 Press V or A to find the directory item you want to edit.
• To search for the item by initial, see page 27.
3 Press fEDifl.
• If you do not need to change the name, go to
step 5.
Dane
4 Edit the name using the dialing buttons, up to
16 characters {p. 26).
• To move the cursor, press ◄ or ►.
5 Press fENT^I.
• If you do not need to change the number, go to
step 7.
□234567
^ Add a number to the current number.
• Pressing [CLEAR] erases the digit to the left of
the cursor. To erase all digits, press and hold
ICLEA^.
7 Press I ENTER I.
• A beep sounds.
• To edit other items, start again from step 2.
• To return to the standby mode, press [EXIT).
Erasing an Item in the Directory
Make sure that the station unit is in the standby mode.
J Press ◄ or ► to enter the directory.
2 Press V or A to find the directory item you want to erase.
• To search for the item by initial, see page 27,
Enter name:
ENTER=Next
Enter name:
Jane WalkeQ
098Q234567
ENTER=Next
ENTER=Save
ENTER=Save
3 Press ICLEAR).
• To stop erasing, press
4 Press I ENTER I.
• A beep sounds and “clear” is displayed,
• To erase other items, start again from step 2.
• To return to the standby mode, press lEXITl.
• To erase all items in the directory, see page 38.
28
Clear?
■4=No ENTER=Yes
Page 29

Caller ID Service
This unit is compatible with a Caller ID service offered by your telephone
company. After subscribing to a Caller ID service, the calling party’s
information will be shown on the display after the first ring.
The station unit can record information of up to 30 different callers,
including the time and date the call was received and the number of times
called, in the caller list.
The Caller List information is sorted from the most recent to the oldest call.
When the unit receives the 31st call, the oldest call is deleted.
Using this list, you can automatically call back a caller. You can store the
callers’ names and numbers from the Caller List in the directory.
If you subscribe to both Caller ID and Call Waiting services, when a
second call is received on the same line, the new caller’s name and phone
number will be displayed {p. 34).
How caller information is displayed when a call is received
The display shows the caller’s
name, number and the called line
after the first ring.
ROBINSON,TINA
1-000-222-3333
----
Linei
----
I After you answer the call, the display
will show the length of the call.
* •
• When more than one line is receiving a call, each caller’s information will be
displayed alternately.
• Caller information cannot be displayed in the following cases:
— If the caller dialed from an area which does not provide a Caller ID service, the
display will show “Out of area".
— If the caller has requested not to display his/her information, the display will
show “Private caller”.
• If the base unit is connected to a PBX which does not support Caller ID services,
you cannot access those services.
• The name display service may not be available in some areas. For more
information, please contact your telephone company.
• If the station unit has lost communication with the base unit when a call is
received, the caller information will not be recorded in its Caller List.
For assistance, please call: 1-800-211-PANA(7262)
29
Page 30

Using the Caller List
If you have received new calls, “Received
calls” will be displayed in the standby mode.
Viewing the Caller List
To check who has called, follow the steps below.
Make sure that the station unit is in the standby mode.
J Press V or A to enter the list.
« The number of new calls is displayed.
VA
10
new calls
►=Directory
2 To search from the most recent call, press v -
To search from the oldest call, press a ■
• The display shows:
— the caller’s name,
— the caller’s number, and
— the time and date of the call (ex. 10:38 AM, Jun. 9).
• To scroll between callers, press v or A.
TURNER,CINDY
1-234-456-7890
10:38A JUN. 9
3 To exit the list, press lEXlfl.
• If “No items stored” ¡s displayed in step 1, the Caller List is empty.
• If there is no name information for a caller, the display will only show the phone
number.
• After viewing all of the new call entries, “Received calls” will disappear.
• Once new calls have been checked “V" will be added.
• In step 1, you can go to the directory by pressing > (p, 27).
What ‘W” means
When the display shows “V”, you have already
viewed this calling information, answered the call
or called back the caller. If the same caller calls
again, the call entry with “V” will be replaced with
the new call entry.
BROWN,NANCY
1-000-222-3333
3:10P JUN.10 -i
If a caller calls more than once
The number of times the same caller called is
displayed (X2 to X9). The date and time of the
most recent call will be recorded. After checking,
X2 to X9 will be replaced with N”.
Ex. The caller called 5
times.
BROWN,NANCY
1-000-222-3333
3:lOP JUN.10 X5
30
Page 31

Calling Back from the Caller List
J Press V or /s to enter the list.
30
VA
2 Press V or /\ to find the desired caller.
SMITH,JACK
1-234-567-8901
3:10P JUN. 9
3 Lift the handset off the cradle or press
[DIGITAL SP-PHON^.
• The displayed phone number is dialed automatically.
• You can press a line button Instead of pressing
I DIGITAL SP-PHONEl. If registered to KX-TG2000B,
do not press (LINE 3l or [LINE 4|.
• In some cases, you may have to edit the number before dialing (see below).
(Ex. You may have to delete “1” and the area code.)
• If a phone number is not displayed in the caller information, you cannot call back
that caller.
Editing the Calier’s Phone Number
You can edit a phone number into one of 4 patterns.
Make sure that the station unit is in the standby mode.
J Press V or A to enter the list.
• The number of new calls is displayed.
2 Press V or A to find the desired caller.
3 Press [EDIT] to select a pattern.
Each time you press [edit], the number is
rearranged into one of 4 different patterns.
Phone no.
® I Area code | - [Phone no.j
@ 1 — Phone no.
(g) 1 - I Area code - [Phone no.
• The order in which patterns (a) - (3) are
displayed depends on how the telephone
number is displayed in step 2.
4 After editing the number, you can continue
with calling back or storing procedures.
To cal! back, lift the handset off the cradle
or press [DIGITAL SP-PHON^. To store the number in the directory,
press I ENTER I (see page 32, from step 3).
• The number edited in step 4 will not be maintained in the Caller List.
For assistance, please call: 1-800-211-PANA(7262)
PARKER,FRED
1-234-321-5555
11:20A JAN.12
PARKER,FRED
321-5555
11:20A JAN.12
PARKER,FRED '
234-321-5555
PARKER,FRED
©
1-321-5555
PARKER,FRED
@
1-234-321-5555
__________
new calls
►-Directory
t
t
1
1
31
Page 32

Using the Caller List
Storing Caller List Information in the Directory
You can store names and phone numbers that are in the Caller List into
the directory.
Make sure that the station unit is in the standby mode.
1 Press V or A to enter the list.
30 new calls
VA ►=Directory
2 Press V or A to find the desired caller.
• If the number requires editing, see page 31.
3 Press [ENTERI.
4 Press [ENTERI again.
TURNER,CINDY
1-234-456-7890
11:20A JUN.12
Save directory?
ENTER^^Yes
TURNER,CINDY
12344567890
If there is no name information for
the caller, “Enter name” will be
displayed.
Enter name:
□
ENTER=Save
a) If a name is not required, press |E~NTER|.
b) If a name is required, enter the name (p. 26),
and press [ENTERI.
'A beep sounds.
' To store other items, repeat from step 2.
'To return to the standby mode, press lEXITl.
• If the display shows “Memory is full" in step 3, press (EX]t)- To erase stored
items from the directory, see page 28.
• You cannot store caller information in the directory if a phone number is not
displayed.
Enter name:
CINDY TURNEB
ENTER^Save
CINDY TURNER
12344567890
32
Page 33

Erasing Caller List Information
After checking the Caller List, you can erase some or all of the entries of
the station unit
Make sure that the station unit is in the standby mode
To erase a specific caller from the Caller List
J Press V or A to enter the list
30 new calls
VA
►=Directory
2 Press V or A to find the caller you want to
erase from the caller list
REAGAN,TOM
1-666-444-5555
11 2 OP JUN 12 V
3 Press [clear!
• A beep sounds and the information is erased
• To erase other items, repeat from step 2
• To return to the standby mode, press [EXIT]
To erase alt entries in the Caller List
Before erasing all entries, make sure that “0 new call” is displayed
J Press V or A to enter the list
0 new call
VA ►-Directory
2 Press [CLEARl
• To stop erasing, press ◄
All clear'^'
3 Press ICL^Rl
• A beep sounds and all entries are erased
All clear
Clear
CLEAR=Yes
§
?
(A
o'
(D
S
5*.
o*
3
For assistance, please call 1 -800-211 -PANA(7262)
33
Page 34

Special Features
How to Use the PAUSE Button
(For Analog PBX Line/Long Distance Service Users)
We recommend you press I^USEl if a pause is required for dialing with a
PBX or to access a long distance service.
Ex. Line access number @ (PBX)
(D m [ PAUSE i
• Pressing [PAUSE) once creates a 3.5 second pause.
This prevents misdialing when you redial or dial a stored number.
• Pressing (PAUSE) more than once increases the length of the pause between
numbers.
For Call Waiting Service Users
If another call is received on the same line while talking, you will hear a
call-waiting tone. Press (CALL wait! to answer the second call.
• The first call is put on hold.
• To return to the first caller, press I CALL WAIT I again.
• The call waiting service cannot be used when:
— the first call on the same line is placed on hold,
— you are having a conference call (p. 24), or
— the Automated Attendant System or Answering System is responding to the
first call on the same line (p. 40, 42).
• If this function.does not operate properly, consult your telephone company for
details.
Phone number
Call Waiting Cailer ID Feature
Call Waiting Caller ID feature allows the unit to
display a second caller’s information.
After you hear a call-waiting tone while talking,
the display will show the caller’s name with the
phone number and “
• Please contact your telephone company for details and availability in your area.
--------
waiting
-------------
”.
BROWN,NANCY
1-000-222-3333
---
Waiting----
FLASH Button
Pressing (FLASH! allows you to use special features of your host PBX such
as transferring an extension call or accessing special telephone services
(optional) such as call waiting.
• The flash time is set by the base unit.
34
Page 35

Temporary Tone Dialing
(For Rotary or Pulse Service Users)
Press [TONEI before entering access numbers which require tone dialing.
• The dialing mode changes to tone. You can enter numbers to access an
answering service, electronic banking service, etc. When you hang up, the mode
will return to pulse.
• Access numbers entered after pressing [TONE] will not be included when
redialing.
______
Other Programmable Settings
Selecting the Ringer Pattern
You can select the desired ringer patterns. 4 patterns are available for
each line. Your phone comes from the factory set to pattern 1.
Make sure that the station unit is in the standby mode.
y Press I function!.
2 Press V Of -A until the arrow points to
“Ringer setting”, and press ►.
3 Press V or A until the arrow points to
“Ringer pattern", and press ►.
• The current settings are displayed.
If registered to KX-TG2000B, “L3” and “L4” are
inoperative.
4 Enter the desired pattern using the dialing
buttons {(T] to (D) for each line. To move to
another line, press ► or ◄.
• If registered to KX-TG2000B, do not select “L3” and
• Each time you select a pattern, it rings.
5 Press I ENTER I.
• A beep sounds.
• To return to the standby mode, press [EXIT],
rFor users registered to KX-TG2000B:
LINE 3 and LINE 4 ringer pattern settings are inoperative.
For assistance, please call: 1 -800-211 -PANA{7262)
►Ringer setting
Ringer volume
►Ringer pattern
Incoming call
Ringer pattern
‘L4”.
Save directory
Line selection
L2 L3 L4
a
S
:3
o
(b
a
§
<b
S
o'
o
35
Page 36

other Programmable Settings
Calling Line Selection
The station unit will automatically select a free line when you make a call.
You can change the calling line selection.
Make sure that the station unit is in the standby mode.
y Press!FUNCTION 1.
Press V or A until the arrow points to
“Line selection”, and press ►.
• The current setting is displayed.
Auto;
A free line will be selected (LINE 1 has priority)
when making a cal) (factory preset).
Linel: Line 1 will be selected when making a call.
Line2: Line 2 will be selected when making a call.
Line3; Line 3 will be selected when making a call (for users registered to
KX-TG4000B only).
Line4: Line 4 will be selected when making a call (for users registered to
KX-TG4000B only).
►Line selection
Line selection
VA ENTEi6=Save''
3 For users registered to KX-TG4000B:
Select “Linei”, “Line2”, “Line3”, “Line4”
or “Auto” by pressing v or A.
VA ENTER^Save"'
For users registered to KX-TG2000B:
Select “Linei”, “Line2” or “Auto” by pressing v or a . (Do not
select “Line3” or “Line4”.)
4 Press fENTERl.
• A beep sounds.
• To return to the standby mode, press [EXIT].
• Any line can be selected manually, regardless of the programmed line selection,
by pressing that line button. If registered to KX-TG2000B, the [UNE^I and
fUNE 4l buttons are inoperative.
Save directory
Ringer setting
:Auto
Line select^i-on ^
:Jjinel ]
t For users registered to KX-TG2000B: I
Do not select “Line3” or “Line4” for the calling line selection. Otherwise j
“Line not available” will be displayed when you lift the handset off ;
the cradle or press I DIGITAL SP-PHONEl to make or answer a call.
36
n
Page 37

Incoming Call Tone
While using one line, you can be informed if another call arrives on another
line by two tones. During an intercom call or while listening to messages
(p. 48), you can also be informed by two tones if a call arrives.
If you set to ON, this incoming call tone will be heard for as long as another
line rings. To delete this incoming call tone, set to OFF. To set the
incoming call tone to sound twice, set to “2”.
Your phone comes from the factory set to “2”.
Make sure that the station unit is in the standby mode.
] Press (FUNCTiON).
2 Press V or A until the arrow points to
“Ringer setting”, and press ►.
3 Press V or A until the arrow points to
“Incoming call”, and press ►.
• The current setting is displayed.
4 Select the desired setting, “on”, “off” or “2’
by pressing v or a ■
•
5 Press dÑTER).
• A beep sounds.
• To return to the standby mode, press I EXIT 1.
Save directory
►Ringer setting
Line selection
Ringer volume
Ringer pattern
►Incoming call
Incoming cal!^
tone ^2 ^
VA ENTER=S’ai?e
Incoming callus
tone :pn^
VA ENTER=Sáv'e
I For assistance, please call: 1-800-211'PANA(7262)
37
Page 38

Other Programmable Settings
Erasing the Directory, Caiier List and Rediai List
You can erase all entries in the directory, caller list and redial list.
Make sure that the station unit is in the standby mode.
J Press IFUNCTIONI.
2 Press V or A until the arrow points to
“initialization", and press ►.
3 Press V or A until the arrow points to
“Dial data”, and press ►.
o The current settings are displayed.
RDL=Redial List
CID=Caller List
DI R=Directory
4 Select “Yes” to erase the list by pressing v
or A. Select “No” to leave the list.
To move to another list, press ► or
5 Press lENTERl.
• A beep sounds.
• To return to the standby mode, press [EXIT].
Clearing Settings
The settings of your station
unit shown on the right will
return to the factory preset.
Make sure that the station
unit is in the standby mode.
/ Press iFUNCTIONl.
Function
Ringer volume HIGH 16
Ringer pattern Pattern 1
Incoming call tone
Line selection
►initialization
VA ►=Set
Function
►Dial data
VA ►=Set
Delete dial data
^„RpL CID DIR
"no No No
Delete dial data
RDL DIR
No Yes No
Factory
preset
2 times
AUTO 36
Reference
page
35
37
2 Press V or A until the arrow points to
“initialization”, and press ►.
3 While “Function” is at the arrow, press ►.
4 Press!CLEARI.
• A beep sounds and “clear” is displayed.
• To return to the standby mode, press [EXIT],
38
►initialization
VA
►Function
Dial data
VA ►^Set
Initialize
function?
► = Set
CLEAR-Delete
Page 39

Canceling Registration
If you no longer need to use the station unit or if you need to register the
unit to a different KX-TG4000B/KX-TG2000B base unit, it may be
necessary to cancel the registration with the base unit
Only one unit can be canceled at a time by using the base unit to which the
station unit IS currently registered
Make sure that the base unit and station unit are in the standby mode
Base unit
1 Press IFUNCTIONI
2 Press V or A until the arrow
points to “Registration", and
press ►
3 Press V or A until the arrow
points to "Deregistration”,
and press ►
• The registered unit numbers are
displayed
Deregistering
HS No. BI2345678
ENTER=Set
4 Press ► or ◄ to move the
cursor to the extension number
to be canceled
5 Press (ENTER 1
Deregister"^
Hands e 12
^=No CLEAR=Yes
'To stop, press <
5 Press ICLE^I
• A beep sounds and “clear” is
displayed
• To return to the standby mode,
press dM)
Station unit
J Press I FUNCTION 1
2 Press V or A until the arrow
points to “Registration”, and
press ►
3 Press V or A until the arrow
points to “Deregistration”,
and press ►
Deregister"^
Handset2
-<=No CLEAR^Yes
• To stop, press ◄
4 Press!CLEAR 1
• A beep sounds and "Clear” is
displayed
• To return to the standby mode,
Dress 1 EXIT]
• [-] Will be displayed
The canceling procedure must be
carried out with both the base unit
and the station unit
'The station unit will not work To use it
again, registration will be required
(P 12, 13)
For assistance, please calf 1 -800-211 -PANA(7262)
39
Page 40

Voice Mail System
The Voice Mai! System allows you to receive and deliver voice messages
using your personal mailbox. The system accommodates one general
delivery mailbox and a maximum of 8 personal mailboxes which are
assigned to the extensions (station units and cordless handsets). The
mailbox numbers are the same as the extension numbers.
The Voice Mail System works fully with the Automated Attendant System,
which routes incoming calls to a specified mailbox and allows a caller to
leave a message (p. 42). If a caller does not specify a mailbox or calls from
rotary telephones, the call is routed to the general delivery mailbox. With
the Answering System (see below)*, all calls are routed to the general
delivery mailbox. Either the Automated Attendant System or the Answering
System can be set to any line by the base unit.
Incoming
If specified
voice
messages |
Each mailbox is assigned to the extension.
You can use the Voice Mail System by accessing your personal mailbox.
Each extension user can only access his/her own personal mailbox. The
general delivery mailbox is managed by the operator (base unit). All users
can access this mailbox through each personal mailbox.
The following functions are possible:
—listening to messages left in your mailbox or the general delivery mailbox
(p. 48, 50)
—transferring a message left in your mailbox to other mailboxes (p. 50)
—delivering your own voice memo message to other mailboxes (p. 51)
You can also access the Voice Mail System features remotely from a touch
tone phone (p. 53).
• All messages (greeting, incoming, etc.) are stored in digital memory of the base
unit. The maximum recording time for each caller is 3 minutes.
• If “Automatic Message Delete Feature" is on by the base unit, incoming messages
left in all mailboxes will automatically be erased after a month.
*The Answering System responds to incoming calls with a greeting message and
callers can leave their messages in the general delivery mailbox. For details see
page 65 in the KX-TG4000B/KX-TG2000B Operating Instructions.
40
Page 41

Setting the Mailbox Password
Assign a 4-digit password (0000-9999) to your personal mailbox to
prevent unauthorized persons from accessing your mailbox and listening to
the messages remotely from a touch tone phone The preset password for
each personal mailbox is a 4-digit number using the mailbox number (Ex
“111T’ for Mailbox 1, “2222” for Mailbox 2) Each password must be unique
You can also stop unauthorized accesses to your personal mailbox from
the station unit using this password If required, turn the direct access
mode OFF Once you turn it OFF, no one can use the IvolCETflAIL] button
features on your unit and access your mailbox without entering the
password Your phone comes from the factory set to ON
Make sure that the station unit is in the standby mode.
J Press fFUNCTIONl
2 Press V or A until the arrow points to
“Voice mail”, and press ►
3 While “Set password” IS at the arrow,
press ►
• The password is displayed
4 Enter a password using a 4-digit number
• If you enter a wrong number, press ICLEARl.
and enter the password again
5 Press (Inter)
• The current setting of the direct access mode is
displayed
^ To select the direct access mode
Select “Off” or “on” by pressing v or a
►Voice mail
Pager setting
Registration
►Set password
Message menu
VA ►=Set
Enter mailbox
password 1230
______
Direct HS access
VA ENTEii'=SaVe
Direct HS '^cce^ss
VA ENTEK=Sa^e
ENTER=Save
On
,Of
7 Press I ENTER I
• A beep sounds
• To return to the standby mode, press lEXIT)
_____
To check the password, repeat steps 1 through 3
• The password will be displayed When finished, press [EXITI
To erase the password
After erasing the password, the remote operation feature will not be used
Press ICLEARl in step 4, and press [ENTERI
• The direct access mode will be on and you can access the mailbox from your unit
without the password
(b
(A
For assistance, please call 1-800-211-PANA{7262)
41
Page 42

Automated Attendant System
How Automated Attendant System Works
The Automated Attendant System is a flexible communication tool that can
enhance your productivity by improving your call management. The
automated attendant answers incoming calls and then routes the callers to
the operator (base unit) or the desired extension (station unit/cordless
handset).
The extension numbers are assigned at registration (p. 12, 13). Callers can
reach desired mailboxes using this system to leave messages.
The Automated Attendant System can be set to any line by the base unit.
Calling the automated attendant
When a caller calls a line to which the Automated Attendant System is
assigned, the caller will first hear the line’s greeting message which is set
by the base unit.
*lf callers select neither extension nor operator, or call from rotary telephones, the
greeting message will be repeated 3 times, and then they will be transferred to the
general delivery mailbox where they can leave messages.
42
Page 43

Setting the Answer Mode
If you are out of the office or unavailable to answer calls, turn ON the
answer mode. Callers who calls your extension will be greeted with a
greeting message of your mailbox (see “Recording a Personal Greeting
Message” on page 44) and callers can leave messages in your mailbox.
Your phone comes from the factory set to OFF. To take calls, leave this
mode OFF.
1 While the station unit is in the standby mode,
press IvoiCE mail).
• If the direct access mode is OFF (p. 41), enter the
mailbox password and press ®.
• If you have new messages, listen to all of them.
• The display will show the command menu as
shown on the right and the menu will be
announced from the speaker (p. 48). You can
switch to the handset by lifting it off the cradle.
2 Press (^.
• The current setting is displayed.
3 To select ON, press (T).
• Your personal greeting, if recorded, can be heard
by the caller at the end of 2nd ring after the caller
selects your extension. If you do not record your
greeting, the pre-recorded greeting will be heard
(p. 44).
l=Play all msg.
2 =Deliver msg.
3=Personal greet
4=To general box
5=Answer on/off
^=End
Auto attendant
Answer :Off
l=On 2=Off
Auto attendant
Answer : On
OR
To select OFF, press (2].
• The caller can only hear a pre-recorded message for Incomplete Call Handing
Status (p. 46), at the end of 5th ring after caller selects your extension, and
may leave a message at your personal mailbox by pressing 1.
4 Press IVOICE MAIL].
• If the handset is off the cradle, you can replace it on the cradle to end the
operation without pressing (VOICE MAIL}.
•
• You can adjust the speaker/handset volume by pressing A or V .
For assistance, please call: 1-800-211-PANA(7262)
43
Page 44

Automated Attendant System
Recording a Personal Greeting Message
If the answer mode is ON (p. 43), callers will hear a pre-recorded personal
greeting message after reaching your personal mailbox, as follows:
“Sorry, no one is available to answer the call. Please leave a message at the tone.”
You can also record your own greeting message of up to 2 minutes.
We recommend you record a brief greeting message (see sample
below) in order to leave more time for recording new messages.
J While the station unit is in the standby
mode, press I VOICE MAlTI.
• If the direct access mode is OFF (p. 41), enter
the mailbox password and press (#].
• If you have new messages, listen to all of them.
• The display will show the command menu as
shown on the right and the menu will be .
announced from the speaker (p. 48).
2 Press d).
• After the current message is played,
“To change, press 1. To accept, press 2” is heard.
3 Press (T|.
• “Record greeting at the tone. To end recording, press
r is heard.
4 After the tone, talk clearly, about 8 inches (20
cm) away from the MIC (microphone). To end,
press Q].
• If the elapsed recording time exceeds 2 minutes, the unit will stop recording.
• The message will be played.
5 Press d).
5 Press [VOICE mail).
l=Play all msg.
2=Deliver msg.
3=Personal greet
4=To general box
5=Answer on/off
*=End
Greeting check
l=Change 2=OK
Greeting record
:00
l=End
Greeting check
: 00
l=Change 2=0K
Greeting message sample:
“Hello, this is (your name). Sorry I cannot take your call. Please leave a message
at the tone. Thank you."
' You can adjust the speak volume by pressing A or V .
44
Page 45

To record a personal greeting message using the handset
1. Press [VOICE mail! while the station unit is in the standby mode, and lift
the handset off the cradle.
• If the direct access mode is OFF (p. 41), enter the mailbox password and press
d).
• If you have new messages, listen to all of them.
2. Press (^, then press (T).
3. After the tone, talk clearly using the handset. To end, press (T).
4. Press d).
5. Replace the handset on the cradle.
• Announcements and the message will be heard through the handset instead of
the speakerphone.
• You can adjust the handset volume by pressing A or V .
To erase the recorded greeting message
1. While the station unit is in the standby mode, press IVOICE mailI.
• If the direct access mode is OFF (p. 41), enter the mailbox password and press
(D.
• If you have new messages, listen to all of them.
2. Press d].
3. Press (D again while the message is being played.
4. Press fvoiCE MAIl].
• The unit will answer with the pre-recorded greeting message (p. 44).
• In step 1, you can lift the handset off the cradle after pressing [VOICE MAIL).
_________________
For assistance, please call: 1-800-211-PANA(7262)
CO
45
Page 46

Automated Attendant System
Call Transfer Status
When a caller specifies an extension by pressing the extension number {(T)
to (U) followed by the call is connected to that extension, and the
extension can take the call. If the extension user is on another call or does
not answer, a fist of options {Incomplete Call Handling Menu) is announced
to guide the caller. If the answer mode is ON (p. 43), the caller can leave a
message in the mailbox.
• If a caller presses an invalid extension number, “Sorry this number is not assigned” is
announced. The caller can call the operator or another extension or leave a
message in the general delivery mailbox following the Incomplete Call Handling
Menu.
Caller specifies an extension.
Answer mode OFF
♦
Call taken
within 5
rings.
Talk
Records a message
Busy
i
“Sorry, this
line is busy”
Not answered
within 5 rings
“Sorry, no one is available
to answer the call,”
- ■ ■
r
Incomplete Call Handling Status
I
The Incomplete Call Handling
Menu is announced up to 3 times;
‘To leave a message, press 1.
To call another extension, press 2,
To call the operator. pres.s 0.”
t
Calls another
extension.
Calls the
operator (p. 47).
Answer mode ON
The personal greeting
message is announced
after the second ring.
♦
Records a message
*lf memory is full, 3 beeps
sound and “Sorry, there is
no space for recording" is
announced. The caller
can call another
extension or the operator
following the Incomplete
Call Handling Menu.
46
Page 47

Call Operator Status
When a caller specifies the operator by pressing (o| and (#), the call is
connected to the operator. If the operator is on another call or does not
answer, a list of options {Incomplete Call Handling Menu) is announced to
guide the caller. The caller can leave a message in the general delivery
mailbox or call an extension.
The operator will also be responsible for answering and handling calls that
have been transferred.
*^lf memory is full, 3 beeps sound and “Sorry, there is no space for recording” is
announced. The caller can call an extension following the Incomplete Call
Handling Menu.
For assistance, please call: 1-800-211-PANA(7262)
47
CO
3
s'
&)
9
to
Page 48

Listening to Messages
You can access your personal mailbox and listen to the messages, transfer
the messages to other mailboxes or erase unnecessary messages. You
can also access the general delivery mailbox from your unit.
If the VOICE MAIL indicator flashes, “(SI” flashes and ‘Voice mail” is
shown on the display, new messages have been received in your maiibox.
During playback “I^” is displayed.
Listening to new messages
J While the station unit is in the standby
mode, press IVOICE MAlLl.
• if the direct handset access mode is OFF (p. 41),
enter the mailbox password and press
• The unit announces the maiibox number and the number of new messages
from the speaker.
New messages are played.
• During each message playback, the message number is displayed.
• After each message playback, the Message
Menu will be displayed as shown on the right and
announced:
“To repeat this message, press I.
To play the next message, press 2.
To erase this message, press 3.
To transfer this message, press 7.”
• At the end of the last message, “This is the last message" will be heard.
New messages
playback
*=Command menu
l=Repeat
3-Erase
7 ^Transfer
2=Next
After listening to all new messages, the
Command Menu is displayed as shown on the
right and announced:
“To play all messages, press I,
To deliver a message, press 2. {p. 51)
To change the personal greeting, press 3. (p. 44)
To change to the general delivery mailbox, press 4.
(p. 50)
For Automated Attendant Status, press 5.
(To turn on/off the answer mode, p. 43)”
To listen to all messages, press [T].
• After each message playback, the Message Menu will be announced and
displayed.
To end the operation, press (VOICE MAIL].
'To delete the Message Menu, see page 52.
48
Page 49

To listen to messages from the handset
While the station unit is in the standby mode, press (VOICE MAIL], and lift
the handset off the cradle.
• The display shows “Playback from handset" for
a few seconds.
• You can switch from the handset to the speaker by
pressing [ ENTER 1. “Playback from speaker” will
be displayed for a few seconds. Each time you press
(ENTER)
will switch to the handset or the speaker.
• To end the operation in the handset mode, you can replace the handset on the
cradle without pressing [VOICE MAIL].
• If the direct access mode is OFF (p. 41), enter the mailbox password and press
while the handset is off the cradle, the mode
During playback
Playback from
handset
ENTER=Speaker
Playback from
speaker
ENTER-Handset
To repeat a
message
To skip a message
Press [i] or ◄. (If you press within 5 seconds of
playback, the previous message will be played.)
Press {2] or ►. (The next message is played.)
To adjust the speaker volume (8 levels) or handset volume (High, Medium or Low):
Press A or V during playback.
• Each time you press A or v. the volume level will change.
For Caller ID service users (p. 29)
During playback, the display shows the name
and/or number of the caller whose message is
being played.
To call back the displayed number:
During playback, press (DIGITAL SP-PHONEI.
• You can press a line button instead of pressing [DIGITAL SP-PHONÉ1. If
registered to KX-TG2000B, do not press ILINE31 or [LINE4I.
• The unit stops playback and automatically dials the displayed phone number.
Listening to your personal mailbox messages from the base unit;
If the battery has no power or the station unit cannot be used any more, you (or
the operator) can access your personal mailbox from the base unit.
1. Press (SI on the base unit. (If there are new messages, listen to all of them.)
2. Press the corresponding INTERCOM button ((T| to (s)).
3. Enter your mailbox password (p. 41), and press [ENTEWI.
SMITH,JACK
1-234-567-8901
--
Message 1-
<b
V)
For assistance, please call; 1-800-211-PANA(7262)
49
Page 50

Listening to Messages
Transferring a Message
After listening to a message left in your personal mailbox, you can transfer
it to other mailboxes.
During playback or before the start of the
7
next message, press @-
• “Enter the destination mailbox number” is announced.
Enter the destination mailbox numbers
using the corresponding dialing buttons (®,
H] to (U). For the general delivery mailbox,
Transfer message
Enter mailbox #
Transfer message
BoxNo. :l-3-5--80
^=Cancel #=OK
enter (o)-
• The mailbox numbers and “To accept, press #.
To cancel, press ^ ” are announced.
• If you make a mistake, press @ and start again from step 1.
Press ®.
• The mailbox numbers entered in step 2 will be
announced, and the next message will be played.
Transfer message
BoxNo. :l-3-5--80
Erasing a Message
We recommend you erase unnecessary messages after each playback.
While the message you want to erase is being played or before the start of
the next message, press [|] or ICLEARl.
• A beep sounds and “Message erased” is heard.
• The unit will play the next message.
Listening to Messages in the General Delivery Mailbox
You can access the general delivery mailbox from the station unit.
y While the station unit is in the standby mode, press I VOICE MAlLl.
• If the direct access mode is OFF (p. 41), enter the mailbox password and
press (D-
• If you have new messages, listen to all of them.
•To listen to messages from the handset instead of the speaker, lift the handset
off the cradle.
2 Press (4)-
• 'This is the general delivery mailbox” is heard.
• After the number of new messages is announced, new messages will be played.
3 After listening to all new messages;
To listen to all messages, press (T|.
To return to your mailbox, press [4].
To end the operation, press IVOICE MAIL].
• If the handset is off the cradle, you can replace it on the cradle to end the
operation without pressing IVOICE MAIL).
50
Page 51

Delivering Your Own Memo Message
You can record and send your own voice memo message of up lo 3
minutes, to other extensions and the operator in a single operation
J While the station unit is in the standby mode,
press (VOICE MAIL)
• If the direct access mode is OFF (p 41), enter the
mailbox password and press (#)
• If you have new messages, listen to all of them
• The display will show the command menu as
shown on the right and the menu will be
announced from the speaker
2 Press(D
3 Enter the destination mailbox numbers
using the corresponding dialing buttons
(®, [n to (D) For the general delivery
mailbox, enter (3
• If you make a mistake, press © and start
again from step 2
4 Press (D
• “Please leave a message at the tone To end
recording press 1" ts heard
5 After the tone, talk clearly, about 8 inches
(20 cm) away from the MIC (microphone)
^ To end recording, press (T]
• The recorded message is played
• To change the message, press (l] and record
the message again
^ Press
l=Play all msg
2=Deliver msg
3=Personal greet
4=To general box
5=Answer on/off
* = End
Deliver message
Enter mailbox #
Deliver message
BoxNo 12--5--80
^=Cancel #=OK
Message record
00
l=End
Message record
50
l = End
Message play
l=Change
00
2=OK
g Press (VOICE MAILl
• To record the message with the handset, lift the handset off the cradle after
pressing (VOICE MAILl in Step 1 In step 5, talk to the handset instead of the MIC
• “Message recorded by (extension number)” is announced before a delivered message
IS played at the destination extension
• You can adjust the speaker/handset volume by pressing A or V
For assistance, please call 1 -800-211-PANA(7262)
57
Page 52

other Voice Mail System Features
Transferring a Call to Other Person’s Mailbox
After you answer an incoming call, the call can be transferred to a mailbox
of the person the caller wishes to speak to, where the caller can leave a
message To transfer to other person’s personal mailbox, calls must be
sent through the General Delivery Mailbox The caller can then enter the
extension number and the # sign to reach the mailbox If the operator
(base unit) or a cordless handset user answers an incoming call, he/she
can also transfer the call to a personal mailbox
The following is how calls must be transferred to the voice mail
After you answered a call, you may announce that person the caller wishes to
speak to is not available, and remind the caller of the extension number followed
by the # sign You then press the (VOICE mail! button, and hang up the line
• The caller will then hear the line’s greeting message While the greeting is playing,
the caller can press the extension number (1 to 8) followed by @ After that,
-If the answer mode of the extension is on (p 43), the caller will hear the personal greeting
message at the end of the 2nd ring, then he/she can leave a message at the tone
-If the answer mode is off (p 43), the caller will hear “Sorry, no one is available to
answer the call To leave a message press I To call another extension press 2 To call the
operator press 0” at the end of the 5th ring Or if the person the caller wishes to
speak to, is on another call, the caller will hear "Sorry, this line is busy To leave a
message press 1 To call another extension press 2 To call the operator press 0”
If the caller who called and talked to the station unit user needs to speak to
the operator or to leave a message for the operator, the station unit user
should let the caller know 1) the operator extension is 0, 2) to reach the
operator or operator’s mailbox (General Delivery Mailbox), the caller should
press 0 and # during the line’s greeting which the caller will hear after the
station unit user presses I VOICE button and hangs up the line
Message Menu Mode
After each message is played, the Message Menu (p 48) is announced
and displayed as a guide With a touch tone phone from a remote location,
this menu can be heard (p 53) To turn off the announcement and the
display, which follow each message played, set the Message Menu to
OFF Your phone comes from the factory set to ON
Make sure that the station unit is in the standby mode.
Press I FUNCTION I
1
Press V Of until the arrow points to “Voice mail”, and press ►
2
52
Press V or A until the arrow points to
3
“Message menu”, and press ►
• The current setting is displayed
Select “Of f” or “On” by pressing v or >\
4
Press [ENT^I
5
• A beep sounds
'To return to the standby mode, press I EXIT)
Message met^u ^
v/\ ENTEI^-saVe
On
Page 53

Remote Operation from a Touch Tone Phone
You can access the Voice Mail System from
any touch tone phone if the Automated
Attendant System or the Answering System is
on for any of lines by the base unit. You can
listen to recorded messages in your personal
mailbox and the general delivery mailbox, and
you can transfer the messages and deliver your
own messages to other maiiboxes.
When you access your maiibox, you are
required to enter your mailbox password (p. 41).
How to Access the Voice Mail System
53
Page 54

^ Remote Operation from a Touch Tone Phone
During message playback
During playback or before the start of the next message,
To repeat the message, press (T)
To play the next message, press @
To erase the message, press [3]
To transfer a message
After listening to a message, you can transfer it to other mailboxes
1 During playback or before the start of the next message, press (7)
2 Enter the destination mailbox numbers using the corresponding dialing
buttons (®, [T| to [s]) For the general delivery mailbox, enter (o]
3 Press ®
To listen to all messages
While the Command Menu is announced {p 53), press Q]
To deliver your own message
You can send your own voice memo message of up to 3 minutes, to
several mailboxes
1 While the Command Menu is announced (p 53), press [D
2 Enter the destination mailbox numbers using the corresponding dialing
buttons (®, [T| to (U) For the general delivery mailbox, enter ®
3 Press ®
4 Talk clearly after the tone To end, press (T)
5 Press©
6 Press © and hang up
To change the personal greeting message
You can change the mailbox personal greeting message
1 While the Command Menu is announced (p 53), press (s)
2 Press (T) ,
3 Talk clearly after the tone To end, press Q]
4 Press ©
5 Press ® and hang up
54
Page 55

To switch to the general delivery mailbox from your personal mailbox
After entering your mailbox, you can switch to the general delivery mailbox
to listen to messages
1 While the Command Menu is announced {p 53), press (4)
• “This IS the general delivery mailbox” is heard
• After the number of new messages is announced, new messages will be
played
2 After listening to all new messages.
To listen to all messages, press [T|
To return to your mailbox, press (4]
To end the operation, press @ and hang up
Interrupting remote operation
If a user IS accessing a mailbox from a remote location, and you
mistakenly answer the call,
1 Press fyoICE ^lLl
2 Place the handset on the cradle or press IbiGlTAL SP-phoneI
The user can then access the mailbox
Cailing the Answering System to leave a message in
the general delivery mailbox without entering the
password
Press @ twice during the line’s greeting message The unit skips the
rest of the message and you can leave your message after the tone
For assistance, please cal! 1-800-211 -PANA{7262)
(A
55
Page 56

Pager Call
This feature allows the station unit to alert your pager when your mailbox
has received an incoming message from an outside caller (When a
message has been transferred or delivered from another user, the unit will
not alert your pager) You can retrieve the message from a touch tone
telephone {p 53) If you subscribe to a Caller ID service, the caller’s
telephone number will be displayed on your pager
First store a pager number and the pager display number (p 56, 57), then
set the unit to call the pager
Make sure that the station unit is in the standby mode.
storing a Pager Number
7 Press I FUNCTION I
2 Press V or /\ until the arrow
points to “Pager setting”,
and press ►
3 While “Pager number” is at the
arrow, press ►
Enter pager No
• If the number has already been
stored.
It
will be displayed
Enter your pager number, and
press IPAUSEI twice * * Enter the
access code, if required by your
pager company
OR
If you use a 1-800 pager
number with a pager PIN
code
Enter the 1-800 number, and
press [PAUSEI 3 times *
Enter the pager PIN code
• If you misdial, press I CLEAR I
Digits are erased from the right To
erase all the digits, press and hold
I CLEAR 1
• You can enter a total of 44 digits
5 Press I ENTER I
• A beep sounds
• To return to the standby mode,
press lE)^
‘Pager companies require a delay
after the pager number and/or the
access code is dialed
For a 1-800 pager number, a delay
will be required after the pager
number and the pager PIN code are
dialed
Contact your pager company
regarding the required pause time
Pressing I PAUSE) once creates a
3 5 second delay and counts as one
digit
• If the line(s) has(have) rotary or pulse
service, press Q between the pager
number and I PAUSE I in step 4
• If you stored a 1 -800 pager number,
alphanumeric voice dispatch pager
services will not work with this
function
56
Page 57

storing the Pager Display Number
After storing one of the unit’s phone numbers, you can check that pager
number is stored correctly This phone number will be displayed on your
pager if the message is received from an area which does not provide a
caller ID service or a caller requests not to show his/her information
J Press I FUNCTION I
2 Press V or A until the arrow
points to “Pager setting”,
and press ►
3 Press V or A until the arrow
points to “Pager display #”,
and press ►
• “Enter display #” is displayed
• If the number has already been
stored, It will be displayed
4 Enter the phone number, up to
11 digits
Enter display #
22233344440
ENTER=Save
• If you misdiat, press ICLEARl
Digits are erased from the right To
erase all the digits, press and hold
ICLEARl
Press I ENTER]
• A beep sounds
• To return to the standby mode,
press fE)^
To check the stored pager
number and pager display
number
1 Press I FUNCTION I
2 Select “Pager setting” by
pressing v or a , and press ►
3 Select “Calling pager” by
pressing v or A, and press ►
4 Press I DIGITAL SP-PHONEI
• The pager number is dialed
• The pager beeps, and displays the
pager display number followed by
“11”* If not, store the pager
number and pager display number
again
' Other users can let you know when
they want you to call back, by
following the procedure above
*What “11” means
When your unit alerts your pager after
receiving a message in the mailbox,
“1 r will be displayed after the caller’s
telephone number
For assistance, please call 1-800-211-PANA(7262)
57
(ft
(A
Page 58

Pager Call
To erase the pager number
Press I FUNCTION, and press v
or A until the arrow points to
“Pager setting”, and press
►
To erase the pager display
number
1
Press I FUNCTION), and press v
or A until the arrow points to
“Pager setting”, and press
While “Pager number” is at the
arrow, press ►
Press I CLEAR 1
Press IENTERI
►The pager call mode will automatically
return to OFF (see below)
Press V or A until the arrow
points to “Pager display
and press >
Press ICLEAR]
Press fENTER)
Setting the Unit to Call a Pager
J Press (FUNCTION)
2 Press V or A until the arrow
points to “Pager setting”,
and press ►
3 Press V or A until the arrow
points to “Pager on/of f”, and
press ►
• “Of f" (factory preset) is displayed
4 Select “On” by pressing v or
A
Pager on/off
V A
VA ENTEii'^saVe
5 Press [ENTERI
• A beep sounds
• To return to the standby mode,
press iE^
On^
if you have not subscribed to a Caller
ID service, the caller’s telephone
number will not be displayed on your
j^pager
• If another message is received before
the unit alerts your pager for a
previous message, the previous caller
information will not be sent to your
pager Only the last call received will
be sent to your pager
• If someone else makes or answers
another call with your unit before the
unit alerts your pager for a previous
message, the unit will stop alerting
your pager for that message
• If you receive a telephone number on
your pager but cannot recognize the
caller, you may have received a direct
inward dial (DID) call, such as from a
PBX Please call your unit to check
the caller’s message
To turn off the pager call mode,
select “Off” in step 4
58
Page 59

Battery Replacement
If “Recharge” IS displayed with the battery icon “CE” flashing, please
recharge the battery for another 8 hours If “Recharge” still shows after
being fully charged (p 10), or if “install battery” is displayed when
the battery has been installed or in use for certain amount of time {p 64),
replace the battery with a new Panasonic HHR-15F2G1 battery To order,
call the accessories telephone number on page 2
J Remove the battery cover
Press down the arrow (©),
then slide the cover in the
direction shown {(D)
2 Replace the battery
Be sure wires are free from
being pressed by the battery
body or battery cover
(D
3 Close the battery cover Slide the battery cover, and push it forward as
shown until It locks into place
4 Connect the AC adaptor to charge (p 9) To use in a remote location
(battery power mode), make sure you charge the new battery for about
8 hours in order to display the battery strength prompt correctly (p 10)
A nickel metal hydride battery that is recyclable powers the
product you have purchased
Please call 1-800-8-BATTERY for information on how to
recycle this battery
For assistance, please call 1-800-211-PANA(7262)
Page 60

Using an Optional Headset
Plugging an optional headset into the station unit allows a hands-free
phone conversation. Please use only the Panasonic KX-TCA88 headset.
To order, call the accessories telephone number on page 2.
Connecting the headset
Connect the headset to the headset jack as shown.
Making/Answering calls
J Press [HEADSET] to make or answer a call.
• You can press the line button instead of pressing [HEADSET]. If registered to
KX-TG2000B, do not press lUNESl or ILINE41.
• If you misdial when making a call, press 1 HEADSET] twice and dial again.
2 To hang up, press [HEADSET].
60
Page 61

Intercom
J To make an intercom call:
Press 1 INTERCOMI. and enter the desired extension number ((o), (D to
(!))■
• To Stop paging, press lINTERCOMl.
To answer an intercom call:
Press [HEADSET].
2 To end the intercom, press (HEADSET).
To adjust the headset receiver volume (High, Medium or Low):
White using the headset, press a or v ■
To switch to the speakerphone while using the headset:
“ENTER=SP-phone” is displayed. Press (ENTER).
To return to the headset, press lENTERl again.
• Each time you press (ENTER), the call will switch to the headset or
speakerphone. While in the speakerphone mode, “ENTER=Headset" is
displayed.
I If you disconnect the headset during a conversation with the handset on the
cradle, you can continue the conversation with the speakerphone. If the handset
is off the cradle, you can continue the conversation with the handset.
While the headset is connected:
• When playing back messages (p. 48), you can listen to them from the
headset.
- To switch from the headset to the speaker, press (ENTER). “Playback
from speaker ENTER^Headset” will be displayed for a few second. To
return to the headset, press (eT^TER 1 again, “playback from headset
ENTER=Speaker” will be displayed. Each time you press (ENTER), the
mode wilt switch to the headset or speaker.
- If you disconnect the headset during playback with the handset on the
cradle, you can continue playback with the speaker. If the handset is off the
cradle, you can continue playback with the handset.
• Wfien recording a personal greeting message (p. 44) or your own
voice memo message (p. 51), you can record the message with the
headset microphone.
For assistance, please call: 1-800-211-PANA{7262)
(b
61
Page 62

Wall Mounting
This unit can be mounted on a wall phone plate,
J Pull down the handset hook until it
locks, so the tab holds the
handset.
2 Connect the AC adaptor.
To Power
Outlet
3 ©Insert the tabs of the wall
mounting adaptor into the wall
openings.
©Push the adaptor in the direction
of the arrow. “UP” should face
upward.
62
Page 63

4 Mount the unit on the wall phone
plate, then slide down.
• Raise the antenna.
• The telephone jack on the plate
will be covered by the unit.
To temporarily set the handset down
during a conversation, place it as
shown here.
For assistance, please call: 1-800-211-PANA(7262)
63
Page 64

Error Messages
Display messages
If the station unit detects a problem, one of the following messages will be
displayed. Error beeps or a busy tone will sound.
Display message Cause & Remedy
No link to base.
Walk closer to
base & try again
Recharge
Systein is busy.
Please try again
later.
Busy
Invalid
The station unit has lost communication with
the base unit. Locate the unit near the base
unit, and try again.
The battery needs to be charged. Connect the
AC adaptor to recharge {p. 9).
If 4 other units are in use (for users registered
to KX-TG4000B), or if more than one unit is in
use (for users registered to KX'TG2000B):
- you may not be able to program certain
function items, such as “Set password” or
“Pager on/off,
- you may not be able to make an external or
internal call, or
- you may not be able to listen to messages in
your mailbox.
Try again later.
• The paged party is engaged in a call.
• While another user is listening to messages in
the general delivery mailbox, you cannot
access that mailbox (p. 50).
• All lines are in use or a line of the button you
pressed is in use. You cannot make a call.
Try again later.
• A paged unit is too far from the base unit.
• A paged unit has not been registered to the
base unit.
•The unit you are canceling has not been
registered to the base unit (p. 39).
Memory is full
Install battery
64
When trying to store an item in the directory,
the directory memory is full. Erase other items
and try again (p. 28).
You have not installed the battery in the battery
compartment (p. 8). However the unit will work
with the AC power. If “install battery”
displays with the battery installed properly, the
battery may be impaired. In that case replace
it with a new one (p. 59).
Page 65

Display message
Cause & Remedy
Line
not available
The station unit has been registered to
KX-TG2000B;
-The ILINE 31 and (LINE 4l buttons are
inoperative.
- Line 3 or Line 4 is selected for the calling line
selection. Change the selection to “Auto”,
“Liner or “Line 2” (p. 36).
Call restriction The dialed number is restricted by the base
unit.
Please set
pager number
You tried to check the number or set the unit to
call the pager without first storing the pager
number {p. 56).
Incorrect PIN.
Try again.
Not available.
Please
deregister HS
Error!1
You entered a wrong PIN (p. 13). Enter the
correct PIN.
The station unit you are registering has already
been registered.
• When you tried to register the station unit, the
unit could not link to the base unit for some
reason, such as interference from other
electrical appliances. Take both units away
from the electrical appliances and try again.
• 8 extension units (station units and cordless
handsets) have already been registered to the
base unit. You may ask the operator to cancel
another unit registration.
s
(D
Please enter
another password
Invalid.
Please register
to the base unit
For assistance, please call: 1 -800-211 -PANA(7262)
You selected a password which is the same as
another mailbox {p. 41). Select another one.
The station unit you tried to make a call or
access the mailbox has not been registered to
the base unit. Register it to the base unit
{p. 12, 13).
65
Page 66

Error Messages
Voice messages
If the station unit detects a problem, one of the following messages will be
announced.
Voice message Cause & Remedy
“Sorry, there Ls no
space for recording”
“Incorrect entry”
“This is your
mailbox”
“Sorry, this
mailbox is in use”
The remaining recording time or the number of
messages which can still be recorded is 0. Erase
unnecessary messages (p. 50) or you may ask the
operator to erase unnecessary messages.
An invalid extension number was entered when
transferring or delivering a message. Make sure
that the unit is registered to the base unit
(p. 50, 51).
You entered your own mailbox number when
transferring or delivering a message (p. 50, 51).
You tried to access the general delivery mailbox
from your unit while another user was listening to
the messages there (p. 50).
66
Page 67

Before Requesting Help
Telephone
Problem { Remedy
The unit does not work. |
.
“No link to base.
Walk closer to
base & try again” is
displayed and an alarm
tone sounds.
Static, sound cuts in/out,
fades. Interference from
other electrical units.
The unit does not ring.
j
• Be sure that the AC adaptor is connected
properly {p. 9),
• Charge the battery fully (p. 10).
• Install the battery properly (p. 8, 59).
• The unit has not been registered to the base
unit. Register it to the base unit (p. 12, 13).
• The base unit backup battery has been
discharged during a power failure.
• You are too far from the base unit. Locate
the station unit near the base unit and try
again.
• Raise the antenna.
• Locate the station unit and the base unit
away from other electrical appliances.
• Locate the station unit near the base unit.
• Raise the antenna.
•The ringer volume is set to OFF. Select
HIGH or LOW (p. 16).
• If registered to KX-TG4000B:
If 4 other units are in use, the station unit
may not ring. Those users will hear
incoming call tones.
• If registered to KX-TG2000B:
If more than one unit is in use, the station
unit may not ring. Those users will hear
incoming call tones.
•The unit is removed from the ring group of
the line by the base unit.
(D
i
a>
5J.
O'
o
i You cannot dial.
The display is blank.
For assistance, please call: 1-800-211-PANA(7262)
•The dialed number is restricted by the base
unit.
•The battery has been discharged. Connect
the AC adaptor to charge the battery fully
(p. 9).
67
Page 68

Before Requesting Help
Problem Remedy
You cannot program | *Do not pause for over 60 seconds while
function items, such as the | programming,
line selection. | »Programming is not possible while the
handset is off the cradle or the DIGITAL
SP-PHONE indicator lights.
• Make sure that the station unit is in the
1 standby mode.
You cannot make a call
even if there is at least one
free line.
You cannot page another
unit.
You cannot store a name
and phone number in the
directory.
■
While programming or
searching, the unit starts to
ring and stops the
program/search.
The caller’s information is
not displayed.
'
• You may not be able to make a call, if 4
other units are in use (for users registered
to KX-TG4000B), or if more than one unit is
in use (for users registered to
KX-TG2000B). Try again later.
• You may not be able to page, if 4 other
units are in use (for users registered to
KX-TG4000B), or if more than one unit is in
use (for users registered to KX-TG2000B).
Try again later.
• The unit is too far from the base unit.
• The paged unit is in use.
• You cannot store an Item in the directory
while the handset is off the cradle or the
DIGITAL SP-PHONE indicator lights.
• Do not pause for over 60 seconds while
programming.
• To answer the call, lift the handset off the
cradle, oress 1 digital SP-PH0NE1 or press
the called line button. Start again from the
beginning after hanging up.
• The unit is removed from the ring group of
the line by the base unit.
• Other telephone equipment may be
interfering with your phone. Disconnect it
and try again.
• Other electrical appliances connected to
the same outlet may be interfering with the
Caller ID information.
• Telephone line noise may be affecting the
Caller ID information.
68
Page 69

Problem 1
The unit exits the Caller
list/directory while you are
viewing it.
Remedy
• Do not pause for over 60 seconds while
searching.
You cannot register the unit
at the base unit.
When a second call is
received on the same line,
the unit does not display
the new caller’s
information.
You cannot redial the last
number dialed.
You cannot have a
conversation using the
headset.
•The battery needs to be charged. Connect
the AC adaptor to charge the battery fully
(p. 9).
• If another call is received on the same line
while;
- the Automated Attendant System or
Answering System is responding to a call,
or
- a call is placed on hold,
the caller information will not be displayed.
• If the last number dialed was more than 32
digits long, the number will not be redialed.
• Access numbers entered after pressing
iTONEl will not be included when redialing.
• The iREDIALl button also functions as the
[PAUSEl button. It will redial the last
number dialed if pressed at the outset of a
call (p. 19). If another number has been
dialed first, it will operate as a pause button
{p. 34).
• Make sure that the headset is plugged into
the headset jack properly (p. 60).
• If “ENTER=Headset” is displayed, press
1 ENTER] to switch from the speakerphone
to the headset.
5
(D
Q>
o'
o
“Recharge” is displayed,
“1_li” flashes or the unit
beeps intermittently.
You charged the battery
fully, but “Recharge” is still
displayed and/or “dll”
still continues to flash.
For assistance, please call: 1-800-211-PANA(7262)
• Connect the AC adaptor to charge the
battery fully {p. 9).
• Install a new battery (p. 59).
Page 70

Before Requesting Help
System Features (Voice Mail System/Automated Attendant System/Answering System)
Problem
I The Automated Attendant
I
System is on, but incoming
! messages are not recorded
’ in you mailbox.
You cannot access your
mailbox by pressing
[VOICE MAILl.
Remedy
►The remaining recording time or the
number of messages which can still be
recorded is 0. Erase unnecessary
messages (p. 50) or you may ask the
operator to erase unnecessary messages.
• Make sure that the station unit is in the
standby mode.
• You may not be able to access the mailbox,
if 4 other units are in use (for users
registered to KX-TG4000B) or if more than
one unit is in use (for users registered to
KX-TG2000B). Try again later.
• If the Automated Attendant System or
Answering System is responding to 4 calls
(for users registered to KX-TG4000B) or 2
calls (for users registered to KX-TG2000B)
on separate lines, you cannot access the
mailbox. Try again later.
•The station unit is too far from the base
unit. Locate the unit near the base unit.
• If “Enter mailbox password” is
displayed, the direct access mode is OFF
(p. 41). Enter the mailbox password and
press [#|.
You cannot access your
mailbox from a touch tone
phone.
While recording a greeting
message, incoming call
tones are heard.
70
• Make sure you press @ and enter the
correct password.
• The Automated Attendant System or
Answering System may not respond if the
tones are too short to activate the unit.
Press each button firmly.
• To answer the call, press the called line
button. The recording will stop. Start from
the beginning after hanging up.
•
Page 71

Problem
Remedy
During playback, incoming
call tones are heard
The display does not show
the name and/or number of
the caller whose message
IS being played
You cannot listen to
messages from the
speaker or handset
• If you cannot solve your problem, call our customer call center at
1-800-211-PANA(7262)
• Panasonic’s e-mail address for customer inquiries
consumerproducts@panasonic com
for customers in the USA or Puerto Rico ONLY
• To answer the call, press the called line
button To resume playback, press
IVOICE MAIL) after hanoino UD
• If the caller is not stored in the caller list,
the caller’s information will not be
displayed
• When the optional headset is connected,
messages are heard from the headset You
can switch to the speaker by pressing
1 ENTER1
5
<D
&>
O’
o
For assistance, please call 1 -800-211 -PANA(7262)
71
Page 72

Important Safety Instructions
When using this unit, basic safety precautions should always be followed
to reduce the risk of fire, electric shock, or personal injury.
I. Read and understand all instructions.
Follow all warnings and instructions marked on this unit.
2.
Unplug this unit from AC outlets before cleaning. Do not use liquid or
3.
aerosol cleaners. Use a damp cloth for cleaning.
4.
Do not use this unit near water, for example, near a bathtub,
washbowl, kitchen sink, or the like.
Place this unit securely on a stable surface. Serious damage and/or
5.
injury may result if the unit falls.
Do not cover slots and openings on the unit. They are provided for
6.
ventilation and protection against overheating. Never place the unit
near radiators, or in a place where proper ventilation is not provided.
Use only the power source marked on the unit. If you are not sure of
7.
the type of power supplied to your home, consult your dealer or local
power company.
Do not place objects on the power cord. Install the unit where no one
8.
can step or trip on the cord.
Do not overload wall outlets and extension cords. This can result in the
9.
risk of fire or electric shock.
10. Never push any objects through slots in this unit. This may result in the
risk of fire or electric shock. Never spill any liquid on the unit.
II. To reduce the risk of electric shock, do not disassemble this unit. Take
the unit to an authorized servicenter when service is required. Opening
or removing covers may expose you to dangerous voltages or other
risks. Incorrect reassembly can cause electric shock when the unit is
subsequently used.
12. Unplug this unit from the wall outlet and refer servicing to an authorized
servicenter when the following conditions occur;
A. When the power supply cord or plug is damaged or frayed.
B. If liquid has been spilled into the unit.
C. If the unit has been exposed to rain or water.
D. If the uriit does not work normally by following the operating
instructions. Adjust only controls covered by the operating
instructions. Improper adjustment may require extensive work by an
authorized servicenter.
E. If the unit has been dropped or physically damaged.
F. If the unit exhibits a distinct change in performance.
13. During thunderstorms, avoid using telephones except cordless types.
There may be a remote risk of an electric shock from lightning.
14. Do not use this unit to report a gas leak, when in the vicinity of the leak.
________
SAVE THESE INSTRUCTIONS
72
Page 73

CAUTION:
To reduce the risk of fire or injury to persons, read and follow these
instructions
1 Use only the battery(ies) specified
2 Do not dispose of the battery(ies) in a fire They may explode Check
with local waste management codes for special disposal instructions
3 Do not open or mutilate the battery(ies) Released electrolyte is
corrosive and may cause burns or injury to the eyes or skin The
electrolyte may be toxic if swallowed
4 Exercise care in handling batteries in order not to short the battery to
conductive materials such as rings, bracelets, and keys The battery
and/or conductor may overheat and cause burns
5 Charge the battery(ies) provided with or identified for use with this
product only in accordance with the instructions and limitations
specified in this manual
WARNING:
TO PREVENT FIRE OR SHOCK HAZARD, DO NOT EXPOSE THIS
PRODUCT TO RAIN OR ANY TYPE OF MOISTURE
•The AC adaptor is used as the mam disconnect device, ensure that the
AC outlet IS Iocated/installed near the unit and is easily accessible
For assistance, please call 1 -800-211 -PANA(7262)
5
73
Page 74

FCC and Other Information
When programming emergency numbers and/or making test calls to emergency
numbers:
1. Remain on the line and briefly explain to the dispatcher the reason for the call
before hanging up.
2. Perform such activities in the off-peak hours, such as early morning hours or
late evenings.
This device complies with Part 15 of the FCC Rules. Operation is subject to the
following two conditions: (1) This device may not cause harmful interference, and
(2) this device must accept any interference received, including interference that
may cause undesired operation.
Privacy of communications may not be ensured when using this phone,
CAUTION:
Any changes or modifications not expressly approved by the party responsible for
compliance could void the user’s authority to operate this device.
Note:
This equipment has been tested and found to comply with the limits for a Class B
digital device, pursuant to Part 15 of the FCC Rules. These limits are designed to
provide reasonable protection against harmful interference in a residential
installation. This equipment generates, uses, and can radiate radio frequency
energy and, if not installed and used in accordance with the instructions, may
cause harmful interference to radio communications. However, there is no
guarantee that interference will not occur in a particular installation. If this
equipment does cause harmful interference to radio or television reception, which
can be determined by turning the equipment off and on, the user is encouraged to
try to correct the interference by one or more of the following measures:
— Reorient or relocate the receiving antenna.
— Increase the separation between the equipment and receiver,
— Connect the equipment into an outlet on a circuit different from that to which the
receiver is connected.
— Consult the dealer or an experienced radio/TV technician for help.
Operating near 2.4GHz electrical appliances may cause interference. Move away
from the electrical appliances.
CAUTION:
To comply with FCC RF exposure requirements, this unit should be installed with
its antenna located at 20 cm or more from persons.
• Environment — do not place the unit in a room where the temperature is less
than 5“C (41°F) or greater than 40°C (104°F). Allow 10 cm (4") clearance around
the unit for proper ventilation. Avoid excessive smoke, dust, mechanical
vibration, shock, or direct sunlight.
• Medical — consult the manufacturer of any personal medical devices, such as
pacemakers, to determine if they are adequately shielded from external RF
(radio frequency) energy. (The unit operates in the frequency range of 2401MHz
to 2480MHz, and the power output level can range from 0.04 watts to 0.40
watts.) Do not use the unit in health care facilities if any regulations posted in
the area instruct you not to do so. Hospitals or health care facilities may be
using equipment that could be sensitive to external RF (radio frequency) energy.
• Routine care — wipe the unit with a soft cloth. Do not use benzine, thinner, or
any abrasive powder. When you leave the unit unused for a long period of time,
unplug the AC adaptor from the outlet.
74
Page 75

Index
A Access to General Delivery Mailbox ..50,55
Access to personal mailbox
Accessories................................................2
AC power mode
Answering calls
Answering System mode
Automated Attendant System
B Backlit LCD
Battery installation
Battery operating time.............................11
Battery power mode.............................8, 10
Battery replacement
Battery strength........................................10
C Call on hold
Call transfer
Call waiting caller ID
Call waiting tone
Caller ID display........................................29, 49
Caller ID service
Caller ID, edit
Caller List, erasing
Caller List, storing
Caller List, viewing...................................30
Calling back from Caller ID List ..31,49
Calling extensions.....................................42, 46
Calling operator
Command menu
Conference call........................................24
D Delivering a voice memo message...51
Deregistration
Direct access
Directory
Directory, dialing
Directory, editing......................................28
Directory, erasing
Directory, name and symbols..................26
Directory, searching.................................27
Displays on LCD
E Erasing a voice mail message ..50, 53
Error messages
Error messages, display
Error messages, voice.............................66
Extension number.....................................12, 22
F Factory preset function setting
FCC and other information
FLASH button
Function Menu, Selection
Function Menu, Table..............................15
G Greeting, answer mode setting...43,44
.........................................
........................................
..................................................
..........................................
.......................................
......................................
.......................................
..........................................
........................................
.......................................
..........................................
..........................................
..................................................
......................................
........................................
.......................................
..........................................
...............
.........................
.....................................
................................
............................
...................................
....................................
....................................
..........................
........................
48, 53
...................
19,21
46, 47
2, 34
..................
......................
For assistance, please call: 1-800-211-PANA(7262)
H Headset, optional
Hold alarm................................................19
Hold time..................................................19
9
I Incoming call tone
20
40
42
7
8
59
34
20, 29
31
33
32
42, 47
43, 48
39
41
25
27
28
7
64
64
38
72
34
14
Initialization
Installation..................................................8
Installation, AC adaptor
Installation, battery
Installation, corded handset.......................8
Intercom call.............................................22
Intercom paging
L Line selection...........................................36
Listening to voice mail messages...48,50
Location of buttons
M Mailbox password
Making Calls
Message Menu
N Noise.........................................................9
P Pager call................................................56
Pager call mode, setting
Pager display number..............................57
Pager number
PAUSE.....................................................34
Personal greeting
PIN number..............................................13
Pulse service
R Redial......................................................19
Redial list, erasing
Registration...............................................12, 13
Remote access.........................................52, 53
Remote access operation ...53, 54, 55
RingerOff..................................................16
Ringer pattern
Rotary service...........................................35, 42
Rotary service, tone dialing
S Safety Instructions
Setting, Ringer volume
Shipping product for service,..Back cover
T Transferring a voice mail message ....50
Troubleshooting, Help line.......................71
Troubleshooting, System
Troubleshooting, Telephone
V Voice Mail
Voice Mail transfer
Voice Mail, General Mailbox
Voice Mai), Personal mailbox
Volume control, Headset.........................61
Volume control, SP-phone
Volume control, Corded handset.. 19, 49
.....
.............................
...................................
.............................................
.............................
....................................
.......................................
....................................
...................................
............................................
..................................
..........................
..........................................
.....................................
...........................................
..................................
..........................................
...................................
............................
................................................
....................................
48, 52
.....................
.........................
....................
....................
..................
................
19, 49
60
37
38
9
8
22
6
41
17
58
56
43, 44
35
19
35
35
72
16
70
67
40
23, 52
40
40
<A
(1>
0
1
EU
o*
:3
75
Page 76

For product service
• Call 1-800-211-PANA{7262) for the location of an authorized servicenter.
• Panasonic’s e-mail address for customer inquiries:
consumeiproducts@panasonic.com
for customers in the USA or Puerto Rico ONLY
When you ship the product
• Carefully pack your unit, preferably in the original carton.
• Attach a letter, detailing the symptom, to the outside of the carton.
Symptom
Send the unit to an authorized servicenter, prepaid and adequately
insured.
Do not send your unit to the Panasonic Consumer Electronics Company
listed below or to executive or regional sales offices. These locations do
not repair consumer products.
This cordless telephone is designed for use in the United States of America.
Sale or use of this product in other countries may violate local laws.
Ce téléphone sans fil est conçu pour être utilisé aux États-Unis d’Amérique.
La vente ou l’emploi de cet appareil dans certains autres pays peut constituer
une infraction à la législation locale.
Este teléfono sin cordon fue elaborado para uso en tos Estados Unidos de
América. La venta o el empleo de este producto en ciertos países puede
constituir violación de la legislación local.
Panasonic Consumer Electronics Company,
Division of Matsushita Electric Corporation of America
One Panasonic Way, Secaucus, New Jersey 07094
Panasonic Sales Company,
Division of Matsushita Electric of Puerto Rico, Inc.
Ave. 65 de Infantería, Km. 9.5, San Gabriel Industrial Park
Carolina, Puerto Rico 00985
PQQX13092ZB-BM SM0701NA1061
 Loading...