

Page 1
– 1 –
Portable Unit
Model No.
KX-TCA391ALN
Operating Instructions
PLEASE READ BEFORE USE AND SAVE.
This model is the optional portable unit for the
KX-TC1170ALN. These operating instructions
cover most of the features of this portable unit.
Please read the KX-TC1170ALN operating
instructions for further details.
Accessories (included)
Charger ..................one
AC Adaptor.............one
Portable Unit Cover
...one
Battery....................one
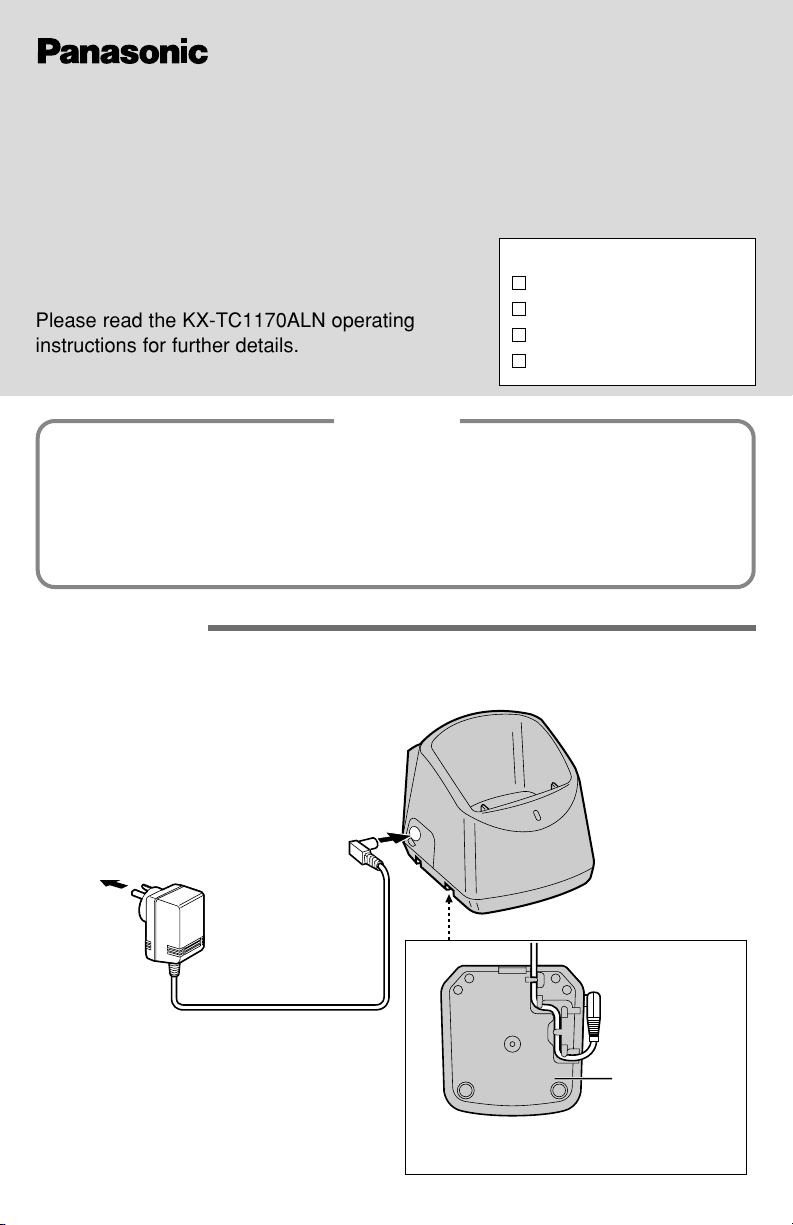
Installation!
Connecting the AC adaptor to the charger
To Power Outlet
(AC 220 V–240 V, 50 Hz)
AC Adaptor
Bottom of
the charger
Fasten the AC adaptor cord to prevent
it from being disconnected.
• USE ONLY WITH Panasonic AC
ADAPTOR PQLV13AL.
• The AC adaptor must remain connected
at all times. (It is normal for the adaptor
to feel warm during use.)
Installation .......................................1
Location of Controls.........................2
Registering Portable Units...............3
Making Calls....................................4
Answering Calls...............................4
Caller ID Service..............................5
Intercom...........................................6
Transferring a Call ...........................7
Using the Directory ..........................8
Battery Replacement .......................9
Wall Mounting..................................9
Safety Instructions .........................10
Contents
Page 2
– 2 –
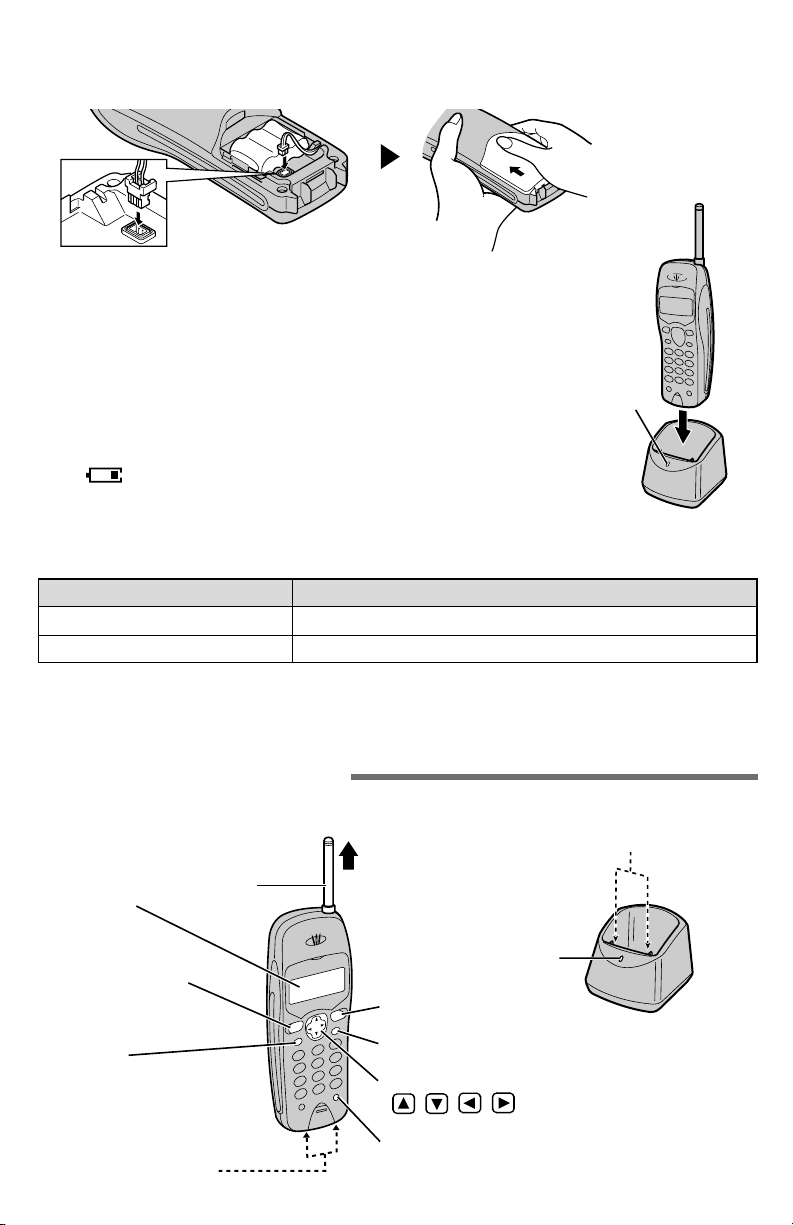
Installing the battery
Install the battery and close the portable unit cover, locking it into place.
Charging the battery
Place the portable unit on the charger and charge
for about 10 hours before initial use.
• Make sure that the confirmation tone sounds when
the portable unit is placed on the charger.
• The CHARGE indicator lights.
• Recharge the battery when:
— “Recharge battery” is displayed,
— “” flashes on the display, or
—
the portable unit beeps intermittently while it is in use.
CHARGE Indicator
8 hours
20 days
Approx. battery life
•
Clean the charge contacts of the portable unit and the charger with a soft, dry cloth
once a month. Clean more often if the unit is subject to grease, dust or high humidity.
Otherwise the battery may not charge properly.
Battery information
After your Panasonic battery is fully charged:
Operation
While in use (TALK)
While not in use (Standby)
Location of Controls!
CHARGE Indicator
Charge Contacts
Extend the antenna for best reception.
(TALK) Button
Antenna
Navigator Key
( , , , OK )
Display
(FUNCTION/EDIT)
Button
Charge Contacts
(EXIT/CH) (Channel) Button
(REDIAL/PAUSE) Button
(INTERCOM) Button
Page 3
– 3 –
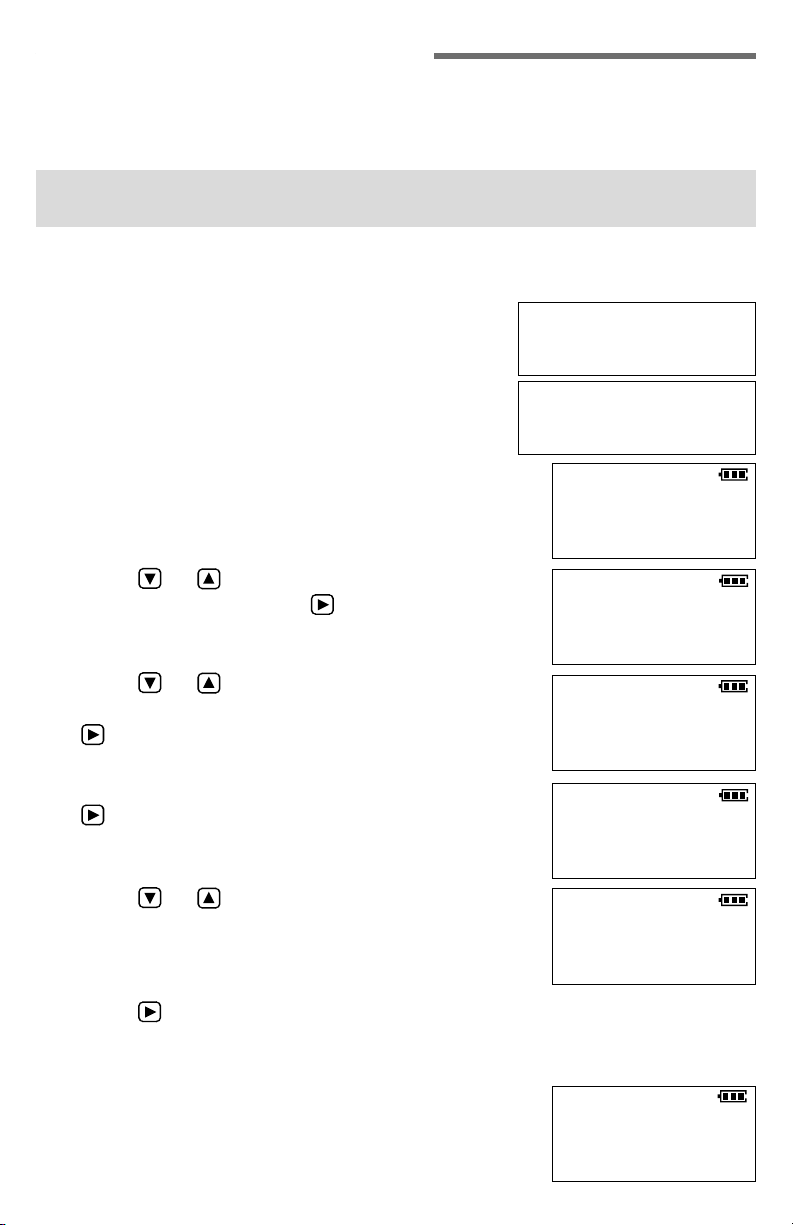
Registering Portable Units!
Registration is necessary for portable units. A portable unit will be assigned the
number at registration. The portable unit number is used when paging and
transferring calls. You can register up to 4 portable units at the base unit.
You can not assign the same number to more than one portable unit. To
confirm the portable unit number, place the portable unit on the charger.
1
Base unit:
Press (FUNCTION/EDIT) until 2 beeps sound.
2
Press (*).
• The IN USE indicator flashes.
3
Portable unit:
Press (FUNCTION/EDIT).
4
Press or repeatedly until the arrow points
to “Program”, then press OK (Yes key).
H
Program
GF
H
OK=Yes
H
Save directory
Ringer volume
GF
H
OK=Yes
Make sure that the portable unit and base unit are in the standby mode.
Registration must be completed within 1 minute.
5
Press or repeatedly until the arrow
points to “Unit option”, then press
OK (Yes key).
6
While “Assign” is at the arrow, press
OK (Yes key).
7
Press or repeatedly until the desired
portable unit number (1 to 4) is displayed.
(Ex. “2” is selected.)
• The selected number is displayed.
8
Press OK (Save key).
• A beep sounds on the base unit and portable unit.
• The IN USE indicator on the base unit goes out.
9
Press (EXIT/CH) to return to the standby mode.
• The portable unit number (1 to 4) will be displayed on
the portable unit.
Set recall time
H
Unit option
GF
H
OK=Yes
H
Assign
Erase
GF
H
OK=Yes
Unit No
:2
GF
H
OK=Save
–2–
11:34
AM
12/25
SAVE AUTO# ?
11:34
AM
12/25
UNIT ASSIGN
Page 4

– 4 –
• You can exit the programming mode any time by pressing
(EXIT/CH).
• If 3 beeps sound and the display shows “Save error”, place the portable unit on the
charger. Start again from step 1.
• When you want to change the portable unit number, erase the previous number. Then
restart from step 1.
• While charging the portable unit, registered portable unit number is displayed.
To erase the portable unit number
Press
(FUNCTION/EDIT)
or to select “Program” OK (Yes key)
or to select “Unit option” OK (Yes key)
or to select “Erase” OK (Yes key) OK (Yes key).
To redial the last number dialled
Press (TALK) (REDIAL/PAUSE).
Making Calls!
1
TALK
ABC DEF
FUNCTION
EXIT/CH
OK
INTERCOM
1
2
3
Press (TALK).
2
ABC DEF
GH I JKL
MNO
PQRS TUV
WXYZ
ON
OFF
Dial a phone number.
3
TALK
ABC DEF
FUNCTION
EXIT/CH
OK
INTERCOM
1
2
3
To hang up, press (TALK)
or place the portable unit on
the charger.
To dial after confirming the entered number:
Enter a phone number and press (TALK).
• To select the receiver volume, press or while talking. 2 levels (HIGH, LOW) are
available. Each time you press or , the volume level will change.
• If noise interferes with the conversation, press
(EXIT/CH) to select a clearer channel or
move closer to the base unit.
• When the base unit or one of the portable units is in use or in the intercom mode, other
portable units can not be used.
TALK
ABC DEF
FUNCTION
EXIT/CH
OK
INTERCOM
1
2
3
Press (TALK).
ABC DEF
GH I JKL
MNO
PQRS TUV
WXYZ
ON
OFF
Press one of the dialling
buttons.
OR
Answering Calls!
• All of the portable units ring
when calls are received.
Page 5

– 5 –
This unit is compatible with a Caller ID service offered by your telephone
company. After subscribing to a Caller ID service, the calling party’s information
will be displayed after the first ring.
The unit can record information of up to 50 different callers, including the time
and date the call was received and the number of times called, in the Caller List.
The Caller List information is sorted from the most recent to the oldest call.
When the 51st call is received, the oldest call is deleted.
When a second call is received while talking, the new caller’s phone number will
be displayed. (For Australia only)
How caller information is displayed when a call is received
The display shows the caller’s phone number after the
first ring.
• After you answer the call, the display will show the length of
the call.
• Caller information cannot be displayed in the following cases:
—If the caller dialled from an area which does not provide a Caller ID service, the
display will show “Out of area”.
—If the caller has requested not to display his/her information, the display will show
“Private caller”.
—If a long distance call cannot be identified, the display will show “Long distance”.
To view the Caller List
You can check who has called as follows.
Ex. When you search from the most recent call:
Press or OK.
Press .
Press .
Press .
Press .
* If you receive a call from one of the same phone
numbers stored in the directory, the caller’s name
will be displayed (Private name display).
** If an arrow (→) is displayed after the number, the
whole phone number has not been shown. Press
(#) (→) to see the remaining numbers. Press (*)
(←) to return to the previous display.
To return to the previous caller, press .
To exit the Caller List, press (EXIT/CH).
• The portable unit will return to the standby mode.
Display meaning:
√
: You have checked this caller information,
answered the call or called back the caller.
✕2–✕9 : The number of times the same caller
called (up to 9). After checking,
“
✕2”–“✕9” will be replaced with “√”.
Caller ID Service!
*
**
2 new calls
G
=New
F
=
Old
02223334444
3:10P JUN10
NANCY BROWN
0244448888
1:54P JUN 9 ✕2
0123456789012345
→
10:38A JUN 9 √
0211115555
Page 6

– 6 –
A 2-way intercom is available between one of the portable units and base unit
when another portable unit is not in use.
To make intercom calls
To answer intercom calls
Intercom!
1
TALK
ABC DEF
FUNCTION/EDIT
EXIT/CH
OK
INTERCOM
1
2
3
Press (INTERCOM).
TALK
ABC DEF
FUNCTION/EDIT
EXIT/CH
OK
INTERCOM
1
2
3
Press (INTERCOM).
2
TALK
ABC DEF
FUNCTION/EDIT
EXIT/CH
OK
INTERCOM
1
2
3
To end the intercom,
press (INTERCOM) or
place the portable unit
on the charger.
Press INTERCOM
To call back from the Caller List
• In step 2, if required, edit the phone number (See the operating instructions for the
KX-TC1170ALN).
1
TALK
ABC DEF
OK
INTERCOM
1
2
3
EXIT/CH
FUNCTION/EDIT
Press or OK
to enter the Caller List.
2
TALK
ABC DEF
OK
INTERCOM
1
2
3
EXIT/CH
FUNCTION/EDIT
Press or
repeatedly to find the
desired caller.
3
TALK
ABC DEF
FUNCTION
EXIT/CH
OK
INTERCOM
1
2
3
Press (TALK).
For New Zealand Users:
Your telephone service provider may charge you for a local call when it is
dialled with an area code prefix. If the charge for a local call is unacceptable,
only the 7-digits of the local number should be dialled from your telephone.
Do not dial the “0” prefix or the area code digit.
Page 7

– 7 –
Transferring a Call!
To the base unit
The intercom can be used during a call. This feature enables you to transfer a
call between the base unit and a portable unit.
To another portable unit
Transferring a call is available between one portable unit and another one.
1
TALK
ABC DEF
FUNCTION/EDIT
EXIT/CH
OK
INTERCOM
1
2
3
During a call, press
(INTERCOM).
• The call is put on hold.
23
When the base unit user
presses (HOLD/RINGER)
or (SP-PHONE) to answer
the call, the transfer is
completed.
When the base unit
user answers the
page, you can
announce the
transfer.
• If the base unit user
does not answer
the page, press
(TALK).
1
TALK
ABC DEF
FUNCTION/EDIT
EXIT/CH
OK
INTERCOM
1
2
3
During a call, press
(INTERCOM).
2
ABC DEF
GH I JKL
MNO
PQRS TUV
WXYZ
ON
OFF
Enter the desired portable
unit number ((1) to (4))
within 2 seconds.
• The call is put on hold.
• If another portable unit
user does not answer the
page, press
(TALK).
3
When another portable unit
user presses (TALK) to
answer the call, the
transfer is completed.
Page 8

– 8 –
Using the Directory!
You can store up to 30 names and phone numbers in the directory. All directory
items are sorted by the first word in alphabetical order. Using the directory, you
can make a call by selecting a name on the display.
To store names and phone numbers in the directory
Make sure that the portable unit is in the standby mode.
1
FUNCTION/EDIT
Press
(FUNCTION/EDIT).
2
TALK
ABC DEF
OK
INTERCOM
1
2
3
EXIT/CH
FUNCTION/EDIT
Press OK (Yes
key) while the arrow
points to “Save
directory”.
3
ABC DEF
GH I JKL
MNO
PQRS TUV
WXYZ
ON
OFF
Enter a name, up to
15 characters (see below).
4
TALK
ABC DEF
OK
INTERCOM
1
2
3
EXIT/CH
FUNCTION/EDIT
Press OK (Next
key).
5
ABC DEF
GH I JKL
MNO
PQRS TUV
WXYZ
ON
OFF
Enter a phone number,
up to 22 digits.
6
TALK
ABC DEF
OK
INTERCOM
1
2
3
EXIT/CH
FUNCTION/EDIT
Press OK (Save key).
• To store other items,
repeat from step 2.
• To return to the standby
mode, press
(EXIT/CH).
To enter names and symbols
The dialling buttons can be used to enter letters and symbols. Pressing each
button selects a character as shown below.
• To enter another character using the same dialling button, press (→) to move the
cursor to the next space.
• If you make a mistake while entering a name, use (←) or (→) to move the
cursor to the incorrect character, press to delete and enter the correct character.
Each time you press , a character is erased from the right.
#
#
Keys Index Keys Index Keys Index
1
# & ’ ( ) S , - . / 1
To move the cursor to
the left
2
A B C a b c 2
6
M N O m n o 6
#
3
D E F d e f 3
7
P Q R S p q r s 7
To move the cursor to
the right
4
G H I g h i 4
8
T U V t u v 8
5
J K L j k l 5
9
W X Y Z w x y z 9
0
0 Blank
TALK
1
ABC DEF
2
EXIT/CH
3
INTERCOM
OK
Page 9

– 9 –
To dial from the directory
1 Press or to enter the directory list.
2 Press or repeatedly to find the desired item.
• To search for a name by the initial:
Press the dialling button for the first letter of the desired name
until any name with the same initial is displayed. Press until
the name is displayed.
3 Press (TALK).
• To leave the directory list at any time, press (EXIT/CH).
TALK
ABC DEF
OK
INTERCOM
1
2
3
EXIT/CH
FUNCTION/EDIT
Battery Replacement!
If “Recharge battery” is displayed and/or “” flashes after being fully
charged, replace the battery with a new Panasonic P-P301 (KX-A36A) battery.
To avoid memory loss, replace within 3 minutes.
1
Remove the portable unit cover by
sliding while pressing the arrow.
2
Replace the battery, and close the
cover.
3
Make sure to charge the new
battery for about 10 hours in order
to display the battery strength
prompt correctly.
Wall Mounting!
The charger can be wall mounted.
Install screws using the wall template below. Connect the AC adapter.
Mount the charger, then slide it down.
To Power Outlet
3 cm
Screws
3 cm
Wall Template
Page 10

– 10 –
Safety Instructions!
Take special care to follow the safety
suggestions listed below.
Safety
1) The unit should be connected to a
power supply only of the type
described in the operating instructions
or as marked on the unit.
2) When left unused for a long period of
time, the unit should be unplugged
from the household AC outlet.
3) To minimize the possibility of lightning
damage when you know that a
thunderstorm is coming, we
recommend that you:
a) Unplug the telephone line cord from
the phone jack.
b) Unplug the power supply cord from
the AC power outlet.
Installations
Environment
1) Do not use this unit near water— for
example, near a bathtub, washbowl,
sink, etc. Damp basements should
also be avoided.
2) The unit should be kept away from
heat sources such as radiators,
kitchen range, etc. It also should not
be placed in rooms where the
temperature is less than 5°C or
greater than 40°C.
3) The AC adaptor is used as the main
disconnect device, ensure that the AC
outlet is located/installed near the unit
and is easily accessible.
Placement
1) Do not place heavy objects on top of
this unit.
2) Care should be taken so that objects
do not fall onto, and liquids are not
spilled into the unit. Do not subject this
unit to excessive smoke, dust,
mechanical vibration or shock.
3) Place the unit on a flat surface.
Kyushu Matsushita Electric Co., Ltd.
1-62, 4-chome, Minoshima, Hakata-ku, Fukuoka 812-8531, Japan
Printed in Malaysia PQQX12815ZA-BM SS0800MK0
For best performance
1) If noise prevents the conversation
from being understood at the portable
unit, approach the base unit to lessen
the noise.
2) The portable unit should be used at
the HIGH volume setting when the
reception tone is difficult to hear.
3) The portable unit should be fully
recharged on the charger
when
“Recharge battery” is displayed
and/or “” flashes.
4) The portable unit antenna should not
be touched during use because of its
high sensitivity.
5) The maximum calling distance may be
shortened when the unit is used in the
following places: Near obstacles such
as hills, tunnels, undergrounds, near
metal objects such as wire fences, etc.
WARNING:
TO PREVENT FIRE OR SHOCK
HAZARD, DO NOT EXPOSE THE
PRODUCT TO RAIN OR ANY TYPE OF
MOISTURE.
When a failure occurs which result in the
internal parts becoming accessible,
disconnect AC adaptor immediately and
return this unit to the place of purchase or
service centre.
This equipment has been tested and
found to comply with AS/NZS 3548: 1995
limits for electromagnetic interference.
Any modifications to any part of the
system or to any peripherals may void the
EMC compliance of the system or the
peripherals.
This equipment will be inoperable if mains
power fails.
The earcap on the portable unit is
magnetised and may retain metallic
objects.
 Loading...