

Panasonic KX-TCA155CE User Manual
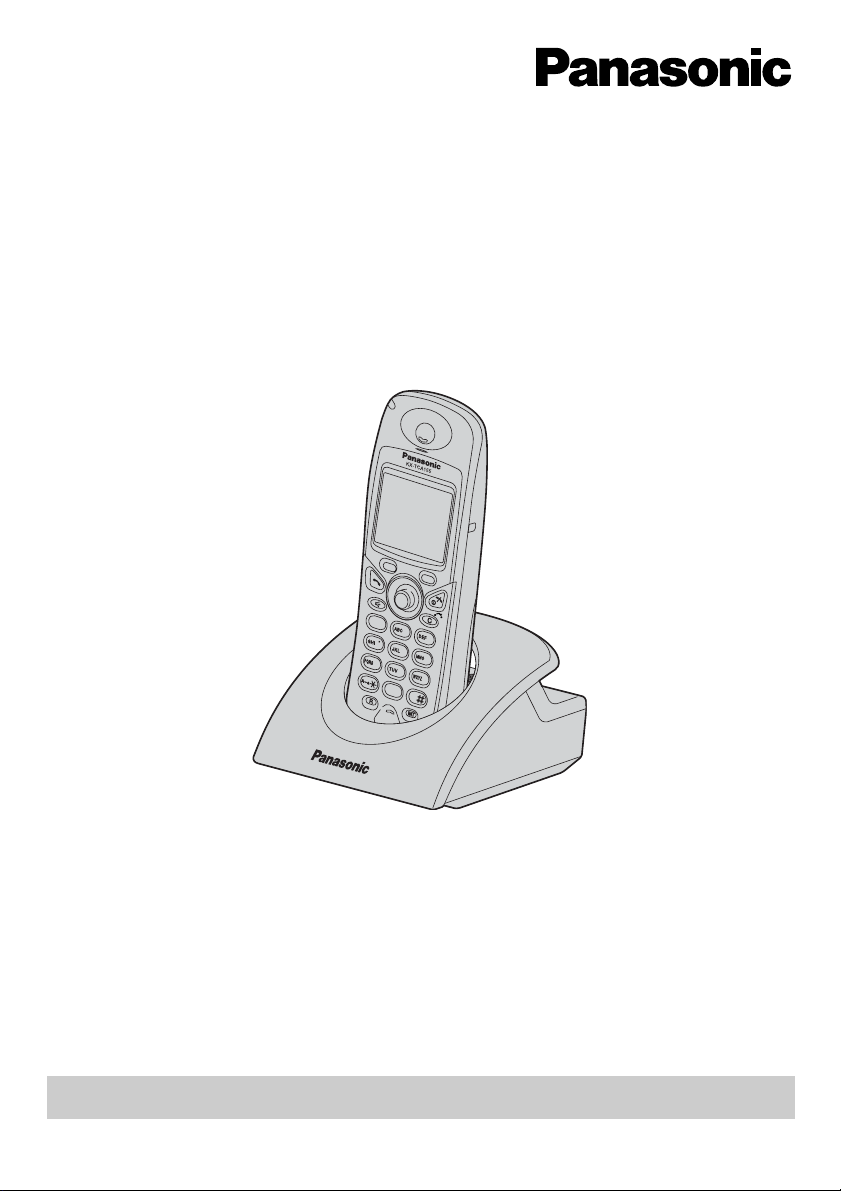
DECT Portable Station
7
1
0
3
6
2
4
8
9
5
Operating Instructions
Model No. KX-TCA155
Thank you for purchasing the Panasonic KX-TCA155, DECT Portable Station. Please
read this manual carefully before using this product and save this manual for future
use.
This manual is designed to be used with the KX-TCA155 DECT Portable Station and a
Panasonic KX-TDA series Business Telephone System.
Charge the battery for about 7 ho ur s befo re initial use.

Table of Contents
Before Initial Use............................................................................................ 4
Before Operating the PS................................................................................ 5
Location of Controls .................................................................................... 5
Connection.................................................................................................. 6
Battery Installation....................................................................................... 7
Battery Charge............................................................................................ 7
Power On/Off ..............................................................................................8
Display Icons...............................................................................................8
Operation Outline........................................................................................ 9
Function Menu Display........ ....... ...... ....... ...... ....... ...... ....... ...... ....... ...... ..... 10
PBX Feature Menu.................................................................................... 11
Flexible Key Display.................................................................................. 11
Soft Key Display........................................................................................ 12
Ringer Volume Adjustment ....................................................................... 13
Receiver/Speaker Volume Adjustment .....................................................13
Key Lock ....................... ...... ....... ...... ....... ...... ....... ...... ....... ........................ 13
Selecting the Display Language................................................................ 14
Making Calls ................................................................................................. 15
Calling Another Extension......................................................................... 15
Calling an Outside Party ........................................................................... 15
Using the Call Log..................................................................................... 16
Using the Phonebook................................................................................ 17
Hot Key Dial .............................................................................................. 19
Receiving Calls............................................................................................. 20
Intercom Calls/Outside Calls/Group Calls................................................. 20
Temporary Ringer Volume Adjustment..................................................... 20
Caller ID........... ....... ...... ...... ....... ...... ....... ...... ....... ...... ....... ...... ....... ...... ..... 21
During a Conversation................................................................................. 22
Transferring a Call..................................................................................... 22
Holding...................................................................................................... 22
Turning the Microphone On/Off................................................................. 23
Using the Phonebook .................................................................................. 24
Handset Phonebook..................................................................................24
Hot Key Dial .............................................................................................. 27
Entering Characters ..................................................................................27
Feature List................................................................................................... 29
Programming................................................................................................ 33
Changing the Initial Settings ................................................... ....... ...... ..... 33
Others............................................................................................................ 41
Walkie-Talkie.............................................................................................41
Using the Belt Clip..................................................................................... 42
2

Table of Contents
Wall Mounting ........................................................................................... 43
Troubleshooting........................................................................................... 44
Troubleshooting ........................................................................................44
Important Information.................................................................................. 45
Battery Information.................................................................................... 45
Safety Instructions.....................................................................................46
3
Before Initial Use
Before Initial Use
Please read “Important Information” on page 45 before use. Read and
understand all instructions.
Registration
Your PS (Portable Station) must be registered in the Business Telephone System and
you have to determine the extension number before initial use.
Accessories (included)
j AC adaptor
For the KX-TCA155CE users:
PQLV200CE
For the KX-TCA155E users:
PQLV200E
j Battery Cover
j Charger
One
One
j Rechargeable Batteries-
AAA size
(HHR-4EPT/BA2)
One
j Belt Clip
One
j CD-ROM.................. One
j Quick Guide.............One
Two
One
• In this manual, the suffix of each model number is omitted.
Some of the features described in this manual are not available when the PS is used with a
Panasonic KX-TD816/KX-TD1232 Business Telephone System, only the single line
telephone (SLT) features are available.
4
Before Operating the PS
Location of Controls
Call/Charge Indicator
Headset Jack
–The headset is an
option.
Please use only the
Panasonic KX-TCA89
headset.
Open the
cover.
SPEAKERPHONE
TALK
Before Operating the PS
Receiver
Display
Soft Buttons
CANCEL/POWER
CLEAR/TRANSFER
3
2
1
4
7
6
5
9
8
0
Joystick
INTERCOM
Charge Contact
RECALL
Charge Contact
Microphone
Back view
Speaker
5
Before Operat in g th e PS
TALK Button:
Used to make or receive calls.
Joystick:
Used to adjust the ringer /receiver
volume, select the Function
mode and the function displayed
directly above, and move the
cursor to select a desired item.
SPEAKERPHONE Button:
Used for the hands-free
conversation. Press TALK button
to return to the receiver.
RECALL Button:
Used to disconnect th e current
call and make another call
without hanging up, or answer
Call Waiting from the telephone
company.
Connection
INTERCOM Button:
Used to make or recei ve intercom
calls.
CLEAR/TRANSFER Button:
Used to clear di gits or c haracters,
or transfer a call to another party.
CANCEL/POWER Button:
Used to end calls, exit the
Phonebook or Function mode , or
turn on/off the PS.
Soft Buttons:
Used to select the function
displayed directly above each
button. Functions displayed
depend on the state of use.
To AC Outlet
Fasten the AC
adaptor cord to
the cord holder.
• USE ONLY the Panasonic AC ADAPTOR.
For the KX-TCA155CE users: PQLV200CE
For the KX-TCA155E users: PQLV200E
AC adaptor
6
Before Operating the PS
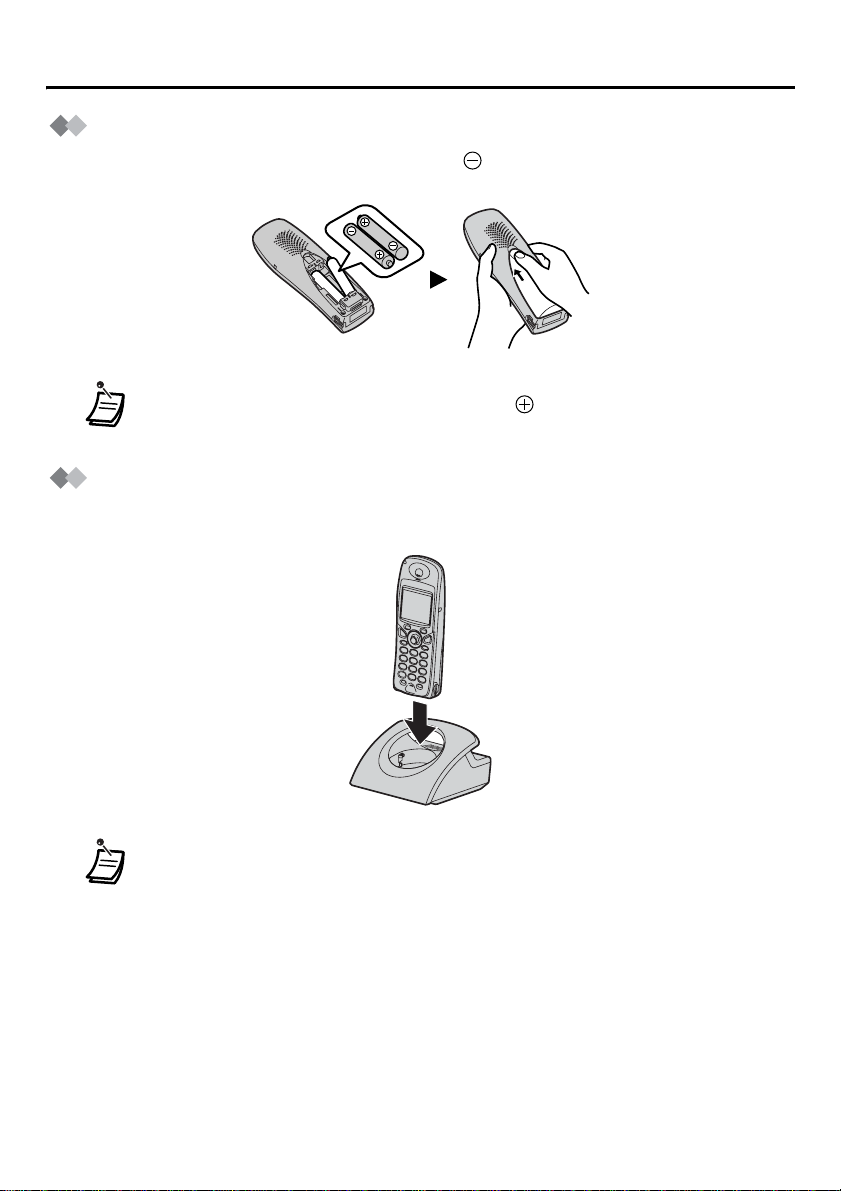
Battery Installation
Insert the batteries as shown. The negative end should be inserted first.
Close the cover as indicated by the arrow.
• When you replace the batteries, the positive end should be removed first.
Battery Charge
At the time of shipment, the batteries are not charged. Please charge the batteries for
about 7 hours before initia l use.
• When the battery has been completely charged, the charge indicator will
change from red to green. Refer to “Battery Information” on page 45.
• It is normal for the PS and charger to feel warm while the battery is charging.
• Keep devices sensitive to magnetic fields away from the charger.
7
Before Operat in g th e PS
Power On/Off
Power On
Press POWER for about 2 seconds. Press POWER for about 2 seconds.
• When the PS is turned on, it will be in standby mode. Standby mode is the state
of the PS when it is not performing any operations and is awaiting calls.
Power Off
The display will go blank.
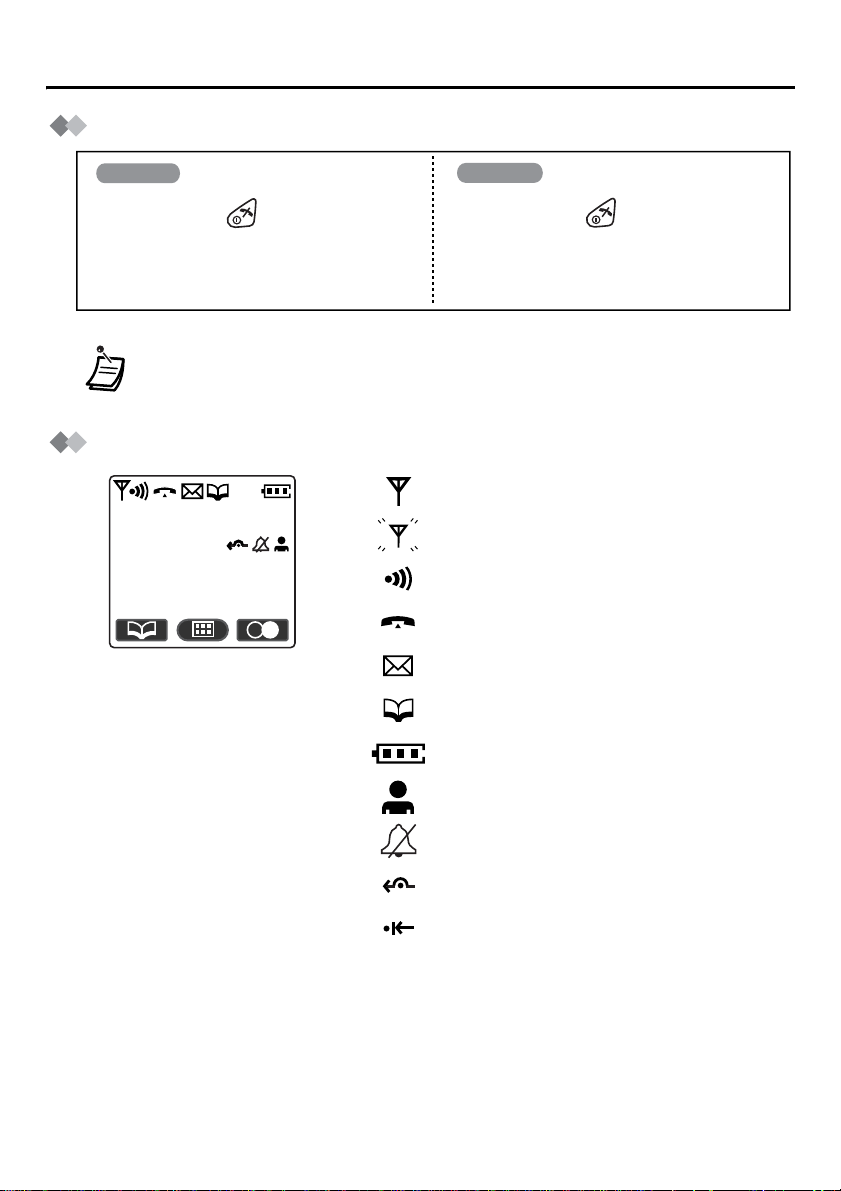
Display Icons
Within range of a Cell Station
301:Paul
Out of range, No registration
Intercom Indicator
3.Jul 10:08
Off-hook Status
Message Wa it ing
Phonebook Mode
Battery strength
Hot line ON
Ringer Volume OFF
Call Forwarding
Do Not Disturb
8
Before Operating the PS
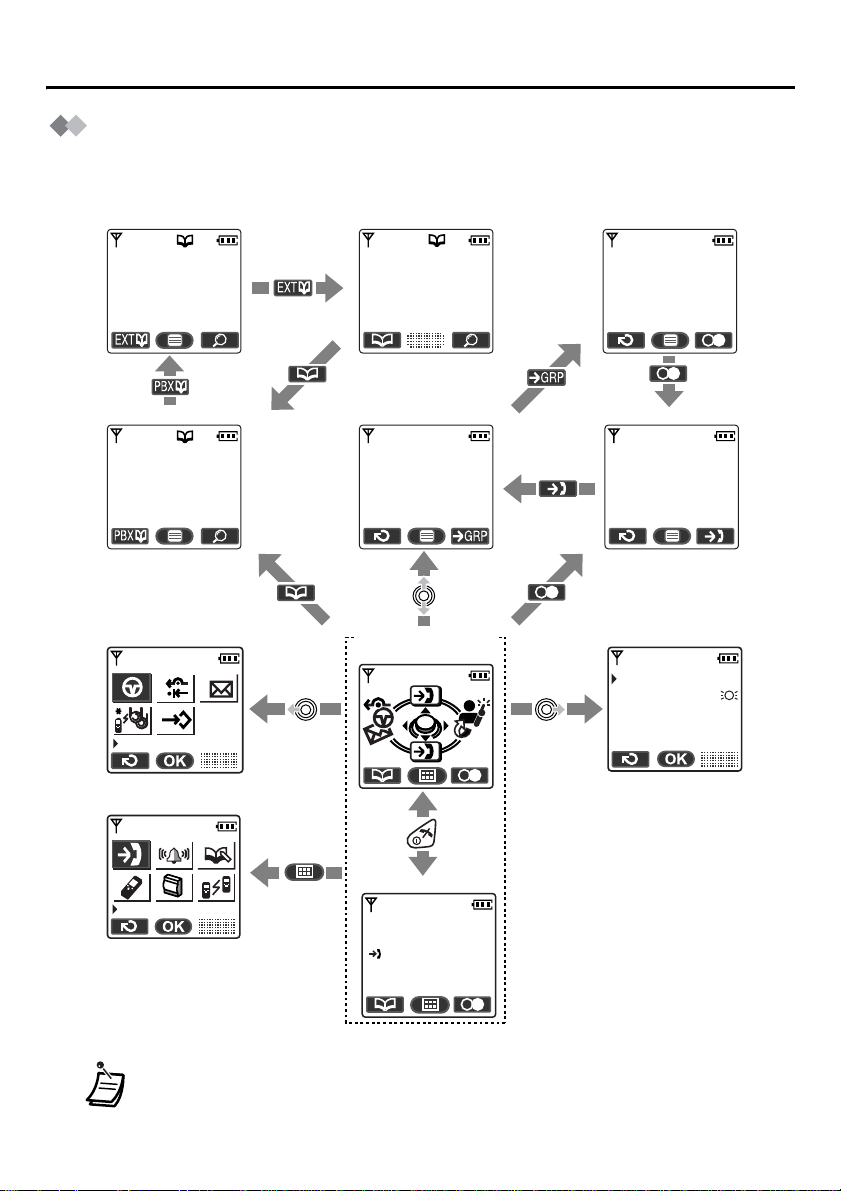
Operation Outline
Functions of the PS are accessed through the display menu, and selected wit h the
joystick and soft keys. The guidance display is shown in standby mode for easy operation
.
<PBX System Phonebook>
Panasonic
99998822
<Handset Phonebook>
David Baker
9876543210
<PBX Feature menu>
1
Pause
3
2
0
<PBX Extension Phonebook>
Anne
103
<Incoming call log>
02 JUL. 14:59
James Smith
0123456789
<In standby mode>
Guidance display
<Incoming call log group>
01 JUL. 15:03
David Baker
9876543210
<Outgoing call log>
Anne
103
<Flexible key display>
1:Single line
2:Trunk Group
3:Loop line
<Main menu>
Normal display
Caller ID
301:Paul
New Calls
3.Jul 10:08
• You cannot toggle the displays while in key lock mode or while the PS is on a
charger.
• You can select whether the guidance display is shown or not. (See page 36.)
9
Before Operat in g th e PS
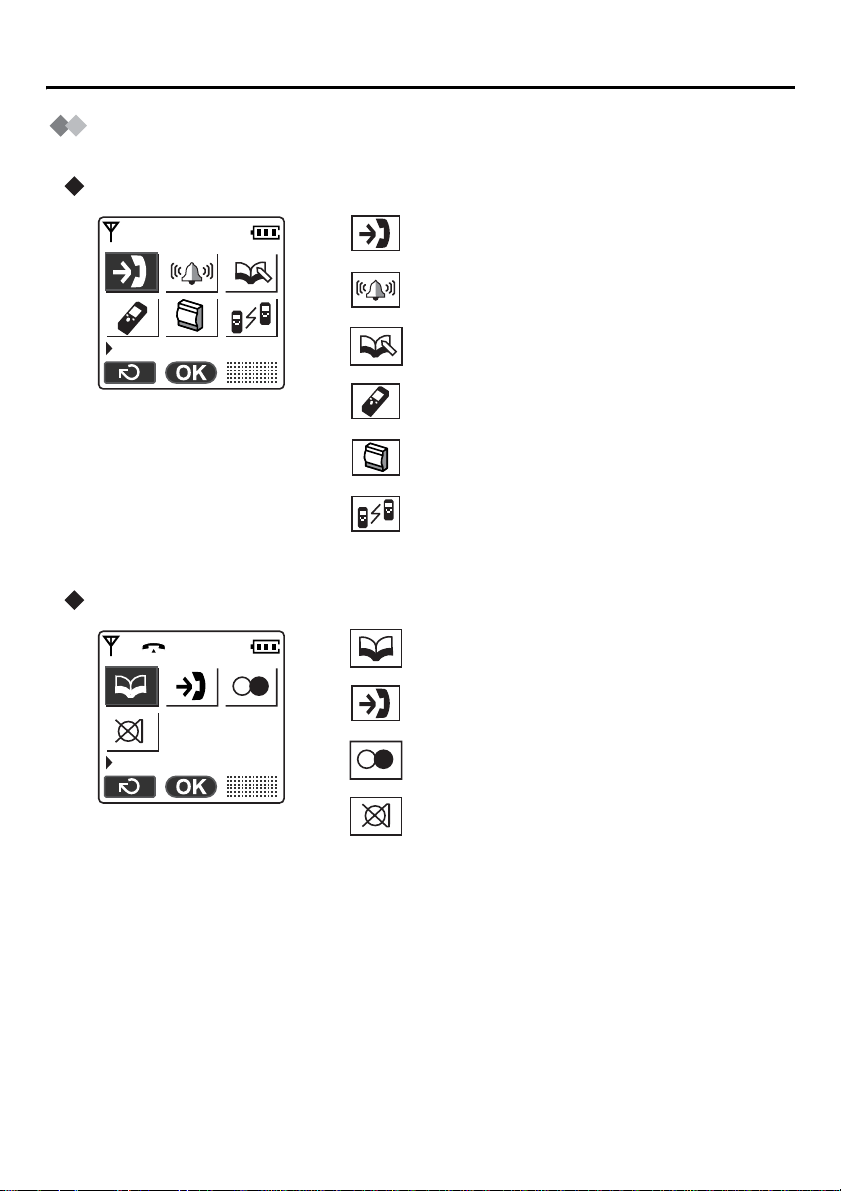
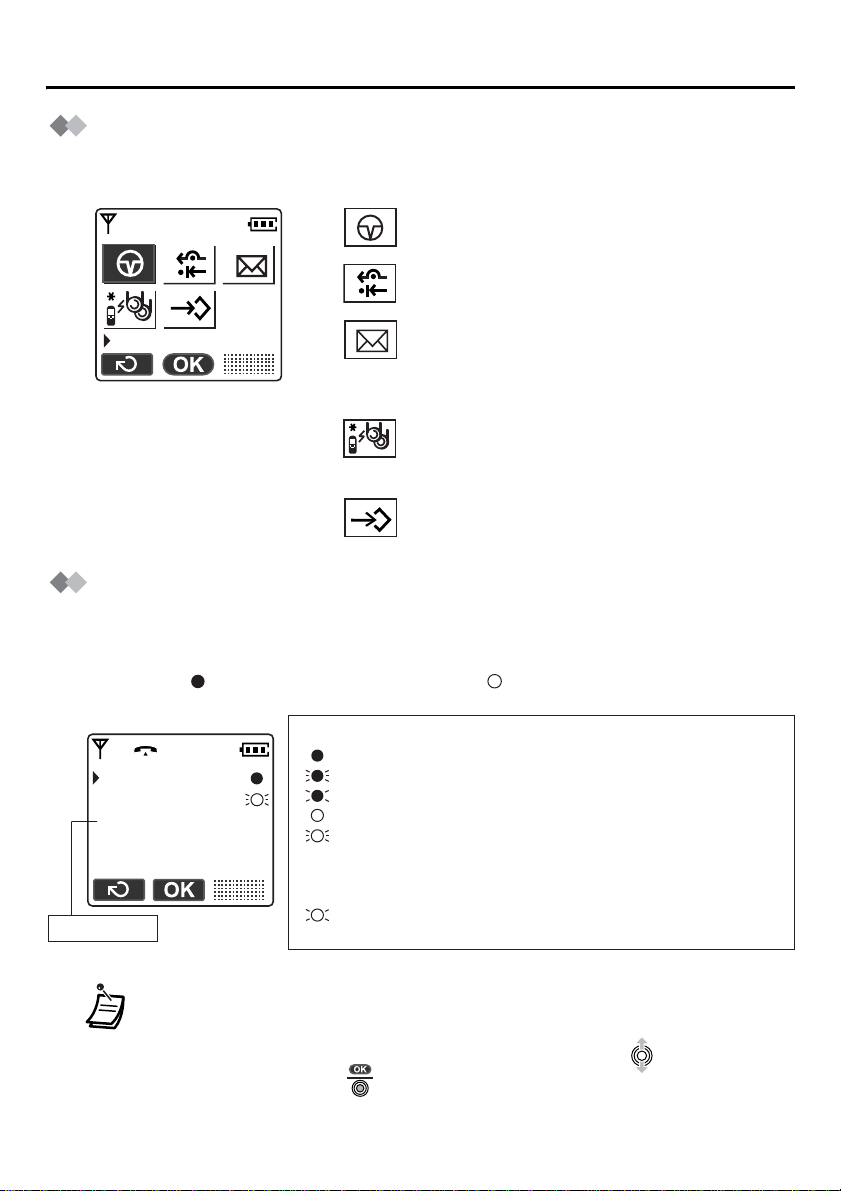
Function Menu Display
Press the joystick to display the function menu.
Main menu – while in standby mode
Caller ID:
Displays the in coming call log.
Ringer Option:
Accesses to the “Ringer Option”.
Caller ID
Sub menu – while in off-hook/during a conversation
New Phonebook:
Stores a new item in the Handset Phonebook.
Setting Handset:
Accesses to the “Setting Handset”.
PBX Program:
Enters the PBX programming mode.
Walkie-Talkie:
Sets or turns on/off the Walkie-Talkie mode.
(See page 41.)
Phone book:
Accesses to the Phonebook.
Caller ID:
Displays the in coming call log.
10
Phone book
Redial:
Displays the outgoing call log.
Mute:
Turns the micro pho ne on/o ff.
Before Operating the PS
PBX Feature Menu
Functions of the PS can be activated through the display key list.
Move the joys tick left to display the key list.
1
1
2
0
Pause
3
2
3
0
Flexible Key Display
The flexible key c an be u se d to se iz e an line while making or rec eiv in g a n ou tside call (FCO key), or used as a function key. Move the Joystick right to display the F-CO key list.
Icons shown in the F-CO list function similarly to the LED indicator on a Proprietary
Telephone; is the same as a green LED, and is the same as a red LED.
Example:
1:Single line
2:Trunk Group
3:Loop line
key number
Understanding the F-CO Key List*
(on): You are currently using this line.
(flashing rapidly): You have an incoming call on this line.
(flashing slowly): You have a call on hold on this line.
(on): This line is in use by someone else.
(flashing rapidly): There is an incoming call received by an
(flashing slowly): Someone has a call on hold on this line.
(no icon): This line is idle.
Pause:
Inserts a dialling pause.
FWD/DND:
Sets Call Forwarding or Do Not Disturb.
Message:
Used to leave a message waiting indication or
call back the party who left you a message
waiting indication.
Search Wave:
Searches the strongest radio signal coming
from the Cell Station.
PBX Program:
Used to enter programming mode.
incoming call distribution group to which
“Ring” is set as the group call distribution
method.
• * The meanings of these icons vary depending on the status of the CO line.
• For further information, refer to “LED Indication” i n the KX-TDA ser ies Busine ss
Telephone System Feature Guide.
• To select a key, press its key number, or move the Joys tick to select the
desired key then press .
• To assign a function to a flexible key, see page 39.
11
Before Operat in g th e PS
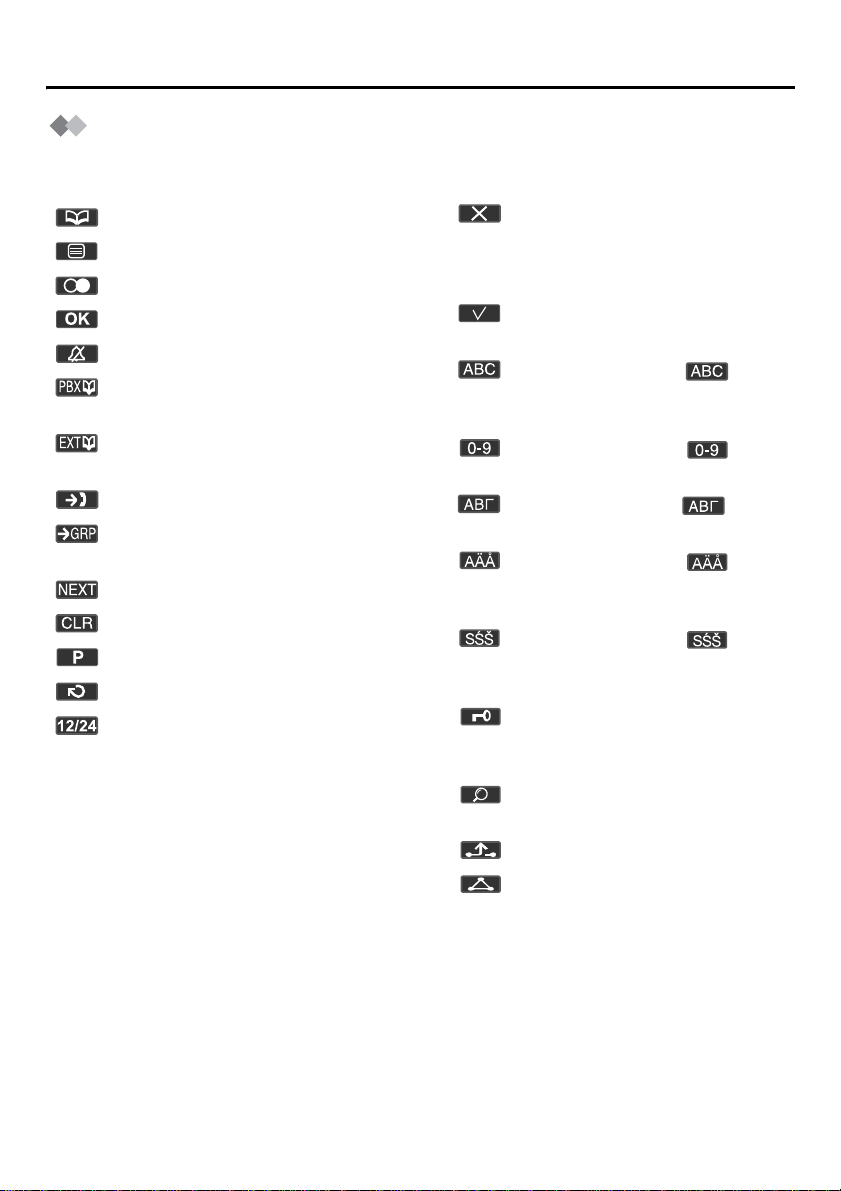
Soft Key Display
Icons and information shown on the display will vary depending on the state of use. To
select an item shown on the display, press the corresponding soft buttons.
Opens the Handset Phonebook.
Opens the function menu.
Used to redial.
Used to confirm the entry.
Turns the ringer off.
Opens the PBX System
Phonebook.
Opens the PBX Extension
Phonebook.
Opens the incoming call log.
Opens the incoming call log
group.
Displays the next screen.
Clears digits or characters.
Inserts a dialling pause.
Returns to the previous screen.
Used to set the time for memo
alarm.
Used to clear the memo alarm
display setting, or enter an X
when storing th e “Line Access
CD”.
Used to select an item when in
setting mode.
Displayed when in
(Alphabetic) character entry
mode.
Displayed when in
(Numeric) character entry mode.
Displayed when in (Greek)
character entry mode.
Displayed when in
(Extended 1) character entry
mode.
Displayed when in
(Extended 2) character entry
mode.
Displayed when in key lock, and
used to unlock the dialling
buttons.
Used to search for an item in the
Phonebook alphabeti cal ly.
12
Used to place a call on hold.
Used to establish a multiple-party
conversation.

Ringer Volume Adjustment
Before Operating the PS
Press the
Joystick.
Adjust the volume
level (6 levels/Off).
Select “ Ringer
Option”.
Press the
Joystick.
Press the
Joystick.
Select “Ringer
Volume”.
Receiver/Speaker Volume Adjustment
During a conversation
Move the Joystick UP or DOWN to adjust the volume.
(Receiver Volume - 3 Levels, Speaker Volume - 6 Levels)
Key Lock
You can lock the dialling buttons while the PS is in idle status.
<Display icon>
Unlocked
Press the
Joystick.
Locked
Press the Joystick for
more than 2 seconds
to lock/unlock.
13
Before Operat in g th e PS
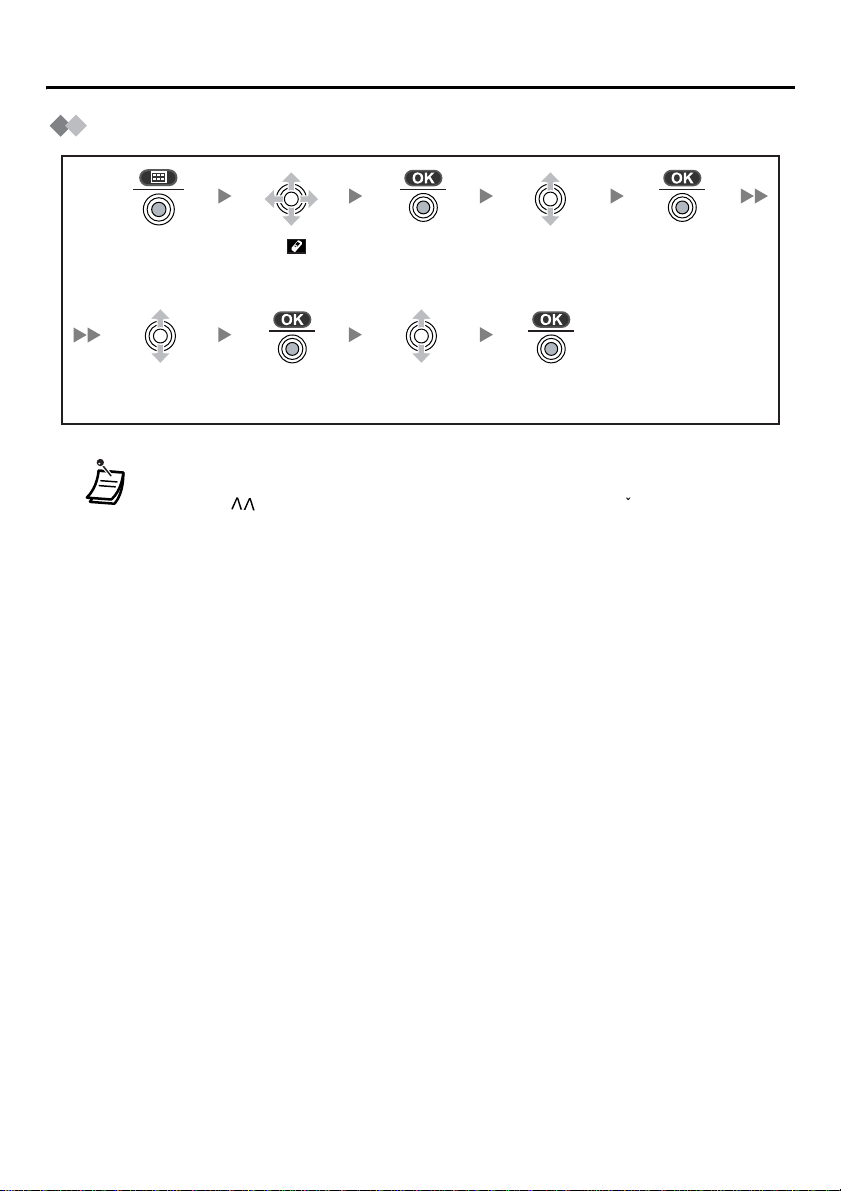
Selecting the Display Language
Press the
Joystick.
Select “Select
Language”.
• You can select one of 16 languages:
Deutsch, English, Español, FRANCAIS, Italiano, Dansk, Nederlands, Svenska,
Suomi, E HNIKA, Magyar, Português, Polski, slovensky, eština, Hrvatski
• The display language of both the PS and Business Telephone System can be
selected, and both should be set to the same language. Refer to the Business
Telephone System User manual for more details.
Select “ Setting
Handset”.
Press the
Joystick.
Press the
Joystick.
Select the
desired language.
Select “Display
Option”.
Press the
Joystick.
Press the
Joystick.
c
14
Making Calls
Calling Another Extension
Making Calls
extension no.
Press TALK.
Dial the extension
number.
Calling an Outside Party
Using the line access numbers
*
9
0
/
OR
CO line
8
group no.
Press
TALK.
Using Flexible CO keys
Move the
Joystick
RIGHT.
Enter the line
access number.
X
Press the idle CO
key number (1-3).
OR
Select the
idle CO key.
Press the
Joystick.
Talk.
phone no.outside phone no.
Dial the outside
phone number.
outside phone no.
Dial the outside
phone number.
Press CANCEL.
Talk.
Talk.
Press
CANCEL.
Press
CANCEL.
• * The line access number (default) varies depending upon Country/Area.
Consult your dealer for more details.
• You can confirm a number was dialled correctly before calling (Predialling) by
entering the number, then pressing .
• To clear an entire number while predialling, press and hold .
• If “ ” flashes, move closer to the Cell Station and dial again.
• To cancel dialling, press .
15
 Loading...