

Page 1

Digital Proprieta ry Telephones
Quick Reference Guide
Model KX-T7625 KX-T7630
KX-T7633 KX-T7636
Important Information
When using the KX-T7600 series, keep the following conditions in mind.
• If there is any problem, unplug the extension line and connect a known working phone. If
the known working phone operates properly, have the defective phone repaired by a
specified Panasonic Factory Service Centre. If the known working phone does not
operate properly, check the PBX System and the internal extension wiring.
• Keep the unit away from heating appliances and electrical noise generating devices such
as fluorescent lamps, motors and televisions. These noise sources can interfere with the
performance of the unit.
• This unit should be kept free of dust, moisture, high temperature (more than 40
vibration, and should not be exposed to direct sunlight.
• Do not use benzine, thinn er , or th e like, or any abrasive pow der to clean the cabinet . Wipe
it with a soft cloth.
• Do not use any handset other than a Panasonic handset.
• Do not disassemble this product. Dangerous electrical shock could result. The unit must
only be disassembled and repaired by qualified service technicians.
• When a failure occurs which exposes any internal parts, disconnect the telephone line
cord immediately and return this unit to service centre.
• This unit is designed to aid the visually handicapped to locate dial keys and buttons.
o
C) and
WARNING:
TO PREVENT THE RISK OF FIRE OR ELECTRIC SHOCK, DO NOT EXPOSE
THIS PRODUCT TO RAIN OR MOISTURE.
THIS HANDSET EARPIECE IS MAGNETISED AND MAY RETAIN SMALL FERROUS OBJECTS.
IMPORTANT NOTICE:
Under power failure conditions, this telephone may not operate. Please ensure
that a separate telephone, not dependent on local power, is available for use in an
emergency.
Note:
In this manual, the suffix of each model number is omitted.
“Installing the KX-T7601/KX-T7603” is shown on page 15.
Page 2
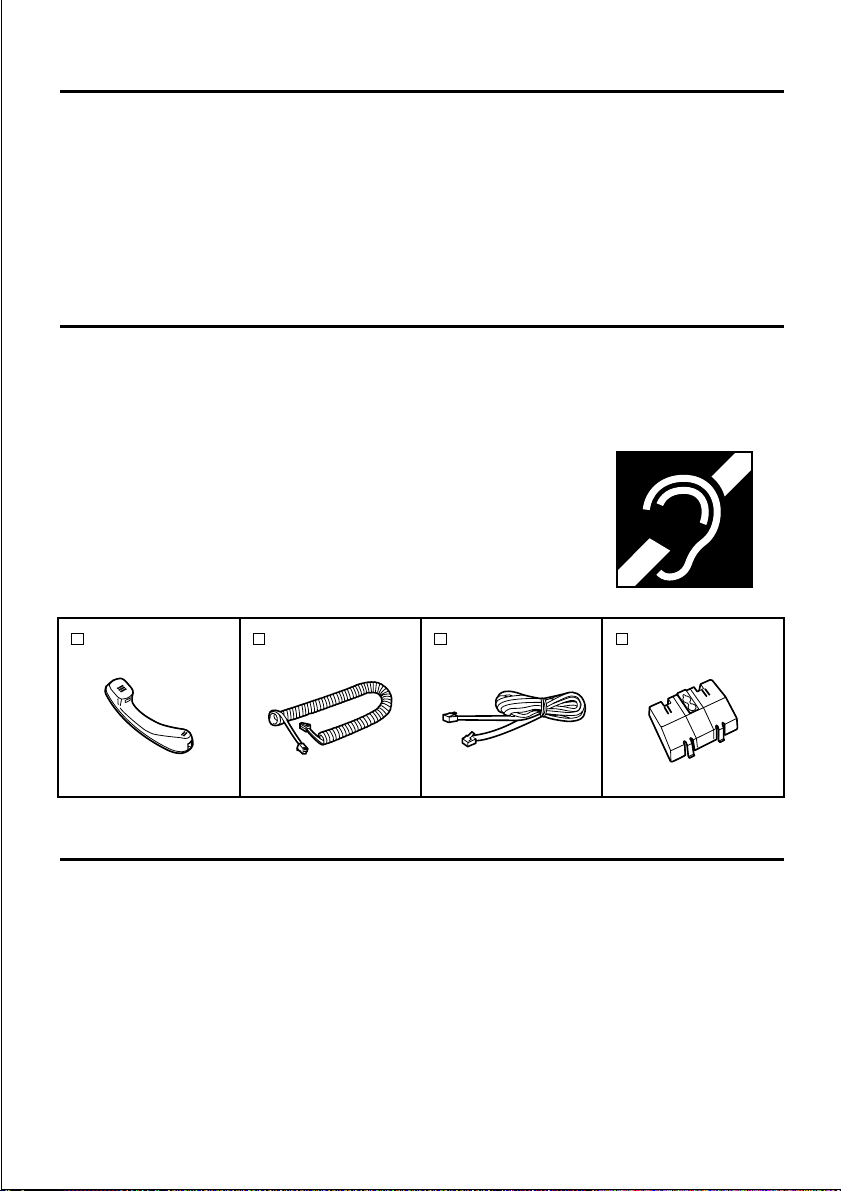
Table of Contents
Features Liatures List ..............................3
Using the Display Proprietary Telephone
Using the Directories...............................5
Accessing the System Features .............6
Entering Characters................................7
Settings on the Programming Mode....... 9
Setting Features......................................9
.. 5
Location of Controls .............................. 11
Connection.............................................. 13
Setting ..................................................... 13
Tilt Angle Adjustment ............................ 14
Wall Mounting......................................... 14
Installing the KX-T7601/KX-T7603 ........ 15
Before Initial Use
Thank you for purchasing the Panasonic model KX-T7600 series, Digital
Proprietary Telephone. Please read this manual carefully before using this
product and save this manual for future use
This manual is designed to be used with your Proprietary Telephone and a Panasonic
Hybrid IP PBX KX-TDA100 / KX-TDA200.
This unit is capable of being used in conjunction with hearing aids
fitted with inductive coil pick-ups. The handset should be held as for
normal conversation. For operation the hearing aid should be set to
its “T” position or as directed in the operating instructions for the
hearing aid.
Accessories (included)
Handset
Handset Cord
.
Telephone Line
Cord
Wall Mounting
Adaptor
One
One
One
Features for the Digital Proprietary Telephones
KX-T7636
• Model with Speakerphone, 6-Line Display with Backlight and 24-CO Keys
• Optional 12-CO Keys and USB port are available.
KX-T7633
• Model with Speakerphone, 3-Line Display with Backlight and 24-CO Keys
• Optional 12-CO Keys and USB port are available.
KX-T7630
•Model with Speakerphone, 3-Line Display with Backlight and 24-CO Keys
KX-T7625
• Model with Speakerphone and 24-CO Keys
2
One
Page 3
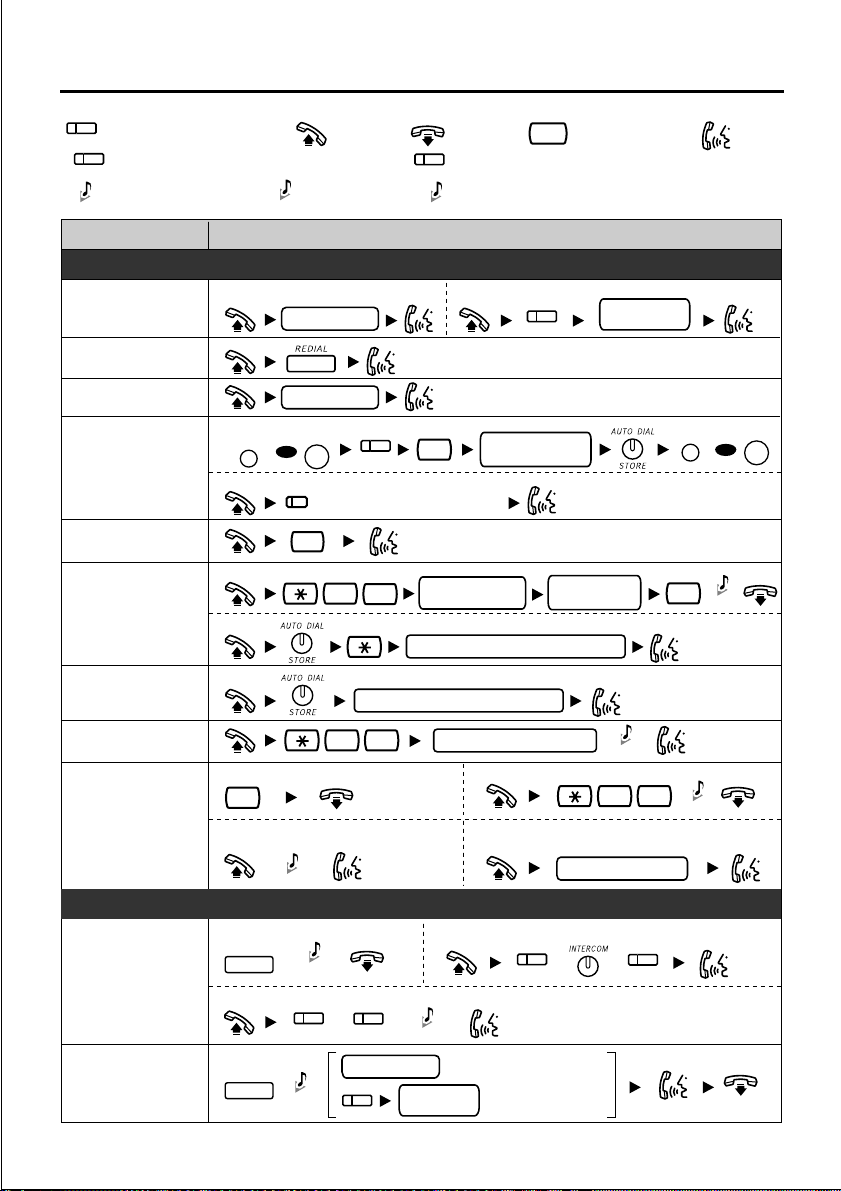
Features List
(CO)
Incoming Call Distribution Group button
(ICD Group)
Confirmation Tone Dial Tone
C. Tone D. Tone
Desired Feature
To an extension
Calling
Redial
Quick Dial
To store
PROGRAM
One-touch
Dialling
To dial
Operator Call
To store
Personal
Speed Dialling
System
To dial
To dial
Speed Dialling
Off-hookOutside (CO) Line button
extension no.
quick dial no.
PAUSE
OR
assigned as a
—
One-touch Dialling button
9
3
system speed dial no. (3 digits)
On-hook Feature number
Direct Station Selection button
(DSS)
Ringback Tone
R.B. Tone
Operation
Making Calls
To an outside party
(CO)
2
personal speed
0
dial no. (2 digits)
personal speed dial no. (2 digits)
desired no.
(max. 32 digits)
(CO)
desired no.
(max. 32 digits)
outside
phone no.
PROGRAM
#
Talk
PAUSE
OR
C. Tone
Doorphone Call
Automatic
Callback Busy
Call Hold
Call Transfer
3 1
While hearing a busy tone
To set To cancel
6
To answer (if set after dialling)
While hearing a callback ringing While hearing a callback ringing
R.B. Tone
doorphone no. (2 digits)
To answer (if set when seizing an outside line)
C. Tone
4 6
outside phone no.
C. Tone
During a Conversation
To hold To retrieve a call at the holding extension
HOLD
C. Tone
To retrieve an outside call from another extension
(CO)
(ICD Group)
TRANSFER
D. Tone
/
extension no.
(CO)
C. Tone
outside
phone no.
(CO)
//
To an extension
To an outside party
(ICD Group)
3
Page 4
Features List
Desired Feature
Operation
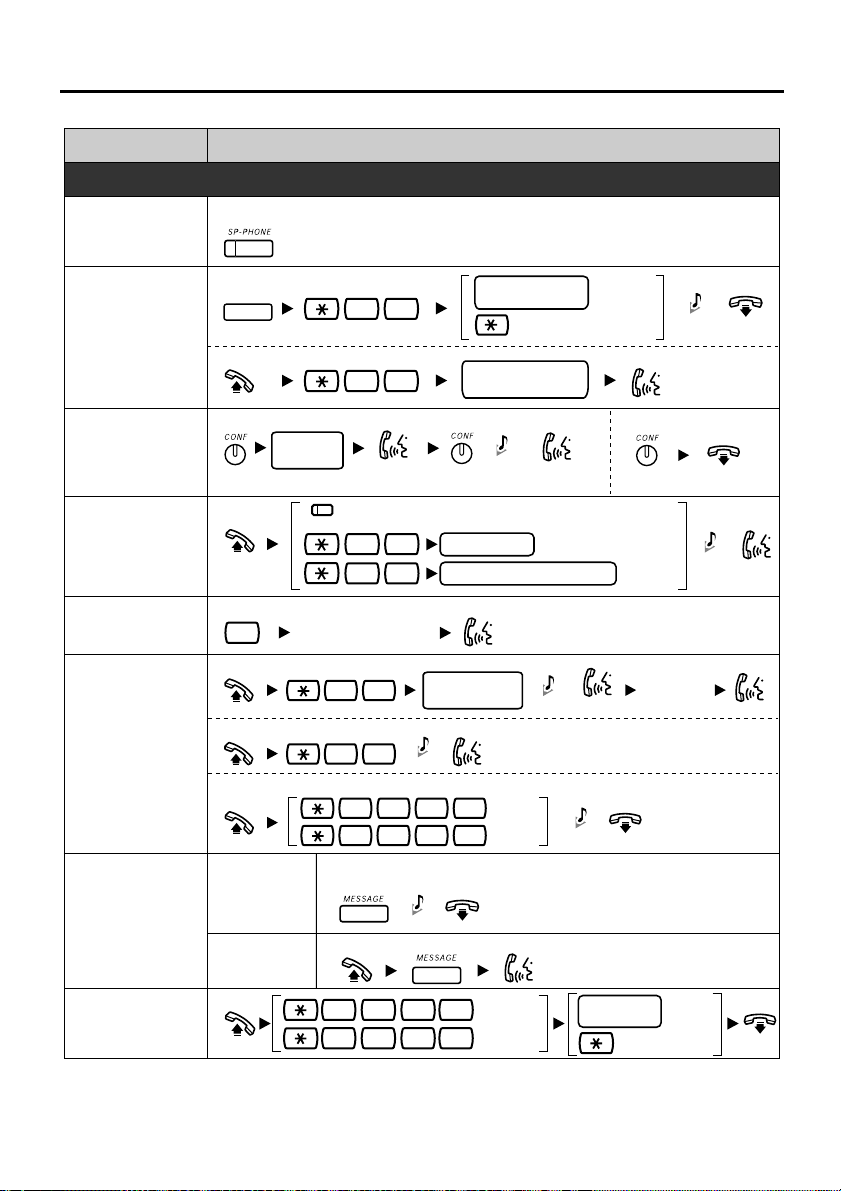
Useful Features
To set/cancel
During a conversation using the handset
Off-Hook Monitor
During a conversation
Call Park
Multiple Party
Conversation
Call Pickup
Sending a Call
Waiting Tone
Paging
Message
Waiting
To set
TRANSFER
To retrieve
5 2
5 2
Conference
During a conversation
desired
phone no.
(DSS)
Talk to the
new party.
4 1
4 0
While hearing a busy tone
1
To page
Wait for an answer.
3 3
To answer
4 3
To deny
7 2 1
7 2 1
To leave a message waiting indication
Caller
Called
When the called extension is busy or does not answer
To call back
C. Tone
C. Tone
parking zone no.
(2 digits)
stored parking
zone no. (2 digits)
C. Tone
Talk with
multiple parties.
extension no.
pickup group no. (2 digits)
paging group
no. (2 digits)
Deny
1
C. Tone
Allow
0
Specified
Auto
Announce.C. Tone
extension
ICDG
extension no.
Log-in/Log-out
For Log-in
1736
For Log-out
0736
* Consult your dealer for more details about feature access numbers.*
* You can change the flexible CO buttons to feature buttons.
* "Location of Controls" is shown on page 11.
C. Tone
To leave a conference
Directed
Group
C. Tone
Wait for
an answer.
Specified
All
4
Page 5
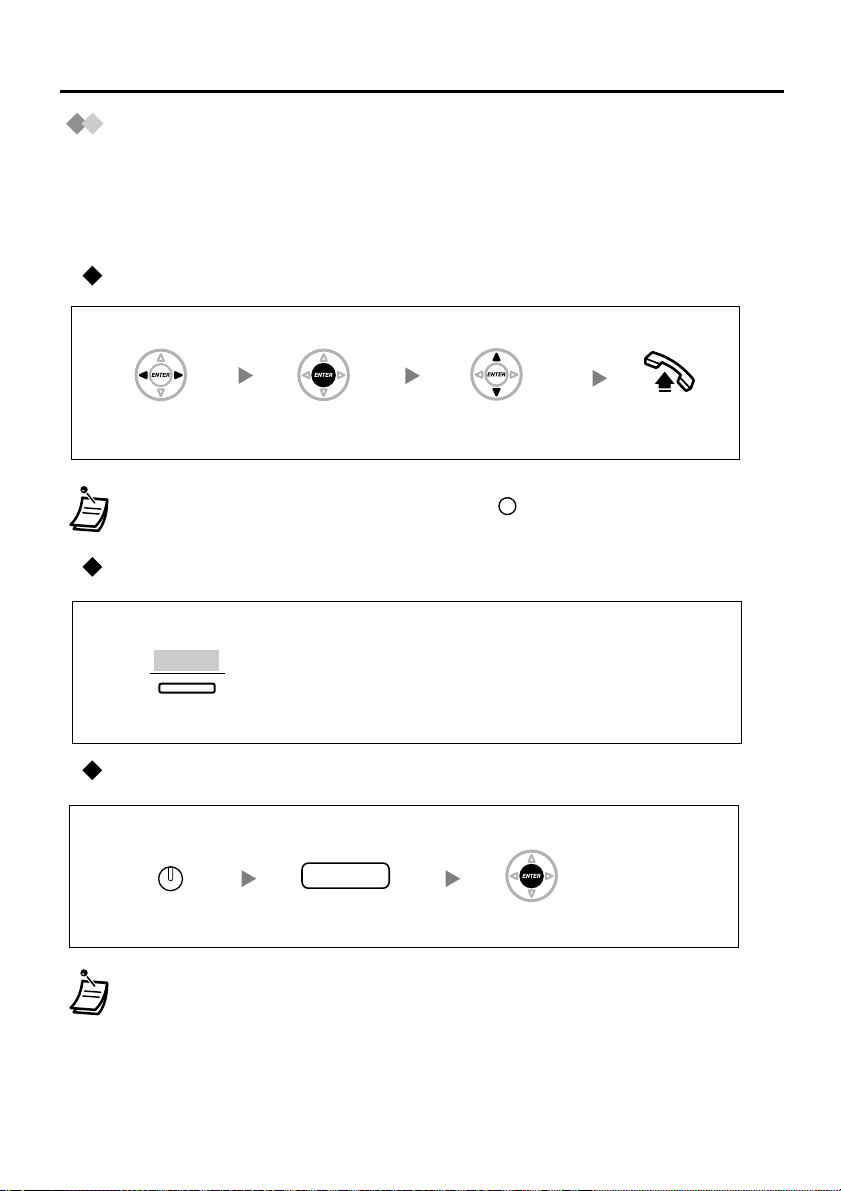
Using the Display Proprietary Telephone
Using the Directories
You can select and call with the directories as follows:
Incoming Call Log
Outgoing Call Log
Extension Number Directory
System Speed Dialling Directory
Personal Speed Dialling Directory
Calling with the directory
While on-hook
Press Left or Right
until desired directory
appears.
Press ENTER.
Press Up or Down until
desired item appears.
• To cancel or exit the current display, press .
CANCEL
Off-hook.
Clearing the log information
When the desired party is displayed
CLEAR
Press "CLEAR".
Storing the log information for Personal Speed Dialling Directory
When the desired party is displayed
AUTO DIAL
STORE
Press STORE.
• * To enter characters, refer to “Entering Characters”.
name
Enter name
(max. 20 characters).
*
Press ENTER.
5
Page 6

Using the Display Proprietary Telephone
Storing the names and numbers in the Personal Speed Dialling Directory
While on-hook
outsidephone no.
Enter outside
phone number
(max. 32 digits).
Press ENTER. Press ENTER.
name
Enter name
(max. 20
characters).
*
• * To enter characters, refer to “Entering Characters”.
Accessing the System Features
You can access features as follows with the “Feature Access” menu:
Automatic Callback Busy Cancel
Call Pickup, Direct
Call Pickup, Group
Doorphone Call
Door Open
External Background Music
Group Paging
While on-hook
Press Left
three times.
Press ENTER.
Press Up or Down
until desired feature
appears.
Press ENTER.
PROGRAM
OR
PAUSE
Press PROGRAM
or PAUSE.
Necessary
information
is required.
• For further information, refer to the Main Unit/PBX User Manual.
6
Page 7

Using the Display Proprietary Telephone
Entering Characters
You can enter alphabetic characters using your telephone keypad. Pressing repeatedly
a numeric key brings out different characters, as shown by the table below.
To toggle between Table 1 and Table 2, press the Soft button (S1) at any time while you
are entering characters.
Table 1 (Standard mode)
Times
Buttons
2
3
4
5
1231456789
?1"
!
BCa bc2
A
E Fdef3
D
HIghi 4
G
K L jkl5
J
6
7
8
9
0
NOmn 6o
M
QRSpqrs7
P
UVt 8uv
T
XYZwxyz
W
(space)
.
,
/+—=<>
%&@() #
$
#
9
’
;
:
0
£
7
Page 8

Using the Display Proprietary Telephone
Table 2 (Option mode)
Buttons
Times
1
123456789
!
? ä"
ö 1ü
10
11 12 13 14 15
2
3
4
5
6
7
8
9
0
#
A
BCa bcÀ
D
E FdefÐ
HIghi Ì
G
K L jkl5
J
NOmn Ño
M
QRSpqrs
P
UVt uv
T
XYZwxyz
W
(space)
.
’
,
:
/+— =<>
%&@() #£
$
БВГДЕЖЗ2
ÈÉÊË3
ÍÎÏ4
ТУФХЦШŒ6
ß 7
ÙÚÛÜ8
ý 9
0
;
8
Page 9

Settings on the Programming Mode
Settings on the Programming Mode
Setting Features
You can program features on the programming mode.
The original settings are shown in bold letters in the shaded boxes. Find and mark your
desired selections for programming.
To enter the
program mode
PROGRAM
OR
PAUSE
program no.
Press
PROGRAM
or PAUSE.
Follow
Programming
Input.
Item
Do you turn on the display
backlight?
(Display Backlight Selection
for the KX-T7633/KXT7636)
How do you prefer to
receive an intercom call?
(Alternate Receiving–Ring/
Voice)
Do you prefer to receive
Call Waiting for outside
calls?
To program To exit
OROR
AUTO DIAL
STORE
Press ENTER
or STORE.
Programming
Input
4
0
[Back Light]
2
1
[Voice Call]
0
3
[C.Wait CO]
OR
program no.
Follow Selection
& Parameter.
Selection & Parameter
0
1
2
0
1
2
0
1
Yes–ON in use
Yes–always ON
No–always OFF
Ringing
Directly–The party's voice is heard
without ringing.
Ring only–Prohibiting the caller
switching to the voice mode.
[Voice Call]
No
Yes
OR
AUTO DIAL
STORE
Press ENTER
or STORE.
[Automatic]
[Always On]
[Always Off]
[Tone Call]
[Voice Call Deny]
[CW Tone Off]
[CW Tone On]
PROGRAM
OR
PAUSE
Press
PROGRAM
or PAUSE.
Which type of Call Waiting
for intercom calls do you
prefer?
(Call Waiting Selection)
Which type of Call Waiting
tone do you prefer?
(Call Waiting Tone Type
Selection)
1
3
[C.Wait Ext]
2
3
[C.Wait Tone]
0
1
2
No Tone
Tone
Voice announcement through the built-in
speaker (OHCA)
[CW Tone Off]
[CW Tone On]
[OHCA (Announce)]
Voice announcement through the
3
0
1
handset without pre-information
(Whisper OHCA)
Tone 1
[CW Tone 1]
Tone 2
[CW Tone 2]
[Whisper OHCA]
9
Page 10

Settings on the Programming Mode
Item
Would you like to show
a message on the
caller's telephone
display?
(Absent Message)
Where are your
incoming calls
forwarded or refused?
(Call Forwarding
[FWD]/Do Not Disturb
[DND])
Which equipment will
you use as a receiver?
(Headset Mode
Selection)
Would you like to set
your extension PIN or
change a stored
extension PIN to new
one? (Extension PIN
[Personal
Identification Number])
To prevent others from
seeing your personal
directory and call log.
(Directory and Call Log
Lock)
• If nothing is entered within one minute in the programming mode, the mode
returns to the normal status.
• To exit the mode at any time, lift the handset.
• For further information on "Settings on the Programming Mode", refer to the
Main Unit/PBX User Manual.
Programming
Input
4 0
[Absent Msg]
5
OR
FWD/DND
(for both calls)
[Fwd/DND Both]
5 1
(for outside
calls)
[Fwd/DND CO]
5
(for intercom
calls)
[Fwd/DND Ext]
6 1
[Headset Mode]
9
[Extension PIN]
9
[Display Lock]
message no. (1-8)
0
2
(max. 32 digits)
3
(max. 32 digits)
4
(max. 32 digits)
2
5
(max. 32 digits)
extension PIN
(max. 10 digits)
+
ENTER/STORE
+ same PIN
0
stored extension
PIN + new PIN
(max. 10 digits)
+ ENTER/
STORE +
same PIN
extension PIN
(max. 10 digits)
+
2
extension PIN
(max. 10 digits)
+
0
9
0
1
+ desired no.
+ desired no.
+ desired no.
+ desired no.
0
1
0
1
Selection & Parameter
No-Off
[Absent Msg Off]
Yes–Shows the selected message
Yes–Shows your personal message
Off
[Fwd/DND Off]
Do Not Disturb (DND)
All–Forward all calls
Busy–Forwarded when your
extension is busy.
No Answer–Forwarded when
you do not answer.
Busy/No Answer–Forwarded when
you do not answer or when your
extension is busy.
Headset off
Headset on
To set an
extension PIN
To change a
stored extension
PIN to new one
To unlock
To lock
[Do Not Disturb]
[Fwd All:]
[Fwd Busy:]
[Fwd N/A:]
[Fwd B/A:]
[Headset Mode Off]
[Headset Mode On]
WARNING
Whe
n a third party
discovers the password
(extension PIN) of the PBX,
there will be a risk that
they will make fraudulent
phone calls using the
telephone line, and the
cost will be charged to
your own account. In order
to avoid this problem, we
strongly recommend the
following points:
a) Carefully maintain the
secrecy of the PIN.
b) Specify a complicated
PIN as long and random as
you can make it.
c) Change the PIN
frequently.
10
Page 11

KX-T7636
Location of Controls
PAUSE
FWD/DND
CONF
INTERCOM
AUTO ANS
/MUTE
AUTO DIAL
/STORE
TRANSFER
REDIAL
LCD (Liquid Crystal Display)
Soft Buttons
(S1 through S4)
Message/
Ringer
Lamp
Ringer Switch
(KX-T7625)
*
On the bottom
of the unit.
Flexible
Outside (CO)
Line Buttons
ENTER
MESSAGE
Headset Jack
* Headset (not included)
Recommended: KX-TCA87, KX-TCA89
Do not use KX-T7090 headset.
FLASH
/RECALL
HOLD
CANCEL
Navigator
Key
KX-T7625
Microphone
SP-PHONE
PROGRAM
Volume Key
11
Page 12

Location of Controls
L
PAUSE
FWD/DND
CONF
INTERCOM
AUTO ANS
MUTE
AUTO DIA
STORE
TRANSFER
REDIAL
MESSAGE
PAUSE:
Used to insert a pause when
storing a telephone number. This
button also functions as the
PROGRAM button when there is
no PROGRAM button on your
telephone.
FWD/DND (Call Forwarding/Do
Not Disturb):
Used to perform Call Forwarding
or Do Not Disturb.
CONF (Conference):
Used to establish a multiple-party
conversation.
INTERCOM:
Used to make or receive intercom
calls.
AUTO ANS (Auto Answer)/
MUTE:
Usedtoreceiveanincomingcallin
hands-free mode or mute the
microphone/handset during a
conversation.
AUTO DIAL/STORE:
Used for System/Personal Speed
Dialling or storing program
changes.
TRANSFER:
Used to transfer a call to another party.
REDIAL:
Used to redial the last dialled
number.
MESSAGE:
Used to leave a message waiting
indication or call back the party
who left the message waiting
indication.
FLASH/
RECALL
HOLD
SP-PHONE
ENTER
VOLUME
CANCEL
PROGRAM
ENTER
(CO)
FLASH/RECALL:
Used to disconnect the current call
and make another call without
hanging up.
HOLD:
Used to place a call on hold.
SP-PHONE (Speakerphone):
Used for the hands-free operation.
Navigator Key (KX-T7630/7633/
7636):
Used to adjust the volume and the
display contrast or select desired
items.
Volume Key (KX-T7625):
Used to adjust the volume.
CANCEL (KX-T7630/7633/7636):
Used to cancel the selected item.
PROGRAM (KX-T7625):
Used to enter and exit the
personal programming mode.
ENTER (KX-T7630/7633/7636):
Used to confirm the selected item.
CO:
Used to make or receive an
outside call. Pressing this button
seizes an idle outside line
automatically. (Button assignment
is required.)
Also used as feature buttons.
(Button assignment is required.)
Message/Ringer Lamp:
When you receive a call, the lamp
flashes green. When someone
has left you a message, the lamp
stays on red.
Soft Buttons (KX-T7630/7633/
7636):
Used to select the item displayed
on the bottom line on the display.
12
Page 13

The telephone line cord (included)
Connection
Connect to a Hybrid IP-PBX ( )
CAUTION
Ensure cords
Connect to a single line telephone for
XDP ( ).
TO TEL
are inserted
into grooves.
< Back view>
• Consult your dealer for more details about XDP.
Speaker volume
Handset/Headset
volume
Ringer volume
While hands-free conversation
While using a handset or headset
KX-T7625
While on-hook or receiving a call
RINGER
Slide the lever of
the Ringer switch
to (Off/On).
KX-T7630/7633/7636
Press Up or Down.
TO MAIN UNIT
/ PABX
CAUTION
Ensure the cord is
inserted in the
hook to prevent
damage to the
connector.
Press Up or Down.
If On is selected,
press Up or Down.
Setting
LCD Contrast
Ringing T one
KX-T7630/7633/7636
PAUSE
0 1
PROGRAM
OR OR
PAUSE
(CO)
Press Twice.
0 1
3 0
OR
AUTO DIAL
STORE
PAUSE
PROGRAM
OR
PAUSE
13
Page 14

Tilt Angle Adjustment
4
3
2
1
Pull down the handset hook until it locks to prevent the
handset from slipping down from the operation board when at
step-angle 4.
Wall Mounting
The tilt angle of the operation board can be
adjusted to four step-angles.
To lift: Lift up the operation board to the desired
step-angle (1 2 3 4).
To set down: Lift up the operation board to the
highest angle and then press down to
step-angle 1. Please do not get your
fingers caught between the base and
the operation board.
1 Fold up the operation board to
step-angle 1.
3 Mount the unit on the wall.
*The illustrations used in this page are a KX-T7636.
2 Connect the telephone line cord, and
then attach first and then of the
wall mounting adaptor.
4
Pull down the handset hook until it locks,
so the tab holds the handset.
To temporarily place the handset down
during a conversation,
topedgeofthephoneasshown.
hook it over the
14
Page 15

Installing the KX-T7601/KX-T7603
Installing the KX-T7601/KX-T7603
Unplug the extension line before you set up the USB Module and the Addon Key Module to the unit.
KX-T7601 (For KX-T7633/7636)
includes USB cable
The USB Module can be connected between
the digital proprietary telephone and the
personal computer through USB interface to
implement personal CTI (Computer Telephony
Integration).
1 Remove the connector cover
using a screwdriver.
2 Insert the flat cable
into the connector.
3 Couple both hinges
and slide in the
unit.
KX-T7603 (For KX-T7633/7636)
The Add-on Key Module has
12 CO buttons. These
buttons are used to seize
an outside line, make a
call using One-touch
Dialling, or access
certain features.
<with a KX-T7603>
1 Open the cover.
Attach the KX-T7603 to
2
your telephone with
screws.
3
Insert the flat cable into the
connector.
4
Push down the cover until it locks,
and connect the USB cable to
USB port.
Connect to PC
* Please use a USB cable shorter than 3 m.
4 Close the cover.
PULL
15
Page 16

Copyright:
This manual is copyrighted by Kyushu Matsushita Electric Co., Ltd. (KME).
Under the applicable copyright laws, this manual may not be reproduced in any
form, in whole or part, without the prior written consent of PCC.
© 2002 Kyushu Matsushita Electric Co., Ltd. All Rights Reserved.
Kyushu Matsushita Electric
Co., Ltd.
1-62, 4-chome, Minoshima, Hakata-ku, Fukuoka 812-8531, Japan
Printed in Japan PSQX2508ZA KK0103YS0(AL)ver.0.152
 Loading...