

Page 1
Panasonic
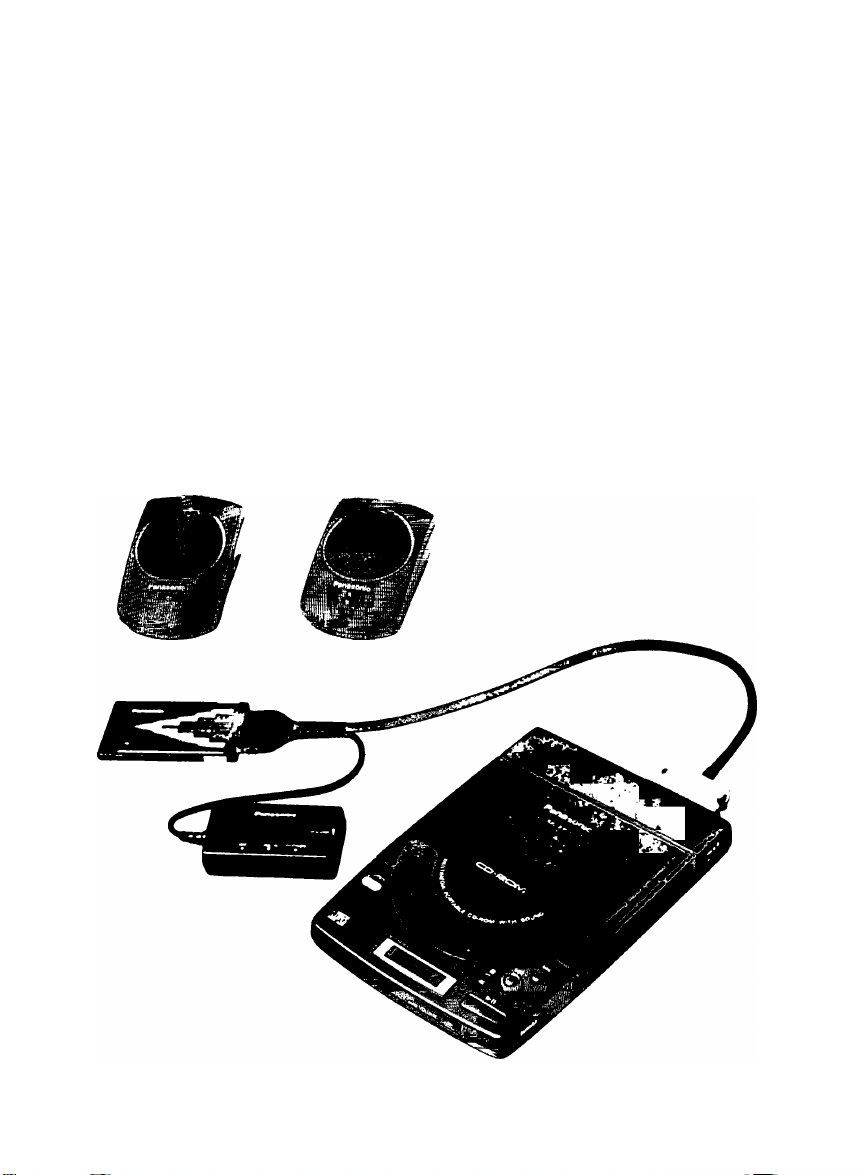
Multimedia Portable CD-ROM
with Sound
Model No.
KXL-D721
Operating Instructions
Please read before using and store in a safe place.
Page 2

Thank you for purchasing the Panasonic Multimedia Portable CD-ROM with Sound
KXL-D721
End-User License Agreement
THIS IS A LEGAL AGREEMENT BETWEEN YOU AND PANASONIC CAREFULLY
READ ALL THE TERMS AND CONDITIONS OF THIS AGREEMENT PRIOR TO OPEN
ING THE PACKET OF SOFTWARE PROGRAM OPENING THE PACKET INDICATES
YOUR ACCEPTANCE OF THESE TERMS AND CONDITIONS If you do not agree to
these terms and conditions, return the unopened packet and the other components of the
Panasonic product to the place of purchase and your money will be refunded No refunds
will be given for the product that have an opened packet or missing components
1 COPYRIGHT
Panasonic has the right to license or has been granted to license the enclosed software
program (“SOFTWARE”), developed and copyrighted by Kyushu Matsushita Electric
Co , Ltd or Its licensor (“Licensor”) You acknowledge that you are receiving only a
LIMITED LICENSE TO USE the SOFTWARE and related documentation, and that you
shall obtain no title, ownership nor any other rights in or to the SOFTWARE and related
documentation, all of which title and rights shall remain with Licensor and Panasonic
2 LICENSE
(1) You have the non-exclusive right to use the one copy of the SOFTWARE on a
single computer used by single user Installation of the SOFTWARE on a network
server for the purpose of distribution to one or more other computers shall not be
granted in this Agreement (2) You may not copy, reproduce, or permit to be copied
or reproduced, the SOFTWARE or related documentation for any purpose, except that
you may either (a) make a reasonable quantity of copies of the SOFTWARE solely for
backup or archival purposes, or (b) transfer the SOFTWARE to a single hard disk,
provided that you keep the original solely for backup or archival purposes All other
copies of the SOFTWARE are in violation of this Agreement (3) You may not rent or
lease the SOFTWARE, but you may transfer your right under this License Agreement
on a permanent basis, provided that you transfer this Agreement, all copies of the
SOFTWARE, all related documentation and your Panasonic product, and the recipient
thereof agrees the terms of this Agreement (4) You may not reverse engineer,
decompile or disassemble the SOFTWARE, except that in European Union and
European Free Trade Association, you may have the limited right to reverse engineer,
decompile or disassemble the SOFTWARE solely to the extent specifically permitted
by the terms and conditions of Article 6 of the European Community's Directive for the
Legal Protection of Computer Programs, OJL 122/42 (17 May 1991) (5) You may not
use, copy, modify, alter, or transfer the SOFTWARE, or any copy thereof, in whole or
in part, except as expressly provided in this Agreement
3 TERM
This license is effective until terminated You may terminate this Agreement at any
time by destroying the SOFTWARE and related documentation and all copies thereof
This license will also terminate if you fail to comply with any term or condition of this
Agreement Upon such termination, you agree to destroy all copies of the SOFTWARE
and related documentation
Page 3

4. LIMITED WARRANTY:
Within ninety (90) days of your receipt of the SOFTWARE, Panasonic warrants that
the storage media on which the SOFTWARE are furnished is free from defect in
materials and workmanship under normal use, and that it will repair or at its option
replace any defective media at no charge to you, provided that such defective media
is returned to Panasonic within such ninety (90) days period.
5. LIMITATION OF LIABILITY:
EXCEPT AS STATED ABOVE, NEITHER PANASONIC NOR PANASONIC’S SUP
PLIER MAKES OR PASSES ON TO YOU OR OTHER THIRD PARTY, ANY WAR
RANTY OR REPRESENTATION INCLUDING, BUT NOT LIMITED TO, THE IMPLIED
WARRANTY OF MERCHANTABILITY AND FITNESS FOR A PARTICULAR PUR
POSE.
WITHOUT LIMITING THE GENERALITY OF THE FOREGOING, NEITHER PANASO
NIC NOR PANASONIC’S SUPPLIER WARRANTS THAT THE SOFTWARE WILL BE
ERROR-FREE OR THAT IT WILL MEET YOUR REQUIREMENTS. NEITHER
PANASONIC NOR PANASONIC’S SUPPLIER SHALL BE LIABLE FOR ANY DAM
AGE SUFFERED BY YOU INCLUDING, BUT NOT LIMITED TO, CONSEQUENTIAL,
INCIDENTAL SPECIAL OR PUNITIVE DAMAGES. THE ABOVE LIMITATIONS
SHALL APPLY REGARDLESS OF THE FORM OF ACTION WHETHER IN CON
TRACT, TORT (INCLUDING NEGLIGENCE), STRICT PRODUCT LIABILITY OR
OTHERWISE, EVEN IF SUCH PARTY HAS BEEN ADVISED OF THE POSSIBILITY
OF SUCH DAMAGES.
WARNING
• The power source voltage of this AC adaptor is listed on the nameplate. Plug the AC
adaptor only into an outlet with the proper voltage.
• To prevent fire or shock hazard, do not expose this product to rain or any type of
moisture.
CAUTION
• When you operate this equipment, the outlet should be near the equipment and
should be easily accessible.
• To prevent the SCSI interface connector from static electricity damage, before you
touch it, discharge any static electricity from your hands by touching a grounded metal
. surface, such as the screw on the plate cover of an electrical outlet.
V____________________________________________________________^
IBM and PC DOS are trademarks of International Business Machines Corporation,
MS-DOS ® and Windows ® are registered trademarks of Microsoft Corporation.
Photo CD is a trademark of Eastman Kodak Company.
Sound Blaster is a trademark of Creative Technology Ltd.
YAMAHA is a trademark of Yamaha Co., Ltd.
Ad-Lib is a trademark of Ad Lib Inc.
All other brand and product names are trademarks or registered trademarks of their
respective companies.
Any details given in these Operating Instructions are subject to change without notice.
All Rights Reserved, © COPYRIGHT 1995 KYUSHU MATSUSHITA ELECTRIC CO., LTD.
Page 4

CAUTION FOR LASER
This product utilizes a laser
Use ol control, adjustment or peiiormanoe of procedures other than those specified
herein may result in hazardous radiation exposure
Do not open covers and do not repair yourself Refer servicing to qualified personnel
Laser diode properttes
Material
Laser output Less than 44 6 pW
Wave length
Emission duration
surface )
GaAIAs
7B0 nm
Continuous
FOR USERS IN UNITED STATES ONLY
This equipment has been tested and found to comply with the limits for a Class B digital
device, pursuant to Part 15 of FCC Rules These limits are designed to provide
reasonable protection against harmful interference in a residential installation
This equipment generates, uses and can radiate radio frequency energy and, if not
installed and used in accordance with the instructions, may cause harmful interference
to radio communications
However, there is no guaranteethat interference will not occur in a particular installation
If this equipment does cause harmful interference to radio or television reception, Which
can be determined by turning the equipment off and on, the user is encouraged to try
to correct the interference by one or more of the following measures
“ Reorient or relocate the receiving antenna
• Increase the separation between the equipment and receiver
■ Connect the equipment into an outlet on a circuit different from that to which the
receiver is connected
■ Consult the dealer or an experienced radio/TV technician for help
The user may find the booklet "Something About Interference" available from FCC local
regional offices helpful
FCC Warning To assure continued FCC emission limit compliance, the user must use
only the recommended shield interfacing cable when connecting to a host computer
Also, any unauthorized changes or modifications to this equipment would void the users
authority to operate this device
Page 5

Table of Contents
End-User License Agreement
Features
Accessories
Precautions............................
Part Names and Functions
Power Supply
Connection ...............................................
Power On..................................................
Software Installation..................................
Inserting/Removing a CD . .
CD-ROM/Audio CD Operation
Audio CD Operation.....................
................................
...........................
6
6
7
8
........................
Using supplied AC adaptor. .
Using batteries (not supplied)
Connecting player to computer
Connecting the speakers
Connecting the microphone
..................
............................
........................
Connecting an audio connecting cable (not supplied)
Before installing software ...........................
installing under Windows 3.1,3.11 . . . .
Installing under Windows 95
installing Windows 95 using the player . .
CD-ROM Operation
.....................
.......................
11
11
11
12
12
13
14
14
15
16
16
17
22
24
25
26
26
27
Before using
Setup
Operation re
HI
m
Error Messages on Computer . .
README File
Troubleshooting...............................
SCSI ID Number and Terminator
Maintenance....................................
Specifications
Index
..............................................
..................................
..................................
29
30
31
33
34
35
38
General
Information
Page 6
Features
Portable CD-ROM player with Sound for Notebook Computer
Double Speed External Drive
Transfer Rate 300 KB/s
128 KB Memory Buffer
Access Time 295 ms with AC Adaptor
Operates on six (6) “AA" Batteries or AC Adaptor for Player
Plays Audio CD, Photo CD Multisession Compatible
Compatible with Window 95, Plug and Play PCMCIA Interface Card
(Type 11}
Sound Blaster FM Sound Source for Windows and DOS Ad-Lib
Compatible
16 bit Quality Sound
YAMAHA 0PL3 Compatible FM Music Synthesizer
Recording & Playback up to 44 1 kHz CD Quality Stereo Sound
Microphone Included for Recording Voice Annotation
Includes a Wide Array of Sound System Utilities & Audio Clip Library
Includes 2 Compact Stereo Speakers by Battery Operation
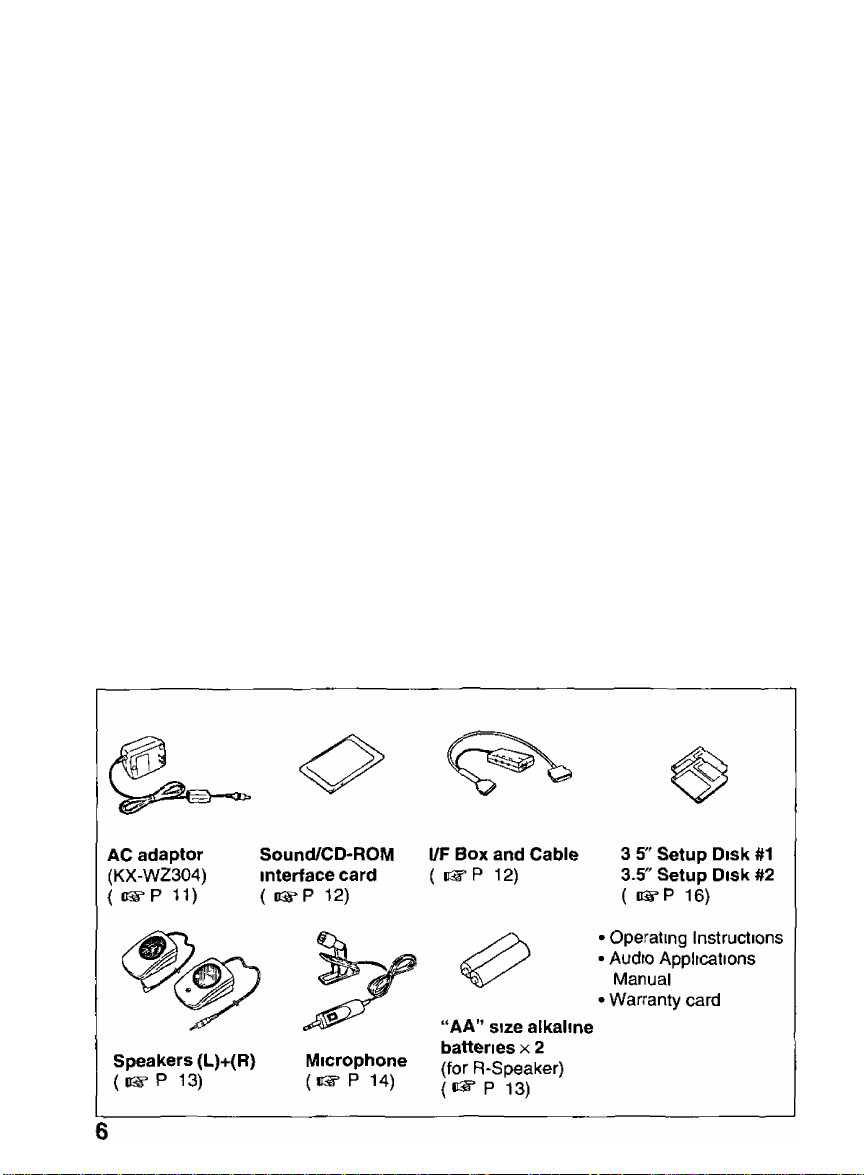
Accessories
Make sure that the following accessories are included with the player
Page 7
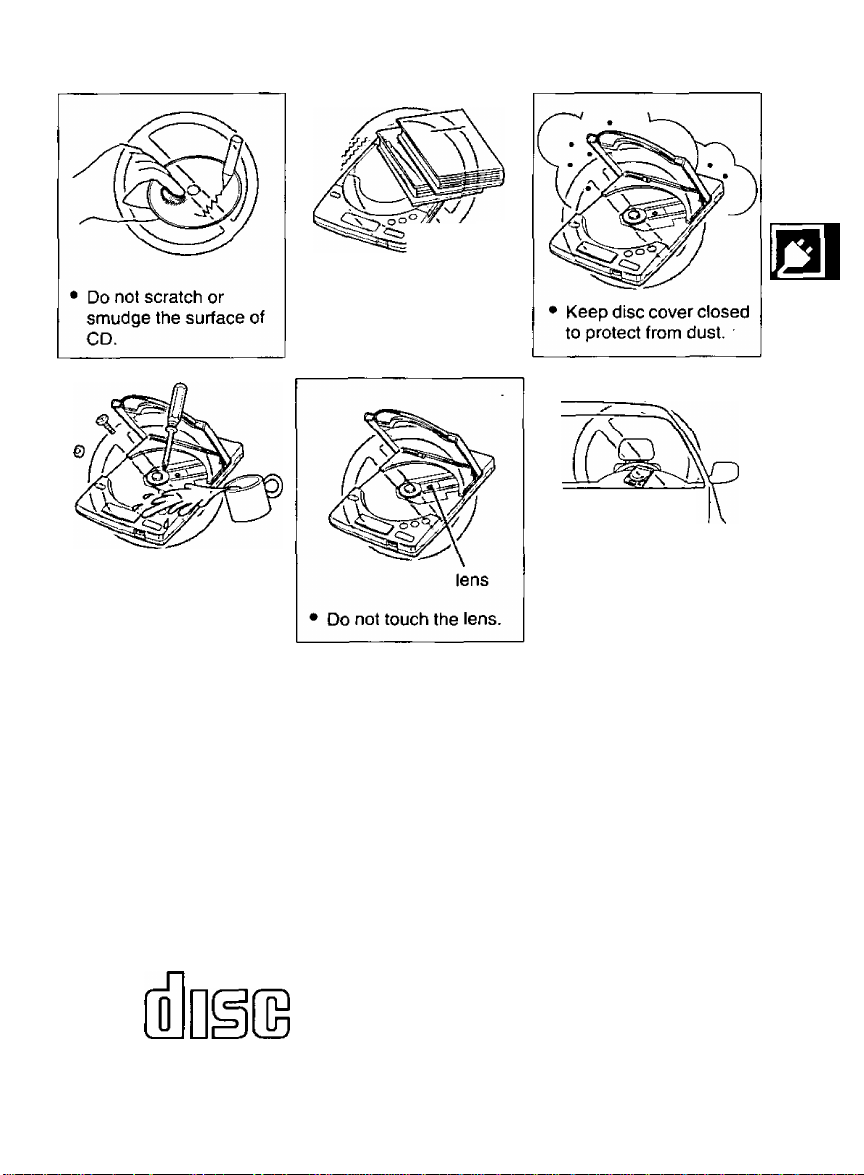
Precautions
• Do not disassemble
the player/speaker.
• Do not spill liquid.
Do not place heavy objects
on the player/speaker.
Do not shake or subject
to intense vibration.
Do not leave the
product in a closed
vehicle during hot
weather, direct sunlight
or near a heater.
o
»
>
o
o
CD
CA
(n
O
cd'
CO
• Do not play CD-ROM/audio CD while transporting,
• Do not use near any appliance that may cause vibration.
• Do not place speaker near the appliance which has cathode-ray tube (CRT) display
tor a long period since the magnetism may affect the CRT.
• Do not crush Sound/CD-ROM Interface Card.
r
Important:
Please use CD-ROMs
with the marking below.
COMPACT
Please use audio CDs
with the marking below.
nCOMPACT
(ilDgE
DIGITAL AUDIO
7
Page 8

Part Names and Functions
Player
(Top view)
Disc caver (1^ P 25) —
OPEN button (ns= P 25)
Opens the disc cover
Display ( P 9)
VOLUME control
P 2B)
Adjusts the vdIuitib of
headphones (0-10)
►II (PLAY/PAUSE button) (P 2B)
Starts/pauses playing audio CD
POWER switch ( P 15)
Turns the power on/off
B (STOP button) (1^ P 2B)
Stops playing audio CD
^ (Forward skip button)
(i^ P 2B)
Skips to the next Irack(s)
“ PHONES jack (i^ P 14,27)
144 (Reverse skip button)
( P 2B)
Skips to the previous track(s)
□r returns to the beginning of
the track being played
Page 9

Display messages
Part Names and Functions
Message/Indtcation
-AUDIO DISC ONLY-
BUSY
d lb L
no
on
01 0000
OPEll
Description
With a CD-ROM inserted in the player, if you press
O ' O ’ O " ], a blinking message
“AUDIO DISC ONLY" will appear
When the battery is low, this blinking indication will
is
appear
When data from CD-ROM is sent to your computer, a
blinking message “BUSY” will appear
CD IS not inserted, or the inserted CD is not recognized
because either the CD is placed with the label side facing
down, or it IS damaged, dirty, wet, etc
When CD-ROM is inserted, a message “on” is displayed
While CD-ROM or audio CD is recognizing, a blinking
message “on" will appear
Audio CD IS recognized
The disc cover is open
■D
0)
z
(U
3
o
(n
a
»
fi)
*<
o
u
u>
■O
Q)
•<
3
(D
W
to
01
(Q
(D
(0
Page 10
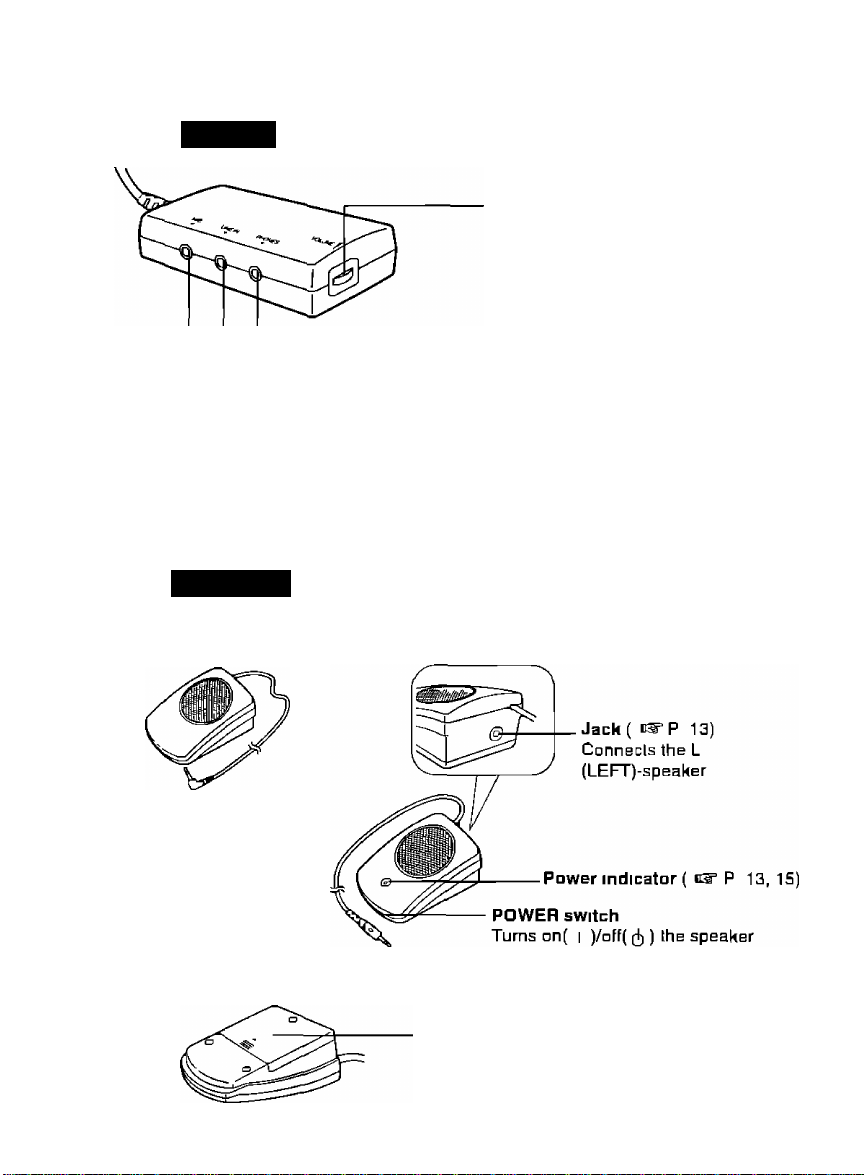
Part Names and Functions
l/F Box
PHONES jack (c^ P 13)
Connects the supplied R-speaker or headphones (not supplied]
LINE IN jack ( c^P 14)
Connects to the player's PHONES jack or to the output jack of an audio
device by using a commercially available audio connecting cable
MIC jack ( P 14)
Connects the supplied microphone for voice or music recording
Speakers
< L-speaker > < R-speaker >
VnlurriB control ( 0^ P 13)
Adjusts the volume of the speaker or
headphones (not supplied) connected
to the PHONES jack (0-10)
< Bollom of R-speaker >
10
Battery cover ( P 13)
Page 11
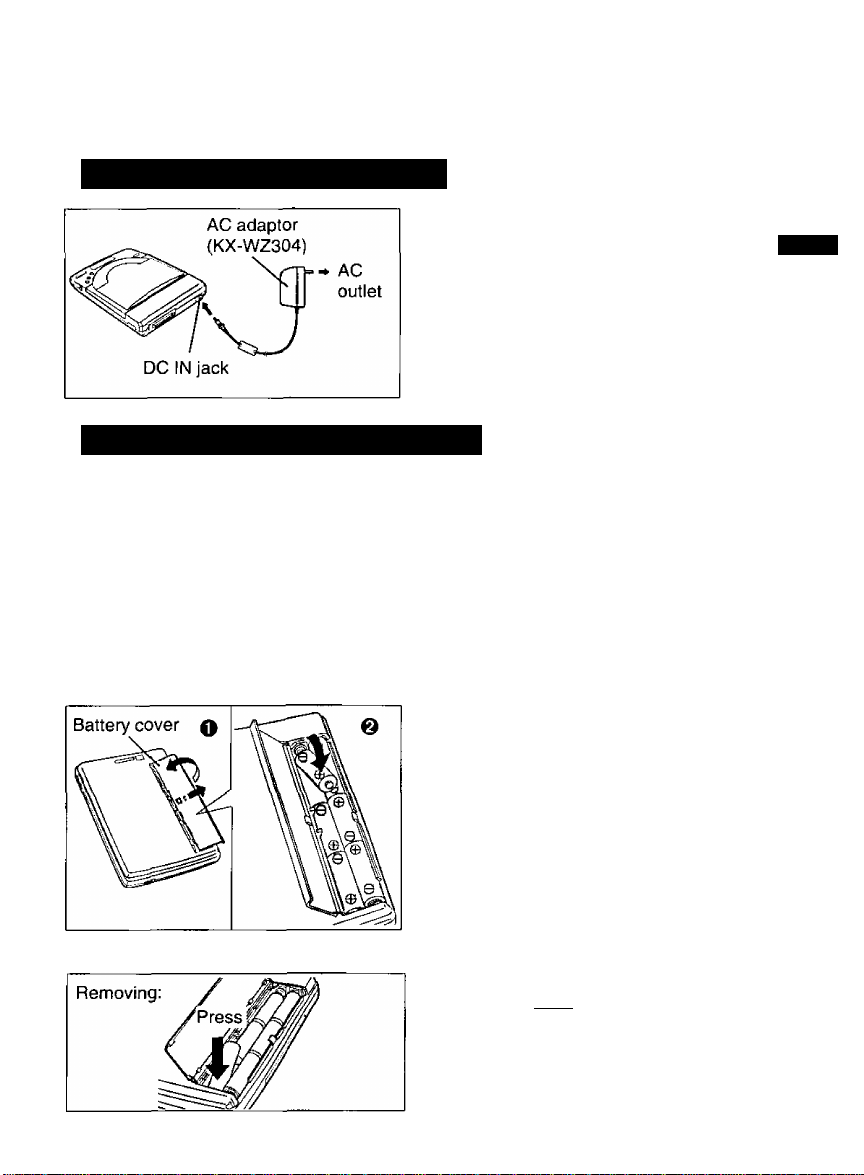
Power Supply
This player can be used by using either supplied AC adaptor or batteries (not supplied).
Using supplied AC adaptor
Connect one end of the AC adaptor
to DC IN jack and the other end to
household AC outlet.
Caution:
• Use only the supplied AC adaptor
(KX-WZ304), since other adaptors
may damage the piayer.
Using batteries (not supplied)
Alkaline batteries are recommended.
Battery Precautions:
If improperly used, the batteries may leak and cause corrosion. Therefore, observe
the following:
• Install batteries according to the diagram.
• Do not mix old and new batteries, or carbon and alkaline battery types.
• Remove all batteries when not using the player for extended periods.
• Do not charge, short-circuit, disassemble, heat, or dispose of in fire.
O Open the battery cover by
sliding and lifting it up.
O Install six “AA” size batteries
(not supplied).
Make sure the polarities (+, -) match
the diagram.
■o
z
B)
3
(D
(0
B)
3
a
■n
c
3
o
o
3
w
UJ
o
X
</)
■D
o
0)
X"
o
CA
*0
O
£
(D
-7
(/>
C
T3
■D
Replacing the Batteries:
Replace the batteries when blink
ing mark “d'X I ” appears on the
display.
11
Page 12

Connection
Connecting player to computer
Make sure thaï your notebook computer and Ihe player are off and the player’s
terminator is set to ON ( P 33)
Connect the cable (“ ^ I I mark
1
racing up) to the Sound/CD-ROM
slot until it stops
Nole
■ On some computers you might have to insert the card with
the "Panasonic" side facing down The card is keyed so it
can only be installed in the correcl direction
Disconnecting Sound/CD-ROM interface Card:
Pull Ihe cable while pressing the
side tabs of the cable
Caution
" Do not pull the cable by force, since
this can damage the card
Page 13

Connection
Connecting the speakers
Be sure that the power switch of the R-speaker is off and the volume control of the
l/F Box is set to the lowest level. You can also connect your headphones to the PHONES
jack of the l/F Box.
Install the supplied two “AA” size alkaline batteries into R-speaker.
1
Make sure the polarities (+, -) match the diagram.
Replacing the batteries
When the power indicator on R-speaker glows faintly and the playback sound becomes
distorted or unstable, replace the batteries by following the instructions inside the Rspeaker.
Please use alkaline batteries.
Battery Precautions:
If improperly used, the batteries may leak and cause corrosion. Therefore, observe
the following.
• Install batteries according to the diagram.
• Do not mix old and new batteries, or carbon and alkaline battery types.
• Remove all batteries when not using the speaker for extended periods.
• Oo not charge, short-circuit, disassembie, heat, or dispose of infire.
13
£ 5
^ O
« 3
■D
0)
Page 14

Connection
Connecting the microphone
The supplied micrDphane can be used Id make recordings of voices or ether acoustical
audio sources Forthe detailed operation, refer to the enclosed Audio Applications Manual
Caution
” Use only the supplied microphone, dherwise proper operalion is not guaranteed
Note
■ Speakers may howl depending on the setting of the audio application (P 10,
20, 25 in Audio Applications Manual)
Connect the microphone to
the MIC jack of the l/F Box
Connecting an audio connecting cable (not supplied)
When you wish to listen to (using the supplied speakers)/record an audio CD or (he sound
of CD-ROM which cemes out of (he player's PHONES jack, connect a commercially
available audio connecting cable as illustrated in the diagram below
Other audio devices such as tape player can be subslituled fer Ihe player
Note.
■ Whenever you connect/disconnecl an audio connecling cable, be sure lhal Ihe
volume of the player and l/F Box are set lo the lowest level
Connect the other end of the audio connecting
cable to Ihe LINE IN jack of the l/F Box.
Connect one end of the
audio connecting cable
to the PHONES jack of
Ihe player.
Page 15

Power On
Player
Turn on the player by pressing the POWER switch and then turn on the computer.
A blinking message “on” appears on the display of the player.
When turning off the player, press the POWER switch again.
The display message(s) will disappear.
Note:
• If the player is not going to be used for an extended period, unplug the AC adaptor
from both the player and AC outlet to save the power consumption. (Approximately
3,0 W power is consumed when the player is OFF and the AC adaptor is connected.)
■ Power Save Function:
Your player enters the Sleep Mode under the following conditions to save power.
• When using the player with your computer, if no command issent to the player from the
computer for more than 4 minutes.
• When using the player independently, if no button of the player is pressed for more than
4 minutes.
During the Sleep Mode, the laser and spindle motor stop.
The player automatically re-starts when it receives a command from the computer or a
button of the player is pressed.
Speakers
Turn on the speakers by switching the POWER switch on R-speaker to on ( i )
position.
Power indicator on R-speaker lights.
Power indicator
POWER switch
When turning off the speaker, set the POWER switch on R-speaker to off (d)) position.
15
O
o
3
3
(D
O
3*
(Q
3"
3
o
o
■o
3"
o
3
fl)
c
a
o'
0
№
2
(p
-o
1
o
-T
o
3
Page 16

Software Installation
Before installing software
The supplied Setup Disks contain the drivers for this product and the Audio Applications
software
Note
■ If you are currently in Windows, please exit Windows forpropersoftware installation
I System requirements
The Setup Disks can be used only in an IBM or compatible computer with a 3 5" floppy
diskdrive System requirements are
■ IBM or IBM Compatible Computer
■ 1 PCMCIA Type II Card Slot
■ PCMCIA Controller 102365 compatible LSI or IBM Card Service (PCMCIA 1 07, 2 □□)
or SystemSoft (PCMCIA 2 01.2 10) or PhoeniM PCMPLUS (PCMCIA 2 00. 2 01,2 10)
or CardTalk
- MS-DOS 5 □ to 6 2 or PC DOS 5 □ to В 3
■ Windows 3 1,311 or Windows Э5
■ 33 MHz 00486 or Faster Micro Processor
■ 4 MB of Available Hard Disk Space
■ 0 MB RAM Recommended
Note
■ This product IS not compatible with the notebook computer which has a built-in
sound system device
Making back-up copy
Before installing software, it is recommended that you make a back-up copy and store the
original in a safe place
Notes
■ Use the DISKCOPY command of DOS to make a back-up copy Refer to your DOS
manual for furlher information
■ You may find it convenient to install the software directly onto your C drive (hard
disk)
16
Page 17

Software tnstaliation
Installing under Windows 3.1,3.11
Make sure that the necessary devices are connected ( i®"P. 12-14) and the player
and the computer are turned on ( P. 15).
Start Windows 3.1,3.11.
2 Insert the supplied Setup Disk #1 into drive A (or B).
0 Select “Run...” from the File menu of the Program Manager.
4 Type A: (or B:)\SETUP and press [ EnteT].
“Multimedia Sound Kit Install Program” window appears.
0 Click [ Continue ].
The following window appears.
Multjfnedî3 Sound. Kit Instafl Program
Choose the desired operation by selecting a button:
jr~Drrver i^taliation^ (nstall drivers and audio applications.
Configure System | Configure drivers.
application inst^lation Install audio applications.
I Exit the Install program.
Exit
• If you want to install the drivers and Audio Applications software, go to next step.
• If you want to change the previous settings, select “Configure System” and follow
the instructions on computer.
• If you want to install only Audio Applications software, select “Application Installa
tion" and follow the instructions on computer.
• If you want to exit the install program, select “Exit” and follow the instructions on
computer.
or
= S’
« £5.
a o
_
=: «
CO 3
« «
(0 J*.
o fi>
ar =.
is
s g
€
0)
o
a
o
€
w
w
I
17
Page 18

Software Installation
0 Click [ Driver Installation] "Dnver Installalian" window appears
Drive^Ir^lallafionii;
ll wml lo in:fdll the suftware in a diTierent dirscfnry
t)De the nama ot the directory beloiv
loot Drrve
EEna
De^tinalion Directory
|C\KMESQUND
The default directory is KMESOUND II you want to install the driver in a diHerenl
directory, type Ihe directory name and go to next slep
Y Click foK] The following window appears
WindowpE Director)^
CMNDOVb'
OK Ewl'
Salad the button tor the type ul card installation you want
irAutomatio Configurational ^le card settings
I Oyslom Configuration | Chnose the card settings ynurselt
r
Unless you need to configure Ihe card settings yourself, select "Automatic
Configuration'' to inslall the hardware driver
If you encounter problems after inslalling software, selecl "Custom Configuralion"
and change the settings
If ycu want to exit the install program, select "Exit" and follow the instruclions on
computer
Exit
I Exit tha Install program
ia
Page 19

0 Click ( Automatic Configuration ).
After copying files, the foilowing message appears.
Software installation
All tiles have been successtully copied.
The C0NFI6.SVS, AUTOEXEC.BAT and SYSTEM.INI will be
modltied. Their current tiles will be saved as CONFIG.KME.
AUTOEXEC.KME and SYSTEM.KME.
Driver IrrstaMatiott
.OK'
Esit
g Click ( OK ].
“Multimedia Sound Kit instali Program” window appears.
Software Installation Complete
After this installation, please remove the floppy disk, and
restart your computer, [f there are any problem, please
refer to 'Troubleshooting', 'Error Messages' or 'README
File' in your Operating Instructions.
[/0 Address was set as: 240
interrupt was set as: 5
[replication InstaliatiorT] I" RestarfComputer | | Exit Program
(O
3
»
o
S.
a
“V
n>
Q.
O
¥
If you want to install the Audio Applications software, go to next step. o
If you want to exit the install program, select “Exit Program”, exit the Windows, S
remove the Setup Disk #1 and then restart you computer. co
Cd
19
Page 20

Soñware Insta/lation
10 Click ( Application Installation).
"Applicalion InslallaliGn" window appears
Setup Will install Ihy audio applications in the tollowing
directory
It you Want to install the software in a dirferent directory
type the name □! the directory below
Destination Directory
'OH'
The dafaull direclory is PCAUDIO If you want to install the Audio Applications in
a different directory, type the directory name, and go to next step
'EMif
11 Click [ OK ] The following window appears
Applicition.Inst illation
Select the button for tha inslallalion you want
F-
-------
—I Install all AudioDrive applications
[Cnmpleta Installahon |
Custom Installalion
E)d
If you want to install all Audio Applications software, go to next step
If you want to select some Audio Applications, select "Custom Installation" and
follow the instructions on computer
If you want to exit the install program, select "Exit" and follow Ihe instructions on
computer
iquires JP/B ^ Bytes of space I
ChoQSB which applications !□ install
Ewt the Install program
20
Page 21

12 Click [ Complete Installation )
While copying files, the following “Confirm" window appears
^Xonfirfii:P;r
Please insert Disk #2 and press OK button when
ready
Software Installation
lOK.
I Cancel
-J
1 O Remove the Setup Disk #1 and insert the Setup Disk #2, and then
click CO0
After copying files, “Multimedia Sound Kit Install Program” window appears
Multimedii Sound Kit install Program
Sottware installation Complete
After this installation please remove the fiopp)' disk and
restart your computer If there are any problem please
refer to Troubleshooting Error Messages or README
RIe in your Operating Instructions
I/O Address was set as
Interrupt was set as
Irgestarl Computerri
240
5
li fgt Program
14 Click f Exit Program] and exit the Windows
n"
3
CO
to
5
(O
№
O
€
to
to
c
3
a
to
3
Q.
O
€
<n
CO
15 Remove the Setup Disk #2 and then restart your computer.
21
Page 22

Software tnstaUation
Installing under Windows 95
rinstalling drivers
Three kinds of drivers need to be inslalled. To install these drivers, follow the instrucllons
below.
^ Power on your computer.
Windows 95 automatically starts.
Power on the player ( P. 15) and inaerl theSound/CD-ROM Interface
Card to your computer's PCMCIA card slot ( P. 12, step 3).
"New Hardware Found" window appears only when the inserted card is not previously
registered in Windows 35,
3 Click foi^.
“Driver from dish provided by hardware manufacturer” is selected and “Install From
Disk" window appears.
^ Insert the supplied Setup Disk #1 into drive A (or B), and click [ OK ]-
"New Hardware Found" window appears.
g Click [ok].
“Install From Disk" window appears.
0 Click [oK].
"New Hardware Found" window appears.
y Click i ol<].
"Install From Dish" window appears.
0 Click [O^.
The initial screen appears and the drivers have been installed.
■ If you want Id install the Audio Applications software, perform Ihe following steps
( P. 23).
22
Page 23

Software installation
Installing Audi^AppMcations software
Double-click the My Computer icon
2 Double-click the 3^/^ Floppy icon
0 Double-click the Setup icon
“Application Installation” window appears
^ Click ( install ].
“Application Installation” window of step 10 ( i^P 20) appears
g Follow the steps 11 to 13 ( cs" P 20, 21)
0 Remove the Setup Disk #2 and then restart your computer.
__ _j
iQ
(fl
U
B
W
O
€
Q)
to
c
3
a.
<D
¥
23
Q.
O
€
(0
CD
U1
Page 24

Software Instaltation
Installing Windows 95 using the player
The Windows Э5 operaling syslem can be installed by inserting the Windows 95 CD-ROM mlo Ihe player
^ Install the saPtware by following the steps 1 to 15 ( P 17-21).
2 Insert the Windows 95 CD-ROM into the player
2 Start Windows 3 1,3 11.
^ Select “Run " from the File menu of the Program Manager
^ Type D VSETUP and press [ Enter].
(D dnVB letter assigned io a CD-ROM drive far example)
Windows 95 installalion will camplete
However, the KXL-D721 DOS driver will currenlly be in use by Windows 95 This
does not yield optimum performance Iherefore, the KXL-D721 Windows 95 driver
should be rnslalled by performing Ihe following sleps ( steps 6 to 9 below)
0 The following message appears when SETUP is completed
System Praperties/Performance
ASPISMGR in CONFIG SYS forces MS-DOS compalibility mode Compatibility
mode paging reduces overall system performance
PC Card (PCMCIA) devices are not using 32-bil support
Click I OK I to ignore this message Meanwhile, PCMCIA controller chip
(iB2365) IS unavailable on Windows 95
^ Double click the PC Card (PCMCIA) icon inside the Control Panel to
enable PCIC (PCMCIA controller chip) on Windows 95.
0 When prompted by the PC Card Wizard, select | No | and select | Next>
Then select | Next> | again
0 Then restart your computer, in order to enable 32 bit- support, click | Rnish ].
To install the software under Windows 95, refer Io “Installing under Windows 95"
( n^P 22)
If you need more information, please refer to SETUP TXT file or GENERAL TXT file of
Windows 95 about installing Windows 95 CD-ROM
24
Page 25

Inserting / Removing a CD
Inserting a CD
To insert your CD, follow the instructions below
Close the disc cover.
3
Place a CD onto the center
spindle, and press on the inner
most part of CD.
Note
• CD should be placed with the
Removing a CD
disc’s label facing up
After CD-ROM operation has finished, remove the CD by following the instructions below
Make sure that a blinking message “BUSY” does not appear on the player’s display
\ Close the disc cover
Carefully remove the CD by pressing the center spindle and lifting
Note
• Replace the CD in its original case
Press to open the
1
disc cover
25
w w
I ^
3 5
“ CQ
1 i
to «
u CD
2 c:
O (A
<D
(U
3
to
o
Page 26

CD-ROM/Audio CD Operation
After installing the software ( P 16), if you start your computer, you are ready lo enjoy
game/photo/audio CDs including the Audio Applications For details about the Audio
Applications operation, refer to the enclosed Audio Applications Manual
Insertion/Removal with Power On (for DOS/Windows 3.1,3 11)
If your computer has a Card Service, the Sound/CD-ROM Interface Card can be
removed or inserted from/into the PCMCIA card slot of the compuer without turning off
yuur computer However, when you start running your computer, make sure that the
Sound/CD-ROM Interface Card is inserted into the PCMCIA card slot and the CD-ROM
player IS on If ASPIS365 SYS and ASPISDBK SYS are being used, Inserlion/Removal
with power on IS not possible
Note
If your computer has more than one slot, and if you want to re-insert the Sound/CDROM Interface Card, make sure to insert it into the same slot it was inserted before
Plug Si Play (for Windows 95)
Windows 95 supports Plug & Play function as the new feature
This Sound/CD-ROM Interface Card supports this feature You can plug/remove this
card in/from your computer When you turn on your computer, Windows recognizes and
sets up your hardware automatically
CD-ROM operation
Before operation make sure that Ihe Sound/CD-ROM Interface Card and l/F Boil are
connected to your computerandio the player properly and all other necessary audio
devices are connected
( P 12-14) The player should be ON when the computer
IS turned on
Notes
■ Some CD-ROMs are soundless
■ The computer sound of some CD-ROMs can be listened through the player's
PHONES jack Connect a commercially available audio connecting cable to Ihe
player's PHONES jack and lo the l/F Bom’s PHONES jack ( P 14)
26
Page 27

CD-ROM/Audio CD Operation
Audio CD Operation
Before operation make sure that the Sound/CD-ROM Interface Card and l/F Box are
connected to your computer and to the player properly, and all other necessary
audio devices are connected ( cS’P. 12~14). The player should be ON when the
computer is turned on.
Listening to an audio CD
You can listen to your audio CD through either the attached speakers or your headphones
(not supplied).
■ Using the Speakers:
After connecting the speakers ( bS^P. 13), connect a commercially available audio con
necting cable to the player’s PHONES jack and to the l/F Box’s PHONES jack ( P. 14).
■ Using your headphones:
Connect it to the player’s PHONES jack as the diagram illustrated below.
Note:
• Before playing an audio CD, make sure that the volume control of the player and/or
l/F Box is set to lower level to avoid hearing very loud sound.
Playing an audio CD on computer
After inserting your audio CD into the player ( n®” P. 25), you can enjoy playing your audio
CD on your computer. If you are using DOS, install audio CD control software (not
supplied) to operate an audio CD on computer. Media player (included with Windows) can
also be used to listen to audio CDs.
Note: ■
• While playing an audio CD on your computer, you can not use (^, (3 and (—~—) buttons on player.
27
T3
o
9
X
o
S
c
Q.
o
o
D
O
(D
Dl
Page 28

CD-ROM/Audio CD Operation
Playing an audio CD on player
ir you are using batteries, you can enjoy lislening to music under stable conditions It is
recommended not to play an audio CD while walking or jogging 1Г ycu want to play an
audio CD without disconnecting from your computer, be sure to open and close the disc
cover before playing to set the player into stand alone play mode
Caution
” It IS not safe to listen to headphones while driving a car
Be sure the volume control is set to lower level to avoid hearing very loud sound
and all necessary devices are connected ( P 12-14)
You can play your audio CD by referring to the following table
Button
►n
I
------
О
о
■
о
Function
Slarts/pauses playing an audio CD
J
Skips to the next track by pressing once
Continues skipping tracks if you hold down
Returns to the beginning of the track being played by pressing once
Skips to the previous track by pressing once when the elapsed time is 00 □□
Continues reversing tracks if ycu hold down
Steps playing an audio CD
2B
Page 29

Error Messages on Computer
When installing the software
The following messages appear only under Windows 3 1,311
Message Solution
The directory you typed is invalid
Please type a full path with drive letter for
example “C \KMESOUND"
CONFIG SYS dose not exist in specified
Drive
Could not find the file [Filenam e]
Please type the directory to look for this
file
Speafied Window directory does not exist
PCMCIA Controller is not found
installation will be terminated
Use less than eight characters
Use only valid characters (refer to the
DOS manual)
Specify the name of the drive containing
CONFIG SYS in Boot Drive
File indicated in [Filename] is not found
Set the directory containing this file
Specify the correct directory-name in
Windows Directory
Make sure that your computer has
PCMCIA slot
Make sure that connection between your
computer and card slot board has been
made properly
•D
O
0
1
J3
o
Q.
O
o
a
o
(D
29
o
3
o
3
O
o
3
■D
C
O
to
m
“1
o
5
(D
(0
M
Q1
(D
(0
Page 30

README File
The README File on Ihe supplied selup disk contains additional information on system
troubleshooting and is copied to the hard disk (normally to C:\KMESOUND) during
installation except Windows 95.
Read or print this file if you have difficulty installing the CD-ROM drive or sound function.
Viewing the README.TXT File in DOS
At the DOS prompt (C:\), type MORE<\KMESOUND\README.TXT
2 Press [ Enter ]■
Viewing the README.TXT File in Windows 3.1, 3,11
^ Double-click the Notepad icon of Accessories.
2 Select "Open" from the File menu.
2 Double-click the copied directory name.
^ (Normally it is C:\KME50UND)
A Select the file name "README.TXT”.
g Click foK].
Viewing the README.TXT File in Windows 95
In case of Windcws 95, README File is not copied to the hard disk. To view the file, follow
Ihe instructions below.
^ Double-click the My Computer icon.
2 Insert the supplied Setup Disk #1.
2 Double-click the 3Vz Floppy icon.
^ Double-click the README icon.
30
Page 31

Troubleshooting
Check the following points before returning the unit for service
Trouble Possible Cause Solution
Turn on the
player’s POWER
switch, but
nothing appears
on the display
The data of
CD-ROM IS not
transmitted to
your computer
No sound can be
listened or Power
indicator on
R-speaker does
not light
AC adaptor is not plugged
into the outlet or DC IN jack
correctly
The batteries are not
installed into player
correctly, or dead
Connection between the
player and the computer is
improper
There are duplicate SCSI
ID numbers in computer
system
The software is not
installed correctly
The interface cable of pm is
bent or broken
Terminator of the player is
set to OFF when using the
player with the l/F Box
attached
The Speaker’s POWER
switch IS turned off
The batteries are not
installed into R-speaker
correctly, or dead
Headphones/Speakers are
not connected
Volume control of player or
l/F Box are set to “0”
L-speaker is not connected
to R-speaker
Volume IS set to the lowest
level or Mute is selected in
the Volume Control/Mixer
application
Plug in the AC adaptor
correctly ( 1®= P 11)
Install the batteries into player
properly or replace with new
ones ( P 11)
Connect Sound/CD-ROM
Interface Card and l/F Box to
the player and to the computer
properly ( P 12)
Set different SCSI ID
number for each device in your
system ( P 33)
Install the software correctly
( P 16)
Contact an Authorized
Panasonic Service Center
Set the terminator of the player
to ON ( P 33)
Turn on the Speaker’s POWER
switch
Install the batteries into
R-speaker properly or replace
with new ones ( c^P 13)
Connect the headphones to the
player's PHONES jack firmly or
connect the speaker to the 1^ Box’s
PHONES jack { P 13.27)
Set the volume control to a
higher level
Connect L-speaker to
R-speaker properly ( c3=P 13)
Set the volume to a higher level
or turn off the Mute in the
Volume Control/Mixer
application ( c®"P 19, 20 in the
Audio Applications Manual)
(O
X
m
>
D
m
(D
2
o
(A
3*
o
o
3
31
Page 32

Troubieshooting
Trouble
Transmission
speed of data
slows down
Buttons/POWER
switch of player
do not function
"no disc"
message appears
on player's
display even after
inserting a CD,
Sound skips, or
data can not be
read
You can not
record using
Microphone
Windows 95
computer does
not recognize
CD-ROM
Speakers howl
Possible Cause Solution
When using the batteries,
the notebook computer has
entered the power
management mode
CD IS placed with the label
side facing down
CD without (|][^| ar fjigg
mark IS used
CD may have become dirty
CD IS damaged
The player or/and CD are
moistened, because the
player or/and CD may be
moved from a cold place to a
warm place
Microphone IS not connected
to the MIC jack properly
Volume of Mic IS set to the
lowest level or Mute is
selected in the Recording
Control application
TheSnund/CD-ROM
Interface Card is not fully
inserted, or the player is not
turned on
The volume of Mic is set too
high, or the Record Monitor
IS on
Set the CPU speed of the
notebook computer faster in
power management or use the
AC adaptor
Press RESET switch located
at the bottom by using a
pointed object like a pen
Place the CD with the label
side facing up ( P 25)
Use the CD marked with
foMg or
Clean the CD ( P 34)
Replace with another CD
Remove the CD from the
player and leave it out for 1
hour
Connect the Microphone to the
MIC jack properly ( D^P 14)
Set the volume of Mic to a
higher level or turn off the
Mute in the Recording Control
application ( P 17 in the
Audio Applications Manual)
After turning on the player,
□pen the My Computer,
Control Panel, System and
then Device Manager and click
"Refresh"
Lower the volume of Mic, mute
the Record Monitor in
Recording Control application
or lower the volume of l/F Box
( P 17 in the Audio
Applications Manual)
32
Page 33

SCSI ID Number and Terminator
■ SCSI ID number:
Each SCSI device connected to your computer system has an individual ID number (refer
to the respective manuals). Be sure that the CD-ROM SCSI ID# does not conflict (is not
the same) as another SCSI device connected to the computer system. Normally personal
compútelas SCSI ID number is set to 7.
The factory setting for the CD-ROM drive is SCSI ID #5.
■ Terminator:
Set the Terminator switch ON or OFF according to the player’s condition.
ON: when the player is connected to the computer system.
OFF: when using independently as an audio player.
The factory setting is ON.
Setting
Turn the ID number switch (1-3) or Terminator switch (4) ON/OFF by using a pointed
object like a pen, and referring to the table below (for ID number).
(For SCSI ID number setting)
ID number switch
1 2 3
off
on
on
on off
off on
off
DIP switch
ON
OFF
Example: ID number-5/Terminator=ON
rGN
nton
12 3 4
ID number switch
Terminator
switch
ID number
0 off off off
1 on
2 off on off
3
4 off off on
5
6 off on on
7 on on on
[ 1: Factory setting.
33
U)
0
£2
a
z
c
3
O’
5
01 o
3 C
a 2
„»
l§
a 3
o to
Page 34

Maintenance
Player
Cautions
■ □□ nnl use benzine, thinner, etc
■ Dd nol USB cammercial lens cleaner
Clean the outside ofthe player with a
soft, dry cloth
Clean the lens with a dry cotton swab
or a lens blower
Lens
CD
Cautions
■ □□ net use solvenls such as benzine, record cleaners or antl-stalic spray fnr
records
■ Do not louch the signal side
■ Do not altach the labels lo the disc
” Do nol write on the surface of disc with a pointed object like a pen
Cotton swab
^
34
Page 35

Specifications
Operating Temperature
Operating Humidity
Storage Temperature
Storage Humidity.
Player.
Dimensions
Mass {Weight}
Power Source
Interface
Buffer Size
Battery Life
(when using Panasonic
alkaline “AA" size)
Power Consumption
Data Transfer Rate
Access Time
5"C {41T} to 35'C {95’F}
20% to 85% RH
-20*C {^T} to 55*C {131 *F}
15% to 85% RH
138 (W) X 204 (D) X 35 (H) mm {5 52" x 8 16" x 1 4"}
0 39 kg {0 878 lb} (without batteries)
Refer to the nameplate at the bottom of the unit
PCMCIA/SCSI I, II
128 KB
Approximately 4 hours when playing audio CD at
20"C {68T}
Approximately 2 hours when playing CD-ROM at
20"C {68T}
•When playing CD-ROM
12
W [with AC adaptor]
4 2 W [with battery]
•When playing audio CD
6
5 W [with AC adaptor]
2 8 W [with battery]
•When player is off
3 0 W [with AC adaptor]
150 KB/s (Normal Velocity mode)
300 KB/s (Double Velocity mode)
• With AC power source
Access time*"' (Double Velocity mode)
295 ms typical {I/3 stroke)
Fullstroke access time*2 (Double Velocity mode)
380 ms typical
• With battery
Access time’^ (Double Velocity mode)
320 ms typical C/S stroke)
Fullstroke access time*2 (Double Velocity mode)
400 ms typical
■o
0)
o
3
tu
3
o
(D
0}
(D
O
o
0}
1^
o
3
№
*■' Access time, Average data read over the complete area from 00' 02" 00 block to
stroke track
*2 Fullstroke access time, Average data read over the complete area from 00' 02" 00
block to 59' 58" 74 block
The above information (‘^, *2) is based on the test results measured by Panasonic internal
test software
35
Page 36

Specifications
Player:
Output Canneclar:
Compalible CD-ROM
Format:
Error Rales:
Audio Performance
(Stereo Headphones):
Sound/CD-ROM Interface
Card;
Dimensions:
Mass (weight);
Card type:
DTE interface:
Power source: DC5V, approximately 160 mA
l/F Bom and cable:
Dimensions:
Mass (weight) 0.13 kg [0.2B6 lb.) with cable
Cable length: l/F Box side: 200 mm (not including connector)
Mic (Monaural)
Input level:
Line in (stereo)
Input level: 1.2 mVrms or lower (impedance 30 k H or higher)
PHONES jack
CD-DA (CD)
CD-ROM (Mode 1 and Mode 2 Form 1)
Photo CD Multi-session
CD-ROM XA (Mode 2 Form 2)
Soft read errors Less than 10’^
Hard read errors Less than 10'^^
Frequency response 20 Hz-2G kHz
S/N More than BQ dB (A Range)
Oulpul level 0.6 Vrms
Audio CD Operation Play/Pause, Stop,
Volume control Rotary (0-10)
54 (W) 1C B5.6 (D) X 5 (H) mm [2.13"x3.37"xQ.20")
0.04 kg (O.OBB lb.) without cable
Type 11
PCMCIA 2.1/JEIDA 4.2
77 (W) x45 (D) M20.5 (H) mm(3.03"x1.77"xO.B1'T
Player side: 500 mm (not including connector)
200 mVrms or lower (impedance 2 k fi or higher)
Reverse skip,
Forward skip
Phones out (stereo)
36
Oulpul level: 15 mW or lower
Frequency response:
Volume control:
±3 dB
Volume Rotary (0-10)
Page 37

Specifications
Speakers:
Dimensions for 2 units:
R-speaker
mass {weight}:
cable length:
impedance:
L-speaker
mass (weight):
cable length; 800 mm (without connector)
impedance:
Power Output: 0.2 W+0.2W (stereo speaker amplifier)
Battery power indicator:
Battery type:
Battery life:
Battery power on/off:
Sound:
Number of quantization
bits;
Sampling frequency: 5.5, 8, 11.025, 22.05, 44.1 kHz (Selectable)
Sound source;
Software compatibility:
68.2 (W) X 101 (D) X 45.8 (H) mm
{2.69"x3.98"x1.80")
0.13 kg {0.286 lb.) (without batteries)
800 mm (without connector)
4ii
0.1 kg {0.22 lb.)
4a
Red LED indication on R-speaker
“AA" size alkaline battery x 2 into R-speaker
Approximately 30 hours
when using Panasonic “AA” size alkaline battery
under the condition of 18 mW-f-18 mW output at 20°C
(68 T)
In front of R-speaker only
(Battery only supplies power to speaker amplifiers.
Power for Sound/CD-ROM Interface Card and
l/F Box is supplied from PCMCIA slot.)
8 bit, 16 bit monaural/stereo recording
FM synthesis (YAMAHA OPL 3 compatible)
PCM (CODEC) (Recording and playing method)
•WAVE (recording/playback) and MIDI (playback)
performed using Windows-compatible audio device
driver
•Sound Blaster FM sound source for Windows and
Ad-Lib for DOS compatible
</)
■O
Q
O
37
w
OBfl
Page 38

Index
AC adaplor
AccBSSories
AudjD Applicalions . .
Audio CD Operalion
Audio connecling cabie
Back-up copy
BaHery . . .
Battery cover
Connection..........................................
CD-ROM Operation
DC IN jack . . . .
DIP switch . . . .
Disc cover . . . .
Display ......
Display Messages
..............................
.........................
Audio connecting cable
l/FBoM
.......................
Microphone...............................
Speakers
...................................
............................
..... J
.... 6. 11
.............
14, 16. 23, 26
..................
..............
B
27
- 14
B
..................
. . 6. 11, 13
S, 10. 11, 13
16
J
. . 12
. . 14
13, 14
. . 14
. . 13
. . 26
□
B, 11
B, 33
B, 25
. . B
. . 9
Error Messages on Computer
Fealures
..........................
Forward skip button
l/FBox...........................................................................
Insertion/Removal with Power On . . .
Installing Windows 95 using the player.
LINE IN jack
L-speaker . .
3B
. 29
. . 6
B, 2B
I
6,10, 13, 14
..............
..............
2B
24
10, 14
10, 13
Page 39

Index
____________________________M____________________________
MlCjack .................................................................................................10.14
Microphone...............................................................................................6, 14
o
OPEN button............................................................................................8, 25
Part Names and Functions..........................................................................8
PHONES jack .........................................................................8,10,13,14,27
PLAY/PAUSE button................................................................................8, 28
Plug & Play.................................................................................................26
Power On...................................................................................................15
Power Save Function.................................................................................15
Power Supply............................................................................................11
Precautions..................................................................................................7
R
R-speaker .............................................................................................10,13
README File.............................................................................................30
RESET switch
Reverse skip button .................................................................................8, 28
SCSI ID number
SCSI interface connector
Setup Disk...........................................................................6,16,17,21,22,23
Software Installation...................................................................................16
Sound/CD-ROM Interface Card..............................................................6,12
Speakers............................................................................................6,10,13
Specifications.............................................................................................35
STOP button.............................................................................................8, 28
System requirements.................................................................................16
Terminator..................................................................................................33
Troubleshooting ........................................................................................31
..........................................................................................
"s
..................................
.......................................................................................
.........................................................................
............t...............
8, 32
8, 33
8, 12
.
'
3
a
(D
X
V
VOLUME control
l/F Box
......................................................................................
Player
.......................................................................................
W
Windows 3.1,3.11.............................................................................17,26,30
Windows 95 ............................................................................... 22,24,26,30
10, 13, 27
8, 27, 28
39
Page 40

FOR USERS IN CONTINENTAL UNITED STATES ONLY
Technical Support and Service Paris Calls
If you have read this manual and tried the IroubleshDaling procedures, and you are still
having difficulty, please contact thestcre from which the unit was purchased. Panasonic
Communications & Systems Company will repair this product with new or refurbished
parts free of charge for two (2) years from the date of purchase.
You may also call the technical support telephone number (24 hours/7 days).
The technical support number is: 1-BOO-PANA-SYS (1-BOD-725-2797)
The service parts number is; 1-BOO-332-S34B
V
_________!!_________________________________________________
The serial number of this unit may be found on the label located at the bottom of the
unit. Write this number below and keep this book along with your proof of purchase to
serve as a permanent record cf ycur purchase or for future reference.
^
MODEL NO. KXL-D721
NAME OF DEALER
SERIAL NO. DATE OF PURCHASE
Panasonic Communications & Systems Company,
Computer Products Division
Division of Matsushita Electric Corporation of America
Two Panasonic Way, Secaucus, New Jersey 07D94
Panasonic Sales Company
Division of Matsushita Electric of Puerto Rico, Inc.
San Gabriel Industrial Park, 65th Infantry Avenue KM. 9.5
Carolina, Puerto Rico 00630
Matsushita Electric of Canada Limited
5770 Ambler Drive, Mississauga, Ontario, L4W 2T3
Matsushita Electric Industrial Co., Ltd.
Central P.O. Box 2BB, Osaka 530-91, Japan
Printed in Japan
PJQMA0114ZA S1095T0
 Loading...